


VS Vereinigte Spezialmöbelfabriken GmbH& Co. KG
Hochhäuser Straße 8 · 97941 Tauberbischofsheim · Tel.: 09341/880 · vs@vs-moebel.de
http://links.vs-service.com/downloads/70-124_V04_DEEN_StepByStep-140941.pdf
Bestimmung:
Der vorliegende Tisch wurde ausschließlich für den Schulbereich konzipiert und ist somit auch nur für diesen Verwendungszweck bestimmt. Eine andere oder darüber hinausgehende Benutzung (z. B. in Werkstätten, Lagerbereich oder
Feuchträumen) gilt als nicht bestimmungsgemäß. Für hieraus
entstehende Schäden haftet die Firma VS Vereinigte Spezialmöbelfabriken GmbH & Co.KG nicht.
Allgemeiner Hinweis zum Lesen und
Aufbewahren der Anleitung:
Lesen Sie diese Anleitung und vor allem die Sicherheitshinweise vor Benutzung der Produkte genau durch und
beachten Sie diese. Bewahren Sie die Anleitung zum späteren
Nachlesen sorgfältig auf und geben Sie diese an andere
Benutzer weiter.
Allgemeiner Sicherheitshinweis:
In unseren Bedienanleitungen verwenden wir folgende
Symbole und Hinweise:
Achtung! Bei diesem Symbol handelt es sich um einen
sehr wichtigen Hinweis.
Im Internet:
Sie finden diese Anleitung im Internet (siehe Kopfleiste).
Normen:
Geprüft nach DIN EN 1729 Teil 1 + 2, Größenklasse 2 bis 7.
Lieferumfang:
Das Produkt wird fertig montiert ausgeliefert.
Betrieb:
Beachten Sie die Hinweise auf der folgenden Seite.
Fehlersuche und Service:
Bei eventuell auftretenden Fehlern, wenden Sie sich bitte an
unseren Kundendienst kundenservice@vs-moebel.de
Wartung und Reinigung
Im Internet: vs.de/kataloge/reinigung/
Weitergabe:
Bei Weitergabe des Produkts ist auch diese Bedienanleitung
zu übergeben.
Entsorgung:
Die gekennzeichneten E-Komponenten dürfen nicht über den
Hausmüll entsorgt werden.
Sie müssen von dem Möbel getrennt werden, bevor
das Möbel der Entsorgung zugeführt wird.
Die Entsorgung erfolgt an zugelassenen Sammel-
und Rücknahmestellen.
BEDIENUNGSANLEITUNG: 70-124 V04 000818
StepByStep-I.
02901, 02904 und 02905.
2
(3)
(2)
(1)
(4)
(6)
(5)
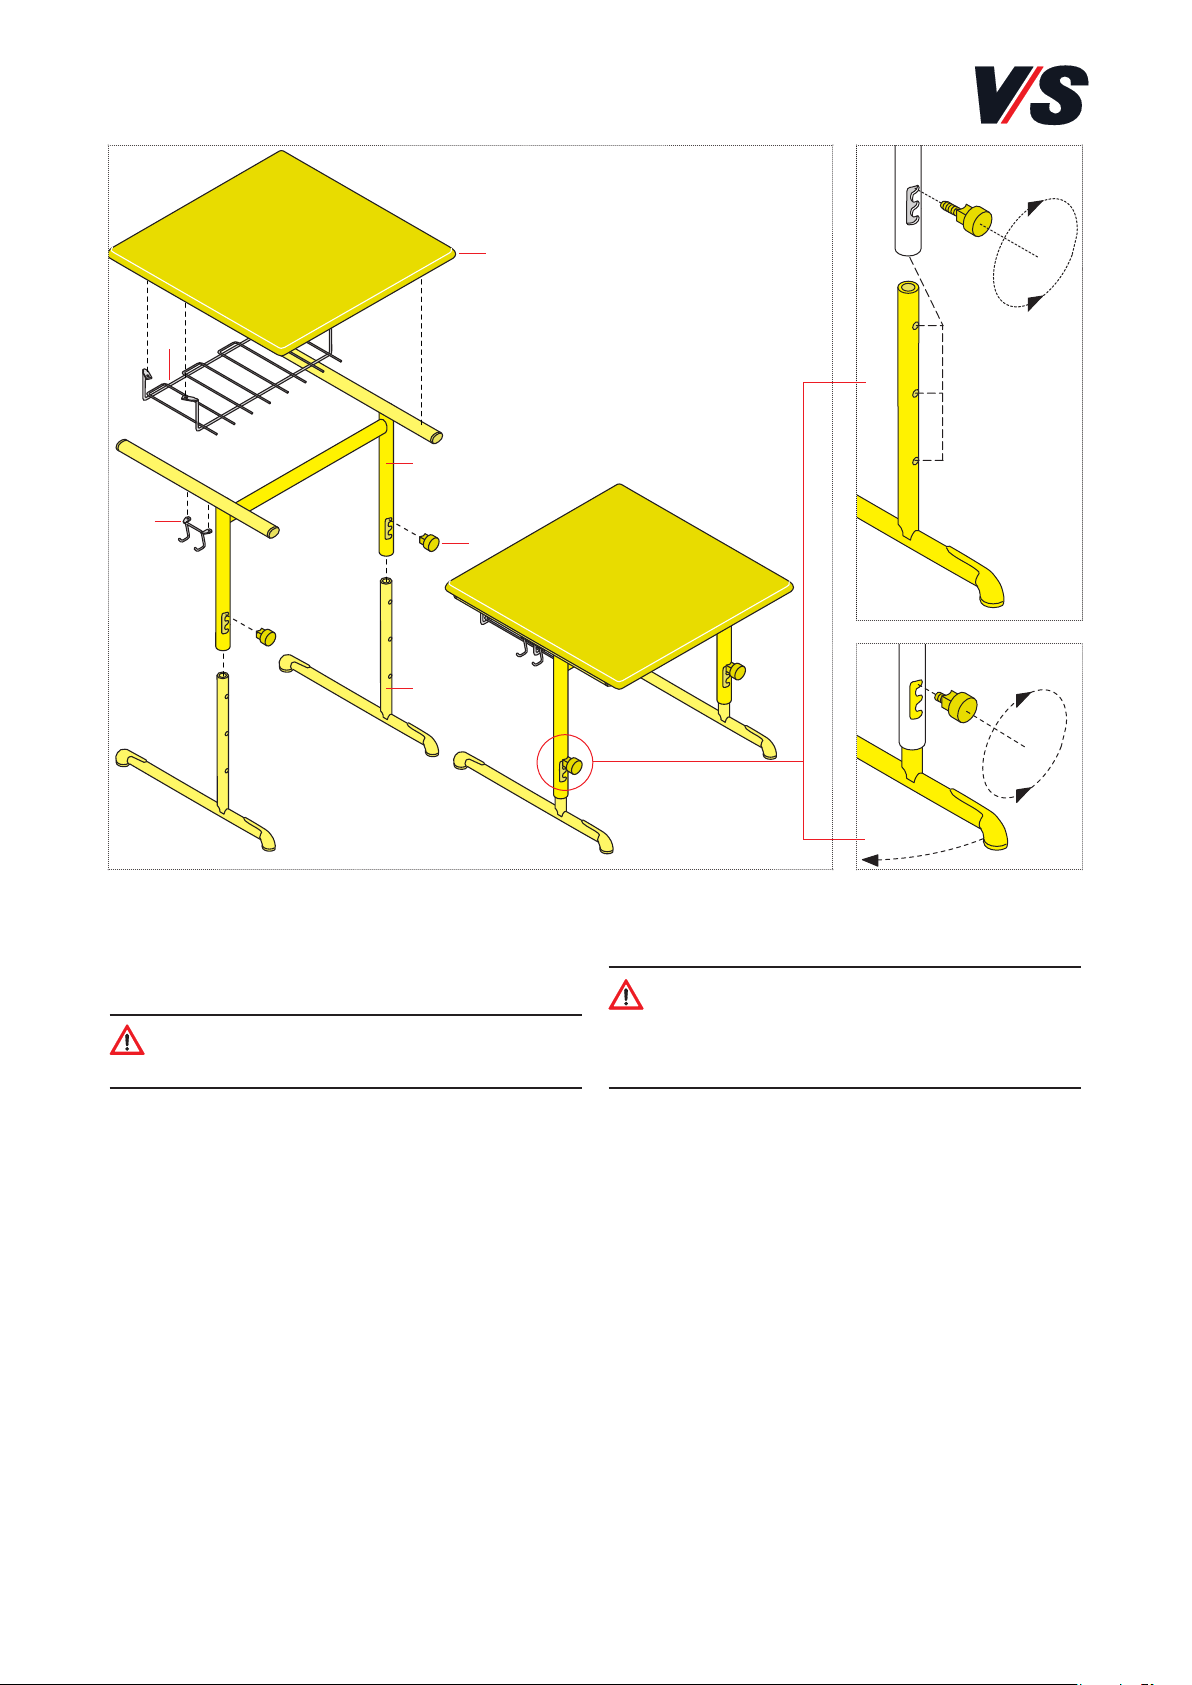
1. Tischgestell
- Tischgestell (1) auf die Tischplattenunterseite (2) legen
und mit 3 Blechschrauben 6,3 x 11 mm je Seite auf die
dafür vorgesehenen Bohrungen aufschrauben.
Achtung! Bei den Zweisitzertischen vorher die Plattenstütze mittig zwischen Platte und Steg legen und von
unten mit einer Linsenkopfschraube M6 x 70 befestigen.
- Ablagekorb (3) mit 4 Blechschrauben 4,8 x 13 mm in
den dafür vorgesehenen Bohrungen der Tischplattenunterseite befestigen.
- Mappenhaken (4) mit 2 Schrauben 4,8 x 13 mm in den
dafür vorgesehenen Bohrungen im Gestell befestigen.
- Kufe (5) des Tisches in das Gestell-Rundrohr stecken,
die gewünschte Höhe einstellen und mit der Feststellschraube (Inbusschlüssel SW 5) bzw. Handrad (6) sichern.
2. Tischhöheneinstellung:
Rasterhöheneinstellungen in den Stufen 53; 59; 64; 71; 76;
82 cm, Größe 2 bis 7. Es gibt 3 Basis-Höheneinstellungen
mit jeweils 3 Feineinstellungen:
- Feststellschraube (Inbusschlüssel SW 5) oder Handrad
(je nach Ausführung) lösen.
- Kufe des Tisches nach rechts drehen.
- Aus der Verankerung lösen und auf die untere oder
obere Größe einstellen (siehe Maßskala).
- Mit Feststellschraube bzw. Handrad sichern.
3. Basis-Höheneinstellungen
- Feststellschraube bzw. Handrad komplett ausdrehen
Achtung Kindersicherung!
1. Handrad aus Gewinde drehen (Leerlauf),
2. Handrad zu sich herandrehen, bis der
zweite Gewindebereich fasst,
3. Komplett herausdrehen.
- Kufe des Tisches senkrecht in gewünschter
Höhe positionieren (siehe Maßskala).
- Mit Feststellschraube bzw. Handrad sichern.

3
VS Vereinigte Spezialmöbelfabriken GmbH& Co. KG
Hochhäuser Straße 8 · 97941 Tauberbischofsheim · Tel.: 09341/880 · vs@vs-moebel.de
http://links.vs-service.com/downloads/70-124_V04_DEEN_StepByStep-140941.pdf
INSTRUCTIONS FOR USE: 70-124 V03 030817
StepByStep-I.
02901, 02904 und 02905.
Intended use:
This desk/table has been designed exclusively for use in
schools and is therefore intended solely for this purpose. Any
other use that goes beyond the intended purpose (e.g. in
workshops, storage areas or damp locations) is classed as
not in accordance with the intended use. The company VS
Vereinigte Spezialmöbelfabriken GmbH&Co.KG shall not be
held liable for damage arising from such non-intended use.
General note on reading and storing the
instructions:
Please read these instructions and in particular the notes on
safety carefully and in full before using the products. Keep
the instructions in a safe place for subsequent reference and
pass them on to other users.
General note on safety:
We use the following symbols and notes in our assembly instructions:
Caution! This symbol refers to
an important note on assembly.
On the internet:
Alternatively, they can be downloaded: (see header title).
Standardize:
Tested according to DIN EN 1729 Part 1 + 2, size class 2 to 7.
Scope of delivery:
The product is delivered fully assembled.
Operation:
Follow the instructions on the following page.
Troubleshooting and service:
If faults occur, please contact our
Aftersales Service kundenservice@vs-moebel.de
Maintenance and Cleaning
On the internet: vs.de/kataloge/reinigung/en
Forwarding:
Also pass on these assembly instructions if the product is
forwarded to another party.
Disposal:
The indicated electric and electronic components must not
be disposed of with the ordinary waste.
They must be removed from the furniture unit
before the unit is sent for disposal.
They are to be disposed of at authorized collection
and return points.

4
(3)
(2)
(1)
(4)
(6)
(5)
1. Table frame
- Place the table frame (1) onto the underside of the table
top (2) and secure with 3 steel screws of 6.3 x 11 mm
on each side using the holes provided for the purpose.
Caution! In the case of two-seater tables, position the
top support between table top and cross-member and
secure from below with M6 x 70 raised head screws.
- Attach the storage basket (3) to the underside of the
table top with 4 steel screws 4.8 x 13 mm using the
holes provided.
- Attach the briefcase hook (4) to the frame with 2
screws 4.8 x 13 mm using the holes provided.
- Insert the skid (5) of the table into the round tubular
frame, adjust to the required height and secure with the
fixing screw (using SW 5 hexagon key) or hand wheel (6).
2. Table height adjustment:
Ratchet type height adjustment in steps of 53; 59; 64; 71;
76; 82 cm, sizes 2 to 7. There are 3 basic height settings
each with 3 fine settings:
- Loosen the fixing screw (using SW5 hexagon key) or
hand wheel (depending on the version).
- Turn the skid of the table in a clockwise direction
- Release it from its anchorage and adjust to the lower
or upper size (look at height scale).
- Secure with the fixing screw or hand wheel.
3. Basic height adjustment
- Completely remove the fixing screw or hand wheel
Caution Child's safety!
1. Turn handwheel out of thread (free wheel),
2. Zoom wheel to rotate until the second threaded
section grips,
3. Completely unscrew.
- Move the skid of the table vertically to required position
(look at height scale).
- Secure once again with the fixing screw or hand wheel.
 Loading...