

Page 1
1
Page 2

2
TABLE OF CONTENTS
INTRODUCTION ............................................................................................. 2
MAIN FEATURES ...................................................................................... 3
UNPACKING .............................................................................................. 3
SAFETY WARNING ......................................................................................... 3
PANEL REVIEW .............................................................................................. 4
INST ALLA TION AND SETTING ....................................................................... 4
1. MULTI-FIXTURES CONNECTI ON ........................................................ 4
2. LAMP BODY INSTALLATION ................................................................ 5
2. DMX CHANNEL SUMMARY ................................................................. 5
3. CHANNEL FUNTIONS .......................................................................... 6
4. ABOUT EACH CHANNEL ......................................................................................... 7
MAINTENANCE ............................................................................................. 10
1.TROUBLESHOOTING .......................................................................... 10
TENICAL SPECIFICATION ............................................................................ 11
INTRODUCTION
Thank you for purchasing the VRL PAR-363 High Power Par Lamp. There are three
Page 3

3
operation modes available –
• Auto
• sound–activation
• master/slave
The PAR-363 also feat ures 8 built-in programs. The product has a long lifespan and lo w
power consumption. Before you begin, pleas e read instruct ions careful ly. If you should
have any problem please contact your nearest distributor.
MAIN FEATURES
■DMX-512 control, 6 channels
■DMX, AUTO, SOUND-ACTIVE, MASTER/SLAVE
■RGB control with 255 grades
■RGB total dimmer is 0~100%
■Shutter speed is 10flashes/sec ~10secs / flash
■36X3W LED
UNPACKING
• VRL PAR-363 High Power Par Lamp
• USER MANUAL
SAFETY WARNING
For your convenient and accurate operation, please read the following information
carefully.
• Suitable for indoor use only.
• Put it in a dry, well -ventilated place in case of short cut caused by erosion of
moisture and rain.
• Do not install nearby hot sources in case that rising temperature of lamp damages
itself.
• Do not barrier vent in order to ventilate well and dissi pate in time.
• Connect the fixture with power source, which has a ground line, and voltage of
power source should accord with rating voltage.
• If fuse was damaged, change the same type.
• You can only choose accessories the manufacturer provides when need repairing.
Ambient temperature of the lamp should not exceed 40
°
• If any problem, contact with professional technicians working in our after-sales
service department.
Page 4
4
PANEL REVIEW
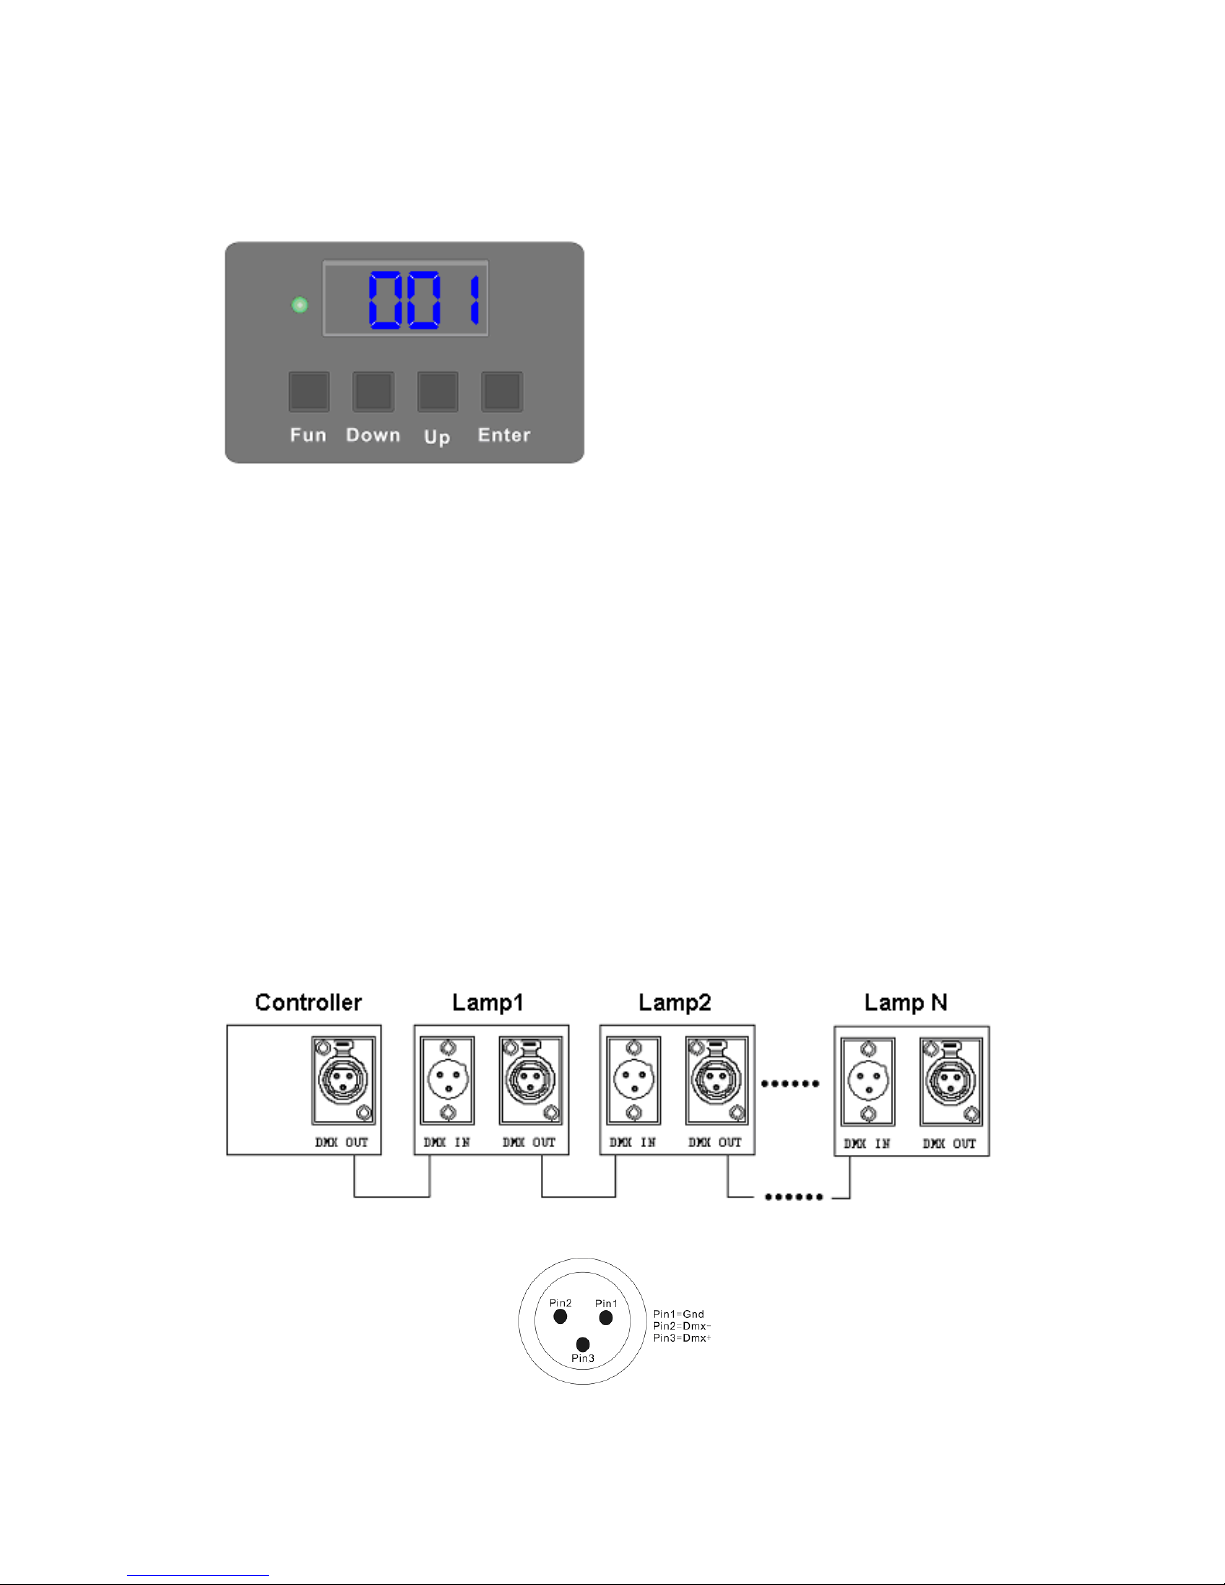
Press FUN button: Switch to function menu or return to previous menu
Press UP/DOWN: Adjusts the currently activated field. The four points will blink indicating
a value change.
Press ENTER: Enter into sub-menu or confirm the current value.
INSTALLATION AND SETTING
1. MULTI-FIXTURES CONNECTION
DMX fixtures are designed to receive data t hrough a serial Daisy Chain. A Daisy Chain
connection is where the DATA OUT of one fixture c onnects to the DATA IN of the next
fixture. The order in which the fixtures are connected is not important and has no effect on
how a controller communicates to each fixture. Use an order that provides for the easies t
and most direct cabling. Connect fixtures using shielded two conductor twist ed pair cable
with three pin XLR male to female connectors.
The shield connection is pin 1, while pin 2 is Data Negative (S-) and pin 3 is Data positive
(S+).
Page 5

5
2. LAMP BODY INSTALLATION
Notes: do not install it nearby the curtain or flammable materials.
Only for indoor use.
OPERATION
1.SET DIPSWITCHES
■Each fixture occupies 6 DMX channels.
■DMX 512 signal can control multi-fixtures together, however you must set the DMX
address of each lamp first. Different DMX address will lead to different movements.
■You can set DMX address from 1~506 on the multi-function display panel.
■Switch on power supply and after finishing resetting, the panel will show 001,that is to
say DMX address is 1 and the first lamp has been controlled by 1~6 channels. In turn the
second fixture has been controlled by 007~012 c hannel s. (Whe n panel shows 001,press
UP button until it shows 007.Then just press ENTER butt on). In the same way, the third
fixture has been controlled by 013~018 channels and the panel shows013.
■Through this method, you can control multi-fixt ures to perform different movements.
2. DMX CHANNEL SUMMARY
Page 6

6
3. CHANNEL FUNTIONS
DISPLAY FUNCTION
VALUE 001-506 DMX address
MODE M-DM DMX mode
M-AU AUTO mode
Notes: Only one lamp can be set as Master and the left are
Slaves (Slaves set to DMX mode wi th DMX addres s “001”). Do
not connect the Slaves lamp with controller.
M-SO SOUND mode
Notes: Only one lamp can be set as Master and the left are
Slaves (Slaves set to DMX mode wi th DMX addres s “001”). Do
not connect the Slaves lamp with controller.
PRCO PR1~8 8 built-in programs
Pr1-4 means skip
Pr5-8 means fade
SPCO SP01~15 Auto speed SP01: 0.1sec/step, SP15: 10secs/step
TEST ALL Check all channels with motors
RED Check red channels
GREEN Check green channels
BLUE Check blue channels
DSPL STND Display bites normally
REV Display bytes upside down
REST REST/ON Reset
(Press ENTER button to enter into REST menu and the screen
reads flashing “REST”. Then pres s UP/DOWN button and the
screen reads flashing “ON”. If you press ENTER again, the light
engine resets again)
Page 7

7
4. ABOUT EACH CHANNEL
■ Channel 1:DMX MODE
Ch DMX Function CH2 CH3 CH4 CH5 CH6
CH1
0~24 RGB
Red
0~255
Green
0~255
Blue
0~255
Strobe
Speed
0~255
Dimmer
0~255
25~49
Built-
in program
1
No
function
No
function
No
function
Auto
speed
No
function
50~74
Built-
in program
2
75~99
Built-
in program
3
100~124
Built-
in program
4
125~149
Built-
in program
5
150~174
Built-
in program
6
175~199
Built-
in program
7
200~224
Built-
in program
8
225~255
Sound-active
program
No
function
■ Channel 2: RED
When CH1 is 0~24
DMX value red
255 carmine
0 0
Page 8

8
■ Channel 3: GREEN
When CH1 is 0~24
DMX value green
255 bottle green
0 0
■ Channel 4:Blue
When CH1 is 0~24
DMX value blue
255 nav y bl ue
0 0
■ Channel 5: Strobe
When CH1 is 0~24
DMX value strobe speed
255 slowest
16 fastest
15 no strobe
0 no strobe
Notes: CH2~4 decides brightness. When CH2, CH3, CH4 is 0, there is no
brightness.
Page 9

9
When CH1 is 25~224:
DMX value AUTO speed
255 slowest
0 fastest
■ Channel 6: RGB Dimming
When CH1is 0~24:
DMX value RGB brightness
255 0
0 brightest
Page 10

10
MAINTENANCE
1.TROUBLESHOOTING
Problem Probable cause(s) Suggested remedy
Fixtures does not work
No power source
Check if power source is on or
cord works well.
Fuse burnt
Cut off power source and change
the same type fuse. If fuse was
burnt on end, it may be the
problem of connection; Find
qualified professors to repair.
Reset normally, but console
abnormally or no response
False or incomplete
data connection
Check, repair or change the data
line. Ensure connection is well
and the first lamp’s single input is
connected with the controller
output.
False address setting
Check DMX address.
P
roblem of signal
connector of some
fixtures
Pull out the signal output and
input of one fixture. Then connect
both directly. If it works well, this
fixture is proved to be the failed
one. Handle the rest fixtures alike
to check which fixture has
problems. If any problem, please
connect the technician.
Page 11

11
TECHNICAL SPECIFICATION
Type------------------------------------------------------------------VRL PAR-363 High Power Par
Lamp
LED Number& Voltage----------------------------------------------------------------------- 36X3W LED
Channel--------------------------------------------------------------------------------------------6 Channels
Power------------------------------------------------------------------------------------------------------74W
Voltage------------------------------------------------------------------------------------AC100V~AC220V
Electrical current---------------------------------------------------------------------------------0.6A ~1.2A
Total lumens------------------------------------------------------------------------------------------675LM
Max light intensity------------------------------------------------------------------------------------2214cd
Dimension----------------------------------------------------------------------------------φ250*H385MM
Weight-----------------------------------------------------------------------------------------------------3.2KG
 Loading...