

Page 1
Page 2

Page 3
BEFORE OPERATION
Dear Customer:
Congratulations! You have purchased one of the finest Color TV's on the market!
This manual will help you use many exciting and useful features to make your TV viewing more enjoyable than
ever before.
Before operating your TV set, please read all these safety and operating instructions completely and then retain
for future reference.
Customer's Record
You will find the model number and chassis number on the back of your TV set.
Record these numbers in the spaces provided below.
Refer to them whenever you call upon your dealer regarding this product.
Model Number: Chassis Number:________________
Safety Precautions
WARNING: TO REDUCE THE RISK OF FIRE OR ELECTRIC SHOCK, DO NOT EXPOSE THIS APPLIANCE
CAUTIONS:
TO PREVENT ELECTRIC SHOCK, DO NOT USE THIS POLARIZED PLUG WITH AN EXTENSION CORD
RECEPTACLE OR OTHER OUTLET UNLESS THE PRONGS CAN BE FULLY INSERTED INTO THE OUTLET
TO PREVENT ANY EXPOSURE OF THE PRONGS ON THE POLARIZED PLUG.
Avoid displaying stationary images on your TV screen for extended periods of time. Stationary patterns
generated by computer displays, video games, stock market reports, etc .can become permanently engrained
on the picture tube. This damage is not protected by your warranty as it is the result of misuse. Should you
wish to use your Television to display still images, it is always advisable to reduce brightness and contrast
settings. Never leave a video game or computer display unattended.
NOTE TO CABLE INSTALLER:
The cable ground shall be connected to the grounding system of the building, as close to the point of cable entry
as practical.
Important Safety instructions
CAUTION
PLEASE READ THESE INSTRUCTIONS, KEEP THESE INSTRUCTIONS AND HEED ALL WARNINGS.
FOLLOW ALL INSTRUCTIONS.
Electrical energy can perform many useful functions. This TV set has been engineered and manufactured to
assure your personal safety. However improper use can result in potential electrical shock or fire hazards. In
order not to defeat the safe guards incorporated in this TV set, observe the following basic rules for antenna/TV
installation, use and servicing. All operating and use instructions should be followed.
Do not remove the cabinet cover. This may expose you to dangerous voltages. Refer all servicing to
qualified service personnel.
Mains plug is used as disconnect device and it shall remain readily operable.
TO RAIN OR MOISTURE.
CAUTION
RISK OF ELECTRIC SHOCK
DO NOT OPEN
CAUTION: TO REDUCE THE RISK OF ELECTRIC
SHOCK, DO NOT REMOVE COVER (OR BACK). NO
USER SERVICEABLE PARTS INSIDE. REFER SERVICING TO QUALIFIED SERVICE PERSONNEL.
The lightning symbol in the triangle tells
you that the voltage inside this product
may be strong enough to cause an electric
shock. DO NOT TRY TO SERVICE OR
CHANGE THIS PRODUCT YOURSELF.
The exclamation point in the triangle tells
you that important operating and maintenance instructions follow this symbol.
I
Page 4

BEFORE OPERATION
Precautions (continued)
Power Sources-The TV set should be operated only from the type of power source indicated on the TV set or
as indicated in the Operation Manual. If you are not sure of the type of power supply in your home, consult your
sales person or your local power company. For TV sets designed to operate from battery power, or other
sources, refer to the operating instructions.
Grounding or Polarization - Do not defeat the safety purpose of the polarized or grounding-type plug. A
polarized plug has two blades with one wider than the other. A grounding-type plug has two blades and a third
grounding prong. The wide blade or the third prong is provided for your safety. If the provided plug does not fit
into your outlet, consult an electrician for replacement of the obsolete outlet.
Alternate Warnings-This plug will only fit into a grounding-type power outlet. This is a safety feature. If you are
unable to insert the plug into the outlet, contact your electrician to have a suitable outlet installed. Do not defeat
the safety purpose of the grounding plug.
Water and Moisture Warnings-Do not use the TV set near water-for example, near a bath tub, wash bowl,
kitchen sink, or laundry tub; in a wet basement; or near a swimming pool; and the like. The TV set shall not be
exposed to dripping or splashing and no objects filled with liquids, such as vases, shall be placed on the TV set.
Ventilation-Slots and openings in the cabinet are provided for ventilation and to ensure reliable operation of the
TV set and to protect it from overheating, and these openings must not be blocked or covered. The openings
should never be blocked by placing the TV set on a bed, sofa, rug, or other similar surface. This TV set should
not be placed in a built-in installation such as a bookcase or rack unless proper ventilation is provided or the
manufacturer's instructions have been adhered to.
Heat - Do not install near any heat sources such as radiators, heat registers, stoves, or other apparatus
(including amplifiers) that produce heat.
Power-Cord Protection-Protect the power cord from being walked on or pinched particularly at plugs,
convenience receptacles, and the point where they exit from the apparatus.
Accessories-Do not place the TV set on an unstable cart, stand, tripod, bracket, or table. The TV set may fall,
causing serious injury to a child or adult, and serious damage to the TV set. Use only with a cart, stand, tripod,
bracket, or table recommended by the manufacturer, or accessory recommended by the manufacturer, or sold
with the TV set, and should use a mounting accessory recommended by the manufacturer.
A product and cart combination should be moved with care. Quick stops, excessive force, and uneven surfaces
may cause the TV set and cart combination to overturn.
Overloading- Do not overload wall outlets, extension cords or integral convenience receptacles as this can
result in fire or electric shock.
Lightning-For added protection for this TV set during a lightning storm, or when it is left unattended and unused
for long periods of time, unplug it from the wall outlet and disconnect the antenna or cable system. This will
prevent damage to the product due to lightning and power-line surges.
Object and Liquid Entry-Never push objects of any kind into the TV set through openings as they may touch
dangerous voltage points or short-out parts that could result in a fire or electric shock. Never spill liquid of any
kind on the TV set.
II
Page 5

BEFORE OPERATION (continued)
Precautions (continued)
Cleaning-Unplug the TV set from the wall outlet before cleaning or polishing it. Do not use liquid cleaners or
aerosol cleaners. Use a dry cloth for cleaning the exterior of the TV set.
Attachments-Do not use attachments not recommended by the product manufacturer as they may cause
hazards or electric shock.
If a snapping or popping sound from a TV set is heard continuously or frequently while the TV set is operated,
unplug the TV set and consult your dealer or service technician. It is normal for some TV sets to make
occasional snapping or popping sounds, particularly when being turned on or off.
Damage Requiring Service-Unplug the TV set from the wall outlet and refer servicing to qualified service
personnel under the following conditions:
a. If the power cord or plug is damaged or frayed.
b. If liquid has been spilled or objects have fallen into the TV set.
c. If the TV set has been exposed to rain or water.
d. If the TV set has been subject to excessive shock by being dropped, or the cabinet has been damaged.
e. If the TV set does not operate normally by following the operating instructions. Adjust only those controls that
are covered by the operating instructions as an improper adjustment of other controls may result in
damage and will often require extensive work by a qualified technician to restore the TV set to its nor
mal operation.
f. When the TV set exhibits a distinct change in performance-this indicates a need for service.
Warning: This unit should only be serviced by an authorized and properly trained technician. Opening the cover
or other attempts by the user to service this unit may result in serious injury or death from electric shock, and
may increase the risk of fire.
Servicing-Do not attempt to service the TV set yourself as opening or removing covers may expose you to
dangerous voltage or other hazards. Refer all servicing to qualified service personnel.
Replacement Parts-When replacement parts are required, be sure the service technician has used replacement
parts specified by the manufacturer or have the same characteristics as the original parts. Unauthorized
substitutions may result in fire, electric shock, or other hazards.
Safety Check-Upon completion of any service or repairs to the TV set, ask the service technician to perform
routine safety checks to determine that the TV set is in proper operating condition.
When the TV set reaches the end of its useful life, improper disposal could result in a picture tube implosion.
Ask a qualified service technician to dispose of the TV set.
ANTENNA
Outdoor Antenna Grounding-if an outdoor antenna is installed, follow the precautions below. An outdoor antenna
system should not be located in the vicinity of overhead power lines or other electric light or power circuits, or
where it can come in contact with such power lines or circuits.
WHEN INSTALLING AN OUTDOOR ANTENNA SYSTEM, EXTREME CARE SHOULD BE TAKEN TO
KEEP FROM CONTACTING SUCH POWER LINES OR CIRCUITS AS CONTACT WITH THEM IS ALMOST
INVARIABLY FATAL.
Be sure the antenna system is grounded so as to provide some protection against voltage surges and built-up
static charges.
This symbol indicates that this product incorporates double insulation between hazardous mains
voltage and user accessible parts. When servicing use only Identical replacement parts.
III
Page 6

CONTENTS
INTRODUCTION
Remote Control Keys ................................................................................................................................. 1
INSTALLATION
To Connect the Antenna ............................................................................................................................2
Installing the Remote Control Batteries ..................................................................................................... 2
To Connect External Equipment ................................................................................................................3
GENERAL OPERATION
Power On/Off ............................................................................................................................................. 4
MENUS OPERATION
Menus ........................................................................................................................................................5
Tune Menu ................................................................................................................................................. 5
Picture Menu ..............................................................................................................................................7
Sound Menu ...............................................................................................................................................7
Setup Menu ................................................................................................................................................8
Timer Menu ................................................................................................................................................ 9
TROUBLESHOOTING GUIDE .............................................................................................. 10
SPECIFICSTIONS ...................................................................................................................11
Note:
1ǃDesigns are subject to change without notice.
2ǃAll the pictures used in this operation manual are just used for reference, and may be different with
practicality.
Page 7
INTRODUCTION
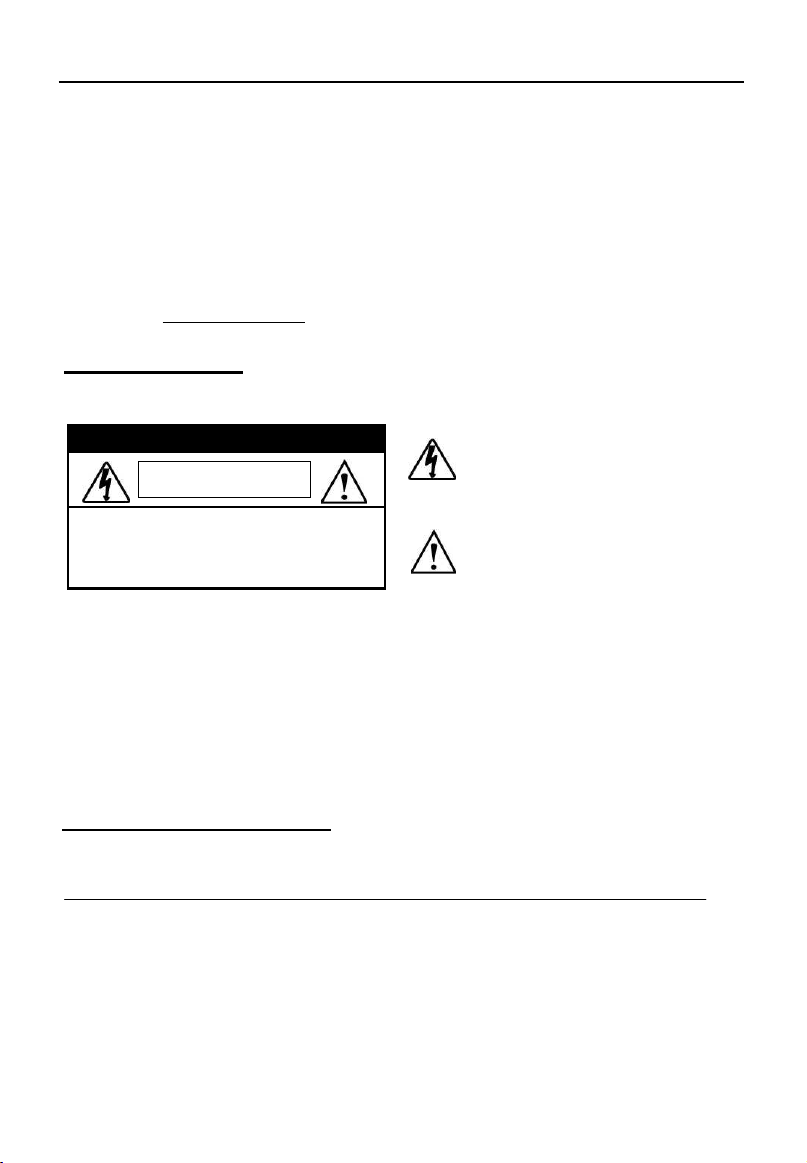
Remote Control Keys
STANDBY
ON-SCREEN DISPLAY
DIRECT SELECT
SETUP MENU
RECALL
MENU SELECT
VOLUME UP
VOLUME DOWN
PICTURE MODE SELECT
*ZOOM SWITCH
FASTMENU SELECT IN TV MODE
MUTE
DIGIT SELECT
TV/AV SELECT
SLEEP TIMER
CHANNEL AUTO SCAN
CHANNEL UP
CHANNEL DOWN
*SOUND MODE SELECT
*TELETEXT FUNCTIONS
(OPTIONAL)
*TELETEXT FUNCTIONS
(OPTIONAL)
Notes:
1˖When in operation, please point your remote control directly to the infrared sensor.
2˖Do not expose the remote control to impacts, water or disassemble it.
3˖The function buttons which marked with * may not be available due to the chassis functions.
1
Page 8
INSTALLATION
Please read the safety instructions in this manual completely before installation.
Install your TV in an area where direct sunlight will not fall upon the screen.
Soft, indirect light is best for television viewing.
Allow enough space (at least 4 in.) between the TV and any walls or enclosures for proper ventilation.
Optimum television viewing distance is 3-5 times the screen's size.
Auto-Degaussing
Color television can be easily affected by magnetism, which shows as color distortion on the screen. If your
TV is affected by nearby magnetic components or appliances, turn it off for a few minutes. The built-in
auto-degaussing circuit will eliminate the magnetic interference.
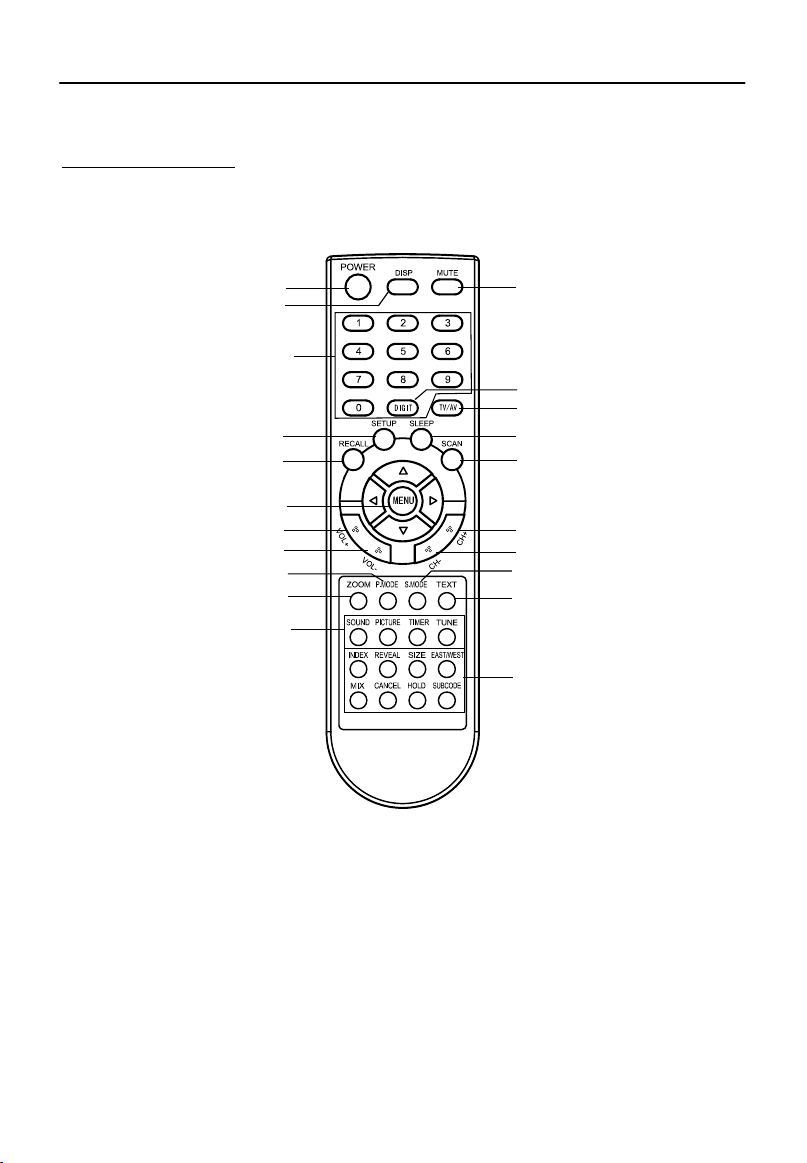
To Connect the Antenna
VHF
75-ohm coaxial cab le (not supplied)
UHF
or Cable
300-ohm twin-lead cable (not supplied)
Antenna adapter
(not supplied)
RF Input
(back of TV unit)
VHF
U/V mixer
(not supplied)
UHF
Notes:
1. It is recommended that a 75 ohm coaxial cable be used in order to eliminate interference and noise
which may occur due to nearby radio transmissions.
2. The antenna cable should not be tied together with other wiring.
3. Set up a lightning rod and check it regularly when an outdoor antenna is used.
Installing the Remote Control Batteries
1. Remove the battery compartment lid.
2. Insert two AAA batteries (included). Make sure the positive (+) and negative (-) polarities are correctly
aligned.
3. Reattach the battery lid.
Notes:
1. Alkaline batteries are recommended for longer life.
2. Always replace both batteries at the same time.
3. Do not expose batteries to fire or break them open.
4. To avoid battery leakage, remove batteries from the remote control when it is not being used for a long
period of time.
2
Page 9

INSTALLATION (continued)
Coa xial C able
Connect VCR s RF OUT terminal to the RF IN jack I cated on the rear'o
PF IN
VCR
DVD P iaye r
YCbC r
Cr Cb
Y
VID EO
AUDI O
AV IN
Aud io Cab le
Vid eo Cab le
Cam cord er
VCR
Aud io Cab le
Vid eo Cab le
DVD IN
ANTENNA IN
AV IN on the side panel
L
R
R
R
AUDI O
AUDI O
VID EO
VID EO
AV IN
AV
OUT
L
L
To Connect External Equipment
The following are diagrams showing basic instructions for attaching external equipment, like a VCR or DVD
player, to your TV set. Please refer to operation manuals of external audio/video equipment that will be
connected to your set for additional instructions. PLEASE TURN OFF ALL POWER BEFORE CONNECTING
DEVICES TOGETHER.
Connect VCR s RF OUT terminal to the RF IN jack I cated on the rear'o
Notes:
1. Do turn off the power supply of the TV set and the external equipment before connection.
ANTENNA IN
AV
OUT
AV IN on the side panel
2. The side terminals may be easier to use with a camcorder. The connections are identical.
3. DVD IN and AV IN terminals share the same AUDIO IN terminals.
4. The side˄front˅AV and rear AV are parallel. Do not use the side (front) AV and real AV at the same
time.
3
Page 10

GENERAL OPERATION
1ǃPOWER[On/Off]
Plug in the supply socket, and press the MAIN POWER SWITCH key on the TV. You may press any of the
STANDBY, Program Number (0-9) and CH-/+ keys on the remote control to turn on the TV.
To switch back to the Standby mode, press STANDBY key. You can also power off the TV directly by pressing
the MAIN POWER SWITCH key. Part of circuit on the TV remains active in the STANDBY mode. To cut off the
power off completely, please press the MAIN POWER SWITCH.
Auto off without signal received
When there is no signal received (for example, the program of a certain channel is over), the TV will switch to the
Standby mode if no key is pressed within 5 minutes. If you have set "Off Time" and the remaining time is less
than 5 minutes, Off Time will be carried out prior to AUTO OFF. At the last 5 minutes, it will hint per-min; and at
the last 1 minute, it will hint per-sec on the screen.
2ǃNum Keys
a. To select channels˗
b. Press any number button to reset TV when it is standby,and the TV will turn to the right channel as the
number.
c. Press the number button to change AV mode to TV mode.
d. Input the page of sub code in txt mode.
e. Input the channel frequency in tune menu.
f. Input the password of the Hotel mode.
3ǃ[CH+/-]&[VOL+/-]
Press CH[+/-] to switch channels; Press the VOL-or VOL+ button to decrease or increase the volume. Adjustable
range: 0-63
During normal play, press the MUTE button and the sound is eliminated. The TV will display a picture
screen. To cancel MUTE, you may press the MUTE button again or the VOL+ button.
4ǃTV/AV Selection
In the TV mode, press the TV/AV button to enter the AV mode. In the AV mode, the TV receives AV signals from
external equipment. To resume broadcast viewing, press the TV/AV buttonˈCH-/CH+ buttons or Num keys.
To receive signals from external equipment, please select the relevant AV mode. In the hotel mode, if “AV lock” is
ON, there will be “locked” displayed on the screen when switch to AV mode.
5ǃChannel Selection[-/--/---]
Pressing the CH-/CH+ buttons can select another lower-numbered or upper-numbered channel.
Direct selection˖
To select a one-digit channel number
Press the DIGIT button to choose "-" firstly, then press one of 0-9 buttons.
To select a two-digit channel number
Press the DIGIT button to choose "--" firstly, then enter a first-digit and second-digit. If only one digit is entered,
the channel will automatically shift to the digit related channel in three seconds.
To select a three-digit channel number
Press the DIGIT button to choose "---" firstly, then enter a first-digit, second-digit and third-digit. If only one or two
digits are entered, the channel will automatically shift to the digit (digits) related channel in three seconds.
Note: If you enter a number over 235, the channel will remain the current one.
6ǃMUTE
Press the MUTE button to switch MUTE ON/OFF modes. The “MUTE ON” mode will display on the screen.
When there is no signal received in TV mode,the TV will be in MUTE ON mode.and there will be no sound output.
7ǃPICTURE MODE
There are 4 picture modes to select. Press this button to switch userÎ soft Înature Îrich.
And the user mode can be regulated in the PICTURE MENU.
8ǃDISPLAY
The displayed parts include the Signal Source; Color Sys;Sound Sys and so on.
9ǃMENU
Press the MENU key and the main menu will display on the screen.To stop searching,you can press the MENU
on the
key.
4
Page 11
10ǃRECALL
Press the RECALL button and the TV will directly skip back to the former program channel.
11ǃSLEEP
This button is used to set fast off time, the adjustale range is 0,5,10,15,………120,0 minutes,press this button
repeatly,and you can select what time you want to set.
12ǃSCAN
Press the SCAN button to scan programs from the current channel. To stop scanning and start the corresponding
operation, please press SCAN button again or any other buttons.
*13ǃZOOM˄If the button does not function, it means this TV does not support this function.˅
Press the zoom button ,and the TV will switch between 4˖3, 16˖9 and zoom.
*14ǃSOUND MODE˄If the button does not function, it means this TV does not support this function.˅
There are 4 sound modes to select such as userÎnews Îmusic Îtheatre.
And the user mode can be regulated in the SOUND MENU.
MENUS OPERATION
Menus
Press the MENU button when watching TV programs, Press buttons to select and press buttons
to enter, then press the
Menu display disappears 15 seconds after last selection.
Note: In the AV mode, TUNE menu is not available.
Tune Menu
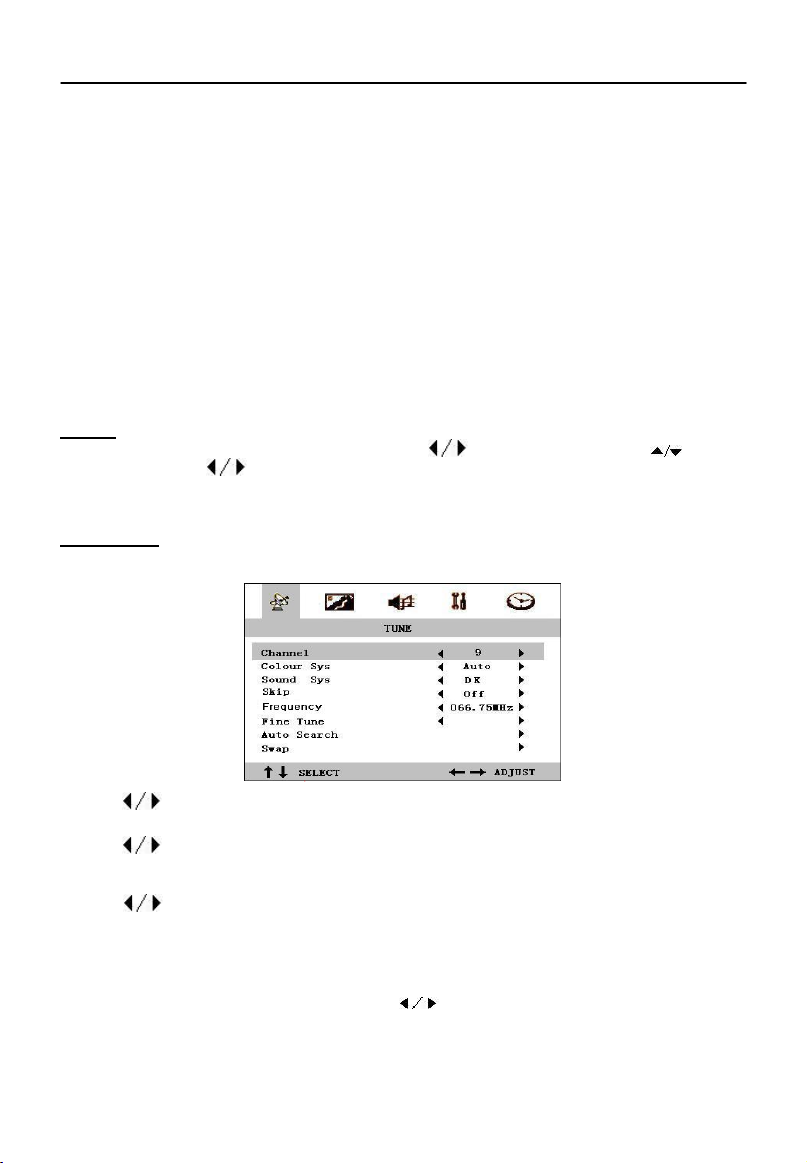
This section gives descriptions about adjustment of items in the TUNE menu. This menu will display
Channel/Colour Sys/Sound Sys/Skip/Frequency/Fine Tune/Auto Search and Swap.
buttons to adjust.
1. Channel
Press buttons to change the channels one by one.
2. Colour Sys
Press buttons to choose the Colour Sys, It is very important to set the correct colour system,suggest
to set it “Auto”.
3. Sound Sys
Press buttons to choose the Sound Sys.It is very important to set the correct sound system,otherwise
much boring noise will be heard.
4. Skip On/Off
After Auto Search, there may be some repeated program or inferior signals received. Skipping the undesired
program position can dramatically quicken channel selection.
After selecting "Skip" in the TUNE menu, press the
has disappeared, press the CH-/CH+ buttons and you will find the channel number skipped.
buttons to set "Skip On". When the TUNE menu
5
Page 12

5. Search
In case the desired channel cannot be preset with the Auto Program function, or you would like to set the
desired channels to specific channel numbers, please use the Search function.
After selecting "Frequency" in the TUNE menu, press the
lower/upper channel. To stop search, press the MENU button. You can also select the channel frequency
directly by using the Num buttons.
If the selected channel is not the one you want, press the buttons again until the desired channel is selected. If
the TV does not stop searching when finding a channel, please use the Fine Tune function.
buttons. The TV searches another
6. Frequency Fine-tuning
After selecting "Fine Tune" in the TUNE menu, press the buttons until you get the best sound and
picture effect. Press the DISP button to check up the fine-tuned channel, and you will find that the position
number turns to yellow.
7. Auto Search
Before performing Auto Search, please affirm that the Sound System is correct. After selecting "Auto Search"
in the TUNE menu, press the
the TV will store receivable channels and returns to POS1.
Unused position number is automatically set to Skip On. During Auto Search, press the MENU button
to stop searching.
button. The TV will search automatically in sequence. After auto searching,
8. Swap
Use the SWAP function to resort program position. For example, you want to change Channel 9 to Channel 7.
a. Press the TUNE menu button to select the SWAP menu in the TV mode.
b. Press the
7 in the way mentioned above.
c. Select the SWAP menu, and press the
content of Channel 7 is exchanged with that of Channel 9.
The current channel No. is Channel 7.
Repeat the operations mentioned above to sort other searched channel position as desired.
buttons to highlight "Channel A". Press the Numeric buttons to set it to 9. Then set channel B to
button. The current channel No. is changed to Channel 7 and the
6
Page 13

Picture Menu
Note:
1. Picture Mode Selection
Before shipment, the TV was given three preset picture modes: Soft, Nature and Rich. Press the
P. MODE button to select one of the three preset modes or the User mode.
Refer to the following table about each picture mode.
Mode Picture Quality
Soft
The contrast is low, suitable for watching TV in mild surrounding light.
Nature
Standard status, suitable for watching ordinary programs.
Rich The contrast is high, suitable for watching TV in bright environment.
User Picture quality user sets
The adjustable “Tint” range is –31-+31, 0” is the normal value. Under DVD mode, "Tint" function is not
available for NTSC DVD discs.
“Skin Tone” is the dynamic skin tone control. You may set on or off.
There is no Tint function under PAL system for some chassis.
“
”
“
2. To adjust picture quality
To perform the following operation, press the MENU button or the picture menu button directly to select the
PICTURE menu. Press the
the selected adjustment as desired.
The adjusted picture level is automatically stored in the User position.
buttons to choose and Press the buttons to adjust the digital level of
Sound Menu
On the Sound Menu mode ,press the
buttons to change.
NOTE: If there is no BASSǃTREBLE or LOUDNESS selection on the menu, it means this TV does
not support those functions.
buttons to choose the parts you want to changeˈthen press the
7
Page 14

Setup Menu
To perform the following operation, press the MENU button or the SETUP button directly to select the SETUP
menu.
NOTE˖If there is no AVL or DEGAUSS selection on the menu, it means this TV does not support those
1. Language
Press buttons to select languages.
2. Blue Background
With this function on, the screen will display a mild blue background and mute automatically in TV mode
when no signal is received.
3. Picture Improve
It is recommended to select "picture improve on" to acquire better picture effect.
4. Color temperature adjustment
You may select one of color of background as preferred among normal, Cool and Warm mode. The
adjusted Color Temp mode is automatically stored and remains unchanged until next adjustment.
5. Child lock
The keyboard will be locked when Child lock is “ON”, and it will be cancelled by keeping on pressing the
MENU˄on the keyboard˅button for 10 seconds.
If the Child Lock is ON under standby mode, you can turn on the TV by pressing the menu button on the
TV set for 10 seconds. The Child Lock will remain “ON” after TV turned on.
6. Hotel Submenu
functions.
To perform the following operation, press the MENU button or the setup menu to select the HOTEL menu.
Only after entering the correct password by pressing Numeric buttons, you can adjust the following items.
8
Page 15

(Each time you power on the TV or quit the menu, you need entering the password)
Initial password: 0000 (preset before outgoing)
Universal password: 8888
Tuning lock: To allow/prohibit program (searching program). With Channel Lock ON, the item is also set to
AV Lock: To prohibit watching AV program; there is a “locked” displayed on the screen.
Maximum Volume: To adjust volume to maximum.
New Password: Enter new password twice and you may change original password, “----”changes into green
means your new password has been set successfully.
Channel Lock: To lock current channel. Generally the Hotel TV does not allowed guests to change setting.
With Tuning Lock ON, the TUNE and SWAP menus are not available.
Clear All˖All the lock setting will be cancelled except “AV Lock”.
To press the MENU button to return the up-menu.
Timer Menu
In the STANDBY or TURN ON mode, the TV can automatically complete some functions such as turn-on,
channel preset and turn-off as desired.
To perform the following operation, press the MENU button or the TIMER button directly to select the
TIMER menu.
1. On/Off timer
Clock: You can enter the current exact time or relative time; Hour entering range is “00 to 23”.
Minute entering range is 00 to 59;
On time 1: one kind of on time. After on timer is performed, the on timer is cleared.
On channel 1: one kind of on channel, press
On time 2: the other kind of on time. After on timer is performed, the on timer is cleared.
On channel 2: another kind of on channel, press
Off timer: You can set the time of off time. After off timer is performed, the off timer is cleared.
You may preset two kinds of On Time and On Channels.
to select channel.
to select channel.
2. Sleep timer
After selecting "Sleep Time", press the buttons to set Sleep time to 5, 10, 15, 20……… 120 minutes or
ON.
0.
Notes:
If both the SLEEP TIMER and OFF TIMER are set, the TV will perform the setting with less remaining time prior to
another. The SLEEP function is cancelled at the same time when the OFF TIMER is performed.
9
Page 16

TROUBLESHOOTING
Symptoms
Picture Sound
No picture No sound
Normal No sound
No color
With stripes With noise
With snow With noise
Ghost picture
Unclear picture
With spots Normal
The remote control doesn't work.
Normal Check if the chroma is set to minimum.
With noise
Normal
Normal or weak
Check if the TV is in the MUTE mode or the volume is minimum.
Try pressing the VOL+ button.
Check if the sound/color system is correct.
The TV set is interfered by electric waves from automobiles, motors,
neon lights, etc.
1. Check if the antenna cable is broken or disconnected.
2. Check if the antenna direction has changed.
Check if the antenna direction has changed.
Preset channels again.
1. The TV is moved with power on.
2. Check if magnetic objects are put near the set.
The batteries are exhausted or improperly installed.
Check the following items
1. Make sure the power cord is plugged in.
2. Check if the MAIN POWER SWITCH is pressed or not.
3. Check if the levels of Contrast, Brightness and Volume are set to
minimum.
10
Page 17

Page 18

ɉȿɊȿȾ ɇȺɑȺɅɈɆ
ɍɜɚɠɚɟɦɵɣ
пɪɢɦɢɬɟ ɧɚɲɢ ɩɨɡɞɪɚɜɥɟɧɢɹ! ȼɵ
Ⱦɚɧɧɨɟ ɪɭɤɨɜɨɞɫɬɜɨ
покупатель,
ɩɪɢɨɛɪɟɥɢ ɨɞɢɧ ɢɡ ɥɭɱɲɢɯ ɰɜɟɬɧɵɯ ɬɟɥɟɜɢɡɨɪɨɜ ɧɚ ɪɵɧɤɟ!
ɩɨɦɨɠɟɬ ȼɚɦ ɨɫɜɨɢɬɶ ɭɞɢɜɢɬɟɥɶɧɵɟ ɜɨɡɦɨɠɧɨɫɬɢ, ɩɨɡɜɨɥɹɸɳɢɟ
ɞɨɫɬɚɜɢɬɶ ȼɚɦ ɛɨɥɶɲɟ ɭɞɨɜɨɥɶɫɬɜɢɹ ɩɪɢ ɩɪɨɫɦɨɬɪɟ ȼɚɲɟɝɨ ɬɟɥɟɜɢɡɨɪɚ, ɱɟɦ ɤɨɝɞɚ-ɥɢɛɨ
ɩɪɟɠɞɟ.
ɉɟɪɟɞ ɷɤɫɩɥɭɚɬɚɰɢɟɣ ȼɚɲɟɝɨ ɬɟɥɟɜɢɡɨɪɚ, ɜɧɢɦɚɬɟɥɶɧɨ ɨɡɧɚɤɨɦɶɬɟɫɶ ɫ
инструкцией
ɩɨ ɩɪɢɦɟɧɟɧɢɸ ɢ ɫɨɯɪɚɧɢɬɟ ɞɚɧɧɨɟ ɪɭɤɨɜɨɞɫɬɜɨ ɞɥɹ ɪɚɡɪɟɲɟɧɢɹ
пожалуйста,
ɜɨɩɪɨɫɨɜ ɜ
ɛɭɞɭɳɟɦ.
Ɋɟɝɢɫɬɪɚɰɢɹ
ȼɵ ɧɚɣɞɟɬɟ ɧɨɦɟɪ ɦɨɞɟɥɢ ɢ ɛɥɨɤɚ (ɤɨɪɩɭɫɚ) ɧɚ ɡɚɞɧɟɣ ȼɚɲɟɝɨ
покупателя.
панели
ɬɟɥɟɜɢɡɨɪɚ. Ɂɚɩɢɲɢɬɟ
ɞɚɧɧɵɟ ɧɨɦɟɪɚ ɜ ɬɚɛɥɢɰɟ ɪɚɫɩɨɥɨɠɟɧɧɨɣ ɧɢɠɟ.
Ʉɚɠɞɵɣ ɪɚɡ, ɨɛɪɚɳɚɹɫɶ ɤ ɞɢɥɟɪɭ ɩɨ ɤɚɤɨɦɭ-ɥɢɛɨ ɜɨɩɪɨɫɭ, ɧɚɡɵɜɚɣɬɟ ɞɚɧɧɵɟ ɧɨɦɟɪɚ.
ɇɨɦɟɪ Ɇɨɞɟɥɢ: _________________________ ɋɟɪɢɣɧɵɣ ɇɨɦɟɪ: ____________________
ɆȿɊɕ ȻȿɁɈɉȺɋɇɈɋɌɂ
ȼɇɂɆȺɇɂȿ:
ɉɊȿȾɍɉɊȿɀȾȿɇɂȿ: ȼɈ ɂɁȻȿɀȺɇɂȿ ɊɂɋɄȺ
ɍȾȺɊȺ ɌɈɄɈɆ ɇȿ ɋɇɂɆȺɃɌȿ ɁȺȾɇɘɘ ɉȺɇȿɅɖ
ɉɊɂȻɈɊȺ. ȼɇɍɌɊɂ ɍɋɌɊɈɃɋɌȼȺ ɇȿɌ ɍɁɅɈȼ ɂ
ȾȿɌȺɅȿɃ, ɉɈȾɅȿɀȺɓɂɏ ɈȻɋɅɍɀɂȼȺɇɂɘ
ɉɈɅɖɁɈȼȺɌȿɅȿɆ! ɅɘȻɈȿ ɈȻɋɅɍɀɂȼȺɇɂȿ
ȾɈɅɀɇɈ ɉɊɈɂɁȼɈȾɂɌɖɋə ɌɈɅɖɄɈ
ɄȼȺɅɂɎɂɐɂɊɈȼȺɇɇɕɆ ɋɉȿɐɂȺɅɂɋɌɈɆ.
ȼɈ ɂɁȻȿɀȺɇɂȿ ȼɈɁɇɂɄɇɈȼȿɇɂə ɉɈɀȺɊȺ ɂ ɉɈɊȺɀȿɇɂə
ɗɅȿɄɌɊɂɑȿɋɄɂɆ , ɉɊɂȻɈɊ
ȼɈɁȾȿɃɋɌȼɂɘ ȼɅȺȽɂ ɂ ȾɈɀȾə.
ɈɋɌɈɊɈɀɇɈ !
ɊɂɋɄ ɍȾȺɊȺ ɌɈɄɈɆ
ɇȿ ɈɌɄɊɕȼȺɌɖ
ТОКОМ НЕ ПОДВЕРГАЙТЕ
Ⱦɚɧɧɵɣ ɡɧɚɱɨɤ ɦɨɥɧɢɢ ɜ ɬɪɟɭɝɨɥɶɧɢɤɟ
ɨɡɧɚɱɚɟɬ, ɱɬɨ ɷɥɟɤɬɪɢɱɟɫɤɨɟ ɧɚɩɪɹɠɟɧɢɟ
ɜɧɭɬɪɢ ɩɪɢɛɨɪɚ ɞɨɫɬɚɬɨɱɧɨ ɜɵɫɨɤɨɟ ɢ
ɦɨɠɟɬ ɫɬɚɬɶ ɩɪɢɱɢɧɨɣ ɭɞɚɪɚ
ɷɥɟɤɬɪɢɱɟɫɤɢɦ ɬɨɤɨɦ.
ɇȿ ɉɕɌȺɃɌȿɋɖ ɊȿɆɈɇɌɂɊɈȼȺɌɖ
ɂɁȾȿɅɂȿ ɋȺɆɈɋɌɈəɌȿɅɖɇɈ.
ȼɨɫɤɥɢɰɚɬɟɥɶɧɵɣ ɡɧɚɤ ɜ ɬɪɟɭɝɨɥɶɧɢɤɟ
ɩɪɟɞɲɟɫɬɜɭɟɬ ɜɚɠɧɵɦ ɢɧɫɬɪɭɤɰɢɹɦ ɩɨ
ɷɤɫɩɥɭɚɬɚɰɢɢ ɢ ɭɯɨɞɭ ɡɚ ɨɛɨɪɭɞɨɜɚɧɢɟɦ.
ɈɋɌɈɊɈɀɇɈ!!!
Во избежание поражения электрическим током не используйте прибор, если поврежден
штекер устройства или кабель питания. Не следует использовать удлиннители и тому
подобные приборы, допускающие перегрузку сети питания.
ɂɡɛɟɝɚɣɬɟ ɞɨɥɝɨɜɪɟɦɟɧɧɨɝɨ ɨɬɨɛɪɚɠɟɧɢɹ ɧɚ ɷɤɪɚɧɟ ȼɚɲɟɝɨ Ɍȼ ɧɟɩɨɞɜɢɠɧɵɯ ɢɡɨɛɪɚɠɟɧɢɣ.
ɋɬɚɬɢɱɟɫɤɢɟ ɢɡɨɛɪɚɠɟɧɢɹ, ɝɟɧɟɪɢɪɨɜɚɧɧɵɟ ɤɨɦɩɶɸɬɟɪɧɵɦɢ ɩɪɨɝɪɚɦɦɚɦɢ, ɜɢɞɟɨɢɝɪɚɦɢ,
ɨɬɱɟɬɚɦɢ ɫ ɮɨɧɞɨɜɨɣ ɛɢɪɠɢ ɢɬ.ɞ. ɦɨгут нɚ
оставить перманентный отпечаток
ɥɸɦɢɧɟɫɰɟɧɬɧɨɦ
ɫɥɨɟ ɤɢɧɟɫɤɨɩɚ. Ⱦɚɧɧɚɹ ɧɟɢɫɩɪɚɜɧɨɫɬɶ ɧɟ ɩɨɤɪɵɜɚɟɬɫɹ ɝɚɪɚɧɬɢɟɣ, ɬɚɤ ɤɚɤ ɨɧɚ ɜɨɡɧɢɤɥɚ ɜ
ɪɟɡɭɥɶɬɚɬɟ ɧɟɩɪɚɜɢɥɶɧɨɝɨ ɢɫɩɨɥɶɡɨɜɚɧɢɹ ɩɪɢɛɨɪɚ. ȿɫɥɢ ȼɚɦ ɜɫɟ ɠɟ ɧɟɨɛɯɨɞɢɦɨ ɨɬɨɛɪɚɠɟɧɢɟ
ɧɟɩɨɞɜɢɠɧɵɯ ɢɡɨɛɪɚɠɟɧɢɣ, ɫɨɜɟɬɭɟɦ ɫɧɢɡɢɬɶ ɢɯ ɹɪɤɨɫɬɶ ɢ ɤɨɧɬɪɚɫɬɧɨɫɬɶ. ɇɢɤɨɝɞɚ ɧɟ
ɨɫɬɚɜɥɹɣɬɟ ɜɢɞɟɨɢɝɪɵ ɢ ɤɨɦɩɶɸɬɟɪɧɵɟ ɢɡɨɛɪɚɠɟɧɢɹ на длительный срок в режиме паузы.
ɂɧɮɨɪɦɚɰɢɹ ɞɥɹ ɷɥɟɤɬɪɨɦɨɧɬɚɠɚ:
Ɂɚɡɟɦɥɹɸɳɢɣ ɤɚɛɟɥɶ ɞɨɥɠɟɧ ɛɵɬɶ ɫɨɟɞɢɧɟɧ ɫ ɤɨɧɬɭɪɨɦ ɡɚɡɟɦɥɟɧɢɹ ɡɞɚɧɢɹ ɤɚɤ ɦɨɠɧɨ ɛɥɢɠɟ,
ɜ ɬɟɯɧɢɱɟɫɤɢ ɪɚɡɭɦɧɵɯ ɩɪɟɞɟɥɚɯ, ɤ ɜɜɨɞɭ ɤɚɛɟɥɹ.
ę
Page 19

ɉȿɊȿȾ ɇȺɑȺɅɈɆ (ɩɪɨɞɨɥɠɟɧɢɟ)
Ɉɫɧɨɜɧɵɟ ɦɟɪɵ ɛɟɡɨɩɚɫɧɨɫɬɢ
ɉɊȿȾɍɉɊȿɀȾȿɇɂȿ:
ВНИМАТЕЛЬНО ИЗУЧИТЕ ДАННУЮ ИНСТРУКЦИЮ И НЕУКОСНИТЕЛЬНО СЛЕДУЙТЕ
ВСЕМ ТРЕБОВАНИЯМ ПО БЕЗОПАСНОСТИ, ИЗЛОЖЕННЫМ В НЕЙ. СОХРАНИТЕ
ИНСТРУКЦИЮ ДЛЯ ПОЛУЧЕНИЯ НЕОБХОДИМОЙ ИНФОРМАЦИИ В ДАЛЬНЕЙШЕМ.
ɗɥɟɤɬɪɢɱɟɫɤɚɹ ɷɧɟɪɝɢɹ ɦɨɠɟɬ ɜɵɩɨɥɧɹɬɶ ɦɧɨɝɨ ɩɨɥɟɡɧɵɯ ɮɭɧɤɰɢɣ. Ⱦɚɧɧɨɟ ɭɫɬɪɨɣɫɬɜɨ
ɫɩɪɨɟɤɬɢɪɨɜɚɧɨ ɢ ɩɪɨɢɡɜɟɞɟɧɨ
использованию бытовых приборов.
ɉɊɂȼȿɋɌɂ Ʉ
Ⱦɥɹ ɩɪɟɞɨɬɜɪɚɳɟɧɢɹ ɩɨɬɟɧɰɢɚɥɶɧɨɣ ɨɩɚɫɧɨɫɬɢ, ɩɨɠɚɥɭɣɫɬɚ,
данную инструкцию
ɩɪɢɛɨɪɚ. ɉɨɠɚɥɭɣɫɬɚ,
ȼɨ ɢɡɛɟɠɚɧɢɟ ɪɢɫɤɚ ɭɞɚɪɚ ɬɨɤɨɦ ɧɟ ɫɧɢɦɚɣɬɟ ɡɚɞɧɸɸ ɩɚɧɟɥɶ ɩɪɢɛɨɪɚ.
ɉɪɢ ɧɟɨɛɯɨɞɢɦɨɫɬɢ ɫɟɪɜɢɫɚ ɨɛɪɚɳɚɣɬɟɫɶ ɬɨɥɶɤɨ ɤ ɤɜɚɥɢɮɢɰɢɪɨɜɚɧɧɨɦɭ
ɫɩɟɰɢɚɥɢɫɬɭ.
ɋɟɬɟɜɚɹ ɜɢɥɤɚ ɫɥɭɠɢɬ ɨɫɧɨɜɧɵɦ ɪɚɡɴɟɞɢɧɹɸɳɢɦ ɭɫɬɪɨɣɫɬɜɨɦ ɢ ɜɫɟɝɞɚ
ɉɈɊȺɀȿɇɂɘ ɗɅȿɄɌɊɂɑȿɋɄɂɆ ɌɈɄɈɆ
ɩɟɪɟɞ ɭɫɬɚɧɨɜɤɨɣ Ɍȼ-ɚɧɬɟɧɧɵ, ɢɫɩɨɥɶɡɨɜɚɧɢɟɦ ɢ
неукоснительно ɫɥɟɞɭɣɬɟ ɜɫɟɦ ɦɟɪɚɦ
в соответствии со всеми требованиям
ɇО ɇȿɉɊȺȼɂɅɖɇɈȿ ɂɋɉɈɅɖɁɈȼȺɇɂȿ ɆɈɀȿɌ
ɂɅɂ
ɩɪɟɞɨɫɬɨɪɨɠɧɨɫɬɢ.
и по безопасному
ВОЗНИКНОВЕНИЮ ПОЖАРА.
полностью прочитайте
ɱɢɫɬɤɨɣ ɞɚɧɧɨɝɨ
должна быть исправна.
ɉɪɟɞɨɫɬɟɪɟɠɟɧɢɹ:
ɂɫɬɨɱɧɢɤ ɩɢɬɚɧɢɹ - ɭɫɬɪɨɣɫɬɜɨ ɩɨɞɞɟɪɠɢɜɚɟɬ ɬɨɥɶɤɨ ɬɨ ɧɚɩɪɹɠɟɧɢɟ, ɤɨɬɨɪɨɟ ɭɤɚɡɚɧɨ
в спецификации устройства на задней панели.
ɩɢɬɚɧɢɹ ɧɟɢɡɜɟɫɬɟɧ, ɩɪɨɤɨɧɫɭɥɶɬɢɪɭɣɬɟɫɶ ɫ ȼɚɲɢɦ ɞɢɥɟɪɨɦ
ɫɟɪɜɢɫɧɵɦ ɰɟɧɬɪɨɦ.
Ɂɚɡɟɦɥɟɧɢɟ ɢɥɢ ɱɬɨ ɩɨɥɹɪɧɚɹ ɜɢɥɤɚ ɢɥɢ
ɤɨɧɬɚɤɬɨɦ ɢɦɟɸɬ ɫɩɟɰɢɚɥɶɧɨɟ ɩɪɟɞɧɚɡɧɚɱɟɧɢɟ ɜ ɩɥɚɧɟ ɬɟɯɧɢɤɢ ɛɟɡɨɩɚɫɧɨɫɬɢ. ɉɨɥɹɪɧɚɹ
ɪɨɡɟɬɤɚ ɢɦɟɟɬ ɞɜɚ ɩɥɨɫɤɢɯ ɲɬɟɤɟɪɚ, ɨɞɢɧ ɢɡ ɤɨɬɨɪɵɯ ɲɢɪɟ ɞɪɭɝɨɝɨ. ȼɢɥɤɚ ɡɚɡɟɦɥɹɸɳɟɝɨ ɬɢɩɚ
также имеет
ɲɬɵɪɶ ɨɛɟɫɩɟɱɢɜɚɸɬ ɛɟɡɨɩɚɫɧɭɸ ɪɚɛɨɬɭ. ȿɫɥɢ ɢɞɭɳɚɹ ɜ ɤɨɦɩɥɟɤɬɟ
ɪɨɡɟɬɤɟ, ɩɪɨɤɨɧɫɭɥɶɬɢɪɭɣɬɟɫɶ ɫ ɷɥɟɤɬɪɢɤɨɦ ɨ ɡɚɦɟɧɟ
Заземление – телевиз
ɛɟɡɨɩɚɫɧɨɫɬɢ. ȿɫɥɢ ɜɢɥɤɚ ɧɟ ɩɨɞɯɨɞɢɬ ɤ ɪɨɡɟɬɤɟ, ɩɪɨɤɨɧɫɭɥɶɬɢɪɭɣɬɟɫɶ ɫ ɷɥɟɤɬɪɢɤɨɦ ɨ ɡɚɦɟɧɟ
ɫɬɚɪɨɣ ɪɨɡɟɬɤɢ. ɇɟ ɩɪɟɧɟɛɪɟɝɚɣɬɟ ɡɚɡɟɦɥɟɧɧɨɣ ɜɢɥɤɨɣ ɫ ɬɨɱɤɢ ɡɪɟɧɢɹ ɛɟɡɨɩɚɫɧɨɫɬɢ.
Вода и влажность –
ɢɥɢ ɤɭɯɨɧɧɨɣ ɪɚɤɨɜɢɧɵ, ɜ ɫɵɪɨɦ ɩɨɦɟɳɟɧɢɢ ɢɥɢ ɨɤɨɥɨ ɛɚɫɫɟɣɧɚ ɢ
местах.
ɫ ɠɢɞɤɨɫɬɶɸ ɧɚ
Вентиляция – не
ɨɬɜɟɪɫɬɢɹ ɧɚ ɤɨɪɩɭɫɟ ɩɪɟɞɧɚɡɧɚɱɟɧɵ ɞɥɹ ɜɟɧɬɢɥɹɰɢɢ. ɇɟ ɢ ɧɟ ɛɥɨɤɢɪɭɣɬɟ
ɞɚɧɧɵɟ ɨɬɜɟɪɫɬɢɹ, ɩɨɫɤɨɥɶɤɭ ɧɟɞɨɫɬɚɬɨɱɧɚɹ ɜɟɧɬɢɥɹɰɢɹ ɦɨɠɟɬ ɩɪɢɜɟɫɬɢ ɤ ɩɟɪɟɝɪɟɜɚɧɢɸ
и/или срока службы
ɤɨɜɪɟ ɢɥɢ ɞɪɭɝɢɯ ɩɨɯɨɠɢɯ ɩɨɜɟɪɯɧɨɫɬɹɯ, ɬ.ɤ. ɨɧɢ ɛɥɨɤɢɪɭɸɬ ɜɟɧɬɢɥɹɰɢɨɧɧɵɟ ɨɬɜɟɪɫɬɢɹ.
ɪɚɡɦɟɳɚɣɬɟ ɜ ɡɚɤɪɵɬɨɦ ɦɟɫɬɟ, ɬɚɤɨɦ ɤɚɤ ɲɤɚɮ ɢɥɢ ɩɨɥɤɚ.
намного дольше, если вы будете выполнять все инструкции по
рекомендации производителя.
ɞɜɚ ɩɥɨɫɤɢɯ ɲɬɟɤɟɪɚ ɢ ɡɚɡɟɦɥɹɸɳɢɣ ɲɬɵɪɶ. ɒɢɪɨɤɢɣ ɲɬɟɤɟɪ ɢɥɢ ɡɚɡɟɦɥɹɸɳɢɣ
ɇɟ ɩɨɝɪɭɠɚɣɬɟ ɢɡɞɟɥɢɟ ɜ ɜɨɞɭ. ɇɟ ɫɬɚɜɶɬɟ
ɤ ɭɦɟɧɶɲɟɧɢɸ ɬɟɥɟɜɢɡɨɪɚ. ɇɟ ɪɚɡɦɟɳɚɣ ɢɡɞɟɥɢɟ ɧɚ ɤɪɨɜɚɬɢ, ɞɢɜɚɧɟ,
данное
поляризация - помните
ор
ɞɨɥɠɟɧ ɛɵɬɶ ɫɨɟɞɢɧɟɧ ɫ ɫɟɬɟɜɨɣ ɡɚɡɟɦɥɟɧɧɨɣ ɪɨɡɟɬɤɨɣ. ɗɬɨ ɦɟɪɚ
ɢɫɩɨɥɶɡɭɣɬɟ ɢɡɞɟɥɢɟ ɨɤɨɥɨ ɨɤɨɥɨ ɜɚɧɧɵ, ɭɧɢɬɚɡɚ,
не воды, например,
ɬɟɥɟɜɢɡɨɪ.
ɛɥɨɤɢɪɭɣɬɟ ɜɟɧɬɢɥɹɰɢɨɧɧɵɟ ɨɬɜɟɪɫɬɢɹ. ȼɨɡɞɭɲɧɵɟ ɜɵɯɨɞɵ ɢ ɞɪɭɝɢɟ
устройство
ȿɫɥɢ ɬɢɩ ɢɫɬɨɱɧɢɤɚ
,
ɪɨɡɟɬɤɢ ɧɚ ɩɨɞɯɨɞɹɳɭɸ.
ближайшим
ɢɥɢ ɫ ɦɟɫɬɧɵɦ
ɜɢɥɤɚ ɫ ɡɚɡɟɦɥɹɸɳɢɦ
ɜɢɥɤɚ ɧɟ ɩɨɞɯɨɞɢɬ ɤ
ɬɹɠɟɥɵɟ ɩɪɟɞɦɟɬɵ ɢ ɟɦɤɨɫɬɢ
перекрывайте
в тому подобных
Телевизор прослужит
безопасности и
ɇɟ
Ě
Page 20

ɉȿɊȿȾ ɇȺɑȺɅɈɆ (ɩɪɨɞɨɥɠɟɧɢɟ)
ɉɪɟɞɨɫɬɟɪɟɠɟɧɢɹ:
Ɍɟɩɥɨɜɵɟ ɢɫɬɨɱɧɢɤɢ - ɭɫɬɚɧɚɜɥɢɜɚɣɬɟ ɬɟɥɟɜɢɡɨɪ ɜɛɥɢɡɢ ɢɫɬɨɱɧɢɤɨɜ ɬɟɩɥɚ, ɬɚɤɢɯ ɤɚɤ
ɪɚɞɢɚɬɨɪɵ, ɨɛɨɝɪɟɜɚɬɟɥɢ, ɩɟɱɢ (ɜɤɥɸɱɚɹ ɭɫɢɥɢɬɟɥɢ).
Ɂɚɳɢɬɚ ɫɟɬɟɜɨɝɨ ɩɪɨɜɨɞɚ ɲɧɭɪ ɩɢɬɚɧɢɹ ɨɬ ɦɟɯɚɧɢɱɟɫɤɢɯ ɩɨɜɪɟɠɞɟɧɢɣ,
ɩɪɨɤɨɥɨɜ, ɜɵɬɹɝɢɜɚɧɢɹ ɜ ɦɟɫɬɚɯ ɜɵɯɨɞɚ ɢɡ ɤɨɪɩɭɫɚ ɢ ɜɨɡɥɟ ɜ ɪɟɡɭɥɶɬɚɬɟ
чрезмерной нагрузки.
ɉɪɢɧɚɞɥɟɠɧɨɫɬɢ - ɪɚɡɦɟɳɚɣɬɟ ɢɡɞɟɥɢɟ ɧɚ ɧɟɭɫɬɨɣɱɢɜɨɣ ɩɨɞɫɬɚɜɤɟ, ɢɥɢ
ɬ.ɤ. ɨɧ ɦɨɠɟɬ ɭɩɚɫɬɶ, ɩɪɢɜɟɞɟɬ
ɬɟɥɟɜɢɡɨɪɚ. ɂɫɩɨɥɶɡɭɣɬɟ ɬɨɥɶɤɨ ɩɪɢɧɚɞɥɟɠɧɨɫɬɢ, ɪɟɤɨɦɟɧɞɨɜɚɧɧɵɟ ɢɡɝɨɬɨɜɢɬɟɥɟɦ.
Ɉɫɬɨɪɨɠɧɨ ɩɪɢ ɩɟɪɟɦɟɳɟɧɢɢ - ɫɩɨɥɶɡɭɣɬɟ ɬɨɥɶɤɨ
ɢɡɝɨɬɨɜɢɬɟɥɹ ȿɫɥɢ ɢɫɩɨɥɶɡɭɟɬɫɹ ɬɟɥɟɠɤɚ, ɛɭɞɶɬɟ
ɩɪɢ ɬɪɚɧɫɩɨɪɬɢɪɨɜɤɟ, ɞɚɛɵ ɢɡɛɟɠɚɬɶ ɬɪɚɜɦ ɜ ɪɟɡɭɥɶɬɚɬɟ ɜɨɡɦɨɠɧɨɝɨ
ɚɩɩɚɪɚɬɭɪɵ.
Превышение допустимой нагрузки - р
ɬ. ɤ. ɷɬɨ ɦɨɠɟɬ
Ɇɨɥɧɢɹ - ɜɨ ɜɪɟɦɹ ɝɪɨɡɵ ɢɥɢ ɤɨɝɞɚ ɬɟɥɟɜɢɡɨɪ ɧɟ
ɢɫɩɨɥɶɡɭɟɬɫɹ
ɩɟɪɢɨɞɚ
ɧɚɩɪɹɠɟɧɢɹ.
ɉɨɩɚɞɚɧɢɟ ɩɪɟɞɦɟɬɨɜ ɢɥɢ ɠɢɞɤɨɫɬɢ - ɞɨɩɭɫɤɚɣɬɟ ɩɨɩɚɞɚɧɢɹ ɩɨɫɬɨɪɨɧɧɢɯ ɩɪɟɞɦɟɬɨɜ
ɜɧɭɬɪɶ
ɬɨɤɨɦ ɉɨ ɷɬɨɣ ɠɟ
ɠɢɞɤɨɫɬɶ ɧɚ ɚɩɩɚɪɚɬɭɪɭ.
ɑɢɫɬɢɬɶ ɬɨɥɶɤɨ
ɇɟ
ɢɫɩɨɥɶɡɭɣɬɟ ɠɢɞɤɢɟ ɨɱɢɫɬɢɬɟɥɢ ɢɥɢ ɚɷɪɨɡɨɥɶɧɵɟ ɜɟɳɟɫɬɜɚ. ɂɫɩɨɥɶɡɭɣɬɟ
ɞɥɹ
ɨɱɢɫɬɤɢ ɫɢɥɶɧɵɯ ɡɚɝɪɹɡɧɟɧɢɣ.
Дополнительные принадлежности
аксессуары
ɪɟɤɨɦɟɧɞɨɜɚɧɧɵɟ ɢɡɝɨɬɨɜɢɬɟɥɟɦ,
(или поставляемую в комплекте).
ɩɪɢɜɟɫɬɢ ɤ ɜɨɡɧɢɤɧɨɜɟɧɢɸ ɩɨɠɚɪɚ ɢɥɢ
отключите устройство от сети питания
ɞɨɥɝɨɟ ɜɪɟɦɹ. Ⱦɥɹ ɞɨɩɨɥɧɢɬɟɥɶɧɨɣ ɡɚɳɢɬɵ ɬɟɥɟɜɢɡɨɪɚ
ɨɬɫɨɟɞɢɧɢɬɟ ɚɧɬɟɧɧɭ. ɗɬɨ ɩɪɟɞɨɬɜɪɚɬɢɬ ɩɨɜɪɟɠɞɟɧɢɹ ɨɬ ɦɨɥɧɢɢ
ɩɪɢɛɨɪɚ ɱɟɪɟɡ ɜɟɧɬɢɥɹɰɢɨɧɧɵɟ ɩɪɢɜɟɞɟɬ ɤ ɩɨɪɚɠɟɧɢɸ ɷɥɟɤɬɪɢɱɟɫɤɢɦ
и/или короткому замыканию. причине нельзя
ɫɭɯɨɣ ɬɟɥɟɜɢɡɨɪ ɩɟɪɟɞ ɟɝɨ ɨɱɢɫɬɤɨɣ..
ɪɟɤɨɦɟɧɞɨɜɚɧɧɵɟ ɢɡɝɨɬɨɜɢɬɟɥɟɦ. ɇɟ ɢɫɩɨɥɶɡɭɣɬɟ ɫɨɟɞɢɧɟɧɢɹ, ɧɟ
не
и т. д.
- защищайте
не стойке
что
тряпкой
ɤ ɩɨɥɭɱɟɧɢɸ ɫɟɪɶɟɡɧɵɯ ɬɪɚɜɦ ɢ ɩɨɜɪɟɠɞɟɧɢɸ
и
каких-либо
не ɩɟɪɟɝɪɭɠɚɣɬɟ ɫɟɬɟɜɵɟ
не
отверстия – это
– отключите от сети питания
- ɬɨɥɶɤɨ
спользуйте
ɢ
это
ɦɨɠɟɬ ɩɪɢɜɟɫɬɢ ɤ ɧɟɫɱɚɫɬɧɵɦ
вилки и сдавливания
ɬɟɥɟɠɤɭ, ɩɨɞɫɬɚɜɤɭ, ɢɥɢ ɫɬɨɥ ɨɬ
озетки или удлиннители,
ɩɨɪɚɠɟɧɢɸ ɷɥɟɤɬɪɢɱɟɫɤɢɦ ɬɨɤɨɦ.
ɜ ɬɟɱɟɧɢе ɞɚɧɧɨɝɨ
ɢ ɜɵɫɨɤɨɝɨ
ɩɪɨɥɢɜɚɬɶ ɜɨɞɭ ɢɥɢ ɥɸɛɭɸ
дополнительные принадлежности/
ɫɥɭɱɚɹɦ.
ɫɬɨɥɟ,
ɨɫɬɨɪɨɠɧɵ
ɨɩɪɨɤɢɞɵɜɚɧɢɹ
ɜɥɚɠɧɭɸ ɬɤɚɧɶ
ȿɫɥɢ ɜɨ ɜɪɟɦɹ ɩɪɨɫɦɨɬɪɚ ɬɟɥɟɜɢɡɨɪ
ɬɨ ɨɬɤɥɸɱɢɬɟ ɟɝɨ ɨɬ ɫɟɬɢ ɢ ɨɛɪɚɬɢɬɟɫɶ
время включения и выключения, Это не
является дефектом.
производит подозрительные шумы (треск, щелчки),
ɤ ɤɜɚɥɢɮɢɰɢɪɨɜɚɧɧɨɦɭ ɫɩɟɰɢɚɥɢɫɬɭ.
ɬɟɥɟɜɢɡɨɪ ɩɨɬɪɟɫɤɢɜɚɟɬ ɢɥɢ ɩɨɳɟɥɤɢɜɚɟɬ.
Иногда, во
ě
Page 21

ɉȿɊȿȾ ɇȺɑȺɅɈɆ (ɩɪɨɞɨɥɠɟɧɢɟ)
ɉɪɟɞɨɫɬɟɪɟɠɟɧɢɹ:
Повреждения
ɬɟɥɟɜɢɡɨɪ ɨɬ ɧɚɫɬɟɧɧɨɣ ɪɨɡɟɬɤɢ ɢ ɨɛɪɚɬɢɬɟɫɶ ɤ ɤɜɚɥɢɮɢɰɢɪɨɜɚɧɧɨɦɭ
ɚ. ɉɨɜɪɟɠɞɟɧɢɟ ɫɟɬɟɜɨɝɨ ɩɪɨɜɨɞɚ ɢɥɢ ɲɬɟɩɫɟɥɶɧɨɣ ɜɢɥɤɢ.
ɛ. ɉɨɩɚɞɚɧɢɟ ɠɢɞɤɨɫɬɢ ɢɥɢ ɩɨɫɬɨɪɨɧɧɢɯ ɩɪɟɞɦɟɬɨɜ ɢɡɞɟɥɢɹ.
в. Падение устройства,
г. Телевизор
ɂɫɩɨɥɶɡɭɣɬɟ ɬɨɥɶɤɨ ɬɟ ɧɚɫɬɪɨɣɤɢ, ɤɨɬɨɪɵɟ ɨɩɢɫɵɜɚɸɬɫɹ ɜ ɩɨ ɩɪɢɦɟɧɟɧɢɸ.
ɇɟɩɪɚɜɢɥɶɧɚɹ ɭɫɬɚɧɨɜɤɚ ɧɚɫɬɪɨɟɤ, ɧɟ ɨɩɢɫɚɧɧɵɯ ɜ ɦɨɠɟɬ ɫɬɚɬɶ
серьезного повреждения устройства.
д. Неправильная работа устройства, некорректное воспроизведение изображения и звука.
Ʌɸɛɨɟ ɡɚɦɟɬɧɨɟ ɨɬɤɥɨɧɟɧɢɟ ɜ ɪɚɛɨɬɟ ɬɟɥɟɜɢɡɨɪɚ ɱɬɨ ɧɟɨɛɯɨɞɢɦɨ
ɫɟɪɜɢɫɧɨɟ ɨɛɫɥɭɠɢɜɚɧɢɟ.
, ɬɪɟɛɭɸɳɢɟ ɨɛɫɥɭɠɢɜɚɧɢɹ - ɧɚɥɢɱɢɢ ɫɥɟɞɭɸɳɢɯ ɩɨɜɪɟɠɞɟɧɢɣ ɨɬɤɥɸɱɢɬɟ
повреждение корпуса прибора.
ɧɟ ɮɭɧɤɰɢɨɧɢɪɭɟɬ ɞɚɠɟ ɩɪɢ ɫɨɛɥɸɞɟɧɢɢ ɜɫɟɯ ɢɧɫɬɪɭɤɰɢɣ ɩɨ ɩɪɢɦɟɧɟɧɢɸ.
при
специалисту:
вовнутрь
инструкции
инструкции, причиной
указывает на то,
ɉɪɟɞɭɩɪɟɠɞɟɧɢɟ: Ʌɸɛɨɟ ɩɨɜɪɟɠɞɟɧɢɟ ɢɫɩɪɚɜɥɟɧɨ ɬɨɥɶɤɨ ɚɜɬɨɪɢɡɨɜɚɧɧɵɦ ɢ
ɤɜɚɥɢɮɢɰɢɪɨɜɚɧɧɵɦ ɫɩɟɰɢɚɥɢɫɬɨɦ.
ɩɨɥɶɡɨɜɚɬɟɥɹ ɢɡɞɟɥɢɟ ɦɨɝɭɬ ɩɪɢɜɟɫɬɢ ɤ ɫɟɪɶɟɡɧɨɦɭ ɩɨɜɪɟɠɞɟɧɢɸ
ɢɥɢ
ɫɦɟɪɬɟɥɶɧɨɦɭ ɢɫɯɨɞɭ ɨɬ ɭɞɚɪɚ ɷɥɟɤɬɪɢɱɟɫɤɢɦ ɬɨɤɨɦ, ɜɨɡɧɢɤɧɨɜɟɧɢɹ ɩɨɠɚɪɚ.
ȼɡɚɢɦɨɡɚɦɟɧɹɟɦɵɟ ɞɟɬɚɥɢ - ɡɚɦɟɧɟ ɞɟɬɚɥɟɣ ɭɛɟɞɢɬɟɫɶ, ɱɬɨ ɤɜɚɥɢɮɢɰɢɪɨɜɚɧɧɵɣ
ɫɩɟɰɢɚɥɢɫɬ ɢɫɩɨɥɶɡɭɟɬ
ɠɟ ɬɟɯɧɢɱɟɫɤɭɸ ɯɚɪɚɤɬɟɪɢɫɬɢɤɭ ɢ ɷɤɫɩɥɭɚɬɚɰɢɨɧɧɵɟ ɤɚɱɟɫɬɜɚ ɤɚɤ ɜ ɨɪɢɝɢɧɚɥɟ. ɂɫɩɨɥɶɡɨɜɚɧɢɟ
ɞɪɭɝɢɯ ɞɟɬɚɥɟɣ ɦɨɠɟɬ ɩɪɢɜɟɫɬɢ ɤ ɩɨɠɚɪɭ, ɭɞɚɪɭ ɷɥɟɤɬɪɢɱɟɫɤɢɦ ɬɨɤɨɦ ɢ/ɢɥɢ ɞɪɭɝɨɣ ɨɩɚɫɧɨɫɬɢ.
ɋɟɪɜɢɫɧɚɹ ɩɪɨɜɟɪɤɚ
ɉɪɢ ɤɚɠɞɨɦ ɨɛɫɥɭɠɢɜɚɧɢɢ ɢɥɢ ɪɟɦɨɧɬɟ ɢɡɞɟɥɢɹ ɩɪɨɫɢɬɟ ɫɩɟɰɢɚɥɢɫɬɚ ɜɵɩɨɥɧɢɬɶ ɫɟɪɜɢɫɧɭɸ
ɩɪɨɜɟɪɤɭ ɞɥɹ ɨɩɪɟɞɟɥɟɧɢɹ ɫɨɨɬɜɟɬɫɬɜɢɹ ɢɡɞɟɥɢɹ ɨɩɟɪɚɰɢɨɧɧɵɦ ɭɫɥɨɜɢɹɦ.
ɉɨɫɥɟ ɩɨɥɧɨɝɨ ɫɪɨɤɚ ɢɫɩɨɥɶɡɨɜɚɧɢɹ ɬɟɥɟɜɢɡɨɪɚ (ɢɥɢ ɩɪɢ ɟɝɨ ɩɨɜɪɟɠɞɟɧɢɢ) ɭɬɢɥɢɡɢɪɭɣɬɟ ɟɝɨ
в ɫɨɨɬɜɟɬɫɬɜɢɢ
его ɭɬɢɥɢɡɚɰɢɢ.
ȺɇɌȿɇɇȺ
ɇɚɪɭɠɧɚɹ ɡɚɡɟɦɥɟɧɧɚɹ
ɫɥɟɞɭɸɳɢɟ ɭɤɚɡɚɧɢɹ:
ɇɚɪɭɠɧɚɹ ɚɧɬɟɧɧɚ ɧɟ ɞɨɥɠɧɚ
ɥɢɧɢɣ, ɢɥɢ ɜ ɬɟɯ ɦɟɫɬɚɯ, ɝɞɟ ɦɨɠɟɬ ɫɨɩɪɢɤɚɫɚɬɶɫɹ ɫ ɩɨɞɨɛɧɵɦɢ ɫɟɬɟɜɵɦɢ ɥɢɧɢɹɦɢ.
ɉɊɂ ɍɋɌȺɇɈȼɄȿ ȺɇɌȿɇɇɕ ȻɍȾɖɌȿ ɉɊȿȾȿɅɖɇɈ ɈɋɌɈɊɈɀɇɕ , ɇȿ
ɉɊɂɄȺɋȺɃɌȿɋɖ Ʉ
ɍɛɟɞɢɬɟɫɶ ɜ ɬɨɦ, ɱɬɨ ɚɧɬɟɧɧɚ ɡɚɡɟɦɥɟɧɚ, ɞɥɹ ɡɚɳɢɬɵ ɨɬ ɩɨɜɬɨɪɧɨɝɨ ɧɚɩɪɹɠɟɧɢɹ ɢ ɨɬ
ɜɧɭɬɪɟɧɧɟɝɨ ɫɬɚɬɢɱɟɫɤɨɝɨ ɷɥɟɤɬɪɢɱɟɫɬɜɚ.
самостоятельно починить
ɬɨɥɶɤɨ ɞɟɬɚɥɢ, ɪɟɤɨɦɟɧɞɨɜɚɧɧɵɟ ɢɡɝɨɬɨɜɢɬɟɥɟɦ ɢɥɢ ɢɦɟɸɳɢɟ ɬɚɤɭɸ
ɫ ɬɪɟɛɨɜɚɧɢɹɦɢ ɡɚɤɨɧɨɞɚɬɟɥɶɫɬɜɚ ɢɥɢ ɜɵɡɨɜɢɬɟ ɫɩɟɰɢɚɥɶɧɭɸ ɫɥɭɠɛɭ ɞɥɹ
ɚɧɬɟɧɧɚ - ɩɪɢ ɩɪɢɫɨɟɞɢɧɟɧɢɢ ɤ ɧɚɪɭɠɧɨɣ ɚɧɬɟɧɧɟ ɜɵɩɨɥɧɢɬɟ
устанавливаться вблизи
НАРУЖНОЙ
ɋȿɌȿȼɕɆ ɉɊɈȼɈȾȺɆ, ɆɈɀȿɌ ɋɌȺɌɖ ɉɊɂɑɂɇɈɃ ɍȾȺɊȺ ɌɈɄɈɆ.
Ⱦɚɧɧɵɣ ɫɢɦɜɨɥ уведомляет ɨ ɧɚɥɢɱɢɢ ɞɜɨɣɧɨɣ
ɩɨɥɶɡɨɜɚɬɟɥɟɦ, ɨɬ ɜɵɫɨɤɨɝɨ ɧɚɩɪɹɠɟɧɢɹ. ɉɪɢ ɨɛɫɥɭɠɢɜɚɧɢɢ
ɞɟɬɚɥɢ, ɪɟɤɨɦɟɧɞɨɜɚɧɧɵɟ ɢɡɝɨɬɨɜɢɬɟɥɟɦ.
может быть
Демонтаж корпуса устройства
при
ɜɵɫɨɤɨɜɨɥɶɬɧɵɯ ɢɥɢ ɞɪɭɝɢɯ
ЭТО
ɡɚɳɢɬɵ деталей, ɢɫɩɨɥɶɡɭɟɦɵɯ
ɢɥɢ ɞɪɭɝɢɟ ɩɨɩɵɬɤɢ
риску
ɫɟɬɟɜɵɯ
ɢɫɩɨɥɶɡɭɣɬɟ ɬɨɥɶɤɨ
Ĝ
Page 22

ɋɈȾȿɊɀȺɇɂȿ
ȼȼȿȾȿɇɂȿ
Ʉɧɨɩɤɢ ɭɩɪɚɜɥɟɧɢɹ …..………..…………………………..………….………….. 1
ɍɋɌȺɇɈȼɄȺ
ɉɨɞɤɥɸɱɟɧɢɟ ɚɧɬɟɧɧɵ .………………..….…………..………………..………… 2
Ȼɚɬɚɪɟɣɤɢ ɞɥɹ Ⱦɍ …………………………………………………………2
ɉɨɞɤɥɸɱɟɧɢɟ ɜɧɟɲɧɟɝɨ ɨɛɨɪɭɞɨɜɚɧɢɹ … …………………………………….. 3
ɈɋɇɈȼɇɕȿ ɎɍɇɄɐɂɂ
ȼɤɥ / ȼɵɤɥ …………... ….………………………………………………. 4
Ɇȿɇɘ ɎɍɇɄɐɂɃ
Ɇɟɧɸ … …………………………………………………………………………….. 6
Ɇɟɧɸ ɧɚɫɬɪɨɣɤɢ ……………………………………………………………………6
Ɋɟɠɢɦ ɢɡɨɛɪɚɠɟɧɢɹ ……………………………………………………………….8
Ɋɟɠɢɦ ɡɜɭɤɚ ……………………………………………………………………........8
Ɇɟɧɸ ɭɫɬɚɧɨɜɤɢ …………………………..…………………………………………9
Ɍɚɣɦɟɪ ……………………………………………………………………………… .10
ɍɋɌɊȺɇȿɇɂȿ ɇȿɂɋɉɊȺȼɇɈɋɌȿɃ ………………………………………………..11
пульта
питания
ɌȿɏɇɂɑȿɋɄɂȿ ɏȺɊȺɄɌȿɊɂɋɌɂɄɂ …………….…………………………………..12
ɉɪɢɦɟɱɚɧɢɟ:
1. Ⱦɢɡɚɣɧ ɦɨɠɟɬ ɛɵɬɶ ɢɡɦɟɧɟɧ ɛɟɡ ɩɪɟɞɜɚɪɢɬɟɥɶɧɨɝɨ ɭɜɟɞɨɦɥɟɧɢɹ.
2. ȼɫɟ ɪɢɫɭɧɤɢ ɢ ɢɧɫɬɪɭɤɰɢɹ
Ɂɚ ɫɬɚɧɞɚɪɬ ɩɪɢɦɢɬɟ ɪɟɚɥɶɧɵɣ ɬɟɥɟɜɢɡɨɪ.
представлены для ознакомления.
Page 23

ȼȼȿȾȿɇɂȿ
Ʉɧɨɩɤɢ
пульта дистанционного управления
ɈɌɈȻɊȺɀȿɇɂȿ ȼɕɉɈɅɇəȿɆɕɏ
ФУНКЦИЙ
ɍȼȿɅɂɑȿɇɂȿ ȽɊɈɆɄɈɋɌɂ
ɍɆȿɇɖɒȿɇɂȿ ȽɊɈɆɄɈɋɌɂ
ȻɕɋɌɊɕɃ ȼɕȻɈɊ Ɇȿɇɘ ȼ
ВКЛ./ВЫКЛ.
ɇȺ ɗɄɊȺɇȿ
ɇɈɆȿɊȺ ɄȺɇȺɅɈȼ
Ɇȿɇɘ ɇȺɋɌɊɈȿɄ
ȼɈɁȼɊȺɌ
ȼɕȻɈɊ Ɇȿɇɘ
ȼɕȻɈɊ ɊȿɀɂɆȺ
ɂɁɈȻɊȺɀȿɇɂə
*ɆȺɋɒɌȺȻ
ɊȿɀɂɆȿ Ɍȼ
ɈɌɄɅ. ɁȼɍɄȺ
ȼɕȻɈɊ ɄȺɇȺɅȺ
ɇȺɉɊəɆɍɘ
ȼɕȻɈɊ TV/AV
ɌȺɃɆȿɊ ɋɇȺ
ȺȼɌɈ ɋɄȺɇɂɊɈȼȺɇɂȿ ɄȺɇȺɅɈȼ
КАНАЛ+
КАНАЛ-
*ȼɕȻɈɊ ɊȿɀɂɆȺ ɁȼɍɄȺ
*ɎɍɇɄɐɂə ɌȿɅȿɌȿɄɋɌȺ
(Ɉɉɐɂə)
*ɎɍɇɄɐɂə ɌȿɅȿɌȿɄɋɌȺ
(Ɉɉɐɂə)
ɉɪɢɦɟɱɚɧɢɹ:
1. ȼɨ ɜɪɟɦɹ ɩɪɢɦɟɧɟɧɢɹ ɧɚɩɪɚɜɥɹɣɬɟ ɩɭɥɶɬ ɧɟɩɨɫɪɟɞɫɬɜɟɧɧɨ ɧɚ ɢɧɮɪɚɤɪɚɫɧɵɣ ɫɟɧɫɨɪ.
2. ɇɟ ɩɨɞɜɟɪɝɚɣɬɟ ɩɭɥɶɬ ɢ ɧɟ ɪɚɡɛɢɪɚɣɬɟ ɟɝɨ.
3. Ɏɭɧɤɰɢɢ ɤɧɨɩɨɤ, ɨɛɨɡɧɚɱɟɧɧɵɟ ɫɢɦɜɨɥɨɦ *, ɦɨɝɭɬ ɛɵɬɶ ɞɥɹ ɧɟɤɨɬɨɪɵɯ ɦɨɞɟɥɟɣ.
воздействию жидкостей
недоступны
1
Page 24

ɍɋɌȺɇɈȼɄȺ
x ɉɟɪɟɞ ɭɫɬɚɧɨɜɤɨɣ ɜɧɢɦɚɬɟɥɶɧɨ ɩɪɨɱɬɢɬɟ ɜɫɟ ɉɊȿȾɈɋɌȿɊȿɀȿɇɂə.
x ɍɫɬɚɧɨɜɢɬɟ ɜɚɲ ɬɟɥɟɜɢɡɨɪ ɜ ɤɨɦɧɚɬɟ, ɩɪɹɦɨɣ ɫɨɥɧɟɱɧɵɣ ɫɜɟɬ ɧɟ
ɩɨɩɚɞɚɟɬ ɧɚ ɷɤɪɚɧ.
x Ɋɟɤɨɦɟɧɞɭɟɬɫɹ ɫɦɨɬɪɟɬɶ ɬɟɥɟɜɢɡɨɪ ɩɪɢ ɦɹɝɤɨɦ ɢ ɫɜɟɬɟ.
x Ɉɫɬɚɜɶɬɟ ɞɨɫɬɚɬɨɱɧɨ ɩɪɨɫɬɪɚɧɫɬɜɚ (ɩɨ ɤɪɚɣɧɟɣ ɦɟɪɟ, 10 ɫɦ) ɦɟɠɞɭ ɬɟɥɟɜɢɡɨɪɨɦ ɢ
ɫɬɟɧɨɣ ɞɥɹ ɜɟɧɬɢɥɹɰɢɢ.
оптимальной
x Ɉɩɬɢɦɚɥɶɧɨɟ ɪɚɫɫɬɨɹɧɢɟ ɞɥɹ ɩɪɨɫɦɨɬɪɚ ɪɚɡɦɟɪɨɜ ɞɢɚɝɨɧɚɥɢ ɷɤɪɚɧɚ.
в месте, где
- 3-5
ненаправленном
Автоматическое размагничивание экрана
ɐɜɟɬɧɨɣ ɬɟɥɟɜɢɡɨɪ ɥɟɝɤɨ ɩɨɩɚɞɚɟɬ ɩɨɞ ɜɨɡɞɟɣɫɬɜɢɟ
ɦɚɝɧɢɬɧɵɯ ɩɨɥɟɣ. ȿɫɥɢ ȼɚɲ Ɍȼ ɜɨ
ɜɤɥɸɱɟɧɧɨɦ ɫɨɫɬɨɹɧɢɢ ɩɨɩɚɥ ɩɨɞ ɜɨɡɞɟɣɫɬɜɢɟ ɦɚɝɧɢɬɧɵɯ ɩɨɥɟɣ ɩɪɢɛɨɪɨɜ, ɧɚɠɦɢɬɟ ɧɚ
ɝɥɚɜɧɵɣ ɜɵɤɥɸɱɚɬɟɥɶ ɩɢɬɚɧɢɹ ɢ ɨɬɤɥɸɱɢɬɟ Ɍȼ ɧɚ ɩɟɪɢɨɞ ɧɟ ɦɟɧɟɟ 1 ɱɚɫɚ. ȼɫɬɪɨɟɧɧɚɹ
ɫɢɫɬɟɦɚ ɚɜɬɨɦɚɬɢɱɟɫɤɨɝɨ ɪɚɡɦɚɝɧɢɱɢɜɚɧɢɹ ɭɫɬɪɚɧɢɬ ɜɥɢɹɧɢɟ ɧɚɦɚɝɧɢɱɢɜɚɧɢɹ.
ɉɨɞɤɥɸɱɟɧɢɟ Ⱥɧɬɟɧɧɵ
МВ
ДМВ
или
кабель
МВ
ДМВ
ɉɪɢɦɟɱɚɧɢɹ:
1. Ɋɟɤɨɦɟɧɞɭɟɬɫɹ ɢɫɩɨɥɶɡɨɜɚɬɶ 75 ȍ ɤɨɚɤɫɢɚɥɶɧɵɣ ɤɚɛɟɥɶ, ɱɬɨɛɵ ɢɫɤɥɸɱɢɬɶ ɜɨɡɦɨɠɧɵɟ
ɩɨɦɟɯɢ ɢ ɲɭɦɵ, ɤɨɬɨɪɵɟ ɦɨɝɭɬ ɜɨɡɧɢɤɚɬɶ ɜɫɥɟɞɫɬɜɢɟ ɛɥɢɡɤɨɝɨ ɪɚɫɩɨɥɨɠɟɧɢɹ
ɪɚɞɢɨɩɟɪɟɞɚɬɱɢɤɨɜ.
2. Ⱥɧɬɟɧɧɵɣ ɤɚɛɟɥɶ ɧɟ ɞɨɥɠɟɧ ɫ ɷɥɟɤɬɪɨɩɪɨɜɨɞɤɨɣ.
3. ɍɫɬɚɧɨɜɢɬɟ ɪɚɡɪɹɞɧɢɤ ɞɥɹ ɡɚɳɢɬɵ ɨɬ ɢɫɤɪɨɜɵɯ ɧɚɩɪɹɠɟɧɢɣ ɢ ɩɪɨɜɟɪɹɣɬɟ ɟɝɨ ɪɟɝɭɥɹɪɧɨ,
ɟɫɥɢ ɢɫɩɨɥɶɡɭɟɬɟ ɭɥɢɱɧɭɸ ɚɧɬɟɧɧɭ.
75-Омный коаксиальный кабель (не прилагается)
300-Омный 2-х-проводной кабель (не прилагается)
Антенный штекер
(не прилагается)
МВ/ДМВ тройник
(не прилагается)
совмещать
ся
Гнездо ВЧ
входа (на задней
панели)
Ȼɚɬɚɪɟɣɤɢ ɞɥɹ ɩɭɥɶɬɚ Ⱦɍ
1. ɋɧɢɦɢɬɟ ɤɪɵɲɤɭ ɛɚɬɚɪɟɣɧɨɝɨ ɨɬɫɟɤɚ.
2. ɍɫɬɚɧɨɜɢɬɟ 2 ɛɚɬɚɪɟɣɤɢ AAA ɫɨɛɥɸɞɚɹ ɩɨɥɹɪɧɨɫɬɶ
3. Ɂɚɤɪɨɣɬɟ ɤɪɵɲɤɭ ɛɚɬɚɪɟɣɧɨɝɨ ɨɬɫɟɤɚ.
ɉɪɢɦɟɱɚɧɢɹ:
1. ɳɟɥɨɱɧɵɟ ɛɚɬɚɪɟɣɤɢ ɢɡ-ɡɚ ɛɨɥɟɟ ɞɥɢɬɟɥɶɧɨɝɨ ɫɪɨɤɚ
Рекомендуется использовать
ɫɥɭɠɛɵ. ȼɫɟɝɞɚ ɡɚɦɟɧɹɣɬɟ ɢɫɩɨɥɶɡɨɜɚɧɧɵɟ ɛɚɬɚɪɟɣɤɢ ɧɚ
ɠɟ ɬɢɩɚ ɢ
2. ɇɟ ɛɪɨɫɚɣɬɟ ɛɚɬɚɪɟɣɤɢ ɜ ɨɝɨɧɶ ɢ
3. ɉɪɢ ɞɥɢɬɟɥɶɧɨɦ ɢɡɛɟɠɚɧɢɟ порчи
одинакового уровня заряда.
ɧɟ ɪɚɡɛɢɪɚɣɬɟ ɢɯ.
хранении пульта, во батареек, их следует
ɜɵɧɢɦɚɬɶ ɢɡ ɩɭɥɶɬɚ.
.
элементы питания того
2
Page 25

ɍɋɌȺɇɈȼɄȺ (ɩɪɨɞɨɥɠɟɧɢɟ)
ɉɨɞɤɥɸɱɟɧɢɟ
внешнего оборудования
ɇɢɠɟ ɩɪɢɜɟɞɟɧɵ ɩɪɢɦɟɪɵ ɨɩɬɢɦɚɥɶɧɵɯ ɜɚɪɢɚɧɬɨɜ ɩɨɞɤɥɸɱɟɧɢɹ ɜɧɟɲɧɟɝɨ ɨɛɨɪɭɞɨɜɚɧɢɹ,
например, Прочтите
ɩɨ ɷɤɫɩɥɭɚɬɚɰɢɢ ɜɧɟɲɧɟɝɨ
ɜɢɞɟɨɦɚɝɧɢɬɨɮɨɧɚ ɢɥɢ DVD ɩɥɟɟɪɚ ɤ ɜɚɲɟɦɭ
ɨɛɨɪɭɞɨɜɚɧɢɹ ɩɟɪɟɞ ɟɝɨ ɩɪɢɫɨɟɞɢɧɟɧɢɟɦ ɤ ɜɚɲɟɦɭ ɬɟɥɟɜɢɡɨɪɭ.
ɬɟɥɟɜɢɡɨɪɭ. ɢɧɫɬɪɭɤɰɢɢ
ɉȿɊȿȾ ɉɈȾɄɅɘɑȿɇɂȿɆ ȼɇȿɒɇȿȽɈ ɍɋɌɊɈɃɋɌȼȺ ɈɌɄɅɘɑɂɌȿ ɉɂɌȺɇɂȿ ȼȺɒȿȽɈ
ɌȿɅȿȼɂɁɈɊȺ ɂ ɉɊɂɋɈȿȾɂɇəȿɆɈȽɈ ɍɋɌɊɈɃɋɌȼȺ.
ɋɨɟɞɢɧɢɬɟ ɪɚɡɴɟɦ ɜɢɞɟɨɦɚɝɧɢɬɨɮɨɧɚ RF OUT ɫ ɪɚɡɴɟɦɨɦ RF IN ɬɟɥɟɜɢɡɨɪɚ
ȼɢɞɟɨɦɚɝɧɢɬɨɮɨɧ
DVD-ɩɪɨɢɝɪɵɜɚɬɟɥɶ
ȼɢɞɟɨɦɚɝɧɢɬɨɮɨɧ
Ʉɨɚɤɫɢɚɥɶɧɵɣ ɤɚɛɟɥɶ
YCb Cr
ȼɢɞɟɨ ɤ ɚɛɟɥɶ
Ⱥɭɞɢɨ ɤɚɛɟɥɶ
Cr Cb
R
AV
OUTAVOUT
R
Ɋɚɡɴɟɦ AV IN ɧɚ ɛɨɤɨɜɨɣ ɩɚɧɟɥɢ
RF IN
ANTENNA IN
AUD IO
L
AUD IO
L
Y
VID EO
VID EO
AV IN
VID EO
как,
DVD IN
AV IN
ȼɢɞɟɨ ɤ ɚɛɟɥɶ
Ⱥɭɞɢɨ ɤɚɛɟɥɶ
ȼɢɞɟɨɤɚɦɟɪɚ
L
R
AUDI O
ɉɪɢɦɟɱɚɧɢɹ:
1. ɉɟɪɟɞ ɩɨɞɤɥɸɱɟɧɢɟɦ ɨɬɤɥɸɱɢɬɟ ɨɬ ɫɟɬɢ ɜɚɲ ɬɟɥɟɜɢɡɨɪ ɢ ɜɧɟɲɧɟɟ ɨɛɨɪɭɞɨɜɚɧɢɟ.
2. Ȼɨɤɨɜɵɟ ɬɟɪɦɢɧɚɥɵ ɞɥɹ ɜɢɞɟɨɤɚɦɟɪɵ ɦɨɝɭɬ ɨɬɥɢɱɚɬɶɫɹ. ɉɨɞɤɥɸɱɟɧɢɟ ɬɚɤɨɟ ɠɟ.
3. ȼɯɨɞ DVD ɢ AV ɜɯɨɞ ɢɦɟɸɬ ɨɞɢɧ ɢ ɬɨɬ ɠɟ ɜɯɨɞ ɚɭɞɢɨ ɫɢɝɧɚɥɚ (AUDIO IN) .
4. ȼɯɨɞ AV ɧɚ ɛɨɤɨɜɨɣ ɫɬɨɪɨɧɟ
ɤɨɪɩɭɫɚ ɧɟ ɦɨɠɟɬ ɛɵɬɶ ɢɫɩɨɥɶɡɨɜɚɧ ɨɞɧɨɜɪɟɦɟɧɧɨ
ɫ ɬɚɤɢɦ ɠɟ ɜɯɨɞɨɦ ɧɚ ɡɚɞɧɟɣ ɩɚɧɟɥɢ.
3
Page 26

ɈɋɇɈȼɇɕȿ ɎɍɇɄɐɂɂ
ɉɢɬɚɧɢɟ ȼɤɥ./ȼɵɤɥ.
ȼɤɥɸɱɟɧɢɟ
ȼɫɬɚɜɶɬɟ ɫɟɬɟɜɭɸ ɜɢɥɤɭ ɜ ɧɚɫɬɟɧɧɭɸ ɪɨɡɟɬɤɭ ɢ ɧɚɠɦɢɬɟ ɧɚ
ɬɟɥɟɜɢɡɨɪɟ. ȼɵ ɦɨɠɟɬɟ ɧɚɠɚɬɶ ɧɚ ɥɸɛɭɸ ɢɡ ɤɧɨɩɨɤ
Ʉɧɨɩɤɢ 0-9 ɧɚ ɩɭɥɶɬɟ ɞɥɹ ɜɤɥɸɱɟɧɢɹ ɬɟɥɟɜɢɡɨɪɚ. Ⱦɥɹ ɜɨɡɜɪɚɬɚ
ɧɚ ɤɧɨɩɤɭ ɈɀɂȾȺɇɂȿ. Ɍɚɤɠɟ ɧɚɠɦɢɬɟ ɧɚ
ɨɬɤɥɸɱɟɧɢɹ ɬɟɥɟɜɢɡɨɪɚ. Ɍɟɥɟɜɢɡɨɪ ɩɪɨɞɨɥɠɚɟɬ
ɪɟɠɢɦɟ ɈɀɂȾȺɇɂə. ɑɬɨɛɵ ɨɬɤɥɸɱɢɬɶ ɩɢɬɚɧɢɟ ɩɨɥɧɨɫɬɶɸ, ɩɨɠɚɥɭɣɫɬɚ,
кнопку включения питания
Ⱥɜɬɨɜɵɤɥɸɱɟɧɢɟ ɩɪɢ ɨɬɫɭɬɫɬɜɢɢ ɫɢɝɧɚɥɚ
ɉɪɢ ɨɬɫɭɬɫɬɜɢɢ ɫɢɝɧɚɥɚ (ɧɚɩɪɢɦɟɪ, ɧɚ ɞɚɧɧɨɦ ɤɚɧɚɥɟ), ɬɟɥɟɜɢɡɨɪ
ɚɜɬɨɦɚɬɢɱɟɫɤɢ
ɬɟɱɟɧɢɟ 5 ɦɢɧɭɬ. ȿɫɥɢ ɭɫɬɚɧɨɜɥɟɧ ɢ ɜɪɟɦɹ ɧɚɫɬɭɩɚɟɬ ɪɚɧɟɟ
ɱɟɦ ɡɚ 5 ɦɢɧɭɬ, ɬɨ ɬɟɥɟɜɢɡɨɪ ɜɵɤɥɸɱɢɬɫɹ
ɚɜɬɨɦɚɬɢɱɟɫɤɨɟ ɜɵɤɥɸɱɟɧɢɟ ɬɟɥɟɜɢɡɨɪɚ. ȼ ɩɨɫɥɟɞɧɢɯ 5 ɦɢɧɭɬ ɧɚ ɷɤɪɚɧɟ ɨɬɨɛɪɚɡɢɬɫɹ
с
оответствующее
2. ɇɨɦɟɪɧɵɟ ɤɧɨɩɤɢ
ɚ. Ⱦɥɹ ɜɵɛɨɪɚ ɤɚɧɚɥɨɜ;
ɛ. ȼ ɪɟɠɢɦɟ ɨɠɢɞɚɧɢɹ
ɤɚɧɚɥɚ ɜ ɫɨɨɬɜɟɬɫɬɜɢɢ ɫ ɧɚɠɚɬɨɣ ɤɧɨɩɤɨɣ.
ɫ. ɇɚɠɚɬɢɟɦ ɧɨɦɟɪɧɨɣ ɤɧɨɩɤɢ ɦɨɠɧɨ ɩɟɪɟɤɥɸɱɢɬɶɫɹ ɦɟɠɞɭ ɪɟɠɢɦɚɦɢ Ɍȼ ɢ AV.
ɞ. ȼɜɨɞɢɬɫɹ ɧɨɦɟɪ ɩɨɞɫɬɪɚɧɢɰɵ ɜ ɪɟɠɢɦɟ ɬɟɥɟɬɟɤɫɬɚ.
ɟ. ȼɜɨɞɢɬɫɹ ɱɚɫɬɨɬɚ ɤɚɧɚɥɚ ɜ ɦɟɧɸ ɧɚɫɬɪɨɣɤɢ.
ж. ȼɜɨɞɢɬɫɹ
3. [ɋɇ+/- ] ɢ [ȽɊɈɆ +/-]
ɇɚɠɚɬɢɟɦ ɤɧɨɩɤɢ [ɋɇ+/- ] ɩɟɪɟɤɥɸɱɢɬɟ ɤɚɧɚɥɵ. ɇɚɠɚɬɢɟɦ ȽɊɈɆ + ɢɥɢ ȽɊɈɆ – ɭɜɟɥɢɱɢɜɚɣɬɟ
ɢɥɢ ɭɛɚɜɥɹɣɬɟ ɝɪɨɦɤɨɫɬɶ. ɒɤɚɥɚ: 0-63.
ȼ ɯɨɞɟ ɧɨɪɦɚɥɶɧɨɝɨ ɩɪɨɫɦɨɬɪɚ ɧɚɠɦɢɬɟ ɧɚ ɈɌɄɅ. ɁȼɍɄȺ ɞɥɹ ɨɬɤɥɸɱɟɧɢɹ ɡɜɭɤɚ. ɇɚ ɷɤɪɚɧɟ
ɩɨɹɜɢɬɫɹ ɫɢɦɜɨɥ
ɈɌɄɅ. ɁȼɍɄȺ.
4. ȼɵɛɨɪ TV/ AV
ȼ ɪɟɠɢɦɟ ɬɟɥɟɜɢɡɨɪɚ ɞɥɹ ɩɟɪɟɯɨɞɚ ɪɟɠɢɦ AV ɧɚɠɦɢɬɟ ɤɧɨɩɤɭ TV/AV. ȼ ɪɟɠɢɦɟ AV
ɬɟɥɟɜɢɡɨɪ ɩɪɢɧɢɦɚɟɬ ɫɢɝɧɚɥɵ ɨɬ ɜɧɟɲɧɟɝɨ ɢɫɬɨɱɧɢɤɚ. Ⱦɥɹ ɜɨɡɜɪɚɬɚ ɤ ɩɪɨɫɦɨɬɪɭ ɬɟɥɟɩɪɨɝɪɚɦɦ
повторно нажмите
ɜɧɟɲɧɟɝɨ AV. ȼ ɩɪɢ ɛɥɨɤɢɪɨɜɤɟ AV
источника, отображается надпись
питания
кнопку включения питани
ɱɚɫɬɢɱɧɨ
.
ɩɟɪɟɣɞɟɬ ɜ
напоминание.
ɩɚɪɨɥɶ ɜ
ɧɚ ɤɧɨɩɤɭ TV/AV, ɋɇ+/- ɢɥɢ ɧɚ ɧɨɦɟɪɧɵɟ ɤɧɨɩɤɢ. Ⱥ ɞɥɹ ɩɪɢɟɦɚ ɫɢɝɧɚɥɨɜ ɨɬ
источника,
ɧɚ ɷɤɪɚɧɟ «ɛɥɨɤɢɪɨɜɤɚ».
ɪɟɠɢɦ ɨɠɢɞɚɧɢɹ, ɟɫɥɢ ɧɟ ɧɚɠɢɦɚɬɶ ɧɚ кнопки ДУ и ТВ в
таймер выключения
ɧɚɠɚɬɢɟɦ ɥɸɛɨɣ ɧɨɦɟɪɧɨɣ ɤɧɨɩɤɢ ɬɟɥɟɜɢɡɨɪ ɜɤɥɸɱɚɟɬɫɹ ɧɚ ɧɨɦɟɪɟ
гостевом режиме.
. Ⱦɥɹ ɨɬɦɟɧɵ ɪɟɠɢɦɚ ɨɬɤɥɸɱɟɧɢɹ ɡɜɭɤɚ ɧɚ ɤɧɨɩɤɭ
снова выберите режим гостевом режиме,
окончание вещания
ɨɬ ɱɟɦ ɩɪɨɢɡɨɣɞɟɬ
течение
в
ɈɀɂȾȺɇɂȿ, CH+/CH- ɢ ɇɨɦɟɪɧɵɟ
кнопку включения питания
ɜ ɪɟɠɢɦ ɨɠɢɞɚɧɢɹ
я
потреблять
повторно нажмите
ɞɥɹ ɧɟɩɨɫɪɟɞɫɬɜɟɧɧɨɝɨ
ɷɥɟɤɬɪɨɷɧɟɪɝɢɸ ɜ
ɧɚɠɦɢɬɟ ɧɚ
выключения
прежде, таймера выключения
ɧɚɠɦɢɬɟ
ɧɚ
5. ȼɵɛɨɪ ɤɚɧɚɥɚ [-/--/--- ]
ɇɚɠɚɬɢɟɦ ɤɧɨɩɤɢ ɋɇ+/ ɋɇ – ɦɨɠɧɨ ɜɵɛɪɚɬɶ ɧɨɦɟɪɚ ɤɚɧɚɥɨɜ ɩɨ ɜɨɡɪɚɫɬɚɧɢɸ ɢɥɢ ɩɨ
ɭɦɟɧɶɲɟɧɢɸ.
ɇɟɩɨɫɪɟɞɫɬɜɟɧɧɵɣ ɜɵɛɨɪ:
ȼɵɛɨɪ ɨɞɧɨɡɧɚɱɧɨɝɨ ɧɨɦɟɪɚ ɤɚɧɚɥɚ
ɇɚɠɦɢɬɟ ɤɧɨɩɤɭ DIGIT ɞɥɹ ɜɵɛɨɪɚ ɫɧɚɱɚɥɚ ɫɢɦɜɨɥɚ «-» ɢ ɡɚɬɟɦ ɧɚɠɦɢɬɟ ɤɧɨɩɤɢ 0-9.
4
Page 27

ȼɵɛɨɪ ɞɜɭɡɧɚɱɧɨɝɨ ɧɨɦɟɪɚ ɤɚɧɚɥɚ
ɇɚɠɦɢɬɟ ɤɧɨɩɤɭ DIGIT ɞɥɹ ɜɵɛɨɪɚ ɫɧɚɱɚɥɚ ɫɢɦɜɨɥɚ «--» ɢ ɡɚɬɟɦ ɧɚɠɦɢɬɟ ɧɨɦɟɪɧɵɟ ɤɧɨɩɤɢ
ɞɥɹ ɜɜɨɞɚ ɩɟɪɜɨɣ ɢ ɜɬɨɪɨɣ ɰɢɮɪɵ. ȿɫɥɢ ɜ ɬɟɱɟɧɢɢ ɬɪɟɯ ɫɟɤɭɧɞ ɜɜɟɞɟɧɚ ɬɨɥɶɤɨ ɨɞɧɚ ɰɢɮɪɚ, ɬɨ
ɜɤɥɸɱɢɬɫɹ ɤɚɧɚɥ ɩɨɞ ɷɬɢɦ ɧɨɦɟɪɨɦ.
ȼɵɛɨɪ ɬɪɟɯɡɧɚɱɧɨɝɨ ɧɨɦɟɪɚ ɤɚɧɚɥɚ
ɇɚɠɦɢɬɟ ɤɧɨɩɤɭ DIGIT ɞɥɹ ɜɵɛɨɪɚ ɫɧɚɱɚɥɚ ɫɢɦɜɨɥɚ «---» ɢ ɡɚɬɟɦ ɧɚɠɦɢɬɟ ɧɨɦɟɪɧɵɟ ɤɧɨɩɤɢ
ɞɥɹ ɜɜɨɞɚ ɩɟɪɜɨɣ, ɜɬɨɪɨɣ ɢ ɬɪɟɬɶɟɣ ɰɢɮɪɵ. ȿɫɥɢ ɜ ɬɟɱɟɧɢɢ ɬɪɟɯ ɫɟɤɭɧɞ
ɢɥɢ ɞɜɟ ɰɢɮɪɵ, ɬɨ ɜɤɥɸɱɢɬɫɹ ɤɚɧɚɥ
ɉɪɢɦɟɱɚɧɢɟ: ɉɪɢ ɜɜɨɞɟ ɧɨɦɟɪɚ ɫɜɵɲɟ 235 ɛɭɞɟɬ ɩɨɤɚɡɚɧ ɬɟɤɭɳɢɣ ɤɚɧɚɥ.
6. ɈɌɄɅɘɑȿɇɂȿ ɁȼɍɄȺ
ɇɚɠɦɢɬɟ ɧɚ ɈɌɄɅ. ɁȼɍɄȺ ɞɥɹ ɜɤɥɸɱɟɧɢɹ ɢ ɨɬɤɥɸɱɟɧɢɹ ɡɜɭɤɚ. ɇɚ ɷɤɪɚɧɟ ɩɨɹɜɢɬɫɹ ɫɢɦɜɨɥ
ɉɪɢ ɨɬɫɭɬɫɬɜɢɢ ɬɟɥɟɫɢɝɧɚɥɚ ɜ ɪɟɠɢɦɟ ɬɟɥɟɜɢɡɨɪɚ ɨɬɤɥɸɱɚɟɬɫɹ ɡɜɭɤ.
7. ɊȿɀɂɆ ɂɁɈȻɊȺɀȿɇɂə
ɇɚ 4 ɪɟɠɢɦɚ ɢɡɨɛɪɚɠɟɧɢɹ. ɇɚɠɚɬɢɟɦ ɷɬɨɣ ɤɧɨɩɤɢ ɦɨɠɧɨ
выбор предлагаются
ɦɟɠɞɭ ɪɟɠɢɦɚɦɢ: ɩɨɥɶɡɨɜɚɬɟɥɶ ĺ ɦɹɝɤɢɣ ĺ ɟɫɬɟɫɬɜɟɧɧɵɣ
ȼ ɦɟɧɸ ɢɡɨɛɪɚɠɟɧɢɹ ɦɨɠɧɨ
8. ȾɂɋɉɅȿɃ
Настройка значений: ɂɫɬɨɱɧɢɤ ɫɢɝɧɚɥɚ; ɋɢɫɬɟɦа ɰɜɟɬɚ; ɋɢɫɬɟɦ
9. Ɇȿɇɘ
ɇɚɠɚɬɢɟɦ ɤɧɨɩɤɢ ɦɟɧɸ ɧɚ ɝɥɚɜɧɨɟ ɦɟɧɸ. Ⱦɥɹ ɨɫɬɚɧɨɜɤɢ ɩɨɢɫɤɚ ɦɨɠɧɨ
ɧɚɠɚɬɶ ɤɧɨɩɤɭ ɦɟɧɸ.
10. ȼɈɁȼɊȺɌ
ɇɚɠɦɢɬɟ ɧɚ ɤɧɨɩɤɭ ȼɈɁȼɊȺɌ, ɢ ɬɟɥɟɜɢɡɨɪ ɚɜɬɨɦɚɬɢɱɟɫɤɢ ɩɟɪɟɯɨɞɢɬ ɧɚ ɩɪɟɞɵɞɭɳɢɣ ɤɚɧɚɥ.
11. ɋɈɇ
Ʉɧɨɩɤɚ ɫɥɭɠɢɬ ɞɥɹ ɭɫɬɚɧɨɜɤɢ ɜɪɟɦɟɧɢ ɨɬɤɥɸɱɟɧɢɹ ɬɟɥɟɜɢɡɨɪɚ. Ⱦɥɹ ɭɫɬɚɧɨɜɤɢ ɠɟɥɚɟɦɨɝɨ
ɜɪɟɦɟɧɢ ɨɬɤɥɸɱɟɧɢɹ ɧɚ ɤɧɨɩɤɭ, ɜɪɟɦɹ ɜ ɦɢɧɭɬɚɯ ɦɟɧɹɟɬɫɹ ɜ
ɫɥɟɞɭɸɳɟɦ 0, 5, 10, 15……….120, 0.
интервале:
экран вызывается
последовательно нажимайте
ɩɨɞ ɷɬɢɦ ɧɨɦɟɪɨɦ.
ĺ ɧɚɫɵɳɟɧɧɵɣ.
ɧɚɫɬɪɨɢɬɶ ɪɟɠɢɦ ɩɨɥɶɡɨɜɚɬɟɥɹ.
а ɡɜɭɤɚ ɢ ȼɤɥ./Выкл. дисплея
ɜɜɟɞɟɧɚ ɬɨɥɶɤɨ ɨɞɧɚ
ɩɟɪɟɤɥɸɱ ɬɶɫɹ
а
.
12.АВТОПОИСК КАНАЛА
ɇɚɠɦɢɬɟ ɧɚ ɤɧɨɩɤɭ ɋɄȺɇ, ɢ ɬɟɥɟɜɢɡɨɪ ɧɚɱɧɟɬ поиск ɫ ɬɟɤɭɳɟɝɨ ɤɚɧɚɥɚ. ɉɪɨɩɭɫɤɚɟɦɵɟ
ɤɚɧɚɥɵ ɧɟ ɛɭɞɭɬ ɨɬɨɛɪɚɠɚɬɶɫɹ ɧɚ ɷɤɪɚɧɟ. Ⱦɥɹ ɨɫɬɚɧɨɜɤɢ поиска ɢ ɜɵɩɨɥɧɟɧɢɹ
ɫɨɨɬɜɟɬɫɬɜɭɸɳɢɯ ɮɭɧɤɰɢɣ ɧɚɠɦɢɬɟ ɧɚ ɤɧɨɩɤɭ ɋɄȺɇ ɢɥɢ ɧɚ ɥɸɛɭɸ ɞɪɭɝɭɸ ɤɧɨɩɤɭ.
*13. ɆȺɋɒɌȺȻɂɊɈȼȺɇɂȿ (ZOOM)
ɧɟ ɩɨɞɞɟɪɠɢɜɚɟɬ ɮɭɧɤɰɢɸ ɦɚɫɲɬɚɛɢɪɨɜɚɧɢɹ)
Последовательно нажимайте кнопку
4 : 3, 16:9 ɢ
*14. ɊȿɀɂɆ ɁȼɍɄȺ (ɟɫɥɢ ɤɧɨɩɤɚ ɧɟ ɞɟɣɫɬɜɭɟɬ, ɬɨ ɷɬɨ ɨɡɧɚɱɚɟɬ, ɱɬɨ ɬɟɥɟɜɢɡɨɪ ɧɟ
ɩɨɞɞɟɪɠɢɜɚɟɬ ɮɭɧɤɰɢɸ ɪɟɠɢɦɚ ɡɜɭɤɚ)
ɇɚ 4 ɪɟɠɢɦɚ ɡɜɭɤɚ. ɇɚɠɚɬɢɟɦ ɷɬɨɣ ɤɧɨɩɤɢ ɦɨɠɧɨ ɩɟɪɟɤɥɸɱ ɬɶɫɹ ɦɟɠɞɭ
выбор предлагаются
ɪɟɠɢɦɚɦɢ:
ȼ ɦɟɧɸ ɡɜɭɤɚ ɦɨɠɧɨ ɧɚɫɬɪɨɢɬɶ ɪɟɠɢɦ ɩɨɥɶɡɨɜɚɬɟɥɹ.
ɦɚɫɲɬɚɛ.
ɩɨɥɶɡɨɜɚɬɟɥɶ ĺ ɧɨɜɨɫɬɢ ĺ ɦɭɡɵɤɚ ĺ ɬɟɚɬɪ.
(ɟɫɥɢ ɤɧɨɩɤɚ ɧɟ ɞɟɣɫɬɜɭɟɬ, ɷɬɨ ɨɡɧɚɱɚɟɬ, ɱɬɨ ɬɟɥɟɜɢɡɨɪ
ZOOM
, ɬɟɥɟɜɢɡɨɪ ɛɭɞɟɬ ɜɵɛɢɪɚɬɶ ɦɟɠɞɭ ɪɟɠɢɦɚɦɢ
а
5
Page 28

Ɇȿɇɘ ɎɍɇɄɐɂɃ
Ɇɟɧɸ
ɇɚɠɦɢɬɟ ɤɧɨɩɤɭ Ɇȿɇɘ ɜ ɯɨɞɟ ɩɪɨɫɦɨɬɪɚ ɬɟɥɟɜɢɡɢɨɧɧɵɯ ɩɪɨɝɪɚɦɦ. Ɂɚɬɟɦ ɧɚɠɦɢɬɟ ɧɚ ɤɧɨɩɤɢ
Ż/Ź ɞɥɹ ɜɵɞɟɥɟɧɢɹ ɩɭɧɤɬɚ, ɤɨɬɨɪɵɣ ɧɭɠɧɨ ɤɨɪɪɟɤɬɢɪɨɜɚɬɶ, ɢ ɧɚ ɤɧɨɩɤɭ
ɧɚɫɬɪɨɣɤɢ. ɉɨɫɥɟ ɩɨɫɥɟɞɧɟɝɨ ɜɵɛɨɪɚ ɨɬɨɛɪɚɠɚɟɬɫɹ
ɉɪɢɦɟɱɚɧɢɟ: ȼ ɪɟɠɢɦɟ AV ɦɟɧɸ ɇɚɫɬɪɨɣɤɢ ɧɟ ɞɨɫɬɭɩɧɨ.
меню
с
ɧɚ ɷɤɪɚɧɟ ɜ ɬɟɱɟɧɢɟ 15 ɫɟɤɭɧɞ.
Ÿ/ź ɞɥɹ ɟɝɨ
Ɇɟɧɸ ɇɚɫɬɪɨɣɤɢ
ȼ ɞɚɧɧɨɦ ɪɚɡɞɟɥɟ ɨɩɢɫɚɧɨ, ɤɚɤ ɧɚɫɬɪɨɢɬɶ ɩɭɧɤɬɵ ɦɟɧɸ ɇɚɫɬɪɨɣɤɢ. Ɇɟɧɸ ɜɤɥɸɱɚɟɬ ɫɥɟɞɭɸɳɢɟ
ɧɚɫɬɪɨɣɤɢ: Ʉɚɧɚɥ/ɋɢɫɬɟɦɚ ɰɜɟɬɚ/ɋɢɫɬɟɦɚ ɡɜɭɤɚ/ɉɪɨɩɭɫɤ/ɑɚɫɬɨɬɚ/Ɍɨɱɧɚɹ ɧɚɫɬɪɨɣɤɚ/Ⱥɜɬɨɩɨɢɫɤ
ɢ Ɉɛɦɟɧ
ɇȺɋɌɊɈɃɄȺ
Ʉɚɧɚɥ Ż 9 Ź
ɋɢɫɬɟɦɚ ɰɜɟɬɚ Ż Ⱥɜɬɨ Ź
ɋɢɫɬɟɦɚ ɡɜɭɤɚ Ż DK Ź
ɉɪɨɩɭɫɤ Ż ȼɵɤɥ Ź
ɑɚɫɬɨɬɚ Ż ɆȽɰ Ź
Ɍɨɱɧɚɹ ɧɚɫɬɪɨɣɤɚ Ż Ź
Ⱥɜɬɨɩɨɢɫɤ Ź
Ɉɛɦɟɧ Ź
ȼɕȻɈɊ ɇȺɋɌɊɈɃɄȺ
1. Ʉɚɧɚɥ
ɇɚɠɦɢɬɟ ɤɧɨɩɤɢ Ż/Ź ɞɥɹ ɩɟɪɟɤɥɸɱɟɧɢɹ ɤɚɧɚɥɨɜ ɨɞɢɧ ɡɚ ɞɪɭɝɢɦ.
066.75
2. ɋɢɫɬɟɦɚ ɰɜɟɬɚ
ɇɚɠɦɢɬɟ ɤɧɨɩɤɢ Ż/Ź ɞɥɹ ɜɵɛɨɪɚ ɫɢɫɬɟɦɵ ɰɜɟɬɚ. Ɉɱɟɧɶ ɜɚɠɧɨ ɜɵɛɪɚɬɶ ɩɪɚɜɢɥɶɧɭɸ
ɫɢɫɬɟɦɭ ɰɜɟɬɚ. Ɋɟɤɨɦɟɧɞɭɟɬɫɹ ɜɵɛɪɚɬɶ «Ⱥɜɬɨ».
3. ɋɢɫɬɟɦɚ ɡɜɭɤɚ
ɇɚɠɦɢɬɟ ɤɧɨɩɤɢ Ż/Ź ɞɥɹ ɜɵɛɨɪɚ ɫɢɫɬɟɦɵ ɡɜɭɤɚ. Ɉɱɟɧɶ ɜɚɠɧɨ ɜɵɛɪɚɬɶ ɩɪɚɜɢɥɶɧɭɸ
ɫɢɫɬɟɦɭ ɡɜɭɤɚ, ɢɧɚɱɟ ɲɭɦɨɜɵɟ ɩɨɦɟɯɢ.
4. ɉɪɨɩɭɫɤ ȼɤɥ./
ɉɨɫɥɟ ɚɜɬɨɦɚɬɢɱɟɫɤɨɣ ɧɚɫɬɪɨɣɤɢ ɧɟɤɨɬɨɪɵɟ ɩɪɨɝɪɚɦɦɵ ɦɨɝɭɬ ɩɨɜɬɨɪɹɬɶɫɹ ɢɥɢ ɫɢɝɧɚɥ
ɦɨɠɟɬ ɫ ɩɨɦɟɯɚɦɢ. ɉɪɨɩɭɫɤ ɧɟɠɟɥɚɬɟɥɶɧɵɯ ɤɚɧɚɥɨɜ
оспроизводитьсяв
ɭɫɤɨɪɢɬɶ
ɞɥɹ ɜɵɛɨɪɚ ɉɪɨɩɭɫɤ ȼɤɥ. ɉɨɫɥɟ
ɤɧɨɩɨɤ
ɩɨɢɫɤ ɧɭɠɧɨɝɨ. ɉɨɫɥɟ ɜɵɛɨɪɚ «ɉɪɨɩɭɫɤɚ» ɜ ɦɟɧɸ ɇɚɫɬɪɨɣɤɢ ɧɚɠɦɢɬɟ ɤɧɨɩɤɢ Ż/Ź
ɋɇ+/ɋɇ
неизбежны
Выкл.
ɬɨɝɨ, ɤɚɤ ɦɟɧɸ ɇɚɫɬɪɨɣɤɢ ɢɫɱɟɡɧɟɬ ɫ ɧɚɠɚɬɢɟɦ
- ɦɨɠɧɨ ɧɚɣɬɢ ɩɪɨɩɭɫɤɚɟɦɵɟ ɧɨɦɟɪɚ ɤɚɧɚɥɨɜ.
6
ɦɨɠɟɬ ɡɧɚɱɢɬɟɥɶɧɨ
экрана,
Page 29

5. ɉɨɢɫɤ
VHF-H Ʉɚɧɚɥ 11
ɉɨɢɫɤ
67.75ɆȽɰ
Ż ȼɇɂɁ Ź ȼȼȿɊɏ
ɂɫɩɨɥɶɡɭɣɬɟ ɮɭɧɤɰɢɸ ɩɨɢɫɤɚ ɟɫɥɢ ɤɚɧɚɥ ɧɟ ɧɚɫɬɪɚɢɜɚɟɬɫɹ ɩɪɢ ɩɨɦɨɳɢ
ɮɭɧɤɰɢɢ ɢɥɢ ɟɫɥɢ ɯɨɬɢɬɟ ɭɫɬɚɧɨɜɢɬɶ ɠɟɥɚɟɦɵɣ ɧɨɦɟɪ ɤɚɧɚɥɚ.
Автопоиск,
ɉɨɫɥɟ ɜɵɛɨɪɚ «ɑɚɫɬɨɬɵ» ɜ ɦɟɧɸ ɧɚɠɦɢɬɟ ɤɧɨɩɤɢ Ż/Ź. Ɍɟɥɟɜɢɡɨɪ ɜɵɛɟɪɟɬ
в том случае,
Настройки,
ɞɪɭɝɢɟ ɧɨɦɟɪɚ ɤɚɧɚɥɨɜ ɩɨ ɜɨɡɪɚɫɬɚɧɢɸ ɢɥɢ ɭɛɵɜɚɧɢɸ. Ⱦɥɹ ɨɫɬɚɧɨɜɤɢ ɩɨɢɫɤɚ ɧɚɠɦɢɬɟ
ɤɧɨɩɤɭ Ɇȿɇɘ. ɑɚɫɬɨɬɭ ɤɚɧɚɥɚ ɬɚɤɠɟ ɦɨɠɧɨ ɜɵɛɪɚɬɶ ɫ ɩɨɦɨɳɶɸ ɧɨɦɟɪɧɵɯ ɤɧɨɩɨɤ.
ȿɫɥɢ ɜɵɛɪɚɧɧɵɣ ɤɚɧɚɥ ɧɟ ɬɨɬ, ɤɨɬɨɪɵɣ ɧɭɠɟɧ, ɧɚɠɢɦɚɣɬɟ ɧɚ ɤɧɨɩɤɭ ɞɨ ɩɨɹɜɥɟɧɢɹ ɧɭɠɧɨɝɨ
ɤɚɧɚɥɚ. ȿɫɥɢ ɩɪɢ ɧɚɯɨɠɞɟɧɢɢ ɤɚɧɚɥɚ ɩɨɢɫɤ ɟɳɟ ɩɪɨɞɨɥɠɚɟɬɫɹ, ɬɨ ɞɥɹ ɧɚɫɬɪɨɣɤɢ ɤɚɧɚɥɚ
ɢɫɩɨɥɶɡɭɣɬɟ ɮɭɧɤɰɢɸ Ɍɨɱɧɨɣ ɧɚɫɬɪɨɣɤɢ.
6. Ɍɨɱɧɚɹ ɧɚɫɬɪɨɣɤɚ
ɉɨɫɥɟ ɜɵɛɨɪɚ «Ɍɨɱɧɨɣ ɇɚɫɬɪɨɣɤɢ» ɜ
ɩɨɤɚ ɞɨɫɬɢɝɧɭɬɨ ɧɚɢɥɭɱɲɟɟ ɤɚɱɟɫɬɜɨ ɢɡɨɛɪɚɠɟɧɢɹ ɢ ɡɜɭɤɚ. Дɥɹ ɩɪɨɜɟɪɤɢ
не бу
дет
ɬɨɱɧɨɣ ɧɚɫɬɪɨɣɤɢ ɤɚɧɚɥɚ ɧɚɠɦɢɬɟ ɧɚ ɤɧɨɩɤɭ DISP ɢ ɧɨɦɟɪ ɤɚɧɚɥа ɞɨɥɠɟɧ
ɦɟɧɸ ɇɚɫɬɪɨɣɤɢ ɤɧɨɩɤɢ Ż/Ź ɞɨ ɬɟɯ ɩɨɪ ,
нажимайте
быть выделен
ɠɟɥɬɵɦ.
7. Ⱥɜɬɨɩɨɢɫɤ
Ⱥɜɬɨ ɉɨɢɫɤ
VHF-H Ʉɚɧɚɥ 11
67.75ɆȽɰ
Ɇȿɇɘ: ɋɬɨɩ
ɉɟɪɟɞ ɜɤɥɸɱɟɧɢɟɦ ɧɟɨɛɯɨɞɢɦɨ ɩɪɚɜɢɥɶɧɨ ɧɚɫɬɪɨɢɬɶ ɋɢɫɬɟɦɭ ɡɜɭɤɚ. ɉɨɫɥɟ
ɜɵɛɨɪɚ «Ⱥɜɬɨɩɨɢɫɤɚ» ɜ ɦɟɧɸ ɇɚɫɬɪɨɣɤɢ ɧɚɠɦɢɬɟ ɤɧɨɩɤɭ Ź ɞɥɹ ɧɚɱɚɥɚ ,
Автопоиска
автопоиска
ɬɟɥɟɜɢɡɨɪ ɧɚɱɢɧɚɟɬ ɚɜɬɨɦɚɬɢɱɟɫɤɢɣ ɩɨɢɫɤ ɞɨɫɬɭɩɧɵɯ ɤɚɧɚɥɨɜ. ɉɪɢ ɷɬɨɦ ɧɚɣɞɟɧɧɵɟ ɤɚɧɚɥɵ
ɫɨɯɪɚɧɹɸɬɫɹ ɚɜɬɨɦɚɬɢɱɟɫɤɢ, ɢ ɩɨ ɡɚɜɟɪɲɟɧɢɸ ɩɨɢɫɤɚ ɬɟɥɟɜɢɡɨɪ ɜɟɪɧɟɬɫɹ ɤ Ʉɚɧɚɥɭ 1. ,
ɇɟɢɫɩɨɥɶɡɭɟɦɵɟ ɧɨɦɟɪɚ ɤɚɧɚɥɨɜ ɚɜɬɨɦɚɬɢɱɟɫɤɢ
«ɉɪɨɩɭɫɤ ɜɤɥ». ȼ ɯɨɞɟ
ɚɜɬɨɩɨɢɫɤɚ
ɧɚɠɦɢɬɟ ɧɚ Ɇȿɇɘ ɞɥɹ ɡɚɜɟɪɲɟɧɢɹ ɩɨɢɫɤɚ.
,
будут перемещены в режим
кнопку
8. Ɉɛɦɟɧ
ɈȻɆȿɇ
Ʉɚɧɚɥ Ⱥ Ż 9 Ź
Ʉɚɧɚɥ ȼ Ż 7 Ź
Ɉɛɦɟɧ Ź
ȼɕȻɈɊ ɇȺɋɌɊɈɃɄȺ
ɋ ɩɨɦɨɳɶɸ ɮɭɧɤɰɢɢ ɨɛɦɟɧɚ ɦɨɠɧɨ ɩɨɦɟɧɹɬɶ ɩɨɥɨɠɟɧɢɟ ɯɨɬɢɬɟ
ɩɨɦɟɧɹɬɶ ɤɚɧɚɥ 9 ɧɚ ɤɚɧɚɥ 7.
ɚ. ɇɚɠɦɢɬɟ
ɤɧɨɩɤɭ ɦɟɧɸ ɇɚɫɬɪɨɣɤɢ
.
ɞɥɹ ɜɵɛɨɪɚ ɦɟɧɸ ɈȻɆȿɇȺ ɜ ɪɟɠɢɦɟ ɬɟɥɟɜɢɡɨɪɚ.
канала, например, если вы
ɜ. ɇɚɠɦɢɬɟ ɤɧɨɩɤɢ Ÿ/ź ɞɥɹ ɜɵɞɟɥɟɧɢɹ «Ʉɚɧɚɥɚ Ⱥ» ɢ ɧɨɦɟɪɧɵɦɢ ɤɧɨɩɤɚɦɢ ɜɵɛɟɪɢɬɟ 9. Ⱦɥɹ
Ʉɚɧɚɥɚ ȼ ɜɜɟɞɢɬɟ 7 ɤɚɤ ɨɩɢɫɚɧɨ .
выше,
ɫ. ȼɵɛɟɪɢɬɟ ɦɟɧɸ ɈȻɆȿɇȺ ɢ ɧɚɠɦɢɬɟ ɤɧɨɩɤɭ Ź. ɇɨɦɟɪ ɬɟɤɭɳɟɝɨ ɤɚɧɚɥɚ ɫɬɚɧɟɬ Ʉɚɧɚɥ 7 ɢ
ɜɦɟɫɬɨ ɤɚɧɚɥɚ 7 ɩɨɹɜɢɬɫɹ Ʉɚɧɚɥ 9.
ɬɟɤɭɳɟɝɨ Ʉɚɧɚɥɚ 7.
ɇɨɦɟɪ
При желании, так же,
как описано выше,
ɦɨɠɧɨ ɨɛɦɟɧɹɬɶ ɩɨɡɢɰɢɢ ɞɪɭɝɢɯ ɤɚɧɚɥɨɜ.
7
Page 30

Ɇɟɧɸ ɂɡɨɛɪɚɠɟɧɢɹ
1. ȼɵɛɨɪ ɪɟɠɢɦɚ ɢɡɨɛɪɚɠɟɧɢɹ
ɂɁɈȻɊȺɀȿɇɂȿ
Ʉɨɧɬɪɚɫɬɧɨɫɬɶ Ż 32 Ź
ɐɜɟɬ Ż 32 Ź
əɪɤɨɫɬɶ Ż 32 Ź
Ɋɟɡɤɨɫɬɶ Ż 32 Ź
ɬ
Ɉɬ ɟɧɨɤ Ż 0 Ź
Ɍɨɧɚɥɶɧɨɫɬɶ Ż ȼɵɤɥ Ź
ȼɕȻɈɊ ɇȺɋɌɊɈɃɄȺ
ɉɪɨɢɡɜɨɞɢɬɟɥɟɦ ɡɚɞɚɧɨ ɬɪɢ ɪɟɠɢɦɚ ɢɡɨɛɪɚɠɟɧɢɹ: Ɇɹɝɤɢɣ, ȿɫɬɟɫɬɜɟɧɧɵɣ ɢ ɇɚɫɵɳɟɧɧɵɣ.
ɇɚɠɚɬɢɟɦ ɧɚ ɤɧɨɩɤɭ Ɋɟɠɢɦ ɂɡɨɛɪɚɠɟɧɢɹ ɜɵɛɟɪɢɬɟ ɨɞɢɧ ɢɡ ɬɪɟɯ ɪɟɠɢɦɨɜ ɢɥɢ ɪɟɠɢɦ
ɉɨɥɶɡɨɜɚɬɟɥɹ.
Ɉɩɢɫɚɧɢɟ ɪɟɠɢɦɨɜ ɢɡɨɛɪɚɠɟɧɢɹ ɜ ɫɥɟɞɭɸɳɟɣ ɬɚɛɥɢɰɟ.
Ɋɟɠɢɦ Ʉɚɱɟɫɬɜɨ ɢɡɨɛɪɚɠɟɧɢɹ
Ɇɹɝɤɢɣ Ʉɨɧɬɪɚɫɬɧɨɫɬɶ ɧɢɡɤɚɹ. ɀɟɥɚɬɟɥɶɧɨ ɫɦɨɬɪɟɬɶ Ɍȼ ɩɪɢ ɫɪɟɞɧɟɦ ɨɫɜɟɳɟɧɢɢ.
ȿɫɬɟɫɬɜɟɧɧɵɣ ɋɬɚɧɞɚɪɬɧɨɟ ɫɨɫɬɨɹɧɢɟ, ɞɥɹ ɩɪɨɫɦɨɬɪɚ ɨɛɵɱɧɵɯ ɩɪɨɝɪɚɦɦ.
ɇɚɫɵɳɟɧɧɵɣ Ʉɨɧɬɪɚɫɬɧɨɫɬɶ ɜɵɫɨɤɚɹ. Ⱦɥɹ ɩɪɨɫɦɨɬɪɚ Ɍȼ ɩɪɢ ɹɪɤɨɦ ɨɫɜɟɳɟɧɢɢ.
ɉɨɥɶɡɨɜɚɬɟɥɶ Ʉɚɱɟɫɬɜɨ ɢɡɨɛɪɚɠɟɧɢɹ ɧɚɫɬɪɚɢɜɚɟɬɫɹ ɩɨɥɶɡɨɜɚɬɟɥɟɦ.
приведено
ɒɤɚɥɚ ɧɚɫɬɪɨɣɤɢ ɨɬɬɟɧɤɚ ɇɨɪɦɚɥɶɧɵɣ ɩɨɤɚɡɚɬɟɥɶ «0». ɉɪɢ ɪɟɠɢɦɟ DVD
ɞɥɹ NTSC
Ɍɨɧɚɥɶɧɨɫɬɶ – ɭɩɪɚɜɥɟɧɢɟ ɞɢɧɚɦɢɱɟɫɤɨɣ ɬɨɧɚɥɶɧɨɫɬɶɸ. Ɇɨɠɧɨ ɜɵɛɪɚɬɶ ɢɥɢ ɜɵɤɥ.
ɉɪɢɦɟɱɚɧɢɟ: Ɉɬɬɟɧɨɤ ɜ ɪɟɠɢɦɟ PAL ɞɥɹ ɧɟɤɨɬɨɪɵɯ ɬɟɥɟɜɢɡɨɪɨɜ ɨɬɫɭɬɫɬɜɭɟɬ.
Ⱦɥɹ ɜɵɩɨɥɧɟɧɢɹ ɫɥɟɞɭɸɳɢɯ ɨɩɟɪɚɰɢɣ ɧɚɠɦɢɬɟ ɧɚ ɤɧɨɩɤɭ Ɇȿɇɘ ɢɥɢ ɧɚ ɤɧɨɩɤɭ МЕНЮ
ИЗОБРАЖЕНИЯ ɞɥɹ
ɞɥɹ ɜɵɞɟɥɟɧɢɹ ɩɭɧɤɬɚ, ɤɨɬɨɪɵɣ ɧɭɠɧɨ ɤɨɪɪɟɤɬɢɪɨɜɚɬɶ, ɢ ɧɚ ɤɧɨɩɤи Ÿ/ź ɞɥɹ ɧɚɫɬɪɨɣɤɢ
ɭɪɨɜɧɹ
ɇɚɫɬɪɨɟɧɧɨɟ ɤɚɱɟɫɬɜɨ ɢɡɨɛɪɚɠɟɧɢɹ ɫɨɯɪɚɧɹɟɬɫɹ ɜ ɪɟɠɢɦɟ ɉɨɥɶɡɨɜɚɬɟɥɹ.
DVD ɞɢɫɤɨɜ ɮɭɧɤɰɢɹ ɨɬɬɟɧɤɚ ɧɟ ɞɨɫɬɭɩɧɚ.
2. ɇɚɫɬɪɨɣɤɚ ɤɚɱɟɫɬɜɚ ɢɡɨɛɪɚɠɟɧɢɹ
оответствии с вашими предпочтениями
в с
- от -31 до +31.
вкл.
ɧɟɩɨɫɪɟɞɫɬɜɟɧɧɨɝɨ ɜɵɛɨɪɚ ɦɟɧɸ ɂɁɈȻɊȺɀȿɇɂə. ɇɚɠɦɢɬɟ ɧɚ ɤɧɨɩɤɢ Ż/Ź
c
.
Ɇɟɧɸ Ɂɜɭɤɚ
ɁȼɍɄ
Ƚɪɨɦɤɨɫɬɶ Ż 32 Ź
ɇɢɡɤɢɟ ɱɚɫɬɨɬɵ Ż 32 Ź
ȼɵɫɨɤɢɟ ɱɚɫɬɨɬɵ Ż 32 Ź
Ɍɨɧɨɤɨɦɩɟɧɫɚɰɢɹ Ż ȼɤɥ Ź
ȼɕȻɈɊ ɇȺɋɌɊɈɃɄȺ
ȼ ɦɟɧɸ ɡɜɭɤɚ ɧɚɠɦɢɬɟ ɧɚ ɤɧɨɩɤɢ Ż/Ź ɞɥɹ ɜɵɞɟɥɟɧɢɹ ɩɭɧɤɬɚ, ɤɨɬɨɪɵɣ ɧɭɠɧɨ ɤɨɪɪɟɤɬɢɪɨɜɚɬɶ
ɢ ɧɚ ɤɧɨɩɤи Ÿ/ź ɞɥɹ ɧɚɫɬɪɨɣɤɢ.
ɉɪɢɦɟɱɚɧɢɟ: ȿɫɥɢ ɨɬɫɭɬɫɬɜɭɸɬ ɇɢɡɤɢɟ ɱɚɫɬɨɬɵ, ȼɵɫɨɤɢɟ ɱɚɫɬɨɬɵ ɢɥɢ Ɍɨɧɨɤɨɦɩɟɧɫɚɰɢɹ, ɬɨ
ɬɟɥɟɜɢɡɨɪ ɧɟ ɩɨɞɞɟɪɠɢɜɚɟɬ ɞɚɧɧɵɟ ɮɭɧɤɰɢɢ.
.
c
8
Page 31

Ɇɟɧɸ ɍɫɬɚɧɨɜɤɢ
Ⱦɥɹ ɜɵɩɨɥɧɟɧɢɹ ɫɥɟɞɭɸɳɢɯ ɨɩɟɪɚɰɢɣ ɧɚɠɦɢɬɟ ɧɚ ɤɧɨɩɤɭ Ɇȿɇɘ ɢɥɢ ɧɚ ɤɧɨɩɤɭ ɍɫɬɚɧɨɜɤɢ ɞɥɹ
ɧɟɩɨɫɪɟɞɫɬɜɟɧɧɨɝɨ ɜɵɛɨɪɚ ɦɟɧɸ ɍɫɬɚɧɨɜɨɤ.
ɍɋɌȺɇɈȼɄɂ
əɡɵɤ Ż Ⱥɧɝɥɢɣɫɤɢɣ Ź
Ƚɨɥɭɛɨɣ ɷɤɪɚɧ Ż ȼɤɥ . Ź
ɍɥɭɱɲɟɧɢɟ ɢɡɨɛɪ. Ż ȼɤɥ. Ź
ɐɜɟɬɨɜɚɹ ɬɟɦɩ. Ż ɇɨɪɦɚɥ. Ź
ȺɊȽ Ż ȼɵɤɥ Ź
Ⱦɟɬɫɤɚɹ ɛɥɨɤɢɪɨɜɤɚ Ż ȼɵɤɥ Ź
Гостевой ежим
Ɋɚɡɦɚɝɧɢɱɢɜɚɧɢɟ Ź
ɉɪɢɦɟɱɚɧɢɟ: ȿɫɥɢ пункты ȺɊȽ ɢɥɢ Ɋɚɡɦɚɝɧɢɱɢɜɚɧɢɟ недоступны, значит, ɬɟɥɟɜɢɡɨɪ ɧе
пɨɞɞɟɪɠɢɜɚɟɬ ɞɚɧɧɵɟ ɮɭɧɤɰɢɢ.
1. Язык
ɇɚɠɦɢɬɟ ɤɧɨɩɤɢ Ż/Ź ɞɥɹ ɜɵɛɨɪɚ ɹɡɵɤɚ.
2. Ƚɨɥɭɛɨɣ ɷɤɪɚɧ
ɉɪɢ ɨɬɫɭɬɫɬɜɢɢ ɜɯɨɞɧɨɝɨ ɫɢɝɧɚɥɚ ɢ ɟɫɥɢ ɷɬɚ ɮɭɧɤɰɢɹ ɜɤɥɸɱɟɧɚ, ɬɟɥɟɜɢɡɨɪ ɩɨɤɚɡɵɜɚɟɬ
ɝɨɥɭɛɨɣ ɮɨɧ, ɚɜɬɨɦɚɬɢɱɟɫɤɢ ɨɬɤɥɸɱɚɟɬɫɹ ɡɜɭɤ.
3. ɍɥɭɱɲɟɧɢɟ ɢɡɨɛɪɚɠɟɧɢɹ
Ɋɟɤɨɦɟɧɞɭɟɬɫɹ ɜɵɛɪɚɬɶ «ɍɥɭɱɲɟɧɢɟ ɢɡɨɛɪɚɠɟɧɢɹ ɜɤɥ» ɞɥɹ ɩɨɥɭɱɟɧɢɹ ɧɚɢɥɭɱɲɟɝɨ
ɤɚɱɟɫɬɜɚ ɢɡɨɛɪɚɠɟɧɢɹ.
4. ɇɚɫɬɪɨɣɤɚ ɬɟɦɩɟɪɚɬɭɪɵ
Ɉɬɬɟɧɨɤ ɮɨɧɚ ɦɨɠɧɨ ɜɵɛɪɚɬɶ ɦɟɠɞɭ ɪɟɠɢɦɚɦɢ ɇɨɪɦɚɥɶɧɵɣ, ɏɨɥɨɞɧɵɣ, Ɍɟɩɥɵɣ.
ȼɵɛɪɚɧɧɚɹ ɧɚɫɬɪɨɣɤɚ ɰɜɟɬɨɜɨɣ ɬɟɦɩɟɪɚɬɭɪɵ ɚɜɬɨɦɚɬɢɱɟɫɤɢ ɫɨɯɪɚɧɹɟɬɫɹ ɞɨ ɫɥɟɞɭɸɳɟɝɨ
ɢɡɦɟɧɟɧɢɹ ɰɜɟɬɨɜɨɣ ɬɟɦɩɟɪɚɬɭɪɵ.
5. Ⱦɟɬɫɤɚɹ ɛɥɨɤɢɪɨɜɤɚ
ȿɫɥɢ ɞɟɬɫɤɚɹ ɛɥɨɤɢɪɨɜɤɚ ɜɤɥɸɱɟɧɚ, ɬɨ ɤɥɚɜɢɲɢ ɛɭɞɭɬ ɡɚɛɥɨɤɢɪɨɜɚɧɵ. Ɉɬɦɟɧɢɬɶ
ɛɥɨɤɢɪɨɜɤɭ ɦɨɠɧɨ ɧɚɠɚɬɢɟɦ ɧɚ ɤɧɨɩɤɭ Ɇȿɇɘ (ɧɚ ) ɜ ɫɟɤɭɧɞ.
ȿɫɥɢ ɞɟɬɫɤɚɹ ɛɥɨɤɢɪɨɜɤɚ ɜɤɥɸɱɟɧɚ ɜ ɪɟɠɢɦɟ ɨɠɢɞɚɧɢɹ, ɬɨ ɬɟɥɟɜɢɡɨɪ ɜɤɥɸɱɚɟɬɫɹ
ɧɚɠɚɬɢɟɦ ɧɚ ɤɧɨɩɤɭ Ɇȿɇɘ ɧɚ ɬɟɥɟɜɢɡɨɪɟ ɜ ɫɟɤɭɧɞ. Ⱦɟɬɫɤɚɹ ɛɥɨɤɢɪɨɜɤɚ
ɫɨɯɪɚɧɹɟɬɫɹ ɢ ɩɨɫɥɟ ɨɬɤɥɸɱɟɧɢɹ ɬɟɥɟɜɢɡɨɪɚ.
6. ɉɨɞɦɟɧɸ
цветовой
Гостевой режим
Ɋ
ȼɕȻɈɊ ɇȺɋɌɊɈɃɄȺ
Ź
пульте ДУ течение 10
течение 10
ГОСТЕВОЙ РЕЖИМ
ɉɚɪɨɥɶ - - - Ȼɥɨɤɢɪɨɜɤɚ ɧɚɫɬɪɨɣɤɢ Ż ȼɵɤɥ. Ź
AV ɛɥɨɤɢɪɨɜɤɚ Ż ȼɵɤɥ. Ź
Ɇɚɤɫɢɦ. ɝɪɨɦɤɨɫɬɶ Ż 63 Ź
ɇɨɜɵɣ ɩɚɪɨɥɶ - - - -
Ȼɥɨɤɢɪɨɜɤɚ ɤɚɧɚɥɚ Ż Ź
Ɉɱɢɫɬɢɬɶ ɜɫɟ Ź
ȼɕȻɈɊ ɇȺɋɌɊɈɃɄȺ
ȼɵɤɥ.
9
Page 32

Ⱦɥɹ ɜɵɩɨɥɧɟɧɢɹ ɫɥɟɞɭɸɳɢɯ ɨɩɟɪɚɰɢɣ ɧɚɠɦɢɬɟ ɧɚ ɤɧɨɩɤɭ Ɇȿɇɘ ɢɥɢ ɧɚ ɤɧɨɩɤɭ ɦɟɧɸ
ɭɫɬɚɧɨɜɤɢ ɞɥɹ ɜɵɛɨɪɚ ɦɟɧɸ . Ɍɨɥɶɤɨ ɩɨɫɥɟ ɜɜɨɞɚ ɩɪɚɜɢɥɶɧɨɝɨ ɩɚɪɨɥɹ ɦɨɠɧɨ
ɧɚɫɬɪɨɢɬɶ
(ɉɪɢ ɤɚɠɞɨɦ ɜɤɥɸɱɟɧɢɢ ɬɟɥɟɜɢɡɨɪɚ ɢɥɢ ɢɡ ɦɟɧɸ ɧɟɨɛɯɨɞɢɦɨ ɜɜɟɫɬɢ ɩɚɪɨɥɶ)
ɉɟɪɜɨɧɚɱɚɥɶɧɵɣ ɩɚɪɨɥɶ «0000» (ɭɫɬɚɧɨɜɥɟɧ ɩɟɪɟɞ ɨɬɝɪɭɡɤɨɣ).
ɍɧɢɜɟɪɫɢɚɥɶɧɵɣ ɩɚɪɨɥɶ: 8888
Ȼɥɨɤɢɪɨɜɤɚ ɇɚɫɬɪɨɣɤɢ: Ⱦɥɹ ɞɨɩɭɫɤɚ/ɡɚɩɪɟɬɚ ( ɩɨɢɫɤɚ ɩɪɨɝɪɚɦɦ).
ɉɪɢ ɜɤɥɸɱɟɧɢɢ Ȼɥɨɤɢɪɨɜɤɢ Ʉɚɧɚɥɚ ɞɚɧɧɵɣ ɩɭɧɤɬ ɬɨɠɟ
AV Ȼɥɨɤɢɪɨɜɤɚ: ȿɫɥɢ AV Ȼɥɨɤɢɪɨɜɤɚ ɜɤɥɸɱɟɧɚ, ɬɨ ɬɟɥɟɜɢɡɨɪ ɧɟ ɛɭɞɟɬ
AV ɢɫɬɨɱɧɢɤɨɜ. ɉɪɢ ɷɬɨɦ ɧɚ ɷɤɪɚɧɟ ɩɨɹɜɥɹɟɬɫɹ ɫɨɨɛɳɟɧɢɟ «Ȼɥɨɤɢɪɨɜɤɚ».
Ɇɚɤɫɢɦɚɥɶɧɚɹ : ɭɫɬɚɧɨɜɤɚ ɦɚɤɫɢɦɚɥɶɧɨɣ Ƚɪɨɦɤɨɫɬɢ для данного режима.
ɇɨɜɵɣ ɩɚɪɨɥɶ: ȼɜɨɞɨɦ ɧɨɜɨɝɨ ɩɚɪɨɥɹ ɜɵ ɦɨɠɟɬɟ ɡɚɦɟɧɢɬɶ ɩɚɪɨɥɶ,
ɭɫɩɟɲɧɨɦ ɢɡɦɟɧɟɧɢɢ ɩɚɪɨɥɹ ɫɢɦɜɨɥɵ «- - - -»
Ȼɥɨɤɢɪɨɜɤɚ ɤɚɧɚɥɚ: Ȼɥɨɤɢɪɨɜɤɚ ɞɚɧɧɨɝɨ ɤɚɧɚɥɚ. ȼ ɨɫɧɨɜɧɨɦ Ɍȼ ɧɟ
ɩɨɡɜɨɥɹɟɬ ɩɨɥɶɡɨɜɚɬɟɥɹɦ ɦɟɧɹɬɶ ɧɚɫɬɪɨɣɤɢ. ɋ ɜɤɥɸɱɟɧɢɟɦ ɛɥɨɤɢɪɨɜɤɢ
НАСТРОЙКИ
Ɉɱɢɫɬɢɬɶ ɜɫɟ: ȼɫɟ ɛɥɨɤɢɪɨɜɤɢ, ɤɪɨɦɟ
ɇɚɠɦɢɬɟ
ɫɥɟɞɭɸɳɢɟ ɮɭɧɤɰɢɢ.
Громкость
ɢ ɈȻɆȿɇȺ ɧɟ ɞɨɫɬɭɩɧɵ.
ɤɧɨɩɤɭ Ɇȿɇɘ
Гостевого режима
при выходе
доступа к программам
ɜɤɥɸɱɚɟɬɫɹ.
дважды,
зеленым цветом.
ɞɥɹ ɜɨɡɜɪɚɬɚ ɤ ɩɪɟɞɵɞɭɳɟɦɭ ɦɟɧɸ.
"AV Блокиров
ка", снимают
ɩɪɢɧɢɦɚɬɶ ɫɢɝɧɚɥɵ ɨɬ
текущий
Гостевой режим
ɧɚɫɬɪɨɟɤ ɦɟɧɸ
ся.
ɉɪɢ
Ɇɟɧɸ Ɍɚɣɦɟɪ
ɌȺɃɆȿɊ
ɑɚɫɵ 00 : 00
ȼɪɟɦɹ ɜɤɥ.1 - - : - -
Ʉɚɧɚɥ ɜɤɥ.1 0
ȼɪɟɦɹ ɜɤɥ.2 - - : - -
Ʉɚɧɚɥ ɜɤɥ.2 0
Ɍɚɣɦɟɪ ɜɵɤɥ. - - : - Ɋɟɠɢɦ ɫɧɚ ȼɵɤɥ
ȼɕȻɈɊ ɇȺɋɌɊɈɃɄȺ
ȼ Ɋɟɠɢɦɟ Ɉɠɢɞɚɧɢɹ ɢɥɢ ȼɤɥɸɱɟɧɢɹ ɬɟɥɟɜɢɡɨɪ ɚɜɬɨɦɚɬɢɱɟɫɤɢ ɜɵɩɨɥɧɹɟɬ ɧɟɤɨɬɨɪɵɟ
такие как, например,
Ⱦɥɹ ɜɵɩɨɥɧɟɧɢɹ ɫɥɟɞɭɸɳɢɯ ɨɩɟɪɚɰɢɣ ɧɚɠɦɢɬɟ ɧɚ ɤɧɨɩɤɭ Ɇȿɇɘ ɢɥɢ ɧɚ ɤɧɨɩɤɭ ɌȺɃɆȿɊ ɞɥɹ
ɧɟɩɨɫɪɟɞɫɬɜɟɧɧɨɝɨ ɜɵɛɨɪɚ ɦɟɧɸ ɌȺɃɆȿɊȺ.
1. Ɍɚɣɦɟɪ ɜɤɥ./ɜɵɤɥ.
ɑɚɫɵ : Ɇɨɠɧɨ ɜɜɟɫɬɢ ɬɟɤɭɳɟɟ ɢɥɢ ɧɟɨɛɯɨɞɢɦɨɟ
Минутный интервал
ȼɪɟɦɹ ɜɤɥ.1: Первый ɜɚɪɢɚɧɬ ɜɪɟɦɟɧɢ ɜɤɥɸɱɟɧɢɹ. ɉɨɫɥɟ ɧɚɫɬɭɩɥɟɧɢɹ ɜɪɟɦɟɧɢ ɜɤɥɸɱɟɧɢɹ
ɬɚɣɦɟɪ ɜɤɥɸɱɟɧɢɹ
Ʉɚɧɚɥ ɜɤɥ.1 : Первый ɢɡ
ȼɪɟɦɹ ɜɤɥ.2:Второй ɜɚɪɢɚɧɬ
ɬɚɣɦɟɪ ɜɤɥɸɱɟɧɢɹ
Ʉɚɧɚɥ ɜɤɥ.2: Второй ɢɡ
Ɍɚɣɦɟɪ ɜɵɤɥ
отключения,
установить
Ɇɨɠɧɨ ɞɜɚ ɜɚɪɢɚɧɬɚ ȼɪɟɦɟɧɢ ȼɤɥɸɱɟɧɢɹ ɢ Ʉɚɧɚɥɚ ɜɤɥɸɱɟɧɢɹ.
2. Ɍɚɣɦɟɪ ɫɧɚ
ɉɨɫɥɟ ɜɵɛɨɪɚ «Ɍɚɣɦɟɪɚ ɋɧɚ» ɧɚɠɦɢɬɟ Ż/Ź ɞɥɹ ɭɫɬɚɧɨɜɤɢ ɜɪɟɦɟɧɢ
ждущий режим в интервале
ɉɪɢɦɟɱɚɧɢɟ:
оба значени
ȿɫɥɢ ɭɫɬɚɧɨɜɥɟɧɵ, ɬɨ ɬɟɥɟɜɢɡɨɪ ɨɬɤɥɸɱɚɟɬɫɹ
ɩɨ
ɧɚɫɬɭɩɥɟɧɢɸ ɨɞɧɨɝɨ ɢɡ
ɨɬɤɥɸɱɟɧɢɹ.
ɜɤɥɸɱɟɧɢɟ ɡɚɞɚɧɧɨɝɨ ɤɚɧɚɥɚ ɢ ɜɵɤɥɸɱɟɧɢɟ ɩɨ ɠɟɥɚɧɢɸ.
ɨɬ 00 ɞɨ 59.
ɨɱɢɳɚɟɬɫɹ.
включаемых ɤɚɧɚɥɨɜ. ɇɚɠɦɢɬɟ Ż/Ź ɞɥɹ ɜɵɛɨɪɚ ɤɚɧɚɥɚ.
ɜɪɟɦɟɧɢ ɜɤɥɸɱɟɧɢɹ. ɉɨɫɥɟ ɧɚɫɬɭɩɥɟɧɢɹ ɜɪɟɦɟɧɢ ɜɤɥɸɱɟɧɢɹ
ɨɱɢɳɚɟɬɫɹ.
включаемых ɤɚɧɚɥɨɜ. ɇɚɠɦɢɬɟ Ż/Ź ɞɥɹ ɜɵɛɨɪɚ ɤɚɧɚɥɚ.
: ɍɫɬɚɧɨɜɤɚ ɜɪɟɦɟɧɢ ɨɬɤɥɸɱɟɧɢɹ ɬɟɥɟɜɢɡɨɪɚ. ɉɨɫɥɟ ɧɚɫɬɭɩɥɟɧɢɹ ɜɪɟɦɟɧɢ
ɬɚɣɦɟɪ ɜɵɤɥɸɱɟɧɢɹ ɨɱɢɳɚɟɬɫɹ.
5, 10, 20 ……..120 ɦɢɧɭɬ ɢɥɢ 0.
я (Время выкл. и Таймер выкл.)
ɧɢɯ. ɋɩɹɳɢɣ ɪɟɠɢɦ ɨɬɦɟɧɹɟɬɫɹ, ɟɫɥɢ ɫɪɚɛɨɬɚɟɬ Ɍɚɣɦɟɪ
-
функции,
Часовой интервал:
ɜɪɟɦɹ. ɨɬ «00» ɞɨ «23».
перехода в
10
Page 33

ɍɋɌɊȺɇȿɇɂȿ ɇȿɂɋɉɊȺȼɇɈɋɌȿɃ
ɉɪɨɛɥɟɦɵ
ɂɡɨɛɪɚɠɟɧɢɟ Ɂɜɭɤ
1. ɍɞɨɫɬɨɜɟɪɶɬɟɫɶ, ɱɬɨ ɲɧɭɪ ɩɢɬɚɧɢɹ ɩɨɞɤɥɸɱɟɧ.
ɇɟɬ
ɢɡɨɛɪɚɠɟɧɢɹ
ɇɨɪɦɚɥɶɧɨ ɇɟɬ ɡɜɭɤɚ
ɇɟɬ ɰɜɟɬɚ
ɋ ɩɨɥɨɫɚɦɢ ɋ ɩɨɦɟɯɚɦɢ
ɋɨ ɫɧɟɝɨɦ ɋ ɩɨɦɟɯɚɦɢ
ɉɪɨɡɪɚɱɧɨɟ
ɢɡɨɛɪɚɠɟɧɢɟ
ɂɫɤɚɠɟɧɧɨɟ
ɢɡɨɛɪɚɠɟɧɢɟ
ɋ ɩɹɬɧɚɦɢ ɇɨɪɦɚɥɶɧɵɣ
ɇɟ ɪɚɛɨɬɚɟɬ ɩɭɥɶɬ ɋɪɨɤ ɛɚɬɚɪɟɟɤ ɢɫɬɟɤ ɭɫɬɚɧɨɜɥɟɧɵ ɧ ɩɪɚɜɢɥɶɧɨ.
ɇɟɬ ɡɜɭɤɚ
ɇɨɪɦɚɥɶɧɵɣ
ɋ ɩɨɦɟɯɚɦɢ ɉɪɨɜɟɪɶɬɟ, ɜ ɩɨɪɹɞɤɟ ɥɢ ɫɢɫɬɟɦɵ ɡɜɭɤɚ/ɰɜɟɬɧɨɫɬɢ.
ɇɨɪɦɚɥɶɧɵɣ ɉɪɨɜɟɪɶɬɟ, ɢɡɦɟɧɢɥɨɫɶ ɧɚɩɪɚɜɥɟɧɢɟ
ɇɨɪɦɚɥɶɧɵɣ
ɢɥɢ ɫɥɚɛɵɣ
2. ɉɪɨɜɟɪɶɬɟ, ɧɟ ɧɚɠɚɬɚ ɥɢ ɤɧɨɩɤɚ
питания устройства.
3. ɧɟ ɭɫɬɚɧɨɜɥɟɧɵ ɥɢ ɧɚ ɦɢɧɢɦɭɦ ɭɪɨɜɟɧɶ
Проверьте,
Ʉɨɧɬɪɚɫɬɧɨɫɬɢ, əɪɤɨɫɬɢ ɢ Ƚɪɨɦɤɨɫɬɢ.
ɍɛɟɞɢɬɟɫɶ, ɧɟ ɧɚɯɨɞɢɬɫɹ ɥɢ ɬɟɥɟɜɢɡɨɪ ɜ
режиме
ɉɨɩɪɨɛɭɣɬɟ ɧɚɠɚɬɶ ɤɧɨɩɤɭ VOL+.
ɉɪɨɜɟɪɶɬɟ, ɧɟ ɧɚɯɨɞɢɬɫɹ ɥɢ ɧɚɫɵɳɟɧɧɨɫɬɶ ɰɜɟɬɚ ɧɚ
ɦɢɧɢɦɚɥɶɧɨɦ ɭɪɨɜɧɟ.
ɍ возможны ɩɨɦɟɯɢ
ɚɜɬɨɦɨɛɢɥɟɣ, ɞɜɢɝɚɬɟɥɟɣ, ɧɟɨɧɨɜых ламп ɢɬ.ɞ
1. ɍɛɟɞɢɬɟɫɶ, ɱɬɨ ɤɚɛɟɥɶ ɚɧɬɟɧɧɵ ɧɟ ɩɨɜɪɟɠɞɟɧ ɢɥɢ ɧɟ
ɪɚɡɴɟɞɢɧɟɧ.
2. ɉɪɨɜɟɪɶɬɟ, ɢɡɦɟɧɢɥɨɫɶ ɧɚɩɪɚɜɥɟɧɢɟ
ɚɧɬɟɧɧɵ.
ɚɧɬɟɧɧɵ.
ȼɵɛɟɪɢɬɟ ɤɚɧɚɥ ɫɧɨɜɚ или проведите точную настройку.
1. Ɍɟɥɟɜɢɡɨɪ ɩɟɪɟɦɟɫɬɢɥɢ ɫ ɜɤɥɸɱɟɧɧɵɦ ɩɢɬɚɧɢɟɦ.
2. ɍɛɟɞɢɬɟɫɶ, ɧɟ ɧɚɯɨɞɹɬɫɹ ɥɢ ɜɨɡɥɟ ɬɟɥɟɜɢɡɨɪɚ
ɦɚɝɧɢɬɧɵɟ ɨɛɴɟɤɬɵ.
ȼɨɡɦɨɠɧɚɹɩɪɢɱɢɧɚ
выключения
ɢɥɢ ɧɚ ɦɢɧɢɦɚɥɶɧɨɣ гɪɨɦɤɨɫɬɢ.
ɢɡ-ɡɚ ɷɥɟɤɬɪɢɱɟɫɤɢɯ ɜɨɥɧ ɨɬ
возможно,
возможно,
или они
беззвучном
.
11
Page 34

Page 35

 Loading...