

Page 1
45 Class
2-cycle engine
70 Class
4-cycle engine
Or Electric equivalent
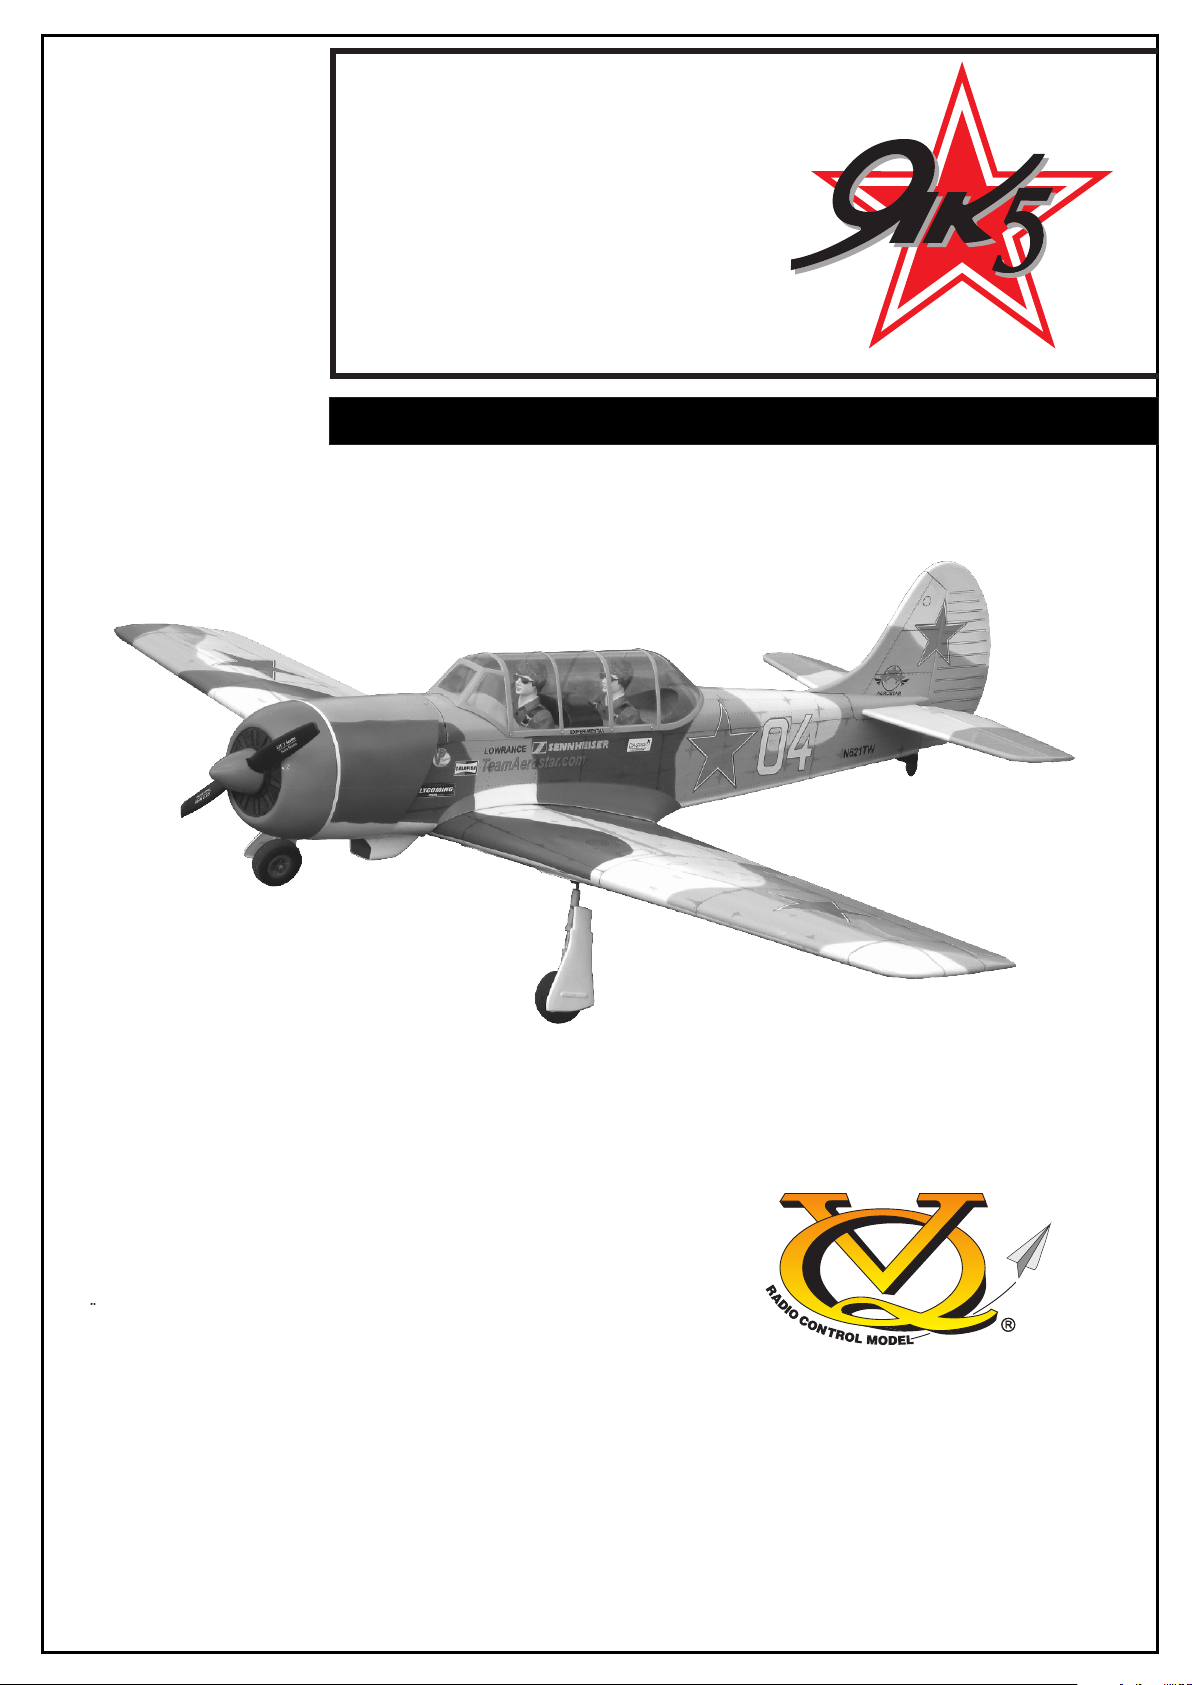
YAKOVLEV
2
YAK-52
INSTRUCTION MANUAL / Montageanleitung
All balsa, plywood construction and almost ready to fly
2
SPECIFICATIONS
Wingspan 60.6 in.
Length 43.9 in.
Electric Motor 870 Watt (PULSAR 60)
Glow Engine .46 2-T / .70 4-T
Radio 5 Channel / 5 Servos
TECHNISCHE DATEN
Spannweiter 1540mm
Lange 1117mm
Elektroantrieb 870 Watt (PULSAR 60)
Verbrennerantrieb 7.5cc 2-T / 11cc 4-T
Fernsteuerung 5 Kanal / 5 Servos
WARNING! This radio controlled model is NOT a toy. If modified or flown carelessly it could go out of controll and
cause serious human injury or property damage. Before flying your airplane, ensure the air field is spacious enough.
Always fly it outdoors in safe areas and seek professional advice if you are unexperienced.
ACHTUNG! Dieses ferngesteuerte Modell ist KEIN Spielzeug! Es ist für fortgeschrittene Modellflugpiloten bestimmt,
die ausreichende Erfahrung im Umgang mit derartigen Modellen besitzen Bei unsachgemäßer Verwendung kann
hoher Personen- und/oder Sachschaden entstehen. Fragen Sie in einem Modellbauverein in Ihrer Nähe um
professionelle Unterstützung, wenn Sie Hilfe im Bau und Betrieb benötigen. Der Zusammenbau dieses Modells ist
durch die vielen Abbildungen selbsterklärend und ist für fortgeschrittene, erfahrene Modellbauer bestimmt.
Page 2
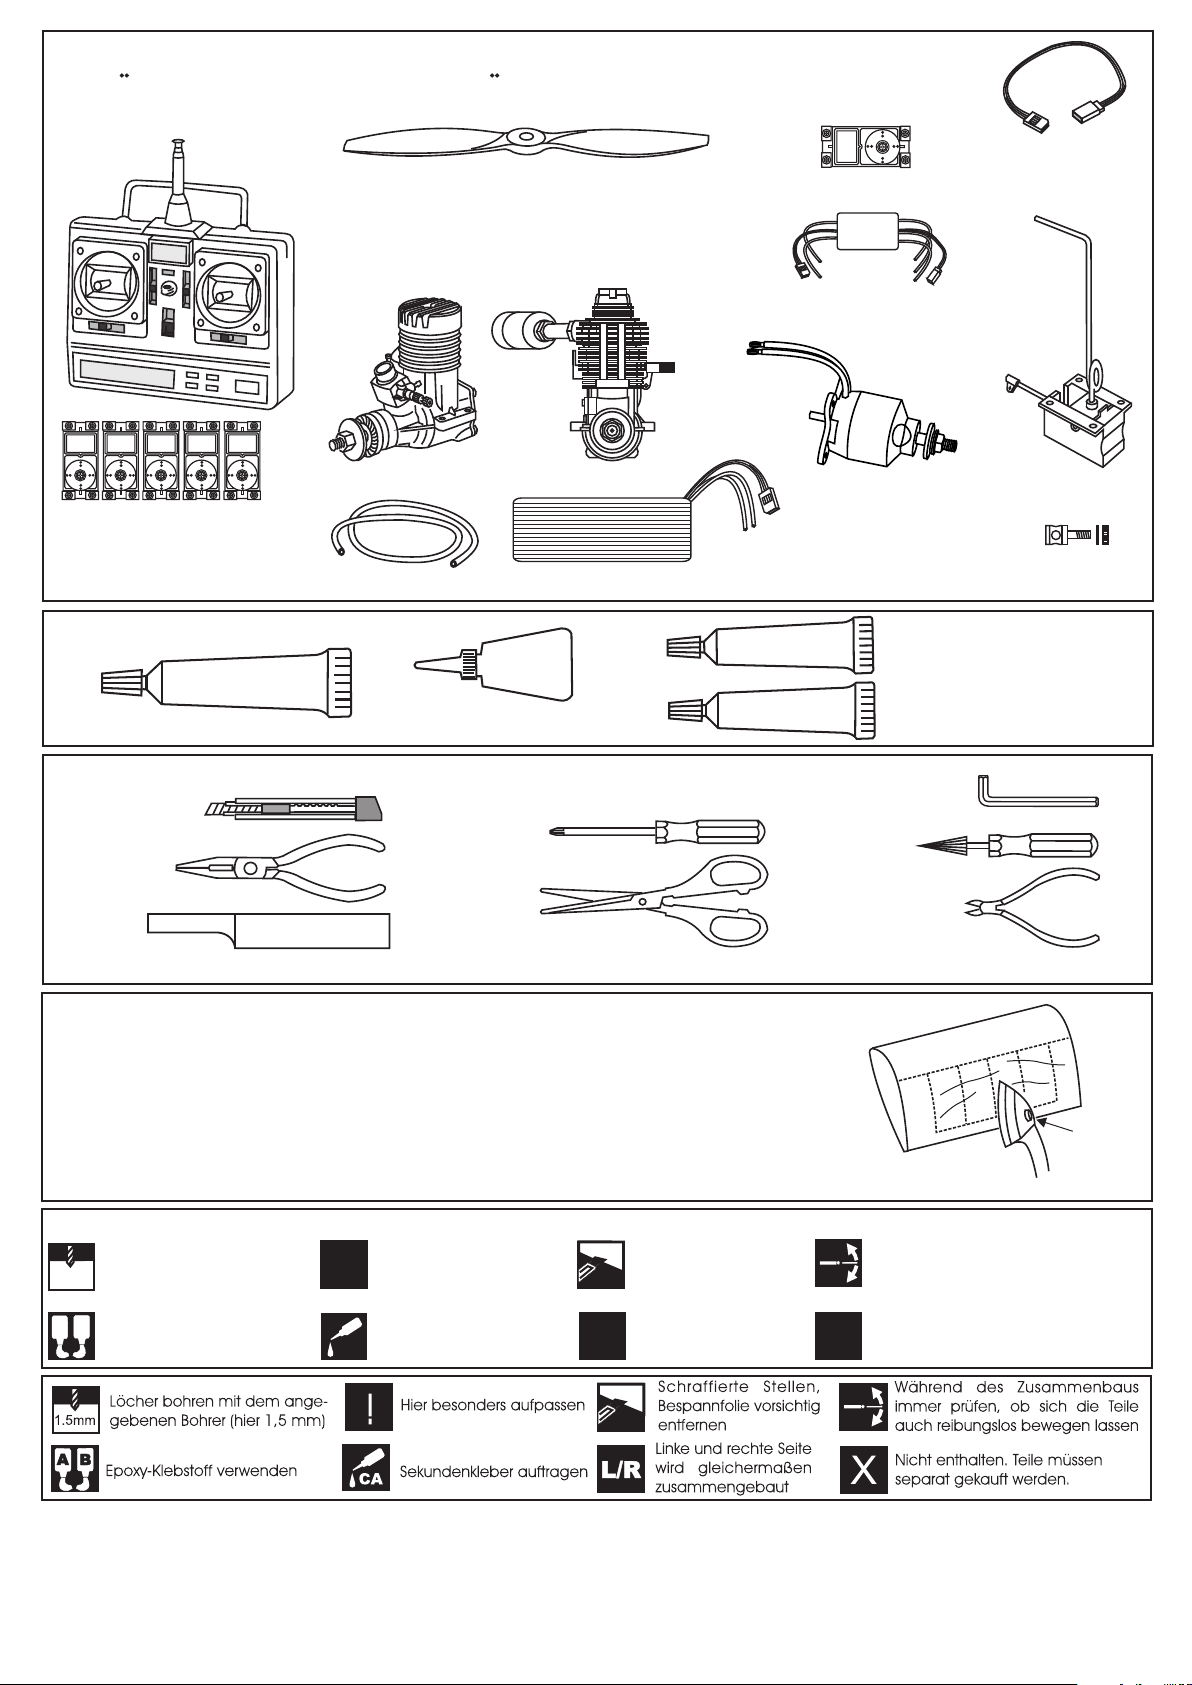
REQUIRED FOR OPERATION (Purchase separately)
BENOTIGTE KOMPONENTEN FUR DEN ABFLUG (Nicht enthalten)
10.5x6 for .40 - 2 cycle engine
11x6 for .46 - 2 cycle engine
12x6 for .60 - 4 cycle engine
12x7 for .70 - 4 cycle engine
13x6 for Quantum 4120/05
Retract servo x1
Phoenix-60 Brushless
Motor Control
Extension for aileron
servo, retract servo.
.46 ~ .50 - 2 cycle
.60 ~.70 - 4 cycle
Minimum 5 channel radio
for airplane with 5 servos
.Motor control x1 .Aileron x2
.Elevator x1 .Rudder x1
GLUE
(Purchase separately)
SILICON
Silicon sealer
TOLLS REQUIRED
Hobby knife
Silicone tube
Cyanoacrylate Glue
(Purchase separately)
Li-Po Battery, 14.8V, 4000mAH, 80A
CA
Phillip screw driver
Needle nose Pliers
Scissors
Sander
.........................................................
.........................................................
.........................................................
.........................................................
.........................................................
.........................................................
.........................................................
.........................................................
.........................................................
.........................................................
.........................................................
Masking tape - Straight Edged Ruler - Pen or pencil - Rubbing alcohol - Drill and Assorted Drill Bits
If exposed to direct sunlight and/or heat, wrinkels can appear. Storing the
model in a cool place will let the wrinkles disappear. Otherwise, remove
wrinkles in covering film with a hair dryer, starting with
low temperature. You can fix the corners by using a hot iron.
Quantum 4120/05
Brushless Motor
or equivalent.
EPOXY A
EPOXY B
Retract landing
gear
Linkage Stopper x2
(for retract servo)
Epoxy Glue ( 5 minute type)
Epoxy Glue (30 minute type)
Hex Wrench
Awl
Wire Cutters
VQAR04
Bei Sonneneinstrahlung und/oder Wärme kann die Folie erschlaffen bzw. Falten
entstehen. Verwenden Sie ein Warumluftgebläse (Haartrockner) um evtl. Falten aus der Folie
zu bekommen. Die Kanten können Sie mit einem Bügeleisen behandeln. Nicht zuviel Hitze anwenden !
Symbols used throughout this instruction manual, comprise:
Drill holes using the stated
1.5mm
size of drill
(in this case 1.5 mm Ø)
A
B
Use epoxy glue
Take particular care here
!
Apply cyano glue
CA
Hatched-in areas:
remove covering
film carefully
Assemble left and right
L/R
sides the same way.
Check during assembly that these
parts move freely, without binding
Not included.
These parts must be
X
purchased separately
Read through the manual before you begin, so you will have an overall idea of what to do.
CONVERSION TABLE
1.0mm = 3/64”
1.5mm = 1/16”
2.0mm = 5/64”
2.5mm = 3/32”
3.0mm = 1/8”
4.0mm = 5/32”
5.0mm = 13/64”
6.0mm = 15/64”
10mm = 13/32”
12mm = 15/32”
15mm = 19/32”
20mm = 51/64”
25mm = 1”
30mm = 1-3/16”
45mm = 1-51/64”
Low setting
Page 3
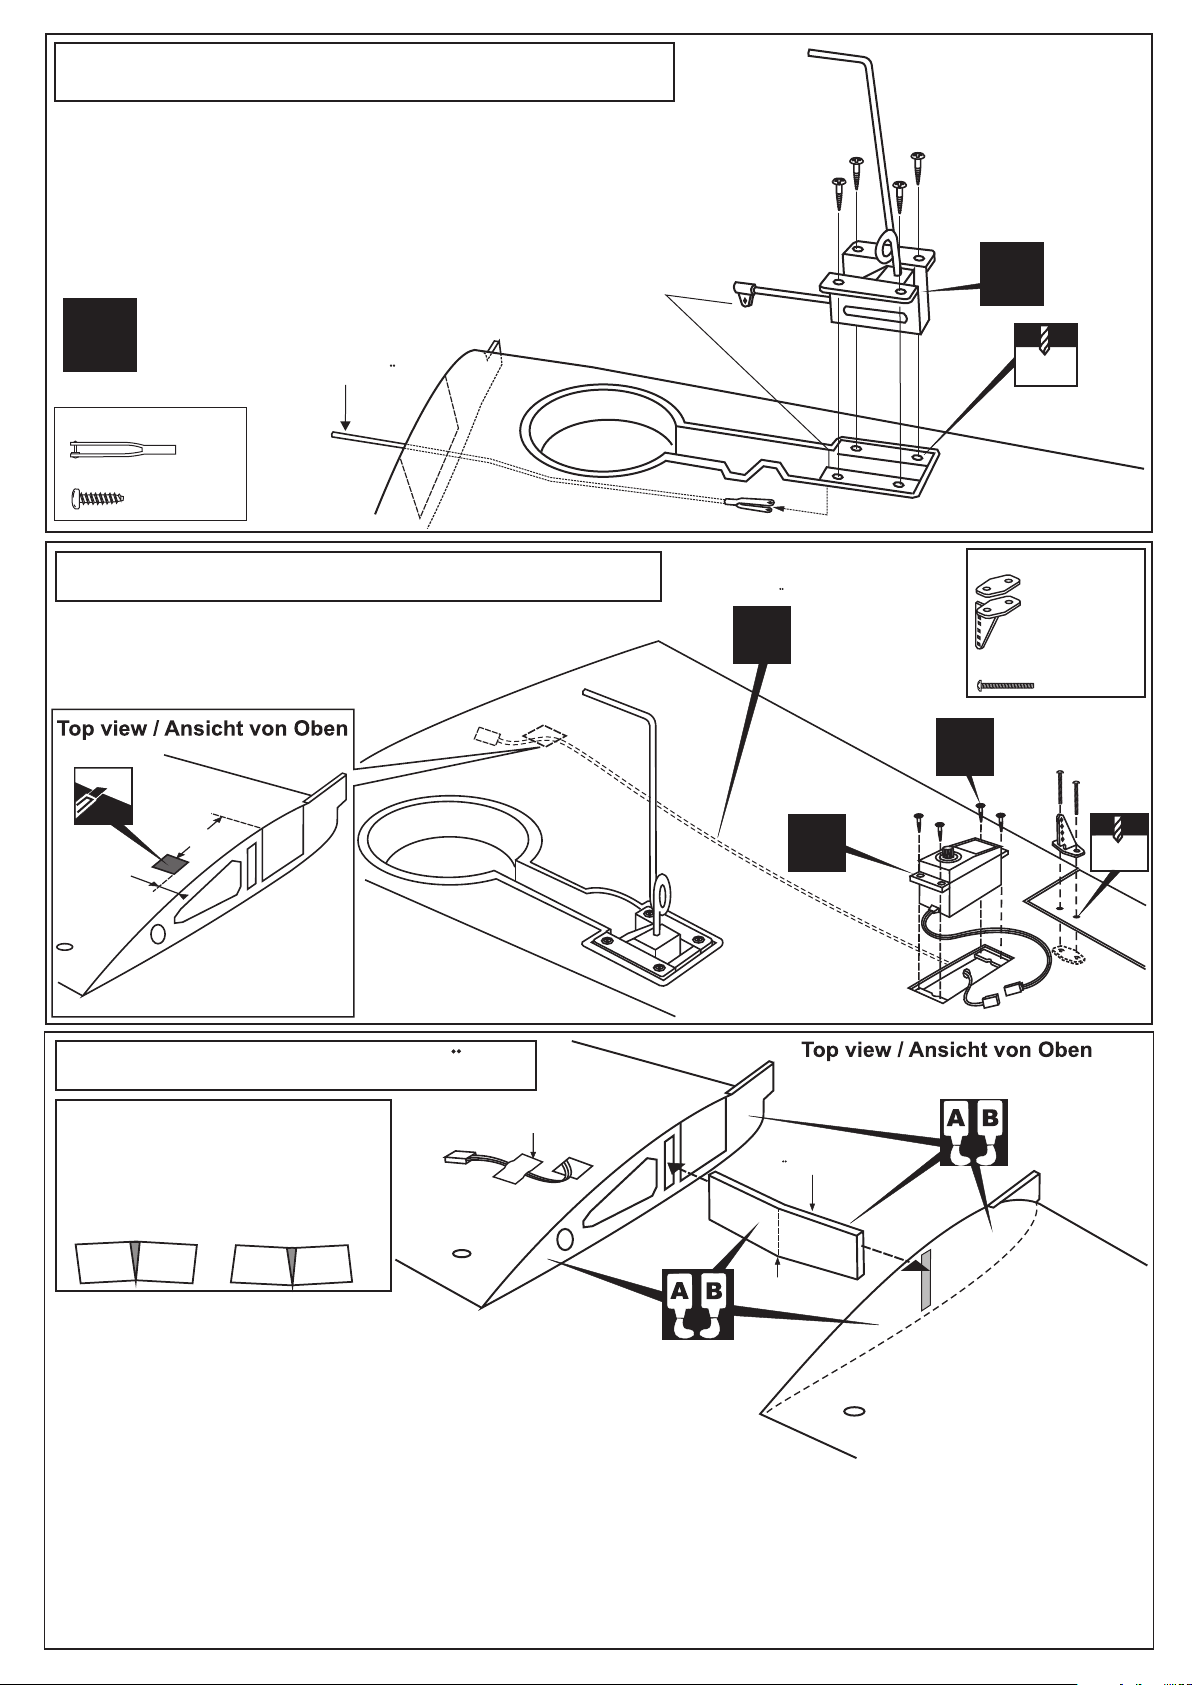
1- Retract landing gear / Fahwerk
Trial fit the push rod into the wing. Join the pushrod to the retract
gear arm and trial fit the retract into the wing.
After checking that the retract works smoothly, fix the retract on the
wing with 3x12mm screws
Bottom view
Ansicht von unten
3x12mm screw
3x12mm schraube
X
L/R
Steel clevis
3x12mm screw
................8
Retract pushrod
Fahrwerkanlenkgestange
.........2
2- Aileron servo / Querruder servo
Bottom view /
40mm
15mm
Ansicht von unten
Aileron extension cord
Servoverlangerungskabel
X
Aileron servo
Querruder servo
X
2mm
Plastic control horn
....................2
2x20mm screw
X
...............4
Included with the
radio set
2mm
3- Joining the wing / Flache
Use epoxy glue to bury the opening
Nehmen Sie Epoxykleber, um die
Tragflachen fest miteinander zu Verbinden
und streifen Sie den herausquellenden
Kleber nach dem Verbinden mit einem
fusselfreien Tuch SOFORT ab!
1- Using a pencil, mark the center of the brace.
2- Trial fit the wing joiner into one of the wing panels. It should
insert smoothly up to the center line marked above.
3- Slide the other wing half onto the dihedral brace until
the wing panel meet. If the fit is over tight, it may be
necessary to lightly sand the dihedral brace.
4- Check for the correct dihedral angle.
5- Mix approximately 30 minute epoxy and apply a generous amount of epoxy into the wing joiner cavity of one wing half.
6- Coat one half of the dihedral brace with epoxy up to the center line. Install the epoxy-coated side of the dihedral brace
into the wing joiner cavity up to the center line, marking sure that the “V” of the dihedral brace is positioned correctly
7- Do the same way with the other wing half.
8- Carefully slide the wing halves together, ensuring that they are accurately aligned. Firmly press the two halves
together, allowing the excess epoxy to run out. Clear off the excess epoxy.
WARNING: Please do not clean off the excess epoxy on the wing with strong solvent or pure alcohol, only use
kerosene to keep the colour of your model not fade.
Secure one end of the aileron
extension cord with adhesive tape
Wing joiner
Tragflachenverbinde
Center line
Page 4
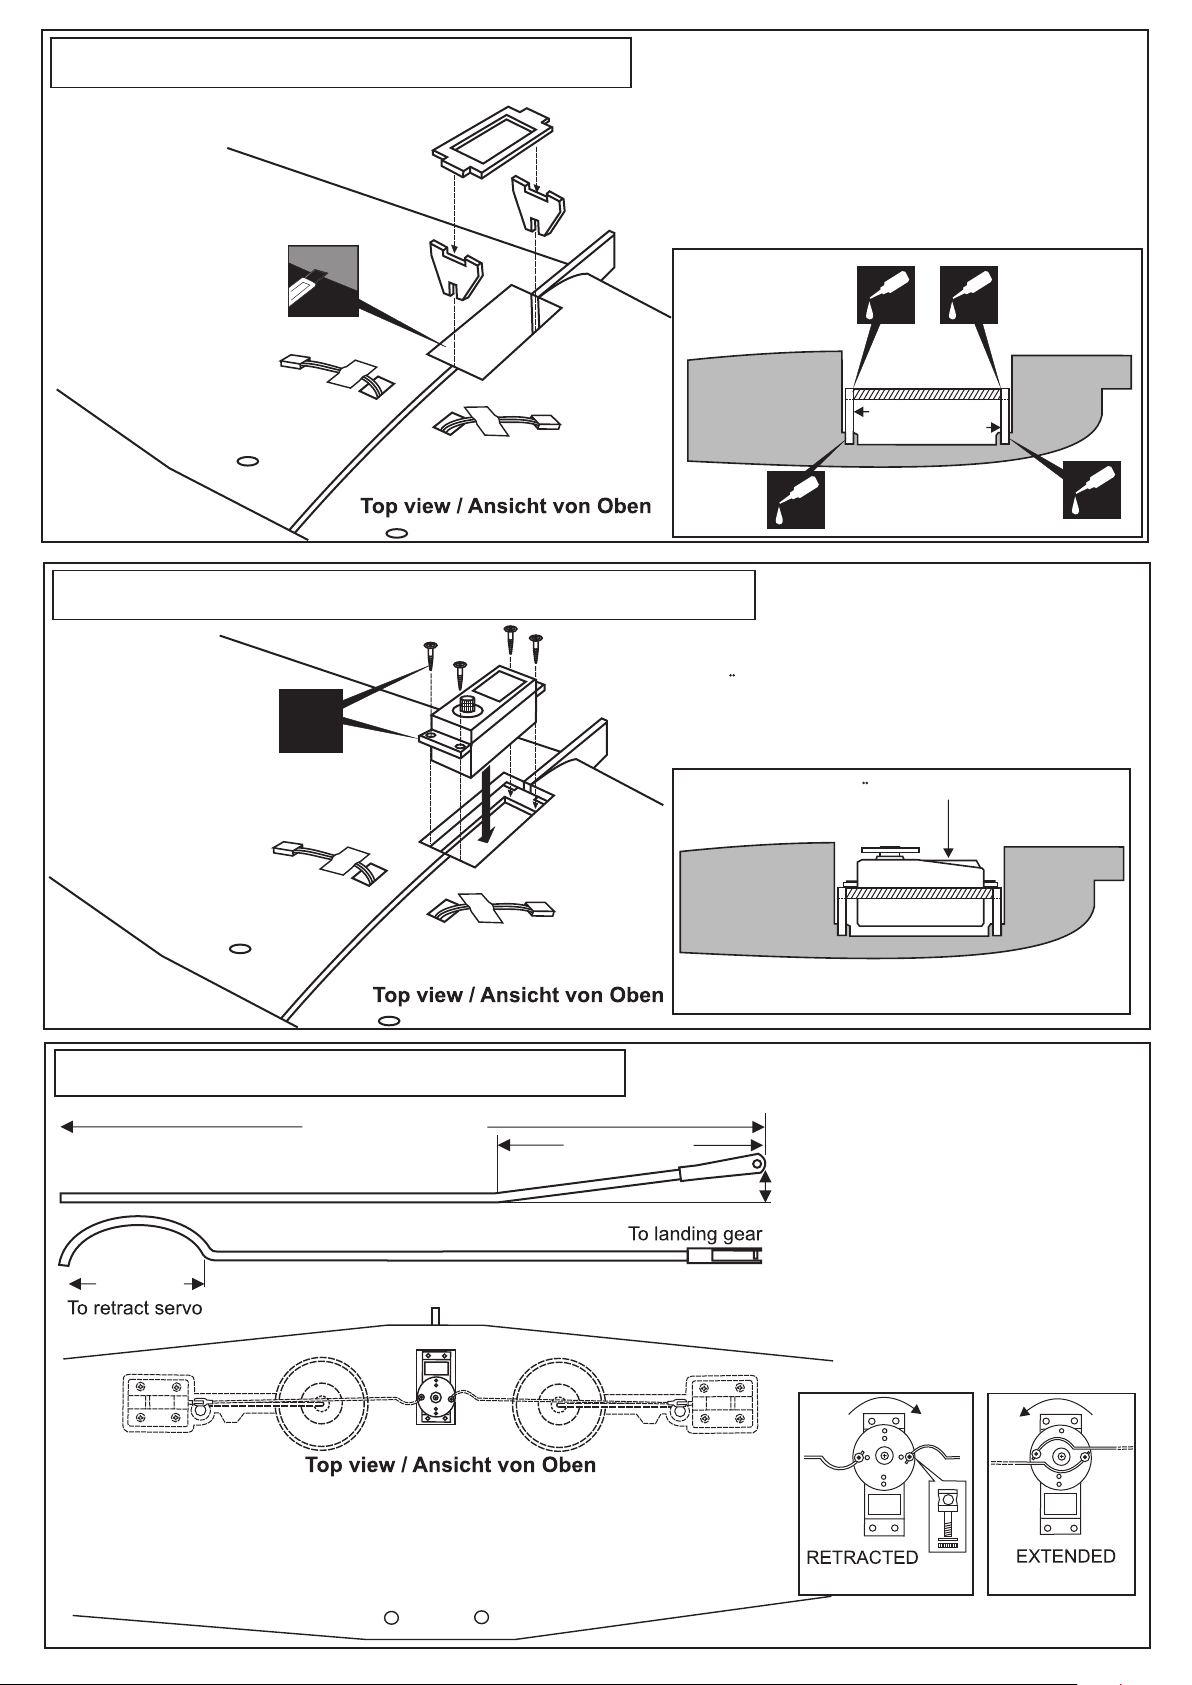
4- Servo mount / Servohalterung
A
Retract servo mount (plywood A,B,C)
Einziehfahrwerk servohalterung
Schneiden Sie etwas
Folie weg
Cut away only
the covering
FWU2
FWU1
CENTER
WING
SECTION
5- Retract servo / Einziehfahrwerk servo
Retract servo
Einbau des Servos fur
das Einziehfahrwerk
X
CA
FWU2
BOTTOM
CA
Install the retract servo onto the retract
servo mount and secure it in place with
four screw (included with radio set).
CA
A
FWU1
CA
6- Linkages / Ruderanlenkung
8-5/16”(~210mm)
RETRACT PUSHROD (SIDE VIEW)
Fahrwerkanlenkgestänge
1”(25mm)
(TOP VIEW)
Instruction how to build in the retracting landing gear
(This Gearis OPTIONAL )
Einbauhilfe bei Anbringen eines
2” (~50mm)
Einziehfahrwerks (Optional
bestellbar; nicht im Baukasten
enthalten!)
Einbau des Servos fur
das Einziehfahrwerk
CENTER
WING
SECTION
BOTTOM
19/64”
(7.5mm)
/ Retract servo
With the retract and retract servo in the retracted position, mark the position where
each of the pushrod will attach to the servo arm, a small piece of masking tape
works well for this. Cut off the excess length each rod.
Link the servo and retract gear arm with push rod. Be sure to adjust the stroke so
that the landing gear locks in both up and down position.
EINGEFAHREN
AUSGEFAHREN
Page 5
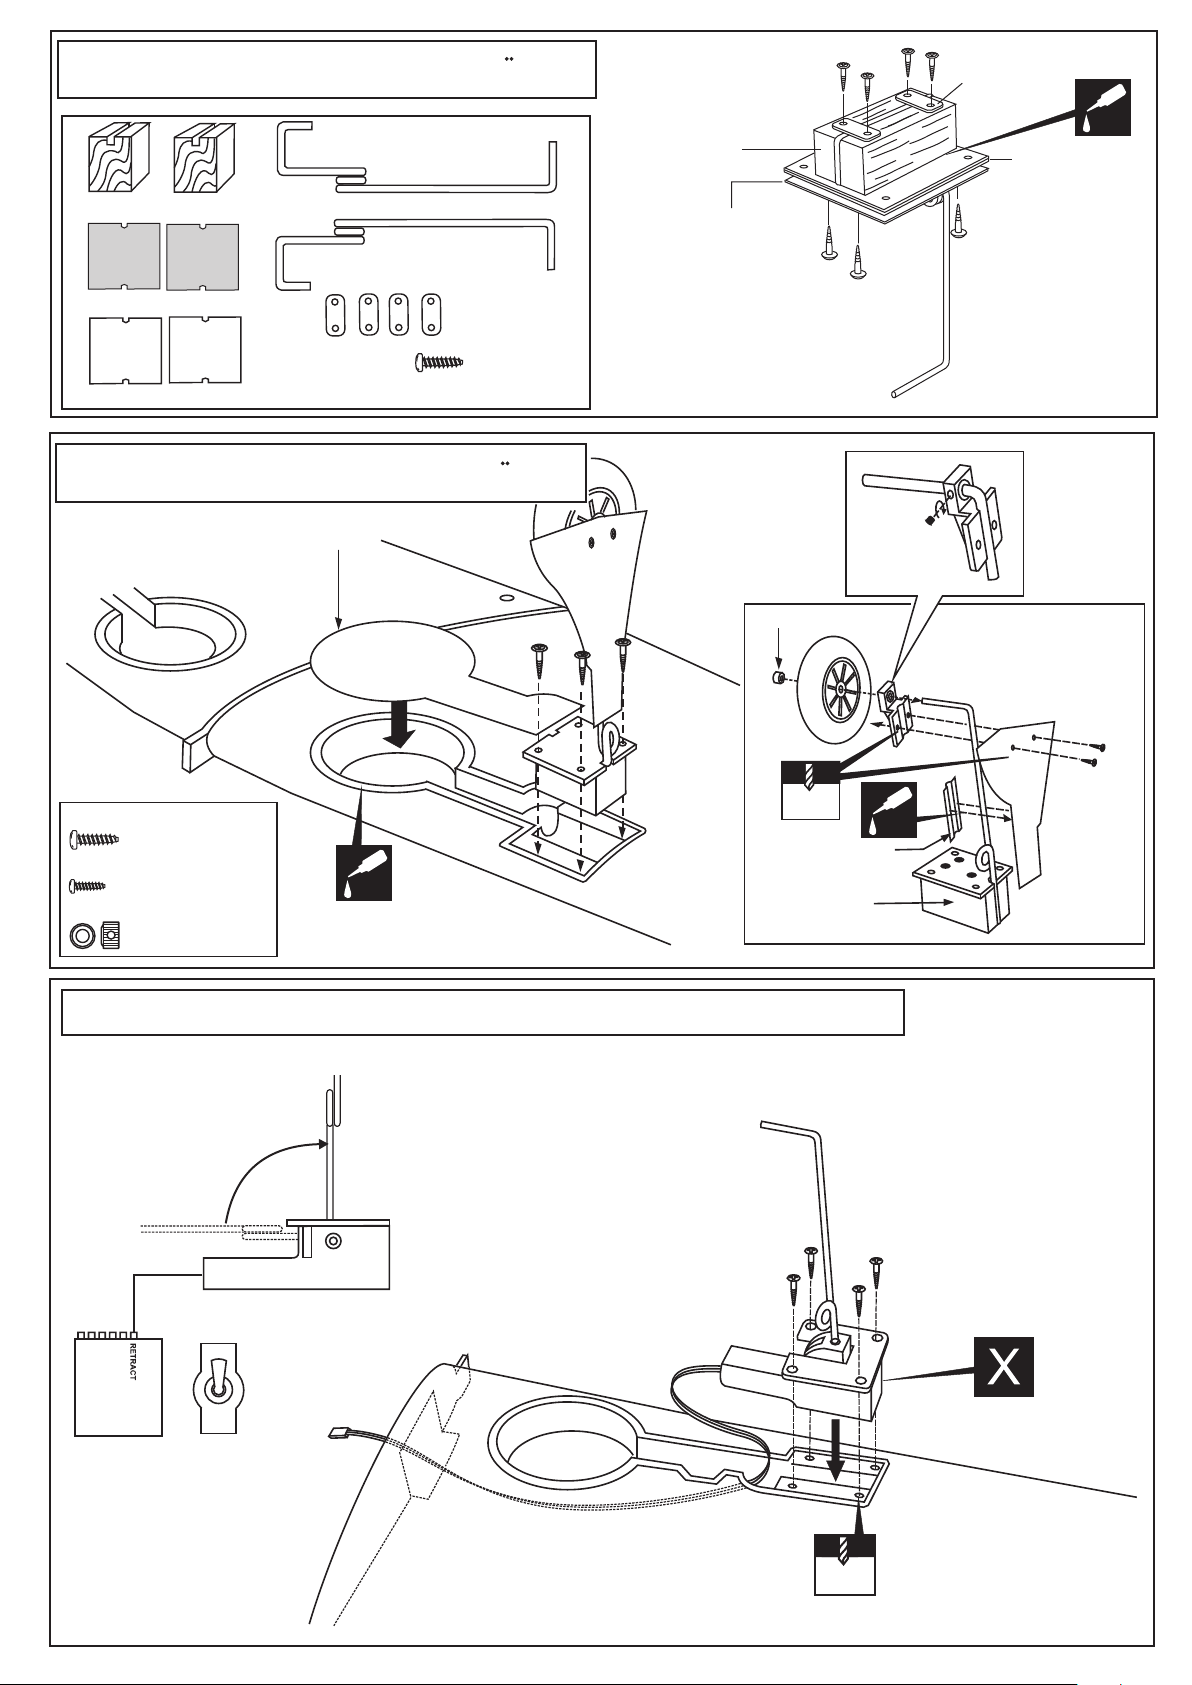
7- Fixed gear / Landegestange
Landegestänge
Main gear (left)
Gear mount (hard wood)
Landegestänge
Main gear (right)
Ply gear mount plate
Square plastic
Plastic strap
Kunststoffstreifen
..............16
3x10mm screw
8- Fixed gear / Landegestange
Befestigungsklötze
für Landegestänge
Gear mount
(hard wood)
Square plastic
3x10mm
3x10mm
Kunststoffstreifen
Plastic strap
CA
Ply gear mount
plate
Main landing gear
Landegestänge
ABS wheel well cover
ABS gear cover
4mm stellring/collar
3x10mm
screw
3x10mm schraube/screw
..........8
2x6mm schraube/screw
..........4
4mm stellring/collar
..........2
CA
Bottom view /
Ansicht von unten
1.5mm
ABS gear strap
Gear mount
(hard wood)
9- Electric retract landing gear / Einziehfahrwerk
EXTENDED POSITION
ABS gear cover
2x6mm
screw
CA
RETRACTED
POSITION
RECEIVER
ELECTRIC RETRACT
LANDING GEAR
ELECTRIC RETRACT
LANDING GEAR
ON
GEAR
OFF
2mm
Bottom view /Ansicht von unten
Page 6
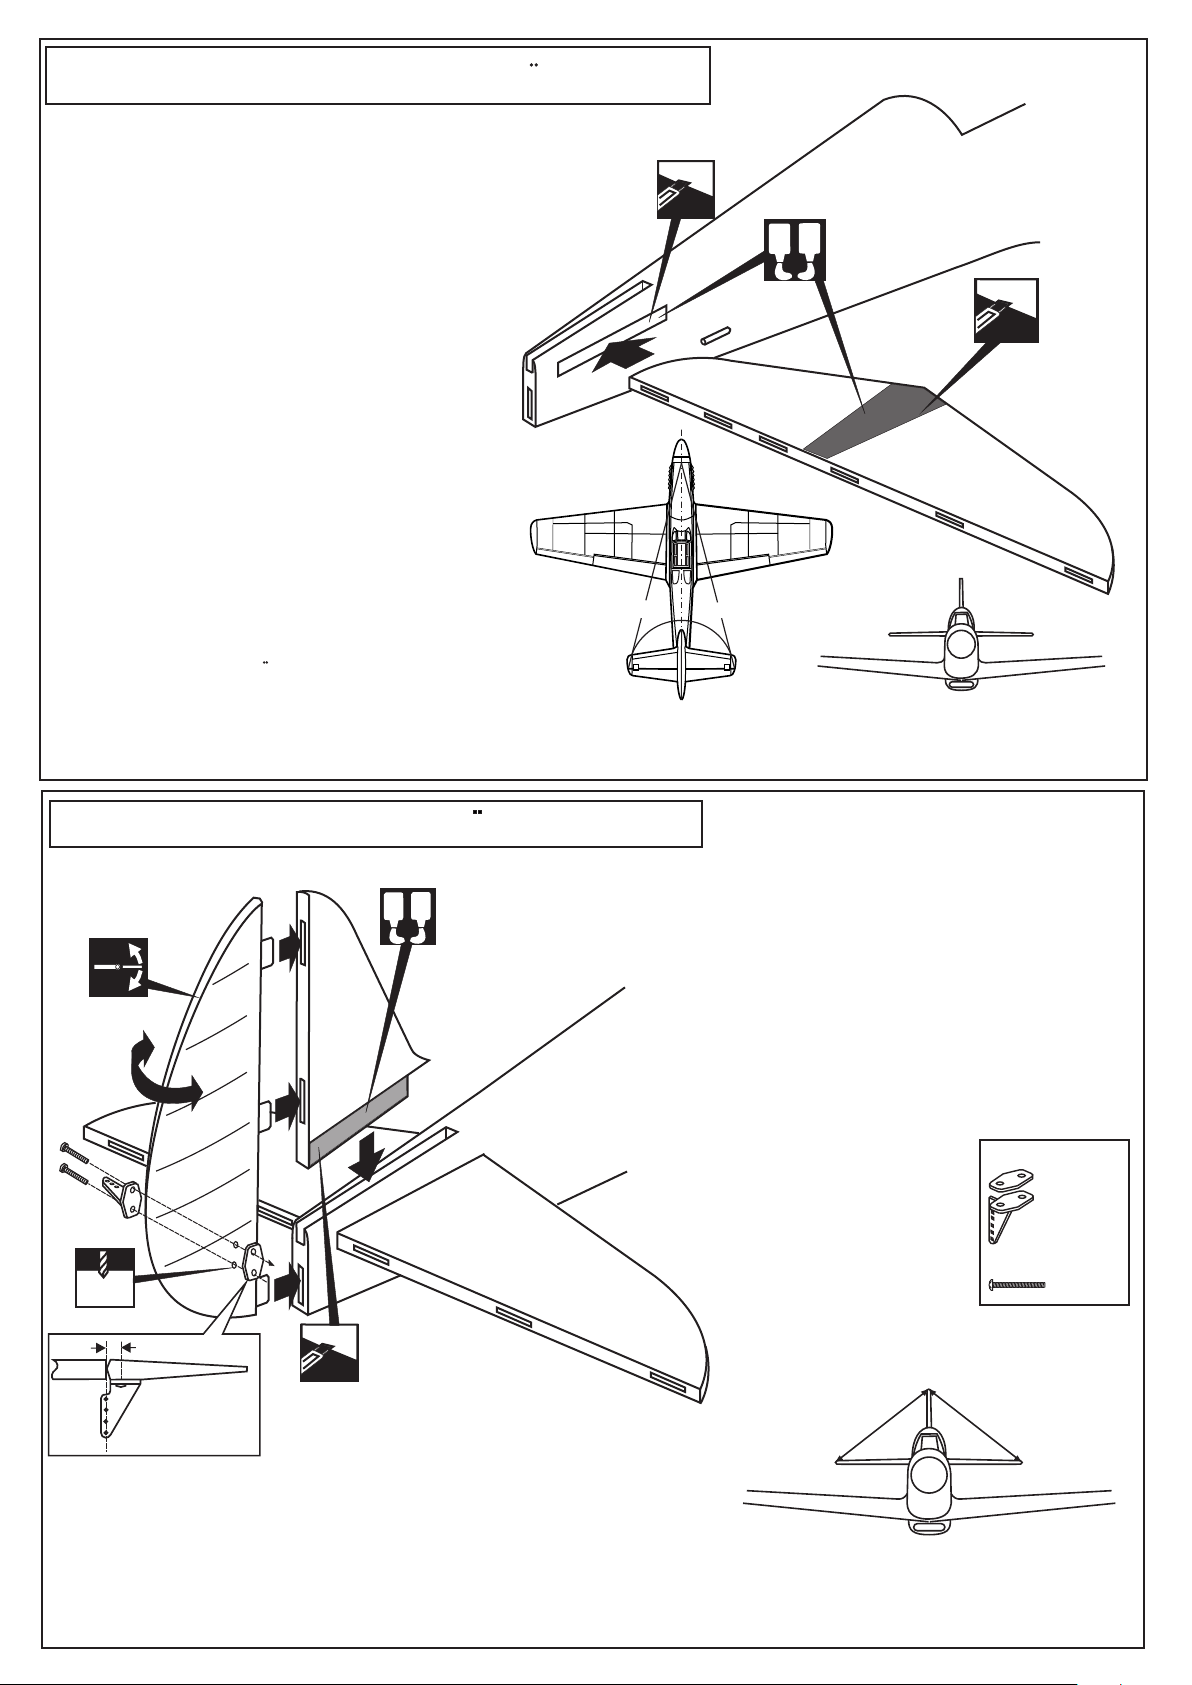
10- Horizontal stabilizer / Hohenruder
1-Trial fit the horizontal stabilizer in place . Check the alignment
of the horizontal stabilizer. When you are satisfied with the
alignment, use a pencil to trace around the top and bottom
of the stabilizer where it meets the fuselage.
2-Remove the horizontal stabilizer from the fuselage. Using the
sharp hobby knife, carefully cut away the covering inside the
lines which were marked above.
3-Spread epoxy (30 minute) onto the top and
bottom of the horizontal stabilizer along the
area where the covering was removed and
to the fuselage where the horizontal stabilizer
mounts.
4-Install the horizontal stabilizer into the fuselage
and adust the alignment as described in steep 1
5-Wipe off any excess epoxy using a paper towel
and kerosene, do not use strong solvent or pure
alcohol to keep the colour of your model not fade.
Allow the epoxy to cure before proceeding to next
step.
Vergewissern Sie sich, sauber geklebt
zu haben. Andernfalls konnen Probleme
mit der Flugeigenschaft auftreten!
Cut away only the
covering both side
A
A
90O90
A’
O
Apply the epoxy
B
both side
A = A’
B = B’
B
Cut away only
the covering
both side *
B’
* WARNING: When removing any covering from the airframe, please ensure that you secure the cut edge with CA
or similar cement. This will ensure the covering remain tight.
11- Vertical stabilizer / Hohenleitwer
1-Trial fit the vertical stabilizer in place . Check the alignment
of the vertical stabilizer. When you are satisfied with the
alignment, use a pencil to trace around the right and left of the
stabilizer where it meets the fuselage.
2-Remove the vertical stabilizer from the fuselage. Using the
sharp hobby knife, carefully cut away the covering inside the
lines which were marked above.
3-Spread epoxy (30 minute) onto the right and left and bottom
of the vertical stabilizer along the area where the covering
was removed and to the fuselage where the vertical stabilizer
mounts.
4-Install the vertical stabilizer into the fuselage and adust the
alignment as described in steep. 1
Control horn
................1
2x12mm screw
..........2
5/64”
2.mm
A
Apply the epoxy
B
both side
Cut away only
the covering
both side*
Stab.
3/8” (10mm)
Elev.
B
B = B’
C = C’
Securely glue together. If coming off during flight,
you lose control of your air plane!
* WARNING: When removing any covering from the airframe, please ensure that you secure the
cut edge with CA or similar cement. This will ensure the covering remain tight.
C C’
B’
Page 7
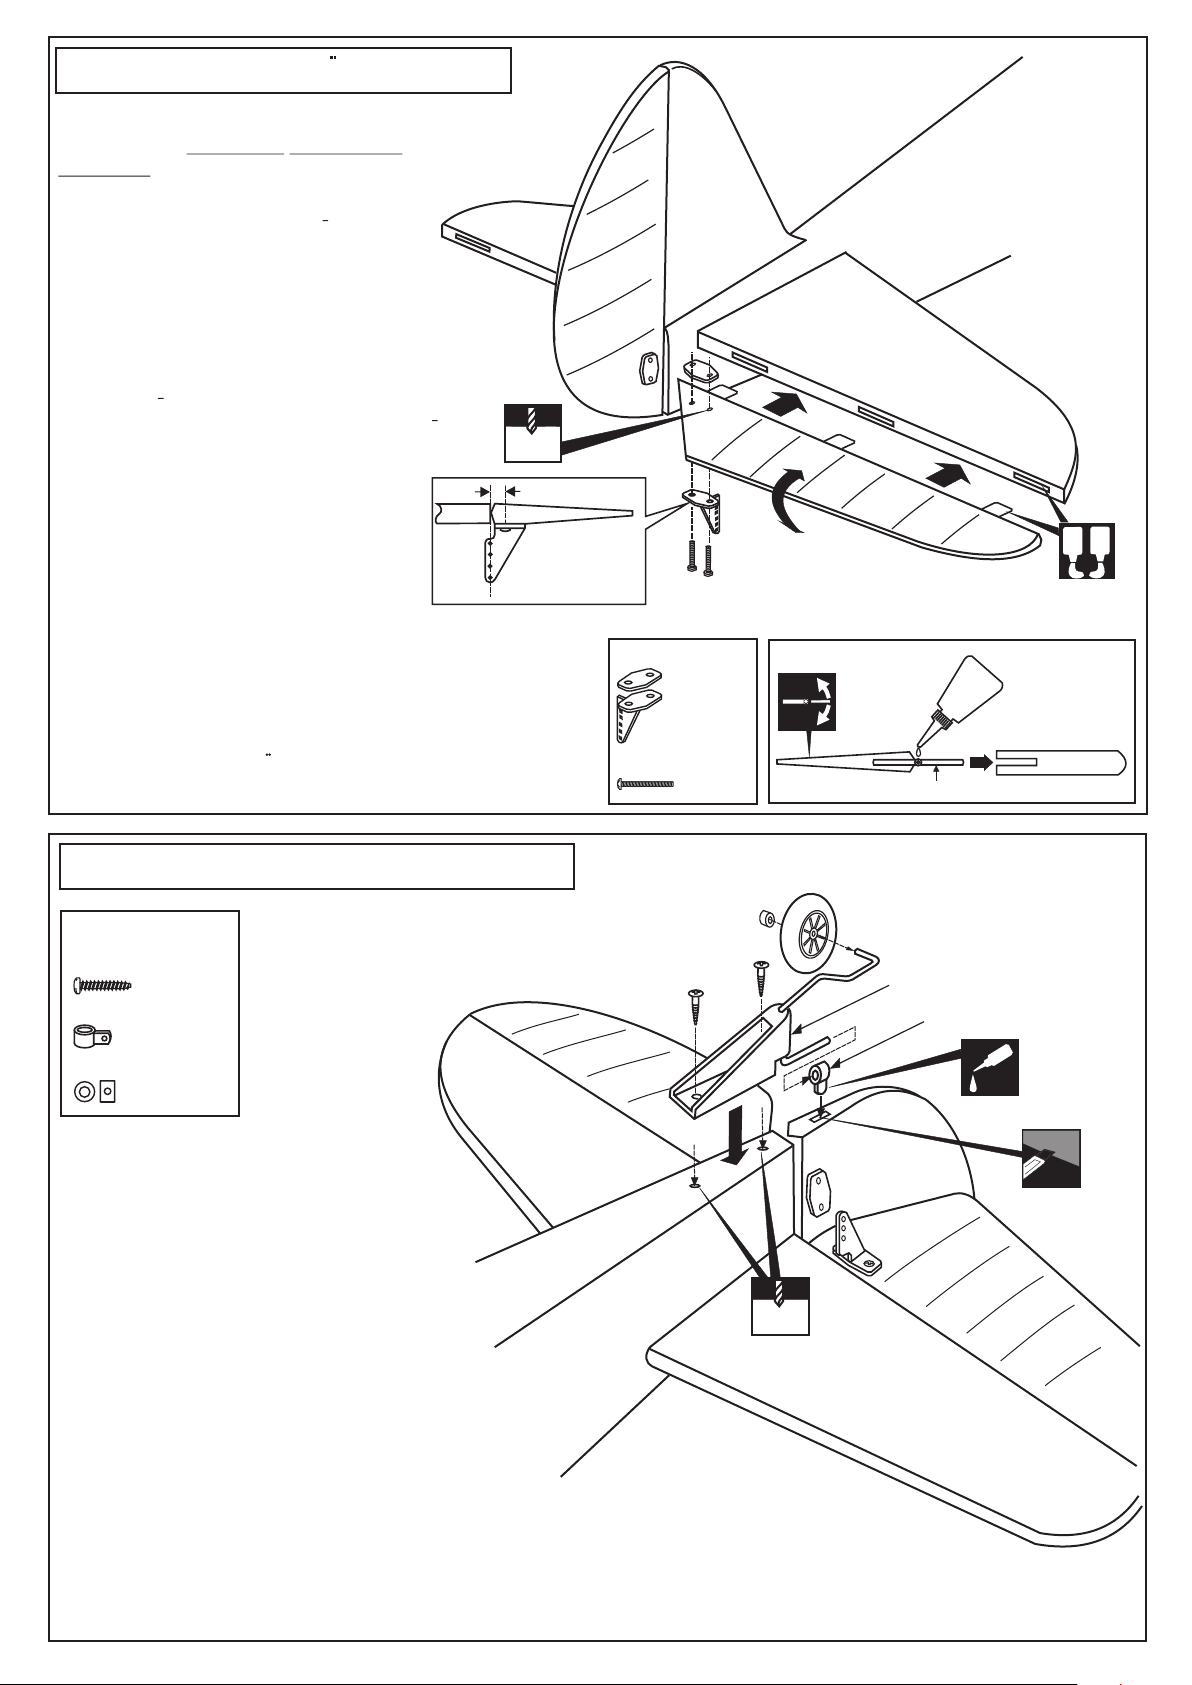
12- Elevator / Hohenruder
Apply a thin layer of machine oil or
petroleum jelly to only the pivot point of
the hinges on the elevator, then push
the elevator and its hinges into the hinge
slots in the trailing edge of the horizontal
stabilizer.
When satisfied with the and alignment,
hinge the elevator to the horizontal
stabilizer using 5 minute epoxy. Make
sure to apply a thin layer of epoxy to the
top and bottom of both hinges and to
inside the hinge slots. Repeat the previous
procedures to hinge the second elevator
to the other side of the horizontal stabilizer.
Stab.
5/64”
2.mm
3/8” (10mm)
Elev.
Apply the epoxy both side
A
B
Securely glue together. If coming off during
flight, you lose control of your air plane!
Vergewissern Sie sich, sauber geklebt zu haben.
Andernfalls konnen Probleme mit der Flugeigenschaft
auftreten!
13- Tail gear / Heckspornrad
1/8x15/32”
(3x12mm) screw
...........2
Tail gear horn
...............1
5/64”(2mm) collar
...............1
Control horn
................2
2x12mm screw
..........4
Bottom view /Ansicht von unten
5/64”(2mm) collar
3x12mm screw
Petroleum jelly
STABILIZER
Hinge
Tail gear mount
Tail gear horn
CA
1-Place the tail gear mount on the bottom
of the fuselage as show, mark the
mounting hole positions with a pencil.
2-Remove the tail gear mount from the
fuselage, Drill the two mounting holes
as marked.
3-Cut a 5/64”(2mm) wide slot which is 5/16”
(8mm) length and 5/16”(8mm) depth on
the bottom of the rudder as shown.
4-Trial fit the tail gear horn into the slot. Do not glue at this time.
5-Slide the tail gear into the tail gear horn. Secure the tail gear
mount in place using the two 3x12mm screw.
6-Secure the tail gear horn in place using CA glue as shown.
1/16
1.5mm
Page 8
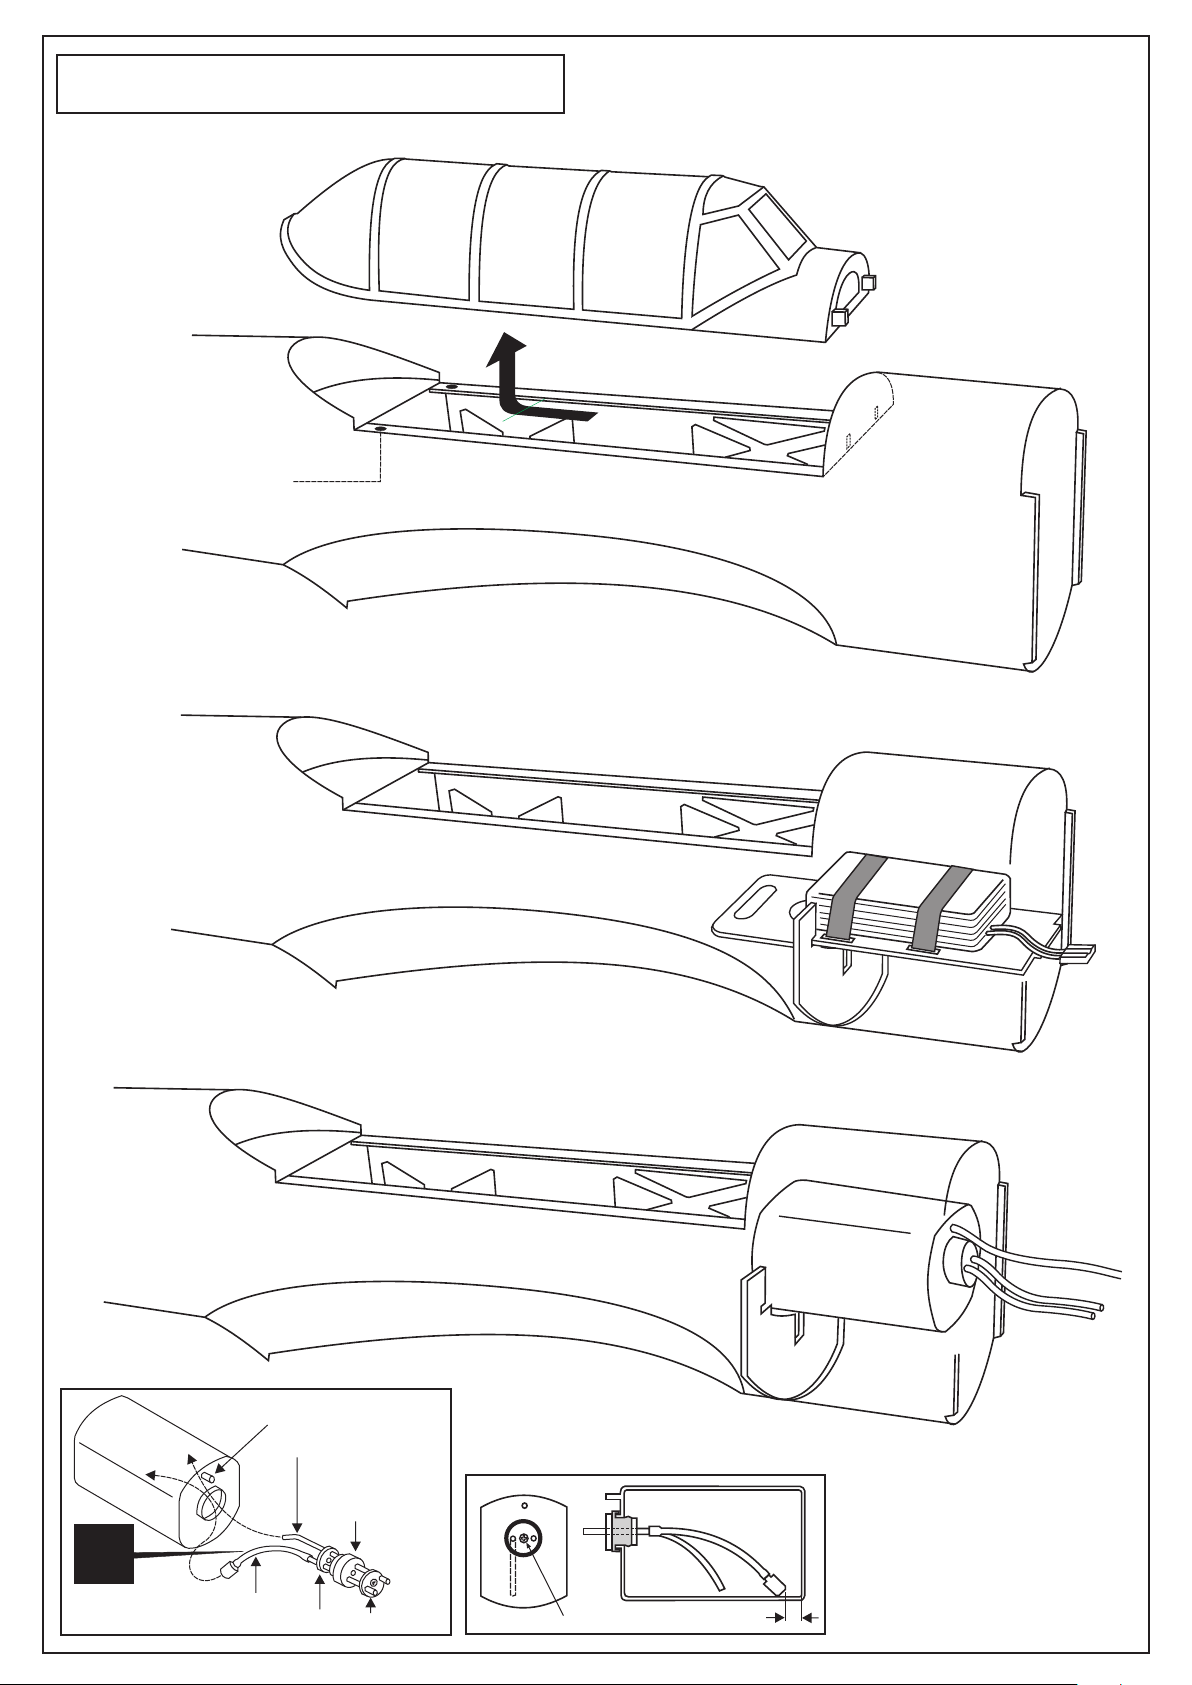
14- Fuel tank / Kraftstofftank
Magnetic canopy
Magnetic piece.
INCASE OF BRUSHLESS MOTOR
INCASE OF GAS ENGINE
X
To engine
Aluminum stopper
To muffler
Filler tube
Rubber
stopper
Aluminum cap
After confirming the direction . Insert and
tighten the screw.
3x35 mm screw
5/32”(4mm)
Push the fuel tank forward until
there are no gaps between the
tank and firewall.
Page 9
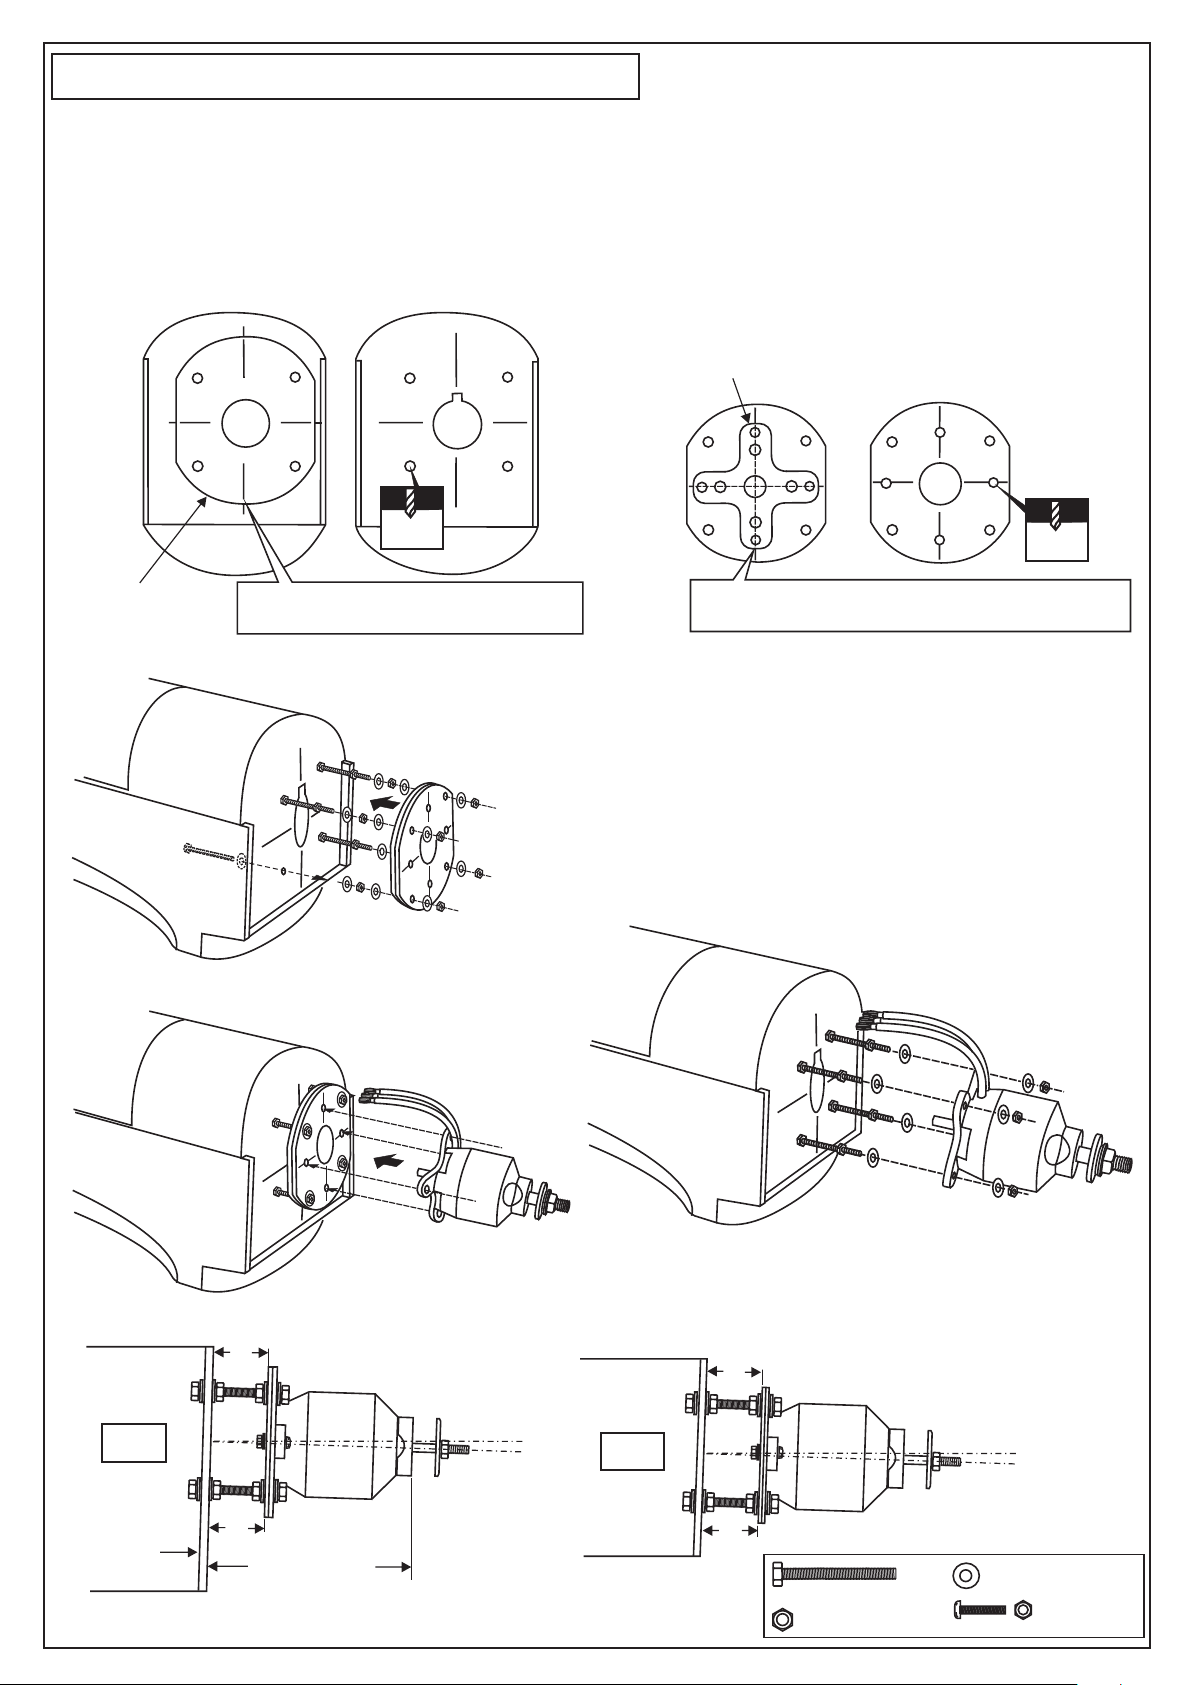
15- Electric Motor / Elektromotor
- Using a plywood motor mounting plate as a template, mark the fire wall where the four holes are to be drilled (1).
- Remove the plywood motor mounting plate and drill a 13/64”(5mm) hole through the fire-wall at each of the four marks
marked (2).
- Using a aluminum motor mounting plate as a template, mark the plywood motor mounting plate where the four holes are
to be drilled (3).
- Remove the aluminum motor mounting plate and drill a 1/8”(3mm) hole through the plywood at each of the four marks
marked (4).
FRONT-VIEW
Aluminum motor
mounting plate
Plywood motor
mounting plate (2pcs)
5
13/64”
1
! Align the mark on the plywood motor
mount with the mark on the fuselage.
5mm
2
-Push the four 5x70mm bolts through the fire-wall as shown (5).
- Reposition the plywood motor mounting plate (2pcs) and secure it
in place with eight 5mm nuts and washers (6).
Note: B=B’(Side-view) and A=A’(Top-view)
-Attach the aluminum motor mounting plate on to the motor and
secure it in place with four screws ( included with motor set) (7).
-Attach the motor on to the plywood motor mounting plate and
secure it in place with four 3x15mm (1/8x19/32”)
screws(8).
6
1/8”
3
! Align the mark on the plywood motor mount
with the center lines on aluminum motor mount.
3mm
4
B=B’
Firewall
B
B’
SIDE-VIEW
118 - 122mm
(4.7”)
7 - 8
A=A’
! Engine thrust on balk head
is already adjust at factory
A
A’
TOP-VIEW
5x70mm.......4
5mm nut.......12
5mm washer...16
3mm screw/nut...4
Page 10
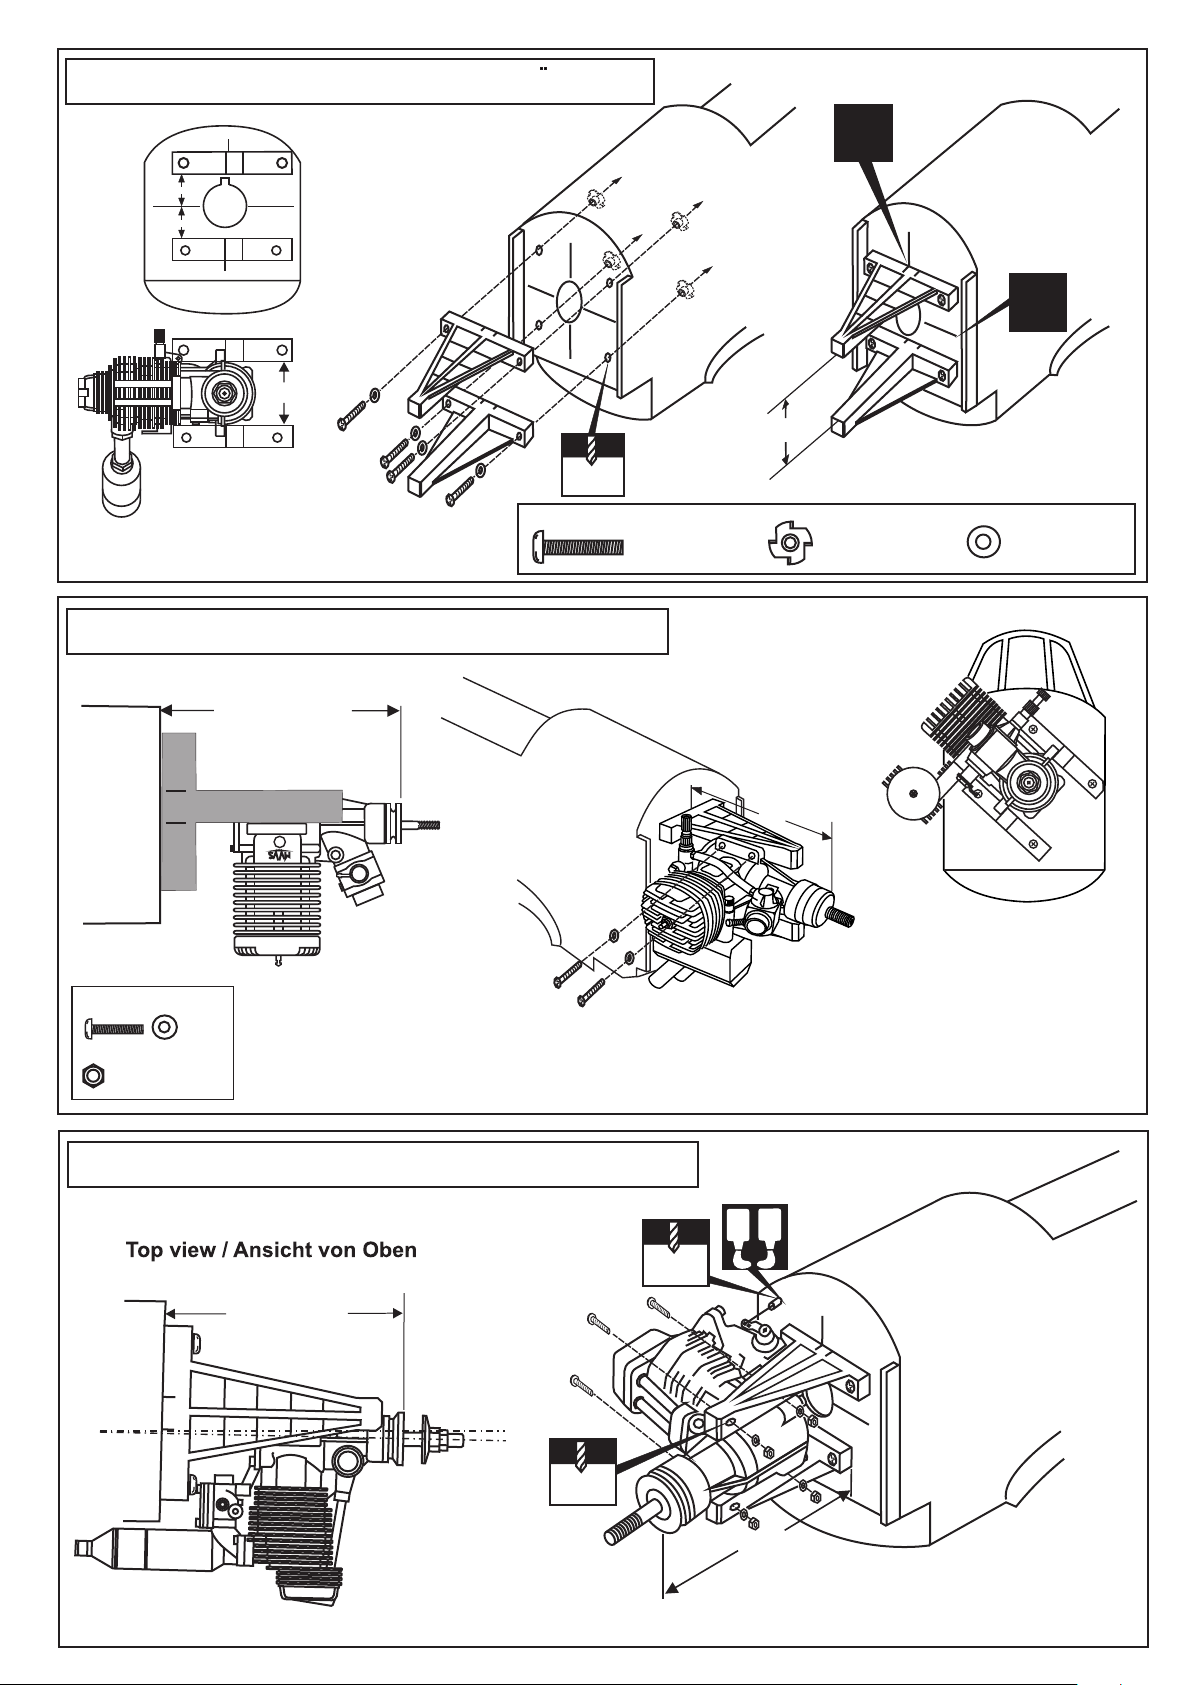
16- Engine mount / Motortrager
! Align the mark on both mounts
with the center mark on the fire wall
! Engine thrust on balk head
is already adjust at factory
B
B’
FRONT-VIEW
B=B’
A
13/64”
5mm
4x25mm screw
......4
17- Engine (two stroke) / 2T Motor
A
118 - 122mm
(4.7”)
A
!
Blind-nut
............4
! Align the engine
center with fire wall
marked line
B
B’
4mm washer
.................4
!
6.5
3x25mm screw
...4
Nut
.............4
With hang silencer
18- Engine (four stroke) / 4T Motor
A
118 - 122mm
(4.7”)
3.mm
1/8
A
A
With side silencer
Determine the angle for
the engine mounts so the
muffler will not contact the
fuselage
B
1/8
3mm
! Engine thrust on balk head
is already adjust at factory
A
5” ~ 5-1/32”
(127~128mm)
Page 11
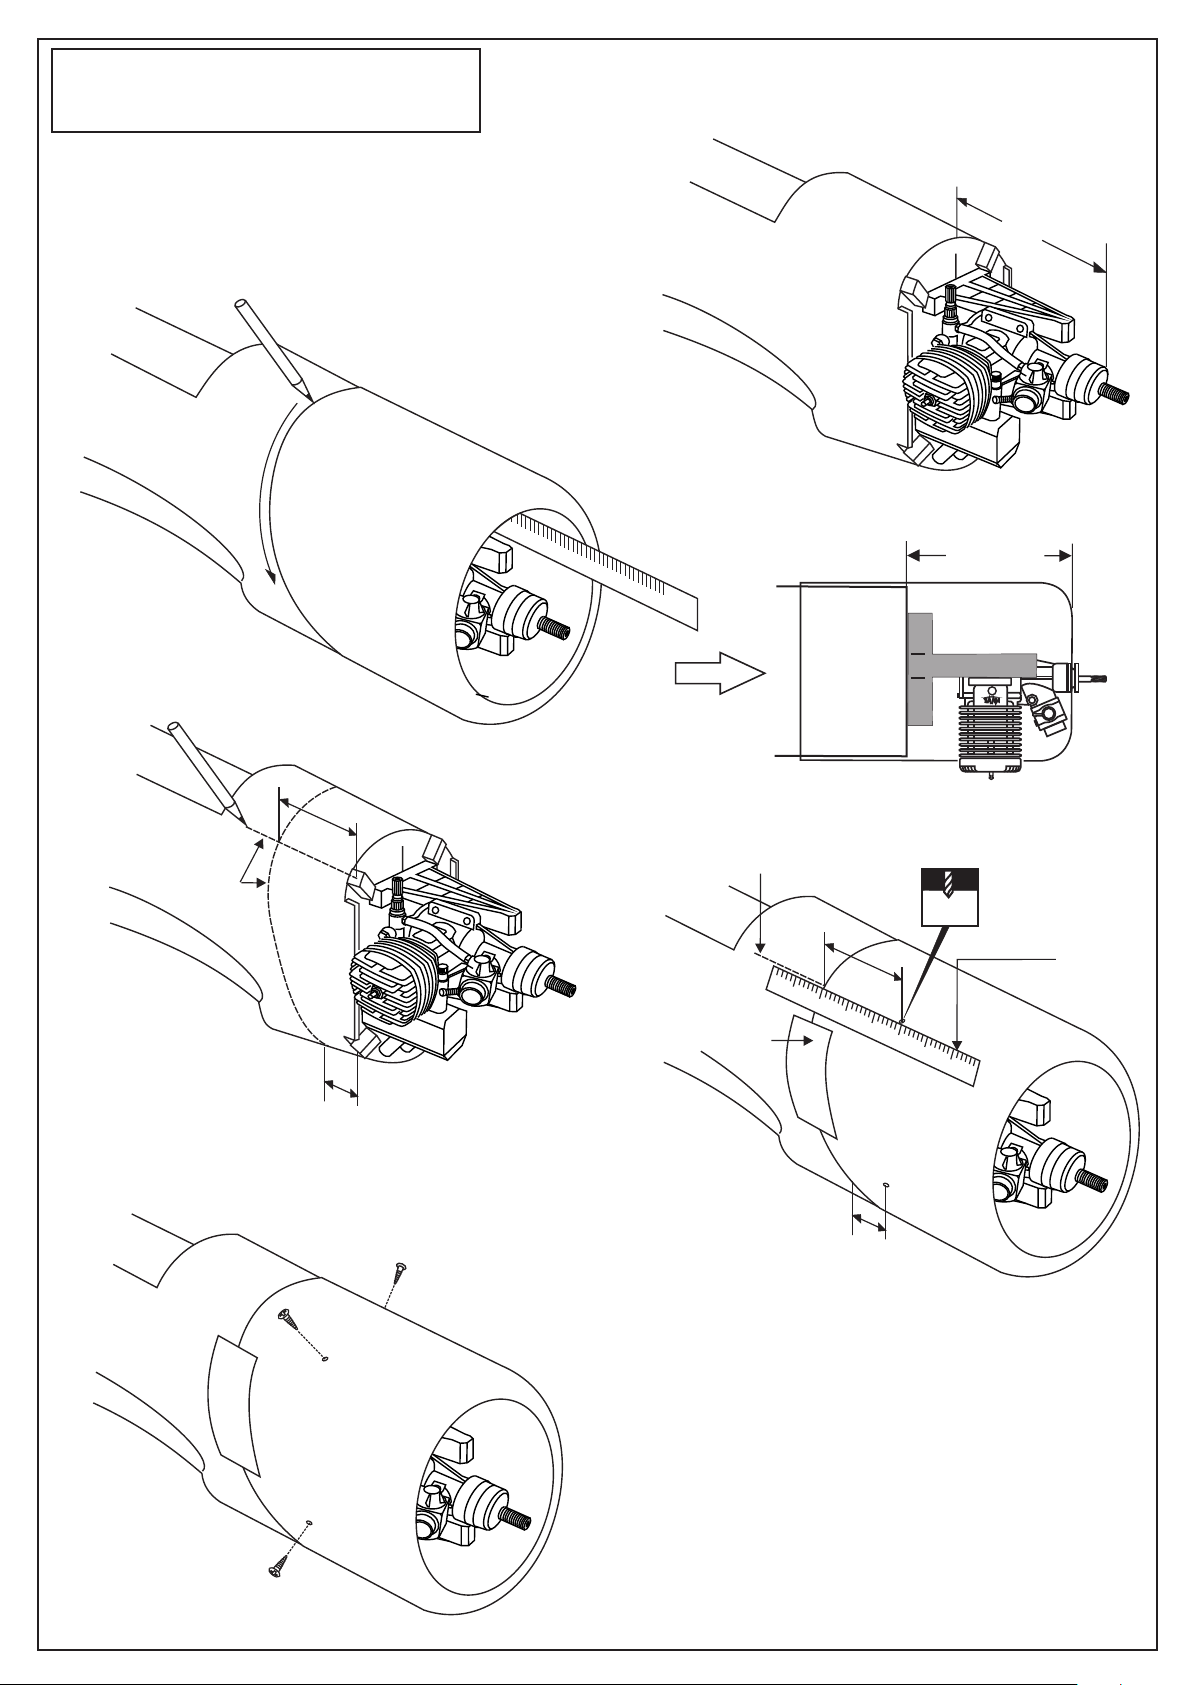
19- Cowling installation
Motorhaube
2
Insert the cowl on to the fuselage so the distance from
the fire-wall to the front of the cowl is 116 - 118mm.
Using a pencil or felt tipped pen trace around the cowl
where it meet the fuselage.
1
Position the engine on to the engine mounts so the
distance from the prop hub to the fire wall is 120mm.
120mm
3
Pencil line
1
1
6
A
Pencil line
A
Adhesive tape
B
116 - 118mm
6.5
2mm
Ruler
5
B
4
Again, insert the cowl on to the fuselage so the
rear edge of the cowl meet the pencil line and
secure it in place with the adhesive tape.
Drill four 2mm holes on the cowl as shown.
Page 12
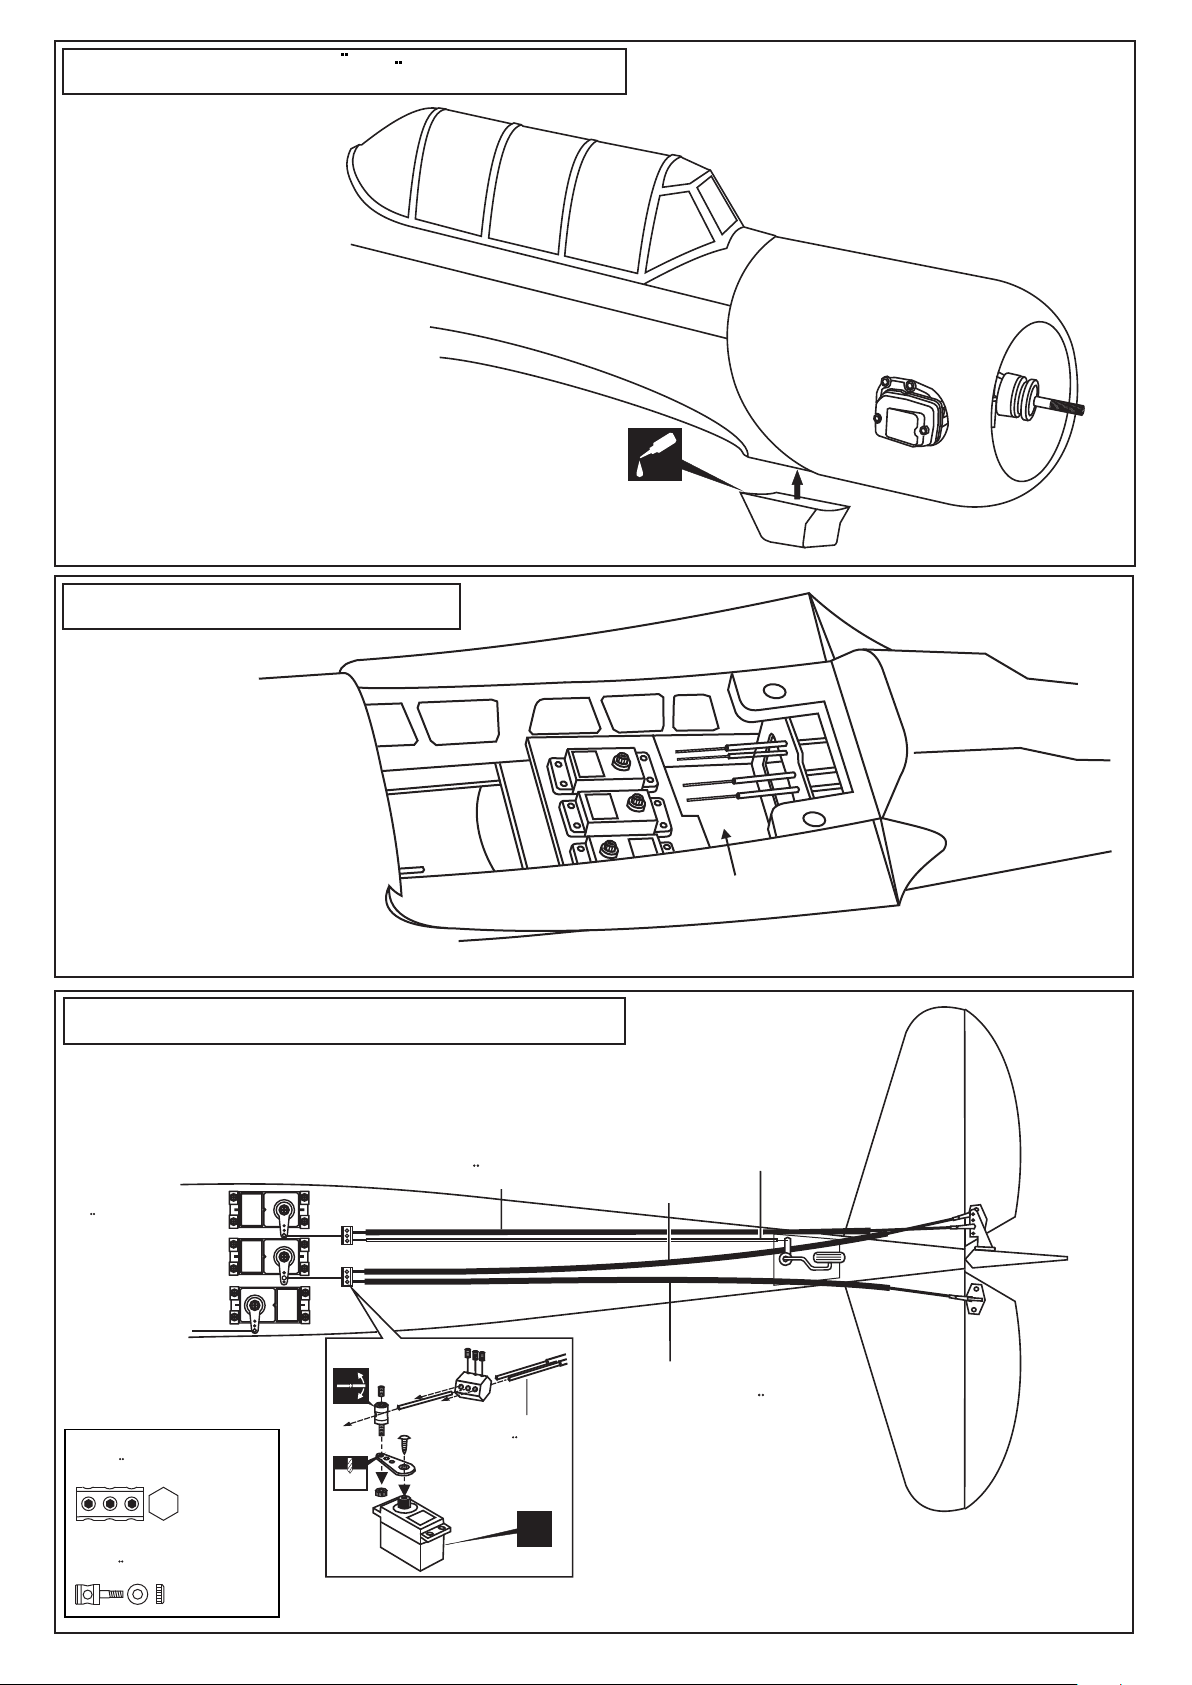
20- Air scoop / Olkuhlerattrappe
Note: Only one pilot in cockpit
The second pilot must purchase separately.
(VQAP09)
21- Servo installation
NOTE: Place of the servos may be
change depend of engine
(Four-stoke or two-stroke engine)
22- Linkages / Ruderanlenkung
CA
ABS air-scoop
Receiver area
Bottom view /Ansicht von unten
Bottom view /Ansicht von unten
Elevator servo
Hohenruderservo
Rudder servo
Seitenruderservo
Throttle servo
Drosselservo
Connector
Gestangeanschluss
............1
Connector
Gestangeanschluss
............3
Elevator pushrod
Rudergestange
3mm set Screw
2 mm
Tail wheel pushrod
Rudder pushrod
Elevator pushrod
Rudergestange
Elevator pushrod
Rudergestange
X
Page 13
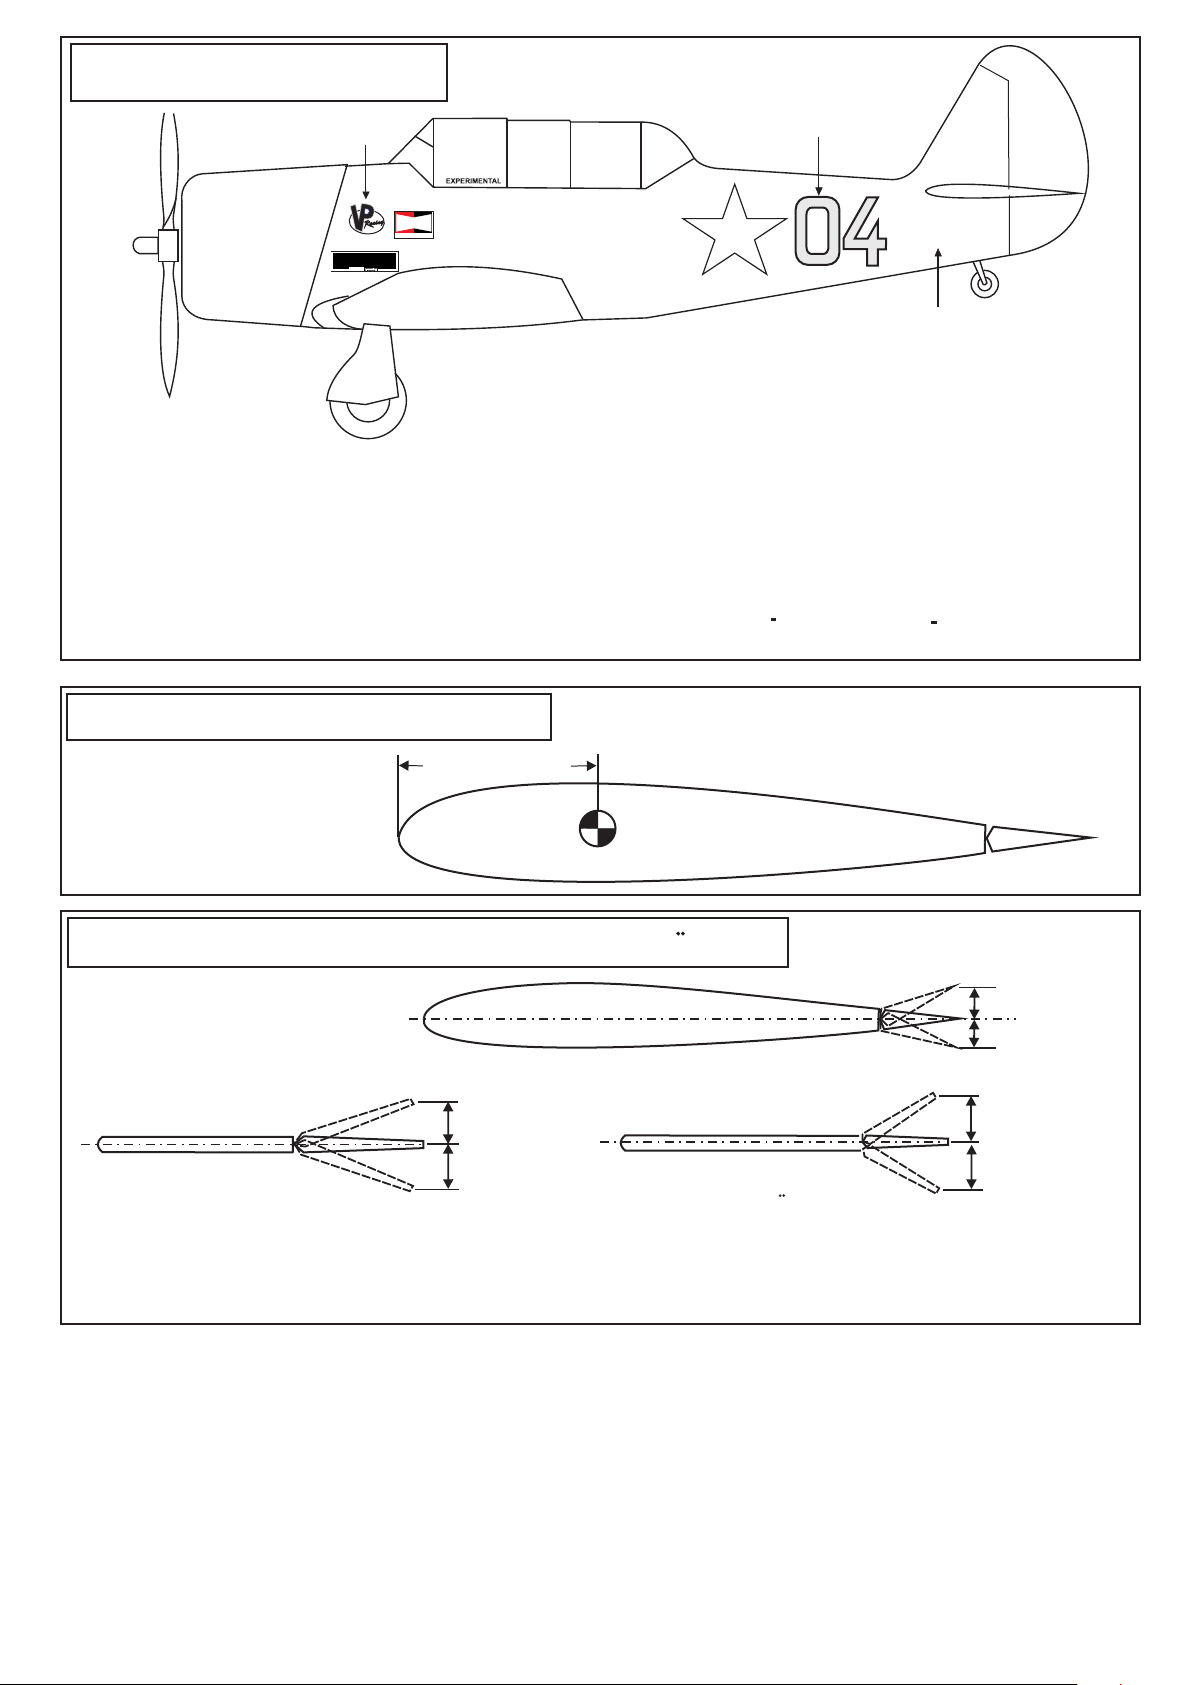
23- Decor / Aufkleber
Sticker
CHAMPION
FUELS
FUELS
A E R O S P A C E
POWERED BY
LYCOMING
TEXTRON
Note: Cut out the stickers and apply them in the proper area. Do not peel the backing paper off all at once. Peel off one corner of the
backing and cut off with scissors. Arrange sticker on model and when satisfied adhere the corner without backing.
Carefully peel back the rest of the backing while at the same time adhering the rest of the sticker.
Try not to make air bubbles, if there are some, carefully puncture sticker (center of bubble) but not model surface with the tip of the
knife or sharp pin and squeeze out the air. At curves stretch sticker and apply a little heat so that no ceases occur. Cut off the excess
that is produced.
WARNING:
Please do not clean your model with pure alcohol or strong solvent, only use liquid soap with water or use glass cleaner
to clean on surface of your model to keep the colour not fade.
All details are subject to change without notice !
Technische Anderungen und Irrtumer vorbehalten !
N621TW
Sticker
24- Balance / Schwerpunkt
DO NOT try to fly an out-of-balance model !
4-1/4”(107 mm)
(A + or - 5mm is fine)
Note: Adjust the location of the
battery pack to achieve this C.G
location.
Wing center section
25- Control surface / Ruderausschlage
1/4” (6mm)
1/4” (6mm)
AILERON / QUERRUDER
1-3/16”(30) mm
1-3/16”(30) mm
RUDDER / SEITENRUDER
IMPORTANT: Flying your model at these throws will provide you with the greatest chance for successful first flights. If, after you have
become accustomed to the way the Yak flies, you would like to change the throws to suit your taste that is fine. However, too much
control throw could make the model difficult to control, so remember, “more is not always better”.
ELEVATOR / HOHENRUDER
25/64”(10mm)
25/64”(10mm)
 Loading...