

VPInstruments VPFlowScope VPS.R080.M050 series, VPFlowScope VPS.R250.M100 series, VPFlowScope VPS.R01K.M200 series User Manual
Page 1
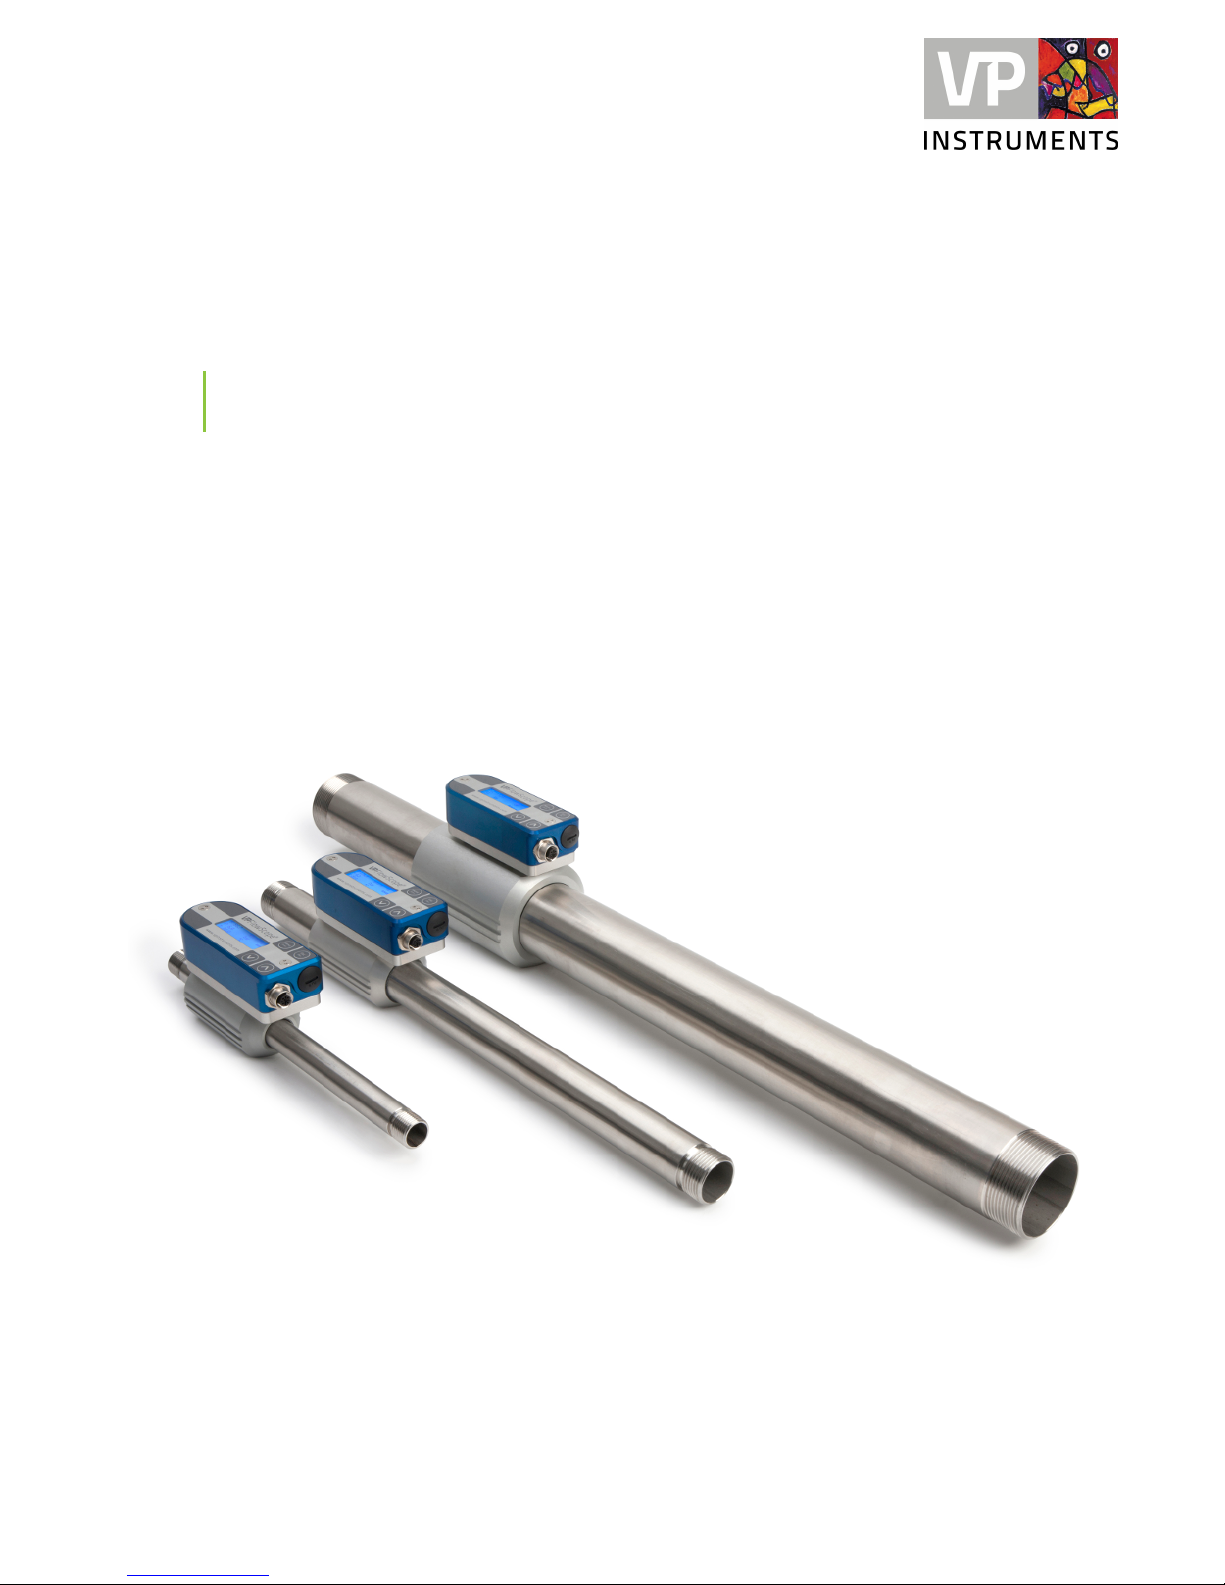
VPFlowScope in-line
VPINSTRUMENTS.COM
User manual
© 2017 Van Putten Instruments BV
MAN-VP-SINL-UK-1701 Date:22-03-2017
Page 2

All rights reserved. No parts of this document may be reproduced in any form or by any means - graphic,
electronic, or mechanical, including photocopying, recording, taping, or information storage and retrieval
systems - without the written permission of the publisher.
Products that are referred to in this document may be either trademarks and/or registered trademarks of the
respective owners. The publisher and the author make no claim to these trademarks.
While every precaution has been taken in the preparation of this document, the publisher and the author
assume no responsibility for errors or omissions, or for damages resulting from the use of information
contained in this document or from the use of programs and source code that may accompany it. In no event
shall the publisher and the author be liable for any loss of profit or any other commercial damage caused or
alleged to have been caused directly or indirectly by this document.
Creation date: 22-03-2017 in Delft
VPFlowScope in-line
© 2017 Van Putten Instruments BV
Publisher
Van Putten Instruments BV
Buitenwatersloot 335
2614 GS Delft
The Netherlands
This document is available in:
English, English (UK)
Page 3

3Contents
3
Table of Contents
1
Warning - Read this first
5
2
Introduction
6
3
Product overview
7
................................................................................................................................... 71 Configuration
................................................................................................................................... 82 VPFlowScope in-line D0 (no display)
................................................................................................................................... 83 VPFlowScope in-line D10 & D11 (display version)
................................................................................................................................... 84 VPFlowScope in-line D0 with the VPFlowTerminal
4
Quick start
9
5
Measurement
10
................................................................................................................................... 101 Flow
................................................................................................................................... 102 Pressure
................................................................................................................................... 103 Temperature
................................................................................................................................... 114 Totalizer
6
Mechanical installation
12
................................................................................................................................... 121 Piping table
................................................................................................................................... 132 Installation without tubing kit
................................................................................................................................... 133 Installation with tubing kit
7
Display
15
................................................................................................................................... 151 Display status icons
................................................................................................................................... 152 LCD display
................................................................................................................................... 153 Data Logger
................................................................................................................................... 164 Keypad
................................................................................................................................... 165 Menu
8
VPStudio software
19
9
Electrical connections
20
................................................................................................................................... 201 4..20mA output
................................................................................................................................... 222 Pulse output
................................................................................................................................... 233 Modbus interface
................................................................................................................................... 274 USB interface
10
Service
28
................................................................................................................................... 281 Software and firmware updates
................................................................................................................................... 282 Calibration interval
Page 4

VPFlowScope in-line4
© 2017 Van Putten Instruments BV | MAN-VP-SINL-UK | Revision:1701 | Date:22-03-2017
................................................................................................................................... 283 Service subscriptions
11
Specifications
29
12
Order information and accessories
30
13
Appendix A - UL
31
Page 5
© 2017 Van Putten Instruments BV | MAN-VP-SINL-UK | Revision:1701 | Date:22-03-2017
5
1 Warning - Read this first
Compressed gasses can be dangerous! Please familiarize yourself with the
forces under pressurized conditions. Respect the local guidelines and regulations
for working with pressurized equipment.
Gas flow through pipes follows certain physical laws. These physical laws
have serious consequences for the installation requirements. Familiarize yourself
with the basic physical laws of flow measurement, to make sure that the product is
installed correctly. Always make sure that upstream length, downstream length,
flow, pressure, temperature and humidity conditions are within specifications.
Precision instruments need maintenance. Check your flow meter regularly and
make sure it remains clean. When polluted, gently clean the sensor using demineralised water or cleaning alcohol.
Precision instruments need regular re-calibration. To keep your
VPFlowScope probe in best shape, it needs recalibration. We advice annual
recalibration.
Not intended for fiscal metering or billing. Our flow meters are not certified for
fiscal metering. Laws on fiscal metering and billing may vary per country or state.
Do not overestimate the results. VPInstruments does not take any
responsibility for the correctness of measurement results under field
conditions. The practical measurement uncertainty of a flow meter in the field may
vary, depending on how well it is installed, due to the nature of gas flow. The piping
table provides guidelines on how to optimize the field accuracy. Our products are
not intended to be used as a single means to determine compressor capacity.
Do not open the device. Our instruments are assembled with high precision.
Opening this device is dangerous and may destroy the instruments. Warranty is
voided when you open the instrument.
Feedback leads to product improvement. Please share your experience with
us, as we are continuously improving our products in our commitment to quality,
reliability and ease of use. Let us know via sales@vpinstruments.com!
Page 6

© 2017 Van Putten Instruments BV | MAN-VP-SINL-UK | Revision:1701 | Date:22-03-2017
6 VPFlowScope in-line
2 Introduction
Congratulations! You purchased the easiest to use and most complete compressed air
measurement tool in the world. With the VPFlowScope in-line, you can monitor and record flow,
pressure, temperature, and total air consumption, simultaneously.
Great products deserve great user manuals. We have done our best to make this user manual as
complete as possible. New users, please read it carefully to familiarize yourself with our products.
Experienced users can check out the Quick start chapter.
Check the packaging box for any inconsistencies. Should there be any shipping damage, notify the
local carrier. At the same time a report should be submitted to Van Putten Instruments BV,
Buitenwatersloot 335, 2614 GS DELFT, The Netherlands.
This manual is dedicated to:
VPS.R080.M050.DXX Where DXX indicates the display type
VPS.R250.M100.DXX Where DXX indicates the display type
VPS.R01K.M200.DXX Where DXX indicates the display type
VPStudio software version 1.24
Sensor firmware version 1.20
Display firmware version 2.9.1
Older software features may not be covered by the contents of this user manual. Please contact us
for a service subscription program, which includes software and firmware updates!
Page 7
© 2017 Van Putten Instruments BV | MAN-VP-SINL-UK | Revision:1701 | Date:22-03-2017
7
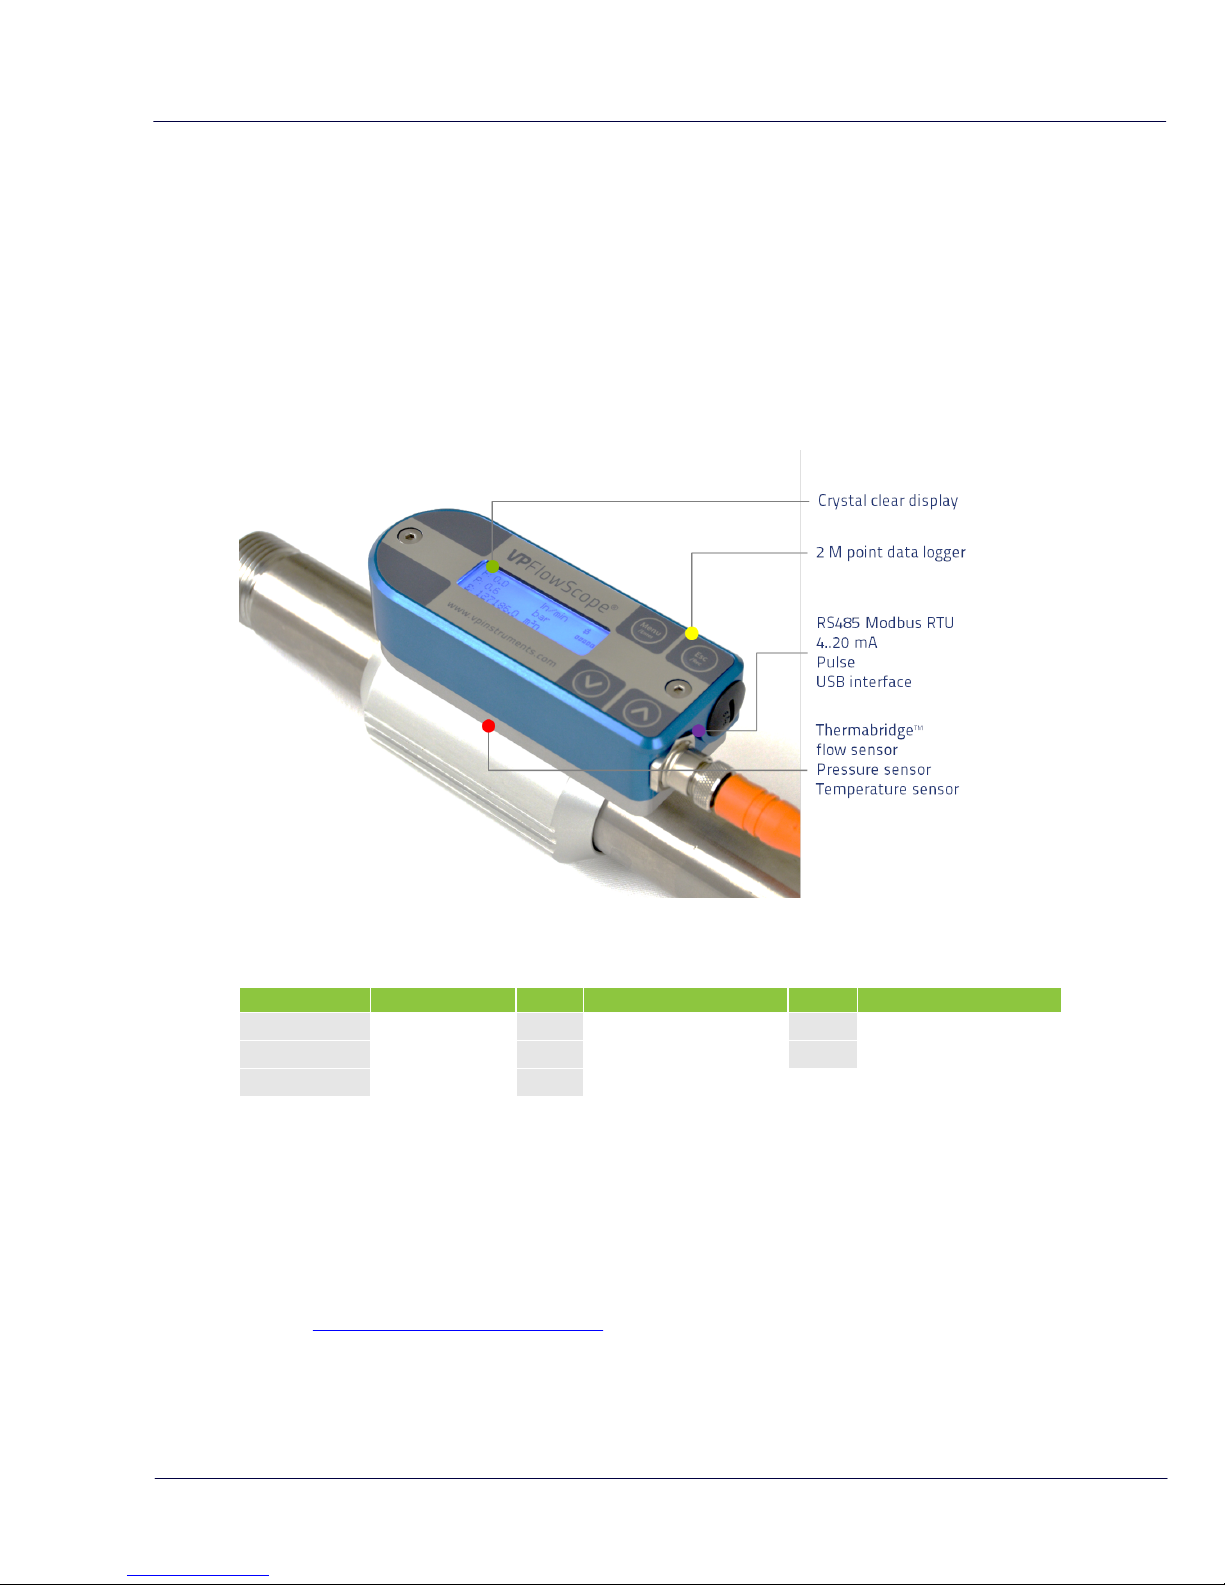
3 Product overview
The VPFlowScope in-line measures mass flow, temperature and pressure simultaneously. All these
parameters are key to proper compressed gas measurement and are therefore included in all
models. All data can be accessed by Modbus RTU, 4..20mA and pulse.
The VPFlowScope in-line is available in three configurations to fit every application. Use the
connector cap for sensor features only, ideal for integration into a central management system. Use
the display module for central read out and data logging. Use the VPFlowTerminal for central read out
and data logging on location where a standard display can not be read out. For all models, all
parameters and outputs are available.
The VPFlowScope in-line is available in three sizes: 0.5", 1" and 2". Additional options are available
for all types:
Order Code
Flow range
Option
Display
Option
Connector
VPS.R080.M050
0 ... 80 m
3
n
/hr
D0
No display
C5
5 Pin M12
VPS.R250.M100
0 ... 250 m
3
n
/hr
D10
Display
C8
8 Pin M12, for remote
logging *
VPS.R01K.M200
0 ... 1000 m
3
n
/hr
D11
Display + 2M point logger
* An 8 Pin M12 connector can only be ordered in combination with a D0 model.
Order the VPFlowScope in-line KIT to receive the complete start kit with all required accessories,
everything you need to get started right away.
3.1 Configuration
The instruments are pre programmed and ready to use. For configuration of the outputs and data
logger, the VPStudio configuration software is used. This software can be downloaded from our
website. www.vpinstruments.com/downloads
Page 8
© 2017 Van Putten Instruments BV | MAN-VP-SINL-UK | Revision:1701 | Date:22-03-2017
8 VPFlowScope in-line
3.2 VPFlowScope in-line D0 (no display)
The D0 model can be used in applications where local read-out and data logging is not required. With
it's various outputs the VPFlowScope in-line can be connected to remote data loggers.
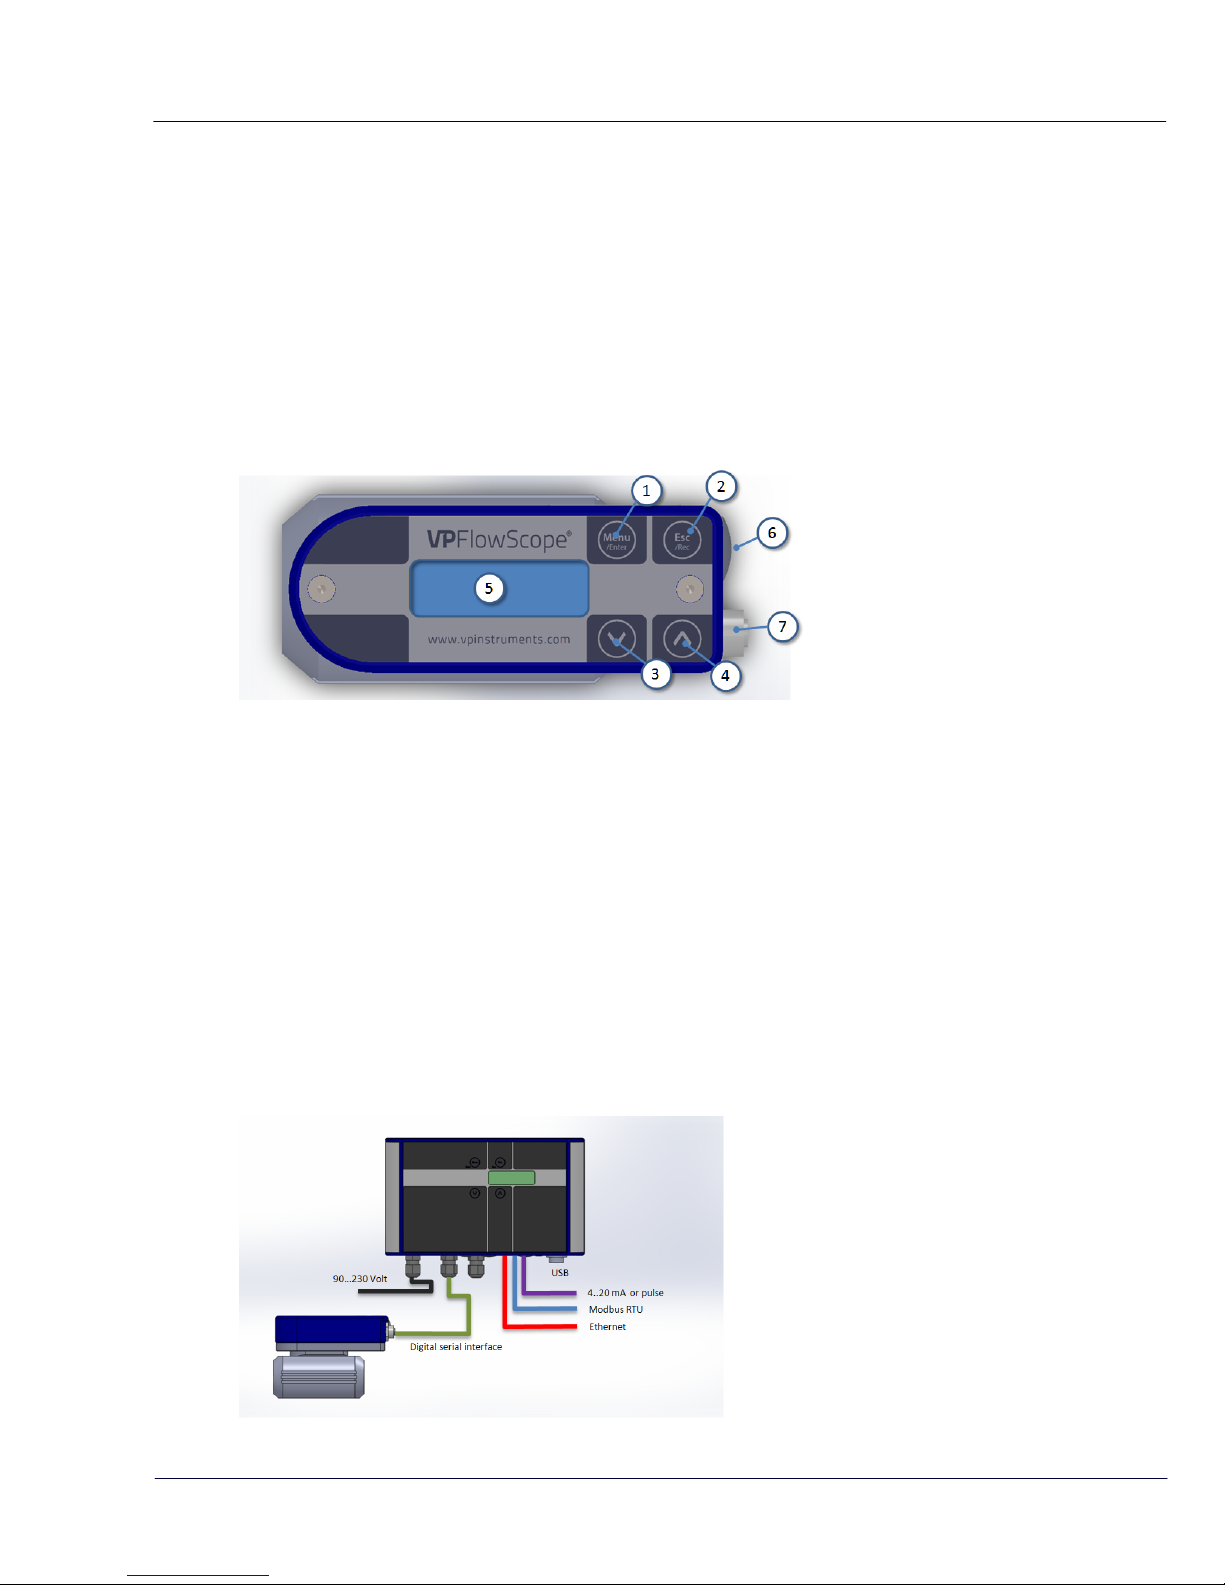
3.3 VPFlowScope in-line D10 & D11 (display version)
The D10 and D11 models add a 3 row display with keypad to the VPFlowScope in-line. All
parameters will be shown on the display in real time. The keypad can be used to start a data log
session or to change the key parameters of the VPFlowScope in-line. The D11 model also features a
2 Million point data logger. All output parameters for remote connection remain available on the M12
connector.
1. Menu / Enter button
2. Esc / Record button
3. Down button
4. Up button
5. LCD display
6. USB interface
7. M12 connector
3.4 VPFlowScope in-line D0 with the VPFlowTerminal
The VPFlowTerminal can be used as a remote display for situations where the local display can't be
read. All display features will be available on the remote display.
The VPFlowTerminal is equipped with a 10 m / 32.8 ft. cable with M12 8-pin connector. Therefore the
D0 model needs to be ordered with an M12 8-pin connector. The VPFlowTerminal features a 2 Million
point data logger which extends the data log capacity of your VPFlowScope in-line.
Page 9

© 2017 Van Putten Instruments BV | MAN-VP-SINL-UK | Revision:1701 | Date:22-03-2017
9
4 Quick start
This chapter contains the basic steps to start using your VPFlowScope in-line flow meter. Additional
information on all subjects can be found in the next chapters.
1. Unpack
Unpack the meter and check if all items are there and in good shape. A checklist with all items is
available on the box.
2. Mechanical installation
· Find the best point of installation for this product. Make sure that all specifications are met.
· For installation of the VPFlowScope in-line, the pipe needs to be cut. Mount the VPFlowScope in-
line between the pipe ends. Use tri-clamp or similar adapters for quick installation and removal.
· For installation with the tubing kit: The connection is BSP outer straight thread [For NPT thread,
chase the BSP thread of the pipe ends with a die]; 0.5", 1" or 2" depending on the VPFlowScope
in-line model.
· For installation without tubing kit: The connection is BSP inner straight thread [It can accept NPT
male thread ends]; 0.5", 1" or 2" depending on the VPFlowScope in-line model.
See chapter mechanical installation for more detailed information.
3. Electrical installation
3.1 Permanent installation
Connect a cable with 5 Pin M12 connector to the VPFlowScope in-line. The cable can be
connected to a central data acquisition / building management system or data logger via
Modbus, 4..20mA or pulse. See chapter electrical connections for more information.
Apply 12-24 VDC to power up the device. Use a Class II power supply (less than 2 Amps). If the
built-in display option is available, it will light up when power is applied.
3.2 Temporary installation
Use a 12 Volt power supply with M12 connector to power the VPFlowScope in-line. This quick
method is ideal for audits.
4. Data recording
When the data logger is available a data log session can be started by pressing the esc button and
then enter. All parameters will be logged with the default logging intervals. These logging intervals can
be changed with the VPStudio software. This software tool is also used to retrieve the recorded
sessions.
Page 10
© 2017 Van Putten Instruments BV | MAN-VP-SINL-UK | Revision:1701 | Date:22-03-2017
10 VPFlowScope in-line
5 Measurement
For all parameters the update interval is 1 second. Within this second, multiple samples are taken
and averaged to provide a stable and reliable output.
5.1 Flow
The VPFlowScope in-line uses our proprietary insertion type thermal mass flow sensor. There is no
bypass flow, which results in a high robustness and less sensitivity for dirt or particles. The flow
sensor is directly temperature compensated.
The sensor response signal is directly related to
the mass flow rate and can be described by the
following formula:
Vout = k *λ* ρ * v * (Ts-Tg)
Vout = output voltage
k = sensor (geometrical) constant
λ = thermal conductivity of the gas
ρ = density of the gas
v = actual velocity in m / sec
Ts = sensor temperature
Tg = gas temperature
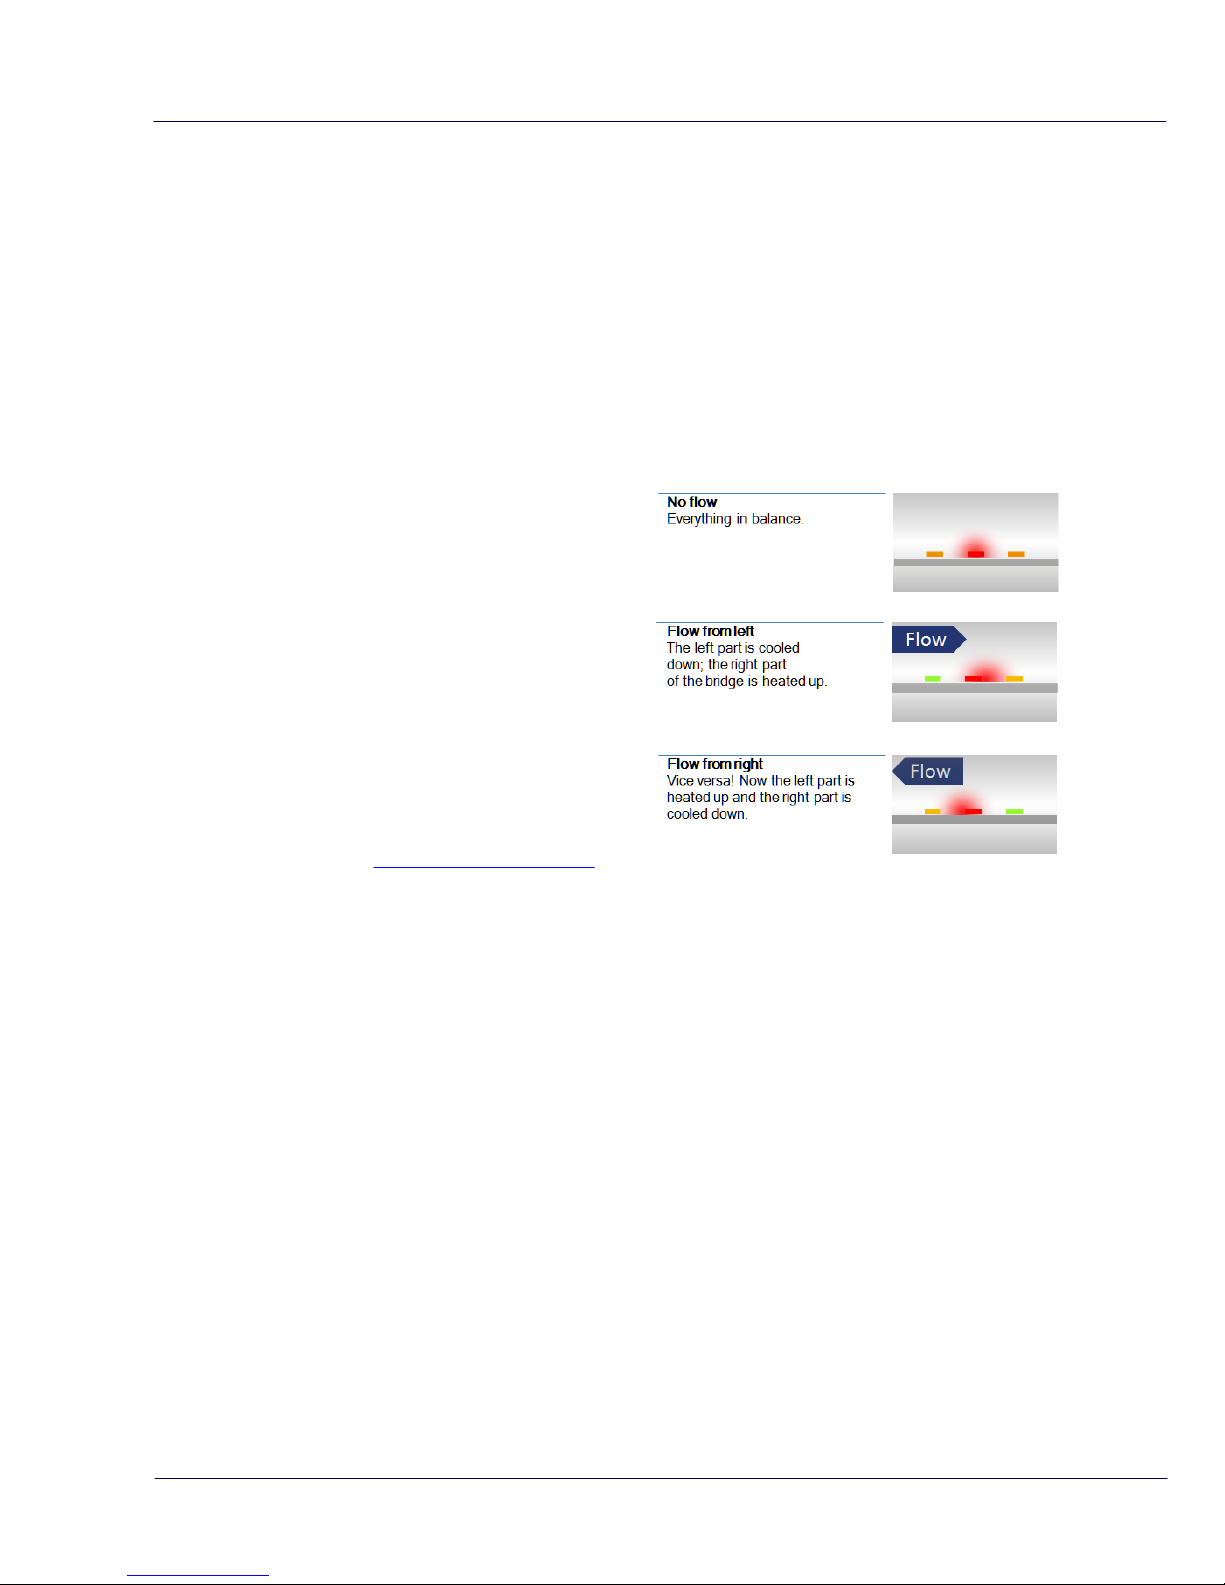
The optional bi-directional sensitivity is shown in
the picture on the right. In bi-directional mode the
negative flow value will show up as a minus sign.
The 4..20 mA value needs to be adapted to suit
the application. See chapter 9.1 for details.
5.2 Pressure
The VPFlowScope in-line features a built-in gauge pressure sensor. The sensor range is 0...250 psi,
rounded off this equals 0...16 bar gauge. The sensor cannot measure vacuum, please contact us if
you have a vacuum application. The sensor membrane can handle media which are compatible with
glass, silicon, stainless steel, Sn/Ni, plating and An/Ag solder.
The sensor signal is sampled with 16 bits. The practical resolution is 0.24 mbar on the 0..16 bar
scale, which is equal to 0.004 psi on the 250 psi scale.
5.3 Temperature
The built in temperature sensor measures the compressed air/ gas temperature. It is mounted in a
separate position, to ensure quick response time and low self-heating of the sensor element.
The signal is sampled with 16 bits. The resolution is less than 0.1 °C.
In a vertical pipe, with flow going down, the temperature sensor may heat up at zero flow conditions,
due to the heated flow sensor element. This effect will disappear as soon as there is consumption.
For optimal measurement performance, the VPlowScope in-line needs to be in a stable temperature
environment. When exposed to quick temperature changes or large temperature changes (for
example taking the unit from outdoor to indoor during winter time, or when mounted downstream of a
heat regenerated drier) the temperature compensation may lag behind, which may result in
significant measurement errors.
Page 11

© 2017 Van Putten Instruments BV | MAN-VP-SINL-UK | Revision:1701 | Date:22-03-2017
11
5.4 Totalizer
The totalizer keeps track of the total consumed amount of compressed air in normal cubic meters, or
in scf depending on which unit you choose to read out. The refresh interval is 1 second, actual
measurement data will be available on the display and by Modbus. For back up reasons, the totalizer
value is written to it's internal memory with an interval of 15 minutes. A power down might result in
maximum 15 minutes of totalizer data loss.
In bi-directional operation, negative flow is subtracted from the totalizer. The totalizer will count
backwards as the compressed air is delivered back to the supply side. The totalizer can only be
reset to zero. It's not possible to set it to a different value.
The display will show totalizer values up to 999.999,9 and will then become 0,0 independent of the
taken unit. This will not clear the internal totalizer.
Page 12

© 2017 Van Putten Instruments BV | MAN-VP-SINL-UK | Revision:1701 | Date:22-03-2017
12 VPFlowScope in-line
6 Mechanical installation
First select the right installation point. The installation point is crucial for the right measurements.
Sources of error can be: installation effects, unknown flow profiles, swirls, pressure and temperature
effects, humidity effects or oscillations in the flow. To ensure the highest possible accuracy of flow
measurement, the installation and piping instructions must be followed. Therefore read this paragraph
carefully.
Take into account:
· Choose a site which is accessible, which allows ease of wiring and maintenance, and which allows
you to still read and access the display if possible.
· Meet the specifications of the VPFlowScope in-line. If the specifications are not met, for instance
the pressure or temperature level is too high; this will cause inaccurate flow measurement and can
even damage your flow meter.
Avoid:
· Excessive heat, check the temperature range of your VPFlowScope in-line.
· Potential water damage on the outside. Avoid areas of high humidity and avoid dripping. Be aware
that the VPFlowScope in-line is not watertight, it is only IP65 (when mated with the USB protection
cap).
· Corrosive atmosphere where possible.
· Electrical problems (high voltage/ high power).
· Mechanical vibration and danger (walking bridges, fork lift trucks).
Warning: These devices are only for use with Air, Nitrogen, Argon, Helium, Carbon
Dioxide and other non hazardous, or non combustible gases. The maximum working
pressure is 16 bar (250 psi)
6.1 Piping table
Check the piping table below for your application. The table shows the amount of length upstream or
downstream depending on the installation. If applicable in front of the meter, use given upstream
length. If applicable in behind the meter, use given downstream length. Gas flow in pipes follows
certain rules, which must be observed for optimal measurement results. For some exceptions the
upstream length needs to be longer, or can be shorter.
If possible choose a longer upstream length, as these are minimum values. The up- and
downstream lengths are used industry wide as guidelines, but will never be a guarantee
for obtaining the “true value”. So always be careful and try to build up your own
experience from practical measurements
Piping table
The following table provides a guideline for proper distances between upstream or downstream
objects and the VPFlowScope in-line. The upstream length is the length between the last nonstraight object and the VPFlowScope in-line. If the upstream length is straight, and the distortion is
downstream of the VPFlowScope in-line, you can use the column "downstream length" as a
guideline. In very complex situations, with multiple up- and downstream objects, you should consider
another location. This table is a practical guideline and is not exact science. Practical situations can
have multiple sources of distortion, therefore VPInstruments does not take any responsibility for the
correctness.
Page 13

© 2017 Van Putten Instruments BV | MAN-VP-SINL-UK | Revision:1701 | Date:22-03-2017
13
Picture
Description
Upstream
length
2
Downstream
length
2
Effect
Single elbow
30 * D1
10 * D1
Distorted flow profile
Complex feed-in situation
(header)
40 * D1
10 * D1
Flow profile will be
distorted
Double elbow, multiple
elbows following each
other
40 * D1
10 * D1
Distorted profile +
swirl
Diameter change from
small to large (gradual or
instant)
40 * D1
5 *D1
Jet shaped flow
Diameter change from
large to small (gradual
change, between 7 and
15 degrees)
10 * D1
5 * D1
Flattened flow profile
1 = inner diameter; 2 = minimum length
6.2 Installation without tubing kit
When you order your VPFlowScope in-line as a base model only, it is delivered without up- and
downstream piping. You can install it directly between two threaded pipe ends. Please be aware that
the connection between the pipe and the VPFlowScope in-line is very important. Any diameter
mismatch will result in higher inaccuracy. For example the inner diameter of the pipe may affect the
reading. Depending on the pipe wall thickness, the inner diameter can be smaller, which results in a
higher measurement value. If you want to be sure of the connection, ask us to supply you with the
piping kit.
The connection is BSP inner straight thread; 0.5", 1" or 2" depending on the VPFlowScope in-line
model. For NPT thread, chase the BSP thread of the pipe ends with a die.
6.3 Installation with tubing kit
If you ordered the tubing kit or a full start kit, the VPFlowScope in-line is delivered with an optimized
up and downstream piping kit, to ensure at least 20 times the pipe diameter ( for 0.5" and 1" )
upstream length. For economical reasons, the 2" model is delivered with the pipe length 15 times
the pipe diameter upstream. For optimum results, see the piping table and create additional
upstream pipe length when required.
Page 14

© 2017 Van Putten Instruments BV | MAN-VP-SINL-UK | Revision:1701 | Date:22-03-2017
14 VPFlowScope in-line
Check the pipework and the O-rings, which are pre-mounted on the pipes. Apply a little O-ring grease
to ease the mounting process. Screw both pipes into the VPFlowScope in-line. Gently screw the
pipes into the flow meter inlet. Turn it all the way in, until the end of the pipe reaches the bottom of
the inlet hole
You can install the VPFlowScope in-line directly between two threaded pipe ends. The connection is
BSP outer straight thread; 0.5", 1" or 2" depending on the VPFlowScope in-line model. If necessary
you can ask our sales team to supply NPT thread on the tubing, or you can chase the thread
yourself with a die.
Page 15

© 2017 Van Putten Instruments BV | MAN-VP-SINL-UK | Revision:1701 | Date:22-03-2017
15
7 Display
The display provide some additional features:
· LCD display with 3 rows of real time data, refreshed every second
· Key pad with menu to configure the main settings
· Data logger with adjustable logging intervals (option)
· 5 custom units (multiply and existing unit with a factor and show it on the LCD display)
7.1 Display status icons
Some status icons show feedback on the meters' status. Below is a list with explanation
Icons
Description
Sensor module is properly connected and supplied with power
No communication with the sensor [Check external power when disconnected]
A blinking dot will indicate that a data session is active
2 rotating arrows indicate that there is communication with the computer
The display is locked. The menu can not be accessed
Memory indication. Each block indicates 20% of memory usage. The blocks start to
blink if the memory is more then 95% full
7.2 LCD display
The LCD display provides 3 rows for real time data. Each row can be configured in the menu by
selecting the desired parameter for this row.
Available options are listed in menu -> display.
7.3 Data Logger
The optional integrated data logger offers you 2 Million data points. Enough to measure all three
channels 1 x per second for more than a week.
Use the following guidelines for the intervals
Application
Flow
Pressure
Temperature
Standard energy management application
5 min
5 min
5 min
Machine testing - quick fluctuations
1 sec
1 sec
1 sec
Audit - one week
10 sec
10 sec
5 min
Audit - one month
30 sec
30 sec
5 min
Page 16

© 2017 Van Putten Instruments BV | MAN-VP-SINL-UK | Revision:1701 | Date:22-03-2017
16 VPFlowScope in-line
Multiple sessions can be recorded. When a session is started, a separate session will be recorded.
It's not possible to append to an existing session.
When a power failure occurs during recording, the session will be stopped. When power is restored,
a new session will start automatically.
7.4 Keypad
The key pad contains 4 buttons to control the display.
1
Menu / Enter
Used to enter the (sub)menu or to confirm a setting
2
Escape / Record
Will start a data logging session when in the data acquisition screen.
Will return from a (sub)menu when not in the data acquisition screen
3
Button down
Navigate down in the menu
4
Button up
Navigate up in the menu
Special key functions
· Lock display
In the main screen, press up and down simultaneously to lock or unlock the display. A lock icon will
appear in the right lower corner of the screen. The lock function will block keypad functionality.
· Clean re-boot.
Hold esc pressed when turning the power on. Use this option when a display will not start up or if a
session won’t stop. This can happen due to subsequent power failures at the moment that the
memory is almost full.
7.5 Menu
The menu is categorized into 3 main items which contain their own sub menu items. The complete
menu structure is shown below:
1. Settings
1. Display
2. Date and Time
3. Modbus address
4. Display dimtime
5. Display orientation
2. DAQ Sessions
1. New Session
2. Delete all
3. Advanced
1. Reset
Page 17

© 2017 Van Putten Instruments BV | MAN-VP-SINL-UK | Revision:1701 | Date:22-03-2017
17
1 Settings
The settings menu can be used to change both functional parameters as display settings.
1.1 Display
The main screen of the display contains 3 rows to display measurement values. Via this menu
measurement values can be assigned to these rows. Available options in the menu are:
Measurand
Available units
Description
Empty
-
Leave this display row empty
Flow
mn/sec
m
3
n
/h
ln/min
SCFM
m
3
n
/min
sfps
Normalized
Pressure
bar
psi
Gauge
Temperature
°C
°F
Totalizer
m
3
n
Normalized
Custom
5 available units to be configured
with VPStudio. Multiply an
existing unit with a user defined
factor.
1.2 Date and Time
Adjust date and time settings. First enter the menu option and set the date with the key pad. The
date is formatted as: DD-MM-YYYY. After setting the date, confirm with enter and then enter the
time settings in format: HH:MM:SS, again confirm with enter. The new date will become active
immediately.
Date/time settings are kept actual by the real time clock until long power down. Date and time will
also be synchronized with the computer when used with VPStudio. Pressing the store button will
trigger the synchronisation.
1.3 Modbus address
The Modbus address can be changed with this option. Use the up and down buttons to change the
number. Available numbers 1 – 247.
After setting the number press enter to save the address. The power of the VPFlowScope in-line
needs to be cycled to activate the new address.
1.4 Display dimtime
The display backlight dimtime can be adjusted here. The default dimtime is set to 10 seconds. Other
Available options are:
· Fading off. The backlight will remain on.
· 5 till 30 seconds with steps of 5 seconds.
Confirming with menu will make this setting immediately active.
1.5 Display orientation
The text on the display can be set upside down for installations were the VPFlowScope in-line is
installed in this way. Enter the menu item and select the desired orientation with the arrow keys.
Confirm with enter to make these settings active.
All keys will maintain their function.
Page 18

© 2017 Van Putten Instruments BV | MAN-VP-SINL-UK | Revision:1701 | Date:22-03-2017
18 VPFlowScope in-line
2 DAQ Sessions
The VPFlowScope in-line contains an optional 2 Million point data logger. When available, the menu
is set to start and stop the sessions or to delete all present data.
2.1 Start session
The session will be started when you push the enter button after selecting this option. When the
session is started, the menu will close and the main screen will be shown. A blinking dot in the right
upper corner will indicate the running session. The menu will be blocked when a session is active.
The session can be stopped by pressing the esc button.
2.2 Delete all
All sessions will be deleted. It is not possible to delete just a single session.
3 Advanced
3.1 Reset
Reset the device. All peripherals will be reinitialized. This option is also needed when updating the
display firmware.
Page 19

© 2017 Van Putten Instruments BV | MAN-VP-SINL-UK | Revision:1701 | Date:22-03-2017
19
8 VPStudio software
The VPFlowScope in-line can be read out and configured with the VPStudio software. This software
can be downloaded from www.vpinstruments.com.
In case of basic configuration and read out, use the free edition. If real time logging is required,
request a license code by our sales department.
A quick start is shown below, read the VPStudio manual for more information. This manual can be
downloaded from www.vpinstruments.com/downloads
Connect the VPFlowScope in-line to the computer
The VPFlowScope in-line can be connected to the computer with the M12 connector through the JB5
interface box. This interface box combines the power and data signals. Power up the device by
connecting the 12VDC power supply to the JB5 interface box. A RS485 to USB converter can be
used to connect the JB5 interface box to the computer.
When a display is available, the VPFlowScope in-line can also be connected by USB. When
connected via USB, you can only download data log sessions and configure the display. For full
functionality you need to connect an additional DC power supply via the M12 connector. We offer a
convenient power supply for this purpose (VPA.0000.200)
Install USB drivers
A driver needs to be installed for the RS485 to USB convert or USB interface. These drivers might be
installed automatically by your windows system or need to be installed manually. All drivers are
available on our website www.vpinstruments.com/downloads.
Configure the VPFlowScope in-line
· Start the VPStudio software
· In the left white window, right click to open the menu. Now click add device
· Click the scan button to search for the right COM port. Select it and click add
· Enter a name for the device
· Now select serial for RS485 converter or USB if the meter is connected with USB
· Set the communication parameters if available
· Click add.
VPFlowScope in-line sensor read out
· Click on the device in the explorer window to read out the settings
· The status tab provides general information
· The installation tab is used to configure the settings
VPFlowScope in-line display read out [option]
· Click on the plus icon to unfold the display icon
· Click on display to read out the display settings
· The status tab provides general information
· The installation tab is used to configure the settings
· Click sessions below display to retrieve session data.
Page 20

© 2017 Van Putten Instruments BV | MAN-VP-SINL-UK | Revision:1701 | Date:22-03-2017
20 VPFlowScope in-line
9 Electrical connections
NEVER USE AC POWER. THIS WILL VOID WARRANTY AND BRING PERMANENT
DAMAGE TO THE ELECTRONICS. THE INSTRUMENT MIGHT BE DAMAGED
BEYOND REPAIR.
CONNECT THE M12 CONNECTOR BEFORE POWERING UP THE INSTRUMENTS.
The VPFlowScope in-line provides a 4..20 mA / pulse output and a Modbus output. All signals are
present in the M12 connector. These outputs can be used to connect the VPFlowScope in-line to a
building management system or energy monitoring system like VPVision.
Pin
Signal
Wire color*
1
+12...24 VDC
Brown
2
0 Volt
White
3
4..20 mA signal, active
Blue4RS485 B
Black
5
RS485 A
Grey
* Wire colors for standard VPInstruments cables
M12 5-pin female connector
Cabling
Shielded twisted pair cabling must be used for proper communication and measurement. Connect
shield to safety ground on one point. The thickness of the wires depends on the cable length. For
cabling below 300 meter | 1000 ft, use 20 awg. For longer runs use 18 awg or better.
Power supply
The input voltage is 12 to 24VDC. Make sure that the power supply is at least 12V at the connector.
Voltage drops will occur in long cables resulting in insufficient power. The display will notify you when
there is insufficient power.
9.1 4..20mA output
The 4..20mA output is an active, non- isolated linearized current loop that can be used to connect
the VPFlowScope in-line to a control system, a building/processing management system or any
4..20 mA based system.
There is one 4..20 mA output available on the VPFlowScope in-line. This output can be assigned to
one of the measurement parameters, only one can be selected. For each measurand, a number of
units is available. The factory default is m
3
n
/hr.
Measurand
Unit
Flow
mn/sec
Flow
m
3
n
/hr
Flow
ln/min
Flow
SCFM
Flow
m
3
n
/min
Flow
sfps
Pressure
bar
Pressure
psi
Temperature
°C
Temperature
°F
Page 21

© 2017 Van Putten Instruments BV | MAN-VP-SINL-UK | Revision:1701 | Date:22-03-2017
21
For scaling purposes, the zero and span matching 4 and 20mA can be modified. This will not effect
the original measurement range. The zero and span are only used to increase or narrow the
resolution. For bi-directional measurement, the zero value needs to be set negative. See below table
for factory defaults.
Mode
Zero
Span
Idle output
Single direction
0% flow range
100% flow range
4 mA
Bi directional
-100% flow range
100% flow range
12 mA
Configuration with VPStudio
VPStudio can be used to configure the 4..20mA settings. Use the select box to choose the preferred
unit that will be assigned to the output. Set zero and span to the preferred values.
Changing to volumetric units, the programmed diameter is calculated in the settings. VPStudio
provides feedback while you are changing the settings. Use “set default” to go back to the factory
default.
4..20mA output
Single direction
Bi directional
0.5" 0% | 100% flow
0.5" -100% | 100% flow
1" 0% | 100% flow
1" -100% | 100% flow
2" 0 | 100% flow
2" -100% | 100% flow
Page 22

© 2017 Van Putten Instruments BV | MAN-VP-SINL-UK | Revision:1701 | Date:22-03-2017
22 VPFlowScope in-line
Electrical scheme:
The current meter is placed in between the current output and the power supply ground. You can
also use a digital multimeter to test the current output.
9.2 Pulse output
The VPFlowScope in-line features a low-frequency active pulse output. The pulse is a ‘non potential’
free output as it acts like a controlled current output. To make it passive, an external isolator can be
used.
The pulse interval can be set with the VPStudio software. A pulse from 0..20mA will be generated
when the interval exceeds. The maximum pulse frequency is once per 2 seconds. If the pulse interval
is set too small, a continuous pulse (20mA high level) will be the result.
The pulse output is connected to the internal totalizer value. When the totalizer has increased by the
pulse interval, the pulse will be generated. As it is not possible to generate a negative pulse, negative
flow can not be indicated by pulse. In case of negative flow, the internal totalizer will count
backwards. Pulses will not be generated until the same amount of positive flow has been added to
the totalizer again. In this way we ensure that the pulse output will always be synchronized with the
internal totalizer of the VPFlowScope in-line. In case of continuous negative flow, consider to swap
the flow meter direction.
Default settings
Diameter
Diameter
Pulse interval
< 25 mm
< 0.5 inch
0.1 m
3
n
> 25 mm and < 45 mm
> 0.5 inch and < 1 inch
0.2 m
3
n
> 45 mm
> 1 inch
1 m
3
n
Page 23

© 2017 Van Putten Instruments BV | MAN-VP-SINL-UK | Revision:1701 | Date:22-03-2017
23
Pulse output
Electrical scheme:
9.3 Modbus interface
Introduction to Modbus
For a complete introduction on the Modbus standard can be found on www.modbus.org. See the
document Modbus_over_serial_line_V1_02.pdf, which can be downloaded from their website. We
strongly recommend to download and read this information carefully before installing Modbus
communication. The following paragraphs in this chapter assume you are familiar with the Modbus
communication standard.
All measurement parameters are available through Modbus in floating point and integer format. The
data will be refreshed every second. Maximum polling interval is 10ms.
Communication settings
The RS485 communication settings can be changed with VPStudio. Below shows the available
options
· Baud rate: 9600 | 19200 | 38400
· Stop bits: 1 | 2
· Parity: None | Even | Odd
The Modbus settings can be changed with VPStudio, the hardware address can also be changed
with the keypad when available. Below shows all available options
· Hardware address: 1-247
· Integer multiplier: 1-1000
Data format
Function code 0x03 for reading(Holding register)
Function code 0x10 for writing (Holding register)
32-bit Floating point Little endian
32-bit signed Integer Little endian
Page 24

© 2017 Van Putten Instruments BV | MAN-VP-SINL-UK | Revision:1701 | Date:22-03-2017
24 VPFlowScope in-line
Register map
The actual measurement data is placed in holding registers. To read out data, you will need to use
the corresponding holding register. All data is stored in 2 16-bit registers with below register number
as start address. Read out the data with this start address and length 2.
Decimal
HEX
Description
Type
Read / Write
16
0x10
Flow in mn/sec
32-bit integer (x10)
Read
17
0x11
Flow in m
3
n
/hr
32-bit integer (x10)
Read
18
0x12
Flow in ln/min
32-bit integer (x10)
Read
19
0x13
Flow in SCFM
32-bit integer (x10)
Read
20
0x14
Flow in m
3
n
/min
32-bit integer (x10)
Read
21
0x15
Flow in sfps
32-bit integer (x10)
Read
32
0x20
Pressure in bar
32-bit integer (x10)
Read
33
0x21
Pressure in psi
32-bit integer (x10)
Read
64
0x40
Temperature in °C
32-bit integer (x10)
Read
65
0x41
Temperature in °F
32-bit integer (x10)
Read
128
0x80
Totalizer in m
3
n
32-bit integer (x10)
Read / Write*
* Writing to the totalizer will reset the totalizer to zero.
Decimal
HEX
Description
Type
Read / Write
8
0x08
Diameter
32-bit Floating point
Read
9
0x09
4..20mA Max
32-bit Floating point
Read / Write
10
0x0A
4..20mA Min
32-bit Floating point
Read / Write
11
0x0B
4..20mA Unit
32-bit Floating point
Read / Write
24
0x18
Flow in mn/sec
32-bit Floating point
Read
25
0x19
Flow in m
3
n
/hr
32-bit Floating point
Read
26
0x1A
Flow in ln/min
32-bit Floating point
Read
27
0x1B
Flow in SCFM
32-bit Floating point
Read
28
0x1C
Flow in m
3
n
/min
32-bit Floating point
Read
29
0x1D
Flow in sfps
32-bit Floating point
Read
40
0x28
Pressure in bar
32-bit Floating point
Read
41
0x29
Pressure in psi
32-bit Floating point
Read
72
0x48
Temperature in °C
32-bit Floating point
Read
73
0x49
Temperature in °F
32-bit Floating point
Read
136
0x88
Totalizer in m
3
n
32-bit Floating point
Read / Write*
* Writing to the totalizer will reset the totalizer to zero.
Page 25

© 2017 Van Putten Instruments BV | MAN-VP-SINL-UK | Revision:1701 | Date:22-03-2017
25
Available write operations
Option
Data
Description
4..20mA unit
0
1
2
3
4
5
6
7
8
9
Other
mn/sec
m
3
n
/hr
ln/min
SCFM
m
3
n
/min
sfps
bar
psi
°C
°F
mn/sec
4..20mA min
Decimal value
4..20mA max
Decimal value
Totalizer
Integer or floating point type
depending on register type
Will reset the totalizer to zero
Installing a RS485 network require specific knowledge. Not following the specifications
strictly might result in in-correct communications and equipment damage. Please
leave installation up to professional contractors. Make sure that they read this chapter
carefully and follow up all RS485 guidelines.
RS485 is a differential balanced line over twisted pair. It can span relatively large distances up to
1200 meter | 4000 feet. The wires should be connected as a point-to-point configuration, or also
called daisy chain. Do not install as star or ring network! The trunk line goes from the master to all
devices making a drop down to each device. The cable length from the trunk line to the Modbus
device needs to be as small as possible. Junction boxes are used to make the T junction.
Shielded twisted pair should be used. Connection of a third wire between the master and slave
should be done to limit the common mode voltage that can be impressed on the slaves inputs. The
required cable quality depends on the total cable distance, the number of nodes and the
environmental influences. A local contractor can help you select the right cable for your application.
Page 26

© 2017 Van Putten Instruments BV | MAN-VP-SINL-UK | Revision:1701 | Date:22-03-2017
26 VPFlowScope in-line
Termination resistor
Termination resistors reduce electrical noise sensitivity. They need to be added to the installation
when cable distances become longer then 10 meter. The value of each termination resistor should be
equal to the cable characteristic impedance (typically, 120 ohms for twisted pairs).
There can only be one termination resistor at the very end of the trunk line. The VPInstruments
junction box features a jumper that can be used to enable a 120 Ohm resistor. When using the
VPInstruments Modbus Junction boxes make sure that the 120 Ohm resistor is only enabled in the
last Modbus Junction box in the daisy chain.
Biasing
When there is no data activity on an RS485 network, the communications lines are "floating" and,
thus susceptible to external noise or interference. Receivers on a RS485 network have built in
hysteresis (200mV differential required to insure known state). To insure that a receiver stays in an
inactive state, when no data signal is present, bias resistors are required. Bias resistors are a pull-up
resistor on Modbus B and a pull-down resistor on the Modbus A line. The value of the bias resistor
depends on the number of devices and the supply voltage. The table below shows which resistor
values can be used for different voltage in a chain with 1 to 8 VPFlowScope in-lines.
Supply voltage
Bias pull up
Bias pull down
12 V
5 KΩ
1 KΩ
24 V
10 KΩ
1 KΩ
Bus power
The VPFlowScope in-line can be powered via the same trunk line. 2 separate wires are used for
power + and power -. Take in account that long wires with multiple slaves will cause voltage drops.
The minimum supply voltage is 12VDC measured at the last VPFlowScope in-line in the daisy
chain.
Electrical scheme
Page 27

© 2017 Van Putten Instruments BV | MAN-VP-SINL-UK | Revision:1701 | Date:22-03-2017
27
9.4 USB interface
The VPFlowScope in-line D10 and D11 model offer a built-in USB interface for configuration and data
log session retrieval. The USB interface is protected by an IP65 rated nylon cap. IMPORTANT: the
IP65 rating may be compromised when this cap is damaged or not placed back in a proper manner.
To ensure proper sealing, the cap must be greased with a little o-ring grease or vaseline grease.
Make sure that the grease is not in contact with the electrical connector!
A standard USB cable with mini connector can be used for connection to a PC or laptop. The USB
interface is not designed for permanent use.
Page 28

© 2017 Van Putten Instruments BV | MAN-VP-SINL-UK | Revision:1701 | Date:22-03-2017
28 VPFlowScope in-line
10 Service
The VPFlowScope in-line needs regular maintenance to ensure that the product is functioning
properly. Especially when the product is used for mobile air audits, we recommend inspecting the
instrument before and after every audit to ensure that the product has not been damaged. For
precision measurement equipment such as the VPFlowScope in-line, a proper maintenance program
is key to reliable measurement results and a long product lifetime.
10.1 Software and firmware updates
News on software and firmware updates can be found on www.vpinstruments.com, or are provided by
your local re-seller. The VPFlowScope in-line sensor can be updated via the RS485 port. The USB
interface is used for updating the firmware of the display. Instructions on the update procedure can be
found in a separate instruction leaflet, which is distributed on request. Upgrading is only possible for
authorized technicians, at own risk.
10.2 Calibration interval
The quality of the compressed air or gas you are measuring could influence the accuracy of this
product. VPInstruments guarantees the accuracy, as indicated on the calibration certificate or in the
product specifications. This accuracy will remain valid until the moment of commissioning within the
first 36 months after purchasing this product under the following conditions:
· The products is stored indoors in a dry, frost free environment.
· Vibrations and heavy shocks should be avoided during transport and storage.
If this product is not commissioned within 36 months after the initial purchase we highly recommend
to send the product back to VPInstruments for check-up and re-calibration.
Once the product is put into operation, the calibration interval depends on the quality of the gas. If the
quality of the gas is unknown, VPInstruments advises annual recalibration. The latest calibration date
can be found in VPStudio.
10.3 Service subscriptions
VPInstruments offers several Service Subscriptions. Enrolling in a Service Subscription helps you get
the most out of your measurement equipment. We keep your equipment in excellent and most
reliable condition, as we include annual re-calibration on our state of the art calibration equipment.
With the latest software releases and expert technical support, you will save time and money. We
offer the following programs:
· Standard Service Agreement; Cleaning. Re-calibration, repair*, firmware update(s) and warranty
extension when serviced within 12 months subsequent intervals.
· Service Exchange Agreement; Annual exchange of your flow meter. No service time! Have a fully
calibrated flow meter 24/7, 365 days a week!
* Repair within terms of usage, see general terms and conditions.
The VPInstruments service subscriptions helps keeping you focused on what matters most for your
company.
Benefits
· Annual calibrated and cleaned instruments
· Warranty extension
· Software- and firmware updates
· Personal (phone) support and e-mail support by our skilled technicians
Consult your distributor for the best VPInstruments service agreement for your business.
Page 29

© 2017 Van Putten Instruments BV | MAN-VP-SINL-UK | Revision:1701 | Date:22-03-2017
29
11 Specifications
Please always check the label of your product for the specifications.
Specifications are subject to change as we are continuously improving our products.
Please contact us to obtain the latest specification sheet.
Flow sensor
(minimum detection level and max flow rate shown)
- VPS.R080.M050
0.23...80 m
3
n
/hr
0.13…50 SCFM
- VPS.R250.M100
0.91...250 m
3
n
/hr
0.54…150 SCFM
- VPS.R01K.M200
3.55...1000 m
3
n
/hr
2.15…600 SCFM
Accuracy
0.5% FSS under calibration conditions with calibration report
5% FSS without calibration report
Reference conditions
0°C, 1013.25 mbar - DIN1343
32°F, 14.65 psi
Gas temperature
0....60°C
32..140°F
Gases
Compressed air, nitrogen, inert gases,
95% non condensing gases
Pressure sensor
Range
0...16 bar gauge
0…250 psi gauge
Accuracy
+/- 1.5% FSS (0...60°C)
+/- 1.5% FSS (32..140°F)
Temperature sensor
Range
0....60°C
32…140°F
Accuracy
+/- 1° (from 10 mn/sec and up) (At zero flow conditions, temperature
reading increases due to self-heating by the flow sensor)
Display
Technology
Liquid crystal
Back light
Blue with auto power save
Memory
2 Million point memory option
Mechanical
VPS.R080.M050
VPS.R250.M100
VPS.R01K.M200
135mm x 50mm x 85mm 0.7 Kg
135mm x 50mm x 85mm 0.7 Kg
155mm x 90mm x 125mm 1.6 Kg
IP grade
IP65 when mated to connector, at room temperature; direct rain and
sunlight should be avoided. Extreme temperature fluctuations may
affect the IP grade over time.
Ambient temperature
0..60°C
32 .. 140°F
Inputs and outputs
Analog
4..20mA or pulse, selectable via installation software
Serial IO
Modbus RTU
USB for configuration (display version only)
Supply
12..24 VDC +-10% CLASS 2 (UL)
Power consumption
150mA at 24VDC
Page 30

© 2017 Van Putten Instruments BV | MAN-VP-SINL-UK | Revision:1701 | Date:22-03-2017
30 VPFlowScope in-line
12 Order information and accessories
Order Code
Flow range
Option
Display
Option
Connector
VPS.R080.M050
0 ... 80 m
3
n
/hr
D0
No display
C5
5 Pin M12
VPS.R250.M100
0 ... 250 m
3
n
/hr
D10
Display
C8
8 Pin M12, for remote
display *
VPS.R01K.M200
0 ... 1000 m
3
n
/hr
D11
Display + 2M point
logger
* The 8 Pin M12 connector can only be used in combination with a D0 model.
Basic features
Display features
Connector types
Thermabridge Flow sensor
Pressure, temperature sensor
4..20mA / pulse output (switchable)
RS485 Modbus RTU
3 row display
Keypad for configuration
USB cable included
Multi session datalogger (option)
M12, 5 pin for standard
application
M12, 8 pin for remote
display function
VPA.0009.001
ISO Calibration report: 5 points, accuracy 0,5% full scale under calibration
conditions with air
VPA.5000.911
Bi-directional measurement option
VPA.0001.093
Pressure upgrade to 35 bar | 500 psi
Tubing kits
VPA.1200.005
0.5 inch, in- and outlet tubes BSP
VPA.1200.105
0.5 inch, in- and outlet tubes NPT
VPA.1200.010
1 inch, in- and outlet tubes BSP
VPA.1200.110
1 inch, in- and outlet tubes NPT
VPA.1200.020
2 inch, in- and outlet tubes BSP
VPA.1200.120
2 inch, in- and outlet tubes NPT
Accessories
VPA.5000.005
Cable, 5m / 16.4 ft with M12 5pin connector on one side, open wires on other side
VPA.5000.010
Cable, 10m / 32.9 ft with M12 5pin connector on one side, open wires on other side
VPA.0000.200
Power supply ( 12V, 5pin )
VPA.5003.000
RS485 to USB converter
VPA.5001.205
JB5 interface kit with 5m / 16.4ft cable + 12 VDC power supply + RS485 to USB
converter
VPStudio software
SFT.5003.100
Free edition
SFT.5003.300
Licensed version
Page 31

© 2017 Van Putten Instruments BV | MAN-VP-SINL-UK | Revision:1701 | Date:22-03-2017
31
13 Appendix A - UL
The VPFlowScope complies with the CE requirements as stated in the CE
declaration. CE compliance can only be achieved when grounding and
shielding directions are followed and proper cables and connector
assemblies are used.
Electrical connection guidelines- UL 508 Listing for USA & Canada (Check label to see if product is UL
marked)
The VPFlowScope is intended to be used with a Class 2 power source or Class 2 transformer in
accordance with UL1310 or UL1585. As an alternative a LVLC (Low Voltage Limited Current) power source,
with the following properties can be used:
· The device shall be used with a suitable isolating source such that the maximum open circuit voltage
potential available? to the product is not more than 24 V DC and the current is limited to a value not
exceeding 8 amperes measured after 1 minute of operation;
· A fuse in accordance with the UL248 series and rated max 4A, shall be installed in the 24V DC power
supply to the device? In order to limit the available current.
Electrical connection guidelines: general remarks
Make sure that the following conditions are met:
· For portable, non-critical applications, a switched mode 12 V DC, 1A power adapter may be used.
Switched mode power supplies that are of poor quality, might affect the accuracy.
Le VPFlowscope est conforme aux exigences CE, comme indiqué dans la
déclaration CE. La conformité CE ne peut être atteinte que lorsque les
directives de mise à la terre et d’isolation sont suivies et que les les
câbles et raccords appropriés sont utilisés.
Lignes directrices pour branchements électriques – UL508 pour le Canada et les États-Unis (voir sur
l’étiquettesi le produit est marqué UL)
Le VPFlowscope est prévu pour être utilisé avec une source d’alimentation Classe 2 ou avec un
transformateur de Classe 2 en accord avec UL1310 ou UL1585. Comme alternative, une source
d’alimentation BTCL (Basse Tension Courant Limité) avec les propriétés suivante peut être utilisée :
· Le dispositif doit être utilisé avec une source d’isolation appropriée afin que le voltage maximal en circuit
ouvert disponible pour le produit ne dépasse pas 24VDC, et que le courant soit limité à une valeur de 8
ampères après 1 minute de fonctionnement.
· Un fusible de 4A maximum, et conforme à la série UL248 doit être installé dans la source d’alimentation
de l’appareil afin de limiter le courant disponible.
Directives pour le raccordement électrique : remarques générales
Assurez-vous que les conditions suivantes sont remplies :
· Pour les applications mobiles, un adapteur de type alimentation à découpage 12VDC, 1A peut-être
utilisée. Cependant, un adapteur de mauvaise qualité pourra affecter la précision.
Page 32

© 2017 Van Putten Instruments BV
VPFlowScope in-line32
Notes
Page 33

EASY INSI GHT I N ENERGY FLOWS
MAN-VP-SINL-UK-1701
Date: 22 -03-201 7
Bui tenwaters loot 335
261 4 GS Del ft
The Nether lands
info@vpinstruments.com
www.vpinstruments.com
VPInstruments
 Loading...