

Page 1

USER MANUAL
Multiparameter for
self testing use
Page 2

Introduction ........................................................................................1
System ................................................................................. 1
Meter .................................................................................... 2
Display .................................................................................. 3
Mode .................................................................................... 3
The measurement .............................................................................4
Coding the meter .................................................................... 4
How to obtain a drop of blood ................................................... 6
Application of blood ................................................................ 7
Procedure to test glucose ........................................................ 7
Procedure to test cholesterol and triglycerides ............................. 8
Warnings .............................................................................................9
Strips ................................................................................................ 10
Control solutions .............................................................................11
Memory functions ........................................................................... 12
General settings .............................................................................. 13
Modification of settings ...........................................................13
Setting the acoustic signal .......................................................14
Setting the alarms ..................................................................14
Enabling data transfer to PC ....................................................15
Maintenance and Preservation conditions ................................. 16
Care and maintenance ............................................................16
Preservation and measuring conditions .....................................16
Error messages ............................................................................... 17
Change of batteries ........................................................................ 20
Warranty ........................................................................................... 21
Symbols ...........................................................................................23
Performance .................................................................................... 24
Table of contents
Contents:
• 3in1. meter
• 3in1. glucose strips 10 pcs
• Lancing device 1 pc
• Sterile lancets 10 pcs
• User manual
• Rapid guide
Page 3
1
System
Thank you for choosing the 3in1. system.
3in1. is a new system, useful for the monitoring of glucose,
cholesterol and triglycerides in the blood.
3in1. has two different technologies:
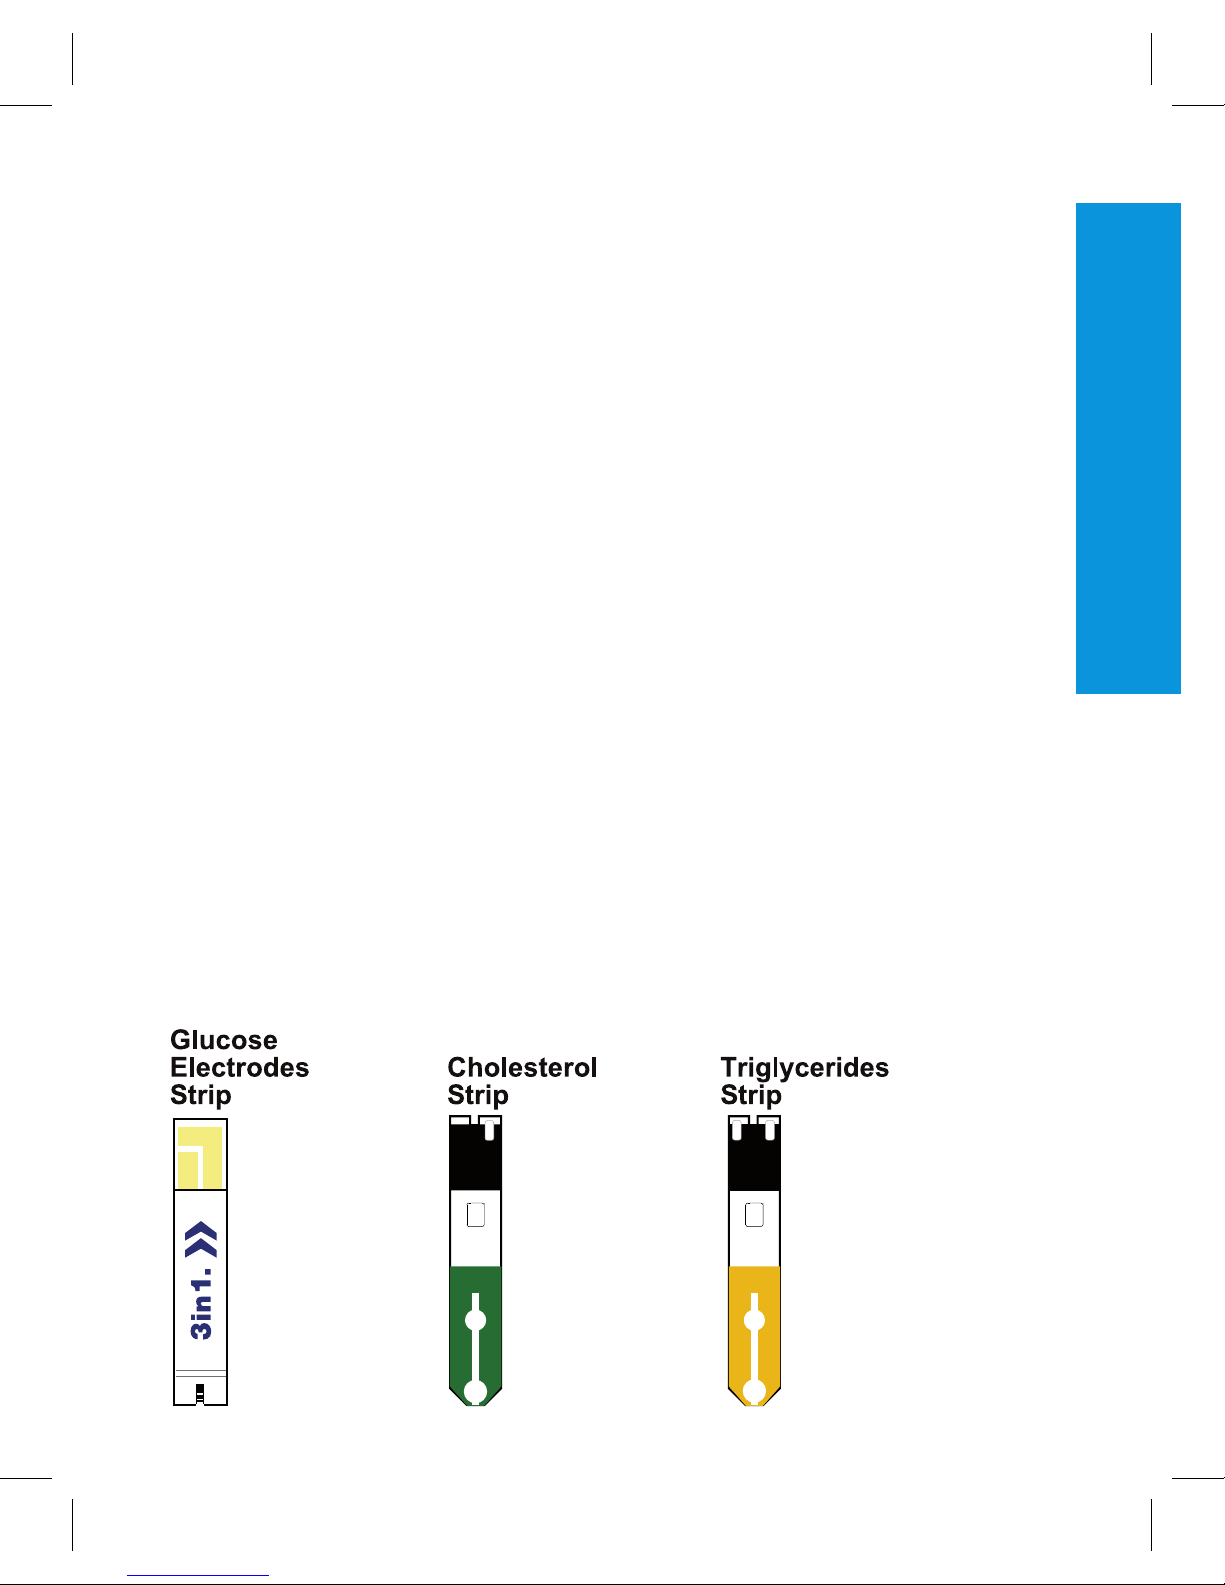
• amperometric, with 3in1. glucose electrodes strips.
• reflectometric, with 3in1. cholesterol and triglycerides strips.
Self–monitoring of glucose, cholesterol and triglycerides could be
helpful, but the treatment to be applied should be agreed with the
physician. The 3in1. system is plasma-calibrated.
Information about 3in1. system line
The 3in1. system line includes everything necessary for self testing:
• 3in1. meter
• 3in1. strips 10 pcs
• Lancing device 1 pc
• Sterile lancets 10 pcs
• 3in1. control solutions - available by extra order
• 3in1. data manager software - by special request.
Read carefully the instructions for use inside the box of 3in1. strips
that you want to use and read carefully the instructions for the use of
the lancing device that are included in the 3in1. meter box.
Introduction
Page 4
2
Meter
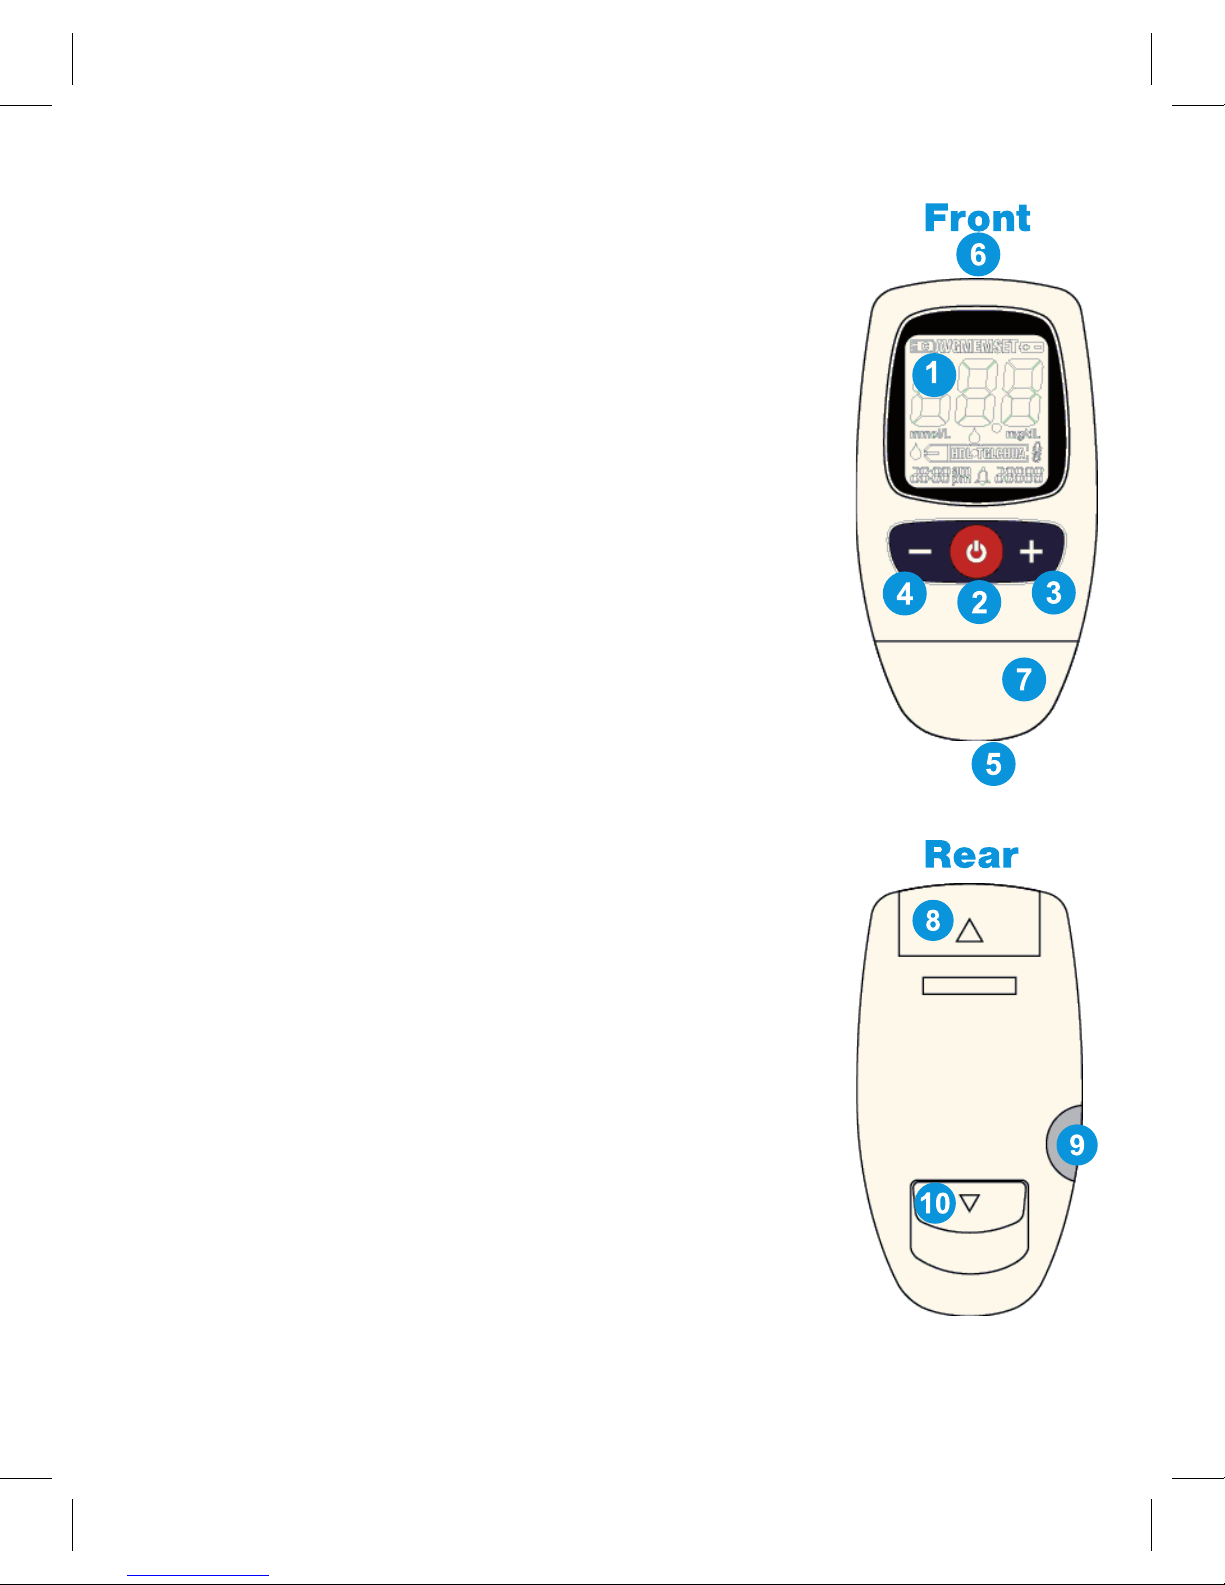
1 Display – shows test results, messages, and results
stored in memory.
2 Power Button – press this button to:
a. Turn on the meter or turn off the meter.
b. Enter the SET mode in the STANDBY mode.
c. Go to the next step in the SET mode.
d. Exit the SET mode and enter the STANDBY
mode.
3 “+” Button -- press this button to:
a. Enter the MEMORY mode.
b. Recall previous stored results in the MEMORY
mode.
c. Change parameters displayed and increase
values in the SET mode.
4 “-” Button – press this button to:
a. Enter the MEMORY mode.
b. Recall next stored results in the MEMORY
mode.
c. Change parameters displayed and decrease
values in the SET mode.
d. Reset the test results.
5 Test Strip Slot – insert test strip here. The meter
automatically enters the TEST mode when a test
strip is inserted.
6 PC Connector – transfers data from the meter to a
computer.
7 Cover – open this for cleaning.
8 Battery Cover
Put your finger on this to let the battery cover slide.
9 Data-Chip Slot – insert the data-chip.
10 Ejector – press to discharge the used strip.
Page 5
3
Display
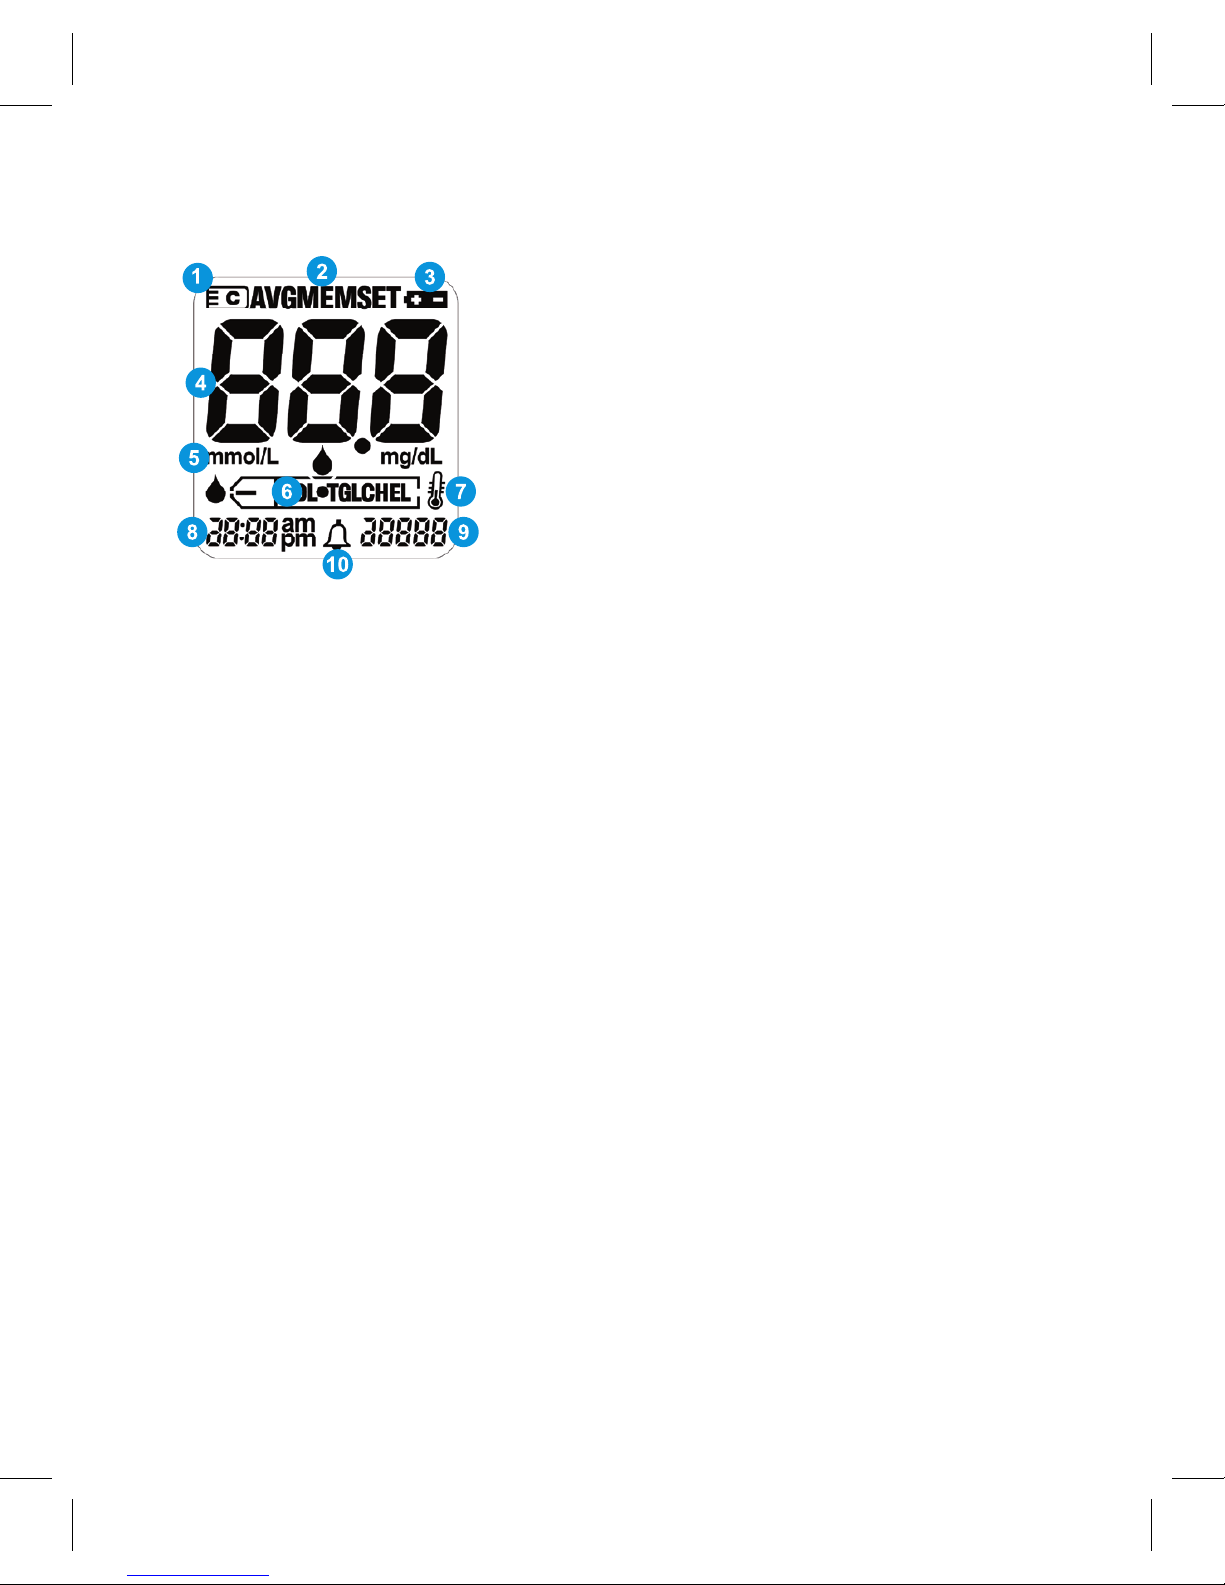
1 Data-chip inserting
2 Meter mode
3 Low battery warning
4 Test results and messages
5 Unit of measurement
6 Test analytes
7 Abnormal temperature warning
8 Time
9 Day and month
10 Alarm
Mode
The 3in1. meter has three modes.
You can check the present mode of the meter by seeing the top of
display.
1. Standby Mode
Press and release the power button.
A strip-shaped symbol will twinkle and the meter will display the data
chip number, time and date.
2. Memory Mode
Press and release the “+” or “-” button in the standby mode.
The meter will display a “MEM” symbol on the top of the display.
3. Set Mode
Press and release the power button in the standby mode.
Press again the power button for 3 seconds.
The meter will display a “SET” symbol on the top of the display.
Page 6
4
Coding the meter
Attention!
The code chip is not necessary for glucose measuring.
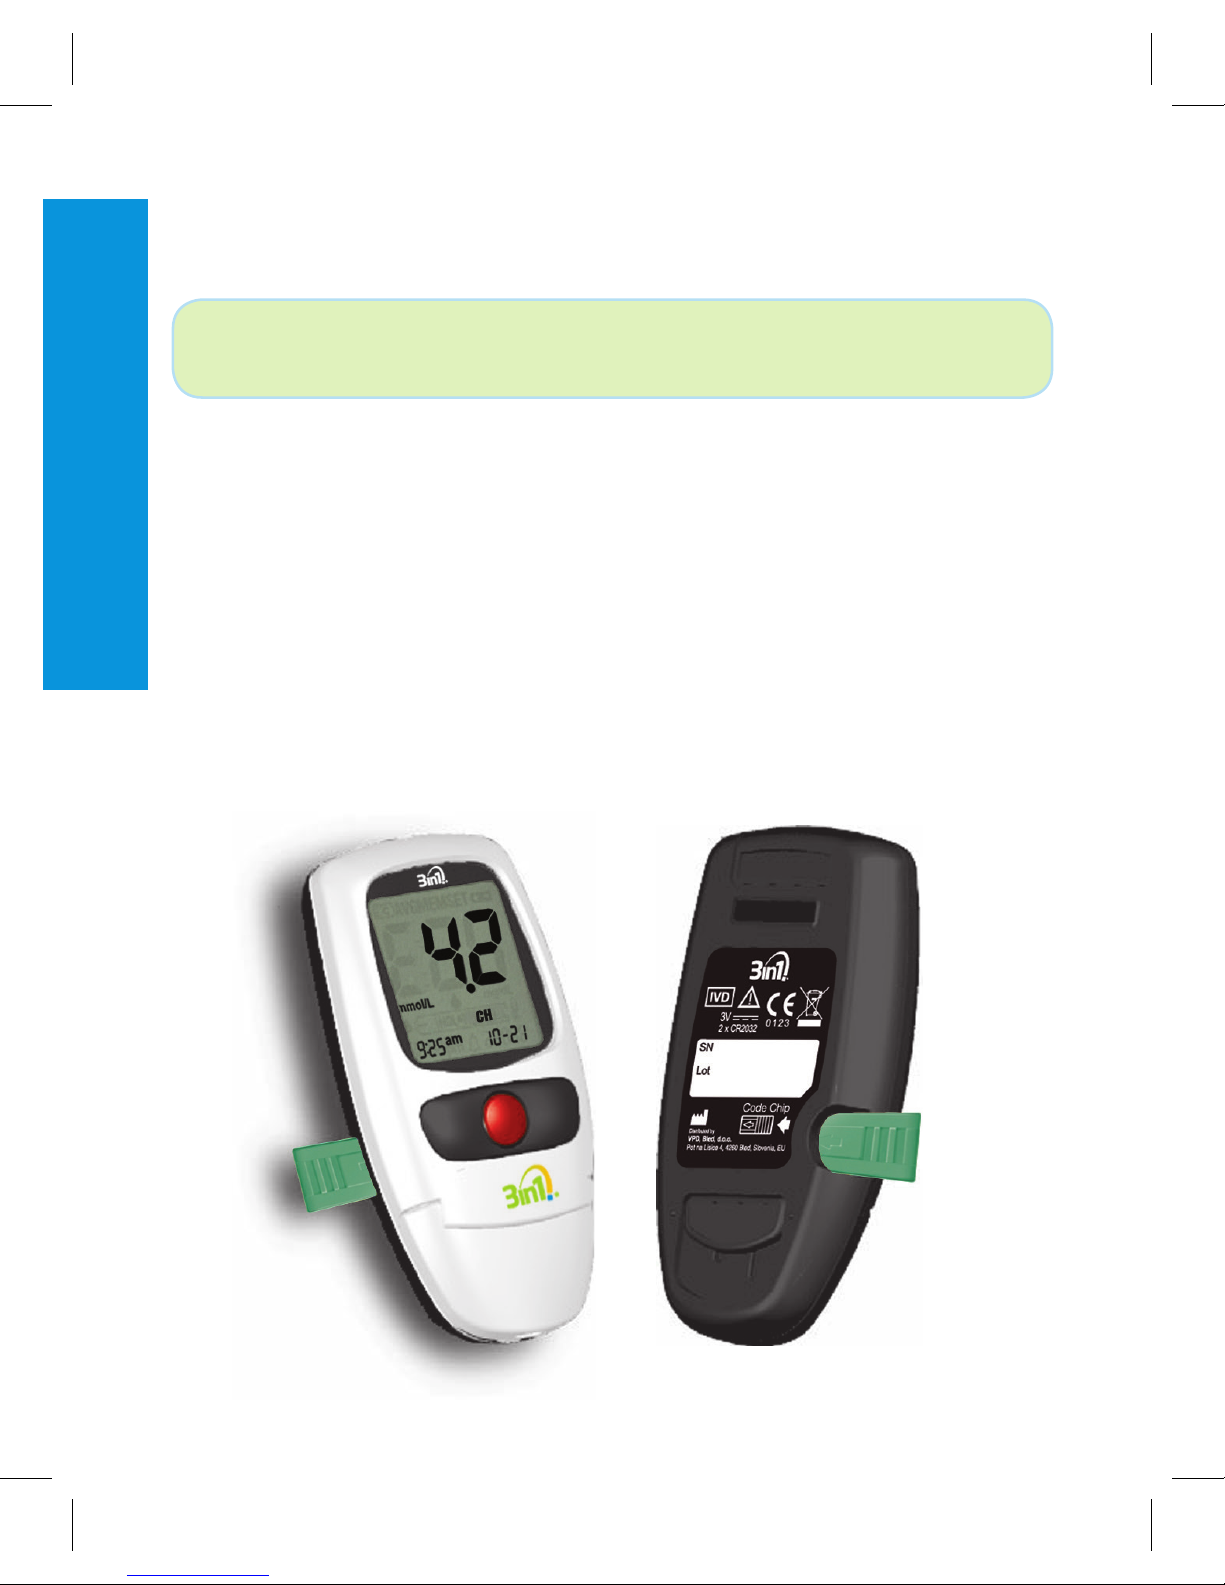
The 3in1. meter uses a data-chip that is inside the strips
box. It will be necessary to change the data-chip in the following
cases:
a. before using a new strips box,
b. when you want to change the analyte.
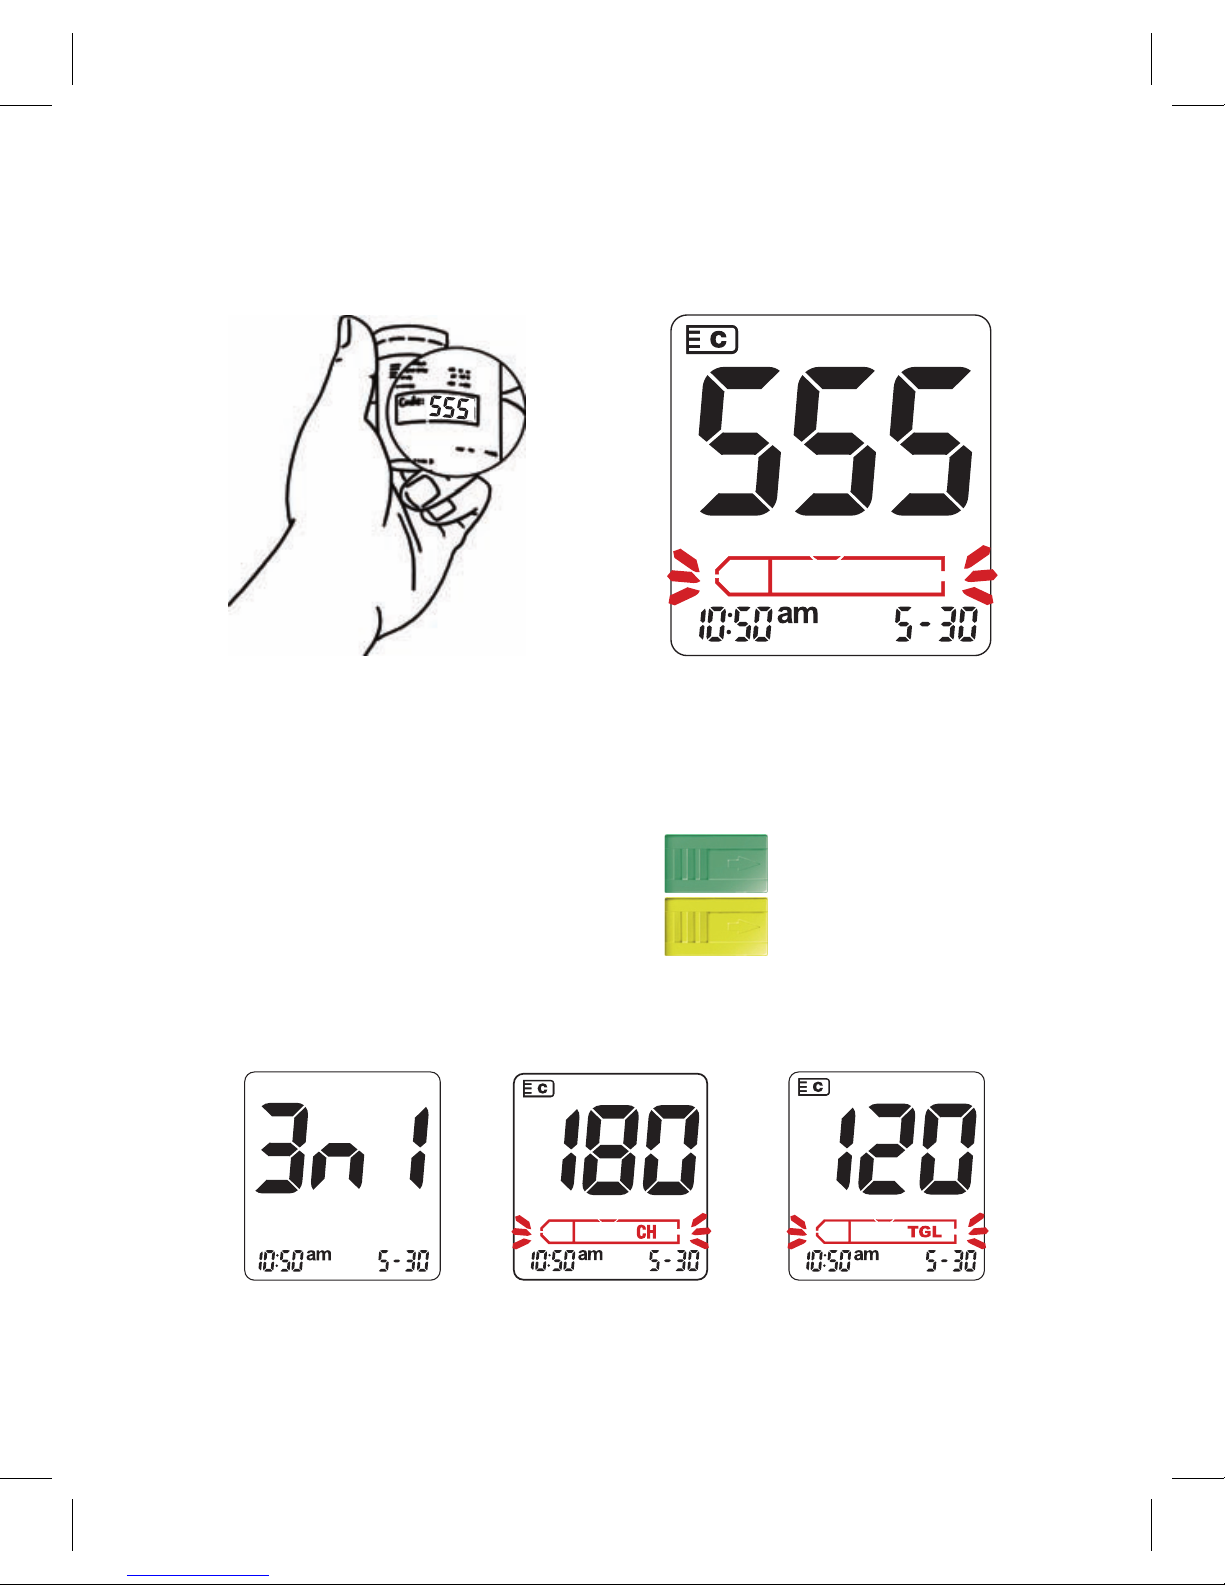
1 Remove the data-chip from the strips box.
2 Insert the data-chip in the proper space in the back part of the
meter.
3 Gently press the data-chip up to the complete insertion.
Measurement
Page 7
5
4 Press power button and check the three digit number is the same
of the one printed on the strips vial.
5 If the data-chip is not inserted, it is impossible to perform the
measurement.
6 Analytes:
CH = CHOLESTEROL (GREEN)
TGL=TRIGLYCERIDES (YELLOW)
Page 8
6
When switching on the meter, check that the date
and the hour are correct.
How to obtain a drop of blood
To perform a measurement with the 3in1. system, it is necessary to
withdraw a drop of capillary blood by following the procedure:
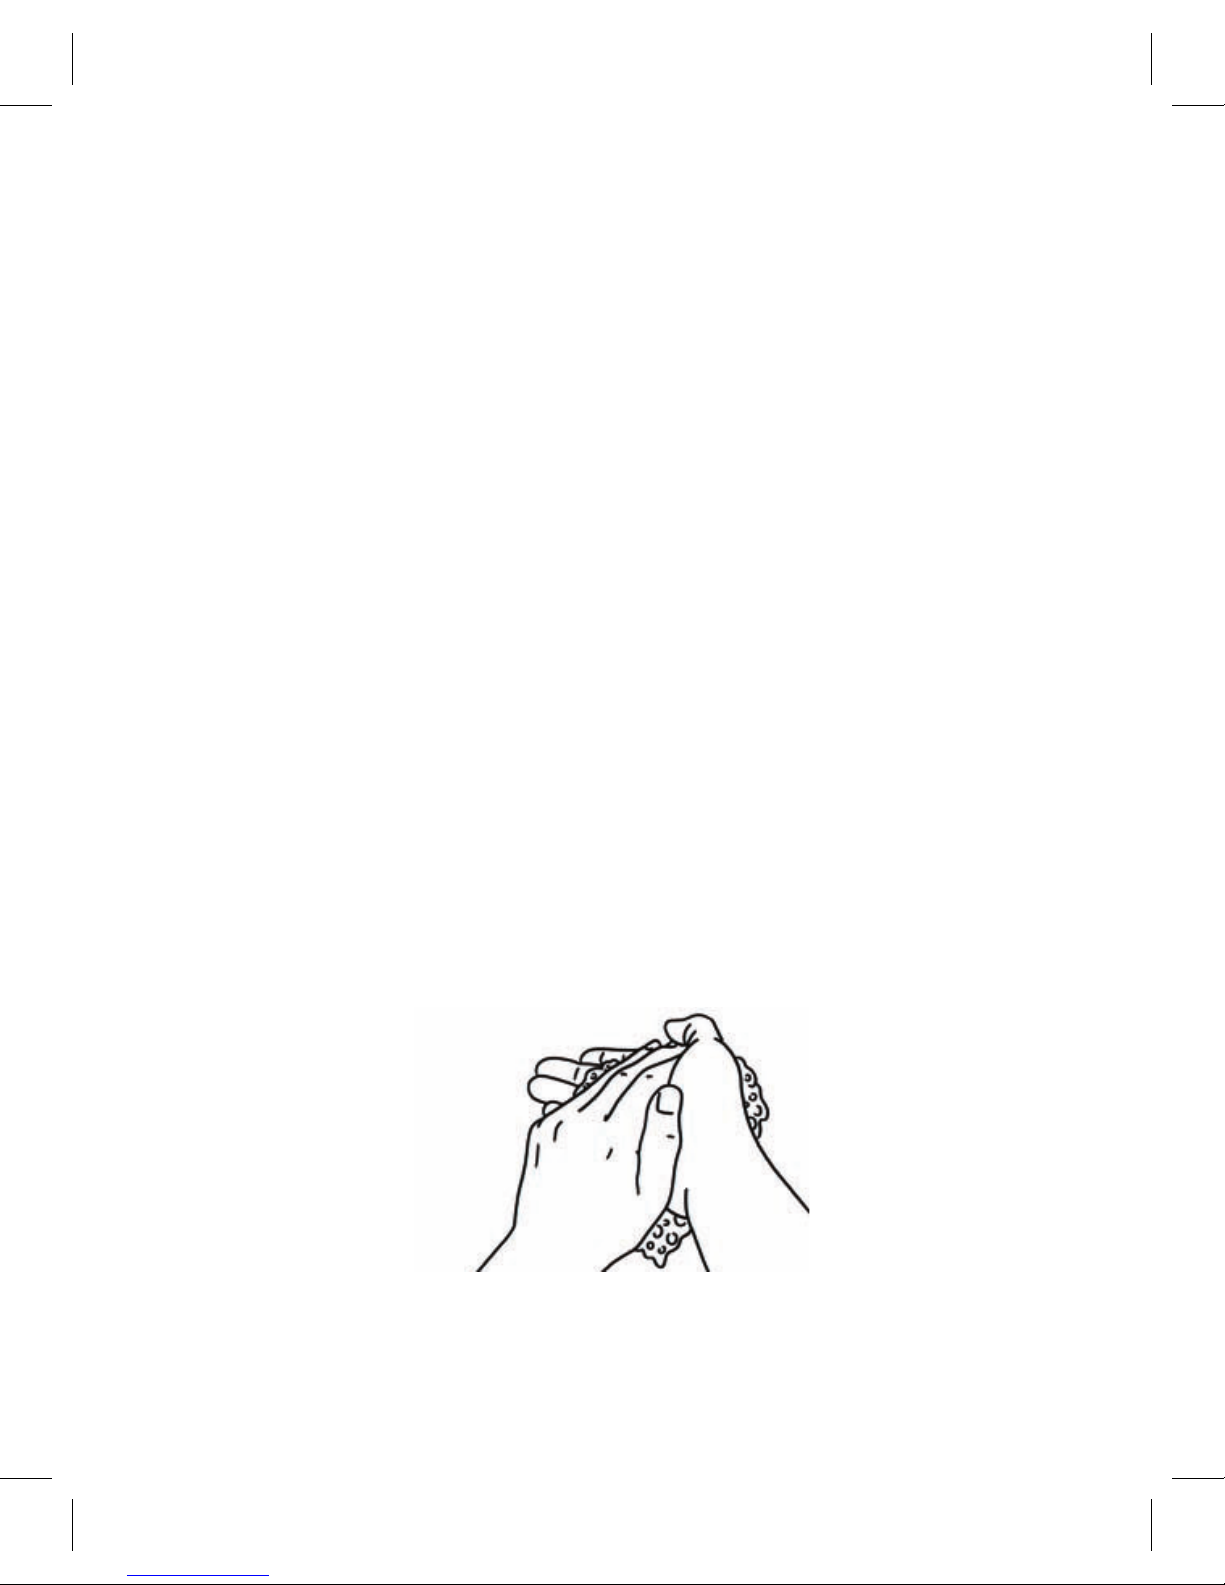
• Wash the hands with warm water to increase blood circulation in
the fingers to simplify the withdrawal of blood.
• Dry your hands.
• Check that the finger to be pricked is completely dried.
• Prepare the lancing device that is inside the 3in1. kit by inserting
the sterile lancet.
Read carefully the instruction for use of the lancing device
contained in the meter kit.
Use a new lancet for each prick and use the lancing device only on
yourself.
Before insertion, verify that the lancets and the protection of the
lancets are intact.
Only an intact lancet protection can guarantee that the lancet remains
sterile.
Store the protection of the lancet in order to use it to seal the lancet
after use.
Page 9
7
Application of blood
Read carefully the instructions for the use strips that you want to use
to perform the measurement.
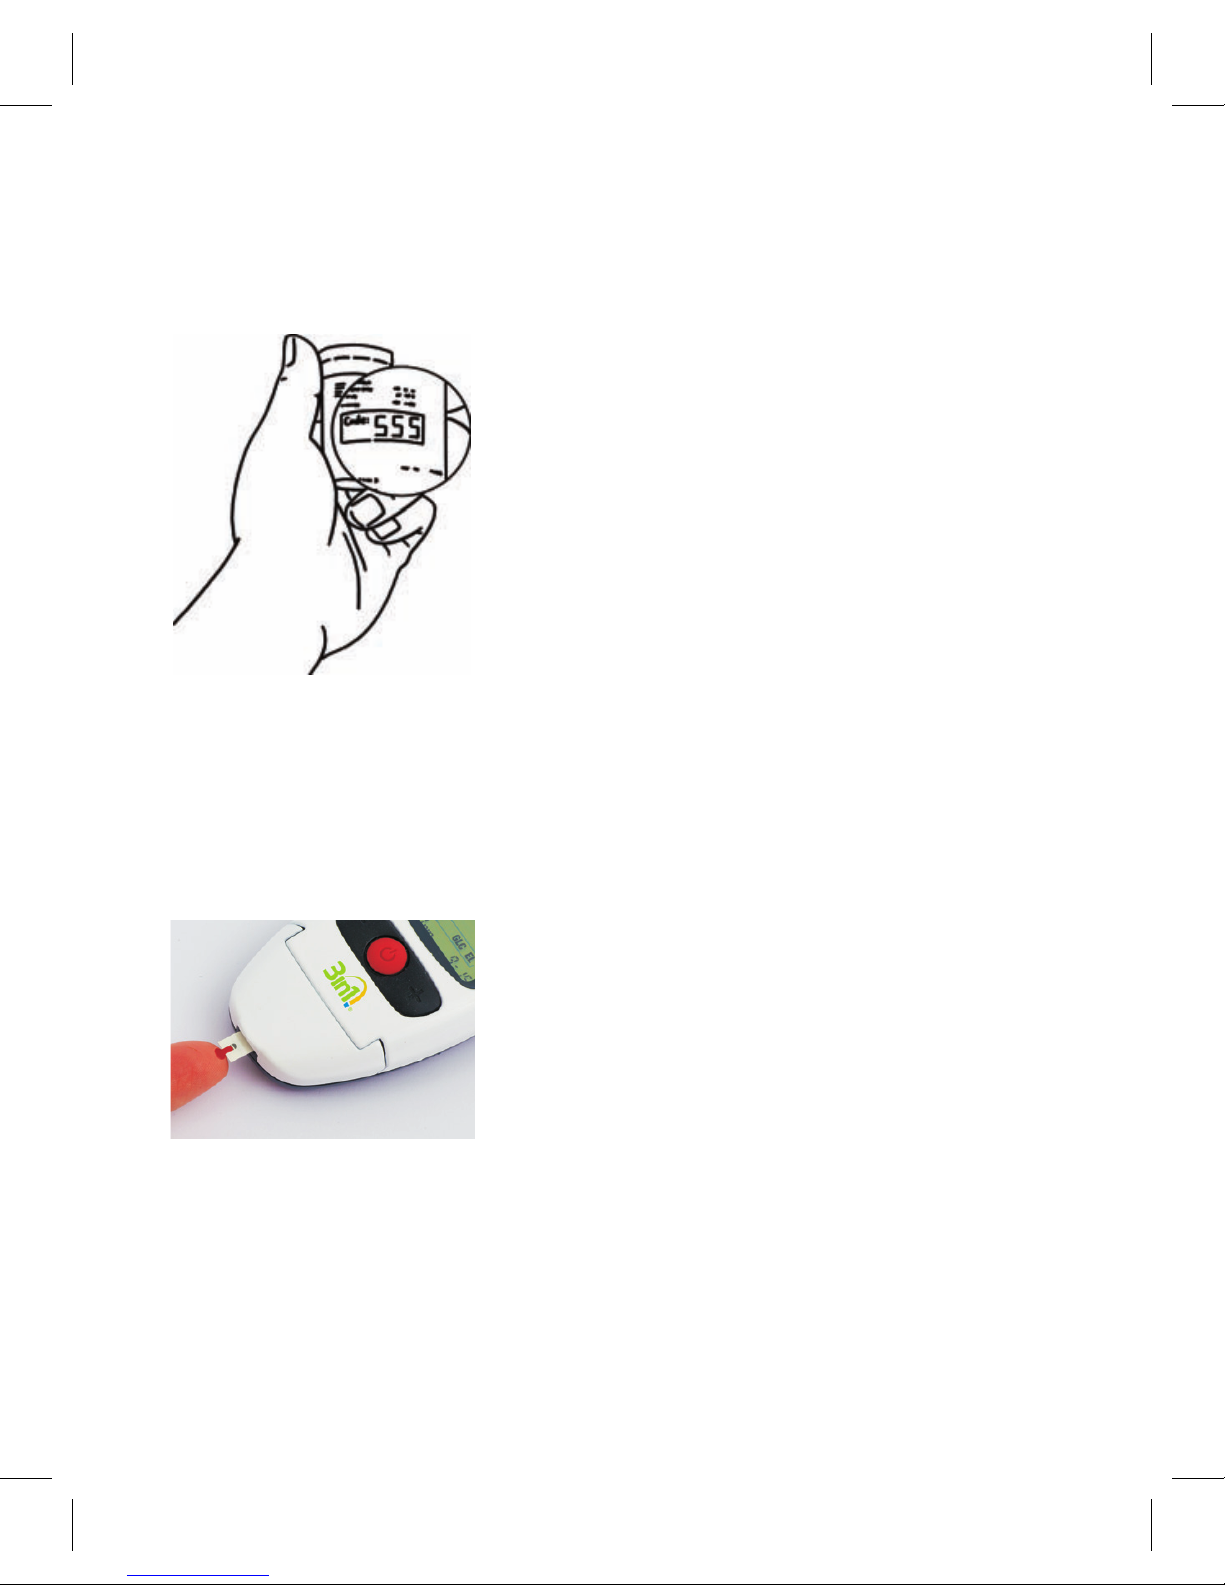
1 Press the Power button. Insert data-chip
only for cholesterol and triglycerides
measurements. The symbol that appears
on the display (3in1. for glucose or a
three digit number for cholesterol and
triglycerides) has to match the symbol
printed on the strips vial. If they do not
match, contact Customer Service.
Glucose measurements do no require
coding.
2 Take a strip from the vial and insert it in the meter with the printed
or coloured part on the upper side. You will hear a click and the
meter will emit an acoustic signal.
3 Procedure to test glucose:
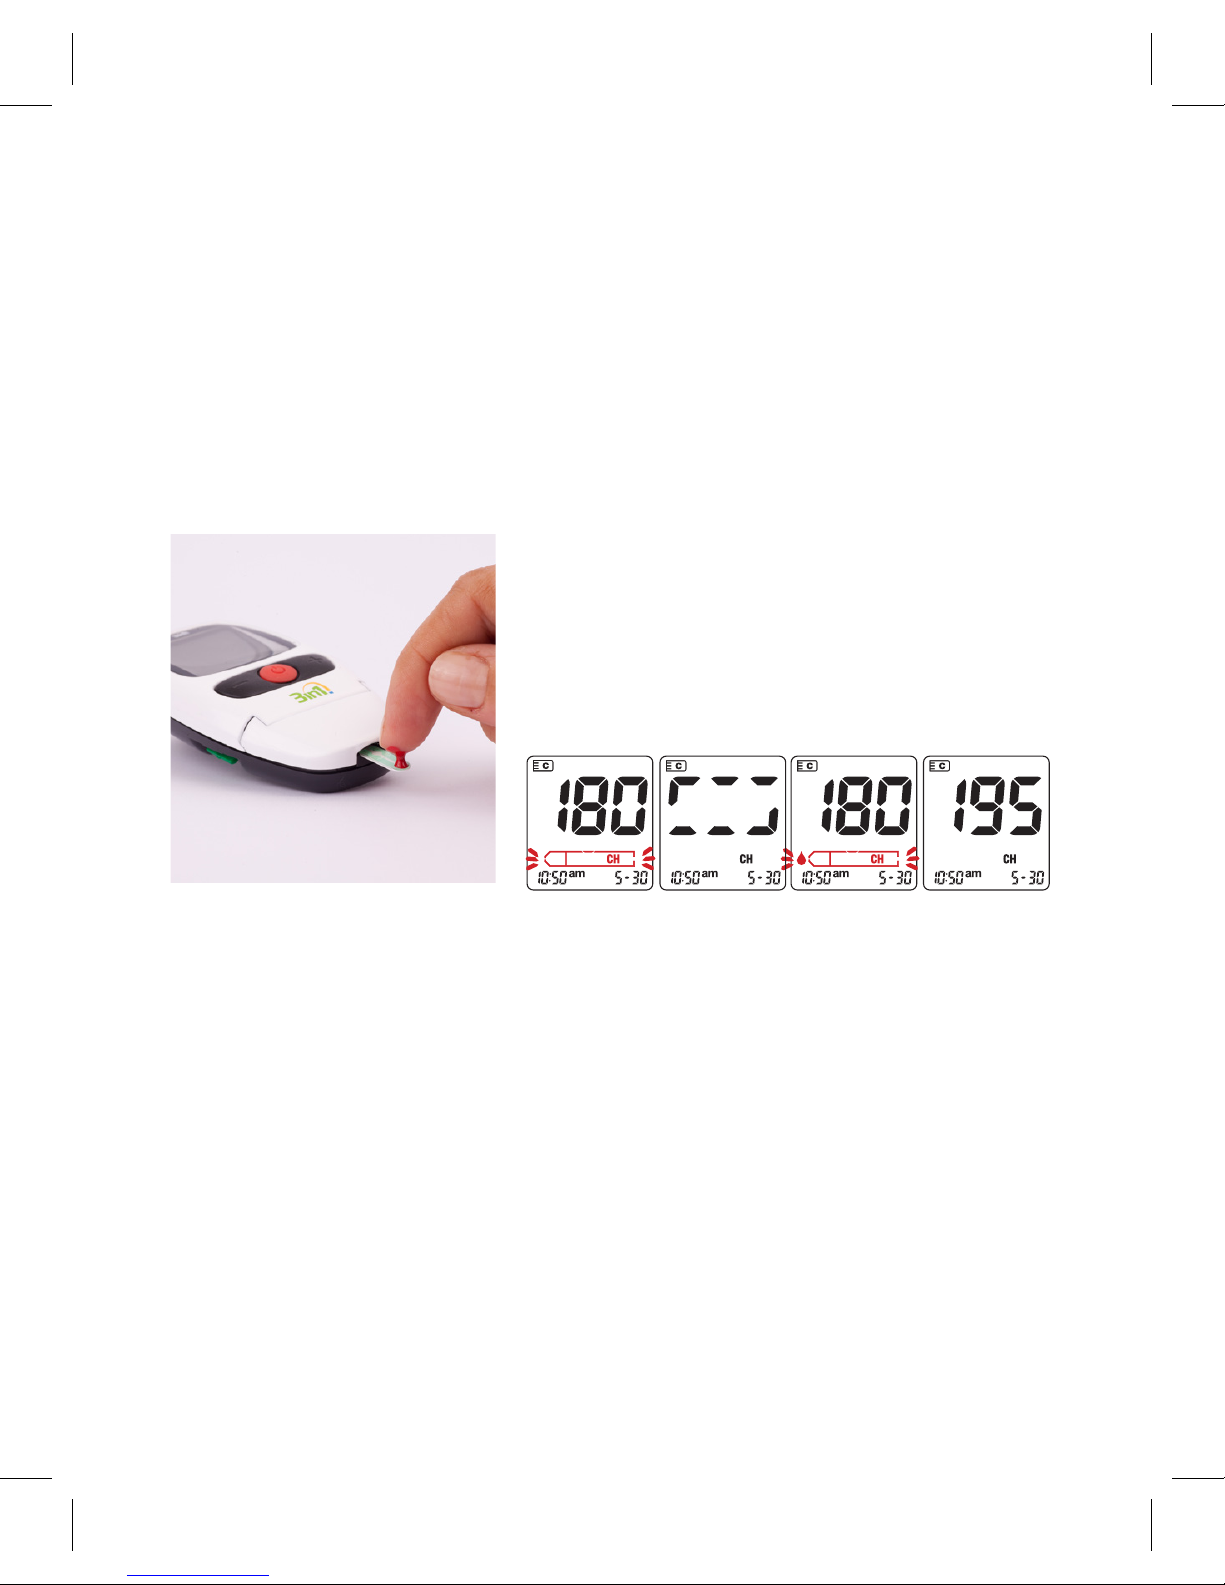
3.a Perform the prick on the finger with the
lancing device.
Apply a drop of blood on the part of the
strip that comes outside the meter.
Let the strip aspirate the blood up to see
the moving segments on the display.
If the volume is not sufficient the measurement does not start.
Page 10
8
Procedure to test cholesterol and triglycerides
3.b Sit down for one minute with the arm along the body.
Massage the finger to be pricked in order to increase the blood
flow.
Prick the finger, remove the first drop with sterile gauze and
gently press the finger to obtain a second drop. Without touching
and pressing the finger on the strip, apply the drop on the white
circular area of the strip that comes out of the meter.
Wait until moving segments will appear on the display.
4 The meter will emit an acoustic signal
and the result will be visualised on the
display and automatically stored in the
memory of the meter (refers to the
instruction for use, that you are using
to know the reading time).
5 Press the ejector key to remove the strip that you used, pointing
the meter down for the low.
Page 11
9
Warnings
If the results obtained do not correspond to the well-being of
the user, proceed with a check up of the 3in1. instrument and
contact your physician. If the results are too high (Hi) or too low
(Lo), contact your physician immediately.
When the measuring is finished, it is possible to turn OFF the 3in1.
meter. The instrument will shut down automatically after 60 seconds if
not used for other operations.
The measured value, along with date and time, will be saved in
position 1 in the memory of the instrument.
The values previously measured will be saved in positions 2, 3 etc.
starting from the most recent. Descriptions on how to recall data from
the memory and how to erase memorised values are presented on
page 12.
Strips and used materials have to be properly
disposed, avoiding contamination. The meter
has to be disposed following the rules regarding
electric and electronic waste disposal.
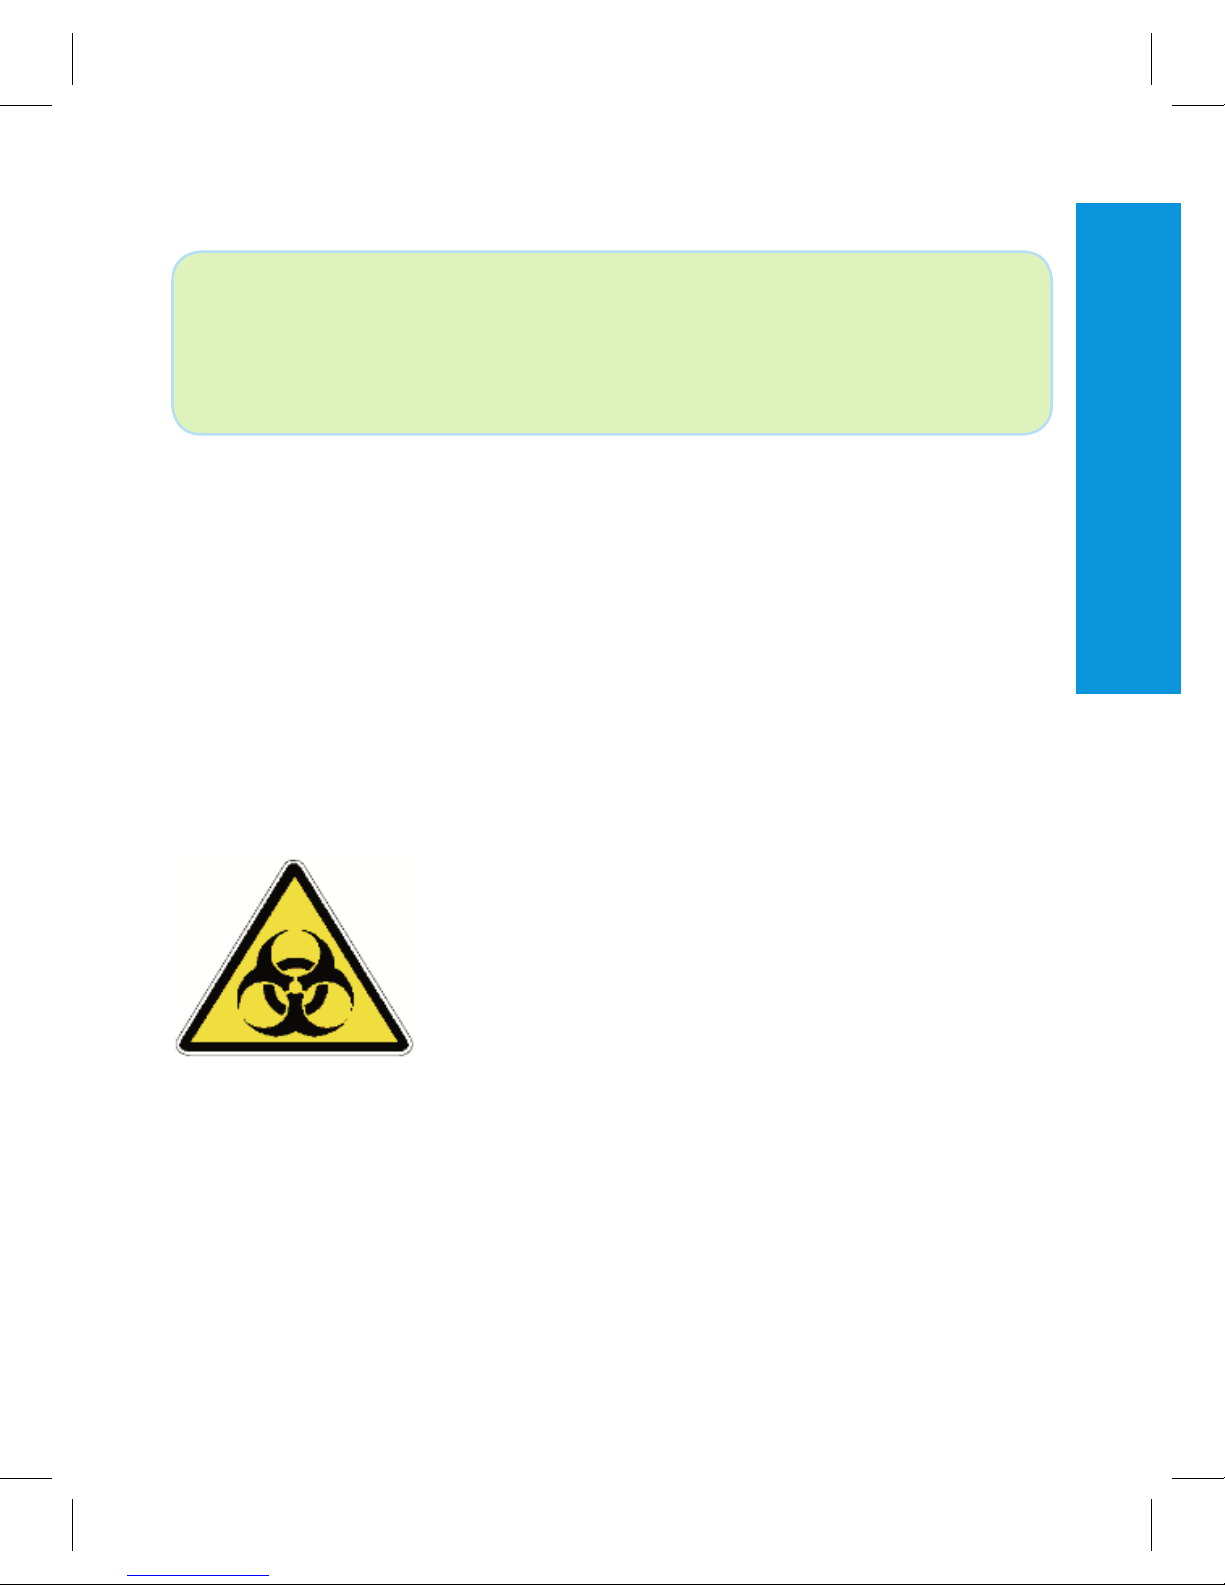
In a laboratory and in a hospital, the procedures
of biological safety must be followed when
handling potentially infected material, in
particular when measurements are performed
on different patients.
To avoid infections clean the instrument regularly
and dispose of the used strips in a way that
there is no risk of infections for other people.
Warnings
Page 12
10
Strips
The correct use of 3in1. strips is very
important for obtaining accurate results.
Therefore it is important to keep in mind the
following:
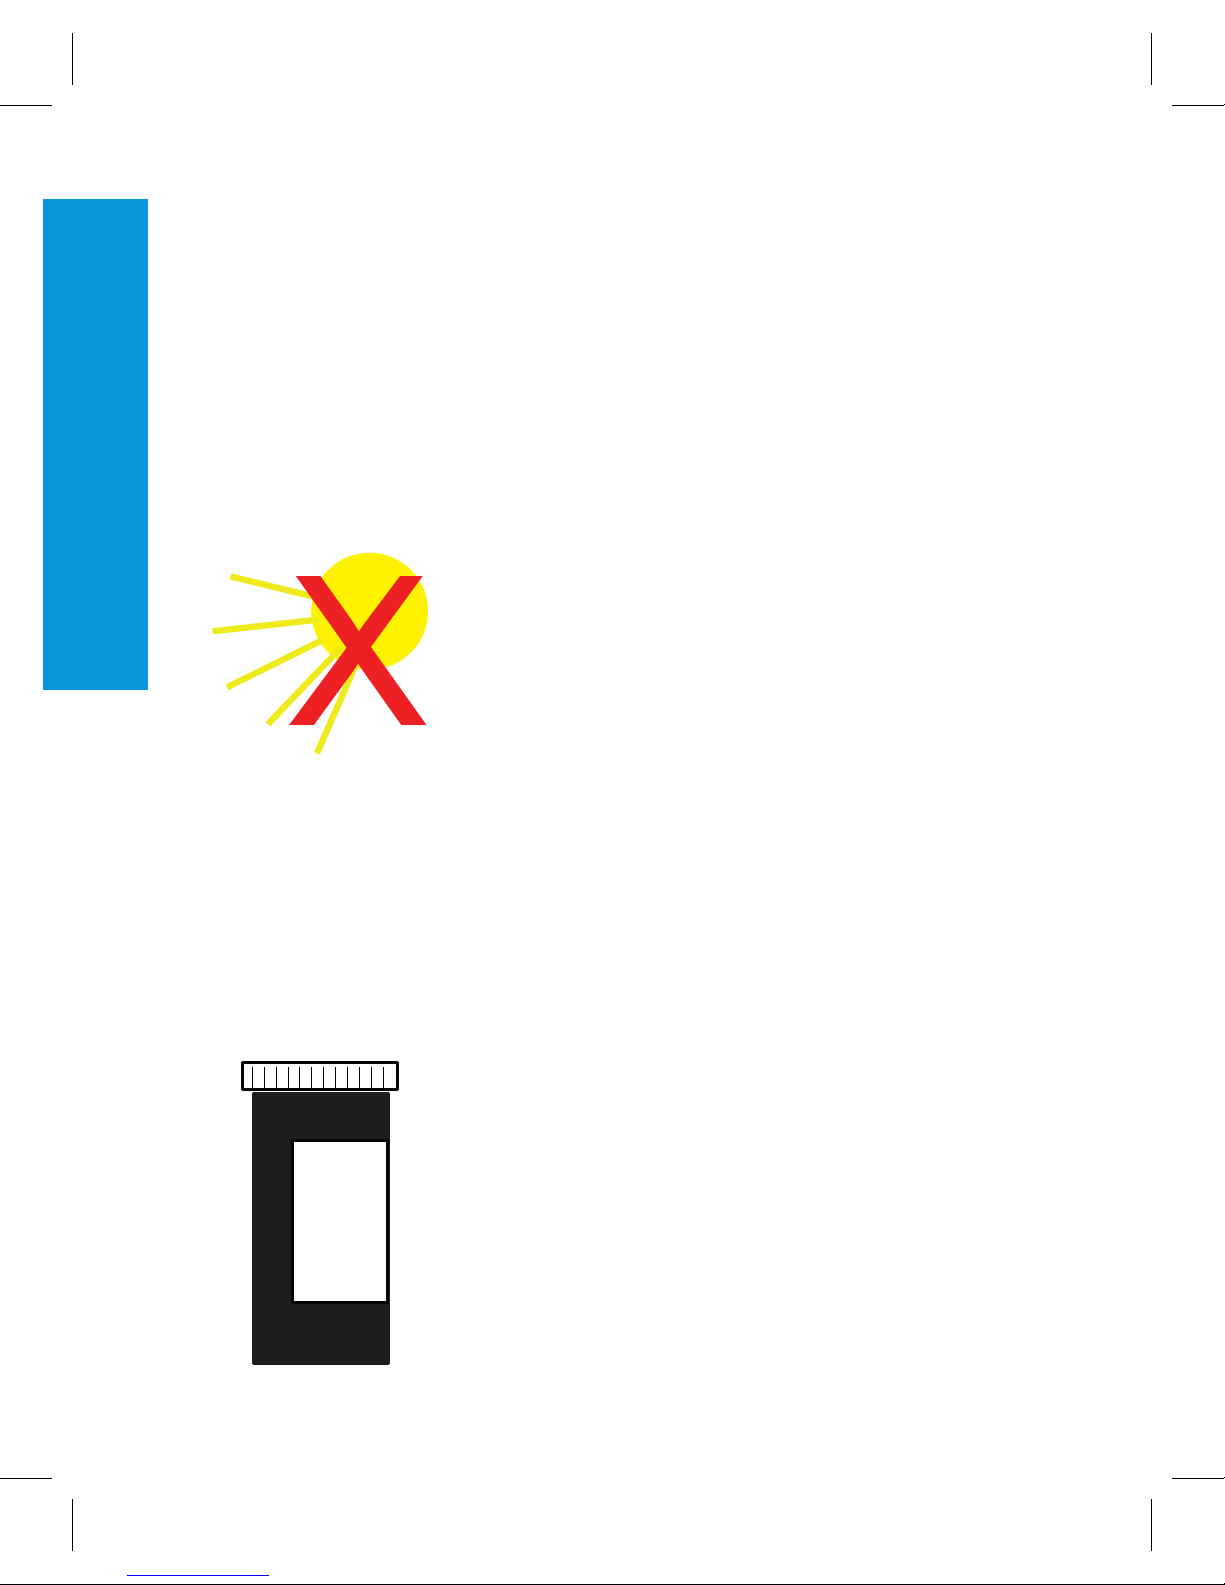
• The strips are sensitive to light and
humidity:
keep the strips only in their original vial.
• Protect the vial from direct sunlight and
keep at a temperature between 5 and
30 °C (41 - 86°F).
• Use the strips immediately after removing
them from the vial and close the vial
immediately
• The strips must not be used after the expiry
date.
• Write the date of the first opening on the
vial:
the strips must be used within 90 days after
the vial has been opened.
• Do not use strips that are damaged.
• Carefully read the instructions contained in
the package of strips.
• Take measurements only with original
3in1. strips.
The strips
Page 13

11
Control Solutions
Read carefully the instructions for use of the control solution that you
want to use.
It is possible to check the working of the 3in1. meter by using the
3in1. control solutions.
The control solutions can be obtained as a separate accessory
through specialised retailers.
The control solution is applied on the strip just like blood.
When testing is done with the control solution, the obtained result
must be within the interval as shown on the label of the strip’s vial.
In this way, it is possible to learn how to use the 3in1. properly
and at the same time to check if it is functioning properly.
Write the date of opening on the vial when the solution is opened for
the first time.
The control solution must be used within 90 days from first opening,
if the expiry date is valid.
When is it necessary to perform a check-up with control solutions:
• When suspecting a possible defect of the 3in1. meter.
• When suspecting that the possibility of a malfunction or wrong
measurement.
The result obtained with the control solutions has to be deleted by
the memory of the meter in order to not interfere with the average
calculation of the glycaemia.
Control solutions
Page 14
12
Memory functions: recalling and
deleting results from the memory
The 3in1. meter stores up to 500 test results for all
analytes, letting you to review them in the order from
the most recent (“1”) to the oldest (“500”).
If you insert the glucose data-chip in the meter, you
allow to recall only previous glucose test results. The
same applies for other analytes.
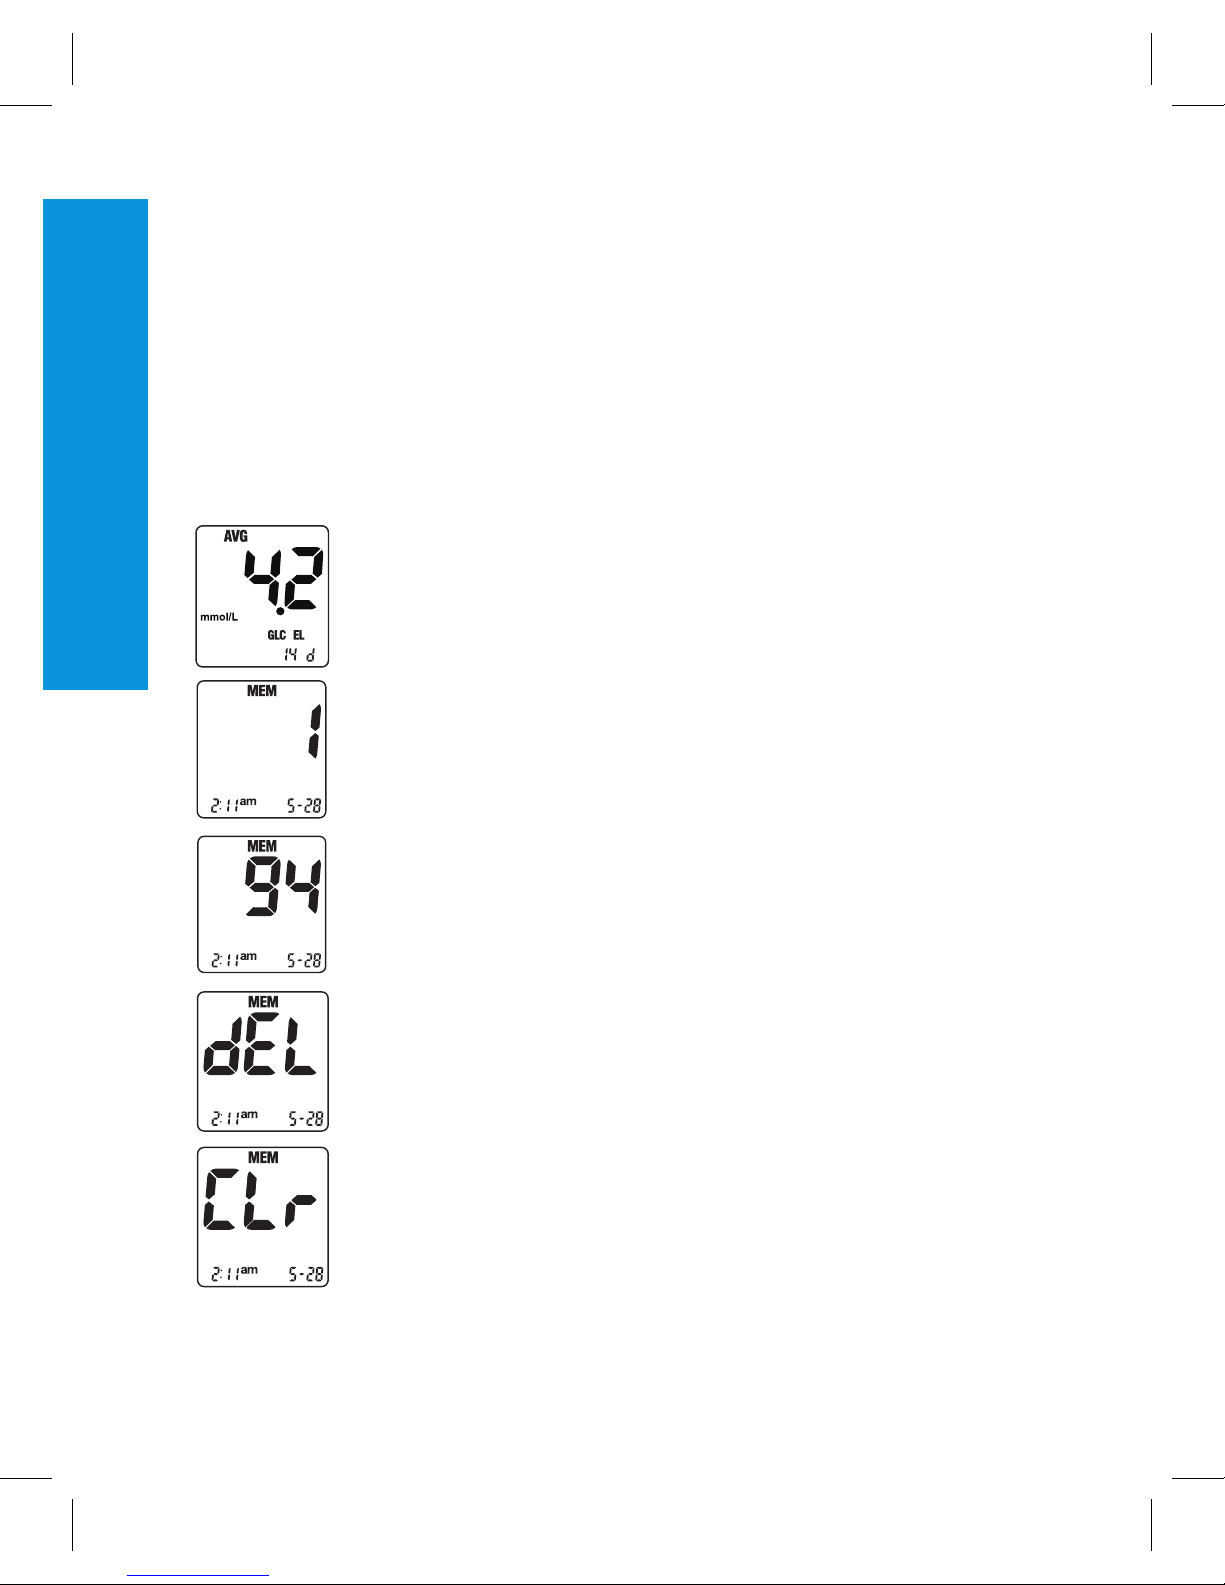
1 Press and release the “+” or “-” button in the
STANDBY mode.
The meter will enter MEMORY mode and the
average of test results is displayed.
2 While pressing the “+” or “-” button, memory
number will be displayed. If you hold down the
“+” or “-” button, the meter scrolls quickly and
only memory positions are displayed. Result is
not shown until you release the button. When
releasing the “+” or “-” button, the corresponding
result will be displayed.
3 Repeat step 2 to see the remaining stored results.
4 Keep the power button pressed and then press
the “-” button for 1 second to delete one test
result stored in the meter.
5 Press “-” button for 5 seconds together with the
power button to delete all test results stored in the
meter.
Memory functions
Page 15
13
Modification of settings
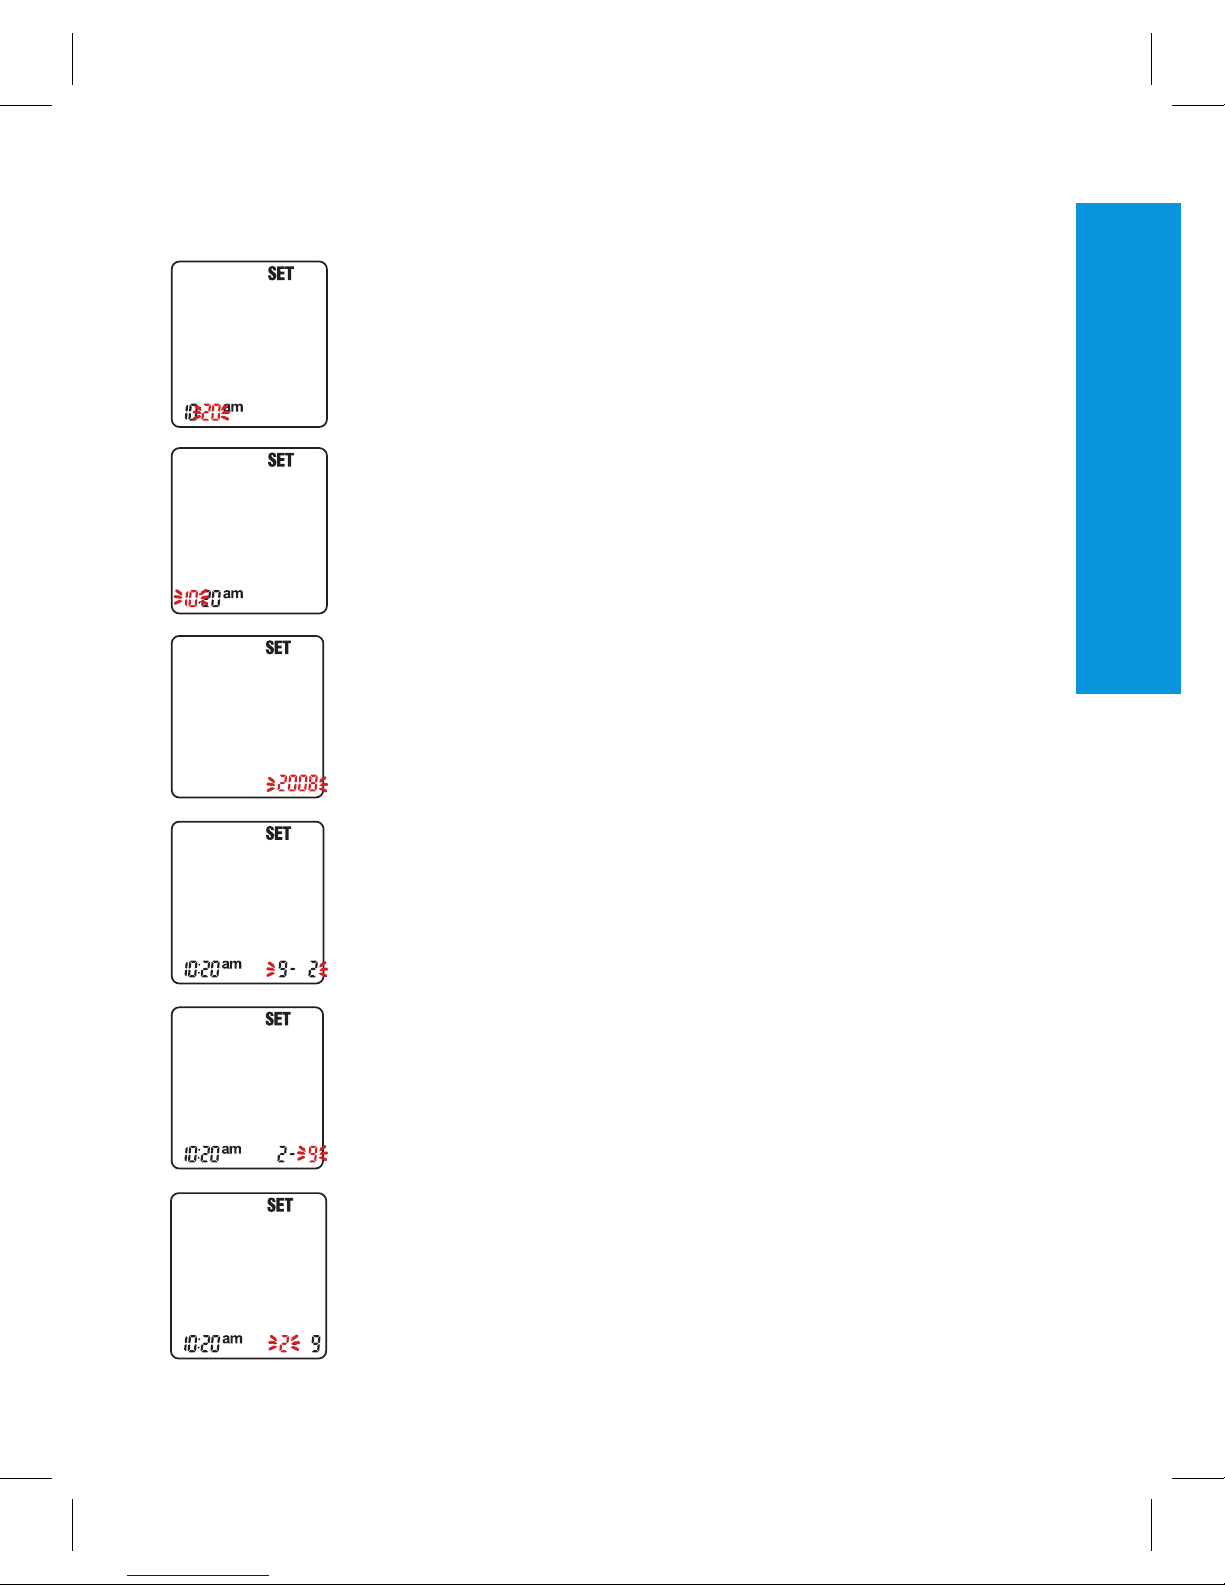
1 Press and release the power button to select the
month.
Press and release the “+” or “-” button up to get
the correct month.
2 Press and release the power button to select the
day.
Press and release the power button to change.
3 Press and release the power button to choose the
date format.
Press and release the “+” or “-” button to choose
between month-day (mm-dd) or day-month (ddmm).
4 Press and release the power button to change the
year. Press and release the “+” or “-” button up to
reach the current year.
The meter enables to change the year from 2011
to 2025.
5 Press continuously the power button for 3
seconds. The meter will enter in the SET mode
and it will be possible to change the hour.
Press and release the “+” or “-” button up to reach
the correct hour.
6 Press and release the power button to change the
minutes. Press and release the “+” or “-” button
up to get the correct minutes.
General settings
Page 16
14
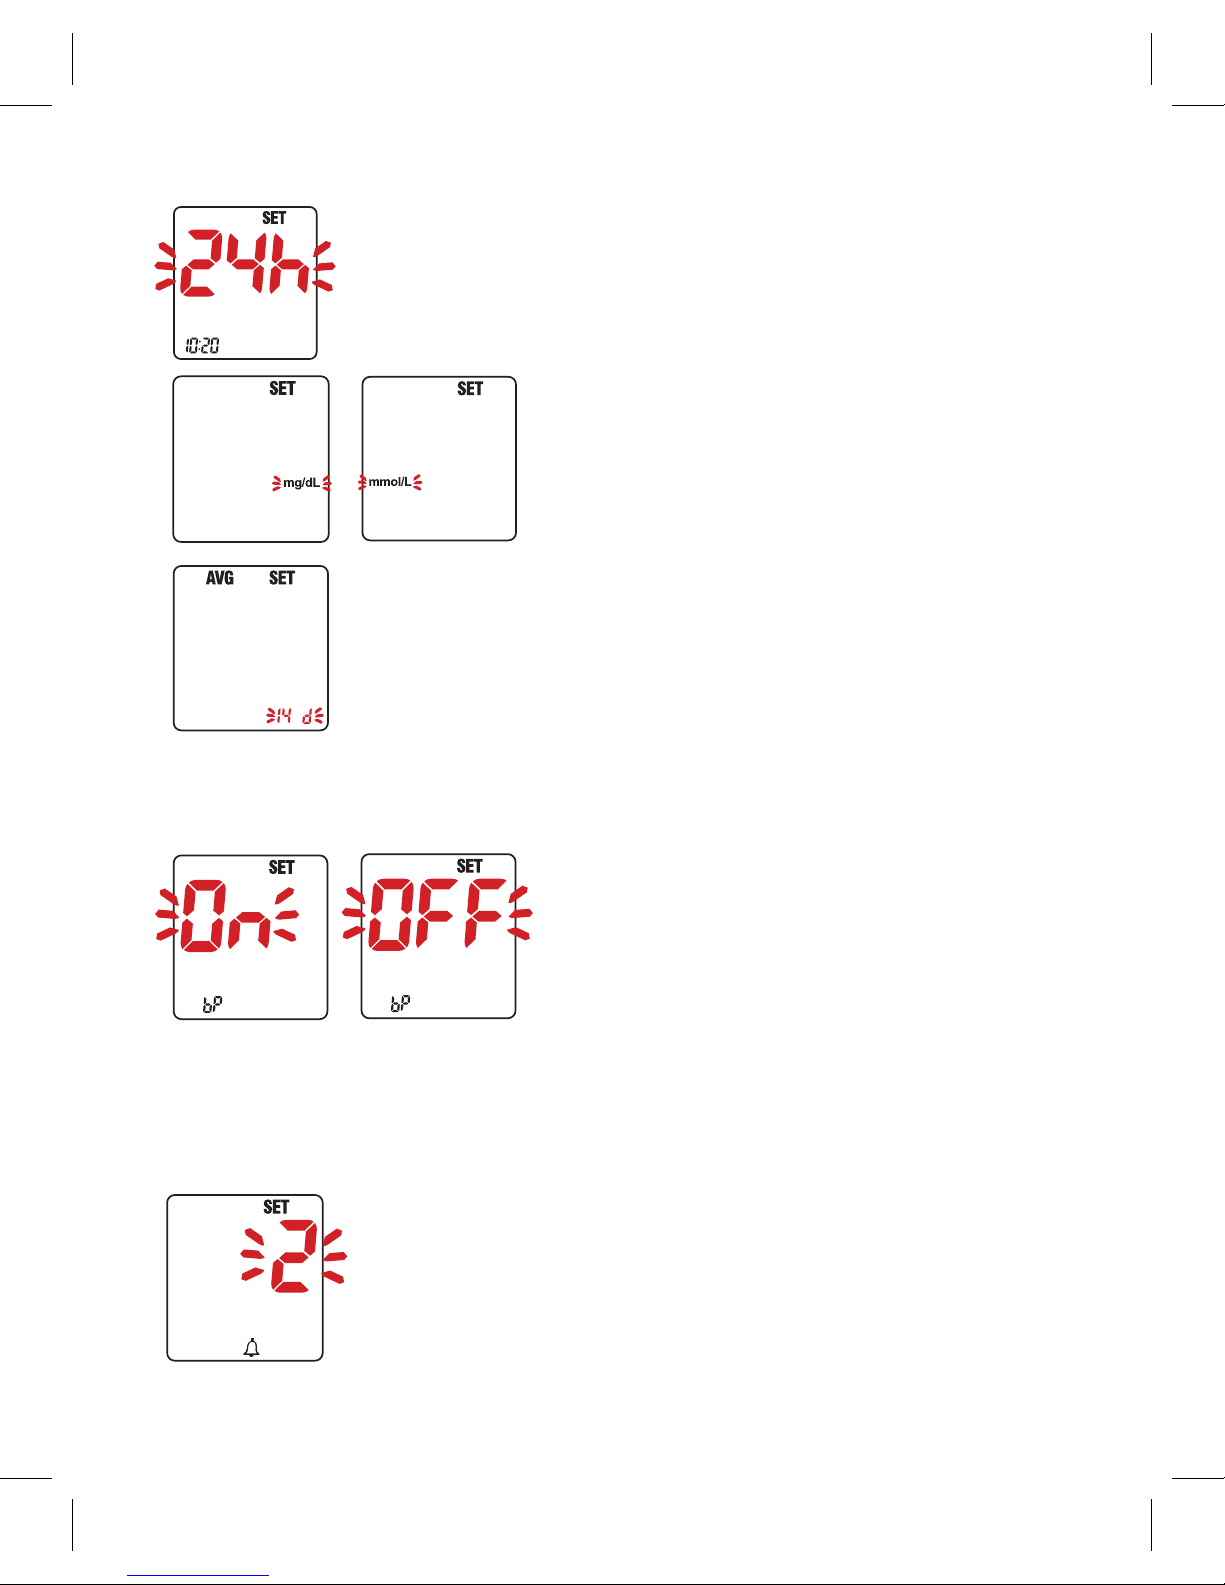
7 Press and release the power button to change
the hour format. Press and release the “+” or “-”
button to choose between 12 or 24 hours.
8 Press and release the power button
to change the unit of measurement.
Press and release the “+” or “-”
button to choose between mg/dL
and mmol/L.
9 Press and release the power button to select
how many days will be included in the average
result. Press and release the “+” or “-” button up
to get the desired number of days (0,7,14,21,28
days -“0” means that the meter will not show any
average of the measurements).
Setting the acoustic signal
1 Switch on the meter and
continuously press the power
button to enter in the SET mode.
Press and release the power button
up to see “bp” fixed and “On”
blinking on the display.
2 Press the “+” or “-” button to
activate or deactivate the acoustic
signal.
Setting the alarms
Follow these instructions to set the alarms:
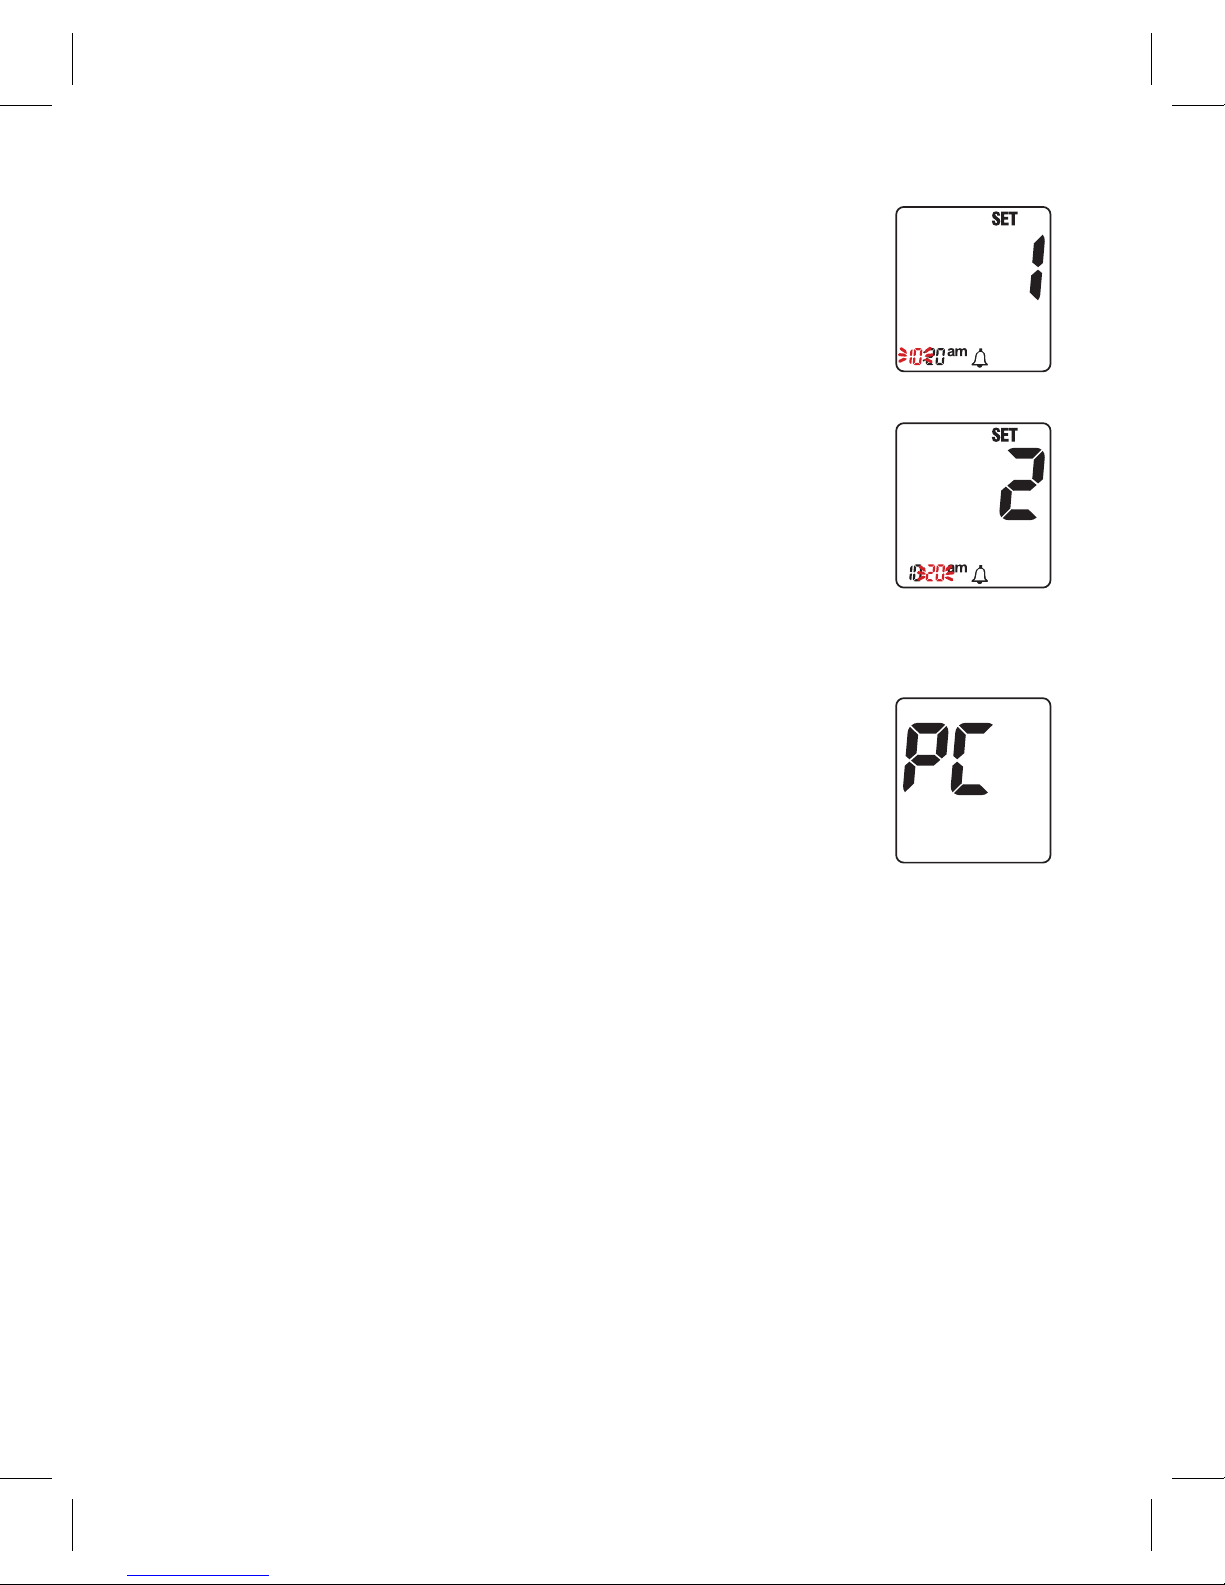
1 Press and release the power button.
Press the power button continuously to enter in
the SET mode. Press and release up to see the
icon of the alarm fixed and “0” blinking.
Page 17
15
2 Press the “+” or “-” button to select the number of
the alarm to be set (0, 1, 2, or 3).
3 Press the power button again to select the hour
and the minutes related to the alarms that you are
setting.
4 You can exit by using the SET mode at any
moment by pressing continuously the power
button for three seconds.
The alarms are not activated if they are set to
12.00 or 0.00.
Enabling data transfer to PC
All the test results that are stored in the 3in1. meter can
be downloaded to a computer.
1 Install the software according to the manufacturer’s instructions.
2 Insert the cable into the USB port of the computer and the jack of
the cable into the meter.
3 Press and release the power button. “PC” will appear on the
meter’s display.
4 Set up your computer software to receive information from the
meter.
After the data has been transferred, you can turn off the meter by
pressing the power button and removing the jack cable from the
port of the meter.
Page 18
16
Care and maintenance
For glucose measurement it is necessary to follow a
particular cleaning procedure only if blood or other material
(debris, dust, etc.) come into direct contact with the plastic
support of the reader. If so, use a wet cloth, moistened
with water or 70% alcohol solution in order to clean the
external parts of the instrument.
In case of cholesterol and triglycerides measurements
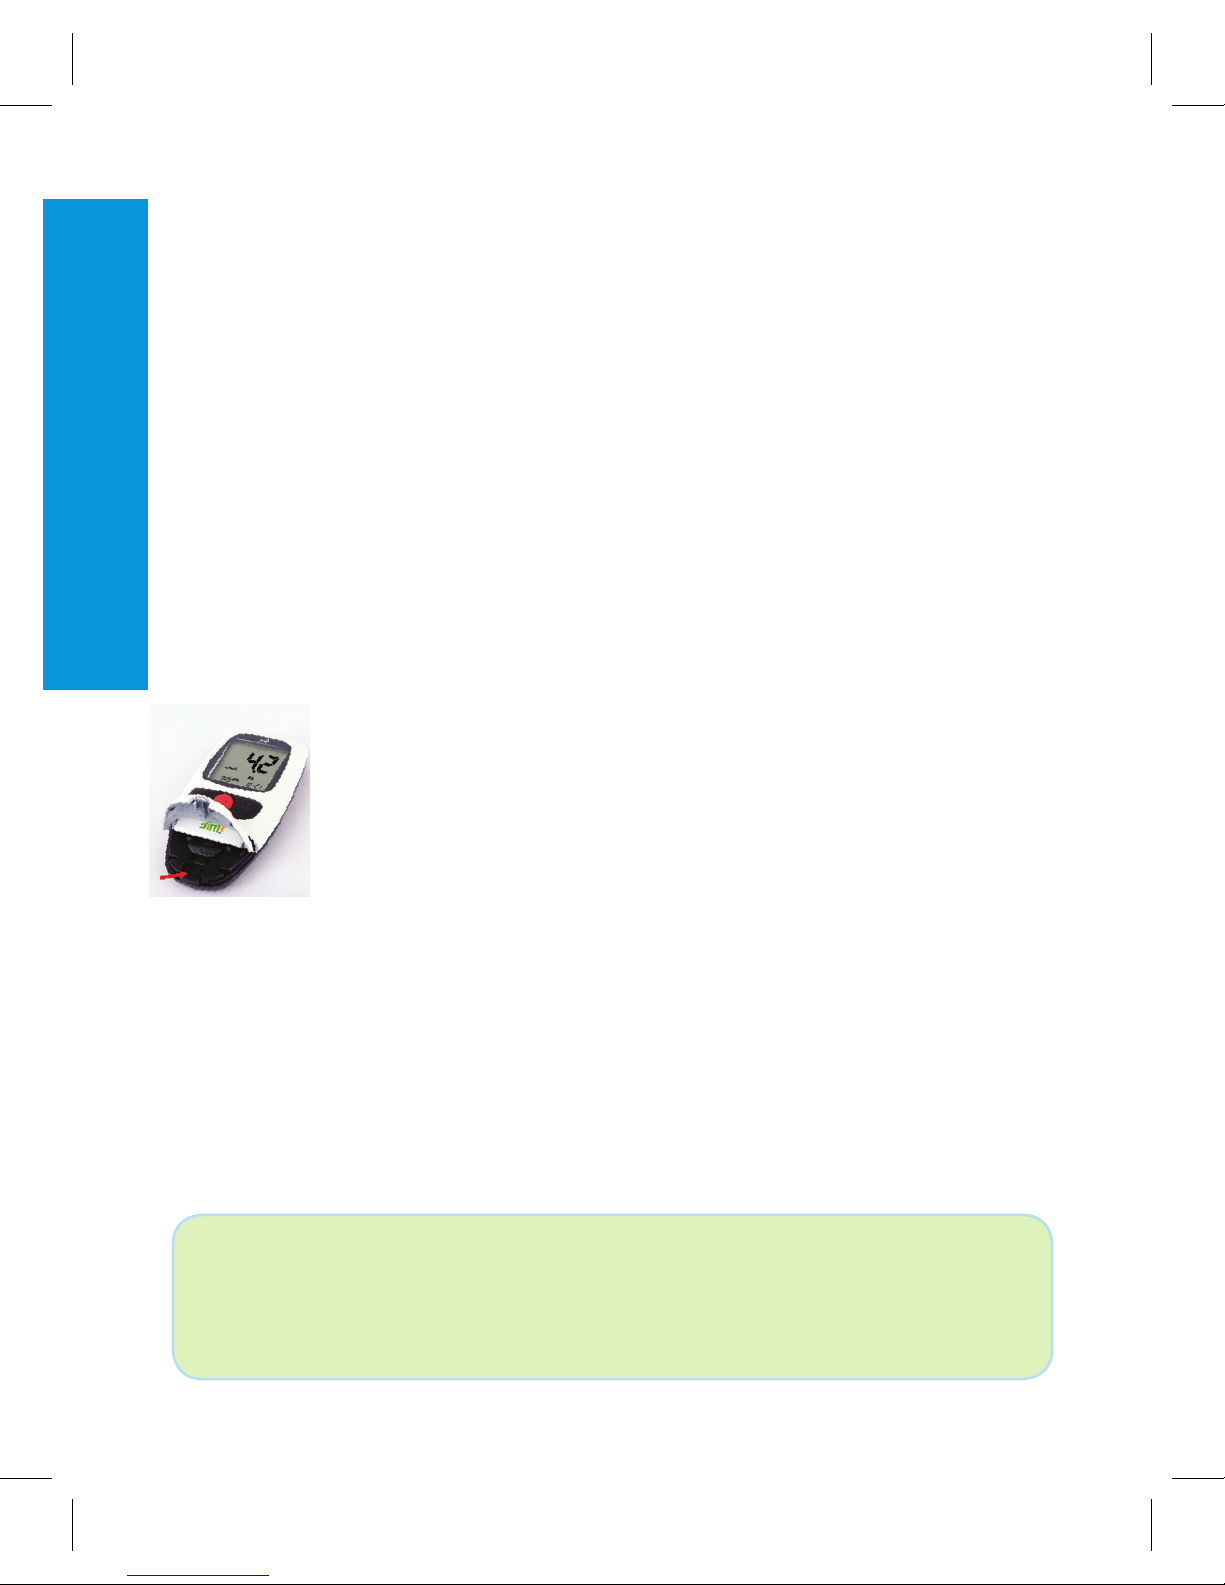
the meteruses an optical measuring method, therefore,
its components must be kept clean. To clean the optical
components, lift the front cover and use a wet cloth on the
glass surface of the optics. After cleaning, dry the plastic
support of the reader without scratching it.
For taking measurements on different people, like
in a hospital for example, clean the instrument after
every measurement with a 70% alcohol solution before
proceeding with the next measurement.
Preservation and measuring conditions
To assure the accuracy of each measurement, it is important to meet
the following conditions.
The measurement with 3in1. strips has to be performed between
10 and 40°C (50-104°F). The 3in1. kit (meter and strips) may not
be stored at temperature lower than 5°C (41°F) or higher than 30°C
(86°F).
Note
If the instrument is too cold or too hot (e.g. after being in a car at
very low or high temperatures), allow it to cool down or to heat
up slowly at room temperature (about 20 minutes).
Maintainance and
Preservation conditions
Page 19
17
Error messages
Error
message
Problem Solution
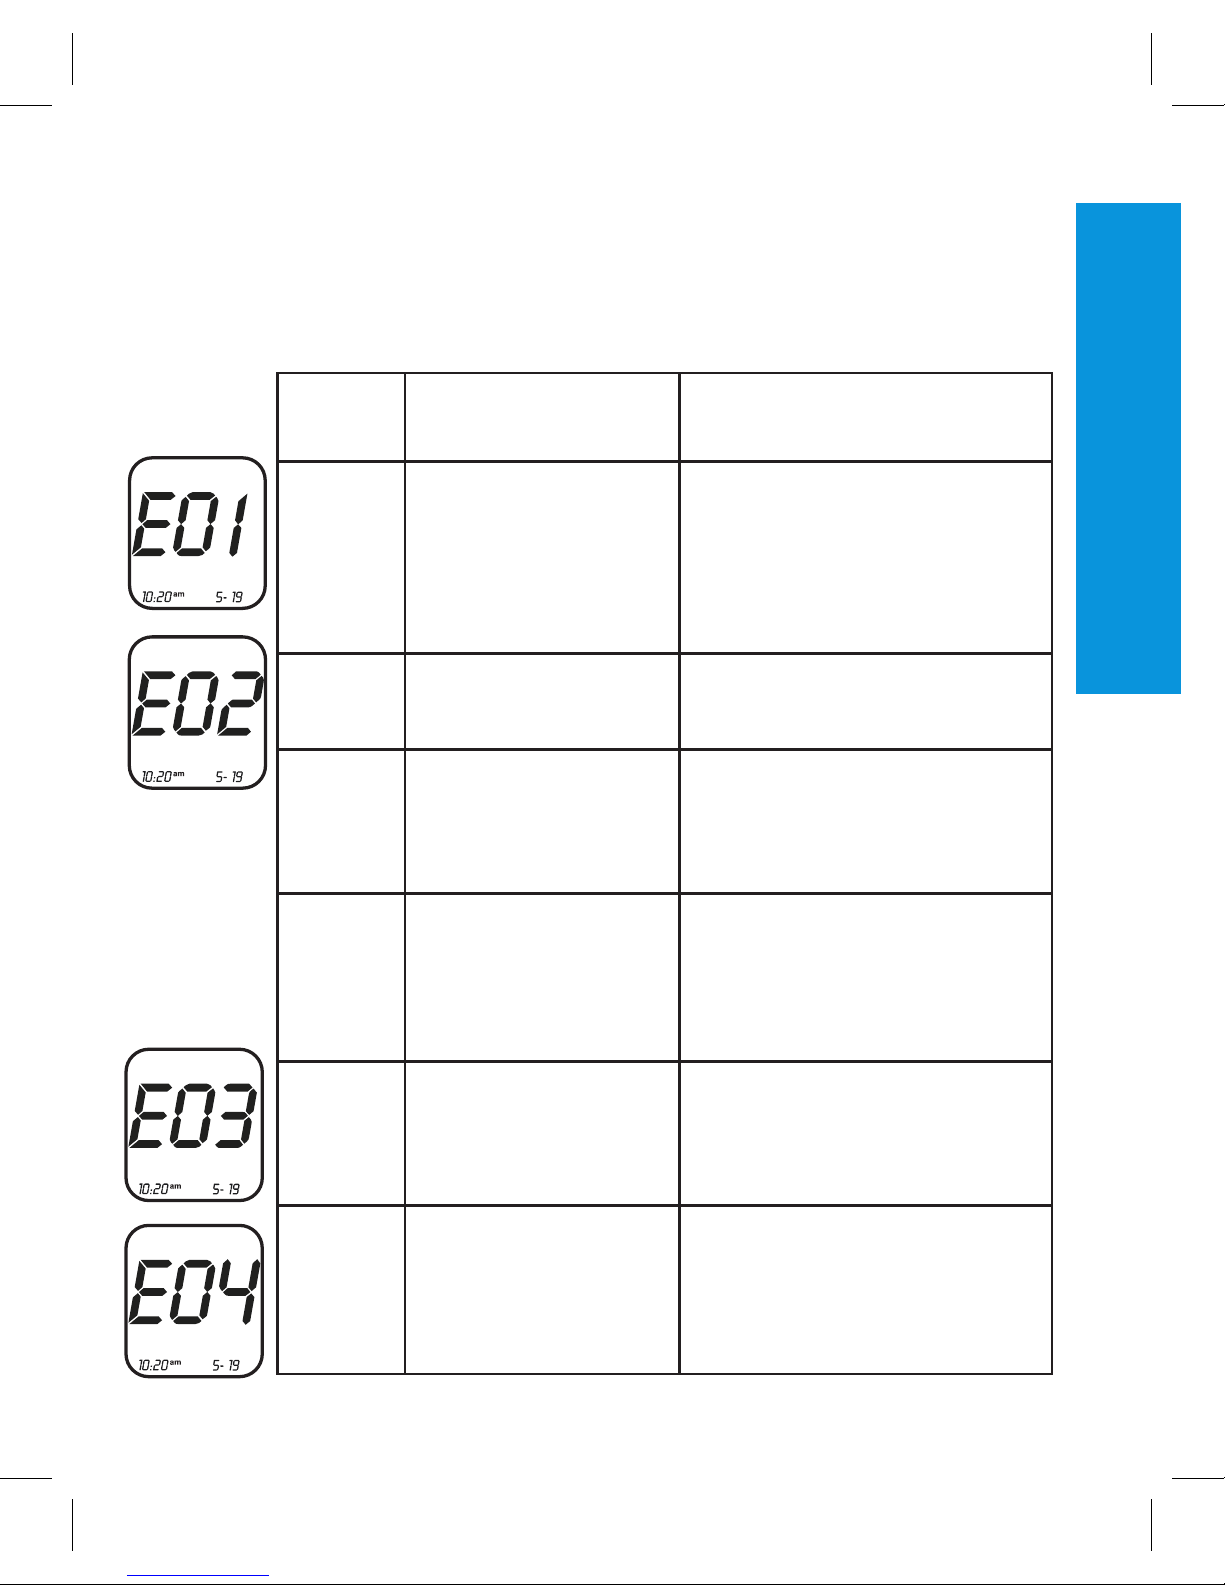
E01 The temperature is out
of the allowed range.
Place the instrument in an area
with temperature between
10°C (50°F) and 40°C (104°F)
and wait for the instrument to
equilibrate with the external
temperature, before performing
the measurement.
E02 The strip is used or
the reactive area is
coloured.
Use a new strip to perform the
measurement.
E02 The blood was applied
on the strip before
waiting for the drop
blinking on the display.
Take a new strip, insert it in
the instrument and, only after
visualised blinking drop on the
display, aspirate the blood on
the strip.
E02 The reading window
is dirty.
Open the plastic cover where you
insert the strip and clean the glass
window using only water. Dry the
glass without scratching it. Do not
use solvents or soap. Close the
plastic counter and repeat the test.
E03 The strip is removed
from the meter without
applying the drop of
blood.
Switch off the meter by using
the power button. Insert the strip
again and aspirate the blood on
the strip without removing the strip
from the strip holder.
E04 The strip that you
are using does not
correspond to the
parameter of the datachip.
Remove the data-chip and use
the one corresponding to the strip
that you want to use and check
that the parameter symbol on the
display is the same of the one
printed on the strip.
Error messages
Page 20
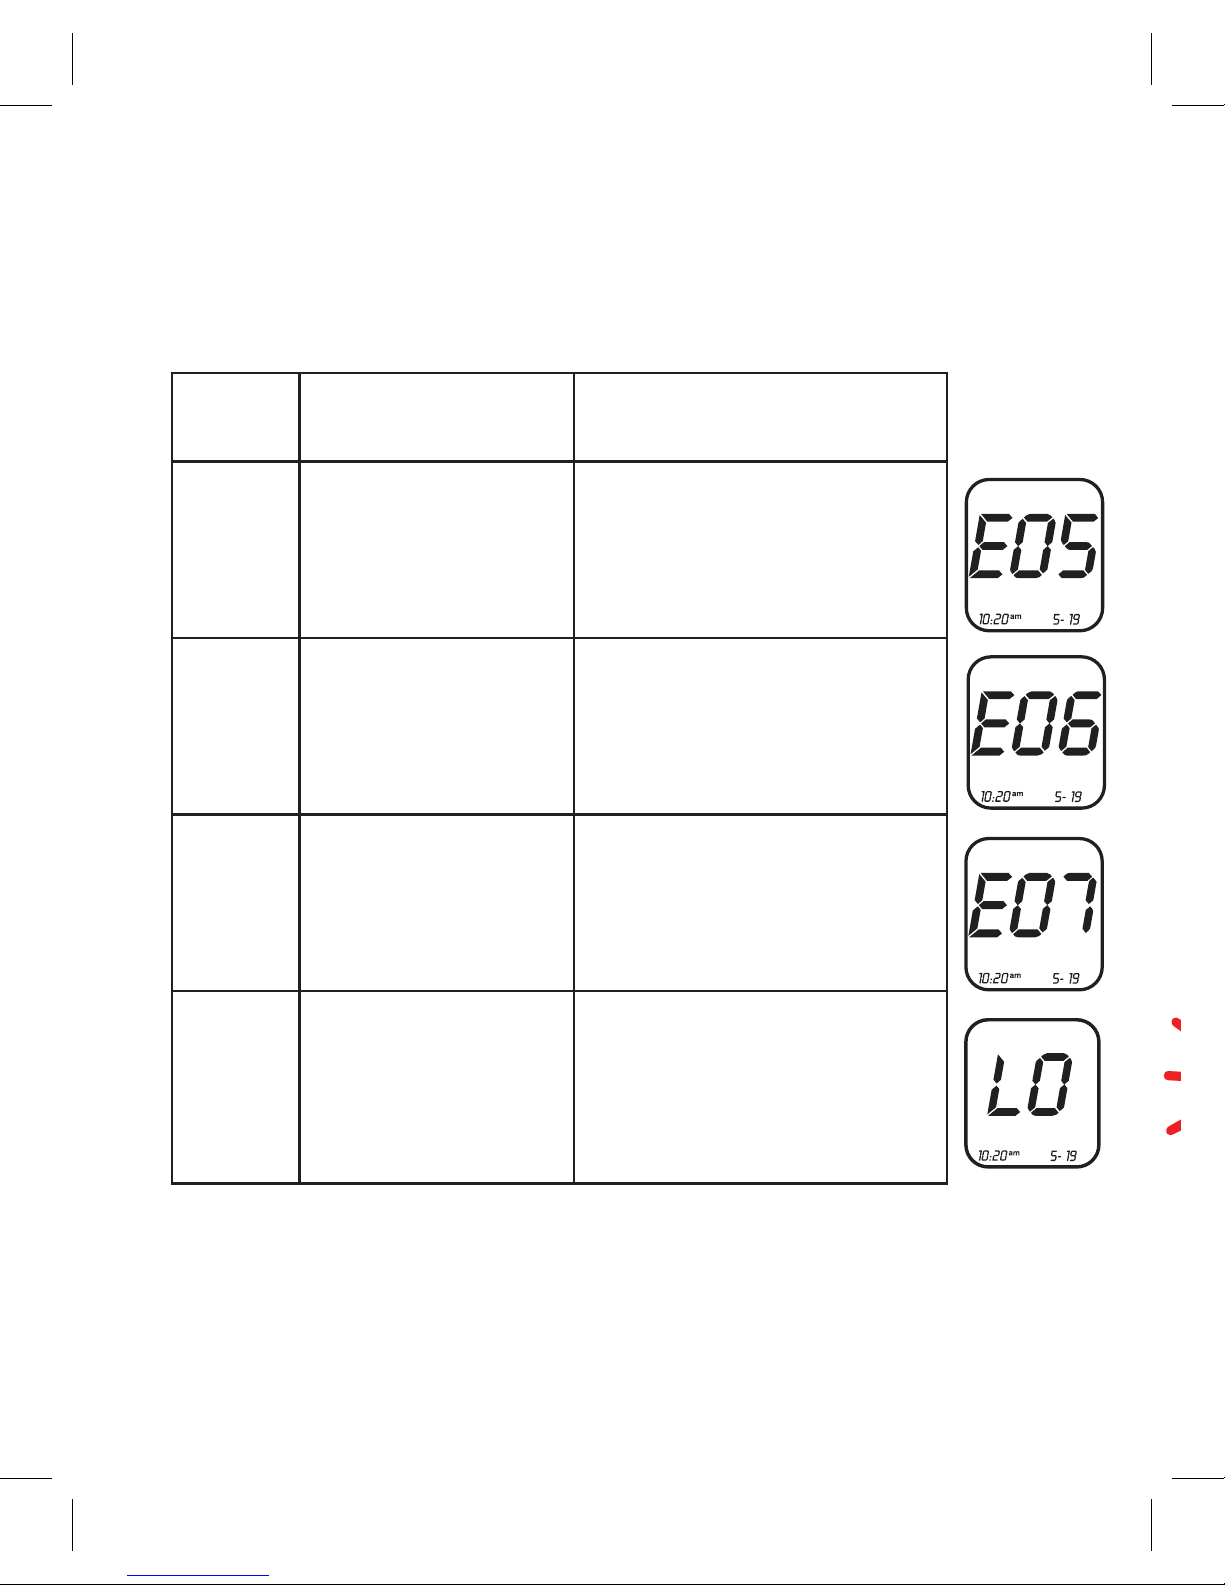
18
Error messages
Error
message
Problem Solution
E05 Data-chip error Remove the data-chip and insert it
again. If E05 still remains, contact
3in1. Customer Service.
E06 There is not enough
blood
Repeat the test and apply more
blood.
E07 The data-chip is not
inserted
Insert the data-chip corresponding
to the strips that you want to use.
LO The result is lower
than the limit of that
parameter (see also
instructions for use of
the strips)
If the result does not correspond
to the personal sensations, repeat
the test, applying a big drop of
blood.
If LO is obtained again, contact
your physician for additional
information.
Page 21
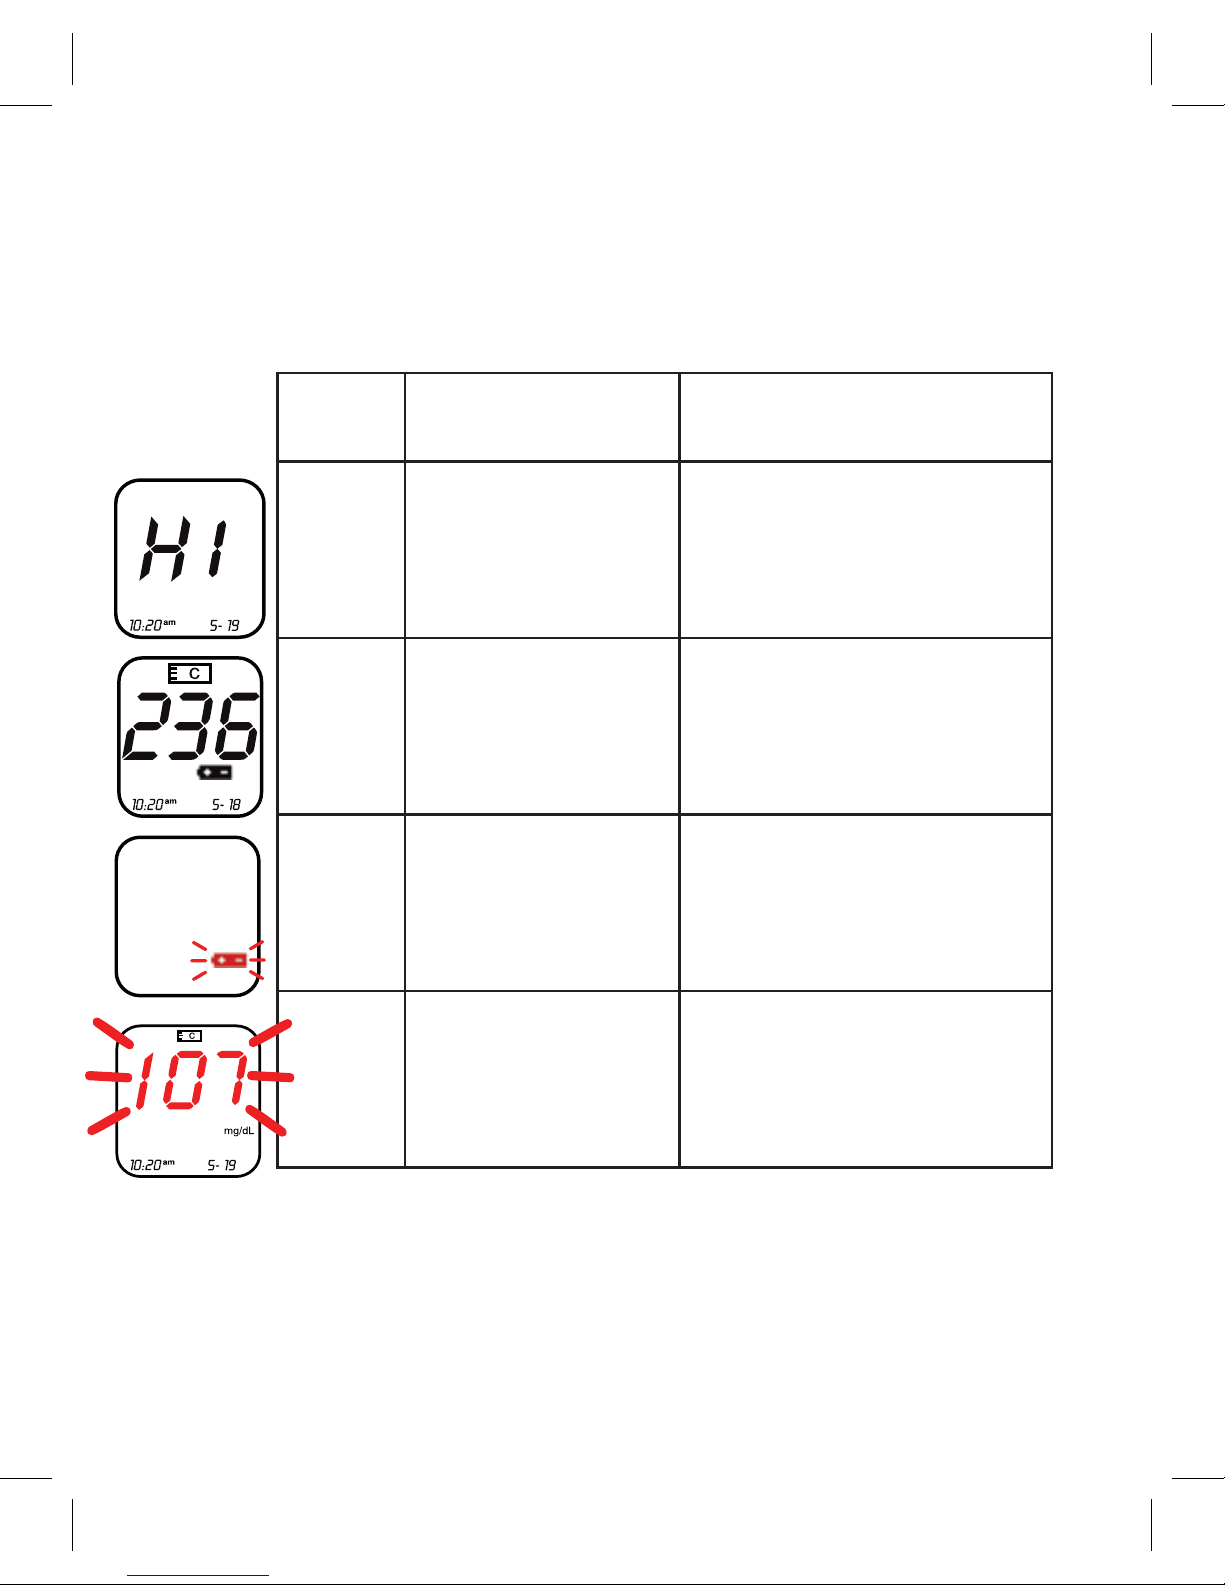
19
Error messages
Error
message
Problem Solution
HI Value is higher than the
limit of reading of that
parameter.
Immediately contact your
physician and repeat the test in a
hospital laboratory.
Get new batteries.
Replace the batteries before
taking a measurement.
Check expiry date of the strips
and use new strips to perform the
measurements. Blinking result is
not saved in the memory.
Page 22
20
Changing the batteries
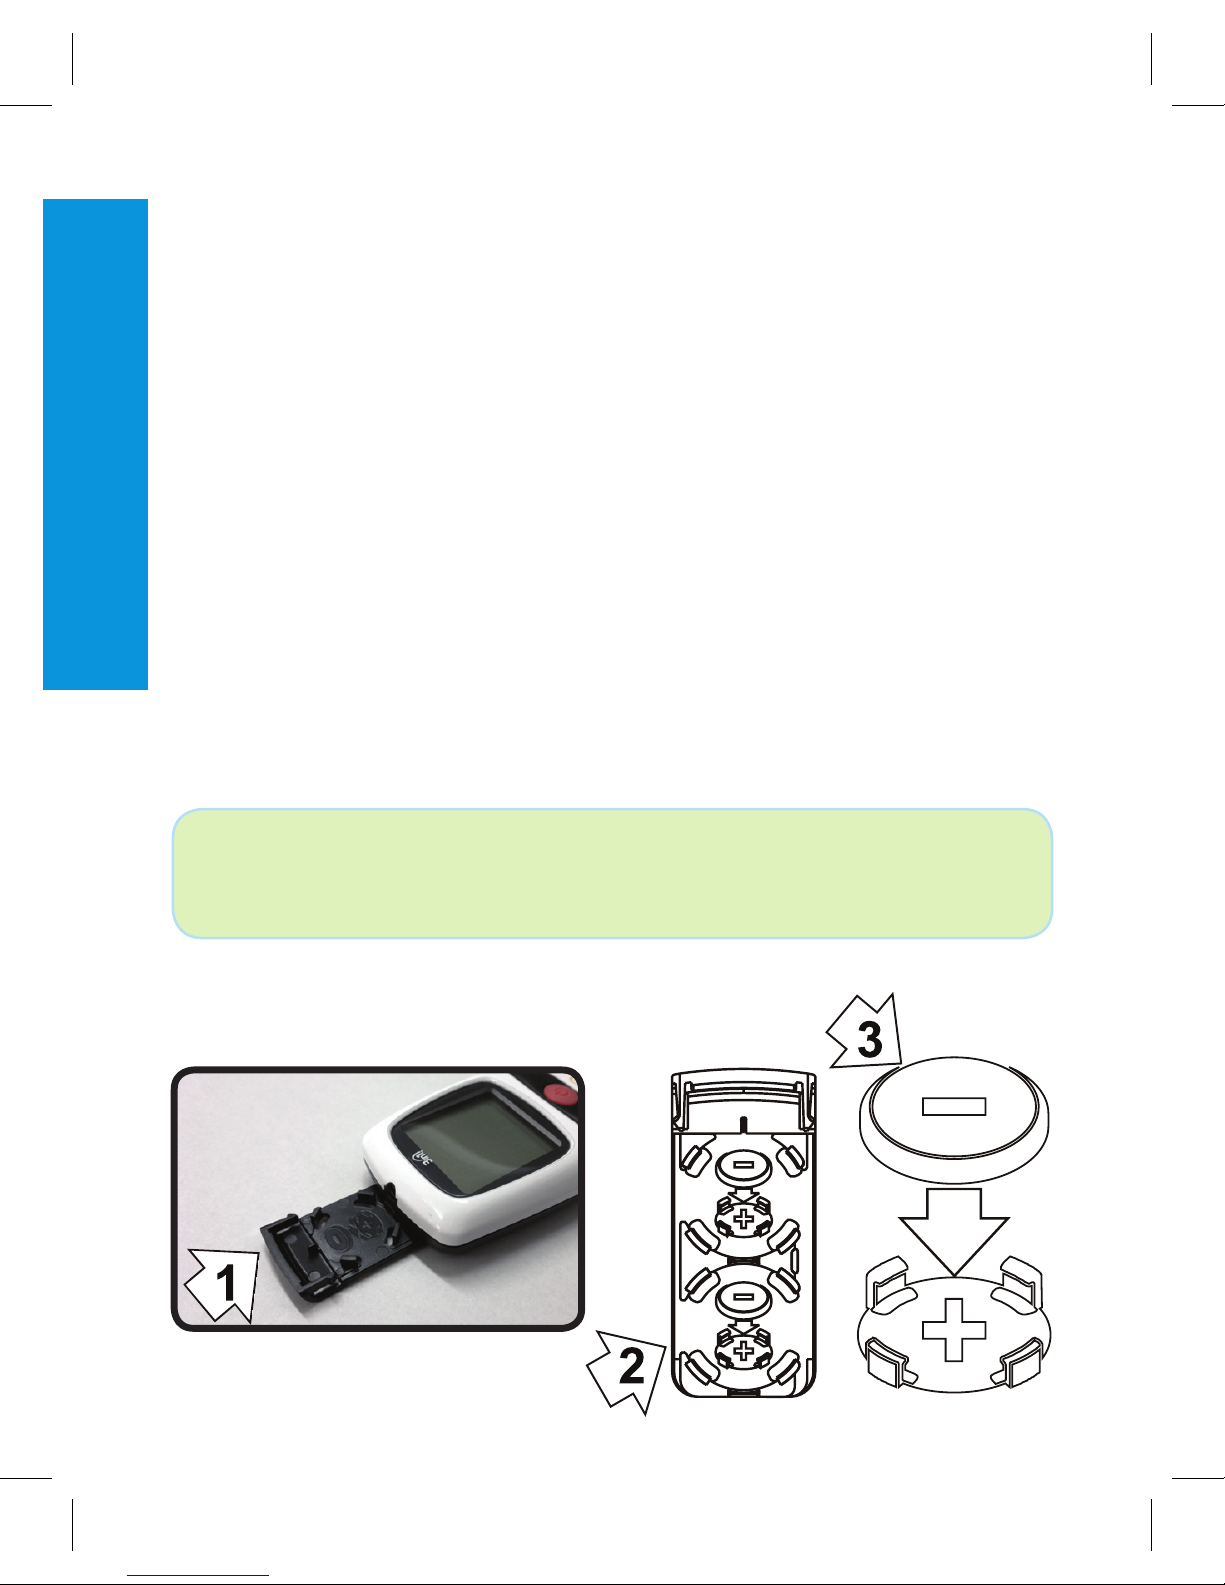
The 3in1. meter houses two 3V lithium batteries (type CR 2032).
If the battery icon is blinking, the charge is low and the battery must
be replaced before taking a measurement.
Always insert new batteries and not a used one.
Shut down the instrument before removing the batteries.
Check the new batteries to see if they apply.
How to change the batteries:
• Open the sliding rear panel of the instrument (1).
• Remove the batteries from the plastic holder (2).
• Place the new batteries so that the type is readable. The negative
side of the batteries must be at the top (3).
• Close the back cover until a click is heard.
Flat batteries can be disposed of in recycling centers.
NOTE
If the batteries are replaced or simply removed for more than 60
seconds, it is necessary to set time and date again.
Substitutinf the batteries
Page 23

21
Information on the conditions of warranty
VPD, Bled, d.o.o. company grants to the customer that the
instrument will be free of material defects and manufacturer handling
for 3 years starting from the purchasing date. During such period,
VPD, Bled, d.o.o. should replace the defected instrument with an
equivalent version or the same model after verifying the defect.
Such warranty is subject to exception and limitation as described
below. The warranty is limited to the replacement due to defects
in some parts and handling. Instruments with defects caused by
improper use, alteration, negligence, technical assistance performed
by unauthorised personnel, or due to an accident, abuse or using
strips that differ from the original 3in1. strips will not be replaced.
VPD, Bled, d.o.o. reserves the right to apply technical modifications
to 3in1. meter without the obligation to insert such specifications to
already marketed products.
Other warranty will be granted for this product if the replacement
option described above shall not deem possible.
The responsibility for special, indirect or consequential damage is
excluded.
Waranty
Page 24

Name
Surname
Street
City & Postal code
Telephone
E-mail
Serial number
Date of purchase
Date
Fax
Send to:
VPD, Bled, d.o.o.
Pot na Lisice 4, 4260 Bled, Slovenia, EU
Signature
Page 25
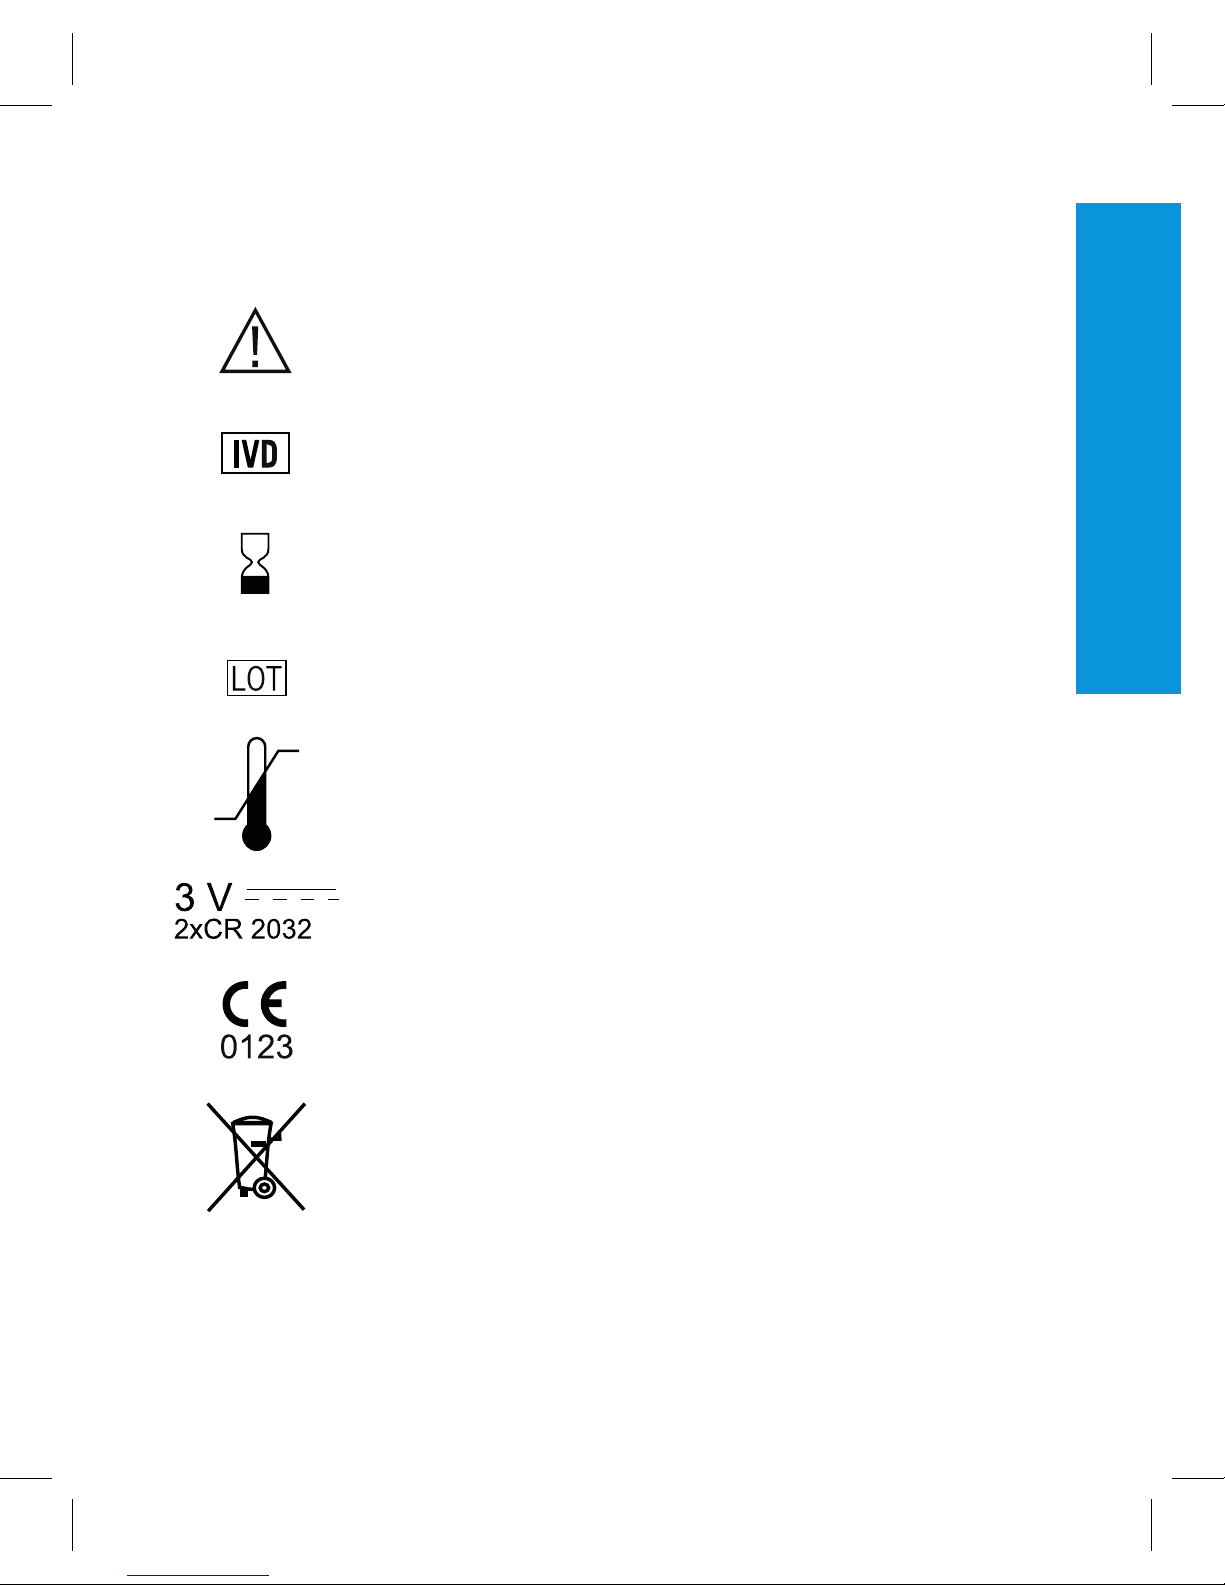
Symbols used on the packaging
Follow instructions
In-Vitro-Diagnosticum
Use until...
Batch number...
Store at temperatures
3V direct current and battery type
CE mark
Do not dispose the instrument in urban waste. Collect
separately, specifically for electric and electronic
waste or give the instrument to the distributor when
you buy a new one or when you want to substitute it.
Please refer to local updated regulations.
Symbols
Page 26

24
Performance
Measurement range: 10-600 mg/dL (0.6-33.3 mmol/L) glucose electrodes
130-400 mg/dL (3.3 - 10.2 mmol/L) cholesterol
50-500 mg/dL (0.56-5.6 mmol/L) triglycerides
Power source: 2x3V lithium button cell, type CR 2032.
The battery can be used for approx. 1 year with 3
measurements per day (approx. 1000 measur.)
Dimensions: 97 mm – length
49 mm – height
20.5 mm - width
Weight: 65 g (incl. battery)
Display: LCD
Temperature limits: 10 to 40°C (50°F to 104°F)
Humidly limits: 0% to 90% relative humidity (non-condensing)
Memory capacity: 500 measured values with time and date
Interface for data
processing:
Connecting cable
Special requirements
for electromagnetic
radiation:
The CE mark on the device indicates that it complies
with the requirements of the EC directives 89/336/EEC
relating to electro-magnetic compatibility 73/23/EEC
for electrical equipment intended for the use in areas of
specific voltage levels
Hint for Healthcare
Professionals:
The appropriate legal provisions apply for the use of
3in1. The accuracy of the instrument should be
checked after 3 years.
Waste management
disposal:
Please refer to local updated regulation!
Performance
Page 27
Page 28
VPD, Bled, d.o.o.
Pot na Lisice 4, 4260 Bled
Slovenia, EU
tel.:
fax:
email:
web:
+386 4 574 50 70
+386 4 574 50 71
[email protected]
www.3in1.si
EDITION DATE AND LAST REVISION DATE:
2014-02-01
 Loading...