

Page 1
GT4060
Six Rotor 4 CHANNEL
2.4GHz RC QUADCOPTER
VOYAGER
Page 2

NOTES AND CAUTIONS
Flight Notes:
* QUADCOPTER is suited for flight in doors and out doors
* Always ensure you have enough space while flying indoors
* Ensure the unit is at least half a metre of the ground before attempting any great manouvers
* Whilst outdoors, never flying in wind greater then 10km/h or during any moist or wet weather
* Never crash unit with any great force, any damage inccured by any sizeable force will void all the warranty
Caution:
* Never disassemble any part of the PCB or any other internal components
* Never wet any part of the Quadcotper or remote control, this will damage the unit beyond repair and
void all warranty
* Never expose the unit to any excessive amount of heat
* Never wet or expose the Li-Po battery to extreme heat or near flames
* Never attempt to charge the Li-Po battery with other charger other then the charger supplied with the unit
* Never attempt to open or modify the Li-Po battery.
Page 3
Each module have hooks that clip in to the bottom of the Quadcopter.
Clip a module on to the Quadcopter by guiding them through the tabs
as shown in the illustration above.
GT3830 - Camera Module
GT3836 - Retractable Winch Module
GT3834 - Water Sprayer Module
GT3832 - Bubble Blowing Module
*NOTE: All modules shown on this page are sold separately
Module Action 1
Module Action 2
The following are the actions for the available add-on Modules when connected to the Quadcopter.
Button: Module Action 1 (located on the top left of the remote)
- GT3830 Camera Module = Start/Stop Video record
- GT3832 Bubble Blower Module = Creates bubbles
- GT3834 Water Sprayer Module = Shoots water
- GT3836 Retractable Winch = Retracts up
Button: Module Action 2 (located on the bottom right, front side of remote)
- GT3830 Camera Modules = Take snap shot
- GT3836 Retractable Winch = Extend down
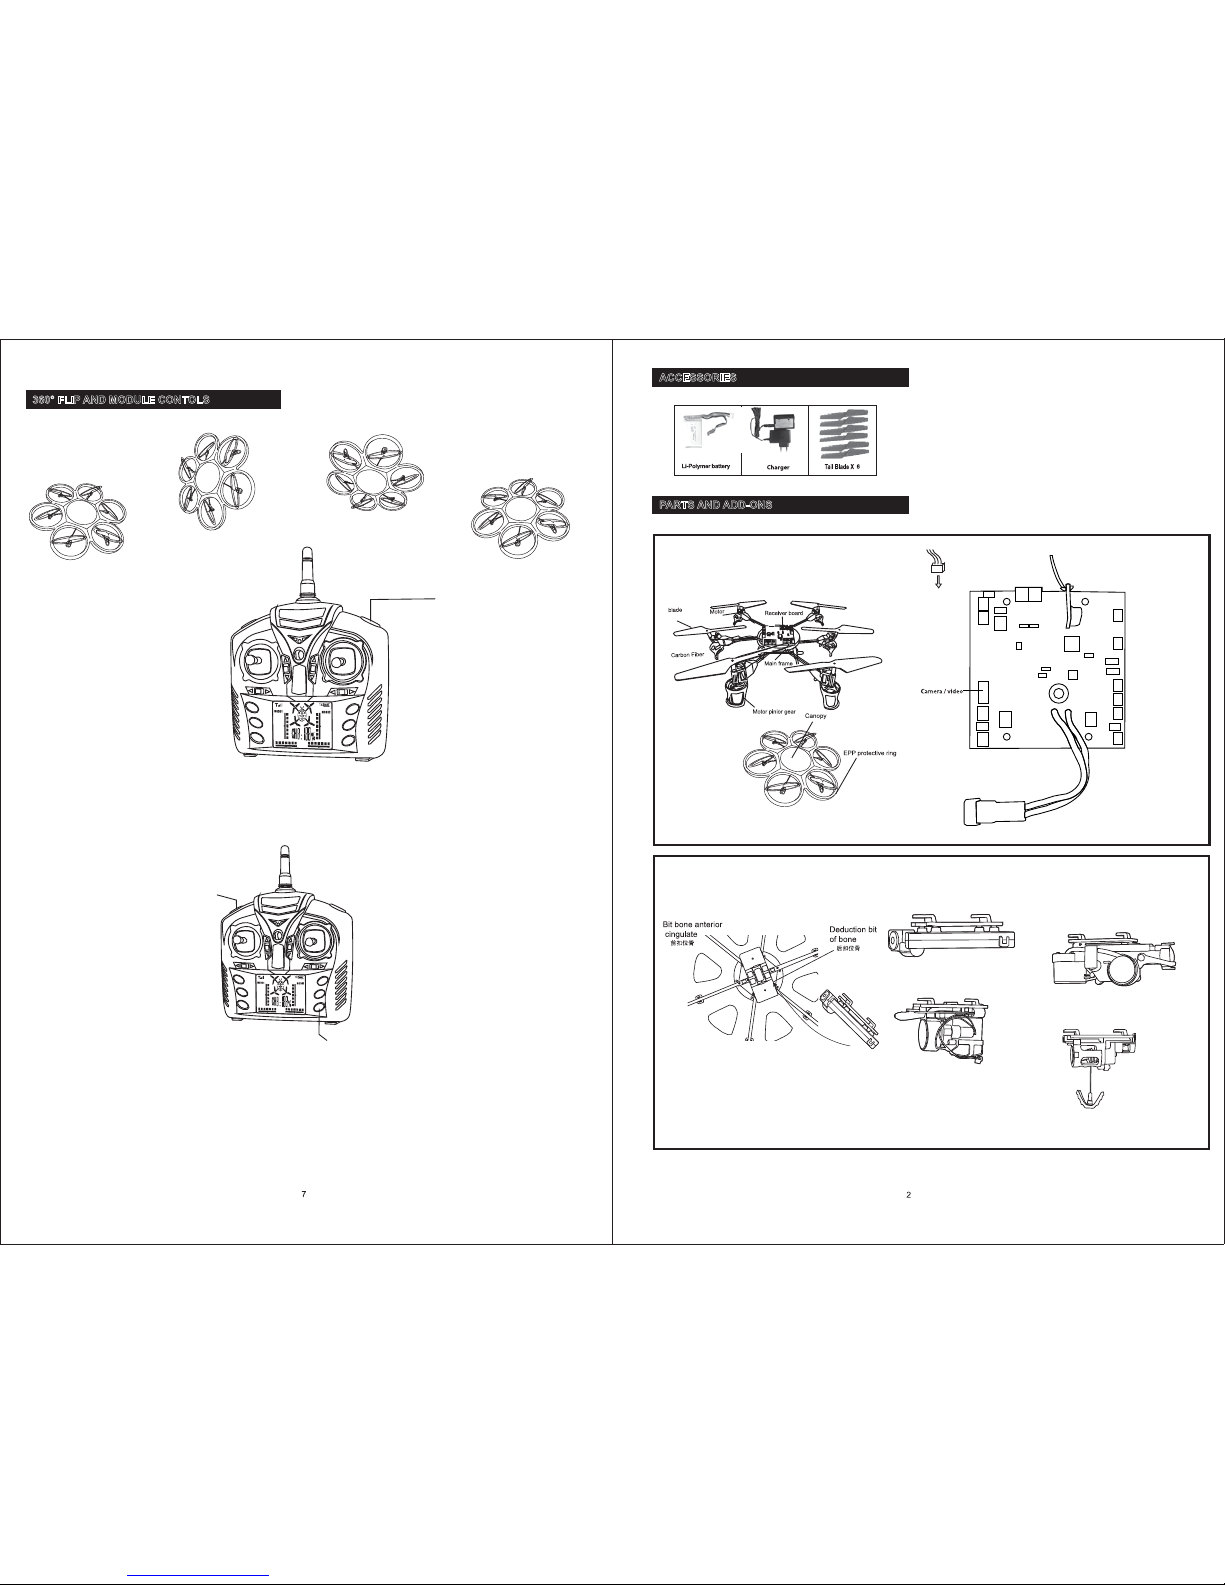
ACCESSORIES
PARTS AND ADD-ONS
360° flip button
During flight and while the Quadcopter is hovering stationary, press the top right button as shown above to
preform a 360° flip.
Ensure the Quadcopter is away from obstacles prior to attempting a 360° flip.
360° FLIP AND MODULE CONTOLS
Page 4

Remote control operation time 18 hours
Battery cover
Open the battery cover
Use 6 x AA batteries, alkalines are
suggested. Place battery in to the battery
holder according to the polarity markings.
Batteries not supplied
Alkaline type are
recommended
1.5V
AA sized batteries
6 Required
REMOTE INFORMATION
CHARGING THE LI-PO BATTERY
BATTERY AND USE INFORMATION
Connect the battery to the unit and place
in to the under carraige of the unit.
Move the throttle stick
to the lowest point.
Please remove the battery from the Quadcopter and ensure
the remote control is turned off with batteries remove prior to
storing the units. Or even once you have stopped playing
with the unit.
Ensure the batteries are installed in to the Remote Control and the Quadcopter.
Then before turning the Remote Control on, move the “Throttle Stick” to the lower point as shown above.
Once the “Throttle Stick” is lowered, turn the remote on.
This will pair the Remote Control with the Quadcopter.
NOTE:
It is important that the Quadcopter is on by installing the batteries first before attempting to turn the Remote
Control on. It will not pair otherwise.
POWERING UP AND PAIRING
7.4V 1600mah
LED Indicator
Li Po Battery
Red light flashingRed light off
Charging Complete Charging
Input Charging Current
240V 500mA
Approx. 60 Minutes
Approx. 15 Minutes
N/A
Page 5

Module Action 1
360° flip button
Left/Right trim
Yaw Trim
Direction sensitivity level 100%
Direction sensitivity level 40%
Direction sensitivity level 60%
Direction sensitivity level 80%
Light power button
Module Action 2
Signal Strength
Speed trim indicator
Yaw trim indicator
Left/Right trim indicator
Forwards and
backwards trim
incicator
Battery cover
Remote Action Quadcopter Movement Remote Action Quadcopter Movement
Direction Stick
Left or Right
Direction Stick
Up or Down
Throttle Stick
Up or Down
Throttle Stick
Left or Right
REMOTE FUNCTIONS
REMOTE ACTIONS
Adjustment of Left/Right Trim:
If the quadcopter keeps turning to the left, please adjust the Yaw trim to the RIGHT until it stops turning
to the left.
If the quadcopter keeps turning to the right, please adjust the Yaw trim to the LEFT until it stops turning
to the right.
Adjustment of Forwards/Backwards Trim:
If the quadcopter keeps going forward, please adjust the trim (Forward/backward) DOWN until it stops
flying forward.
If the quadcopter keeps going backward, please adjust the trim (Forward/backward) UP until it stops
flying backward.
Adjustment of Yaw Trim:
If the quadcopter keeps leaning to the left, please adjust the trim (Left/right) to the RIGHT until it stops
flying to the left.
If the quadcopter keeps leaning to the right, please adjust the trim (Left/right) to the LEFT until it stops
flying to the right.
TRIM ADJUSTMENTS
Page 6

Page 7

Each module have hooks that clip in to the bottom of the Quadcopter.
Clip a module on to the Quadcopter by guiding them through the tabs
as shown in the illustration above.
GT3830 - Camera Module
GT3836 - Retractable Winch Module
GT3834 - Water Sprayer Module
GT3832 - Bubble Blowing Module
Module Action 1
360° flip button
Left/Right trim
Yaw Trim
Direction sensitivity level 100%
Direction sensitivity level 40%
Direction sensitivity level 60%
Direction sensitivity level 80%
Light power button
Module Action 2
Signal Strength
Speed trim indicator
Yaw trim indicator
Left/Right trim indicator
Forwards and
backwards trim
incicator
Battery cover
Remote Action Quadcopter Movement Remote Action Quadcopter Movement
Direction Stick
Left or Right
Direction Stick
Up or Down
Throttle Stick
Up or Down
Throttle Stick
Left or Right
*NOTE: All modules shown on this page are sold separately
Module Action 1
Module Action 2
The following are the actions for the available add-on Modules when connected to the Quadcopter.
Button: Module Action 1 (located on the top left of the remote)
- GT3830 Camera Module = Start/Stop Video record
- GT3832 Bubble Blower Module = Creates bubbles
- GT3834 Water Sprayer Module = Shoots water
- GT3836 Retractable Winch = Retracts up
Button: Module Action 2 (located on the bottom right, front side of remote)
- GT3830 Camera Modules = Take snap shot
- GT3836 Retractable Winch = Extend down
ACCESSORIES
PARTS AND ADD-ONS
REMOTE FUNCTIONS
Remote control operation time 18 hours
Battery cover
Open the battery cover
Use 6 x AA batteries, alkalines are
suggested. Place battery in to the battery
holder according to the polarity markings.
Batteries not supplied
Alkaline type are
recommended
1.5V
AA sized batteries
6 Required
REMOTE INFORMATION
CHARGING THE LI-PO BATTERY
BATTERY AND USE INFORMATION
REMOTE ACTIONS
Adjustment of Left/Right Trim:
If the quadcopter keeps turning to the left, please adjust the Yaw trim to the RIGHT until it stops turning
to the left.
If the quadcopter keeps turning to the right, please adjust the Yaw trim to the LEFT until it stops turning
to the right.
Adjustment of Forwards/Backwards Trim:
If the quadcopter keeps going forward, please adjust the trim (Forward/backward) DOWN until it stops
flying forward.
If the quadcopter keeps going backward, please adjust the trim (Forward/backward) UP until it stops
flying backward.
Adjustment of Yaw Trim:
If the quadcopter keeps leaning to the left, please adjust the trim (Left/right) to the RIGHT until it stops
flying to the left.
If the quadcopter keeps leaning to the right, please adjust the trim (Left/right) to the LEFT until it stops
flying to the right.
TRIM ADJUSTMENTS
360° flip button
During flight and while the Quadcopter is hovering stationary, press the top right button as shown above to
preform a 360° flip.
Ensure the Quadcopter is away from obstacles prior to attempting a 360° flip.
360° FLIP AND MODULE CONTOLS
NOTES AND CAUTIONS
Flight Notes:
* QUADCOPTER is suited for flight in doors and out doors
* Always ensure you have enough space while flying indoors
* Ensure the unit is at least half a metre of the ground before attempting any great manouvers
* Whilst outdoors, never flying in wind greater then 10km/h or during any moist or wet weather
* Never crash unit with any great force, any damage inccured by any sizeable force will void all the warranty
Caution:
* Never disassemble any part of the PCB or any other internal components
* Never wet any part of the Quadcotper or remote control, this will damage the unit beyond repair and
void all warranty
* Never expose the unit to any excessive amount of heat
* Never wet or expose the Li-Po battery to extreme heat or near flames
* Never attempt to charge the Li-Po battery with other charger other then the charger supplied with the unit
* Never attempt to open or modify the Li-Po battery.
Connect the battery to the unit and place
in to the under carraige of the unit.
Move the throttle stick
to the lowest point.
Please remove the battery from the Quadcopter and ensure
the remote control is turned off with batteries remove prior to
storing the units. Or even once you have stopped playing
with the unit.
Ensure the batteries are installed in to the Remote Control and the Quadcopter.
Then before turning the Remote Control on, move the “Throttle Stick” to the lower point as shown above.
Once the “Throttle Stick” is lowered, turn the remote on.
This will pair the Remote Control with the Quadcopter.
NOTE:
It is important that the Quadcopter is on by installing the batteries first before attempting to turn the Remote
Control on. It will not pair otherwise.
POWERING UP AND PAIRING
GT4060
Six Rotor 4 CHANNEL
2.4GHz RC QUADCOPTER
VOYAGER
7.4V 1600mah
LED Indicator
Li Po Battery
Red light flashingRed light off
Charging Complete Charging
Input Charging Current
240V 500mA
Approx. 60 Minutes
Approx. 15 Minutes
N/A
Page 8

 Loading...