

Voxx SB10MD1, SB10M1 Quick Start Guide
FIRST TIME SETUP
QUICK START GUIDE
Powering up the System
1. When vehicle power is applied to the system, the POWER and HOME buttons on each
monitor will ash RED/BLUE for approximately 12 to 15 seconds and then the buttons
will remain solid RED. This is normal and a notication that the system is booting up.
Once the POWER and HOME buttons are solid RED, you can press the POWER
button to turn on the monito
Wi-Fi
1. Press the
2. Toggle the WIFI to “ON”.
3. Press WIFI to show available networks.
4. Select the WIFI network you would like to connect to and use the touchscreen keyboard to enter the password.
5. Press the green check mark to connect. The system will remember and automatically
reconnect to any saved available networks (maximum of 10).
Wireless Headphones
1. To use the wireless headphones, press the
2. Select “IR TRANSMITTER” and toggle the switch to “ON”.
3. Select “CHANNEL A” or “CHANNEL B” on each monitor.
4. Set the switch on your wireless headphones to “A” or “B” to listen to that monitor.
Downloading Apps on the System Monitors
1. Select the
2. Open the “Play Store” application, preloaded on the system. You will need to create or
sign in with your Google account.
3. Browse the Google Play Store and download the applications you wish to the system
monitors.
Voxx Link
1. Go to the Google Play Store or iTunes Store and download the free Voxx Link
application for your Smart Device.
Your Smart Device must be connected to the same WIFI network as the System
Monitors for the Voxx Link app to function.
2. Press the Setup icon to open the settings menu.
3. Select “VOXX LINK” from the menu on the left. This will enable the feature.
4. Open the application on your mobile device and select the monitor you wish to control
(example: SB10MD1_xxx). Once selected, the Monitor’s screen will display on your
mobile device, allowing full control of the Monitor.
NOTE: This Voxx Link application is designed to allow a remote user (ie. Parent) that does
not have direct visibility to each monitors to control each monitor.
Setup icon to open the Settings Menu.
apps icon from the main menu.
Scan the QR Codes below to download the Voxx Link application.
iTunes Store
rs.
Setup icon to open the settings menu.
Google Play Store
10.1” SEATBACK IN-VEHICLE
ENTERTAINMENT SYSTEM
Congratulations on the purchase of your In-Vehicle Entertainment System!
This Quick Start Guide is a brief tutorial allowing you quick access to enjoying your new
system. You will nd the system very user friendly and intuitive but in the event you need
further information on how to operate your system, please go to the following URL to review
or download the complete Operation Manual:
www.voxxintl.com/seatbackOM
SYSTEM FEATURES:
• DVD Player – Plays DVDs, CDs, MP3 discs
• HDMI Input – Connect HDMI Devices such as Smart Phones or Game Consoles
• SmartStream – Allows Wireless Content Transfer from Smart Phones to Monitors
• SD Input – Media Playback of Videos, Music, Photos
• USB Input – Media Playback of Videos, Music, Photos, and Charging Support for
USB based devices
• Wi-Fi Dual Screen – Wireless content sharing between System Monitors in Hi-Def
• Dual Screen – Wired content sharing between System Monitors in Standard-Def
• Apps – Download apps from the Google Play Store (Google Play Store, Google
Chrome, and Netix preloaded)
• Setup:
• Wi-Fi - Connect to an In-Vehicle Wi-Fi Hotspot or other Wi-Fi Hotspot
(ie. Smart Phone) for full functionality of the system
• Voxx Link - Allows Wi-Fi pairing of an Android or iOS based Smart Device to
the System Monitors allowing full system remote control and monitoring of the
System Monitors from anywhere in the vehicle. *Voxx Link app required
• WFMM - Built-In 100 Channel Wireless FM Transmitter to broadcast Audio from
a System Monitor to a Vehicle’s Audio System. *Must choose 1 monitor
• IR Transmitter - 2 Channel Wireless Headphone Transmitter
• Language - Select system language: English, Spanish, French, Chinese, or
Japanese
• About Device - System Info and Update Tools
• Reset - Resets the System Monitor to Factory Default
4
700078
SB10MD1
SCREENOFF
DVD
SmartStream
USB
SD
DUAL SCREEN WIFI DUAL SCREEN
APPS
SETUP
SCREENOFF
HDMI
SmartStream
USB
SD
DUAL SCREEN WIFI DUAL SCREEN
APPS
SETUP
SCREENOFF
HDMI
SmartStream
USB
SD
DUAL SCREEN WIFI DUAL SCREEN
APPS
SETUP
SB10M1
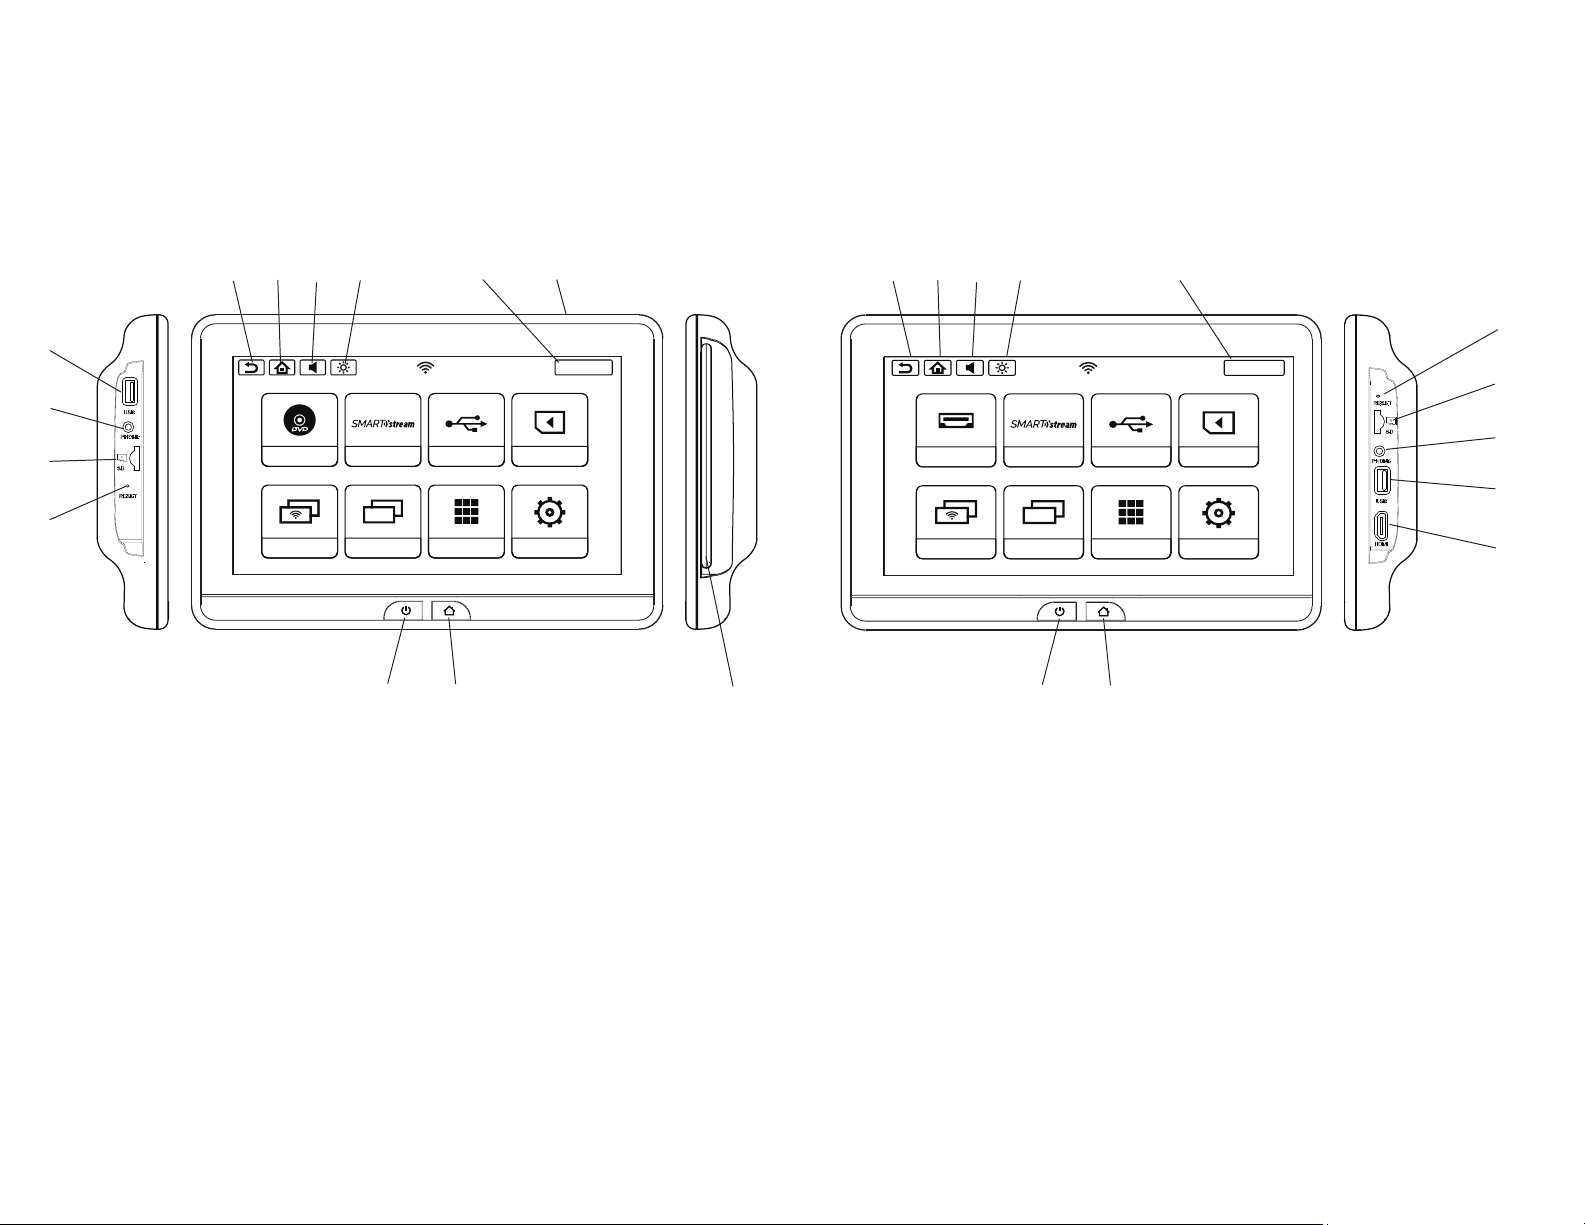
OVERVIEW
WITH DVD PLAYER
9 8 10 11 12 2
8 7 9 10 11
OVERVIEW
WITHOUT DVD PLAYER
5
4
2
5
4
3
3
6
1
7 8 1
6 7
1. DVD Player - Plays DVDs, CDs, MP3 discs
2. Eject Button - Eject a DVD, CD, or MP3 disc (on top of monitor)
3. Micro SD Card Input - For SD Media Playback
4. USB Input - For USB Media Playback and Charging Support
5. Headphone Output - For use with Wired Headphones
6. Reset - Reboots the Monitor
7. Power - Turns the Monitor On/Off
8. Home - Returns to Home Screen
9. Return - Returns to Previous Screen
10. Sound - Adjusts Wired Headphone Volume
11. Brightness - Adjusts Screen Brightness
12. Screen Off - Turns the Monitor Display Off
*Touch the Screen to turn the Monitor back On
1. HDMI Input - Connect HDMI Devices such as Smart Phones or
Game Consoles
2. Micro SD Card Input - For SD Media Playback
3. USB Input - For USB Media Playback and Charging Support
4. Headphone Output - For use with Wired Headphones
5. Reset - Reboots the Monitor
6. Power - Turns the Monitor On/Off
7. Home - Returns to Home Screen
8. Return - Returns to Previous Screen
9. Sound - Adjusts Wired Headphone Volume
10. Brightness - Adjusts Screen Brightness
11. Screen Off - Turns the Monitor Display Off
*Touch the Screen to turn the Monitor back On
32
 Loading...