

Voxx REV IIG, REV II, REV III Owner's Manual
1

2

3
REVOLUTIONSERIES
Rear Seat Entertainment System
Owner’s Manual

4

5
EN
ES
FR
REV IIG • REV II • REV III
Owner’s Manual
REV IIG • REV II • REV III
Manual del usuario
REV IIG • REV II • REV III
Manuel de l’utilisateur
7
33
59

6

7
EN
REV IIG • REV II • REV III
Owner’s Manual
© 2010 INVISION Automotive Systems, Inc. All rights reserved.
This manual, or any portion thereof, may not be reproduced
without the express written permission of INVISION Automotive Systems, Inc.
Contents
Welcome ..............................................................................8
Control Description of the Front Panel
.................. 10
Functional Verication
................................................. 12
Remote Control Operations
...................................... 13
Button Function Descriptions
................................... 14
General Operating Instructions
................................ 18
How to use the DVD OSD Menu
.............................. 20
How to use the Device OSD Menu
.......................... 23
Playing an Audio CD
..................................................... 24
Playing an MP3 Disc
..................................................... 25
Troubleshooting
............................................................ 26
Specications
.................................................................. 27
Compliance Information
............................................. 29
Warranty
........................................................................... 30
Notes
.................................................................................. 31

8
Welcome
Welcome
Thank you for purchasing this REVOLUTION
headrest video monitor with built-in DVD player.
Before operating this system, read this manual
thoroughly and retain it for future reference.
Important Notice
It is unlawful in most jurisdictions for a person
to drive a motor vehicle which is equipped with
a television viewer or screen that is located in
the motor vehicle at any point forward of the
back of the driver’s seat, or that is visible, directly or indirectly, to the driver while operating the
vehicle. In the interest of safety, the unit should
never be installed where it will be visible, directly or indirectly, by the operator of the motor
vehicle. If your vehicle is equipped with a wireless rear seat audio system or any other wireless
IR device, power system o in order to operate
the DVD headrest system. If system is powered
on, the two systems may interfere with each
other canceling out or creating undesirable
audio through the wireless headphones.
Safety Precaution
For safety reasons, when changing video disc
it is recommended that the vehicle not be in
motion, and that you do not allow children
to unfasten safety belts to change disc or
make any adjustments to the system. System
adjustments can be accomplished using the
remote control unit, while safety belts remain
fastened. Enjoy your entertainment system
but remember that safety of all passengers
remains the number one priority.
Product Features
• 7-inch Color TFT-LCD Panel
(480x234) with 16:9 aspect
• Built-in Top-Loading Slot load DVD Player
• Infrared Transmitters for IR Wireless Head-
phones
• Audio/Video Source Input- 3 RCA Jacks
• Audio/Video Signal Output- 1/8-inch
Headphone Jack
• 1/8-inch Stereo Headphone Jack
• Forward Remote Sensor on the Front Panel
• Full Function Remote Control
• 5 Control Buttons on the Front Panel-
POWER, SOURCE, STOP, PLAY, EJECT
• OSD (On Screen Display) Control
• 12V DC Power Input
• FM Transmitter (may be optional)
Caution:
• Do not touch the inner pins of the jacks on
the front panel. Electrostatic discharge may
cause permanent damage to the device.
• Be sure to run the vehicle engine while using the device. Using this device without
running the engine can result in battery
drainage. To avoid the risk of battery
drainage, please remember to turn o the
device when the vehicle is not in use for
long periods of time.
9
Welcome
EN
Wireless Headphones
(models AX, BX, AE, BE, AG, AGE, 3X & 4X only)
This unit includes a built-in dual channel infrared transmitter for use with a wireless headphone. The volume can then be adjusted with
the controls on each headset. The wireless
headphone must be used within a line of sight
from the transmitter as infrared transmission,
like visible light, travels only in a straight line.
Wired Headphones
There is a 1/8-inch headphone jack on the device that can be used with any standard stereo
headphone. Remove and save the protective
plastic cover to access the jacks. Remember
to replace the cover when the jacks are not in
use.
AV Input
An external AV device such as a DVD player,
video game device, or other audio/video
device may be connected to the unit by using
the “AV INPUT” port consisting of 3 RCA jacks
(Yellow:video, Red: audio-R, White: audio-L).
To display and listen to the video/audio signal of this external source, connect the video
source RCA cables to the AV inputs on the
monitor. The video source will overide any
other video source for that monitor.
Wireless FM Transmitter
Your video device may be equipped with an
external FM transmitter, which allows you to listen to the audio signal by tuning your vehicle’s
FM radio to one of six frequencies. Whenever
the FM transmitter is active, broadcast radio
reception will be poor. Turn the FM transmitter
o to allow normal radio reception.
How to use the FM Transmitter
Power up your system and place a disc in
monitor “A”. While pointing your remote at
the monitor press the “DVD A” button directly
under the red “POWER” button on your remote control. Next press the “Sound Around
ON/OFF” button to turn FM transmission on
or o as desired. Three buttons to right is the
“Sound Around SELECT” button which will
cycle through 6 possible stations (88.3, 88.7,
89.1, 89.5, 89.9, and 90.3MHz) for broadcasting audio to your radio. Once you’ve selected
a frequency, you must then tune your radio to
the corresponding frequency. Try each station
frequency until you achieve a clear audio signal.
Dolby Compatibility
When using this unit with a multi-channel
processor, you can enjoy the atmosphere and
excitement provided by DVD movie and music
software featuring stereo 2-channel recordings. Manufactured under license from Dolby
Laboratories. “Dolby” and double-D symbol
are trademarks of Dolby Laboratories.

10
Control Description of the Front Panel
Control Description of the Front Panel
POWER SOURCE
AV OUTPUT
VIDEOL AUDIO R
AV INPUT
PLAY STOP EJECT
DVD/CD/MP3 PLAYER MONITOR BX
POWERSOURCE
AV OUTPUT
VIDEOL AUDIO R
AV INPUT
DVD/CD/MP3 PLAYER MONITOR AG
Model AX, BX, AE, BE, 3X, 4X
Monitor with DVD Player
Model AG, AGE, AM, AME
Satellite Monitor (No DVD Player)

11
Control Description of the Front Panel
1. DVD Compartment Slot
(models AX, BX, AE, BE, 3X & 4X only)
2. Infrared Transmitters
(models AX, BX, AE, BE, AG, AGE, 3X & 4X only)
These are used to transmit audio to the
wireless headphones.
3. IR Sensor - Forward Sensor Eye
Allow the remote control to navigate the
OSD (On Screen Display) on the device.
4. Level Lock & Release Latch
Allow the user to adjust the viewing angle
of the LCD panel or lock the panel into the
secure position.
5. TFT LCD Panel
7-inch TFT LCD Panel (480x3 (RGB) x234).
6. POWER Button
Press this button to turn the system on or off.
7. SOURCE Button
Press this button to select between
Monitor A, Monitor B, TV (if available), and
AUX (if available).
8. AV Output Jack
Audio/Video output.
9. Video Input Jack (Yellow)
Connect using a cable (RCA connector).
10. Audio Input Jack (White)
Connect using a cable (RCA connector).
11. Audio Input Jack (Red)
Connect using a cable (RCA connector).
12. 1/8-inch Headphone Jack
Allow plug-in of wired headphones with
1/8-inch stereo connector plug for monitoring the audio from the program.
13. PLAY Button
(models AX, BX, AE, BE, 3X & 4X only)
Press this button to play the DVD.
14. OP Button
(models AX, BX, AE, BE, 3X & 4X only)
Press this button to stop playing the DVD.
15. EJECT Button
(models AX, BX, AE, BE, 3X & 4X only)
Press this button to eject the disc from the
DVD compartment.
Warnings
• Do not use any solvents or cleaning materials when cleaning the video device.
• Do not use any abrasive cleaners, that
may scratch the screen. Use only a lightly
dampened lint free cloth to wipe the
screen if it is dirty.
• Lock the LCD screen in the fully closed
position when not in use.
• Do not put pressure on the screen.
• Caution children to avoid touching or
scratching the screen, as it may become
dirty or damaged.
EN

12
Functional Verication
Function Checks: Look for:
Turn vehicle ignition to ON, depress power
button on each headrest monitor.
Monitor should power on and start up
screen should appear on screen.
Insert disc into DVD player, press ENTER
button on the remote control or front panel.
Disc should begin playing.
Listen with wireless headphones (be sure
to set to channel “A” to listen to Monitor A
and channel “B” to listen to Monitor B.
Audio should be heard through wireless
headphones.
Press SOURCE button on Monitor B until it
reads Monitor A.
DVD in Monitor A should be displayed on
Monitor B also.
Press SOURCE button on Monitor A until it
reads Monitor B.
DVD in Monitor B should be displayed on
Monitor A also.
Depress eject button on the remote control or front panel.
Disc should eject.
Turn on vehicle radio and set station to the
frequency set on FM transmitter
(if available).
Only audio from Monitor A should be
heard through vehicle speakers.
Functional Verication
13
Remote Control Operations
EN
Remote Control Operations
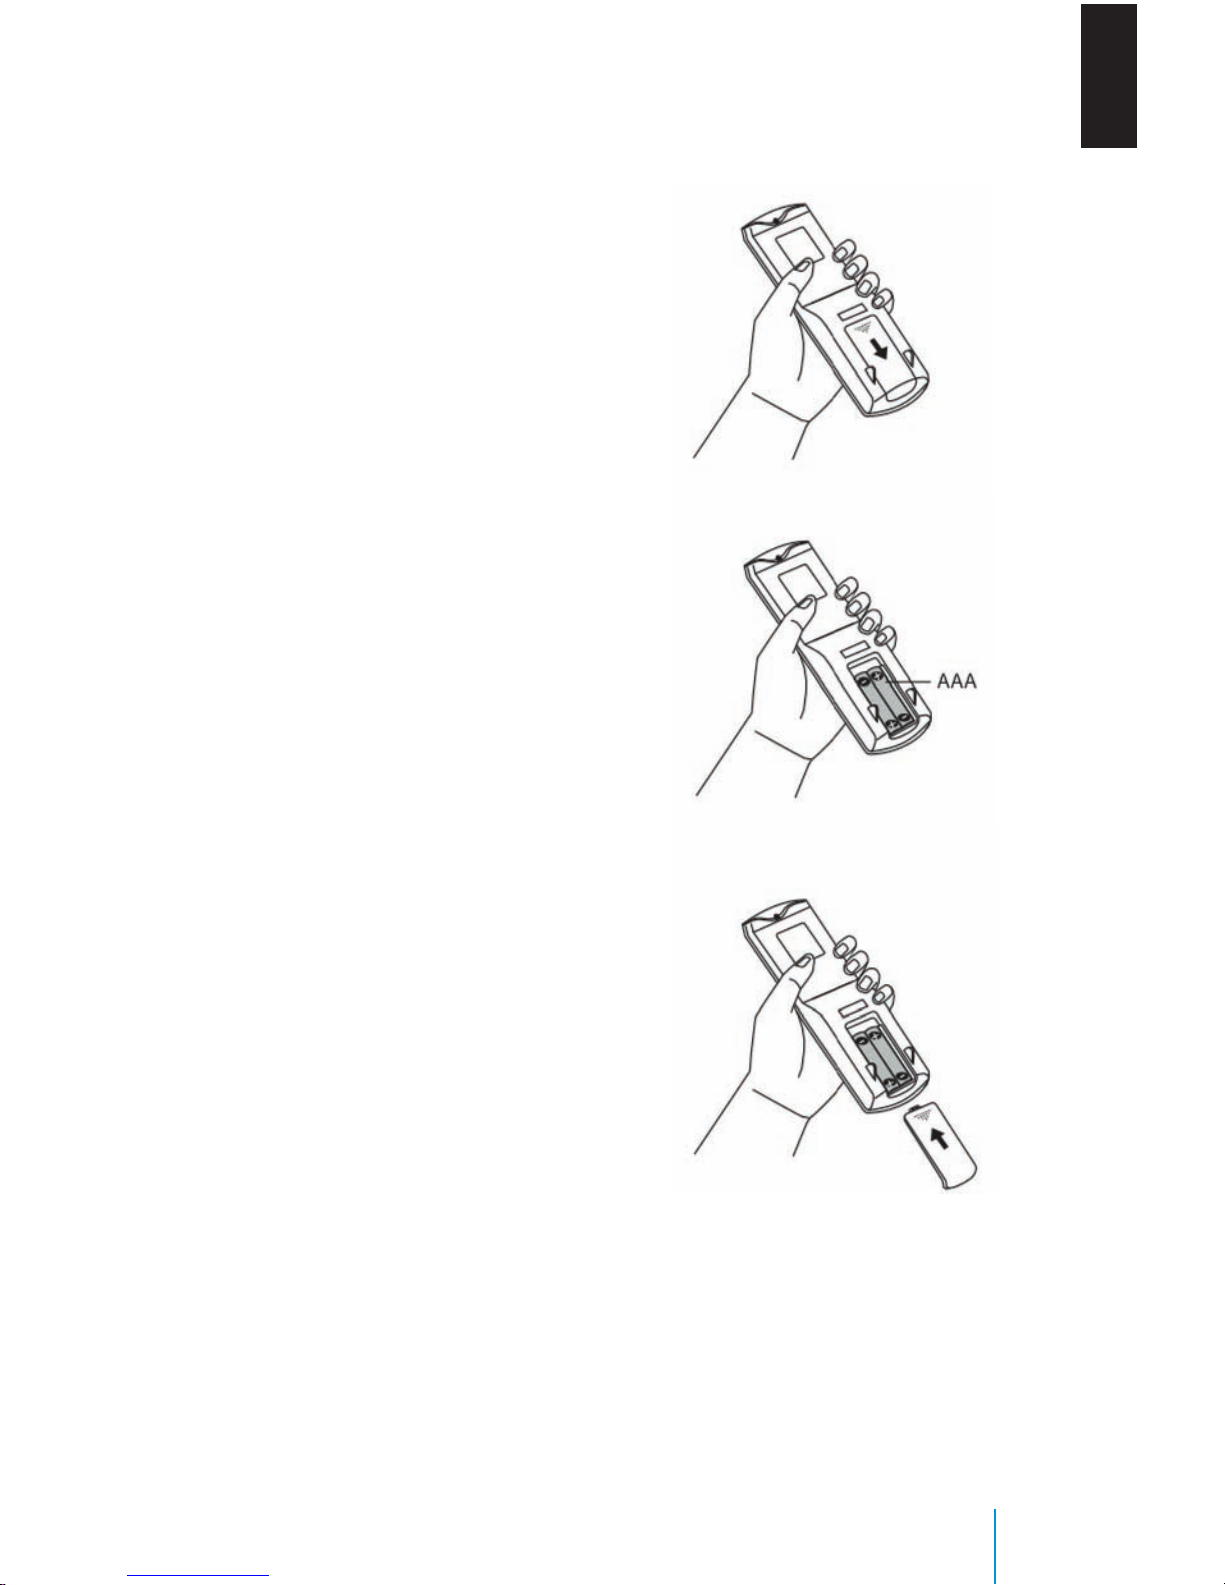
Installing the Battery
Before attempting to operate your remote control, install the batteries as described below.
1. Turn the remote control face down. Press
down on the ridged area of the battery
cover and slide it o.
2. Install two “AAA” batteries as shown.
Make sure that proper polarity (+ or -) is
observed.
3. Slide the cover back until it clicks.
The remote control will only operate this device.
It is not a universal remote control and will not
control other equipment.
Warning/Caution on using batteries
• Always ensure that the batteries are
inserted with the positive and negative
terminals in the correct direction as shown
in the battery compartment.
• Dierent types of batteries have dierent
characteristics. Do not mix dierent types.
• Do not mix old and new batteries. Mixing
old and new batteries will shorten battery
life and/or cause chemical leaks from the
old batteries.
• When batteries fail to function, replace
them immediately.
• Keep the batteries out of the reach of
children. Should the batteries be swallowed, immediately consult a doctor. Also,
when disposing of used batteries, please
comply with governmental regulations or
environmental public institution rules that
apply in your country/area.
• Remove the batteries if the remote control
is not used for a month or longer.
14
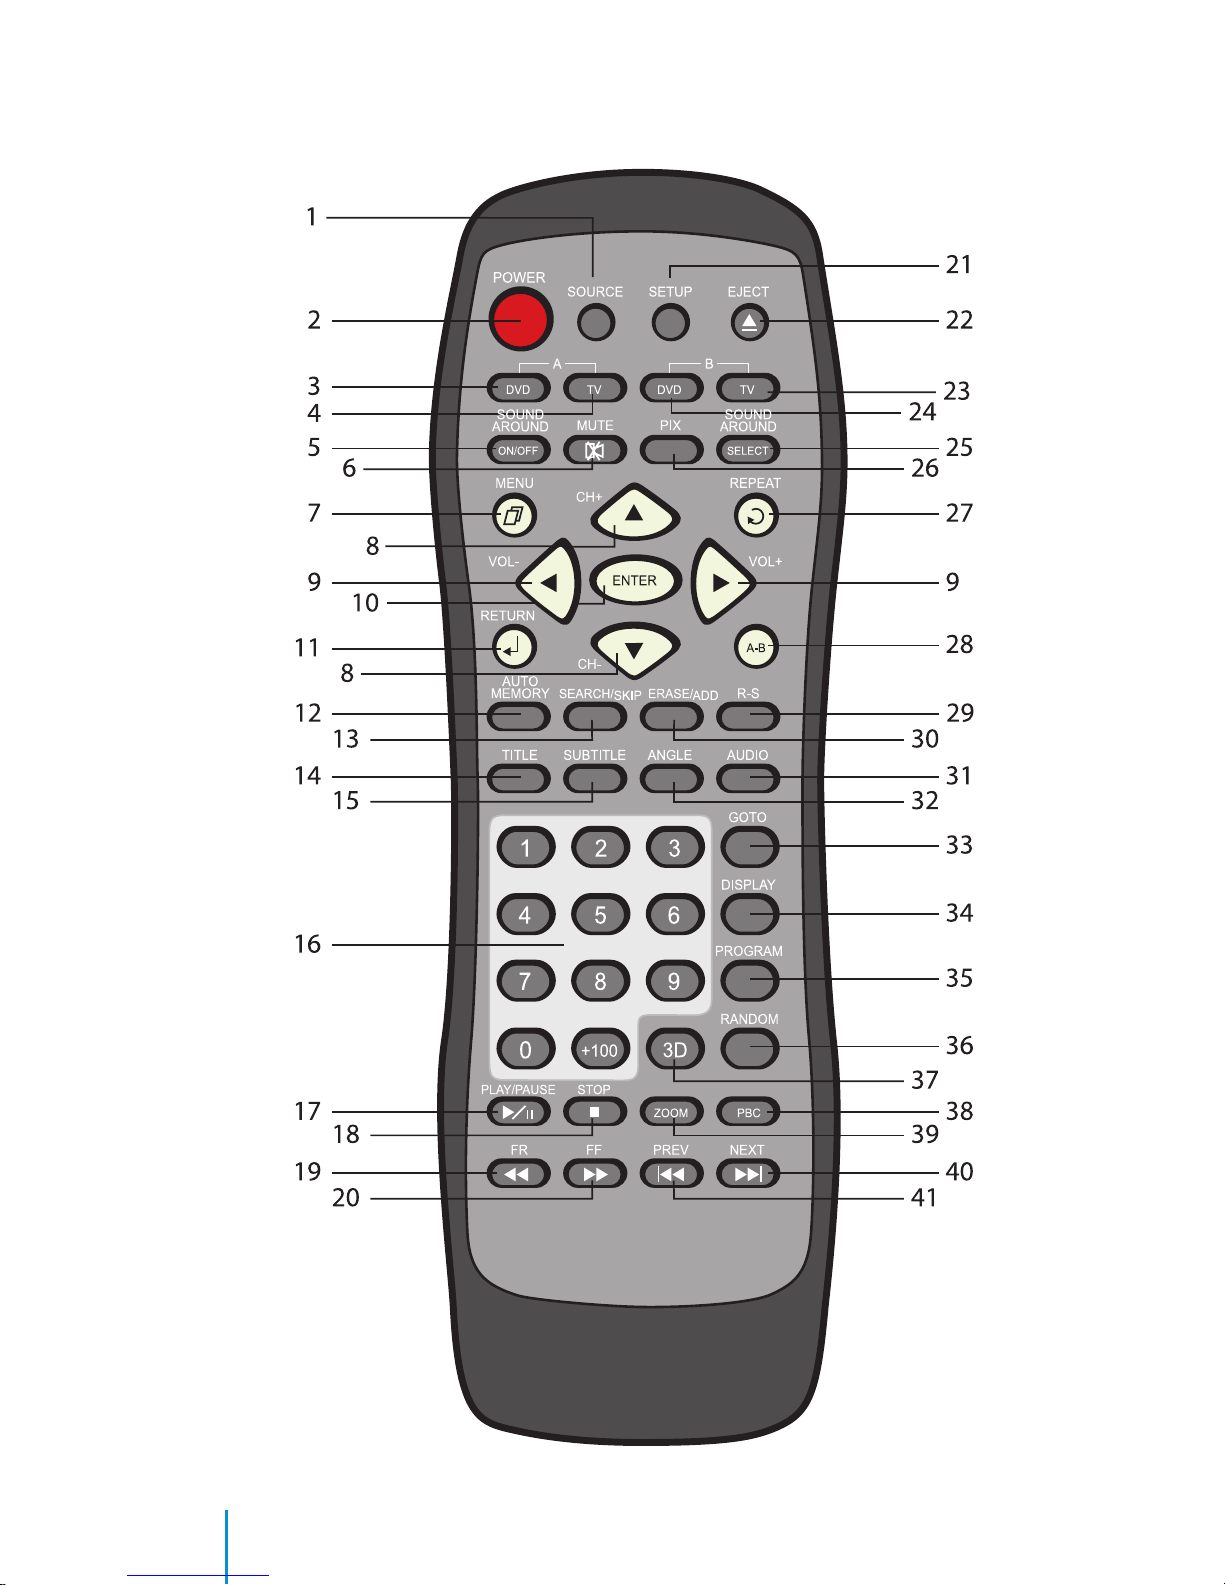
Button Function Descriptions
Button Function Descriptions

15
Button Function Descriptions
EN
1. SOURCE
Any video equipment connected to the
audio/video inputs can be used with the
monitor by pressing this button. Each
time the button is pressed, the audio/
video source will change in the following
sequence: Monitor A, Monitor B, AUX, TV.
2. POWER
Press the button to turn the device on. The
current video source will be displayed on
the screen, and the picture will appear in a
few seconds. Press the button again to turn
the device off.
3. DVD-Monitor A
Transmit IR codes for DVD mode of
MONITOR A.
4. TV-Monitor A (If available)
Transmit IR codes for TV mode of Monitor A.
5. SOUND AROUND ON/OFF (If available)
Turn the FM transmitter ON/OFF.
6. MUTE (for DVD only)
Press the button to shut off the sound
transmitted to the headphone stations.
The screen will display that the sound has
been turned off. Pressing the button again
restores sound to the previously set level.
7. MENU
Press the button to go to the Root Menu
included on the disc.
8. UP, DOWN
For DVD: Navigation button, you can
use this button to move the select bar to
items among the menu or file list. For TV:
Use these buttons to advance to the next
higher or lower channel. For OSD: Increase
or decrease the setting of selected item.
9. LEFT, RIGHT
Navigation button; you can use this button
to move the select bar to one of the items
in the menu or file list.
10. ENTER
Makes a selection or begins playback of
the disc.
11. RETURN
Returns to the previous menu screen or
resumes disc playback.
12. AUTO MEMORY
(If TV mode is available)
When the AUDIO MEMORY button is pressed,
all channels in TV mode are searched and
tuned; all the channels with signals that are
detected are automatically stored.
13. CH-SEARCH/SKIP
(If TV mode is available)
This button selects between SEARCH and
SKIP modes. In SKIP mode, the TV only
stops on channels that are programmed
into memory when the UP/DOWN buttons
are used. When the SKIP mode is off, TV will
stop on all active channels.
14. TITLE
Navigate the title menu included in the disc.
15. SUBTITLE
Press this button. If the current disc has different subtitles options, this now appears
on the screen. Press this button repeatedly until you have reached your desired
subtitles option.
16. Numbers
Decimal number: 0 to 9; and +100: Add 100.
17. PLAY/PAUSE
While playing, press this button once to
pause the playback. Press the button again
to resume playback.
18. STOP
Stop playing the movie or songs.
STOP PLAY: Resumes disc playback.
STOP STOP PLAY: Resumes from the beginning of the disc.
19. FR (Fast Rewind)
Press this button to search disc backward

16
Button Function Descriptions
continuously. There are 5 speed options to
choose: 2X, 4X, 8X, 16X, and 32X.
20. FF (Fast Forward)
Press this button to search disc forward
continuously. There are 5 speed options to
choose: 2X, 4X, 8X, 16X, and 32X.
21. SETUP
Navigate the Setup Menu. Please refer
to the following pages to configure the
system: General Setup Page, Audio Setup
Page, Preference Page, and Password
Setup Page.
22. EJECT
Eject the disc from the disc compartment
or load the disc into the disc compartment.
23. TV-Monitor B (If available)
Transmit IR codes for TV mode of Monitor B.
24. 24. DVD-Monitor B
Transmit IR codes for DVD mode of Monitor B.
25. SOUND AROUND SELECT (If available)
Select a FM transmitter channel. There are
6 channels: CH1: 88.3MHz; CH2: 88.7MHz;
CH3: 89.1MHz; CH4: 89.5MHz; CH5:
89.9MHz; CH6: 90.3MHz.
26. PIX (Picture Selection)
Each time the button is pressed, the picture
adjustment OSD, cycles through bars for
BRIGHTNESS, CONTRAST, SATURATION,
HUE, SHARPNESS, IR HEADPHONE, and
RESET. Once the desired adjustment bar
is displayed, use the UP/DOWN button
to adjust the setting. The bar display will
automatically disappear, if no adjustments
are made within 6 seconds or if any button
is pressed.
27. REPEAT
Press this button to switch the repeat mode
by ALL, TITLE, CHAPTER and cancel the repeat
mode while playing DVD-video. Other disc
types such as VCD, CD, and SVCD that only
have two repeat modes that can be selected:
TRACK and ALL
Note: Both repeat functions of VCD and SVCD
need the PBC status set to ON when available.
28. A-B (Except MP3)
Repeat from point A to point B.
29. R-S (If TV mode is available)
The button selects between Antenna and
CATV modes.
30. ERASE/ADD (If TV mode is available)
When tuned to a channel, press the button
to store or erase the channel from memory.
The stored channel numbers are displayed
in green on the screen, and the non-stored
channel numbers are in red. When the SKIP
mode is on, the device will be tuned to
only the stored channels when using the
UP/DOWN buttons.
31. AUDIO
Press this button if the current disc has
different language options.
Press this button repeatedly until you have
reached your desired language option.
32. ANGLE
View with a different camera angle (The
button takes effect only on the DVD that
supports frames with multiple angles).
Press this button repeatedly until you have
reached your desired viewing angle.
33. GOTO
For the DVD, pressing this button will enter
the menu to set the Title/Chapter/Audio/
Subtitle/Angle/Title Time/Chapter Time/
Repeat Mode/Time display mode while
normal playing. For the SVCD and VCD,
pressing this button can enter the menu
to set the Track/Disc Time/Track Time/
Repeat Mode/Time display mode during
normal playback.
34. DISPLAY
Show information on the screen including
title, chapter/track, time elapsed, and time
remaining, or turn off the display.

17
Button Function Descriptions
EN
35. PROGRAM
Edit a playback program containing desired
titles in the DVD or tracks in the CD-DA.
36. RANDOM
Play titles randomly.
37. 3D
Press this button to set the audio effect for
the following audio options:
DVD mode: Off, Rock, Pop, Live, Dance,
Techno, Classic, and Soft.
CD mode: Off, Concert, Living Room, Hall,
Bathroom, Cave, Arena, and Church.
38. PBC (Video CD only)
Turn the PBC (Play Back Control) on or off.
39. ZOOM
Enlarge the picture in the movie by 2x, 3x,
and 4x, or shrink the picture in the movie
by 1/2, 1/3, and 1/4.
40. NEXT
When a disc has more than one Chapter,
Track, or File, you can move to another
Chapter/Track/File.
Press the button briefly during play to
select the next Chapter for DVD-video or
Track/File for VCD, SVCD, MP3, CD, etc.
41. PREV
When a disc has more than one Chapter,
Track, or File, you can move to another
Chapter/Track/File.
Press this button briefly during play to step
back to the previous Chapter for DVD-video
or Track/File for VCD, SVCD, MP3, CD, etc.
Note:
The remote control incorporates an infrared
sensor that relays signals from the remote
control to be controlled simply by pointing its
remote control at the remote sensor eye. This
provides control of auxiliary equipment such
as a video DVD player. The infrared sensor cannot relay signals from any other manufacturer’s
remote control to its respective component
connected to the AUX input, such as a DVD
player. In this case, you must use the remote
control supplied with the device.
18
General Operating Instructions
General Operating Instructions
Turning the Device ON or OFF
1. Pivot the screen downward until a comfortable viewing angle is reached.
2. Pressing the POWER button on the
lower-left corner of the front panel or the
remote control will turn the device on or
o. When in use, the controls will be lit.
3. After the device has been turned on
and is displaying a picture, adjust the
viewing angle by pivoting the screen to
optimize the picture quality.
4. Remember to turn the device o and
pivot the LCD panel to the locked position when not in use.
DVD Basic
To get the most use out of each DVD, make
sure you read this section completely.
Regional Coding
Both the DVD player and disc are coded by
region. These regional codes must match in
order for the disc to play. If the codes do not
match, the disc will not play by default. The
system’s code is set to region 1. Other regions
may not be played in this system.
Type of Discs your DVD will play
DVD-Video: DVD contains video.
DVD +/-R: DVD contains video
CD-DA: CD contains musical or sound content
only.
CD-Video: CD contains movie only.
CD-R/RW: A disc that contains audio les (for
example, a CD-R with downloaded MP3 les),
MPEG, or JPEG les.
Loading and Playing Discs
Before you load a disc, make sure that it is compatible with the player. Note that the following
discs CANNOT be used with this player:
Optical disc- CD-1, CD-ROM, and DVD-ROM
Mini disc- CDG (audio only, not graphics)
To Load and Play a Disc
When you press the POWER button the system turns on in DVD mode. Put the disc’s
printed-side facing rear of vehicle into the disc
compartment about halfway into the slot. The
disc will load automatically and begin to play.
(Some discs may start at the root menu, where
play must be selected to start movie.)
Depending on the disk and playback location
on the disc, the icon may be displayed in the
upper-left corner of the screen indicating that
still playback is not possible.
Notes on Discs
• To keep a disc clean, do not touch its surface. Handle the disc by its edge.
• Keep your discs in their cases or disc
magazines when not in use. Also, do not
subject disc to heat/high temperature.
Avoid leaving them in a parked vehicle or
on a dashboard/rear tray.
• Do not attach labels, or use discs with
sticky ink/residue. Such discs may stop
spinning when used, causing a malfunction, or may ruin the disc.
• Do not use any discs with labels or stickers
19
General Operating Instructions
EN
attached. The following malfunctions may
result from using such discs:
• Inability to eject a disc (due to a label
or sticker peeling o and jamming the
eject mechanism).
• Inability to read audio data correctly (i.e., playback skipping, or no
playback) due to heat shrinking of a
sticker or label causing a disc to warp.
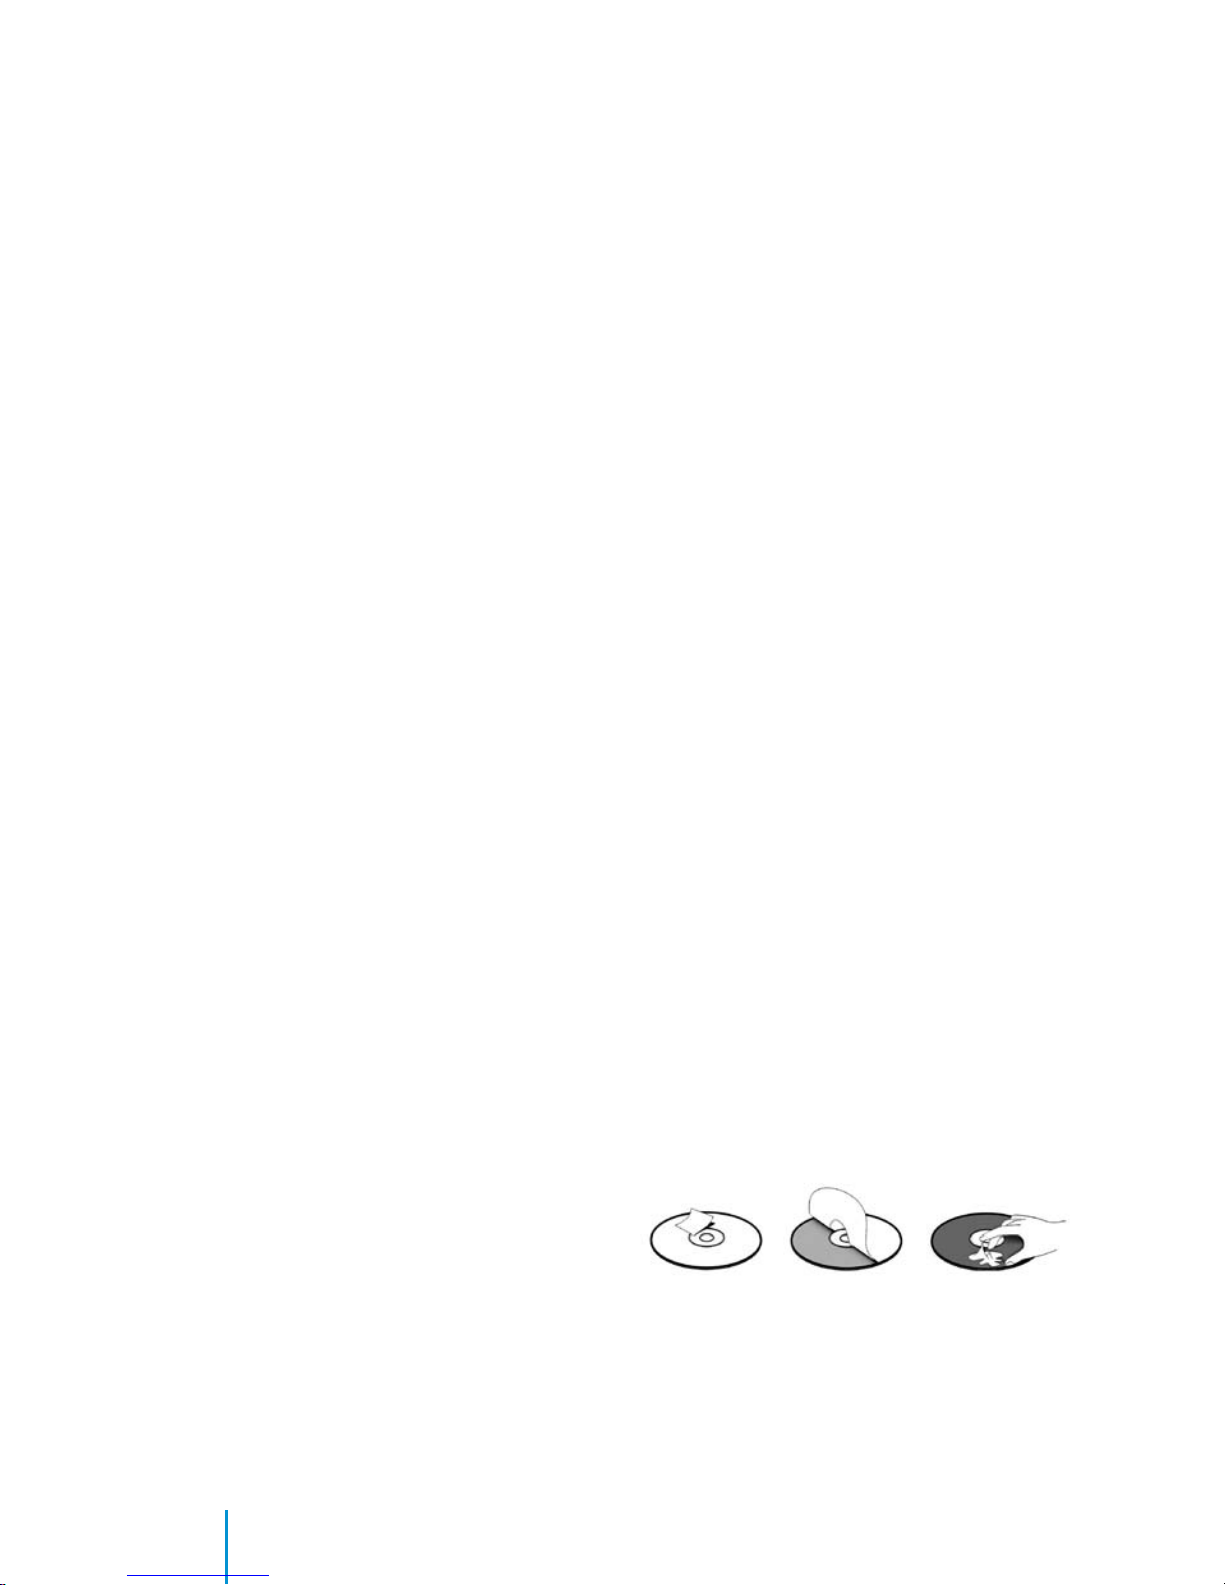
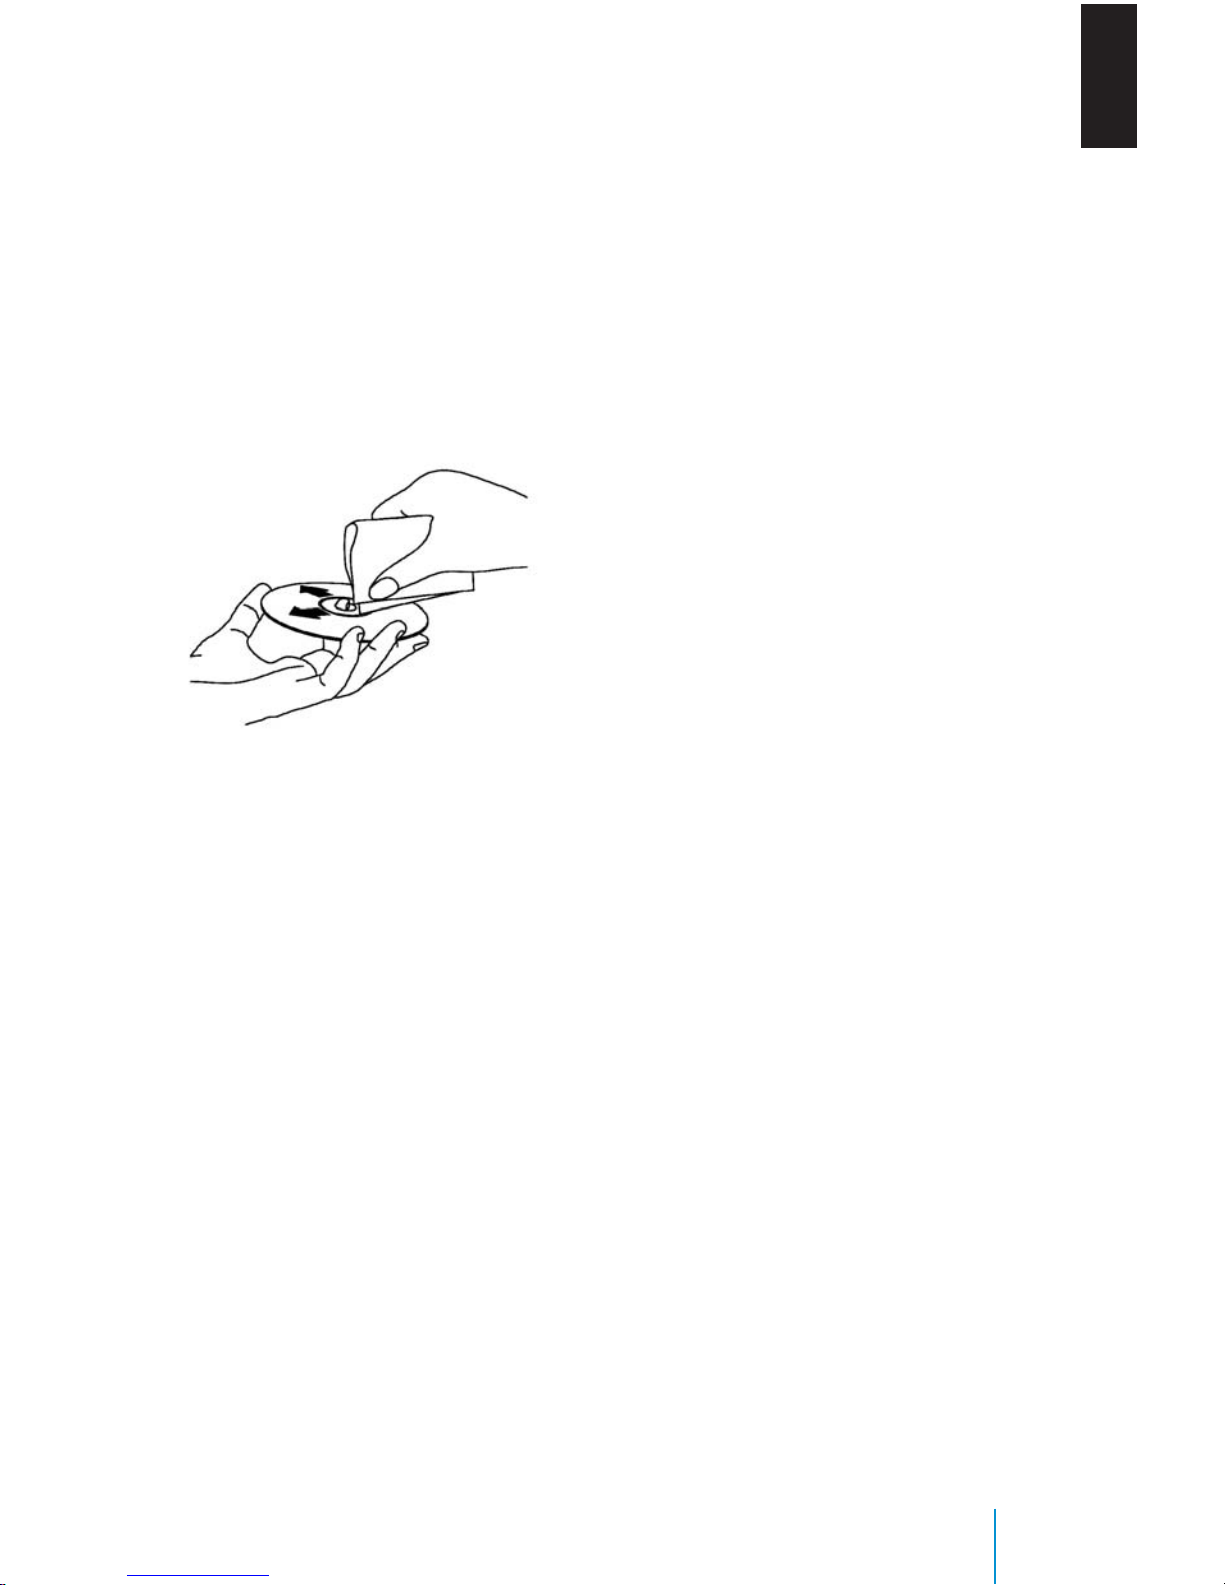
• Before playing, clean the discs with a
commercially available cleaning cloth.
Wipe each disc from the center out.
Do not use solvents such as benzene,
thinner, commercially available cleaners, or antistatic spray intended for
analogue discs.
• Use only normal, round discs. If you
insert irregular, non-round, shaped
discs they may jam in the DVD player
or not play properly.
20
How to use the DVD OSD Menu
How to use the DVD OSD Menu
This section describes how to set and adjust
settings using the on-screen setup pages
included in the OSD Menu. You can use the
OSD menu screen to adjust all the settings on
your screen. Follow the steps outlined below
to select the function you desire, and refer to
the pages indicated for more information.
Using the Setup Menu
Use the Setup Menu to do the initial setup,
adjust the picture quality, and set the various
output. You can also set a language for the
on-screen display, the setup display, and limit
playback by children.
1. Press the SETUP button on the remote
control to bring up the following Setup
Menu on screen.
2. Press the 3or4 buttons to select the
desired page on screen, choose functions or change settings.
To Cancel using the Setup Display
Press the SETUP button on the remote control.
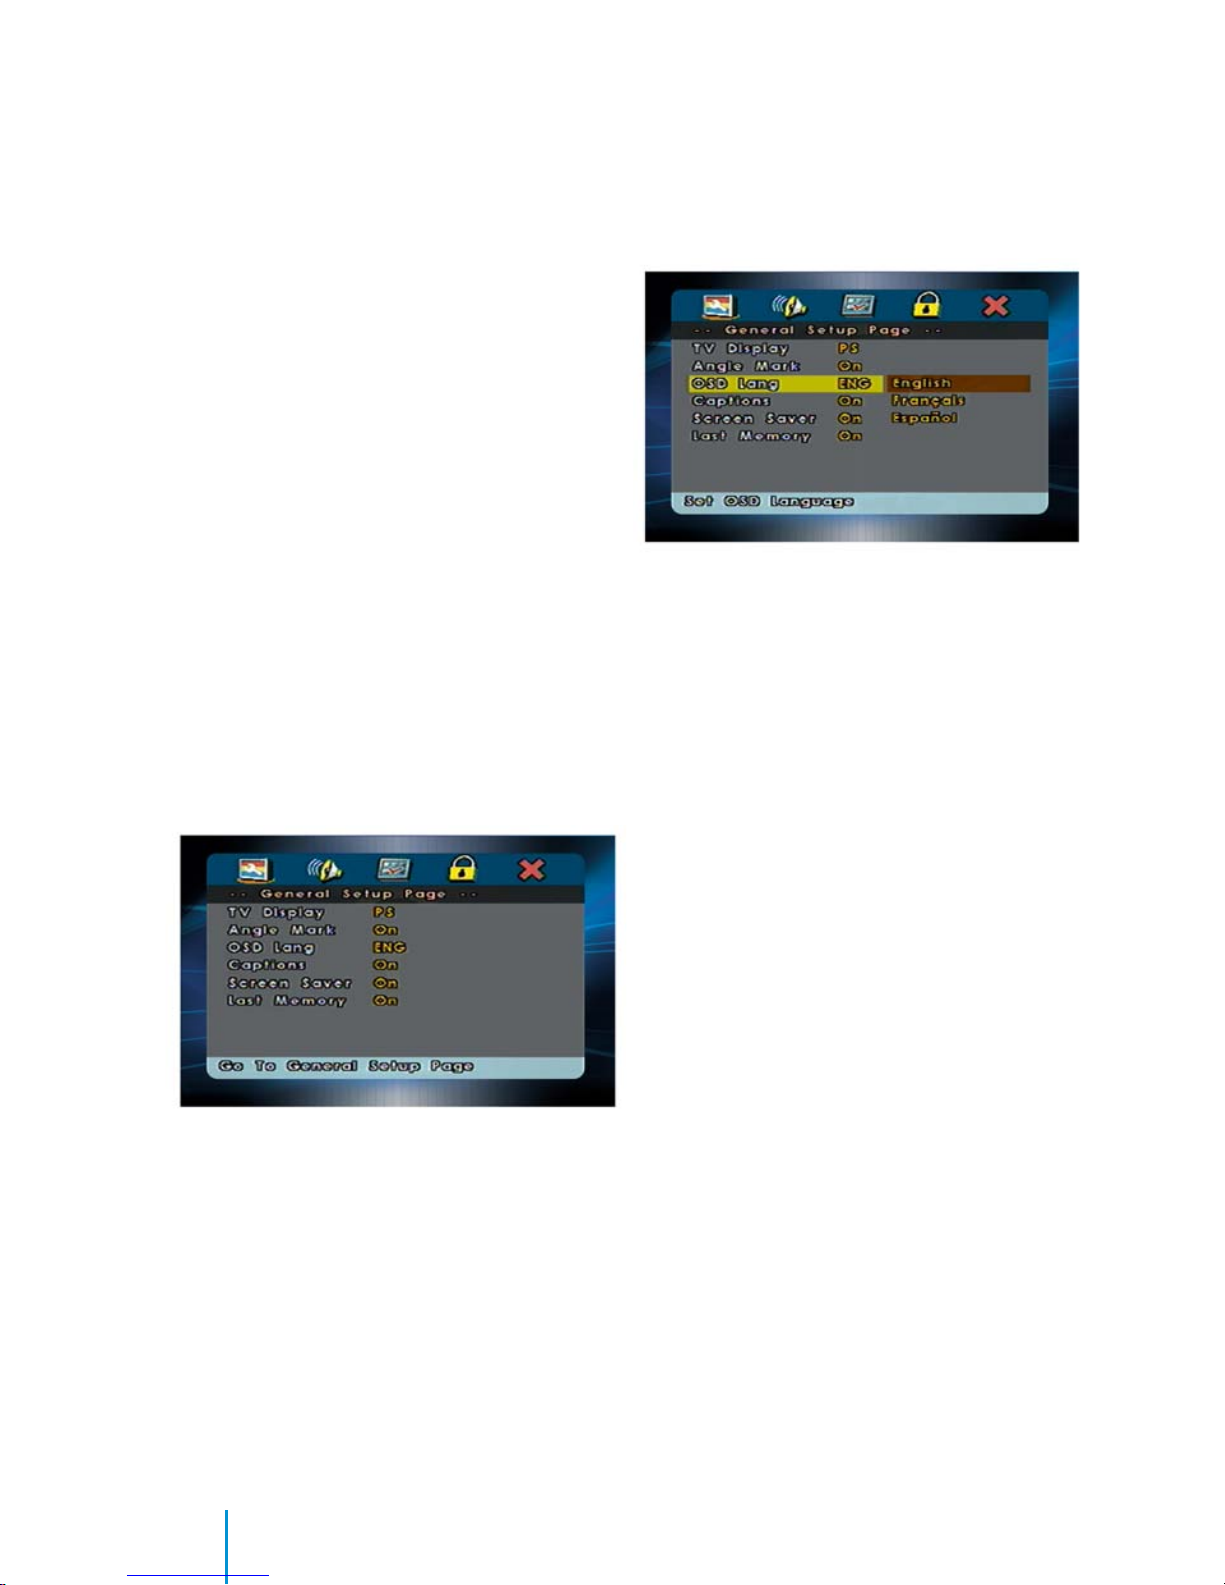
General Setup Page
Setting the Language for
On-Screen Display
Press the SETUP button on the remote control, use the 34buttons to navigate to the
General Setup Page, and then use the 6button
to select OSD Lang sub-menu.
OSD (On Screen Display)
Language Menu
The OSD Lang sub-menu allows the user to
select the language for the on-screen display.
Press the4button and then use the 65
buttons on the remote control to select the
desired language. The user can select English,
French, or Spanish for the OSD language.
Setting the Display
Press the SETUP button on the remote control,
use the 34buttons to navigate to the General Setup Page, and then use the 6 button to
select TV Display sub-menu. The setup allows
you to adjust the screen aspect ratio. Press the
4button, and then use the buttons 65 to
select the appropriate setting.
The options are as follows:
Normal/PS (Pan and Scan)
This displays the wide picture on the screen with
a portion of the left and right sides removed.
Normal/LB (Letter-Box)
This displays the wide picture with black bands
on the upper and lower portions of the screen.
21
EN
Wide (16:9)
This option displays the full widescreen picture if the LCD panel is widescreen.
Then press the ENTER button on the remote
control to conrm the screen.
Preference Page
Default Setting
Press the SETUP button, and use the 34 and
6 buttons on the remote control to navigate
to the default sub-menu under Preference
Page. The default setup allows you to reset all
options to factory defaults.
Press the4 button and then press ENTER button to carry out the reset.
Note: This function will not aect the parental
setting.
Setting for Parental (Parental Control)
(Accessible when no disc is loaded)
This section of the Setup Menu allows user to
control the content of movie playback from G
to ADULT. The parental control function allows
you to limit viewing to your preference.
1. After navigating to the Parental submenu under the Preference Page, use the
4and 65 the buttons on the remote
control to select: KID SAF (Children); G;
PG; PG 13; PGR; R; NC 17; ADULT.
Note: The lower the value, the more
strict the limitation.
2. Press the ENTER button on the remote
control to conrm the selection.
3. Input a password in 6 digits using the
numeric buttons and then press the
ENTER button on the remote control.
Note: The default password is 136900.
Note: If a disc is inserted into the DVD Compartment Slot and exceeds the Parental Setting, the
following message appears on the screen:
The Parental Settings of this player prohibits
play. Would you like to allow this disc to play?
If you select yes, the password must be entered
for the disc to play. If wrong password is entered,
the following message appears on the screen:
This movie will not play due to the Parental
Settings of the player.
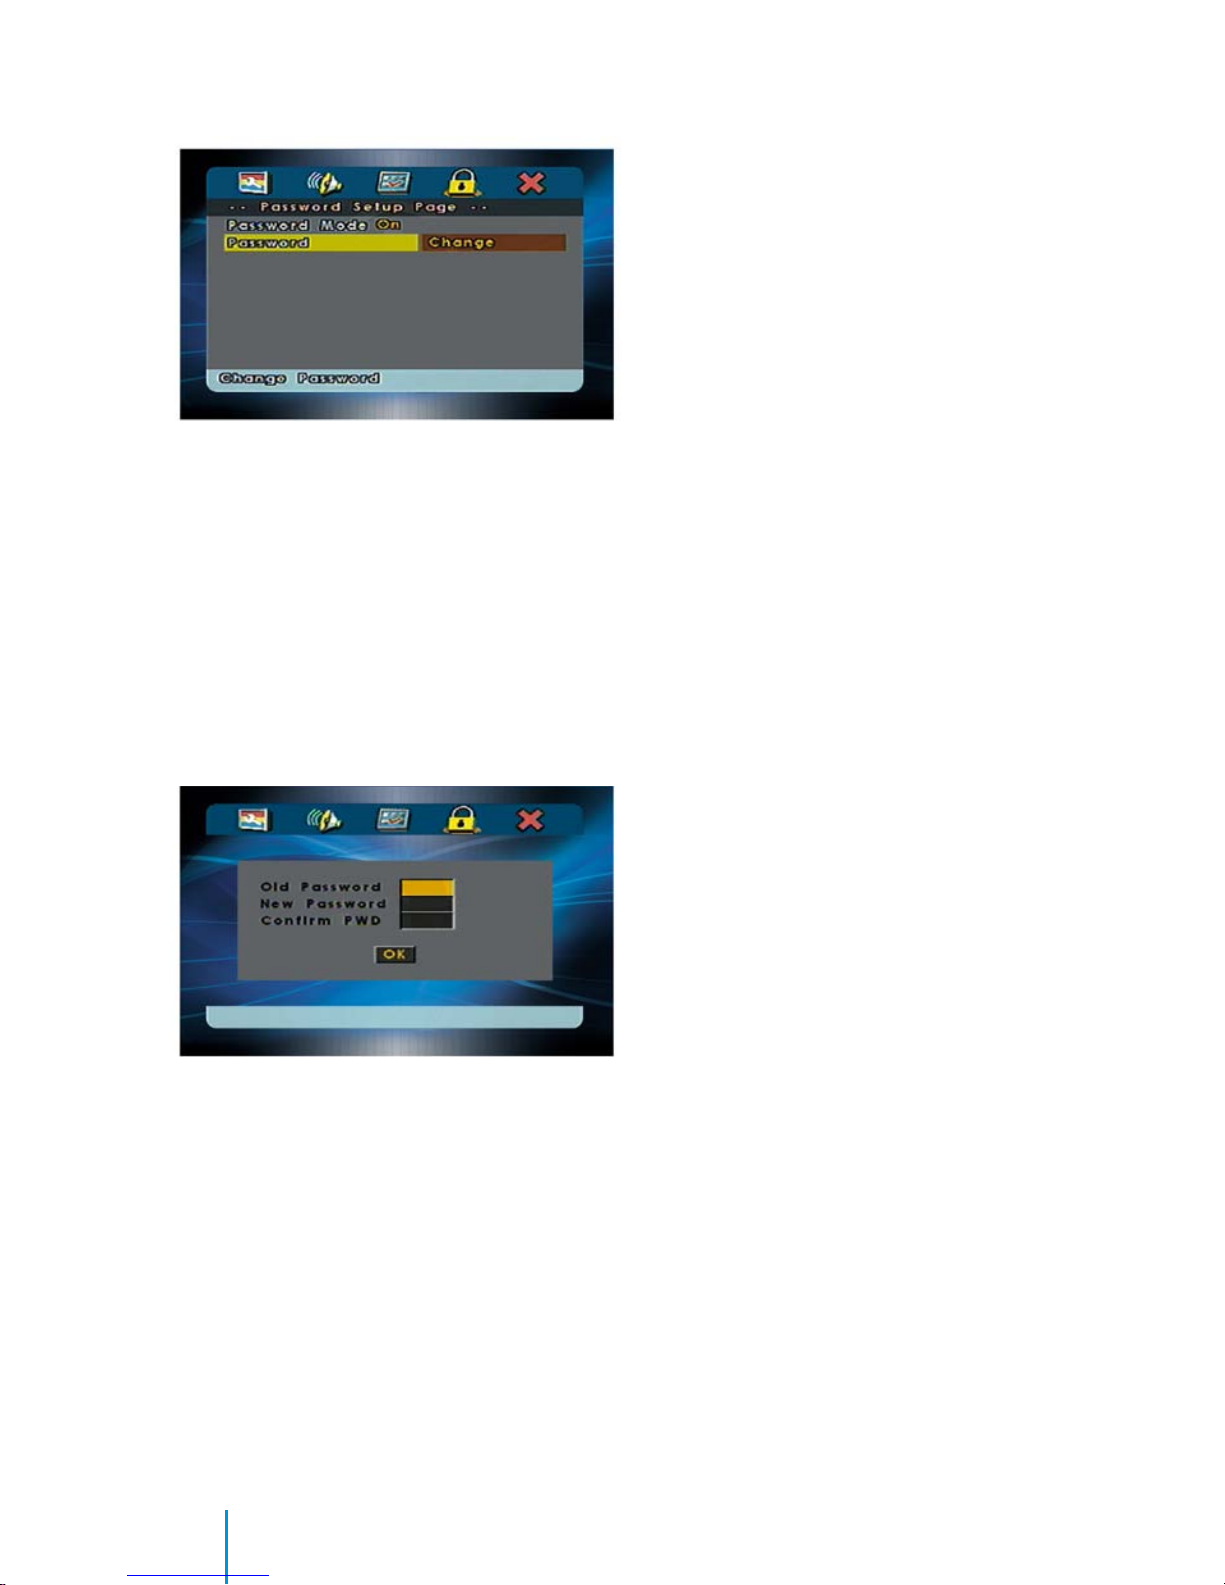
Password Setup Page
Setting the Password
(Parental Control Password)
Press the SETUP button and navigate to the
Password submenu under the Password Setup
Page. The menu appears and allows you to
change the parental control password.
Press the4 button and then press the ENTER
button on the remote control to enter the
sub-menu.
22
Old Password
Input the old password or the default password (6 digits).
New Password
Input a new password (6 digits) using numeric
buttons.
Conrm PWD
Conrm the new password by entering the
same new password again.
Then scroll to the OK button and press the
ENTER button on the remote control. Your
password has been changed.
(Note: The default password is 136900)
23
How to use the Device OSD Menu
EN
How to use the Device OSD Menu
Picture Adjustment
This section describes how to set and adjust
settings using the on-screen display (OSD)
Menu. You can use the device OSD Menu
screen to adjust advanced picture selections
on your screen.
• Press the PIX button on the remote con-
trol to select the BRIGHTNESS, CONTRAST,
SATURATION, HUE, and SHARPNESS options to adjust value and setting.
• After selecting the desired option use the
6 or 5 buttons to adjust the setting.
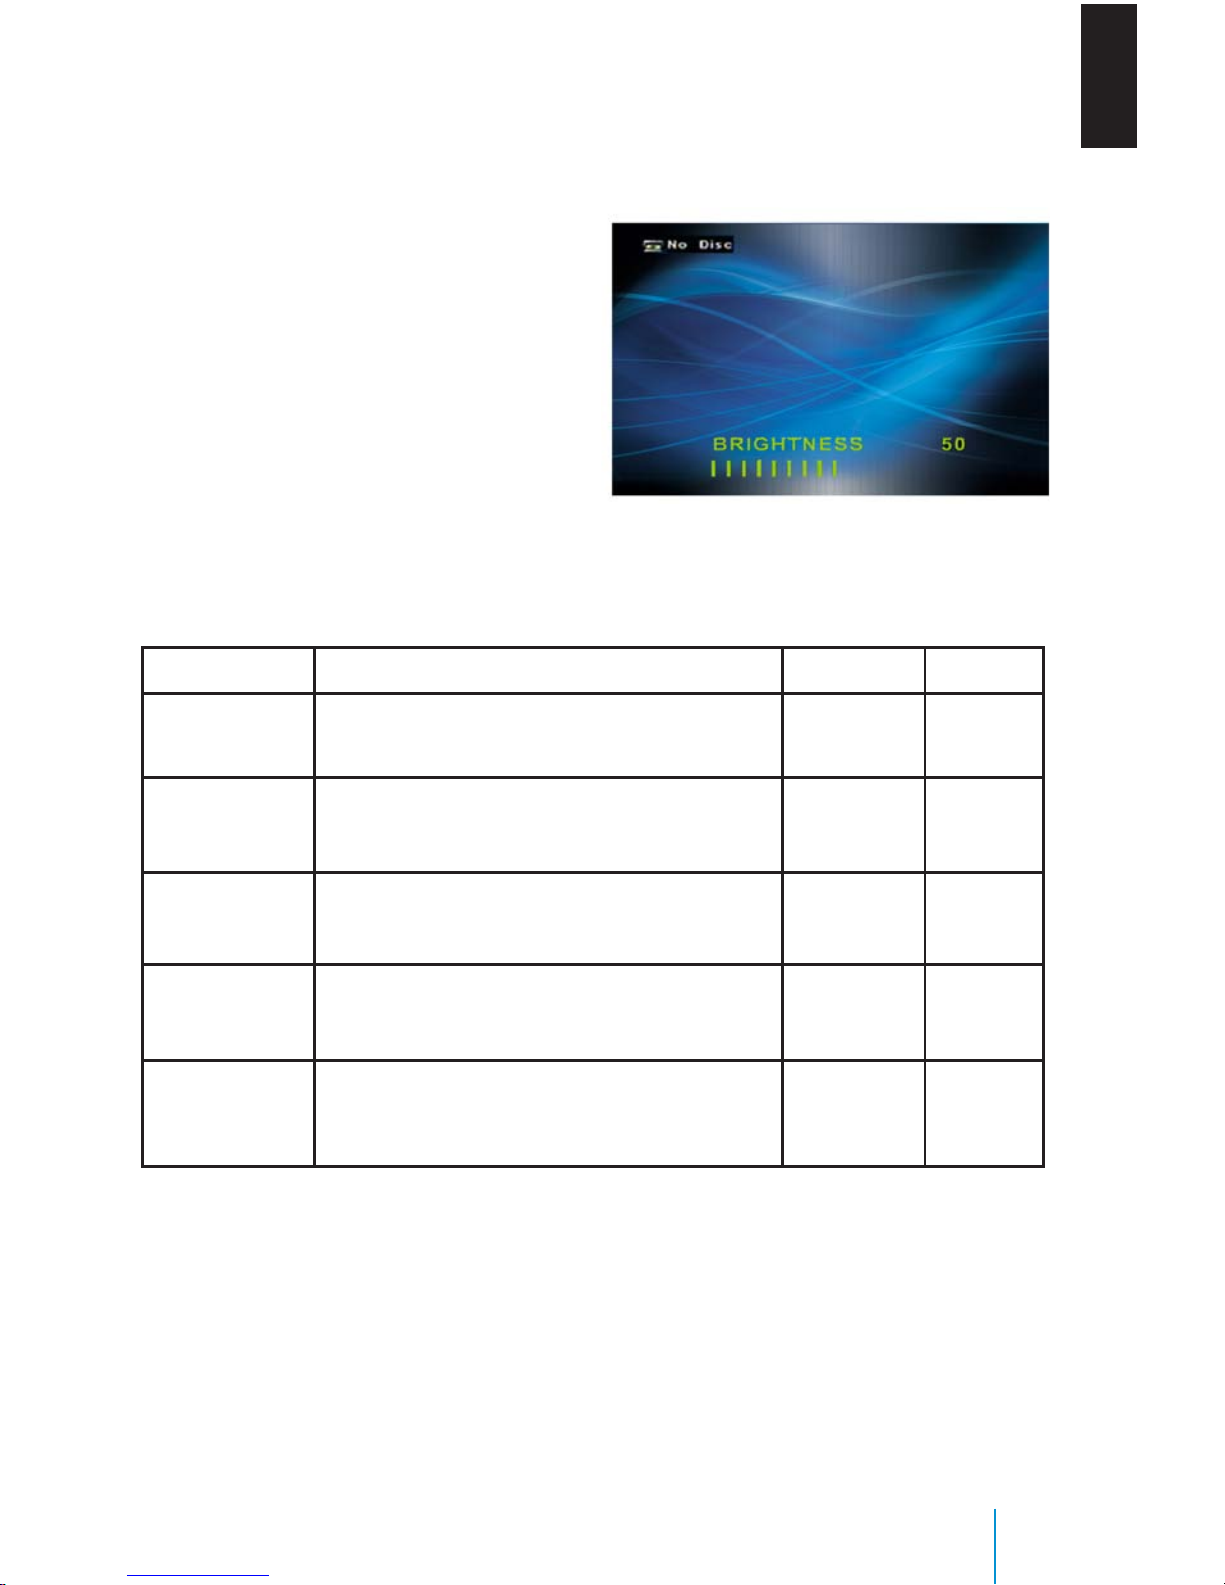
Option Description Range Default
BRIGHTNESS Adjust to brighten or darken the picture. 0-100 50
CONTRAST Adjust to increase or decrease picture contrast. 0-100 50
SATURATION Adjust to increase or decrease color intensity. 0-100 50
HUE Adjust to increase or decrease the color hue. 0-100 50
SHARPNESS Adjust to sharpen or soften the picture. 0-100 50

24
Playing an Audio CD
Playing an Audio CD
When playing an audio CD, the DISPLAY banner appears automatically. It displays the current track and the amount of time the track has
been playing, the total amount of time on the
disc and the current time running on the disc.
Press the DISPLAY button on the remote con-
trol to display the DISPLAY banner.
The options below show you what happens
when you press the DISPLAY button.
Press DISPLAY (1x)
“Single Elapsed” appears along with the current track playing and the time of that track.
Press DISPLAY (2x)
“Single Remain” appears along with the current track playing and the amount of time left.
Press DISPLAY (3x)
“Total Elapsed” appears along with the current
track playing and the total time playing on CD.
Press DISPLAY (4x)
“Total Remain” appears along with the current
track playing and the amount of time left on CD.
Using the REPEAT Feature
The default mode for the REPEAT feature is
OFF. Pressing REPEAT button on the remote
control consecutively changes the REPEAT
options as follows:
Track - repeat the track that is playing.
All - repeat the disc that is playing.
As you toggle through the options, the REPEAT
option changes. The track repeats once that
track has ended. The selected repeat option
loops repeatedly until you turn it o.
25
Playing an MP3 Disc
EN
Playing an MP3 Disc
MP3 is the format for storing digital audio. An
audio CD-quality song can be compressed into
the MP3 format with very little loss of quality,
while talking up much less space. CD-R discs
that have been encoded in MP3 format can be
played on your DVD player. Press the DISPLAY
button on the remote control to show DISPLAY
Banner. The options below show you what happens when you press the DISPLAY button.
• Press DISPLAY (1x) “TIME REMAIN” appears
along with the amount of time left in the
song that is playing. “TIME REMAIN” and
the time that is left will remain on-screen
until you press DISPLAY button again.
• Press DISPLAY (2x) “TIME ELAPSED” appears along with the amount of time the
song that is played. “TIME ELAPSED” and
the elapsed time will remain on-screen
until you press DISPLAY button again.
• Press DISPLAY (3x) “OFF” appears and then
disappears after a few seconds.
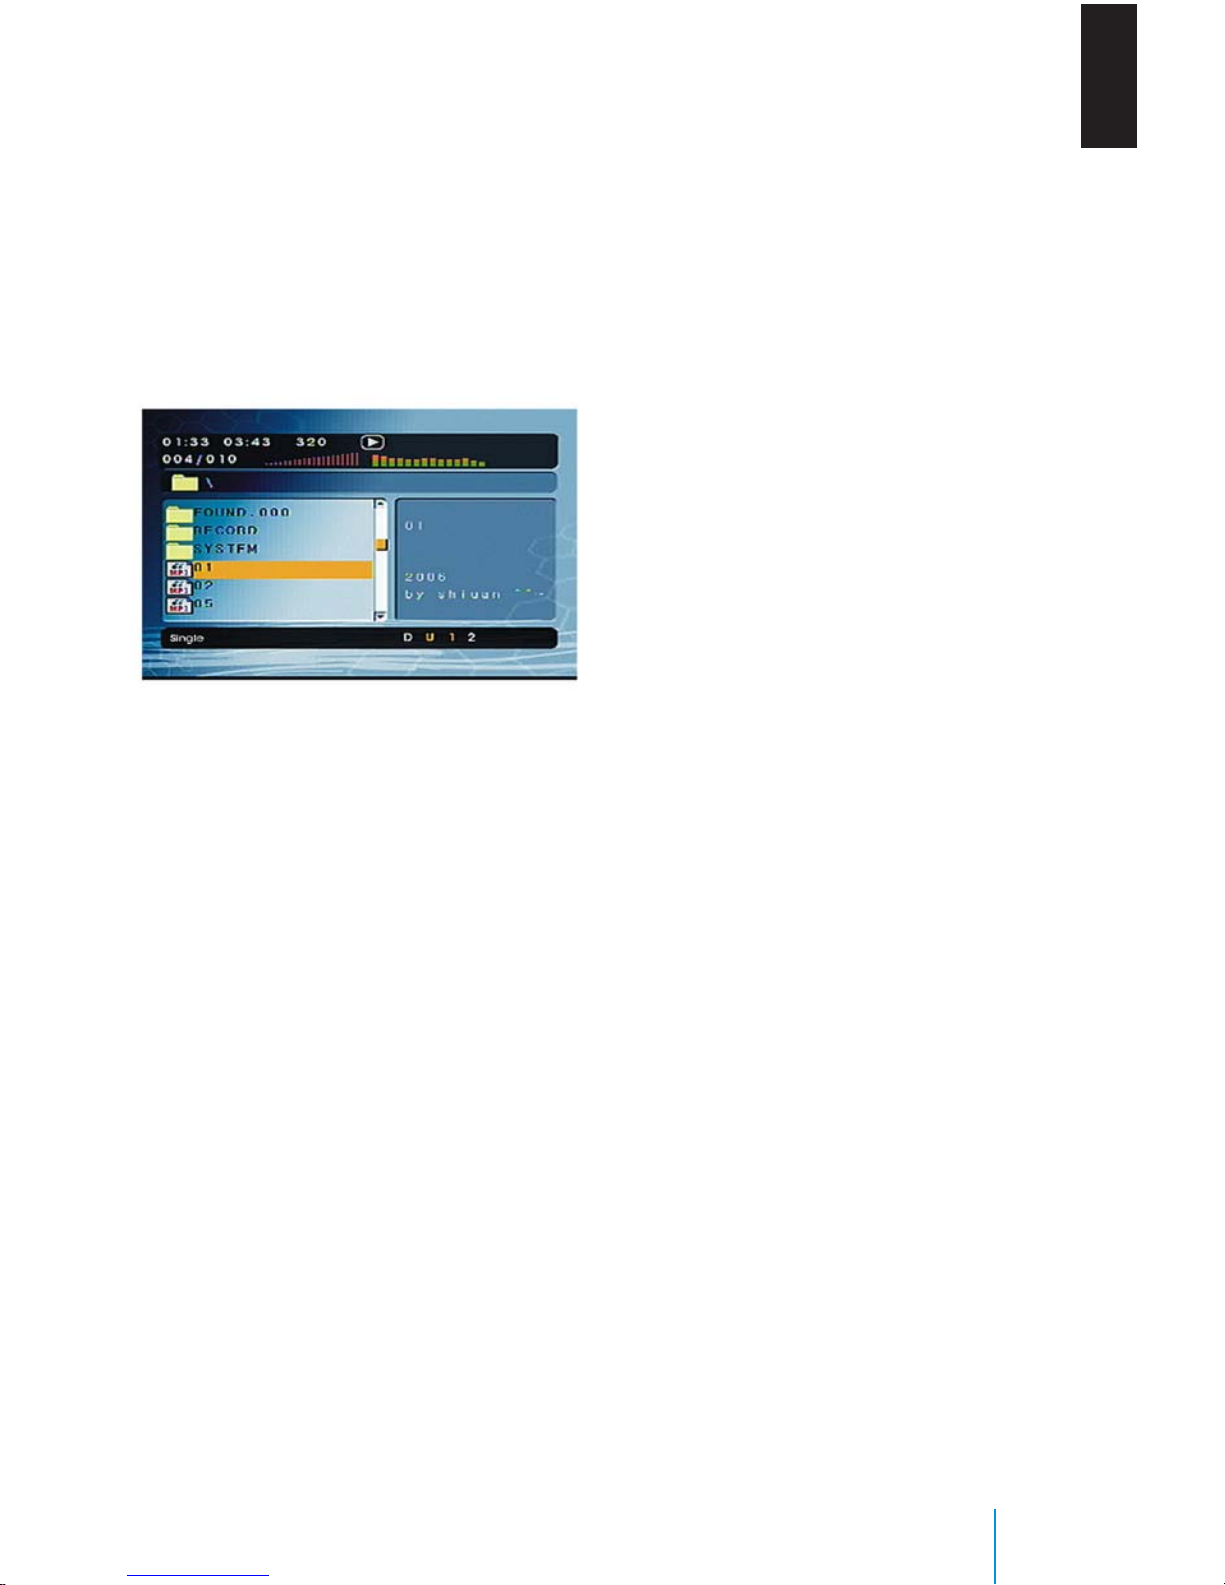
Selecting Folders and Songs
When an MP3 disc is inserted in the player, the
navigation screen appears automatically. You
can change folders and songs by navigating
the le system. The DVD player plays the songs
in the order they were burned to the disc.
1. If a disc is playing, press the STOP
button on the remote control, and then
press the UP or DOWN arrow buttons to
go through the folder list on the left side
of the navigation screen.
2. Once the folder you want is highlighted,
press the ENTER button on the remote
control (the folder list shifts to left side
of the screen and the songs in the folder
appear on the right).
3. Press the UP or DOWN arrow button on
the remote control to go through the
song list and highlight the song you
want. Press the ENTER button to begin
the playback of the highlighted song.
Skipping Songs
Use the : (NEXT) button on the remote
control to move to the next song. Use the 9
(PREV) button to move to the beginning of
the currently playing song. Press the 9 (PREV)
button 2 times to move to the previous song.
Selecting a Play Mode
You can choose what order the songs will play
on a disc temporarily. The FOLDER play mode
is the default. To access the play mode operations, press the REPEAT button on the remote
control. The play mode options are as follows:
Single: Play a selected song.
Repeat One: Repeat the song that is playing.
Folder: Play the folder in the order the songs
were recorded.
Folder Repeat: Repeat the folder that is playing.
Random: Play the songs in the random order.
Shue: Play the songs in random order (with-
in the selected folder).

26
Troubleshooting
Troubleshooting
Symptom Remedy
Device does not power “ON”
• Is ignition turned “ON”?
• Are batteries installed in remote control?
IR sensor inoperative
• Verify that the batteries in the remote control are good.
• Verify that the remote sensor eye is not obstructed.
• Verify that the infrared transmitter is axed over the
sensor eye of the component to be controlled.
Disc won’t play
• Insert a disc with label side rear of the vehicle.
• Check if the disc is defective by trying another disc.
• Check the type of disc you put into DVD compartment
slot. This DVD player only plays DVDs, audio CDs, and
MP3s.
• Both the device and the disc are coded by region.
If the regional codes don’t match, the disc can’t be
played. This DVD player us set to region number 1.
Disc plays, but then stops
immediately
• The disc is dirty and needs cleaning.
• Condensation has formed. Allow player to dry out.
No picture
• Check that the signal source is connected.
• The setting may be in the wrong status. Match your
monitor mode with the source correctly.
Distorted picture
• Check the disc for ngerprints and clean with a soft
cloth, wiping from center to edge.
• Sometimes a small amount of picture distortion may
appear. This is not a malfunction.
Cannot advance through a
movie
• You cannot advance through the opening credits and
warning information that appears at the beginning of
movies because the disc is programmed to prohibit
that action.
No sound or distorted sound
• Make sure that the DVD player is connected properly,
and all cables are securely inserted into the appropriate jacks.
• If you are using the IR headphones, make sure you
turn on the IR power.
• Is volume turned “UP” on headphones?
• Is anything blocking signal between monitor and
headphones?
Device feels warm
• When the device is in use for a long period of time, the
surface will be heated. This is normal.
Player does not respond to all
commands during playback
• Operations are not permitted by the disc.
• Refer to the instructions in the disc inlay.
 Loading...