

Page 1

Up and
Running In
Just a Few
Baby Steps...
Page 2
2
Unpack
1
Smart Baby
WiFi Camera
The accessories:
(1) Power adapter
(1) 10’ Power cable
(2) Mounting screws
Check out our setup videos
On your computer, go to
http://bit.ly/2k9veoG or scan the QR
code here.
Position the camera
2
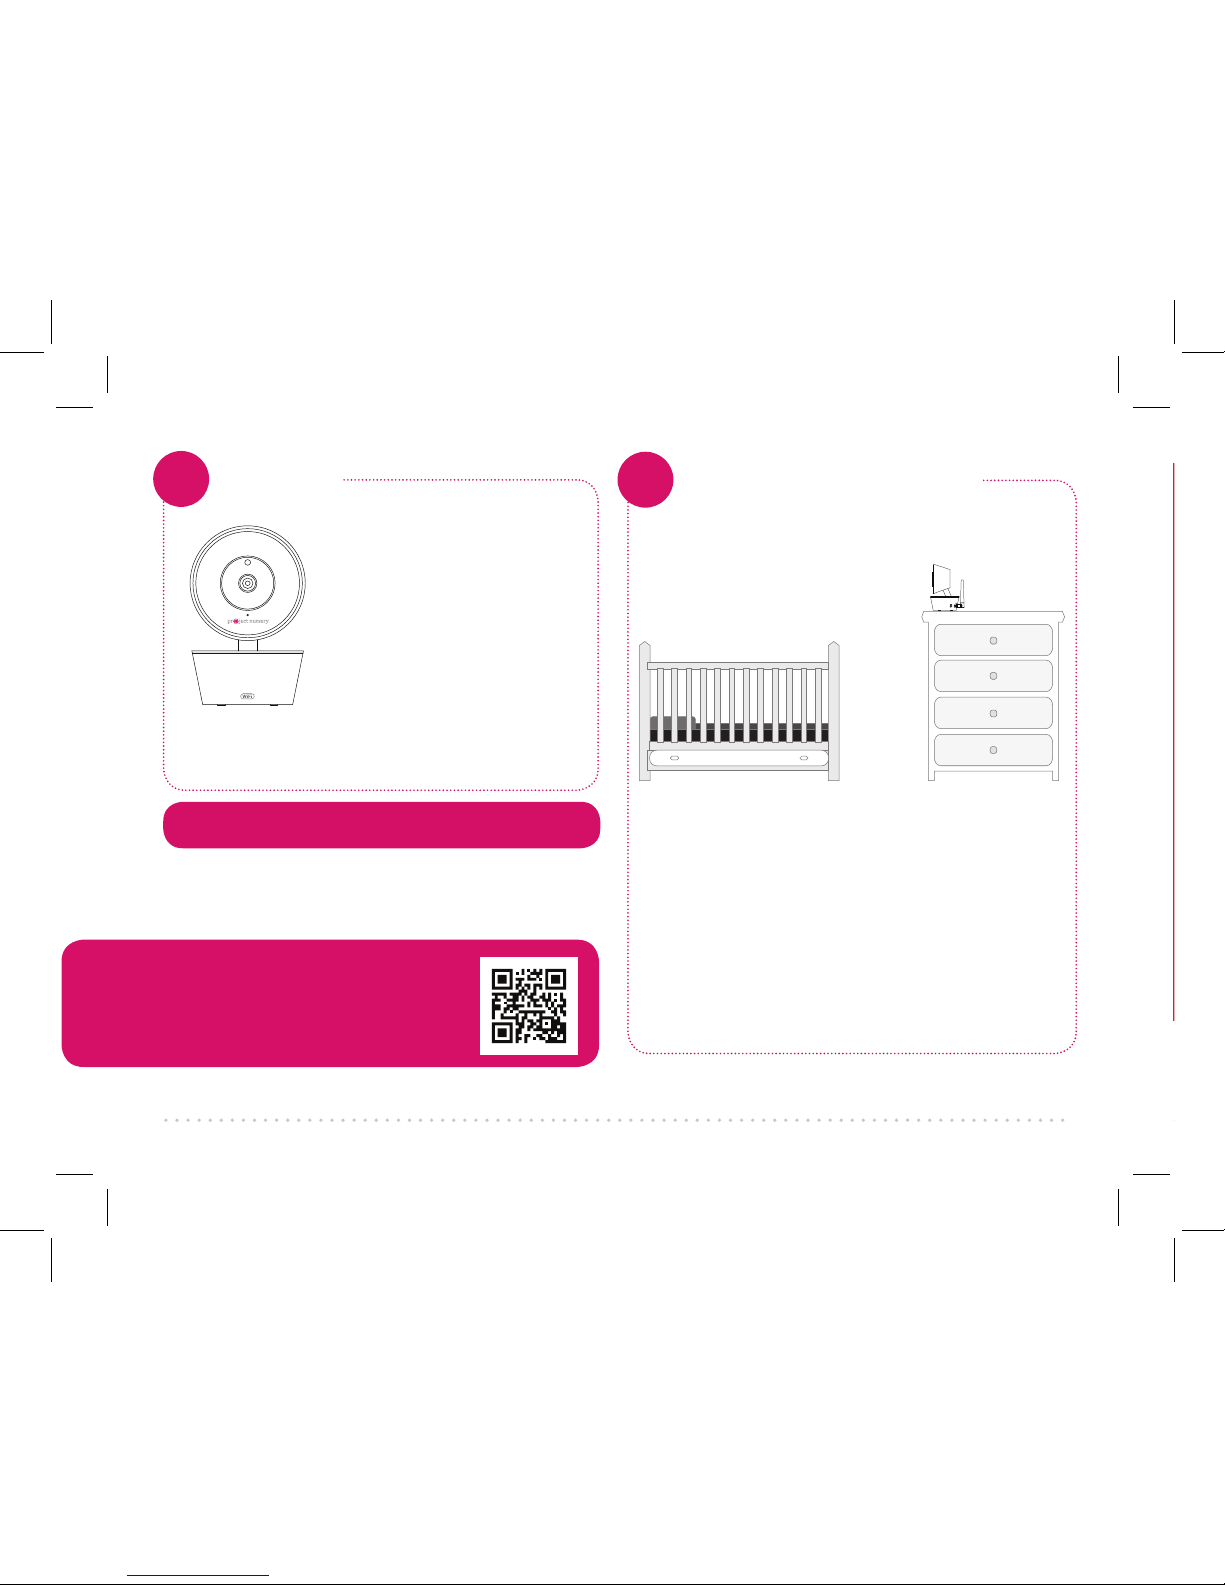
Find a location for the
camera that gives you the
best view of your baby in his
or her crib.
Place the camera on a flat surface, like a
dresser or shelf, or mount the camera to a
wall using the keyhole slots on its bottom
(see the mounting template included in this
package).
IMPORTANT: NEVER place the camera or
cords of any kind inside the crib. NEVER
place the camera or cords within reach of
the baby.
Don’t forget to remove the protective film covering the
front of the camera!
Page 3
3
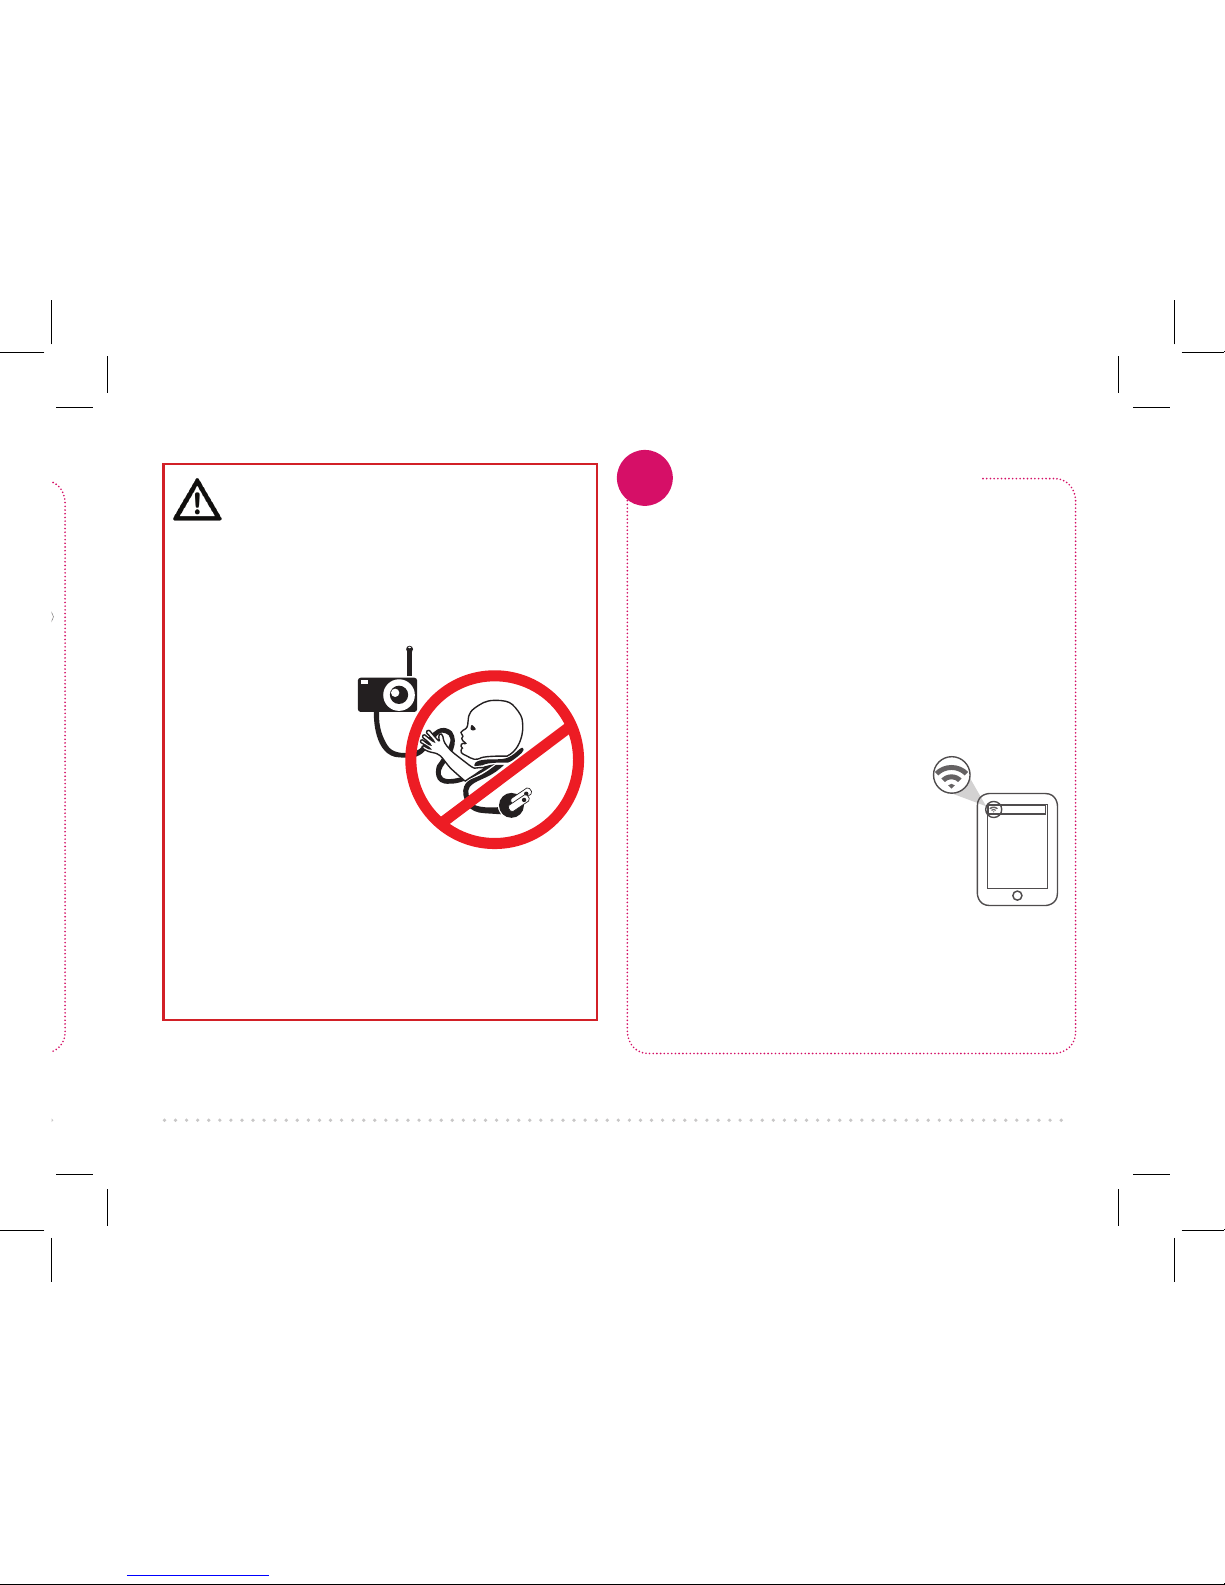
WARNING
Strangulation Hazard:
Children have STRANGLED
in cords. Keep this cord out
of the reach
of children
(more than
3ft (0.9m)
away).
Never use
extension
cords with AC Adapters.
Only use the AC Adapters
provided.
Test your WiFi signal
3
Your Project Nursery Smart Baby WiFi
Camera needs a strong enough signal from
your WiFi router to send its video signal.
Here’s how to test for signal strength.
First, go to where you want to put the
camera. Make sure your smartphone or
other portable wireless device is connected
to the WiFi network you want to test.
Look at the WiFi icon on
your device screen to
see the strength of the
connection. For example,
on iOS devices look in the
upper left-hand corner of
the screen for the WiFi icon
(shown here).
For best results, look for a location with at
least 50% strength to use the WiFi camera.
Page 4
4
Plug in the camera
4
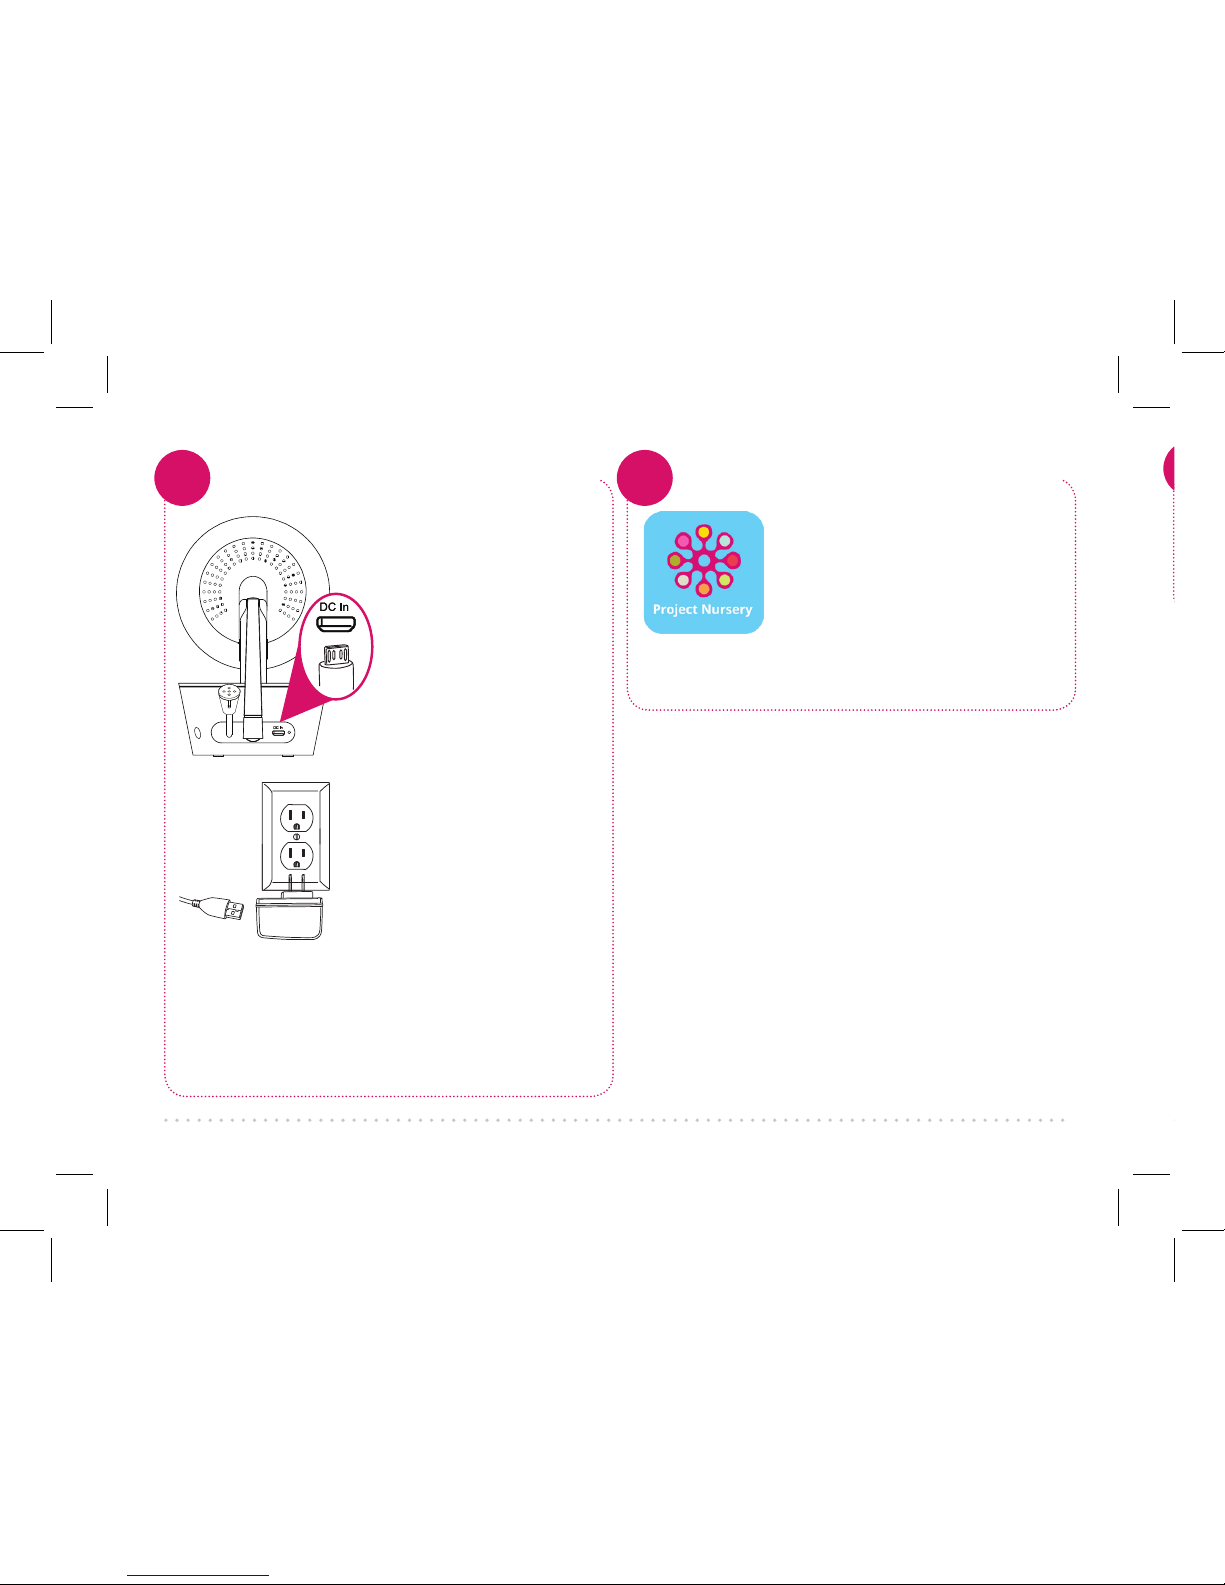
Plug one end of the
included power cable
into the DC In jack
on the back of the
camera.
Plug the other end
into the included
power adapter. Then
plug the adapter into
an outlet or surge
protector.
The camera turns on
automatically when
you plug it in (the
indicator light on
its back panel turns
solid red).
In the Google Play or
Apple App Stores, search
for “PROJECT NURSERY
SMART CAMERA” and look
for the icon shown here.
Then download and install
the App.
Install the App on your phone
5
6
Page 5
5
Launch the App
6
Once the Project Nursery Smart Camera
App has installed on your smartphone or
tablet, press the icon to launch the App.
The first time you launch
the Project Nursery App,
you’ll need to create an
account and password so
that you can access your
camera securely.
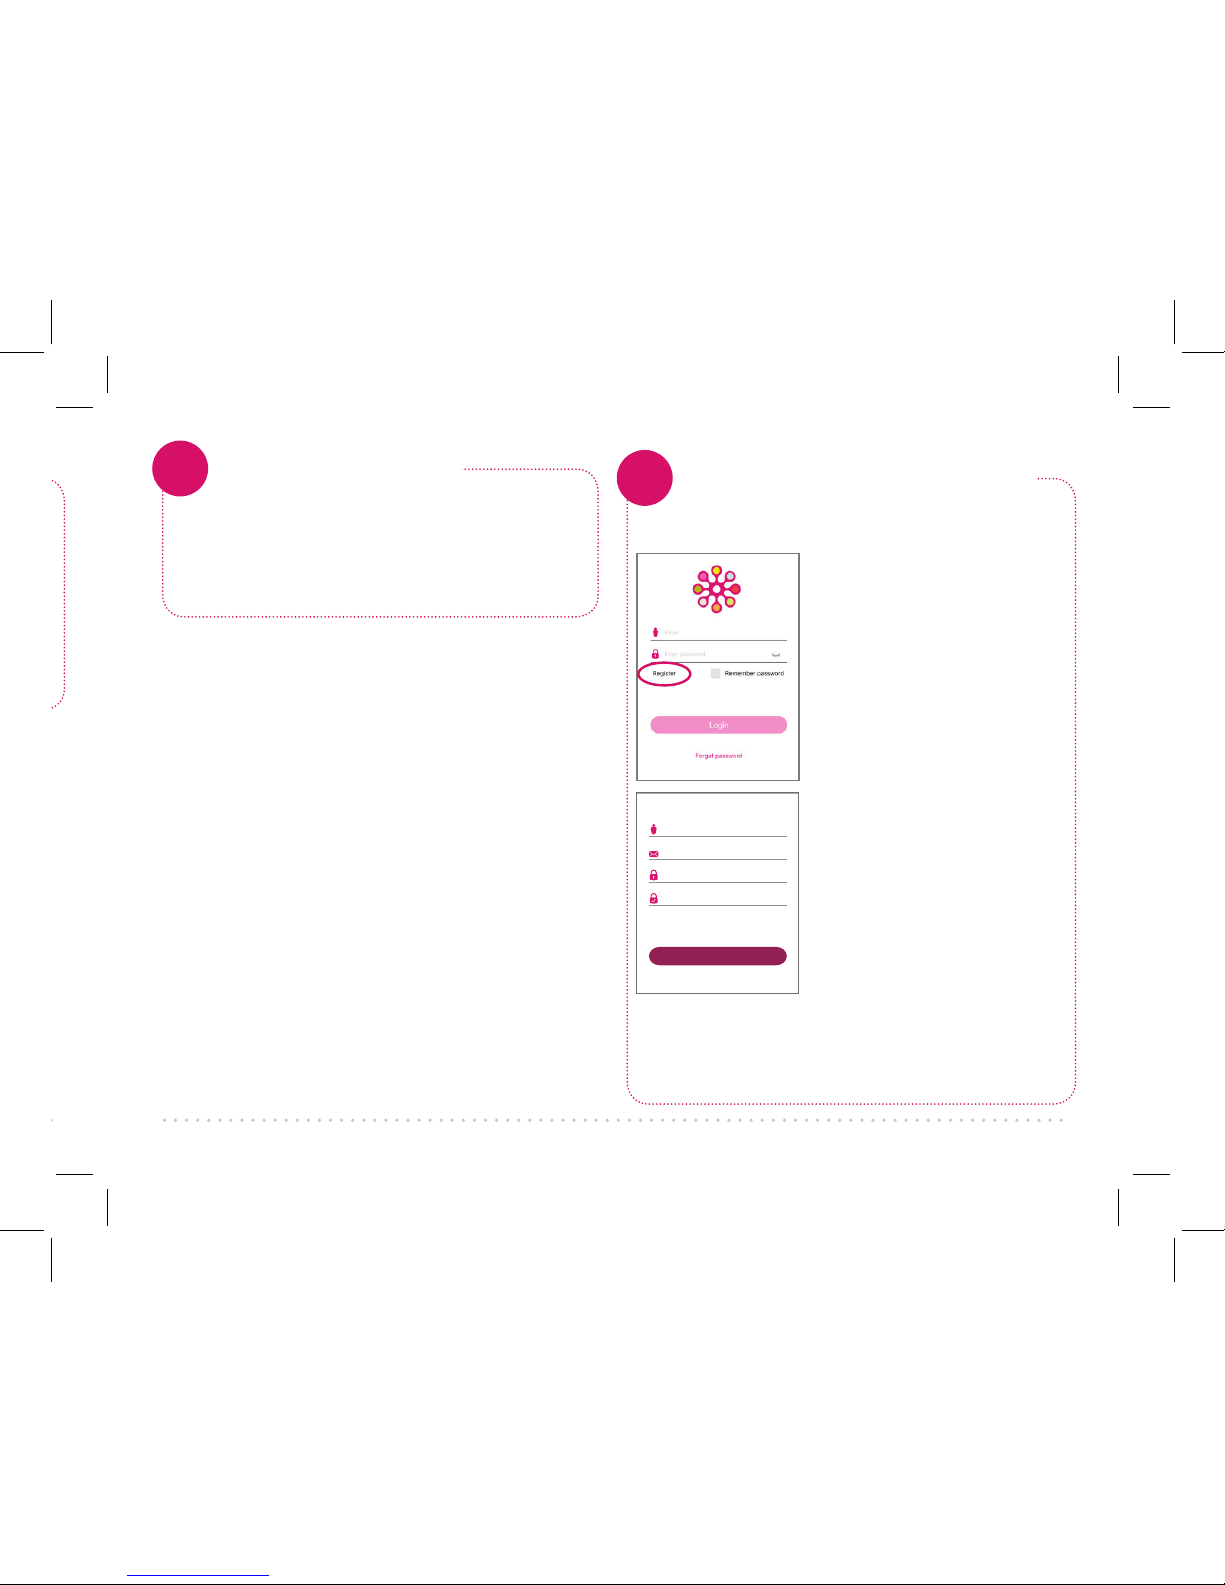
Press Register to start,
then follow the steps to
set up your account.
IMPORTANT: Make sure you
give a valid email address that
you have easy access to. The
App will use this address if
you ever need to recover or
reset your password.
Create a Project Nursery
account and password
7
Once you’ve finished
creating your account
and password, the App
will ask you to Login
with the email address
and password for your
account.
Quick register
Email address
Re-enter the email address
Password format: between 8 and 16 characters in length,
numbers, capital letters, lowercase letters at least two types
have to included
New password
Re-enter new password
Register
Page 6
6
Pair the Project Nursery camera with the App
8
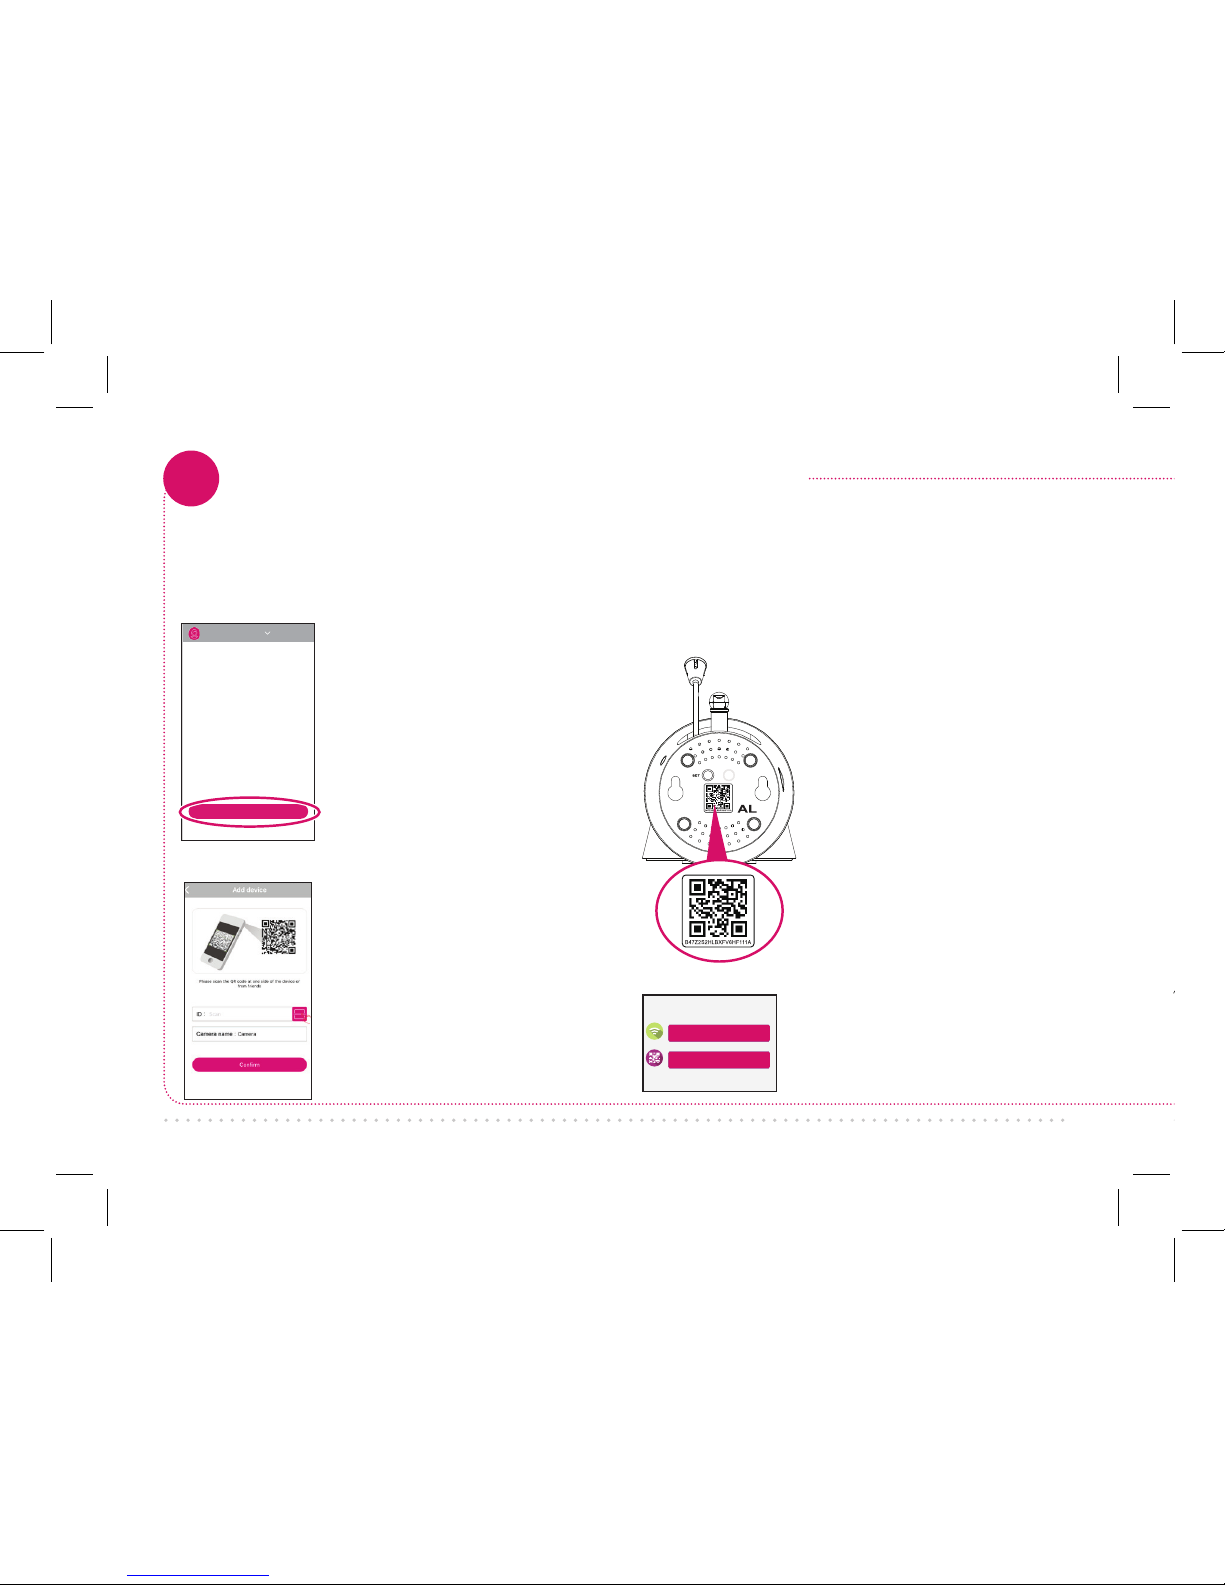
The next screen in the App
lets you name the camera
you’re setting up and
prompts you to scan the
QR code on the bottom of
the camera.
Add camera
Camera list
Make sure the Project Nursery Smart
Camera App is open on your phone or
tablet. Also make sure that your phone or
tablet is connected to your WiFi network.
Add new camera with WiFi
Add Camera
Add new camera with QR code
In the next screen, press
the Add new camera
with WiFi button.
In the App’s home screen,
press the Add camera
button at the bottom of
the screen.
NOTE: Make sure your camera
is on! If you haven’t already
turned it on, press the Power
button on the right side of
the camera (the camera’s LED
lights up).
To scan the QR code on
the camera: Find the QR
code on the bottom of
the camera. Position your
smartphone or tablet so
that its camera can scan
this QR code. Then press
where indicated in the
App to scan the QR code
on the bottom of your
camera.
To name the camera you’re setting up:
Press in the Camera name field and enter
the name you want to use. Hint: Use a name
that’s easy for Alexa to recognize with voice
commands, like “nursery.”
Page 7
7
Continues on next page...
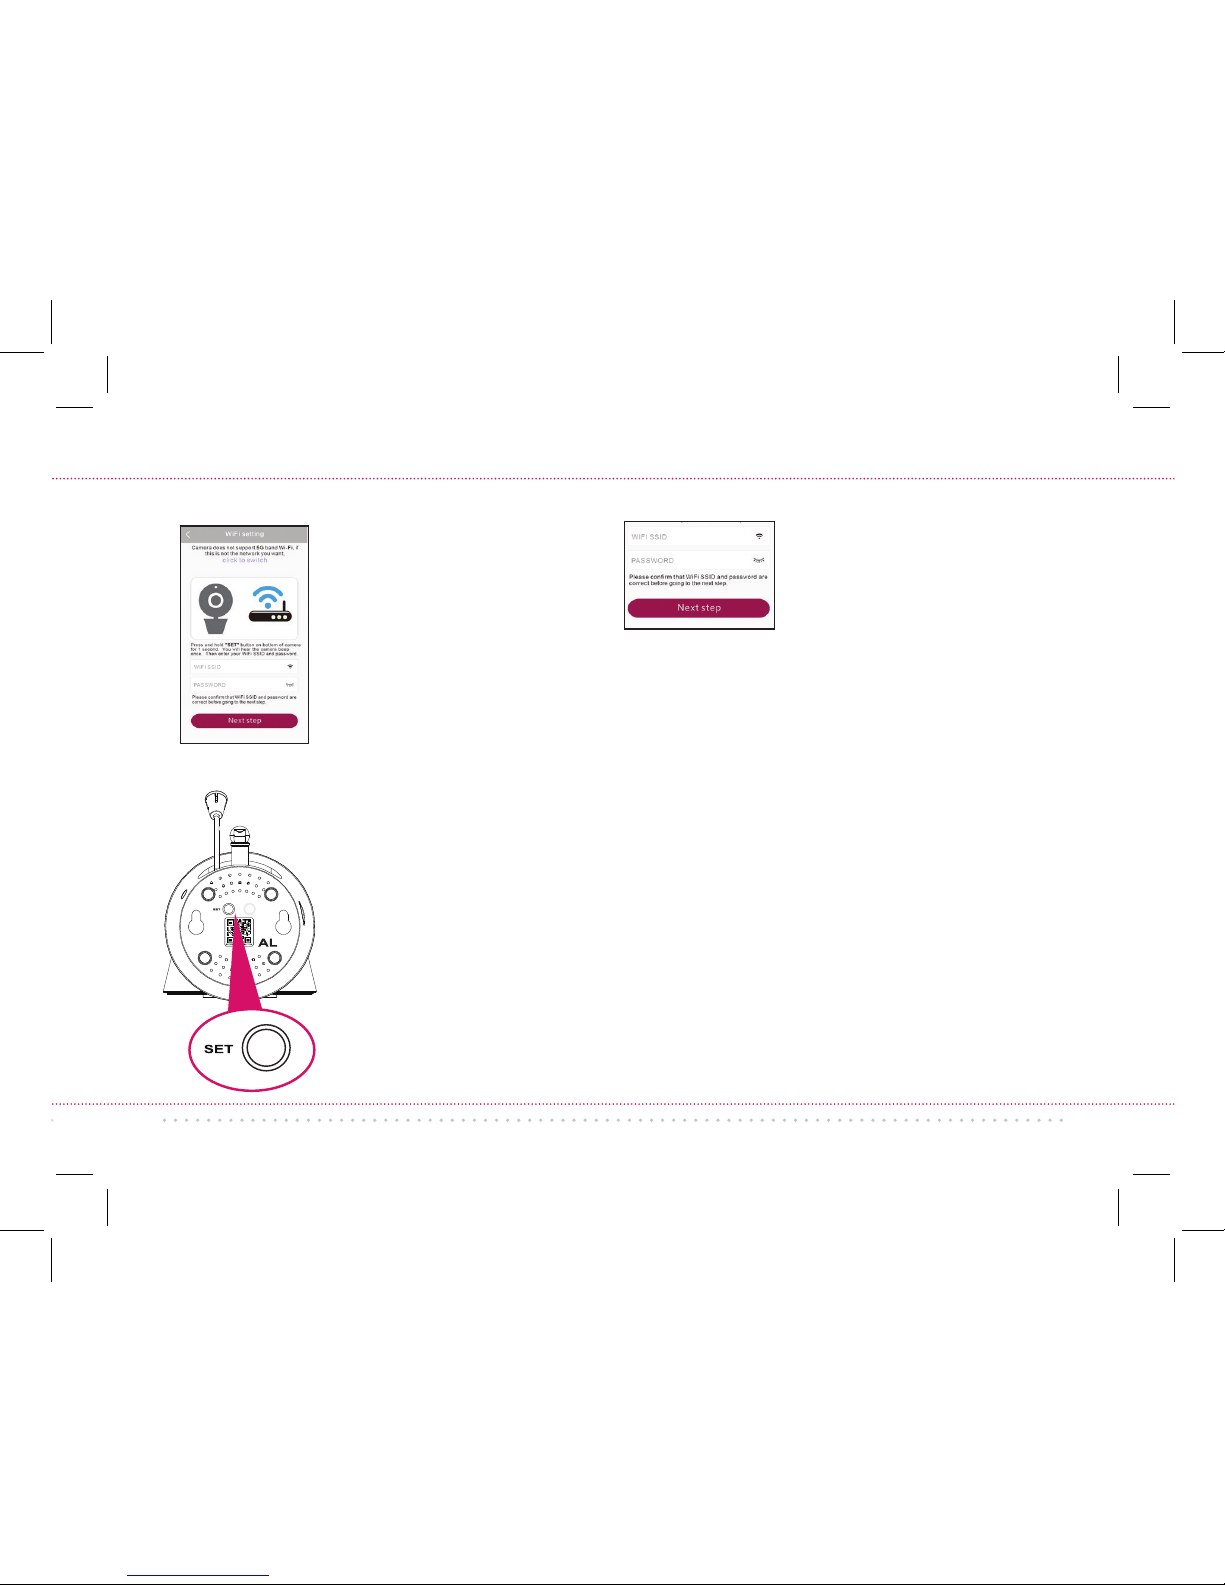
The App will ask you to
press the SET button on
the bottom of the camera
and enter the name (WIFI
SSID) and password of
your WiFi network.
Find the SET button on
the bottom of your WiFi
camera. Press it for one
second (until the camera
gives an audio signal).
Enter the name (WIFI
SSID) and password for
your home WiFi network
in the App.
Once you’ve finished entering your network
name and password, press the Next step
button on the App screen. The indicator
light on the back of the camera starts
flashing—the camera is trying to join your
WiFi network.
IMPORTANT:
Double check your network name
and password—these must be correct to work with
the App!
Page 8
8
Pair the Project Nursery
camera with the App (continued)
8
+ Make sure your phone or tablet is connected to
the WiFi network you want to use.
+ Make sure the camera is getting a good signal
from your WiFi router. See step 3 for more
information.
+ Test your WiFi network with other devices to
make sure its working.
+ Double check that you’ve entered the correct
password for your WiFi network in the Project
Nursery App.
+ Make sure your router is broadcasting its SSID
(name). The Project Nursery camera does not
support hidden SSIDs.
+ Make sure that Wi-Fi signal is 2.4GHz. The
Project Nursery camera does not support 5GHz
WiFi.
+ Make sure that your WiFi router uses either
WPA2-PSK/WPA-PSK or AES as its encryption
method.
+ Make sure that there is no MAC filter on router
or add MAC address to router whitelist.
+ Reset the camera to set up connection again.
Press and hold SET button on the bottom of
the camera for 10 seconds. The camera gives a
long beep when it is fully reset.
Connection Troubleshooting
For additional assistance, please
call 1-844-393-7338.
9
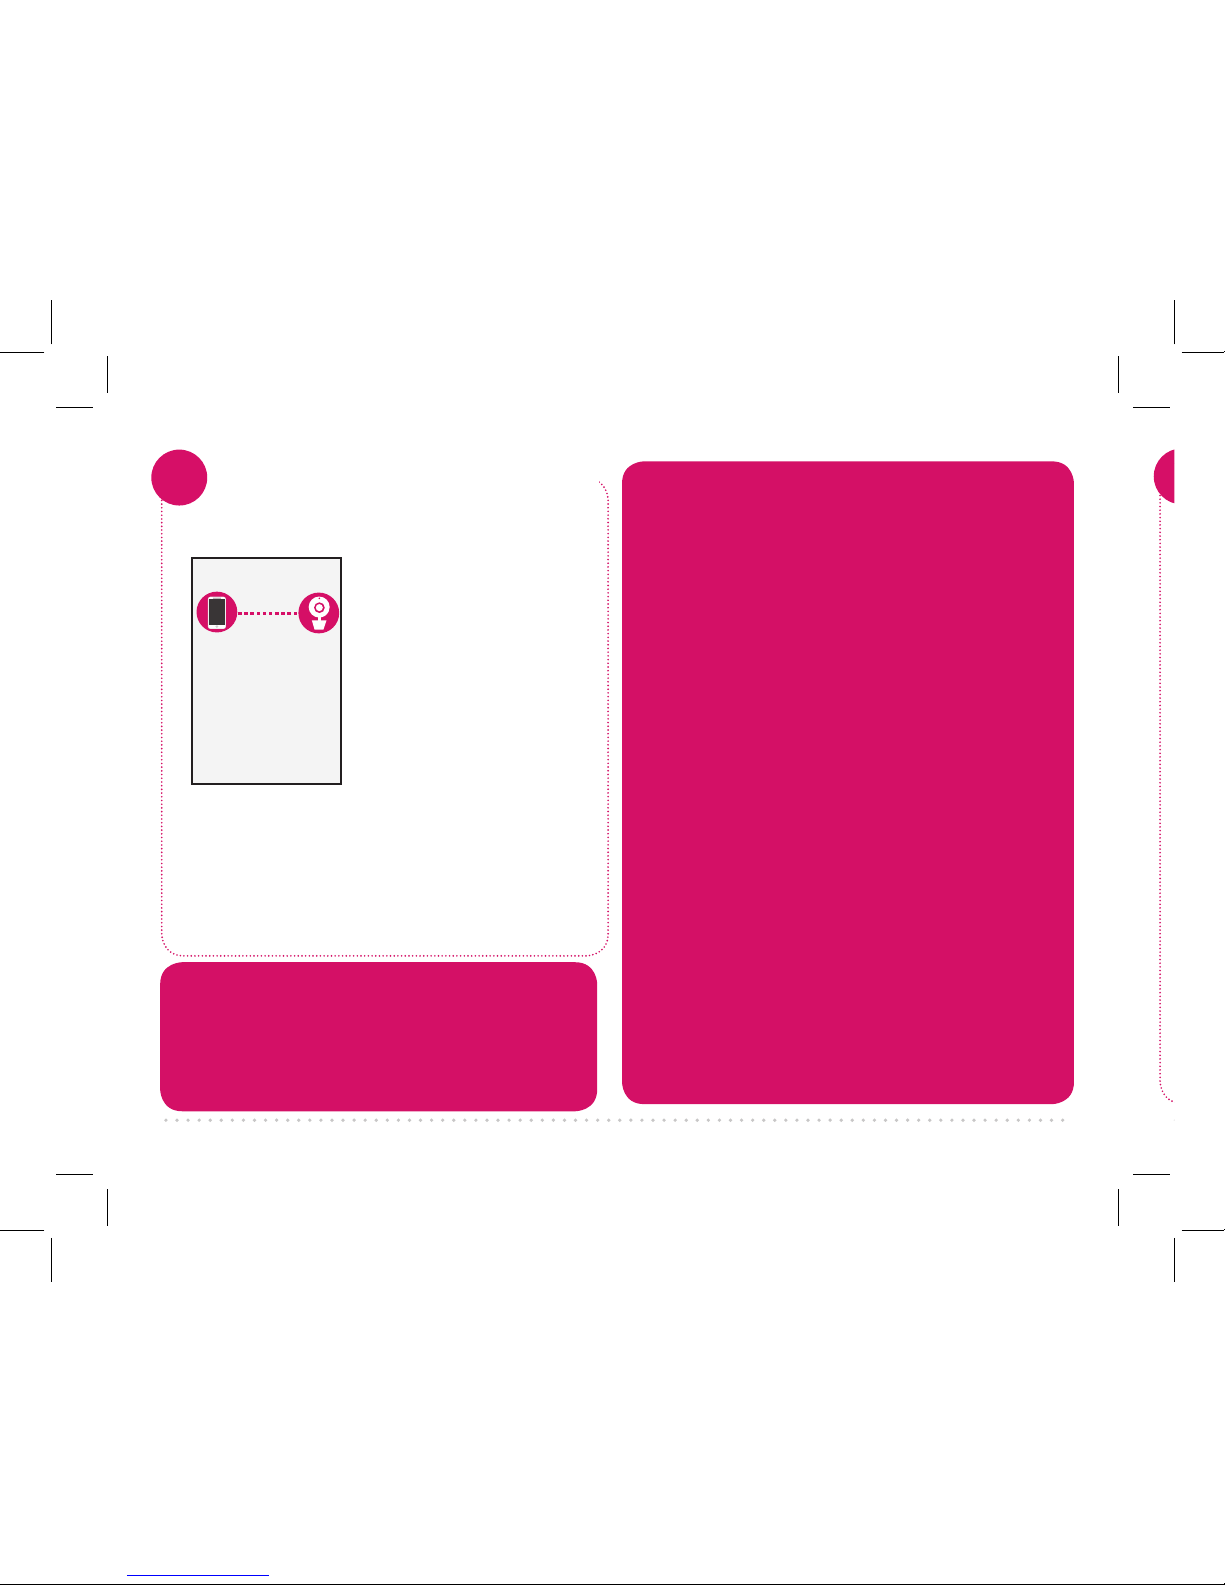
Once the camera
has successfully
connected to your
WiFi network, you’ll
see the Success
screen in the App and
the indicator light
on the back of the
camera will turn green.
Congratulations—
you’ve just set up
your first camera!
IMPORTANT: If your
camera does not connect,
follow the instructions in
the App to troubleshoot.
Congratulations!
Camera successfully added!
Configure WiFi
Problems connecting?
If the Add new camera with WiFi method
doesn’t work, try the Add new camera with QR
code method. Choose Add Camera, then Add
new camera with QR code and follow the on-
screen directions.
Page 9
9
Add ca mera
Camera list
Nursery
Nursery
31°C
2017/04/21 11:45AM
Sound
Snapshot
Speak
HD
68ºF
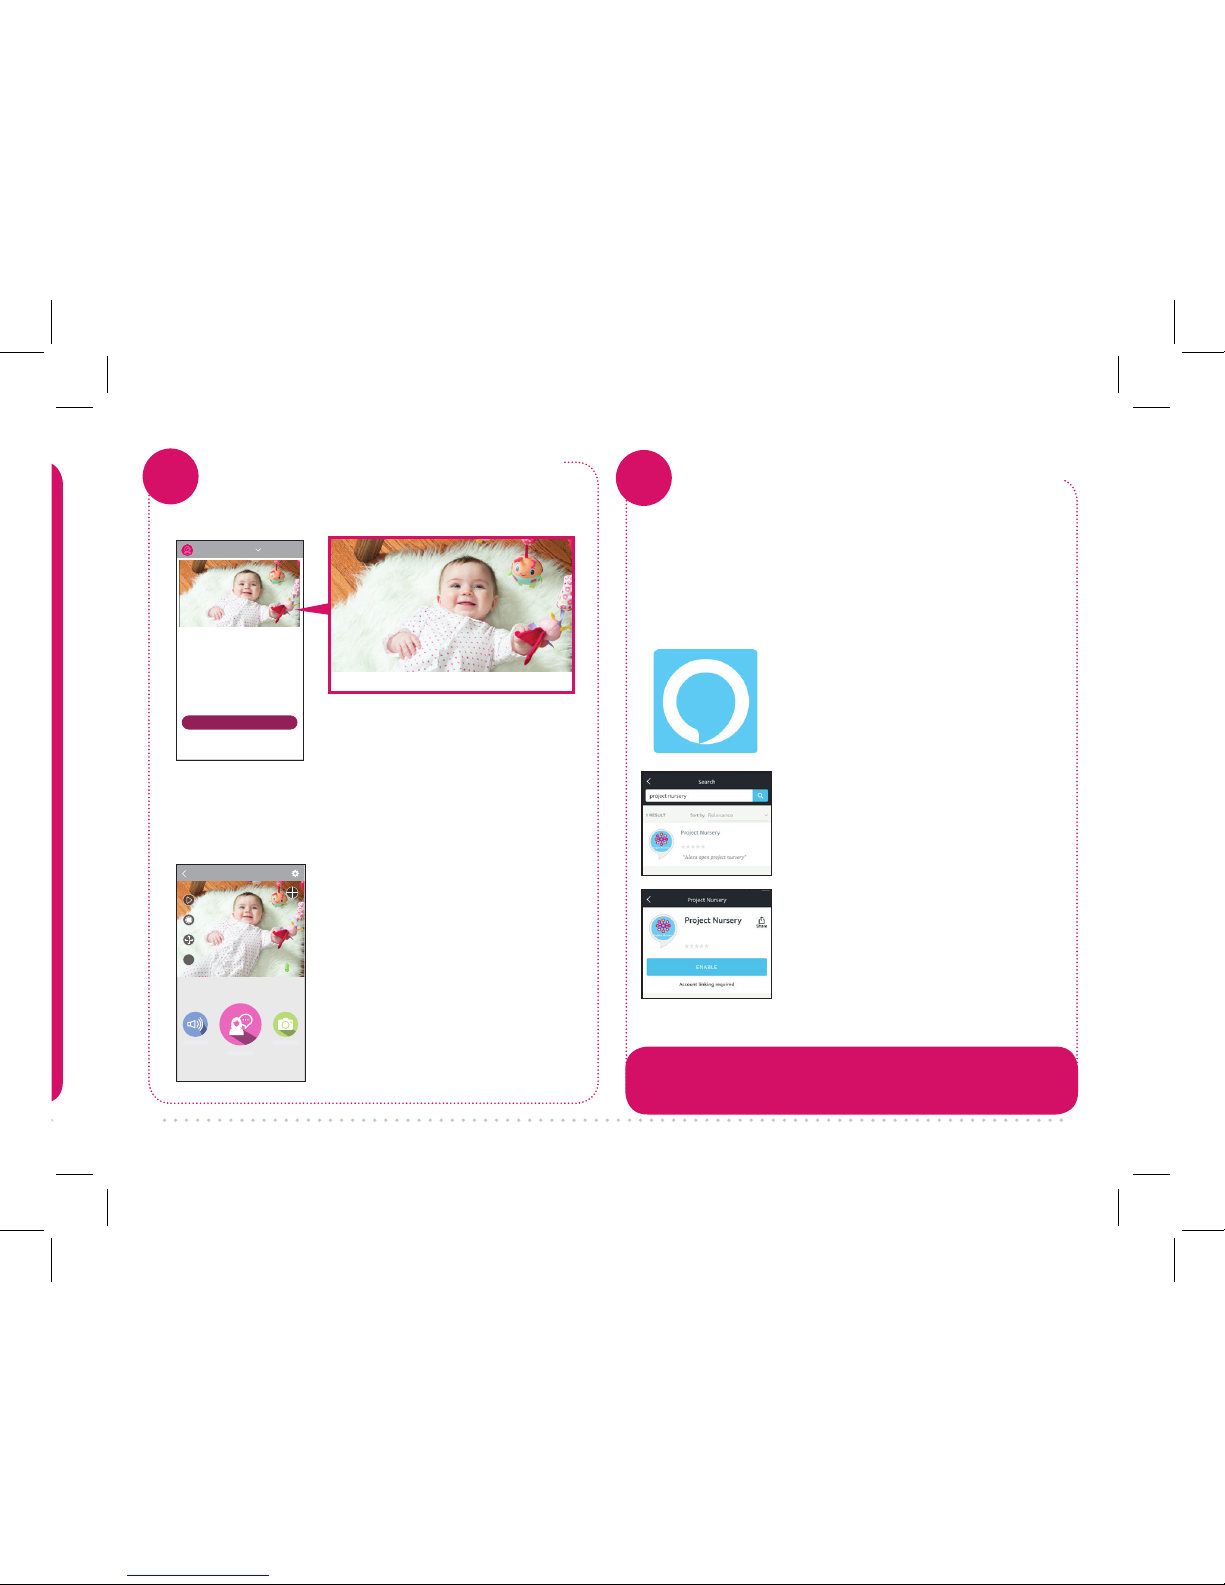
Press the part of the home
screen showing the camera
you set up in order to
choose this camera.
The Camera View screen
is your gateway to total
control of your WiFi
camera from virtually
anywhere.
The next section gives
you a tour of the features
available from this screen.
Camera list
Nursery
Choose the camera from the
home screen
9
If you have an Alexa-enabled speaker,
you can control the Project Nursery
Smart Baby Monitor System with your
voice! Here’s how...
Download and launch the
Amazon Alexa App on
your smartphone or tablet.
Activate the Project Nursery
Alexa Skill
10
In the Alexa App, search
for “Project Nursery.” Then
choose the Project Nursery
skill from the results.
In the next screen, press
the ENABLE button. Then
follow the on-screen
instructions to link your
Project Nursery Smart
Camera account with the
Project Nursery skill.
IMPORTANT: Make sure you link with the same
email address and password you used to set up the
camera!
Page 10

10
IMPORTANT: New voice commands are added to your Project Nursery Smart Baby Monitor System all the time—the
commands here are just a small sample to get started. For all the latest voice commands, go to the Project Nursery
Smart Camera skill in the Alexa App.
Once you’ve enabled the Project Nursery Alexa Skill, you’re ready to start using Alexa with
your Smart WiFi Baby Monitor system.
To start controlling with Alexa: Say “Alexa, open Project Nursery.” Then use one of voice
commands below. IMPORTANT: Use the name you gave your camera in the setup process—
in the examples below the camera is named “Nursery.”
Using Alexa (“Open Project Nursery” commands)
Say...
Lullaby
“Play/stop pink noise on the Nursery camera.”
(waves and rain are also available)
“Play/stop ‘Jolene’ on the Nursery camera.”
(“Holiday” and “I Don’t Want to Miss A Thing” are also available)
Snapshots/Video
*You must have an SD
card (not included) in the
camera to use these.
“Take a picture with the Nursery camera.”
“Start/stop recording with the Nursery camera.”
*The camera stops recording after 1 minute unless you stop it before then.
MotionSound Alerts/
Temperature
“Turn on/off Nursery camera motion/sound detection.”
“When was the last motion/sound detected by the Nursery camera?”
“What is the temperature at the Nursery camera?”
“What is the status update on the Nursery camera?”
Page 11
11
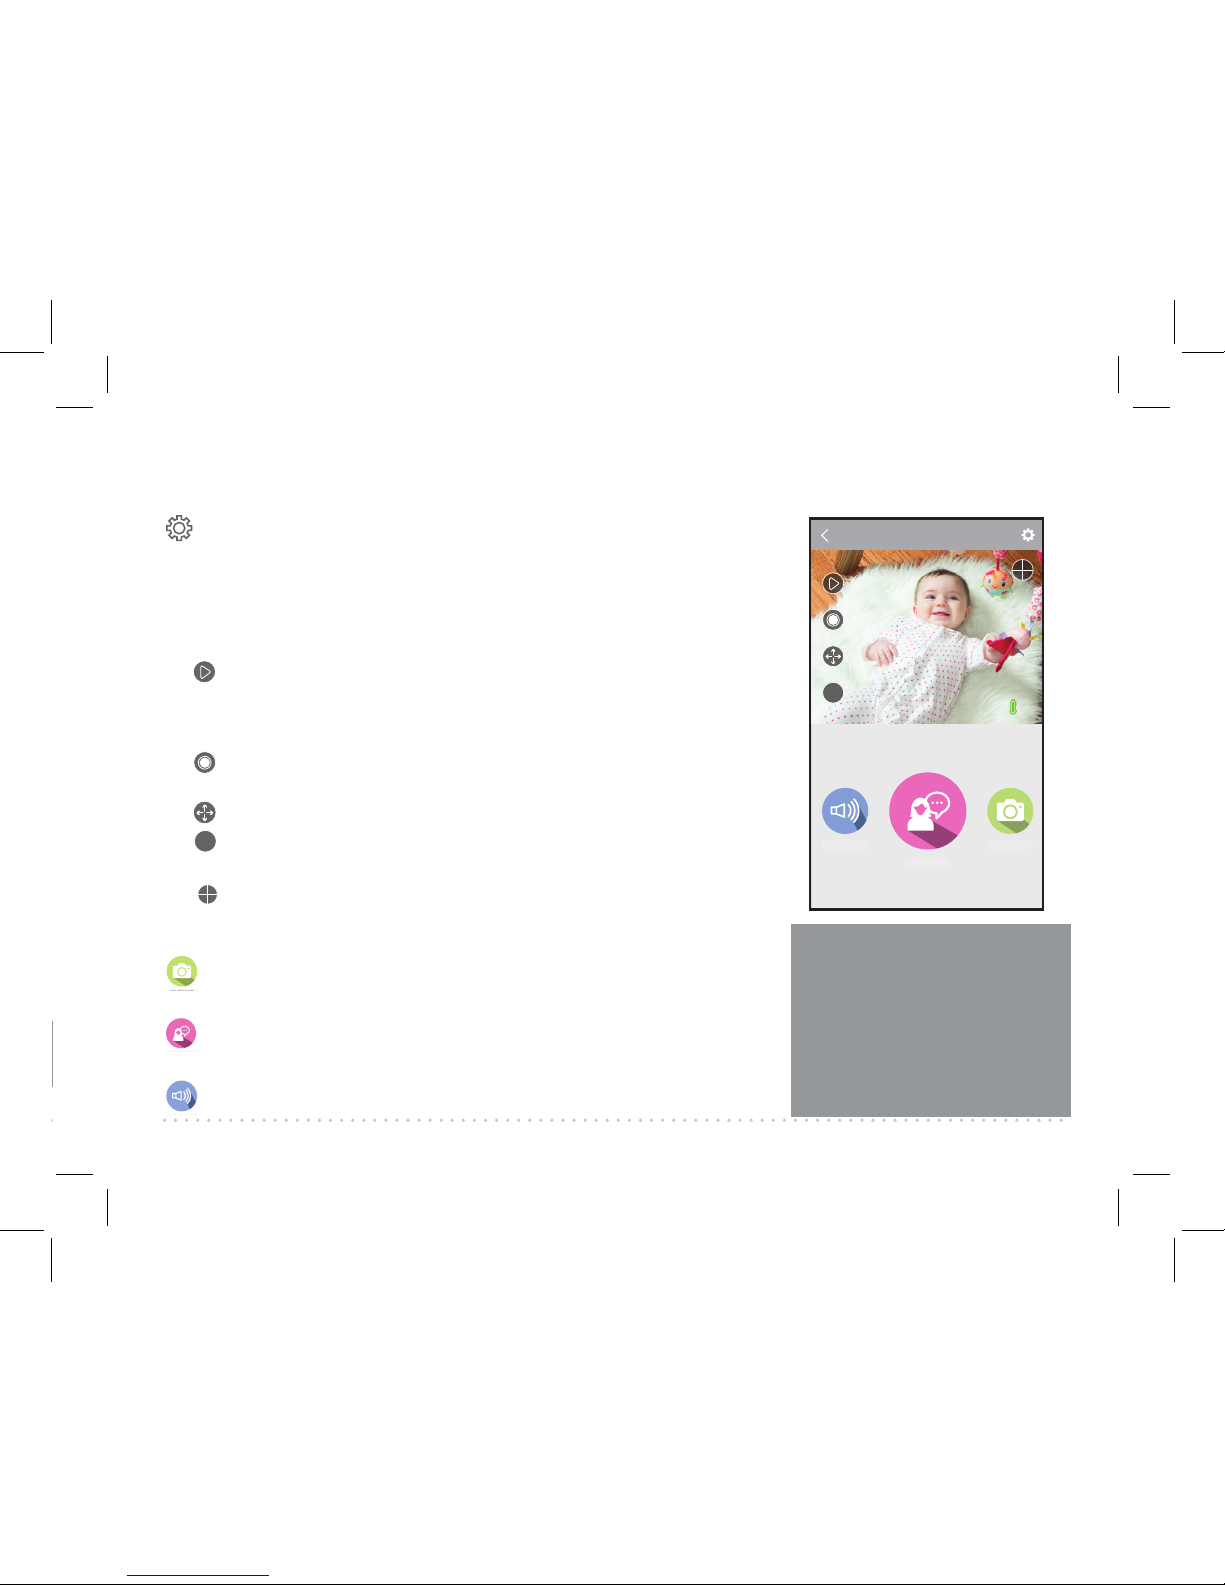
Tour of the System: Camera View Screen
Nursery
31°C
2017/04/21 11:45AM
Sound
Snapshot
Speak
HD
68ºF
(Settings) accesses the Settings menu for this camera. Press this
icon to adjust the WiFi and other settings.
Camera view shows you the image from your WiFi camera. Pan and
tilt the camera by swiping on the screen left/right or up/down. Zoom
the camera by pinching the screen where you want to zoom. Tap the
screen to see these controls:
(Micro-SD Card) accesses any content stored on the camera’s
Micro-SD Card (not included). Press this icon to start viewing or
downloading motion/sound-activated videos or images from the
camera’s Micro-SD Card. (This is where you’ll see auto recordings.)
(Record) starts/stops recording video. The video file is saved to
your smartphone or tablet.
(Pan/Tilt) starts panning or tilting the camera.
HD
(HD-SD Select) lets you switch between high- and standarddefinition video on the view screen.
(Multi-Camera View) lets you see multiple cameras at once on
a single screen (if you’ve set up multiple cameras). Press this icon
to access the multi-camera view screen.
(Snapshot) takes a still photo of the camera video. The snapshot
file is saved to your smartphone or tablet.
(Speak) lets you speak through this camera’s built-in speaker.
Press and hold this icon to start speaking.
(Sound) turns the sound from the camera on and off.
Pan, Tilt, and Zoom
To zoom the active camera:
Pinch the screen where you
want to zoom.
To pan or tilt the active
camera: Swipe the camera
view screen left/right or up/
down.
Page 12

PNMAL2 QSG 02
 Loading...