

Voxx HR8D Owner's Manual
HR8D
REAR SEAT VIDEO HEADREST SYSTEM
8” MONITOR WITH BUILT-IN DVD PLAYER
Owner’s Manual
TM
TM

2

1
HR8D REAR SEAT VIDEO HEADREST SYSTEM Owner’s Manual
Contents
CONGRATULATIONS ..............................................................................................................................................2
CAUTIONS ..................................................................................................................................................................2
PRODUCT FEATURES .............................................................................................................................................3
QUICK START GUIDE ..............................................................................................................................................4
REMOTE CONTROL BATTERY INSTALLATION .............................................................................................6
HEADPHONE BATTERY INSTALLATION ..........................................................................................................7
BATTERY CAUTIONS AND WARNINGS ...........................................................................................................7
FRONT PANEL CONTROLS ...................................................................................................................................8
REMOTE CONTROL OPERATION ....................................................................................................................10
SYSTEM MENU .....................................................................................................................................................14
SYSTEM SETUP MENUS ..................................................................................................................................... 14
DVD PLAYBACK SETTINGS AND ADJUSTMENTS .................................................................................... 18
DVD REGION CODES ..........................................................................................................................................22
AV INPUTS, OUTPUTS AND HDMI/MHL AND USB PORT INFORMATION ...................................... 23
GAME CONTROLLER OPERATION .................................................................................................................25
TROUBLESHOOTING ..........................................................................................................................................27
SPECIFICATIONS ..................................................................................................................................................29
COMPLIANCE INFORMATION ......................................................................................................................... 30
NOTES ......................................................................................................................................................................31
TABLE OF CONTENTS
© 2014 VOXX Electronics Corp. All rights reserved. This manual, or any portion thereof,
may not be reproduced without the express written permission of VOXX Electronics Corp.

2
HR8D REAR SEAT VIDEO HEADREST SYSTEM Owner’s Manual
Thank you for purchasing the HR8D Rear Seat Video Headrest System. Before operating this
system read this manual thoroughly and retain it for future reference.
CONGRATULATIONS
Patented, refer to www.voxxintl.com/company/patents
The Rear Seat Video Headrest System is
set-up and adjusted with easy to use menus
that are accessed using the remote control or
the buttons on the front panel.
The two-channel wireless Infrared (IR)
headphones have an A-B switch that allows
the users to select the audio from either M1
on “CH A” or M2 on ”CH B”.
The M1 monitor will only respond to the
remote control when the Monitor Select “M1”
button is pressed.
The M2 monitor will only respond to the
remote control when the Monitor Select “M2”
button is pressed.
The HR8D Rear Seat Video Headrest System
has two replacement video monitor
headrests referred to as either “M1” or “M2”
in this manual. The system allows the users
to watch the same DVD/Video Source on
both monitors simultaneously or individual
DVD/Video sources on either monitor.
The full function wireless remote control
operates either monitor by selecting the
Monitor Select “M1” or “M2” button.
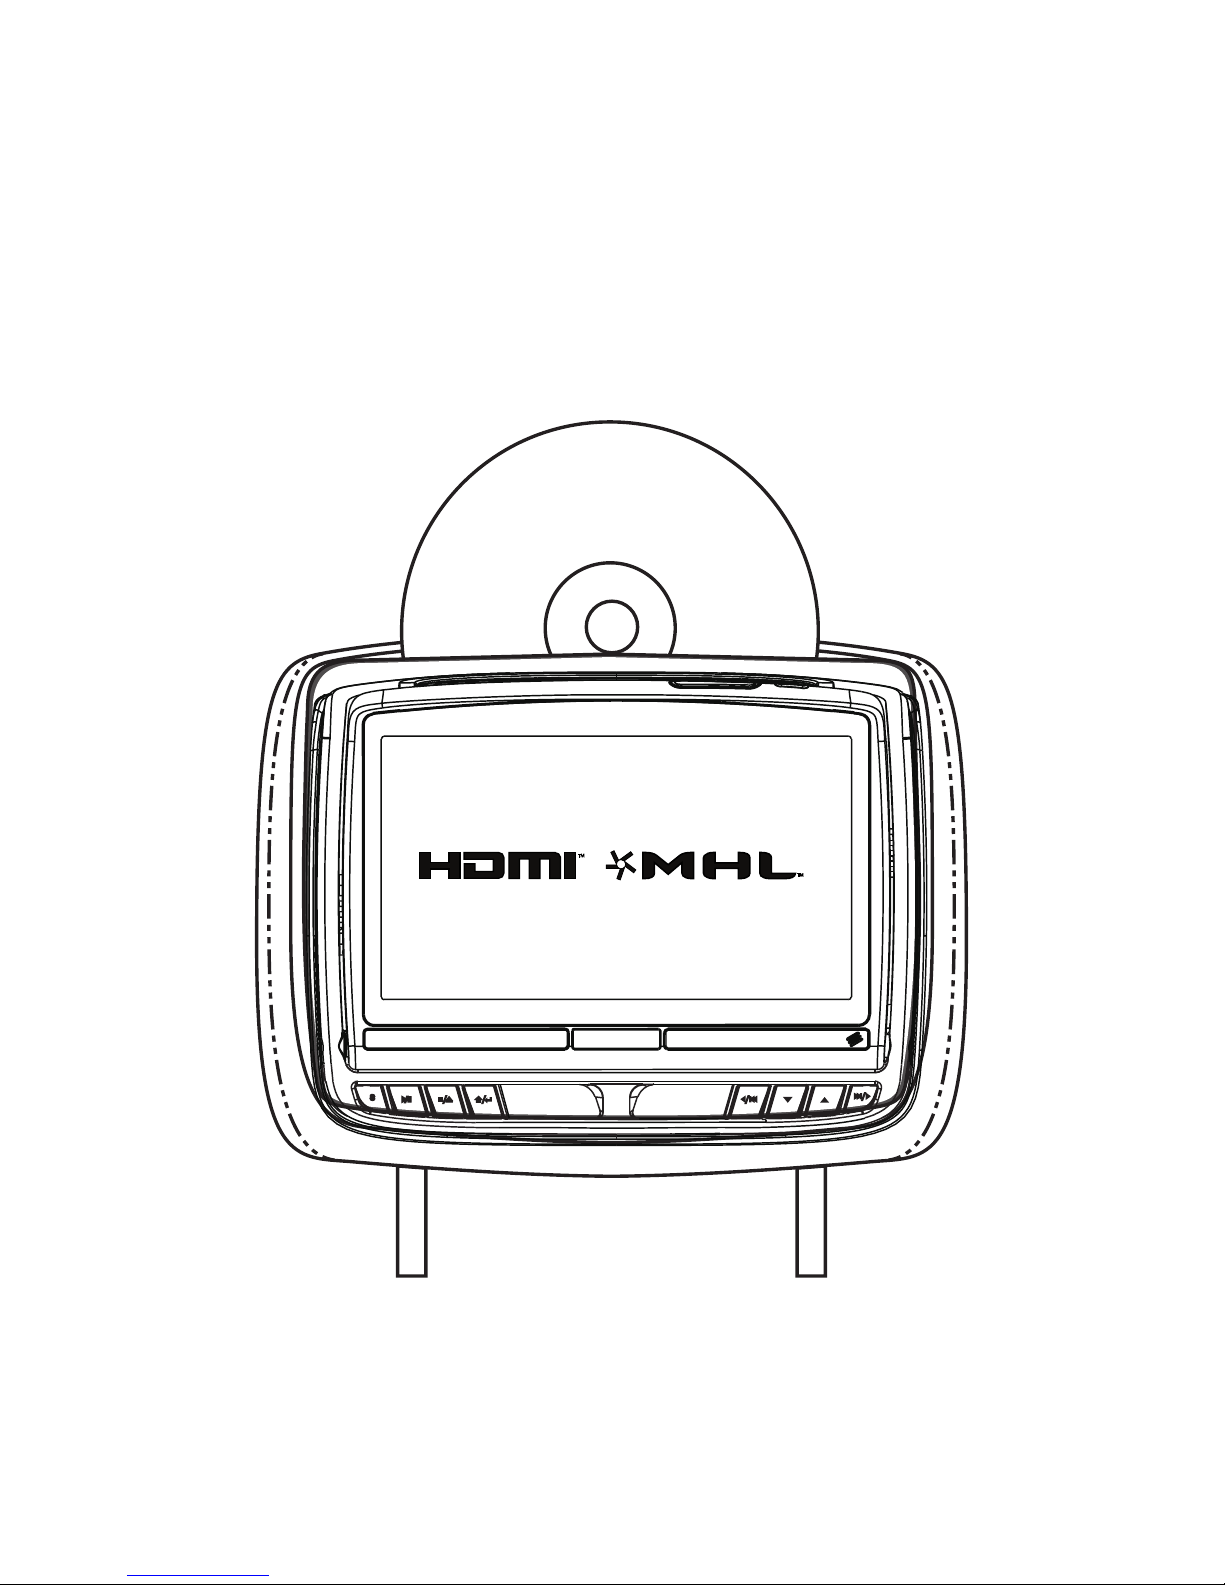
Each headrest has an 8” LCD monitor with a
built-in DVD player that allows the user
to select from several sources (DVD/
USB, HDMI®/MHL®, M1/M2, A/V-IN
and GAME*). Each monitor has a builtin infrared audio transmitter channel.
* GAME Optional
Safety Precaution
For safety reasons, when changing a video
disc, it is recommended that the vehicle
not be in motion, and that you do not allow
children to unfasten safety belts to change a
disc or make any adjustments to the system.
System adjustments can be accomplished
using the remote control, while safety belts
remain fastened. Enjoy your entertainment
system but remember that the safety of all
passengers remains the number one priority.
CAUTION
Always run the vehicle’s engine while using
the HR8D Rear Seat Video Headrest System.
Using this system without running the
engine can result in battery drainage. To
avoid the risk of battery drainage, please
remember to turn system OFF when the
vehicle is not in use for long periods of time.
Important Notice
An LCD Panel and/or Video Monitor may be
installed in a motor vehicle and visible to the
driver if the LCD Panel or Video Monitor is
used for vehicle information, system control,
rear or side observation or navigation. If
the LCD Panel or Video Monitor is used for
television reception, video or DVD play,
the LCD Panel or Video Monitor must be
installed so that these features will only
function when the vehicle is in “park” or
when the vehicle’s parking brake is applied.
An LCD Panel or Video Monitor used for
television reception, video or DVD play that
operates when the vehicle is in gear or when
the parking brake is not applied must be
installed to the rear of the driver’s seat where
it will not be visible, directly or indirectly, by
the operator of the motor vehicle.
CAUTIONS

3
HR8D REAR SEAT VIDEO HEADREST SYSTEM Owner’s Manual
The HR8D Rear Seat Video Headrest System
consists of:
1. Two matching Headrests with 8-inch
Color TFT-LCD Display Screens
(800x4800)16:9 aspect ratio.
2. Two Infrared (IR) Transmitters for
listening to the audio signal through
Wireless IR Headphones.
3. Two wireless Infrared (IR)
Headphones equipped with
volume control and an A/B switch
to select between “M1” and “M2”.
NOTE: The wireless IR headphones must
be used within a line of sight from the
transmitter as infrared transmission,
like visible light, travels only in an
unrestricted line of sight.
4. One wireless 100 channel FM
transmitter for listening to audio (from
the M1 Monitor only) through the
vehicle’s FM radio by tuning to one of
100 frequencies. Locate an unused
FM frequency on the radio and set
the FM modulator to that frequency.
NOTE: Whenever the FM transmitter
is active, regular radio reception may
be poor. Turn the FM transmitter o to
allow normal radio reception.
5. USB Input, used to connect a USB
memory device. This input will also
charge a USB device that contains a
battery.
6. Sources - DVD, USB, A/V-IN, M1 (or M2),
HDMI or Game (optional).
7. HDMI/MHL Input, is used to connect
a device with an HDML/MHL output.
NOTE: Requires an HDML/MHL enabled
device and a special HDML/HML
adapter. Contact your HDML/MHL
device supplier for the adapter. (see
page 23 for more information)
8. Remote Sensors on the front panels.
9. Two full function remote controls
to operate either headrest by
selecting “M1” or “M2”.
PRODUCT FEATURES
10. Controls & Indicators on the Front and
Top Panels.
• POWER
• SOURCE (S)
• PLAY/PAUSE ( )
• STOP/ EJECT (n )
• ENTER ( )
• LEFT / PREVIOUS ( / )
• DOWN (q)
• UP (p)
• NEXT / RIGHT ( / )
• USB Connector
• HDMI/MHL INPUT
11. OSD (On Screen Display) menus.
12. MVGP1 Game Pack (Optional):
The Game Pack consists of fty four 32-
bit games (six dual players). Includes 2
Game Controllers (P1 & P2), see pages
25 and 26 for more information.
When the Game Pack is installed, either
monitor can be designated as “Player
1”. Selection is based on a “rst come,
rst serve” basis. The second monitor
will automatically become “Player 2”,
see page 25 for more information.

4
HR8D REAR SEAT VIDEO HEADREST SYSTEM Owner’s Manual
QUICK START GUIDE
1. Press the Power button on the top of the
front panel or on the remote control.
The power indicator will be dimly lit.
2. Insert a DVD, CD, or MP3 disc (label
toward user) into the disc slot located
on top of the M1 monitor. The disc
player will pull the disc in automatically.
NOTE: Do not force the disc in the slot.
The monitor must be in DVD mode to
accept a disc.
3. Tilt the Screen to a comfortable viewing
position. The screen has a built-in stop.
Do not force it past this stop, otherwise
damage will occur.
4. Each wireless IR headphone has an
”A-B” switch used to select the audio
from either the “M1” or “M2” monitor.
When sitting in front of the M1 screen,
use the CH A setting. When sitting in
front of the M2 screen, use the CH B
setting.
• Set the headphone to the
proper channel and press the
Power On/O button to turn
the headphones ON. The power
indicator will light up red.
NOTE: Turn the volume down to its
lowest setting before putting the
headphones on.
5. When the DVD menu appears, select
the menu item using the UP/DOWN
buttons and press the Enter or Play
button.
6. If audio playback through the
vehicle radio is preferred, use the FM
transmitter ON/OFF button on the
remote control. Set the vehicle radio to
the channel selected on the M1 monitor.
If interference with a local radio station
occurs, set the FM modulator to one
of the other 100 radio frequencies
using the Channel Select button on
the remote control or front panel.
NOTE: To operate the M1 screen, press
M1 button on the remote control. To
operate the M2 screen, press the M2
button on the remote control.
7. To turn OFF either the M1 or M2
monitor, press and hold the Power ON/
OFF button for 5 seconds.

5
HR8D REAR SEAT VIDEO HEADREST SYSTEM Owner’s Manual
For the best disc operation, it is important
that you read this section completely.
DVD Region Coding
DVD discs are coded by region. These region
codes must match in order for the DVD to
play. If the codes do not match, the DVD
will not play. The HR8D region code is set to
Region 1. Playback of a disc from any other
region will not work in the HR8D.
Types of Discs the HR8D Will Play
• DVD-Video: DVD containing video.
• CD-DA: CD containing musical or sound
content only.
• CD-Video: CD contains video only.
• CD-R/RW: CD contains audio les (for
example, a CD-R with downloaded MP3
les), MPEG, or JPEG les.
NOTE: The following discs will NOT play in
the HR8D: Optical disc- CD-1, CD-ROM, and
DVD-ROM Mini disc- CDG (audio only, not
graphics), Blu-ray.
Loading and Playing Discs
Before loading a disc, make sure that it is
compatible with the player.
Press the POWER button to turn the system
ON. Load the disc (label facing the user) into
the disc slot. The disc will load automatically
and begin to play.
NOTE: Some discs may start at the root
menu, where play must be selected to start
movie.
NOTES on Discs
• Do not touch the disc surface. Handle the
disc by the edge.
• It is important that discs are clean prior to
use.
• If disc is not clean, use a commercially
available cleaning cloth to gently wipe
the disc from the center out. (Figure 1)
NOTE: Do not use solvents such as
benzene, thinner, cleaners, or antistatic
spray intended for analog discs.
• Keep discs protected in their cases or
disc magazines when not in use. Do not
subject discs to heat or high temperature.
Avoid leaving discs in a parked vehicle or
on a dashboard or rear tray.
• Do not use discs that have aftermarket
paper or plastic labels or stickers attached.
The following malfunctions may result
from using such discs:
• Inability to eject a disc (due to a label
or sticker peeling o and jamming the
eject mechanism).
• Inability to read audio data correctly
(i.e. playback skipping, or no playback)
due to heat shrinking of a sticker or
label causing a disc to warp.
• Use only standard, round discs. If you
insert irregular, non-round, shaped discs
they may jam in the DVD player or not play
properly.
Figure 1
GENERAL OPERATING INSTRUCTIONS
6
HR8D REAR SEAT VIDEO HEADREST SYSTEM Owner’s Manual
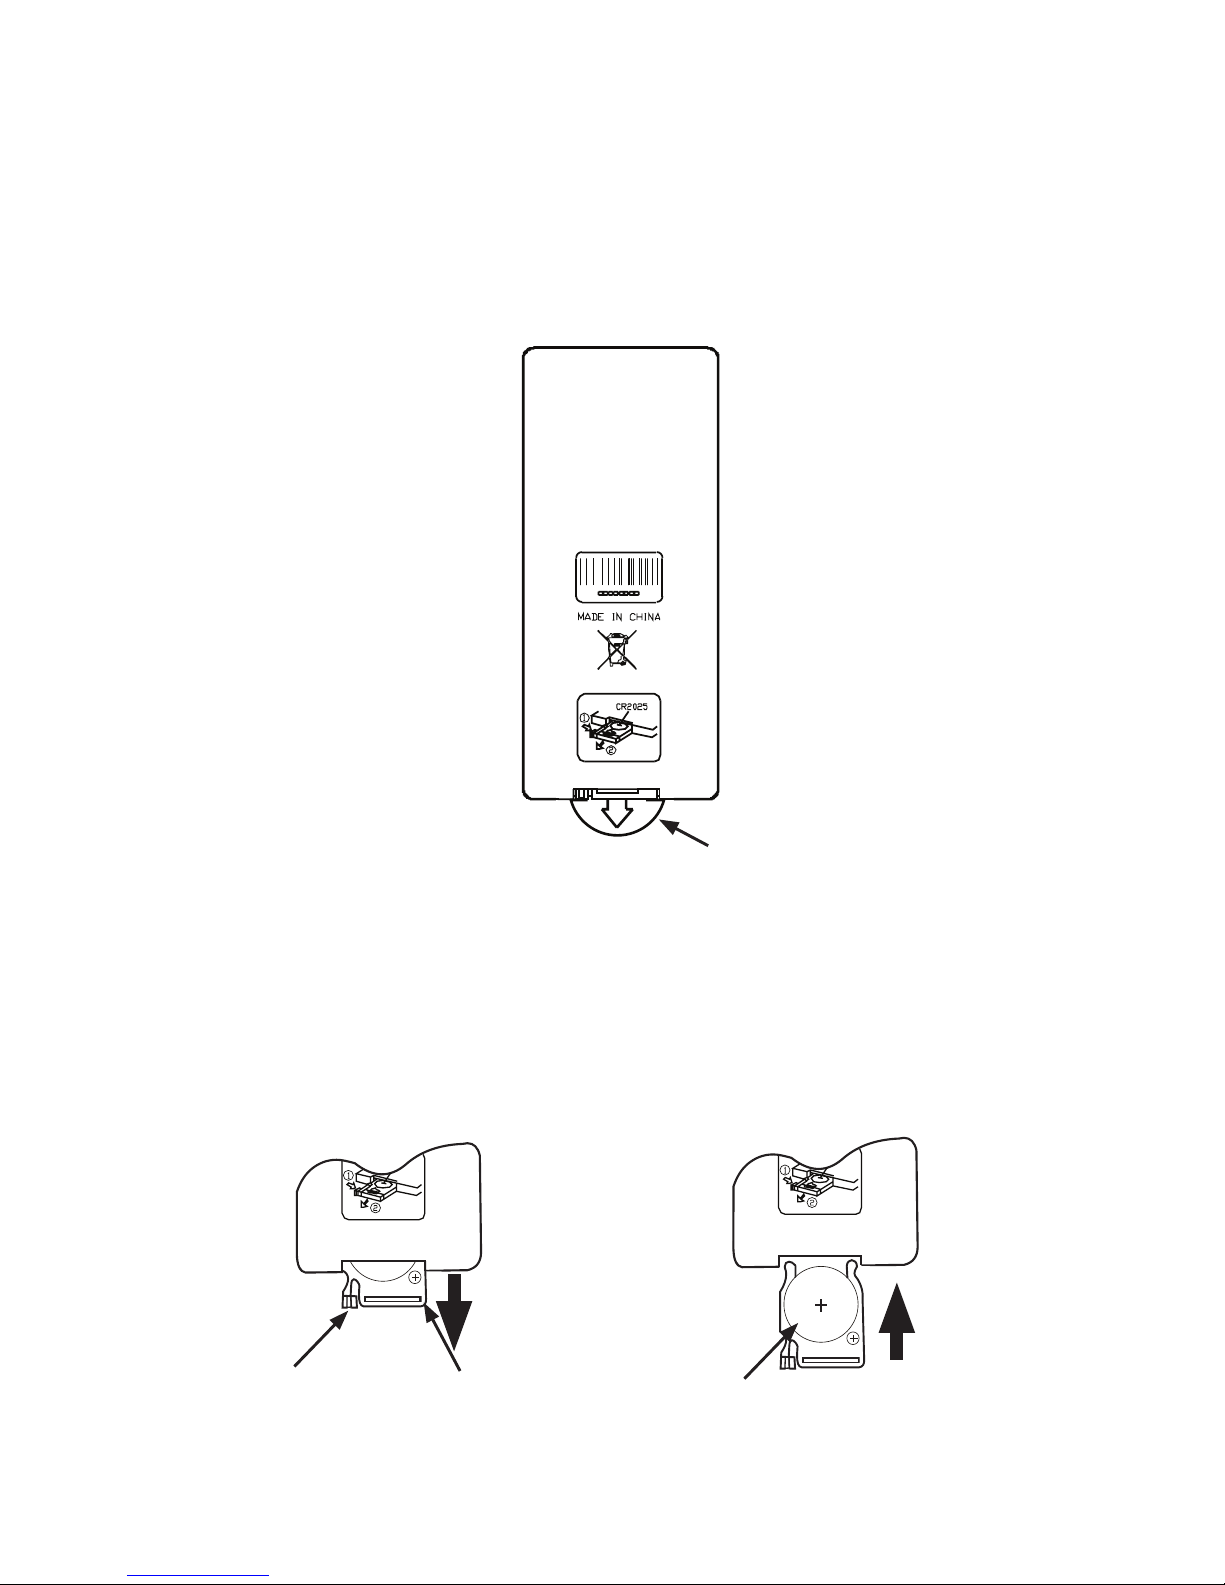
REMOTE CONTROL BATTERY INSTALLATION
Installation of the Remote Control Battery
Figure 2
Figure 3 Figure 4
Each remote control comes with a battery already installed with a Pull Tab to prevent battery
discharge. Remove the Pull Tab before attempting to use the remote control. (Figure 2)
NOTE: The remote control will only operate with the HR8D Rear Seat Video Headrest System.
It is not a universal remote control and will not control other equipment.
Remote control
Back View
Protective Pull Tab (Clear Plastic)
(1)
(2)
(1)
1. While holding the remote control,
insert thumbnail into the battery door
side notch (1) and index ngernail into
battery door upper notch (2) and slide
battery holder open. (Figure 3)
2. Install one CR2025 battery (1). (Figure 4)
NOTE: Make sure that the proper polarity
(+ or -) is observed.
3. Slide the battery holder back into the
remote control until it locks. (Figure 4)
CR2025
3V
CR2025
3V
7
HR8D REAR SEAT VIDEO HEADREST SYSTEM Owner’s Manual
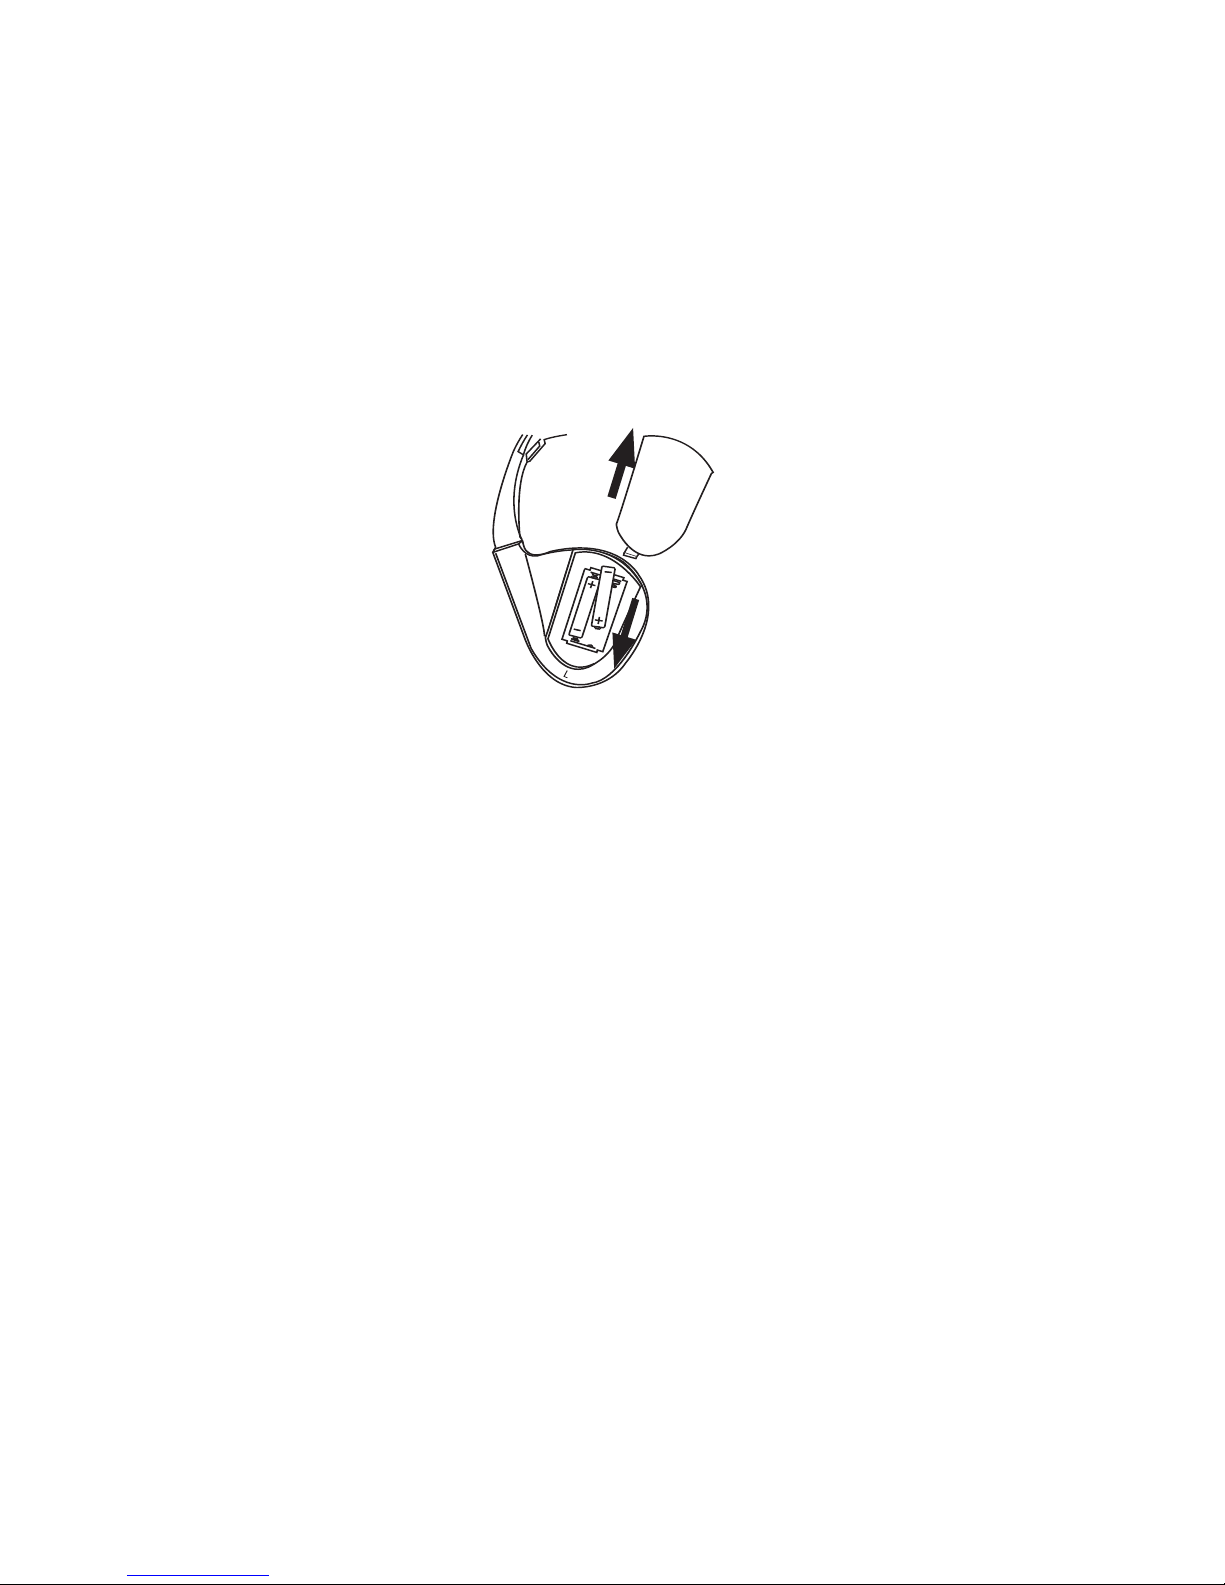
Each wireless IR headphone requires two AAA batteries.
1. Locate the battery compartment cover on the left earphone.
2. While holding the left earphone in one hand, press down on the battery compartment
cover and slide it UP and OFF in the direction shown. (Figure 5)
3. Insert two AAA batteries, carefully following the markings inside to ensure the batteries
are inserted properly ( “+”and “-” ends in the correct positions).
4. Replace the battery compartment cover. (Figure 5)
Installation of the Headphone Batteries
HEADPHONE BATTERY INSTALLATION
Figure 5
• Always keep the monitors, remote
controls and headphones clean and dry.
• Always seek qualied personnel to
perform repairs to the system or
individual components of the system.
Never attempt your own repairs.
• Do not drop remote controls and
headphones or expose to strong
impacts.
• Do not expose monitors, remote controls
and headphones to direct sunlight for
extended periods of time.
• Always ensure that the batteries are
correctly installed in the remote controls
and headphones with the positive and
negative sides in the directions as shown
in the battery compartment.
• Use one CR2025 (3V) Lithium battery
(160mAh) in the remote controls
NOTE: Do not use dierent types.
• Use two AAA (1.5v) Alkaline batteries in
each of the headphones.
NOTE: Do not use dierent types.
• Do not use old batteries in the remote
controls or headphones.
• When the batteries fail to function, replace
them immediately.
• Remove the batteries if the remote
controls and headphones are not used for
a month or longer.
• Keep all batteries out of the reach of
children. Should a battery be swallowed,
immediately consult a doctor.
• When disposing of used batteries, please
comply with governmental regulations
or environmental rules that apply in your
area.
BATTERY CAUTIONS AND WARNINGS
Cautions and Warnings
8
HR8D REAR SEAT VIDEO HEADREST SYSTEM Owner’s Manual
Figure 6
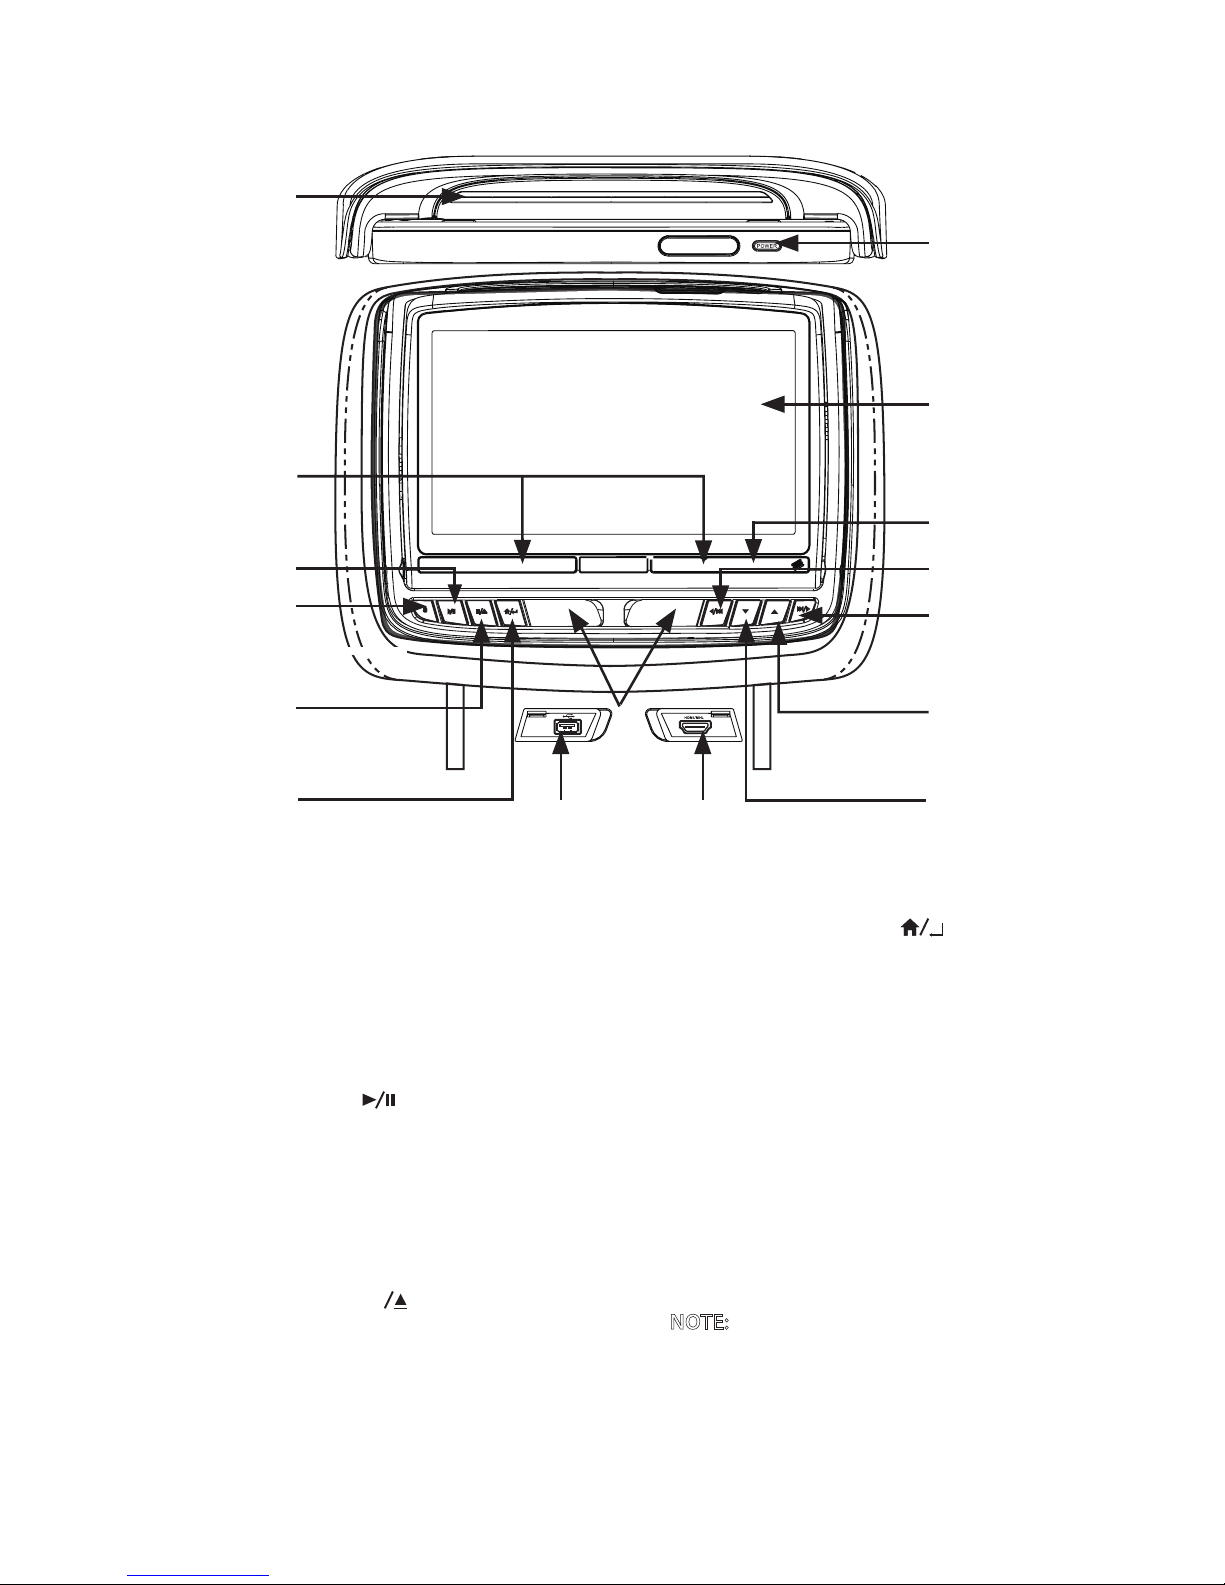
FRONT PANEL CONTROLS
1. DVD disc insertion slot
2. IR TRANSMITTER and IR SENSOR
IR Transmitter: Used to broadcast audio
signal to the wireless IR headphones.
IR Sensor: Used to receive signals from
the remote control.
3. PLAY/PAUSE ( ) Button
This button is used to start playback of
the disc or pause a disc.
4. SOURCE (S) Button
This button is used to select the DVD/
USB, M1/M2, A/V IN, HDMI/MHL or GAME
(optional) sources.
5. STOP / EJECT (n ) Button
This button is used to stop the
playback of the disc or USB
in use and to eject the disc.
6. HOME / MENU SELECT ( ) Button
This button is used to access the system
menu. Used to execute a selected setting
or menu option.
7. USB PORT
This port is used to connect a USB
device for playback of content. To
view content, select “USB” as the video
source and insert the USB device. The
USB device will start automatically.
NOTE: This input will also charge a USB
device that contains a battery.
8. HDMI/MHL INPUT
For connection of device with HDMI/
MHL output.
NOTE: Requires a HDMI/MHL enabled
device and a special HDMI/MHL adapter.
Contact your HDMI/MHL device supplier
for adapter.
1
12
13
10
8
6
5
7
9
2
3
16
4
11
14
15

9
HR8D REAR SEAT VIDEO HEADREST SYSTEM Owner’s Manual
FRONT PANEL CONTROLS (continued)
9. JACK COVERS
Used to protect and cover the HDMI jack
and USB port when not in use.
10. DOWN (q) Button
This button is used to navigate through
menu selections in downward direction.
11. UP (p) Button
This button is used to navigate through
menu selections in upward direction.
12. NEXT / RIGHT ( / ) Button
Press and hold this button to skip to the
next chapter or track during playback
of a disc. This button is also used to
navigate through menu selections.
13. LEFT / PREVIOUS ( / ) Button
Press and hold this button to skip to
the previous chapter or track during
playback of a disc. This button is
also used to navigate through menu
selections.
14. POWER INDICATOR
Bright Red when OFF and dimly lit when
ON.
15. 8-inch TFT LCD Display Screen
(800 x 480)
16. POWER Button
• Press and release this button to turn
the monitor ON.
• Press and hold this button for 3 to 5
seconds to turn the monitor OFF.
 Loading...