

Voxx HR7012S, HR7012, HR7012MA, HR7012D Owner's Manual
S
S
P
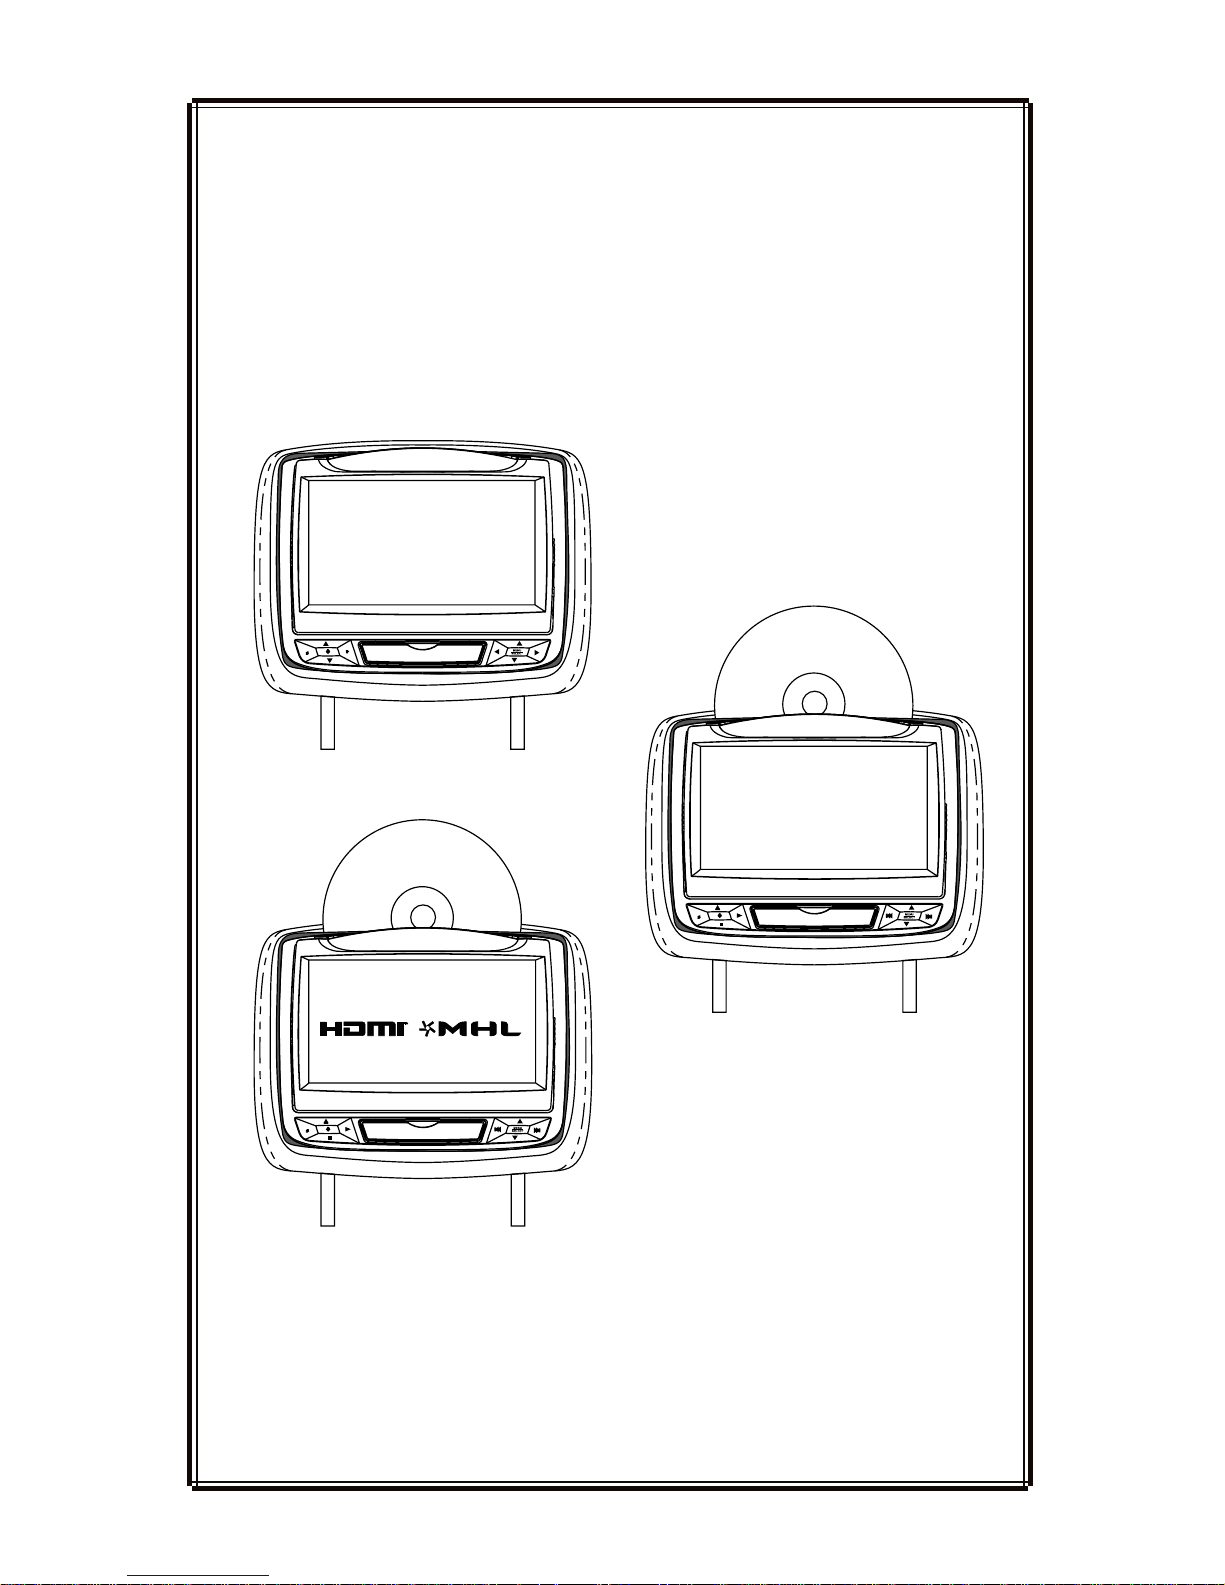
HR7012MA
HR7012
REAR SEAT VIDEO
HEADREST SYSTEM
Owner’s Manual
HR7012S
AvAilAble in six configurAtions
HR7012D
S
TM
TM

2

Contents
CONGRATULATIONS ...............................................................................................................................................2
HR7012 REAR SEAT VIDEO HEADREST SYSTEM CONFIGURATIONS ...................................................3
PRODUCT FEATURES .............................................................................................................................................5
CAUTIONS ..................................................................................................................................................................6
QUICK START GUIDE ..............................................................................................................................................6
GENERAL OPERATING INSTRUCTIONS ..........................................................................................................7
FRONT PANEL CONTROLS - HR7012MA .........................................................................................................8
FRONT PANEL CONTROLS - HR7012S .......................................................................................................... 10
FRONT PANEL CONTROLS - HR7012D ......................................................................................................... 12
REMOTE CONTROL BATTERY INSTALLATION ...........................................................................................14
HEADPHONE BATTERY INSTALLATION ....................................................................................................... 15
BATTERY CAUTIONS AND WARNINGS ........................................................................................................ 15
REMOTE CONTROL OPERATION ....................................................................................................................16
SYSTEM MENU .....................................................................................................................................................20
SYSTEM SETUP SUBMENUS ........................................................................................................................... 22
DVD PLAYBACK SETTINGS AND ADJUSTMENTS ................................................................................... 31
DVD REGION CODES ..........................................................................................................................................35
AV INPUTS, OUTPUTS, HDMI/MHL and USB PORT INFORMATION ......................................................36
GAME CONTROLLER OPERATION OPTIONAL ........................................................................................38
TROUBLESHOOTING ..........................................................................................................................................40
SPECIFICATIONS ..................................................................................................................................................42
COMPLIANCE INFORMATION ......................................................................................................................... 43
USER NOTES ..........................................................................................................................................................44
TABLE OF CONTENTS
© 2014 VOXX. Electronics Corp. All rights reserved. This manual, or any portion thereof,
may not be reproduced without the express written permission of VOXX Electronics Corp.
1

2
HR7012 REAR SEAT VIDEO HEADREST SYSTEM Owner’s Manual
CONGRATULATIONS
The HR7012 Rear Seat Video Headrest
System has two factory matched replacement
headrests with 7” video monitors in each
headrest. The monitors are hereafter
referred to in this manual as “M1” and “M2”
The M1 and M2 monitors are equipped with
easy to use front panel controls and auxiliary
input connection options.
The system allows the users to watch the
same DVD or video source on both monitors
simultaneously or allows individual viewing
of content.
The HR7012 monitor is available in three
models, HR7012MA, HR7012D and HR7012S.
These three models can be congured to
allow six possible combinations, which are
detailed on pages 3 and 4. Below are the
details for each monitor:
HR7012MA: is a 7” LCD monitor with a
built-in DVD player that allows the user
to select from several sources (DVD/
USB, M1 (M2), A/V-IN, AUX MEDIA,
and GAME* Source). The monitor has
a built-in infrared audio transmitter
channel.
HR7012S: is a 7” LCD monitor (No DVD)
that allows the user to select from
several sources (M1 (M2), A/V-IN, AUX,
and GAME* Source). The monitor has
a built-in infrared audio transmitter
channel.
HR7012D: is a 7” LCD monitor with
a built-in DVD player that allows the
user to select from several sources
(DVD/USB, HDMI/MHL, M1 (M2), A/VIN, and GAME* Source). The monitor
has a built-in infrared audio transmitter
channel.
* GAME Optional
Thank you for purchasing the HR7012 Rear Seat Video Headrest System. Before operating this
system read this manual thoroughly and retain it for future reference.
The HR7012 Rear Seat Video Headrest
System is set up and adjusted with easy to
use menus that are accessed using the front
panel controls or the remote controls.
The two-channel wireless Infrared (IR)
headphones have an A-B switch that allow
the users to select the audio from either M1
on “CH A” or M2 on ”CH B”
• The M1 monitor will only respond to
the remote control when the Monitor
Select “M1” button is pressed.
• The M2 monitor will only respond to
the remote control when the Monitor
Select “M2” button is pressed.
(Optional wired headphones allow the user
to listen to audio from the system through
the 1/8” jack located on the front of the
HR7012MA and HR7012S. The HR7012D
does not have a wired headphone jack)
Patented, refer to www.voxxintl.com/company/patents
3
HR7012 REAR SEAT VIDEO HEADREST SYSTEM Owner’s Manual
HR7012 REAR SEAT VIDEO HEADREST SYSTEM CONFIGURATIONS
Available in six congurations as follows:
Conguration 1:
• Two 7” LCD monitors (M1/M2), each with a built-in DVD player (HR7012MA)
(Figure 1)
Conguration 2:
• One 7” LCD monitor with a built-in DVD player (M1) (HR7012MA)
One 7” LCD monitor (M2) (screen only) (HR7012S) (Figure 2.)
NOTE: When the M2 Monitor is set to the M1 source and to “AUTO ON”, M2 will turn
ON automatically when M1 is in playback mode. (See page
30)
Conguration 3:
• Two 7” LCD monitors (M1/M2) (HR7012S) (screens only) connected to automotive
head unit (radio) with built-in DVD player or external DVD, Blu-ray player or other
A/V source. (Figure 3)
NOTE: When the Monitors are set to the “A/V” IN source and “AUTO ON” is selected both
monitors will turn ON automatically when a video signal is received from a external
source. (See page 30)
Your system may have an additional A/V (Audio/Video) input such as Conguration 3
above and/or an optional Game Pack (MVGP1). When an optional Game Pack is installed,
either monitor can be designated as “Player 1”. Selection is based on a “rst come, rst
serve” basis. The second monitor will automatically become “Player 2”. See pages 38-39
for details)
S
P
HR7012S
(M2)
+
S
P
HR7012MA
(M1)
Figure 2
S
P
HR7012MA
(M2)
+
S
P
HR7012MA
(M1)
Figure 1
S
P
S
P
HR7012S
(M2)
HR7012S
(M1)
+
Figure 3
4
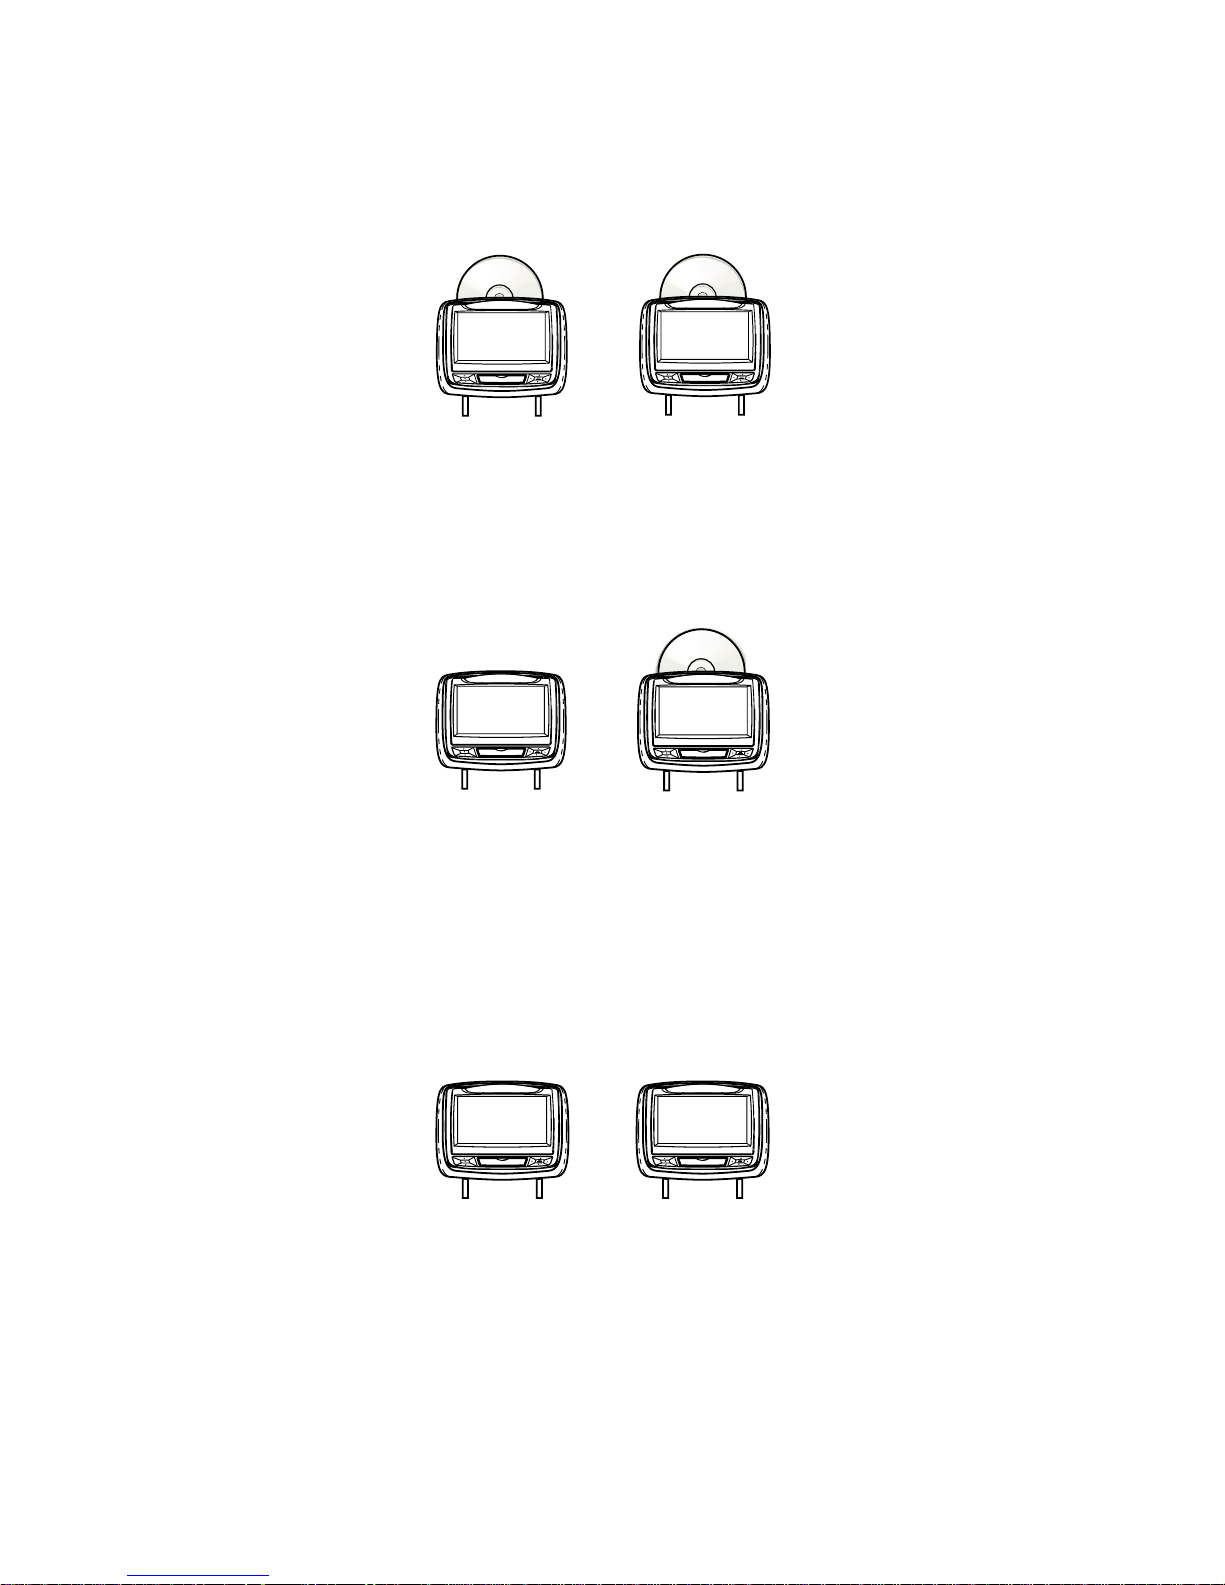
HR7012 REAR SEAT VIDEO HEADREST SYSTEM Owner’s Manual
S
P
HR7012MA
(M2)
+
S
P
HR7012D
(M1)
Figure 5
HR7012 REAR SEAT VIDEO HEADREST SYSTEM CONFIGURATIONS
(continued)
Conguration 4:
Two 7” LCD monitors (M1/M2) with a built-in DVD player and HDMI input (HR7012D)
(Figure 4)
Conguration 5:
One 7” LCD monitor with a built-in DVD player and HDMI input (HR7012D) and One 7”
LCD monitor with a built in DVD player and AUX input (HR7012MA). (Figure 5)
Conguration 6:
One 7” LCD monitor (M1) with a built-in DVD player and HDMI input (HR7012D) and
One 7” LCD monitor (M2) (screen only) (HR7012S). (Figure 6)
Figure 6
S
P
HR7012S
(M2)
+
S
P
HR7012D
(M1)
S
P
HR7012D
(M2)
+
S
P
HR7012D
(M1)
Figure 4

5
HR7012 REAR SEAT VIDEO HEADREST SYSTEM Owner’s Manual
The HR7012 Rear Seat Video Headrest System
consists of:
1. Two factory matched Headrests with
7-inch Color TFT-LCD Display Screen
(800x480) 16:9 aspect ratio. (See
conguration options on previous
pages.)
2. Two Infrared (IR) Transmitters for
listening to audio signal through
Wireless IR Headphones.
3. Two Wireless Infrared (IR) Headphones
equipped with volume control and A/B
switch to select between “M1” and “M2”.
NOTE: The wireless IR headphones must
be used within a line of sight from the
transmitter as infrared transmission,
like visible light, travels only in an
unrestricted line of sight.
4. One wireless FM transmitter used to
listen to audio (M1 only) through the
vehicle’s FM radio by tuning to one
of 100 frequencies. Locate an unused
station on the vehicle radio. Turn the
M1 headrest ON. Turn the FM Modulator
ON and set the FM Modulator to the
frequency on the vehicle radio. (See
page
24-26 for details) NOTE: Whenever
the FM transmitter is active, regular
radio reception may be poor. Turn the
FM transmitter o to allow normal radio
reception.
5. Audio/Video (AUX) Signal Input Jacks
(yellow, white and red) (HR7012MA
and HR7012S only) used to connect
items such as a DVD player, video game
device, or other audio/video devices.
Two 1/8-inch (3.5mm) Wired Stereo
Headset Jacks that can be used with
any standard stereo headphones.
(HR7012MA and HR7012S only)
6. USB Port (HR7012MA only) used to
connect a USB memory device (eg.
thumb drive) Content on the USB device
can be played by selecting “DVD” as
the video source. The USB device will
automatically start up upon connection,
PRODUCT FEATURES
thereby overriding the DVD disc.
USB port (HR7012D only) 2.0 input
on the front for phone/tablet
charging or for playing digital
content from a USB Flash drive.
Disconnect the USB device
to play DVD’s and CD’s.
NOTE: Refer to the HDMI/MHL
information on pages 36 for tablet/phone
charging capability and supported
digital audio and video le formats
7. HDMI®/MHL® (HR7012D only) input on
the front panel for media streaming
devices such as Roku Streaming Stick
and Chromecast (Not Included). This
input will also allow connection of a
smartphone (with the proper adapter)
for playing digital content from your
phone to the LCD screen.
8. Remote Sensor on the Front Panel.
9. Full Function Remote Controls to operate
either headrest by selecting “M1” or “M2”.
10. Control Buttons on the Front Panel.
• HR7012MA: POWER, SOURCE, STOP,
PLAY, EJECT, MENU/SELECT, PREV,
NEXT, VOLUME UP/DOWN.
• HR7012S: POWER, SOURCE, PIX, LEFT/
RIGHT, MENU/SELECT, VOLUME UP/
DOWN
• HR7012D: POWER, SOURCE, STOP,
PLAY, EJECT, MENU/SELECT, PREV,
NEXT, UP, DOWN.
11. MVGP1 Game Pack (Optional): The
Game Pack consists of fty four
32-bit games (six dual player games) and
includes 2 Game Controllers (P1 & P2),
see pages 33 and 34 for more information.
When the Game Pack is installed, either
monitor can be designated as “Player 1”.
Selection is based on a “rst come,
rst serve” basis. The second monitor
will automatically become “Player 2”,
see page 38-39
for more information.

6
HR7012 REAR SEAT VIDEO HEADREST SYSTEM Owner’s Manual
Turn ON the Monitors (M1 and M2).
1. Press the Power
( ) button. The control
keys will light up blue.
2. Insert a DVD, CD, MP3 disc into the disc
slot located on top of the M1 monitor
(disc label toward user) (HR7012MA and
HR7012D only). Push down gently on
the disc until the player pulls the disc
in (Do Not force disc). When the DVD
menu appears, select the menu item
using the UP/DOWN buttons and press
Enter or Play button.
3. Tilt the monitor to a comfortable
viewing position.
4. The wireless IR headphones have an ”A-
B” switch used to select the audio from
either the “M1” or “M2” monitor. When
sitting in front of the M1 screen, use
the CH A setting. When sitting in front
of the M2 screen, use the CH B setting.
Press the Power ON/OFF switch. The
power indicator will light up red. Turn
the volume down to its lowest setting
before putting the headphones on.
QUICK START GUIDE
If audio playback through the
vehicle radio is preferred, use the FM
transmitter ON/OFF button on the
remote control. Set the vehicle radio to
the channel selected on the M1 monitor.
If interference with a local radio station
occurs, set the FM modulator to one
of the other 100 radio frequencies
using the Channel Select buttons on
the remote control or front panel.
NOTE: The FMM modulator function
is only available on the M1 monitor.
NOTE: To operate the M1 screen, press
M1 on the remote control. To operate
the M2 screen, press M2.
5. To turn OFF either M1 or M2 from the
front panel press and hold the Power
ON/OFF button for 5 seconds or turn
the vehicle OFF.
Safety Precaution
For safety reasons, when changing a video
disc it is recommended that the vehicle
not be in motion, and that you do not
allow children to unfasten safety belts to
change a disc or make any adjustments to
the system. System adjustments can be
accomplished using the remote control unit,
while safety belts remain fastened. Enjoy
your entertainment system but remember
that the safety of all passengers remains the
number one priority.
CAUTION
Always run the vehicle’s engine while using
the HR7012 Rear Seat Video Headrest
System. Using this system without running
the engine can result in battery drainage.
Important Notice
An LCD Panel and/or Video Monitor may be
installed in a motor vehicle and visible to the
driver if the LCD Panel or Video Monitor is
used for vehicle information, system control,
rear or side observation or navigation. If
the LCD Panel or Video Monitor is used for
television reception, video or DVD play, the
LCD Panel or Video Monitor must be installed
so that these features will only function when
the vehicle is in “park” or when the vehicle’s
parking brake is applied.
An LCD Panel or Video Monitor used for
television reception, video or DVD play that
operates when the vehicle is in gear or when
the parking is not applied must be installed
to the rear of the driver’s seat where it will
not be visible, directly or indirectly, to the
operator of the motor vehicle.
CAUTIONS

7
HR7012 REAR SEAT VIDEO HEADREST SYSTEM Owner’s Manual
For best disc operation , it is important that
you read this section completely.
DVD Region Coding
The HR7012MA/HR7012D and the DVD are
coded by region. These region codes must
match in order for the DVD to play. If the
codes do not match, the DVD will not play.
The HR7012MA/HR7012D code is set to
region 1. Playback of any other region will
not work in the HR7012MA/HR7012D.
Type of Discs the HR7012MA/HR7012D
Will Play
• DVD-Video: DVD containing video.
• CD-DA: CD containing musical or sound
content only.
• CD-Video: CD contains movie only.
• CD-R/RW: A disc that containing audio les
(for example, a CD-R with downloaded
MP3 les), MPEG, or JPEG les.
NOTE: The following discs will NOT play in
the HR7012MA, Optical disc- CD-1, CD-ROM,
and DVD-ROM Mini disc- CDG (audio only,
not graphics), Blu-ray.
Loading and Playing Discs
Before loading a disc, make sure that it is
compatible with the player.
Press the POWER button to turn the system
ON. Load the disc (label facing the user) into
the disc slot. The disc will load automatically
and begin to play.
Note: Some discs may start at the root menu,
where play must be selected to start movie.
Notes on Discs
• Do not touch the disc surface. Handle the
disc by the edge.
• It is important that discs are clean prior to
use.
• If disc is not clean, use a commercially
available cleaning cloth to gently wipe
the disc from the center out. (Figure 7)
Note: Do not use solvents such as benzene,
thinner, cleaners, or antistatic spray
intended for analog discs.
• Keep discs protected in their cases or
disc magazines when not in use. Do not
subject discs to heat/high temperature.
Avoid leaving discs in a parked vehicle or
on a dashboard/rear tray.
• Do not use discs that have after-market
Paper or plastic labels/stickers attached.
The following malfunctions may result
from using such discs:
• Inability to eject a disc (due to a label
or sticker peeling o and jamming the
eject mechanism).
• Inability to read audio data correctly
(i.e., playback skipping, or no playback)
due to heat shrinking of a sticker or
label causing a disc to warp.
• Use only standard, round discs. If you
insert irregular, non-round, shaped discs
they may jam in the DVD player or not play
properly.
Figure 7
GENERAL OPERATING INSTRUCTIONS
8
HR7012 REAR SEAT VIDEO HEADREST SYSTEM Owner’s Manual
S
AUDIO
R
VIDEO
AUDIO
L
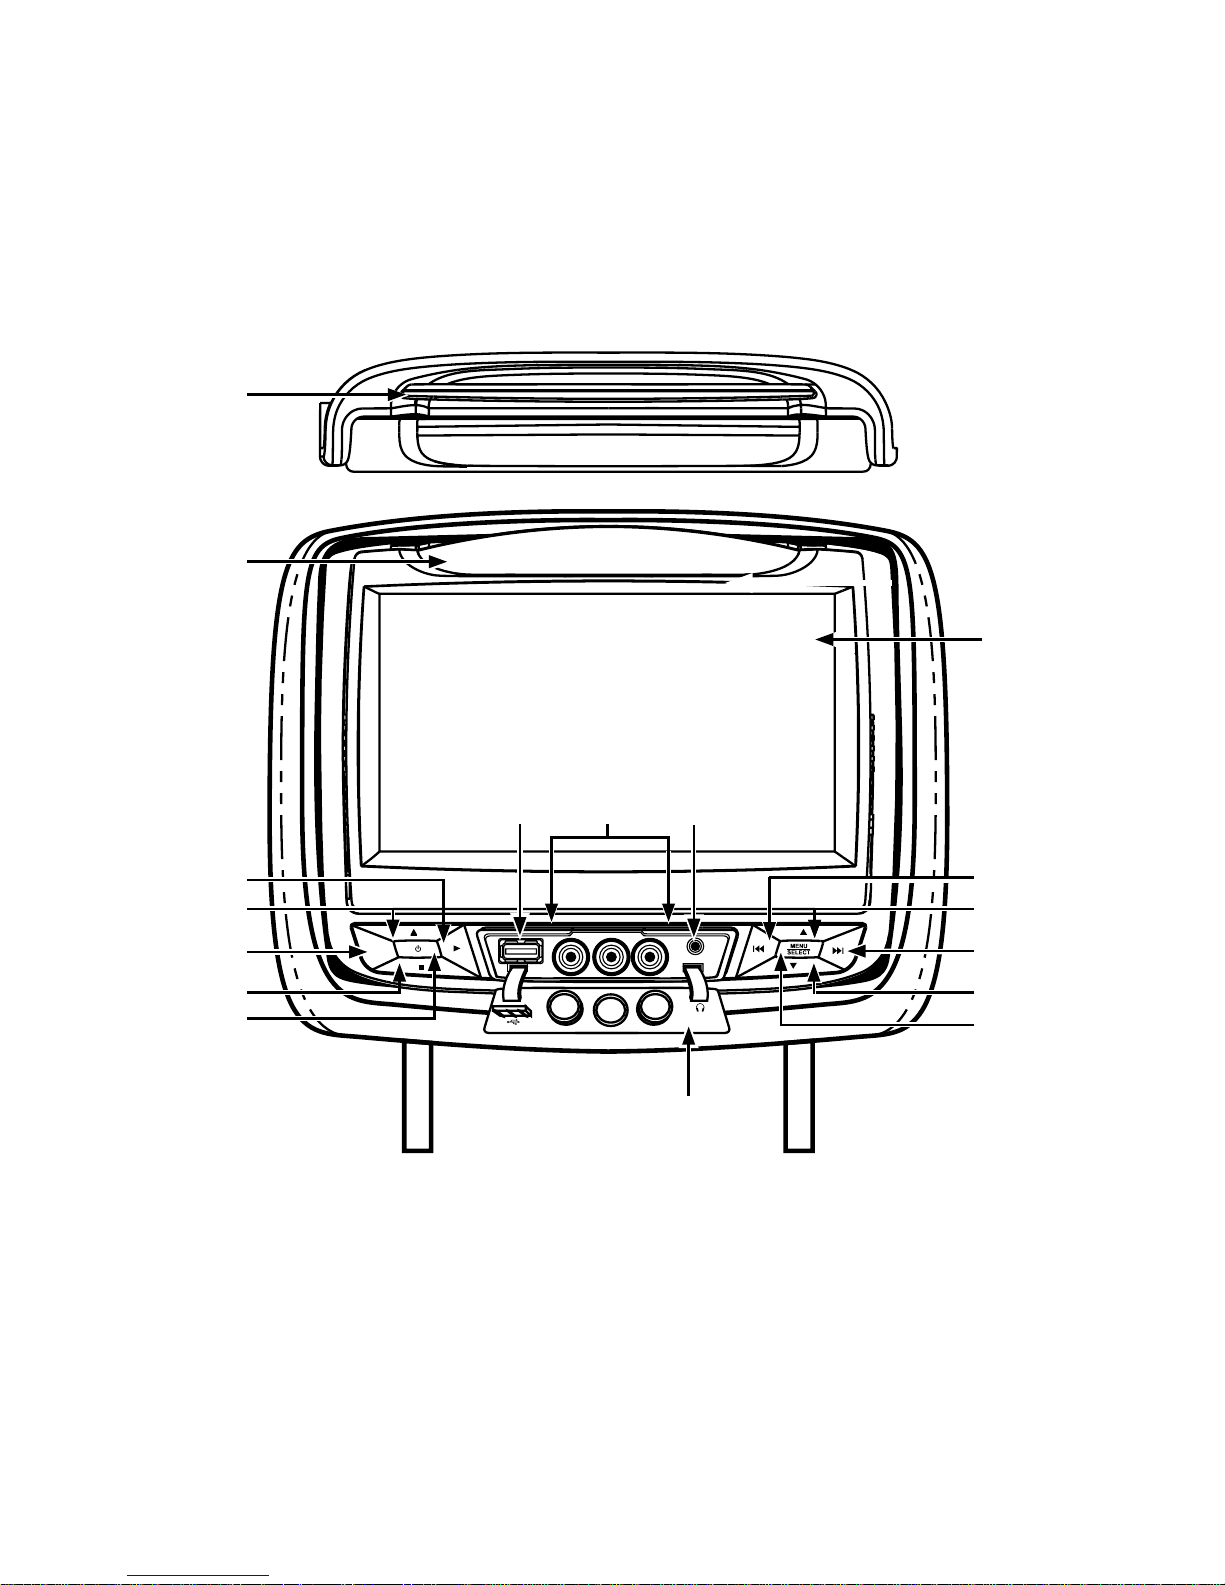
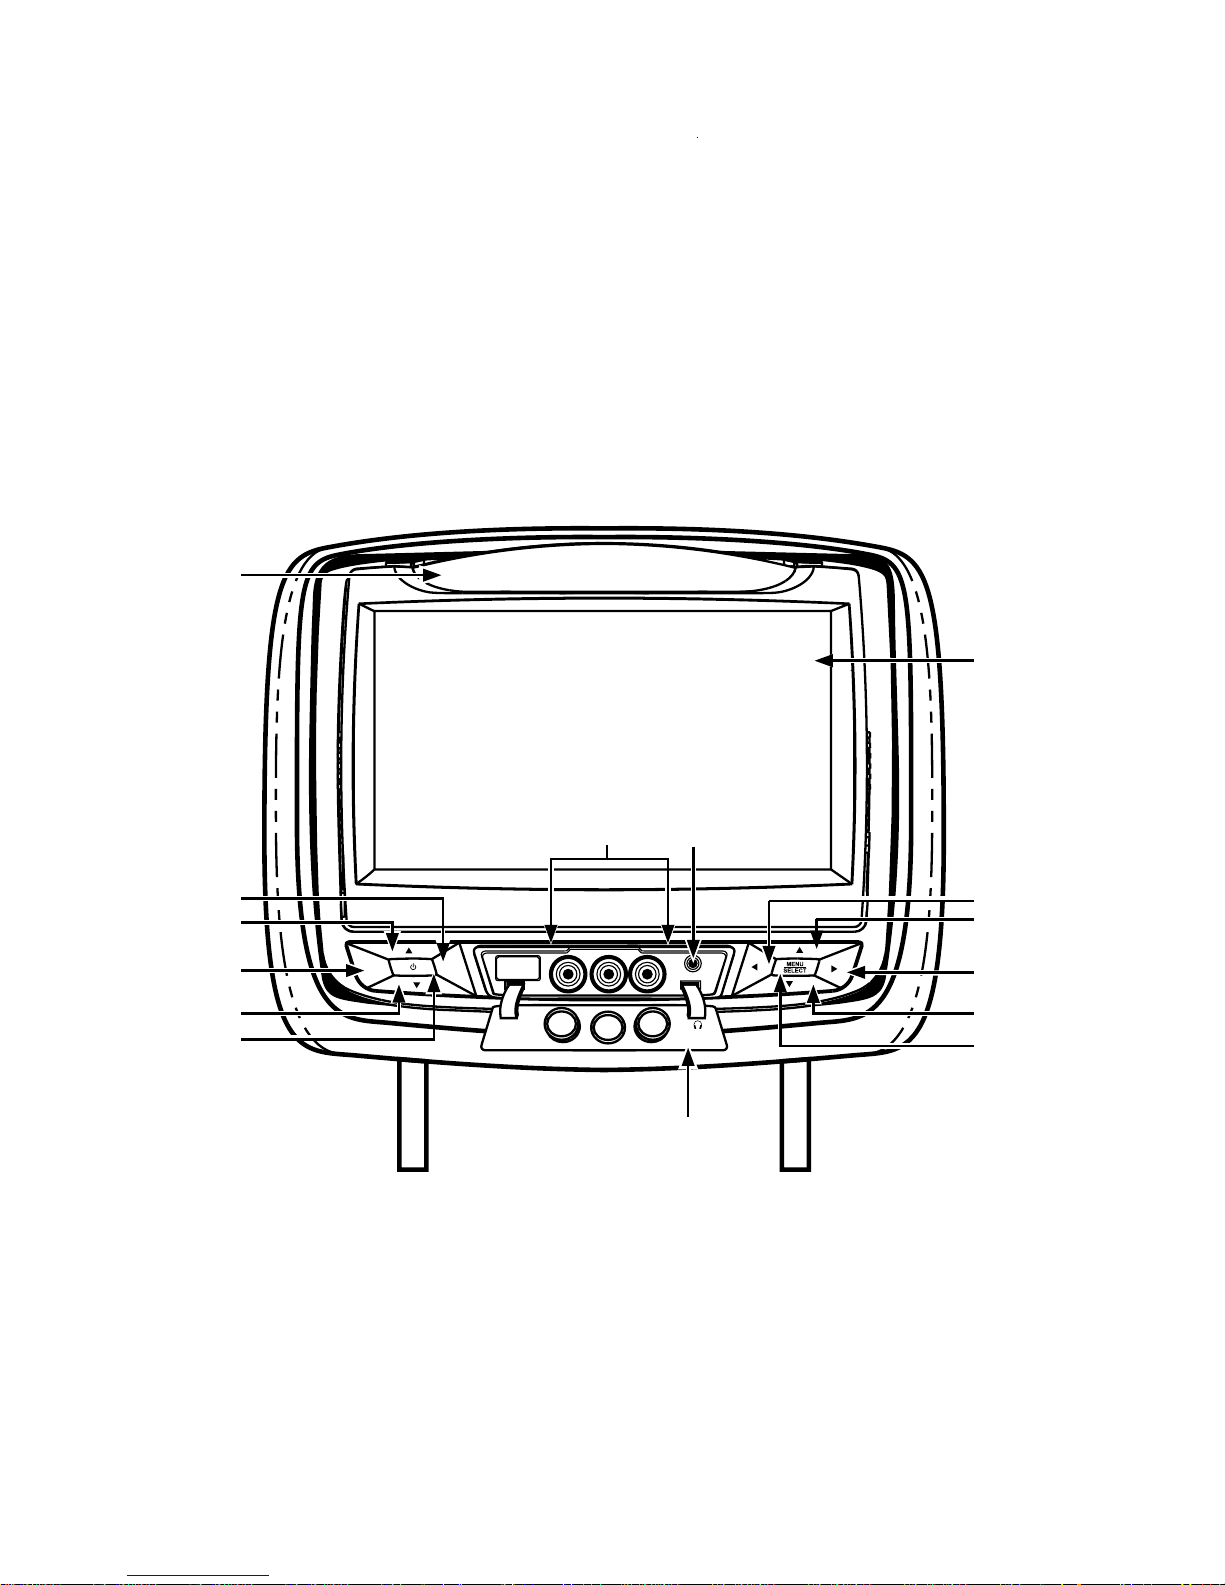
FRONT PANEL CONTROLSHR7012MA
Figure 8
1
13
2
14
13
12
7
3
4
5
6
8
9
15
16
HR7012MA
11
10

9
HR7012 REAR SEAT VIDEO HEADREST SYSTEM Owner’s Manual
1. DVD disc insertion slot. (Figure 8)
2. IR TRANSMITTER and IR SENSOR
IR Transmitter: is used to broadcast audio
signal to the wireless IR headphones.
IR Sensor: is used to receive signals from
the remote control. (Figure 8)
3. Play
( ) Button
This button is used to begin playback of
the disc or USB media inserted. (Figure
8)
4. EJECT (
) Button
This button is used to eject the disc.
(Figure 8)
5. SOURCE (S) Button
This button is used to select the DVD/
USB, M1/M2, A/V IN, AUX, MEDIA or
GAME (optional). (Figure 8)
6. STOP ( n ) Button
This button is used to stop the playback
of the disc or USB media in use.
(Figure 8)
7. POWER
( ) Button
This button is used to turn the
HR7012MA ON and OFF (Figures 8).
(press and hold for 5 seconds to turn
OFF) (Figure 8)
8. AUX Jacks (RCA Type)
The Jacks are intended for temporary
connection of an additional AV source
such as a video game device, or other
audio/video devices. To play the
external device connect to the AUX
Jacks, press the SOURCE button on the
front panel of the HR7012MA or on
the remote control until “AUX” appears
on the screen and press PLAY on the
connected source. (Figures 8)
9. USB PORT
This port is used to connect a USB
device for playback of content. To
view content, select “DVD” as the video
source and insert the USB device. The
USB device will start automatically and
take priority over the DVD. To play
DVD’s, disconnect the USB device from
the port. (Figure 8)
10. Protective Cover
Used to protect and cover the Headset/
Earbud jack, AV Input jacks and USB
port when not in use. (Figure 8)
11. 1/8”Wired Headset/Earbud Output
Jack
This jack is used to connect a
standard wired headphone/earbuds.
(Figure 8)
12. MENU/SELECT Button
This button is used to display and select
options on the System Menu when
a disc or USB media is not inserted.
When a disc or USB media is inserted,
this button is used to display and select
available Disc/Media option. Press and
hold this button for 3 -5 seconds to
display the System Menu. (Figures 8)
13. VOLUME UP
/DOWN Buttons
These buttons are used to raise and
lower the volume. (Figures 8)
14. NEXT / RIGHT (
) Button
This button is used to skip to the next
chapter or track during playback of a
disc. (Figure 8)
15. PREVIOUS / LEFT (
)Button
This button is used to skip to the
previous chapter or track during
playback of a disc. (Figure 8)
16. 7-inch TFT LCD Display Screen
(800 x 480). (Figure 8)
Warnings
• Do not use any solvents or abrasive
cleaning materials when cleaning the
screen. Use only a lightly dampened lint
free cloth to wipe the screen if it is dirty.
• Lock the front panel in the fully closed
position when not in use. Do not put
pressure on the screen, caution children to
avoid touching or scratching the screen.
FRONT PANEL CONTROLSHR7012MA continued
10
HR7012 REAR SEAT VIDEO HEADREST SYSTEM Owner’s Manual
S
P
AUDIO
R
VIDEO
AUDIO
L
HR7012S
Figure 9
10
1
11
10
9
5
2
3
4
3
6
11
12
7
8
FRONT PANEL CONTROLSHR7012S

11
HR7012 REAR SEAT VIDEO HEADREST SYSTEM Owner’s Manual
1. IR TRANSMITTER and IR SENSOR
IR Transmitter: is used to broadcast audio
signal to the wireless IR headphones.
IR Sensor: is used to receive signals from
the remote control. (Figure 9)
2. PIX (P) Button
This button is used to control levels of
Brightness, Contrast, Color, Tint and to
Reset all picture adjustment levels to
original factory settings. (Figure 9)
3. VOLUME UP
/DOWN Buttons
These buttons are used to raise and
lower the volume. (Figure 9)
4. SOURCE (S) Button
This button is used to select the A/V IN,
AUX, M2 or GAME (optional). (Figure 9)
5. POWER
( ) Button
This button is used to turn the HR7012S
ON and OFF (press and hold for
5 seconds to turn OFF) (Figures 9).
6. AUX Jacks (RCA Type)
The Jacks are intended for temporary
connection of an additional AV source
such as a video game device, or other
audio/video devices. To play the
external device, connect to the AUX
Jacks, press the SOURCE button on
the front panel of the HR7012S or on
the remote control until “AUX” appears
on the screen and press PLAY on the
connected source. (Figure 9)
7. 1/8”Wired Headset/Earbud Output
Jack
This jack is used to connect standard
wired headphones/earbuds. (Figure 9)
8. Protective Cover
Used to protect and cover the Headset/
Earbud jack and AV Input jacks when not
in use. (Figure 9)
9. MENU/SELECT Button
This button is used to display and select
options on the System Menu. Press and
hold this button for 3 -5 seconds to
display the System Menu. (Figure 9)
10. UP
/DOWN Buttons
These buttons are used to navigate
menu selections on the screen in an Up
or Down direction. (Figure 9)
11. LEFT /RIGHT Buttons
These buttons are used to navigate
menu selections on the screen in a LEFT
or RIGHT direction. (Figure 9)
12. 7-inch TFT LCD Display Screen
(800 x 480). (Figure 9)
Warnings
• Do not use any solvents or abrasive
cleaning materials when cleaning the
screen. Use only a lightly dampened lint
free cloth to wipe the screen if it is dirty.
• Lock the front panel in the fully closed
position when not in use. Do not put
pressure on the screen, caution children to
avoid touching or scratching the screen.
FRONT PANEL CONTROLSHR7012S continued
12
HR7012 REAR SEAT VIDEO HEADREST SYSTEM Owner’s Manual
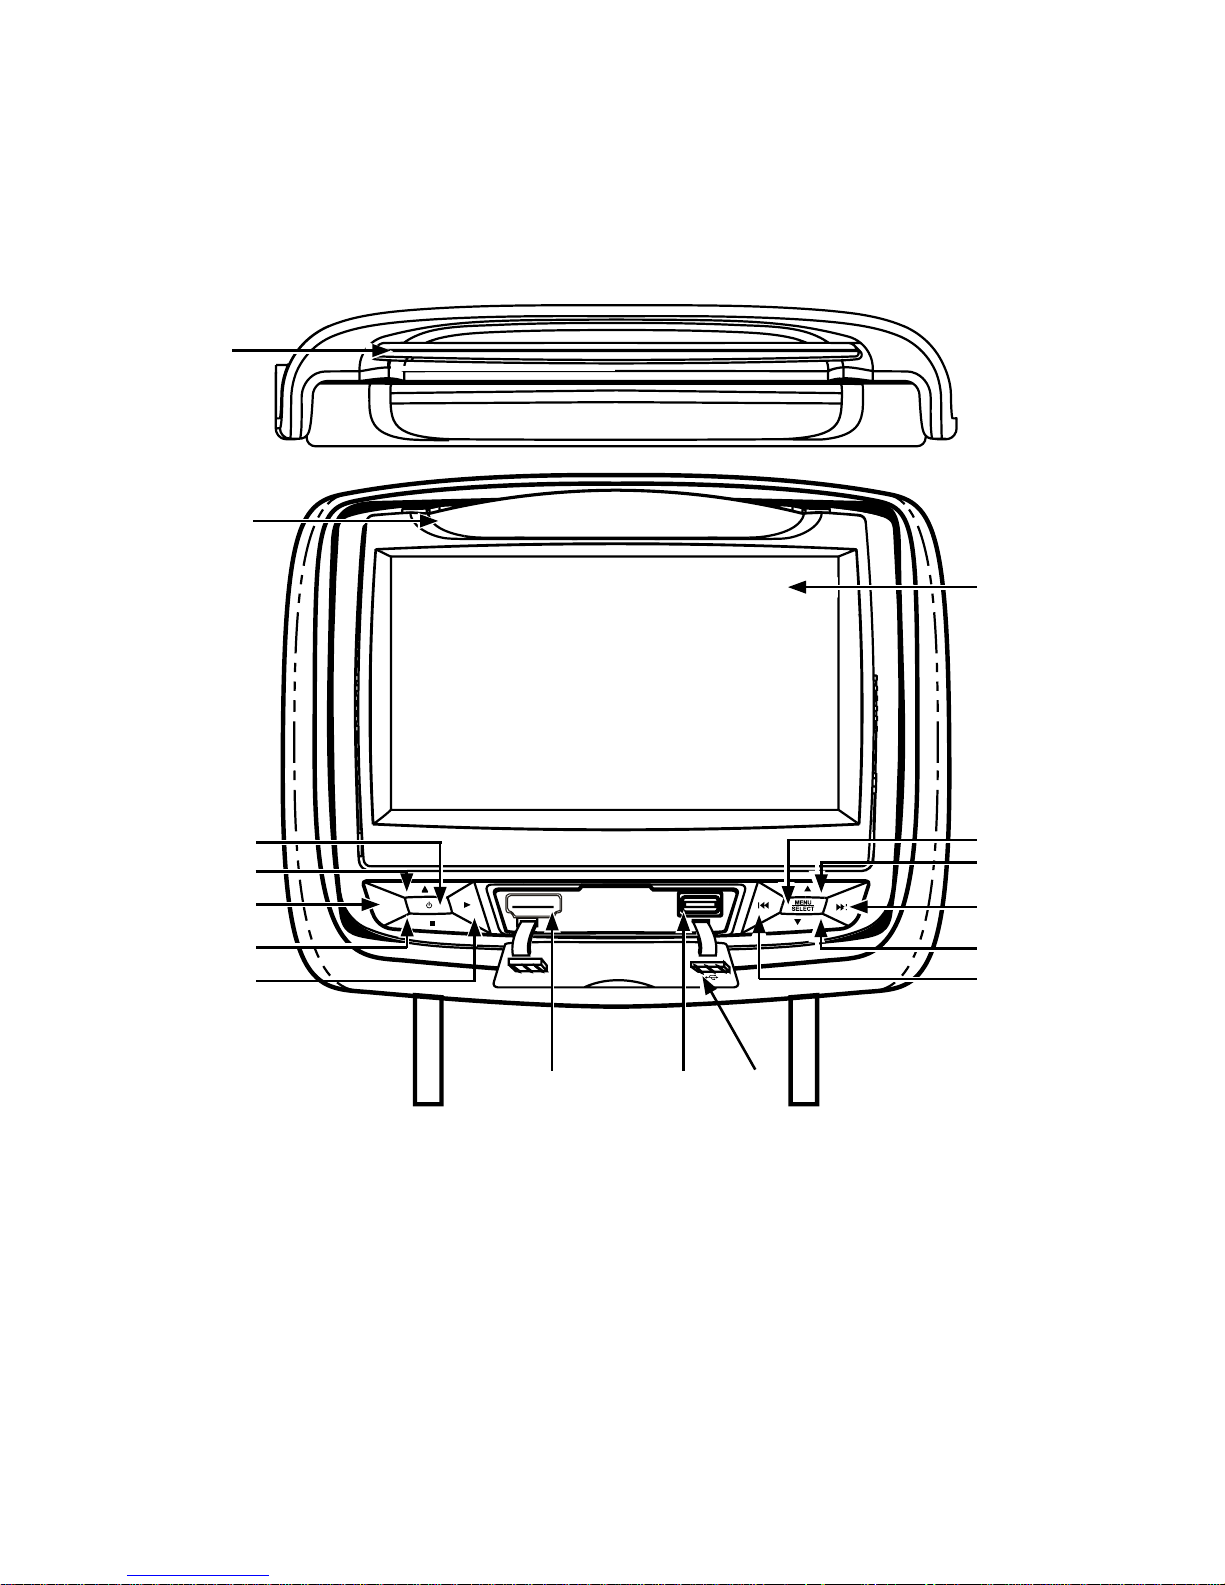
S
HDMI/MHL
HR7012D
FRONT PANEL CONTROLSHR7012D
Figure 10
14
10
15
13
12
11
7
6
1
2
3
5
16
4
8
9

13
HR7012 REAR SEAT VIDEO HEADREST SYSTEM Owner’s Manual
1. DVD disc insertion slot. (Figure 10)
2. IR TRANSMITTER and IR SENSOR
IR Transmitter: is used to broadcast audio
signal to the wireless IR headphones.
IR Sensor: is used to receive signals from
the remote control. (Figure 10)
3. POWER
( ) Button
This button is used to turn the HR7012D
ON and OFF. (Figure 10) (press and hold
for 5 seconds to turn OFF)
4. EJECT (
) Button
This button is used to eject the disc.
(Figure 10)
5. SOURCE (S) Button
This button is used to select the DVD/
USB, M1/M2, A/V IN, or GAME (optional).
(Figure 10)
6. STOP ( n ) Button
This button is used to stop the playback
of the disc or USB in use. (Figure 10)
7. Play
( ) Button
This button is used to begin playback of
the disc or USB inserted. (Figure 10)
8. HDMI/MHL INPUT
For connection of a device with
HDMI/MHL output. (Figure 10)
NOTE: Requires a HDMI/MHL enabled
device and a special HDMI/MHL adapter.
Contact your HDMI/MHL device supplier
for adapter. (see page 36 for more
information)
9. USB PORT
This port is used to connect a USB device
for playback of content. To view content,
select “DVD” as the video source and
insert the USB device. The USB device
will start automatically and take priority
over the DVD. To play DVD’s, disconnect
the USB device from the port. This port
may be used to charge a cellphone or
tablet see page 37 for more information.
(Figure 10)
10. Protective Cover
Used to protect and cover the HDMI jack
and USB port when not in use. (Figure 10)
11. PREVIOUS / LEFT (
) Button
Press and hold to skip to the previous
chapter or track during playback of a
disc. This button is used in the SYSTEM
MENU to adjust settings. (Figure 10)
12. DOWN q Button
This button is used to navigate selections
on the screen and can also be used to
navigate the DVD menu. (Figure 10)
13. NEXT / RIGHT (
) Button
Press and hold to skip to the next chapter
or track during playback of a disc.
This button is used in the SYSTEM MENU
to adjust settings. (Figure 10)
14. UP
Button
This button is used to navigate selections
on the screen and can also be used to
navigate the DVD menu. (Figure 10)
15. MENU/SELECT Button
This button is used to display and select
options on the System Menu when a
disc or USB media is not inserted. Press
and hold this button for 3 -5 seconds to
display the System Menu. (Figure 10)
16. 7-inch TFT LCD Display Screen
(800 x 480). (Figure 10)
Warnings
• Do not use any solvents or abrasive
cleaning materials when cleaning the
screen. Use only a lightly dampened lint
free cloth to wipe the screen if it is dirty.
• Lock the front panel in the fully closed
position when not in use. Do not put
pressure on the screen, caution children to
avoid touching or scratching the screen.
FRONT PANEL CONTROLSHR7012D continued
 Loading...