

Page 1
USER MANUAL
SQU.ID® SQ.410
Page 2

Page 3

To order SQU.ID® SQ.410 language translation products, contact:
Voxtec International, Inc.
20 Ridgely Avenue, Suite 301
Annapolis, Maryland 21401
410.626.1110 | info@voxtec.com | www.voxtec.com
The SQU.ID® SQ.410 language translation system is developed,
manufactured, and distributed by Voxtec International, Inc. (Voxtec).
The SQU.ID SQ.410 language translation system and associated
software are protected by copyright, trade secret, international
treaties, and U.S. Patent No. 7,369,998. Other patents are
registered or pending in various countries around the world.
Copyright
This manual, the SQU.ID SQ.410 wearable translation system
described in it, and the SQU.ID SQ.410 look and feel are furnished
under license and may only be used or copied in accordance
with the terms of such license. No part of this manual may be
reproduced in any form by any means without the prior written
permission of Voxtec.
Copyright © 2015 Voxtec International, Inc. All rights reserved.
Trademarks
The Voxtec®, , and SQU.ID® trademarks are registered in
the U.S. Patent and Trademark Office and may be pending or
registered in other countries. Other brands, product names,
company names, trademarks, and service marks are the properties
of their respective owners.
Page 4

Table of Contents
Welcome ....................................... 1
Navigating the SQ.410 ......................... 2
Preparing the SQ.410 .......................... 4
Primary Headset Connection ......................... 4
Secondary Microphone Connection .................... 5
External Speaker Connection ......................... 5
Batteries ........................................ 6
Micro-SD Card Removal and Replacement ............... 7
Powering On ..................................... 7
Selecting a Module ................................ 8
Overview of SQ.410 Features .................. 9
My Favorites: ..................................... 9
System (Settings): ................................. 9
Application (Settings): .............................. 11
About (Settings): ................................. 12
Talk Through Feature (Bypass Translation Software): ....... 12
Translating with the SQ.410 ................... 12
Expanded Feature Descriptions ............... 14
Secondary Audio and Speaker Volume ................. 14
Primary Headset Volume ........................... 14
Controls ....................................... 14
Advanced Features ............................... 14
Programming Hot Buttons for Quick Play mode ........... 18
My Favorites .................................... 20
Select Language ................................. 23
Changing a Module ............................... 23
Add Phrases .................................... 24
Logged Phrases ................................. 26
Create Recordings ................................ 27
Power Management ........................... 29
Checking Battery Status ............................ 29
Power Modes ................................... 30
Page 5

Troubleshooting ............................... 30
If you are encountering speech recognition errors ......... 30
If you encounter a software “lock up” .................. 32
If you encounter a blank screen ...................... 22
Maintenance and Care of the Device .......... 33
Handling ....................................... 33
Dust and Water Exposure ........................... 33
Cleaning the Device ............................... 34
Cleaning the Screen .............................. 34
Extreme Temperatures ............................. 34
Long-Term Storage ............................... 34
Service and Technical Support ................ 35
End User License Agreement ................. 36
Limited Warranty .............................. 42
Disclaimer and Notices ....................... 45
Addendum for Optional
Two-Way Software Upgrade .............Addendum A
Page 6

6
www.voxtec.com
Page 7

1
SQU.ID® SQ.410
Welcome
Voxtec’s SQU.ID SQ.410 is a wearable or handheld, mobile and
rugged, machine-based language translation device combining
modern industrial design techniques with advanced software
engineering and custom components to form a complete
system. While the SQ.410 represents the state of the art
for speech-to-speech machine-based language translation
system technology it is not intended to be a replacement for
fluent foreign language speakers or interpreters. The SQ.410
enhances the work fluent foreign language speakers and
interpreters carry out, by freeing them up to focus on those
situations where body language and cultural sensitivity are of
paramount importance.
The SQ.410 should be widely employed as a necessary tool that
can bridge the communication gap between individuals who do
not share a common language, resulting in stronger mutual trust
and understanding. This user manual was designed to help you
gain an appreciation for what the SQ.410 can do to support your
foreign language translation needs, with a particular emphasis on
the one-way, phrase-based translation software. An addendum
to this manual is included for Voxtec’s optional free-speech, twoway translation software. Acquiring a strong understanding of
the SQ.410 and how to integrate its capabilities into your mission
and activities will increase your overall success.
Page 8
2
www.voxtec.com
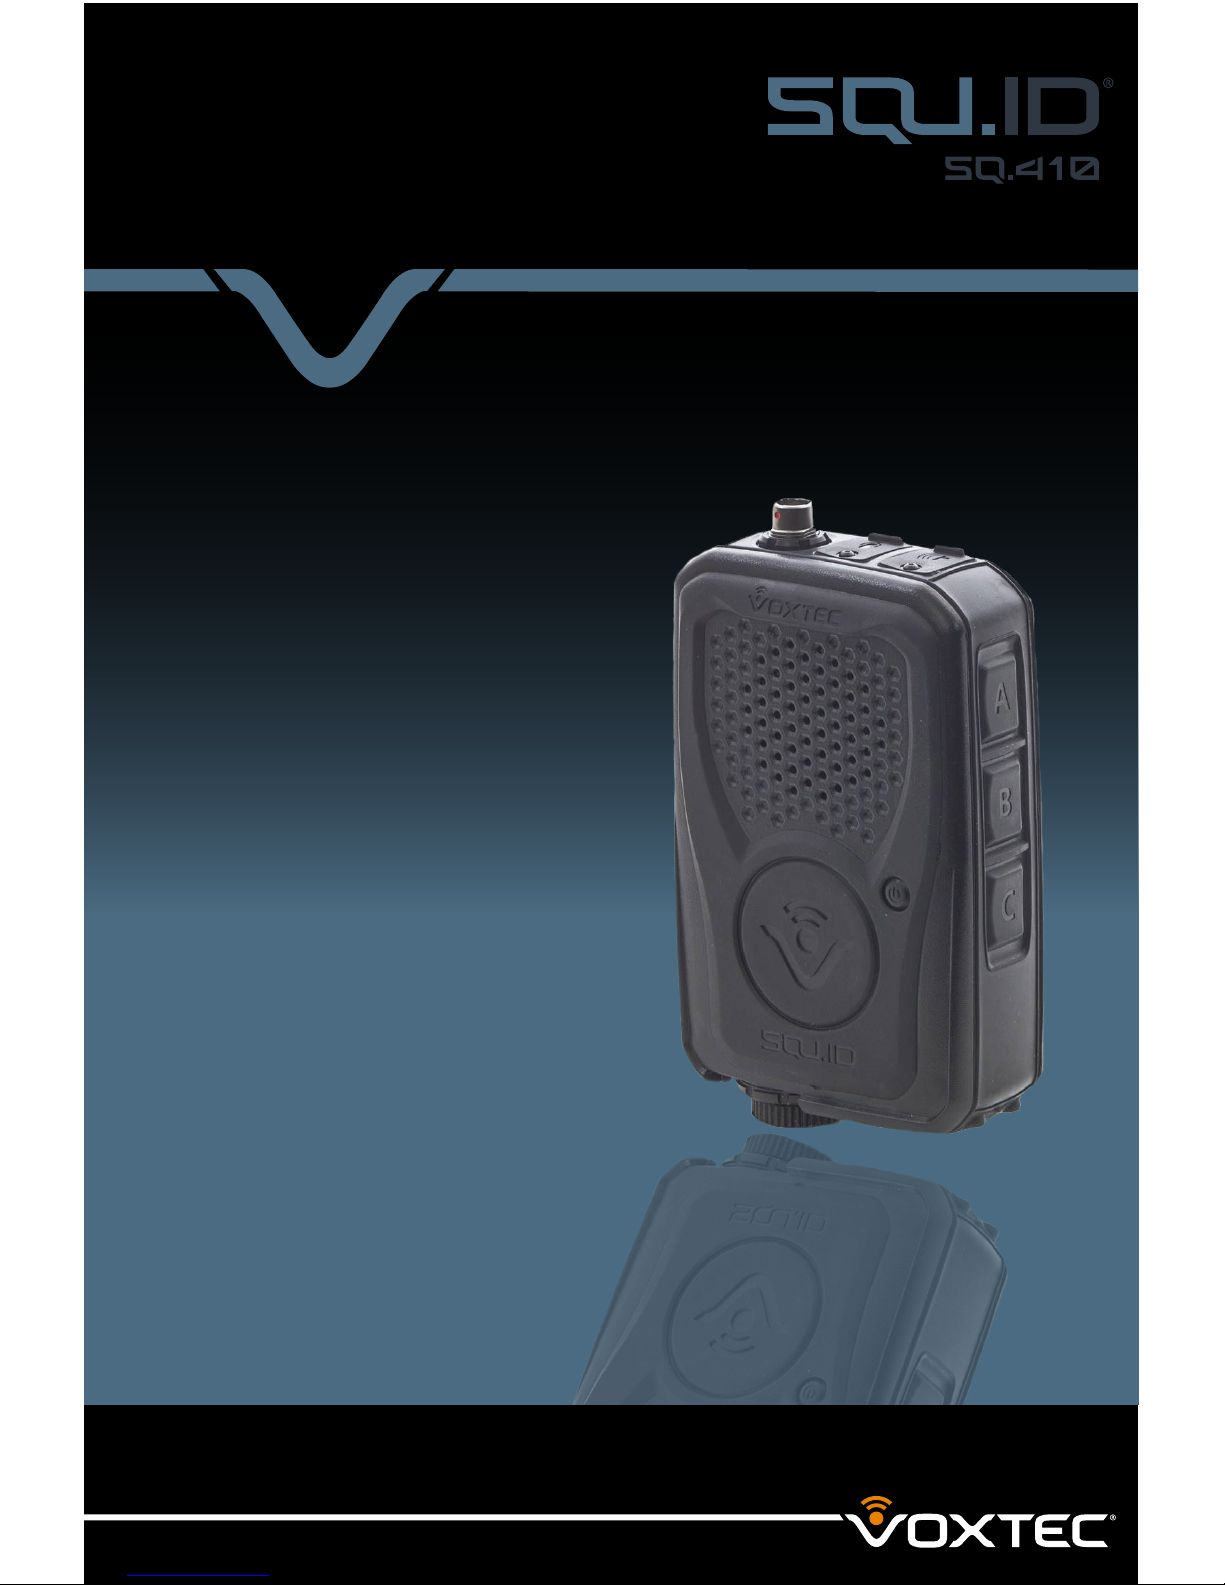
SQ.410 (Front View)
1. Speaker. Powerful Mylar, weather resistant,
hi-fidelity speaker.
2. POWER button. Turn the SQ.410 on, off or
put into standby mode.
3. PUSH TO TALK button. This is the primary
English PUSH TO TALK button on the
SQ.410.
SQ.410 (Back View)
NOTE: The SQ.410’s back plate five-button
keypad allows you to manually navigate
software application and system settings,
play translations and more.
1. Liquid Crystal Display (LCD). 2-inch,
176 x 220 RGB TFT LCD that displays
the SQ.410 software application and
module content, including settings, system
information and operational menus.
2. UP button. Move up menu and list options;
raise system settings and increase speaker
or headset earpiece volume.
3. DOWN button. Move down menu and list
options; lower system settings and decrease
speaker or headset earpiece volume.
4. RIGHT button. Press right to make menu
selections. After a phrase has played you can
press and release the right button and you will
see a pop up window for the current phrase
enabling you to add the current phrase to your
My Favorites folder, log the current phrase,
set the current phrase as Quick Play A, B,
or C, delete all quick play buttons, or loop all
phrases in your My Favorites folder.
5. LEFT button. Press left to move back to a
previous menu selection.
6. CENTER button. Press and release the
center button to play a translation, make
menu selections and accept settings.
Quickly double click the center button to
loop the current phrase.
7. Serial Number Display. Your SQ.410’s
serial number is displayed in both bar code
and numeric format for ready reference and
inventory control.
Navigating the SQ.410
The SQ.410’s overall dimensions are: 5.2” (L) x 3.2” (W) x 1.5” (H)
Page 9
3
SQU.ID® SQ.410
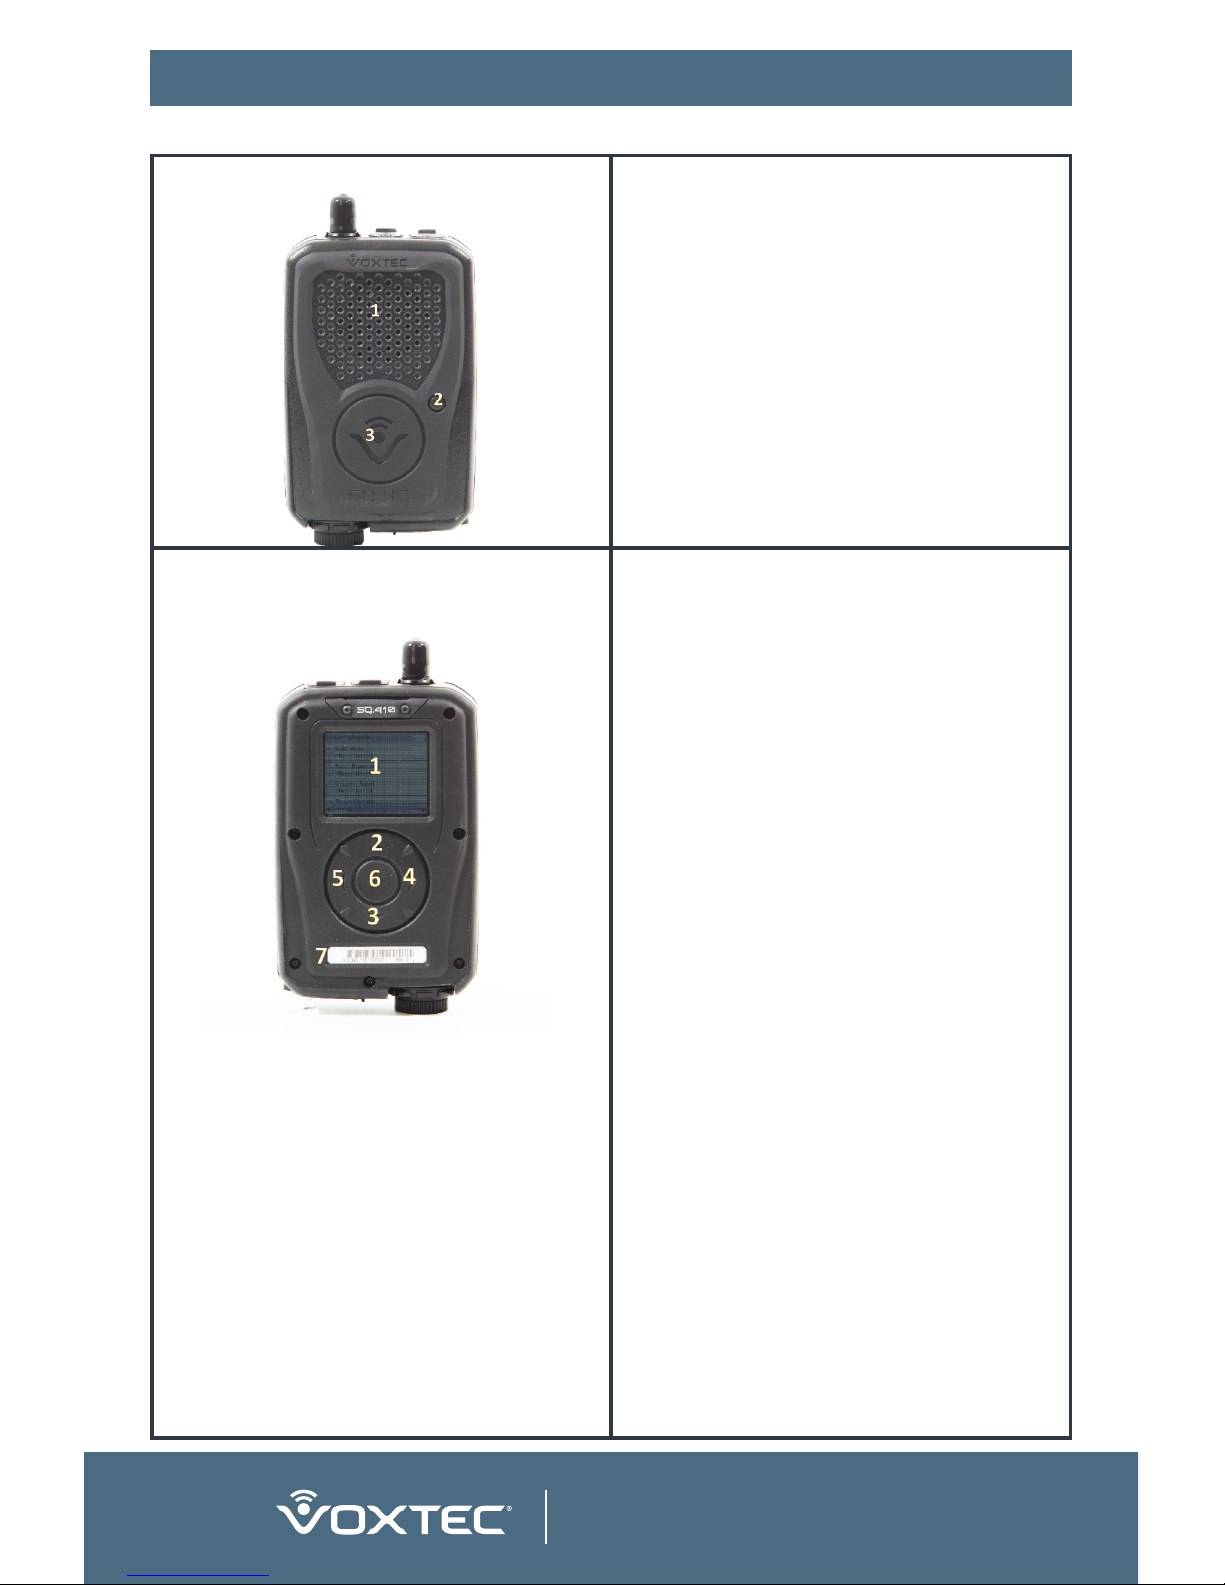
SQ.410 (Top View)
1. ODU® Advanced Military Connector (AMC).
Primary microphone or headset connector.
2. Audio Input / Microphone Jack. Secondary
microphone 3.5mm audio input jack.
3. Audio Output Jack. 3.5mm audio output
jack.
SQ.410 (Bottom View)
1. Battery Compartment. Insert two CR123A
batteries into the battery compartment.
2. Micro-SD Card. Micro-SD card slot for
inserting and removing the provided
micro-SD card, which stores the SQ.410
modules, recordings and more.
3. USB Port. For connecting a mini-USB cable
(for future software update capability).
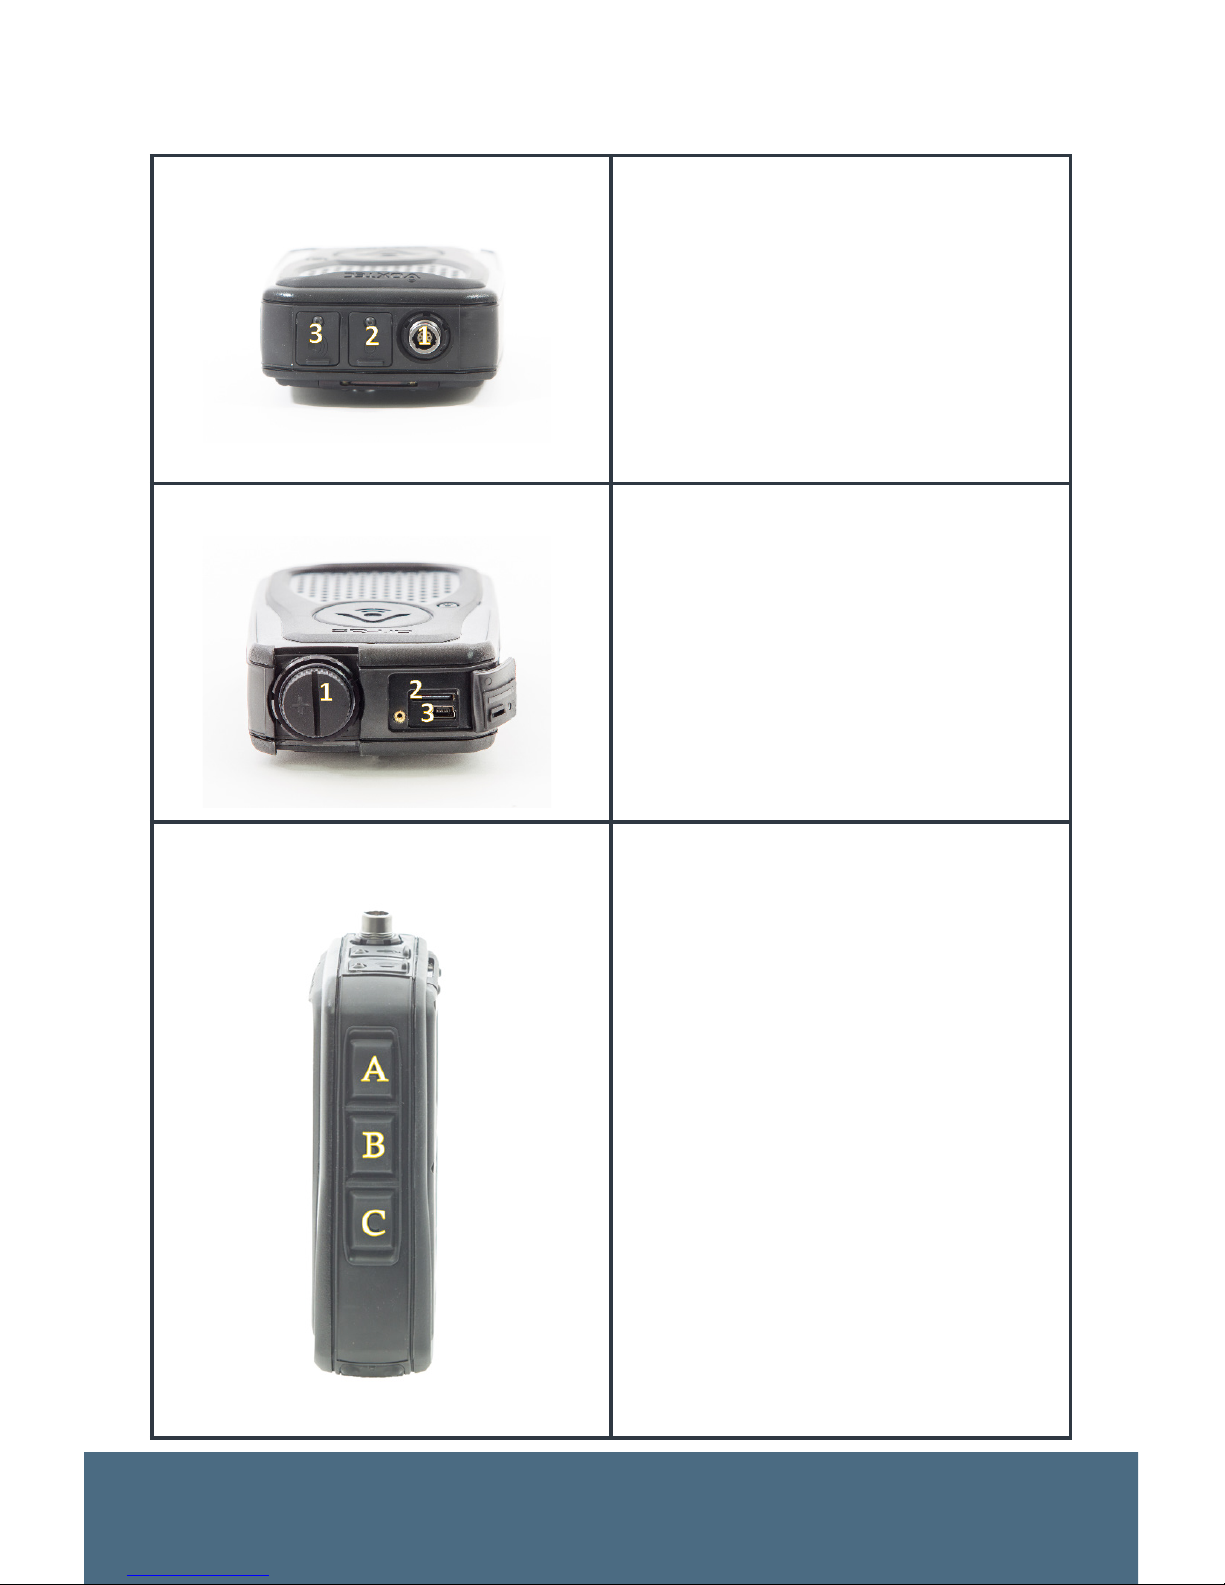
SQ.410 (Right Side View)
A. A button. This is the secondary English PUSH
TO TALK button, which also acts as the Quick
Play A button when pressed twice.
B. B button. This is the primary foreign
language recording PUSH TO TALK button,
which also acts as the Quick Play B button
when pressed twice.
C. C button. The C button can be used for
three purposes. If pressed and held, the C
button is a passive “Talk Through” button to
by-pass the translation software and pass
audio to an external speaker system. If
pressed and released once, the C button
will log a phrase. If pressed and released
twice, it acts as the Quick Play C button.
Page 10

4
www.voxtec.com
Preparing the SQ.410
Primary Headset Connection
The TACK-1 Headset (optional, but highly recommended) is
connected via an ODU® Advanced Military Connector (AMC).
The AMC combines two components. The upper component
terminates at the base of the headset audio line and the lower
component is secured into the top of the SQ.410. In the software
application, the headset connected to the AMC is referred to
as the “Primary Microphone.” The initial setup of the device and
after any resetting of the system to default values returns the
headset connection as the default for all speech input.
CAUTION: Do not twist or bend the AMC components when
disconnecting from or connecting to the SQ.410.
To connect the AMC:
1. Line up the red dots painted on the upper and
lower components.
2. Firmly press straight together until you hear a
“click.”
To disconnect the AMC:
1. Firmly squeeze and pull straight UP on the
connector with the fingers of one hand, while
tightly holding the SQ.410 steady in the
other hand to disconnect it from the lower
component.
Page 11

5
SQU.ID® SQ.410
Secondary Microphone Connection
The top of the device has a 3.5mm stereo audio connector
for connecting a microphone. In the software application any
microphone connected to the 3.5mm microphone input jack
connector is referred to as the “Secondary Microphone.” To
connect to the secondary microphone adapter:
1. Open the audio input / microphone jack flap door
(microphone icon) on top of the SQ.410 to gain access to the
secondary microphone 3.5mm audio input jack.
2. Insert the microphone 3.5mm stereo connector tip straight
into the secondary microphone audio input jack until it is
seated in place.
A recommended near field noise cancelling microphone inserted
into the secondary microphone audio input jack is pictured below:
External Speaker Connection
The top of the device also has a 3.5mm stereo audio connector
for connecting an external speaker. If an external speaker is being
used, insert the 3.5mm connector tip from the cable to a speaker
into the audio out jack (speaker icon) until it is seated in place.
Page 12

6
www.voxtec.com
Batteries
The SQ.410 operates on two CR123A lithium batteries that slide
into the battery tube. Unscrew the cap and insert the batteries
negative side first, with the last battery’s positive terminal touching
the inside of the battery cap. If you insert the batteries incorrectly,
the unit will not power on. If you notice the unit not working,
troubleshoot by inspecting that the batteries are installed correctly.
Micro-SD Card Removal and Replacement
Translation software for the SQ.410 is stored on a removable
micro-SD card found under a secured flapper door on the
bottom of the unit. Note that the SQ.410 ships with a 32 GB
micro-SD card already installed.
CAUTION: DO NOT REMOVE THE MICRO-SD CARD
WHILE THE UNIT IS TURNED ON. DOING SO MAY DAMAGE
THE MICRO-SD CARD OR CORRUPT THE TRANSLATION
SOFTWARE RENDERING IT UNUSABLE.
To remove the micro-SD card:
1. Ensure that the unit is fully powered down.
2. Use a small Philips screwdriver to remove the screw securing
the bottom flapper door.
3. Use gentle pressure with a fingernail or solid pointed object
to push the card in slightly until the internal cradle spring
releases and pushes the card part way out of the unit.
4. After the cradle spring has pushed the card part of the way
out, grab the card and fully remove it from the unit.
To replace the micro-SD card:
1. Ensure that the unit is fully powered down.
2. Insert the thinner, notched end of the card first into the unit,
ensuring that the top of the card (logo bearing side) is facing
the same direction as the front of the unit.
3. Push the card gently into the slot until it clicks into place.
Page 13

7
SQU.ID® SQ.410
4. Use a small Philips screwdriver to replace the screw securing
the bottom flapper door until it is just finger tight. DO NOT
OVERTIGHTEN THE SCREW OR IT MAY DAMAGE THE
FLAPPER DOOR.
Powering On
During initial startup or anytime the SQ.410 is coming out of off
mode, it will take approximately 45-60 seconds to completely
load the Android™-based operating system (OS) and software
application.
Note: Prior to powering on the SQ.410 ensure the micro-SD
card is properly installed in the device. If the micro-SD card is
not installed during the initial loading cycle, the system must
be rebooted after installation in order for the software to load
properly.
CAUTION: DO NOT REMOVE THE BATTERIES WHILE THE
DEVICE DISPLAYS THE VOXTEC LOGO DURING THE
INITIAL BOOT SEQUENCE. DOING SO MAY CORRUPT
THE INTERNAL SYSTEM MEMORY. IN THE EVENT
SYSTEM MEMORY IS CORRUPTED, THE DEVICE WILL
AUTOMATICALLY REPAIR THE INTERNAL MEMORY THE
NEXT TIME THE SYSTEM IS POWERED ON, BUT BOOT
TIME MAY BE SIGNIFICANTLY INCREASED.
To power on the SQ.410:
1. Press and release the POWER button located on the front of
the device.
2. The LCD will light up indicating power is on. During the boot
cycle the Voxtec “V” logo will appear on the LCD until the
OS and software application are completely loaded.
3. Once the OS and software application are loaded the LCD
will display the Select Module screen.
Page 14
8
www.voxtec.com
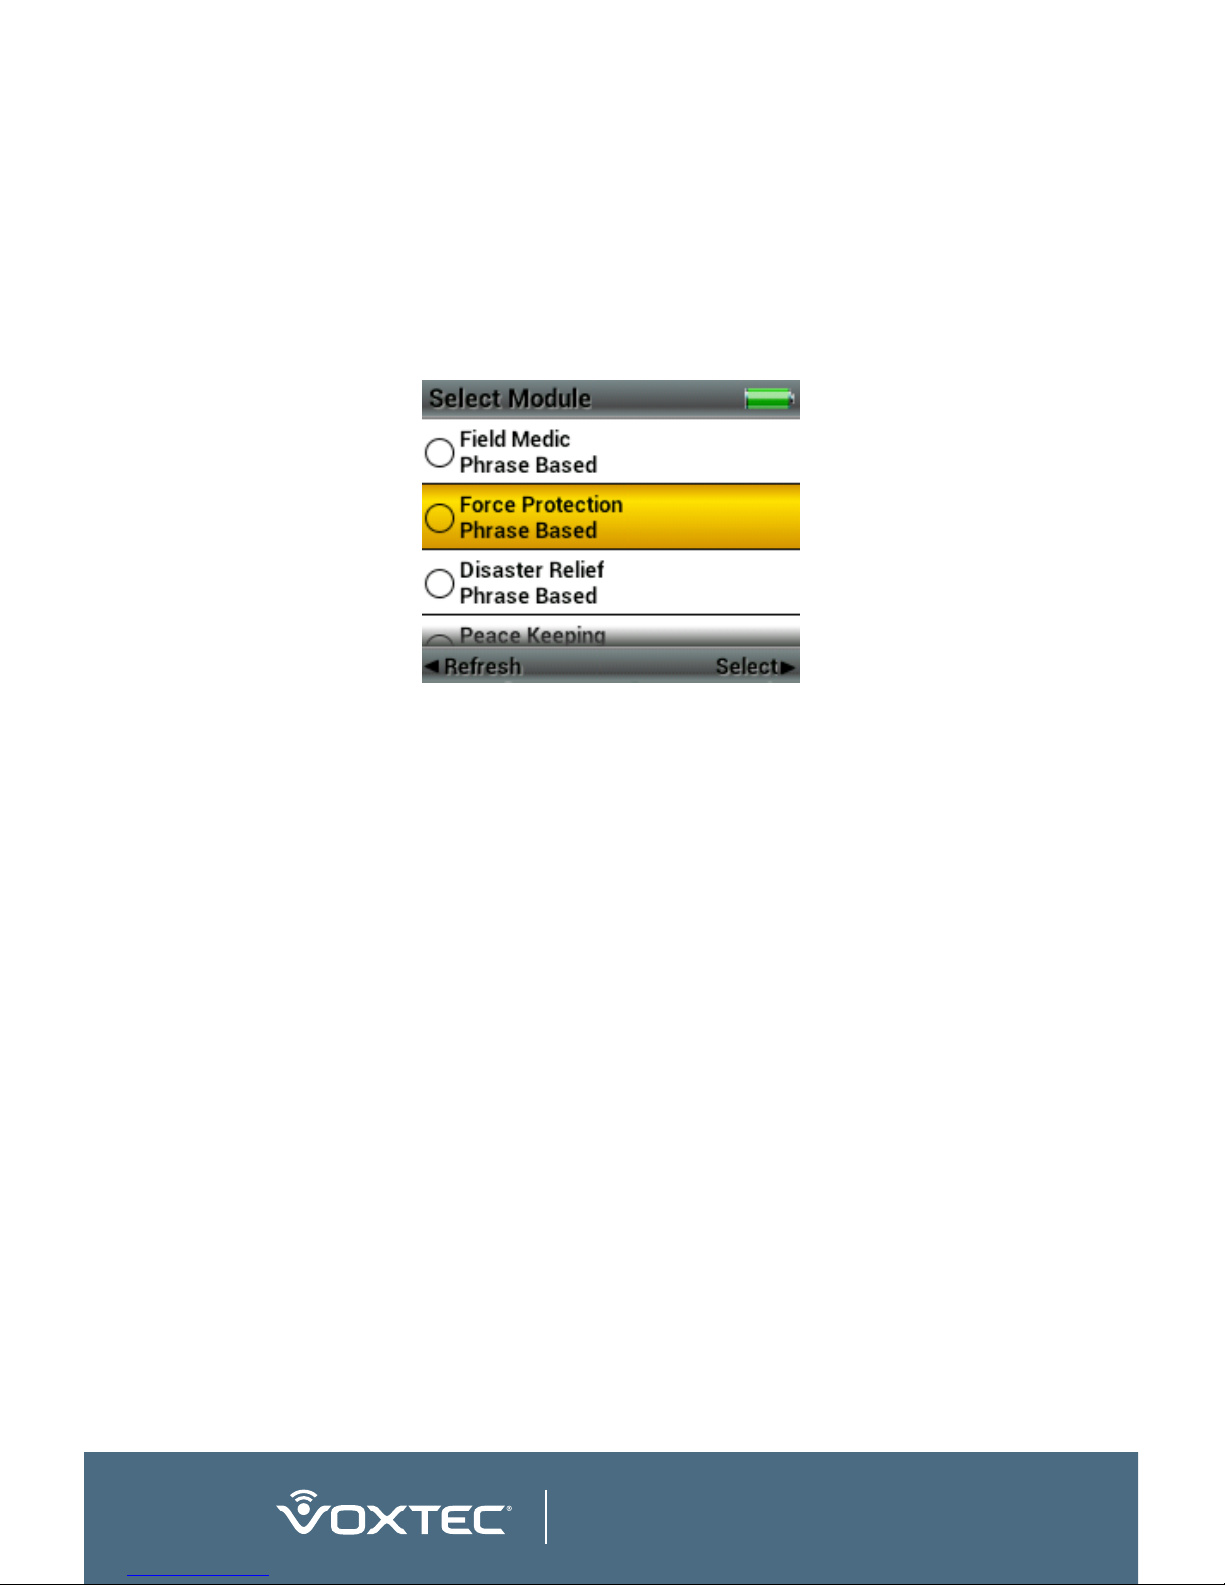
Selecting a Module
Using the five-button keypad you can scroll up and down the
Select Module screen reviewing the available modules. To select
and load a module, scroll to it, this will highlight it, then press
and release the CENTER or RIGHT button. Depending on the
size of the module, it may take several seconds to fully load.
Before selecting a module, it is important to consider your foreign
language and use case requirements.
• Phrase based one-way modules are displayed on the Select
Module screen with the words “Phrase Based” in the title,
for example if included on your micro-SD card you could
see: “Force Protection Phrase Based.” Phrase based
modules are one-way modules consisting of predefined sets
of English words, phrases, and questions that have been
pre-established by subject matter experts within a particular
domain or functional area. These predefined English phrase
sets have been pre-translated and vetted for accuracy by
fluent foreign language speakers and interpreters. You speak
one of the predefined English phrases into the SQ.410’s
microphone and the SQ.410’s software application utilizes
ASR to match your spoken phrase with its foreign language
equivalent and broadcast the result through the SQ.410’s
speaker or, if connected, an external speaker. Phrase based
modules cannot translate back from the foreign language
to English, but have the benefit of containing many foreign
languages in the topic area.
Page 15

9
SQU.ID® SQ.410
• Optional Phrase Reference Booklets are available for
certain Phrase Based modules and are designed to fit inside
an optional wearable wrist booklet holder. A phrase reference
booklet contains a categorized listing of all the available
English words and phrases that make up the given phrase
based module. The user inserts the booklet into the wrist
holder, slides the holder over his or her wrist and then has
easy access to all possible English words and phrases for
that given module.
Overview of SQ.410 Features
Once you have selected and loaded a module you can configure
the SQ.410 using the five-button keypad. When configuring the
SQ.410 it is important to consider the environment you will be
using it in. Will you be operating indoors or outdoors, in daytime
or nighttime? Do you anticipate significant background noise?
Will you be using the headset, microphone setup, or both?
What type of module did you select and load and what is your
use case? The answers to these questions will impact how you
configure the SQ.410 to accomplish your goals.
The Settings on the SQ.410 are separated into five main sections for
your convenience: My Favorites, System, Application, and About.
My Favorites:
• You can store and organize words, phrases and questions in
the My Favorites folder that are tailored to your specific foreign
language needs and use case requirements. Sequence
these favorite phrases in a logical order and loop them to
communicate instructions or warnings to large crowds.
System (Settings):
• Secondary Audio and Speaker Volume: adjust the volume
of the built-in speaker and the Audio Output jack
• Primary Headset Volume: adjust the headset earpiece
volume up or down to hear English verifications
Page 16

10
www.voxtec.com
• Controls: adjust device specific controls on the SQ.410
including:
o Brightness: adjust the LCD brightness depending on
day or night visibility.
o Timeout to Standby: manage the SQ.410’s battery life
by controlling the time to standby.
o Set Time: change the device’s internal clock.
o Set Date: adjust day, month and year of the device.
• Advanced Features: tailor advanced features on the
SQ.410 to your specific use case
o English Verification: The various options allow for
different instances when the device will first play English
before playing the foreign language. The possible
selections are “None”, “Speech Selections Only”,
“Button Selections Only”, and “Both”.
o English Verification to Speaker: turn on or off English
verification broadcast through the speaker.
o Primary Mic Automatic Gain: turn on or off the primary
microphone automatic gain feature.
o Primary Mic Manual Gain: manually adjust the
microphone gain of the headset or microphone attached
to the SQ.410’s primary AMC.
o Secondary Mic Automatic Gain: turn on or off the
secondary microphone automatic gain feature.
o Secondary Mic Manual Gain: manually adjust the
microphone gain of the microphone attached to the
SQ.410’s secondary audio input jack.
o Select Connected Microphone: choose the
connected microphone(s) – primary only, secondary only,
or both. When “both” is selected the primary headset
is for English speech recognition and recording and the
secondary microphone is for foreign language recording.
Page 17

11
SQU.ID® SQ.410
o Enable Built-in Speaker: The built-in speaker can be
disabled separately from the 3.5mm Audio Output jack.
o Reset to Defaults: you have the option to reset all the
system settings to factory default values. A full explanation
of those default settings is provided in detail on page 15.
Application (Settings):
• Select Language: Select or change the language you wish
to translate using the phrase based module.
• Change Module: this will take you to the Select Module screen
where you can select and load a different module from the available
modules included on your micro-SD card to meet your needs.
• Added Phrases: add any phrase directly onto the SQ.410
through the use of an on screen keyboard that you control
via the five-button keypad. Adding phrases that specifically
address your location and the people you are working
amongst can greatly increase the SQ.410’s effectiveness.
Using the RIGHT navigation button brings up the menu for
adding, deleting and editing user added phrases.
• Logged Phrases: the logged phrases folder acts as a
repository for any word or phrase you have logged using the
C button log feature.
• Create Recordings: create and store custom audio recordings
within the selected module. Using the RIGHT navigation button
brings up the menu for renaming or deleting recordings.
• Set Constant Logging: turn on or off the SQ.410 constant
logging feature. The constant logging feature enables the SQ.410
to be used as a “data collection” tool. If turned on, the SQ.410
will constantly log both the English and foreign language word or
phrase spoken into the device, including the ASR audio and text.
Words or phrases that have been collected using the constant
logging feature are stored on the micro-SD card and cannot be
accessed or viewed directly on device. The micro-SD card must
be removed and the logged file folders viewed with a computer.
Page 18

12
www.voxtec.com
• Storage Capacity: displays the total and available amount
of removable micro-SD card space on your SQ.410. Also
displays total number of logged audio files for the current
module that is loaded.
About (Settings):
• Look up the application version, platform OS version, and
complete product version running on your SQ.410.
• Read through summary of intellectual property and licensing
information.
Talk Through Feature (Bypass Translation Software):
• You can bypass the translation software and use the SQ.410
to broadcast speech using any external speaker connected
through the audio out jack (speaker icon) located on top of
the device. To use this feature press and hold the C button
while speaking into either the headset or the secondary
microphone (as applicable).
• Note: Be certain to have the headset or microphone of the
SQ.410 well behind the external speaker, otherwise loud
audio feedback noises will be created by the speaker.
• Voxtec recommends the use of a TACK-1 headset when
using very high powered external speakers to minimize the
risk of dangerous audio feedback noise levels.
Translating with the SQ.410
The SQ.410 provides three convenient ways to translate:
• Eyes Free mode: In Eyes Free mode you are wearing the
SQ.410 typically in your upper left chest area or along your
waist line with the speaker facing out and the LCD concealed
against the custom holster secured to your equipment. To
begin translating from English to a foreign language, you will
press and hold either the PUSH TO TALK button or the A
(English) button, say the word or phrase you wish to translate,
then release the button.
Page 19

13
SQU.ID® SQ.410
• Handheld mode: In Handheld mode you have removed the
SQ.410 from the custom holster and hold it in your hand with
the speaker facing out and the LCD facing you. To begin
translating from English to a foreign language, you will press and
hold either the PUSH TO TALK button or the A button, say the
word or phrase you wish to translate, then release the button.
• Manual mode: In Manual mode you have removed the
SQ.410 from the custom holster and hold it in your hand. You
will use the five-button keypad to locate words and phrases.
You can broadcast one of these phrases by highlighting it, then
pressing and releasing the CENTER button.
Translating a phrase based one-way module in Eyes Free or
Handheld mode:
1. Press and hold either the PUSH TO TALK or A button. You will
hear a single audible “ping” in your headset earpiece or through
the SQ.410’s speaker if you are using a secondary microphone for
English input or you have elected to turn on English verification to
the speaker. This ping indicates that the SQ.410 is waiting for you
to say an English word or phrase to be translated.
2. Say the English word or phrase that you wish to translate
into the headset microphone or secondary microphone, as
applicable based on how the device was configured.
3. Release the PUSH TO TALK or A button after you have
finished saying the phrase. You will hear an audible two beat
“ping, PING” after you release the button and the LCD will
display a thinking window.
4. For English verification, you can choose to have the English
word or phrase played through the headset earpiece or
speaker before the foreign language translation broadcasts.
5. The corresponding foreign language translation of the English
word or phrase will then be broadcast through the SQ.410
speaker.
6. The LCD will highlight the selected phrase in the phrase list.
Page 20

14
www.voxtec.com
NOTE: In some cases, instead of hearing the correct English
verification in your headset earpiece (or speaker), you may
hear the no-recognition tone. In other cases, you may
simply hear the wrong phrase verified back in your headset
earpiece (or speaker). To interrupt the SQ.410 from playing
the incorrectly identified phrase, tap the PUSH TO TALK
or A button. Then, press and hold the PUSH TO TALK or
A button and say the English word or phrase again. If you
continue to have recognition issues, see the Troubleshooting
section of this Manual.
Expanded Feature Descriptions
Secondary Audio and Speaker Volume
The speaker volume controls the volume of the built-in speaker
on the device as well as the volume of whatever external speaker
is connected to the 3.5mm Audio Output jack.
Primary Headset Volume
Adjusts the headset earpiece volume up or down to hear English
Verification.
Controls
• Brightness: Adjust the LCD brightness depending on day or night
visibility. Pushing the UP button raises the brightness; pushing the
DOWN button lowers the brightness. Push the CENTER or RIGHT
button to accept a setting or LEFT button to cancel the change.
• Timeout to Standby: Manage the SQ.410’s battery life by
controlling the time to standby. Use the UP and DOWN buttons
to select from 1 minute to standby all the way to never. Push
the CENTER or RIGHT button to accept a setting or LEFT
button to cancel the change. Standby mode conserves battery
life by suspending many device operations, such as turning off
the LCD. Once in standby mode pressing and holding the Push
to Talk or A buttons will immediately wake up the unit and the
unit will begin listening for speech input. Quickly pressing and
Page 21

15
SQU.ID® SQ.410
releasing the power button will simply wake up the unit without
taking further action. Pressing any other button will wake up
the unit as well, but will also complete any action normally
performed by the button based on what the application was
doing before the unit went into standby (e.g., if the last action
performed was playing a phrase in the module, pressing the
center button will play the highlighted phrase).
• Set Time: The device’s internal clock may be adjusted to reflect
local time. Time is set in 24-hour format. To adjust time: (1) use
the UP and DOWN buttons to increase or decrease the hour,
then press the CENTER button when the correct hour is shown;
(2) use the UP and DOWN buttons to increase or decrease the
minute, then press the CENTER button when the correct minute
is shown; and (3) press the RIGHT button to accept the changes.
Note that pressing the LEFT button will cancel the changes.
• Set Date: Similar to setting time, the internal clock may be
adjusted to reflect a new day, month and year. Although the
device’s date is set at the factory and should not vary even after
repeated battery changes and power cycles, this functionality is
provided in the event of discrepancies that might arise in adjusting
the time to a local time zone. To adjust the date: (1) use the UP
and DOWN buttons to increase or decrease the month, then
press the CENTER button when the correct month is shown; (2)
use the UP and DOWN buttons to increase or decrease the day,
then press the CENTER button when the correct day is shown;
(3) use the UP and DOWN buttons to increase or decrease the
Year, then press the CENTER button when the correct year is
shown; and (4) press the RIGHT button to accept the changes.
Note that pressing the LEFT button will cancel the changes.
Advanced Features
• English Verification: The selections are “None”, “Speech
Selections Only”, “Button Selections Only”, and “Both”. When
“Speech Selections Only” is selected using the ASR to select
a phrase will first play English then the foreign language.
Page 22

16
www.voxtec.com
Pressing the button will not play English. If “Button Selections
Only” or “Both” is selected then when the button pad is used
to play a phrase the English is played first then the foreign
audio. Any form of “Looping” is treated as a button selection.
• English Verification to Speaker: turn on or off English verification
broadcast through the speaker. English verification as selected
in the previous setting will always play through the primary
headset speaker. This feature allows the user additionally to play
the English verification through the built in speaker and external
speaker. In a crowd control type of situation where the external
audio is connected to a loud speaker, it can be convenient to
turn this feature on so that people in the immediate area who only
speak English can understand what is being broadcast.
• Primary Mic Automatic Gain: turn on or off the primary
microphone automatic gain feature. If using the TCI® TACK1 headset in a moderate noise environment it is best to
leave this turned on. This allows the microphone gain to be
adjusted to match the volume of the speaker.
• Primary Mic Manual Gain: manually adjust the microphone gain
of the headset or microphone attached to the SQ.410’s primary
ODU® Advanced Military Connector (AMC). Enabling Manual
Gain will turn off Primary Mic Automatic Gain. This is best done
when in a high noise environment or when using a low impedance
microphone such as a Peltor headset. Adjust the gain so your
speaking voice moves the volume meter into the green zone.
When setting the gain try to speak at the level that will be used in
the operational environment. If the operational environment has a
very loud background noise level you may need to speak louder
into the SQ.410 and therefore set the manual gain lower.
• Secondary Mic Automatic Gain: turn on or off the
secondary microphone automatic gain feature. If using the
noise cancelling microphone in a moderate noise environment
it is best to leave this feature turned on.
• Secondary Mic Manual Gain: manually adjust the microphone
Page 23

17
SQU.ID® SQ.410
gain of the microphone attached to the SQ.410’s secondary
audio input jack. This is generally not recommended, because
it requires the user to keep a very consistent distance between
the secondary microphone and the foreign language speaker for
each phrase. In a high noise environment it may be necessary
to use manual gain. This is recommended if a headset is
connected to the Secondary Microphone input. Adjust the
gain so the speaking voice moves the volume meter into the
green zone. When setting the gain try to speak at the level that
will be used in the operational environment. If the operational
environment has a very loud background noise level you may
need to tell the foreign speaker to talk louder into the SQ.410
and therefore set the manual gain lower.
• Select Connected Microphone: choose the connected
microphone(s) – primary only, secondary only, or both. When
Both microphones are selected all English input as initiated
with the A button is received from the Primary Headset
connector and all Foreign language audio recording input as
initiated with the B button is received from the Secondary
Headset Connector. When Primary only is selected then all
audio inputs come through the Primary Headset connector.
Likewise when Secondary Only is selected all audio inputs
come through the Secondary connector.
• Enable Built-in Speaker: The built in speaker can be
disabled separately from the 3.5mm Audio Output Jack.
This can be useful if the situation requires that only the Audio
Output be used and no audio is projected locally through the
built in speaker.
• Reset to Defaults: you have the option to reset all the system
settings to factory default values. Those values are as follows:
o Secondary Audio and Speaker Volume: Level Bar 5
o Primary Headset Volume: Level Bar 5
o Screen Brightness: Level Bar 7
Page 24
18
www.voxtec.com
o Timeout To Standby: Never
o English Verification: Speech Selection Only
o English Verification to Speaker: Off
o Primary Mic Automatic Gain: On
o Secondary Mic Automatic Gain: On
o Select Connected Microphone: Primary Only
o Enable Built-in Speaker: On
o Set Constant Logging: Off
Programming Hot Buttons for Quick Play mode
The SQ.410 has three “hot buttons” featured on the side of
the device that are labeled A, B and C. These buttons can be
programmed to accommodate Quick Play mode, which enables
you to broadcast one of three preselected phrases quickly
without having to say the phrase into the SQ.410 in English first.
To program a Hot Button for Quick Play mode:
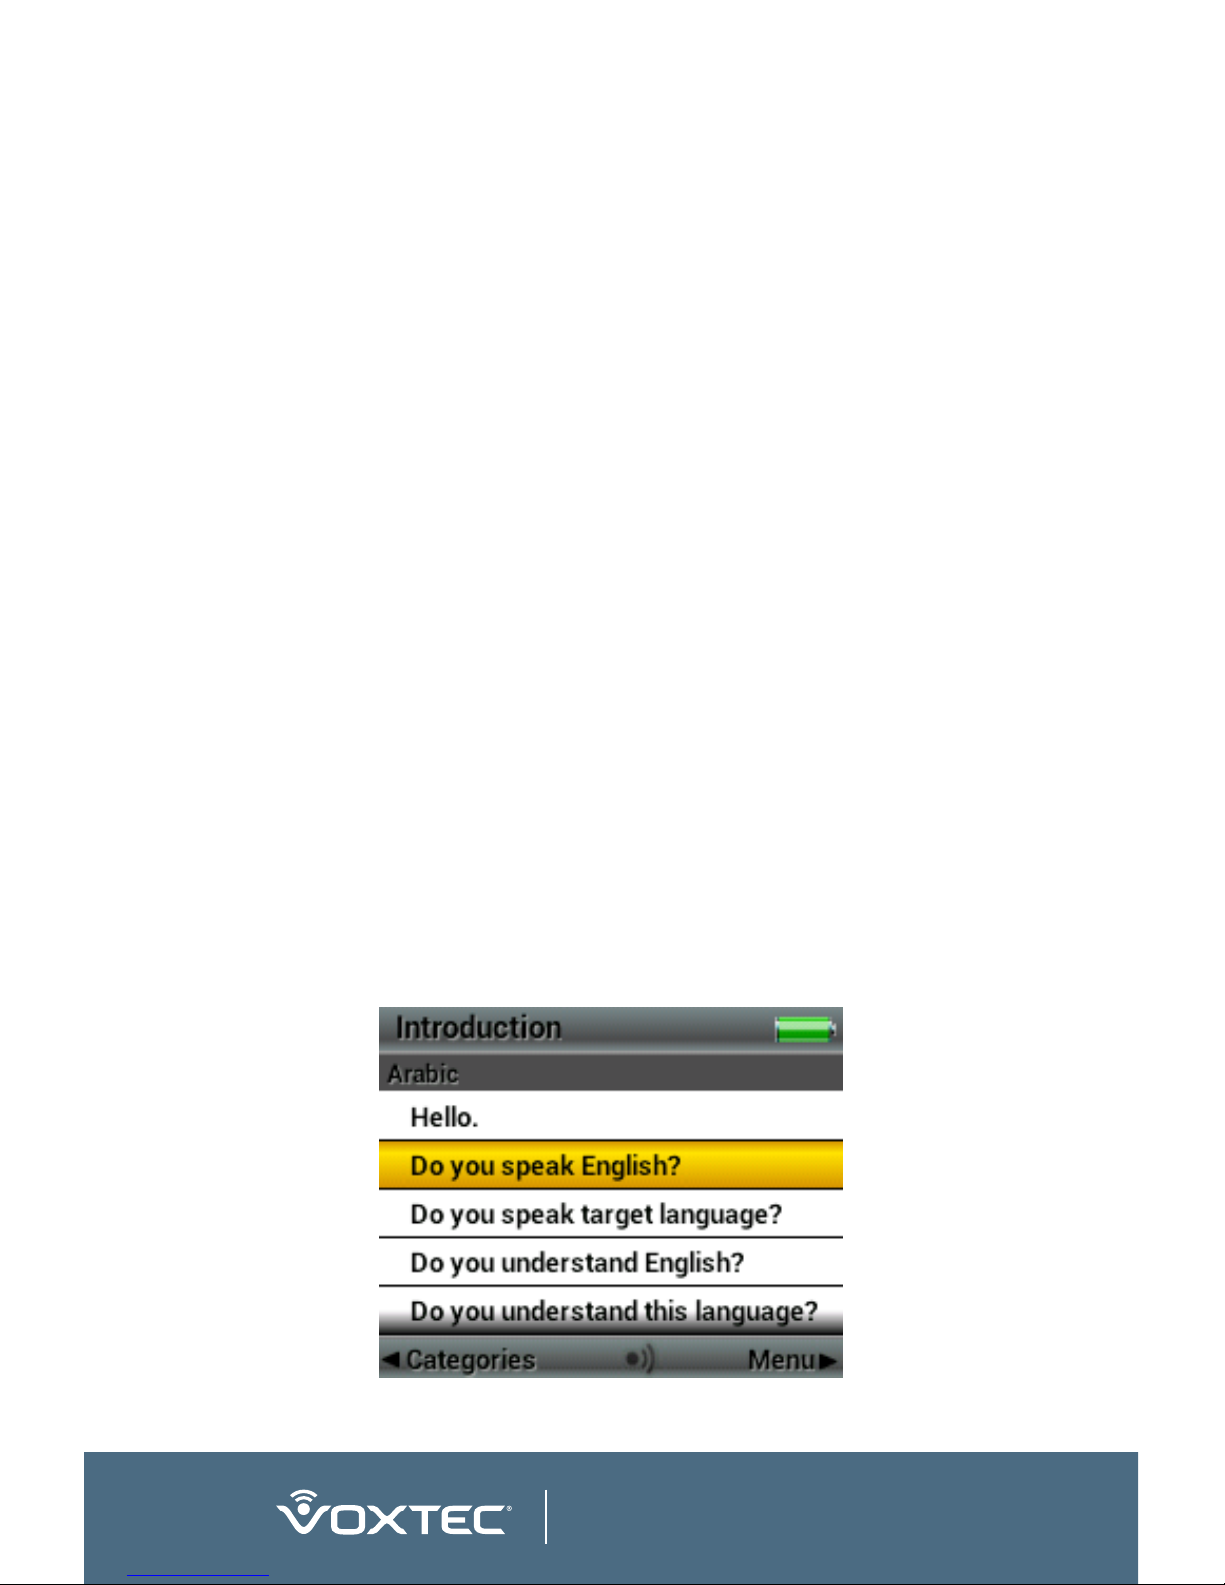
1. Be sure the word or phrase you would like to store as a quick play
was just broadcast and remains displayed on the main screen. In
the example below, you want to store the Arabic translation for the
question: “Do You Speak English?” so that when you hit the quick
play button it will immediately play the Arabic translation for this
question out of the SQ.410’s speaker.
SQ.410 Main Screen
Page 25

19
SQU.ID® SQ.410
2. Press the RIGHT button to bring up the Current Phrase
menu. Then scroll down and select “Set as Quick Play…” (A,
B or C) and then press the CENTER select button to set the
phrase to a specific button. If you have “English Verification”
for “Buttons Selections Only” or “Both” turned on you will
hear an audio acknowledgment that the quick play button
has been programmed through the main speaker.
To play a programmed Quick Play button:
1. Quickly double tap and release the hot button (A, B or C) that
you set as quick play.
2. To loop a programmed Quick Play button, quickly triple tap and
release the hot button (A, B or C) that you set as quick play. To
stop the phrase from audibly looping, simply press and release
the PUSH TO TALK button or one of the hot buttons (A, B or C).
To remove hot button translations:
1. Highlight any phrase on the screen and press and release the
RIGHT button.
2. A “Current Phrase” pop up window will appear displaying
various options, scroll down until you come to the option
“Clear All Quick Play Buttons.”
3. Select “Clear All Quick Play Buttons” (see screenshot below)
which will remove all programmed Quick Play buttons at once.
Current Phrase Menu, Set as Quick Play A
Page 26

20
www.voxtec.com
Note: It is recommended that you remove translations from being
programmed as hot buttons unless they are being used regularly.
My Favorites
You can add phrases into the My Favorites folder by ensuring the phrase
you want to add is displayed on the main screen, then after pressing
and releasing the RIGHT button a “Current Phrase” pop up window
will appear displaying the current phrase options. The first option is
“Add to My Favorites,” which you can highlight and accept using the
five-button keypad. Once you accept a phrase to be added, you will
see a confirmation pop up window that audibly announces (if Audio
Verification is turned on) and reads: “Phrase added to My Favorites.”
You can access the My Favorites folder from the Settings page (it is
the first option on that page). If you are currently in a category (or
Current Phrase Menu, Clear All Quick Play Buttons
Current Phrase Menu, Add to My Favorites
Page 27

21
SQU.ID® SQ.410
in the option “All Phrases”) and viewing phrases, then you access
the Settings page by pressing and releasing the LEFT button twice
(once changes to the “Categories” page and the second press and
release takes you to the Settings page). To enter the My Favorites
folder press and release the CENTER or RIGHT button. Once in
the My Favorites folder you will see all the phrases you have added.
Using the UP or DOWN button you can select a phrase.
Once you have selected a phrase, if you press and release the
RIGHT button a pop up window will appear titled “Selected
Phrase,” that offers you the ability to: Loop Phrase, Loop all
Phrases, Reorder Phrase, Record New Translation (only applicable
if the phrase is one you added to the module because prerecorded phrases may not be modified) or Remove from My
Favorites. Select any option by scrolling to that option such that it
is highlighted, then press and release the CENTER button.
My Favorites Folder
My Favorites Folder, Selected Phrase Menu
Page 28

22
www.voxtec.com
Loop Phrase: enables the selected phrase to be broadcast
continually through the SQ.410’s main speaker until you press
and release the LEFT, CENTER, RIGHT, A, B,C, or PUSH TO
TALK button on the device to stop the broadcast. In order to
loop phrases first in English and then in the translated language
you go to the “English Verification” setting and select either
“Button Selection Only” or “Both,” because either will activate
English first in the looped phrases.
Loop all Phrases: enables you to loop the entire sequence of phrases
that you have added to My Favorites. In order to first hear the English
of each phrase and then in the translated language, go to the “English
Verification” setting and select either “Button Selection Only” or “Both,”
because either option will activate English first in the looped phrases.
Reorder Phrase: enables you to build a custom sequence of
phrases by reordering how they appear. After you select Reorder
Phrase the pop up window will disappear and the selected phrase
will be highlighted in blue. You can now use the UP or DOWN
buttons to place the selected phrase in the order you would like it.
Once you have the highlighted phrase in the position you want it
simply press the LEFT button to set it in place.
Record New Translation: enables you to quickly record a
new foreign audio recording for the selected phrase. Only new
phrases that have been added can be modified. Selecting this
option takes you immediately to the Added phrases window with
the corresponding phrase selected.
Remove from My Favorites: enables you to remove a selected
phrase from the My Favorites folder. When you select Remove from
My Favorites, a pop up window will appear asking you to confirm
that you want to remove the phrase from My Favorites, simply press
and release the CENTER button to accept the confirmation.
Within the My Favorites folder, if you select a phrase, you can
manually play it by pressing and releasing the CENTER button.
You can stop the broadcast of any My Favorites phrase while
Page 29

23
SQU.ID® SQ.410
it is being played by pressing and releasing the A or B buttons.
Pressing A or B button will then take you back to the main
category screen immediately upon pressing and releasing.
Select Language
In Phrase-Based modules there is the option to change the
outputted foreign language.
To activate a different language, go to Select Language from the
Application Settings menu. There is a list of languages available
in the current module. Change to the highlighted one by pressing
and releasing either the CENTER or RIGHT button. The currently
loaded language has a filled dot next to it.
Changing a Module
1. Select Change Module from the Application settings screen.
All the modules available on your removable micro-SD card
will be listed. A module is defined primarily by the base domain
or topic area that is covered. Phrase based modules cannot
translate back from the foreign language to English, but have
the benefit of containing many foreign languages in the topic
area. The currently loaded module has a filled dot next to it.
2. Select the desired module by scrolling up/down and pressing
either the CENTER or RIGHT navigation button to load the
highlighted module.
3. Selecting a new module will unload the currently loaded module.
Page 30

24
www.voxtec.com
Add Phrases
It is possible to add new phrases directly onto the SQ.410.
Adding phrases that specifically address your location and
the people you are working amongst can greatly increase the
SQ.410’s effectiveness.
To add a phrase, select “Added Phrases” under the Application
menu. Press and release either the CENTER or RIGHT button
to get the “Selected Phrase” menu. Select the first item in the
list “Add New Phrase.” Using the five way key pad, navigate the
on-screen keyboard to type in the phrase as it is normally written
in English. Select the phrase area itself to move the cursor in the
phrase. When finished writing the phrase select the check mark
(“”) in the lower right corner.
Note: How the phrase is written in this window will match
how it must be spoken to trigger the recorded translation. It is
not necessary that the written English matches the meaning
of the foreign translation exactly. It is more useful that the
written English be easy to remember and something that is well
recognized by the ASR. It is recommended that the new English
phrase consist of at least four syllables with several distinct
consonant sounds to ensure proper ASR recognition (e.g.,
the word “blue” alone makes a very poor choice for an added
phrase, while “blue ink must be used” would be a suitable added
phrase).
Page 31

25
SQU.ID® SQ.410
On the next screen press and hold down the “B” hot button,
while the foreign language speaker says the new translation. The
Phrase will be added to the Added Phrases list and automatically
to My Favorites (not the main list of phrases).
Note: It is highly recommended a quiet location with no
background noise be used when recording foreign translations
on device. It is also recommended that the microphone gain
setting be changed from automatic to manual and adjusted to
an appropriate setting given the recording environment to ensure
the best possible audio recording quality.
Note: Modified translations have a red icon associated with them
in the My Favorites folder rather than the typical green icon.
Note: A red icon means a recording exists for this phrase. A gray
icon with a diagonal line through it means there is no recording
for this phrase yet in the current language selected.
After translating press the CENTER button to play the new
phrase. Press the RIGHT button to change the Translation using
“Record New Translation”, edit the English phrase using “Edit
Phrase” (if deleted from My Favorites), add back the new phrase
to Favorites by selecting “Add to Favorites”, or delete the phrase
by selecting “Delete Translation”.
Page 32

26
www.voxtec.com
Logged Phrases
The logged phrases folder acts as a repository for any word or
phrase you have logged using the C button log feature.
To log a phrase on the Main Window quickly press and release the
C button such that the message “Phrase saved in log” appears.
Using the C button log feature with official module phrases stores
the matched ASR result in English (showing the English text on
screen) and displays the phrase text matched by the software to
that ASR result. When the C button log feature is used with useradded phrases, the logging feature stores original audio as sent to
the ASR (showing both the written text associated with that phrase
and playing an audio clip of what was sent to the ASR) as well as
the audio associated with that phrase in the foreign language.
It may be advisable to log a phrase for various reasons: For
example, the user may suspect that a given translation from
English to the Foreign Language may be incorrect and the
user wants to remember for verification at a later time. Another
example is when the user wants to make a record of a sequence
of phrases being used as part of a set of operational procedures.
To view logged phrases, select Logged Phrases from the
Application menu.
• Select any of the logged phrases and press the CENTER
button to view and, if applicable, hear certain information about
Page 33

27
SQU.ID® SQ.410
the logged phrase. If the phrase logged was triggered by voice,
you will hear the audio passed by the ASR to the system. If the
phrase was logged after selecting the phrase with the UP or
DOWN buttons, you will not hear any audio. With all logged
phrases you will see the phrase text in English.
• Press and release the RIGHT button and select Play Foreign
Audio to hear the foreign language translation associated with
that phrase.
• Logged phrases can be deleted from the RIGHT button menu.
Note: The audio recordings and text of all the logged phrases
are stored on the removable micro-SD Card in a standard format
that can be accessed on a PC if need be.
Note: The phrases logged by the Constant Log feature are not listed
on this screen, but are stored in a standard format on the removable
micro-SD card that can be accessed on a PC if need be.
Create Recordings
You can use the SQ.410 as a digital recorder and create new
recordings directly on device.
The easiest way to create an audio recording is to simply
press and hold the B BUTTON. A message will pop up saying
“Recording <foreign language>”. To listen to the foreign speech
recording, go into the Application menu and select the “Create
Recordings” options. Then highlight the recording you want to
listen to and press the CENTER button to play the recording.
Alternatively, if you want to use the PUSH TO TALK BUTTON
(English), A button (English) or B button (foreign):
1. Select Create Recordings under Application settings menu.
2. While pressing down and holding either the PUSH TO TALK
or A button you can speak into the microphone the English
phrase you wish to record. Release the PUSH TO TALK or
A button when you have finished speaking. Use the A button
Page 34

28
www.voxtec.com
or PUSH TO TALK button to record from the microphone set
up to record English. Use the B button to record from the
microphone set up to record the foreign language. Refer to
“Select Connected Microphone” in the advanced features
menu to setup which microphone is recording.
3. Recorded phrases are listed numerically in order of recording
unless the recording has been manually renamed.
4. Scroll through the list to highlight individual recordings
using the UP/DOWN buttons. You can play the highlighted
recording by pressing the CENTER button.
5. To rename or delete a recording, press and release the
RIGHT button. You will see a “Selected Recording” pop up
window appear.
6. When you highlight and accept the Rename Recording option
an Edit Filename a screen will appear with an alphabetical
keyboard and text input screen. Use the five button keypad
to navigate to the Edit Filename screen to select the letters
for your new filename – select check mark (“”) when you
are finished. You will be taken back to the Create Recordings
screen where you will see the newly renamed recording listed
in alphabetical order.
7. When you highlight the Delete Recording option, simply press
and release the CENTER button to accept the deletion. You
will see a pop up window asking you if you are sure you want
to delete the recording. Press and release the CENTER
button to accept the deletion. You will be taken back to
the Create Recordings screen where you will see that the
recording has been deleted from the list.
Note: Users have found great utility in the ability to digitally
record custom English or foreign phrases directly on the SQ.410.
Additionally, for human intelligence gathering and basic interview
type scenarios, the ability to record a statement or testimony
in either English or a foreign language (for later translation) has
proven very valuable.
Page 35

29
SQU.ID® SQ.410
Power Management
The SQ.410 operates on two CR123A lithium batteries. In most
typical use scenarios the unit should last at least 8 hours on
one set of batteries. Standard disposable CR123A batteries are
recommended. Although rechargeable CR123A batteries exist
in the market, Voxtec does not recommend their use because
the unit may behave erratically, even if useable the device will
probably have significantly less than 8 hours of use, and the
battery meter displayed on the SQ.410’s screen will not be
accurate.
Checking Battery Status
The battery meter located at the top right of the SQ.410 software
application screen shows the current battery status. Example
battery meter progression (from left to right) during use:
It is time to swap fresh batteries when the unit displays the single
red bar warning.
Note: If your SQ.410 loses power during use, you will not lose
the software application, modules, or audio recordings you have
created, which are all stored on the internal storage and the
removable card.
Page 36

30
www.voxtec.com
Power Modes
The SQ.410 has three power modes:
• On
• Standby
• Off
TIP: You can set the SQ.410 to automatically go into standby
mode after a certain amount of time. Under Settings go
to System then to Controls where you will see “Timeout to
Standby”. When you select Timeout to Standby you will notice
you can set the time to standby to occur in: 1, 5, or 20 minutes,
1 hour, or Never.
Note: In order to ensure the batteries do not drain down when
the SQ.410 is not being used make sure the SQ.410 is turned off
and not left in Standby inadvertently.
Troubleshooting
If you are encountering speech recognition errors
The SQ.410 uses advanced speech recognition technology to
quickly and accurately identify and translate the phrases you
On Standby Off
To turn the SQ.410 on,
firmly press and release
the POWER button.
If the SQ.410 is on and
you wish to put it into
standby, firmly press
and release the POWER
button.
To turn the SQ.410 off, firmly
press and hold the POWER
button down for 3 seconds
and then release. Note:
Ensure the “Powering Down”
sequence is displayed on
the screen prior to releasing
the POWER button.
When the SQ.410 is on,
the batteries are being
drained and will eventually
need to be replaced.
When the SQ.410 is put in
standby mode, your settings
and last screen viewed will
be preserved, meaning
pressing any button will take
you directly to the screen
from which you exited.
When the SQ.410 is off,
and the batteries remain
inside the SQ.410 there
will be only minimal battery
drain. Turn your SQ.410
off when you will not be
using it for a while.
Page 37

31
SQU.ID® SQ.410
say. However, factors such as background noise, improper
microphone placement, pauses and other irregularities of speech
can cause recognition errors. In some cases, instead of hearing
the correct English verification in your headset earpiece, you may
hear the no-recognition tone. In other cases, you may simply
hear the wrong phrase verified back in your headset earpiece.
To interrupt the SQ.410 from playing the incorrectly identified
phrase, tap the PUSH TO TALK or A button. Then, press and
hold the PUSH TO TALK or A button and say the English word or
phrase again. If you continue to have recognition issues, try the
following potential fixes:
1. Ensure the micro-SD card (with application software) is
properly installed in the device.
2. Confirm in Settings that the correct microphone input has
been selected.
3. If using the optional TACK-1 headset, confirm that you are
wearing it properly. The headset earpiece is designed to fit
over your left ear.
4. If using the optional TACK-1 headset, also confirm that
the headset microphone is in proper position. It should be
positioned close to the left corner of your mouth, about two
inches away from your lips. Do not let the microphone touch
against your face while speaking.
Example of proper headset position (below):
Page 38

32
www.voxtec.com
CAUTION: Facial hair such as a moustache or beard can
sometimes rub against the microphone’s protective foam
covering and cause unnecessary noise input which could
confuse the ASR and reduce accuracy. If you have any sort of
facial hair, be sure to position the microphone far enough away
to eliminate any interference.
5. Try repeating the phrase. Be sure to enunciate your words,
and speak in a clear, commanding voice.
6. If necessary, double-check the microphone gain input.
Note: When coaching a foreign language speaker on how
to interact with the SQ.410, consider all the factors listed
above. It may take a couple attempts for the foreign speaker to
understand the concept that you are controlling the B button for
voice recording, and that he or she needs to wait for the ping
before beginning to talk.
If you encounter a software “lock up”
The SQ.410 is a mobile and rugged computer running
sophisticated software. Like all computers, it may lock up
occasionally. If this occurs, pressing any of the SQ.410’s buttons
will not change its current state, except one – the Power button.
In a lock up situation, pressing and holding the Power button for
approximately 10 seconds will force the unit to turn off and reset
itself.
TIP: If you experience a software lockup, and do not wish to
use the Power button, removing the batteries from the SQ.410 is
another excellent way of resetting the software application.
If you encounter a blank screen
There are several error conditions that might cause the SQ.410
to be stuck on a blank screen.
• Bright but Blank Screen. If the screen is bright but no text
is showing and pushing the buttons does not result in any
changes to the device’s functional state, ensure that the
Page 39

33
SQU.ID® SQ.410
micro-SD card (with application software) is properly installed
in the device (refer to instructions on page 10 for proper
removal and replacement instructions).
• Dark Blank Screen. If the screen is dark and blank, ensure
that fresh batteries are installed and restart the system. Note
that if the unit lost power during the initial boot sequence the
internal system memory may have become corrupted. The
unit will automatically repair the internal memory the next time
the system is powered on, but boot time will be significantly
increased, therefore when attempting to troubleshoot a dark
black screen state be sure to allow the unit several minutes
to attempt to complete the boot sequence before powering
down or removing batteries.
Maintenance and Care of the Device
Handling
Do not pound, drop, or throw the device. Never carry the device
by the headset or microphone. Do not open or disassemble
the device. Keep all connector covers in place until ready to
use the connector, and replace the cover immediately once the
accessory has been disconnected. Do not open the micro-SD
compartment in dusty or wet conditions, and ensure that the
micro-SD card is free of dust and not wet when inserted into
the device. At least once a month, inspect the O-ring inside
the battery cap to ensure it is not cracked or blocked by grit or
dust. Do not use solvents to clean the O-ring, but rather use
gentle stream of compressed air or a soft, damp cloth to remove
obstructions. A silicon-based lubricant may be used on the
battery cap O-ring.
Dust and Water Exposure
The device is dust proof and waterproof to IEC Standard 60529
IP54. This means it can withstand exposure to fine dust without
affecting performance during normal device operation and
can withstand being splashed with water. However, prolonged
Page 40

34
www.voxtec.com
exposure to extreme dust or water submersion can cause
damage to the device. Use the headset configuration if the unit
will be used in conditions where continuous water exposure is
anticipated, such as during a rainstorm. Before using the device
in extreme conditions, ensure that both audio covers are closed,
micro-SD cover is screwed down and battery compartment is
tightly closed.
Cleaning the Device
Note: Avoid chemical cleaners and solvents which can
damage plastic or rubber components.
1. Dampen a clean cloth with a mild detergent solution.
2. Wipe the device with the damp cloth.
3. Dry the device thoroughly with a soft, lint-free cloth and allow
the device to dry completely before opening the micro-SD
compartment, battery compartment or audio flapper covers.
4. Compressed air may be used to remove dust from surfaces
and inside speaker compartment, but ensure that only a
gentle stream of air is used otherwise dust may be forced
inside the device.
Cleaning the Screen
1. Dampen a soft, clean, lint-free cloth with water, isopropyl
alcohol, or eyeglass lens cleaner.
2. Wipe the screen with the cloth.
3. Thoroughly dry the screen with a soft, lint-free cloth.
Extreme Temperatures
Do not store the device where prolonged exposure to extreme
temperatures can occur because it can cause permanent
damage.
Long-Term Storage
Remove the batteries when the device will not be used for several
days or more. Stored data is not lost when batteries are removed.
Page 41

35
SQU.ID® SQ.410
Service and Technical Support
If your SQ.410 needs service or you require technical support,
please contact us via the Voxtec corporate website at www.
voxtec.com/contact_us, or contact Voxtec directly. If possible,
be sure to have the following information available before you
contact Voxtec:
• Applicable technical problem or error message
• Model name (e.g., “SQU.ID”), model number (e.g., “SQ.410”),
and date of manufacture (listed on product sticker on outside
of original packaging)
• Product Serial Number (listed on back of device)
• Application Version and platform OS (found in the About
section under Settings)
Return Merchandise Authorization
You must have a Return Merchandise Authorization (RMA)
number before returning your SQ.410, or any of its components
for repair. To obtain an RMA number, please contact Voxtec.
Contact Voxtec International, Inc.
Address 20 Ridgely Avenue
Suite 301
Annapolis, MD 21401, USA
Phone 1.866.4VOXTEC (toll free) or 410.626.1110
+1.410.626.1110 (international)
Fax 410.626.1112
Email info@voxtec.com
Web voxtec.com
Page 42

36
www.voxtec.com
End User License Agreement
YOU HAVE ACQUIRED A SQU.ID® TRANSLATION DEVICE
(“DEVICE”). READ THE TERMS AND CONDITIONS OF THIS
END USER LICENSE AGREEMENT (“EULA”) CAREFULLY
BEFORE USING THIS DEVICE. BY USING THIS DEVICE
YOU ARE ACCEPTING AND AGREEING TO THE TERMS
OF THIS EULA. IF YOU ARE NOT WILLING TO BE BOUND
BY THE TERMS OF THIS EULA, YOU SHOULD PROMPTLY
CONTACT VOXTEC INTERNATIONAL, INC. (REFERRED TO
AS “LICENSOR”) OR YOUR AUTHORIZED DISTRIBUTOR
OF THE DEVICE FOR INSTRUCTIONS ON RETURN OF THE
DEVICE FOR A REFUND.
1. OWNERSHIP.
(a) SOFTWARE. The SOFTWARE is owned and copyrighted
by LICENSOR or its third party suppliers (“THIRD PARTY
SUPPLIERS”), and is protected by copyright laws and
international copyright treaties, as well as other intellectual
property laws and treaties. Your license to use the
SOFTWARE confers no title or ownership and is not a sale of
any rights in the SOFTWARE, its documentation or the media
on which they are recorded or printed. LICENSOR and its
THIRD PARTY SUPPLIERS may protect their rights in the
SOFTWARE in the event of any infringement.
(b) HARDWARE. The DEVICE hardware (“HARDWARE”) involves
valuable patent, copyright, trademark, trade secret and
other intellectual property rights of LICENSOR and its THIRD
PARTY SUPPLIERS. LICENSOR and its THIRD PARTY
SUPPLIERS reserve all such rights in the HARDWARE. No
title to or ownership of any intellectual property rights related
to the HARDWARE is transferred to you pursuant to these
terms and conditions. LICENSOR and its THIRD PARTY
SUPPLIERS may protect their rights in the HARDWARE in the
event of any infringement.
2. GRANT OF LICENSE. LICENSOR hereby grants to you, and
you accept, a nonexclusive license to use the DEVICE and the
Page 43

37
SQU.ID® SQ.410
SOFTWARE as authorized in this EULA. The SOFTWARE may
be used only on a single DEVICE owned, leased, or otherwise
controlled by you. You agree that you will not assign, sublicense,
transfer, pledge, lease, rent, or share your rights under this EULA.
You agree that you will not: (a) attempt to reverse engineer
any HARDWARE or any component thereof, or otherwise
misappropriate, circumvent or violate any of LICENSOR’S
or its THIRD PARTY SUPPLIERS’ intellectual property rights
thereto; (b) reverse assemble, reverse compile, translate, modify,
create derivative works of, or attempt to derive source code
or underlying user interface techniques or algorithms of the
SOFTWARE by any means whatever, or disclose any of the
foregoing; and (c) knowingly take any action that would cause
any element of the HARDWARE or SOFTWARE to be placed in
the public domain.
3. RESTRICTED FUNCTIONALITY. You are licensed to use the
SOFTWARE to provide only the limited functionality (specific
tasks or processes) for which the DEVICE has been designed
and marketed by LICENSOR. This license specifically prohibits
any other use of the software programs or functions, or inclusion
of additional software programs or functions that do not directly
support the limited functionality on the DEVICE. Notwithstanding
the foregoing, you may install or enable on a DEVICE, systems
utilities, resource management or similar software solely for the
purpose of administration, performance enhancement and/or
preventive maintenance of the DEVICE.
4. NOT FAULT TOLERANT. THE SOFTWARE IS NOT FAULT
TOLERANT. LICENSOR HAS INDEPENDENTLY DETERMINED
HOW TO USE THE SOFTWARE IN THE DEVICE, AND THE
THIRD PARTY SUPPLIERS HAVE RELIED UPON LICENSOR TO
CONDUCT SUFFICIENT TESTING TO DETERMINE THAT THE
SOFTWARE IS SUITABLE FOR SUCH USE.
5. LIMITED WARRANTY.
(a) SOFTWARE. LICENSOR warrants to you that the unaltered
SOFTWARE will substantially perform the functions described
Page 44

38
www.voxtec.com
in the documentation for a period of 90 days after the
date of delivery of the SOFTWARE to you. LICENSOR’S
sole obligation under this warranty shall be limited to
using reasonable efforts to correct material, documented,
reproducible defects in the unaltered SOFTWARE that you
describe and document to LICENSOR during the 90day period. In the event that LICENSOR fails to correct
a material, documented, reproducible defect within a
reasonable period, LICENSOR may, in its discretion, replace
the defective SOFTWARE, or refund to you the amount that
you paid for the defective SOFTWARE and cancel this EULA
and the licenses granted herein. In such event, you shall
promptly return to LICENSOR all copies of the SOFTWARE
and associated media and documentation. THE FOREGOING
LIMITED WARRANTIES DO NOT ORIGINATE FROM, AND
ARE NOT BINDING ON, LICENSOR’S THIRD PARTY
SUPPLIERS.
(b) HARDWARE. LICENSOR’S limited warranty and related
support obligations regarding the HARDWARE are
provided separately in the documentation provided with
the DEVICE. THE FOREGOING LIMITED WARRANTIES
DO NOT ORIGINATE FROM, AND ARE NOT BINDING ON,
LICENSOR’S THIRD PARTY SUPPLIERS.
6. DISCLAIMER OF OTHER WARRANTIES. EXCEPT FOR
THE EXPRESS LIMITED WARRANTIES SET FORTH IN
PARAGRAPHS 5(A) AND 5(B) ABOVE, THE SOFTWARE AND
HARDWARE ARE PROVIDED “AS IS, WHERE IS”. WITHOUT
LIMITING THE GENERALITY OF THE FOREGOING, LICENSOR
AND ITS THIRD PARTY SUPPLIERS MAKE NO WARRANTY,
EXPRESS OR IMPLIED, AS TO MERCHANTABILITY,
NONINFRINGEMENT OR FITNESS FOR A PARTICULAR
PURPOSE.
7. NO LIABILITY FOR CERTAIN DAMAGES. EXCEPT AS
PROHIBITED BY LAW, NEITHER LICENSOR NOR ITS THIRD
PARTY SUPPLIERS SHALL HAVE ANY LIABILITY FOR ANY
INDIRECT, SPECIAL, CONSEQUENTIAL OR INCIDENTAL
Page 45

39
SQU.ID® SQ.410
DAMAGES ARISING FROM OR IN CONNECTION WITH
THE USE OR PERFORMANCE OF THE SOFTWARE OR
THE DEVICE, WHETHER THE CLAIM IS BASED IN TORT
(INCLUDING NEGLIGENCE), CONTRACT, OR OTHERWISE,
EVEN IF LICENSOR WAS ADVISED OF THE POSSIBILITY OF
SUCH DAMAGES. THIS LIMITATION SHALL APPLY EVEN IF
ANY REMEDY FAILS OF ITS ESSENTIAL PURPOSE. IN NO
EVENT SHALL LICENSOR OR THIRD PARTY SUPPLIERS
BE LIABLE FOR ANY AMOUNT IN EXCESS OF U.S. TWO
HUNDRED FIFTY DOLLARS (U.S. $250.00).
8. TRANSFER ALLOWED BUT WITH RESTRICTIONS. You
may permanently transfer your rights under this EULA only as
part of a permanent sale or transfer of the DEVICE, and only
if the recipient agrees to this EULA. If the SOFTWARE is an
upgrade, any transfer must also include all prior versions of the
SOFTWARE.
9. RESTRICTED USES. The DEVICE, including the SOFTWARE,
is not designed or intended for use or resale in hazardous
environments requiring fail-safe performance, such as in
the operation of nuclear facilities, aircraft navigation or
communication systems, air traffic control, or other devices or
systems in which a malfunction of the software would result in
foreseeable risk of injury or death to the operator of the device or
system, or to others.
10. ADDITIONAL SOFTWARE/SERVICES. This EULA applies
to updates, add-on components, product support services, or
Internet-based services components of the SOFTWARE that you
may obtain from LICENSOR and/or its Third Party Suppliers after
the date you obtain your initial copy of the SOFTWARE, unless
you accept updated terms or another agreement governs.
11. THIRD PARTY SOFTWARE NOTICES. The SOFTWARE
may contain third-party software which requires notices and/
or additional terms and conditions. Such required third-party
software notices and/or additional terms and conditions are
located at http://www.voxtec.com and are made a part of
Page 46

40
www.voxtec.com
and incorporated by reference into this EULA. By accepting
this EULA, you are also accepting the additional terms and
conditions, if any, set forth therein.
12. SUBMISSIONS. Should you decide to transmit to LICENSOR’S
website by any means or by any media, any materials or other
information (including, without limitation, ideas, concepts
or techniques for new or improved services and products),
whether as information, feedback, data, questions, comments,
suggestions or the like, you agree such submissions are
unrestricted and shall be deemed non-confidential and you
automatically grant LICENSOR and its assigns a non-exclusive,
royalty-free, worldwide, perpetual, irrevocable license, with the
right to sublicense, to use, copy, transmit, distribute, create
derivative works of, display and perform the same.
13. GOVERNING LAW. This EULA shall be construed and governed
in accordance with the laws of the State of Maryland, U.S.A.,
without regards to its conflict of laws principles. The U.N.
Convention on Contracts for the International Sale of Goods
shall not apply to these terms and conditions. Any dispute,
claim or controversy arising out of, or related to, this EULA shall
have exclusive venue in the state and/or federal courts located
in the State of Maryland. You hereby irrevocably consent to
the personal jurisdiction of those courts for such purposes.
NOTWITHSTANDING ANYTHING IN THIS SECTION TO THE
CONTRARY, LICENSOR AND ITS THIRD PARTY SUPPLIERS
SHALL NOT BE PREVENTED FROM ENFORCING THEIR
RESPECTIVE OR COLLECTIVE INTELLECTUAL PROPERTY
RIGHTS IN ANY APPROPRIATE JURISDICTION.
14. COSTS OF LITIGATION. If any action is brought by either
party to this EULA against the other party regarding the subject
matter hereof, the prevailing party shall be entitled to recover, in
addition to any other relief granted, reasonable attorney fees and
expenses of litigation.
15. SEVERABILITY. Should any term of this EULA be declared void
or unenforceable by any court of competent jurisdiction, such
Page 47

41
SQU.ID® SQ.410
declaration shall have no effect on the remaining terms hereof.
16. NO WAIVER. The failure of either party to enforce any rights
granted hereunder, or to take action against the other party in the
event of any breach hereunder, shall not be deemed a waiver by
that party as to subsequent enforcement of rights or subsequent
actions in the event of future breaches.
17. RESTRICTED GOVERNMENT RIGHTS. The SOFTWARE
is licensed with restricted rights. The SOFTWARE constitutes
“commercial items” as that term is defined in 48 C.F.R. 2.101
consisting of “commercial computer software” and “commercial
computer software documentation” as such terms are used in
48 C.F.R. § 12.212. Consistent with 48 C.F.R. § 12.212 and
48 C.F.R. §§ 227.7202-1, 227.7202-3 and 227.7202-4, if the
customer is the U.S. Government or any agency or department
thereof, the SOFTWARE is licensed hereunder (i) only as a
commercial item, and (ii) with only those rights as are granted to
all other customers.
18. EXPORT RESTRICTIONS. You acknowledge that the
SOFTWARE and HARDWARE is subject to U.S. and European
Union export jurisdiction. You agree to comply with all applicable
international and national laws that apply to the SOFTWARE
and HARDWARE, including the U.S. Export Administration
Regulations, as well as end-user, end-use and destination
restrictions issued by U.S. and other applicable governments.
19. TERMINATION. Without prejudice to any other rights,
LICENSOR may terminate this EULA if you fail to comply with
the terms and conditions of this EULA. Upon termination, you
must immediately cease use of the HARDWARE and destroy the
SOFTWARE and all of its component parts.
Page 48

42
www.voxtec.com
Limited Warranty
PLEASE READ THIS LIMITED WARRANTY CAREFULLY TO
UNDERSTAND YOUR RIGHTS AND OBLIGATIONS.
LIMITED WARRANTY. This limited warranty (“Limited Warranty”)
applies to the Voxtec International, Inc. (“Voxtec”) branded hardware
products sold by Voxtec or its authorized distributors with this
Limited Warranty (collectively, the “Voxtec Product”). Voxtec
warrants that (a) the hardware constituting the Voxtec Product will be
free from defects in materials or workmanship under normal use for a
period of one (1) year, and (b) the software Voxtec has included with
your Voxtec Product (the “Voxtec Software”) will perform substantially
in accordance with the accompanying written materials for a period
of ninety (90) days (both (a) and (b), the “Limited Warranty Period”).
START DATE. The Limited Warranty Period starts on the date of
purchase of your Voxtec Product from Voxtec or one of its authorized
distributors. Your dated sales or delivery receipt, showing the date of
purchase of the Voxtec Product, is your proof of the purchase date.
You may be required to provide proof of purchase as a condition
of receiving warranty service. Any implied warranties that may
be imposed by law are limited in duration to the Limited Warranty
Period.
EXCLUSIVE REMEDY. During the Limited Warranty Period and
subject to applicable law, Voxtec will, at its option and as your
exclusive remedy for breach of this Limited Warranty or any implied
warranties:
• Repair or replace a defective Voxtec Product, or
• Following return of your Voxtec Product to Voxtec or one of its
authorized repair centers, make payment to you for the allowable
damages that you incur in reasonable reliance on this Limited
Warranty, but only up to the amount of the purchase price that
you paid for your Voxtec Product. This refund may include, at
Voxtec’s reasonable discretion, a deduction for depreciation
based on your actual use.
Voxtec will use commercially reasonable efforts to diagnose and
Page 49

43
SQU.ID® SQ.410
attempt to correct, or suggest solutions for, Voxtec Product and
Voxtec Software defects that are covered by this Limited Warranty.
Any replacement parts or Voxtec Product will be new or refurbished
or serviceably used, comparable in function and performance to
the original part or Voxtec Product and warranted for the remainder
of the original Limited Warranty Period or 30 days from the date of
shipment of the Voxtec Product back to you, whichever is longer. All
component parts or hardware products removed under this Limited
Warranty become the property of Voxtec.
After the Limited Warranty Period has expired, Voxtec may
charge you a fee for its efforts to diagnose and service any
Voxtec Product-related problems.
In the unlikely event that your Voxtec Product has a recurring failure,
Voxtec, at its discretion, may elect to provide you with a replacement
unit of Voxtec’s choosing that is at least equivalent to your Voxtec
Product in hardware performance.
EXCLUSIONS AND LIMITATIONS. Voxtec does not warrant that
the operation of the Voxtec Product will be uninterrupted or errorfree. Voxtec is not responsible for damage that occurs as a result
of your failure to follow the instructions that came with the Voxtec
Product.
Voxtec is not responsible for the restoration or reinstallation of any
programs or data other than software installed by Voxtec when the
product was originally manufactured. You agree that Voxtec is not
liable to you for any loss of your data resulting from Voxtec’s repair or
replacement of your Voxtec Product.
This Limited Warranty is not transferable to anyone who obtains
ownership of the Voxtec Product from the original purchaser.
This Limited Warranty does not extend to any Voxtec Product
from which the serial number has been removed or that has been
damaged or rendered defective (a) as a result of accident, misuse,
abuse, or other external causes; (b) by operation outside the usage
parameters stated in the user documentation that shipped with the
product; (c) by the use of parts not manufactured or sold by Voxtec;
Page 50

44
www.voxtec.com
or (d) by modification or service by anyone other than (i) Voxtec, or (ii)
a Voxtec authorized service provider.
This Limited Warranty does not apply to expendable parts.
These terms and conditions of Limited Warranty constitute the
complete and exclusive warranty regarding the Voxtec Product
you have purchased. No change to the conditions of this Limited
Warranty is valid unless it is made in writing and signed by an
authorized representative of Voxtec. No information (oral or written)
or suggestions given by Voxtec, its agents or suppliers or its or their
employees, shall create a warranty or condition or expand the scope
of this Limited Warranty.
LIMITATION OF LIABILITY. TO THE FULL EXTENT ALLOWED BY
LAW, VOXTEC IS NOT LIABLE FOR ANY:
• CONSEQUENTIAL OR INCIDENTAL DAMAGES;
• DAMAGES OR LOSS OF ANY NATURE WHATSOEVER
RELATING TO LOST PROFITS, LOSS OF DATA OR PRIVACY OR
CONFIDENTIALITY, ANY INABILITY TO USE ALL OR PART OF
THE VOXTEC PRODUCT OR VOXTEC SOFTWARE, PERSONAL
INJURY, OR ANY FAILURE TO MEET ANY DUTY (INCLUDING
BUT NOT LIMITED TO ANY LACK OF NEGLIGENCE OR OF
WORKMANLIKE EFFORT); OR
• INDIRECT, SPECIAL, OR PUNITIVE DAMAGES; ARISING OUT
OF RELATING IN ANY WAY TO THE VOXTEC PRODUCT.
THE FOREGOING APPLIES EVEN IF VOXTEC OR ANY SUPPLIER
OR AGENT HAS BEEN ADVISED OF THE POSSIBILITY OF SUCH
LOSSES OR DAMAGES; EVEN IN THE EVENT OF FAULT, TORT
(INCLUDING NEGLIGENCE), STRICT OR PRODUCT LIABILITY,
MISREPRESENTATION OR OTHER REASON; AND EVEN IF ANY
REMEDY FAILS OF ITS ESSENTIAL PURPOSE.
ADDITIONAL PROVISIONS. The Voxtec Software is licensed to
you, not sold, and requires that you first accept and agree to the
terms of the enclosed End User License Agreement. The laws of
the State of Maryland, U.S.A., apply to this Limited Warranty, without
application of its choice or conflicts of laws provisions.
Page 51

45
SQU.ID® SQ.410
Disclaimer and Notices
This manual is provided “as is” and Voxtec assumes no responsibility
for any typographical, technical, or other inaccuracies in this
document.
While every effort has been made to ensure that the information
contained in this manual is accurate and complete, no liability can
be accepted for any errors or omissions. Voxtec reserves the right
to change the specifications of the hardware and software described
herein at any time without prior notice.
VOXTEC MAKES NO REPRESENTATIONS, WARRANTIES,
CONDITIONS, OR COVENANTS, EITHER EXPRESS OR IMPLIED
(INCLUDING ANY EXPRESS OR IMPLIED WARRANTIES OR
CONDITIONS OF FITNESS FOR A PARTICULAR PURPOSE, NONINFRINGEMENT, MERCHANTABILITY, DURABILITY, TITLE, OR
RELATED TO THE PERFORMANCE OR NONPERFORMANCE
OF ANY SOFTWARE REFERENCED HEREIN). NEITHER VOXTEC
NOR ITS AFFILIATED COMPANIES AND THEIR RESPECTIVE
DIRECTORS, OFFICERS, EMPLOYEES, OR AGENTS SHALL BE
LIABLE TO YOU FOR ANY DAMAGES WHATSOEVER BE THEY
DIRECT, ECONOMIC, COMMERCIAL, SPECIAL, CONSEQUENTIAL,
INCIDENTAL, EXEMPLARY, OR INDIRECT DAMAGES, EVEN IF
VOXTEC HAS BEEN ADVISED OF THE POSSIBILITY OF SUCH
DAMAGES, INCLUDING LOSS OF BUSINESS REVENUE OR
EARNINGS, LOST DATA, DAMAGES CAUSED BY DELAYS, LOST
PROFITS OR A FAILURE TO REALIZE EXPECTED SAVINGS.
FCC Notice
Operation is subject to the following two conditions: (1) This device
may not cause harmful interference, and (2) this device must accept
any interference received, including interference that may cause
undesired operation.
Caution
Changes or modifications to this equipment not expressly approved
by the party responsible for compliance could void the user’s
authority to operate the equipment.
Page 52

Page 53

ADDENDUM TO USER MANUAL
OPTIONAL TWO-WAY TRANSLATION
SOFTWARE UPGRADE
SQU.ID® SQ.410
Page 54

Page 55

A-1
SQU.ID® SQ.410
Introduction
This manual addendum explains the use of the optional two-way
software available for the SQU.ID SQ.410 translation device.
Optional two-way software upgrades are available from Voxtec for
purchase on a per-device basis.
This addendum assumes that the user has become familiar with
the SQ.410 and its use as described in the user manual. This
addendum merely serves to explain that which is different between
using the SQ.410 in one-way mode versus two-way mode, with the
assumption that anything not covered in this two-way addendum is
simply not different from how the SQ.410 works in one-way mode.
As with one-way software, the two-way software uses automatic
speech recognition (ASR) technology to recognize your spoken
English, but unlike the one-way software it also uses ASR technology
to recognize what is spoken by the foreign speaker. Also unlike the
phrase-based software which uses predefined sets of English words
and phrases that are pre-translated and vetted for accuracy by fluent
foreign language speakers and interpreters, the two-way software uses
statistical machine translation (SMT) to translate spoken words
between two languages and automatic text-to-speech (TTS) to
broadcast the translation over the device’s speaker or, if attached, an
external speaker. By its very nature, SMT is subject to translation errors
and TTS is subject to pronunciation errors, unlike one-way software.
Given the possibility of errors in translation and pronunciation, the
two-way software is not recommended in situations where mistakes in
communication could prove dangerous.
The two-way software is designed with the assumption that the
principal user of the device speaks English and that the English
speaker will generally be in control of the device. In order to be
most effective, the English speaker should direct the conversation by
asking specific questions to elicit short responses (e.g. “How many
people were injured in the explosion?” NOT “Tell me everything you
witnessed.”). Foreign language speaker responses will be recognized
and translated more effectively if they remain within the expected
speech domain. Even in English, but especially in the foreign language,
simple, non-colloquial phrases will result in better translations.
Page 56

A-2
www.voxtec.com
Selecting a Two-Way Module
The two-way software is treated as different modules on the
Select Module screen, just like one-way phrase-based modules.
You can recognize a two-way module by the words “Two-Way”
in the title and a reference to which language pair it translates
to and from. As with one-way modules, there are certain
domains associated with the language pairs, such as “BasicConversation” or “Force Protection.” Only one language pair
and one domain is handled per module, therefore changing the
paired language or domain requires selecting a new module.
Viewing the list of available modules on the Select Module
screen will show all one-way and two-way modules available as
a combined list. For example, here is the two-way module for
Basic-Conversation English-Spanish being selected:
As with all modules, the currently loaded module has a filled dot
next to it and selecting a new module will unload the currently
loaded module. Because two-way modules are larger than one-way
modules, loading a two-way module will take comparatively longer.
Basic Translation Steps in Two-Way Modules
English to foreign language
1. Press and hold either the PUSH TO TALK or A button. You will
hear a single audible “ping” in your headset earpiece or through the
SQ.410’s speaker if you have elected to turn on English verification
Page 57

A-3
SQU.ID® SQ.410
to the speaker. This ping indicates that the SQ.410 is waiting for
you to say an English word, phrase or question to be translated.
2. Say the English word, phrase or question you wish to
translate into the microphone.
3. Release the PUSH TO TALK or A button after you have
finished speaking. You will hear an audible two beat “ping,
PING” after you release the button.
4. For English verification, you can choose to have the English
word or phrase played through the headset earpiece
or speaker just before the foreign language translation
broadcasts (same as in one-way modules).
5. The corresponding foreign language translation of the English
word, phrase or question will then be broadcast through the
SQ.410 speaker. Note that a small speaker icon will appear
next to the foreign language portion of the screen indicating
that the TTS was broadcast in that language.
6. The LCD will display the written English ASR result along with
the translated foreign language text equivalent. Note that a
small microphone icon next to the “English” portion of the
screen indicates the ASR just recognized the English speaker.
Foreign language to English
1. Help the foreign speaker to position the microphone near
his or her mouth. Depending on environmental factors (e.g.
wind, road noise, or quiet setting) and the foreign speaker’s
Page 58

A-4
www.voxtec.com
voice level you may need to adjust the SQ.410’s secondary
microphone gain up or down for good voice recognition.
2. Press and hold the B button. You will hear a single audible
“ping” through the SQ.410’s speaker. This ping indicates
that the SQ.410 is waiting for the foreign speaker to respond
with a word, phrase or answer to be translated. While you
continue to hold down the B button, the foreign speaker
should say the word, phrase or answer to your question.
3. Release the B button after the foreign speaker has finished
speaking. You will hear an audible two beat “ping, PING”
after you release the button.
4. The corresponding English language audio translation of
the foreign language word, phrase or answer will then be
broadcast through the SQ.410 speaker. Note that a small
speaker icon will appear next to the “English” portion of the
screen indicating that the TTS was broadcast in English.
5. The LCD will display the written foreign language ASR result
along with the translated English text equivalent. Note that a small
microphone icon next to the foreign language portion of the screen
indicates the ASR just recognized the foreign language speaker.
NOTES:
1. Best results are obtained if there is a slight pause
after the “ping” before a speaker starts speaking. It
Page 59

A-5
SQU.ID® SQ.410
may take a couple attempts for the foreign speaker
to understand the concept that you are controlling
the B button, and he or she needs to wait for the
“ping” before beginning to talk.
2. If the text displayed in English or the foreign
language is too long to read, press and hold the
RIGHT button then press the DOWN or UP buttons
to scroll through the text as necessary.
3. Vulgar words in English and the foreign language are
replaced with “<beep>” in the translation text and
are heard as a “beep” noise when played through
the TTS.
Edit ASR Results
The two-way software allows the user to manually edit the
ASR results. This is useful when the ASR will not recognize one
or more words correctly. While it is possible to edit either the
English or the foreign language ASR results, in most use cases
this feature will be used for English.
To manually edit the ASR result:
1. With the phrase needing correction showing, press and
release the RIGHT button to show a menu of options for that
phrase.
2. Scroll down and select “Edit ASR Results” from the pop-up
menu.
Page 60

A-6
www.voxtec.com
3. Using the five way key pad, navigate the on-screen keyboard
to edit the phrase. Select the text area itself to move the cursor
within the phrase.
4. When finished entering text, select the check mark (“”) in the
lower right corner.
5. Press and release the CENTER button to repeat the translation
with the now corrected phrase.
System Setting Differences for Two-Way Modules
The system settings are virtually identical whether in a one-way module or
a two-way module. In System settings the only substantive difference is
paying close attention to the connected microphone settings.
It is NOT recommended that “Primary Only” be selected, because
that would require handing the headset to foreign speakers in order
to recognize their speech.
Also note that when “Both” is selected under microphone settings,
the primary headset is for English and the secondary microphone
is for foreign language speech recognition.
Page 61

A-7
SQU.ID® SQ.410
The user must determine the appropriate headset and/or microphone
combination depending on appropriate use case, including whether to
use a near field, far field, handheld, clipped on, etc., type of microphone.
Application Setting Differences
for Two-Way Modules
In Application settings there are two new options: (A) Modified
Translations, and (B) Added Words.
A. Modified Translations. Is almost identical to the “Added
Phrases” menu in the one-way modules, which it replaces.
As with the Added Phrases concept in one-way modules,
the “Modified Translations” of the two-way modules allows
you to create modified audio recorded translations you have
created by collaborating with a fluent foreign language speaker
or interpreter. The ability to modify SMT generated foreign
language translations to better comply with local terminology or
colloquialisms increases the SQ.410’s flexibility and usefulness
in the field. Unlike one-way modules which require you to add
new phrases only via the “Add Phrase” Application menu, you
can modify a translation in a two-way module by not only using
the “Modified Translation” menu but also directly from the Main
Screen. To add a modified translation from the Main Screen:
1. Speak the phrase in English from the Main Screen.
2. Press and release the RIGHT button to show a menu of
options for that phrase.
3. Scroll down and select “Record New Translation” from
the pop-up menu.
Page 62

A-8
www.voxtec.com
4. On the next screen press and hold down the “B”
button while the trusted foreign language speaker says
the new translation.
5. The phrase will then be added to the Modified
Translations list.
NOTES:
1. As with one-way modules, it is highly recommended
that a quiet location with no background noise be
used when recording foreign translations on device.
2. It is recommended that the microphone gain setting be
changed from automatic to manual and adjusted to an
appropriate setting given the recording environment to
ensure the best possible audio recording quality.
Page 63

A-9
SQU.ID® SQ.410
B. Added Words. Add a person’s first name, last name, place
name, or generic word directly onto the SQ.410 through the
use of an on screen keyboard that you control via the fivebutton keypad. Adding words that specifically address your
location and the people you are working amongst can greatly
increase the SQ.410’s effectiveness.
To add a word:
1. Select “Added Words” under the Application menu.
2. Select the first item in the list “Add New Word…”
3. Choose what type of word is being added. Choosing
the proper type of word increases translation and
speech recognition accuracy.
4. Using the five way key pad, navigate the on-screen
keyboard to type in the word as it is normally written in
English. Select the word area itself to move the cursor
in the word.
Page 64

A-10
www.voxtec.com
5. When finished spelling the word select the check mark
(“”) in the lower right corner.
The system will automatically generate a pronunciation of the
added word in English and the foreign language. Some words
sound very different than they are spelled. In that case the
phonetic pronunciation of the word should be modified. The user
may also wish to make a first or last name sound more familiar
in a particular language, in which case the pronunciation of that
name can similarly be modified.
To modify the pronunciation of an Added Word:
1. Select the word on the Added Words List, then press the
CENTER button and choose “Edit English Phonetic” if the
added word is in English or “Edit Foreign Phonetic” if the
added word is in the foreign language.
2. Use the on screen keyboard to modify the spelling of the word
to match how it sounds. Use the “Play” button to test how
the Speech Synthesizer pronounces the word. Modify the
spelling until it sounds correct. For example, set forth below
are screenshots of adding the First Name “Laurent” and then
modifying it so that it is pronounced as “Lawrence” in English.
3. When finished spelling the word phonetically, select the check
mark (“”) in the lower right corner.
Page 65

A-11
SQU.ID® SQ.410
Notes:
1. When adding words in a foreign language it is
strongly recommended that a fluent translator verify
the spelling and pronunciation to ensure the correct
meaning and pronunciation are conveyed by the
system.
2. The phonetic spelling and the written spelling are
stored separately and therefore do not affect each
other for purposes of ASR or SMT results.
Other Expanded Functionality
Two-way modules feature expanded functionality in two other
areas when compared to one-way modules: (A) Data Captured
for Logged Phrases; and (B) Expanded Functionality of the My
Favorites Folder.
A. Data Captured for Logged Phrases.
Logging phrases in two-way modules is identical to how it is
done in one-way modules, i.e., either quickly press and release
the C button or select the “Log Phrase” option from the Main
Screen menu. But in two-way modules the logging feature
stores the original audio as sent to the ASR, the text results of
the ASR, the text results of the SMT and the audio of the TTS.
This expanded data capability can be especially helpful in
situations where the foreign speaker may have talked much
longer than the machine can translate in one phrase, but the
user thinks there is good information that can be understood
by a human interpreter at a later time.
B. Expanded Functionality of My Favorites Folder
The My Favorites folder works nearly identically in one-way
and two-way modules. The only significant difference is that
ANY phrase saved to the My Favorites folder can now be
modified by selecting the Record New Translation menu
option, unlike one-way modules in which only user-added
phrases can be modified.
Page 66

A-12
www.voxtec.com
Licensing Notice
If the optional two-way software is ordered, it will be loaded
on the micro-SD card along with the base one-way software.
The license right purchased to use the two-way software is
handled on a per-device basis. This means that if the customer
buys multiple SQ.410 devices but only one two-way software
upgrade, only one device may use the two-way software and it
is a violation of Voxtec’s intellectual property rights to copy the
micro-SD card containing the two-way software to use it on
multiple devices.
Page 67

Page 68

WWW.VOXTEC.COM | DOCS-52-0147 SQ410 USER MANUAL V1.0
 Loading...