

Page 1
VVOOXXTTRRAACCKK 880000
High Powered GPS Navigation Unit
HHaarrddwwaarree UUsseerr MMaannuuaal
l
Page 2

Con
g
ratulations on purchasing your Voxtrack 800 Navigation system. For
warranty support and upgrade information be sure to register your product
using the included Warranty Registration Card or visit the support section of
our website www.voxson.com.au
This model features:
9
300 Mhz CPU providing peak performance
9
TFT LCD with anti-reflective glass with landscape display
9
Multimedia function supporting, navigation, music (MP3), video (MPEG4) and picture (JPEG)
9
Sirf III GPS providing exceptionally quick cold/warm/hot start
9
Enhanced navigation features including turn-indicating lamps
9
Simple touch screen interface
Page 3

This handbook provides a quick guide to the VOXTRACK 800 NAVIGATION system, and the basic functions
of the device are described, mainly in respect of hardware. The contents of this manual may be changed at
any time without prior notification. No liability shall be assumed for technical or editorial errors or omissions
herein; nor for incidental or consequential damages resulting from the performance or use of this material.
This document contains information protected by copyright and thus may not be reproduced in whole
or in part for any purpose whatsoever. Likewise, it may not be transmitted or reproduced in any form
whatsoever, whether electronically or mechanically - including photocopying and recording.
A
ll brands and trademarks mentioned in this document may be registered by a third party and subject
to current legislation and to the rights of their respective owners, without reservation. The absence of
explicit labeling of registered trademarks does not admit the conclusion that the brand is not subject to
the rights of third parties.
© Copyright 2006, Voxson Ltd. All rights reserved.
1. About This Book
Page 01
Page 4

ⓐ
Effective route planning prior to beginning each journey is recommended. If you need to setup a new
itinerary while en route, stop the vehicle in a safe place in which to do so. For your own safety, do not
operate the product while driving.
ⓑ
The product is intended to be used only as a navigation aid, not as a precise measurement of
direction, distance, location or topography. Calculated routes and voice guidance are for
reference only and may be different from the actual road circumstances, therefore it is the user’s
responsibility to follow traffic signs, road layout and local regulations above all else.
ⓒ
Do not leave your device on the dashboard in direct sunlight when vehicle is parked for extended
periods as the internal battery may overheat and can cause malfunction and/or potential hazard. Use the
product within the recommended operational temperature range (0°C ~ 50°C), and do not expose it to
excess heat or cold.
ⓓ
GPS satellite signals cannot pass through solid materials other than glass. When inside a tunnel or a
building GPS positioning may not be available. Likewise, signal reception can be affected by situations such
as bad weather or dense overhead cover such as trees. Similarly, wireless devices may interfere with
satellite signals, causing variable signal reception. Some vehicles may be fitted with a metallic windscreen
which may interfere with GPS satellite signals. In this case the use of optional external antenna may be
required.
ⓔ
Look at the display only when it is absolutely safe to do so. If you have not fully understood the
2.1 General
2. For Proper/Best Use
Page 02
Page 5

instructions given by the device, or if you are not sure about what to do next, you may refer briefly
to the map or visual indicators on your navigation system.
ⓕ
A mounting bracket is included and necessary when using the device in a vehicle. When mounting the
device in a vehicle ensure that you place the device in an appropriate position, avoiding areas which
obstruct airbag panels, instrumentation, or which interfere with the driver’s vision.
ⓖ
Taking good care of your Voxtrack 800 will ensure trouble-free operation and reduce the risk of damage.
Use only the stylus to tap on the screen. Avoid touching it with your fingers, pens, pencils or any other
sharp objects. Never clean your Voxtrack 800 with the power on. Use only a soft, lint-free cloth lightl
y
moistened with water to wipe the screen and the exterior of your Voxtrack 800. Do not use paper towels to
clean the screen. Do not place anything on top of your Voxtrack 800 or drop objects on top of it. Do not
drop your Voxtrack 800 or subject it to severe shock. The screen surface may be easily scratched.
ⓗ
Keep your Voxtrack 800 away from excessive moisture and extreme temperatures. Do not subject your
V
oxtrack 800 to sudden and severe temperature changes that could cause condensation inside the unit as
this may cause damage. In the event of moisture condensation, allow your device to dry out completely.
A
void exposing your device to direct sunlight or strong ultraviolet light for extended periods of time.
2.1 General
2. For Proper/Best Use
Page 03
Page 6

ⓐ
Voxtrack 800 Navigation System
Never attempt to disassemble, repair or make any modification to your Voxtrack 800 since this could cause
damage to the device, and even injury or property damage. Do not store or carry flammable liquids, gases
or explosive materials in the same compartment as your Voxtrack 800 and/or accessories.
ⓑ
Battery
This device contains an internal and non-replaceable Lithium-Ion internal battery that can burst or explode,
releasing hazardous chemicals. To reduce the danger of fire or burns, never disassemble, crush, puncture,
or dispose of in fire or water. Since there is a high risk of explosion if the battery is replaced by an
incorrect type, it should only be serviced by a qualified Voxson technician. The battery must be recycled or
disposed of properly. Similarly, use only a specified battery charger as approved and supplied by the
manufacturer.
ⓒ
If Using the Optional AC Charger Adapter
Never use the charger adapter in a high-moisture environment, or touch it when your hands/feet are wet.
A
lso, for cooling purposes, make sure there is adequate ventilation around the adapter when in use, and do
not cover it with paper, vinyl, cloth (including the carrying case) or any other material. The adapter must be
connected to the correct power source, according to the voltage requirements indicated on the case or
packaging of the product. Do not attempt to service the unit if its power lead or body becomes damaged or
exposed to excess moisture.
ⓓ
SD Memory Card
Keep SD or MMC cards in a well-protected case so as to avoid dust and humidity when not in use. Ensure
no foreign objects can enter the SD slot in the device.
2.2 Safety Precaution
2. For Proper/Best Use
Page 04
Page 7
Page 05
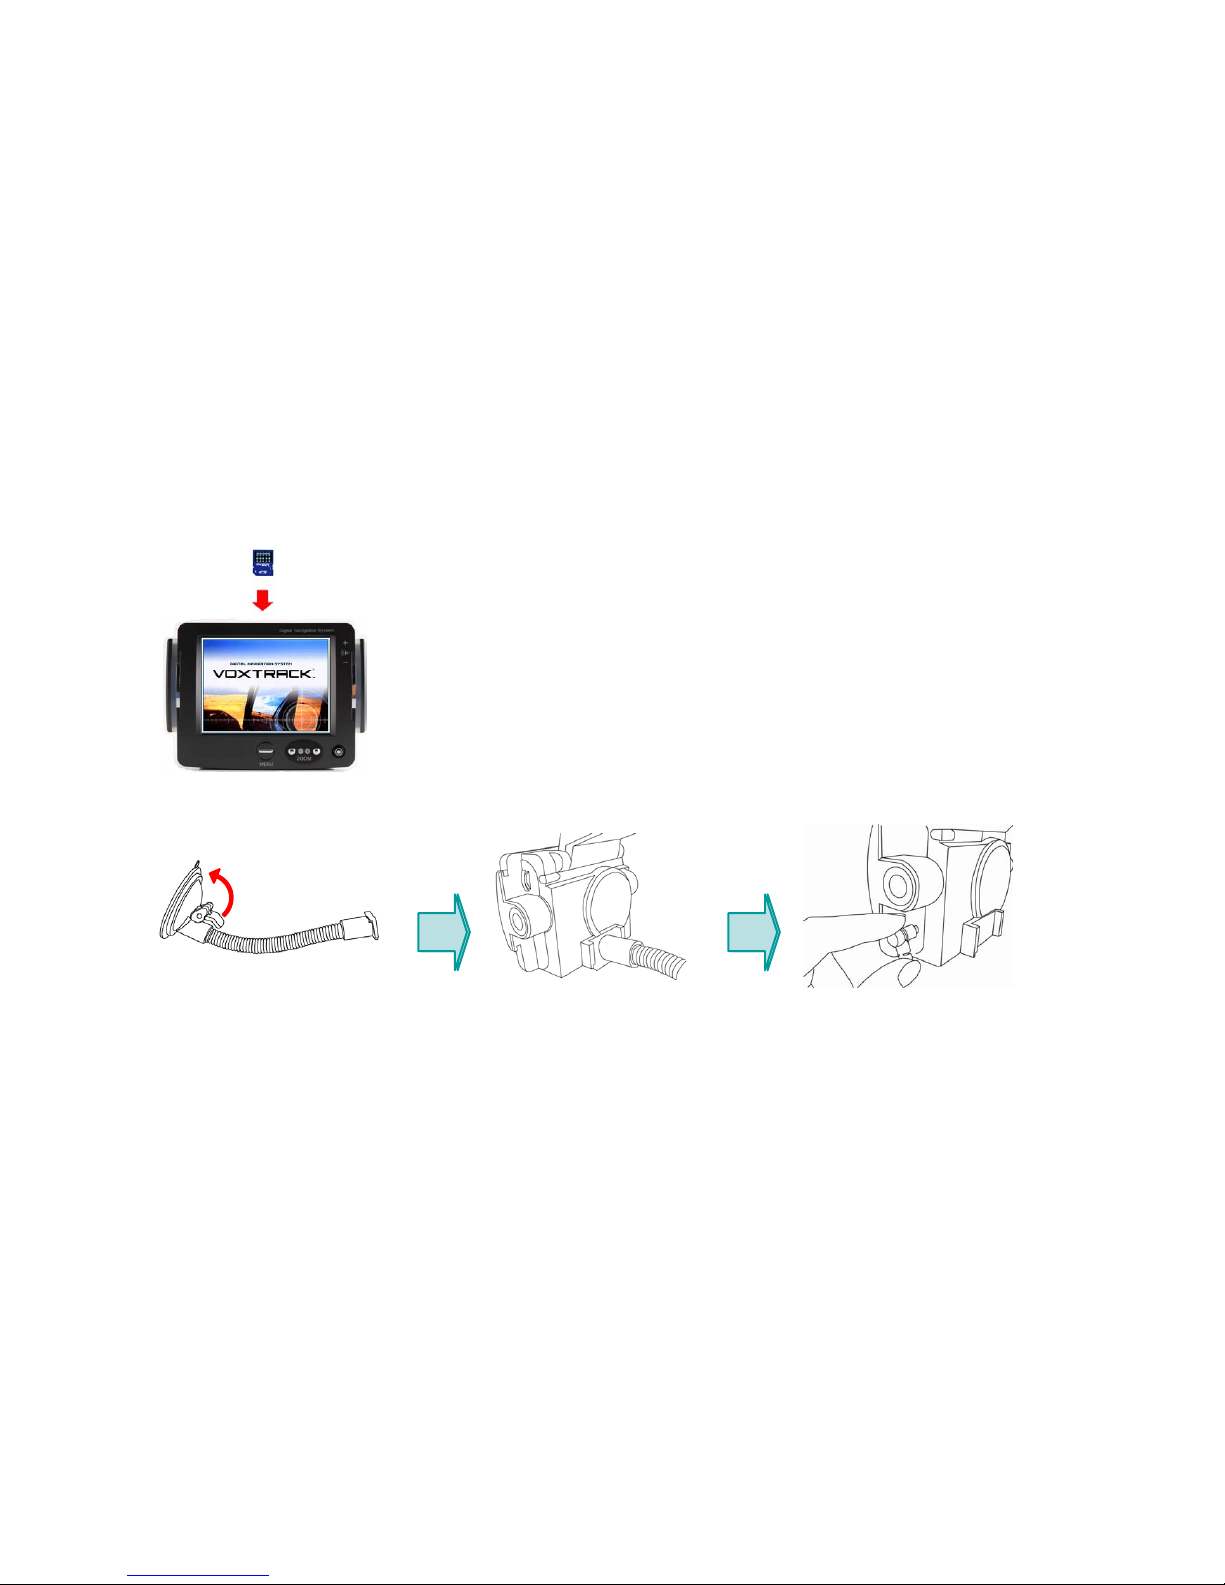
Y
our device has an SD card slot in the centre of the top of the GPS unit and the
V
oxtrack 800 package includes an SD card preloaded with maps for navigation
function. Optional SD cards containing MP3 files, movie files, and image files
may be swapped into the Voxtrack 800 to make use of other features as
described in Section 6. To use the memory card, insert it with the angled corner
pointing down towards the slot, and the label facing the front of the device. To
remove the card, turn off the device by holding the power button, slightly push
the top of the card down to release it, and then pull it out of the slot. When
swapping or replacing cards, press the reset button on the side of the device
once the new card is inserted.
NOTE: Do not erase the SD card included with the device as this contains the
map data and doing so will prevent the device from working in navigation mode.
3.2 Mounting & Connecting
1. First, thoroughly clean the
windshield. Then, Push the
center of the suction cup onto
the windshield and press the
fixing lever down
2. Slide the rectangular part
of the suction-cup mount
into the corresponding part
at the bottom rear of the unit
3. Insert the jack at the end of
the DC power lead into the small
socket on the side of device and
place the other end into the cigar
lighter socket.
3.1 Inserting a SD Card
3. Getting Started
Page 8
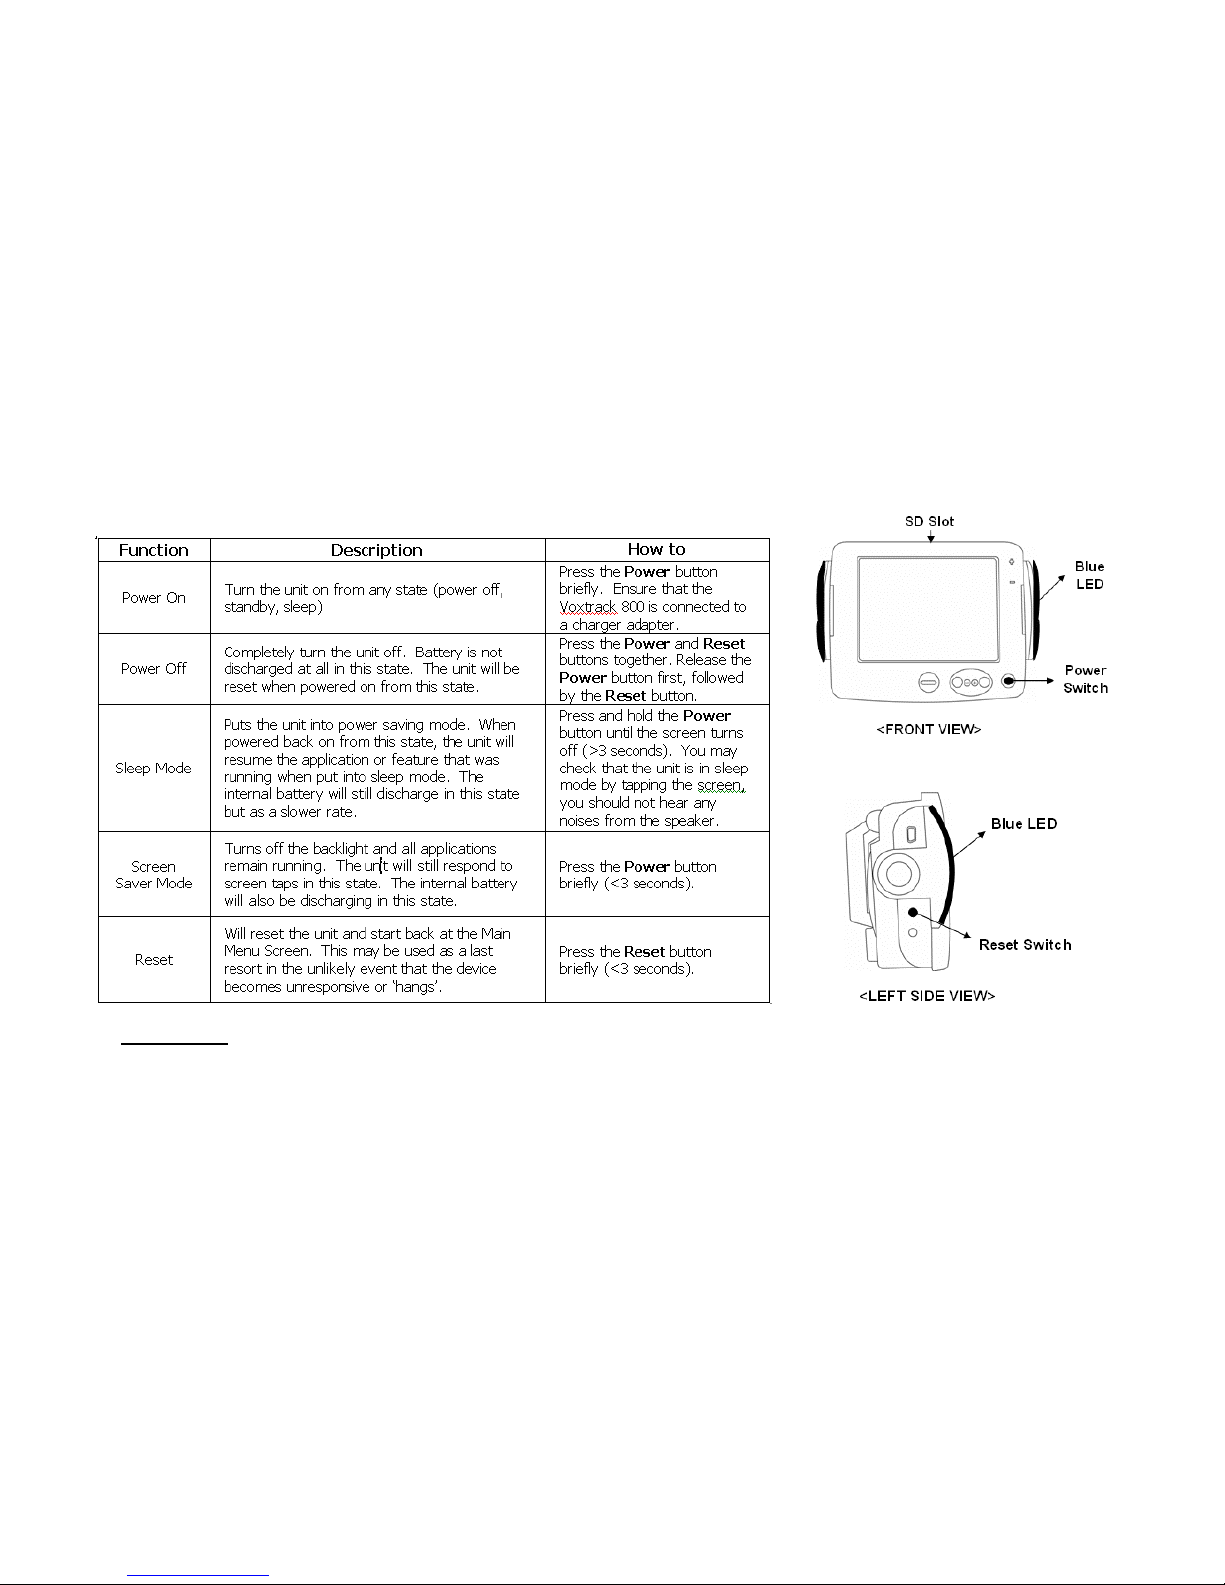
WARNING: the battery is still running and discharging in all modes, except Power Off mode.
* Please allow the Voxtrack 800 Navigation System to have enough time for its operation (e.g. in
pressing buttons, tapping touch screen, etc.). Excessive button pressing or screen tapping when
waiting for device to respond may lead to mechanical failure.
3.3. Power Manipulation
3. Getting Started
Page 06
Page 9

3.4. GPS Satellite Reception
3. Getting It Started
Page 07
T
he Voxtrack 800 Navigation System relies on receiving signals sent from GPS satellites orbiting the earth. In
order to obtain an accurate fix on your location, the antenna on the Voxtrack 800 must have a clear view o
f
the sky and be continually receiving data from at least 4 of these satellites. With the unit fixed to the
windscreen as described in section 3.1, the antenna must be folded out so that it is parallel to the ground
(Figure 3.4). Surrounding buildings, trees, etc will hinder the reception of these GPS signals and hence you
r
location may become less accurate or not available at all.
Once the unit is powered on it may take several minutes to acquire a fix on your current location, this is
known as a “cold start”. When in navigation mode (described in section 6.2) your current position is
indicated by a green triangle
. When your location cannot be determined, due to lack of satellite
reception, this symbol is marked with a cross
.
If the unit has a position fix and then loses satellite reception (when entering a tunnel for example) it will
reacquire a position fix much faster (<30 seconds) once a clear view of the sky is restored. This is known as
a “hot start”.
Figure 3.4 – Correct antenna position
Page 10

①
Turn-Indicating Lamp
②
Map Zoom-In/Out Button
③
Power On/Off Button
④
Main Menu Button
⑤
Touch Screen
①
Built-In Battery
②
Speaker
③
External GPS Antenna Connector
④
Vehicle Mount Connector
⑤
Secure Digital Card Slot
4. Hardware Features
Page 08
4.2 Rear View
4.1 Front View
Page 11

①
USB Connector
②
Reset Button
③
Sync Button
①
Folding GPS antenna
②
Volume Control
③
Power-Supply Jack
④
Audio-Out Jack
⑤
Stylus-Pen Pocket
Slide the stylus out from the holder
to use the touch-screen.
4. Hardware Features
Page 09
4.4 Right Side 4.3 Left Side
Page 12

① ②
③
④
⑤
⑥
⑦
①
Manual CD
② User Manuals
③ Suction-Cup Mount
④ Stylus-Pen
5.2 Options
⑤
Cigar-Lighter Adapter
⑥ Carrying Case
⑦ USB Cable
⑧
SD Memory Card Containing Australian Map Data
⑧
①
④
①
External GPS antenna
②
AC Charger Adapter
5.1 Standard
5. Hardware Accessories
Page 10
②
Page 13

When you first switch on your Voxtrack 800, the Main Menu
screen appears as shown here. At the top right corner you
can see the battery-status indicator, together with the
percentage of battery remaining. A clock is displayed in the
top left corner.
In the main menu, there are nine option buttons split across
two screens. The arrows on the right hand side may be
used to switch between the two screens.
Each button represents a software feature (e.g. NAVI,
MUSIC, MOVIE or PICTURE) or a setting-related function
(e.g. GPS, BRIGHTNESS, TIMESET, CALIBRATE or ABOUT);
to access any of them, just tap the relevant screen icon. To
exit from any of the features and return to the Main Menu
screen, press the MENU button
on the front of the
device. The MENU button may also be used to go back to
the previous screen within the current running feature.
The following sections describe these nine features in detail.
6.1 Overview
6. A Look at the Main Menu Screen
Page 11
Page 14

6.2 Navigation
6. A Look at the Main Menu Screen
Page 12
T
his function launches the navigation program (Destinator) that guides you to your final destination by voice
and visual prompts and a mapping screen. Once a destination is entered it will notify you know when to make
a turn, by means of voice prompting and a flashing light on the left/right side. It will also provide various
map-guiding modes and the approximate time left to your destination.
To activate the navigation function tap the NAVI button on the Main Menu screen. Once the program has been
launched, a loading screen will appear as the map data is loaded. Shortly after this a digital map will appear
on the screen. From here a destination address may be entered by tapping the car icon (see below) on the
left of screen and following the prompts. For further information regarding navigation refer to the Voxtrac
k
Navigation Software User Guide included with the VOXTRACK 800 package. This manual is also available on
the included CD.
Car icon. This appears semitransparent until screen is tapped.
Page 15

6.3 Music
6. A Look at the Main Menu Screen
Page 13
The Voxtrack 800 Navigation System has a pre-installed MP3 player so you can listen to your favorite music
while driving, you just need to save your favorite songs to any SD or MMC card. Avoid using the SD card
included with the device to prevent accidental erasure of the map data.
Pressing the MUSIC button from the Main Menu screen will start the MP3 player. The upper part of the player
has a play list from which you can select the song you want to play, and also a left/right slider which displays
the progress through the current playing track. You may tap and drag this slider to fast forward and rewind
the current track.
There are more buttons in the lower part. They are (in order from left to right): Previous track,
Play/Pause, Next Track, Repeat (the cycle-symbol button). In addition, a slider bar to adjust volume and
an on/off button to mute the speaker. Press the Menu button
to exit the MP3 player.
Page 16

6.4 Movie
6. A Look at the Main Menu Screen
Page 14
The Voxtrack 800 Navigator includes a movie player that supports most common movie formats. To add
movies, save movie files to any SD or MMC card. Avoid using the SD card included with the device to prevent
accidental erasure of the map data.
Pressing the MOVIE button on the Main Menu screen will start the Movie Player. Select the movie you want to
play by tapping it in the list. The up and down arrow buttons may be used to scroll through the list. Once you
have selected the desired movie, simply tap the Play button.
During movie screening, if you have missed a scene and want to go back to a certain point, all you have to do
is to touch the screen. The screen will freeze so that you can drag the slider to skip forwards or backwards
within the movie. Touching the screen once again will unfreeze the screen. Press the Menu button
to
exit the movie player.
Page 17

6.5 Picture
6. A Look at the Main Menu Screen
Page 15
The Voxtrack 800 Navigator also includes a picture viewer for viewing photos or image files. To add pictures,
save image files to any SD or MMC card. Avoid using the SD card included with the Voxtrack 800 to prevent
accidental erasure of the map data.
To launch the picture viewer, tap the PICTURE button from the Main Menu screen and you will see a frame
with an image on the left and function buttons on the right. The left arrow button skips to the previous image
and the right arrow button skips to the next one. If you want to see a picture in full-screen mode, just tap the
image, and the picture will appear full-screen.
Under the two arrows is a ‘+’ button, which enables you to add the present image to your photo album, and
the ‘My’ button takes you to your photo album. In album mode the first two buttons at the top, function the
same as in the previous screen. The ‘X’ button totally deletes the image from the album. The ‘>>’ button
makes the image full screen. Press the Menu button
on the Voxtrack 800 to exit album mode and then
again to exit the picture viewer.
Page 18

6.6 GPS
6. A Look at the Main Menu Screen
Page 16
T
he GPS button on the Main Menu screen will start an application to view the raw data received by the GPS.
This can be used to determine status and strength of received satellite signals as well as detailed data
regarding the location fix determined by the GPS.
T
his feature is intended only to give extended information to advanced users who are familiar with the
technical aspects of GPS. It does not affect the navigation feature.
T
apping the Reset icon will force the GPS to reacquire a location fix from a ‘cold start’. This process may take
several minutes.
Press the Menu button
to return to the Main Menu screen.
Page 19

6.7 Brightness
6. A Look at the Main Menu Screen
Page 17
Initially your device has the backlight set to a default setting. However, depending on the ambient light
surrounding the device or personal needs, you can select the most suitable background lighting for you, by
adjusting the brightness of the screen. Once you customise it, the settings will remain until it is changed
again.
To access the brightness setting, tap the BRIGHTNESS button on the Main Menu screen. Three icons will
appear, each indicating a different degree of brightness. From left to right there is darkest (suitable for night
or low ambient light); moderate; and brightest (for better visibility in high ambient light such as sunlight). The
appropriate brightness setting may be selected by tapping the corresponding button. Press OK to accept or
Cancel to undo changes.
Page 20

6.8 Time Setting
Page 18
To adjust the system clock tap TIME SET button from the Main Menu screen.
Use the arrows above and below each digit to set the current time. Tap on the AM/PM symbol to toggle
between the two. Tap OK to accept or Cancel to undo the changes.
Pressing the Menu button
at any stage will exit to the Main Menu screen.
6. A Look at the Main Menu Screen
Page 21

Crosshair target
6.9 Calibration
Page 19
If the touch screen of your device doesn’t seem to work correctly – i.e not responding accurately to your
stylus taps - you can adjust it with the calibration function. Tap CALIBRATE button from the Main Menu
screen to enter calibration mode.
T
o begin the calibration, tap and hold the center of the target with the stylus. When the target moves to
another position, tap and hold again. Repeat the same step to complete the adjustment. The crosshair target
will move to all four corners of the screen and the centre to complete calibration. Once calibration is
completed, a new screen with a message “New calibration settings have been measured”, tap the screen to
continue and exit calibration mode.
6. A Look at the Main Menu Screen
Carefully press and briefly hold stylus
on the center of the tar
g
et. Repeat as
the target moves around the screen.
Press the MENU butt on to ca ncel
New calibration settings have been
measured. Press the screen to
accept or press the MENU button to
keep the old settings.
Page 22

6.10 About
Page 20
T
he ABOUT button on the Main Menu screen provides a brief explanation for each function on the Main Menu
screen. Use the up and down arrows to scroll between the different functions.
Pressing the Menu button
will exit back to the Main Menu screen.
6. A Look at the Main Menu Screen
Page 23

7.1 Using USB Cable
7. Transferring Multimedia Files
①
You need the Microsoft ActiveSync Program
(included on the CD) to be installed in your PC in
order to transfer desired music/movie files to an
SD/MMC card inserted in the VOXTRACK 800
Navigation system. Once you have installed this
program, you do not need to install again each time
you connect the device to your PC. To install, insert
the CD into your PC and then locate and run the
MSASYNC.EXE file in the ActiveSync folder.
②
To upload music/movie files to the Voxtrack 800 Navigator, first ensure the device is fully charged or
connected to a charger adapter. Next, connect the mini-USB end of the USB cable to the Voxtrack 800
Navigators top left USB socket and the other end to an available USB port on your computer. Once you
have done that, a window will pop up on your computer (Partnership), follow the prompts to create a
partnership or simply choose ‘Cancel’. You can add files to the SD card by copying them in Windows by
going to [My Computer], [Mobile Device] and then [Storage Card]. All files copied or moved into this folder
will be stored onto the SD card in the device. NOTE: Use an SD card other than the one included as to
avoid damaging the map data.
* When you connect the VOXTRACK 800 Navigator to a computer through the provided USB
cable, it is important not to modify the system files and to not disconnect the device when
transferring files. If wrong information is transmitted to the VOXTRACK 800 Navigator,
possible damage can occur to your VOXTRACK 800 Navigator. This kind of damage is easily
recognizable by our technical services; it is crucial to be really careful with the connection to a
computer. All internal deterioration of the VOXTRACK 800 Navigator is not under guarantee.
Page 21
Page 24

7.2 Using an SD Card Reader
①
Insert an SD storage card (there are brands specified/
supported by VOXTRACK 800 Navigation) into your device and
turn on your computer and the device. Once the SD reader and
your PC are connected by the USB cable, move the desired
files to the SD card through “My Computer”.
7. Transferring Multimedia Files
Page 22
 Loading...