

Page 1
Page 2

1 VOXSON HD50
Page 3

CONTENTS
SAFETY AND WARNINGS .....................................................................1
CONTENTS AND EQUIPMENT ..............................................................2
Package Contents................................................................................2
Front Panel...........................................................................................3
Rear Panel............................................................................................3
Remote Control Unit.............................................................................4
CONNECT YOUR EQUIPMENT..............................................................5
BASIC OPERATION................................................................................9
MAIN MENU ..........................................................................................12
MENU TREE..........................................................................................13
INSTALLATION.....................................................................................13
Auto Scan (Recommended) ...............................................................14
Manual Scan.......................................................................................14
PROGRAM EDIT...................................................................................15
SYSTEM SETUP ...................................................................................17
A/V Settings........................................................................................17
Local Time Setting..............................................................................17
System Information.............................................................................17
Default Setting....................................................................................17
USER PREFRENCES............................................................................18
TROUBLE SHOOTING..........................................................................19
TECHNICAL SPECIFICATION..............................................................20
GLOSSARY OF TERMS .......................................................................21
Page 4
SAFETY AND WARNINGS
This digital terrestrial receiver has been manufactured to satisfy international safety
standards. Please read the following safety precautions carefully.
Safety Instructions and Precautions
This symbol alerts the user to the presence of ‘dangerous voltage’ within
the enclosure of the receiver. It may cause an electric shock to person.
This symbol is intended to alert user to the presence of important
operating and maintenance instructions in the literature accompanying
the receiver.
Notice
Follow these directions in order to protect your receiver better.
• Do not place too many objects on the top.
• Do not use damp cloth to clean.
• Do not operate in wet environment and avoid being exposed in the sun.
• Do not use in the atrocious weather, such as storm.
• Turn off the power when connecting to the antenna / TV.
Warning
1. Follow these directions in order to minimise the damage to the power cord
or plug
• Do not modify or process the power cord or plug arbitrarily.
• Do not bend or twist the power cord too much.
• Pull the plug, instead of the cord, while disconnecting the power.
• Keep heating appliances as far as possible from the power cord.
2. Follow these directions in case of electrical shock.
• Make sure that the type of power supply in your home is AC 100~240V 50Hz 10W
• Do not open the main body.
• Do not insert metals or inflammable objects inside the product.
• Do not touch the power plug with a wet hand.
• Disconnect the power cord in case of lightening.
1 VOXSON HD50
Page 5
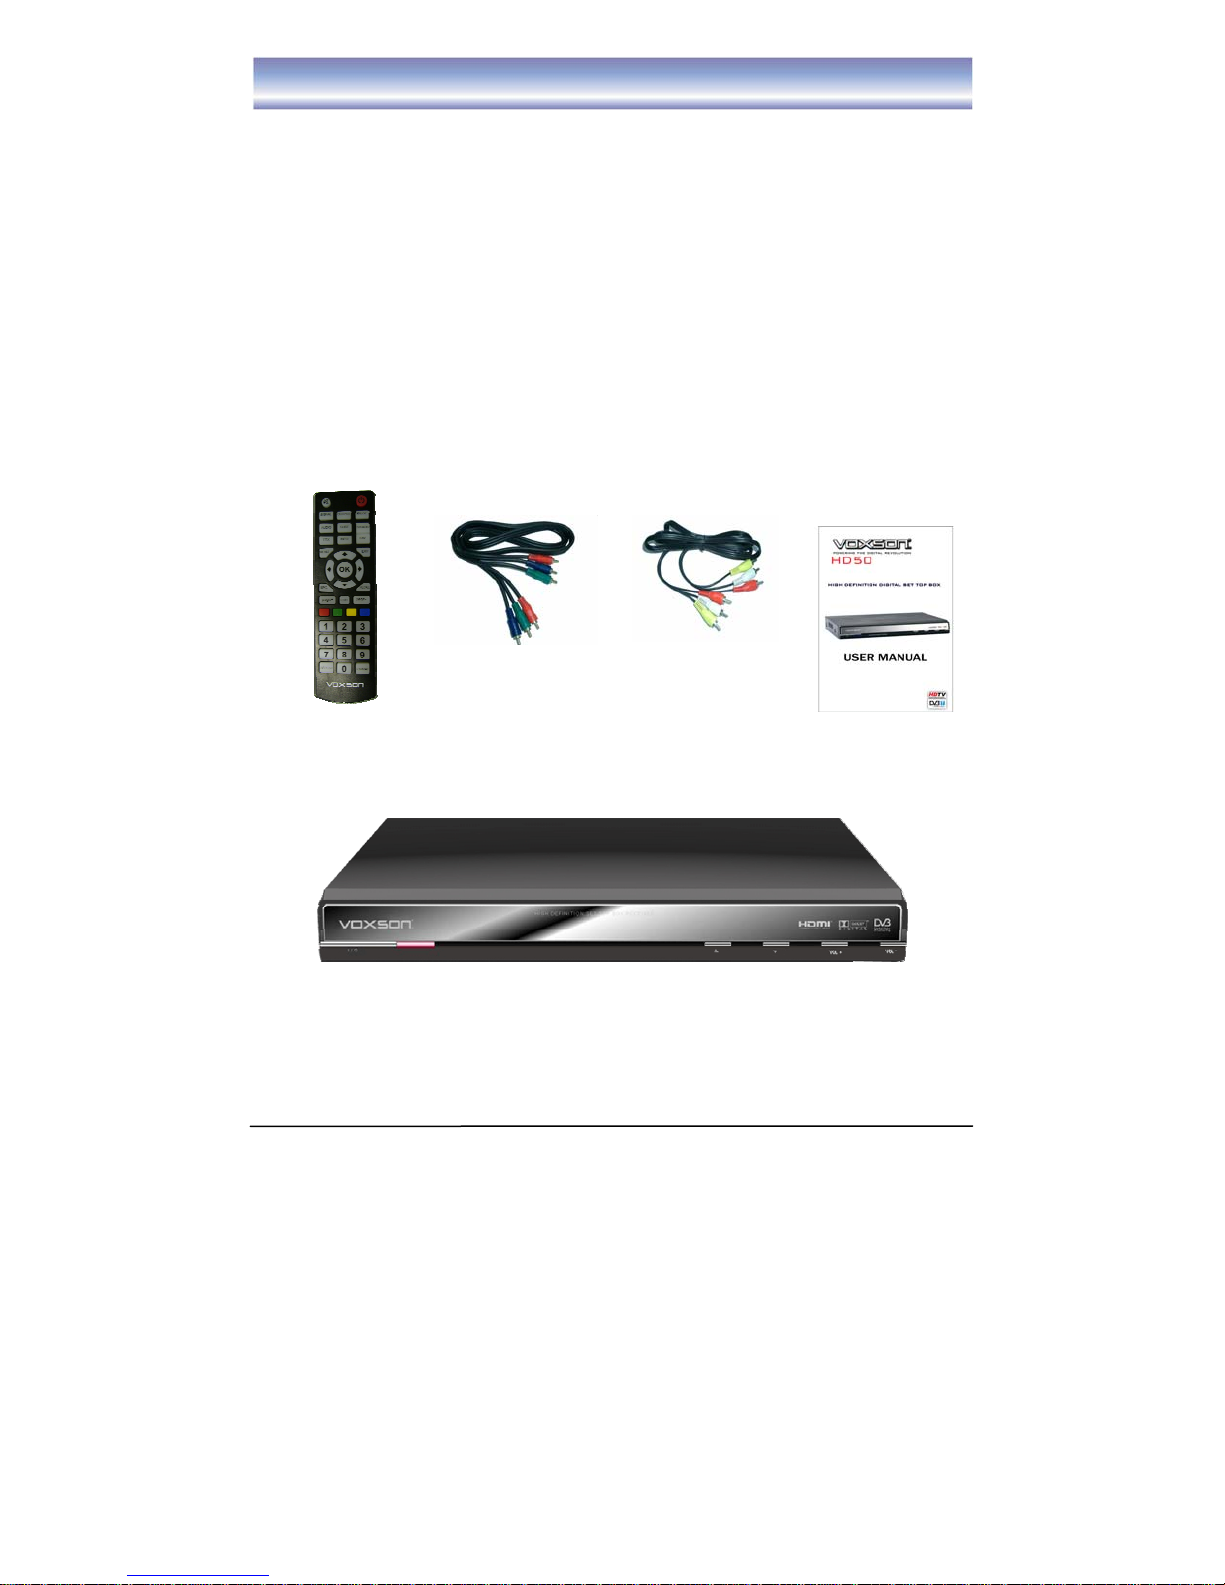
CONTENTS AND EQUIPMENT
This chapter describes detail instructions about the product and its Accessories
NOTE: Only the special RS-232 upgrading cable provided by the manufacture can
be used for upgrading. The normal RS-232 cab le can damage the receiver. Please
contact your supplier when upgrading.
Package Contents
• Please check all package contents before using your receiver
Remote Control YPbPr Cable CVBS Cable Owner’s manual
Voxson HD50 Set Top Box
2 VOXSON HD50
Page 6
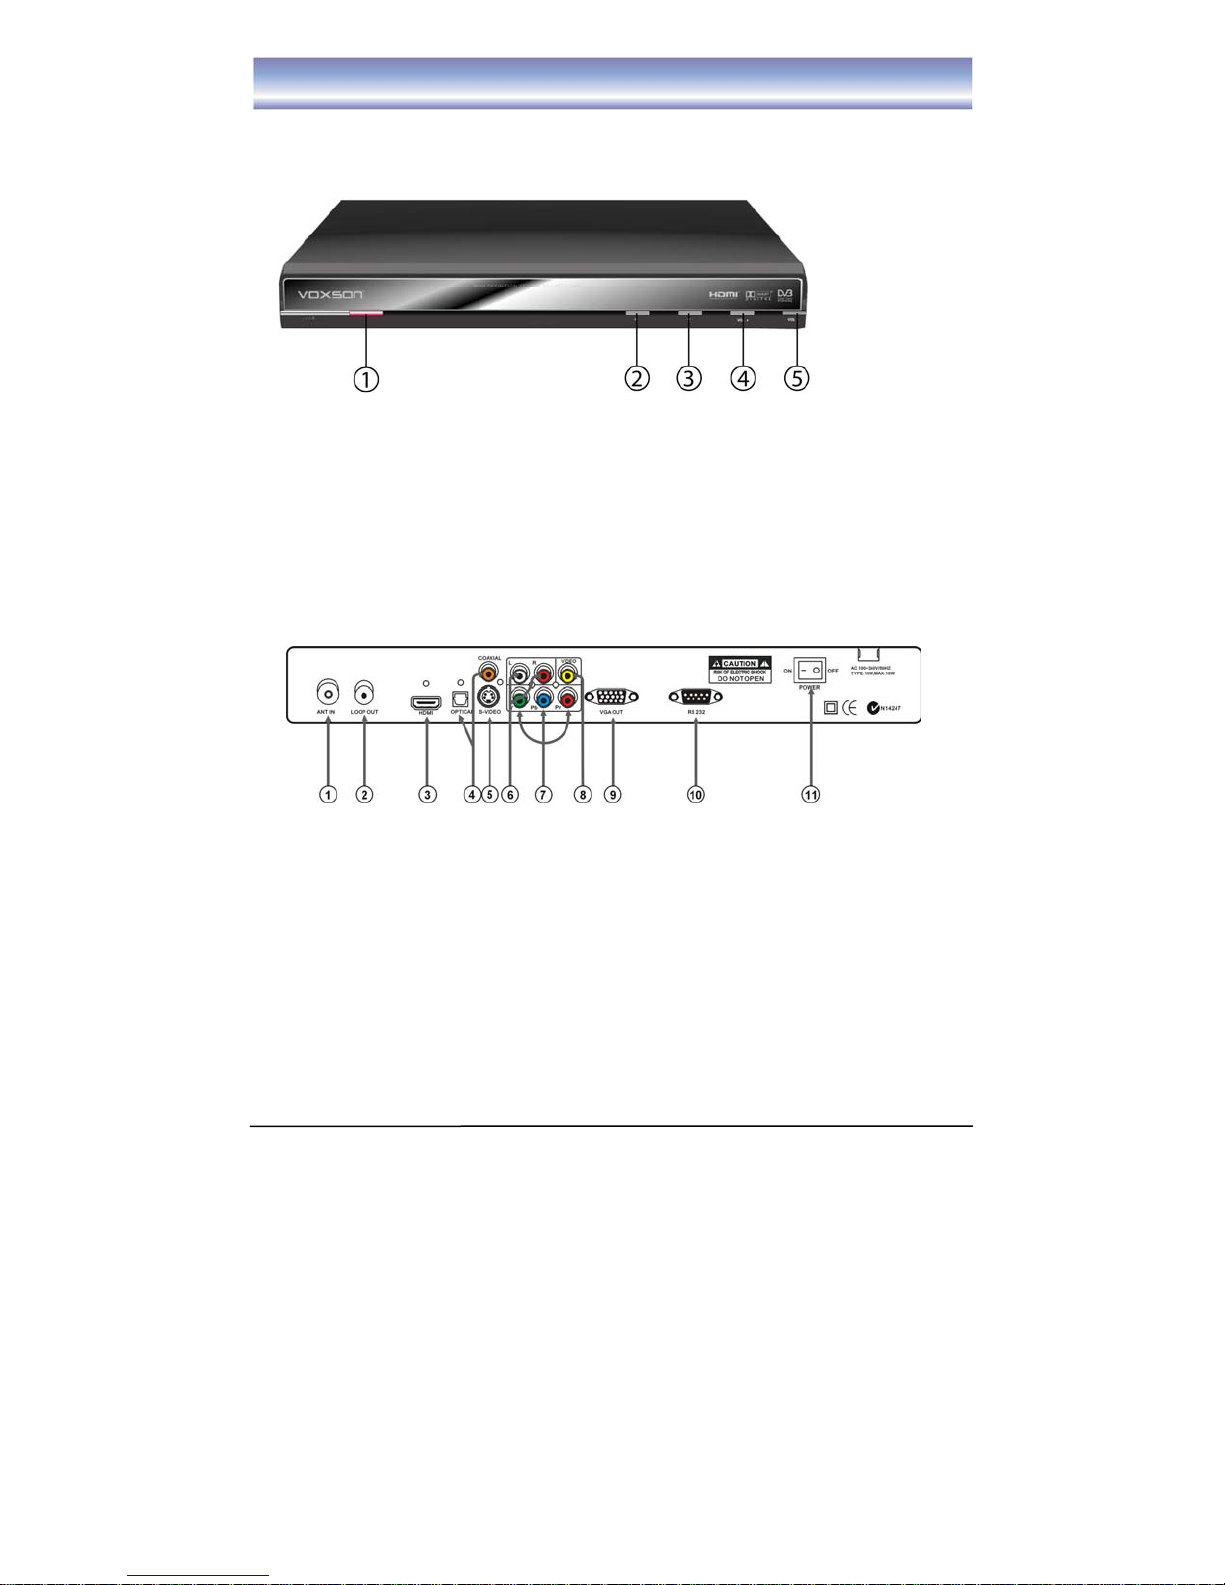
CONTENTS AND EQUIPMENT
Front Panel
① POWER turns the Stand-by mode ON/OFF.
② CHANNEL- Changes the channel downward.
③ CHANNEL+ Changes the channel upward.
④ VOL DOWN decreases volume.
⑤ VOL UP increases volume.
Rear Panel
① ANT IN connect the antenna here.
② LOOP OUT connect a RF signal from the STB to either the RF Input jack (anten na)
on your VCR or to the antenna input of your TV.
③ HDMI HD video output used to connect to your HDMI device.
④ PDIF/COAXIAL Digital audio output.
⑤ S-VIDEO Y/C output for a S-VHS or Hi-Fi Video Recorder.
⑥ AUDIOL/R Audio output to connect to your TV.
⑦ VIDEO CVBS output to connect to your TV.
⑧ YPbPr High definition video output to connect to your TV.
⑨ VGA Video output to connect a VGA display monitor.
⑩ RS-232 Serial port for software upgrade.
⑪ POWER Switch ON/OFF.
3 VOXSON HD50
Page 7
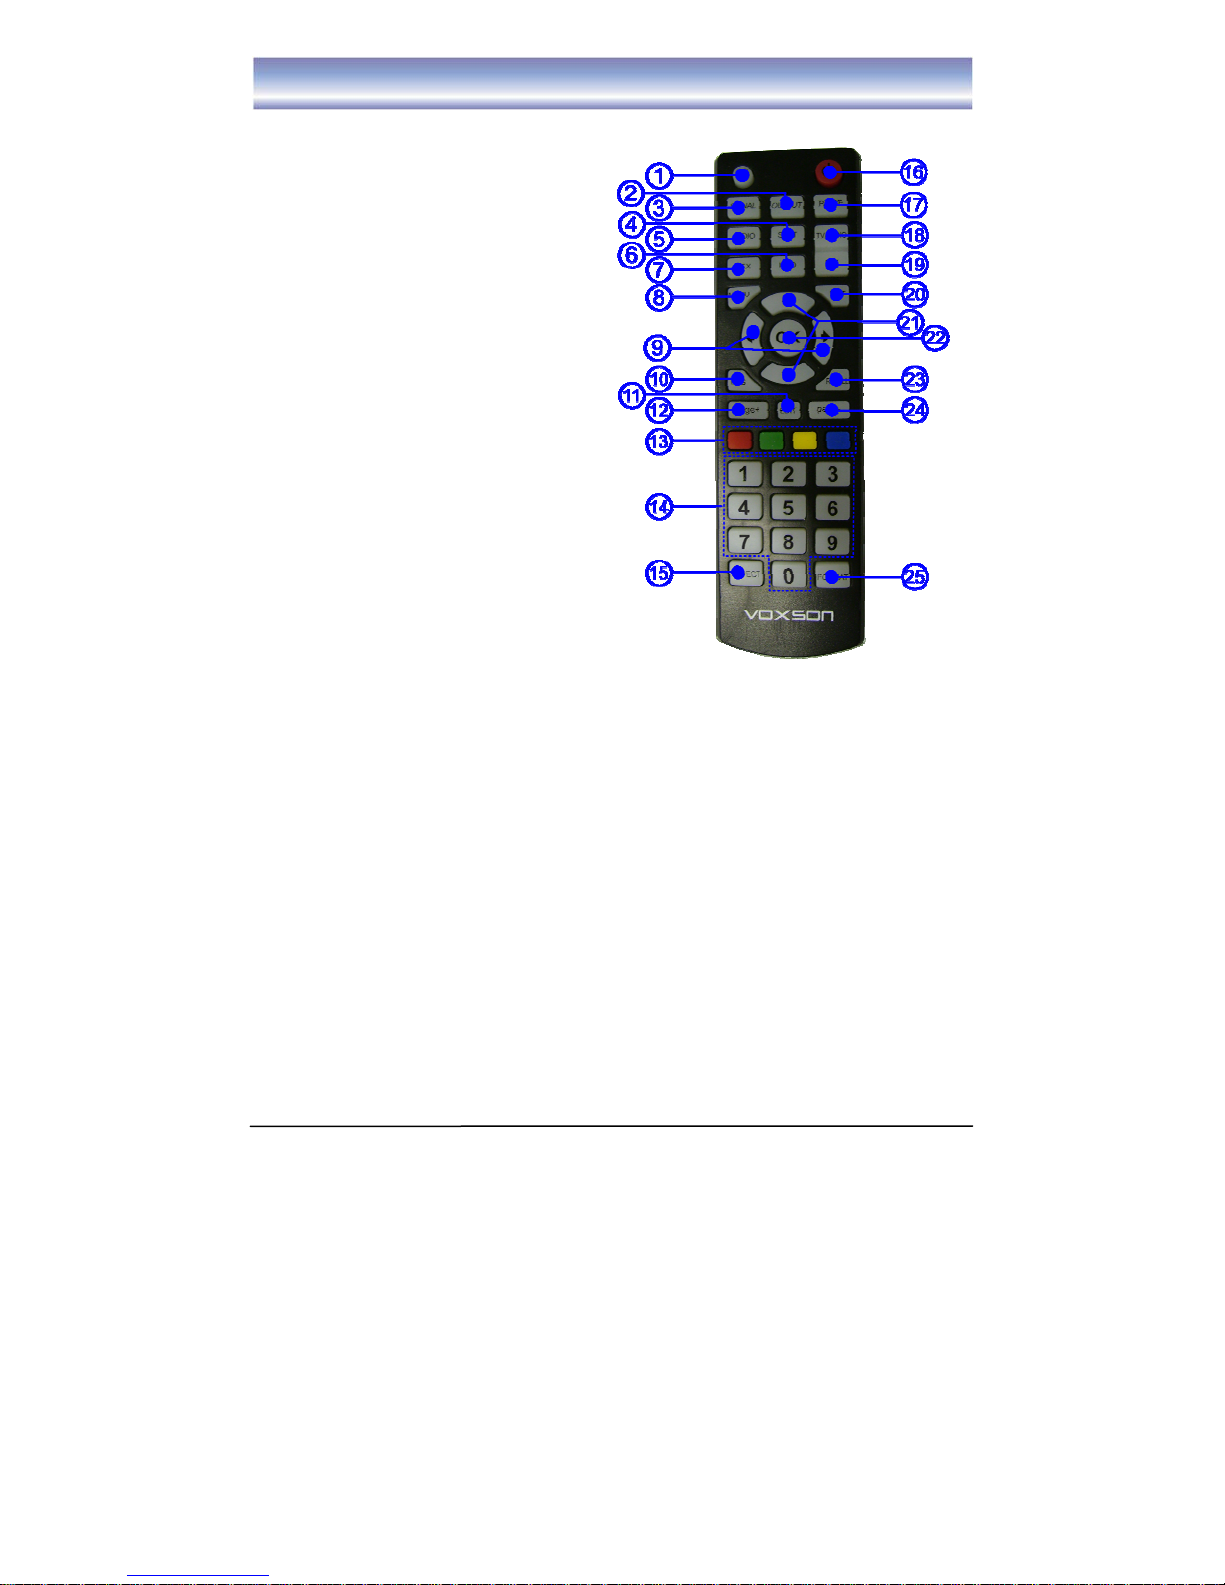
CONTENTS AND EQUIPMENT
Remote Control Unit
1. MUTE mute or unmute the audio.
2. OUTPUT switches the out mode of
HD between YPbPr and VGA.
3. SIGNAL shows the quality level of the
signal.
4. SUBT switches closed captions
ON/OFF
5. AUDIO displays the Audio format of
the selected channel.
6. INFO displays the current program
information.
7. TTX switches the teletext service
ON/OFF.
8. MENU To enter into the main menu,
Press again to exit to previous menu.
9. ◀▶ controls the level of the volume.
10. EPG Electronic Program Guide.
11. EDIT To edit the properties of the
current program. Add to favourites groups,
lock and skip.
12. PAGE+ To Page up (5+).
13. FOUR COLOUR KEYS To assist in
the operation of the box.
14. NUMBER BUTTONS (0-9) used for numerical operations, especially to change
program directly.
15. ASPECT To toggle among 16:9 full screen, 16:9 letter box, 4:3 full screen, 4:3 letter
box, 4:3 panscan.
16. POWER turns the Stand-by mode ON/OFF.
17. PAUSE pauses the current program when pressed and plays when pressed again.
18. TV/RADIO To switch the program between TV and Radio.
19. FAV lists channels stored as your favourites.
20. EXIT To cancel an operation or exit a menu directly.
21. ▲▼ changes the channe l upward / downward.
22. OK To confirm the choice with the highlighted menu item / to open the program list
and select the program by moving upward/downward.
23. RECALL returns to view the previous channel.
24. PAGE- To Page down (5-).
25. FORMAT To switch the different resolution (1080i, 720P, 576P supported).
4 VOXSON HD50
Page 8
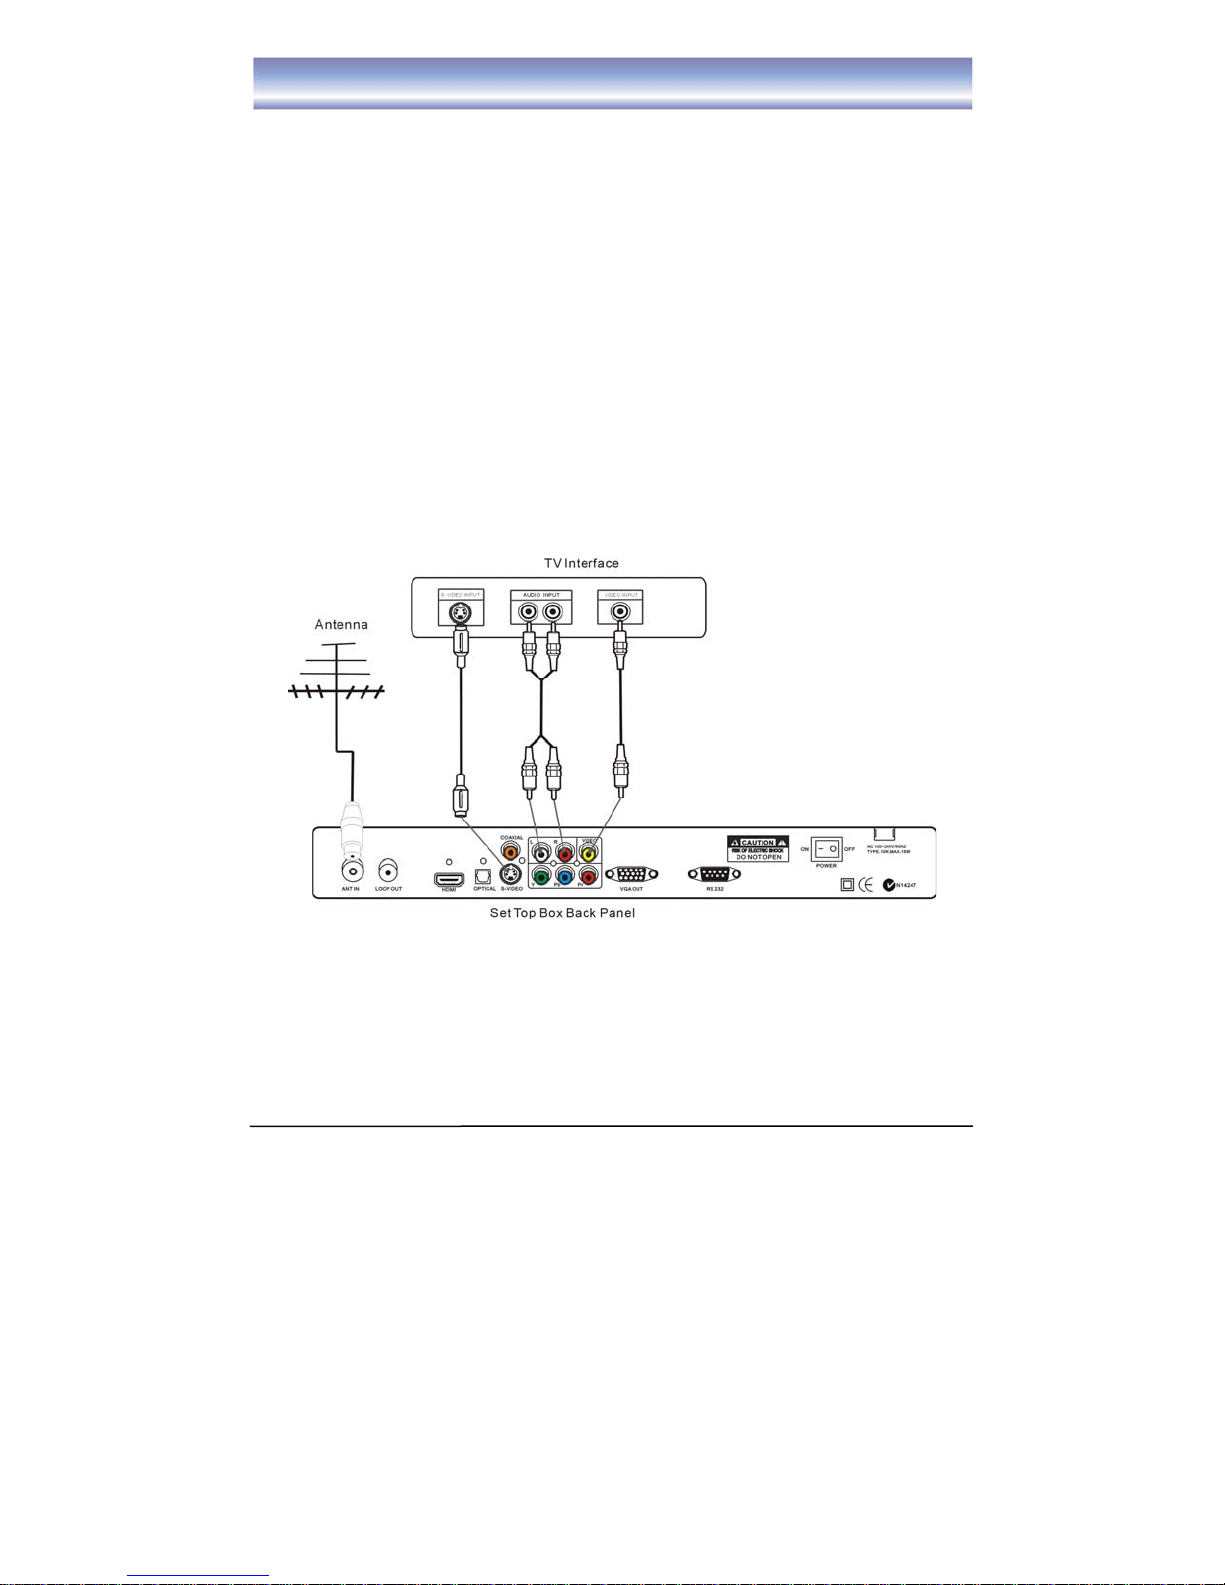
CONNECT YOUR EQUIPMENT
HOW TO GET GOOD RECEPTION
• In general you are not required to change the existing antenna. However if your antenna
is not in good condition you should consider replacing them to ensure uninterrupted digital
television viewing.
• Viewers in areas of poor analogue reception may need specialists’ advice about
antenna requirements for digital reception in their area.
• It’s recommended that viewers use quad shielded cable from the antenna to the
television.
Connections to a TV
There are several ways of connecting your STB to the TV and Hi-Fi S ystem. For high
definition viewing your display must support either 576p, 720p, 1080i resolution. Also th e
connection between the STB and display must be YPbPr component, VGA, or HDMI.
Other connection will provide standard definition viewing.
METHOD 1. Connect the STB via Video and Audio (for general viewing
/connection to a VCR)
1. Connect your terrestrial antenna to Antenna IN socket on the rear of your receiver.
2. Using 3RCA cable (yellow, white and red) provided, connect to the VIDEO and
AUDIO R and AUDIO L connections on the rear of the box. Be sure that the colour
matches the plugs.
3. Using a S-VHS cable (not provided), connect the STB to the TV. The audio
connection is as above (Item 2).
5 VOXSON HD50
Page 9

CONNECT YOUR EQUIPMENT
METHOD 2. Connect the STB via YPbPr (for high definition viewing)
1. Connect your terrestrial antenna to Antenna IN socket on the rear of your receiver.
2. Using 3 RCA Cable (green, blue and red) provided, connect to the YPbPr
connections on the rear of the box. Be sure that colour matches the plugs.
3. Using the white and red cable, connect the audio to the TV.
METHOD 3. Connect the STB via VGA connection (for high definition viewing)
6 VOXSON HD50
Page 10

CONNECT YOUR EQUIPMENT
1. Connect your terrestrial antenna to Antenna IN socket on the rear of your receiver.
2. Using a standard DB15 computer monitor cable to connect VGA connection on the
rear of the box. (This cable is not provided in the package). When connecting this, you
are sure to switch to the VGA mode by pressing Output key.
3. Using the 3 RAC cable (yellow, white and red) provided, connect only th e audio to
the TV.
METHOD 4. Connect the STB via HDMI connection (for high definition viewing)
1. Connect your terrestrial antenna to Antenna IN socket on the rear of your receiver.
2. Using a HDMI cable to connect HDMI connection on the rear of the box. (This cable
is not provided in the package).
7 VOXSON HD50
Page 11

CONNECT YOUR EQUIPMENT
METHOD 5. Audio connections
1. Connect your terrestrial antenna to Antenna IN socket on the rear of your receiver.
2. Using a COXIAL cable, connect to the TV
3. Also using SPDIF cable, connect to the TV
4. Also using the 3 RAC cable (white, red for audio) provided, connect to the TV.
8 VOXSON HD50
Page 12

BASIC OPERATION
NOTE: Be sure to turn on the main power at the rear of your receiver before using
the box.
SWITCH PROGRAM
1. Press the NUMERIC keys (0~9) on the remote control to select the channel number you want.
2. Press the ▲▼ key on the remote control or the front panel to change the available channels upward/downward.
3. Press the RECALL key to view the previous channel selected.
4. Press the FAV key on the remote control to open the favourite program list and select the channel you want from
the list. Press the ▲▼ key to navigate on the list, and the ◀▶ key to page the list.
VOLUME CONTROL
1. Press the ◀▶ (LEFT/RIGHT) key on the remote control or front panel to control the volume. The
following volume bar will be showed.
MUTE
1. Press the MUTE key to temporarily stop the sound.
2. To unmute, press the MUTE key again or press◀▶key.
PAUSE CONTROL
1. Press Pause key to pause current program.
2. To cancel pause and continue to play, press again the PAUSE key.
CHANGE AN AUDIO LANGUAGE AND AUDIO MODE
Press the AUDIO key on the remote control to select the audio
control menu. In the menu, press the ◀▶,▲▼ and OK keys to
select an audio language you want. Surely you can also select
the types of the audio (AC3, MPEG supported) as well as the
audio track mode (Stereo, Left, Right supported) by means of
this.
NOTE: Languages are available only when the
program provides them, so are the types of the audio.
CHANGE SCREEN ASPECT
Press Aspect key to switch screen mode (16:9 full screen, 16:9 letter box, 4:3 full screen, 4:3 letter
box, 4:3 panscan supported).
9 VOXSON HD50
Page 13

BASIC OPERATION
CHANGE VIDEO RESOLUTION
Press Format key to match the resolution when the resolution of the TV mismatches the
resolution of the box set (1080i, 720P, 576P SUPPORTED).
NOTE: You can see nothing when you switch the resolution, so it is probable that
you can’t succeed in it. There is a solution. You can press the “EXIT” key before
pressing the “FORMAT” key.
CHANGE VIDEO MONITOR
Press Output key to select the matched video monitor between YPbPr and VGA.
CHANGE TV/RADIO MODE
Press TV/Radio key to change the program list mode between TV and Radio.
VIEW PROGRAM INFO
1. Press INFO key to view the detailed information of
current program.
2. Press INFO/ EXIT to exit view.
SUBTITLE/CLOSE CAPTION
1. Press SUBT key to switch Close Caption on/off. This service is a good help to those
people who have difficulty in hearing.
NOTE: Not all programs have this function. Available only when the program
provides the service. Press INFO key to view whether the service is available for the
current program.
TELETEXT SERVICE
1. Press TTX key to turn the TELETEXT service on/off.
2. Press EXIT key to disable this function.
NOTE: Just like for SUBTITLE, TELETEXT is
available only when being provided. Press INFO key
to view whether the service is available for the current
program.
VIEW SIGNAL INFO
1. Press SIGNAL key to view the signal level and quality of the playing channel.
2. Press EXIT/SIGNAL key to exit view.
3. Press INFO key to view the signal info too.
10 VOXSON HD50
Page 14

BASIC OPERATION
EASY AND QUICK EDIT OF PROGRAM
1. Press EDIT key to show the edit short-cut menu,
press ◀▶ to move cursor und er the desired selection.
Then press OK key to add the mode of the current icon
to the current program. To cancel the mode selected,
press OK key again, the selected mode will be
canceled. Press EXIT/Edit key to exit the menu.
2. You can add/remove the current program into a
favourite list, lock/unlock the program, and skip/unskip
the current program.
ELECTRONIC PROGRAM GUIDE
1. Press EPG key to show the EPG menu. In this
menu, all the programs in a week are showed on the
screen.
2. Press ▲▼ key to view the event information such as
event name, event time and period.
3. Press OK key to view the detailed information on
the selected event of the current program.
4. Press RED key to view the event information of the next day, press BLUE key view the
event information of the previous day.
5. Press EPG key again or press EPG/EXIT key to exit
the menu.
NOTE: The EPG service may not be
available if the broadcaster does not provide. In
addition, it is also probable that you can’t watch
all the programs in one week. For example, there
is only information on the current program and
next program in Australia.
First Setup
When the receiver is turned on for the first time or
restored to the factory settings. The message box will
pop up. Use this to select the time zone, set the
daylight savings and set the TV screen type. After this
is set an option to auto scan will be offered.
11 VOXSON HD50
Page 15

MAIN MENU
This section only covers the very basic uses of the Main Menu. The following
chapters will be the step-by-step walk through of all aspects and options in the Menu
screen
NAVIGATION IN THE MAIN MENU
1. MENU key to bring up the main menu or return previous.
2. ▲▼ key to move upward/ down to the desired sub menu.
3. OK key to enter into the sub menu you select.
4. EXIT key to exit the main menu directly.
The main menu is divided into the following sections, referring to the following
chart (in the next page).
Installation
Locate the channels by either an Auto scan or a Manual scan.
Channel Edit
For editing; such as rename, move, lock, delete, skip, sort, make favourite, for all the
programs stored in the STB.
NOTE: If there is no program stored, the menu can’t be entered into.
System Setup
Modify system settings, AV, local time and factory settings. You can also view information
about the versions of software and hardware.
User Preferences
For setting up the user interface according to your preference, such as the menu language,
on screen display transparency, timeout for the information box, PIN code as well as menu
lock.
12 VOXSON HD50
Page 16

MENU TREE
Menu Tree
Installation
Scan selected channels
Auto scan
Channel Edit
Edit FAV
Browse
Lock
Skip
Delete
Rename
Move
System Setup
A/V setting
Local time setting
User Preference
System information
Default setting
OSD Language
OSD Transparence
CH info bar time out
Volume bar time out
13 VOXSON HD50
Page 17

INSTALLATION
In the installation menu, you can see the channel list, showing all the frequencies
info in Australia.
Auto Scan (Recommended)
1. Press BLUE key to auto scan all the channels to
search all the programs
2. Press EXIT key if you want to exit during the course
of auto scan.
Manual Scan
1. Press ▲▼ to move the cursor to the chann el you
want to scan. Press ◀▶ key to page up/down.
2. Press the OK key to select the channel, press again
to cancel your selection. If the channel is selected, an
icon “√” is shown at the back of the selected item.
3. Repeat step1, 2 to select other channels.
4. Press the RED key to start scanning the selected
channels, a list box will be shown at the same time.
5. Press the EXIT key to exit if you want to exit during the scan.
14 VOXSON HD50
Page 18

PROGRAM EDIT
In this menu, all the saved programs are listed on the screen for editing.
NOTE: If there is no program stored into the box, the menu can’t be entered into at all.
EDIT FAVOURITE
1. Press YELLOW key to show the list of 4 favourite types
and then press ▲▼ to move the cursor to the favourite group
you desire, press OK key to select it. Then, you can
designate your favourite channels for that group.
2. Press ▲▼ key to select the channel you want.
3. Press the OK key to add the channel to the favourite group. At
this time, a “FAV” icon is displayed on the screen beside
the channel.
4. Press OK again to cancel this operation, the “FAV” icon
will be removed from the screen.
5. Press EXIT to exit all menus or press MENU to return to
the previous menu
Lock Program
1. Press the RED key to show a list box of all Edit modes.
Press ▲▼ to move cursor to the “Lock” option.
2. Press OK to enable the lock function.
3. Press ▲▼ to select a channel you want, and press the OK
key to lock this channel. At this time a lock icon is
shown on the screen.
4. Press the OK key again to cancel the selection. The lock
icon will disappear.
5. Press EXIT to exit all menus or press MENU to return to
the previous menu.
Skip Program
1. Press the RED key to show a list box of all Edit modes.
Press ▲▼ to move cursor to the “Skip” option.
2. Press OK to enable the “Skip” function.
3. Press ▲▼ key to select a channel you want, and press OK
key to Skip this channel. At this time an arrow icon is
shown on the screen.
4. Press OK again to cancel the selection. The arrow icon will
disappear.
5. Press EXIT key to exit all menus or press MENU to return
to the previous menu.
15 VOXSON HD50
Page 19

PROGRAM EDIT
Delete program
1. Press the RED key to show a list box of all Edit
modes. Press ▲▼ to move cursor to the “Delete”
option.
2. Press OK to enable the “Delete” function.
3. Press ▲▼ key to select the channel yo u wish to
remove, and press OK key to mark this channel. At
this time a cut icon is showed on the screen.
4. Press OK again to cancel the selection. The cut
icon will disappear.
5. Press EXIT key to exit all menus or press MENU to return to the previous menu. A
confirmation box will popup as pictured. Select OK to delete the channels.
Rename
1. Press the RED key to show a list box of all Edit modes. Press ▲▼ key to move cursor to
the “Rename” item.
2. Press OK to enable the “Rename” function.
3. Press ▲▼ to select a channel you want to rename, and press OK to enter the Name
Edit screen. A keyboard will be showed on the screen.
4. Press ▲▼ ◀▶ to move the cursor, press OK to select the letters, the YELLOW key to
save and the GREEN key to delete unwanted letters.
5. Press EXIT key to exit all menu or press MENU to return to the previous menu.
Move Program
1. Press the RED key to show a list box of all Edit
modes. Press ▲▼ to move cursor to the “Move” option.
2. Press OK to enable the “Move” function.
3. Press ▲▼ key to select a channel you want to move,
and press OK.
4. Press NUMERIC key to set a new position number
for the selected channel.
5. Press the OK key to confirm, the selected channel
will be moved to the new position.
6. Press EXIT key to exit all menus or press MENU to return to the previous menu.
SWITCH TV/RADIO LIST
Press BLUE key to switch between the TV channel list and the radio channel list.
16 VOXSON HD50
Page 20

SYSTEM SETUP
This Section walks through the system setup menu, which is used to setup advanced
options.
This menu is divided into 4 parts: A/V Settings, Local Time Setting, System Information,
and Default Setting.
A/V Settings
In this menu, you can set video resolution, video output, screen mode and audio mode.
1. Press ▲▼ to select the option you’d like to set, and press OK to show its value in a list
box.
2. Press ▲▼ to select to the value that want to set in the list box, and press OK.
3. There are 3 resolutions you can set: 1080i, 720P, 576P
4. There are 2 monitors supported: YPbPr, VGA.
5. There are 5 screen modes to select: 4:3 Letter box, 16:9 Letter box, 6:3 Full, 16:9 Full
and 4:3 Panscan.
6. Press EXIT to exit all menus or press MENU to return to the previous menu.
Local Time Setting
Set the time zone and daylight savings.
1. Press ▲▼ to move to the option you want to set (if
the option is displayed in blue it is disabled), and press
the OK key to show its value in a list box.
2. Press ▲▼ key to move the cursor to the value that
you want to set in the list box, and press OK.
3. Select the time zone where you live in the time
zone section
4. Select “YES” in the daylight saving time section
when currently in Daylight Saving.
5. Press EXIT key to exit all menu or press MENU to return to the previous menu.
System Information
Press the OK key to view the System Information.
Default Setting
Press OK and input the correct the PIN code and confirm
your selection, the factory default data will be loaded.
NOTE: Factory default PIN is “0000”. All data you
have saved will be discarded if you use this function.
17 VOXSON HD50
Page 21

USER PREFRENCES
This menu is divided into 5 items: OSD languages, OSD transparence, CH info bar
timeout, volume info bar timeout.
OSD Language
Only English is supported.
OSD Transparency
In this menu, you can set 4 kinds of transparence (30%,
50%, 75%, and 100%) for the OSD (On Screen Display).
1. Press ▲▼ key to move to the OSD Transparency
option, and press the OK key to show its value in a list
box.
2. Use ▲▼ to move the cursor to select the
transparency that you want in the list box, and press
the OK key.
3. Press EXIT key to exit all menus or press MENU to return to the previous menu.
CH Info Bar Time Out
In this menu you can set 4 options for the timeou t function (1
second, 3 second, 5 second, 10 second)
1. Press ▲▼ to move to the CH Info Bar Time Out option,
and press OK key to show its value in a list box.
2. Press ▲▼ to move the cursor to the timeout setting tha t you
want in the list box, and press OK.
3. Press EXIT key to exit all menus or press MENU to return
to the previous menu.
Volume Bar Timeout (Refer to CH Info Ba r Time Out option)
In this menu, you can set 4 options for volume bar timeout (1 second, 3 second, 5 second,
and 10 second)
1. Press ▲▼ to move to the Volume Bar Time Out option, and press OK to show its value
in a list box.
2. Press ▲▼ to move the cursor to the timeout setting that you want in the list box, and
press OK.
3. Press EXIT key to exit all menus or press MENU to return to the previous menu.
18 VOXSON HD50
Page 22

TROUBLE SHOOTING
If receiver is not functioning correctly check it according to the procedures shown
below. If the receiver does not work properly after checking it, please contact the
dealer. DO NOT open the receiver cover.
The display on front panel does not light up
• Check that the power cord is plugged into the wall outlet.
• Check that the Power Switch on the back of the unit is on.
No picture
• Make sure that the product is in Operation Mode.
• Make sure that the AV Cable is correctly connected to the TV.
• Make sure that antenna cable is correctly connected to the equipment.
• Make sure the TV is in the correct AV mode.
• Check the brightness level of TV.
No or bad signal message appears
• Check other devices connected between antenna and the receiver, or adjust the antenna position.
Poor Picture & sound quality
• Install antenna in a position offering better reception.
• Avoid putting mobile phone or microwave oven around the equipment.
• Use 75Ω coaxial cable to connect the TV and antenna.
No or poor sound
• Check the volume level of the TV.
• Check the Mute status of the TV and STB.
• Press the Audio button to change the Sound Track type.
Remote control does not work
• To manipulate the equipment with the remote control, the control’s emitting part should be directly
pointing towards the receiving part (IR Sensor) of receiver.
• Check the batteries in the remote control.
NOTE:
If the problem is still unsolved after going through this procedure please
contact customer support.
19 VOXSON HD50
Page 23

TECHNICAL SPECIFICATIONS
Tuner & Channel
Input Connector IEC-TYPE, TEC 169-24,Female
RF Loop through Output connectorIEC-TYPE, IEC 169-24,Male
Frequency Range
Signal Level -10 to -70dBm
Demodulation COFDM
Mode 2K, 8K
FEC mode 1/2,2/3,3/4,5/6&7/8
Guard Intervals 1/4,1/8,1/16&1/32
MPEG T ransport Stream A/V Decoding
Transport Stream MPEG-2 ISO/IEC 13818
Profile Level MPEG2 MP@HL
Input Rate 40Mbit/s Max
Aspect Radio
Video Resolution 1920X1080i,1280X720p, 720X576p, 720X576i
Audio Decoding MPEG I Layer I & II, MPEG II Layer II, Dolby
Audio Mode Single/Dual mono/Stereo/Joint stereo
Memory
Flash Memory 4 Mb
Graphics (MPEG)&System Memory
A/V& Data In/Out
RCA JACK CVBS, AUDIO R/L, YPbPr
S/PDIF
RS232 RS232C D-sub female type
Connector VGA, HDMI
Power Supply
Input Voltage AC 100~240V, 50HZ
Type Switching Mode Power Supply
Power Consumption Operation mode: TYPE.10w, MAX.15w
Physical Specification
Size 360X235X43mm
Weight (Net) 2.2kg
Operating Temperature 0 C to +45 C
Storage Temperature -10 C to +70 C
174MHz to 230(UHF), 470MHz to 862MHz(UHF)
4:3Letterbox,16:9Letterbox,4:3Full,16:9Full,4:3panscan
64 Mb
AC3,Fiber-Optic connection(Digital Audio Output)
20 VOXSON HD50
Page 24

GLOSSARY OF TERMS
EPG
Electronic Program Guide. Software that enable viewers to navigate easily among the
large number of channels provided by digital technology and view information on current
and upcoming programs.
FEC
Forward Error Correction. Correction of faulty bits in the received signal.
FTA
Free To Air
OSD
On Screen Display
RGB
A colour system consisting of Red, Green and Blue being used to create a full spectrum.
RS232
Serial data port.
S-Video
Y/C output for a S-VHS or Hi-Fi Video Recorder
S/PDIF
Digital audio output
SMPS
Switching Mode Power Supply
STB
Set Top Box
21 VOXSON HD50
Page 25

VOXSON Pty Ltd
1 VOXSON HD50
Page 26

Technical enquiries: support@voxson.com.au
www.voxson.com
2 VOXSON HD50
 Loading...