

User Manual
使用說明書
P40
CD/MP3/USB Player
With Recording
CD/MP3/USB
可錄音播放器
MCU-20A(P40) 090516 Rev..indd 1MCU-20A(P40) 090516 Rev..indd 1 2016/9/6 上午 11:05:392016/9/6 上午 11:05:39
2
目錄
中文
重要安全指示
......................................................................................................... 04
產品特色
............................................................................................................... 06
主要特色
.............................................................................................................. 06
功能與特色
............................................................................................................ 07
連接方式
............................................................................................................... 09
部件名稱與功能
...................................................................................................... 10
前面板
............................................................................................................... 10
後背板
................................................................................................................ 13
顯示屏幕
............................................................................................................. 14
遙控器
................................................................................................................ 16
功能設定選單
......................................................................................................... 18
操作控制
............................................................................................................... 19
VOXOA TUNEBOX資料庫建立軟件
........................................................................... 21
規格
..................................................................................................................... 24
MCU-20A(P40) 090516 Rev..indd 章節1:2MCU-20A(P40) 090516 Rev..indd 章節1:2 2016/9/6 上午 11:05:492016/9/6 上午 11:05:49
P40
P40
3
CD/MP3/USB Player
With Recording
ContentsContents
ENGLISH
IMPORTANT SAFETY INSTRUCTIONS ............................................................................ 26
FEATURES .................................................................................................................. 28
MAIN FEATURES
........................................................................................................ 28
FEATURES & FUNCTION
............................................................................................... 29
CONNECTIONS ........................................................................................................... 30
PART NAMES AND FUNCTIONS ..................................................................................... 32
FRONT PANEL
........................................................................................................... 32
REAR PANELl
.............................................................................................................35
DISPLAY
................................................................................................................... 36
REMOTE CONTROLLER
................................................................................................ 38
Utility Menu ............................................................................................................... 41
OPERATIONS .............................................................................................................. 42
VOXOA TUNEBOX SOFTWARE ................................................................... 45
SPECIFICATIONS.......................................................................................................... 48
MCU-20A(P40) 090516 Rev..indd 章節2:3MCU-20A(P40) 090516 Rev..indd 章節2:3 2016/9/6 上午 11:05:492016/9/6 上午 11:05:49
4
中
文
1. 閱讀說明書 - 操作本產品前應先閱讀所有安全性及操作說明。
2. 保留說明書 - 安全性及操作說明應妥善保存供未來參考用。
3. 留心警告 - 所有在本產品及操作說明上的警告都要遵守。
4. 參照說明書 - 需參照所有操作及使用說明。
5. 水和濕氣 - 在操作本產品時絕對不要靠近水-例如靠近浴缸、臉盆、洗碗槽、洗衣盆、游泳池、及在潮濕
地下室等等。禁止將装有液体的容器,例如花瓶,酒瓶等至於本產品上。
6. 移動平台及固定檯面 - 本產品只能使用在製造商所建議的移動平台及固定檯面。本產品與移動平
台的組合在移動時應特別注意。突然地停止,過大的外力及不平衡的表面,都會造成本產品在移
動平台上翻覆。
7. 牆壁或天花板架置 - 本產品應只參照製造商所建議的方式來架置在牆壁或天花板上。
8. 高溫 - 本產品應遠離熱氣來源,例如散熱器、暖器、火爐或者其他會產生高溫的用品(包含擴大機)。
9. 電源 - 本產品只能照電壓標籤所示來操作。如果你不確定你住家的電源的種類,請諮詢你的產品賣家或當
地電力公司。若本產品需要用電池或其他電源,請參照操作說明書。
10. 接地與電極 - 本產品可能供給極化交流電插頭。插頭只有一個方向插入插座。這是一個安全裝置,如果沒
辦法完全插入插座,請試著把插頭反方向。如果插頭仍無法插入插座,請連絡電工來更換插座,請勿毀
損安全性為考量的插頭。
11. 電源線的保護 - 電源供應線應該妥善規劃佈線的路徑,避免被其他物件所纏繞。應特別注意所使用的插座
是否與電源供應線的插頭吻合,這插座要靠近本產品的使用地點。
12. 清潔 - 本產品須依照製造商所建議的方式做清潔。清潔本產品應使用柔軟的乾布清潔。
13. 交流電供電零件 - 維修完成後在交還產品給使用者前,應使用電阻測量表測量交流電插頭及所有暴露在外
的金屬零件,電阻值應大於100k歐姆。
14. 長時間未使用 - 本產品在長時間未使用的狀況下,應將插頭拔除。
15. 物體及液體進入 - 小心不要讓物體掉入及液體流進本產品裡。
16. 損壞需求服務 - 當A.電源線或插頭已經毀損;或B.異物或液體掉進本產品;或C.本產品暴露在雨中;或
D.操作或功能不正常;或E.本產品被摔落或內部損壞時,應送回合格的服務人員處進行維修。
17. 售後服務 - 除了操作說明書所提到的正常操作外,使用者不應進行其他不當操作或試圖自行維修。當本產
品有問題時應請教合格的維修服務人員或送回合格的維修站進行維修服務。
重要安全指示
MCU-20A(P40) 090516 Rev..indd 章節2:4MCU-20A(P40) 090516 Rev..indd 章節2:4 2016/9/6 上午 11:05:492016/9/6 上午 11:05:49
P40
P40
5
中
文
CD/MP3/USB
可錄音播放器
18. 保持本產品在空氣流通的環境中 - 本產品上的散熱孔提供流通的空氣,以避免本產品在操作時產生過熱的
現象。這些為保持本產品空氣流通的散熱孔嚴禁被阻隔或被其他物品覆蓋。特別是較柔軟的表面,例如
床,沙發及地毯等等。本產品不應被安裝在內建的空間內,例如書櫥及架子,除非能夠依製造產商所規範
的空氣流通指示建構。
19. 連接安裝 - 請勿安裝非本產品製造商所建議的連接器材,以避免本產品遭受損害。
20. 配件 - 請勿將本產品放置在不穩定的移動推車,三角架,支撐架或桌子上。本產品可能會掉落因而使小孩
或是成人受傷,並且本產品會受到嚴重的損害。只能使用製造商所建議的移動推車,三角架,支撐架或桌
子,或是與本產品一起銷售的配件。必須依製造商指示安裝本產品,並且安裝的配件必須使用製造商所建
議的。
21. 閃電 - 為保護本產品在風雨期間不受到閃電的影響及侵害,當本產品長時間不使用時將插頭拔除,並拆除
天線。這將保護本產品免於受到閃電及電源突然增加的損害。
22. 替換零件 - 當需要替換零件時,請確保維修技術人員使用製造商所指定的零件或是與原零件具有相同特性
的替代品。未經授權的替代零件會導致過熱著火,電磁衝擊或其他嚴重的損害。
23. 安全性檢查 - 本產品在進行維修或任何服務時,請要求維修服務人員進行安全性檢查,以確保本產品在正
確地操作狀況下。
重要安全指示
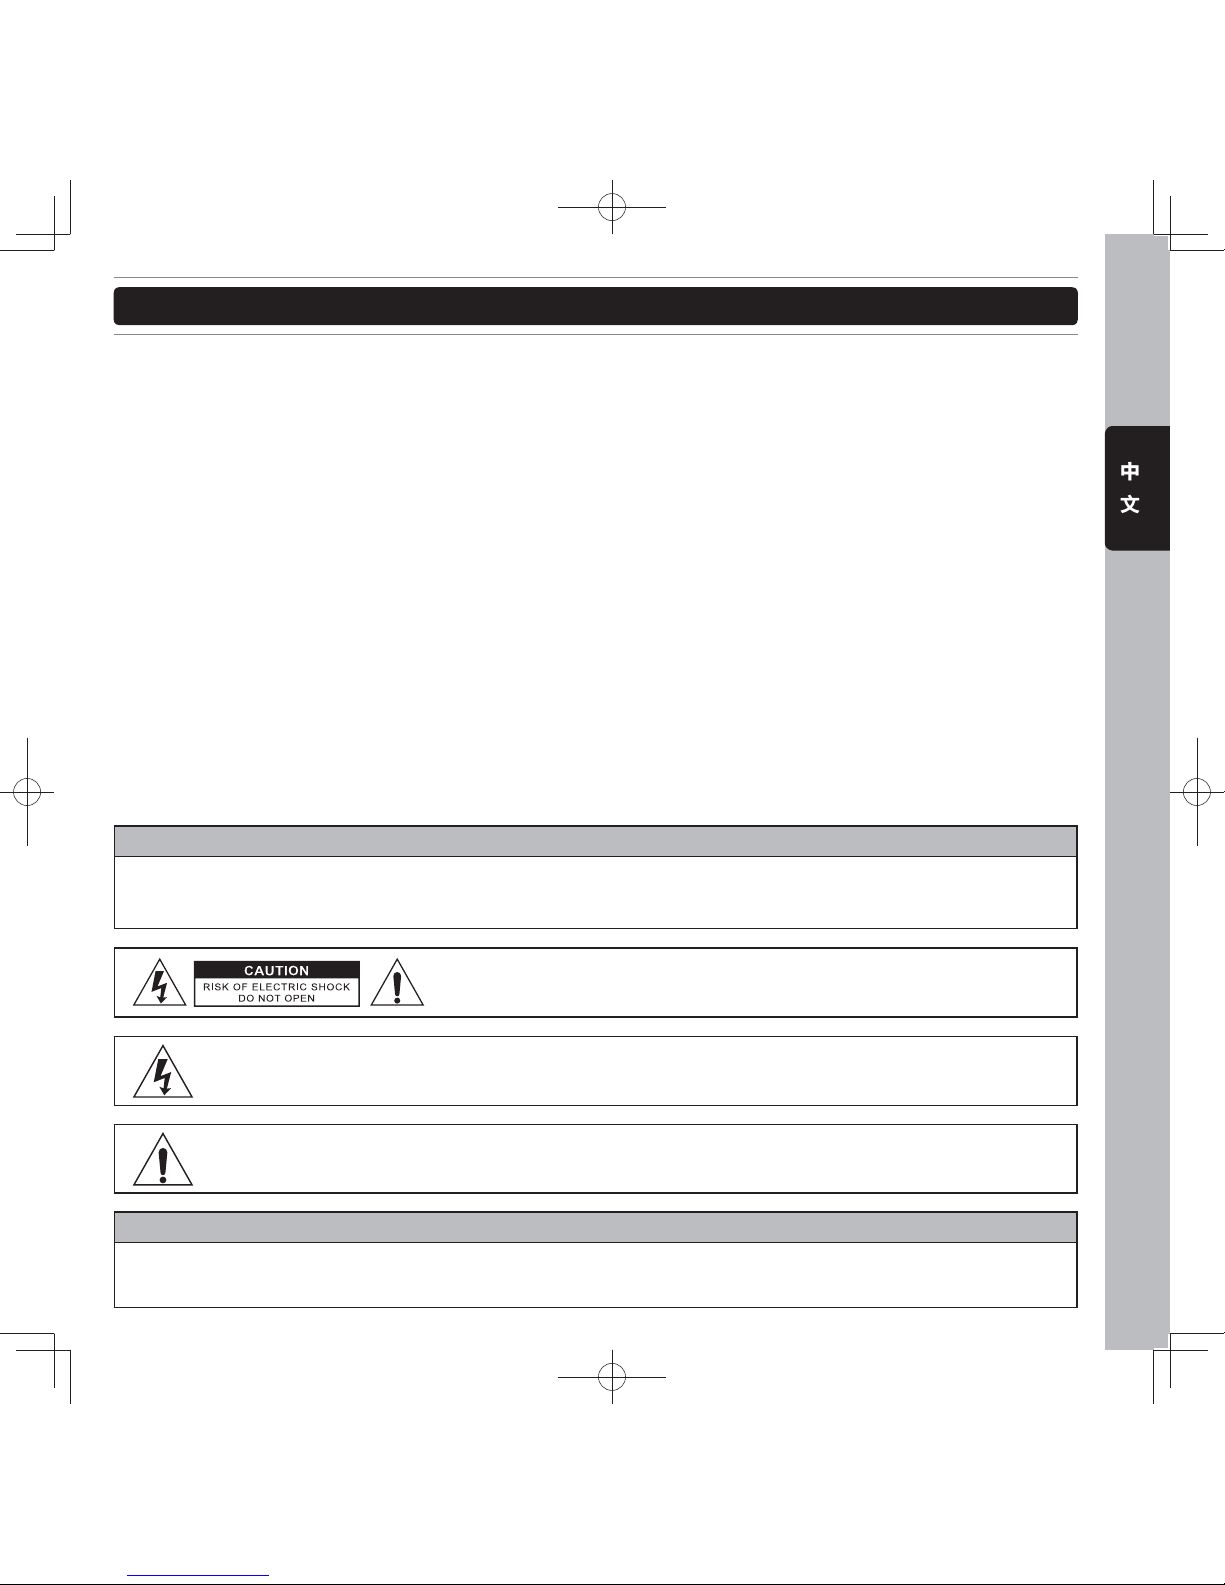
警 告
嚴禁本產品暴露在下雨及潮濕的環境之中,以降低起火及觸電的危險。本產品避免暴露在會滴水及會濺到
水的環境中。裝有液體的容器絕對禁止放在本產品上,例如酒瓶,花瓶等等。
注 意
為了杜絕觸電的危險,請勿使用不合規格的插座。應使用插頭能夠完全插入插座的插孔。
注意:嚴禁打開機蓋以降低觸電的風險。維修及更換零件請諮詢維修中心
合格的維修工程師。
三角形中有個驚嘆號是為了提醒使用者重要的操作及維護指示。
三角形中有個箭頭的閃電標誌是為了警告在產品內部因未絕緣而可能產生的高壓電,這高壓電會
造成觸電的危險。
MCU-20A(P40) 090516 Rev..indd 章節2:5MCU-20A(P40) 090516 Rev..indd 章節2:5 2016/9/6 上午 11:05:492016/9/6 上午 11:05:49
6
中
文
產品特色
- 主要特色
播放MP3/WAV的檔案
P40 可以讀取與顯示燒錄在光盤的MP3/WAV檔案,可以由單一的光盤上儲存更多的音樂,大幅增加一張光盤可
以播放的時間。透過內建的檔案搜尋系統,檔案可以被很快地找尋。除此之外MP3檔案的ID3標籤,可以顯示在
屏幕上,便於音樂的找尋與使用。
MP3 檔案搜尋系統
越來越多的MP3音樂檔案,要找尋實在不容易。P40 內建MP3檔案搜尋系統,讓你從眾多的檔案中能夠快速的找
尋,你可搜尋檔案依照歌手名稱,歌曲名稱或是由檔案夾名稱來找尋。除此之外,MP3 ID3 Tag可支援顯示在超
大易於閱讀的顯示屏幕上,讓搜尋歌曲的操作更為容易。
支援外接USB設備
在現今數碼時代,USB設備成為最便利的音樂儲藏收集設備。P40具有兩個USB連接接口,一個在前面版,另一
在背版,支援外接的USB大量儲存設備。你可以連接U盤或是USB外接硬盤,儲存MP3/WAV檔案多達999個資料
夾,每個資料夾可以有多達999個檔案。
VOXOA TUNEBOX 軟件
支援VOXOA TUNEBOX軟件可以使得讀取與搜尋大量的檔案變得更為快速與容易。VOXOA TUNEBOX軟件可以
一次性的掃描所有儲存在你外接USB設備的音樂檔案,然後建立一個資料庫檔案加快讀取速度。
紅外線遙控器
內附紅外線遙控,讓你不在播放器旁也能控制播放器,對於小型營業場所Lounge Bar、 音樂餐廳、娛樂場所提
供了非常大的便利與移動性。
抗震緩衝內存
使用抗震緩衝內存來避免因震動所引起的音樂播放中斷。緩衝內存的設計,播放器不因外力的震動所影響,以確
保音樂在播放的過程中能夠持續不間斷的播放。
無縫循環
透過無縫循環的功能,任何音樂的段落能在起始點(CUE Point)與結束點(Out Point)間不斷地重複播放。
播放速度控制與控制範圍
高精確度推子,確保播放速度的調整的方便性與準確性。播放速度控制的範圍包含+/- 4%, +/-8%, +/-16%,
+/-100%(CDDA)。
MCU-20A(P40) 090516 Rev..indd 章節2:6MCU-20A(P40) 090516 Rev..indd 章節2:6 2016/9/6 上午 11:05:502016/9/6 上午 11:05:50
P40
P40
7
中
文
CD/MP3/USB
可錄音播放器
產品特色
音調鎖定(Key Lock)
當你調整歌曲播放速度時,音調鎖定功能可以鎖定歌曲音樂的音調。你可以加快或減慢歌曲播放速度,音樂的音
調絲毫不會受到播放速度的改變而有變化。
錄音 (Record)
可選擇USB接口錄製外部音源,將CD/MP3光碟中音樂或外部輸入的音源直接錄音至USB儲存設備,錄音格式可
為WAV (16bit, 44.1kHz), MP3 (64kbps~320kbps)
雙播放方式選擇
可以選擇一般播放(一邊播放+一邊錄音,可以不同音源)或是錄音播放(同步錄音與播放,同音源)
- 功能與特色
播放器
• 標準19英吋 2U 機架式
• 高信賴性緩衝內存防震動播放
• 自動及手動節拍計算器
• 紅外線遙控器
媒體種類
• 支援MP3 /WAV播放及文字顯示
• 兩個USB 插口可外接USB儲存設備
• 支援ID3 TAG歌曲文字顯示
播放功能
• 立即讀取技術
• 單曲與連續播放模式
音樂資料搜尋
• 歌曲與資料夾搜尋系統
• 一禎一禎精確搜尋
• 支援VOXOA TUNEBOX軟件,讓USB設備的音樂資料能快速搜尋
• 顯示音樂檔名與資料夾名稱
Cue點/音樂循環
• 自動Cue點功能設定每首音樂起始點
• 無縫的循環(Loop)與再循環功能(Reloop)
MCU-20A(P40) 090516 Rev..indd 章節2:7MCU-20A(P40) 090516 Rev..indd 章節2:7 2016/9/6 上午 11:05:502016/9/6 上午 11:05:50

8
中
文
產品特色
速度調整
• 可調整播放速度範圍±4%, ±8%, ±16%, ±100%(CDDA)
• 高品質速度控制推子
• Pitch bend 增加/減少控制按鈕
• Pitch bend可調整到+/- 100%
• 音調鎖定能夠讓音樂速度改變但不會影響到音樂原本的音調
轉盤
• 高品質2.4”轉盤
• 轉盤可用來做Pitch Bend與每禎(Frame Search)搜尋
顯示屏幕
• 超大高亮顯示屏幕能夠顯示重要功能
• 顯示目前播放位置
• 已播放/剩餘時間顯示
• 顯示MP3檔案ID3 Tag 及檔案夾名稱便於找尋
• 文字顯示檔案夾名稱
輸出
• 類比RCA輸出
• 平衡式XLR 輸出
輸入
類比RCA輸入(輸入錄音音源)
MCU-20A(P40) 090516 Rev..indd 章節2:8MCU-20A(P40) 090516 Rev..indd 章節2:8 2016/9/6 上午 11:05:502016/9/6 上午 11:05:50

P40
P40
9
中
文
CD/MP3/USB
可錄音播放器
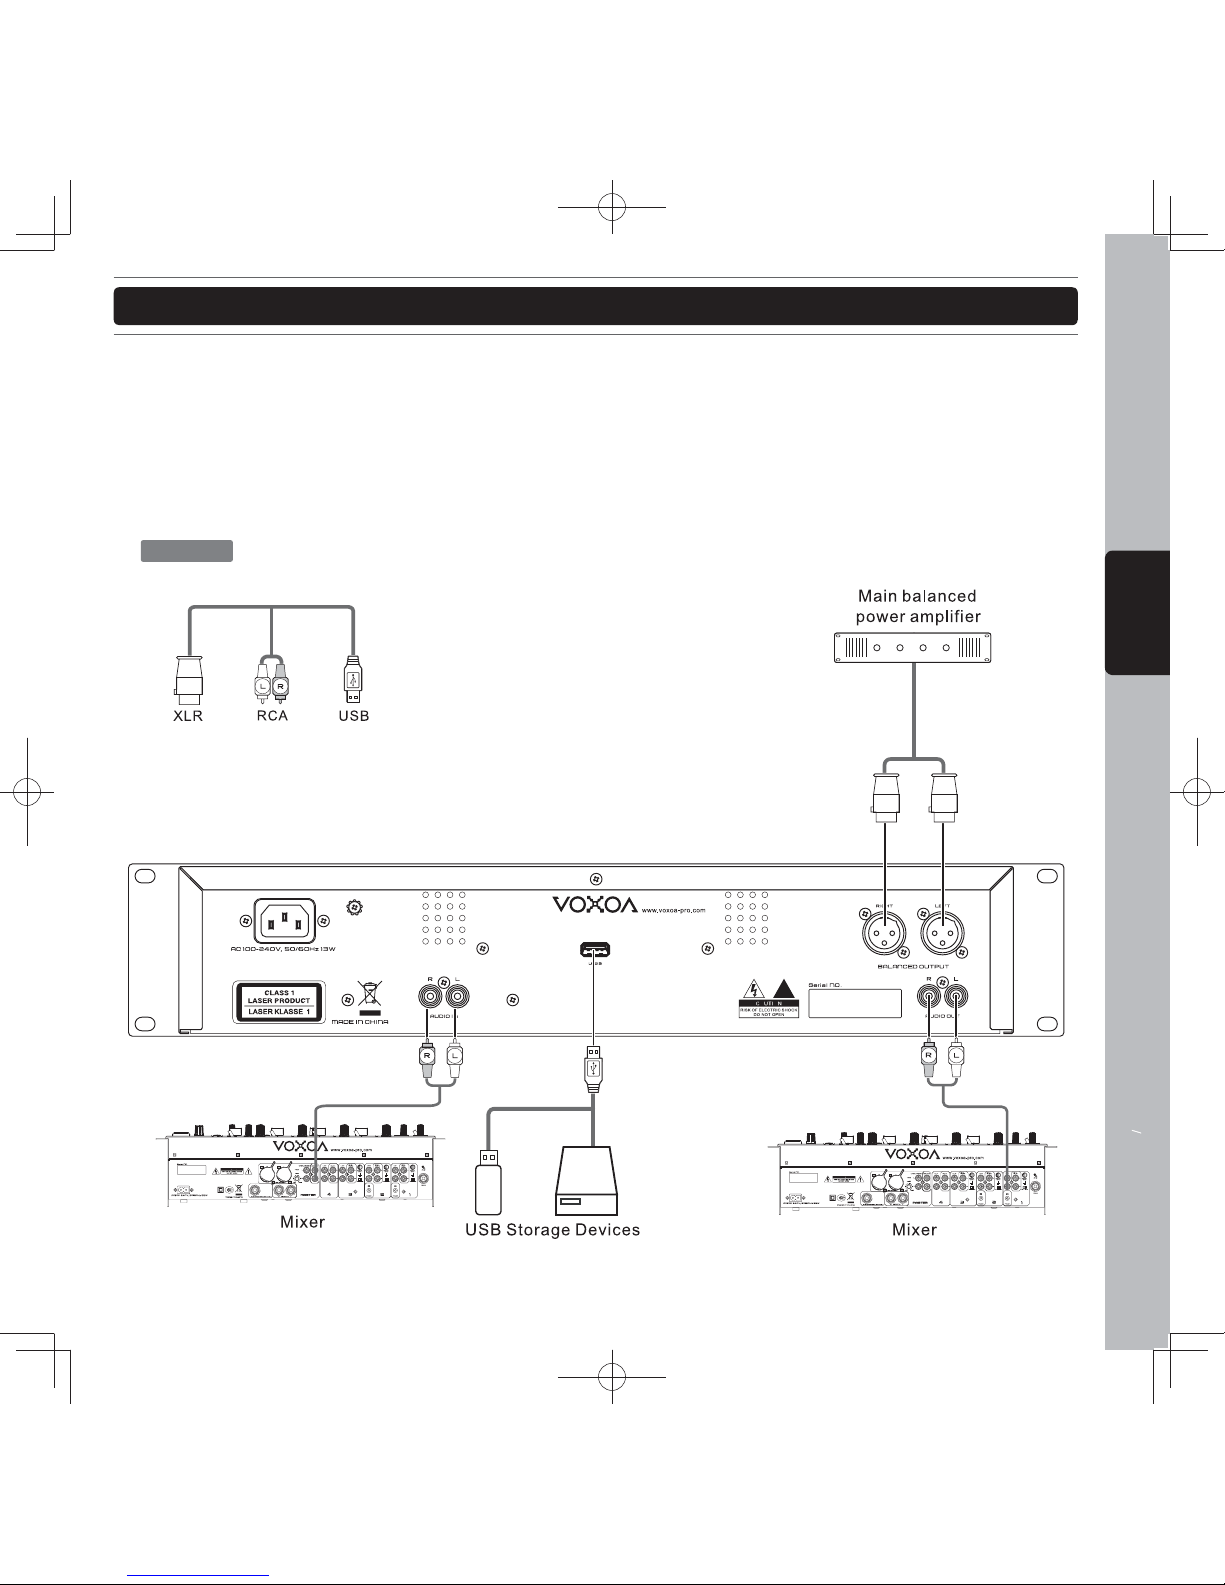
連接方式
1. 在進行連接前,請務必關掉電源開關,拔下插頭
2. 高品質的連接線可以提高保真度,為使本產品產生最好的聲音品質,盡請使用高品質的音訊連接線。
3. 不要使用過長的連接線。並確保插頭與插座是穩固的連接,若插頭與插座連接過鬆,會造成哼聲,雜訊,或是
斷斷續續的聲音輸出,這將會對你的喇叭,造成極大的危害。
4. 使用RCA音訊連接線,連接本器材與混音器。
注 意
: 請務必使用所提供的接線,使用其他類型的連接纜線恐會導致危險。
MCU-20A(P40) 090516 Rev..indd 章節2:9MCU-20A(P40) 090516 Rev..indd 章節2:9 2016/9/6 上午 11:05:502016/9/6 上午 11:05:50

10
中
文
部件名稱與功能
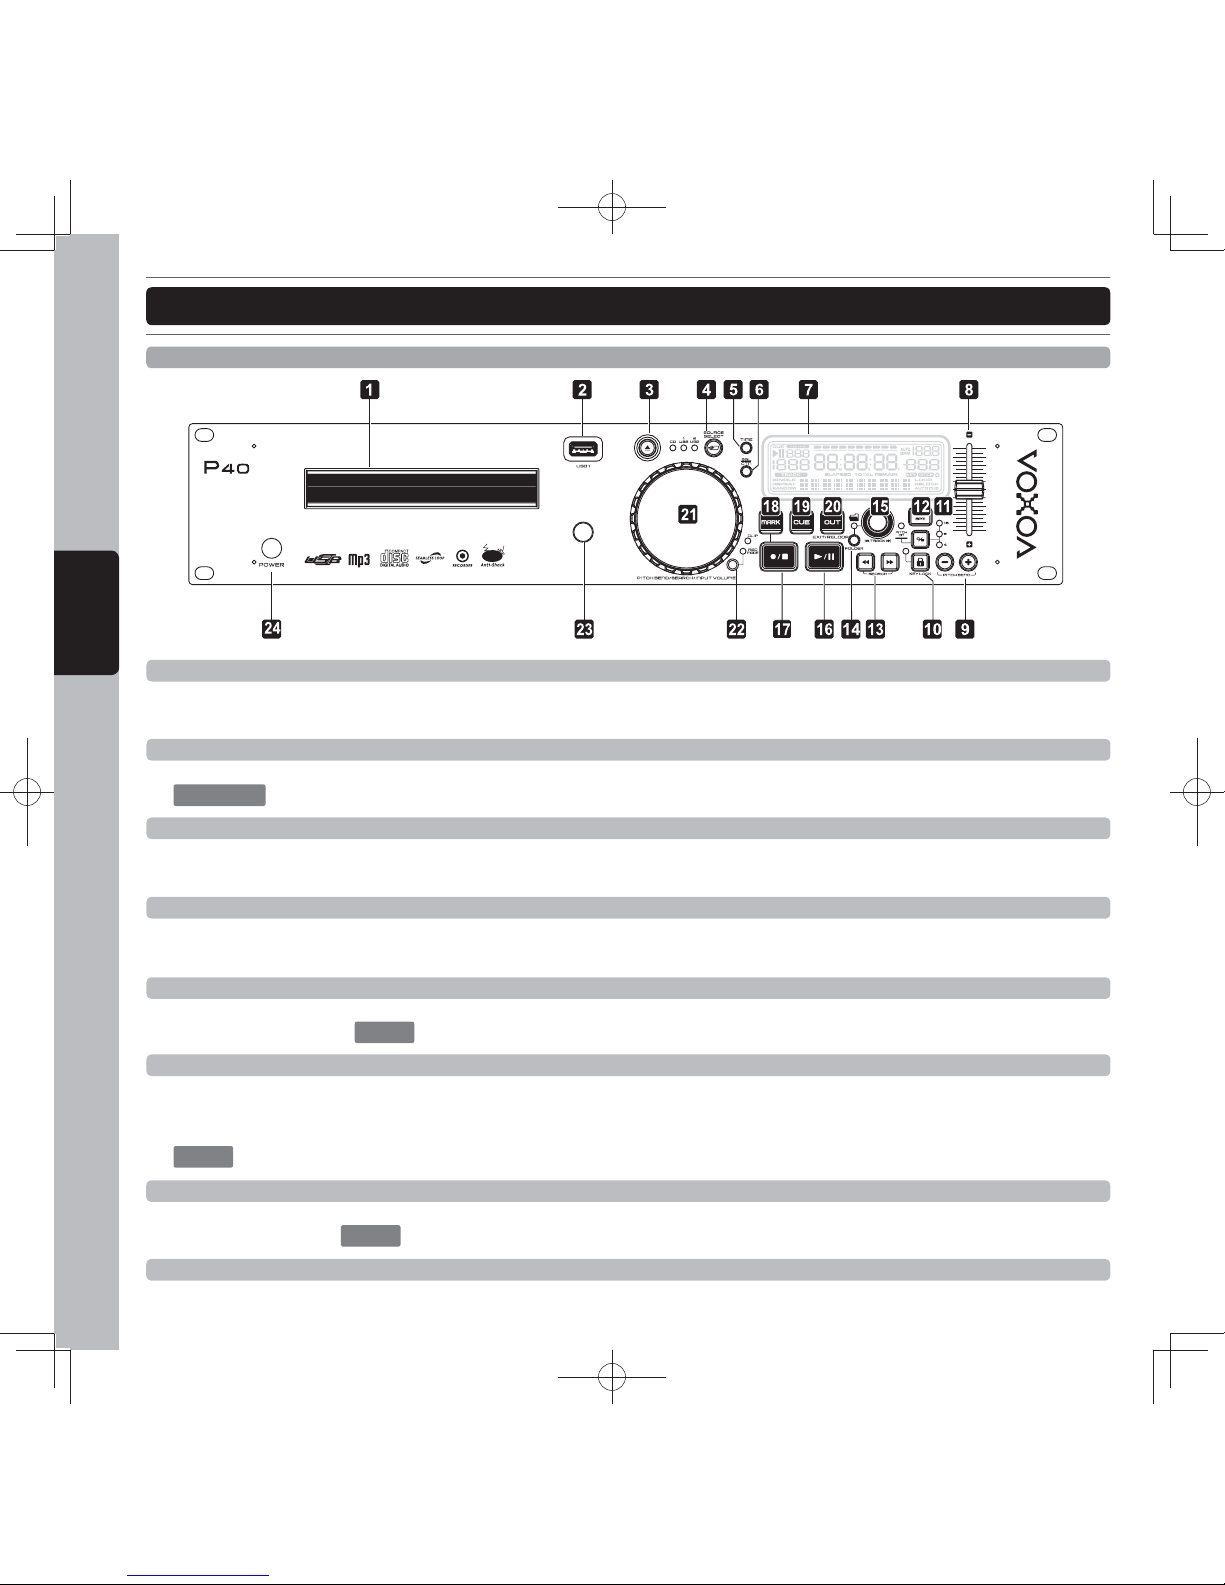
前面板
1. 光盤托盤
這個托盤用來載入或是卸載光盤,打開或關閉托盤請按退片鍵。電源關閉時,切勿強制打開或關閉托盤。
2. USB1連接插口 (U盤插口)
此插口用來外接U盤或是USB周邊。
注 意
: 請先開啟電源,再插上USB周邊。
3. 退片鍵(DISC EJECT)
按下此按鈕將光盤退出。為了避免在音樂播放時誤觸此鍵而造成音樂中斷,退出光盤的功能,只有在播放暫停
的狀態下,才能夠使用。
4. 音樂來源選擇按鍵
用此按鍵選擇切換三種不同的音樂來源包含CD/USB1/USB2,當一打開電源開關時,內定的模式是CD。
5. 播放時間顯示模式切換按鍵
切換顯示屏幕上時間的表示方式。
• ELAPSED 表示目前已播放的時間
• REMAIN 表示剩餘多少時間
• TOTAL REMAIN 表示整片音樂光盤剩餘播放時間
注 意
:长按 TIME 2秒以上,進入功能選單
6. SGL/CTN 單曲/連續播放切換按鍵
這個功能讓你切換音樂的播放是單曲播放還是連續播放。
SGL = 單曲播放 → 當目前播放的音樂播放結束,播放器立即成為暫停的模式。
CTN = 連續播放 → 整片CD或是全部檔案夾的音樂連續播放。
注 意
:按下SGL/CTN鍵 一秒可啟動或關閉自動起始點(AUTO CUE)的功能。
MCU-20A(P40) 090516 Rev..indd 章節2:10MCU-20A(P40) 090516 Rev..indd 章節2:10 2016/9/6 上午 11:05:522016/9/6 上午 11:05:52
P40
P40
11
中
文
CD/MP3/USB
可錄音播放器
部件名稱與功能
7. LCD顯示屏
LCD顯示屏可以清晰地顯示出所有的功能狀態下的指示,并且在多个不同的角度都可以看得舒适。
8. 音樂速度調整推子
這個推子用來調整音樂播放的速度。
9. 播放速度調整+/-鍵
當此組按鍵按住不放時,按“+”鍵加速播放,按“-”鍵減速播放,音樂播放速度立即被改變,放開時立即回
復到原來的速度。
10. 音調鎖定KEY LOCK
此項功能開啟時,當你改變音樂拍子的速度,音樂的音調卻不會受任何變化。
11. 拍子速度調整範圍選擇按鍵
每按一次此按鍵,拍子速度改變推子的範圍變化,由±4%, ±8%, ±16%及±100%(CDDA)間切換。
12. 手動/自動BPM按鈕
當自動BPM無法鎖定音樂節拍時,可透過手動BPM來產生。順著音樂節拍輕敲此按鍵會產生音樂的BPM(每
分鐘節拍數)數值,為了準確計算BPM數值,你至少必須敲四個拍子。按住TAP BPM,轉動Track旋鈕
15
可調
整BPM值,按住並轉動Track旋鈕 15 可以調整BPM小數點值。
注 意
:如何回到自動BMP的計算模式,只要按住此鍵直到顯示屏幕出現AUTO BPM。
13. 搜尋SEARCH鍵
搜尋鍵用來協助你快速的找到你所需要歌曲的位置, 這個搜尋鍵能夠讓你快速的往後搜尋, 這個搜尋
鍵能夠讓你快速的往前進搜尋。
14. 音樂TRACK / 檔案夾FOLDER選擇切換按鍵
按下此鍵,切換旋鈕
15
的功能為音樂Track選擇旋鈕,或是檔案夾FOLDER選擇旋鈕。
按住不放此鍵,可啟動或關閉重複播放(REPEAT)功能。
•
當REPEAT ON,連續播放時,表示當前資料夾內的曲目將ㄧ首接著一首重複播放,直到關閉重複播放(REPEAT)
的功能。
當REPEAT ON,單曲播放時,表示當前曲目將ㄧ直重複播放,直到關閉重複播放(REPEAT)的功能。
•當REPEAT OFF時,表示播放的曲目能超越當前的資料夾到下一個資料夾。
15. 音樂TRACK / 檔案夾FOLDER選擇旋鈕
當作音樂TRACK選擇旋鈕使用時,此旋鈕有三項功能
1) 此旋鈕用來選擇歌曲,在同一片CD或是同一個歌曲目錄中來選擇歌曲。
2) 按下此旋鈕並同時旋轉,可以快速前進或是後退,每旋轉一格可跳10首歌曲。
3) 單獨按下此旋鈕可切換顯示屏幕上歌曲顯示的模式,可以切換file name/title (ID3)/artist (ID3)/Album (ID3)/
Genre (ID3)
按下切換鍵 14,LED燈亮,切換成“檔案夾FOLDER選擇旋鈕時”– 在CD/MP3光盤中或是在U盤中的音樂檔
案,放在不同的檔案夾中,可利用此檔案夾搜尋旋鈕來切換不同的檔案夾。
MCU-20A(P40) 090516 Rev..indd 章節2:11MCU-20A(P40) 090516 Rev..indd 章節2:11 2016/9/6 上午 11:05:532016/9/6 上午 11:05:53

12
中
文
16. 播放/暫停 PLAY/PAUSE 鍵
每按一次此按鍵可切換暫停變成播放,或是播放變成暫停。
17. 錄音開启/停止RECORD鍵
按此按鍵開启/停止錄音功能。當启动錄音功能LED灯將会閃爍,錄音设备運行正常。錄音的文檔被保存在USB
移动盤REC文件夾上,格式為RECxxxxx.mp3.
18. 錄音紀錄分割MARK按鍵
在錄音過程中,按此按鍵就可以將先前錄音保存。此時仍然是繼續錄音狀態,再按下此按鍵会保存另外一段錄
音。
19. CUE 按鍵
所謂的Cue點是一個自身定義的播放起點,通常是在節奏一開始的位置。在音樂播放的模式下,按下Cue鍵,
音樂會立即暫停並回到上一次Cue點設定的位置。按著Cue鍵不放,將會變成播放模式,一旦你放開Cue鍵,
播放就會立即暫停播放,並回到Cue點。
注 意
:在音樂播放或搜尋的模式下,先按播放/暫停鍵暫停音樂播放,再按CUE鍵可設一新CUE點(也可當是
無縫循環的起始IN點)。
20. 循環結束點OUT// 離開/再循環(EXIT/RELOOP) 多功能鍵
按下這個按鍵來設定循環的結束點(OUT),一個無縫循環由設定新CUE點-起始點開始,到結束點(OUT)結束。
循環會連續不斷的播放,循環播放時CUE與OUT按鍵會不停閃動,直到離開/再循環(EXIT/RELOOP) 20 的按鍵
被按下。
注 意
:
如果已經設定一個無縫循環,但是已經離開循環播放模式,按下此鍵將立即啟動循環播放的模式;如果要
離開循環播放再按此鍵一次。循環播放中,再循環播放(RELOOP)會顯示在屏幕上。
如果要重設結束點(OUT),在沒有RELOOP下按壓Track/Folder選擇旋鈕15不放,再按循環結束點
(OUT)鍵。
21. 轉盤 Jog Wheel
這個轉盤有幾個不同的功能,說明如下:
1) 一幀一幀精確搜尋(Frame Search) - 暫停播放時,旋轉轉盤可精確的找到要播放的幀數。
2) Pitch Bend - 當在播放模式下,轉盤可當做Pitch Bend使用。順時針轉動轉盤可加速音樂播放的速度,最多
加至100%。逆時針轉動轉盤可減慢音樂播放的速度,最多減至-100%,控制調整取決於轉動
轉盤距離的多寡。
3) 錄音狀態下- 錄音输入的音量大小調整。(功能選單下,REC. Input必須選擇MANUAL,詳見第18頁功能設定選單
第7項)
22. 錄音模式按鍵
此按鍵是切換錄音功能/正常播放模式。當REC模式LED灯亮着,如下錄音的信息狀態將会出現在顯示屏上:
ELAPSED TIME:紀錄錄音文件的時间
REMAIN TIME:剩余的時间
TOATAL TIME:USB移动设备可錄音的時间
當CLIP LED亮起紅色灯,REC输入的音量是超過安全的范圍。
部件名稱與功能
MCU-20A(P40) 090516 Rev..indd 章節2:12MCU-20A(P40) 090516 Rev..indd 章節2:12 2016/9/6 上午 11:05:552016/9/6 上午 11:05:55

P40
P40
13
中
文
CD/MP3/USB
可錄音播放器
部件名稱與功能
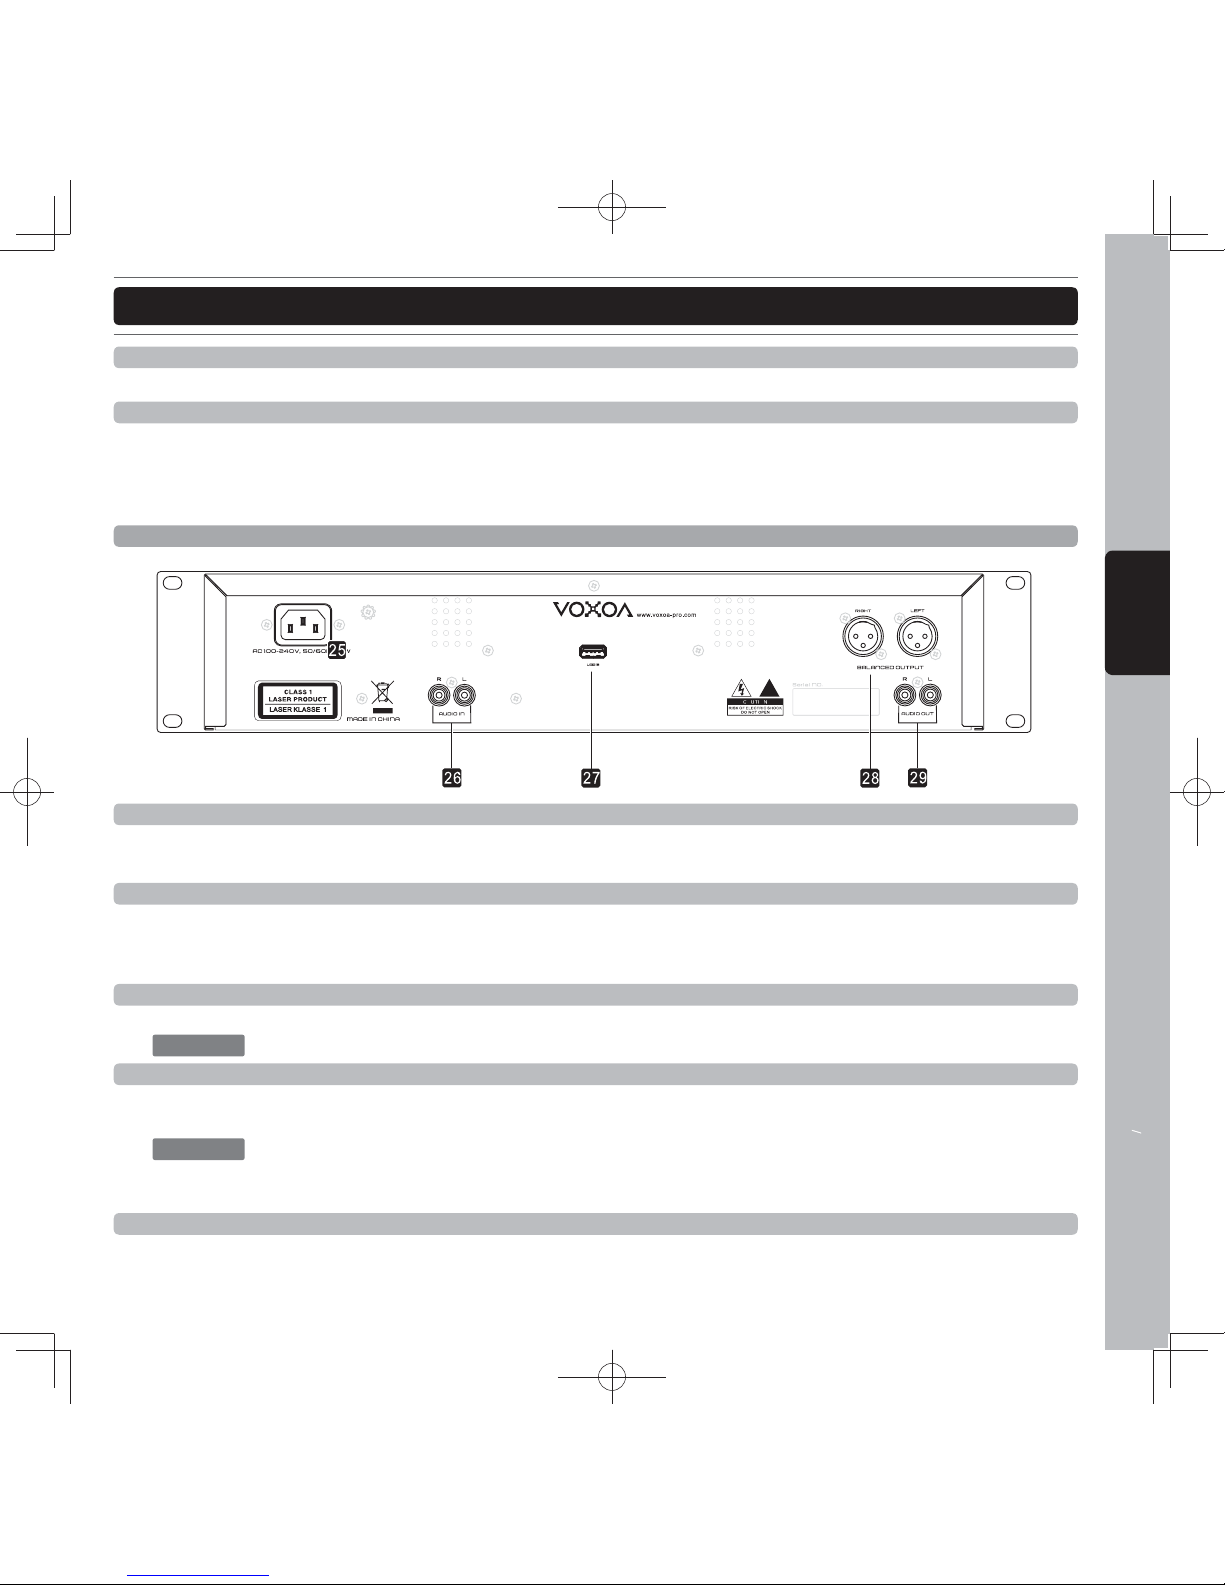
25. 電源線插口
這個插口用來連接電源供應,插頭只有一個方向能夠插入,若方向不符合時,切勿強制插入。
26. RCA音頻输入端口
左右声道信号输入端口。紅色端口表示右通道信号输入,白色端口表示左通道信号输入,使用這两个端口傳送
音頻到此播放设备進行錄音。
27. USB2連接插口 (U盤插口)
此插口用來外接U盤或是USB周邊。
注 意
: 請先開啟電源,再插上USB周邊。
28. 平衡式XLR主音量輸出插口
這個3-pin XLR插口送出高電流平衡輸出訊號。
注 意
: 這個插口需用於連接推動具有平衡式輸入的功率放大器或是音訊設備。或是當訊號線長度超過15英呎
時。
29. RCA聲音輸出插口
左右声道信号输出端口。使用這两个端口傳送音頻到混音器或者接收器。紅色端口表示右通道信号输出,白色
端口表示左通道信号输出
後背板
23. 紅外線接收器
用來接收遙控器所發出的訊號。
24. 電源開關
這個開關用來開啟與關閉電源。
MCU-20A(P40) 090516 Rev..indd 章節2:13MCU-20A(P40) 090516 Rev..indd 章節2:13 2016/9/6 上午 11:05:552016/9/6 上午 11:05:55

14
中
文
30. CUE指示
在CUE模式下,此指示燈亮起。暫停模式下,指示燈會閃爍,此時可重新設定新的CUE點。
31. 資料夾顯示
顯示目前資料夾的編號,資料夾的編號方式是以光盤或U盤中資料結構為主,由根目錄開始編輯。
32. 播放位置
這個長條提供視覺音樂播放位置的顯示,當音樂快播放結束時,長條開始閃爍。
33. CUE及播放內存緩衝指示
內存的使用狀況以條狀的方向顯示在屏幕上,第一條表示5秒的CUE內存緩衝,接下的條狀表示1秒的播放內存
緩衝。
34. BPM 顯示
顯示目前播放歌曲BPM(Beat per Minute每分鐘節拍數)數值. 當AUTO BPM 顯示時表示自動節拍計算器運作
中。
35.速度調整顯示
顯示目前音樂播放速度調整百分比。
36. 音調鎖定KEY LOCK指示
指示音調鎖定功能已經啟動。
部件名稱與功能
顯示屏幕
MCU-20A(P40) 090516 Rev..indd 章節2:14MCU-20A(P40) 090516 Rev..indd 章節2:14 2016/9/6 上午 11:05:562016/9/6 上午 11:05:56
P40
P40
15
中
文
CD/MP3/USB
可錄音播放器
37. 循環播放LOOP指示
表示目前正在播放循環LOOP。
38. 再循環指示RELOOP指示
當循環在播放時,此指示呈現閃爍的狀態。
39. 自動起始(AUTO CUE)點指示
指示自動起始(AUTO CUE)點功能開始或是關閉,按下SGL/CTN鍵 一秒可啟動或關閉自動起始(AUTO CUE)點
功能。
40. 點矩陣訊息顯示列
當播放有ID3標籤的MP3檔案,或是有文字的音樂光盤時,顯示資料夾名稱,音樂的表演者名稱,檔案名稱,
專輯名稱,音樂類別與音樂名稱等。切換不同的顯示方式按歌曲選擇旋鈕做切換。
41. 時間顯示模式指示
指示目前顯示時間的模式。ELAPSED已播放時間,REMAIN剩餘播放時間,TOTAL REMAIN整片光盤剩餘播
放時間,使用播放時間顯示模式切換按鍵在不同模式之間做切換。
42. 時間顯示
提供目前音樂詳細的分,秒與幀。顯示的方式由時間顯示功能所決定,可顯示已播放時間(ELAPSED)/剩餘時
間(REMAIN)/ 整片光盤剩餘播放時間(TOTAL REMAIN)。
43. 重複播放REPEAT
指示目前播放模式在重複播放模式下。
44. 播放模式指示
指示播放器在單曲播放模式或是連續播放模式,在單曲播放模式顯示SINGLE,在連續播放模式不做任何顯
示。
45. 音樂編號顯示
指示目前音樂的編號。
46. 播放/暫停指示
指示目前音樂在播放模式下或是暫停模式。
部件名稱與功能
MCU-20A(P40) 090516 Rev..indd 章節2:15MCU-20A(P40) 090516 Rev..indd 章節2:15 2016/9/6 上午 11:05:562016/9/6 上午 11:05:56

16
中
文
部件名稱與功能
47. 光碟托盤開啟/關閉鍵
按下此按鈕將光盤退出。為了避免在音樂播放時誤觸此鍵而造成音樂中斷,退出光盤的功能,只有在播放暫停
的狀態下,才能夠使用。再按一次,托盤關起。
48. 音樂來源選擇按鍵
用此按鍵選擇切換三種不同的音樂來源包含CD/USB1/USB2。
49. CUE/循環起始點按鍵
所謂的Cue點是一個自身定義的播放起點,通常是在節奏一開始的位置。在音樂播放的模式下,按下Cue鍵,
音樂會立即暫停並回到上一次Cue點設定的位置。按著Cue鍵不放,將會變成播放模式,一旦你放開Cue鍵,
播放就會立即暫停播放,並回到Cue點。
在音樂播放或搜尋的模式下,先按播放/暫停鍵暫停音樂播放再按CUE鍵可設一新CUE點(也可當是無縫循環的
起始(IN)點。
50. 循環結束點OUT 鍵
按下這個按鍵來設定循環的結束點(OUT),一個無縫循環由設定新CUE點-起始點開始,按下結束鍵(OUT)結
束。循環會連續不斷的播放,直到再循環(RELOOP)
的按鍵被按下,循環播放才會停止。
51. 再循環/離開(RELOOP) 鍵
如果已經設定一個無縫循環,但是已經離開循環播放模式,按下此鍵立即啟動循環播放的模式,離開循環播放
再按此鍵一次。循環播放中,再循環播放(RELOOP)會顯示在屏幕上。
52. 播放/暫停 PLAY/PAUSE 鍵
每按一次此按鍵可切換暫停變成播放,或是播放變成暫停。
遙控器
MCU-20A(P40) 090516 Rev..indd 章節2:16MCU-20A(P40) 090516 Rev..indd 章節2:16 2016/9/6 上午 11:05:562016/9/6 上午 11:05:56
P40
P40
17
中
文
CD/MP3/USB
可錄音播放器
部件名稱與功能
53. 錄音紀錄分割MARK按鍵
在錄音過程中,按此按鍵就可以將先前錄音保存。此時仍然是繼續錄音狀態,再按下此按鍵会保存另外一段錄
音。
54. 錄音/停止按鍵
每按一次此按鍵可啟動或關閉錄音功能。
55. SGL/CTN 單曲/連續播放切換按鍵
這個功能讓你切換音樂的播放是單曲播放還是連續播放。
SGL = 單曲播放 → 當目前播放的音樂播放結束,播放器立即成為暫停的模式。
CTN = 連續播放 → 整片CD或是檔案夾的音樂持續播放。
56. 重複播放按鍵
按下此按鍵,可啟動或關閉重複播放(REPEAT)的功能。
57. 音調鎖定KEY LOCK
此項功能開啟時,當你改變音樂拍子的速度,音樂的音調卻不會受任何變化。
58. 音樂速度調整鍵
這組按鍵用來調整音樂播放的速度,按+增快播放速度,按-減緩播放速度。
按下0%音樂速度重置鍵- 音樂播放速度立即變成正常播放速度,沒有速度的改變。
按下% 拍子速度調整範圍選擇按鍵- 每按一次此按鍵,拍子速度改變推子的範圍變化,由±4%, ±8%,±16%
及±100%(CDDA)間切換。
59. 靜音MUTE 鍵
按下此鍵,輸出音量立即變成0。
60. 音量控制鍵
控制輸出的音量大小,按+增加音量,按-降低音量。
61. 檔案夾搜尋鍵
在CD/MP3光盤中或是在U盤中的音樂檔案,放在不同的檔案夾中,可利用此檔案夾搜尋鍵來切換不同的檔案
夾。
62. 音樂TRACK選擇鍵
此組按鍵用來選擇歌曲,在同一片CD或是同一個歌曲目錄中,來選擇歌曲。
63. 搜尋SEARCH鍵
搜尋鍵用來協助你快速的找到你所需要歌曲的位置,
這個搜尋鍵能夠讓你快速的往後搜尋, 這個搜尋
鍵能夠讓你快速的往前進搜尋。
MCU-20A(P40) 090516 Rev..indd 章節2:17MCU-20A(P40) 090516 Rev..indd 章節2:17 2016/9/6 上午 11:05:562016/9/6 上午 11:05:56
18
中
文
功能設定選單
步驟1 : 按住TIME鍵 5 2秒進入功能設定選單。
步驟2 : 轉動TRACK 搜尋旋鈕
15
切換不同的功能設定。
步驟3 : 按下TRACK進入每一個選項的設定模式。
步驟4 : 旋轉TRACK旋鈕,選擇所需要的設定。
步驟5 : 再按下TRACK旋鈕,離開單一功能設定選單。
步驟6 : 儲存設定及離開,旋轉TRACK旋鈕到A.Exit & Save,再按TRACK旋鈕,屏幕出現Saving,表示正在儲
存中,儲存結束離開功能設定選單。
注 意
: 按下TIME鍵 5 ,隨時都可以離開“功能設定選單”,但所做的改變,不會被儲存。
1. Playlist -音樂播放清單排序模式:設定音樂播放清單排序方式,可依 一般Normal(無資料庫)/音樂名稱Title /音
樂表演者名稱Artist /專輯名稱Album /音樂類型Genre (只有USB才有)播放時的排序方式。
VOXOA TUNEBOX軟件能夠針對U盤產生“音樂播放清單”(PLAYLIST),可以依照需求而篩選不同
的播放清單排序的方式。旋轉“音樂TRACK選擇旋鈕
15
”去選擇播放清單依照何種方式排序,選擇
確定按TRACK旋鈕 15 並離開。
• 一般模式Normal : 這是內定值。播放清單是依照檔案階層架構所排序。
• 音樂名稱Title : 播放清單依照依“音樂名稱Title”,按英文字母順序排序。
• 音樂表演者名稱Artist : 播放清單依照依”音樂表演者名稱Artist”,按英文字母順序排序。
• 專輯名稱Album : 播放清單依照依“專輯名稱Album”,按英文字母順序排序。
• 音樂類型Genre : 播放清單依照依“音樂類型Genre”,按英文字母順序排序。
2. Sleep Time - 當光碟未操作時,會進入停止狀態可調整5-120分鐘及無停止狀態。
3. Line Mode - 點矩陣訊息顯示列模式,1-跑馬播放後暫停再繼續跑馬,2- 跑馬播放後停止,3- 連續跑馬播放。
- Dis = 顯示時間調整0.5~12.0 秒。
- Run = 跑馬速度調整 50~2000毫秒。
4. Bit Rate = MP3壓縮率–是否顯示MP3的壓縮率,可設定顯示ON/關閉OFF。
5. REC. USB - Select the recording device between USB1 and USB2. (The default setting is USB2.)
6. REC. Bitrate - Select the REC. Bitrate between WAV/MP3 64000,128000(Defaults),192000,256000,320000
7. REC. Input - Auto(Defaults) / manual Input level
8. 輸出模式-正常播放(預設)/錄音監聽
9. Version = 韌體版本資訊.
- CON : XX(Control 版本).
- DSP : XX(DSP 版本).
A. Load Defaults = 載入預設值,按下TRACK旋鈕載入預設值。
B. Exit & Save = 離開並儲存設定。
MCU-20A(P40) 090516 Rev..indd 章節2:18MCU-20A(P40) 090516 Rev..indd 章節2:18 2016/9/6 上午 11:05:572016/9/6 上午 11:05:57

P40
P40
19
中
文
CD/MP3/USB
可錄音播放器
操作控制
開始播放與停止播放
• 開始播放
在暫停或是Cue模式下,按下播放/暫停PLAY/PAUSE鍵 16 啟動播放模式。
• 停止播放
有兩種方式可以停止播放。在播放下,按下播放/暫停PLAY/PAUSE鍵
16
,播放立即暫停在你所按下的時間點,
或是按下CUE鍵 19,播放立即停止並回到起始 (Cue)點。
設定起始(Cue)點
所謂的Cue點就是音樂播放的起始點,設定Cue點是為播放做準備的動作。在暫停模式下,一旦按下Cue 鍵,Cue
點就會被儲存在內存中。在音樂播放時,按下Cue鍵,音樂會立即暫停並回到Cue點,當再按下播放/暫停(PLAY/
PAUSE)鍵時,音樂開始從Cue點播放。
也可以回到Cue點立即播放,按住不放Cue 鍵,再按下播放/暫停(PLAY/PAUSE)鍵,音樂就會回到Cue點並立即播
放。
步驟 1 : 在播放中,當音樂播放到你所想要的時間點,按下播放/暫停PLAY/PAUSE鍵 16 暫停音樂播放。
步驟 2 : 精確的搜尋Cue點的位置,使用轉盤可以做一幀一幀精確搜尋。
步驟 3 : 找到你所想要的播放點,按下Cue鍵 19,Cue按鍵燈會由閃動轉為恆亮表示Cue點的設定完成,新設定
的Cue點會覆蓋原有的。
• 即時設定Cue點
在播放模式下,在你所希望設定的時間點,先按下播放/暫停PLAY/PAUSE鍵 16後再按下Cue鍵 19,Cue點
立即被儲存,只要稍做練習,這是最快設定Cue點的方式。
• 自動Cue點
自動Cue點功能,能夠自動設定每一首音樂,一開始的起點。按住SGL/CTN鍵 6,開啟自動Cue點功能,屏
幕上會顯示AUTO CUE。
秘訣:任何時間Cue鍵在閃動時,表示已經準備好記錄新的Cue點。
MCU-20A(P40) 090516 Rev..indd 章節2:19MCU-20A(P40) 090516 Rev..indd 章節2:19 2016/9/6 上午 11:05:582016/9/6 上午 11:05:58

20
中
文
操作控制
調整播放速度 Adjusting the Pitch
• 使用速度調整推子 Pitch Slider
當第一台播放器正在播放,第二台播放器準備好要播放時,兩台播放的拍子速度要保持一致,最迅速的方式是
調整第二台播放器的速度調整推子,讓第二台播放器去吻合第一台播放器的拍子速度。推子往上(-)移動會降低
拍子速度,往下(+)移動會增加拍子速度。
• Pitch Bending
使用Pitch Bend 按鍵
9
調整速度
當音樂的速度調整到對的節奏,要調整每一個拍子要相符合的狀態,Pitch Bending提供一個快速修正拍子位
置的方式,讓第二台播放器拍子的位置盡可能的與第一台播放器的位置相接近。按下PITCH BEND- or PITCH
BEND+鍵會暫時減慢或增快播放速度。速度改變的程度會依照按著按鍵時間的長短成正比,舉例說明,持續
按著按鍵不放,播放速度一直改變直到速度調整範圍的最大值。一放開按鍵,速度就回到速度調整推子(Pitch
Slider)的設定值。
• 使用轉盤調整速度
轉盤也可作為暫時調整速度用,當音樂播放時,順時針轉動轉盤增快播放速度,逆時針轉動轉盤減慢播放速
度。改變速度的幅度會依照你所轉動轉盤的速度而定。
• 音調鎖定KEY LOCK功能
這項功能讓音樂的速度改變時不影響音樂的音調,當音調鎖定功能的LED 亮時,音調是保持原音調不變的。
無縫循環 Seamless Loops
• 創造一個無縫循環 (LOOP)
步驟 1 : 按下播放/暫停鍵(PLAY/PAUSE) 16 開始播放。
步驟 2 :
播放至要求的循環起始點,按下暫停鍵(PLAY/PAUSE) 16 暫停播放,再按下CUE鍵 19設一新CUE點/新起
始
點。
步驟 3 : 按下結束點(OUT)鍵 20,設定循環的結束點。播放立即回到先前所設定的起始點(CUE),並開始播放到
結束點(OUT)反覆播放,不會有任何間斷。當循環設定完成,RELOOP指示在屏幕顯示閃動,同時CUE
鍵和結束點(OUT)鍵同時閃動。
• 離開循環播放模式
在循環播放時,按下離開/再循環 EXIT/RELOOP鍵 20離開循環播放模式,音樂播放到結束點(OUT)時,會持續
往下播放,而不是回到起始點(CUE)再播放。
• 再播放循環(Reloop)
只要再按“離開/再循環 EXIT/RELOOP鍵 20 ”即可進入循環播放狀態。離開循環播放,只需再按一次“離開/
循環 EXIT/RELOOP鍵 20”。
MCU-20A(P40) 090516 Rev..indd 章節2:20MCU-20A(P40) 090516 Rev..indd 章節2:20 2016/9/6 上午 11:05:592016/9/6 上午 11:05:59
P40
P40
21
中
文
CD/MP3/USB
可錄音播放器
VOXOA TUNEBOX 資料庫建立軟件
VOXOA TUNEBOX 資料庫建立軟件
VOXOA TUNEBOX資料庫建立軟件,在計算機端先針對外接的USB 儲存設備做演算,建立音樂資料庫,當接上
USB 儲存設備接上播放器時,播放器就可立即讀取,並且可以依照音樂檔案的名稱,表演者,專輯名稱及類別做
立即的搜尋。
• 系統需求
處理器: 英特爾奔騰4, 1 GHz 處理器, Intel Centrino Mobile Technology 1.6 GHz 或更高等級。
內存: 512 MB。
硬盤空間: 100MB 可使用的硬盤空間。
作業系統: Microsoft Windows XP SP3, Vista SP2 或更新的版本。
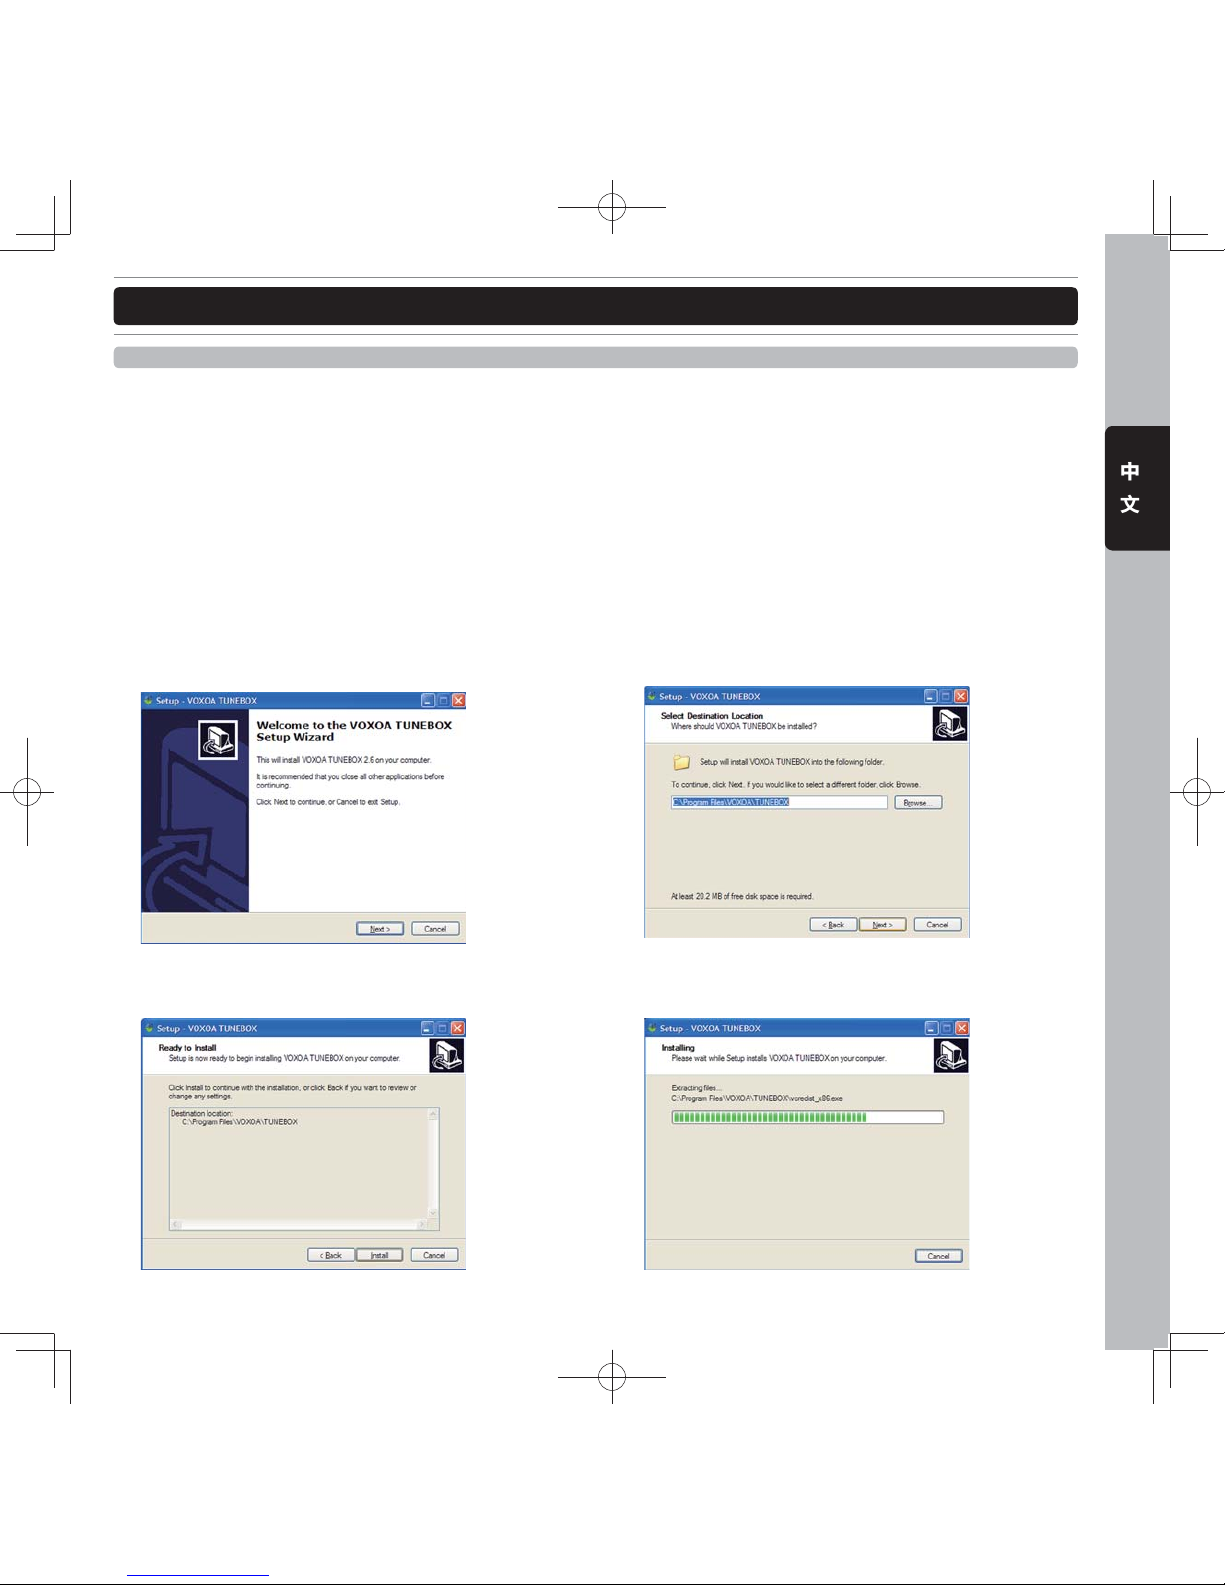
安裝軟件 : 請參照下列步驟安裝資料庫建立軟件在計算機中。
步驟 1 : 執行資料庫建立軟件安裝程式。
步驟 3 : 準備好安裝。
步驟 2 : 選擇要將軟件安裝在計算機的那個資料夾。
步驟 4 : 安裝進行中。
MCU-20A(P40) 090516 Rev..indd 章節2:21MCU-20A(P40) 090516 Rev..indd 章節2:21 2016/9/6 上午 11:06:012016/9/6 上午 11:06:01

22
中
文
VOXOA TUNEBOX 資料庫建立軟件
步驟 5 : 安裝完成,按下Finish 結束,離開安裝程式。
如何使用VOXOA TUNEBOX資料庫建立軟件
VOXOA TUNEBOX資料庫建立軟件可以一次性掃描所有在外接USB儲存設備中所有的檔案,並且建立檔案資料庫
去確定音樂檔案在資料庫中的位置。這使得播放器在讀取外接USB儲存設備時,更迅速更容易找到你所要播放的
音樂。
步驟 1: 執行VOXOA TUNEBOX程序。
步驟 2 : 選取所要建立資料庫的外接USB儲存設備,然後
按下建立Build鍵。
步驟 3 : VOXOA TUNEBOX開始進行建立資料庫的工作。
步驟 4 : 完成資料庫建立,顯示建立的訊息。
注 意
: 每次外接USB儲存設備的內容有做更動
時,請重新執行VOXOA TUNEBOX去更
新最新的資料庫。
MCU-20A(P40) 090516 Rev..indd 章節2:22MCU-20A(P40) 090516 Rev..indd 章節2:22 2016/9/6 上午 11:06:022016/9/6 上午 11:06:02

P40
P40
23
中
文
CD/MP3/USB
可錄音播放器
VOXOA TUNEBOX 資料庫建立軟件
播放清單操作方式:
1. 按住Time鍵
5
3秒進入”功能設定選單”,旋轉 Track 旋鈕 15 去找尋播放清單 (PLAYLIST)的選項。
2. 旋轉 Track 旋鈕去選擇 一般(Normal) / 曲目名稱(Title) /表演者( Artist) /專輯名稱(Album )/ 類別(Genre) (只有
USB才有。
3. 使用Folder鍵
14
去切換到資料夾(Folder)模式
(示範操作選取表演者Artist做為播放清單)
(a) 按住並旋轉Track選鈕,你可以依照表演者英文字母的第一個字,依序選擇你所喜愛的表演者。
(b) 按住並旋轉Track選鈕,或是按住Track選鈕然後旋轉轉盤,你可以選擇下一個你所喜愛的表演者。
使用Folder鍵 14去切換到音樂(Track)模式
(a) 按住並旋轉Track選鈕,或是按住Track選鈕然後旋轉轉盤去選擇你所喜歡的音樂。
注 意
: 在Windows Vista 作業系統下,執行VOXOA TUNEBOX軟件,造成無法執行的問題,請依照下列步驟
解決此問題。
在 Windows Vista作業系統下,會造成出現 “Failed to open device”(打開設備失敗)的錯誤訊息。
1. 主要原因來自於 使用者帳號管理控制(User Account
Control)的限制,而造成無法執行VOXOA
TUNEBOX。
2. 在執行VOXOA TUNEBOX時,必須先按鼠標右鍵
,然後選擇Run as administrator。
3. 授權允許VOXOA TUNEBOX在 Windows Vista作
業系統下執行,就能解決無法執行的問題。
MCU-20A(P40) 090516 Rev..indd 章節2:23MCU-20A(P40) 090516 Rev..indd 章節2:23 2016/9/6 上午 11:06:032016/9/6 上午 11:06:03

24
中
文
1. 一般規格
電源 : AC100 - 240V, 50/60Hz
耗電量 : 13WATTS
尺寸 :
482mm (W) X 270.5mm (D) X 88.8 mm (H)
重量 :
4.25kg
2. 声音特性 : (光盤測試: TCD-782 & TCD-781; USB 測試格式: MP3, 128KBPS; 承載=100KOHM)
項目 典型 限制 條件
(1) 输出电平 CD: 2V +/-0.5dB 2V +/-1dB 1KHz, 0dB (TCD782,TRK2)
USB: 2V +/-0.5dB 2V +/-1dB 1KHz, 0dB (TCD782,TRK2)
(2) 通道平衡 WITHIN 0.2dB WITHIN 1dB 1KHz, 0dB (TCD782,TRK2)
(3) 頻率響應 CD:
17-20KHz +/-0.4dB 17-20KHz +/-1dB
0dB OUTPUT(TCD782,TRK2/3/7)
USB:
17-16KHz
+/-0.2dB
17-16KHz +/-1dB
0dB
OUTPUT(TCD781,TRK1/4/16)
(4) 信号
還原 CD: -20dB +/-0.2dB -20dB +/-1dB 16KHz,-20dB(TCD782,TRK2/14)
(5) 通道分隔(*2) CD, USB: 93dB 85dB 1KHz, 0dB (TCD782,TRK2/9/11)
(6) 總諧波失真+噪音(*1) CD: 0.008% 0.015% 1KHz, 0dB (TCD782,TRK2)
USB: 0.007% 0.015% 1KHz, 0dB (TCD782,TRK2)
(7) 信噪比(*2) CD: 126dB 90dB 1KHZ, 0dB (TCD782,TRK2/8)
USB: 85dB 80dB 1KHZ, 0dB (TCD782,TRK2/8)
(8) 動態範圍(*2) CD: 92dB 88dB 1KHz, -60dB (TCD782,TRK18)
(9) XLR 輸出等級 8.22dBm(2V)
+/-0.5dB
8.22dBm(2V)
+/-1dB
1KHz, 0dB (TCD782,TRK2)
NOTE
: *1 : WITH 20KHz低通濾波器.
*2 : WITH 20KHz低通濾波器, "IHF-A" WEIGHTED.
3. 光盤搜尋時間 : (測試光盤:: TCD-792)
項目 典型 限制 條件
(1) 短存取時間 2秒 4秒 播放下一首
(2) 長存取時間 4秒 6秒 第1首到第20首,第20首到第1首
規格規格
MCU-20A(P40) 090516 Rev..indd 章節2:24MCU-20A(P40) 090516 Rev..indd 章節2:24 2016/9/6 上午 11:06:042016/9/6 上午 11:06:04

P40
P40
25
中
文
CD/MP3/USB
可錄音播放器
4. 光盤播放能力 :
項目 典型 限制 條件
(1) 中斷INTERRUPTION 1mm 0.7mm TCD-725
(2) 黑點BLACK DOT 1mm 0.6mm TCD-725
(3) 指紋FINGER PRINTS 75um 65um TCD-725
(4) 偏心率ECCENTRICITY 140um 140um TCD-712 W/O TRACK JUMP
(5) 垂直軸偏差VERTICAL DEVIATION 1mm 0.5mm TCD-731R
(6) 刮痕SCRATCH 2mm 1.2mm TCD-721 W/O TRACK JUMP
5. SOUND RECORDING
(1) MENU REC INPUT: AUTO / REC BIT RATE: WAV.(REC INPUT: 1KHZ / +10dBV)
PLAY AUDIO FILES LEVEL: 1KHZ / 4dBV +/-2dBV
THD+N: LESS THAN 0.015% (W/20KHz LPF, A-WEIGHTED)
(2) MENU REC INPUT: MANUAL / REC BIT RATE: WAV.(REC INPUT: 1KHZ / -4dBV) / GAIN 0dBV
PLAY AUDIO FILES LEVEL: 1KHZ / 0dBV +/-2dBV
THD+N: LESS THAN 0.03% (W/20KHz LPF, A-WEIGHTED)
6. MP3 格式 :
光盤格式 可讀取的延伸檔名 mp3. MP3. mP3. Mp3
ISO9660 最多 63 字元
Joliet 最多 63 字元
CD-ROM區段格式 mode-1 only
最大資料夾數 255
最大檔案數 最多999檔案 (每個資料夾最多255檔案。)
USB 格式 檔案系統 FAT 12/16/32
可讀取的延伸檔名 mp3. MP3. mP3. Mp3
最大資料夾數 999
最大檔案數 最多999檔案
MP3 格式
標準MPEG 1 Layer 3 (ISO/IEC 11172-3), 提供
單音軌
(“
mono”) 與雙音軌 (“stereo”) 編碼取樣
率32, 44.1 與48kHz.
32/40/48/56/80/96/112/128/160/192/224/256/
320 kbps
Xing/VBRI VBR
標準MPEG 2 Layer 3 (ISO/IEC 13818-3), 提
供類似的編碼取樣率16, 22.05 and 24kHz.
32/40/48/56/64/80/96/112/144/160 Kbps
Xing/VBRI VBR
標準MPEG 2.5 Layer 3提供類似的編碼取
樣率8, 11.025 and 12 kHz.
32/40/48/56/64/80/96/112/144/160 Kbps
Xing/VBRI VBR
光盤寫入方式 Disc at Once and Track at Once
多重區段
假設第一個區段是CDDA,只能播放CDDA的音樂。
假設第一個區段是MP3,只能播放MP3的音樂。
注 意
: 本手冊中的規格及資訊如有變更,恕不另行通知,請上網下載最新版本。
規格
MCU-20A(P40) 090516 Rev..indd 章節2:25MCU-20A(P40) 090516 Rev..indd 章節2:25 2016/9/6 上午 11:06:042016/9/6 上午 11:06:04

26
ENGLISH
IMPORTANT SAFETY INSTRUCTIONS
1. Read these instructions.
2. Keep these instructions.
3. Heed all warnings.
4. Follow all instructions.
5. Do not use the apparatus near water.
6. Clean only with dry cloth.
7. Do not block any ventilation openings. Install in accordance with the manufacturer’s instructions.
8. Do not install near any heat sources such as radiators, heat registers, stoves, or other apparatus (including amplifi ers) that
produce heat.
9. Do not defeat the safety purpose of the polarized or grounding-type plug. A polarized plug has two blades with one wider
than the other. A grounding- type plug has two blades and a third grounding prong. The wide blade or the third prong is
provided for your safety. If the provided plug does not fi t into your outlet, consult an electrician for replacement of the obsolete
outlet.
10. Protect the power cord from being walked on or pinched particularly at plugs, convenience receptacles, and the point where
they exit from the apparatus.
11. Only use attachments/ accessories specifi ed by the manufacturer.
12. Use only with a cart, stand, tripod, bracket or table specifi ed by the manufacturer, or sold with the apparatus.
When a cart is used, use caution when moving the cart/apparatus combination to avoid injury from tip-over.
13. Unplug this apparatus during lighting storms or when unused for long periods of time.
14. Refer all servicing to qualifi ed service personnel. Servicing is required when the apparatus has been damaged in any way,
such as power-supply cord or plug is damaged, liquid has been spilled or objects have fallen into the apparatus, the
apparatus has been exposed to rain or moisture, does not operate normally, or has been dropped.
15. When the mains plug or appliance coupler used as the disconnect device, it shall remain readily operable.
16. Please keep the unit in a good ventilation environment.
To reduce the risk of fi re or electric shock, do not expose this apparatus to rain or moisture. The apparatus shall not be
exposed to dripping or splashing and that no objects fi lled with liquids, such as vases, shall be placed on the apparatus.
To prevent electric shock, do not use this polarized plug with an extension cord, receptacle or other outlet unless the blades
can be fully inserted to prevent blade exposure.
The lightning fl ash with arrowhead symbol within the equilateral triangle is intended to alert the use to the presence
of un-insulated “dangerous voltage” within the product’s enclosure that may be of suffi cient magnitude to constitute
a risk of electric shock.
CAUTION : To reduce the risk of electric shock, do not remove any cover. No userserviceable parts inside. Refer servicing to qualifi ed service personnel only.
The exclamation point within the equilateral triangle is intended to alert the user to the presence of important
operation and maintenance (servicing) instructions in the literature accompanying this appliance.
WARNING
CAUTION
MCU-20A(P40) 090516 Rev..indd 章節2:26MCU-20A(P40) 090516 Rev..indd 章節2:26 2016/9/6 上午 11:06:052016/9/6 上午 11:06:05

P40
P40
27
ENGLISH
CD/MP3/USB Player
With Recording
IMPORTANT SAFETY INSTRUCTIONS
17. All warnings on the appliance and in the operating instructions should be adhered to.
18. Heat - The appliance should be situated away from heat sources such as radiators, heat registers, stoves, or other appliances
(including amplifi ers) that produce heat.
19 .Power Sources - This product should be operated only from the type of power source indicated on the rating label. If you are
not sure of the type of power supply to your home, consult your product dealer or local power company. For products
intended to operate from battery power, or other sources, refer the operating instructions.
20. Grounding or Polarization - This product may be equipped with a polarized alternation-current line plug (a plug having one
blade wider than the other). This plug will fi t into the power outlet only one way. This is a safety feature. If you are unable to
insert the plug fully into the outlet, try reversing the plug. If the plug should still fail to fi t, contact your electrician to replace
your obsolete outlet. Do not defeat the safety purpose of the polarized plug.
21. Power-Cord Protection - Power-supply cords should be routed so that they are not likely to be walked on or pinched by items
placed upon or against them, paying particular attention to the cord in correspondence of plugs, convenience receptacles,
and the point where they exit from the appliance.
22. For AC line powered units - Before returning repaired unit to user, use an ohm-meter to measure from both AC plug blades to
all exposed metallic parts. The resistance should be more than 100,000 ohms.
23. Non-use Periods - The power cord of the appliance should be unplugged from the outlet when left unused for a long period
of time.
24. Object and Liquid Entry - Care should be taken so that objects do not fall and liquids are not spilled into the enclosure through
openings.
25. Damage Requiring Service - The appliance should be serviced by qualifi ed service personnel when: A. The power-supply cord
or the plug has been damaged; or B. Objects have fallen, or liquid has been spilled into the appliance; or C. The appliance
has been exposed to rain; or D. The appliance does not appear to operate normally or exhibits a marked change in
performance; or E. The appliance has been dropped, or the enclosure damaged.
26. Servicing - The user should not attempt any service to the appliance beyond that that described in the operating instructions.
All other servicing should be referred to qualifi ed service personnel.
27. Lightning - For added protection for this product during a lightning storm, or when it is left unattended and unused for long
periods of time, unplug it from the wall outlet and disconnect the antenna or cable system. This will prevent damage to the
product due to lightning and power-line surges.
28. Replacement Parts - When replacement parts are required, be sure the service technician has used replacement parts
specifi ed by the manufacturer or have the same characteristics as the original part. Unauthorized substitutions may result in
fi re, electric shock, or other hazards.
29. Safety Check - Upon completion of any service or repairs to this product, ask the service technician to perform safety checks
to determine that the product is in proper operating condition.
MCU-20A(P40) 090516 Rev..indd 章節2:27MCU-20A(P40) 090516 Rev..indd 章節2:27 2016/9/6 上午 11:06:052016/9/6 上午 11:06:05

28
ENGLISH
- MAIN FEATURES
MP3/WAV Playback
The P40 can read, display and play MP3/WAV fi les written to CD-R/CD-RW providing DJs with the ability to store
more music on a single media or for extended playback time. Files can be searched for easily either manually, or by
scanning or using a number of fi le search functions including File search and File/Folder search. Additionally MP3
ID3 tag information can be viewed on the display.
MP3 File Search System
MP3 File Search System allows you to locate in seconds hundreds of MP3 tracks on by artist name, song title or
folder. In addition, MP3 ID3 Tags are supported on a large, easy-to-read dot matrix fl uorescent tube display.
External USB Device
In this digital era, USB devices become the most convenient for music collection. P40 can support external USB
mass storage devices. Connect an MP3 player, thumb drive and large hard drives for easy access to small or
extensive MP3/WAV libraries up to 999 folders and each folder 999 fi les.
Support with VOXOA TUNEBOX Software
Support with the VOXOA TUNEBOX software makes reading and searching fi les much quicker and easier. The
VOXOA TUNEBOX can scan all of music fi les in your USB mass storage devices and then create database fi les to
locate the fi les in your music library.
Infrared Ray Remote Controller
P40 includes infrared ray remote controller, so you can control the player when you are not in front of the player.
The feature adds a lot of convenience helpful for small lounge bars, music restaurants, and other entertainment places.
Anti-Shock Buffer Memory
Sound jumps or skipping is prevented by using Anti-Shock buffer memory for continuous playback even in the
event of a bump or knock.
Tempo Control and Range
A high precision slider gives DJs total control and ensures that the tempo adjustment is easy and accurate. The
range of tempo +/- 4%, +/-8%, +/-16%, +/-100%(CDDA) can be assigned to the Tempo Control slider.
Key Lock
The Key Lock function locks the pitch of the track even when you adjust the speed of the track. You can speed up
or slow down the beat without any noticeable difference in how the vocal and music sound.
Record
P40 could record the music from CD/MP3 Disc or outside input audio source directly into the USB storage device.
The recording bit rate is between WAV (16bit, 44.1kHz) and MP3 (64kbps~320kbps).
Two Output Choice
P40 could choose normal playback(play while recording with different music source)or recording
output(synchronous recording and playback with same music source)
FEATURES
MCU-20A(P40) 090516 Rev..indd 章節2:28MCU-20A(P40) 090516 Rev..indd 章節2:28 2016/9/6 上午 11:06:052016/9/6 上午 11:06:05

P40
P40
29
ENGLISH
CD/MP3/USB Player
With Recording
- FEATURES AND FUNCTIONS
Player
•
19” 2U Rack-moutable
•
Reliable Anti-Shock playback with buffer memory
•
Automatic and manual tap beat counter
•
Remote Controller
Media Types
•
Support for MP3/ WAV playback with text display
•
2 USB sockets for external USB device support
•
ID3 TAG support
Playback
•
Instant start via 1 bit technology (8 fold)
•
Single and Continuous play modes
Music Search
•
Track and folder searching system
•
Frame search for precisely searching
•
VOXOA TUNEBOX software for fast searching massive USB device
•
Onboard fi le and folder browsing
Cue/Loop
•
Auto cue function cues track to start of music
•
Seamless loop function / reloop function
Pitch Control
•
Adjustable pitch rang ±4%, ±8%, ±16% and ±100%(CDDA)
•
High quality pitch fader
•
Pitch bend control button
•
Pitch bend up to +/- 100%
•
Key Lock allow a track’s tempo to be changed without affecting the original key of the track
FEATURES
MCU-20A(P40) 090516 Rev..indd 章節2:29MCU-20A(P40) 090516 Rev..indd 章節2:29 2016/9/6 上午 11:06:052016/9/6 上午 11:06:05

30
ENGLISH
FEATURES
Jog Wheel
•
High quality 2.4” jog wheel
•
Jog wheel control for pitch bending and frame searching
Display
•
Large extra bright display for all important functions
•
Display playing address
•
Elapsed / Remain / Total remain time display
•
Displays text for ID3 tags and folder names for easy navigation
•
Text display for navigating folders on MP3 CDs and USB fl ash drives
Output
•
Analog RCA outputs
•
Balanced XLR outputs
Intput
Analog RCA intputs (For recording)
MCU-20A(P40) 090516 Rev..indd 章節2:30MCU-20A(P40) 090516 Rev..indd 章節2:30 2016/9/6 上午 11:06:052016/9/6 上午 11:06:05
P40
P40
31
ENGLISH
CD/MP3/USB Player
With Recording
CONNECTIONS
1. Before making or changing connections, switch off the power and disconnect the power cord from the AC
outlet.
2. Quality cables make a big difference in fidelity and punch. Use high-quality, audio cables.
3. Do not use excessively long cables. Be sure plugs and jacks are securely fastened. Loose connections
cause hum, noise, or intermittence that could damage your speakers.
4. Connect the RCA pin cords to the inputs on your mixer.
CAUTION
: Be sure to use the supplied control cord. Using another type of cable may result in damage.
MCU-20A(P40) 090516 Rev..indd 章節2:31MCU-20A(P40) 090516 Rev..indd 章節2:31 2016/9/6 上午 11:06:052016/9/6 上午 11:06:05
32
ENGLISH
PART NAMES AND FUNCTIONS
Front Panel
1. Compact disc tray
This tray is used to load and unload a compact disc. The tray is opened and closed by pressing the Disc open/
close button. Never attempt to force the tray open or closed when the power is turned off.
2. USB 1 port
The port use to connect a USB memory device.
CAUTION
: Please turn on the P40 before you plug USB storage device.
3. Disc tray open/close button
Pressing this button will open the CD tray. The open function will only when the unit is in cue or pause mode, this
is to prevent accidentally opening the tray when in play mode. Press the button again to close the CD tray.
4. Source select button
Use this button to switch between the three media modes – CD/USB1/USB2. When turning on the P40 will
automatically be in CD mode.
5. Time display mode switch button
The button will switch the time display mode between Elapsed playing time, Track Remaining time and entire CD
Total Remaining time.
NOTE
: Hold this button more than 2 seconds to enter the internal menu.
6. SGL/CTN switch button
This function allows you to switch single track play or continuous track play (all tracks in order).
SGL = Single → The current title is played; the player goes into pause mode.
CTN = Continue → The entire CD or folders will be continually played.
NOTE
: Hold this button down at least 1 second to activate or to deactivate AUTO CUE mode.
7. LCD display
This high quality LCD display indicates all the functions, as they are occurring. This display is viewable at several
comfortable angles.
NOTE
: When REC MODE LED is on, the recording information will illustrate in the display.
8. Tempo adjust slider
This slider is used to adjust the playback pitch percentage.
MCU-20A(P40) 090516 Rev..indd 章節2:32MCU-20A(P40) 090516 Rev..indd 章節2:32 2016/9/6 上午 11:06:072016/9/6 上午 11:06:07

P40
P40
33
ENGLISH
CD/MP3/USB Player
With Recording
PART NAMES AND FUNCTIONS
9. Pitch bend +/- button
The desired pitch decrease (-) or increase (+) when button is pressing and returns to the original pitch when the
button is released.
10. Key Lock button
This function allows the tempo or BPM of the music to be altered without affecting the musical key. While this
LED is illuminated, the key will be locked at zero.
11. Tempo control range selector button
Each time this button is pressed, the tempo adjust slider’s variable range alternates between ±4%, ±8%, 16%
and 100% (CDDA).
12. TAP /Auto BPM button
Tap along with the music to enter manual BPM values. This is generally used to manually calculate BPMs when
the Auto BPM function is unable to lock onto a consistent beat. You must tap at least four times in order for
a calculation to occur, and the calculation will only be as accurate as your tapping. Holding TAP BPM button,
turning track knob
15
is able to adjust BPM value, holding down and turning track knob to adjust the decimal
BPM value.
NOTE
: Using this button will disengage the Auto BPM function. To return to Auto BPM, simply
hold down the Tap button until the display reads AUTO BPM in the display screen.
13. Search buttons
This search button allows you to quickly scan backwards through a track. This search button allows you
to quickly scan forwards through a track.
14. Track / Folder search switch button
Press this button to switch the konb’s function as Track search knob or Folder search knob.
Holding this button to turn ON/OFF REPEAT function.
REPEAT ON : In continuous mode, all the tracks in the current folder will be played track by track until the repeat
function is deceived.
In single mode, the current track will repeat play until the repeat function is inactive.
REPEAT OFF : All the tracks in the device will be played in normal mode.
15. Track / Folder search knob
Under Track Search this knob has three functions.
1) The knob is used to select a track. Turning track knob will forward/backward skip to next track.
2)
Holding down and turning track knob will rapidly forward/backward skip through the tracks by 10 tracks per click
.
3) Press track knob to switch fi le name/title (ID3)/artist (ID3)/Album (ID3)/Genre (ID3) on the display screen.
Press the Track Folder Search switch button 14 and the LED lit to switch the Knob as Folder Search Knob.
Folder Search Knob – If a CD/MP3 or USB device is divided into folders, change directly into these folders use
the Folder Search Knob. Turn the knob to search the desired folder.
Hold this knob and press Tap BPM button to start or to stop RECORD function. When recording the LED will
fl ash which recording device is activated.
16. PLAY/PAUSE button
Each press of the button to change from play to pause or from pause to play.
MCU-20A(P40) 090516 Rev..indd 章節2:33MCU-20A(P40) 090516 Rev..indd 章節2:33 2016/9/6 上午 11:06:082016/9/6 上午 11:06:08
34
ENGLISH
PART NAMES AND FUNCTIONS
17.STOP/RECORD button
Press this button to start or to stop RECORD function. When recording the LED will fl ash which recording device
is activated. The recorded fi les will be saved as REC xxxxx.mp3 in the USB driver REC. directory.
18.MARK button
It will be saved in a fi le when press MARK BUTTON during recording. And then go on record in another new fi le.
19. CUE button
A Cue Point is self-defi ned starting point, usually at the beginning of a beat. Pressing the cue button during
playback immediately pause playback and returns the tracks to the last set cue point. By pressing and holding
the Cue Button you will return to Play mode until you release the button again. The player will then returns to the
Cue Point and go into Pause mode.
To set a new Cue point, pressing the pause button when you fi nd a favorite point during playback, the Cue LED
will fl ash; use Jog wheel to search the Cue point you like, then press the Cue button.
20. LOOP OUT button
This button is used to set the ending point of a loop. A loop is started by pressing the CUE button in the pause
mode and ending by pressing the OUT button. The loop will continue to play until the RELOOP/EXIT button
20
is pressed once again.
If a SEAMLESS LOOP has been made, but the player is not actively in seamless loop mode, pressing the reloop
button will instantly reactivate the seamless loop mode. To exit loop, press the button again. RELOOP will
appear in the LCD display when the RELOOP function is activated. During play mode, pressing the RELOOP
button will instantly return play to the last set point without interrupting playback.
You can hold the TRACK knob and press OUT button to set a new ending out when it is not in RELOOP mode.
21. Jog wheel
This wheel has multiple functions:
1) Frame Search - The jog wheel will act as a frame search control when the track in the pause or cue mode,
allowing you to set a point.
2) Pitch Bend - The wheel also works as a pitch bend during playback, similar to a “push” or a “drag” on a
turntable. Turning the wheel clockwise will increase the pitch percentage up to 100%, and turning the wheel
counterclockwise will decrease the pitch percentage down to -100%. The pitch bend will be determined on
how long you turn the jog wheel continuously.
3) Input volume control - The jog wheel also acts as input volume control during in the record mode when set
manual control in the internal menu, allowing you to set input volume. (refer to P18/item 7)
22.RECORD MODE button
This button is used to switch RECORD / NORMAL mode.
When REC MODE LED is on, the recording information will illustrate in the display as below:
ELAPSED TIME: Indicates the elapsed time of a recorded fi le.
REMAIN TIME: Indicates the remaining time of a recorded fi le.
TOTAL REMAIL: Indicates the remaining time of the whole USB device.
When CLIP LED is lighting red, the REC. input level is over the safety ranger.
MCU-20A(P40) 090516 Rev..indd 章節2:34MCU-20A(P40) 090516 Rev..indd 章節2:34 2016/9/6 上午 11:06:092016/9/6 上午 11:06:09
P40
P40
35
ENGLISH
CD/MP3/USB Player
With Recording
PART NAMES AND FUNCTIONS
25. Power connector
This connection is used to connect your main power supply. The plug can only be inserted in one direction, so
do not force it.
26. AUDIO IN R & L jacks
These jacks send a left and right analog mono input signal. The red colored jack represents the right channel
input and white jack represents the left channels input. Use these jacks to send audio to this device for
recording.
27. USB 2 port
The port used to connect a USB memory device.
CAUTION
: Please turn on the P40 before you plug USB storage device.
28. BALANCED XLR MASTER OUTPUT jacks
The Master Output includes a pair of XLR Balanced jacks. The 3-pin XLR jacks send a high current balanced
output signal.
CAUTION
: These jacks should be used when you will be driving an amp or other audio equipment with
a balanced input, or whenever you will be running a signal line greater than 15 feet. Always,
use these jacks whenever possible.
29. RCA audio output jacks
This analog output signal requires a pair of RCA cables (Left and Right) to be connected to a mixing console or
amplifi er.
Rear Panel
23. Remote control's infrared sensor
To receive signal from remote controller.
24. Power switch
This switch is used to turn your unit’s power on and off.
MCU-20A(P40) 090516 Rev..indd 章節2:35MCU-20A(P40) 090516 Rev..indd 章節2:35 2016/9/6 上午 11:06:092016/9/6 上午 11:06:09

36
ENGLISH
27. Cue indicator
This indicator will glow when the unit is in CUE mode, and will fl ash when in pause mode to enable to set a new
cue point.
28. Folder display
Indicates the number of the current folder.
29. Playing address
This bar gives a visual approximation of a track's or disc's time. This bar will begin to flash when a track is
ending.
30. CUE & play memory buffer indicator
The memory status is represented on the display by the line bar being fi lled or emptied. The fi rst bar itself
represents 5 seconds of cue memory buffer. And following bars each represents 1 second of play memory
buffer.
31. BPM display
Indicates the current BPM value of the track. AUTO BPM - This will indicate that the AUTO BPM counter is
active.
32. Pitch display
Indicates the set pitch value of a track in percent.
PART NAMES AND FUNCTIONS
Display
MCU-20A(P40) 090516 Rev..indd 章節2:36MCU-20A(P40) 090516 Rev..indd 章節2:36 2016/9/6 上午 11:06:092016/9/6 上午 11:06:09

P40
P40
37
ENGLISH
CD/MP3/USB Player
With Recording
PART NAMES AND FUNCTIONS
33. Key Lock indicator
Indicates the Key Lock function has been activated.
34. Loop indicator
IIndicates that the loop is ready to be played again.
35. Reloop indicator
When “RELOOP” fl ashes, the loop is active.
36. Auto cue indicator
This will indicate if the Auto Cue is on or off. Press and hold the SGL/CTN button for 1 sec. to turn the Auto Cue
function on and off.
37. Dot matrix Information display
Indicates the name of the folder, artist, fi le, album, genre and title while playing a MP3 with ID3 TAG. To change
between the name of a folder, artist and title of a MP3, press the Track Knob.
38. Time mode indicator
Indicates if the player shows the elapsed time of a track (the display reads „ELAPSED“), the remaining time of a
track (the display reads „REMAIN“) or the remaining time of the entire CD (the display reads „TOTAL REMAIN“).
Use the Time Display Mode Button to switch between the modes.
39. Time display
These indicators will detail the current Minutes, Seconds, and Frames. The display will indicate either the elapse,
total, or remaining time of a track or the entire disc. The display time will depend on the selected time function.
The selected time function will be displayed above the Time Display as total remaining, remaining track time, or
elapsed track time.
40. REPEAT indicator
Indicates the play mode is repeat play mode.
41. Play mode indicator
Indicates if the player is in Single mode (the display reads “SINGLE”) or in Continue mode (nothing on display). In
single play mode, the track will play once and return to CUE mode.
42. Track display
This indicator describes which track is currently cued or is playing.
43. Play/Pause indicator
The indicator current play mode is play mode or pause mode.
MCU-20A(P40) 090516 Rev..indd 章節2:37MCU-20A(P40) 090516 Rev..indd 章節2:37 2016/9/6 上午 11:06:092016/9/6 上午 11:06:09

38
ENGLISH
PART NAMES AND FUNCTIONS
47. Disc Tray OPEN/CLOSE button
Pressing this button will open the CD tray. The open function will only when the unit is in cue or pause mode,
this is to prevent accidentally ejecting the disc when in play mode. Press the button again to close the CD tray.
48. Source select button
Use this button to switch between the three media modes – CD/USB1/USB2.
49. CUE button
A Cue point is self-defi ned starting point, usually at the beginning of a beat. Pressing the cue button during
playback immediately pause playback and returns the tracks to the last set cue point. By pressing and holding
the Cue button you will return to Play mode until you release the button again. The player will then returns to the
Cue point and go into Pause mode.
This function allows you to set a cue point and the point also can be the starting point of a seamless loop.
50. LOOP OUT button
This button is used to set the ending point of a loop. A loop is started by pressing the CUE button in pause
mode and it is ended by pressing the OUT button. The loop will continue to play until the EXIT/RELOOP button
is pressed once again.
51. RELOOP/EXIT button
If a SEAMLESS LOOP has been made, but the player is not actively in seamless loop mode, pressing the reloop
button will instantly reactivate the seamless loop mode. To exit loop, press the button again. RELOOP will
appear in the LCD display when the RELOOP function is activated.
During play mode, pressing the RELOOP button will instantly return play to the last set point without interrupting
playback.
Remote Controller
MCU-20A(P40) 090516 Rev..indd 章節2:38MCU-20A(P40) 090516 Rev..indd 章節2:38 2016/9/6 上午 11:06:102016/9/6 上午 11:06:10
P40
P40
39
ENGLISH
CD/MP3/USB Player
With Recording
PART NAMES AND FUNCTIONS
52. PLAY/PAUSE button
Each press of the button to change from play to pause or from pause to play.
53. MARK BUTTON
Used to separate the recording data into several fi les by each pressing MARK button during recording.
54. REC BUTTON
Used to activate or deactivate REC mode.
55. SGL/CTN switch button
This function allows you to switch single track play or continuous track play (all tracks in order).
SGL = Single
→
The current title is played once and the player goes into pause mode.
CTN = Continue
→
The entire CD or folders will be played continually track by track.
56. Repeat button
Press this button to activate/deactivate repeat mode.
57. Key Lock
This function allows the tempo or BPM of the music to be altered without affecting the musical key. While this
LED is illuminated, the key will be locked at zero.
58. Tempo adjust buttons
These buttons are used to adjust the playback pitch percentage.
Press “+” buton to increase playback speed.
Press “–” button to decrease playback speed.
Press “0%” button causes the tempo to be reset instantly to “0” (normal tempo).
Press “%” button to adjust slider’s variable range alternates between ±4%, ±8%, 16% and 100% (CDDA).
59. Mute button
Press this button to reduce volume to 0.
60. Volume control button
These buttons can control output volume. Press “+” to increase volume and press “-“ to decrease volume.
61. Folder search buttons
If a CD/MP3 or USB device is divided into folders, change directly into these folders use the Folder Search
buttons. Press the buttons to search the desired folder.
62. Track search buttons
These buttons are used to select a track.
63. Search buttons
This search button allows you to quickly scan backwards through a track. This search button allows you
to quickly scan forwards through a track.
MCU-20A(P40) 090516 Rev..indd 章節2:39MCU-20A(P40) 090516 Rev..indd 章節2:39 2016/9/6 上午 11:06:102016/9/6 上午 11:06:10

40
ENGLISH
STEP 1 : Hold the TIME button 5 for three second to enter the utility menu.
STEP 2 : Turn the TRACK KONB to select different function setup.
STEP 3 : Press the TRACK KONB to enter the setup mode for each function.
STEP 4 : Turn the TRACK KNOB to select desired function and adjustment.
STEP 5 : Press the TRACK KNOB to exit single function setup mode.
STEP 6 : Save and exit utility menu. Turn the TRACK KNOB to 7.SAVE&EXIT and press the TRACK KNOB¸ the
display indicates “SAVING”. When the player fi nish the saving process and exit the utiltiy menu.
NOTE
: Anytime you can exit the Utility Menu just press the TIME button. However, the modifed setting
would not be saved.
1. Playlist - Normal / Title/ Artist / Album/ Genre (for USB only)
The VOXOA TUNEBOX can generate “Playlist” for USB device. You can adjust various criteria in order
to fi lter track in this setting.
You can turn the TRACK (SEARCH0 KNOB to select “Normal / Title/ Artist / Album/ Genre (for USB
only)” and press the TRALK button again to memorize your setting and exit the utility menu.
Normal : This is the default setting. The tracks are played corresponding to the established hierarchical data
structure.
Title : It is possible to continuously and alphabetically browse track database through the title structure.
Artist: It is possible to continuously and alphabetically browse track database through the Artist’s name structure.
Album: It is possible to continuously and alphabetically browse track database through the album structure.
Genre: It is possible to continuously and alphabetically browse track database through the track’s genre structure.
2. Sleep Time - 5~120min, No Sleep.
3. Line Setup - To setup the Dot Matrix Information Display mode.
- Dis = 0.5~12.0 sec. (LINE NAME start/stop time adjustment).
- Run = 50~2000 msec. (LINE NAME move time adjustment).
4. Bit Rate - Display MP3 bit rate ON/OFF.
5. REC. USB - Select the recording device between USB1 and USB2. (The default setting is USB1.)
6. REC. Bitrate - Select the REC. Bitrate between 32000,40000,48000,56000,64000,80000,96000,112000, 1280
00(Defaults),160000,192000,224000,256000,320000.
7. Version - To display the fi rmware version.
- CON : XX(Control version).
- SER : XX(Servo version).
- DSP : XX(DSP version).
8. Load Default - Press TRACK Knob to enter load defaults.
9. Exit & Save = Save the setting and exit utility menu.
Utility Menu
MCU-20A(P40) 090516 Rev..indd 章節2:40MCU-20A(P40) 090516 Rev..indd 章節2:40 2016/9/6 上午 11:06:102016/9/6 上午 11:06:10
P40
P40
41
ENGLISH
CD/MP3/USB Player
With Recording
OPERATIONS
Starting and Stopping Playback
•
Starting Playback
Press the PLAY/PAUSE button
16
during the pause or cue mode to start playback. The PLAY/PAUSE button
illuminates with a solid green light during playback.
•
Stopping Playback
There are two ways to stop playback. Press the PLAY/PAUSE button
16
during playback to pause at that point,
or press the CUE button 19 during playback to return to the position at which playback started.
How to Set a Cue Point
Cueing is the action of preparing tracks for playback. Once a cue point has been stored in memory when the CUE
button is pressed, playback returns to the cue point and enters pause mode. When the PLAY/PAUSE button is
pressed during the cue mode, playback starts. Playback can also be resumed from cue mode by pressing the
PLAY/PAUSE button while holding the CUE button.
Step 1 : During playback, press the Play/Pause button 16 to pause playback at the point you wish to begin playback.
Step 2 : Search for the precise position of the cue point. Using the jog wheel to advance frames search.
Step 3 : Press the PLAY/PAUSE button 16 when you reach the desired point and then press the CUE button. Cue
point memory setting is completed when the PLAY/PAUSE button 16 is fl ashing. When a new cue point is
stored in memory the previous setting will be erased.
•
Real-time Cue
During playback, press the PLAY/PAUSE button 16 at the desired cue point and then press the CUE button to
save the Cue Point. With a little practice, this is a faster way to set the desired Cue Point.
•
Auto Cue
The Auto Cue function will automatically set the fi rst cue point at the beginning of each track. To turn Auto Cue
on and off, hold down the SGL/CTN button 6. When Auto Cue is on, the display will show AUTO CUE.
HINT: Anytime the CUE button is fl ashing, it means it is ready to save a new cue point.
MCU-20A(P40) 090516 Rev..indd 章節2:41MCU-20A(P40) 090516 Rev..indd 章節2:41 2016/9/6 上午 11:06:102016/9/6 上午 11:06:10

42
ENGLISH
OPERATIONS
How to Adjust the Pitch
•
Pitch Slider
With your fi rst deck playing and your second deck cued, start playback in sync with the downbeat of the song .
Quickly adjust the pitch using the PITCH SLIDER
8
to match the tempo of deck one. Moving the slider up (-) will
decrease the tempo, while moving it down (+) will increase the tempo.
•
Pitch Bending
Use Pitch Bend Button
9
As you are fi nding the right tempo, the track position will drift until it is fi ne-tuned and the tempo is matched.
Pitch Bending provides a quick fi x to keep the position as close as possible to deck one. Pressing the PITCH
BEND – or PITCH BEND + buttons will decrease or increase the speed of playback temporarily. The extent to
which the speed is changed is proportionate to the amount of time the button is pressed. For example, if the
PITCH BEND + button is held in continuously, the speed continues to increase until the maximum limit set by the
PITCH RANGE is reached. Once the PITCH BEND + button is released the pitch will return to the pitch set by the
PITCH SLIDER.
Use Jog Wheel
The jog wheel can also be used to temporarily bend the pitch of the music during normal playback. During
playback rotate the wheel clockwise to speed up and counterclockwise to slow down. The speed that you rotate
the jog wheel determines the percent of pitch bend.
•
Key Lock
This function allows the tempo or BPM of the music to be altered without affecting the musical key. While this
KEY LOCK LED is illuminated, the key will be locked at zero.
How to Set a Seamless Loop
•
Creating a Seamless Loop
Step 1 : Press the PLAY/PAUSE button 16 to begin playback. The button illuminates solid green (not fl ashing).
Step 2 : Set the start point of the seamless loop by pressing the CUE button 19 at the desired point in pause
mode.
Step 3 : Set the out point of the loop by pressing the OUT button 20 at the desired point in time. Playback will
immediately return to the previously set IN point and play to the OUT point, creating a seamless loop
without interruption. When the loop has been set, the LOOP indicator on the LCD screen will light. In
the same time, the CUE and OUT button are fl ashing.
•
To Exit the Loop
During loop playback, press the RELOOP/EXIT button 20 to exit the loop. When the music reaches the OUT
point, it will play through it instead of looping back to the IN point.
•
To replay a seamless loop (Reloop)
To replay the loop, press the RELOOP/EXIT button 19 . The loop can be re-triggered by pressing the button (until
a new loop is created). Press the RELOOP/EXIT button to exit the loop again.
MCU-20A(P40) 090516 Rev..indd 章節2:42MCU-20A(P40) 090516 Rev..indd 章節2:42 2016/9/6 上午 11:06:122016/9/6 上午 11:06:12

P40
P40
43
ENGLISH
CD/MP3/USB Player
With Recording
VOXOA TUNEBOX SOFTWARE
VOXOA TUNEBOX
Free bundle database management software enables you to search for your fi les by Title, Artist, Album, and Genre.
•
SYSTEM REQUIREMENTS
_ CPU : Intel Pentium 4, 1 GHz processor, Intel Centrino Mobile Technology 1.6 GHz or above
_ RAM : 512 MB
_ DISK SPACE : 100MB of free disk space need
_ OS : Microsoft Windows XP SP3, Vista SP2 or later version
Installation : Refer to the following fi gures for installing VOXOA TUNEBOX software on your computer
Step 1 :
Execute the VOXOA TUNEBOX software.
Step 3 : Ready to install.
Step 2:
Select the desired folder to install the VOXOA TUNEBOX in
your computer.
Step 4 : Installing.
MCU-20A(P40) 090516 Rev..indd 章節2:43MCU-20A(P40) 090516 Rev..indd 章節2:43 2016/9/6 上午 11:06:132016/9/6 上午 11:06:13

44
ENGLISH
VOXOA TUNEBOX SOFTWARE
Step 5 : Completing the VOXOA TUNEBOX setup. Click the Finish to quit the installation.
How to use the VOXOA TUNEBOX
The VOXOA TUNEBOX can scan all of music fi les in your USB storage device and then create database fi les to
locate the fi les in your music library. This makes the P40 read music fi les from USB hard drive much quicker and
easier.
Step 1: Execute the VOXOA TUNEBOX program.
Step 2 : Select the desired USB device and click “Build”
to build a music database of your device.
Step 3 : The VOXOA TUNEBOX is working on building
database.
Step 4 : Complete the building process.
CAUTION
: Every time your change the music
contents in your USB storage
device, please re-execute the
VOXOA TUNEBOX to re-build the
music database.
MCU-20A(P40) 090516 Rev..indd 章節2:44MCU-20A(P40) 090516 Rev..indd 章節2:44 2016/9/6 上午 11:06:142016/9/6 上午 11:06:14

P40
P40
45
ENGLISH
CD/MP3/USB Player
With Recording
VOXOA TUNEBOX SOFTWARE
PLAYLIST OPERATION :
1. Hold the Time button
5
for 3 sec. to enter the utility menu and turn Track knob 15 to search PLAYLIST.
2. Turn the Track knob to select “Normal / Title / Artist / Album / Genre (for USB only)”
3. Use Folder button
14
to switch to Folder mode: ex: to select “Artist”
(a) Hold and turn the Track knobyou can select the folder you like by fi rst letter of Artist, and the Artist alphabet
is arranged in order.
(b) Turn the Track knob or hold the Track knob and turn Jog Wheel to select next “Artist”
Use Folder button 14) to switch Track mode:
(a) Turn the Track knob; or hold the Track knob and turn Jog Wheel to select the track you like.
The main reason for user failed to run VOXOA TUNEBOX in Windows Vista.
1. User fail to run VOXOA TUNEBOX in Windows
Vista because the User Account Control limitation.
2. User should press the right button of mouse to run
the VOXOA TUNEBOX with the option of Run as
administrator
3. Allow the VOXOA TUNEBOX to run.
MCU-20A(P40) 090516 Rev..indd 章節2:45MCU-20A(P40) 090516 Rev..indd 章節2:45 2016/9/6 上午 11:06:142016/9/6 上午 11:06:14

46
ENGLISH
SPECIFICATIONS
1. GENERAL SECTION
POWER SOURCE :
AC100 - 240V, 50/60Hz, 13WATTS
DIMENSION :
482mm (W) X 270.5mm (D) X 88.8 mm (H)
WEIGHT :
4.25 kg
2. AUDIO CHARACTERISTICS :
(CD TEST DISC: TCD-782 & TCD-781; USB TEST FORMAT: MP3, 128KBPS; LOAD=100KOHM)
ITEM TYPICAL LIMIT CONDITION
(1) OUTPUT LEVEL CD: 2V +/-0.5dB 2V +/-1dB 1KHz, 0dB (TCD782,TRK2)
USB:
2V +/-0.5dB 2V +/-1dB 1KHz, 0dB (TCD782,TRK2)
(2) CHANNEL BALANCE WITHIN 0.2dB WITHIN 1dB 1KHz, 0dB (TCD782,TRK2)
(3) FREQUENCY RESPONSE CD:
17-20KHz +/-0.4dB 17-20KHz +/-1dB
0dB OUTPUT (TCD782,TRK2/3/7)
USB:
17-16KHz +/-0.2dB 17-16KHz +/-1dB
0dB OUTPUT (TCD781,TRK1/4/16)
(4) DE-EMPHASIS CD: -20dB +/-0.2dB -20dB +/-1dB 16KHz,-20dB (TCD782,TRK2/14)
(5) CHANNEL SEPARATION(*2) CD, USB: 93dB 85dB 1KHz, 0dB (TCD782,TRK2/9/11)
(6) THD+N (*1) CD: 0.008% 0.015% 1KHz, 0dB (TCD782,TRK2)
USB: 0.007% 0.015% 1KHz, 0dB (TCD782,TRK2)
(7) S/N (*2) CD: 126dB 90dB 1KHZ, 0dB (TCD782,TRK2/8)
USB: 85dB 80dB 1KHZ, 0dB (TCD782,TRK2/8)
(8) DYNAMIC RANGE (*2) CD: 92dB 88dB 1KHz, -60dB (TCD782,TRK18)
(9) XLR OUTPUT LEVEL 8.22dBm (2V)+/-
0.5dB
8.22dBm (2V)
+/-
1dB
KHz, 0dB (TCD782,TRK2)
NOTE
: *1 : WITH 20KHz LOW PASS FILTER.
*2 : WITH 20KHz LOW PASS FILTER, "IHF-A" WEIGHTED.
3. CD SEARCHING TIME : (TEST DISC: TCD-792)
ITEM TYPICAL LIMIT CONDITION
(1) SHORT ACCESS TIME 2Sec 4Sec PLAY NEXT TRACK
(2) LONG ACCESS TIME 4Sec 6Sec TRACK 1 TO 20,20 TO 1
MCU-20A(P40) 090516 Rev..indd 章節2:46MCU-20A(P40) 090516 Rev..indd 章節2:46 2016/9/6 上午 11:06:162016/9/6 上午 11:06:16

P40
P40
47
ENGLISH
CD/MP3/USB Player
With Recording
SPECIFICATIONS
4. CD PLAYABILITY :
ITEM TYPICAL LIMIT CONDITION
(1) INTERRUPTION 1mm 0.7mm TCD-725
(2) BLACK DOT 1mm 0.6mm TCD-725
(3) FINGER PRINTS 75um 65um TCD-725
(4) ECCENTRICITY 140um 140um TCD-712 W/O TRACK JUMP
(5) VERTICAL DEVIATION 1mm 0.5mm TCD-731R
(6) SCRATCH 2mm 1.2mm TCD-721 W/O TRACK JUMP
5. SOUND RECORDING
(1) MENU REC INPUT: AUTO / REC BIT RATE: WAV.(REC INPUT: 1KHZ / +10dBV)
PLAY AUDIO FILES LEVEL: 1KHZ / 4dBV +/-2dBV
THD+N: LESS THAN 0.015% (W/20KHz LPF, A-WEIGHTED)
(2) MENU REC INPUT: MANUAL / REC BIT RATE: WAV.(REC INPUT: 1KHZ / -4dBV) / GAIN 0dBV
PLAY AUDIO FILES LEVEL: 1KHZ / 0dBV +/-2dBV
THD+N: LESS THAN 0.03% (W/20KHz LPF, A-WEIGHTED)
6. MP3 FORMAT :
Disc Format Applicable file extensions mp3 . MP3 . mP3 . Mp3
ISO9660 max. 63 characters
Joliet max. 63 characters
CD-ROM sector format mode-1 only
Max. number of Folders 255
Max. number of files max. 999 files
(
max.255 fi les each folder.
)
USB Format File System FAT 12/16/32
Applicable file extensions mp3. MP3. mP3. Mp3
Max. number of Folders 999
Max. number of files max. 999 files
MP3 Format
MPEG 1 Layer 3 standard (ISO/IEC 11172-3),
which provides for single channel
(“
mono”)
and
two-channel
(“stereo”)
coding at sampling rates
of 32, 44.1 and 48kHz.
32/40/48/56/80/96/112/128/160/192/224/256
/320 kbps
Xing/VBRI VBR
MPEG 2 Layer 3 standard (ISO/IEC 13818-3),
which provides for similar coding at sampling
rates of 16, 22.05 and 24 kHz.
32/40/48/56/64/80/96/112/144/160 Kbps
Xing/VBRI VBR
MPEG 2.5 Layer 3 standard, which provides
for similar coding at sampling rates of 8,
11.025 and 12 kHz.
32/40/48/56/64/80/96/112/144/160 Kbps
Xing/VBRI VBR
Disc Writing Method
Disc at Once and Track at Once
Multi Session
If the 1st session is CDDA, you can playback
Only CDDA track, If the 1st session is
MP3,you can playback only MP3 file.
NOTES : Specifi cations and improvements in the design of this unit and this manual are subject to change
without any prior written notice.
MCU-20A(P40) 090516 Rev..indd 章節2:47MCU-20A(P40) 090516 Rev..indd 章節2:47 2016/9/6 上午 11:06:162016/9/6 上午 11:06:16
Printed in ChinaVERSION 1.0
MCU-20A(P40) 090516 Rev..indd 章節2:48MCU-20A(P40) 090516 Rev..indd 章節2:48 2016/9/6 上午 11:06:162016/9/6 上午 11:06:16
 Loading...