

Page 1

SVN
HRV
PRT
GBR
^Z
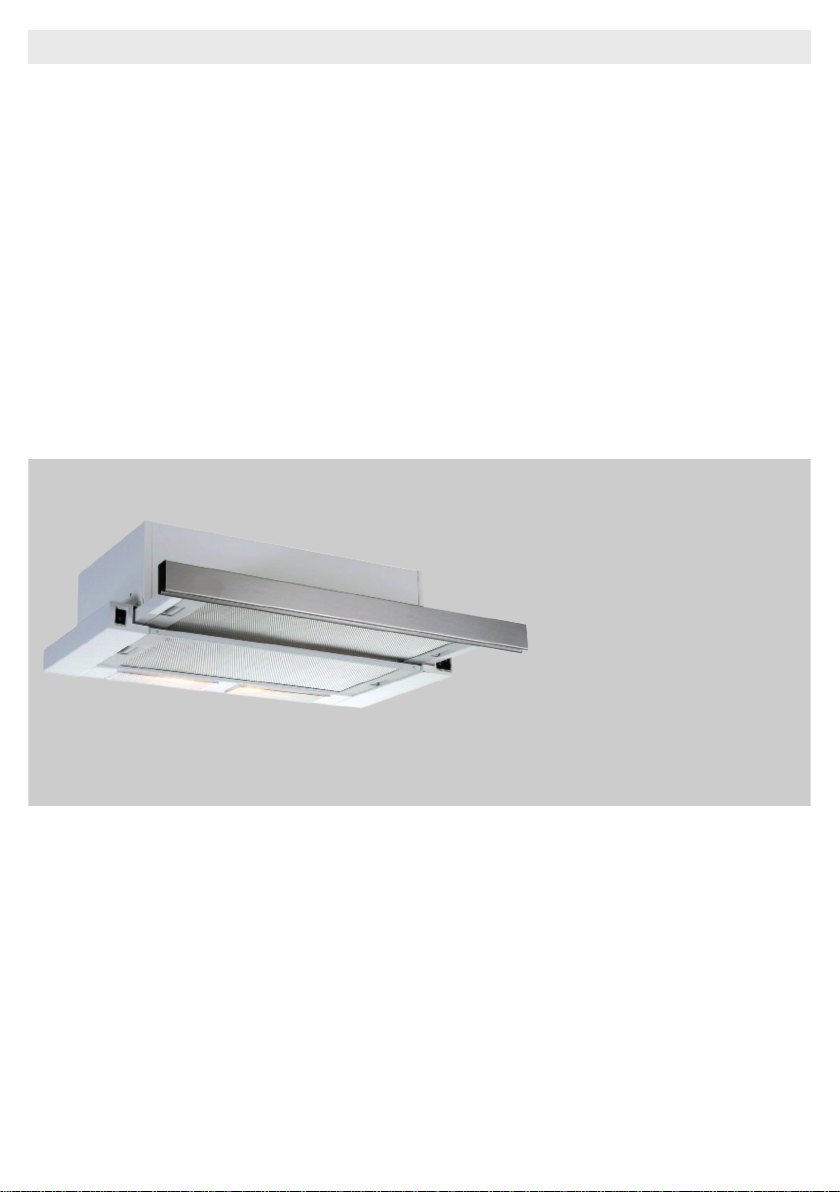
PIO 650 2MW - 650 2MIX
OPERATING INSTRUCTIONS
UPUTSTVO ZA UPOTREBU
NAVODILA ZA UPORABO KUH I NJSKA NAPA
UPUTE ZA UPORABU
KUHINJSKA NAPA
MANUAL DE ISTRUÇÕESEXAUSTOR
COOKER HOOD
ASPIRATOR
Page 2

GBR
PIO - 650 2MW
PIO - 650 2MIX
OPERATING INSTRUCTIONS HOOD
Page 3
PIO650 2MW
PIO650 2MIX
Read the User Manual Carefully!
1
Page 4

1 TECHNICAL DRAWING 3
2 WARNINGS AND SAFETY PRECAUTIONS 4
2.1 Life-Threatening Danger, Poisoning Danger 6
2.2 Danger of electric shock! 6
2.3 Danger of physical injury! 6
2.4 Danger of burn, danger of electric 7
2.5 Dangers of fire and physical injury! 7
3 USAGES WITH AND WITHOUT CARBON USE 8
3.1 Replacement of Carbon Filter 9
3.2 Replacement of Carbon Filter 9
3.3 Replacement of Carbon Filter 9
4 CLEANING AND PREVENTIVE MAINTENANCE 10
4.1 Washing in Dishwasher 10
4.2 Hand Wash 10
4.3 Removal/Installation of Aluminium Filter 10
5 INSTALLATION OF APPLIANCE 11
5.1 Installation and Unpacking of the Appliance 11
5.2 Installation and Unpacking of the Appliance 11
5.3 Exhaust Air Mode 12
5.4 Air Discharge Line 12
5.5 Checking the Wall 12
5.6 Electrical Connection 12
5.7 Danger of Electric Shock! 12
6 OVERVIEW OF APPLIANCE 13
7 ASSEMBLY OF PRODUCT 14
8 USE OF PRODUCT 15
9 REPLACEMENT OF LAMPS 17
9.1 Replacement of Halogen Lamp 17
9.2 Replacement of Spark Plug Lamp 17
10 AUTHORIZED TECHNICAL SERVICE 18
10.1 Potential Failures and Solutions 19
10.2 Technical Table 19
"Complies with EEE Regulation. No PCB Included"
2
Page 5

1 TECHNICAL DRAWING
Max425 Min305
280
600
223
462
78,5
499
146
50
174
283
27
20
41
Fig. 1: TECHNICAL DRAWING
3
Page 6

2 WARNINGS AND SAFETY PRECAUTIONS
■ This appliance can be used by children
aged from 8 years and above and persons with
reduced physical, sensory or mental capabilities or lack of experience and knowledge if they
have been given supervision or instruction concerning use of the appliance in a safe way and
understand the hazards involved.
■ This product is designed for home use.
■ Usage voltage of your product is 220-240
Volt~50 Hz.
■ Power cord of your product is tted with a
grounded plug. This cord must be plugged into
a grounded outlet.
■ The whole electrical wiring must be installed
by a qualied electrician.
■ Installation by unauthorized persons could
lead to poor operation performance, damage to
the product, and accidents.
■ Feeder cable of the appliance mustn't be exposed to jamming or crashing during assembly.
Feeder cable mustn't be placed near the cooker. In such cases, it might melt down and lead
to re.
■ Do not plug in the appliance before the installation.
■ Make sure that the installation place allows
the user to easily unplug the power cable in
case of any danger.
■ Do not touch your product's lamps when
they work for a long time. Since they would be
hot, they could burn your hand.
■ Kitchen cooker hoods are designed for normal cooking and home use. For uses other than
specied, there is the risk of failure and the appliance becomes out of warranty.
■ Comply with the rules and instructions regarding discharge of outgoing air, stipulated by
the relevant authorities. (This warning does not
apply to uses without ue.)
■ Flammable foods must not be cooked under
the appliance.
■ Turn on the appliance after placing a saucepan, pan, etc. on the cooker. Otherwise, high
temperature might lead to deformation on some
components of your product.
■ Turn off the cooker's burner before taking
the saucepan, pan, etc. off the cooker.
■ Do not leave hot oil on your cooker. Pots
that contain hot oil might lead to inammation.
■ Since oils could catch re when you cook
fried foods in particular, be careful about your
curtains and tablecloths.
■ Ensure timely replacement of the lters. Filters not replaced in a timely manner pose risk
of re due to accumulated grease deposits on
them.
■ Do not use non-re-resistant ltering materials instead of the lter.
■ Do not operate your product without lter,
and do not remove the lters when the product
is in use.
■ In case of any deagration, de-energize the
cooker hood and cooking appliances. (Plug off
the appliance or turn off the main switch).
■ If your product's periodic cleaning is not
made in a timely manner, it could pose risk of
re.
■ De-energize the appliance before any maintenance operations. (Plug off the appliance or
turn off the main switch.)
■ When electric cooker hood and devices
fed with energies other than electricity operate
simultaneously, the negative pressure in the
room must not exceed 4 Pa ( 4 X 10 bar ).
■ Gas or fuel oil burning appliances, such as
room heaters, which share the same environ-
4
Page 7

ment with your product, must be fully insulated
from the exhaust of this product or they must be
hermetical.
■ When you make a ue connection for your
product, use pipes with a diameter of 150mm
or 120 mm.
■ The length of the pipe connection as well as
the number of elbows must be as minimum as
possible.
■ Children must not play with the appliance.
■ For your safety, use ”MAX 6 A” fuse in the
cooker hood system.
■ Since the packing materials could be dangerous, keep them away from children.
■ If the feeder cable is damaged, it must be
replaced by its manufacturer or authorized technical service or any other personnel qualied at
the same level, in order to avoid any dangerous
situation.
■ In case of any deagration, de-energize the
cooker hood and cooking appliances, and cover the ame. Never use water to extinguish the
re.
■ When cooking appliances are in operation,
their accessible parts could be hot.
■ This appliance is not intended to be used
by people with physical, sensory and mental
disabilities (including children) or those who
have not adequate experience and knowledge
regarding its use, unless they are under the supervision of a person responsible for the safety
of the appliance.
■ After the installation of the cooker hood, the
minimum distance must be 65 cm between the
product and any electric cooker; and 75 cm between it and any gas ranges or cookers burning
other fuels.
■ Output of the cooker hood must not be connected to air ducts, where there exist another
smokes.
■ You must be careful when using the appliance spontaneously with other appliances (e.g.
gas, diesel fuels, coal or wood burning heaters,
shower heaters, etc.) Attention must be paid
when using them simultaneously. It is because
the cooker hood could adversely affect the combustion, by discharging the ambient air.
■ This warning does not apply to uses without
ue.
■ When electric cooker hood is used simultaneously with devices that use gas or other fuels,
there must be sufcient ventilation in the room
(might not apply to devices that discharges the
air back into the room).
■ Simultaneous operation of more than one
gas cooker leads to generation of high heat. A
ventilation appliance placed on the surface of
cookers might therefore get damaged or burn.
Do not operate two gas cookers in high heat for
more than 15 minutes. One large burner with
more than 5kW (Work) power generates power
equal to that of two gas burners.
5
Page 8
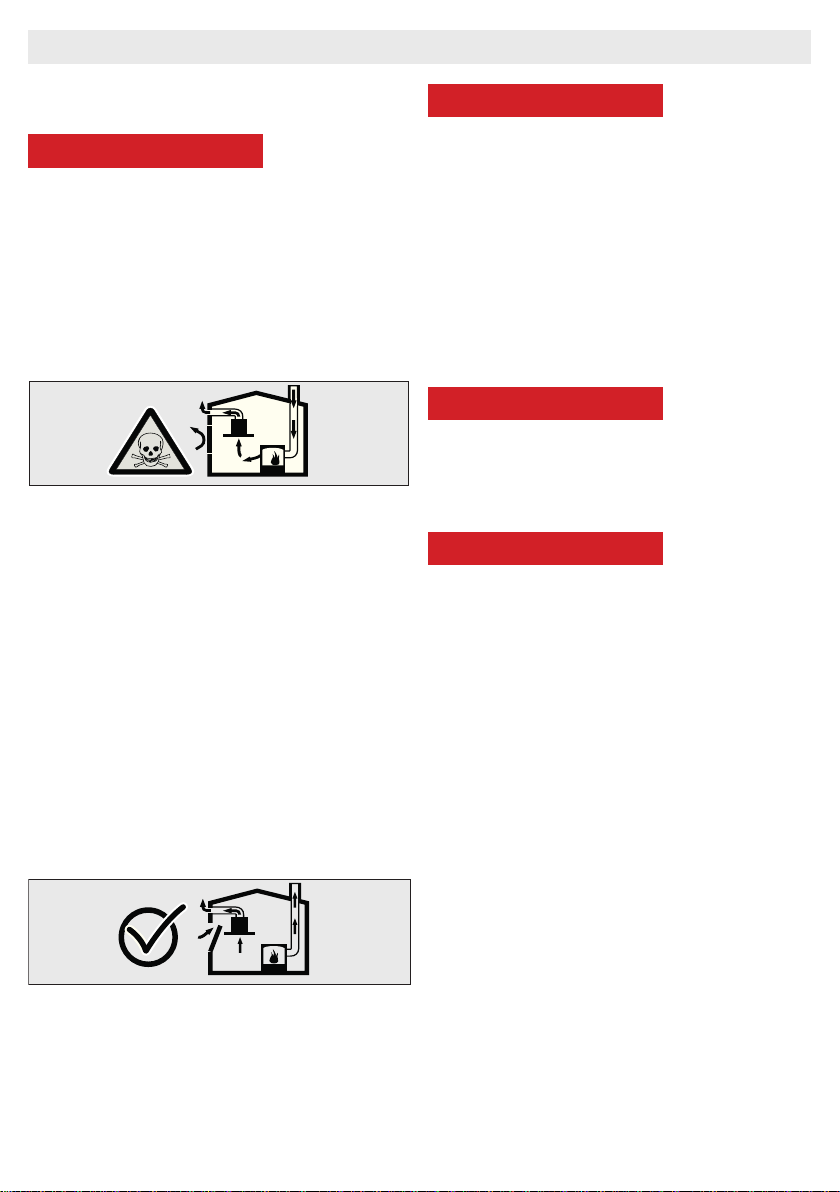
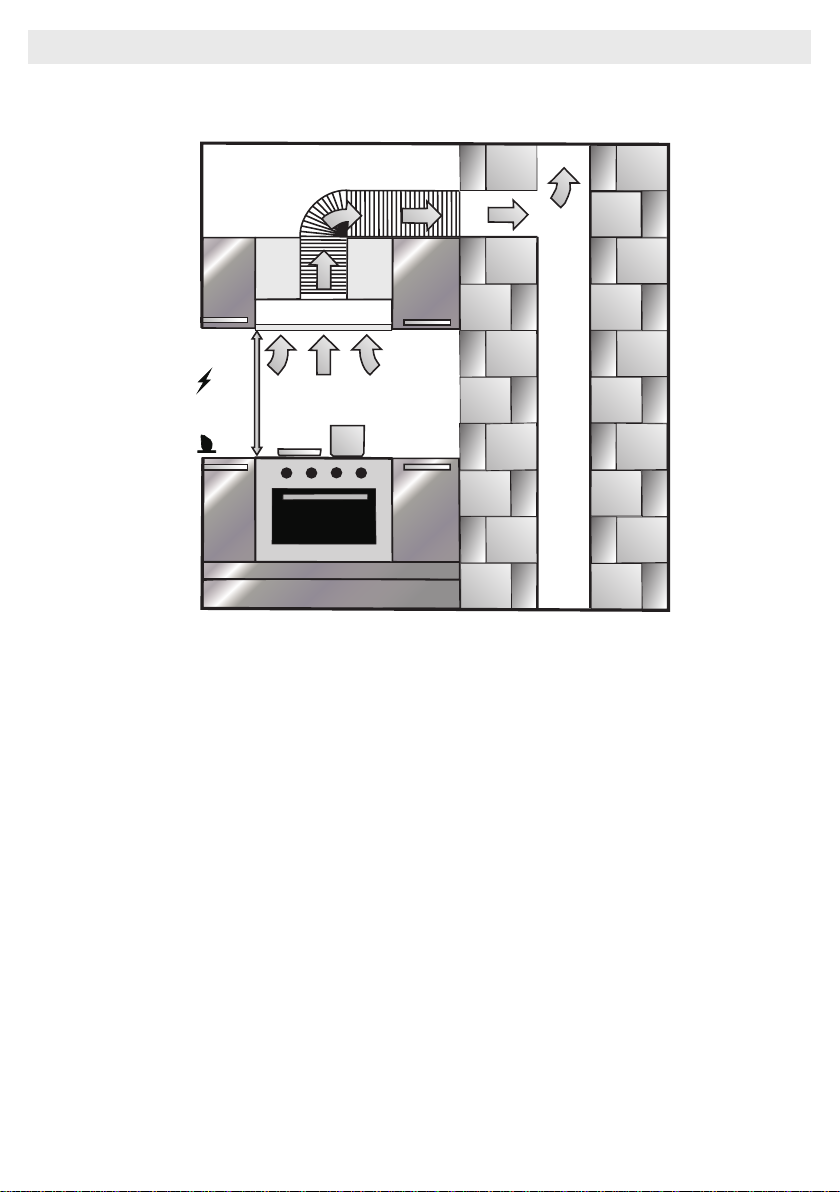
2.1 Life-Threatening Danger, Poisoning Danger
A DANGER
There are life-threatening danger and poisoning
danger due to reabsorbed combustion gases.
During the air discharge outlet use, unless sufcient air supply is provided, do not use the appliance simultaneously with devices that discharge
toxic gases through ue such as ventilated, gas,
oil, wood or coal burning heaters, shower heaters, water heaters, etc.
Fig. 2: Poisoning Danger
Ventilated devices (e.g. gas, oil, wood or coal
burning heaters, shower heaters, water heaters) take combustion air from the installation
location, and discharge the waste gas through
a waste gas system (e.g. ue). When the cooker hood is active, it absorbs air from the kitchen
and neighbouring rooms. If adequate air entry is
not provided
vacuum emerges. In such a case, the toxic gases are absorbed from the ue and waste gas
channel, and are taken into to door again. Fig. 2
Therefore, adequate fresh air ingress must always be ensured. Fig. 3
A DANGER
Fire danger!
Due to sparkling. Installation of appliance over
a heating device that is heated by using solid
fuels (for ex. wood or coal) is only allowed if an
non-detachable cover is present. For the installation process, attention must be paid to current
applicable construction regulations and regulations of local electric and gas companies.
Appliance might lead to re unless it is produced
in accordance with cleaning instructions.
A DANGER
2.2 Danger of electric shock!
Do not bend or jam the connection cable during
installation due to danger of damaged connection cable.
A DANGER
2.3 Danger of physical injury!
■ During the installation, there is a danger
of physical injury due to the sharp edges. Use
protective gloves throughout the installation process of the appliance.
■ Due to risk of dropping the appliance, assembly of all safety bolts and covers must be
performed as specied in the user manual.
Fig. 3
6
Page 9
A DANGER
2.4 Danger of burn, danger of electric shock!
■ Allow the appliance to cool before cleaning
or maintenance process. Switch off the fuse or
pull out the mains plug from the socket.
■ There is risk of damage due to ingress of
moisture in the electronics. Do not clean the
control components with a wet cloth.
■ The surface could be damaged due to a
wrong cleaning process. Clean stainless steel
surfaces only in their brushing direction. Do not
use a stainless steel cleaner for the control elements.
■ The surface could be damaged due to aggressive and abrasive cleaning agents. Never
use aggressive and abrasive cleaning agents.
■ There is risk of damage due to backow of
condensate. Mount the air outlet channel downwards from the appliance (slope of 1°).
A DANGER
2.5 Dangers of re and physical
injury!
In case of repairing that is not performed according to the rules or as required, turn off the fuse
or unplug the feeder cable of your appliance.
Repairing must be performed only by the authorized technical service or authorized experts.
NOTE
If the appliance is faulty or damages, turn off the
fuse or unplug the feeder cable of your appliance
and call the authorized service.
NOTE
If the feeder cable is damaged, it must be
replaced by its manufacturer or its authorized
technical service or any other personnel
qualied at the same level, in order to avoid any
dangerous situation.
NOTE
If the bulbs of your appliance are faulty, turn
off the fuse or unplug the feeder cable of your
appliance. Replace the bulbs immediately to
avoid overload on other bulbs (wait for the bulbs
to cool down rst)
A ATTENTION
Accessible components might be heated when
used with cooking devices.
A DANGER
Air outlet pipe of this appliance mustn't be connected in the ue used to discharge the fume
generated by devices that use gas or other fuels.
7
Page 10
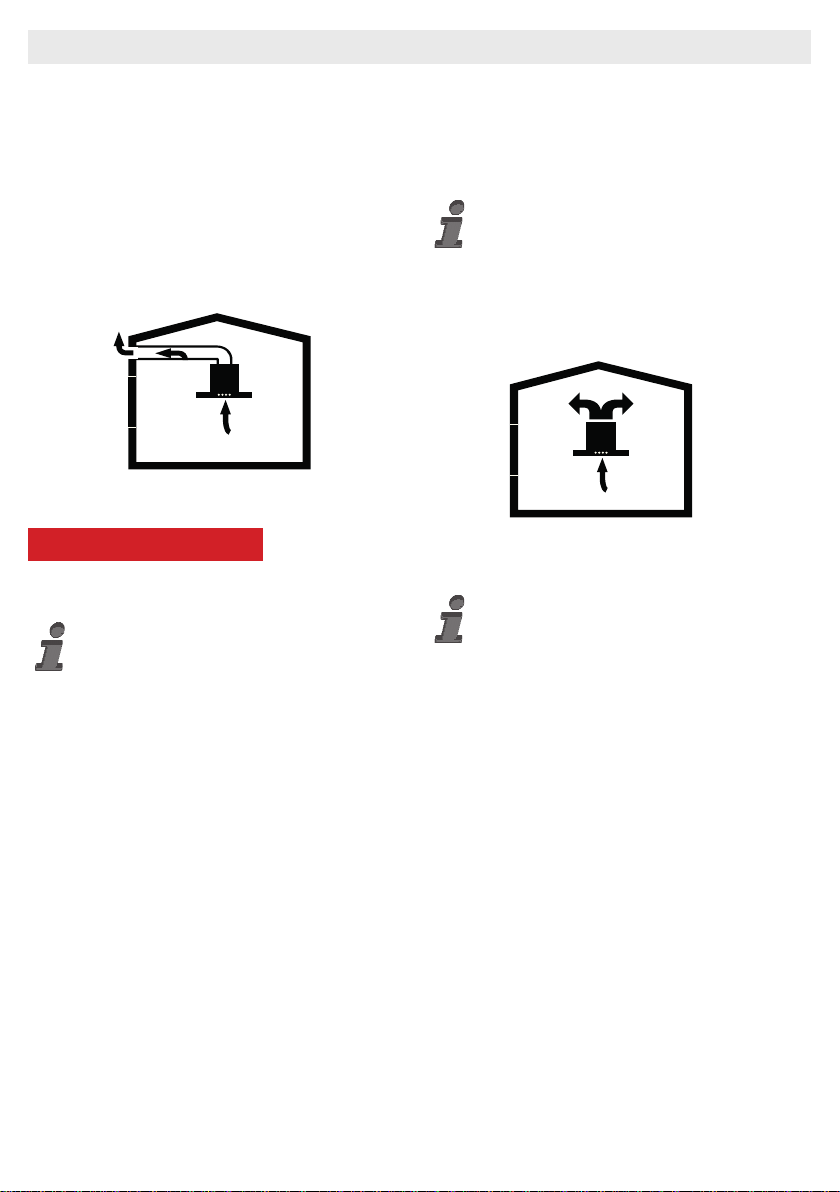
3 USAGES WITH AND WITHOUT CARBON USE
You can use this appliance in exhaust air mode
and ventilated air mode.
Exhaust air mode
The absorbed air is cleaned by the grease lters,
and is discharged through a piping system. 4
Fig. 4: Air Outlet without Carbon Filter
A WARNING
Death Risk!
Exhaust gases that are reabsorbed might lead to
poisoning. Exhaust air must not be transferred
to an active smoke or waste gas ue; or a ue
used for ventilation of the places, where heat
sources are installed.
■ If you want to transfer exhaust air to an inactive smoke or waste gas ue, you need to obtain
permission from an authorized chimney sweep.
■ If exhaust air is discharged through the external wall, a telescopic wall safe must be used.
Ventilated air mode
Absorbed air is cleaned by the grease lters and
an active carbon lter, and then it is transferred
back to the kitchen. 5
Fig. 5: Air Outlet with Carbon Filter
To retain the substances that lead to odour in
ventilated air mode, you must attach an active
carbon lter. Consult your authorized dealer for
various options available to use your appliance
in ventilated air mode. You can purchase the
accessories required for this process for related
sales points, authorized services or online sales
centre
8
Page 11
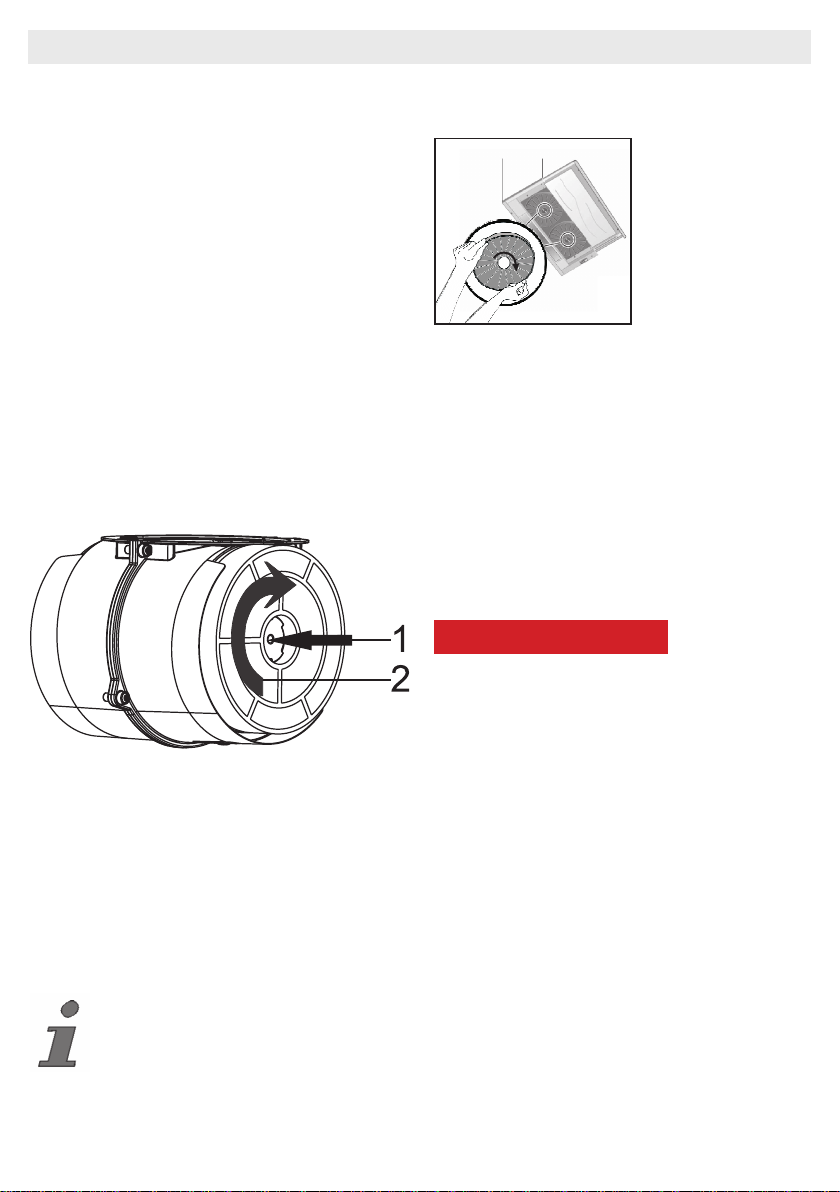
3.1 Replacement of Carbon Filter
In environments without ue, active carbon lter
must be used for ltering the air and resending
it in. Active carbon lter must be supplied from
service or your dealer. De-energize the appliance before replacing the carbon lter. Since
carbon lter is used in kitchens with no ue
outlet, it must be replaced in every 3-5 months
depending on the use.
Carbon lter must never be washed. Grease lters must be installed in the product, regardless
of whether or not carbon lters are used. Do not
use your product without grease lter.
3.2 Replacement of Carbon Filter
3.3 Replacement of Carbon Filter
Fig. 6: CARBON FILTER
The appliance you have purchased is
appropriate for use with carbon lters.
3. Place the carbon lter in its housing. Fig. 6
4. Rotating the carbon lter clockwise, ensure
that it is completely t. Fig. 6
A DANGER
Do not wash carbon lters. Keep the carbon lters away from children.
Fig. 6: CARBON FILTER
The appliance you have purchased is
appropriate for use with carbon lters.
1. Place the carbon lter in its housing. Fig. 6
2. Rotating the carbon lter clockwise, ensure
that it is completely t. Fig. 6
If carbon lter does not t in
completely, it might drop and damage your
product.
9
Page 12

4 CLEANING AND PREVENTIVE MAINTENANCE
A ATTENTION
■ Prior to each maintenance and cleaning,
cooker hood must be unplugged, and appliance
must be dead
■ Cleaning and user maintenance of the appliance shall not be performed by unattended
children.
■ The surface could be damaged due to aggressive and abrasive cleaning agents. Never
use aggressive and abrasive cleaning agents.
Supply your cleaning and protective substances that are appropriate for your appliance from
the authorized technical service. Surface of
appliance and control units are sensitive to
scratching.
■ Clean the surfaces with a soft and damp
cloth, dish-washing liquid or mild glass cleaning
agent. Soften the dry, sticky dirt with a damp
cloth. Do not scrape!
■ It is not appropriate to use dry cloths, sponges
that may scratch, materials that require rubbing,
and other aggressive cleaning agents containing sand, soda, acid or chlorine.
■ Clean the stainless steel surfaces in their
brushing direction only.
■ Do not use stainless steel cleaning agents
and wet clothes for control units. Cleaning of
metal grease lters Used metal grease lters
retain the greasy particles in the moisture and
vapour generated in the kitchen. Clean the metal grease lters about every three months, under normal use conditions (1 to 2 hours a day).
■ Do not use excessively effective, acidic or alkaline cleaning agents.
■ For cleaning the metal grease lters, clean
the holder parts of the metal grease lters in the
appliance, with a damp cloth as well.
■ You can clean the metal grease lters in the
dishwasher or by hand.
4.1 Washing in Dishwasher
■ In case of washing in dishwasher, a slight
change might occur in colour. This has no effect
on the function of the metal grease lter.
■ Do not wash the excessively dirty metal
grease lters together with dishes.
■ Place the metal grease lters loosely and
freely in the dishwasher. Metal grease lters
must be placed in the dishwasher without jamming.
4.2 Hand Wash
For stubborn dirts, you can use a special
grease solvent. You can buy such an agent
from the authorized sales centre.
■ Soften the metal grease lters in a hot water
with dish-washing liquid.
■ Use a brush for cleaning and wait for the liquid in metal grease lters to ow off completely.
■ Rinse the lters thoroughly after cleaning.
A ATTENTION
Thanks to timely cleaning of metal grease lter,
the re danger caused by excessive heat that is
generated during frying is avoided.
4.3 Removal/Installation of Aluminium Filter
Pull the aluminium lter towards you by pressing on its tab. Reverse the process to install the
lter.
10
Page 13
5 INSTALLATION OF APPLIANCE
Min.65 cm
Min.75 cm
Fig. 7: INSTALLATION OF APPLIANCE
After completing the installation of cooker hood, the minimum distance must be 650 mm between
the product and any electric cooker; and 750 mm between it and any gas ranges or cookers burning
other fuels. Fig. 7
5.1 Installation and Unpacking of
the Appliance
Check that your appliance is not deformed.
■ Report the transport issues immediately to
transport operator.
■ Any faults encountered shall be reported to
the dealer, too.
■ Do not allow children to play the with packag-
ing materials !!!
5.2 Recommendation for Energy
Saving
■ Replace the carbon lters on a regular basis.
■ Regularly clean your aluminium lters. Since
dirty lters would block the air passage, you
might have to use the appliance at a higher
speed.
■ Use your product according to its normal
speeds.
■ Use at higher speed would cause an increase
in the energy consumption.
11
Page 14
5.3 Exhaust Air Mode
A WARNING
Death Risk!
Exhaust gases that are reabsorbed might lead to
poisoning. Exhaust air must not be transferred to
an active smoke or waste gas ue; or a ue used
for ventilation of the places, where heat sources
are installed. If you want to transfer exhaust air
to an inactive smoke or waste gas ue, you need
to obtain permission from an authorized chimney sweep.
If exhaust air is discharged over the external
wall,
a telescopic wall case must be used.
5.4 Air Discharge Line
Information: Manufacturer of appliance can-
not be held responsible for defects caused by
laid pipes.
■ Appliance shows the highest performance
when a short and at air outlet pipe and a pipe
diameter as large as possible is used.
■ Optimum ventilation performance cannot be
reached and noise of fan increases when long
and rough air outlet pipes and multiple pipe elbows or pipe diameters smaller than 150mm are
used.
■ Pipes or hoses used in laying the air outlet
line must be made of inammable materials.
Circular Pipes
It is recommended that inner diameter should be
150 mm or at least 120 mm.
Flat Channels
Inner Section must be appropriate to the diameter of circular pipes.
Ø150 mm approx. 177 cm²
Ø120 mm approx. 173 cm²
■ Flat channels shouldn't have sharp elbows.
■ Use sealing strips for different pipe diameters.
5.5 Checking the Wall
■ Wall must be at, straight and have the suf-
cient bearing capacity.
■ Depth of drilling holes must comply with the
length of bolts. Dowels must t in properly.
■ Bolts and dowels in the enclosure are appropriate for use in rigid monolithic walls. Use appropriate fasting materials for different constructions (for ex. plasterboard, aerated concrete,
proton bricks).
5.6 Electrical Connection
A WARNING
Electric Shock Danger!
Components in the appliance might have sharp
edges. Connection cable can be damaged. Do
not bend or jam the connection cable during installation.
Necessary connection data is provided on the
type label found inside your appliance; metal
grease lters must be removed to see the label.
Length of connection line: approx.
1.3 m
This appliance complies with EU interference
elimination guidelines.
A WARNING
5.7 Danger of Electric Shock!
It must always be possible to disconnect the
appliance from the electric network. Appliance
must be plugged in a protected contact outlet
that is mounted in accordance with the rules. If
the plug cannot be reached after installation or
during the required xed connection, there must
be many pole separation assemblies available
with at least 3 mm contact distance to the installation. Fixed connection must be performed by
an electronics expert only.
12
Page 15
6 OVERVIEW OF APPLIANCE
1
2
3
4
1
2
3
4
Djt anahtarlı modeller
Fig. 9: OVERVIEW OF COOKER HOOD
1. Front Panel
2. Key
3. Filter
4. Lighting
13
Page 16
7 ASSEMBLY OF PRODUCT
305
80
B
C
D
A
A
B
C
D
Drilling the Hanger Holes
Make holes with Ø4 mm diameter on the points
marked as A, B, C, D on the mounting scheme.
Figure 2
520
19
10
2
A
10
10
MOUNTINGTEMPLATE SCALE 1:1
MONTAGESCHABLONE MAßSTAB 1:1
50
SAGOMADI MONTAGGIO RELAZIONE 1:1
ESTAMPADE MONTAJE ESCALA1:1
GABARITPOUR MONTAGE ECHELLE 1:1
SZABLON MONTAZOWYSKALA1:1
283
223±2
B
28
500
462±2
CUT-OUTLINE ON CUPBOARD FORAIR EXIT
AUSSCHNITTIM SCHRANK FÜR LUFTAUSTRITT
LINEADI TAGLIO PER USCITAARIA
RECORTE DELARMARIO PARALA SALIDA DEAIRE
LIGNEA COUPER POUR LASORTIE D'AIR
ZAZNACZYCW SZAFCE OTWÓR POD WYLOT POWIETRZA
2
±
0
3
1
Ø
A,B,C,D =
248
Ø4
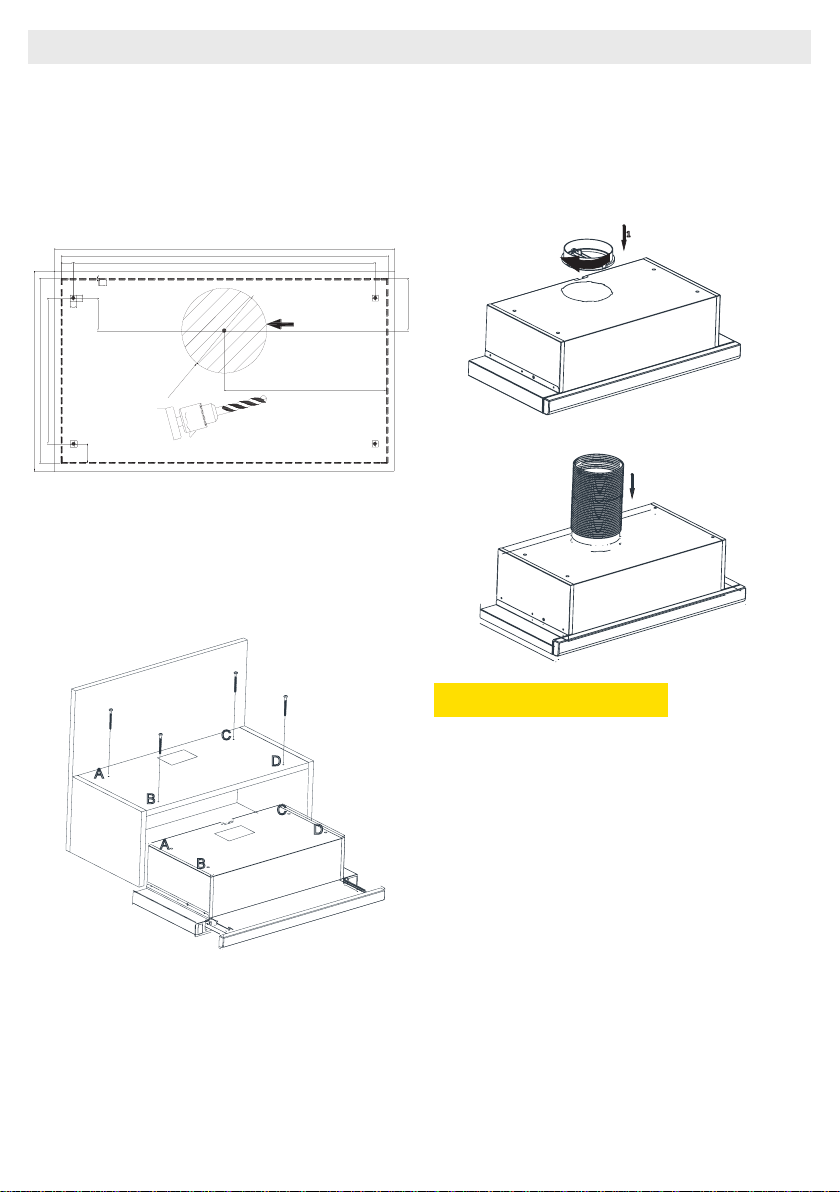
Figure 2
The appliance should be mounted on the cabinet on the points A, B, C, D by using 4 x 40
screws provided with the appliance. The front
panel should not be rubbed against the cabinet
cover when the sliding set moves. Figure 3
Figure 3
Place the plastic ue provided with the appliance on the ue outlet on the appliance. Rotate
the plastic ue clockwise. Figure 4
Install exible aluminium pipe to
plastic ue outlet. Install the other
end of the pipe to the ue hole on
the wall.Figure 5
1
2
C
D
Figure 4
Figure 5
A ATTENTION
Since twists and bends in the aluminium pipe
will lead to reduction in the air suction power,
avoid using twists and bends as much as possible.
Functions of Device
Cooker hood is used in kitchens with or without
ue.
In case of use with ue;
In ue-connected use, cooker hood must be
connected to a ue that will discharge the air.
Prefer the shortest way for the pipe system that
leads to ue, in order to get the maximum efciency from your cooker hood. Your product is
manufactured in a form appropriate for use with
ue.
14
Page 17
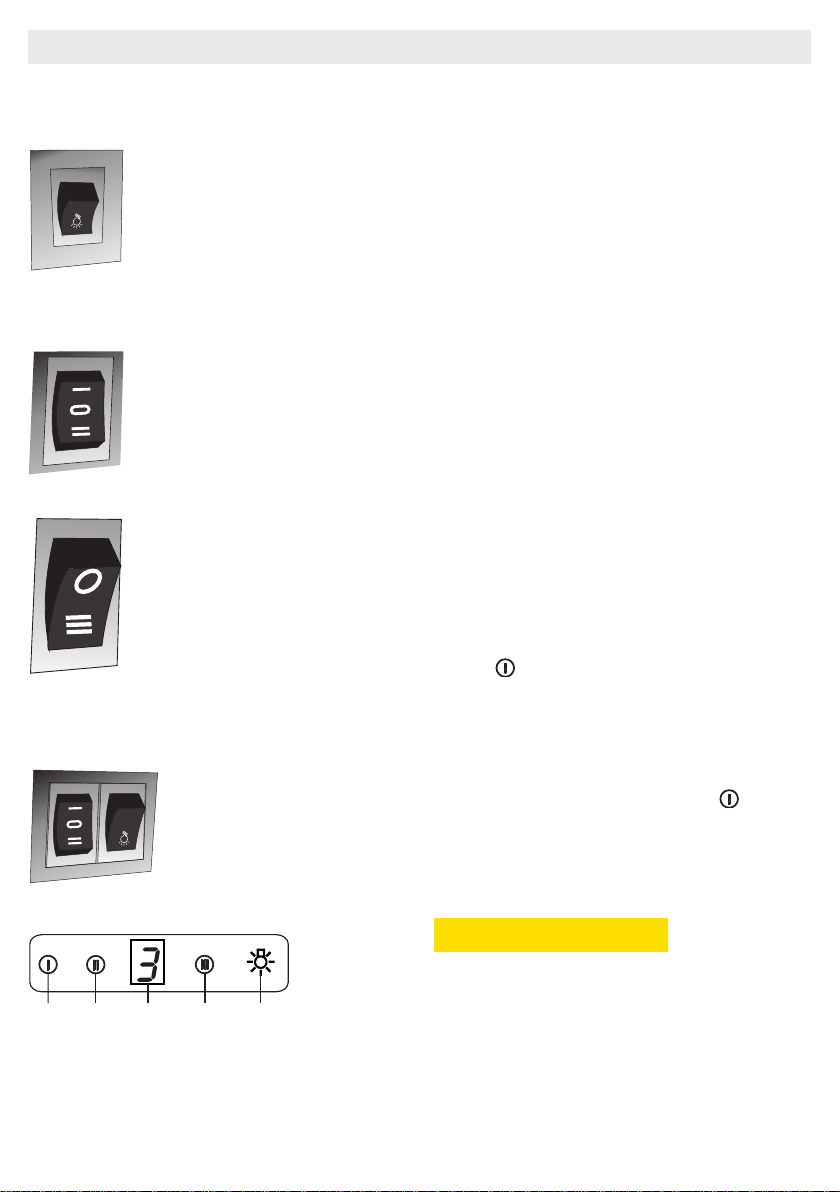
8 USE OF PRODUCT
1
23
4
5
3 Spd Rocker Switch
Lamp Switch
Turn the switch to lamp position to
turn on the light of the appliance.
The sliding set must be detached to
turn on lights.
3. Circulation Switch
If you want to run the appliance at
the third speed move the switch
down.
3. Circulation Switch
If you want to run the appliance at
the third speed move the switch
down.
2 Spd Rocker Switch
The product has 2 lamps and a switch to
control lighting. The sliding set
must be detached to turn on
lights.
3- Press this button when you want to operate
the product in speed 3.
4- Press this button when you want to turn on
the product lights.
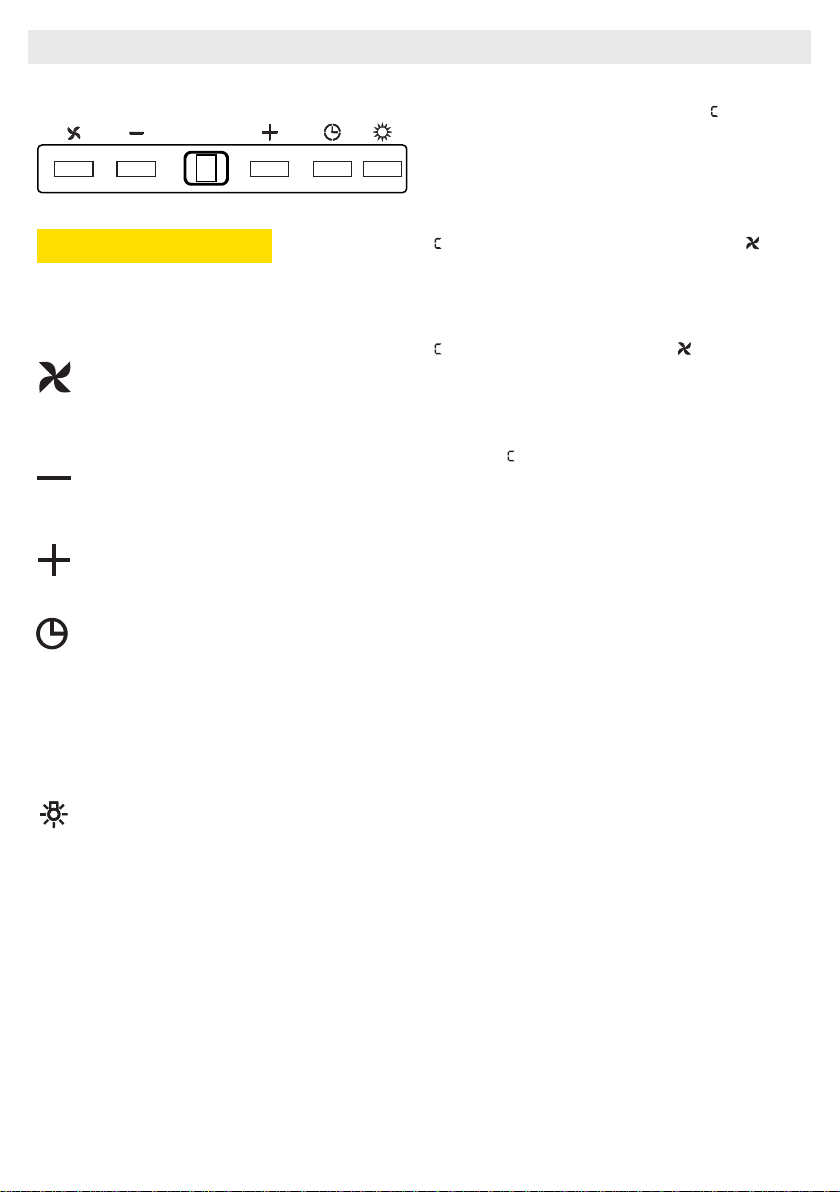
Speed Selection
Appliance has is a 3-level ventilation. One of
the low-medium-high ventilation levels is selected according to cooking and frying vapour. It
is started by pressing the motor control buttons
on the front panel. Electronic controlled models
have automatic timer.
Timer
If you press any of the motor starting buttons
for longer than 2 seconds, a timer function shall
activate with 15 minutes duration. Display shall
also give a signal when the timer starts and the
motor shall stop automatically 15 minutes later.
Cleaning Periods of the Metal Filter:
The lters must be cleaned when "C" signal
appears on the display or (depending on usage) after every 2-3 weeks. When the lters
are cleaned and mounted in their places, press
button ( ) for more than 3 seconds in order to
delete "C" signal (when the product is inactive).
Letter "E" will appear on the display, and the
product will switch to normal operation. If the
operation is desired to continue without deleting "C" signal, when you push on ( ) button,
active operation will be observed for 1 sec. and
then "C" signal will reappear and the motor will
continue to run.
3 Spd Dgt Switch
1- Press this button when you want to operate
the product in speed 1.
2- Press this button when you want to operate
the product in speed 2.
A ATTENTION
"C" mark will appear at the end of the product's
usage period of 60 hours.
15
Page 18
5
5 Spd Dgt Switch
A ATTENTION
"C" mark will appear at the end of the product's
usage period of 60 hours.
On-Off: The appliance will start once this
button is pressed.
Decreasing Speed: Speed will decrease if
this button is pressed.
Increasing Speed: Speed will increase if
this button is pressed.
Timer: When the button is pushed on, a
timing function is activated for a period of
15 minutes, and once the timing starts,
also the display gives a signal, and the
motor stops automatically after 15 minutes.
Lamp: The lamp will turn on once the button is pressed. Re-press the button to turn
off the lamp.
Cleaning Periods of the Filters:
The lters must be cleaned when " " signal appears on the display or (depending on usage)
after every 2-3 weeks. When the lters are
cleaned and mounted in their places, press button for more than 3 seconds in order to delete
" " signal (when the product is inactive) .Letter
"E" will appear on the display, and the product will switch to normal operation. If the operation is desired to continue without deleting
" " signal, when you push on ( ) button, active
operation will be observed for 1 sec. and then
"C" signal will reappear and the motor will continue to run.
NOTE: “ ” mark will appear at the end of the
product's usage period of 60 hours.
Ecient Use With Regard to Energy
Saving:
* When using your hood, adjust the speed settings according to vapour and odour intensity, in
order to save energy.
* Use low speeds (1-2) under normal conditions,
and high speeds (3) in intense odour and vapour.
* The lamps on the hood are placed for illuminating the cooking area.
Using them for environmental lighting shall
cause unnecessary energy expenditure and insufcient lighting.
Use of Hood:
* Your hood contains a motor that has various
speeds.
16
Page 19
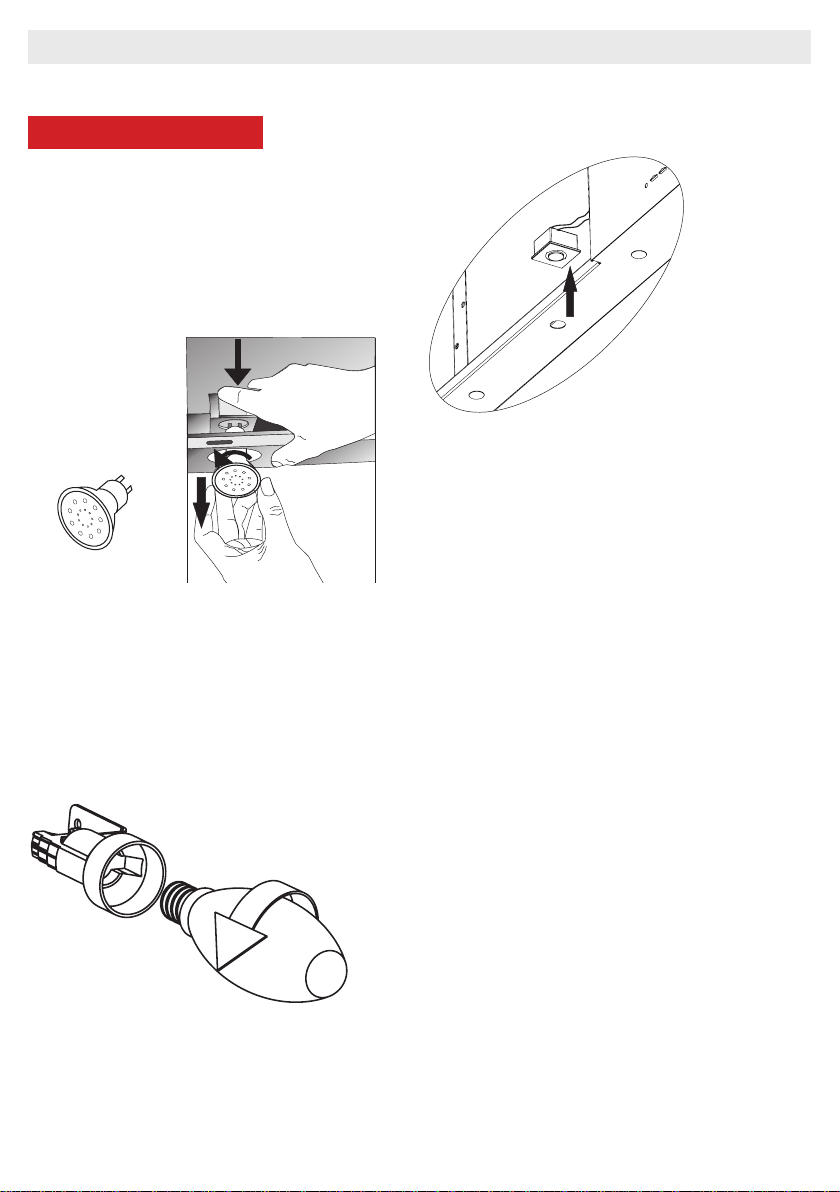
9 REPLACEMENT OF LAMPS
A DANGER
Disconnect the electrical supply of the cooker
hood. Leave the lamps to cool down rst because they could burn your hands when they
are hot.
9.1 Replacement of Halogen Lamp
Fig. 13: Replacement of LED Lamp
Remove the aluminium cartridge lter. Remove
the faulty bulb and replace with a new one with
the same rating. Fig. 13
9.3 1W Replacement of LED Lamp
• Disconnect the electrical connection of
LED lamp.
• Push on the lamp with your hand, to remove it.
• Separate the self adhesive tape around the
lamps and the body plate from each other.
• Before placing the new LED lamp, remove
the protective folio from the frame, and
then stick it on its place on the body of the
product.
9.2 Replacement of Spark Plug
Lamp
Fig. 14: Replacement of Spark Plug Lamp
Remove the aluminium cartridge lter. Remove
the faulty bulb and replace with a new one with
the same rating.Fig. 14
17
Page 20

10 AUTHORIZED TECHNICAL
SERVICE
If Lighting is Not Functioning:
■ Make sure that the plug is plugged in, and that the fuses are intact.
■ Check the bulbs. Make sure you unplugged the device before performing this check. Tighten the
bulbs if they are loose; you can replace the bulbs if they still don't work.
Possible Faults and What-to-Do Before
Calling the Technical Service:
A) If the appliance does not work in any way:
■ Check to see if the cooker hood is plugged in or if the plug is t properly into the socket.
■ Check the fuse, to which the appliance is connected, as well as the main fuse of your house.
If the performance of appliance is insucient
or it operates with too much noise:
■ Is the outlet diameter of the appliance's ue adequate? (min.120 mm).
■ Are the metal lters clean? Please check.
■ If you use the cooker hood without ue, make sure that the carbon lters are not older than 6
months.
■ Be attentive to ventilate your kitchen adequately, in order to provide an airow. If you are still not
satised with the performance of the appliance, consult the authorized technical service.
18
Page 21
10.1 Potential Failures and Solutions
Description of Failure Reason Help
Mains voltage must be 220-240 V, and
product must be plugged into a grounded
socket.
Mains voltage must be 220-240 V, and
product must be plugged into a grounded
socket.
Lamp switch must be at "on" position.
The aluminium cartridge lter should
be washed once a month under normal
conditions.
Air Outlet Flue Must Be Open.
In products that work with carbon lters,
carbon lter must be replaced once in
every 3 months under normal conditions.
The aluminium cartridge lter should
be washed once a month under normal
conditions.
In products that work with carbon lters,
carbon lter must be replaced once in
every 3 months under normal conditions.
Appliance Does Not Work.
Lighting Lamp Does Not
Operate.
Lighting Lamp Does Not
Operate.
Lighting Lamp Does Not
Operate.
Product's Air Intake is Weak.
Product's Air Intake is Weak.
Product's Air Intake is Weak.
It Does Not Discharge Air (in
ueless use)
It Does Not Discharge Air (in
ueless use)
Check the power
connection.
Check the power
connection.
Check the power
connection.
Check the bulbs. Bulbs must be operative.
Check the aluminium
lter.
Check the air
outlet ue.
Check the carbon
lter.
Check the Aluminium
lter.
Check the carbon
lter.
10.2 Technical Table
Supply Voltage 220 - 240 V 50Hz
Insulation Class of Motor F
Insulation Class CLASS I
19
Page 22

SRB
PIO - 650 2MW
PIO - 650 2MIX
UPUTSTVO ZA UPOTREBU ASPIRATOR
Page 23

PIO650 2MW
PIO650 2MIX
Pažljivo pročitajte uputstvo za upotrebu!
20
Page 24

1 TEHNIČKI CRTEŽ ........................................................................................................... 22
2 UPOZORENJA I SIGURNOSNE MERE .......................................................................... 23
2.1 Opasnost po život, opasnost od trovanja ...................................................................... 25
2.2 Opasnost od strujnog udara! ......................................................................................... 25
2.3 Opasnost od telesne povrede! ....................................................................................... 25
2.4 Opasnost od opekotina, opasnost od strujnog udara! ................................................... 26
2.5 Opasnost od požara i telesne povrede! ......................................................................... 26
3 KORIŠĆENJE SA I BEZ FILTERA SA AKTIVNIM UGLJEM 27
3.1 Zamena filtera sa aktivnim ugljem ................................................................................................ 28
3.2 Zamena AF 90 filtera sa aktivnim ugljem ....................................................................... 28
3.3 Zamena AF 100 filtera sa aktivnim ugljem ..................................................................... 28
4 ČIŠĆENJE I PREVENTIVNO ODRŽAVANJE .................................................................. 29
4.1 Pranje u mašini za pranje sudova ................................................................................................29
4.2 Ručno pranje ................................................................................................................. 29
4.3 Uklanjanje/postavljanje aluminijumskog filtera .............................................................. 29
5 INSTALACIJA UREĐAJA ............................................................................................... 30
5.1 Instalacija i raspakivanje uređaja ................................................................................... 30
5.2 Instalacija i raspakivanje uređaja ................................................................................... 30
5.3 Režim izduvnih gasova .................................................................................................. 31
5.4 Izduvna cev ................................................................................................................... 31
5.5 Provera zida .................................................................................................................. 31
5.6 Električni priključak ........................................................................................................ 31
5.7 Opasnost od strujnog udara! ......................................................................................... 31
6 PREGLED UREĐAJA ....................................................................................................... 32
7 MONTAŽA UREĐAJA ....................................................................................................... 33
8 KORIŠĆENJE UREĐAJA ................................................................................................. 34
9 ZAMENA SIJALICA .......................................................................................................... 36
9.1 Zamena halogene sijalice .............................................................................................. 36
9.2 Zamena sijalice sa užarenim vlaknom ........................................................................... 36
10 OVLAŠĆENI TEHNIČKI SERVIS ................................................................................... 37
10.1 Mogući kvarovi i rešenja .............................................................................................. 38
10.2 Tabela sa tehničkim podacima .................................................................................... 38
„Usklađeno sa EEE uredbom. Nije uključen PCB“
21
Page 25
1 TEHNIČKI CRTEŽ
Max425 Min305
Sl. 1: TEHNIČKI CRTEŽ
280
600
223
462
78,5
499
146
50
174
283
27
20
41
22
Page 26

2 UPOZORENJA I SIGURNOSNE MERE
■ Ovaj uređaj ne smeju da koriste deca mlađa
od 8 godina, kao ni osobe sa ograničenim
zičkim ili mentalnim sposobnostima, niti
osobe koje nemaju dovoljno znanja ili iskustva
u korišćenju ovog uređaja, osim ako su pod
nadzorom osobe koja je odgovorna za njihovu
bezbednost i ako su od nje dobile uputstva o
pravilnom korišćenju ovog proizvoda.
■ Ovaj proizvod je namenjen za kućnu
upotrebu.
■ Napon napajanja vašeg uređaja je 220-240
V ~50 Hz.
■ Kabl za napajanje uređaja ima uzemljenu
utičnicu. Ovaj kabl se uvek mora priključiti u
uzemljenu utičnicu.
■ Sve električne veze mora da izvede
kvalikovani električar.
■ Neovlašćena instalacija može da dovede do
lošeg rada, oštećenja uređaja i nesreća.
■ Kabl za napajanje uređaja ne sme da se
zaglavi ili prignječi tokom instalacije. Kabl
za napajanje ne sme da se postavi u blizini
šporeta. To može da izazove topljenje i požar.
■ Ne uključujete uređaj u struju pre završetka
instalacije.
■ Pobrinite se da mesto instalacije omogućava
korisniku da jednostavno izvuče kabl za
napajanje u slučaju opasnosti.
■ Ne dodirujte sijalice uređaja kada su
uključene duže vreme. Sijalice mogu da izazovu
opekotine na vašim rukama jer su vruće.
■ Kuhinjski aspiratori su namenjeni za kućnu
upotrebu i standardne uređaje za kuvanje.
Ukoliko se uređaj koristi u druge svrhe, on može
da otkaže, a garancija neće važiti.
■ Poštujte propise i pravila nadležnih organa
o pražnjenju izduvnih gasova. (Ovo ne važi za
korišćenje bez izduvnih kanala).
■ Zapaljiva hrana ne sme da se kuva ispod
ovog uređaja.
■ Uređaj uključite nakon što šerpe, lonce,
itd. stavite na šporet. U suprotnom, visoka
temperatura može da izazove deformaciju
nekih delova uređaja.
■ Isključite uređaj pre nego što šerpe, lonce,
itd. sklonite sa šporeta.
■ Ne ostavljajte vruće ulje na šporetu. Šerpe
sa vrućim uljem mogu da izazovu požar.
■ Pošto ulje može da se zapali tokom prženja,
pazite na zavese i stolnjake.
■ Vodite računa da se lteri zamene na vreme.
Filteri koji se ne zamene na vreme predstavljaju
rizik od požara zbog ulja koje se nataložilo u
njima.
■ Nemojte umesto ltera da koristite materijal
za ltriranje koji nije otporan na vatru.
■ Nemojte uključivati uređaj bez ltera i
nemojte uklanjati ltere tokom korišćenja
uređaja.
■ U slučaju požara, aspirator i šporet isključite
iz struje. (Uređaj isključite iz struje ili isključite
glavni prekidač.)
■ Ukoliko se ne čisti redovno, uređaj može da
predstavlja rizik od požara.
■ Pre održavanja, uređaj isključite iz struje.
(Uređaj isključite iz struje ili isključite glavni
prekidač)
■ Negativni pritisak koji se javlja u prostoriji
kada se pored aspiratora istovremeno koriste
uređaji koji se ne napajaju električnom
energijom, ne sme da premaši 4 Pa ( 4 X 10
bara ).
■ Ukoliko se uređaji koji rade na ulje ili gas,
kao što su sobne grejalice, nalaze u prostoriji u
kojoj se koristi vaš uređaj, izduvni gasovi iz ovih
uređaja se moraju potpuno izolovati ili uređaj ne
23
Page 27

sme da propušta vazduh.
■ Prilikom povezivanja izduvnih kanala
uređaja, koristite cevi prečnika 150 ili 120mm.
■ Veza mora da bude što kraća, sa najmanjim
mogućim brojem kolena.
■ Deca ne smeju da se igraju sa uređajem.
■ Zbog vaše bezbednosti, u uređaju koristite
osigurač od maksimalno 6 A.
■ Ambalažu držite dalje od dece, jer ona može
biti opasna.
■ Ukoliko se kabl za napajanje ošteti, mora
ga zameniti proizvođač, njegov servis ili lica
odgovarajućih kvalikacija da bi se izbegle
opasnosti.
■ U slučaju požara, aspirator i šporet isključite
iz struje i pokrijte plamen. Nikada ne koristite
vodu za gašenje požara.
■ Pristupačni delovi mogu biti veoma topli
tokom rada šporeta.
■ Ovaj uređaj ne smeju da koriste osobe
sa ograničenim zičkim, čulnim ili mentalnim
sposobnostima (uključujući decu), niti osobe
koje nemaju dovoljno znanja ili iskustva u
korišćenju ovog uređaja, osim ako su pod
nadzorom osobe koja je odgovorna za njihovu
bezbednost i ako su od nje dobile uputstva o
pravilnom korišćenju ovog uređaja.
■ Prilikom montaže aspiratora, između
uređaja i električnih šporeta mora da se ostavi
najmanje 65 cm prostora ili 75 cm prostora
između uređaja i šporeta koji rade na gas ili
druga goriva.
■ Odvod kuhinjskog aspiratora ne sme da
se povezuje na izduvne kanale na koje su
priključeni drugi proizvođači dima.
■ Vodite računa kada uređaj istovremeno
koristite sa drugim uređajima (npr. grejalice koje
rade na gas, dizel gorivo, ugalj ili drvo, grejalice
u kupatilu itd.) koji koriste isti vazduh u istom
okruženju. Ovo je važno zato što aspirator
može da ima negativan uticaj na sagorevanje,
jer vraća vazduh u prostoriju.
■ Ovo ne važi za korišćenje bez izduvnih
kanala.
■ Prostorija mora da ima dovoljnu ventilaciju
kada se šporet, aspirator i uređaji koji rade na
gas i druga goriva koriste istovremeno (ovo
možda neće važiti za uređaje koji dovode do
cirkulacije vazduha u prostoriji).
■ Istovremeni rad više od jednog šporeta
na gas može da dovede do pojave visokih
temperatura. Zato uređaj za ventilaciju koji se
stavi na površinu šporeta može da se ošteti ili
zapali. Dva šporeta na gas ne smeju da rade
istovremeno na visokoj temperaturi duže od
15 minuta. Jedan veliki gorionik sa (radnom)
snagom većom od 5 kW generiše snagu koja je
jednaka onoj koju generišu dva gasna gorionika.
24
Page 28
2.1 Opasnost po život, opasnost od
trovanja
A OPASNOST
Postoji opasnost po život i opasnost od trovanja
zbog ponovnog uvlačenja dimnih gasova.
Osim ako se ne obezbedi odgovarajući dovod
vazduha, izduvni kanal ovog uređaja nemojte
koristiti u kombinaciji sa uređajima koji ispuštaju
opasne dimne gasove, kao što su peći za
grejanje na gas, lož-ulje ili ugalj, uređaji za
zagrevanje vode itd.
Sl. 2: Opasnost od trovanja
Uređaji koji ispuštaju gasove (npr. pećnice,
gorionici, bojleri koji rade na gas, ulje, drvo
ili ugalj), uzimaju vazduh za sagorevanje iz
prostorije u kojoj su instalirani, a dimove odvode
preko sistema za odvod dimova (npr. izduvnih
kanala). Uključeni aspirator usisava vazduh
iz kuhinje i susednih prostorija. Ukoliko se ne
omogući odgovarajući dovod vazduha,
stvara se vakuum. U tom slučaju, otrovni gasovi
izlaze iz izduvnog kanala i ponovo ulaze u
prostoriju. Sl. 2
Zbog toga, uvek treba da se obezbedi dovoljan
dovod svežeg vazduha. Sl. 3
A OPASNOST
Opasnost od požara!
Usled stvaranja varnica. Instalacija ovog uređaja
na uređaj za grejanje na čvrsto gorivo (npr. na
drvo ili ugalj) može da se dozvoli samo u slučaju
da postoji nepovratna klapna. Tokom montaže
treba obratiti pažnju na važeće građevinske
propise i propise lokalnih preduzeća za
snabdevanje električnom energijom i preduzeća
za vodosnabdevanje.
Ukoliko se uređaj ne čisti u skladu sa uputstvima
za čišćenje, on može da izazove požar.
A OPASNOST
2.2 Opasnost od strujnog udara!
Nemojte savijati niti prignječiti kabl za napajanje
prilikom instalacije, jer postoji mogućnost da se
on ošteti.
A OPASNOST
2.3 Opasnost od telesne povrede!
■ Tokom instalacije postoji opasnost od
povrede zbog oštrih ivica. Prilikom instalacije
uređaja, uvek nosite zaštitne rukavice.
■ Zbog rizika od pada uređaja, svi sigurnosni
zavrtnji i poklopci treba da se postave na način
opisan u uputstvu za upotrebu.
Sl. 3
25
Page 29

A OPASNOST
2.4 Opasnost od opekotina,
opasnost od strujnog
udara!
■ Pre čišćenja i održavanja, sačekajte da se
uređaj ohladi. Izvucite osigurač ili izvucite mrežni
utikač iz utičnice.
■ Postoji rizik od oštećenja usled nakupljanja
vlage na električnim delovima. Kontrolne
elemente nikada nemojte čistiti vlažnom krpom.
■ Usled nepravilnog čišćenja može doći do
oštećenja površine. Površine od nerđajućeg
čelika čistite samo u smeru četkanja. Za
kontrolne elemente nemojte koristiti sredstva za
čišćenje nerđajućeg čelika.
■ Može doći do oštećenja površine zbog
agresivnih ili abrazivnih sredstava za čišćenje.
Nikada ne koristite agresivna ili abrazivna
sredstva za čišćenje.
■ Postoji rizik od oštećenja usled vraćanja
kondenzata. Kanal za odvod vazduha postavite
pod silaznim nagibom od uređaja (nagib od 1°).
A OPASNOST
2.5 Opasnost od požara i telesne
povrede!
Ako je vršena nestručna ili pogrešna popravka,
izvucite osigurač ili isključite uređaj iz struje.
Popravke sme da vrši samo ovlašćeni servis ili
ovlašćeno stručno osoblje.
NAPOMENA
U slučaju kvara ili oštećenja uređaja, izvucite
osigurač ili isključite uređaj iz struje i pozovite
ovlašćeni servis.
NAPOMENA
Ukoliko se kabl za napajanje ošteti, mora
ga zameniti proizvođač, njegov servis ili lica
odgovarajućih kvalikacija da bi se izbegle
opasnosti.
NAPOMENA
Kada su sijalice uređaja u kvaru, izvucite
osigurač ili isključite uređaj iz struje.. Da biste
sprečili preopterećenje ostalih sijalica, uvek
odmah zamenite neispravne sijalice (sačekajte
da se sijalice ohlade).
A PAŽNJA
Kada se koristi zajedno sa šporetima, pristupačni
delovi mogu da se zagreju.
A OPASNOST
Izduvna cev za vazduh ovog uređaja ne sme da
se poveže unutar izduvnog kanala koji se koristi
za izbacivanje izduvnih gasova koje ispuštaju
uređaji na gas ili druga goriva..
26
Page 30
3 KORIŠĆENJE SA I BEZ FILTERA SA AKTIVNIM UGLJEM
Režim ventilacije
Ovaj uređaj možete koristiti u režimu izduvnih
gasova i režimu ventilacije.
Režim izduvnih gasova
Usisani vazduh se prečišćava u lterima za ulje i
odvodi kroz sistem cevi. 4
Usisani vazduh prečišćavaju
filteri za ulje i filter sa
aktivnim ugljem, a zatim se
vraća u kuhinju. 5
Sl. 4: Odvod vazduha bez ltera sa aktivnim
ugljem
A UPOZORENJE
Rizik od smrtnog ishoda!
Izduvni gasovi koji se ponovo uvuku mogu
izazvati trovanje. Izduvni gasovi ne smeju
da se prenesu u izduvni kanal za dim
ili neprečišćeni vazduh; izduvni kanal
ne sme da se koristi u prostorijama u
kojima su postavljeni izvori toplote.
■ Ako želite da prebacite izduvne gasove u
izduvni kanal za dim ili neprečišćeni vazduh,
morate dobiti dozvolu od ovlašćene dimničarske
službe.
■ Ukoliko se izduvni gasovi izbacuju kroz
spoljašnji zid, mora da se koristi spoljna zidna
ventilaciona klapna.
Sl. 5: Odvod vazduha sa lterom sa aktivnim
ugljem
Da bi se uklonile supstance koje ispuštaju
neprijatne mirise u režimu ventilacije, morate da
postavite lter sa aktivnim ugljem. Posavetujte
se sa ovlašćenim prodavcem o različitim
opcijama koje su dostupne za vaš uređaj u
režimu ventilacije. Dodatnu opremu potrebnu
za ovaj proces možete kupiti u odgovarajućim
prodavnicama, ovlašćenim servisima ili u
prodajnom centru na mreži
27
Page 31

3.1 Zamena ltera sa aktivnim
ugljem
U uslovima bez izduvnog kanala, lter sa
aktivnim ugljem mora da se koristi za ltriranje
vazduha i njegovo vraćanje u prostoriju. Filter sa
aktivnim ugljem mora da se nabavi od servisne
radionice ili prodavca. Pre zamene ltera sa
aktivnim ugljem, isključite uređaj iz struje. Pošto
se lter sa aktivnim ugljem koristi u kuhinjama
bez odvoda za izduvni kanal, on treba da se
zameni novim nakon 3 do 5 meseci korišćenja.
Nikada nemojte prati lter sa aktivnim ugljem.
Filteri za ulje uvek treba da se instaliraju na
uređaj, bez obzira na to da li se koristi lter sa
aktivnim ugljem. Nemojte koristiti uređaj bez
ltera za ulje.
Ukoliko ne nalegne u potpunosti, lter
sa aktivnim ugljem može da padne i ošteti
uređaj.
3.3 Zamena ltera sa aktivnim
ugljem
3.2 Zamena ltera sa aktivnim
ugljem
Sl. 6: FILTER SA AKTIVNIM UGLJEM Uređaj
koji ste kupili je pogodan za korišćenje sa
lterom sa aktivnim ugljem.
1. Postavite lter sa aktivnim ugljem u njegovo
kućište. Sl. 6
2. Zarotirajte lter sa aktivnim ugljem u smeru
kazaljke na satu dok potpuno ne nalegne. Sl. 6
Sl. 6: FILTER SA AKTIVNIM UGLJEM Uređaj
koji ste kupili je pogodan za korišćenje sa
lterom sa aktivnim ugljem.
3. Postavite lter sa aktivnim ugljem u njegovo
kućište. Sl. 6
4. Zarotirajte lter sa aktivnim ugljem u smeru
kazaljke na satu dok potpuno ne nalegne. Sl. 6
A OPASNOST
Nemojte prati ltere sa aktivnim ugljem. Filtere
sa aktivnim ugljem držite dalje od dece.
28
Page 32

4 ČIŠĆENJE I PREVENTIVNO
ODRŽAVANJE
A PAŽNJA
■ Pre svakog čišćenja i održavanja, aspirator
mora da se isključi iz struje i da bude bez
napona.
■ Čišćenje i servisiranje koje obavlja korisnik
ne treba da obavljaju deca koja nisu pod
nadzorom.
■ Može doći do oštećenja površine zbog
agresivnih ili abrazivnih sredstava za čišćenje.
Nikada ne koristite agresivna ili abrazivna
sredstva za čišćenje. Kod ovlašćenog servisa
potražite sredstva za čišćenje i zaštitu koja
su pogodna za vaš uređaj. Površina uređaja i
kontrolnih jedinica je osetljiva na ogrebotine.
■ Površine čistite mekom, vlažnom krpom,
sredstvom za pranje sudova ili blagim sredstvom
za čišćenje stakla. Sasušenu i zalepljenu
prljavštinu omekšajte vlažnom krpom. Nemojte
strugati!
■ Korišćenje suvih krpa, sunđera koji mogu da
izazovu ogrebotine, sredstava koja zahtevaju
trljanje, sredstava za čišćenje koja sadrže
pesak, sodu, kiselinu, hlor ili druge jake
supstance nije prikladno.
■ Površine od nerđajućeg čelika čistite samo u
smeru četkanja.
■ Za kontrolne jedinice nemojte koristiti
sredstva za čišćenje nerđajućeg čelika i
vlažne krpe. Čišćenje metalnih ltera za ulje.
Korišćeni lteri za ulje hvataju samo čestice
ulja koje se nalaze u vlažnom vazduhu i pari
u kuhinji. Kod normalnog korišćenja (1-2 sata
dnevno), metalne ltere za ulje čistite na svaka
tri meseca.
■ Nemojte koristiti previše jaka, kisela sredstva
niti sredstva za čišćenje na bazi hlora.
■ Tokom čišćenja metalnog ltera za ulje,
vlažnom krpom očistite rešetke na metalnim
lterima za ulje.
■ Metalne ltere za ulje možete oprati u mašini
za pranje sudova ili ručno.
4.1 Pranje u mašini za pranje
sudova
■ U slučaju pranja u mašini za pranje sudova,
može doći do blagog gubitka boje. To nema
uticaja na funkcionisanje metalnog tera za ulje.
■ Veoma zaprljane metalne ltere za ulje
nemojte prati zajedno sa sudovima.
■ Metalne ltere za ulje stavite u mašinu za
pranje sudova tako da stoje slobodno. Metalni
lteri za ulje treba da se stave u mašinu za
pranje sudova tako da se na njih ne primenjuje
nikakav pritisak.
4.2 Ručno pranje
Za uklanjanje tvrdokornih mrlja, možete da
koristite specijalni rastvarač ulja. Ovaj proizvod
možete kupiti u ovlašćenom prodajnom centru.
■ Omekšajte mrlje na metalnom lteru za
ulje tako što ćete ga staviti u toplu vodu sa
deterdžentom za pranje sudova.
■ Za čišćenje koristite četku i potpuno ispustite
tečnost iz metalnih ltera za ulje.
■ Nakon čišćenja, temeljno isperite ltere.
A PAŽNJA
Blagovremenim čišćenjem metalnog ltera za
ulje, izbegava se opasnost od požara izazvana
prekomernom toplotom koja se generiše tokom
prženja.
4.3 Uklanjanje/postavljanje
aluminijumskog ltera
Izvucite aluminijumski lter pritiskom na jezičak.
Postupite obrnuto prilikom postavljanja ltera.
29
Page 33

5 INSTALACIJA UREĐAJA
Min.65 cm
Min.75 cm
Sl. 7: INSTALACIJA UREĐAJA
Prilikom montaže aspiratora, između uređaja i električnih šporeta mora da se ostavi najmanje 650
mm prostora ili 750 mm prostora između uređaja i šporeta koji rade na gas ili druga goriva. Sl. 7
5.1 Instalacija i raspakivanje
5.2 Saveti za uštedu energije
uređaja
■ Redovno menjajte ltere sa aktivnim ugljem.
Proverite da li postoje bilo kakva oštećenja na
uređaju.
■ Oštećenja prilikom transporta odmah moraju
da se prijave osobi odgovornoj za transport.
■ Vidljivi nedostaci moraju da se prijave i
prodavcu.
■ Redovno čistite aluminijumske ltere. Možda
ćete morati da uključujete uređaj na većoj brzini,
jer će prljavi lter blokirati dovod vazduha.
■ Uređaj koristite na normalnim brzinama.
■ Korišćenje većih brzina će povećati potrošnju
električne energije
■ Ne dozvolite deci da se igraju ambalažom.
30
Page 34

5.3 Režim izduvnih gasova
A UPOZORENJE
Rizik od smrtnog ishoda!
Izduvni gasovi koji se ponovo uvuku mogu
izazvati trovanje. Izduvni gasovi ne smeju da se
prenesu u izduvni kanal za dim ili neprečišćeni
vazduh; izduvni kanal ne sme da se koristi
u prostorijama u kojima su postavljeni izvori
toplote. Ako želite da prebacite izduvne gasove
u izduvni kanal za dim ili neprečišćeni vazduh,
morate dobiti dozvolu od ovlašćene dimničarske
službe.
Ukoliko se izduvni gasovi ispuštaju kroz
spoljašnji zid,
mora da se koristi spoljna zidna ventilaciona
klapna.
5.4 Izduvna cev
Informacije: Proizvođač uređaja nije
odgovoran za kvarove izazvane postojećom
instalacijom.
■ Uređaj najbolje radi kada se koristi kratka
i ravna cev za odvod vazduha sa što većim
prečnikom.
■ Optimalne performanse ventilacije ne mogu
da se dostignu i buka ventilatora se povećava
kada se koriste duge i neravne cevi za odvod
vazduha i nekoliko kolena za cevi, ili prečnici
cevi koji su manji od 150 mm.
■ Cevi ili creva koja se koriste za izvođenje
instalacije za odvod vazduha moraju da budu
napravljene od nezapaljivih materijala.
Kružne cevi
Preporučuje se da unutrašnji prečnik bude 150
mm ili najmanje 120 mm.
Ravni kanali
Unutrašnji deo mora da odgovara prečniku
kružnih cevi.
Ø150 mm otpr. 177 cm²
Ø120 mm otpr. 173 cm²
■ Ravni kanali ne treba da imaju oštra kolena.
■ Za cevi različitih prečnika koristite zaptivne
trake.
5.5 Provera zida
■ Zid mora da bude ravan, prav i da ima dovolj-
nu nosivost.
■ Dubina izbušenih rupa mora da odgovara
dužini zavrtnjeva. Tipli moraju da upadnu do
kraja.
■ Isporučeni zavrtnjevi i tipli su odgovarajući za
upotrebu na krutim, monolitnim zidovima. Za ostale konstrukcije koristite odgovarajuće vezivne
materijale (npr. gips, gas-beton, proton cigle).
5.6 Električni priključak
A UPOZORENJE
Opasnost od strujnog udara!
Komponente u uređaju mogu da imaju oštre
ivice. Kabl za napajanje može biti oštećen.
Nemojte savijati niti stiskati kabl za napajanje
tokom procesa instalacije.
Neophodni podaci o povezivanju se mogu naći
na tipskoj nalepnici koja se nalazi u unutrašnjosti
uređaja; da bi se nalepnica videla, moraju se
izvaditi metalni lteri za ulje.
Dužina priključnog voda: oko 1,3 m
Ovaj uređaj je usklađen sa EU smernicama o
eliminisanju smetnji.
A UPOZORENJE
5.7 Opasnost od strujnog udara!
Isključivanje aparata sa električne mreže uvek
mora biti moguće. Uređaj mora biti priključen na
uzemljenu utičnicu koja je instalirana u skladu sa
pravilima. Ukoliko utičnica ne može da se dohvati
nakon instalacije ili tokom izvođenja ksne
veze, mora biti dostupno nekoliko rastavljača
sa razmakom kontakta od najmanje 3 mm.
Fiksnu vezu sme da izvede samo kvalikovani
električar.
31
Page 35

6 PREGLED UREĐAJA
1
2
3
4
1
2
3
4
Djt anahtarlı modeller
Sl. 9: PREGLED DELOVA ASPIRATORA
1. Prednja ploča
2. Taster
3. Filter
4. Osvetljenje
32
Page 36

7 MONTAŽA UREĐAJA
305
80
B
C
D
A
A
B
C
D
1
2
Bušenje montažnih otvora
Izbušite otvore prečnika Ø4 mm u tačkama
obeleženim sa A, B, C, D na šemi montaže.
Slika 2
19
A
283
223±2
B
10
10
28
10
2
MOUNTINGTEMPLATE SCALE 1:1
MONTAGESCHABLONE MAßSTAB 1:1
50
SAGOMADI MONTAGGIO RELAZIONE 1:1
ESTAMPADE MONTAJE ESCALA1:1
GABARITPOUR MONTAGE ECHELLE 1:1
SZABLON MONTAZOWYSKALA1:1
520
500
462±2
CUT-OUTLINE ON CUPBOARD FORAIR EXIT
AUSSCHNITTIM SCHRANK FÜR LUFTAUSTRITT
LINEADI TAGLIO PER USCITAARIA
RECORTE DELARMARIO PARALA SALIDA DEAIRE
LIGNEA COUPER POUR LASORTIE D'AIR
ZAZNACZYCW SZAFCE OTWÓR POD WYLOT POWIETRZA
2
±
0
3
1
Ø
A,B,C,D =
248
Ø4
C
D
Slika 2
Uređaj treba da se montira na orman u tačkama
A, B, C, D pomoću 4 x 40 zavrtnja koji su
isporučeni uz uređaj. Prednja ploča ne treba
da dolazi u dodir sa vratima ormana prilikom
pomeranja kliznog mehanizma. Slika 3
Plastičnu cev isporučenu uz uređaj postavite na
odvod za izduvni kanal uređaja. Plastičnu cev
zarotirajte u smeru kretanja kazaljke na satu.
Slika 4
Slika 4
Fleksibilnu aluminijumsku cev postavite na
plastični odvod za izduvni kanal. Drugi kraj cevi
postavite na otvor kanala na zidu. Slika 5
Slika 5
A PAŽNJA
Pošto će krivine i kolena u aluminijumskoj cevi
dovesti do smanjenja usisne snage uređaja,
izbegavajte korišćenje krivina i kolena što je
moguće više.
Slika 3
Funkcije uređaja
Aspiratori se koriste u kuhinjama sa ili bez
izduvnog kanala.
U slučaju korišćenja sa izduvnim kanalom;
Kod korišćenja sa povezanim izduvnim
kanalom, aspirator mora biti povezan na izduvni
kanal koji će odvoditi vazduh. Da biste ostvarili
maksimalnu ekasnost aspiratora, sistem
cevi koji vodi do izduvnog kanala povežite
na najkraći mogući način. Vaš proizvod je
proizveden u obliku koji odgovara korišćenju sa
izduvnim kanalom.
33
Page 37

8 KORIŠĆENJE UREĐAJA
1
23
4
5
Preklopni prekidač sa 3 brzine
Prekidač za svetlo
Prekidač za svetlo okrenite u
položaj za uključivanje svetla
uređaja. Da bi se svetla upalila,
klizni mehanizam mora biti odvojen.
3. Prekidač cirkulacije
Ako želite da uređaj prebacite u
treću brzinu, prekidač pomerite
nadole.
3. Prekidač cirkulacije
Ako želite da uređaj prebacite u
treću brzinu, prekidač pomerite
nadole.
Preklopni prekidač sa 2 brzine
Uređaj ima 2 lampice i prekidač za
kontrolisanje osvetljenja. Da
bi se svetla upalila, klizni
mehanizam mora biti odvojen.
Prekidač sa 3 brzina
3- Pritisnite ovo dugme kada želite da uređaj
radi u 3. brzini.
4- Pritisnite ovaj taster za uključivanje svetla
uređaja.
Izbor brzine
Uređaj ima 3 nivoa ventilacije. Jedan od
nivoa ventilacije nisko-srednje-visoko se
bira u skladu sa isparenjima od kuvanja i
prženja. On se pokreće pritiskom na dugmad
za kontrolu motora na prednjoj ploči. Modeli
sa elektronskom kontrolom imaju automatski
tajmer.
Tajmer
Ako pritisnete bilo koje od dugmadi za pokretanje
motora duže od 2 sekunde, aktiviraće se funkcija
tajmera u trajanju od 15 minuta. Ekran takođe
daje signal kada se tajmer pokrene i motor će
se automatski zaustaviti nakon 15 minuta.
Periodi čišćenja metalnog ltera:
Filteri moraju da se očiste kada se znak „C“
pojavi na displeju (u zavisnosti od korišćenja)
nakon svake 2-3 nedelje. Kada se lteri očiste
i vrate na mesto, pritisnite taster ( ) duže od
3 sekunde da bi se izbrisao znak „C“ (kada
uređaj nije aktivan). Slovo „E“ će se pojaviti na
displeju i uređaj će preći u normalan režim
rada. Ako želite da uređaj nastavi sa radom
bez brisanja znaka „C“, kada pritisnete taster
( ), aktivni rad će se pratiti 1 sekundu, a
zatim će se ponovo pojaviti znak „C“ i motor će
nastaviti sa radom.
A PAŽNJA
Znak „C“ će se pojaviti na kraju perioda
korišćenja uređaja od 60 sati.
1- Pritisnite ovo dugme kada želite da uređaj
radi u 1. brzini.
2- Pritisnite ovo dugme kada želite da uređaj
radi u 2. brzini.
34
Page 38

5
Prekidač sa 5 brzina
A PAŽNJA
Znak „C“ će se pojaviti na kraju perioda
korišćenja uređaja od 60 sati.
Uključeno-Isključeno: Uređaj će se
pokrenuti kada se pritisne ovo dugme.
Periodi čišćenja ltera:
Filteri moraju da se očiste kada se znak „ “
pojavi na displeju (u zavisnosti od korišćenja)
nakon svake 2-3 nedelje. Kada se lteri očiste
i montiraju na svoja mesta, pritisnite taster duže
od 3 sekundi da biste izbrisali simbol „ “ (kada
je proizvod isključen) . Slovo „E“ će se pojaviti
na displeju kada se proizvod vrati na normalan
rad. Ako želite da uređaj nastavi sa radom bez
brisanja znaka „ “, kada pritisnete taster ( ),
aktivni rad će se pratiti 1 sekundu, a zatim će
se ponovo pojaviti znak „C“ i motor će nastaviti
sa radom.
Smanjenje brzine: Brzina će se smanjiti
ako se pritisne ovo dugme.
Povećanje brzine: Brzina će se povećati
ako se pritisne ovo dugme.
Tajmer: Kada se ovaj taster pritisne,
aktivira se funkcija tajmera na 15 minuta.
Kada odbrojavanje započne, na displeju
se prikazuje simbol, a motor se automatski
isključuje nakon 15 minuta.
Sijalica: Sijalica će se uključiti kada se
pritisne ovaj taster. Ponovo pritisnite ovaj
taster da biste isključili sijalicu.
NAPOMENA: Znak „ “ će se pojaviti na
kraju perioda korišćenja uređaja od 60 sati.
Ekasno korišćenje da akcentom na
uštedu energije:
* Kada koristite aspirator, podesite brzinu prema
intenzitetu pare ili mirisa da biste uštedeli
energiju.
* Koristite manje brzine (1-2) pod normalnim
uslovima, a veće brzine (3) za intenzivnu paru
i mirise.
* Na aspiratoru su postavljene sijalice za
osvetljavanje zone kuvanja.
Njihovo korišćenje za osvetljenje okoline će
dovesti do dodatnih troškova za energiju i
nedovoljnog osvetljenja.
Korišćenje aspiratora:
* Vaš aspirator sadrži motor koji radi sa različitim
brzinama.
35
Page 39

9 ZAMENA SIJALICA
A OPASNOST
Isključite aspirator iz struje. Sačekajte da se
sijalice ohlade pošto mogu da opeku vaše ruke
kada su vruće.
9.1 Zamena halogene sijalice
Sl. 13: Zamena LED sijalice
Skinite aluminijumski umetak ltera. Skinite
neispravnu sijalicu i zamenite je novom iste
jačine. Sl. 13
9.3 Zamena LED sijalice od 1 W
• Odvojite električni priključak LED sijalice.
• Rukom pritisnite sijalicu da biste je uklonili.
• Odvojite samolepljivu traku od sijalica i
ploče kućišta.
• Pre nego što postavite novu LED sijalicu
uklonite zaštitnu foliju sa okvira, a zatim je
zalepite na odgovarajuće mesto na kućište
proizvoda.
9.2 Zamena sijalice sa užarenim
vlaknom
Sl. 14: Zamena sijalice sa užarenim vlaknom
Skinite aluminijumski umetak ltera. Skinite
neispravnu sijalicu i zamenite je novom iste
jačine. Sl. 14
36
Page 40

10 OVLAŠĆENI TEHNIČKI
SERVIS
Ukoliko rasveta ne radi:
■ Proverite da li je uređaj uključen u struju i da li su osigurači pregoreli.
■ Proverite sijalice. Obavezno isključite uređaj iz struje pre obavljanja ove provere. Pritegnite
sijalice ako su labave; možete da ih zamenite ako se i dalje ne pale.
Mogući kvarovi i radnje koje možete obaviti pre
pozivanja servisa:
A) Uređaj uopšte ne radi:
■ Proverite da li je uređaj uključen u struju i da li je utikač dobro pričvršćen u utičnicu.
■ Proverite osigurač na koji je uređaj povezan, kao i glavni osigurač u vašoj kući.
Ukoliko uređaj slabo radi
ili pravi jaku buku dok radi:
■ Da li uređaj ima odgovarajući prečnik izduvnog kanala? (min. 120 mm).
■ Da li su metalni lteri čisti? Proverite.
■ Ukoliko koristite aspirator bez izduvnog kanala, pobrinite se da lteri sa aktivnim ugljem ne budu
stariji od 6 meseci.
■ Vodite računa da kuhinja ima dovoljnu ventilaciju da bi se osigurao protok vazduha. Ukoliko ste i
dalje nezadovoljni radom uređaja, kontaktirajte ovlašćeni servis.
37
Page 41

10.1 Mogući kvarovi i rešenja
Opis kvara Razlog Pomoć
Mrežni napon mora da bude 220-240
V i uređaj mora da bude povezan na
uzemljenu utičnicu.
Mrežni napon mora da bude 220-240
V i uređaj mora da bude povezan na
uzemljenu utičnicu.
Prekidač rasvete mora biti u položaju „on“
(uključeno).
Uređaj ne radi
Rasveta ne radi.
Rasveta ne radi.
Proverite
električne veze.
Proverite
električne veze.
Proverite
električne veze.
Rasveta ne radi. Proverite sijalice. Sijalice moraju da budu ispravne.
Usisna snaga uređaja je
slaba.
Usisna snaga uređaja je
slaba.
Proverite
aluminijumski
lter.
Proverite kanal za
izduvne gasove.
Aluminijumski umetak ltera u normalnim
uslovima treba da se pere najmanje
jednom mesečno.
Kanal za izduvne gasove mora biti
otvoren.
Kod uređaja kod kojih se koriste lteri sa
Usisna snaga uređaja je
slaba.
Proverite lter sa
aktivnim ugljem.
aktivnim ugljem, pod normalnim uslovima
oni moraju da se zamene na svaka 3
meseca.
Ne odvodi vazduh (korišćenje
bez izduvnog kanala)
Proverite
aluminijumski
lter.
Aluminijumski umetak ltera u normalnim
uslovima treba da se pere najmanje
jednom mesečno.
Kod uređaja kod kojih se koriste lteri sa
Ne odvodi vazduh (korišćenje
bez izduvnog kanala)
Proverite lter sa
aktivnim ugljem.
aktivnim ugljem, pod normalnim uslovima
oni moraju da se zamene na svaka 3
meseca.
10.2 Tabela sa tehničkim podacima
Napon 220 - 240 V 50Hz
Klasa izolacije motora F
Klasa izolacije KLASA I
38
Page 42

SVN
PIO - 650 2MW
PIO - 650 2MIX
NAVODILA ZA UPORABO NAPA
Page 43

PIO650 2MW
PIO650 2MIX
Pozorno preberite ta navodila!
39
Page 44

1 TEHNIČNA RISBA 41
2 OPOZORILA IN VARNOSTNI UKREPI 42
2.1 Nevarnost smrtnih poškodb, nevarnost zastrupitve 44
2.2 Nevarnost električnega udara! 44
2.3 Nevarnost telesnih poškodb! 44
2.4 Nevarnost opeklin, nevarnost električnega udara 45
2.5 Nevarnost požara in telesnih poškodb! 45
3 UPORABA Z IN BREZ OGLENEGA FILTRA 46
3.1 Menjava oglenega filtra 47
3.2 Menjava oglenega filtra 47
3.3. Menjava oglenega filtra 47
4 ČIŠČENJE IN PREVENTIVNO VZDRŽEVANJE 48
4.1 Pranje v stroju za pomivanje posode 48
4.2 Ročno pranje 48
4.3 Odstranjevanje/Namestitev aluminijskega filtra 48
5 MONTAŽA APARATA 49
5.1 Montaža in razpakiranje 49
5.2 Montaža in razpakiranje 49
5.3 Način delovanja 50
5.4 Odvodna napeljava 50
5.5 Preverjanje zida 50
5.6 Električni priključek 50
5.7.Nevarnost električnega udara! 50
6. PREGLED NAPE 51
7. MONTAŽA APARATA 52
8. UPORABA IZDELKA 53
9. MENJAVA ŽARNIC 55
9.1 Menjava halogenske žarnice 55
9.2 Menjava klasične žarnice 55
10. POOBLAŠČENI SERVIS 56
10.1 Reševanje težav 57
10.2 Tehnična Tabela 57
40
Page 45

1 TEHNIČNA RISBA
Max425 Min305
280
600
223
462
78,5
499
146
50
174
283
27
20
41
Slika 1: TEHNIČNA RISBA
41
Page 46

2 OPOZORILA IN VARNOSTNI
UKREPI
■Aparat smejo uporabljati otroci starejši od
8 let in posamezniki brez fizičnih, zaznavnih ali
intelektualnih motenj, vendar le pod nadzorom
in z navodili za varno uporabo ter pod pogojem,
da razumejo nevarnosti.
■ Izdelek je namenjen izključno uporabi v
gospodinjstvu.
■Aparata zahteva napajanje 220-240 V pri 50
Hz.
■Kabel za napajanje vašega aparata je
opremljen vtikačem, ki ima ozemljitev. Ta vtikač
mora biti vključen v ozemljeno vtičnico.
■Vse električne povezave mora opraviti
ustrezno usposobljeno osebje.
■Nepooblaščena montaža lahko povzroči
slabše delovanje ali poškodbe aparata in
nesrečo.
■Kabel aparata se ne sme zavozlati ali
poškodovati med montažo. Kabla ne smete
priključiti v bližini štedilnika, saj lahko tako
povzročite topljenje materiala ali požar.
■ Aparata ne priključujte preden je montaža
končana.
■Poskrbite da je el. vtičnica lahko dostopna,
tako da lahko v sili izključite aparat.
■Po daljšem delovanju se ne dotikajte žarnic,
saj lahko zaradi visoke temperature povzročijo
opekline.
■Nape so načrtovane za uporabo v
gospodinjstvu, pri običajnem kuhanju. Če se
uporabljajo v druge namene, lahko pride do
okvare ali prenehanja veljavnosti garancije.
■Sledite predpisom in odredbam v zvezi z
odvajanjem zraka. (To ne velja v primeru
uporabe brez ventilatorja.)
■Vnetljiva hrana se ne sme pripravljati pod tem
aparatom.
■Zaženite aparat po postavljanju posod, loncev
itn. na štedilnik. V nasprotnem lahko visoka
temperatura povzroči deformacija na nekaterih
delih aparata.
■Ko odstranite posode in lonce s štedilnika,
izklopite grelne plošče.
■Ne puščajte vročega olja na štedilniku. Kozice
z vročim oljem se lahko vnamejo in povzročijo
požar.
■Pri praženju lahko pride do vnetja olja. Bodite
pozorni z zavesami in pokrivali.
■Poskrbite za pravočasno menjavo filtrov. Filtri,
ki se ne zamenjajo pravočasno, predstavljajo
požarno nevarnost zaradi v njih nakopičene
maščobe.
■Ne uporabljajte materiala za filtriranje, ki ni
odporen na ogenj, namesto filtrov.
■Izdelka ne uporabljajte brez filtrov. Ne
odstranjujte filtrov med uporabo.
■V primeru požara, izključite aparat in štedilnik.
(Izključite aparat iz el. vtičnice ali z glavnim
stikalom)
■Če aparata ne čistite redno, lahko predstavlja
požarno nevarnost.
■Pred vzdrževalnimi dejavnostmi izklopite
aparat. (Izključite aparat iz el. vtičnice ali z
glavnim stikalom)
■Negativni tlak v prostoru med uporabo nape
in aparatov, ki delujejo z drugih virov
el. energije istočasno, ne sme presegati 4 PA
(4 k 10 bar).
■Če so prisotni aparati, ki uporabljajo gorivo ali
plin, kot so sobni grelci, mora biti
42
Page 47

odvajanje teh aparatov popolnoma ločeno, ali
pa morajo biti aparati hermetično zaprti.
■Pri povezovanju dimnikov vašega aparata
uporabljajte cevi prečnika 150 ali 120 mm.
■Odvod mora biti čim krajši in s čim manj
koleni.
■Otroci se ne smejo igrati z aparatom.
■Iz varnostnih razlogov za aparat uporabljajte
»MAX 6 A« varovalke.
■Ne dovolite otrokom blizu embalaže, saj lahko
predstavlja nevarnost zanje.
■Če je poškodovan napajalni kabel, ga mora
zamenjati proizvajalec, pooblaščeni serviser ali
ustrezno usposobljena oseba, da ne bi prišlo
do nevarnih situacij
■V primeru požara, izklopite napo in štedilnik
ter pogasite ogenj. Nikoli ne uporabljajte vode
za gašenje.
■Izpostavljeni deli aparata so lahko med
delovanjem štedilnika vroči.
■Ta aparat ne smejo uporabljati posamezniki z
zmanjšanimi fizičnimi, zaznavnimi ali
intelektualnimi sposobnostmi (vključno z otroci)
ali osebe brez ustreznega znanja in izkušenj,
razen v primeru da jih nadzira oseba
odgovorna za varnost aparata.
■Pri montaži nape, mora biti med električnim
■Potrebno je biti pozoren pri uporabi z aparati,
ki uporabljajo gorivo in zrak (npr. grelci, kotli na
plin, dizel, oglje ali drva). To pa zato, ker
odvajanje zraka prek nape lahko zmanjša
izgorevanje v prostoru.
■To ne velja za uporabo brez ventilatorja.
■Prostor mora imeti zadostno prezračevanje v
primeru istočasne uporabe štedilnika, nape in
aparatov na plin ali druga goriva (to ne velja za
aparate, ki povzročajo kroženje zraka v
prostoru.)
■Istočasno delovanje več gorilnikov na plin
povzroča veliko segrevanje. Prezračevalni
aparat, ki je postavljen čez štedilnik se lahko
zaradi tega poškoduje ali zgori. Ne uporabljajte
dveh plinskih gorilnikov hkrati pri visoki
temperaturi dlje od 15 minut. Ena grelna plošča
z močjo več kot 5 kW proizvaja toploto enako
dvema plinskimima gorilnikoma.
štedilnikom in napo najmanj 65 cm prostora, pri
štedilnikih, ki uporabljajo plin ali drugo gorivo pa
mora razdalja biti najmanj 75 cm.
■Izhodni deli nape ne smejo biti povezani na
zračne odvode, ki vlečejo druge oblike dima.
43
Page 48

2.1 Nevarnost smrtnih poškodb -
nevarnost zastrupitve
A NEVARNOST
Nevarnost zastrupitve zaradi ponovne
absorpcije plinov izgorevanja. Razen v primeru,
da je pri odvajanju zraka z napo zagotovljen tudi
ustrezen dotok svežega zraka, nape ne
uporabljajte istočasno z napravami, ki odvajajo
strupene pline skozi dimnik, kot so peči,
gorilniki, kotli itn., ki uporabljajo zemeljski plin,
nafto, oglje ali drva kot gorivo.
Slika 2: Nevarnost yastrupitve
Naprave v katerih kroži zrak (npr. peči, gorilniki,
kotli itn., ki uporabljajo zemeljski plin, nafto,
oglje ali drva kot gorivo) jemljejo zrak za
izgorevanje iz prostora v katerem so nameščeni.
Pri delovanju nape se zrak se odvaja iz kuhinje
in sosednjih sob. Če ni poskrbljeno za ustrezen
dovod zraka, pride do vakuuma. V tem primeru
se strupeni plini vračajo v prostor iz dimnika oz.
odvoda. Slika 2
Zaradi tega je potrebno vedno zagotoviti
ustrezen dotok svežega zraka.. Slika 3
A NEVARNOST
Nevarnost požara!
Zaradi letečih isker. Namestitev aparata nad
štedilniki, ki uporabljajo čvrsto gorivo, kot so
drva ali oglje je dovoljena samo če imajo
nepredušen pokrov. Potrebno je upoštevati
veljavne gradbene, električne, in vodovodne
predpise pri montaži.
Če se aparat ne čisti v skladu z navodili, lahko
povzroči požar.
A NEVARNOST
2.2 Nevarnost električnega udara!
Ne pregibajte in ne pritiskajte napajalni kabel pri
montaži aparata.
A NEVARNOST
2.3 Nevarnost telesnih poškodb!
■ Obstaja nevarnost telesnih poškodb pri
montaži, zaradi ostrih robov. Pri vgradnji
aparata, vedno uporabljajte zaščitne rokavice.
■ Vse varnostne vijake in pokrove je potrebno
namestiti tako, kot je opisano v navodilih, da ne
bi prišlo do padanja aparata.
Slika 3
44
Page 49

A NEVARNOST
2.4 Nevarnost opeklin, nevarnost
električnega udara!
■Pred čiščenjem aparata, počakajte da se
ohladi. Izvlecite varovalko ali izklopite aparat iz
električnega omrežja.
■Obstaja nevarnost poškodb zaradi kapljanja
na elektronske dele aparata. Nikoli ne čistite
upravljalnih elementov z vlažno krpo.
■Površina aparata se lahko ob nepravilnem
čiščenju poškoduje. Površine iz nerjavečega
jekla čistite izključno v smeri brušenja. Ne
uporabljajte sredstva za čiščenje nerjavečega
jekla na upravljalnih elementih.
■Površine lahko poškodujete z grobimi čistilnimi
sredstvi ali pripomočki. Nikoli ne uporabljajte
pripomočkov za čiščenje, ki so ostri ali
zahtevajo ribanje.
■Obstaja nevarnost poškodbe aparata zaradi
povratnega kapljanja kondenzata. Montirajte
kanal za izhod zraka z rahlim nagibom navzdol
od aparata (pod kotom 1°)
A NEVARNOST
2.5 Nevarnost požara, nevarnost
telesnih poškodb!
OPOMBA
Če je poškodovan napajalni kabel, ga mora
zamenjati proizvajalec, pooblaščeni
serviser ali ustrezno usposobljena oseba,
da ne bi prišlo do nevarnih situacij.
OPOMBA
V kolikor je poškodovana žarnica na
aparatu, izvlecite varovalko ali izklopite
aparat iz električne vtičnice. Da ne bi prišlo
do preobremenitve ostalih žarnic, takoj
zamenjajte poškodovano (počakajte da se
ohladi).
A POZOR
Kadar je uporabljate štedilnik se lahko
izpostavljeni deli aparata močno segrejejo
.A NEVARNOST
Odvodna cev aparata nikoli ne sme biti
povezana na dimnik, ki služi za odvajanje dima
iz peči ali drugih naprav, ki uporabljajo plin ali
druga goriva.
Izvlecite varovalko ali izklopite aparat iz
električne vtičnice pred vsakršnim popravilom.
Popravila mora opraviti pooblaščeni serviser ali
ustrezno usposobljena oseba.
OPOMBA
V primeru okvare ali poškodbe aparata,
izvlecite varovalko ali izklopite aparat iz
električne vtičnice in pokličite pooblaščeni
servis.
45
Page 50

3 UPORABA Z ALI BREZ OGLENEGA FILTRA
Ta aparat lahko uporabljate z zračnim
odvodom ali brez.
Uporaba z zračnim odvodom
Vsesani zrak se prečisti na filtrih maščobe in
nato zapušča prostor skozi sistem cevi. Slika 4
Slika 4: Odvod za zrak brez
oglenega filtra
A OPOZORILO
Smrtna nevarnost!
Izpušni plini, ki ponikajo v prostor lahko
povzročijo zastrupitev. Zrak, ki ga vleče
napa ne sme biti speljan v vod, ki
odvaja dim oz. pline, ki nastajajo z
izgorevanjem.
■ Če napo želite priključiti na vod, ki odvaja dim
oz. pline, ki nastajajo z izgorevanjem, morate
imeti dovoljenje od ustrezno kvalificiranih
dimnikarjev.
■Če se zrak odvaja skozi zunanji zid, se mora
Uporaba brez zračnega odvoda
Vsesani zrak se prečisti na filtrih za
maščobo in filtru z aktivnim ogljem, in
nato kroži nazaj v kuhinjo. 5
Slika 5: Odvod za zrak - filter z aktivnim ogljem
Da bi nevtralizirali snovi, ki povzročajo
neprijetne vonjave pri uporabi nape
brez zračnega odvoda, morate
namestiti filter z aktivnim ogljem.
Stopite v stik z pooblaščenim
distributerjem, da bi izvedeli katere so
možnosti za uporabo aparata brez
zračnega odvoda. Opremo za ta način
delovanja lahko kupite na prodajnih
mestih, pri pooblaščenem serviserju ali
v spletni prodaji.
uporabljati teleskopski zid..
46
Page 51

3.1 Menjava oglenega filtra
Kadar ne uporabljate ventilatorja oz. ne
odvajate zraka iz prostora prek nape, je
potrebno uporabljati filter z aktivnim ogljem, za
recirkulacijo zraka v prostoru. Filter z aktivnim
ogljem nabavite pri serviserju ali vašem
prodajalcu. Pred menjavo oglenega filtra
izklopite aparat. Ker se ogleni filter uporablja v
kuhinjah brez ventilatorja, ga je potrebno po 3-5
mesecih uporabe zamenjati.
Oglenega filtra nikoli ne perite. V vsakem
primeru morajo biti filtri nameščeni na napo tudi
v primeru da oglenega filtra ne uporabljate. Ne
uporabljajte nape brez filtra za maščobo.
3.2 Menjava oglenega filtra
3.3 Menjava oglenega filtra
Slika 6: ogleni filter
Aparat, ki ste ga kupili, je primeren za uporabo z
oglenim filtrom.
1. Namestite ogleni filter v njegovo ohišje. Slika 6
2. Obrnite ogleni filter v smeri urinega kazalca in
preverite ali je pravilno nameščen. Slika 6
A NEVARNOST
Nikoli ne perite oglenih filtrov. Držite oglene filtre
dlje od otrok.
Slika 6: ogleni filter
Aparat, ki ste ga kupili, je primeren za uporabo z
oglenim filtrom.
1. Namestite ogleni filter v njegovo ohišje. Slika 6
2. Obrnite ogleni filter v smeri urinega kazalca in
preverite ali je pravilno nameščen. Slika 6
Če ogleni filter ni pravilno
nameščen, lahko izpade in
poškoduje izdelek.
47
Page 52

4 ČIŠČENJE IN PREVENTIVNO
VZDRŽEVANJE
A POZOR
■ Pred vzdrževanjem oz. čiščenjem
popolnoma izklopite aparat.
■ Otroci ne smejo čistiti aparata brez
nadzora.
■ Nikoli ne uporabljajte grobih čistilnih sredstev
ali pripomočkov, saj lahko poškodujejo površino
izdelka. Nabavite primerna sredstva za čiščenje
in zaščito za vaš izdelek od pooblaščenega
servisa. Površina aparata in upravljalnih
elementov je občutljiva na praske.
■ Očistite površine z mehko, vlažno krpo,
sredstvom za pranje posode ali blagim
sredstvom za čiščenje stekel. Zmehčajte
posušeno in zapečeno umazanijo z vlažno
krpo. Ne drgnite po aparatu!
■ Uporaba suhih krp, grobih gobic, sredstev za
ribanje, sredstev ki vsebujejo trdne delce, sodo,
kisline, klor ali druge agresivne sestavine, ni
primerna.
■ Površine iz nerjavečega jekla čistite samo v
smeri brušenja.
■Ne uporabljajte sredstev za čiščenje
nerjavečega jekla ali mokre krpe na upravljalnih
elementih. Čiščenje kovinskih filtrov za
maščobo: Kovinski filtri ujamejo delce maščobe
iz pare v kuhinji. Pri normalni uporabi (1-2 uri
dnevno), je filtre potrebno čistiti približno vsake
tri mesece.
■ Ne uporabljajte preveč agresivne, preveč
kisle ali bazične raztopine za čiščenje.
■ Pri čiščenju kovinskega filtra za maščobo,
očistite tudi naložene delce na notranji strani
nape z vlažno krpo.
■ Kovinske filtre za maščobo lahko pomivate v
pomivalnem stroju ali ročno.
4.1 Pranje v stroju za pomivanje
posode
■ V primeru da uporabljate stroj za pomivanje
posode, lahko pride do blažje izgube barve. To
ne vpliva na delovanje kovinskefa filtra za
maščobo.
■ Ne pomivajte zelo umazanega filtra skupaj s
posodo.
■Filter za maščobo v storj za pomivanje
posode postavite tako, da je dovolj prostora
okoli njega. Ne sme biti postavljen tako, da kaj
pritiska nanj.
4.2 Ročno pranje
Uporabite lahko posebno oljno raztopino za
odstranjevanje trdovratnih madežev. Takšno
čistilno sredstvo lahko kupite v pooblaščenome
prodajnem centru.
■ Zmehčajte madeže na kovinskih filtrih
maščobe v topli vodi z detergentom.
■ Uporabite ščetko in pustite, da se tekočina
popolnoma odcedi s kovinskih filtrov.
■ Po čiščenju podrobno izperite filtre.
A POZOR
Z rednim čiščenjem kovinskih filtrov za
maščobo, se izognete požarni nevarnosti, ki bi
izhajala iz zamaščenih filtrov pri visokih
temperaturah.
4.3 Odstranjevanje/namestitev
aluminijskega filtra
Povlecite aluminijski filter k sebi s pritiskom na
to kartico. Storite obratno, kadar ga želite
ponovno namestiti.
48
Page 53

5 MONTAŽA APARATA
Min.65 cm
Min.75 cm
Slika. 7: MONTAŽA APARATA
Pri montaži nape mora biti zagotovljeno najmanj 65 cm prostore med izdelkom in štedilnikom, če
gre za električni štedilnik, če pa gre štedilnik na plin ali druga goriva, mora biti ta razdalja najmanj
75 cm. Slika 7
5.2 Montaža in razpakiranje
5.1 Montaža in razpakiranje
■ Redno menjajte ogleni filter.
Preverite ali so na aparatu prisotne poškodbe.
■ V kolikor opazite poškodbe nastale pri prevozu,
to takoj sporočite odgovornim osebam.
■Vidne pomanjkljivosti na izdelku morate prav
tako nemudoma prijaviti prodajalcu.
■Ne dovolite otrokom, da se igrajo z embalažo.
■ Redno čistite aluminijske filtre. Možno je, da
boste prisiljeni uporabljati napo pri visoki
nastavitvi pretoka zraka, saj umazan filter lahko
ovira odvod zraka.
■ Pravilno uporabljajte nastavitve moči
delovanja aparata.
49
Page 54

5.3 Način delovanja
A OPOZORILO
Smrtna nevarnost!
Izpušni plini, ki ponikajo v prostor lahko
povzročijo zastrupitev. Zrak, ki ga vleče napa ne
sme biti speljan v vod, ki odvaja dim oz. pline, ki
nastajajo z izgorevanjem.
Če napo želite priključiti na vod, ki odvaja dim
oz. pline, ki nastajajo z izgorevanjem, morate
imeti dovoljenje od ustrezno kvalificiranih
dimnikarjev. Če se zrak odvaja skozi zunanji zid,
se mora uporabljati teleskopski zid.
5.4 Odvodna napeljava
Informacije: Proizvajalec aparata ne
odgovarja za pomanjkljivosti zaradi neprimerno
nameščenih cevi.
■ Aparat najučinkoviteje deluje kadar se
uporablja ravna in kratka odvodna cev, čim
večjega premera.
■ Če uporabljate dolge in ozke cevi oz. s
premerom manjšim od 150 mm in z veli kim
številom pregibov, se zmanjša zmogljivost
odvajanja in poveča hrup ventilatorja.
■ Cevi, ki jih uporabljate za odvodno napeljavo
morajo biti iz negorečih materialov.
Okrogle cevi
Priporočamo premer 150 mm oz. ne manj od
120 mm.
Ravni kanali
Notarnji del mora ustrezati premeru okroglih
cevi.
Ø150 mm okoli 177 cm²
Ø120 mm okoli 173 cm²
■ Ravni kanali ne smejo imeti pregibov pod
ostrimi koti.
■ Če imate cevi različnega premera uporabite
tesnilni trak.
5.5 Preverjanje zida
■ Zid mora biti raven in imeti dovoljšnjo
nosilnost.
■ Globina lukenj mora ustrezati dolžini vijakov.
Klini se morajo ustrezno prilagajati.
■ Vijaki in zidni vložki, ki jih dobite z aparatom,
so primerni za zidove iz trdnega, enakomernega
materiala. Uporabljajte ustrezen material za
spajanje različnih konstrukcij (npr. gips, beton,
proton opeke).
5.6 Električni priključek
A OPOZORILO
Nevarnost električnega udara!
Nekateri deli aparata imajo ostre robove, na
katerih se lahko poškoduje napajalni kabel.
Kabla ne zvijajte in ne zapletajte med montažo.
Podatki v zvezi z električnim priključkom so
prikazani na napisni tablici v notranjosti aparata.
Če želite prebrati podatke s tablice, morate
odstraniti kovinske filtre za maščobo.
Dolžina napajalnega voda:
okoli 1,3 m.
Ta aparat ustreza EU smernicam glede
motenja signalov.
A OPOZORILO
5.7 Nevarnost električnega udara!
Aparat mora biti priključen tako, da ga lahko v
kateremkoli trenutku izklopite iz električnega
omrežja. Prikjlučen mora biti na zaščiteno
kontaktno vtičnico, ki je nameščena v skladu
s predpisi. Če aparat mora biti nameščen tako,
da vtičnica ni dostopna oz. ima fiksni
priključek, mora imeti ločilno stikalo z
najmanj 3 mm prostora med kontakti. Fiksni
priključek mora opraviti ustrezno usposobljen
električar.
50
Page 55

6 PREGLED NAPE
1
2
3
4
1
2
3
4
Djt anahtarlı modeller
Fig. 9: PREGLED NAPE
1. Upravljalna plošča
2. Stikalo
3. Filter
4. Osvetlitev štedilnika
51
Page 56

7 MONTAŽA APARATA
Izvrtajte luknje za nosilce.
Izvrtajte luknje premera 4 mm na mestih, ki so
na shemi označena z A, B, C in D Slika 2
520
19
10
2
A
10
10
MOUNTINGTEMPLATE SCALE 1:1
MONTAGESCHABLONE MAßSTAB 1:1
50
SAGOMADI MONTAGGIO RELAZIONE 1:1
ESTAMPADE MONTAJE ESCALA1:1
GABARITPOUR MONTAGE ECHELLE 1:1
SZABLON MONTAZOWYSKALA1:1
283
223±2
B
28
500
462±2
CUT-OUTLINE ON CUPBOARD FORAIR EXIT
AUSSCHNITTIM SCHRANK FÜR LUFTAUSTRITT
LINEADI TAGLIO PER USCITAARIA
RECORTE DELARMARIO PARALA SALIDA DEAIRE
LIGNEA COUPER POUR LASORTIE D'AIR
ZAZNACZYCW SZAFCE OTWÓR POD WYLOT POWIETRZA
2
±
0
3
1
Ø
A,B,C,D =
248
Ø4
C
D
Slika 2
Aparat montirajte v viseč položaj s štirimi
priloženimi vijaki, na točkah A, B, C in D.
Sprednja plošča se ne bi smela dotikati vrat
visečega pohištva med premikanjem
teleskopskih drsnikov. Slika 3
namestite na vhod dimnika. Slika 5
1
2
Slika 4
Slika 5
A OPOZORILO
Slika 3
Postavite spajalni prstan na izhod za odvodno
cev na aparatu in ga obrnite v smeri urinega
kazalca. Slika 4
Postavite upogljivo aluminijsko cev preko
spajalnega prstana, drugi konec pa
Opozorilo: Ukrivljanje in upogibanje aluminijske
cevi ovira pretok zraka skozi cev, tako da se je
treba temu izogibati.
Funkcije aparata
Napo lahko uporabljate v kuhinjah z dimnikom
ali brez.
V primeru uporabe z dimnikom/
odvodom;
V primeru uporabe z dimnikom, mora napa biti
povezana nanj s karseda kratkim vodom, da bi
se zagotovila maksimalna učinkovitost nape.
Aparat je izdelan tako, da je primeren za
uporabo z dimnikom oz. odvodom.
52
Page 57

8 UPORABA IZDELKA
1
23
4
5
3 Stikalo hitrosti
Stikalo svetilke
Pretaknite stikalo na položaj
svetilke, če želite prižgati svetilko.
Napa mora biti izvlečena, da bi se
luči prižgale.
3. Stikalo hitrosti
Če želite da naprava obratuje z
maksimalno hitrostjo, pretaknite
stikalo na spodnji položaj.
3. Stikalo hitrosti
Če želite da naprava obratuje z
maksimalno hitrostjo, pretaknite
stikalo na spodnji položaj.
2 Stikalo hitrosti
Izdelek ima 2 svetilki in stikalo za vklop/izklop
svetilk. Napa mora biti
izvlečena, da bi se luči
prižgale.
3 Digitalno stikalo hitrosti
3 Pritisnite ta gumb za obratovanje pri hitrosti 3
4 Pritisnite ta gumb če želite prižgati luč na
izdelku.
Izbira hitrosti
Aparat ima tri stopnje hitrosti ventilatorja.
Izbirajte hitrost ventilacije glede na količino
pare oz. dima pri kuhanju. Venitlator zaženete
prek stikal na sprednji strani aparata. Modeli z
eletronsko nadzorno ploščo imajo samodejni
časovnik.
Časovnik
Če držite katerikoli od gumbov za zagon
ventilatorja pritisnjen dlje od dveh sekund, se
bo prižgala funkcija časovnika s trajanjem 15
minut. Na prikazovalniku bo prikazano
opozorilo, ko se časovnik aktivira, ventilator pa
se bo samodejno izklopil po 15 minutah.
Interval čiščenja kovinskega filtra:
Filtre je potrebno čistiti, kadar se prikaže signal "C" na prikazovalniku oz. (v odvisnosti od
uporabe) na vsake 2-3 tedne. Kadar filtre
očistite in ponovno namestite na njihovo
mesto, pritisnite in držite pritisnjeno stikalo za
vklop/izklop več kot tri sekunde, da bi odstranili
signal 'C' na prikazovalniku. Pojavila se bo
črka 'E' in izdelek bo preklopil na običajen
način obratovanja. Če želite nadaljevati z
uporabo ne da bi izbrisali signal 'C', lahko
pritisnete na stikalo za vklop/izklop, nakar se
bo po eni sekundi ponovno pojavil signal 'C',
ventilator pa bo nato nadaljeval z
obratovanjem.
A POZOR
Signal 'C' se bo pojavil po 60 urah obratovanja
aparata.
1 Pritisnite ta gumb za obratovanje pri hitrosti 1
2 Pritisnite ta gumb za obratovanje pri hitrosti 2
53
Page 58

5 Digitalno stikalo hitrosti
5
A POZOR
Signal 'C' se bo pojavil po 60 urah obratovanja
aparata.
Vklop/Izklop: Stikalo za zagon aparata.
Zmanjševanje hitrosti: Zmanjševanje
hitrosti ventilatorja.
Povečevanje hitrosti: Povečevanje hitrosti
ventilatorja.
Čistilni interval za filtre:
Filtre je potrebno očistiti kadar se prikaže signal
'C' na prikazovalniku ali pa (v odvisnosti od
uporabe) na vsake 2-3 tedne. Kadar filtre
očistite in ponovno namestite na njihovo mesto,
pritisnite in držite pritisnjeno stikalo za vklop/
izklop več kot tri sekunde, da bi odstranili signal
'C' na prikazovalniku. Pojavila se bo črka 'E' in
izdelek bo preklopil na običajen način
obratovanja. Če želite nadaljevati z uporabo ne
da bi izbrisali signal 'C', lahko pritisnete na
stikalo za vklop/izklop, nakar se bo po eni
sekundi ponovno pojavil signal 'C', ventilator pa
bo nato nadaljeval z obratovanjem.
OPOMBA: Signal 'C' se bo pojavil po 60 urah
obratovanja aparata.
Napotki za varčevanje z energijo:
* Pri uporabi prilagodite hitrost ventilatorja
količini pare in vonjav, da bi prihranili energijo.
Časovnik: Kadar pritisnete to stikalo,
boste sprožili 15-minutni časovnik, kar bo
nakazano tudi z izpisom na
prikazovalniku, ventilator pa se bo izklopil
po 15 minutah obratovanja.
Svetilka: Pritiskom na to stikalo boste
vklopili svetilko. Izklopite jo tako, da
ponovno pritisnete isti gumb.
* Pri normalnih pogojih uporabljajte nižje hitrosti
(1-2), visoko hitrost (3) pa samo pri večji količini
pare oz. močnejših vonjavah.
* Svetilke na napi so namenjene osveltljevanju
kuhalne površine.
Njihova uporaba za osvetljevanje prostora bo
povzročila neustrezno osvetljenost in
nepotrebno porabo energije.
Uporaba nape:
* Napa ima ventilator, ki obratuje pri različnih
hitrostih.
54
Page 59

9 MENJAVA ŽARNICE A
NEVARNOST
Izklopite napo iz električnega omrežja.
Počakajte, da se žarnica ohladi, da se ne bi
opekli.
9.1 Menjava halogenske žarnice
Slika 13: Menjava LED žarnice
Odstranite aluminijski vstavek filtra. Odstranite
nedelujočo žarnico in jo zamenjajte z žarnico
enake zmogljivosti. Slika 13
9.3 Menjava LED žarnice
• Izklopite električno povezavo LED žarnice.
• Z roko potisnite žarnico, da bi jo odstranili.
• Odstranite samolepilni trak med žarnicami
in ohišjem.
• Pred namestitivijo nove LED žarnice,
odstranite zaščitno folijo z okvirja, nato pa je
zalepite na ustrezno mesto na ohišju izdelka.
9.2 Menjava klasične žarnice
(žarilna nit)
Slika 14: Menjava klasične žarnice
Odstranite aluminijski vstavek filtra. Odstranite
nedelujočo žarnico in jo zamenjajte z žarnico
enake zmogljivosti. Slika 14
55
Page 60

10 POOBLAŠČENI SERVIS
Če ne deluje osvetlitev:
■ Preverite ali je vtikač priključen v električno vtičnico ter preverite varovalke.
■ Preverite žarnice. Prepričajte se, da je aparat izključen preden preverite žarnice. Zategnite
žarnice če je to potrebno. Če tudi po tem ne delujejo, jih zamenjajte.
Možne okvare in ukrepi preden pokličete servis:
A) Če aparat ne deluje:
■ Preverite ali je aparat vklopljen in ali je vtikač dobro priključen v električno vtičnico.
■ Preverite varovalke aparata in glavne varovalke v vašem domu.
Če aparat slabo deluje ali je pri delovanju glasen:
■ Ali je dovolj velik premer ventilatorja? (min120 mm).
■ Preverite ali so kovinski filtri čisti..
■ Če aparat uporabljate brez ventilatorja, se prepričajte ali ogleni filtri niso starejši od šestih
mesecev
■Poskrbite, da je kuhinja dobro prezračena. Če še vedno niste zadovoljni z delovanjem aparata,
stopite v stik s pooblaščenim servisom.
56
Page 61

10.1 Reševanje težave
Težava Vzrok Pomoč
Napetost el. napajanja mora biti 220-
240V, proizvod mora biti povezan na
Aparat ne deluje.
Preverite el
napajanje.
vtičnico z ozemljitvijo.
Osvetlitev ne deluje.
Preverite el.
napajanje.
Napetost el. napajanja mora biti 220-
240V, proizvod mora biti povezan na
vtičnico z ozemljitvijo.
Osvetlitev ne deluje.
Osvetlitev ne deluje.
Preverite el.
napajanje.
Stikalo za osvetlitev mora biti na položaju "on".
Preverite žarnice. Žarnice morajo biti nepoškodovane.
Aparat slabo vleče zrak.
Preverite
aluminijski filter.
Aparat slabo vleče zrak.
Preverite dimnik za
odvod zraka.
Aparat slabo vleče zrak.
Aparat ne izpušča zraka
Preverite ogleni
lter.
Preverite
aluminijski filter.
(uporaba brez dimnika)
Aparat ne izpušča zraka
(uporaba brez dimnika)
Preverite ogleni
filter.
10.2 Tehnična Tabela
Napetost 220 - 240 V 50Hz
Razred izolacije motorja F
Razred izolacije RAZRED I
Kaseta aluminijskega ltra se mora prati
vsaj enkrat mesečno pri normalnih pogojih
uporabe.
Vod za odvajanje zraka mora biti odprt.
Pri izdelkih, na kateri se uporablja ogleni
filter, se ti filtri morajo menjati na vsake tri
mesece pri normalnih pogoji uporabe.
Kaseta aluminijskega filtra se mora prati
vsaj enkrat mesečno pri normalnih pogoji
uporabe.
Pri izdelki, na kateri se uporablja ogleni
filter, se ti filtri morajo menjati na vsake tri
mesece pri normalnih pogoji uporabe.
57
Page 62

HRV
PIO - 650 2MW
PIO - 650 2MIX
UPUTE ZA UPORABU NAPA
Page 63

PIO650 2MW
PIO650 2MIX
Pažljivo pročitajte upute za uporabu!
20
Page 64

1 TEHNIČKI CRTEŽ ........................................................................................................... 22
2 UPOZORENJA I SIGURNOSNE MJERE ........................................................................ 23
2.1 Opasnost po život, opasnost od trovanja ...................................................................... 25
2.2 Opasnost od strujnog udara! ......................................................................................... 25
2.3 Opasnost od tjelesne povrede! ...................................................................................... 25
2.4 Opasnost od opekotina, opasnost od strujnog udara! ................................................... 26
2.5 Opasnost od požara i tjelesne povrede! ........................................................................ 26
3 KORIŠTENJE SA I BEZ FILTERA SA AKTIVNIM UGLJEM 27
3.1 Zamjena filtera sa aktivnim ugljem ............................................................................................... 28
3.2 Zamjena filtera sa aktivnim ugljem ................................................................................ 28
3.3 Zamjena filtera sa aktivnim ugljem ................................................................................ 28
4 ČIŠĆENJE I PREVENTIVNO ODRŽAVANJE .................................................................. 29
4.1 Pranje u perilici posuđa ...............................................................................................................29
4.2 Ručno pranje ................................................................................................................. 29
4.3 Uklanjanje/postavljanje aluminijskog filtera .................................................................. 29
5 INSTALACIJA UREĐAJA ............................................................................................... 30
5.1 Instalacija i raspakiranje uređaja ................................................................................... 30
5.2 Instalacija i raspakiranje uređaja ................................................................................... 30
5.3 Način izduvnih plinova ................................................................................................... 31
5.4 Izduvna cijev ................................................................................................................. 31
5.5 Provjera zida ................................................................................................................. 31
5.6 Električni priključak ........................................................................................................ 31
5.7 Opasnost od strujnog udara! ......................................................................................... 31
6 PREGLED UREĐAJA ....................................................................................................... 32
7 MONTAŽA UREĐAJA ....................................................................................................... 33
8 KORIŠTENJE UREĐAJA ................................................................................................. 34
9 ZAMJENA ŽARULJA ....................................................................................................... 36
9.1 Zamjena halogene žarulje ............................................................................................. 36
9.2 Zamjena žarulje sa užarenim vlaknom ......................................................................... 36
10 OVLAŠTENI TEHNIČKI SERVIS ................................................................................... 37
10.1 Mogući kvarovi i rješenja ............................................................................................. 38
10.2 Tabela sa tehničkim podacima .................................................................................... 38
„Usklađeno sa EEE uredbom. Nije uključen PCB“
21
Page 65

1 TEHNIČKI CRTEŽ
Max425 Min305
Sl. 1: TEHNIČKI CRTEŽ
280
600
223
462
78,5
499
146
50
174
283
27
20
41
22
Page 66

UPOZORENJA I MJERE BEZBJEDNOSTI
2 UPOZORENJA I MJERE
BEZBJEDNOSTI
Ovaj aparat mogu koristi samo djeca starija
od 8 godina i pojedinci bez zičkih, čulnih ili
mentalnih nedostataka, sa potrebnim iskustvom i znanjem, onda kada su ima dati nadzor ili
upute o bezbjednom korištenju i konstatovano je
da razumiju opasnosti.
Ovaj proizvod je namijenjen za uporabu u
kućanstvu.
Uporabni napon uređaja je 220-240 Volt~50 Hz.
Kabel za napajanje vašeg uređaja je opremljen
utikačem za uzemljenje. Ovaj kabel mora biti uključen u kabel za uzemljenje.
Sve strujne konekcije mora da poveže kvalicirani tehničar.
Neovlaštena montaža može da izazove loše
performanse uređaja, oštećenje uređaja ili nezgode.
Kabel uređaja ne smije biti zapetljan ili polomljen
tjekom montaže. Kabel za napajanje ne smije da
se uključuje blizu štednjaka. Ovo može izazvati
topljenje ili požar.
Nemojte priključivati uređaj prije nego što je
montaža gotova.
Uvjerite se da je priključak lako dostupan kako
biste isključili mašinu u slučaju nužde.
Ne dirajte žarulje aparata kada su duže vrijeme
otvorene. Žarulje mogu izazvati opekotine na
vašim rukama jer mogu biti vrele.
Nape su projektovane za uporabu u
kućanstvu kod uobičajenog kuhanja. Ako se
koriste u druge svrhe može doći do kvara ili
prestanka jamstva.
Pratite pravila i zvanične odredbe u vezi ispuštanja izduvnog zraka. (Ovo ne važi za
korištenje bez dimnjaka).
Hrana koja se pali tjekom kuhanja ne smije da
se kuha ispod ovog aparata.
Pokrenite aparat nakon što ste stavili posude, lonce itd. na štednjak. U suprotnom,
visoka temperatura može da izazove
deformacije na nekim dijelovima uređaja.
Isključite aparat nakon što ste uklonili posude,
lonce itd. sa štednjaka.
Ne ostavljajte vruće ulje na štednjaku. Tave sa
vrelim uljem mogu izazvati samo-zapaljivanje i
požar.
Ulje može da se zapali tjekom prženja i sl.
Budite oprezni sa zavjesama i pokrivačima.
Postarajte se da su lteri zamijenjeni na
vrijeme. Filteri koji nisu zamijenjeni na vrijeme
predstavljaju rizik od požara, zbog
nagomilanog ulja u njima.
Nemojte koristiti materijal za ltriranje koji nije
otporan na vatru umesto ltera.
Nemojte koristiti ovaj proizvod bez ltera.
Nemojte uklanjati ltere dok se proizvod koristi.
U slučaju požara, isključite napu i štednjak.
(Isključite uređaj ili isključite glavni prekidač).
Ako ne čistite aparat redovito, on može predstavljati rizik od požara.
Isključite aparat prije radova na održavanju.
(Isključite uređaj ili isključite glavni prekidač).
Negativan pritisak u sobi, dok su uključeni
napa i uređaji koji rade na drugim izvorima
električne energije i koriste se u isto vrijeme, ne
smije da pređe 4 PA (4 k 10 bar).
Ako postoje uređaji koji koriste gorivo ili plin,
kao što su sobne grijalice u oblasti gdje se koristi vaš aparat, izduvni put ovih uređaja mora
biti potpuno izoliran ili uređaj mora biti hermetičan.
Kada povezujete dimnjake vašeg aparata koristite cijevi prečnika 150 ili 120 mm.
Priključak mora biti što je kraći moguće i sa
što manje pregiba.
23
Page 67

UPOZORENJA I MJERE BEZBJEDNOSTI
Djeca ne smiju da se igraju sa aparatom.
Iz bezbjednosnih razloga, koristite „MAX 6 A“
osigurač u aparatu.
Držite ambalažni materijal dalje od djece jer to
može biti opasno.
Ako je oštećen kabel napajanja, mora
biti zamijenjen od strane proizvođača,
njegovog servisnog agenta ili bilo kog osoblja
ekvivalentnih kvalikacija, da bi se izbjegla bilo
kakva opasna situacija.
U slučaju požara, isključite napu i štednjak i
ugasite vatru. Nikada ne koristite vodu za
gašenje.
Dostupni dijelovi mogu biti vrući kada
radi štednjak.
Ovaj aparat nije namijenjen za uporabu
od strane pojedinaca sa ograničenim
zičkim, čulnim ili mentalnim sposobnostima
(uključujući i djecu) ili osoba sa ograničenim
znanjem ili iskustvom, osim ukoliko su pod
nadzorom i obavješteni su o rizicima od strane
osobe odgovorne za njihovu bezbjednost.
Kada se montira napa, mora da postoji
najmanje 65 cm razdaljine između proizvoda i
električnih štednjaka i 75 cm za štednjake koji
rade na plin ili druga goriva.
Izlazni dijelovi nape ne smiju biti povezani na zračne kanale koji uključuju druge
oblike dima.
Mora se voditi računa kada se uređaj koristi sa
uređajima koji koriste zrak i gorivo (npr. grijači, bojleri koji rade na plin, dizel gorivo, ugalj
ili drva). To je zato što se sagorijevanje
može umanjiti kada se u prostoriju otpušta
zrak iz nape.
Ovo ne važi za korištenje bez dimnjaka.
Prostorija mora imati dovoljnu ventilaciju
kada se štednjak, napa i uređaji koji rade na
plin i druga goriva koriste u isto vrijeme (ovo
ne može da se primjeni na uređaje koji vrše
cirkulaciju zraka u prostoriji).
24
Page 68

RIZIK OD SMRTI- RIZIK OD TROVANJA
2.1 Rizik od smrti- Rizik od trovanja
A OPASNOST
Opasnost od trovanja zbog ponovne apsorpcije
plinova sagorijevanja. Osim ukoliko je
adekvatan ulaz zraka obezbjeđen tjekom
izlaska zraka, uređaj ne koristite istovremeno
sa spravama koje izduvavaju otrovne plinove
kroz dimnjak kao što su peći, grijači, bojleri i
sl. koji se baziraju na cirkulaciji zračnog gasa,
ulja, drveta ili uglja.
Slika 2: Rizik od trovanja
Uređaji u kojima cirkulira zrak (npr. peći, gri-jači,
bojleri koji rade na plin, ulje, drvo ili ugalj)
uzimaju zrak za sagorijevanje iz mjesta instalacije i izbacuju izduvne plinove kroz sustav za
ispust zraka (npr. dimnjak). Zrak se apsorbuje iz kuhinje i soba pored kroz napu u
radu. Vakuum se javlja ukoliko adekvatan ulaz
zraka nije predviđen. U tom slučaju, otrovni
plinovi se ponovno apsorbiraju iz dimnjaka i
kanala za izduvavanje zraka i ponovo ulaze u
kuću. Slika 2
Iz tog razloga, uvijek treba osigurati
adekvatan unos svježeg zraka. Slika 3
A OPASNOST
Rizik od požara!
Zbog letećih iskri, instalacija uređaja na grijnoj
opremi koja se zagrijeva pomoću čvrstog
goriva (npr. drvo ili ugalj) može biti dozvoljena
samo ako postoji neodvojiv poklopac. Potrebno je obratiti pažnju na ažurirane postojeće
građevinske propise i propise za lokalne kompanije za električnu energiju i vodovod tjekom
montaže.
Ako uređaj nije očišćen u sukladu sa uputama
za čišćenje, može izazvati požar.
A OPASNOST
Opasnost od strujnog udara!
Zbog oštećenog kabla. Nemojte savijati ni
pritiskati kabel za povezivanje tjekom montaže.
A OPASNOST
Opasnost od povreda!
– Postoji opasnost od ozljeda tjekom montiranja
zbog oštrih rubova. Uvijek koristite zaštitne
rukavice tjekom ugradnje uređaja.
- Sve sigurnosne zavrtnje i poklopce treba montirati kao što je opisano u uputama za
rukovanje zbog rizika od padanja uređaja.
Slika 3
25
Page 69

RIZIK OD SMRTI- RIZIK OD TROVANJA
A OPASNOST
Opasnost od opekotina, opasnost od
strujnog udara!
- Sačekajte da se uređaj ohladi prije čišćenja
i održavanja. Isključite osigurač ili isključite
uređaj iz struje.
- Postoji opasnost od oštećenja zbog vlažnog
kapanja na elektronske komponente. Nikada ne
čistite kontrolne elemente vlažnom krpom.
- Površina može da se ošteti kao rezultat
pogrešnog čišćenja. Čistite površine od
nehrđajućeg čelika samo u pravcu brušenja.
Nemojte koristiti sredstva za čišćenje
nehrđajućeg čelika na kontrolnim elementima.
- Površine mogu da se oštete zbog oštrih ili ribajućih sredstava za čišćenje. Nikad ne koristite
sredstva za čišćenje koja su oštra ili
zahtijevaju ribanje.
A OPASNOST
Opasnost od požara, opasnost od
povreda!
Isključite osigurač ili isključite uređaj iz struje
kod vanrednih popravki. Popravke uvijek
treba da obavlja samo ovlašteni servis ili
ovlašteni stručnjak.
NAPOMENA
U slučaju greške ili oštećenja uređaja, isključite
osigurač ili isključite uređaj iz struje kod
vanrednih popravki i pozovite ovlašteni servis.
NAPOMENA
Ako je oštećen kabel napajanja, mora
biti zamijenjen od strane proizvođača,
njegovog servisera ili bilo kog osoblja
ekvivalentnih kvalikacija, da bi se izbjegla bilo
kakva opasna situacija.
NAPOMENA
Ukoliko je žarulja uređaja oštećena, isključite
osigurač ili isključite uređaj iz struje. Da biste
izbjegli preopterećenje ostalih žarulja,
odmah zamijeniti pokvarenu žarulju
(sačekajte da se žarulja ohladi).
A OPREZ
Kada se koriste štednjakom, dostupni dijelovi
uređaja se mogu ugrijati.
A OPASNOST
Odvodna cijev za zrak ovog uređaja nikada ne
smije da bude povezana unutar dimnjaka za
izbacivanje plinova koji izlaze iz uređaja koji
koriste plin ili druga goriva.
26
Page 70

3 KORIŠTENJE SA I BEZ FILTERA SA AKTIVNIM UGLJEM
Ovaj uređaj možete koristiti u načinu izduvnih
plinova i načinu ventilacije.
Način izduvnih plinova
Usisani zrak se prečišćava u lterima za ulje i
odvodi kroz sustav cijevi. 4
Sl. 4: Odvod zraka bez ltera sa aktivnim
ugljem
A UPOZORENJE
Rizik od smrtnog ishoda!
Način ventilacije
Usisani zrak prečišćavaju
filteri za ulje i filter sa aktivnim
ugljem, a zatim
se vraća u kuhinju. 5
Izduvni plinovi koji se ponovo uvuku mogu
izazvati trovanje. Izduvni plinovi ne smiju
da se prenesu u izduvni kanal za dim
ili neprečišćeni zrak; izduvni kanal
ne smije da se koristi u prostorijama
u kojima su postavljeni izvori topline.
■ Ako želite da prebacite izduvne plinove u
izduvni kanal za dim ili neprečišćeni zrak,
morate dobiti dozvolu od ovlaštene dimničarske
službe.
■ Ukoliko se izduvni plinovi izbacuju kroz
vanjski zid, mora da se koristi vanjska zidna
ventilaciona klapna.
Sl. 5: Odvod zraka sa lterom sa aktivnim
ugljem
Da bi se uklonile supstance koje ispuštaju
neprijatne mirise u načinu ventilacije, morate da
postavite lter sa aktivnim ugljem.
Posavjetujte se sa ovlaštenim prodavcem
o različitim opcijama koje su dostupne za
vaš uređaj u načinu ventilacije. Dodatnu
opremu potrebnu za ovaj proces možete
kupiti u odgovarajućim prodavnicama,
ovlaštenim servisima ili u prodajnom
centru na mreži
27
Page 71

3.1 Zamjena ltera sa aktivnim
ugljem
U uvjetima bez izduvnog kanala, lter sa
aktivnim ugljem mora da se koristi za ltriranje
zraka i njegovo vraćanje u prostoriju. Filter sa
aktivnim ugljem mora da se nabavi od servisne
radionice ili prodavca. Prije zamjene ltera
sa aktivnim ugljem, isključite uređaj iz struje.
Pošto se lter sa aktivnim ugljem koristi u
kuhinjama bez odvoda za izduvni kanal, on
treba da se zamjeni novim nakon 3 do 5
mjeseci korištenja. Nikada nemojte prati lter
sa aktivnim ugljem. Filteri za ulje uvijek
treba da se instaliraju na uređaj, bez obzira
na to da li se koristi lter sa aktivnim ugljem.
Nemojte koristiti uređaj bez ltera za ulje.
Ukoliko ne nalegne u potpunosti, lter
sa aktivnim ugljem može da padne i ošteti
uređaj.
3.3 Zamjena ltera sa aktivnim
ugljem
3.2 Zamjena ltera sa aktivnim
ugljem
Sl. 6: FILTER SA AKTIVNIM UGLJEM
Uređaj koji ste kupili je pogodan za korištenje
sa lterom sa aktivnim ugljem.
1. Postavite lter sa aktivnim ugljem u njegovo
kućište. Sl. 6
2. Zarotirajte lter sa aktivnim ugljem u
smjeru kazaljke na satu dok potpuno ne
nalegne. Sl. 6
Sl. 6: FILTER SA AKTIVNIM UGLJEM
Uređaj koji ste kupili je pogodan za korištenje
sa lterom sa aktivnim ugljem.
3. Postavite lter sa aktivnim ugljem u njegovo
kućište. Sl. 6
4. Zarotirajte lter sa aktivnim ugljem u
smjeru kazaljke na satu dok potpuno ne
nalegne. Sl. 6
A OPASNOST
Nemojte prati ltere sa aktivnim ugljem. Filtere
sa aktivnim ugljem držite dalje od djece.
28
Page 72

4 ČIŠĆENJE I PREVENTIVNO
ODRŽAVANJE
A PAŽNJA
■ Prije svakog čišćenja i održavanja, napa
mora da se isključi iz struje i da bude bez
napona.
■ Čišćenje i servisiranje koje obavlja korisnik
ne treba da obavljaju djeca koja nisu
pod nadzorom.
■ Može doći do oštećenja površine zbog
agresivnih ili abrazivnih sredstava za čišćenje.
Nikada ne koristite agresivna ili abrazivna
sredstva za čišćenje. Kod ovlaštenog servisa
potražite sredstva za čišćenje i zaštitu koja
su pogodna za vaš uređaj. Površina uređaja i
kontrolnih jedinica je osjetljiva na ogrebotine.
■ Površine čistite mekom, vlažnom krpom,
sredstvom za pranje sudova ili blagim sredstvom
za čišćenje stakla. Sasušenu i zalepljenu
prljavštinu omekšajte vlažnom krpom. Nemojte
strugati!
■ Korišćenje suhih krpa, spužvi koji mogu da
izazovu ogrebotine, sredstava koja zahtevaju
trljanje, sredstava za čišćenje koja sadrže
pijesak, sodu, kiselinu, klor ili druge
jake supstance nije prikladno.
■ Površine od nehrđajućeg čelika čistite samo
u smjeru četkanja.
■ Za kontrolne jedinice nemojte koristiti
sredstva za čišćenje nehrđajućeg čelika
i vlažne krpe. Čišćenje metalnih ltera za
ulje. Korišćeni lteri za ulje hvataju samo
čestice ulja koje se nalaze u vlažnom zraku i
pari u kuhinji. Kod normalnog korištenja (1-2
sata dnevno), metalne ltere za ulje čistite na
svaka tri mjeseca.
■ Nemojte koristiti previše jaka, kisela sredstva
niti sredstva za čišćenje na bazi klora.
■ Tjekom čišćenja metalnog ltera za
ulje, vlažnom krpom očistite rešetke na
metalnim lterima za ulje.
■ Metalne ltere za ulje možete oprati u perilici
posuđa ili ručno.
4.1 Pranje u perilici posuđa
■ U slučaju pranja u perilici posuđa, može
doći do blagog gubitka boje. To nema
uticaja na funkcioniranje metalnog tera za ulje.
■ Veoma zaprljane metalne ltere za ulje
nemojte prati zajedno sa sudovima.
■ Metalne ltere za ulje stavite u perilicu
posuđa tako da stoje slobodno. Metalni lteri
za ulje treba da se stave u perilicu posuđa
tako da se na njih ne primenjuje nikakav
potisak.
4.2 Ručno pranje
Za uklanjanje tvrdokornih mrlja, možete da
koristite specijalni rastvarač ulja. Ovaj proizvod
možete kupiti u ovlaštenom prodajnom centru.
■ Omekšajte mrlje na metalnom lteru za
ulje tako što ćete ga staviti u toplu vodu sa
deterdžentom za pranje sudova.
■ Za čišćenje koristite četku i potpuno ispustite
tekućinu iz metalnih ltera za ulje.
■ Nakon čišćenja, temeljito isperite ltere.
A PAŽNJA
Blagovremenim čišćenjem metalnog ltera za
ulje, izbjegava se opasnost od požara
izazvana prekomjernom toplinom koja se
generiše tjekom prženja.
4.3 Uklanjanje/postavljanje
aluminijskog ltera
Izvucite aluminijski lter pritiskom na jezičak.
Postupite obrnuto prilikom postavljanja ltera.
29
Page 73

5 INSTALACIJA UREĐAJA
Min.65 cm
Min.75 cm
Sl. 7: INSTALACIJA UREĐAJA
Prilikom montaže nape, između uređaja i električnih štednjaka mora da se ostavi najmanje 650
mm prostora ili 750 mm prostora između uređaja i štednjaka koji rade na plin ili druga goriva. Sl. 7
5.1 Instalacija i raspakivanje
5.2 Savjeti za uštedu energije
uređaja
■ Redovito mijenjajte ltere sa aktivnim ugljem.
Provjerite da li postoje bilo kakva oštećenja na
uređaju.
■ Oštećenja prilikom transporta odmah moraju
da se prijave osobi odgovornoj za transport.
■ Vidljivi nedostaci moraju da se prijave i
prodavcu.
■ Redovito čistite aluminijske ltere. Možda
ćete morati da uključujete uređaj na većoj brzini,
jer će prljavi lter blokirati dovod zraka.
■ Uređaj koristite na normalnim brzinama.
■ Korištenje većih brzina će povećati potrošnju
električne energije
■ Ne dozvolite deci da se igraju ambalažom.
30
Page 74

5.3 Način izduvnih plinova
A UPOZORENJE
Rizik od smrtnog ishoda!
Izduvni plinovi koji se ponovo uvuku mogu
izazvati trovanje. Izduvni plinovi ne smiju da se
prenesu u izduvni kanal za dim ili neprečišćeni
zrak; izduvni kanal ne smije da se koristi u
prostorijama u kojima su postavljeni izvori
topline. Ako želite da prebacite izduvne plinove
u izduvni kanal za dim ili neprečišćeni zrak,
morate dobiti dozvolu od ovlaštene dimničarske
službe.
Ukoliko se izduvni plinovi ispuštaju kroz
vanjskii zid,mora da se koristi vanjska zidna
ventilaciona klapna.
5.4 Izduvna cijev
Informacije: Proizvođač uređaja nije
odgovoran za kvarove izazvane postojećom
instalacijom.
■ Uređaj najbolje radi kada se koristi kratka
i ravna cijev za odvod zraka sa što većim
prečnikom.
■ Optimalne performanse ventilacije ne mogu
da se dostignu i buka ventilatora se povećava
kada se koriste duge i neravne cijevi za
odvod zraka i nekoliko koljena za cijevi, ili
prečnici cijevi koji su manji od 150 mm.
■ Cijevi ili crijeva koja se koriste za
izvođenje instalacije za odvod zraka moraju
da budu napravljene od nezapaljivih materijala.
Kružne cijevi
Preporučuje se da unutarnji prečnik bude 150
mm ili najmanje 120 mm.
Ravni kanali
Unutarnji dio mora da odgovara prečniku
kružnih cijevi.
Ø150 mm otpr. 177 cm²
Ø120 mm otpr. 173 cm²
■ Ravni kanali ne treba da imaju oštra koljena.
■ Za cijevi različitih prečnika koristite
zaptivne trake.
5.5 Provjera zida
■ Zid mora da bude ravan, prav i da ima dovoljnu nosivost.
■ Dubina izbušenih rupa mora da odgovara
dužini zavrtnjeva. Tipli moraju da upadnu do
kraja.
■ Isporučeni zavrtnjevi i tipli su odgovarajući za
uporabu na krutim, monolitnim zidovima. Za ostale konstrukcije koristite odgovarajuće vezivne
materijale (npr. gips, gas-beton, proton cigle).
5.6 Električni priključak
A UPOZORENJE
Opasnost od strujnog udara!
Komponente u uređaju mogu da imaju oštre
rubove. Kabel za napajanje može biti
oštećen. Nemojte savijati niti stiskati kabel za
napajanje tjekom procesa instalacije.
Neophodni podaci o povezivanju se mogu naći
na tipskoj naljepnici koja se nalazi u unutarnjosti
uređaja; da bi se naljepnica vidjela, moraju
se izvaditi metalni lteri za ulje.
Dužina priključnog voda: oko 1,3 m
Ovaj uređaj je usklađen sa EU smjernicama o
eliminisanju smetnji.
A UPOZORENJE
5.7 Opasnost od strujnog udara!
Isključivanje aparata sa električne mreže
uvijek mora biti moguće. Uređaj mora biti
priključen na uzemljenu utičnicu koja je
instalirana u sukladu sa pravilima. Ukoliko
utičnica ne može da se dohvati nakon
instalacije ili tjekom izvođenja ksne veze,
mora biti dostupno nekoliko rastavljača sa
razmakom kontakta od najmanje 3 mm.
Fiksnu vezu smije da izvede samo kvalicirani
električar.
31
Page 75

6 PREGLED UREĐAJA
1
2
3
4
1
2
3
4
Djt anahtarlı modeller
Sl. 9: PREGLED DIJELOVA NAPE
1. Prednja ploča
2. Taster
3. Filter
4. Osvjetljenje
32
Page 76

7 MONTAŽA UREĐAJA
305
80
B
C
D
A
A
B
C
D
1
2
Bušenje montažnih otvora
Izbušite otvore prečnika Ø4 mm u točkama
obilježenim sa A, B, C, D na šemi montaže.
Slika 2
19
A
283
223±2
B
10
10
28
10
2
MOUNTINGTEMPLATE SCALE 1:1
MONTAGESCHABLONE MAßSTAB 1:1
50
SAGOMADI MONTAGGIO RELAZIONE 1:1
ESTAMPADE MONTAJE ESCALA1:1
GABARITPOUR MONTAGE ECHELLE 1:1
SZABLON MONTAZOWYSKALA1:1
520
500
462±2
CUT-OUTLINE ON CUPBOARD FORAIR EXIT
AUSSCHNITTIM SCHRANK FÜR LUFTAUSTRITT
LINEADI TAGLIO PER USCITAARIA
RECORTE DELARMARIO PARALA SALIDA DEAIRE
LIGNEA COUPER POUR LASORTIE D'AIR
ZAZNACZYCW SZAFCE OTWÓR POD WYLOT POWIETRZA
2
±
0
3
1
Ø
A,B,C,D =
248
Ø4
C
D
Slika 2
Uređaj treba da se montira na orman u točkama
A, B, C, D pomoću 4 x 40 zavrtnja koji su
isporučeni uz uređaj. Prednja ploča ne treba
da dolazi u dodir sa vratima ormana prilikom
pomijeranja kliznog mehanizma. Slika 3
Plastičnu cijev isporučenu uz uređaj postavite
na odvod za izduvni kanal uređaja. Plastičnu
cijev zarotirajte u smjeru kretanja kazaljke na
satu. Slika 4
Slika 4
Fleksibilnu aluminijsku cijev postavite na
plastični odvod za izduvni kanal. Drugi kraj
cijevi postavite na otvor kanala na zidu. Slika 5
Slika 5
A PAŽNJA
Pošto će krivine i koljena u aluminijskoj cijevi
dovesti do smanjenja usisne snage uređaja,
izbjegavajte korištenje krivina i koljena što
je moguće više.
Slika 3
Funkcije uređaja
Nape se koriste u kuhinjama sa ili bez
izduvnog kanala.
U slučaju korištenja sa izduvnim kanalom;
Kod korištenja sa povezanim izduvnim
kanalom, napa mora biti povezana na izduvni
kanal koji će odvoditi zrak. Da biste ostvarili
maksimalnu ekasnost nape, sustav
cijevi koji vodi do izduvnog kanala
povežite na najkraći mogući način. Vaš
proizvod je proizveden u obliku koji odgovara
korištenju sa izduvnim kanalom.
33
Page 77

8 KORIŠĆENJE UREĐAJA
1
23
4
5
Preklopni prekidač sa 3 brzine
Prekidač za svjetlo
Prekidač za svjetlo okrenite
u položaj za uključivanje
svjetla uređaja. Da bi se svjetla
upalila, klizni mehanizam mora biti
odvojen.
3. Prekidač cirkulacije
Ako želite da uređaj prebacite u
treću brzinu, prekidač pomerite
nadolje.
3. Prekidač cirkulacije
Ako želite da uređaj prebacite u
treću brzinu, prekidač pomerite
nadolje.
Preklopni prekidač sa 2 brzine
Uređaj ima 2 lampice i prekidač za
kontrolisanje osvjetljenja. Da
bi se svjetla upalila, klizni
mehanizam mora biti odvojen.
3- Pritisnite ovaj gumb kada želite da uređaj
radi u 3. brzini.
4- Pritisnite ovaj gumb za uključivanje svjetla
uređaja.
Izbor brzine
Uređaj ima 3 razine ventilacije. Jedna
od razina ventilacije nisko-srednje-visoko
se bira u sukladu sa isparenjima od
kuhanja i prženja. On se pokreće pritiskom
na gumbe za kontrolu motora na prednjoj
ploči. Modeli sa elektronskom kontrolom
imaju automatski tajmer.
Tajmer
Ako pritisnete bilo koji gumb za pokretanje
motora duže od 2 sekunde, aktiviraće se funkcija
tajmera u trajanju od 15 minuta. Ekran takođe
daje signal kada se tajmer pokrene i motor će
se automatski zaustaviti nakon 15 minuta.
Periodi čišćenja metalnog ltera:
Filteri moraju da se očiste kada se znak „C“
pojavi na displeju (u zavisnosti od korištenja)
nakon svake 2-3 nedelje. Kada se filteri očiste i
vrate na mjesto, pritisnite taster ( ) duže od 3
sekunde da bi se izbrisao znak „C“ (kada uređaj
nije aktivan). Slovo „E“ će se pojaviti na displeju
i uređaj će preći u normalan način rada. Ako
želite da uređaj nastavi sa radom bez brisanja
znaka „C“, kada pritisnete taster ( ), aktivni rad
će se pratiti 1 sekundu, a zatim će se ponovo
pojaviti znak „C“ i motor će nastaviti sa radom.
Prekidač sa 3 brzina
1- Pritisnite ovaj gumb kada želite da uređaj
radi u 1. brzini.
2- Pritisnite ovaj gumb kada želite da uređaj
radi u 2. brzini.
A PAŽNJA
Znak „C“ će se pojaviti na kraju perioda
korištenja uređaja od 60 sati.
34
Page 78

5
Prekidač sa 5 brzina
A PAŽNJA
Znak „C“ će se pojaviti na kraju perioda
korištenja uređaja od 60 sati.
Uključeno-Isključeno: Uređaj će se
pokrenuti kada se pritisne ovaj taster.
Periodi čišćenja ltera:
Filteri moraju da se očiste kada se znak „ “
pojavi na displeju (u zavisnosti od korištenja)
nakon svake 2-3 nedelje. Kada se lteri očiste
i montiraju na svoja mesta, pritisnite taster duže
od 3 sekundi da biste izbrisali simbol „ “ (kada
je proizvod isključen) . Slovo „E“ će se pojaviti
na displeju kada se proizvod vrati na normalan
rad. Ako želite da uređaj nastavi sa radom bez
brisanja znaka „ “, kada pritisnete taster ( ),
aktivni rad će se pratiti 1 sekundu, a zatim će
se ponovo pojaviti znak „C“ i motor će nastaviti
sa radom.
Smanjenje brzine: Brzina će se smanjiti
ako se pritisne ovaj taster.
Povećanje brzine: Brzina će se povećati
ako se pritisne ovaj taster.
Tajmer: Kada se ovaj taster pritisne,
aktivira se funkcija tajmera na 15 minuta.
Kada odbrojavanje započne, na displeju
se prikazuje simbol, a motor se automatski
isključuje nakon 15 minuta.
Žarulja: Žarulja će se uključiti kada se
pritisne ovaj taster. Ponovo pritisnite ovaj
taster da biste isključili žarulju.
NAPOMENA: Znak „ “ će se pojaviti na
kraju perioda korištenja uređaja od 60 sati.
Ekasno korištenje da akcentom na
uštedu energije:
* Kada koristite napu, podesite brzinu prema
intenzitetu pare ili mirisa da biste uštedeli
energiju.
* Koristite manje brzine (1-2) pod normalnim
uvjetima, a veće brzine (3) za intenzivnu paru
i mirise.
* Na nape su postavljene žarulje za
osvjetljavanje zone kuhanja.
Njihovo korištenje za osvjetljenje okoline će
dovesti do dodatnih troškova za energiju i
nedovoljnog osvjetljenja.
Korišćenje nape:
* Vaš nape sadrži motor koji radi sa različitim
brzinama.
35
Page 79

9 ZAMJENA SIJALICA A
OPASNOST
Isključite napu iz struje. Sačekajte da se
žarulje ohlade pošto mogu da opeku vaše ruke
kada su vruće.
9.1 Zamjena halogene žarulje
Sl. 13: Zamjena LED žarulje
Skinite aluminijski umjetak ltera. Skinite
neispravnu žarulje i zamijenite je novom
iste jačine. Sl. 13
9.3 Zamjena LED žarulje od 1 W
• Odvojite električni priključak LED žarulje.
• Rukom pritisnite žarulje da biste je uklonili.
• Odvojite samoljepljivu traku od žarulja
i ploče kućišta.
• Prije nego što postavite novu LED
žarulju uklonite zaštitnu foliju sa okvira, a zatim
je zaljepite na odgovarajuće mjesto na kućište
proizvoda.
9.2 Zamjena žarulje sa užarenim
vlaknom
Sl. 14: Zamena žarulje sa užarenim vlaknom
Skinite aluminijski umjetak ltera. Skinite
neispravnu žarulju i zamijenite je novom
iste jačine. Sl. 14
36
Page 80

10 OVLAŠTENI TEHNIČKI
SERVIS
Ukoliko rasvjeta ne radi:
■ Provjerite da li je uređaj uključen u struju i da li su osigurači pregorjeli.
■ Provjerite žarulje. Obavezno isključite uređaj iz struje prije obavljanja ove provjere.
Pritegnite žarulje ako su labave; možete da ih zamijenite ako se i dalje ne pale.
Mogući kvarovi i radnje koje možete obaviti prije
pozivanja servisa:
A) Uređaj uopće ne radi:
■ Provjerite da li je uređaj uključen u struju i da li je utikač dobro pričvršćen u utičnicu.
■ Provjerite osigurač na koji je uređaj povezan, kao i glavni osigurač u vašoj kući.
Ukoliko uređaj slabo radi
ili pravi jaku buku dok radi:
■ Da li uređaj ima odgovarajući prečnik izduvnog kanala? (min. 120 mm).
■ Da li su metalni lteri čisti? Provjerite.
■ Ukoliko koristite napu bez izduvnog kanala, pobrinite se da lteri sa aktivnim ugljem ne budu
stariji od 6 mjeseci.
■ Vodite računa da kuhinja ima dovoljnu ventilaciju da bi se osigurao protok zraka. Ukoliko ste i
dalje nezadovoljni radom uređaja, kontaktirajte ovlašteni servis.
37
Page 81

10.1 Mogući kvarovi i rješenja
Opis kvara Razlog Pomoć
Mrežni napon mora da bude 220-240
V i uređaj mora da bude povezan na
uzemljenu utičnicu.
Mrežni napon mora da bude 220-240
V i uređaj mora da bude povezan na
uzemljenu utičnicu.
Prekidač rasvjete mora biti u položaju „on“
(uključeno).
Uređaj ne radi
Rasvjeta ne radi.
Rasvjeta ne radi.
Provjerite
električne veze.
Provjerite
električne veze.
Provjerite
električne veze.
Rasvjeta ne radi. Provjerite žarulje. Žarulje moraju da budu ispravne.
Usisna snaga uređaja je
slaba.
Usisna snaga uređaja je
slaba.
Provjerite
aluminijski
lter.
Provjerite kanal za
izduvne plinove.
Aluminijski umjetak ltera u normalnim
uvjetima treba da se pere najmanje
jednom mjesečno.
Kanal za izduvne plinove mora biti
otvoren.
Kod uređaja kod kojih se koriste lteri sa
Usisna snaga uređaja je
slaba.
Provjerite lter sa
aktivnim ugljem.
aktivnim ugljem, pod normalnim uvjetima
oni moraju da se zamjene na svaka
3 mjeseca.
Ne odvodi zrak (korištenje
bez izduvnog kanala)
Provjerite
aluminijski
lter.
Aluminijski umjetak ltera u normalnim
uvjetima treba da se pere najmanje
jednom mjesečno.
Kod uređaja kod kojih se koriste lteri sa
Ne odvodi zrak (korištenje
bez izduvnog kanala)
Provjerite lter sa
aktivnim ugljem.
aktivnim ugljem, pod normalnim uvjetima
oni moraju da se zamjene na svaka
3 mjeseca.
10.2 Tabela sa tehničkim podacima
Napon 220 - 240 V 50Hz
Klasa izolacije motora F
Klasa izolacije KLASA I
38
Page 82

PRT
SRB
PIO - 650 2M W
PIO - 650 2M IX
MANUAL DO USUÁRIO EXAUSTOR
Page 83

PIO650 2MW
PIO650 2MIX
Leia atentamente as instruções !
1
Page 84

1 DESENHO TÉCNICO 3
2 ADVERTENCIAS E PRECAUÇÕES DE SEGURANÇA 4
2.1 Perigo de morte, risco de envenenamento 6
2.2 Risco de choque elétrico! 6
2.3 Riscos de lesões! 6
2.4 Perigo de queimaduras, aviso de eletricidade 7
2.5 Risco de fogo e danos físicos! 7
3 UTILIZAÇÕES COM E SEM USO DE CARBONO 8
3.1 Substituição do Filtro de Carbono 9
3.2 Substituição do Filtro de Carbono 9
3.3 Substituição do filtro de carbono 9
4 LIMPEZA E MANUTENÇÃO PREVENTIVA 10
4.1 Lavando na Máquina de Lavar Louça 10
4.2 Lavagem com as mãos 10
4.3 Remoção / Instalação do Filtro de Alumínio 10
5 INSTALAÇÃO DO APARELHO 11
5.1 Instalação e Desembalagem do Aparelho 11
5.2 Instalação e Desembalagem do Aparelho 11
5.3 Modo de exaustão de ar 12
5.4 Linha de Descarga de ar 12
5.5 Verificando a parede 12
5.6 Conexão Elétrica 12
5.7 Perigo de choque elétrico! 12
6 VISÃO GERAL DO APARELHO 13
7 MONTAGEM DO PRODUTO 14
8 USO DO PRODUTO 15
9 SUBSTITUIÇÃO DE LAMPADAS 17
9.1 Substituição da Lãmpada de Halogénio 17
9.2 Substituição da Lãmpada de Ignição 17
10 SERVIÇO TÉCNICO AUTORIZADO 18
10.1 Falhas potenciais e Soluções 19
10.2 Tabela técnica 19
"Em conformidade com os regulamentos EEE. Sem PCB incluído"
2
Page 85

1 DESENHO TÉCNICO
Max425 Min305
280
600
223
462
78,5
499
146
50
174
283
27
20
41
Fig. 1: DESENHO TÉCNICO
3
Page 86

2 AVISOS E PRECAUÇÕES DE SEGURANÇA
■ Alimentos inflamáveis não devem ser cozidos sob
■
Este aparelho pode ser utilizado por crianças com
idade igual ou superior a 8 anos e pessoas com
capacidades físicas, sensoriais ou mentais
reduzidas ou com falta de experiência e
conhecimento, se tiverem recebido supervisão ou
instruções relativas ao uso do aparelho de forma
segura e compreenderem os perigos envolvidos.
■
Este produto é projetado para uso doméstico.
■
A tensão de uso do seu produto é de 220-240
Volts ~ 50 Hz.
■
O cabo de alimentação do seu produto está
equipado com uma ficha terra. Esta deve ser
conectada a uma tomada correspondente.
■
Toda a fiação elétrica deve ser instalada por um
eletricista qualificado.
■
A instalação por pessoas não autorizadas pode
resultar em mau desempenho operacional, danos
no produto e acidentes.
■
O cabo do alimentador do aparelho não deve ficar
exposto a obstruções ou falhas durante a
montagem.
■
O cabo do alimentador não deve ser colocado
perto do fogão. Em tais casos, este pode derreter e
causar fogo.
■
Não ligue o aparelho antes da instalação.
■
Certifique-se de que o local de instalação permite
ao utulizador desconectar facilmente o cabo de
alimentação em caso de qualquer perigo.
■
Não toque nas lâmpadas do seu produto quando
elas funcionarem por um longo período, pois
tornam-se quentes, podendo causar queimaduras.
■
Os exaustores de cozinha são projetados para
cozinhar e usar em casa. Para usos diferentes dos
especificados, existe o risco de falha e o aparelho
não será abrangido pela garantia.
■
Deve cumprir as regras e instruções relativas à
descarga de saída de ar, estipuladas pelas
autoridades competentes. (Este aviso não se aplica
a usos sem chaminé.)
o aparelho.
■ Ligue o aparelho depois de colocar uma panela,
frigideira, etc. no fogão. Caso contrário, a alta
temperatura pode causar deformação em alguns
componentes do produto.
■Desligue o queimador antes de retirar a panela,
frigideira ou outros do fogão.
■Não deixe óleo quente no seu fogão. Os
recepientes que contêm óleo quente podem causar
inflamação.
■Uma vez que os óleos podem incendiar-se
quando cozinhar alimentos fritos em particular e
tenha cuidado com suas cortinas e toalhas de
mesa.
■Assegure a substituição oportuna dos filtros.
Filtros não substituídos em tempo útil apresentam
risco de incêndio devido a depósitos de resíduos
neles acumulados.
■Não use materiais filtrantes e não resistentes ao
fogo em vez do filtro
■Não opere o produto sem filtro e não remova os
filtros quando o produto estiver em uso. Em caso de
deflagração, desligue o exaustor e os aparelhos de
cozimento. (Desligue o aparelho ou desligue o
interruptor principal).
■Se a limpeza periódica do seu produto não for
feita regularmente, tal pode representar um risco de
incêndio.
■ Desligue o aparelho antes de qualquer operação
de manutenção. (Desligue o aparelho ou desligue o
interruptor principal.)
■ Quando a placa elétrica e os dispositivos
alimentados com outra energia além da eletricidade
operam simultaneamente, a pressão negativa na
sala não deve exceder 4 Pa (4 X 10 bar).
■ Aparelhos de queima de gás ou óleo combustível
como aquecedores, que compartilham o mesmo
ambiente com o produto, devem ser totalmente
isolados deste produto ou ser herméticos.
4
Page 87

■ Quando fizer uma conexão de combustão do seu
produto, use tubos com um diâmetro de 150 mm ou
120 mm.
■ O comprimento da conexão do tubo, bem como o
número de dobradiças, deve ser o mínimo possível.
■As crianças não devem brincar com o
aparelho.Para sua segurança, use o fusível "MAX 6
A" no sistema de exaustor.
■Os materiais de embalagem podem ser perigosos,
mantenha-os longe das crianças.
■Se o cabo do alimentador estiver danificado, deve
ser substituído pelo fabricante ou pelo serviço
técnico autorizado ou qualquer outro pessoal
qualificado no mesmo nível, a fim de evitar qualquer
situação perigosa.
■Em caso de deflagração, desligue o exaustor e os
aparelhos de cozimento e cubra a chama. Nunca
use água para extinguir o fogo.
■Quando aparelhos de cozinha estão em operação,
as partes acessíveis podem estar quentes.
■Este aparelho não se destina a ser utilizado por
pessoas com deficiências físicas, sensoriais e
mentais (incluindo crianças) ou que não tenham
experiência e conhecimentos adequados quanto à
sua utilização, a menos que estejam sob a
supervisão de uma pessoa responsável pela
segurança do aparelho.
■Após a instalação do exaustor, a distância mínima
deve ser de 65 cm entre o produto e qualquer fogão
elétrico e 75 cm entre ele e quaisquer fontes de gás
ou fogões queimando outros combustíveis.
■A saída do exaustor não deve ser ligada a
condutas de ar, onde existam outros fumos.
■ Deve ter cuidado ao usar a aplicação
espontaneamente com outros aparelhos (por
exemplo, gás, combustível diesel, aquecedores a
carvão ou a lenha, aquecedores de chuveiro, etc.),
deve-se prestar atenção ao usá-los
simultaneamente, dado que o exaustor pode afectar
a combustão e o ambiente da sala.
■Este aviso não se aplica ao uso sem chaminé.
■Quando o exaustor elétrico é usado
simultaneamente com dispositivos que usam gás ou
outros combustíveis, deve haver ventilação
suficiente na sala (pode não ser aplicável a
dispositivos que descarregam o ar de volta para a
sala).
■Operação simultânea de mais de um fogão a gás
leva a geração de calor elevado. O aparelho de
ventilação colocado na superfície dos fogões pode,
portanto, ficar danificado ou queimar. Não opere
dois fogões a gás em alta temperatura por mais de
15 minutos. Um grande queimador com potência
superior a 5kW gera energia igual a de dois
queimadores a gás.
5
Page 88

2.1 Perigo de morte e de envenenamento
Perigo de fogo!
PERIGO
Existe perigo de vida e envenenamentodevido a
gases de combustão que podem ser
reabsorvidos. Durante o fluxo das saídas de
descarga de ar, a menos que haja uma
suficiente circulação e renovação de ar. Não
use o dispositivo em simultâneo com outros
capazes de emitir gases tóxicos através de
chaminés, como aquecedores ventilados (a
gás, óleo, madeira ou carvão), aquecedores de
água, etc.
Fig. 2: Perigo de envenenamento
Dispositivos ventilados como aquecedores
(gás, óleo, madeira ou carvão) ou aquecedores
de água retiram usam ar para combustão no
local onde se encontram instalados e
descarregam gás residual através de um
sistema de gás residual (p. e. combustão).
Quando o exaustor está ativo ele absorve o ar
da cozinha e das salas vizinhas. Assim, se uma
entrada de ar adequada não for fornecida, o
vácuo surge. Nesse caso, os gases tóxicos são
absorvidos pelo canal de exaustão e gases de
exaustão são expelidos novamente. Fig. 2
Concluíndo, uma entrada adequada de ar
fresco deve sempre ser garantida. Fig. 3
Devido a faíscas. A instalação do aparelho
sobre um dispositivo de aquecimento aquecido
com combustíveis sólidos (p.e. madeira ou
carvão) só é permitida se estiver presente uma
tampa não amovível. Para o processo de
instalação, deve-se prestar atenção aos atuais
regulamentos de construção aplicáveis das
empresas elétricas e de gás locais. O aparelho
pode causar incêndio, a menos que seja
produzido de acordo com as instruções de
limpeza.
2.2 Risco de choque eléctrico!
Não dobre ou aperte o cabo de conexão
durante a instalação, devido aos diversos
riscos que representa um cabo danificado.
2.3 Perigo de danos físicos!
■ Durante a instalação, existe o perigo de
ferimentos físicos devido as bordas afiadas.
Use luvas de proteção durante todo o processo
de instalação do aparelho.
■ Devido ao risco de queda do aparelho, a
montagem de todos os parafusos e tampas de
segurança deve ser executada conforme
especificado no manual de instruções.
PERIGO
PERIGO
PERIGO
Fig 3
7
Page 89

A PERIGO
2.4.Perigo de queimadura e de choque
elétrico!
■ Deixe o aparelho arrefecer antes de limpeza
ou manutenção. Desligue o fusível ou retire a
ficha da tomada.
■ Há risco de danos devido à entrada de
humidade nos componentes electrónicos. Não
limpe os componentes de controle com um
pano húmido.
■ A superfície pode ser danificada devido a um
processo de limpeza incorreto. Limpe as
superfícies de aço inoxidável somente na
direção de escova. Não use um limpador de aço
inoxidável para os elementos de controle.
■ A superfície pode ser danificada devido a
agentes de limpeza agressivos e abrasivos.
Nunca use agentes de limpeza agressivos e
abrasivos.
■ Há risco de danos devido ao refluxo do ar
condensado. Monte o canal de saída de ar para
baixo a partir do aparelho (inclinação de 1 °).
A PERIGO
2.5 Perigos de fogo e ferimentos físicos!
No caso da reparação não se realizar de acordo com
as regras ou conforme necessário, desligue o fusível
ou desconecte o cabo do alimentador do seu
eletrodoméstico. A reparação deve ser realizada
apenas pelo serviço técnico autorizado ou
especialistas autorizados.
NOTA
Se o aparelho apresentar defeitos ou danos,
desligue o fusível ou desconecte o cabo de
alimentação de seu aparelho e ligue para o serviço
autorizado.
NOTA
Se o cabo do alimentador estiver danificado, ele
deve ser substituído pelo fabricante ou pelo
serviço técnico autorizado ou qualquer outro
pessoal qualificado com o mesmo nível, a fim
de evitar qualquer situação perigosa.
NOTA
Se as lâmpadas do aparelho estiverem com
defeito, desligue o fusível ou desconecte o cabo
do alimentador do aparelho. Substitua as
lâmpadas imediatamente para evitar sobrecarga
em outras lâmpadas (espere que as lâmpadas
arrefeçam primeiro)
A ATENÇÃO
Os componentes acessíveis podem sobreaquecer
quando usados com dispositivos de cozinha.
A PERIGO
A tubulação de saída de ar deste aparelho não
deve ser conectada na chaminé usada para
descarregar o fumo gerado pelos dispositivos
que usam gás ou outros combustíveis.
7
Page 90

3 UTILIZAÇÕES COM E SEM USO DE CARBONO
Pode usar este aparelho no modo de exaustão
de ar e no modo de ventilação de ar.
Modo de exaustão de ar
O ar absorvido é limpo pelos filtros de gordura e
descarregado através de um sistema de
tubulação. 4
Fig. 4: Saída de Ar sem Filtro de Carbono
Modo de ar ventilado
O ar absorvido é limpo pelos filtros de gordura e
por um filtro de carbono ativo, sendo então
transferido de volta para a cozinha. 5
A PERIGO
Risco de Morte!
Gases de exaustão absorvidos podem
levar a envenenamento. O ar de exaustão
não deve ser transferido para um tubo de
fumo ativo ou de fluente gasoso; ou uma
chaminé usada para ventilação dos lugares
onde fontes de calor estão instaladas.
■ Se quiser transferir o ar de exaustão para
fumos ou de fluente gasoso, deve utilizar
uma chaminé devidamente capacitada.
■ Se o ar de exaustão for descarregado
através da parede externa, deve ser
instalado por um técnico experiente e
utilizar uma saída telescópica de parede
externa.
Fig. 5: Saída de Ar com Filtro de Carbono
Para reter as substâncias que causam odores
no modo de ar ventilado, deve anexar um filtro
de carbono ativo. Consulte o seu revendedor
autorizado para várias opções disponíveis para
usar o seu aparelho em modo de ventilação.
Você pode comprar os acessórios necessários
para este processo em pontos de venda
relacionados, serviços autorizados ou centro de
vendas on-line.
8
Page 91

3.1 Substituição do Filtro Carbono
Em ambientes sem chaminé, o filtro carbono
activo deve ser usado para filtrar o ar e
reencaminhá-lo. O filtro de carbono activo deve
ser fornecido pelo serviço ou pelo seu
revendedor. Desligue o aparelho antes de
substituir o filtro de carbono. Como o filtro de
carbono é usado em cozinhas sem saída de
combustão, ele deve ser substituído a cada 3-5
meses, dependendo do uso.O filtro de carbono
nunca deve ser lavado. Filtros de resíduos
gordurosos devem ser instalados no produto,
independentemente do uso dos filtros de
carbono. Não use seu produto sem filtro de
resíduos gordurosos.
3.2 Substituição do filtro de carbono
3.3 Substituição do filtro de carbono
Fig. 6: FILTRO DE CARBONO
Não lave os filtros de carbono. Mantenha os
filtros de carbono longe das crianças.O
aparelho é apropriado para o uso com filtros de
carbono.
3. Coloque o filtro de carbono em seu aparelho.
Fig. 6
4. Girando o filtro de carbono no sentido
horário, assegure-se de que esteja
completamente em forma. Fig. 6
A PERIGO
Fig. 6: FILTRO DE CARBONO
O aparelho que adquiriu é apropriado para uso
com filtros de carbono.
1. Coloque o filtro de carbono no aparelho. Fig.
6.
2. Rodando o filtro de carbono no sentido dos
ponteiros do relógio, certifique-se de que está
completamente encaixado. Fig. 6
Se o filtro de carbono não encaixar
completamente, pode cair e danificar
o seu produto.
Não lave os filtros de carbono. Mantenha os
filtros de carbono longe das crianças.
9
Page 92

4 LIMPEZA E MANUTENÇÃO
PREVENTIVA
A ATENÇÃO
■ Antes de cada manutenção e limpeza, o
exaustor deve ser desligado e o aparelho deve
estar desconectado da ficha eléctrica.
■ A limpeza e a manutenção do aparelho não
devem ser realizadas por crianças.
■ A superfície pode ser danificada devido a
agentes de limpeza agressivos e abrasivos.
Nunca use agentes de limpeza agressivos e
abrasivos. Adquira as substâncias de limpeza e
proteção apropriadas para o seu aparelho no
serviço técnico autorizado. A superfície do
aparelho e unidades de controle são sensíveis a
riscos.
■ Limpe as superfícies com um pano macio e
húmido, detergente líquido ou detergente para
limpeza de vidros suaves. Amoleça os resíduos
secos e pegajosos com um pano húmido. Não
raspe!
■ Não é apropriado usar panos secos, esponjas
que possam riscar, materiais que exijam fricção
e outros agentes de limpeza agressivos que
contenham areia, ácido ou cloro.
■ Limpe as superfícies de aço inoxidável
apenas na direção da escovagem.
■ Não use agentes de limpeza de aço
inoxidável e panos molhados nas unidades de
controle. Faça a limpeza de partes metálicas
que retêm as partículas gordurosas e humidade
do vapor gerado na cozinha. Limpe os filtros de
gordura metalizados a cada três meses, em
condições normais de uso (1 a 2 horas por dia).
■ Não use agentes de limpeza excessivamente
agressivos, ácidos ou alcalinos.
■ Para limpar os filtros metálicos, limpe as
partes do suporte dos filtros de metal no
aparelho, com um pano húmido.
■ Pode limpar os filtros de metal na máquina
de lavar louça ou com a mão.
4.1 Lavar na Máquina de Lavar Louça
■ Em caso de lavagem na máquina de lavar
loiça, pode ocorrer uma ligeira alteração na
cor. Isso não tem efeito sobre a função do filtro
de metal.
■ Não lave os filtros de gordura
excessivamente sujos de metal juntamente
com as loiças.
■ Coloque os filtros metálicos soltos na
máquina de lavar louça. Os filtros metálicos
devem ser colocados na máquina de lavar loiça
sem obstrução.
4.2 Lavagem a mão
Para sujidades difíceis, pode usar um solvente
especial. Você pode comprar um solvente
desse tipo no centro de vendas autorizado.
■ Suavize os filtros de gordura de metal em
água quente com detergente para louça.
■ Use um pincel para limpeza e aguarde até
que o líquido nos filtros metálicos escorra
completamente.
■ Seque bem os filtros após a limpeza.
A ATENÇÃO
Graças à limpeza atempada do filtro de metal,
o perigo de incêndio causado pelo calor
excessivo gerado durante a fritura é reduzido.
4.3 Remoção / Instalação do filtro de
AlumínioPuxe o filtro de alumínio em sua
direção pressionando a aba. Inverta o
processo para instalar o filtro.
10
Page 93

5 INSTALANDO DO APARELHO
Min.65 cm
Min.75 cm
Fig. 7: INSTALANDO O APARELHO
Após completar a instalação do exaustor, a distância mínima deve ser de 650 mm entre o produto
e qualquer fogão elétrico e 750 mm entre ele e quaisquer faixas de gás ou fogões queimando
outros combustíveis. Fig. 7
5.1 Desembalar e instalar a máquina
Verifique se o seu dispositivo não está
deformado.
■ Em caso de problemas, relate imediatamente
ao transportador.
■ Qualquer falha encontrada também deve ser
imediantamente relatada ao revendedor.
■ Não permita que crianças brinquem com
materiais de embalagem!
5.2 Desembalando e instalando a Máquina
■ Substitua o filtro de carbono regularmente.
■ Limpe seus filtros de alumínio regularmente.
Como os filtros sujos bloqueariam o fluxo de ar,
talvez seja necessário usar o aparelho a uma
velocidade maior.
■ Use seu produto de acordo com as
velocidades normais.
■ O uso mais rápido da velocidade causara um
aumento no consumo de energia
11
Page 94

5.3 Modo de Exaustão
ATENÇÃO
Risco de Morte!
Gases de exaustão que são reabsorvidos
podem levar a envenenamento. O ar de
exaustão não deve ser transferido para um
tubo ativo ou efluente gasoso; ou uma chaminé
usada para ventilação dos lugares, onde fontes
de calor são instaladas. Se você quiser
transferir o ar de exaustão para uma fumaça
inativa ou uma tubulação de gás residual, deve
recorrer a um técnico qualificado e utilizar uma
chaminé apropriada.Se o ar de exaustão for
descarregado através da parede externa, deve
ser instalado por um técnico experiente e
utilizar uma saída telescópica de parede
externa.
5.4 Informações sobre a linha de descarga
de ar: O fabricante do aparelho não pode ser
responsabilizado por defeitos causados por
tubulações.
■ O aparelho apresenta um maior
desempenho quando usado um tubo de saída
de ar curto com um diâmetro de tubo o maior
possível.
■ O desempenho ideal da ventilação não pode
ser atingido e o ruído da ventoinha aumenta
quando tubos de saída de ar longos e
irregulares com múltiplos tubos ou diâmetros
de tubos menores que 150 mm são usados.
■ Tubos ou mangueiras usadas na colocação
da linha de saída de ar devem ser feitos de
materiais inflamáveis.
Tubos Circulares: Recomenda-se que o
diâmetro interno seja de 150 mm ou de pelo
menos 120 mm.
Canais planosA seção interna deve ser
apropriada ao diâmetro dos tubos circulares.
Ø150 mm aprox. 177 cm2
Ø120 mm aprox. 173 cm2
■ Canais planos não devem ter dobradiças
afiadas.
■ Use fitas de vedação para diferentes
diâmetros de tubo.
5.5 Verificando a parede
■ A parede deve ser plana, recta e ter
capacidade de carga suficiente.
■ A profundidade dos orifícios de perfuração
deve estar de acordo com o comprimento dos
parafusos. As cavilhas devem caber
corretamente.
■ Parafusos e buchas são apropriados para
uso em paredes monolíticas rígidas. Use
materiais de adequados para diferentes
construções (por exemplo, placas de gesso,
concreto aerado, tijolos).
5.6 Ligação eléctrica
A ATENÇÃO
Perigo de choque elétrico!
Componentes no aparelho podem ter bordas
afiadas. O cabo de ligação pode estar
danificado. Não dobre nem atinja o cabo de
ligação durante a instalação.Os dados de ligação
necessários são fornecidos na etiqueta de tipo
disponível no seu aparelho. Filtros metálicos
devem ser removidos para ver o rótulo.
Comprimento da linha de ligação: aprox.
1.3m Este aparelho está em conformidade com
as directrizes de eliminação de resíduos da UE.
A ATENÇÃO
5.7 Perigo de Choque Elétrico!
Deve sempre ser possível desconectar o
aparelho da rede elétrica. O aparelho deve ser
conectado a uma tomada de protegida e
montada de acordo com as regras. Se a ficha
não puder ser alcançada após a instalação ou
durante a conexão fixa requerida, deve haver
muitos conjuntos de separação de polos
disponíveis com pelo menos 3 mm de distância
de contato da instalação. A ligação fixa deve
ser realizada apenas por um especialista em
electricidade.
12
Page 95

6 VISÃO GERAL DO APARELHO
1
2
3
4
1
2
3
4
Fig. 9: VISÃO GERAL DO COPO DE COZEDURA
1. Painel Frontal
2. Chave
3. Filtro
4. Iluminação
13
Page 96

7 MONTAGEM DO PRODUTO
305
80
B
C
D
A
A
B
C
D
Perfurando os furos do gancho
Faça furos com Ø4 mm de diâmetro nos pontos
marcados como A, B, C, D no esquema de
10
10
B
Figura 2
10
2
MOUNTINGTEMPLATE SCALE 1:1
MONTAGESCHABLONE MAßSTAB 1:1
50
SAGOMADI MONTAGGIO RELAZIONE 1:1
ESTAMPADE MONTAJE ESCALA1:1
GABARITPOUR MONTAGE ECHELLE 1:1
SZABLON MONTAZOWYSKALA1:1
28
520
500
462±2
CUT-OUTLINE ON CUPBOARD FORAIR EXIT
AUSSCHNITTIM SCHRANK FÜR LUFTAUSTRITT
LINEADI TAGLIO PER USCITAARIA
RECORTE DELARMARIO PARALA SALIDA DEAIRE
LIGNEA COUPER POUR LASORTIE D'AIR
ZAZNACZYCW SZAFCE OTWÓR POD WYLOT POWIETRZA
2
±
0
3
1
Ø
A,B,C,D =
248
Ø4
C
D
montagem.
19
A
283
223±2
Figura 2
O aparelho deve ser montado nos furos dos
pontos A, B, C, D usando parafusos 4 x 40
fornecidos com o aparelho. O painel frontal não
deve ser empurrado contra a tampa do
gabinete quando o conjunto deslizante se
Figura 3
move.
Instale a outra extremidade do tubo no orifício
de combustão na parede.
2
Figura 5
1
Figura 4
Figura 5
A ATENÇÃO
Figura 3
Coloque a chaminé de plástico fornecida com a
aplicação na saída de fumos do aparelho. Gire
a tubulação de plástico no sentido horário.
Figura 4
Instale o tubo de alumínio flexível na saída de
fumos de plástico.
Desde torções e curvas no tubo de alumínio
levará a redução no poder de sucção de ar,
evite usar torções e curvas tanto quanto
possível.
Funções do dispositivoExaustor é usado em
cozinhas com ou sem combustão.
Em caso de uso com chaminé;
No uso ligado à chaminé, o exaustor deve ser
ligado a uma chaminé que descarregará o ar.
Prefira o caminho mais curto para o sistema de
tubagem que conduz à combustão, a fim de
obter a máxima eficiência do seu exaustor. Seu
produto é fabricado em uma forma apropriada
para uso com combustão.
14
Page 97

8 USO DO PRODUTO
1
23
4
5
3 Velocidades Rocker Interruptor
Interruptor da lâmpada
Coloque o interruptor na posição da
lâmpada para acender a luz do
aparelho. O conjunto deslizante deve
ser destacado para acender as luzes.
3. Interruptor de Circulação
Se quiser executar o aparelho na
terceira velocidade, mova o
interruptor para baixo.
3. Interruptor de Circulação
Se quiser executar o aparelho na
terceira velocidade, mova o
interruptor para baixo.
2 Velocidades Rocker Interruptor
O produto tem 2 lâmpadas e
um interruptor para controlar a
iluminação. O conjunto
deslizante deve ser destacado
para ligar as luzes.
3 Velocidades Dgt interruptor
3- Pressione este botão quando quiser operar
o produto na velocidade 3.
4- Pressione este botão quando quiser ligar as
luzes do produto.
Seleção de velocidade
O aparelho tem uma ventilação de 3 níveis.
Um dos níveis de ventilação baixa-média-alta
é selecionado de acordo com o vapor de
cozimento e fritura. É iniciado pressionando os
botões de controle do motor no painel frontal.
Modelos controlados eletronicamente possuem
temporizador automático.
Cronômetro
Se você pressionar qualquer um dos botões de
partida do motor por mais de dois segundos,
uma função de temporizador será ativada com
15 minutos de duração. O display também dará
um sinal quando o temporizador iniciar e o
motor deverá parar automaticamente 15
minutos depois.
Períodos de limpeza do filtro metálico:
Os filtros devem ser limpos quando o sinal "C"
aparecer no visor ou (dependendo do uso) após
cada 2-3 semanas. Quando os filtros forem
limpos e montados em seus lugares, pressione
o botão por mais de 3 segundos para excluir
o sinal "C" (com o aparelho desligado). A letra
"E" aparecerá no visor e o produto mudará para
a operação normal. Se desejar continuar a
operação sem apagar o sinal "C", ao pressionar
o botão , a operação ativa será observada
por 1 segundo e então o sinal "C" reaparecerá e
o motor continuará a funcionar.
1- Pressione este botão quando quiser operar
o produto na velocidade 1.
2- Pressione este botão quando quiser operar
o produto na velocidade 2.
A ATENÇÃO
A marca "C" aparecerá no final do período
de uso do produto de 60 horas.
15
Page 98

5
5 Velocidades Dgt interruptor
A ATENÇÃO
A marca "C" aparecerá no final do período de
uso do produto de 60 horas.
On-Off: O aparelho será iniciado assim
que este botão for pressionado.
Diminuindo a velocidade: A velocidade
diminuirá se este botão for pressionado.
Períodos de limpeza dos filtros:
Os filtros devem ser limpos quando o sinal "c"
aparecer no visor ou (dependendo do uso) a
cada 2-3 semanas. Quando os filtros forem
limpos e montados em seus lugares, pressione
o botão por mais de 3 segundos para excluir o
sinal "c" (quando o aparelho estiver inactivo) .
A letra "E" aparecerá no visor e o produto
mudará para operação normal. Se a operação
desejada continuar sem apagar o sinal "c",
quando você pressiona o botão ( ), a
operação ativa será observada por 1 segundo.
e então o sinal "C" reaparecerá e o motor
continuará a funcionar.
NOTA: A marca "c" aparecerá no final do
período de uso do produto de 60 horas.
Velocidade crescente: A velocidade
aumentará se este botão for pressionado.
Temporizador: Quando o botão é
pressionado, uma função de
temporização é ativada por um período
de 15 minutos, e uma vez que o tempo
comece a contar, o display também dá
um sinal, e o motor para
automaticamente após 15 minutos.
Lâmpada: A lâmpada acenderá quando o
botão for pressionado. Volte a pressionar
o botão para desligar a lâmpada.
Uso eficiente com relação a economia de
energia:
* Ao usar o aparelho, ajuste as configurações
de velocidade de acordo com a intensidade do
vapor e odor, a fim de economizar energia.
* Use velocidades baixas (1-2) em condições
normais e altas velocidades (3) em odor e
vapor intensos.
* As lâmpadas no aparelho são colocadas para
iluminar a área de cozimento.
Usá-los para iluminação ambiental causará
gasto de energia desnecessário e iluminação
insuficiente.
Uso de tampa:
* A tampa contém um motor com várias
velocidades.
16
Page 99

9 SUBSTITUIÇÃO DE LUZES
A PERIGO
Desligue a alimentação elétrica do exaustor.
Deixe as lâmpadas esfriarem primeiro porque
podem queimar suas mãos quando estão
quentes.
9.1 Substituição da lâmpada de
halogéneo
Fig. 13: Substituição da Lâmpada LED
Remova o filtro do cartucho de alumínio.
Remova a lâmpada defeituosa e substitua-a
por uma nova com a mesma classificação. 13
9.3 1W Substituição da lâmpada Led
■ Desconecte a ligação elétrica da lâmpada
LED.
■ Empurre a lâmpada com a mão para movê-la.
■ Separe a fita adesiva em torno das lâmpadas
e a placa do corpo uma da outra.
■ Antes de colocar a nova lâmpada LED,
remova a folha protetora da moldura e, em
seguida, cole-a em seu lugar no corpo do
produto.
9.2 Substituição da Lâmpada de Vela de
Ignição
Fig. 14: Substituição da lâmpada de vela de ignição
Remova o filtro do cartucho de alumínio. Remova a
lâmpada defeituosa e substitua-a por uma nova com a
mesma classificação. Figura 14
17
Page 100

10 SERVIÇO TÉCNICO AUTORIZADO
Se a iluminação não estiver funcionando:
■ Certifique-se de que a ficha esta conectada e de que os fusíveis estão intactos.
■ Verifique as lâmpadas. Certifique-se de desconectar o dispositivo antes de realizar essa
verificação. Aperte as lâmpadas se estiverem soltas; você pode substituir as lâmpadas se elas
ainda não funcionarem.
Possíveis falhas e o que fazer antes de chamar o serviço técnico:
A) Se o aparelho não funcionar de alguma forma:
■ Verifique se o exaustor está conectado ou se a ficha está encaixada corretamente.
■ Verifique o fusível, ao qual o aparelho está ligado, bem como o fusível principal da sua casa.
Se o desempenho do aparelho for insuficiente ou se operar com muito ruído
O diâmetro de saída do tubo do aparelho é adequado? (min.120 mm).
■
■ Se você usar o exaustor sem chaminé, verifique se os filtros de carbono não têm mais de 6
meses.
■ Se você usar o exaustor sem chaminé, verifique se os filtros de carbono não têm mais de 6
meses.
■ Esteja atento a sua cozinha adequadamente, a fim de fornecer um fluxo de ar. Se ainda estiver
satisfeito com o desempenho do aparelho, consulte o serviço técnico autorizado.
:
18
 Loading...