

VOX electronics ES-8112SN Instruction Manual

Please save and read this instruction manual carefully before use.
LET’S LIVE TOGETHER
INSTRUCTION MANUAL
GB
JUICE EXTRACTOR
MOdEL: ES-8112SN
2
IMPORTANT SAFEGUARdS
When using this electrical appliance. Basic safety precautions should always be followed, including the
following.
1. Read all instructions before operating.
2. Always use this appliance on a dry, level surface.
3. To protect against risk of electrical shock, do not immerse cord, plugs, or the appliance in water or
other liquid.
4. This appliance is not intended for use by person (including children) with reduced physical,sensory
or mental capabilities,or lack of experience and knowledge,unless they have been given
supervision or instruction concerning use of appliance by a person responsible for their safety.
5. Children should be supervised to ensure that they do not play with the appliance.
6. Unplug from outlet when not in use, before addition or removal of any parts, and before cleaning.
7. Do not operate any appliance with a damaged cord or plug or after the appliance malfunctions is
dropped or damaged in any manner. Return appliance to dealer or authorized service agent for
examination, repair or electrical or mechanical adjustment.
8. The use of accessories or attachments not recommended or sold by dealer may cause fire, electric
shock or injury.
9. Do not use outdoors.
10. Do not let cored hang over edge of table or counter, or touch hot surfaces.
11. Do not use outdoors.
12. This appliance is for Household Use Only. Do not use appliance for other than intended use.
13. Always turn the appliance off and unplug from the outlet when left unattended or finished using.
14. Check to be sure that the switch is in the off position and the unit is unplugged before assembling.
15. Avoid contacting moving parts.
16. The cutting blades in the strainer basket are sharp. Handle with care.
17. Do not leave unit unattended while in use.
18. Always make sure the juicer is fully assembled and the juicer cover is locked securely in position
before the motor is turned on.
19. Be careful, when cleaning the blade and teeth on the filter as these are very sharp.
20. Do not use this appliance if the strainer basket is damaged.
21. Do not push food into the feed tube with your fingers. Always use the food pusher push it down.
22. Do not place on or near a hot gas or electric burner, or in a heated oven.
23. Do not operate the appliance exceed 1 minute, the appliance need to cool down for not overheating.
SAVE THESE INSTRUCTIONS • HOUSEHOLD USE ONLY
BEFORE FIRST USE
1. Read the instructions carefully and keep for future reference
2. Remove all packaging.
3. Disassemble the juicer (see the Care and Cleaning section).Wash all removable parts to remove
and residue left over from the manufacturing process.
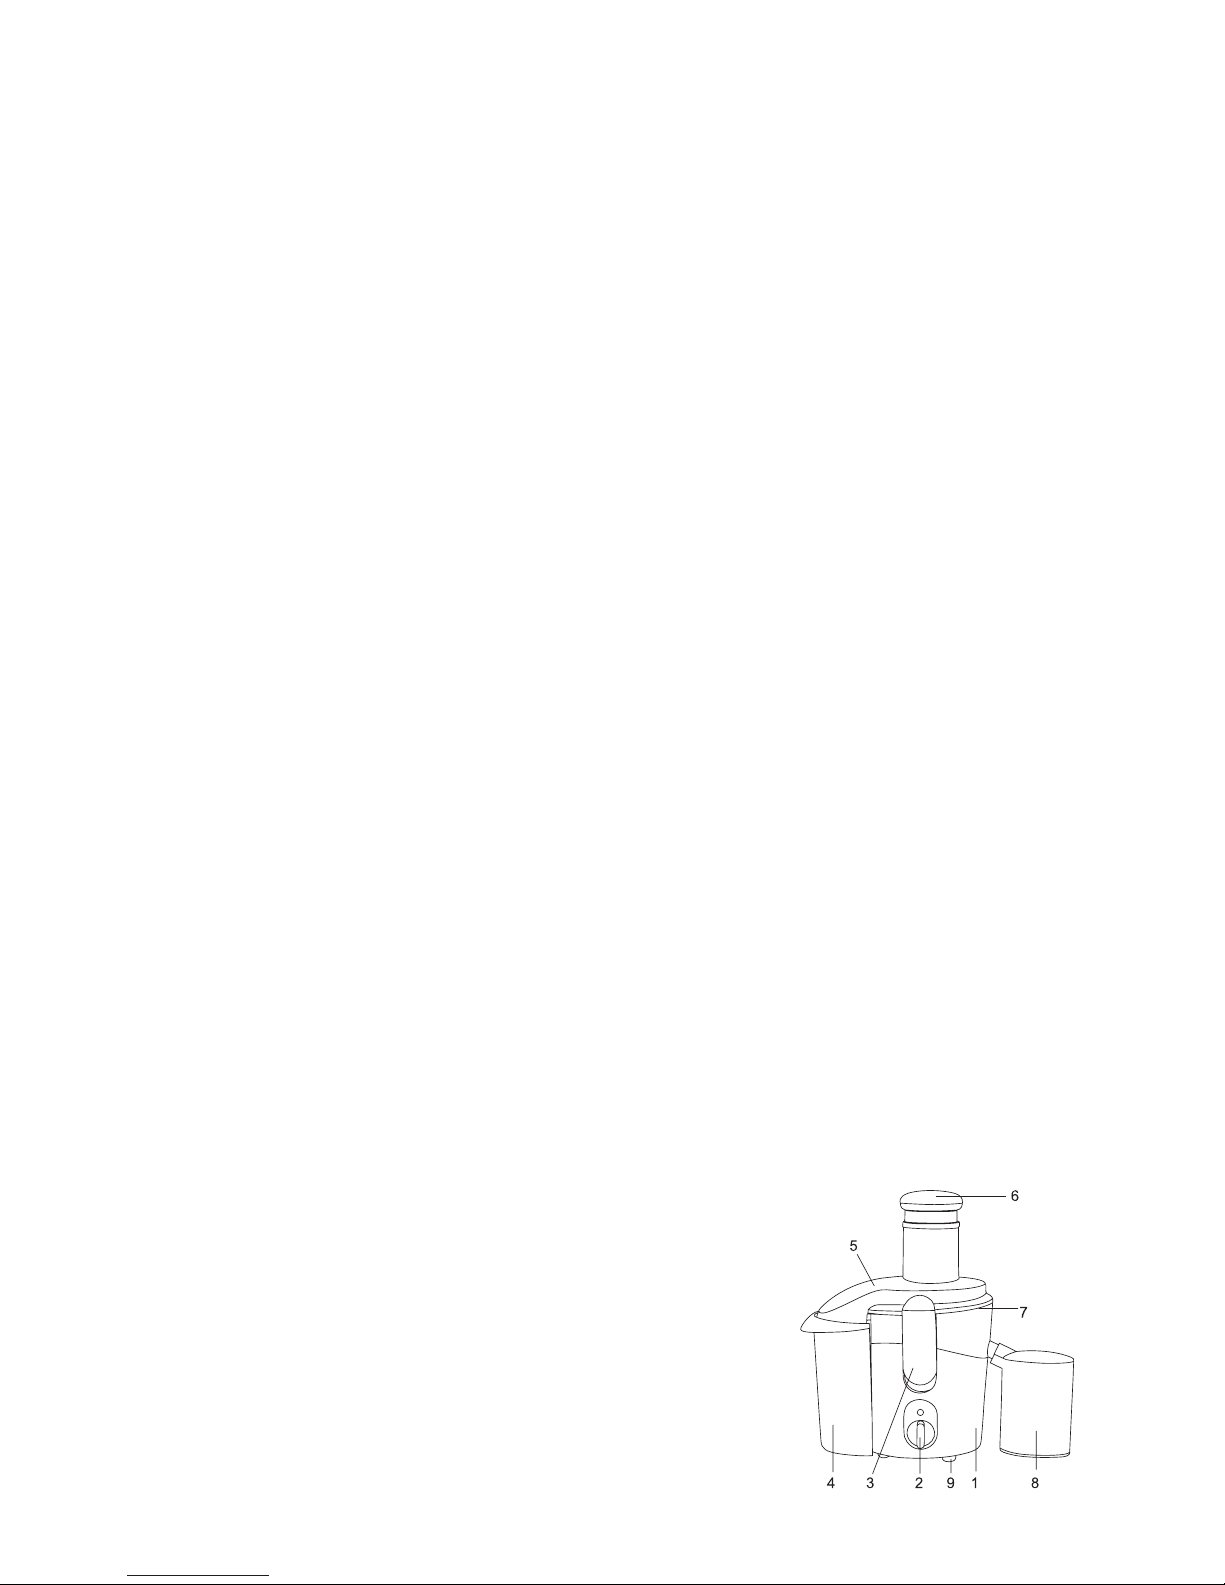
dESCRIPTION OF PARTS
1. Motor Housing
2. Electronic Control Assembly
- low speed
- High speed
3. Locking handle
4. Pulp container
5. Pulp Chute/Juicer cover
6. Food Pusher Assembly
7. Juicer Collector Assembly
8. Juice Jug Assembly
9. Rubber Feet
3
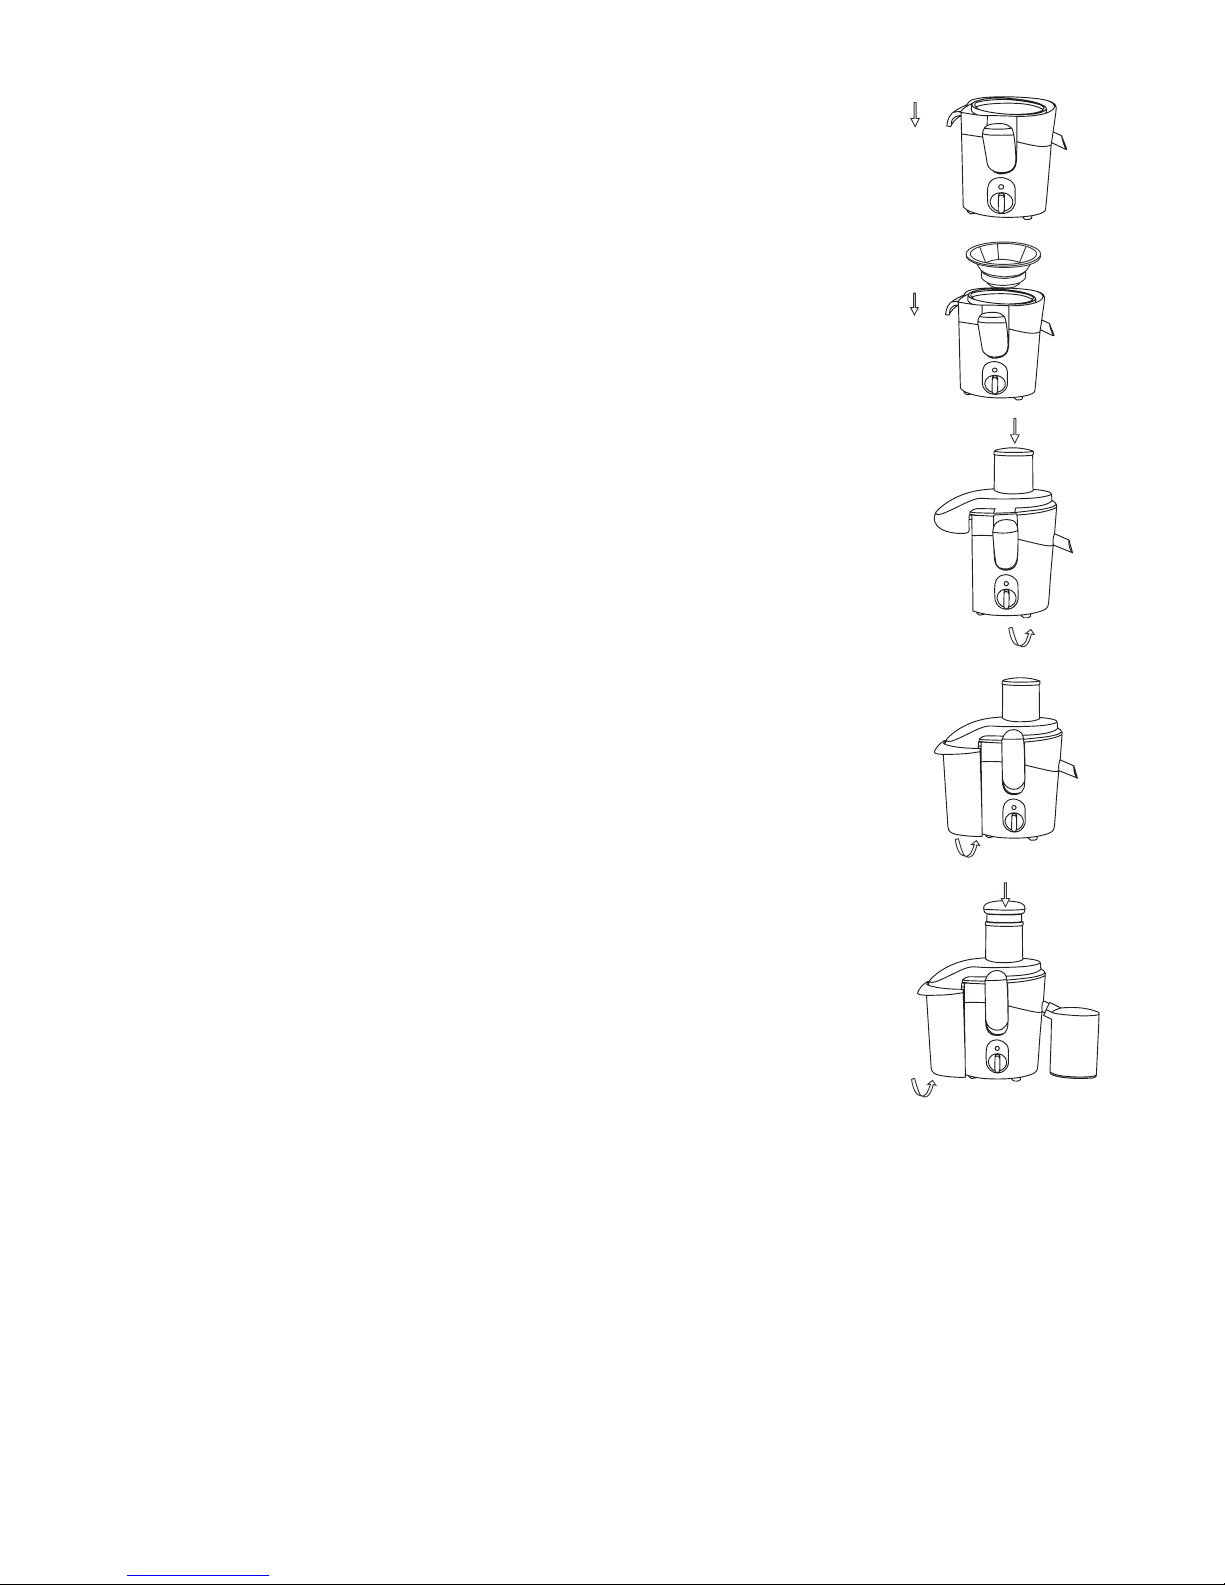
HOW TO ASSEMBLE THE JUICER
1. Place the Plastic Juice collector assembly on the motor housing with the spout of
right hand facing the direction of the Locking Handle. Swivel until it fits into place.
2. Place the Stainless Steel sieve assembly Firstly Ensure the white dot on blade
assembly are Correct match to the white dot on the lower coupling, then, put
down the Steel sieve into lower coupling and assemble completely.
Twist the Strainer Basket and gently push down Until it is seated in the
Juice Collector.
NOTE: The top edge of the Strainer Basket should not be higher than
the edge of the Juice Collector when properly installed.
3. Place the Pulp Chute/Juicer Cover on the top so that the opening of the Pulp
Chute is on the side opposite the spout.
4. Lock the Pulp Chute/Juicer Cover into position by raising the Locking Handle
until it clicks into the grooves located on both side of the Pulp Chute /Juicer
Cover.
NOTE: Push the Locking Handle until it is fully upright otherwise the Juice will not
operate.
1. Align the groove in the Food Pusher with the small protrusion on the inside of
the Feed Tube.
2. Slide the Pulp Container into position under the Pulp Chute.
3. Place the Juice Jug or a glass under the spout.
HOW TO PREPARE FRUIT ANd
VEGETABLES FOR JUICING
1. Wash fruits and vegetables.
2. Peel fruits that have inedible skins such as citrus fruits, pineapple, melons,
papaya, etc.
3. Pit all fruits with hard seeds or stones such as peaches, nectarines, cherries, etc.
4. Most fruits and vegetables such as apples, carrots and cucumbers will not need
to be cut, If the pieces are too big for the Feed Tube, slice the fruit or vegetables
before starting to juice.
HOW TO JUICE
1. Assemble the juicer. The Juice Jug or a glass can be placed below the pout to
collect juice.
2. Plug the power cord into a 220-240V power outlet.
3. Choose either ‘Hi’ or ‘Lo’ speed on the Electronic Control depending on the type of fruit or
vegetable that is being juiced. Never put any fruit or vegetables in the juicer until power turned
on. Soft fruit or vegetables, such as berries, melons, cucumber, tomatoes, etc, should be juiced on
Lo speed. Harder fruit and vegetables such as apples, celery, carrots, etc. should be juiced at ‘Hi’
speed.
4. With the motor running, place food into the feed Tube. Using the Food Pusher, gently guide food
down the Feed Tube. To extract the maximum amount of juice, always push the Food Pusher down
slowly.
IMPORTANT: DO NOT PLACE HANDS OR FOREIGN OBJECTS DOWN THE FEED TUBE. ALWAYS USE THE
FOOD PUSHER
5. If the Pulp Container is full it can be emptied during juicing. Turn the Juicer Off and remove the
Pulp Container by holding onto the Feed Tub.
6. The froth separator in the Juice Jug will eliminate froth being poured into the glass. If you prefer to have
juice with froth, simply remove the for the separator attachment from the Juice Jug before juicing.
4
HELPFUL HINTS
1. A small amount of lemon juice can be added to apple juice to prevent browning.
2. Do not use bananas or avocados as they do not contain juice and will clog the juicer.
3. Allow the juicer to run for one minute before turning ‘Off’ to allow any excess juice to be extract
from the pulp.
4. A plastic bag can be put in the pulp container for easy clean-up.
5. Disassemble the Juicer and rinse off the pulp immediately after juicing. The Strainer Basket/
Cutting Blades can be soaked in water to loosen the pulp. Then wash in warm soapy water.
6. Wash parts immediately after use to avoid discolouration of the plastic parts which may occur with
some fruits and vegetables.
7. If juicing herbs or leafy green vegetables process in combination with other fruits or vegetables to
yield more juice.
CARE ANd CLEANING
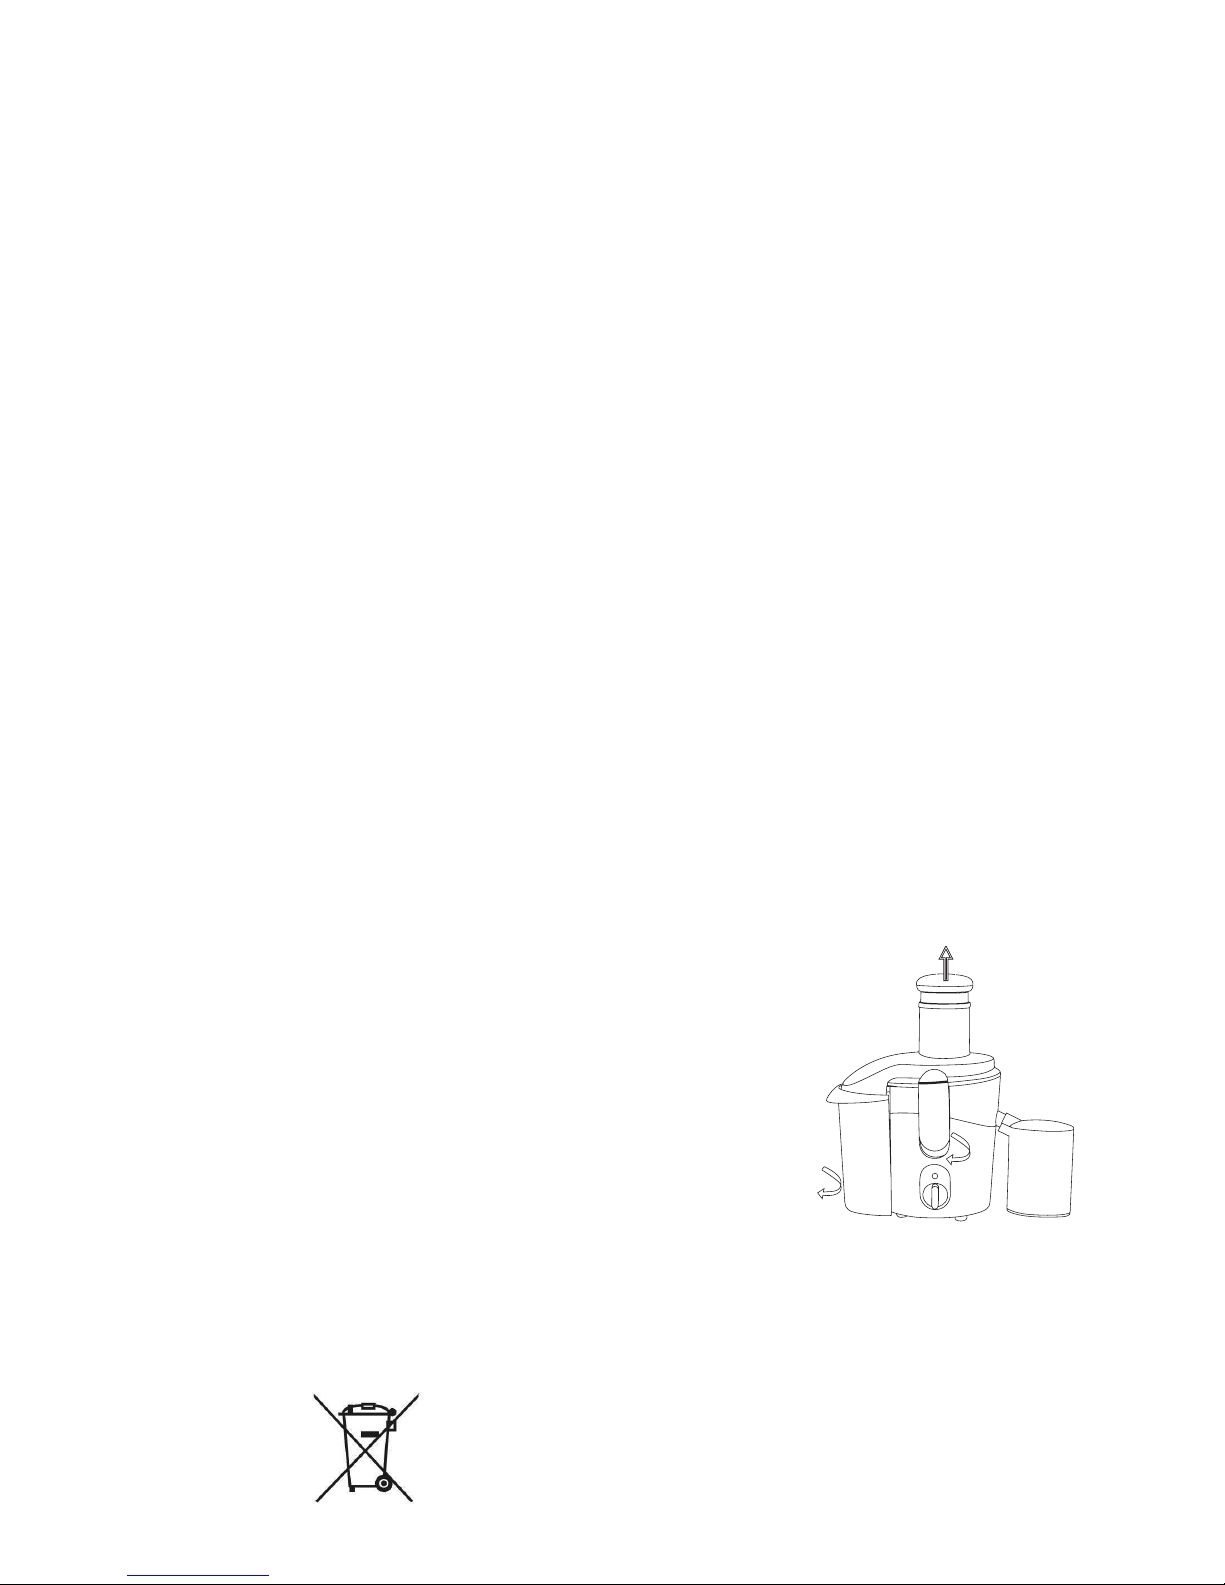
How to disassemble the Juicer
IMPORTANT: Before disassembling the Juicer make sure that the Electronic Control is in the Off position,
the plug has been removed from the wall outlet and the motor has stopped completely.
1. Remove the Food Pusher from the Feed Tube.
2. Remove the Pulp Container by holding onto the Feed Tube and tilting the juicer slightly disengage
the Pulp Container.
3. Remove the Juice Jug.
4. Hold the Pulp Chute/Juicer Cover and disengage The Locking Bar from the grooves on the side of
5. The Pulp Chute/Juicer Cover.
6. Lift and remove the Pulp Chute/Juicer Cover.
7. Remove the Plastic Juice Collector and Strainer Basket by placing one hand under the spout and
the other under the black plastic edge opposite the spout and lifting upwards. The Stainless Steel
Strainer Basket can be removed from the Juice Collector by pushing it up through the hole in the
bottom of the Juice Collector.
NOTE: Be careful when handling the Strainer Basket as the as the cutting blades are very sharp.
HOW TO CLEAN
1. Move the Control Switch to the Off position and wait for the motor to stop
completely.
2. Unplug from the wall outlet.
3. Disassemble the Juicer(see directions on page 8)
4. Clean the Pulp Container, Pulp Chute/Juicer Cover, Food Pusher,
Plastic
5. Juice Collector, Juice Jug and Froth Separator in warm, soapy water,
A mild detergent is recommended. Rinse well and dry thoroughly.
6. Hold the Stainless Steel Strainer Basket/Cutting Blades under
clean running water. Use the cleaning brush included with the Juicer
to gently clean away pulp from the filter and cutting blades. Rinse under running
water. Hold the Strainer Basket/Cutting Blades up to the light to ensure that the fine mesh holes
are not blocked. If the holes are blocked, soak the Strainer Basket/Cutting Blades in hot water to
loosen the pulp and clean with the nylon brush again. Allow to dry on a cloth or paper towel before
reassembling the juicer. Wipe the Motor Housing with a soft cloth moistened in warm soapy water.
You can help protect the environment!
Please remember to respect the local regulations: hand in the non-working electrical
equipments to an appropriate waste disposal centre.
ENVIRONMENT FRIENdLY dISPOSAL

5
SR
Pažljivo pročitajte ovo uputstvo pre korišćenja i sačuvajte ga za kasniju upotrebu
UPUTSTVO ZA UPOTREBU
SOKOVNIK
MOdEL: ES-8112SN
 Loading...