

VOX electronics EBB7226, EBB7116 Operating Instructions Manual

GBR
SRB
MKD
EBB7226 - EBB7116
OPERATING INSTRUCTIONS
UPUTSTVO ZA UPOTREBU
УПАTСТВА ЗА РАКУВАЊЕ
BUILT-IN OVEN
UGRADNA RERNA
ВГРАДНА РЕРНА
SVN
HRV
GRC
NAVODILA ZA UPORABO
UPUTSTVO ZA UPORABU
ЕГХЕIРIΔIO ХРНΣТН
ΕNΤΟΙΧΙΣΜΕΝΟΣ ΦΟΥΡΝΟΣ
UGRADBENA PEĆNICA
UGRADBENA PEČA

EBB7226
EBB7116
OPERATING AND INSTALLATION
INSTRUCTIONS OF
BUILT-IN OVEN
GBR

Dear Customer,
Our goal is to offer you high quality products that exceed your expectations. Your
appliance is produced in state of the art facilities and is carefully tested for quality.
This manual is prepared to help you use your appliance, which has been manufac-
tured using the most recent technology, with condence and maximum efciency.
Before using your appliance, carefully read this guide which includes basic information on safe installation, maintenance and use. Please contact your nearest
Authorized Service Centre for the installation of your product.
EN - 2

Contents
Presentation and size of product
Warnings
Preparation for installation and use
Using the oven
Cleaning and maintenance of your product
Service and Transport
EN -3

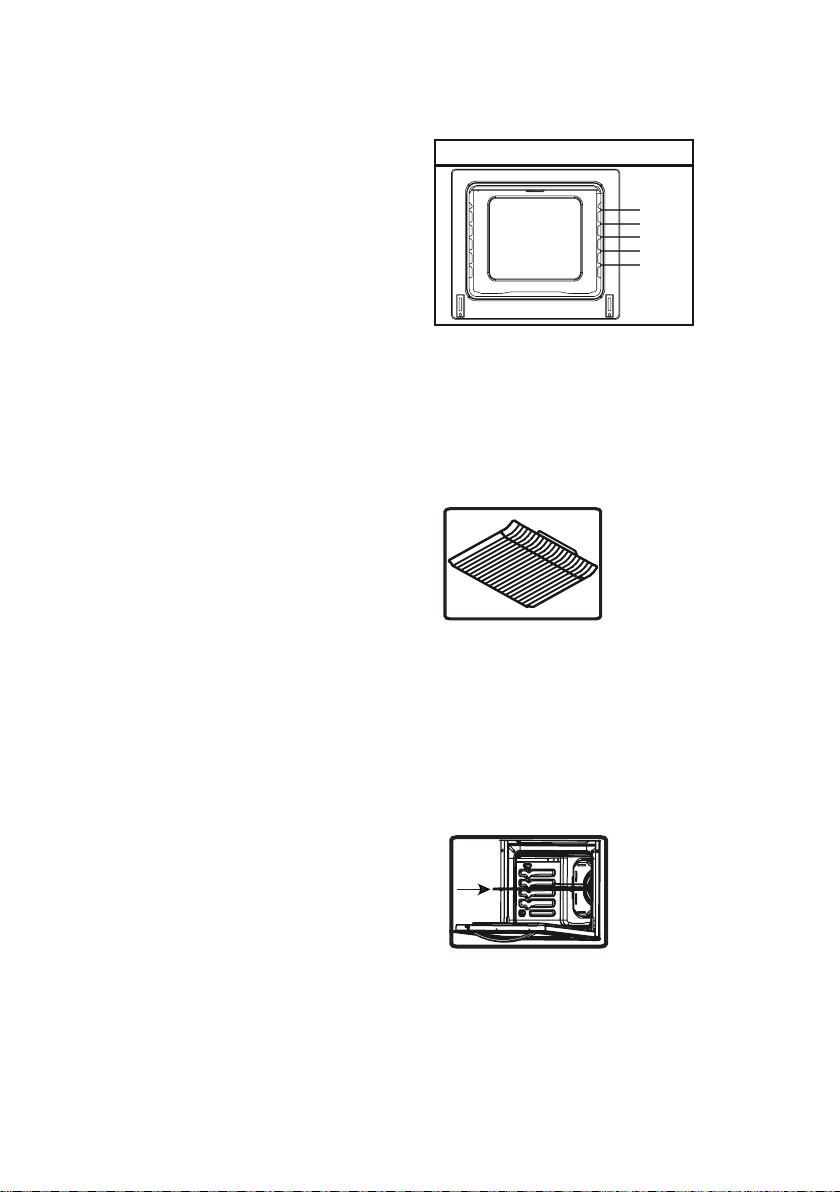
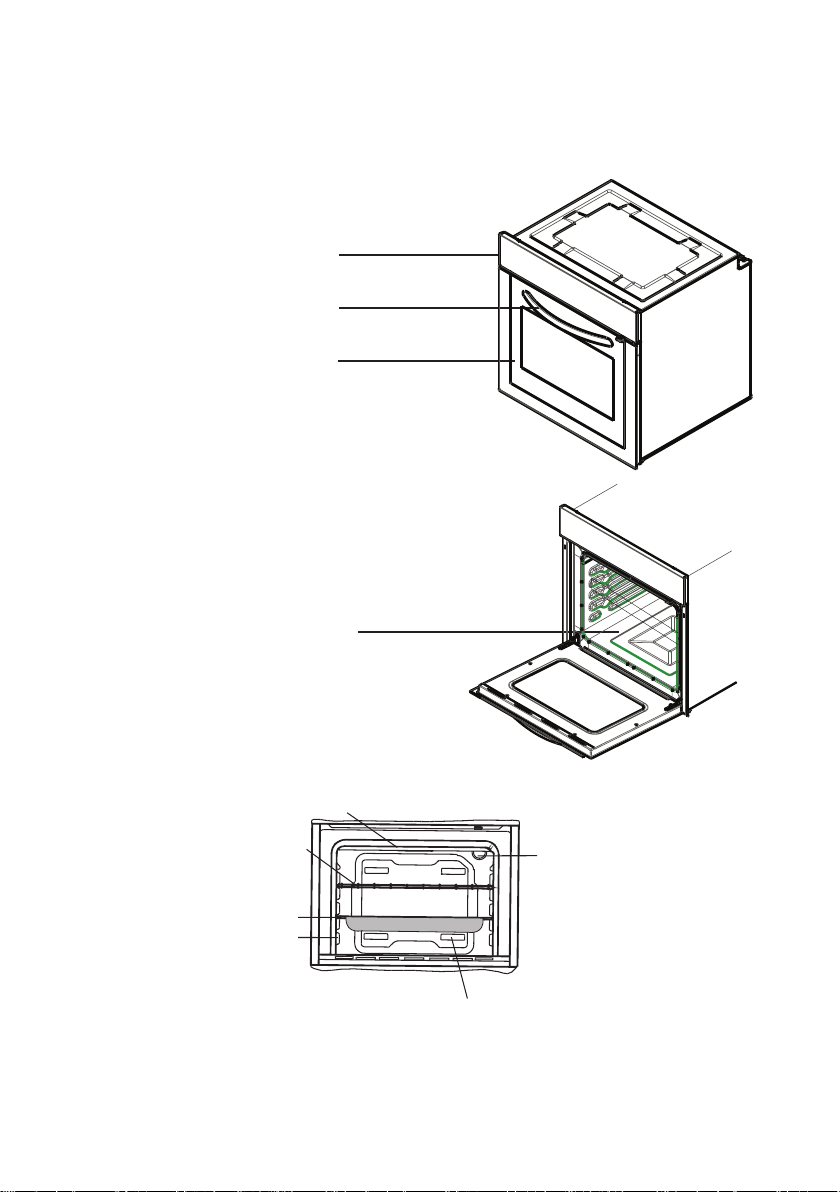
PRESENTATION AND SIZE OF PRODUCT
Control panel
Handle
Oven Door
Lower Heating
Element (behind the
plate)
Upper Heating Element (behind the plate)
Wire
Grill
Tray
Racks
Air Outlet Shutters
EN - 4
Oven Light

SAFETY WARNINGS
READ THESE INSTRUCTIONS CAREFULLY AND COMPLETELY BEFORE USING YOUR APPLIANCE, AND
KEEP THEM IN A CONVENIENT PLACE FOR REFERENCE WHEN NECESSARY.
THIS MANUAL IS PREPARED FOR
MORE THAN ONE MODEL. YOUR
APPLIANCE MAY NOT HAVE SOME
OF THE FEATURES THAT ARE EXPLAINED IN THIS MANUAL. WHILE
YOU ARE READING THE OPERATING
MANUAL, PAY A SPECIAL: ATTENTION TO THE EXPRESSIONS THAT
HAVE IMAGES.
General Safety Warnings
• This appliance can
be used by children
aged 8 years and
above and persons
with reduced physical, sensory or mental capabilities or lack
of experience and
knowledge if they
have been given supervision or instruction concerning use
of the appliance in
a safe way and understand the hazards
involved. Children
shall not play with the
appliance. Cleaning
and user maintenance shall not be done
by children without
supervision.
• WARNING: The app-
liance and its accessible parts become
hot during use. Care
should be taken to
avoid touching the
heating elements.
Children under the
age of 8 should stand
away from the appliance unless continuously supervised.
• WARNING: Fire ha-
zard: do not store
items on the cooking
surfaces.
• WARNING: If the
surface is cracked,
switch the appliance
off to avoid the possibility of electric shock.
• The appliance is not
intended to be ope-
EN - 5

rated by means of an
external timer or separate remote-control
system.
switched off before
replacing the lamp to
avoid the possibility
of electric shock.
• The appliance beco-
mes hot during use.
Care should be taken
to avoid touching heating elements inside
the oven.
• During use, handles
held for short periods
in normal use can become hot.
• Do not use harsh
abrasive cleaners or
sharp metal scrapers
to clean the oven
door glass and other
surface since they
can scratch the surface, which can cause
the glass to shatter or
cause damage to the
surface.
• Do not use steam
cleaners to clean the
appliance.
• WARNING: Ensure
that the appliance is
• CAUTION: Accessib-
le parts may become
hot when cooking or
grilling. Young children should be kept
away from the appliance.
• Your appliance is produced in ac-
cordance with all applicable local
and international standards and
regulations.
• Maintenance and repair work must
be carried out only by authorized
service technicians. Installation
and repair work that is carried out
by unauthorized technicians may
endanger you. Altering or modifying the specications of the appliance in any way is hazardous.
• Prior to installation, ensure that
the local distribution conditions
(nature of the gas and gas pressure or electricity voltage and frequency) and the requirements of the
appliance are compatible. The requirements for this appliance are
stated on the label.
• CAUTION: This appliance is de-
signed only for cooking food and is
intended for indoor domestic household use only and should not be
used for any other purpose or in
EN - 6

any other application, such as for
non-domestic use or in a commercial environment or room heating.
• Do not try to lift or move the appli-
ance by pulling on the door handle.
• All possible security measures
have been taken to ensure your
safety. Since the glass may break,
you should be careful while cleaning it to avoid scratching. Avoid
hitting or knocking on the glass
with accessories.
• Ensure that the supply cord is not
wedged during the installation.
If the supply cord is damaged, it
must be replaced by the manufacturer, its service agent or similarly
qualied persons in order to prevent a hazard.
• While the oven door is open, do
not let children climb on the door
or sit on it.
Installation Warnings
• Do not operate the appliance be-
fore it is fully installed.
• The appliance must be installed
by an authorized technician and
put into use. The manufacturer is
not responsible for any damage
that might be caused by defective
placement and installation by unauthorized persons.
• When you unpack the appliance,
make sure that it was not damaged during transportation. In the
event of any defect; do not use
the appliance and contact a qua-
lied service agent immediately.
As the materials used for packa-
ging (nylon, staplers, styrofoam...
etc.) may cause harmful effects to
children, they should be collected
and disposed of immediately.
• Protect your appliance against
atmospheric effects. Do not expose it to effects such as sun, rain,
snow etc.
• The surrounding materials of the
appliance (cabinet) must be able
to withstand a temperature of a
min. of 100°C .
During use
• When you rst run your oven, a
certain smell will emanate from the
insulation materials and the heater
elements. For this reason, before
using your oven, run it empty at
the maximum temperature for 45
minutes. At the same time you
need to properly ventilate the environment in which the product is
installed.
• During use, the outer and inner
surfaces of the oven become hot.
While opening the oven door,
step back to avoid the hot steam
coming out of the oven. A risk of
burns may occur.
• Do not put ammable or combus-
tible materials, in or near the appliance when it is in operation.
• Always use oven gloves to remo-
ve and replace food in the oven.
• Do not leave the cooker while co-
oking with solid or liquid oils. They
may catch re as a result of of extreme heating. Never pour water
on to ames that are caused by
oil. Cover the saucepan or frying
EN -7

pan with its cover to choke the ame that has arisen in this case and
turn the cooker off.
• If you are not going to use the
appliance for a long time, remove
the plug from the socket. Keep the
main control switched off. Additionally, when not using the appliance, shut the gas valve off.
• Make sure the appliance control
knobs are always in the “0” (stop)
position when it is not being used.
• The trays incline when pulled out.
Be careful not to let hot liquid spill
over.
• When the door or drawer of the
oven is open, do not leave anything on it. You may unbalance
your appliance or break the cover.
• Do not put heavy things or am-
mable or ignitable goods (nylon,
plastic bag, paper, cloth...etc.) into
the drawer. This includes cookware with plastic accessories (e.g.
handles).
• Do not hang towels, dishcloths or
clothes from the appliance or its
handles.
• During cleaning and maintenance
• Always turn the appliance off befo-
re operations such as cleaning or
maintenance. You can do this after
removing the plug for the appliance off or turning the main switches
off.
• Do not remove the control knobs
to clean the control panel.
•
• TO MAINTAIN THE EFFICIENCY
AND SAFETY OF YOUR APPLI-
ANCE, WE RECOMMEND YOU
ALWAYS USE ORIGINAL SPARE PARTS AND ONLY CALL
OUR AUTHORIZED SERVICE
AGENTS SHOULD SUCH A
NEED ARISE.
PREPARATION FOR
INSTALLATION AND USE
Manufactured with best quality parts
and materials, this modern, functional
and practical oven will meet your needs in all respects. Make sure to read
the manual to obtain successful results
and not to experience any problems in
the future. The information given below
contain rules that are necessary for correct positioning and service operations.
They should be read in detail especially
by the technician who will position the
appliance.
CONTACT THE AUTHORIZED SERVICE FOR THE INSTALLATION OF
YOUR OVEN!
CHOOSING A PLACE FOR THE
OVEN
– There are several points to pay at-
tention to when choosing a place for
your oven. Make sure to take our recommendations below into account
in order to prevent any problems and
dangerous situations, which may occur later!
– When choosing a place for the oven,
attention should be paid that there are
no ammable or combustible materials in the close vicinity, such as curta-
EN - 8
ins, oil, cloth etc., which quickly catch
re.
– Furniture surrounding the oven must
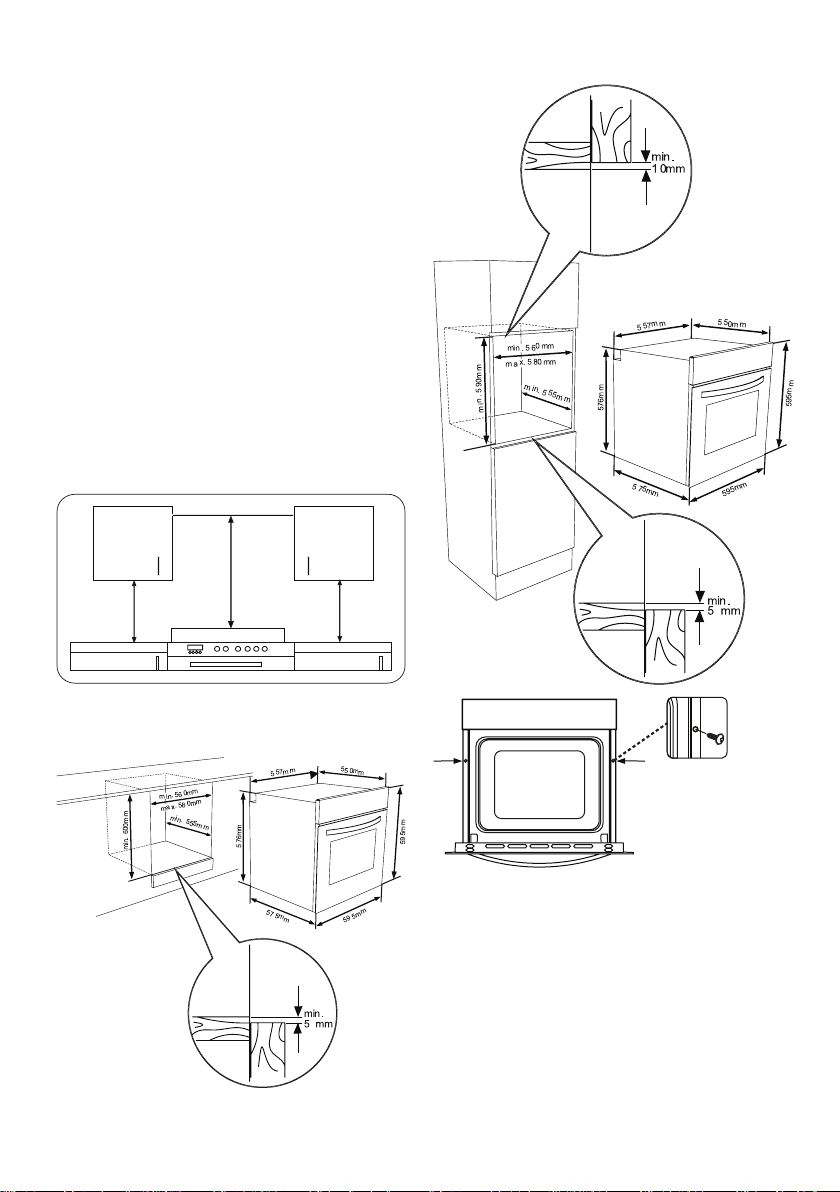
be made of heat resistant materials more than 50 C° of the room temperature.
Required changes to wall cabinets and
exhaust fans above the built-in combined product as well as minimum heights from the oven board are shown in
Figure 1. Accordingly, the exhaust fan
should be at a minimum height of 65 cm
from the hob board. If there is no exhaust fan, the height should not be less
than 70 cm.
(with hood)
(without hood)
Minimum 65 cm
42 cm
Minimum
Minimum 70 cm
HOB
42 cm
Minimum
INSTALLATION OF BUILT-IN
OVEN
2 x
Insert the oven into the cabinet by pushing it forward. Open the oven door and
insert 2 screws in the holes located on
the oven frame. When the product frame touches the wooden surface of cabinet, tighten the screws.
EN - 9
Worktop
min.
min.
50 mm
25 mm
Built-in hob
Built-in oven
If the oven is installed under a hob, the
distance between the worktop and the
top panel of the oven must be a minimum of 50 mm and the distance between the worktop and the top of control
panel must be a minimum of 25 mm.
WIRING AND SAFETY OF THE
BUILT IN OVEN
The instructions given below must be
followed explicitly during wiring:
– The grounding cable must be connec-
ted via the screw with the grounding
mark. The supply cable connection
must be carried out as shown in gure. If there is no grounded outlet conforming to regulations in the installation environment, call the Authorized
Service Centre immediately.
– The grounded outlet must be in close
proximity to the appliance. Never use
an extension cord.
– The supply cable should not contact
the product’s hot surface.
– In the event of any damage to the
supply cable, make sure to call the
Authorized Service Centre. The cable
must be replaced by the Authorized
Service technician.
– Wiring of the appliance must be per-
formed by the Authorized Service
technician. A H05VV-F type supply
cable must be used.
– Faulty wiring may damage the appli-
ance. Such damage will not be covered under the warranty.
– The appliance is designed to connect
to 220-240V~. If the electricity is different than the value given above, call
the Authorized Service Centre immediately.
– The manufacturer declares that its
bears no liability of any kind for damage and loss arising from not
complying with safety standards!
EN - 10

USING THE OVEN
Control Panel
Oven function
Control Knob
Oven Operation Light
Digital Timer
Oven
Function Control Knob
To select the desired cooking function,
turn the knob to the related symbol the
details of the oven functions are explained in the next section.
Thermostat Control Knob
To select the desired temperature, turn
the knob to the related degrees the details of the oven functions are explained
in the next section.
Oven function
Control Knob
Oven Thermostat Light
EN - 11
Oven Functions
* The functions of your oven may be different due to the model of your product.
Oven Lamp:
Only the oven light will be turned on and
it will remain on in all cooking functions.
Defrost Function:
The oven’s warning lights will be turned
on, the fan will start operating.
To use the defrost function, take your
frozen food and place it in the oven on
a shelf placed in the third slot from the
bottom. Placing an oven tray under the
defrosting food to catch the water accumulated due to the melting ice is recommended. This function will not cook or
bake your food, it will only help defrost it.
Turbo Function
The oven's thermostat and warning
lights will be turned on, the ring heating
element and fan will start operating.
The turbo function evenly disperse the
heat in the oven. All foods on all racks
will be cooked evenly. It is recommended
to pre-heat the oven about 10 minutes.
pastries. Cooking is carried out by the
lower and upper heating elements
within the oven and by the fan
providing air circulation, which will give
the food a slightly grilled effect. Preheating the oven for about 10 minutes
is recommended.
Static Cooking Function:
The oven’s thermostat and warning
lights will be turned on, the lower and
upper heating elements will start operating. The static cooking function emits
heat, ensuring even cooking of the food
on the lower and upper shelves. This is
ideal for making pastries, cakes, baked
pasta, lasagne and pizza. Pre-heating
the oven for 10 minutes is recommended and it is best to cook on only one
shelf at a time when using this function.
Pizza Function:
The oven’s thermostat and warning
lights will be turned on, the ring and
lower heating elements and fan will start
operating.
Fan and lower heating function is ideal for
baking food, such as pizza, equally in a
short time. While the fan evenly disperses
the heat of the oven, the lower heating
element ensures the baking of food dough.
Fan Function:
The oven's thermostat and warning
lights will be turned on, the upper and
lower heating elements and fan will
start operating.
This function is very good for baking
Grilling Function:
The oven’s thermostat and warning lights
will be turned on, the grill heating element
will start operating. This function is used
for grilling and toasting foods. Use the
upper shelves of the oven. Brush the wire
EN - 12
grid lightly with oil to stop foods sticking
and place foods in the centre of the grid.
Always place a tray beneath to catch any
oil or fat drippings. Pre-heating the oven
for about 10 minutes is recommended.
Warning: When grilling, the oven door
must be closed and the oven temperature
0
should be adjusted to 190
C.
Faster Grilling Function:
The oven’s thermostat and warning
lights will be turned on, the grill and upper
heating elements will start operating. The
function is used for faster grilling and for
covering a larger surface area, such as
grilling meats. Use the oven's upper
shelves. Brush the wire grid lightly with
oil to stop foods sticking and place foods in
the centre of the grid. Always place a tray
beneath to catch any oil or fat drippings.
Pre-heating the oven for about 10 minutes
is recommended. Warning: When grilling,
the oven door must be closed and the
oven temperature should be adjusted
0
to 190
C
sticking and place foods in the centre
of the grid. Always place a tray beneath
to catch any oil or fat drippings. Preheating the oven for about 10 minutes
is recommended.
Warning: When grilling, the oven door
must be closed and the oven temperature
0
should be adjusted to 190
C.
Vap Clean Function
Set your oven function and thermostat
to vap clean function. symbol. Spill 200250ml of water (about 1 cup) is stated
into the small tray on the oven base.
VapClean run approximately 20 minutes
and prepare your oven to clean easily.
Use of digital timer
Double Grill and Fan
Function:
The oven’s thermostat and warning
lights will be turned on, the grill and
upper heating elements and fan will start
operating.
This function is used for faster grilling of
thicker foods and for covering a larger
surface area. Both the upper heating
elements and grill will be energised along
with the fan to ensure even cooking.
Use the upper shelves of the oven. Brush
the wire grid lightly with oil to stop foods
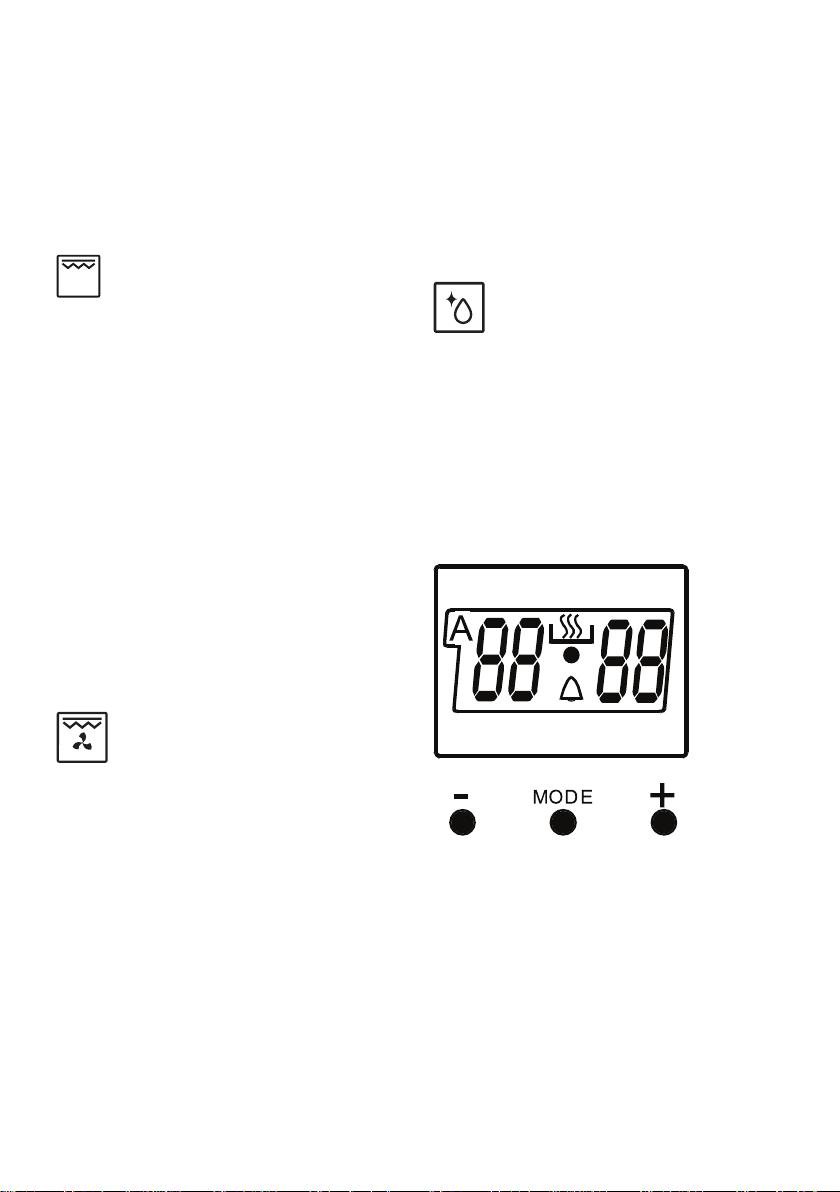
Time Adjustment:
The time must be adjusted before
starting to use the oven. Following the
power supply to the oven, the symbol
(A) and the three “0” on the screen
will begin to ash. Press the (+) and
(-) keys simultaneously. The symbol
will appear on the screen. Also, the
dot in the middle of the screen will
begin to ash. Using the (+) and (-)
EN - 13
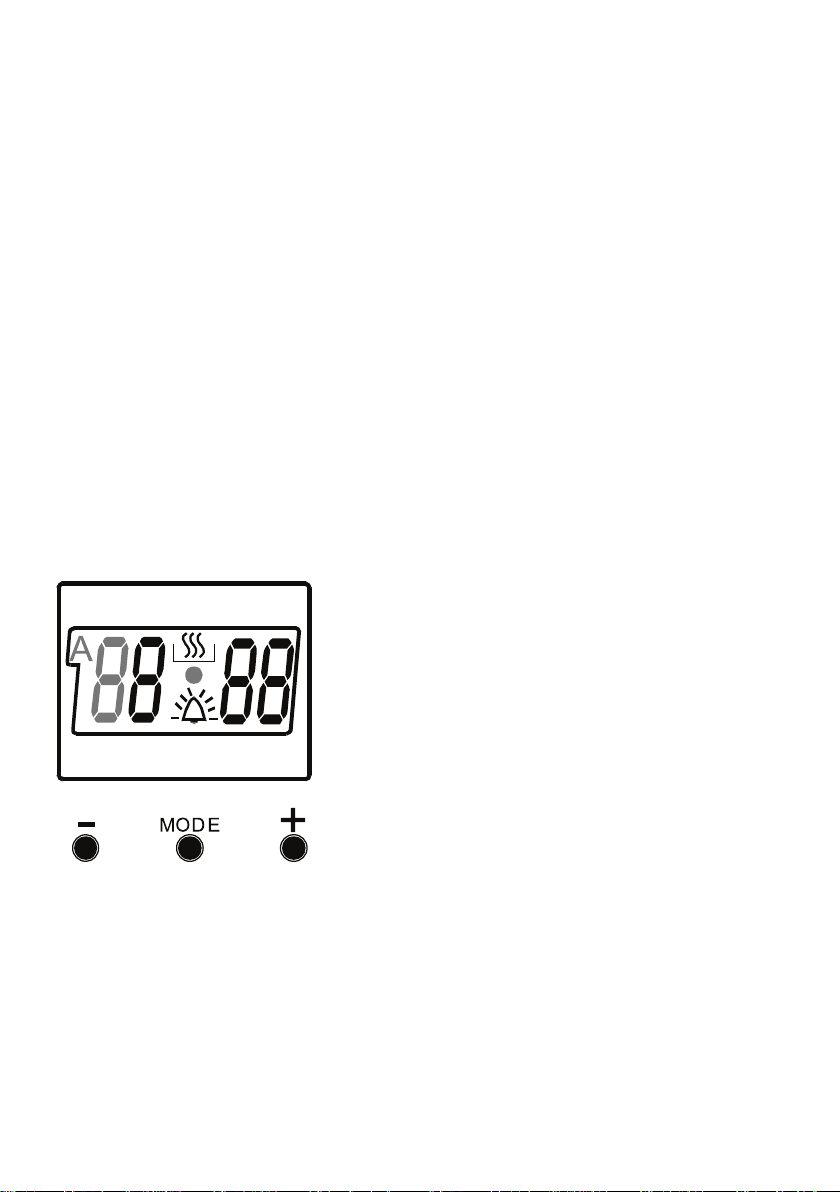
buttons, adjust the day's time while this
dot is ashing. After the adjustment, it
should be expected that the dot will be
lit continuously.
Following the power supply to the
oven, when the symbol (A) and the
three “0” on the screen begin to ash,
the oven can not be operated using
the control buttons. When the (+) and
(-) buttons are pressed simultaneously
for time adjustment, the symbol will
appear on the screen. When this
symbol appears on the screen, you
can manually operate the oven. As the
adjusted time will be reset in the event
of a power failure, time adjustment
operation willl have to performed again.
Audible Warning Time
Adjustment:
the screen will begin to ash. Using
the (+) and (-) keys, adjust the day’s
time while this dot is ashing. After
the adjustment, it should be expected
that the dot will be lit continuously.
This function can be used to recieve
audible warning at the completion of
the adjusted time period.
Press the MODE key in the middle.
The symbol will ash on the screen.
Also three “0”s will appear. Adjust the
desired time period for the warning
by using (+) and (-) keys while the
symbol is ashing. Some time after
the completion of the adjustment, the
symbol will begin to light continuously.
When the symbol begins to light
continuously, the audible warning time
adjustment is done.
The audible warning time can be set to
a time between the time range of 0 and
23.59.
The time must be adjusted before
starting to use the oven. Following the
power supply to the oven, the symbol
(A) and the three “0” on the screen will
begin to ash. Press the (+) and (-)
keys simultaneously.
The symbol will appear on the
screen. Also, the dot in the middle of
When the set time is up, the timer
gives an audible warning and the
symbol begins to ash on the screen.
Pressing any key will stop the audible
warning and the symbol disappears
on the screen.
Audible Warning time adjustment is
for warning purposes only. The oven
will not be activated at this function.
Adjustment of the cooking
time:
EN -14
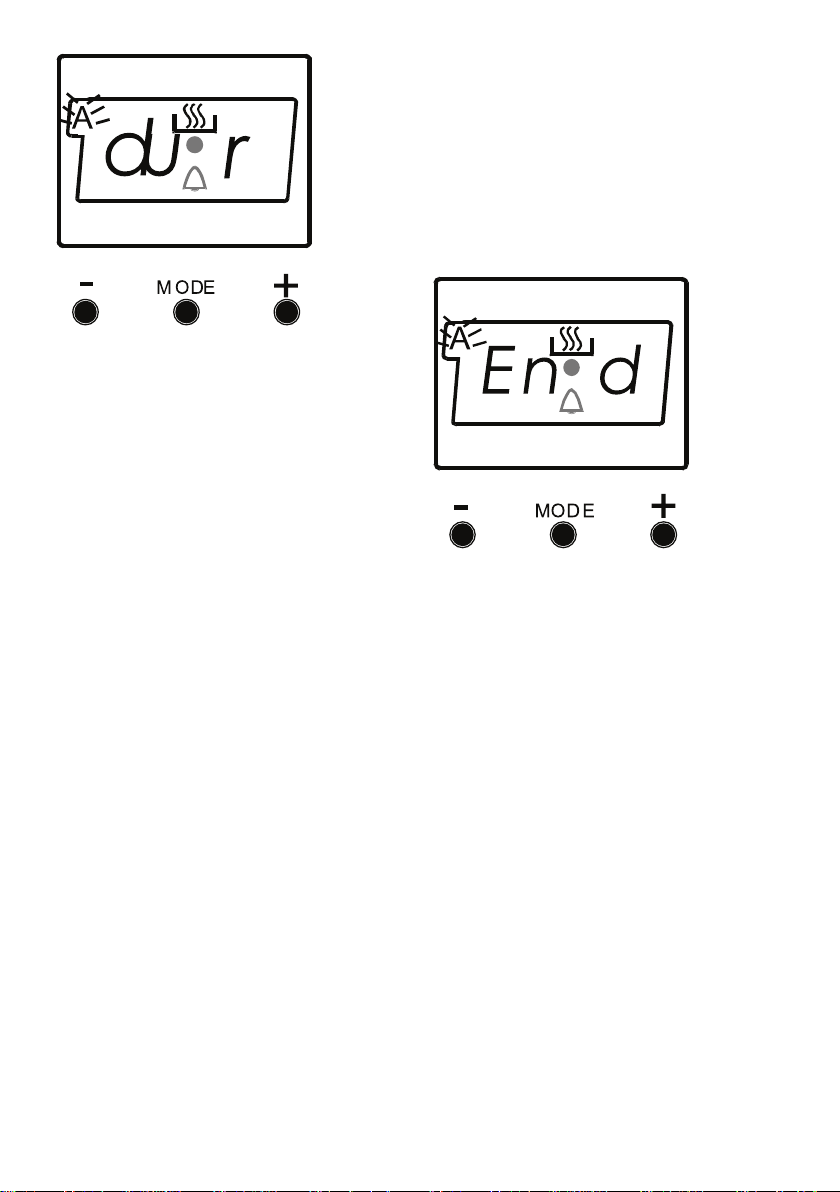
This function is used to cook in the
desired time range. The foods to
be cooked are put into the oven.
The oven is adjusted to the desired
cooking function. The oven thermostat
is adjusted to the desired degree
depending on the dish to be cooked.
Keep pressing on the MODE button
until you see “stop” on the timer
screen. When you see “stop” on the
timer screen, the symbol (A) will begin
to ash. Adjusted the cooking period
for the food you wish to cook, by using
the (+) and (-) buttons while the timer
is in his position. Some time after the
adjustment operation is completed, the
day’s time wil appear on the screen
and the symbols (A) and will begin to
continuously light on the screen. While
doing this, the oven will also start to
operate.
A cooking period between the time
range of 0 and 10 hours can be set.
At the completion of the set duration,
the timer wil stop the oven and give
an audible warning. Also, the symbol
(A) will begin to ash on the screen.
After bringing the oven button and
oven thermostat button to 0 position,
pressing any button of the timer will
end the audible warning. Also, the
timer wil be brought to manual use
function.
Adjustment of the cooking end
time
This function is used to cook according
to desired nishing time. The food
to be cooked is put into the oven.
The oven is adjusted to the desired
cooking function. The oven thermostat
is adusted to the desired degree
depending on the dish to be cooked.
Keep pressing on the MODE button
until you see “end” on the timer screen,
the symbol (A) and the day’s time will
respectively begin to ash.
Adjust the nishing time for the food
you wish to cook, by using the (+)
and (-) keys while the timer is in
this position. Some time after the
adjustment operation is completed, the
day’s time will appear on the screen
and the symbols (A) and will begin to
continuously light on the screen. While
doing this, the oven will also start to
operate.
EN - 15

You can set a time which can be up to
10 hours after the day’s time.
At the completion of the set duration,
the timer will stop the oven and give
audible warning. Also the symbol
(A) will begin to ash on the screen.
After bringing the oven button and
oven thermostat button to 0 position,
pressing any button of the timer will
end the audible warning. Also, the
timer will be brought to manual use
function.
Full-Automatic Programming:
This function is used to cook after a
certain period of time, within a certain
duration. The food to be cooked is put
into the oven. The oven is adjusted to
the desired cooking function. The oven
thermostat is adjusted to the desired
degree depending on the dish to be
cooked.
First; keep pressing on the MODE
button until you see “stop” on the timer
screen. When you see “stop” on the
timer screen, the symbol (A) will begin
to ash. Adjust the cooking period for
the food you wish to cook, by using
the (+) and (-) keys while timer is in
this position. Some time after the
adjustment operation is completed, the
day’s time will appear on the screen
and the symbols (A) and will begin to
continuously light on the screen.
A cooking period between the
time range of 0 and 10 hours
can be set.
Second; keep pressing on the MODE
button until you see “end” on the timer
screen. When you see “end” on the
timer screen, the symbol (A) and the
cooking end time begin to ash. Adjust
the nishing time for the food by using
the (+) and (-) keys while the timer is
in this position. Some time after the
adjustment operation is completed,
the day’s time will appear on the
screen and the symbol (A) will begin to
continuously light on the screen.
You can set a time which can
be up 23.59 hours after the
time obtained by adding the
cooking periot the day’s time.
The oven will start operating at the time
calculated by deducting the cooking
period from the set nishing time,
and will stop at the set nishing time.
EN - 16
The timer will give an audible warning
and the symbol (A) will begin to ash.
After bringing the oven button and
oven thermostat button to 0 position,
pressing any button of the timer will
end the audible warning. Also, time of
day will be displayed on timer
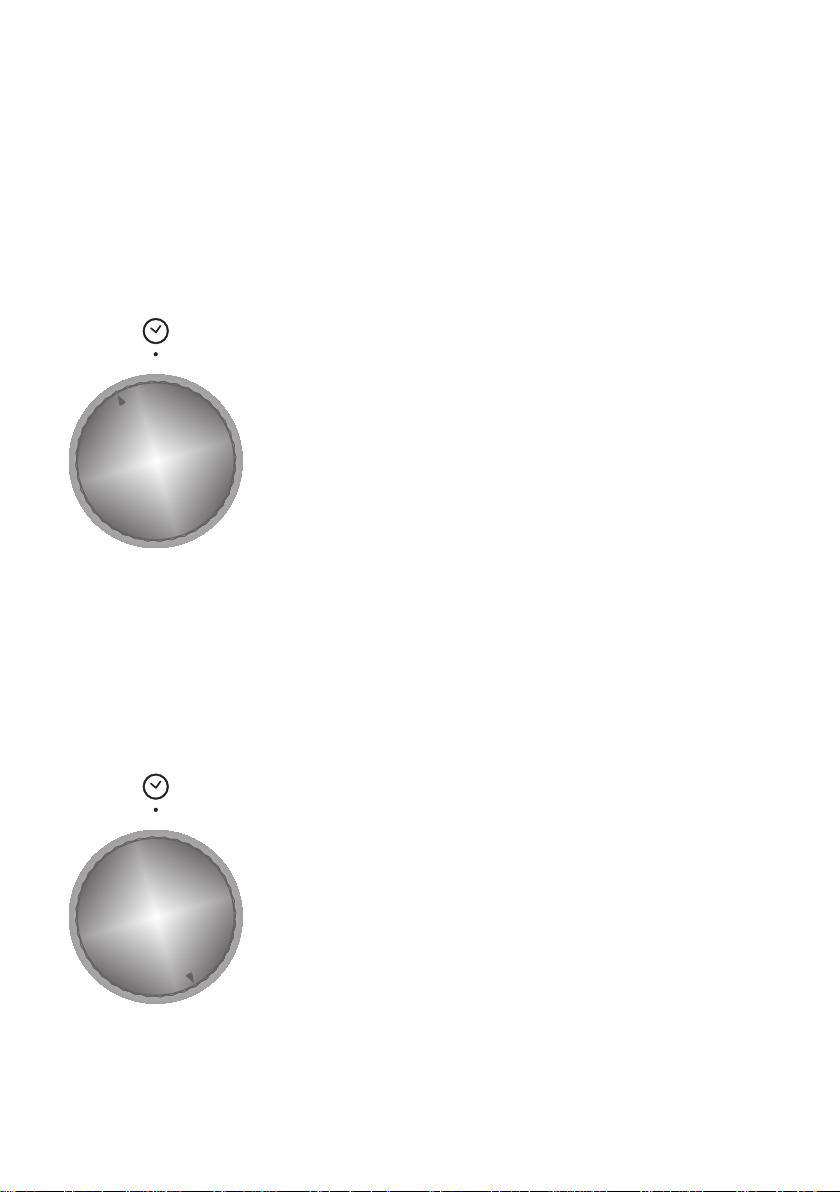
Using the mechanical timer
Manual Operation
When you set the timer button to the
position indicating M as shown on the
picture, you can continuously run your
oven. When the timer button is in the 0
position, the oven will not operate.
Operating by adjusting the time
Set the desired cooking time by turning
the timer button to a certain time range
between 0 - 100 minutes. At the end of
this time period, the oven will stop working
and the timer will give an audible warning
once.
EN - 17
(min)
period
Cooking
pos.
Rack
pos. (min)
Thermostat
(min)
period
Cooking
pos.
Rack
pos. (°C)
Thermostat
(min)
period
Cooking
pos.
Rack
200 4 10-15
TURBO LOWER-UPPER LOWER-UPPER FAN GRILL
pos. (°C)
Thermostat
(min)
period
Cooking
pos.
Rack
pos. (°C)
Thermostat
DISHES
170-190 1-2-3 35-45 170-190 1-2 35-45 170-190 1-2 25-35
Layered
pastry
Cake 150-170 1-2-3 30-40 170 -190 1-2 30-40 150-170 1-2-3 25-35
Cookie 150-170 1-2-3 25-35 170-190 1-2 30-40 150-170 1-2-3 25-35
Grilled
meatballs
EN - 18
Watery food 175-200 2 40-50 175-200 2 40-50 175-200 2 40-50
Chicken 200 1-2 45-60 200 1-2 45-60 200 * 50-60
Chop 200 3-4 15-25
Beefsteak 200 4 15-25
160-180 1-4 30-40
Two-tray
cake
170-190 1-4 35-45
Two-tray
pastry
* Cook with roasted chicken skewer...
Accessories
The product is supplied with accessories. You can also use accessories you
purchase from other sources, but they
must be heat and ame resistant. You
can also use glass dishes, cake moulds
and oven trays that are appropriate for
use in an oven. Follow the
manufacturer’s instructions when using
other accessories. In the event small
size dishes are used, place the dish
onto the wire grid, as it will completely
be on the middle part of the grid. If the
food to be cooked does not cover the
oven tray completely, if the food is taken
from the deep freezer or the tray is being used for collecting the food’s juices
that ow during grilling, form changes
can be observed in the tray. This is due
to the high temperatures that occur during cooking. The tray will return to its
old form when the tray cools down after
cooking. This is a normal physical event
that occurs during heat transfer. Do not
place hot glass trays and dishes into a
cold environment straight from the oven
to avoid breaking the tray or dish. Do
not put onto cold and wet surfaces. Place on a dry kitchen cloth and allow to
cool slowly. When using the grill in your
oven; we recommend you use the grid
that was supplied with the product
(where appropriate). When using the
wire grid; put a tray onto one of the lower shelves to allow the oil to be collected. Water may be added to the tray to
assist in cleaning. As explained in the
corresponding clauses, never attempt
to use the gas operated grill burner without the grill protection lid. If your oven
has a gas operated grill burner, but the
grill heat shield is missing, or if it is da-
maged and cannot be used, request a
spare part from the nearest Authorized
Service Centre.
Oven Cavity
5. Rack
4. Rack
3. Rack
2. Rack
1. Rack
Oven Accessories
The accessories for your oven may be
different due to the model of your product.
Wire grid
The wire grid is used to grill or place different cookwares on it.
WARNING- Fit the grid correctly into
any corresponding rack in the oven cavity and push it to the back.
Shallow Tray
The shallow tray is used to bake pastry
such as ans etc.To locate the tray correctly in the cavity, put it to any rack and
EN - 19
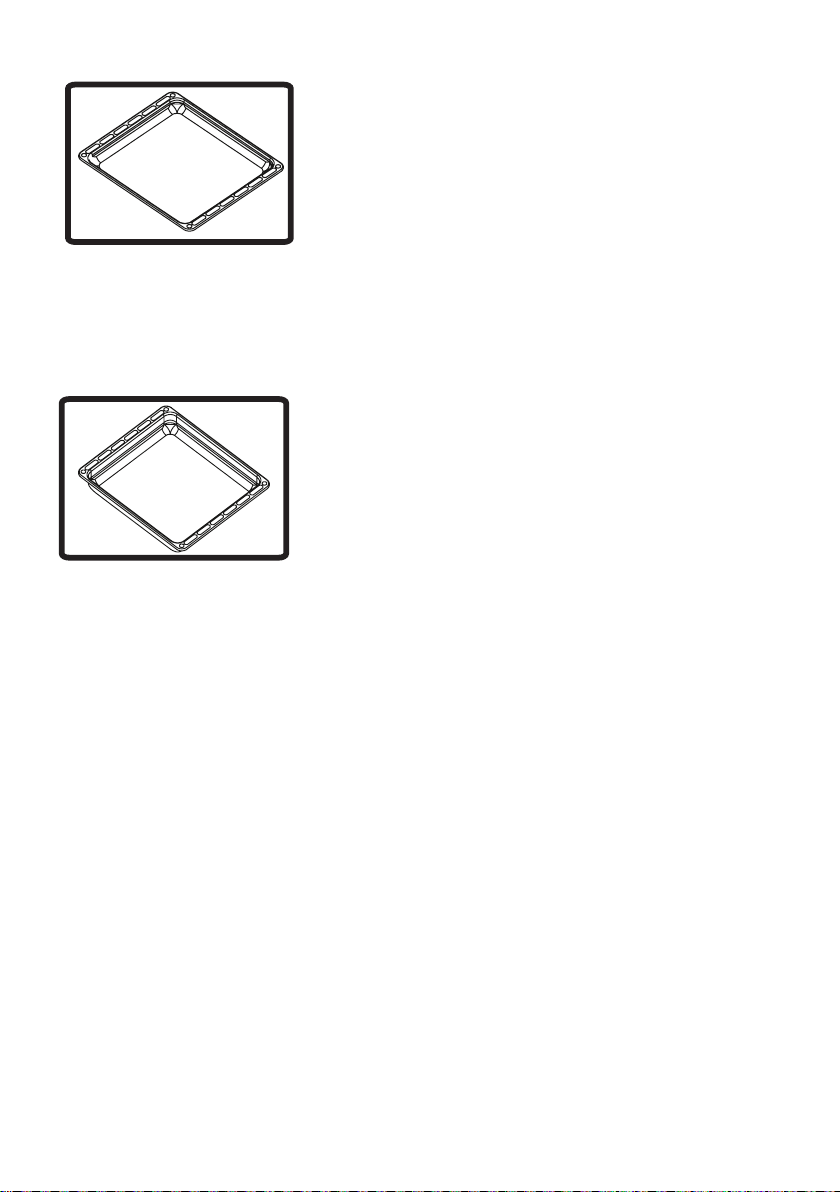
push it to the back.
Deep Tray
The deep tray is used to cook stews.To
locate the tray correctly in the cavity, put
it to any rack and push it to the back.
CLEANING AND
MAINTENANCE OF YOUR
OVEN
CLEANING
Before starting to clean your oven, be
sure that all control buttons are off and
your appliance has cooled down. Unplug the appliance.
Do not use cleaning materials containing particles that might scratch the
enamelled and
painted parts of your oven. Use cream cleaners or liquid cleaners, which
do not contain particles. As they might
harm the surfaces, do not use caustic
creams, abrasive cleaning powders, rough wire wool or hard tools. In the event
the excess liquids spill over and your
oven should burn, this may cause damage to the enamel. Clean up the split
liquids immediately. Do not use steam
cleaners to clean the oven.
Cleaning the interior of the
oven
Make sure to unplug the oven before
you start cleaning it. You will obtain best
results if you clean the oven interior while the oven is slightly warm. Wipe your
oven with a soft piece of cloth dampened with soap and water after each
use. Then wipe it again, this time with a
wetted cloth, and wipe it dry. Complete
cleaning using dry and powder type cleaners. For product with catalytic enamel
frames, the rear and side walls of the
EN - 20

inner frame do not require cleaning. However; depending on usage, replacing
them after a certain period of time is recommended.
MAINTENANCE
Replacing the Oven Light
The change of oven lamp must be done
by by an authorized technician. The rating of the bulb should be 230V, 25Watt,
Type E14,T300 before changing the
lamp, the oven should be switched off
and it should be cool.
The lamp design is specic for use in
household cooking appliances and it is
not suitable for household room illumination.
SERVICE AND
TRANSPORT
REQUIREMENTS BEFORE
CONTACTING SERVICE
If the oven does not operate:
The oven may have be switched off, or
disconnected On models tted with a timer, the time may not be regulated.
If the oven does not heat:
the heat may be not adjusted with the
oven’s heater control switch.
If the interior lighting lamp does not
light:
The electricity must be inspected. It
must be inspected to see whether the
lamps are defective. If they are defective, you can change them following the
guide.
Cooking (if the lower-upper parts do not
cook equally):
Control the shelf locations, cooking period and heat values according to the
manual.
Apart from these issues, if you are experiencing any problems with your product, please call to the Authorized Service Centre.
INFORMATION RELATED TO
TRANSPORT
If you need any transport:
Keep the original product packaging
and use the original case for carrying.
Follow the transport instructions on the
case. Tape the cooker on upper parts,
EN - 21

hats and heads and saucepan carriers
to the cooking panels.
Place a paper between the upper cover
and cooking panel, cover the upper cover, than tape to the side surfaces of the
oven.
Tape cardboard or paper onto the front
cover on interior glass of the oven as it
will be suitable to the trays, for the wire
grill and trays in your oven not damage to the oven’s cover during transport.
Also tape the oven’s covers to the side
walls.
If you do not have the original case :
Take appropriate measures to secure
the external surfaces (glass and painted surfaces) and of the oven to protect
it against possible blows.
EN - 22

The symbol on the product or on its packaging indicates that this product may
not be treated as household waste. Instead it shall be handed over the applicable
collection point for recycling of electrical and electronic equipment. By ensuring
this product is disposed of correctly, you will help prevent potential negative con-
sequences for the environment and human health, which could otherwise
be caused by inappropriate waste handling of this product. For more detailed
information about recycling this product, please contact your local city ofces,
your household waste disposal service or the shop where you purchased the
product.

EBB7226
EBB7116
RUKOVANJE I INSTALACIJA
UPUTSTVA ZA
Ugradnu rernu
SRB

Poštovani korisniče,
Naš cilj je da vam ponudimo proizvode visokog kvaliteta koji prevazilaze vaša
očekivanja. vaš uređaj je proizveden u modernim objektima i pažljivo je i naročito
testiran zarad kvaliteta. Ovo uputstvo je pripremljeno kako bi vam se pomoglo da
koristite svoj uređaj, koji je proizveden koristeći najnoviju tehnologiju uz poverenje i maksimalnu ekasnost. Pre korišćenja svog uređaja, pažljivo pročitajte ovo
uputstvo koje uključuje osnovne informacije za bezbedno instaliranje, održavanje
i korišćenje. Molimo vas da kontaktirate svoj najbliži ovlašćeni servisni centar za
instalaciju vašeg proizvoda.
SR - 25

Sadržaj
Predstavljanje i veličina proizvoda
Upozorenja
Priprema za instalaciju i korišćenje
Korišćenje rerne
Čišćenje i održavanje vašeg proizvoda
Servisiranje i transport
SR - 26
PREDSTAVLJANJE I VELIČINA PROIZVODA
Grejač
Kontrolna tabla
Ručka
Vrata rerne
Grejač
Gril
žice
Tacna
Police
Grejač
Svetla rerne
Vazdušni izlaz zatvarača
SR - 27
BEZBEDNOSNA UPOZORENJA
VAŠ UREĐAJ MOŽDA NEĆE IMATI
NEKE FUNKCIJE KOJE SU OPISANE
U OVOM UPUTSTVU.
OBRATITE PAŽNJU NA IZRAZE
KOJI SADRŽE CIFRE DOK ČITATE
UPUTSTVO ZA RUKOVANJE.
PAŽLJIVO I U POTPUNOSTI PROČITAJTE
OVA UPOZORENJA PRE KORIŠĆENJA
VAŠEG UREĐAJA I SAČUVAJTE IH NA
ZGODNOM MESTU ZARAD REFERENCI
AKO JE TO POTREBNO.
OVO UPUTSTVO JE PRIPREMLJENO
ZA VIŠE MODELA. IMATI NEKE
FUNKCIJE KOJE SU OPISANE U
OVOM UPUTSTVU. OBRATITE
PAŽNJU NA IZRAZE KOJI SADRŽE
CIFRE DOK ČITATE UPUTS-TVO ZA
RUKOVANJE
Opšta bezbednosna upozorenja
• Ovaj uređaj mogu
da koriste deca od
8 godina i starija
i osobe sa smanjenim zičkim, senzornim ili mentalnim
mogućnostima ili ona
koja nemaju iskustva ili znanje ako im
se pruži nadgledanje ili daju instrukcije
u vezi sa korišćenjem
uređaja na siguran
način i ako razumeju
opasnosti koje postoje. Deca ne treba da
se igraju sa aparatom.
Čišćenje i korisničko
održavanje ne treba
da se izvrši od strane
dece bez nadgledanja.
•
UPOZORENJE:
Uređaj i njegovi pristupni delovi
postaju topli u toku
korišćenja. Treba
voditi računa da se
izbegne dodirivanje
elemenata koji greju.
Deca mlađa od 8 godina treba da se drže
podalje osim ako nisu
neprekidno nadgledana.
• UPOZORENJE:
Opasnost od požara:
ne čuvajte stvari na
površini za kuvanje.
• UPOZORENJE: Ako
je površina napukla,
isključite uređaj da biste izbegli mogućnost
strujnog udara.
• Uređaj nije napravljen
za rukovanje putem
eksternog tajmera ili
odvojenog sistema
daljinske kontrole.
SR - 28
• U toku korišćenja,
Pre instalacije, postarajte se da
lokalni distributivni uslovi i zahtevi
uređaja budu kompatibilni. Zahtevi
ovog uređaja su navedeni na
etiketi.
uređaj postaje topao.
Treba voditi računa
da se izbegne dodirivanje elemenata za
grejanje unutar rerne.
U toku korišćenja,
•
drške koje se drže na
kratko pri normalnoj
upotrebi postaju vruće.
•
Ne koristite jaka abrazivna sredstva za
čišćenje ili oštre metalne strugalice da
biste očistili staklo od
vrata rerne ili druge
površine jer ona mogu
da ogrebu površinu
što može da dovede
do slamanja stakla ili
štete nad površinom.
• Ne koristite sredstva
za čišćenje na paru
za čišćenje uređaja.
• UPOZORENJE: Pro-
verite da li je uređaj
isključen pre nego što
zamenite lampicu da
biste izbegli mogućnost
strujnog udara.
• OPREZ: Dostupni
delovi mogu da budu
topli kada se koristi
kuvanje ili grilovanje.
Mala deca treba da
se čuvaju podalje.
• Vaš uređaj je proizveden u skladu
sa primenjivim lokalnim i internacionalnim standardima i propisima.
Održavanje i popravka moraju da se
•
načine samo od strane ovlašćenih
servisnih tehničara. Instalacija
i popravka koje je izvršena od strane neovlašćenih tehničara može da
vas dovede u opasnost. Opasno je
menjati ili modikovati specikacije
uređaja na bilo koji način.
• Pre instalacije, postarajte se da
lokalni distributivni uslovi (priroda
gasa i pritisak gasa ili napon stru-
je i frekvencija) i zahtevi uređaja
budu kompatibilni. Zahtevi ovog
uređaja su navedeni na etiketi.
• OPREZ: Ovaj uređaj je dizajniran samo za kuvanje hrane i za
unutrašnje
i ne treba da se koristi za bilo koju
drugu svrhu ili u bilo koju drugu
primenu, kao što je korišćenje van
domaćinstva ili u komercijalnom
okruženju ili zarad grejanja sobe.
• Ne pokušavajte da podignete ili
pokrenete uređaj tako što ćete
povući ručku od vrata.
• Sve moguće bezbednosne mere
su se preuzele da bi se obezbedila vaša bezbednost. Pošto staklo
može da se polomi, treba da budete
SR - 29
korišćenje u
domaćinstvu
 Loading...