


GBR
SRB
MKD
EBB7226 - EBB7116
OPERATING INSTRUCTIONS
UPUTSTVO ZA UPOTREBU
УПАTСТВА ЗА РАКУВАЊЕ
BUILT-IN OVEN
UGRADNA RERNA
ВГРАДНА РЕРНА
SVN
HRV
GRC
NAVODILA ZA UPORABO
UPUTSTVO ZA UPORABU
ЕГХЕIРIΔIO ХРНΣТН
ΕNΤΟΙΧΙΣΜΕΝΟΣ ΦΟΥΡΝΟΣ
UGRADBENA PEĆNICA
UGRADBENA PEČA

EBB7226
EBB7116
OPERATING AND INSTALLATION
INSTRUCTIONS OF
BUILT-IN OVEN
GBR

Dear Customer,
Our goal is to offer you high quality products that exceed your expectations. Your
appliance is produced in state of the art facilities and is carefully tested for quality.
This manual is prepared to help you use your appliance, which has been manufac-
tured using the most recent technology, with condence and maximum efciency.
Before using your appliance, carefully read this guide which includes basic information on safe installation, maintenance and use. Please contact your nearest
Authorized Service Centre for the installation of your product.
EN - 2

Contents
Presentation and size of product
Warnings
Preparation for installation and use
Using the oven
Cleaning and maintenance of your product
Service and Transport
EN -3

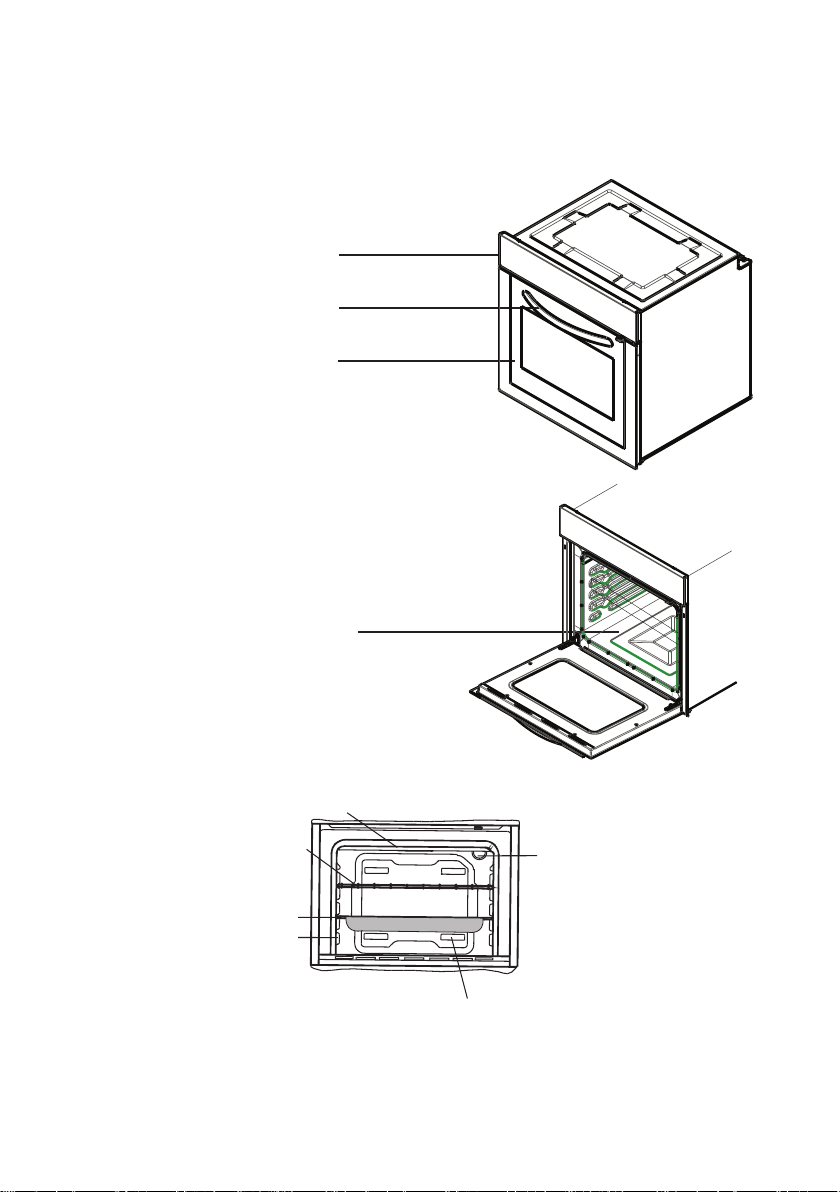
PRESENTATION AND SIZE OF PRODUCT
Control panel
Handle
Oven Door
Lower Heating
Element (behind the
plate)
Upper Heating Element (behind the plate)
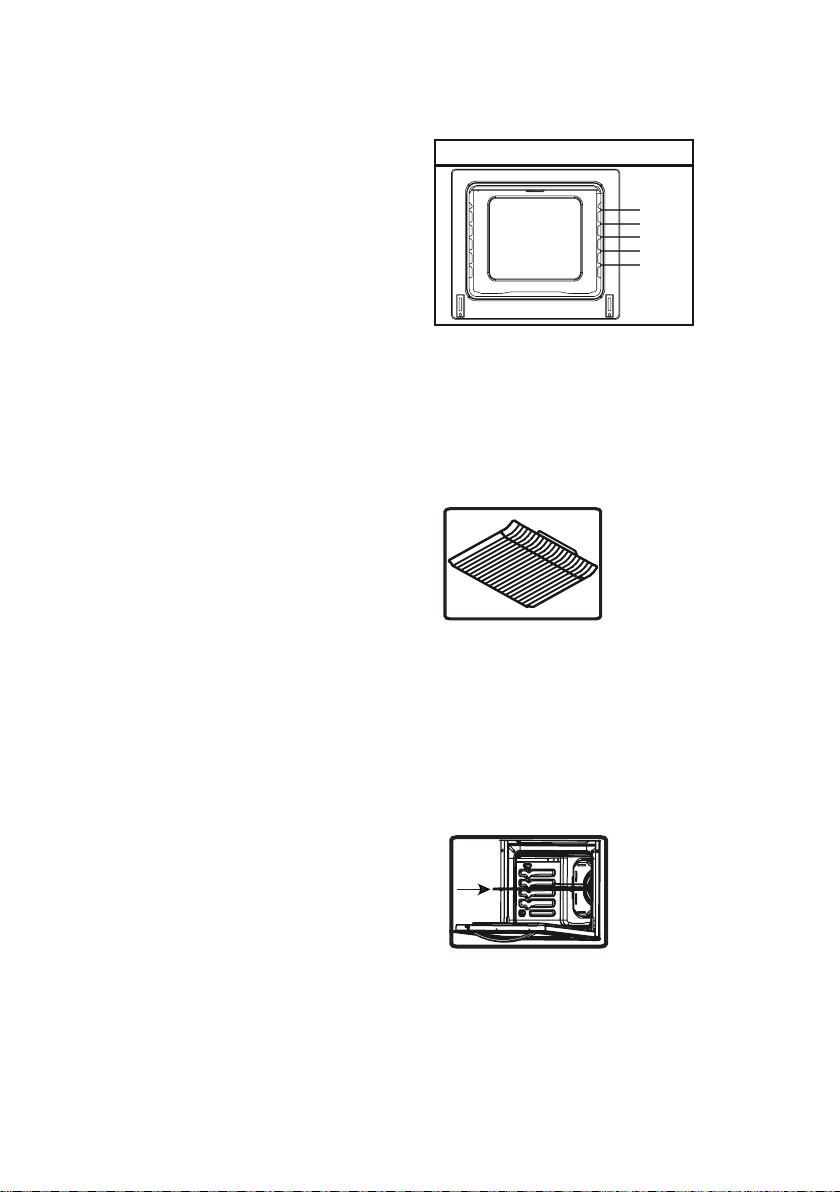
Wire
Grill
Tray
Racks
Air Outlet Shutters
EN - 4
Oven Light

SAFETY WARNINGS
READ THESE INSTRUCTIONS CAREFULLY AND COMPLETELY BEFORE USING YOUR APPLIANCE, AND
KEEP THEM IN A CONVENIENT PLACE FOR REFERENCE WHEN NECESSARY.
THIS MANUAL IS PREPARED FOR
MORE THAN ONE MODEL. YOUR
APPLIANCE MAY NOT HAVE SOME
OF THE FEATURES THAT ARE EXPLAINED IN THIS MANUAL. WHILE
YOU ARE READING THE OPERATING
MANUAL, PAY A SPECIAL: ATTENTION TO THE EXPRESSIONS THAT
HAVE IMAGES.
General Safety Warnings
• This appliance can
be used by children
aged 8 years and
above and persons
with reduced physical, sensory or mental capabilities or lack
of experience and
knowledge if they
have been given supervision or instruction concerning use
of the appliance in
a safe way and understand the hazards
involved. Children
shall not play with the
appliance. Cleaning
and user maintenance shall not be done
by children without
supervision.
• WARNING: The app-
liance and its accessible parts become
hot during use. Care
should be taken to
avoid touching the
heating elements.
Children under the
age of 8 should stand
away from the appliance unless continuously supervised.
• WARNING: Fire ha-
zard: do not store
items on the cooking
surfaces.
• WARNING: If the
surface is cracked,
switch the appliance
off to avoid the possibility of electric shock.
• The appliance is not
intended to be ope-
EN - 5

rated by means of an
external timer or separate remote-control
system.
switched off before
replacing the lamp to
avoid the possibility
of electric shock.
• The appliance beco-
mes hot during use.
Care should be taken
to avoid touching heating elements inside
the oven.
• During use, handles
held for short periods
in normal use can become hot.
• Do not use harsh
abrasive cleaners or
sharp metal scrapers
to clean the oven
door glass and other
surface since they
can scratch the surface, which can cause
the glass to shatter or
cause damage to the
surface.
• Do not use steam
cleaners to clean the
appliance.
• WARNING: Ensure
that the appliance is
• CAUTION: Accessib-
le parts may become
hot when cooking or
grilling. Young children should be kept
away from the appliance.
• Your appliance is produced in ac-
cordance with all applicable local
and international standards and
regulations.
• Maintenance and repair work must
be carried out only by authorized
service technicians. Installation
and repair work that is carried out
by unauthorized technicians may
endanger you. Altering or modifying the specications of the appliance in any way is hazardous.
• Prior to installation, ensure that
the local distribution conditions
(nature of the gas and gas pressure or electricity voltage and frequency) and the requirements of the
appliance are compatible. The requirements for this appliance are
stated on the label.
• CAUTION: This appliance is de-
signed only for cooking food and is
intended for indoor domestic household use only and should not be
used for any other purpose or in
EN - 6

any other application, such as for
non-domestic use or in a commercial environment or room heating.
• Do not try to lift or move the appli-
ance by pulling on the door handle.
• All possible security measures
have been taken to ensure your
safety. Since the glass may break,
you should be careful while cleaning it to avoid scratching. Avoid
hitting or knocking on the glass
with accessories.
• Ensure that the supply cord is not
wedged during the installation.
If the supply cord is damaged, it
must be replaced by the manufacturer, its service agent or similarly
qualied persons in order to prevent a hazard.
• While the oven door is open, do
not let children climb on the door
or sit on it.
Installation Warnings
• Do not operate the appliance be-
fore it is fully installed.
• The appliance must be installed
by an authorized technician and
put into use. The manufacturer is
not responsible for any damage
that might be caused by defective
placement and installation by unauthorized persons.
• When you unpack the appliance,
make sure that it was not damaged during transportation. In the
event of any defect; do not use
the appliance and contact a qua-
lied service agent immediately.
As the materials used for packa-
ging (nylon, staplers, styrofoam...
etc.) may cause harmful effects to
children, they should be collected
and disposed of immediately.
• Protect your appliance against
atmospheric effects. Do not expose it to effects such as sun, rain,
snow etc.
• The surrounding materials of the
appliance (cabinet) must be able
to withstand a temperature of a
min. of 100°C .
During use
• When you rst run your oven, a
certain smell will emanate from the
insulation materials and the heater
elements. For this reason, before
using your oven, run it empty at
the maximum temperature for 45
minutes. At the same time you
need to properly ventilate the environment in which the product is
installed.
• During use, the outer and inner
surfaces of the oven become hot.
While opening the oven door,
step back to avoid the hot steam
coming out of the oven. A risk of
burns may occur.
• Do not put ammable or combus-
tible materials, in or near the appliance when it is in operation.
• Always use oven gloves to remo-
ve and replace food in the oven.
• Do not leave the cooker while co-
oking with solid or liquid oils. They
may catch re as a result of of extreme heating. Never pour water
on to ames that are caused by
oil. Cover the saucepan or frying
EN -7

pan with its cover to choke the ame that has arisen in this case and
turn the cooker off.
• If you are not going to use the
appliance for a long time, remove
the plug from the socket. Keep the
main control switched off. Additionally, when not using the appliance, shut the gas valve off.
• Make sure the appliance control
knobs are always in the “0” (stop)
position when it is not being used.
• The trays incline when pulled out.
Be careful not to let hot liquid spill
over.
• When the door or drawer of the
oven is open, do not leave anything on it. You may unbalance
your appliance or break the cover.
• Do not put heavy things or am-
mable or ignitable goods (nylon,
plastic bag, paper, cloth...etc.) into
the drawer. This includes cookware with plastic accessories (e.g.
handles).
• Do not hang towels, dishcloths or
clothes from the appliance or its
handles.
• During cleaning and maintenance
• Always turn the appliance off befo-
re operations such as cleaning or
maintenance. You can do this after
removing the plug for the appliance off or turning the main switches
off.
• Do not remove the control knobs
to clean the control panel.
•
• TO MAINTAIN THE EFFICIENCY
AND SAFETY OF YOUR APPLI-
ANCE, WE RECOMMEND YOU
ALWAYS USE ORIGINAL SPARE PARTS AND ONLY CALL
OUR AUTHORIZED SERVICE
AGENTS SHOULD SUCH A
NEED ARISE.
PREPARATION FOR
INSTALLATION AND USE
Manufactured with best quality parts
and materials, this modern, functional
and practical oven will meet your needs in all respects. Make sure to read
the manual to obtain successful results
and not to experience any problems in
the future. The information given below
contain rules that are necessary for correct positioning and service operations.
They should be read in detail especially
by the technician who will position the
appliance.
CONTACT THE AUTHORIZED SERVICE FOR THE INSTALLATION OF
YOUR OVEN!
CHOOSING A PLACE FOR THE
OVEN
– There are several points to pay at-
tention to when choosing a place for
your oven. Make sure to take our recommendations below into account
in order to prevent any problems and
dangerous situations, which may occur later!
– When choosing a place for the oven,
attention should be paid that there are
no ammable or combustible materials in the close vicinity, such as curta-
EN - 8
ins, oil, cloth etc., which quickly catch
re.
– Furniture surrounding the oven must
be made of heat resistant materials more than 50 C° of the room temperature.
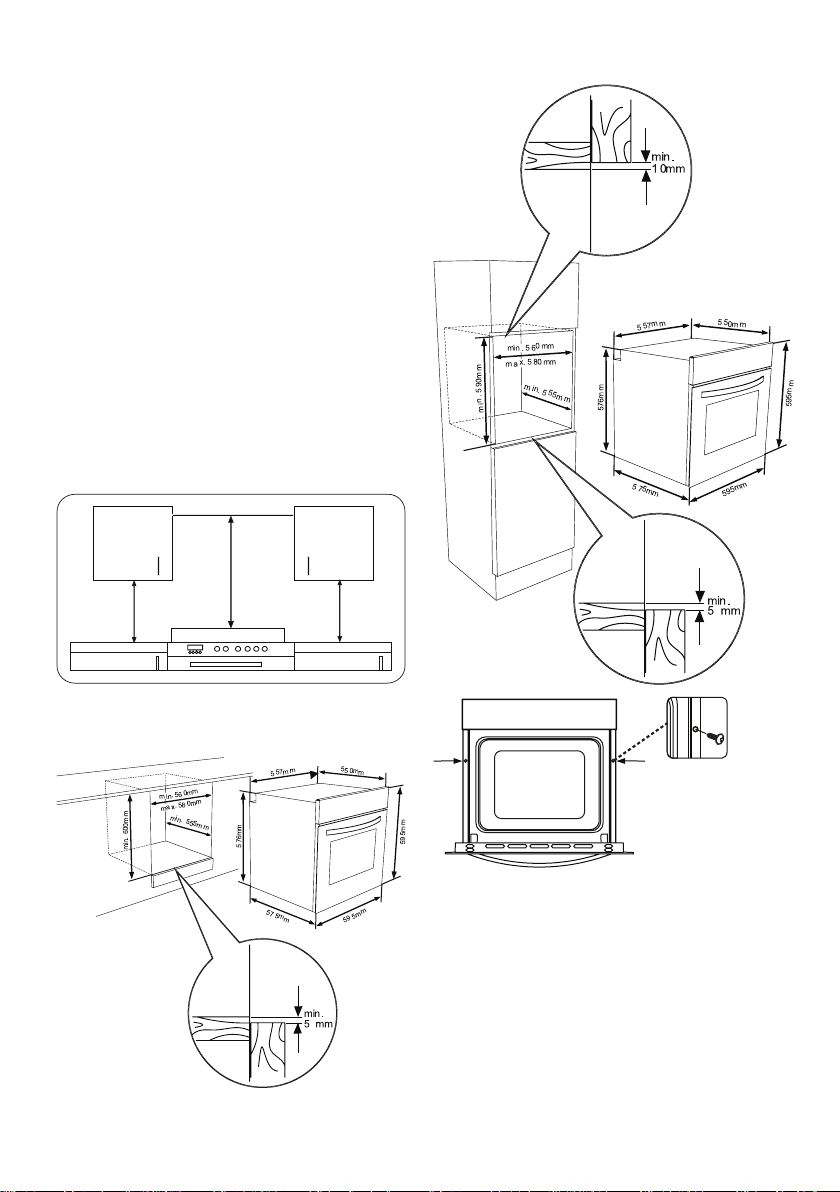
Required changes to wall cabinets and
exhaust fans above the built-in combined product as well as minimum heights from the oven board are shown in
Figure 1. Accordingly, the exhaust fan
should be at a minimum height of 65 cm
from the hob board. If there is no exhaust fan, the height should not be less
than 70 cm.
(with hood)
(without hood)
Minimum 65 cm
42 cm
Minimum
Minimum 70 cm
HOB
42 cm
Minimum
INSTALLATION OF BUILT-IN
OVEN
2 x
Insert the oven into the cabinet by pushing it forward. Open the oven door and
insert 2 screws in the holes located on
the oven frame. When the product frame touches the wooden surface of cabinet, tighten the screws.
EN - 9
Worktop
min.
min.
50 mm
25 mm
Built-in hob
Built-in oven
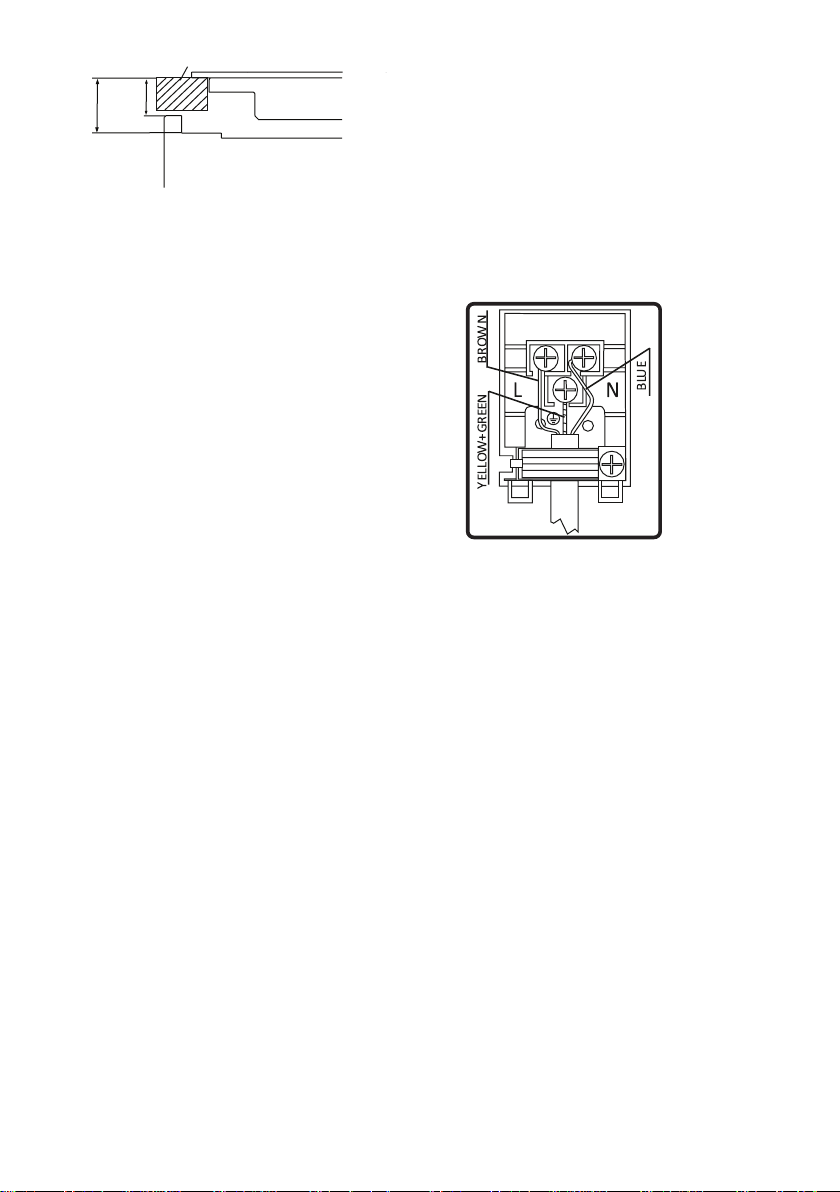
If the oven is installed under a hob, the
distance between the worktop and the
top panel of the oven must be a minimum of 50 mm and the distance between the worktop and the top of control
panel must be a minimum of 25 mm.
WIRING AND SAFETY OF THE
BUILT IN OVEN
The instructions given below must be
followed explicitly during wiring:
– The grounding cable must be connec-
ted via the screw with the grounding
mark. The supply cable connection
must be carried out as shown in gure. If there is no grounded outlet conforming to regulations in the installation environment, call the Authorized
Service Centre immediately.
– The grounded outlet must be in close
proximity to the appliance. Never use
an extension cord.
– The supply cable should not contact
the product’s hot surface.
– In the event of any damage to the
supply cable, make sure to call the
Authorized Service Centre. The cable
must be replaced by the Authorized
Service technician.
– Wiring of the appliance must be per-
formed by the Authorized Service
technician. A H05VV-F type supply
cable must be used.
– Faulty wiring may damage the appli-
ance. Such damage will not be covered under the warranty.
– The appliance is designed to connect
to 220-240V~. If the electricity is different than the value given above, call
the Authorized Service Centre immediately.
– The manufacturer declares that its
bears no liability of any kind for damage and loss arising from not
complying with safety standards!
EN - 10

USING THE OVEN
Control Panel
Oven function
Control Knob
Oven Operation Light
Digital Timer
Oven
Function Control Knob
To select the desired cooking function,
turn the knob to the related symbol the
details of the oven functions are explained in the next section.
Thermostat Control Knob
To select the desired temperature, turn
the knob to the related degrees the details of the oven functions are explained
in the next section.
Oven function
Control Knob
Oven Thermostat Light
EN - 11
Oven Functions
* The functions of your oven may be different due to the model of your product.
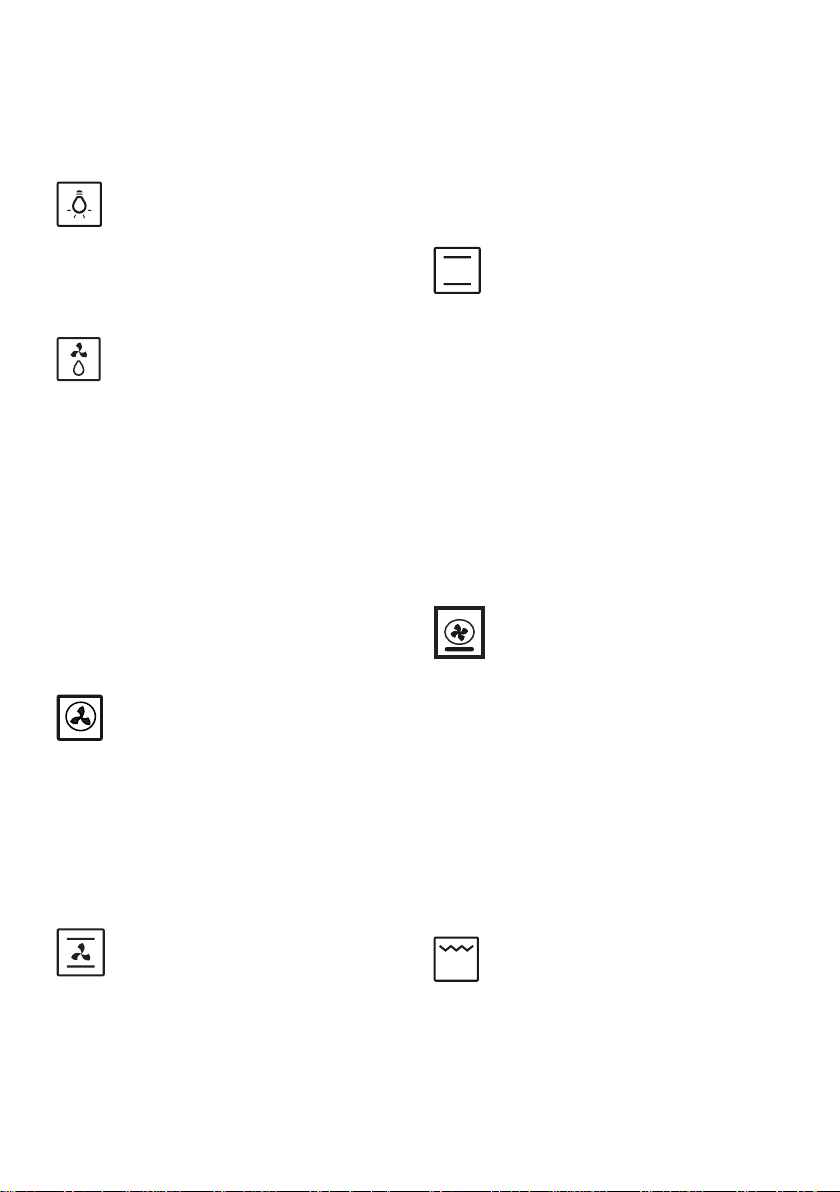
Oven Lamp:
Only the oven light will be turned on and
it will remain on in all cooking functions.
Defrost Function:
The oven’s warning lights will be turned
on, the fan will start operating.
To use the defrost function, take your
frozen food and place it in the oven on
a shelf placed in the third slot from the
bottom. Placing an oven tray under the
defrosting food to catch the water accumulated due to the melting ice is recommended. This function will not cook or
bake your food, it will only help defrost it.
Turbo Function
The oven's thermostat and warning
lights will be turned on, the ring heating
element and fan will start operating.
The turbo function evenly disperse the
heat in the oven. All foods on all racks
will be cooked evenly. It is recommended
to pre-heat the oven about 10 minutes.
pastries. Cooking is carried out by the
lower and upper heating elements
within the oven and by the fan
providing air circulation, which will give
the food a slightly grilled effect. Preheating the oven for about 10 minutes
is recommended.
Static Cooking Function:
The oven’s thermostat and warning
lights will be turned on, the lower and
upper heating elements will start operating. The static cooking function emits
heat, ensuring even cooking of the food
on the lower and upper shelves. This is
ideal for making pastries, cakes, baked
pasta, lasagne and pizza. Pre-heating
the oven for 10 minutes is recommended and it is best to cook on only one
shelf at a time when using this function.
Pizza Function:
The oven’s thermostat and warning
lights will be turned on, the ring and
lower heating elements and fan will start
operating.
Fan and lower heating function is ideal for
baking food, such as pizza, equally in a
short time. While the fan evenly disperses
the heat of the oven, the lower heating
element ensures the baking of food dough.
Fan Function:
The oven's thermostat and warning
lights will be turned on, the upper and
lower heating elements and fan will
start operating.
This function is very good for baking
Grilling Function:
The oven’s thermostat and warning lights
will be turned on, the grill heating element
will start operating. This function is used
for grilling and toasting foods. Use the
upper shelves of the oven. Brush the wire
EN - 12
grid lightly with oil to stop foods sticking
and place foods in the centre of the grid.
Always place a tray beneath to catch any
oil or fat drippings. Pre-heating the oven
for about 10 minutes is recommended.
Warning: When grilling, the oven door
must be closed and the oven temperature
0
should be adjusted to 190
C.
Faster Grilling Function:
The oven’s thermostat and warning
lights will be turned on, the grill and upper
heating elements will start operating. The
function is used for faster grilling and for
covering a larger surface area, such as
grilling meats. Use the oven's upper
shelves. Brush the wire grid lightly with
oil to stop foods sticking and place foods in
the centre of the grid. Always place a tray
beneath to catch any oil or fat drippings.
Pre-heating the oven for about 10 minutes
is recommended. Warning: When grilling,
the oven door must be closed and the
oven temperature should be adjusted
0
to 190
C
sticking and place foods in the centre
of the grid. Always place a tray beneath
to catch any oil or fat drippings. Preheating the oven for about 10 minutes
is recommended.
Warning: When grilling, the oven door
must be closed and the oven temperature
0
should be adjusted to 190
C.
Vap Clean Function
Set your oven function and thermostat
to vap clean function. symbol. Spill 200250ml of water (about 1 cup) is stated
into the small tray on the oven base.
VapClean run approximately 20 minutes
and prepare your oven to clean easily.
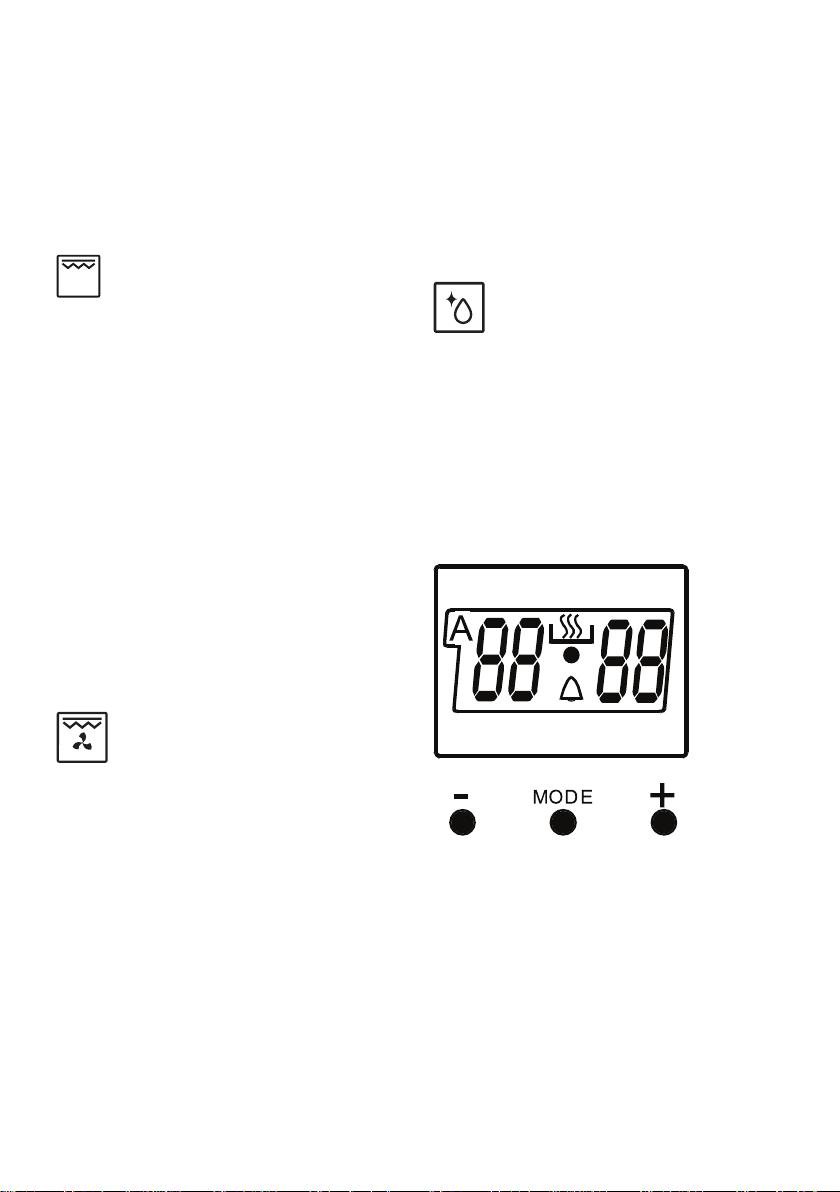
Use of digital timer
Double Grill and Fan
Function:
The oven’s thermostat and warning
lights will be turned on, the grill and
upper heating elements and fan will start
operating.
This function is used for faster grilling of
thicker foods and for covering a larger
surface area. Both the upper heating
elements and grill will be energised along
with the fan to ensure even cooking.
Use the upper shelves of the oven. Brush
the wire grid lightly with oil to stop foods
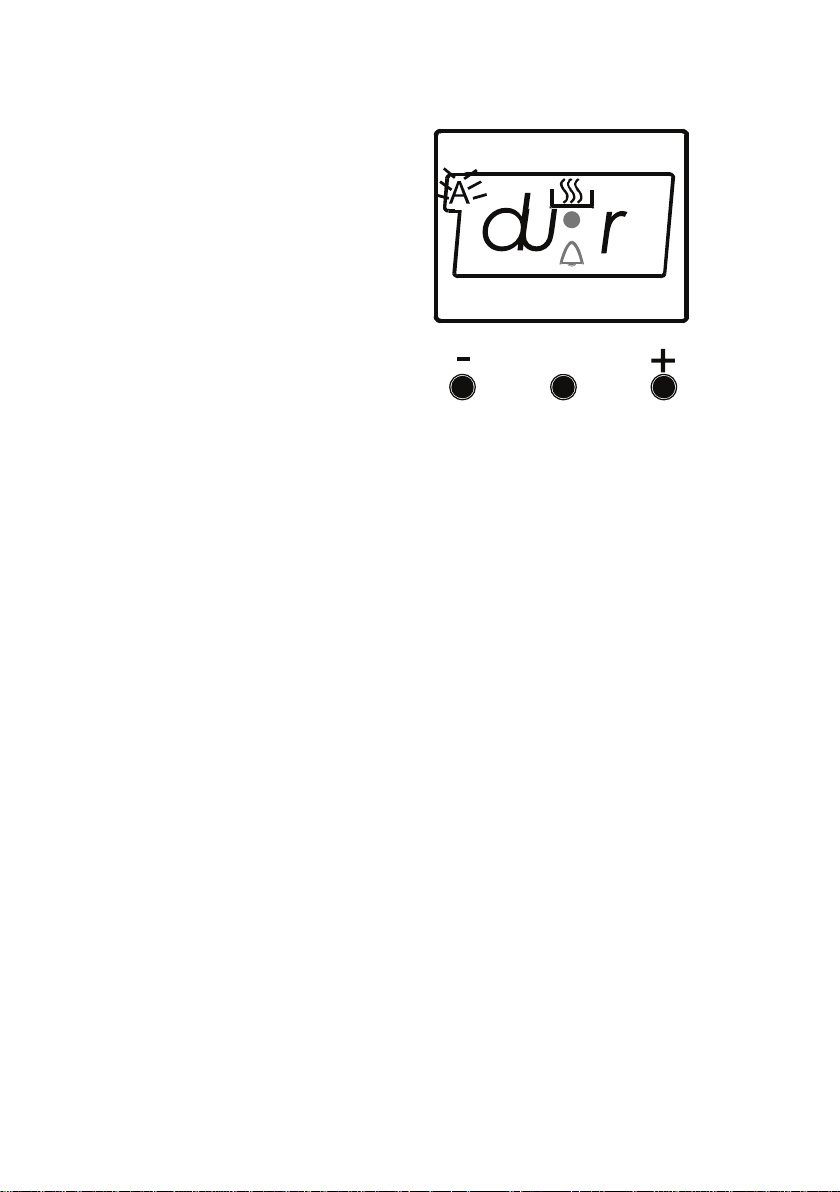
Time Adjustment:
The time must be adjusted before
starting to use the oven. Following the
power supply to the oven, the symbol
(A) and the three “0” on the screen
will begin to ash. Press the (+) and
(-) keys simultaneously. The symbol
will appear on the screen. Also, the
dot in the middle of the screen will
begin to ash. Using the (+) and (-)
EN - 13
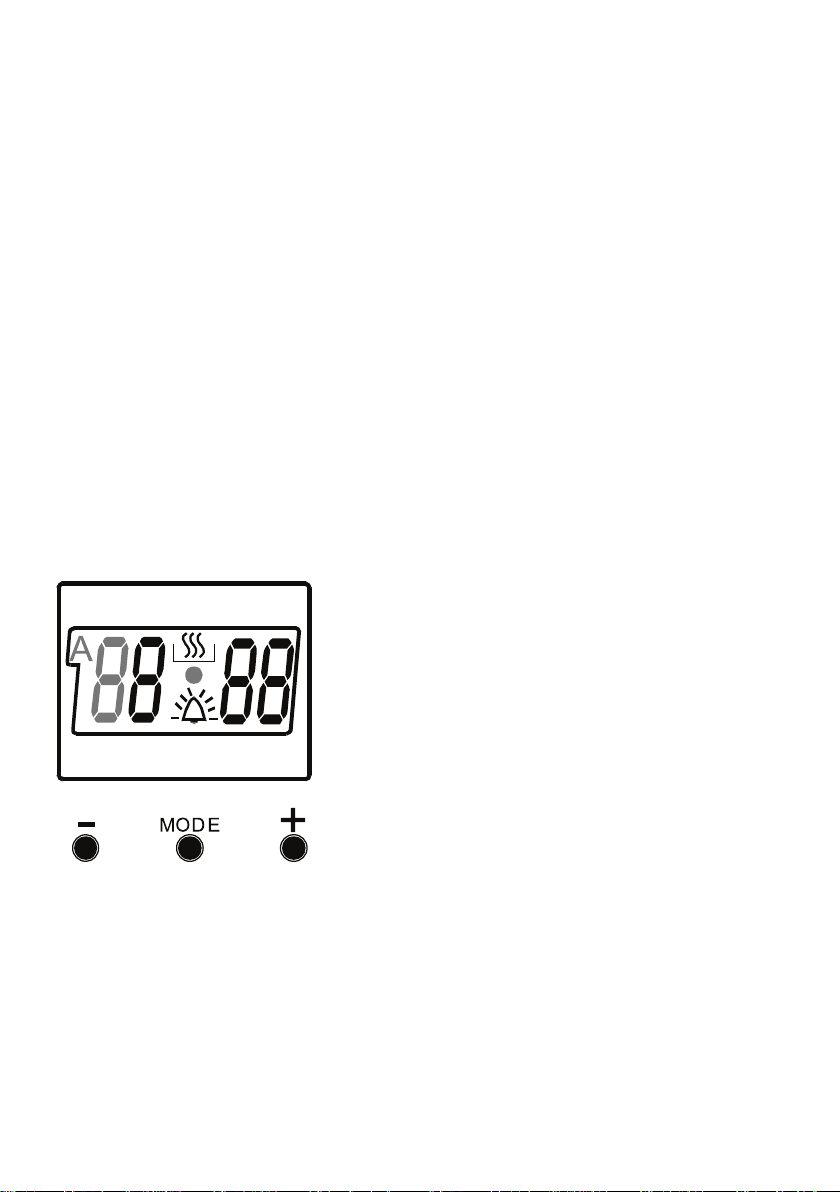
buttons, adjust the day's time while this
dot is ashing. After the adjustment, it
should be expected that the dot will be
lit continuously.
Following the power supply to the
oven, when the symbol (A) and the
three “0” on the screen begin to ash,
the oven can not be operated using
the control buttons. When the (+) and
(-) buttons are pressed simultaneously
for time adjustment, the symbol will
appear on the screen. When this
symbol appears on the screen, you
can manually operate the oven. As the
adjusted time will be reset in the event
of a power failure, time adjustment
operation willl have to performed again.
Audible Warning Time
Adjustment:
the screen will begin to ash. Using
the (+) and (-) keys, adjust the day’s
time while this dot is ashing. After
the adjustment, it should be expected
that the dot will be lit continuously.
This function can be used to recieve
audible warning at the completion of
the adjusted time period.
Press the MODE key in the middle.
The symbol will ash on the screen.
Also three “0”s will appear. Adjust the
desired time period for the warning
by using (+) and (-) keys while the
symbol is ashing. Some time after
the completion of the adjustment, the
symbol will begin to light continuously.
When the symbol begins to light
continuously, the audible warning time
adjustment is done.
The audible warning time can be set to
a time between the time range of 0 and
23.59.
The time must be adjusted before
starting to use the oven. Following the
power supply to the oven, the symbol
(A) and the three “0” on the screen will
begin to ash. Press the (+) and (-)
keys simultaneously.
The symbol will appear on the
screen. Also, the dot in the middle of
When the set time is up, the timer
gives an audible warning and the
symbol begins to ash on the screen.
Pressing any key will stop the audible
warning and the symbol disappears
on the screen.
Audible Warning time adjustment is
for warning purposes only. The oven
will not be activated at this function.
Adjustment of the cooking
time:
EN -14
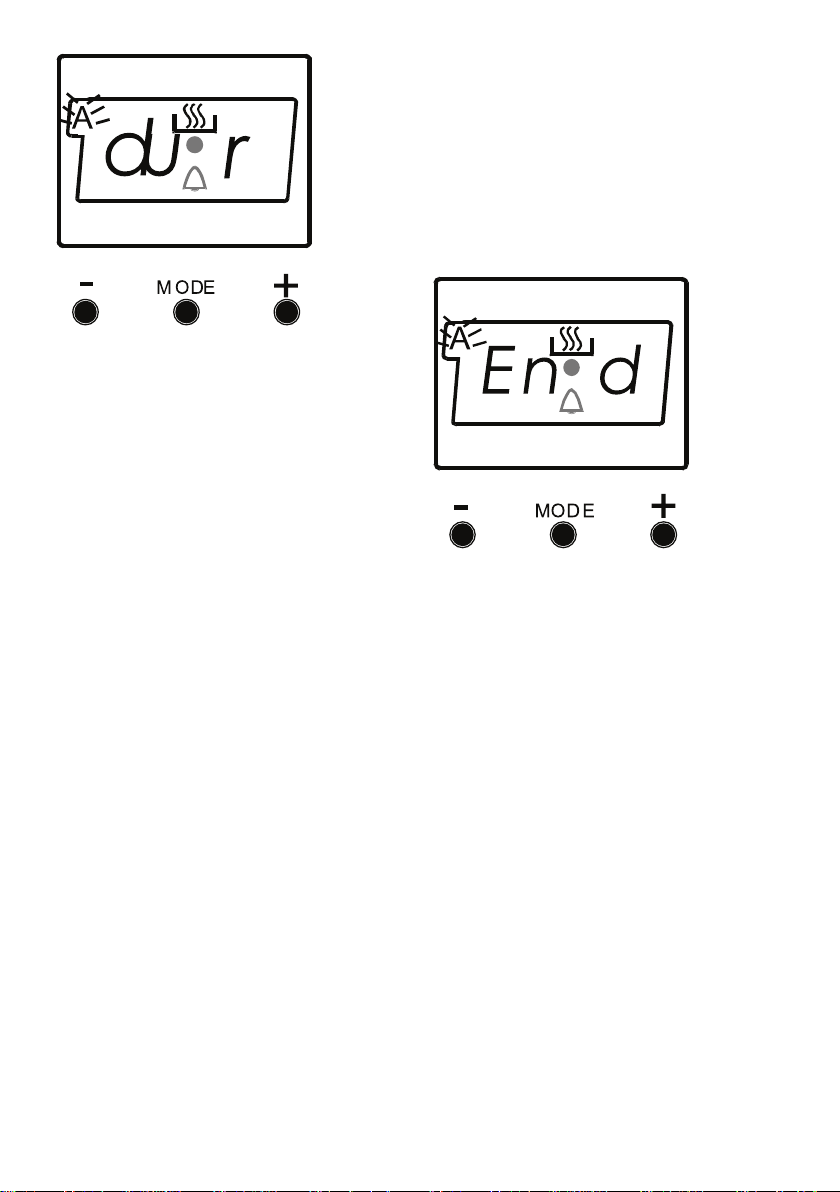
This function is used to cook in the
desired time range. The foods to
be cooked are put into the oven.
The oven is adjusted to the desired
cooking function. The oven thermostat
is adjusted to the desired degree
depending on the dish to be cooked.
Keep pressing on the MODE button
until you see “stop” on the timer
screen. When you see “stop” on the
timer screen, the symbol (A) will begin
to ash. Adjusted the cooking period
for the food you wish to cook, by using
the (+) and (-) buttons while the timer
is in his position. Some time after the
adjustment operation is completed, the
day’s time wil appear on the screen
and the symbols (A) and will begin to
continuously light on the screen. While
doing this, the oven will also start to
operate.
A cooking period between the time
range of 0 and 10 hours can be set.
At the completion of the set duration,
the timer wil stop the oven and give
an audible warning. Also, the symbol
(A) will begin to ash on the screen.
After bringing the oven button and
oven thermostat button to 0 position,
pressing any button of the timer will
end the audible warning. Also, the
timer wil be brought to manual use
function.
Adjustment of the cooking end
time
This function is used to cook according
to desired nishing time. The food
to be cooked is put into the oven.
The oven is adjusted to the desired
cooking function. The oven thermostat
is adusted to the desired degree
depending on the dish to be cooked.
Keep pressing on the MODE button
until you see “end” on the timer screen,
the symbol (A) and the day’s time will
respectively begin to ash.
Adjust the nishing time for the food
you wish to cook, by using the (+)
and (-) keys while the timer is in
this position. Some time after the
adjustment operation is completed, the
day’s time will appear on the screen
and the symbols (A) and will begin to
continuously light on the screen. While
doing this, the oven will also start to
operate.
EN - 15

You can set a time which can be up to
10 hours after the day’s time.
At the completion of the set duration,
the timer will stop the oven and give
audible warning. Also the symbol
(A) will begin to ash on the screen.
After bringing the oven button and
oven thermostat button to 0 position,
pressing any button of the timer will
end the audible warning. Also, the
timer will be brought to manual use
function.
Full-Automatic Programming:
This function is used to cook after a
certain period of time, within a certain
duration. The food to be cooked is put
into the oven. The oven is adjusted to
the desired cooking function. The oven
thermostat is adjusted to the desired
degree depending on the dish to be
cooked.
First; keep pressing on the MODE
button until you see “stop” on the timer
screen. When you see “stop” on the
timer screen, the symbol (A) will begin
to ash. Adjust the cooking period for
the food you wish to cook, by using
the (+) and (-) keys while timer is in
this position. Some time after the
adjustment operation is completed, the
day’s time will appear on the screen
and the symbols (A) and will begin to
continuously light on the screen.
A cooking period between the
time range of 0 and 10 hours
can be set.
Second; keep pressing on the MODE
button until you see “end” on the timer
screen. When you see “end” on the
timer screen, the symbol (A) and the
cooking end time begin to ash. Adjust
the nishing time for the food by using
the (+) and (-) keys while the timer is
in this position. Some time after the
adjustment operation is completed,
the day’s time will appear on the
screen and the symbol (A) will begin to
continuously light on the screen.
You can set a time which can
be up 23.59 hours after the
time obtained by adding the
cooking periot the day’s time.
The oven will start operating at the time
calculated by deducting the cooking
period from the set nishing time,
and will stop at the set nishing time.
EN - 16
The timer will give an audible warning
and the symbol (A) will begin to ash.
After bringing the oven button and
oven thermostat button to 0 position,
pressing any button of the timer will
end the audible warning. Also, time of
day will be displayed on timer
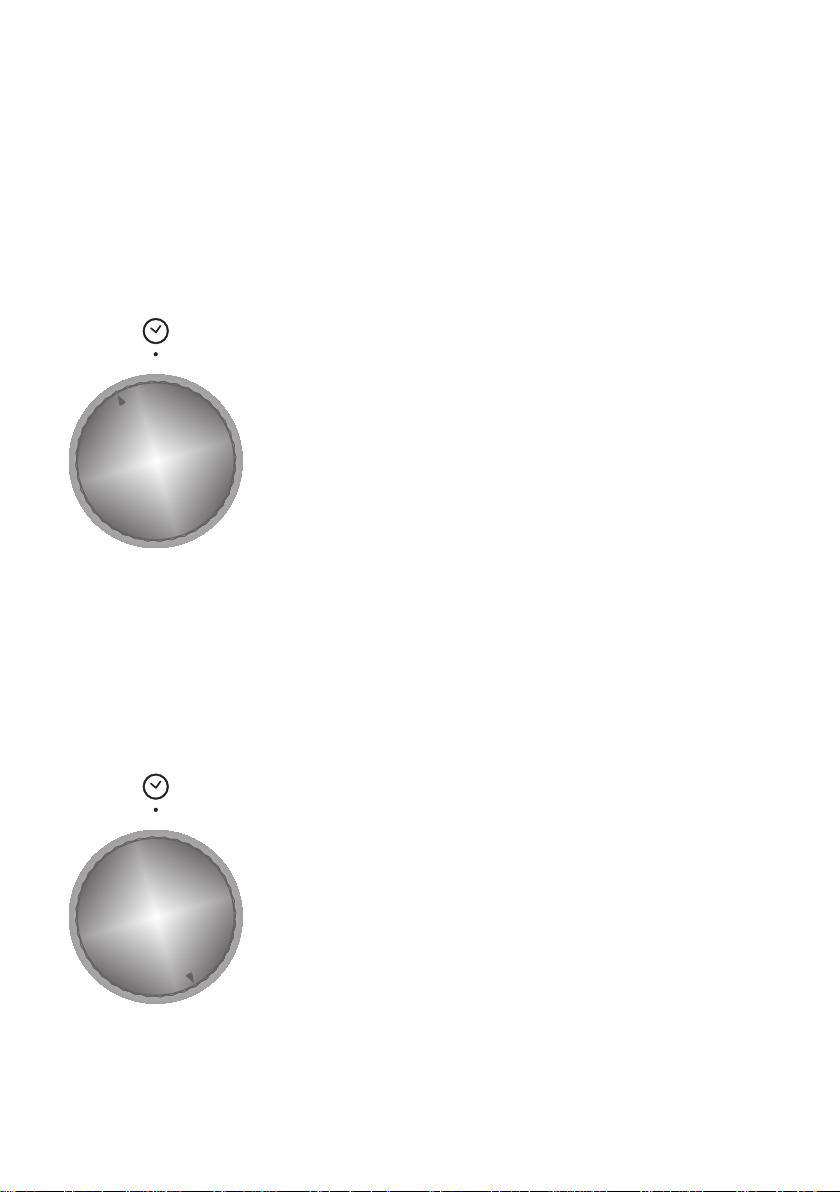
Using the mechanical timer
Manual Operation
When you set the timer button to the
position indicating M as shown on the
picture, you can continuously run your
oven. When the timer button is in the 0
position, the oven will not operate.
Operating by adjusting the time
Set the desired cooking time by turning
the timer button to a certain time range
between 0 - 100 minutes. At the end of
this time period, the oven will stop working
and the timer will give an audible warning
once.
EN - 17
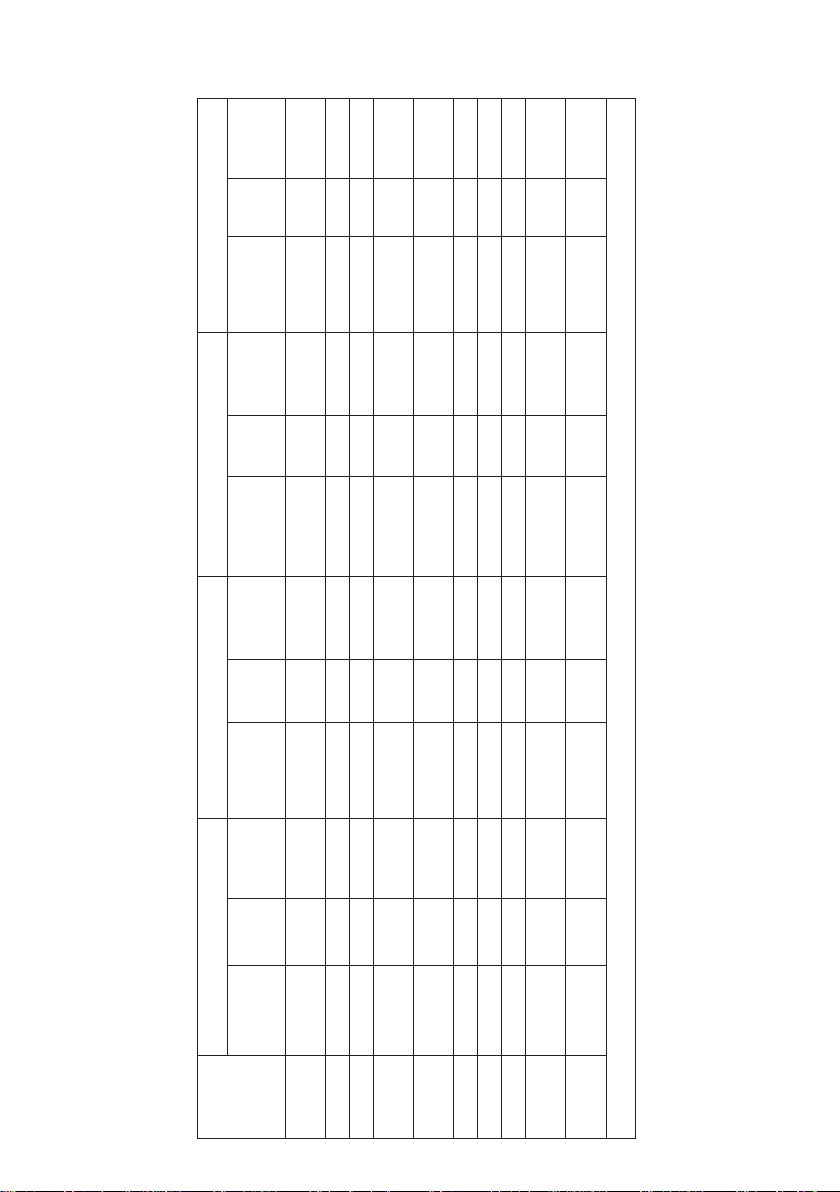
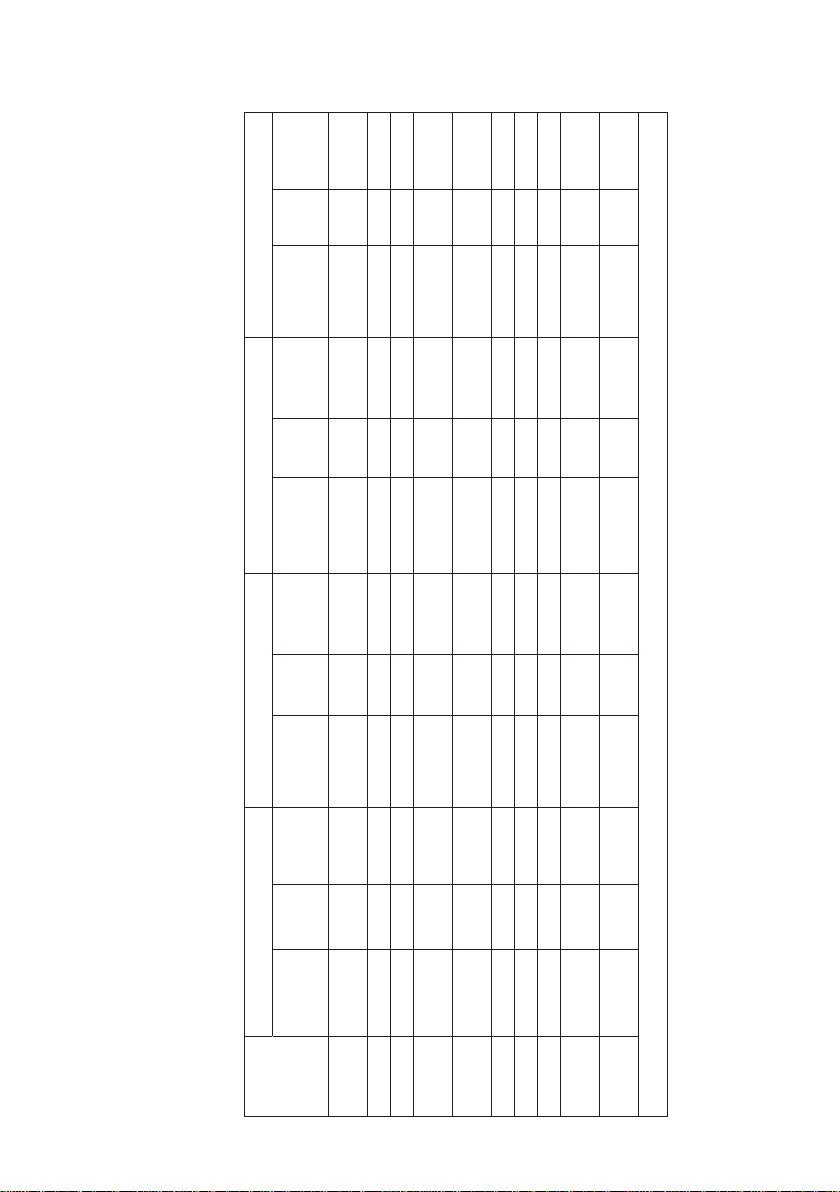
(min)
period
Cooking
pos.
Rack
pos. (min)
Thermostat
(min)
period
Cooking
pos.
Rack
pos. (°C)
Thermostat
(min)
period
Cooking
pos.
Rack
200 4 10-15
TURBO LOWER-UPPER LOWER-UPPER FAN GRILL
pos. (°C)
Thermostat
(min)
period
Cooking
pos.
Rack
pos. (°C)
Thermostat
DISHES
170-190 1-2-3 35-45 170-190 1-2 35-45 170-190 1-2 25-35
Layered
pastry
Cake 150-170 1-2-3 30-40 170 -190 1-2 30-40 150-170 1-2-3 25-35
Cookie 150-170 1-2-3 25-35 170-190 1-2 30-40 150-170 1-2-3 25-35
Grilled
meatballs
EN - 18
Watery food 175-200 2 40-50 175-200 2 40-50 175-200 2 40-50
Chicken 200 1-2 45-60 200 1-2 45-60 200 * 50-60
Chop 200 3-4 15-25
Beefsteak 200 4 15-25
160-180 1-4 30-40
Two-tray
cake
170-190 1-4 35-45
Two-tray
pastry
* Cook with roasted chicken skewer...
Accessories
The product is supplied with accessories. You can also use accessories you
purchase from other sources, but they
must be heat and ame resistant. You
can also use glass dishes, cake moulds
and oven trays that are appropriate for
use in an oven. Follow the
manufacturer’s instructions when using
other accessories. In the event small
size dishes are used, place the dish
onto the wire grid, as it will completely
be on the middle part of the grid. If the
food to be cooked does not cover the
oven tray completely, if the food is taken
from the deep freezer or the tray is being used for collecting the food’s juices
that ow during grilling, form changes
can be observed in the tray. This is due
to the high temperatures that occur during cooking. The tray will return to its
old form when the tray cools down after
cooking. This is a normal physical event
that occurs during heat transfer. Do not
place hot glass trays and dishes into a
cold environment straight from the oven
to avoid breaking the tray or dish. Do
not put onto cold and wet surfaces. Place on a dry kitchen cloth and allow to
cool slowly. When using the grill in your
oven; we recommend you use the grid
that was supplied with the product
(where appropriate). When using the
wire grid; put a tray onto one of the lower shelves to allow the oil to be collected. Water may be added to the tray to
assist in cleaning. As explained in the
corresponding clauses, never attempt
to use the gas operated grill burner without the grill protection lid. If your oven
has a gas operated grill burner, but the
grill heat shield is missing, or if it is da-
maged and cannot be used, request a
spare part from the nearest Authorized
Service Centre.
Oven Cavity
5. Rack
4. Rack
3. Rack
2. Rack
1. Rack
Oven Accessories
The accessories for your oven may be
different due to the model of your product.
Wire grid
The wire grid is used to grill or place different cookwares on it.
WARNING- Fit the grid correctly into
any corresponding rack in the oven cavity and push it to the back.
Shallow Tray
The shallow tray is used to bake pastry
such as ans etc.To locate the tray correctly in the cavity, put it to any rack and
EN - 19
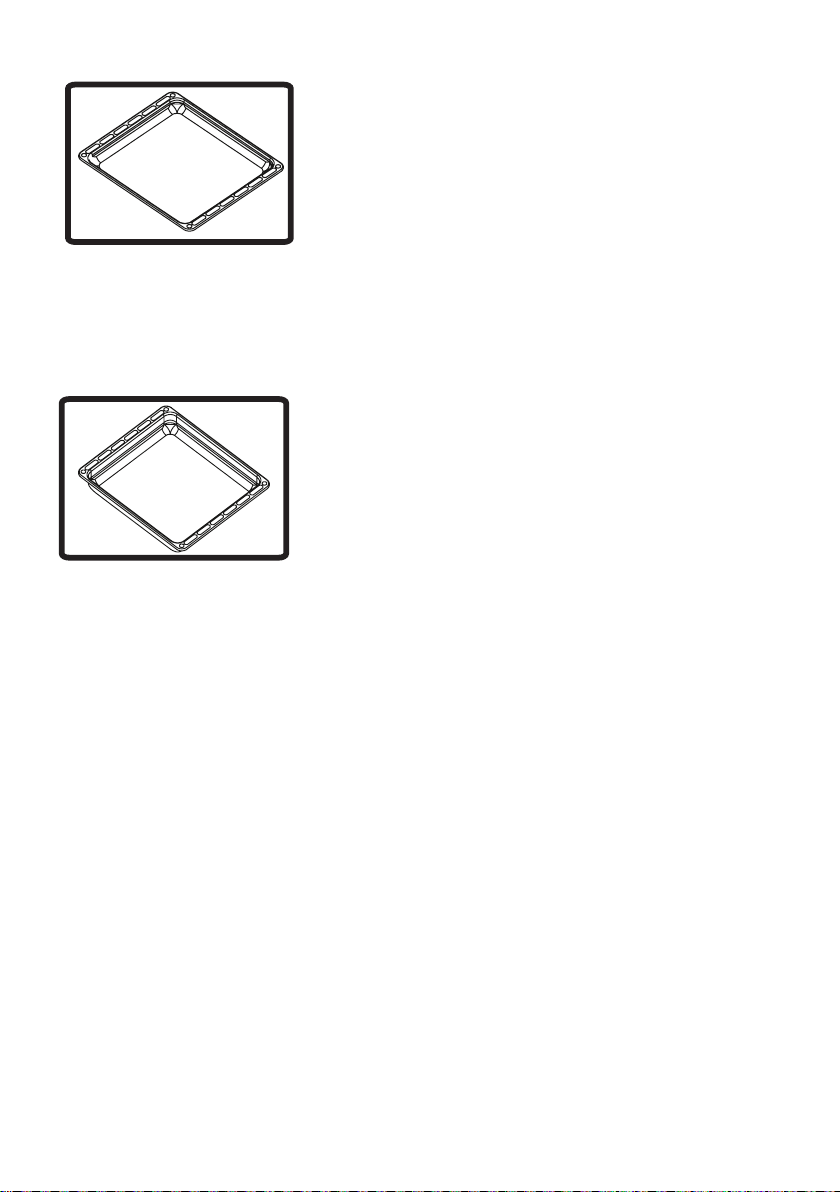
push it to the back.
Deep Tray
The deep tray is used to cook stews.To
locate the tray correctly in the cavity, put
it to any rack and push it to the back.
CLEANING AND
MAINTENANCE OF YOUR
OVEN
CLEANING
Before starting to clean your oven, be
sure that all control buttons are off and
your appliance has cooled down. Unplug the appliance.
Do not use cleaning materials containing particles that might scratch the
enamelled and
painted parts of your oven. Use cream cleaners or liquid cleaners, which
do not contain particles. As they might
harm the surfaces, do not use caustic
creams, abrasive cleaning powders, rough wire wool or hard tools. In the event
the excess liquids spill over and your
oven should burn, this may cause damage to the enamel. Clean up the split
liquids immediately. Do not use steam
cleaners to clean the oven.
Cleaning the interior of the
oven
Make sure to unplug the oven before
you start cleaning it. You will obtain best
results if you clean the oven interior while the oven is slightly warm. Wipe your
oven with a soft piece of cloth dampened with soap and water after each
use. Then wipe it again, this time with a
wetted cloth, and wipe it dry. Complete
cleaning using dry and powder type cleaners. For product with catalytic enamel
frames, the rear and side walls of the
EN - 20

inner frame do not require cleaning. However; depending on usage, replacing
them after a certain period of time is recommended.
MAINTENANCE
Replacing the Oven Light
The change of oven lamp must be done
by by an authorized technician. The rating of the bulb should be 230V, 25Watt,
Type E14,T300 before changing the
lamp, the oven should be switched off
and it should be cool.
The lamp design is specic for use in
household cooking appliances and it is
not suitable for household room illumination.
SERVICE AND
TRANSPORT
REQUIREMENTS BEFORE
CONTACTING SERVICE
If the oven does not operate:
The oven may have be switched off, or
disconnected On models tted with a timer, the time may not be regulated.
If the oven does not heat:
the heat may be not adjusted with the
oven’s heater control switch.
If the interior lighting lamp does not
light:
The electricity must be inspected. It
must be inspected to see whether the
lamps are defective. If they are defective, you can change them following the
guide.
Cooking (if the lower-upper parts do not
cook equally):
Control the shelf locations, cooking period and heat values according to the
manual.
Apart from these issues, if you are experiencing any problems with your product, please call to the Authorized Service Centre.
INFORMATION RELATED TO
TRANSPORT
If you need any transport:
Keep the original product packaging
and use the original case for carrying.
Follow the transport instructions on the
case. Tape the cooker on upper parts,
EN - 21

hats and heads and saucepan carriers
to the cooking panels.
Place a paper between the upper cover
and cooking panel, cover the upper cover, than tape to the side surfaces of the
oven.
Tape cardboard or paper onto the front
cover on interior glass of the oven as it
will be suitable to the trays, for the wire
grill and trays in your oven not damage to the oven’s cover during transport.
Also tape the oven’s covers to the side
walls.
If you do not have the original case :
Take appropriate measures to secure
the external surfaces (glass and painted surfaces) and of the oven to protect
it against possible blows.
EN - 22
The symbol on the product or on its packaging indicates that this product may
not be treated as household waste. Instead it shall be handed over the applicable
collection point for recycling of electrical and electronic equipment. By ensuring
this product is disposed of correctly, you will help prevent potential negative con-
sequences for the environment and human health, which could otherwise
be caused by inappropriate waste handling of this product. For more detailed
information about recycling this product, please contact your local city ofces,
your household waste disposal service or the shop where you purchased the
product.

EBB7226
EBB7116
RUKOVANJE I INSTALACIJA
UPUTSTVA ZA
Ugradnu rernu
SRB

Poštovani korisniče,
Naš cilj je da vam ponudimo proizvode visokog kvaliteta koji prevazilaze vaša
očekivanja. vaš uređaj je proizveden u modernim objektima i pažljivo je i naročito
testiran zarad kvaliteta. Ovo uputstvo je pripremljeno kako bi vam se pomoglo da
koristite svoj uređaj, koji je proizveden koristeći najnoviju tehnologiju uz poverenje i maksimalnu ekasnost. Pre korišćenja svog uređaja, pažljivo pročitajte ovo
uputstvo koje uključuje osnovne informacije za bezbedno instaliranje, održavanje
i korišćenje. Molimo vas da kontaktirate svoj najbliži ovlašćeni servisni centar za
instalaciju vašeg proizvoda.
SR - 25

Sadržaj
Predstavljanje i veličina proizvoda
Upozorenja
Priprema za instalaciju i korišćenje
Korišćenje rerne
Čišćenje i održavanje vašeg proizvoda
Servisiranje i transport
SR - 26
PREDSTAVLJANJE I VELIČINA PROIZVODA
Grejač
Kontrolna tabla
Ručka
Vrata rerne
Grejač
Gril
žice
Tacna
Police
Grejač
Svetla rerne
Vazdušni izlaz zatvarača
SR - 27
BEZBEDNOSNA UPOZORENJA
VAŠ UREĐAJ MOŽDA NEĆE IMATI
NEKE FUNKCIJE KOJE SU OPISANE
U OVOM UPUTSTVU.
OBRATITE PAŽNJU NA IZRAZE
KOJI SADRŽE CIFRE DOK ČITATE
UPUTSTVO ZA RUKOVANJE.
PAŽLJIVO I U POTPUNOSTI PROČITAJTE
OVA UPOZORENJA PRE KORIŠĆENJA
VAŠEG UREĐAJA I SAČUVAJTE IH NA
ZGODNOM MESTU ZARAD REFERENCI
AKO JE TO POTREBNO.
OVO UPUTSTVO JE PRIPREMLJENO
ZA VIŠE MODELA. IMATI NEKE
FUNKCIJE KOJE SU OPISANE U
OVOM UPUTSTVU. OBRATITE
PAŽNJU NA IZRAZE KOJI SADRŽE
CIFRE DOK ČITATE UPUTS-TVO ZA
RUKOVANJE
Opšta bezbednosna upozorenja
• Ovaj uređaj mogu
da koriste deca od
8 godina i starija
i osobe sa smanjenim zičkim, senzornim ili mentalnim
mogućnostima ili ona
koja nemaju iskustva ili znanje ako im
se pruži nadgledanje ili daju instrukcije
u vezi sa korišćenjem
uređaja na siguran
način i ako razumeju
opasnosti koje postoje. Deca ne treba da
se igraju sa aparatom.
Čišćenje i korisničko
održavanje ne treba
da se izvrši od strane
dece bez nadgledanja.
•
UPOZORENJE:
Uređaj i njegovi pristupni delovi
postaju topli u toku
korišćenja. Treba
voditi računa da se
izbegne dodirivanje
elemenata koji greju.
Deca mlađa od 8 godina treba da se drže
podalje osim ako nisu
neprekidno nadgledana.
• UPOZORENJE:
Opasnost od požara:
ne čuvajte stvari na
površini za kuvanje.
• UPOZORENJE: Ako
je površina napukla,
isključite uređaj da biste izbegli mogućnost
strujnog udara.
• Uređaj nije napravljen
za rukovanje putem
eksternog tajmera ili
odvojenog sistema
daljinske kontrole.
SR - 28
• U toku korišćenja,
Pre instalacije, postarajte se da
lokalni distributivni uslovi i zahtevi
uređaja budu kompatibilni. Zahtevi
ovog uređaja su navedeni na
etiketi.
uređaj postaje topao.
Treba voditi računa
da se izbegne dodirivanje elemenata za
grejanje unutar rerne.
U toku korišćenja,
•
drške koje se drže na
kratko pri normalnoj
upotrebi postaju vruće.
•
Ne koristite jaka abrazivna sredstva za
čišćenje ili oštre metalne strugalice da
biste očistili staklo od
vrata rerne ili druge
površine jer ona mogu
da ogrebu površinu
što može da dovede
do slamanja stakla ili
štete nad površinom.
• Ne koristite sredstva
za čišćenje na paru
za čišćenje uređaja.
• UPOZORENJE: Pro-
verite da li je uređaj
isključen pre nego što
zamenite lampicu da
biste izbegli mogućnost
strujnog udara.
• OPREZ: Dostupni
delovi mogu da budu
topli kada se koristi
kuvanje ili grilovanje.
Mala deca treba da
se čuvaju podalje.
• Vaš uređaj je proizveden u skladu
sa primenjivim lokalnim i internacionalnim standardima i propisima.
Održavanje i popravka moraju da se
•
načine samo od strane ovlašćenih
servisnih tehničara. Instalacija
i popravka koje je izvršena od strane neovlašćenih tehničara može da
vas dovede u opasnost. Opasno je
menjati ili modikovati specikacije
uređaja na bilo koji način.
• Pre instalacije, postarajte se da
lokalni distributivni uslovi (priroda
gasa i pritisak gasa ili napon stru-
je i frekvencija) i zahtevi uređaja
budu kompatibilni. Zahtevi ovog
uređaja su navedeni na etiketi.
• OPREZ: Ovaj uređaj je dizajniran samo za kuvanje hrane i za
unutrašnje
i ne treba da se koristi za bilo koju
drugu svrhu ili u bilo koju drugu
primenu, kao što je korišćenje van
domaćinstva ili u komercijalnom
okruženju ili zarad grejanja sobe.
• Ne pokušavajte da podignete ili
pokrenete uređaj tako što ćete
povući ručku od vrata.
• Sve moguće bezbednosne mere
su se preuzele da bi se obezbedila vaša bezbednost. Pošto staklo
može da se polomi, treba da budete
SR - 29
korišćenje u
domaćinstvu

pažljivi dok čistite kako biste izbegli
ogrebotine. Izbegavajte udaranje ili
kucanje po staklu sa dodacima.
Postarajte se da produžni kabl ne
•
bude uglavljen u toku instalacije. Ako je produžni kabl oštećen,
mora biti zamenjen od strane
proizvođača, njegovog uslužnog
agenta ili slično kvalikovanih osoba kako bi se sprečila opasnost.
• Dok su vrata od rerne otvorena,
ne dopustite deci da se penju na
vrata ili da sede na njima.
Instalaciona upozorenja
• Ne rukujte uređajem pre nego što
je u potpunosti instaliran.
Uređaj mora da se instalira od
•
strane ovlašćenog tehničara i da
se stavi u upotrebu. Proizvođač ne
odgovara za bilo kakve štete koje
mogu da se izazovu od strane defektivnih zamena i instalacija od
strane neovlašćenih ljudi.
• Kada otpakujete uređaj, postarajte
se da nije oštećen u toku transporta. U slučaju bilo kakvog defekta;
ne koristite uređaj i odmah kontaktirajte kvalikovanog servisnog
agenta. Pošto materijali koji se koriste za pakovanje (najlon, heftalice, stiropor...itd.) mogu da izazovu
štetne efekte nad decom, treba da
se sakupe i odmah uklone.
• Zaštitite svoj uređaj od atmosferskih efekata. Ne izlažite ga efektima
kao što su sunce, kiša, sneg itd.
• Materijali u blizini uređaja (ormarić)
moraju da budu u mogućnosti da istrpe temperaturu od minimalno 100 °C.
U toku korišćenja
• Kada prvi put pokrenete rernu
određeni miris će se osetiti od
izolacionih materijala i elemenata
grejanja. Zbog ovoga, pre upotrebe rerne, uključite je da radi na
prazno pri maksimalnoj temperaturi od 45 minuta. U isto vreme
treba da pravilno provetrite okoli-
kojoj je proizvod instaliran.
nu u
U toku upotrebe, spoljne
•
i unutrašnje površine rerne postaju vrele. Dok otvarate vrata rerne,
udaljite se kako biste izbegli vruću
paru koja dolazi iz rerne. Može da
postoji rizik od opekotina.
• Ne stavljajte zapaljive ili sagorive
materijale u ili u blizinu uređaja
kada on radi.
•
Uvek koristite rukavice za rernu da
biste uklonili i zamenili hranu u rerni.
Ne ostavljajte šporet dok kuvate sa
•
tvrdim ili tečnim uljima. Ona mogu
da se zapale pod uslovom ekstremne toplote. Nikada ne sipajte
vodu na plamen koji je izazvan od
strane ulja. Pokrijte šerpu ili tiganj
sa njihovim poklopcima kako biste
zaustavili plamen koji se u ovom
slučaju pojavio i isključite šporet.
• Ako uređaj nećete koristiti duži
vremenski period, isključite ga.
Neka glavni kontrolni prekidač
bude isključen. Takođe, kada ne
koristite uređaj neka ventil za gas
bude isključen.
• Postarajte se da dugmad kontrolnog uređaja uvek bude na poziciji
„0“ (stop) poziciji kada se ne koristi.
• Tacne se naginju kada se izvuku.
Obratite pažnju da se vrela tečnost
ne prospe.
SR - 30

• Kada su vrata ili oka rerne otvoreni,
U toku čišćenja i održavanja
ništa ne stavljajte na nju. Možete da
pogoršate ravnotežu vašeg uređaja
ili da slomite poklopac.
• Ne stavljajte teške stvari ili zapaljivu robu (najlon, plastičnu
kesu, papir, tkaninu...itd.) u oku.
Ovo uključuje posuđe za kuvanje sa plastičnim dodacima (npr.
ručkama).
• Ne kačite peškire, krpe ili garderobu na uređaj ili na njegove ručke.
•
• Uvek isključite uređaj pre rukovanja kao što su čišćenje ili
održavanje. To možete da uradite
nakon što isključite uređaj ili nakon što isključite glavni prekidač.
• Ne uklanjajte kontrolnu dugmad
da biste očistili kontrolnu tablu.
DA BISTE ODRŽALI EFIKAS-
•
NOST I BEZBEDNOST VAŠEG
UREĐAJA, PREPORUČUJEMO
DA UVEK KORISTITE ORIGINALNE REZERVNE DELOVE
I DA POZOVETE SAMO NAŠE
OVLAŠĆENE USLUŽNE AGENTE U SLUČAJU POTREBE.
PRIPREMA ZA INSTALACIJU
I KORIŠĆENJE
Proizvedeno sa najboljim kvalitetnim
delovima i materijalima, ova moderna,
funkcionalna i praktična rerna će ispuniti vaše potrebe na svaki način. Postarajte se da pročitate uputstvo kako biste
dobili uspešne rezultate i kako ne biste
imali nikakvih problema u budućnosti.
Informacije date ispod sadrže pravila
koja su neophodna za pravilno pozi-
cioniranje i uslužne operacije. Treba
obavezno da se pročitaju od strane
tehničara koji će pozicionirani uređaj.
KONTAKTIRAJTE OVLAŠĆENI SERVIS ZA INSTALACIJU VAŠE RERNE!
BIRANJE MESTA ZA RERNU
– Postoji nekoliko tačaka na koje treba
obratiti pažnju kada se bira mesto za
vašu rernu. Postarajte se da uzmete
u obzir naše preporuke ispod kako
biste sprečili bilo kakve probleme
i opasne situacije, koje mogu kasnije
da se pojave!
– Kada birate mesto za rernu, treba ob-
ratiti pažnju da nema zapaljivih materijala u bliskoj blizini, kao što su zavese, ulje, tkanina, itd. koje mogu brzo
da se zahvate vatrom.
– Nameštaj oko rerne mora da bude
napravljen od materijala koji su otporni na toplotu na više od 50 C° sobne
temperature.
Obavezne promene za viseće ormariće
i propusne ventilatore iznad ugrađenog
kombinovanog proizvoda kao i minimalne visine od ploče rerne su prikazane
na Slici 1. Prema tome, propusni ventilator treba da bude pri minimalnoj visini
od 65 cm od ploče. Ako ne postoji propusni ventilator, visina ne treba da bude
manja od 70 cm.
SR - 31

(bez poklopca)
(sa poklopcem)
Minimalno 65cm
42 cm
Minimalno
PLOČA
Minimalno 70cm
Minimalno
INSTALACIJA UGRAĐENE
RERNE
42 cm
Ubacite rernu u ormarić tako što ćete
je gurnuti napred. Otvorite vrata rerne
i ubacite 2 šrafa u rupe koje su locirane na okviru rerne. Dok okvir proizvoda
dodiruje drvenu površinu ormarića, zategnite šrafove.
SR - 32

Gornji radni deo
min.
min.
50 mm
25 mm
Ugrađena ploča
Ugrađena rerna
Ako je rerna instalirana ispod ploče,
razdaljina između gornjeg dela i gornje table ploče mora da bude minimalno
50 mm a razdaljina između radnog dela
i glavne kontrolne table mora da bude
minimalno 25 mm.
POVEZIVANJE I BEZBEDNOST
UGRAĐENE RERNE
Instrukcije date ispod moraju da se slede bez pogovora u toku povezivanja:
– Kabl za uzemljenje mora da se
poveže putem šrafa sa oznakom za
uzemljenje. Povezivanje dostavljenog
kabla mora biti onako kako je prikazano na Slici 6. Ako ne postoji uzemljen izlaz koji je u skladu sa propisima
u okolini instaliranja, odmah pozovite
ovlašćeni servis.
– Uzemljen izlaz mora da bude u blizini
uređaja. Nikada ne koristite produžni
kabl.
– Dostavljeni kabl ne treba da dođe u kon-
takt sa toplom površinom proizvoda.
– U slučaju bilo kakve štete na dostavl-
jenom kablu, postarajte se da pozovete ovlašćeni servis. Kabl mora da
zameni ovlašćeni servis.
– Povezivanje uređaja mora da se izvrši od
strane ovlašćenog servisa. H05VV-F tip
dostupnog kabla mora da se koristi
gore pomenute vrednosti, pozovite
odmah ovlašćeni servis.
– Proizvođačka rma izjavljuje da
ne snosi nikakvu odgovornost za
bilo kakvu štetu i gubitak do kojeg
dolaz od neusaglašenošću sa bezbednosnim propisima!
PLAVO
BRAON
ŽUTO+ZELENO
– Pogrešno povezivanje može da ošteti
uređaj. Takva šteta se neće pokriti
pod garancijom.
– Uređaj je dizajniran za povezivanje
na 220-240V~ struju se razlikuje od
SR - 33

KORIŠĆENJE RERNE EBB7226
Kontrolno dugme za
temperaturu
Da biste izabrali temperaturu kuvanja,
okrenite dugme na povezani simbol.
Kontrolna ploča
Kontrolno dugme za
funkcionisanje rerne
Svetlo za rukovanje rernom
Digitalni tajmer
Kontrolno dugme za
funkcionisanje rerne
Da biste izabrali željenu funkciju kuvanja, okrenite dugme na povezani simbol, detalji funkcija rerne su objašnjeni
u
sledećem odeljku.
Kontrolno dugme za
funkcionisanje rerne
Da biste izabrali željenu funkciju kuvan-
ja, okrenite dugme na povezani sim-
bol, detalji funkcija rerne su objašnjeni
u
sledećem odeljku.
Kontrolno dugme za
funkcionisanje rerne
Svetlo za termostat rerne
SR - 34

Funkcije rerne
Termostat rerne i svetla upozorenja će
se uključiti, donji i gornji grejač će
početi sa radom. Funkcija statičkog
kuvanja širi toplotu, starajući se o tome
da kuvanje bude ujednačeno na nižoj i
višoj hrani. Ovo je idealno za pravljenje
testa, kolača, upečenog testa, lazanje i
pice. Unapred grejanje rerne na 10
minuta se preporučuje i najbolje je
kuvati na jednoj polici pojedinačno
u ovoj funkciji.
Termostat rerne i svetla upozorenja će
se uključiti, gornji i donji grejač i
ventilator će početi da rade.
Ova funkcija je dobra za dobijanje
rezultata pri pečenju testa. Kuvanje se
vrši od strane gornjeg i donjeg grejača
u okviru rerne i od strane ventilatora koji
dostavlja cirkulaciju vazduha, što će
hrani pomalo dati efekat grila.
Preporučuje se da se rerna unapred
zagreje na oko 10 minuta.
* Funkcije vaše rerne mogu da se razlikuju usled modela vašeg proizvoda.
Lampica rerne:
Samo će lampica rerne biti uključene
i
ostaje uključena u svim funkcijama ku-
vanja.
Funkcija odleđivanja:
Svetla za upozorenje na rerni će se
uključiti, ventilator će početi da radi.
Da biste koristili funkciju odleđivanja, izvadite zaleđenu hranu i stavite je u
na policu koja se nalazi na trećem nivou
od dole. Preporučuje se da stavite tacnu za rernu ispod hrane za odleđivanje,
kako bi primila vodu koja se akumulira
usled odleđivanja leda. Ova funkcija
neće kuvati ili peći vašu hranu, samo će
pomoći da se ona odledi.
rernu
Funkcija statičkog kuvanja:
Termostat rerne i svetla upozorenja
će se uključiti, elementi nižeg i višeg
grejanja će početi sa radom. Funk-
cija statičkog kuvanja širi toplotu,
starajući se o tome da kuvanje bude
ujednačeno na nižoj i višoj hrani. Ovo
je idealno za pravljenje testa, kolača,
upečenog testa, lazanje i pice. Unap-
red grejanje rerne na 10 minuta se
preporučuje i najbolje je kuvati na jed-
noj polici pojedinačno u ovoj funkciji.
Funkcija ventilatora:
Termostat rerne i svetla upozorenja
će se uključiti, gornji i donji elementi
grejanja i ventilator će početi da rade.
Ova funkcija je dobra za dobijanje
rezultata pri pečenju testa. Kuvanje
se vrši od strane gornjeg i donjeg
elementa grejanja u okviru rerne
od strane ventilatora koji dostavlja
i
cirkulaciju vazduha, što će hrani
pomalo dati efekat grila. Preporučuje
se da se rerna unapred zagreje na oko
10 minuta.
Turbo funkcija
Svetla upozorenja termostata rerne će
se uključiti, elemenat prstena grejanja i
ventilator će početi da rade.
Turbo funkcija podjednako širi toplotu u
rerni. Sva hrana na svim policama će
se podjednako skuvati. Preporučuje se
da se rerna unapred zagreje na oko 10
minuta.
Funkcija pice:
Termostat rerne i svetla upozorenja će se
uključiti, prsten i donji elementi grejanja
i ventilator će početi da rade.
Ventilator i donja funkcija grejanja
je idealna za pečenje hrane, kao
što je pica, podjednako za kratko
vreme. Dok ventilator podjednako
širi toplotu rerne, donji elemenat
grejanja se stara o pečenju testa.
SR - 35

Funkcija grilovanja:
Svetla upozorenja termostata rerne će se
upaliti, elemenat grejanja grila će početi
da radi. Funkcija se koristi za grilovanje
i tostiranje hrane, koristite gornju policu
rerne. Nežno očistite žicu rešetke sa
uljem da biste sprečili da se hrana zalepi
i stavite hranu u centar rešetke. Uvek
ispod stavite tacnu kako biste uhvatili kapi
ulja ili masnoće. Preporučuje se da se
rerna unapred zagreje na oko 10 minuta.
Upozorenje: Kada grilujete, vrata rerne
moraju da se zatvore i temperatura rerne
treba da se podesi na 190
0
C.
Funkcija dupli gril:
Termostat rerne i svetla upozorenja će
se uključiti, gril i gornji elementi grejanja
će početi da rade. Funkcija se koristi za
brže grilovanje i za pokrivanje velikog
područja površine, kao što su grilovanje
mesa, koristite gornje police rerne. Nežno
očistite žicu rešetke sa uljem da biste
sprečili da se hrana zalepi i stavite hranu
u centar rešetke. Uvek ispod stavite tacnu
kako biste uhvatili kapi ulja ili masnoće.
Preporučuje se da se rerna unapred
zagreje na oko 10 minuta. Upozorenje:
Kada grilujete, vrata rerne moraju da budu
zatvorena i temperatura rerne treba da
se podesi na 190
0
C.
područja površine. I gornji elementi
grejanja i gril će se napajati zajedno
sa ventilatorom kako bi se obezbedilo
podjednako kuvanje.
Koristite gornje police rerne. Nežno
očistite žicu rešetke sa uljem da biste
sprečili da se hrana zalepi i stavite hranu
u centar rešetke. Uvek ispod stavite
tacnu kako biste uhvatili kapi ulja ili
masnoće. Preporučuje se da se rerna
unapred zagreje na oko 10 minuta.
Upozorenje: Kada grilujete, vrata rerne
moraju da budu zatvorena i temperatura
0
rerne treba da se podesi na 190
C.
Funkcija čišćenja
Podesite funkciju rerne i termostata na
simbol funkcije čišćenja. Prospite 200250 ml vode (oko 1 šolje) u malu tacnu
u dnu rerne. Čišćenje radi oko 20
minuta i priprema vašu rernu za lako
čišćenje.
Dupli gril i funkcija ventilatora:
Termostat rerne i svetla upozorenja će
se uključiti, gril i gornji elementi grejanja
i ventilator će početi da rade.
Funkcija se koristi za brže grilovanje
deblje hrane i za pokrivanje većeg
SR - 36

Korišćenje digitalnog tajmera
Režim
Prilagođavanje vremena:
Vreme mora da se prilagodi pre nego
što se počne sa korišćenjem rerne.
Prateći dovod napajanja rerne, simbol
(A) i tri „0“ na ekranu će početi da
blješte. Simultano pritisnite (+) i (-)
dugmad. Simbol će se pojaviti na
ekranu. Takođe, tačka na sredini
ekrana će početi da blješti. Koristeći
(+) i (-) dugmad, prilagodite vreme
dana dok tačka blješti. Nakon
prilagođavanja, treba očekivati da
tačka bude neprekidno upaljena.
Prateći dovod napajanja rerne, kada
simbol (A) i tri „0“ na ekranu počnu
da blješte, rernom može da se rukuje
koristeći kontrolna dugmad. Kada su
(+) i (-) dugmad simultano pritisnuta za
prilagođavanje vremena, simbol će se
pojaviti na ekranu. Kada se ovaj ekran
pojavi na ekranu, možete manuelno
da rukujete delom rerne. Pošto će
se prilagođeno vreme resetovati u
slučaju nestanka struje, podešavanje
prilagođavanja vremena mora ponovo
da se izvrši.
Prilagođavanje vremena
zvučnog upozorenja:
Režim
Vreme mora da se prilagodi pre nego
što se počne sa korišćenjem rerne.
Prateći dovod napajanja rerne, simbol
(A) i tri „0“ na ekranu će početi da
blješte. Simultano pritisnite (+) i (-)
dugmad.
Simbol će se pojaviti na ekranu.
Takođe, tačka na sredini ekrana
će početi da blješti. Koristeći (+)
i (-) dugmad, prilagodite vreme
dana dok tačka blješti. Nakon
prilagođavanja, treba očekivati da
tačka bude neprekidno upaljena.
Ova funkcija može da se koristi za
primanje zvučnog upozorenja pri kraju
prilagođenog vremenskog perioda.
Pritisnite dugme REŽIM na sredini.
Simbol će blještati na ekranu. Takođe,
tri „0“ će se pojaviti. Prilagodite željeni
vremenski period za upozorenje
koristeći (+) i (-) dugmad dok simbol
blješti. Nakon nekog vremena posle
završetka prilagođavanja, simbol će
početi da se neprekidno pali. Kada
simbol počne neprekidno da se pali,
SR - 37

vremensko prilagođavanje zvučnog
upozorenja je završeno.
Vreme zvučnog upozorenja može
da se podesi na vreme između
vremenskog opsega od 0 do 23.59.
Kada je podešeno vreme isteklo,
tajmer daje zvučno upozorenje i simbol
počinje da blješti na ekranu. Pritiskanje
bilo kojeg dugmeta će zaustaviti
zvučno upozorenje i simbol nestaje sa
ekrana.
Nastavite da pritiskate dugme REŽIM
dok ne vidite „stop“ na ekranu tajmera.
Kada vidite „stop“ na ekranu tajmera,
simbol (A) će početi da blješti. Prilagodite
period kuvanja za hranu koju želite da
kuvate, koristeći (+) i (-) dugmad dok
je tajmer u svojoj poziciji. Neko vreme
nakon što se operacija prilagođavanja
završi, vreme dana će se pojaviti na
ekranu a simboli (A) i će početi da
neprekidno svetle na ekranu. Dok ovo
radite, rerna će takođe početi da radi.
Prilagođavanje vremena zvučnog
upozorenja je samo zarad upozorenja.
Rerna ne može da se aktivira ovom
funkcijom.
Polu-automatsko
prilagođavanje vremena prema
periodu kuvanja:
Režim
Ova funkcija se koristi za kuvanje
u željenom vremenskom opsegu.
Hrana koja treba da se kuva se
stavlja u rernu. Rerna se prilagođava
željenoj funkciji kuvanja. Termostat
rerne se prilagođava na željeni stepen
u zavisnosti od jela koje se kuva.
Period kuvanja između vremenskog
raspona od 0 do 10 sati može da se
podesi.
Po završetku podešenog trajanja,
tajmer će zaustaviti rernu i dati zvučno
upozorenje. Takođe, simbol (A) će
početi da blješti na ekranu. Nakon
što postavite dugme rerne i
dugme
termostata rerne na poziciju 0,
pritiskanje bilo kojeg dugmeta tajmera
će okončati zvučno upozorenje.
Takođe, tajmer će se dovesti na
funkciju manuelnog korišćenja.
Polu-automatsko
programiranje prema vremenu
završetka:
Režim
SR - 38
Ova funkcija se koristi za kuvanje
prema željenom vremenu završavanja.
Hrana koja treba da se kuva se
stavlja u rernu. Rerna se prilagođava
željenoj funkciji kuvanja. Termostat
rerne se prilagođava željenom
stepenu u zavisnosti od jela koje se
kuva. Nastavite da pritiskate dugme
REŽIM dok ne vidite „kraj“ na ekranu
tajmera, simbol (A) i vreme dana će
pojedinačno početi da blješte.
Puno-automatsko
programiranje:
Podesite vreme završavanja za hranu
koju želite da kuvate, koristeći (+) i (-)
dugmad dok je tajmer u ovoj poziciji.
Neko vreme nakon što se operacija
prilagođavanja završi, vreme dana će
se pojaviti na ekranu i simboli (A) i će
početi da neprekidno svetle na ekranu.
Dok ovo radite, rerna će takođe početi
da radi.
Možete da podesite vreme koje može
biti do 10 sati nakon vremena dana.
Nakon završetka podešenog trajanja,
tajmer će zaustaviti rernu i dati zvučno
upozorenje. Takođe, simbol (A) će
početi da blješti na ekranu. Nakon
što postavite dugme rerne i
dugme
termostata rerne na poziciju 0,
pritiskanje bilo kojeg dugmeta tajmera
će okončati zvučno upozorenje.
Takođe, tajmer će se dovesti do
funkcije manuelnog korišćenja.
Režim
Ova funkcija se koristi za kuvanje
nakon određenog vremenskog
perioda, u okviru određenog trajanja.
Hrana koja treba da se kuva se
stavlja u rernu. Rerna se prilagođava
željenoj funkciji kuvanja. Termostat
rerne se prilagođava na željeni stepen
u zavisnosti od jela koje se kuva.
Prvo; nastavite da pritiskate REŽIM
dugme dok ne vidite „stop“ na ekranu
tajmera. Kada vidite „stop“ na ekranu
tajmera, simbol (A) će početi da blješti.
Prilagodite period kuvanja za hranu
koju želite da skuvate, koristeći (+) i (-)
dugmad dok je tajmer u ovoj poziciji.
Neko vreme nakon što se operacija
prilagođavanja završi, vreme dana će
se pojaviti na ekranu i simboli (A) i će
početi da neprekidno svetle na ekranu.
SR -39

Period kuvanja između
Korišćenje mehaničkog tajmera
za model EBB7116
vremenskog raspona od 0 do 10
sati može da se podesi.
Režim
Drugo; nastavite da pritiskate REŽIM
dugme dok ne vidite „kraj“ na ekranu
tajmera. Kada vidite „kraj“ na ekranu
tajmera, simbol (A) i vreme dana će
početi da blješti, zajedno sa periodom
kuvanja. Prilagodite vreme završetka
za hranu koristeći (+) i (-) dugmad dok
je tajmer u ovoj poziciji. Neko vreme
nakon što se operacija prilagođavanja
završila, vreme dana će se pojaviti
na ekranu i simbol (A) će početi
neprekidno da svetli na ekranu.
pritiskanje bilo kojeg dugmeta tajmera
će okončati zvučno upozorenje.
Takođe, vreme će biti dovedeno do
funkcije manuelnog korišćenja.
Korišćenje mehaničkog tajmera
Manuelno rukovanje
Kada podesite dugme tajmera na poziciju
navedenu od strane M kao što je prikazano
na slici, možete neprekidno da rukujete
svojom rernom. Kada je dugme tajmera
na poziciji 0 rerna neće raditi.
Možete da podesite vreme
koje može da bude do 23.59
sati nakon vremena dobijenog
dodavanjem perioda kuvanja na
vreme dana.
Rerna će početi da radi u vreme
izračunato oduzimanjem vremena
kuvanja sa podešenog vremena
završetka i zaustaviće se na
podešenom vremenu završetka.
Tajmer će dati zvučno upozorenje
simbol (A) će početi da blješti. Nakon
i
što postavite dugme rerne i dugme
termostata rerne na poziciju 0,
SR - 40
Rukovanje podešavajući vreme
Podesite željeno vreme kuvanja tako što
ćete okrenuti dugme tajmera na određeni
opseg vremena između 0 - 100 minuta. Na
kraju ovog vremenskog perioda, rerna će
prestati da radi i tajmer će jednom pružiti
zvučno upozorenje.
(min)
Period
kuvanja
Poz.
stalka
poz. (min)
Termostat
(min)
Period
kuvanja
Poz.
stalka
poz. (°C)
Termostat
(min)
Period
kuvanja
Poz.
stalka
poz. (°C)
Termostat
(min)
Period
kuvanja
200 4 10-15
TURBO DONJE-GORNJE DONJI-GORNJI VENTILATOR GRIL
Poz.
stalka
poz. (°C)
Termostat
POSUĐE
Slojevito
170-190 1-2-3 35-45 170-190 1-2 35-45 170-190 1-2 25-35
testo
Grilovane
Sitni kolači 150-170 1-2-3 25-35 170-190 1-2 30-40 150-170 1-2-3 25-35
Kolač 150-170 1-2-3 30-40 170 -190 1-2 30-40 150-170 1-2-3 25-35
SR - 41
ćufte
175-200 2 40-50 175-200 2 40-50 175-200 2 40-50
Vodena
hrana
Piletina 200 1-2 45-60 200 1-2 45-60 200 * 50-60
Kotlet 200 3-4 15-25
Biftek 200 4 15-25
160-180 1-4 30-40
Kolač od
dva sloja
170-190 1-4 35-45
Pecivo od
dva sloja
* Kuvanje sa pečenim piletom na ražnju...

Dodaci
5. Rack
4. Rack
3. Rack
2. Rack
1. Rack
Proizvod je dostavljen sa dodacima.
Takođe možete da koristite dodatke
koje kupite od drugih prodavaca, ali moraju da budu otporni na toplotu i plamen. Takođe možete da koristite staklene činije, činije za kolače i tacne za
rernu koje odgovaraju za korišćenje
u
rerni. Sledite instrukcije proizvođača
kada koristite druge dodatke. U slučaju
da se male činije koriste, stavite činiju
na rešetku od žice jer će kompletno biti
na sredini rešetke. Ako hrana koju treba
skuvati ne pokriva tacnu rerne u potpunosti, ako je hrana izvađena duboko
zamrznuta ili se tacna koristi za prikupljanje tečnosti iz hrane koja curi u toku
grilovanja, menjanje oblika može da se
vidi na tacni. To je usled visokih temperatura koje se pojavljuju u toku kuvanja.
Tacna će se vratiti u svoj stari oblik kada
se tacna ohladi nakon kuvanja. Ovo je
normalni zički događaj koji se pojavljuje u toku transfera toplote. Ne stavljajte
tacne od vrućeg stakla i činije u hladno
okruženje odmah nakon vađenja iz rerne kako biste sprečili da se tacna ili
činija slome. Ne stavljajte na hladne
i
mokre površine. Stavite na suvu ku-
hinjsku krpu i dopustite da se sporo ohladi. Kada koristite gril u svojoj rerni,
preporučujemo (kada to odgovara) da
koristite rešetku koja je dostavljena sa
proizvodom. Kada koristite žičanu
rešetku; stavite tacnu na jednu od nižih
polica kako biste omogućili da se sakupi ulje. Voda može da se doda na tacnu
da bi pomogla pri čišćenju. Kao što je
objašnjeno u odgovarajućim
rečenicama, nikada ne pokušavajte da
koristite grejač grila koji je pokrenut od
strane gasa bez zaštitnog poklopca gri-
la. Ako vaša rerna sadrži grejač grila
koji je pokrenut od strane gasa, ali nedostaje zaštitnik toplote grila, ili ako je
oštećen i ne može se koristiti, zatražite
rezervni deo od najbližeg servisnog
centra.
Prostor rerne
Police:
5
4
3
2
1
Dodaci rerni
Dodaci za vašu rernu mogu da budu
različiti u zavisnosti od modela vašeg
proizvoda.
Žičana rešetka
Žičana rešetka se koristi za gril ili za
stavljanje različitih posuđa.
UPOZORENJE- Postavite rešetku pravilno u bilo koji odgovarajući stalak
u
prostoru rerne i gurnite je nazad.
SR - 42

Plitka tacna
Plitka tacna se koristi za pečenje testa
kao što su anovi itd. Da biste locirali tacnu pravilno u unutrašnjosti rerne,
stavite je na bilo koji stalak i gurnite je
nazad.
Duboka tacna
Duboka tacna se koristi za kuvanje
paprikaša. Da biste locirali tacnu pravilno u unutrašnjosti rerne, stavite je na
bilo koji stalak i gurnite je nazad.
ČIŠĆENJE I ODRŽAVANJE
VAŠE RERNE
ČIŠĆENJE
Pre nego što počnete da čistite svoju
rernu, postarajte se da sva kontrolna
dugmad budu isključena i da je vaš
uređaj ohlađen. Isključite uređaj.
Ne koristite materijale za čišćenje koji
sadrže čestice koje mogu da ogrebu
emajlirane i
obojene delove vaše rerne. Koristite
gušće čistače ili tečne čistače koji ne
sadrže čestice. Pošto mogu da oštete
površinu, ne koristite kaustične kreme,
abrazivne pudere za čišćenje, oštru žicu
od vune ili teške alatke. U slučaju da se
višak tečnosti prospe preko vaše rerne
i počne da gori, to može da dovede do
štete na emajlu. Odmah očistite prosutu tečnost. Ne koristite parne čistače za
čišćenje rerne.
Čišćenje unutrašnjosti rerne
Postarajte se da isključite rernu pre nego
što počnete da je čistite. Dobićete najbolje rezultate ako očistite unutrašnjost
rerne dok je rerna malo topla. Obrišite
rernu mekim parčetom tkanine koja je
umočena u sapunica nakon svake upotrebe. Zatim je ponovo obrišite, ovog
puta sa mokrom krpom i obrišite je onda
suvom. Kompletno čišćenje koristeći
čistače koji su suvi i od pudera. Za proizvode sa katalističkim emajliranim okvirima, zadnji i bočni zidovi unutrašnjeg
okvira ne zahtevaju čišćenje. Međutim,
SR - 43

u zavisnosti od korišćenja, preporučuje
se da ih zamenite nakon određenog
vremenskog perioda.
ODRŽAVANJE
SERVISIRANJE
I
TRANSPORT
ZAHTEVI KOJI PRIPADAJU
SERVISIRANJU
Zamena svetla u rerni
Zamenu lampice u rerni mora da izvrši
ovlašćeni tehničar. Mera svetiljke mora
da bude 230V, 25 vata, tip E14,T300
pre nego što se promeni lampica, rerna
treba da se isključi i da se ohladi.
Dizajn lampice je specičan za
korišćenje u uređajima za kuvanje
u
domaćinstvu i ne odgovara osvetlji-
va n ju s ob a u d o ma ć in s tv u .
Ako rerna ne radi:
Rerna može da se isključi, došlo je do
nestanka struje. Na modelima koji dolaze sa tajmerom, vreme možda neće biti
regulisano.
Ako rerna ne greje:
Toplota možda neće biti prilagođena sa
kontrolnim prekidačem grejača rerne.
Ako se unutrašnja lampica za osvetljen-
je ne upali:
Struja mora da se kontroliše. Mora se
kontrolisati da bi se videlo da li su lampice defektne. Ako su defektne, možete
da ih promenite onako kako piše
u
uputstvu.
Kuvanje (ako donji-gornji deo ne kuva
podjednako) :
Kontrolišite lokaciju police, period kuvanja i vrednosti toplote prema uputstvu.
Osim ovih, ako još uvek imate neki
problem sa svojim proizvodom, molimo
vas da pozovete „ovlašćeni servis“.
INFORMACIJA U VEZI SA
TRANSPORTOM
Ako vam je potreban neki transport:
Čuvajte originalno pakovanje proizvo-
da i nosite ga sa njegovim originalnim
pakovanjem kada treba da ga nosite.
Poštujte znake za transport na pako-
SR - 44

vanju. Zalepite šporet na gornje delove,
poklopce i šerpe na tablu za kuvanje.
Stavite papir između gornjeg poklopca
i table za kuvanje, poklopite gornji poklopac, zatim zalepite na bočne površine
rerne.
Zalepite karton ili papir na glavni poklopac unutrašnjeg stakla rerne jer će odgovarati tacnama, da žičani gril i tacne
u vašoj rerni ne oštete poklopac rerne
u toku transporta. Takođe zalepite poklopce rerne na bočne zidove.
Ako nemate originalno pakovanje:
Preuzmite mere za eksterne podloge
(staklo i ofarbane površine) rerne zbog
mogućih udaraca.
SR -45

Marka
Model
EBB7226
EBB7116
Tip rerne ELEKTRIČNA
Težina kg 32,0(+/-2)
Indeks energetske ekasnosti - standardna 119,1
Indeks energetske ekasnosti - sa ventilatorom 115,4
Energetska klasa B
Potrošnja energije (struje) - standardna kWh/
ciklus
Potrošnja energije (struje) - sa ventilatorom kWh/
ciklus
Broj otvora 1
Izvor toplote ELEKTRIČNA
Zapremina l 65
Ova rerna je u skladu sa EN 60350-1
Saveti za uštedu energije
Rerna
- Jela spremajte zajedno, ako je moguće.
0,98
0,95
- Održavajte kratko vreme predzagrevanja.
- Nemojte da produžavte vreme pečenja.
- Nemojte da zaboravite da isključite rernu na kraju kuvanja.
- Nemojte da otvarate vrata rerne tokom perioda kuvanja.
SR - 46

Simbol na proizvodu ili na njegovom pakovanju naznačava da ovaj proizvod
možda neće biti tretiran kao otpad iz domaćinstva. Umesto toga će se predati
primenljivoj tački za preuzimanje zarad recikliranja električne
i elektronske opreme. Starajući se da ovaj proizvod bude pravilno uklonjen,
pomoćićete da se spreče potencijalne negativne posledice za okruženje i ljudsko
zdravlje, što može da u suprotnom izazove neodgovarajuće upravljanje otpadom
ovog proizvoda. Za detaljnije informacije o recikliranju ovog proizvoda, molimo
vas da kontaktirajte vašu lokalnu gradsku kancelariju, uslugu otklanjanja vašeg
otpada iz domaćinstva ili prodavnicu gde ste kupili proizvod.

EBB7226
EBB7116
УПАТСТВА ЗА РАБОТЕЊЕТО
И ИНСТАЛАЦИЈАТА НА
ВГРАДЕНА РЕРНА
MKD

Почитувани корисници,
Нашата цел е да ви понудиме високо квалитетни производи кои ги надминуваат
вашите очекувања. Вашиот апарат е произведен во модерни капацитети
и е внимателно и посебно тестиран за квалитет. Ова упатство е подготвено
за да ви помогне да го користите апаратот, кој е произведен со користење
на најнова технологија, со доверба и максимална ефикасност. Пред да
го користите апаратот, внимателно прочитајте го овој водич кој ги содржи
основните информации за безбедна инсталација, одржување и употреба.
Контактирајте го најблискиот овластен сервисен центар за инсталацијата на
вашиот производ.
MК -49

Содржина
Претставување и големина на производот
Предупредувања
Подготовка за инсталација и употреба
Користење на рерната
Чистење и одржување на производот
Сервис и транспорт
MК -50

ПРЕТСТАВУВАЊЕ И ГОЛЕМИНА НА ПРОИЗВОДОТ
Контролен панел
Рачка
Врата на рерната
Долен грејач
(зад плочата)
Метална решетка за скара
Плех
Држачи
Горен грејач (зад плочата)
Сијаличка на рерната
Капаци на вентилаторот
MК - 51

БЕЗБЕДНОСНИ ПРЕДУПРЕДУВАЊА
ВНИМАТЕЛНО И ЦЕЛОСНО ПРОЧИТАЈТЕ
ГО ОВА УПАТСТВО ПРЕД ДА ГО КО-
РИСТИТЕ АПАРАТОТ И ЧУВАЈТЕ ГО НА
ПРАКТИЧНО МЕСТО ЗА ДА СЕ ПОСОВЕТУВАТЕ КОГА Е ТОА ПОТРЕБНО.
ОВА УПАТСТВО Е ПОДГОТВЕНО ЗА
ПОВЕЌЕ ОД ЕДЕН ЗАЕДНИЧКИ МОДЕЛ. ВАШИОТ АПАРАТ МОЖЕ ДА ГИ
НЕМА НЕКОИ ОД КАРАКТЕРИСТИКИТЕ
КОИ СЕ ОБЈАСНЕТИ ВО УПАТСТВОТО.
ОБРНЕТЕ ВНИМАНИЕ НА ИЗРАЗИТЕ
КОИ СОДРЖАТ БРОЈКИ, ДОДЕКА ГО
ЧИТАТЕ УПАТСТВОТО ЗА РАБОТЕЊЕ.
Општи безбедносни предупредувања
• Овој апарат може да се
користи од деца на возраст од 8 години па нагоре, како и од лица со намалени физички, сетилни
или умствени способности
или со недостаток на искуство и
знаење, ако се под
надзор или се обучени
како да го користат апаратот на безбеден начин
и ги разбираат вклучените
ризици. Децата не смеат
да си играат со апаратот.
Чистењето и одржувањето не смеат да го прават
деца без надзор.
• ПРЕДУПРЕДУВАЊЕ:
Апаратот и неговите
достапни делови се
загреваат за време
на употребата. Треба
да се внимава да не
се допрат грејачите.
Децата помали од
8 години треба да се
држат настрана освен
ако не се под постојан надзор.
• ПРЕДУПРЕДУВАЊЕ:
Опасност од пожар: не
чувајте предмети на површините за готвење.
• ПРЕДУПРЕДУВАЊЕ:
Ако површината е напукната, исклучете
го апаратот за да се
избегне можноста од
струен удар.
• Апаратот не е наменет за да се управува
со помош на надворешен тајмер или посебен систем со далечинско управување.
• За време на употребата, апаратот се загрева. Треба да се внимава да не се допрат
грејачите во рерната.
• За време на употребата, рачките кои се
MК -52

држат краткотрајно при
нормална употреба можат да станат жешки.
• Не користете груби
абразивни средства
или остри метални
стругалки за чистење
на стаклената врата
на рерната и останатата површина бидејќи тие може да ја
изгребат површината,
што може да резултира со кршење на
стаклото или оштетување на површината.
• Не користете средства на пареа за чистење на апаратот.
• ПРЕДУПРЕДУВАЊЕ:
Осигурајте се дека
апаратот е исклучен
пред заменување на
ламбата за да се избегне можноста од
струен удар.
• ВНИМАНИЕ: Достапните делови може да
бидат жешки кога во
употреба е готвење
или печење на скара.
Малите деца треба да
се држат настрана.
• Вашиот апарат е произведен во согласност со сите важечки локални
и
меѓународни стандарди и прописи.
• Одржувањето и поправката мора
да се направат само од страна
на овластени сервисери. Инсталацијата и поправката кои се извршени од неовластени мајстори
може да ви го загрозат животот.
Опасно е да се преправуваат или
модификуваат спецификациите
на апаратот на било каков начин.
• Пред инсталацијата, осигурајте
се дека локалните услови за дистрибуција (природата на гасот
и гасниот притисок или волтажата и фреквенцијата на електричната енергија) и барањата
на апаратот се компатибилни.
Барањата за овој апарат се наведени на етикетата.
• ВНИМАНИЕ: Овој апарат е дизајниран само за готвење храна
и
наменет само за внатрешна
е
употреба во домаќинството и
треба да се користи за друга на
мена или за било каква друга примена, како што е употребата вон
дом
от или во комерцијална сре-
дина или за затоплување на соби.
•
Не се обидувајте да го кревате
или преместувате апаратот со повлекување на рачката на вратата.
• Преземени се сите можни заштитни мерки за да се осигура
вашата безбедност. Бидејќи стаклото може да се скрши, треба да
бидете внимателни при чистењето за да се избегне гребење. Избегнувајте удирање или тропање
не
-
MК - 53

на стаклото со додатоци.
Осигурајте се дека кабелот за
•
напојување со струја не е заглавен во текот на инсталацијата.
Ако кабелот за напојување со
струја е оштетен, мора да биде
заменет од страна на производителот, неговиот сервисер или
други квалификувани лица за да
се спречи опасност.
• Додека вратата од рерната е отворена, не им дозволувајте на
децата да се качуваат на вратата или да седат на неа.
Предупредувања за инсталацијата
• Не ракувајте со апаратот пред
да биде целосно инсталиран.
Апаратот мора да биде инста-
•
лиран од страна на овластен
мајстор и пуштен во употреба.
Производителот не е одговорен
за било каква штета која може да
биде предизвикана од неисправно поставување и инсталација
од страна на неовластени лица.
•
Кога ќе го отпакувате апаратот,
осигурајте се дека не е оштетен за време на транспортот. Во
случај на некаков дефект, не го
користете апаратот и веднаш
контактирајте го квалификуваниот сервисер. Бидејќи материјалите кои се користат за
пакување (најлон, хефталици,
стиропор...итн.) може да предизвикаат штетни влијанија кај
децата, истите треба веднаш да
се соберат и да се отстранат.
• Заштитете го апаратот од атмосферските влијанија. Не го изложувајте на влијанија како што се
сонце, дожд, снег итн.
• Материјалите кои го опкружуваат апаратот (витрината) мора да
бидат способни да издржат температура од минимум 100°C.
За време на употребата
• Кога за прв пат ќе ја вклучите
рерната, ќе се појави одредена
миризба од материјалите за изолација и грејачите. Поради таа причина, пред да ја користите рерната,
вклучете ја на празно на максимална температура во рок од 45 минути. Во исто време, треба правилно
да ја проветрите средината во која
е инсталиран производот.
• За време на употребата, надворешните и внатрешните површини на рерната се загреваат. Кога
ја отворате вратата на рерната,
потргнете се наназад за да ја
избегнете жешката пареа која
излегува од рерната. Може да
постои опасност од изгореници.
• Не ставајте запаливи или експлозивни материјали, во или близу
апаратот додека тој работи.
• Секогаш користете ракавици за
рерна за да ја вадите и заменувате храната во рерната.
• Не го оставајте шпоретот додека
готвите со цврсти или течни масла. Можат да се запалат во случај на прекумерно загревање.
Никогаш не туривајте вода
на пламенот предизвикан од
масло. Покријте ги тенџерето
или тавата за пржење со соодветниот капак, со цел да се задуши
пламенот кој се појавил во овој
случај и исклучете го шпоретот.
• Ако нема да го користите апара-
MК - 54

тот подолг период, исклучете го
од струја. Главното копче нека
биде исклучено. Исто така, кога
не го користите апаратот, нека
биде исклучен вентилот за гас.
Осигурајте се дека копчињата
•
за регулирање на апаратот се
секогаш во позиција „0“ (стоп)
кога тој не се користи.
• Плеховите се навалуваат при вадењето. Внимавајте да не дозволите да се прелее жешка течност.
Кога вратата или фиоката на
•
рерната е отворена, не ставајте
ништо врз неа. Може да се неурамнотежи апаратот или да се
скрши капакот.
•
Не ставајте тешки предмети или
запаливи или разгорувачки артикли (најлон, пластични кеси, хартија, крпи...итн.) во фиоката. Ова
вклучува и садови со пластични
додатоци (на пример, рачки).
•
Не закачувајте пешкири, кујнски
крпи или облека на апаратот
или неговите рачки.
• За време на чистењето и одржувањето.
• Секогаш исклучувајте го апаратот пред операции како што се
чистење и одржување. Можете
да го направите тоа откако ќе го
исклучите апаратот или откако ќе
ги исклучите главните копчиња.
•
Не ги отстранувајте копчињата
за регулирање за да го исчистите контролниот панел.
• ЗА ДА СЕ ЗАДРЖИ ЕФИКАСНОСТА И БЕЗБЕДНОСТА НА ВАШИОТ АПАРАТ, ВИ ПРЕПОРАЧУВАМЕ СЕКОГАШ ДА КОРИСТИТЕ
ОРИГИНАЛНИ РЕЗЕРВНИ ДЕ-
ЛОВИ И ДА ГИ ПОВИКАТЕ САМО
НАШИТЕ ОВЛАСТЕНИ СЕРВИСЕРИ ВО СЛУЧАЈ НА ПОТРЕБА.
ПОДГОТОВКА ЗА ИНСТАЛАЦИЈА И УПОТРЕБА
Изработена со најквалитетни делови
и материјали, оваа модерна, функционална и практична рерна ќе ги
задоволи вашите потреби во секаков
поглед. Не заборавајте да го прочитате упатството за да добиете успешни
резултати и да не доживеете никакви
проблеми во иднина. Информациите
дадени подолу содржат правила кои
се потребни за точно позиционирање
и работење. Треба внимателно да
се прочитаат, посебно од страна на
мајсторот кој ќе го мести апаратот.
КОНТАКТИРАЈТЕ ГО ОВЛАСТЕНИОТ СЕРВИСЕР ЗА ИНСТАЛАЦИЈАТА НА ВАШАТА РЕРНА!
КАКО ДА ОДБЕРЕТЕ МЕСТО
ЗА РЕРНАТА
– Постојат неколку точки на кои тре-
ба да обрнете внимание кога одбирате место за рерната. Не заборавајте да ги земете предвид
нашите препораки дадени подолу
за да се спречат било какви проблеми и опасни ситуации, кои би
можеле да се случат подоцна!
– Кога одбирате место за рерната,
треба да обрнете внимание да
нема запаливи или експлозивни
материјали во непосредна близина,
како завеси, масло, ткаенини итн.
кои брзо може да се запалат.
– Мебелот кој се наоѓа околу рерната
мора да биде направен од материјали кои се отпорни на топлина поголема од 50 C° од собната температура.
MК - 55

Потребните промени на ѕидните витрини и аспираторите над вградениот
комбиниран производ, како и минималните висини од плочата на рерната се прикажани на слика 1. Соодветно на тоа, аспираторот треба да биде
на висина од најмалку 65 см од плочата. Ако нема аспиратор, висината не
треба да биде помала од 70 см.
(со аспиратор)
Минимум 65см
Минимум 70см
Минимум
42 см
ПЛОЧА
(без аспиратор)
42 см
Минимум
ИНСТАЛАЦИЈА НА ВГРАДЕНАТА РЕРНА
Ставете ја рерната во витрината туркајќи ја нанапред. Отворете ја вратата на рерната и ставете 2 шрафа во
дупките кои се наоѓаат на рамката на
рерната. Додека рамката на производот ја допира дрвената површина на
витрината, затегнете ги шрафовите.
MК - 56

Површина за готвење
мин.
мин.
50 мм
25 мм
Вградена плоча
Вградена рерна
Ако рерната е инсталирана под грејна
плоча, растојанието помеѓу површината за готвење и горниот панел на
рерната мора да биде минимум 50 мм,
а растојанието помеѓу површината за
готвење и врвот на контролниот панел
мора да биде минимум 25 мм.
ЕЛЕКТРИЧНА ИНСТАЛАЦИЈА
И БЕЗБЕДНОСТ НА ВГРАДЕНАТА РЕРНА
Мора внимателно да се следат инструкциите дадени подолу за време
на електричната инсталација:
– Кабелот за заземјување мора да
биде поврзан преку шрафот со знакот за заземјување. Поврзувањето со кабел за напојување мора
да биде како што е прикажано на
слика 6. Ако нема заземјен штекер
во согласност со прописите за средината на инсталирање, јавете се
веднаш во овластениот сервис.
– Заземјениот штекер мора да биде
во непосредна близина на апаратот. Никогаш не користете продолжен кабел.
– Кабелот за напојување не треба да ја до-
пира топлата површина на производот.
– Во случај на било какво оштетување
на кабелот за напојување, не заборавајте да се јавите во овластениот
сервис. Кабелот мора да биде заменет од страна на овластениот сервис.
– Поставувањето на електричната ин-
сталација на апаратот мора да биде
извршено од страна на овластениот
сервис. Мора да се користи кабел за
напојување од типот H05VV-F.
– Неправилната електрична инста-
лација може да го оштети апаратот.
Таквата штета нема да биде покриена со гаранцијата.
– Апаратот е дизајниран за да се по-
врзе со струја од 220-240 волти; ако
струјата е поразлична од вредноста
дадена погоре, јавете се веднаш во
овластениот сервис.
– Фирмата на производителот изја-
вува дека не сноси никаква одговорност за било какви штети
изагуби кои настануваат од непочитувањето на правилата за безбедност!
КАФЕАВА
СИНА
ЖОЛТА+ЗЕЛЕНА
MК -57

КОРИСТЕЊЕ НА РЕРНАТА
Контролен панел
Контролно копче за
функции на рерната
Сијаличка за работење на рерната
Дигитален
тајмер
Контролно копче за функции
на рерната
За да ја изберете саканата функција
за готвење, свртете го копчето кон
соодветниот симбол. Деталите за
функциите на рерната се објаснети
во следниот дел.
Контролно копче за функции
на рерната
За да ја изберете саканата функција
за готвење, свртете го копчето кон
соодветниот симбол. Деталите за
функциите на рерната се објаснети
во следниот дел.
Контролно копче за
функции на рерната
Сијаличка за термостатот на рерната
MК - 58

Функции на рерната
* Функциите на рерната може да се
разликуваат во зависност од моделот
на вашиот производ.
Ламба на рерната:
Ќе се вклучи само сијаличката на
рерната и ќе остане вклучена во сите
функции за готвење.
Функција за одмрзну-
вање:
Предупредувачките светла на рерната ќе се вклучат, а вентилаторот ќе
почне да работи.
За да ја користите функцијата за
одмрзнување, земете ја замрзнатата храна и ставете ја во рерната на
полицата сместена во третиот отвор
од дното. Се препорачува да ставите плех за рерна под храната што се
одмрзнува, за да ја фати акумулираната вода што настанува поради топење на мразот. Оваа функција нема
да ја зготви или испече храната, туку
само ќе помогне таа да се одмрзне.
Tурбо функција
Предупредувачките светла на
рерната ќе се вклучат, а вентилаторот ќе почне да работи. Турбо
функција рамномерно шири топлота
во рерната. Хране ќе биде на сите
полици рамномерно зготвена
Препорачливо е претходно да се
загрее рерната околу 10 минути.
Функција за статично готвење:
Термостатот и предупредувачките
светла на рерната ќе се вклучат, а долниот и горниот грејач ќе почнат да работат. Функцијата за статично готвење
испушта топлина, обезбедувајќи рамномерно готвење на храната од горе
и од долу. Ова е идеално за подготвување на печива, торти, печени тестенини, лазањи и пица. Се препорачува
рерната претходно да се загрее околу
10 минути и најдобро е да се готви само
на една полица кај оваа функција.
Функција за вентилатор:
Термостатот и предупредувачките светла на рерната ќе се вклучат,
а горниот и долниот грејач и вентилаторот ќе почнат да работат. Оваа
функција е многу добра за добивање
резултати при печење на печива.
Готвењето се врши од страна на
долниот и горниот грејач во рерната
и од страна на вентилаторот кој
овозможува струење на воздухот,
што ќе ѝ даде на храната делумен
ефект на печење на скара. Препорачливо е претходно да се загрее
рерната околу 10 минути.
Pizza функција:
Термостатот и предупредувачките
светла на рерната ќе се вклучат, а
прстен и долниот грејач и
вентилаторот ќе почнат да работат.
Вентилатор и долниот грејач са
идеални за печење на храната, како
што е пицца. Додека вентилаторот
рамномерно шири топлота, долниот
грејач овозможува печење на печиво.
Функција за печење на скара:
Термостатот и предупредувачките
светла на рерната ќе се вклучат,
а грејачот за печење на скара ќе почне
да работи. Функцијата се користи за
печење на скара и затоплување на
MК - 59
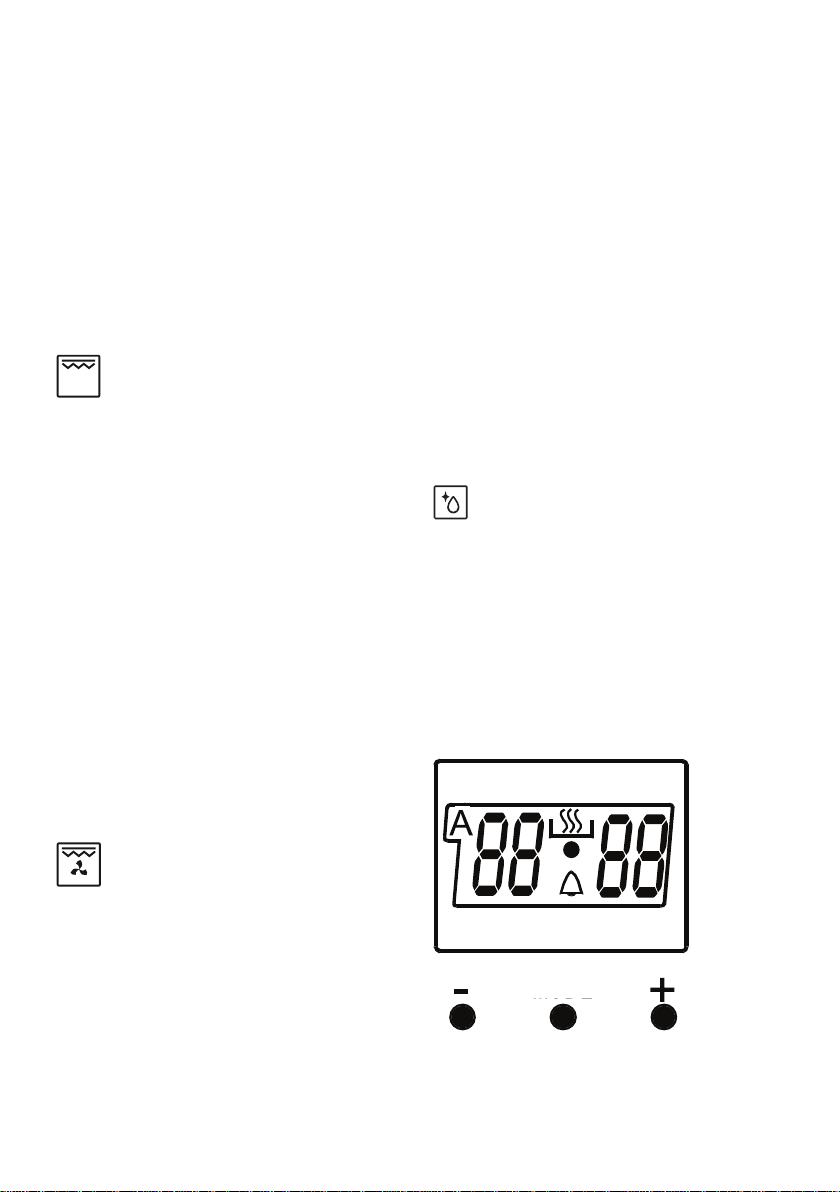
храна; користете ги горните полици на
рерната. Лесно поминете ја металната
решетка со масло за да спречите
лепење на храната и ставете ја храната
на средината на решетката. Секогаш
ставајте плех одоздола за да ги фати
капките масло или маст. Препорачливо
е претходно да се загрее рерната
околу 10 минути. Предупредување:
При печење на скара, вратата од
рерната мора да биде затворена,
а
температурата на рерната треба да
се прилагоди на 190
0
C.
Функција за побрзо печење
на скара:
Термостатот и предупредувачките
светла на рерната ќе се вклучат,
скарата и горниот грејач ќе почнат
а
да работат. Функцијата се користи за
побрзо печење на скара и за покривање
на поголема површина, како што
е печењето на меса; користете ги
горните полици на рерната. Лесно
поминете ја металната решетка со
масло за да спречите лепење на храната
и ставете ја храната на средината на
решетката. Секогаш ставајте плех
одоздола за да ги фати капките масло
или маст. Препорачливо е претходно
да се загрее рерната околу 10 минути.
Предупредување: При печење, вратата
од рерната мора да биде затворена,
а температурата на рерната треба да
се прилагоди на 190
0
C
И горниот грејач и скарата ќе бидат
напоени со електрицитет заедно
со вентилаторот за да се обезбеди
подеднакво готвење.
Користете ги горните полици на
рерната. Лесно поминете ја металната
решетка со масло за да спречите
лепење на храната и ставете ја
храната на средината на решетката.
Секогаш ставајте плех одоздола за
да ги фати капките масло или маст.
Препорачливо е претходно да се
загрее рерната околу 10 минути.
Предупредување: При печење на
скара, вратата од рерната мора да биде
затворена, а температурата на рерната
треба да се прилагоди на 1900C.
Функција на чистење
Прилагодете функција на рерната и
термостатот на симболот за
функција за чистење. Истурете 200250ml вода (околу 1 чаша) во
малечак сад на дното на рерната.
Чистење работи околу 20 минути и
подготвува рерната за лесно
чистење.
Користење на дигитален тајмер
Двојна функција за печење
на скара и вентилатор:
Термостатот и предупредувачките
светла на рерната ќе се вклучат,
а скарата и горниот грејач
и вентилаторот ќе почнат да работат.
Функцијата се користи за побрзо
печење на скара на подебели јадења
и за покривање на поголема површина.
MК - 60
Режим
Прилагодување на време:
Времето мора да се прилагоди пред
да се почне со користење на рерна-

та. По напојувањето на рерната,
симболот (A) и трите „0“ на екранот
ќе почнат да трепкаат. Истовремено
притиснете ги копчињата (+) и (-).
Симболот ќе се појави на екранот.
Исто така, точката на средината
на екранот ќе почне да трепка. Со
користење на копчињата (+) и (-),
прилагодете го времето од денот додека трепка оваа точка. По прилагодувањето, треба да се очекува дека
точката постојано ќе биде запалена.
По напојувањето на рерната, кога
симболот (A) и трите „0“ на екранот
ќе почнат да трепкаат, рерната нема
да може да се управува со користење на контролните копчиња. Кога
копчињата (+) и (-) се истовремено
притиснати за прилагодување на
времето, симболот
ќе се појави на
екранот. Кога овој симбол ќе се појави на екранот, ќе можете рачно да
управувате со рерната. Бидејќи прилагоденото време ќе се ресетира во
случај на прекин на струјата, повторно ќе мора да се изврши операција
за прилагодување на времето.
Прилагодување на време со
звучно предупредување:
Режим
Времето мора да се прилагоди пред
да се почне со користење на рерната. По напојувањето на рерната,
симболот (A) и трите „0“ на екранот
ќе почнат да трепкаат. Истовремено
притиснете ги копчињата (+) и (-).
Симболот ќе се појави на екранот.
Исто така, точката на средината
на екранот ќе почне да трепка. Со
користење на копчињата (+) и (-),
прилагодете го времето од денот додека трепка оваа точка. По прилагодувањето, треба да се очекува дека
точката постојано ќе биде запалена.
Оваа функција може да се користи
за да добиете звучно предупредување по завршувањето на прилагодениот временски период.
Притиснете го копчето РЕЖИМ во
средината. Симболот ќе трепне на
екранот. Исто така, ќе се појават три
„0“. Прилагодете го посакуваниот
временски период за предупредувањето со користење на копчињата
(+) и (-) додека трепка симболот .
Извесно време по завршувањето
на прилагодувањето, симболот ќе
почне постојано да се пали. Кога
симболот почнува постојано да се
пали, завршено е прилагодувањето
на времe со звучно предупредување.
Времето со звучно предупредување
може да се намести на време во
опсег помеѓу 0 и 23.59.
Кога ќе истече наместеното време,
тајмерот дава звучно предупредување, а симболот почнува да
трепка на екранот. Со притискање на
било кое копче ќе се запре звучното
предупредување, а симболот ќе
исчезне од екранот.
Прилагодувањето на време со звучно
предупредување се користи само за
предупредувачки цели. Рерната нема
да се активира со оваа функкција.
MК - 61

Полуавтомаско прилагодување на време според периодот на готвење:
Режим
Оваа функција се користи за да
се готви во посакуваниот временски опсег. Јадењата што треба да
се зготват се ставаат во рерната.
Рерната се прилагодува на посакуваната функција за готвење. Термостатот на рерната се прилагодува
на посакуваниот степен во зависност од јадењето што треба да се
зготви. Продолжете да притискате
на копчето РЕЖИМ сѐ додека не
видите „стоп“ на екранот на тајмерот.
Кога ќе видите „стоп“ на екранот на
тајм
ерот, симболот (A) ќе почне да
трепка. Прилагодете го периодот на
готвење за храната што сакате да ја
зготвите, со користење на копчињата (+) и (-) додека тајмерот се наоѓа
во оваа позиција. Извесно време по
завршувањето на операцијата на
прилагодување, времето од денот ќе
се појави на екранот, а симболите (A)
и ќе почнат постојано да се палат на
екранот. Додека се прави ова, рерната исто така ќе почне да работи.
Може да се намести период на
готвење во временски опсег помеѓу 0 и 10 часа.
По завршување на наместеното
времетраење, тајмерот ќе ја запре
рерната и ќе даде звучно предупредување. Исто така, симболот (A)
ќе почне да трепка на екранот. Откако ќе ги донесете копчето на рерната
и копчето на термостатот на рерната до позиција 0, со притискање
на било кое копче на тајмерот ќе
заврши звучното предупредување.
Исто така, тајмерот ќе се донесе до
функција за рачно користење.
Полуавтоматско програмирање според времето на
завршување:
Режим
Оваа функција се користи за да се
готви според посакуваното време на
завршување. Јадењето што треба
да се зготви се става во рерната.
Рерната се прилагодува на посакуваната функција за готвење. Термостатот на рерната се прилагодува на
посакуваниот степен во зависност
од јадењето што треба да се зготви.
Продолжете да притискате на копчето РЕЖИМ сѐ додека не видите
„крај“ на екранот на тајмерот. Симболот (A) и времето од денот соодветно ќе почнат да трепкаат.
Прилагодете го времето на завршување за храната што сакате да ја
зготвите, со користење на копчињата
(+) и (-) додека тајмерот се наоѓа во
оваа позиција. Извесно време по
завршувањето на операцијата на
прилагодување, времето од денот
ќе се појави на екранот, а симболи-
MК - 62

те (A) и ќе почнат постојано да се
палат на екранот. Додека се прави
ова, рерната исто така ќе почне да
работи.
Може да наместите време што може да
биде до 10 часа по времето од денот.
По завршување на наместеното
времетраење, тајмерот ќе ја запре
рерната и ќе даде звучно предупредување. Исто така, симболот (A)
ќе почне да трепка на екранот. Откако ќе ги донесете копчето на рерната
и копчето на термостатот на рерната до позиција 0, со притискање
на било кое копче на тајмерот ќе
заврши звучното предупредување.
Исто така, тајмерот ќе се донесе до
функција за рачно користење.
Целосно автоматско програмирање:
Прво; продолжете да притискате
на копчето РЕЖИМ сѐ додека не
видите „стоп“ на екранот на тајмерот.
Кога ќе видите „стоп“ на екранот на
тајмерот, симболот (A) ќе почне да
трепка. Прилагодете го периодот на
готвење за храната што сакате да ја
зготвите, со користење на копчињата (+) и (-) додека тајмерот се наоѓа
во оваа позиција. Извесно време по
завршувањето на операцијата на
прилагодување, времето од денот
ќе се појави на екранот, а симболите (A) и ќе почнат постојано да се
палат на екранот.
Може да се намести период
на готвење во временски
опсег помеѓу 0 и 10 часа.
Режим
Оваа функција се користи за да се
готви по одреден временски период,
со одредено времетраење. Јадењето што треба да се зготви се става
во рерната. Рерната се прилагодува
на посакуваната функција за готвење. Термостатот на рерната се
прилагодува на посакуваниот степен
во зависност од јадењето што треба
да се зготви.
MК - 63
Режим
Второ; продолжете да притискате на
копчето РЕЖИМ сѐ додека не видите
„крај“ на екранот на тајмерот. Кога ќе
видите „крај“ на екранот на тајмерот,
симболот (A) и времето од денот ќе
почнат да трепкаат, покрај периодот
на готвење. Прилагодете го времето
на завршување за храната со користење на копчињата (+) и (-) додека
тајмерот се наоѓа во оваа позиција.
Извесно време по завршувањето
на операцијата на прилагодување,
времето од денот ќе се појави на
екранот, а симболот (A) ќе почне
постојано да се пали на екранот.

Може да наместите време што
може да биде до 23.59 часа
по времето добиено со додавање на периодот на готвење
на времето од денот.
Рерната ќе почне да работи во времето пресметано со одземање на
периодот на готвење од наместеното
време на завршување, а ќе престане во наместеното време на завршување. Тајмерот ќе даде звучно
предупредување, а симболот (A) ќе
почне да трепка. Откако ќе ги донесете копчето на рерната и копчето на
термостатот на рерната до позиција
0, со притискање на било кое копче
на тајмерот ќе заврши звучното предупредување. Исто така, тајмерот
ќе се донесе до функција за рачно
користење.
Користење на механичкиот тајмер
Ракување со поставување на
времето
Наместите го саканото време на
готвење со вртење на копчето на
тајмерот во одредено време помеѓу
10-100 минути. На крајот на овој
оериод, рерната ќе стане со работа
и тајмерот ќе даде звучниот сигнал.
Рачно користење
Кога ќе го завртете копчето на
позиција М како што е прикажано
на сликата, можете непрекинато
да ја користете рерната. Кога
кочето на тајмерот е во позиција
0 рерна нема да работи.
MК - 64

(мин)
готвење
Период на
на
Позиција
држачот
(мин)
Позиција на
термостатот
(мин)
готвење
Период на
на
Позиција
држачот
(°C)
Позиција на
термостатот
(мин)
готвење
Период на
на
Позиција
држачот
(°C)
Позиција на
термостатот
200 4 10-15
ТУРБО ГОРЕ-ДОЛУ ДОЛЕН-ГОРЕН ВЕНТИЛАТОР СКАРА
(мин)
готвење
Период на
на
Позиција
држачот
(°C)
Позиција на
термостатот
ЈАДЕЊА
170-190 1-2-3 35-45 170-190 1-2 35-45 170-190 1-2 25-35
Лиснати
175-200 2 40-50 175-200 2 40-50 175-200 2 40-50
Ќофтиња
на скара
Водлеста
храна
Колачиња 150-170 1-2-3 25-35 170-190 1-2 30-40 150-170 1-2-3 25-35
печива
Торти 150-170 1-2-3 30-40 170 -190 1-2 30-40 150-170 1-2-3 25-35
Пилешко 200 1-2 45-60 200 1-2 45-60 200 * 50-60
Котлети 200 3-4 15-25
Бифтек 200 4 15-25
160-180 1-4 30-40
Торти во
170-190 1-4 35-45
Печива во
два плеха
два плеха
* Гответе со ражен за печено пилешко...
MК - 65

Додатоци
5. Rack
4. Rack
3. Rack
2. Rack
1. Rack
Производот се испорачува со
додатоци. Можете, исто така, да
користите и додатоци кои ќе ги купите
од друга страна, но мора да бидат
отпорни на топлина и пламен. Можете
да користите и стаклени садови,
калапи за торти и плехови за рерна
кои се соодветни за користење во
рерна. Следете ги упатствата на
производителот кога употребувате
други додатоци. Во случај да се
користат садови со мали димензии,
ставете го садот врз металната
решетка бидејќи целосно ќе се наоѓа
на средниот дел од решетката. Ако
храната што треба да се зготви не го
покрива целосно плехот од рерната,
ако храната е земена од длабоко
замрзнување или ако плехот се
користи за собирање на соковите од
храната кои течат во текот на
печењето, промените на формата ќе
може да се забележат во плехот. Ова
се должи на високите температури
кои се јавуваат за време на готвењето.
Плехот ќе се врати во својата
првобитна форма кога ќе се излади по
готвењето. Ова е нормален физички
настан што се случува за време на
пренос на топлина. Не ставајте
вжештени стаклени тави и садови во
ладна средина директно од рерната
за да се спречи кршење на тавата или
садот. Не ставајте на ладни и влажни
површини. Поставете на сува кујнска
крпа и дозволете полека да се излади.
Кога ја користите скарата од рерната;
препорачуваме (каде што е соодветно)
да ја користите решетката која
е
испорачана со производот. Кога ја
користите металната решетка; ставете
плех врз една од долните полици за
се овозможи собирање на маслото.
Може да се додаде вода во плехот за
да се помогне при чистењето. Како
што е објаснето во соодветните точки,
никогаш не се обидувајте да го
користите потпалувачот за скара кој
работи на гас без заштитниот капак на
скарата. Ако вашата рерна има
потпалувач за скара кој работи на гас,
но недостасува топлотниот штит на
скарата, или ако е оштетен и не може
да се употреби, побарајте резервен
дел од најблискиот сервисен центар.
Внатрешност на рерната
Држачи:
5
4
3
2
1
Додатоци за рерна
Додатоците за рерната може да се
разликуваат во зависност од моделот
на вашиот производ.
Метална решетка
Металната решетка се користи за
печење на скара или за ставање на
различни садови.
ПРЕДУПРЕДУВАЊЕ- Наместете ја
решетката правилно на соодветниот
држач во внатрешноста на рерната
и турнете ја наназад.
MК - 66

Плиток плех
Плиткиот плех се користи за печење
на печива како што се колачи итн. За
правилно да го наместите плехот во
внатрешноста, ставете го на било кој
држач и турнете го наназад.
ЧИСТЕЊЕ
И
ОДРЖУВАЊЕ НА
РЕРНАТА
ЧИСТЕЊЕ
Пред да почнете да ја чистите рерната,
проверете дали сите контролни
копчиња се исклучени и дали апаратот
е изладен. Исклучете го апаратот.
Длабок плех
Длабокиот плех се користи за
готвење на варива. За правилно да го
наместите плехот во внатрешноста,
ставете го на било кој држач и турнете
го наназад.
Не користете средства за чистење
што содржат честици кои можат да ги
изгребат емајлираните и обоени
делови од рерната. Користете
кремасти или течни средства за
чистење, кои не содржат честици.
Бидејќи можат да ги оштетат
површините, не користете корозивни
кремови, абразивни прашоци за
чистење, груби жици за чистење
садови или тешки алати. Во случај
вишокот течности кои се прелеваат
на вашата рерна да почнат да горат,
тоа може да предизвика оштетување
на емајлот. Веднаш исчистете
ги прелеаните течности. Не
користете средства на пареа за
чистење на рерната.
Чистење на внатрешноста на
рерната
Не заборавајте да ја исклучите
рерната пред да почнете да ја чистите.
Ќе добиете најдобри резултати ако
ја чистите внатрешноста на рерната
додека рерната е малку топла.
Избришете ја рерната со меко парче
ткаенина потопено во насапунета
MК - 67

вода после секоја употреба. Потоа
повторно избришете, овој пат со
намокрена крпа и добро исушете.
Комплетно чистење со користење на
суви и прашести средства за чистење.
За производ со катализаторски
емајлирани рамки, задните
и
страничните ѕидови на внатрешиот
дел на рамката не бараат чистење.
Сепак, во зависност од употребата,
се препорачува да ги замените по
одреден временски период.
ОДРЖУВАЊЕ
Менување на сијаличката на
рерната
Промената на ламбата на рерната
мора да биде извршена од страна
на овластен мајстор. Моќноста
на сијалицата треба да биде 230
волти, 25 вати, тип E14, T300; пред
менување на ламбата, рерната треба
да биде исклучена и изладена.
Дизајнот на ламбата е специфичен
за употреба во апарати за готвење
во домаќинствата и не е погоден за
осветлување на соби во домаќинствата.
СЕРВИС И ТРАНСПОРТ
БАРАЊА ПРЕД
ПОДЛОЖУВАЊЕ НА СЕРВИС
Ако рерната не работи:
Рерната може да е исклучена бидејќи
имало прекин на електричната
енергија. На моделите кои се
опремени со тајмер, може да не
е
регулирано времето.
Ако рерната не загрева:
Топлината може да не е прилагодена
со копчето за регулирање на грејачот
на рерната.
Ако внатрешната ламба за
осветлување не се пали:
Мора да се регулира струјата. Мора
да се изрегулира ако ламбите се
неисправни. Ако се неисправни,
може да ги смените според водичот.
Готвење (ако долниот и горниот дел
не готват подеднакво):
Регулирајте ги местополжбата на полиците,
времето на готвењ
топлината според упатството.
Освен овие, ако сѐ уште имате
некаков проблем со производот,
јавете се во „овластениот сервис“.
е и вредностите на
ИНФОРМАЦИИ ПОВРЗАНИ СО
ТРАНСПОРТОТ
Ако ви треба транспорт:
Чувајте ја оригиналната опаковка
на производот и носете го со
оригиналната опаковка кога треба да
се пренесува. Следете ги знаците за
MК - 68

транспорт на опаковката. Залепете
го шпоретот на горните делови,
капаците и носачите на тенџериња
со панелите за готвење.
Ставете хартија помеѓу горниот капак
и панелот за готвење, покријте го
горниот капак, а потоа залепете го со
страничните површини на рерната.
Залепете картон или хартија на
предниот капак на внатрешното
стакло на рерната бидејќи тоа ќе
биде соодветно за плеховите, за
металната решетка за скара и тавите
во рерната за да не се оштети капакот
на рерната за време на транспортот.
Исто така, залепете ги капаците на
рерната за страничните ѕидови.
Ако ја нема оригиналната опаковка:
Преземете мерки за надворешните
површини (стаклени и бојадисани
површини) на рерната за да се
за шт и тат од м ож н и уд ар и .
MК - 69

Симболот на производот или на неговата амбалажа означува дека овој
производ не може да биде третиран како домашен отпад. Тој треба да биде
предаден на соодветно место за рециклирање електрични и електронски
опреми. Со правилното отстранување на овој производ помагате во
спречување на можни негативни последици за околината и за човековото
здравје до кои може да дојде со неправилно остранување на производот. За
подетални информации за рециклирање на овој производ, ве молиме да се
обратите во локалната општина,секторот одговорен за отстранување отпад
или во продавницата каде што сте го купиле вашиот производ.

EBB7226
EBB7116
UPORABA IN NAMESTITEV
NAVODILA ZA
VGRADNO PEČICO
SVN

Dragi kupec,
želimo Vam ponuditi visoko kakovostne izdelke, ki presegajo Vaša
pričakovanja. Vaša naprava je izdelana v sodobnih obratih in njena kakovost je
skrbno preverjena. Ta navodila za uporabo so pripravljena, da vam pomagajo
uporabljati napravo, ki je bila izdelana z najsodobnejšo tehnologijo z zaupanjem
in najboljšo učinkovitostjo. Pred uporabo naprave skrbno preberite ta navodila,
ki vključujejo osnovne informacije o varni namestitvi, vzdrževanju in uporabi. Za
namestitev izdelka kontaktirajte najbližji pooblaščeni servisni center.
SL - 72

Vsebina
Predstavitev in velikost izdelka
Opozorila
Priprava za namestitev in uporabo
Uporaba pečice
Čiščenje in vzdrževanje izdelka
Servis in prevoz
SL - 73

PREDSTAVITEV IN MERE IZDELKA
Nadzorna plošča
Ročaj
Vrata pečice
Spodnji grelni element (za ploščo)
Zgornji grelni element (za ploščo)
Mrežica
za žar
Pladenj
Vodila
Lučka pečice
Zaslonke za izstop zraka
SL - 74

VARNOSTNA OPOZORILA
PRED ZAČETKOM UPORABE NAPRAVE NATANČNO PREBERITE TA
NAVODILA IN JIH HRANITE NA VARNEM MESTU, ZA KASNEJŠO
UPORABO.
TA NAVODILA SO PRIPRAVLJENA ZA VEČ PODOBNIH MODELOV.
VAŠA NAPRAVA MORDA NE BO
IMELA VSEH FUNKCIJ V TEH NAVODILIH. MED BRANJEM NAVODIL
UPOŠTEVAJTE IZRAZE S SLIKAMI.
Splošna varnostna opozorila
• Uporaba te naprave ni namenjena
otrokom, mlajšim
od 8 let, in osebam z zmanjšanimi
zičnimi, senzoričnimi
in mentalnimi
zmožnostmi ali z nezadostnimi izkušnjami
in znanjem o pravilni uporabi, razen če
te osebe niso bile
ustrezno podučene
s strani odgovornega in zato razumejo
možno tveganje. Otroci se ne smejo igrati
z napravo Čiščenje in
vzdrževanje s strani
otrok brez nadzora ni
dovoljeno.
• OPOZORILO: Med
uporabo lahko dosegljivi deli naprave
postanejo vroči. Pazite, da se grelnih
delov ne dotikate.
Otroci, mlajši od 8 let,
lahko pečico uporabljajo le pod stalnim
nadzorom.
• OPOZORILO: Nevarnost ognja: predmetov ne shranjujte na
kuhalnih površinah.
•
OPOZORILO: Če je
površina počena, izklopite napravo, da se
izognete nevarnosti
električnega udara.
• Naprava ni namenjena uporabi z zunanjim časovnikom ali
ločenim sistemom daljinskega upravljanja.
• Med uporabo naprava postane vroča.
Pazite, da se grelnih
SL - 75

delov znotraj pečice
ne dotikate.
• Med običajno uporabo lahko ročaji, ki jih
držite krajši čas, postanejo vroči.
• Za čiščenje stekla pečice in drugih
površin ne uporabljajte
grobih čistilnih sredstev in ostrih, kovinskih
strgalnikov, ki lahko
povzročijo praske.
• Za čiščenje naprave
ne uporabljajte parnih
čistilnikov.
• OPOZORILO: Pred
zamenjavo žarnice se
prepričajte, da je naprava izključena, da se
izognete nevarnosti
električnega udara.
• POZOR: Dosegljivi deli so lahko med
kuhanjem ali uporabo
žara vroči. Otrokom
ne dovolite, da se dotikajo naprave.
• Vaša naprava je izdelana v skladu
z vsemi veljavnimi lokalnimi in mednarodnimi standardi in predpisi.
SL - 76
• Vzdrževalna dela in popravila lahko opravljajo samo pooblaščeni
servisni tehniki. Namestitev
in popravila, ki jih opravljajo
nepooblaščeni tehniki, lahko
povzročijo nevarnost. Spreminjanje ali prilagajanje specikacij
naprave v kakršni koli meri je
nevarno.
• Pred namestitvijo zagotovite,
da so lokalni distribucijski pogoji
(vrsta plina in tlak ali električna
napetost in frekvenca) in zahteve
naprave združljive. Zahteve za to
napravo so navedene na njeni
napisni tablici.
• POZOR: Ta naprava je načrtovana samo za kuhanje hrane in je
namenjena samo za domačo
gospodinjsko uporabo, zato je
ne smete uporabljati v katere koli
druge namene, kot je uporaba
izven gospodinjstev ali v gospodarske namene ali za segrevanje prostorov.
• Nikoli ne dvigujte ali premikajte
naprave za ročaj na vratih.
• Vsi varnostni ukrepi za Vašo
varnost so v veljavi. Ker lahko steklo
poči, bodite pri čiščenju previdni, da
se izognete praskam. Izogibajte se
trkom in udarcem v steklo s
pripomočki.
• Zagotovite, da napajalni kabel
med namestitvijo ni zvit. Če se napajalni kabel poškoduje, ga mora
zamenjati proizvajalec, usposobljen serviser ali podobno usposobljena oseba, saj je le tako zagotovljena ustrezna varnost.
• Ko so vrata pečice odprta, ne pustite, da na njo plezajo otroci.
Namestitvena opozorila

• Naprave ne prižigajte, dokler ni
dokončno nameščena.
• Napravo mora namestiti in
prižgati pooblaščen serviser.
Proizvajalec ni odgovoren za
kakršno koli škodo, ki jo lahko
povzroči neustrezna namestitev s
strani nepooblaščenih oseb.
• Ko odpakirate napravo se
prepričajte, da se med prevozom
ni poškodovala. V primeru okvare, naprave ne uporabljate in
takoj stopite v stik s servisom. Ker
so lahko materiali, uporabljani za
embalažo (najlon, sponke,
stiropor ipd.) nevarni za otroke,
jih nemudoma zberite in
odstranite.
• Zavarujte svojo napravo pred
okoljskimi vplivi. Ne izpostavljajte
je soncu, dežju, snegu itd.
• Materiali, ki obkrožajo napravo
(ohišje), morajo vzdržati temperaturo najm. 100 °C.
Med uporabo
• Pri prvem zagonu pečice bo iz
izolacijskih materialov in delov
grelnika izhajal določen vonj. Zato
naj pred uporabo pečica 45 minut
prazna deluje pri najvišji temperaturi. Prav tako morate istočasno
dobro prezračiti prostor, v katerem
uporabljate napravo.
• Med uporabo se notranje in zunanje površine pečice segrejejo.
Pri odpiranju vrat pečice stopite
korak nazaj, da se izognete vroči
pari, ki izhaja iz pečice. Obstaja
tudi nevarnost opeklin.
• Med delovanjem naprave vanjo ali
v njeno bližino ne postavljajte
vnetljivih snovi.
SL - 77
• Pri odstranjevanju in dodajanju
hrane v pečico vedno
uporabljajte primerne rokavice.
• Če kuhate vsakovrstna olja, ne
zapuščajte kuhalnika. Lahko se
namreč pri ekstremnem segrevanju vnamejo. Na oljne plamene nikoli ne zlivajte vode. Pokrijte
ponev ali drugo posodo s pokrovko, da zadušite nastali plamen, in
ugasnite kuhalnik.
• Če naprave dalj časa ne boste
uporabljali, jo ugasnite. Glavno
stikalo naj bo ugasnjeno. Ko ne
uporabljate naprave, naj bo ventil
za plin zaprt.
• Prav tako naj bodo krmilni gumbi
naprave vedno v položaju “0” (stop).
• Pladnji se nagibajo, ko jih
izvlečete. Bodite pazljivi, da ne
polijete tekočine.
• Ko so vrata ali predali pečice odprta, na njih ne puščajte nobenih
predmetov. Lahko nagnete napravo ali zlomite pokrov.
• V predal ne vstavljajte težjih predmetov ali vnetljivih materialov
(najlon, plastična vrečka, papir,
brisačke ipd.). To vključuje posodo
s plastičnimi deli (npr. ročaji).
• Ne obešajte brisač, kuhinjskih krp
ali oblačil na napravo ali ročaje.
Med čiščenjem in vzdrževanjem
• Pred čiščenjem ali vzdrževanjem
vedno izklopite napravo. Lahko
izklopite glavno stikalo ali pa odklopite napajanje.
• Za čiščenje upravljalne plošče ne
odstranjujte upravljalnih gumbov.
•

• DA OHRANITE UČINKOVITOST
IN VARNOST VAŠE NAPRAVE
PRIPOROČAMO, DA VEDNO
UPORABLJATE ORIGINALNE NADOMESTNE DELE IN
PO POTREBI POKLIČETE LE
POOBLAŠČENE SERVISNE
SLUŽBE.
Priprava za namestitev in
uporabo
Ta sodobna, funkcionalna in praktična
pečica bo izpolnila Vaše
zahteve v vseh pogledih, saj je
izdelana z najkakovostnejšimi deli in
materiali. Za uspešno delovanje in da
se izognete težavam v bodoče, skrbno
preučite priročnik za uporabo. Spodnje
informacije vsebujejo pravila, potrebna
za pravilno namestitev in servisne
postopke. Natančno jih mora prebrati
predvsem tehnik, ki bo namestil
napravo.
ZA NAMESTITEV VAŠE PEČICE
STOPITE V STIK S POOBLAŠČENIM
SERVISOM!
– Pohištvo, ki obdaja pečico, mora biti
izdelano iz materialov, odpornih proti vročini, ki je 50 C° višja od sobne
temperature.
Potrebne spremembe za stenska ohišja
in izpušne ventilatorje nad vgrajenim
kombiniranim izdelkom ter minimalne
razdalje od plošče pečice so prikazane
na Sliki 1. Izpušni ventilator naj bo prav
tako na najmanjši višini 65 cm od grelne
plošče. Če ventilatorja ni v bližini, višina
ne sme biti manjša od 70 cm.
(z napo)
(brez nape)
Minimum 70cm
42 cm
Minimum
Minimum 65 cm
GRELNA PLOŠČA
42 cm
Minimum
NAMESTITEV VGRADNE
PEČICE
IZBIRANJE MESTA ZA PEČICO
– Pri izbiranju mesta za vašo pečico
je treba upoštevati več dejavnikov.
Da se izognete težavam in nevarnim
situacijam, do katerih lahko pride v
bodoče, upoštevajte naša spodnja
priporočila.
– Ko izbirate mesto za postavitev
Vaše pečice, bodite pozorni na
to, da v bližini ni vnetljivih
materialov, kot so zavese, olja, krpe
ipd., ki so hitro vnetljivi.
SL -78

Pečico vstavite v ohišje tako, da jo potisnete navznoter. Odprite vrata
pečice in vstavite 2 vijaka v luknji na
ogrodju pečice. Ko se ogrodje
dotika lesene površine ohišja,
zategnite vijaka.
SL - 79
Delovna površina
min.
min.
50 mm
25 mm
Vgradna grelna plošča
Vgradna pečica
Če je pečica nameščena pod grelno
ploščo, mora biti najmanjša razdalja
med delovno površino in zgornjo ploščo
pečice 50 mm in razdalja med delovno
površino in vrhom upravljalne plošče
najmanj 25 mm.
EL. NAPELJAVA IN VARNOST
VGRADNE PEČICE
Spodnja navodila morate med napeljavo upoštevati brez napake.
– Ozemljitveni kabel mora biti priključen
prek vijaka z ozemljitveno oznako.
Priključek napajalnega kabla se mora
ujemati s prikazanim na Sliki 6. Če
v namestitvenem okolju ni ozemljene vtičnice v skladu s predpisi, takoj
pokličite pooblaščeni servis.
– Ozemljena vtičnica mora biti v nepos-
redni bližini naprave. Nikoli ne uporabljajte podaljškov.
– Napajalni kabel se ne sme dotikati
vroče površine naprave.
– Če je napajalni kabel poškodovan,
pokličite pooblaščeni servis. Ta mora
zamenjati kabel.
– Prav tako mora priključitev na el.
omrežje opraviti pooblaščeni servis.
Uporabiti je treba napajalni kabel tipa
H05VV-F.
– Napačna napeljava lahko poškoduje
napravo. Tovrstnih poškodb garancija
ne krije.
– Naprava je načrtovana za
priklop na 220-240 V~ če je
električna napetost drugačna od
zgornjih vrednosti, nemudoma
pokličite pooblaščeni servis.
– Proizvajalec izjavlja, da ne nosi od-

govornosti za kakršno koli škodo
ali izgube, ki nastanejo zaradi
neupoštevanja varnostnih
predpisov!
RJ AVA
MODRA
RUMENA+ZELENA
SL - 80

UPORABA PEČICE
Nadzorna plošča
Gumb za upravljanje
delovanja pečice
Lučka delovanja pečice
Digitalni časovnik
Gumb za upravljanje delovanja pečice
Če želite izbrati želeno funkcijo kuhanja, obrnite gumb do želenega simbola - podrobnosti o funkcijah pečice so
razložene v naslednjem delu.
Gumb za upravljanje delovanja
pečice
Če želite izbrati želeno funkcijo kuhanja, obrnite gumb do želenega simbola - podrobnosti o funkcijah pečice so
razložene v naslednjem delu.
Gumb za upravljanje
delovanja pečice
Lučka delovanja termostata
SL - 81

Funkcije pečice
* Funkcije pečice se lahko razlikujejo in
so odvisne od modela.
Lučka pečice:
Vključena bo samo lučka pečice, ki
ostane vključena pri vseh funkcijah kuhanja.
Funkcija odmrzovanja:
Opozorilne lučke pečice se bodo
vključile in ventilator bo začel delovati.
Če želite uporabiti funkcijo odtajevanja, postavite zmrznjeno hrano v pečico
na polico na tretje mesto, gledano
s spodnje strani. Priporočamo, da
pod hrano za odtajevanje postavite
pladenj pečice, ki bo zbiral vodo, ki
se je nabrala zaradi staljenega ledu.
S to funkcijo hrane ne boste skuhali ali spekli, ampak le lažje odtajali.
bodo vključene, spodnji in zgornji grelni
elementi bodo začeli delovati. Funkcija
statičnega kuhanja oddaja toploto, kar
zagotavlja enakomerno kuhanje hrane zgoraj in spodaj. To je popolno za
pripravo peciva, tort, testenin, lazanj in
pic. Priporočamo predgretje pečice za
10 minut in pri tej funkciji je najbolje kuhati samo na eni polici.
Delovanje ventilatorja:
Termostat in opozorilne lučke pečice
bodo vključene, zgornji in spodnji grelni
element in ventilator bo začel delovati.
Ta funkcija je zelo dobra pri pečenju
peciva. Za kuhanje v pečici poskrbita
zgornji in spodnji grelni element,
ventilator pa zagotavlja kroženje zraka,
zaradi česar bo hrana rahlo zapečena.
Priporočeno je predgrevanje pečice za
pribl. 10 minut.
Funkcija za pico:
Termostat in opozorilne lučke pečice bodo
vključene, obroč in spodnji grelni element
ter ventilator bo začel delovati.
Funkcija turbo delovanja
Termostat in opozorilne lučke pečice
bodo vključene, grelni element žara in
ventilator bo začel delovati.
Funkcija turbo delovanja toploto enakomerno razporedi v pečici.
Vsa hrana na rešetkah bo skuhana
enakomerno. Priporočeno je predgrevanje pečice za pribl. 10 minut.
Funkcija statičnega
kuhanja:
Termostat in opozorilne lučke pečice
SL - 82
Funkcija spodnjega grelnega elementa in
ventilatorja je popolna za pečenje hrane,
kot je pica, v kratkem času. Ko ventilator
enakomerno razporeja toploto po pečici,
spodnji grelni element zagotavlja pečenje
testa.
Funkcija žara:
Termostat in opozorilne lučke pečice
bodo vključene, grelni element žara bo
začel delovati. Funkcija se uporablja za
pečenje in praženje hrane, uporabite
zgornje police pečice. Rahlo očistite
mrežico z oljem, da se hrana ne lepi nanjo

in postavite hrano na središče mrežice.
Spodaj naj bo vedno pladenj, da ujame
kapljice olja ali maščobe. Priporočeno je
predgrevanje pečice za pribl. 10 minut.
Opozorilo: Pri pečenju z žarom morajo
biti vrata pečice zaprta in temperatura
0
pečice prilagojena na 190
C.
Funkcija za hitro pečenje:
Termostat in opozorilne lučke pečice
bodo vključene, zgornji grelni element in
element žara bo začel delovati. Funkcija
se uporablja za hitro pečenje in pokrivanje
večjih površin, kot je pečenje mesa;
uporabite zgornje police pečice. Rahlo
očistite mrežico z oljem, da se hrana ne
lepi nanje in postavite hrano na središče
mrežice. Spodaj naj bo vedno pladenj,
da ujame kapljice olja ali maščobe.
Priporočeno je predgrevanje pečice za
pribl. 10 minut. Opozorilo: Pri pečenju
z žarom morajo biti vrata pečice zaprta in
temperatura pečice prilagojena na 190
0
C.
mrežice. Spodaj naj bo vedno pladenj,
da ujame kapljice olja ali maščobe.
Priporočeno je predgrevanje pečice za
pribl. 10 minut.
Opozorilo: Pri pečenju z žarom morajo
biti vrata pečice zaprta in temperatura
0
pečice prilagojena na 190
C.
Funkcija Vap Clean
Nastavite delovanje pečice in termostata
na funkcijo čiščenja z uparjevalnikom.
Polijte 200-250 ml vode (pribl. 1 skodelico)
v manjši pladenj na podnožju pečice.
VapClean deluje približno 20 minut
in vašo pečico pripravi na enostavno
čiščenje.
Uporaba digitalnega časovnika
Funkcija dvojnega žara in
ventilatorja:
Termostat in opozorilne lučke pečice
bodo vključene, zgornji grelni element
in element žara ter ventilator bo začel
delovati.
Funkcija se uporablja za hitrejše pečenje
"debelejše" hrane in pri večjih površinah.
Tako zgornji grelni elementi kot žar
bodo delovali skupaj z ventilatorjem za
enakomerno kuhanje.
Uporabite zgornje police pečice. Rahlo
očistite mrežico z oljem, da se hrana ne
lepi nanje in postavite hrano na središče
SL - 83
Način
Nastavitev časa:
Pred začetkom uporabe pečice morate
nastaviti čas. Po vklopu napajanja
pečice bo na zaslonu začel utripati
simbol (A) in trikrat “0”. Istočasno
pritisnite gumba (+) in (-). Na zaslonu
bo prikazan simbol . Na sredini zaslona
bo začela utripati tudi pika. Z gumboma
(+) in (-) prilagodite čas dneva, ko utripa

ta pika. Po prilagoditvi naj bi bila pika
stalno osvetljena.
Po vklopu napajanja pečice, ko na
zaslonu začne utripati simbol (A) in
trikrat “0”, pečice ne morete uporabljati
s krmilnimi gumbi. Ko hkrati pritisnete
gumba (+) in (-) za prilagoditev časa,
bo na zaslonu prikazan simbol
Ko se na zaslonu prikaže ta simbol,
lahko ročno upravljate pečico. Ker se
prilagoditev časa v primeru izpada el.
energije ponastavi, jo morate ponovno
opraviti.
.
časovnega obdobja.
Pritisnite gumb MODE v sredini. Na
zaslonu bo utripal simbol . Prav tako
se bodo pojavile tri “0”. Prilagodite
želeno časovno obdobje za opozorilo
s tipkama (+) in (-), medtem ko
simbol utripa. Nekaj časa zatem, ko
ste zaključili prilagoditev, bo simbol
neprekinjeno osvetljen. Ko je simbol
neprekinjeno osvetljen, je prilagoditev
časa zvočnega opozorila zaključena.
Čas zvočnega opozorila lahko
nastavite med 0 in 23.59.
Prilagoditev časa zvočnega
opozorila:
Način
Pred začetkom uporabe pečice morate
nastaviti čas. Po vklopu napajanja
pečice bo na zaslonu začel utripati
simbol (A) in trikrat “0”. Istočasno
pritisnite gumba (+) in (-).
Na zaslonu bo prikazan simbol . Na
sredini zaslona bo začela utripati tudi
pika. S tipkama (+) in (-) prilagodite čas
dneva, ko utripa ta pika. Po prilagoditvi
naj bi bila pika stalno osvetljena.
S to funkcijo lahko nastavite zvočno
opozorilo po koncu nastavljenega
Ko je čas nastavljen, se časovnik
oglasi z zvočnim opozorilom in simbol
na zaslonu začne utripati. S pritiskom
na kateri koli gumb se bo zvočno
opozorilo ugasnilo in simbol bo izginil
iz zaslona.
Prilagoditev časa zvočnega opozorila
je namenjena samo za opozorila.
Pečica se s to funkcijo ne bo aktivirala.
Samodejna prilagoditev
časa glede na čas kuhanja:
Način
To funkcijo lahko uporabite za kuhanje
v želenem časovnem obdobju.
Hrano za kuhanje vstavite v pečico.
SL - 84

Sledi nastavitev pečice na želeno
funkcijo kuhanja. Termostat pečice se
nastavi na želeno stopnjo glede na
hrano za kuhanje. Pritiskajte gumb
MODE (NAČIN), dokler na se zaslonu
časovnika ne pojavi napis “stop”. Ko
na zaslonu časovnika vidite napis
“stop", začne simbol (A) utripati.
Prilagodite čas kuhanja za hrano, ki
jo želite kuhati, z gumboma (+) in (-),
medtem, ko je časovnik nastavljen. Po
zaključeni nastavitvi bo na zaslonu
prikazan čas dneva in simboli (A)
in na zaslonu bodo neprekinjeno
osvetljeni. Medtem bo začela delovati
tudi pečica.
Obdobje kuhanja lahko nastavite
med 0 in 10 ur.
Ko izteče nastavljeni čas bo časovnik
zaustavil delovanje pečice
in zazvenelo bo zvočno opozorilo.
Na zaslonu bo prav tako začel
utripati simbol (A). Ko gumb pečice
in termostata prestavite v položaj 0,
boste s pritiskom katerega koli gumba
časovnika prekinili zvočno opozorilo.
Časovnik bo prešel v funkcijo ročnega
delovanja.
Samodejno programiranje
glede na čas zaključka:
Način
To funkcijo lahko uporabite za kuhanje
glede na želeni čas zaključka. Hrano
za kuhanje vstavite v pečico. Sledi
nastavitev pečice na želeno funkcijo
kuhanja. Termostat pečice se nastavi
na želeno stopnjo glede na hrano za
kuhanje. Še naprej pritiskajte gumb
MODE, dokler se na zaslonu časovnika
prikaže napis “end”, simbol (A) in čas
dneva bosta začela utripati.
Nastavite čas zaključka za hrano,
ki jo želite kuhati, s tipkama (+) in (-),
medtem ko je časovnik nastavljen. Po
zaključeni nastavitvi bo na zaslonu
prikazan čas dneva in simboli (A)
in na zaslonu bodo neprekinjeno
osvetljeni. Medtem bo začela delovati
tudi pečica.
Lahko nastavite čas, ki je do 10 ur za
časom dneva.
Po izteku nastavljenega časa bo
časovnik zaustavil delovanje pečice
in zazvenelo bo zvočno opozorilo.
Na zaslonu bo prav tako začel
utripati simbol (A). Ko gumb pečice
in termostata prestavite v položaj 0,
boste s pritiskom katerega koli gumba
časovnika prekinili zvočno opozorilo.
Časovnik bo prešel v funkcijo ročnega
SL - 85

delovanja.
Popolnoma samodejno
programiranje:
Način
S to funkcijo lahko kuhate po
določenem časovnem obdobju
z določenim trajanjem. Hrano za
kuhanje vstavite v pečico. Sledi
nastavitev pečice na želeno funkcijo
kuhanja. Termostat pečice se nastavi
na želeno stopnjo glede na hrano za
kuhanje.
Najprej pritiskajte gumb MODE
(NAČIN), dokler na se zaslonu
časovnika ne pojavi napis “stop”. Ko na
zaslonu časovnika vidite napis “stop",
začne simbol (A) utripati. Nastavite
čas kuhanja za hrano, ki jo želite
kuhati, s tipkama (+) in (-), medtem ko
je časovnik nastavljen. Po zaključeni
nastavitvi bo na zaslonu prikazan čas
dneva in simboli (A) in na zaslonu
bodo neprekinjeno osvetljeni.
Obdobje kuhanja lahko
nastavite med 0 in 10 ur.
Način
Nato pritiskajte gumb MODE (NAČIN),
dokler na se zaslonu časovnika ne
pojavi napis “end”. Ko na zaslonu
časovnika zagledate napis “end”, bosta
simbol (A) in čas dneva začel utripati
z dodatkom časa kuhanja. S tipkama
(+) in (-) nastavite čas zaključka
za hrano, medtem ko je časovnik
nastavljen. Po zaključeni nastavitvi
bo na zaslonu prikazan čas dneva in
simbol (A) na zaslonu bo neprekinjeno
osvetljen.
Lahko nastavite čas, ki je do
23:59 za določenim časom, tako
da čas kuhanja dodate času
dneva.
Pečica bo začela delovati ob
izračunanem času z odštevanjem
časa kuhanja od nastavljenega
časa zaključka in se zaustavila na
nastavljenem času zaključka. Časovnik
bo zazvenel z zvočnim opozorilom
in simbol (A) bo začel utripati. Ko
gumb pečice in termostata prestavite
v položaj 0, boste s pritiskom katerega
koli gumba časovnika prekinili
zvočno opozorilo. Časovnik bo prešel
SL -86

v funkcijo ročnega delovanja.
Uporaba mehanskega časovnika
Ročno delovanje
Ko nastavite gumb časovnika v položaj
M, kot je prikazano na sliki, lahko stalno
upravljate pečico. Ko je gumb časovnika
v položaju 0, pečica ne bo delovala.
Delovanje s prilagajanjem časa
Nastavite želeni čas kuhanja, tako da
obrnete gumb časovnika na določen
časovni razpon med 0 in 100 minut. Po
preteku časa bo pečica prenehala delovati
in časovnik se bo enkrat oglasil z zvočnim
signalom.
SL - 87

Čas kuha-
Pol.
rešet-
nja (min)
ke
tata (min)
Pol. termos-
nja (min)
Čas kuha-
Pol.
rešetke
ta (°C)
Pol. termosta-
nja (min)
Čas kuha-
Pol.
rešetke
tata (°C)
Pol. termos-
200 4 10-15
200 4 15-25
TURBO SPODAJ-ZGORAJ VENTILATOR SPODAJ-ZGORAJ ŽAR
nja (min)
Čas kuha-
Pol.
rešetke
-
tata (°C)
Pol. termos
POSODA
170-190 1-2-3 35-45 170-190 1-2 35-45 170-190 1-2 25-35
Pecivo v
vrstah
orta 150-170 1-2-3 30-40 170 -190 1-2 30-40 150-170 1-2-3 25-35
T
Piškoti 150-170 1-2-3 25-35 170-190 1-2 30-40 150-170 1-2-3 25-35
Mesne
kroglice na
žaru
175-200 2 40-50 175-200 2 40-50 175-200 2 40-50
Vodena
hrana
SL - 88
Piščanec 200 1-2 45-60 200 1-2 45-60 200 * 50-60
Kotlet 200 3-4 15-25
Goveji
zrezek
170-190 1-4 35-45
160-180 1-4 30-40
Dvoplastno
Dvoplastna
torta
pecivo
* Kuhanje s pečenim piščančjim nabodalom ...

Pripomočki
5. Rack
4. Rack
3. Rack
2. Rack
1. Rack
Izdelku so priloženi pripomočki. Lahko
uporabljate tudi pripomočke, ki jih kupite pri drugih proizvajalcih, vendar morajo biti odporni proti vročini in ognju.
Uporabljate lahko tudi steklene posode,
kalupe za peciva in pladnje, ki so
primerni za uporabo v pečicah. Če
uporabljate druge pripomočke,
upoštevajte navodila teh proizvajalcev.
Če uporabljate posode manjših dimenzij, jih postavite na srednji del mrežice.
Če hrana za kuhanje ne prekrije celotnega pladnja pečice, če uporabljate globoko zamrznjeno hrano ali pladenj uporabljate za zbiranje sokov hrane, ki se
stekajo med pečenjem z žarom, se lahko pladenj deformira. Do tega pride zaradi visokih temperatur med kuhanjem.
Ko se pladenj po kuhanju ohladi, se bo
povrnil v prvotno obliko. To je običajna
pojava, do katere pride pri segrevanju.
Vročih steklenih pladnjev in posod ne
postavljajte v hladno okolje neposredno
iz pečice, sicer lahko počijo. Ne
postavljajte jih na hladne in vlažne
površine. Postavite jih na suho
kuhinjsko krpo in pustite, da se počasi
ohladijo. Ko uporabljate žar v
pečici, priporočamo (če je to primerno) uporabo mrežice, ki je priložena z
izdelkom. Ko uporabljate mrežico,
postavite pladenj na eno izmed spodnjih polic, da se lahko nabere olje. Za
pomoč pri čiščenju lahko na pladenj dodate vodo. Kot že razloženo nikoli ne
poskušajte uporabljati žar na plin brez
zaščitnega pokrova za žar. Če ima vaša
pečica žar na plin, a zaščita žara pred
vročino manjka ali je poškodovana in je
ni mogoče uporabiti, zahtevajte nadomestno pri vašem najbližjem servisnem
centru.
Prostor za kuhanje
Vodila:
5
4
3
2
1
Pripomočki pečice
Pripomočki pečice se lahko razlikujejo
in so odvisne od modela.
Mrežica
Mrežico lahko uporabljate za pečenje
ali da nanjo postavite različne posode.
OPOZORILO- Mrežico pravilno namestite na ustrezno vodilo v pečici in jo potisnite nazaj.
Plitki pladenj
Plitki pladenj se uporablja za pečenje
peciva, kot so pite. Za pravilno vstavljanje pladnja v pečico ga nastavite na
vodilo in potisnite navznoter.
SL - 89

Globoki pladenj
Globoki pladenj se uporablja kuhanje
obar. Za pravilno vstavljanje pladnja
v pečico ga nastavite na vodilo in potisnite navznoter.
ČIŠČENJE IN
VZDRŽEVANJE PEČICE
ČIŠČENJE
Preden začnete čistiti pečico se
prepričajte, da so gumbi za upravljanje
izključeni in je naprava ohlajena. Odklopite napravo.
Ne uporabljajte čistilnih materialov, ki
vsebujejo delce, ki lahko opraskajo
emajlirane in barvane dele pečice.
Uporabite gosta ali tekoča kuhinjska
čistila, ki ne vsebujejo delcev. Ker
lahko poškodujejo površine, ne
uporabljajte jedkih čistil, abrazivnih
praškov, jeklene žice ali trdih orodij.
Če se po pečici polije večja količina
tekočine in se lahko vname, lahko
poškoduje emajlirane površine. Takoj
počistite razlito tekočino, vendar
bodite previdni, da se ne opečete. Za
čiščenje pečice ne uporabljajte parnih
čistilnikov.
Čiščenje notranjosti pečice
Pred začetkom čiščenja se prepričajte,
da je pečica izklopljena. Najbolje boste pečico očistili, ko je njena notranjost malce ogreta. Po vsaki uporabi
obrišite pečico z mehko in vlažno krpo,
navlaženo v milnici. Nato jo ponovno
obrišite z vlažno krpo in jo obrišite do
suhega. Za popolno čiščenje uporabite
suha čistilna sredstva ali sredstva v prahu. Pri izdelkih s katalitičnimi emajliranimi ogrodji čiščenje zadnje in stranske
notranje stene ni potrebno. Kljub temu
pa glede na uporabo priporočamo, da
jih po določenem času zamenjate.
VZDRŽEVANJE
Zamenjava lučke pečice
Lučko pečice mora zamenjati pooblaščeni serviser. Specikacije
žarnice so 230 V, 25 W, tip E14, T300
- pred zamenjavo lučke mora biti pečica
izklopljena in ohlajena.
Zasnova lučke je določena za uporabo
v gospodinjskih kuhinjskih napravah in
n i p r i m e r n a z a h i š n o r a z s v e t l j a v o .
SL - 90

SERVIS IN PREVOZ
površine) zavarujte pred možnimi udarci.
PREVERITE PRED KLICANJEM
SERVISA
la pečice nalepite karton ali papir,
da mrežice in pladnji v notranjosti ne
poškodujejo pokrova med prevozom.
Prav tako prelepite stranske stene pokrovov pečice.
Če pečica ne deluje:
Morda je bila pečica odklopljena, ali
pa je prišlo do izpada el. energije.
Pri modelih s časovnikom morda čas
ni nastavljen. Če se pečica ne segreva:
Mogoče toplota ni prilagojena z upravljalnimi stikali pečice.
Če notranja lučka ne sveti:
Preverite električno napajanje.
Preverite ga tudi, ko so lučke v okvari.
Če so v okvari, jih lahko zamenjate v
skladu z navodili. Kuhanje (če zgornji-
spodnji del ne kuha enakomerno) :
Preverite na kateri polici kuhate, čas
kuhanja in vrednosti toplote v skladu z
navodili,
Če imate še vedno težave z izdelkom
pokličite “pooblaščeni servis”.
INFORMACIJE GLEDE
PREVOZA
Če ni na voljo originalna
embalaža:
Zunanje površine (steklene in obarvane
Če nameravate prevažati napravo:
Shranite originalno embalažo izdelka
in ga prevažajte v njej. Upoštevajte
transportne oznake na ohišju.
Prelepite zgornje dele kuhalnika, glave
in nosilce za ponve na kuhalne plošče.
Med zgornji pokrov in kuhalno ploščo
vstavite papir, pokrijte zgornji pokrov in
nato prelepite stranske površine pečice.
Na sprednji pokrov notranjega stek-
SL - 91

Simbol na izdelku ali embalaži označuje, da s tem izdelkom ni dovoljeno ravnati
kot z običajnimi gospodinjskimi odpadki. Treba ga je oddati na ustrezno zbirno
reciklirno mesto za električno in elektronsko opremo. S pravilnim odlaganjem tega
izdelka boste pomagali pri preprečevanju potencialnih negativnih vplivov na okolje
in zdravje ljudi, ki ga sicer lahko povzroči neprimerno odlaganje tega izdelka. Za
podrobnejše informacije o recikliranju tega izdelka se obrnite na lokalne oblasti,
pristojne za odstranjevanje odpadkov ali trgovino, v kateri ste kupili izdelek.

EBB7226
EBB7116
UPORABA I UGRADNJA
UPUTE ZA
UGRADBENU PEĆNICU
HRV

Poštovani korisniče,
naš cilj je da vam pružimo visoko kvalitetne proizvode koji će nadmašiti vaša
očekivanja. Vaš uređaj proizveden je u modernim postrojenjima gdje su izvedena
ispitivanja kvalitete proizvoda. Ovaj priručnik sadrži upute kako sigurno i učinkovito
koristiti ovaj uređaj koji je proizveden pomoću najnovije tehnologije. Prije uporabe uređaja pažljivo pročitajte ove upute za uporabu u kojima se nalaze osnovne
informacije za sigurnu instalaciju, održavanje i uporabu. Za instalaciju proizvoda
obratite se vama najbližem ovlaštenom servisnom centru.
HR - 94

Sadržaj
Prikaz i veličina proizvoda
Upozorenja
Priprema za ugradnju i uporabu
Uporaba pećnice
Čišćenje i održavanje proizvoda
Servis i prijevoz
HR - 95

PRIKAZ I VELIČINA PROIZVODA
Upravljačka ploča
Ručka
Vrata pećnice
Donji grijaći element
(iza ploče)
Rešetka
za roštilj
Pladanj
Vodilice
Gornji grijaći element (iza ploče)
Svjetlo u pećnici
Zatvarači za izlaz zraka
HR - 96

SIGURNOSNA UPOZORENJA
PAŽLJIVO PROČITAJTE CIJELI
SADRŽAJ OVIH UPUTA PRIJE UPORABE OVE NAPRAVE I DRŽITE IH NA
LAHKO DOSTUPNOM MJESTU KAKO
BISTE IH MOGLI KORISTITI KADA
BUDE POTREBNO.
ti. Djeca se ne smiju
igrati s napravom.
Čišćenje i
korisničko
održavanje ne smiju
obavljati djeca bez
nadzora.
OVAJ PRIRUČNIK SASTAVLJEN
JE ZA VIŠE RAZLIČITIH MODELA.
VAŠA NAPRAVA MOŽDA NEĆE IMATI NEKE ZNAČAJKE POJAŠNJENE
U OVOM PRIRUČNIKU. TIJEKOM
PROUČAVANJA PRIRUČNIKA OBRATITE POZORNOST NA ILUSTRACIJE
S BROJKAMA.
Opća sigurnosna upozorenja
• Ovaj uređaj mogu koristiti djeca od 8 godina pa na više i osobe
smanjenih tjelesnih,
osjetilnih ili mentalnih
mogućnosti ili osobe koje ne raspolažu
iskustvom ili znanjem
ako su pod nadzorom osobe odgovorne
za njihovu sigurnost
i rade po uputama
koje se odnose na
sigurno korištenje
uređaja te razumiju
uključene opasnos-
• UPOZORENJE: Naprava i pristupačni
dijelovi zagrijavaju
se tijekom uporabe.
Obratite pažnju kako
se vrući dijelovi ne bi
dirali. Djeca mlađa od
8 godina ne smiju biti
sama u blizini naprave osim ako su pod
nadzorom.
• UPOZORENJE:
Opasnost od požara:
ne stavljajte predmete na površine za kuhanje.
• UPOZORENJE: Ako
se na površini nalazi
napuklina, napravu
isključite kako biste
izbjegli mogućnost
električnog udara.
• Naprava nije namijenjena za rad uz pomoć
HR - 97

vanjskog mjerača
vremena ili zasebnog
sustava daljinskog
upravljanja.
Tijekom uporabe nap-
•
rava se zagrijava.
Obratite pažnju kako
se vrući dijelovi unutar
pećnice ne bi dirali.
• Tijekom uporabe se
ručke koje se drže kraće
razdoblje zagrijavaju.
• Za čišćenje staklenih
vrata pećnice i ostalih
površina nemojte koristiti gruba abrazivna
sredstva za čišćenje
jer bi mogla ogrepsti
površinu što bi moglo
dovesti do rasprsnuća
stakla i površinskih
oštećenja.
• Za čišćenje naprave nemojte koristiti
čistače na paru.
• UPOZORENJE: Pri-
je zamjene žaruljice
provjerite ako ste
isključili napravu
kako ne bi došlo do
električnog udara.
OPREZ: Pristupačni
•
dijelovi mogu biti
vrući kad se kuha ili
roštilja. Držite djecu
podalje od naprave.
• Naprava je proizvedena u skladu sa
svim važećim lokalnim i međunarodnim
standardima i propisima.
• Radove održavanja i popravke
smije obavljati samo ovlašteno
servisno osoblje. Radovi ugradnje i popravci koje je obavljalo neovlašteno servisno osoblje
mogu vas dovesti u opasnost.
Svaka izmjena ili modikacija specikacija naprave na bilo koji način
iznimno je opasna.
• Prije ugradnje provjerite ako su lokalni uvjeti distribucije (vrsta plina,
tlak plina ili električni napon ili frekvencija) kompatibilni sa zahtjevima naprave. Zahtjevi za ovu napravu navedeni su na naljepnici.
• OPREZ: Ova naprava dizajnirana
je samo za kuhanje hrane i namijenjena je samo za unutarnju uporabu u domaćinstvu te se ne smije
koristiti ni u kakve druge svrhe ili
namjene, npr. komercijalna uporaba ili u uporaba u komercijalnom
okruženju ili za grijanje prostorija.
• Napravu nemojte dizati ili micati
držanjem ručke vrata.
• Kako biste osigurali sigurnost,
potrebno je poduzeti sve mjere sigurnosti. Budući da je napuknuće
stakla moguće, budite pažljivi tijekom čišćenja kako se staklo ne bi
HR - 98

ogreblo. Nemojte udarati ili kucati na
staklo uz pomoć drugih predmeta.
• Provjerite ako je kabel napajanja
savinut tijekom ugradnje. Ako je kabel napajanja oštećen, proizvođač,
servisni tehničar ili kvalicirana
osoba ga moraju zamijeniti kako bi
se spriječile opasne situacije.
• Kad su vrata pećnice otvorena, na
njima ne smiju sjediti djeca odnosno ne smiju se penjati na vrata.
Upozorenja tijekom ugradnje
• Napravu smijete koristiti tek nakon
što su završeni radovi ugradnje.
Ovlašteni tehničar mora obaviti ra-
•
dove ugradnje ove naprave te osposobiti ju za uporabu. Proizvođač
nije odgovoran za oštećenja nastala zbog neispravnog postavljanja i ugradnje koje je obavilo
neovlašteno osoblje.
• Tijekom raspakiravanja naprave
provjerite ako su na njoj vidljiva
oštećenja nastala tijekom prijevoza. U slučaju pronalaska oštećenja
napravu nemojte koristiti i odmah
se obratite kvaliciranoj servisnoj
službi. Budući da materijali koji
se koriste za pakiranje (najlon,
spajalica, stiropor) predstavljaju
opasnost za djecu, potrebno ih je
prikupiti i odmah ukloniti.
• Zaštitite napravu od atmosferskih
utjecaja. Nemojte ga izlagati npr.
suncu, kiši, snijegu itd.
• Materijali koji se nalaze u blizini naprave (ormarić) moraju biti otporni na
temperature od minimalno 100°C.
Tijekom uporabe
• Kod prve uporabe pećnice osje-
tit ćete neobičan miris koji dolazi
iz izolacijskih materijala i grijaćih
elemenata. Iz tog razloga prije
uporabe pećnice uključite praznu
pećnicu da radi na maksimalnoj
temperaturi u trajanju od 45 minuta. Istovremeno prozračite prostoriju u kojoj je proizvod ugrađen.
•
Tijekom uporabe zagrijavaju
se vanjska i unutarnja površina
pećnice. Kad otvarate vrata
pećnice, odmaknite se od vrata kako biste izbjegli vruću paru
iz pećnice. Postoji opasnost od
opeklina.
• Tijekom rada u napravu nemojte
stavljati zapaljive materijale.
Uvijek koristite rukavice kad iz
•
pećnice vadite hranu.
•
Ploču za kuhanje uvijek držite pod
nadzorom kad kuhate s krutim ili
tekućim uljima. U suprotnom postoji opasnost od požara nakon njihovog pretjeranog zagrijavanja.
Požar uzrokovan uljem nikad ne
gasite vodom. Stavite poklopac
na lonac za umak ili tavu kako bi
se nastali požar ugasio i isključite
ploču za kuhanje.
Ako se naprava neće koristiti
•
neko duže vremensko razdoblje,
isključite utikač iz utičnice. Glavni upravljački prekidač mora biti
u položaju isključeno. Također,
kad se naprava ne koristi, ventil za
plin mora biti u položaju isključeno.
• Upravljački gumbi naprave uvijek
moraju biti u položaju "0" (stop)
kad se naprava ne koristi.
• Kad je pladnjeve potrebno izvući
van, oni se naginju. Pazite da
HR -99
 Loading...