

User Manual
Wi-Fi Camera Alarm Clock

Contents
1.
BUTTONS AND LIGHTS .................................. 1
2.
CONDITIONS AND PREPARATIONS ................ 2
2.1 I
NSERT MICRO
SD
CARD
...................................... 2
2.2 C
HARGE
............................................................ 2
2.3 P
OWER ON/OFF THE CAMERA
............................... 2
2.4 R
ESET
............................................................... 3
3.
PRIMARY FUNCTIONS ................................... 3
F
OR DETAILS, PLEASE FOLLOW THE STEPS BELOW
. ............ 4
3.1 S
CAN THE
QR
TO DOWNLOAD THE APP
VOTECOM. . 4
3.2 O
PEN THE APP, CHOOSE WI-FI CAMERA
. ................ 5
3.3 T
AP CONNECT CAMERA, AND CONNECT THE CAMERA TO
YOUR SMARTPHONE VIA HOTSPOT
(UID). ...................... 6
3.4 P
LEASE CHOOSE THE WAY OF CONNECTING
. .............. 7
3.5 D
EVICE LIST
..................................................... 11
3.6 D
EVICE SETTINGS
.............................................. 12
3.7 L
IVE VIDEO
...................................................... 18
4.
USE MORE .................................................. 19
5.
SPECIFICATIONS .......................................... 20
6.
TROUBLESHOOT ......................................... 21

Here come some tips for you. Please go
through the following items before setup.
Users should be responsible for any damage
and abnormalities due to improper operation.
1. Make sure you removed the plastic
insulating slip inside the back cover.
2. Before power it on, please charge it for
at least 1h for easy setup (maybe the
battery has run out). Or keep charging it
all the time.
3. Make sure you have connected your
VOTECOM Wi-Fi camera to your
smartphone via hotspot (named the
camera’s UID pasted on the camera)
before connecting it to a Wi-Fi.
4. Make sure your Wi-Fi is in 2.4G mode.
Ask the router manufacturer for help if
you need.
5. Simply reset it if your VOTECOM Wi-Fi
camera performs abnormally (such as
your smartphone couldn’t find the
hotspot, it can’t connect to Wi-Fi, or it
goes offline frequently).
For details, please refer to instructions
below.
VOTECOM Customer Care
1
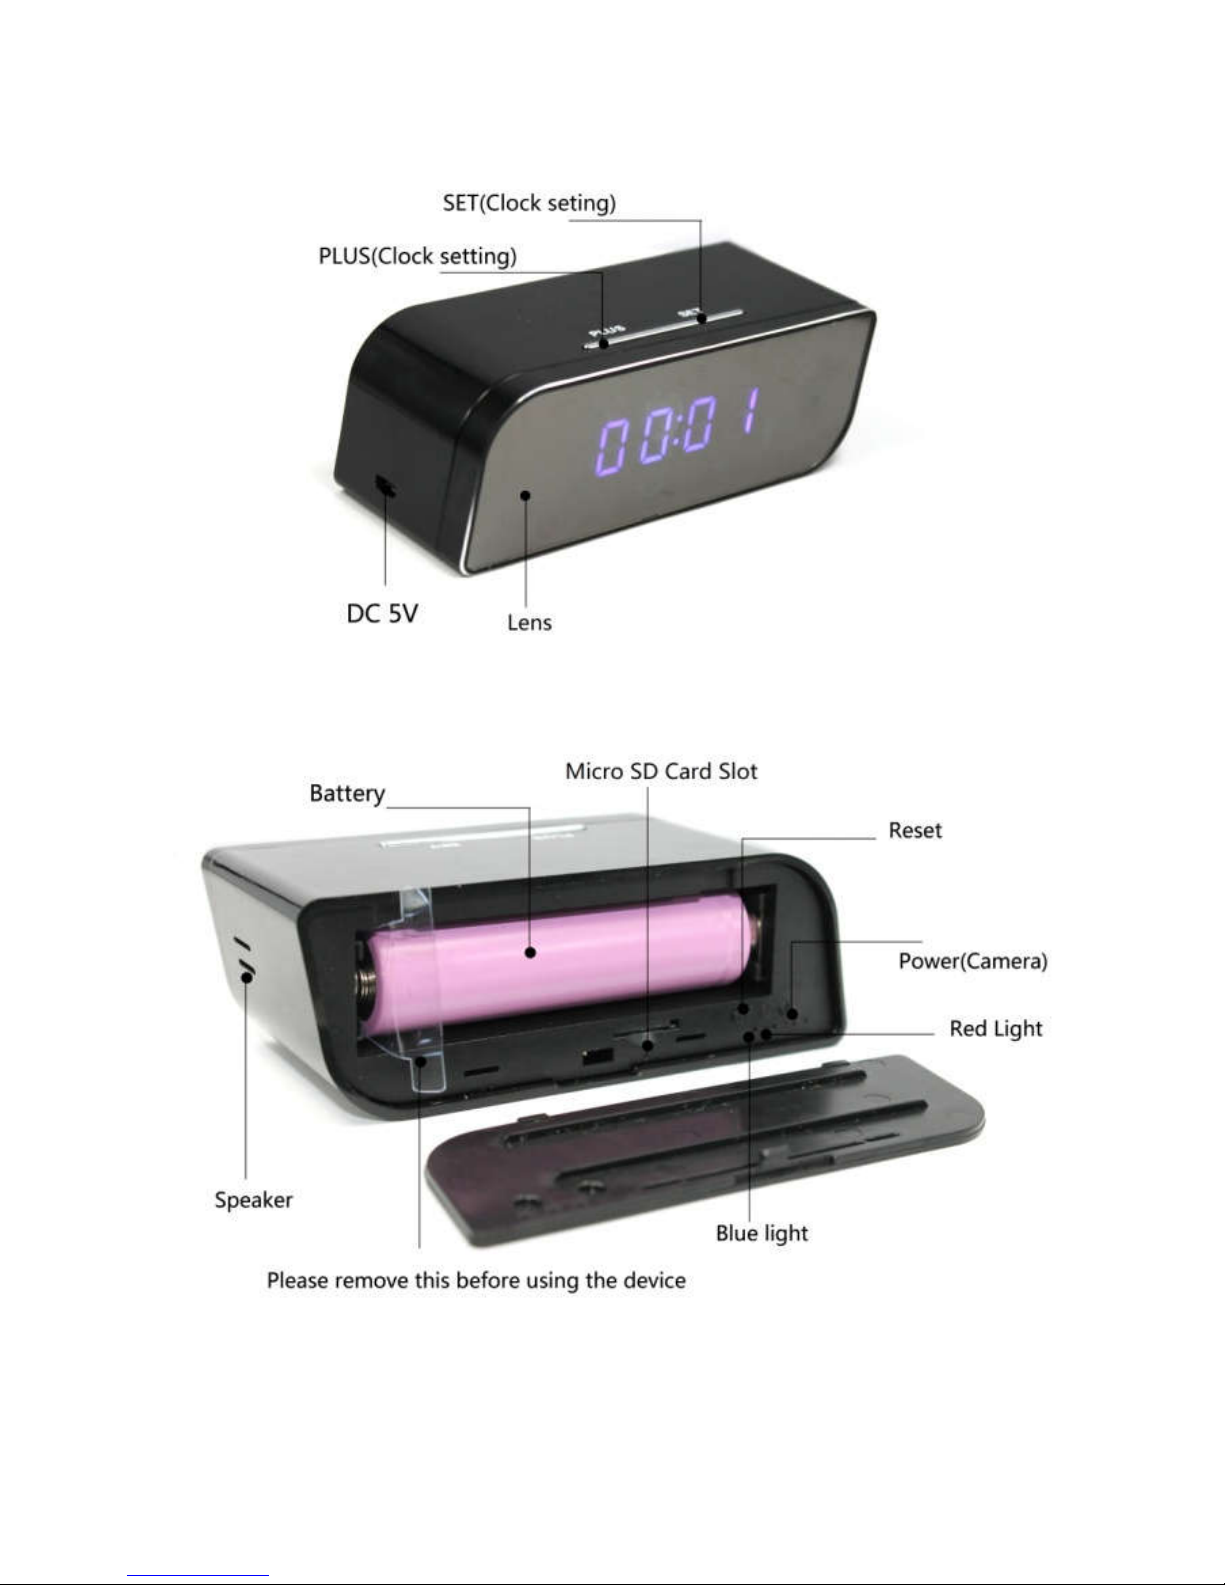
1. Buttons and Lights

2
2. Conditions and Preparations
Open the back cover, and remove the plastic
insulating slip inside.
2.1 Insert Micro SD card
Here comes a Micro SD card for SD card
recording. Hold golden fingers of the Micro SD
card downwards, and then insert it into the
slot.
2.2 Charge
Please charge it before the first use. It can
support 1.5h after fully charged. To charge,
simply connect it to your adapter (DC 5V)
through the USB cord included.
Keep charging it if you use it for continuous
working. In this case, to maintain battery life
and avoid getting hot, we recommend you
remove the battery.
Please note that files will be saved
automatically when the battery runs out.
2.3 Power on/off the camera
2.3.1 Power on: Press “Power” button, it will

3
create a hotspot (named the camera’s UID
pasted on the camera).
2.3.2 Power off: Press “Power” button again to
power it off.
Please note that the clock is always working
until the battery runs out, no matter the
camera is on or off.
2.4 Reset
Simply reset it if the camera performs
abnormally. When the camera is on, just press
and hold “Reset” button for about 5s until
indicator lights turn off, it will create the
hotspot (named the camera’s UID pasted on
the camera) within 15s.
3. Primary Functions
Functions stated below are primary features of
this item. Download the App VOTECOM, go
step by step to set it up.
Please note: 1. It only supports 2.4G Wi-Fi
network. 2. The default password of the

4
camera is 8888.
To set it up, simply go through the following
process:
Download the App
Connect your smartphone to the device via
hotspot (named the camera’s UID pasted on
the camera)
Connect the device to Wi-Fi through the App
Congratulations. Enjoy this gadget
For details, please follow the steps below.
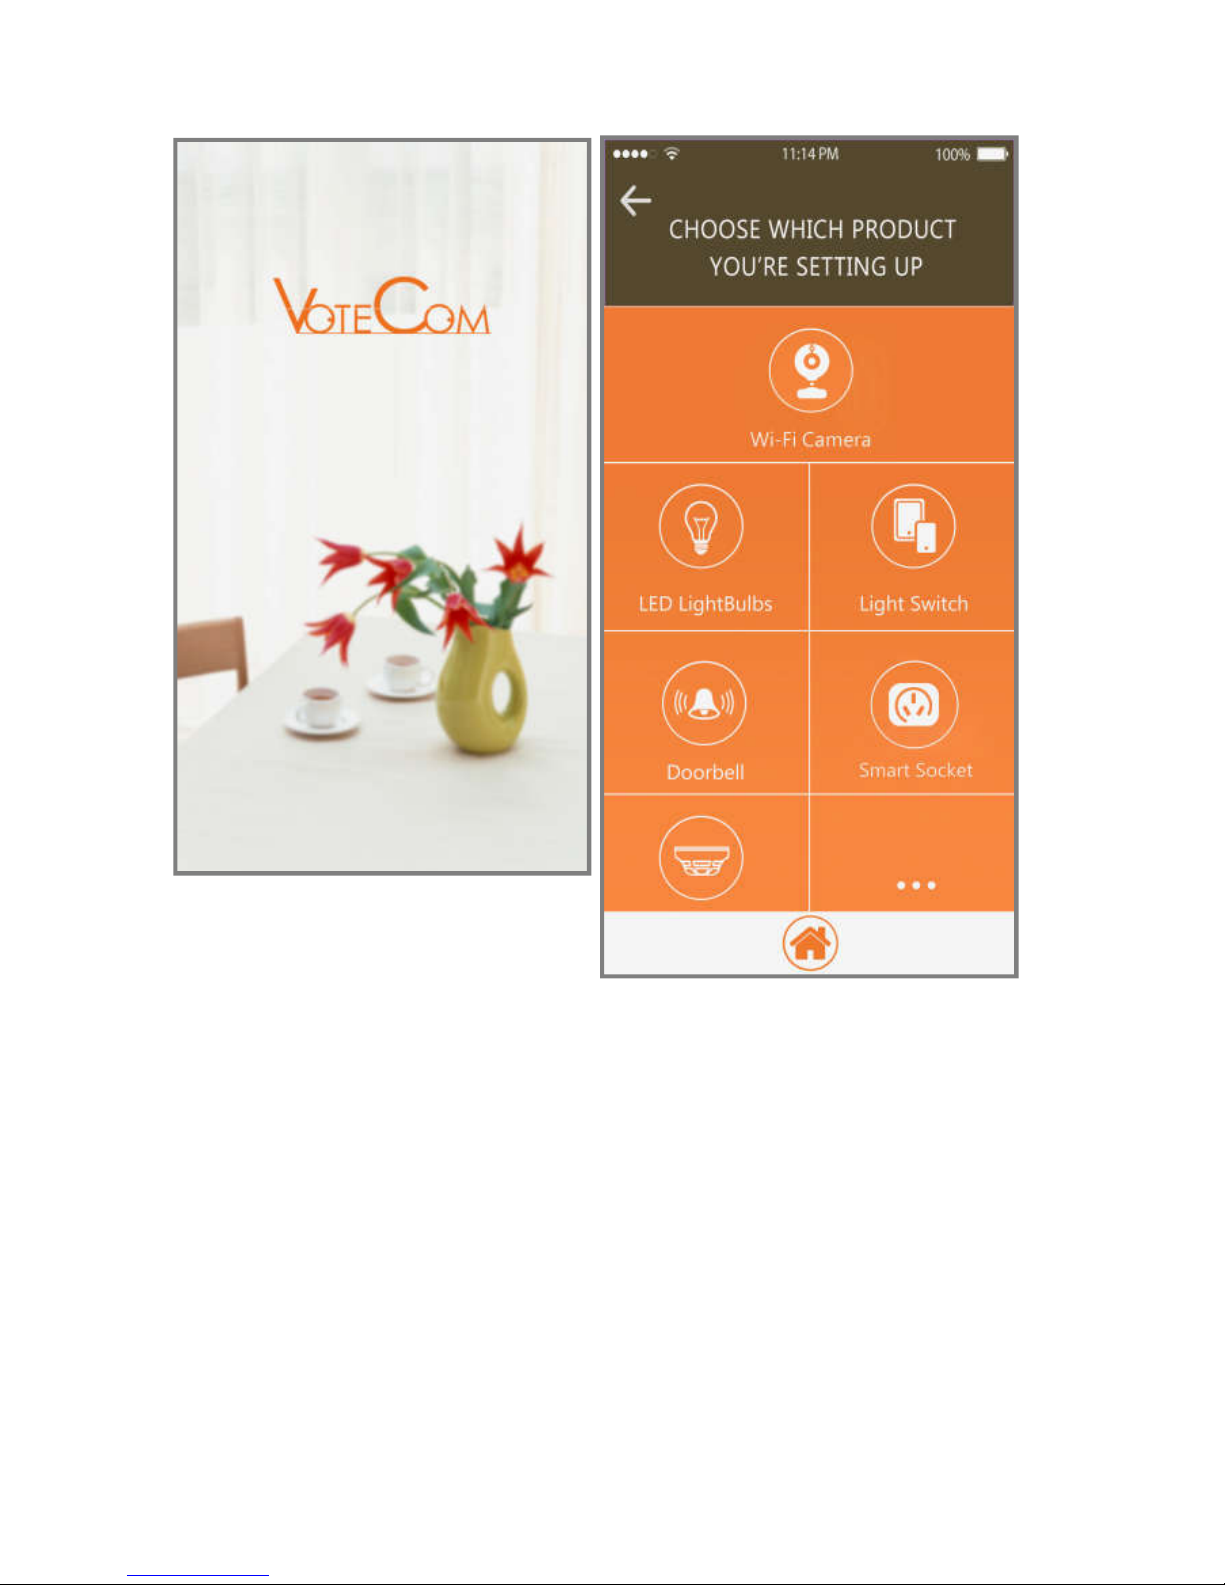
3.1 Scan the QR to download the App
VOTECOM.
You can also download the App VOTECOM
from Google Play Store (for Android) or Apple
Store (for iOS).
5
3.2 Open the App, choose Wi-Fi Camera.

6
3.3 Tap Connect Camera, and connect the
camera to your smartphone via hotspot
(UID).
Important Notice
In this step, you should choose the
network named UID pasted on the
camera (beginning with CM or PQ), NOT
YOUR HOME WI-FI.

7
3.4 Please choose the way of connecting.
Way1 Connect device to wireless router
In this way, you can view real-time video
anywhere.

8
Choose your Wi-Fi, enter its password and
then join.

9
Tap the icon to enter Device List. And then
go directly to item 3.5.
Way2 Connect directly by Point-to-Point
Your smartphone can connect directly by
Point-to-Point (hotspot) when your
smartphone is near.
In this way, it can’t support viewing real-time
video remotely.

10
Tap the right arrow icon to enter Device List.
If you want to connect your camera to Wi-Fi,
please go to Device list> Settings>Device
Settings>Wi-Fi Settings.

11
3.5 Device list
Tap it to add a new device
Tap it to add as many as 4 cameras in one
page
Motion detection is enabled
Motion detection is disabled
Tap it to enter Settings

12
Tap it to view real-time video
Tap it to view snapshots captured in the
real-time video interface
Tap it to view videos recorded in the
real-time video interface or Micro SD card
Tap it to view photos taken when it is
alarming
3.6 Device Settings
Tap to enter Settings>Device Settings.
3.6.1 Alarm Settings
Motion detection sensitivity: When
motion detection is enabled, the device
will send you an alarm automatically if
motion is detected. You can choose a
sensitivity level for Motion detection. It
has 7 levels. When you choose “disabled”,
motion detection will be closed.
Alarm schedule: You can set a time period
only in which it sends alarm information to

13
you.
Warming Tone: After enabling motion
detection (Motion detection sensitivity is
not set to “disabled”), you can enable the
camera to send out alarm sound or not.
This function applies to certain types. For
some types, if smoke/gas detection is
available, the alarm also can be triggered.

14
When it sounds an alarm, you can tap the
icon to stop it.
E-mail Alert: After enabling motion
detection, you can enable or disable the
E-mail alarm. Just go to “Email Settings” to
set it, then it will send you photos shot at
the moment it detects movement. For
some types, if smoke/gas detection is
available, the alarm also can be triggered.
Alarm interval: After enabling motion
detection, if motion is detected, the
camera will perform alarm. You can type in
a number between 30 and 300 to set the
time interval between two alarms.
Push notifications: You can enable or
disable this functionality. If you enable it,
the App will send you push notifications
even if you exit the App in
iOS-powered devices, or run the App in
background in Android-powered devices.
On-Screen Display: If you enable this

15
functionality, current time stamp will show
up in the real-time video.
Certain types with smoke/gas detection
functionality have a more item to enable
or disable smoke/gas detection alarm.
After setting, please tap “OK” to save.
3.6.2 SD Card Record Settings
Record: If you want to record all the time,

16
please choose “All day”. If you choose
“On alarm”, you need to enable motion
detection. You can also choose “Timing
Record” to set a time only in which it
records videos into Micro SD card.
Resolution: You can choose the resolution
of video recorded in the Micro SD card
(not live video).
File length (minute): It generates a file
every 3 minutes by default (that means it
will automatically generate a video file
every 3 minutes and continue recording).
You can type in a number to set file length
between 1 and 60 minutes.
Record sound: When you enable this
functionality, it will record sound while
recording video.
Loop recording: When you enable this
functionality, it will override the oldest file
and continue recording even if the Micro
SD card is full.

17
After setting, please tap “OK” to save.
3.6.3 Email Settings
Type in E-mail addresses for a sender and as
many as 4 recipients. Fill in “User” and
“Password” with the sender’s E-mail addresses
and corresponding password, respectively.
Then tap “OK” to save.

18
3.7 Live Video
Tap the screen to unhide the icons.
Adjust the brightness of the live video
Adjust the contrast of the live video
Enable or disable IR lights(for some types)
Tap it to turn off indicator lights, tap it
again to turn them on
Adjust the quality of the live video
Enable or disable speaker
Snapshoot
Record video into your smartphone
Rotate video image left and right

19
Rotate video image up and down
Hold it to send voice (only applies to types
with two way audio)
4. Use More
You can set the clock time.
Press the “Plus” button, and press “Set”
button to set Hour.
Press the “Plus” button again, and press
“Set” button to set Minute.
Press “Plus” button for the third time to
save.
You can switch the time system between
12-hour and 24-hour by pressing “Set” button
when it displays time.
Also, you can use this item to do more. Please
refer to the CD included to get more
information regarding functions including
real-time video view in IP camera client.

20
5. Specifications
Video Resolution
1920*1080
Frame Frequency
25FPS
Video Format
AVI
Photo Resolution
1920*1080
Charging Voltage/
Current
DC 5V/1-2A
Support Wi-
Fi
Mode
802.11bgn 2.4GHz
Charging Time
5h (When off)
Support System
iOS, Android,
Windows PC
Hotspot Range
10m
Wi-Fi Receiving Range
15-20m
Last after Fully
Changed
1.5h
8GB for 1080P
5MB/min

21
6. Troubleshoot
To save your time, before asking for help, try
one or more of the following methods please.
Note that some methods may not apply to
your device. If it still doesn’t work, please don’t
hesitate to let us know.
If your device performs abnormally, please
reset it. Just press and hold “Reset” button
for about 5s until indicator lights turn off,
it will create the hotspot (named the
camera’s UID pasted on the camera)
within 15s.
If your device can’t connect to Wi-Fi, keep
charging it to give it enough energy if you
didn’t do that. Then, make sure your Wi-Fi
is in 2.4G mode and DHCP is enabled. We
recommend you to ask the router
technical support for more information.
Now, you can reset your device and go
from the step 3.2.
If your device is offline, keep charging it.

22
Make sure your Wi-Fi is good. You can use
your smartphone to test it by connecting.
Tap the gear icon in the “Device list” and
then “Reconnect” to reconnect it. After
doing all above, if it still doesn’t work,
please reset it.
If your device goes offline frequently,
please adjust the resolution to a lower
level to adapt the Wi-Fi once it is online.
If the real-time video is bad, please keep
charging your device and adjust the
resolution to a lower level.
If your device got hot, keep charging it and
remove the battery.
Safety Information
Please don’t collide and damage physically
your device.
Getting USB ports and battery electrode in
contact with conductive objects, such as
metal and liquids, is forbidden.

23
Please don’t touch your device or adapter
with wet hands while charging.
Please keep your device dry.
Visit www.votecoms.com to learn more.
 Loading...