

Page 1
QUICK START GUIDE
V100-V (US only)
& comparables*
V 1.3
Page 2

IN THE BOX
1x Camera
1x Mount
1x Installation strap
1x Quick start guide
1X Micro SIM card is pre-activated and inserted in the camera
Note: Memory card and batteries are sold separately.
ENGLISH
User manual, latest firmware & FAQ available at:
www.vosker.com
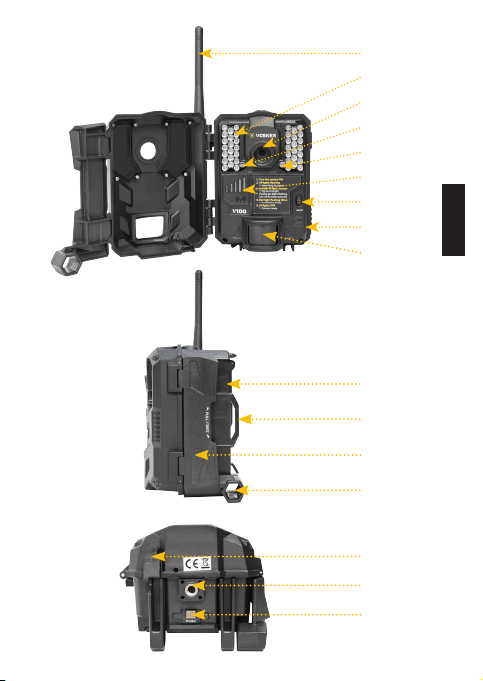
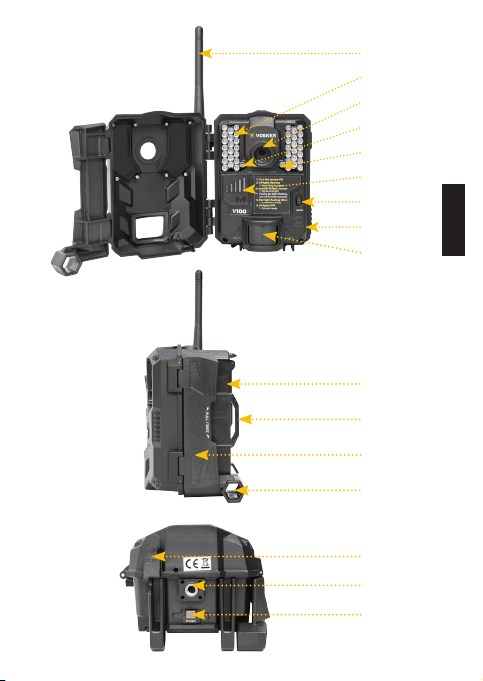
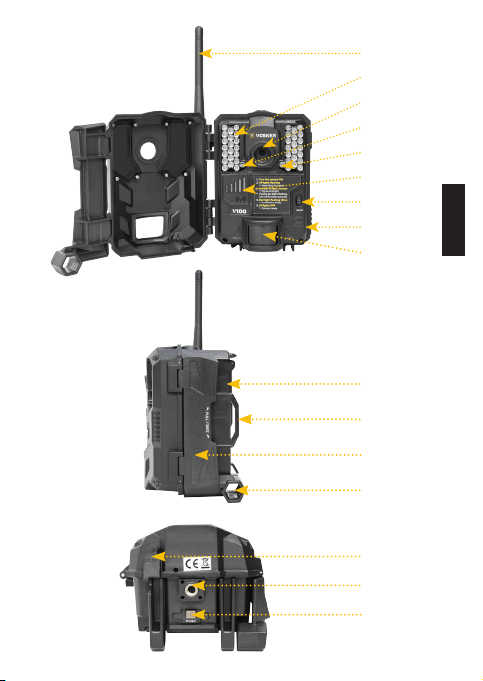
COMPONENTS
1. Antenna
2. LEDs
3. Photo lens
4. Light sensor
5. Test light
6. Signal meter
7. ON / OFF Switch
8. SD card slot
9. Detection lens
Steel security boxes may reduce
the wireless functionalities of the product.
* Specs and features may differ across comparable models.
Refer to the website or packaging for full details.
2
10. Battery case & Micro SIM
card reader
11. Slot for installation strap
12. Locking latch
13. Cable lock hole
14. 12V jack
15. Tripod mount
16. Battery door push button
Page 3
1
2
3
4
5
6
7
8
9
10
11
12
13
14
15
16
ENGLISH
3
Page 4
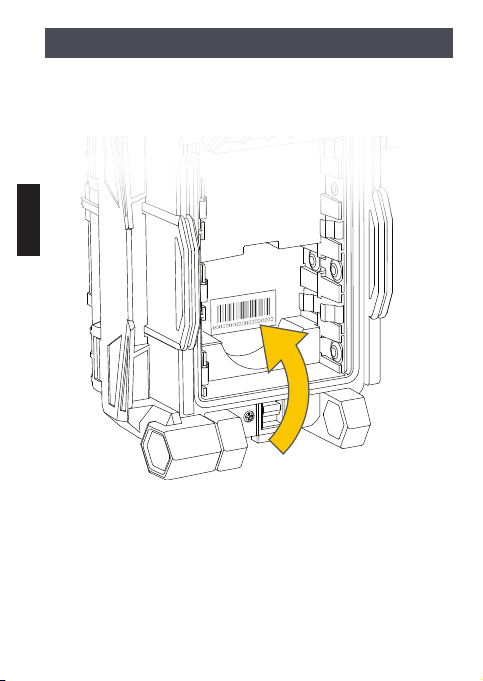
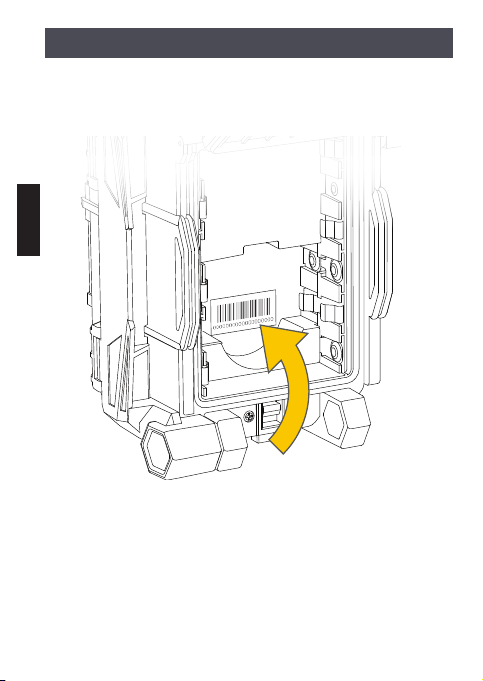
FINDING THE SIM ID
The SIM ID number can be found in the battery case. You will need this
number to complete the registration of the V100 camera and connect
to the application.
ENGLISH
4
Page 5
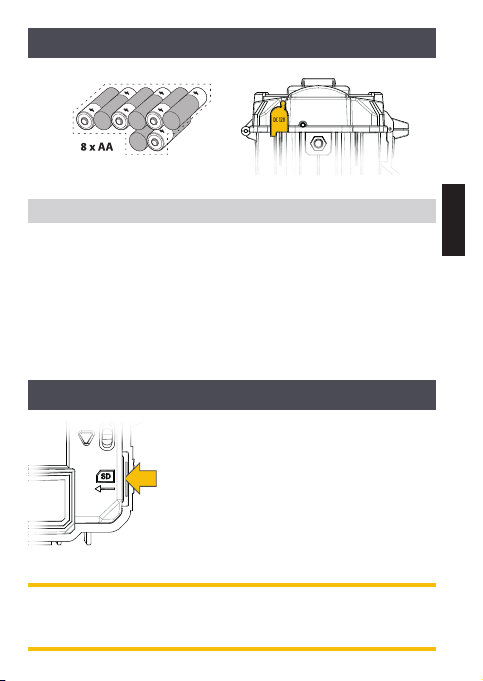
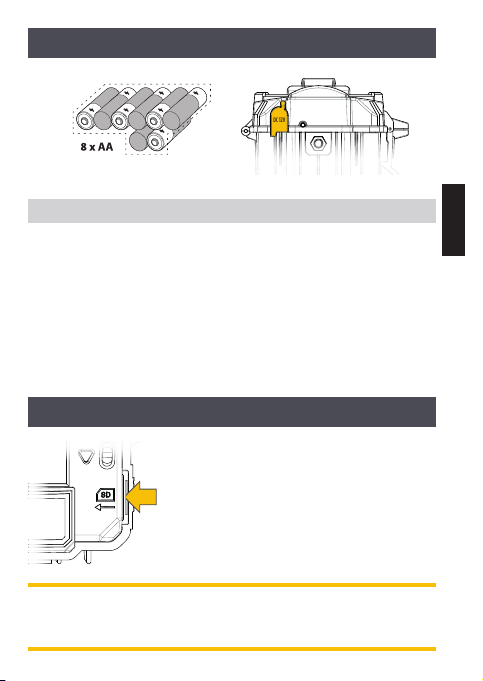
CHOOSE A POWER SOURCE
DC 12V
Lithium or Alkaline batteries
Be sure to insert the AA batteries according to the polarity indications (+) and (-).
To ensure maximum performance of the camera and prevent battery
leak, we recommend the use of new batteries. Use ONLY Lithium
batteries or ONLY Alkaline batteries. Rechargeable AA batteries are
not recommended as the lower voltage they produce can cause
operational issues.
In order to get best results and longer battery life, we recommend the
use of an external 12V source.
12V power source
INSERT THE MEMORY CARD
Insert an SD/SDHC memory card (up to
32 GB capacity) in the card slot with the label
side facing upward. The card is inserted correctly when click is heard. Always ensure that
the camera power is OFF before inserting an
SD card.
We suggest formatting your SD card
if it’s been in another electronic device.
ENGLISH
5
Page 6
GETTING STARTED
INSTALL THE FREE VOSKER APP
The VOSKER App lets you connect and control your camera remotely
using a smartphone or tablet. Features include viewing your camera
status, pictures, full-camera control and more.
Install the free App
ENGLISH
1. Make sure you have a data package with either your smartphone
or tablet or a Wi-Fi connection.
2. To install the App, you can either:
• Get it on Google Play
(Google Play is a trademark of Google Inc.)
• Download on the App StoreTM
(App Store is a trademark of Apple Inc.)
3. Search for the VOSKER App from VOSKER.
4. Install the App on your smartphone or tablet.
Run the VOSKER APP
Start the app and it will walk you through a few questions. Press the
button at the bottom of the screen once you have finished. You will
then receive an email confirming the activation.
Once in the app, you will have the following 4 options at the bottom:
Account:
Select the data plan and modify
your profile information.
Status:
See general information like the cellular signal strength,
battery level or percentage of space used on your SD card.
TM
6
Page 7
Settings:
Modify the mode of the picture settings,
the synchronization frequency & all others
Photos:
Let you see your pictures by date, months and years.
Also let you share or download the photo.
Note: If you have more than one camera, it will let you select the
camera name with the white bar with a scrolling menu at the top
of the screen
SETTING THE APP
The VOSKER App let you configure all the camera’s settings. These new
settings will take effect the next time the V100 camera connects to
update its status. Here are the most important settings, there are more
available in the app.
BASIC SETTINGS
Mode - PHOTO
Delay : Sets the time interval between each detection before the
camera records the next photo.
Multi-shot : Takes up to 2 consecutive shots at each detection,
with a 5 second delay between each photo.
Mode - TIME LAPSE
Interval : This option allows the camera to take photos at regular
preset intervals without detection.
ENGLISH
7
Page 8
Mode - VIDEO
Blur reduction
Battery life
Flash range
Delay : Sets the time interval between each detection before the
camera records the next video.
Photo first: When this option is enabled, a photo is taken immediately before each video.
Video length : Allows the user to select the duration of the recording.
ENGLISH
TRANSFER SETTINGS
First transfer time: Allows the user to choose at what time of the day
the camera communicates for the first time.
Transfer frequency: Allows the user to choose the number of synchronizations that the camera performs daily.
ADVANCED OPTIONS
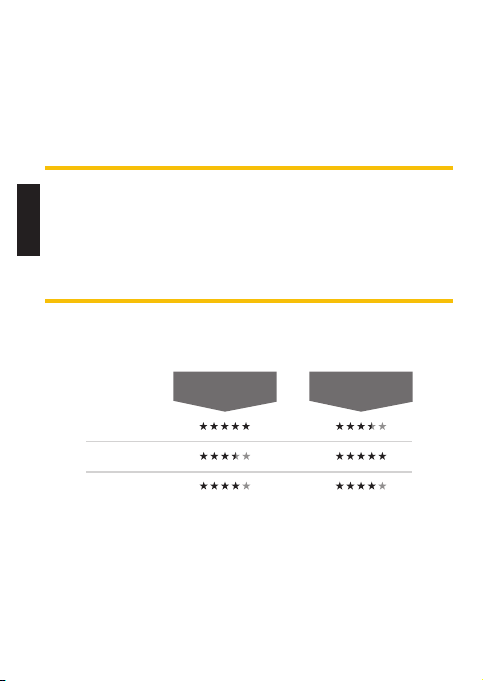
Night mode: Allows the user to set the best option for photos
OPTIMAL
MODE
IR-BOOST
Schedule: Allows the user to set the period of operation of the
camera for each day of the week. The start and stop time are the
hours during which the camera is in action and can record pictures
or videos. For the activation of 24 hours, the same start and stop time
must enter 00h00 or 12 AM.
8
MODE
Page 9
START THE CAMERA
We strongly suggest to slow format your SD card in a computer, even more if it has been used in another electronic device.
1. Turn the camera ON
Use the ON/OFF switch to turn the camera ON.
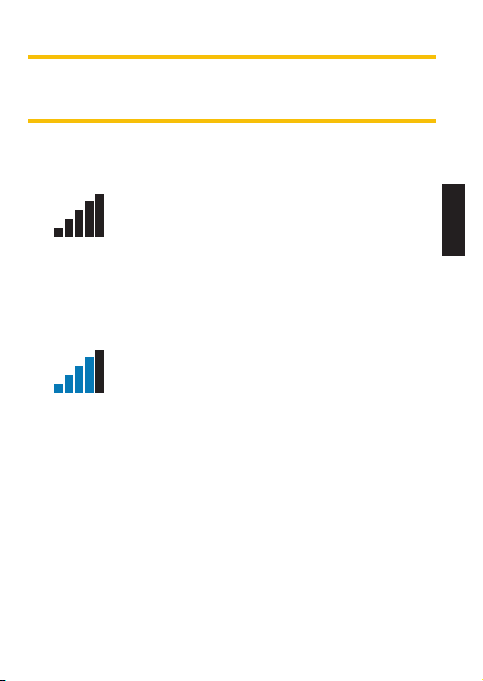
2. All lights flashing - Searching for signals
3. Solid blue bars - Signal strength
4. Red light flashing (30 s) - Installation delay
5. All lights OFF - Camera ready
The signal search can take few minutes to process. If
only 1 blue bar is flashing, the network test was un-
successful. Get outside or near a window to maximize
signal strength and restart the camera. This operation might need
to be repeated as the VOSKER SIM card and services are powered
by multiple providers. The network modem will maneuver to
ensure strongest signal strength by searching for the best tower
available (cell network).
Once the network test is completed, blue bars will
stabilize showing the signal strength. Note that signal
bars displayed on the camera can differentiate of those
shown on other cellular devices as there is no industry standards
and practice to label DBM values to a specific number of bars.
The test light in front of the camera will flash for 30 seconds to
allow the user to leave the area without being photographed or
recorded.
The camera has sent a picture and updated its status in the
VOSKER app with its latest information. The camera is now ready
to take pictures and transmit them to your VOSKER app upon
the next synch. Synchs are set by default to every 4 hours from
midnight.
ENGLISH
9
Page 10

Note: If your camera did not send the photo and/or the
status in the 15 minutes following the completion of
the last step. Please turn OFF the camera and perform
the steps 1 to 5 again. If the problem persists, please
consult the Help section of your VOSKER APP.
INSTALLATION OF THE CAMERA
Install the camera with or without the mount
ENGLISH
Recommended installation height:
The camera should be installed at a reasonable distance from the area
you want to secure.
Ideal installation for quality pictures & videos:
For a better field of view, keep in mind that depending on the weather
and the camera you are using, the normal range of detection is 100 feet
To get brighter pictures at night, you should have elements in the
background to reflect back the IR flash to the camera.
Note: Camera should not directly be facing the sun to avoid back
lighting and false detection.
IMPORTANT • BEFORE THE END OF THE 30-DAY FREE TRIAL
In the VOSKER app, go activate your plan under the Account tab. For
more details about the available plans, look at the Account tab in the
App or follow the link below.
If you choose not to activate a plan, note that you’ll still be able to
transmit/receive pictures with our FREE monthly plan. It will allow you
to transmit/receive up to 100 photos per month with a photo history
of the last 7 days.
WWW.VOSKER.COM
Help
10
Page 11

THIS DEVICE COMPLIES WITH PART 15 OF THE FCC RULES.
Operation is subject to the following two conditions
(1) this device may not cause harmful interference,
(2) this device must accept any interferenc received,
including interference that may cause undesired
operation.
ENGLISH
11
Page 12

THANK YOU FOR CHOOSING
ENGLISH
Sit back & relax as this VOSKER cameras are covered by the “Know
you’re covered” 2 year warranty. We strive on offering all customers a
positive, user-friendly experience that will have a lasting impression.
FAQ, user manual & latest firmware available at:
www.vosker.com
Live Chat support at VOSKER.COM
USA : 1-888-986-7537 | Canada & INTL : 1-866-986-7537
Join the community
12
Page 13
GUIDE DE DÉMARRAGE RAPIDE
& comparables*
Page 14

DANS LA BOÎTE
1x Caméra
1x Socle de fixation
1x Courroie d’installation
1x Guide de démarrage rapide
1X Carte Micro SIM pré activé et inséré dans la caméra
Note: Carte mémoire et piles sont vendues séparément.
FRANÇAIS
Manuels d’utilisation, mise à jour du logiciel & FAQ disponible au:
www.vosker.com
COMPOSANTES
1. Antenne
2. DEL
3. Lentille photo
4. Capteur de lumière
5. Lumière de test
6. Indicateur de signal
7. Bouton ON / OFF
8. Fente pour carte SD
9. Lentille de détection
Les boîtiers de sécurités en métal peuvent réduire
les fonctionnalités sans fil du produit.
* Les spécifications et caractéristiques peuvent varier selon les modèles comparables.
Référez-vous au site web ou à l’emballage pour tous les détails.
14
10. Compartiment à piles &
fente de carte Micro SIM
11. Fente pour courroie
d’installation
12. Loquet de verrou
13. Ouverture pour câble cadenas
14. Prise 12V
15. Support pour trépied
16. Bouton-poussoir pour la porte
du compartiment à piles
Page 15
1
2
3
4
5
6
7
8
9
10
11
12
13
14
15
16
FRANÇAIS
15
Page 16
TROUVER LE SIM ID
Le numéro de SIM ID se trouve dans le compartiment à piles. Vous
aurez besoin de ce numéro pour compléter l’enregistrement de la
caméra V100 et vous connecter à l’application.
FRANÇAIS
16
Page 17
CHOISIR UNE SOURCE D’ALIMENTATION
DC 12V
Piles lithium or alkaline
Veillez à insérer les piles AA en respectant les indications de polarité (+) et (-).
Pour assurer une performance maximale de l’appareil et éviter une
fuite des piles, nous recommandons l’utilisation de piles neuves.
Utiliser SEULEMENT des piles au Lithium ou SEULEMENT des piles
alcalines. Les piles AA rechargeables ne sont pas recommandées, car
le voltage inférieur qu’elles produisent peut provoquer des problèmes
de fonctionnement.
Afin d’obtenir les meilleurs résultats et une autonomie de batterie plus
longue, nous recommandons l’utilisation d’une source externe de 12V.
Source 12V
INSÉRER UNE CARTE MÉMOIRE
Insérez une carte mémoire de type SD/SDHC
(jusqu’à une capacité de 32 Go) dans la fente
pour carte SD avec le côté de l’étiquette vers
le haut. La carte est correctement insérée
lorsqu’un clic se fait entendre. Toujours
s’assurer que la caméra est éteinte avant
d’y insérer une carte mémoire.
Nous conseillons de formater votre carte SD si elle
a été dans un autre appareil électronique au préalable.
FRANÇAIS
17
Page 18

MISE EN ROUTE
INSTALLATION DE L’APP VOSKER GRATUITE
L’App VOSKER vous permet de connecter et de contrôler votre caméra
à distance en utilisant un téléphone intelligent ou une tablette. Les
options comprennent l’affichage du statut de la caméra, des photos,
un contrôle complet de la caméra à distance et plus.
FRANÇAIS
Installez l’application gratuite
1. Assurez-vous que vous avez un forfait de données soit avec
votre téléphone intelligent, et/ou votre tablette ou encore d’une
connexion WIFI;
2. Pour installer l’application, vous pouvez soit:
• Disponible sur Google Play
(Google Play est une marque déposée de Google inc.)
• Téléchargez dans l’App Store
(App Store est une marque de commerce d’Apple inc.)
3. Recherchez le lien de l’App VOSKER de VOSKER;
4. Installez l’application sur votre téléphone intelligent ou votre tablette;
Exécutez l’App VOSKER
Démarrez l’application, elle vous guidera à travers quelques questions.
Appuyez sur le bouton au bas de l’écran une fois que vous aurez terminé. Par la suite, vous recevrez un courriel confirmant l’activation.
Une fois dans l’application, vous avez les 4 options suivantes:
Compte:
Sélectionnez le plan et modifiez votre
profil d’informations et de données.
TM
TM
18
Page 19
Statut:
Voir les informations générales (ex. : la force du signal cellulaire, le niveau de la batterie, le pourcentage d’espace utilisé
sur votre carte SD)
Configuration:
Modifiez le mode de fonctionnement
(ex. : les paramètres de prise de vue, la fréquence de transfert…)
Photos:
Permets de voir vos photos par date, par mois et par années.
Permets de partager ou de télécharger vos photos.
Note: Si vous avez plus d’une caméra, vous aurez une barre blanche
avec un menu déroulant en haut de l’écran pour sélectionner le nom
de votre caméra.
CONFIGURATION DE L’APP
L’Application VOSKER vous permet de configurer tous les paramètres
de la caméra. Ces nouveaux paramètres prendront effet la prochaine
fois que la caméra se connectera pour mettre à jour son statut. Voici
les paramètres les plus importants.
CONFIG. DE BASE
Mode - PHOTO
Délai : Permet de choisir l’intervalle de temps avant que la caméra ne
détecte à nouveau et puisse enregistrer la prochaine photo.
Multi-photos : Permets de prendre jusqu’à 2 photos consécutives à
chaque détection, avec un délai de 5 secondes entre chaque photo.
Mode - TIME-LAPSE
Intervalle : Permet la prise de photos à intervalle régulier prédéfini
sans qu’il y ait pour autant, une détection de mouvement.
FRANÇAIS
19
Page 20
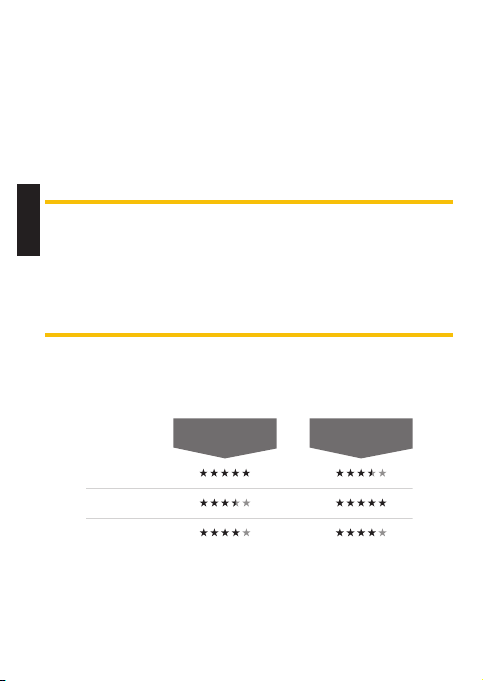
Mode - VIDÉO
Réduction du ou
Autonomie de la pile
Portée du ash
(une photo est prise automatiquement avant chaque vidéo.)
Délai : Permet de choisir l’intervalle de temps avant que la caméra ne
détecte à nouveau et puisse enregistrer la prochaine vidéo.
Photo pré-vidéo: Lorsque cette option est activée, une photo est
prise immédiatement avant chaque vidéo.
Durée vidéo : Permets de configurer la durée d’enregistrement des
séquences vidéo.
FRANÇAIS
CONFIG. DE TRANSFERT
Heure de transfert #1: Permets de choisir, à quel moment de la
journée la caméra communique pour la première fois.
Fréquence de transfert: Permets de choisir le nombre de transferts
que la caméra effectue par jour.
CONFIG OPTIONS AVANCÉES
Mode de nuit: Permets à l’utilisateur de définir la meilleure option
pour les photos.
MODE
OPTIMAL
IR-BOOST
Période: Permets à l’utilisateur de régler l’horaire de fonctionnement
de la caméra pour chaque jour de la semaine. Le temps de démarrage
ainsi que l’arrêt programmé sont les heures pendant lesquelles l’appareil sera en fonction et enregistrera les photos ou les vidéos. Pour une
activation de 24 heures, l’heure de début et d’arrêt devra être 00h00
ou 12 H AM.
20
MODE
Page 21
DÉMARRER LA CAMÉRA
Nous conseillons fortement de formater votre carte SD si elle
a été dans un autre appareil électronique.
1. Allumez la caméra
Utilisez l’interrupteur ON / OFF pour allumer la caméra.
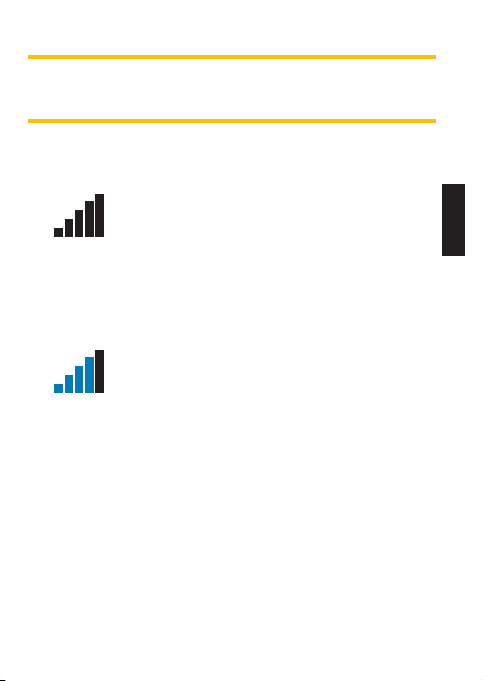
2. Toutes les lumières clignotent - Recherche de réseau
3. Barres bleues stables - Force du signal
4. Lumière rouge clignote - Délai d’installation
5. Toutes lumières éteintes - Caméra prête
La recherche de signal peut prendre quelques minutes
à compléter. Si seulement 1 barre bleue clignote, le test
réseau a échoué. Déplacez-vous à l’extérieur ou près
d’une fenêtre afin d’optimiser la force du signal et redémarrez la
caméra. Cette étape peut nécessiter quelques reprises car la carte
SIM et le service VOSKER sont alimentés par de multiples fournisseurs réseau. Le modem cherchera à capter le signal (service
cellulaire) et la tour la plus forte.
Une fois le test réseau terminé, les barres bleues se
stabilisent et indiquent la puissance du signal. Notez
que les barres de signal affichées sur la caméra peuvent
différencier de celles sur d’autres appareils cellulaires puisqu’il n’y
a pas de norme ou de pratique dans l’industrie qui étiquette les
valeurs DBM à un nombre spécifique de barres.
La lumière test devant la caméra clignote pendant 30 secondes
pour permettre à l’utilisateur de quitter la zone sans être photographié ou enregistré.
La caméra a transféré une photo et mis à jour son statut et ses
dernières informations dans l’application VOSKER. La caméra
est maintenant prête à prendre des photos et à les transmettre
lors de la prochaine synchronisation. Les synchronisations sont
définies par défaut à toutes les 4 heures à partir de minuit.
FRANÇAIS
21
Page 22

Note: Si votre caméra n’a pas transmis la photo et/ou
son statut dans les 15 minutes suivant la fin de la dernière
étape. Veuillez éteindre la caméra et recommencer les
étapes 1 à 5. Si le problème persiste, veuillez consulter
la section Aide de l’application VOSKER.
L’INSTALLATION DE LA CAMÉRA
Installez la caméra avec ou sans le socle de fixation
FRANÇAIS
Hauteur d’installation recommandée
La caméra doit être placée à une distance raisonnable de la zone que
vous souhaitez sécuriser.
Installation idéale pour des images et vidéos de qualités:
Pour un meilleur champ de vision, n’oubliez pas qu’en fonction de
la météo et de la caméra que vous utilisez, la plage de détection
normale est de 100 pieds.
Pour obtenir des photos plus lumineuses la nuit, vous devriez avoir
des éléments en arrière-plan pour réfléchir le flash IR de la caméra.
Note: la caméra ne devrait pas être directement face au soleil pour
éviter d’être à contre-jour et d’avoir de fausse détection.
IMPORTANT • AVANT LA FIN DE L’ESSAI GRATUIT DE 30 JOURS
Dans l’application VOSKER, activez votre plan sous l’onglet Compte.
Pour plus de détails sur les plans disponibles, consultez l’onglet
Compte ou le lien ci-dessous.
Si vous choisissez de ne pas activer un plan, notez que vous pourrez
toujours transmettre/recevoir des photos avec notre plan mensuel
GRATUIT. Il vous permettra de transmettre / recevoir jusqu’à 100 photos par mois avec un historique des photos des 7 derniers jours.
WWW.VOSKER.COM
Aide
22
Page 23

CET APPAREIL EST CONFORME À LA SECTION 15 DES RÉGLEMENTATIONS DE LA FCC.
Son fonctionnement est soumis aux deux conditions suivantes :
(1) cet appareil ne doit pas créer d’interférences nuisibles et
(2) cet appareil doit tolérer les interférences reçues,
ce qui inclut les interférences qui risquent de provoquer
un fonctionnement indésirable.
FRANÇAIS
23
Page 24

MERCI DE CHOISIR
FRANÇAIS
Détendez-vous, vous êtes couvert. Cette caméra est couverte par
notre garantie « Vous êtes couverts » d’une durée de 2 ans. Nous nous
efforçons d’offrir à tous nos clients une expérience positive et un
service hors pair.
Manuel d’utilisation, mise à jour logiciel & FAQ disponible au:
www.vosker.com
Assistance en ligne au VOSKER.COM
USA : 1-888-986-7537 | Canada & INTL : 1-866-986-7537
Rejoignez la communauté
24
Page 25
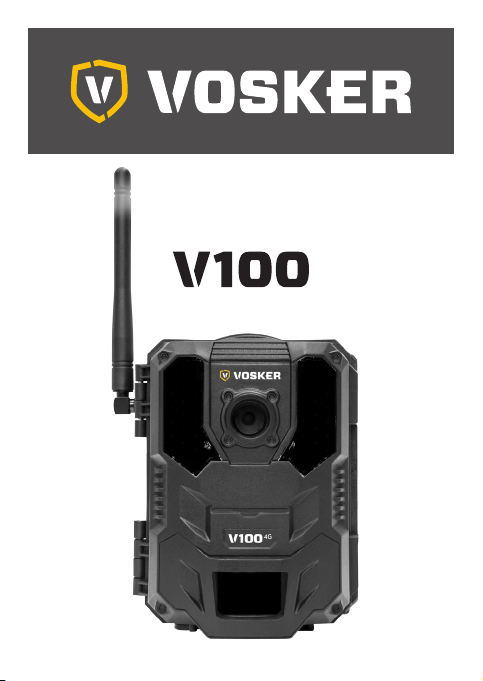
SCHNELLSTARTANLEITUNG
und vergleichbare*
Page 26

IN DER BOX
1x Kamera
1x Montieren
1x Befestigungsgurt
1x Schnellstartanleitung
1X Die Micro SIM-Kar te ist bereits aktiviert und in der Kamera eingelegt
Hinweis: peicherkarte und Batterien separat erältlich.
DEUTSCH
Bedienungsanleitung, neuste Softwareversion & FAQ verfügbar auf:
www.vosker.com
KOMPONENTEN
1. Antenne
2. LEDs
3. Fotolinse
4. Lichtsensor
5. Test-LED
6. Signal Meter
7. ON / OFF Switch
8. SD-Kartensteckplatz
9. Erfassungslinse
Das Metallgehäuse kann die Sendeleistung
des Produkts vermindern.
* Spezifikationen und Funktionen können bei vergleichbaren Modellen abweichen.
Siehe unsere Webseite oder die Verpackung der Kamera für weitere Informationen.
26
10. Batteriegehäuse &
Micro-SIM-Kartenleser
11. Löcher für den Befestigungsgurt
12. Verschlussgsriegel
13. Löcher für das Kabelschloss
14. 12V Anschluss
15. Stativgewinde
16. Druckknopf der Batterieklappe
Page 27
1
2
3
4
5
6
7
8
9
10
11
12
13
14
15
16
DEUTSCH
27
Page 28
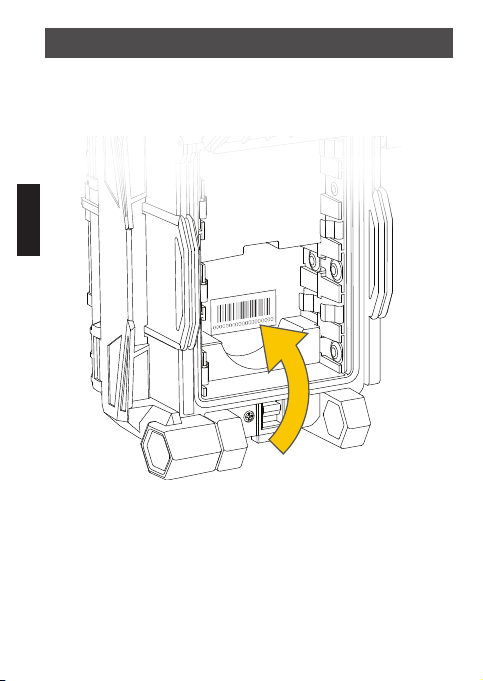
DIE SIM-ID FINDEN
Die SIM-ID können Sie im Batteriefach der Kamera finden. Sie
benötigen diese Nummer, um die Registrierung Ihrer V100 Kamera
abzuschließen und mit der App zu verbinden.
DEUTSCH
28
Page 29
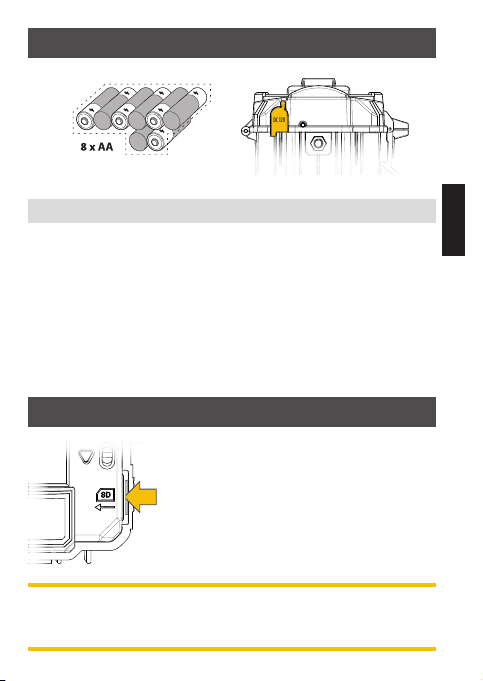
WÄHLEN SIE IHRE STROMQUELLE
DC 12V
Lithium oder Alkaline Batterien
Achten Sie darauf, dass Sie die AA-Batterien gemäß den Polaritätsangaben (+) und (-) einlegen.
Um die maximale Leistung der Kamera sicherzustellen und Batterien vor
dem Auslaufen zu schützen, empfehlen wir immer neue Batterien zu
verwenden. Verwenden Sie entweder NUR Lithium Batterien oder NUR
Alkaline Batterien. Wiederaufladbare AA Batterien werden nicht empfohlen, da es aufgrund geringerer Spannung zu Fehlern kommen kann.
Um die besten Ergebnisse zu erzielen und eine längere Akkulaufzeit zu erhalten, empfehlen wir die Verwendung einer externen
12V-Stromquelle.
Externe 12V Batterie
LEGEN EINE SD-KARTE EIN
Legen Sie eine SD/SDHC Speicherkarte (bis
zu 32 GB) in den Kartenschacht ein. Wenn ein
klicken zu hören ist, wurde die Karte korrekt
eingelegt. Stellen Sie immer sicher, dass
die Kamera ausgeschaltet ist, bevor Sie die
SD-Karte einlegen.
Wir empfehlen, die Speicherkarte vor Verwendung zu formatieren,
wenn diese in einem anderen elektronischen Gerät genutzt wurde
DEUTSCH
29
Page 30

STARTEM
INSTALLIEREN SIE DIE KOSTENLOSE VOSKER APP
Die VOSKER App ermöglicht Ihnen, Ihre Kamera mit Ihrem Smartphone oder Tablet zu verbinden und zu steuern. Features, wie den
Kamerastatus und Bilder abzufragen, die vollständige Kontrolle über
Ihre Kamera und Vieles weiteres.
DEUTSCH
Die kostenlose App installieren
1. Stellen Sie sicher, dass Sie eine Internetverbindung via Mobilenetz
oder Wi-Fi mit Ihrem Smartphone oder Tablet haben.
2. Die App finden Sie im:
• Jetzt Bei Google PlayTM
(Google Play ist eine eingetragene Marke von Google Inc.)
• Ladem im App StoreTM
(App Store ist eine eingetragene Marke von Apple Inc.)
3. Suchen Sie nach VOSKER App von VOSKER.
4. Installieren Sie die App auf Ihrem Smartphone oder Tablet.
VERWENDEN DER VOSKER APP
Starten Sie die App, während des Einrichtungsprozesses werden
einige Informationen abgefragt. Drücken Sie die Taste am unteren
Rand des Bildschirms sobald Sie fertig sind. Sie erhalten nach der
Aktivierung eine Bestätigung per E-Mail.
Im Betrieb sehen Sie An der Unterseite haben Sie die 4 folgenden Optionen:
Benutzer:
Wählen Sie einen Datenplan
und ändern Sie Ihr Profil.
30
Page 31
Status:
Allgemeine Informationen, wie die Mobilfunk-Signal-Stärke,
Batterieladezustand oder prozentualer, verwendeter Speicherplatz Ihrer SD-Karte.
Einstellungen:
Ändern der Foto-Einstellungen, der Synchronisation-Frequenzen & alle anderen.
Fotos:
Sie können Ihre Fotos nach Datum, Monat und Jahren abrufen.
Außerdem können Sie Ihre Bilder teilen oder herunterladen.
Hinweis: Wenn Sie mehr als eine Kamera haben, können Sie den
Namen der Kamera mit dem weißen Balken mit einem Scroll-Menü
am oberen Rand des Bildschirms wählen.
DIE APP KONFIGURIEREN
Die VOSKER App ermöglicht es Ihnen alle Kameraeinstellungen zu
konfigurieren. Die vorgenommen Einstellungen werden bei der
nächsten automatischen Statusabfrage wirksam. Hier sind die wichtigsten Einstellungen und Weitere sind in der App verfügbar.
GRUNDEINSTELLUNGEN
Modus - FOTO
Verzögerungszeit : Hier stellen Sie die Verzögerungszeit zwischen
den einzelnen Aufnahmen ein.
Mehrfachaufnahme : Mit einer Erfassung bis zu 2 folgende Bilder in
einem Abstand von 5 Sekunden.
Modus - ZEITRAFFER
Interval : In dieser Option nimmt die Kamera in voreinges tellten
regulären Intervallen und ohne Erfassung einer Bewegung Bilder auf.
DEUTSCH
31
Page 32
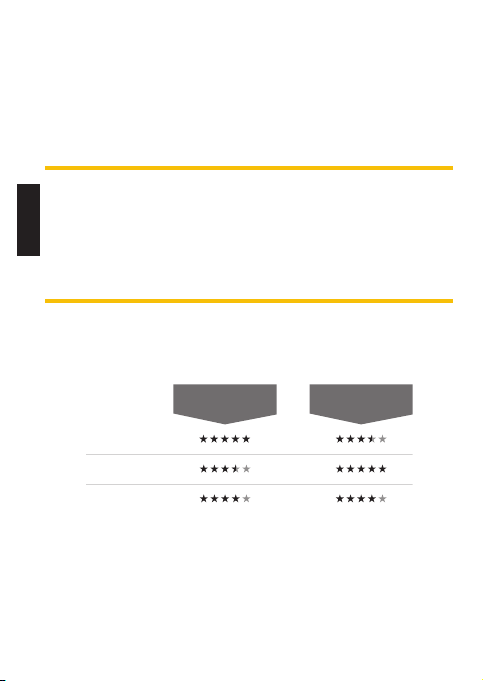
Modus - VIDEO
Unschärfenreduzierung
Batterielebensdauer
Blitzreichweite
Verzögerungszeit : Hier stellen Sie die Verzögerungszeit zwischen
den einzelnen Aufnahmen ein.
Zusätzliche Bild: Zusätzliches Bild : Wenn diese Option aktiviert ist,
nimmt die Kamera unmittelbar vor jedem Video ein Foto auf.
Videolänge : Hier stellen Sie die Dauer einer Aufnahme ein.
DEUTSCH
EINSTELLUNGEN ÜBERTRAGEN
Erste Übertragungszeit: Wählen Sie die Uhrzeit, zu der die Kamera
die erste Synchronisation durchführt.
Übertragungsfrequenz: Wählen Sie die Anzahl der Synchronisationen pro Tag.
ERWEITERTE OPTIONEN
Nacht-Modus: Ermöglicht dem Benutzer, die beste Option für Fotos
festzulegen.
OPTIMAL
MODUS
IR-BOOST
Arbeitszeitraum: Erlaubt dem Benutzer, die Betriebszeit der Kamera
für jeden einzelnen Wochentag einzustellen. Die Start- und Stoppzeit
sind die Stunden, in der die Kamera aktiv ist, um Fotos oder Videos
aufzunehmen. Für eine 24 Stunden Aktiveriung, muss die selbe Startund Stoppzeit eingestellt warden (00h00 oder 12 AM).
32
MODUS
Page 33
DIE KAMERA STARTEN
Wir empfehlen, die Speicherkarte vor Verwendung zu formatieren,
wenn diese in einem anderen elektronischen Gerät genutzt wurde.
1. Schalten Sie die Kamera ein
Verwenden Sie den ON/OFF-Schalter, um die Kamera einzuschalten.
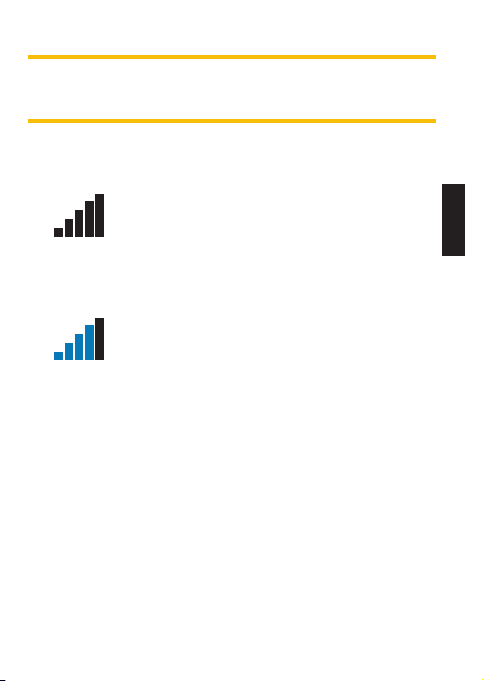
2. Alle Lichter blinken - Signalsuche
3. Anzahl der Balken - Signalstärke
4. Rotes Blinklicht (30 s) - Installationsverzögerung
5. Alle Lichter aus - Kamera ist bereit
Die Signalsuche kann ein paar Minuten in Anspruch
nehmen. Wenn Sie nur 1 Balken blinken sehen, war der
Netzwerktest nicht erfolgreich. Wenn Sie kein Signal haben, gehen Sie nach draußen oder in der Nähe eines Fensters und
starten Sie die Kamera erneut. Diesen Vorgang wenn Notwendig
mehrfach wiederholen.
Sobald der Netzwerktest abgeschlossen ist, sehen Sie
die Beachten Sie, dass die Signalbalken Ihrer LINK-S
möglicherweise nicht mit Ihren anderen Mobilfunk-Geräten übereinstimmt, da es keinen Industriestandart gibt
dBm-Werte auf eine bestimmte Anzahl von Balken zu beschriften.
Das Testlicht an der Vorderseite der Kamera blinkt nun für 30
Sekunden und ermöglicht es Ihnen sich von der Kamera zu entfernen, ohne aufgenommen zu werden.
Die Kamera hat den Status in der LINK App aktualisiert. Die Kamera ist nun bereit für die Aufnahme von Bildern und überträgt sie
bei der nächsten Synchronisierung an Ihre LINK App. Die Synchronisierung erfolgt standardmäßig alle 4 Stunden ab Mitternacht.
DEUTSCH
33
Page 34

Hinweis: Wenn Ihre Kamera das Foto und/oder seinen
Status nicht innerhalb von 15 Minuten nach dem Ende
des letzten Schritts übertragen hat. Schalten Sie die
Kamera aus und wiederholen Sie die Schritte 1 bis 5.
Wenn das Problem weiterhin besteht, lesen Sie bitte
den Hilfeabschnitt der VOSKER-App.
DIE MONTAGE DER KAMERA
DEUTSCH
Installieren Sie die Kamera mit oder ohne Halterung:
Empfohlene Installationshöhe
Die Kamera sollte sich in einem angemessenen Abstand von dem
Bereich befinden, den Sie sichern möchten.
Ideale Installationshöhe für hochwertige Bilder & Videos:
Beachten Sie für ein besseres Sichtfeld, dass der normale Erkennungsbereich je nach Wetter und verwendeter Kamera 100 Fuß beträgt.
Für eine bessere Ausleuchtung bei Nachtaufnahmen sollten sich
Elemente im Hintergrund (z.B Bäume) befinden, an denen das IR-Licht
reflektiert werden kann.
Hinweis: Beachten Sie bitte, die Kamera nicht direkt in die Sonne zu
richten, hierbei kann es zu Überbelichtung und Fehlerfassung kommen.
WICHTIG • VOR ABLAUF DER 30-TAGE TESTPHASE
Aktivieren Sie in der LINK App Ihren Plan in der Registerkarte “Konto”.
Weitere Einzelheiten zu den verfügbaren Plänen finden Sie entweder
auf der Registerkarte “Konto” oder unter dem folgenden Link.
Wenn Sie einen Plan nicht aktivieren möchten, beachten Sie, dass Sie
trotzdem in der Lage sein werden, Bilder mit unserem kostenlosen
monatlichen Plan zu senden / zu empfangen. Dieser ermöglicht
Ihnen, bis zu 100 Fotos pro Monat mit einem Foto-Verlauf der letzten
7 Tage zu senden / zu empfangen.
WWW.VOSKER.COM
34
Hilfe
Page 35

DIESES GERÄT ERFÜLLT DIE BESTIMMUNGEN VON TEIL 15 DER FCC-REGELN.
Der Betrieb ist nur zulässig, wenn die folgenden beiden
Bedingungen erfüllt sind:
(1) Dieses Gerät darf keine schädlichen
Interferenzen erzeugen und
(2) dieses Gerät muss empfangene Interferenzen
aufnehmen, auch wenn diese zu Betriebsstörungen
führen können.
DEUTSCH
35
Page 36

VIELEN DANK, DASS SIE SICH FÜR
DEUTSCH
ENTSCHIEDEN HABEN
Wir bemühen uns, allen Kunden eine positive und benutzerfreundliche Erfahrung zu bieten, die einen bleibenden Eindruck hinterlässt.
Bedienungsanleitung, neuste Softwareversion & FAQ verfügbar auf:
www.vosker.com
Live Chat-Unterstützung bei VOSKER.COM
UNTERSTÜTZUNG [email protected]
USA : 1-888-986-7537 | Canada & INTL : 1-866-986-7537
Werden Sie Mitglied in der Community
36
 Loading...