

Vortice VORTEX 60-I, VORTEX 60-B, VORTEX 90-B, VORTEX 90-I Instruction Booklet/installation Manual
Page 1
Instruction booklet / Installation manual
Betriebsanleitung / Installationshandbuch
Notice d’emploi et d’entretien / Manuel d’installation
Libretto istruzioni / Manuale installazione
Manual de instrucciones / Instalación
Manual d’instruções / Instalaçaõ
Aanwijzing voor gebruik / Installatie
VORTEX 60-I,60-B, 90-I,90-B
COD. 5.471.084.640
VORTICE LIMITED
Beeches House - Eastern Avenue
Burton on Trent
DE13 0BB
Tel. (+44) 1283-492949
Fax (+44) 1283-544121
UNITED KINGDOM
VORTICE FRANCE
72 Rue Baratte-Cholet
94106 Saint Maur Cedex
Tel. (+33) 1-55.12.50.00
Fax (+33) 1-55.12.50.01
FRANCE
10/03/2017
VORTICE ELETTROSOCIALI S.p.A.
Strada Cerca, 2 - frazione di Zoate
20067 TRIBIANO (MI)
Tel. (+39) 02-90.69.91
Fax (+39) 02-90.64.625
ITALIA
Page 2
ENGLISH
INSTALLATION
The hood is available in the ducting version (air evacuated outside the room) or the filtering
version (air recirculated inside the room).
1) The following operations are essential for assembly:
Install a proper wiring system.
If your apparatus is to be assembled as a Ducting appliance, you must first make the air venting
hole and get a proper pipe to connect the hole to the flange of the hood; use an outlet pipe with:
- minimum indispensable length;- minimum possible bends (maximum angle of bend:90°); - certified
material (according to the State); - an as smooth as possible inside. It is also advisable to avoid
any drastic changes in pipe cross-section. For air evacuation to the outside, follow all the instructions
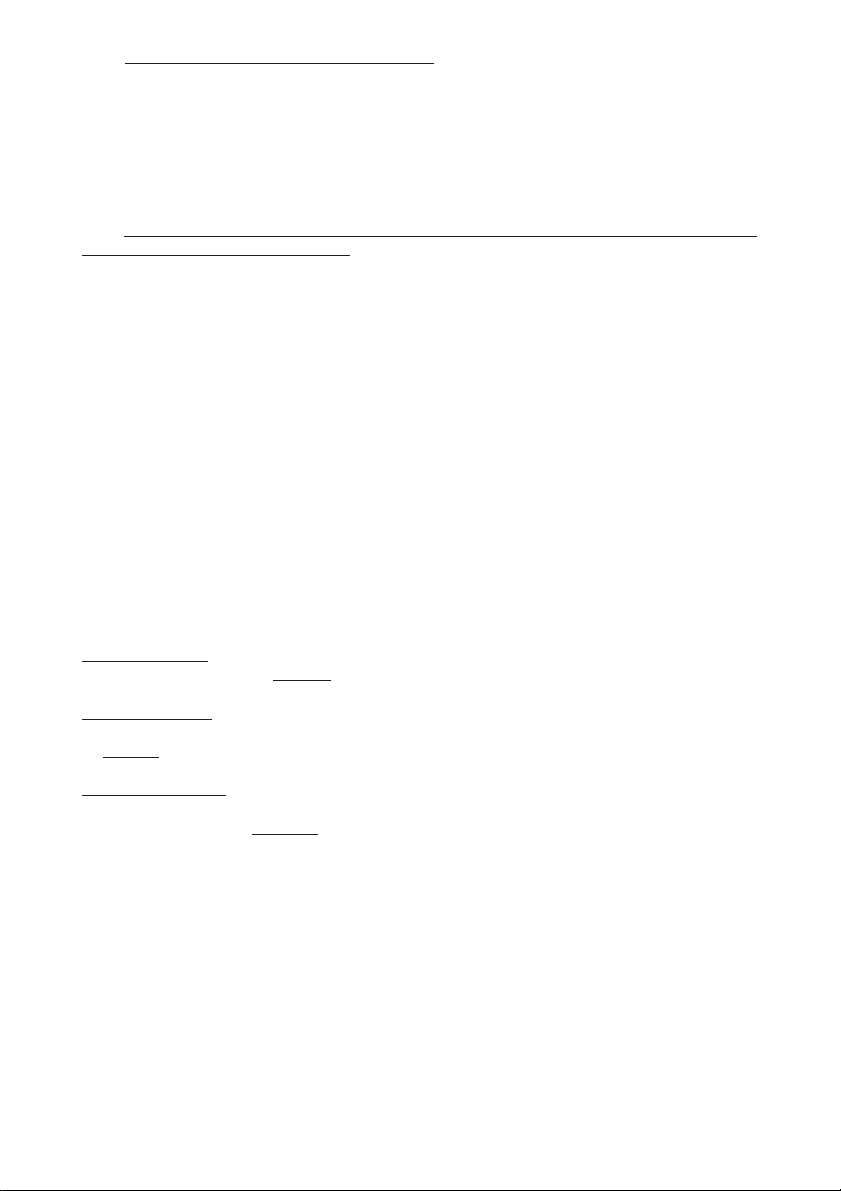
given on the “Warnings” sheet. Make an air evacuation hole in the wall as shown in Fig.1 which
gives all the measurements required for the various possible installations.
2) The hood is fitted with two air outlets, one at the top (Fig. 2B) and one at the rear (Fig. 2A),
which can be used according to requirements. In the ducting version, mount the flange (C) on the
opening used and close the other opening with the plug (E). With the filtering version, the 2 vents
DO NOT have to be closed.
3) Wall mounting: Drill 4 holes in the wall using the measurements shown in Fig. 3 and insert
the screw anchors;take 2 of the supplied screws (Fig. 4G) and screw them into the uppermost
anchors without tightening them. Attach the hood to the 2 screws and, working from inside, fully
tighten them. Complete mounting by inserting and tightening the other 2 screws H (Fig. 4).
4) Mounting under a wall unit: If the ducting version of the hood is mounted with the air outlet
in the upper opening(Fig. 2B), before mounting, drill a 133 mm diameter hole in the wall unit (Fig.
5).Drill 4 holes in the wall unit using the measurements shown in Fig. 6. Attach the hood with 4
screws working from inside the wall unit.
5) For the ducting version: connect a flex tube to the hood flange using a metal retainer clamp.
The tube and clamp are not included in the supply.
6) Make the electrical connection.
7) CHECK THAT THE DUCTING-FILTERING LEVER IS IN THE RIGHT POSITION: The lever
is found on the motor unit and must be positioned on the symbol (P) in the case of installation in
ducting version, on the symbol (Q) in the case of installation in filtering version (Fig. 7).
8) PAY ATTENTION TO THE CHARCOAL FILTER/S (A) - Fig. 8-9-10-11: One or more charcoal
filters are required for the filtering version. If they are not yet installed in the hood, fit it/them as
follows depending on the model you have purchased:- if the hood is fitted with round charcoal
filters (Fig. 11R), fit the charcoal filter by turning it anticlockwise. - if the hood is fitted with a panel
charcoal filter (Fig. 8A or 9A or 10A), position the charcoal filter inside the hood and fit the 2 filter
clips (M) to lock the charcoal filter. The ducting version does not require the charcoal filter/s,
therefore, if already fitted in the hood remove it/them.
OPERATION
The hoods are provided with the following type of controls:
Controls of Fig. 12: A = light switch. B = first speed motor ON/OFF switch. C = second speed
switch. D = thirdspeed switch. E = warning light: indicates motor operation.
Controls of Fig. 13: A = light switch; position 0: light off; position 1: light on. B = motor switch;
position 0: motor off; position 1-2-3: motor first, second and thrid speed motor on. C = warning
light: indicates motor operation.
Grease filter/s: Depending on the version, the hood features different types of grease filters:
Modular metal filters (of the type shown in Fig. 14): these are metal filters and must be periodically
cleaned, depending on extent of operation (at least every two months). Wash the filters with
neutral detergent. Panel type metal filter (as shown in Fig. 15N): this is a metal filter and is
positioned inside the metal grid; the filter must be periodically cleaned, depending on extent of
operation (at least every two months). Wash the filter with neutral detergent. Remove the 2 filter
retainers (M) and the metal panel filter. Panel type synthetic filter (as shown in Fig. 16P): this
filter is made of white synthetic fibres and is located inside the metal grid; it cannot be cleaned,
but must be replaced from time to time according to use (at least every two months). Remove the
2
Page 3
2 filter retainers (M) and the synthetic panel filter.
Charcoal filter/s: The charcoal filters must be replaced periodically depending on their use,
on average every 6 months. Remove the charcoal filters as follows, depending on the model you
have purchased:
- if the hood is fitted with round charcoal filters (Fig. 17R), remove the charcoal filter by turning it
clockwise.
- if the hood is fitted with a panel charcoal filter (Fig. 8A or 9A or 10A), remove the 2 filter clips (M)
and then remove the charcoal filter.
Lighting: To replace the lamps remove the light fitting after unscrewing the setscrew "A" (Fig.
18). If replacement is necessary, use lamp ILCOSD: HSGB/C/UB-28-230-E14.
IMPORTANT INFORMATION CONCERNING THE ENVIRONMENTALLY
COMPATIBLE DISPOSAL OF THE APPLIANCE
In certain european union countries this product does not fall within the requirements of the national
laws implementing the Weee directive, and in these countries the product is not subject to separate disposal operations at the end of its working life.
Important
This product conforms to EU Directive 2002/96/EC.
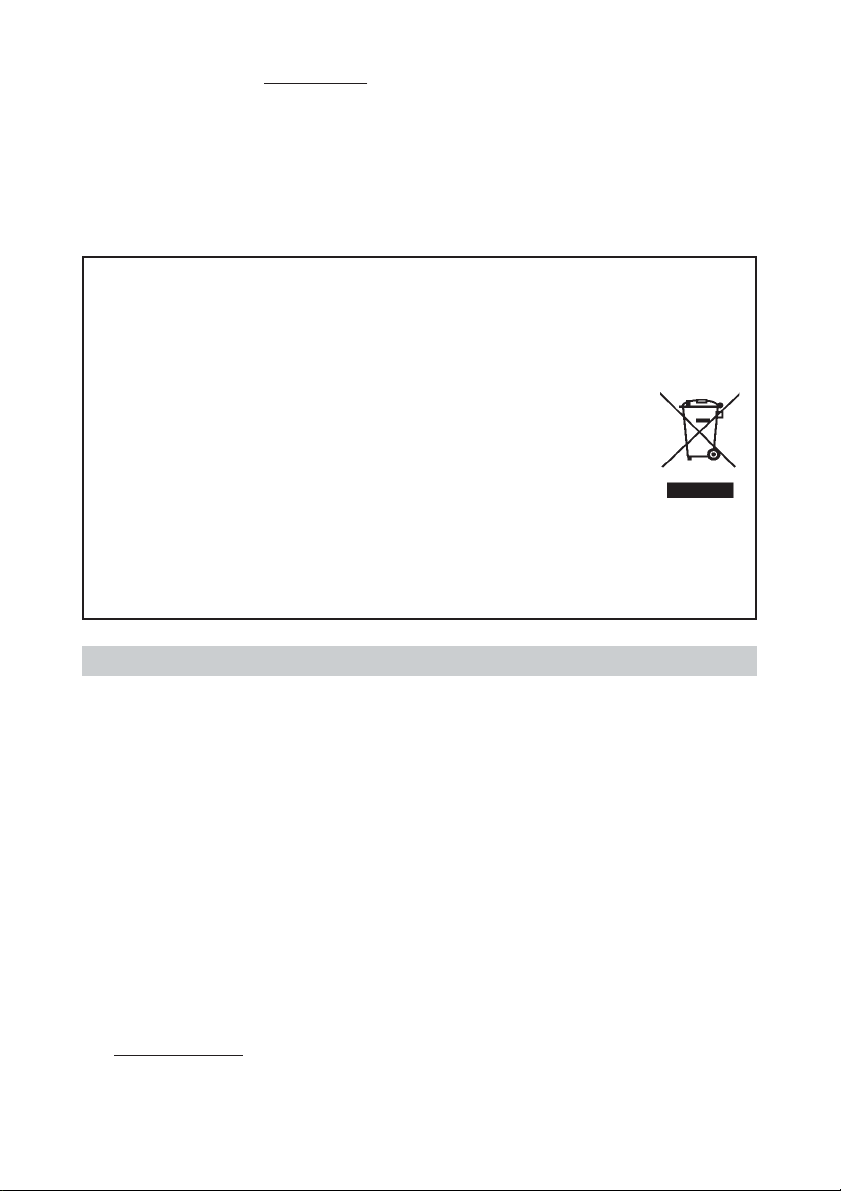
This appliance bears the symbol of the barred waste bin. This indicates that, at the end of its
useful life, it must not be disposed of as domestic waste, but must be taken to a collection centre
for waste electrical and electronic equipment, or returned to a retailer on purchase of a
replacement.It is the user’s responsibility to dispose of this appliance through the appropriate
channels at the end of its useful life. Failure to do so may incur the penalties established by
laws governing waste disposal. Proper differential collection, and the subsequent recycling,
processing and environmentally compatible disposal of waste equipment avoids unnecessary damage to
the environment and possible related health risks, and also promotes recycling of the materials used in the
appliance.For further information on waste collection and disposal, contact your local waste disposal service,
or the shop from which you purchased the appliance.Manufacturers and importers fulfil their responsibilities
for recycling, processing and environmentally compatible disposal either directly or by participating in
collective systems.
DEUTSCH
INSTALLATION
Die Abzugshaube wird in Abluftversion (Dunstabführung ins Freie) oder Umluftversion (Umwälzung
der Dünste imRaum).
1) Mindestvoraussetzungen für eine korrekte Installation:Sicherstellen, dass eine angemessene
Stromversorgung vorhanden ist.Wenn Sie das Gerät in der Abluftversion installieren wollen, ist
zuvor ein Loch für die Abführung der Küchendünste anzulegenund ein entsprechendes
Verbindungsrohr zwischen dem Loch und dem Flansch auf der Abzugshaube zu sorgen;
DasAbluftrohr muss folgende Merkmale besitzen: - erforderliche Mindestlänge; - so wenig Kurven
wie möglich (maximaleKurvenkrümmung:90°); - zulässiges Material (Landesnormen); - Innenseite
so glatt wie möglich. Es wird außerdem empfohlen,starke Wechsel des Rohrdurchmessers zu
vermeiden. Für die Luftabführung nach außenalle weiteren Angaben im Blatt “Hinweis”
befolgen.Loch in die Wand bohren; hierbei ist Fig. 1 zu beachten, in welcher die jeweiligen Maße
für die verschiedenen Lösungeangegeben sind.
2) Die Abzugshaube ist mit 2 Dunstabzugsöffnungen versehen - eine befindet sich im oberen
Teil (Abb.2B)die andere hingegen im rückwärtigen Teil (Abb. 2A) - die entsprechend Ihren
Bedürfnissen verwendet werdenkönnen. Bei der Abluftversion ist der Flansch (C) auf der jeweils
verwendeten Öffnung zu montieren; die andereÖffnung ist mit dem Deckel (E) zu schließen. In
der Umluftversion die 2 Öffnungen NICHT schließen.
3) Wandbefestigung: 4 Löcher unter Berücksichtigung der in Abb.3 angegebenen Maße in die
Wand Bohren und Dübeleinstecken; Stecken Sie 2 der mitgelieferten Schrauben (Abb. 4G) in
die obersten Dübel und drehen Sie sie ein ohne siefestzuziehen. Hängen Sie die Haube in die
beiden Schrauben ein und ziehen Sie die Schrauben von der Geräteinnenseiteaus an. Nehmen
Sie die endgültige Befestigung durch Eindrehen der Schrauben H (Abb.4) vor.
3
Page 4
4) Befestigung des Haubenunterschrankes: Wenn Sie die Haube in Abluftversion mit
Dunstabführung in das obereLoch installieren (Abb. 2B), müssen Sie vor der Befestigung ein
Loch des Durchmessers 133 mm (Abb. 5) in denHängeschrank bohren.
5). Bohren Sie die 4 Löcher unter Beachtung der in Afb. 6 angegebenen Maße in den
Hängeschrank.Befestigen Sie die Haube mit den 4 Schrauben von der Innenseite der Haube
aus.5) Bei der Abluftversion: Verbinden Sie den Schlauch unter Verwendung einer Schlauchschelle
aus Metall mit demFlansch der Dunsthaube. Schlauch und Schlauchschelle sind nicht im
Lieferumfang enthalten.
6) Stellen Sie den Anschluss an die Stromversorgung her.
7) ÜBERPRÜFEN SIE, DAß SICH DER HEBEL ”ABLUFT-/UMLUFTVERSION” IN DER
KORREKTEN POSITION BEFINDET: der Hebel befindet sich auf dem Motoraggregat und muss
auf dem Symbol (P) eingestellt werden, wenn die Abluftversioninstalliert ist, bzw. auf dem Symbol
(Q), wenn die Umluftversion installiert ist (Abb. 7).
8) ACHTUNG MIT KOHLEFILTER(N) (A) - Abb. 8- 9- 10- 11: In der Umluftversion muß ein/
mehrere Kohlefilterverwendet werden. Wenn nicht schon einer in der Kappe angebracht ist, muß
er, wie nachfolgend beschrieben undabhängig vom Modell montiert werden: - Wenn die Kappe
mit Kohlefiltern ausgestattet ist (ABB. 11R), den Kohlefilterdurch eine Drehbewegung entgegen
dem Uhrzeigersinn einsetzen. – Wenn die Kappe mit einem Feld-Kohlefilter (Abb.8A oder 9A
oder 10A) ausgestattet ist, den Kohlefilter innen anbringen und die 2 Haltefilter (M) einsetzen,
umden Kohlefilter zu blockieren. In der Abluftversion ist ein/mehrere Kohlefilter nicht notwendig.
Deshalb wird/werdender/die Kohlefilter entfernt, wenn sie in der Kappe angebracht sein sollten.
SCHALTUNG DES GERÄTS
Je nach Version ist das Gerät mit folgenden Bedienungsarten ausgestattet:
Bedienungsschalter in Abb. 12: A = Lichtschalter. B = Zündschalter Motor ON/OFF bei der I.
Geschwindigkeit. C = SchalterII. Geschwindigkeit. D = Schalter III. Geschwindigkeit. E =
Motorfunktionsanzeige.
Bedienungsschalter in Abb. 13: A = Lichtschalter; Position 0: Licht aus; Position 1: Licht an.
B = Motorschalter; Position0: Motor ausgeschaltet; Position 1-2-3: Motor eingeschaltet mit
erster, zweiter und dritter Geschwindigkeit. C: Motorfunktionsanzeige.
Fettfilter: Je nach Version wird die Haube mit verschiedenen Fettfiltern geliefert:
Metallfiltermodule (wie in Abb. 14 gezeigt): diese Filter bestehen aus Metall und sind je nach
Benutzung periodisch zu reinigen (wenigstens alle zwei Monate). Den Filter mit neutralem
Reinigungsmittel abwaschen.
Metallfilterpaneele (wie in Abb. 15N gezeigt): dieser aus Metall bestehende Filter befindet sich
im Innern des Metallgitters undist je nach Benutzung periodisch (wenigstens alle zwei Monate)
zu reinigen. Den Filter mit neutralem Reinigungsmittelabwaschen. Entfernen Sie die 2 Filterhalter
(M) und ziehen Sie den Metallpaneelfilter heraus.
Synthetikfilterpaneel (wie in Abb.16P gezeigt): dieser aus weißer Synthetikfaser bestehende
Filter befindet sich imInnern des Metallgitters und ist je nach Benutzung periodisch (wenigstens
alle zwei Monate) zu ersetzen. EntfernenSie die 2 Filterhalter (M) und ziehen Sie den
Synthetikpaneelfilter heraus.
Kohlenfilter: Die Kohlefilter müssen im Durchschnitt alle 6 Monate ausgetauscht werden. Je
nach Nutzung der Dunstabzugshaube kann sich dieses Austauschintervall verkürzen oder
verlängern. Der Austausch des/der Kohlefilter wird folgendermaßen durchgeführt:
- Wenn die Kappe mit runden Kohlefiltern ausgestattet ist (Abb. 17R), den Kohlefilter durch eine
Drehbewegung imUhrzeigersinn entfernen.
- Wenn die Kappe mit einem Feld-Kohlefilter ausgestattet ist (Abb. 8A oder 9A oder 10A), den
Kohlefilter entfernen, wobeierst die 2 Haltefilter M entfernt werden.
Beleuchtung:
- Um die lampen auszuwechseln, die Deckenlampe entfernen, nachdem die Halteschraube „A”
ausgeschaltet wurde(Abb. 18). Wenn die Lampe ausgewechselt werden muss, eine Ersatzlampe
mit ILCOSD: HSGB/C/UB-28-230-E14 benutzen.
4
Page 5
WICHTIGE INFORMATION FÜR DEN BENUTZER ZUR
UMWELTFREUNDLICHEN ENTSORGUNG DES GERÄTES
In einigen Eu-Ländern gelten für dieses Produkt nicht die vorgaben der europäischen Richtlinie
über Elektro- und Elektronik-Altgeräte (Weee-Richtlinie) und demnach besteht in diesen Ländern
auch keine Pflicht für die Mülltrennung bei der Entsorgung des Gerätes.
Achtung
Dieses Gerät entspricht der EG-Richtlinie 2002/96/EG. Das Symbol mit der
durchgestrichenen Abfalltonne am Gerät bedeutet, dass das Gerät nach seiner
Aussonderung nicht im Haushaltsmüll entsorgt werden darf, sondern an einer
Sammelstelle für Elektro- und Elektronikgeräte oder beim Kauf eines gleichwertigen
Neugerätes beim Händler abzugeben ist.Der Benutzer hat Sorge zu tragen, dass das
Gerät nach seiner Aussonderung an einer geeigneten Sammelstelle abgegeben wird.
Ein Nichtbeachten dieser Vorschrift ist gemäß der geltenden Abfallordnung strafbar.
Das geeignete Sortieren von Abfall und nachfolgende Recyceln des aussortierten Gerätes zur
umweltverträglichen Entsorgung trägt zum Schutz von Umwelt und Gesundheit bei und dient der
Wiederverwendung der recyclingfähigen Materialien, aus denen das Gerät besteht.Für detailliertere
Informationen bezüglich der verfügbaren Sammelsysteme wenden Sie sich an Ihre örtliche Behörde oder
an den Händler, bei dem Sie das Gerät gekauft haben.Die Hersteller und Importeure kommen ihrer
Verpflichtung zum umweltfreundlichen Recycling, Verarbeiten und Entsorgen sowohl direkt als auch durch
Teilnahme an einem Kollektivsystem nach.
FRANCAIS
INSTALLATION
La hotte peut être en version aspirante (évacuation de l’air à l’extérieur) ou en version recyclage
(recirculation de l’air à l’intérieur).
1) Conditions essentielles pour le montage:
Prévoyez une alimentation électrique appropriée.
Si votre appareil doit être installé en version Aspirante, vous devez prévoir auparavant le trou
d’évacuation de l’airet vous munir d’un tuyau reliant ce dernier à la bride qui se trouve sur votre
hotte; employez un tuyau d’évacuation qui a : - la longueur minimum indispensable ; - le moins
de courbes possible (angle maximum des courbes : 90°) ;- qui soit fait d’une matière autorisée
par les normes en vigueur; - la surface intérieure la plus lisse possible. Nous vous conseillons
aussi d’éviter les changements brusques de section du tuyau. Pour l’évacuation de l’air à l’extérieur,
suivez toutes les autres indications données par le feuille “Attention”. Percez le trou dans le mur
pour la sortie de l’air, en suivant les instructions de la Fig. 1 où sont indiquées les mesures pour
les différentes possibilités.
2) La hotte est équipée de 2 sorties d’air, une sur la partie supérieure (Fig. 2B) et une sur
l’arrière (Fig. 2A), pouvant être utilisées selon vos exigences. Pour la version aspirante, il faut
monter le flasque (C) sur l’ouverture utilisée et fermer l’autre ouverture avec le couvercle (E).
Pour la version filtrante, il n’est PAS nécessaire de fermerles 2 ouvertures.
3) Fixation murale: Percez 4 trous dans le mur, en respectant les mesures indiquées sur la Fig.
3 et enfoncez les chevilles ; prenez 2 des vis fournies en équipement (Fig. 4G), puis enfilez-les
dans les chevilles situées plus haut, sans les visser complètement. Accrochez la hotte aux 2 vis
et, en agissant de l’intérieur de l’appareil, serrez à fond les 2 vis. Effectuez la fixation définitive en
introduisant les 2 autres vis H (Fig. 4).
4) Fixation sous un meuble: Si vous installez la hotte en version aspirante avec l’évacuation
de l’air par l’ouverture supérieure (Fig. 2B), avant la fixation vous devez effectuer un trou de 133
mm de diamètre sur le meuble (Fig. 5). Percez 4 trous sur le meuble, en respectant les mesures
indiquées sur la Fig. 6. Fixez la hotte avec les 4 vis en agissant de l’intérieur du meuble.
5) Pour la version aspirante : raccordez un tuyau flexible au flasque de la hotte, en une utilisant
une bande métallique. Le tuyau et la bande ne sont pas fournis.
6) Effectuez le branchement électrique.
7) VERIFIER QUE LE LEVIER ASPIRANTE-RECYCLAGE SOIT SUR LA BONNE POSITION:
le levier se trouvesur le groupe moteur, et doit être placé sur le symbole (P) si l’installation est
version aspirante, sur le symbole (Q) si l’installation est version recyclage (Fig. 7).
8) FAIRE ATTENTION AU(X) FILTRE (S) A CHARBON (A) - Fig. 8-9-10-11: sur la version
recyclage, il est nécessaire d’utiliser le ou les filtres à charbon, aussi dans le cas où il(s) ne serai
5
Page 6

(en)t pas encore installé(s) dans la hotte, le(s) monter comme suit, en fonction du modèle acheté:
- si la hotte est dotée de filtres à charbon ronds (Fig. 11R), fixer le filtre à charbon par un mouvement
de rotation dans le sens contraire des aiguilles d’une montre. - si la hotte est dotée de filtre à
charbon à panneau (Fig. 8A, 9A ou 10A), placer le filtre à charbon à l’intérieur et mettre en place
les 2 fixations (M) pour bloquer le filtre à charbon. Sur la version aspirante, le ou les filtres à
charbon n’est/ne sont pas nécessaires, aussi dans le cas où il(s) serai(en)t installé(s) dans la
hotte, le/les en retirer.
FONCTIONNEMENT
Selon les modéles, l'appareil est muni des types suivants de commandes:
Commandes de la Fig.12: A = Interrupteur d'éclairage. B = Interrupteur ON/OFF moteur 1e
vitesse. C = Interrupteur 2e vitesse. D = Interrupteur 3e vitesse. E = Voyant de fonctionnement
du moteur.
Commandes de la Fig.13: A = Interrupteur d'éclairage; position 0: lumière éteinte; position 1:
lumière allumée. B = Interrupteur moteur; position 0: moteur arrêté; position 1-2-3: moteur en
marche à la première, seconde ou troisième vitesse. C = Voyant de fonctionnement du moteur.
Filtre/s à graisse: En fonction des versions, la hotte est équipée de différents types de filtre à
graisse:
Filtres métalliques modulaires (du type indiqué en Fig. 14): ces filtres sont métalliques et doivent
être nettoyés périodiquement, en fonction de l’usage (au moins tous les deux mois). Lavez les
filtres avec un détergent neutre.
Filtre métallique à panneau (du type indiqué en Fig. 15N): ce filtre est métallique et est positionné
à l’intérieur de la grille métallique ; il doit être nettoyé périodiquement, en fonction de l’usage (au
moins tous les deux mois). Lavez le filtre avec un détergent neutre. Déposez les 2 blocages
filtres (M), puis extraire le filtre métallique à panneau.
Filtre synthétique à panneau (du type indiqué en Fig. 16P): ce filtre est en fibre synthétique et
est positionné à l’intérieur de la grille métallique ; il ne peut pas être nettoyé mais doit être
remplacé périodiquement, en fonction de l’usage (au moins tous les deux mois). Déposez les 2
blocages filtres (M), puis extraire le filtre synthétique à panneau.
Filtre(s) à charbon: les filtres à charbon doivent être remplacés à intervalles réguliers en
fonction de l’utilisation del’appareil (en moyenne tous les 6 mois). Retirer les filtres à charbon en
précédant comme suit, en fonction du modèle acheté:
- si la hotte est dotée de filtres à charbon ronds (Fig. 17R), retirer le filtre à charbon par un
mouvement de rotation dans le sens des aiguilles d’une montre.
- si la hotte est dotée de filtre à charbon à panneau (Fig. 8A, 9A ou 10A), retirer le filtre à charbon
et retirant préalablement les 2 fixations M.
Eclairage: Pour remplacer les ampoules, retirer le plafonnier après avoir desserré la vis de blocage
“A” (Fig. 18). Pour remplacer l'ampoule, utiliser ampoule ILCOSD: HSGB/C/UB-28-230-E14.
INFORMATION IMPORTANTE POUR L’ÉLIMINATION COMPATIBLE AVEC
L’ENVIRONNEMENT
Dans certains pays de l’union européenne, ce produit ne fait pas partie du domaine d’application
de la loi nationale d’assimilation de la directive Deee et par conséquent, il n’y existe aucune obligation
de collecte différenciée à la fin de sa durée de vie.
Attention
Ce produit est conforme à la directive EU 2002/96/EC.Le symbole représentant une poubelle
barrée présent sur l’appareil indique qu’à la fin de son cycle de vie, il devra être traité
séparément des déchets domestiques. Il devra donc être confié à un centre de collecte
sélective pour appareils électriques et électroniques ou rapporté au revendeur lors de l’achat
d’un nouvel appareil.L’utilisateur est responsable de la remise de l’appareil usagé aux
structures de collecte compétentes sous peine des sanctions prévues par la législation sur
l’élimination des déchets. La collecte sélective réalisée avant le recyclage, le traitement et l’élimination
compatible avec l’environnement de l’appareil usagé contribue à éviter les nuisances pour l’environnement
et pour la santé et favorise le recyclage des matériaux qui composent le produit.Pour de plus amples
informations concernant les systèmes de collecte existants, adressez-vous au service local d’élimination des
déchets ou au magasin qui vous a vendu l’appareil.Les fabricants et les importateurs optempèrent à leur
responsabilité en matière de recyclage, de traitement et d’élimination des déchets compatible avec
l’environnement directement ou par l’intermédiaire d’un système collectif.
6
Page 7

ITALIANO
INSTALLAZIONE
La cappa puo’ essere in versione aspirante (evacuazione dell’aria all’esterno) o in versione filtrante (riciclo dell’aria all’interno).
1) Requisiti essenziali per una corretta installazione :
Predisporre di una adeguata alimentazione elettrica.
Se il Vostro apparecchio deve essere installato in versione Aspirante, predisporre precedentemente il foro di evacuazione dell’aria e munirsi di apposito tubo di collegamento tra questo e la
flangia presente sulla cappa; utilizzare un condotto di scarico che abbia: – lunghezza minima
indispensabile; – minor numero possibile di curve (angolo massimo della curva: 90°); – materiale
approvato normativamente (a seconda dello Stato); – lato interno piú liscio possibile. Si consiglia
inoltre di evitare cambiamenti drastici di sezione del tubo. Per lo scarico dell’aria all’esterno,
seguire tutte le altre indicazioni riportate nel foglio “Avvertenze”. Effettuate il foro a muro per
l’uscita dell’aria, facendo riferimento alla Fig. 1 in cui sono indicate le misure per le varie possibilità.
2) La cappa è provvista di 2 uscite dell’aria, una nella parte superiore (Fig. 2B) ed una nella
parte posteriore (Fig. 2A), utilizzabili secondo le vostre esigenze. Nella versione aspirante, montare la flangia (C) sull’apertura utilizzata e chiudere l’altra apertura con il tappo (E). Nella versione
filtrante NON occorre chiudere le 2 aperture.
3) Fissaggio a parete: Effettuate 4 fori sulla parete, rispettando le misure indicate in Fig. 3 ed
inserite i tasselli; prendete 2 delle viti in dotazione (Fig. 4G), ed infilatele nei tasselli posti piu’ in
alto, senza pero’ avvitarle del tutto. Agganciate la cappa alle 2 viti e operando dall’interno dell’apparecchio, stringete le 2 viti del tutto. Procedete al fissaggio definitivo inserendo le altre 2 viti H
(Fig. 4).
4) Fissaggio sottopensile: Se installate la cappa in versione aspirante con evacuazione dell’aria nell’apertura superiore (Fig. 2B), prima del fissaggio dovete effettuate sul pensile un foro di
diametro 133 mm (Fig. 5). Effettuate 4 fori sul pensile, rispettando le misure indicate in Fig. 6.
Fissate la cappa con 4 viti operando dall’interno del pensile.
5) Per la versione aspirante: collegate un tubo flessibile alla flangia della cappa, utilizzando
una fascetta metallica.Tubo e fascette non sono in dotazione.
6) Effettuate il collegamento elettrico.
7) VERIFICARE CHE LA LEVA ASPIRANTE-FILTRANTE SIA NELLA POSIZIONE CORRETTA: la leva si trova sul gruppo motore, e deve essere posizionata sul simbolo (P) in caso di
installazione in versione aspirante, sul simbolo (Q) in caso di installazione in versione filtrante
(Fig. 7).
8) FARE ATTENZIONE AL FILTRO/I CARBONE (A) - Fig. 8-9-10-11: nella versione filtrante è
necessario l’uso del filtro/i carbone, per cui, nel caso non sia già installato nella cappa, montatelo/i come segue, a seconda del modello da voi acquistato:
- se la cappa è dotata di filtri al carbone rotondi (Fig. 11R), agganciate il filtro carbone con
movimento rotatorio, in senso anti-orario.
- se la cappa è dotata di filtro carbone a pannello (Fig. 8A o 9A o 10A), posizionare il filtro carbone
all’interno ed inserire i 2 fermafiltri (M) per bloccare il filtro al carbone. Nella versione aspirante il/
i filtro/i al carbone non è necessario, per cui se è già installato/i nella cappa rimuovetelo/i.
FUNZIONAMENTO
A seconda delle versioni l'apparecchio è dotato dei seguenti tipi di comandi:
Comandi di Fig.12: A = interruttore accensione luce. B = interruttore accensione ON/OFF
motore alla I velocità. C = interruttore II velocità. D = interruttore III velocità. E = gemma spia di
funzionamento del motore.
Comandi di Fig.13: A = interruttore accensione luce; posizione 0: luce spenta; posizione 1: luce
accesa. B = interruttore motore; posizione 0: motore spento; posizione 1-2-3: motore acceso alla
prima, seconda e terza velocità. C = gemma spia di funzionamento del motore.
Filtro/i anti-grasso: a seconda delle versioni, la cappa è fornita con diversi tipi di filtro antigrasso:
Filtri metallici modulari (del tipo in Fig. 14): questi filtri sono metallici e devono essere puliti
periodicamente, in rapporto all'uso (almeno ogni due mesi). Lavate i filtri con detersivo neutro.
7
Page 8

Filtro metallico a pannello (del tipo indicato in Fig. 15N): questo filtro è metallico ed è posizionato
all’interno della griglia metallica; il filtro deve essere pulito periodicamente, in rapporto all'uso
(almeno ogni due mesi). Lavate il filtro con detersivo neutro. Togliere i 2 fermafiltri (M) e rimuovere il filtro metallico a pannello.
Filtro sintetico a pannello (del tipo indicato in Fig. 16P): questo filtro è in fibra sintetica di colore
bianco ed è posizionato all’interno della griglia metallica; non puo’ essere lavato, ma va sostituito
periodicamente in rapporto all'uso (almeno ogni due mesi). Togliere i 2 fermafiltri (M) e rimuovere
il filtro sintetico a pannello.
Filtro/i al carbone: i filtri al carbone vanno sostituiti periodicamente in rapporto all’uso, mediamente ogni 6 mesi. Rimuovere i filtri al carbone come segue a seconda del modello da voi
acquistato:
- se la cappa è dotata di filtri al carbone rotondi (Fig. 17R), rimuovere il filtro carbone con movimento rotatorio, in senso orario.
- se la cappa è dotata di filtro carbone a pannello (Fig. 8A o 9A o 10A), rimuovere il filtro carbone
togliendo prima i 2 fermafiltri M.
Illuminazione:
Per sostituire le lampade, rimuovere la plafoniera dopo aver disinserito la vite di fermo “A” (Fig.18).
In caso di sostituzione, utilizzare una lampada ILCOSD: HSGB/C/UB-28-230-E14.
INFORMAZIONE IMPORTANTE PER LO SMALTIMENTO
AMBIENTALMENTE COMPATIBILE
In alcuni paesi dell’unione europea questo prodotto non ricade nel campo di applicazione della
legge nazionale di recepimento della direttiva Raee e quindi non è in essi vigente alcun obbligo
di raccolta differenziata a fine vita.
Attenzione
Questo prodotto è conforme alla Direttiva EU 2002/96/EC.Il simbolo del cestino barrato
riportato sull’apparecchio indica che il prodotto, alla fine della propria vita utile, dovendo
essere trattato separatamente dai rifiuti domestici, deve essere conferito in un centro di
raccolta differenziata per apparecchiature elettriche ed elettroniche oppure riconsegnato
al rivenditore al momento dell’acquisto di una nuova apparecchiatura equivalente.
L’utente è responsabile del conferimento dell’apparecchio a fine vita alle appropriate strutture di raccolta,
pena le sanzioni previste dalla vigente legislazione sui rifiuti.L’adeguata raccolta differenziata per l’avvio
successivo dell’apparecchio dismesso al riciclaggio, al trattamento e allo smaltimento ambientalmente
compatibile contribuisce ad evitare possibili effetti negativi sull’ambiente e sulla salute e favorisce il riciclo
dei materiali di cui è composto il prodotto.Per informazioni più dettagliate inerenti i sistemi di raccolta
disponibili, rivolgersi al servizio locale di smaltimento rifiuti, o al negozio in cui è stato effettuato l’acquisto.I
produttori e gli importatori ottemperano alla loro responsabilità per il riciclaggio, il trattamento e lo smaltimento
ambientalmente compatibile sia direttamente sia partecipando ad un sistema collettivo.
ESPAÑOL
INSTALACIÓN
La campana está disponible en versión aspirante (evacuación del aire al exterior) o en versión
filtrante (reciclado del aire en el interior).
1) Requisitos fundamentales para un montaje correcto: Tener a disposición una adecuada
alimentación eléctrica. Si se instala el aparato en versión Aspirante, predisponer, en primer
lugar, el orificio de evacuación del aire y, munirse, a continuación, del tubo de evacuación que
une dicho orificio con la abrazadera presente en la campana; utilice un conducto de descarga
que tenga : - longitud mínima indispensable: – el menor número posible de curvas (ángulo
máximo de la curva: 90°); – material de acuerdo con la normativa vigente (de cada país); – parte
interna lo más lisa posible. Se aconseja además evitar cambios drásticos de sección del tubo.
Para la descarga del aire hacia el exterior, siga todas las demás indicaciones que aparecen en el
capítulo “Advertencia”. Realice el orificio en la pared para la salida del aire (de 133 mm de
diámetro), conforme a la referencia de la fig.1, en laque se indican las medidas para las diferentes
opciones.
2) La campana se suministra con dos salidas de aire, una en la parte superior (Fig. 2B) y una
en la parte posterior (Fig. 2A), utilizables según sus necesidades. En la versión aspirante, monte
8
Page 9

la arandela (C) en la abertura utilizada y cierre la otra abertura con el tapón (E). En la versión
filtrante NO es necesario cerrar las 2 aberturas.
3) Fijación en la pared: Realice cuatro orificios en la pared, respetando las medidas indicadas
en la fig. 3, e insertalos tacos; tome dos de los tornillos suministrados (Fig. 4G) e introdúzcalos
en los tacos colocados antes, pero sin atornillarlos del todo. Acople la campana a los dos tornillos
y, trabajando desde el interior del aparato, apriete completamente los dos tornillos. Para proceder a la fijación definitiva, inserte los otros dos tornillos H (Fig.4).
4) Fijación bajo armario de pared: Si instala la campana en versión aspirante con evacuación
del aire en la abertura superior (Fig. 2B), antes de la fijación debe efectuar en el armario de
pared un orificio de 133 mm de diámetro (Fig.5). Realice cuatro orificios en el armario de pared,
respetando las medidas indicadas en la Fig. 6. Fije la campana con cuatro tornillos trabajando
desde el interior del armario de pared.
5) Para la versión aspirante: conecte un tubo flexible a la arandela de la campana mediante
una abrazadera metálica.Tubo y abrazadera no se suministran.
6) Realice la conexión eléctrica.
7) CONTROLAR QUE LA PALANCA ASPIRANTE-FILTRANTE ESTE EN LA POSICION
CORRECTA: la palanca se encuentra en el bloque motor, y debe colocarse en el simbolo (P) en
caso de instalación en versión aspirante, e nel simbolo (Q) en caso de instalación en versión
filtrante (Fig.7).
8) PONER ATENCIÓN AL FILTRO/S DE CARBÓN (A) - Fig. 8-9-10-11: en la versión filtrante
es necesario usar filtro/s de carbón, por consiguiente, si no han sido ya instalados en la campana, móntelo/s siguiendo las instrucciones que se indican a continuación, para el modelo que ha
comprado: - si la campana está dotada de filtros de carbón redondos (Fig. 11R), enganche el
filtro de carbón girándolo en sentido antihorario. – si la campana está dotada de un filtro de
carbón de panel (Fig. 8A o 9A o 10A), coloque el filtro de carbón en el interior eintroduzca los 2
retenes del filtro (M) para bloquear el filtro de carbón. En la versión aspirante, el/los filtro/s de
carbón no son necesarios, por lo tanto, si está/n instalado/s en la campana, deberán ser removidos.
FUNCIONAMIENTO
Las campanas possen el siguiente tipo de controles:
Controles de la Fig. 12: A = interruptor encendido luz. B = interruptor encendido ON/OFF
motor en la Ia velocidad. C = interruptor II velocidad. D = interruptor III velocidad. E = gema
espía del funcionamiento del motor.
Controles de la Fig. 13: A = interruptor encendido luz; posición 0: luz apagada; posición 1: luz
encendida. B = interruptor encendido motor; posición 0: motor apagado; posición 1-2-3: motor
encendido en primera, segunda o tercera velocidad. C = gema espía del funcionamiento del
motor.
Filtro/os antigrasa: Según las versiones, la campana se suministra con diferentes tipos de
filtro antigrasa:
Filtros metálicos modulares (del tipo indicado en la Fig. 14): estos filtros son metálicos y deben
ser lavados periódicamente en base al uso (al menos cada 2 meses). Lavar los filtros con detergente neutro.
Filtro metálico de panel (del tipo indicado en la Fig. 15N): este filtro es metálico y se encuentra en
el interior de la rejilla metálica; el filtro debe ser lavado periódicamente en relación al uso (al
menos cada 2 meses). Lavar el filtro con detergente neutro. Extraiga las dos sujeciones de los
filtros (M) y saque el filtro metálico del panel.
Filtro sintético de panel (del tipo indicado en la Fig. 16P): este filtro es de fibra sintética de color
blanco y se encuentra en el interior de la rejilla metálica; este filtro no puede ser lavado, sino que
debe ser cambiado periódicamente en relación al uso (al menos cada 2 meses). Extraiga las 2
sujeciones de los filtros (M) y saque el filtro sintético del panel.
Filtros de carbón: los filtros de carbón deben sustituirse periódicamente en función de su
uso, generalmente cada 6 meses. Quite los filtros de carbón según las instrucciones indicadas
para el modelo que ha comprado:
- si la campana está dotada de filtros de carbón redondos (Fig. 17R), quite el filtro de carbón
girándolo en sentido antihorario.
– si la campana está dotada de filtros de carbón de panel (Fig. 8A o 9A o 10A), remueva el filtro
de carbón quitando primero las 2 piezas que sujetan el filtro M.
9
Page 10

Iluminación:
- Para sustituir las lámparas, quite el aplique para techo luego de haber extraído el tornillo de
fijación "A" (Fig.18).En caso de sustitución, utilizar una lámpara ILCOSD: HSGB/C/UB-28-230-E14
INFORMACIÓN IMPORTANTE SOBRE ELIMINACIÓN
RESPETUOSA CON EL MEDIO AMBIENTE
En algunos países de la unión europea este producto no está incluido en el ámbito de aplicación
de la ley nacional que traspone la directiva Raee y, por lo tanto, no existe obligación alguna de
recogida selectiva al finalizar su vida útil.
Atención
Este producto cumple los requisitos de la Directiva EU 2002/96/EC.El símbolo del
contenedor de basura tachado, que hay sobre el aparato, indica que no puede ser
eliminado con los desechos domésticos al finalizar su vida útil. Se ha de llevar a un punto
de recogida selectiva para aparatos eléctricos o electrónicos o entregar al proveedor
durante la compra de un aparato equivalente. El usuario deberá llevar el aparato a un
punto de recogida selectiva para su eliminación, de lo contrario se aplicarán las sanciones previstas por
las normas sobre eliminación de desechos.La recogida selectiva para la reutilización, tratamiento y
eliminación respetuosa con el medio ambiente del aparato ayuda a evitar los efectos sobre el medio ambiente y la salud y favorece el reciclaje de los materiales que componen el producto.Para más información
sobre los sistemas de eliminación disponibles, contactar con el servicio local de eliminación de desechos
o con la tienda que vendió el aparato.Los fabricantes y los importadores cumplen con su responsabilidad
de recuperación, tratamiento y eliminación respetuosa con el medio ambiente directamente o participando
a un sistema colectivo.
PORTUGUÊS
INSTALAÇÃO
O exaustor pode ser em versão aspirante (evacuação do ar para o exterior) ou em versão filtrante (reciclagem do ar no interior).
1) Requisitos indispensáveis por uma correcta instalação:
Predispor uma adequada alimentação eléctrica.
Se o vosso aparelho tem de ser instalado na versão aspirante, predispor primeiro o furo de
evacuação do ar e colocar tubo de ligação apropriado entre este e o flange sobre o exaustor;
utilizar uma conduta de descarga que tenha: - o comprimento mínimo indispensável; - o menor
número de curvas possível (ângulo máximo da curva: 90°); - material aprovado pelos regulamentos
de lei existentes (de acordo com o Estado); - o lado de de ecção de tubo. Para a evacuação no
exterior, seguir todas as indicações dadas na folha “Advertências”. Efectuar o furo na parede
para a saída do ar, de acordo com a Fig. 1 onde estão indicadas as medidas para as diferentes
opções.
2) O exaustor tem 2 pontos de venda, uma na parte superior (Fig. 2B) e um na parte
traseira (Fig. 2A), podem ser utilizadas de acordo com as suas necessidades. Na versão aspirante, montar o flange (C) utilizado na abertura e fecho da outra abertura, com a tampa (E). Na
versão filtrante não é necessário fechar nenhuma abertura.
Fixação na parede: Efectue 4 furos na parede, respeitando as medidas indicadas na Fig.
3)
3 e coloque os parafusos e respectivas buchas; Coloquem 2 dos parafusos fornecidos (Fig. 4G),
e coloquem-nos nas respectivas buchas mais acima, sem os aparafusar completamente. Prender o exaustor a os 2 parafusos actuando a partir do interior do aparelho, apertar completamente
os 2 parafusos. Proceder à fixação definitiva colocando os outros 2 parafusos H (Fig. 4).
4) Fixação parte inferior do armário de parede : Se instalar o exaustor em versão aspirante
com evacuação do ar na abertura superior (Fig. 2B), antes da fixação devem efectuar no armário
de parede um furo de 133 mm de diâmetro (Fig. 5). Efectue 4 furos no armário de parede,
respeitando as medidas indicadas na Fig. 6. Fixe o exaustor com 4 parafusos a partir do interior
do armário de parede.
5) Para a versão aspirante: utilize um tubo flexível e bloqueá-lo na boca da saída de ar do
exaustor com uma braçadeira metálica. Tubo e braçadeiras não são fornecidos.
6) Efectue a ligação eléctrica.
7) VERIFICAR SE A ALAVANCA ASPIRANTE-FILTRANTE ESTÁ NA POSIÇÃO CORRECTA:
10
Page 11

a referida alavanca está situadano grupo motor e; em caso de instalação na versão aspirante,
deverá ser colocada em cima do símbolo (P) , em casode instalação na versão filtrante, deverá
ser colocada em cima do símbolo (Q) - Fig. 7.
8) PRESTAR ATENÇÃO NO/S FILTRO/S AO CARVÃO (A) - Fig. 8-9-10-11: na versão filtrante é necessário usar o/s filtro/s ao carvão, sendo assim se já não tiver sido instalado na coifa,
montá-lo/s como está descrito a seguir, de acordo como modelo que foi comprado – se a coifa
tiver filtros ao carvão redondos (Fig. 11R), enganchar o filtro ao carvão com movimento rotatório,
no sentido anti-horário. - se a coifa possuir filtro ao carvão em painel (Fig. 8A ou 9A ou 10A),
posicionaro filtro ao carvão dentro e introduzir 2 retentores de filtros (M) para bloquear o filtro ao
carvão. Na versão aspiradora o/os filtro/s ao carvão não é/são necessário/s, logo se já tiver/em
sido instalado/s na coifa, retire-o/os.
FUNCIONAMENTO
De acordo com as versões, o aparelho é dotado dos seguintes tipos de comandos:
Comandos de Fig. 12: A = interruptor da luz. B = interruptor ON/OFF motor primeira velocidade.
C = interruptor segunda velocidade. D = interruptor terceira velocidade. E = sinal luminoso de
funcionamento do motor.
Comandos de Fig. 13: A = interruptor para acender a luz; posição 0 : luz desligada; posição 1:
luz acesa. B = interruptor motor; posição 0: motor desligado; posição 1-2-3: motor aceso velocidade I, II, III. C = sinal luminoso do funcionamento do motor.
Filtro/s anti-gordura: O exaustor pode ser dotado com vários tipos de filtro anti-gordura, de
acordo com a versão de exaustor de que se dispõe:
Filtros metálicos modulares (do tipo indicado na Fig. 14): estes filtros são de metal e devem ser
limpos periodicamente, de acordo com o uso que têm (pelo menos de dois em dois meses).
Lavar os filtros com detergente neutro.
Filtro metálico em forma de painel (do tipo indicado na Fig.15N): este filtro é de metal e está
posicionado na parte de dentro da grelha metálica; o filtro deve ser limpo periodicamente, de
acordo com o uso que tem (pelo menos de dois em dois meses). Lavar o filtro com detergente
neutro. Retirar os 2 bloqueia-filtro (M) e remover o filtro metálico na vertical.
Filtro sintético em forma de painel (do tipo indicado na Fig. 16P): trata-se de um filtro branco de
fibra sintética que se encontra colocado na parte de dentro de grelha metálica; não pode ser
lavado e deve substituído periodicamente de acordo com o uso que tem (pelo menos de dois em
dois meses). Retirar os 2 bloqueia-filtros (M) e remover o filtro sintético na vertical.
Filtro/os de carvão: os filtros ao carvão dever ser substituídos periodicamente de acordo
com o seu uso, mediamentea cada 6 meses. Remover os filtros ao carvão como está explicado
a seguir de acordo com o modelo comprado:
-se a coifa possuir filtros ao carvão redondos (Fig. 17R), remover o filtro ao carvão com movimento rotatório, no sentido horário.
-se a coifa possuir filtro de carvão em painel (Fig. 8A ou 9A ou 10A), posicionar o filtro ao carvão
retirando primeiro os 2 retentores de filtros M.
Iluminação:
-Para substituir as lâmpadas, remover o lustre depois de ter retirado o parafuso de retenção “A”
(Fig.18). Em caso de substituição, utilizar uma lâmpada ILCOSD: HSGB/C/UB-28-230-E14.
11
Page 12

INFORMAÇÕES IMPORTANTES SOBRE A ELIMINAÇÃO
COMPATÍVEL COM O AMBIENTE
Nalguns países da união europeia este produto não recai no campo de aplicação da lei nacional de
transposição da directiva Reee, pelo que não vigora neles qualquer obrigação de recolha selectiva
no fim de vida.
Atenção
Este produto está em conformidade com a Directiva EU 2002/96/EC. O símbolo do caixote
com uma barra existente no aparelho indica que o produto, no fim da sua própria vida
útil, deve ser tratado separadamente dos resíduos domésticos, devendo ser enviado
para um centro de recolha selectiva para aparelhos eléctricos ou electrónicos ou então,
devolvido ao revendedor aquando da compra de um novo aparelho equivalente.
O utilizador é responsável pelo envio do aparelho para as estruturas de recolha adequadas,
sob pena das sanções previstas na lei em vigor sobre os resíduos. A recolha selectiva adequada para o
envio sucessivo do aparelho eliminado para a reciclagem, para o tratamento e para a eliminação compatível
com o ambiente, contribui para evitar possíveis efeitos negativos no ambiente e na saúde, favorecendo a
reciclagem dos materiais que compõem o produto. Para informações mais pormenorizadas sobre os
sistemas de recolha disponíveis, dirija-se ao serviço local de eliminação de resíduos, ou à loja onde foi
efectuada a aquisição. Os fabricantes e importadores serão então responsáveis pela reciclagem, tratamento
e eliminação compatível com o ambiente, seja directamente seja participando num sistema colectivo.
NEDERLANDS
INSTALLATIE
De wasemkap bestaat in een afzuigversie (met afvoer van de lucht naar buiten) en in een filterversie
(met recirculatie van de lucht in het vertrek).
1) Belangrijke voorwaarden voor de montage:
Voorzie een elektrische aansluiting.
Als de dampkap voorzien is in versie afzuiging, een gat voor de buitenafvoer voorzien; pas een
afvoerpijp toe die de volgende eigenschappen heeft:- minimum benodigde lengte;- zo min mogelijk
bochten (maximaal toegestane hoek van de bochten: 90°); - materiaal dat goedgekeurd is volgens
de voorschriften (afhankelijk van het land); - binnenkant zo glad mogelijk. Er wordt bovendien
geadviseerd om drastische veranderingen van de doorsnede van de pijp te vermijden. Om de
lucht naar buiten af te voeren moet u alle andere aanwijzingen die op het blad "Opgelet" staan
opvolgen.
Boor het gat in de muur voor de luchtuitgang. Zie afb. 1 voor de maten voor de verschillende
mogelijkheden.
2) De wasemkap heeft 2 luchtuitgangen, één aan de bovenkant (afb. 2B) en een aan de
achterkant (afb. 2A), die worden gebruikt al naar gelang de gewenste installatieversie. In de
afzuigversie moet de flens (C) op de gebruikte opening wordengemonteerd, terwijl de andere
opening moet worden gesloten met het deksel (E). In de filterversie de 2 openingen NIETsluiten.
3) Muurbevestiging: Boor 4 gaten in de muur volgens de maten die worden aangegeven op
(afb. 3) en steek de pluggen erin; neem 2 van de bijgeleverde schroeven (afb. 4G) en steek deze
in de bovenste pluggen, maar zonder hen helemaal vast te draaien. Haak de wasemkap aan de
2 schroeven en span deze helemaal, vanaf de binnenkant van het apparaat. Bevestig de wasemkap
definitief door nog 2 schroeven H in de gaten te steken (afb.4).
4) Bevestiging onder een bovenkast : Als de wasemkap geïnstalleerd wordt in de afzuigversie
met afvoer van de lucht door de opening aan de bovenkant (afb. 2B), moet eerst een gat met een
diameter van 133 mm in de bovenkast worden gemaakt (afb. 5). Boor 4 gaten in de bovenkast,
volgens de maten die worden aangegeven op afb. 6. Bevestig de wasemkapmet 4 schroeven; ga
hierbij te werk vanuit de binnenkant van het bovenkastje.
5) Voor de afzuigversie: bevestig een buigzame leiding aan de flens van de wasemkap, met
behulp van een metalen bandje. Leiding en bandjes worden niet meegeleverd.
6) Maak de elektrische aansluiting.
7) TE CONTROLEREN OF DE HENDEL AFZUIGEN-FILTEREN IN DE JUISTE STAND STAAT:
de hendel bevindtzich op de motorgroep, en moet op het symbool (P) staan voor installatie in de
afzuigversie, of op het symbool (Q)in het geval van installatie in de filterversie (afb. 7).
8) LET OP MET KOOLFILTER(S) (A) - Afb. 8-9-10-11: In de filterversie moet(en) koolfilters
12
Page 13

gebruikt worden. Daarom moet(en) deze, mits zij nog niet geinstalleerd zijn zoals volgt en
afhankelijk van het model gemonteerd worden:
- als de kap van ronde koolfilters voorzien ist (Afb. 11R) de koolfilter door een draaiende beweging
tegen de wijzers van de klok in inbrengen.
- als de kap van een paneel-koolfilter voorzien is (Afb. 8A of 9A of 10A) de koolfilter binnen
positioneren en de 2 stopfilters(M) aanbrengen om de koolfilter te blokeren. In de zuiger-versie
zijn de koolfilter(s) niet nodig en worden daarom, mits reeds geônstalleerd verwijderd.
WERKING
Afhankelijk van de versies is het apparaat uitgerust met de volgende bedieningen:
Bedieningen van Afb. 12: A = schakelaar voor de verlichting. B = schakelaar AAN/UIT motor
I ste snelheid. C = schakelaar 2 de snelheid. D = schakelaar 3 de snelheid. E = lampje motor in
functie.
Bedieningen van Afb. 13: A = schakelaar voor de verlichting: positie 0: licht uit; positie 1: licht
aanbestoken. B = schakelaar voor de motor: positie 0: motor gestopt; positie 1-2-3: motor draait
in eerste, tweede of derde snelheid. C = getuigc lampje voor de werking van de motor.
Vetfilter(s): Afhankelijk van het model wordt de wasemkap met verschillende vetfilters geleverd:
Modulaire metalen filters (van het type dat aangegeven wordt op afb. 14): deze filters zijn van
metaal en moeten geregeld worden schoongemaakt, (de frequentie hangt af van de intensiteit
waarmee u de kap gebruikt), minstenseenmaal per twee maanden. Was de filters met een neutraal
reinigingsmiddel af.
Metalen paneelfilter (van het type dat aangegeven wordt op afb. 15N): dit filter is van metaal en
zit al in het metalenrooster; het filter moet regelmatig schoongemaakt worden (de frequentie
hangt af van de intensiteit waarmee de kap wordt gebruikt), minstens één keer in de twee maanden.
Was het filter met een neutraal reinigingsmiddel af. Verwijderde 2 filterbevestigingen (M) en
verwijder het metalen paneelfilter.
Synthetisch paneelfilter (van het type aangegeven op afb. 16P): dit filter is van witte synthetische
vezel en zit in het metalen rooster; het filter mag niet afgewassen worden maar moet regelmatig
vervangen worden, (de frequentiehangt af van de intensiteit waarmee de kap wordt gebruikt),
minstens één keer in de twee maanden. Verwijder de 2 filterbevestigingen (M) en verwijder het
synthetische paneelfilter.
Koolstoffilters: de koolfilters worden afhankelijk van het gebruik regelmatig vernieuwd, meestal
na telkens 6 maanden. De koolfilters zoals volgt en afhankelijk van het model verwijderen:
- als de kap van ronde koolfilters is voorzien (Afb. 17R) de koolfilter door een draaibeweging met
de wijzers van de klokverwijderen.
- als de kap van een paneel-koolfilter is voorzien (Afb. 8A of 9A of 10A), de koolfilter verwijderen,
waarbij eerst de 2 stopfilters M verwijderd worden.
Belichting: - Om de gloeilamp te vernieuwen, het plafondlampje verwijderen nadat de
stelschroef „A” uitgeschakeld is (Afb. 18).In geval van vervanging, een lampje gebruiken met een
vermogen van ILCOSD: HSGB/C/UB-28-230-E14.
13
Page 14

BELANGRIJKE INFORMATIE OVER MILIEUVRIENDELIJKE
AFVALVERWERKING
In enkele landen van de europese unie valt dit product niet onder het toepassingsgebied van de
nationale wetgeving voor erkenning van de Aeea-richtlijn en derhalve bestaat er geen enkele
verplichting tot gescheiden inzameling aan het einde van de levensduur van dit product.
Let op
Dit apparaat is conform de EU Richtlijn 2002/96/EC.Het symbool op het apparaat met de
afvalbak met een kruis erdoor geeft aan dat het apparaat, aan het einde van de levensduur,
niet bij het huisvuil gezet mag worden maar ingeleverd moet worden bij een centrum
voor gescheiden afvalinzameling voor elektrische en elektronische apparaten of
teruggegeven moet worden aan de winkel op het moment van de aanschaf van een
gelijkwaardig nieuw apparaat.De gebruiker is verantwoordelijk voor het inleveren van het
apparaat bij een daarvoor geschikt inzamelingspunt, op straffe van sancties op basis van de heersende
wetgeving inzake afvalverwerking.De adequate gescheiden inzameling ten einde het ingeleverde apparaat
te kunnen recyclen, behandelen en milieuvriendelijk tot afval te kunnen verwerken draagt bij aan het
voorkomen van mogelijk negatieve invloeden op het milieu en de gezondheid en bevordert de recycling
van materialen waaruit het apparaat is samengesteld.Voor nadere informatie over de beschikbare
afvalverwerkingssystemen kunt u contact opnemen met de plaatselijke afvalverwerkingsdienst, of bij de
winkel waar u het apparaat heeft aangeschaft.De fabrikanten en importeurs zijn verantwoordelijk voor de
recycling, de behandeling en de milieuvriendelijke afvalverwerking zowel direct als door deelname aan
een collectief systeem.
14
Page 15

85
Ø133
720
min
940
min650
C
E
2
B
A
1
4
G
H
Ø 8mm
A
44
732
min650
=
=
MODELS A X
50cm 44cm 41cm
55cm 49cm 46cm
60cm 54cm 51cm
70cm 64cm 61cm
80cm 74cm 71cm
90cm 84cm 81cm
3
5
Ø 133
85
6
Ø 6mm
X
34
256
=
=
7
PQ
15
Page 16

9
10
A
M
A
M
8
A
M
11
R
12
14
B
C
A
13
A
B
C
D
E
15
N
M
16
P
18
M
17
R
Vortice S.p.A. reserves the right to make improvements to products at any time and without prior notice
Die Firma Vortice S.p.A. behält sich vor, alle eventuellen Verbesserungsänderungen an den Produkten des Verkaufsangebots vorzunehmen
La société Vortice S.p.A. se réserve le droit d'apporter toutes les variations afin d'améliorer ses produits en cours de commercialisation.
La Vortice S.p.A. si riserva il diritto di apportare tutte le varianti migliorative ai prodotti in corso di vendita.
Vortice se reserva el derecho de incorporar todas las mejoras necesarias a los productos en fase de venta.
A Vortice S.p.A. reserva-se o direito de efectuar melhoramentos aos produtos durante a venda.
Vortice S.p.A. behoudt zich het recht voor elke gewenste verbetering aan te brengen in reeds op de markt gebrachte producten
16
04308063/3
 Loading...