

Page 1

OWNERS MANUAL V-V500
These Instructions contain important information which will help you get best from your
equipment and ensure safe and correct assembly, use and maintenance.
Important –
Please read these instructions fully before assembly or using
Spin Bike
Page 2

Page 3
、
To reduce the risk of serious injury, read the entire manual before you assemble or operate the Pro Fitness
Assembly
• Check you have all the components and tools
listed on pages 3 and 4, bearing in mind that, for
ease of assembly, some components are
pre-assembled.
• Keep children and animals away from the work
area, small parts could choke if swallowed.
• Make sure you have enough space to layout the
parts before starting.
• Assemble the item as close to its final position
(in the same room) as possible.
• Position the equipment on a clear, level surface.
• Dispose of all packaging carefully and responsibly.
Using
• Chain-driven designed for this product,35-40DB is
available while exercising.
• It is the responsibility of the owner to ensure that
all users of this product are properly informed as to
how to use this product safely.
• This product is intended for domestic use only.
Do not use in any commercial, rental, or institutional
setting.
• Before using the equipment to exercise, always do
stretching exercises to properly warm up.
• If the user experiences dizziness, nausea, chest
pain, or other abnormal symptoms stop the
workout and seek immediate medical attention.
• Only one person at a time should use the
equipment.
• Keep hands away from all moving parts.
• Always wear appropriate workout clothing when
exercising. Do not wear loose or baggy clothing,
since it may get caught in the equipment. Wear
athletic shoes to protect your feet while exercising.
• Do not place any sharp objects around the
equipment.
• Disabled persons should not use the equipment
without a qualified person or doctor in attendance.
• This product is suitable for user’s weight of:
120kgs.
• This product conforms to: (BS EN957)
- PARTS 1.10 class (H) - Home Use - Class (C).
• This exercise product has been designed and
manufactured to comply with the latest (BS EN 957)
British and European Safety Standards.
Battery safety
•
Warning: Incorrect installation of batteries
may cause battery leakage and corrosion,
resulting in damage to the computer.
• Do not
mix old and new batteries, or
batteries of different types.
•
Do not
dispose of batteries in a fire.
•
Do not
dispose of batteries with
normal household waste, take to a local recycling
center
Warning: Before beginning any exercise program, consult your Doctor. This is especially
Important –
Please read fully before assembly or using
Safety Information
2
Aerobic Cycle, In particular, note the following safety precautions:
MUST read all instructions before using any fitness equipment. We assumes no responsibility for
personal injury or property damage sustained by or through the use of this product.
important for persons over the age of 35 or persons with pre-existing health problems. You
Page 4
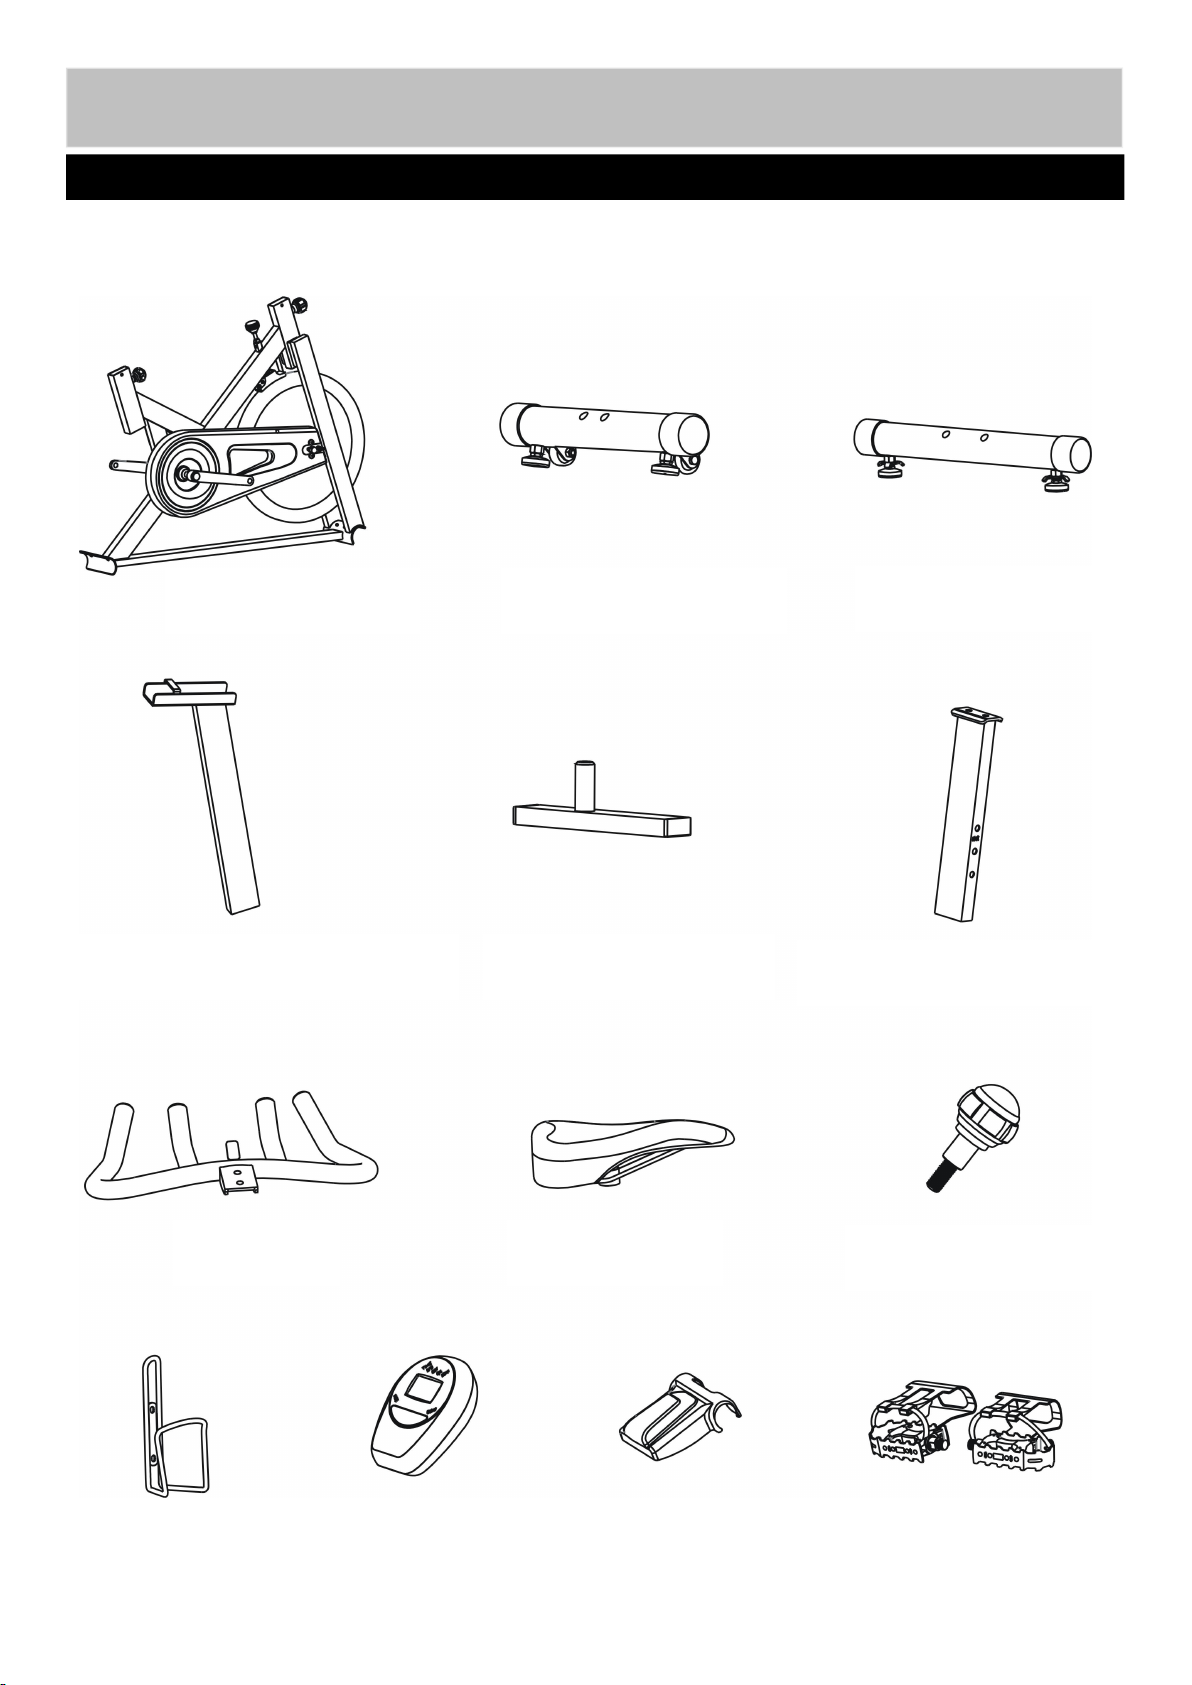
Note: Some of the smaller components may be pre-fitted to larger components. Please check carefully
Components - Parts
Please check you have all parts listing below
3
1 Main Body
2 Front
Sta
biliz
er
3 Rear
Sta
bili
zer
4 Saddle Post
5 Saddle Support
7 Handle Post
8 Han
dle
9 Saddle
14 M10 Lock Knob
16 Water
BottleHolder
20 Handle Cover
17 Console
31 L&R Pedal
before contacting Argos regarding any missing components.
Page 5

Note: Some of the fixings are pre-fitted to the larger components. Please check carefully before contacting
Argos regarding any missing fixings.
Components - Fixings
4
Please check you have all parts listing below
20mm Allen Bolt × 6
Φ10 Spring Washer × 6
Φ10 Flat Washer × 2
Φ10 Curved Washer × 4
15mm Philips Screw × 2
6# Allen Wrench × 1
Mu
lti
Wrench
× 1
61
63
65
67
77
Page 6

Assembly Instructions
Step 1
5
a. Attach Front stabilizer (2) to Main Body (1) using 2 x 20mm Allen bolts (61), 2 x Ø10mm Spring
washers (63) and 2 x Ø10 Curved Washers ( 67).
b. Repeat step a to install Rear stabilizer (3) to Main Body (1).
C. Level the machine
The user can tighten or loose 2 x Level Feet (35) to level the machine if needed. Tighten 2 x Level
Note: Level Feet (35) and Level foot lock nuts (34) are pre-fitted.
foot lock nuts (34) to make the machine stable before starting workout.
Page 7
Assembly Instructions
Step 2
6
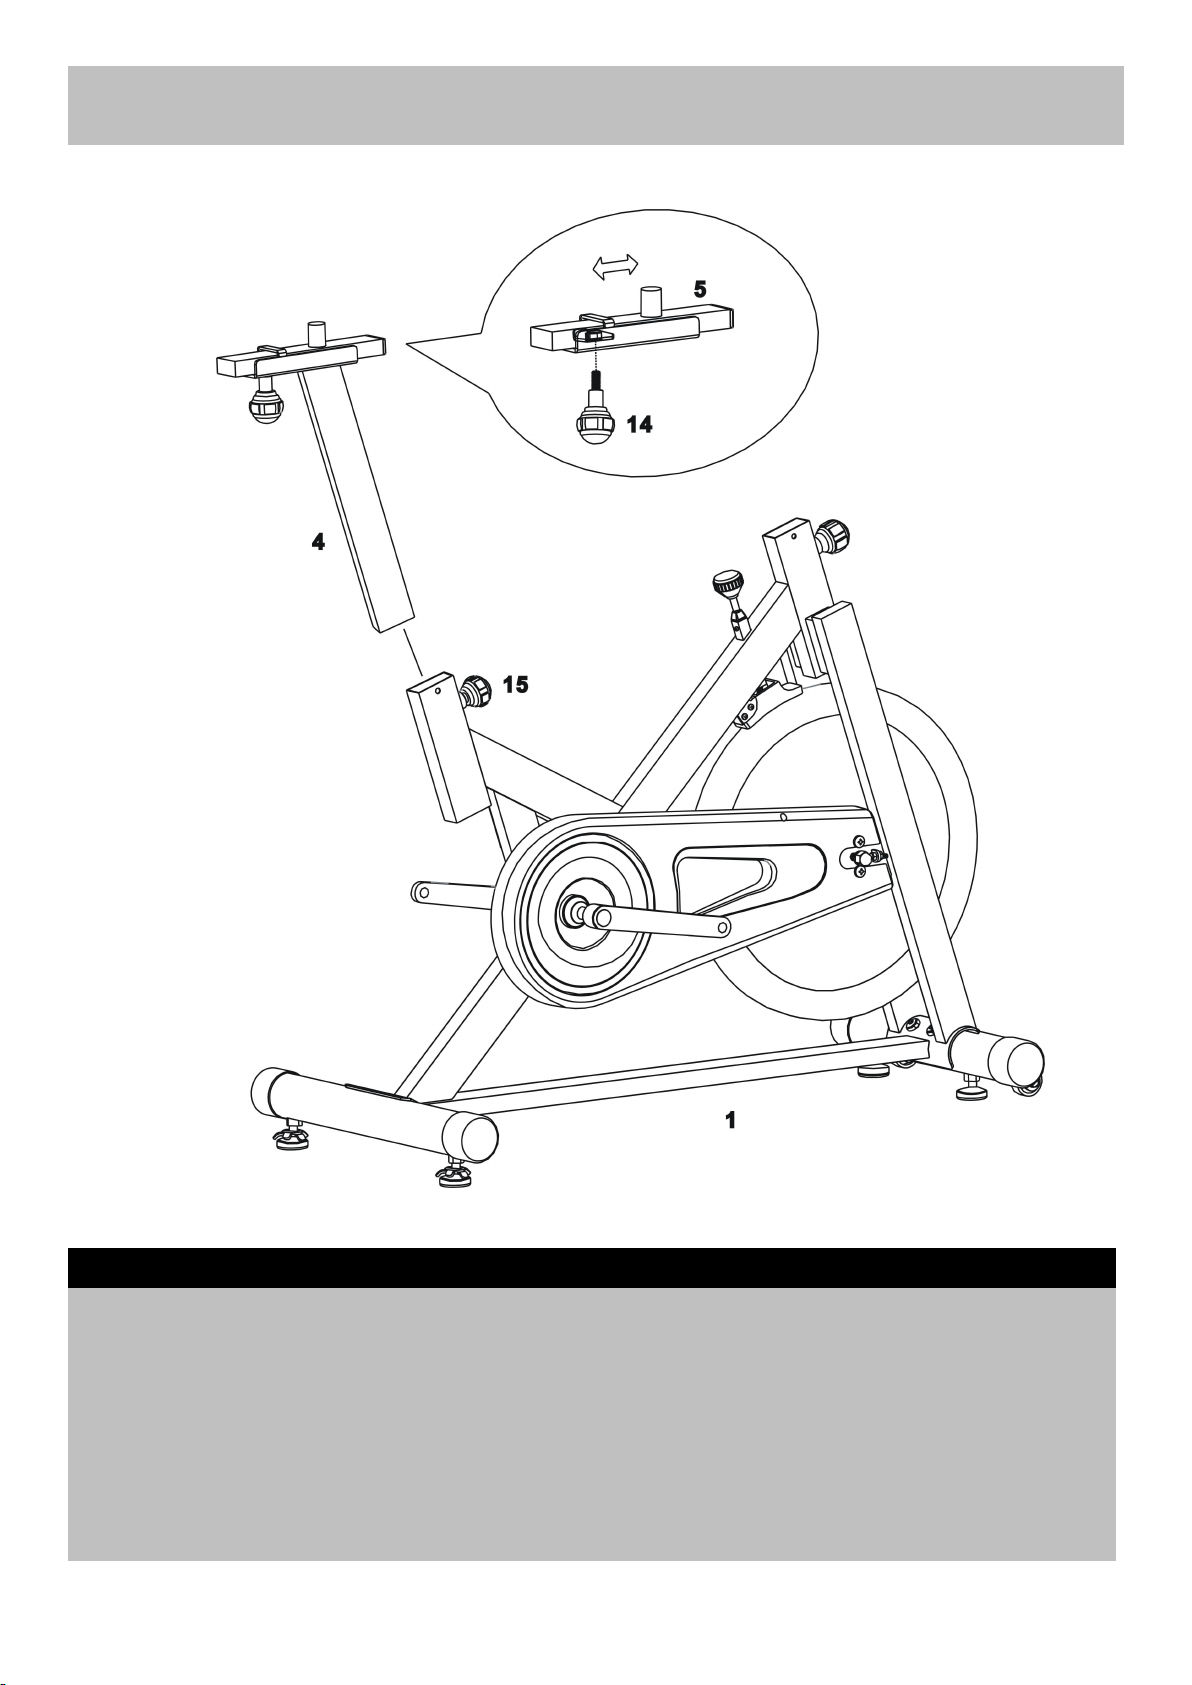
a. Attach the Saddle Support Frame (5) onto the Saddle Post (4),secure with Lock Knob (14).
b. Loosing M16 Lock Knob (15) and remove, insert Saddle Post Assembly (4&5) into the rear opening
tube of the Main body (1).
c. Adjust the Saddle Post Assembly (4&5) to your desired height, then refit and tighten the Lock knob
(15).
d. Loosing Lock Knob (14) to select your desired forward or backward position, then tighten the Lock
knob (14).
5
14
Page 8
Assembly Instructions
Step 3
7
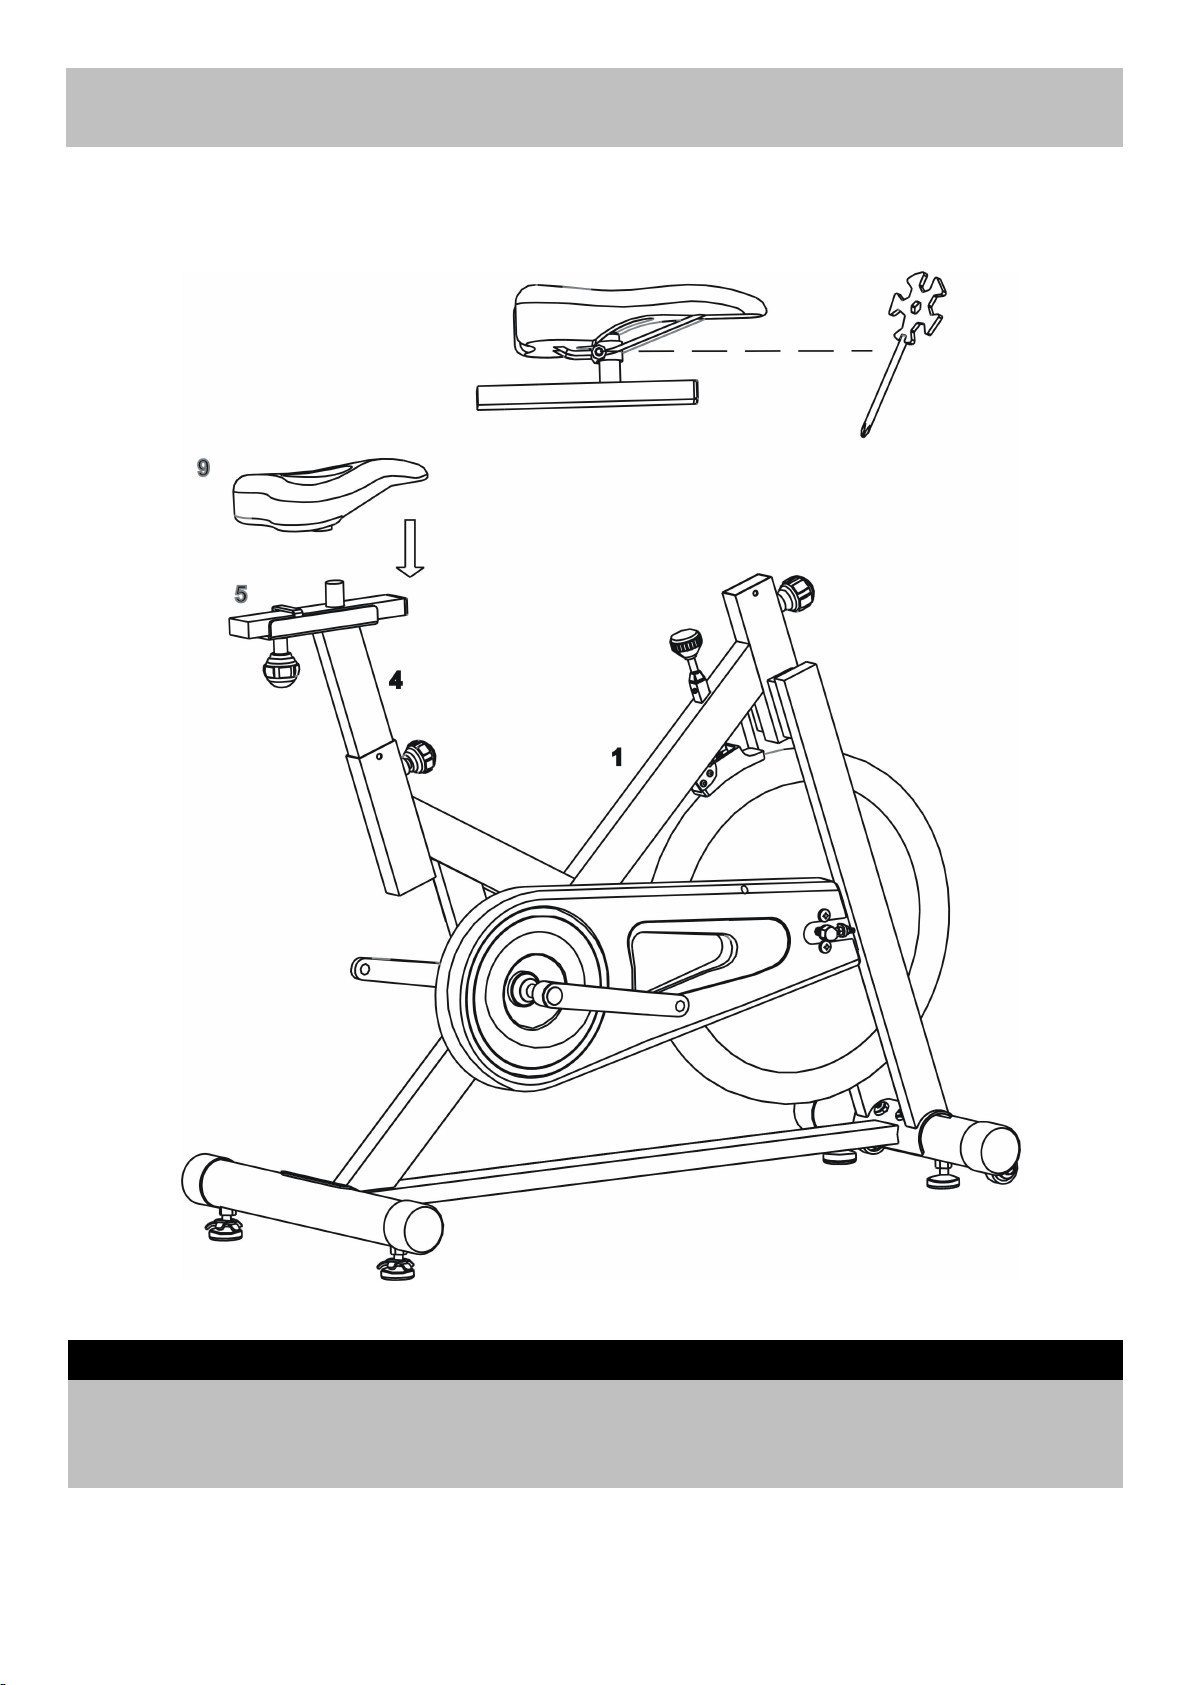
Place Saddle (9) onto the post of the Saddle Support (5), secure the Saddle (9) by tightening the saddle
locking nuts (Pre-fitting on the Saddle).
Page 9
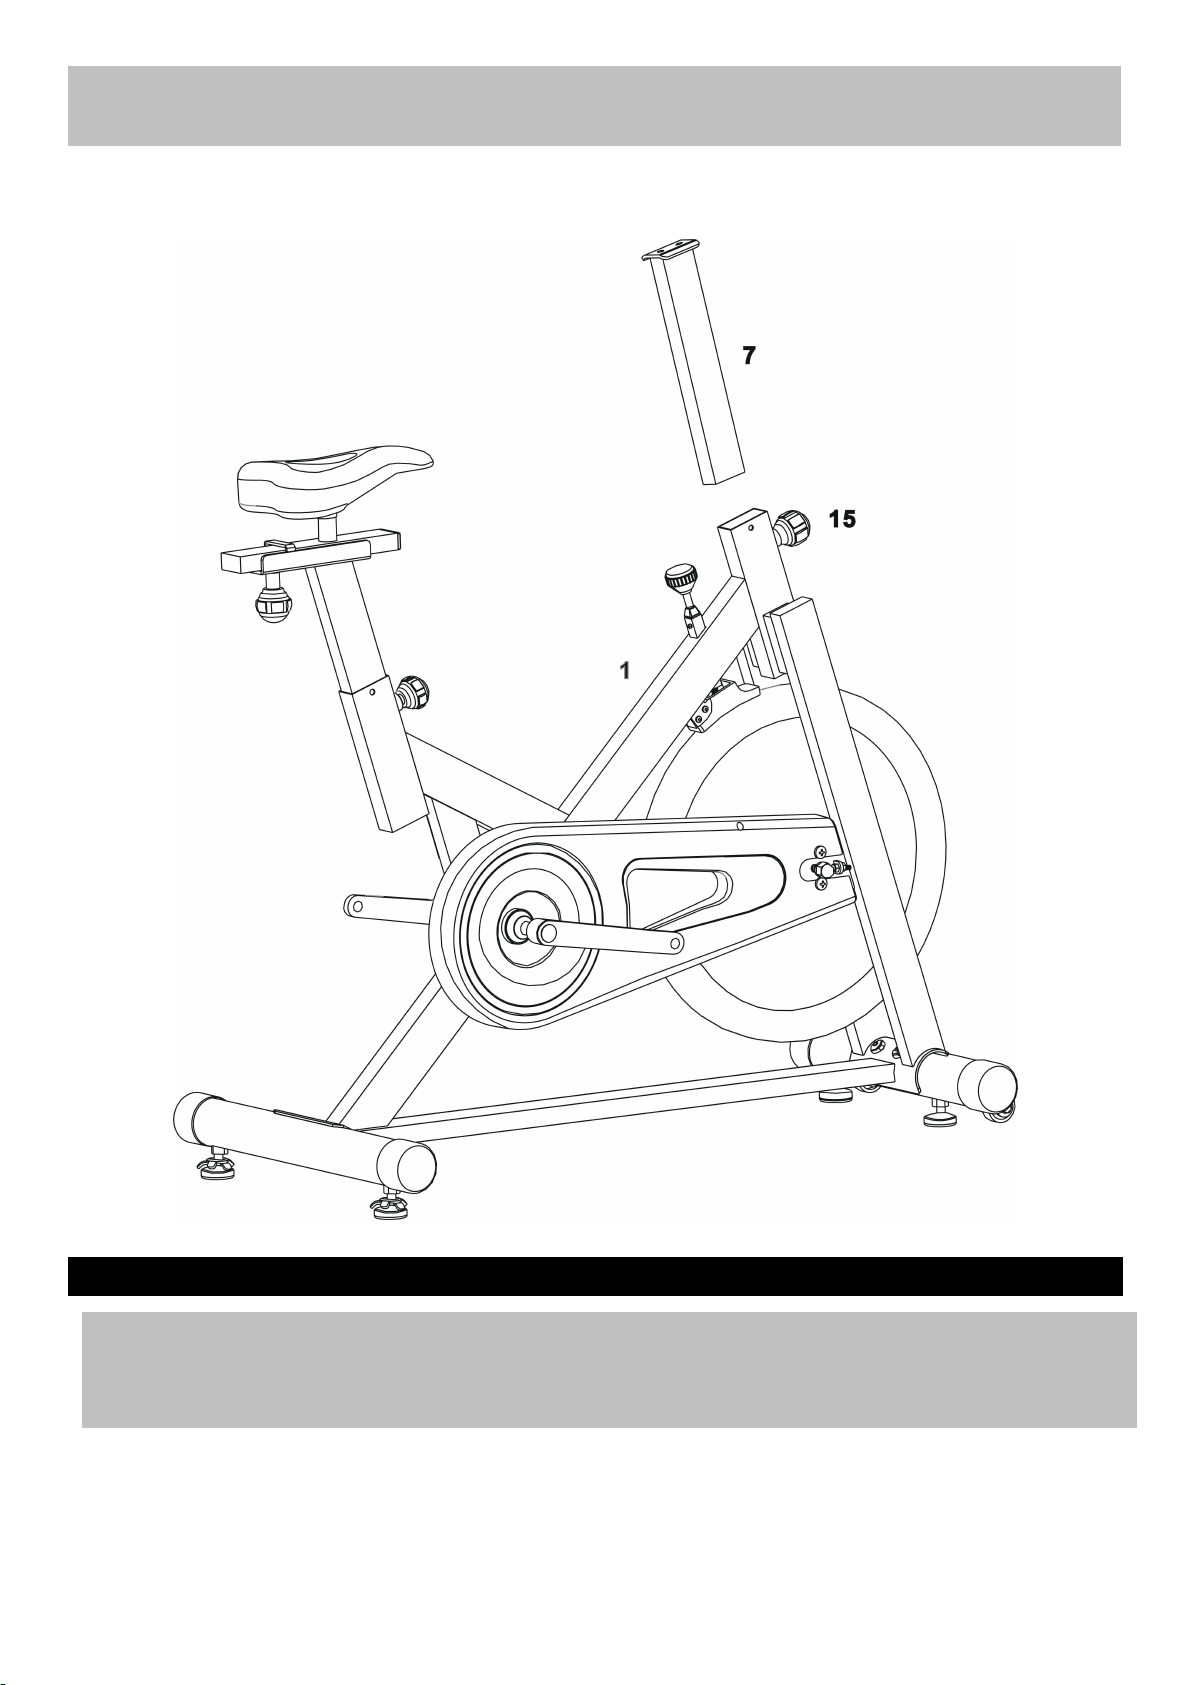
Assembly Instructions
Step 4
8
Loosing the M16 Lock Knob (15) and remove. Insert Handle Post (7) into the front opening tube of the
Main Body (1). Adjust to your desired height and refit and tighten the Lock knob (15) .
Page 10
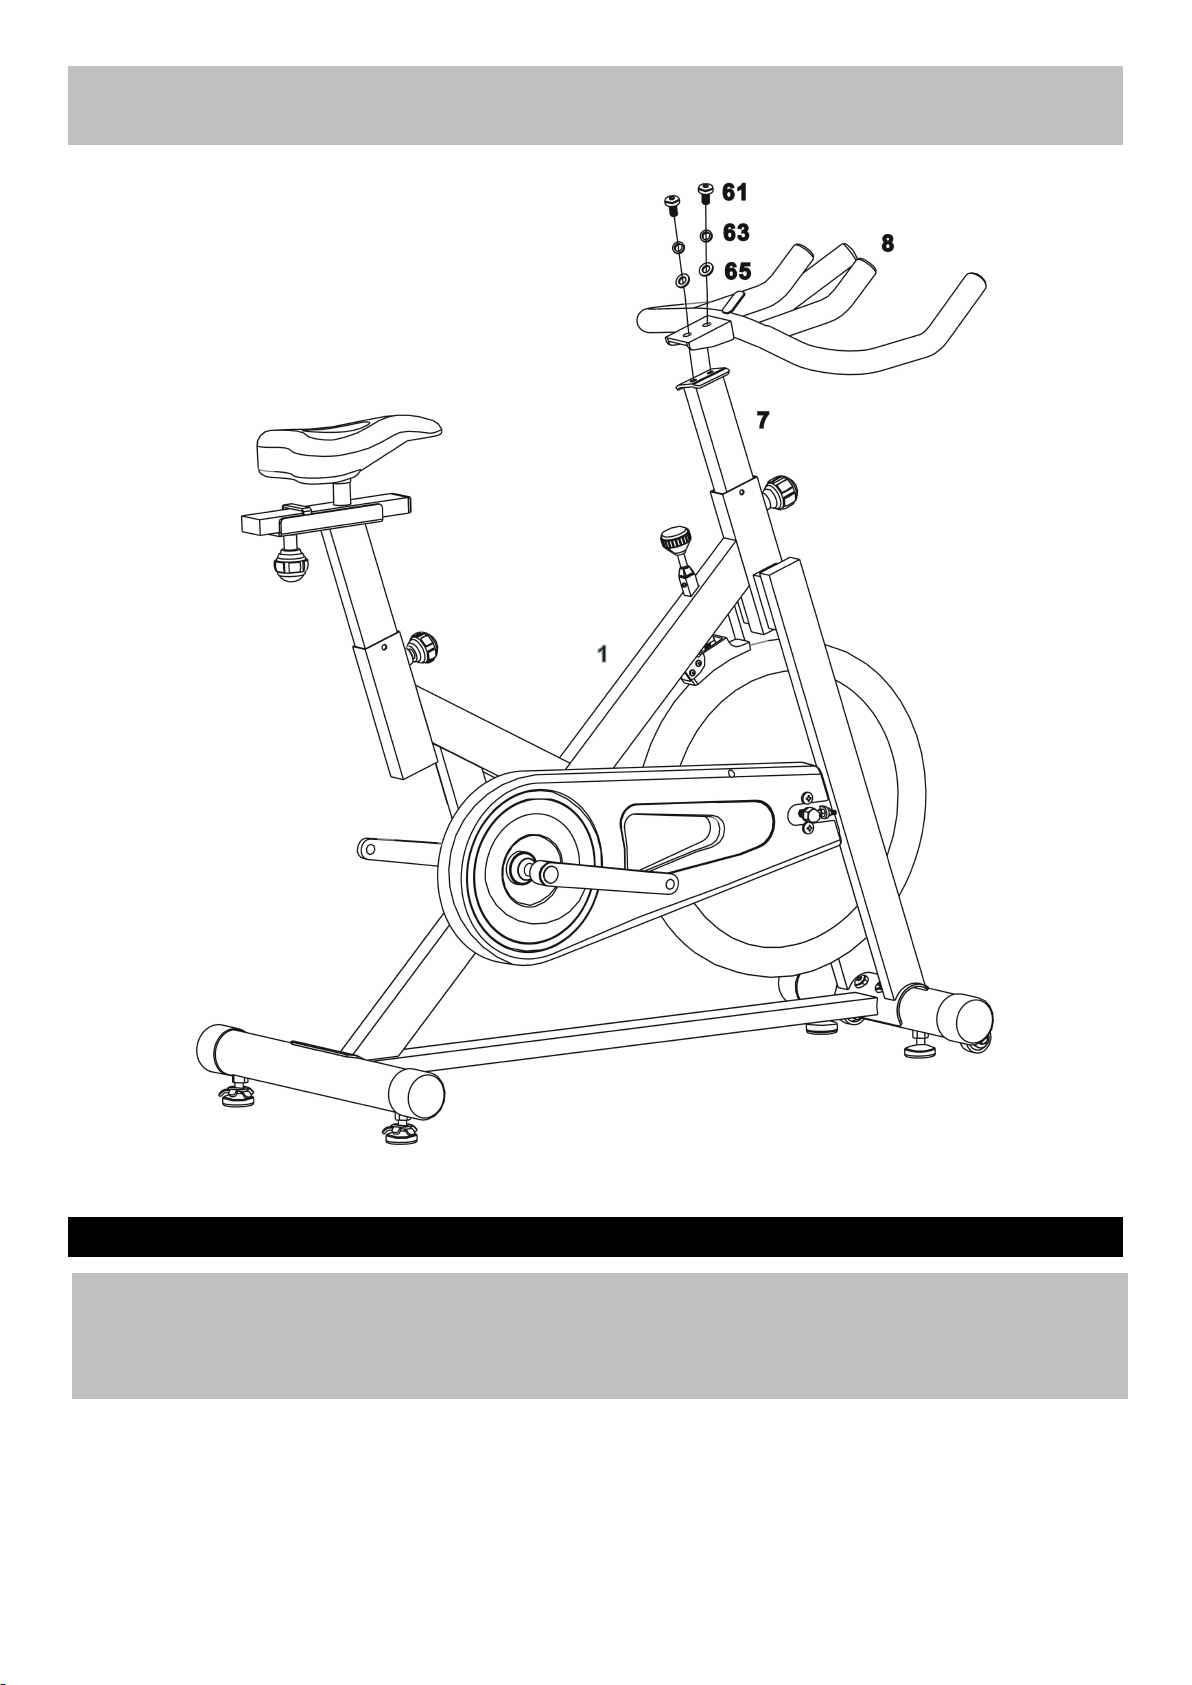
Step 5
9
Assembly Instructions
Attach the Handle (8) onto the top of the Handle Post (7). Secure using 2 x M10x20mm Allen Bolts ( 61),
2 x Ø10mm Spring Washers (63) and 2 x Ø10mm Flat Washers ( 65).
Page 11
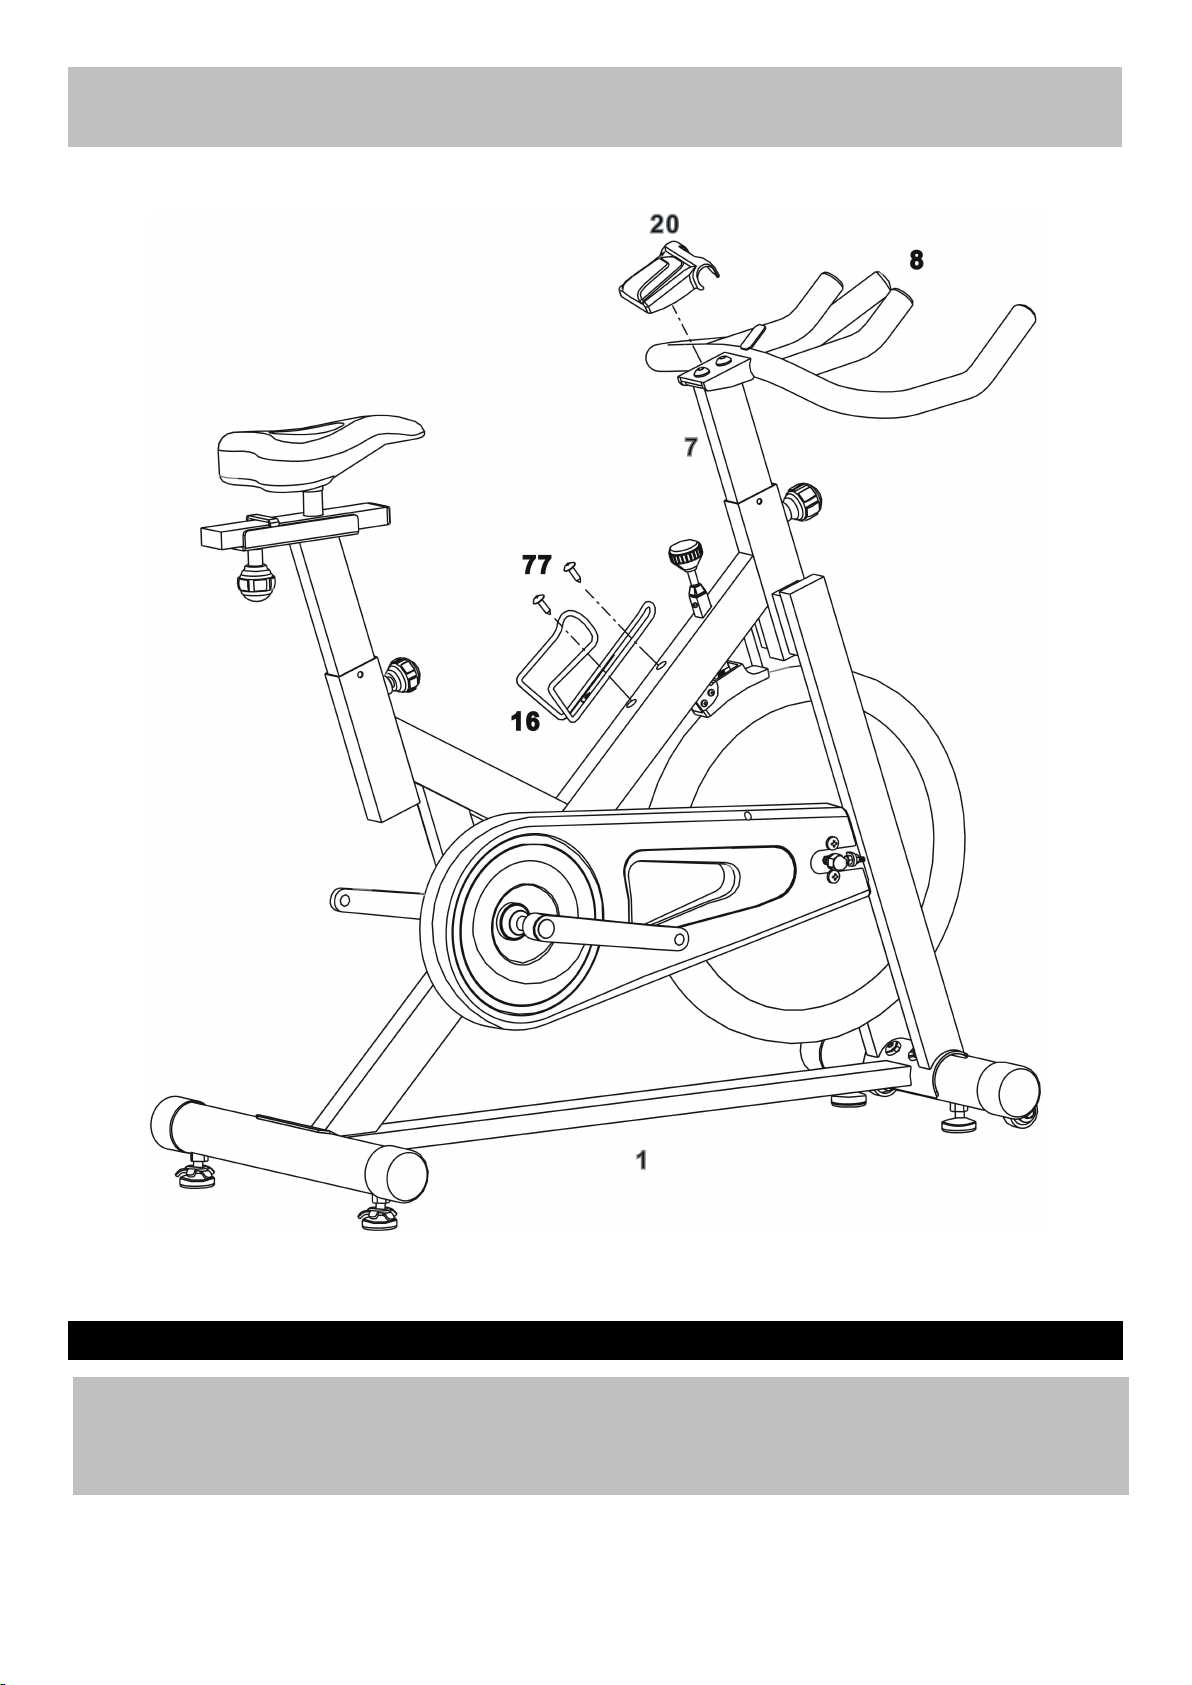
Assembly Instructions
Step 6
a. Place the Handle Cover (20) on the connection point of the Handle ( 8) and Handle Post (7).
b. Attach Water Bottle Holder (16) to the Main Body (1), fix using 2 x 15mm Philips Screws (77).
10
Page 12
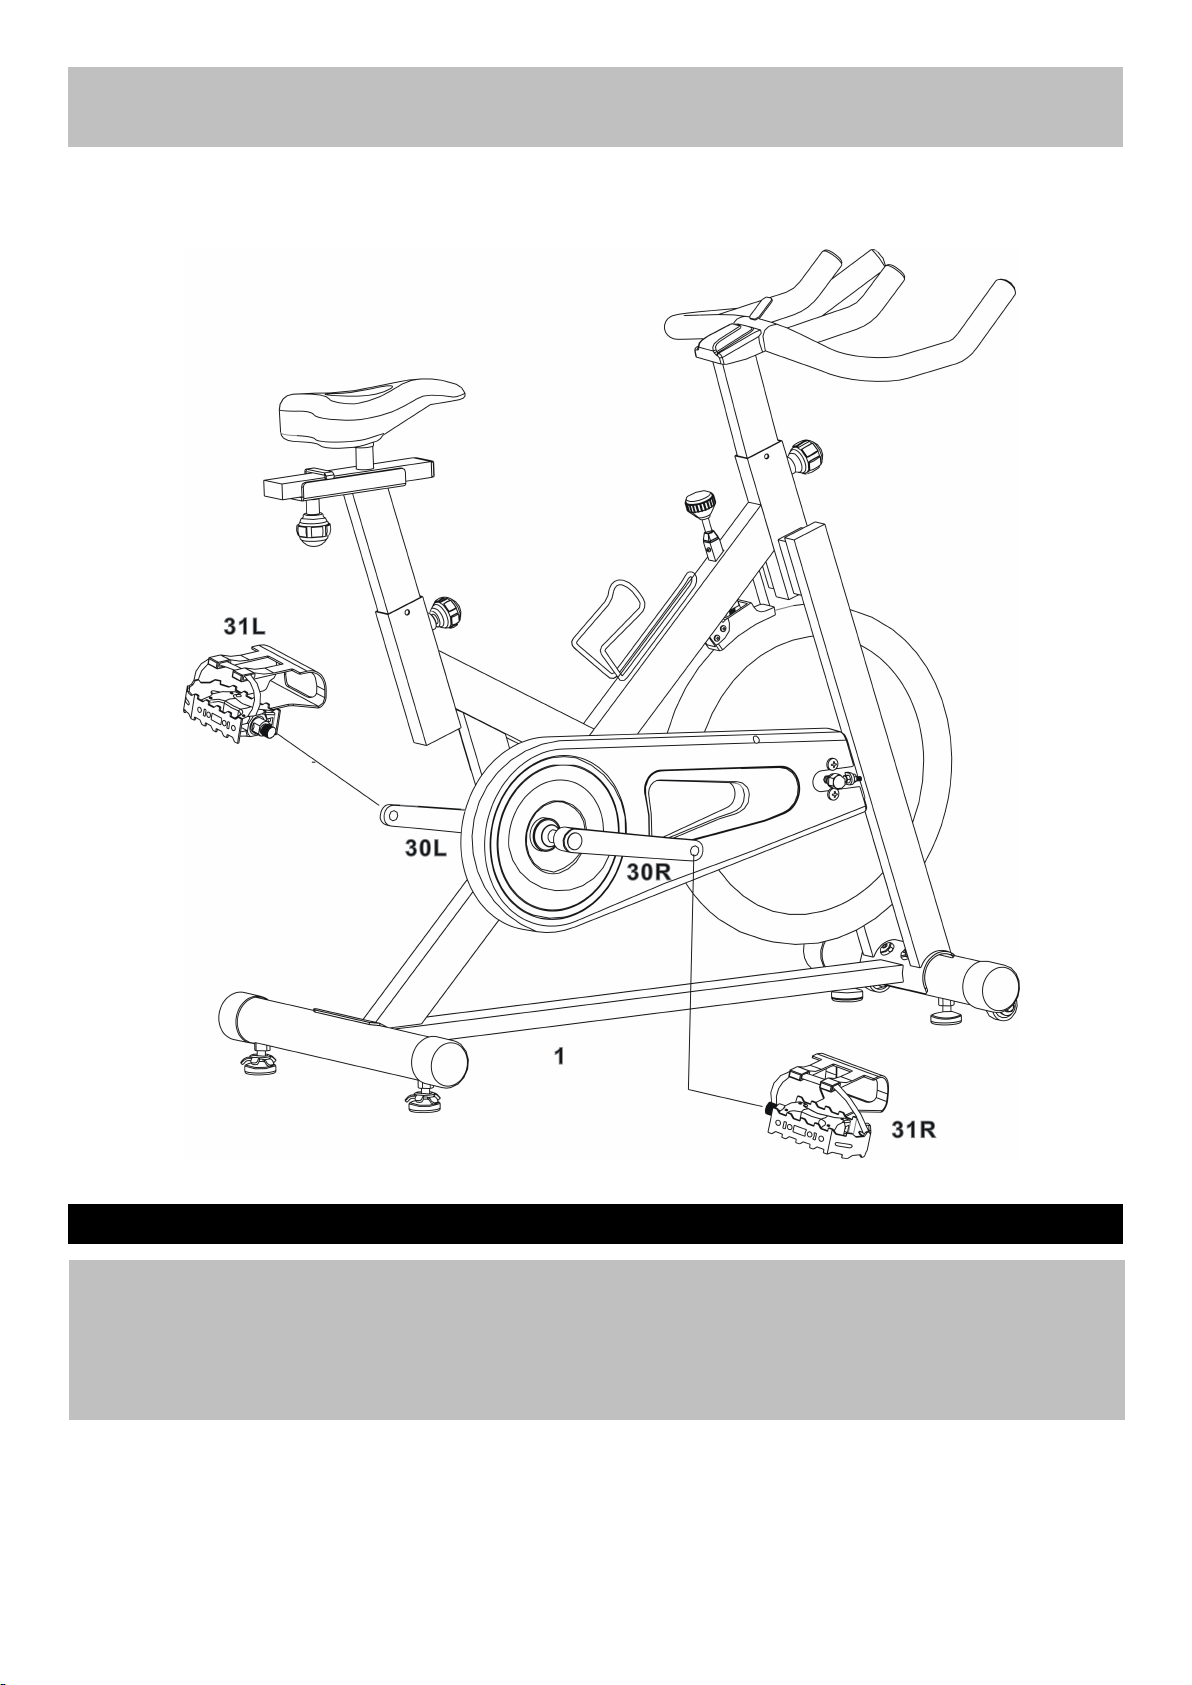
Assembly Instructions
Step 7
Connect Pedals (31 Right & Left) to Cranks as shown in above diagram.
Note: The left one is marked "L" and right one marked "R". Fasten the left pedal by turning in an anticlockwise direction and fasten the right pedal by turning in a clockwise direction.
11
Clockwise
Anti-Clockwise
Page 13
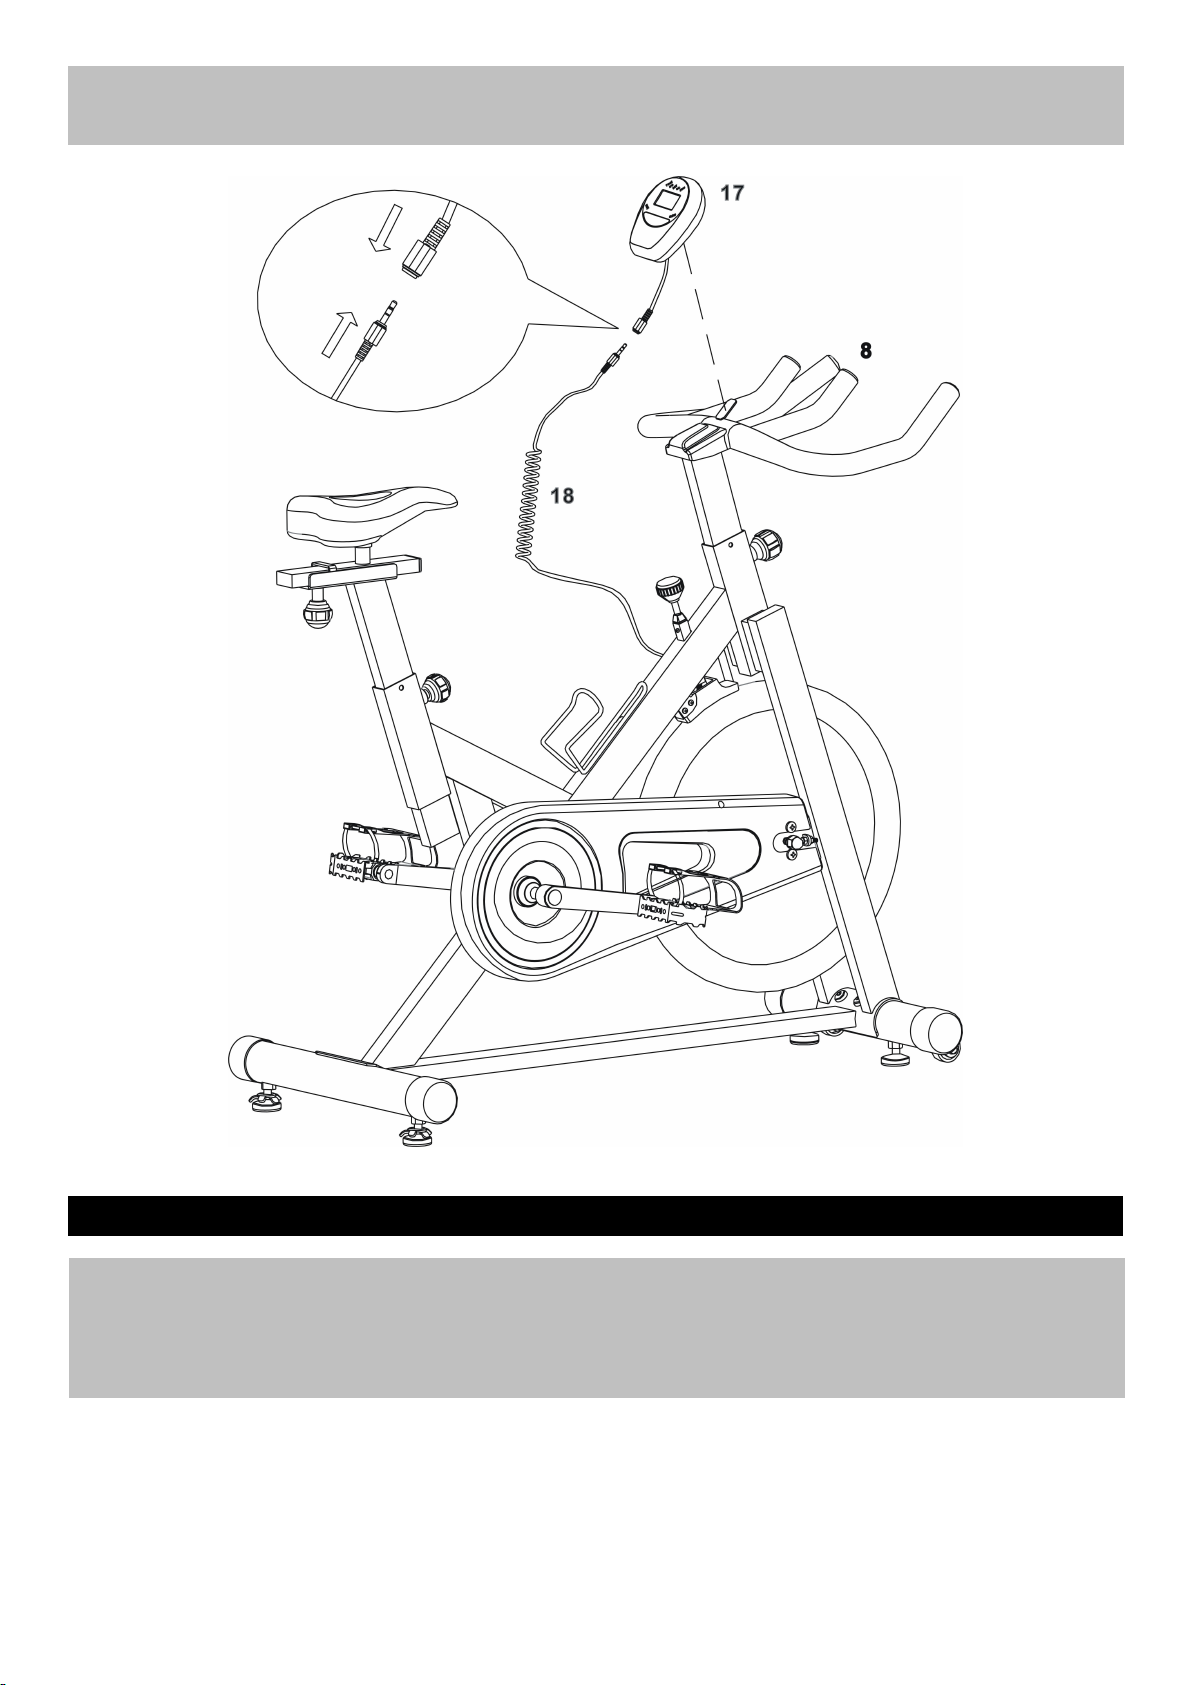
Step 8
Assembly Instructions
a. Attach the Console (17) to the bracket on the Handle (8) .
b. Connect Sensor wire (18) from the Main Body (1) to the Sensor wire from Computer (17).
12
Page 14
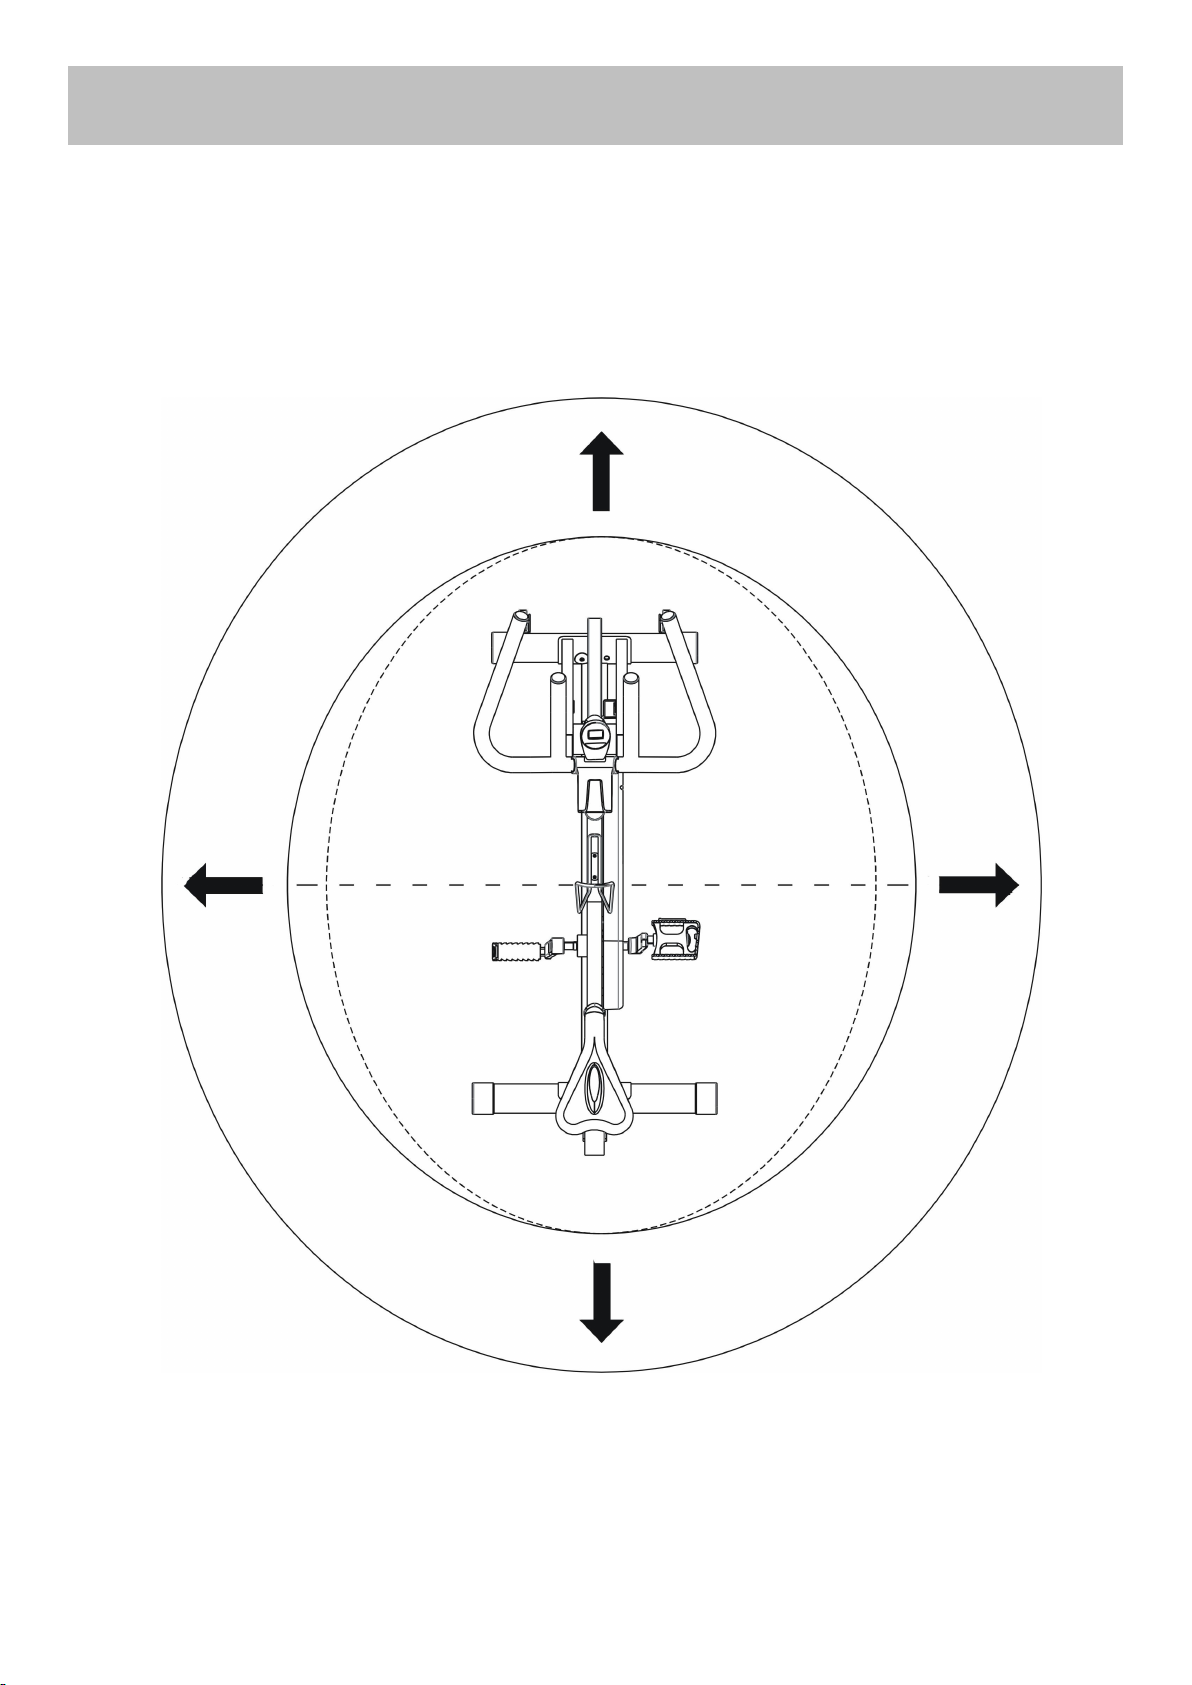
The free area shall be not less than 0.6m greater than the training area in the directions from which the
Free area and training area
13
0.6m
(Free area)
0.6m
(Free area)
0.6m
(Free area)
0.6m
(Free area)
Training area
1.3m
equipment is accessed. The free area must also include the area for emergency dismount. Where
equipment is positioned adjacent to each other the value of the free area may be shared.
Page 15
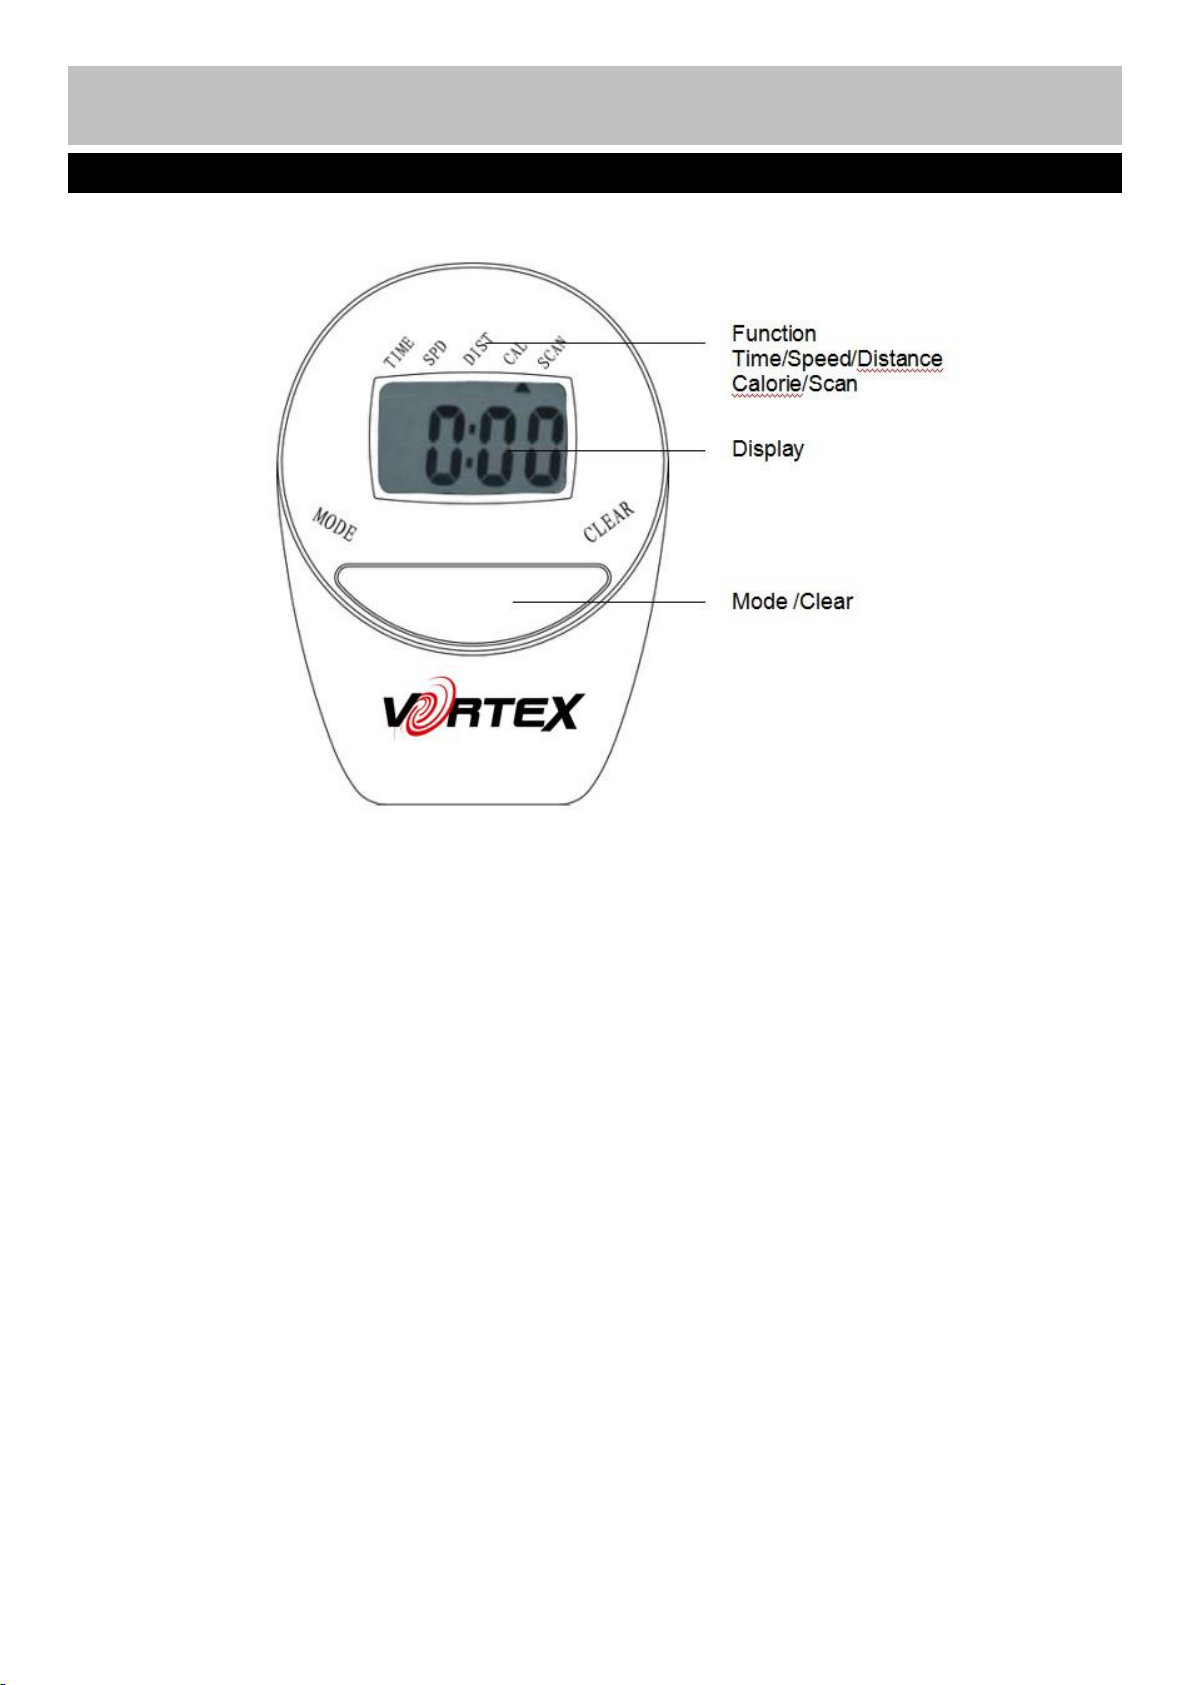
MODE : This key lets you select and lock on to a particular function which you want.
Press to Choose SCAN or LOCK, if you do not want the scan mode, press the Mode key until the pointer is
next to the “flashing” function which you want.
CLEAR:Reset the value to zero by pressing the key.
AUTO ON /OFF:The monitor will switch on automatically when the exercise machine is in motion. The
monitor will turn off automatically when the speed has no signal input or no keys are pressed for
approximately 4 minutes.
RESET: The unit can be reset by either changing the battery or pressing the MODE key for 3 seconds.
SPEED: Press Mode key until the pointer advances to SPEED. The Computer will display the current speed.
DISTANCE: Press Mode key until the pointer advances to DIST. The Computer will display each trip
distance you have traveled.
TIME: Press Mode key until the pointer advances to TIME. The total working time will be shown when
starting exercise.
CALORIES: Press Mode key until the pointer advances to CAL. The Computer will display total calories
burnt when starting to exercise.
SCAN: Press Mode key until the pointer advances to SCAN, the display will automatically rotate between
Time, Speed, Distance, Calories, each display will be held for 4 seconds.
Computer Operation
Functions and operations
Page 16
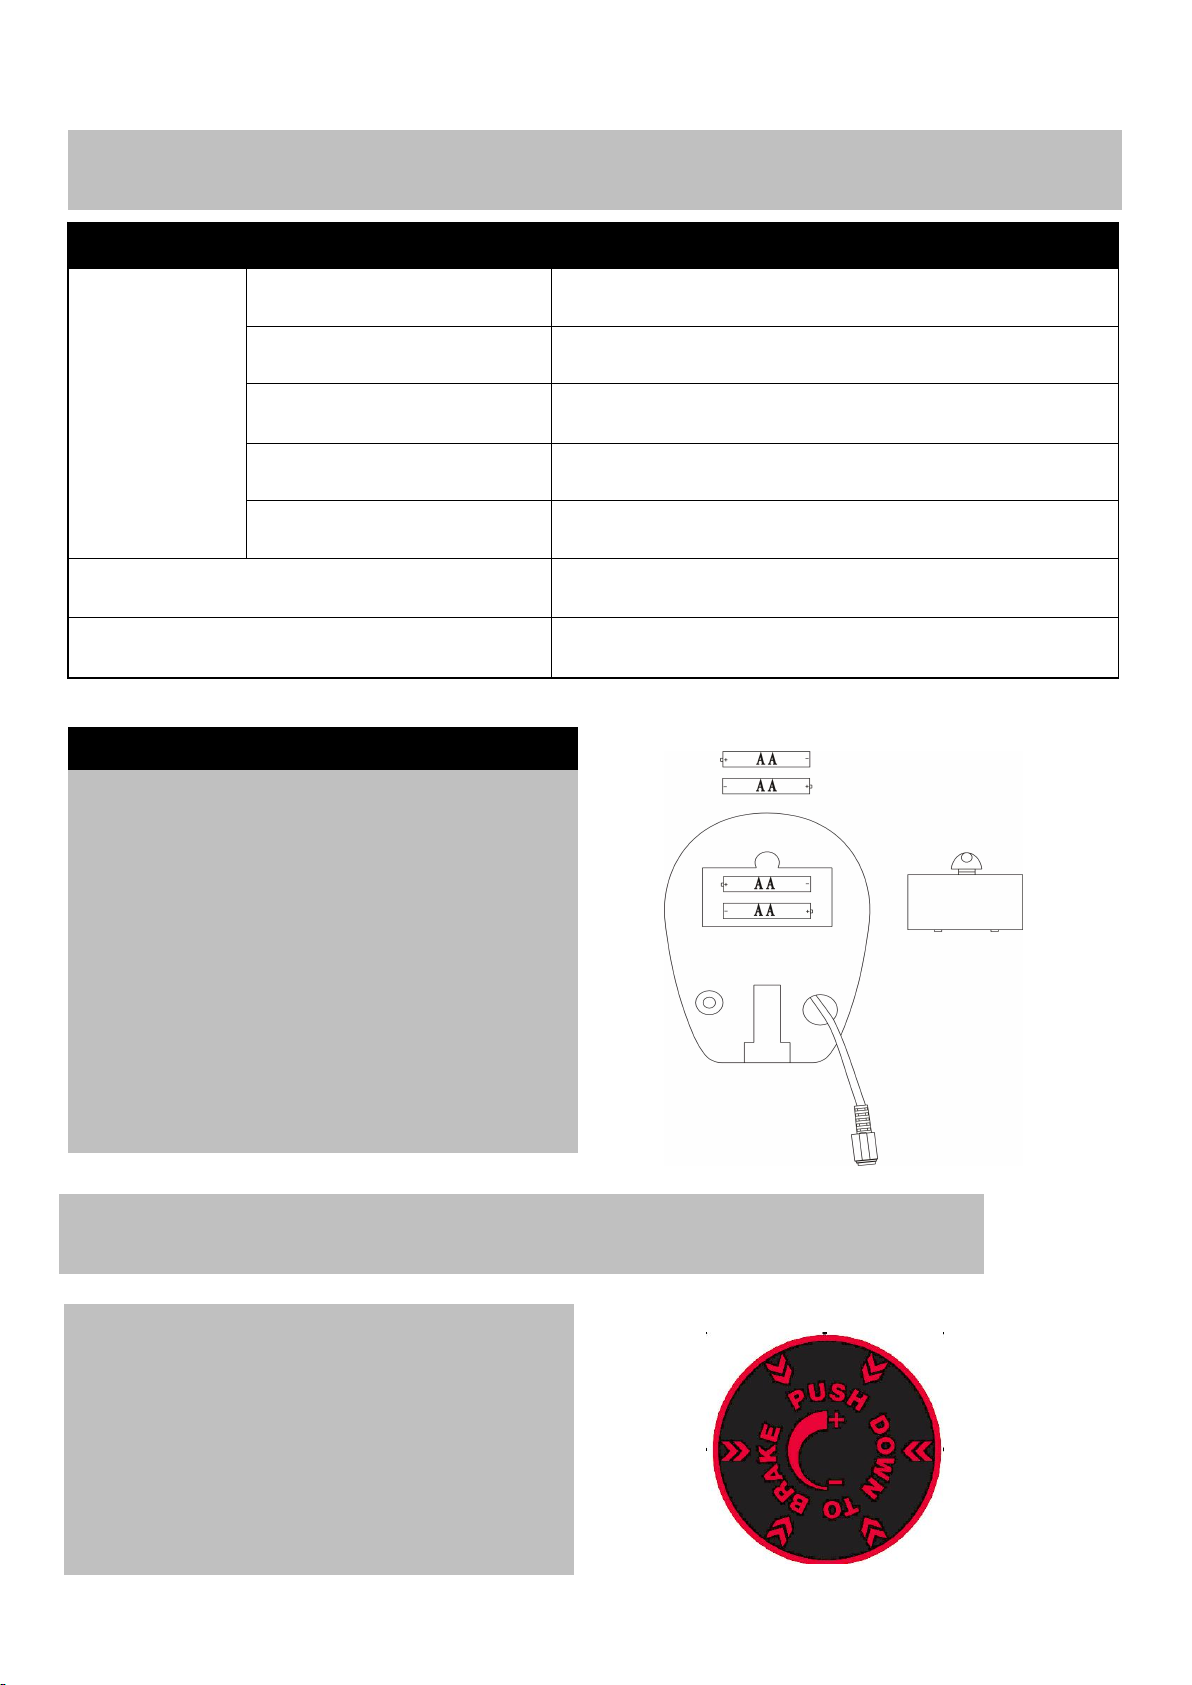
Specification
Function
Auto Scan
Every 4 Seconds
Speed
0.0 – 99.9 Km/h
Distance
0.0 – 999.9 Km
Time
00:00 – 99:59 (Minute: Second )
Calories
0.0 – 999.9 Kcal
Battery type
2 x SIZE – AA
Operation Temperature
0℃ - +40℃
Replacement of the battery
1. Remove the battery cover on the back of the
computer.
2. Replace 2x1.5V (AA) batteries.
3. Make sure the batteries are installed
correctly and the polarities are correct.
4. If the display is not clear or only partial
segments appeared, remove the batteries
and wait for 15 seconds before re-installing
them.
5. The battery life is approx. 10 months under
normal usage.
6. When the batteries are removed, all the
functional values will reset to zero.
14
Computer Operation
15
Battery Cover
Resistance Adjustment Instructions
1
.
Turn the Brake Knob (10) clockwise to
increase training resistance, Turn the Brake
Knob (10) anticlockwise to reduce the training
resistance.
2
.
Push down the Brake Knob (10) to brake the
flywheel during your workout.
Page 17

How you begin your exercise will vary from person to person. If you have not exercised for a long period of
Combine a carefully structured nutritious diet with a simple but effective exercise routine and this can help
make you feel better, look better and will almost certainly enable you to enjoy life more.
Exercising Information
Before starting to exercise
Aerobic fitness
Aerobic exercise is simply defined as any
sustained activity that increase the supply of
oxygen to your muscles via the blood pumped by
your heart. With regular exercise, your
cardiovascular system will become stronger and
more efficient. Your recovery rate i.e, the time
taken for your heart to reach its normal level, will
also decrease.
Initially you may only be able to exercise for a
few minutes each day. Do not hesitate to breath
through your mouth should you need more
oxygen.
Do not be discouraged if it takes longer than this
to begin to feel lethargic, everyone is different
and some will achieve their targets quicker than
others, work at your own, comfortable pace and
the results will come, the better your aerobic
fitness the harder you will have to work to start in
your “Target Zone”.
Warming up
A successful exercise program consists of three
parts: Warm up. Aerobic exercise and cool down.
Never start a training session without warning up
and never finish one without cooling down
correctly. Perform between five and ten minutes
of stretching before starting your workout to
prevent muscle strains, pulls and cramps.
Aerobic exercise session
Those new to exercise should exercise no more
than every other day to start with.
When you are comfortable with your routine, you
can exercise for 6 days per week. Always take at
least one day off per week.
Exercise in your Target Zone
To ensure that your heart is working in its
exercise target zone, you need to be able to take
your pulse, if you do not have a pulse monitor,
you will need to locate the pulse in your carotid
artery. This is situated in the side of the neck and
can be felt by using the index and middle fingers.
Simply count the number of beats you feel in 10
seconds and then multiply by six to get your
pulse rate. This should be taken before you start
to exercise for easy reference.
People, who have a greater aerobic fitness, will
have a lower resting pulse level and will also be
able to exercise with a higher pulse level.
Target Zone
To determine your “Target Zone”, see table on
page 16, if you are new to exercise and by
definition unfit, refer to the middle column, if you
exercise regularly and have good aerobic fitness,
refer to the right column.
16
time, or are severely overweight, you MUST start slowly and increase your time gradually, by perhaps only
few minutes for each session per week.
Page 18
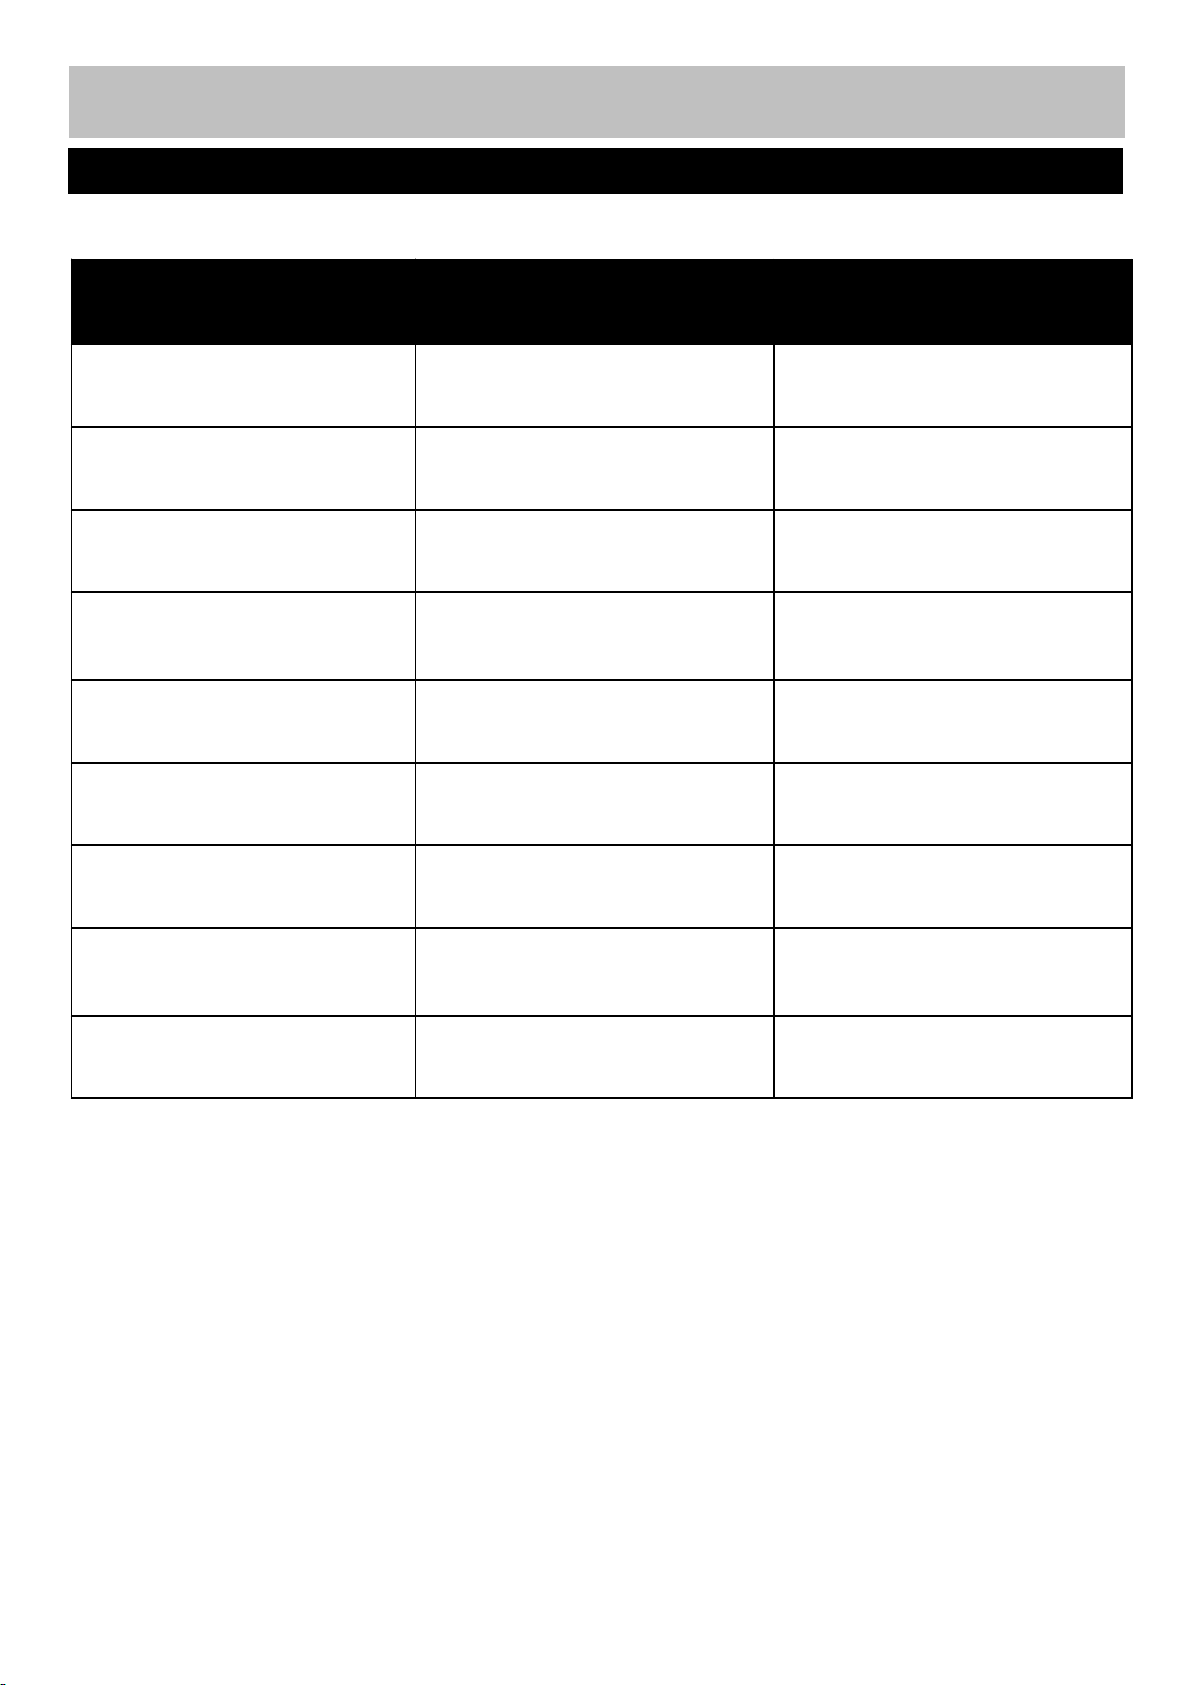
Users age
(years)
Unconditioned
(Target Zone A )
beats per minute
Conditioned
(Target Zone B)
Beat per minute
20 ------24
145----165
155----175
25------29
140----160
150----170
30------34
135----155
145----165
35------39
130----150
140----160
40------44
125----145
135----155
45------49
120---140
130----150
50------54
115---135
125----145
55------59
110----135
120----140
60 and over
105----125
115----135
Exercising Information
17
Before starting to exercise
Page 19
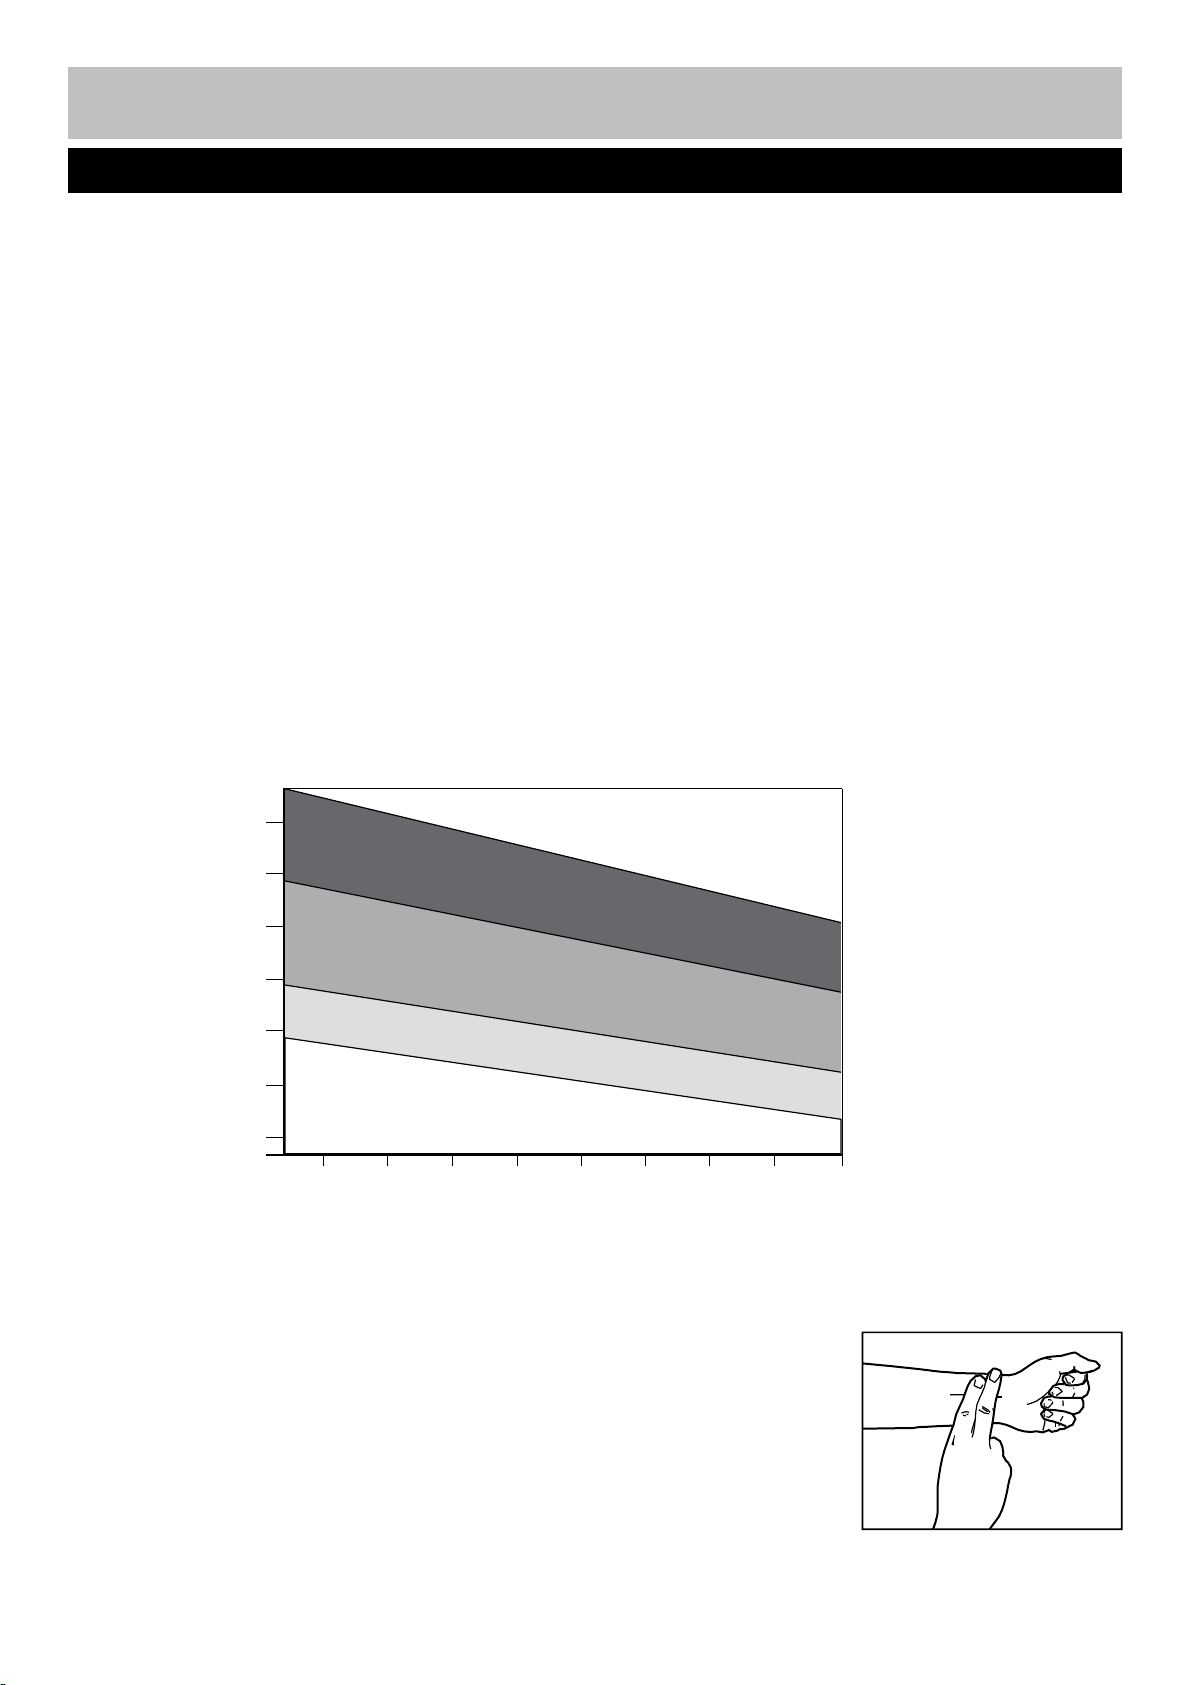
85% to Max
65% to 85%
55% to 65%
Up to 55%
How you begin your exercise program depends on your physical condition. If you have been inactive for
Exercise intensity
200
180
160
140
120
100
80
Age
During the first few months of your exercise program, keep your heart rate near the low end of your target zone
Cardiovascular
performance
Intermediate aerobic
Effective fat burning
Before starting to exercise
18
Beats per minutes (bpm)
Exercising Information
several years, or are severely overweight, you must start slowly and increase your time on the equipment;
a few minutes per workout.
Initially, you may be able to exercise only for a few minutes in your target zone, however, your aerobic fitness
will improve over the next six to eight weeks. Don’t be discouraged if it takes longer. It’s important to work
at your own pace. Ultimately, you’ll be able to exercise continuously for 30 minutes. The better your aerobic
fitness, the harder you will have to work to stay in your target zone.
Please remember these essentials:
• Have your doctor review your training and diet programs to advise you of a workout routine you should adopt.
• Begin your training program slowly with realistic goals that have been set by you and your doctor.
• Monitor your pulse frequently. Establish your target heart rate based on your age and condition.
• Set up your equipment on a flat even surface at least 3 feet from walls and furniture.
To maximize the benefits of exercising, it is important to exercise with the proper intensity. The proper intensity
level can be found by using your heart rate as a guide. For effective aerobic exercise, your heart rate should
be maintained at a level between 65% and 85% of your maximum heart rate as you exercise. This is known as
your target zone. You can find your target zone in the table below.
25 30 35 40 45 50 55 60 70
as you exercise. After a few months, your heart rate can be increased gradually until it is near the middle of
your target zone as you exercise.
To measure your heart rate, stop exercising but continue moving your legs or
walking around and place two fingers on your wrist. Take a six-second heartbeat
count and multiply the results by 10 to find your heart rate. For example, if your
six-second heartbeat count is 14, your head rate is 140 beats per minute.
(A six-seconds count is used because your heart rate will drop rapidly when you
stop exercising.) Adjust the intensity of your exercise until your heart rate is at the
proper level.
Page 20
Aerobic Exercise
Aerobic exercise improves the fitness of your lungs and heart - your body’s most important muscle. Aerobic
Weight Training
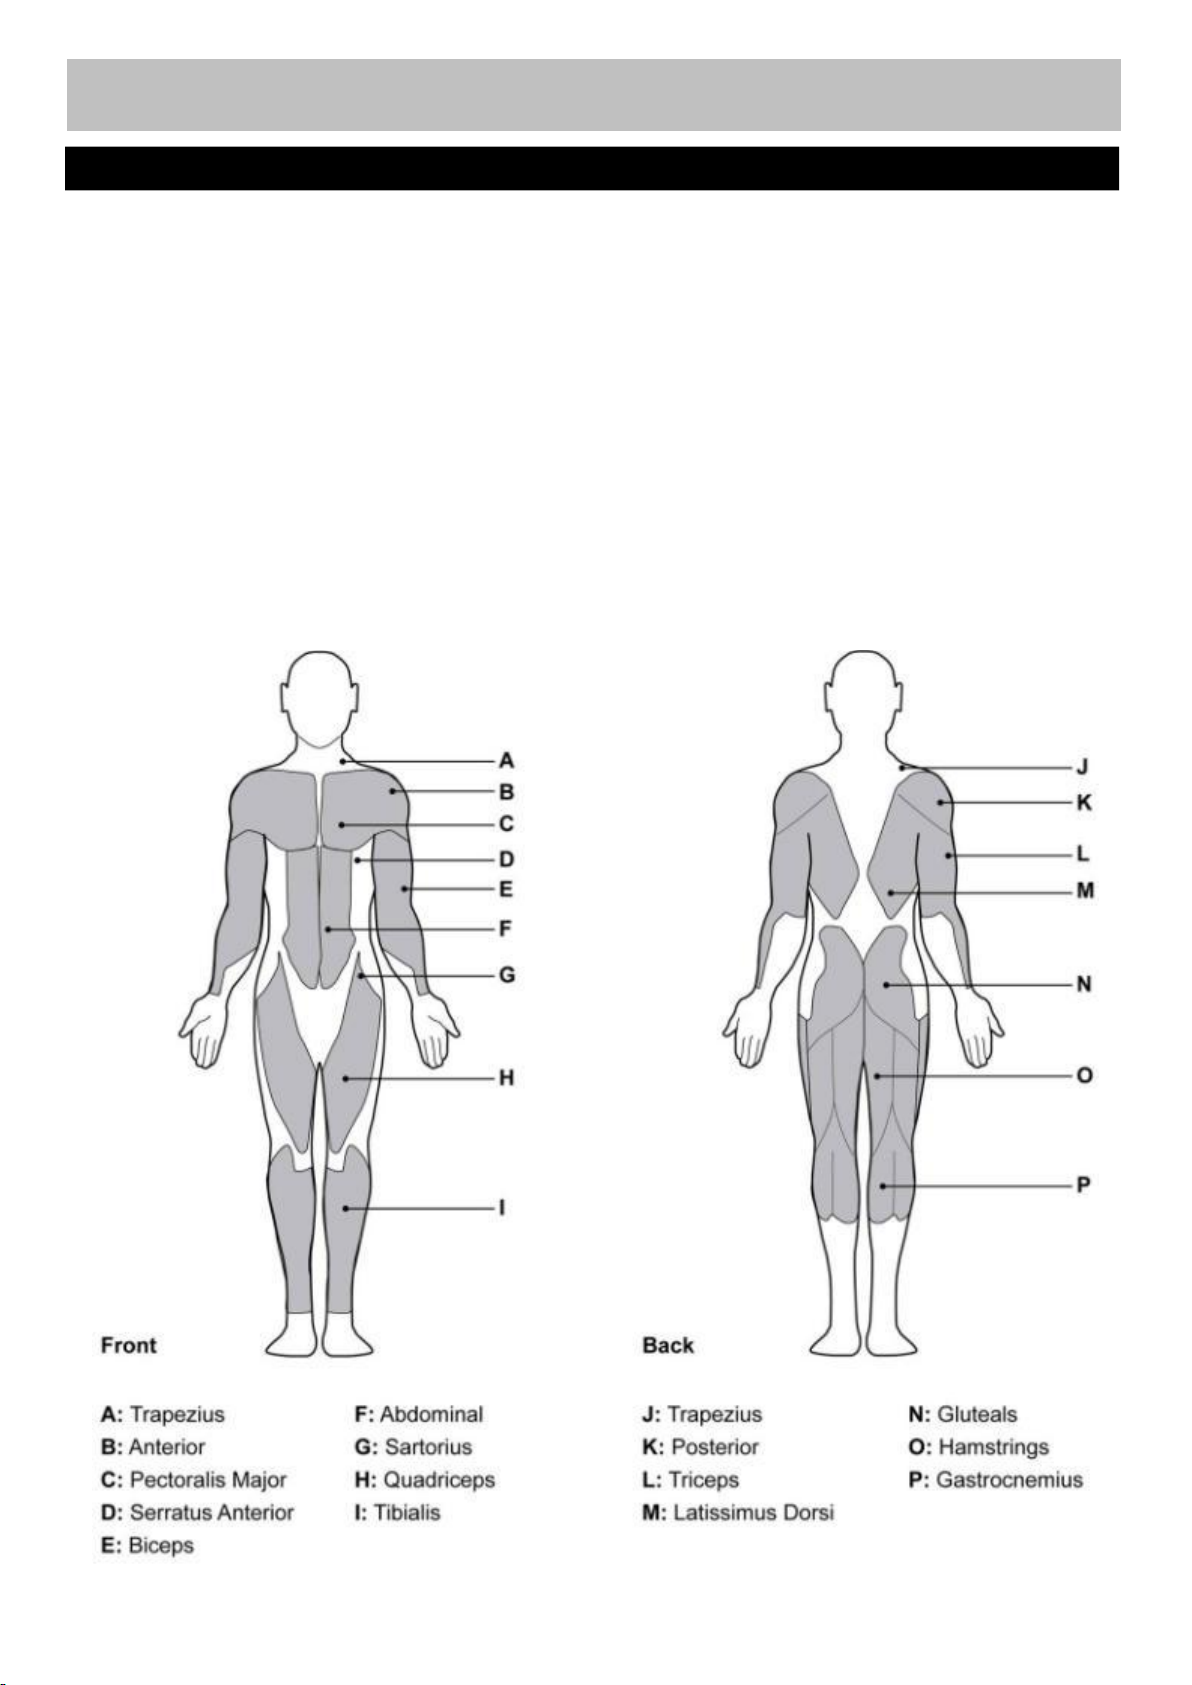
Targeted Muscle Groups
Muscle Chart
19
Exercising Information
exercise fitness is promoted by any activity that uses your large muscles (arms, legs, or buttock, for example).
Your heart beats quickly and you breathe deeply. An aerobic exercise should be part of your entire exercise
routine.
Along with aerobic exercising which helps get rid of and keep off the excess fat that our bodies can store,
weight training is an essential part of the exercise routine process. Weight training helps tone, build and
strengthen muscle. If you are working above your target zone, you may want to do a lesser amount of reps.
As always, consult your doctor before beginning any exercise program.
The exercise routine that is performed on the Pro Fitness Aerobic Cycle will develop the upper and lower
body muscle groups. These muscle groups are highlighted on the muscle chart below.
Page 21
Each workout should include the following three parts:
Exercise Frequency
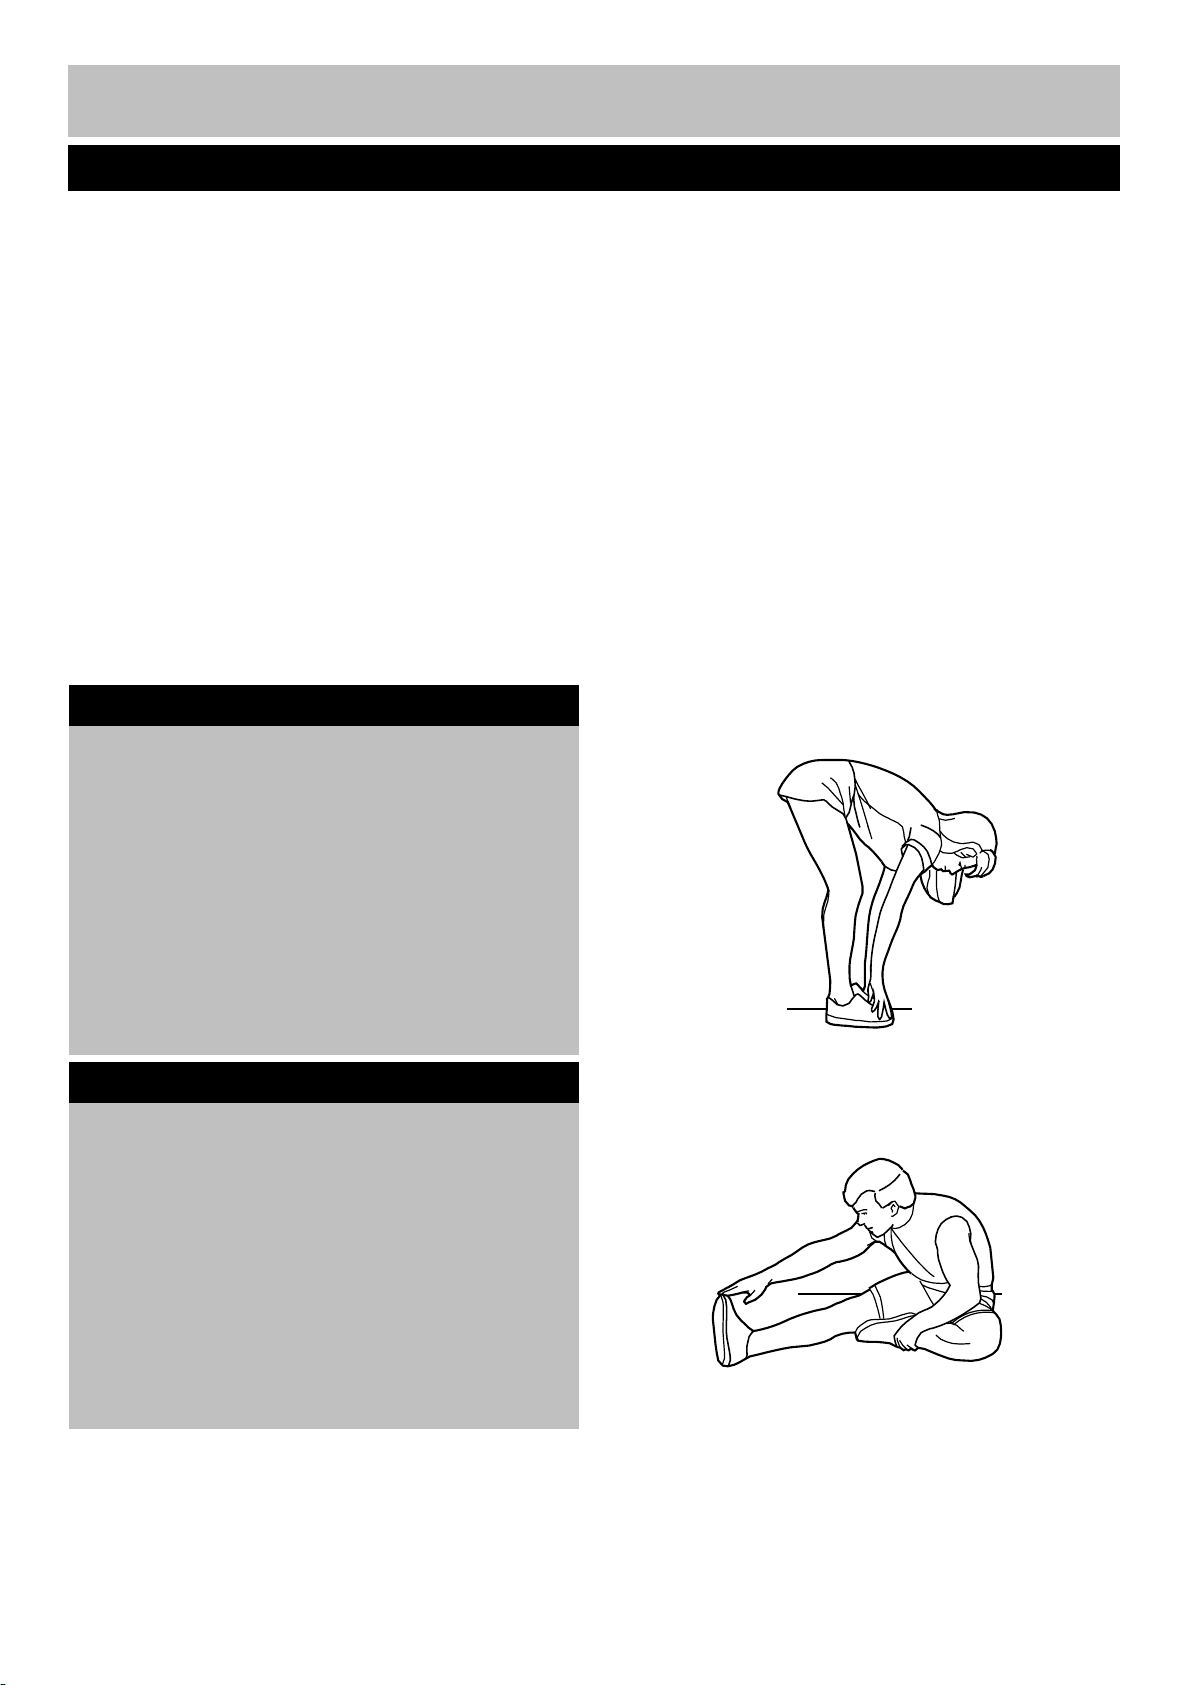
Toe touch stretch
Hamstring stretch
Warming up and Cooling down exercises
20
Exercising Information
leg.
1. A warm-up, consisting of 5 to 10 minutes of stretching and light exercise. A proper warm-up increases
your body temperature, heart rate, and circulation in preparation for exercise.
2. Training zone exercise, consisting of 20 to 30 minutes of exercising with your heart rate in your training
zone. (Note: During the first few weeks of your exercise program, do not keep your heart rate in your
training zone for longer than 20 minutes.)
3. A cool-down, with 5 to 10 minutes of stretching. This will increase the flexibility of your muscles and will help
to prevent post-exercise problems.
To maintain or improve your condition, plan three workouts each week, with at least one day of rest
between workouts. After a few months of regular exercise, you may complete up to five workouts each
week, if desired. Remember, the key to success is make exercise a regular and enjoyable part of your
everyday life.
Stand with your knees bent slightly and
slowly bend forward from your hips.
Allow your back and shoulders to relax
as you reach down toward your toes as
far as possible.
Hold for 15 counts, then relax
Repeat 3 times.
Stretches: Hamstrings, back of knees and back.
Sit with one leg extended. Bring the sole
of the opposite foot toward you and rest
it against the inner thigh of your
extended leg. Reach toward your toes
as far as possible.
Hold for 15 counts, then relax
Repeat 3 times for each
Stretches: Hamstrings, lower back and groin.
Page 22
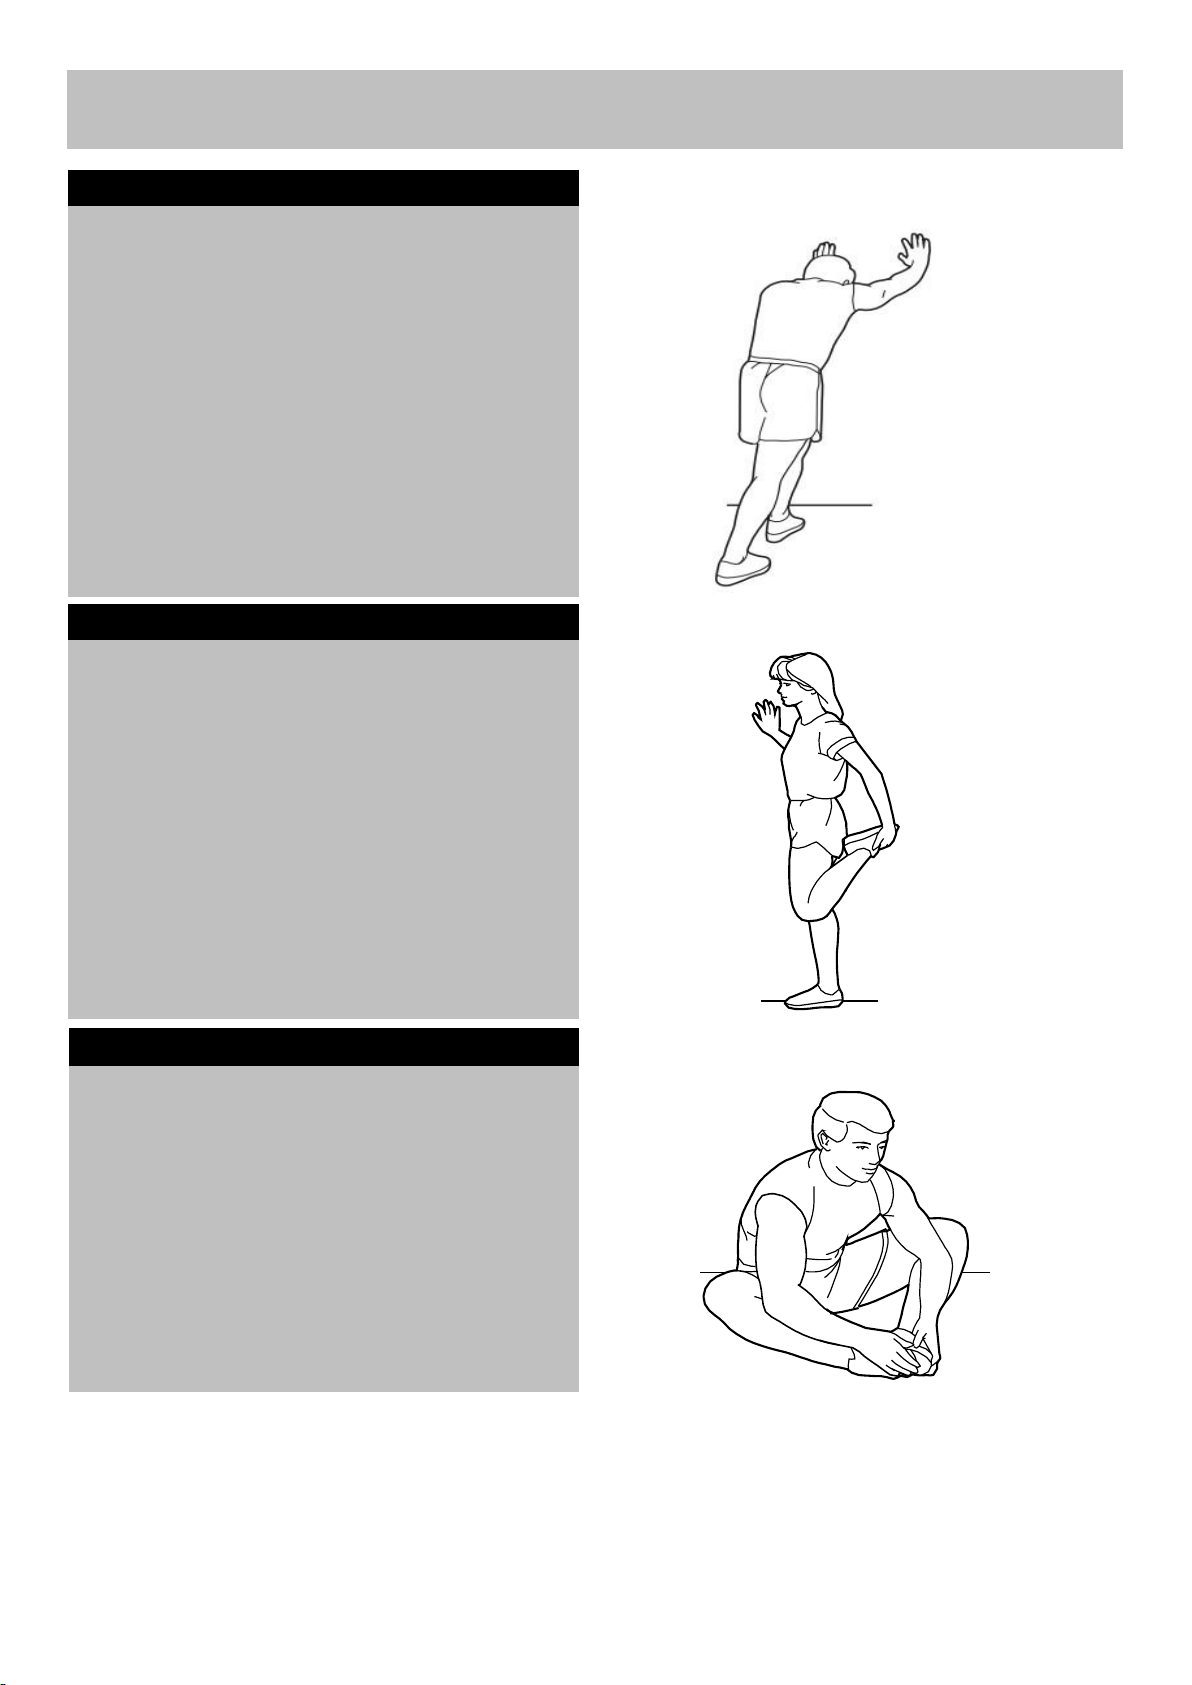
Inner thigh stretch
Calf/achilles stretch
With one leg in front of the other, reach
Quadriceps stretch
With one hand against the wall for
balance, reach back and grasp one foot
with your other hand. Keeping your bent
knee pointing directly downward towards
the floor, gentle pull your
heel towards your buttock until you feel a gentle
stretch in the target area.
Hold for 15 counts, then relax.
Repeat 3 times .
Stretches: Quadriceps and hip muscles.
Exercising Information
21
for each leg.
forward and place your hands against a wall.
Keep your back leg straight and your back
foot flat on the floor. Bend your front leg,
lean forward and move your hips toward the
wall.
Hold for 15 counts, then relax.
Repeat 3 times for each leg. To cause
further stretching of the achilles
tendons, bend your back leg as well.
Stretches: Calves, achilles tendons and ankles.
Sit with the soles of your feet together
and your knees outward. Pull your feet
toward your groin area as far as possible.
Hold for 15 counts, relax.
Repeat 3 times.
Stretches: Quadriceps and hip muscles.
Page 23
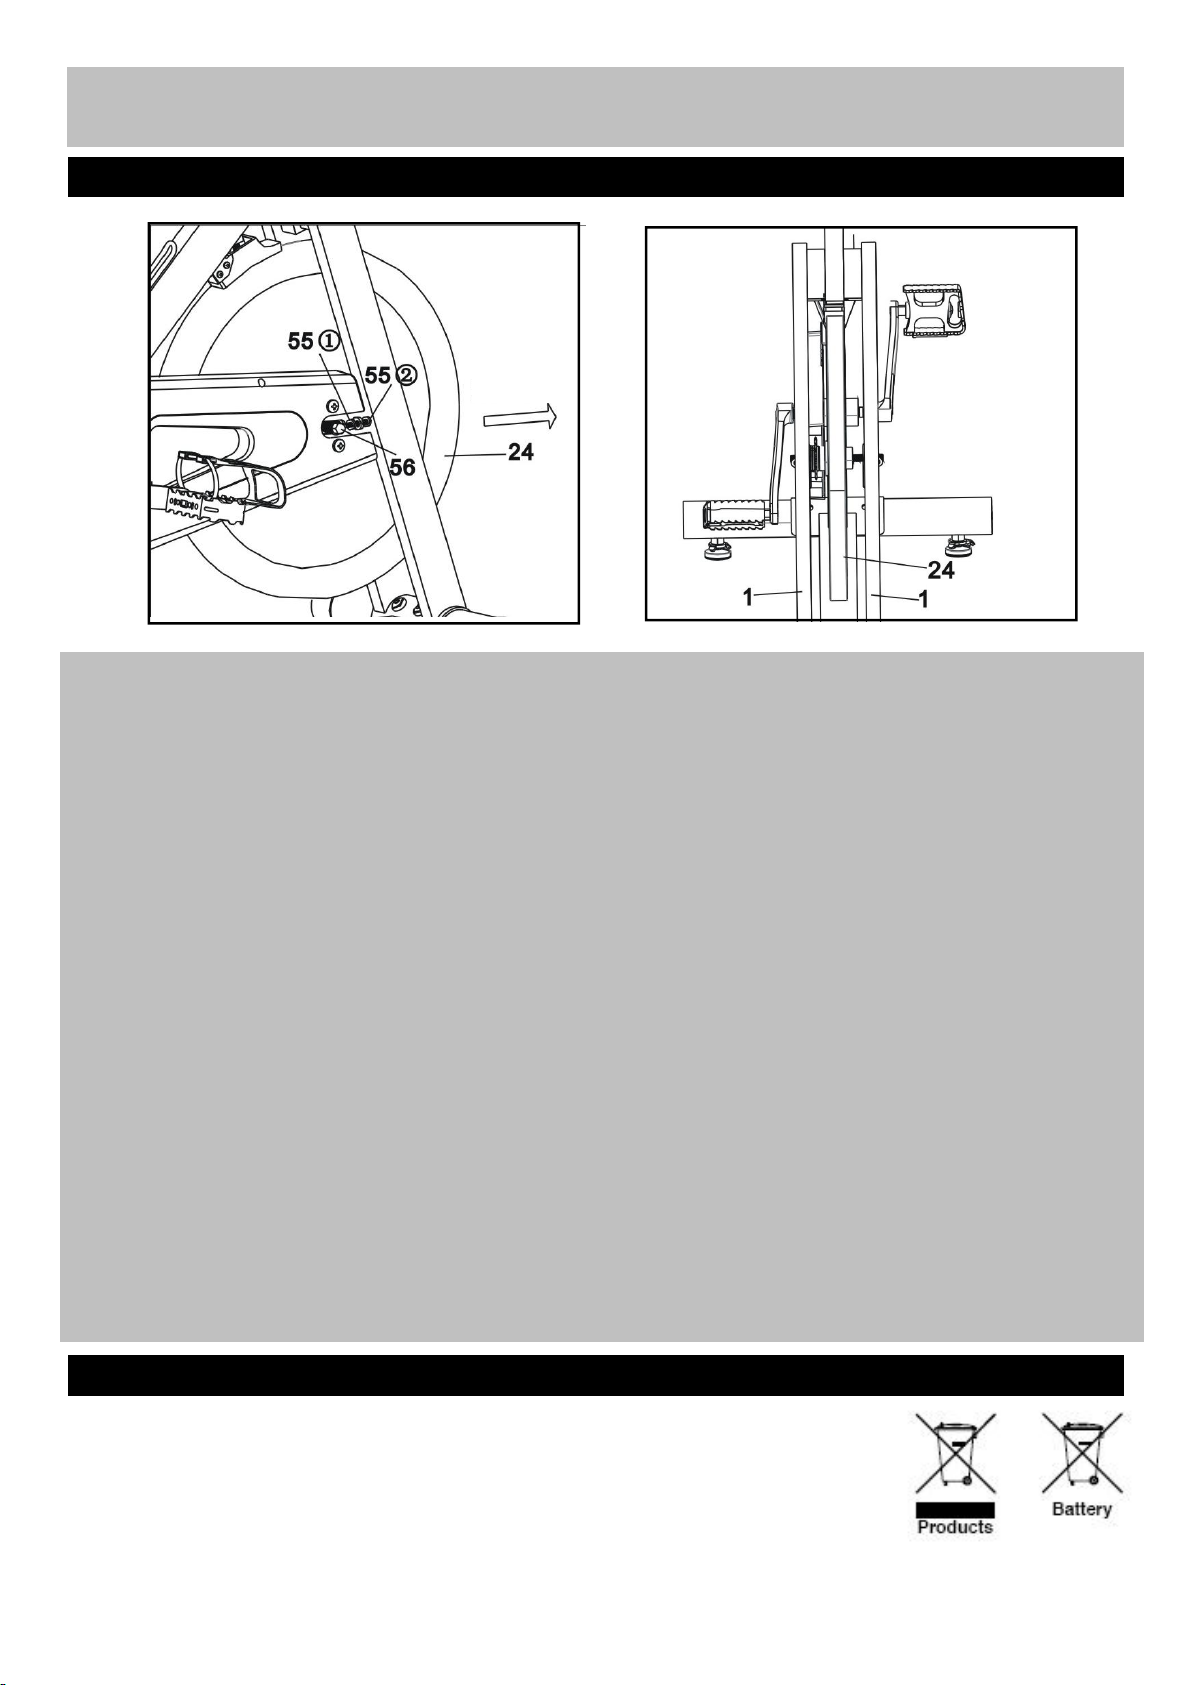
Please adjust the tensioning of the chain after 8-10 months.
2. Examine the equipment
periodically in order to detect
any damage or wear which
may have been produced.
3. Lubricate moving parts with
light oil periodically to prevent
premature wear.
4.
Inspect and tighten all parts
before using the equipment,
replace any defective parts
immediately, and do not use
the equipment again until it is
in perfect working order.
5. The equipment can be
cleaned using a damp cloth
and mild non-abrasive
detergent. Do not use
solvents.
6. Do not attempt to repair
this equipment yourself. Should
you have any difficulty with
assembly, operation or use of
your exercise product or if you
think that you may have parts
missing, contact the
manufacturer, their approved
service agent.
Guarantee:
For guarantee purposes,
please retain your
purchase receipt.
Information for Users on Disposal of old Equipment and Batteries (European Union only)
These symbols indicate that equipment with these
symbols should not be disposed of as general
household waste. If you want to dispose of the product
or battery, please consider the collection systems or
facilities for appropriate recycling.
Notice: The sign Pb
below the symbol for
batteries indicates that
this battery contains
lead.
22
Care and Maintenance
1.
(1)As the diagram shown,loose the 56(M12 Dome Head Nut ),and tighten the 55①(M6 Hex Nut ) to
left side,be noted that adjust the two sides at the same time.
(2)Moving the 24(Fly Wheel ) forward as diagram shown,tighten the 55②(M6 Hex Nut) to left
side,preliminarily tighten the 55①(M6 Hex Nut )、55②(M6 Hex Nut ) according to the actual
situation,slowly adjust the 55①(M6 Hex Nut )、55②(M6 Hex Nut ) to make the 24(Fly Wheel ) center and
the cycle chain with a slight tighten status .
When the 24(Fly Wheel ) turns,it’s swinging to the left and right sides not too much and the noise from the
cycle chain not too much,(please be careful on this progress),then the adjustment is done.
(3)Tighten the 55②(M6 Hex Nut) to left side and 55①(M6 Hex Nut) to right side,then tighten 56(M12
Dome Head Nut),make this operation at the same time.
Page 24
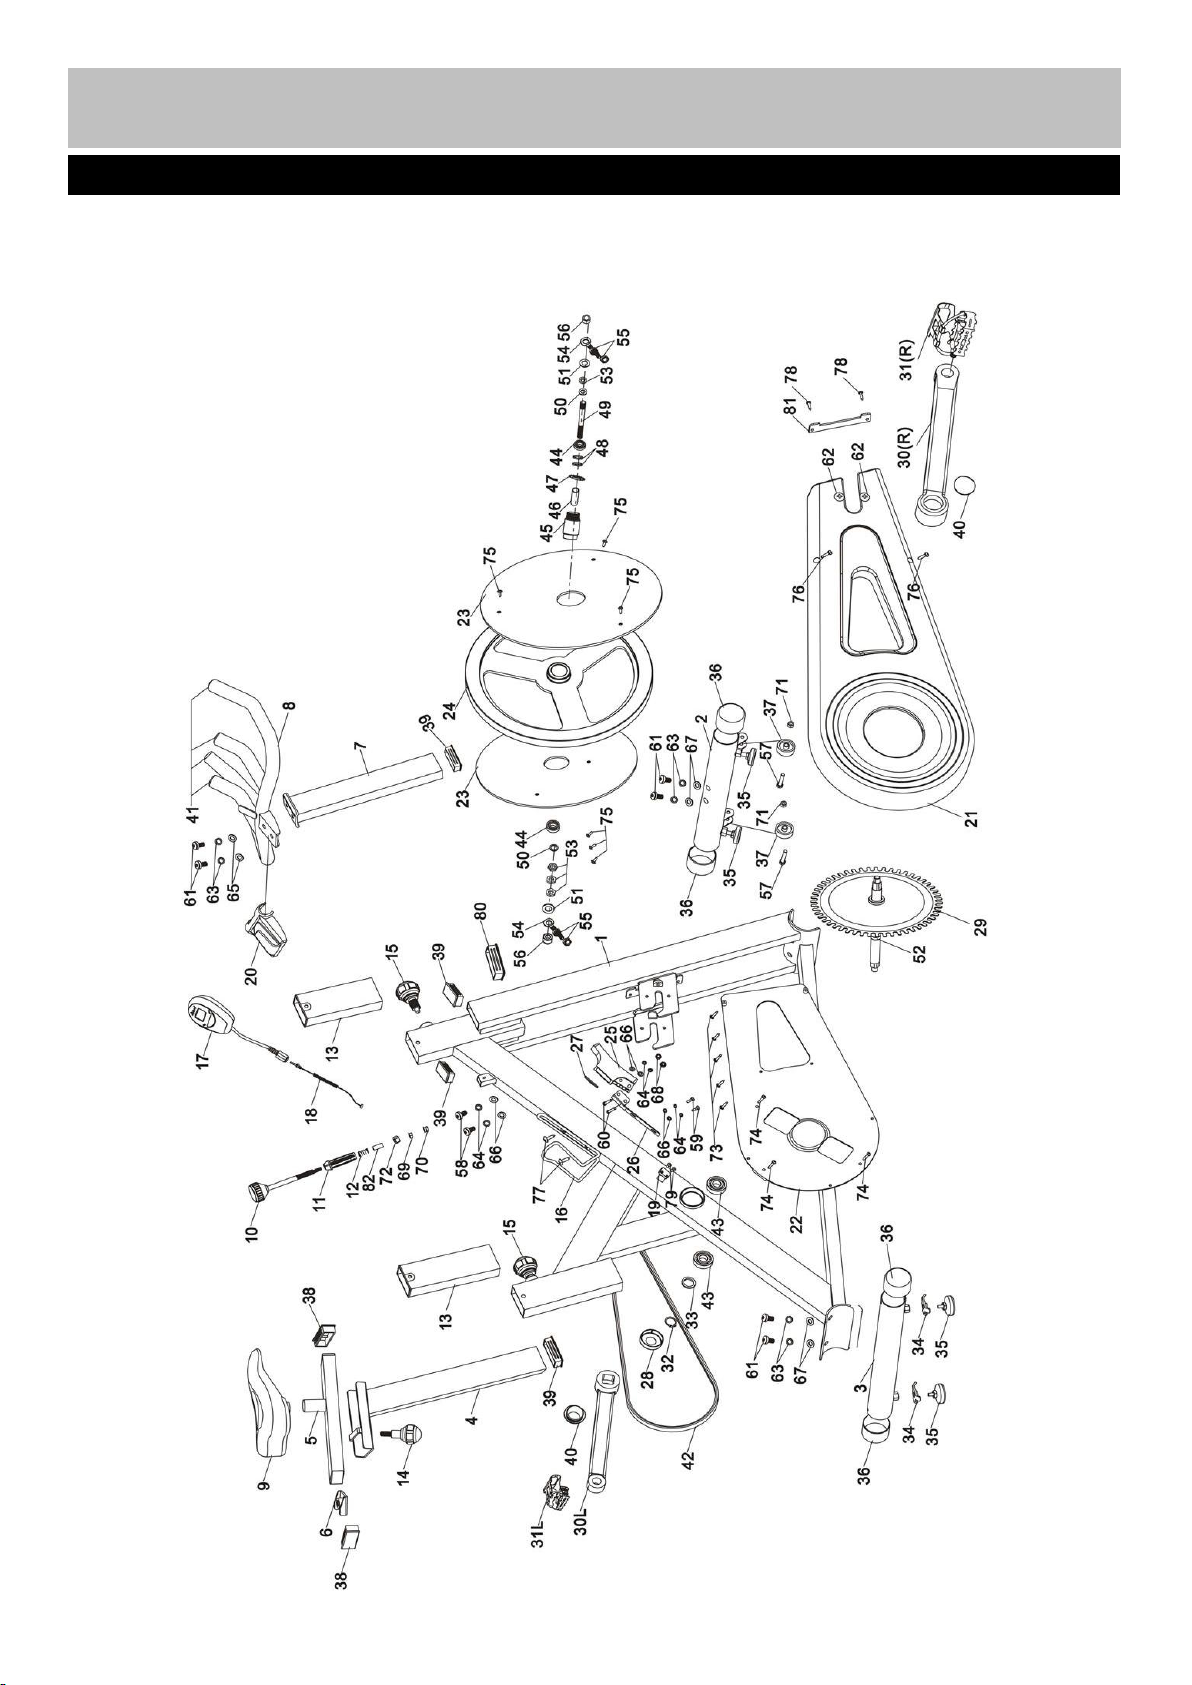
Exploded Parts Diagram
23
Page 25

Key No.
Description
QTY
Key No.
Description
QTY
1
Main Body
1
31
Pedal
1
2
Front Stabilizer
1
32
17mm Elastic Damping Ring
1
3
Rear Stabilizer
1
33
17mm Corrugated Gasket
1
4
Saddle Post
1
34
Level Foot Lock Bracket
2
5
Saddle Support Frame
1
35
Level Foot
4
6
Seat Lock Bracket
1
36
60mm End Cap
4
7
Handle Post
1
37
Transport Wheel
2
8
Handle138
40×20×1.5mm Flat End Cap
2
9
Saddle139
23.5×53.5×1.5mm Flat End Cap
4
10
Brake Knob
1
40
Crank Cover
2
11
Brake Sleeve
1
41
Φ25x2mm Cone End Cap
4
12
Brake Spring
1
42
Chain / 104Joints / Joint length
12.7mm
1
13
30×60×145mm Sleeve
2
43
6203 Bearing
2
14
M10 Knob
1
44
6001 Bearing
2
15
M16 Lock Knob
2
45
Axle Sleeve
1
16
Water Bottle Holder
1
46
Fly Wheel Sleeve
1
17
Console147
Gear wheel
1
18
Sensor Wire
1
48
42×5T×m33×1mm Lock Ring
2
19
Reed149
Fly Wheel Axle
1
20
Handle Cover
1
50
17×12.5×2mm Washer
2
21
Outer Chain Cover
1
51
20×12.5×5mm Washer
2
22
Inner Chain Cover
1
52
28mm Nylon Washer
1
23
Fly Wheel Cover
2
53
M12×1/5Tmm Pyramidal Face Hex
Nut
4
24
Fly Wheel
1
54
Tension Bolt
2
25
Brake155
M6 Hex Nut
4
26
Brake Holder
1
56
M12 Dome Head Nut
2
27
Bracket157
M8x40mm Hex Bolt
2
28
Bearing Block
1
58
M5x5mm Philips Bolt
2
29
Chain Wheel Assembly
1
59
M5x10mm Philips Bolt
2
30
Crank160
M5x30mm Philips Bolt
2
Exploded Parts List
24
Page 26

Key
No.
Description
QTY
Key
No.
Description
QTY
61
M10x20mm Allen Bolt
6
72
Brake Square Nut
1
62
M6x10mm Philips Bolt
2
73
ST4.2×15mmSelf Tighten Philips Screw
5
63
10mm Spring Washer
6
74
ST4.2×20mm Philips Screw
3
64
5mm Spring Washer
6
75
ST4.2×12mm Philips Screw
6
65
10mm Washer
2
76
ST4.2×20mm Philips Screw
2
66
5mm Washer
6
77
ST4.2×15mm Philips Screw
2
67
10×R33mm Arc Washer
4
78
ST4.2×12mm Self Tighten Philips Screw
2
68
M5 Aircraft Nut
2
79
ST2.9×20mm Self Tighten Philips Screw
2
69
M6 Hex Nut
1
80
60×30×1.5mm Flat End Cap
1
70
M6 Aircraft Nut
1
81
Chain Cover
1
71
M8 Aircraft Nut
2
82
Brake Casing
1
Exploded Parts List
25
 Loading...