

Page 1

®
REd Dot Scope
Viper
®
red dot
Page 2
VIPER RED DOT
2 3
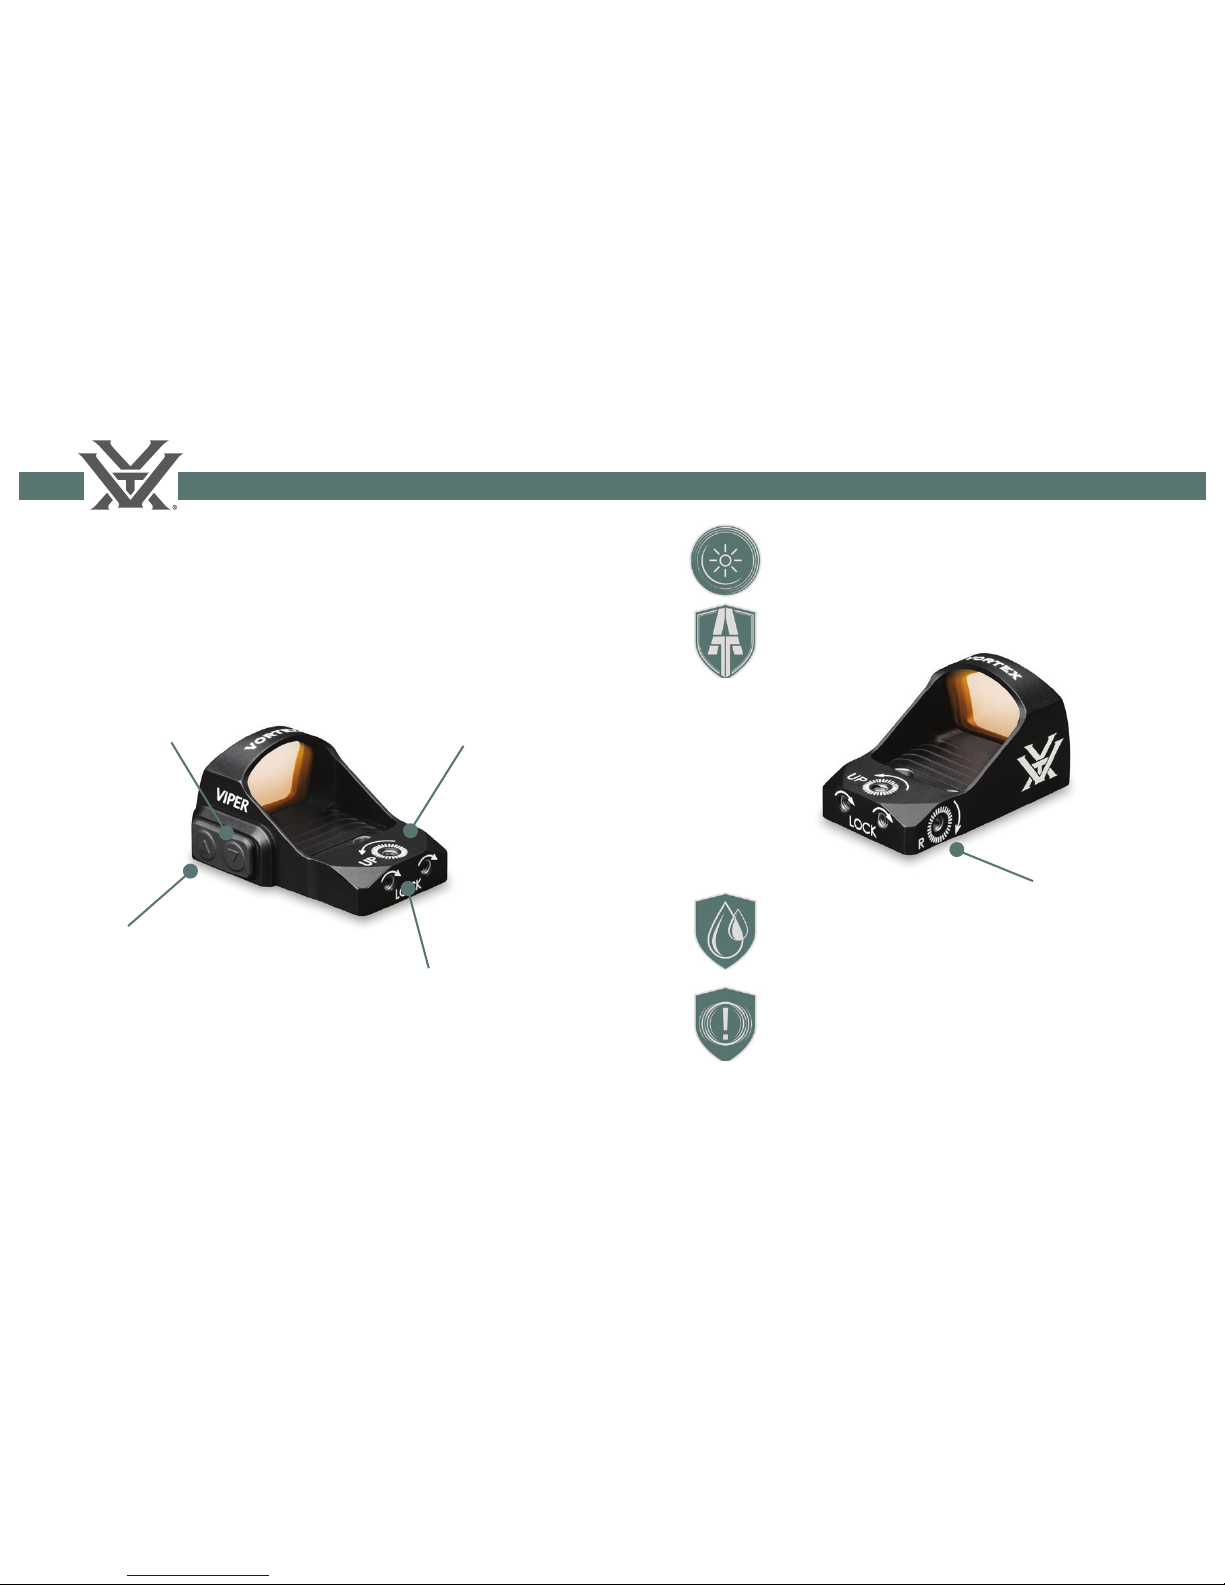
The Viper® Red Dot combines speed and simplicity
in a tiny, powerful package. The 6 MOA dot
diameter gets you on target fast.
Down Arrow
Power On/Off
Decrease Brightness
Elevation
Adjustment
Dial
Windage and Elevation
Adjustment Lock Screws
1
Up Arrow
Power On
Increase Brightness
Windage
Adjustment
Dial
Anti-reflective lens coating on lens
surface for brighter views
ArmorTek® protects exterior lens from
scratches, oil, and dirt.
O-ring sealed for waterproof
performance.
Shockproof construction withstands
impact.
Page 3

VIPER RED DOT
4 5
Protective Cover
Protective Cover
Remove cover when using or adjusting Viper red dot.
Please note that installing the cover does NOT shut
the Viper off.
Battery
To install, place the battery in the circular slot with
numbers facing outward. Attach the body to the
base using the two attachment screws.
2 3
Battery Compartment
CR 2032
Battery
Base
Page 4

VIPER RED DOT
6 7
The Viper features adjustable elevation and windage
dials with 1 MOA marks.
Note: The adjustments are protected by lock screws
which must be loosened with the
small screwdriver before any
adjustments are made.
Windage and Elevation Adjustment
To turn the Viper on, press either the up or down
arrow. To turn off, press and hold the down arrow for
five seconds.
Powering Up
Adjust the illumination instensity using the
appropriate arrow button:
Brightness Adjustments
4 5
Power Off
Press and hold
the down arrow.
Power On
Press the up or
down arrow.
• Tap the up arrow to increase brightness.
• Tap the down arrow to decrease brightness.
To adjust the elevation and windage settings:
1. Loosen the Adjustment Lock Screws 1½ turns.
2. Adjust dials up or down or left or right as
indicated by arrows.
3. Re-tighten lock screws after making adjustments.
Lock Screws
Elevation Dial
Windage Dial
One dial mark yields one MOA of adjustment.
One MOA = 1.05 inches @100 yards.
Page 5

VIPER RED DOT
8 9
MOUNTING THE VIPER
In addition to the supplied low rail mount, an
optional riser mount places the Viper red dot at
correct height for AR-15 rifl es.
Mounting Options
6 7
The Viper red dot is shipped from the factory with
a low rail mount that clamps to both a Weaver or
Picatinny rail.
Note: If your fi rearm is
not already equipped
with a base rail, it may
be purchased from many
fi rearms dealers.
1. Attach the low rail
mount to the Viper using
the included screws.
2. Attach the Viper to the
Picatinny base rail, making
sure the recoil lug is solidly
seated in the base groove.
3. Check to see that the clamp is fully down and
hooked around the outside of the base.
4. Press the Viper down and forward toward
the muzzle and, using the supplied hex wrench,
fi rmly tighten down the clamp screw.
Check www.vortexoptics.com for other mount options.
Page 6

VIPER RED DOT
10 11
Sighting in
After mounting, an initial sight-in of the Viper red
dot at 25 yards will be helpful. Final sight-in should
be done at the desired distance (typically 25-50
yards).
1. Be sure the windage and elevation lock screws
are tight before firing. Fire a three-shot group as
precisely as possible at 25 yards.
• Loosen the Windage and Elevation Adjustment
Lock Screws before adjusting.
• Using the center of the three-shot group as a
reference, make the necessary adjustments for
windage and elevation correction. Using arrows
for reference, adjust dials in the direction you
wish the group to move. At 25 yards, each dial
mark will yield about ¼ inch of adjustment.
• Re-tighten the lock screws.
2. Fire a three-shot group at final preferred sight-in
distance (25-50 yards).
• Loosen windage and elevation lock screws
before adjusting.
• Using the center of the three-shot group as
a reference, make necessary adjustments for
windage and elevation correction. Using arrows
for reference, adjust dials in the direction you
wish the group to move. At 50 yards, each dial
mark will yield about ½ inch of adjustment.
• After achieving satisfactory zero, re-tighten
lock screws.
3. Fire a final three-shot group to confirm proper
adjustment. Repeat as necessary.
• Confirm that all mounting screws and lock
screws are snug and tight.
8 9
Page 7

VIPER RED DOT
12 13
Maintenance
The Viper red dot will require very little routine
maintenance other than periodically cleaning the
exterior lenses. If desired, the exterior lens may be
cleaned by wiping with a soft, dry cloth.
When cleaning the lenses, be sure to use products
that are specifically designed for use on coated
optical lenses such as the Vortex Lens Pen and
FogFree Cleaning Kits.
• Be sure to blow away any dust or grit on the lens
prior to wiping the surface.
• Using your breath, or a very small amount of
water or pure alcohol, can help remove stubborn
things like dried water spots.
Cleaning
If the red dot does not illuminate, please check the
following before returning the red dot for service:
• Is the battery oriented correctly? Be sure the
battery is installed with the + side facing upwards.
• Is the battery dead? If so, replace the battery.
Troubleshooting
10 11
Page 8

VIPER RED DOT
14 15
Dual Use: Shooting Tactical / Hunting
12
VIP Warranty
Vortex Optics
2120 West Greenview Drive
Middleton, WI 53562
service@vortexoptics.com
We build optics based on our commitment to your
absolute satisfaction. That’s why Vortex products are
unconditionally guaranteed and we make this Very
Important Promise to you—a Very Important Person.
Rest assured that in the event your optic becomes
damaged or defective, Vortex Optics will repair or
replace it at no charge to you. If we cannot repair
your riflescope, we will replace it with a riflescope in
perfect working order and in equal or better physical
condition. Call Vortex Optics at 800-426-0048 for
prompt, professional, and friendly service.
Visit www.vortexoptics.com for more information.
Canadian customers may visit www.vortexcanada.net
for customer service information.
Note: The VIP Warranty does not cover loss, theft,
deliberate damage, or cosmetic damage that does
not hinder the performance of the product.
Page 9

®
REd Dot Scope
© Vortex Optics USA
Manual #VRD-RD-15A
 Loading...