

Page 1

Application Note
Polycom Installed
Voice Business Group
September 2004
Rev. F
Interfacing to the SoundStation VTX 1000TM
®
with Vortex
Devices
Page 2

TABLE OF CONTENTS
TABLE OF CONTENTS......................................................................................................................... 2
INTRODUCTION................................................................................................................................... 6
SUMMARY............................................................................................................................................ 7
SYSTEM OVERVIEW ........................................................................................................................... 8
Voice (Narrowband and Wideband) ..............................................................................................................................8
Voice (Narrowband and Wideband) and Video.............................................................................................................9
Narrowband Voice via Vortex Hybrid and Wideband Voice through SoundStation VTX 1000 ..................................10
SYSTEM SETUP DIRECTIONS......................................................................................................... 11
1.) CONNECTING A MICROPHONE TO A VORTEX DEVICE........................................................ 12
Overview Drawing ........................................................................................................................................ 12
Physical Connections .................................................................................................................................... 13
Using Wired Microphones ............................................................................................................................ 13
Using Wireless Microphones ....................................................................................................................... 14
2.) CONNECTING A LOUDSPEAKER TO A VORTEX DEVICE ...................................................... 15
External Amplifier ......................................................................................................................................... 16
External Amplifier Inputs.............................................................................................................................................16
Internal Amplifier Overview Drawing ........................................................................................................... 17
3.) CONNECTING THE SOUNDSTATION VTX 1000 TO A VORTEX DEVICE ............................. 18
Wiring ........................................................................................................................................................... 18
Input to Interface Module from Output of Vortex device............................................................................................19
Output of Interface Module to Input of Vortex device................................................................................................19
4.) CONNECTING A SUBWOOFER TO A VORTEX DEVICE.......................................................... 19
Wiring ........................................................................................................................................................... 20
5.) CONNECTING THE TELEPHONE LINE TO THE SOUNDSTATION VTX 1000 AND A VORTEX
DEVICE
................................................................................................................................................. 20
6.) VERIFYING THE PROPER FIRMWARE IN THE SOUNDSTATION VTX 1000 AND THE VORTEX
DEVICE
................................................................................................................................................. 22
7.) CONFIGURING THE SOUNDSTATION VTX 1000..................................................................... 22
2
Page 3

8.) CONNECTING OTHER SOURCES TO A VORTEX DEVICE ...................................................... 25
Vortex Input Wiring....................................................................................................................................... 25
Balanced Input.............................................................................................................................................................25
Unbalanced Input.........................................................................................................................................................25
Vortex Output Wiring.................................................................................................................................... 26
Balanced Input.............................................................................................................................................................26
Unbalanced Input.........................................................................................................................................................26
9.) SETTING THE GAIN OF THE VORTEX DEVICE......................................................................... 26
Microphone Levels........................................................................................................................................ 27
Gain Structure for External Amplifiers and Other Sources........................................................................... 27
10.) ENABLE VTX MODE IN THE VORTEX DEVICE....................................................................... 28
11.) MAKING A TEST CALL WITH SOUNDSTATION VTX 1000.................................................. 30
VORTEX EF2280 EXAMPLES ............................................................................................................ 31
8 Mics, 4 Loudspeakers ................................................................................................................................32
Introduction / Room Layout.........................................................................................................................................32
System Layout .............................................................................................................................................................34
Conference Composer Layout......................................................................................................................................36
Mic/Line Inputs ............................................................................................................................................................................36
Matrix Mixer.................................................................................................................................................................................37
Output Filters................................................................................................................................................................................ 38
Outputs.........................................................................................................................................................................................40
Presets.......................................................................................................................................................................................... 41
12 Mics, 8 Loudspeakers, 4 Zones Sound Reinforcement............................................................................ 42
Introduction / Room Layout.........................................................................................................................................43
System Layout .............................................................................................................................................................45
Conference Composer Layout Vortex EF2241 .............................................................................................................47
Options .........................................................................................................................................................................................47
Mic/Line Inputs ............................................................................................................................................................................47
Automixer .....................................................................................................................................................................................48
EFBus ............................................................................................................................................................................................49
Matrix Mixer.................................................................................................................................................................................51
Output Filters................................................................................................................................................................................ 53
Outputs.........................................................................................................................................................................................53
Presets.......................................................................................................................................................................................... 54
Conference Composer Layout Vortex EF2280 .............................................................................................................55
Automixer .....................................................................................................................................................................................56
EFBus ............................................................................................................................................................................................56
Matrix Mixer.................................................................................................................................................................................57
Output Filters................................................................................................................................................................................ 60
3
Page 4

Presets.......................................................................................................................................................................................... 61
16 Mics, 8 Loudspeakers, 2 Zones Sound Reinforcement............................................................................ 62
Introduction / Room Layout.........................................................................................................................................62
System Layout .............................................................................................................................................................64
Conference Composer Layout Vortex EF2280 ID 00....................................................................................................66
Mic/Line Inputs ............................................................................................................................................................................66
Automixer .....................................................................................................................................................................................67
EFBus ............................................................................................................................................................................................67
Matrix Mixer.................................................................................................................................................................................69
Output Filters................................................................................................................................................................................ 72
Outputs.........................................................................................................................................................................................74
Presets.......................................................................................................................................................................................... 75
Conference Composer Layout Vortex EF2280 ID 01....................................................................................................75
Automixer .....................................................................................................................................................................................76
Matrix Mixer.................................................................................................................................................................................76
Presets.......................................................................................................................................................................................... 77
Conference Composer Layout Vortex EF2201 .............................................................................................................78
Options .........................................................................................................................................................................................79
EFBus ............................................................................................................................................................................................79
Matrix Mixer.................................................................................................................................................................................81
Presets.......................................................................................................................................................................................... 82
VORTEX EF2241 EXAMPLES ............................................................................................................ 84
12 Mics, 8 Loudspeakers, 4 Zones Sound Reinforcement............................................................................ 84
4 Mics, 2 Loudspeakers ................................................................................................................................84
Introduction / Room Layout.........................................................................................................................................84
System Layout .............................................................................................................................................................86
Conference Composer Layout......................................................................................................................................88
Options .........................................................................................................................................................................................88
Mic/Line Inputs ............................................................................................................................................................................89
Matrix Mixer.................................................................................................................................................................................89
Output Filters................................................................................................................................................................................ 90
Outputs.........................................................................................................................................................................................92
Presets.......................................................................................................................................................................................... 93
APPENDIX A: INTERFACE MODULE ............................................................................................. 94
Overview ....................................................................................................................................................... 95
Wiring Recommendations / Limitations ....................................................................................................... 95
APPENDIX B: SOUNDSTATION VTX 1000 USER CONTROLS / LCD LAYOUT ........................ 98
APPENDIX C: VORTEX INPUT WIRING ........................................................................................ 99
Cable Drawing 1: Wired Microphone Connection .....................................................................................................99
Cable Drawing 2: Balanced Output to Vortex Input Connection................................................................................99
4
Page 5

Cable Drawing 3: Unbalanced Output to Vortex Input Connection............................................................................99
APPENDIX D: VORTEX OUTPUT WIRING .................................................................................. 100
Cable Drawing 1: Vortex Output to Balanced Input.................................................................................................100
Cable Drawing 2: Vortex Output to Unbalanced Input.............................................................................................100
APPENDIX E: VORTEX INTERNAL AMPLIFIER WIRING.......................................................... 101
Two 8 ohm Loudspeakers Connected in Parallel ........................................................................................ 101
Three 8 ohm Loudspeakers Connected in Parallel...................................................................................... 102
TECHNICAL SUPPORT.................................................................................................................... 103
5
Page 6

INTRODUCTION
TM
This application note explores how to configure the SoundStation VTX 1000
a Vortex• EF2280, EF2241, EF2210, or EF2211 device. The SoundStation VTX 1000 is the first voice
conferencing phone to offer wideband capability over the public switched telephone network. The
SoundStation VTX 1000 is capable of sending up to 7 kHz signal over a telephone line. The SoundStation
VTX 1000 also has one input and one output that allows for the SoundStation VTX 1000 to be connected to
a Vortex device such as the Vortex EF2280, EF2241, EF2210, or EF2211.
This application note only applies to the SoundStation VTX 1000 and the Vortex product
line. You cannot interface a Vortex device to any other non-SoundStation VTX product
such as the SoundStation
In order for the SoundStation VTX 1000 to work correctly with Vortex devices, the firmware
must be upgraded to Version 1.22 (August 26, 2003) or higher. Please refer to the
SoundStation VTX 1000 User's Guide / Administrator's Guide for the proper instructions.
Also, the Vortex device firmware must be 2.5.0 or higher.
•
EX , SoundStation Premier •, or VoiceStation
to send and receive audio to
TM
100.
6
Page 7

SUMMARY
If you are already familiar with Vortex devices, you may not need to read the entire application note. Here
is a quick overview of the entire process:
1. Connect the microphones to the Vortex device(s). Make sure phantom power is enabled for
microphones that require it. For wireless microphones, phantom power is not needed.
2. Connect the loudspeakers to the Vortex device(s). If you are connecting non-70V loudspeakers
directly to the amplifier output of the Vortex EF2241, EF2210, or EF2211, make sure that the total
load of the loudspeakers is between 4 and 8 ohms. You may also use an external amplifier to
power the loudspeakers via an output of a Vortex device.
3. Connect the SoundStation VTX 1000 phone to a Vortex device. Connect the Auxiliary Output of the
SoundStation VTX 1000 Interface Module to a line level input. Connect an output of the Vortex
device to the Auxiliary Input of the Interface Module.
4. Connect the Subwoofer to the Vortex device. Use an output of the Vortex device to connect to the
Subwoofer. This is optional.
5. Connect the Telephone line to the SoundStation VTX 1000 and Vortex device. If you have a Vortex
EF2241, EF2201, or EF2211 and would like to make narrowband calls through the Vortex device,
connect the telephone wall jack to the L
telephone jack of the SoundStation VTX 1000.
6. Verify the Proper Firmware in both the SoundStation VTX and Vortex device. The SoundStation VTX
1000 firmware should be at least 1.22 or higher. The Vortex device firmware should be at least
2.5.0.
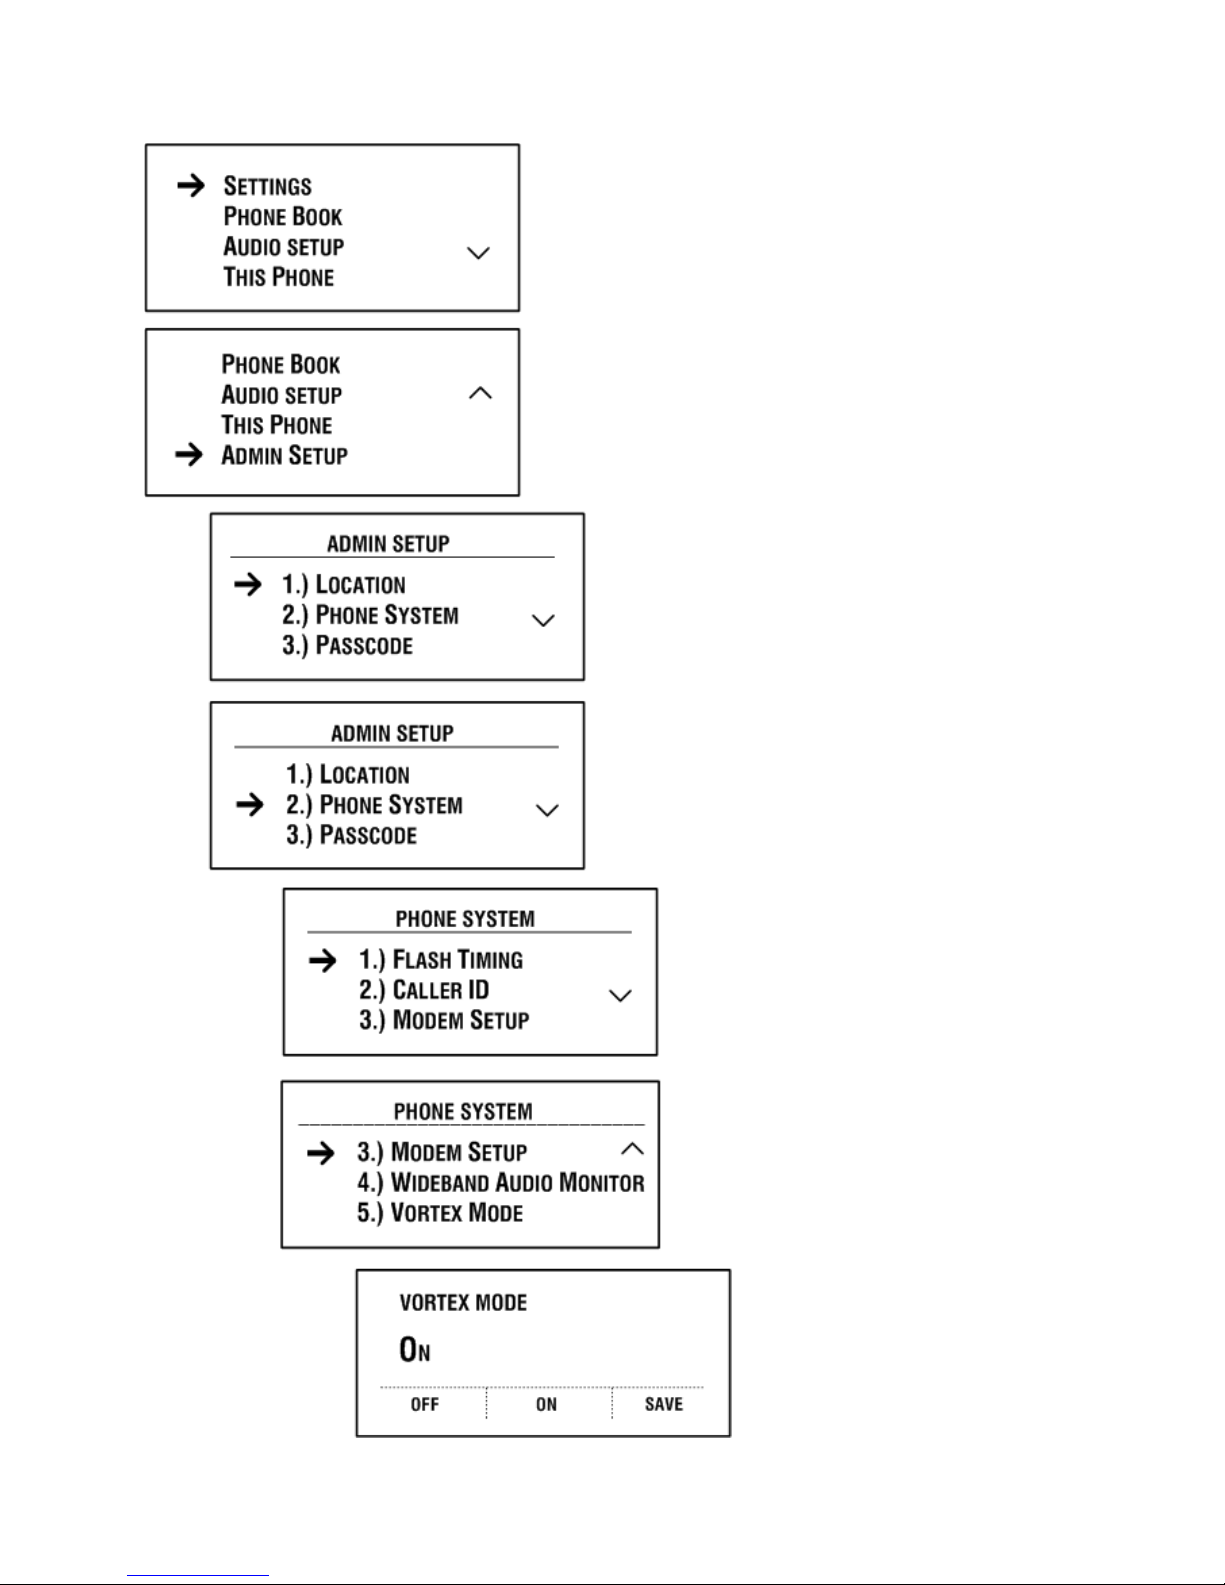
7. Configure Vortex Mode in the SoundStation VTX 1000. Press the M
SETUP. Once you are in the ADMIN SETUP sub-menu, select PHONE SYSTEM and then select VORTEX
MODE.. To enable the VORTEX MODE, select ON and then select SAVE.
8. Connect any other sources to the Vortex device(s). These sources would include video codecs,
recorders, CD players, and DVD players.
9. Set the gain of all input and output sources that are connected to the Vortex device(s) based upon
the nominal send and receive levels of the Vortex device(s). Unbalanced sources need an input
gain of +10 dB and an output gain of -10 dB.
10. Enable the VTX Mode in the Vortex device. Go to the O
click the VTX Mode button on the output of the Vortex device that is connected to the SoundStation
VTX 1000. Enable the VTX Mode on the I
the Polycom Instant
Designer
TM
(included with Conference Composer) to create a configuration file
that configures the VTX Mode on the inputs and outputs when the file is uploaded to the Vortex
device. For more information, see the Polycom InstantDesigner application note.
11. Make a test call via the SoundStation VTX 1000.
INE jack of the Vortex device. Connect the PHONE jack to the
ENU key and the select ADMIN
UTPUTS page of Conference Composer
NPUTS page of Conference Composer. You can also use
TM
and
7
Page 8
SYSTEM OVERVIEW
Below are three system examples that illustrate the signal flow between a Vortex device and a
SoundStation VTX 1000.
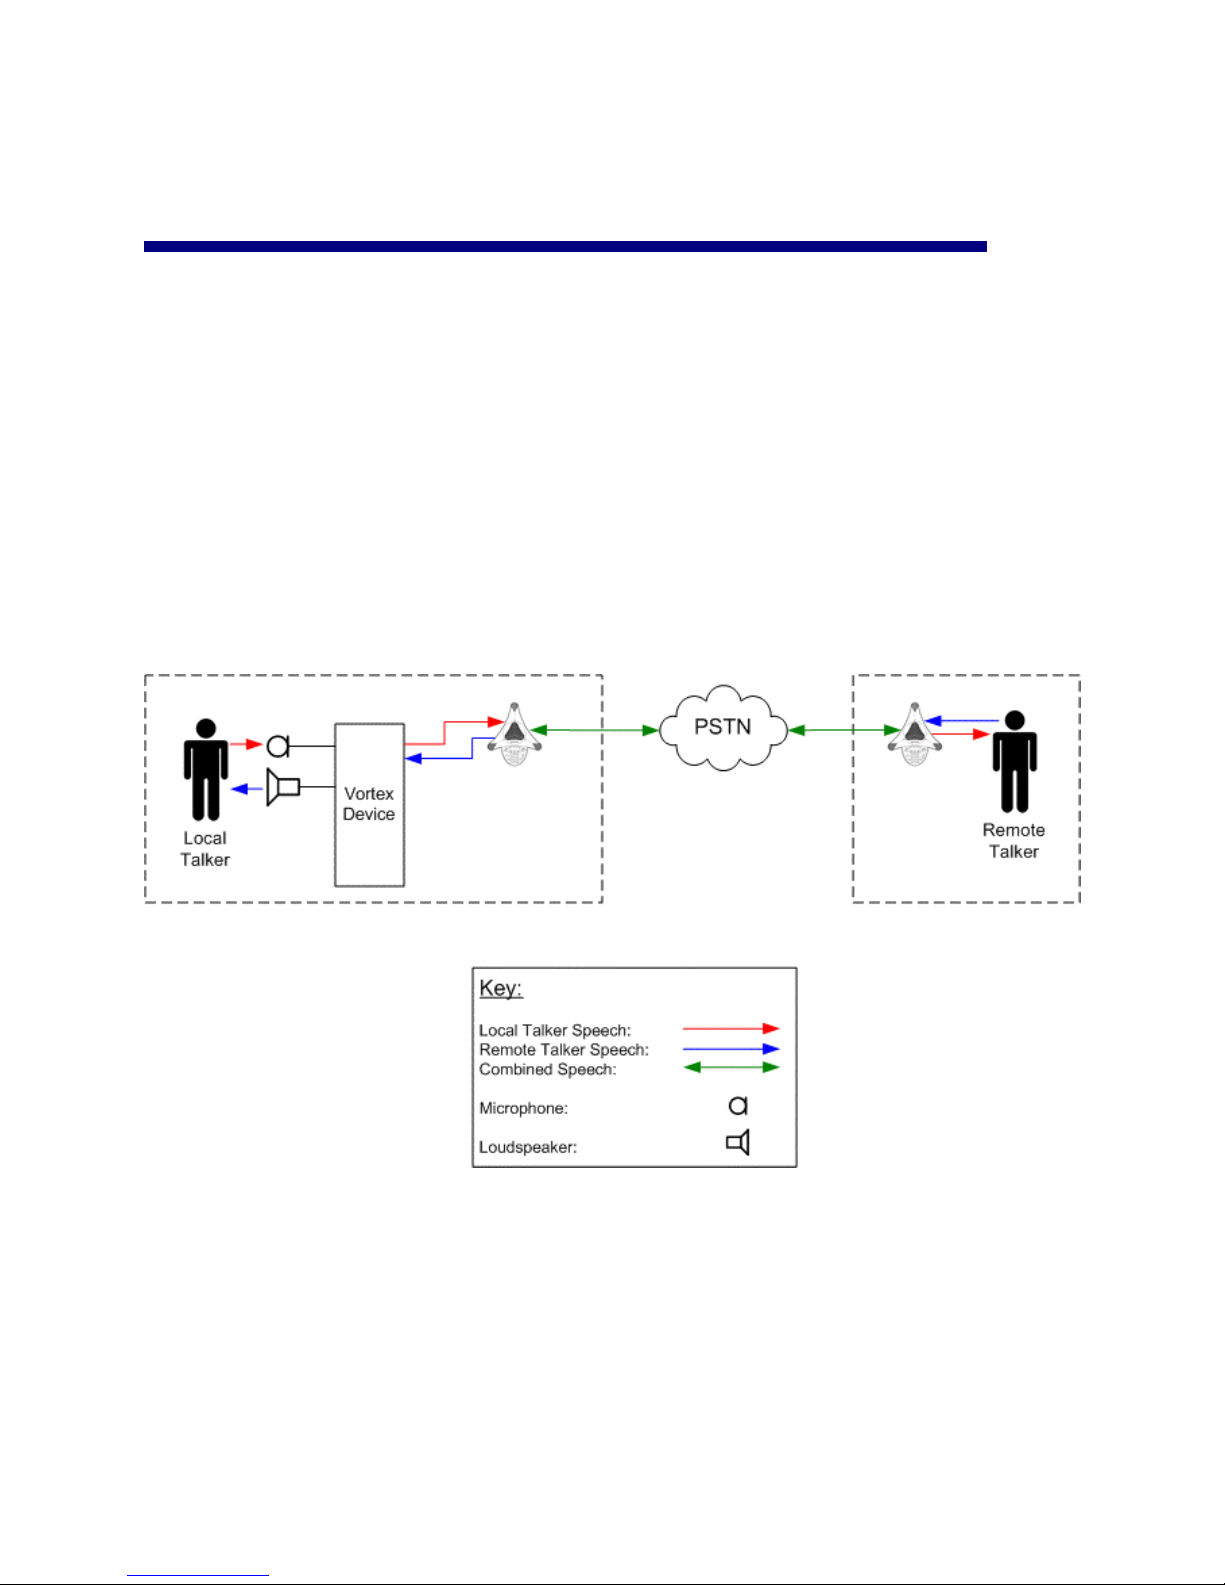
VOICE (NARROWBAND AND WIDEBAND)
Here, a local talker uses a Vortex device and a SoundStation VTX 1000 to send audio, both narrowband and
wideband, to a remote person via the Public Switched Telephone Network (PSTN). We will assume that
the Remote Talker has a SoundStation VTX 1000 and can receive wideband calls. The Vortex device
receives audio from a microphone in the local room and sends the remote speech to a loudspeaker also in
the local room.
8
Page 9

VOICE (NARROWBAND AND WIDEBAND) AND VIDEO
Here, a local talker uses a Vortex device, a SoundStation VTX 1000, and a video codec to send audio to two
remote people. We will assume that Remote Talker 1 has a SoundStation VTX 1000 and can receive
wideband telephone calls. The Vortex device receives audio from a microphone in the local room and sends
the remote speech from both sources to a loudspeaker also in the local room. The Vortex device also mixes
the local speech and Remote Talker 1 speech so that the mix can be sent to Remote Talker 2. Likewise, the
Vortex device mixes the local speech and Remote Talker 2 speech so that the mix can be sent to Remote
Talker 1.
9
Page 10
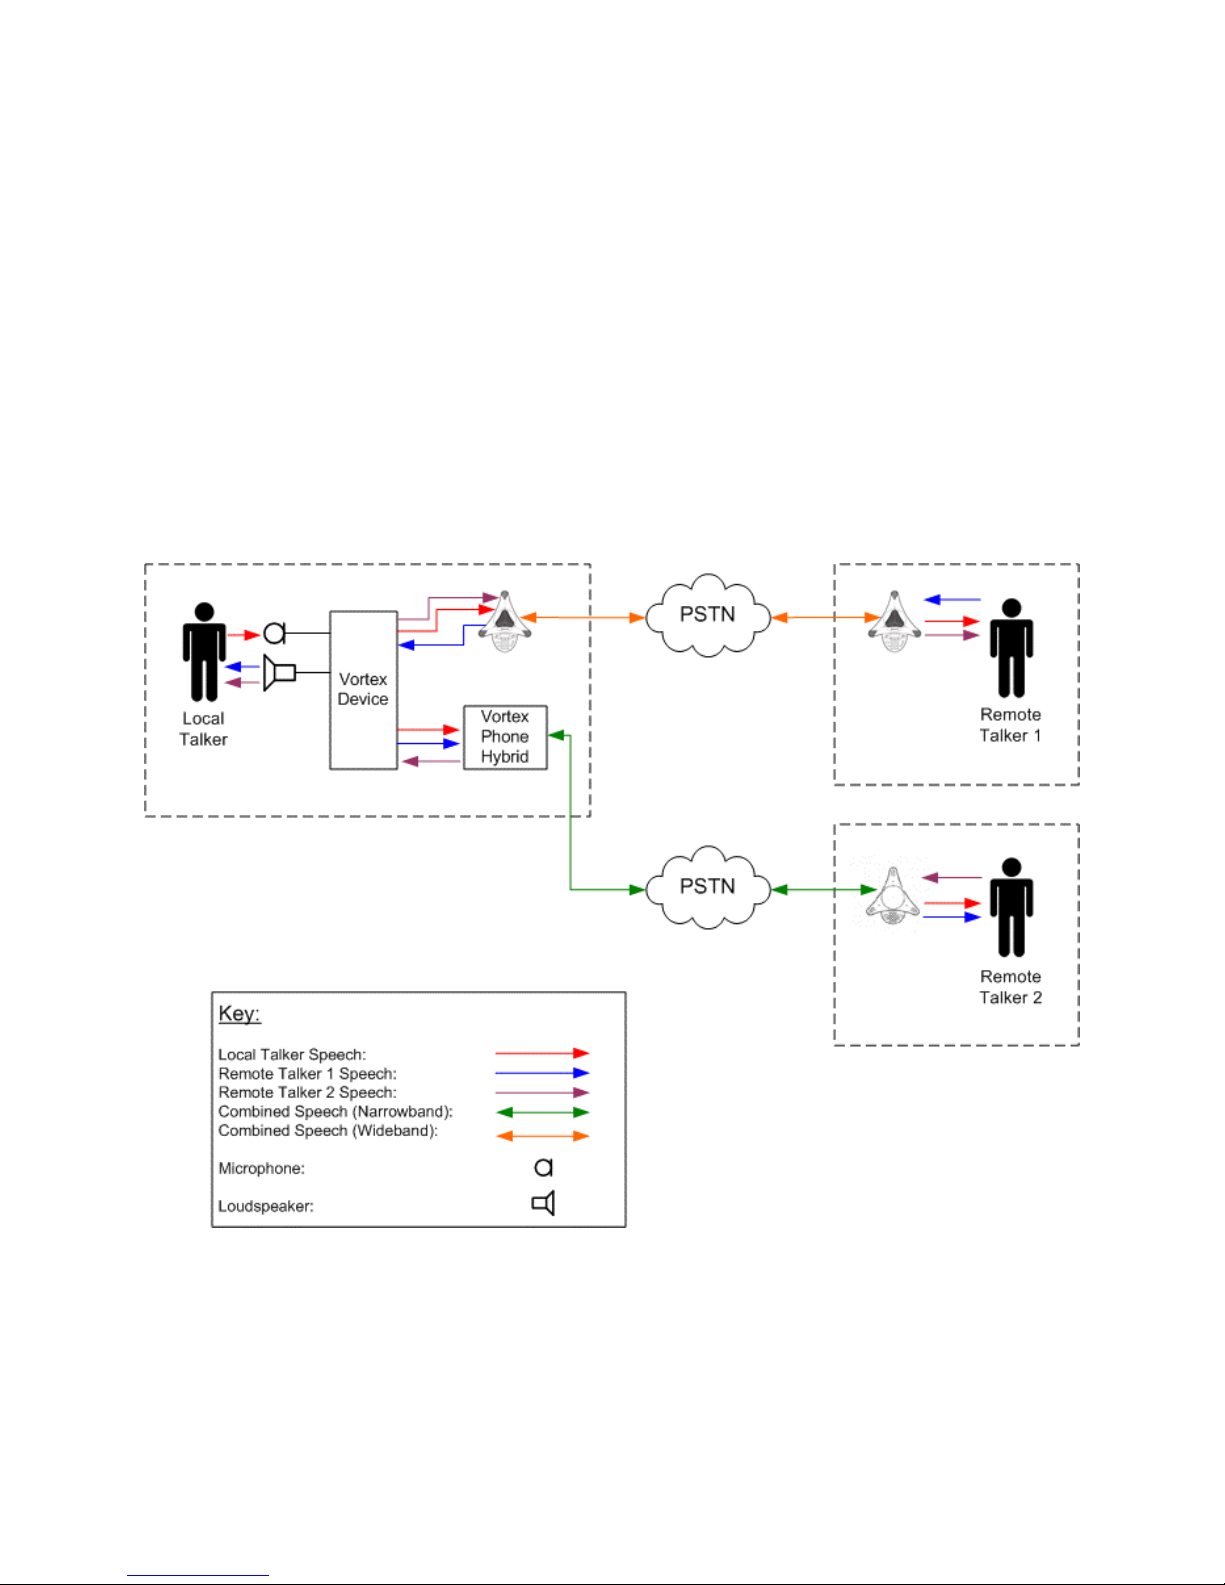
NARROWBAND VOICE VIA VORTEX HYBRID AND WIDEBAND VOICE THROUGH
SOUNDSTATION VTX 1000
Here, a local talker uses a Vortex device, a Vortex Phone Hybrid, and a SoundStation VTX 1000 to send
audio to two remote people. We will assume that Remote Talker 1 has a SoundStation VTX 1000 and can
receive wideband telephone calls. We will also assume that Remote Talker 2 has a non-SoundStation VTX1000 (i.e. SoundStation
narrowband calls, so the SoundStation VTX 1000 will only be used for wideband calls. The Vortex device
receives audio from a microphone in the local room and sends the remote speech from both sources to a
loudspeaker also in the local room. The Vortex device also mixes the local speech and Remote Talker 1
speech so that the mix can be sent to Remote Talker 2. Likewise, the Vortex device mixes the local speech
and Remote Talker 2 speech so that the mix can be sent to Remote Talker 1.
•
EX) that only receives narrowband calls. The Vortex Phone Hybrid can only make
10
Page 11

SYSTEM SETUP DIRECTIONS
Here is a step-by-step list of directions that one should follow in setting up a conference room to work with
a SoundStation VTX 1000 and a Vortex device:
1. Connect the microphones to the Vortex device(s).
2. Connect the loudspeakers to the Vortex device(s).
3. Connect the SoundStation VTX 1000 phone to a Vortex device.
4. Optionally connect a subwoofer to the Vortex device.
5. Connect the telephone line to the SoundStation VTX 1000 and Vortex device.
6. Verify the proper firmware in both the SoundStation VTX and Vortex device
7. Configure Vortex Mode in the SoundStation VTX 1000.
8. Connect any other sources to the Vortex device(s). These sources would include video codecs,
recorders, CD players, and DVD players.
9. Set the gain of all input and output sources that are connected to the Vortex device(s) based upon
the nominal send and receive levels of the Vortex device(s).
10. Enable the VTX Mode in the Vortex device.
11. Make a test call via the SoundStation VTX 1000.
11
Page 12
1.) CONNECTING A MICROPHONE TO A VORTEX
DEVICE
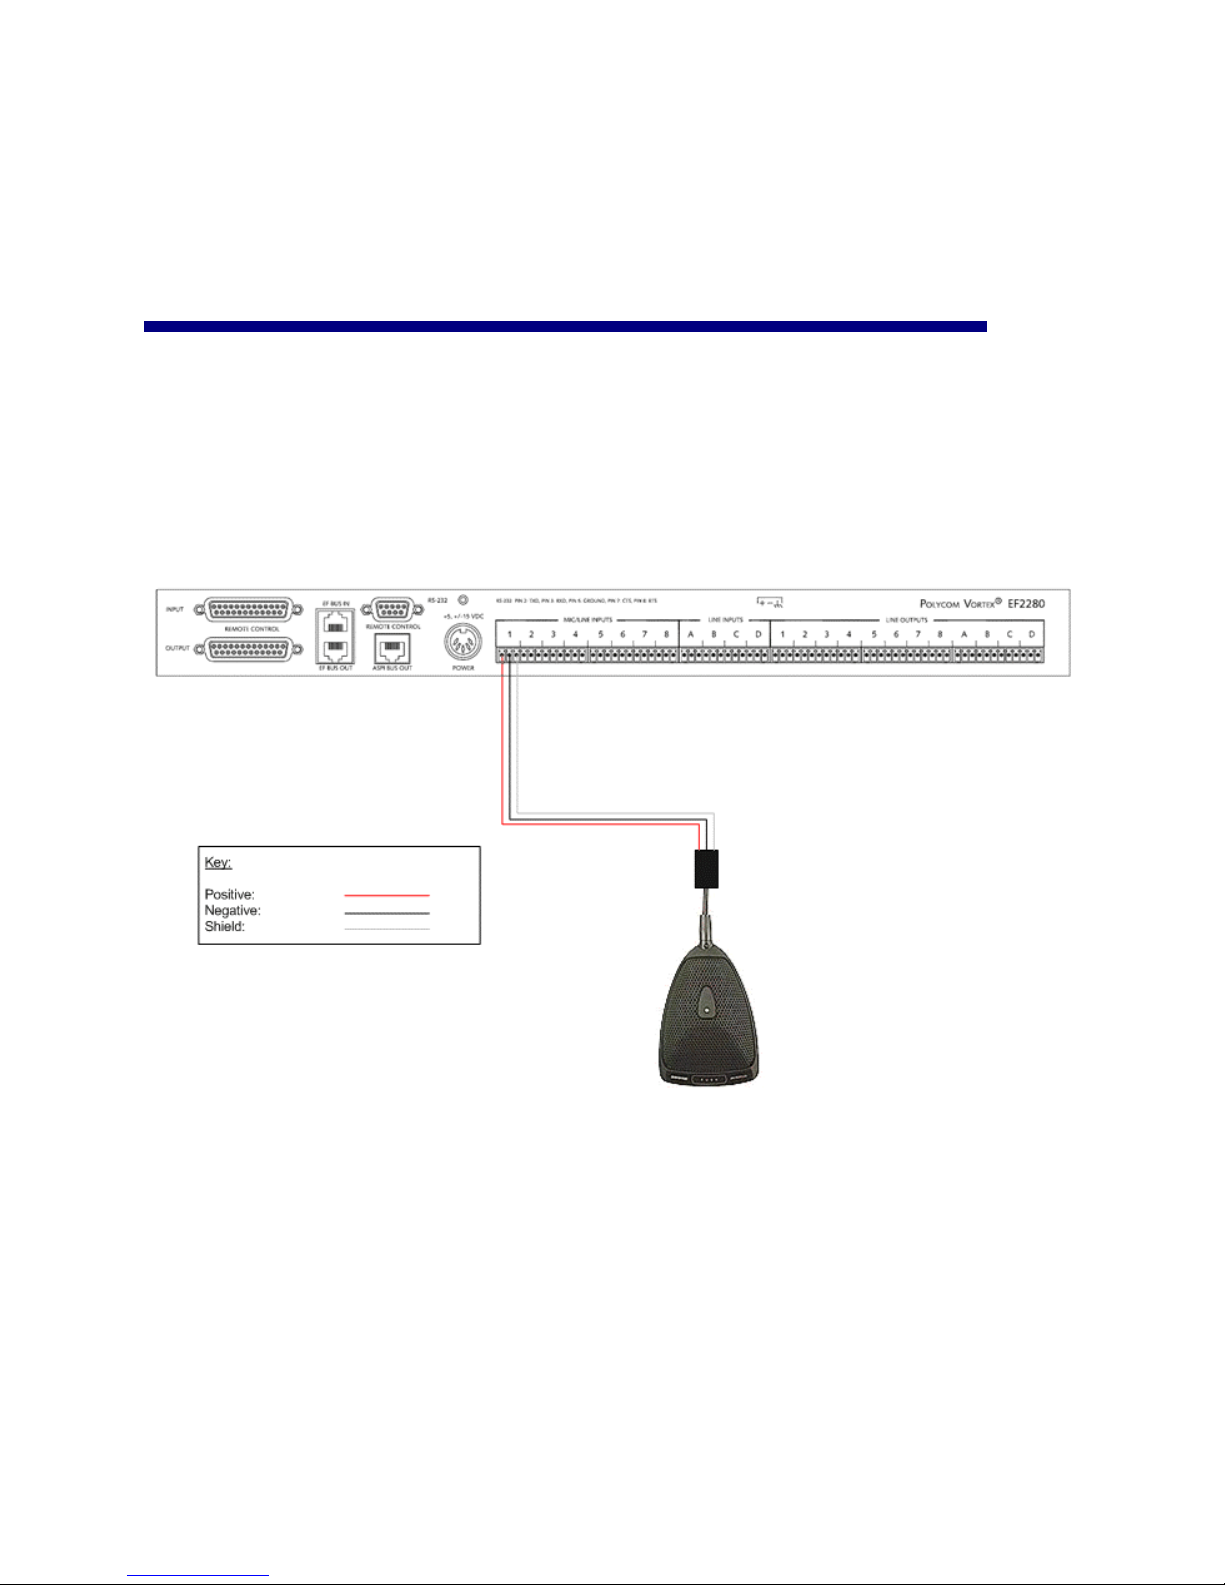
OVERVIEW DRAWING
This drawing illustrates 1 tabletop microphone that is connected to Mic / Line Input
1 of a Vortex EF2280:
12
Page 13
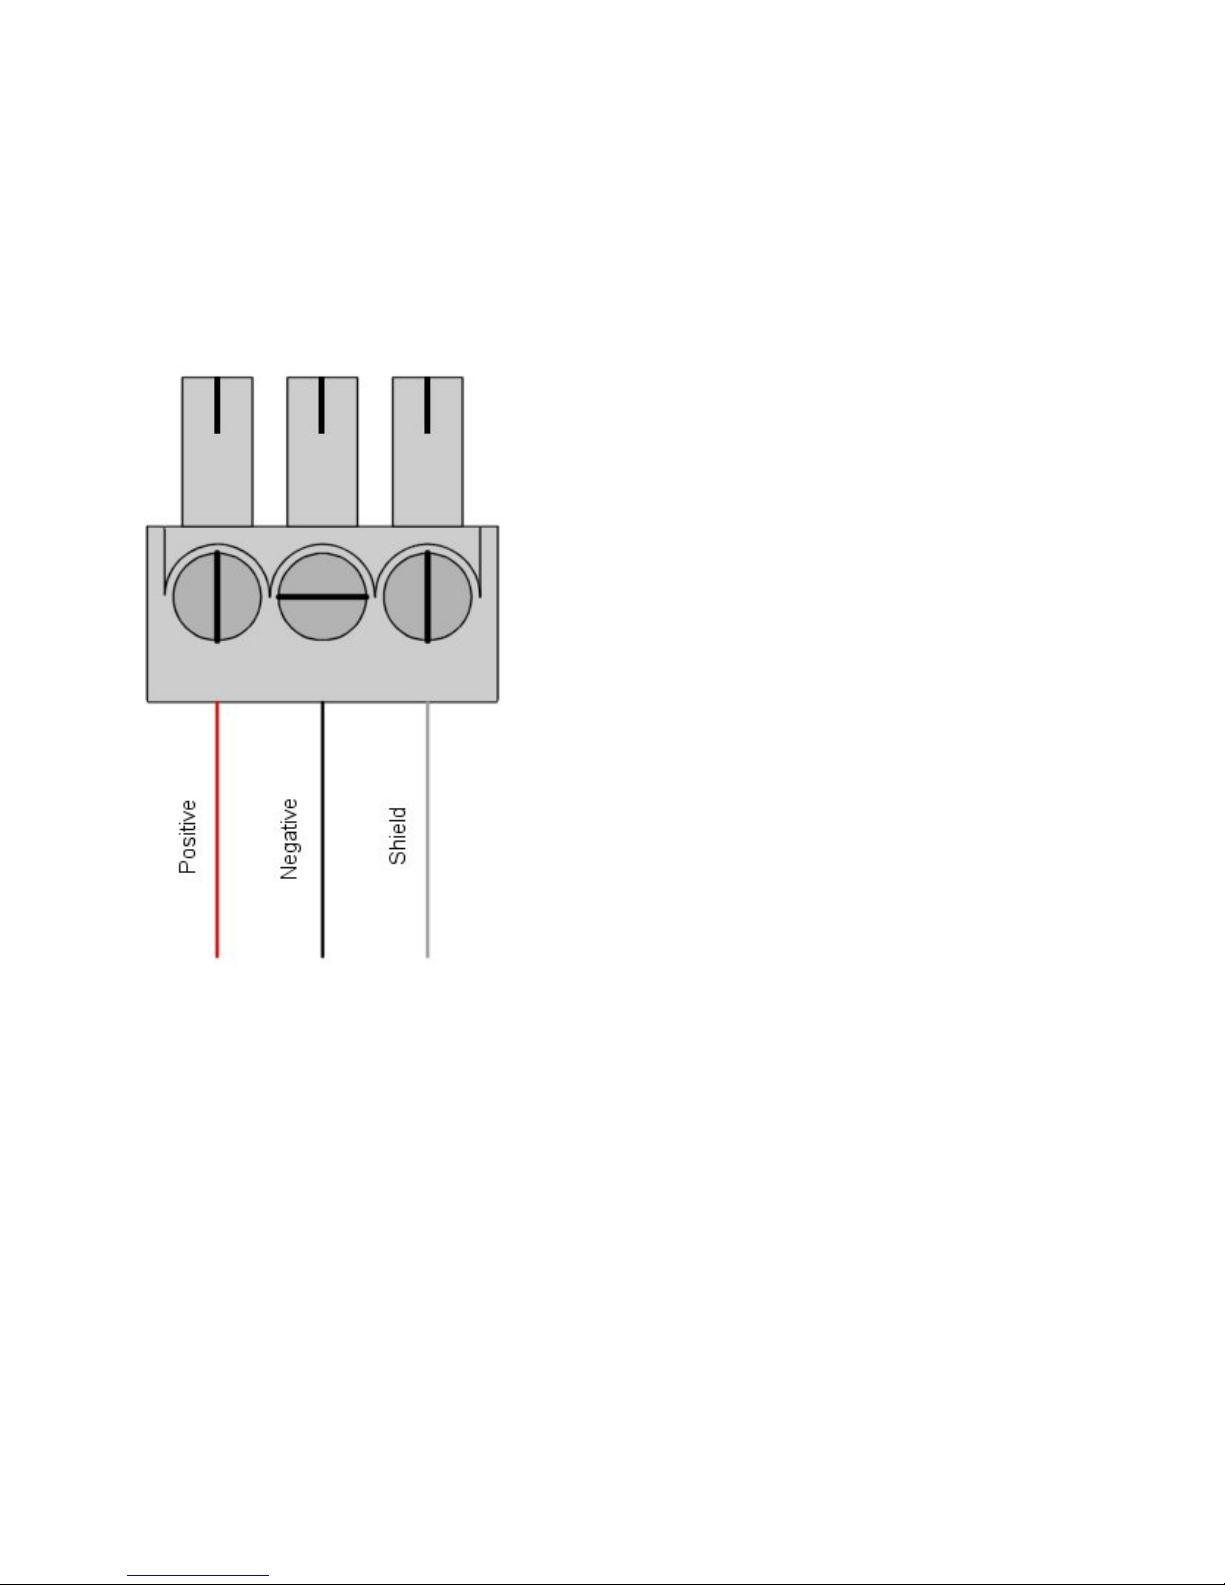
PHYSICAL CONNECTIONS
We use terminal blocks to make the audio connections to the printed circuit board. We use 3.5 mm pitch
plugs. Looking left to right, the conductors are positive, negative, shield (where shield is connected to
chassis ground of the Vortex device):
U
SING WIRED MICROPHONES
Most wired microphones will have a male XLR connector on the end of its cable. As a result, you will need
to make a XLR to Phoenix converter cable. Connect the Positive conductor of the Vortex device to Pin 2 of
the XLR connector, the Negative conductor of the Vortex device to Pin 3 of the XLR connector, and the
Shield of the Vortex device to the Pin 1 of the XLR connector. Refer to Cable Drawing 1 in the Vortex Input
Wiring section of the Appendix.
13
Page 14
If the cable that comes with the microphone is long enough to reach the Vortex device, you may cut off the
male XLR connector and use wire strippers to remove the outer sheath and any shielding of the conductors.
This will allow you to connect the wire directly to one of the provided Phoenix connectors.
USING WIRELESS MICROPHONES
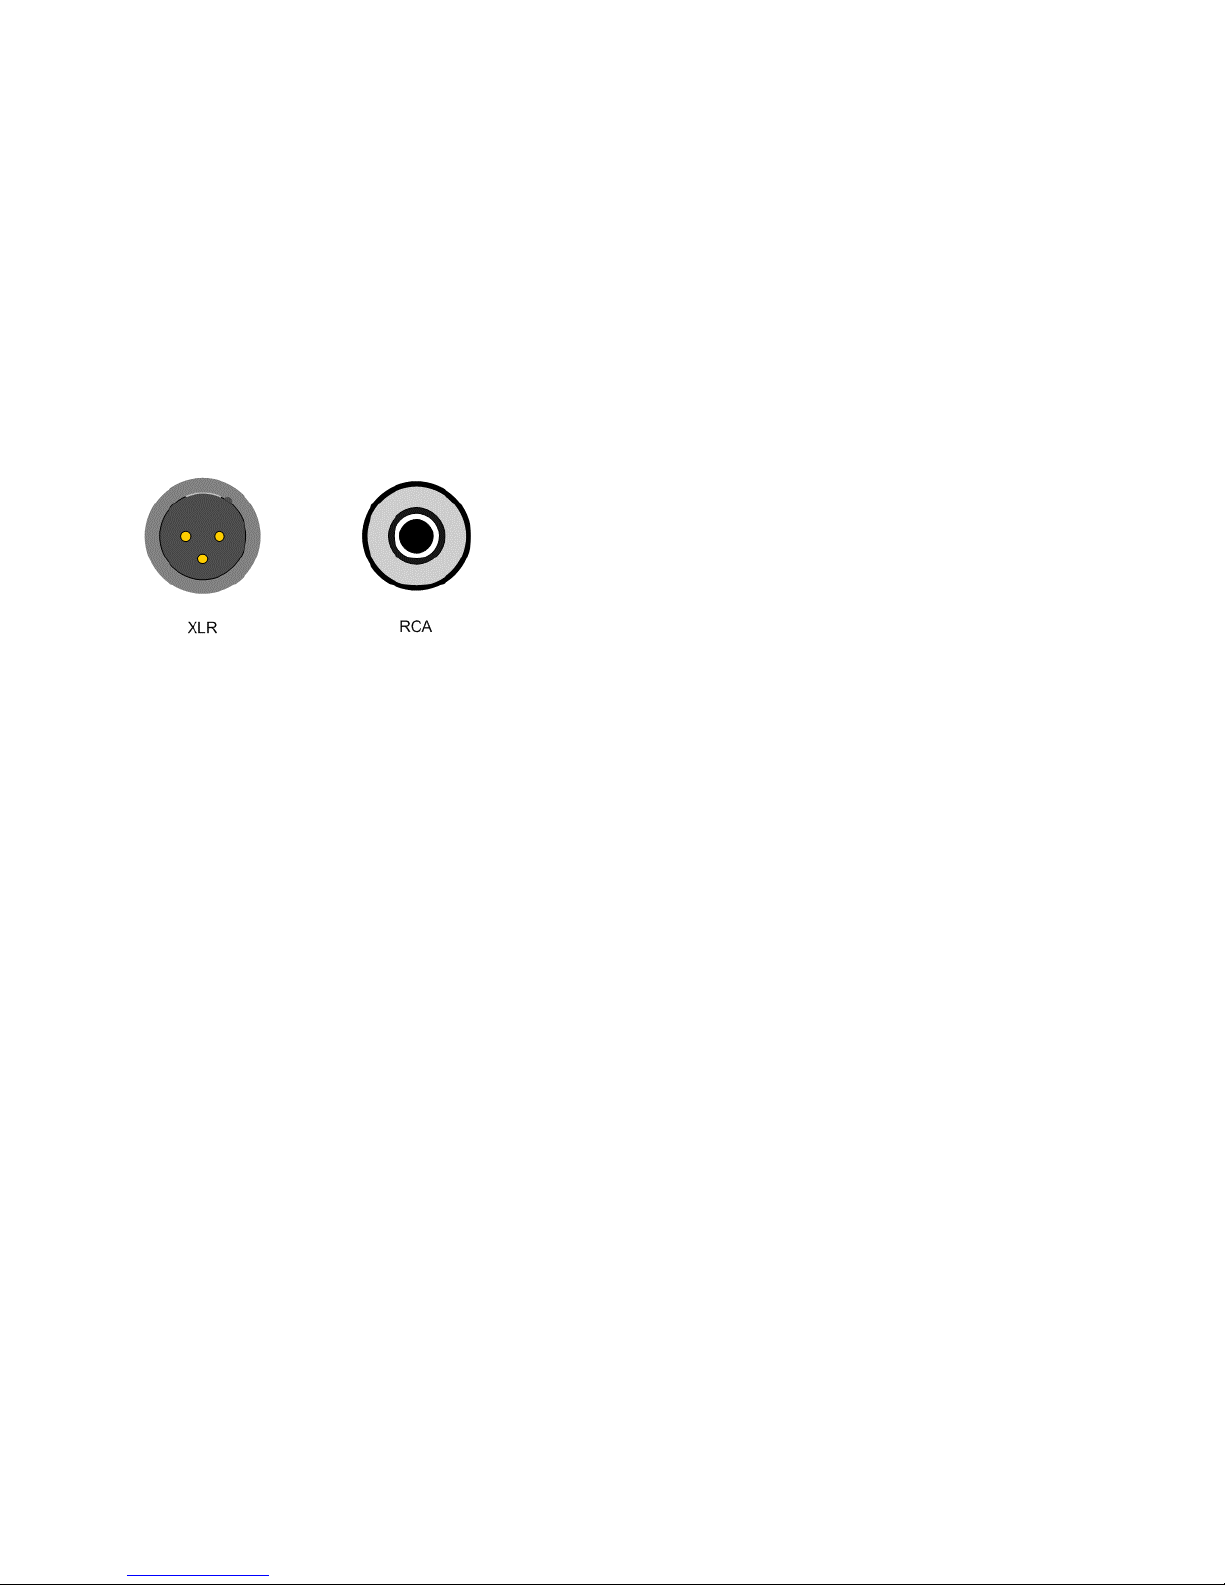
All wireless microphones will require the use of a receiver to demodulate the signal. In this case, the
receiver will typically have one of two types of output connectors: XLR or RCA:
An XLR connector uses two conductors (positive and negative) and a ground line to transfer signal from one
device to another device. This is referred to as "balanced". Pin 1 is shield, Pin 2 is positive, and Pin 3 is
negative. An RCA connector only uses one conductor and one ground line and is referred to as
"unbalanced". The signal conducting part of the connector is called "tip" and the ground line is called
"shield".
If the output of the wireless receiver has a balanced output, connect the Positive conductor of the Vortex
device to Pin 2 of the XLR connector, the Negative conductor of the Vortex device to Pin 3 of the XLR
connector, and the Shield of the cable to the only to the Vortex device. Refer to Cable Drawing 2 in the
Vortex Input Wiring section of the Appendix.
If the output of the wireless receiver has an unbalanced output, connect the Positive conductor of the
Vortex device to the Tip of the RCA connector and the Negative conductor of the Vortex device to Shield of
the RCA connector. The shield of the cable is not connected at the unbalanced end of the cable. Refer to
Cable Drawing 3 in the Vortex Input Wiring section of the Appendix.
14
Page 15

2.) CONNECTING A LOUDSPEAKER TO A VORTEX
DEVICE
There are two ways to connect a loudspeaker (or multiple loudspeakers) to a Vortex device: Via an
amplifier or via the loudspeaker output of a Vortex EF2241, EF2210, or EF2211. If your loudspeaker has a
70V transformer on it, you will need an external amplifier to power the loudspeaker. If your loudspeaker
impedance is 4-8 ohms, you may use the loudspeaker output of a Vortex EF2241, EF2210, or EF2211 to
directly power the loudspeaker without the need for an external amplifier.
The loudspeaker output of the Vortex EF2241, EF2210, or EF2211 supports a total loudspeaker load of 4 - 8
ohms. The built-in amplifier can provide a maximum of 10 Watts of power to the loudspeaker. Below are
several examples to illustrate proper and improper loudspeaker configurations:
15
Page 16
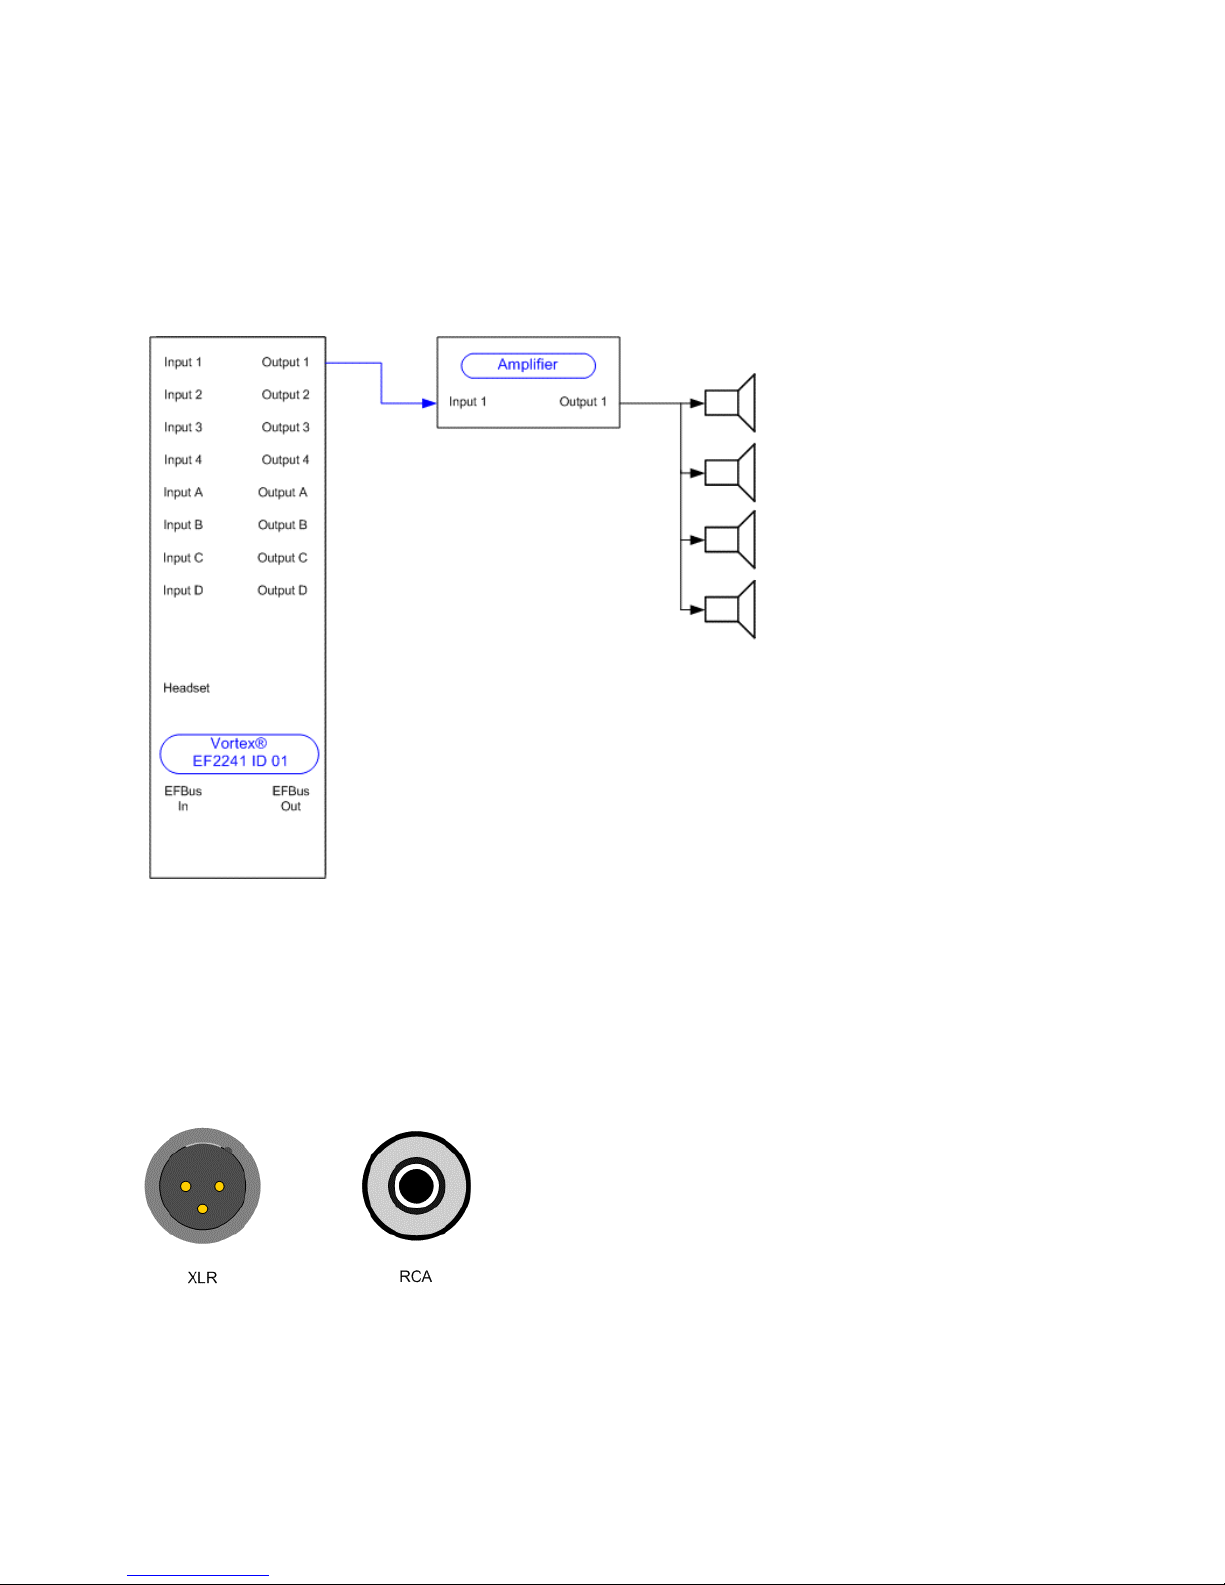
EXTERNAL AMPLIFIER
Here, one of the line-level outputs of a Vortex EF2241 is sent to an amplifier to power a group of
loudspeakers.
XTERNAL AMPLIFIER INPUTS
E
All amplifiers will have one of two types of connectors: XLR or RCA:
An XLR connector uses two conductors (positive and negative) and a ground line to transfer signal from one
device to another device. This is referred to as "balanced". Pin 1 is shield, Pin 2 is positive, and Pin 3 is
negative. An RCA connector only uses one conductor and one ground line and is referred to as
16
Page 17
"unbalanced". The signal conducting part of the connector is called "tip" and the ground line is called
"shield".
If the input of the amplifier has a balanced input, connect the Positive conductor of the Vortex device to Pin
2 of the XLR connector, the Negative conductor of the Vortex device to Pin 3 of the XLR connector, and the
Shield of the Vortex device to the Pin 1 of the XLR connector. Refer to Cable Drawing 1 in the Vortex
Output Wiring section of the Appendix.
If the input of the amplifier has a unbalanced input, connect the Positive conductor of the Vortex device to
the Tip of the RCA connector and the Negative conductor of the Vortex device to Shield of the RCA
connector. The shield of the cable is not connected at the unbalanced end. Refer to Cable Drawing 2 in the
Vortex Output Wiring section of the Appendix.
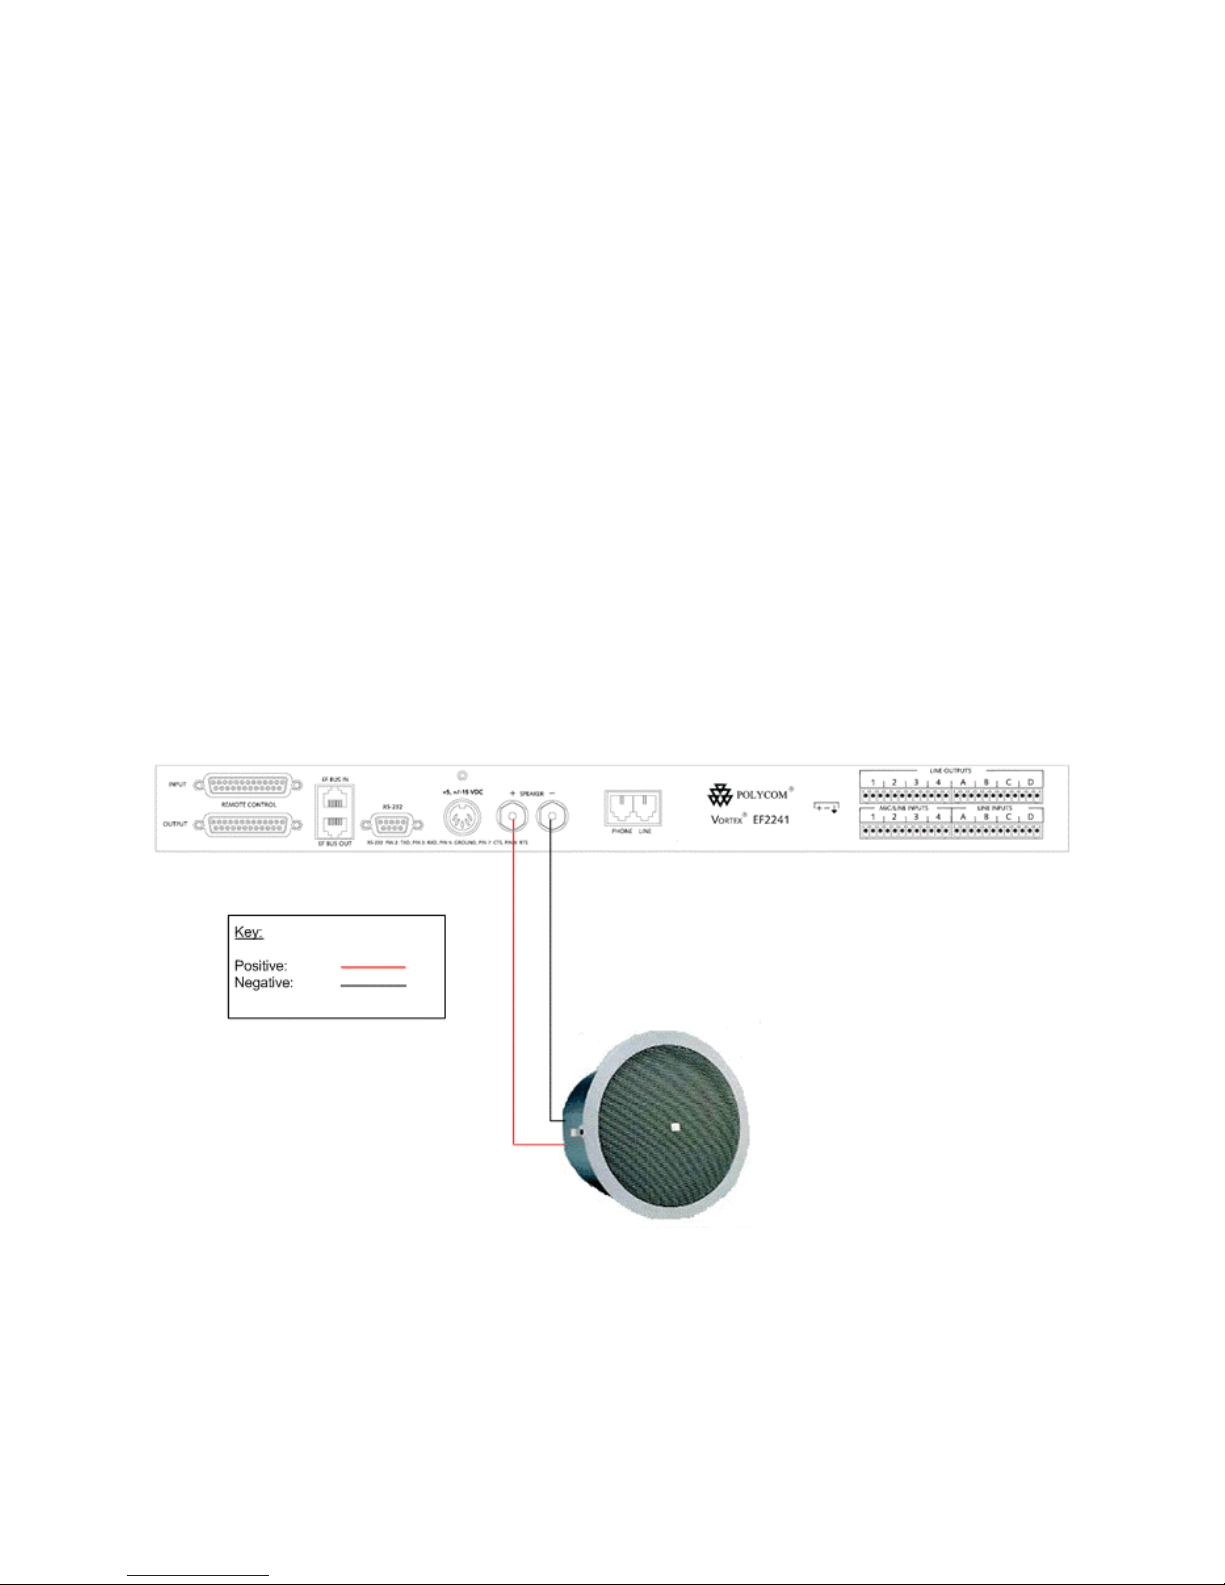
INTERNAL AMPLIFIER OVERVIEW DRAWING
This drawing illustrates 1 loudspeaker that is connected to the Speaker Output terminals of a Vortex
EF2241.
Refer to the Vortex Internal Amplifier Wiring section of the Appendix for several examples to illustrate
proper and improper loudspeaker configurations.
17
Page 18
3.) CONNECTING THE SOUNDSTATION VTX
1000
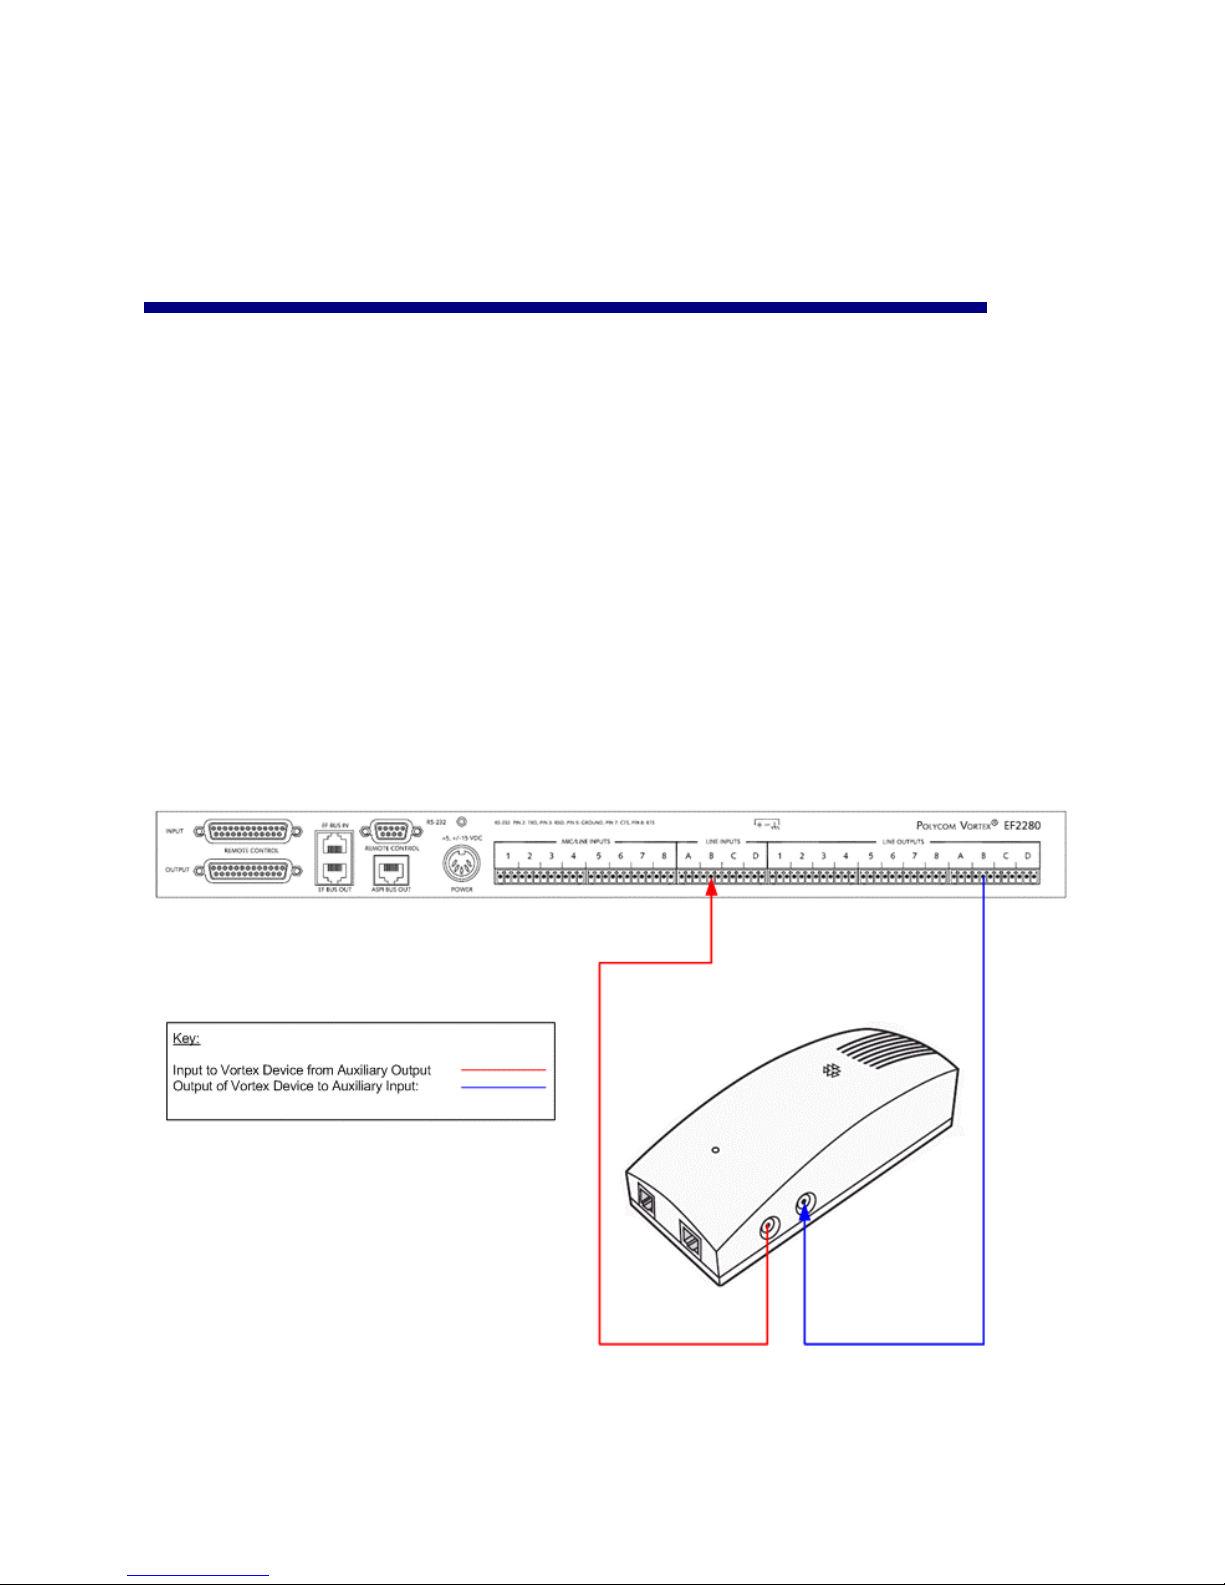
In order to send and receive audio to the SoundStation VTX 1000 Interface Module, you need to observe the
following wiring procedure:
1.) Connect the Auxiliary Output of the Interface Module to a line level input of a Vortex device.
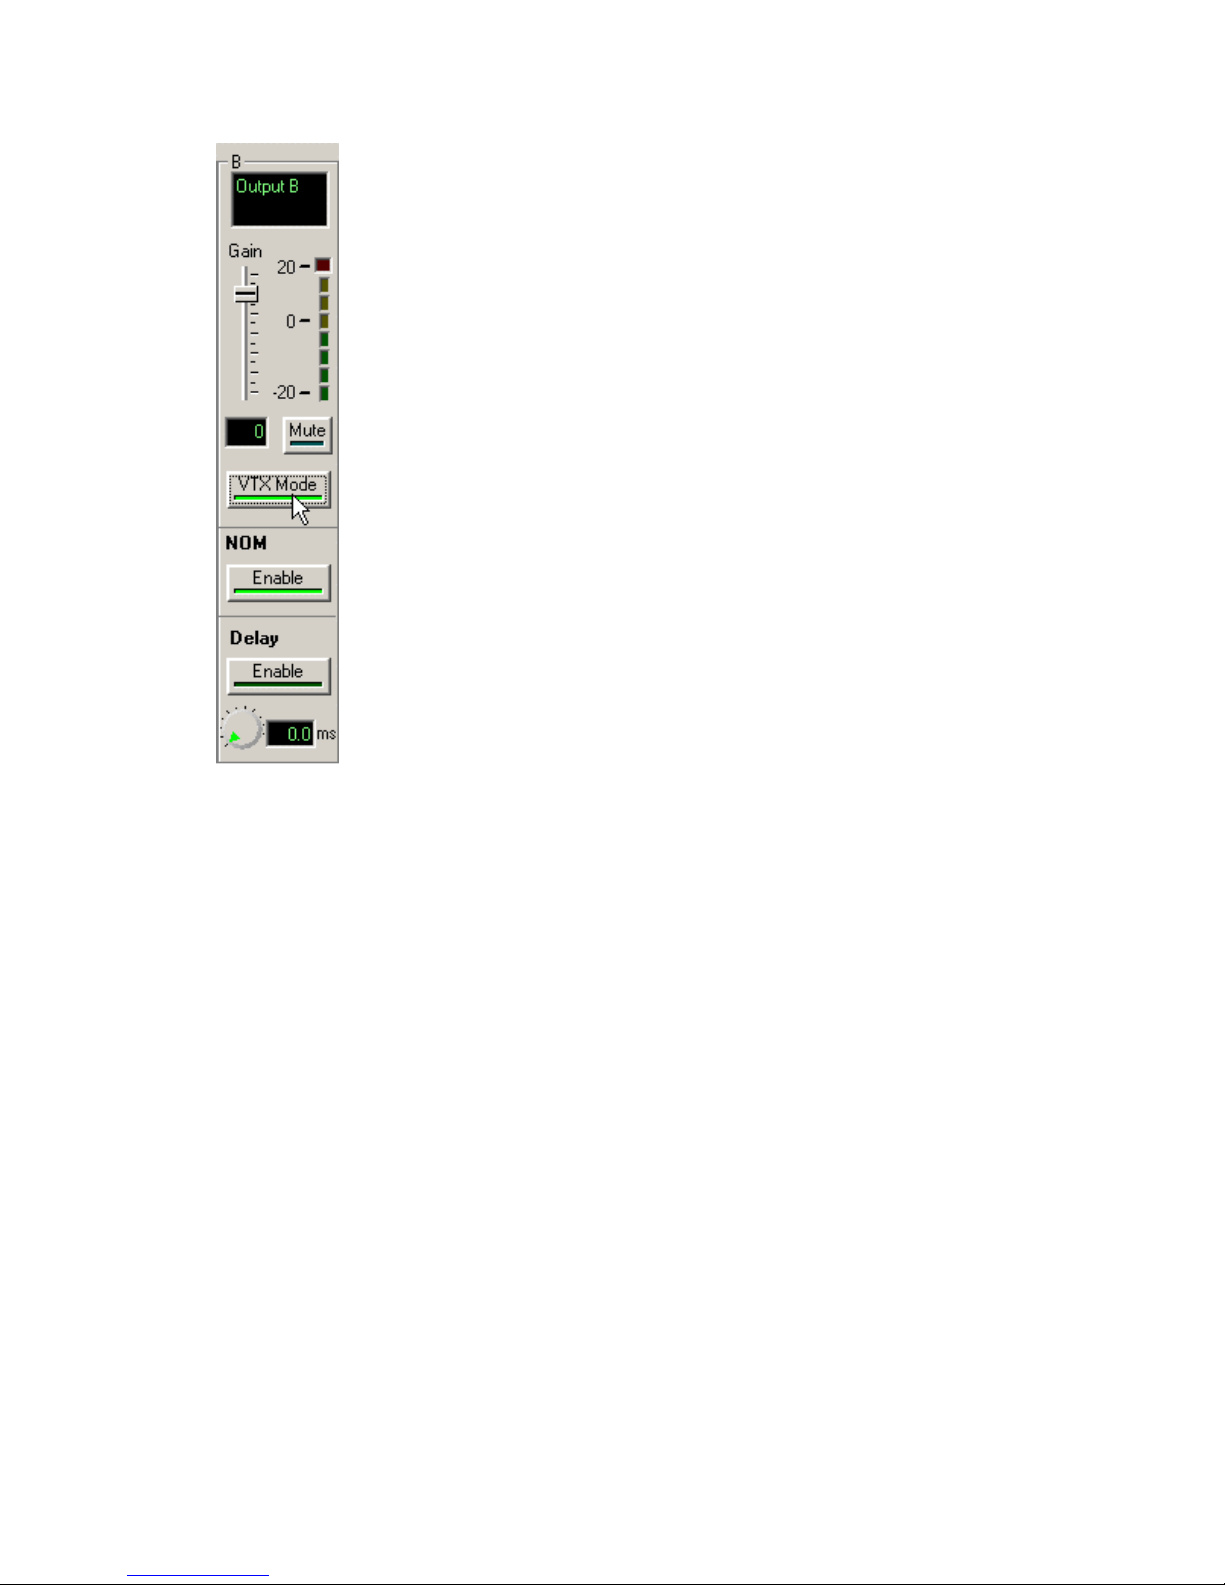
2.) Connect Output B the Vortex device to the Auxiliary Input of the Interface Module. By default,
The drawing below illustrates the use Input B and Output B of a Vortex EF2280 to connect to the Interface
Module.
If you are using the Polycom Instant
the Instant
TO A VORTEX DEVICE
Outputs A, B, and C of the Vortex device is a mix-minus version of the Input B signal.
Designer™ software, connect the Vortex inputs and outputs selected by
Designer to the SoundStation VTX 1000 interface Module.
WIRING
18
Page 19

INPUT TO INTERFACE MODULE FROM OUTPUT OF VORTEX DEVICE
Connect the Positive conductor of the Vortex device to the Tip of the RCA connector and the Negative
conductor of the Vortex device to Shield of the RCA connector. The shield of the cable is not connected.
Refer to Cable Drawing 2 in the Vortex Output Wiring section of the Appendix.
OUTPUT OF INTERFACE MODULE TO INPUT OF VORTEX DEVICE
Connect the Positive conductor of the Vortex device to the Tip of the RCA connector and the Negative
conductor of the Vortex device to Shield of the RCA connector. The shield of the cable is not connected.
Refer to Cable Drawing 3 in the Vortex Output Wiring section of the Appendix.
4.) CONNECTING A SUBWOOFER TO A VORTEX
DEVICE
19
Page 20

A subwoofer can be used with the SoundStation VTX 1000 to enhance the low frequency response when
connected to another party via wideband mode. The use of the subwoofer is optional when using the
Vortex as there may be other loudspeakers in the room that you may wish to use.
If you do want to use a subwoofer, you can connect an output of the Vortex directly to the subwoofer as a
subwoofer typically accepts a line level input. You will need to set the output gain of the Vortex to -30 dB
because if the Vortex output is set higher than -30 dB, the subwoofer voice coil may "bottom out" on high
amplitude transient sounds. This can be destructive because when a loudspeaker "bottoms out", the voice
coil moves beyond its designed physical limits. If this happens enough, the voice coil may be damaged, and
then the subwoofer would not work properly. A setting of -30 dB should give you enough headroom so that
if the subwoofer voice coil does bottom out, it should only be during brief, high-volume signals which would
probably only occur during playback of program audio.
We also recommend creating a low pass filter in the Vortex to filter any signal that will be sent to the
subwoofer. We recommend using a low pass or a Linkwitz-Riley low pass at 250 Hz. This is recommended
in order to remove the high frequency energy to the subwoofer since it cannot reproduce mid and high
frequencies. You may also want to place a high pass filter on the output(s) of the Vortex that drive other
loudspeakers (other than the subwoofer). The reason for this filter is to remove the low frequency energy
from these loudspeakers that may not be able to properly reproduce signals below 250 Hz. This is the
purpose of the subwoofer.
WIRING
Connect the Positive conductor of the Vortex device to the Tip of the RCA connector and the Negative
conductor of the Vortex device to Shield of the RCA connector. The shield of the cable is not connected.
Refer to Cable Drawing 2 in the Vortex Output Wiring section of the Appendix.
5.) CONNECTING THE TELEPHONE LINE TO THE
SOUNDSTATION VTX 1000 AND A VORTEX
DEVICE
There are 2 ways to connect the RJ-11 telephone line to a system:
20
Page 21
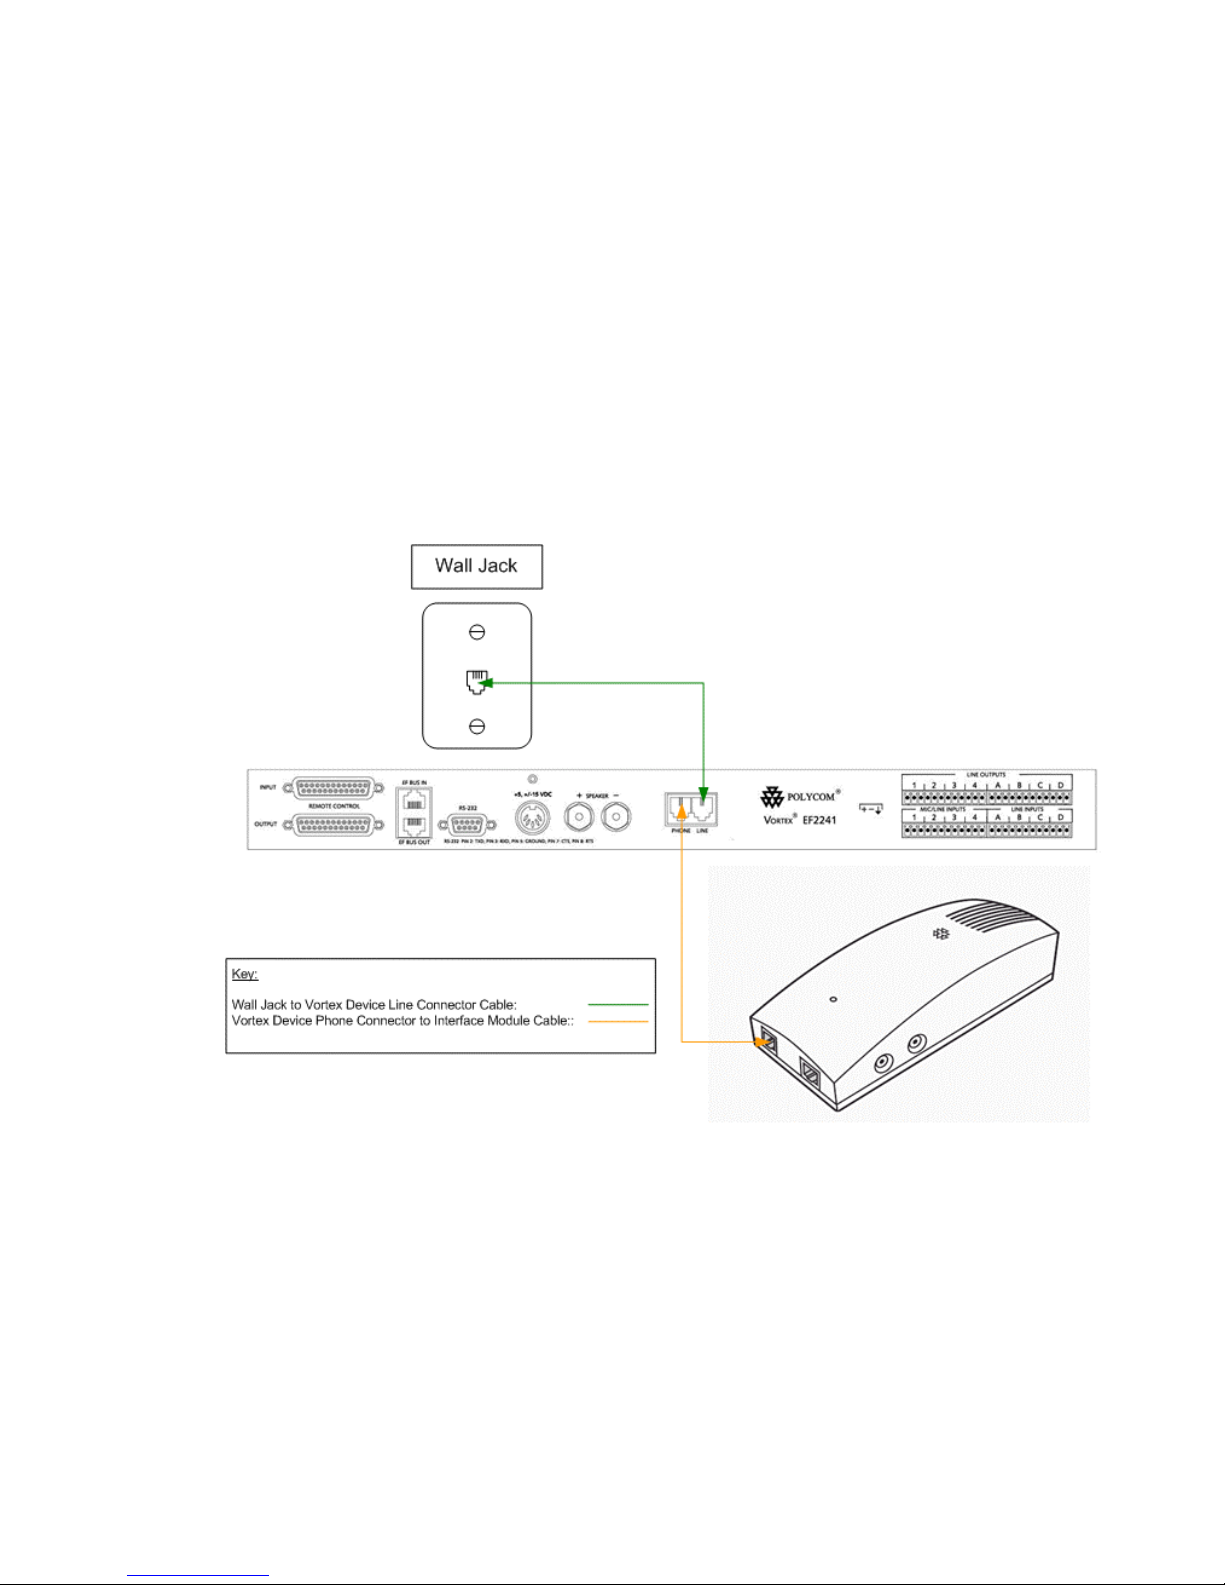
1.) Connect the wall jack to the L
EF2201 or Vortex EF2211). Connect the P
VTX Interface Module.
This method will be required if you want to control the narrowband telephone calls with a control
system (AMX or Crestron). If the telephone portion of the Vortex EF2241 is active, the P
the Vortex EF2241 is disabled until the Vortex EF2241 is placed on-hook. When wideband calls are
desired, the telephone portion of the Vortex EF2241 will not be active and the Vortex EF2241 will
pass any signals at the LINE jack to the PHONE jack. The user interface will be the keypad of the
SoundStation VTX 1000 since the SoundStation VTX 1000 does not offer the capability of external
control.
INE jack connection on the back of the Vortex EF2241 (or Vortex
HONE jack of the Vortex EF2241 to the phone jack on the
HONE jack of
2.) Connect the wall jack directly to the phone jack of the VTX Interface Module and do not use the
telephone capabilities of the Vortex EF2241.
This method places the control of both narrowband and wideband telephone calls to the keypad of
the SoundStation VTX 1000. There can still be external control of the Vortex EF2241 via a control
system (volume control, muting, etc.), but the control system will not be interfaced for dialing
purposes.
21
Page 22

6.) V
ERIFYING THE PROPER FIRMWARE IN THE
SOUNDSTATION VTX 1000 AND THE VORTEX
DEVICE
In order for the SoundStation VTX 1000 to work correctly with Vortex devices, the firmware must be
upgraded to Version 1.22 (August 26, 2003) or higher. Please refer to the SoundStation VTX 1000 User's
Guide / Administrator's Guide for the proper instructions.
To upgrade the firmware in the Vortex device, please consult the C
Instructions that are located in the C
OMMON OPERATIONS folder of each device type.
ONFERENCE COMPOSER HELP FILE.
7.) C
ONFIGURING THE SOUNDSTATION VTX
1000
Both the Vortex device and the SoundStation VTX 1000 must be setup properly to input and output audio
22
Page 23

signals to the Vortex as well as to make wideband audio calls. The default settings for the SoundStation
VTX 1000 will not allow one to send and receive audio from the VTX into the Vortex. We will discuss how
to setup the Vortex device in Step 10.
You must perform this step; otherwise, you will not be able to operate the SoundStation
VTX 1000 properly.
Enable Vortex Mode in the SoundStation VTX 1000. Press the M
you are in the A
V
ORTEX MODE, select ON and then select SAVE.
DMIN SETUP sub-menu, select PHONE SYSTEM and then select VORTEX MODE. To enable the
ENU key and the select ADMIN SETUP. Once
23
Page 24
24
Page 25

8.) CONNECTING OTHER SOURCES TO A VORTEX
DEVICE
All Vortex devices (except the Vortex EF2201) have line level inputs and outputs that may be used to bring
in other sources into the system. These are sources such as video codecs, laptop computers, CD players,
DVD players, VCR's, and audio recorders.
There are specific wiring methods that we recommend for connecting balanced and unbalanced sources to
all Vortex devices. We will assume that balanced inputs and outputs use XLR connectors. Unbalanced
inputs and outputs will be assumed to use RCA connectors.
VORTEX INPUT WIRING
BALANCED INPUT
Connect the Positive conductor of the Vortex device to Pin 2 of the XLR connector, the Negative conductor
of the Vortex device to Pin 3 of the XLR connector, and the Shield of the cable to the only to the Vortex
device. Refer to Cable Drawing 2 in the Vortex Input Wiring section of the Appendix.
UNBALANCED INPUT
Connect the Positive conductor of the Vortex device to the Tip of the RCA connector and the Negative
conductor of the Vortex device to Shield of the RCA connector. The shield of the cable is not connected at
the unbalanced end. Refer to Cable Drawing 3 in the Vortex Output Wiring section of the Appendix.
25
Page 26

VORTEX OUTPUT WIRING
BALANCED INPUT
Connect the Positive conductor of the Vortex device to Pin 2 of the XLR connector, the Negative conductor
of the Vortex device to Pin 3 of the XLR connector, and the Shield of the cable to the only to the Vortex
device. Refer to Cable Drawing 1 in the Vortex Output Wiring section of the Appendix.
UNBALANCED INPUT
Connect the Positive conductor of the Vortex device to the Tip of the RCA connector and the Negative
conductor of the Vortex device to Shield of the RCA connector. The shield of the cable is not connected at
the unbalanced end. Refer to Cable Drawing 2 in the Vortex Output Wiring section of the Appendix.
9.) SETTING THE GAIN OF THE VORTEX DEVICE
26
Page 27
MICROPHONE LEVELS
For wired microphones, the input gain is dependant on the sensitivity of the microphone as well as the
typical distance from the talker to the microphone.
Type of Microphone Average Level
Tabletop Mic Mode, 15 dB
Ceiling Mic Mode, 25 dB
Podium Mic Mode, 10 dB
Gooseneck Mic Mode, 5 dB
Wireless Depends on the receiver*
*Some wireless receivers transmit audio at line level (approximately 0 to -10 dB) and others transmit at mic
level (approximately -30 dB). Based on the transmit level, you may need to apply gain in the Vortex device.
For example, if a wireless receiver's nominal transmit level is -10 dB, you will need to apply +10 dB on the
input of the Vortex device to achieve unity (0 dB) gain.
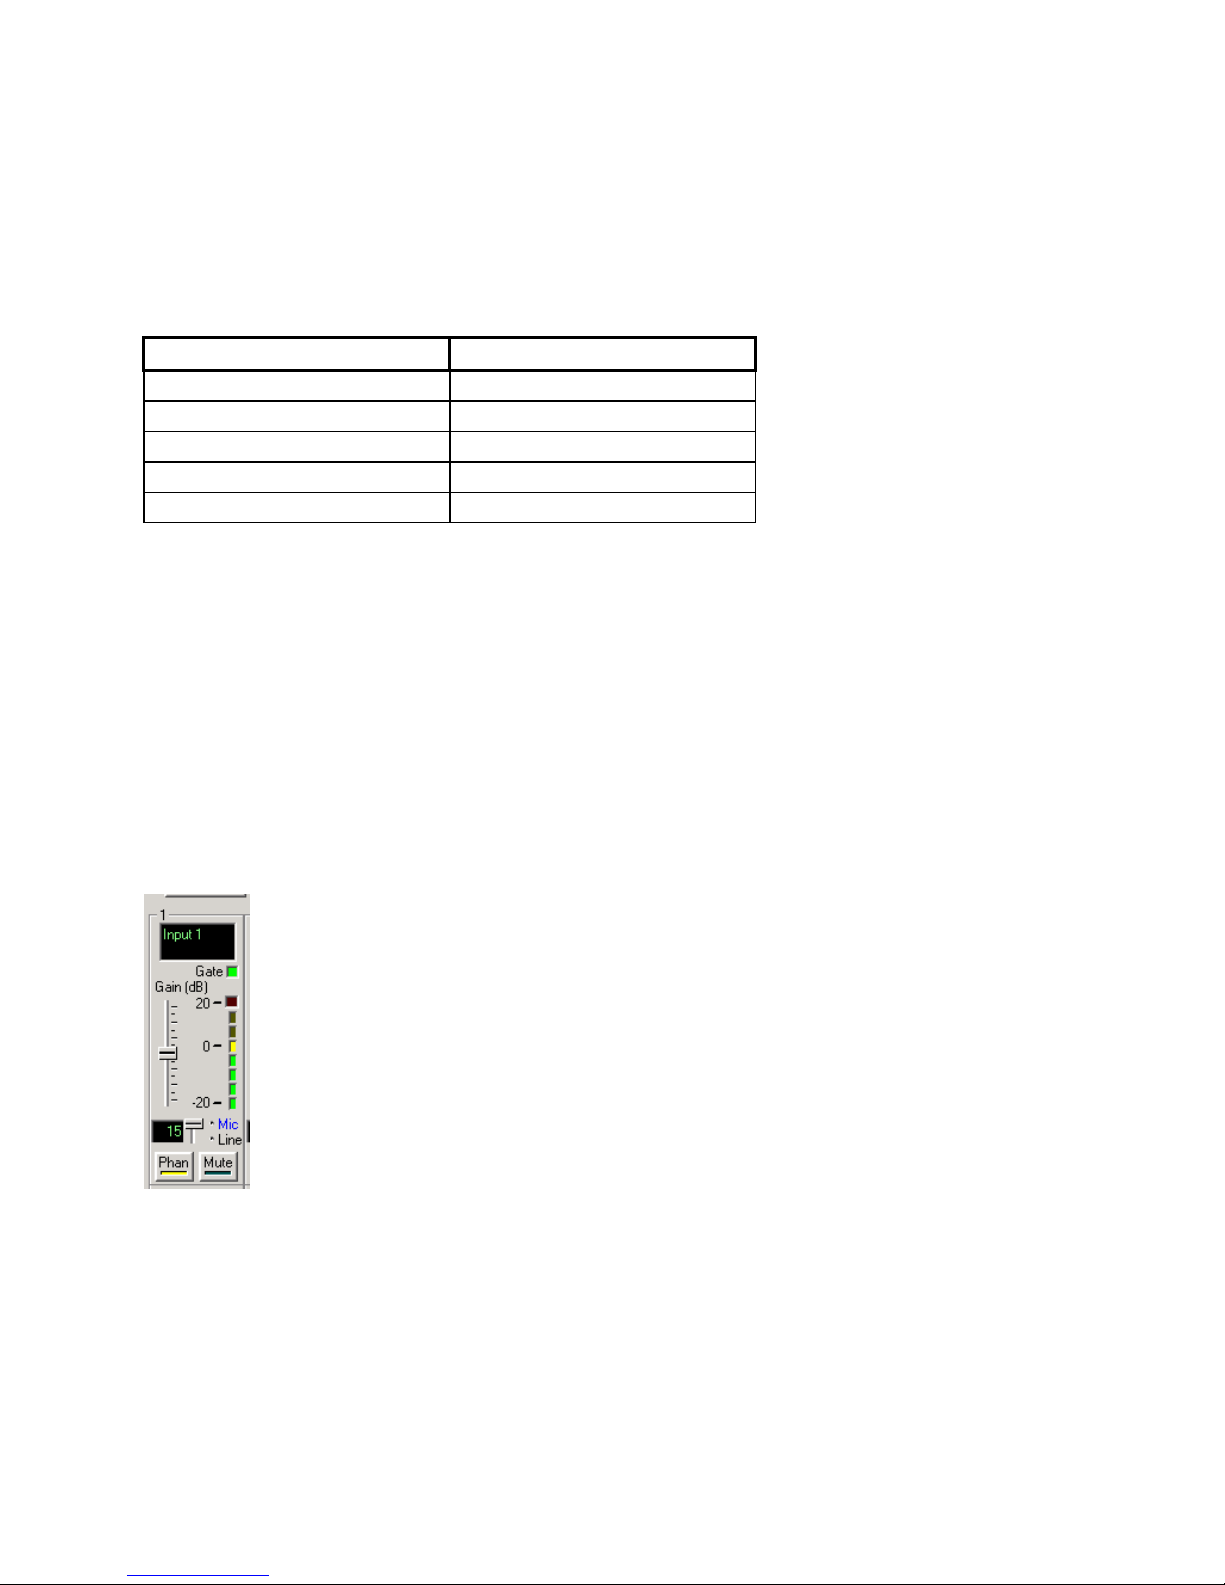
In order to set the gain appropriately, we recommend leaving all processing enabled and having someone
talk into the microphone. Have another person watch the levels in Conference Composer or via the front
panel of the Vortex device. You want the speech to light up the first yellow LED (0 dBu) and flicker the
second yellow LED (+3 dB). This level indicates that the Vortex device has a good level for processing while
still retaining about 20 dB of headroom.
GAIN STRUCTURE FOR EXTERNAL AMPLIFIERS AND OTHER
SOURCES
27
Page 28
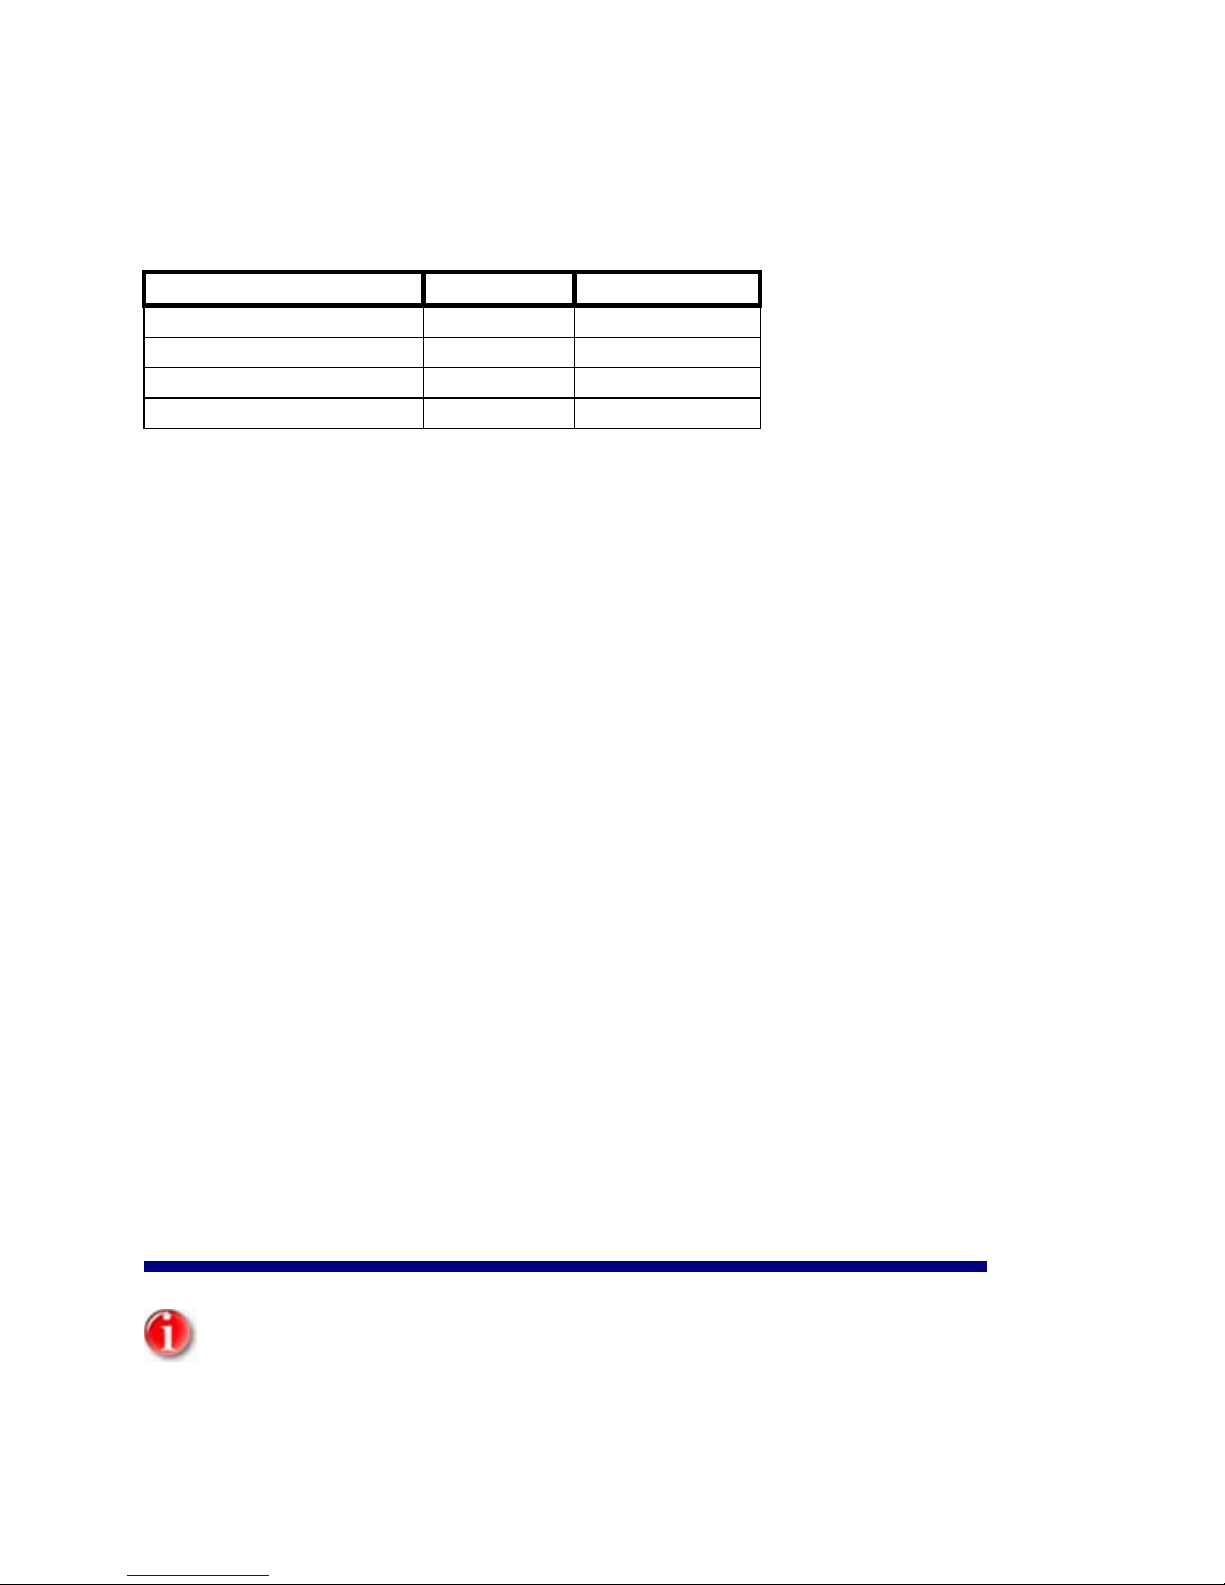
Once the external devices have been wired to the Vortex device, the Input and/or Output gain of the Vortex
device needs to be set to match the nominal level of the external devices. Here is a table that references
the types of connectors to the proper input / output level:
Connector Type Input Gain Output Gain
RCA +10 dB -10 dB
1/8 inch +10 dB -10 dB
XLR 0 dB 0 dB
Phoenix / Terminal Block 0 dB 0 dB
The issue of nominal levels is important because it will affect the gain structure of the Vortex device.
devices that have RCA and 1/8 inch style connectors are normally designed to operate with a nominal level
of .3 Vrms. The Vortex device is designed to operate with a nominal input and output level of .775 Vrms.
This equates to a difference of 8.24 dB between the two nominal levels. For simplicity, you may round that
value to 10 dB. Therefore, the inputs of the Vortex that receive consumer level outputs need to be set to
+10 dB in order to achieve a unity gain. The outputs of the Vortex will be about 10 dB too high for the
consumer level equipment and, in turn, need to be set to -10 dB to avoid clipping and to maintain enough
headroom in the consumer level devices.
The Input gain of a Vortex device that is connected to a SoundStation VTX 1000 should be set to +10 dB.
The Output gain of a Vortex device that is connected to a SoundStation VTX 1000 should be set to -10 dB.
10.) E
You must perform this step; otherwise, you will not be able to operate the SoundStation
VTX 1000 properly.
NABLE VTX MODE IN THE VORTEX DEVICE
28
Page 29

1. Enable SoundStation VTX 1000 Mode for the appropriate input of the Vortex device. This can be
done from Conference Composer or via the front panel of the unit. In Conference Composer, go to
the Inputs page and click the SoundStation VTX 1000 Mode button:
From the front panel, go to the V
input, use the D
P, and then ENTER to enable VTX Mode.
U
OWN or UP buttons to scroll the menu items until you see VTX MODE. Press ENTER,
ORTEX INPUT SETTINGS menu item, press ENTER, select the appropriate
2. Enable SoundStation VTX 1000 Mode for the appropriate Output of the Vortex device. This can be
done from Conference Composer of via the front panel of the unit. In Conference Composer, go to
the Outputs page and click the SoundStation VTX 1000 Mode button:
29
Page 30
From the front panel, go to the V
appropriate input, use the D
Press E
NTER, UP, and then ENTER to enable VTX Mode.
ORTEX OUTPUT SETTINGS menu item, press ENTER, select the
OWN or UP buttons to scroll the menu items until you see VTX MODE.
11.) MAKING A TEST CALL WITH
30
Page 31

SOUNDSTATION VTX 1000
1. Press the P
connected to a analog telephone line.
2. Dial a telephone number via the Keypad.
3. If the far end has also has a SoundStation VTX 1000, you will connect in wideband mode.
4. Use the VOLUME UP and DOWN buttons to control the far end volume.
5. Use the M
far end audio into the local room.
6. If a video codec is connected to the system, we recommend making a video call to another party.
Make sure the local and far ends can hear each other.
HONE BUTTON. You should hear a dial tone in the room if the interface module is
UTE button to mute the local audio to the far end. The MUTE button does not effect the
V
ORTEX EF2280 EXAMPLES
31
Page 32

8 MICS, 4 LOUDSPEAKERS
INTRODUCTION / ROOM LAYOUT
This example illustrates a 23 ft. X 17 ft. X 10 ft. conference room that has 8 tabletop microphones and 4
ceiling loudspeakers. The system includes a Vortex EF2280 matrix mixer, a video codec, a program audio
source, and the SoundStation VTX 1000. There is no sound reinforcement in this room.
32
Page 33

33
Page 34

SYSTEM LAYOUT
The audio components for the room are 8 tabletop microphones, 1 Vortex EF2280, 1 video codec, 1 program
audio source, 1 SoundStation VTX 1000, and 4 ceiling loudspeakers. The interface module will use Input B
/ Output B. The video codec will use Input A / Output A. The program audio will use Inputs C and D. The
amplifier will use Output C and a subwoofer will use Output D.
We will assume that the microphones and amplifier have balanced connections (.775 Vrms professional
nominal levels). The Interface Module, subwoofer, program audio, and video codec will have unbalanced
connections (typically .3 Vrms consumer nominal levels).
We will set the output to the subwoofer at -30 dB in order to protect the subwoofer from "bottoming out"
on high-amplitude transient sounds.
34
Page 35

35
Page 36

CONFERENCE COMPOSER LAYOUT
Most of the default parameters of the Vortex EF2280 will satisfy our design. However, we will need to
change the Mic/Line Inputs, Matrix Mixer, Output Filters, Outputs, and Presets to satisfy our design goals.
Mic/Line Inputs
The VTX Mode Option for Input B needs to be selected so that the SoundStation VTX 1000 can make
wideband audio calls.
36
Page 37

Matrix Mixer
The matrix mixer will need to be changed from the default settings in order to use Output A for the Video
Codec, Output B for the Interface Module, Output C for the Amplifier, and Output D for the Subwoofer.
Inputs 1-8 need to be assigned to Outputs A and B so that the people on the far end of a SoundStation VTX
1000 or video codec call can hear the local microphones. The cross-points are colored blue to indicate that
they are gated to Outputs A and B.
The Interface Module (Input B) needs to be assigned to all outputs except Output B. If Input B is assigned
to Output B, then you will create a loopback inside the Vortex EF2280. This will cause the far end of the
SoundStation VTX 1000 to hear an "echo" of themselves although it is an electronically created echo and
not an acoustic echo. The same logic applies to the video codec (Input A / Output A).
Inputs C and D are attenuated by 3 dB to Outputs B, C, D and R1 because if the left and right channels are
mono, both channels will increase 6 dB in gain
if a program source is mixed at 0 dB with local speech, it may be difficult for the remote person on the
telephone to distinguish between the program audio and the local speech due to the frequency limitations
of the telephone network. By attenuating the program audio, you "bias" the audio sent to the telephone in
favor of the local speech.
In this example, we will assume that the video codec and program audio outputs are designed to send
and/or receive a consumer level signal. Therefore, Inputs A, B, C, and D and Outputs A and B will be set to
+10 dB (Inputs) and -10 dB (Outputs) respectively. Please refer to the section entitled “Gain Structure”
under the W
IRING THE SOUNDSTATION VTX 1000 TO A VORTEX DEVICE heading for more information as to the
reasoning behind the gain levels.
Output D will be set to -30 dB in order to protect the subwoofer from "bottoming out" on high-amplitude
transient sounds.
The output R1 is our Acoustic Echo Canceller (AEC) reference signal. This signal is what the internal AEC
uses to remove from the local microphones. In our example, we will remove the codec, telephone hybrid
audio, SoundStation VTX 1000 audio, and program audio from the local microphones.
1
. Inputs C and D are reduced by 10 dB to Output A because
Local Microphones should NEVER be included in the reference signal!
1
If two signals with an amplitude of 1V peak-to-peak each are added together, the summed signal’s amplitude will be 2V peak-
to-peak. In terms of decibels, that can be expressed as 20*log (2V / 1V) which equals 6 dB).
37
Page 38

Output Filters
38
Page 39

Since we have the SoundStation VTX 1000's subwoofer in the system design, we need to use filters to
direct the energy of the incoming signal to the appropriate loudspeakers. Since the subwoofer is designed
to handle low frequency energy, a Linkwitz-Riley low pass filter has been assigned to Output D. The cutoff
frequency is 250 Hertz, meaning that above that frequency, the signal will be attenuated at a rate of 12 dB /
octave.
The ceiling loudspeakers may not be able to reproduce low frequency energy. Since the subwoofer handles
that job, we will remove low frequency energy from the ceiling loudspeakers via a Linkwitz-Riley high pass
filter has been assigned to Output C. The cutoff frequency is 250 Hertz, meaning that below that frequency,
39
Page 40

the signal will be attenuated at a rate of 12 dB / octave.
Outputs
The VTX Mode Option for Output B needs to be selected so that the SoundStation VTX 1000 can make
wideband audio calls.
40
Page 41

Presets
In order to permanently save the settings to the Vortex EF2280, you must use a User Preset. Here, we've
RESET 16, although you may use any of the User Presets 16-47 to accomplish this task. We've also
used P
renamed U
SER PRESET 16 to CONFERENCE ROOM. Once the User Preset has been saved, you must also change
41
Page 42

the POWER ON PRESET to reflect the proper Preset that you want the unit to power up to if the unit loses AC
power.
12 MICS, 8 LOUDSPEAKERS, 4 ZONES SOUND
42
Page 43

REINFORCEMENT
INTRODUCTION / ROOM LAYOUT
This example illustrates a 24 ft. X 50 ft. X 10 ft. conference room that has 12 tabletop microphones and 8
ceiling loudspeakers. The system includes a Vortex EF2280 matrix mixer, a Vortex EF2241 matrix mixer /
telephone hybrid, a video codec, the SoundStation VTX 1000, and a program audio source.
We want both Vortex devices to function as one automixer so as to allow only four microphones to gate on
at any one time.
We want the Vortex EF2241 to automatically hang up on loop current or call progress tones. For privacy
reasons, we do not want the Vortex EF2241 to auto answer.
There are 4 zones of sound reinforcement in this room. Here are the loudspeaker zone / reinforced
microphone assignments:
Loudspeaker Zone Microphones
Zone 1 4 - 10
Zone 2 6 - 8
Zone 3 1 - 2, 12
Zone 4 1 - 4, 10 - 12
43
Page 44

44
Page 45

SYSTEM LAYOUT
The audio components for the room are 12 tabletop microphones, 1 Vortex EF2280, 1 Vortex EF2241, 1 video
codec, 1, 4-channel amplifier, 1 program audio source, 1 SoundStation VTX 1000, and 8 ceiling
loudspeakers. Microphones 1-8 will use Inputs 1-8 on the Vortex EF2280 and Microphones 9-12 will use
Inputs 1-4 on the Vortex EF2241. The video codec will use Input A / Output A of the Vortex EF2280. The
program source will use Inputs B and C of the Vortex EF2280. The Interface Module for the SoundStation
VTX 1000 will use Input B / Output B of the Vortex EF2241 and the subwoofer will use Output D of the
Vortex EF2241. The amplifier will use Outputs 1-4 of the Vortex EF2280. There will be 4 sound
reinforcement zones with 2 loudspeakers assigned to each zone.
We will assume that the microphones, program audio, and amplifier have balanced connections (.775 Vrms
professional nominal levels). The Interface Module, subwoofer, and video codec will have unbalanced
connections (typically .3 Vrms consumer nominal levels).
We will set the output to the subwoofer at -30 dB in order to protect the subwoofer from "bottoming out"
on high-amplitude transient sounds.
The telephone wall jack is connected to the L
calls can be controlled via an external control system. The P
the phone jack on the VTX Interface Module in order to facilitate wideband calls from the SoundStation VTX
1000.
INE jack of the Vortex EF2241 so that narrowband telephone
HONE jack of the Vortex EF2241 is connected to
45
Page 46

46
Page 47

CONFERENCE COMPOSER LAYOUT VORTEX EF2241
Most of the default parameters of the Vortex EF2241 will satisfy our design such as microphone gains.
However, we will need to re-label the EFBus for clarity and change the Options, Mic/Line Inputs, Automixer,
Matrix Mixer, Output Filters, Outputs, and Presets to satisfy our design goals.
Options
One of our design goals was to have the Vortex EF2241 automatically hang up if the unit detected a drop in
loop current or a call progress tone such as a busy signal. To achieve that goal, the AUTO HANGUP (CALL
PROGRESS BASED
) and the AUTO HANGUP (LOOP DROP BASED) boxes should be checked.
Mic/Line Inputs
47
Page 48

The VTX Mode Option for Input B needs to be selected so that the SoundStation VTX 1000 can make
wideband audio calls.
Automixer
One of our design requirements was to make each Vortex device operate as one 12-channel automixer in
order to limit the maximum number of open microphones to 4 across both units. In order to achieve that,
we need to set the G
and the Bus Mixer is set to 1 (The Bus Mixer refers to the ability of each unit to send and receive the
Automixing information from each unit over the EFBus. In order for both units to function as one automixer,
the Bus Mixer ID needs to be set to the same value. In this case, the default is 1. A Bus Mixer ID of 0
means that each unit will function as a separate Automixer and that unit will not send its automixer
information to any other linked unit(s)).
LOBAL MAX NOM to 4 on both linked units. By default, the LOCAL MAX NOM is set to 4
48
Page 49

EFBus
The default routing of the EFBus will be sufficient for our design. However, for clarity, the labels have been
changed to reflect the signals that are placed onto the bus and all unneeded cross-points have been muted.
Since the Vortex EF2280 uses the W and Y buses to send microphone, codec, and program audio to the
Vortex EF2241 and the ID of the Vortex EF2280 is 00, the audio signals WB0 and YB0 need to be routed to
Inputs WM0 and YM0 of the Vortex EF2280. Remember that the signals that a unit places onto the EFBus
is put into a placeholder where that placeholder is identified by the device ID of the unit that put the audio
signal into this placeholder. Here, the Vortex EF2280 placed audio onto the W and Y buses and since the
unit has a device ID of 00, the placeholder is identified as WB0 and YB0 where the "B" stands for bus. The
Vortex EF2241 takes that signal from the bus and internally assigns that signal to one of three mixes for the
W Bus (WM0, WM1, or WM2) and one of three mixes for the Y Bus (YM0, YM1, or YM2) where the "M"
stands for mix. By default, WM0 and YM0 are routed to Output T of the matrix mixer, so we will keep that
default routing and use the WM0 and YM0 mixes for this example.
49
Page 50

50
Page 51

Matrix Mixer
The matrix mixer will need to be changed from the default settings in order to send Inputs 1-4 as well as
Output W, X, Y, and Z bus channel. Note that since Inputs 1-4 are microphones, the cross-points are
colored blue to indicate that they are gated to Outputs W, X, Y, and Z. The default routing to Output B and
T will satisfy our design goals.
The outputs P, W, X, Y, and Z are signals that will be sent over the EFBus to the Vortex EF2280. See the
section entitled Conference Composer Layout Vortex EF2280 to find out how to take those signals from the
bus and send them to the loudspeakers and video codec.
Input B and Output B are set to +10 dB and -10 dB respectively. Please refer to the section entitled “Gain
Structure” under the W
to the reasoning behind the gain levels.
We will set Output D to -30 dB in order to protect the subwoofer from "bottoming out" on high-amplitude
transient sounds.
The output R1 is our Acoustic Echo Canceller (AEC) reference signal. This signal is what the internal AEC
uses to remove from the local microphones. In our example, we will remove the codec, telephone,
SoundStation VTX 1000, and program audio from the local microphones. Note that local microphones are
not included in the Reference Signal even though we are reinforcing them.
IRING THE SOUNDSTATION VTX 1000 TO A VORTEX DEVICE heading for more information as
Local Microphones should NEVER be included in the reference signal!
51
Page 52

52
Page 53

Output Filters
Since we have the SoundStation VTX 1000's subwoofer in the system design, we need to use filters to
direct the energy of the incoming signal to the appropriate loudspeakers. Since the subwoofer is designed
to handle low frequency energy, a Linkwitz-Riley low pass filter has been assigned to Output D. The cutoff
frequency is 250 Hertz, meaning that above that frequency, the signal will be attenuated at a rate of 12 dB /
octave.
Outputs
53
Page 54

The VTX Mode Option for Output B needs to be selected so that the SoundStation VTX 1000 can make
wideband audio calls.
Presets
54
Page 55

In order to permanently save the settings to the Vortex EF2241, you must use a User Preset. Here, we've
used P
RESET 16, although you may use any of the User Presets 16-47 to accomplish this task. We've also
renamed U
SER PRESET 16 to CONFERENCE ROOM. Once the User Preset has been saved, you must also change
the POWER ON PRESET to reflect the proper Preset that you want the unit to power up to if the unit loses AC
power.
CONFERENCE COMPOSER LAYOUT VORTEX EF2280
55
Page 56

Most of the default parameters of the Vortex EF2280 will satisfy our design such as microphone gains.
However, we will need to re-label the EFBus for clarity and change the Automixer, Matrix Mixer, Output
Filters, and Presets to satisfy our design goals.
Automixer
One of our design requirements was to make each Vortex device operate as one 12-channel automixer in
order to limit the maximum number of open microphones to 4 across both units. In order to achieve that,
we need to set the G
and the Bus Mixer is set to 1 (The Bus Mixer refers to the ability of each unit to send and receive the
Automixing information from each unit over the EFBus. In order for both units to function as one automixer,
the Bus Mixer ID needs to be set to the same value. In this case, the default is 1. A Bus Mixer ID of 0
means that each unit will function as a separate Automixer and that unit will not send its automixer
information to any other linked unit(s)).
LOBAL MAX NOM to 4 on both linked units. By default, the LOCAL MAX NOM is set to 4
EFBus
The default routing of the EFBus will be sufficient for our design. However, for clarity, the labels have been
changed to reflect the signals that are placed onto the bus and all unneeded cross-points have been muted.
Since the Vortex EF2241 uses the P Bus to send telephone and SoundStation VTX 1000 audio to the Vortex
EF2280 and the ID of the Vortex EF2241 is 01, the audio signal PB1 needs to be routed to Input PM0 of the
Vortex EF2280. Also, for sound reinforcement purposes, each Mic Input audio signal of the Vortex EF2241
has been placed in its own channel. This means that Input 9 has been assigned to WB1, Input 10 assigned
to XB1, Input 11 assigned to YB1, and Input 12 assigned to ZB1. Remember that the signals that a unit
places onto the EFBus is put into a placeholder where that placeholder is identified by the device ID of the
unit that put the audio signal into this placeholder. Here, the Vortex EF2241 places audio onto the P, W, X,
Y, and Z Buses and since the unit has a device ID of 01, the placeholders are identified as PB1, WB1, XB1,
YB1, and ZB1 where the "B" stands for bus. The Vortex EF2280 takes those signals from the bus and
internally assigns those signals to various submixes. In the case of the P Bus, the Vortex EF2280 assigns
that audio to one of two mixes for the P Bus: PM0 or PM1 where the "M" stands for mix. In the case of the
56
Page 57

W, X, Y, and Z buses, the Vortex EF2280 assigns that audio to one of three mixes for the W, X, Y, and Z
Buses: WM0, WM1, WM2, XM0, XM1, XM2, YM0, YM1, YM2, ZM0, ZM1, or ZM2 where the "M" stands
for mix.
Matrix Mixer
The matrix mixer will need to be changed from the default settings in order to use Outputs 1-4 for the
57
Page 58

amplifier. Inputs A, B, and C need to be assigned to Outputs 1-4 and Y. By default, Inputs 1-8 are routed to
Output's A and W. Note that since Inputs 1-8 are microphones, the cross-points are colored blue to
indicate that they are gated to Outputs 1-4, B, and W.
Inputs B and C are attenuated by 3 dB to Outputs 1-4, A, and R1 because if the left and right channels are
mono, both channels will increase 6 dB in gain
2
. Inputs B and C are reduced by 10 dB to Output A because
if a program source is mixed at 0 dB with local speech, it may be difficult for the remote person on the
telephone to distinguish between the program audio and the local speech due to the frequency limitations
of the telephone network. By attenuating the program audio, you "bias" the audio sent to the telephone in
favor of the local speech.
Inputs A, B, and C and Output A are set to +10 dB and -10 dB respectively. Please refer to the section
entitled “Gain Structure” under the W
IRING THE SOUNDSTATION VTX 1000 TO A VORTEX DEVICE heading for more
information as to the reasoning behind the gain levels.
The outputs W and Y are signals that will be sent over the EFBus to the Vortex EF2241. See the section
entitled Conference Composer Layout Vortex EF2241 to find out how to take those signals from the bus and
send them to the telephone line and the interface module.
In order to properly reinforce the local speech, we have used cross-point attenuation to achieve a good
listening level in all zones. Remember that the goal of sound reinforcement is to permit the local listeners
to still "localize" to the local talkers while using the reinforced audio to improve the overall intelligibility of
the local speech.
The output R1 is our Acoustic Echo Canceller (AEC) reference signal. This signal is what the internal AEC
uses to remove from the local microphones. In our example, we will remove the codec, telephone,
SoundStation VTX 1000, and program audio from the local microphones. Note that local microphones are
not included in the Reference Signal even though we are reinforcing them.
Local Microphones should NEVER be included in the reference signal!
2
If two signals with an amplitude of 1V peak-to-peak each are added together, the summed signal’s amplitude will be 2V peak-
to-peak. In terms of decibels, that can be expressed as 20*log (2V / 1V) which equals 6 dB).
58
Page 59

59
Page 60

Output Filters
The ceiling loudspeakers may not be able to reproduce low frequency energy. Since the subwoofer that is
connected to the Vortex EF2241 handles that function, we will remove low frequency energy from the
ceiling loudspeakers via a Linkwitz-Riley high pass filter has been assigned to Outputs 1, 2, 3, and 4. The
cutoff frequency is 250 Hertz, meaning that below that frequency, the signal will be attenuated at a rate of
12 dB / octave.
60
Page 61

Presets
In order to permanently save the settings to the Vortex EF2280, you must use a User Preset. Here, we've
used P
RESET 16, although you may use any of the User Presets 16-47 to accomplish this task. We've also
renamed USER PRESET 16 to CONFERENCE ROOM. Once the User Preset has been saved, you must also change
the POWER ON PRESET to reflect the proper Preset that you want the unit to power up to if the unit loses AC
power.
61
Page 62

16 MICS, 8 LOUDSPEAKERS, 2 ZONES SOUND
REINFORCEMENT
INTRODUCTION / ROOM LAYOUT
This example illustrates a 40 ft. X 18 ft. X 10 ft. conference room that has 16 tabletop microphones and 8
ceiling loudspeakers. The system includes 2 Vortex EF2280 matrix mixers, a video codec, a program audio
source, and the SoundStation VTX 1000. There are 2 zones of sound reinforcement in this room.
We want both Vortex devices to function as one automixer so as to allow only four microphones to gate on
at any one time.
We want the Vortex EF2201 to automatically hang up on loop current or call progress tones. For privacy
reasons, we do not want the Vortex EF2201 to auto answer.
62
Page 63

63
Page 64

SYSTEM LAYOUT
The audio components for the room are 16 tabletop microphones, 2 Vortex EF2280's, 1 video codec, 1
program audio source, 1 SoundStation VTX 1000, 1 Vortex EF2201, and 8 ceiling loudspeakers.
Microphones 1-8 will be connected to Vortex EF2280 ID 00 and microphones 9-16 will be connected to
Vortex EF2280 ID 01. The interface module will use Input B / Output B. The video codec will use Input A /
Output A. The program audio will use Inputs C and D. The amplifier will use Outputs 1 and 2 and the
subwoofer will use Output D. There will be 2 sound reinforcement zones with 4 loudspeakers assigned to
each zone.
We will assume that the microphones, program audio, and amplifier have balanced connections (.775 Vrms
professional nominal levels). The Interface Module, subwoofer, and video codec will have unbalanced
connections (typically .3 Vrms consumer nominal levels).
We will set the output to the subwoofer at -30 dB in order to protect the subwoofer from "bottoming out"
on high-amplitude transient sounds.
The telephone wall jack is connected to the L
calls can be controlled via an external control system. The P
the phone jack on the VTX Interface Module in order to facilitate wideband calls from the SoundStation VTX
1000.
INE jack of the Vortex EF2201 so that narrowband telephone
HONE jack of the Vortex EF2201 is connected to
64
Page 65

65
Page 66

CONFERENCE COMPOSER LAYOUT VORTEX EF2280 ID 00
Some of the default parameters of the Vortex EF2280 will satisfy our design. However, we will have to
change the Mic/Line Inputs, Automixer, EFBus, Matrix Mixer, Output Filters, Outputs, and Presets to satisfy
our design goals.
Mic/Line Inputs
The VTX Mode Option for Input B needs to be selected so that the SoundStation VTX 1000 can make
wideband audio calls.
66
Page 67

Automixer
One of our design requirements was to make all Vortex devices operate as one 16-channel automixer in
order to limit the maximum number of open microphones to 4 across both units. In order to achieve that,
we need to set the G
NOM to 4 as well. The difference between the Local Max NOM and the Global Max NOM is that the Local
NOM refers to the number of microphones that can gated on within a single unit. The Global NOM refers
to the number of microphones that can be gate don across both units.
The Bus Mixer is set to 1 in each unit. The Bus Mixer refers to the ability of each unit to send and receive
the Automixing information from each unit over the EFBus. In order for both units to function as one
automixer, the Bus Mixer ID needs to be set to the same value. In this case, the default is 1. A Bus Mixer
ID of 0 means that each unit will function as a separate Automixer and that unit will not send its automixer
information to any other linked unit(s).
LOBAL MAX NOM to 4 on all linked Vortex EF2280’s. We will also set the LOCAL MAX
EFBus
The default routing of the EFBus will not satisfy our design. We will need to make our own custom mixes
to satisfy the requirement of reinforcing certain groups of microphones into different zones at different
levels.
Each Vortex EF2280 can place 4 different signals on the bus (W, X, Y, and Z), but each Vortex EF2280 can
retrieve signals from any of the P, W, X, Y, or Z buses; thus, there are 5 sub-matrices to allow flexibility in
how the signals from other devices get mixed together and get presented to the main matrix.
Inputs to the Submatrix come from the top and outputs are on the left. The "B" part of the inputs stands for
bus and the "M" part of the output stands for mix. Any of the rows of the matrices can be configured as a
mix-minus which allows the user to work with a simple mix-minus sum of all the other devices. Each one of
the 8 inputs represents a signal from another unit that is maintained in its discrete form until this
submatrix. Here you decide which signals to pull off of the bus, what mixes to create, and what gain or
attenuation values to assign to each one of those signals.
67
Page 68

Let's look at the 8 signals WB0-WB7 in the above screenshot. These signals are from 7 other Vortex
devices. In this example, the Vortex EF2280 has a device ID of 00. As a result, the WB0 column is grayed
out because the EF Bus does an automatic mix-minus so that one cannot create a loopback on the EF Bus.
The WB1-WB7 inputs can be assigned to one of the three submixes that are available for each bus channel.
Here, we are creating three mixes for three different zones. These mixes will be available as inputs to the
Matrix Mixer of the Vortex EF2280 so that these signals can be sent to the appropriate reinforcement
zones.
68
Page 69

In order to satisfy the sound reinforcement requirements, Mic 9 in Vortex EF2280 ID 01 has been placed on
the W Bus, Mics 10 and 11 have been placed on the X Bus, Mics 12-14 have been placed on the Y Bus, and
Mics 15-16 have been placed on the Z Bus. In order to remove those signals from the EFBus so that we can
send them to the outputs of Vortex EF2280 ID 00, we need to assign the WB1, XB1, YB1, and ZB1 signals to
one of the three mix signals that are available per each W, X, Y, or Z bus channel (Before we go further,
remember that the "1" after each EFBus Input (WB1, XB1, YB1, and ZB1) refers to the device ID of the unit
that placed that signal onto the bus). In this case, WB1 is assigned to WM0, XB1 is assigned to XM0, YB1
is assigned to YM0, and ZB1 is assigned to ZM0. Once a signal has been assigned to one of the mixes
(WM0 for example), then it is now a valid input to the Matrix Mixer of Vortex EF2280 ID 00.
Also, note that the Vortex EF2280 ID 00 is exporting its reference signal to the EFBus. This is to allow the
same audio signal to be removed from the local microphones in the other Vortex EF2280 in the system.
Only one signal can be exported as a AEC Reference Signal over the entire EFBus. As a result, the other
Vortex EF2280 in the system cannot export a signal (and should not need to).
Matrix Mixer
The matrix mixer will need to be changed from the default settings in order to use Outputs 1 and 2 for the
Amplifier, Output A for the video codec, Output B for the Interface Module, and Output D for the Subwoofer.
Inputs 1-8 need to be assigned to Outputs A and B so that the people on the far end of a SoundStation VTX
1000 or video codec call can hear the local microphones. The cross-points are colored blue to indicate that
they are gated to Outputs A and B.
Inputs C and D are attenuated by 3 dB to Outputs D, Y, and R1 because if the left and right channels are
mono, both channels will increase 6 dB in gain
because if a program source is mixed at 0 dB with local speech, it may be difficult for the remote person on
the telephone to distinguish between the program audio and the local speech because of the frequency
limitations of the telephone network. By attenuating the program audio, you "bias" the audio sent to the
telephone in favor of the local speech.
The Interface Module (Input B) needs to be assigned to all outputs except Output B. If Input B is assigned
to Output B, then you will create a loopback inside the Vortex EF2280. This will cause the far end of the
SoundStation VTX 1000 to hear an "echo" of themselves although it is an electronically created echo and
not an acoustic echo. The same logic applies to the video codec (Input A / Output A).
Inputs A, B, C, and D and Outputs A and B are set to +10 dB and -10 dB respectively. Please refer to the
section entitled “Gain Structure” under the W
for more information as to the reasoning behind the gain levels.
3
Inputs C and D are reduced by 10 dB to Output A and B
IRING THE SOUNDSTATION VTX 1000 TO A VORTEX DEVICE heading
3
If two signals with an amplitude of 1V peak-to-peak each are added together, the summed signal’s amplitude will be 2V peak-
to-peak. In terms of decibels, that can be expressed as 20*log (2V / 1V) which equals 6 dB).
69
Page 70

We will set Output D to -30 dB in order to protect the subwoofer from "bottoming out" on high-amplitude
transient sounds.
The output R1 is our Acoustic Echo Canceller (AEC) reference signal. This signal is what the internal AEC
uses to remove from the local microphones. In our example, we will remove the codec, telephone,
SoundStation VTX 1000, and program audio from the local microphones. Note that local microphones are
not included in the Reference Signal even though we are reinforcing them.
In this example, we will assume that the video codec and program audio outputs are designed to send
and/or receive a consumer level signal This signal represents the nominal level that the device will output
audio. Typically, this level is .3 Vrms. You can usually identify these types of devices if they use an "RCA"
connector. The Interface Module and subwoofer use RCA connectors.
We will set Output D to -30 dB in order to protect the subwoofer from "bottoming out" on high-amplitude
transient sounds.
The crosspoint levels for the reinforced microphones to Outputs 1 and 2 have been set so that people who
will be sitting furthest from the loudspeaker zone will receive the most amplification. Those who are sitting
closest to the loudspeaker zone will receive either no reinforcement or very little. Please note that the
overall goal of sound reinforcement is not to amplify everyone in the room at the same level to all
loudspeaker zones. Rather, the goal is to improve the intelligibility of the speech without altering the
listeners ability to spatially recognize who and where a talker is located in the room. If done correctly, the
electronic reinforcement should be transparent to those in the room and that is the reason for the different
crosspoint levels based on microphone and loudspeaker location in the room.
The output R1 is our Acoustic Echo Canceller (AEC) reference signal. This signal is what the internal AEC
uses to remove from the local microphones. In our example, we will remove the codec, telephone hybrid
audio, SoundStation VTX 1000 audio, and program audio from the local microphones.
Local Microphones should NEVER be included in the reference signal!
70
Page 71

71
Page 72

Output Filters
Since we have the SoundStation VTX 1000's subwoofer in the system design, we need to use filters to
direct the energy of the incoming signal to the appropriate loudspeakers. Since the subwoofer is designed
to handle low frequency energy, a Linkwitz-Riley low pass filter has been assigned to Output D. The cutoff
frequency is 250 Hertz, meaning that above that frequency, the signal will be attenuated at a rate of 12 dB /
octave.
72
Page 73

The ceiling loudspeakers may not be able to reproduce low frequency energy. Since the subwoofer handles
that job, we will remove low frequency energy from the ceiling loudspeakers via a Linkwitz-Riley high pass
filter has been assigned to Outputs 1 and 2. The cutoff frequency is 250 Hertz, meaning that below that
frequency, the signal will be attenuated at a rate of 12 dB / octave.
73
Page 74

Outputs
The VTX Mode Option for Output B needs to be selected so that the SoundStation VTX 1000 can make
wideband audio calls.
74
Page 75

Presets
In order to permanently save the settings to the Vortex EF2280, you must use a User Preset. Here, we've
RESET 16, although you may use any of the User Presets 16-47 to accomplish this task. We've also
used P
renamed U
the POWER ON PRESET to reflect the proper Preset that you want the unit to power up to if the unit loses AC
power.
SER PRESET 16 to CONFERENCE ROOM. Once the User Preset has been saved, you must also change
CONFERENCE COMPOSER LAYOUT VORTEX EF2280 ID 01
75
Page 76

Some of the default parameters of the Vortex EF2280 will satisfy our design. However, we will have to
change the Automixer, Matrix Mixer, and Presets to satisfy our design goals.
Automixer
One of our design requirements was to make all Vortex devices operate as one 16-channel automixer in
order to limit the maximum number of open microphones to 4 across both units. In order to achieve that,
we need to set the G
4 as well. The difference between the Local Max NOM and the Global Max NOM is that the Local NOM
refers to the number of microphones that can gated on within a single unit. The Global NOM refers to the
number of microphones that can be gate don across both units.
The Bus Mixer is set to 1 in each unit. The Bus Mixer refers to the ability of each unit to send and receive
the Automixing information from each unit over the EFBus. In order for both units to function as one
automixer, the Bus Mixer ID needs to be set to the same value. In this case, the default is 1. A Bus Mixer
ID of 0 means that each unit will function as a separate Automixer and that unit will not send its automixer
information to any other linked unit(s).
LOBAL MAX NOM to 4 on both Vortex EF2280’s. We will also set the LOCAL MAX NOM to
Matrix Mixer
The matrix mixer will need to be changed from the default settings in order properly send Microphones 9-16
from Vortex EF2280 ID 01 to Vortex EF2280 ID 00. The microphone / EFBus assignments were based on the
relationship of the microphones and loudspeakers in the room so that in Vortex EF2280 ID 00 we can
achieve uniform sound reinforcement in the room. Remember that people who will be sitting furthest from
the loudspeaker zone will receive the most amplification and those who are sitting closest to the
loudspeaker zone will receive either no reinforcement or very little. By assigning different microphones to
different EFBus channels, we will have the ability to create the appropriate reinforcement zones with the
appropriate levels in Vortex EF2280 ID 00.
Please see the Matrix Mixer for Vortex EF2280 ID 00 for more information.
Note that the AEC for each Input 1-8 has been set to Bus. This signal is generated from the R1 mix of
Vortex EF2280 ID 00 and Vortex EF2280 ID 01 is using this signal from the EFBus as its echo canceller
reference.
76
Page 77
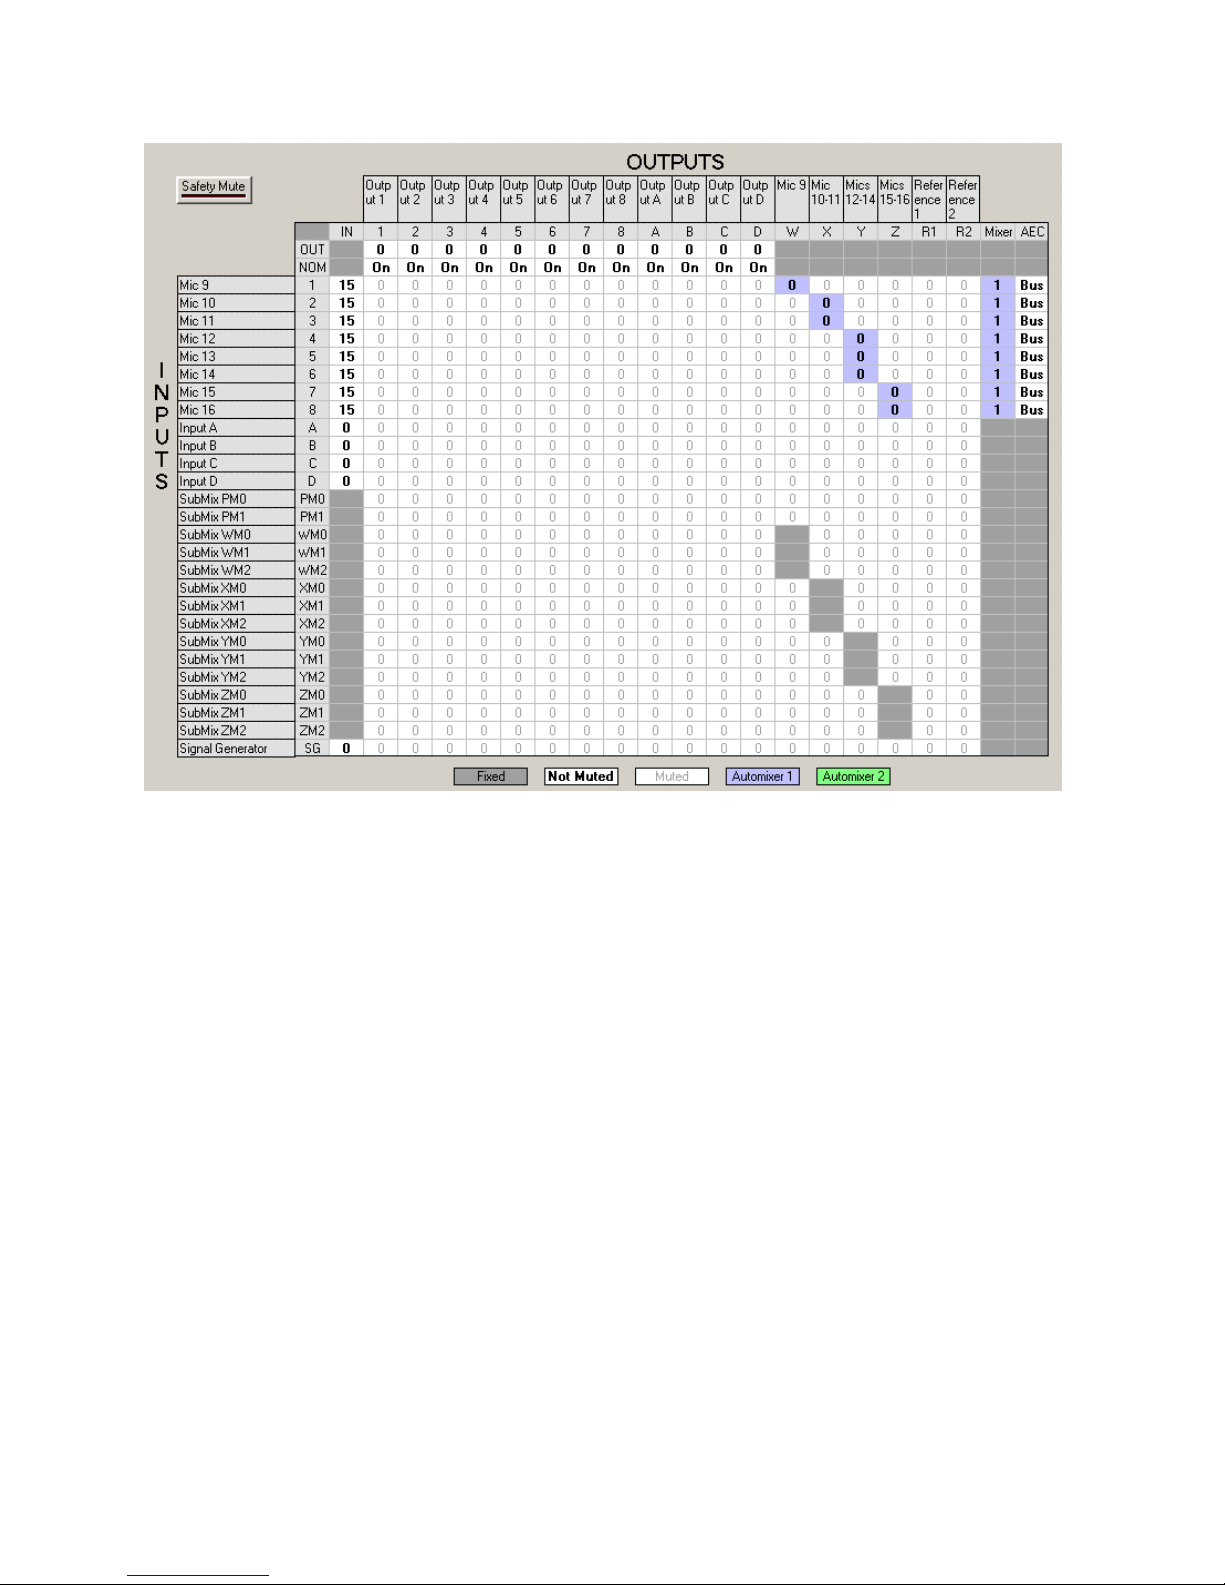
Presets
In order to permanently save the settings to the Vortex EF2280, you must use a User Preset. Here, we've
used P
RESET 16, although you may use any of the User Presets 16-47 to accomplish this task. We've also
77
Page 78
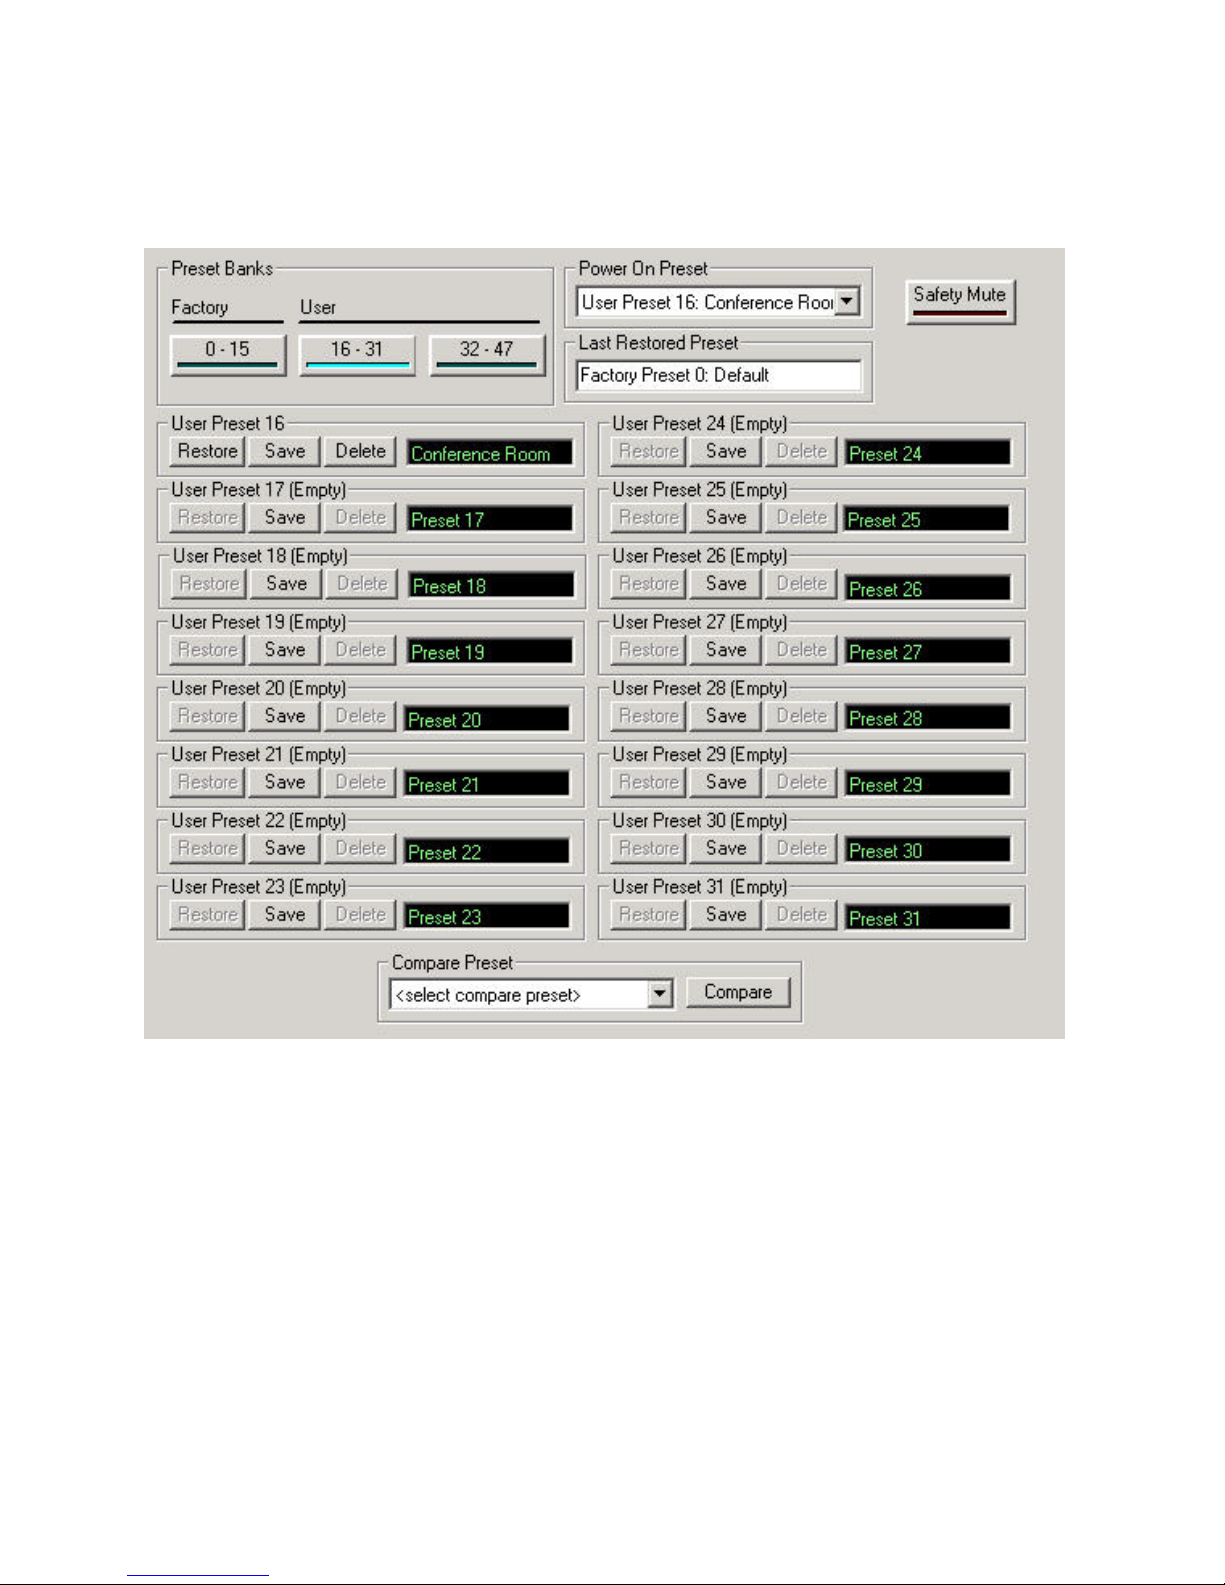
renamed USER PRESET 16 to CONFERENCE ROOM. Once the User Preset has been saved, you must also change
the POWER ON PRESET to reflect the proper Preset that you want the unit to power up to if the unit loses AC
power.
CONFERENCE COMPOSER LAYOUT VORTEX EF2201
Most of the default parameters of the Vortex EF2201's will satisfy our design. We will have to change the
78
Page 79

Options, EFBus, Matrix Mixer and Presets to satisfy our design goals.
Options
One of our design goals was to have the Vortex EF2201 automatically hang up if the unit detected a drop in
loop current or a call progress tone such as a busy signal. To achieve that goal, the A
PROGRESS BASED
) and the AUTO HANGUP (LOOP DROP BASED) boxes should be checked.
UTO HANGUP (CALL
EFBus
79
Page 80

The Vortex EF2201 can place 1 signal on the bus (P) but can retrieve signals from any of the P (except ID 00),
W, X, Y, or Z buses; thus, there are 5 sub-matrices to allow flexibility in how the signals from other devices
get mixed together and are presented to the main matrix.
Inputs to the Submatrix come from the top and outputs are on the left. The "B" part of the inputs stands for
bus and the "M" part of the output stands for mix. Any of the rows of the matrices can be configured as a
80
Page 81

mix-minus which allows the user to work with a simple mix-minus sum of all the other devices. If more
complicated mixing from other devices is required, any of the matrix rows can have arbitrary cross points
gains. Each one of the 8 inputs represents a signal from another unit that is maintained in its discrete form
until this submatrix. Here you decide which signals to pull off of the bus, what mixes to create, and what
gain or attenuation values to assign to each one of those signals.
The Vortex EF2201 only transmits and receives audio on the P Bus. For each channel that the device
transmits on, there is an automatic mix-minus performed so that one cannot create a loopback on the EF
Bus. This restriction is based on the device ID of the unit. Using the above screenshot as an example, the
device ID of the Vortex EF2201 is 00. As a result, the PB0 cross-points are grayed out.
Since the Vortex EF2201 does not transmit on the W, X, Y, or Z busses, there are no grayed out crosspoints. Let's look at the 8 signals WB0-WB7. These signals are from 8 other Vortex devices. The WB0WB7 inputs can be assigned to one of the three submixes that are available for each bus channel. This lets
you create one overall mix at 0 dB to send to a codec or phone hybrid, and two other submixes for sound
reinforcement applications. The same logic can be extended to the P, X, Y, and Z busses with the exception
that the P bus cross-points will always be grayed out based on the device ID of the unit you are working
with.
The routing here is fairly straightforward. We do not need discrete mixes of all the microphones in the
system so it is OK to make mixes of all microphones in the system. We need to make sure that the Program
Audio signals are kept separate from any other signals so that those signals can be attenuated before those
signals are sent to the far side of the telephone call (see the Matrix Mixer for more information on why that
made be necessary).
Matrix Mixer
81
Page 82

Each group of microphones, the codec, and the interface module are sent at 0 dB to Output T. The Program
Audio signals are attenuated by 10 dB and then sent to Output T. This is done so that the local and codec
speech are "biased" above the program audio. If the program audio is sent at 0 dB to the far side caller, it
may be difficult for the far side caller to differentiate between local speech and program audio if both
signals are active at the same time.
Presets
82
Page 83

In order to permanently save the settings to the Vortex EF2201, you must use a User Preset. Here, we've
used Preset 16, although you may use any of the User Presets 16-47 to accomplish this task. We've also
renamed User Preset 16 to Classroom. Once the User Preset has been saved, you must also change the
Power on Preset to reflect the proper Preset that you want the unit to power up to if the unit loses AC
power.
83
Page 84

VORTEX EF2241 EXAMPLES
12 MICS, 8 LOUDSPEAKERS, 4 ZONES SOUND
REINFORCEMENT
See the section entitled “12 Mics, 8 Loudspeakers, 4 Zones Sound Reinforcement” in the Vortex EF2280
Examples section.
4 M
ICS, 2 LOUDSPEAKERS
INTRODUCTION / ROOM LAYOUT
This example illustrates a 15 ft. X 15 ft. X 10 ft. conference room that has 4 tabletop microphones and 2
ceiling loudspeakers. The system includes an Vortex EF2241 matrix mixer / telephone hybrid, a video
codec, a program audio source, and the SoundStation VTX 1000. There is no sound reinforcement in this
room.
84
Page 85

85
Page 86

SYSTEM LAYOUT
The audio components for the room are 4 tabletop microphones, 1 Vortex EF2241, 1 video codec, 1 program
audio source, 1 SoundStation VTX 1000, and 2 ceiling loudspeakers. The loudspeakers are wired in parallel
to match the load requirements of the loudspeaker output of the Vortex EF2241 (4-8 ohms). Since the
loudspeakers have an impedance of 8 ohms each, we can wire them in parallel and then the impedance of
both loudspeakers will be 4 ohms. The equation to calculate that value is:
Each of the microphones will use Inputs 1-4. The interface module will use Input B / Output B. The video
codec will use Input A / Output A. The program source will use Inputs C and D. The subwoofer will use
Output D. The loudspeakers will use Output L.
We will assume that the microphones have balanced connections (.775 Vrms professional nominal levels).
The Interface Module, subwoofer, program audio, and video codec will have unbalanced connections
(typically .3 Vrms consumer nominal levels).
We will set the output to the subwoofer at -30 dB in order to protect the subwoofer from "bottoming out"
on high-amplitude transient sounds.
The telephone wall jack is connected to the L
calls can be controlled via an external control system. The P
the phone jack on the VTX Interface Module in order to facilitate wideband calls from the SoundStation VTX
1000.
INE jack of the Vortex EF2241 so that narrowband telephone
HONE jack of the Vortex EF2241 is connected to
86
Page 87

87
Page 88

CONFERENCE COMPOSER LAYOUT
Most of the default parameters of the Vortex EF2241 will satisfy our design. However, we will need to
change the Mic/Line Inputs, Options, Matrix Mixer, Output Filters, Outputs, and Presets to satisfy our
design goals.
Options
One of our design goals was to have the Vortex EF2241 automatically hang up if the unit detected a drop in
loop current or a call progress tone such as a busy signal. To achieve that goal, the A
PROGRESS BASED
) and the AUTO HANGUP (LOOP DROP BASED) boxes should be checked.
UTO HANGUP (CALL
88
Page 89

Mic/Line Inputs
The VTX Mode Option for Input B needs to be selected so that the SoundStation VTX 1000 can make
wideband audio calls.
Matrix Mixer
The matrix mixer will need to be changed from the default settings in order to use Output B for the Interface
Module, Output D for the subwoofer, Output A for the video codec, and Output L for the loudspeaker.
Inputs 1-4 need to be assigned to Outputs A, B, and T so that the people on the far end of a SoundStation
VTX 1000, video codec, or telephone hybrid call can hear the local microphones. The cross-points are
colored blue to indicate that they are gated to Outputs A, B, and T.
The Interface Module (Input B) needs to be assigned to all outputs except Output B. If Input B is assigned
to Output B, then you will create a loopback inside the Vortex EF2241. This will cause the far end of the
SoundStation VTX 1000 to hear an "echo" of themselves although it is an electronically created echo and
not an acoustic echo. The same logic applies to the video codec (Input A / Output A) and the telephone
hybrid of the Vortex EF2241 (Input T / Output T).
89
Page 90

Inputs C and D are attenuated by 3 dB to Outputs D, Y, and R1 because if the left and right channels are
mono, both channels will increase 6 dB in gain
4
. Inputs C and D are reduced by 10 dB to Output B and T
because if a program source is mixed at 0 dB with local speech, it may be difficult for the remote person on
the telephone to distinguish between the program audio and the local speech due to the frequency
limitations of the telephone network. By attenuating the program audio, you "bias" the audio sent to the
telephone in favor of the local speech.
We will set Output C to -30 dB in order to protect the subwoofer from "bottoming out" on high-amplitude
transient sounds.
The output R1 is our Acoustic Echo Canceller (AEC) reference signal. This signal is what the internal AEC
uses to remove from the local microphones. In our example, we will remove the codec, telephone hybrid
audio, SoundStation VTX 1000 audio, and program audio from the local microphones.
Local Microphones should NEVER be included in the reference signal!
Output Filters
4
If two signals with an amplitude of 1V peak-to-peak each are added together, the summed signal’s amplitude will be 2V peak-
to-peak. In terms of decibels, that can be expressed as 20*log (2V / 1V) which equals 6 dB).
90
Page 91

Since we have the SoundStation VTX 1000's subwoofer in the system design, we need to use filters to
direct the energy of the incoming signal to the appropriate loudspeakers. Since the subwoofer is designed
to handle low frequency energy, a Linkwitz-Riley low pass filter has been assigned to Output D. The cutoff
frequency is 250 Hertz, meaning that above that frequency, the signal will be attenuated at a rate of 12 dB /
octave.
The ceiling loudspeakers may not be able to reproduce low frequency energy. Since the subwoofer handles
that job, we will remove low frequency energy from the ceiling loudspeakers via a Linkwitz-Riley high pass
filter has been assigned to Output L. The cutoff frequency is 250 Hertz, meaning that below that frequency,
91
Page 92

the signal will be attenuated at a rate of 12 dB / octave.
Outputs
The VTX Mode Option for Output B needs to be selected so that the SoundStation VTX 1000 can make
92
Page 93
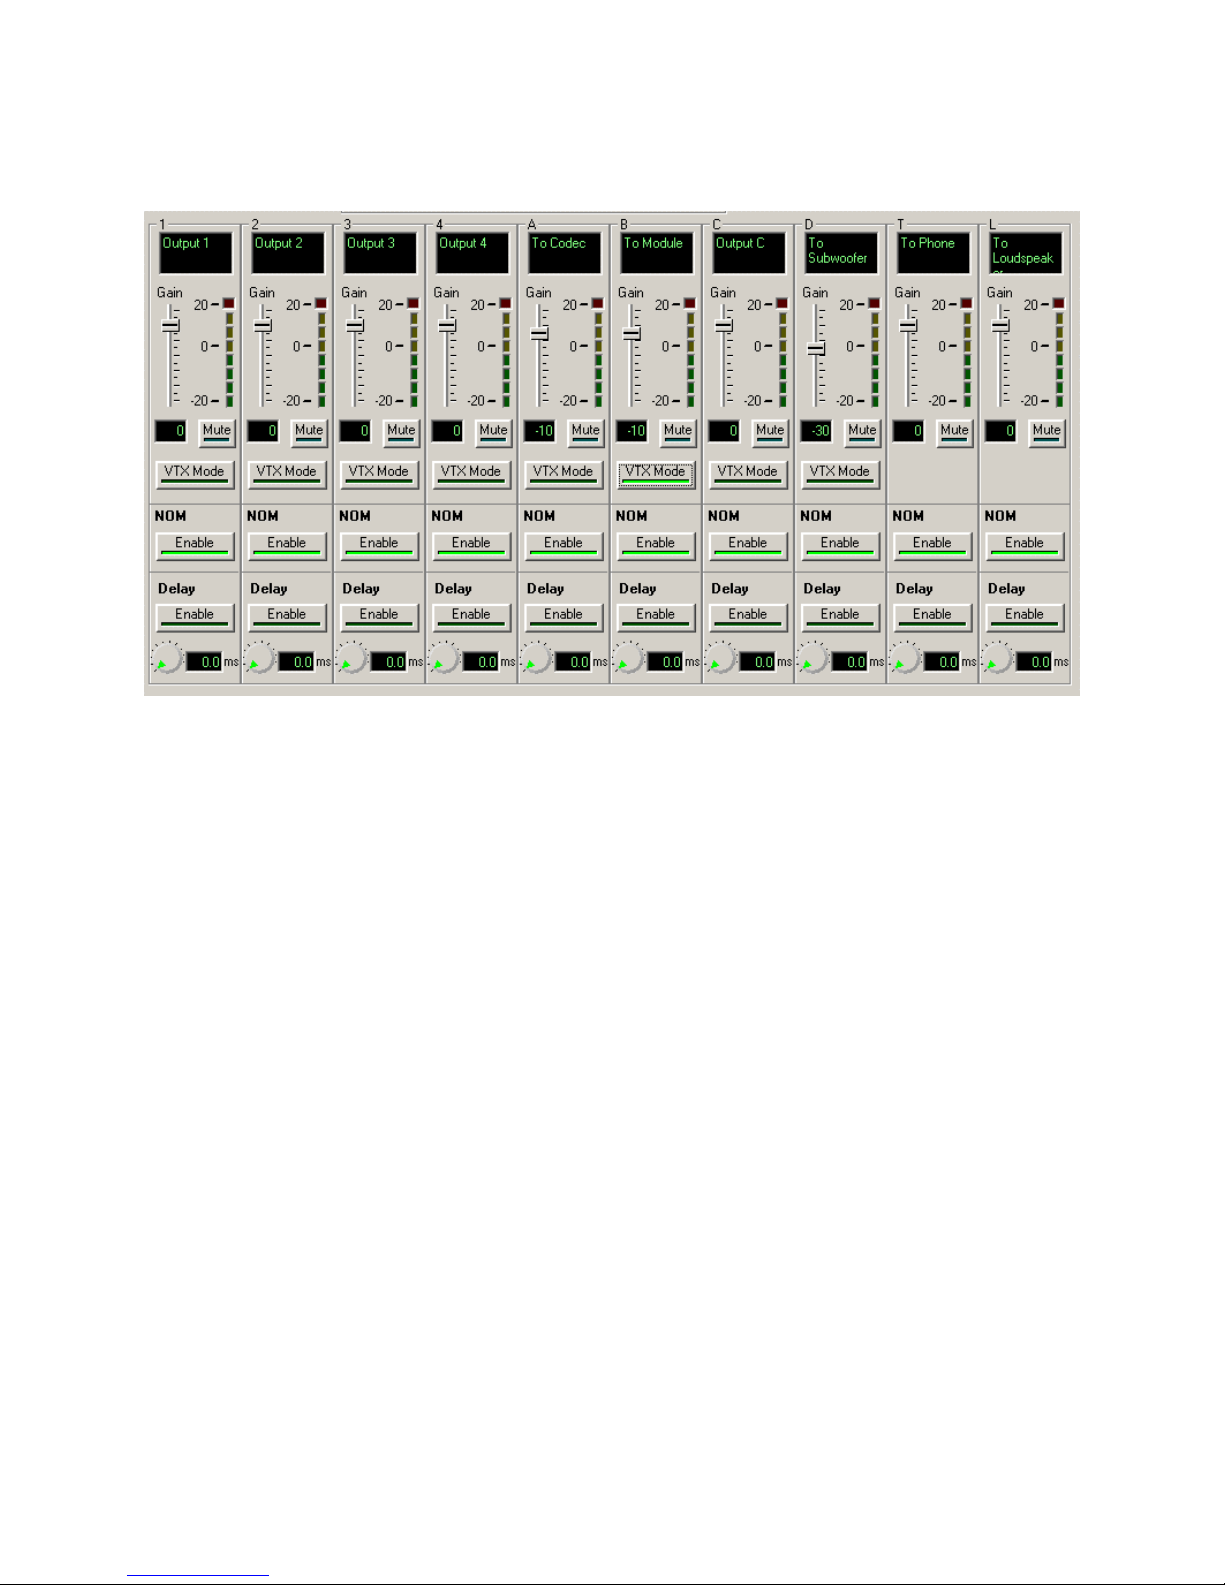
wideband audio calls.
Presets
In order to permanently save the settings to the Vortex EF2241, you must use a User Preset. Here, we've
RESET 16, although you may use any of the User Presets 16-47 to accomplish this task. We've also
used P
93
Page 94

renamed USER PRESET 16 to CONFERENCE ROOM. Once the User Preset has been saved, you must also change
the POWER ON PRESET to reflect the proper Preset that you want the unit to power up to if the unit loses AC
power.
APPENDIX A: INTERFACE MODULE
94
Page 95

OVERVIEW
Here is a drawing of all the connectors on the SoundStation VTX 1000 Interface Module.
WIRING RECOMMENDATIONS / LIMITATIONS
The maximum length of the cable that connects the SoundStation VTX 1000 console and the Interface
Module is 25 feet (This is the length of cable that is shipped with the SoundStation VTX 1000). If the
95
Page 96

supplied RCA cables to connect the Vortex to the Auxiliary Input and Output jacks on the Interface Module
are not long enough, we recommend using a audio transformer to interface between the two devices. The
audio transformer will help prevent ground loops that may form over the earth ground if two devices are
connected to wall outlets that are separated from each other (i.e. not in one location such as a power strip).
We recommend using the Jensen ISO-Max DIN-2LO-11FL. This transformer has a terminal (phoenix) strip
for inputs and outputs. Here is a drawing showing how to connect a Vortex EF2280, SoundStation VTX
1000, and Jensen DIN-2LO-11FL transformer together using Input and Output A of the EF2280:
96
Page 97
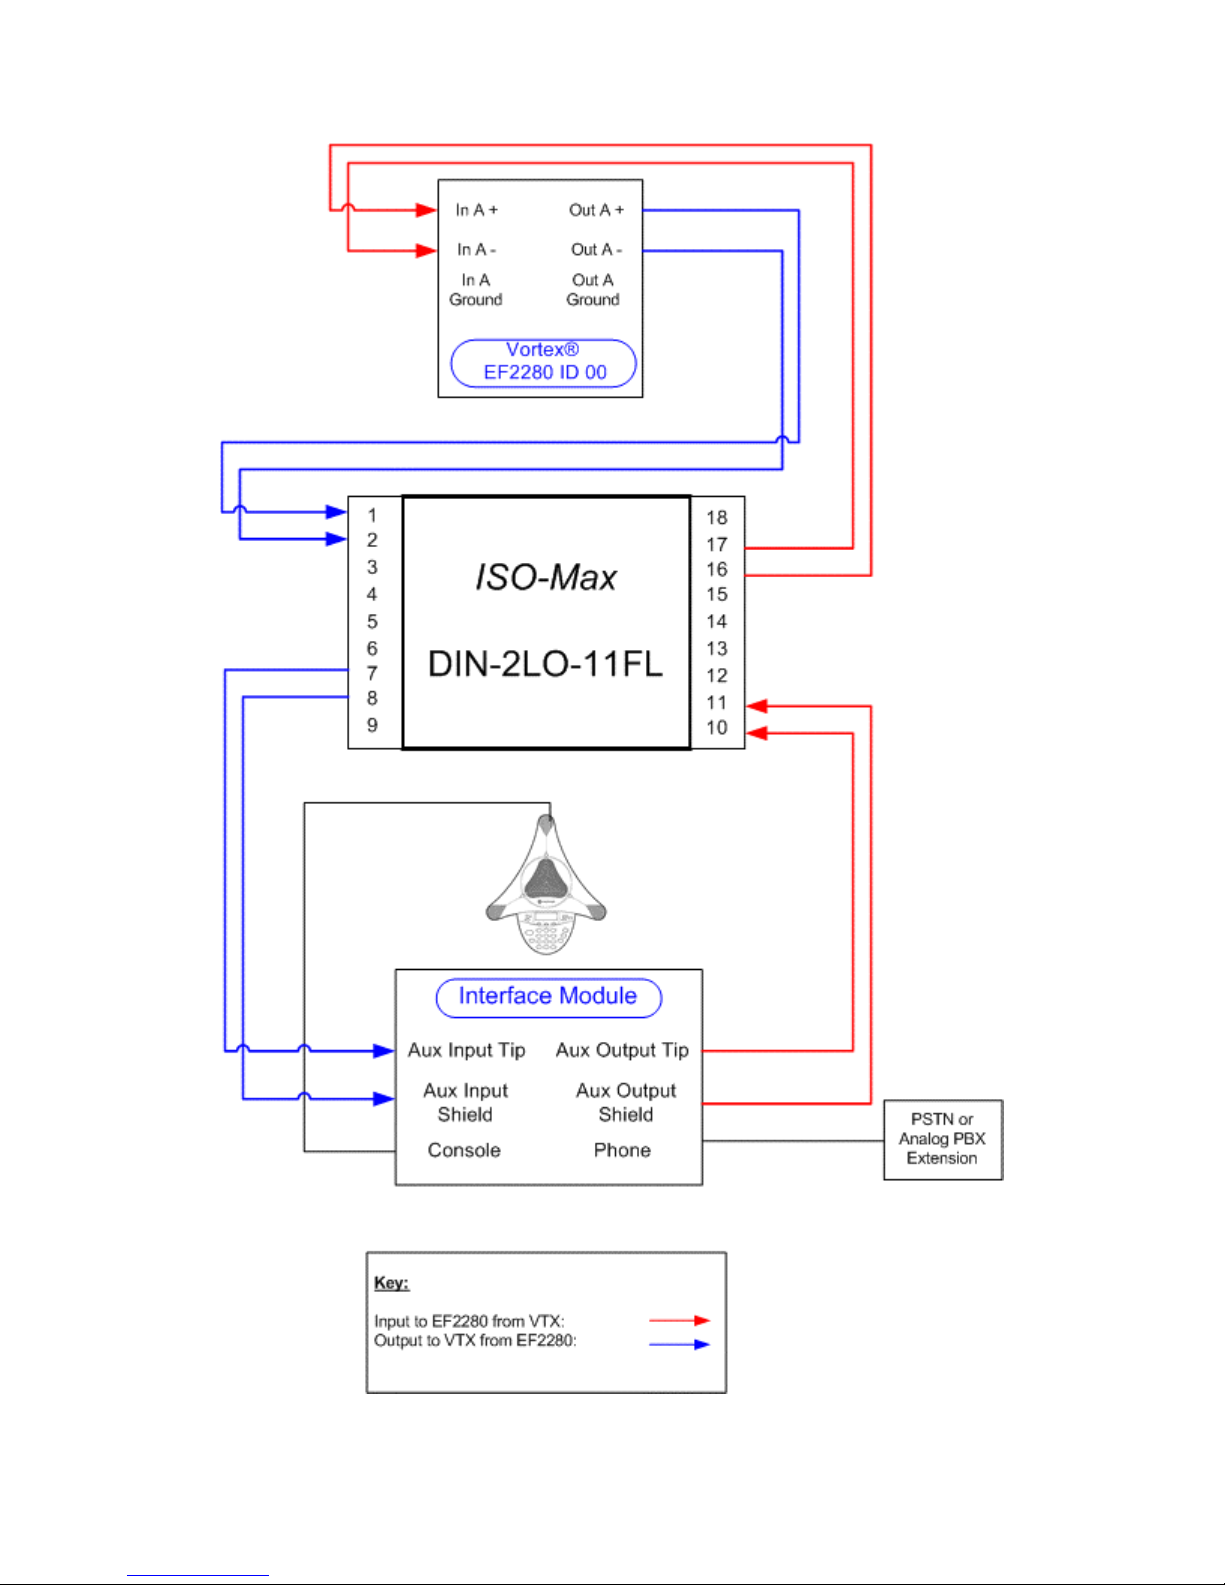
97
Page 98

APPENDIX B: SOUNDSTATION VTX 1000 USER
CONTROLS / LCD LAYOUT
Here is a drawing of the User Controls and the LCD screen layout of the SoundStation VTX 1000:
98
Page 99

APPENDIX C: VORTEX INPUT WIRING
CABLE DRAWING 1: WIRED MICROPHONE CONNECTION
Connect the Positive conductor of the Vortex device to Pin 2 of the XLR connector, the Negative conductor
of the Vortex device to Pin 3 of the XLR connector, and the Shield of the Vortex device to the Pin 1 of the
XLR connector.
CABLE DRAWING 2: BALANCED OUTPUT TO VORTEX INPUT CONNECTION
Connect the Positive conductor of the Vortex device to Pin 2 of the XLR connector, the Negative conductor
of the Vortex device to Pin 3 of the XLR connector, and the Shield of the cable to the only to the Vortex
device.
CABLE DRAWING 3: UNBALANCED OUTPUT TO VORTEX INPUT CONNECTION
Connect the Positive conductor of the Vortex device to the Tip of the RCA connector and the Negative
conductor of the Vortex device to Shield of the RCA connector. Although the wiring will not affect the gain
structure of the unbalanced output, this type of wiring method will take advantage of the common- mode
rejection characteristics of the balanced input since both the positive and negative pins of the balanced
input are used. The shield of the cable is not connected at the unbalanced end.
99
Page 100

APPENDIX D: VORTEX OUTPUT WIRING
CABLE DRAWING 1: VORTEX OUTPUT TO BALANCED INPUT
The above diagram illustrates the use of an XLR connector. Connect the Positive conductor of the Vortex
device to Pin 2 of the XLR connector, the Negative conductor of the Vortex device to Pin 3 of the XLR
connector, and the Shield of the cable to the only to the Vortex device.
CABLE DRAWING 2: VORTEX OUTPUT TO UNBALANCED INPUT
Connect the Positive conductor of the Vortex device to the Tip of the RCA connector and the Negative
conductor of the Vortex device to Shield of the RCA connector. The shield of the cable is not connected at
the unbalanced end.
100
 Loading...