

Page 1

Change the way you think about time
Page 2

INSTRUCTION MANUAL
Button A
Button D
Button B
Button C
touch sensitive screen
Page 3
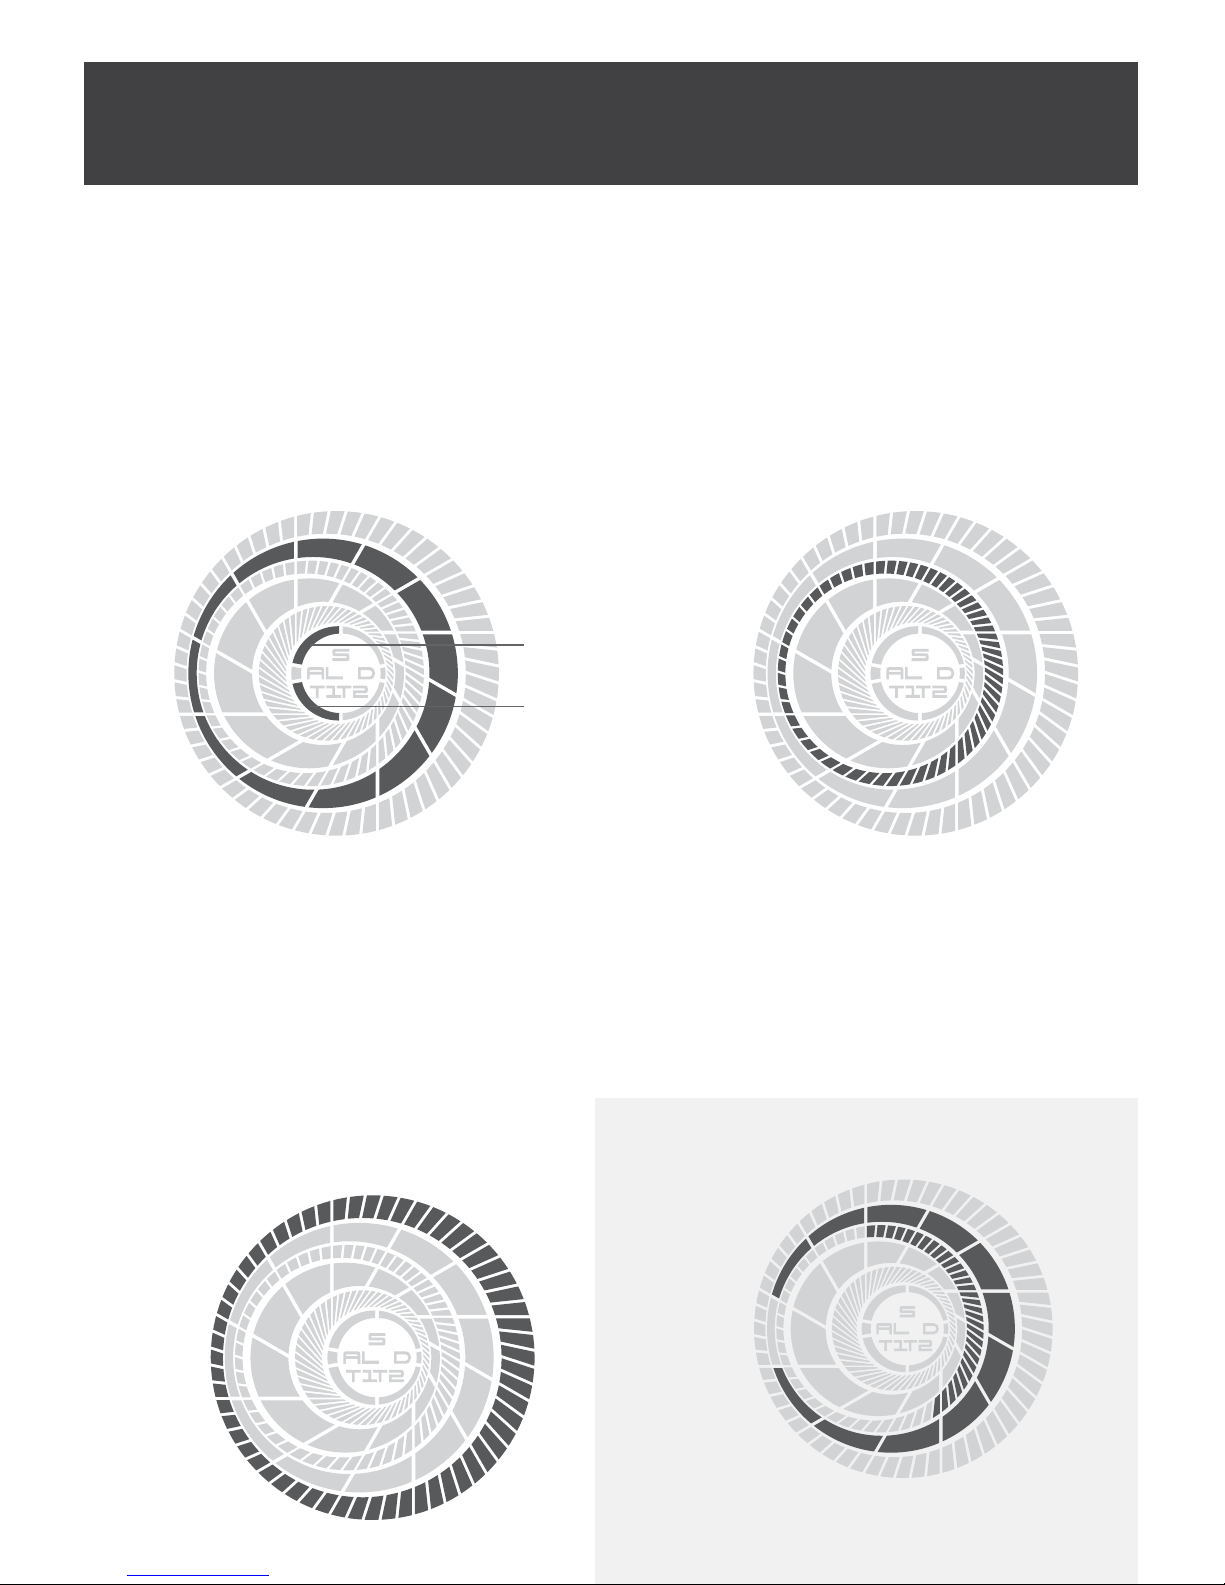
• This watch uses an LCD “always on” display to show the time.
• Hours are displayed in the same position as hours on a clock.
• The outer ring of large blocks represents hours.
• The position of the gap in the ring shows the current hour.
• The inner ring of small dots represents minutes.
• Small blocks in the outer ring show seconds.
Hours and AM/PM
(time 1)
Seconds
Minutes
(time 1)
PM indicator
(time 1)
09:31
Example 1:
Hours and Minutes
AM indicator
(time 1)
1. How to read the time
Page 4
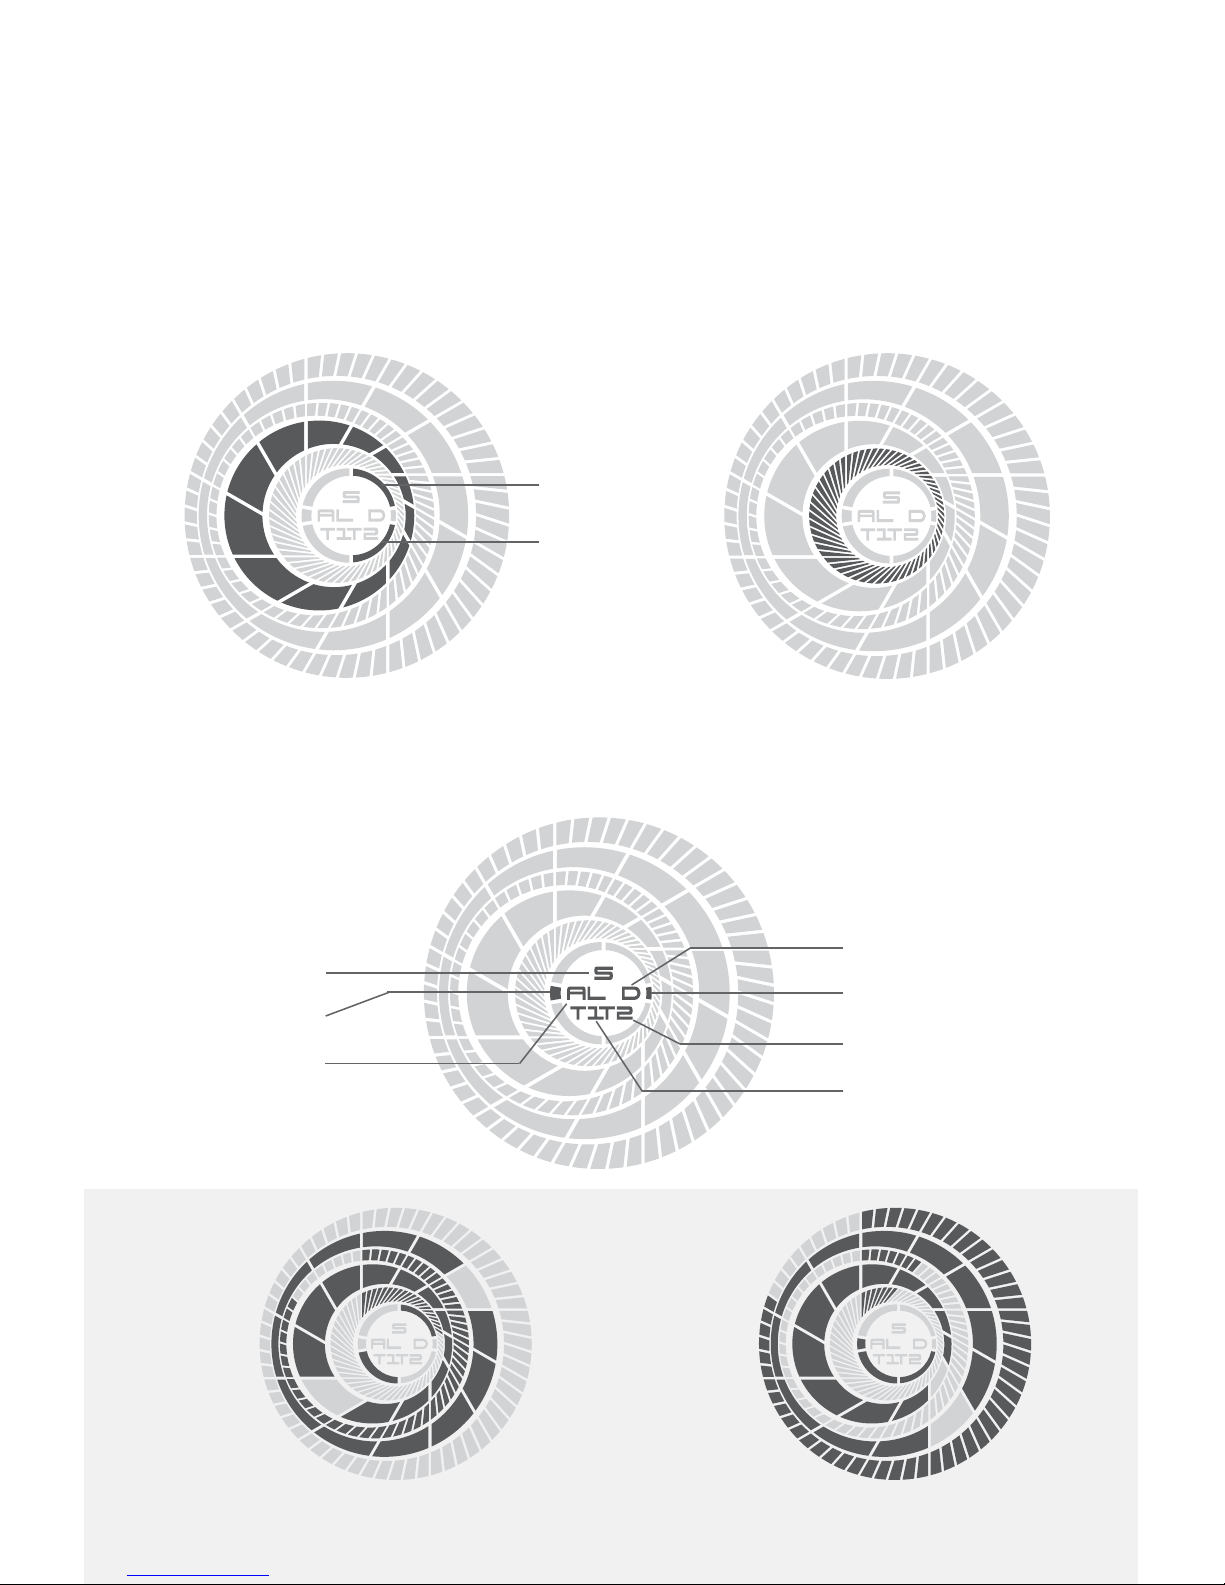
• This watch has a second time zone (time 2).
• Hours are displayed in the same position as hours on a clock.
• The inner ring of large blocks represents hours.
• The position of the gap in the ring shows the current hour.
• The inner ring of small blocks represents minutes.
Hours and AM/PM
(time 2)
Minutes
(time 2)
Other indicators
AM indicator
(time 2)
Screen Locked
Alarm on
Date
Time 2 Setting
Setting
Time 1 Setting
Alarm
02:52:00 PM (time 2: 8:21:00 AM) 05:07:51 PM (time 2: 05:07:51 PM)
Example 3:Example 2:
PM indicator
(time 2)
Page 5

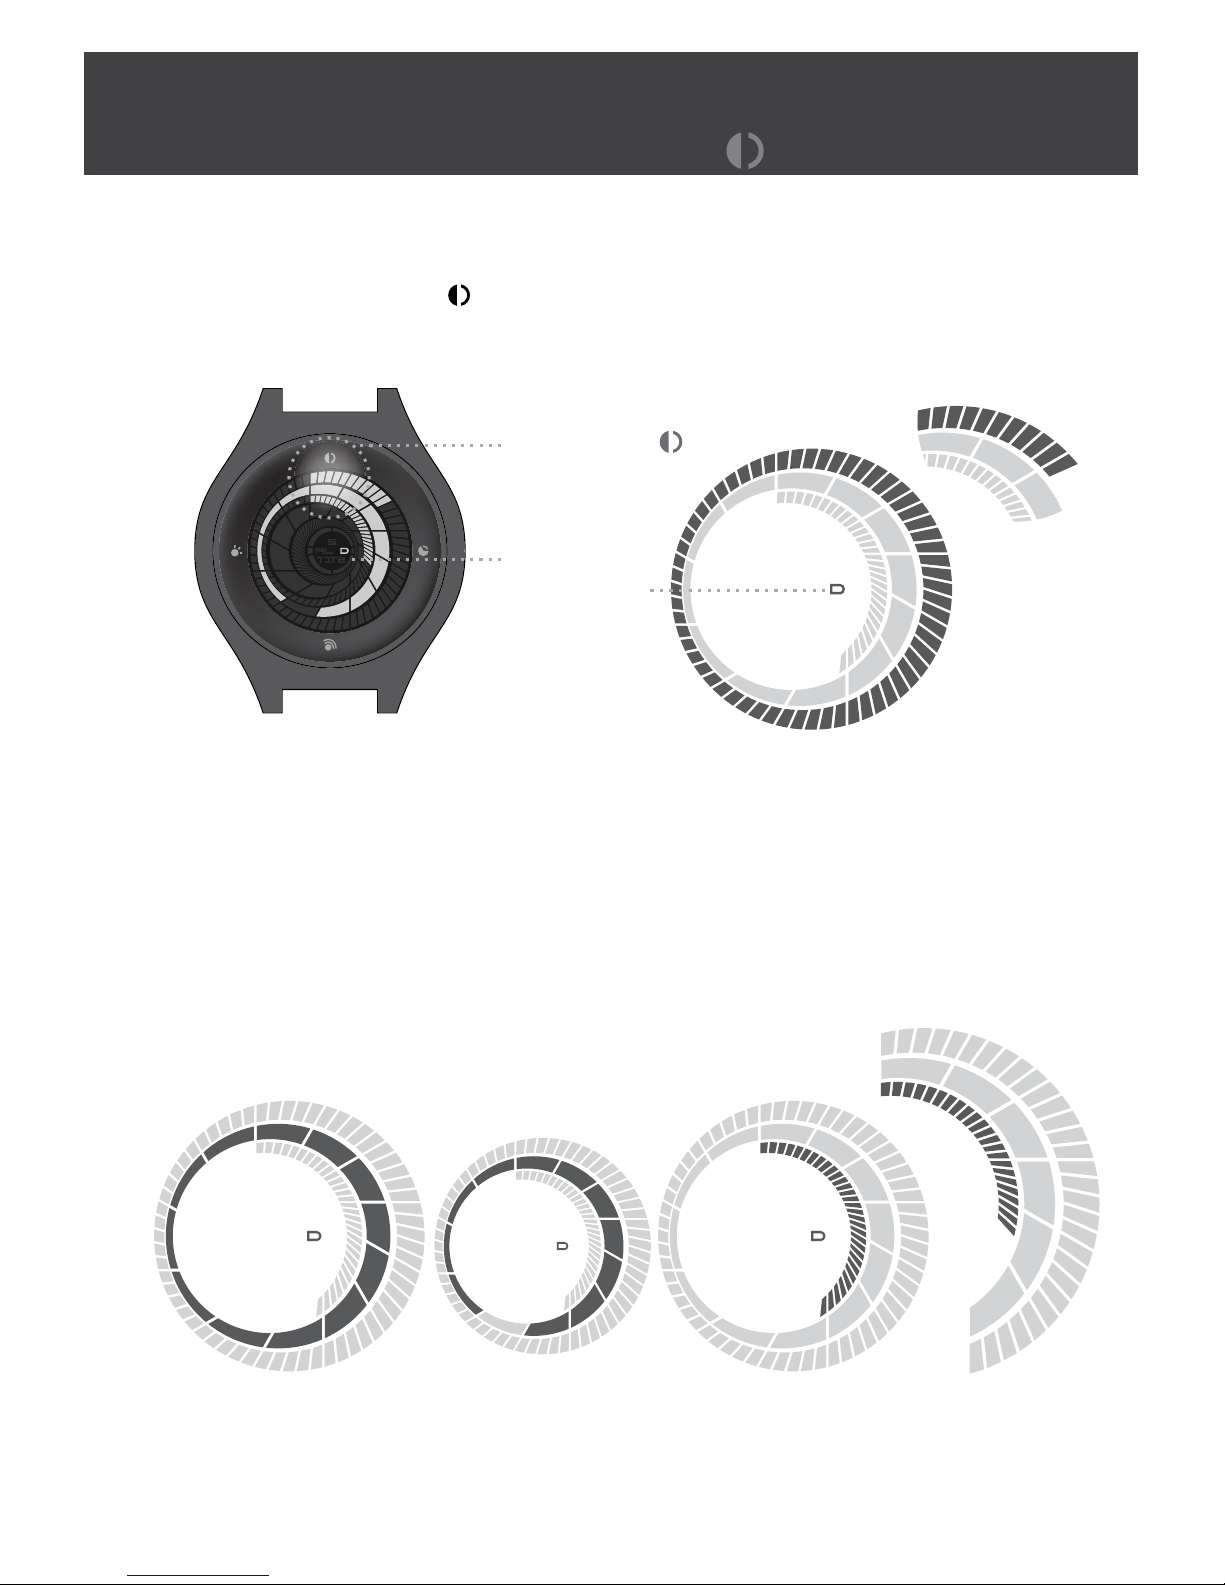
• You can operate the LED
backlight and turn the alarm on
or off when the display is locked
but for all other functions you
need to unlock the display.
• To unlock the display slide
your finger from button D to
button B. (The screen lock
indicator will disappear.)
• The display will automatically
lock after 60 seconds.
• To turn the backlight on, touch button D.
• The backlight will illuminate the display for
7 seconds.
Note: In setting mode you cannot operate the LED
backlight.
• Unlock the screen.
• To turn the display sound on or off, hold
button D for 3 seconds.
Note: Turning the display sound off doesn’t affect
the alarm sound.
II. Turning on the backlight
III. Turning the display sound on or off
I. Unlocking the display
2. Operating the basic functions
touch Button D
hold Button D
Screen lock
indicator
Button D
Button B
Page 6
• Unlock the screen (see “operating the basic functions”).
• Touch button A once (the date indicator will appear on
the screen).
• The year is displayed in the same position as the seconds.
• When no segments are on it shows the year 2000. Each
segment indicates one year.
• The month is displayed in the same position as hours (time 1).
• The position of the gap in the ring shows the current month.
Years
ex: 2011
ex: 23rd
ex: July
Months Days
3. How to read the date
Button A
Date
Indicator
ex: July 23rd 2011
• The date is displayed in the same position as minutes (time 1).
Page 7

• Unlock the screen (see “operating the basic functions”).
• Touch button C to display the alarm time (the alarm indicator
will appear on the screen).
• The alarm time is displayed in the same way as time 1.
• The alarm on indicator will be displayed when the alarm is on
and will not be displayed when the alarm is off.
• AM/PM indicators are the same as time 1.
• When the alarm sounds, you can turn it of by touching
any button.
Alarm on
Hours Minutes
4. How to check the alarm time
Alarm On 07:30 AM
Example:
Button C
ex: Alarm Time 6:30 AM Alarm On
Alarm indicator
Alarm on indicator
Page 8

Increase the Hour Decrease the Hour
• To make time setting easier, it is recommended that
you turn the display sound on. (see “operating the basic
functions”).
• Unlock the screen (see “operating the basic functions”).
• Hold button B for 3 seconds to enter setting mode.
Note: after 7 seconds of inactivity, setting mode will deactivate.
• The hour block will flash when you are in hour setting mode.
• Move your finger around the screen in a clock wise direction
to increase the hour or in a counter clock wise direction to
decrease the hour as required.
• If the display sound is on, there will be a beep each time
you increase or decrease the time by an hour.
5. How to set the time and animation
I. Setting the hour for time 1
Button D
Button B
Button A
Button C
Page 9

• Move your finger around the screen in a clock wise direction
to increase the minutes or in a counter clock wise direction
to decrease the minutes as required.
• Hold button B for 3 seconds to confirm and move to the
hour for time 2.
• The minute blocks will flash when you are in minute
setting mode.
• The AM or PM indicator will be displayed to indicate that
you are setting the time in AM or PM.
• Hold button B for 3 seconds to confirm and move to
minutes for time 1.
II. Setting the minutes for time 1
PM indicator
AM indicator
9H
11H
8H
10H
7H
12H
1H
5H
6H
3H
2H
4H
15mn
1mn
45mn
30mn
59mn
Page 10

• The hour blocks will flash when you are in hour setting mode.
• Move your finger around the screen in a clock wise direction
to increase the hour or in a counter clock wise direction to
decrease the hour as required.
• The AM or PM indicator will be displayed to indicate that you
are setting the time in AM or PM.
• Hold button B for 3 seconds to confirm and move to the
minutes for time 2.
• The minute blocks will flash when you are in minute
setting mode.
III. Setting the hour for time 2
IV. Setting the minutes time 2
PM indicator
AM indicator
9H
12H
6H
3H
15mn
1mn
45mn
30mn
59mn
Page 11

• Move your finger around the screen in a clock wise
direction to increase the minutes or in a counter
clock wise direction to decrease the minutes as required.
• Hold button B for 3 seconds to confirm and move to the
animation.
• In setting mode, when the animation feature is on, the
display will animate. When the animation is off, the display
will flash.
• Touch button A to turn the animation on or off.
• Hold button B for 3 seconds to confirm and exit setting mode.
V. Turning the animation on/off
Display Flashing: Animation OffDisplay Animating: Animation On
Page 12

• The years blocks will flash when you are in year setting mode.
• The year is displayed in the same position as seconds.
• When no segments are on it shows the year 2000. Each
segment indicates one year.
• Move your finger around the screen in a clock wise direction
to increase the year or in a counter clock wise direction to
decrease the year as required.
• Hold button A for 3 seconds to confirm and move to the
month.
Years
ex: 2011
• To make date setting easier, it is recommended that you turn
the display sound on. (see “operating the basic functions”).
• Unlock the screen (see “operating the basic functions”).
• Hold button A for 3 seconds to enter date setting mode.
Note: after 7 seconds of inactivity setting mode will deactivate
• The setting and date indicator will be displayed when you are
in date setting mode.
6. How to set the date
I. Setting the year
Page 13

• The month block will flash when you are in month setting
mode.
• The month is displayed in the same position as hours
(time 1).
• The position of the gap in the ring shows the current month.
• Move your finger around the screen in a clock wise direction
to increase the month or in a counter clock wise direction to
decrease the month as required.
• Hold button A for 3 seconds to confirm and move to the date.
• The date blocks will flash when you are in date setting mode.
• The date is displayed in the same position as minutes
(time 1).
• Move your finger around the screen in a clock wise direction
to increase the date or in a counter clock wise direction to
decrease the date as required.
• Hold button A for 3 seconds to confirm and exit setting mode.
II. Setting the month
III. Setting the date
Page 14

• Touch button B to turn the alarm on or off.
• When the alarm is on, the “alarm on” indicator will be
displayed.
• Hold button C for 3 seconds to confirm and move to
alarm hour setting mode.
• To make alarm setting easier, it is recommended that
you turn the display sound on. (see “operating the basic
functions”).
• Unlock the screen (see “operating the basic functions”).
• Hold button C for 3 seconds to enter alarm setting mode.
Note: after 7 seconds of inactivity setting mode will deactivate.
• The setting and alarm indicators will be displayed when you
are in alarm setting mode.
7. How to set the alarm
I. Turning the alarm on/off
Alarm indicator
Alarm on indicator
setting indicator
Page 15

II. Setting the alarm hour
III. Setting the alarm minutes
• The hour block will flash when you are in alarm hour
setting mode.
• The alarm hours are displayed in the same position as
hours (time 1).
• The position of the gap in the ring shows the current
alarm hour.
• Move your finger around the screen in a clock wise
direction to increase the alarm hour or in a counter
clock wise direction to decrease the alarm hour as required.
• Hold button C for 3 seconds to confirm and move to alarm
minutes setting mode.
• The minutes blocks will flash when you are in alarm
minute setting mode.
• The alarm minutes are displayed in the same position as
minutes (time 1).
• Move your finger around the screen in a clock wise
direction to increase the alarm minutes or in a counter
clock wise direction to decrease the alarm minutes as
required.
• Hold button C for 3 seconds to confirm and leave the
alarm setting mode.
Page 16

• This watch is covered by a 1 year warranty. This warranty
does not cover water damage, accidental damage, neglect or
unauthorized repair.
II. Warranty
• This watch uses a CR2025 replaceable watch battery.
• Battery lifetime will vary depending on use, but is
estimated to last for at least one year.
• To maximize battery life you should limit use of the LED
backlight.
8. User information
I. Battery
III. Caution
• This watch is water resistant to 3ATM. Please do not use
the watch in the shower, for swimming or for other water
related activities.
Page 17

Case Materials
Case Dimensions
Maximum Fit
Wrist Size
Display
Water Resistance
Strap Materials
Finish
Weight
Battery
Stainless Steel
Stainless Steel
44mm x 51mm x 12.9mm
210mm (approx.)
LCD with LED backlight
3ATM
Polished
140g
CR2025
SPECIFICATIONS
Page 18

 Loading...