

DP/N: 4GP020-015 - v1.1 05/30/06
1650 Pacific Avenue, Channel Islands CA 93033-9901 • Phone: 805 247-0226
Fax: 805 247-0669 • www.vortechsuperchargers.com • M-F 8:00AM - 4:30PM (PST)
ENGINEERING, LLC
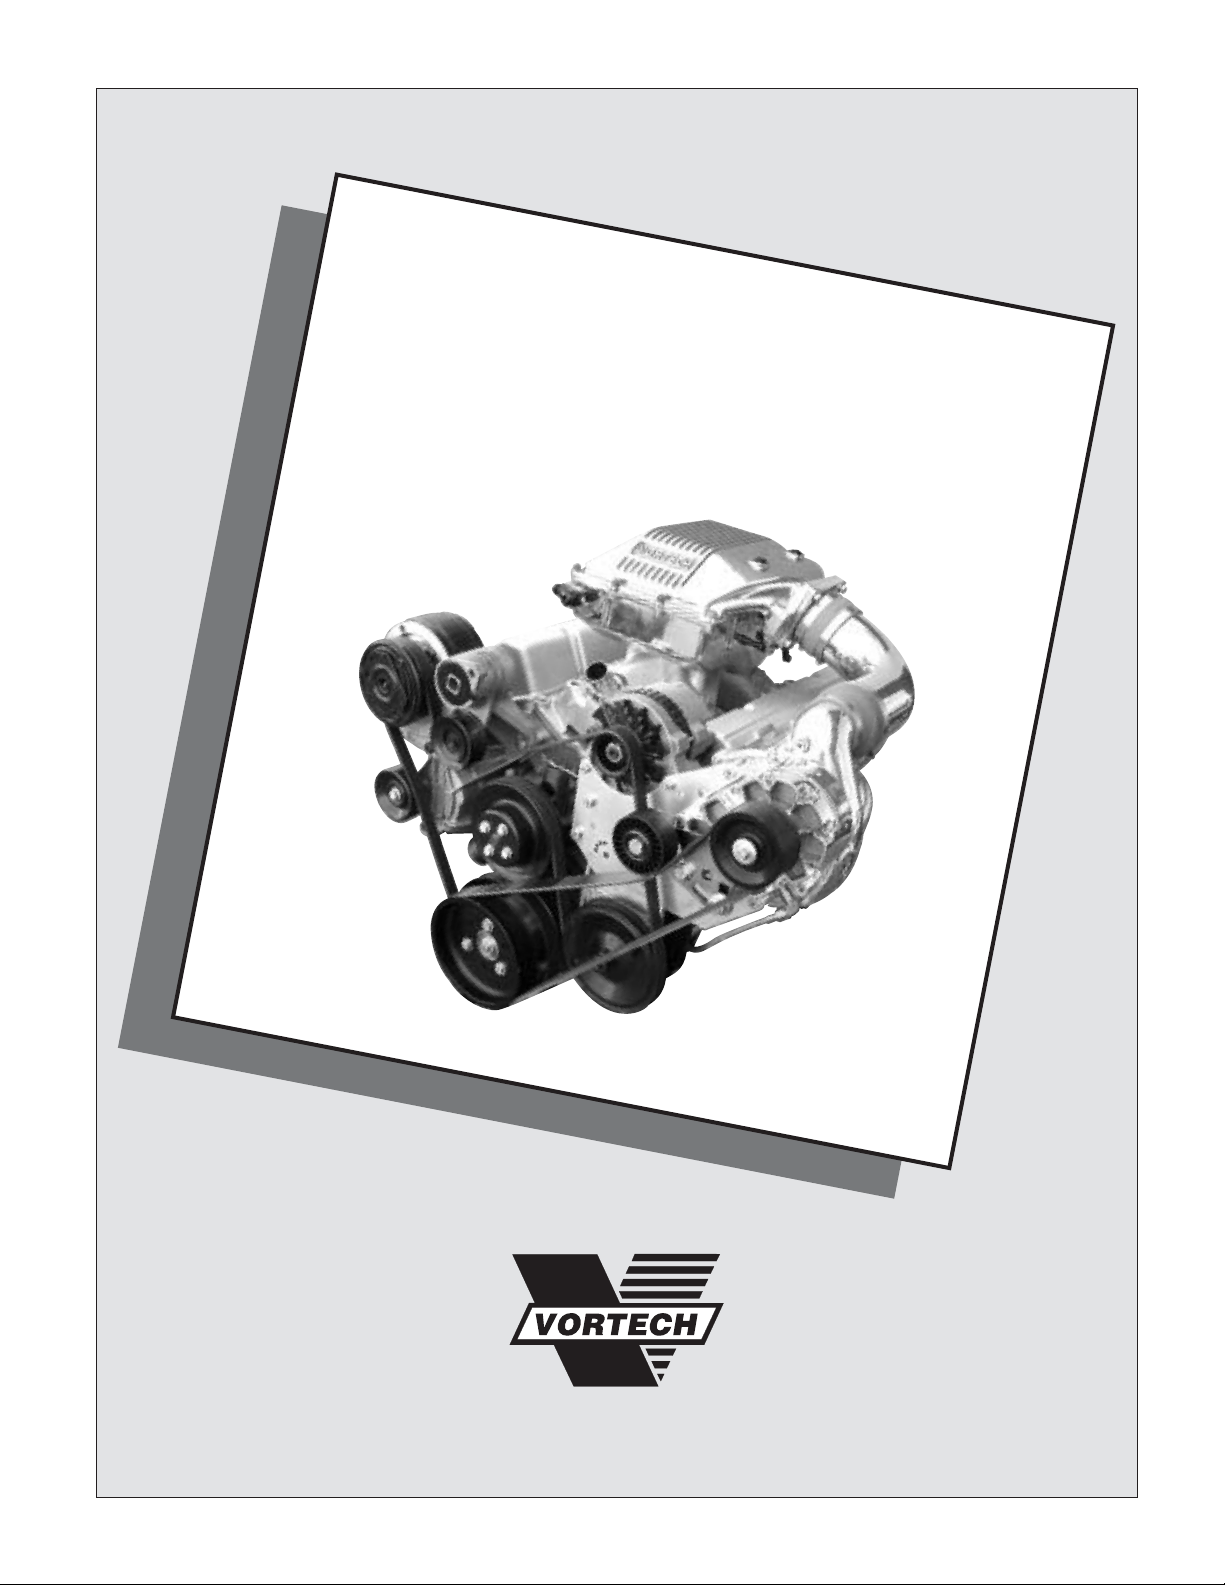
Universal Small
Block Chevy-Carbureted
Supercharger System
Installation Instructions
*Legal in California only for racing vehicles which may never be used upon a highway.
®

P/N: 4GP020-015
©2006 Vortech Engineering, LLC
All Rights Reserved, Intl. Copr. Secured
30MAY06 SmallBlockChev(4GP..015v1.1)
ii
Proper installation of this system requires general automotive mechanic knowledge and experience. Please browse through each step of this instruction
manual prior to beginning the installation to determine if you should refer the
job to a professional installer/technician. Please call Vortech Engineering for
installers in your area.
FOREWORD
© 2006 VOR TECH ENGINEERING, LLC
All rights reserved. No part of this publication may be reproduced, transmitted, transcribed,
or translated into another language in any form, by any means without written permission
of Vortech Engineering, LLC
Important Installation Notes:
• This system was designed to fit on engines equipped with a “long” water pump.
and OEM V-belt drives or serpentine accessory dr ives (OEM TPI/TBI) applications, 1990-1995 and GM Perfor mance Parts accessor y drive system #’s
12497697, 12497698 and 12497869). For correct belt alignment, the proper
accessory drive crank pulley and accessory bracketry must be used.These
components are not supplied in this kit. Earlier models equipped with short
water pumps will require a long water pump to be installed.
• This kit can be used on engines with and without power steering. For engines
equipped with power steering and V-belt accessory drives, a Saginaw type
pump will be required as well as an optional Vortech power steering pulley
assembly. This assembly includes all required hardware, tensioner assembly
and anodized billet aluminum pulley. Depending on the vehicle, power steering
lines may require fabrication.
— Optional Vortech power steering pulley and hardware assembly: 4GP110-051
The following carbureted system support parts are not included as part
of the system but are available from Vortech:
1. Supercharger pulleys and retainer assembly: contact techical department for proper
application match.
• Vortech #2A031-250: Ø2.50", 10-rib driven pulley
• Vortech #2A031-275: Ø2.75", 10-rib driven pulley
• Vortech #2A031-295: Ø2.95", 10-rib driven pulley
• Vortech #2A031-312: Ø3.12", 10-rib driven pulley
• Vortech #4MA018-051: Ø7.00", 10-rib drive (crank) pulley
2. Compressor bypass valve and flange: (Contact the technical department to deter-
mine the proper valve selection for the application)
• Vortech #4GP012-031: Ø3" aluminum discharge duct w/attached flange for
Vortech race bypass valve. Simple attachment to supplied silicone discharge
elbow contained in #4GP218-030/-038
• Vortech #8D204-001: Race Bypass Valve
• Vortech #8D004-052: Race Bypass weld-on flange (aluminum)
• Vortech #8D103-001: Mondo Bypass Valve
• Vortech #8D003-052: Mondo Race Bypass weld-on flange (aluminum)
• Vortech #8D205-003: BV57 Bypass Valve
• Vortech #8D005-051: BV57 Bypass weld-on flange (aluminum)
3. Custom fuel line/fitting kits for carburetor, stainless steel (designed specifically for
Vortech carburetor enclosure)
• Vortech #8M110-020: Holley 4150 series (w/dual metering blocks), SS fuel line kit
• Vortech #8M110-030: Demon series, SS fuel line kit
4. Aftermarket ignition amplifier (not required, but recommended)
• Vortech #5A001-008: Crane HI-6 ignition amplifier box w/rev-limiter
• Power steering pulley and hardware assembly as described above
• Vortech #4GP110-051
5. Carburetor air diffuser. Straightens airflow into the carburetor for improved
response/driveability
• Vortech #8M011-001: Ø5.75" x 2.50" tall carburetor air-diffuser, stainless steel

P/N: 4GP020-015
©2006 Vor tech Engineer ing, LLC
All Rights Reserved, Intl. Copr. Secured
30MAY06 SmallBlockChev(4GP..015v1.1)
iii
TABLE OF CONTENTS
FOREWORD . . . . . . . . . . . . . . . . . . . . . . . . . . . . . . . . . . . . . . . . . . . . . . . . . . . . . . . .ii
TABLE OF CONTENTS . . . . . . . . . . . . . . . . . . . . . . . . . . . . . . . . . . . . . . . . . . . . . . . .iii
TOOL AND SUPPLY REQUIREMENTS . . . . . . . . . . . . . . . . . . . . . . . . . . . . . . . . . . . .iv
PARTS LIST (Universal Small Block Chevy Carbureted - V2 S-Trim) . . . . . . . . . . . . . .v
PARTS LIST (Universal Small Block Chevy Carbureted - V1 T-Trim) . . . . . . . . . . . . . .vi
PARTS LIST (Universal Small Block Chevy Carbureted - V7 YSI-Trim) . . . . . . . . . . . .vii
1. PREPARATION/REMOVAL . . . . . . . . . . . . . . . . . . . . . . . . . . . . . . . . . . . . . . . . . .1
2. OIL FEED INSTALLATION . . . . . . . . . . . . . . . . . . . . . . . . . . . . . . . . . . . . . . . . . .1
3. OIL DRAIN INSTALLATION . . . . . . . . . . . . . . . . . . . . . . . . . . . . . . . . . . . . . . . . .2
4.1 MAIN BRACKET/SUPERCHARGER INSTALLATION (Serpentine) . . . . . . . . . . .3
4.2 MAIN BRACKET/SUPERCHARGER INSTALLATION (V-Belt) . . . . . . . . . . . . . . .4
5. CRANK PULLEY AND SUPERCHARGER DRIVE PULLEY INSTALLATION . . . .6
6. DISCHARGE DUCTING/CARBURETOR ENCLOSURE . . . . . . . . . . . . . . . . . . . .8
7. FINAL REASSEMBLY AND CHECK . . . . . . . . . . . . . . . . . . . . . . . . . . . . . . . . . . .9
P/N: 4GP020-015
©2006 Vortech Engineering, LLC
All Rights Reserved, Intl. Copr. Secured
30MAY06 SmallBlockChev(4GP..015v1.1)
iv
INSTALLATION INSTRUCTIONS
Universal Small Block Chevrolet
Carbureted System
PLEASE READ CAREFULLY
This kit should only be installed by qualified mechanics. It is imperative
that the correct air/fuel mixture be maintained at all times.This Universal
Kit is to be supplied to competent engine tuners for their completion by
the addition of, and tuning of, an appropriate carburetor unit and fuel
pump.
This product is intended for use on healthy, well maintained engines.
Installation on a worn-out or damaged engine is not recommended and
may result in failure of the engine.
Vortech Engineering is not responsible for engine damage.Installation on
new engines will not harm or adversely affect the break-in period so long
as factory break-in procedures are followed.
For best performance and continued durability, please take note of the following
key points:
1. Use only premium grade fuel 91 octane or higher (R+M/2).
2. The engine must have stock or lower than stock compression ratio.
3. If the engine has been modified in any way, check with Vortech prior to using this
product.
4. Always listen for any sign of detonation (pinging) and discontinue hard use (no
boost) until problem is resolved.
5. Perfor m an oil and filter change upon completion of this installation and pr ior to
operating the vehicle.Thereafter, always use a high grade SF rated engine oil or a
high quality synthetic, and change the oil and filter every 3000 miles.
6. Before beginning installation, replace all spark plugs with one to two step colder
heat range and reset timing to no more than 26°-28° total.(Always follow the procedures indicated in the factory repair manual.)
TOOL AND SUPPLY REQUIREMENTS:
• Factor y Repair Manual
• 3/8" Drive and Socket Set: SAE and Metric
• 1/2" Drive and Socket Set: SAE and Metric
• Adjustable Wrench
• Open End Wrenches: SAE and Metric
• Center Punch
• SF Rated Quality Engine Oil
• Loctite Sealer #RC-609
• Oil Filter, and Wrench
• Heavy Grease
• Silicone Sealer
• Teflon Paste Sealant
• TAP, 3/8-18 NPT
®
ENGINEERING, LLC
P/N: 4GP020-015
©2006 Vor tech Engineer ing, LLC
All Rights Reserved, Intl. Copr.Secured
30MAY06 SmallBlockChev(4GP..015v1.1)
v
Universal Small Block Chevy Carbureted
V2 S-TRIM
Part No. 4GP218-030SQ/038SQ
ENGINEERING, LLC
PART NO. DESCRIPTION
QTY PART NO. DESCRIPTION
QTY
IMPORTANT: Before beginning installation, verify that all parts are included in the kit. Report any shortages or damaged parts
immediately.
2E128-040 S/C CHEV UNIV CARB, GEN2 V2 1
2A032-333 S/C DRIVE PLY, 3.33" 10-GRV 1
8R101-003 PULLEY RETAINED ASY, 10-RIB 1
7U100-071 KEY, 3/16"SQ x 1-1/8" LONG 1
2A040-011 PULLEY RETAINER S/C 1
7B375-150 3/8-24 x1-1/2" GR8 HX 1
7K375-040 3/8"AN960 FLAT WASHER, PLATED 1
8M001-060 CABLE, THROTTLE 1
8M010-170 BRKT, CHVY THROTTLE CABLE 1
8M205-012 CARB ENCLOSURE ASY 1
007051 CARB ENCL ASY, UNIV SAT, G2 L 1
7A312-078 5/16-18 x 3/4" SHCS, S'STL 16
7A312-253 STUD, 5/16" x 2-1/2" CARB ENCLOSURE 4
7C011-050 10-32 PLUG SCREW 1
7F312-024 5/16-24 JAM NUT 4
7J312-000 5/16" FLAT WASHER, SAE 4
7J375-024 3/8" COPPER WASHER 4
7K312-030 5/16"AN WASHER, SS 12
7P187-102 -3 BULKHEAD FITTING TO 1/4" HOSE 1
7P187-103 PLUG, -3 O-RING PORT 3
7P250-120 1/4"NPT PIPE PLUG 1
7P375-104 PLUG, 3/8-16, BRASS SHORT 4
7PP500-087 PLUG, AN-8 O-RING PORT 3
7U100-003 O-RING 3 - 903 4
7U100-008 O-RING 3 - 908 3
7U100-020 10-32 GASKET 1
8M001-018 GASKET, 90mm THROTTLE BODY 1
8M003-051 MACH, MONDO COOLER COVER2 1
8M010-025 MORSE CABLE BRKT, CARB ENC 1
8M105-012 ENCL, STD. MACH ASY SAT. 1
8M110-010 ASY, THROTTLE LINK, CARB ENCLOSURE 1
8M001-017 HOLLEY 4-BARREL BASE GASKET 2
4GP111-031 MTG BRKT ASY, SBC GEN2 1
4GP017-021 GM THROTTLE CABLE 1
4GP010-035 MOUNT PLATE, SBC UNIV, GEN2 1
2A017-751-05 SPACER, .750"OD x .360" LONG 2
2A041-594 BELT, K100594-GATES 1
7A375-500 3/8-16 x 5" HXHD GRADE-8 2
7A375-400 3/8-16 x 4" BOLT HXHD GR8 3
7A375-100 3/8-16 x 1" G5 HHCS, PLT 5
7A375-126 3/8-16 x 1.25" HHCS, GR8, PLT 4
4GB011-021 MOUNTING BRKT-MACH 1
7K375-040 3/8"AN960 FLAT WASHER, PLATED 14
7A375-475 3/8-16 x 4.75" HXHD GR8 PLTD 2
7A375-375 3/8-16 x 3-3/4" HXHD 3
7A375-112 3/8-16 x 1.125" FLT HD ALN 2
7A375-077 3/8-16 x 3/4" GR8 FLAT HD ZNC 1
7C080-030 M8 x 1.25" x 30 HXHD CL10.9 1
7C080-070 M8 x 1.25" x 70 HXHD ZINC 1
7F008-023 NUT, M8 x 1.25" x 70 HXHD ZINC 1
7J008-001 3/8" FLAT WASHER 2
PARTS LIST
4GP111-041 ASY, MAN TENS. SBC GEN2 1
4MA116-160 IDLER ASY, MARINE GEN2 1
4FA011-032 BELT TENSIONER PLATE STD 1
4GP017-051 SPACER, 10-RIB MAN TENS. SBC 1
7A437-300 7/16-14 x 3.00" SHCS GR8 1
7C012-020 M12 x 1.75 x 20mm HXHD CL8.8 3
7J012-092 12mm WASHER, FLAT 3
7J438-072 7/16" WASHER, .94"OD x .109" THK 1
7J437-081 7/16"SAE WASHER PLATED 1
4GB130-026 OIL FEED LINE ASY 1
70000 INSPECTOR NUMBER 0
7P125-026 1/8"NPT x #4 SAE FLARE, 90° 1
7P250-036 -4 SAE FLARE TO 1/4"NPT 1
7P250-066 -4 45° FEM SWIVEL x 1/4"NPT 2
7P250-080 1/4"NPT FEM. ELBOW, 90° 1
7P250-123 1/4"NPT x 1-1/2" PIPE NIPPLE 1
7P525-067 .525" CRIMP FERRULES 2
7U030-026 1/4" OIL FEED HOSE 3
7U100-055 TIE-WRAP, 7.5" NYLON 4
4GP130-036 OIL DRAIN ASY 1
7U030-036 1/2" OIL DRAIN HOSE 3
7P375-017 3/8"NPT x 1/2" BEADED HOSE BARB 1
7P375-033 3/8"NPT x 3/8"NPT SRT EL 2
7R001-008 #8 STNLS HOSE CLAMP 2
70000 INSPECTION NUMBER 0
7T640-011 PUNCH, OIL PAN FTG 1
4GP112-010 INLET ASY, S.B. CHEVY CARB. 1
8H040-050 AIR FILTER 3.5" FLG. 7"L 1
4FA012-011 INTAKE TUBE, 180° w/o BOSSES 1
7S350-200 SLEEVE, 3-1/2" x 2" BLUE 1
7R002-056 #56 SAE TYPE “F” SS HOSE CLAMP 3
7R002-044 #44 SAE TYPE “F” SS HOSE CLAMP 1
75375-200 SLEEVE, Ø3.75" x 2.00" 1
75350-004 SLEEVE, Ø3.5" x 1" 1
7R002-060 #60 SAE TYPE “F” SS HOSE CLAMP 1
4GP112-040 DISCHARGE ASY, SBC GEN2 SAT 1
8M003-041 MACHINE, Ø3.5" FLANGE, SATIN 1
7S350-276 ELBOW, SIL Ø3.5" x 2.75" CHEVY CARB 1
7R002-056 #56 SAE TYPE “F” SS HOSE CLAMP 1
7R002-044 #44 SAE TYPE “F” HOSE CLAMP 1
4GP116-041 6" CRANK PLY ASY, SBC UNIV GEN2 1
4GP017-031 SPACER, SBC CRANK PULLEY, SERP 1
4MA018-041 6" CRANK PULLEY, UNIVERSAL 1
7B375-500 3/8-24 x 5.0" HXHD GR8 3
7B437-600 7/16-20 x 6.0" HXHD GR8 1
7J375-044 3/8"SAE WASHER, PLTD 3
7J438-081 7/16"SAE WASHER, PLATED 1
4GP017-041 SPACER, SBC CRANK PULLEY, V-BELT 1
7B375-475 3/8-24 x 4-3/4" HXHD GR8 3
4GP020-015 INSTR. MANUAL, UNIV. SBC GEN2 KIT 1
008443 S/C RACE INFO. PKG ASY, VORTECH 1
008130 LICENSE PLATE FRAME, VORTECH 1
008110 SMALL SILVER DIE-CUT DECAL 2
®
P/N: 4GP020-015
©2006 Vortech Engineering, LLC
All Rights Reserved, Intl. Copr. Secured
30MAY06 SmallBlockChev(4GP..015v1.1)
vi
Universal Small Block Chevy Carbureted
V1 T-Trim
Part No. 4GP218-030T/038T
ENGINEERING, LLC
PART NO.
DESCRIPTION QTY PART NO. DESCRIPTION QTY
IMPORTANT: Before beginning installation, verify that all parts are included in the kit. Report any shortages or damaged parts
immediately.
2A138-040 S/C CHEV UNIV CARB, GEN2 V1 1
2A032-333 S/C DRIVE PLY, 3.33" 10-GRV 1
8R101-003 PULLEY RETAINED ASY, 10-RIB 1
7U100-071 KEY, 3/16"SQ x 1-1/8" LONG 1
2A040-011 PULLEY RETAINER S/C 1
7B375-150 3/8-24 x 1-1/2" GR8 HX 1
7K375-040 3/8"AN960 FLAT WASHER, PLATED 1
8M001-060 CABLE, THROTTLE 1
8M010-170 BRKT, CHVY THROTTLE CABLE 1
8M205-012 CARB ENCLOSURE ASY 1
007051 CARB ENCL ASY, UNIV SAT, G2 L 1
7A312-078 5/16-18 x 3/4" SHCS, S'STL 16
7A312-253 STUD, 5/16" x 2-1/2" CARB ENCLOSURE 4
7C011-050 10-32 PLUG SCREW 1
7F312-024 5/16-24 JAM NUT 4
7J312-000 5/16" FLAT WASHER, SAE 4
7J375-024 3/8" COPPER WASHER 4
7K312-030 5/16"AN WASHER, SS 12
7P187-102 -3 BULKHEAD FITTING TO 1/4" HOSE 1
7P187-103 PLUG, -3 O-RING PORT 3
7P250-120 1/4"NPT PIPE PLUG 1
7P375-104 PLUG, 3/8-16, BRASS SHORT 4
7PP500-087 PLUG, AN-8 O-RING PORT 3
7U100-003 O-RING 3 - 903 4
7U100-008 O-RING 3 - 908 3
7U100-020 10-32 GASKET 1
8M001-018 GASKET, 90mm THROTTLE BODY 1
8M003-051 MACH, MONDO COOLER COVER2 1
8M010-025 MORSE CABLE BRKT, CARB ENC 1
8M105-012 ENCL, STD. MACH ASY SAT. 1
8M110-010 ASY, THROTTLE LINK, CARB ENCLOSURE 1
8M001-017 HOLLEY 4-BARREL BASE GASKET 2
4GP111-031 MTG BRKT ASY, SBC GEN2 1
4GP017-021 GM THROTTLE CABLE 1
4GP010-035 MOUNT PLATE, SBC UNIV, GEN2 1
2A017-751-05 SPACER, .750"OD x .360" LONG 2
2A041-594 BELT, K100594-GATES 1
7A375-500 3/8-16 x 5" HXHD GRADE-8 2
7A375-400 3/8-16 x 4" BOLT HXHD GR8 3
7A375-100 3/8-16 x 1" G5 HHCS, PLT 5
7A375-126 3/8-16 x 1.25" HHCS, GR8, PLT 4
4GB011-021 MOUNTING BRKT-MACH 1
7K375-040 3/8"AN960 FLAT WASHER, PLATED 14
7A375-475 3/8-16 x 4.75" HXHD GR8 PLTD 2
7A375-375 3/8-16 x 3-3/4" HXHD 3
7A375-112 3/8-16 x 1.125" FLT HD ALN 2
7A375-077 3/8-16 x 3/4" GR8 FLAT HD ZNC 1
7C080-030 M8 x 1.25" x 30 HXHD CL10.9 1
7C080-070 M8 x 1.25" x 70 HXHD ZINC 1
7F008-023 NUT, M8 x 1.25" x 70 HXHD ZINC 1
7J008-001 3/8" FLAT WASHER 2
PARTS LIST
4GP111-041 ASY, MAN TENS. SBC GEN2 1
4MA116-160 IDLER ASY, MARINE GEN2 1
4FA011-032 BELT TENSIONER PLATE STD 1
4GP017-051 SPACER, 10-RIB MAN TENS. SBC 1
7A437-300 7/16-14 x 3.00" SHCS GR8 1
7C012-020 M12 x 1.75 x 20mm HXHD CL8.8 3
7J012-092 12mm WASHER, FLAT 3
7J438-072 7/16" WASHER, .94"OD x .109" THK 1
7J437-081 7/16"SAE WASHER PLATED 1
4GB130-026 OIL FEED LINE ASY 1
70000 INSPECTOR NUMBER 0
7P125-026 1/8"NPT x #4 SAE FLARE, 90° 1
7P250-036 -4 SAE FLARE TO 1/4"NPT 1
7P250-066 -4 45° FEM SWIVEL x 1/4"NPT 2
7P250-080 1/4"NPT FEM. ELBOW, 90° 1
7P250-123 1/4"NPT x 1-1/2" PIPE NIPPLE 1
7P525-067 .525" CRIMP FERRULES 2
7U030-026 1/4" OIL FEED HOSE 3
7U100-055 TIE-WRAP, 7.5" NYLON 4
4GP130-036 OIL DRAIN ASY 1
7U030-036 1/2" OIL DRAIN HOSE 3
7P375-017 3/8"NPT x 1/2" BEADED HOSE BARB 1
7P375-033 3/8"NPT x 3/8"NPT SRT EL 2
7R001-008 #8 STNLS HOSE CLAMP 2
70000 INSPECTION NUMBER 0
7T640-011 PUNCH, OIL PAN FTG 1
4GP112-010 INLET ASY, S.B. CHEVY CARB. 1
8H040-050 AIR FILTER 3.5" FLG. 7"L 1
4FA012-011 INTAKE TUBE, 180° w/o BOSSES 1
7S350-200 SLEEVE, 3-1/2" x 2" BLUE 1
7R002-056 #56 SAE TYPE “F” SS HOSE CLAMP 3
7R002-044 #44 SAE TYPE “F” SS HOSE CLAMP 1
75375-200 SLEEVE, Ø3.75" x 2.00" 1
75350-004 SLEEVE, Ø3.5" x 1" 1
7R002-060 #60 SAE TYPE “F” SS HOSE CLAMP 1
4GP112-040 DISCHARGE ASY, SBC GEN2 SAT 1
8M003-041 MACHINE, Ø3.5" FLANGE, SATIN 1
7S350-276 ELBOW, SIL Ø3.5" x 2.75" CHEVY CARB 1
7R002-056 #56 SAE TYPE “F” SS HOSE CLAMP 1
7R002-044 #44 SAE TYPE “F” HOSE CLAMP 1
4GP116-041 6" CRANK PLY ASY, SBC UNIV GEN2 1
4GP017-031 SPACER, SBC CRANK PULLEY, SERP 1
4MA018-041 6" CRANK PULLEY, UNIVERSAL 1
7B375-500 3/8-24 x 5.0" HXHD GR8 3
7B437-600 7/16-20 x 6.0" HXHD GR8 1
7J375-044 3/8"SAE WASHER, PLTD 3
7J438-081 7/16"SAE WASHER, PLATED 1
4GP017-041 SPACER, SBC CRANK PULLEY, V-BELT 1
7B375-475 3/8-24 x 4-3/4" HXHD GR8 3
4GP020-015 INSTR. MANUAL, UNIV. SBC GEN2 KIT 1
008443 S/C RACE INFO. PKG ASY, VORTECH 1
008130 LICENSE PLATE FRAME, VORTECH 1
008110 SMALL SILVER DIE-CUT DECAL 2
®

P/N: 4GP020-015
©2006 Vortech Engineering, LLC
All Rights Reserved, Intl. Copr. Secured
30MAY06 SmallBlockChev(4GP..015v1.1)
vii
Universal Small Block Chevy Carbureted
V7 YSI-Trim
Part No. 4GP218-030YSI/038YSI
ENGINEERING, LLC
PART NO.
DESCRIPTION QTY PART NO. DESCRIPTION QTY
IMPORTANT: Before beginning installation, verify that all parts are included in the kit. Report any shortages or damaged parts
immediately.
2A158-070 S/C CHEV UNIV CARB, GEN2 V7 1
2A032-333 S/C DRIVE PLY, 3.33" 10-GRV 1
8R101-003 PULLEY RETAINED ASY, 10-RIB 1
7U100-071 KEY, 3/16"SQ x 1-1/8" LONG 1
2A040-011 PULLEY RETAINER S/C 1
7B375-150 3/8-24 x 1-1/2" GR8 HX 1
7K375-040 3/8"AN960 FLAT WASHER, PLATED 1
8M001-060 CABLE, THROTTLE 1
8M010-170 BRKT, CHVY THROTTLE CABLE 1
8M205-012 CARB ENCLOSURE ASY 1
007051 CARB ENCL ASY, UNIV SAT, G2 L 1
7A312-078 5/16-18 x 3/4" SHCS, S'STL 16
7A312-253 STUD, 5/16" x 2-1/2" CARB ENCLOSURE 4
7C011-050 10-32 PLUG SCREW 1
7F312-024 5/16-24 JAM NUT 4
7J312-000 5/16" FLAT WASHER, SAE 4
7J375-024 3/8" COPPER WASHER 4
7K312-030 5/16"AN WASHER, SS 12
7P187-102 -3 BULKHEAD FITTING TO 1/4" HOSE 1
7P187-103 PLUG, -3 O-RING PORT 3
7P250-120 1/4"NPT PIPE PLUG 1
7P375-104 PLUG, 3/8-16, BRASS SHORT 4
7PP500-087 PLUG, AN-8 O-RING PORT 3
7U100-003 O-RING 3 - 903 4
7U100-008 O-RING 3 - 908 3
7U100-020 10-32 GASKET 1
8M001-018 GASKET, 90mm THROTTLE BODY 1
8M003-051 MACH, MONDO COOLER COVER2 1
8M010-025 MORSE CABLE BRKT, CARB ENC 1
8M105-012 ENCL, STD. MACH ASY SAT. 1
8M110-010 ASY, THROTTLE LINK, CARB ENCLOSURE 1
8M001-017 HOLLEY 4-BARREL BASE GASKET 2
4GP111-031 MTG BRKT ASY, SBC GEN2 1
4GP017-021 GM THROTTLE CABLE 1
4GP010-035 MOUNT PLATE, SBC UNIV, GEN2 1
2A017-751-05 SPACER, .750"OD x .360" LONG 2
2A041-594 BELT, K100594-GATES 1
7A375-500 3/8-16 x 5" HXHD GRADE-8 2
7A375-400 3/8-16 x 4" BOLT HXHD GR8 3
7A375-100 3/8-16 x 1" G5 HHCS, PLT 5
7A375-126 3/8-16 x 1.25" HHCS, GR8, PLT 4
4GB011-021 MOUNTING BRKT-MACH 1
7K375-040 3/8"AN960 FLAT WASHER, PLATED 14
7A375-475 3/8-16 x 4.75" HXHD GR8 PLTD 2
7A375-375 3/8-16 x 3-3/4" HXHD 3
7A375-112 3/8-16 x 1.125" FLT HD ALN 2
7A375-077 3/8-16 x 3/4" GR8 FLAT HD ZNC 1
7C080-030 M8 x 1.25" x 30 HXHD CL10.9 1
7C080-070 M8 x 1.25" x 70 HXHD ZINC 1
7F008-023 NUT, M8 x 1.25" x 70 HXHD ZINC 1
7J008-001 3/8" FLAT WASHER 2
PARTS LIST
4GP111-041 ASY, MAN TENS. SBC GEN2 1
4MA116-160 IDLER ASY, MARINE GEN2 1
4FA011-032 BELT TENSIONER PLATE STD 1
4GP017-051 SPACER, 10-RIB MAN TENS. SBC 1
7A437-300 7/16-14 x 3.00" SHCS GR8 1
7C012-020 M12 x 1.75 x 20mm HXHD CL8.8 3
7J012-092 12mm WASHER, FLAT 3
7J438-072 7/16" WASHER, .94"OD x .109" THK 1
7J437-081 7/16"SAE WASHER PLATED 1
4GB130-026 OIL FEED LINE ASY 1
70000 INSPECTOR NUMBER 0
7P125-026 1/8"NPT x #4 SAE FLARE, 90° 1
7P250-036 -4 SAE FLARE TO 1/4"NPT 1
7P250-066 -4 45° FEM SWIVEL x 1/4"NPT 2
7P250-080 1/4"NPT FEM. ELBOW, 90° 1
7P250-123 1/4"NPT x 1-1/2" PIPE NIPPLE 1
7P525-067 .525" CRIMP FERRULES 2
7U030-026 1/4" OIL FEED HOSE 3
7U100-055 TIE-WRAP, 7.5" NYLON 4
4GP130-036 OIL DRAIN ASY 1
7U030-036 1/2" OIL DRAIN HOSE 3
7P375-017 3/8"NPT x 1/2" BEADED HOSE BARB 1
7P375-033 3/8"NPT x 3/8"NPT SRT EL 2
7R001-008 #8 STNLS HOSE CLAMP 2
70000 INSPECTION NUMBER 0
7T640-011 PUNCH, OIL PAN FTG 1
4GP112-010 INLET ASY, S.B. CHEVY CARB. 1
8H040-050 AIR FILTER 3.5" FLG. 7"L 1
4FA012-011 INTAKE TUBE, 180° w/o BOSSES 1
7S350-200 SLEEVE, 3-1/2" x 2" BLUE 1
7R002-056 #56 SAE TYPE “F” SS HOSE CLAMP 3
7R002-044 #44 SAE TYPE “F” SS HOSE CLAMP 1
75375-200 SLEEVE, Ø3.75" x 2.00" 1
75350-004 SLEEVE, Ø3.5" x 1" 1
7R002-060 #60 SAE TYPE “F” SS HOSE CLAMP 1
4GP112-040 DISCHARGE ASY, SBC GEN2 SAT 1
8M003-041 MACHINE, Ø3.5" FLANGE, SATIN 1
7S350-276 ELBOW, SIL Ø3.5" x 2.75" CHEVY CARB 1
7R002-056 #56 SAE TYPE “F” SS HOSE CLAMP 1
7R002-044 #44 SAE TYPE “F” HOSE CLAMP 1
4GP116-041 6" CRANK PLY ASY, SBC UNIV GEN2 1
4GP017-031 SPACER, SBC CRANK PULLEY, SERP 1
4MA018-041 6" CRANK PULLEY, UNIVERSAL 1
7B375-500 3/8-24 x 5.0" HXHD GR8 3
7B437-600 7/16-20 x 6.0" HXHD GR8 1
7J375-044 3/8"SAE WASHER, PLTD 3
7J438-081 7/16"SAE WASHER, PLATED 1
4GP017-041 SPACER, SBC CRANK PULLEY, V-BELT 1
7B375-475 3/8-24 x 4-3/4" HXHD GR8 3
4GP020-015 INSTR. MANUAL, UNIV. SBC GEN2 KIT 1
008443 S/C RACE INFO. PKG ASY, VORTECH 1
008130 LICENSE PLATE FRAME, VORTECH 1
008110 SMALL SILVER DIE-CUT DECAL 2
7S400-350 REDUCER, 4" - 3.5" 1
7R002-064 #64 SAE TYPE “F” SS HOSE CLAMP 1
®

P/N: 4GP020-015
©2006 Vortech Engineering, LLC
All Rights Reserved, Intl. Copr. Secured
30MAY06 SmallBlockChev(4GP..015v1.1)
viii
This Page Left Intentionally Blank

P/N: 4GP020-015
©2006 Vortech Engineering, LLC
All Rights Reserved, Intl. Copr. Secured
30MAY06 SmallBlockChev(4GP..015v1.1)
1
Fig. 2-a
A. Disconnect the negative lead to the bat-
tery.
B. Remove the fan and shroud to aid in
installation. It may also be necessary to
install a fan spacer at a later time.
C. (V-Belt) Loosen all nuts and bolts that
are used to tension the alternator and
power steering pump V-belts. Remove
the factory belts.
D. (Serpentine) Loosen tension on the ten-
sioner and remove the factory drive belt.
E. (Serpentine) If so equipped, loosen the
two screws securing the alternator to the
cast factory bracket on the driver’s side.
Remove any other electrical connections
to the alternator. Remove the alternator
from the bracket and set aside.
C. Connect the supplied feed line to the flare fit-
ting and route it up to the front of the driver’s
side cylinder head. Secure the hose with tiewraps away from exhaust heat, chaffing
and/or sharp objects.Temporarily cover the
open end from debris until the connection is
made to the supercharger.
(See Fig. 2-a.)
A. The supercharger uses engine oil for lubrica-
tion and must have an oil feed line connected
to a filtered oil access point on the engine.
B. Remove the 1/4"NPT plug located on the
engine block just above the oil filter boss.
Replace the plug with the supplied 1/4"NPT x
90° elbow and 1/4"NPT x -4 flare fitting.
1. PREPARATION/REMOVAL
2. OIL FEED INSTALLATION
V-BELT NOTE: This kit is designed to work
with later model V-belt power
steering pumps. The power steering pulley shaft should be Ø3/4"
and is not threaded at the end.
NOTE: Use clean engine oil on the pipe threads.
Teflon tape and sealant is not recommended as it might loosen and cause
blockage of the small oil feed orifice
resulting in supercharger failure.
F. (Serpentine) Remove the power steer-
ing pulley from the power steering
pump.Loosen the screws securing the
pump and remove the pump from the
factory bracket.Temporarily lay the
pump in the engine compartment.
G. (Serpentine) Remove the factory cast
bracket from the driver’s side of the
motor.
H. (V-Belt) Remove the factory power
steering pump from the motor.
TO SUPERCHARGER
OIL
FILTER

P/N: 4GP020-015
©2006 Vortech Engineering, LLC
All Rights Reserved, Intl. Copr. Secured
30MAY06 SmallBlockChev(4GP..015v1.1)
2
Fig. 3-a
3. OIL DRAIN INSTALLATION
A. To provide an oil drain for the supercharger, it
is necessary to make a hole in the oil pan.
Locate and mark the hole location. (See Fig.
3-a.) It is best to punch the hole rather than
drill.
B. Remove any paint from around the hole area.
C. Use a small center punch to perforate the
pan and expand the hole, switch to a larger
diameter punch and expand the hole further
to approximately Ø9/16". Most punches are
made from hexagon material and may be
placed in a socket with an extension to make
this procedure easier.Use caution so that the
hole is not enlarged too much and that the
punch does NOT contact the crankshaft.
D. Tap the hole with a 3/8"NPT tap approximate-
ly 1/4" deep.Pack the flutes of the tap with
heavy grease to hold the chips.Use a small
magnet to check for any stray chips.
E. Thoroughly clean the threaded area. Apply a
small amount of silicone sealer to the new
threads. Apply more sealer to the supplied
3/8"NPT x 90° elbow and secure in the previously threaded hole. Make sure a seal is
formed all around the fitting. Rotate the fitting
so that the oil drain hose can be easily routed
to it. Apply sealer to the supplied 3/8"NPT x
1/2" beaded hose barb fitting and install in
the previously installed 90° elbow.
F. Drain the engine oil, install a new filter and
refill with fresh oil.
NOTE: Removal of the oil pan may ease oil
drain fitting installation on some applications.
NOTE: This method of rolling over the lip of the
hole and tapping works well if carefully
done and should cause no problems.
DOWN 2"
1"
IN-LINE
FOURTH BOLT
OIL PAN
PUNCH HOLE THROUGH
OIL FILTER

P/N: 4GP020-015
©2006 Vortech Engineering, LLC
All Rights Reserved, Intl. Copr. Secured
30MAY06 SmallBlockChev(4GP..015v1.1)
3
Fig. 4.1-a
NOTE: Some applications (depending on intake
manifold height) may require the reclocking
of the supercharger volute. If reclocking is
required for your application, loosen and
remove the six 1/4-20 cap screws and retaining plates that hold the compressor housing
(volute) to the gearcase. If the compressor
housing does not rotate freely relative to the
gearcase, DO NOT FORCE IT. SERIOUS
SUPERCHARGER DAMAGE MAY OCCUR.
The machined mating surfaces are designed
to prevent pressurized air from escaping and
have minimal tolerances. If the housing will
not move or is very tight, contact Vortech
Engineering immediately at 805 247-0226
and ask our service department for further
assistance.
4.1 MAIN BRACKET/SUPERCHARGER INSTALLATION (Serpentine)
A. Locate the supplied cast bracket, L-shaped
spacer, and two .360" thick spacers.
B. Use the 3/8-16 x 4" screws and washers to
mount the cast bracket to the cylinder head
using the .360" L-shaped spacer between the
bracket and cylinder head.Use the 3/8-16 x
5" hardware to mount the lower section of the
cast bracket to the block with the two .360"
spacers. (See Fig. 4.1-a.)
C. Locate the supplied supercharger mounting
plate. Secure the plate to the mounting bracket with the supplied 3/8-16 x 1.25" screws
and washers. (See Fig. 4.1-b.)
D. Mount the power steering pump (if equipped)
to the back side of the cast bracket using the
supplied 3/8-16 flat-head screws.Reinstall
the power steering pulley. (See Figs. 4.2-b,
4.2-c.)
E. Mount the alter nator to the mounting plate
with the supplied 8mm hardware. (See Fig.
4.1-c.)
Fig. 4.1-b
3/8-16 x 4"
HARDWARE
.360" SPACERS
BETWEEN CAST
BRACKET AND
BLOCK
ALTERNATOR
MOUNT
.360" L-SHAPED SPACER
BETWEEN CAST BRACKET
AND CYLINDER HEAD
3/8-16 x1.25"
SCREWS AND
WASHERS
3/8-16 x 5"
HARDWARE
SUPERCHARGER
MOUNTING PLATE
FRONT VIEW

P/N: 4GP020-015
©2006 Vortech Engineering, LLC
All Rights Reserved, Intl. Copr. Secured
30MAY06 SmallBlockChev(4GP..015v1.1)
4
NOTE: Due to the many possible configu-
rations of accessory drives in
Small Block Chevy applications,
the accessory drive crank pulley
spacer may be modified to mate
with the supplied supercharger
drive crank pulley and the vehiicle’s existing accessory drive
crank pulley.
4.2 MAIN BRACKET/SUPERCHARGER INSTALLATION (V-Belt)
A. Locate the supplied cast bracket.(See Fig.
4.2-a.)
B. (Non-power steering only, P/S models
proceed to 4.2-C.) Using the 3/8-16 x
3.75" screws and washers, mount the cast
bracket to the cylinder head.Use the 3/8-16
x 4.75" screws and washers to secure the
lower section of the cast bracket to the
engine block.
C. (Power steering models only.) Locate the
optional 4GP110-051 P/S pump support
assembly. Using the 3/8-16 x 3.75" screws
and washers, mount the cast bracket to the
cylinder head. Install the 3/8-16 x 6.75"
screws and washers through the power
steering tensioner bracket, .915" long spacers, cast bracket, and into the engine block.
(See Fig. 4.2-a.)
1. Locate the supplied P/S belt tensioner
pulley. Install the 3/8-16 x 1.75" screw
and washer through the tensioner
bracket.Place the pulley/pilot assembly
onto the previously installed 3/8-16 x
1.75" screw and loosely secure using
the 3/8" washer and NYLOC
Fig. 4.2-a
(Power Steering Equipped Models Only)
4.1 MAIN BRACKET/SUPERCHARGER INSTALLATION (Serpentine), cont’d
Fig. 4.1-c
F. Attach the oil drain hose to the 1/2" barbed
fitting on the bottom of the supercharger.
Secure the hose with the supplied hose
clamp.
G. Using the supplied 3/8-16 x 1.25" screws
secure the supercharger to the mounting
plate. (See Fig. 4.1-b.)
.915" LONG
SPACERS BETWEEN
TENSIONER BRACKET
AND CAST BRACKET
3/8-16 x 6.75"
w/POWER
STEERING,
3/8-16 x 4.75"
w/o POWER
STEERING
CAST BRACKET
POWER
STEERING TENSIONER
BRACKET
FRONT VIEW

P/N: 4GP020-015
©2006 Vortech Engineering, LLC
All Rights Reserved, Intl. Copr. Secured
30MAY06 SmallBlockChev(4GP..015v1.1)
5
Fig. 4.2-c
NOTE: The end of the pump shaft
should be flush with the end of
the drive flange when fully
installed.
2. Mount the power steering pump to the
back side of the cast bracket using the
supplied 3/8-16 flat-head screws.Locate
the power steering pump drive flange.
Using the appropriate GM power steering
pulley installer, install the dr ive flange as
you would a normal power steering pulley.
(See Fig. 4.2-b.)
3. Using the six 1/4-20 x .75" screws and
washers, attach the supplied power steering pulley. (Blue loc-tite on the threads is
recommended.) (See Figs. 4.2-b, 4.2-c.)
Fig. 4.2-b
(Power Steering Equipped Models Only)
POWER STEERING
TENSIONER
POWER STEERING PUMP
DRIVE FLANGE
POWER STEERING
PUMP
TENSIONER IDLER
D. Locate the supplied supercharger mounting
plate. Secure the plate to the mounting bracket with the supplied 3/8-16 x 1.25" screws
and washers. (See Fig. 4.1-b on previous
page.)
E. Attach the oil drain hose to the 1/2" barbed
fitting on the bottom of the supercharger.
Secure the hose with the supplied hose
clamp.
F. Using the supplied 3/8-16 x 1.0" screws and
washers secure the supercharger to the
mounting plate. (See Fig. 4.2-c.)
3/8-16 x
1.0" SCREWS
P/S PUMP
3/8-16 FLAT-HEAD
SCREWS
SIX 1/4-20 x .75"
SCREWS
AND WASHERS
(V-BELT ONLY)
FRONT VIEW

P/N: 4GP020-015
©2006 Vortech Engineering, LLC
All Rights Reserved, Intl. Copr. Secured
30MAY06 SmallBlockChev(4GP..015v1.1)
6
A. Locate the supercharger drive assembly
(4GP116-041). Using the 7/16-20 x 6" screw
and washer, loosely install the appropriate
spacer for your application to the front of the
factory crank pulley.
B. Rotate the previously installed spacer to align
the three mounting holes. Install the supplied
10-rib crank pulley and secure using the supplied hardware.(3/8-24 x 5" for Serpentine and
3/8-24 x 4.75" for V-belt applications.) Torque
center bolt to 35 ft.lbs.and the three pulley
retainers to 25 ft.lbs.
E. Locate the manual tensioner assembly
(4GP111-041). Install the 7/16-20 screw
through the 7/16" “thick” washer, tensioner
pulley, pulley spacer and tensioner plate.
Secure using the 7/16"SAE washer (thinner
one) and Nyloc nut provided.
F. Loosely install the belt tensioner assembly
onto the supercharger using the M12 hardware provided. Locate the supplied 10-Rib
supercharger drive belt and install between
the crank pulley and supercharger pulley.
Using a 1/2" ratchet, apply tension to the
supercharger drive belt and secure the three
M12 screws previously installed.(See
Fig. 5-b.)
5. CRANK PULLEY AND SUPERCHARGER DRIVE PULLEY INSTALLATION
NOTE: If the supercharger drive pulley will not
slide onto the shaft DO NOT FORCE IT.
Light heating of the supercharger drive
pulley with a propane torch will aid in
installation.
NOTE: Take care to ensure that all pulleys and
spacer are piloting correctly and seated
flat against their mounting faces.
NOTE: Two crank pulley spacers are provided in this
system. 4GP017-031 (3.695" long) is to be
used for serpentine drive systems. The
4GP017-041 (3.293" long) is to be used for
V-belt applications.
NOTE: The bearing retaining ring on the pulley
should be facing the pulley spacer to properly clear the “thick” retaining washer.
(See Fig. 6-d.)
C. Install all applicable accessory belts at this time
and tension using the appropriate belt tensioner for your application.
D. Lightly grease the supercharger input shaft
and/or the supercharger drive pulley bore.
Install the pulley onto the supercharger input
shaft and rotate the pulley to align the keyways.
Slide the square key into the keyway. Install the
pulley retainer assembly into the input shaft
and hand tighten.

P/N: 4GP020-015
©2006 Vortech Engineering, LLC
All Rights Reserved, Intl. Copr. Secured
30MAY06 SmallBlockChev(4GP..015v1.1)
7
Fig. 5-b
TENSIONER PULLEY
TENSIONER PLATE
7/16 -14 x 3"
THREE M12 x 1.75" x 20mm
SCREWS AND WASHERS

P/N: 4GP020-015
©2006 Vortech Engineering, LLC
All Rights Reserved, Intl. Copr. Secured
30MAY06 SmallBlockChev(4GP..015v1.1)
8
Fig. 6-a (Optional)
Fig. 6-b (Optional)
A. Install Vortech carburetor enclosure (if not
already completed) assembly #8M205-012
included in this kit. Instructions are included
in the enclosure assembly.
B. Locate the 4GP112-040 discharge assembly.
Using the supplied gasket and 5/16-18 x 3/4"
socket-head screws from the carburetor
enclosure assembly, secure the 3/5" aluminum flange to the carburetor enclosure lid.
C. Install the 3/5" x 2.75" 90° elbow (7S350-276)
between the supercharger discharge and the
3.5" aluminum flange previously installed.
Trim the ends if necessary for best fit. Secure
using a #44 and #56 hose clamp.
6. DISCHARGE DUCTING/CARBURETOR ENCLOSURE
NOTE: OPTIONAL: Due to the many possible con-
figurations of intake manifolds (with regard
to carburetor flange height) a carburetor
spacer may be required to obtain the necessary height for proper supercharger and discharge duct alignment. As an option, the
carburetor enclosure cover may be turned
around so that the inlet is facing the passenger side of the vehicle. This may be desirable on some vehicle applications with tall
intake manifolds or for vehicles with other
clearance issues. (See Figs. 6-a, 6-b for
more detail.)
1. This optional discharge arrangement
requires the supercharger to be sent into
Vortech for a volute exchange to a straight
discharge unit (a curved volute is originally
supplied on the supercharger).
2. An extended discharge elbow must be purchased from Vortech (#4GA012-021).
3. Also a discharge elbow must be purchased
from Vortech (#8M012-012).
4. Routing of the fuel line inlet to the rear of
the enclosure must also be performed.
NOTE: The 7S350-276 is made to be trimmed in
order to fit, allowing for various intake
manifold heights.
4GA012-021
8M012-012

P/N: 4GP020-015
©2006 Vortech Engineering, LLC
All Rights Reserved, Intl. Copr. Secured
30MAY06 SmallBlockChev(4GP..015v1.1)
9
A. Refit the upper fan shroud.
B. Reconnect the battery.
C. If your vehicle has gone over 15,000 miles
since its last spark plug change, you will need
to change the spark plugs now before test
driving the vehicle.
D. Check all fittings, nuts, bolts and clamps for
tightness. Pay particular attention to oil and
fuel lines around moving parts, sharp edges
and exhaust system parts. Make sure all
wires and lines are properly secured with
clamps or tie-wraps.
E. Check all fluid levels, making sure that your
tank(s) is filled with 91 octane or higher fuel
before commencing test drive.
F. Start engine and allow to idle a few minutes,
then shut off.
G. Recheck to be sure that no hoses, wires, etc.
are near exhaust headers or moving parts
and for signs of any fluid leakage.Re-jet the
carburetor as required. Install a boost referenced high-performance mechanical fuel
pump or high performance electric fuel pump
with boost referenced fuel regulator. Use a
wide band O2 sensor to verify a proper
air/fuel ratio (Vor tech suggests 11.0:1 for 91
octane pump fuel).
H. Check ignition timing to make sure it is prop-
erly set before commencing test drive.
I. PLEASE TAKE SPECIAL NOTE: Operating
the vehicle without all sub assemblies completely and properly installed and working
may cause FAILURE OF MAJOR ENGINE
COMPONENTS.
J. Test drive the vehicle.
K. Read the Street Supercharger System
Owner's Manual and RETURN THE
WARRANTY REGISTRATION FORM within
thirty (30) days of purchasing your supercharger system to qualify.
7. FINAL REASSEMBLY AND CHECK
WARNING: Do not attempt to operate the vehicle
until all components are installed and all
operations are completed including final
check.

DP/N: 4GP020-015 - v1.1 05/30/06
®
1650 Pacific Avenue, Channel Islands CA 93033-9901 • Phone: 805 247-0226
Fax: 805 247-0669 • www.vortechsuperchargers.com • M-F 8:00AM - 4:30PM (PST)
ENGINEERING, LLC
 Loading...