

Page 1
Maxflow® Fuel Pressure Optimizer 86-95 Mustang
®
Installation Instructions
Before beginning installation of the Maxflow Fuel Pressure Optimizer, it is imperative to ensure that the
vehicle's engine is cold/cool to the touch, and the fuel pressure has been properly relieved. Refer to a service
manual for the proper technique.
A. Component Removal/Preparation
1. Disconnect the negative cable from the battery
negative terminal.
WARNING: Do not smoke while working on the
2. Disconnect the vacuum line from the regulator.
Remove the screws securing the fuel regulator to
the fuel rail.
NOTE: Inspect the fuel regulator O-ring for
3. Referring to the graphic assembly diagram, measure down 1/4" from the top of the fuel regulator
and mark the location. Cut the upper portion of
the fuel regulator top off and discard.
fuel system. Keep open flame
away from your work area!
cracks and tears. Replace if necessary.
NOTE: Be sure not to cut into or puncture the
4. Install the O-ring onto the factory fuel regulator
and seat onto the lip. Install the Vortech
optimizer as shown in
fuel regulator diaphram. Remove any
burrs and sharp edges.
®
fuel
Fig. 1
. The adjustment
screw should be unscrewed as far as possible to
ease installation. Using a 7/64" hex key, tighten
the four supplied 6-32 x 1/2" stainless steel
screws evenly, using a criss-cross pattern.
is no need to tighten screws excessively
There
. A small
amount of blue loctite 247 is recommended on
each of the four previously mentioned screws.
5. Reinstall the fuel regulator using the previously
removed hardware and tighten to the vehicle
manufacturers torque specifications.
6. Reconnect the vacuum line to the regulator. Reconnect the negative battery cable to the battery
terminal.
7. Turn the ignition switch on, but do not operate the
starter. After the fuel pump has run for approximately two seconds, the fuel pressure in the fuel
line will rise. Repeat this two or three times, then
check for any possible fuel leaks.
8. Adjust the fuel pressure to the desired setting
(turn clockwise to raise fuel pressure) using a
5/32" hex key and secure this setting, tightening
the jam nut against the regulator cover.
TOOLS REQUIRED:
• Metric and standard hex key set (Allen wrenches)
• Pneumatic cutoff wheel or fine tooth hacksaw
• 1/2" wrench
TOOLS RECOMMENDED:
• Blue loctite 247
• High quality/high pressure fuel pressure gauge
P/N: 007067
©2001 Vortech Engineering, LLC
All Rights Reserved, Intl. Copr. Secured
19DEC01 V1.0
(7067 V1.0)
ENGINEERING, LLC
1
Page 2
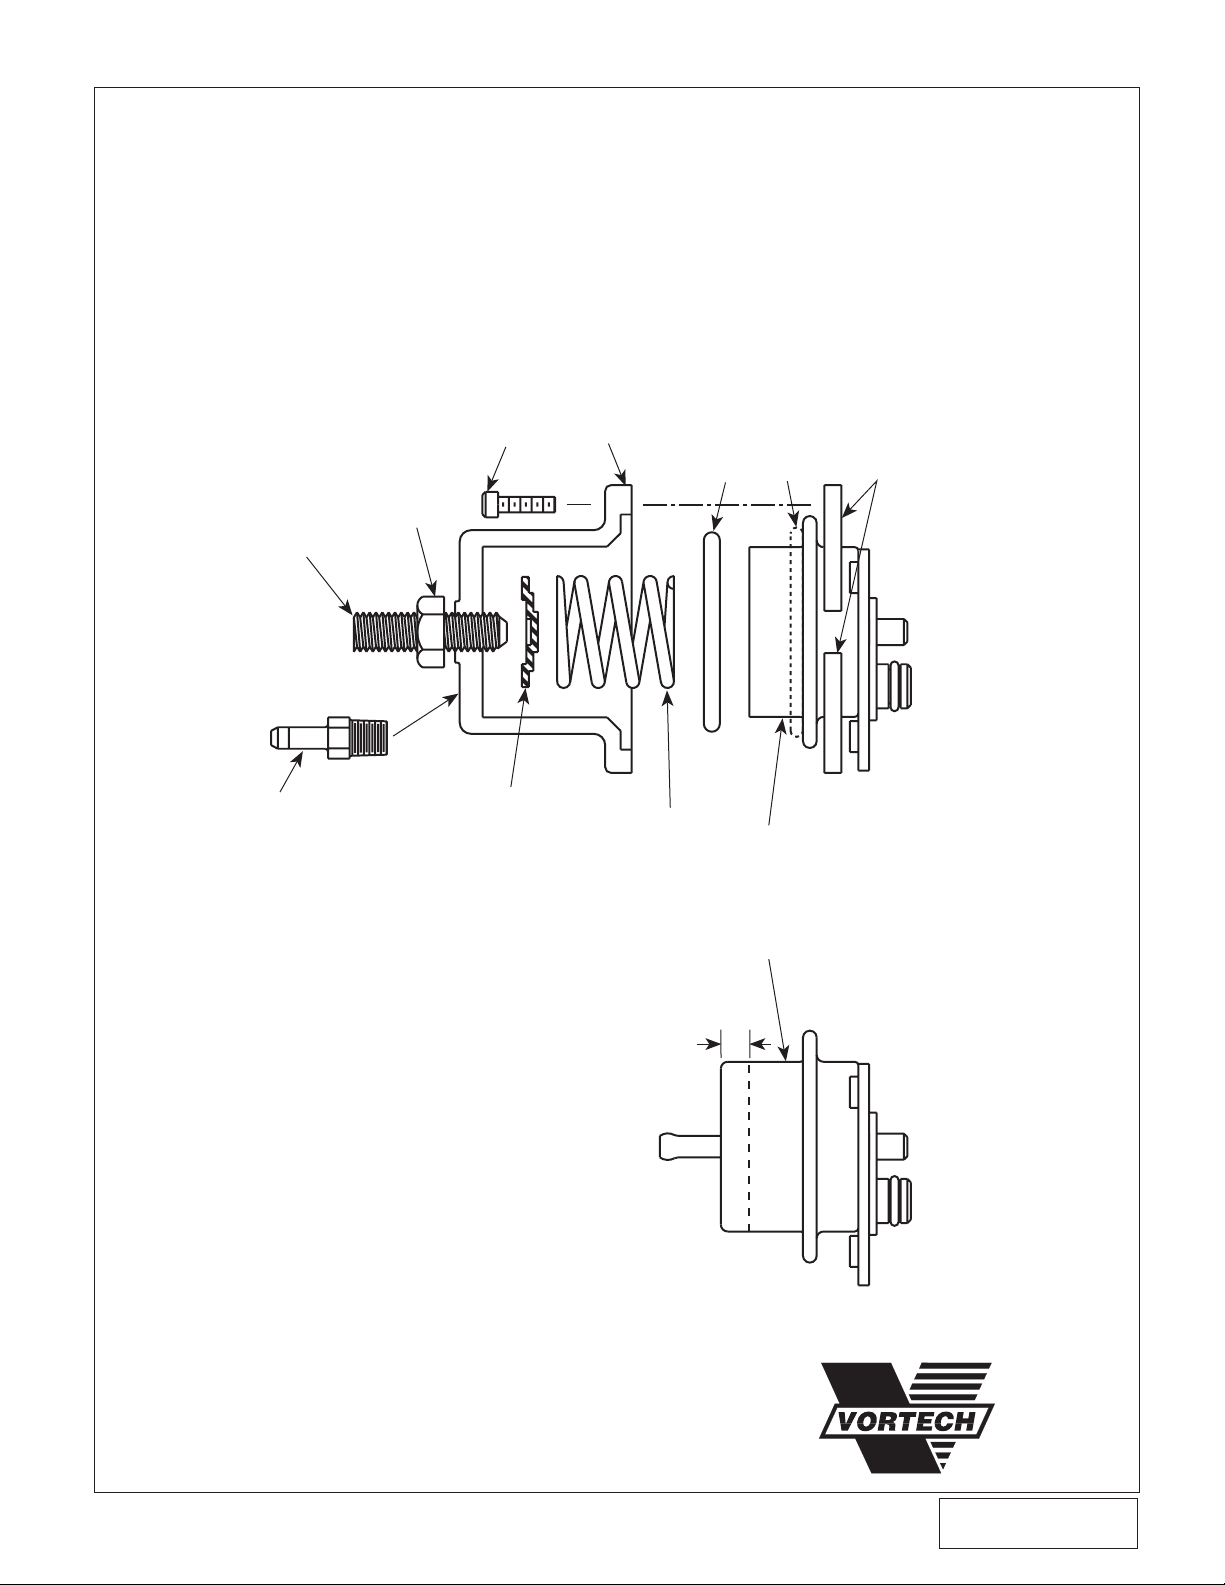
INSTALLATION INSTRUCTIONS
5/16-18 NUT
5/16-18 x 1.25 SET SCREW
6-32 x 1.5" SOCKET HEAD
COVER
O-RING
SPRING RETAINER
1/8 NPT - 5/32 HOSE BARB
SPRING
COVER RETAINERS
FUEL REGULATOR
CUT OFF TOP PORTION
AND DISCARD
1/4”
O-RING SEATS HERE
WHEN INSTALLED
®
Fig. 1
ENGINEERING, LLC
©2001 Vortech Engineering, LLC
2
All Rights Reserved, Intl. Copr. Secured
19DEC01 V1.0
P/N: 007067
(7067 V1.0)
 Loading...