

Page 1

VOOK
VOOK premium DVR 1
DVR QUICK START GUIDE
VDT2304FD
VDT2308FD
VDT2316FD
Page 2

4/8/16DVR Quick Start Guide
VOOK premium DVR 2
1. Install Hard Drive &DVD Writer
1.1 Install Hard Drive
Notice: 1. this series support eight SATA hard drives or support seven SATA hard drives
plus one DVD writer. Please use the hard drive the manufacturers recommend specially for
security and safe field.
2. Please calculate HDD capacity according to the recording setting. Please refer
to “Appendix B Calculate Recording Capacity”.
STEP1 Unscrew and Open the top cov er
STEP2 Connect the power and data cables. Place the HDD onto the
bottom case as below.
Fig 1.1 Connect HDD
STEP3 Screw the HDD
Note: For the convenience to install, please connect the power and
data cables firstly, and then screw to fix.
1.2 Install DVD Writer
STEP1 Unscrew and Open the top cover, connect the power and data
cables. Place the DVD writer onto the bottom case as below.
Fig 1.2 Connect the DVD Writer
STEP2 Screw the DVD writer.
2. Connections
Page 3
4/8/16DVR Quick Start Guide
VOOK premium DVR 3
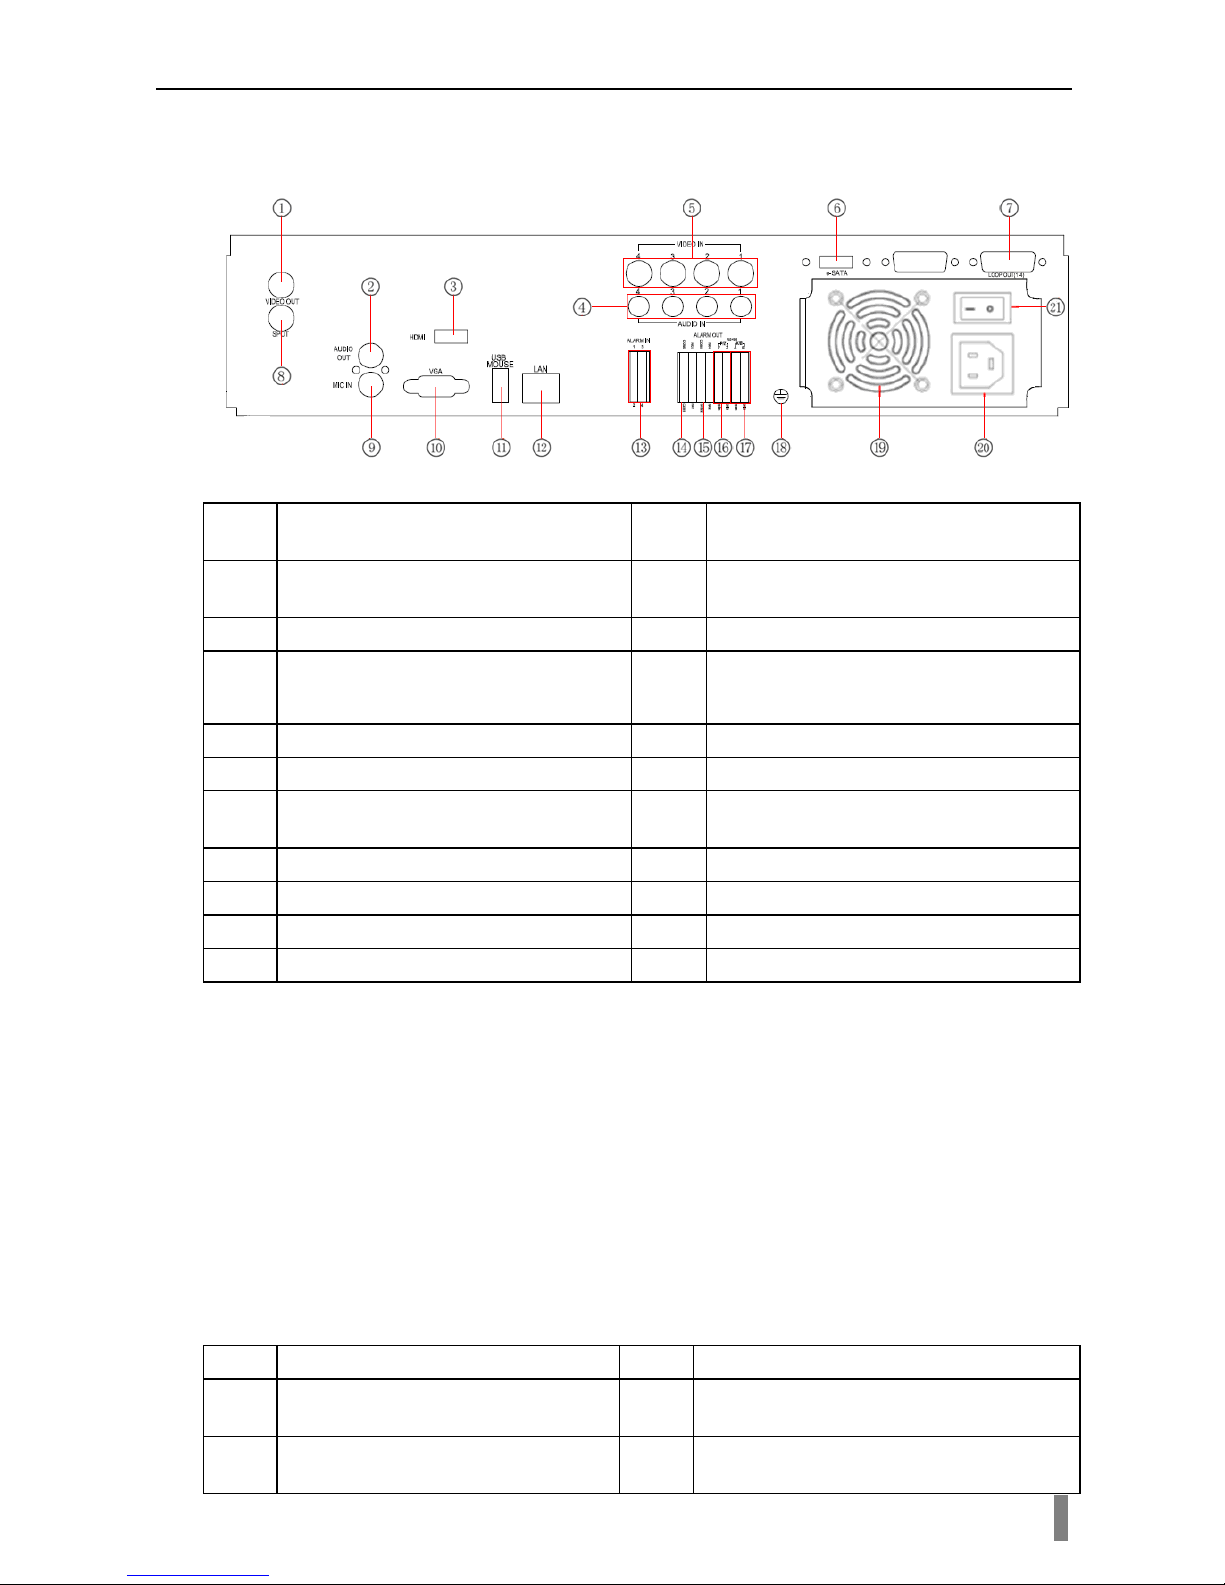
2.1 Rear view for 4-ch DVR
Note: the USB port on rear panel can only connect to USB mouse.
Fig 2.1 Rear view for 4-ch DVR
1 Video out: Connect to monitor 2 Audio output, connect to the sound
box
3
Connect to high-definition display
device
4
4 CH Audio input
5
Video input chann els from 1-4
6
Connect to HDD f or backup (optional)
7
Loop out; for outputting 1-4ch
image independently
8
Connect to monitor as an AUX output
channel by channel. O
nly video
display, no menu show
9 MIC IN: talk 10 VGA output, connect to monitor
11 connect to USB mouse 12 Network port
13 Connect to external sensor1-4 14 4ch relay output. Connect to external
alarm
15 Grounding 16 Connect to speed dome
17 Connect to keyboard 18 Grounding
19 For cooling the device 20 POWER INPUT
21 Switch on/off
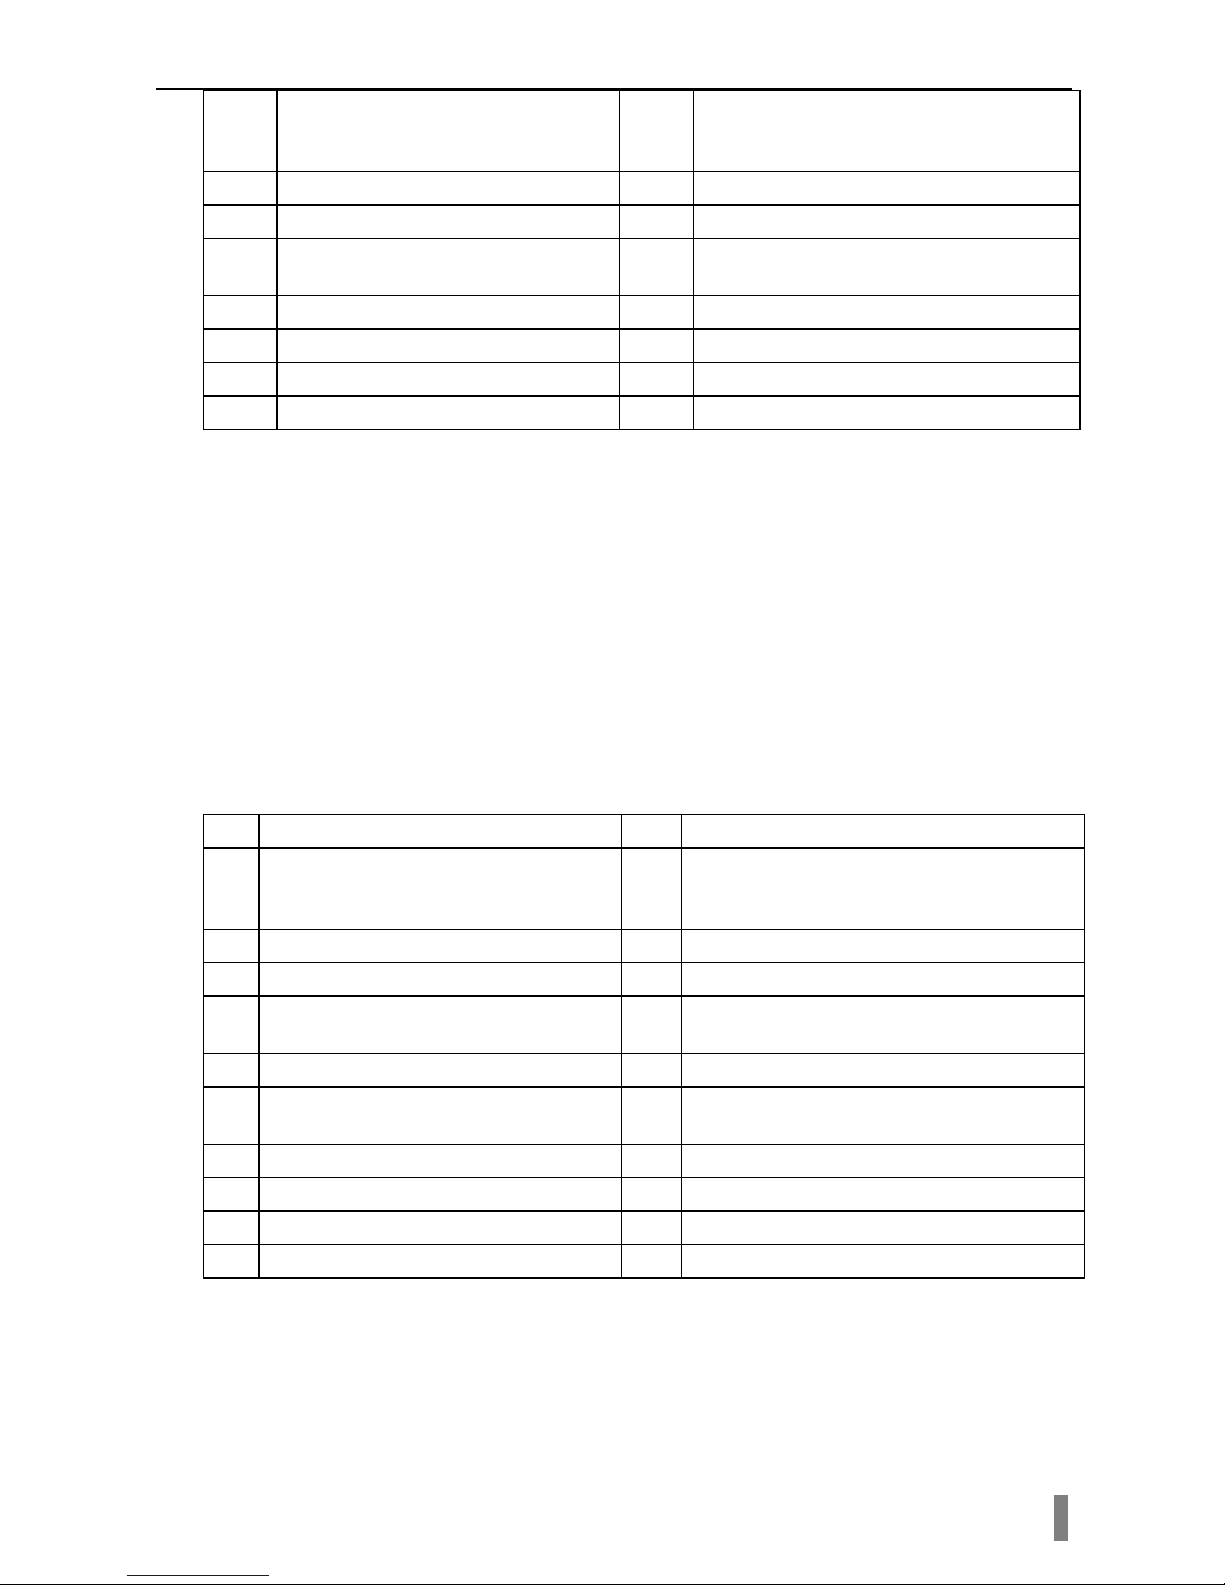
2.2 Rear view for 8-ch DVR
Fig 2.2 Rear view for 8-ch DVR
1 Video out: Connect to monitor 2 Audio output, connect to the sound box
3 Connect to high-definition display
device
4 8 CH Audio input
5 Video input chann el s fr om 1-8 6 Loop out; for outputting 1-8ch image
independently
Page 4
4/8/16DVR Quick Start Guide
VOOK premium DVR 4
7
Connect to monitor as an AUX
output channel by channel. Only
video display, no menu show
8
MIC IN: talk
9
VGA output, connect to monitor
10
connect to USB mouse
11 Network port 12 Connect to HDD for backup (optional)
13
Connect to external sensor1-8
14 4ch relay output. Connect to external
alarm
15
Grounding
16
Connect to speed dome
17 Connect to keyboard 18 Grounding
19 For cooling the device 20 POWER INPUT
21 Switch on/off
2.3 Rear view for 16-ch DVR
2.3 Rear view for 16-ch DVR
1
Video out: Connect to monitor
2
Video input chann el s fr om 1-16
3 Loop out; for outputting 1-16ch
image independently
4 Connect to monitor as an AUX output
channel by channel. Only video display,
no menu show
5
16 CH Audio input
6
Audio output, connect to the sound box
7
MIC IN: talk
8
VGA output, connect to monitor
9
Connect to high-definition display
device
10
connect to USB mouse
11
Network port
12
Connect to HDD for backup (optional)
13
Connect to external sensor1-16
14
4ch relay output. Connect to external
alarm
15
Grounding
16 Connect to speed dome
17
Connect to keyboard
18
Grounding
19
For cooling the device
20
POWER INPUT
21
Switch on/off
3. Power on
STEP1 Step1: connect with the source power; switch on the power butt on
near the power port on the rear panel
STEP2 Step2: the device will be loaded, and the power indicator will
display blue
Page 5
4/8/16DVR Quick Start Guide
VOOK premium DVR 5
STEP3 Step3: before start, a WIZZARD window will be pop-up an d show
some information about time zone,time setup,network configuration, record
configuration and disk management. User can setup here and refer to the
concrete setup steps from the correspondin g chapters. If users don’t want to
setup Wizard, please click Exi t button to exit.
After the device power on, if there is no menu or onl y has live image display,
user can long press ESC button to switch.
Notice: this serial device can onl y dis pla y menu on VG A monitor or BNC moni tor a t one
time, if there is live image display without menu display, please check up whether other
device has menu display firstly, or long press ESC key to wait for login di alog box to
appear. Long press ESC key can switch the output bet ween BNC and VGA.
4. Basic setup
4.1 Accessing the DVR menus
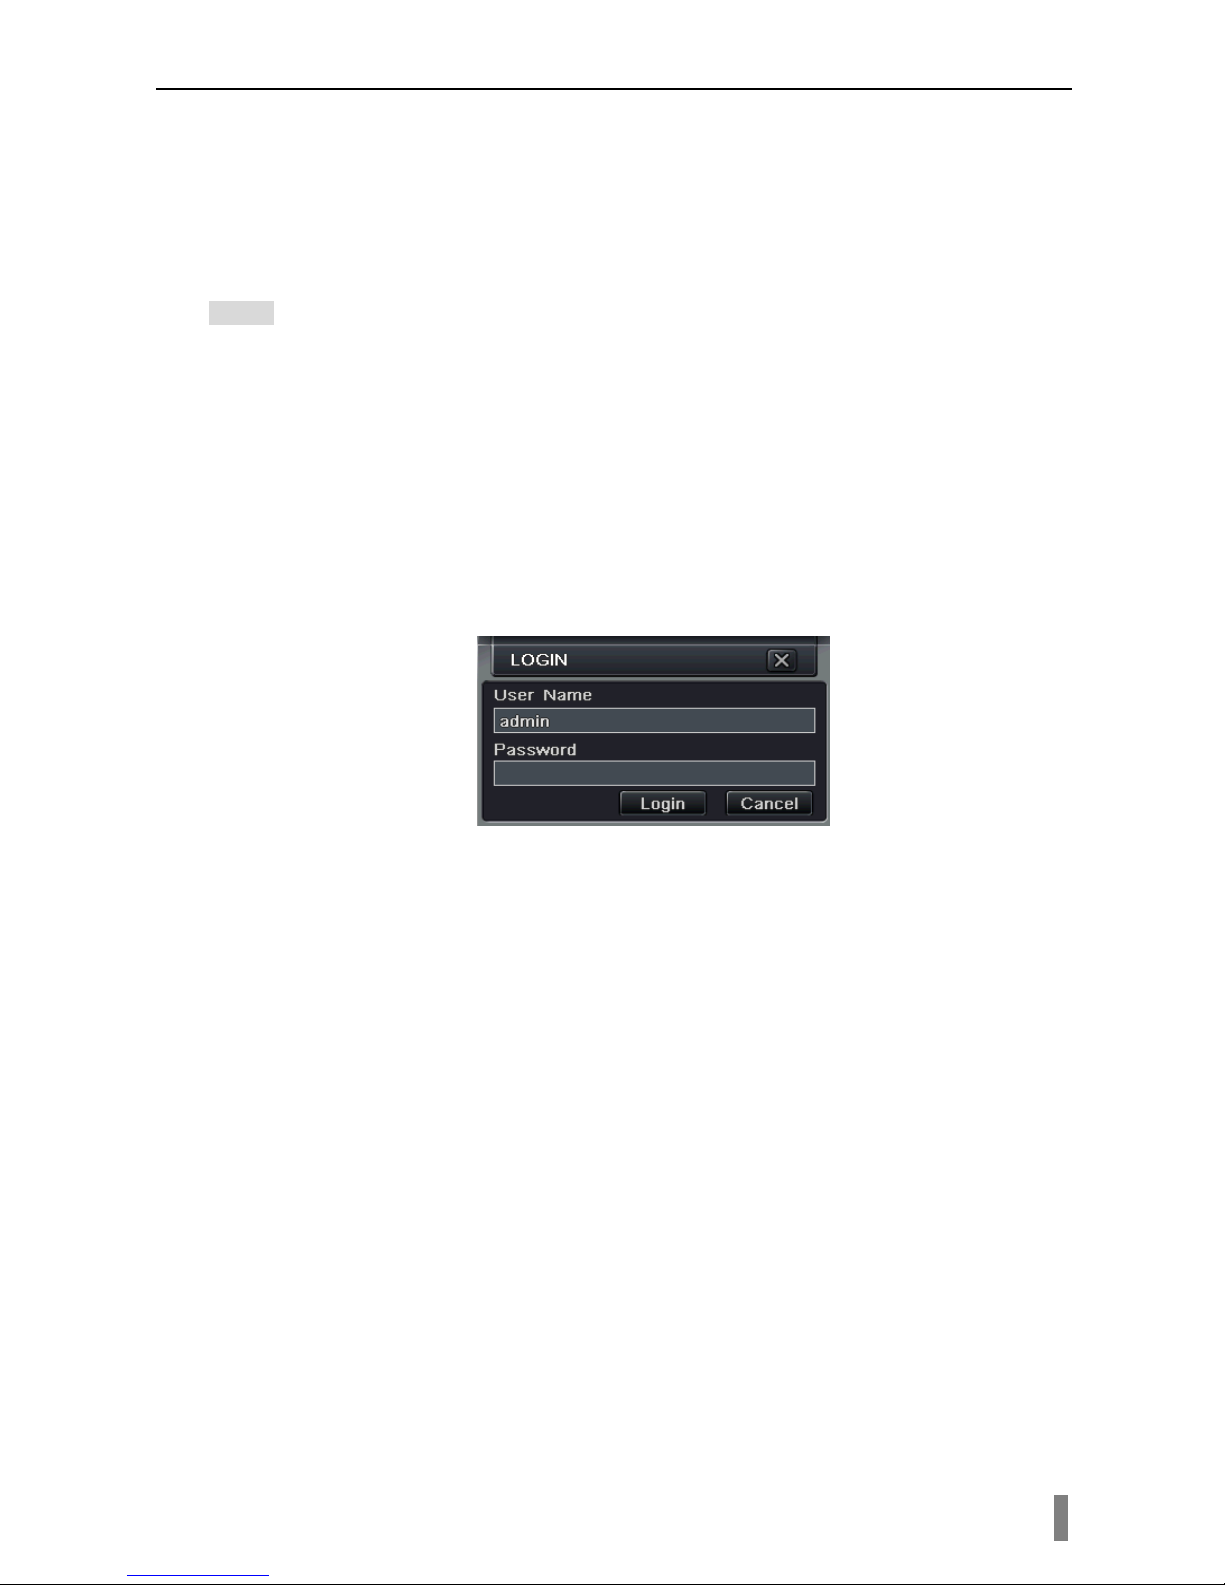
4.1.1 Login
Press the MENU button which will bring the LOGIN dialogue box and enter the
user name: admin and password: 123 456
Fig 4.1 Login
4.1.2 Main menu setup
Click right mouse, or press ENTER button on the front panel can enter into the
main menu. Menu-System refer to Fig 4.2
Fig 4-2 Main menu setup
Basic configuration: us er can set video system, menu language, audio, t ime
and authorization check.
Live configuration:User can set name/time display, picture color and hide
cameras.
Record configuration:User can set record quality, frame rate, resolution, time
stamp and recycle.
Page 6
4/8/16DVR Quick Start Guide
VOOK premium DVR 6
Schedule configuration: users can set schedule for timer, motion detection,
and sensor alarm respectively.
Alarm configuration: users can set sensor type, alarm trigger and buzzer
alarm.
Network configuration: Users enable network function, and configure IP
address, DDNS, transmi s sion video parameters here.
User configuration: Administrator can add, delete users, and change their
authorization
PTZ configuration: users can set protocol, baud rate, address, presets and
auto cruise track here.
Advanced configuration: users can reboot the device and import & export data
into or from mobile storage medium.
4.2 DVR recording modes
User need to install and format a HD D, and set all the recording parameters
before recording. There are four k i nds of record modes.
4.2.1 Manual Recording
User can press REC button on the front panel after quitting system setup.
Press this button again to st op r ecording.
Or press REC button on remote controller, click again to stop.
Or click REC button on the tool bar with mouse, click again to stop.
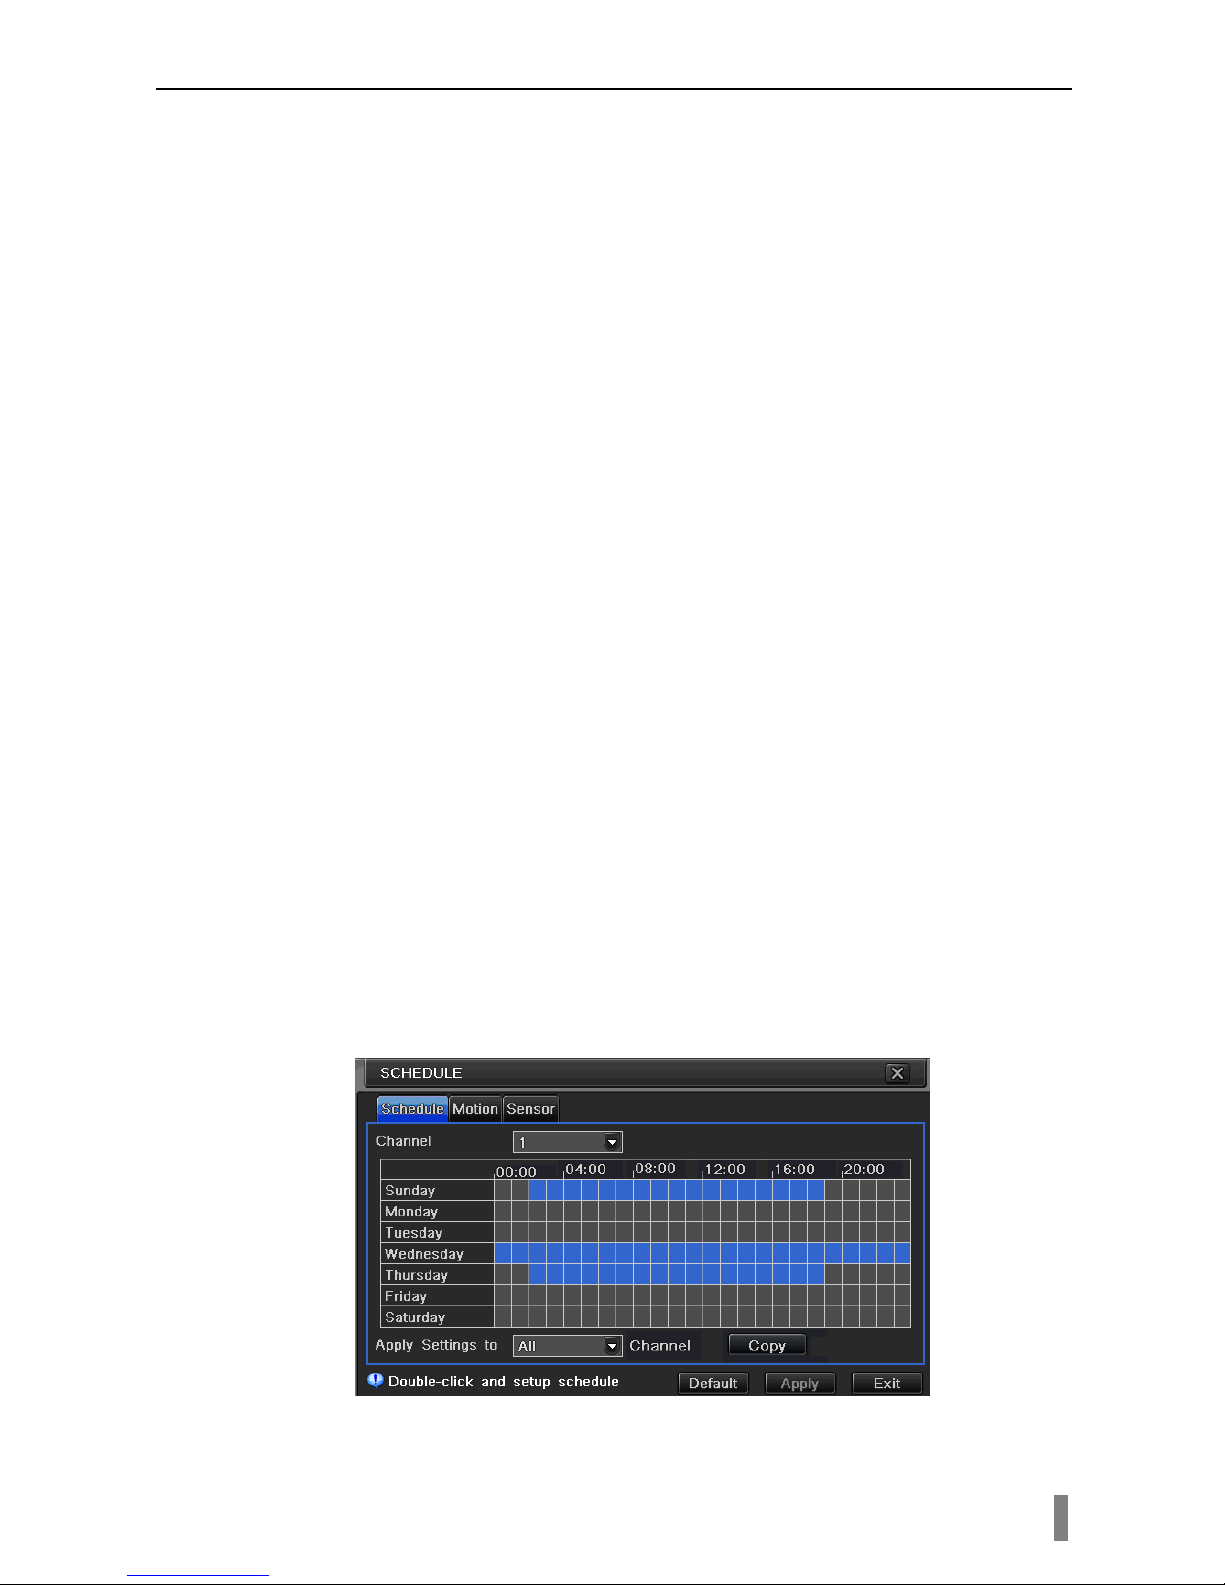
4.2.2 Schedule Recording
Enter into main menu—schedule configuration (refer to Fig 4-3). Users can set
different schedule time for every day in one week. If user wants a special
schedule for one day can use Hol iday function.
The column means the seven days of a week from Monday to Sunday , the row
means 24 hours of a day. Click the grid to do relevant setup. Blue means
checked area, gray means unchecked area.
Fig 4-3 Schedule record setup
4.2.3 Motion Detection Recording
Page 7
4/8/16DVR Quick Start Guide
VOOK premium DVR 7
Motion detection recording: when there is a motion event detected, the camera
will be triggered to record and have an alarm out.
Enter into main menu-alarm configuration-motion configuration (refer to Fig
4-4), enable Detection first;
Fig 4-4 Motion detection interface
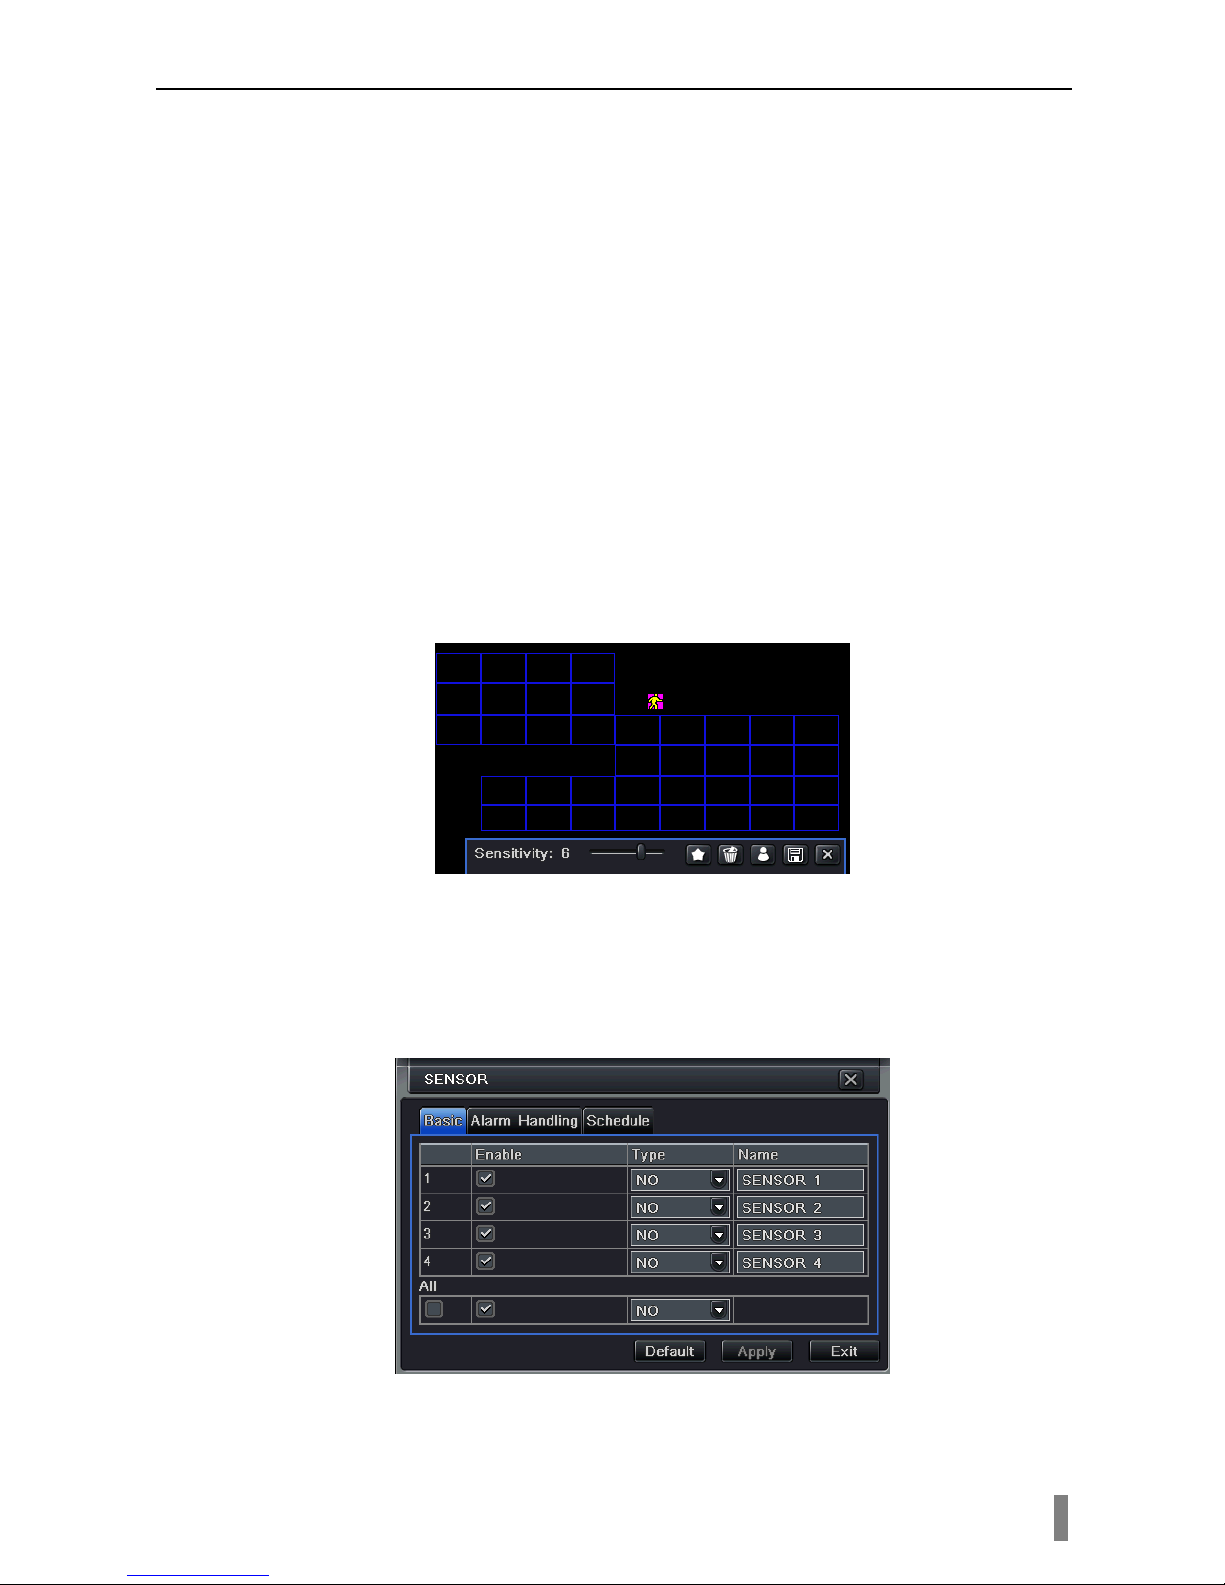
Enter Motion detection area ( refer to Fig 4-5) to set Sensiti vity and Detection
area.
Fig 4-5 motion detection area setup
4.2.4 Alarm Recording
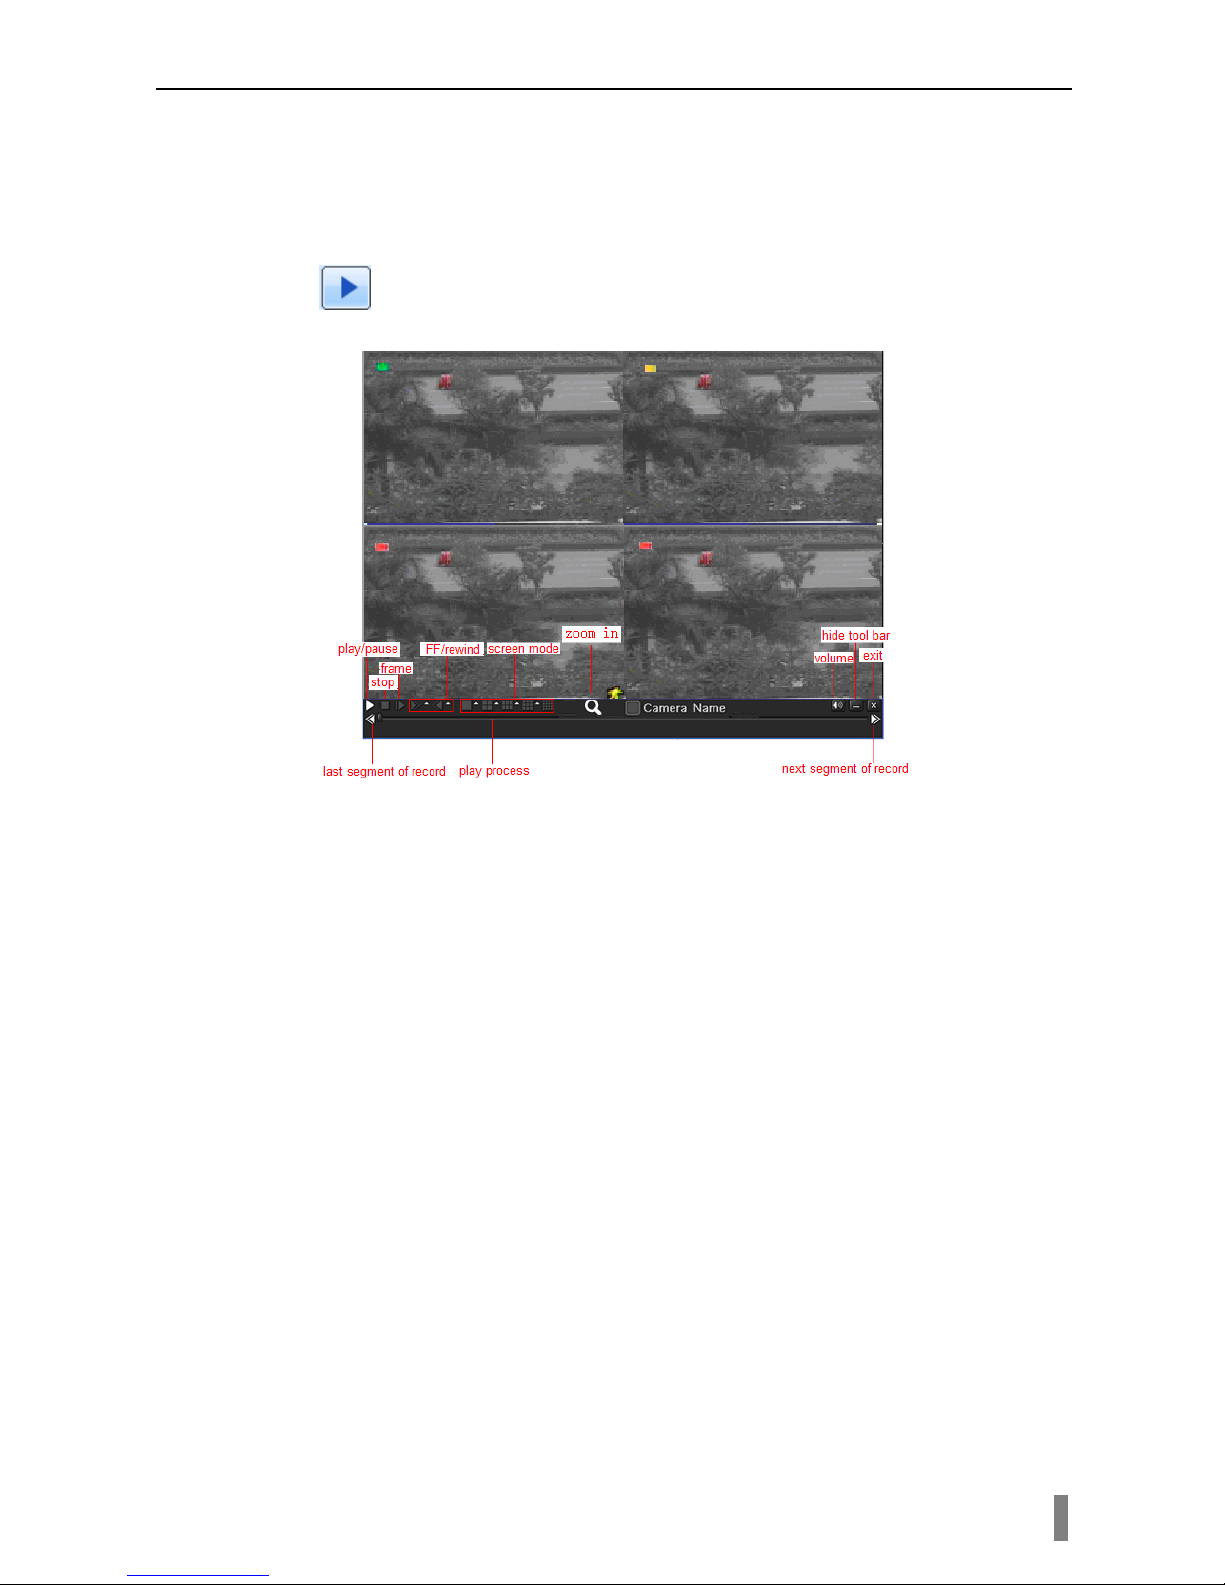
Enter into main menu-Alarm configuration-Sensor alarm (refer to Fig 4-6),
enable Detection first , setup the device type.
Fig 4-6 sensor alarm record
Enter into Trigger configuration, select alarm out and recording cameras and
linked PTZ; set Alarm out hold time and Buz zer hold time. Click OK to save
Page 8
4/8/16DVR Quick Start Guide
VOOK premium DVR 8
settings.
4.3 Playback
This unit supports live record playback, time search and event search. It
displays full or 4 screens in playback.
4.3.1 Live playback
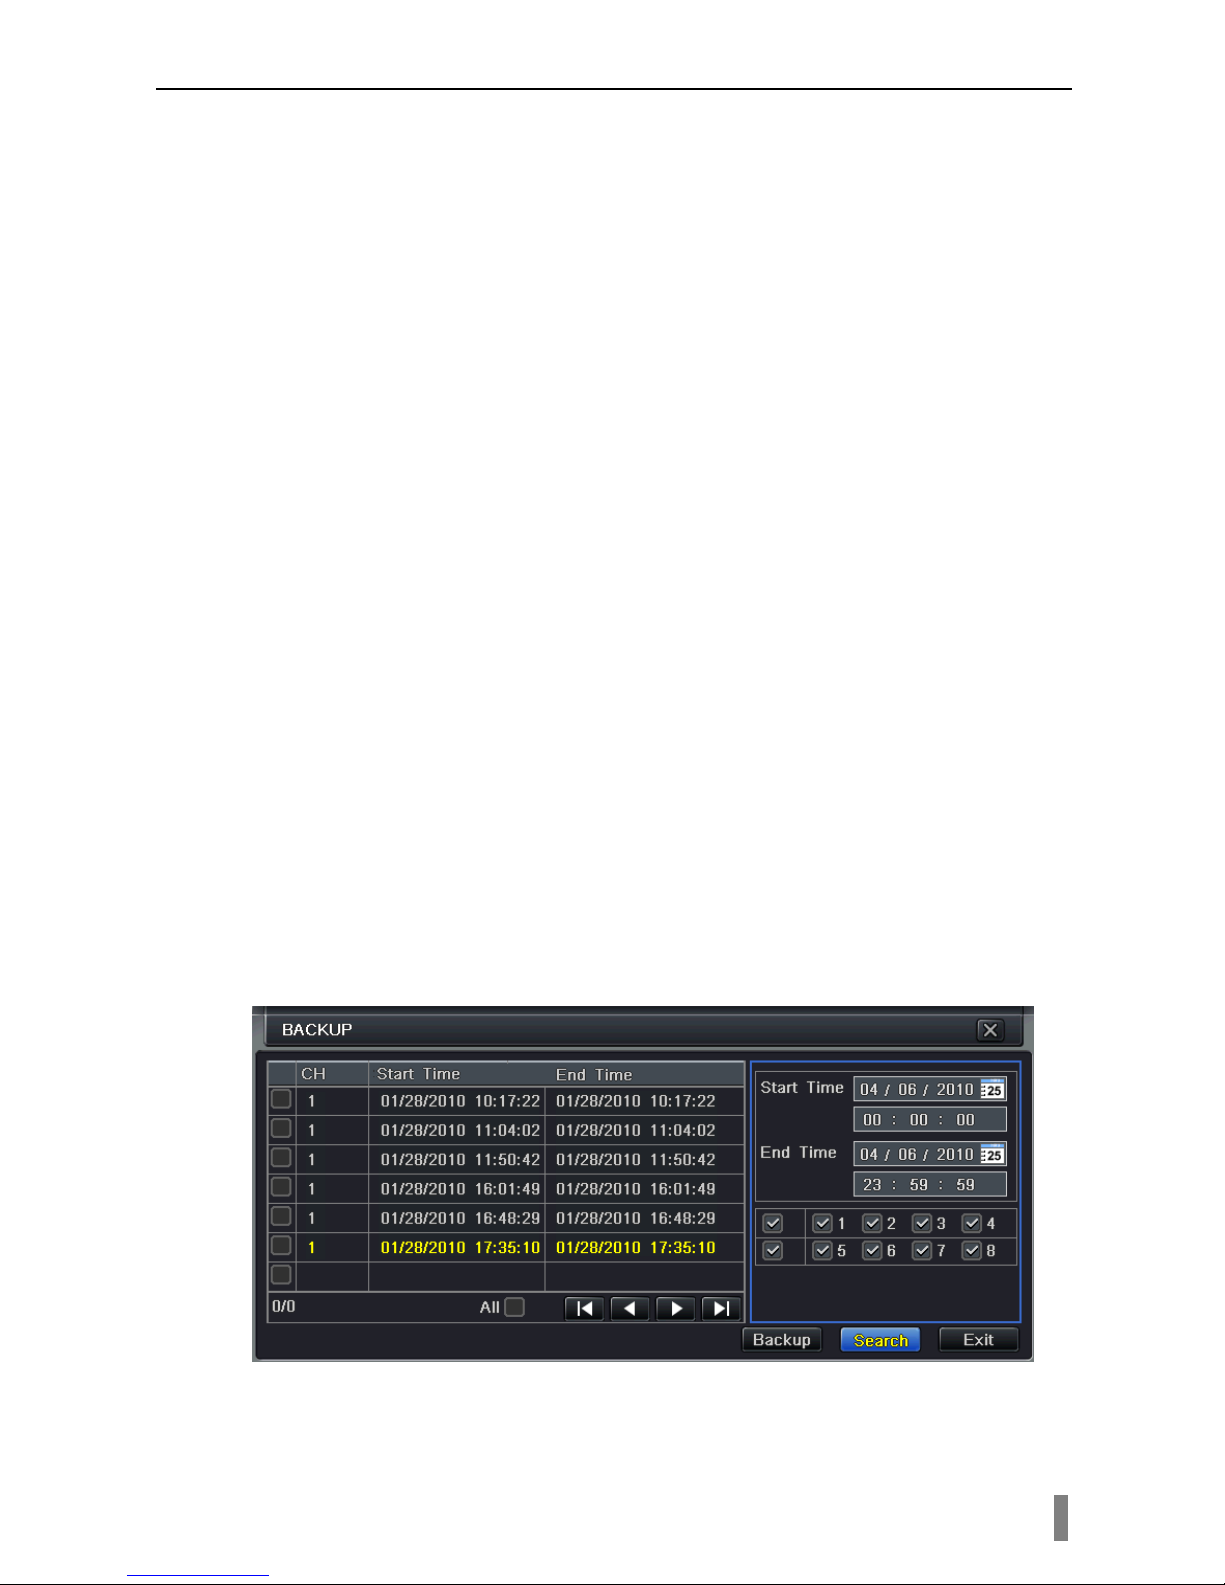
Click Play
button to playback the record. Refer t o Figure4-7. User can do
concrete operation by clic k the buttons on screen.
Fig 4-7 live playback
4.3.2 Time search
Enter into Search configuratio n, select Time search. If it recorded in a certain
day, the date will show highlight.
Select a date, press Se ar ch button, click the time grid to set the play start time
or input play record time man ual ly. The selected time match the blue grid.
Click Play button. It will play from the time point where user set.
Click the relative buttons on the screen to do fast forward/rewind, pause, stop,
and change the screen mode and re-search.
Fig 4-8 time search
4.3.3 Event search
Page 9
4/8/16DVR Quick Start Guide
VOOK premium DVR 9
Enter into Search configuration, select Event search (refer to Fig 4-9), and
choose a certain day in the event search interface.
Click Search button, the searched event information will displaye d in the event
list box, user can select date, channel, tick off Motion, Sensor or All
accordingly.
Double click a video file to playback.
Fig 4-9 Event search
4.4 Back up
This unit supports backup by built-in SATA DVD Writer, with USB Flash and
USB HDD.
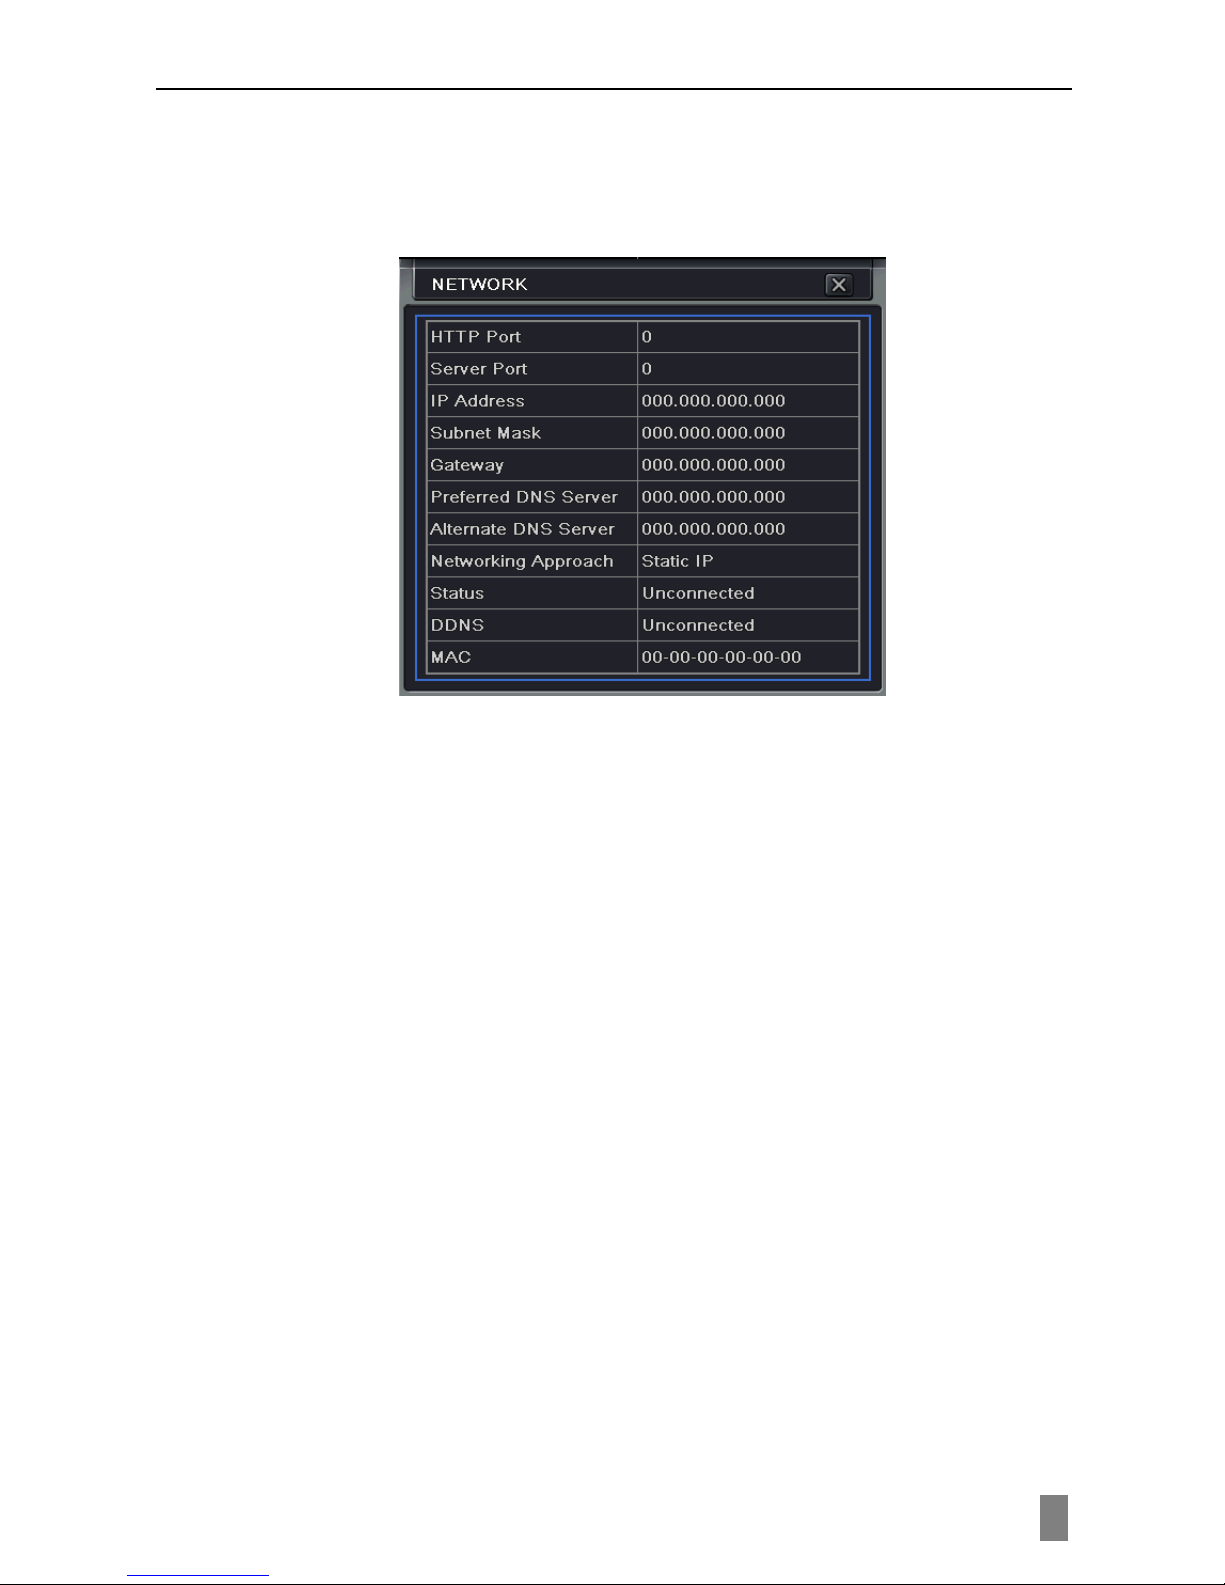
Install DVD Writer (refer to Chapter1.2), enter into Backup interface (refer to
Fig 3-10), set the start & end tim e, select channels, click Search button; the
searched data will be displaye d in the data backup list box.
Press Backup button, it will begin to write video from HDD inside DVR to
backup device. Click Start button to start backup.
Fig 4-10 Backup setup
5. Remote Surveillance
Page 10
4/8/16DVR Quick Start Guide
VOOK premium DVR 10
To making remote access , the DVR should be connecting to LAN or Int ernet.
There are three kind of method for remote accessing.
5.1 Using DHCP to get IP address automatically
Click the Menu but ton, enter into System—Net work configuration (r efer to Fig
5-1), enable DHCP in the both the DVR and the router.
Fig 5-1 Network configur ation
Enter Video to set network video parameters like resolution, frame rate etc.
Open an IE bro wser on computer on the same LAN. Input the IP address of
the DVR in IE address blank and enter.
IE will download ActiveX autom atically. Then a window pops up and asks for
user name and password.
Input name and password correctly (the default user name is admin and the
password is 123456), and enter. It will show the remote picture.
Note:If the ActiveX canno t be downloaded or installed, please refer to
Appendix A Q7 in the user manual.
5.2 Access DVR on WAN
Input IP address, Subnet, Gateway. If using DHCP, please enable DHCP in
both the DVR and router.
Enter Video to set network video parameters like resolution, frame rate etc.
Forward IP address and por t number in Virtual Server setup of the router or
virtual server. Close firewall.
If users want to utilize d ynamic domain nam e, need apply for a doma in name
in a DNS server supported by the DVR or router. Then add to the DVR or
router.
Open IE browser, input IP address, or dynamic domain name and enter. If
HTTP port is not 80, add the port number after I P address or domain name.
IE will download ActiveX autom atically. Then a window pops up and asks for
Page 11

4/8/16DVR Quick Start Guide
VOOK premium DVR 11
user name and password.
Input name and password correct ly, and enter to view.
5.3 Connect the DVR to Internet through dial-up ADSL
Input IP address, Subnet, Gateway gotten from your ISP. If using ADSL,
please input user name and password, and click OK. The DVR will connect the
server and show “connection succeeds”.
The following steps are the same as S TEP4-7 of the connection way above.
If users want to utilize d ynamic domain nam e, need apply for a doma in name
in a DDNS server supported by the DVR or router. Then add to the DVR or
router.
Open IE browser, input IP address, or dynamic domain name and enter. If
HTTP port is not 80, add the port number after I P address or domain name.
IE will download ActiveX autom atically. Then a window pops up and asks for
user name and password.
Input name and password correct ly, and enter to view.
 Loading...