

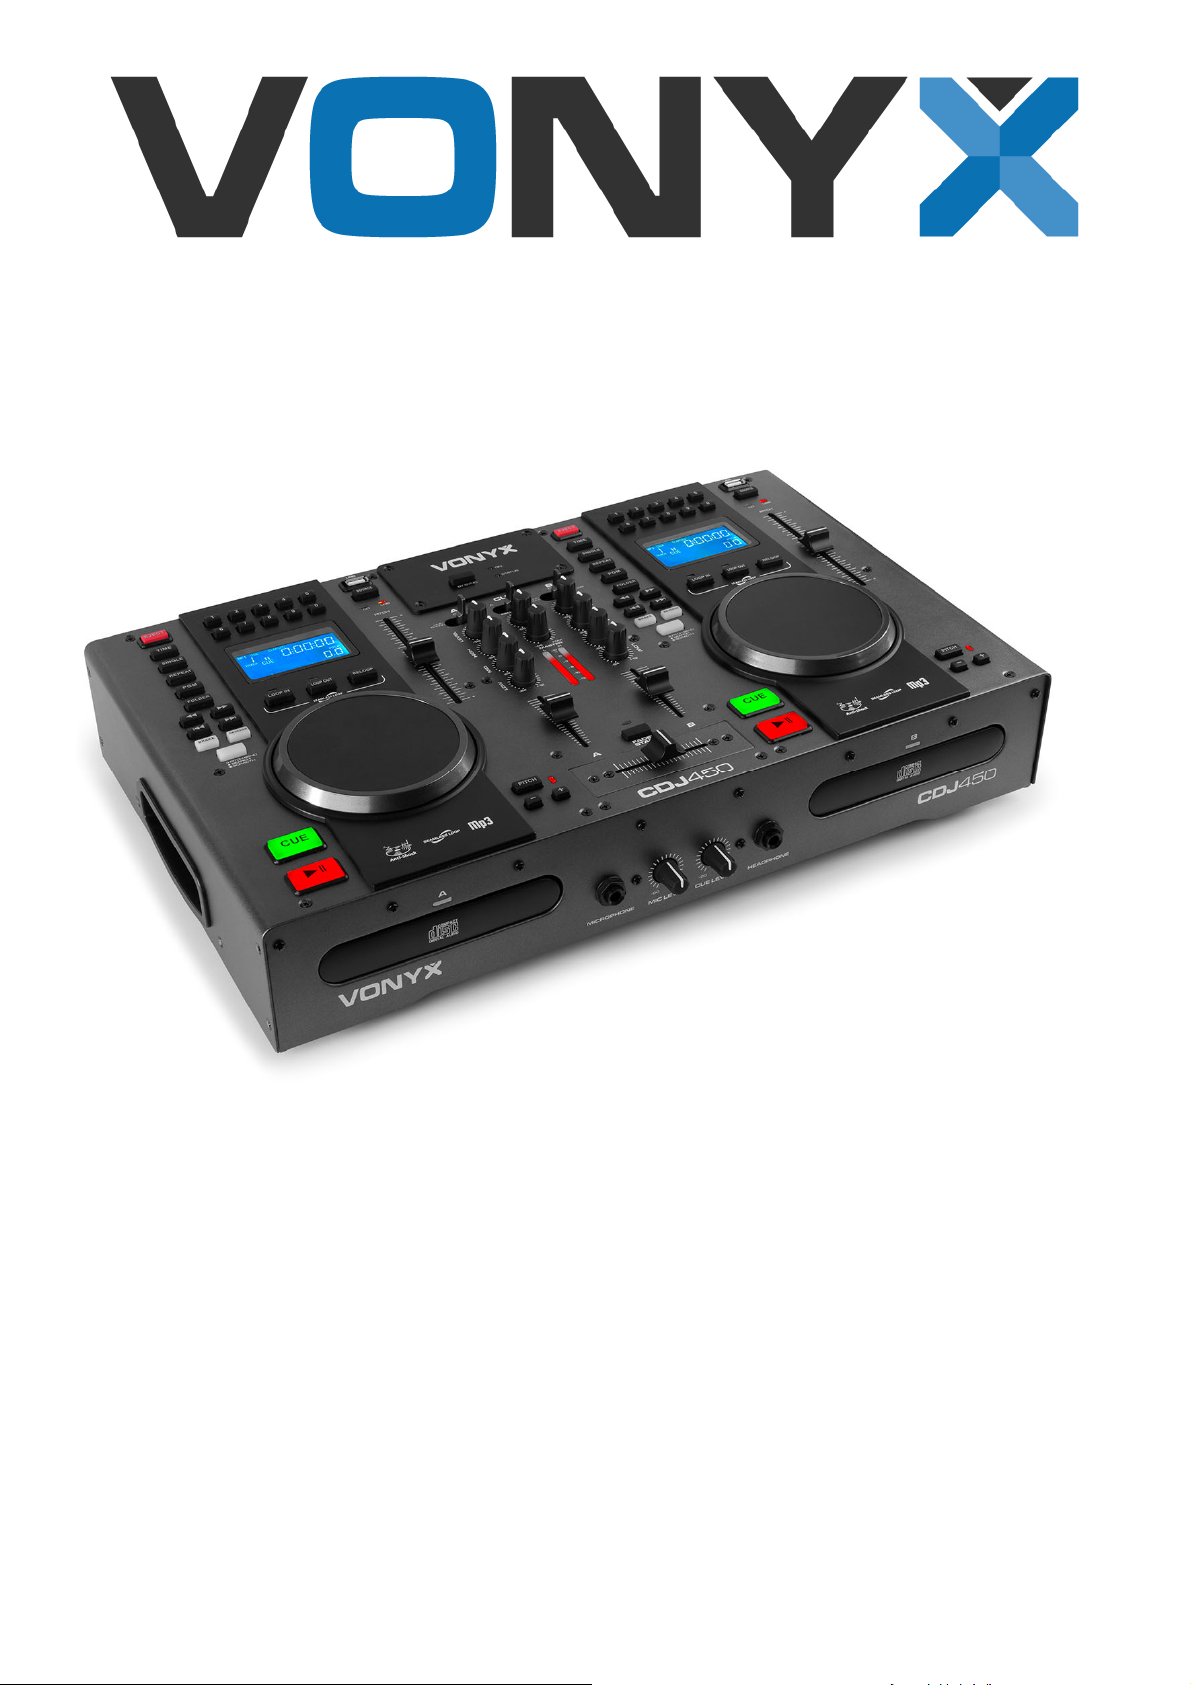
CDJ450 Double CD/MP3/USB BT Station
Ref. nr.: 172.805
INSTRUCTION MANUAL
GEBRUIKSAANWIJZING
GEBRAUCHSANLEITUNG
MANUAL DE INSTRUCCIONES
MANUEL D'INSTRUCTIONS
INSTRUKCJA OBSŁUGI
V1.0
ENGLISH
Congratulations to the purchase of this Vonyx product. Please read this manual thoroughly prior to using the product in order to
benefit fully from all features.
Read the manual prior to using the product. Follow the instructions in order not to invalidate the warranty. Take all precautions
to avoid fire and/or electrical shock. Repairs must only be carried out by a qualified technician in order to avoid electrical shock.
Keep the manual for future reference.
- Prior to using the product, please ask advice from a
specialist. When the product is switched on for the first
time, some smell may occur. This is normal and will
disappear after a while.
- The product contains voltage carrying parts. Therefore do
NOT open the housing.
- Do not place metal objects or pour liquids into the
product. This may cause electrical shock and
malfunction.
- Do not place the product near heat sources such as
radiators, etc. Do not place the product on a vibrating
surface. Do not cover the ventilation holes.
- The product is not suitable for continuous use.
- Be careful with the mains lead and do not damage it. A
faulty or damaged mains lead can cause electrical shock
and malfunction.
- When unplugging the product from a mains outlet,
always pull the plug, never the lead.
- Do not plug or unplug the product with wet hands.
- If the plug and/or the mains lead are damaged, they
need to be replaced by a qualified technician.
- If the product is damaged to such an extent that internal
parts are visible, do NOT plug the product into a mains
outlet and DO NOT switch the unit on. Contact your
dealer. Do NOT connect the product to a rheostat or
dimmer.
- To avoid fire and shock hazard, do not expose the
product to rain and moisture.
- All repairs should be carried out by a qualified technician
only.
- Connect the product to an earthed mains outlet (220240Vac/50Hz) protected by a 10-16A fuse.
- During a thunderstorm or if the product will not be used
for a longer period of time, unplug it from the mains. The
rule is: Unplug it from the mains when not in use.
- If the product has not been used for a longer period of
time, condensation may occur. Let the unit reach room
temperature before you switch it on. Never use the
product in humid rooms or outdoors.
- To prevent accidents in companies, you must follow the
applicable guide lines and follow the instructions.
- Do not repeatedly switch the product on and off. This
shortens the life time.
- Keep the product out of the reach of children. Do not
leave the product unattended.
- Do not use cleaning sprays to clean switches. The
residues of these sprays cause deposits of dust and
grease. In case of malfunction, always seek advice from
a specialist.
- Do not force the controls.
- If this product is with speaker inside which can cause
magnetic field. Keep the product at least 60cm away
from computer or TV.
- If this product have a built-in lead-acid rechargeable
battery. Please recharge the battery every 3 months if
you are not going to use the product for a long period of
time. Otherwise the battery may be permanently
damaged.
- If the battery is damaged please replace with same
specifications battery. And dispose the damaged battery
environment friendly.
- If the product has fallen, always have it checked by a
qualified technician before you switch the product on
again.
- Do not use chemicals to clean the unit. They damage the
varnish. Only clean the product with a dry cloth.
- Keep away from electronic equipment that may cause
interference.
- Only use original spares for repairs, otherwise serious
damage and/or dangerous radiation may occur.
- Switch the product off prior to unplugging it from the
mains and/or other equipment. Unplug all leads and
cables prior to moving the product.
- Make sure that the mains lead cannot be damaged when
people walk on it. Check the mains lead before every use
for damages and faults!
- The mains voltage is 220-240Vac/50Hz. Check if power
outlet match. If you travel, make sure that the mains
voltage of the country is suitable for this product.
- Keep the original packing material so that you can
transport the product in safe conditions.
This mark attracts the attention of the user to high voltages that are present inside the housing and that are of sufficient
magnitude to cause a shock hazard.
This mark attracts the attention of the user to important instructions that are contained in the manual and that he should
read and adhere to.
The product has been certified CE. It is prohibited to make any changes to the product. They would invalidate the CE certificate
and their guarantee!
NOTE: To make sure that the product will function normally, it must be used in rooms with a temperature between 5°C/41°F and
35°C/95°F.
Electric products must not be put into household waste. Please bring them to a recycling centre. Ask your local authorities or your
dealer about the way to proceed. The specifications are typical. The actual values can slightly change from one unit to the other.
Specifications can be changed without prior notice.
Do not attempt to make any repairs yourself. This would invalid your warranty. Do not make any changes to the product. This would also
invalid your warranty. The warranty is not applicable in case of accidents or damages caused by inappropriate use or disrespect of the
warnings contained in this manual. Vonyx cannot be held responsible for personal injuries caused by a disrespect of the safety
recommendations and warnings. This is also applicable to all damages in whatever form.
2
UNPACKING INSTRUCTION
CAUTION! Immediately upon receiving the product, carefully unpack the carton, check the contents to ensure that all parts are
present, and have been received in good condition. Notify the shipper immediately and retain packing material for inspection if
any parts appear damage from shipping or the package itself shows signs of mishandling. Save the package and all packing
materials. In the event that the product must be returned to the factory, it is important that the product be returned in the original
factory box and packing.
If the device has been exposed to drastic temperature fluctuation (e.g. after transportation), do not switch it on immediately. The
arising condensation water might damage your device. Leave the device switched off until it has reached room temperature.
POWERSUPPLY
On the label on the backside of the product is indicated on this type of power supply must be connected. Check that the mains
voltage corresponds to this, all other voltages than specified, the light effect can be irreparably damaged. The product must also
be directly connected to the mains and may be used. No dimmer or adjustable power supply.
Always connect the device to a protected circuit (circuit breaker or fuse). Make sure the device has an appropriate
electrical ground to avoid the risk of electrocution or fire.
CAUTION LASER RADIATION!
This device is equipped with two Class 1 laser diodes. To ensure a safe operation do not remove any covers or try to
access the inside of the equipment. The inside of the device does not contain any parts which are subject to
maintenance. Maintenance must only be carried out by qualified staff.
CONTROLS AND CONNECTIONS
For a detailed and numbered illustration of the device please see end of this manual.
CD PLAYER AND MIXING CONSOLE:
1. EJECT BUTTON
Press to load or eject disk. Each press will open or close the disk tray.
NOTE: Disc holder will not open unless stop or pause button has been pushed first.
2. TIME BUTTON
Use this button to choose the time mode: elapsed time, remaining time or total remaining time.
3. SINGLE BUTTON
Press this button to switch between the SINGLE and CONTINUOUS play mode. The selected mode is indicated on the
LCD. In SINGLE mode, after each track, the unit stops the reading. In CONTINUOUS mode, the unit reads all tracks
and stops.
4. REPEAT BUTTON
Use this button to repeat one track or all the tracks on the CD.
5. PROG BUTTON
In STOP mode, you can program several tracks (20 tracks maximum):
- Press the STOP button to enter the stop mode.
- Press the PROG button to enter the program mode.
- Use the skip track buttons to choose the track you want to listen to, then press the PROG button to enter your
choice.
- Repeat the operation to select all the tracks you want to listen to.
- Press the PLAY/PAUSE button to start the playback.
6. FOLDER BUTTON
Allows you to navigate through folders in either USB or CD mode.
7. SEARCH ◄◄ AND ►► BUTTON
Press to rewind or fast-forward through a track.
8. TRACK SEARCH I◄◄ AND ►►I BUTTON
Select the previous or next track.
9. DSP / BRAKE
In play mode, push the BRAKE button first and then the PLAY/PAUSE button to slow the track to a halt.
Push the PLAY/PAUSE button again to cancel this feature.
10. DSP / REVERSE
Push the REVERSE button to play your track in reverse. Push the reverse button again to cancel this feature.
11. TRACK SELECT BUTTONS
Press this button to be able to switch between PITCH BEND, SCRATCH and SEARCH functions.
When the indicator LED is off, the jog can be used for PITCH BEND function. When the indicator LED is on, the jog
wheel can be used for scratching. When the indicator LED flashes, quick search forward and backwards is enabled.
3

12. JOG & SHUTTLE WHEELS
Shuttle: Use the dial to select the scanning direction and speed. The disc is scanned in the forward direction when the
shuttle dial is turned clockwise from the neutral position, in the reverse direction when the shuttle dial is turned
counterclockwise. The scanning speeds up when the shuttle dial is turned faster.
Jog: In pause mode, when turning the jog, the point at which the sound is being produced moves by a number of
frames corresponding to the number of clicks. Clockwise moves the point forwards; counterclockwise backwards. In
play mode, the jog increases or decreases the speed of the track.
13. CUE BUTTON
Pressing the CUE button during play causes a return to the position at which play was started.
14. PLAY / PAUSE BUTTON
By pressing this button, the operation changes from play to pause or from pause to play.
15. DIRECT ACCESS BUTTONS
Press one of the 0-9 buttons to select that one track from the CD.
16. DISPLAY
LCD Display to indicate Track / Numbers / Time / Remain / Pitch / Continue / Single.
17. CD LIGHT
When entering CD work mode, this will light up.
18. SOURCE BUTTON
Press this button to toggle between CD or USB mode.
19. USB PORT
Supports playing tracks by USB. Computer connection by USB eligible only when entered USB work mode.
20. USB LIGHT
When entering USB work mode, this will light up.
21. INPUT TOGGLE SWITCH
Selects which source will be live based on what you have connected to the rear panel input section. In Midi and CD A
position the internal CD units are active.
22. BLUETOOTH®
Connect your BT-device to this device and select by SOURCE and INPUT TOGGLE switches.
NOTE: DJ-functions are disabled during BT usage.
23. CUE FOR CHANNEL A-B
Selects which source will be live for CH A and CH B in the mix.
24. INPUT TOGGLE SWITCH
Selects which source will be live based on what you have connected to the rear panel input section. In Midi and CD B
position the internal CD units are active.
25. CHANNEL A & B GAIN CONTROL
Adjusts CH A and CH B level.
26. CUE / MIX / PGM CONTROL
Counter clockwise you will be able to monitor the assigned CUE signal. Slowly turning the control clockwise to the
assigned CUE signal. Slowly turning the control clockwise to middle position allows you to monitor CUE MIX with PGM.
Moving the control clockwise to the right allows you to monitor the PGM output.
27. HIGH FADER A-B
Adjust CH A and CH B equalization of high frequencies.
28. MASTER LEVEL
Adjusts master level output signal.
29. LED METER
Indicates the master output level.
30. MID FADER A-B
Adjust CH A and CH B equalization of mid frequencies.
31. LOW FADER A-B
Adjust CH A and CH B equalization of low frequencies.
32. INPUT FADER
Controls individual source levels for CH A and CH B in the mix.
33. FADER START
Activation allows you to start the CD players from your cross fader.
34. CROSS FADER
Allows for clean segues between the two input channels. Fully left selects channel A, fully right selects channel B. With
the cross fader centered, both assigned channels are live. Use the cross fader for fast and seamless segues from one
selected channel to the other.
35. PITCH CONTROL
Use this fader to increase or decrease the speed of the track.
36. RELOOP
Use this button to start the last saved loop. To finish the loop, press the button once more.
4

37. LOOP IN
Pressing this button sets the starting-point of the seamless loop and indicates on the display.
38. LOOP OUT
Pressing this button sets the end-point of the seamless loop and starts the loop. To finish the loop, press the button
once more.
39. PITCH
Pushing this button makes the adjustment of the potentiometer available.
40. PITCH BEND +
The pitch will rise when this button is pressed and held and return to the original value when released.
41. PITCH BEND -
The pitch will drop when this button is pressed and held and return to the original value when released.
FRONT PANEL
42. DISC TRAYS
Place your CD in here. Press EJECT button to open the tray.
43. MIC INPUT
Plug 1/4” microphone plug in here.
44. MIC VOLUME ADJUSTER
Use this knob to adjust the microphone volume.
45. CUE LEVEL CONTROL
Use this knob to adjust the cue volume.
46. HEADPHONE INPUT
Plug in headphones here.
REAR PANEL
47. AC CORD INPUT
Insert supplied power cord here.
48. POWER ON/OFF SWITCH
Flip the switch to either turn the device on or off.
49. XLR BALANCED MASTER OUTPUT
XLR stereo balanced output of the master signal for connecting with units with line level inputs.
50. MASTER AND REC OUTPUTS
Recording output REC: Stereo output (RCA) of the master signal for connecting and amplifier or other units with line
level inputs.
Master output: Unbalanced stereo output (RCA) of the master signal for connecting an amplifier or other units with line
level inputs.
51. INPUT SELECTOR SWITCH LINE / PHONO CHANNEL B
Switch the analog inputs between phono and line input.
52. ANALOG INPUT LINE / PHONO
Stereo inputs (RCA) for CH A and CH B for connecting analog units with line level outputs or turntables with magnetic
system.
53. INPUT SELECTOR SWITCH LINE / PHONO CHANNEL A
Switch the analog inputs between phono and line input.
54. USB PORT
USB port type B for connecting with computers.
55. GND
Grounding lug for turntable connection. Always use this connection (your turntable cable should have a grounding
wire).
56. DJ MIC
Plug XLR type microphone in here.
5
NEDERLANDS
Hartelijk dank voor de aanschaf van dit Vonyx product. Neemt U a.u.b. een paar momenten de tijd om deze handleiding
zorgvuldig te lezen, aangezien wij graag willen dat u onze producten snel en volledig gebruikt.
Lees deze handleiding eerst door alvorens het product te gebruiken. Volg de instructies op anders zou de garantie wel eens
kunnen vervallen. Neem ook altijd alle veiligheidsmaatregelen om brand en/of een elektrische schok te voorkomen. Tevens is
het ook raadzaam om reparaties / modificaties e.d. over te laten aan gekwalificeerd personeel om een elektrische schok te
voorkomen. Bewaar deze handleiding ook voor toekomstig gebruik.
- Bewaar de verpakking zodat u indien het apparaat defect is,
dit in de originele verpakking kunt opsturen om
beschadigingen te voorkomen.
- Voordat het apparaat in werking wordt gesteld, altijd eerst
een deskundige raadplegen. Bij het voor de eerste keer
inschakelen kan een bepaalde reuk optreden. Dit is normaal
en verdwijnt na een poos.
- In het apparaat bevinden zich onder spanning staande
onderdelen; open daarom NOOIT dit apparaat.
- Plaats geen metalen objecten en mors geen vloeistof in het
effect. Dit kan leiden tot elektrische schokken of defecten.
- Toestel niet opstellen in de buurt van warmtebronnen zoals
radiatoren etc. en niet op een vibrerende onder- grond
plaatsen. Dek ventilatieopeningen nooit af.
- Het apparaat is niet geschikt voor continu gebruik.
- Wees voorzichtig met het netsnoer en beschadig deze niet.
Als het snoer kapot of beschadigd is, kan dit leiden tot
elektrische schokken of defecten.
- Als u de stekker uit het stopcontact neemt, trek dan niet aan
het snoer, maar aan de stekker.
- Om brand of elektrische schok te voorkomen, dient u dit
apparaat niet bloot te stellen aan regen of vocht.
- Verwijder of plaats een stekker nooit met natte handen resp.
uit en in het stopcontact.
- Indien zowel de stekker en/of netsnoer als snoeringang in het
apparaat beschadigd zijn dient dit door een vakman hersteld
te worden.
- Indien het apparaat zo beschadigd is dat inwendige
(onder)delen zichtbaar zijn mag de stekker NOOIT in het
stopcontact worden geplaatst en het apparaat NOOIT
worden ingeschakeld. Neem in dit geval contact op met de
dealer.
- Sluit het apparaat nooit op een dimmer aan.
- Reparatie aan het apparaat dient te geschieden door een
vakman of een deskundige.
- Sluit het apparaat alleen aan op een 220-240VAC / 50Hz
(geaard) stopcontact, verbonden met een 10-16A
meterkastgroep.
- Bij onweer altijd de stekker uit het stopcontact halen, zo ook
wanneer het apparaat voor een langere tijd niet gebruikt
wordt. Stelregel: Bij geen gebruik stekker verwijderen.
Deze markering wordt weergegeven om u erop attent te maken dat een levensgevaarlijke spanning in het product
aanwezig is en dat bij aanraking van deze delen een elektrische schok wordt verkregen.
Deze instructiemarkering wordt weergegeven om u erop te wijzen dat de instructie zeer belangrijk is om te lezen en/of op
te volgen.
OPMERKING: Om zeker te zijn van een correcte werking, dient u dit apparaat in een ruimte te gebruiken waar de temperatuur
tussen de 5°C/41°F en 35°C/95°F ligt.
Raadpleeg eventueel www.wecycle.nl en/of www.vrom.nl v.w.b. het afdanken van elektronische apparaten in het kader van de
WEEE-regeling. Vele artikelen kunnen worden gerecycled, gooi ze daarom niet bij het huisvuil maar lever ze in bij een gemeentelijk
depot of uw dealer. Lever ook afgedankte batterijen in bij uw gemeentelijk depot of bij de dealer, zie www.stibat.nl
Alle (defecte) artikelen dienen gedurende de garantieperiode altijd retour te worden gezonden in de originele verpakking. Voer zelf geen
reparaties uit aan het toestel; in élk geval vervalt de totale garantie. Ook mag het toestel niet eigenmachtig worden gemodificeerd, ook in dit
geval vervalt de totale garantie. Ook vervalt de garantie bij ongevallen en beschadigingen in élke vorm t.g.v. onoordeelkundig gebruik en
het niet in achtnemen van het gestelde in deze gebruiksaanwijzing. Tevens aanvaardt Vonyx geen enkele aansprakelijkheid in geval van
persoonlijke ongelukken als gevolg van het niet naleven van veiligheidsinstructies en waarschuwingen. Dit geldt ook voor gevolgschade in
wélke vorm dan ook.
- Als u het apparaat lang niet gebruikt heeft en het weer wil
gebruiken kan er condens ontstaan; laat het apparaat eerst
op kamertemperatuur komen alvorens het weer in werking
te stellen.
- Apparaat nooit in vochtige ruimten en buiten gebruiken.
- Om ongevallen in bedrijven te voorkomen moet rekening
worden gehouden met de daarvoor geldende richtlijnen en
moeten de aanwijzingen/waarschuwingen worden gevolgd.
- Het apparaat buiten bereik van kinderen houden.
Bovendien mag het apparaat nooit onbeheerd gelaten
worden.
- Gebruik geen schoonmaakspray om de schakelaars te
reinigen. Restanten van deze spray zorgen ervoor dat
smeer en stof ophopen. Raadpleeg bij storing te allen tijde
een deskundige.
- Gebruik geen overmatige kracht bij het bedienen van het
apparaat.
- Dit apparaat kan magnetisch veld veroorzaken. Houd dit
apparaat ten minste 60 cm afstand van de computer of tv.
- Indien dit apparaat beschikt over een loodaccu, dient deze
tenminste elke 3 maanden opgeladen te worden indien
deze voor een langere periode niet wordt gebruikt anders
bestaat de kans dat de accu permanent beschadigd.
- Bij een ongeval met dit product altijd eerst een deskundige raadplegen alvorens opnieuw te gebruiken.
- Tracht het apparaat niet schoon te maken met chemische
oplossingen. Dit kan de lak beschadigen. Gebruik een
droge doek om schoon te maken.
- Blijf uit de buurt van elektronische apparatuur die
bromstoringen zouden kunnen veroorzaken.
- Bij reparatie dienen altijd originele onderdelen te worden
gebruikt om onherstelbare beschadigingen en/of
ontoelaatbare straling te voorkomen.
- Schakel eerst het toestel uit voordat u het netsnoer
verwijdert. Verwijder netsnoer en aansluitsnoeren voordat u
dit product gaat verplaatsen.
- Zorg ervoor dat het netsnoer niet beschadigd/defect kan
raken wanneer mensen erover heen lopen. Het netsnoer
vóór ieder gebruik controleren op breuken/defecten!
- In Nederland/België is de netspanning 220-240Vac/50Hz.
Indien u reist (en u neemt het apparaat mee) informeer dan
naar de netspanning in het land waar u verblijft.
6
UITPAKKEN
LET OP! Onmiddellijk na ontvangst, zorgvuldig uitpakken van de doos, controleer de inhoud om ervoor te zorgen dat alle
onderdelen aanwezig zijn en zijn in goede staat zijn ontvangen. Bij transportschade of ontbreken van onderdelen onmiddellijk
de verkopende partij inlichten. Bewaar de verpakking en het verpakkingsmateriaal. Indien het product moet worden
teruggestuurd, is het belangrijk dat het product in originele verpakking wordt geretourneerd.
Als het apparaat is blootgesteld aan drastische temperatuurverschillen (bv. na het transport), schakel het apparaat niet
onmiddellijk in. De ontstane condensatie kan het apparaat beschadigen. Zorg ervoor dat het apparaat op kamertemperatuur
komt en steek vervolgens de voeding stekker in het stopcontact/wandcontactdoos.
AANSLUITSPANNING
Op het label aan de achterzijde van het product staat aangegeven op welke netspanning deze moet worden aangesloten.
Controleer of de netspanning hiermee overeenkomt, bij alle andere netspanningen dan aangegeven kan het apparaat
onherstelbaar worden beschadigd. Tevens moet het apparaat direct op de netspanning worden aangesloten en mag géén
dimmer of regelbare voeding worden gebruikt.
Sluit het apparaat altijd aan op een beschermd circuit (aardlekschakelaar of zekering). Zorg ervoor dat het apparaat
voldoende elektrisch is geaard om het risico op elektrocutie of brand te vermijden.
VOORZICHTIG LASERSTRALING!
Waarschuwing!
Dit apparaat is uitgerust met een klasse 1 laserdiode. Om een veilige werking te garanderen, mogen er geen
panelen worden verwijderd om toegang tot de binnenkant te verkrijgen. Er bevinden geen serviceonderdelen in het
apparaat. Onderhoud en service activiteiten mogen alleen door geautoriseerde dealers worden uitgevoerd.
BEDIENELEMENTEN EN AANSLUITINGEN
Voor een genummerde detailillustratie van het apparaat zie het einde van deze manual.
CD SPELER EN MIXER:
1. EJECT TOETS
Druk op deze toets om de CD-lade te openen of te sluiten.
2. TIME TOETS
Bij gebruik van deze toets wordt de verstreken tijd, resterende tijd en totaal resterende tijd weergegeven.
3. SINGLE TOETS
Druk op deze toets om te wisselen tussen SINGLE en CONTINUOUS afspeelmodus. De geselecteerde modus wordt
aangegeven op de LCD weergave. In SINGLE modus stopt de speler na afloop van een track. In CONTINUOUS
modus stopt de speler na afloop van alle tracks.
4. REPEAT TOETS
Druk deze toets om het afspelen van een track te herhalen of om de gehele CD te herhalen.
5. PROG TOETS
In STOP modus kunnen maximaal 20 tracks worden geprogrammeerd:
- Druk op de STOP- en daarna de PROG toets om de programmeer-modus te betreden.
- Gebruik de skip track toetsen om de gewenste track te kiezen en druk op de PROG toets om op te slaan.
- Herhaal deze handeling om alle tracks te programmeren.
- Gebruik te PLAY / PAUSE toets om af te spelen.
6. FOLDER TOETS
M.b.v. deze toets kan door mappen genavigeerd worden in zowel USB als CD modus.
7. SEARCH ◄◄ EN ►► TOETSEN
M.b.v. deze toetsen kan binnen een track genavigeerd worden.
8. TRACK SEARCH I◄◄ EN ►►I TOETSEN
Gebruik deze toetsen om naar een voorgaande- of volgende track te gaan.
9. DSP / BRAKE
Wanneer tijdens het afspelen op deze toets wordt gedrukt en daarna op PLAY / PAUSE, wordt de afspeelsnelheid
langzaam minder tot pauze is bereikt. Druk opnieuw op PLAY / PAUSE om deze functie te beëindigen.
10. DSP / REVERSE
Druk deze toets om een track achterstevoren af te spelen. Druk nog een keer om deze functie te beëindigen.
11. TRACK SELECT TOETS
Druk deze toets om te wisselen tussen PITCH BEND, SCRATCH en SEARCH functies.
Wanneer de LED-indicator uit is, kan het jog wheel worden gebruikt om de snelheid (pitch) te regelen. Een brandende
LED-indicator duidt erop dat het jog wheel gebruikt kan worden als scratch functie. Wanneer de LED-indicator knippert
heeft het jog wheel de snelzoekfunctie. Als het jog wheel 8 seconden niet wordt gebruikt gaat de speler automatisch
terug naar PITCH BEND functie.
12. JOG & SHUTTLE WHEELS
Shuttle: Gebruik het wiel om te scannen of de tracksnelheid te regelen in pauze- of afspeelmodus. Als het wiel linksom
wordt gedraaid wordt terug gescand en bij rechtsomdraaien wordt verder gescand. Wanneer het wiel sneller wordt
gedraaid wordt de scansnelheid verhoogd.
Jog: Wanneer in pauzemodus aan het wiel wordt gedraaid wordt het afspeelstartpunt een aantal frames opgeschoven.
Bij linksom draaien gaat het startpunt een aantal frames terug en bij rechtsom draaien een aantal frames verder. In
afspeelmodus wordt de afspeelsnelheid van de track veranderd bij linksom/rechtsom draaien.
7

13. CUE TOETS
Geeft de mogelijkheid een bepaald punt in een track op te slaan in het geheugen.
Bij het indrukken van deze toets zal de speler teruggaan naar dit punt en het afspelen hervatten.
14. PLAY / PAUSE TOETS
Bij het indrukken van deze toets wisselt het apparaat tussen afspeel- en pauzemodus.
15. NUMMERIEK TOETSENPANEEL
Druk een van de 0-9 toetsen om dat nummer van een CD af te spelen.
16. DISPLAY
LCD weergave toont track / tijd / resterende tijd / snelheid / continue / single.
17. CD INDICATOR
Bij het selecteren van de CD modus licht deze indicator op.
18. SOURCE TOETS
Gebruik deze toets om te wisselen tussen USB- en CD modus.
19. USB POORT
Voor het aansluiten van een USB-stick.
20. USB INDICATOR
Bij het selecteren van de USB modus licht deze indicator op.
21. CD / LINE / PHONE SCHAKELAAR
Hiermee selecteert u de audiobron die op de ingang is aangesloten.
22. BLUETOOTH®
Koppel uw BT-apparaat met de CDJ450 en selecteer BT via de “SOURCE” toets en de “INPUT TOGGLE”
schakelaar(s).
LET OP: DJ-functies zijn uitgesloten tijdens het afspelen via BT.
23. CUE SCHAKELAAR
Gebruik deze schakelaar om een keuze te maken tussen kanaal A of B.
24. CD / LINE / PHONE SCHAKELAAR
Hiermee selecteert u de audiobron die op de ingang is aangesloten.
25. GAIN REGELAAR
Hiermee regelt u het ingangsniveau van kanaal A en kanaal B.
26. CUE / MIX / PGM CONTROL
Hiermee kan de mix ingesteld worden tussen het uitgangssignaal en het vooraf ingestelde (gecuede) ingangssignaal.
27. HIGH FADER A-B
Hiermee regelt u de hoge frequenties van de equalizer.
28. MASTER REGELAAR
Regelt het Master uitgangssignaal.
29. LEDMETER
Geeft het Master uitgangsniveau weer.
30. MID FADER A-B
Hiermee regelt u de middenfrequenties van de equalizer.
31. LOW FADER A-B
Hiermee regelt u de lage frequenties van de equalizer.
32. KANAALFADERS
Geven de mogelijkheid voor het instellen van volumeniveau ’s van kanalen A en B.
33. FADER START
Wanneer deze toets gedrukt wordt is de crossfader (34) te gebruiken.
34. CROSSFADER
Als deze schuif helemaal links staat hoort u kanaal A en als de schuif rechts staat hoort u kanaal B. In de middenstand
hoort u beide. Het is mogelijk om met behulp van deze schuif overgangen te creëren tussen kanaal A en kanaal B.
35. PITCH REGELAAR
Gebruik deze schuif om de afspeelsnelheid te verhogen of te verlagen.
36. RELOOP TOETS
Druk deze toets om de laatst opgeslagen LOOP te starten. Druk nog een keer om de LOOP te beëindigen.
37. LOOP IN TOETS
Druk deze toets om het beginpunt van een LOOP te bepalen.
38. LOOP OUT TOETS
Druk deze toets om het eindpunt van een LOOP te bepalen en de LOOP wordt gestart. Druk de toets nogmaals om de
LOOP te beëindigen.
39. PITCH TOETS
Om de pitch regelaar (35) te kunnen gebruik dient eerst op deze toets te worden gedrukt.
40. PITCH BEND +
De afspeelsnelheid wordt verhoogd bij het drukken op deze toets. Zodra de toets niet meer wordt ingedrukt gaat de
speler terug naar de oorspronkelijke snelheid.
41. PITCH BEND -
De afspeelsnelheid wordt verlaagd bij het drukken op deze toets. Zodra de toets niet meer wordt ingedrukt gaat de
speler terug naar de oorspronkelijke snelheid.
8

VOORPANEEL
42. CD LADES
Hierin kunnen CD’s worden geplaatst. Voor het openen van de lade is een druk op de EJECT toets (1) benodigd.
43. MICROFOON INGANG
Sluit hier een microfoon aan.
44. MICROFOON VOLUMEREGELAAR
Gebruik deze draaiknop om het volume van de microfoon te regelen.
45. CUE VOLUMEREGELAAR
Gebruik deze draaiknop om het cue volume te regelen.
46. HOOFDTELEFOON UITGANG
Sluit hier een hoofdtelefoon aan.
ACHTERPANEEL
47. NETENTREE
Sluit hier het geleverde netsnoer aan.
48. NETSCHAKELAAR
Gebruik deze schakelaar om het apparaat aan dan wel uit te zetten.
49. MASTER UITGANG
Gebalanceerde stereo uitgang (XLR) van master signaal voor aansluiten van o.a. een versterker.
50. MASTER EN REC UITGANGEN
Rec. opname uitgang: Stereo uitgang (RCA) van master signaal voor opnamedoeleinden.
Master uitgang: Ongebalanceerde stereo uitgang (RCA) van master signaal voor aansluiten van o.a. een versterker.
51. INGANG KEUZE SCHAKELAAR LIJN / PHONO KANAAL B
Keuzeschakelaar voor analoge ingang Lijn / Phono.
52. ANALOGE INGANG LIJN / PHONO
Stereo ingang (RCA) voor kanaal A en kanaal B voor het aansluiten van analoge apparaten met lijnuitgangssignaal.
53. INGANG KEUZE SCHAKELAAR LIJN / PHONO KANAAL A
Keuzeschakelaar voor analoge ingang Lijn / Phono.
54. USB POORT
USB poort type B voor het aansluiten van een computer.
55. GND AARDAANSLUTING
Aardingschroef voor het aansluiten van draaitafels.
56. XLR MICROFOON INGANG
Aansluiting voor een XLR type microfoon.
9

DEUTSCH
Vielen Dank für den Kauf dieses Vonyx gerat. Nehmen Sie sich einen Augenblick Zeit, um diese Anleitung sorgfältig
durchzulesen, damit sie die Möglichkeiten, die unser Produkt bietet, sofort voll ausnutzen können.
Lesen Sie erst die Anleitung vollständig vor der ersten Inbetriebnahme durch. Befolgen Sie die Anweisung, da sonst jeglicher
Garantieanspruch verfällt. Treffen Sie stets alle Sicherheits-vorkehrungen um Feuer und/oder Stromschlag zu vermeiden.
Reparaturen dürfen nur von qualifiziertem Fachpersonal ausgeführt werden, um Stromschlag zu vermeiden. Bewahren Sie
diese Anleitung für spätere Bezugnahme auf.
- Bewahren Sie die Verpackung auf, um das Gerät im
Bedarfsfall sicher transportieren zu können.
- Bevor das Gerät in Betrieb genommen wird, muss es erst
von einem Fachmann überprüft werden. Bei der ersten
Benutzung kann etwas Geruch auftreten. Das ist normal und
verschwindet nach einer Weile
- Das Gerät enthält unter Spannung stehende Teile. Daher
NIEMALS das Gehäuse öffnen.
- Keine Metallgegenstände oder Flüssigkeiten ins Gerät
dringen lassen. Sie können zu Stromschlag und Defekten
führen.
- Gerät nicht in der Nähe von Wärmequellen wie Heizkörpern
aufstellen. Nicht auf eine vibrierende Oberfläche stellen.
Niemals die Belüftungsschlitze abdecken.
- Das Gerät ist nicht für Dauerbetrieb geeignet.
- Gehen Sie vorsichtig mit dem Netzkabel um und
beschädigen Sie es nicht. Eine beschädigte Netzschnur kann
zu Stromschlag und Defekten führen.
- Wenn Sie das Gerät vom Netz trennen, immer am Stecker
ziehen, niemals an der Schnur.
- Um Feuer und Stromschlag zu vermeiden, das Gerät vor
Regen und Feuchtigkeit schützen.
- Den Stecker nie mit nassen Händen in eine Netzsteckdose
stecken oder abziehen.
- Wenn sowohl der Stecker und/oder die Netzschnur bzw. der
Kabeleintritt ins Gerät beschädigt sind, müssen sie von
einem Fachmann repariert werden.
- Wenn das Gerät so beschädigt ist, dass Innenteile sichtbar
sind, darf der Stecker NICHT in eine Steckdose gesteckt
werden und das Gerät darf NICHT eingeschaltet werden.
Wenden Sie sich in dem Fall an Ihren Fachhändler. Das
Gerät darf nicht an einen Dimmer angeschlossen werden.
- Reparaturen dürfen nur von einem Fachmann oder
Sachverständigen ausgeführt werden.
- Das Gerät nur an eine geerdete 10-16A Netzsteckdose mit
220-240V AC/50Hz Spannung anschließen.
- Bei Gewitter oder längerem Nichtgebrauch den Netzstecker
abziehen. Die Regel gilt: Bei Nichtgebrauch Netzstecker
abziehen.
- Wenn das Gerät längere Zeit nicht benutzt wurde, kann sich
Kondenswasser gebildet haben. Lassen Sie das Gerät erst
auf Zimmertemperatur kommen, bevor Sie es einschalten.
Dieses Zeichen weist den Benutzer darauf hin, dass lebensgefährliche Spannungen im Gerät anliegen, die bei
Berührung einen Stromschlag verursachen.
Dieses Zeichen lenkt die Aufmerksamkeit des Benutzers auf wichtige Hinweise in der Anleitung hin, die unbedingt
eingehalten werden müssen.
HINWEIS: Um einen einwandfreien Betrieb zu gewährleisten, muss die Raumtemperatur zwischen 5° und 35°C.
liegen.
Tronios BV Registrierungsnummer : 21003000 (BatterieG).
Lithiumbatterien und Akkupacks sollten nur im entladenen Zustand in die Altbatteriesammelgefäße bei Handel und bei öffentlich-rechtlichen
Entsorgungsträgern gegeben werden. Bei nicht vollständig entladenen Batterien Vorsorge gegen Kurzschlüß treffen durch Isolieren der Pole mit
Klebestreifen. Der Endnutzer ist zur Rückgabe von Altbatterien gesetzlich verpflichtet.
Tronios BV Registrierungsnummer : DE51181017 (ElektroG).
Dieses Produkt darf am Ende seiner Lebensdauer nicht über den normalen Haushaltsabfall entsorgt werden, sondern muss an einem
sammelpunkt für das Recycling abgegeben werden. Hiermit leisten Sie einen wichtigen Beitrag zum Schutze unserer Umwelt.
Reparieren Sie das Gerät niemals selbst und nehmen Sie niemals eigenmächtig Veränderungen am Gerät vor. Sie verlieren dadurch den
Garantieanspruch. Der Garantieanspruch verfällt ebenfalls bei Unfällen und Schäden in jeglicher Form, die durch unsachgemäßen
Gebrauch und Nichtbeachtung der Warnungen und Sicherheitshinweise in dieser Anleitung entstanden sind. Vonyx ist in keinem Fall
verantwortlich für persönliche Schäden in Folge von Nichtbeachtung der Sicherheitsvorschriften und Warnungen. Dies gilt auch für
Folgeschäden jeglicher Form.
Das Gerät nicht in feuchten Räumen oder im Freien
benutzen.
- Um Unfällen in der Öffentlichkeit vorzubeugen, müssen die
geltenden Richtlinien beachtet und die
Anweisungen/Warnungen befolgt werden.
- Niemals das Gerät kurz hintereinander ein- und
ausschalten. Dadurch verkürzt sich die Lebensdauer
erheblich.
- Das Gerät außerhalb der Reichweite von Kindern halten.
Das Gerät niemals unbeaufsichtigt lassen.
- Die Regler nicht mit Reinigungssprays reinigen. Diese
hinterlassen Rückstände, die zu Staub- und
Fettansammlungen führen. Bei Störungen immer einen
Fachmann um Rat fragen.
- Das Gerät nur mit sauberen Händen bedienen.
- Das Gerät nicht mit Gewalt bedienen.
- Wenn dieses Gerät eine Blei-Säure-Batterie hat, soll dies
jede 3 Monate zumindest wieder aufgeladen werden, wenn
es nicht für eine längere Zeit nicht benutzt wird, sonst ist es
möglich, dass die Batterie dauerhaft beschädigt.
- Nach einem Unfall mit dem Gerät immer erst einen
Fachmann um Rat fragen, bevor Sie es wieder einschalten.
- Keine chemischen Reinigungsmittel benutzen, die den
Lack beschädigen. Das Gerät nur mit einem trockenen
Tuch abwischen.
- Nicht in der Nähe von elektronischen Geräten benutzen,
die Brummstörungen verursachen können.
- Bei Reparaturen nur die Original-Ersatzteile verwenden,
um starke Schäden und/oder gefährliche Strahlungen zu
vermeiden.
- Bevor Sie das Netz- und/oder Anschlusskabel abziehen,
erst das Gerät ausschalten. Netz- und Anschlusskabel
abziehen, bevor Sie das Gerät umstellen.
- Sorgen Sie dafür, dass das Netzkabel nicht beschädigt
werden kann, wenn Menschen darüber laufen. Das
Netzkabel vor jedem Einsatz auf Brüche/Schadstellen
überprüfen.
- In Deutschland beträgt die Netzspannung 220-240V AC /
50Hz. Wenn Sie das Gerät auf Reisen mitnehmen, prüfen
Sie, ob die örtliche Netzspannung den Anforderungen des
Geräts entspricht.
10

AUSPACKEN
Packen Sie das Gerät sofort nach Empfang aus und prüfen Sie den Inhalt. Wenn Teile fehlen oder beschädigt sind,
benachrichtigen Sie sofort den Spediteur und bewahren Sie die Verpackung auf. Falls ein Gerät ins Werk zurückgeschickt
werden muss, ist es wichtig, dass es in der Originalverpackung versandt wird.
Das Gerät darf nicht in Betrieb genommen werden, nachdem es von einem kalten in einen warmen Raum gebracht wurde. Das
dabei entstehende Kondenswasser kann unter Umständen Ihr Gerät zerstören. Lassen Sie das Gerät solange uneingeschaltet,
bis es Zimmertemperatur erreicht hat!
NETZANSCHLUSS
Die benötigte Versorgungsspannung steht auf dem Typenschild auf der Rückseite des Geräts. Die angegebenen Stromwerte
entsprechen einem Durchschnittswert bei normalem Betrieb. Alle Geräte müssen direkt ans Netz angeschlossen werden und
dürfen nicht über Dimmerpacks geschaltet werden. Bevor Sie eine Spannung anlegen, prüfen Sie, ob der Wert der zulässigen
Spannung entspricht.
Verbinden Sie immer das Gerät an einem geschützten Schaltkreis (Leistungsschalter oder Sicherung). Stellen Sie
sicher, das Gerät ist elektrisch geerdet, um das Risiko eines Stromschlags oder Feuer zu vermeiden.
VORSICHT LASERSTRAHLUNG!
Vorsicht!
Dieses Gerät enthalt eine Laserdiode der Klasse 1. Um einen sicheren Betrieb zu gewährleisten, dürfen weder
Abdeckungen entfernt werden, noch darf versucht werden, sich Zugang zum Geräteinneren zu verschaffen. Im
Geräteinneren befinden sich keine zu wartenden Teile. Wartung- und Servicearbeiten dürfen nur von autorisierten
Fachhandel ausgeführt werden.
CD SPIELER FUNKTIONEN
Eine detaillierte und nummerierte Darstellung des Gerätes finden Sie am Ende dieser Anleitung.
CD SPIELER UND MISCHPULT:
1. EJECT TASTE
Drücken Sie diese Taste um die Lade zu öffnen oder zu schließen. HINWEIS: die Lade wird nur im Stop- oder Pause
Modus öffnen.
2. TIME TASTE
Mit dieser Taste wird die verbleibende Laufzeit, Zeit und gesamte verbleibende Zeit angezeigt.
3. SINGLE TASTE
Drücken Sie diese Taste, um zwischen SINGLE- und CONTINUOUS Modus zu wechseln. SINGLE Modus stoppt die
Wiedergabe nach einem Titel. Im CONTINUOUS Modus, stoppt der Player nach allen Titeln.
4. REPEAT TASTE
Drücken Sie diese Taste, um einen Titel erneut abzuspielen oder um den insgesamten Diskette zu wiederholen.
5. PROG TASTE
Im STOP Modus können bis zu 20 Titeln programmiert werden. Drücken Sie erst STOP und dann die PROG taste um
den Programmiermodus zu starten. Verwenden Sie die Titelsprungtasten SKIP um den gewünschten Titel zu wählen
und drücken Sie PROG um zu speichern. Wiederholen Sie diese Programmierung um alle Titel zu speichern. Drücken
Sie die PLAY / PAUSE Taste um abzuspielen.
6. FOLDER TASTE
Mit Hilfe dieser Taste kann man durch die Folder navigieren in USB- oder CD Funktion.
7. SEARCH ◄◄ UND ►► TASTEN
Mit Hilfe dieser Tasten können Sie durch einen Titel navigieren.
8. TRACK SEARCH I◄◄ UND ►►I TASTEN
Drücken Sie diese Tasten um zu dem vorherigen oder nächsten Titel zu gehen.
9. DSP / BRAKE
Wenn während der Wiedergabe diese Taste gedrückt wird und dann die PLAY / PAUSE Taste, wird die WiedergabeGeschwindigkeit langsam niedriger bis PAUSE Modus erreicht ist. Drücken Sie erneut die PLAY / PAUSE Taste, um
diesen Modus zu beenden.
10. DSP / REVERSE
Drücken Sie die Taste um einen Titel rückwärts ab zu spielen. Drücken Sie erneut um den Modus zu beenden.
11. TRACK SELECT TASTE
Drück diese Taste um zu schalten zwischen SEARCH, PITCH BEND und SCRATCH Modus. Wenn die Anzeige
ausgeschaltet ist, drehen Sie das Jog-Rad zum Einstellen der Geschwindigkeit (Pitch). Wenn die Anzeige leuchtet,
kommt der Spieler mit Hilfe des Jog-Rads in Scratch Modus. Wenn die Anzeige blinkt, kommt der Spieler mit Hilfe des
Jog-Rads im schnellen Suchlauf (Quick Search). Wenn das Jog-Rad 8 Sekunden nicht verwendet wird, wird der
Spieler in PITCH BEND Modus zurückzukehren, die Anzeige ist dann ausgeschaltet.
12. JOG UND SHUTTLE RAD
Shuttle: Mit dem Rad kann man scannen oder die Geschwindigkeit einstellen in Pause oder Play-Modus. Wenn das
Rad gegen den Uhrzeigersinn gedreht wird, wird rückwärts gescannt, rechtsherum drehen heißt weiter scannen. Wenn
das Rad schneller gedreht wird, wird die Scan-Geschwindigkeit erhöht.
11

Jog: Wenn im Pause-Modus das Rad gedreht wird, wird eine bestimmte Stelle in einem Titel eine Reihe von Frames
verschoben. Wenn das Rad gegen den Uhrzeigersinn gedreht wird, wird der Ausgangspunkt rückwärts verschoben, im
Uhrzeigersinn wird der Ausgangspunkt weiter verschoben. In Play-Modus ändert sich die Abspielgeschwindigkeit des
Tracks wenn das Rad im/gegen Uhrzeigersinn gedreht wird.
13. CUE TASTE
Um einen Cue-Punkt (eine bestimmte Stelle in einem Titel) zu machen und zu Speichern. Wenn der Cue Taste
gedrückt wird, kehrt der Player zum Cue-Punkt zurück.
14. PLAY / PAUSE TASTE
Jedes Mal wenn die Taste gedrückt wird, wird der Spieler abwechselnd in Play und Pause-Modus gehen.
15. NUMMERISCHE TASTEN
Drücken Sie eine der 0-9 Tasten, um den Song von einer CD abzuspielen.
16. DISPLAY
LCD-Display zeigt Titel / Anzahl / Restspieldauer / Pitch / Continuous / Single an.
17. CD ANZEIGE
Wenn Sie den CD-Modus wählen, leuchtet diese Anzeige auf.
18. SOURCE TASTE
Drücken Sie diese Taste um zu schalten zwischen USB und CD.
19. USB ANSCHLUSS
Hier können Sie ein USB-Speichergerät anschließen.
20. USB ANZEIGE
Wenn Sie den USB-Modus wählen, leuchtet diese Anzeige auf.
21. CD / LINE / PHONE SCHALTER
Wählt die an den Eingang angeschlossene Audioquelle aus.
22. BLUETOOTH®
Verbinden Sie Ihr BT-Gerät mit dem CDJ450 und wählen Sie BT mit der Taste "SOURCE" und dem Schalter "INPUT
TOGGLE".
HINWEIS: DJ-Funktionen sind während der BT-Wiedergabe ausgeschlossen..
23. CUE SCHALTER
Verwenden Sie diesen Schalter, um zwischen Kanal A und B zu wählen.
24. CD / LINE / PHONE SCHALTER
Wählt die an den Eingang angeschlossene Audioquelle aus.
25. GAIN REGLER
Stellt den Eingangspegel von Kanal A und Kanal B ein.
26. CUE / MIX / PGM REGLER
Ermöglicht die Einstellung der Mischung zwischen dem Ausgangssignal und dem voreingestellten (CUE)
Eingangssignal.
27. HIGH FADER A-B
Regler für die hohen Frequenzen des Equalizers.
28. MASTER LAUTSTÄRKE REGLER
Stellt das Master-Ausgangssignal ein.
29. LED ANZEIGE VU METER
Anzeige des Master-Ausgangssignals.
30. MID FADER A-B
Regler für die mitten Frequenzen des Equalizers.
31. LOW FADER A-B
Regler für die tiefen Frequenzen des Equalizers.
32. KANAL FADERS
Geben Sie die Möglichkeit die Lautstärke der Kanäle A und B einzustellen.
33. FADER START
Bei Betätigung dieser Taste kann der Cross fader (34) verwendet werden.
34. CROSS FADER
Wenn dieser Regler ganz links ist, hören Sie Kanal A und wenn der Regler rechts ist, hören Sie Kanal B. In der
mittleren Position hören Sie beide. Mit Hilfe dieser Regler ist es möglich, Übergänge zwischen Kanal A und Kanal B
herzustellen.
35. PITCH REGLER
Verwenden Sie diesen Schieberegler, um das Abspieltempo zu erhöhen oder zu verringern.
36. RELOOP TASTE
Drücken Sie diese Taste, um den zuletzt gespeicherten LOOP zu starten. Drücken Sie erneut, um den LOOP zu
beenden.
37. LOOP IN TASTE
Drücken Sie diese Taste um den Startpunkt vom LOOP zu bestimmen.
38. LOOP OUT TASTE
Drücken Sie diese Taste, um das Ende vom LOOP zu bestimmen und das Looping wird gestartet. Um das Looping zu
beenden muss diese Taste erneut gedrückt werden.
39. PITCH TASTE
Um den Pitch Regler (35) zu verwenden, muss diese Taste zuerst gedrückt werden.
40. PITCH BEND +
Durch Drücken dieser Taste wird das Tempo erhöht. Wenn die Taste nicht mehr gedrückt wird, kehrt der Player zur
ursprünglichen Tempo zurück.
41. PITCH BEND -
Das Tempo wird reduziert, wenn diese Taste gedrückt wird. Wenn die Taste nicht mehr gedrückt wird, kehrt der Player
zur ursprünglichen Tempo zurück.
12

VORDERSEITE
42. CD FACH
Hier können CDs eingelegt werden. Um die Schublade zu öffnen, drücken Sie die EJECT Taste (1)
43. MIKROFON EINGANG
Schließen Sie hier ein Mikrofon an.
44. MIKROFON LAUTSTÄRKE REGLER
Mit diesem Drehknopf können Sie die Lautstärke des Mikrofons einstellen.
45. CUE PEGELREGLER
Mit diesem Drehknopf können Sie die Cue Lautstärke einstellen.
46. KOPFHÖRER AUSGANG
Schließen Sie hier ein Kopfhörer an.
RÜCKSEITE
47. NETZEINGANG
Schließen Sie das Netzkabel hier an.
48. NETZSCHALTER
Verwenden Sie diesen Schalter, um das Gerät ein- oder auszuschalten
49. MASTER AUSGANG
Symmetrischer Stereo-Ausgang (XLR) des Master-Signals zum Anschluss u.a. eines Verstärkers.
50. MASTER UND REC AUSGÄNGE
Rec Ausgang: Stereo Ausgang (RCA) des Master-Signals für Aufnahmezwecke.
Master Ausgang: Unsymmetrischer Stereo-Ausgang (RCA) des Master-Signals zum Anschluss u.a. eines
Verstärkers.
51. LINE / PHONO EINGANGSSCHALTER KANAL B
Analogeingangswahlschalter Line/Phono.
52. ANALOGEINGANG LINE / PHONO
Stereoeingang (RCA) für Kanal A und B zum Anschluss analoger Geräte mit Line-Ausgangssignal.
53. LINE / PHONO EINGANGSSCHALTER KANAL A
Analogeingangswahlschalter Line/Phono.
54. USB ANSCHLUSS
USB-Anschluss Typ B zum Anschluss eines Computers.
55. GND
Der Erde-Anschluss für einen Plattenspieler.
56. DJ MIKROFON EINGANG
Symmetrischer Mikrofon Eingang XLR.
13

ESPAÑOL
Felicitaciones a la compra de este producto Vonyx. Por favor lea atentamente este manual antes de usar el aparato para
disfrutar al completo de sus prestaciones.
Seguir las instrucciones le permite no invalidar la garantía. Tome todas las precauciones para evitar que se produzca fuego o
una descarga eléctrica. Las reparaciones solo deben llevarse a cabo por técnicos cualificados para evitar descargas eléctricas.
Guarde el manual para futuras consultas.
Antes de usar el aparato, por favor pida consejo a un profesional. Cuando el aparato se enciende por primera vez, suele
sentirse cierto olor. Esto es normal y desaparece al poco tiempo.
- Este aparato contiene piezas que llevan voltaje. Por lo
tanto NO abra la carcasa.
- No coloque objetos metálicos o vierta líquidos dentro del
aparato Podría producir descargas eléctricas y fallos en
el funcionamiento.
- No coloque el aparato cerca de fuentes de calor tipo
radiadores, etc. No coloque el aparato en superficies
vibratorias. No tape los agujeros de ventilación.
- Este aparato no está preparado para un uso continuado.
- Tenga cuidado con el cable de alimentación y no lo
dañe. Un daño o defecto en el cable de alimentación
puede producir una descarga eléctrica o fallo en el
funcionamiento.
- Cuando desconecte el aparato de la toma de corriente,
siempre tire de la clavija, nunca del cable.
- No enchufe o desenchufe el aparato con las manos
mojadas.
- Si la clavija y/o el cable de alimentación están dañados,
necesitan reemplazarse por un técnico cualificado.
- Si el aparato está dañado de modo que puedan verse
sus partes internas, NO conecte el aparato a la toma de
corriente y NO lo encienda. Contacte con su distribuidor.
NO conecte el aparato a un reostato o dimmer.
- Para evitar un fuego o peligro de descarga, no exponga
el aparato a la lluvia y a la humedad.
- Todas las reparaciones deben llevarse a cabo
exclusivamente por técnicos cualificados.
- Conecte el aparato a una toma de corriente con toma de
tierra (220-240Vca/50Hz) protegida por un fusible de 1016A.
- Durante una tormenta o si el aparato no va a usarse
durante un periodo largo de tiempo, desconéctelo de la
toma de corriente. La regla es: Desconéctelo si no lo va
a usar.
- Si el aparato no se ha usado en mucho tiempo puede
producirse condensación. Deje el aparato a temperatura
ambiente antes de encenderlo. Nunca utilice el aparato
en ambientes húmedos o en el exterior.
Esta señal advierte al usuario de la presencia de alto voltaje en el interior de la carcasa y que es de la suficiente
magnitud como para producir una descarga eléctrica.
Esta señal advierte al usuario de que el manual contiene instrucciones importantes que han de leerse y seguirse al pie
de la letra.
NOTA: Para asegurarse de que el aparato funcione correctamente, debe usarse en ambientes a una temperatura de entre
5°C/41°F y 35°C/95°F.
Los productos electrónicos no pueden tirarse a la basura normal. Por favor lleve este producto a un centro de reciclaje. Pregunte a la
autoridad local en caso de duda. Las especificaciones son generales. Los valores actuales pueden variar de una unidad a otra. Las
especificaciones pueden variar sin previo aviso.
- Para prevenir accidentes en las empresas, debe seguir
las directrices aplicables y seguir las instrucciones.
- No lo apague y encienda repetidamente. Esto acorta su
tiempo de vida.
- Mantenga el aparato fuera del alcance de los niños. No
deje el aparato sin vigilancia.
- No utilice sprays limpiadores para limpiar los
interruptores. Los residuos de estos sprays producen
depósitos de polvo y grasa. En caso de mal
funcionamiento, siempre consulte a un profesional.
- No fuerce los controles.
- Si el aparato se ha caído, siempre haga que lo verifique
un técnico cualificado antes de encenderlo otra vez.
- NO utilice productos químicos para limpiar el aparato.
Dañan el barniz. Tan solo límpielo con un trapo seco.
- Manténgalo lejos de equipos electrónicos ya que pueden
producir interferencias.
- Si este producto incorpora una batería recargable con
base ácida, por favor recarge bateria cada 3 meses si no
va a usar la unidad por un tiempo prolongado. En caso
contrario la batería podría dañarse.
- Solo utilice recambios originales para las reparaciones,
de otro modo pueden producirse daños serios y/o
radiaciones peligrosas.
- Apague el aparato antes de desconectarlo de la toma de
corriente y/o de otros equipos. Desconecte todos los
cables y conexiones antes de mover el aparato.
- Asegúrese de que el cable de alimentación no puede
dañarse cuando la gente lo pise. Compruebe el cable de
alimentación antes de cada uso por si hay daños o
defectos.
- El voltaje de funcionamiento es 220-240Vca/50Hz.
Compruebe que la toma de corriente coincide. Si tiene
que viajar, asegúrese de que el voltaje del país es el
adecuado para este aparato.
- Guarde el embalaje original para poder transportar el
aparato en condiciones seguras.
14
Nunca intente reparar usted mismo este equipo. Esta manipulación anulará la garantía. No realice cambios en la unidad. Esta
manipulación anulará la garantía. Esta garantía no es aplicable en caso de accidente o daños ocasionados por uso indebido del aparato
o mal uso del mismo. Vonyx no se hace responsable de daños personales causados por el no seguimiento de las normas e instrucciones
de este manual. Esto es aplicable también a los daños de cualquier tipo.
INSTRUCCIONES DE DESEMBALAJE
ATENCIÓN! Inmediatamente después de recibir un dispositivo, desempaque cuidadosamente la caja de cartón, compruebe el
contenido para asegurarse de que todas las partes están presentes, y se han recibido en buenas condiciones. Notifique
inmediatamente al transportista y conserve el material de embalaje para la inspección por si aparecen daños causados por el
transporte o el propio envase muestra signos de mal manejo. Guarde el paquete y todos los materiales de embalaje. En el caso
de que deba ser devuelto a la fábrica, es importante que el aparato sea devuelto en la caja de la fábrica y embalaje originales.
Si el aparato ha estado expuesto a grandes cambios de temperatura (tras el transporte), no lo enchufe inmediatamente. La
condensación de agua producida podría dañar su aparato. Deje el dispositivo apagado hasta que se haya alcanzado la
temperatura ambiente.
FUENTE DE ALIMENTACIÓN
En la etiqueta de la parte trasera del controlador se indica el tipo de fuente de alimentación que debe ser conectado.
Compruebe que la tensión de red corresponda a esto, todos los otros voltajes a la especificada, puede causar efectos
irreparable. El producto también debe estar conectado directamente a la red para ser utilizado. No en ninguna fuente de
alimentación o dimmer ajustable.
Conecte siempre el producto a un circuito protegido (disyuntor o fusible). Asegúrese de que el producto tiene una
toma de tierra adecuada para evitar el riesgo de electrocución o incendio.
PRECAUCIÓN RADIACIÓN LASER!
Este dispositivo está equipado con dos diodos láser de Clase 1. Para garantizar una operación segura, no retire
ninguna cubierta ni intente acceder al interior del equipo. El interior del dispositivo no contiene ninguna pieza que
esté sujeta a mantenimiento. El mantenimiento solo debe ser realizado por personal calificado.
CONTROLES Y CONEXIONES
Para obtener una ilustración detallada y numerada del dispositivo, consulte el final de este manual.
REPRODUCTOR CD Y CONSOLA MEZCLADORA:
1. BUTÓN EJECT
Presione para cargar o expulsar el disco. Cada pulsación abrirá o cerrará la bandeja de disco.
NOTA: el soporte del disco no se abrirá a menos que se haya presionado primero el botón de parada o pausa.
2. BUTÓN TIME
Utilice este botón para elegir el modo de tiempo: tiempo transcurrido, tiempo restante o tiempo restante total.
3. BOTÓN BUTTON
Presione este botón para cambiar entre el modo de reproducción SINGLE y CONTINUO. El modo seleccionado se
indica en la pantalla LCD. En el modo SINGLE, después de cada pista, la unidad detiene la lectura. En el modo
CONTINUO, la unidad lee todas las pistas y se detiene.
4. BOTÓN REPEAT
Use este botón para repetir una pista o todas las pistas del CD.
5. BOTÓN PROG
En el modo STOP, puede programar varias pistas (20 pistas máximo):
- Pulse el botón STOP para entrar en el modo de parada.
- Presione el botón PROG para ingresar al modo de programa.
- Use los botones de saltar la pista para elegir la pista que desea escuchar, luego presione el botón PROG
para ingresar su elección.
- Use los botones de omitir pista una vez más para elegir la pista que desea escuchar, luego presione el botón
PROG para ingresar su elección.
- Repita la operación para seleccionar todas las pistas que desee escuchar.
- Presione el botón REPRODUCIR / PAUSA para iniciar la reproducción.
6. BOTÓN FOLDER
Le permite navegar a través de carpetas de manera similar en modo USB o CD.
7. BOTÓN SEARCH ◄◄ y ►►
Presione para retroceder o avanzar rápidamente por las pistas.
8. BOTÓN TRACK SEARCH I◄◄ y ►►I
Seleccione la pista anterior o siguiente.
9. DSP / BRAKE
En el modo de reproducción, presione el botón BRAKE primero y luego el botón REPRODUCIR / PAUSA para
ralentizar la pista hasta detenerla.
Presione el botón REPRODUCIR / PAUSAR nuevamente para cancelar esta función.
15

10. DSP / REVERSE
Presiona el botón REVERSE para reproducir tu pista en reversa. Presione nuevamente el botón de retroceso para
cancelar esta función.
11. BOTONES TRACK SELECT
Presione este botón para poder cambiar entre las funciones de PITCH BEND, SCRATCH y SEARCH.
Cuando el indicador LED está apagado, se puede utilizar el jog para la función PITCH BEND. Cuando el LED
indicador está encendido, la rueda de desplazamiento se puede usar para scratch. Cuando el LED indicador
parpadea, la búsqueda rápida hacia adelante y hacia atrás está habilitada.
12. RUEDAS JOG & SHUTTLE
Shuttle: Utilice el dial para seleccionar la dirección de escaneo y la velocidad. El disco se escanea hacia adelante
cuando se gira en el sentido de las agujas del reloj desde la posición neutral, en la dirección de retroceso cuando el
disco se gira hacia la izquierda. El escaneo se acelera cuando se gira más rápido.
Jog: En el modo de pausa, al girar el jog, el punto en el que se produce el sonido se mueve en una serie de cuadros
correspondientes al número de clics. En el sentido de las agujas del reloj mueve el punto hacia delante; hacia la
izquierda hacia atrás. En el modo de reproducción, el jog aumenta o disminuye la velocidad de la pista.
13. BOTÓN CUE
Al presionar el botón CUE durante la reproducción, se regresa a la posición en la que se inició la reproducción.
14. BOTÓN PLAY / PAUSE
B Al presionar este botón, la operación cambia de reproducción a pausa o de pausa a reproducción.
15. BOTONES DIRECT ACCESS
Presione uno de los botones 0-9 para seleccionar esa pista del CD.
16. DISPLAY
Pantalla LCD para indicar Track / Numbers / Time / Remain / Pitch / Continue / Single.
17. LUZ CD
Al ingresar al modo de trabajo de CD, este se iluminará.
18. BOTÓN SOURCE
Presione este botón para alternar entre el modo CD o USB.
19. PUERTO USB
Soporta la reproducción de pistas por USB. Conexión de computadora por USB solo cuando se ingresa al modo de
trabajo USB.
20. LUZ USB
Al ingresar al modo de trabajo USB, esto se encenderá.
21. CONMUTADOR DE ENTRADA
Selecciona qué fuente estará en vivo según lo que haya conectado a la sección de entrada del panel posterior. En las
posiciones Midi y CD A, las unidades de CD internas están activas.
22. BLUETOOTH®
Conecte su dispositivo BT a esta base y seleccione los interruptores SOURCE y INPUT TOGGLE.
NOTA: las funciones de DJ están deshabilitadas durante el uso de BT.
23. CUE PARA CANAL A-B
Selecciona qué fuente estará en vivo para CH A y CH B en la mezcla.
24. CONMUTADOR DE ENTRADA
Selecciona qué fuente estará en vivo según lo que haya conectado a la sección de entrada del panel posterior. En las
posiciones Midi y CD B, las unidades de CD internas están activas.
25. CONTROL GANANCIA CANAL A & B
Ajusta el nivel de CH A y CH B.
26. CONTROL CUE / MIX / PGM
En el sentido contrario a las agujas del reloj, podrá monitorear la señal CUE asignada. Girando lentamente el control
hacia la derecha a la señal CUE asignada. Si gira lentamente el control en el sentido de las agujas del reloj hasta la
posición intermedia, podrá monitorear CUE MIX con PGM. Mover el control a la derecha hacia la derecha le permite
monitorear la salida PGM.
27. HIGH FADER A-B
Ajustar CH A y CH B ecualización de altas frecuencias.
28. MASTER LEVEL
Ajusta la señal de salida de nivel maestro.
29. LED METER
Indica el nivel de salida maestro.
30. MID FADER A-B
Ajustar CH A y CH B ecualización de frecuencias medias.
31. LOW FADER A-B
Ajustar CH A y CH B ecualización de bajas frecuencias.
32. INPUT FADER
Controla los niveles de fuente individuales para CH A y CH B en la mezcla.
33. FADER START
La activación le permite iniciar los reproductores de CD desde su cross fader.
34. CROSS FADER
Permite una mezcla limpia entre los dos canales de entrada. Totalmente a la izquierda selecciona el canal A,
totalmente a la derecha selecciona el canal B. Con el crossfader centrado, ambos canales asignados están en vivo.
Utilice el cross fader para obtener segmentos rápidos y sin problemas de un canal seleccionado al otro.
35. PITCH CONTROL
Utilice este deslizador para aumentar o disminuir la velocidad de la pista.
36. RELOOP
Utilice este botón para iniciar el último loop guardado. Para finalizar el loop, pulse el botón una vez más.
16

37. LOOP IN
Al presionar este botón se establece el punto de inicio del loop continuo e indica en la pantalla.
38. LOOP OUT
Al presionar este botón se establece el punto final del loop y se inicia el loop. Para finalizar el loop, pulse el botón una
vez más.
39. PITCH
Al presionar este botón se dispone el ajuste del pitch.
40. PITCH BEND +
El pitch aumentará cuando se mantenga presionado este botón y volverá al valor original cuando se suelte.
41. PITCH BEND -
El pitch disminuirá cuando se mantenga presionado este botón y volverá al valor original cuando se suelte.
PANEL FRONTAL
42. BANDEJAS DE DISCO
Coloque su CD aquí. Use CDs originales o CDs grabados a la velocidad mínima posible. Presione el botón EJECT
para abrir la bandeja.
43. MIC INPUT
Conecte el jack del micrófono de 1/4 "aquí.
44. AJUSTE VOLÚMEN MIC
Use este control para ajustar el volúmen del micrófono.
45. CUE LEVEL CONTROL
Utilice este mando para ajustar el volumen de cue.
46. HEADPHONE INPUT
Conecte los auriculares aquí.
PANEL TRASERO
47. ENTRADA ALIMENTACION 220V
Inserte el cable de alimentación suministrado aquí.
48. INTERRUPTOR POWER ON/OFF
Interruptor para encender o apagar el dispositivo.
49. SALIDA MASTER BALANCEADA XLR
Salida balanceada estéreo XLR de la señal maestra para conectar unidades con entradas de nivel de línea.
50. SALIDAS MASTER Y REC
Salida para grabación REC: Salida estéreo (RCA) de la señal maestra para conexión y amplificador u otras unidades
con entradas de nivel de línea.
Salida Master: Salida estéreo desbalanceada (RCA) de la señal maestra para conectar un amplificador u otras
unidades con entradas de nivel de línea.
51. INTERRUPTOR SELECTOR DE ENTRADA LINE / PHONO CHANNEL B
Cambia las entradas analógicas entre phono y entrada de línea.
52. ENTRADA ANALOGICA LINE / PHONO
Entradas estéreo (RCA) para CH A y CH B para conectar unidades analógicas con salidas de nivel de línea o
giradiscos con sistema magnético.
53. INTERRUPTOR SELECTOR DE ENTRADA LINE / PHONO CHANNEL A
Cambia las entradas analógicas entre phono y entrada de línea.
54. PUERTO USB
Puerto USB tipo B para conectar con computadoras.
55. GND
Terminal de conexión a tierra para la conexión de la plataforma giratoria. Siempre use esta conexión (el cable de su
giradiscos debe tener un cable de conexión a tierra).
56. DJ MIC
Enchufe el micrófono tipo XLR aquí.
17
FRANÇAIS
p
Nous vous remercions d’avoir acheté un produit Vonyx. Veuillez lire la présente notice avant l’utilisation afin de pouvoir en
profiter pleinement.
Veuillez lire la notice avant toute utilisation. Respectez impérativement les instructions afin de continuer à bénéficier de la
garantie. Prenez toutes les précautions nécessaires pour éviter tout incendie ou décharge électrique. Seul un technicien
spécialisé peut effectuer les réparations. Nous vous conseillons de conserver la présente notice pour pouvoir vous y reporter
ultérieurement.
- Avant d’utiliser l’appareil, prenez conseil auprès d’un
spécialiste. Lors de la première mise sous tension, il est
possible qu’une odeur soit perceptible. C’est normal,
l’odeur disparaîtra peu de temps après.
- L’appareil contient des composants porteurs de tension.
N’OUVREZ JAMAIS le boîtier.
- Ne placez pas des objets métalliques ou du liquide sur
l’appareil, cela pourrait causer des décharges électriques
et dysfonctionnements..
- Ne placez pas l’appareil à proximité de sources de
chaleur, par exemple radiateur. Ne positionnez pas
l’appareil sur une surface vibrante. N’obturez pas les
ouïes de ventilation.
- L’appareil n’est pas conçu pour une utilisation en
continu.
- Faites attention au cordon secteur, il ne doit pas être
endommagé.
- Lorsque vous débranchez l’appareil de la prise secteur,
tenez-le par la prise, ne tirez jamais sur le cordon.
- Ne branchez pas et ne débranchez pas l’appareil avec
les mains mouillées.
- Seul un technicien spécialisé peut remplacer la fiche
secteur et / ou le cordon secteur.
- Si l’appareil est endommagé et donc les éléments
internes sont visibles, ne branchez pas l’appareil, NE
L’ALLUMEZ PAS. Contactez votre revendeur. NE
BRANCHEZ PAS l’appareil à un rhéostat ou un dimmer.
- Pour éviter tout risque d’incendie ou de décharge
électrique, n’exposez pas l’appareil à la pluie ou à
l’humidité.
- Seul un technicien habilité et spécialisé peut effectuer les
réparations
- Branchez l’appareil à une prise secteur 220-240 Vac/50
Hz avec terre, avec un fusible 10-16 A.
- Pendant un orage ou en cas de non utilisation prolongée
de l’appareil, débranchez l’appareil du secteur.
- En cas de non utilisation prolongée de l’appareil, de la
condensation peut être créée. Avant de l’allumer, laissez
l’appareil atteindre la température ambiante. Ne l’utilisez
jamais dans des pièces humides ou en extérieur.
- Afin d’éviter tout accident en entreprise, vous devez
respecter les conseils et instructions.
- N’allumez pas et n’éteignez pas l’appareil de manière
répétée. Cela réduit sa durée de vie.
- Conservez l’appareil hors de la portée des enfants. Ne
laissez pas l’appareil sans surveillance.
- N’utilisez pas d’aérosols pour nettoyer les interrupteurs.
Les résidus créent des dépôts et de la graisse. En cas
de dysfonctionnement, demandez conseil à un
spécialiste.
- Ne forcez pas les réglages.
- L’appareil contient un haut-parleur pouvant engendrer
des champs magnétiques. Tenez cet appareil à 60 cm
au moins d’un téléviseur ou ordinateur.
- Si le produit comprend un accumulateur intégré plombacide, rechargez l'accumulateur tous les 3 mois en cas
de non utilisation prolongée de l'appareil. Sinon,
l'accumulateur pourrait être endommagé de manière
permanente.
- Si l’accumulateur est endommagé, remplacez-le par un
accumulateur de même type et déposez l’ancien
accumulateur dans un container de recyclage adapté.
- Si l’appareil est tombé, faites-le toujours vérifier par un
technicien avant de le rallumer.
- Pour nettoyer l’appareil, n’utilisez pas de produits
chimiques qui abîment le revêtement, utilisez
uniquement un tissu sec.
- Tenez toujours l’appareil éloigné de tout équipement
électrique pouvant causer des interférences.
- Pour toute réparation, il faut impérativement utiliser des
pièces d’origine, sinon il y a risque de dommages graves
et / ou de radiations dangereuses.
- Eteignez toujours l’appareil avant de le débrancher du
secteur et de tout autre appareil. Débranchez tous les
cordons avant de déplacer l’appareil.
- Assurez-vous que le cordon secteur n’est pas abîmé si
des personnes viennent à marcher dessus. Avant toute
utilisation, vérifiez son état.
- La tension d’alimentation est de 220-240Vac/50 Hz.
Vérifiez la compatibilité. Si vous voyagez, vérifiez que la
tension d’alimentation du pays est compatible avec
l’appareil.
- Conservez l’emballage d’origine pour pouvoir transporter
l’appareil en toute sécurité.
Ce symbole doit attirer l’attention de l’utilisateur sur les tensions élevées présentes dans le boîtier de l’appareil, pouvant
engendrer une décharge électrique.
Ce symbole doit attirer l’attention de l’utilisateur sur des instructions importantes détaillées dans la notice, elles doivent
être lues et respectées.
Cet appareil porte le symbole CE. Il est interdit d’effectuer toute modification sur l’appareil. La certification CE et la garantie
deviendraient caduques !
NOTE: Pour un fonctionnement normal de l’appareil, il doit être utilisé en intérieur avec une plage de température maximale
autorisée entre 5°C/41°F et 35°C/95°F.
Ne jetez pas les produits électriques dans la poubelle domestique. Déposez-les dans une décharge. Demandez conseil aux autorisés
ou à votre revendeur. Données techniques réservées. Les valeurs actuelles peuvent varier d’un produit à l’autre. Tout droit de
modification réservé sans notification préalable.
N’essayez pas de réparer l’appareil vous-même. Vous perdriez tout droit à la garantie. Ne faites aucune modification sur l’appareil. Vous
perdriez tout droit à la garantie La garantie deviendrait également caduque en cas d’accidents ou dommages causes par une utilisation
inappropriée de l’appareil ou un non respect des consignes présentes dans cette notice. Vonyx ne pourrait être tenu responsable en cas
de dommages matériels ou corporels causés par un non respect des consignes de sécurité et avertissements. Cela est également valable
our tous les dommages quelle que soit la forme.
18

DÉBALLAGE
ATTENTION ! Immédiatement après réception, vérifiez le contenu du carton et assurez-vous que tous les éléments sont bien
présents et en bon état. Si besoin, faites les réserves nécessaires si le matériel ou les cartons sont endommagés. SI l’appareil
doit être retourné, faites-le dans l’emballage d’origine.
Si l’appareil a été exposé à des fluctuations importantes de températures (par exemple après le transport), ne l’allumez pas
immédiatement. De la condensation peut survenir. Laissez l’appareil éteint le temps qu’il atteigne la température ambiante.
ALIMENTATION
Vous trouvez sur l’étiquette à l’arrière de l’appareil, le type d’alimentation à utiliser. Vérifiez que la tension d’alimentation
corresponde à celle mentionnée. Toute autre alimentation peut endommager l’appareil. Reliez l’appareil au secteur, il est prêt à
être utilisé. En aucun cas, vous ne devez utiliser de dimmer ou d’alimentation réglable.
Connectez toujours l'appareil à un circuit protégé (disjoncteur ou fusible). Assurezvous que l'appareil soit correctement
relié à la terre afin d'éviter tout risque d'électrocution ou d'incendie.
ATTENTION : RAYONNEMENT LASER!
Cet appareil est équipé de deux diodes laser Clase 1. Pour garantir un fonctionnement sûr, ne retirez pas les
couvercles ou n’essayez pas d’accéder à l’intérieur de l’appareil. L’intérieur de l’appareil ne contient pas de
composants soumis à une maintenance. Seul un personnel qualité peut effectuer la maintenance.
CONTROLS AND CONNECTIONS
Reportez-vous à la fin de cette notice pour la présentation détaillée et numérotée de l’appareil.
LECTEUR CD ET CONSOLE DE MIXAGE :
1. TOUCHE EJECT
Touche pour charger ou éjecter un disque. A chaque pression, vous ouvrez ou fermez le tiroir.
NOTE: Le tiroir ne s’ouvre pas tant que la touche Stop ou Pause n’a pas été préalablement activée.
2. TOUCHE TIME
Utilisez cette touche pour choisir le mode de la durée : durée écoulée, durée restante du titre, durée totale restante.
3. TOUCHE SINGLE
Appuyez sur la touche pour commuter entre le mode de lecture SINGLE et CONTINUOUS (continue). Le mode
sélectionné est indiqué sur l’affichage. En mode SINGLE, après chaque voie, l’appareil arrête la lecture. En mode
CONTINUOUS, l’appareil lit toutes les voies et s’arrête.
4. TOUCHE REPEAT
Touche pour répéter une voie ou toutes les voies sur le CD.
5. TOUCHE PROG
En mode STOP mode, vous pouvez programmer plusieurs voies (20 au plus) :
- Appuyez sur la touche STOP pour accéder au mode Stop.
- Appuyez sur la touche PROG pour accéder au mode Programmation.
- Utilisez les touches de sélection pour choisir la voie à écouter puis appuyez sur la touche PROG pour valider
le choix.
- Répétez la procédure pour sélectionner toutes les voies que vous souhaitez écouter.
- Appuyez sur la touche Play/Pause pour démarrer la lecture.
6. TOUCHE FOLDER
Vous permet de naviguer dans des dossiers en mode USB ou CD.
7. TOUCHES SEARCH ◄◄ et ►►
Appuyez sur les touches pour une avance /retour rapide dans les voies.
8. TOUCHES TRACK SEARCH I◄◄ et ►►I
Pour sélectionner la voie précédente ou suivante.
9. DSP / BRAKE
En mode Lecture, appuyez sur le bouton BRAKE puis sur la touche PLAY / PAUSE pour ralentir la voie.
Appuyez à nouveau sur la touche PLAY / PAUSE pour désactiver la fonction.
10. DSP / REVERSE
Appuyez sur la touche REVERSE pour lire la voie en sens inverse. Appuyez sur la touche REVERSE pour désactiver
la fonction.
11. TOUCHES TRACK SELECT – sélection des voies
Appuyez sur la touche pour commuter entre les fonctions PITCH BEND, SCRATCH et SEARCH.
Lorsque la LED témoin est éteinte, vous pouvez utiliser la molette pour la fonction PITCH BEND. Lorsque la LED est
allumée, vous pouvez utiliser la molette pour la fonction Scratching. Lorsque la LED clignote, une recherche rapide
avant et arrière est possible.
19

12. MOLETTES JOG & SHUTTLE
Shuttle: pour sélectionner la direction et la vitesse de recherche. Le disque est lu vers l’avant lorsque la molette est
tournée vers la droite depuis la position neutre et en sens inverse lorsque la molette est tournée vers la gauche. La
vitesse augmente lorsque la molette est tournée plus rapidement.
Jog: En mode Pause lorsque vous tournez la molette, le point auquel le son est produit se déplace par un nombre de
frames correspondant au nombre de clics. Un mouvement vers la droite déplace le point vers l’avant ; un mouvement
vers la gauche, un déplacement vers l’arrière. En mode Play, la molette augmente ou diminue la vitesse de la voie.
13. TOUCHE CUE
Appuyez sur la touche CUE pendant la lecture pour revenir à la position à laquelle la lecture a démarré.
14. TOUCHE PLAY / PAUSE
A chaque pression sur la touche PLAY / PAUSE, l’appareil commute entre les modes Lecture et Pause ou Pause et
lecture.
15. DIRECT ACCESS – Accès direct
Appuyez sur une des touches 0 à 9 pour sélectionner la voie correspondante sur le CD.
16. AFFICHAGE
L’affichage LCD indique : voie / numéros / durée / durée restante / pitch / continue / single.
17. LUMIERE CD
Brille lorsque vous activez le mode CD.
18. TOUCHE SOURCE
Appuyez sur la touche pour commuter entre le mode CD ou USB.
19. PORT USB
Pour relier par exemple un ordinateur via le cordon USB ; fonctionne uniquement si le mode USB est activé.
20. LUMIERE USB
Brille lorsque vous activez le mode USB.
21. SELECTEUR ENTREE (INPUT TOGGLE)
Pour sélectionner la source reliée à la section d’entrée sur la face arrière. En position Midi et CD A, les unités CD
internes sont activées.
22. BLUETOOTH®
Reliez votre appareil BT et sélectionnez avec les commutateurs SOURCE et INPUT TOGGLE.
23. CUE POUR CANAL A-B
Pour sélectionner la source utilisée pour CH A et CH B dans le mix.
24. SELECTEUR ENTREE (TOGGLE SWITCH)
Pour sélectionner la source reliée à la section d’entrée sur la face arrière. En position Midi et CD B, les unités CD
internes sont activées.
25. REGLAGE GAIN CANAUX A & B
Pour régler le niveau de CH A et CH B.
26. REGLAGE CUE / MIX / PGM
En tournant le réglage dans le sens inverse des aiguilles d’une montre, vous pouvez contrôler le signal CUE assigné.
Tournez lentement le réglage dans le sens des aiguilles d’une montre pour le signal CUE assigné. Tournez lentement
le réglage vers la position médiane pour régler CUE MIX avec PGM. En déplaçant le réglage vers la droite, vous
pouvez gérer la sortie PGM.
27. FADER A-B AIGUS
Pour régler la tonalité des aigus des canaux CH A et CH B.
28. MASTER LEVEL
Pour régler le niveau Master du signal de sortie.
29. LED METER
Indique le niveau de sortie Master.
30. MID FADER A-B
Pour régler la tonalité des médiums des canaux CH A et CH B.
31. LOW FADER A-B
Pour régler la tonalité des graves des canaux CH A et CH B.
32. INPUT FADER
Réglage de niveau individuel es sources pour CH A et CH B dans le mix.
33. FADER START
En activant cette fonction, vous pouvez démarrer les lecteurs CD depuis le cross fader.
34. CROSS FADER
Permet des transitions propres entre les deux canaux d’entrée. Potentiomètre entièrement à gauche pour sélectionner
le canal A, entièrement à droite pour sélectionner le canal B. Lorsque le cross fader est au centre, les deux canaux
assignés sont traités. Utilisez le cross fader pour des transitions rapides d’un canal sélectionné vers l’autre.
35. PITCH CONTROL
Potentiomètre pour augmenter ou diminuer la vitesse de la voie.
36. RELOOP
Pour démarrer la dernière boucle mémorisée. Pour arrêter la boucle, appuyez à nouveau sur la touche.
37. LOOP IN
Appuyez sur la touche pour définir le point de départ de la boucle continue ; est indiqué sur l’affichage.
38. LOOP OUT
Appuyez sur la touche pour définir le point de fin de la boucle continue et démarrer la boucle. Pour arrêter la boucle,
appuyez à nouveau sur la touche.
20

39. PITCH
En appuyant sur la touche, le réglage du potentiomètre est disponible.
40. PITCH BEND +
Le Pitch augmente lorsque la touche est enfoncée et revient à la valeur d’origine lorsque vous relâchez la touche.
41. PITCH BEND -
Le Pitch diminue lorsque la touche est enfoncée et revient à la valeur d’origine lorsque vous relâchez la touche.
FACE AVANT
42. TIROIR CD
Placez votre CD. Utilisez des CDs du commerce ou des CDs réinscriptibles à la vitesse minimale possible. Appuyez
sur la touche EJECT pour ouvrir le tiroir.
43. ENTREE MIC INPUT
Pour brancher un micro avec prise jack 6,35 (1/4”).
44. REGLAGE VOLUME MIC
Pour régler le volume du micro.
45. REGLAGE NIVEAU CUE
Pour régler le volume CUE.
46. ENTRÉE CASQUE
Pour brancher un casque.
FACE ARRIERE
47. PRISE CORDON SECTEUR
Prise secteur pour brancher le cordon secteur livré.
48. INTERRUPTEUR POWER ON/OFF
Interrupteur Marche / Arrêt de l’appareil.
49. XLR MASTER SYMETRIQUE
Sortie XLR stéréo symétrique pour le signal master pour brancher des appareils avec entrées niveau ligne.
50. SORTIES MASTER ET REC
Sortie REC Enregistrement : sortie stéréo RCA du signal master pour brancher un amplificateur et des appareils
avec entrées niveau ligne.
Sortie Master : sortie stéréo asymétrique RCA du signal master pour brancher un amplificateur et des appareils avec
entrées niveau ligne.
51. SELECTEUR ENTREE LINE / PHONO CANAL B
Commute les entrées analogiques entre entrée phono et ligne.
52. ENTREE ANALOGIQUE LINE / PHONO
Entrées stéréo RCA pour CH A et CH B pour brancher des appareils analogiques avec sorties niveau ligne ou des
platines disques avec système magnétique.
53. SELECTEUR ENTREE LINE / PHONO CANAL A
Commute les entrées analogiques entre entrée phono et ligne.
54. PORT USB
Port USB, type B pour une connexion à un ordinateur.
55. GND
Prise de mise à la terre pour brancher une platine disque. Utilisez toujours cette connexion
(votre platine disque peut avoir un conducteur de mise à la terre).
56. DJ MIC
Pour brancher un micro avec fiche XLR.
21

POLSKI
j
Gratulujemy zakupu urządzenia marki Vonyx. Proszę o przeczytanie instrukcji przed użyciem urządzenia, aby jak najlepiej móc
wykorzystać jego możliwości.
Przeczytaj tę instrukcję przed pierwszym użyciem urządzenia. Postępuj zgodnie z instrukcją, aby nie utracić gwarancji. Zwróć
uwagę na wszystkie ostrzeżenia, aby uniknąć pożaru lub/oraz porażenia prądem. Naprawy mogą być przeprowadzane jedynie
przez autoryzowany serwis. Zatrzymaj tę instrukcję na wypadek potrzeby w przyszłości.
- Przed użyciem skonsultuj się ze specjalistą. Podczas
pierwszego użycia urządzenie może wydzielić
specyficzny zapach. To zupełnie normalne, zniknie po
chwili.
- Urządzenie posiada podzespoły przewodzące prąd. Nie
otwieraj obudowy urządzenia.
- Nie umieszczaj metalowych obiektów ani płynów w
urządzeniu. Może to spowodować porażenie prądem lub
uszkodzenie sprzętu.
- Nie umieszczaj w pobliżu takich źródeł ciepła jak grzejnik
itd. Nie umieszczaj urządzenia na wibrującej powierzchni.
Nie zasłaniaj kanałów wentylacyjnych.
- Urządzenie nie jest przeznaczone do ciągłej pracy.
- Pamiętaj, aby nie uszkodzić przewodu zasilającego.
Uszkodzony przewód zasilający może spowodować
porażenie prądem lub uszkodzenie sprzętu.
- Podczas wyjmowania wtyczki z gniazdka zawsze ciągnij
za wtyczkę
, nie za kabel.
- Nie wtykaj kabla mając mokre dłonie.
- Jeśli wtyczka lub/oraz kabel zasilający jest uszkodzony,
musi być wymieniony przez wykwalifikowaną osobę.
- Jeśli urządzenie jest uszkodzone na tyle, że widoczne są
części wewnętrzne, nie podłączaj sprzętu do gniazdka,
ani go nie uruchamiaj. Skontaktuj się z dystrybutorem.
Nie podłączaj urządzenia do opornika bądź dimmera.
- Aby uniknąć porażenia prądem, nie wystawiaj urządzenia
na działanie warunków atmosferycznych ani na wilgoć.
- Sprzęt może być naprawiany tylko w autoryzowanym
serwisie.
- Podłączaj urządzenie do uziemionego źródła zasilania
(220-240Vac/50Hz) z bezpiecznikiem 10-16A.
- Podczas burzy lub w sytuacjach, gdy urządzenie nie jest
używane przez dłuższy czas, odłącz je od gniazdka.
Zasada brzmi: odłącz sprzęt od gniazdka, gdy go nie
używasz.
- Jeśli urządzenie nie było używane przez dłuższy czas,
może wystąpić kondensacja. Pozwól na to, aby sprzęt
osiągnął temperaturę pokojową. Nigdy nie używaj w
wilgotnych pomieszczeniach, bądź na zewnątrz.
- Podczas użytkowania znacznie wzrasta temperatura
obudowy. Nie dotykaj jej w czasie pracy, bądź
natychmiast po wyłączeniu urządzenia.
- Aby uniknąć wypadków w pracy, wykonuj polecenia
zawarte w tej instrukcji.
- Zabezpiecz urządzenie dodatkowym łańcuchem
bezpieczeństwa. Używaj wysokiej jakości haków.
Upewnij się, że nikt nie stoi w pobliżu okolicy montażu.
Montuj sprzęt w odległości co najmniej 50cm od
materiałów łatwopalnych i zachowuj co najmniej 1m
wolnej przestrzeni z każdej strony, aby zapewnić
odpowiednie chłodzenie
- Urządzenie posiada diody LED wysokiej mocy. Nie
patrz bezpośrednio na diody, aby nie uszkodzić wzroku.
- Nie włączaj i wyłączaj urządzenia co chwilę. Skraca to
jego żywotność.
- Trzymaj z dala od dzieci. Nie zostawiaj sprzętu bez
opieki.
- Nie używaj spray’ów do czyszczenia przełączników. To
powoduje osiadanie się kurzu oraz tłuszczu. W
przypadku usterki zasięgnij rady u specjalisty. Obsługuj
urządzenie mając czyste ręce.
- Nie naciskaj przycisków z zbyt dużą siłą.
- Jeśli urządzenie upadnie, przed kolejnym włączeniem
zawsze musi być sprawdzone przez wykwalifikowanego
technika.
- Nie używaj chemikaliów do czyszczenia obudowy.
Niszczą one lakier. Dokonuj czyszczenia za pomocą
suchej szmatki.
- Trzymaj z dala od innej elektroniki, która może
spowodować zakłócenia.
- Urządzenie posiada wbudowany akumulator kwasowoołowiowy. Pamiętaj, aby wykonać cykl
rozładowania/naładowania co 3 miesiące, jeśli nie
zamierzasz go używać przez dłuższy czas. W innym
przypadku akumulator może ulec uszkodzeniu.
- Podczas serwisu używaj tylko oryginalnych części. W
innym przypadku może nastąpić poważne uszkodzenie
sprzętu, lub niebezpieczne promieniowanie.
- Wyłącz urządzenie przed wyciągnięciem kabla
zasilającego. Odłącz wszystkie kable przed
przenoszeniem sprzętu.
- Upewnij się, że nikt nie uszkodzi kabla zasilającego.
Sprawdź przed każdym użyciem, czy kabel zasilający
nie nosi znamion uszkodzenia.
- Urządzenie może pracować przy napięciu 220240Vac/50Hz. Jeśli podróżujesz ze sprzętem, sprawdź,
czy możesz je bezpiecznie podłączyć do prądu.
- Zachowaj oryginalny karton, aby móc transportować
urządzenie w bezpiecznych warunkach.
Ten znak zwraca uwagę użytkownika na wysokie napię
jest wystarczające, aby porazić użytkownika.
cie, które jest obecne w środku obudowy urządzenia. Napięcie
Ten znak zwraca uwagę użytkownika do ważnych informacji, które znajdują się w instrukcji. Informacje te powinny być
przeczytane oraz uwzględnione w codziennym użytkowaniu
Urządzenie posiada certyfikat CE. Nie wolno wprowadzać żadnych zmian w urządzeniu. Każda modyfikacja sprzętu spowoduje
utratę certyfikatu CE oraz gwarancji!
UWAGA: Urządzenie może funkcjonować w pomieszczeniach o temperaturze pomiędzy 5°C/41°F oraz 35°C/95°F.
WAŻNA INFORMACJA: Urządzenia elektryczne muszą być składowane w miejscach do tego przeznaczonych.
Sprawdź, gdzie w Twojej okolicy znajduje się najbliższe centrum recyklingu. Specyfikacja techniczna poszczególnych
urządzeniach może się nieznacznie różnić. Specyfikacja może ulec zmian bez powiadomień.
Nie próbuj dokonywać żadnych napraw samodzielnie, to spowoduje unieważnienie gwarancji. Gwarancja nie dotyczy uszkodzeń
spowodowanych niewłaściwym użytkowaniem sprzętu, niezgodnie z instrukcją. Vonyx nie jest odpowiedzialny za uszczerbek na
zdrowiu oraz kontuz
e spowodowane niestosowaniem się do zaleceń bezpieczeństwa. Dotyczy to wszelakich uszkodzeń.
22

INSTRUKCJA ROZPAKOWYWANIA
OSTRZEŻENIE! Natychmiast po odbiorze urządzenia, ostrożnie otwórz karton ochronny, oraz sprawdź zawartość i stan
techniczny przedmiotu. Niezwłocznie powiadom kuriera oraz zachowaj opakowanie zewnętrzne do kontroli, jeśli jakikolwiek
element zawartości wygląda na zniszczony w transporcie lub nosi objawy złego traktowania paczki. W takim wypadku należy
niezwłocznie odesłać sprzęt do producenta. Sprzęt należy wysłać w oryginalnym opakowaniu.
Jeśli urządzenie było wystawione na działanie niskich temperatur (np. podczas transportu), nie uruchamiaj go od razu.
Powstające zjawisko kondensacji widy może uszkodzić urządzenie. Pozostaw urządzenie wyłączone, dopóki nie osiągnie
temperatury pokojowej.
ZASILANIE
Na naklejce z tyłu urządzenia znajduje się oznaczenie dotyczące rodzaju zasilania. Sprawdź, czy napięcie w gniazdku zgadza
się z wymaganym przez producenta. Złe napięcie może spowodować nienaprawialne uszkodzenie urządzenia.
Zawsze podłączaj urządzenie do zabezpieczonego obwodu elektrycznego (za pomocą bezpiecznika lub wyłącznika
instalacyjnego). Upewnij się, że urządzenie jest uziemione, aby uniknąć pożaru lub śmiertelnego porażenia prądem.
OSTROŻNIE PROMIENIOWANIE LASEROWE
To urządzenie jest wyposażone w dwie diody laserowe klasy 1. Aby zapewnić bezpieczną obsługę, nie należy
zdejmować żadnych osłon ani próbować uzyskać dostępu do wnętrza urządzenia. Wnętrze urządzenia nie zawiera
żadnych części podlegających konserwacji. Konserwacja może być wykonywana wyłącznie przez wykwalifikowany
personel.
STEROWANIE
Szczegółowe i ponumerowane ilustracje urządzenia znajdują się na końcu niniejszej instrukcji.
ODTWARZACZ I MIKSER:
1. PRZYCISK WYSUNIĘCIA DYSKU
Naciśnij, aby załadować lub wysunąć dysk. Każde naciśnięcie otworzy lub zamknie tacę dysku.
UWAGA: Uchwyt dysku nie otworzy się, dopóki przycisk zatrzymania lub pauzy nie zostanie wcześniej naciśnięty.
2. PRZYCISK CZASU
Za pomocą tego przycisku można wybrać tryb czasu: czas, pozostały czas lub całkowity pozostały czas.
3. POJEDYNCZY PRZYCISK
Naciśnij ten przycisk, aby przełączyć pomiędzy trybem odtwarzania SINGLE i CONTINUOUS. Wybrany tryb jest
wskazany na wyświetlaczu LCD. W trybie POJEDYNCZY po każdym utworze urządzenie zatrzymuje odczyt. W trybie
CONTINUOUS urządzenie odczytuje wszystkie ścieżki i zatrzymuje się.
4. PRZYCISK REPEAT
Użyj tego przycisku, aby powtórzyć jeden utwór lub wszystkie ścieżki na płycie CD.
5. PRZYCISK PROG
W trybie STOP można zaprogramować kilka ścieżek (maksymalnie 20 ścieżek):
- Naciśnij przycisk STOP, aby przejść do trybu zatrzymania.
- Naciśnij przycisk PROG, aby przejść do trybu programowania.
- Użyj przycisków ścieżki pomijania, aby wybrać ścieżkę, której chcesz słuchać, a następnie naciśnij przycisk
PROG, aby wprowadzić swój wybór..
- Użyj przycisków ścieżki pomijania jeszcze raz, aby wybrać utwór, który chcesz słuchać, a następnie naciśnij
przycisk PROG, aby wprowadzić swój wybór.
- Powtórz operację, aby wybrać wszystkie utwory, które chcesz odsłuchać.
- Naciśnij przycisk PLAY / PAUSE, aby rozpocząć odtwarzanie.
6. PRZYCISK FOLDEROWY
Umożliwia poruszanie się po folderach w podobny sposób w trybie USB lub CD.
7. SZUKAJ ◄◄ I ►► PRZYCISK
Naciśnij, aby przewinąć utwory do tyłu lub do przodu.
8. SZUKAJ ŚCIEŻKI I◄◄ I ►►I PRZYCISK
Wybierz poprzedni lub następny utwór.
9. DSP / BRAKE
W trybie odtwarzania naciśnij najpierw przycisk BRAKE, a następnie przycisk PLAY / PAUSE, aby spowolnić
hamowanie. Naciśnij ponownie przycisk PLAY / PAUSE, aby anulować tę funkcję.
10. DSP / REVERSE
Naciśnij przycisk REVERSE, aby odtwarzać utwór w odwrotnej kolejności. Naciśnij ponownie przycisk cofania, aby
anulować tę funkcję.
23

11. PRZYCISKI WYBORU TRACK
Naciśnij ten przycisk, aby móc przełączać między funkcjami PITCH BEND, SCRATCH i SEARCH.
Gdy dioda LED wskaźnika jest wyłączona, można użyć przycisku jog do funkcji PITCH BEND. Gdy świeci się dioda
LED, pokrętło można wykorzystać do zarysowania. Gdy dioda LED wskaźnika zacznie migać, włączone jest szybkie
wyszukiwanie do przodu i do tyłu.
12. KOŁA JOG i SHUTTLE
Shuttle: Użyj pokrętła, aby wybrać kierunek i prędkość skanowania. Płyta zostanie zeskanowana w kierunku do
przodu, gdy pokrętło kierownicy zostanie obrócone zgodnie z ruchem wskazówek zegara z położenia neutralnego, w
odwrotnym kierunku, gdy pokrętło przewijania zostanie obrócone przeciwnie do ruchu wskazówek zegara. Skanowanie
przyspiesza, gdy pokrętło przenoszenia jest obracane szybciej.
Jog: W trybie pauzy, podczas obracania, punkt, w którym powstaje dźwięk, porusza się o liczbę klatek odpowiadającą
liczbie kliknięć. Zgodnie z ruchem wskazówek porusza punkt do przodu; przeciwnie do ruchu wskazówek zegara do
tyłu. W trybie odtwarzania jog zwiększa lub zmniejsza prędkość ścieżki.
13. PRZYCISK CUE
Naciśnięcie przycisku CUE podczas odtwarzania powoduje powrót do pozycji, w której rozpoczęto odtwarzanie.
14. PRZYCISK PLAY / PAUSE
Naciśnięcie tego przycisku powoduje zmianę trybu z odtwarzania na pauzę lub z pauzy na odtwarzanie.
15. BEZPOŚREDNIE PRZYCISKI DOSTĘPU
Naciśnij jeden z przycisków 0-9, aby wybrać jedną ścieżkę z płyty CD.
16. WYŚWIETLACZ
Wyświetlacz LCD do wskazywania ścieżki / liczby / czasu / pozostałej / wysokości / kontynuacji / pojedynczej.
17. CD LIGHT
Po przejściu w tryb pracy CD, zapali się.
18. PRZYCISK ŹRÓDŁOWY UTTON
Naciśnij ten przycisk, aby przełączać pomiędzy trybem CD lub USB.
19. PORT USB
Obsługuje odtwarzanie utworów przez USB. Połączenie komputerowe przez USB jest możliwe tylko po wejściu w tryb
pracy USB.
20. USB LIGHT
Po przejściu do trybu pracy USB zapali się.
21. PRZEŁĄCZNIK PRZEŁĄCZNIKA WŁĄCZENIA
Określa, które źródło będzie aktywne w oparciu o to, co zostało podłączone do sekcji wejściowej panelu tylnego. W
pozycji Midi i CD A aktywne są wewnętrzne jednostki CD.
22. BLUETOOTH®
Podłącz swoje urządzenie BT do tej stacji dokującej i wybierz za pomocą przełączników SOURCE i INPUT TOGGLE.
UWAGA: Funkcje DJ-owe są wyłączone podczas użytkowania BT.
23. CUE DLA KANAŁU A-B
Określa, które źródło będzie aktywne dla CH A i CH B w miksie.
24. PRZEŁĄCZNIK PRZEŁĄCZNIKA WŁĄCZENIA
Określa, które źródło będzie aktywne w oparciu o to, co zostało podłączone do sekcji wejściowej panelu tylnego. W
pozycji Midi i CD B wewnętrzne jednostki CD są aktywne.
25. CHANNEL A & B GAIN CONTROL
Dostosowuje poziom CH A i CH B.
26. CUE / MIX / PGM CONTROL
Przeciwnie do ruchu wskazówek zegara będziesz mógł monitorować przypisany sygnał CUE. Powoli obrócić pokr
zgodnie z ruchem wskazówek zegara do przypisanego sygnału CUE. Powolne obracanie pokrętła w kierunku zgodnym
z ruchem wskazówek zegara do położenia środkowego umożliwia monitorowanie CUE MIX za pomocą PGM.
Przesunięcie pokrętła w prawą stronę w prawo pozwala monitorować wyjście PGM.
27. WYSOKOWY FADER A-B
Dostosuj wyrównywanie wysokich i wysokich wartości CH A i CH B.
28. POZIOM MASTER
Dostosowuje sygnał wyjściowy poziomu głównego.
29. MIERNIK LED
Wskazuje główny poziom wyjściowy.
30. FADER MID A-B
Wyreguluj wyrównanie CH A i CH B dla średnich częstotliwości.
31. NISKI FADER A-B
Wyreguluj wyrównanie CH A i CH B dla niskich częstotliwości.
32. FADER WEJŚCIA
Kontroluje indywidualne poziomy źródła dla CH A i CH B w miksie.
33. FADER START
Aktywacja umożliwia uruchomienie odtwarzaczy CD z crossfader.
34. CROSS FADER
Pozwala na czyste selekcje między dwoma kanałami wejściowymi. W pełni lewy wybiera kanał A, w pe
wybiera kanał B. Przy centralnym cross crossie, oba przypisane kanały są pod napięciem. Użyj poprzecznego fadera
do szybkiego i płynnego segues z jednego wybranego kanału do drugiego.
35. KONTROLA PITCH
Użyj tego suwaka, aby zwiększyć lub zmniejszyć prędkość ścieżki.
36. RELOOP
Użyj tego przycisku, aby rozpocząć ostatnią zapisaną pętlę. Aby zakończyć pętlę, naciśnij jeszcze raz przycisk.
37. LOOP IN
Naciśnięcie tego przycisku ustawia punkt początkowy płynnej pętli i wskazuje na wyświetlaczu.
łni prawy
ętło
24

38. LOOP OUT
Naciśnięcie tego przycisku ustawia punkt końcowy płynnej pętli i rozpoczyna pętlę. Aby zakończyć pętlę, naciśnij
jeszcze raz przycisk.
39. PITCH
Naciśnięcie tego przycisku powoduje dostrojenie potencjometru.
40. PITCH BEND +
Wysokość dźwięku wzrośnie po naciśnięciu i przytrzymaniu tego przycisku, a po zwolnieniu powróci do pierwotnej
wartości.
41. PITCH BEND -
Po naciśnięciu i przytrzymaniu tego przycisku wysokość dźwięku spadnie, a po zwolnieniu powróci do pierwotnej
wartości.
PRZEDNI PANEL
42. TACE PŁYT
Umieść tutaj swoją płytę CD. Używaj komercyjnych płyt CD lub nagrywających płyt CD z minimalną możliwą
szybkością. Naciśnij przycisk EJECT, aby otworzyć tacę.
43. MIC INPUT
Podłącz wtyczkę mikrofonową 1/4 "tutaj.
44. REGULACJA OBJĘTOŚCI MIKROFONU
Użyj tego pokrętła, aby wyregulować głośność mikrofonu.
45. KONTROLA POZIOMU CUE
Użyj tego pokrętła, aby dostosować głośność cue.
46. WEJŚCIE SŁUCHAWEK
Podłącz tutaj słuchawki.
TYLNY PANEL
47. WEJŚCIE DO WEJŚCIA DO AC
Włóż dostarczony w zestawie przewód zasilający.
48. PRZEŁĄCZNIK WŁĄCZANIA / WYŁĄCZANIA ZASILANIA
Przekręć przełącznik, aby włączyć lub wyłączyć urządzenie.
49. ZBALANSOWANE WYJŚCIE MASTER XLR
XLR stereo zbalansowane wyjście sygnału głównego do połączenia z jednostkami z wejściami liniowymi.
50. WYJŚCIA MASTER I REC
Wyjście nagrywania REC: Wyjście stereo (RCA) sygnału głównego do podłączenia i wzmacniacza lub innych
urządzeń z wejściami poziomu liniowego.
Wyjście główne: Niezbalansowane wyjście stereo (RCA) sygnału głównego do podłączenia wzmacniacza lub innych
urządzeń z wejściami poziomu liniowego.
51. KANAŁ PRZEŁĄCZNIKA WYBORU WEJŚ
Przełącz wejścia analogowe między phono i wejściem liniowym.
52. ANALOG INPUT LINE / PHONO
Wejścia stereo (RCA) dla CH A i CH B do łączenia urządzeń analogowych z wyjściami liniowymi lub obrotowymi z
układem magnetycznym.
53. KANAŁ PRZEŁĄCZNIKA WYJŚCIA WEJŚCIOWEGO / KANAŁU PHONO A
Przełącz wejścia analogowe między phono i wejściem liniowym.
54. PORT USB
Port USB typu B do łączenia z komputerami.
55. GND
Końcówka uziemiająca do podłączenia gramofonu. Zawsze używaj tego połączenia (twój kabel gramofonu powinien
mieć przewód uziemiający).
56. DJ MIC
Podłącz tutaj mikrofon typu XLR.
CIOWEGO / KANAŁU PHONO B
25
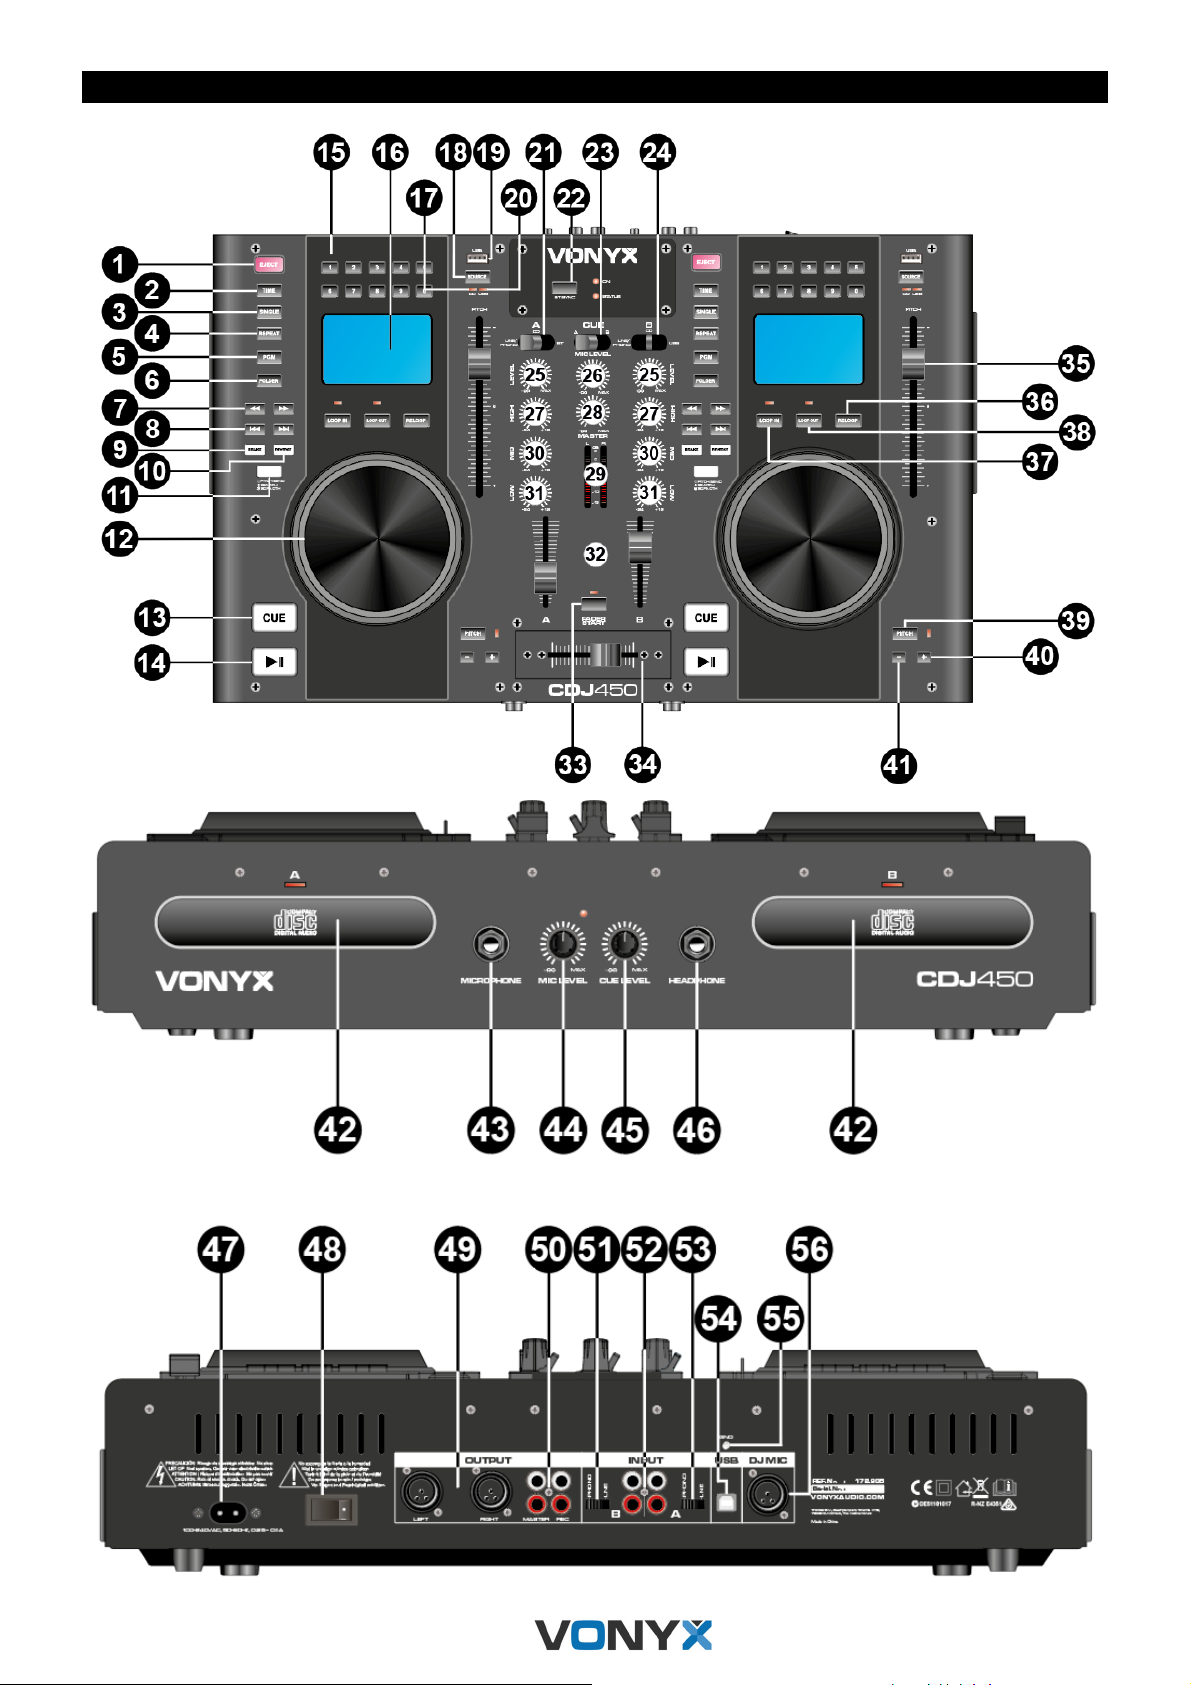
OVERVIEW
26

TECHNICAL SPECIFICATION / TECHNISCHE SPECIFICATIE / TECHNISCHE
DATEN / ESPECIFICACIONES TÉCNICAS / SPÉCIFICATIONS TECHNIQUES /
SPECYFIKACJA TECHNICZNA
Power supply: 115~240VAC 50-60Hz
Frequency response: 20Hz – 20kHz
Signal to noise ratio: >90dB
Pitch bend: +/- 16%
Pitch slider: +/- 16%
Output: Line: 1V
Dimensions: 482 x 98 x 296 mm
Weight: 6.5 kg
The specifications are typical. The actual values can slightly change from one unit to the other. Specifications can be changed
without prior notice.
Specifications and design are subject to change without prior notice.
www.tronios.com
Copyright © 2018 by TRONIOS the Netherlands
27

Declaration of Conformity
Manufacturer: Tronios B.V.
Bedrijvenpark Twente 415
7602KM Almelo
The Netherlands
Phone: +31(0)85-1053155
Product number: 172.805
Product Description: CDJ450
Trade Name: VONYX
I hereby declare that the product meets the requirements stated in Directives:
LVD 2014/35/EU
EMC 2014/30/EU
RoHS 2011/65/EU
Almelo,
4-10-2018
Name : M. Velders
Signature :
28

 Loading...