

Page 1

Instructions
for use for Electronic Handheld Magnifier
Mode d‘emploi de la Loupe portable électronique eMag 43
Handleiding voor elektronisch vergrotende handloep eMag 43
Page 2

GB
2
Contents
.
Contenu . Inhoudstabel
GB
Instruction manual english page 3
F
Manuel d’utilisation francais page 27
NL
Handleiding nederlandse bladzijde 51
Page 3

3
GB
Electronic Handheld Magnifier
User's Guide
Distributor:
A. SCHWEIZER GmbH
Hans-Böckler-Str. 7
91301 Forchheim
www.schweizer-optik.de
Congratulations on your purchase of the eMag 43. This electronic handheld magnifier allows you to magnify
printed text and objects from 2 to 14 times the object's original size. The eMag 43 features a 4.3-inch, widescreen (16:9 aspect ratio) LCD display.
Information in this document is subject to change without notice. No part of this publication may be
reproduced or transmitted in any form or any means electronic or mechanical, for any purpose, without the
express written permission of A. SCHWEIZER GmbH.
Copyright © 2014 A. SCHWEIZER GmbH. All Rights Reserved.
Page 4
4
GB
Technical information
Wavelength: 400 nm to 750 nm
Energy: < 1mW CW
Safety: UL 60950
CAN/CAS-C22.2 No. 60950
IEC 60950
EMC: EN 60825-1:2001
FCC (CFR-47, part 15) Class A
EN 55022 Class A
EN 55024
LED RADIATION
DO NOT STARE
INTO BEAM
CLASS 2 LED
LED STRAHLUNG
SCHAUEN SIE NICHT
DIREKT IN DIE LED
LED KLASSE 2
Manufacturer:
Freedom Scientific GmbH
Bahnstr. 1
CH-8274 Tägerwilen
Page 5

5
GB
Table of contents
Safety and maintenance 6
Cleaning instructions 6
Quick start 7
Overview 8
What's in the box? 10
Batterie safety notes 10
Inserting batteries 12
Charging batteries 14
LED descriptions 15
Using the eMag 43 16
Reading with the eMag 43 16
Magnifying an image 17
Magnification level with handle collapsed 18
Magnification level with handle extended 18
Freezing and magnifying an image 19
Saving and deleting an image 20
Saving an image when the memory is full 21
Turn LED Lights Off 21
Hardware description 22
Carrying the eMag 43 23
Service and support 24
Troubleshooting 24
Page 6
6
GB
Safety and maintenance
To keep your eMag 43 magnifier in good condition, please observe the following guidelines:
Read the instructions in this user's guide before attempting to use the eMag 43.
Please do not attempt to repair the eMag 43 yourself or open its case. This product contains no user
serviceable parts.
Keep the eMag 43 away from wet areas, rain, and other sources of liquids or environments with high humidity.
Do not submerge the eMag 43 in water or other liquids.
Always operate your eMag 43 in a place where the temperature is between 10° and 35° Celsius.
Do not store the eMag 43 in places subject to temperature extremes such as in a parked car.
Do not attempt to use force when connecting the cables to the eMag 43. All appropriate connectors fit easily
into the ports. Use only the power adapter that came with the eMag 43 to charge the NiMH batteries (nickelmetal hydride). Other adapters may damage the unit.
Cleaning intructions
CAUTION: When cleaning the screen or camera window, turn off the unit, unplug the power cord, and
apply a small amount of non-abrasive cleanser, such as the following, to a soft cloth (not a
paper towel) and gently wipe: water, isopropyl alcohol or vinegar mixed with water at a
concentration of no more than 10 % vinegar. Do not use any cleaner that contains the
following agents: acetone, ethyl alcohol, ethyl acid, ammonia, or methyl chloride. Do not spray
cleanser directly on the screen. Do not apply excessive pressure to the screen.
Page 7
7
GB
Quick start
Note: Before using the eMag 43 electronic handheld magnifier, you must charge the unit. The batteries
charge faster when the unit is off. Allow at least two hours for a complete charge before using the
unit for the first time. Please observe the "Inserting and Charging the Batteries" chapter.
The eMag 43 is easy to use, even for those unfamiliar with assistive technology. Press the
green/yellow
power button to turn the unit on. Hold or place the eMag 43 over an object and adjust the magnification to
your preference using the yellow magnification button. The magnified image appears on the unit's display.
For safety reasons, eMag 43 turns off automatically after 30 minutes if no button is pressed during that time.
The following describes the location of the eMag 43 components and the LED operation.
Page 8
8
GB
Power
button
Power port
Battery indicator LED
Magnification button
Fold-Out handle
(extended position)
Freeze frame button
Colour
select
button
Overview
Page 9
9
GB
Fold-Out handle
(extended position)
Wrist strap post
Battery indicator LED
Lights
Camera window
Power port
Battery compartment
Page 10
10
GB
What's in the box?
Before using the eMag 43, please take out and verify all the items that are in the box:
• eMag 43 electronic handheld magnifier
• AC power adapter with four international adapters
• Four AAA nickel-metal hydride (NiMH) rechargeable batteries
• Carrying case with shoulder strap
• Wrist strap
• eMag 43 User's Guide
Charging batteries
Note: Before using the eMag 43 for the first time, you must charge the four AAA NiMH batteries.
Four AAA NiMH rechargeable batteries are included with the eMag 43. You can also use four micro type
batteries (LR3, AAA, AM-4) to operate the unit. In this case, do not connect the power adapter.
Note: Do not mix NiMH batteries with alkaline batteries. Replace all batteries with four new ones of
the same chemistry at the same time. Do not mix new batteries with old batteries. Failure to follow this precaution can lead to battery failure or leakage.
Dispose of NiMH and alkaline batteries properly. They should not be disposed of with normal
household waste. Check with your local government for disposal and recycling procedures.
CAUTION: Risk of malfunction if a NiMH or alkaline battery is replaced with an incorrect type.
Page 11
11
GB
We would like to inform you that our batteries/rechargeable batteries are marketed in accordance with the
current law and refer you to the following points:
1.
eMag 43 is operated by rechargeable batteries type AAA HR03. You can also use batteries type AAA LR03.
2. To prevent harmful effects to the environment and health, used batteries/rechargeable batteries must be
disposed of properly at community recycling centres or returned to the merchant. Returning batteries is
required by law and is completely free-of-charge for you.
3. Batteries/rechargeable batteries should only be returned in a discharged state.
4. Valuable raw materials such as zinc, iron and nickel can be reclaimed by recycling used batteries/
rechargeable batteries.
5. The batteries/rechargeable batteries can be easily removed from our devices for disposal (see User's Guide).
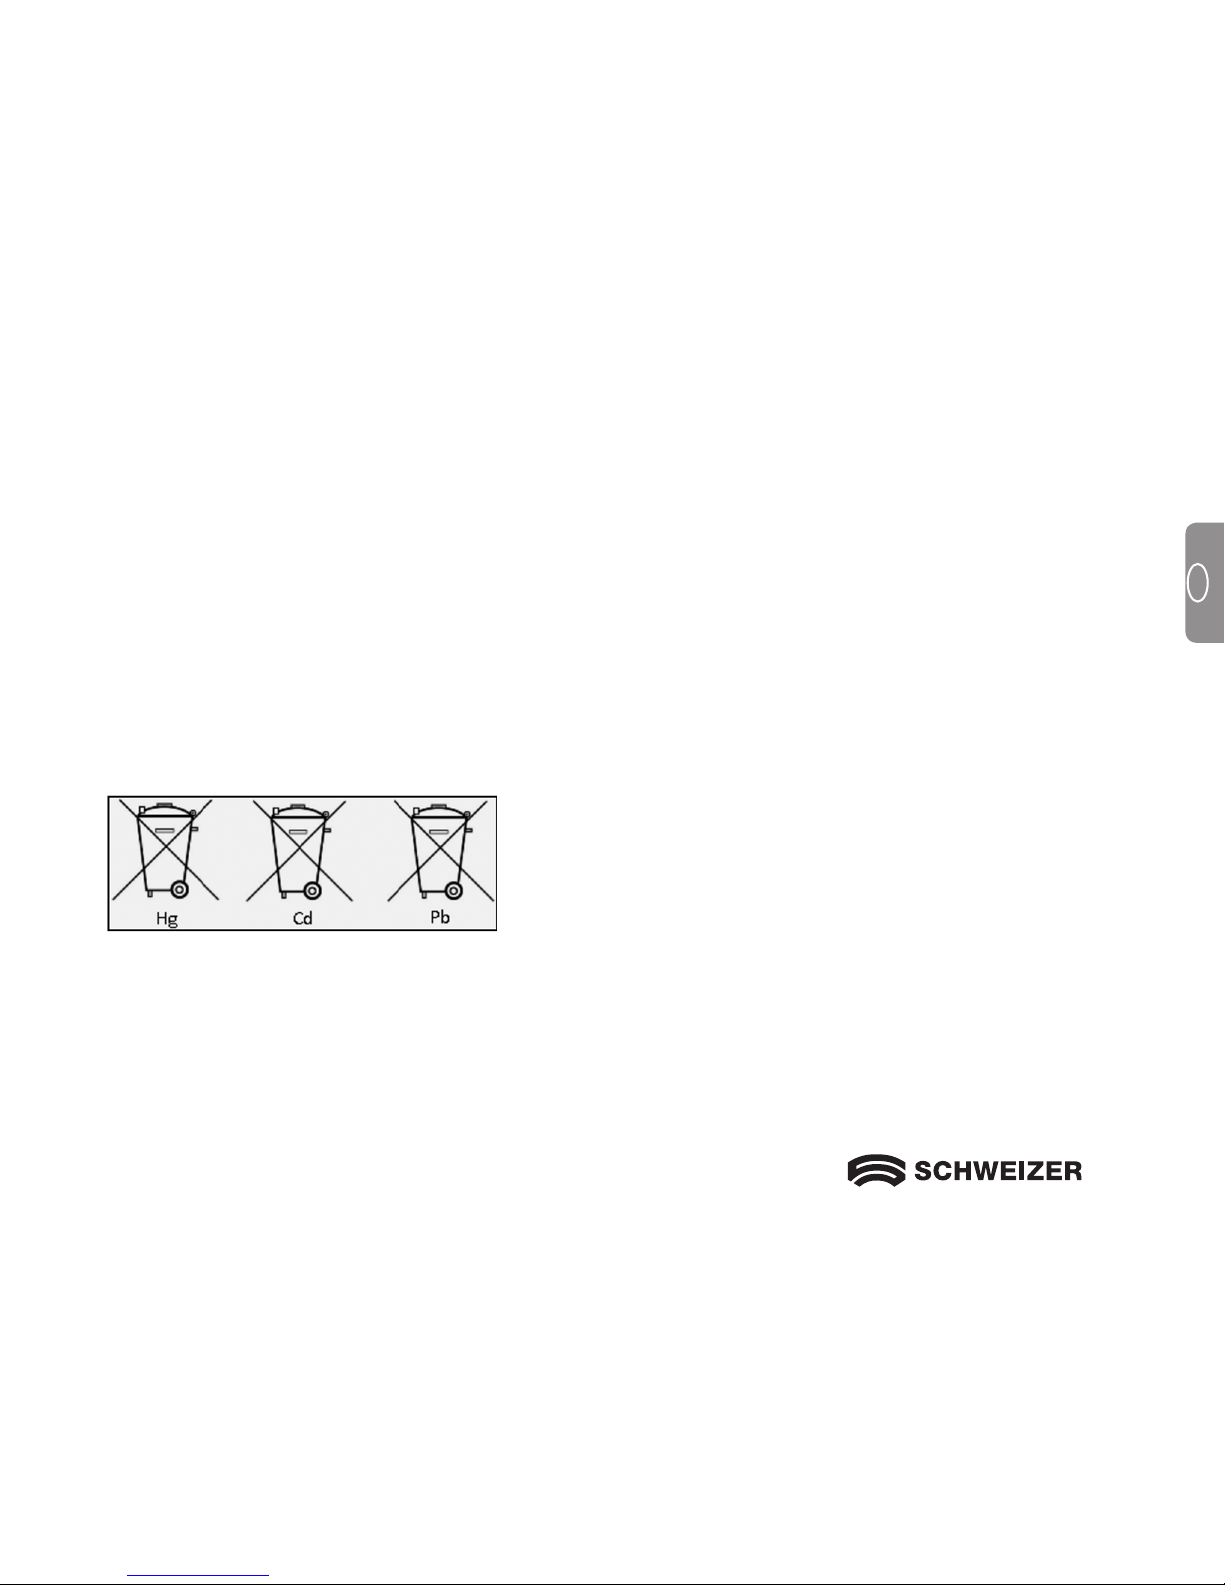
6. The symbol of a "crossed-out trash container" indicates that it is illegal to dispose of used batteries with
regular domestic waste.
The additional specification of the chemical sign for lead (Pb),
cadmium (Cd) and mercury (Hg) indicates that these materials
are contained in the batteries/rechargeable batteries in
accordance with the legally-specified limits.
Page 12
12
GB
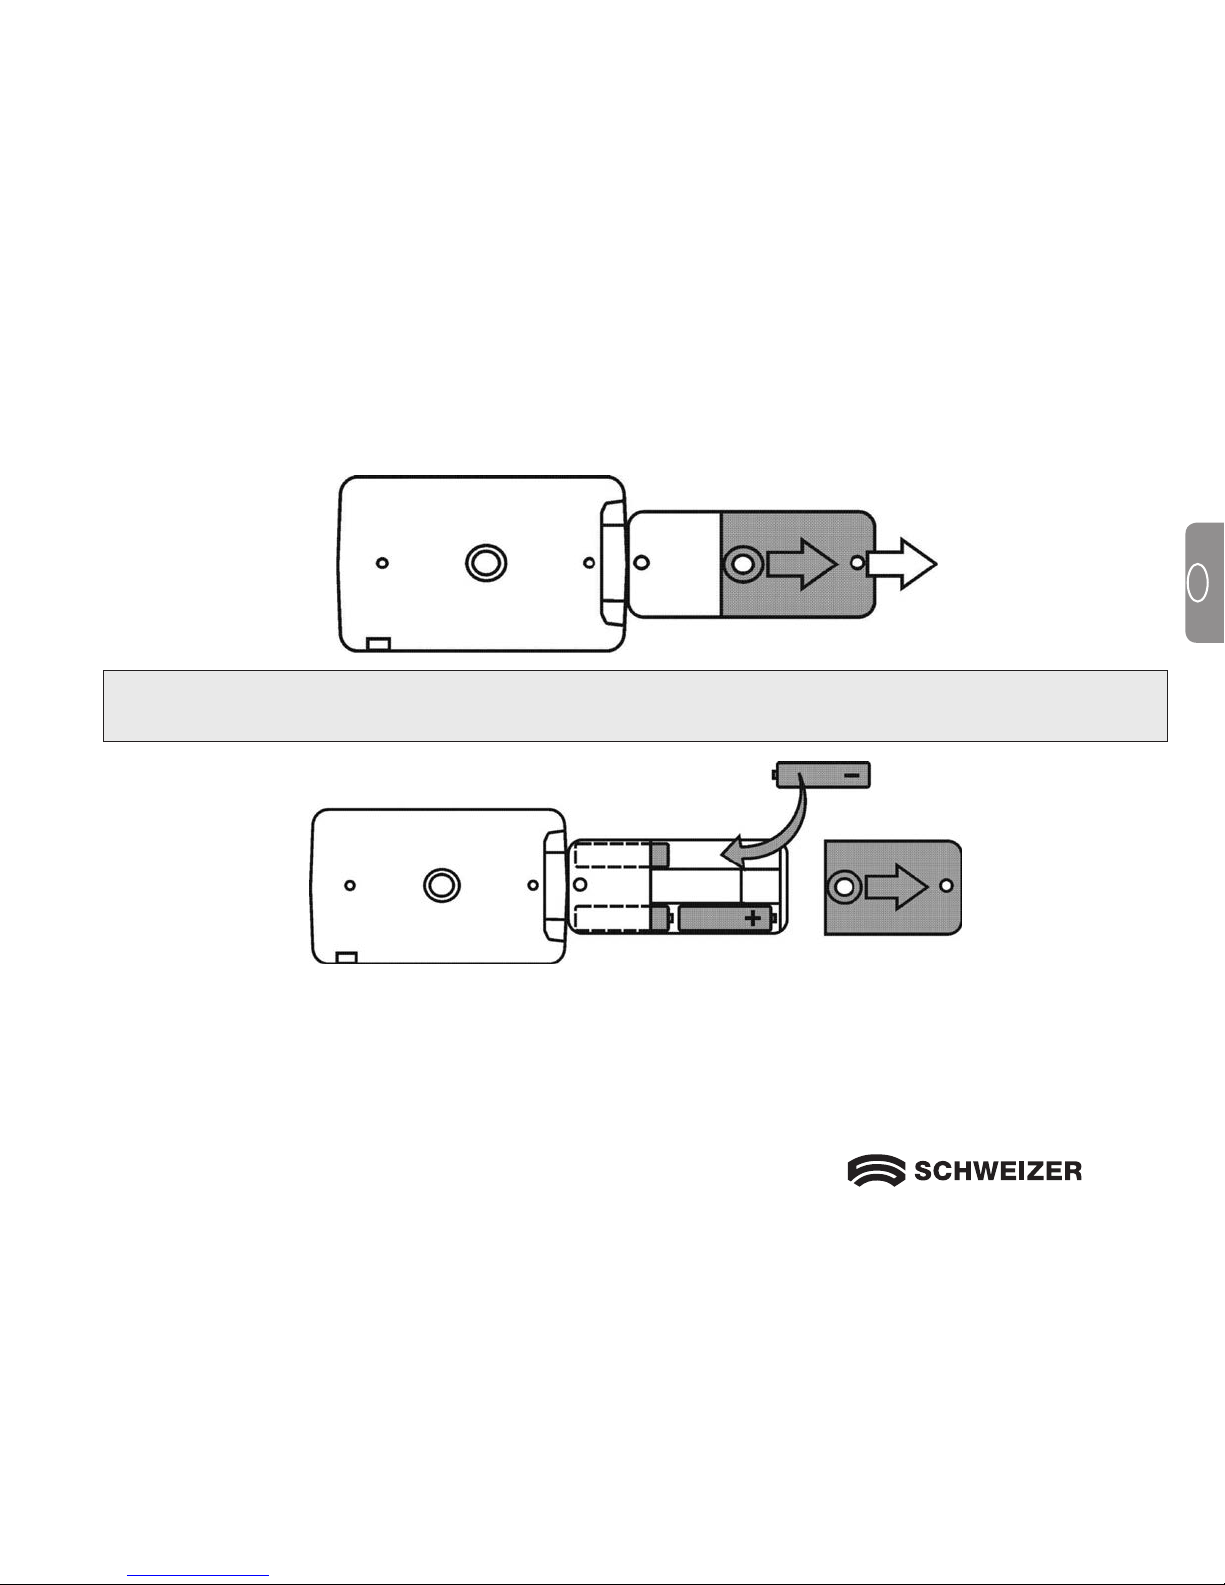
Inserting batteries
To insert the batteries, do the following:
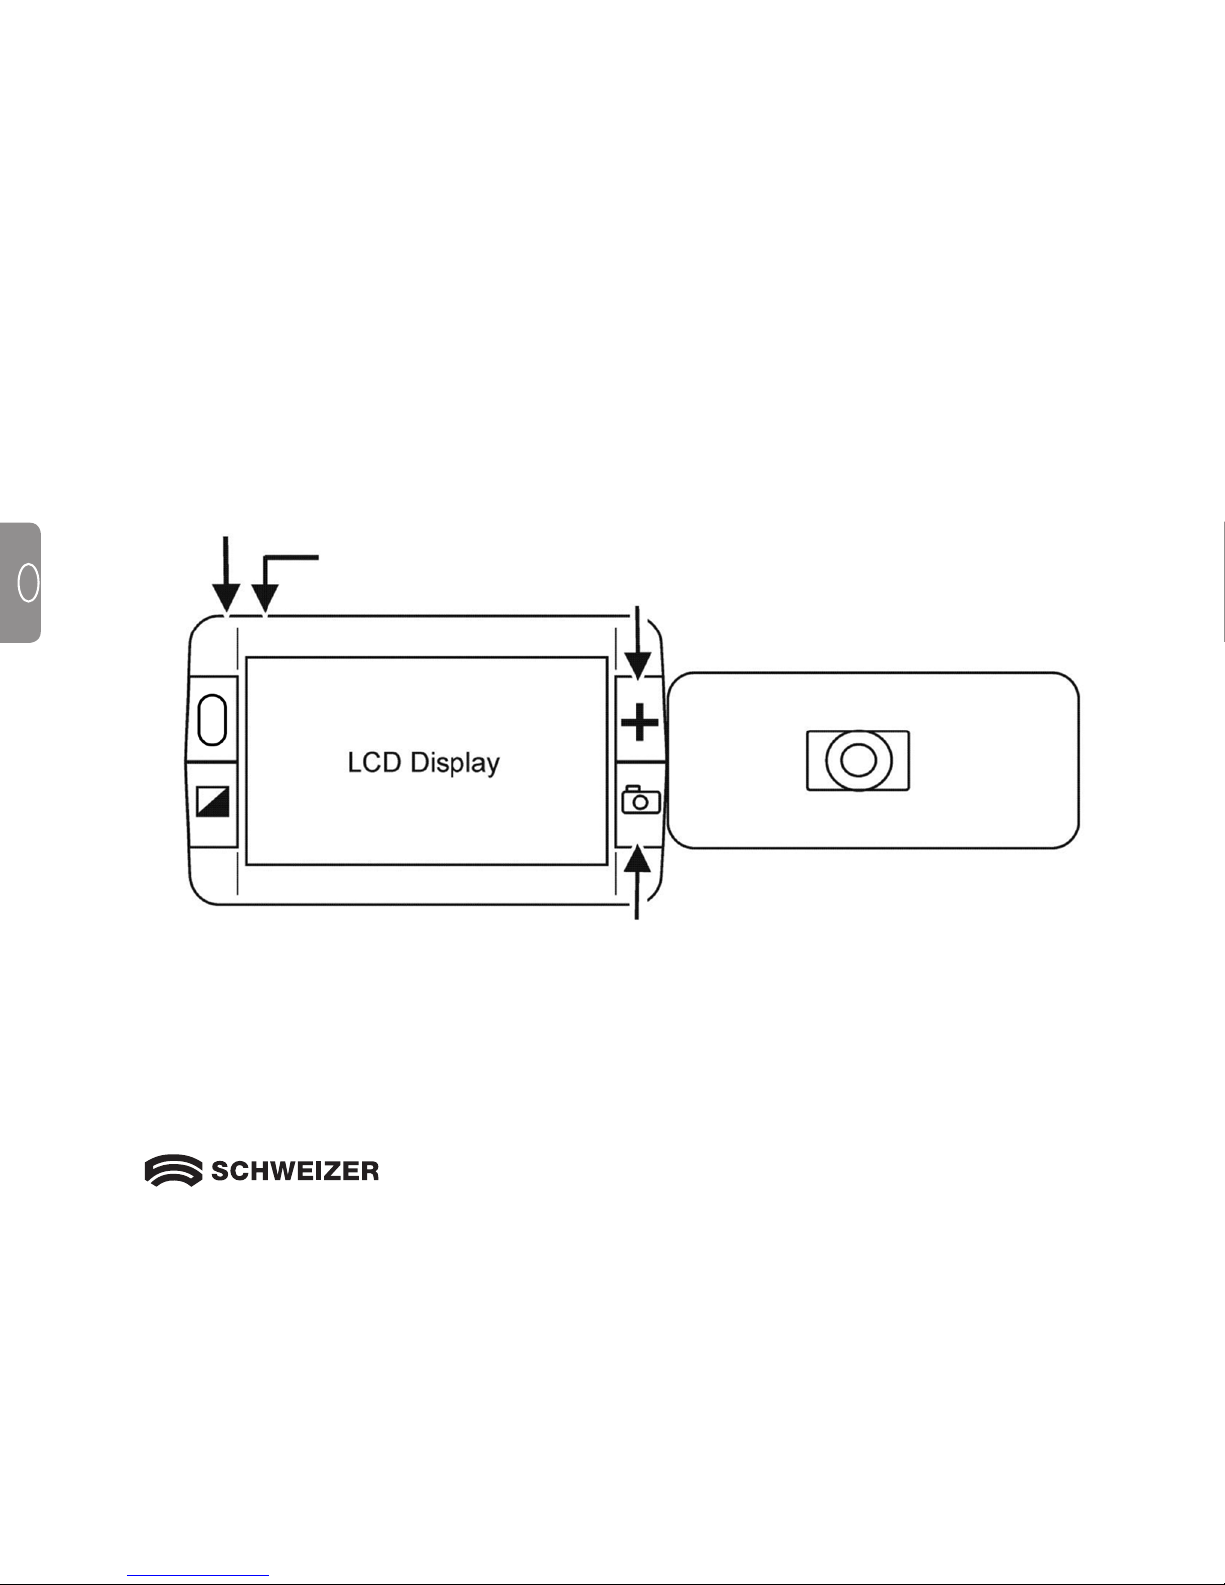
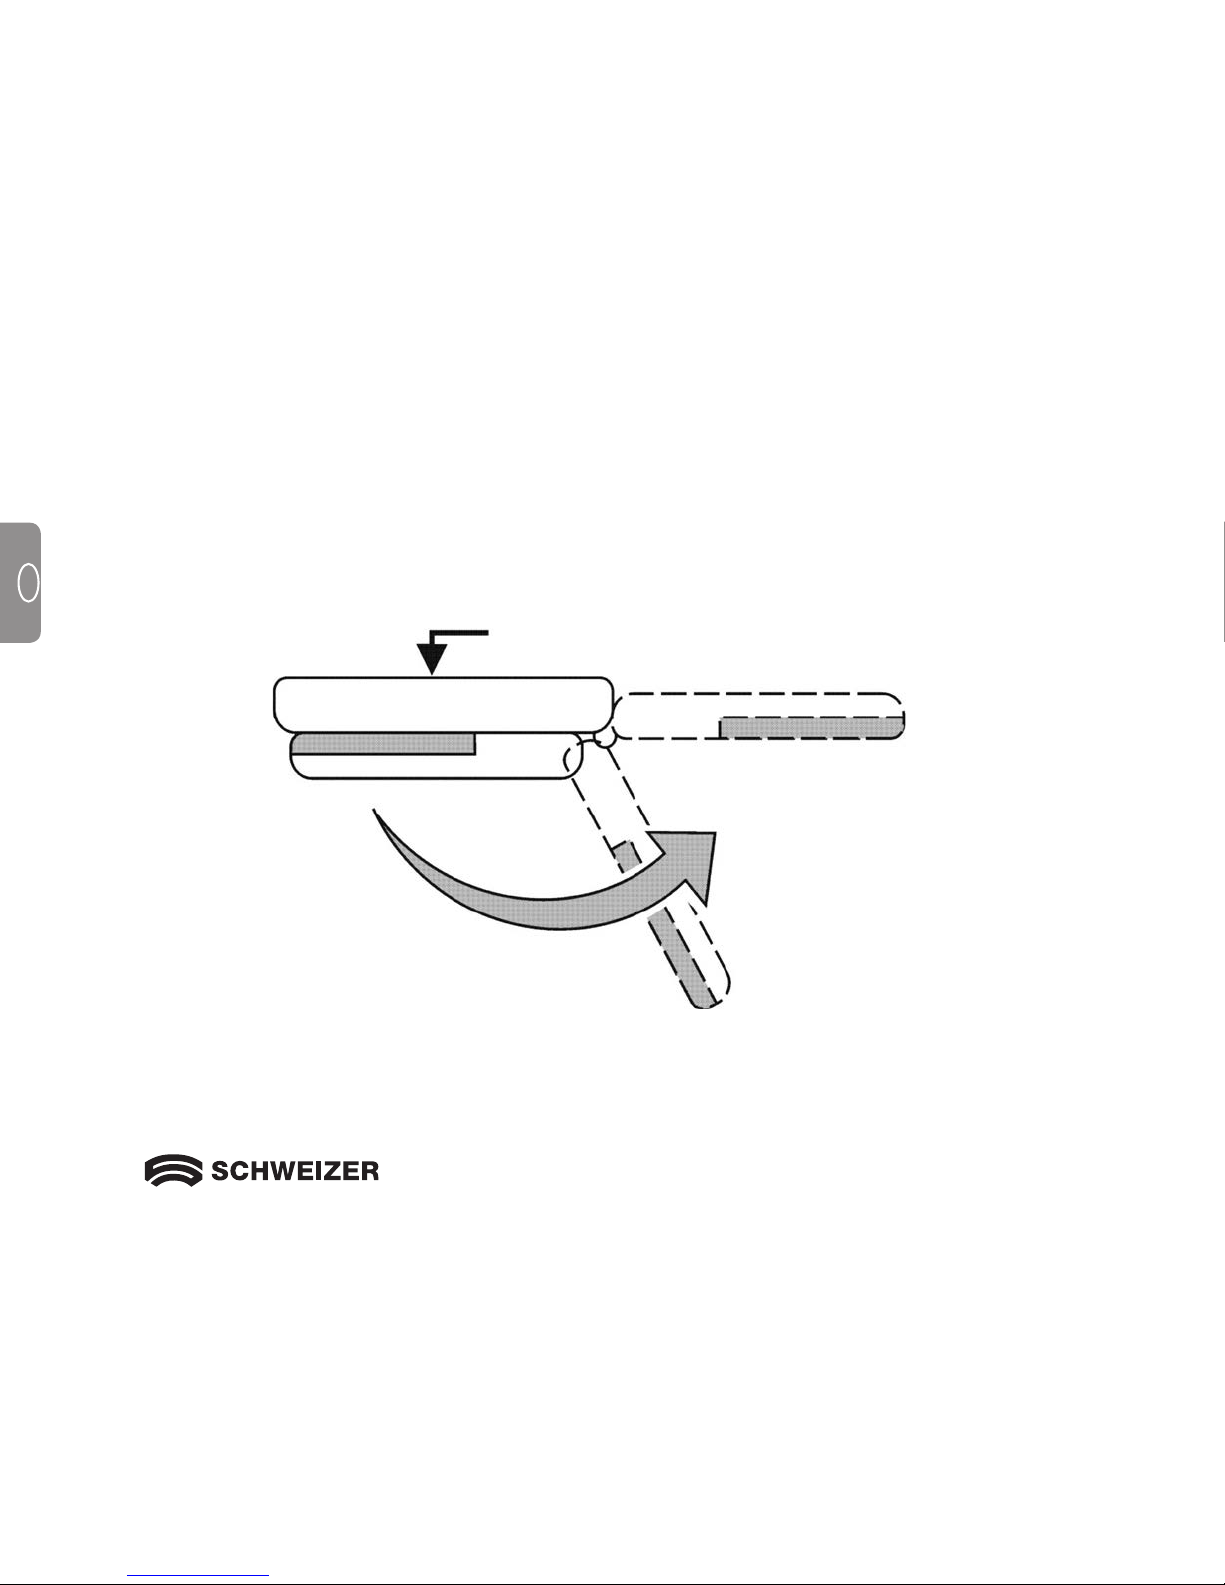
1. Hold the eMag 43 in one hand. With the other hand, rotate and swing the handle until it is fully extended
as shown in the following illustration.
Fold-Out handle
LCD Display
Page 13
13
GB
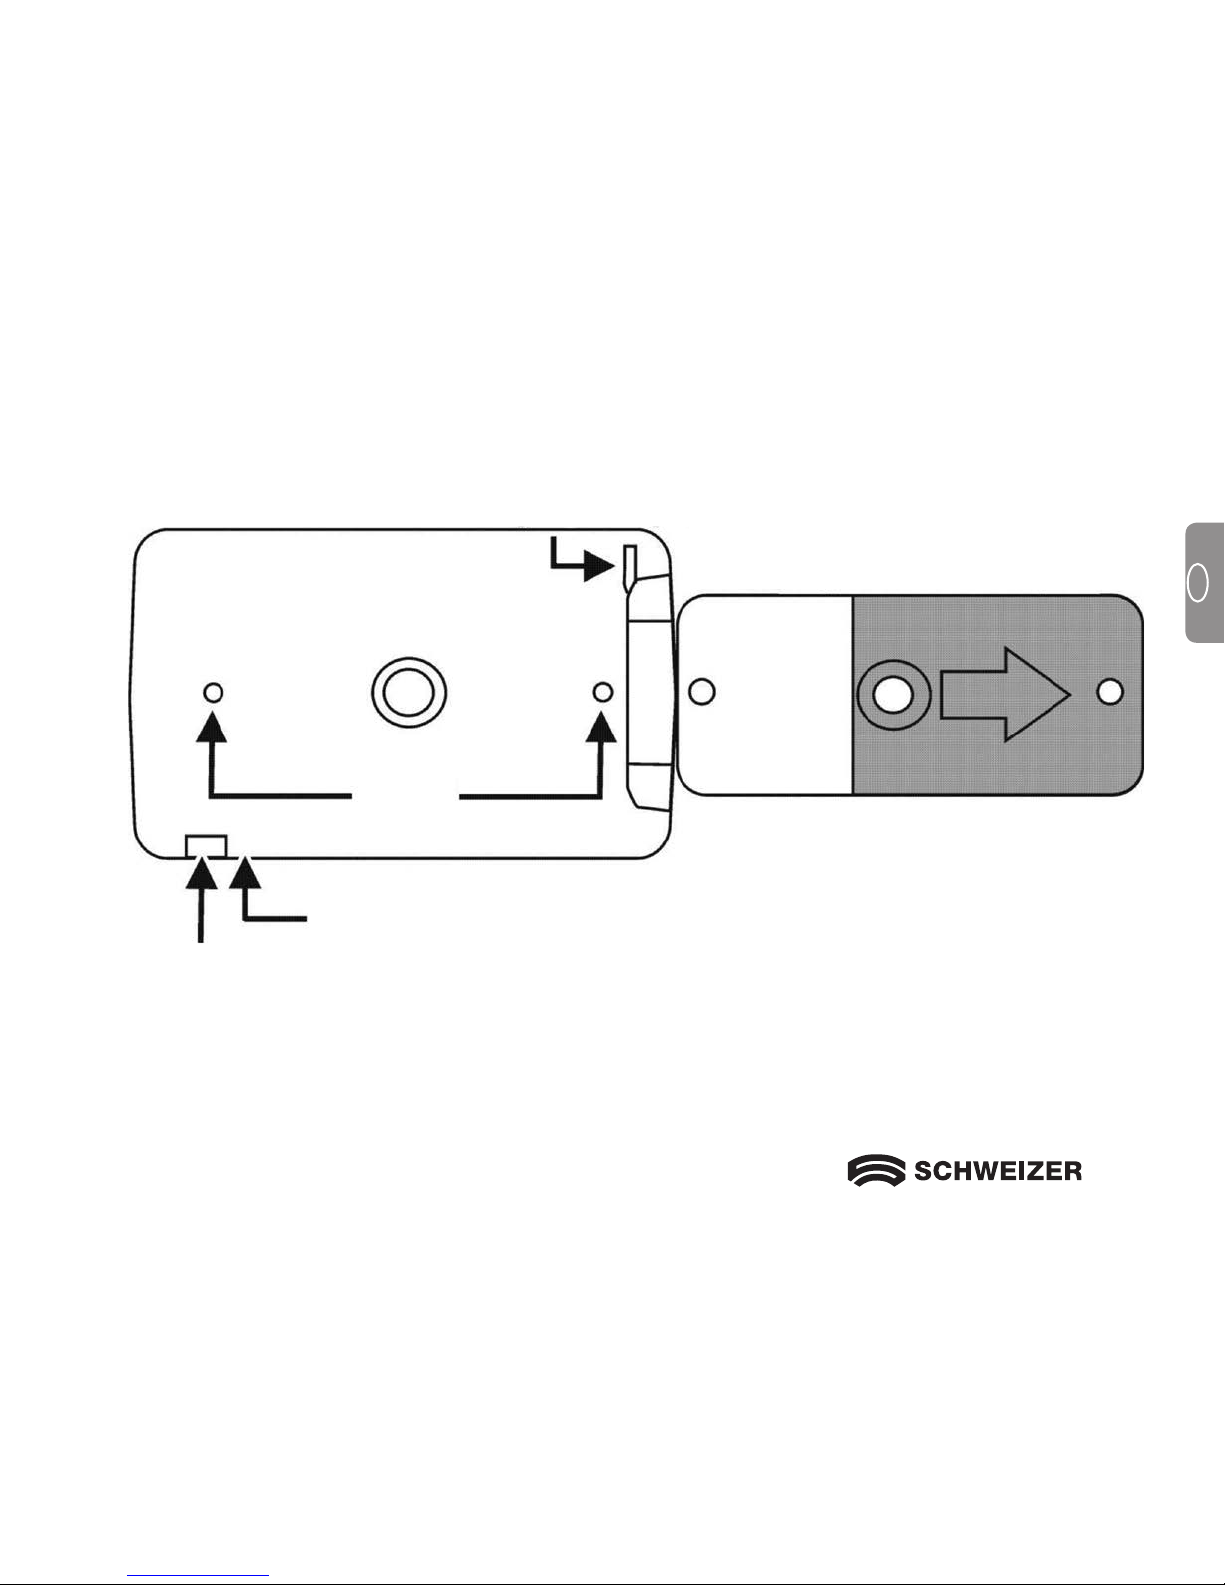
2. Turn the eMag 43 so that the LCD display is facing away from you, then slide the battery cover in the direction of the arrow shown in the following illustration.
Note: Observe the correct polarity of the batteries when inserting. Insert the batteries as shown in the
following illustration.
3. Close the battery cover again.
Page 14
14
GB
Charging batteries
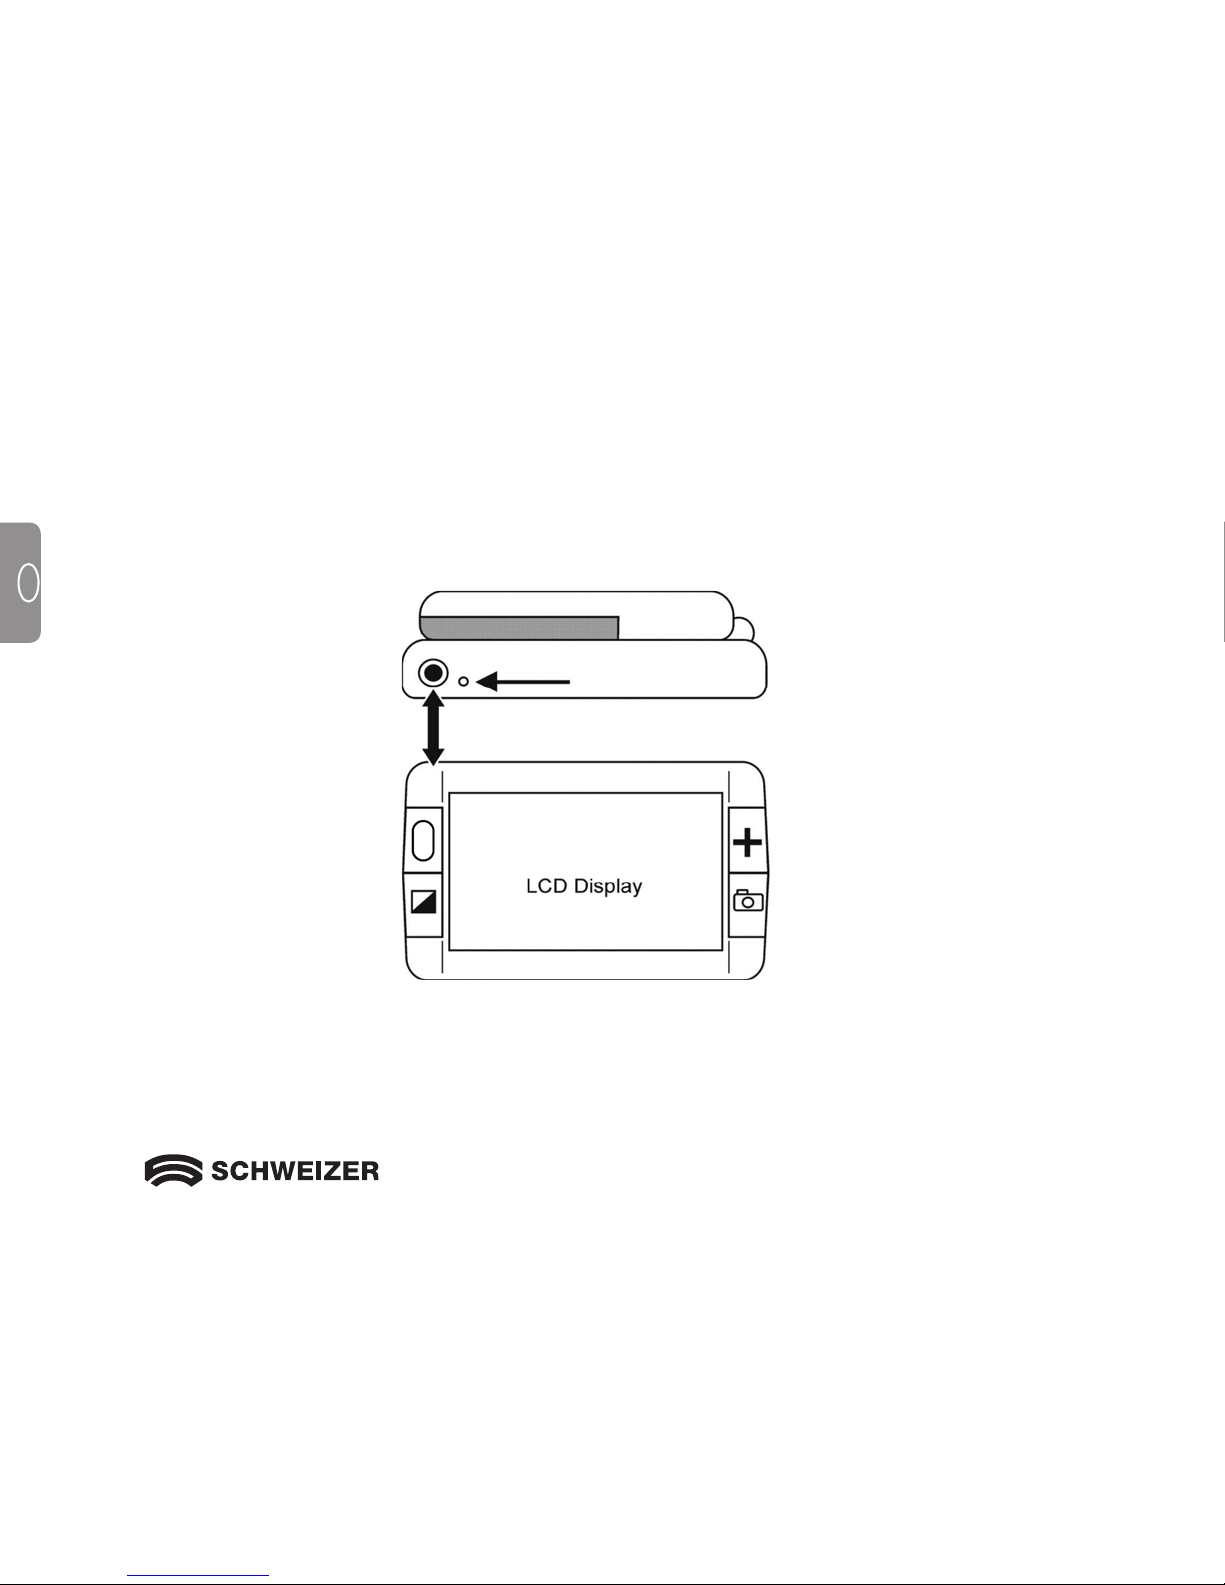
To charge NiMH batteries, do the following:
1. Plug the small end of the power adapter into the power port. The port is located on the left top-edge of the
unit next to the LED as shown in the following illustration.
2. Plug the other end of the power adapter into a standard AC outlet. The battery indicator LED blinks green
to show that the batteries are charging.
3. Once the batteries are charged, the LED stops blinking and glows a steady green. Unplug the power
adapter from the eMag 43. The battery indicator LED turns off.
Power port
Battery indicator LED
Page 15
15
GB
LED Descriptions
Red – Flashing Battery low
Green – Flashing Battery charging - power adapter connected
Green – Solid Battery charged - power adapter connected
Red – Solid Error – unplug power adapter, wait a few seconds and plug in again
No LED Battery charge ok, power adapter not connected or the unit is off
Your eMag 43 is now ready for up to two hours of continuous use. When the batteries are low, the battery
indicator LED flashes red. Connect the power adapter and plug it in to recharge the batteries.
Note: Please note that after 30 minutes the eMag 43 switches to energy-saving mode (screen goes
blank) ifno key is pressed during this time.
Press the On/Off Button to reactivate the eMag 43.
Page 16
16
GB
After charging the batteries, you are ready to begin reading with the eMag 43. With the unit’s powerful
magnification features, you can read or view letters, menus, maps, photos, labels, bus and train schedules,
television listings, receipts, ingredients, and much more.
Reading with the eMag 43
To read by using the eMag 43, do the following:
1. Make sure that the unit is charged.
2. Press the
green/yellow
power
button to turn on the eMag 43. After a few seconds, the LCD displays the
current view as seen through the camera window.
3. If you are reading a book, letter, or other printed item, place it on a flat surface, such as a table or desk.
4. You can then hold the eMag 43 by its handle the same way as you would hold a normal magnifying glass,
or you can fold the handle under the unit and place the eMag 43 directly over the text or object that you
want to read or view. Anything under the unit is magnified and shown on the screen.
5. Adjust the zoom using the yellow magnification
button located on the left side next to the LCD.
6. Select a colour mode by pressing the blue colour select button located on the left side of the screen.
Five different video modes are available: Normal (full colour), White on Black (enhanced positive), Black on
White (enhanced negative), Yellow on Blue and Yellow on Black.
7. Move or slide the unit to the right to read to the end of the line. Slide the unit first to the left and then down
to read the next line of text.
For safety reasons, eMag 43 turns off automatically after 30 minutes if no button is pressed during that time.
Using the eMag 43
Page 17
17
GB
Magnifying an Image
The eMag 43 has three digital zoom settings. Depending on the position and placement of the unit, it
supports screen magnification levels from 2x to 14x.
1. To increase screen magnification, press the yellow magnification button.
2. To step up to the next level of magnification, press the yellow magnification button again.
3. Pressing the yellow magnification button a third time returns the eMag 43 to its initial
magnification level.
For more information about the different magnification levels, please refer to the following section.
Page 18
18
GB
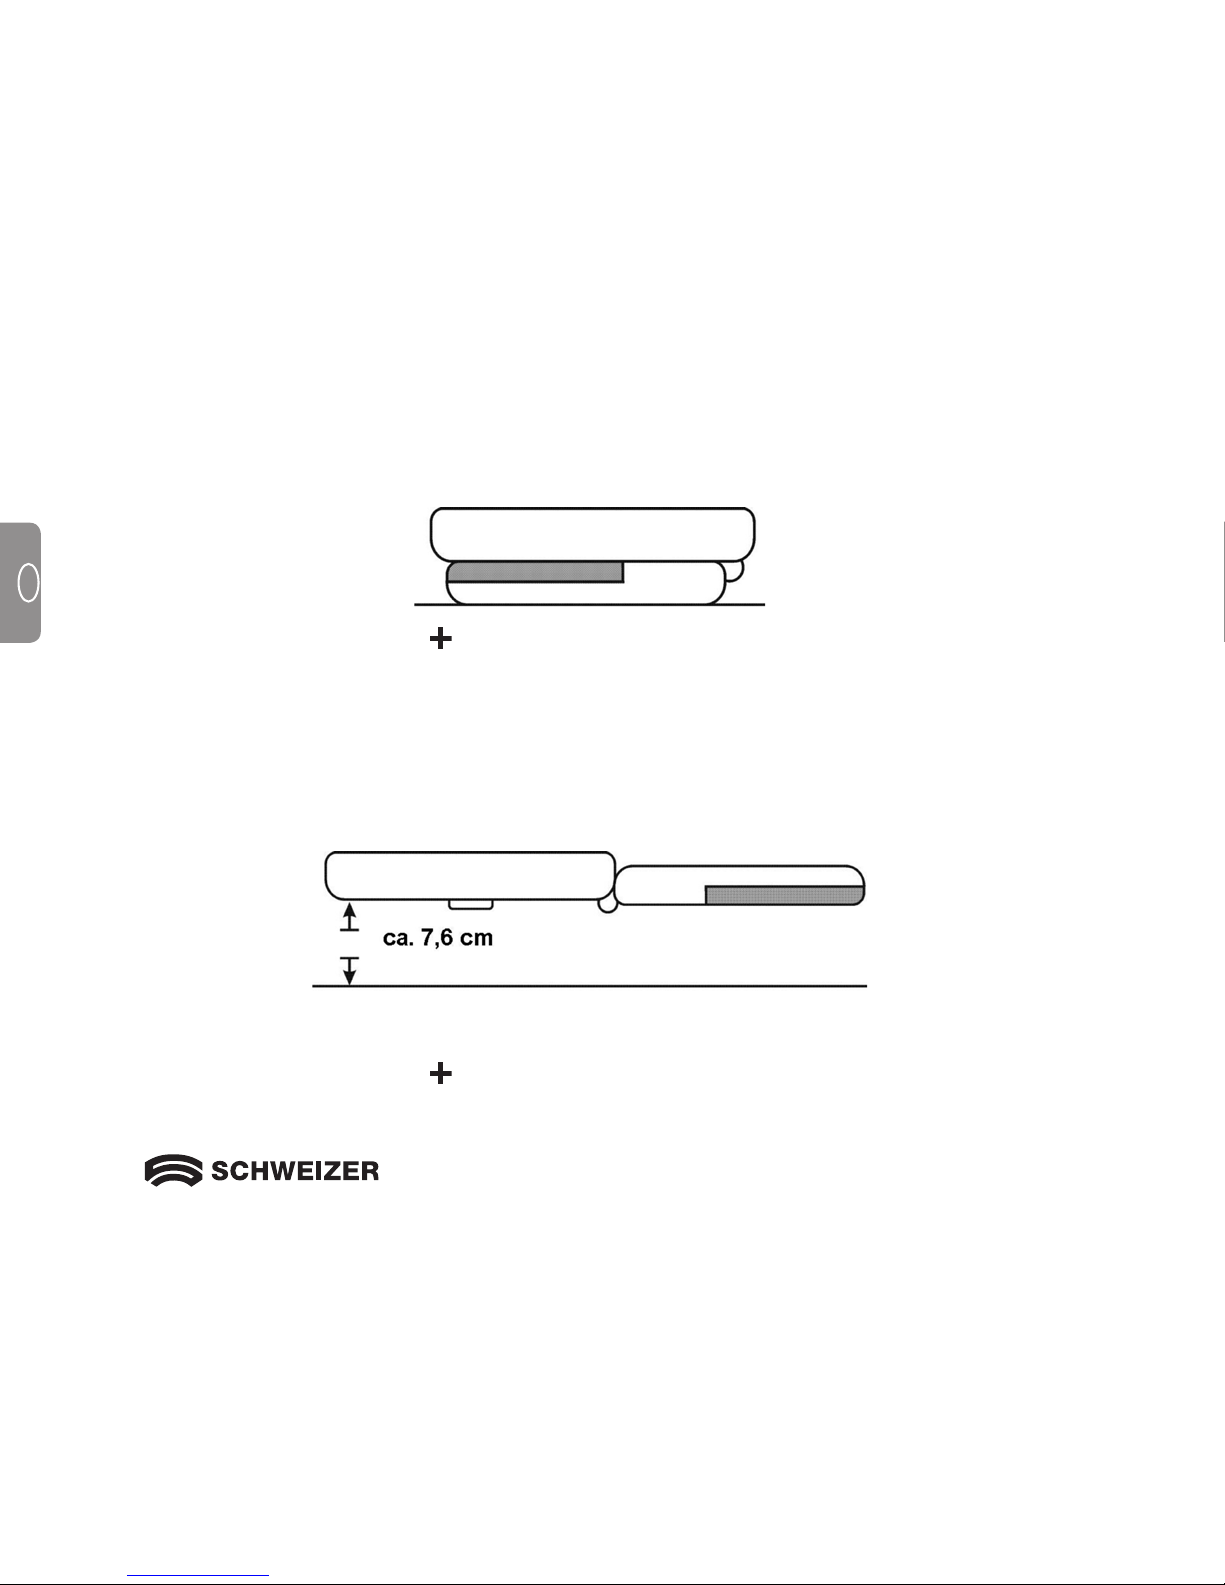
Magnification level with handle collapsed
When the eMag 43 is placed on a document, the starting magnification is 5x.
By pressing the yellow magnification button repeatedly, the magnification increases to 7.5x, to 10x, and
then back to 5X.
Magnification level with handle extended
When the eMag 43 is held over a document (as shown in the illustration), the starting magnification is 2x.
Magnification level 2x while holding the eMag 43 approximately 7.6 cm above item.
By pressing the yellow magnification button repeatedly, the magnification increases to 3x, to 4x, and
then back to 2x.
Page 19
19
GB
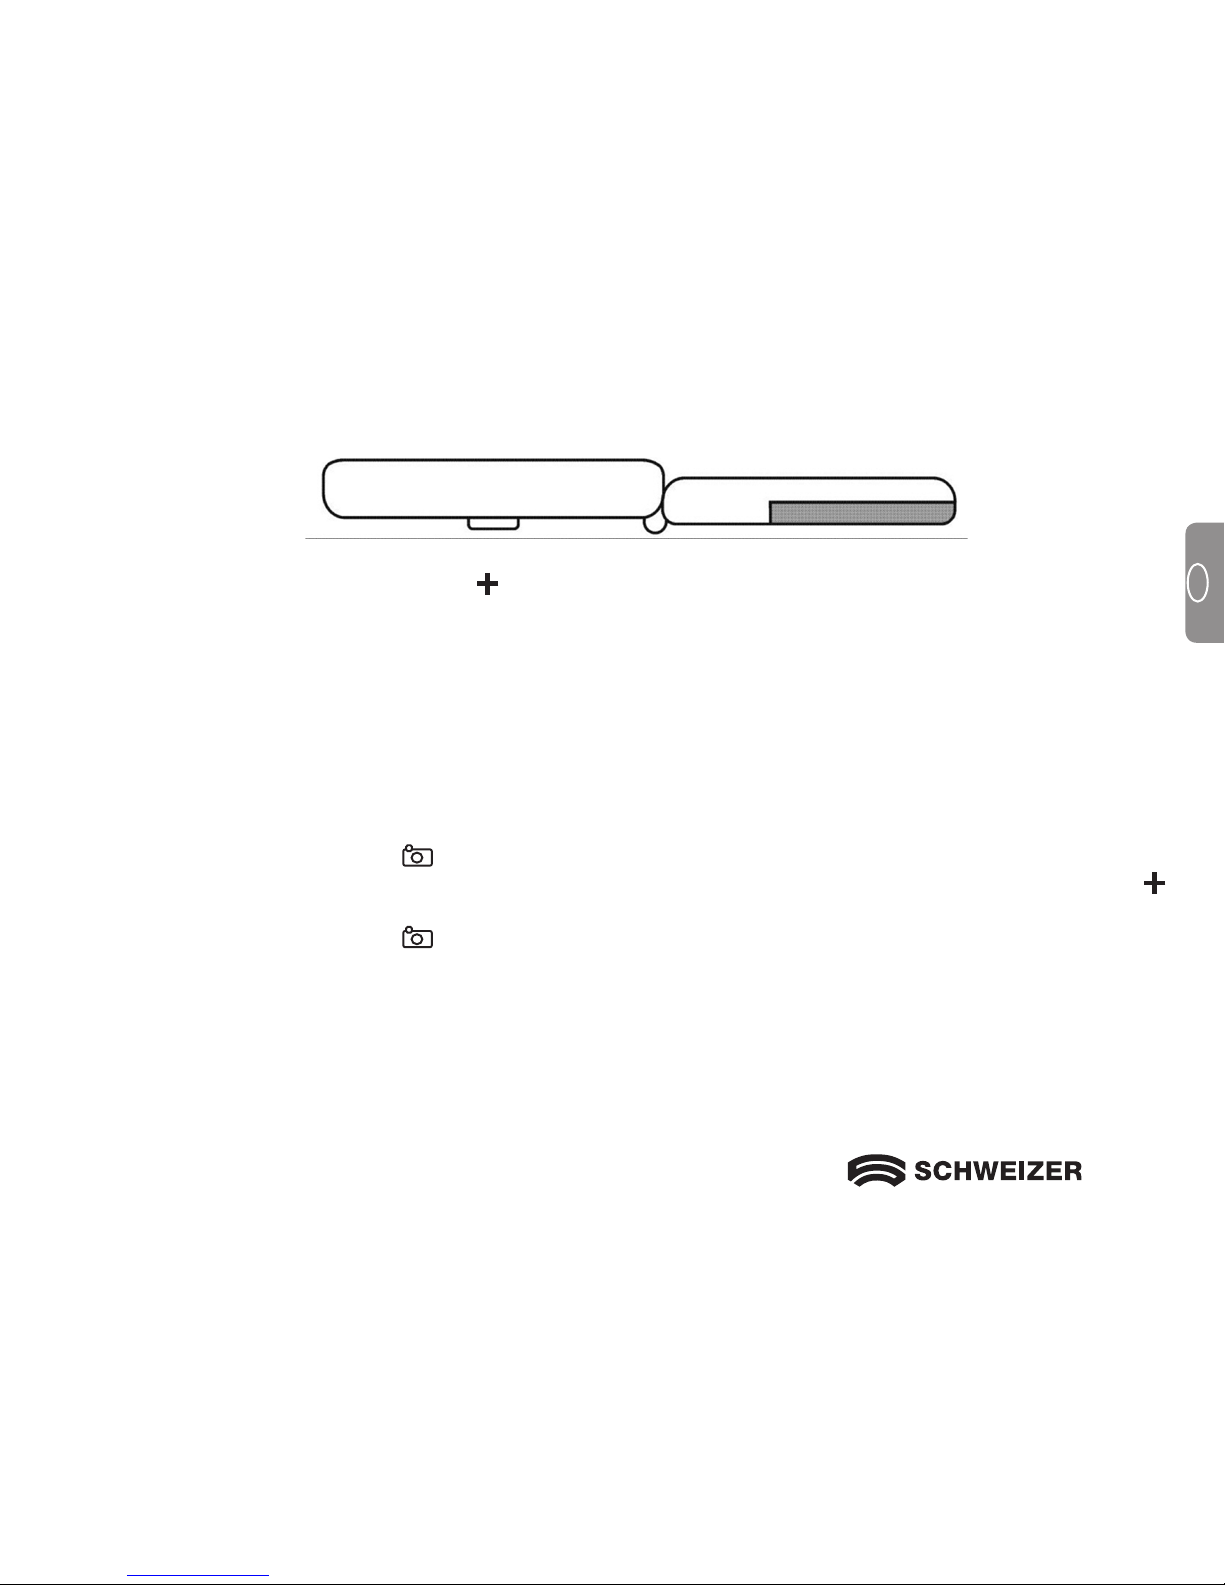
When the eMag 43 is in this low position (approx. 1.3 cm) above a document, the starting magnification is 7x.
By pressing the yellow magnification button repeatedly, the magnification increases to 10.5x, to 14x, and
then back to 7x.
Freezing and magnifying an Image
Freezing an image can be useful for reading labels on items on a store shelf, for example. By holding the
eMag 43 close to the item and capturing the image, you can then hold the unit close enough for you to read.
To freeze the current image on the LCD screen, do the following:
1. Press the red freeze frame button.
2. If you wish, you can change the magnification of the picture taken by pressing the yellow magnification
button.
3. Press the red freeze frame button again to turn off the freeze frame mode.
Page 20

20
GB
Saving and deleting an image
Switch on the
eMag 43
(press the green/yellow button ). Then press the red button
to take the desired
image. The image on the display can be saved as follows
• Press
and HOLD this red button for 6 seconds to enter Storage mode.
• The check box in the lower left corner will be automatically checked. This indicates that the image will
be stored when you exit Storage mode.
• The Forwards symbol is now displayed in the bottom right corner
Press the red button to ad-
vance to the next image. Press the button
repeatedly to advance through all the images saved in
theeMag43
• To delete an image, press the blue button to clear the check box The image is deleted when you exit
Storage mode.
• Press and HOLD the red button
for 3 seconds to leave Storage mode.
• To view stored images press and HOLD the red
button for 6 seconds. You will then enter Storage
mode You can then advance through the images as previously described in this section.
Page 21
21
GB
Saving an image when the memory is full
The eMag 43
can store a maximum of 15 images. If you try to store another image, the "Memory full" icon
is displayed in the bottom left corner.Before you can save another image
you must delete one ormore images
from the memory:
•
Press the red button to advance to the desired image and then press the blue button
to clear
thecheck box.
• Press and HOLD the red button
for 3 seconds to leave Storage mode. The new image is saved,
andall unchecked images are deleted.
Turn LED Lights Off
To avoid glare when viewing reflective surfaces you can turn off the LED lights.
• Press and HOLD
the green/yellow button and then press the red button . The LED lights turn off.
• To turn on the lights again, press and HOLD the green/yellow button
and then press the red
button
.
Page 22
22
GB
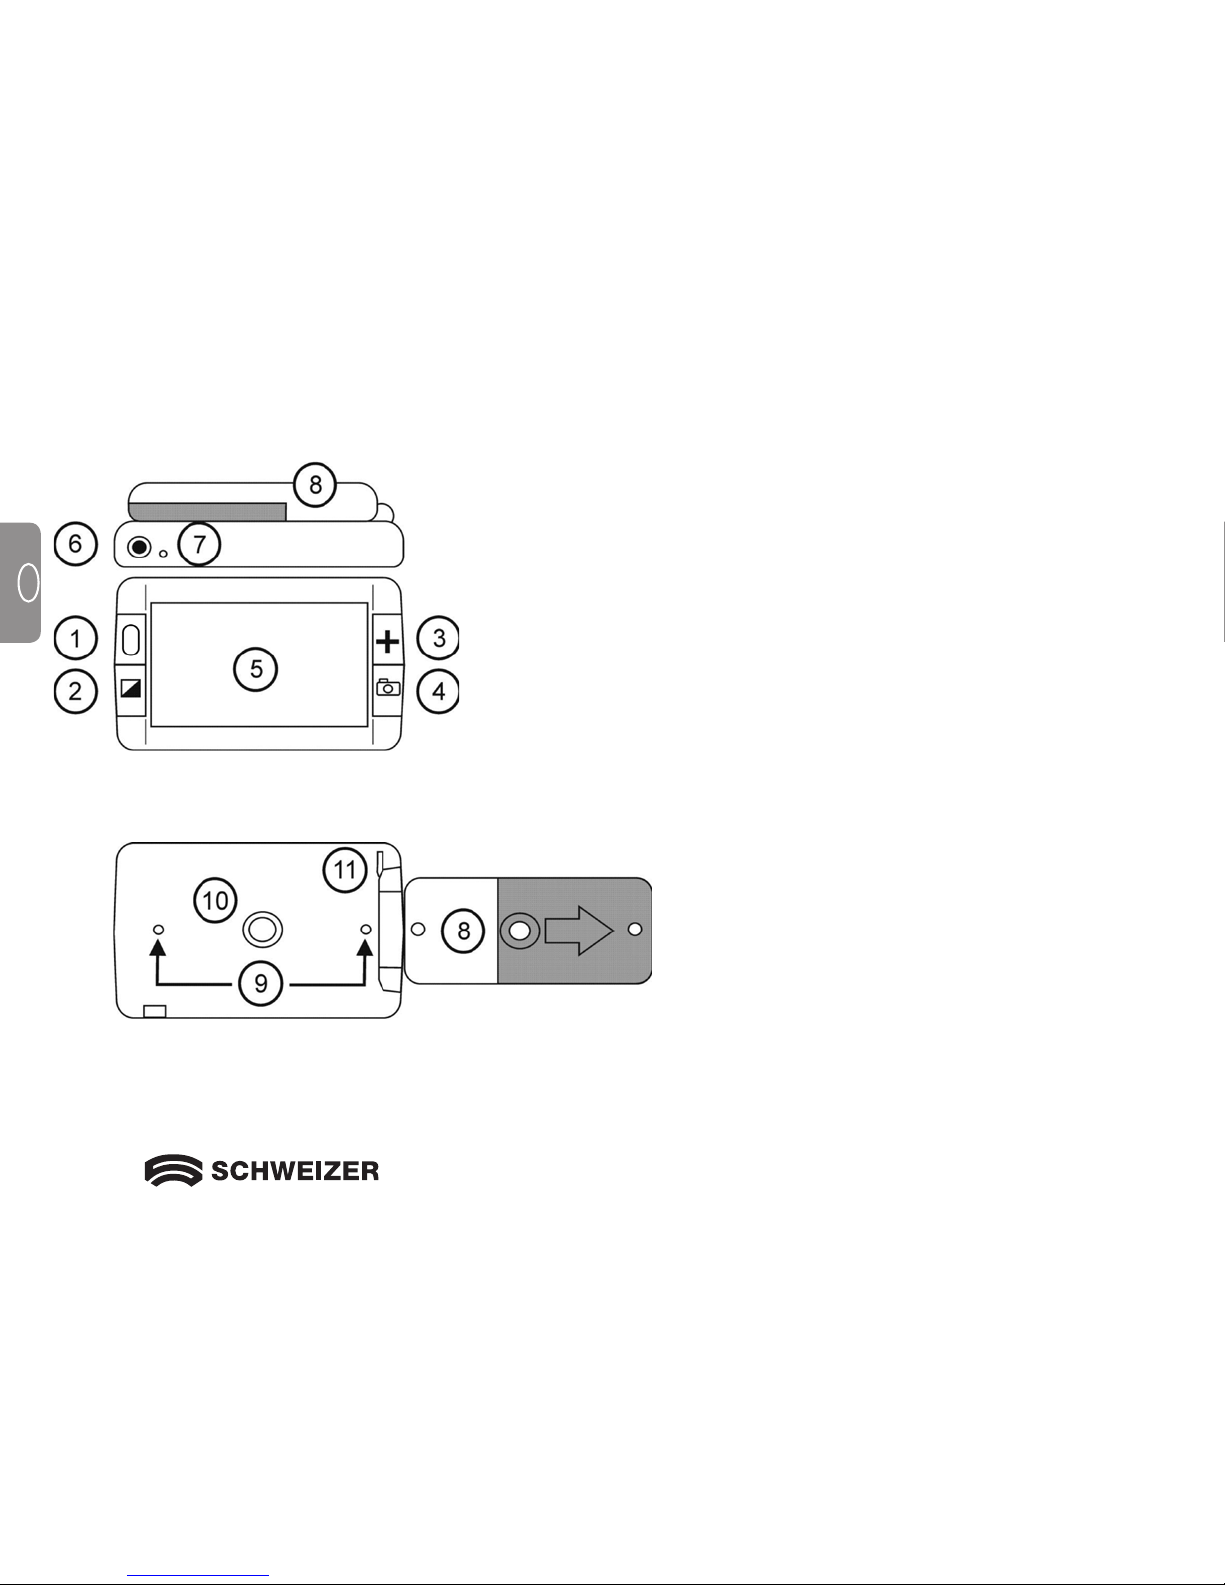
eMag 43 front and top view
eMag 43 rear view
1. Power button (green)
2. Colour select button (blue)
3. Magnification button (yellow)
4. Freeze frame button (red)
5. LCD screen
6. Power port
7. Battery indicator LED
8. Handle and battery compartment
9. Lights
10. Camera window
11. Wrist strap post
Hardware Description
Page 23
23
GB
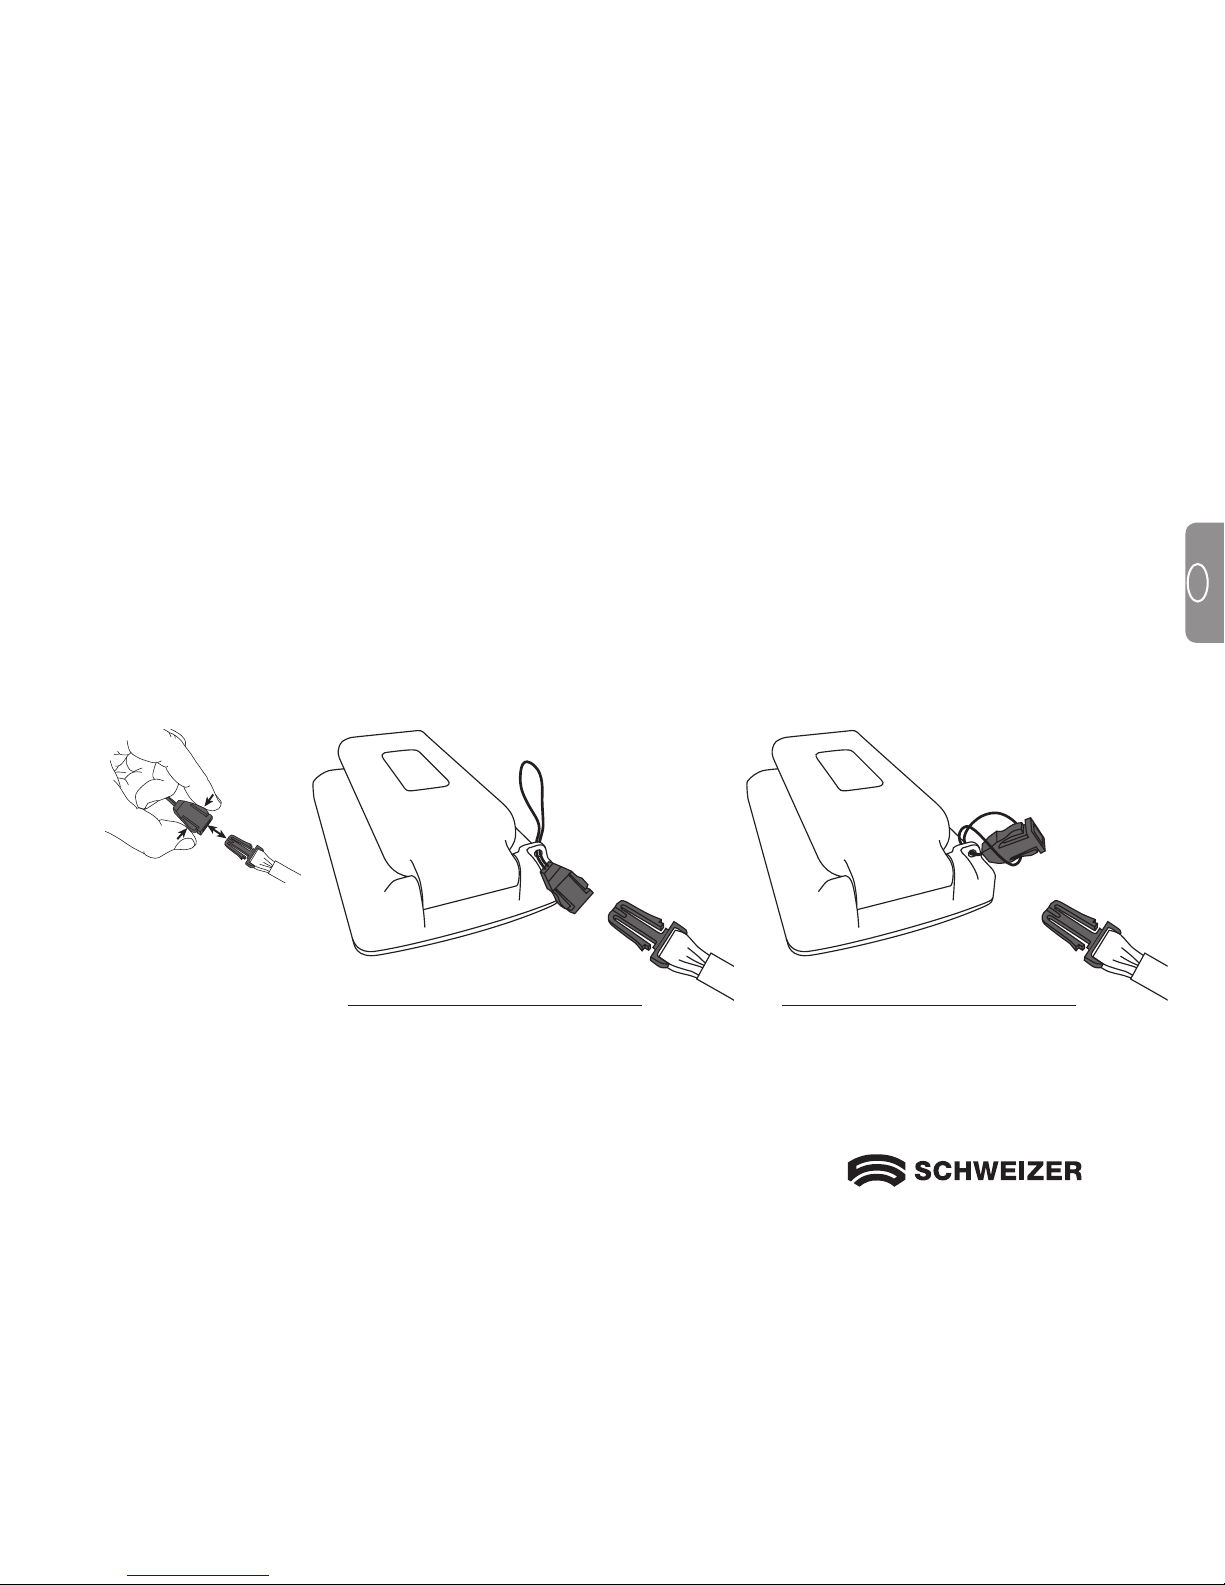
The eMag 43 has a wrist strap that you can use to carry it comfortably and safely. To attach the strap, do the
following:
1. Push one end of the strap through the hole in the wrist strap post that is located on the rear of the eMag 43.
2. Loop one end of the wrist strap through the other end of the wrist strap and pull the strap tight.
When using the eMag 43, you can now place your hand in the wrist strap. This helps protect the eMag 43
from falling if you let it go of by accident.
Carrying the eMag 43
1. 2.
Page 24

24
GB
Troubleshooting
Problem
Solution
The screen is blank. Ensure that the power is on. Verify that the item you want to
magnify is positioned correctly under the camera window.
Reduce the magnification level. Charge the NiMH batteries.
Ifusing AAA alkaline batteries, replace the alkaline batteries.
(Do not mix NiMH batteries and alkaline batteries.)
The unit does not turn on. Charge the NiMH batteries. If using AAA alkaline batteries,
replace the alkaline batteries. (Do not mix NiMH batteries and
alkaline batteries.)
The image on the screen is dark or
distorted.
Make sure that the eMag 43 is positioned flat on the page you
are reading.
Service and Support
Note: This device has no user-serviceable components. Any unauthorised attempt to service or replace
internal components will void the product warranty.
Please contact your merchant if you need technical assistance for your eMag 43.
Page 25

25
GB
The battery indicator LED is flashing red. Charge the NiMH batteries, or, if using AAA alkaline batteries,
replace the alkaline batteries. (Do not mix NiMH and alkaline
batteries.)
The battery LED is solid red while the
power adapter is connected to the
eMag 43.
A battery error has occurred. Unplug the power adapter from
the eMag 43 and plug it in again. Charge the NiMH batteries
for at least 2 hours. If using AAA alkaline batteries, replace the
alkaline batteries. If the problem continues, disconnect the
power adapter and call your eMag 43 merchant.
The battery indicator LED does not flash
green, even though the power adapter is
connected and plugged into a wall socket.
Ensure that the small end of the power adapter is properly plugged
into the unit's power port.
Ensure that the outlet has power and is not malfunctioning. If the wall
outlet is connected to a wall switch, make sure that the switch is on.
The NiMH batteries are not charging.
Ensure that the small end of the power adapter is properly
plugged into the unit's power port.Ensure that the batteries are
inserted properly. Observe the correct polarity.Ensure that the
outlet has power and is not malfunctioning. If the wall outlet is
connected to a wall switch, make sure that the switch is on.
There are smudges or blemishes on the
screen.
Clean the LCD display and the camera window.
The text is too small to read. Press the yellow Magnification button to increase the
magnification level.
The text is too large to read. Press the yellow Magnification button to cycle through to
alower magnification level.
Page 26

26
F
Page 27

27
F
Loupe portable électronique
Manuel d’utilisation
Fournisseur:
A. SCHWEIZER GmbH
Hans-Böckler-Str. 7
91301 Forchheim
www.schweizer-optik.de
Nous vous félicitons pour l’acquisition de l’eMag 43. Avec cette loupe portable électronique, vous
grossissez de 2 à 14 fois la taille d’origine. L’eMag 43 est équipée d’un écran LCD large de 4,3 pouces
(format d’image 16/9).
Les informations et données contenues dans ce document sont susceptibles de changer sans préavis.
Aucune partie de ce document ne peut être reproduite ni transmise, quels qu’en soient la manière ou les
moyens, électroniques ou mécaniques, sans l’autorisation écrite de la A. SCHWEIZER GmbH.
Copyright © 2014 A. SCHWEIZER GmbH. Tous droits réservés.
Page 28

28
F
Caractéristiques techniques
Longueur d’onde : 400 nm à 750 nm
Energie : < 1mW CW
Norme de sécurité : UL 60950
CAN/CAS-C22.2 No. 60950
IEC 60950
CME : EN 60825-1:2001
FCC (CFR-47, partie 15) classe A
EN 55022 classe A
EN 55024
LED RADIATION
DO NOT STARE
INTO BEAM
CLASS 2 LED
RAYONNEMENT
DE LA DEL
NE REGARDEZ PAS
DIRECTEMENT LA
DEL DE CLASSE 2
Fabricant:
Freedom Scientific GmbH
Bahnstr. 1
CH-8274 Tägerwilen
Page 29

29
F
Table des matières
Sécurité et maintenance 30
Procédure de nettoyage 30
Démarrage rapide 31
Vue d’ensemble 32
Qu’est-ce qui fait partie de l’étendue
de livraison ? 34
Notices sécurité pour accus et piles 34
Mise en place des accus ou piles 36
Charger les accus 38
Vue d’ensemble des fonctions de la DEL
decontrôle de charge 38
Utiliser l’eMag 43 40
Lire avec l’eMag 43 40
Agrandir une image 41
Taux de grossissement poignée repliée 42
Taux de grossissement poignée dépliée 42
Prendre une photo et l’agrandir 43
Enregistrement et suppression d'une image 44
Enregistrement d'une image lorsque
la mémoire est pleine 45
Eteindre les LED 45
Composants matériels 46
Emmener l’eMag 43 avec soi 47
Service et support 48
Dépannage 48
Page 30

30
F
Sécurité et maintenance
Pour garder votre loupe électronique eMag 43 toujours en bon état, veuillez suivre les instruction suivantes:
Veuillez lire le manuel d’utilisation avant d’utiliser l’eMag 43.
N’essayez pas de réparer vous-même l’eMag 43 ou d’ouvrir le couvercle. Ce produit contient des pièces qui
ne doivent pas être entretenus par l'utilisateur.
Evitez d’utiliser l’eMag 43 dans des endroits humides, en cas de pluie ou dans des environnements à
humidité élevée. N'immergez jamais l’eMag 43 dans l’eau ou dans d’autres liquides.
Utilisez votre eMag 43 dans un environnement où la température est comprise entre 10° et 35° C.
Ne stockez pas l’eMag 43 dans des endroits pouvant être soumis à des températures, comme dans une
voiture garée par exemple.
Raccordez les câbles à l’eMag 43 sans forcer. Les connecteurs peuvent être raccordés sans problèmes aux
interfaces. Utilisez uniquement le chargeur réseau qui a été livré avec l’eMag 43 pour charger les piles NiMH
(nickel-métal hydride) . D’autres adaptateurs peuvent éventuellement endommager l’appareil.
Procédure de nettoyage
ATTENTION: Pour nettoyer l’écran ou la caméra, commencez par éteindre l’appareil, débranchez le cordon
d’alimentation. Mettez une petite quantité de produit de nettoyage non abrasif, comme mentionné
ci-dessous, sur un chiffon doux non pelucheux (pas serviette en papier): eau, alcool isopropylique
ou eau vinaigrée avec 10% de vinaigre au maximum. N'utilisez pas de produit de nettoyage
contenant les composants suivants : acétone, alcool éthyliquel, acide éthylique, ammoniac,
chlorure de méthyle. Ne vaporisez pas irectement le produit de nettoyage sur l’écran. N'exercez pas de forte pression sur l’écran.
Page 31

31
F
Démarrage rapide
Note: Avant de pouvoir utiliser la loupe portable électronique eMag 43, il faut la recharger. Les piles se
chargent plus rapidement quand l’appareil est éteint. Il faut environ deux heures pour que les accus
soient complètement chargés et que vous puissiez utiliser l’appareil une première fois. Veuillez tenir
compte du paragraphe „Mise en place et charge des accus “.
L’eMag 43 est très facile à utiliser même si vous n’avez pas encore eu à faire à des instruments techniques
jusqu’à présent. Appuyez sur le bouton
vert/jaune
de marche-arrêt pour allumer l’appareil. Tenez ou
placez l’eMag 43 au-dessus d’un objet et ajustez le grossissement avec le bouton jaune de grossisse-
ment . L’image agrandie apparaît sur l’écran de l’appareil. Pour des raisons de sécurité, l'eMag 43
s'éteint automatiquement après 30 minutes à moins que vous appuyiez sur une touche entre-temps.
Les pages suivantes décrivent les composants de l’eMag 43 et les fonctions des DEL.
Page 32

32
F
Bouton
marchearrêt
Branchement réseau
DEL d’indication de charge
Bouton de grossissement
Poignée pliable
Bouton de gel de l´image
Bouton de
sélection
de couleur
Page 33

33
F
Poignée pliable
Œillet pour la dragonne
DEL d’indication de charge
Eclairage
Fenêtre de caméra
Branchement réseau
Couvercle des piles
Page 34

34
F
Qu’est-ce qui fait partie de l’étendue de livraison?
Avant d’utiliser l’eMag 43, veuillez déballer toutes les pièces fournies:
• Loupe portable électronique eMag 43
• Chargeur réseau avec quatre adaptateurs internationaux
• Quatre accus AAA NiMH (nickel-métal hydride) rechargeables
• Housse de transport avec bandoulière
• Dragonne
• Manuel d’utilisation eMag 43
Charger les accus
Note: Avant de pouvoir utiliser l’eMag 43 pour la première fois, vous devez charger les accus AAA NiMH.
Quatre accus AAA NiMH rechargeables sont fournis avec l’eMag 43. Vous pouvez aussi faire fonctionner
l’appareil avec quatre piles de type Micro (LR3, AAA, AM-4). Ne raccordez en aucun cas le chargeur réseau.
Note: Ne mélangez pas les accus et les piles. Remplacez toujours les quatre piles par des piles
neuves de même type. Ne mélangez pas es piles neuves et les piles usagées. Cela peut
avoir pour conséquence que les piles ne fonctionnent pas ou coulent.
Mettez les accus NiMH et les piles au rebut en bonne et due forme. Ils ne font pas partie des
ordures ménagères.
ATTENTION
: Si les accus ou les piles sont remplacés par un type inadéquat, il peut y avoir des
dysfonctionnements.
Page 35

35
F
Nous voudrions vous informer que nos piles/accus sont mis en circulation conformément à la loi et attirer
votre attention sur les points suivants :
1. eMag 43 contient des batteries de type AAA HR03. Vous pouvez également utiliser des batteries de type
AAA LR03.
2. Pour éviter toute nuisance à l’environnement et/ou la santé, les piles/accus usagés doivent être remis aux
centres de recyclage des communes pour une élimination conforme directement ou par la voie du
revendeur. Ce retour est prescrit par la loi et entièrement gratuit pour vous.
3. Les piles/accus ne doivent être mises au rebut qu’à l’état déchargé.
4. Le recyclage des piles/accus usagés permet de récupérer des matières premières précieuses comme le
zinc, le fer, le nickel etc.
5. Pour la mise au rebut, les piles/accus peuvent être retirés sans problème de nos appareils (voir le manuel
d’utilisation).
6. Le symbole de "poubelle barrée" sur les piles/accus signifie que leur élimination par la voie des déchets
ménagers est interdite.
L’indication supplémentaire des symboles chimiques pour le
plomb (Pb), le cadmium (Cd) et le mercure (Hg) signifie que ces
substances sont contenues dans les piles au-delà des valeurs
limites fixées par la loi.
Page 36

36
F
Mise en place des accus ou piles
Veuillez procéder comme suit quand vous voulez mettre en place les accus ou piles:
1. Tenez l’eMag 43 dans une main. Avec l’autre main, dépliez complètement la poignée comme le montre
l’illustration suivante.
Poignée pliable
Écran ACL
Page 37

37
F
2. Retournez l’eMag 43 de façon à voir le dos de l’écran ACL puis faites coulisser le couvercle des piles dans
le sens de la flèche comme l’indique l’illustration suivante.
Note: Lors de la mise en place des accus ou piles, respectez la polarité correcte. Mettez en place les
accus ou piles comme représenté sur l’illustration suivante.
3. Refermez le couvercle.
Page 38

38
F
Charger les accus
Pour charger les accus NiMH, procédez comme suit:
1. Enfichez le petit connecteur du câble de charge dans le raccord pour le câble secteur. La prise se trouve
en haut à gauche sur l’appareil à côté de la DEL comme le montre l’illustration suivante.
Branchement réseau
DEL d’indication de charge
2. Branchez le chargeur réseau dans une prise électrique. La DEL d’indication de la charge clignote en vert
pour indiquer que les accus sont en trains d’être chargés.
3. Dès que les accus sont chargés, la DEL arrête de clignoter et reste au vert. Débranchez le chargeur
réseau de l’eMag 43. La DEL d’indication de charge s’éteint.
Page 39

39
F
Vue d’ensemble des fonctions de la DEL de contrôle de charge
Rouge – clignotement Etat de charge faible des accus
Vert – clignotement Le charge réseau est raccordé - les accus sont en cours de charge
Vert – allumage permanent Le chargeur réseau est raccordé - les accus sont chargés
Rouge – allumage permanent Défaut – retirer le chargeur secteur, attendre quelques secondes et
raccorder à nouveau l’adaptateur
DEL éteinte Etat de charge suffisant de l’accu ou adaptateur réseau non raccordé
ou appareil éteint
Vous pouvez maintenant utiliser l’eMag 43 pendant jusqu’à deux heures sans interruption. Quand les accus
sont vides, la DEL d’indication de charge clignote en rouge. Raccordez le chargeur réseau pour recharger
les accus.
Remarque: Veuillez prendre en compte que la fonction d'économie d'énergie de l'eMag 43 est activée
au bout de 30 min. (l'écran s'éteitn), si aucune touche n'a été actionnée au cours de cette
période.
Appuyez sur l'interrupteur marche/arrêt pour réactiver l'eMag 43.
Page 40

40
F
Une fois les accus chargés, vous pouvez lire avec l’eMag 43. A l’aide des fonctions de grossissement vous
pouvez lire et étudier des lettres, menus, plans de ville, photos, des inscriptions, horaires de trains et d’autobus, des magazines de télévision, des recettes, des listes d’ingrédients et bien plus encore.
Lire avec l’eMag 43
Pour lire avec l’eMag 43, veuillez procéder comme suit:
1. Assurez-vous que l’appareil est chargé.
2. Appuyez sur le bouton
vert/jaune
de marche-arrêt pour allumer l’eMag 43. Au bout de quelques
secondes, l’écran ACL affiche la vue actuelle dans la zone de la caméra.
3. Si vous voulez lire un livre, une lettre ou tout autre document imprimé, placez-la sur une surface plane
comme par exemple une table ou un pupitre.
4. Prenez ensuite l’eMag 43 par la poignée comme pour une loupe normale. Ou bien vous pliez la poignée
sous l’appareil et placez l’eMag 43 directement sur un texte ou un objet que vous voulez lire ou examiner.
La prise de vue de la caméra est alors agrandie et affiché à l’écran.
5. Ajustez le zoom adéquat avec le bouton jaune de grossissement situé à gauche de l’écran ACL.
6. Sélectionnez un réglage couleur en appuyant sur le bouton bleu de sélection de couleur situé à
gauche de l’écran. Il y a cinq combinaisons de couleur différentes: Normale (pleine couleur), blanc sur noir
(en positif), noir sur blanc (en négatif), jaune sur bleu et jaune sur noir.
7. Déplacez lentement l’appareil vers la droite pour effectuer la lecture jusqu’à la fin de la ligne. Déplacez
l’appareil d’abord vers la gauche puis vers le bas, pour lire la ligne suivante.
Pour des raisons de sécurité, l'eMag 43 s'éteint automatiquement après 30 minutes à moins que vous
appuyiez sur une touche entre-temps.
Utiliser l'eMag 43
Page 41

41
F
Agrandir une image
L’eMag 43 dispose de deux réglages numériques du zoom. Selon la position de l’appareil, vous pouvez
grossir l’image de 2 à 14 fois.
1. Pour augmenter le grossissement, appuyez sur le bouton jaune de grossissement .
2. Appuyez à nouveau sur le bouton jaune de grossissement pour passer au grossissement suivant.
3. Si vous appuyez une troisième fois sur la touche jaune , l’eMag 43 retourne au petit grossissement
de départ.
Le paragraphe suivant vous fournit de plus amples informations sur les différents taux de grossissement.
Page 42

42
F
Taux de grossissement poignée repliée
Si l’eMag 43 est placée sur un document, le grossissement de départ est de 5x.
Quand on appuie plusieurs fois sur le bouton jaune de grossissement , le grossissement passe à 7,5x et
va jusqu'à 10x, avant de retourner au grossissement 5x.
Taux de grossissement poignée dépliée
Si vous maintenez l’eMag 43 au-dessus d’un document (comme sur l’illustration), le taux de grossissement
de départ est de 2x.
Taux de grossissement 2 X quand l’eMag 43 est tenue à env. 7,6 cm au-dessus de l’objet.
En appuyant plusieurs fois sur le bouton jaune de grossissement , le grossissement passe de 3x à 4x et
puis retourne à 2x.
Page 43

43
F
Si vous tenez l’eMag 43 à une faible hauteur (env. 1,3 cm) au-dessus d’un document, le grossissement de
départ est de 7x.
En appuyant plusieurs fois sur le bouton jaune de grossissement , le grossissement passe à 10,5x et va
jusqu'à 14x avant de retourner à 7x.
Prendre une photo et l’agrandir
Une prise de vue peut être rationnelle si vous voulez lire les inscriptions sur des objets difficilement accessibles,
qui se trouvent par exemple sur une étagère. Tenez l’eMag 43 près de l’objet et prenez la photo.
Pour prendre en photo l’image sur l’écran ACL, veuillez procéder comme suit :
1. Appuyez sur le bouton rouge de prise de vue .
2. Si vous le voulez, vous pouvez modifier le grossissement de la prise de vue en appuyant sur le bouton
jaune de grossissement .
3. Appuyez à nouveau sur le bouton rouge pour désactiver à nouveau la fonction de prise de vue.
Page 44

44
F
Enregistrement et suppression d'une image
Mettez l'
eMag 43
en service (appuyez sur le bouton vert/jaune ). Puis appuyez sur le bouton rouge
pour
prendre l'image désirée.
L'image sur l'écran peut être enregistrée de la manière suivante
• Appuyez sur
et MAINTENEZ ce bouton rouge actionné pendant 6 secondes pour entrer dans le
mode de stockage.
• La case dans le coin inférieur gauche sera automatiquement cochée. Cela signifie que l'image sera
enregistrée à la fermeture du mode de stockage.
• Le symbole Suivant est maintenant affiché dans le coin inférieur droit
Appuyez sur le bouton rouge
pour avancer à la prochaine image. Appuyez sur le bouton
à plusieurs reprises pour faire défiler toutes
les images enregistrées dans l'eMag 43
• Pour supprimer une image, appuyez sur le bouton bleu pour décocher la case. L'image est supprimée
à la sortie du mode de stockage.
• Appuyez et MAINTENEZ enfoncé le bouton rouge
pendant 3 secondes pour quitter le mode de stoc-
kage.
• Pour visualiser les images enregistrées, appuyez et MAINTENEZ enfoncé le bouton rouge
pendant
6secondes. Vous entrerez alors dans le mode de stockage. Vous pouvez alors naviguer à travers les
images de la manière décrite précédemment dans le présent chapitre.
Page 45

45
F
Enregistrement d'une image lorsque la mémoire est pleine
L'eMag 43
peut enregistrer 15 images au maximum. Si vous tentez d'enregistrer une autre image, l'icône
"Memory full" est affichée dans le coin inférieur gauche. Pour pouvoir enregistrer une autre image
il est
nécessaire d'en supprimer une ou plusieurs de la mémoire :
•
Appuyez sur le bouton rouge pour avancer à l'image désirée puis appuyez sur le bouton bleu
pour décocher la case.
• Appuyez et MAINTENEZ le bouton rouge enfoncé
pendant 3 secondes pour quitter le mode de
stockage. La nouvelle image est enregistrée et toutes les images désélectionnées sont supprimées.
Eteindre les LED
Pour éviter l'éblouissement en regardant les surfaces réfléchissantes, vous pouvez éteindre les LED.
• Appuyez et MAINTENEZ enfoncé
le bouton vert/jaune puis appuyez sur le bouton rouge .
Les LED s'éteignent.
• Pour rallumer les LED, appuyez et MAINTENEZ enfoncé le bouton vert/jaune
puis appuyez sur le
bouton rouge
.
Page 46

46
F
eMag 43 Vue avant et vue du haut
eMag 43 Vue arrière
1. Bouton marche-arrêt (vert)
2. Bouton de sélection de couleur (bleu)
3. Bouton de grossissement (jaune)
4. Bouton de prise de vue (rouge)
5. Écran ACL
6. Branchement réseau
7. DEL d’indication de charge
8. Poignée et compartiment des piles
9. Eclairage
10. Fenêtre de caméra
11. Œillet pour la dragonne
Composants matériels
Page 47

47
F
L’eMag 43 dispose d’une dragonne pour le poignet et peut être ainsi facilement utilisée partout et en toute
sécurité. Veuillez procéder comme suit pour mettre en place la dragonne:
1. Faites passer une extrémité de la dragonne par l’orifice du support qui se trouve au dos de l’eMag 43.
2. Faites passer cette extrémité de la dragonne dans l’autre pour former une boucle et serrer.
Quand vous emmenez l’eMag 43 avec vous, passez votre poignet dans la dragonne. L’eMag 43 ne peut
ainsi pas tomber si vous la lâchez.
Emmener l’eMag 43 avec soi
1. 2.
Page 48

48
F
Dépannage
Problème
Solution
L’écran est vide. Vérifiez l’arrivée de courant. Assurez-vous que l’objet à grossir
est correctement placé sous la fenêtre de la caméra. Réduisez
le grossissement. Rechargez les accus NiMH. Si vous utilisez
des piles AAA nickel-fer, remplacez-les. (Ne pas mélanger avec
des accus NiMH.)
L’appareil ne s’allume pas. Chargez les accus NiMH. Si vous utilisez des piles nickel-fer,
remplacez-les. (Ne pas mélanger avec des accus NiMH.)
L’image à l’écran est sombre ou
déformée.
Assurez-vous que l’eMag 43 est positionnée à plat sur la page
que vous voulez lire.
Service et support
Note : Cet appareil ne dispose pas de composants pouvant être entretenus par l’utilisateur. Toute tentative
non autorisée de maintenance ou de remplacement de composant interne annulera la garantie du
produit.
Veuillez contacter votre revendeur si vous avez besoin d’un support technique pour votre eMag 43.
Page 49

49
F
La DEL d’indication de charge clignote
en rouge.
Chargez les accus NiMH ou si vous utilisez des piles AAA nickel-fer, remplacez-les. (Ne pas mélanger accus NiMH et piles
nickel-fer.)
La DEL d’indication de charge est au
rouge bien que le chargeur secteur soit
raccordé à l’eMag 43.
Un défaut au niveau de la pile est survenu. Débranchez le
chargeur secteur de l’eMag 43 et puis le rebrancher.
Chargez les accus NiMH pendant au moins 2 heures. Si vous
utilisez des piles nickel-fer, remplacez-les.
Si le problème persiste, débranchez le cordon secteur et
contactez le revendeur de votre eMag 43.
La
DEL
d’indication de charge ne clignote
pas en vert bien que le chargeur réseau soit
raccordé et branché à une prise électrique.
Assurez-vous que la petite extrémité du chargeur réseau est
bien enfiché dans la prise de l’appareil.
Vérifiez que la prise électrique fonctionne correctement.
Les accus NiMH ne se rechargent pas.
Assurez-vous que la petite extrémité du chargeur réseau est
bien enfiché dans la prise de l’appareil.
Vérifiez si les accus sont correctement en place. Veillez à la
polarité correcte.
Vérifiez que la prise électrique fonctionne correctement.
Il y a des tâches ou des salissures sur
l’écran.
Nettoyez l’écran ACL et la fenêtre de caméra.
Le texte à lire est trop petit. Appuyez sur le bouton de grossissement jaune pour
augmenter le taux de grossissement.
Le texte à lire est trop grand. Appuyez sur le bouton de grossissement jaune pour
sélectionner un taux de grossissement inférieur.
Page 50

NL
50
Page 51

NL
51
Elektronisch vergrotende handloep
Handleiding
Leverancier:
A. SCHWEIZER GmbH
Hans-Böckler-Str. 7
91301 Forchheim
www.schweizer-optik.de
Gefeliciteerd met de aankoop van uw eMag 43. Met deze elektronische handloep kunt u teksten en
voorwerpen twee tot veertien keer vergroten ten opzichte van de originele grootte. De eMag 43 is
uitgerust met een 4.3” breedbeeld LCD scherm (16:9 beeldformaat).
De informatie in deze brochure is onderhevig aan veranderingen, zonder aankondiging. Niets uit deze
publicatie mag in enige vorm, elektronisch of manueel, gebruikt of gekopieerd worden zonder de uitdrukkelijke, geschreven, toestemming van A. SCHWEIZER GmbH.
Copyright © 2011 A. SCHWEIZER GmbH. Alle rechten voorbehouden.
Page 52

NL
52
Technische informatie
Golflengte: 400 nm tot 750 nm
Energie: < 1 mW CW
Veiligheid: UL 60950
CAN/CAS-C22.2 No. 60950
IEC 60950
EMC: EN 60825-1:2001
FCC (CFR-47, part 15) Klasse A
EN 55022 Klasse A
EN 55024
LED RADIATION
DO NOT STARE
INTO BEAM
CLASS 2 LED
LED STRALING
NIET RECHSTREEKS
IN DE LICHTSTRAAL
KIJKEN
KLASSE 2 LED
Fabrikant:
Freedom Scientific GmbH
Bahnstr. 1
CH-8274 Tägerwilen
Page 53

NL
53
Inhoudstabel
Veiligheid en onderhoud 54
Schoonmaakinstructies 54
Snelle start 55
Overzicht 56
Wat zit er in de doos? 58
Veiligheidsvoorschriften 58
Batterijen insteken 60
Batterijen opladen 62
Functies LED verlichting 63
Gebruik van de eMag 43 64
Lezen met de eMag 43 64
Een beeld vergroten 65
Vergrotingsniveau met ingeklapt handvat
66
Vergrotingsniveau met opengeklapt handvat
66
Een beeld opnemen en vergroten 67
Opslaan en wissen van een afbeelding 68
Hoe kunt u een afbeelding opslaan als het
geheugen vol is? 69
Uitschakelen van de LED-verlichting 69
Hardware componenten 70
eMag 43 meenemen 71
Service en ondersteuning 72
Probleemoplossingen 72
Page 54

NL
54
Veiligheid en onderhoud
Om uw
eMag 43
in goede staat te houden, gelieve volgende richtlijnen te lezen:
Lees de instructies in deze handleiding alvorens uw
eMag 43
in gebruik te nemen.
Probeer uw
eMag 43
NOOIT zelf te repareren of te openen. Dit toestel bevat geen onderdelen die door de
gebruiker kunnen vervangen worden.
Houd de
eMag 43
uit de buurt van water, regen of andere vloeistoffen of plaatsen met hoge vochtigheid. Dompel
de
eMag 43
nooit onder in water of een andere vloeistof!
Gebruik uw
eMag 43
steeds op een plaats met een temperatuur tussen 10° C en 35° C. Bewaar de
eMag 43
niet op plaatsen onderhevig aan extreme temperaturen, zoals bijvoorbeeld een geparkeerde wagen. Gebruik geen
kracht bij het aansluiten van kabels op de
eMag 43
.
Alle geschikte aansluitingskabels passen gemakkelijk in de ingangen. Maak enkel gebruik van de bijgeleverde
adapter om de NiMH (nikkelmetaal hybride) batterijen op te laden. Andere adapters kunnen uw toestel beschadigen.
Schoonmaakinstructies
WAARSCHUWING: Voor het schoonmaken van het scherm of het cameravenster schakelt u het toestel uit en
verwijder de stroomkabel. Gebruik een kleine hoeveelheid mild, niet-schurend schoonmaakmiddel, zoals water, isopropylalcohol of azijnwater met maximaal 10% azijn, op een
zachte, vezelvrije doek (geen papierdoek). Gebruik geen schoonmaakmiddel dat één van
volgende bestanddelen bevat: aceton, ethyl alcohol, ammoniak of methylchloride. Sproei
geen schoonmaakmiddel rechtstreeks op het scherm. Oefen geen bovenmatige druk uit
op het scherm.
Page 55

NL
55
Snelle start
Opmerking: Alvorens het eMag 43 elektronische vergrotingstoestel te gebruiken, moet u het toestel eerst
opladen. De batterijen laden sneller op wanneer het toestel uit staat. Houdt rekening met een
oplaadtijd van minstens 2 uur wanneer u het toestel voor de eerste keer oplaadt. Gelieve ook
de pagina’s „Batterijen en insteken en Batterijen opladen“ te lezen.
De eMag 43 is gemakkelijk in gebruik, ook voor diegenen die niet bekend zijn met hulpmiddelen. Druk op de
groen/gele
aan-/uitknop
om het toestel aan te zetten. Houd of plaats de eMag 43 over een voorwerp en
pas de vergroting aan uw behoeften aan met de gele vergrotingsknop
. Het vergrote beeld verschijnt op
uw scherm.
Om veiligheidsredenen schakelt de eMag 43 zichzelf uit indien er geen enkele knop wordt ingedrukt
gedurende 30 minuten.
Hieronder worden de onderdelen van de eMag 43 en de LED-functies beschreven.
Page 56

NL
56
Aan/
uitknop
Ingang stroomkabel
Batterij indicatie LED lampje
Vergrotingsknop
Uitklapbaar handvat
(uitgeklapte positie)
Beeldopnameknop
Kleurselectie
knop
LCD Scherm
Overzicht
Page 57

NL
57
Uitklapbaar handvat
(uitgeklapte positie)
Polsband bevestiging
Batterij indicator LED
Lampjes
Camera
Ingang stroomkabel
Batterij compartiment
Page 58

NL
58
Wat zit er in de doos?
Voordat u de eMag 43 in gebruik neemt, gelieve alle onderdelen uit de doos te nemen en te verifiëren:
• eMag 43 elektronische vergrotende handloep
• AC adapter met 4 internationale adapterstukken
• 4 heroplaadbare AAA Nikkelmetaal hybride (NiMH) batterijen
• Draagtas met schouderriem
• Polsband
• eMag 43 handleiding
Veiligheidsvoorschriften van de batterijen
Opmerking: Voordat u de
eMag 43
voor de eerste keer gebruikt, moeten de NiHM batterijen opgeladen worden.
Er worden 4 oplaadbare batterijen geleverd met de
eMag 43
. U kan ook gebruik maken van 4 micro batterijen
(LR3, AAA, AM-4) om met het toestel te werken. Sluit in dat geval de adapter niet aan.
Opmerking: Meng geen NiHM batterijen met alkaline batterijen! Vervang steeds de 4 batterijen tegelijkertijd
door 4 nieuwe van hetzelfde type (oplaadbaar of niet-oplaadbaar). Meng nieuwe batterijen niet
met oude. Indien u deze waarschuwing niet opvolgt, kan dit leiden tot het uitvallen of lekken van
uw batterijen. Gooi de NiHM of de Alkaline batterijen op de voorgeschreven manier weg. Ze kunnen niet met gewoon huishoudelijk afval weggegooid worden. Controleer de plaatselijke, wettelijke richtlijnen in verband met afval en recyclage.
WAARSCHUWING: U riskeert een defect aan uw toestel indien de NiHM of de alkaline batterijen door
verkeerde batterijen worden vervangen.
Page 59

NL
59
We willen u er graag op attent maken dat onze batterijen/oplaadbare batterijen voldoen aan de huidige wetten en wijzen u op de volgende zaken:
1. Onze producten bevatten oplaadbare AAA HR03-batterijen. U kunt ook batterijen van het type AAA LR03
gebruiken.
2. Om de schadelijke effecten op het milieu en de gezondheid te voorkomen, moeten gebruikte batterijen/op-
laadbare batterijen op de juiste manier weggegooid worden. Breng ze naar uw lokaal containerpark of naar
de verkoper. Batterijen terugbrengen is wettelijk verplicht en is kosteloos voor u.
3. Batterijen/oplaadbare batterijen moeten worden weggebracht in lege staat.
4. Waardevolle materialen zoals zink, ijzer en nikkel kunnen opgevraagd worden bij het recycleren van batte-
rijen/oplaadbare batterijen.
5. De batterijen/oplaadbare batterijen kunnen gemakkelijk verwijderd worden uit onze toestellen om daarna
weg te gooien, zie handleiding.
6. Het symbool van de ‘doorgestreepte vuilnisbak’ duidt aan dat het verboden is om gebruikte batterijen met
het huishoudafval weg te gooien.
De bijkomende specificatie van de chemische symbolen voor
lood (Pb), cadmium (Cd) en kwik (Hg) duiden aan dat deze
stoffen aanwezig zijn in de batterijen/oplaadbare batterijen
overeenkomstig met de wettelijk vastgestelde hoeveelheden.
Page 60

NL
60
Batterijen insteken
Om de batterijen in uw toestel te steken, volg deze richtlijnen:
1. Houd de eMag 43 in uw ene hand. Met uw andere hand draait u het handvat open tot een volledig uit-geklapte positie, zie afbeelding.
Uitklapbaar handvat
LCD Scherm
Page 61

NL
61
2. Draai de eMag 43 om, zodat het LCD Scherm zich aan de achterzijde bevindt. Schuif daarna het deksel
van het batterijcompartiment in de richting van de pijl, zie afbeelding.
Opmerking: Let bij het plaatsen van de batterijen op de juiste polen (+/-). Steek de batterijen in het toestel
zoals aangegeven in volgende afbeelding.
3. Sluit het deksel van het batterijcompartiment.
Page 62

NL
62
Batterijen opladen
Ga als volgt te werk om de NiMH-batterijen op te laden:
1. Steek de kleine stekker van de laadkabel in de stroomkabelingang. Deze ingang bevindt zich in de linker
bovenhoek van het toestel naast de batterij indicator LED, zie afbeelding.
Ingang stroomkabel
Batterij indicatie LED lampje
LCD Scherm
2. Steek het andere uiteinde van de lader in een standaard AC stopcontact. Het batterij indicatie LED lampje
knippert groen om aan te tonen dat de batterijen aan het opladen zijn.
3. Zodra de batterijen opgeladen zijn, stopt het groene LED lichtje met knipperen en brandt het continu.
Verbreek de verbinding tussen de oplader en uw eMag 43. Het groene LED indicatie lampje gaat uit.
Page 63

NL
63
Functies LED verlichting
Rood – knipperend Batterijen bijna leeg
Groen – knipperend Batterijen wordt opgeladen – lader is aangesloten
Groen – constant Batterijen zijn opgeladen – lader is aangesloten
Rood – constant Foutmelding – verwijder de lader, wacht enkele minuten en steekt de lader terug in
Geen LED verlichting Batterijen zijn voldoende opgeladen of de lader is niet aangesloten of het toestel is
uitgeschakeld.
U kan uw eMag 43 maximaal twee uur ononderbroken gebruiken. Wanneer de batterijen bijna leeg zijn,
gaat het LED lampje rood knipperen. Sluit de lader aan en steek hem in het stopcontact om de batterij
te herladen.
Aanwijzing: Let u er a.u.b. op dat de eMag 43 na 30 minuten overgaat op de energiespaarstand
(hetbeeldscherm schakelt uit), als u binnen deze tijd geen toets aanraak.
Druk op de aan/uit-schakelaar om de eMag 43 weer te activeren.
Page 64

NL
64
Nadat de batterijen zijn opgeladen, bent u klaar om te beginnen lezen met de eMag 43. Met de vergrotingsfuncties van het toestel bent u in staat om brieven, kaarten, foto’s, etiketten, bus en treinschema’s, televisieprogrammatie, recepten, ingrediënten en nog veel meer te zien of te lezen.
Lezen met de eMag 43
Om de eMag 43 te gebruiken tijdens het lezen, gaat u als volgt te werk:
1. Controleer of het toestel volledig opgeladen is.
2. Druk op de
groen/gele
aan/uitknop om de eMag 43 op te starten. Na enkele seconden vertoont het LCD
Scherm datgene waarop het camera venster momenteel gericht is.
3. Wanneer u een boek, een brief of een andere geprinte tekst wilt lezen, plaats die dan op een vlak
oppervlakte zoals een tafel op een bureau.
4. Vervolgend kunt u de eMag 43 op dezelfde wijze vasthouden bij het handvat zoals u een gewoon vergrootglas zou vasthouden. Of u kan het handvat dichtklappen en de eMag 43 rechtstreeks op de tekst of
het voorwerp plaatsen dat u wilt lezen of zien. Alles wat zich onder het toestel bevindt, wordt vergroot en is
zichtbaar op het scherm.
5. Pas de vergroting aan met de gele vergrotingsknop
die zich links naast het LED lampje bevindt.
6. Selecteer de kleurinstelling met de blauwe kleurselectieknop
die zich links van het scherm bevindt.
Er zijn vijf verschillende kleurencombinaties mogelijk; Normaal (volledige kleuren), Wit op Zwart (verbeterd
positief), Zwart op Wit (verbeterd negatief), Geel op Blauw en Geel op Zwart.
7. Beweeg het toestel naar rechts om tot het einde van een zin te lezen. Beweeg het toestel eerst naar links
en dan naar beneden om de volgende zin te lezen.
Om veiligheidsredenen schakelt de eMag 43 zichzelf uit indien er geen enkele knop wordt ingedrukt
gedurende 30 minuten.
Gebruik van de eMag 43
Page 65

NL
65
Een beeld vergroten
De eMag 43 heeft drie digitale zoom instellingen. Afhankelijk van de positie en de plaatsing van het toestel
geeft het een vergroting op het scherm van 2 x tot 14 x.
1. Om de vergroting op het scherm te verhogen, druk op de gele vergrotingsknop .
2. Om het volgende niveau in vergroting te bereiken, druk nogmaals op de gele vergrotingsknop .
3. Wanneer de gele vergrotingsknop
voor de derde maal wordt ingedrukt, keert de eMag 43 naar het
laagste vergrotingsniveau.
Voor meer informatie over de verschillende vergrotingsinstellingen, gelieve de volgende beschrijvingen te
lezen.
Page 66

NL
66
Vergrotingsniveau met ingeklapt handvat
Wanneer de eMag 43 geplaatst wordt op een document is het beginniveau van de vergroting 5 x.
Door de gele vergrotingsknop herhaaldelijk in te drukken, verhoogt de vergroting via 7,5 x naar 10 x en
terug naar 5 x.
Vergrotingsniveau met uitgeklapt handvat
Wanneer de eMag 43 over een document gehouden wordt (zie afbeelding) dan is het beginniveau van de
vergroting 2 x.
Vergrotingsniveau is 2 x wanneer de
eMag 43
ongeveer 7,6 cm boven een voorwerp of tekst wordt gehouden.
Door de gele vergrotingsknop
herhaaldelijk in te drukken, verhoogt de vergroting via 3 x naar 4 x en terug
naar 2 x.
Page 67

NL
67
Wanneer de eMag 43 op geringe hoogte geplaatst wordt (ongeveer 1,3 cm) over een document, dan is het
beginniveau van de vergroting 7 x.
Door de gele vergrotingsknop
herhaaldelijk in te drukken, verhoogt de vergroting via 10,5 x naar 14 x en
terug naar 7 x.
Een beeld opnemen en vergroten
Een beeld opnemen (Freeze) kan handig zijn voor het lezen van etiketten op voorwerpen in de supermarkt
bijvoorbeeld. Houd de eMag 43 dicht bij het voorwerp en neem het beeld op. Vervolgens kan u het toestel
dichterbij brengen zodat u kan lezen.
Om het huidige beeld op het LCD scherm op te nemen, gaat men als volgt te werk:
1. Druk de rode opnameknop in.
2. Indien u wenst, kan u de vergroting van het opgenomen beeld veranderen door de gele vergrotingsknop
in te drukken
3. Druk de rode opnameknop
nog een keer in om de opname functie te verlaten.
Page 68

NL
68
Opslaan en wissen van een afbeelding
Schakel de
eMag 43
in (druk op de groen/gele toets ). Druk daarna de rode toets in om de gewenste
afbeelding op te nemen.
U kunt de afbeelding op het scherm als volgt opslaan:
• Druk deze rode toets
zes seconden lang in om naar de Opslagmodus te gaan.
• Het aanvinkvlakje in de hoek linksonder wordt automatisch aangevinkt . Dit geeft aan dat de afbeelding
zal worden opgeslagen zodra u de Opslagmodus verlaat.
• De toets 'vooruit'
verschijnt nu in de rechter onderhoek. Druk op de rode toets om door te gaan
naar de volgende afbeelding. Druk deze toets
een aantal keren in om te bladeren door alle afbeeldin-
gen, opgeslagen in uw eMag 43.
• Druk op de blauwe toets om het vinkje uit het aanvinkvlakje weg te halen en een afbeelding te wissen.
De afbeelding wordt gewist zodra u de Opslagmodus verlaat.
• Druk de rode toets
drie seconden lang in om de Opslagmodus te verlaten.
• Om opgeslagen afbeeldingen te bekijken drukt u de rode toets
zes seconden lang in. U komt
dan inde Opslagmodus. Daarna kunt u door de afbeeldingen bladeren op de manier, zoals hiervoor
isbeschreven.
Page 69

NL
69
Hoe kunt u een afbeelding opslaan als het geheugen vol is?
Uw eMag 43
kan maximaal vijftien afbeeldingen opslaan. Als u nog een afbeelding probeert op te slaan, dan
verschijnt in de hoek linksonder het icoontje "Geheugen vol" . U moet nu eerst een of meer afbeeldingen uit
het geheugen wissen, voordat u een andere afbeelding kunt opslaan
:
•
Druk de rode toets in om naar de gewenste afbeelding te gaan; druk daarna op de blauwe toets
om het vinkje van het aanvinkvlakje weg te halen.
• Druk de rode toets drie seconden lang in om de Opslagmodus te verlaten. De nieuwe afbeelding
wordt bewaard, èn alle niet-aangevinkte afbeeldingen worden gewist.
Uitschakelen van de LED-verlichting
U kunt de LED-verlichting uitschakelen om schitteringen te voorkomen als u naar reflecterende oppervlakken
kijkt.
•
Druk op de groen/gele toets , HOUD deze INGEDRUKT en druk vervolgens de rode toets in.
DeLED-verlichting dooft nu.
•
Om de verlichting weer in te schakelen drukt u op de groen/gele toets , HOUD die INGEDRUKT en
drukt uvervolgens de rode toets
in.
Page 70

NL
70
eMag 43 voor- en bovenaanzicht
eMag 43 achterzijde
1. Aan – Uitknop (Groen)
2. Kleurselectieknop (Blauw)
3. Vergrotingsknop (Geel)
4. Opnameknop (Rood)
5. LCD Scherm
6. Ingang stroomkabel
7. Batterij indicatie lampje
8. Handvat en batterijcompartiment
9. Verlichting
10. Camera
11. Polsband bevestiging
Hardware componenten
Page 71

NL
71
De eMag 43 wordt geleverd met een polsband die u kan gebruiken om het toestel gemakkelijk en veilig mee
te nemen. Om de polsband vast te maken, gaat u als volgt te werk:
1. Maak het kapje van de polsband los door aan weerszijden te drukken.
2.
Duw de lus aan het uiteinde van het kapje door de polsbandbevestiging aan de achterzijde van de
eMag 43
.
3. Duw het kapje door de lus en trekt goed aan. Klik de polsband terug in het kapje.
Wanneer u nu gebruik maakt van de eMag 43, kan u uw pols door het polsbandje steken. Daardoor is de
eMag 43 beschermt tegen vallen indien u het toestel per ongeluk zou los laten.
eMag 43 meenemen
2.1. 3.
Page 72

NL
72
Probleemoplossingen
Probleem
Oplossing
Geen beeld op het scherm. Controleer of er stroom is. Kijk na of het voorwerp dat u wilt vergro-
ten correct onder de camera ligt. Verklein het vergrotingsniveau. Laad
de NiHM batterijen op. Indien u AAA Alkaline batterijen gebruikt, dient
u deze te vervangen (niet samen te gebruiken met NiHM batterijen)
Het toestel start niet op.
Laadt de NiHM batterijen op. Indien u AAA Alkaline batterijen gebruikt,
vervang de batterijen. (NiMH en Alkaline batterijen niet samen gebruiken).
Het beeld op het scherm is donker of
vervormd.
Controleer of de eMag plat op de pagina ligt die u wil lezen.
Service en ondersteuning
Opmerking: Dit toestel bevat geen onderdelen die door de gebruiker kunnen vervangen worden. De garan-
tie vervalt bij een ongeoorloofde poging om het toestel zelf te reparen.
Gelieve contact op te nemen met uw lokale verdeler wanneer u technische ondersteuning nodig hebt.
Page 73

NL
73
Het batterij LED lampje knippert rood. Laadt de NiHM batterijen op. Indien u AAA Alkaline batterijen
gebruikt, vervang de batterijen. (NiHM batterijen niet samen
gebruiken met Alkaline batterijen.)
Het batterij LED lampje blijft constant
rood terwijl de lader is aangesloten op
de eMag 43.
Er is een probleem met de batterij opgetreden. Trekt de lader uit
de
eMag 43
en steek hem terug in. Laadt de NiHM batterijen
voor ten minste 2 uren op. Indien u Alkaline batterijen gebruikt,
vervang de Alkaline batterijen. Indien het probleem blijft, verwijder de lader en breng het toestel naar uw lokale verdeler.
Het batterij LED lampje licht niet groen
op, ondanks dat de lader insteekt en
aangesloten is op een stopcontact.
Controleer of het smalle uiteinde van de lader op de juiste manier in de ingang van het toestel steekt. Controleer of er stroom
is op het stopcontact. Indien het stopcontact gekoppeld is aan
een lichtschakelaar, controleer dan of de lichtschakelaar aan
staat.
De NiHM batterijen laden niet op. Controleer of de kleine stekker van de lader op de juiste manier
in de ingang van het toestel steekt. Controleer of de batterijen
op de juiste manier (+/- zijde) in het toestel steken. Controleer
of er stroom is op het stopcontact. Indien het stopcontactgekoppeld is aan een lichtschakelaar, controleer dan of de
lichtschakelaar aan staat.
Er zijn vlekken of vegen op het scherm. Maak het LCD scherm en het camera schoon.
De tekst is te klein om te lezen.
Druk op de gele vergrotingsknop om de vergroting te verhogen.
De tekst is te groot om te lezen. Druk op de gele vergrotingsknop om alle mogelijke vergrotin-
gen te overlopen.
Page 74

14-032 / 313358 / 00
 Loading...