

Vonino Navo QS Quick Start Manual
DESIGNED BY TZIGARET-DESIGN.COM
®
Copyright © 2015 Vonino. All right reserved. Vonino logo is registered trademark of Vonino Inc.
QUICK
START
GUIDE
www.vonino.us
VONINO Inc.
72608 El Paseo I Palm Desert I CA 92260 USA I Tel: +17609331533 I info@vonino.us

QUICK
START
GUIDE
EN
DE
IT
CZ
HR
BG
RO
2 - 11
12 - 19
20 - 27
28 - 35
36 - 43
44 - 51
52 - 59

01 | The product
03EN
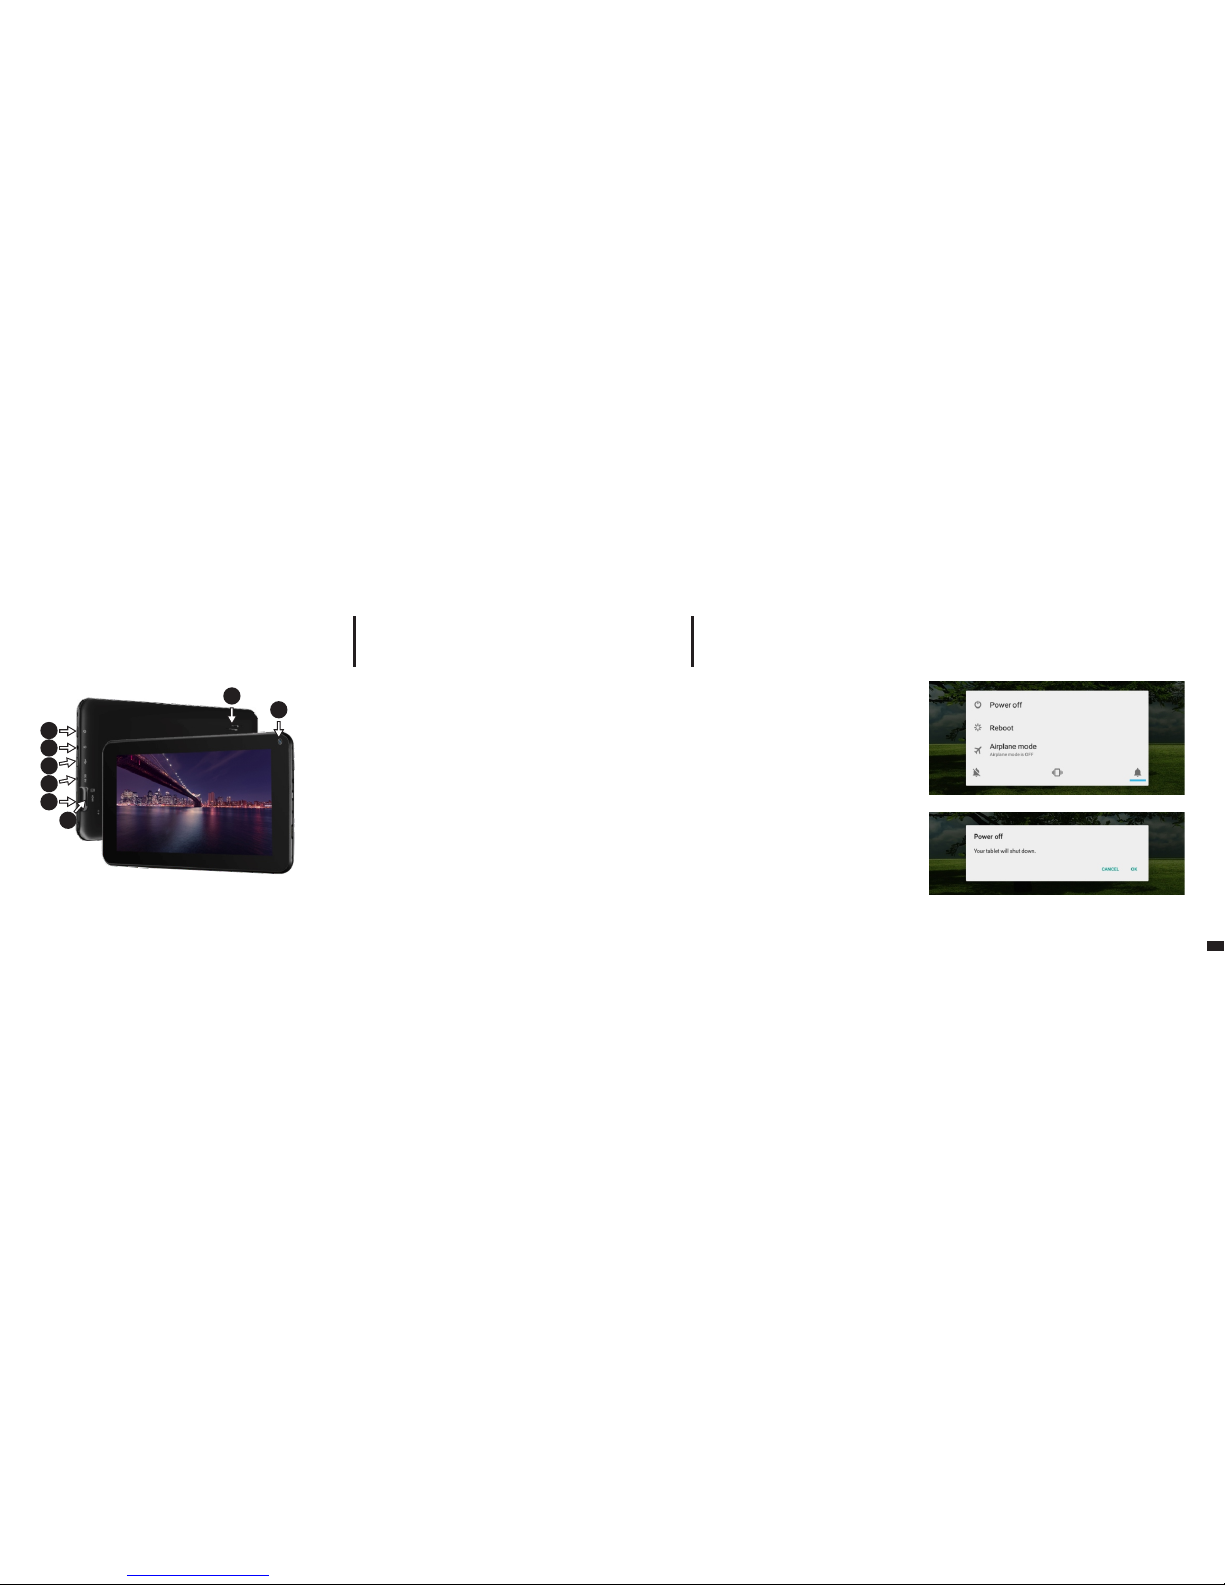
1.1 APPEARANCE AND DESCRIPTION OF THE DEVICE
1. Power / Lock / Unlock
2. 3.5mm audio jack
3. microUSB charging and data connector
4. Charging connector
5. miniHDMI connector
6. microSD card reader
7. Speaker
8. Front camera
UNPACKING:
Your Vonino tablet should come securely packaged in its
shipping container along with the items listed below.
Contact your dealer immediately if you find that anything is
missing or damaged. Note, however, that contents may be
changed without notice.
To start your device, press and hold the Power Key for 5
seconds .
To power off your device, press and hold the power button for
5 seconds and tap “OK” to power it off, when the automatic
dialogue box appears.
In the operating mode, shortly press the Power Key to lock the
screen or enter sleep mode.
In the operating mode, shortly press the Power Key and glide
the locked icon on to the unlocked icon , in order to unlock.
While in function, the tablet can automatically enter stand-by,
if this option is enabled, after a preset period of time.
02 | Starting up
your device
7
1
2
3
4
5
6
8

3.1 PERMANENT KEYS
03 | The main
interface
Press this icon to return to the previous page.
Press this icon to access the applications running in
the background.
The TIME icon.
The strength of the wireless signal.
TM
Pre ss Goog le sear ch fo r a quic k searc h of the
information you need.
Press this icon to go to your home screen.
Pres s this icon to ac cess the me nu with ins talled
applications.
Battery status icon.
4.1 THE DESCRIPTION AND THE FUNCTIONALITY OF THE
SETTINGS SUBMENUS:
4.2 WIRELESS & NETWORKS
4.2.1 Wi-Fi
4.2.2 Bluetooth
4.3 DEVICE
4.3.1 Display
4.3.2 Sound & notification
05EN
4.2.3 Data usage
4.2.4 More
4.3.3 Storage
4.3.4 Battery
4.5.4 Printing
4.5.5 About device
4.3.5 Apps
4.4 PERSONAL
4.4.1 Location
4.4.2 Security
4.4.3 Accounts
4.5 SYSTEM
4.5.1 Date & time
4.5.2 Schedule power
on & off
4.5.3 Accessibility
4.3.6 Users
4.4.4 Language & input
4.4.5 Backup & reset
4.2 WIRELESS & NETWORKS
4.2.1 Wi-Fi - Start/Stop wireless connection and connect to
wireless networks available; go to in the top right corner to
access submenu items. Choose Advanced to setup Network
notification, Keep Wi-Fi on during sleep, setup Wi-Fi Direct,
see MAC address, IPv4 address and IPv6 address.
4.2.2 Bluetooth - Turn on/off Bluetooth connectivity; in this
submenu, you can find the visibility settings of the device and
the Bluetooth devices available for connection.
4.2.3 Data usage - Displays information about the use of data
connections. In this menu you can restrict/grant access for
the apps.
4.2. 4 More – Using t his men u you ac tivate Airp lane
mode(switch on/off all network connection), set Default SMS

07EN
app, setup the Tethering & portable hotspot, setup a VPN
connection or set the Cellular network related function – Data
roaming, Preferred networks, Preferred network type, Access
Point Names and Network operators.
4.3 Device
4.3.1 Display
a. Personalize:
- Wallpaper: choose a background image. To change the
background image when you are in a main screen, press and
hold on an empty side of the screen, until the necessary menu
is displayed.
b. Display:
- Brightness level: manual brightness adjustment or use
Adaptive brightness menu and the display brightness will be
automatically optimized for the level of available light in the
environment. Sleep menu sets up the time to keep the display
on when the device is not used or manually locked. Font size
menu is used to choose the best size of the font you have on
the display for the menu of your device. When device is
rotated menu sets up the behavior of the display when
rotating the device. Daydream sets up the displayed content
when activated. Cast screen option is for mirroring the screen
device to a wireless smart TV.
4.3.2 Sound & notification
b.1. Sound general settings: set up and activate the desired
profile for notifications – Volumes, Phone ringtone, Default
notification sound, activate or deactivate Vibrate, Dial pad
touch tones, Touch sounds, Screen lock sound and Vibrate on
Touch.
b.2. Notification & Others: set up Notification behavior When
devic e is loc ked and App not ificati ons, Int errupti ons
behavior for alerts When calls and notifications arrive.
4.3.3 Storage - Check the available memory for storage and
set the Default write disk. The use of a microSD card: After the
device has been connected to the computer, you will find two
storage devices. The first is the integrated memory and the
second is the MicroSD card. If there is no card inserted, the
second device cannot be accessed. To insert a microSD card,
hold the microSD card in the indicated position near the
tablet's reader and carefully insert it in the slot. Now you can
access the contents of the MicroSD card. To remove the card,
first press the Remove the SD card button in the submenu,
then gently push the microSD card inside and release, after
which you can remove it.
4.3.4 Battery - Displays information on the power status. The
dev ice use s a L i-Io n ba tter y of h igh capa city. The
consumption of energy depends on both the size and the type
of the files you access, as well as on the operations you
perform on the device. The device can be configured by the
user in the Settings menu, accessing the submenus present
there. The device can be recharged using an USB cable or its
charger. Plug the charger to an alternative electric power
source of 220V, then connect the charger to the jack of the
device.
4.3.5 Apps - Displaying and managing installed applications.
In this s ubmenu, you can see all the appli cations and
software installed on your tablet. By accessing this submenu,
you can choose which applications to keep and which you
want to uninstall, you can view the location of the application
on your device or which of your applications is running at the
time.
4.3.6 Users – setup different User & profiles with different
access and features for each.
4.4 PERSONAL
4.4.1 Location - Contains settings to turn On or Off automatic
location through GPS or Wi-Fi connection and set the Mode of
function. Your device is equipped with a global positioning
system (GPS) receiver. For better reception of GPS signals,
avoid using your device in the following conditions: Between
buildings, in tunnels or underground passages, or inside
buildings; In poor weather conditions; Around high voltage or

electromagnetic fields; In a vehicle with sun protection film.
Do not touch or cover the area around the antenna with your
hands or other objects while using the GPS functions. This
feature may be unavailable depending on your region or
service provider.
4.4.2 Security
a. Screen security - Screen lock: You can configure the way
you wish to unlock your screen: None, Swipe – just swipe the
screen upwards to unlock, Voice Unlock – unlock with a
predefi ned spoken text, Patter n – unlock by dra gging
according to pattern, by PIN or Password.
b. Encryption – activate to encrypt the content of you device.
c. Passwords – activate in order to see the passwords you
enter when required.
d. De vice ad ministr ation – activat e or cre ate Dev ice
administrators, allow installation of apps from Unknown
sources, setup Auto-start management for apps during boot-
up, activate or deactivate App permissions for security and
privacy protection and setup Data Protection for unwanted
access.
e. Credential storage – display and allows access for Trusted
credentials and install certificates from internal storage.
4.4.3 Accounts – add or remove synchronized account by
email and setup the sync information between the device and
it.
4.4.4 Language & input - change th e menu Language,
activate and setup the Spell checker for typing.
a. Keyboard & input methods – setup the Current Keyboard
TM
layout, Google Keyboard and Google Voice typing.
b. Speech – setup for Voice input, Text-to-speech output and
Voice Control of the device.
c. Mouse/trackpad – access this menu to setup Pointer
speed.
4.4.5 Backup & reset
a. Backup & restore – setup the Back up my data option to
09EN
account of your choice and a ctivate or de activate the
Automatic restore option.
b. Personal data – access the menu for DRM reset licenses
and Factory data reset of the device in order to restore it to its
factory settings.
4.5 SYSTEM
4.5.1 Date & time – the menu gives you control to setup
Automatic date & time, activate or deactivate Automatic time
zone, manual setup for date, time and time zone and display
format for date and time.
4.5.2 Schedule power on & off – setup automatic ON and OFF
time and days for the device.
4.5.3 Accessibility
a. Services – this menu accesses installed services like
TalkBack or Switch Access so you can turn it On / Off
b. System – gives access to the functions of Magnification
gestures, Large tex t, High contrast text, Power bu tton
behavior, Auto-rotate screen, Speak passwords, Accessibility
shortcut, Touch and hold delay
c. Display – activates or deactivates Color inversion and
Color correction.
4.5.4 Printing – allows you to install printing services for the
compatible printers.
4.5.5 About tablet - access the System updates menu,
Status of your device – Battery status and level, IP address,
Wi-Fi MAC address, Bluetooth address, Serial number and Up
time; Legal information regarding Open source licenses,
Googl e legal and W allpaper s; Model number, running
TM
Android version, Baseband version, Kernel version and
Build number.
NOTE: Android, Google, Google Play, Google Play logo and
other marks are trademarks of Google Inc.

11EN
We hereby declare that [all essential radio test suites have
been carried out and that] the above named product is in
conformity to all the essential requirements of Directive
1999/5/EC.
The technical documentation kept at:
Vonino Inc.
wich will be made available upon request by
Advanced Technologies SRL
(Representative in the EU)
Putul lui Zamfir 7 street, 4th floor, 1st district, Bucharest,
Romania, ZIP
Code 021255
2015.09.23
(date of issue)
Declaration of conformity (R&TTE)
We, Vonino
declare under our sole responsibility that the product:
Portable Bluetooth/Wi-Fi Device: Navo QS
to which this declaration relates, is in conformity with the
following standards and/or other normative documents
EN 60950-1 : 2006+A11:2009
EN 50332-1 : 2000
EN 50332-2 : 2003
62311 : 2008
EN 503671 : 2002
IEC 62209-2 : 2010
Council Recommendation 1999/519/EC
SAFETY
SAR EN
EN 301 489-01 V1.8.1 (04-2008)
EN 301 489-17 V2.1.1 (05-2009)
EMC
EN 300 328 V1.7.1 (10-2006)
EN 300 440-1 V1.5.1 (03-2009)
RADIO
EN 300 440-2 V1.3.1 (03-2009)
EN 301 893 V1.5.1 (12-2008)
Vasile Razvan
CEO
01 | Das produkt
1.1 Aussehen und Beschreibung des Gerates
1. Power / Lock / Unlock
2. 3,5 mm Audio-Buchse
3. Micro-USB-Lade- und Datenanschluss
4. Ladeanschluss
5. Mini HDMI-Anschluss
6. microSD-Kartenleser
7. Lautsprecher
8. Frontkamera
UNPACKING:
Ihre Vonino Gerät soll sicher und in der Versandverpackung
zusammen mit den unten aufgeführten Artikel verpackt
kommen. Kontaktieren Sie Ihren Händler sofort, wenn Sie
feststellen, dass etwas fehlt oder beschädigt ist. Beachten
Sie jedoch, dass Inhalte können ohne vorherige
Ankündigung geändert werden.
13
DE
Für 5 Sekunden startet das Gerät, drücken und halten Sie die
Taste Power .
So schalten Sie das Gerät aus, drücken und halten Sie die
Power-Taste für 5 Sekunden und tippen Sie auf "OK", um sie
auszuschalten, wenn die automatische Dialogfeld erscheint.
In der Betriebsart, kurz die POWER-Taste drücken, um zu
verriegeln Im Betrieb, um das Gerät zu Entsperren, drücken
Sie kurz das Start-Symbol und ziehen Sie das Symbol mit
dem Fingerin Richtung Symbol . Während des Betriebs kann
das Tablet automatisch nach einer voreingestellten Zeit in
den Standby Modus übertreten, falls diese Option aktiviert
ist.
Wenn das Tablet während der Anwendung sich blockiert,
kann man durch Verwendung der Rücksetzen-Taste (Reset)
einen Neustart erzwingen.
Zum Einstellen der Lautstärke Drücken Sie die LautstärkeTaste.
02 | Inbetriebnahme
Ihres Geräts
7
1
2
3
4
5
6
8

15
3.1 Tasten
03 | Wichtigste
schnittstelle
Tippen Sie auf dieses Symbol, um zur vorherigen
Seite zurückzukehren.
Tippen Sie auf dieses Symbol, um auf Anwendungen
die im Hintergrund laufen zuzugreifen.
Lebensdauer de Tablets.
Wireless-Signalstärke-Symbol.
Tippen Sie Google search für die schnelle Suche
nach Informationen, die Sie benötigen.
Tippen Sie auf dieses Symbol, um die Startseite in
jeder Anwendung zu greifen.
Tippen Sie auf dieses Symbol, um das Menü mit
installierten Anwendungen zu greifen.
Batteriestatus-Symbol.
Netzwerke Signalstärke-Symbol.
4. 1 Be sc hre ibu ng un d Ei ns tel lun gen Un ter men üs
Funktionalität:
4.2 Drahtlos & Netzwerke
4.2.1 WLAN
4.2.2 Bluetooth
4.3 Gerät
4.3.1 Display
4.3.2 Ton &
Benachrichtigungen
4.2.3 Datenverbrauch
4.2.4 Mehr
4.3.3 Speicher
4.3.4 Akku
DE
4.5.4 Drucken
4.5.5 Über das Tablet
4.3.5 Apps
4.4 Nutzer
4.4.1 Standort
4.4.2 Sicherheit
4.4.3 Konten
4.5 System
4.5.1 Datum & Uhrzeit
4.5.2 Ein-/Abschaltung
nach Zeitplan
4.5.3 Bedienungshilfen
4.3.6 Nutzer
4.4.4 Sprache & Eingabe
4.4.5 Sichern &
zurücksetzen
4.2 Drahtlos & Netzwerke
4.2.1 WLAN - Start / Stop der Wireless-Verbindung; Fügen
Sie in di esem Men ü die Eins tellu ngen für Wirel essVerbindung. Selektieren Erweitert für Netzwerk hinzufügen,
WLAN im Ruhemodus aktiviert lassen, Wi-Fi Direct, M AC
addresse, IPv4 addresse und IPv6 addresse.
4.2.2 Bluetooth - Start/Stop der Bluetooth-Verbindung, in
die sem U nterm enü f inde n Sie die E inste llun gen d er
Sichtbarkeit des Gerätes und dieBluetooth-Verbindungen.
4.2.3 Datenverbrauch - Informationen über die Verwendung
von D atenve rbindu ngen. I n dies em Menü könne n Sie
beschränken / Zugang für die Apps zu gewähren.
4.2.4 Mehr – Besuchen Sie dieses Menü, um zu aktivieren
Flugmodus

17
Satz Standard-SMS-App, Einrichten der Tethering & mobiler
Hotspot, Setup eine VPN-Verbindung oder setzen Sie die
Mobil funknetz e bezogen e Funktio n – Date n-Roamin g,
Präfere nzen, Bevor zugter Net zwerktyp, Zugang spunkte
(APNs) and Mobilfunkanbieter.
4.3 Gerät
4.3.1 Display
a. Personalisieren:
- Hintergrund: Wählen Sie ein Hinte rgrundbild. Um das
Hi nter grun dbi ld z u än dern , we nn S ie s ich in eine r
Hauptbildschirm, drücken und halten Sie auf eine leere Seite
des Bildschirms, bis der erforderliche Menü angezeigt wird..
b. Display:
- Helli gkeitsstufe: m anuelle Hell igkeitseinste llung oder
Ve rw en du ng Ad ap ti ve He ll og ke it Me nü un d d ie
Bi ldsc hir mhe llig kei t au toma tis ch f ür d ie H öhe der
ver füg bare n Lic ht i n die Umw elt o ptim ier t wer den.
Ruhezustand Menü stellt die Zeit, um die Anzeige auf, wenn
das Gerät nicht benutzt wird oder manuell verriegelt zu
halten. Schriftgröße Menü wird verwendet, um die beste
Größe der Schriftart, die Sie in der Anzeige für das Menü des
Geräts haben, zu wählen. Bei Drehung des Geräts Menü stellt
das Verhalten der Anzeige, wenn das Drehen des Geräts.
Daydream richtet den angezeigten Inhalt, wenn aktiviert.
4.3.2 Ton & Benachrichtigungen
b.1. Vordefi nierte Profile: S etup und aktivi eren Sie die
gewünschte Profil für Benachricht igungen – Allgemein ,
Klin gelton, Stan dard-Ben achrich tigungs ton, Vi brieren,
Wähltastentone, Töne bei Berührung, Ton bei Displaysperre
und Bei Berührung vibrieren.
b. 2. Be na ch ri ch ti gu ng en un d S on st ig es : S et up
Be nach ric htig ung , Be i ge sper rte m Ge rät un d Ap pBenach richtigung en, Uterbr echungen, Bei ei ngehenden
Anrufen und Benachrichtigungen.
4.3.3 Speicher - Überprüfen Sie den verfügbaren Speicher für
d i e L a g e r u n g u n d s t e l l e n S i e d i e
Standardschreibdatenträger.
DE
Nachdem das Gerät mit dem Computer verbunden ist, werden
Sie z wei Speic hergeräte n zu find en. Der e rste ist der
integrierte Speicher und die zweite ist die MicroSD-Karte.
Wenn es keine Karte eingelegt ist, kann das zweite Gerät nicht
zugegriffen werden. Um eine microSD-Karte einlegen, halten
Sie die microSD-Karte in die angegebene Position in der Nähe
des Tabletts Leser und so rgfältig legen Sie sie in d en
Steckplatz. Jetzt können Sie den Inhalt der MicroSD-Karte
zugreifen. Um die Karte, drücken Sie zuerst die zu entfernen
Entfernen Sie die SD-Card-Taste in das Untermenü, und
drücken Sie dann vorsichtig die microSD-Karte innen und
loslassen, danach können Sie es zu entfernen.
4.3.4 Akku - Zeigt den Ladezustand. Das Gerät verwendet
einen Lithium-Ionen-Akku mit hoher Kapazität. Dauer der
Energiespeicherung hängt von der Größe und Art der Dateien
ab, und Benutzung des Gerät es. Das Gerät kann durch den
Benutzer konfiguriert werden, durch die Untermenüs aus den
Einstellungen. Das Gerät kann über USB-Kabel oder über
Ladegerät aufgeladen werden.
Schließen Sie den Adapter in die Steckdose 220V (maximale
Ausgangsstrom 2000mA, 5V
5.2V Ausgangsspannung) ein, dann stecken Sie den Stecker
in die Buchse für die Stromversorgungsgerät.
4.3.5 App s - Anzeigen un d Verwalten von installie rten
Anwe ndungen . In di esem Un termen ü könne n Sie al le
Anwendungen und Software auf Ihrem Tablet installiert
sehen. Durch den Zugriff auf dieses Untermenü können Sie
wählen, welche Anwendungen zu behalten und welche Sie
deinstallieren m öchten, können Sie den Speicherort de r
Anwendung auf Ihrem Gerät oder dem Ihrer Anwendungen
anzeigen zu dem Zeitpunkt ausgeführt wird.
4.3.6 Nutzer – Setup Nutzer & Profile mit unterschiedlichen
Zugriffs und Funktionen für jeden
4.4 Nutzer
4.4.1 Standort - enthält Einstellungen zu Ein oder Aus
 Loading...