

Page 1

Workshop manual
Group 20-23, 26, 30
A
2(0)
D2-55, D2-75
Page 2

Page 3

Marine engine
D2-55 A/B/C • D2-75 A
Safety Precautions .............................................. 2
General information ............................................ 5
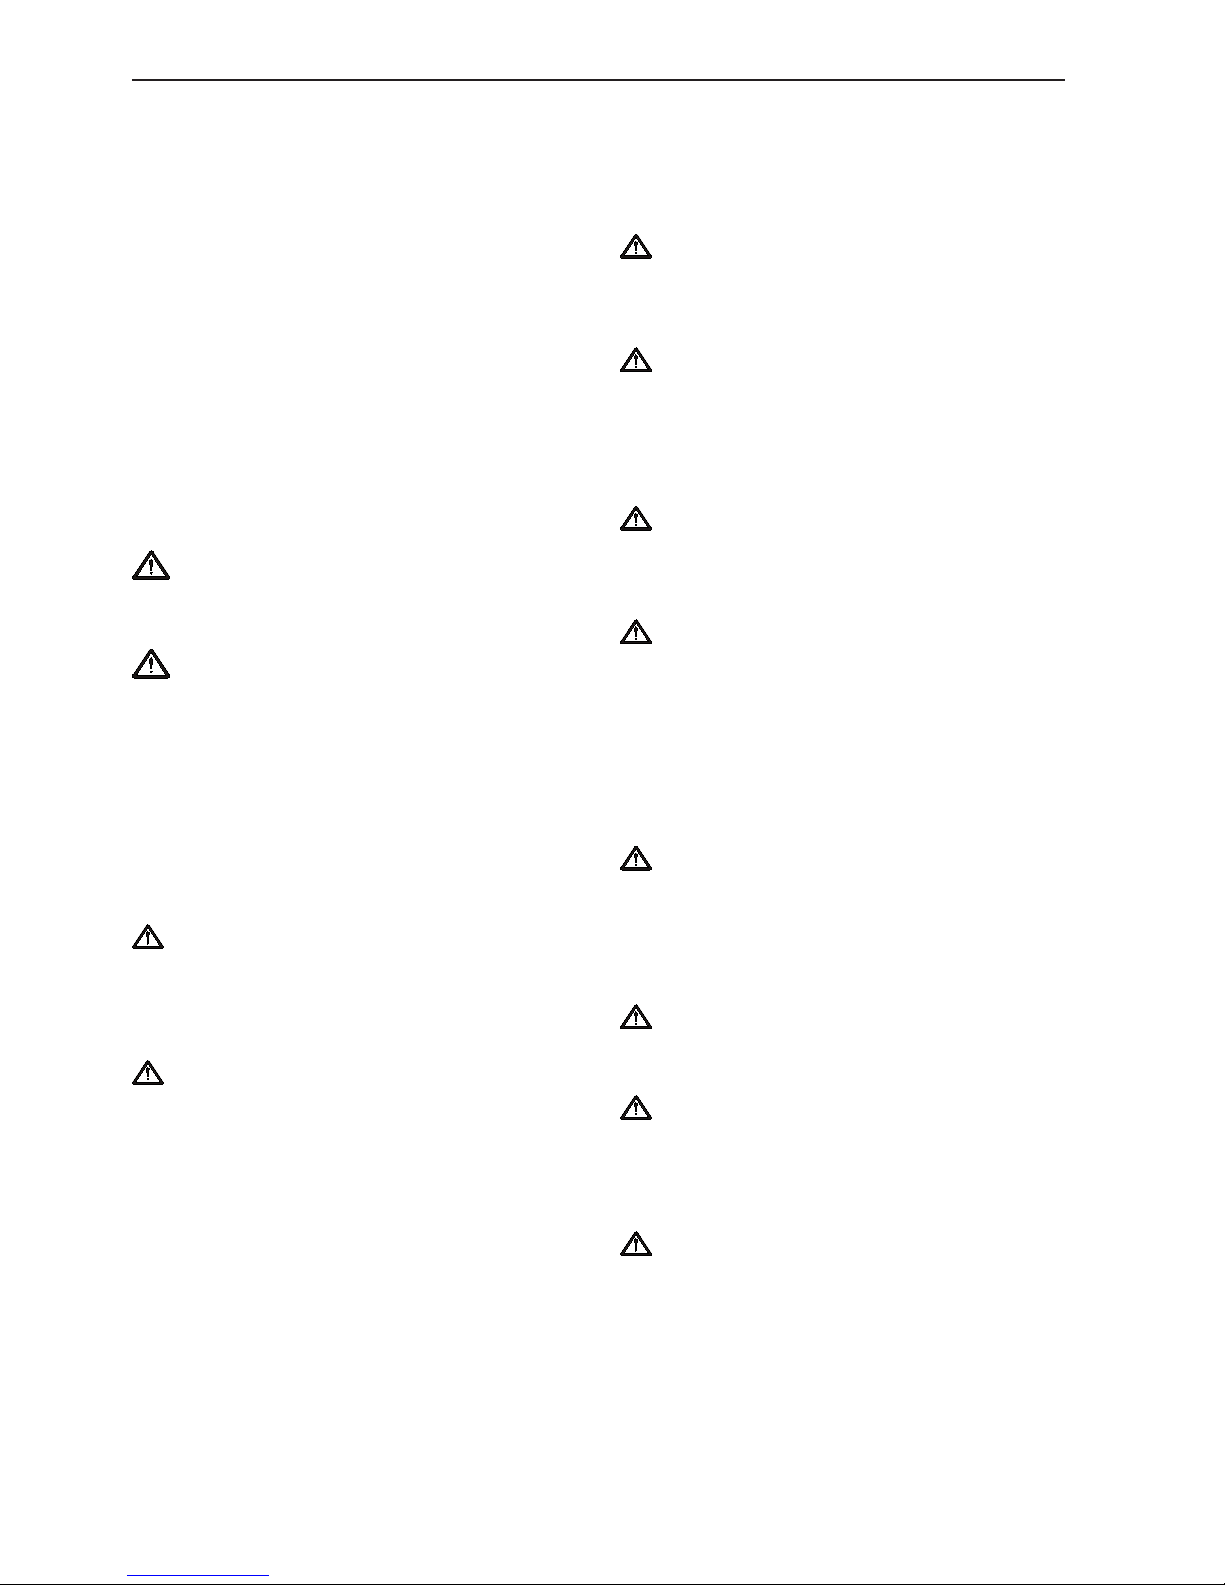
Special tools ....................................................... 9
Design and function ............................................ 10
Location of engine type signs ................................ 10
Engine introduction ............................................... 11
Component description .......................................... 16
Repair instructions .............................................. 23
General ................................................................. 23
Engine fixture, fixing ............................................. 24
Compression test .................................................. 24
Group 21: Short block
Short block, disassembly ...................................... 25
Inspecting the engine block ................................... 29
Upper block plane ................................................. 29
Cylinder bore ......................................................... 29
Cylinder head, overhaul ......................................... 30
Cylinder head, disassembly .................................. 30
Cylinder head, inspection ...................................... 30
Valve seat, replace ............................................... 31
Valves and valve seats, grinding........................... 31
Valve guides, check .............................................. 32
Rocker arm mechanism, overhaul ......................... 33
Cylinder head, assembly ....................................... 33
Crankshaft, inspection .......................................... 34
Main and big-end bearings, inspection .................. 34
Crankshaft bush, front, inspection ......................... 35
Crankshaft bush, front, replace ............................. 35
Crank bearing play, check ..................................... 36
Piston rings, inspection and adjustment ................ 37
Piston and cylinder bore, inspection and
measurement ........................................................ 37
Con rods, inspection ............................................. 38
Con rod bush, replace ........................................... 38
Piston, piston rings and con rods, installation ....... 39
Camshaft, measurement ....................................... 40
Timing gear assembly, inspection ......................... 40
Crankshaft, installation.......................................... 40
Piston, installation in cylinder ................................ 41
Camshaft, installation ........................................... 42
Cylinder head, installation ..................................... 44
Valve lifters, inspection ......................................... 47
Valves, adjustment ............................................... 49
Flywheel, replace ring gear .................................... 49
Crankshaft seal, rear, replace ............................... 50
Crankshaft seal, front, replace .............................. 50
Group 22: Lubrication system
Oil pump ............................................................... 51
Oil channels .......................................................... 54
Oil pump bearing, overhaul ...................................... 55
Group 23: Fuel system
Injection pump ...................................................... 56
Setting injection timing .......................................... 57
Setting the engine speed....................................... 59
Feed pump ............................................................ 60
Venting the fuel system ........................................ 61
Fuel filter, replace ..................................................... 63
Fuel pre-filter, drain and replace .............................. 63
Injectors ................................................................ 64
Group 26: Cooling system
Fresh water system .............................................. 67
Coolant ................................................................. 68
Draining coolant ........................................................ 69
Filling with coolant ................................................ 69
Checking the coolant level .................................... 70
Cleaning heat exchanger ....................................... 71
Circulation pump ................................................... 72
Sea water pump .................................................... 73
Thermostat ........................................................... 73
Group 30: Electrical system
Description ............................................................ 74
Important information concerning
the electrical system ......................................... 76
Fault tracing, glow plugs, charging system............ 78
Alternator .............................................................. 82
Starter motor ......................................................... 86
Electrical components ........................................... 89
Wiring diagrams .................................................... 92
Group 20: Technical data
Technical data ...................................................... 96
Wear tolerances .................................................... 100
Tightening torque .................................................. 101
Contents
Page 4
2
Safety Precautions
Introduction
This Service Manual contains technical data, descriptions and repair instructions for the Volvo Penta products or product versions noted in the table of contents. Check that you have the correct Workshop
Manual for your engine.
Read the available safety information, General Information and Repair Instructions in the Service Manual
before you start to do any service work.
Important
In this book and on the product you will find the following special warning symbols.
WARNING! Possible danger of personal injury,
extensive damage to property or serious mechanical malfunction if the instructions are not
followed.
IMPORTANT! Used to draw your attention to
something that can cause damage or malfunctions on a product or damage to property.
NOTE! Used to draw your attention to important information that will facilitate the work or operation in
progress.
Below is a summary of the risks involved and safety
precautions you should always observe or carry out
when operating or servicing the engine.
Immobilize the engine by turning off the power
supply to the engine at the main switch (es) and
lock it (them) turned off before starting work. Set
up a warning notice by the helm station.
As a general rule all service operations must be
carried out with the engine stopped. Some work,
such as adjustments, need the engine to be running, however. Approaching an engine which is
running is a safety risk. Remember that loose
clothing or long hair can fasten in rotating parts
and cause serious personal injury.
If work is done adjacent to a running engine, a
careless movement or a dropped tool can lead,
in the worst case, to personal injury. Be careful
with hot surfaces (exhaust pipes, turbos, charge
air pipes, starting heaters etc.) and hot fluids in
pipes and hoses on an engine which is running
or which has just stopped. Always refit shields
that have been removed for service work before
starting the engine.
Check that the warning or information labels on
the product are always clearly visible. Replace
labels which have been damaged or painted over.
Never start the engine without installing the air
cleaner filter. The rotating compressor turbine in
the turbocharger can cause severe injury. Foreign objects entering the intake ducts can also
cause mechanical damage.
Never use start spray or similar products as a
starting aid. They may cause an explosion in
the inlet manifold. Danger of personal injury.
Avoid opening the coolant filling cap when the engine is hot. Steam or hot coolant can spray out
and the system pressure will be lost. Open the
filler cap slowly, and release the pressure in the
cooling system if the filling cap or tap has to be
opened, or if a plug or coolant hose has to be removed when the engine is hot. Steam or hot coolant might spray out in an unexpected direction.
Hot oil can cause burns. Avoid skin contact with
hot oil. Ensure that the lubrication system is not
under pressure before carrying out any work.
Never start or operate the engine with the oil filler cap removed, otherwise oil could be ejected.
Stop the engine and close the sea cocks before
doing any work on the cooling system.
Only start the engine in a well- ventilated area.
When operated in a confined space, exhaust
fumes and crankcase gases must be ventilated
from the engine bay or workshop area.
Always use protective glasses or goggles when
carrying out work where there is a risk of splin-
ters, grinding sparks, acid splashes or where
other chemicals are used. Your eyes are extremely sensitive, injury could cause blindness!
Page 5
3
Safety Precautions
Avoid getting oil on your skin! Repeated exposure to oil or exposure over a long period can re-
sult in the skin becoming dry. Irritation, dryness
and eczema and other skin problems can then
occur.
Used oil is more dangerous than fresh oil from a
health aspect. Use protective gloves and avoid
oil-soaked clothes and rags. Wash regularly, especially before eating. There are special skin
creams which counteract drying out of the skin
and make it easier to clean off dirt after work is
completed.
Most chemicals intended for the product (e.g.
engine and transmission oils, glycol, petrol (gas-
oline) and diesel oil) or chemicals for workshop
use (e.g. degreasers, paints and solvents) are
hazardous. Read the instructions on the product
packaging with care! Always follow the safety
precautions for the product (for example use of
protective mask, glasses, gloves etc.). Make
sure that other personnel are not inadvertently
exposed to hazardous chemicals, for example in
the air. Ensure good ventilation in the work
place. Follow the instructions provided when disposing of used or leftover chemicals.
Exercise extreme care when leak detecting on
the fuel system and testing the fuel injector noz-
zles. Use eye protection. The jet from a fuel
nozzle has very high pressure and great penetration power. Fuel can force its way deep into
body tissue and cause severe injury. Danger of
blood poisoning (septicemia).
All fuels, and many chemicals, are flammable.
Do not allow naked flame or sparks in the vicini-
ty. Petrol (gasoline), some thinners and hydrogen gas from batteries are extremely flammable
and explosive when mixed with air in the correct
ratio. No Smoking! Ensure that the work area is
well ventilated and take the necessary safety
precautions before starting welding or grinding
work. Always ensure that there are fire extinguishers at hand when work is being carried out.
Make sure that oil and fuel soaked rags, and
used fuel and oil filters are stored in a safe
place. Rags soaked in oil can spontaneously ignite under certain circumstances. Used fuel and
oil filters are polluting waste and must be handed to an approved waste management facility
for destruction, together with used lubrication oil,
contaminated fuel, paint residue, solvents, degreasers and wash residue.
Never expose a battery to naked flame
or electrical sparks. Never smoke close to the
batteries. The batteries generate hydrogen gas
when charged, which forms an explosive gas
when mixed with air. This gas is easily ignited
and highly volatile. A spark, which can be
caused by incorrect battery connection, can
cause a single spark which is sufficient to
cause an explosion with resulting damage. Do
not move the connections when you attempt to
start the engine (risk of arcing), and do not
stand and lean over one of the batteries.
Always ensure that the Plus (positive) and Minus (negative) battery cables are correctly in-
stalled on the corresponding terminal posts on
the batteries. Incorrect installation can result in
serious damage to the electrical equipment. Refer to the wiring diagram.
Always use protective goggles when charging
and handling the batteries. Battery electrolyte
contains sulfuric acid which is highly corrosive.
Should the battery electrolyte come into contact
with unprotected skin wash off immediately using plenty of water and soap. If you get battery
acid in your eyes, flush at once with a generous
amount of water, and get medical assistance at
once.
Turn the engine off and turn off the power at the
main switch(es) before carrying out work on the
electrical system.
Clutch adjustments must be carried out with the
engine stopped.
The existing lugs on the engine/reversing gear
should be used for lifting the assembly.
Always check that the lifting equipment used is
in good condition and has the load capacity to
lift the engine (engine weight including gearbox,
if fitted, and any extra equipment).
Use an adjustable lifting beam or lifting beam
specifically for the engine to raise the engine to
ensure safe handling and to avoid damaging engine parts installed on the top of the engine. All
chains and cables should run parallel to each
other and as perpendicular as possible in relation to the top of the engine.
If other equipment connected to the engine has
altered its center of gravity, special lifting devises may be needed to obtain the correct balance
and safe handling.
Never carry out work on an engine suspended
on a hoist.
Page 6

4
Never work alone when removing heavy engine
components, even when using lifting devices
such as locking tackle lifts. When using a lifting
device two people are usually required to do the
work, one to take care of the lifting device and
another to ensure that components are lifted
clear and not damaged during the lifting operations.
When you work aboard a boat, always make
sure that there is enough space for disassembly
where you are working, with no risk of personal
injury or damage to materials.
Components in the electrical and fuel systems
on Volvo Penta products have been designed to
minimize the risks of explosion and fire. The engine must not be run in areas where there are
explosive materials.
Fuel delivery pipes must not be bent or straightened under any circumstances. Damaged pipes
must be replaced.
Remember the following when washing with a
power washer: Never aim the water jet at seals,
rubber hoses or electrical components. Never
use a power washer for engine cleaning.
Only use the fuels recommended by Volvo Penta. Refer to the Operator’s Manual. Use of fuels
that are of a lower quality can damage the engine. On a diesel engine, poor quality fuel can
cause the control rod to bind and the engine to
over-rev with resulting risk of damage to the engine and personal injury. Poor fuel can also lead
to higher service costs.
Safety Precautions
© 2006 AB VOLVO PENTA
We reserve the right to make modifications without prior notice.
Printed on environmentally compatible paper.
Page 7

5
General information
About this Service Manual
This Service Manual contains technical data, descriptions and repair instructions for the standard version of
engine unit D2-55.
The Service Manual can illustrate tasks done on any of
the engines noted above. This means that the illustrations and photographs which clarify certain details might
not correspond with other engines in some cases. Repair methods are however in general, identical. If this is
not the case, this will be noted and important differences will be shown separately. The engine designation and
engine number are given on a type plate (see page 14).
The engine designation and number must always be given
in all correspondence about an engine.
The Service Manual is produced primarily for the use of
Volvo Penta workshops and service technicians. This
assumes that people who use the Manual have basic
knowledge of marine drive systems and can do the tasks
of a mechanical or electrical nature associated with the
trade.
Volvo Penta constantly improves its products, so we
reserve the right to make modifications without prior
notification. All information in this manual is based on
product data which was available up to the date on which
the manual was printed. Any material changes introduced
into the product or service methods after this date are
notified by means of Service Bulletins.
Spare parts
Spare parts for electrical and fuel systems are subject
to various national safety requirements such as the
US Coast Guard Safety Regulations. Volvo Penta
Original Spare Parts meet these specifications. No
damage whatever, occasioned by use of non-original
Volvo Penta spares for the product, will be compensated by the warranty offered by Volvo Penta.
Certified engines
When doing service and repair on emission certified
engines, it is important to be aware of the following:
Certification means that an engine type has been
checked and approved by the relevant authority. The
engine manufacturer guarantees that all engines made
of the same type are equivalent to the certified engine.
This makes special demands on service and repair
work, as follows:
● Care and Service intervals recommended by Volvo
Penta must be followed.
● Only Volvo Penta original spare parts may be
used.
● Service to injection pumps, pump settings and in-
jectors must always be performed by an authorized
Volvo Penta workshop.
● The engine must not be converted or modified, ex-
cept for the accessories and service kits that Volvo Penta has approved for the engine.
● No installation changes to the exhaust pipe and
engine air inlet ducts may be made.
● Any anti-tamper seals on the engine may not be
broken by unauthorized persons.
The general advice in the instruction book about operation, care and maintenance, applies.
IMPORTANT! Neglected or poorly performed
care/service, as well as use of non-original
spare parts, entails that AB Volvo Penta can no
longer guarantee that the engine conforms to the
certified model.
Damage, injury and/or costs which arise from
this will not be compensated by Volvo Penta.
Page 8

6
Repair procedures
The working methods described in the Service Manual
apply to work carried out in a workshop. For this reason, the engine is lifted out of the boat and mounted
on an engine support. Renovation work which does
not need the engine to be lifted out can be done in
situ, with the same work methods, unless otherwise
specified.
Warning symbols used in this Service Manual (for full
explanation of the symbols refer to the section;
“Safety Precautions”
)
WARNING!
IMPORTANT!
NOTE!
are not in any way comprehensive since it is
impossible to predict every circumstance under which
service work or repairs may be carried out. For this
reason, all we can do is to point out the risks which
we believe could occur due to incorrect work in a wellequipped workshop, using work methods and tools
tested by us.
All operations described in the Service Manual for
which there are Volvo Penta Special Tools available
assume that these tools are used when carrying out
the repair. Volvo Penta Special Tools have been
specifically developed to ensure the most safe and
rational working methods possible. It is therefore the
responsibility of anyone using other tools or other
working methods than we recommend to determine
that there is no risk of personal injury or mechanical
damage or malfunction as a result.
In some cases special safety precautions and user
instructions may be required in order to use the tools
and chemicals mentioned in the Service Manual.
These rules must always be observed, so there are no
special instructions about this in the Service Manual.
By following these basic recommendations and using
common sense it is possible to avoid most of the
risks involved in the work. A clean workplace and a
clean engine will eliminate many risks of personal
injury and engine malfunction.
Above all, when work on fuel systems, lubrication
systems, induction systems, turbocharger, bearing
caps and seals is done, it is extremely important that
no dirt or other kinds of foreign particles are able to
get in, since this would otherwise cause malfunctions
or shortened repair life.
Our common responsibility
Each engine consists of a large number of collaborating
systems and components. Any deviation of a
component from its technical specification can
dramatically increase the environmental impact of an
otherwise good engine. For this reason, it is extremely
important that specified wear tolerances are
maintained, that systems with adjustment facilities are
correctly adjusted and that Volvo Penta Original Spares
are used for the engine. The stated service intervals in
the Maintenance Schedule must be observed.
Some systems, such as the components in the fuel
system, require special expertise and special testing
equipment for service and maintenance. Some
components are sealed at the factory, for
environmental reasons etc. It is only permissible to
work on sealed components if you are authorized to
do such work.
Remember that most chemical products, incorrectly
used, damage the environment. Volvo Penta
recommends the use of biodegradable degreasers
whenever engine components are de-greased, unless
otherwise specified in the Service Manual. When
working aboard a boat, be careful to ensure that oils,
wash residue etc. are processed for destruction, and
are not inadvertently discharged with bilge water into
the environment.
Tightening torque
The tightening torque for critical joints that shall be
tightened with a torque wrench, are listed in
”Specifications: Tightening torque” and noted in the
job descriptions in the book. All torque specifications
apply to clean screws, screw heads and mating faces.
Torque data stated apply to lightly oiled or dry
threads. Where grease, locking or sealing agents are
required for screwed joints, this is stated in both the
operation description and in “Torque”. Where a
particular torque value is not specified for any fastener, the general tightening torque in the table below
shall apply. The torque specification is a target value
and the fastener does not need to be tightened with a
torque wrench.
Dimension Tightening torque
Nm lbf.ft
M5 6 4.4
M6 10 7.4
M8 25 18.4
M10 50 36.9
M12 80 59.0
M14 140 103.3
Page 9

7
Repair instructions
Torque-angle tightening
With torque/angle tightening, the fastener is tightened
to the specified torque, and tightening then continues
through a pre-determined angle. Example: for 90°
angle tightening, the fastener is turned a further 1/4
turn in one sequence, after the specified tightening
torque has been achieved.
Lock nuts
Disassembled locknuts shall not be re-used, they
shall be replaced by new ones, since the locking
properties are impaired or lost when the nut is used
several times. For locknuts with plastic inserts, i.e.
Nylock® the tightening-torque given in the table shall be
reduced if the Nylock®-nut has the same nut height as
a standard all-metal hex-nut. Reduce the torque by
25% for screw size 8 mm or larger. Where Nylock
®
nuts are higher, i.e. the metallic thread is of the same
height as a standard hexagonal nut, the torque given
in the table apply.
Strength classes
Screws and nuts are sub-divided into different
strength classes. Classification is indicated by
markings on the screw head. A marking with higher
number indicates stronger material. For example, a
screw marked 10-9 is stronger than one marked 8-8.
For this reason, when fasteners are removed, it is
important that the screws are put back in the correct
places when they are re-installed. If a screw must be
replaced, check in the spare parts catalogue to make
sure the correct screw is used.
Sealant
Several different types of sealant and locking fluids
are used on the engine. The properties of the
preparations differ, and they are intended for different
strengths of fastener, temperature, resistance to oil
and other chemicals, and for the different materials
and gap thicknesses found in the engine.
To ensure service work is correctly carried out it is
important that the correct sealant and locking fluid
type is used on the joint where the agents are
required.
In this Service Manual, the user will find that each
section where these agents are applied in production
states which type was used on the engine.
In service work, the same preparations or preparations
of corresponding properties, but of other makes, shall
be used.
When sealants and locking fluids are used, it is
important that the surfaces are free from oil, grease,
paint and rust-protection, and that they are dry.
Always follow the manufacturer’s instructions for use
regarding temperature range, curing time and any other instructions for the product.
Two different basic types of agent are used on the
engine. These are:
RTV preparations (Room Temperature Vulcanizing).
Used for gaskets, sealing gasket joints or coating
gaskets. RTV is visible when a part has been
disassembled; old RTV must be removed before
resealing the joint.
The following RTV preparations are mentioned in the
workshop manual: Loctite® 574, Silicone GE
RTV1473W, Permatex® No. 3, Volvo Penta 11610995, Permatex® No 77. Old sealant can be removed
using denatured alcohol in all cases.
Anaerobic agents. These agents cure in the absence
of air. These preparations are used when two solid
components, such as two cast components, are fitted
together without a gasket. Common uses are also to
lock and seal plugs, stud threads, taps, oil pressure
monitors etc. Hardened anaerobic preparations are
glassy and for this reason, the preparations are
colored to make them visible. Hardened anaerobic
preparations are highly resistant to solvents, and old
compound can not be removed. On re-installation,
degrease carefully and then apply new sealant.
The following anaerobic preparations are mentioned in
the workshop manual: Loctite® 572 (white color).
NOTE: Loctite® is a registered trademark belonging to the Loctite
Corporation, Permatex® is a registered trademark belonging to the
Permatex Corporation.
Page 10

8
Repair instructions
Safety rules for
Fluorocarbon rubber
Fluorocarbon rubber is a common material in seal
rings for shafts, and in O-rings, for example.
When fluorocarbon rubber is subjected to high temperatures (above 300°C), hydrofluoric acid can be formed, which is highly corrosive. Contact with the skin
can result in severe chemical burns. Splashes in your
eyes can result in severe chemical burns. If you breathe in the fumes, your lungs can be permanently
damaged.
WARNING! Be very careful when working on
engines which have been exposed to high
temperatures, e.g. overheating during a seizure
or fire. Seals must never be cut with a flame
torch during disassembly, or burned in
uncontrolled circumstances afterwards.
• Always use gloves made of chloroprene rubber
(gloves for handling chemicals) and protective
goggles.
• Handle the removed seal in the same way as
corrosive acid. All residue, including ash, can be
highly corrosive. Never use compressed air to
blow anything clean.
• Put the remains in a plastic jar which is sealed
and provided with a warning label. Wash the
gloves under running water before removing them.
The following seals are most probably made from
fluorocarbon rubber:
Seal rings for the crankshaft, camshaft and drive
shafts.
O-rings, regardless of where they are installed. Orings for cylinder liner sealing are almost always made
of fluorocarbon rubber.
Note that seals which have not been subjected to
high temperature can be handled normally.
Page 11
9
Special tools
Wherever feasible, the tool numbers have been punched on the tools.
856 927
885 252
885 820 9812519
999 6662
999 9179
384 9641
885 485
856 927 Plastigauge, for measuring main and big-
end bearing play
884 892 Regulator tester
885 023 Valve spring compressor
885 252 Adapter for testing compression pressure
885 484 Adapter for testing compression pressure
885 485 Engine fixture for overhaul stand
885 820
1)
Puller for pulleys
885 822 Magnetic pen
885 498 Pressure foot (used together with valve
spring compressor 885 023)
981 2519 Multimeter
998 8539 Compression tester
998 9876 Dial indicator
999 5919 Puller, seals
999 6662 Pressure testing equipment
999 9179 Wrench for removing fuel/oil filters
999 9684 Rocker indicator
999 9696 Magnetic stand
999 9772 Injector tester
384 9641 Assembly tool for oil pump shaft
998 6485 or 999 2520 Overhaul stand
1)
This tool is used with one or more of Volvo Penta’s older products
998 8539
885 822
999 9772
998 9876
999 9696
998 6485 or 999 2520
999 9683
884 892
885 484885 023
885 498
999 5919
Page 12
10
Design and function
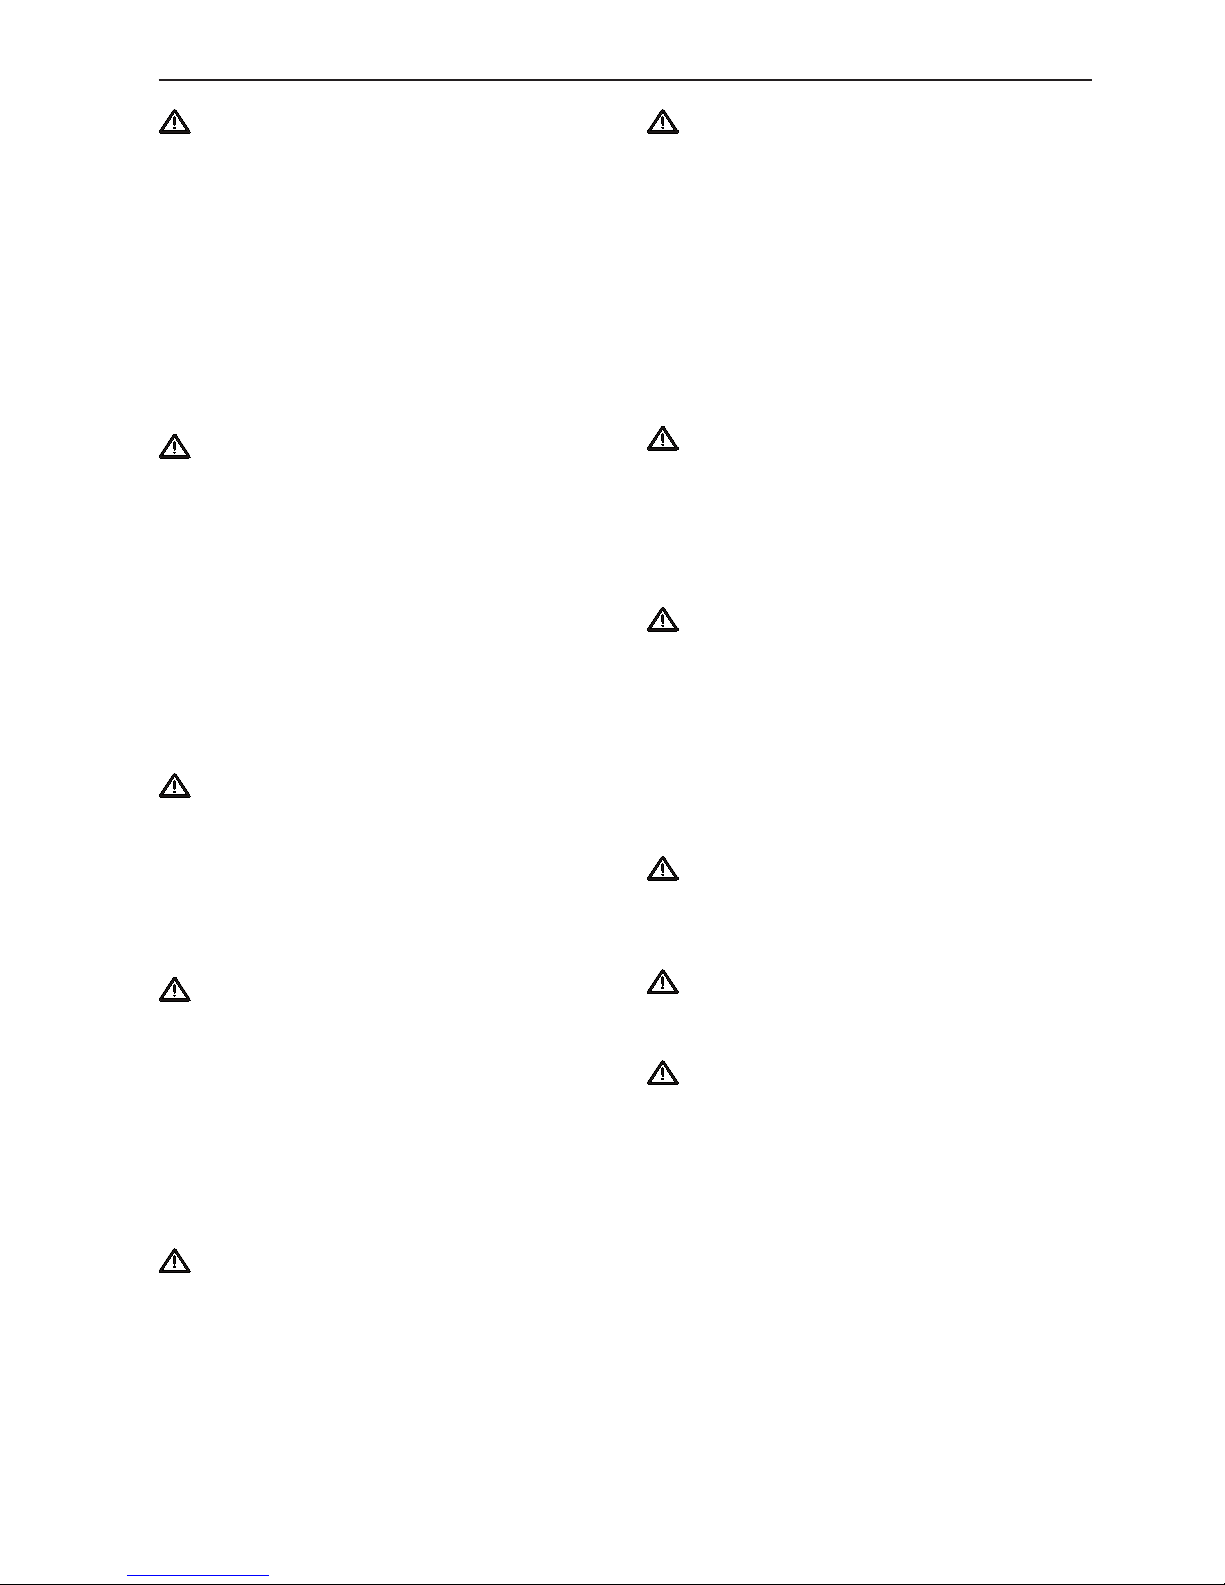
Location of information decals and type plates
There are type plates on the engine and transmission, marked with identification numbers. This information must
always be used a reference when spare parts are ordered. The appearance and location of the type plates is
shown below. The figures in brackets refer to the location of the identification number on the type plate.
Engine
Product designation (1) .......................................................................................................
Serial number (2) .................................................................................................................
Product number (3) .............................................................................................................
Certification number (4) .......................................................................................................
S-drive / Reverser
Product designation (5) ........................................................................................................
Serial number (6) ..................................................................................................................
Product number (7) ..............................................................................................................
Gear ratio (8) ........................................................................................................................
Propeller designation ............................................................................................................
Engine plate
Engine and transmission decal
XXXXXX (7)
XXX (5)
XXXXXXXXXX (6)
XX (8)
S-drive and reversing gear sign
Page 13
11
Design and function
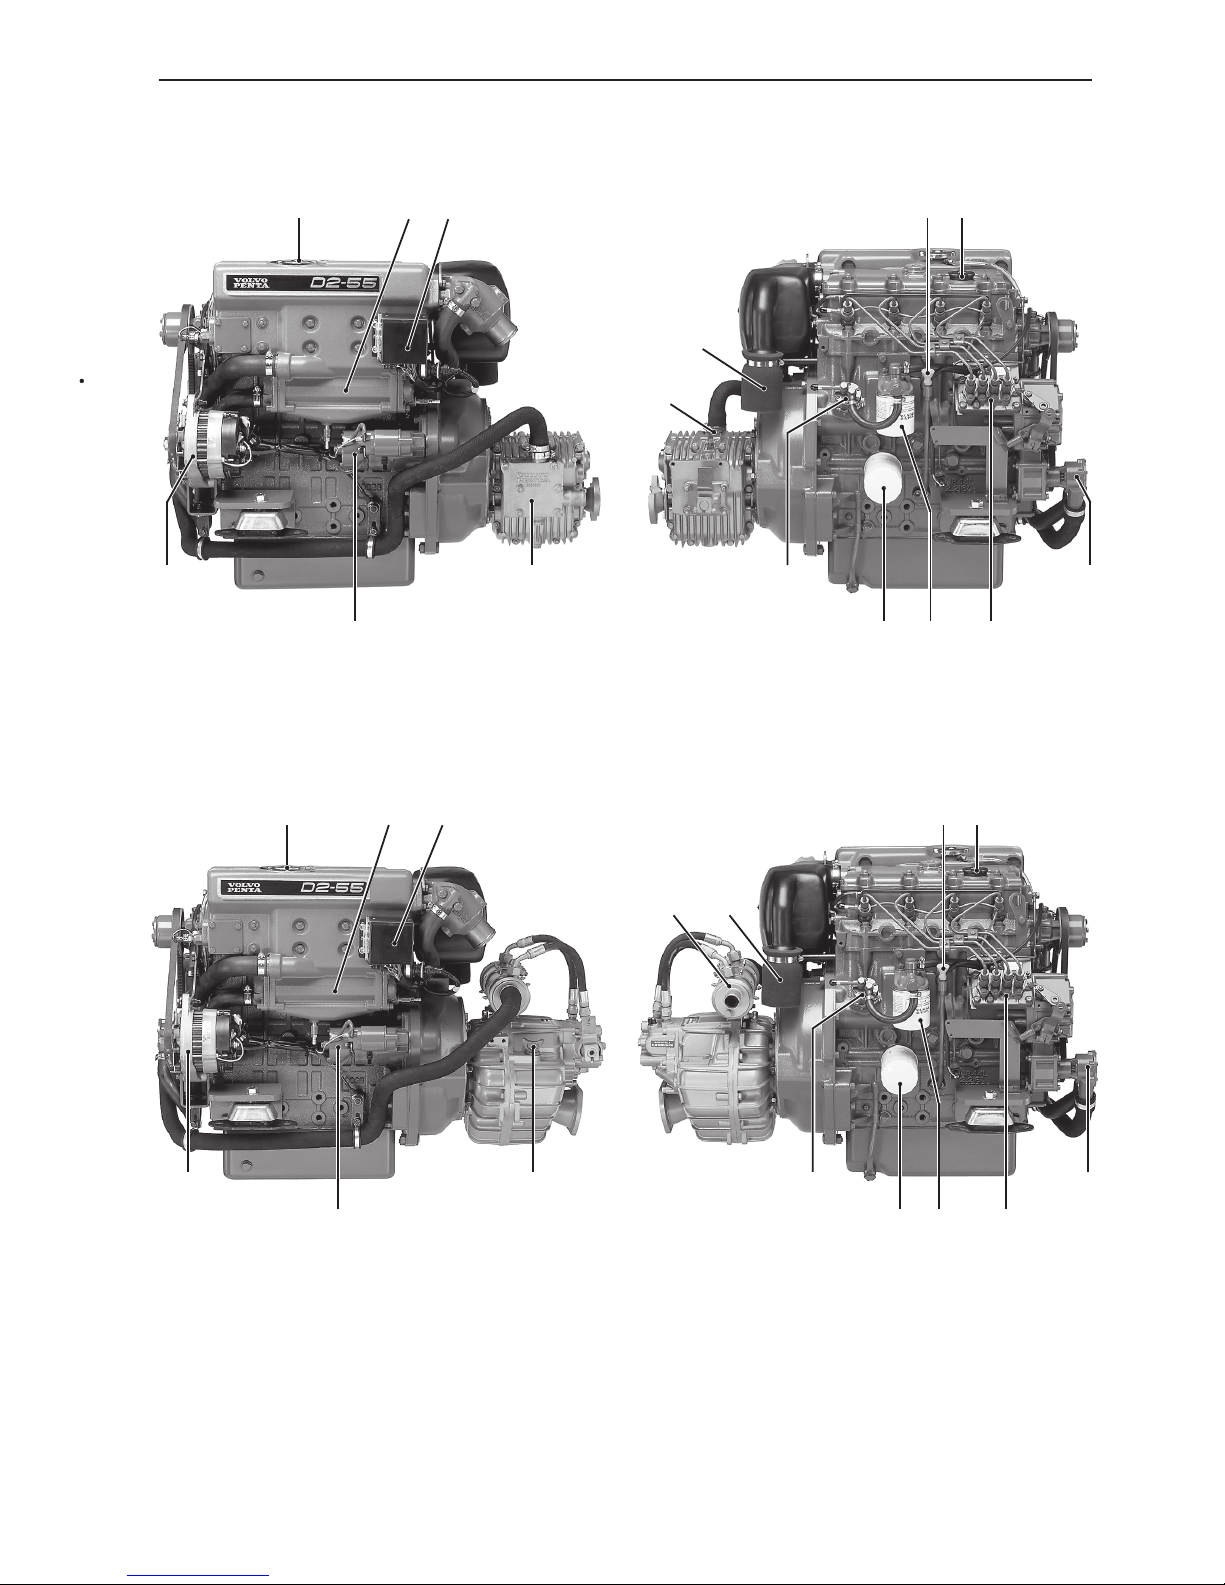
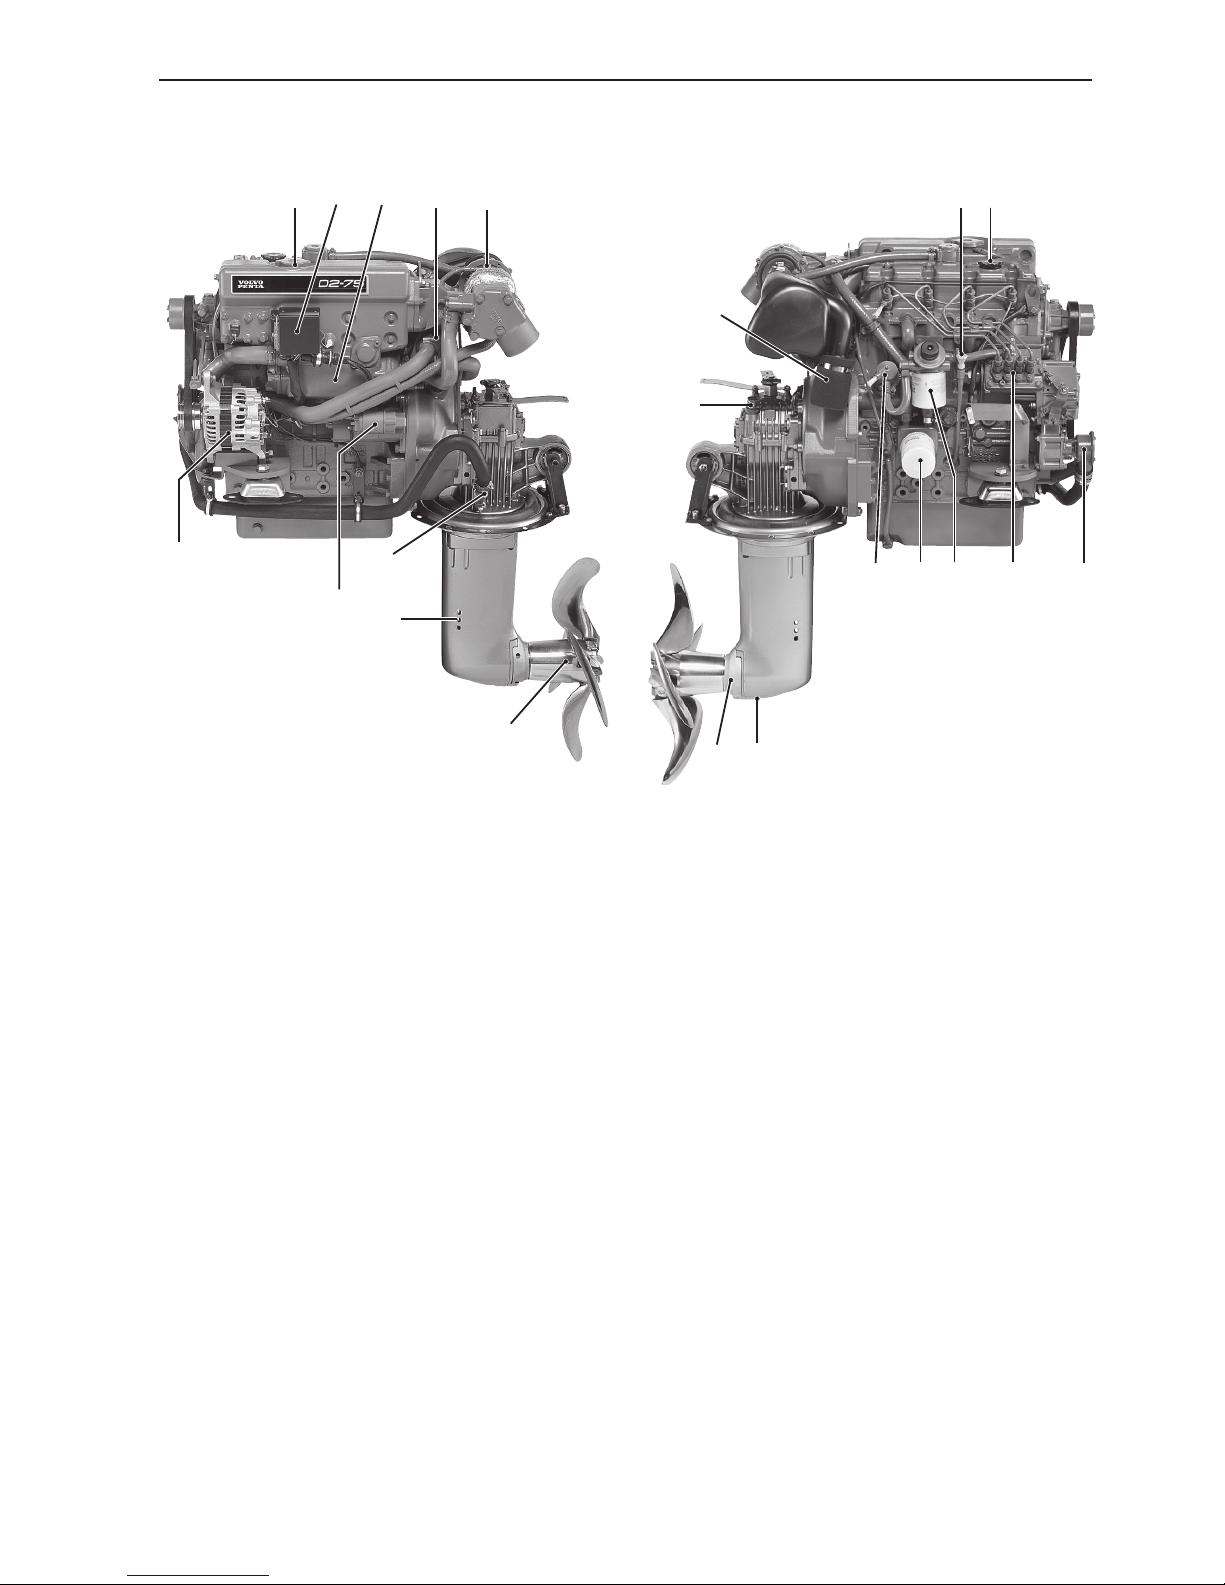
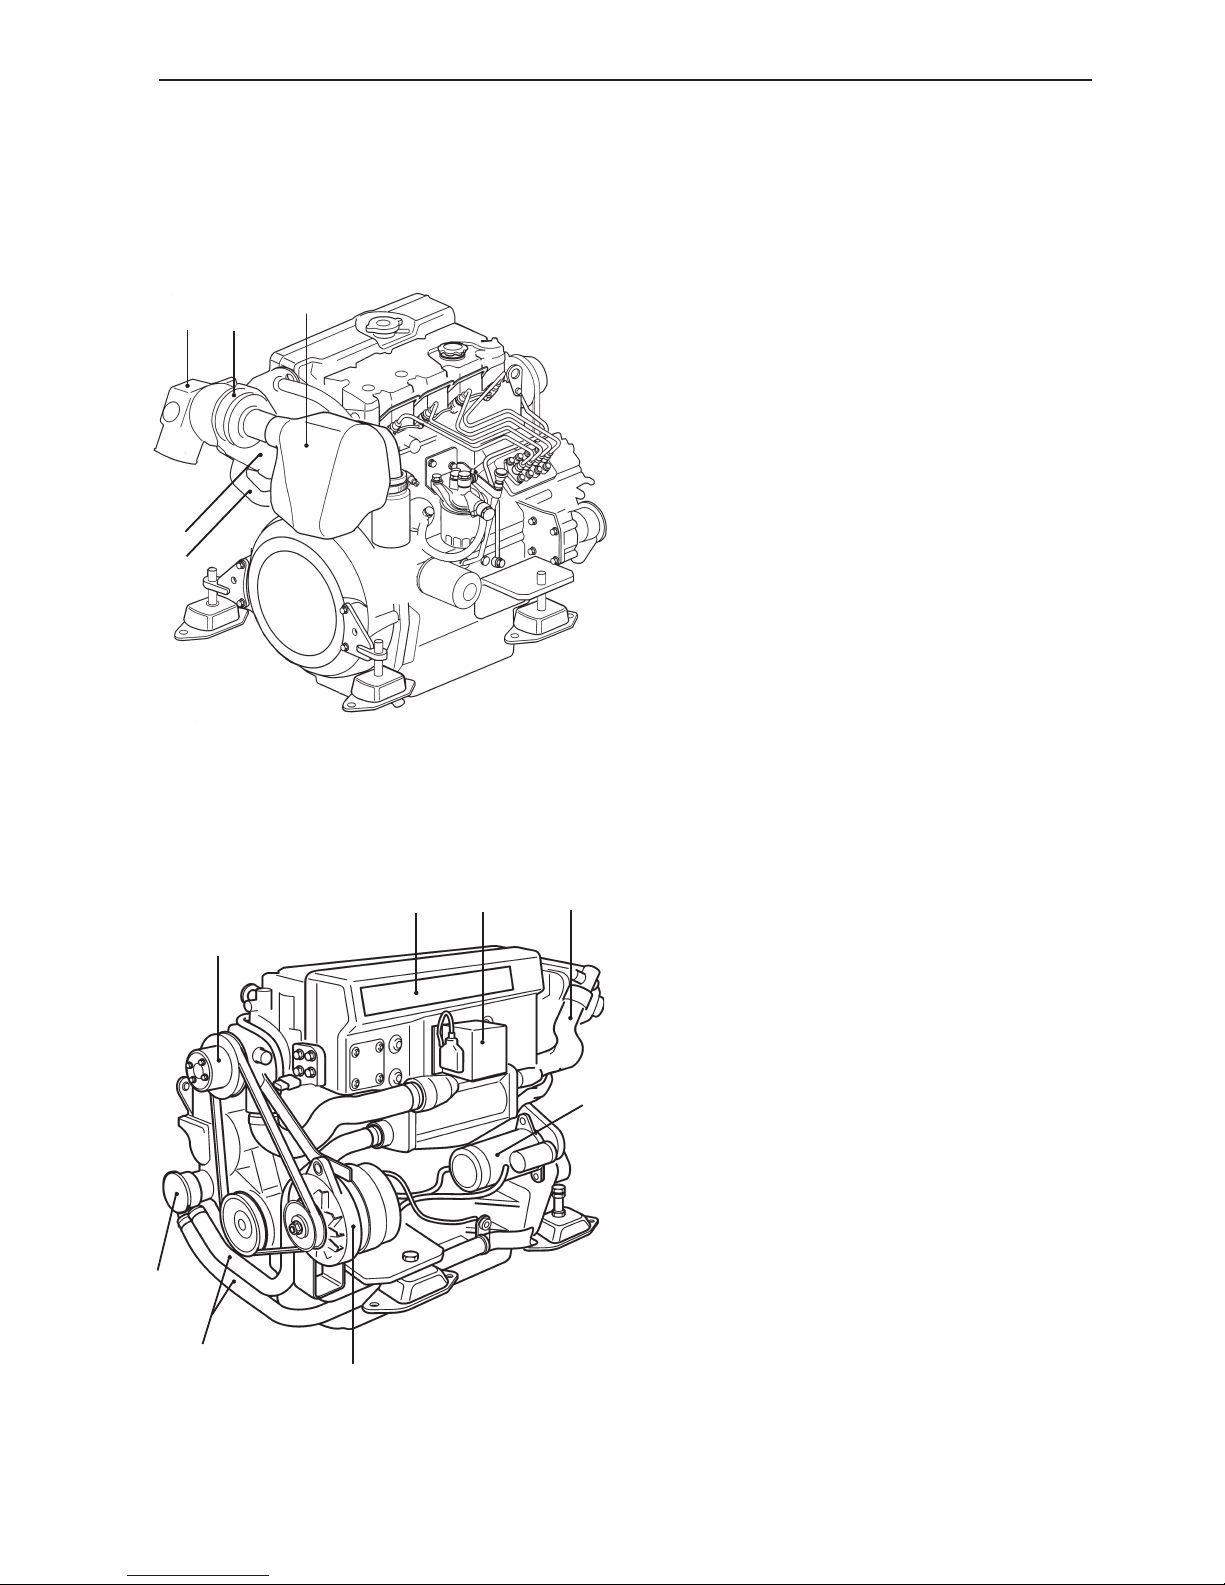
Engine introduction
D2-55 A/B with reverser MS25L
5
3 2
D2-55 A/B with reverser MS25L
13 12
15
6 11
1
14
7
8
10 9
4
D2-55 A/B with reverser HS25A
1
5
7
D2-55 A/B with reverser HS25A
15
14
9 2 3
13
10
6 4 8
11
12
1. Coolant filling
2. Heat exchanger
3. Relay box with fuses
4. Alternator
5. Starter motor
6. Oil cooler, reversing gear
7. Oil dipstick, reverser/S-drive
8. Air filter/Air intake
9. Oil dipstick, engine
10. Oil filler, engine
11. Fuel pump
12. Oil filter
13. Fuel filter
14. Injection pump
15. Sea water pump
Page 14
12
Design and function
1. Coolant filling
2. Heat exchanger
3. Relay box with fuses
4. Alternator
5. Starter motor
7. Oil dipstick, reverser/S-drive
8. Air filter/Air intake
9. Oil dipstick, engine
10. Oil filler, engine
11. Fuel pump
12. Oil filter
13. Fuel filter
14. Injection pump
15. Sea water pump
16. Cooling water inlet, S-drive
17. Sea cock, S-drive
18. Folding propeller
19. Sacrificial anodes
20. Oil drain, S-drive
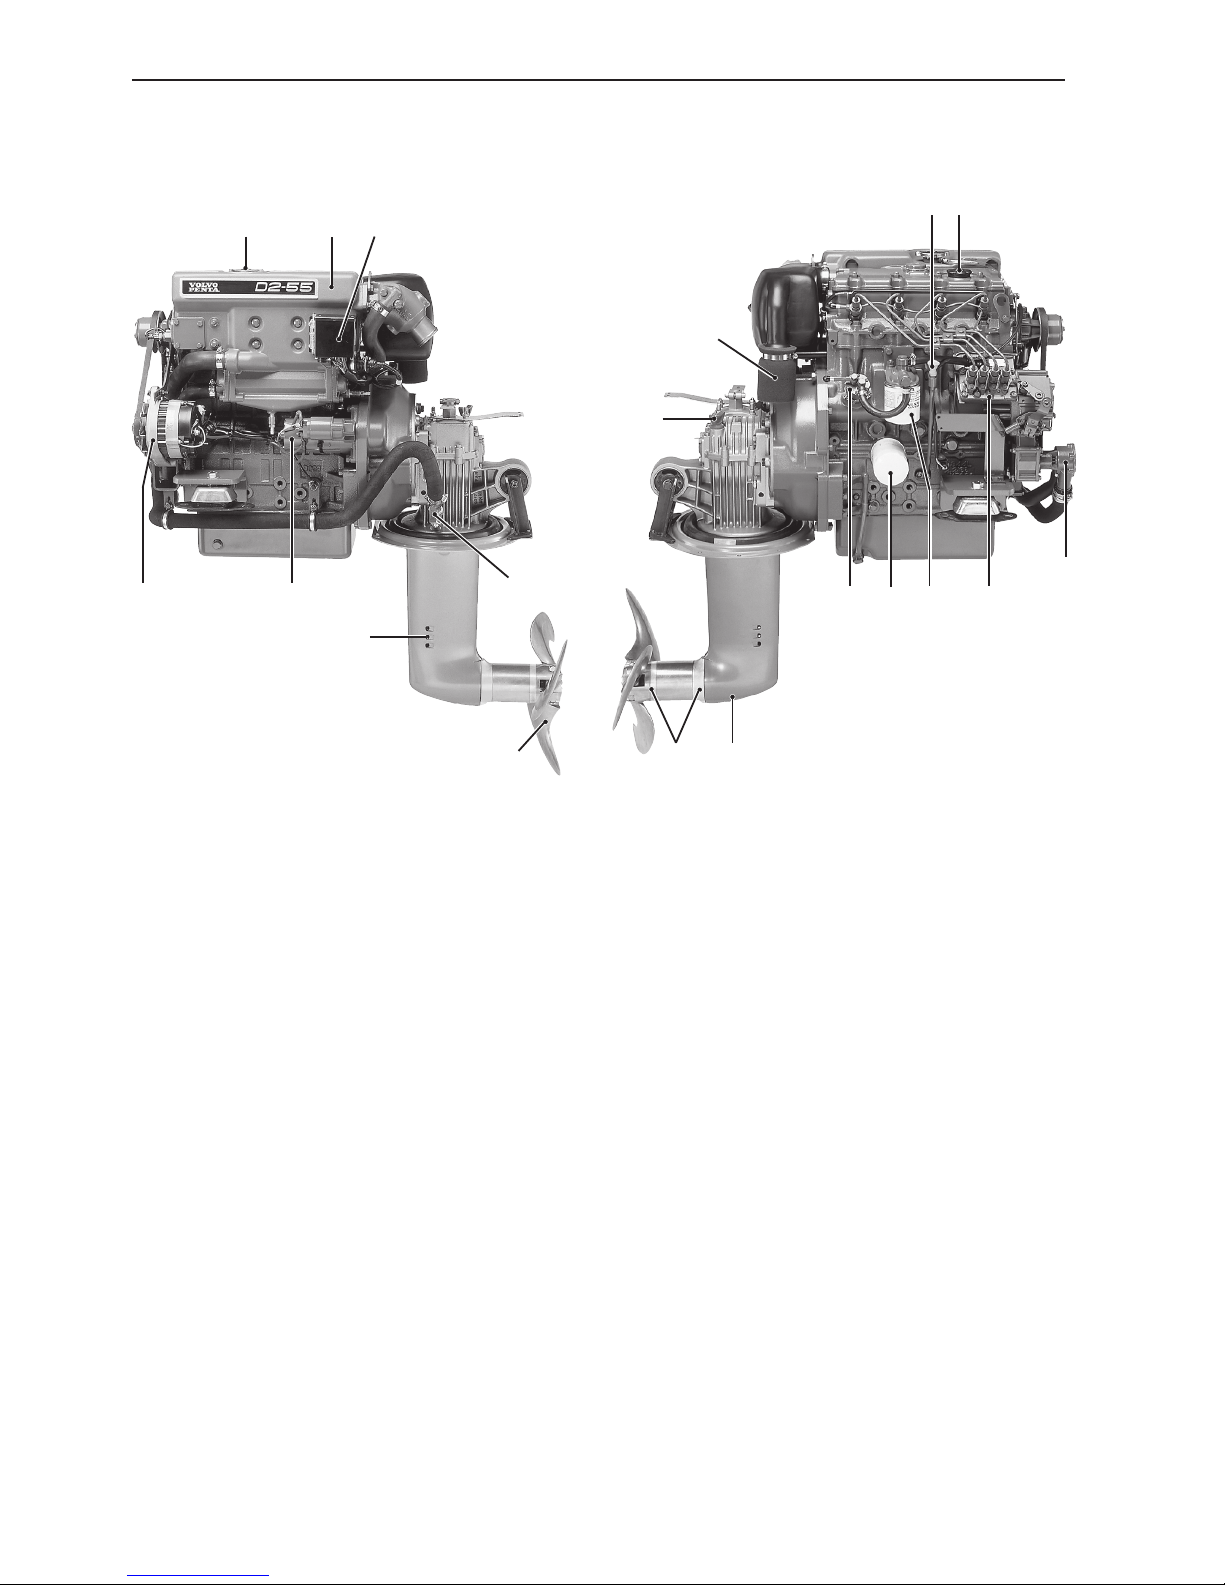
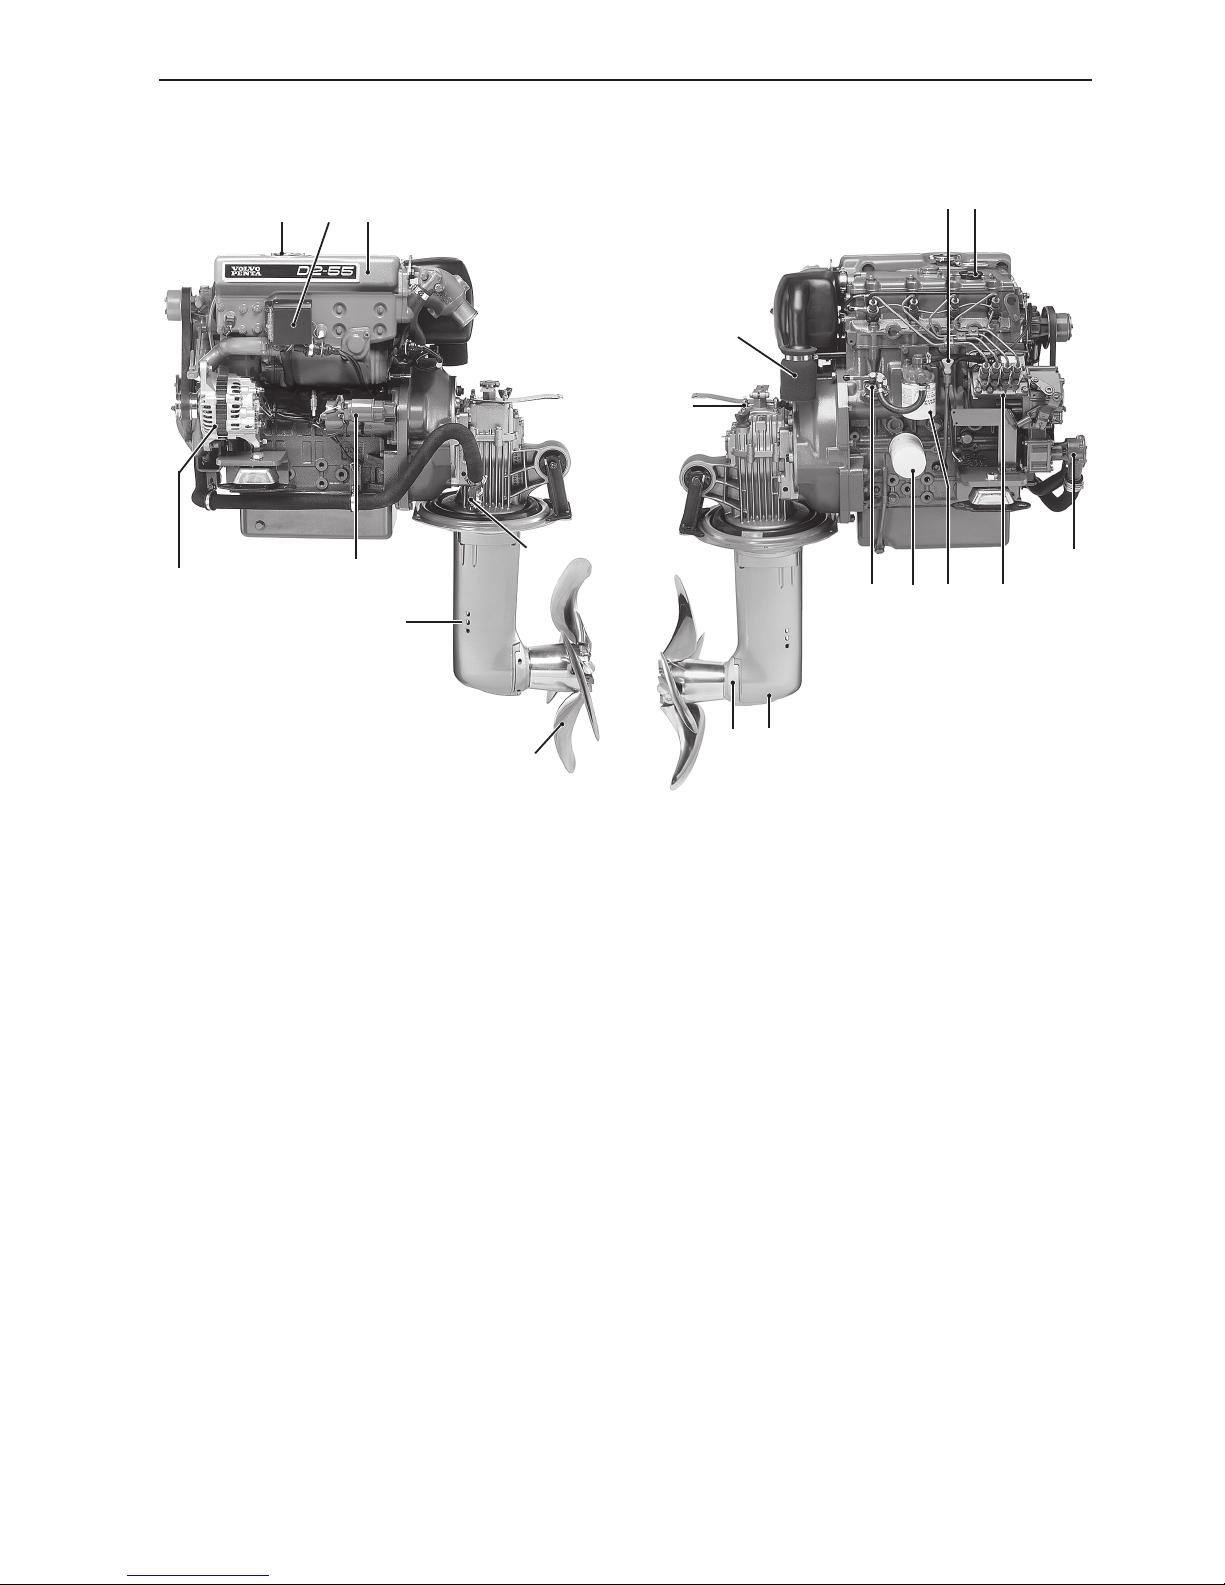
D2-55 A/B with sail-drive MS25S
D2-55 A/B with sail-drive MS25S
18
16
1 3
5
17
2
4
12
8
10
7
19 20
9
13 14
15
11
Page 15
13
Design and function
18
16
1
3
5
17
2
4
12
8
10
7
19 20
9
13 14
15
11
1. Coolant filling
2. Heat exchanger
3. Relay box with fuses
4. Alternator
5. Starter motor
7. Oil dipstick, reverser/S-drive
8. Air filter/Air intake
9. Oil dipstick, engine
10. Oil filler, engine
11. Fuel pump
12. Oil filter
13. Fuel filter
14. Injection pump
15. Sea water pump
16. Cooling water inlet, S-drive
17. Sea cock, S-drive
18. Folding propeller
19. Sacrificial anodes
20. Oil drain, S-drive
D2-55 C with sail-drive 130S D2-55 C with sail-drive 130S
Page 16
14
Design and function
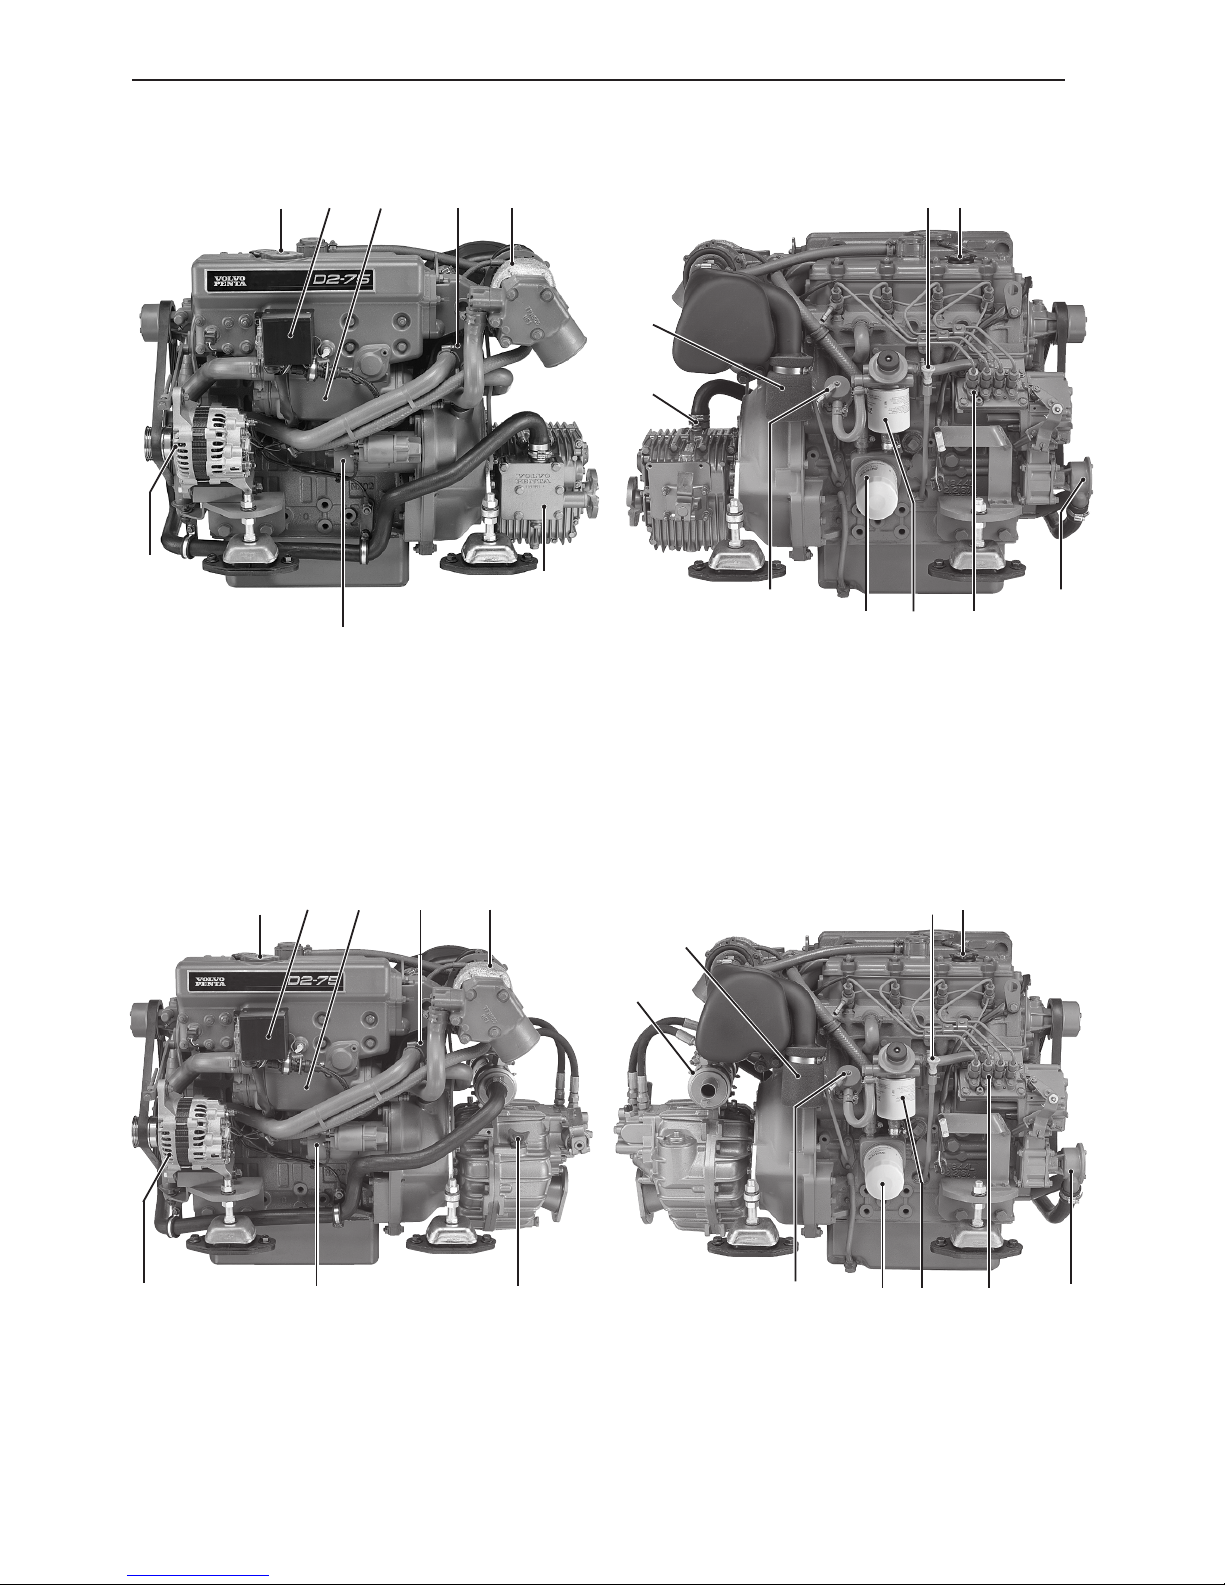
D2-75 A with reverser HS25A D2-75 A with reverser HS25A
D2-75 A with reverser MS25L
7
23
D2-75 A with reverser MS25L
6
1
8
5
4
15 14
17
13
16
9
10
12 11
7
23
9
1
8
5
4
17
16
11
15
12
6
10
13 14
Page 17
15
Design and function
D2-75 A with sail-drive 150S
20
18
19
14
10
12
9
21 22
11
15
16
17
13
D2-75 A with sail-drive 150S
7
23
1
8
5
4
1. Coolant filling
2. Relay box with fuses
3. Heat exchanger
4. Charge air cooler
5. Turbo
6. Oil cooler, reversing gear
7. Starter motor
8. Alternator
9. Oil dipstick, reverser/S-drive
10. Air filter/Air intake
11. Oil dipstick, engine
12. Oil filler, engine
13. Fuel pump
14. Oil filter
15. Fuel filter
16. Injection pump
17. Sea water pump
18. Cooling water inlet, S-drive
19. Sea cock, S-drive
20. Folding propeller
21. Sacrificial anodes
22. Oil drain, S-drive
Page 18
16
Design and function
Component description
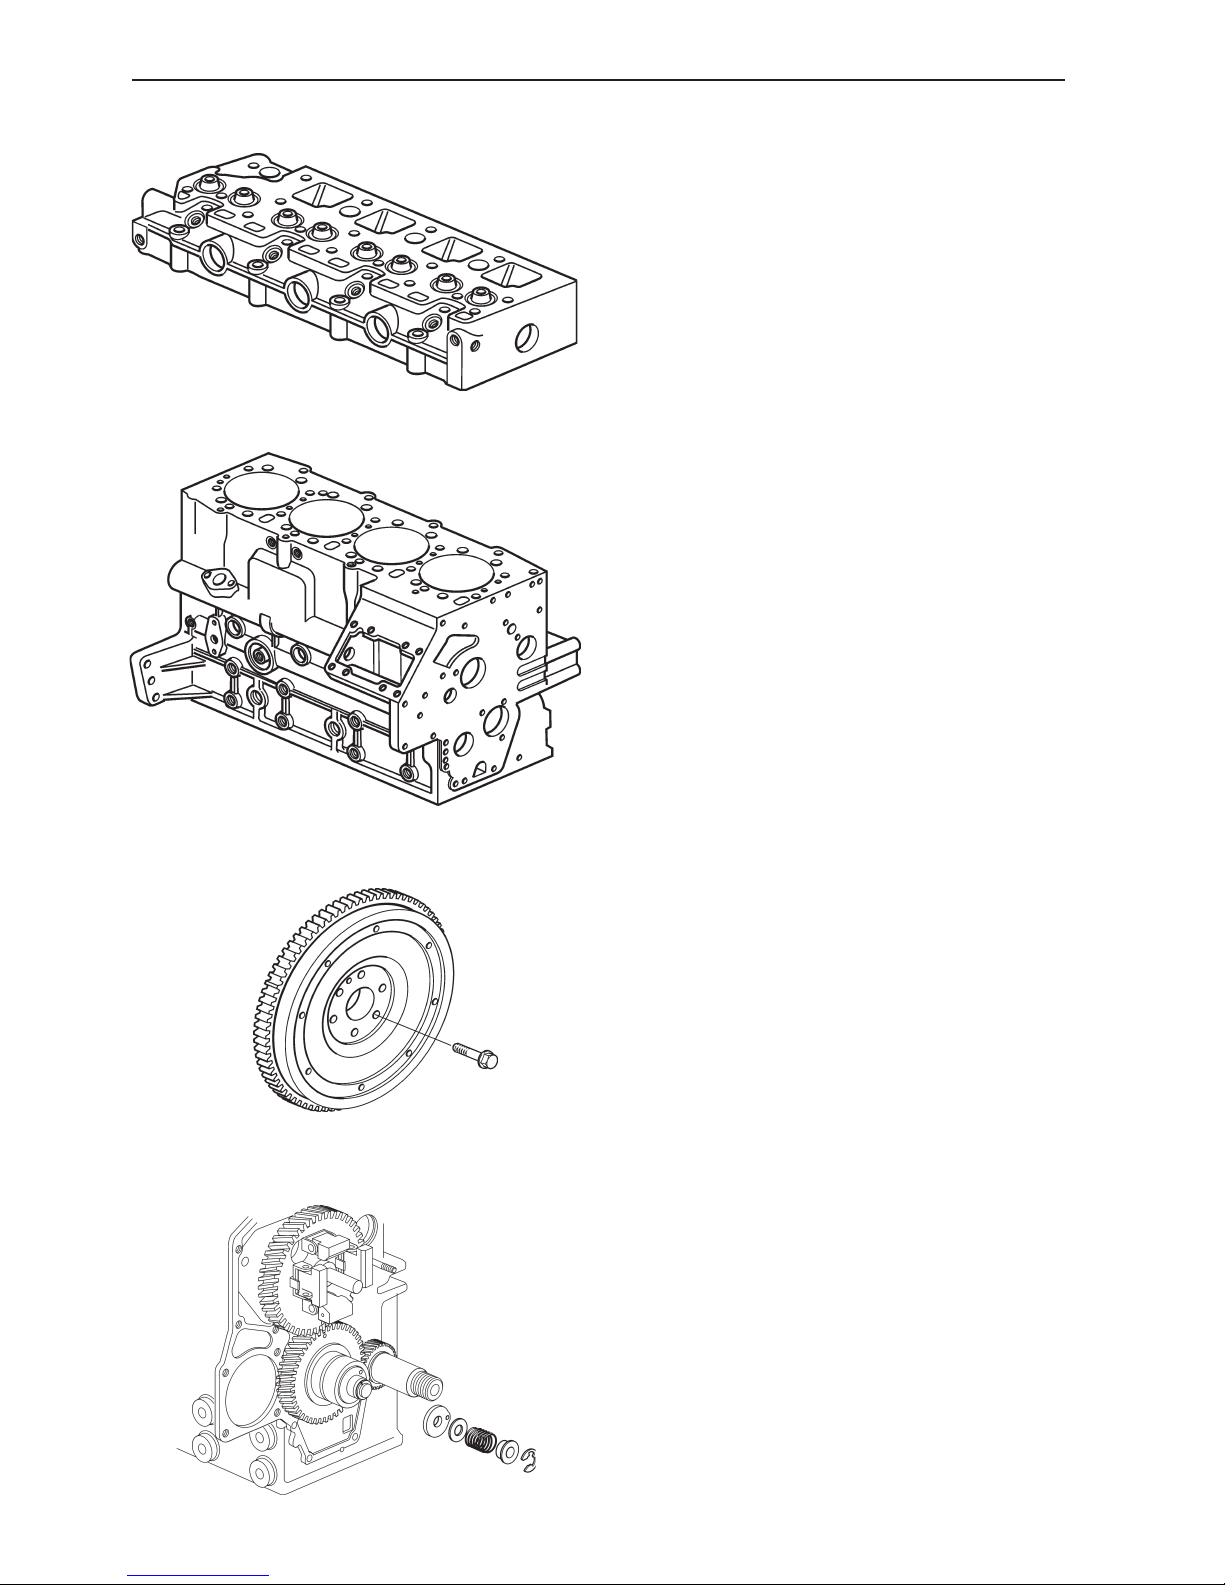
Cylinder head
The cylinder head is made from specially alloyed cast
iron. It has replaceable valve seats for inlet and exhaust valves on D2-55 A/B/C and for exhaust valves
on D2-75 A.
Engine block
The cylinder block is cast in one piece from specially
alloyed cast iron.
Flywheel
An elastic coupling with a rubber damping element is
screwed onto the flywheel. The coupling transfers the
power to the reverser/S-drive.
Timing gear
The timing gears comprise both straight-cut and helical gears.
The camshaft and sea water pump are driven from the
crankshaft gear via an idler gear. The engine’s lubrication pump is integral with the idler gear, and is driven
by it. Regulator weights are suspended on the front of
the camshaft gear.
Page 19
17
Design and function
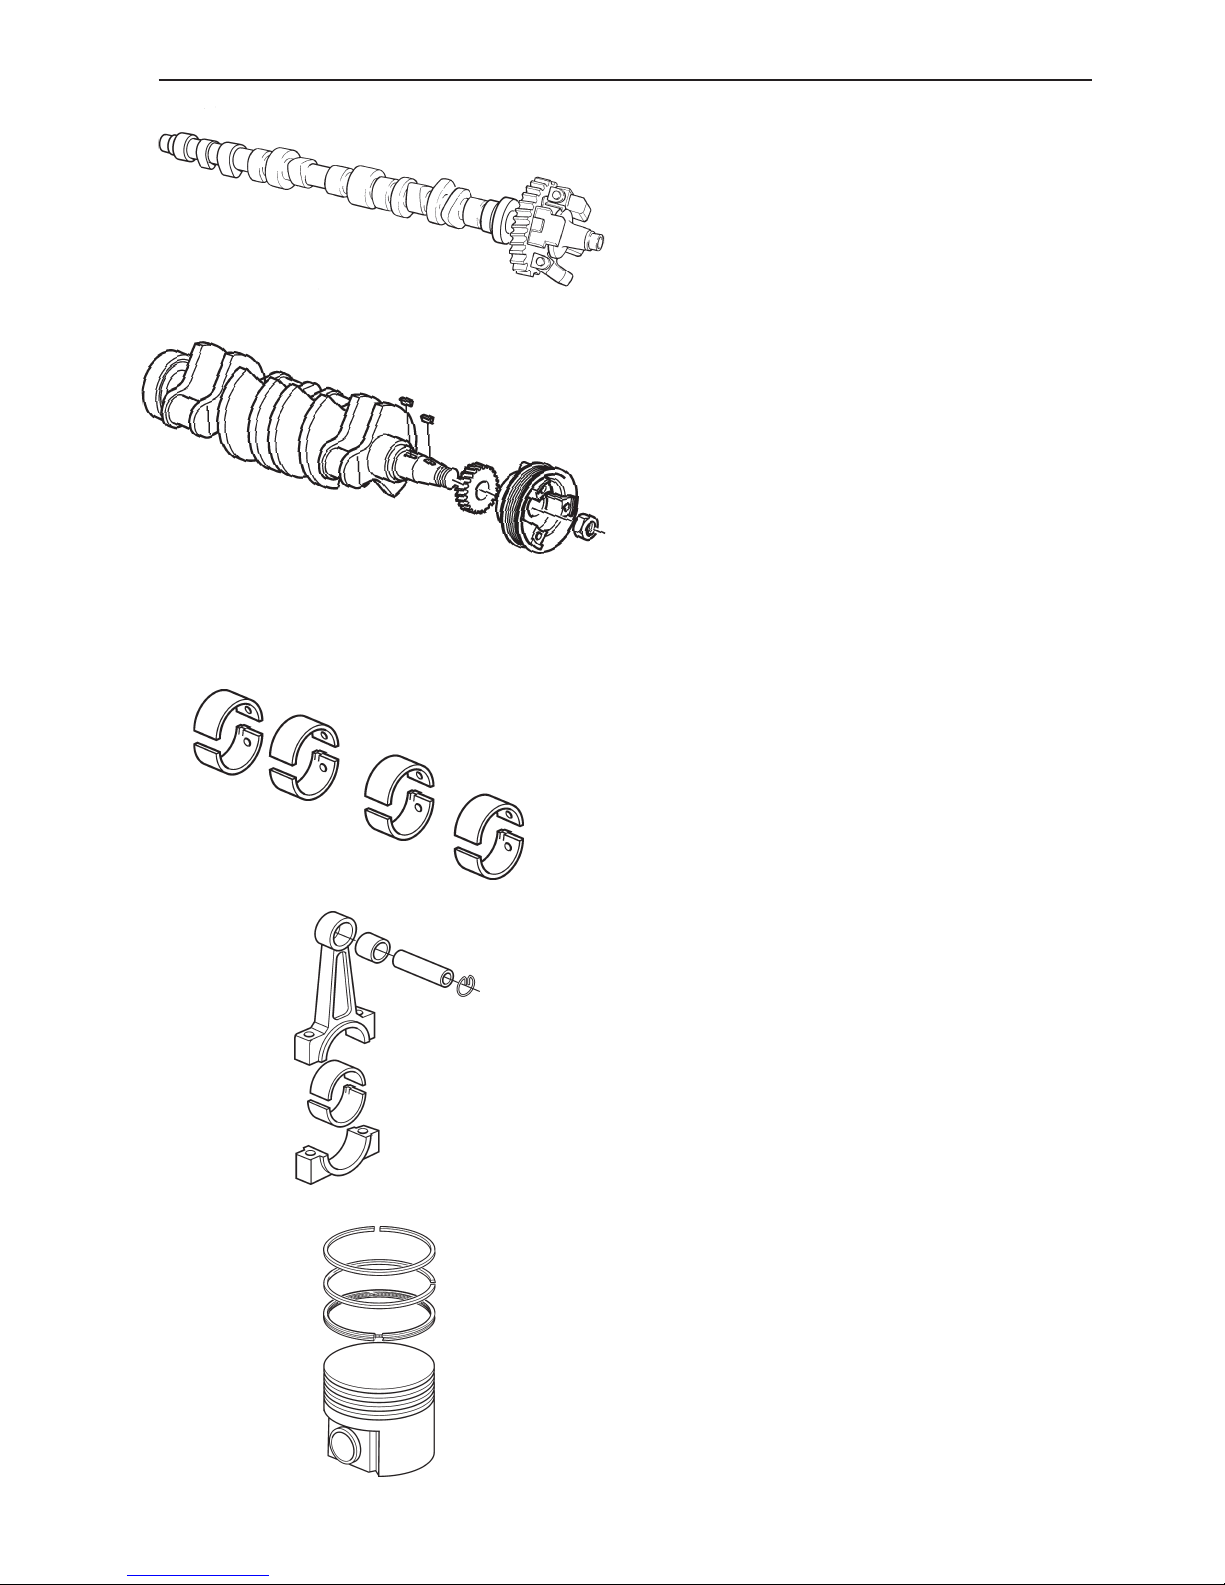
Camshaft
The camshaft is of conventional design with eight
lobes that operate the pushrods and valves.
Crankshaft
The crankshaft is suspended in five main bearings.
Axial thrust is taken up by separate thrust washers
placed on the rear main bearing. The crankshaft is
statically and dynamically balanced, and has induction hardened bearing surfaces. The front end of the
crankshaft has a Woodruff key and the rear end has a
flange upon which the flywheel is mounted.
Main and big-end bearings
The main and big-end bearings comprise steelshells
lined with bearing metal. The bearings are precision
made and are ready to be installed.
The thrust washers for the crankshaft axial bearings
are not available in oversize.
Con rods
The con rods are of I-section. The small end is drilled
for gudgeon pin lubrication.
Pistons, piston rings
The pistons are made from aluminum alloy. They are
fitted with three piston rings (chrome plated) – two
compression rings and an oil ring.
Page 20
18
Design and function
Cooling system, general
The engine is fresh water cooled with a closed cooling
system. The system is divided into two circuits.
In the inner circuit, the fresh watersystem, coolant is
pumped around by a circulation pump, driven via a
belt from the crankshaft pulley.
The fresh water system works under pressure, thus
reducing the risk of boiling if the temperature becomes
high. If the pressure becomes excessive, a pressure
valve opens in the filler cap.
The coolant temperature is regulated by a thermostat.
The flow in the sea water system is accomplished by
a gear-driven impeller pump.
The heat exchanger transfers heat from the coolant to
the sea water.
As extra equipment, the engine can be equipped with
a separate expansion tank.
Thermostat
The engine is equipped with a thermostat whose sensor body contains wax.
When the engine is cold, the thermostat closes the
way to the heat exchanger. Coolant then passes
through a by-pass pipe, back directly to the suction
side of the pump. As the engine warms up, the volume of the wax increases and the thermostat progressively opens the passage to the heat exchanger, at
the same time as the by-pass channel is closed.
Please refer to the “Technical Data” chapter for opening temperatures.
Sea water pump
The sea water pump is driven by the gears in the timing gear. The impeller (pump wheel) is made from rubber and is replaceable.
NOTE! The impeller will be damaged if the pump is run
dry.
Page 21
19
Design and function
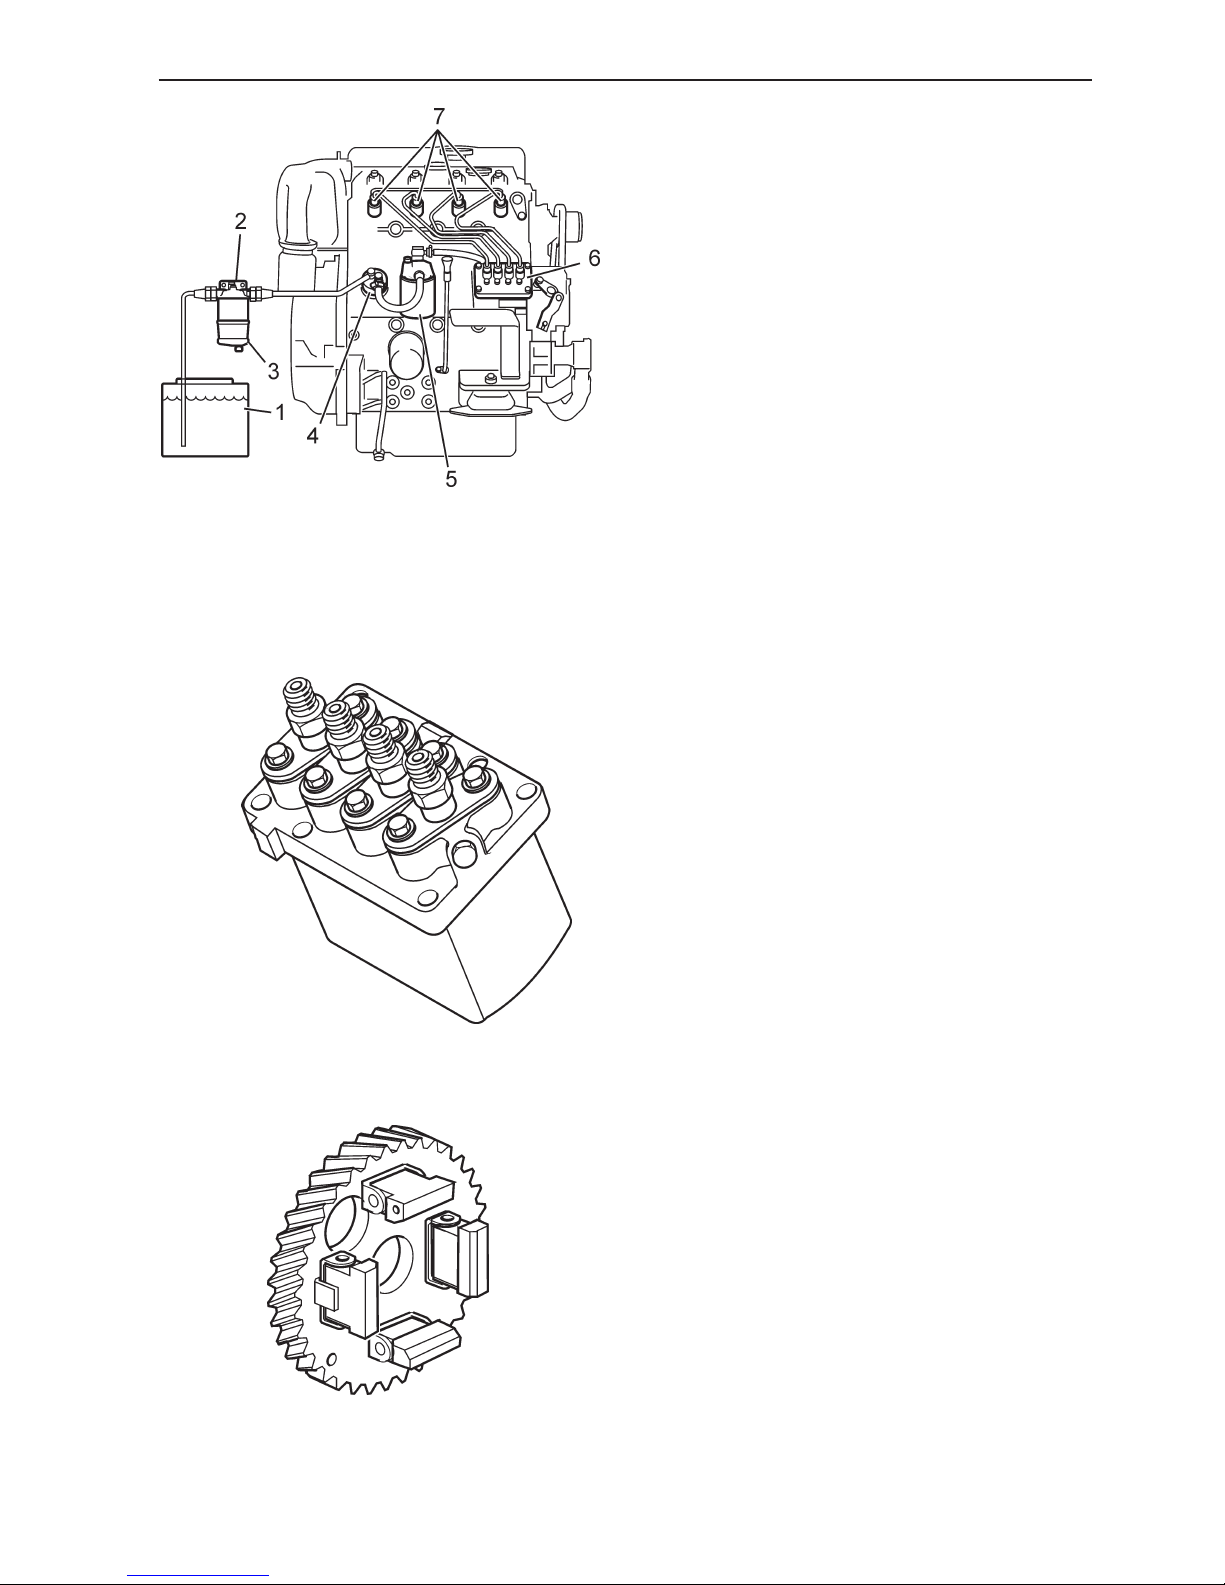
Fuel system, general
The fuel is sucked from the fuel tank by the feed
pump, through a water separator/pre-filter (extra
equip.) and is pressed through a fine filter to the injection pump.
Return fuel from the injectors is fed through return fuel
lines, back to the tank.
Injection pump
The injection pump is an in-line flange mounted pump.
The pump is driven by cams on the engine’s camshaft, which operates the pump chambers directly.
Centrifugal regulator
The regulator is mechanical and works with speedsensitive regulator weighs. It is mounted on the front
of the camshaft gear, from where it is also driven.
The regulator weights operate the injector pump control rod via the regulation sleeve, a lever and a regulator arm. The engine speed is regulated throughout the
entire range, from low idle to high idle (all-speed type).
1. Fuel tank 5. Fuel fine filter
2. Primary filter 6. Injection pump
3. Water separator 7. Injectors
4. Feed pump
Page 22
20
Design and function
Feed pump
The feed pump is driven by an eccentric on the camshaft rear end. The pump on D2-55 A/B is also
equipped with a manual hand pump.
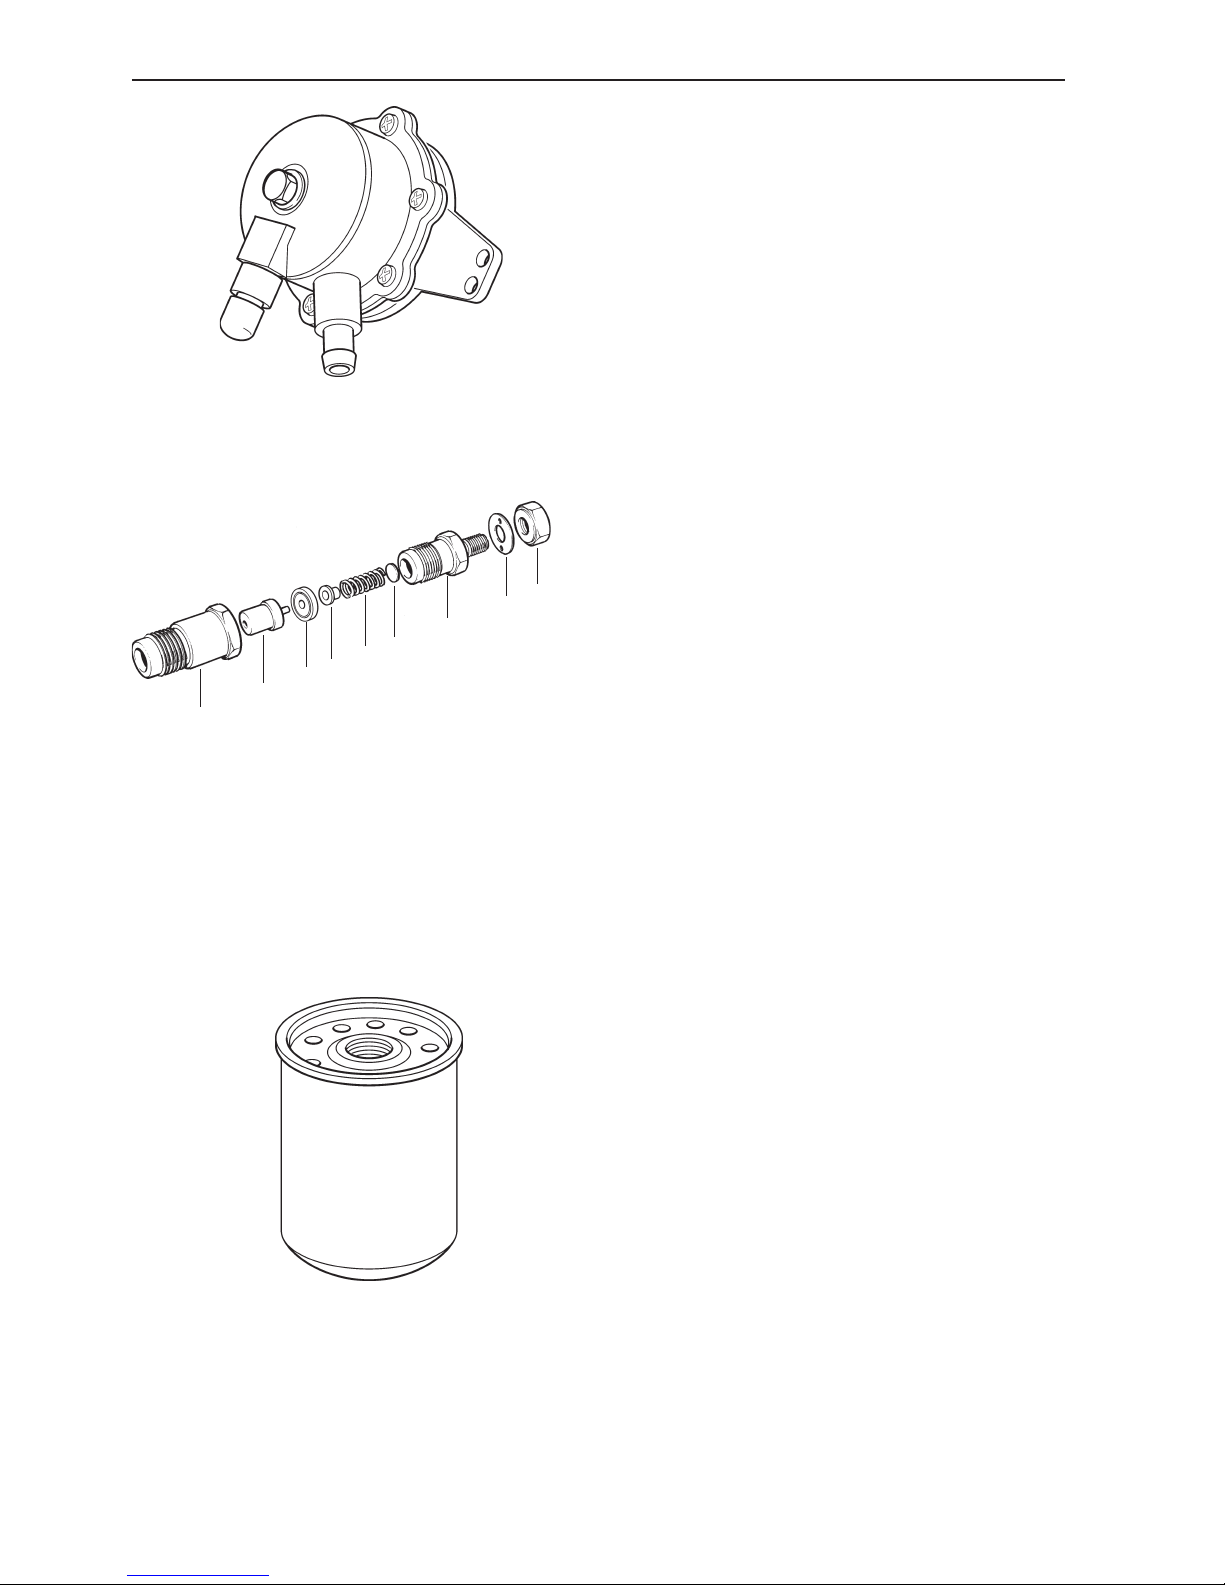
Injectors
The engines is provided with pintle - type injectors.
Each injector basically consists of a nozzle retainer
and a nozzle.
When the fuel pressure increases to the set value
(opening pressure), the injector needle which is held
pressed against its seat by the compression spring is
lifted and atomized fuel is injected into the precombustion chamber of the engine.
The opening pressure of the injector is determined by
the compression spring which is adjustable with shims.
Fuel filter
The fuel filter is discardable. The filter insert is a paper filter.
1. Injector nut 6. Adjustment shims
2. Injectors 7. Injector holder
3. Joining piece 8. Washer
4. Compression screw 9. Nut
5. Spring
1
2
3
4
5
6
7
8
9
Page 23

21
Design and function
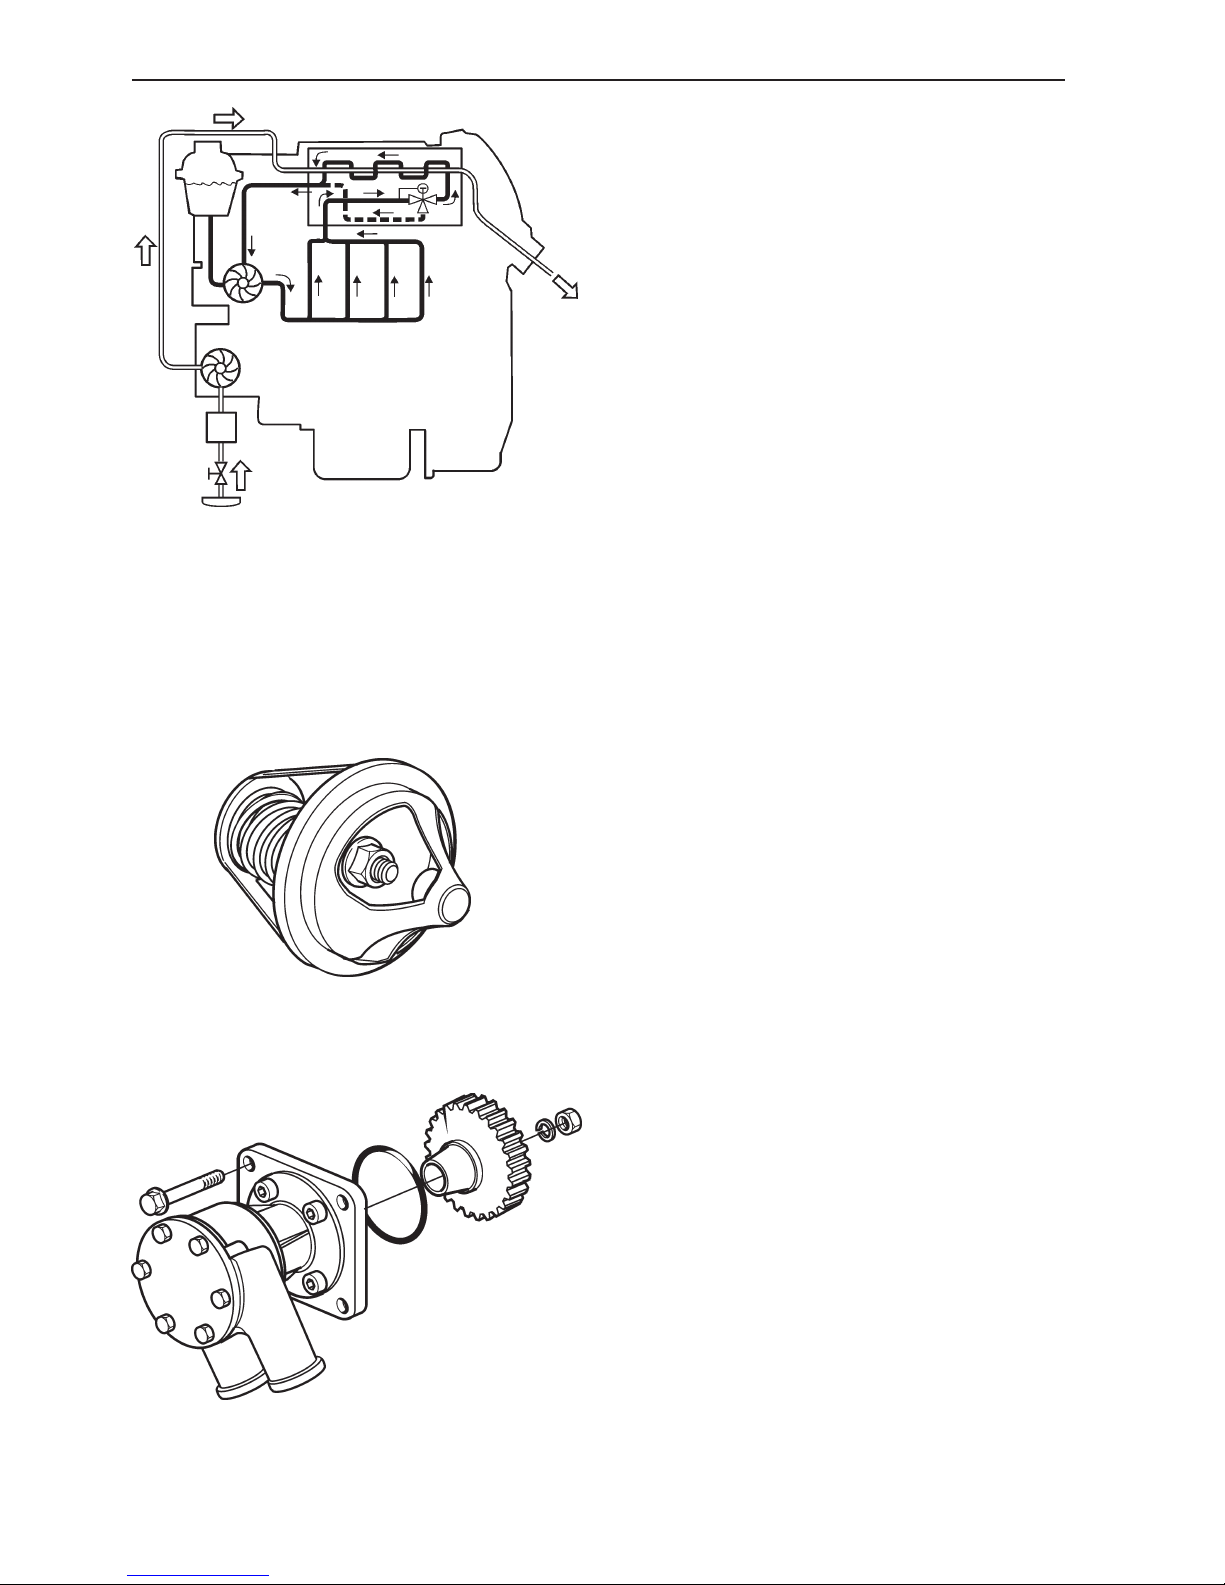
Lubrication system, general
The engine has a pressurized lubrication system with
full-flow oil filter.
Oil pump
The lubrication pump is located within the idler gear on
the timing gears, from where it is also driven.
The pump is a rotor pump, with an inner rotor and an
outer rotor, eccentrically mounted in relation to each
other. The inner rotor has one “tooth” less than the
outer rotor.
The function of the pump is that the volume of the
spaces between the inner and outer gears increases
and decreases. During the first section of the rotation
of the inner rotor, the volume increases, a partial vacuum occurs and oil is sucked into the inlet. After
about a half rotation, the volume is reduced and a
pressure occurs, which forces the oil out through the
outlet.
Page 24
22
Design and function
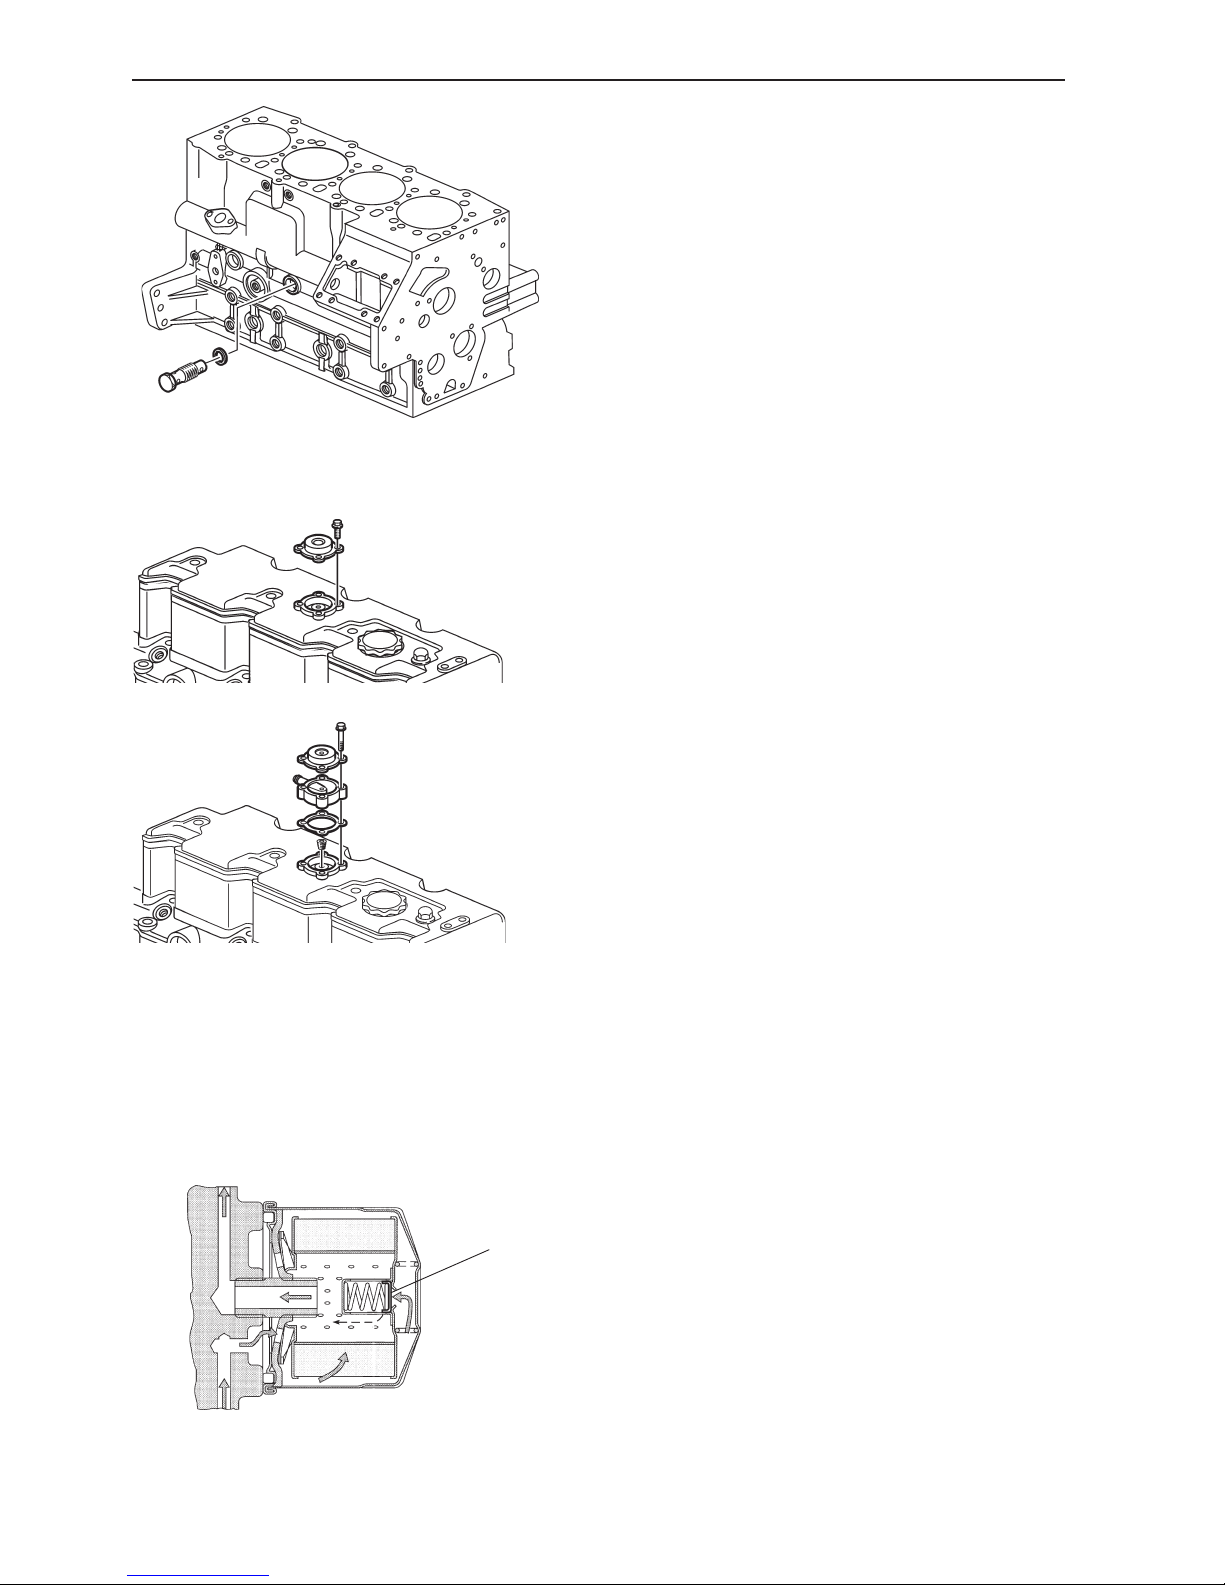
Reduction valve
The lubricating oil pressure is limited by a reduction
valve. The valve is located in the lubricating system
just before the oil filter. The valve opens with high
pressure and allows the oil to flow back into the sump.
Crankcase breather
To prevent over-pressure and to separate fuel vapor,
water vapor and other gaseous combustion products,
the engine is fitted with closed crankcase ventilation.
Oil filter
The filter is a full flow filter, which means that all the
oil is filtered before it is forced out into the lubrication
system.
The filter element consists of folded filter paper.
There is a bypass valve (A) at the base of the filter,
which opens and allows oil to flow past the filter if the
filter insert should become blocked.
A
D2-55A/B/C
D2-75A
Page 25

23
General
A condition test should be done before each major
service activity, if possible, to determine the general
condition of the engine and discovery any concurrent
fault causes. A condition test requires the engine to
be run, so this should be done before the engine or
any engine components are disassembled.
Please refer to “Condition test, engine”.
Repair instructions
Measures before overhaul in boat
1 Remove battery power.
2 Clean the outside of the engine.
NOTE! Make sure that wash residue is collected
for destruction and does not inadvertently end up
in the water. Also refer to the warning text under
“Actions after lifting the engine”.
3 Work involving the cooling system: Close the sea
cocks and drain the coolant from the sea water
and fresh water systems.
WARNING! Make sure that all sea water inlets
are securely closed, so that water cannot find
its way in during disassembly of cooling system
sub-components.
Actions before lifting the engine
from the boat
1 Lift the boat ashore.
2 Disconnect battery power, remove battery con-
nection on the starter motor.
3 Disconnect the engine-
instrument cable harness connector.
4 Disconnect the sea water connection/keel-cooling
connection.
5 Remove the exhaust system.
6 Close the fuel stopcocks. Remove the fuel con-
nections.
7 Disconnect the throttle and gearshift wires.
8 Disconnect the propshaft from the reverser. Undo
the engine mounting pads from the bed and lift the
engine out.
Actions after lifting the engine
1 Clean the engine.
IMPORTANT! Remember the following when
washing with a power washer: Be extremely
careful when cleaning, to avoid getting water inside engine components. When a power washer
is used, the water jet must never be aimed at
seals, such as shaft seals, joints with gaskets,
rubber hoses or electrical components.
2 Drain the engine oil.
3 Remove the reverser (if required).
Page 26
24
Repair instructions
Condition test, engine
Compression test
Special tools: 885 484, 885 252 and 998 8539
A compression test is done, which shows the sealing
of the cylinders and valves, to assess the condition of
the engine in a simple, reliable manner.
• Warm the engine up, then stop it.
• Remove all the injectors and test each of the cylin-
ders in turn.
IMPORTANT! Observe the greatest possible
cleanliness, to avoid getting dirt in the fuel sys-
tem. Plug the connections for the disassembled
injectors and fuel pipes.
The compression pressure shall be read off at normal
starter motor speed, refer to “Technical data”.
Low combustion pressure in all cylinders indicates
worn cylinder bores and piston rings. If one cylinder
has lower compression pressure than the others, the
reason can be poor valve sealing, broken piston rings
or a damaged cylinder head gasket.
Insert adapter nos. 885 484 and 885 252 in the injector hole. Install a compression gauge 998 8539 in the
adapter, and carry out the compression test.
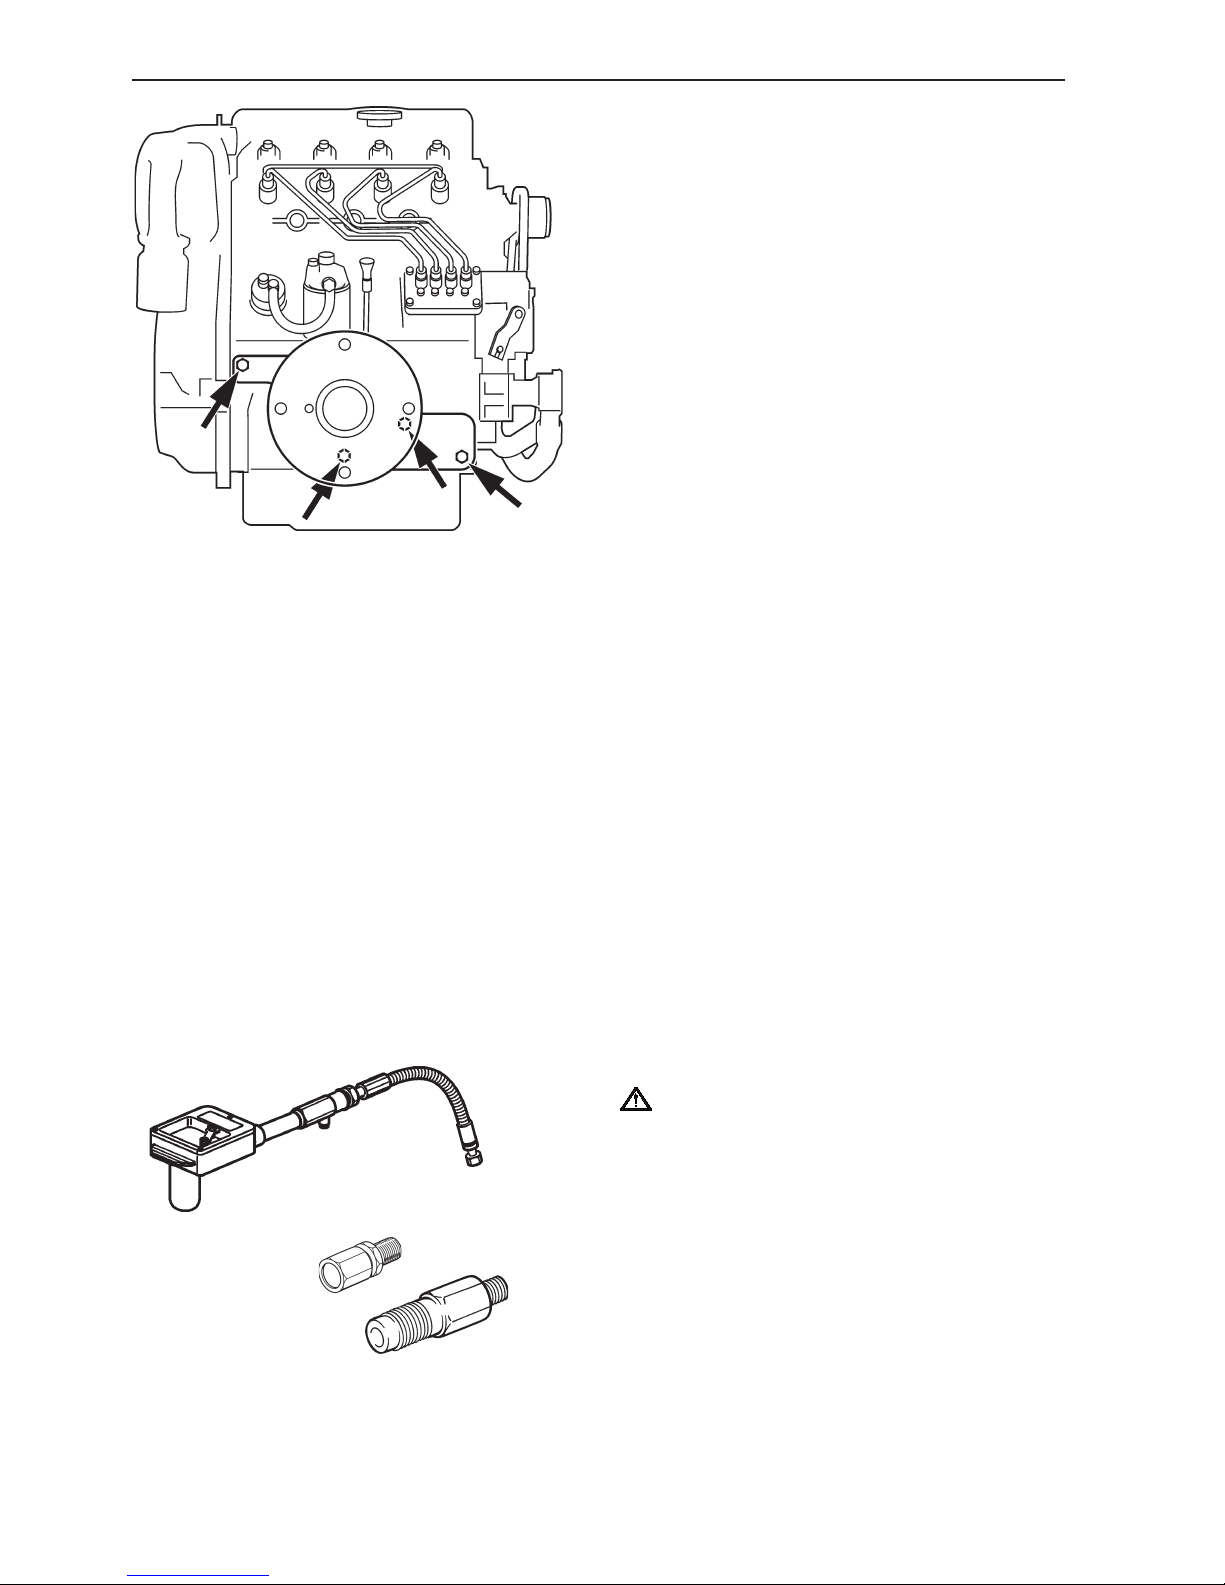
Engine fixture, fixing
Special tools: 885 485, 998 6485 or 856 927
Use fixture 885 485 to attach the engine to overhaul
stand 998 6485 or 856 927.
The fixture is attached to the right side of the engine
as illustrated below.
NOTE! It is important that the instructions regarding
number of attachment bolts and sizes are followed to
ensure secure engine attachment.
Bolts required:
1 pcs M10 x 35 mm
3 pcs M14 x 1.5 x 35 mm
Before the engine fixture can be mounted and the engine attached to the overhaul stand, the right front engine mounting, oil dipstick tube, oil cooler with oil filter
and turbo oil pipe (D2-75), must be removed from the
engine.
Page 27
25
Group 21 Short block
Short block, disassembly
Special tools: 885 510, 885820, 885822
Empty the oil and water from the engine.
Lift the engine with a suitable lifting device. Installing
the engine fixture, please refer to “Engine fixture, fixing”.
1. Remove the exhaust bend (1).
2. Remove the induction silencer (2).
3. Remove the turbo (3) with associated oil return
pipe (only D2-75).
4. Remove the electronics box (4) complete with cabling.
5. Remove the starter motor (5) and alternator (6)
and front left engine mounting.
6. Remove the coolant hoses (7), heat exchanger
(8), sea water pump (9) and circulation pump (10).
7. Remove the charge air cooler (11) and oil pipe to
the turbo (only D2-75).
6
2
3
1
5
4
9
11
10
8
7
7
7
Page 28
26
Group 21 Short block
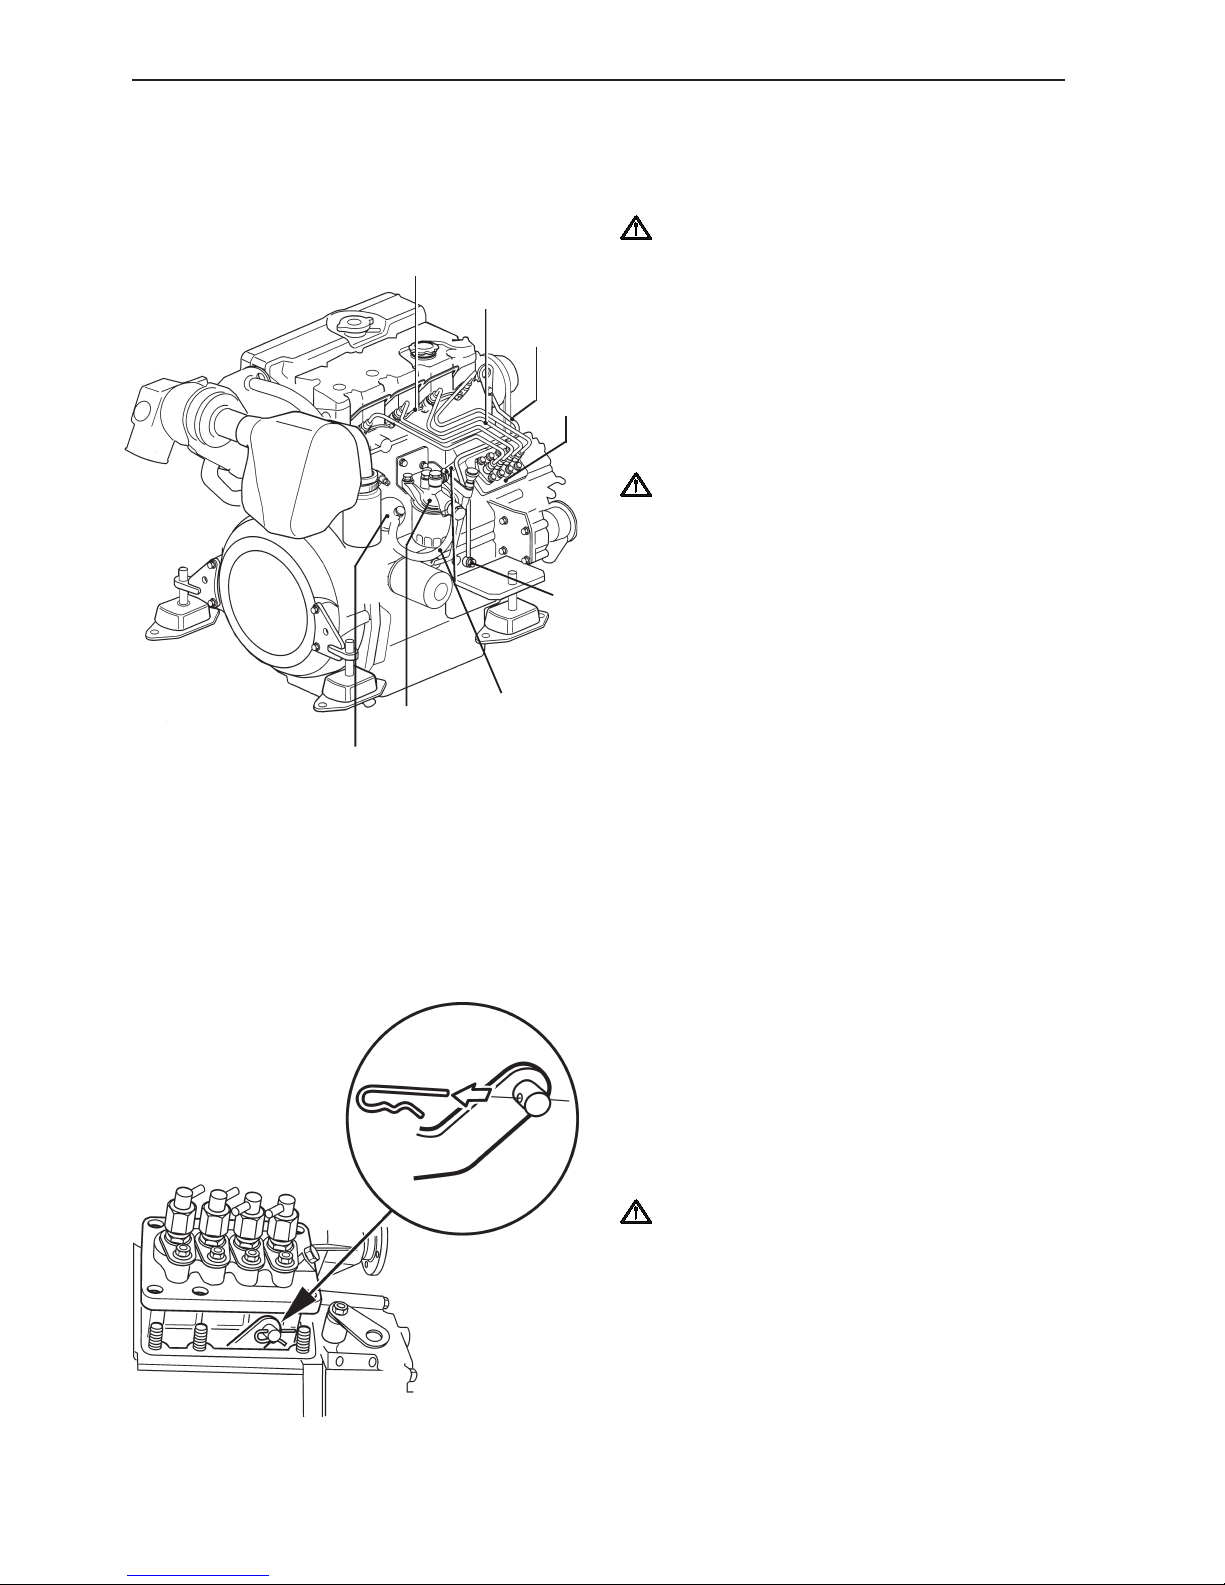
8. Remove (13) oil pressure monitor and oil pressure
pipe (12) to the cylinder head.
9. Remove the fuel lines (14) between the injection
pump, fuel filter and feed pump.
WARNING! Observe the greatest possible
cleanliness in work on the fuel system. Watch
out for fuel spillage, diesel oil is hazardous on
repeated skin contact.
10. Remove the supply pipes (15) between the fuel
pump and injectors, use the nut on the return fuel
line as a counterhold so as not to bend the pipes.
Remove the fuel supply pipes and put them on a
clean, dry surface.
11. Remove the return fuel pipe (16) and the injectors.
IMPORTANT! Observe the greatest possible
cleanliness, to avoid getting dirt in the fuel sys-
tem. Plug the fuel pump and injector connections with suitable plugs, for example kit number
885510.
12. Remove the fuel filter and bracket (17), feed pump
(18) and the nipple to the injection pump.
14
18
17
19
16
15
12
13
13. Remove the injection pump (19). Remove the fixing screws and nuts on the pump. Turn the stop
lever clockwise and carefully lift the pump, to
make the lock clip on the regulator arm accessible.
Remove the lock clip and free the regulator arm.
IMPORTANT! Be careful when disassembling
the injection pump, avoid damaging or bending
the lever.
NOTE! Retain any shims from beneath the injection
pump flange. Use the same thickness of shims when
re-installing, unless the camshaft, engine block or injection pump have been changed.
Page 29
27
Group 21 Short block
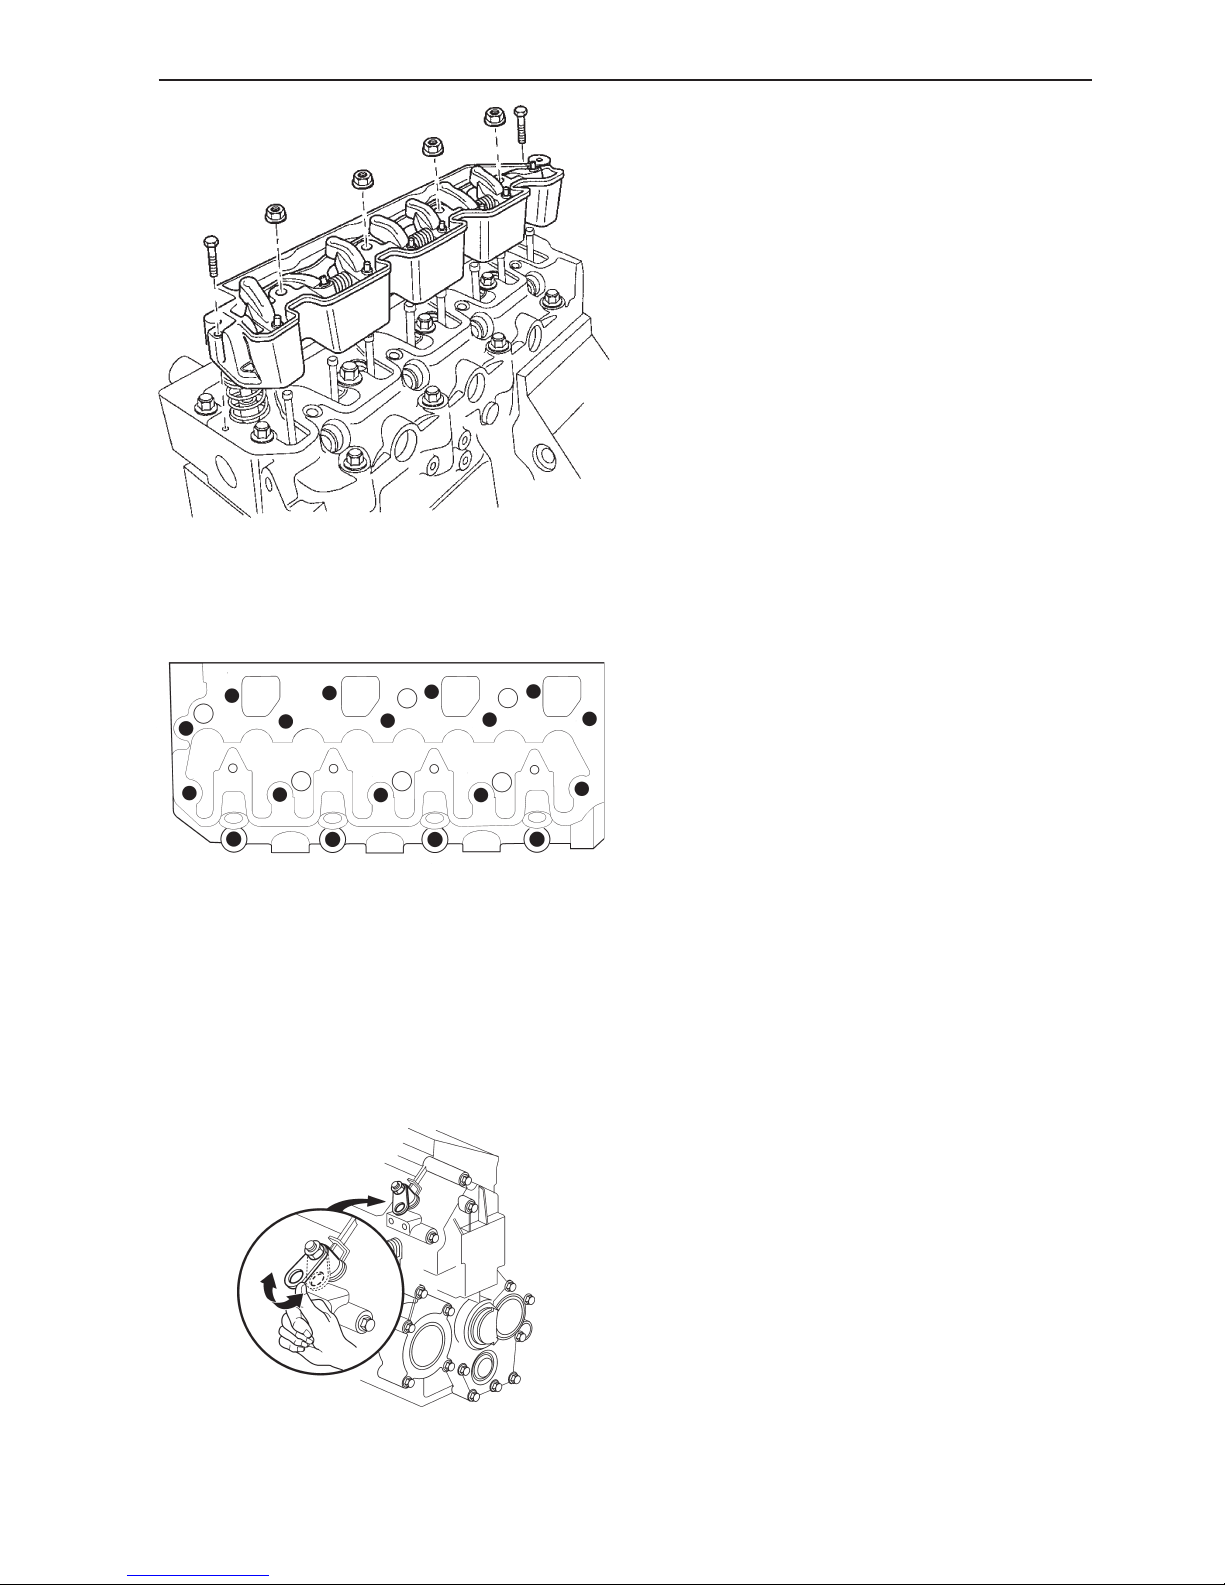
14. Remove the rocker cover, power rail and glow
plugs.
15. Remove the lower part of the rocker cover with integrated rocker arm bridge. Start by unscrewing
the two M6 screws at the outer edge, then loosen
the rocker arm bridge nuts half a turn at a time,
until the rocker arms are no longer under load.
16. Prepare a stand, marked with cylinder numbers. If
the rocker arms, valve caps, pushrods and valve
lifters are to be re-used, these must be fitted in
their original positions.
Lift the push rods and valve caps out and put in
them in number sequence in the marked stand.
17. Loosen the bolts in the opposite tightening sequence (refer to “Installing cylinder head”). Remove the cylinder head.
18. Remove the valves, if these are to be re-used,
they must be fitted in their original positions. Special tool magnetic pen, part number 885 822.
19. Remove the crankshaft sensor, flywheel casing
and vibration damper.
NOTE! To reduce the risk of damage to the crankshaft
sensor, this should be removed before the flywheel
casing is removed.
20. Mark the position of the flywheel on the crankshaft. Remove the flywheel.
22. Remove the inner flywheel casing and the rear
shaft seal.
23. Remove the pulley, use special tool 885 820 and
3 pcs. M10x40 mm bolts. Remove the timing gear
cover. Load the stop arm so that the springs on
the inside of the housing do not come out of position or spring out.
18
17
16
15
14
1312
11
10
98
7
6
54
3
2
1
Page 30

28
Group 21 Short block
24. Remove the idler lock ring. Save the sleeve washer, spring and shims.
Lift away the idler gear complete with cover and
oil pump. Note the thrust washer behind the oil
pump.
25. Remove the camshaft and gear. Remove the
screws from the locking plate, the screws are accessible through a hole in the camshaft gear.
Lift out the camshaft complete with gear and regu-
lator weights.
NOTE! Take care so that bearings, journals and cam
lobes are not damaged.
26. Remove the timing gear plate.
27. Invert the engine and remove the sump together with
the external oil pipe. Remove the oil strainer and
suction pipe.
28. Scrape away the carbon from the top of the cylinders to simplify disassembly. Check that the conrod caps are marked so that they can be reassembled correctly.
Remove the con rod caps and push out the pistons.
Page 31

29
Group 21 Short block
Inspecting the engine block
Upper block plane
Check that the upper engine block plane does not
have any cracks or other damage. Also check that it
is not warped (in the same way as for the cylinder
head).
Max warpage, please refer to “Technical Data”.
Change the engine block if it is outside the tolerances.
Cylinder bore
Check that the cylinder bores are not scored or damaged in other ways.
Measure the cylinder bores at the upper and lower
turning positions for the piston rings (app 10 mm and
100 mm below the engine block plane) and also in the
middle. Measurement should be done with an internal
dial gauge and both along and transverse to the engine block (A and B).
Concerning max. permitted cylinder diameter, see under “Wear tolerances” in Technical data.
29. Remove the oil pressure valve to allow removal of
the crankshaft and simplify flushing of the oil
channels.
IMPORTANT! Check that the oil pressure valve
on the right side of the block is removed before
removing the crankshaft.
NOTE! Tape the crankshaft gear to protect the bearing
surfaces in the block during disassembly.
30. Remove the locking screws holding the main
bearing caps. Lift the crankshaft out carefully,
complete with caps, backwards.
Page 32

30
Group 21 Short block
Cylinder head, overhaul
Disassembling cylinder head
Special tools: 885 023, 885 498
1. Remove the valves (1) and valve springs (3).
Compress the springs with compressor 885 023
together with pressure foot 885 498 and remove
the valve cotters (5). Place the valves in order in
a marked valve holder, so they can be refitted in
their original positions. Remove the valve stem
seals (2).
2. Clean all components. Be especially careful with
the cylinder head oil and coolant channels.
3. Remove any remaining carbon/deposit from the
cylinder head sealing surface.
Note. A wire brush may not be used for cleaning the
cylinder head bolt threads or the underside of the bolt
heads.
FBE
ACD
Inspecting the cylinder head
Cylinder head warping must not exceed the value given in “Technical data”. The check should be done with
a feeler gauge and a straight edge. Measurement is
done at six positions (A - F).
If warpage above the permissible level is found, the
cylinder head must be changed. If leakage has been
found, or if the cylinder head has blow lines, no special measurement is needed since such a cylinder
head will have to be attended to in any case.
Check the valve seats and check that the studs are
firmly seated.
Inspect the cylinder head for cracks. Carefully check
the areas around the valve seats and the holes for the
injector nozzles.
885 023885 498
Page 33

31
Group 21 Short block
Changing the valve seats
NOTE! On D2-75 only the inlet valve seat can be
changed. On D2-55 both the inlet and exhaust valve
seats can be changed.
The valve seat should be changed when the distance
“A” measured with a new valve exceeds 1.8 mm.
1. Remove the old valve seat by heating it with a gas
flame (600-700 oC) diagonally across the seat.
Let the cylinder heat cool for 3-5 min in the air.
Then carefully tap the seat out with a mandrel
(check that the cylinder head is not damaged).
The valve seat can also be milled out (check that
the cylinder head is not damaged).
2. Carefully clean the valve seat bed in the cylinder
head. Check the cylinder head for cracks.
3. Cool the new seat with dry ice or similar to minus
60-70 oC and heat the cylinder head to approx.
60-100 oC.
4. Press the seats into the cylinder head. Use a hydraulic press and a suitable mandrel.
5. Machine the seats to the correct angle and width.
A
Grinding of valve and valve seats
Special tools: 885 023, 885 498
1. Use valve spring compressor 885 023 and pressure foot 885 498 to remove the valve cotters.
Remove the valve washers, springs and valves.
Place the parts in the correct order in a valve
holder. Remove the valve stem seals.
2. Clean the components.
3. Check valve stem wear. Measure the diameter
with a micrometer at points I, II and III.
Diameter, min. inlet: 6.89 mm
Diameter, min. exhaust: 6.84 mm
Page 34

32
Group 21 Short block
4. Grind the valves in a valve grinding machine.
Grind the sealing surface as little as possible, just
enough to “clean” it up. If the edge of the valve
head (B) after grinding is less than 0.5 mm, the
valve must be scrapped. Equally, any valve with
a bent valve stem must be scrapped.
5. Check the wear of the valve guides (refer to
“Check of valve guides”) before machining the
valve seats.
6. Mill the valve seats. When machined, only remove enough material to give the valve seat the
correct shape and a good mating surface.
Note. Do not grind so much that the valve depth exceeds the permissible value. Please refer to “Changing the valve seats”.
New valve seats shall be milled down so far that
the distance between the cylinder head plane and
the valve head surface (A) is 0.65-0.95 mm
7. Grind the valves in with grinding paste, and check
contact with marker dye.
8. Install the seals, valves, valve springs, spring
washers, valve cotters and valve caps. Refer to
“Assembly of cylinder head”.
Checking the valve guides*
Special tools: 999 9683, 999 9696
1 Put the cylinder head on the bench, and put
valves in the valve guides.
2 Measure the wear with rocker indicator 999 9683
and magnetic stand 999 9696.
Lift each valve about 2 mm from its seat, put the
measurement tip on the edge of the valve head
and check the wear.
Permissible clearance between valve and valve
guide:
Inlet valve, max clearance 0.20 mm
Exhaust valve, max clearance 0.25mm
* Note. Since the valve guides are machined directly in the
cylinder head, the cylinder head must be changed when the
clearance is too great, even when the valve is new.
A
B
45
o
45
o
Page 35

33
Group 21 Short block
Overhauling the rocker arm
mechanism
Special tools: 999 6400
1. Remove the screw from the front edge of the
rocker arm shaft.
Screw an M8 bolt into the rocker arm shaft. Grab
the bolt with i.e. a pair of pliers and pull the rocker
arm shaft out.
2. Disassemble the rocker arm mechanism. Remove
the rocker arms, springs and washers.
3. Clean the components. Be especially careful with
the rocker arm shaft oil channels and the oil holes
in the rocker arms
4. Check the wear of the rocker arm shaft with a micrometer.
5. Check that the rocker arm bearing surface is not
worn oval. Check the clearance between rocker
arm and shaft.
Check that the spherical section of the adjustment screw is not deformed or worn. The threads
on the pin and lock nut should be undamaged.
The lock nut should be in good condition.
6. Oil the rocker arm shaft and assemble the various
parts.
Assembly of cylinder head
Special tools: 885 023, 885 498
1. Press the new valve stem seals onto the valve
guides.
Note. The seals for the inlet and exhaust valve
guides are different. The inlet valve seal has a silver
spring while the exhaust valve seal’s spring is black.
2. The valves must be installed in the correct order.
Oil the valve stems and install one valve (1) in it’s
guide. Place the valve spring (2) and spring washer (3) in place and compress the spring with valve
spring compressor 885 023 and pressure foot 885
498. Install the valve cotters (4).
Be careful when mounting the valves and when
compressing the springs, so that the valve stem
seals are not damaged. Check that the valve cotters are properly seated.
3. Install the valve caps (5) once all the valves are
fitted.
4. Mount new core plugs if these have been removed.
5. Install the glow plugs. Tightening torque, please refer to “Technical Data”. Install the power rail.
1
2
3
4
5
Page 36

34
Group 21 Short block
Inspecting the crankshaft
Clean the crankshaft carefully in all channels after disassembly and inspect thoroughly to determine if overhaul is really necessary.
1. Check wear and ovality with a micrometer. Measure the diameters “A-A” and “B-B” at points “1”
and “2”.
Max. permissible taper and ovality in the main
and big-end journals is 0.05 mm*. Grind the crankshaft to a suitable undersize dimension, if these
values are exceeded. Bearing shells are available
in two oversizes.
NOTE! Check first which oversize bearing shells are
available for the engine type in question.
2. Measure lengthwise crookedness in the crankshaft (runout). Lay the crankshaft on a pair of Vblocks placed under the front and rear main bearing journals. Alternately, the crankshaft can be
set up between centers. Measurements shall be
done on the center main bearing journal(s).
Max. lengthwise crookedness (runout) refer to
“Wear tolerances”.
If these values are exceeded, the crankshaft
must be straightened or replaced.
3. Check that the crankshaft seal mating surfaces
on the crankshaft are not worn or damaged.
* Max. wear, refer to “Technical data”.
Inspection of main and big end
bearings
Check the main and big-end bearing shells and the
front crankshaft bush. Change worn bearing shells, or
any with damaged bearing surfaces.
Page 37

35
Group 21 Short block
Inspection of front crankshaft bush
Check the bearing play between the crankshaft journal
and the bush. Use both internal and external micrometers.
1. Measure the bushes inner diameter at points 1
and 2. Measure in two directions (“A” and “B”) at
each point.
2. Measure the bearing journal outer diameter and
calculate the bearing play (difference between previous measurement and max. diameter of the
bearing journal).
Max bearing clearance, please refer to “Technical
Data”.
Change the bush if the clearance exceeds the
permissible value. If necessary, the crankshaft
can be ground to a suitable undersize and the
bush replaced with a corresponding oversize.
Check the bearing play again before the crankshaft is installed, if grinding has been performed.
Replacement of front crankshaft
bush
1. Remove the bush from the cylinder block.
2. Check that the bush contact surface in the housing has no burrs or deformities.
3. Mark a line across the hole in the housing and the
bush with a marker pen. Oil the outside of the
bush and the contact surface in the housing.
4. Place the bush (1) in the cylinder housing.
IMPORTANT! Place the bush so that the oil hole
is correctly positioned in the cylinder block. The
oil groove (2) in the bush must be furthest in.
Tap the bushing in with a suitable mandrel (3) until
it lines up with the cylinder block.
5. Check that the oil channels are open are pressing
in. Check also that the inner diameter of the bush
is the same as the crankshaft diameter.
Page 38

36
Group 21 Short block
Checking the big end bearing
clearance
Special tools: 856 927
The big-end bearing radial play can be checked by using plastigauge 856 927 as follows:
1. Wipe off any oil from the big end bearing and big
end journal. Apply a piece of plastigauge the
same length as the width of the bearing along the
big-end journal. Avoid the oil hole.
2. Mount the con rod and bearing cap (observe the
markings) and tighten the conrod bolts.
Tightening torque, please refer to the “Technical
Data” chapter.
NOTE! Do not rotate the con rod or crankshaft during
measurement, since this spoils the measurement
strip.
3. Remove the big end cap and measure the width of
the pressed-out measurement putty at the widest
point. Use the scale supplied with the plastigauge.
Max permissible big end bearing clearance,
please refer to the “Technical Data”.
Change the big-end bearing if the bearing clearance
exceeds the permissible value. The big-end journal
can be ground to an undersize if required and a
corresponding oversize bearing shell fitted. The
big-end bearings are available in two oversizes.
NOTE! After grinding the bearing journals, check the
bearing clearance again before assembly.
Page 39

37
Group 21 Short block
Piston ring inspection and
adjustment
1. Remove the piston rings with piston ring pliers.
2. Remove the gudgeon pin circlips and remove the
gudgeon pin carefully, with a suitable mandrel.
3. Check that the rings do not bind in the ring
grooves.
4. Check the piston ring gap. Push the ring down be-
low the lower turning point with a piston.
Change the piston ring if the gap exceeds 1.0 mm.
Check the piston ring gap with new rings. Please
refer to the “Technical Data, specifications” chapter for measurements.
In general, piston rings should be changed if there
is any noticeable wear or out-of-roundness in the
cylinders, since the piston rings frequently do not
end up in the same positions as they had before
disassembly.
Oil consumption is also of decisive importance for
the point in time when a piston ring change should
be done.
5. Check the clearance in the piston ring grooves.
Roll the ring in its groove in the piston, and measure the clearance at several points with a feeler
gauge. Please refer to the “Technical Data, specifications” chapter for measurements.
Inspection and measurement of
piston and cylinder bore
Check the pistons for cracks and worn piston ring
grooves. Change the piston if it has deep grooves in
the skirt surface. Likewise, if the piston has one or
more cracks in the gudgeon pin hole. If any such
damage is found, the injection equipment should also
be checked.
Measure the piston diameter with a micrometer at
right angles to the gudgeon pin hole and 10 mm from
the bottom edge of the piston. Then measure the cylinder bore and calculate the clearance between the
cylinder and piston.
Replace the piston if the clearance exceeds the permitted or if the piston diameter is less than permitted
value.
Page 40

38
Group 21 Short block
Inspecting the con rod
1. Check the con rods for cracking, straightness and
twist before considering changing the gudgeon pin
bush.
Discard the connecting rod if it is cracked, bent or
twisted.
Check the wear of the little end with a gudgeon
pin. If the clearance is correct, an oiled gudgeon
pin should slide slowly, due to its own weight,
through the bush.
2. Use a new gudgeon pin and measure con rod
straightness in a fixture. Max. deviation: 0.15 mm
for 100 mm measured length
3. Measure any con rod twist. Max. deviation: 0.20
mm for 100 mm measured length
Replacing con rod bushes
1. Press the old bush out.
2. Press the new bush in.
NOTE! Make sure that the oil hole in the bush lines up
with the drilling in the con rod. Draw a line across the
hole in the con rod and the bush, with a felt tip pen.
Check that the oil duct is open after pressing.
3. Broach the bush and measure the con rod with an
internal dial gauge.
4. Check the end float between the con rod and
crankshaft.
Change the con rod if the end float exceeds 0.035-
0.085 mm.
Also check the con rod bushes. Clearance between the gudgeon pin (A) and con rod bush (B),
refer to “Technical data”.
Page 41

39
Group 21 Short block
Assembling the piston, piston
rings and con rod
1. Install one of the circlips in the piston.
2. Oil the gudgeon pin and con rod bush.
3. Heat the piston to approx. 100
o
C. Place the piston
and con rod so that the marks align.
The marking on the con rod and the “SHIBAURA”
marking inside the piston must face the same way.
Slide the gudgeon pin in.
NOTE! It should be possible to slide the gudgeon pin
in easily. It must not be driven in.
4. Install the other circlip.
5. Check that the con rod is not tight on the gudgeon
pin bearing.
6. Check the big end bearing clearances. Please refer to “Inspecting the crankshaft” and “Inspecting
the main and big end bearings”.
7. Check the piston ring gap in the cylinder bore and
that the rings do not bind in the piston ring
grooves.
8. Install the piston rings on the pistons, using piston ring pliers. Letters or markings on ring surfaces must always be turned so that the marking faces upwards.
Install the oil scraper ring first. Put the expansion
spring (1) for the oil scraper ring in the lower piston ring groove, with the location dowel (A) inside
both ends of the spring. Check that the ends of
the expansion spring do not overlap. Install the oil
scraper ring (2) above the expansion spring.
Check that the ring gap is displaced 180o from the
guide pin.
Install the ring with the tapered surface (3) in the
center piston ring pair so that the marking faces
the piston crown.
Install the upper ring (4) with the marking upwards.
Check that the ring gaps are displaced 90o from
each other.
1
2
3
4
A
Page 42

40
Group 21 Short block
Measuring the camshaft
Cam height (inlet and exhaust), “A” 33.7 mm
Cam height “B” (for injection pump) 41.8 mm
Cam height “C” (for feed pump) 30.0 mm
Change the camshaft if the wear limits have been exceeded.
Inspection of timing gears
Special tools: 999 9683
Clean the gears and other parts of the timing system
and check them carefully. Replace gears that are badly worn or damaged.
Check the backlash with feeler gauges or a dial gauge,
special tool 999 9683.
Max. permitted backlash: 0.25 mm. If the backlash
exceeds the permitted value, then all gears in the timing system must be replaced.
Installing the crankshaft
Special tools: 998 9876, 999 9696
1. Check the cleanliness of the crankshaft drillings
and bearing surfaces, engine block and bearing
caps. Check that the bearing shells and their beds
do not have any burrs or upsets.
2. Place the main bearing shell in position in the
bearingcap. The bearing shells have an oil groove
that should be placed in the upper bearing cap.
Check that the lubrication holes in the upper
bearing shells are centered on the oil ducts.
3. Oil the bearing and main bearing journal and
mount the bearing cap in its correct place. The
chamfered edge shall face forwards on all bearing
caps.
Page 43

41
Group 21 Short block
4. Place the thrust washers in the rearmost bearing
cap (flywheel side) with the oil groove towards the
crankshaft.
Torque the bearing caps, please refer to the
“Technical Data” chapter for tightening torque.
5. Carefully lift the crankshaft into position in the cylinder block.
Note. Tape the crankshaft gear before lifting the
crankshaft into place, to prevent the gear teeth from
damaging the front bearing.
6. Torque the main bearing caps in the engine block.
Tightening torque, please refer to the “Technical
Data” chapter.
Mounting pistons in cylinders
Note. After replacing the crankshaft, piston or gud-
geon pin, the weight difference between con rods with
piston and piston rings shall not exceed 10 g between
cylinders.
1. Lubricate the pistons and piston rings with engine
oil beside the rings, so that the oil finds its way
into the piston ring grooves. Turn the piston rings
so that the ring gaps are displaced 90o from each
other.
Make sure that no piston ring gap is placed in line
with the gudgeon pin.
2. Place the bearing shells in position in the con
rods and bearing caps. Oil the bearing journals
with engine oil.
7. Check that the end float does not exceed. 0.5 mm
by using a special tool, magnetic stand 999 9696
and dial gauge 998 9876.
Page 44

42
Group 21 Short block
3. Check that the markings on the piston crown or
inside the piston line up with those on the con rod.
Use a piston ring compressor and install the piston with con rod in its cylinder, starting with cylinder no. 1 (forwards).
The con rod with the lowest number shall be
mounted first (in cyl. no. 1) and the con rod with
the highest number closest to the flywheel.
The con rods shall be turned so that the mark
(number/colorsplash) is facing “towards the injection pump” (camshaft side).
4. Mount the bearing cap and tighten the con rod
bolts. Tightening torque, please refer to the “Technical Data” chapter. Bearing caps must be installed so that the number markings/paint marks
on con rod and cap coincide.
Undamaged con rod bolts do not need to be
changed, they can be put back again.
5. Mount the oil suction pipe and oil strainer. Tightening torque, please refer to the “Technical Data”
chapter. Use a new O-ring.
6. Install the sump with a new gasket. Tightening
torque, please refer to the “Technical Data” chapter.
Installing the camshaft
The parts of the camshaft are mounted as illustrated.
1. Woodruff key 5. Gear wheel
2. Camshaft 6. Camshaft gear
3. Bearing 7. Regulator sleeve
4. Spacer
A
B
1. Install the front plate (A) with a new gasket. Tightening torque, please refer to the “Technical Data”
chapter.
2. Oil the camshaft bearing surfaces and carefully
lift the camshaft into place, complete with drive
gear and regulator weights.
Note. Be careful to avoid damaging the bearings,
bearing tracks and camshaft lobes.
3. Install the camshaft lock washer (B) in the correct
position and tighten it. Tightening torque, please
refer to the “Technical Data” chapter.
2
6
4
5
3
7
1
Page 45

43
Group 21 Short block
Mounting and installation
Gears that are of importance in the timing gear assembly are marked as follows:
Crankshaft gear (1) and idler gear (2) are marked with
a punch mark.
The idler gear (2) and camshaft gear (3) with a
punched line in front of a tooth and tooth groove respectively.
1. Fit the Woodruff key in place and mount
the crankshaft gear.
4. Adjust the oil pump end float to 0.10-0.15 mm.
Shims are available in thicknesses 0.10; 0.15;
0.20 and 0.50 mm.
5. Install a new crankshaft seal.
6. Center the cover in front of the oil pump.
Note. Check that the spring pin in the timing gear
cover can engage in the hole in the oil pump cover.
Turn the cover back and forwards, and center it in the
mid position. The stop arm must be turned and held in
place while the timing gear cover is positioned.
IMPORTANT! The components must be oiled before installation.
IMPORTANT! Make sure that the gear wheel
markings coincide.
2. Install the thrust washer (8) on the idler wheel
shaft stub. Install the idler gear so that the marks
align.
NOTE! Do not turn the crankshaft before the timing
gear cover has been installed.
3. Install the inner rotor and cover to the oil pump.
Install shims, spring, spring washer and lock
washer.
1. Thrust washer
2. Idler wheel with outer rotor
3. Inner rotor
4. Cover for oil pump
5. Shim.
6. Spring
7. Spring washer
8. Circlip
6
7
3
5
1
2
4
8
Page 46

44
Group 21 Short block
7. Place a new gasket on the timing gear cover.
NOTE! If the gasket contains a center part, this must
be cut away.
Install the timing gear cover with the new gasket.
Check that the start spring is in position in the
timing gear cover and is connected to the regulator arm (link arm). Push the regulator arm through
the hole in the cylinder block.
Screw the timing gear cover down.
8. Turn the stop arm clockwise and connect to the
injection pump. Fit the clip.
NOTE! Be careful to ensure that the shim that was
placed underneath the injection pump flange is put
back, before the pump is placed in the block (applies
when the pump has been removed).
9. Tighten the injection pump, tightening torque refer
to “Technical data”.
10. Fit the key into the crankshaft and install the
crankshaft pulley. Tightening torque, please refer
to the “Technical Data” chapter.
11. Connect the fuel hose to the injection pump.
12. Check the injection timing (crankshaft position) in
cases where a new complete camshaft has been
installed or if a new cylinder block is used.
ä
1
Installing cylinder head
1. Clean the cylinder head and cylinder block surfaces. Remove any rust and carbon from bolt holes
and from the threads on the cylinder head bolts.
2. Install the valve lifters.
Note Install the valve lifters in their original positions.
3. Insert the cylinder head gasket with the mark (1)
upwards.
NOTE! The new gasket must be of the same thickness as the old one.
If a piston, con rod, crankshaft or engine block has
been changed, new measurement must be done.
The height difference between Gasket
pistons and cylinder head thickness
-0.45 to -0.30 mm 0.4 mm
-0.29 till -0.20 mm 0.5 mm
Page 47

45
Group 21 Short block
4. Dip them completely (even bolt heads) in rust preventative 116 1346 and let them run off on a net.
The bolts should have stopped dripping when they
are installed (otherwise oil cold may well up and
be regarded as leakage).
IMPORTANT! The bolts are phosphated and
must not be cleaned with a steel wire brush. If
the cylinder head is painted, the contact surfaces for the cylinder head bolts must be free from
paint. The clamping force in the joint could otherwise be very poor.
5. Check that the dowels (guides) are fitted to the
block.
6. Tighten the cylinder head bolts in three steps as
follows. Refer to tightening diagram.
1st tightening 30 Nm
2nd tightening 70 Nm
Final tightening: 100 ± 2.5 Nm
7. Install the copper injector washers.
Install the injectors. Tightening torque refer to
“Technical data”.
8. Install the pushrods, valve caps and rocker arm
mechanism with gasket. Tightening torque, please
refer to the “Technical Data” chapter.
9. Install the oil pressure pipe between the block and
rocker arm mechanism together with the oil pressure sensor. Install the oil pressure valve.
Tightening torque, please refer to the “Technical
Data” chapter.
Turn the crankshaft round a couple of rotations.
10. Adjust the valve clearances. Tightening torque,
please refer to the “Technical Data” chapter.
11. Install the valve cover.
12. Install the injection pump hollow bolt and banjo
union with new copper washers.
13. Install new copper gaskets and install the return
fuel line. Tighten the nuts and connect the return
pipe.
14. Install the delivery pipes, tightening torque refer to
“Technical data”.
15. Install the glow plugs and power rail.
16. Install the circulation pump, tightening torque refer
to “Technical data”.
17. Clean the sealing ring seat in the cylinder block
and the contact surface of the plate. Install the
rear crankshaft seal.
18
17
16
15
14
1312
11
10
98
7
6
54
3
2
1
Page 48

46
Group 21 Short block
18. Check that the spaces for the seal on the engine
block and crankshaft are clean. Apply grease to
the sealing edges and fit the seal (1). Apply an
even layer of sealant 840 879 around the seal (2)
and camshaft (3).
D2-55 A, B
D2-55 C & D2-75
1
3
1
2
3
19. Install the plate, flywheel according to previous
markings, the elastic coupling and the flywheel
housing, tightening torque refer to “Technical
data”.
20. Install the heat exchanger. Mount the hoses on
the heat exchanger and coolant pump. Tighten the
hose clamps.
Install the oil pipe to the turbo and charge air cool-
er (only D2-75).
Install the turbo (only D2-75).
21. Install the sea water pump.
22. Install the fuel filter bracket and feed pump, tightening torque refer to “Technical data”.
Mount hoses and tighten hose clamps.
23. Install the starter motor and alternator together
with the front engine mounting.
24. Connect the hose to the sea water pump and tighten the hose clamp. Install the exhaust pipe.
25. Install the electronics box, install the connectors
and other electrical connections.
26. Install the induction silencer.
27. Fill with oil, refer to “Technical data”. Fill with coolant, refer to “Technical data”.
28. Connect the battery cables. Open the fuel taps
and the sea cock. Start the engine and check
carefully that no leakage occurs.
Page 49

47
Group 21 Short block
Camshafts and valve lifters, inspection
Check, using a steel ruler (1), that valve lifter contact
surface facing the camshaft is convex or flat. If the
surface is concave, change the valve lifter.
If the valve lifter is worn all across the lifting surface,
the valve lifter should be scrapped. “The ditch” shows
that the lifter has not been turning.
A dark line on the outside of the valve lifter shows
that the surface is not worn, on the other hand. The
condition of the valve lifters determines whether it is
necessary to check for camshaft wear.
Check that the lifting surfaces on the camshaft and
the valve lifters do not have large areas of pitting
damage. Pitting damage can occur for various reasons. The damage is caused when small pieces of
metal loosen from the hardened surface. Lifters and
camshafts with minor pitting damage can be used.
Pitting damage seldom become worse.
Check that the camshaft bearing surfaces and cam
curves are not abnormally worn.
Change the camshaft if major damage or wear occurs.
NOTE! When replacing camshaft, all valve lifters
should be replaced too.
Guidelines for replacement
In normal conditions, un-evenness may occur on the
camshaft lobes in the engine. This does not mean
that the camshaft has to be changed. These marks do
not have any negative influence on either engine performance or durability of the engine and its components.
The next pages shows examples of acceptable wear
and non-acceptable wear.
1
Page 50

48
Group 21 Short block
Acceptable wear.
The camshaft does not need to be changed.
Unacceptable wear.
NOTE! Camshaft with associated rocker arms must
be replaced.
Page 51

49
Group 21 Short block
Adjusting valves
NOTE! The clearances shall never be checked while
the engine is running, but on a stationary cold engine.
Valve clearances: Inlet and exhaust: 0.2 mm.
1. Remove the valve cover.
2. Turn the engine in normal direction of rotation until
no.1 piston is at TDC after the compression
stroke. The valves on cylinder 4 overlap.
3. Check and adjust the valve clearances for cyl. no.
1. Turn the engine in normal direction of rotation a
half turn and check the clearances for cyl. no. 3,
the valves on cylinder 2 overlap.
Check the clearances for the remaining cylinders
in firing order.
4. Replace seal. Clean the valve cover and install it.
Test run the engine and check that no oil leakage
occurs.
Replace ring gear on flywheel
1. Mark the flywheel position on the crankshaft (simplifies installation). Remove the flywheel.
2. Drill a hole or two in a tooth root on the ring gear.
Crack the ring gear with a chisel at the drilled
holes and remove it.
3. Clean the ring gear contact surface on the flywheel with a wire brush.
4. Heat up the new ring gear in an oven (120-150oC)
so that the ring gear is heated evenly.
5. Place the heated ring gear on the flywheel and
drive into place with a hammer and soft mandrel.
The ring gear should then cool naturally.
6. Clean the contact surfaces on the flywheel and
crankshaft. Check the rear crankshaft seal.
Change as necessary.
7. Install the flywheel according to previously made
marks.
Tightening torque, please refer to the “Technical
Data” chapter.
Firing order 1 3 4 2
Corresponding cylinder 4 2 1 3
who’s valves “overlap”
Inlet Exhaust
Page 52

50
Group 21 Short block
Replacement of rear crankshaft
seal
The seal consists of a rubber ring and is accessible
once the plate behind the flywheel housing and the
elastic coupling, flywheel* and flywheel housing have
been removed.
*Note. Mark the flywheel position on the crankshaft (simplifies
installation).
1. Remove the crankshaft rear seal (1). Check that
the spaces for the seal on the engine block and
crankshaft are clean. Apply grease to the sealing
edges and install the seal.
2. Apply an even layer of sealant 840 879 around the
seal (2) and camshaft (3).
3. Install the flywheel, the elastic coupling, the
adapter plate and the flywheel housing.
Tightening torque, please refer to the “Technical
Data” chapter.
Replacement of front crankshaft
seal
The seal consists of a rubber ring and can be replaced
once the crankshaft pulley has been removed. Use
puller 999 5919 to remove the seal.
1. Remove the key and tape over the keyway.
2. Apply grease to the new seal and install it with a
suitable socket.
3. Remove the tape. Install the key and crankshaft
pulley.
Tightening torque, please refer to the “Technical
Data” chapter
Page 53

51
Group 22 Lubrication system
Repair Instructions
Checking lubrication oil pressure
The lubrication oil pressure can be checked by connecting a manometer with a hose to the connection for
the oil pressure switch (thread size in cylinder block =
1/8"). For the correct pressure at operating speed and
temperature, refer to “Technical data”.
If the oil pressure is too high or too low, first try replacing the reduction valve and then check the oil
pressure again.
Oil pump
Removing oil pump
1. Remove the injection pump (19). Remove the fixing screws and nuts on the pump. Turn the stop lever clockwise and carefully lift the pump, to make
the lock clip on the regulator arm accessible.
Remove the lock clip and free the regulator arm.
IMPORTANT! Be careful when disassembling
the injection pump, avoid damaging or bending
the lever.
NOTE! Retain any shims from beneath the injection
pump flange. Use the same thickness of shims when
re-installing, unless the camshaft, engine block or injection pump have been changed.
2. Remove the pulley, use special tool 885 820 and
3 pcs. M10x40 mm bolts. Remove the timing gear
cover. Load the stop arm so that the springs on
the inside of the housing do not come out of position or spring out.
Page 54

52
Group 21 Short block
3. Remove the idler lock ring. Save the sleeve washer, spring and shims.
Lift away the idler gear complete with cover and
oil pump. Note the thrust washer behind the oil
pump.
A
Inspection of oil pump
1. Check that the oil pump’s cover and the outer and
inner rotors are not worn or damaged.
2. Check the clearance (A) between the inner (1) and
outer (2) rotor. Max. permitted clearance 0.25 mm.
3. Check the idler gear bearings and stub axle. If
necessary these shall be replaced. Refer to “Oil
pump bearing, overhaul”.
Page 55

53
Group 21 Short block
Installing the oil pump
Gears that are of importance in the timing gear assembly are marked as follows:
Crankshaft gear (1) and idler gear (2) are marked with
a punch mark.
The idler gear (2) and camshaft gear (3) with a
punched line in front of a tooth and tooth groove respectively.
IMPORTANT! The components must be oiled before installation.
IMPORTANT! Make sure that the gear wheel
markings coincide.
1. Thrust washer
2. Idler wheel with outer rotor
3. Inner rotor
4. Cover for oil pump
5. Shim.
6. Spring
7. Spring washer
8. Circlip
6
7
3
5
1
2
4
8
1. Install the thrust washer (8) on the idler wheel
shaft stub. Install the idler gear so that the marks
align.
NOTE! Do not turn the crankshaft before the timing
gear cover has been installed.
2. Install the inner rotor and cover on the oil pump.
Install shims, spring, spring washer and lock
washer.
3. Adjust the oil pump end float to 0.10-0.15 mm.
Shims are available in thicknesses 0.10; 0.15;
0.20 and 0.50 mm.
4. Install new crankshaft seal.
5. Center the cover in front of the oil pump.
NOTE! Check that the spring pin in the timing gear
cover can engage in the hole in the oil pump cover.
Turn the cover back and forwards, and center it in the
mid position. The stop arm must be turned and held in
place while the timing gear cover is positioned.
Page 56

54
Group 21 Short block
6. Install a new gasket on the timing cover.
NOTE! If the gasket contains a center part, this must
be cut away.
Install the timing gear cover with the new gasket.
Check that the start spring is in position in the
timing gear cover and is connected to the regulator arm (link arm). Push the regulator arm through
the hole in the cylinder block.
Screw the timing gear cover down.
Oil channels
Clean and flush the oil channels in the engine with
cleaning liquid and then with steam or rinsing oil at a
pressure of 300-400 kPa in conjunction with a larger
engine overhaul. Clean the oil pressure pipe between
the cylinder block and cylinder head.
Clean the drilled oil channels in the cylinder block,
crankshaft and con rods with a cleaning brush.
7. Turn the stop arm clockwise and connect to the
injection pump. Fit the clip.
NOTE! Be careful to ensure that the shim that was
placed underneath the injection pump flange is put
back, before the pump is placed in the block (applies
when the pump has been removed).
8. Tighten the injection pump, tightening torque refer
to “Technical data”.
9. Fit the key into the crankshaft and install the
crankshaft pulley. Tightening torque, please refer
to the “Technical Data” chapter
10. Connect the fuel hose to the injection pump.
11. Check the injection timing (crankshaft position) in
cases where a new complete camshaft has been
installed or if a new cylinder block is used.
Page 57

55
Oil pump bearing, overhaul
Special tools: 384 9641
In order to remove the oil pump, the timing gear and
crankshaft must be removed.
2. Use tool 384 9641. First screw the tool’s guide
pin (1) into the engine block.
Then put the new oil pump bearing (2) into the
tool block (3).
1. Drive out the oil pump bearing section (1) located
in the engine block. Tap it out from inside the
crankcase.
3. Place the tool block with the bearing in place, using the guide pin.
Tap in the bearing until the tool bottoms on the
engine block.
NOTE! It is important that the engine block surface towards the tool is clean and even.
Page 58

56
Group 23 Fuel system
Repair Instructions
Observe the greatest possible cleanliness in work on
the fuel system.
Injection pump
Removing the injection pump
NOTE! Repair work that requires work on the injection
pump and which can change it’s settings shall only be
performed by a specially trained mechanic who has
the necessary equipment at his/her disposal.
All warranties for the engine are forfeit if the seals are
broken by unauthorized personnel.
1. Wash the injection pump, injection pipes and the
engine closest to the pump very thoroughly.
2. Close the fuel taps. Remove the delivery pipes
complete. Release the fuel hose from the pump.
Fit protective plugs to all connections.
3. Remove the fixing screws and nuts on the pump.
Turn the stop lever clockwise and carefully lift the
pump, to make the lock clip on the regulator arm
accessible.
Remove the lock clip and free the regulator arm.
NOTE! Retain any shims/gaskets from under the injection pump’s flange when the pump is lifted from the
cylinder block.
4. Send the pump to an authorized diesel workshop
for repair if the workshop does not have specially
trained personnel with the necessary testing
equipment.
Page 59

57
Group 23 Fuel system
Installing the injection pump
Check that the pump is free from faults and if necessary has been tested and approved before installation.
Do not remove the protective plugs before the pipes
are to be connected.
1. Insert the injection pump into the cylinder block.
NOTE! Make sure that any shims that were placed
under the injection pump flange are in replaced as
they were, before the pump is installed on the block.
This normally ensures that the pump settings are correct. If the camshaft complete or the cylinder block
have been replaced then the injection pump settings
need adjusting. Refer to the next paragraph, “Setting
injection timing”.
2. Turn the stop arm clockwise and connect the regulator arm to the regulator rod on the pump. Fit
the clip. Screw the pump in place.
3. Connect the fuel hose and return fuel line to the
pump. Install the delivery pipes.
4. Prime the fuel system and test run the engine.
Setting injection timing
1. Remove the delivery pipes and return line.
If the block or the camshaft have been replaced,
a 0.5 mm shim shall be placed under the injection
pump flange when installing.
2. Remove the front (1st) pressure valve holder. Remove the pressure valve and refit the pressure
valve holder.
It is recommended to remove the pump and hold
it in an upright position when installing the pressure valve holder.
NOTE! Be aware of the pump element so as not to
damage it.
3. Make a drop pipe from i.e. a scrapped delivery
pipe and mount it on the pressure valve holder.
Place a fuel container under the pressure valve
holder drop pipe.
Page 60

58
Group 23 Fuel system
4. Connect a fuel container with stopcock to the inlet
of the injection pump. It should hold about 0.7 liter. Use the hose between the fuel filter and the
injection pump to connect the fuel container. If everything is correctly arranged, fuel should start to
run out of the drop pipe.
5. Turn the crankshaft in normal direction until the
piston in cylinder 1 is at TDC, the rocker arms on
cylinder 1 should overlap.
Turn the crankshaft another half turn (180°) in the
normal direction.
6. Move the actuator arm to maximum position.
7. Turn the crankshaft slowly in the normal direction
until the flow is 7 drops/minute, then read off the
number of degrees on the crankshaft pulley. If the
value read off diverges from the value in technical
data, the injection timing must be adjusted.
A 0.1 mm shim alters the injection timing approx.
1°. Thicker shims give later timing and thinner
shims give earlier timing.
8. Refit the pressure valve.
Page 61

59
Group 23 Fuel system
Adjust the following as necessary
1. Loosen the stop screw (3) so that it does not limit
the movement of the actuator arm (1).
2. Run the engine unloaded at full throttle and adjust
to the correct racing speed with adjuster screw (4)
(remember to re-seal the screw).
3. Adjust stop screw (3) to give a clearance of 0.1
mm between stop screw (3) and the actuator arm
(1) when the throttle control is at the full throttle
position.
Setting the engine speed
Check that the accelerator control functions normally,
i.e. the actuator arm (1) is pressed against the low idle
stop (2) when the accelerator control is at idle, and is
pressed against the full throttle screw (3) when the accelerator control is at full throttle. Adjust the control if
necessary. Also check that the air filter is not
blocked, and that the air inlet is not blocked.
IMPORTANT! The engine’s fuel volume and
speed are set at the factory to give highest power and least environmental impact. These settings must not be disturbed.
NOTE! Seals on injection equipment may only be broken by authorized personnel. Seals which have been
broken must be re-sealed.
Low idle
1. Check that the gap (6) is about 3 mm when the
accelerator is in the idle position. If necessary:
Undo locknut (7) and adjust screw (8) to give the
correct gap.
2. Warm up the engine and check the idle speed
with a tachometer (refer to Technical data for the
correct idle speed).
3. Adjust to the correct idle speed with adjusting
screw (2).
4. Check the gap (3) again as in item 1.
Racing speed (high idle)
Warm the engine up and check the racing speed with
a workshop tachometer when the engine is unloaded
at full throttle (please refer to “Technical data” for correct racing speed).
1. Actuator arm
2. Adjustment screw, low idle
3. Stop screw, full throttle
4. Adjustment screw, racing speed
5. Adjustment screw, max. fuel volume
7. Lock nut
7
6
8
543
2
1
Page 62

60
Group 23 Fuel system
Feed pump
Removal of the feed pump
1. Clean around the pump.
2. Close the fuel taps. Loosen the fuel connections
from the pump.
3. Remove the feed pump from the cylinder block.
Empty the pump from fuel.
1. Piston
2. Strainer
3. Valve housing
4. Lid
5. Pump housing
6. Pin
7. Diaphragm
ä
ä
2
3
4
1
6
5
7
Disassembly and inspection of the feed
pump
1. Check that the piston (1) does not bind in the
pump housing.
Note. The feed pump’s hand pump only functions
when the piston is depressed.
2. Remove the strainer (2) from the feed pump’s inlet
pipe and check that it is not restricted by dirt. Re install the strainer by pressing it in until a “click” is
heard.
3. Check the function in the valve housing (3) before
disassembly as follows:
Suck in the inlet (IN), and blow in the outlet
(OUT). The function is normal if they seal in both
cases.
4. Mark the position of the cover (4), valve housing
and pump housing (5).
5. Remove the screws holding the cover. Remove
the cover and valve housing.
6. Turn the membrane and piston until the pin (6) in
the piston is in front of the groove in the pump
housing.
7. Press in the piston and membrane (7). Press the
pin out of the piston and remove the piston, membrane and springs from the pump housing.
8. Check that the membrane is undamaged and
shows no cracks.
Assembling the feed pump
1. Assemble the piston (1), membrane (7) and
springs in the pump housing (5). Press the piston
and membrane together and press the pin (6) into
the piston.
2. Turn the membrane and piston so that the pin (6)
in the piston is not aligned with the groove in the
pump housing.
3. Install the valve housing (3) and cover (4) according to the previously made marks. Tighten the
screws.
Page 63

61
Group 23 Fuel system
1
2
D2-55 A, B
Priming the fuel system
The fuel system must be primed after a filter change,
if the fuel tank has been run dry and after a long-term
stoppage.
D2-55A/B:
1. Open the priming screw (1) on the fuel filter. Avoid
fuel spillage. Use i. e. rags on the priming point.
2. Pump fuel up with the hand pump (2) until fuel
without air bubbles can be seen. Continue pumping
and tighten the priming screw at the same time.
Note. If the pump works poorly, crank the engine so
that the mark on the pulley is at “TOP” if it is still
poor, crank the engine another revolution to “TOP”.
3. Normally, additional priming is not required. Start
the engine and check that no leakage occurs.
4. If the engine does not start after a short attempt,
loosen the pressure pipes at the injectors a few
turns. Hold the injection pump actuator arm in it’s
max. position and crank the engine with the starter motor until fuel leaks from the pressure pipes.
Tighten the pressure pipe nuts. Tightening torque,
please refer to the “Technical Data” chapter.
The glow plugs are activated at the same time as the
starter motor. You can save the batteries if the starter
motor is only used for short periods when priming.
Page 64

62
Group 23 Fuel system
D2-55 C, D2-75 A
2
1
3
4
D2-55C and D2-75A:
1. Open the priming screw (1) on the fuel filter. Avoid
fuel spillage. Use i. e. rags on the priming point.
2. Pump fuel up with the hand pump (2) until fuel
without air bubbles can be seen. Continue pumping
and tighten the priming screw at the same time.
The pump’s inlet pipe contains a strainer (3) which
normally does not need to be cleaned since the engine has a fuel pre-filter. If a pre-filter is not fitted,
poor feed flow can be due to a blocked strainer.
Note. If either of the two O-rings (4) are damaged,
they must be replaced.
3. Normally, additional priming is not required. Start
the engine and check that no leakage occurs.
4. If the engine does not start after a short attempt,
loosen the pressure pipes at the injectors a few
turns. Hold the injection pump actuator arm in it’s
max.position and crank the engine with the starter
motor until fuel leaks from the pressure pipes.
Tighten the pressure pipe nuts. Tightening torque,
please refer to the “Technical Data” chapter.
The glow plugs are activated at the same time as the
starter motor. You can save the batteries if the starter
motor is only used for short periods when priming.
Page 65

63
Group 23 Fuel system
Fuel filter, replace
Clean the filter bracket. To prevent fuel spill, a plastic
bag can be pulled over the filter. Unscrew the filter.
Wipe a film of oil on the gasket of the new filter.
Screw the filter on by hand until it touches the contact
surface. Then tighten an extra half turn, no more!
Prime the fuel system. Deposit the old filter at a
waste management facility.
Start the engine and check that no leakage occurs.
WARNING! Working with, or going close to a running engine is a safety risk. Watch out for rotating components and hot surfaces.
Fuel pre-filter, draining and replacement
of filter insert
Draining
The fuel pre-filter is extra equipment.
Put a suitable vessel underneath the filter. Drain off
water and contaminants through the tap/plug in the
bottom of the filter bowl.
IMPORTANT! Draining should be performed first
a number of hours after stopping.
Replacing filter insert
Close the fuel stop cock on the tank. Put a suitable
vessel underneath the filter.
Remove the filter bowl by undoing the screw (1). Empty and clean the filter bowl. Replace the insert and assemble the bowl. Open the stop cock. Prime the fuel
system. Deposit the old filter at a waste manage-
ment facility.
Start the engine and check that no leakage occurs.
WARNING! Working with, or going close to a running engine is a safety risk. Watch out for rotat-
ing components and hot surfaces.
1
Page 66

64
Group 23 Fuel system
Injectors
Changing the injectors
1. Wash around the injectors.
2. Undo the delivery pipes at the injection pump and
at the injectors. Lift the fuel delivery pipes away
together.
3. Undo the nut at the top of each injector, use the
nuts beneath the return fuel line as a counterhold
so that the pipes are not bent. Lift the return fuel
pipe away.
4. Unscrew the injectors (1). Use socket, L=80 mm.
Remove the copper washers (2) beneath the injectors.
5. Fit a protective plug to the injector’s pipe connec-
tion and over the injector nozzle if it is not to be
installed immediately.
6. Install the new injector. Tightening torque, please
refer to the “Technical Data” chapter.
7. Install the return fuel pipe, use the nut underneath
the fuel return pipe to avoid kinking the pipe.
8. Install the pressure pipes. Check that they do not
come out of alignment, and tighten the nuts.
Tightening torque, please refer to the “Technical
Data” chapter.
9. Start the engine and check that no leakage occurs.
2
1
Testing of injectors
Testing is done in an injector tester. During the test,
the opening pressure and sealing are the most important things. The spray pattern is more difficult to evaluate and does not fully indicate the condition of the
nozzle.
WARNING! Be careful when testing injectors,
avoid getting the fuel jet from an injector on unprotected parts of your body. The spray has
such great penetration power that it can penetrate the skin and cause blood poisoning.
Page 67

65
Group 23 Fuel system
Opening pressure
With the pressure gauge connected, press the injector
tester lever down slowly until the injector opens and
releases fuel. Read off the opening pressure at the
opening instant.
If the value read does not coincide with the specified
value, the setting must be changed. This is done with
shims.
Note. The opening pressure increases or decreases
by about 1 MPa with a change of shim thickness of
0.1 mm.
Checking injectors
Spray pattern
Special tools: 999 9772
1. Pump with injector tester 999 9772 and check the
spray pattern. The fuel spray should be coneshaped and aligned with the injector center line.
Fuel drops shall not occur in the spray.
2. Check that the fuel spray has a circular cross-
section.
Sealing
When sealing is checked, investigate the fuel leakage
which can occur between the injector nozzle seat and
the tapered sealing surface in the injector sleeve.
1. Dry the injector nozzle so that it is dry.
2. Pump the pressure up to about 2 MPa below the
opening pressure of the injector (please refer to
Technical Data). Keep the pressure constant for
about 10 sec. and check that no fuel drips out
from the tip of the injector. Damp injectors can be
approved.
Fit a protective plug to the injector’s pipe connection
and over the injector nozzle if it is not to be installed
immediately.
Page 68

66
Group 23 Fuel system
Overhauling injectors
1. Clean the injector externally.
2. Fix the injector (holder) in a vise. Unscrew the in-
jector nut and disassemble the injector.
Note. Be careful that the injector nozzle does not fall
out during disassembly.
3. Pull the injector nozzle out of the injector sleeve
and put the components in cleaning petrol (gasoline).
Note. Make sure that the injector needles and injector
sleeves which belong with each other, and fit together,
are not mixed up if several injectors are cleaned at the
same time. To avoid mixing up, the injectors should
be put in an injector stand or in different compartments.
4. Check the injector nozzle thoroughly with a lamp
magnifier or nozzle microscope. Also check the
other components.
5. When installing a new nozzle it is important that
the conserving oil is cleaned off the injector needle and sleeve before the injector is assembled
(avoid skin contact with the needle’s sliding surface).
Clean the components in chemically pure petrol
(gasoline). Check that the needle slides in the
sleeve with no tendency to bind.
6. Dip the injector components in pure Diesel or test-
ing oil, and fit the components together. Use the
original thickness of adjustment washer(s) to set
the opening pressure.
7. Check the opening pressure, jet pattern and seal-
ing in an injector tester.
1
2
3
4
5
6
7
8
9
1. Injector nut 6. Adjustment shims
2. Injectors 7. Injector holder
3. Joining piece 8. Washer
4. Compression screw 9. Nut
5. Spring
Page 69

67
Group 23 Fuel system
Fresh water system
The freshwater system is the engines internal cooling
system that ensures that the engine operates at the
correct temperature. It is a closed system and must
therefore always be filled with a mixture of at least
40 % concentrated coolant and 60 % water, to offer
protection from interior corrosion, cavitation and frost
bursting.
We recommend that you use “Volvo Penta Coolant,
Ready Mixed”, alternatively “Volvo Penta Coolant”
(concentrated) mixed with pure water according to
spec, see “Coolant. Mixing”. This grade of coolant is
the only one that is developed for and approved by
Volvo Penta.
The coolant should contain ethylene glycol of a good
quality with a suitable chemical consistency that offers complete engine protection. Using an anti-corrosion mixture exclusively is not permitted in Volvo
Penta’s engines. Never use water by itself as the
coolant.
IMPORTANT! Coolant of a suitable chemical formula must be used all year round. This applies
even if there is no risk for frost damage, so that
the engine always has complete corrosion protection.
Future warranty claims on the engine and ancillaries may be rejected if an unsuitable coolant
has been used or if the instructions concerning
coolant mixing have not been adhered to.
NOTE! The anti-corrosive agents become less effective after a time, which means that the coolant must
be replaced, see “Service schematic”. The cooling
system should be flushed when the coolant is
changed, please refer to “Cooling system. Cleaning”.
“Volvo Penta Coolant” is a concentrated coolant
that is to be mixed with water. It has been prepared to
work best with Volvo Penta engines and offers excellent protection against frost and cavitation damage,
plus frost bursting.
“Volvo Penta Coolant, Ready Mixed” is a readymixed coolant, 40 % “Volvo Penta Coolant” and 60 %
water. This concentration protects the engine against
corrosion, cavitation damage and freezing conditions
down to -28 °C.
Group 26 Cooling system
Page 70

68
Coolant. Mixing
WARNING! All glycol is dangerous to human
health and ecologically damaging. Shall not be
consumed!
Glycol is flammable.
IMPORTANT! Ethylene glycol should not be
mixed with other types of glycol.
Mix:
40 % “Volvo Penta Coolant” (conc. coolant)
60 % water
This mixture protects against internal corrosion, cavitation and frost damage down to -28 °C. (Using 60 %
glycol lowers the freezing point to -54 °C.) Never mix
more than 60 % concentrate (Volvo Penta Coolant) in
the cooling liquid, since this would give reduced cooling effect and increase the risk of overheating and
frost damage.
IMPORTANT! Coolant shall be mixed with pure
water, use distilled - de-ionized water. The water must fulfill the requirements specified by Volvo Penta, see “Water quality”.
IMPORTANT! It is extremely important that the
correct concentration of coolant is added to the
system. Mix in a separate clean vessel before
filling the cooling system. Make sure that the liquids mix.
Water quality
ASTM D4985:
Total solid particles ...................................... < 340 ppm
Total hardness ............................................. < 9.5° dH
Chloride ......................................................... < 40 ppm
Sulfate ........................................................... < 100 ppm
pH value ........................................................ 5,5 -9
Silica (acc. to ASTM D859) .......................... < 20 mg SiO2/l
Iron (acc. to ASTM D1068) .......................... < 0.10 ppm
Manganese (acc. to ASTM D858) ............... < 0.05 ppm
Conductivity (acc. to ASTM D1125) ............ < 500 µS/cm
Organic content, CODMn (acc. ISO8467) .... < 15 mg KMnO4/l
Page 71

69
Group 26 Cooling system
Draining coolant
Stop the engine before draining the cooling system.
Freshwater system
WARNING! Do not open the filler cap when the
engine is hot, except in emergencies. Steam or
hot fluid may spray out
1. Place a suitable collection vessel beneath the en-
gine block drain plug (1) and at the heat exchanger drain tap.
2. Open the drain plug (1) and drain tap and drain all
coolant.
NOTE! Deposit the old coolant at a recycling station
for destruction.
Draining the seawater system
WARNING! Risk for flooding. Close the sea-
cocks before starting work.
1. Close the sea cock (1) or the valve on the S-
drive. Remove the cover (2) from the seawater
pump and let the water run out.
2. Undo the hose (3) from the seawater pump and
seawater filter at the reverser/drive and angle
them downwards to let the water out.
3. Check if there are extra taps/plugs at the cooling
and exhaust systems lowest points.
Check carefully that all the water runs out.
4. Tighten the hoses and the cover on the seawater
pump. Bilge-pump the boat
WARNING! Check that there are no leaks
in the seawater system.
Filling with coolant
Flush the cooling system clean before new coolant is
added.
Close all drain points and fill up with coolant to the
correct level.
The engine must be stationary when the cooling
system is filled, and must not be started until the
system is vented and completely filled. If a heating
unit is connected to the engine cooling system, the
heat control valve should be fully opened and the installation vented during filling.
Check the hoses and joints and rectify any leaks.
Fill the system slowly! Filling must not be done so fast
that air locks are formed in the system. The air should
be allowed to flow out through the filling opening. Check
the coolant level after the engine has been run for
about an hour. Top up with coolant as necessary.
21
3
Page 72

70
Group 26 Cooling system
Checking the coolant level
WARNING! Do not open the filler cap when the
engine is hot, except in emergencies. Steam or
hot fluid may spray out.
Turn the filler cap to the first stop and allow any excess pressure to hiss out before removing the cap
completely. Top the coolant up as necessary. The
level should be between the filler opening and the lower edge of the level marker (1). Fit the filler cap.
If a separate expansion tank is fitted (extra equipment), the coolant level shall be between the MIN and
MAX marks.
Coolant temperature too low
Low coolant temperature can be caused by:
• Faulty thermostat.
• Faulty temperature sensor or instrument.
• Engine running with low load.
Coolant temperature too high
High coolant temperature (warning lamp lights up) can
be caused by:
• Blocked sea water inlet or sea water filter
• Defective impeller in the sea water pump.
• Coolant level Too low, air in the fresh water sys-
tem.
• Slipping or broken drive belt for circulation pump.
• Faulty thermostat, temperature sensor or instru-
ment.
• Blocked cooling system.
• Incorrectly set injection timing on the injection
pump.
• Filler cap gasket does not seal.
1
MAX
MIN
Page 73

71
Group 26 Cooling system
Coolant losses
There are two types of coolant losses:
• Coolant losses during operation.
• Coolant losses after stopping a hot engine.
Coolant losses during operation can be due to a leaking cooling system or air or combustion gases being
forced into the cooling system.
Checking the pressure valve in
the filler cap
Special tools: 999 6662
1. Drain some of the coolant and connect the pres-
sure testing device 99 6662 to a nipple or other
plugged hole in the cooling system.
2. Extend the drain hose from the filler pipe with a
hose which ends up in a water - filled vessel.
3. Increase the pressure and read the pressure
gauge when the valve opens (water bubbles into
the vessel with the drain hose). The valve should
open at 0.09 MPa.
4. Remove the test equipment. Install the plug and
fill the engine up with coolant.
Cleaning heat exchanger
Clean the heat exchanger insert at any sign of blockage (slowly increasing coolant temperature).
NOTE! First check/clean the seawater filter. Also
checkthe seawater pump impeller wheel and the seawater intake.
IMPORTANT! Close the sea cocks before working on the cooling system.
1. Drain the water from the seawater and freshwater
systems.
2. Disassemble the exhaust manifold together with
the heat exchanger.
3. Undo the screws and covers at the front and rear
of the heat exchanger. Pull out the insert.
4. Flush and clean the insert, both internally and ex-
ternally. Also clean the housing.
If there are loose deposits in the insert, cleaning can
be performed by passing a suitable steel rod through
the tubes in the opposite direction to the water flow.
NOTE! Check that the rod does not damage the
tubes.
Page 74

72
Group 26 Cooling system
5. Install the insert in the heat exchanger.
NOTE! Be careful to install the insert in the correct
position.
Make sure the hole in the insert aligns with the
hole in the housing and that the venting hole is
upwards. The insert is marked with “UP”.
6. Install the covers on the front and rear ends of the
heat exchanger. Connect the hose from the seawater pump and tighten the clamp.
7. Assemble the exhaust manifold together with the
heat exchanger.
8. Fill the engine with coolant.
9. Open the sea cocks or valve on the S-drive and
start the engine. Check that no leakage occurs.
Replacing the circulation pump
Removal
1. Drain the coolant from the engine (freshwater system).
2. Undo the alternator and remove the drive belt. Remove the alternator tensioner.
3. Remove the rubber hoses to and from the pump.
4. Remove the electric connection from the temperature monitor.
5. Remove the pump’s fixing bolts and lift out the
pump.
Fitting
1. Clean the contact surfaces on the pump and cylinder block.
2. Install the coolant pump with a new gasket.
3. Fit the tensioner to the alternator.
4. Install the rubber hoses to and from the pump.
Tighten the hose clamps.
5. Install the drive belts. It should be possible to depress the belt approx. 10 mm between the pulleys.
6. Reconnect the temperature monitor.
7. Fill the engine with coolant. Start the engine and
check carefully that no leakage occurs.
Page 75

73
Group 26 Cooling system
Replacing impeller in seawater
pump
Close the sea cock or the valve on the S-drive before
working on the cooling system.
1. Remove the end cover of the pump and drain the
water from the seawater system.
2. Pull and twist out the impeller with water-pump
piers.
3. Clean inside the housing. Grease the pump housing and the inside of the cover with a little waterresistant grease intended for rubber.
4. Push in the new impeller with a twisting motion
(clockwise). Install the sealing washer at the outer
end of the impeller center.
5. Install the cover with a new gasket.
6. Open the sea cock, or tap on the S-drive. Start
the engine and check carefully that no leakage
occurs.
Thermostat
Replacing the thermostat
1. Turn the main switch off. Drain the water from the
freshwater system.
2. Remove the cover (1), the spacer (2) and lift out
the thermostat (3). Remove the rubber ring.
Checking the thermostat
1. Check that the thermostat closes completely.
2. Heat up water in a container to 75 oC .
3. Lower the thermostat into the water. Check that
the thermostat is still closed after 3-5 minutes.
4. Raise the temperature to boiling point (100 oC).
Check that the thermostat has opened at least
8 mm after 3-5 minutes. Replace the thermostat if
it does not fulfill the requirements.
NOTE! If the thermostat does not close completely,
the engine will run too cold.
D2-55 C & D2-75
1
3
1
2
3
D2-55 A/B
Page 76

74
Group 30 Electrical system
1. Coolant temperature sensor (extra equipment)
2. Coolant temperature monitor
3. Fuses
4. Starter relay
5. Glowplug relay
6. Charge sensing resistor
7. Engine speed sensor
8. Starter motor
9. Alternator
10. Glowplug , 4 pcs.
11. Oil pressure sensor (extra equipment)
12. Oil pressure monitor
1
2
4
5
6
7
8
9
3
10
11
12
General
The engine is fitted with an AC alternator. The system
voltage is 12V and the electrical system is single-pole.
The electrical system can include, as extra equipment, sensors for monitoring the engine’s coolant
temperature and oil pressure.
The electrical system is shown in two ways. The wiring diagram shows wire runs, cable cross section and
color.
Fuses
The engine is equipped with a fuse block with four fuses (15A). One fuse safeguards the electrical system
and blows if overloaded, the others are spares.
If a fuse blows, the electrical system can be reconnected by moving the cable to the next fuse/connector. Always first investigate the reason for the overload.
Relays
The starting and glowplug functions are each controlled by a switching relay. These relays are identical
and are thus mutually interchangeable.
Page 77

75
Group 30 Electrical system
Alternator
Voltage regulator with sensor system
The voltage regulator on the standard alternator
(14V/60A) is equipped with a sensor system.
The sensor system compares the charge voltage between the alternator terminals, B+ and B-, with the
voltage across the battery positive and negative terminals. The voltage regulator then compensates for any
voltage drop in the cables between the alternator and
the batteries, by increasing the charge voltage supplied by the alternator as necessary.
When delivered from Volvo Penta, the sensor system
is not activated. The connection has probably been
done during engine installation, however.
1. Sensor wire (yellow, 1.5 mm2)
2. Charge splitter (extra equip.)
3. Alternator
4. Fuse panel (extra equip.)
5. Starter motor
6. Main switch
7. Auxiliary batteries (extra equip.)
8. Starting battery (engine)
Charge splitter
As extra equipment, the engine’s standard alternator
can be fitted with a charge splitter. Two independent
battery circuits can in this way, be charged at the
same time. The charge splitter separates the two circuits from each other so that the engine’s starting battery
is kept fully charged even if the “accessory batteries”
are weak or even totally discharged.
Connecting the sensor system
IMPORTANT! Stop the engine and disconnect
power with the main switch before working on
the electrical system.
1. Release the yellow sensor wire from connection
B+ on the alternator.
2. Splice the wire (yellow, 1.5 mm2) and run it to the
batteries. Connect the wire to the batteries’ positive pole (+).
2
3
4
5
6
7
8
1
Page 78

76
Group 30 Electrical system
Important information – electrical
system
IMPORTANT! Stop the engine and turn off the
power at the main switch(es) before carrying out
work on the electrical system.
Battery main switch
Never break the circuit between the alternator and the
battery while the engine is running. The main switch
(es) shall, therefore never by switched off before the
engine has stopped. If the circuit is disconnected
while running, the voltage regulator can be destroyed
and the alternator can be seriously damaged.
The charging circuits must never be re-connected with
the engine running, for the same reason. For simultaneous charging of two independent battery circuits, a
Volvo Penta charge splitter can be fitted to the standard alternator (accessory).
Batteries
Never mix up the battery’s positive and negative terminals when fitting batteries. Incorrect installation can
result in serious damage to the electrical equipment.
Refer to the wiring diagram. The battery poles shall be
kept well cleaned and the cable shoes shall always be
tightened and well greased, to avoid power loss.
Fast charging of the batteries should be avoided. If
fast charging must be used, the batterycables shall
always be disconnected first.
NOTE! Follow the appropriate safety regulations when
charging batteries. During charging, unscrew the cell
plugs but leave them in the plug holes. Ventilate well,
especially if the batteries are charged in an enclosed
space. Always switch off the charging current before
the charging clips are removed.
WARNING! Never expose the battery area to
naked flame or electrical sparks. Never smoke
close to the batteries. The batteries generate
hydrogen gas when charged, which forms an explosive gas when mixed with air. This gas is
easily ignited and highly explosive.
Always use protective goggles when charging
and handling the batteries.
Battery electrolyte contains sulfuric acid which
is highly corrosive. Should the battery electrolyte come into contact with unprotected skin
wash off immediately using plenty of water and
soap. If you get battery acid in your eyes, flush
at once with a lot of water, and get medical assistance at once.
Page 79

77
Group 30 Electrical system
Electrical wiring
Never make holes in the cables insulation to perform
measurements with needles. In a corrosive atmosphere such as a boat, it only takes 2 years for a
small cable with a needle hole to oxidize off.
If it is absolutely necessary to make a hole in the insulation, this must be repaired in a suitable way after
testing.
Galvanic corrosion
The S-drive is electrically isolated from the engine and
shall never be used as a grounding plane.
The S-drive has insulation (B) placed between the
adapter plate and the upper gear housing. An isolation
bush (A) shall be installed on one of the lower bolts.
IMPORTANT! The S-drive shall never be used
as a grounding plane or be electrically connected with any other equipment, i.e. radio, navigation equipment, rudder, bathing steps, etc.
Connection of extra equipment
All extra equipment shall be connected to a separate
connection box and correctly fused. Extra power takeoffs directly from the instrument panel should be
avoided. The permitted extra take off is however total-
ly max. 5A (applies to all instrument panels together).
Electric welding
Remove the positive and negative cables from the
batteries. Then disconnect all cables connected to the
alternator.
Always connect the welder earth clamp to the component to be welded, and as close as possible to the
weld site. The clamp must never be connected to the
engine or in such a way that current can pass through
a bearing.
WARNING! After welding is finished ,the wires
to the alternator must be reconnected before
the battery cables are reconnected.
B
A
Page 80

78
Group 30 Electrical system
Repair Instructions
Fault finding glow plugs
Special tools: 9812519
1. Remove both battery cables.
2. Remove the power rail between the glow plugs.
3. Measure the resistance of each glow plug to the
engine block with an ohmmeter. The resistance
shall be 1.6 ± 0.16 Ω. If the instrument shows 0
the glow plug is short-circuit and must be replaced.
Replacing glow plugs
1. Remove both battery cables.
2. Clean around the glow plugs.
3 Undo the connection from the power rail to the glow
plug.
4. Remove the power rail and unscrew the glow plug.
5. Install the new glow plug. Tightening torque,
please refer to the “Technical Data” chapter.
6. Reinstall the power rail and connect the glow plug.
Install the battery cables.
Fault tracing the charging system
The engines are equipped with a rectified three-phase
delta-coupled alternator of 14V/60A (840W).
The alternator’s designation can be found on a plate
on the rear of the alternator.
Checking and overhauling
Before disassembly of the alternator is started, fault
tracing of the battery circuit should be performed in order to eliminate other possible faults. Testing should
be performed with the alternator “hot”. Run the engine
at 2000 r.pm. for about 3 minutes before measuring.
WARNING! The alternators, voltage regulators
and battery circuit connections may not be disconnected or be disconnected with the engine
running. Check carefully that the measuring instrument is set to voltage measurement (“V”) to
avoid short circuiting between the alternators
connections.
1. Glow wire 5. Nut
2. Jacket 6. Magnesium oxide
3. Seal 7. Insulation
4. Socket 8. Core
Page 81

79
Group 30 Electrical system
WARNING! Be extremely careful so that the
measurement cables, clothes or similar come
into contact with the drive beltor pulleys on the
engine or alternator when the engine is running.
Check the tension of the alternator belt and the belt
condition. Replace the belt if it is cracked, worn or
oily. Adjust the belt tension as required. It should be
possible to depress the belt approx. 10 mm between
the pulleys.
Current loss check
1. Wash the battery with lukewarm water and dry off.
Remove the battery cables and clean the poles.
2. Reconnect the positive pole (+) again.
3. Turn off the keyswitch or disconnect power to the
instrument panel and all other consumers connected to the starting battery.
4. Set the multimeter for DC current measurement
(+20A). Connect the multimeter between the battery’s negative pole (-) and the negative cable.
The current loss may not exceed 0.1 A with the
keyswitch or instrument panel disconnected.
If the current loss is greater than 0.1 A:
Check that no short circuits or leakage occurs at
any of the connection points. Leakage can occur
through dirty or salt-encrusted electrical components.
Clean and check all connection points.
If the current loss is less than 0.1 A:
Check the charge status of the battery.
Fault tracing the battery circuit
Special tools: 9812519
Note that other instruments may use different symbols for the set measurement function.
}
Page 82

80
Group 30 Electrical system
Load testing the battery
The battery acid density may not be less than
1.21 g/cm3.
1. Fix a voltmeter across the battery poles
2. Activate the stop function and run the starter motor for about 10 seconds with the glow plugs activated and read off the start voltage. It should not
be less than 9.5 V.
3. Check if any of the cells bubble when the starter
motor is operated (short-circuit cell).
4. If the voltage is less than 9.5 V or if any of the
cells bubble:
Replace the battery and try again.
If the voltage is 9.5 V or higher:
The battery is OK. Check the charging voltage
(see next paragraph).
Checking charge status
Check the charge status with an acid densitometer.
Measure the acid density of all cells at +25 oC. Measurement shall not be done immediately after charging
or filling with battery water.
The acid density of a fully charged battery at +25
o
C
shall be 1.28 g/cm3. Charge the battery if the acid
density is less than 1.24 g/cm3 (approx. 75 %
charged). Charge at 5-6A for 10 hr.
WARNING! The battery generates hydrogen gas
which is easily ignited and highly explosive.
Never expose the battery to naked flame or
electrical sparks. Ventilate the battery area well,
especially after charging.
Check 2hr. after charging
If the acid density of the cells is uneven, a cell is
probably short circuit. Replace the battery if the difference between cells is 0.04 g/cm3 or more (i.e. 1.28-
1.24 g/cm3).
If the acid density between cells is even, then the battery is not fully charged.
Sulfated battery. A minor case of sulfating can be broken down by an additional 10 hours charging. Replace
the battery if this does not help.
Page 83

81
Group 30 Electrical system
Checking the battery leads
Set the multimeter to voltage test and connect the
multimeter between the battery’s positive and negative poles. Run the engine at 2000 r.p.m. Read off and
note the voltage across the poles.
The alternator delivers approx.14.0 V:
Perform the test as follows:
1. Connect the multimeter between the alternator
connections B+ and B-.
2. Run the engine at 2000 r.p.m. The alternator shall
deliver 14.0-14.4 V. The total voltage drop shall
not exceed 0.4 V.
Voltage drop less than 0.2 V:
Battery leads OK.
Voltage drop more than 0.3 V:
Perform a check of the battery leads.
The alternator supplies more than 14.4 V:
See sections “Checking and Fault Tracing the Alternator”, and “Checking the Regulator”.
Checking the positive (+) battery lead
1. Connect the multimeter between the alternator
connection B+ and the battery positive pole.
2. Run the engine at 2000 r.p.m. The voltage drop
shall not exceed 0.2 V. If the voltage drop exceeds this, the battery lead/connection must be
remedied according to “Actions” below.
Then perform the test for “Check of the negative
battery lead”.
Page 84

82
Group 30 Electrical system
Checking negative (-) battery lead
1. Connect the multimeter between the alternator
connections B- and battery negative pole (-).
2. Run the engine at 2000 r.p.m. The voltage drop
shall not exceed 0.2 V. If the voltage drop exceeds this, the battery lead/connection must be
remedied according to “Actions”.
Actions
WARNING! Disconnect power and remove both
battery cables before working on the charging
circuit.
If the voltage drop in any of the tests above exceeded
0.2 V, the battery leads/connections must be removed
and cleaned from oxide etc. They spray the connections with a moisture dispersent contact oil and tighten the connections once more.
Treat the connections at the battery, main switch,
starter motor, alternator, glow plug relay and glow
plugs.
Alternator
Checking and fault tracing the alternator
1. Remove the alternator’s electrical connections.
Remove the alternator belt. Remove the alternator.
2. Undo the voltage regulator’s connection at the alternator connection B+. Unplug the blade connectors at connections B+ and D+. Remove the protective cover from the W connection.
3. Lever the plastic cover fixing ears from side to
side off the alternator. Undo the regulator’s connection cables to the diode bridge. Use flat pliers
or poke the cable shoes out with a screwdriver.
Do not pull on the cables!
Page 85

83
Group 30 Electrical system
Replacing alternator brushes
Unscrew the voltage regulator. Unscrew the brush
holder. Check the length of the brushes. Replace the
brushes if they are 5 mm or shorter. The brush and
holder are replaced as a unit. Unsolder the connection
cables and solder on the new with acid-free solder.
Checking the regulator
Special tools: 884 892
Before performing the test, check that the regulator
tester battery has the correct voltage. Press the
“Test” button and check that the green lamp (“Batt.”)
lights. Replace batteries (2 pcs alcaline, 9 V) if the
lamp does not light. The batteries are in a compartment on the underside of the instrument.
Connect the tester’s gray wire to the brush.
Connect the tester’s brown wire to the regulator’s yellow and brown wires, which are to be held together for
the test.
Connect the tester’s black wire to the regulator’s black
wire.
Press the “Test” button and and at the same time turn
the rheostat from “0” to “1”.
Regulator OK
The red and green lamps shall light from “0” . As the
rheostat is turned, the red lamp should go out at “1”.
Faulty regulator
Replace the regulator if the red lamp lights through the
whole travel of the rheostat or if it does not light at all.
Note. Point “2” on the tester is not used for this type
of regulator.
Page 86

84
Group 30 Electrical system
Checking the rotor winding
Once the regulator and brushes have been removed, it
is possible to measure the resistance of the rotor
windings.
Set the measurement instrument to position Ω.
Make
sure the probes have good contact with the slip rings.
The rotor resistance should be 3.0-5.0 Ω.
Also check for grounding faults by measuring between
the slip rings and ground.
Removing the diode bridge
In order to check the diode bridge and stator windings,
the diode bridge should be removed.
Unsolder the three stator windings. Do not use too
much heat as this can damage the diodes. Undo the
nuts (note how the nuts and washers are fitted).
Checking the diode bridge
Set the multimeter to position “Diode test”. Be very
sure that you have good probe contact for all measurements.
Checking B+ diodes
1. Connect the multimeters positive probe to one of
the stator winding’s connections (1-2-3). Then
connect the instruments negative probe to the diode plate B+ connection. Read off the instrument.
A normal value should be between 450 and 650
mV which is the voltage drop across the diode.
Any other value indicates a faulty diode.
2. Check the other B+ diodes by moving the positive
probe to the other connections (1-2-3).
3. Then check the B+ diodes in the opposite direc-
tion by reversing the positive and negative
probes. Perform the same measurements as
above. The instrument should show a one “1” with
these measurements (furthest to the left). Any
other value on the instrument indicates a faulty diode.
Page 87

85
Group 30 Electrical system
Checking B- diodes
1. Connect the instruments positive probe to the diode plate B- connection and the instruments negative probe to one of the stator windings connections (1-2-3).
2. Read off the instrument as previously. A normal
value should be between 450 and 650 mV. Any
other value indicates a faulty diode.
3. Then check the B- diodes in the opposite direction
by reversing the positive and negative probes.
Perform the same measurements as above. The
instrument should show a one “1” with these measurements (furthest to the left). Any other value
on the instrument indicates a faulty diode. If any
of the diodes are faulty, the whole diode plate must
be replaced.
Checking D+ diodes
The diode plate’s three magnetization diodes are
checked in the same way as above.
1. Connect the instrument’s positive probe to each
stator winding connection (1-2-3) and the negative
probe to D+. The voltage drop for each diode
should be between 450 and 650 mV.
2. Then check the D+ diodes in the opposite direction by reversing the positive and negative
probes. Perform the same measurements as
above. The instrument should show a one “1” with
these measurements (furthest to the left). Any
other value on the instrument indicates a faulty diode. If any of the diodes are faulty, the whole diode
plate must be replaced.
Page 88

86
Group 30 Electrical system
Checking the stator windings
Once the diode bridge is removed, the stator windings
can be measured by setting the multimeter to “buzzer
position”.
Measure the resistance of each winding.
NOTE! First check the internal resistance of the measurement wires. When measurement of the stator
windings is performed, the internal resistance of the
measurement wires (i.e. 0.10Ω) must be subtracted
from the value displayed.
Measure between all winding connections (three measurements). The resistance be 0.10Ω.
Also measure to the alternator body by connecting the
instrument in position Ω. And then measure from each
winding to the body. The instrument should show a one
“1” with these measurements (which means infinity).
If the instrument shows any other value, the stator
winding is faulty. If any of the stator windings are
faulty, the complete stator ring must be replaced.
Starter motor
General
The starter motor is a DC series motor. The starter
pinion is operated by a control solenoid and can be
slid axially on the rotor.
The starter motor is fitted with a reduction gear, which
provides a higher torque.
Removing the starter motor
1. Remove both battery cables.
2. Undo the electrical connections from the starter
motor.
3. Remove the starter motors fixing bolts and lift off
the starter motor.
Page 89

87
Group 30 Electrical system
Disassembling the starter motor
1. Clean the starter motor externally.
2. Remove the solenoid.
3. Remove the protective cover from the rear bearing
casing. Remove the locking ring and where fitted,
the shim(s).
4. Remove the rear bearing casing.
5. Remove the brush plate. Remove the stator housing from the gear housing.
6. Remove the lever arm that is fitted in the gear
housing and the rotor.
7. Remove the starter gear that is fitted in the gear
housing. First remove the locking ring by striking
the contact ring with a suitable sleeve.
Page 90

88
Group 30 Electrical system
Inspecting the starter motor
Fault tracing the starter motor should be left to an authorized electrical workshop which has the necessary
test equipment.
1. Test the rotor with regard to winding breakdown
and open circuits with the appropriate test equipment.
2. Check that the brushes’ contact surface on the
commutator is even and free from dirt and oil. If
the commutator is worn or burnt it can be ground
with emery paper no. 500 or 600.
Measure the commutator with a dial gauge. Max.
permitted runout is 0.05 mm.
3. Check that the insulation is at least 0.2 mm below
the commutator surface. Correct as necessary.
4. Check the straightness of the rotor. Set the rotor
up between centers and measure the runout of the
rotor frame with a dial gauge. Max. runout 0.08
mm. The runout is half of the indicated value.
5. Check the starter gear teeth. Replace damaged
gears. Also check the ring gear if the starter gear
is damaged.
Field windings
Check with the test instrument that there is no open
circuit in the windings. Faulty field windings must be
replaced.
Assembling the stator
Assembly is the reverse of disassembly.
Connect + and - from a 12 V battery to the terminals
on the solenoid and check that the starter gear is
thrown forward to the gear stop.
Installing the starter motor
1. Place the starter motor in position on the flywheel
housing and tighten it.
2. Connect the electrical wiring to the starter motor.
See wiring diagram for starter motor.
3. Connect the battery cables.
Page 91

89
Group 30 Electrical system
Electrical components
Relay box with fuses
The engine is equipped with a fuse block with four fuses (15A). One fuse safeguards the electrical system
and blows if overloaded, the others are spares.
If a fuse blows, the electrical system can be reconnected by moving the cable to the next fuse/connector. Always first investigate the reason for the overload.
Monitors
Lube oil pressure monitor - alarm
Contact type: Normally open. The contacts close if
the lube oil pressure in the engine drops below
0.3 ± 0.15 bar.
Check of the closing point is done with falling pressure.
Coolant temperature monitor - alarm
Contact type: Normally open. The contacts close if
the coolant temperature rises above 95 oC ± 3 oC.
Check of the closing point is done with rising temper-
ature.
Page 92

90
Group 30 Electrical system
Sensor
Note. Sensors are only supplied together with the “De
Luxe” instrument panel.
Lubrication oil pressure sensor
Resistance checking, measured with falling pressure
and instrument connected. Measured with ohmmeter
class 1 at + 20oC.
Pressure
0 bar: 10 + 3 /-5 Ω
2 bar: 52 ± 4 Ω
4 bar: 88 ± 4 Ω
6 bar: 124 ± 5 Ω
Coolant temperature sensor
Resistance checking, measured with sensor im-
mersed in circulating liquid down to the hexagonal
screw for 3 minutes with power connected:
Temp. 60 oC: 134,0 ± 13,5 Ω (±4 oC)
90 oC: 51,2 ± 4,3 Ω (±4 oC)
100 oC: 38,5 ± 3,0 Ω (±4 oC)
Page 93

91
Group 30 Electrical system
1. Battery
2. Starter motor
3. Alternator
4. Main switch
5. Glow plugs
6. Oil pressure monitor, engine
7. Oil pressure sensor
8. Coolant temperature monitor
9. Coolant temperature sensor
10. Fuses (4 pcs.), max. 15A (+)
11. Starter relay
12. Glowplug relay
13. Magnetisation resistance
14. Engine speed sensor
Engine
Cable colors
BL = Blue
LBL = Light blue
BN = Brown
LBN = Light brown
GN = Green
GR = Gray
OR = Orange
PU = Purple
R = Red
SB = Black
W = White
Y = Yellow
Cable cross section in mm2 is given after the color
code on the wiring diagram.
Cross section not given = 1.0 mm
2
.
Dotted wires not included from Volvo Penta.
Page 94

92
Group 30 Electrical system
1. Instrument illumination
2. Tachometere with built-in running hours timer (extra equip.).
Or blanking plug
3. Connector for connecting extra warning display
(optional equipment)
4. Electronic unit (alarm)
5. Warning lamp, coolant temperature
6. Warning lamp, oil pressure
7. Charge warning lamp
8. Indication lamp, glow plugs
9. Starter button
10. Press switch. Instrument panel On/Off
11. Connector for connecting extra neutral position switch
(optional equipment)
12. Semiconductor diode
13. Alarm
14. Tumbler switch. Glow – Alarm test/Acknowledge
15. 16-pin connector
Cable colors
BL = Blue
BN = Brown
GN = Green
GR = Gray
OR = Orange
PU = Purple
R = Red
SB = Black
W = White
Y = Yellow
Cable cross section in mm2 is given after the color
code on the wiring diagram.
Instrument panel, alternative “A” *
* (without starter switch)
Page 95

93
Group 30 Electrical system
Instrument panel, alternative “B” *
* (with starter switch)
Spring biased
Spring biased 1. Instrument illumination
2. Tachometere with built-in running hours timer (extra equip.).
Or blanking plug
3. Connector for connecting extra warning display (optional
equipment)
4. Electronic unit (alarm)
5. Warning lamp, coolant temperature
6. Warning lamp, oil pressure
7. Charge warning lamp
8. Indication lamp, glow plugs
9. Switch, instrument lighting
10. Switch - Alarm test/Acknowledge
11. Key switch
12. Alarm
13. Connector for connecting neutral position switch
(extra equip.)
14. 16-pin connection
Cable colors
BL = Blue
BN = Brown
GN = Green
GR = Gray
OR = Orange
R = Red
SB = Black
VO = Violet
W = White
Y = Yellow
Cable cross section in mm
2
is given after the color
code on the wiring diagram.
Cross section not given = 1.0 mm
2
Page 96

94
Group 30 Electrical system
Instrument panel, alternative “C”
1. Instrument lighting
2. Voltmeter
3. Oil pressure gauge
4. Coolant temperature gauge
5. Connector for connection of extra
warning display (extra equip.)
6. Electronic unit (alarm)
7. Warning lamp, coolant temperature
8. Warning lamp, oil pressure
9. Charge warning lamp
10. Indication lamp, glow plugs
11. Switch, instrument lighting
12. Switch - Alarm test/Acknowledge
13. Tachometer with built-in running hours timer
(extra equip.). Or blanking plug
14. Key switch
15. Alarm
16. Connector for connecting
neutral position switch (extra equip.)
17. 16-pin connector
18. 2-pole connector (for possible additional panel)
Cable cross section in mm2 is given after the color
code on the wiring diagram.
Cross section not given = 1.0 mm
2
Spring biased
Spring biased
Cable colors
BL = Blue
LBL = Light blue
BN = Brown
LBN = Light brown
GN = Green
GR = Gray
OR = Orange
R = Red
SB = Black
VO = Violet
W = White
Y = Yellow
Page 97

95
Group 20 Technical data
General
Engine designation ............................................................ D2-55 A/B/C D2-75 A
No. of cylinders ................................................................. 4 4
Induction system .............................................................. Atmospheric pressure Turbocharger with
charge air cooler
Bore .............................................................................. 84 mm 84 mm
Stroke ........................................................................... 100 mm 100 mm
Cylinder volume, total ................................................... 2.2 liter 2.2 liter
Power output, see sales literature
Idling speed .................................................................. 850 ± 25 rpm 850 ± 25 rpm
High idle ........................................................................ 3185 ±15 rpm 3240 ±15 rpm
Compression ratio ......................................................... 23,3:1 23,3:1
Compression pressure at starter motor speed ............... >27 Bar >27 Bar
Firing sequence (cyl. no. 4 closest to flywheel) .............. 1-3-4-2 1-3-4-2
Direction of rotation (seen from front) ............................ Clockwise Clockwise
Max. permissible rearwards inclination in operation ....... 20
o
20
o
Max. side inclination in operation................................... 30
o
30
o
Valve clearance, stationary cold engine, inlet and exhaust ... 0.20 mm 0.20 mm
Weight, engine less oil and water .................................. 225 kg 250.6 kg
Max. permitted back-pressure in exhaust system ......... 20 kPa 20 kPa
Pistons
Material ......................................................................... Aluminum alloy Aluminum alloy
Height, total .................................................................. 87.66-87.74 mm 87.66-87.74 mm
Height from gudgeon pin center to piston crown ............ 47.66-47.74 mm 47.66-47.74 mm
Piston clearance ........................................................... 0.038-0.072 mm 0.038-0.072 mm
Front marking ................................................................ “SHIBAURA”-mark inside piston shall when mounted
face the fuel pump (D2-55 A/B/C & D2-75).
Piston rings
Compression rings:
Quantity ........................................................................ 2 2
Upper compression ring, height ..................................... 1.97-1.99 mm 1.97-1.99 mm
2nd compression ring, height ........................................ 1.47-1.49 mm 1.47-1.49 mm
Oil ring:
Quantity ........................................................................ 1 1
Height ........................................................................... 3.90-3.98 mm 3.90-3.98 mm
Piston ring gap in cylinder:
Upper compression ring ................................................ 0.20-0.35 mm 0.20-0.35 mm
2nd compression ring .................................................... 0.20-0.40 mm 0.20-0.40 mm
Piston ring clearance in groove,
upper compression ring ................................................. 0.07-0.11 mm 0.07-0.11 mm
2nd compression ring .................................................... 0.04-0.08 mm 0.04-0.08 mm
oil ring ........................................................................... 0.02-0.06 mm 0.02-0.06 mm
Gudgeon pins
Clearance, piston pin – connecting rod bush ................. 0.010-0.027 mm 0.010-0.027 mm
gudgeon pin – gudgeon pin hole .................................... -0.001- +0.011 mm -0.001- +0.011 mm
Gudgeon pin diameter ................................................... 27.996-28.000 mm 27.996-28.000 mm
Conrod bush int. diameter ............................................. 28.010-28.021 mm 28.010-28.021 mm
Gudgeon pin hole diameter in piston ............................. 27.999-28.005 mm 27.999-28.005 mm
Page 98

96
Group 20 Technical data
D2-55 A/B/C D2-75 A
Cylinder head
Height ........................................................................... 69.7-70.3 mm 69.7-70.3 mm
Valve seat (inlet and exhaust)
Inlet, diameter ............................................................... 36.35-36.45 mm 36.35-36.45 mm
Exhaust, diameter ......................................................... 32.35-32.45 mm 32.35-32.45 mm
Inlet, width .................................................................... 1.5-2.0 mm 1.5-2.0 mm
Exhaust, width .............................................................. 1.9-2.2 mm 1.9-2.2 mm
Crankshaft with bearings
(Replaceable bearing shells for main and big-end bearings)
Crankshaft, end float ..................................................... 0.1-0.4 mm 0.1-0.4 mm
Main bearings, radial clearance
no. 1, 2, 3 & 4 ................................. 0.044-0.102 mm 0.044-0.102 mm
Main bearing journals
Diameter in mm, bearing journal, standard
no. 1, 2, 3 & 4 ................................. 67,957-67,970 67,957-67,970
Big end journals
Big end, radial clearance ............................................... 0,035-0.085 mm 0,035-0.085 mm
Length of bearing journal ............................................... 17,70-20.60 mm 17,70-20.60 mm
Diameter, standard ........................................................ 51,964 -51.975 mm 51,964-51.975 mm
Big end journal shells
Thickness in mm, standard ........................................... 1,482-1,495 1,482-1,495
Con rods
Fitted with replaceable bearing shells.
Diameter, conrod bush bearing position .......... 30,500-30,516 30,500-30,516
bearing shell bearing position .......... 28,010-28,021 28,010-28,021
gudgeon pin bush ........................... 28,010-28,021 28,010-28,021
End float, con rod – crankshaft ..................................... 0.035-0.085 mm 0.035-0.085 mm
Page 99

97
Group 20 Technical data
D2-55 A/B/C D2-75 A
Camshaft
Drive ............................................................................. Gear wheel Gear wheel
No of bearings ............................................................... 3 3
Valve timing:
inlet valves opens b.t.d.c. .......... 13
o
13
o
closes a.b.d.c. ........ 43
o
43
o
exhaust valves opens b.b.d.c. ......... 43
o
43
o
closes a.t.d.c.......... 13
o
13
o
Valves
Inlet
Valve stem diameter ..................................................... 6.955-6.970 mm 6.955-6.970 mm
Valve head edge ........................................................... 0.925-1.075 mm 0.925-1.075 mm
Clearance, valve stem - valve guide ............................. 0.03-0.06 mm 0.03-0.06 mm
Valve seat angle in cylinder head .................................. 45
o
45
o
Valve clearance, cold engine ......................................... 0.20 mm 0.20 mm
Exhaust
Valve stem diameter ..................................................... 6.94-6.95 mm 6.94-6.95 mm
Valve head edge ........................................................... 0.925-1.075 mm 0.925-1.075 mm
Clearance, valve stem - valve guide ............................. 0.050-0.075 mm 0.050-0.075 mm
Valve seat angle in cylinder head .................................. 45
o
45
o
Valve clearance, cold engine ......................................... 0.20 mm 0.20 mm
Valve springs
Length unloaded ................................................. 35 mm 35 mm
with 79.4 N (8.1 kp) load ......................... 30.4 mm 30.4 mm
Pushrods
Length, total .................................................................. 226 mm 226 mm
Outer diameter .............................................................. 6.35 mm 6.35 mm
Rocker arm mechanism
Rocker arm shaft, diameter ........................................... 14.95-14.97 mm 14.95-14.97 mm
Clearance, rocker arm shaft – rocker arm bush ............. 0.030-0.093 mm 0.030-0.093 mm
Lubrication system
Oil pressure, hot engine at operating speed .................. 150-500 kPa 150-500 kPa
Oil pressure, idle ........................................................... 50-150 kPa 50-150 kPa
Reduction valve, opening pressure ................................ 245-345 kPa 245-345 kPa
Lubrication oil pump:
clearance, inner - outer rotor ................... 0.01-0.15 mm 0.01-0.15 mm
end float, rotor - cover ............................. 0.01-0.15 mm 0.01-0.15 mm
Oil grade ....................................................................... VDS-2, VDS-2,
..................................................................................... ACEA E5, ACEA E5,
..................................................................................... API CH-4 API CH-4
Viscosity at -5 to +50°C* ............................................... SAE 15W/40, SAE 15W/40,
..................................................................................... SAE 20W/50 SAE 20W/50
Max oil volume incl. oil filter, no engine
inclination, approx. ........................................................ 10.6 liter 10.6 liter
Min. oil volume incl. oil filter, no engine
inclination, approx. ........................................................ 8.9 liter 8.9 liter
*Note The temperature values refer to constant ambient temperatures
Page 100

98
Group 20 Technical data
D2-55 A/B/C D2-75 A
Fuel system
Injection sequence ........................................................ 1-3-4-2 1-3-4-2
Feed pump max. suction height .................................... 0.8 m 0.8 m
Feed pressure ............................................................... 15-25 kPa 15-25 kPa
Injection pump
Injection start, crankshaft position ................................ 22.0o ± 1o b.t.d.c. 22.0o ± 1o b.t.d.c.
Pump element diameter ................................................ 6 mm 6 mm
Stroke ........................................................................... 7 mm 7 mm
Injectors
Opening pressure (for checking) .................................... 15.2-16.2 MPa 15.2-16.2 MPa
Opening pressure (when adjusting) ................................ 15.7 MPa 15.7 MPa
Needle valve, diameter.................................................. 4 mm 4 mm
Pin diameter .................................................................. 1 mm 1 mm
Jet angle ....................................................................... 4
o
4
o
Cooling system
Type .............................................................................. Over-pressure, Over-pressure,
closed cooling system closed cooling system
Freshwater system volume, approx. .............................. 9.5 liter 9.8 liter
Thermostat, qty. ............................................................ 1 1
Thermostat starts opening at ........................................ 82o ± 4oC82
o
± 4oC
fully open at .................................................................. 95 oC 95 oC
Thermostat valve lifting height ...................................... 8 mm 8 mm
Electrical system
System voltage ............................................................. 12 V 12 V
Fuses ........................................................................... 15 A 15 A
Battery capacity (starter battery)................................... 88 Ah 88 Ah
Glow plugs:
rated voltage ................................................................. 10.5 V 10.5 V
current .......................................................................... 6.9 A 6.9 A
Alternator
Voltage output at +20 °C with sensor ................ 14.2 ± 0.15 V 14.2 ± 0.15 V
without sensor............ 14.2 ± 0.3 V 14.2 ± 0.3 V
Max current ................................................................... 115 A 115 A
Power, approx. .............................................................. 1630 W 1630 W
Suppression capacitor ................................................... 2.2 μF 2.2 μF
Starter motor
Starter motor, power app. .............................................. 2.0 kW 2.0 kW
 Loading...