

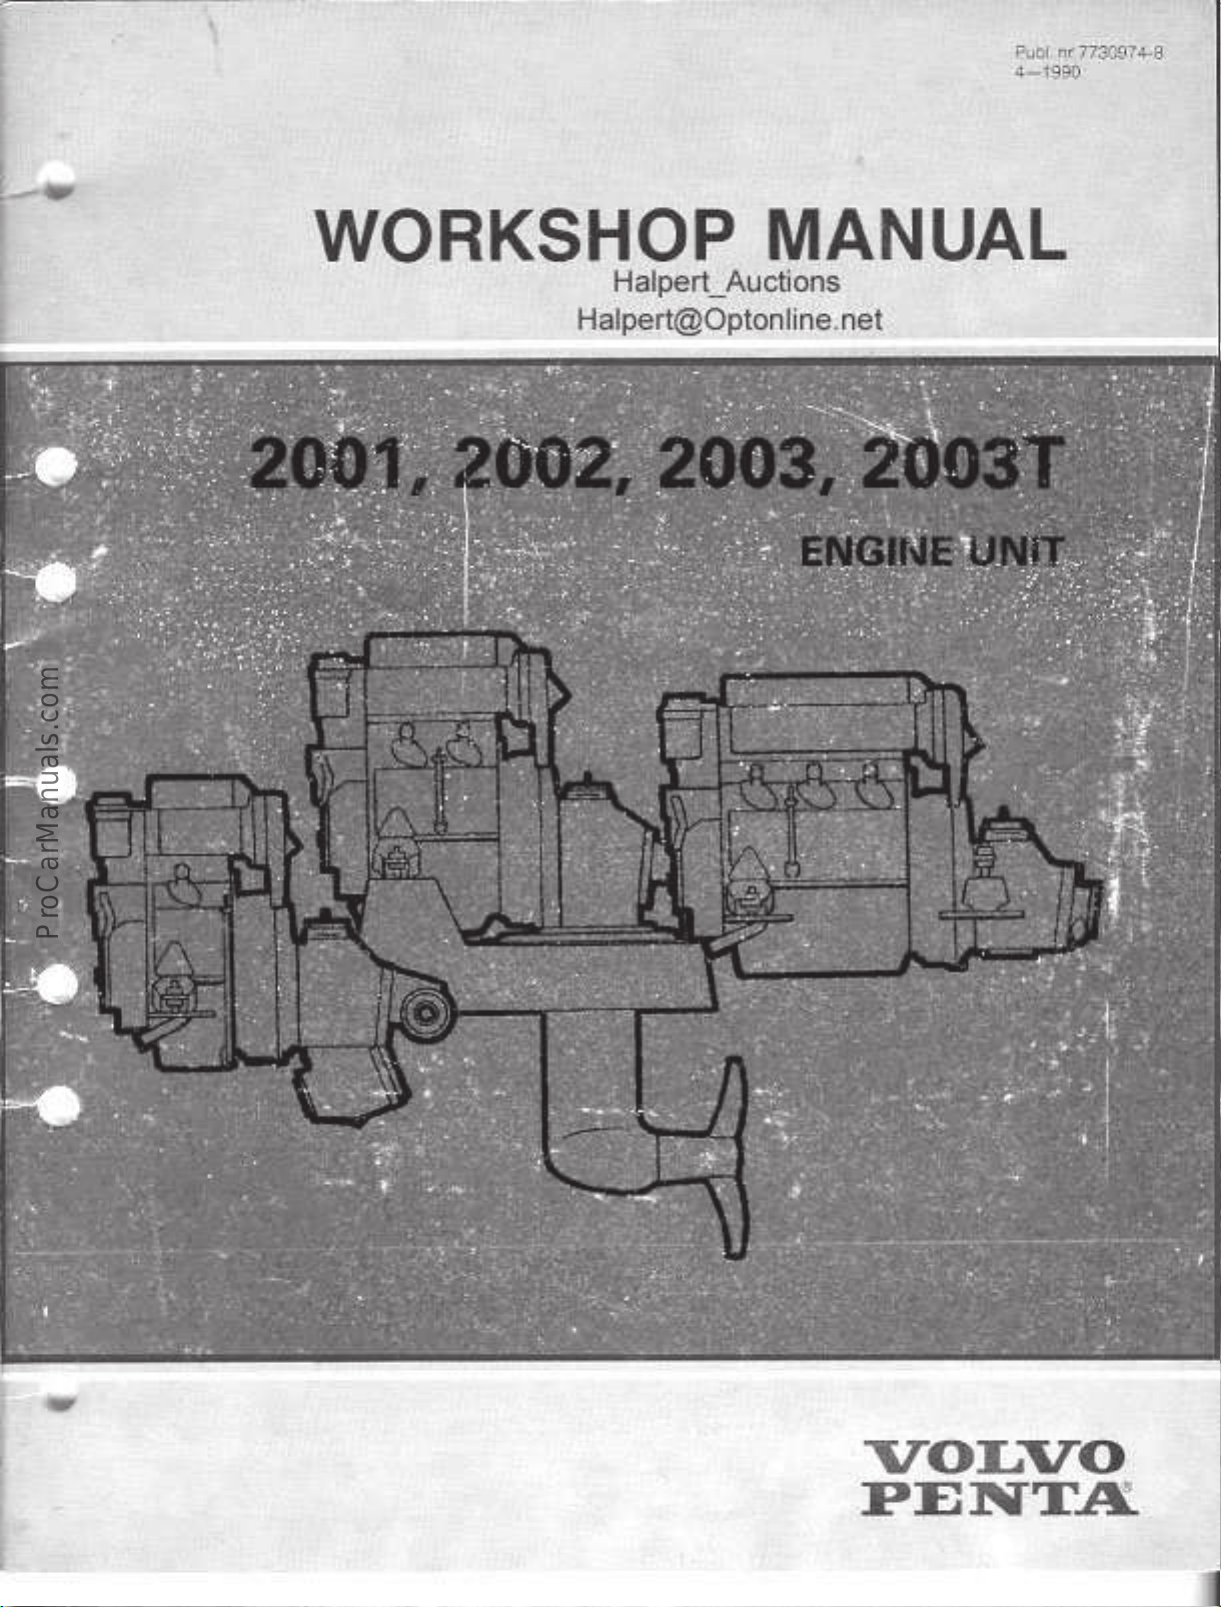
Page 1
Page 2
FOREWORD
wor kshop
Thi s
The
i nst r uct i ons
t he
headi ng
Bot h t he
when
or der i ng
r eser ve
We
bi ndi ng
.
UNI T
SI
Uni t s
accor di ng
Power
Tor que
i s
ear l i er uni thp( hor se- power )
ear l i er uni t
ear l i er uni t
Pressur e
ear l i er
ear l i er
manual
" Speci al
engi ne
i s
desi gnat i on
par t s
t he
r i ght
gi ven
i nkW( ki l owat t )
gi ven
kpm
l bf
i s
gi ven
uni t
kp/ cm
uni t
I bf / i n2( pounds
cont ai ns
concer ni ng over haul i ng
t ool s"
.
t o
car r y
SYSTEM
i nt er nat i onalSIsyst em
t o
t he
i n
Nm
( newt on
( ki l opond
f t ( poundf oot )ear l i er uni t
( Pascal )
i n
Pa
2
( ki l oponds
.
and
out
met r e)
per
r epai r
i t s
ser i al
desi gn
met r e)
per
squar e
i nst r uct i ons
descr i be
number
modi f i cat i ons
squar e
cent i met r e)
i nch)
f or
t he 2001,
t he
most
sui t abl e
mustbecl ear l y
and,
f or
t hi s
have been
I mp
used
i n
Speed
Vol ume
. gal ( I mper i al gal l on)
2002
wor ki ng
st at ed
r eason,
t hi s
ear l i er
ear l i er
ear l i er
and
2003
met hod
i n
al l
cor r espondence
t he
cont ent soft hi s
book.The
i s
gi ven
uni t
r ev/ mi n
i s
gi ven
uni tl( l i t r e)
uni t
US
ear l i er
i n
r ev/ s
i ndm3
gal
engi nes
usi ng
Techni cal
uni t s
( r evol ut i ons
( r evol ut i ons
( cubi c
( Uni t ed
.
t he
speci al
concer ni ng
manual cannotber egar ded
Publ i cat i ons
ar e
deci met r e)
St at es
gi ven
per
t ool s
AB
af t er
per
second)
mi nut e)
gal l on)
l i st ed
t he
VOLVO
Depar t ment
t he
engi ne
PENTA
SI
under
and
uni t s
as
.
Page 3
I NDEX
Component s
DI SASSEMBLY
Cyl i nder
Tr ansmi ssi on
Pi st on,
Fl ywheel
Cr ankshaf t
Camshaf t
OVERHAUL
Di sassembl i ng
Val ve
Val ve
Val ves......
Val ve
Rocker
I nj ect or
I nj ect or s....
Assembl i ng
Feed- pump.. . ... . . . . . ... . . . . . ... . . . . . ... . . . . . .....
Pi st ons...... . ....... . ... . . . . . ... . . . . . ..... . . . .....
Cr ankshaf t..
Camshaf t.... . ....... . ....... . ....... . ....... . .....
Connect i ng
Ther most at.. . ....... . ... . . . . . ... . . . . . ... . . . . . ... . .
Sea- wat er
gui de..
head
. ... . ... . .....
. ... . ... . ....... . ..... . . . ....... . ... . . .
pi st on
. . ... . .
. . . . ... . ... . ....... . ... . . . . . ... . ... . ... . . .
. ... . ... . ... . ....... . .....
..... . ........... . ..... . . . ... . . . . . ... . . .
gui des
seat s.. . ....... . ....... . ... . . . . . ... . . . . . . . . . . .
. . ....... . ... . ... . ....... . .....
spr i ngs
. ....... . ....... . ....... . ... . ... . ... . . .
ar m
mechani sm...... . ... . . . . . ....... . ..... .
sl eeve..
. . ....... . ....... . ..... . . . ....... . ... . ..8
t he
...
r ods
pump....
. . ....... . ... . . . . . ... . . . . . ... . .
.
. . ....... . ....... . ... . . .
r ods..
. . ... . ... . ... . . . . . ....... . ... . . .
... . ....... . ....... . ... . ... . ... . . .
...
. . .
...
.
.
.
t he
cyl i nder
. . ... . ....... . ..... . . . ....... . .....
cyl i nder
.
...
.
. . . . . . . . . . . ....... . ... . ... . . ... . . .
head.... . . . ..... . . . ... . . .
... .
head
. . ..... . . . ... . . . . . ... . ..9
.
.
. . . . . . ... . . . . . ... . ... . .....
. .
. . ... . . . . . ... . . . . . ..... . . . .....
. . ... . . .
.
. .
. .
. 12
.
2
3
4
5
5
5
5
7
7
7
7
8
8
8
.
10
11
11
11
13
13
ASSEMBLY
Cr ankshaf t..
Pi st ons...... . ..... . . . ... . . . . . ....... . ... . ... . ... . .
Fl ywheel
Tr ansmi ssi on
Adj ust i ng t he
Checki ng
2003
Tur bo..
Fr esh
El ect r i cal
Faul t t r aci ng
Speci al
Techni cal
. . ... . ... . ... . ... . ... . . . . . ....... . ... . .
. . . . . . ... . ... . ... . ... . ..:........ . ... . ... . .
. ... . ... . ... . ... . ........... . ... . ... . .
val ve
cl ear ance
t he
i nj ect i on
. . ... . . . . . . . . . . . . . . . .
wat er
cool i ng
syst em
scheme
t ool s.. . . . . . . . . . . . ... . . . . . . . . ... . . . . . . . . . . . .
Dat a.. . . . . . . . ..... . . . . . . . . . . . . . . . . . . . . . . .
. . . . . . . . . . . . . . . . . ... . . . . . . . . . . . .
. . . . . . . . . . . . . . . . . . . . . . . . . . . . . . . . . . .
. . . . . . . . . . . . . . . . ... . . . . . . . . . . . .
. . . . ... . . . ... . . ....... .
angl e
. . . . . ... . . . ... . . ... . ... .
. . . . . . . . . ..... . . .
14
14
15
15
17
17
21
25
26
28
29
30
Page 4
COMPONENTS
8
GUI DE
1
.Exhaust
2.I nj ect or s
3.Temper at ur e
4
.El ect r i cal
5
.Fuel
6.Al t er nat or
7
8
9.Feed- pump
10
11
12
13
14.Oi l
15
f i l t er
Engi ne
di pst i ck
mot or
ser i al
ai r
si l encer
i nj ect i on
.St ar t er
.Dr ai nage,
.
.Decompr essi on
.I nl et
.Fuel
.Sea- wat er
el bow
sender
di st r i but i on
cool i ng
number
devi ce
pumps
pump
box
wat er
Halpert@Optonline.net
Page 5
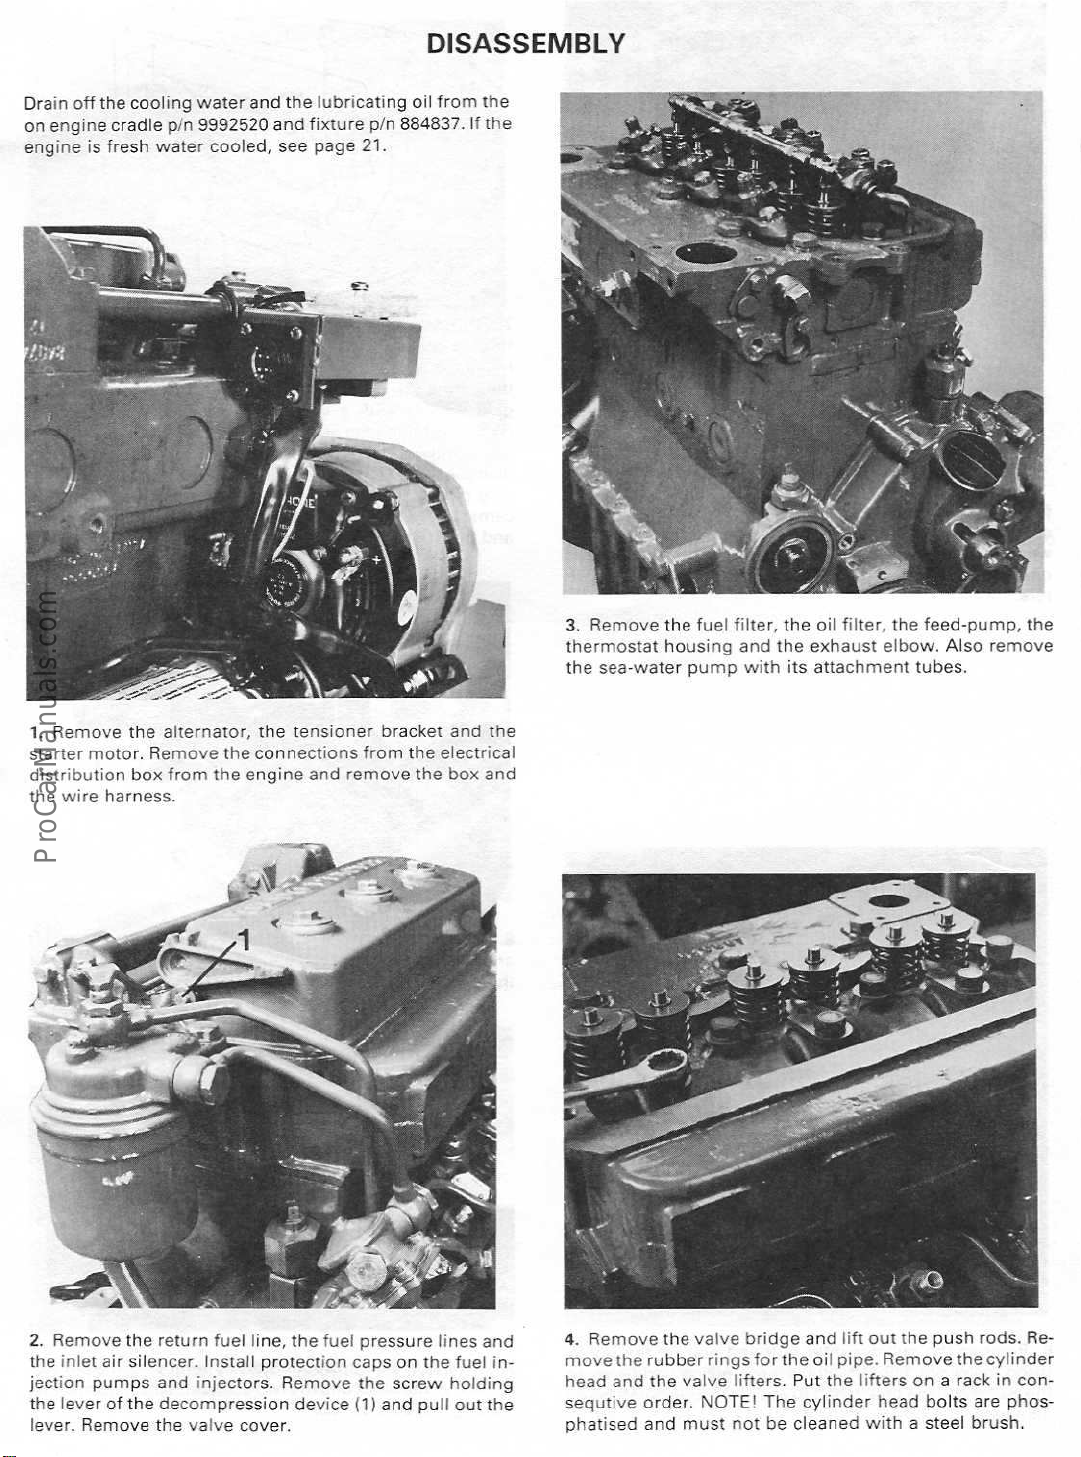
Dr ai n
on
engi ne
engi ne
of f
t he
i s
cool i ng
cr adl e
f r esh
p/ n
wat er
wat er
9992520
cool ed,
and
t he
and
see
l ubr i cat i ng
f i xt ur e
p/ n
page21.
DI SASSEMBLY
oi l
f r om
t he
.
I f
884837
t he
1.Remove
st ar t er
di st r i but i on
wi r e
t he
t he
al t er nat or ,
mot or.Remove
box
f r om
har ness
.
t he
t he
engi ne
connect i ons
t he
t ensi oner
and
r emove
br acket
f r om
t he
t he
and
t he
el ect r i cal
box
and
3.Remove
t her most at
t he
sea- wat er
t he
f uel
housi ng
pump
f i l t er ,
and
wi t h
t he
t he
exhaust
i t s
oi l
f i l t er ,
el bow.Al so
at t achment
t he
f eed- pump,
t ubes
t he
r emove
.
2
.
Remove
t he
i nl et
t he l everoft he
l ever.Remove
t he
ai r
si l encer.I nst al l
pumps
r et ur n
f uel
l i ne,
and
i nj ect or s
decompr essi on
t he
val ve cover
t he
f uel
pr ot ect i on
.
Remove
devi ce
.
pr essur e
caps on
t he
scr ew
and
( 1)
t he
pul l
l i nes
f uel
hol di ng
out
and
t he
and
l i f t
out
t he
push
r ods
t he
r ack
.
cyl i nder
Remove
i n
consecut i ve
or der , NOTE!Thecyl i nder
head
bol t sar e
phosphat i sed
andmustnot becl eanedwi t ha
st eel
br ush.
4.Remove
i nj ect i on
head
t he
and
t he
r ubber
t he
val ve
r i ngs
val ve
br i dge
f or t heoi l
l i f t er s.Put t he
pi pe.Remove
l i f t er sona
Page 6
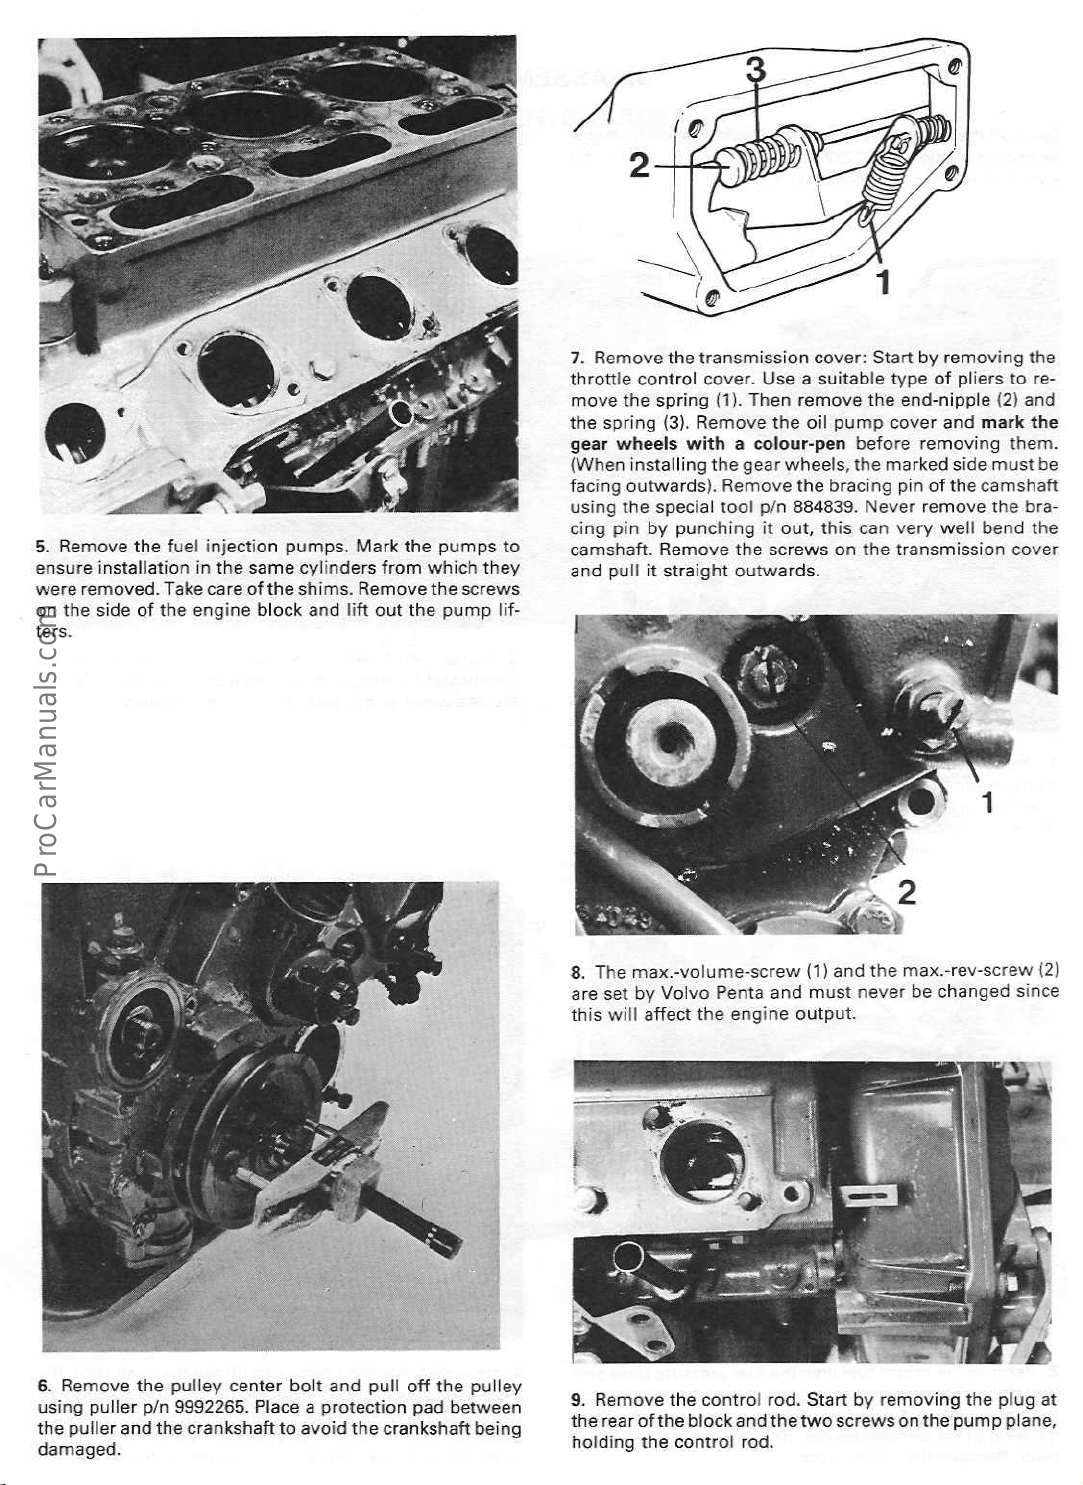
5.Remove
ensur e
wer e
on
t he
.
t he
f uel
i nst al l at i on
r emoved.Take
si de of
t he
i nj ect i on
i n
t he
car eoft he
engi ne
same
bl ock
pumps.Mar k
cyl i nder s
shi ms.Remove
and
f r omwhi ch
l i f t
out t he
t he
pumps
t he
pump
t hey
scr ews
l i f t er s
7.Remove
t hr ot t l e
t he spr i ng
gear
( When
f aci ng
usi ng
t o
camshaf t.Remove
and
t he
t r ansmi ssi on
cont r ol
t he
wheel s
i nst al l i ng
out war ds).Remove
t he
pi nbypunchi ng
pul l
cover.Use a
spr i ng
( 1).Then
( 3).Remove
wi t hacol our - pen
t he
speci al
i t
st r ai ght
t ool
t he
out war ds
cover:St ar tbyr emovi ng
sui t abl e
r emove
t he
oi l
gear
wheel s,
t he
884839.Never
p/ n
i t
out ,
scr ewsont he
.
pump
t he
br aci ng
t hi s
t ypeofpl i er s
t he
end- ni ppl e
cover
bef or e
mar ked
pi noft he
can
ver y
t r ansmi ssi on
and
r emovi ng
si de
r emove
wel l
t he
t o
r emove
( 2)
and
mar k
t he
t hem
must
camshaf t
t he
br aci ng
bend
t he
cover
.
be
6.
Remove
usi ng
pul l er
t he
pul l er
damaged
and
.
t he
p/ n
t he
pul l ey
cent er
9992265.Pl ace
cr ankshaf t
t o
bol t
avoi d
and
a
pr ot ect i on
t he
pul l
of f
pad bet ween
cr ankshaf t
t he
pul l ey
bei ng
8.The
ar e
t hi s
9.Remove
t he
set
wi l l
r ear of
hol di ng
max
by
t he
. - vol ume- scr ew
Vol vo
Pent a
af f ect
t he
engi ne out put
t he
cont r ol
t he
bl ock
cont r ol
( 1)
and
t he
and
must
never
.
r od.St ar tbyr emovi ng
and
r od
t het wo
.
scr ewsont he
max
. - r ev- scr ew
changed
be
t he
pump
si nce
pl ug
pl ane,
( 2)
at
Page 7
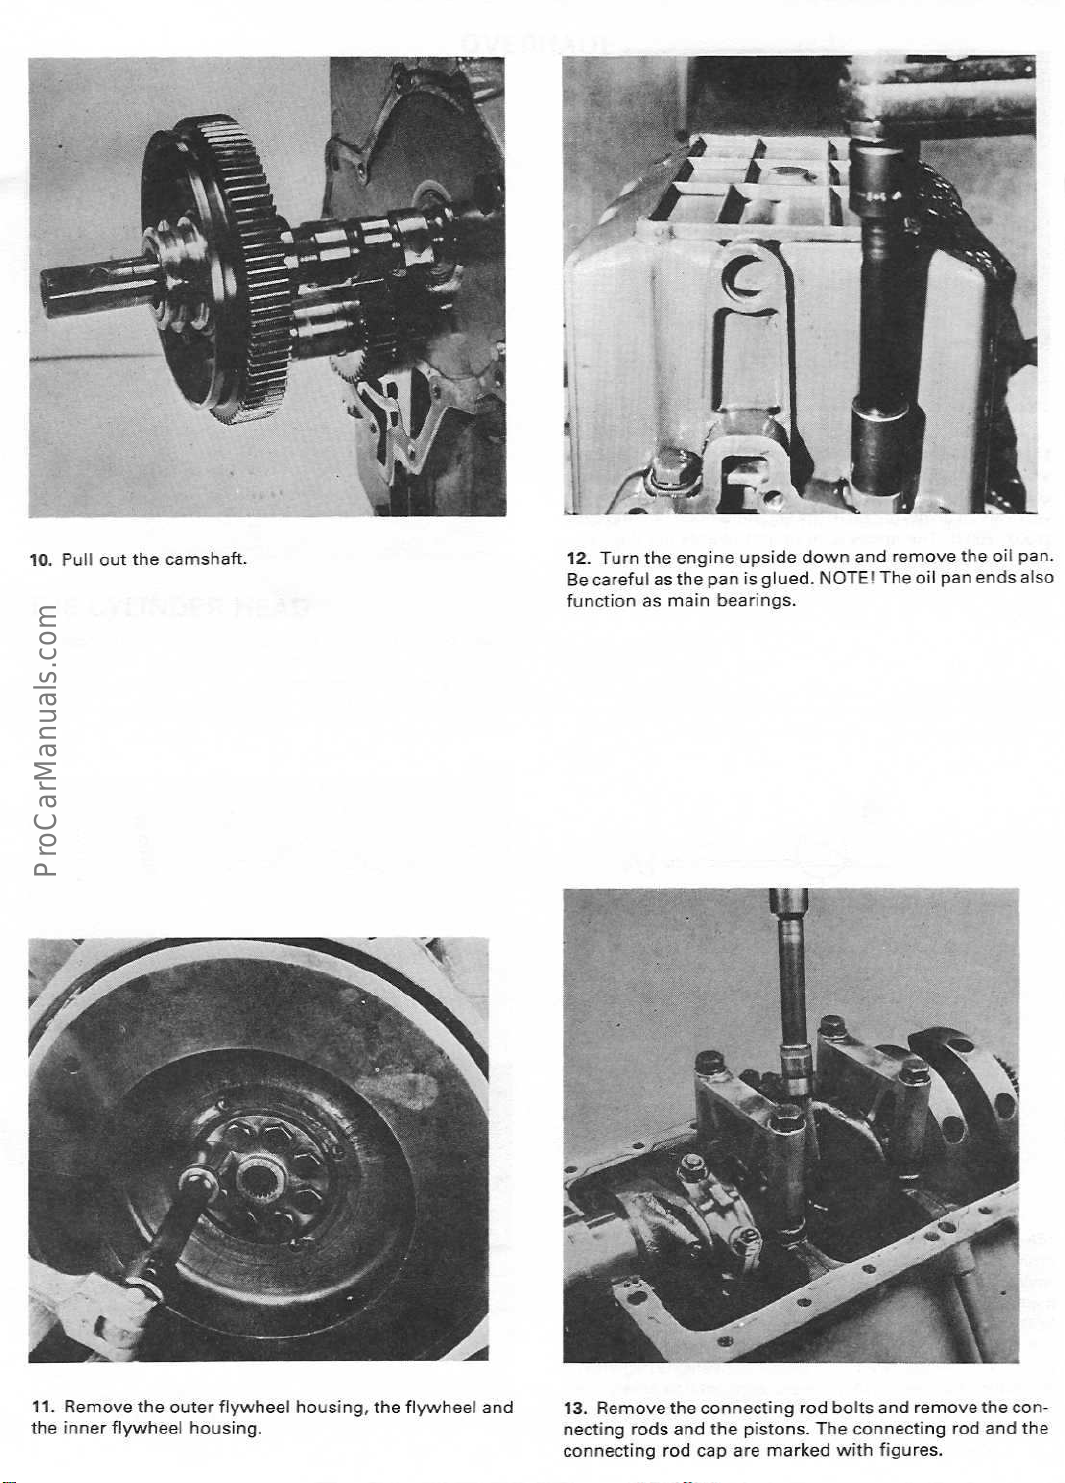
10.Pul l
out t he
camshaf t
.
12.Tur n
Be
f unct i onasmai n
t he
engi ne
car ef ulast he
upsi de
pan
i s
bear i ngs
gl ued
down
.
NOTE!
.
and
r emove
The
oi l
pan
t he
oi l
ends
pan
al so
.
11
.
Remove
t he i nner
t he
f l ywheel
out er
f l ywheel housi ng,
housi ng
t he
f l ywheel
.
and
13.Remove
r ods
connect i ng
t he
r od
and
cap
connect i ng
t he
pi st ons
ar e
mar ked
r od
.
The
bol t s
and
connect i ng
wi t h
f i gur es
r emove
r od
.
t he
and
t he
connect i ng
Page 8
t he
mai n
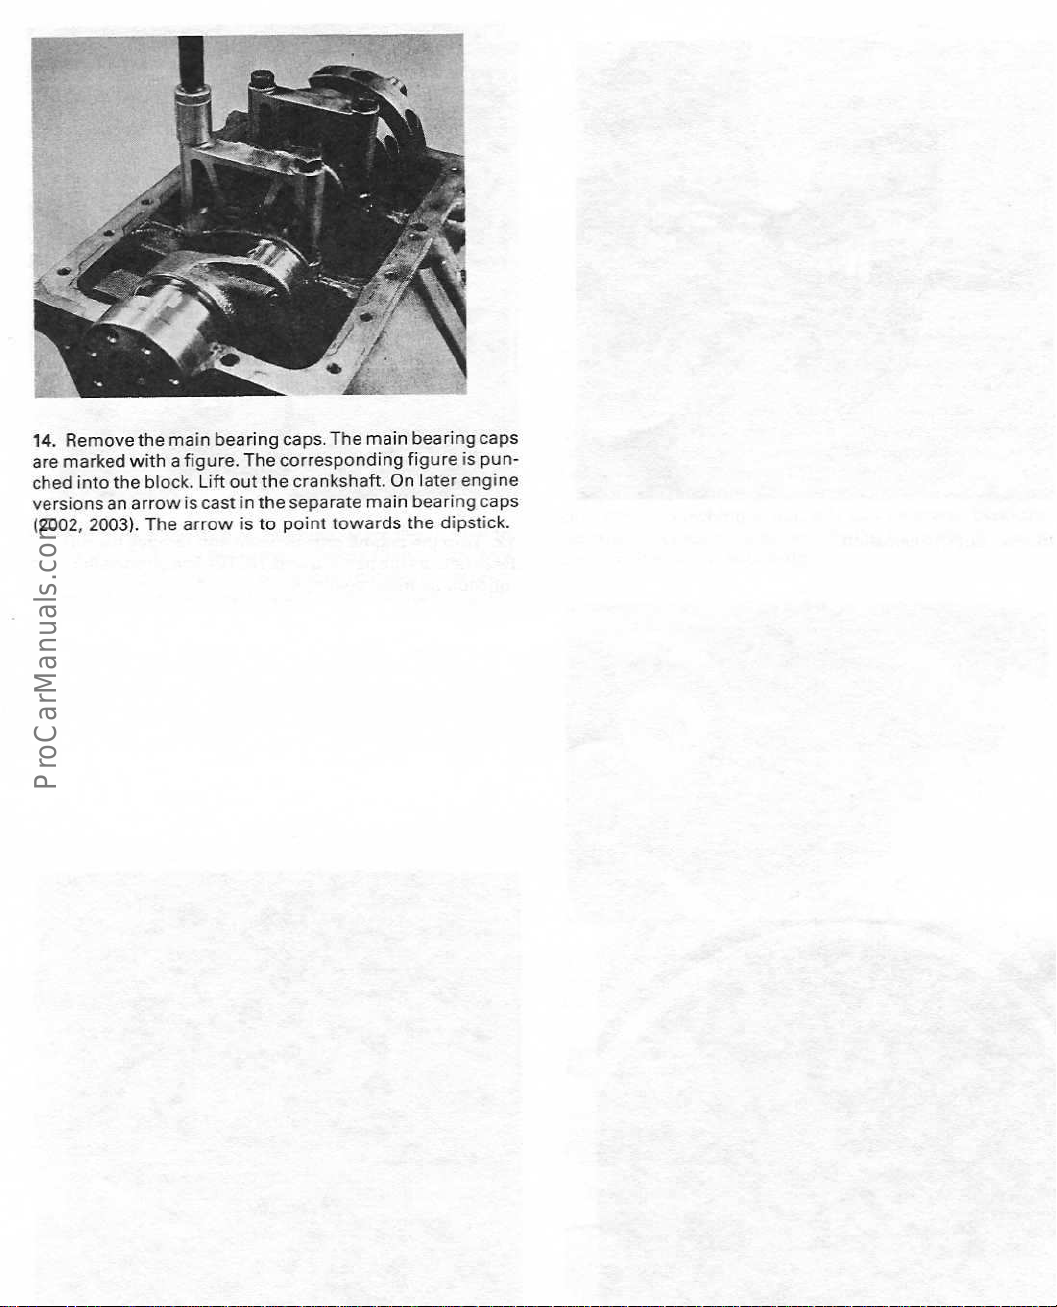
14.Remove
ar e
mar ked
i nt o
t he
ver si ons
( 2002,
an
2003).The ar r ow
wi t h
bl ock.Li f t
ar r ow
bear i ng
a f i gur e.The
out
i s
cast
i n
i s
t he
t he
t o
caps.The
cor r espondi ng
cr ankshaf t.On
separ at e
poi nt
mai n
mai n
t owards
bear i ng
f i gur e
l at er
bear i ng
t he
di pst i ck
caps
i s
engi ne
punched
caps
.
Page 9

3.Use
t he
new
884559
down
mandr el
val ve
i nst al l
t o
t o
t he
.
p/ n
gui des
t hem.Press
cyl i nder
5218
t o
pr ess
ext er nal l y
head.Ream
down
out t he
and
t he
mandr el
t he
val ve
use
val ve
gui des.Oi l
mandr el
al l
t he
gui des
p/ n
way
i f
necessar y
THE CYLI NDER
1 .
Remove
bow.Remove
Pl ace
st and
.
t he
t he
" col l et s"
t he val ves.Removethe
val ves
i n
HEAD
and
t he
val ve
pr oper
spr i ngs
val ve
sequence
usi ng
a
st em
i naval ve
val ve
seal s
.
Val ve
gui des
2.Check
i nt o
t he
necessar y,
Wear
l i mi t s
I nl et
val ve,
Exhaust
t he val ve
gui de.Measur e
r epl ace t he
val ve,
:
max
pl ay
max
gui de
pl ay
wearbyi nser t i ng
gui des
usi ng
.
t he pl ay
val ve
. ...
. . . . . . ... . .0. 15
. . . . . . . . . . . .0. 15
anew
a
di al
val ve
i ndi cat or.I f
mm
( 0
mm
( 0
. 0059
. 0059
st em
i n)
i n)
Val ve
seat s
and
4.Mi l lorr eam
( f or
2003T,
30°
( B)
shoul dbe1±0. 1
i n
a val ve
t he
f or
bent
i n)
r ocker s
past e
gr i ndi ng
di sc
t hi ckness
nat ur al l y
engi nes,
st ems,ori f
must
al sobescr apped.Gr i nd
i f
necessar y.Lap
and
check
val ves
t he
val ve
f or
t he
machi ne.The
af t er
aspi r at ed
t he
t he
t he
seat s.The
i nl et
val ve).The
mm
( 0
. 039±0
gr i ndi ng
engi nes
val ves
must
measur ement
i n
t he
cont act
ar ea
angl e
( C)
seal i ng
sur f ace' s
. 0039
i n).Gr i nd
angl e
( D) ,
see
t han
i s
l ess
or 0
. 8
be scr apped.Val ves
( A)
t he
val ves
wi t h
1
. 0
mm
( 0. 031
exceeds2. 5
val ve
t i p
usi ng
mar ki ng
shoul dbe45°
wi dt h
t he
val ves
Tech.dat a.I f
mm
( 0
. 039
i n)
f or
wi t h
t ur bochar ged
mm
( 0
. 098
t owards
val ve
gr i ndi ng
dye
.
i n)
t he
Page 10
Repl aci ng
Gr i nd
27
mm
gui de.NOTE! Do
j ust
t hr ee poi nt s usi ngael ect r i c
Cool
head
cool ed
t ool
down
( 1
bel ow
t he
t he
shoul d
seat on
NOTE!
.
t he
. 063
t he
val ve
new
t he
beat
Tur n
val ve
seat
exhaust
val ve
di scofa
i n)
di amet er
not
edge
gui de
seat
t ool
r oom
.
push
i n t oo
of t he
seat.Spot
wi t hapl ast i c- headed
t o
appr ox.- 20°C
t emper at ur e
884961- 4
t he seat
di scar ded
Push
wel der.Knockout
and
wi t h
por t
2003T
t he
val ve
f ar -
t he
wel d
( - 4°F);t he
( +
20° 0168° F).Pl ace
knock
i t
t he
val ve
val ve
st em
val ve
t he
hammer
down
f ace
t o j ust
t hr ough
di sc
di sc
i n
t he seat
unt i l
t owards
bel ow
shoul d
pl ace
by
.
cyl i nder
i t
bot t oms.
t he
be
hi t t i ng
t he
t he
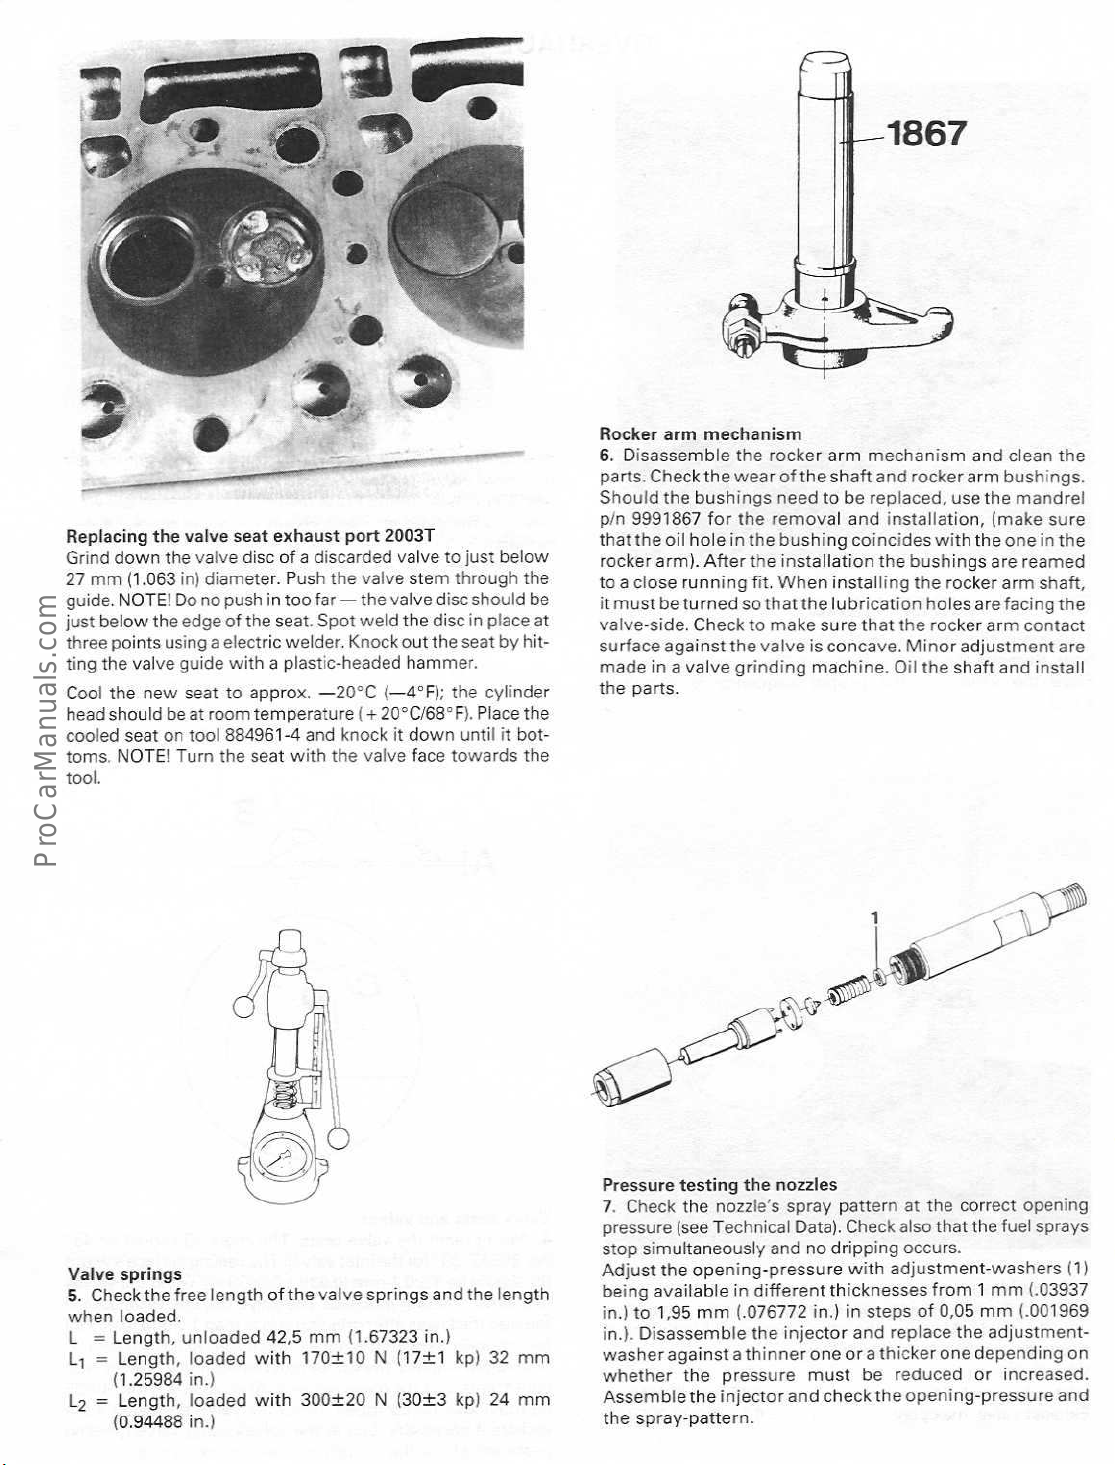
Rocker
6
par t s.Check
Shoul d
p/ n
t hat
r ocker
t oacl ose
at
i t
val ve- si de
sur f ace
made
t he
ar m
.
Di sassembl e
t he
9991867
t he
oi l
ar m)
must
be t ur nedsot hat
agai nst t he
i naval ve
par t s
.
mechani sm
t he
t he
wearoft he
bushi ngs
f or t he
hol e
i n
.
Af t er
r unni ng
.
Check
gr i ndi ng
r ocker
need
r emoval
t he
bushi ng
i nst al l at i on
t he
f i t
. When
t o
make
val ve
ar mmechani sm
shaf t
and
t ober epl aced,
and
i nst al l at i on,
coi nci des
t he
i nst al l i ng
t he
l ubr i cat i on
sur e
t hat t he
i s
concave.Mi nor
machi ne.Oi l
and
cl ean
r ocker ar m
wi t h
bushi ngs
t he r ocker ar m shaf t ,
hol es
r ocker
t he
bushings
uset he
shaf t
mandr el
( make
t he
one
ar e
ar e
f aci ng
ar m
adj ust ment s
and
r eamed
cont act
i nst al l
sur e
i n
t he
.
t he
t he
ar e
Val ve
spr i ngs
5.Checkt he
when
l oaded
L =
Lengt h,
L
1 =
Lengt h,
( 1
. 25984
L2=
Lengt h,
( 0
. 94488
f r ee
l engt h
.
unl oaded
l oaded
i n
. )
l oaded
i n
. )
t he
val ve
of
42, 5
mm
wi t h
170±10 N
wi t h
300±20N( 30±3
spr i ngs
( 1
. 67323
i n
( 17±1
and
. )
kp)
kp)
t he
l engt h
32
24
mm
mm
Pressur e
7.Check
pr essur e
st op
Adj ust
bei ng
i n
i n
whet her
Assembl e
t he
t est i ng
t he
( see
si mul t aneousl y
t he
avai l abl e
. )
t o 1, 95
. ).Di sassembl e
t he
t he
spr ay- pat t er n
t he
nozzl es
nozzl e' s
Techni cal
openi ng- pr essur e
mm(. 076772
pr essur e
i nj ect or
spr ay
Dat a)
andnodr i ppi ng
i n
di f f er ent
t he
i nj ect or
and
.
i n
must
pat t er natt he
Check
al so t hat t he
.
wi t h
adj ust ment - washer s
t hi cknesses
. )
i n
st eps
and
r epl ace
be
r educed
check
t he
cor r ect
occur s
.
f r om1mm
of
0, 05
t he
openi ng- pr essur e
openi ng
f uel
U3937
mm(. 001969
adj ust ment - washer
or
i ncr eased
spr ays
( 1)
agai nstat hi nneroneorat hi ckeronedependi ngon
.
and
Page 11
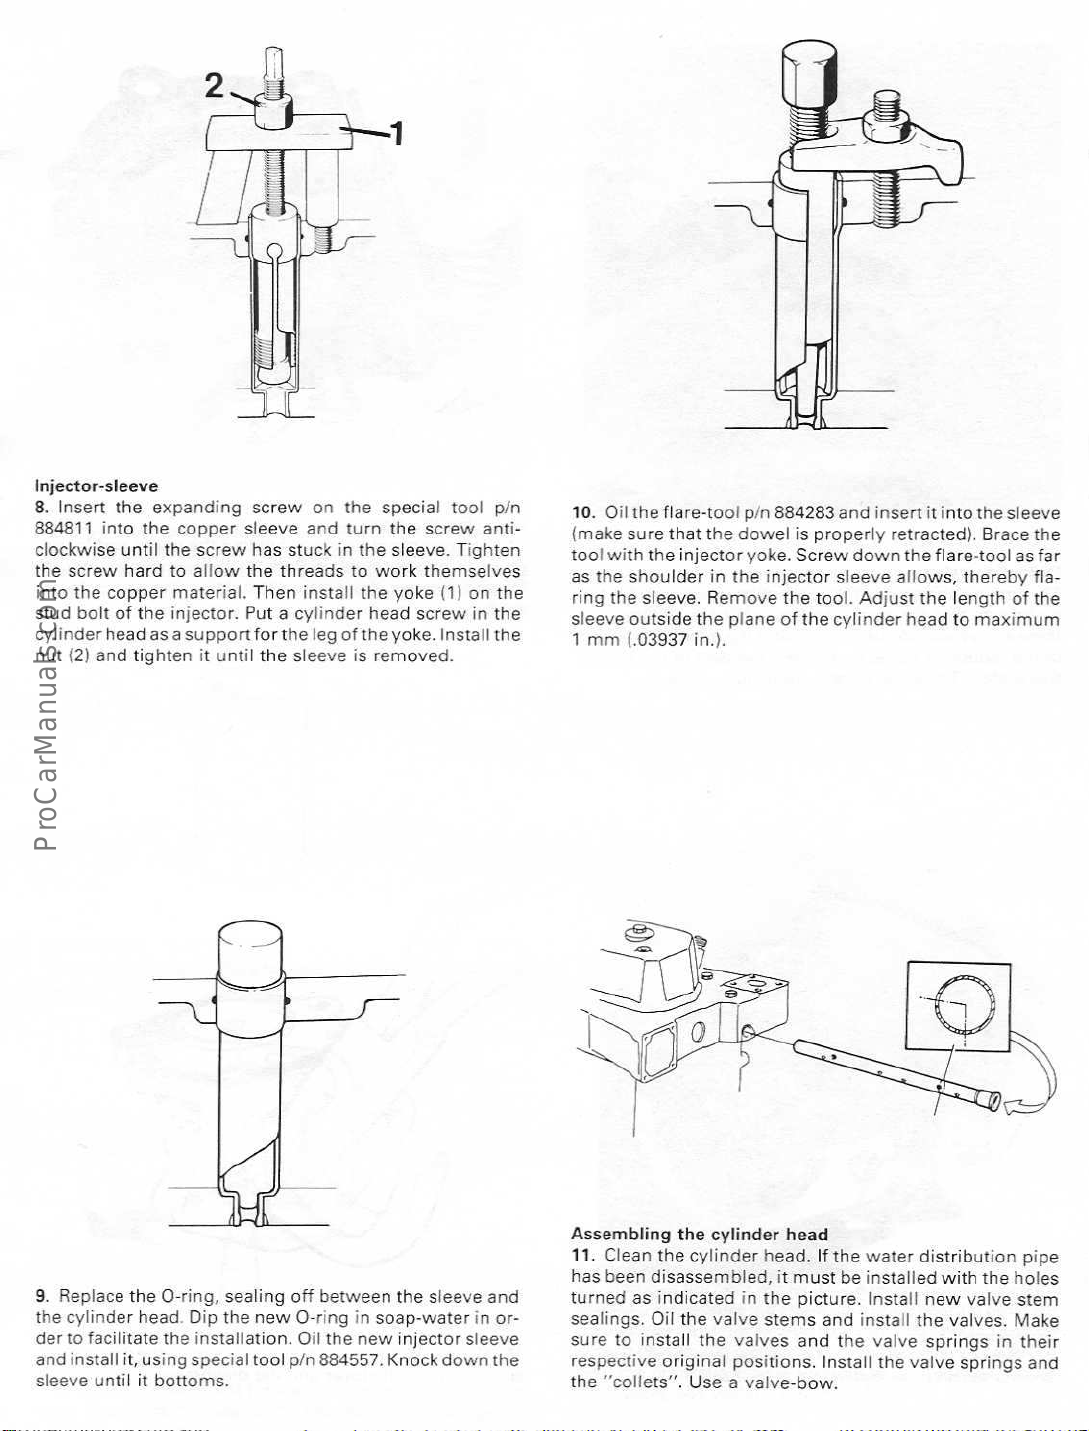
I nj ect or - sl eeve
8.I nser t
884811
t he
i nt o
st ud
cyl i nder
nut
scr ew
t he
bol t of
( 2)
and
t he
expandi ng
i nt o
t he
har d
copper
t he
headasa
t i ght en
scr ew
copper
t o
mat er i al.Then
i nj ect or.Putacyl i nder
sl eeve
al l ow
t he
suppor t f or t he
unt i l
i t
t he
on
and
t hr eads
i nst al l
l egoft he
sl eeve
t he
t ur n
t o
t he
i s
wor k
head
r emoved
speci al
t he
t ool
scr ew
t hemsel ves
( 1)
yoke
scr ew
yoke.I nst al l
.
on
i n
p/ n
ant i - cl ockwi se
t he
t he
t he
10.Oi l
t hef l ar e- t ool
( make
sur e
unt i l
t he
scr ew
has
st uck
i n
t he
sl eeve. Ti ght en
t ool
as
t he
sl eeve
1
mm
wi t h
t hat
t he
i nj ect or
shoul der
t he
sl eeve.Remove
out si de
(
. 03937
t he
dowel
i n
t he
t he
pl aneoft he
i n
. )
.
p/ n
884283 and
i s
pr oper l y
yoke.Scr ew
i nj ect or
t he
t ool.Adj ust
i nser t
r et r act ed).Brace
down
sl eeve
cyl i nder
i t
i nt ot he
t he
f l ar e- t oolasf ar
al l ows,
t he
head
t her eby
l engt h
t o
sl eeve
t he
f l ar i ng
of t he
maxi mum
9.Repl ace
t he
cyl i nder
t o
f aci l i t at e
and
i nst al l
sl eeve
unt i l
t he
O- r i ng,
head.Di p t he
t he
i nst al l at i on.Oi l
i t ,
usi ng
speci al
i t
bot t oms
seal i ng
new
t ool
.
of f
bet ween
O- r i ng
i n
t he
p/ n
884557.Knock
t he
soap- wat er
new
i nj ect or
sl eeve
down
and
i n
or der
sl eeve
t he
Assembl i ng
11.Cl ean
has
been
t ur nedasi ndi cat ed
seal i ngs.Oi l
sur e
t o
r espect i ve
t he
" col l et s".Useaval ve- bow
t he
cyl i nder
t he
cyl i nder
di sassembl ed,
t he
val ve
i nst al l
t he
or i gi nal
i n
val ves
posi t i ons.I nst al l
head
head.I f
t he
st ems
t he
i t
mustbei nst al l ed
pi ct ur e.I nst al l
and
and
t he
.
wat er
di st r i but i on
new
i nst al l
t he val ves.Make
val ve
spr i ngs
t he
val ve
wi t h
spr i ngs
t he
val ve
i n
pi pe
hol es
st em
t hei r
and
Page 12

Reduct i on
12.Remove
make
t her e ar e
of t he
See
sur e t hat
r easons
r educt i on
under
val ve
t he
coveroft he r educt i on
spr i ng
t he
t o
suspectaf aul t
val ve,
t hen
" Techni cal
Dat a"-r educt i on val ve
and
t he
check
val ve
and
pi st on
ar e
i n
t he
openi ng
t he
dat aoft he spr i ng
check
f aul t l ess.I f
pr essur e
.
Changi ng
14.Remove
pump
t o
( 1)
shaf t
.
housi ngs
and
.
t he
t he
r emove
di aphr agm
si x
scr ews, hol di ng
t oget her.Remove
t he
scr ew
( 2)
t he
t he
hol di ng
upper
pump
t he
and
l ever
pump
l ower
spr i ng
l ever
Feed- pump
13
.
Depr ess
sounds
squeaky,
t he
pump
t he
l ever.i f
di aphr agm
t he
di aphr agm
i s
f aul t l ess
of t he
.
pump
15.Useasui t abl e
shaf t.Pul l
out
t he
pai rofpl i er s
l ever
and
and
di aphr agm
t he
r emovet he
.
pump
l ever
Page 13

16.Cl ean
par t s.I nst al l
scr ew.Assembl e
at t achment
t he
shaf t
pump
t he
Then
.
pl at e
housi ng
di aphr agm
i nser t
t he
t wo
( 1).Then
t he
housi ng
i nst al l
Val ve
l i f t er s
17.Check
sar y
t he
val ve
l i f t er s
f or
.
car ef ul l y
and
shaf t
wear.Repl ace
t he
t he
and
hal ves
spr i ng
and
l ever
t i ght en
r epl ace
on
and
( 2)
t he
i t
wi t h
i nst al l
and
t hem
wor n
di aphr agm
t he
t he
t heO-r i ng
i f
neces
19.Pl ace a
hydr aul i c pr ess
( 3)
.
suppor t
t o
under
r emove
t he
t he
camshaf t
gear
.
gear
and
use
a
Camshaf t
18.Check
ces.Al so
pr essed
t he
i nst al l at i on
t he
check
i nt o
camshaf t
t he
t hei r
.
f or
wearoft he
l ocat i ons
wearoncams
bear i ngs.The
and must
be
and
l i ne
bear i ng
bear i ngs
bor ed
r a
ar e
af t er
Cr ankshaf t
20.Remove
cr ankshaf t.Measur e
eccent r i ci t y
t aper
t he
0. 05
mm(. 001969
cr ankshaf t
t he
must
gear
not
wheel
.
Use
a
t he
cr ank- and
exceed0. 06
i n
. ).Shoul d
must be gr ound
mm(. 002362
pr ong
mai n
t hese
t o
pul l er.Cl ean
bear i ng
val uesbeexceeded,
a
i n
sui t abl e
pi ns.The
. )
and
under - di mensi on,
t he
t he
seeunder" Techni calDat a".
Page 14

Pi st ons,
21.Check
pi ns.Repl ace
gauge
t he
t he
sur ementoft he
cent er.As
Useami cr omet er
see
t o
bi ggest
upper
under
cyl i nder s
t he
wearonpi st ons, pi st on ri ngs
t hese
i f
necessar y
measur e
dead
t o
" Techni cal
wear
t he
t he
i s
made
cent er
smal l est
cyl i nder
t o
cyl i nder
i mmedi at el y
and
cr osswi se
wear
di amet er , see
measur e
Dat a"
.
Use
bor es.The
i s
madeatt he
t he
pi st ons.Pi st on
.
cyl i nder
a
measur ement
beneat h
t he
engi ne.The
" Techni cal
and
t he
l ower
gudgeon
i ndi cat or
edge
mea
dead
Dat a"
di amet er ,
of
of
24
.
.
Use
mar ki ngoft he
must
be
pr essi on
compr essi on
r i ngssot hat
pi st on
r i ngs
t ur ned
r i ng:1, 75
r i ng
pl i er s
( TOPort he
upwards.The
mm(. 068898
r i ng
;
2, 00
t he
gaps
t o
i nst al l
mar koft he
hei ghtoft he
i n
. )
mm(. 07874
ar e
t ur ned
t he
The
pi st on
manuf act ur er )
hei ght
i n
. ).Tur n
120
°
f r om
r i ngs.The
upper
of
t he
t he
each
com
l ower
pi st on
ot her.
22.I nser t a
t he
pi st on ri ng
" Techni cal
speci al
23.Measur e
r i ng
" Techni cal
new
Dat a".I f
f i l e
.
gr ooves.Regar di ng
Dat a"
pi st on
gap.As
necessar y
t he
cl ear anceoft he
.
r i ng i nt o
t o
t he
t he
t he
cyl i nder and
measur ement ,
i ncr ease
pi st on r i ngs
measur ement ,
t he
gap,
i n
measur e
see
usi ng
t he
see
under
pi st on
under
a
Connect i ng
25.Check
.
r ods
t he
connect i ng
r ods
f or
st r ai ght ness
and
t wi st i ng
Page 15

26
.
Check
t he
pi n asagauge.Ther e
must
be
r epl aced,
and
i nst al l at i on.Make
oi l
hol e
coi nci di ng
t he
new
bushi ngs.The
pi n
by
i t s
own
connect i ng
useasui t abl e
wei ght
wi t h
sur e
t hat of
f i t
can
r od
i s
mustbeno
t o
cor r ect
sl owl y
bushi ngs
mandr el
i nst al l
t he
t he
connect i ng
whenanoi l ed
sl i de
by
pl ay.I f
f or
bushi ng
t hr ough
usi ng
t he
t he
r od.Ream
t he
gudgeon
bushi ngs
r emoval
wi t h
t he
gudgeon
t he
bushi ng.
Sea- wat er
27.The
When
housi ng
f ol l owi ng.Useasui t abl e
f r om
Repl ace
and
t he
di st ance
bal l - bear i ng.Coat
t hr ough
damage
bear i ngs
Checki ng
28.I mmer se
Techni cal
f aul t y,
pump
pump
i s
equi pped
di sassembl i ng,
and
push
out t he
t he shaf t.NOTE!
seal i ngs
t he
make
sur e
pump- housi ng.Repl ace
of
39, 5
t he
seal i ngs
t hem.Push
t o
bot t om
t he
t her most at s
check
Dat a
i t
mustber epl aced
( 4).NOTE!
t hat
t heydonot
mm
( 1
t he
and
i n
and
t he
t her most at
i f
i t
opens
f or openi ng t emper at ur es.I f
r emove
shaf t ,
mandr el
Do
not
. 55512
shaf t
t he
t he
t hen
at
.
wi t h
t he
wher eby
f or get t he
Tur n
bl ock
t he
O- r i ng
i n
. )
f r om
wi t h
O- r i ng
shaf t
i nst al l
i n
wat er
t he
cor r ect
t wo
bal l - bear i ngs
l ocki ng- r i ng
t he
t o
r emove
spacer
t he
seal i ngs
t he
dr ai nage
( 5).I nst al l
t he shaf t
gr ease
and
t ake
as
f ar
as t o
t he
l ocki ng- r i ng
and,
t emper at ur e.See
t he
bear i ngs
t he
sl eeve
end
and
" scr ew"
car e
usi ng
t her most at
( 2)
i n
bear i ngs
cor r ect l y
hol e
t he
bal l - bear i ngs
t o
not
al l ow
( 2)
a
t her momet er ,
( 1)
t he
ar e
( 3)
t he
t he
.
.
i n
and t hespacersl eeve
ont o
t heshaf tand
l eave
a
i t
t o
.
i s
Page 16

ASSEMBLY
Al ways
and
t hem
I f
1.Heat
pr i or
cr ankshaf t
bear i ng
Put
f l ywheel
use
l ock- washer s.Coat
and
al so
engi ne
t he
t he
cr ankshaf t
t he
i nst al l at i on.Pl ace
t o
and
hal ves
t he
cr ankshaf t.NOTE!
i n
al so
new
gasket s,
al l
oi l
i s
f r esh- wat er
pr ess
( wi t h
f unct i ons
seal i ng
t he
movi ng
gear wheel
on
t he
oi l
hol e)
as a
r i ngs,
seal i ngs wi t h
par t s
pr i or t o
cool ed,
gear
The
see
t o
appr ox
key
wheel
i nst al l
mai n
i n
bear i ng
t he
and
t hr ust - bear i ng
seal i ng
gr ease
i nst al l i ng
21
page
150° C
.
t he
key- wayoft he
Oi l
.
t he
t hem
i n
shel latt he
.
washer s
or
t hem
.
( 302°F)
new
t he
bl ock
mai n
oi l
.
3
t o
poi nt s
Fi t
.
mar ki ng.The
t owards
Ti ght eni ng
St ep
St ep2:70Nm
.
each
Tur n
t he
1
t he
ot her.The
t owards
caps
t he pi st on
:25Nm
pi st on
t he
wi t h
cr ankshaf t
t or ques
( 2
( 7
r i ngs
pi st on
t he
. 5
. 0
bel t
mar ki ng
.
:
kpm)
kpm)
so t hat
t he
cr own
pul l ey.Use
al i gned
can
( 18
f t / l b)
( 53
f t / l b)
gaps
i s
mar ked
i nst al l at i on
be
t ur ned
ar e
of f set
wi t h an
r i ng
wi t h
t he cr ankshaf t ' s
i n
any
i n
r el at i on
ar r ow
t hat
884813- 7
di r ect i on
.
2.Oi l
t he
cap
bear i ng
caps
i n
accor dance
no
i nt er medi at e
t owards
bear i ngs
t i ght eni ng60Nm
t he
oi l
: 1st
t i ght eni ng20Nm( 2
hal ves
t he
wi t h
bear i ng).I fanar r ow
di pst i ck
Ti ght eni ng t or que
.
kpm)
( 44
( 6
and
mar ki ng
. 2
f t
i nst al l
t hem.I nst al l
i n
t he
i s
cast ,
kpm)
( 14
. l bs).Tur n
bl ock
i t
f or
. 7
t he
( 2001
shal l
t he
f t
. l b) ,
engi ne
t he
has
poi nt
mai n
2nd
i n
oi l
4.I nst al l
t he
scr ews
( 2, 0
60
.
t he
edgeoft he
p/ n
840879
and
t he
kpm)
( 14
( 6, 0
kpm)
Nm
mai n
mai n
. 7
f t
. l bs
bear i ng
oi l
pan
I nst al l
.
bear i ng
. )
( 44
. 2
and
f t
wi t h
t he
t hen
. l bs
hal ves
oi l
scr ews
. )
t hi n l ayer of
pan and
al t er nat i ngl y
t he
mai n
.
t he
t i ght en
pan
seal i ng
bear i ng
and
t he
oi l
t o20Nm
scr ews
coat
compound
pan
t o
Page 17

5.Repl ace
compound
housi ng
spr i ng
shal l
t he
seal i ng
t he
( p/ n
and
be t ur ned
i s
f l ywheel
t he
i nst al l ed
840879)ont he
housi ng
seal i ng.NOTE!
t owards
i n
accor dance
r
seal i ng
edge
bet ween
The
t he
engi ne.Make
( 1).Smear
seal i ng
wi t h
t he pi ct ur e
t he
seal i ng
f l ywheel
l i p
wi t h
sur e
t hat
.
7A.Heat
appr ox.150° C
a
Check
camshaf t.I nst al l
mar ki ngsont he
t he
t he
camshaf t
( 302° F)
t o
make
sur e
gear
wheel
camshaf t gear
i nsot hat
t he
gear
wheel
and use
t hat
t he
camshaf t
camshaf t
coi nci de.Put t he
wheel
t abs
t he
( 2)
gear
.
Check
ar e
a
gear
t oat emper at ur e
sui t abl e
and
wheel
t hat
i nsi de
sl eeve
wheel
make
and
washer
al l
t he
t o
i nst al l
" bot t oms"ont he
sur e
t hat
t he
t he
on
cr ankshaf t
( 1)ont he
wei ght s
washer
ar e
.
hub
pr essed
of
i t
.
of
6.Repl ace
Ti ght eni ng
I nst al l
t he
( 48
. 0
f t
. l bs) .
t he
O- r i ngs
t or que25Nm
f l ywheel.Ti ght eni ng t or que 65
and
( 2, 5
i nst al l
kpm)
t he
( 18
f l ywheel
. 4
f t
. l bs)
Nm
housi ng
.
( 6, 5
kpm)
.
7B.I nst al l
l i p
wi t h
t he spr i ng
i n
t he
seal i ng
" bot t oms"
oi l
channel
Useanew
t he
pr essur e
washer )
by
pr essi ng
sl eeve
i s
camshaf t ,
equal l y
ar e
you
pi n
i nt o
i t s
wi l l
t henbebent
anew
seal i ng
housi ng,
r i ng
agai nst
i n
t he
gasket
sl eeve
i n
t he
cont r ol
t he
l ever
pr essed
t o
agai nst
usi ng
speci al
muchonbot h
useahammerorsome
l ocat i on
.
r i ng
usi ng
mandr el
i s
t o
bet ur ned t owar ds
f r om
t he
housi ng.I nst al lanew
bl ock
( 3
and
i nst al l
( wi t h
t he
ar m
t o
t he
t ool
wi t h
t he
f or
t he
camshaf t
p/ n
884838.The
t he
out si de
f i g.7A)
i t s
.
t he t i mi ng
bear i ng
l ever.Hol d
bot t om
t owards
posi t i on
housi ng.I nst al l
884839.The
p/ n
si des.Under no
such
ai d of a
mandr el.The
i n
t he
engi ne.Press
unt i l
t he
O- r i ng
gear
cover.Pl ace
t he
t he
sl eeve
t he
pi n
ci r cumst ances
t ool
t o
t he
t r ansmi ssi on
seal i ng
mandr el
i n
pr essur e
i n
pl ace
wher e
pi n of t he
must
punch
camshaf t
t he
t he
pr ot r ude
t he
Page 18

8
.I nser t
gear
casi ng.I nst al l
push
t he
Fi t
t he
( wi t h
Then,
i n
t he engi ne
seal i ng
t he
cont r ol
t he
cont r ol
spr i ng
( Not e!
copper
scr ew
washer s
cont r ol
r od
t hr ough
t he bear i ng
r od
t hr ough
( 3)
and
scr ewont he
Do
seal i ng
t he
not use
l ower
any
washer s)
bol t s
bl ock.NOTE! The
Appl y
r od
.
moves
Permat ex
f r eel y
t he
bl ack
bal l
i nt o
( 1)
t he
hol e
i n
end
t ool s).Scr ew
t hat
gui de
t hat
hol d
t he
l ower
bol t s
t o
t he
.
and
i nt o
t he
t he
cont r ol
t he
cont r ol
ni ppl e
( 4)
unt i l
i n
t he
upper
t he
cont r ol r od
cont r ol
r od
shoul d
t hr eads.Check
r od
l ever
i n
not
t i mi ng
and
( 2)
i t
bot t oms
bol t s
pl ace
have
t hat
.
.
10
.I nser t
t he
f t.I bs)
t he key
f or
t he
pul l ey
i n
pul l ey.Ti ght eni ng t or que 40
.
t he
cr ankshaf t
Nm
( 4, 0
and
kpm)
i nst al l
( 29
. 5
I nst al l
9
.
( f r om
gear
seal i ng
pump' s
t he
oi l
di sassembl y).I nser t
t he
cover.Oi l
r i ng
t he
.
gear
gear wheel
wheel and
a
new
f i t
accor di ng
O- r i ng
The
cover
mar ks
t o
t he
i n
t he t i mi ng
usi nganew
11.Cl ean
sur f
ace
agai nst
Oi l
t he
.
Cl ean
t he
t hen
t hr ough
t he
ar e
t he
t he
t hr eads).Check
cor r ect l y
gr oove
2001
Regar di ng
page
t he
val ve
l i f t er s
t he
camshaf t
val ve
gui des
r ol l er
l i f t er soft he
i n
t he
bl ock.Lock
bl ock
af t er
car ef ul l y
i nst al l ed
.
t he
i nst al l at i onoft he
.
t he
and
i n
t he
car ef ul l y
wi t h
mol ybdenum
bl ock
f uel
i nj ect i on
t he
r ol l er
i nst al l at i on
t o
make
t hat
t hey
cyl i nder
and
and
ar e
coatt he
i nst al l
l i f t er s
( appl y
sur e
r unni ng
head,
pumps
wi t h
Permat ex
t hat
seet he
di sul phi de
t he
t he
cont act
l i f t er s
and
scr ews
l i f t er s
easi l y
.
i nst al l
t o
i n
f ol l owi ng
Page 19

2003
14.Val ve
i n
. ).Tur n
val ves
one
t ur n
t he
cl ear ance
t he
i n
one
mor e
pr ocedur e
engi ne
cyl i nder
and
col d/ war m
i n
t he
ar e
" rocki ng".Then
t he val ves
adj ust
f or
t he
engi ne0. 30
di r ect i on of rot at i on
t ur n
f or
t hi s
r emai ni ng
cyl i nder s
mm
(
unt i l
t he
cyl i nder
.
. 01181
t he
engi ne
.
Repeat
12.Ti ght en
and
" Top"
Make
bol t s
bol t s,
r esul t.NOTE!
cl ean
Coat
and
t i ght en
20
Nm
f t . l bs) .
13.I nst al l
new
on
same
t he
i nst al l
t he
f aci ng
upwards
sur e
t hat
ar e
f r ee
t her e
i s
al ways
f or ce
i n
t hem
wi t hast eel - br ush
t he
cyl i nder
t hem
( 2
. 0
kpm/ 14. 7
t he
push
r ubber
t i me as
t he r ocker
t wo
gui de
cyl i nder
t he
cont act sur f ace
f r om
pai nt.Shoul d
t he
t he
bol t
The
bol t s
head
i n
accor dance
f t
. l bs)
r ods
r i ngs
t o
scr ews
head
.
I nst al l
r i skofhavi ng an
j oi nt
ar e
bol t s
and
and
t he
ar m
gasket wi t h
t he
wi t h
subsequent
phospat ed,
.
wi t h
mol ybdenum
wi t h
t hen
t he
r ocker
oi l
pi pe
br i dge
p/ n
884840
cyl i nder
f or
t he
t her e
be
i nsuf f i ci er t
t her ef or edonot
t he
di agr am,
t o70Nm
ar m
whi ch
.
i n
t he
head
cyl i nder
pai nt
l eakages
di sul phi de
( 7
. 0
br i dge,
i s
f i t t ed at
t he
bl ock
mar ki ng
.
on
f i r st
kpm/ 51
push
head
t he
t i ght eni ng
as a
t he
. 6
t o
Adj ust i ng
15.i f
ar e
be
shi m
bei ng
new
bl ock
t hi ckness
t hatont he
Exampl e:The
I n
t hi s
i n
. ).Pl ace
i nst al l
wi t h
0
. 6
Sof t
(
. 007874
t he
f uel
i nj ect i on
t he
same
bl ock
camshaf t
used
when
assembl i ng,
i nst al l ed
ones.Car ef ul l y
anot her
and0. 9
shi ms
i n
t hei r
or i gi nal
t hi cknessasear l i er.The
i nst al l ed
and
case
t he
pump
agai nst
t he
f uel
equal
f uel
bl ock
(
. 015748
The
pump
(
. 015748
Tot al
sel ect
t he
har d
pump.NOTE!
har d
.
Har d
mm(. 011811, . 02362,
ar e
and
. 011811
t he
cl ean
i nj ect i on
t o t he
sumoft he
i nj ect i on
mar ki ng
i n
. )
mar ki ng4( =4t ent hs
i n
. )
amountofshi ms=0
t wo
sof t
shi m bet ween
shi moragai nst
shi ms
avai l abl e
i n
pump
and
t he
f uel
posi t i ons
so
bl ock,
t he
cont act
pumps
pump,
4 ( =4t ent hs
shi ms0. 2
Never
i nst al lahar d
ar e
avai l abl e
i n
t hi cknesses0. 2
. )
.
l ocat i on
cal l ed
mustber epl aced
and
mar ki ng
( 4)
ear l i er
t he
t he
. 035433
wi t h
f uel
I nj ect i on
i nj ect i on
and
wi t h
sof t
shi ms,
sur f aces
i nst al l
on
t he
mar ki ng
ofami l l i met er )
of a
. 8
mm(. 031496
and0. 3
mm(. 011811
t wo
sof t
shi m
bl ock
or
i n
t hi cknesses0. 3,
i n
.
r espect i vel y)
pump
bet ween
shi ms
mi l l i met er )
t he
and0. 3
shi ms
pumps
must
t he
same
al ways
agai nst
wi t h
bl ock
.
ones
t oget her
f uel
t he
and
i n
and
mm
. )
i nj ect i on
.
Page 20

On
l at er
seal
har d
Har d
0
. 3
ver si on
bet ween
shi ms
shi ms
mm
( 0
engi nesanO- r i ng
t he
i nj ect i on
may
be
ar e
avai l abl e
. 0118
i n) ,
pump
usedont hese
i n
t hi cknesses
0
. 6
mm
. 0024
( 0
and
i n)
has
been
t he
bl ock.Onl y
engi nes
of 0
and0. 9
i nt r oduced
when
. 2
mm
mm
as a
so- cal l ed
shi mmi ng
( 0
. 0079
( 0
. 0354
i n) ,
i n)
.
.
16.New
I f
t he
measur ed and
andasl i di ng
A.The
out er.The
each
The
a
pi n
B.Mount
not t i ght en t he bol t s.Tur n
bl ock
or
camshaf t
bl ockort he
set t i ng- di sc
r espect i ve
i nj ect i on
( 1)
.
t he set t i ng- di scort he
cal i per
i nner
angl e
camshaf t
mar ked,
r i ng
engi ne
usi ng
.
consi st soft wo
det er mi nes
t ype,
i s
st amped
t he
set t i ng- di sc
ar e
r epl aced
t he
see
Techni cal
i n
degr ees
pul l ey
t he
bl ock
set t i ng- di sc
r i ngs,ani nner
t he
i nj ect i on
Dat a
and
wi t h
t wo
so
t hat t he
p/ n
i s
must be
884787
and
angl e
( page
f i xed
bol t s,
an
f or
25)
wi t h
do
gui de
pi n
( 2)
comes
Press
i n
t i ght en
The
set t i ng- di sc
Mar ki ng
.
Cyl i nder
Cyl i nder
Cyl i nder
Cyl i nder
i n
t he l ar gest of
t he
gui de
pi n
( 2)sot hat
t he
bol t s
.
i s
mar ked
Denot es
1
Cyl i nder1( 1,2,3
2/ 2Cyl i nder2( 2
2/ 3Cyl i nder2( 3
3/ 3Cyl i nder3( 3
t he
f or
each
cyl i nder
cyl i nder
cyl i nder
f our
t he
di sc
r espect i ve
cyl i nder
engi ne)
engi ne)
engi ne)
hol es
i n
t he
i s
cent er ed
engi nes
pul l ey
cyl i nder
;
.
and
:
Page 21

Tur n
C
gui de
t he
set t i ng- di sc' s
Measur e
bl ock
r ol l er )
The
2001:55
2002,
2003T:55
Exampl e
2001
means
be pl aced
2002,
i n)
i n)
The measur ed shi ms
t o
The
measur ement s
Exampl e
The
The pump' s
No
cyl i nderno.1t o
.
pi n
( 2)
i n
cr ankshaf tal i t t l e
and
t her eaf t er
gui de
usi ngacal i per
and
t he
.
di st ance
2003:55, 6
.
I f
2003.I f
t hi s
i s
t obepl aced
be
t ot al
bl ock' s
of
.
mm
. 8
mm
. 9
:
t he
measur ed
t hat a
bet ween
means
st amped
shi m
measur ement s
shi ms
shoul d be
shi m
t he
mar ki ng
t he
r ol l er
( 2
. 1
mm
( 2
t hatashi m
i nt o
t hi ckness
and
i t ' s
set t i ng- di sc' s
agai nst
i n
t he
nor mal
pi n
( 2)
goes
t he
l i f t er ' s
:
i n)
9685
( 2
. 18504
. 2007
i n)
di st ance
wi t h
t hi ckness
t he
cal i per
measur ed
wi t h
bet ween
t hi ckness
t he
bl ockasi n
i s
t he
pump' s
i nj ect i on.posi t i on
hol e
mar ked
t he
nor mal
r ot at i on di r ect i on
i n
di st ance
edge
( do
i n)
i s55. 2
0 . 6
and
di st ance
t hi ckness0. 6
cal i per
t he
( i n
f oun
d
mar ki ng
6 ( =0. 6
2(=0. 2
di r ect i on of
t he t i mi ng
bet ween
not
mm
mm
bl ock
t he
i s55. 0
and
t hi s
exampl e0. 6
f i g.15
by
addi ng
.
0
. 8
.
Pl ace
t he
. 1 .
Tur n
cyl
unt i l
t he
r ot at i on
cover ' s
measur eont he
. 17323
( 2
( 0
. 02362
.
mm
mm
t he
.
mm/ 0
mm/ 0. 007874
mm
t he
( 2
( 0
bl ock.
t he
. 02362
hol e
cyl i nder
i n)
t hi s
i n)
i s
. 16535
. 02362
mm)
bl ock' s
i n)
i n)
wi t h
t he
17.Fi t
t he
i nj ect i on
shi m
t hi ckness
pump
i s
not
i n
pi n l ocat es
and
f i t t i ng
.
Ti ght eni ng t or que
f t
. l bs).Connect
pi pe
hol e
channel
' Out " )
t o
i s
i n
t he l ocks
each
f r om
t he
bol t f or
t han
.
t he
pump
Tur n
.
t he
l i f t i ng
cont r ol r od' s
mar ki ngs
t hat
f or
t he
f uel
f uel
f i l t er
t he
r et ur n
t he
ot her s
pump( s)
t he
engi nesot hat
posi t i on.Check
coi nci de
t he
t he
nut s
pi pe
t o
t he
hose
( on
t oget her
gr oove
cont r ol
bet ween
hasasmal l er
( see
20
i s
i nj ect i on
l at er
ver si ons
and
f i gur e).Check
r od
Nm
t he
pump.NOTE!
cal cul at ed
t he
cam
t hat
t he
t hat
oper at es
pump( s)
t he
( 2, 0
kpm)
pumps
t hr ough- f l ow
i t
i s
f or
t he
pump' s
af t er
easi l y
( 14. 7
and
t he
The
mar ked
.
t hi s
I n
( 0
( 0
ones
f i t t ed
t he
Har d
( 0
Sof t
( 0, 007874
D.Repeat
i n
The
case
. 007874
. 011811
. 011811,0. 02362
t he
and
i n).Pl ace
and
r ef i t
t oget her wi t h
bl ockorpump
shi ms
shi ms
and0. 011811
t he
same
set t i ng- di sc' s
choose t wo
. 011811
0
t he
ar e
avai l abl e
ar e
avai l abl e
pr ocedur e
way
i n)and one
t he
pump.NOTE!Ahar d
anot her
.
and0. 035433
as f or
cyl i nder1.
mar ki ng
sof t
shi ms0. 2
har d
shi m bet ween
har d
shi m
har d
shi mordi r ect l y
i n
t hi cknesses0. 3,0. 6
i n)
.
i n
t hi cknesses0. 2
i n)
.
f or
t he
ot her
pumps
expl ai ned
i s
and0. 3
shi mof0 . 3
t he
must
and
and0. 3
( 2002,
under
poi nt B
t wo
never
agai nst
0 . 9
2003)
mm
mm
sof t
mm
mm
.
be
18.I nst al l
t her most at
f or get
t he
housi ng
t hef eed
housi ng
l i f t i ng
.
pump
eyel et
wi t h
bet ween
and
t hef uel
t he
t her most at.NOTE!
t he
f i l t er.Al so
f i l t er
f uel
and
i nst al l
Do
t he
t he
not
t her most at
Page 22

21.Fi t
t he
t he
r ound
posi t i on.Fi t
pi pes
Al so
r ef i t
val ve
cover usi nganew
hol e
f or
t he
decompr essi on
bet ween
t he
i nl et
t he
t he
ai r
si l encer
cr ankcase
i nj ect or s
gasket.Make
vent i l at i on
devi ce
and
.
l ever.Fi t
t he
i s i n
i nj ect i on
sur e
t he
t he
pumps
t hat
r i ght
pr essur e
.
19.I nst al l
t he
sea- wat er
.
pump
and
t he
cool i ng
wat er
pi pes
20.I nst al l
t or que
f or
i nst al l
t he
t her most at
t he
i nj ect or s
t he
i nj ect or s
exhaust
housi ng
el bow
and
and
20
and
t he
t he
Nm
r et ur n
( 2, 0
t he
wat er
exhaust
f uel
pi pe.Ti ght eni ng
kpm)
( 14
pi pe
el bow
. 7
f t
. l bs
bet ween
.
. ) .
Al so
t he
22.I nst al l
hook- up
t he
st ar t er
V-bel t.Al so
t he
cabl e
mot or ,
i nst al l
har ness
t he
t he
el ect r i cal
.
al t er nat or
di st r i but i on
and
t he
box
al t er nat or
and
Page 23

2003T
Tur bo- Compr essor
Wher e
be
t hat
t he
boat ' s
t he
cl eaned
become
t her e
i sanexcessi ve
t he
t ur bo- compr essor
speed
t hr ough
boat ' s
wher e
cl ogged,
bot t om
necessar y.Check
and
shoul d
cl ean
t he
amount
i s
wat er
t he
of
not
f unct i oni ng pr oper l y
i s
gr adual l y
al so
be
t hat
t he
i nt ake
si l ender
smoke
ai r
i n
decr easi ng,
i nspect ed,
i nt ake
.
t he
has
exhaust
and
not
f umesor
t he
engi neout puti s par t i cul ar l yl owi t may
.
I f
Fi l lupwi t h
23
.
quant i t y
l ubr i cat i ng
and
qual i t y,
see
I nspect i ng
Check
t he
bear i ng
j oi nt s
bear i ng
housi ng
t he
bet ween
housi ng,
and
Seal s
t he
t he
t ur bi ne
and bet ween
compr essor
housi ng
t he
housi ng
and
t he
compr essor
compr essor
.
Checks
Check
t he
pr e- i nj ect i on
and
t he
spr ay
shoul d
oi l
t o
t he
under
cor r ect
" Techni cal
l evel.Regar di ng
Dat a"
.
Checki ng
Di smount
measur e
Maxi mum
axi al
t he
t ur bo- compr essor
t he
r ot or
per mi ssi bl e
angl e,
t he
and
axi al
axi al
The
.
r adi al
cl ear ance
pat t er n
al sobechecked
uni t ' s
i nj ect or ' s
val ve
.
cl ear ance
f r om
and
r adi al
openi ng
cl ear ance
t he
engi ne,
cl ear ance
and
0
. 09
pr essur e
compr essi on
and
.
mm
24.Vent i ng
A.Open
Wat ch
B.Use
bubbl es
C.Ease
t ur n t he
of t he
nut s
t he
out
t he
i s
of f
t he
engi ne
f uel
.
t he
f uel
vent i ng
f or
f uel - spl ashes
hand- pump
comi ng
t he
f uel
t hr ot t l e
cont r ol
wi t h
pr essur e
syst em
scr ewon
out.Cl ose
pr essur e
t he
pi pes.Ti ght en
t he
.
t o
pump
pi pe nut satt he
i n
t he
st ar t er
f uel
f uel
t he
vent i ng
posi t i on
mot or
unt i l
t he
f i l t er
unt i l
f uel
appr ox.4
f uel
f r ee
scr ew
i nj ect or s
f or
f ul l
f uel
pr essur e
t ur ns
f r om
ai r
.
.
Posi t i on
speed and
comes
out
pi pe
.
Maxi mum
I f
wear
t ur bo- compr essor
per mi ssi bl e
and
t ear
r adi al
cl ear ance
has
r eached
shoul dber econdi t i onedorr epl aced
t he
maxi mum
per mi ssi bl e
0
. 17
mm
t he
.
Page 24

RECONDI TI ONI NG
l i ne- up
Make
bear i ng
t he
t hr eaded
dol l i esont he
( 2)
housi ng
compr essor
nut
and
di smant l e
mar ks bet ween
and
t he
housi ng
whi ch
hol ds
t ur bi ne
shaf t.Remove
t he
t ur bi ne
t he
compr essor
( 1).Unscr ew
t he
compr essor
housi ng
t ur bi ne
t he
housi ng,
housi ng.Di smant l e
t he
l ef t - hand
wheel ,
compr essor
( 3)
.
t he
usi ng
wheel
Di smant l e
t ur bi ne
.
Unf ast en
and
scr ew
Take
t he
shaf t
oi l
t he
t ur bi ne
st i cks,
t wo
def l ect or
t he
M5
shaf t
t ap t he
t hr ee
scr ews
( 7)
( 4)
and
end
gent l y
scr ews
outoft he
i nt o
whi ch
t he
t he
heat
shi el d.I f
wi t hawooden
hol d
t he
cover.Then
cover
.
t he
hammer
cover
l i f t i tup.
( 3)
Page 25

Compr essor
Check
t hat
t he
causedbyexcessi ve
shoul d
Heat
Check
wear
be
Shi el d
t hat
and
.
r epl aced
t he
t ear ,
Housi ng,
housi ngs
heat
heatorcor r osi on,
.
shi el d
ar e
f r ee
wear
i s
f r ee
Tur bi ne
f r om
cr acksorot her
and
t ear.Damaged
f r om
and
Housi ng
damage
r epl ace
caused
i t
i f
necessar y
damage
par t s
by
Unf ast en
bear i ng
compr essi on
t he
t wo
Remove
t wo
car ef ul l y
Measur i ng
Tur bi ne
Check
shape.Do
shoul d
t he
f our
scr ews
( 8).Usi ngasmal l
bear i ng
ci r cl i ps
bear i ngs
t he
packi ng
.
( 10)
( 11)
packi ng
r i ngs
and
Wheel
t hat
be
t ur bi ne
t he
damage.The
not
r epl aced
i nsi de
.
r i ng
( 13)
I nspect i on
and
Shaf t
t r y
t o
.
and
t he
bear i ng
( 12)ont he
t he
on
wheel
vanes
r eal i gn
whi ch
copper
t he
bushi ng
housi ng
oi l
def l ect or.Cl ean
and
shaf t
must
t he
vanes.Damaged
hol d
mandr el ,
t ur bi ne
not
t he
compr essi on
( 9)
.
Then
and
shaf t
ar e
f r ee
be
wor norout
out
t ap
r emove
r emove
and
t he
f r om
t he
t he
t he
par t s
mechani cal
par t s
Bushi ng,
Oi l
Def l ect or ,
Compr essor
Bear i ng
Check
t hat
amount
.
of
t he
.
wear
of
Damaged
par t s ar e f r ee
and
f r om
par t s
shoul dber epl aced
t ear
i s
wi t hi n
wear
and
t he per mi t t ed
t ear
and
even
i f
t he
di scol our at i on
t ol er ances
Bushi ng
Check
4
. 07
measur ement
mm
.
( A) ,
whi ch
shoul d
not
be
l ess
t han
Pl ace
t he
bear i ng
shaf t.The
Check
t he
per mi ssi bl e
t he
shaf t
i s1. 29
mm
shaf tont wo
r ecesses,
maxi mum
di amet eroft he
pi st on
and
di amet er
r i ng
.
suppor t s,
check
per mi ssi bl e
shaf t
i s7. 98
gr oove
Maxi mum
.
whi ch
t he
bear i ng
shoul dbeunder
t hr ow
at t he
t hr ow
i s0. 011
r ecesses.The
mm.Check
per mi ssi bl e
endoft he
mm
t he
wi dt h
wi dt h
Def l ect or
Oi l
( B)
and
t he
Check
measur ement s
t han1. 31
mm,
Compr essor
Check
of
wear
Mi ni mum
wi dt hoft he
t he
and
per mi ssi bl e
t ear
( C)
shoul d notbemor e
Bear i ng
bear i ng,
i s
i n
excess
wi dt h
( C).( B)
of
i s3. 98
and
r epl ace
t he
shoul d
t han1. 11
i t i f
per mi t t ed
mm
.
notbemor e
mm
.
t he
amount
t ol er ance
.
Bear i ngs
.
mi ni mum
of
Check
i nt er nal
di amet er
di amet er
t he
and
bear i ngs
ext er nal
shoul d
shoul d
f or
abnor mal
di amet er sofal l
notbel ess
not
be
mor e
t han
t han
and
wear
bear i ngs.The
12
. 31
8. 04
mm
mm,
t ear or
t he
.
di scol our at i on,
ext er nal
i nt er nal
and
r epl acet hem
wher e
necessar y.Check
t he
Page 26

Bear i ng
Check
measur ement
Housi ng
t he
housi ng
( D)
and
Measur ement
.
( E) ,
( E)
f or
cor r osi on
and
( D)
shoul d
r epl ace
shoul d
not
cr acks.Check
or
t he
be
not
be
mor e
housi ng
mor e t han
t han 15
wher e
12
. 05
measur ement s
. 42
necessar y
mm
mm,
.
Reassembl y
Gr ease
Mount
Posi t i on
pl ace
Mount
bear i ng
The
Ti ght en
quar t er
t or que
Posi t i on
The
Posi t i on
t he
The
Ti ght en
t or que
al l
r emovabl e
t he
ci r cl i ps
i n
t hem
t he
packi ng
i n
r i ngsot hat
t he
t he
t he
t ur bi ne
t he
bushi ngont he
bear i ng
casi ng,
t or que
t he
t ur n
agai n
t he t wo
openi ng
t hat
i n
t he
bear i ng
usi ng
Permat ex
t hi cknessoft he
Fi t t he
coveront he
scr ews
quar t er
Posi t i on
f ast en
be
t he
Smear
t ouch
t he
0
posi t i on.The
Check
agai n
i t
2 . 0
Nm±0
Mount
t he
t o
t he
maki ng
compr essor
Nm±0
. 5
t he
wi t h
pur pose.The
. 1- 0
. 2
t o
t he
t he
axi al
cl ear ance
and
t he
t ur n
t he
wi t h
( M6) ,
mm.Then
l i ne- up
cl ear ance
ar e
heat
shoul dbe1
scr ews
.
i n
t he
oi l
housi ng
washer s.The
scr ews
.
compr essor wheel
t ur bi ne
l i ne- up
edgesoft he
t he
axi al
par t s
i n
t he
f aci ng
r i ng
shi el dont he
axl e
i n
wi t h
engi ne
usi ng
new
t o t he
bef or e
bef or e
t he
. 1
t i ght eni ng
packi ng
t he
i nner
out er
r i ng
def l ect or
whi ch
f or t he
seal ant
bear i ng
t he
t o
t i ght eni ng
l ef t - hand
.
housi ngont he
mar ks.Scr ew
sur e
t hat
housi ng
26. 0±1, 0
compr essor
t hi cknessoft he
mount
mar ks,
i s
and
0
shoul dbe4
r adi al
i s
0. 09
. 17
mm
t or que
when
r eassembl i ng
bear i ng
t owards
on
i t
. 3
pur pose
bear i ng
housi ngsot hat
t he
oi l
shaf t.Tur n
t he
t ur bi ne
i s
f aci ng
t owards
bear i ng
t he
bear i ng
t ur bi ne
scr ews
Nm±0
above
r i ngsont he
r i ng
shoul dbef aci ng
shoul d
i n
t he
come
shoul dbeabout0. 1- 0
housi ng,
t or que shoul dbe1 . 3
above
t hr ead
t he
scr ews
.
The
( M8)
.
housi ng,
t he
compr essor
and
scr ew
cl ear ance.Maxi mum
mm,
.
housi ng
shaf t.Gr ease
oi l ,
and
and washer s
. 1
.
t or que,
cover.Smear
t or que,
t hen l oosen
t hem
oi l
f aci ng
be
i n
t ouch
.
and
t hen l oosen
t hem
on
t he
nut.The
bear i ng
t he
l ocki ng
used
t or que shoul d
housi ng
usi ng
seal ant
t he
. 5
Nm±0
maxi mum
t hem
t he
out l et
.
t he
t he
oi l
i nt ake
casi ng,
mount
up
def l ect or.NOTE
f ast en
up
t ur bi ne
wher e
l ocki ng
and
.
i n
t he
i t
on
f ast en
t o
t hem
t o
t he
cor r ect
t he
oi l
t he
oi l
i nt ake
t he
edges
wi t h
t he
. 2
i t wi t h
Nm±0
t hem
t o
t he
cor r ect
shaf t
t or que shoul d
housi ng
ar e not
shoul dbeabout
housi ng
. 5
per mi ssi bl e
cover
i nt o
t hose
be11. 0
i t
comes
Permat ex
accor di ng
cover
.
per mi ssi bl e
accor di ng
.
Posi t i on
openi ngs
openi ng
t hen
compr essor
t he
out l et ,
cover ,
mm
new
. 1
and
i nt o
f or
posi t i on,
f or
r adi al
.
i t
.
a
:
.
of
.
.
a
i n
Cover
Check
measur ement s
wher e
necessar y
t han12. 45
10
. 05
mm
Packi ng
Check
t he
r y
and
.
shape,
mm,
measur ement
.
Ri ngs
packi ng
r epl ace
( F)
and
Measur ement
.
r i ngs
t o
t hem
see
wi t h
( G)
( G)
.
( F)
shoul d
i f
t hey
new
and
shoul d
ar e
ones
r epl ace
t he
not
notbemor e
wor norout
wher e
be
cover
mor e
t han
necessa
Fi t t i ng
Bef or e
cl ean
shaf tsot hat
cor r ect
of
changes
Cl ean
t he
Tur bo- Compr essor
f i t t i ng
t he
engi ne
t he
oi l
t he
qual i t yofoi l
shoul d be
i n
t he
ai r
f i l t er
t ur bo- compr essor
i nt o
t he
oi l
i nt ake,
evenl y
( see
i n
di st r i but ed.Cl ean
under
out
or der
oi l i s
car r i ed
Manual ,
.
on
and
" Techni cal
i n
accor dance
t o
keep
t he
t ur n
t he
engi ne,
t he
t he
Dat a" ).Oi l
wi t h
engi ne
spr ay
t ur bi ne
t ur bo- compr essor ' s
t he
cl ean
i nst r uct i ons
del i ver yandr et ur noi ll i nes.Changet heengi neoi landt hef i l t erf ort hel ubr i cant.Besur et ouset he
.
Page 27

FRESHWATER
1
.Fi t
t he
20
Nm
2
.Suspend
doubl e
b)
Fi t
Fi t
c)
3
.Locat e t he
washer s) ,
4
.Fi t
t he
11)
and
Fi t
t he
5
.
6
.Fi t
t he
7
.Fi t
t he
8
.Fi t
t he
Fi t
t he
9
.
i n)
( onl y si ngl e
10
.Fi t
t he
Fi t t he
11
.
i n) ,
posi t i on18.
12.Fi t
13
.Fi l l
2003=5
t he
t he
COOLI NG
ci r cul at i on
( 2, 0
kpm)
t he
heat
a)
hose cl amps
t he
pi pe
bet ween
t he
pi pe
bet ween
pi pes
posi t i ons
pi pe
bet ween
t he
l ock (posi t i on11a)
pi pe
bet ween
pi pe
bet ween
al t er nat or ,
expansi on
hose
bet ween
ni ppl e,
hose
pl ugs
syst em
addi t i ve
posi t i on17.
bet ween
i n
t o
. 5dm3
pump
( 14
. 7
exchanger
Fi t
t he
i n
t he
5 and9.
t he
pl ace
t ank
hose
t he
exhaust
t he
( VP
accessor y)
( l i t r e) ( 1
2002,
( compl et e
f t
pi pe
( appl y
t he
heat - exchanger
heat - exchanger
t he
t he
t he
t o
t he
t ank
cl amps
t he
t ank
r i ght
2003
wi t h
. l bs) ,
posi t i on1.
l oosel ybyt he
( posi t i on6)and t he
soapy
heat - exchanger
t he
heat - exchanger
.
ci r cul at i on
ci r cul at i on
bol t
t he
and
ar e
and
el bow and
l evel
. 2
I mp.gal s)
pump
pump
f or
t he t ensi oner
exhaust
t he
ci r cul at i on
usedont he
t he
t her most at
wi t hami xt ur eoff r esh
. The
f r esh- wat er
t ensi oner
r ear bol t
hose
wat er
t o
t he
and
and
and and dr aw
and
t he
( l ower
( upper
el bow,
( 1
posi t i on15.
f r esh- wat er syst em) ,
t he
cyl i nder
. 45USgal s)
br acket
t he
exhaust
pump
housi ng
syst em vol umes:2002 = 4. 0 dm2
and
spacer
( M8x16 and
( posi t i on3)bet ween
r ubber
t her most at
out l et )
out l et )
br acket
r i ngs,
housi ng,
ci r cul at i on
i t
f or war d
el bow,
( doubl e
head,
.
posi t i on10.
and
t he
and
t he
wi t h
pi pe)2002
( ni ppl e 17):2002=350
posi t i ons19and20.
wat er
( 50%)and
sl eeve,
spr i ng
t he
appl i es
posi t i on7.
pump,
t i ght eni ng
cyl i nder
cyl i nder
t he
head
posi t i on16.
washer
heat
f or
posi t i on
f or war ds.Put
=
ant i - f r eeze
posi t i on
exchanger
al l
r ubber
8
i t
wi t h
NOTE!
head,
head,
450
mm
mm
( l i t r e)
4).Ti ght en
. ) ,
posi t i on5.
and t he
r i ngs)
.
t he
t wo
bol t s
The
hol der f or t he
posi t i on12.
posi t i on13.
on and
( 17
. 7
i n) ,
( 13
i n) ,
. 8
( 50%) ,
( 0. 88 I mp.
t he
bol t s
sea- wat er
.
( M8x16 and
pi pe, (posi t i on
t ensi on
2003=550
2003=450
al t emat i vel y
gal s)
( 1. 1 US gal s) ,
( M8x75)
pump, usi ng
spr i ng
t he
V-bel t
mm
( 21
mm
( 17
r ust - pr ot ect i on
t o
.
. 7
. 7
Pos21and 23
ar e
f or
hot
wat er
out l et
.
Page 28

I NSTRUMENTPANEL
1 .Pri nt ed
2
.Rev
3
.
4
.Swi t ch
5
.Al ar m
6.Al ar m
Max
t he
panel=5
Cabl e
R
PU- BN
OR= Or ange
GR=
SB=
W
Y
GN=
BL=
count er
St ar t
out put
col our
=
Red
Purpl e
=
Brown
Gr ey
Bl ack
= Whi t e
=
Yel l ow
Gr een
ci r cui t
but t on
f or
t est
Bl ue
i nst r ument
but t on
f r om
A
car d
( accessor y)
panel
Wi r i ng
di agr am,
( St andar d)
al t er nat i ve
A
Z
ENGI NE
1.Rel ay
2
.
Fuse
3
.Temp
4
.
Wi r e
Wi r e
mm
1, 0
1, 5
2, 5
10
.
al ar m
Oi l
pr essur e al ar m
ar eas
ar ea
2
i n
AWG
16
14
12
6
mm
sender
sender
2
26
Page 29

I NSTRUMENT
1.Vol t met er
2
.
Oi l
3
.Cool ant
4
.Pri nt ed
.
5
Al ar m
Swi t ch
6
.
7
.Rev.count er
8
.Key
9.Al ar m
Max
out put
t he
panel:5
Cabl e
GR=
SB=
BN=
LBN
R=
P=
GN=
Y=
W=
BL=
LBL=
pr essur e
swi t ch
col our
Gr ey
Bl ack
Brown
=
Li ght
Red
Purpl e
Gr een
Yel l ow
Whi t e
Bl ue
Li ght
PANEL
gauge
t emper at ur e
ci r cui t
car d
t est
f or
i nst r ument
f r om
A
br own
bl ue
gauge
l i ght i ng
Wi r i ng
di agr am,
( De Luxe)
al t er nat i ve
B
ENGINE
1
.Cool ant
2
.Oi l
Cool ant
3
.
4
.pi t
5.Rel ay
6.Fuse
ar eas
Wi r e
t emper at ur e
pr essur e
t emper at ur e
pr essur e
i nmm2
al ar m
sender
sender
sender
al ar m
sender
Page 30

FAULT
TRACI NG
Engi ne
does
not
st ar t
" " "
Engi ne
st ops
"
Engi ne not
r eachi ng
cor r ect
at
"
f ul l
t emp
r pm
Engi ne
r oughl y
vi br at es
r uns
or
abnor mal l y
Engi ne
becomes
abnor mal l y
hot
"
Faul t
St op
cont r ol
back.Mai n
on.Fl at
wi r es
.
Mai n
Empt y
f uel
or
cl ogged
Wat er
or
Faul t y
i nj ect or sorai r
syst em
i nt ake
on
Engi ne
Cl ogged
wat er
pump
Boat
t he
.
.
abnor mal l y
ai r
boat
not
damaged
j acket s
Faul t y
.
Faul t y
cool i ng
head
not
f ul l y
pushed
swi t ch:not
bat t er y.Broken
f use
t ank,
cl osed
f uel
f i l t er
i mpur i t i es
l oaded,
f i l t erormar i ne gr owt h
bot t om
pr oper l y
.
cool i ng
i n
t he
i mpel l er
t her most at.Cl ogged
wat er
.
swi t ched
el ect r i c
bl own
. zyxwvutsrqponmlkjihgfedcbaZYXWVUTSRQPONMLKJIHGFEDCBA
f uel
cock
.
i n
t he
f uel
i n
t he f uel
cl ogged
.
al i gned
wat er
exhaust
pi pe
i nt ake
i n
sea- wat er
i n
.
Propel l er
mani f ol d
t he
.
or
cyl i nder
Page 31

1
9992265- 0
884813- 7
9995218- 6
884557- 0
884559- 6
884787- 3
Pul l ey
pul l er
I nst al l at i on
Mandr el
Mandr el
Mandr el
Set t i ng- di sc
f or
f or
f or
r i ng
f or
pi st on
val ve gui de
i nst al l at i on
i nst al l at i onofval ve
f or
i nj ect i on
r emoval
i nj ect or
of
pump
sl eeve
gui de
set t i ng
884811- 1
884823- 6
884837- 6
884838- 4
884839- 2
Pul l er
f or
Fl ar i ng
Fl ange
Mandr el
cover
Assembl y
i nj ect or
t ool
f or
f or
and
sl eeve
f or
i nj ect or
engi ne
cr adl e
i nst al l at i onofseal i ng
di sassembl y
sl eeve
t ool
r i ng
f or
i n
camshaf t
t r ansmi ssi on
pi n
884840- 0
Gui de
.
pi n
f or
cyl i nder
head.NOTE!
Two
ar e
r equi r ed
Page 32

Gener al
TECHNI CAL
Type
desi gnat i on.... . . . . . . . . ... . . . . . . . . . . . . . . ..... . . .
2001
DATA
2002
2003, 2003T
Number
Di spl acement
Cyl i nder
St roke.. . ... . . . ....... . . . . . . . . . . . ... . ...
Compr essi on
Compr essi on
Di r ect i onofr ot at i on
I dl i ng
Oi l
Oi l
Cyl i nder
Mat er i al
Cyl i nder
0, 25
0, 50
Pi st ons
Mat er i al
Tot al
Hei ght
Pi st on
Pi st on
0, 25
0, 50
of
cyl i nder s
. ....... . . .....
bor e
. . ..... . ...
r at i o.... . . . . . . ... . . ... . ... . ... . ....... . ...
r at i oatst ar t er
speed
. ... . ..... . ... . . . . . .....
pr essur e
pr essur eati dl i ng
mm
mm
mm
mm
at
bl ock
. . ... . ... . .
di amet er ,
over - si ze
over - si ze
. . . . . . ... . ... . ... . ... . ... . ... . ... ...
hei ght
. . . ... . ... . ... . ... . ....... . ... . ... . ....... .
f r om
gudgeon
cl ear ance
i n
st andar d
over - si ze.... . ... . ... . ... . ... . ... . ... . ....... .
over - si ze. . . . . . .
. . . ......... . . . . ... . . . . . ... . . . . . . .
. . .
. . ... ... . .
. . ....... . ... . ... . ... . . ... ... . . .
mot or
speed
( seen
f r om
t he
f r ont
.
. . ... . . . . . . . . . . . .
f ul l
speed
and
war m
engi ne
and
war m
engi ne
. . . . . . . . . . . . . . . . .
.
. . ... . ....... . ... . . . . . ... .
st andar d
. ... . . . . . . . . . . . . . ... ... . . . ... . . . . . . . .
. ..... . . . . . . ... . . ... ... . ..... . . . .
i n
cyl i nder..
di mensi on
.
. . . . . . ... . . . . . . ..... . .
pi n
cent er
t o
pi st on
. . ... . ... . ... . ... . ... . ... .
. . ... . ... . ... . ... . ... . ... .
. . ... . ... . ... . ... . ... . ... . ... .
. . . ... . . .
. ... . ....... . ...
. . ... . ... . ... . ...
end)
. . . . . . ... . . . .
t op
, . . .
. . . . . . . . . .
. .
. . . . . .
. . . .
. . . .
. . ... . ... .
. . ... . ... .
1
0. 43
i n)
.
dm
3 (26
2 3
. 2
cu 0. 852dm3
79
mm
( 3
. 11024
mm
87
17
2- 2
Cl ockwi se
13- 14
0, 35- 0, 40
0, 08- 0, 15
Speci al
79, 00- 79, 03
79, 25- 79, 28
79, 50- 79, 53
Li ght - al l oy
78, 3mm
50, 3
0, 09
78, 903- 78, ) 17
79, 153- 79, 167
79, 403- 79, 417
( 3
. 4252
. 5
: 1
. 5
MPa
r / ' s
( 775- 825
MPa
MPa
al l oy
( 3
mm
( 1
mm(. 00354
( 20- 25
cast
( 3
. 11025- 3
. 12008- 3
( 3
( 3
. 12992- 3
. 08268
. 98031
( 3, 10642- 3, 10697
( 3, 11626- 3, 11681
( 3, 12610- 3, 12665
( 51
i n)
i n)
kp/ cm2)
r pm)
( 3, 5- 4, 0
( 0, 8- 1, 5
i r on
i n
. )
i n
. )
i n
. )
. 9
cu
i n)
kp/ cm2)
kp/ cm
. 11142
. 12126
. 1311
1
. 278m3
cu
i n)
)
2
i n
. )
i n
. )
i n
. )
i n
. )
i n
. )
i n
. )
( 77. 99
Gudgeon
Di amet er
Gudgeon
Cl ear ance
pi ns
. . ...
. ... . . . . . . ... . . . . . ... . . . . . . . . . . . . . . . ... .
pi n
bushi ng,
gudgeon
di amet er
pi n
-
bushi ng
Pi st on
Compr essi on
Oi l
The
The
f or
i n
Pi st on
Upper compr essi on
Lower
Oi l
Pi st on
Upper
Lower
Oi l
Cr ankshaf t
Mat er i al
Cr ankshaf t
Mai n
Bi g- end
1
r i ngs
r i ng,
number
r i ng,
number
upper
pi st on
0, 250
and
. )
r i ng
compr essi on
r i ng
. . . . . . ... ... . . . . . . . ... . ... . . . . . . . . . . . . . . ... . . . .
r i ng
compr essi on
compr essi on
r i ng
. . . . .
. . . . . . . . ... . . . . . ..... . . . ..... . . . . ..... . ..... . .
bear i ng
bear i ng,
Propel l er
shaf t
. . . . . . ... . ... . ... . ... . . . . . . ....... . . . .
compr essi on
r i ngs
ar e
avai l abl e
0, 500
axi al
cl ear ance
r i ng
r i ng
gap
i n
t he
r i ng
r i ng
... . . . .
axi al
. .
cl ear ance.. . ... . ... . ... . ... ... . ..... . .
r adi al
cl ear ance......
r adi al
out put
...
r i ng
mm
over si ze
. . . .
. . . . . . . ... . . . .
cyl i nder
. . . . ... .......
. . . . . . . . ..... . . . . . . . . . ... ... . . .
. . . . . . . . . . .
cl ear ance
i n
accor dance
. . ... . . . . . . . . . ..... . . . . .
. . . . . . . . . . . . . ... . .
...
. . ... . . . . . . .......
hasani nl ay of
f or
st andar d
( 0, 00984
i n
t he
gr oove
. . . . . . . . . . . ... . . . . . . . . . . . . .
. .
. . . . . . ... . . ... ... . . .
. . . . . . . . . ... . ..... . .
...
. . ... . . . . .
wi t h
chr ome
di mensi on
and
. . . . . . ... . .
. . ... . . . . . . .
... ..... . .
DI N
6270B
. . .
.
.
and
0, 0996)
. . . . . .
. zyxwvutsrqponmlkjihgfedcbaZYXWVUTSRQPONMLKJIHGFEDCBA
.
25, 995- 26, 000
26, 005- 26, 011
0, 0050- 0
2
1
0, 070- 0, 102
0, 050- 0, 082
0, 030- 0, 062
0, 30- 0, 50
0, 30- 0, 50
0, 25- 0, 50
Nodul ar
0, 040- 0, 221
0, 040- 0, 092
0, 024- 0, 068
. 0160
( 0, 001181- - 0, 00197
( 0, 001181- 0, 00197
: 0, 009842- 0, 00197
i r on
( 1, 02343- 1, 02362
( 1, 02382- 1, 02406
( 0, 00020- 0, 0063
( 0
. 00276- 0, 00402
( 0, 00197- 0, 00323
( 0, 00118- 0, 00244
( 0, 00157- 0, 00870
( 0, 00157- 0, 00362
( 0, 00094- 0
. 00268
i n
. )
i n . )
i n
. )
i n
. )
i n
. )
i n
. )
i n
. )
i n
. )
i n
. )
i n
. )
i n
. )
i n
. )
Page 33

Mai n
bear i ng
Di amet er ,
0, 250mm
0, 500
mm
j our nal s
st andar d
under - si ze
under - si ze-
. ... . . . . . ... . ....... . . . ..... . .. .
. . . . . . . . ... . .
59, 987- 60, 000
.
59, 737- 59, 750
59, 487- 59, 500
( 2, 36169- 2, 36220
( 2, 35185- 2, 35236
( 2, 34200- 2, 34252
i n
i n
i n . )
. )
. )
bear i ng
Mai n
Thi ckness,
0, 250
0, 500
Bi g- end
Di amet er ,
0, 250
0, 500
Bi g- end bear i ng
Thi ckness,
0, 250
0, 500
Connect i ng
Axi al
Camshaf t
Axi alcl ear ance
Radi al
Camshaf t
Li f t i ng
Bushi ng
st andar d
mm
over - si ze
mm
over - si ze
j our nal s
st andar d.. ...
mm
aver - si ze
mmover - si ze
st andar d
mm
over - si ze
mm
over - si ze
r ods
cl ear ance
cl ear ance
di amet er.. . ....... . ... . ... . ... . . . . . . ..... . . .
hei ghtofcams..
di amet er..
shel l s
. . ...
. . . . ... . . . . .
. . . . . . ... . . . . . ....... . . . ... . . . . ... .
. . ..-- - . - . . ... . . . . . . . ..... . . . . . . . .
. . . . . . . . . . . . . . ... . ... . ... . ... . .
- - . -
. - -.. -
. . . . . . . . ..... . ... . ... . ... . .
shel l s
. . ... . . . . . . . . . . .
. . .
. . . . . . . . . . . . .
. ..... . . . . . . . . . .
at t he
cr ankshaf t
. . . .... ....... . ... ... . . ... . . . . . . ..... . . .
i n
bear i ngs
. . ... . ... . . . ..... . .
. . ... . ... . .
. . . . . . . . .
. .
. . . . . . ... . . . . .
. .
. . . . . . . . . . . . . .
. .
. . . . . . ... . . . . .
. ... . ... . ... . .
.
. - - -
. - - --- - - - --..
. - - --- - - - -- - -
.
. . ... . .
. . .
. .
. .
. .
. .
. . .
. - -
. . .
.
. .- - . - . . . . . . .
.
.
.
.
. .
2, 987- 2, 997
3, 112- 3, 122
3, 237- 3, 247
47, 989- 48, 000
47, 739- 47
47, 489- 47, 500
1, 478- 1, 488
1, 603- 1, 613
1, 728- 1, 738
0, 15- 0, 35
0, 160- 0, 300
0, 020- 0, 075
46, 975- 47, 000
5, 48- 5, 52
47, 02- 47, 05
. 750
mm
mm
( 0, 11760- 0, 11799
( 0, 12252- 0, 12291
( 0, 12744- 0, 12783
( 1, 88933- 1, 88976
( 1, 87949- 1, 87992
( 1, 86965- 1, 87008
( 0, 05819- 0, 05858
( 0, 06311- 0, 06350
( 0, 06803- 0, 06843
( 0, 00590- 0, 01378
mm
( 0, 0063- 0, 01181
mm
( 0, 000787- 0, 00295
( 1, 8494- 1, 85039
( 0, 21575- 0, 21732
mm
( 1, 85118- 1, 85236
i n
. )
i n
. )
i n
. )
i n
. )
i n
. )
i n
. )
i n
. )
i n
. )
i n
. )
i n
. )
i n
. )
i n
. )
i n
. )
i n
. )
i n
. )
Cyl i nder
Mat er i al
I nl et
Di sc
St em
Val ve
Cyl i nder
Seat
Cl ear ance,
Exhaust
Di sc
St em
Val ve
Cyl i nder
Seat
Cl ear ance,
Val ve
Lengt h,
Lengt h,
I nner
Hei ght
head
. ... ..... . .
val ves
di amet er
di amet er
seat
angl e
head
wi dt h
i n
col d/ war m
val ves
di amet er..
di amet er.. ........... . ..... . ..... . . . ... . . . . . ...
seat
angl e..
head
wi dt h- i n
col d/ war m
gui des
i nl et
val ve
out l et
di amet er
above
. .
. . . . . . ... . . . ... . . . . . ... . . . ..... . .
. . . . . ... . . .
. . . . . ... . . . . . . . . . . . . . . . . . ..... . ....... . .
. . ... . . . . . . . . . . . . . . . . . . . . ... . ....... . .
seat
t he
cyl i nder
. ... . ...
seat
t he
cyl i nder
val ve..
- - -- - - - --- - -
spr i ng- pl ane
. . . . . . . . . . . . . . . . . ... . ....... . .
angl e
. . . ... . . . . . . . . . . . ... . ....... . .
head
. . . . . . . . . . . . . . . . . ..... . .
engi ne
. . ....... . ..... . . . ..... . ... . . . . . ...
angl e
engi ne
. ... . . . . . . . . . ..... . .
. ... . . . . . . ..... . ..... . . . ... ... . . .
. . . . . . . ... . . . . . . . . . . . .
- - --
. . . ........... . ... . . . . . ...
-.. - . . ... . . . ..... . . . . . . . . .
head.- -.. . ....... . . . . . ..... .
- - -- -.. . ....... . .
.....
. . . . . ..... . ..... . . . ... . ... . .
of
cyl i nder
head
. . .
. - -
. .
. - - -
. . .
. ...
. . . .
... . ....... . .
34, 4- 34, 6
7, 955x7, 970
44° 55' - 44°85'
45°
appr
.
0, 3
.
.
.
.1mm
mm
Speci al
mm
( 1, 35433- 1
mm
( 0, 03) 37
( 0, 011811
29, 9- 30, 1
7, 950- 7, 465
45
°
appr
0, 3
mm
38
mm
mm
38
8, 000- 8, 015
8, 70- 9, 30
al l oy
cast
i r on
. 36220
( 0, 31319- 0, 31378
i n
. )
i n
. )
mm
( 1, 14716- 1, 18504
mm
( 0
.1mm
( 0, 03937
( 0, 011811
( 1, 49606
( 1, 49606in
i n
( 0, 31496- 0, 31555
mm
( 0, 34252- 0, 36614
. )
20031
i n
. )
35, 8- 36, 0
i n
. )
7, 995- 7, 970
29° 45' - - 30
30°
appr.1
0
. 3
. 31299- 0, 31339
i n
. )
44° 55' - 44°85'
i n
. )
. )
i n
mm
i n
. )
i n
mm
( 0, 011811
. )
i n
. )
. )
mm
15'
! 0
mm
. 03) 37
i n
.
i n
. )
Val ve
Lengt h,
Loaded
Loaded
spr i ngs
unl oaded
wi t h
170±10N( 17±1
wi t h
300±20N( 30±2
. . ... . . . . . . . ..... . ..... . . . . . . . . . . . .
kp)
. ... . ..... . . . ....... . .
kp)
. . . . . . . . . ... . . . ..... . .
42, 5
32
24
mm
mm
mm
( 1
( 0, 94488
( 1, 67323
. 25984
i n
. )
i n
. )
i n
. )
Page 34

Lubr i cat i ng
ENGI NE
Oi l
quant i t y
Oi l
quant i t y
Oi l
quant i t y
Oi l
qual i t y
Vi scosi t y
Oi l
Oi l
. . . . ... . .....
pr essur e,
pr essur e,
syst em
model
model
model
accor di ng
war m
war m
2001
.
2002
. . . ... . .
2003
. . . . . ... . ... . ... . . . .
t o
t he
API - syst em
. . . . . . ...
engi ne,
engi ne,
i dl i ng
f ul l
r pm
. ...
. . . .....
.
. ... .
speed
. . . . . . ... . ... . .
. .
. . . . . . . . ... . ... . .
. .
.
1, 40
dm3( 1
. 2
.
2
. 75
dm3( 2
4, 10
dm3( 3. 6
CD
( DS)
15
W/ 40
.
.
0, 8- 1, 5
3, 5- 4, 0
quar t s)
. 42
quar t s)
quar t s)
( 11
kp/ cm2
kp/ cm2( 49
. 37- 21
. 78- 56
. 33
. 89
l bf t / i n
l bf t / i n
)
2
2
)
Lubr i cat i ng
Type
..... ... . . . ... . . . . . . . . . .
Gear
wheel
Spri ng
Loaded
Fuel
Syst em
Openi ng
Spray
I nj ect i on
I nj ect i on
I nj ect i on
I nj ect i on
Gover nor
Feed
Feed
pr essur e42r / s
El ect r i cal
Bat t er y vol t age....
Bat t er y
St ar t er - mot or
St ar t er - mot or
Al t er nat or
Vol t age/ max.cur r ent..
Out put
El ect r ol yt e
oi l
pump
. . . .
. . . . . . . . . . . . ..... . .
unl oaded
. 8
f t
. l bs
. )
. . . . . . . . . . . . . . . .
. . .
. ...
. . . ... ... . ....... . .
. .
. . . . .
f or
wi t h
pr essur e
angl e
angl e
angl e
angl e
quant i t y
axi al
r educt i on
35
Nm
. . . . . .
2001
2002,
2003T
over r un
cl ear ance
( 3, 5
i nj ect or s.. . . . ..... . . . . . ... . . . . . ... .
.
. .
. . . ..__
. . . . . . . . . . . . . . . . . . . . . ... . ...
val ve,
l engt h
kp) ( 25
. . . . . ... . . . . .
2003.. . . . . . ....... . ... . . . . . .
... . . . . . . . . . . . . . . . . . . . ... ... .
. .
. . . . . . ... . ... . . .
. .
. . . . . ... . ... . . . . . . . . . . . ... . . . . . . . . .
pump
( 2500
r pm)
. . ..... . . . . ... . . ... ... .
syst em
. ...
. . . . . . . . . . ... . . . ... . . . . . . ... . . . .
capaci t y
. ....... . . . ... . . . . . ... . . . . . . . . . : . ..... . . . .
out put
out put
out put
2001
. . . .
.
. . ....... . . . ... . . . ..-
2002
and
2003....
. . . . . . . . . . ... . . . . . .
:
. . . . . . . . . ..... . . . . . . . . .
. . . . . . ... ... . . . . . . . . . . . . ..... . . . . . . . . . .
spec.gr avi t y:Ful l y
l oaded
bat t er y
. . . . . ... . . . .
Tobechar gedat... . . . . . ... ... . . . ..... . . . . . . . .
Ther most at
Begi ns
Ful l y
. . . . ....... . . . . . . . . . . ..... . . . ... . . . .
t o
open
at
..... . . . . . . . . . . ....... . . . . . .
openat. ......... . . . ... . . . . . . ..... . . . . . . . . .......
. . . .
. . .
. .
. .....
. .
. .....
. .
..... . .
. .
. . .
. . . . .
. . . . .
. . . . .
.
.
.
. . . .
.
.
Gear wheel
pump
0, 025- 0, 065 ( 0, 00098- 0, 00256
49
mm
( 1, 92913
40
mm
( 1, 57480
180- 190
150
°
22±1°B
. T
20+1° CB. T
23±1°
B
. T. D
25+1
. 5
mm3/ st r okeat40±5° C
andat25
54
r / s
( 3250
0, 65- 0, 85
kp/ cm2( 2560- 2702
i n
i n
. D
. C
. D-C
.
. C
.
r / s
( 1500
r pm)
kp/ cm2( 9
. )
. )
r pm)
. 20- 12
pump
. 10
12V
Max.70
0
. 8kW! 1
1
. 4kW( 1
14W50
700
Amp
Wat t s
Ah
. 1HP)
. 9
HP)
1, 275- - 1, 285
1, 230
Wax
t her most at
60±2` C
75' C
( 140±4°F)
{ 165°F1
i n
. )
l bf t / i n2)
( 104° F±10
r evs
l bf / i n2)
1)
. 6° F)
Cool i ng
Wi t h
St ar t s
Ful l y
Fr esh- wat er syst em,
syst em
f r esh- wat er
cool i ng
( 2002,
2003)
openi ngat........... . ....... . . . ..... . . . ..... . . . . .
openat.
.
. . ........... . .......
vol ume
2002...... . . . ...
. .....
2003_____
WEAR
TOLERANCES
Cyl i nder s
0, 25
mm
Tobebor ed
at
wear
( 0, 00984
i n
. )
Cr ankshaf t
and
Mai nPermi t t ed
Permi t t ed
axi al
Max
.
1)
2003T
bi g- end
out - of - r ound.. . ... ... . ... . ... . . ... . . . . . . . . . .
t aper
cl ear ance
=
204- 212
j our nal s
. .
. . .
kp/ cm2
:
.....
. .
. . .
on
cr ankshaf t.. . ... . . . . . . . . . . . . . . .
. . ... . ...
( 2900- - 3015
. . ... . . . . . . . .
)
l bf / i n
2
. .
. ..... ... . .
. .
. . . .
74±1° C
87° C
( 189°F)
4
. 0
dm3l i t r e)
5
. 5
dm3( l i t r e)11. 2
0, 06
mm
0, 05
mm
0, 40
mm
( 164±2°F)
( 0
( 0, 00236
( 0, 00197
( 0, 01575
I mp
. 88
I mp.gal s)
i n- )
i n
. )
i n
. )
.
gal s)
( 1 . 1USgal s)
( 1
. 45
US
gal s)
Page 35

Camshaf t
Bear i ng
Max.cl ear ance
Val ves
Max.cl ear ance
The
val ve
j our nal s,
di sc
per mi t t ed
bet ween
bet ween
edge
must
out - of - round
camshaf t
val ve
st em and
at
be
l east
and
bushi ngs
. . . . . . . . . . . ... .
. . ... . . .
val ve
gui de.. . .
0, 03
0, 15
0, 15
1, 5
mm
mm
mm
mm
( 0, 00118
( 0, 00590
( 0, 00590
( 0, 05906
i n
. )
i n
. )
i n
. )
i n
. )
Ti ght eni ng
Mai n
Bi g- end
Fl ywheel
Fl ywheel
Cyl i nder
Rocker
Fuel
i nj ect i on
Pul l ey.. . . . . . . . ... . ... . . . ...
I nj ect or s
t or ques
bear i ng
bol t s,
2nd
bear i ng
head
ar m
. . . . . . . . . . . ... . . . . .
bol t s..
housi ng
bol t s
bol t s
. ... . ... . . . . . . . ..... . ... . . . . . . . . ... . ...
bol t s, 1st
br i dge
. ... . . . . . ... . ... . ..... . . . . . . ... . . . .
pumps.. . .
1st t i ght eni ng....
t i ght eni ng..
. . . . . . . . . . . . ... . . . . . . . . ..... . . .
. . . . . . . . . ... . ..... . . . . . . ... . . . .
t i ght eni ng
2nd
t i ght eni ng
. . . ....... . ... . . ... ..... . . . . .
. . . . . . . . ....... . . .
. . . . . . ... . . . . . ... . . .
. . ..... . . . . . . . . . . . . .
. ... . . . . . . . . ... . . . .
.
. . ....... . ... . ... . . . . . . . .
. .......
20
Nm
( 2, 0
kpm)
( 14
( 44
{ 51
( 18
( 47
( 14
( 51
( 18
( 18
( 29
( 14
. 7
. 2
. 6
. 4
. )
. 7
. 6
. 4
. 4
. 5
. 7 f t
20
60
Nm
( 6, 0
kpm)
70
Nm
( 7, 0
kpm)
25
Nm
( 2, 5
( 6, 5
( 2, 0
( 7, 0
( 2, 5
( 2, 5
{ 4
( 2, 0
, 0
kpm)
kpm)
kpm)
kpm)
kpm)
kpm)
kpm)
kpm)
.
.
.
.
.
.
65
20
70
25
25
40
20
Nm
Nm
Nm
Nm
Nm
Nm
Nm
. )
f t
. l bs
f t
. l bs
. )
f t
. l bs
. )
f t
. l bs
. )
f t
. l bs
. )
f t
. l bs
. )
f t
. l bs
. )
f t
. l bs
. )
f t
. l bs
. )
f t
. l bs
. )
. l bs
. )
 Loading...