

Page 1
VOLVO NAVIGATION SYSTEM (VNS)
XC90
WEB EDITION
Page 2
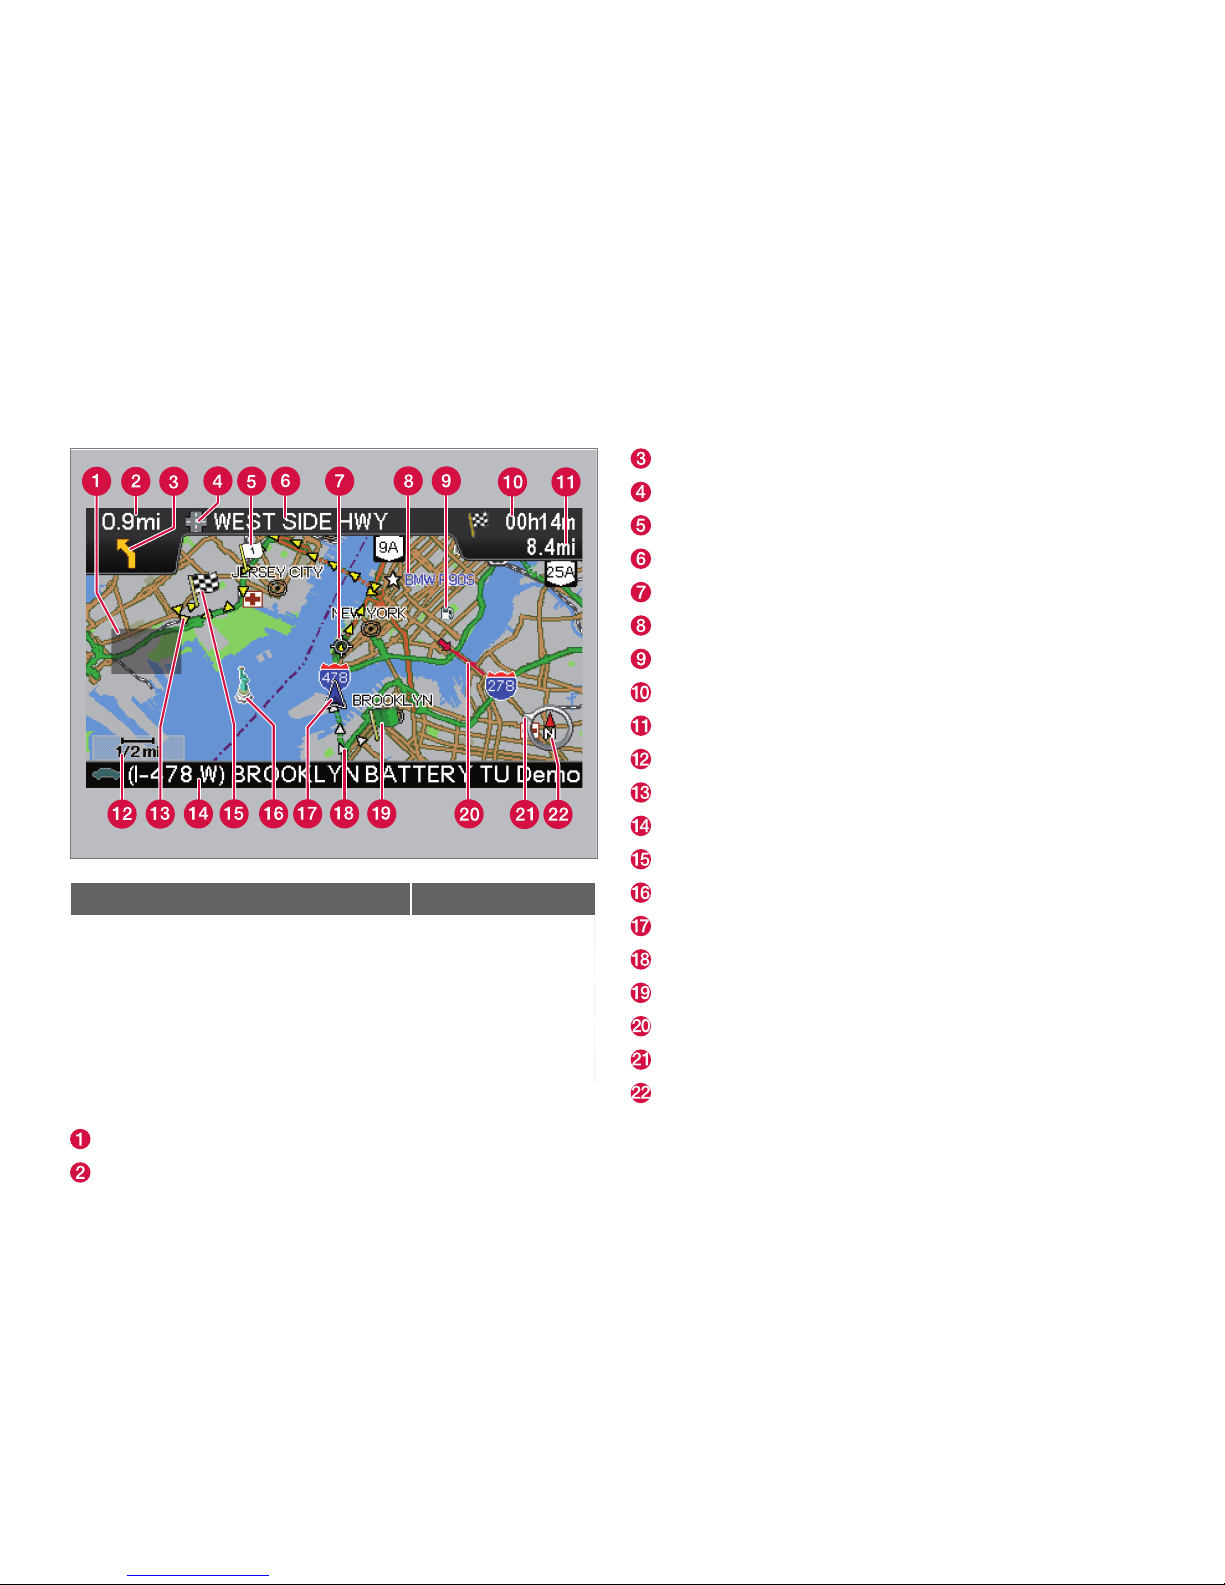
G033441
Types of roads Color
Freeways Green
Main roads Red
Secondary main roads Brown
Normal roads Dark gray
Local roads Dark green
Text and symbols on the screen
Area to be avoided
Distance to the next guidance point
Direction to take at next guidance point
Type of junction
Intermediate destination
Name of next street or road
Next guidance point
Stored location
Symbol for a Point of Interest – POI (Gas station)
Remaining time to destination
Remaining distance to destination
Map scale
Route
Current road
Final destination
Famous landmarks
The vehicle’s current location
Completed section of the route
Starting point
Traffic information
Outer ring of compass – direction to destination
Compass
Page 3

VOLVO NAVIGATION SYSTEM (VNS) WITH RTT
VNS is a navigation system developed by Volvo,
which is designed to help guide you to the destination of your choice and provide information
along the way.
RTT1 (Real Time Traffic) is an information system
developed by Volvo, which can detect roads/
streets with traffic disruptions and make it possible to select an alternative route past the problem
area.
The system includes features that enable you to
set itineraries, search for certain types of points of
interest along your route, store special destinations, obtain traffic informaton en route, etc.
The system indicates the vehicle’s current location, and shows part or all of the route to your
destination, depending on the settings you have
made. If at any time you should decide to deviate
from the route originally set by the system, a new
route to the destination will automatically be calculated.
By enabling you to reach your destination quickly
and by the most direct route, Volvo's navigation
system also helps contribute to improving the
environment.
NAVTEQ DATABASE End-User License Agreement
See the information on page see page 74.
1
Option. Not available in all markets.
Page 4

Contents
2
01
01 Getting to know the
navigation system
This manual................................................. 8
Before you start.......................................... 9
Navigation system, updating and care..... 11
XC90 system overview.............................. 12
Navigation system controls...................... 14
On-screen keypad.................................... 15
Display and voice guidance...................... 16
Unverified roads and Compass................ 18
Menu selections........................................ 19
02
02 Easy user mode
Main menu, Shortcut menu, Scroll menu. 24
Menu selections........................................ 25
Setting a destination................................. 26
Show/Remove destination........................ 29
Settings..................................................... 30
03
03 Advanced user mode
Main menu, Shortcut menu...................... 34
Map scroll menu....................................... 37
Menu selections........................................ 38
Setting a destination................................. 40
Itinerary..................................................... 45
Next destination........................................ 48
Current position........................................ 49
Traffic information (option)........................ 50
Settings..................................................... 51
System simulation..................................... 55
Page 5
Contents
3
04
04 Traffic information
Introduction............................................... 58
Avoiding traffic problems ......................... 59
Selecting information................................ 61
Reading information.................................. 62
05
05 Symbols on the map
Road numbers and Points of interest....... 66
06
06 Questions & answers
Frequently asked questions...................... 72
EULA – End User License Agreement...... 74
Page 6

Contents
4
07
07 Index
Index......................................................... 78
Page 7
Contents
5
Page 8

G028780
6
This manual............................................................................................... 8
Before you start........................................................................................ 9
Navigation system, updating and care................................................... 11
XC90 system overview............................................................................ 12
Navigation system controls..................................................................... 14
On-screen keypad.................................................................................. 15
Display and voice guidance.................................................................... 16
Unverified roads and Compass.............................................................. 18
Menu selections...................................................................................... 19
Page 9
G E T T I N G T O K N O W T H E N A V I G A T I O N S Y S T E M
Page 10
01 Getting to know the navigation system
This manual
01
8
Using this manual
The manual is divided into chapters describing the various features and functions of the
navigation system.
A section dealing with common questions
and answers, and an index, can be found at
the end of the manual.
Menu selections/Paths
Menu selections are shown in gray text in this
manual, for example:
Set destination Address City
Changes in the manual
The specifications, design features, and illustrations in this manual are not binding. We
reserve the right to make modifications without prior notice.
© 2009 Volvo Car Corporation
Page 11
01 Getting to know the navigation system
Before you start
01
9
Introduction
The VNS system can be used even if a destination has not been selected.
The vehicle’s current route will be shown on
the screen and the vehicle’s position will be
indicated by a blue arrow on the map.
The system’s contents may vary from state to
state, and not all menu selections may be
available for technical reasons.
Start up
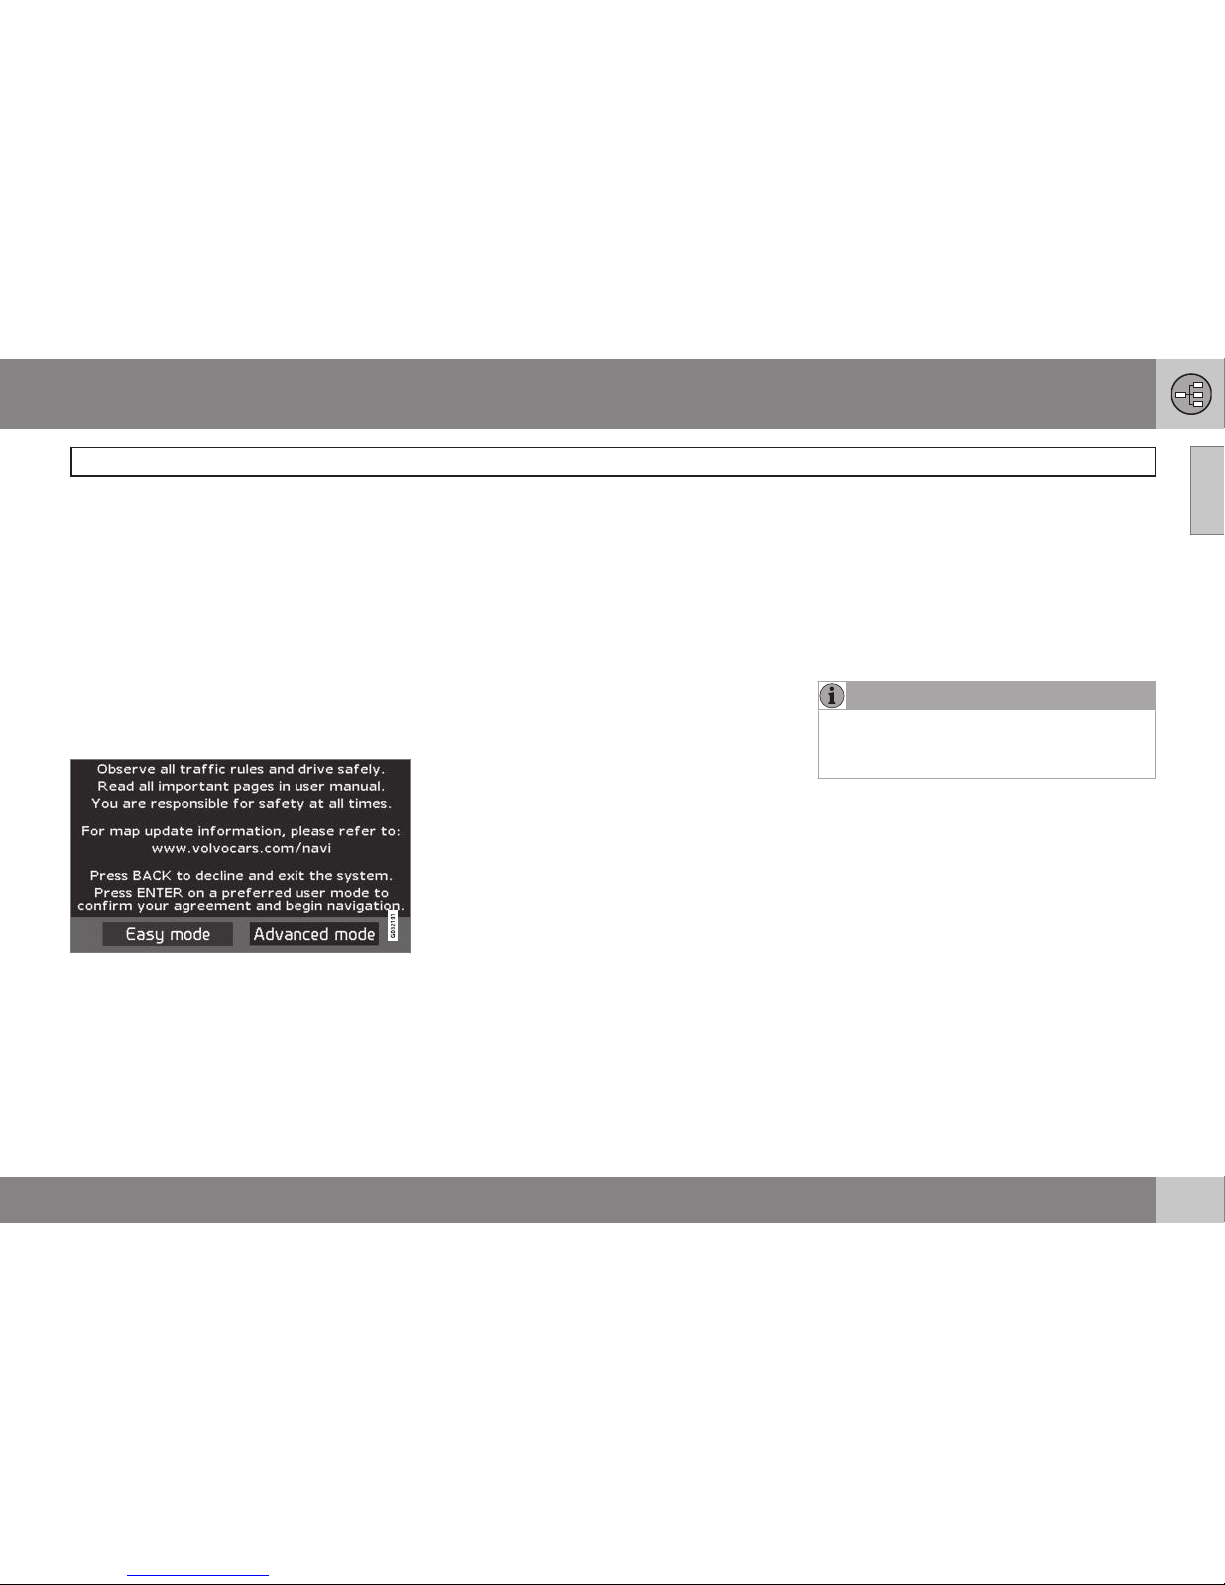
The system starts up by displaying text on
the screen that must be confirmed by pressing ENTER after you have selected to use
either
Easy mode or Advanced mode.
Map mode
When the system has started, the screen will
display the main menu briefly before entering
Map mode. A map of the vehicle's current
location will then be displayed.
•
Press BACK to display the main menu.
•
Press ENTER to activate the shortcut
menu.
•
Press the navigation control to activate
Map scroll mode, for example to see
parts of the map that are outside of the
screen area.
Pressing ENTER in this mode activates the
Map scroll menu, see page 24.
On/Off
ON
The ignition must be in position I or II in order
to operate the system (refer to the vehicle’s
owner’s manual).
•
Press ENTER or BACK.
The screen will slide up from the dashboard
automatically. It may take several seconds for
the system to determine the vehicle’s location
and direction.
Off
1.
Use the navigation control to go to
Shut
down.
2. Press ENTER (press BACK to go to the
main menu before shutting down).
The screen will retract automatically into the
dashboard.
NOTE
The system can be used even if the engine
is not running. It should be turned off when
not in use to help avoid battery drain.
Settings
The system is provided with default settings,
but it will start with the settings that were
most recently used.
If a setting is changed and you wish to return
to the default setting, only the currently
selected function will be affected.
There is no global reset function to return all
settings to default.
Page 12
01 Getting to know the navigation system
Before you start
01
10
Easy/Advanced modes
When the navigation system is started, the
desired user mode can be selected.
•
Easy
Only the primary menus are available in this
mode, and can be used to simply get directions from point A to B.
•
Advanced
This mode makes all settings and functions
available.
Switching between modes
Switching between modes can be done in
Settings.
NOTE
Settings made in Easy mode are not used
if the system is switched to Advanced
mode, and vice versa. Settings are stored
in the mode in which they were made.
Demo (simulated guidance)
The navigation system contains a function
that demonstrates guidance to a destination.
However, please be aware that the demo can
only be run when the vehicle is at a standstill.
This function is only available when VNS is in
Advanced mode, see Demo on page 55.
Page 13
01 Getting to know the navigation system
Navigation system, updating and care
01
11
Contents of the main unit
All map information is stored on the main
unit’s hard drive. There is no DVD in the unit
when it is delivered. The DVDs are used for
any updates to system or map information,
see the instructions of the DVD’s cover.
New DVDs are issued on a regular basis with
updated and new information. The latest
DVDs can be purchased from a Volvo retailer.
Volvo cannot be responsible for the accuracy
or completeness of data, maps, or routing
guidance presented by your navigation system. Please contact the map developer, NavTeq at www.navteq.com.
NOTE
The main unit’s DVD player is intended for
Volvo DVDs only.
Updating with a DVD
NOTE
Please note that an update may take up to
90 minutes. Be sure the vehicle’s battery is
adequately charged before beginning.
If a DVD contains new system software in
addition to map information, the system will
begin by running the software installation.
The vehicle can be driven while the navigation
system is being updated, but VNS cannot be
used while the update is in progress.
To perform an update:
1. Switch on the navigation system.
2. Remove a DVD if one is already inserted
in the system’s DVD player.
3. Insert the DVD containing the updated
information. If there is more than one
disc, insert them in the numbered order.
4. The system will now be automatically
updated. Information will be displayed to
show update progress.
5. After the update, the DVD containing the
most recent update must remain in the
system’s DVD player. If more than one
disc has been used, insert disc 1. If the
disc is removed from the player, the navigation system will stop functioning.
If the system is switched off while an update
is in progress, the update will be resumed the
next time the system is switched on.
In certain cases, updating map information
will add new system functions.
The VNS start screen will be displayed when
updating is completed.
NOTE
The type of information that may be displayed on the map is regulated by national
legislation. For the latest information, go to
www.volvocars.com/navi.
DVD care
•
When changing discs, make sure that
they are kept free of oil, grease and other
impurities.
•
The discs must not be exposed to moisture.
•
The discs must be kept in their packaging
when not in use. Avoid storing discs in
excessive heat, direct sunlight or in a
dusty environment.
Screen care
Clean the display screen with a soft, nonstatic cloth or a moist paper towel and a mild
window cleaning agent.
Never use petroleum based solvents or abrasive substances when cleaning the screen.
Page 14
01 Getting to know the navigation system
XC90 system overview
01
12
Page 15
01 Getting to know the navigation system
XC90 system overview
01
13
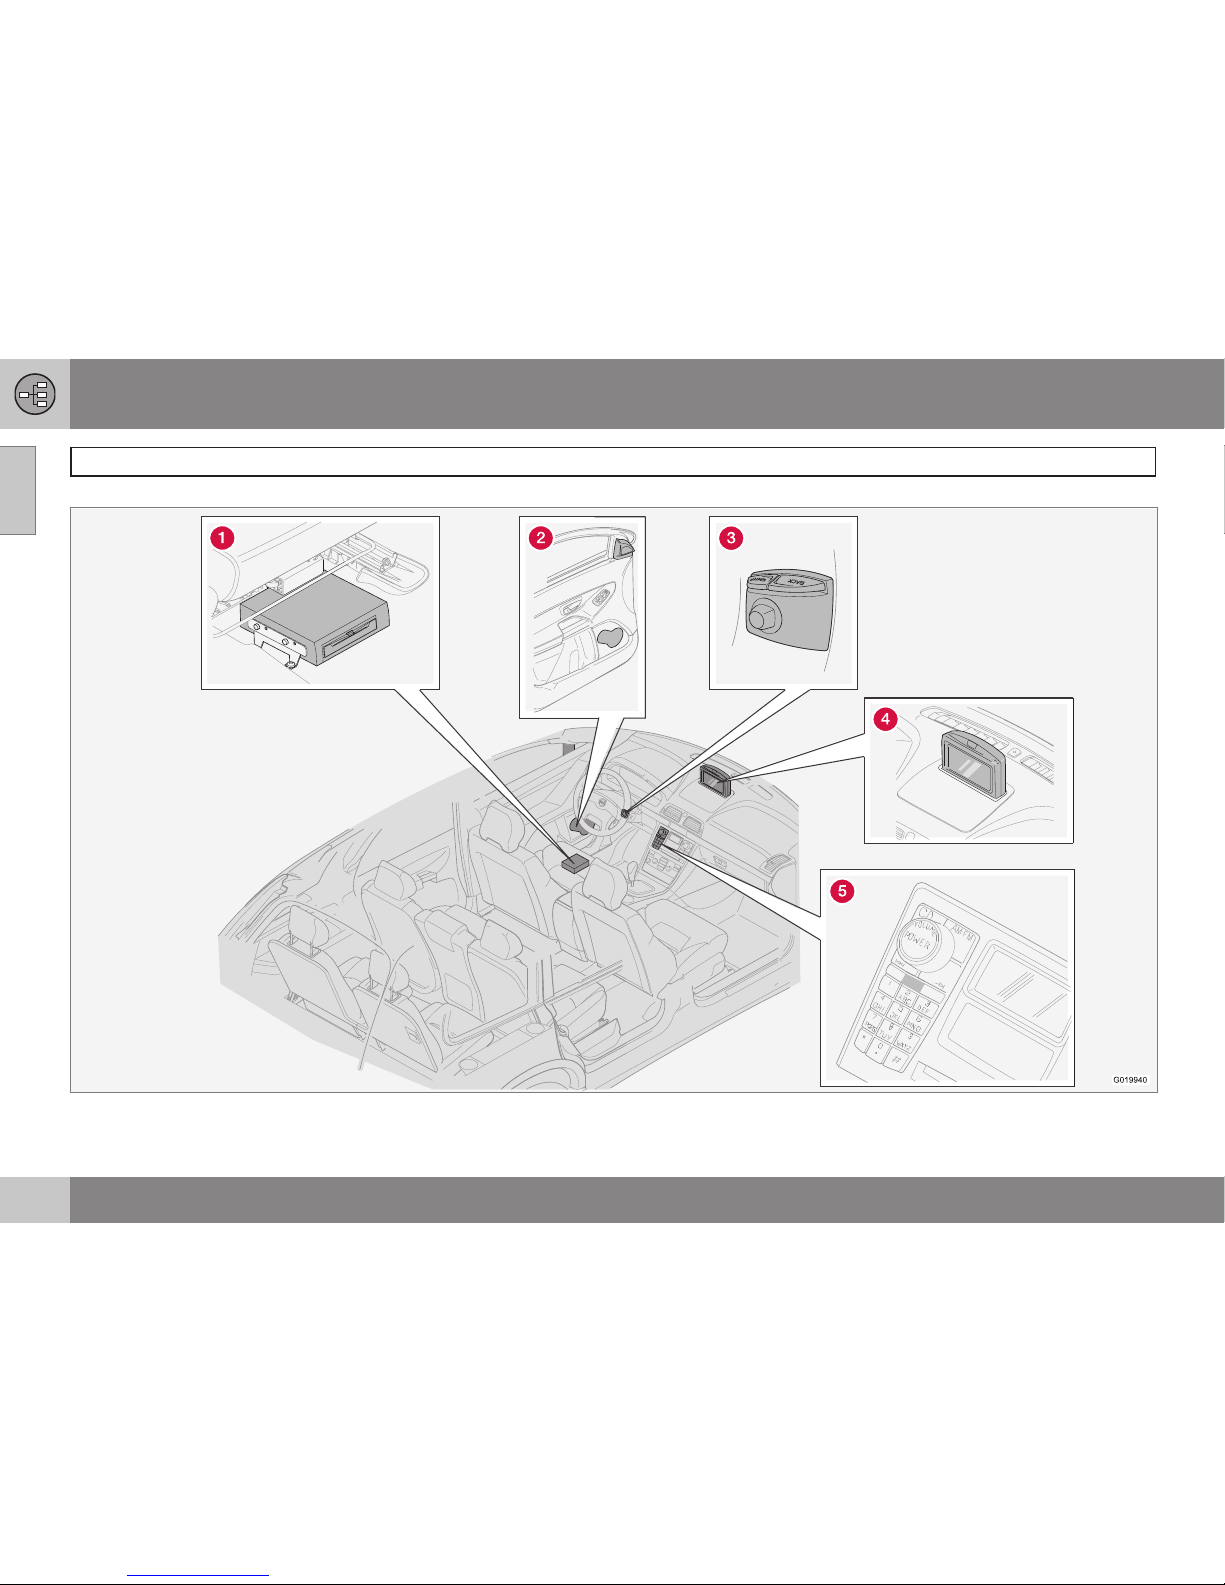
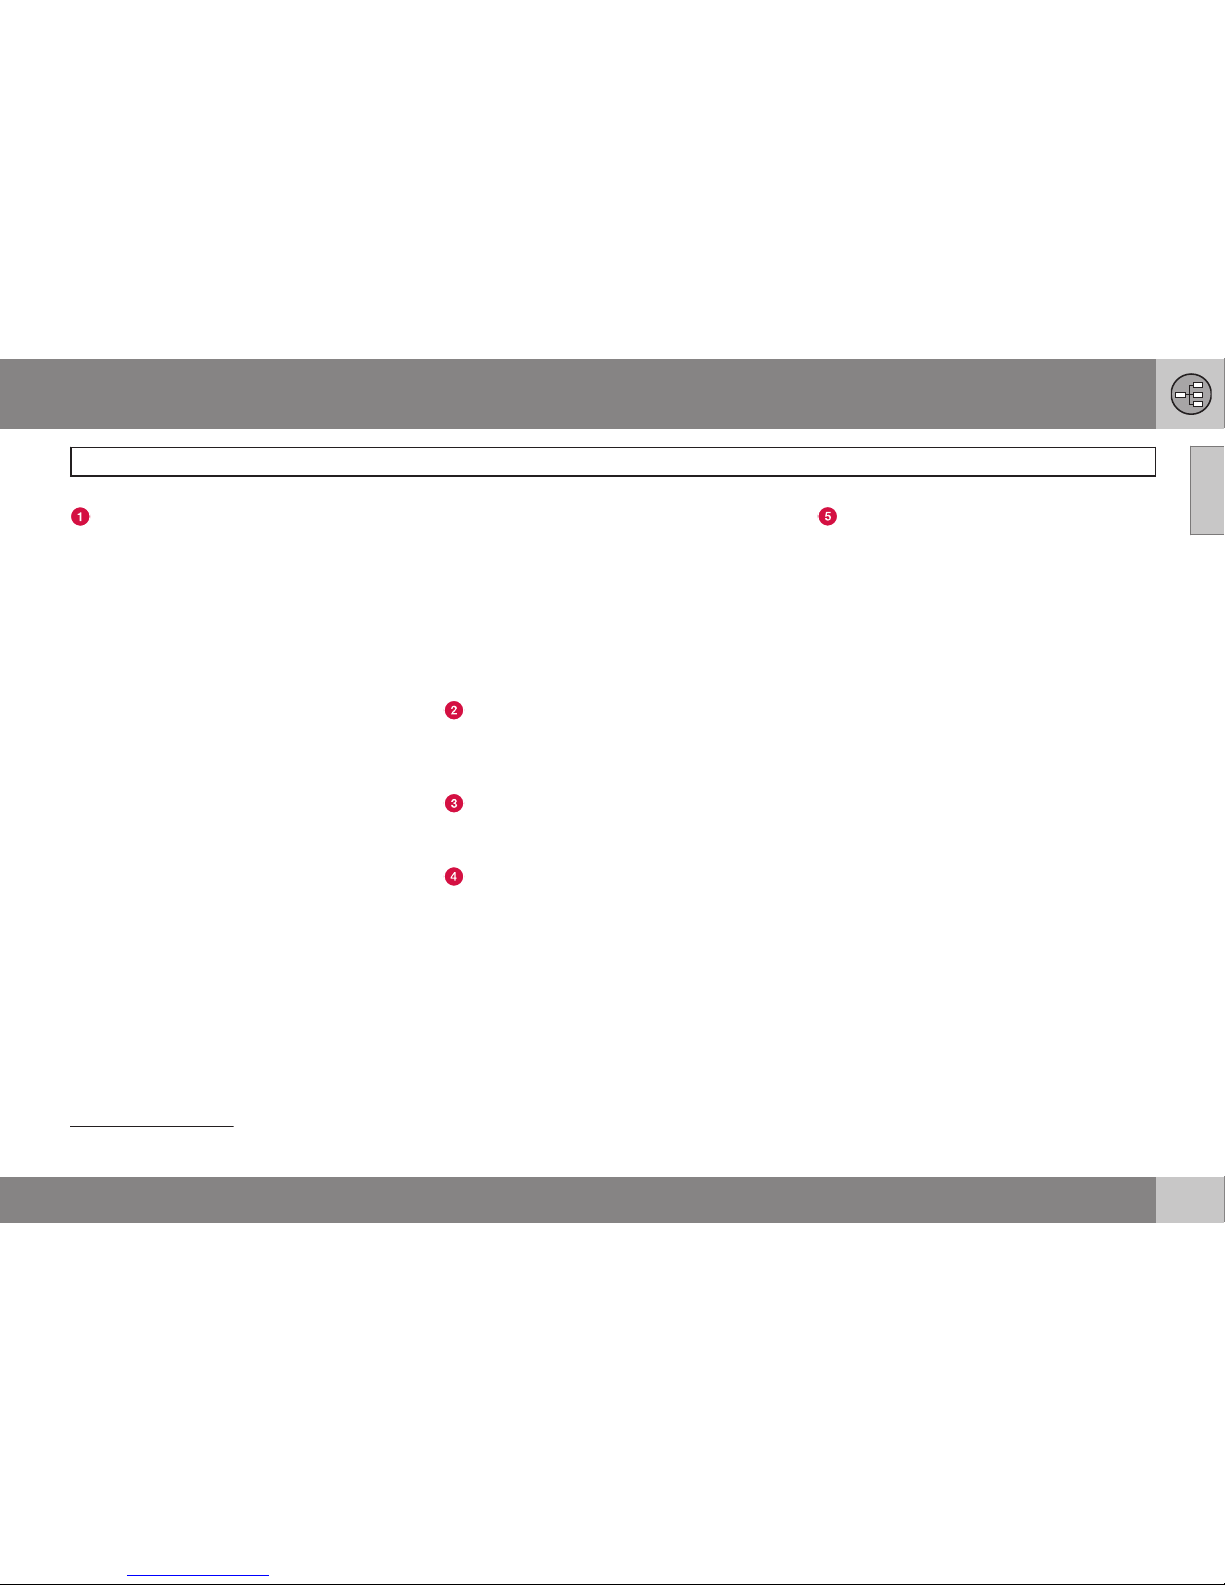
Main unit
The main unit contains a hard drive, a DVD
player (for navigation system map discs only)
and an integrated GPS (Global Positioning
System) receiver and a TMC (Traffic Message
Channel) receiver.
The main unit has the following functions:
•
Calculates the vehicle’s current position
•
Calculates the route to the selected destination
•
Processes traffic information
•
Provides voice guidance
•
Stores map data
•
Uses the DVD player to update map data
and system software
GPS receiver
The navigation system uses GPS signals, the
vehicle’s speedometer and a gyroscope to
determine the vehicle’s current location and
direction.
Traffic information – TMC (option)
1
TMC is a standardized code system for transmitting traffic information. The receiver automatically tunes to the correct frequency and
reception is handled by the audio system’s
FM antenna.
The area covered by the system is being
steadily expanded, which makes occasional
updates necessary, see page 11.
Regardless of whether the navigation system
is in Easy or Advanced mode, broadcast
traffic information is always received and presented. see page 58 for additional information.
Speakers
Sound from the navigation system comes
through the audio system’s front speakers.
Navigation control
See page 14.
Screen
The screen displays the maps and provides
detailed information on intersections, distances, etc. See page 11 for information on
caring for the screen.
IR port for the remote control
See page 14.
1
Not available in all markets.
Page 16
01 Getting to know the navigation system
Navigation system controls
01
14
Location of the navigation control and
IR port
G019916
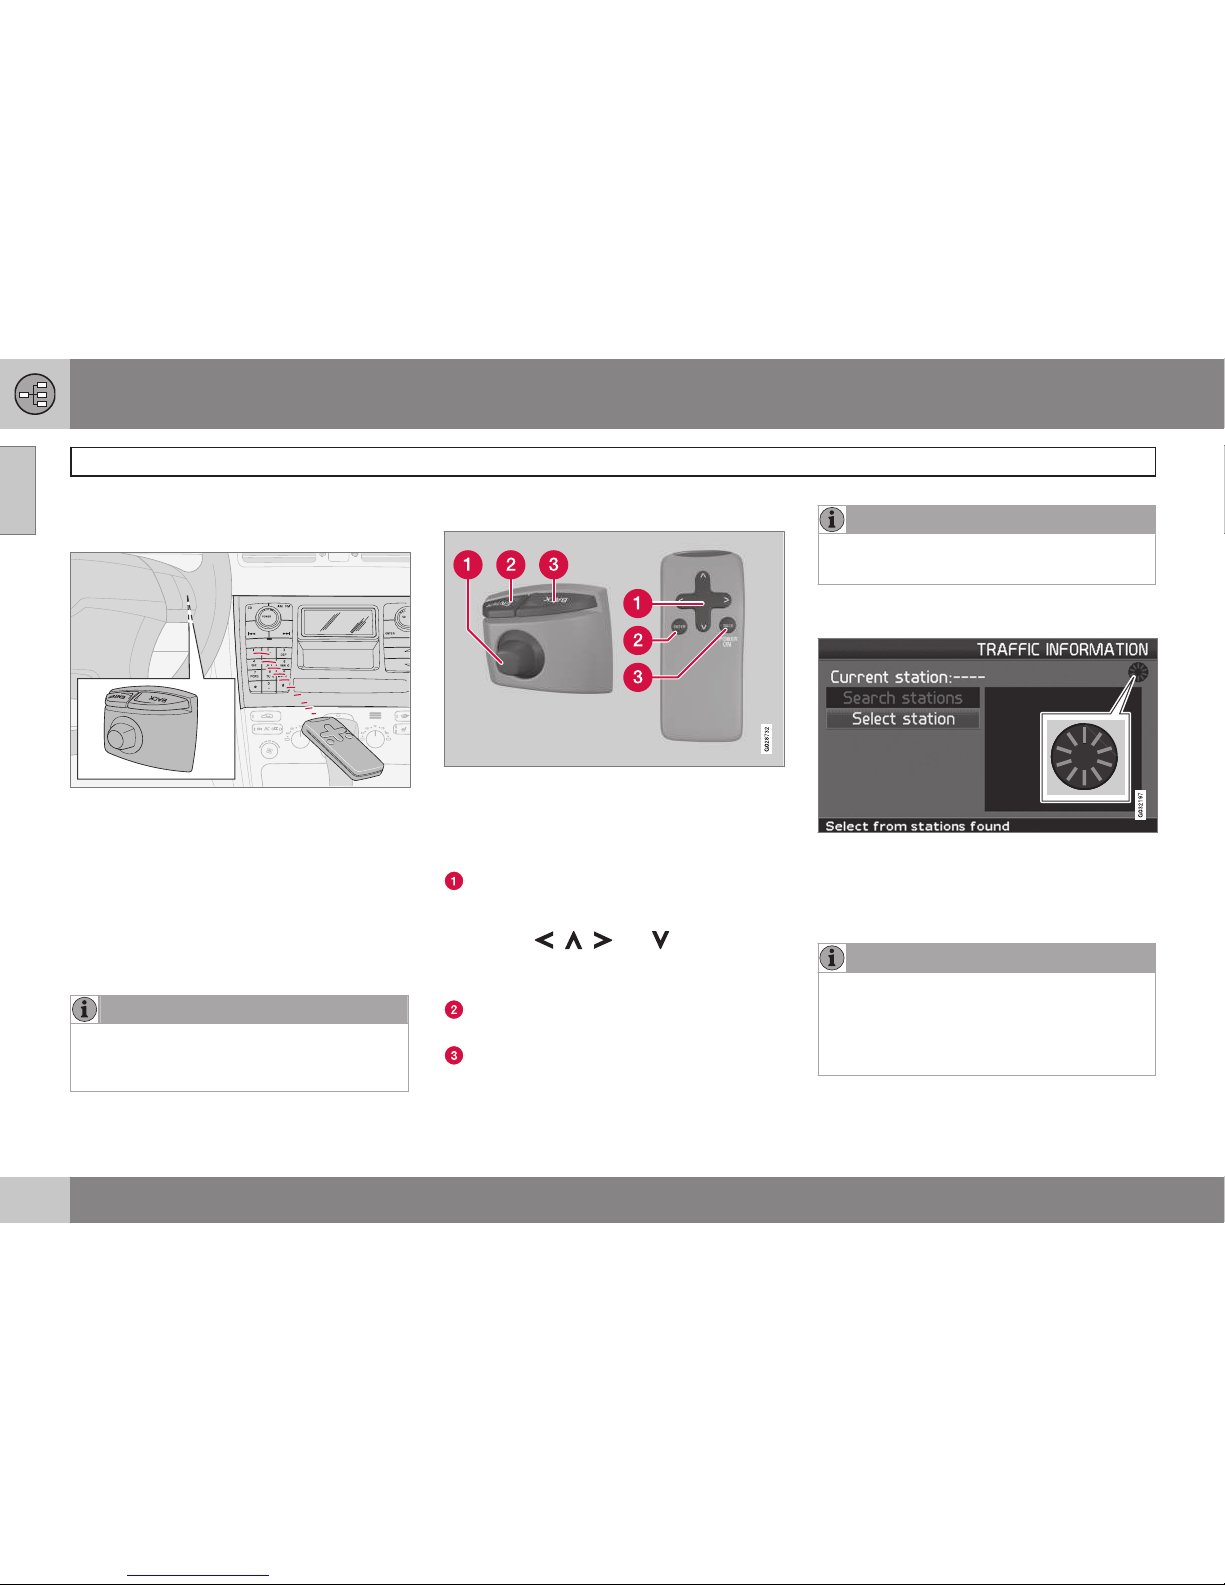
The navigation system can be operated with
the steering wheel-mounted navigation control or with the remote control.
The navigation control is located on the
right, rear side of the steering wheel.
Point the remote toward the IR port located at
the screen (only the XC90 has the IR port on
the audio system as shown above).
NOTE
The remote control runs on AAA or R03
batteries. Check the batteries if the remote
does not function properly.
Navigation control/remote control
The navigation control and remote control
have the same functions. Each enables you to
navigate through the menus and make settings/selections.
Use the navigation control to move
among various menu alternatives or to
move the cross hairs on the map. The
buttons
, , and on the remote
control can be used for the same purpose.
ENTER – Confirms or activates selections.
BACK – Press this key to go to the previous menu or to undo a selection.
NOTE
The exact design of the navigation control
may vary from model to model.
"Do not disturb"
In certain situations, the system may need a
few extra seconds to calculate a route. A
symbol will be displayed while this is taking
place.
NOTE
While the route calculation symbol is displayed, the navigation system cannot
accept any commands from the naviga-
tion control, or the ENTER or BACK buttons.
Page 17
01 Getting to know the navigation system
On-screen keypad
01
15
Entering letters and selecting
alternatives
G033459
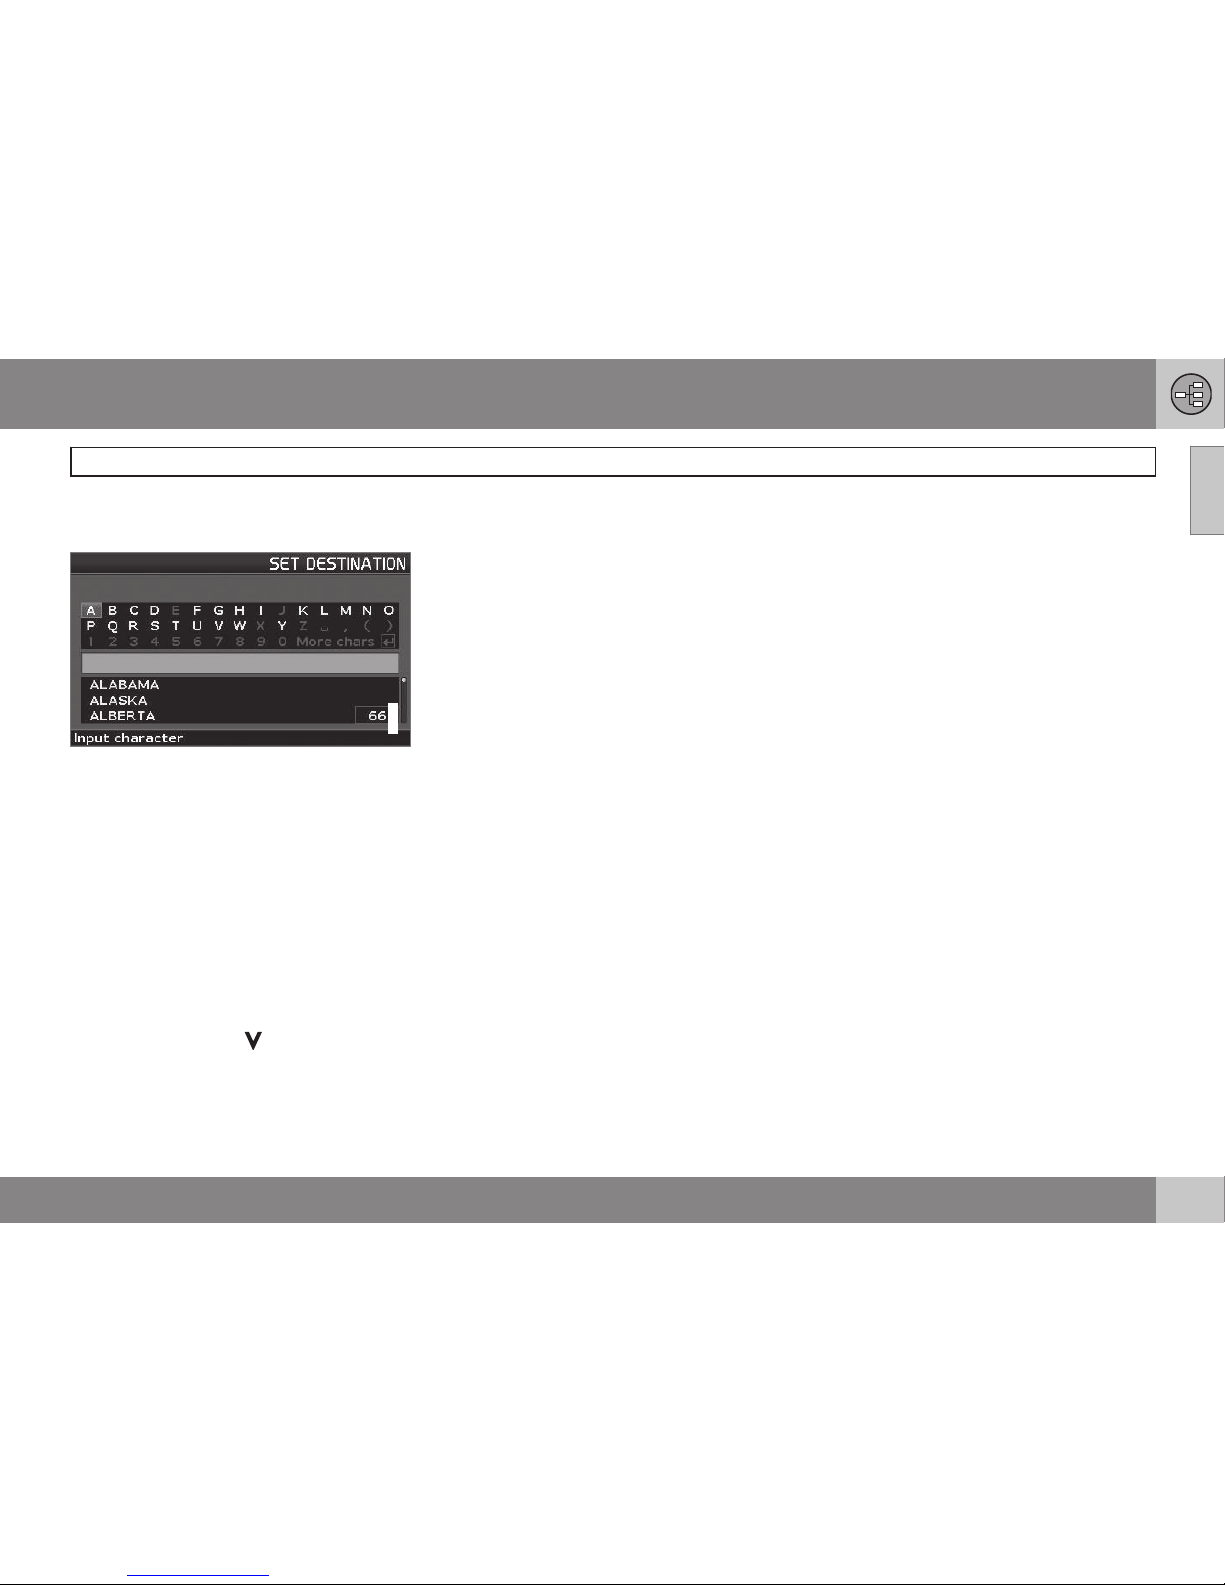
The on-screen keyboard is used in many situations in the menus to select specific information such as points of interest, a state/city/
street address/zip code, etc.
•
Select letters with the navigation control
and press ENTER.
When there are no further alternatives, the
entire name will be displayed automatically.
The list at the bottom of the screen shows the
first three possible alternatives made available by the letters that have been entered.
1. You can also go directly to the list of
names by pressing
.
2. Select a name and press ENTER.
The scroll bar at the right of the screen indicates that there are more alternatives than
can be displayed at one time.
The figure shown indicates the number of
names on the list.
•
Press BACK to exit the list of names.
•
You can also press BACK to delete letters one at a time
General searches
Searches can be made at any time and
always function in the same way, regardless
of where you may be in the menu system
when a destination is selected.
Pressing ENTER while keying in characters
displays all result combinations for the
respective selections: City, Street, Points of
interest, etc.
For example, when searching for Newark
Airport, all combinations of Newark will be
displayed when NE is entered. As the search
becomes more specific, fewer alternatives will
be displayed, making selection easier.
A search beginning with NE will also display,
for example, NEwmaket restaurant since all
alternatives containing a number of words
separated by spaces are included in the
search.
Page 18
01 Getting to know the navigation system
Display and voice guidance
01
16
Page 19
01 Getting to know the navigation system
Display and voice guidance
01
17
Display appearance
The screen display is determined by factors
such as geographic location and settings that
have been made, such as map scale, the
symbols selected to be displayed, etc.
An explanation of the text, signs, and symbols that may be displayed on the screen can
be found on the inside of the front cover of
this manual.
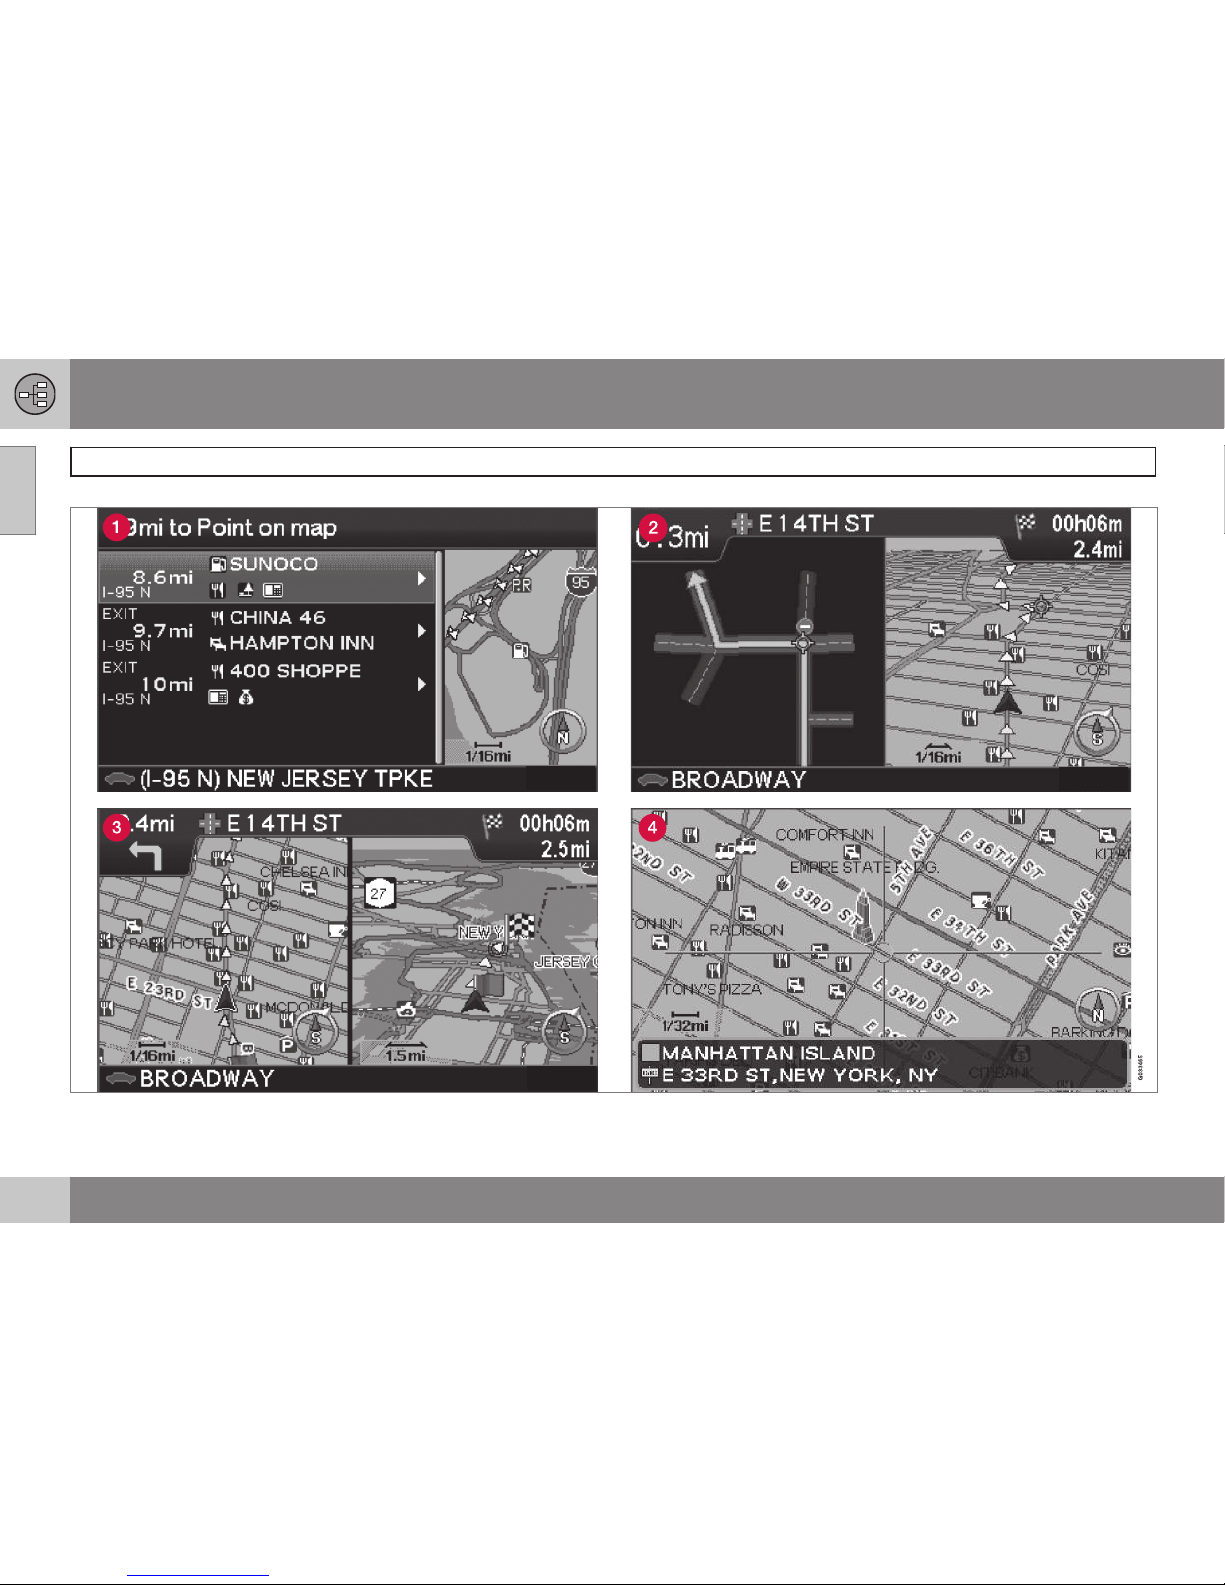
On a highway. The screen will display the
points of interest along the highway. This
function is available even if a destination
has not been selected. A scroll list at the
right indicates that there are additional
alternatives.
Detailed map showing intersections. The
screen will display lanes on the road to
help you select the correct one at the
next intersection. This function is only
available on major roads. Voice guidance
is also always provided.
Two maps have been selected in
Settings. Both sections of the screen
display the same map, but with different
scales, see p. 38 for more information.
Map scroll mode.
Voice guidance
After a destination and guidance has started,
a voice message indicating the action to be
taken and distance will be provided as you
approach an intersection, exit, etc. A detailed
map of the intersection will also be displayed.
The message will be repeated as you come
closer to the intersection.
The upper row on the screen shows the distance to the next exit or turn, and the name of
the exit.
The next row provides road sign information.
If the number of the road or exit, or the name
of the exit are available, this information will
also be displayed.
The vehicle’s current location is shown at the
bottom of the screen.
Toll booths
When driving on toll roads, you will receive
voice notification as you approach toll
booths.
This message will only be provided if a destination has been selected.
NOTE
Toll booths are shown on the map but
cannot be searched for as points of interest.
Page 20
01 Getting to know the navigation system
Unverified roads and Compass
01
18
Unverified roads
A small number of roads in the system may
be unverified. This means that information on
signs, one-way streets, left turns, etc., may
not be accurate. An itinerary containing
unverified roads will be displayed with gray
arrows instead of the usual yellow ones.
The system provides information when an
unverified road is added to an itinerary and
when the vehicle begins to travel on one of
these roads.
WARNING
Always use good judgment when following
navigation system guidance, and do not
follow guidance that seems contrary to
your own best judgment.
Never use the navigation system or any
other feature in your vehicle in a way that
distracts you from the task of driving
safely. Distraction can lead to a serious
accident.
Set and make changes in your navigation
system only with the vehicle parked.
Be aware of the current traffic situation.
Always comply with relevant traffic regulations.
Compass
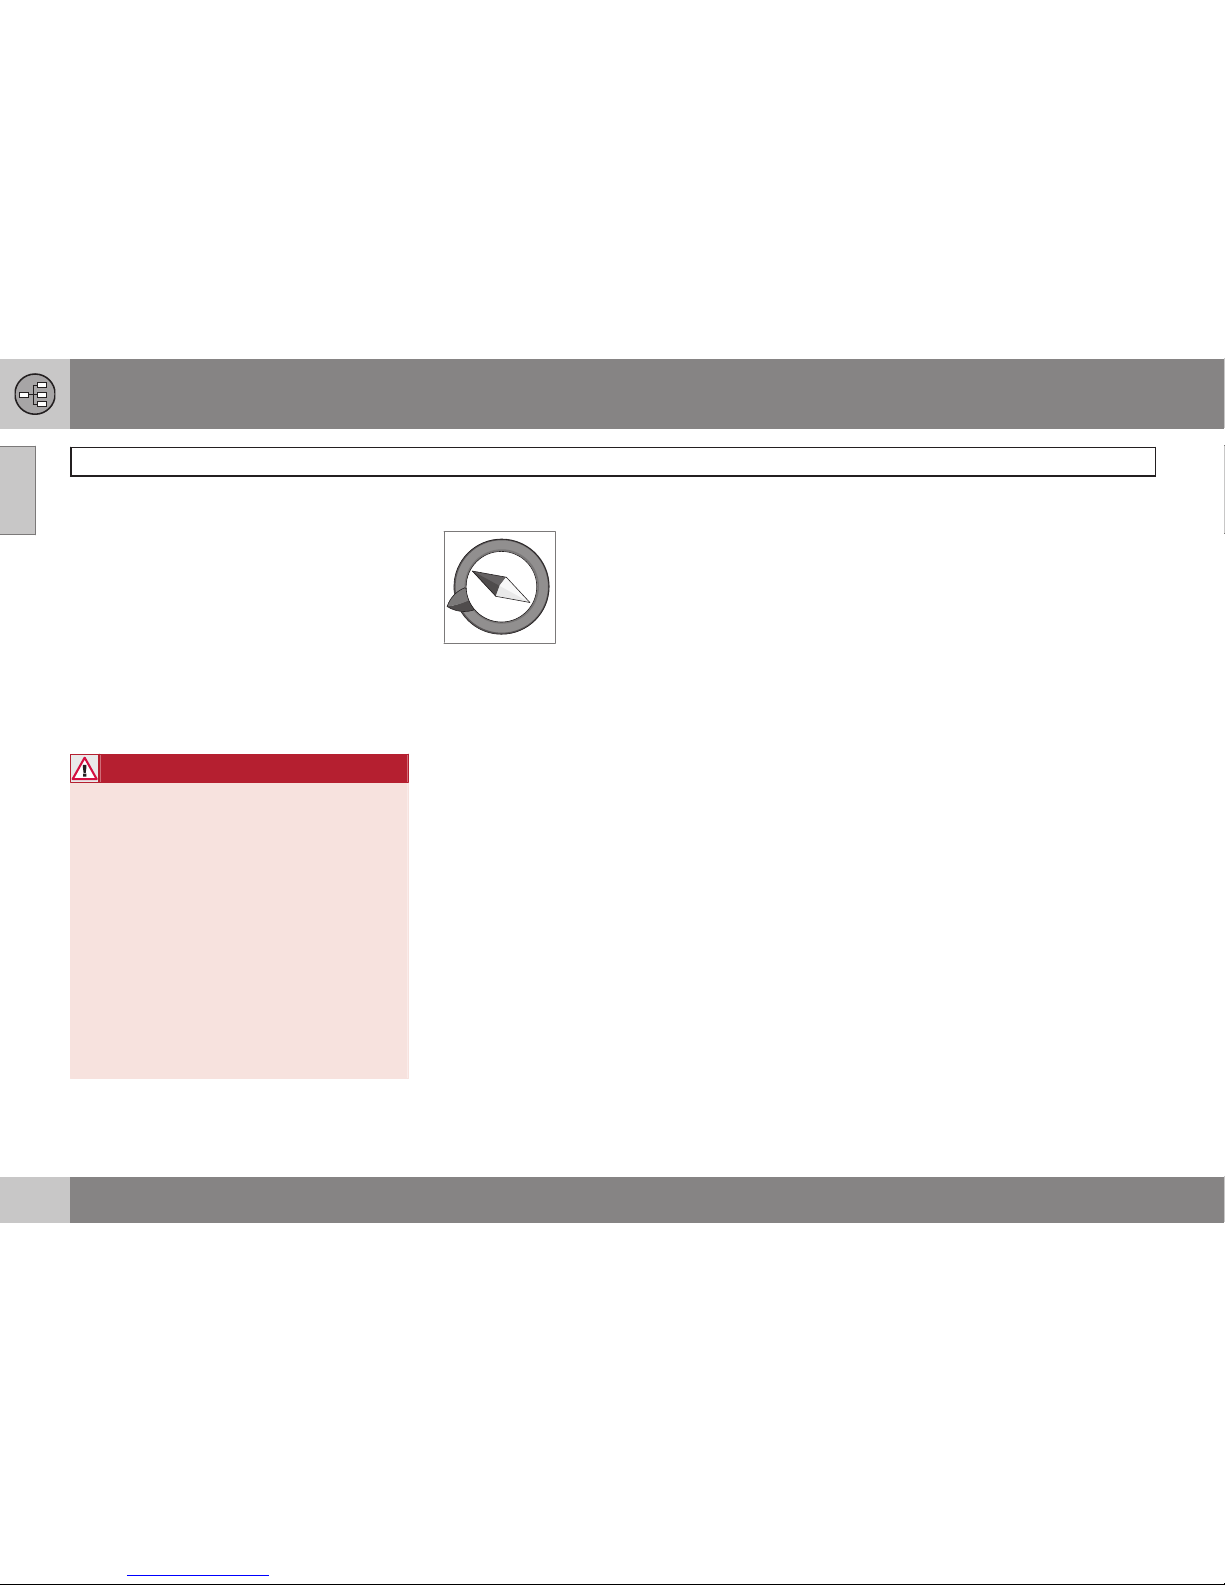
The compass can be displayed in two ways:
– With north always at the
top of the screen.
– With the vehicle's current
direction at the top of the
screen.
The red point of the compass needle points
north on the map.
The gray destination arrow in the outer ring of
the compass points toward the destination.
Go to
Map Options under Settings to
change the way in which the compass is displayed or to hide it.
Page 21
01 Getting to know the navigation system
Menu selections
01
19
Menus on two levels – Easy mode
Set destination
Address
Points Of Interest (POI)
Last 20
Point on map
Show destination
Remove destination
Settings
Guiding voice
Guiding volume
Language
Color
Map view
Distance unit
User mode
Shut down
For information on all of the menu alternatives
in Easy mode, see page 25.
Menus on two levels – Advanced
mode
Set destination
Address
Points Of Interest (POI)
Stored locations
Last 20
Return trip
Point on map
Latitude/longitude
Itinerary
Start guidance
Add to itinerary
Route options
Clear itinerary
Next destination
Page 22
01 Getting to know the navigation system
Menu selections
01
20
Current position
Settings
Traffic information
Route options
Map options
Guiding options
System options
Start demo
Shut down
For information on all of the menu alternatives
in Advanced mode, see page 38.
Page 23
01 Getting to know the navigation system
01
21
Page 24

G029194
22
Main menu, Shortcut menu, Scroll menu............................................... 24
Menu selections...................................................................................... 25
Setting a destination............................................................................... 26
Show/Remove destination...................................................................... 29
Settings................................................................................................... 30
Page 25

E A S Y U S E R M O D E
Page 26
02 Easy user mode
Main menu, Shortcut menu, Scroll menu
02
24
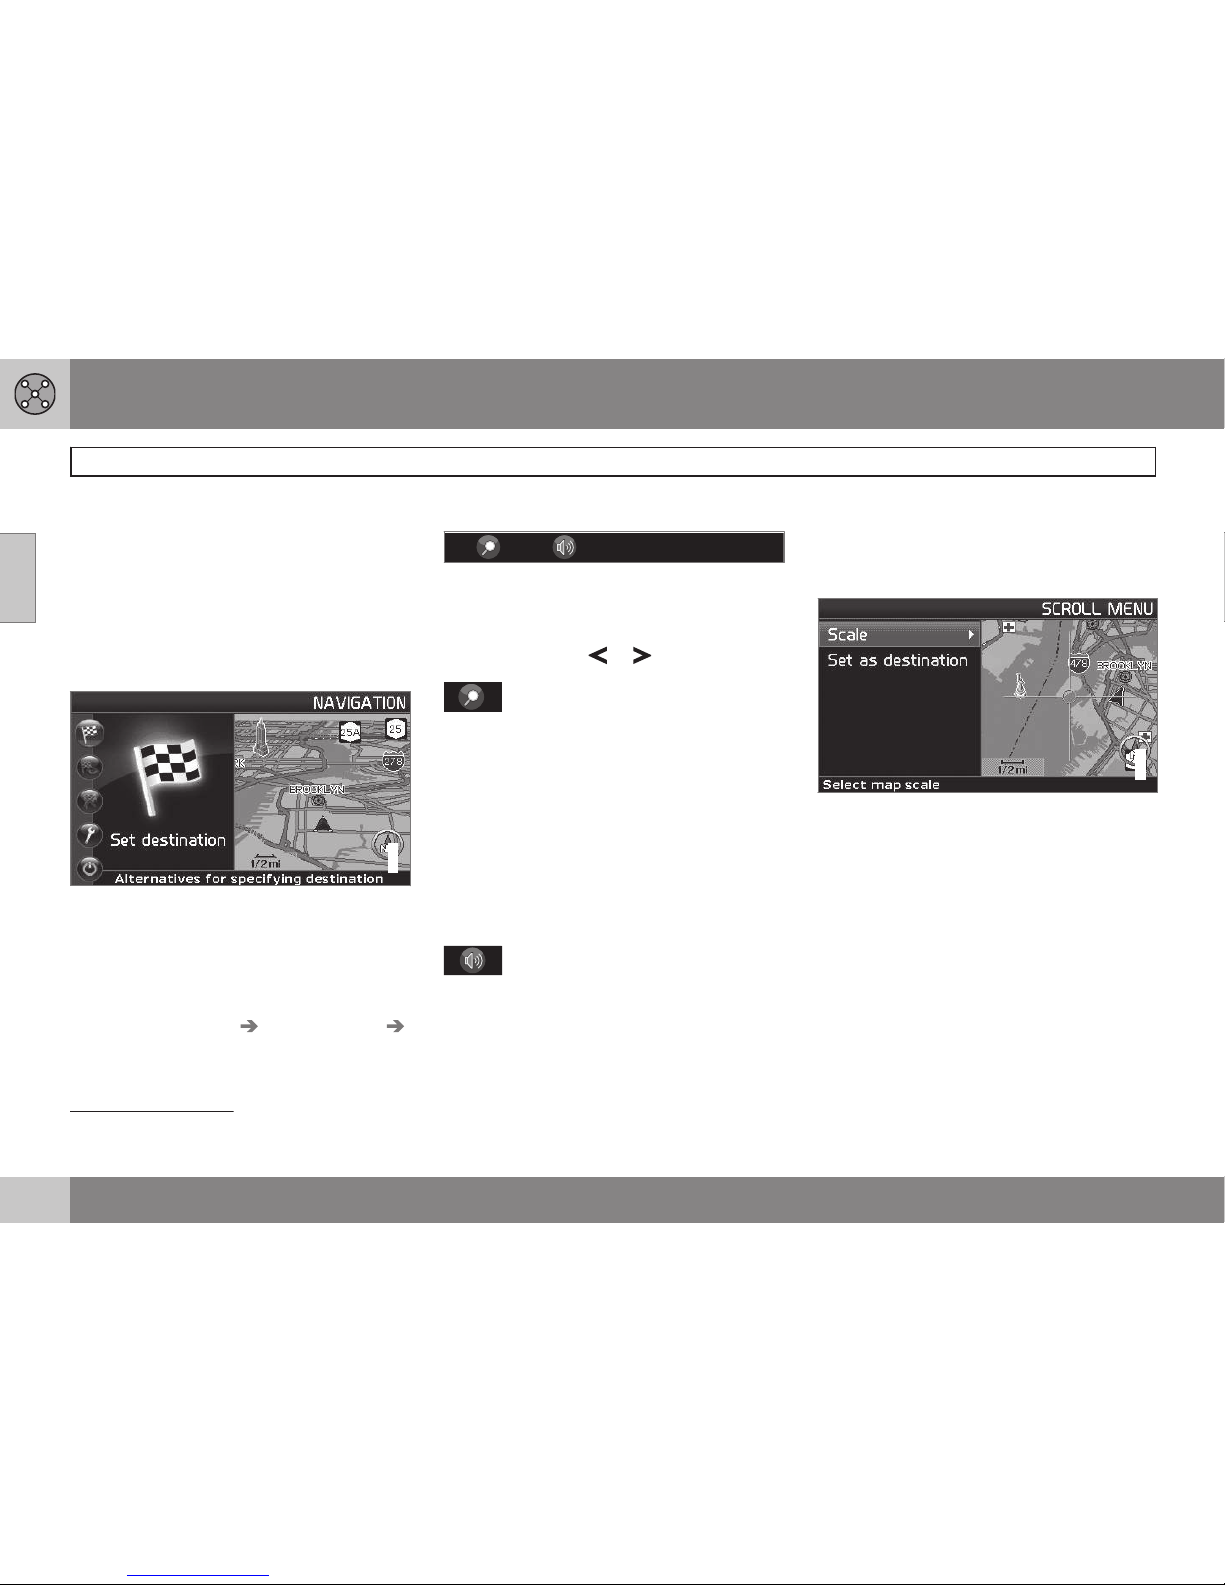
Introduction
The navigation system starts in Easy user
mode.
The most important menus are available in
this mode, which makes things easier if
changes in Settings are not often made.
Main menu
G033469
The main menu is at the top of the menu
structure and can be accessed by pressing
the BACK key several times.
Switching between settings
To switch between Easy and advanced
modes, go to
Settings System options
User mode.
Shortcut menu
G029190
This menu offers icons for making quick setting changes.
•
Press ENTER in map mode and select a
sub-menu with
or .
G028755
– Map scale/Current route
Change the map scale for a larger perspective or to display greater detail.
At the top of the menu, you can choose to
see either the remainder of the route1to the
destination from your current location, or the
entire route.
The map scale can be changed from 1/32 of
a mile to 60 miles. Hold the button down until
the map scale of your choice is displayed,
and release the button.
G028755
– Guidance
Press ENTER to repeat voice guidance.
Traffic information (option)
2
Regardless of whether the navigation system
is in Easy or Advanced mode, broadcast
traffic information is always received and pre-
sented. see page 58 for additional information.
Scroll menu
G033467
•
Activate map scrolling by pressing the
navigation control.
•
Press ENTER in scroll mode to activate
the Scroll menu.
Scale
This function changes the scale of the area in
which you are currently driving. The scale can
be changed from 150 ft to 60 miles.
Set as destination
Select a position on the map. Guidance will
begin immediately.
1
A destination must be selected.
2
Not available in all areas.
Page 27
02 Easy user mode
Menu selections
02
25
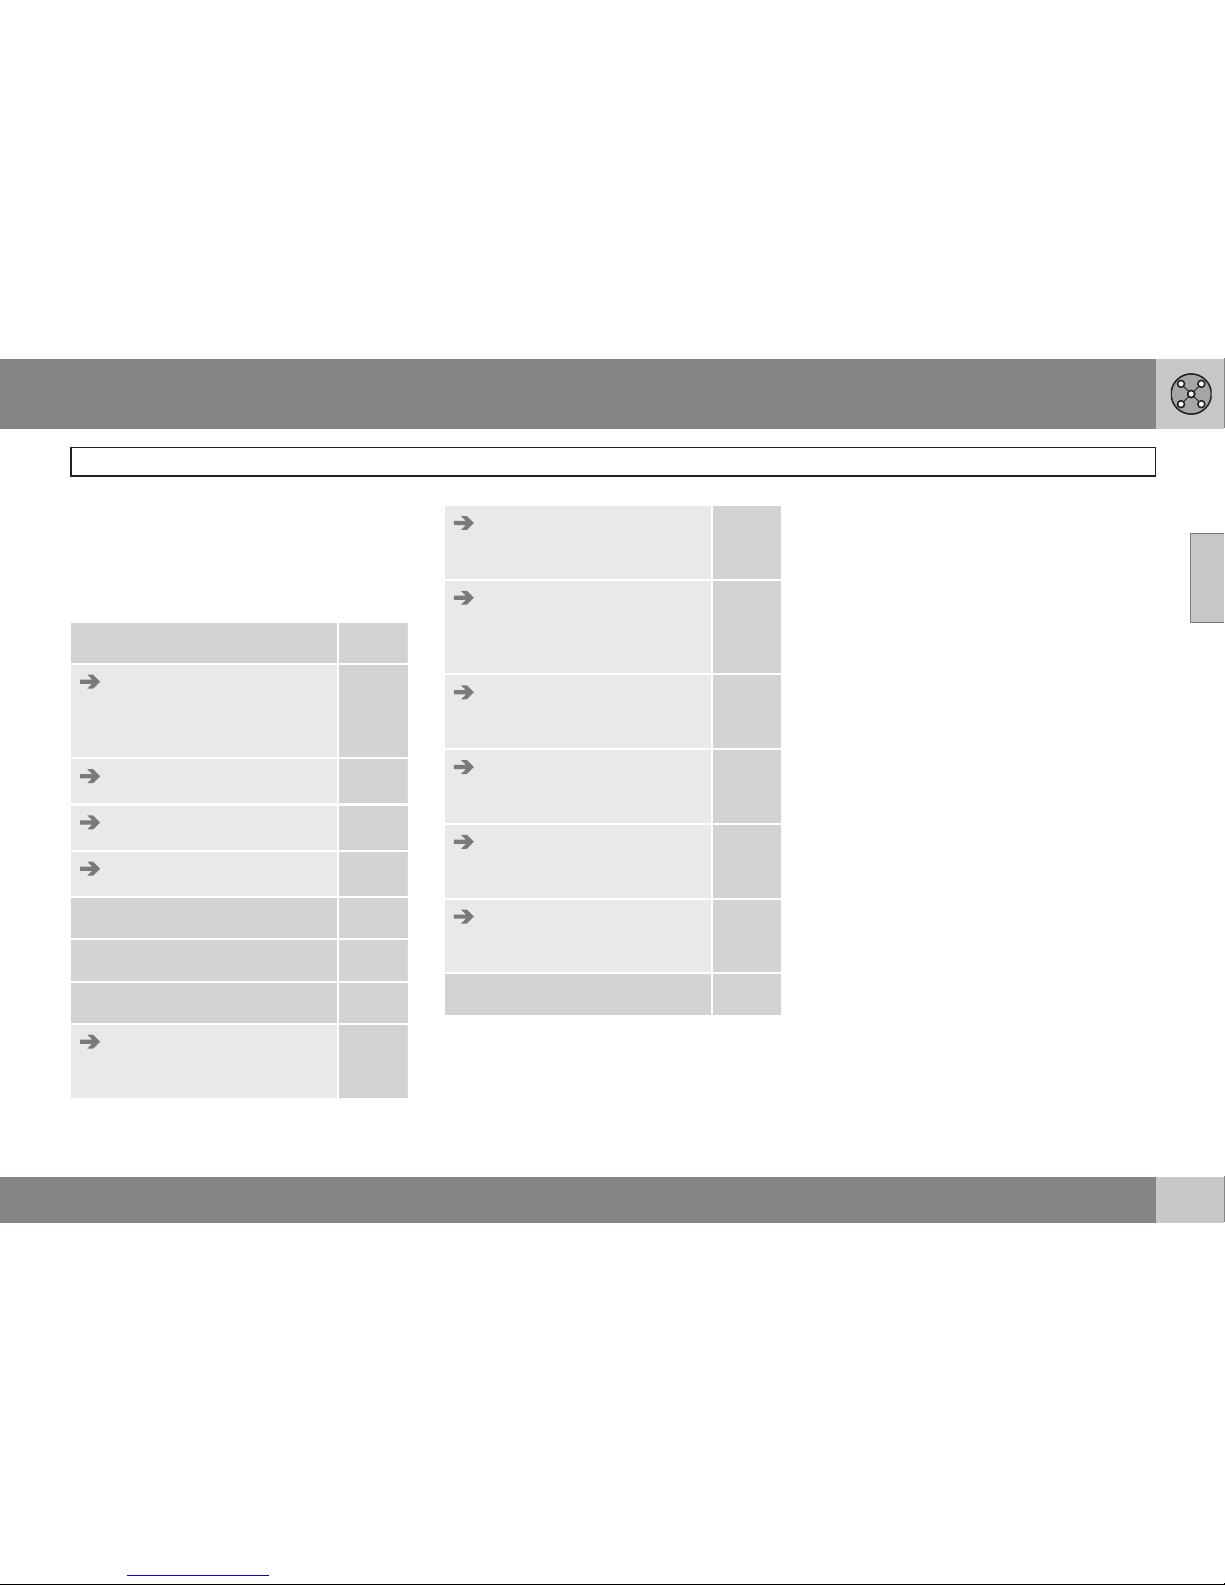
Three levels of the menu structure are shown
here. A number of the third level menus also
have sub-menus, which are described in
detail in their respective sections in this manual.
Set destination
Address
State/City/Number/
Street/Interse.
p. 26
Points Of Interest (POI)
p. 27
Last 20
p. 27
Point on map
p. 28
Show destination
p. 29
Remove destination
p. 29
Settings
Guiding voice
Female/Male
p. 30
Guiding volume
Off/1/2/3/4/5
p. 30
Language
US English/Espanol/Francais CAN
p. 30
Color
Black/Chrome/Blue/Dark
p. 30
Map view
2D/3D
p. 30
Distance unit
Km/Miles
p. 30
User mode
Easy/Advanced
p. 30
Shut down
p. 9
Page 28
02 Easy user mode
Setting a destination
02
26
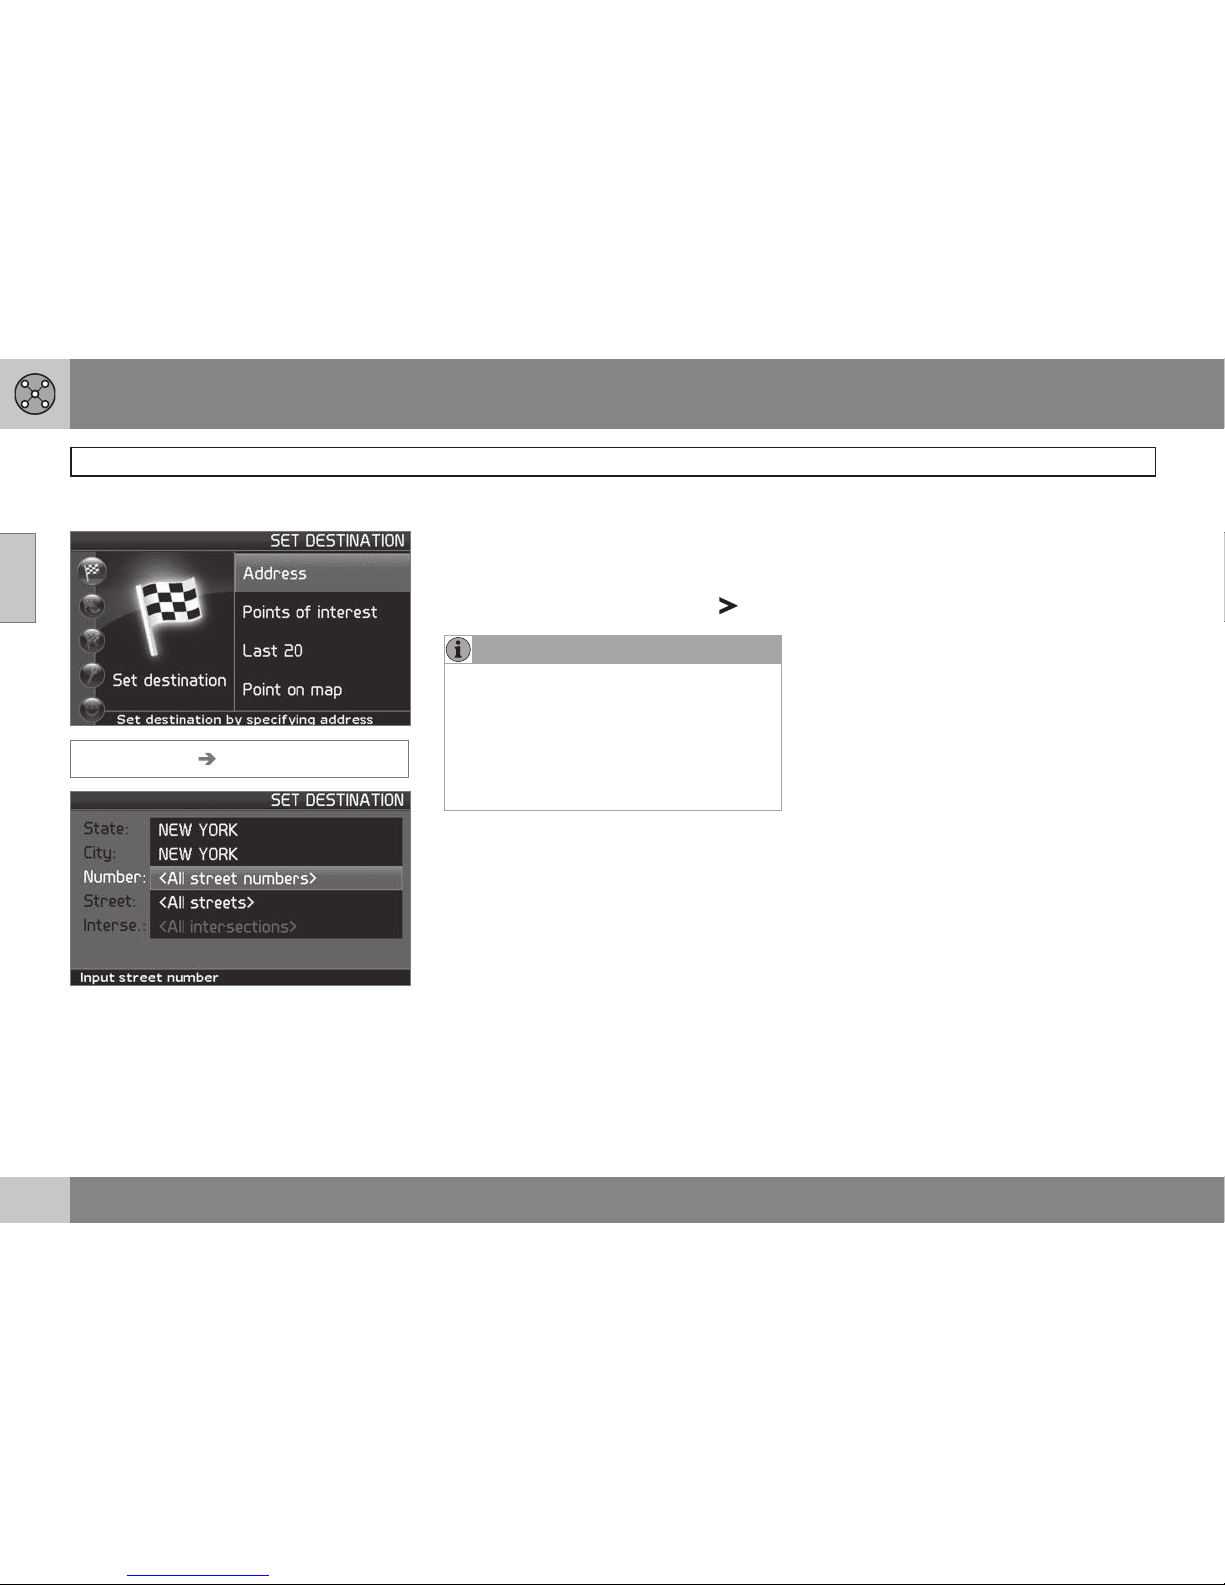
Selecting an address
Set destination Address
Selecting a street address
The system will place the cursor on Street.
The most recently selected State and City will
be pre-selected.
1. To change the state or city, use the
navigation control to move to
State
and/or City.
2. Press ENTER, or choose among the most
recently chosen alternatives with
.
NOTE
The definition of a city or area may vary. It
will sometimes be an entire city, or a particular section of a city.
The system does not contain street
addresses for very small towns or villages.
In these cases, the center of the town is
used as the destination.
Alternative 1
•
Select
Street without choosing a city.
The system will provide guidance to the midpoint of the selected street. If the street exists
in more than one city, a list of alternatives will
be displayed.
Alternative 2
1.
Begin by selecting a
City.
2.
Select a
Street.
Selecting a street number
If the address selected has a street number,
this can be used as a specific destination.
1. After selecting a street, go to the
Number row and press ENTER
or
Go directly to
Set. Alternative street num-
bers will be displayed.
2.
Go to
Set after you have entered a street
number.
If a street number has not been entered,
the system will guide you to the mid-point
of the selected street.
Set
Confirms the entered number.
Undo
Returns to the previous screen.
Selecting an intersection
•
Go to
Interse. and choose a street that
intersects the selected street.
Start guidance
•
Go to
Start guidance to begin receiving
directions to the destination.
Page 29
02 Easy user mode
Setting a destination
02
27
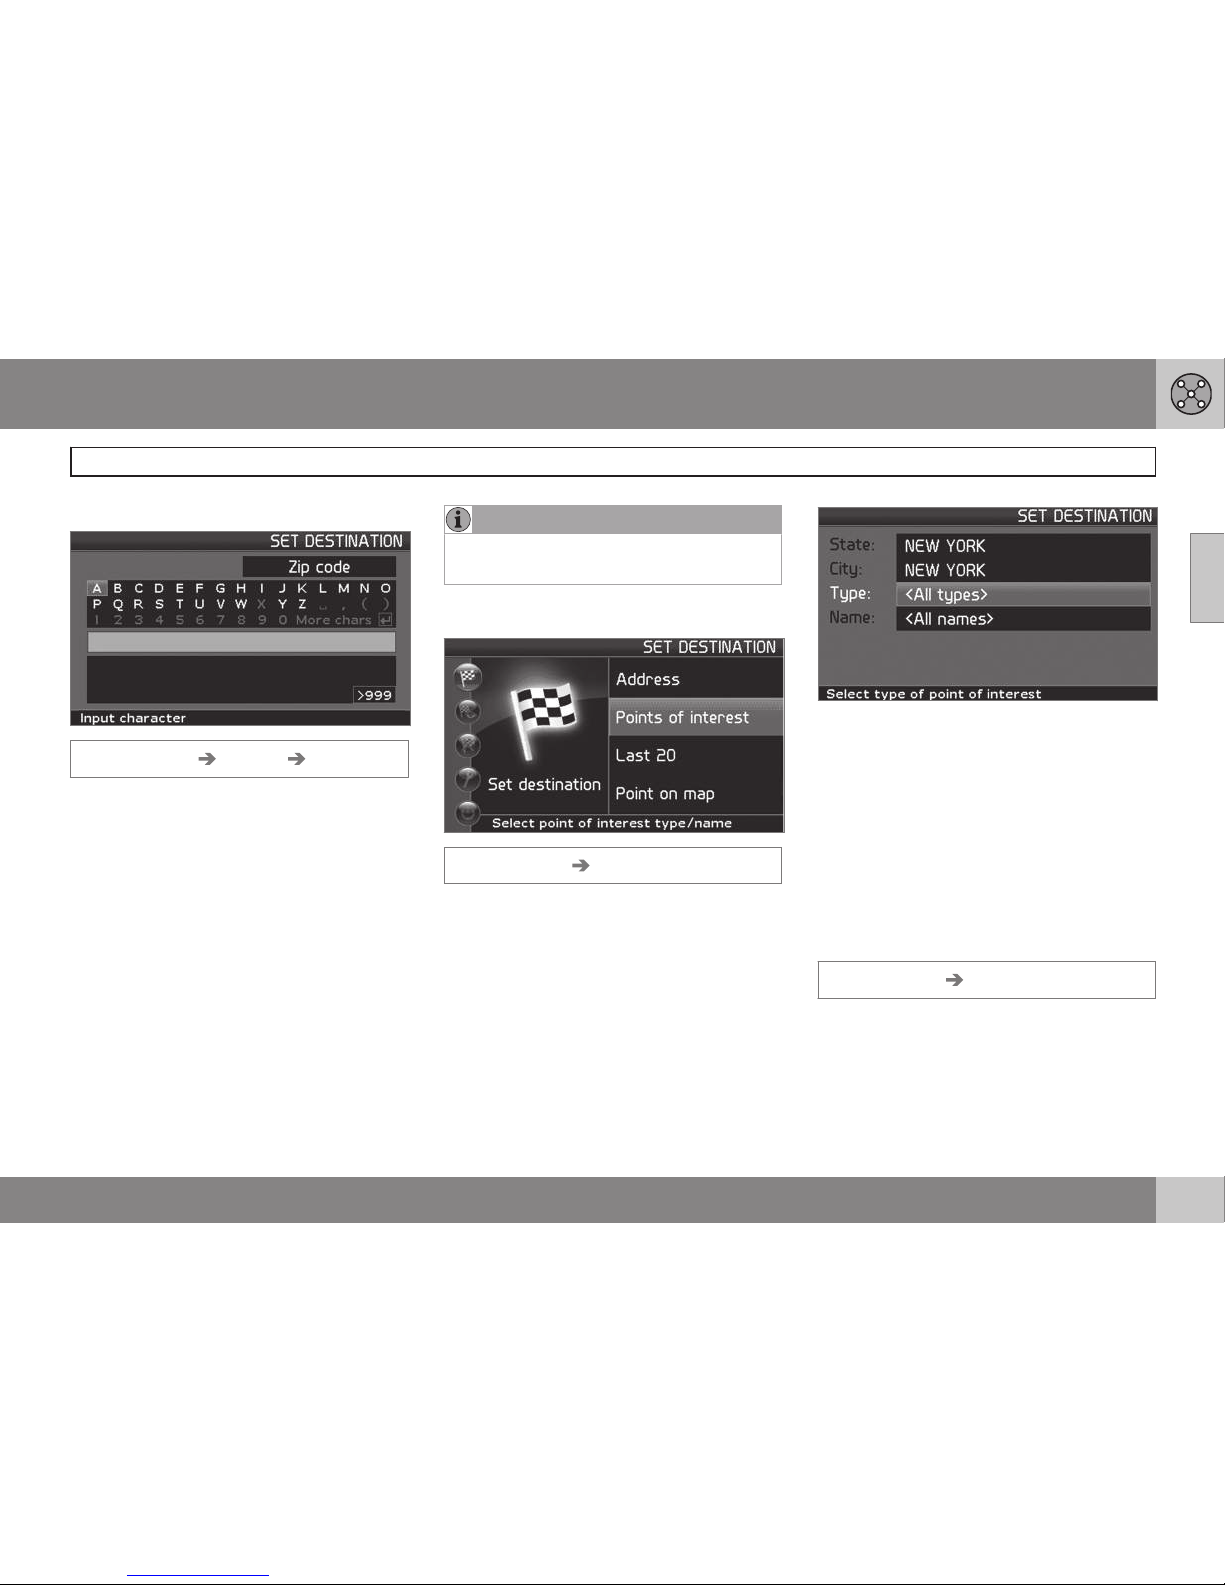
Search using a Zip code
Set destination Address City
Instead of searching in a city, you can opt to
search for an area’s Zip code.
1.
Go to
ZIP code and press ENTER.
2. Select the digits in the Zip code and
press ENTER
or
Select a Zip code from the list.
3.
Go to
Street to select a street with the
Zip code entered and press ENTER.
4.
Go to
Start guidance to begin receiving
directions to the destination.
NOTE
This also applies to searches using Points
of interest.
Point of Interest (POI)
Set destination Points of interest
Points of interest include gas stations, hotels,
restaurants, Volvo retailers, hospitals, parking
lots, etc.
1.
Highlight menu alternative
POI.
2. Press ENTER to access a sub-menu with
different search options in order to select
a point of interest.
3.
Go to
Type, press ENTER.
4. Select a POI from the list provided, press
ENTER.
5.
In the list
All names, select a name from
the list.
6. Press ENTER to display all information
about the selected POI.
7. Press ENTER to start guidance.
Last 20
Set destination Last 20
This is a list of the twenty most recently
selected destinations. The scroll bar at the
right of the screen indicates that there are
more alternatives than can be displayed at
one time.
Page 30
02 Easy user mode
Setting a destination
02
28
•
Go to the desired destination and press
or ENTER to access the sub-menu.
Set as destination
Adds the destination to the itinerary.
Delete location
Remove the destination from the Last 20 list.
Point of the map
Set destination Point on map
1. Use the Arrow keys to move the cursor
to the desired destination, press ENTER
to access the map scroll menu.
2.
Select
Set as destination and press
ENTER.
NOTE
A position on the map can be selected
directly with the cursor by using the Arrow
keys in map mode.
Page 31
02 Easy user mode
Show/Remove destination
02
29
Show the destination on the map
Show destination
•
Press ENTER for an overview on the map
of the area that you have selected as your
final destination.
Remove the destination
Remove destination
1. Press ENTER and go to the destination
to be deleted.
2. Press ENTER again.
Page 32
02 Easy user mode
Settings
02
30
Guiding voice
Settings Guiding voice
Select a male or female voice for directions.
Guiding volume
Settings Guiding volume
Set the volume level for voice guidance or
turn off this function.
Language
Settings Language
Select the language for menus, text and voice
messages.
Colors
Settings Color
There are 4 screen settings that can be made
– choose the one that you prefer.
Two-dimensional (2D) or threedimensional (3D)
Settings Map view
The map can be displayed in 2D (viewed
straight from above) or in 3D (an angled view
from above).
Distance unit
Settings Distance unit
Choose between miles and kilometers.
User mode
Settings User mode
Switch between the Easy and Advanced
user modes.
Page 33
02 Easy user mode
02
31
Page 34

G029196
32
Main menu, Shortcut menu..................................................................... 34
Map scroll menu..................................................................................... 37
Menu selections...................................................................................... 38
Setting a destination............................................................................... 40
Itinerary................................................................................................... 45
Next destination...................................................................................... 48
Current position...................................................................................... 49
Traffic information (option)...................................................................... 50
Settings................................................................................................... 51
System simulation................................................................................... 55
Page 35
A D V A N C E D U S E R M O D E
Page 36
03 Advanced user mode
Main menu, Shortcut menu
03
34
Introduction
The Advanced user mode can be selected
when the navigation system starts.
This mode provides access to all of the system’s settings and functions.
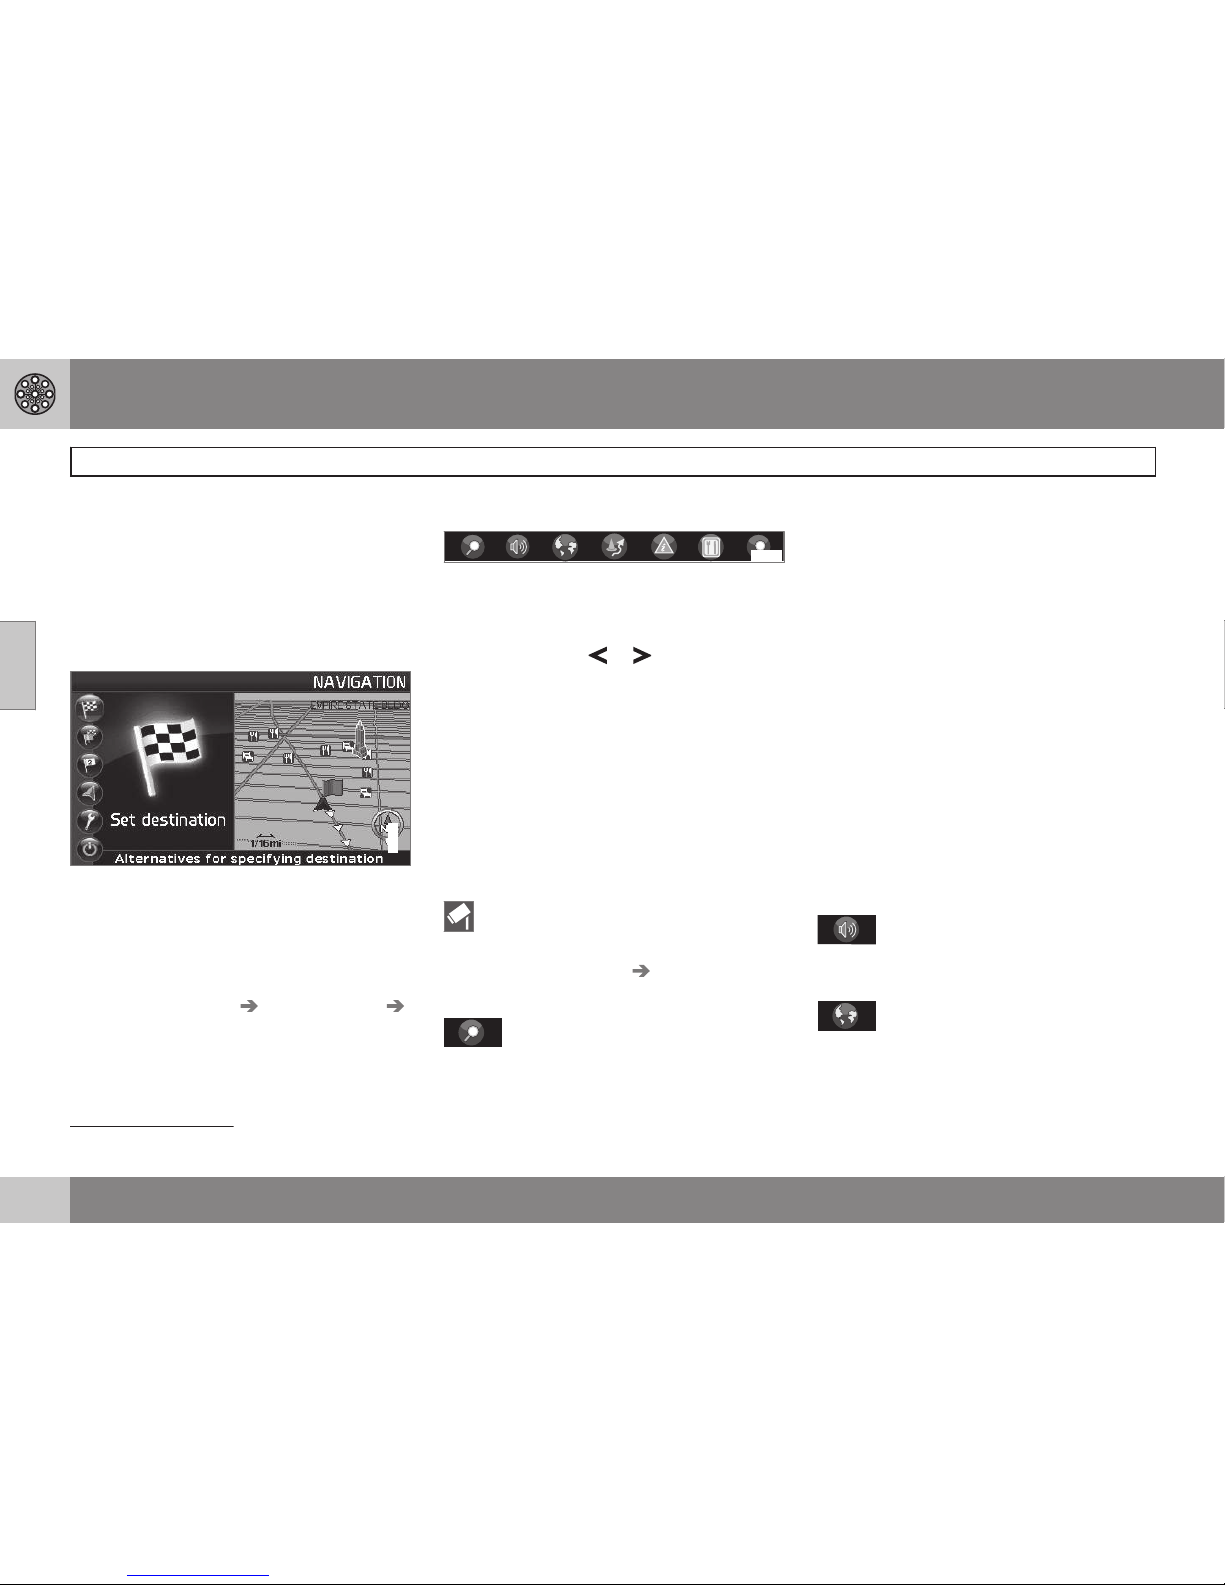
Main menu
G033461
The main menu is at the top of the menu
structure and can be accessed by pressing
the BACK key several times.
Switching between settings
To switch between Easy and advanced
modes, go to
Settings System options
User mode.
Shortcut menu
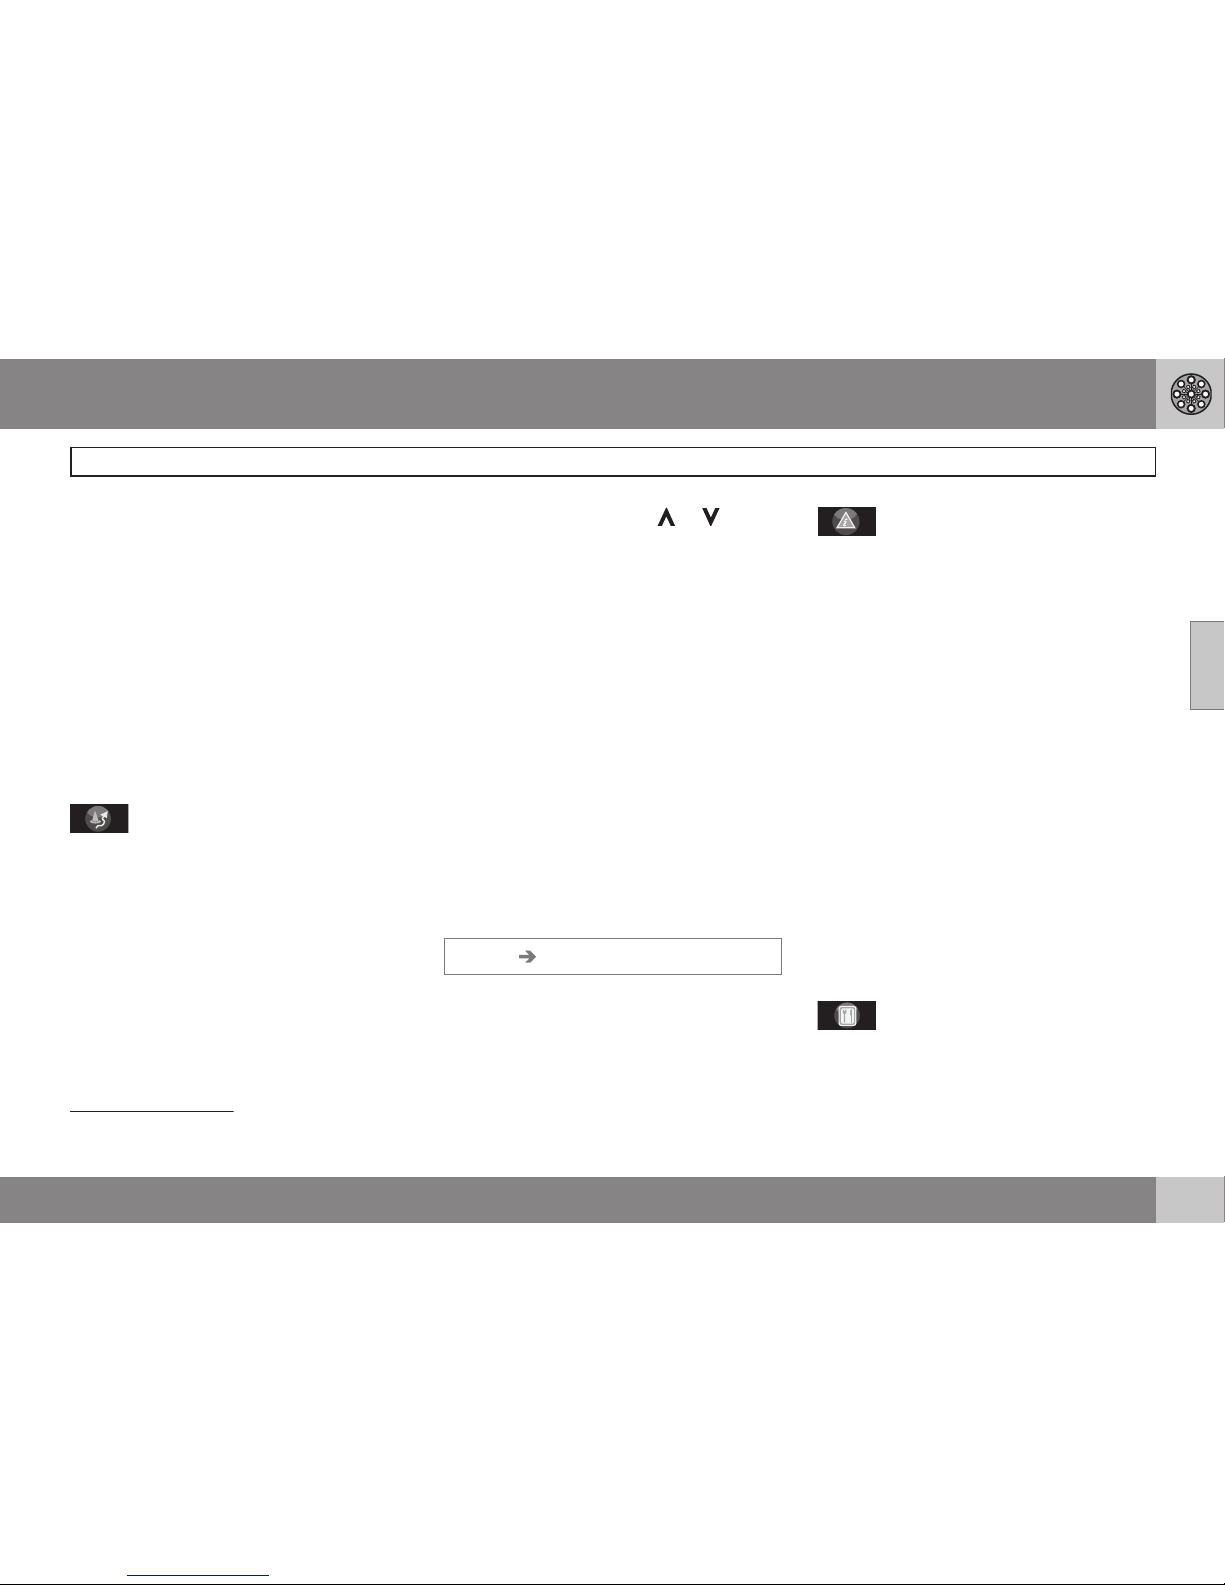
G029190
This menu offers icons for making quick setting changes.
•
Press ENTER in map mode and select a
sub-menu with
or .
Most system settings can be made in
Settings in the main menu while the remain-
ing ones can only be made in the Shortcut
menu.
Quick storage of the current position
It is possible to store the vehicle's current
location on the map by simply pressing one
button.
•
Press and hold ENTER: press the button
until the screen changes appearance.
The newly stored location will be indicated by this symbol. The information
linked to this position can be edited by
going to
Stored location Adjust, see
page 46.
G028755
– Map scale/Current route
A menu with 4 alternatives will be displayed.
Pressing ENTER on the first alternative displays a map showing the remainder of the
route 1 from the vehicle's current location to
the destination.
Pressing ENTER on the second alternative
displays a map showing the entire route1.
Pressing ENTER on the alternatives (+) or (–)
changes the map scale in different steps from
1/32 of a mile to 60 miles to make it possible
to see either a larger perspective or greater
detail.
The map scale can be changed freely by
holding down ENTER until you see the scale
of your choice.
If you have chosen to display two maps, the
map scale symbol is displayed at both ends
of the Shortcut menu to make it possible to
adjust the maps scales individually.
G028755
– Guidance
Press ENTER for guidance or to repeat voice
guidance.
G028755
– Map/Route
Route outline
A list of coming guidance points. In addition
to the name of the road or street, the distance
1
A destination must be selected
Page 37
03 Advanced user mode
Main menu, Shortcut menu
03
}}
35
between guidance points and an arrow showing the type of action to be taken will be displayed.
One map/Two maps
Choose to display either one or two maps of
the area in which you are traveling.
Surveillance
2
This function makes it possible to store map
views of 3 different areas for surveillance,
such as ones with heavy traffic, road construction areas, etc.
Select
Surveillan. 1, 2 or 3 to view previously
set surveillance areas, see page 37.
G028755
G028755
– Detour
This displays a menu with Avoid and the
available alternatives. 1-3-6-12-25-50 miles.
Avoid streets/roads
This function removes streets or roads from a
set itinerary to help you avoid driving through
road construction areas, etc.
1.
Select
Avoid in the Detour menu and
press ENTER. A list of streets included in
your route will be displayed.
2. Go to the street to be avoided and press
ENTER.
3.
Select other streets with
or and
press ENTER.
Whenever possible, the system will then
calculate a new route that will guide you
back to the original one after you have
passed the area(s) to be avoided.
Avoid next ½–50 miles
This function enables you to avoid an entire
area in the original itinerary, for example to
avoid a city during rush hour..
–
Select an alternative in the Detour menu
½–50 miles and press ENTER.
Whenever possible, the system will then calculate a Detour that will guide you back to the
original route after you have passed the
area(s) to be avoided.
It is also possible to avoid a certain area by
drawing a box directly on the map, see
Avoid
specified areas under
Settings Route options
on page 51.
G028755
G028755
– Traffic information (option)
3
Choose to read information on traffic disruptions in the area displayed on the screen.
A change in map scale also changes the
number of messages displayed, see page 24,
see page 34 or see page 62.
Read message
Scroll among the messages displayed on the
screen.
Show all
Display all messages.
Hide all
Do not display traffic messages.
Show selected
Select the types of traffic messages to be displayed on the map.
Regardless of whether the navigation system
is in Easy or Advanced mode, broadcast
traffic information is always received and presented. see page 58 for additional information.
G028755
G028755
– Points of interest (POI)
Displays a menu with different ways of
searching for a point of interest.
2
Only available in areas with TMC reception.
3
Not available in all areas.
Page 38
03 Advanced user mode
Main menu, Shortcut menu
03
36
Around the car
Pressing ENTER makes it possible to search
for POIs around the vehicle.See page 41.
Along the route
Pressing ENTER makes it possible to search
along the route. See page 41.
Along HWY
Pressing ENTER makes it possible to search
along the highway on which you are currently
driving.
Choose to search for rest areas, gas stations,
restaurants, etc., that are easy to access from
the highway.
If a route crosses a number of highways, the
system will search along the highway on
which you are traveling.
Page 39
03 Advanced user mode
Map scroll menu
03
37
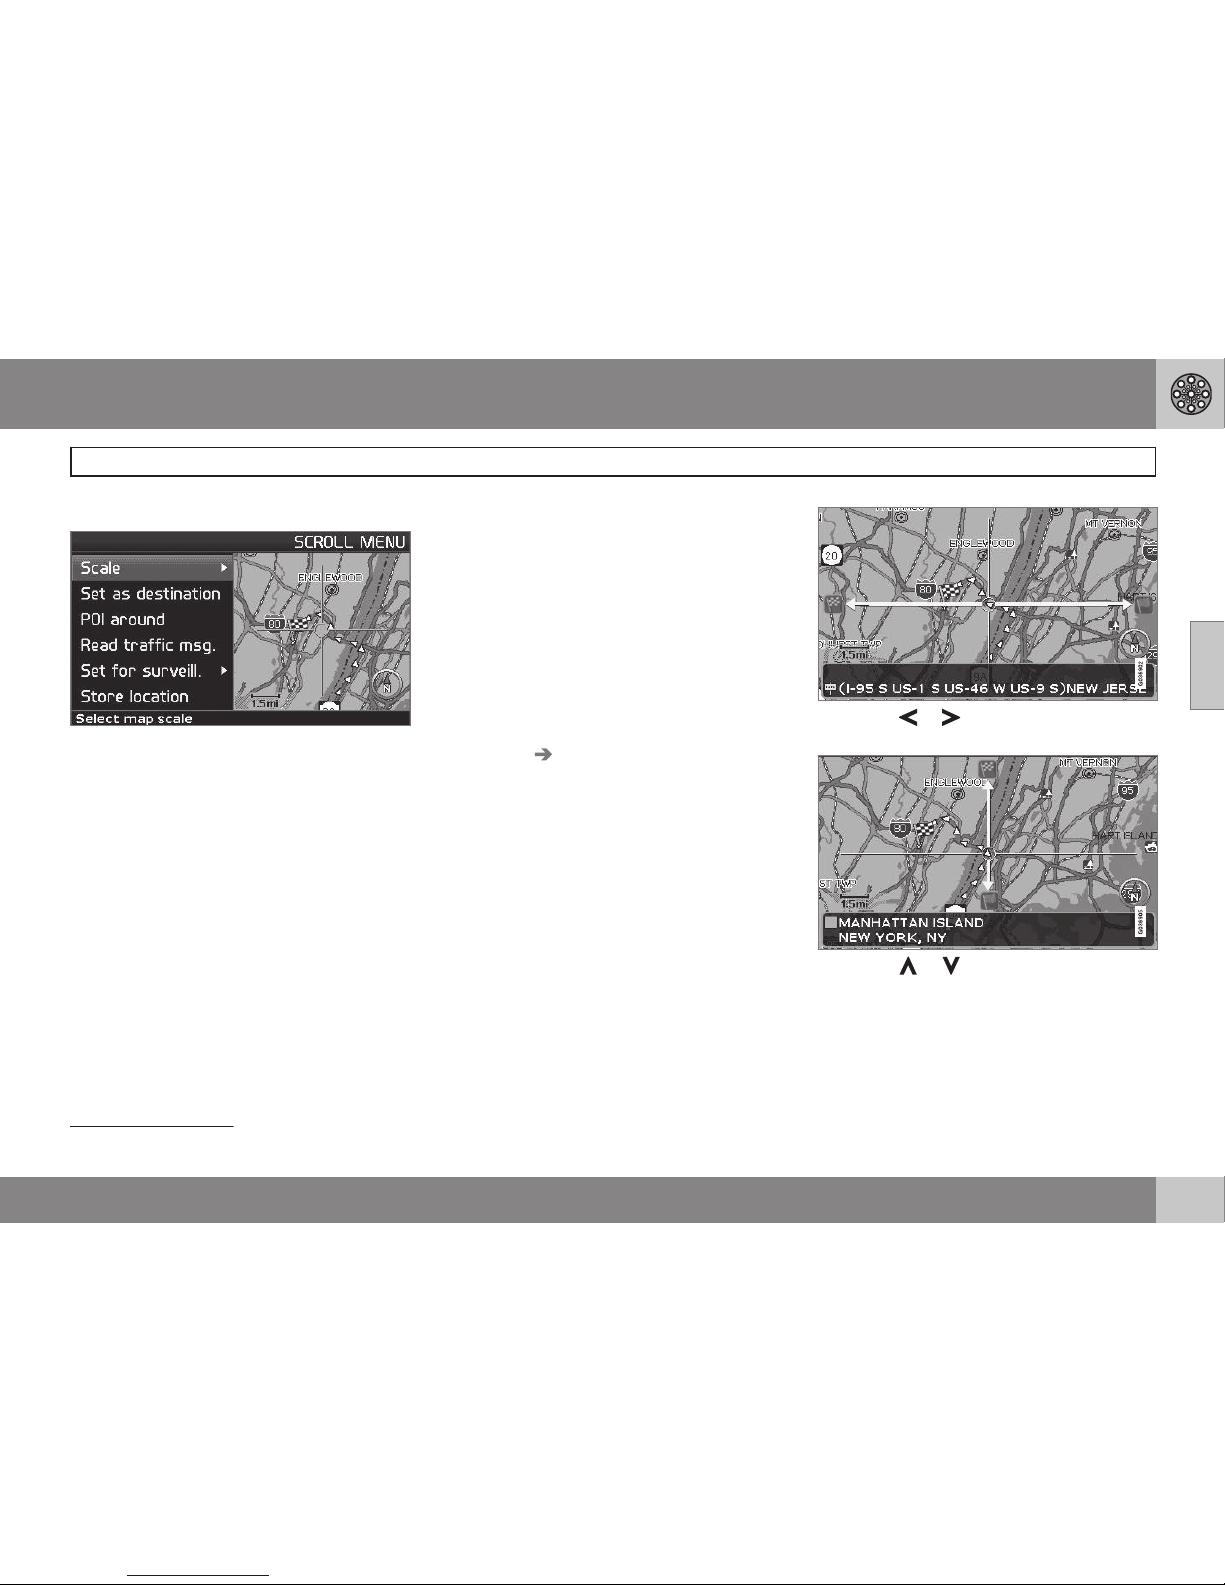
Map scroll menu
G033468
1. Activate map scrolling with the
navigation control.
2. Press ENTER in scroll mode to display
the scroll menu.
Scale
Change the map scale over the area selected.
Set as destination
Add the location as a destination in an itinerary.
POI around
Search for nearby points of interest.
Read traffic msg.
Search for current traffic messages in the
area.
Surveillance
1
Select between Set for surveill. 1, 2 or 3 and
press ENTER to store a map view you want
to save as a surveillance area, e.g. heavily
trafficked roads that are often subject to traffic problems.
Activating the map
Select map options in the Shortcut menu and
select the areas requiring surveillance.
Store location
Save the location for later use in Set
destination
Stored locations.
Following a route on the map
To make it easy to follow a set itinerary, the
system has a built-in "magnet" function. This
means that regardless of the number of turns
or changes of direction in the route, the cross
hairs will follow the route by simply holding
down a button.
One of the lines in the cross hairs will be displayed darker than the other one to indicate
which button should be pressed.
Use button or to follow the route automatically.
Use button or to follow the route automatically.
To deactivate the "magnet" function, move
the cross hairs slightly away from the route
until the line in the cross hairs is no longer
dark. Scrolling will then function normally.
1
Not available in all areas.
Page 40
03 Advanced user mode
Menu selections
03
38
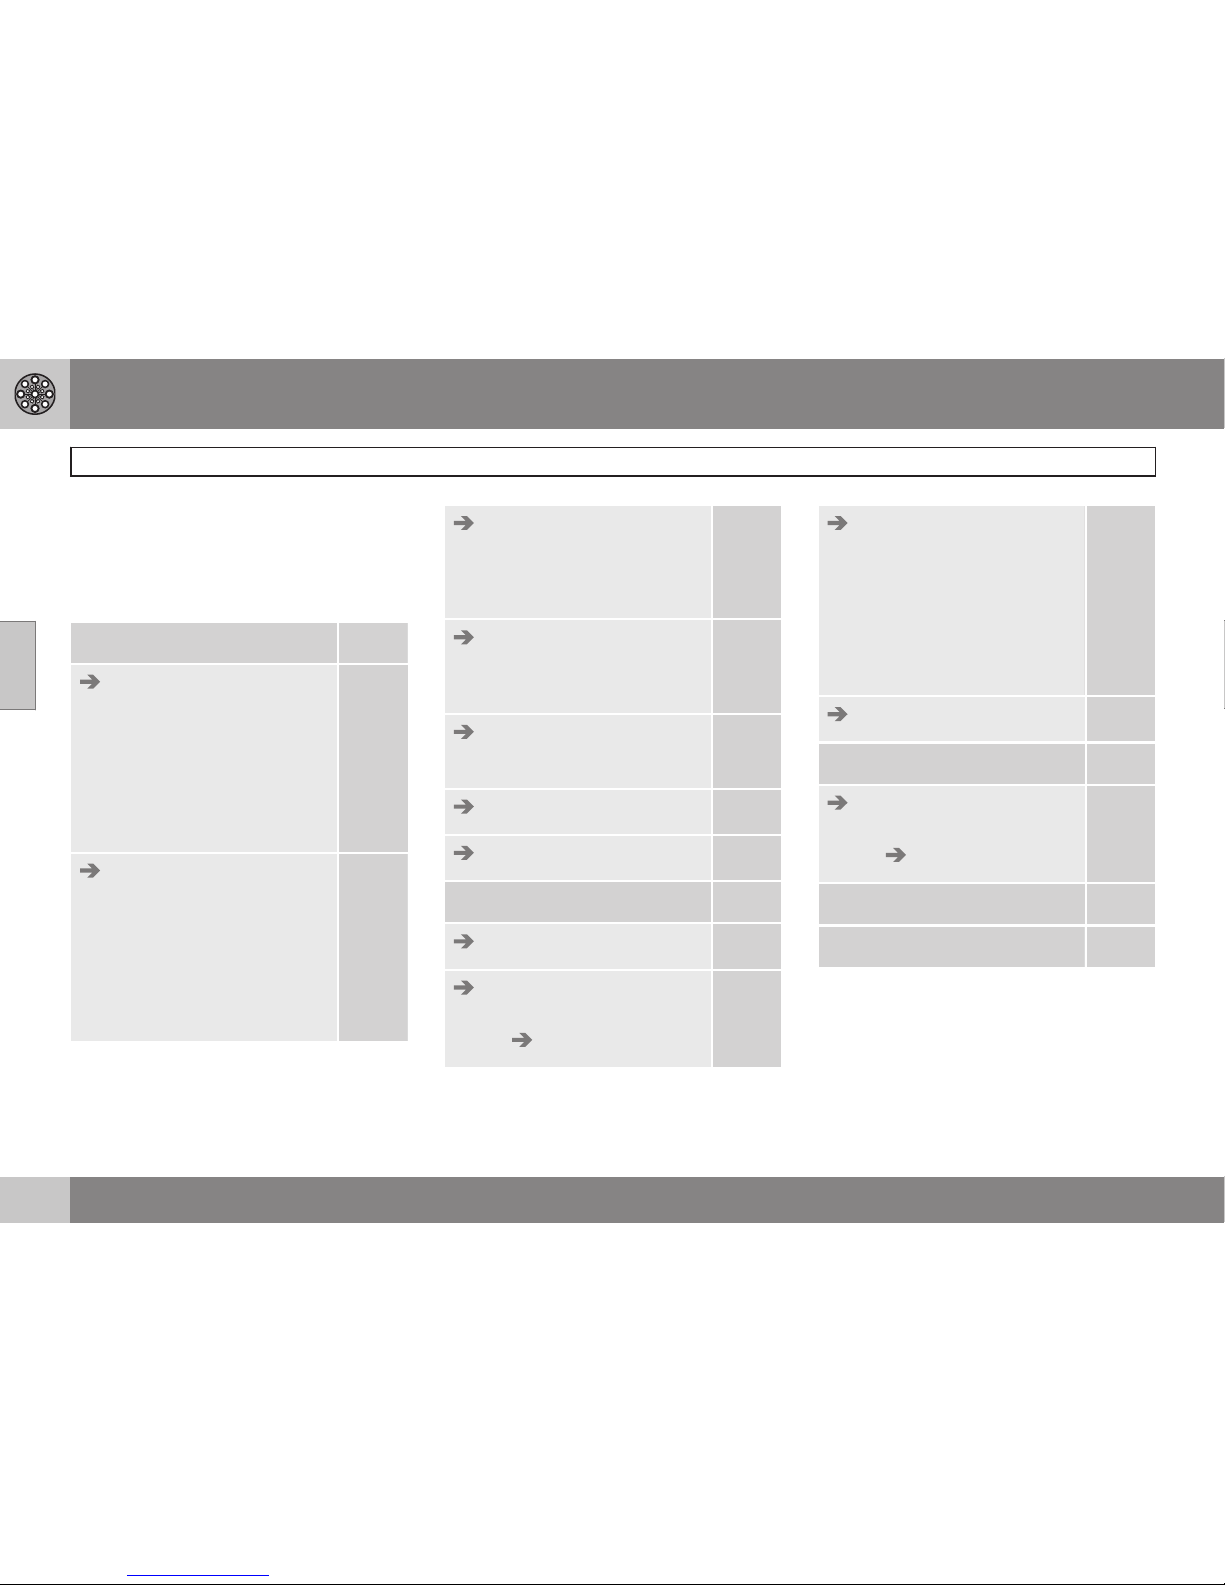
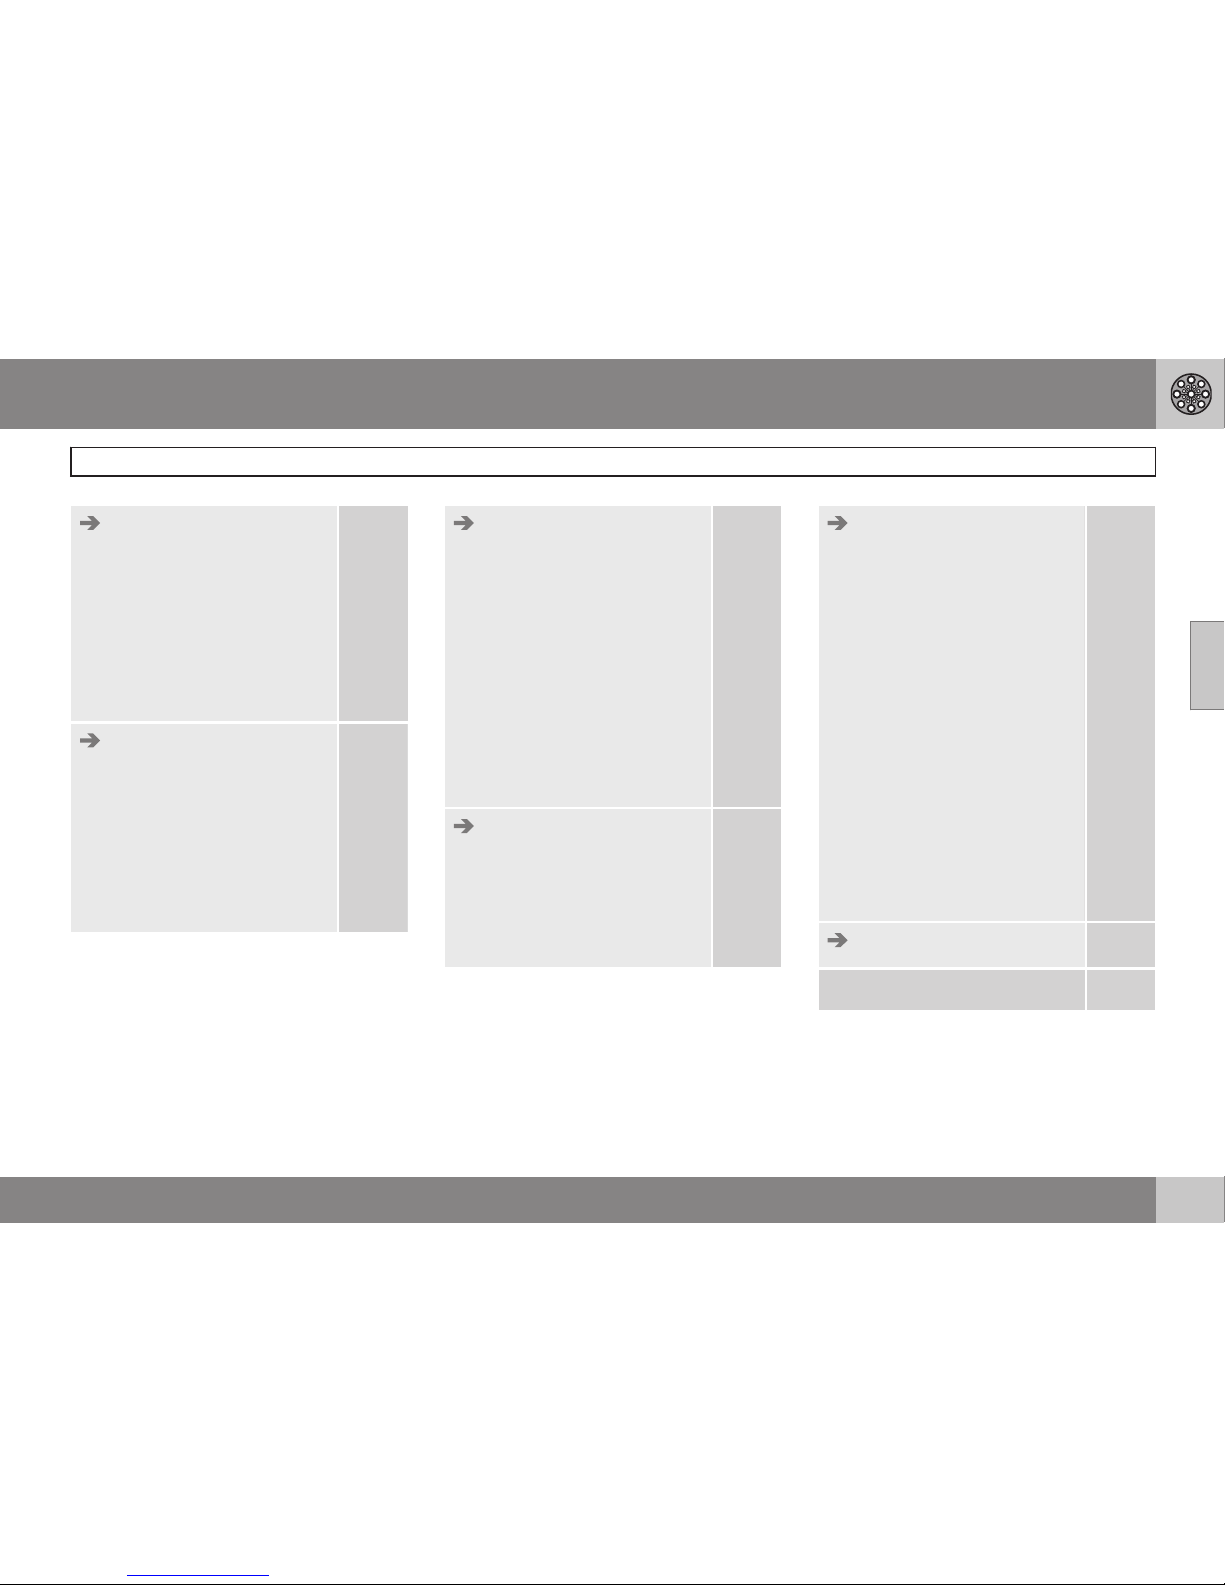
Three levels of the menu structure are shown
here. A number of the third level menus also
have sub-menus, which are described in
detail in their respective sections in this manual.
Set destination
p. 40
Address
State
City
Number
Street
Interse.
p. 40
Points Of Interest (POI)
POI by name
Around the car
Along the route
Around point on map
Along a street
p. 41
Stored locations
Add to itinerary/Information/Edit/Sorting/Delete
location
p. 42
Last 20
Add to itinerary/Information/Delete location
p. 43
Return trip
see Itinerary
p. 43
Point on map
p. 43
Latitude/longitude
p. 44
Itinerary
p. 45
Start guidance
p. 45
Add to itinerary
see Set destination
Address
p. 45
Route options
Route
Avoid highways/toll
roads/ferries/car train/
time-restr. roads/specified areas
Reset to default
p. 51
Clear itinerary
p. 45
Next destination
p. 40
Address
see Set destination
Address
p. 40
Current position
p. 49
Settings
p. 51
Page 41
03 Advanced user mode
Menu selections
03
39
Traffic information
A
Dynamic route guidance
Traffic-info. selection
Search stations
Current station
Traffic service
Reset to default
p. 61
Route options
Route
Avoid highways/toll
roads/ferries/car train/
time-restr. roads/specified areas/traffic problems
Reset to default
p. 51
Map options
POI selection
Map
Map view
2D map orientation
Right map view
Left map view
Compass
Current location
Reset to default
p. 52
Guiding options
Time/dist. to go
POI warning
Charge area warning
Reset to default
p. 52
System options
Guiding voice
Guiding volume
Language
Menu color
Map color
Screen saver
Help
Distance unit
User mode
Date & time info
GPS Information
About
Reset to default
p. 54
Start demo
p. 55
Shut down
p. 9
A
Option. Not available in all markets.
Page 42
03 Advanced user mode
Setting a destination
03
40
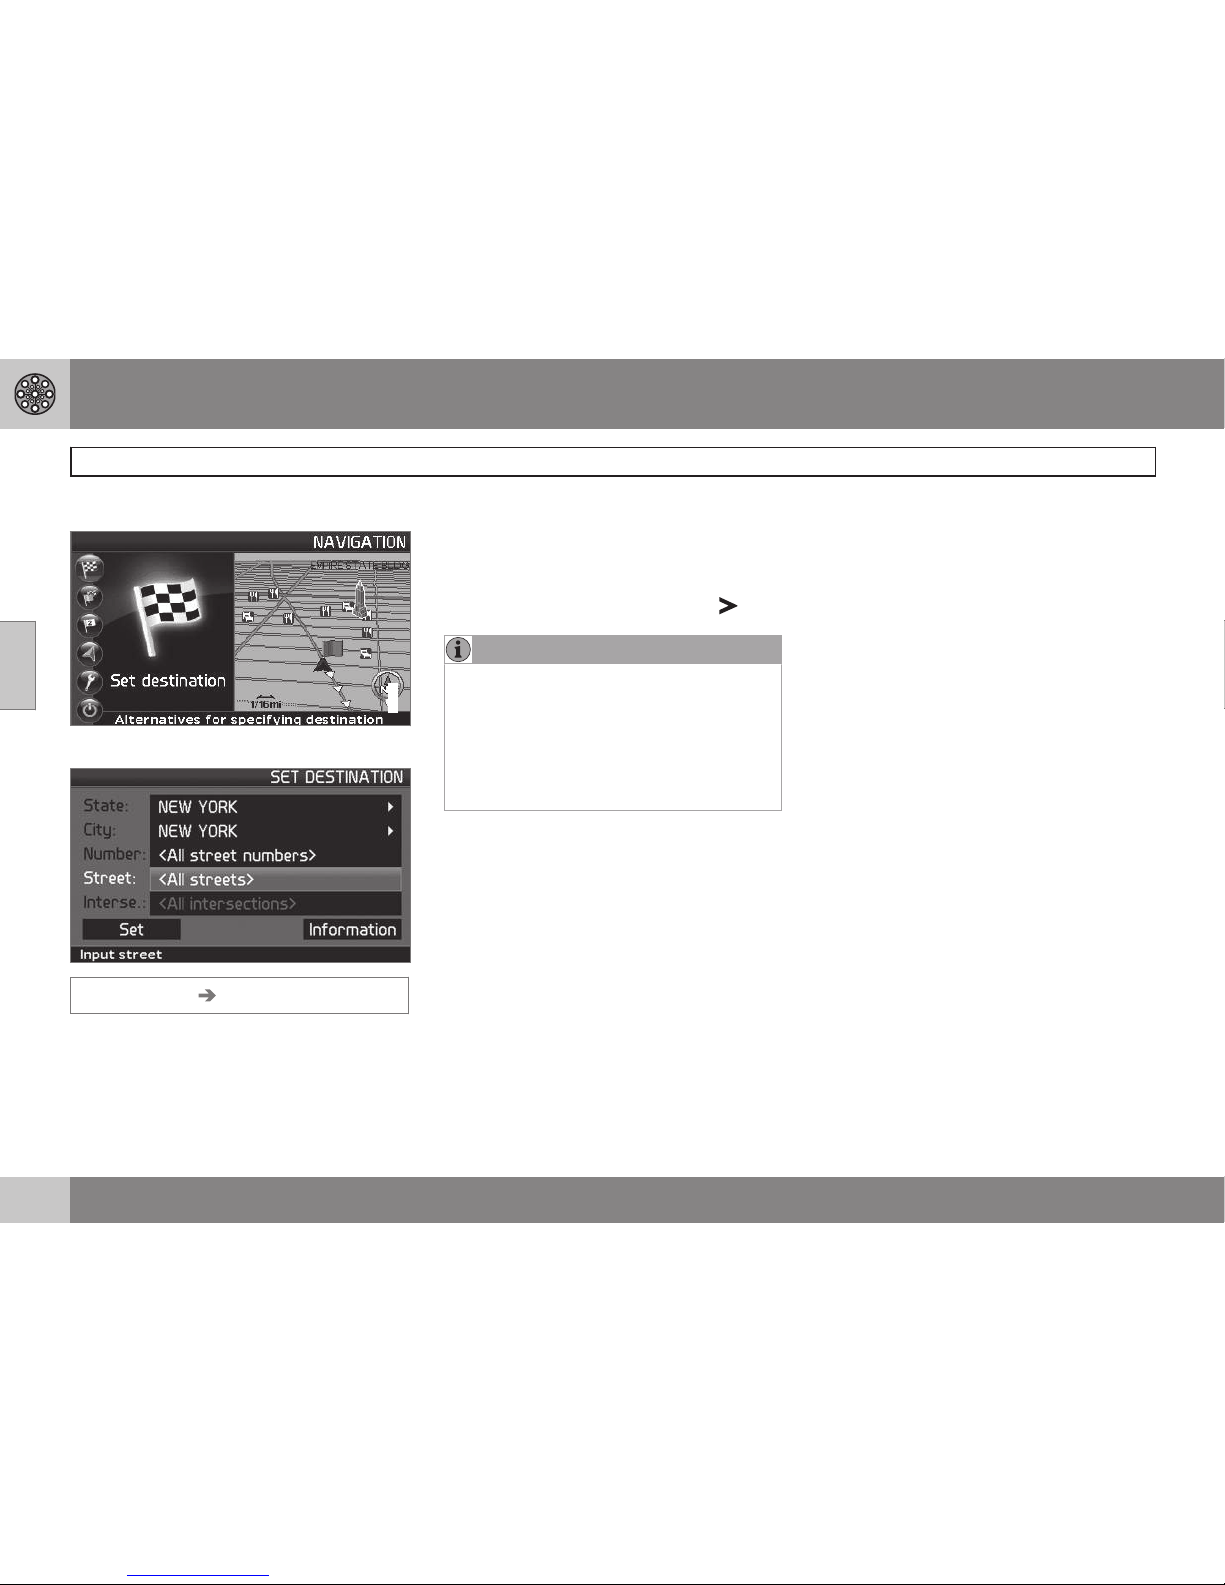
Selecting an address
G033461
Selecting a street address
Set destination Address
The system will place the cursor on Street.
The most recently selected State and City will
be pre-selected.
1. To change the state or city, use the
navigation control to move to
State
and/or City,
2. Press ENTER, or choose among the most
recently chosen alternatives with
.
NOTE
The definition of a city or area may vary. It
will sometimes be an entire city, or a particular section of a city.
The system does not contain street
addresses for very small towns or villages.
In these cases, the center of the town is
used as the destination.
Alternative 1
•
Select
Street without choosing a city.
The system will provide guidance to the midpoint of the selected street. If the street exists
in more than one city, a list of alternatives will
be displayed.
Alternative 2
1.
Begin by selecting a
City.
2.
Select a
Street.
Selecting a street number
If the address selected has a street number,
this can be used as a specific destination.
1. After selecting a street, go to the
Number row and press ENTER
or
Go directly to
Set. Alternative street num-
bers will be displayed.
2.
Go to
Set after you have entered a street
number.
> If a street number has not been
entered, the system will guide you to
the mid-point of the selected street.
Set
Confirms the entered number.
Adjust
Returns to the previous screen.
Selecting an intersection
•
Go to
Interse. and choose a street that
intersects the selected street.
Start guidance
•
Go to
Set to add the entered address to
the itinerary.
•
Go to
Start guidance to begin receiving
directions to the destination.
Information
Provides information about the destination.
Page 43
03 Advanced user mode
Setting a destination
03
41
Search using a Zip code
Set destination Address City
Instead of searching in a city, you can opt to
search for an area’s Zip code.
1.
Go to
ZIP code and press ENTER.
2. Select the digits in the Zip code and
press ENTER
or
Select a Zip code from the list.
3.
Go to
Street to select a street with the
Zip code entered and press ENTER.
4.
Go to
Start guidance to begin receiving
directions to the destination.
NOTE
This also applies to searches using Points
of interest.
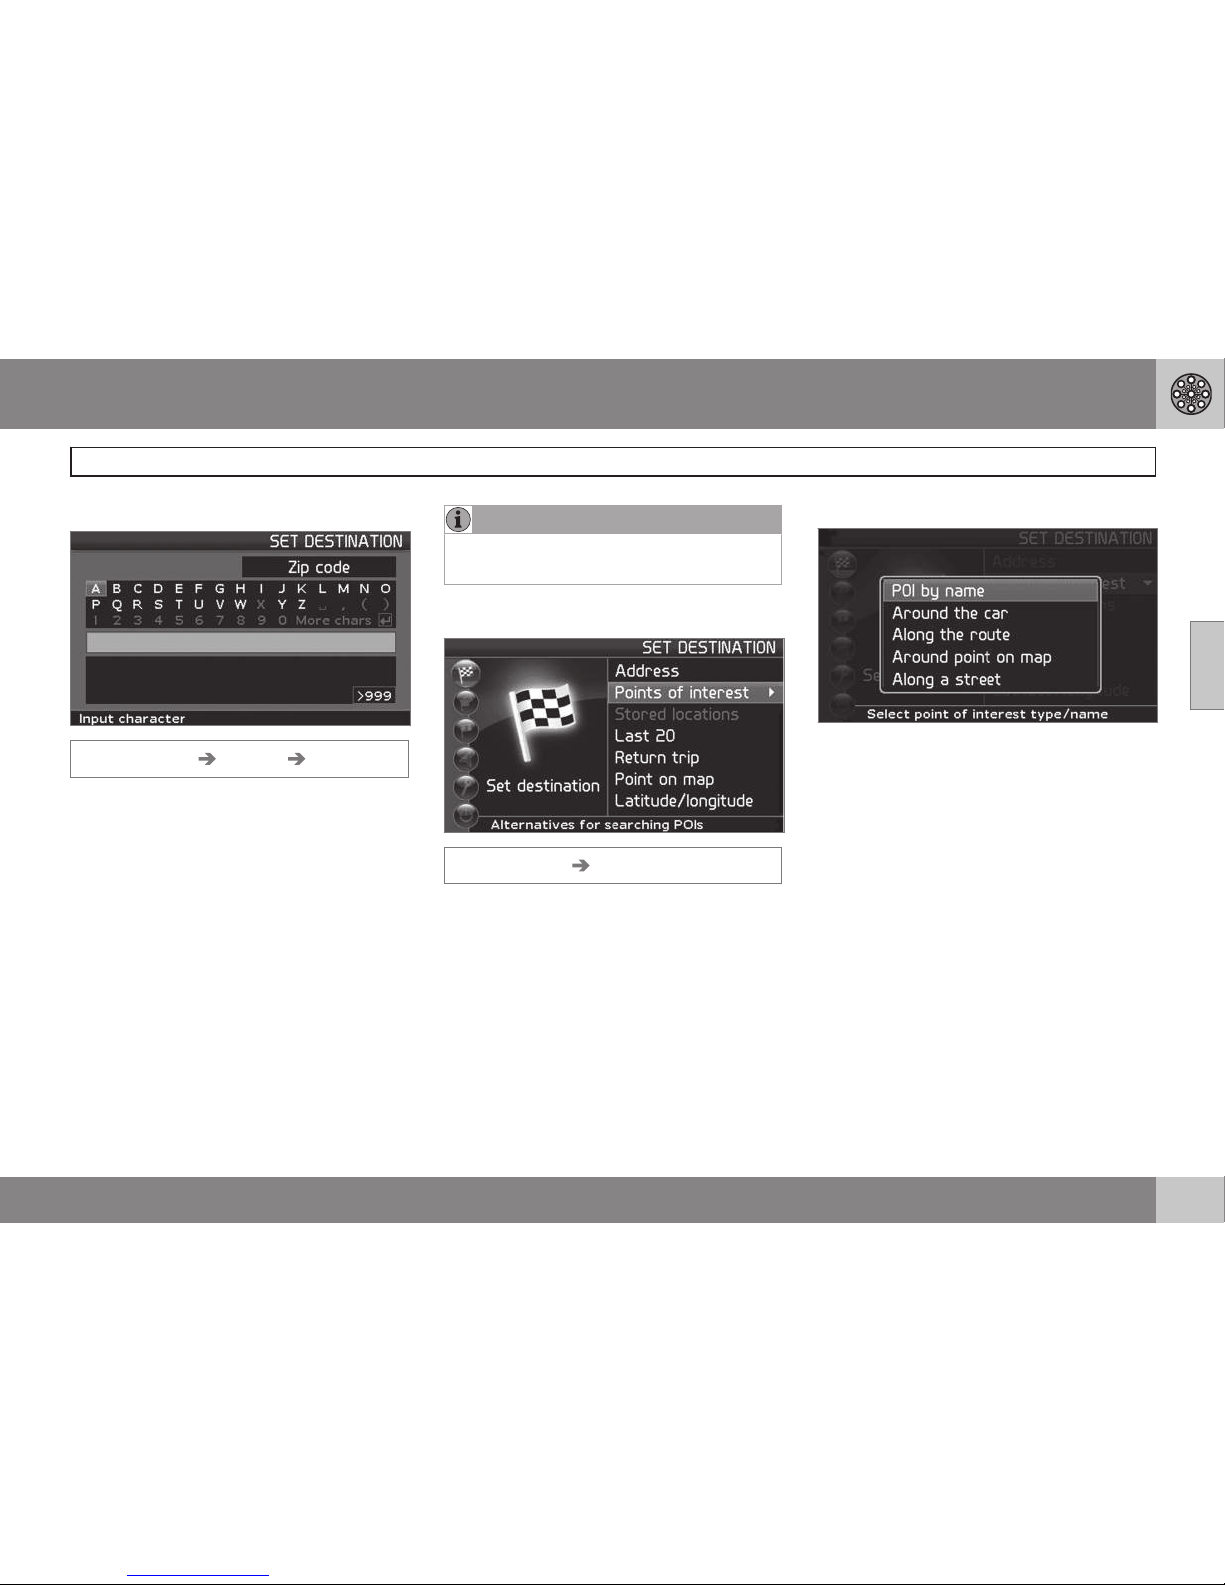
Point of Interest (POI)
Set destination POI
Points of interest (POI) include gas stations,
hotels, restaurants, Volvo retailers, hospitals,
parking lots, etc.
•
Press ENTER to access a sub-menu with
different search options in order to select
a point of interest.
POI by name
Enter the name of the point of interest, or
select an alternative in the menu. The list only
shows the points of interest in the selected
city/area.
Around the car
The system will search for POIs around the
car (max. 60 mile radius) The search will stop
after 40 POIs have been found.
Along the route
If a destination has been selected, the system
can search for points of interest along the
route (within approx. 0.5 miles from the
route).
Around point on map
The system will perform the same type of
search as for
Around the car, but the search
will be based on a point on the map.
Page 44
03 Advanced user mode
Setting a destination
03
42
Along street
The system will search along a specified
street.
NOTE
You can also search for Points of interest
around the car, along the route, or along
the highway in the Shortcut menu, see
page 24.
Types of points of interest/Different
categories
Set destination POI POI by name
The system will first place the cursor on
Type. The most recently selected State and
City should be displayed.
If this is not the case:
1.
Go to
State and/or City and press
ENTER
or
Choose among the most recently
selected ones using
.
2.
Go to
Name and press ENTER to select
a POI without specifying a city.
3.
Go to
Set and press ENTER.
4.
Then go to
Start guidance and press
ENTER to receive directions to the desti-
nation.
NOTE
For a more detailed search, first select City
and then go to Name.
There are sub-categories for restaurants,
etc., to simplify the search.
Information about the point of interest
Information shows the address, geographic
coordinates, and in certain cases, also the
telephone number of the point of interest.
Map
Shows the POI’s location on the map.
2nd POI
Points of interest such as airports often have
restaurants, gas stations, etc., on site.
Instead of searching for a restaurant in the
main menu, you can choose a restaurant
directly under the selected airport. Avoiding
alternatives outside of the airport makes the
search quicker and easier.
Stored locations
Previously stored locations
Set destination Stored locations
A stored location is a previously stored destination, such as a home address, favorite restaurant, an airport, or a Volvo retailer. Information about storing locations can be found
on see page 46.
•
Navigate among the stored locations and
press
or ENTER to access the sub-
menu.
Add to itinerary
Place the stored location in the itinerary.
Information
Provides information about the stored location.
Edit
Change the name, add a sound, etc., for the
stored area. See also the heading "Add information about a stored location."
Sorting
Sort the list of stored locations by icon or
name.
Delete location
Deletes the stored location.
Page 45
03 Advanced user mode
Setting a destination
03
43
Select a position for a new stored
location
1.
Select
Edit,
2.
Use
, to go to Adjust.
3. Press ENTER to specify a position on the
map for a new stored location.
4. Move the cursor with the navigation
control to a new position and press
ENTER.
5.
Then select
Store and press ENTER to
store the new location.
Add information about a stored location
–
Select Edit and use to go to Add
info.
. Press ENTER to add additional
information about the stored location.
The following can be added to each
stored location:
•
Alert On/Off (to remind the driver that
he/she is approaching the stored location)
•
Icon
•
Name
•
Address
•
City
•
State
•
Phone
•
E-mail
•
URL
Last 20
Set destination Last 20
This is a list of the twenty most recently
selected destinations. The scroll bar at the
right of the screen indicates that there are
more alternatives than can be displayed at
one time.
•
Go to the desired destination and press
or ENTER to access the sub-menu.
Add to itinerary
Adds the destination to the itinerary.
Information
Provides a summary about the destination.
Delete location
Remove the destination from the Last 20 list.
Return trip
Set destination Return trip
•
Select
Start guidance and press
ENTER.
The system will begin guiding you back to the
location where
Start guidance was most
recently selected.
Point on the map
Searching via a point on the map
Set destination Point on map
1. Use the navigation control to move the
cursor to the desired destination.
2. Press ENTER to access the map scroll
menu.
3.
Select
Set destination, see page 37.
NOTE
A position on the map can be selected
directly with the cursor by using the
navigation control in map mode.
Page 46
03 Advanced user mode
Setting a destination
03
44
Latitude/longitude
Search by coordinates
Set destination Latitude/longitude
1. Select a destination by specifying coordinates on the map.
2. Select a latitude with the navigation
control:
N for north or S for south.
3. Go to the second row to specify a longitude: select
E for east or W for west.
>
OK
Shows the position with the specified
coordinates on the map.
4. Press ENTER to access the map scroll
menu.
5.
Go to
Set as destination and press
ENTER to select the position as a desti-
nation.
6. Press BACK to resume entering coordinates.
>
Cancel
Return to the previous screen.
Page 47
03 Advanced user mode
Itinerary
03
}}
45
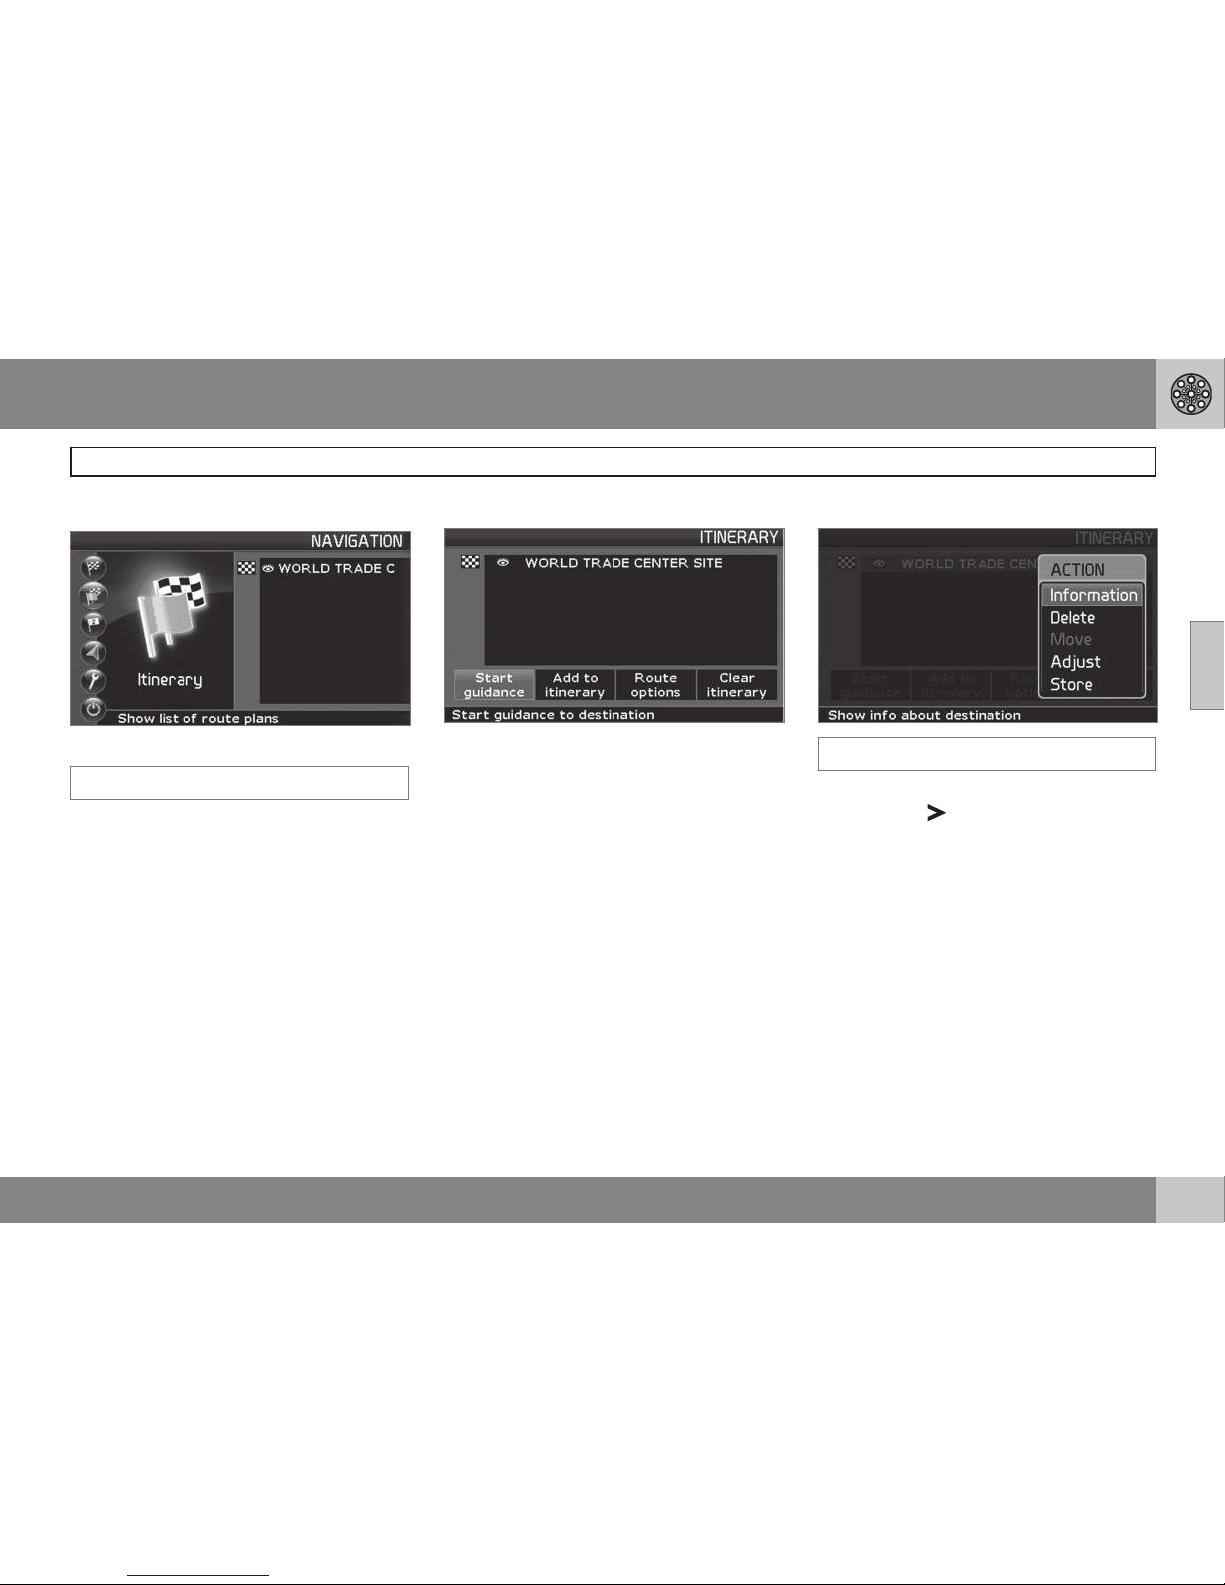
Making an itinerary
Destination/Intermediate destination
Itinerary
The menu selection Itinerary becomes
accessible after a destination has been
selected.
Make an itinerary with several stops to avoid
selecting a number of destinations during a
trip.
Up to six intermediate destinations and one
final destination can be specified in an itinerary.
Start guidance
Begin guidance to the destination.
Add to itinerary
All additional destinations are added to the
itinerary.
Route options
Provides settings for selecting various types
of roads, etc.
Clear itinerary
Deletes the entire itinerary.
Editing an itinerary
Itinerary
•
Select a specified destination and press
ENTER or
to access a sub-menu.
Information
Provides information about the destination.
Delete
Removes the destination from the itinerary.
Move
Change the destination’s position in the itinerary.
Adjust
Select a new location on the map as a destination.
Store
Save the destination, which will be accessible
under
Itinerary.
Page 48
03 Advanced user mode
Itinerary
03
46
Removing destinations from an
itinerary
Itinerary
Delete all destinations: All intermediate destinations and the final destination will be
deleted.
•
Go directly to
Clear itinerary and press
ENTER.
Delete intermediate destinations in an itinerary:
1. Select one of the specified intermediate
destinations and press ENTER or
to
access a sub-menu.
2.
Go to
Delete and press ENTER.
NOTE
Destinations that have been passed are
automatically deleted from the itinerary.
Saving destinations for a return trip
Up to 250 destinations can be stored for reuse in different itineraries.
An audible signal that alerts the driver that
he/she is approaching a stored destination as
well as additional information can be linked to
a stored destination, see page 43 – "Add
information about a stored location."
Itinerary
Saving a destination from the itinerary
1. Go to the destination to be saved with the
navigation control and press ENTER or
to access a sub-menu.
2.
Select
Store and press ENTER.
3. Use the navigation control to select the
symbol to be displayed on the map and
press ENTER.
4.
Then use
to enter a name for the loca-
tion.
5.
Go to
Store and press ENTER.
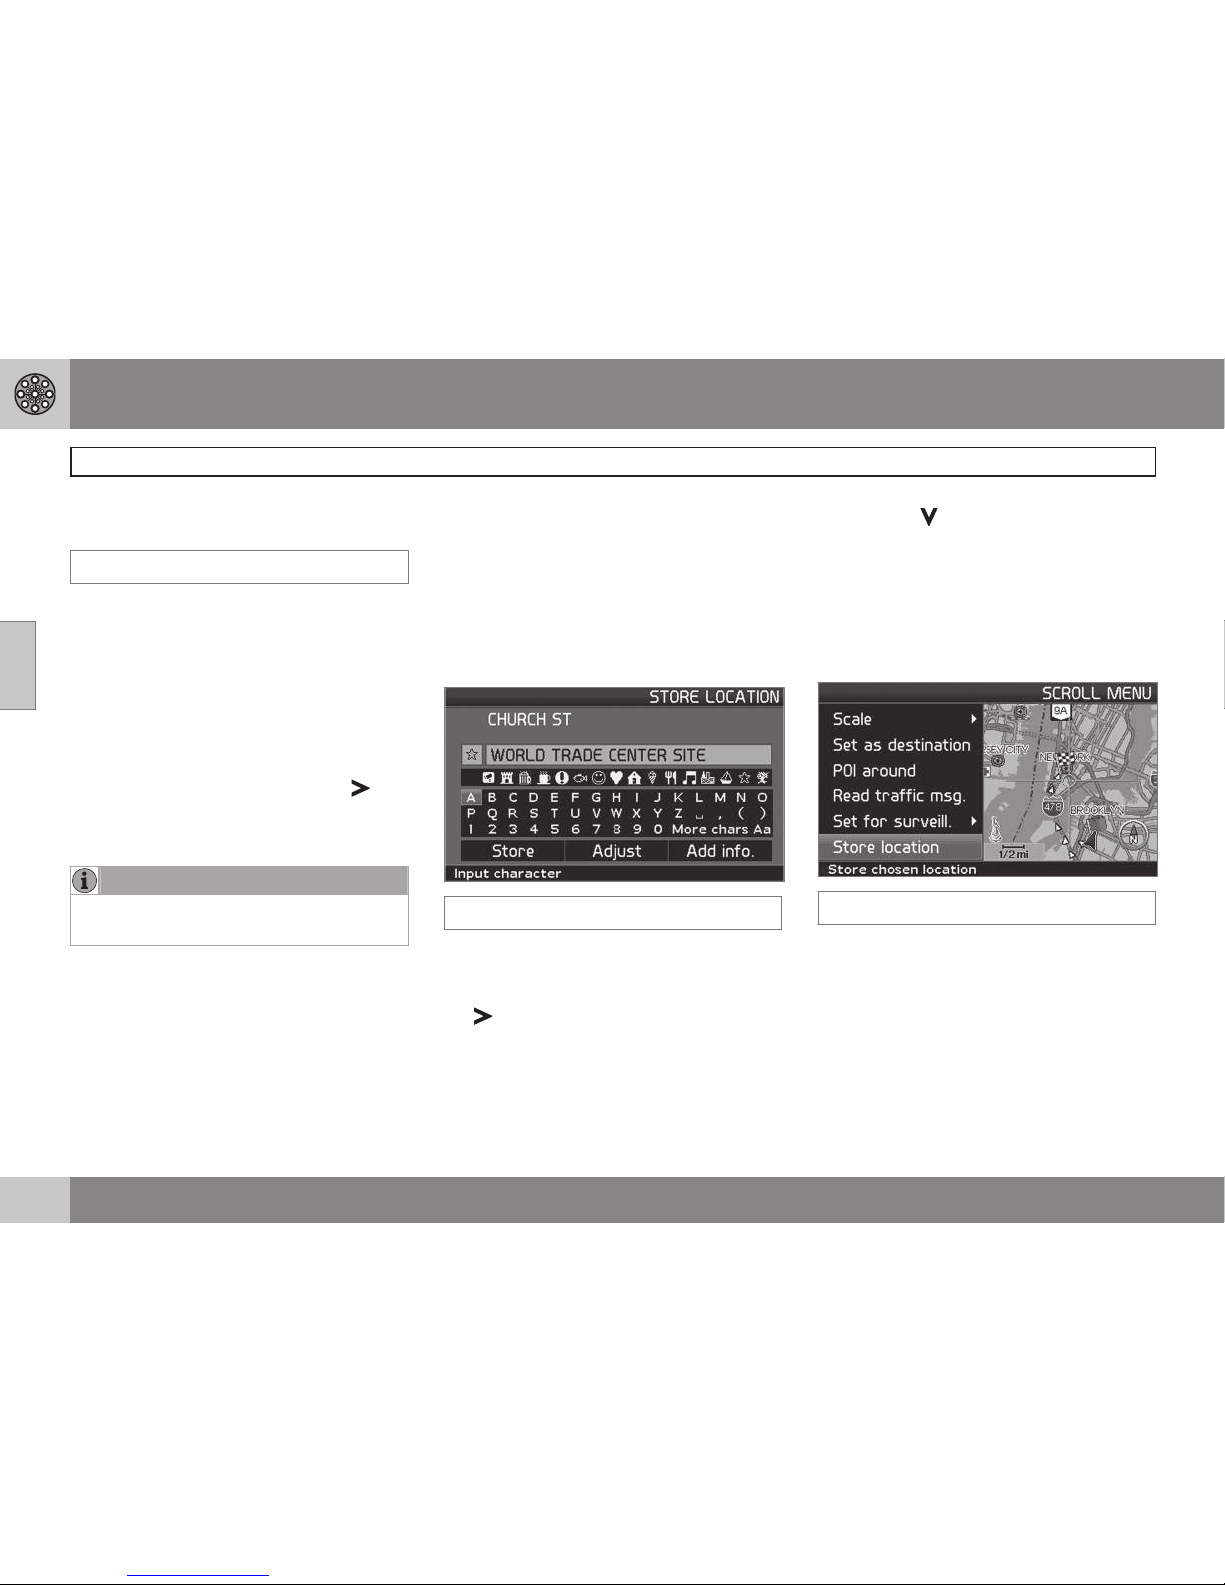
The current position can also be stored
quickly, for example while driving, by simply
pressing one button, see page 34.
Save a position on the map
Map mode
1. In Map mode, use the navigation control
to move the cursor to the point on the
map to be saved and press ENTER.
2.
Select
Store in the Map scroll menu and
press ENTER.
3. Use the navigation control to select the
symbol to be displayed on the map and
press ENTER.
Page 49
03 Advanced user mode
Itinerary
03
47
4.
Then use
to enter a name for the loca-
tion and press ENTER.
Page 50
03 Advanced user mode
Next destination
03
48
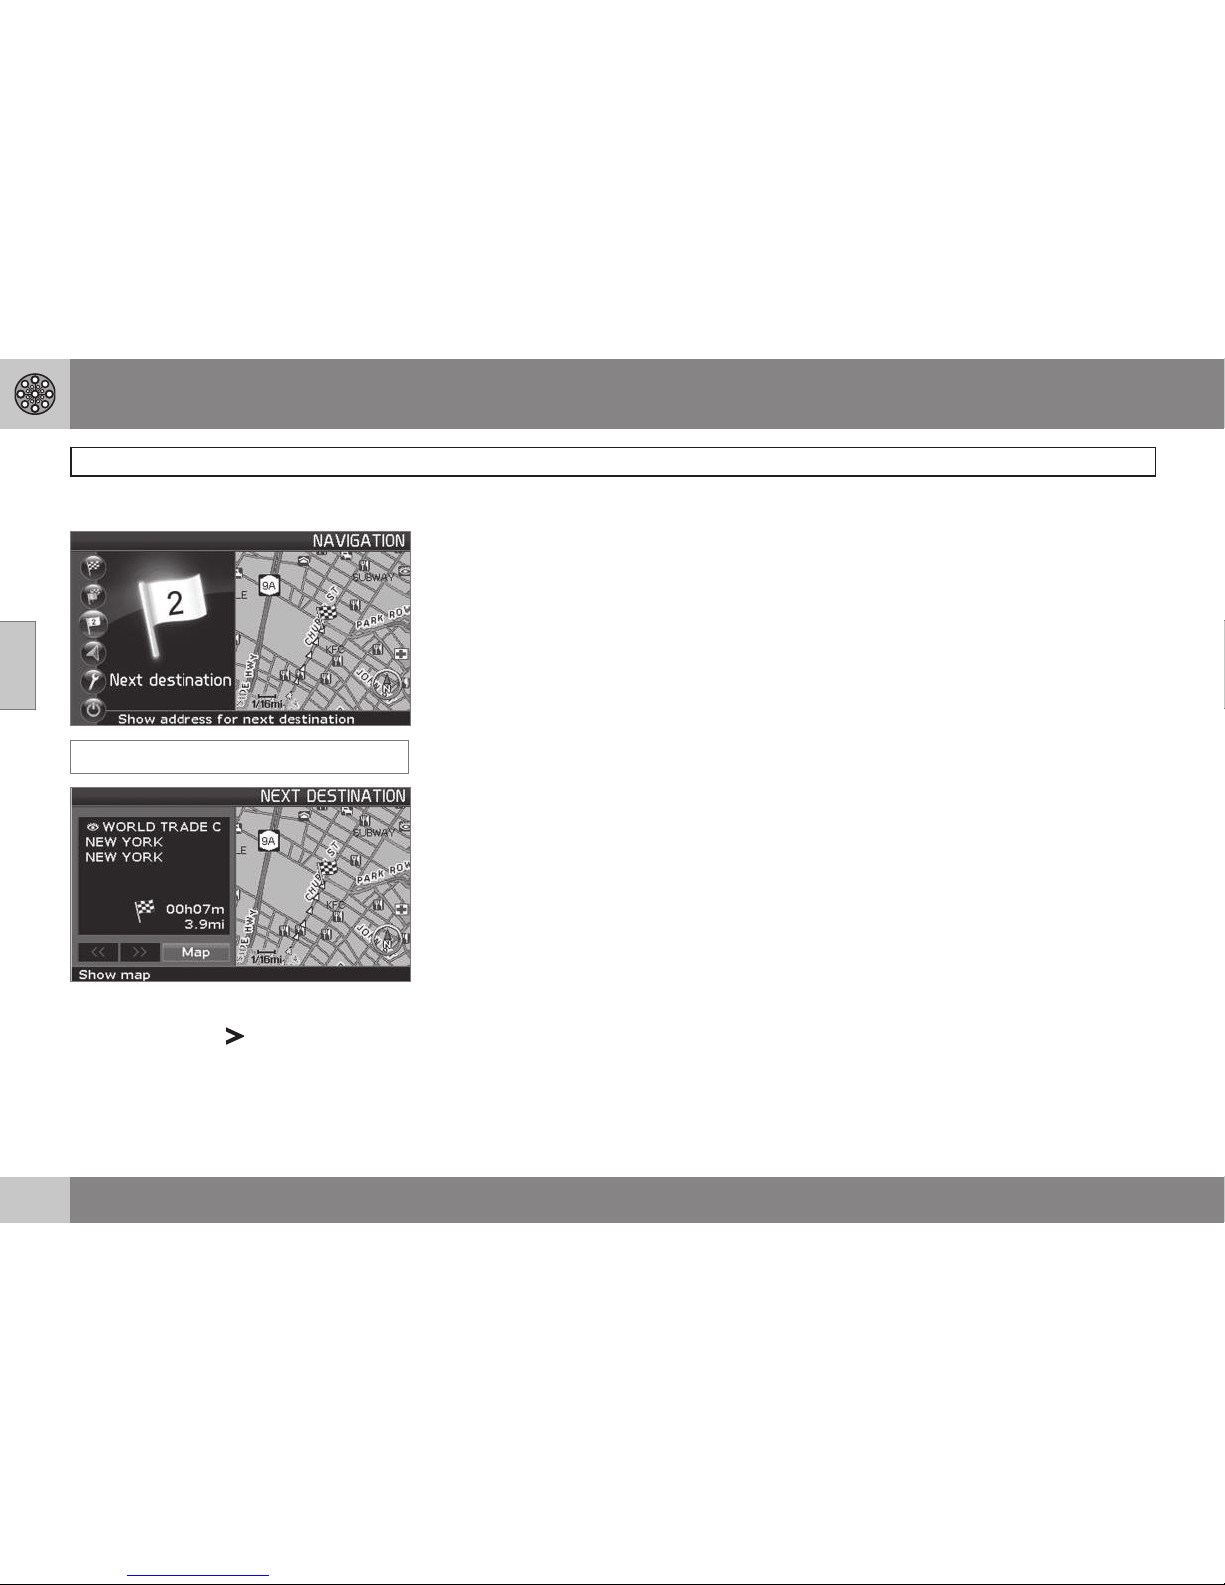
Next destination in the itinerary
Next destination
The map will show the next destination.
1.
Press ENTER or for information such
as the name of the destination, or remaining travel time or distance from the current location to the destination.
2. Press ENTER again if other destinations
have been specified for information and
to see these destinations on the map.
3.
Go to
Map and press ENTER to see map
information over the area.
Page 51
03 Advanced user mode
Current position
03
49
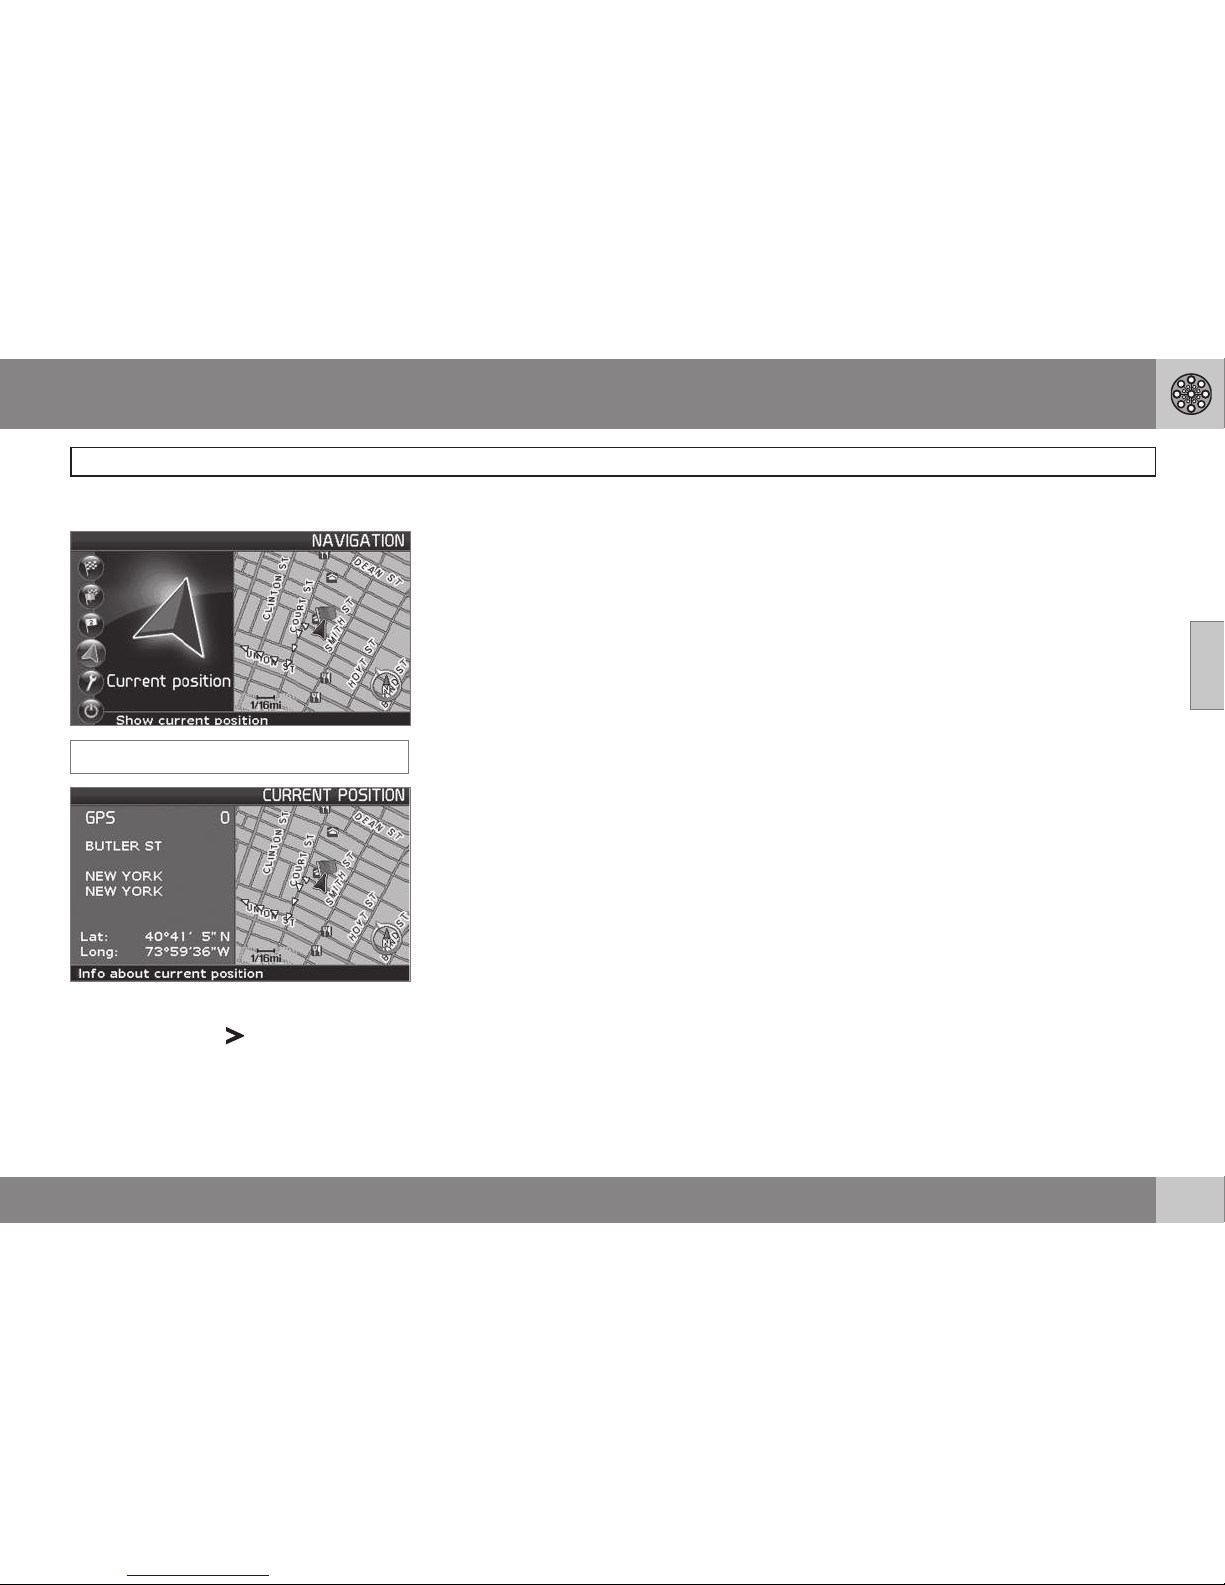
Current position
Current position
The map shows the vehicle’s current position.
•
Press ENTER or
for information about
this position, such as its name or coordinates.
GPS
Shows the number of satellites with which the
system is in contact.
Page 52
03 Advanced user mode
Traffic information (option)
03
50
Traffic information
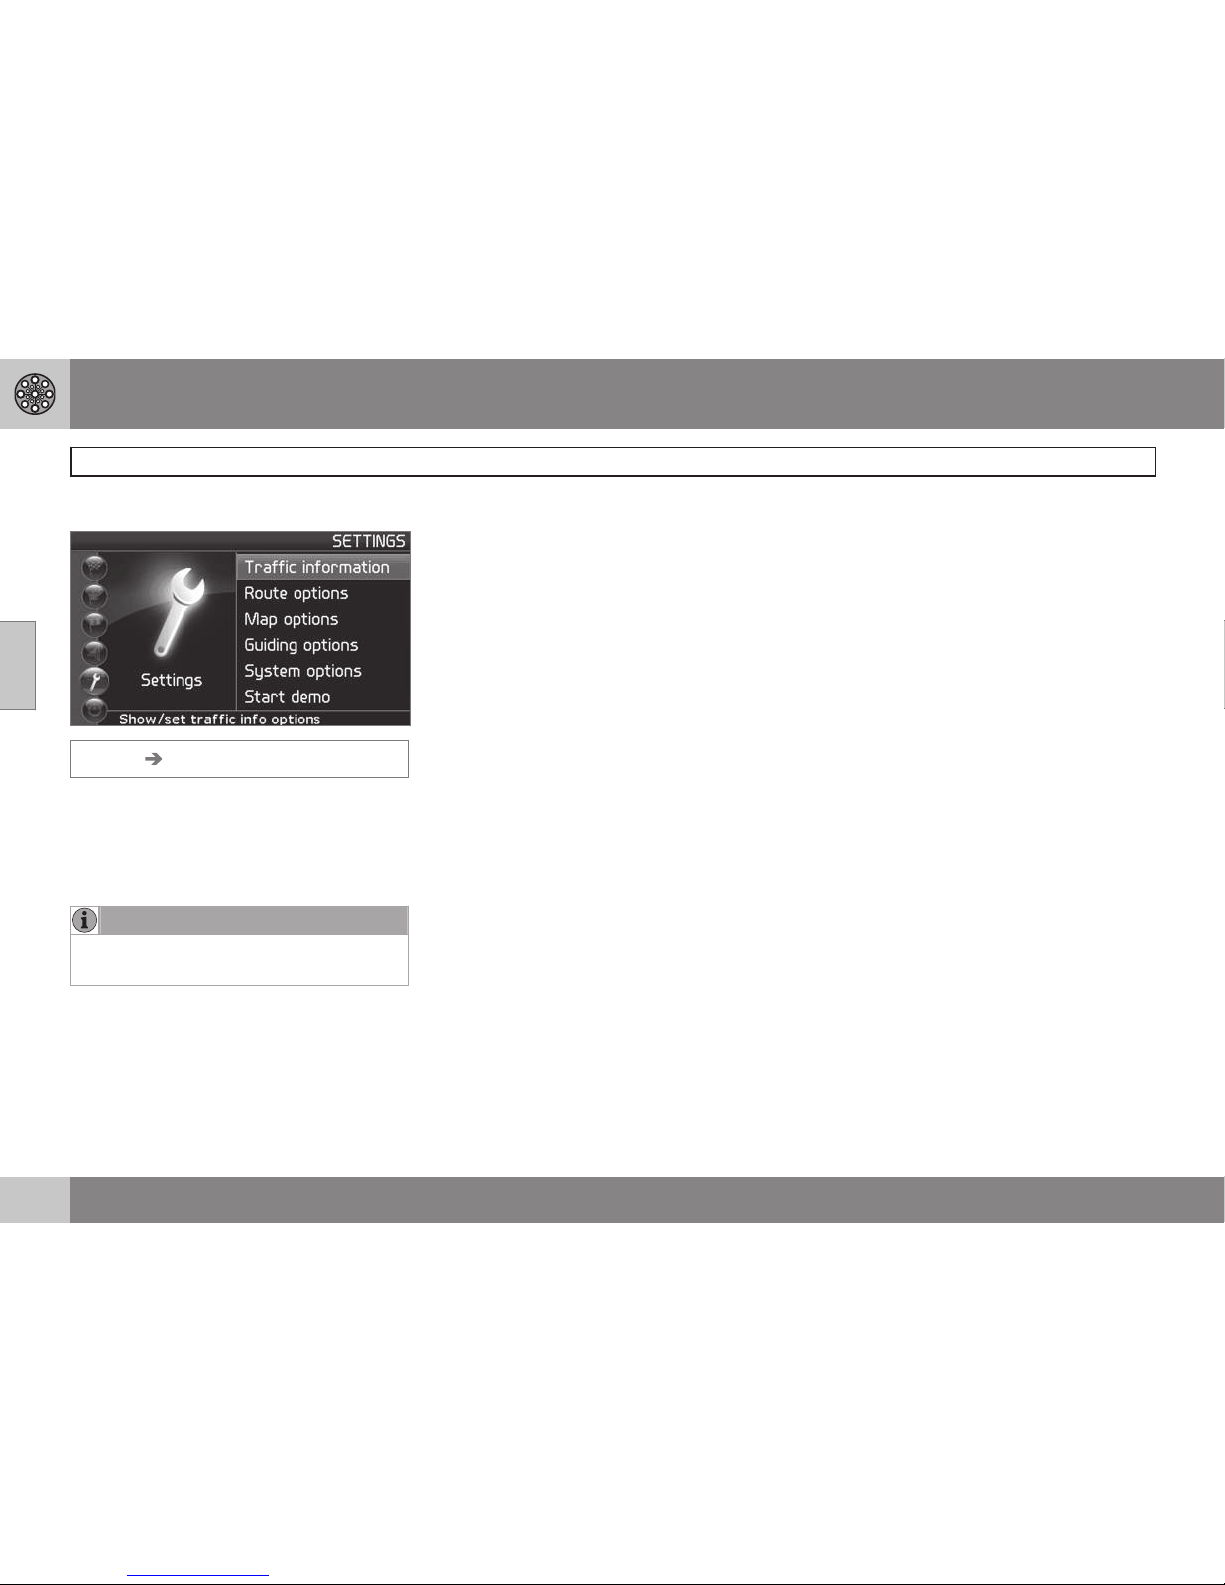
Settings Traffic information
Regardless of whether the navigation system
is in Easy or Advanced mode, broadcast
traffic information is always received and presented. see page 58 for additional information.
NOTE
Please be aware that traffic information
may not be available in all areas.
Page 53
03 Advanced user mode
Settings
03
51
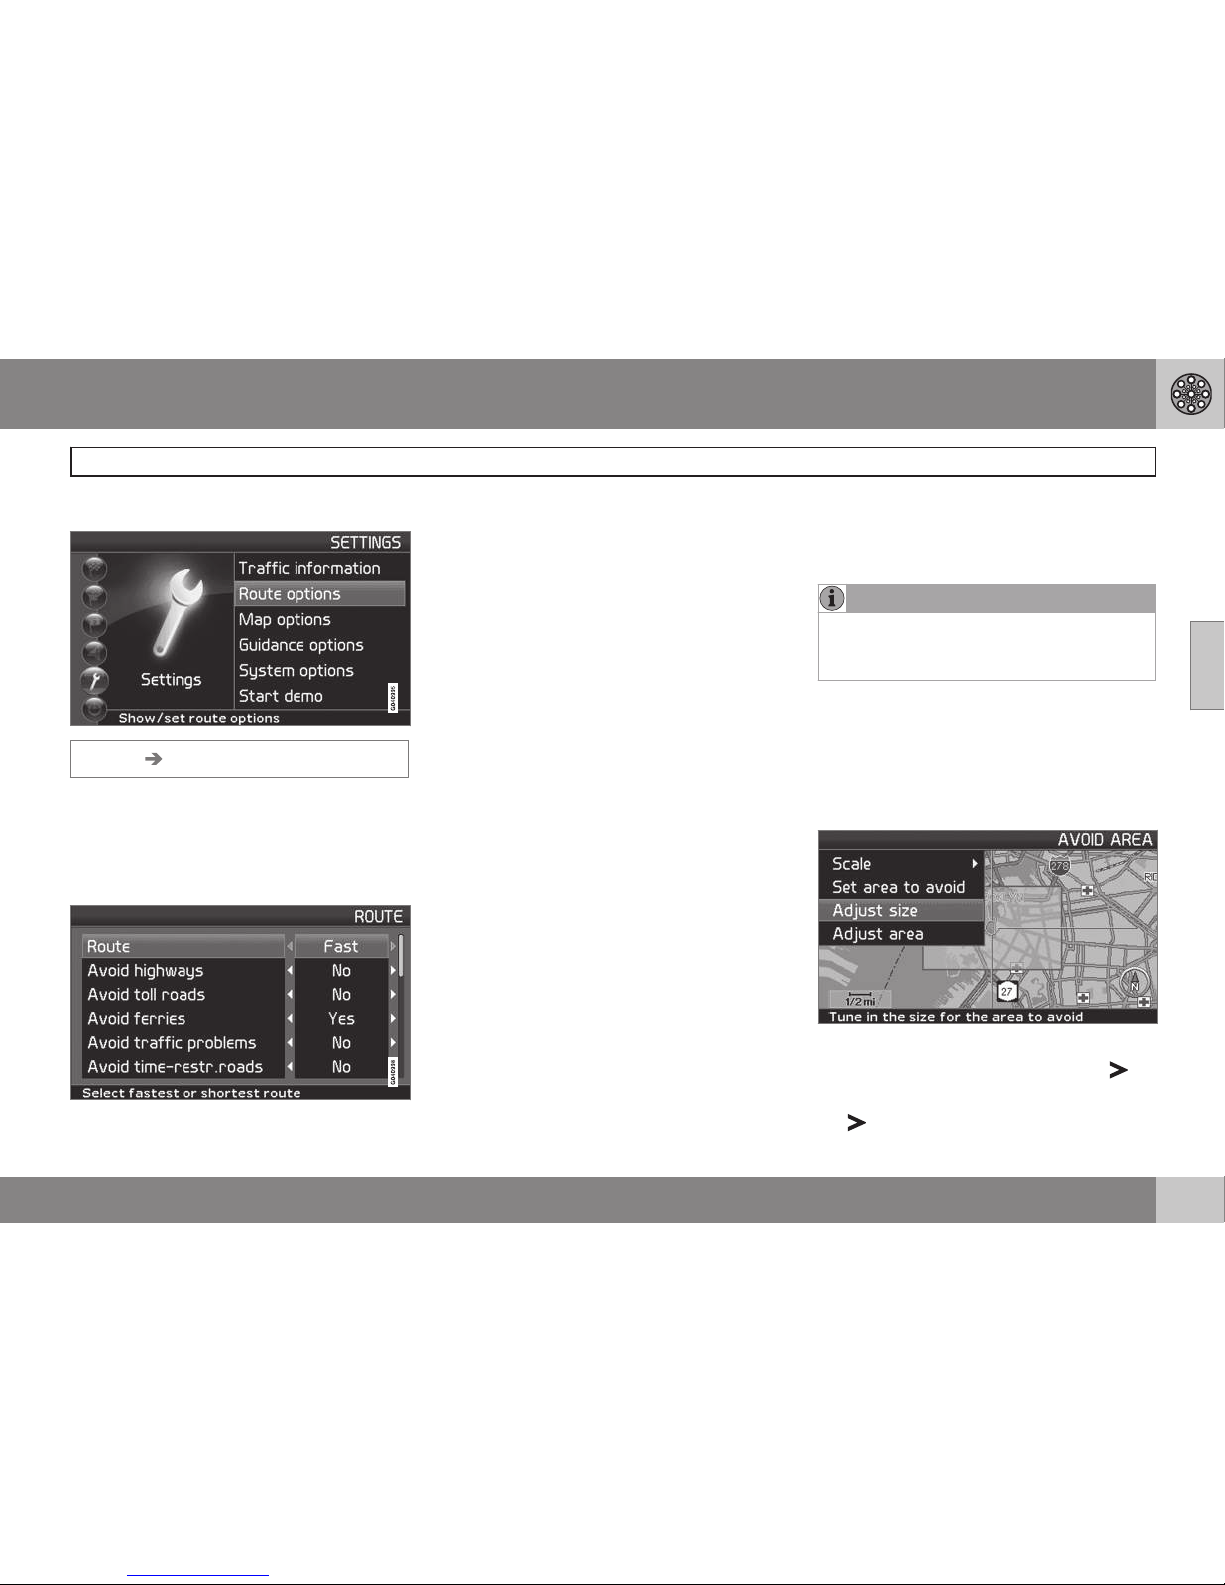
Route options
Settings Route options
•
Use the navigation control to move
among the options, select the desired
settings and press ENTER to save the
settings.
•
Press BACK to undo a setting.
Route
Select Fast, short, or easy for the system to
calculate a route.
– Fast: The system will prioritize major roads
for the fastest permitted driving.
– Short: The system will prioritize as far as
possible the shortest distance to the destination.
– Easy: The system will prioritize as far as
possible roads that do not entail difficult driving situations or numerous intersections.
Avoid highways
Set the system to avoid highways/freeways
when calculating a route.
Avoid toll roads
Set the system to avoid toll roads when calculating a route.
Avoid ferries
Set the system to avoid ferries when calculating a route.
Avoid car train
Set the system to exclude car trains when
calculating a route.
Avoid traffic problems
Set the system to take traffic disruptions into
consideration when calculating a route.
Avoid time-restr. roads
Set the system to avoid time-restricted roads
when calculating a route.
NOTE
This function requires that the vehicle’s
clock be correctly set for the current time
zone.
Avoid specified areas
This function is designed to help you avoid
being guided to areas, cities or sections of
cities that you prefer not to drive through. The
system always excludes these areas when
calculating a route.
1. Set the system to avoid specified areas
when calculating a route and press .
2.
Select
Avoid specified areas and press
again to specify an area.
Page 54
03 Advanced user mode
Settings
03
52
Reset to default
Return to the system’s factory settings for
route options.
•
Press
, select OK and press ENTER.
NOTE
When the system calculates a route over
longer distances, it is designed to select
major roads (highways/freeways, etc.).
If you have set the system to avoid highways and toll roads, the system will avoid
guiding you to these types of roads to as
great an extent as possible, and will only
use such roads when no other reasonable
alternative is available.
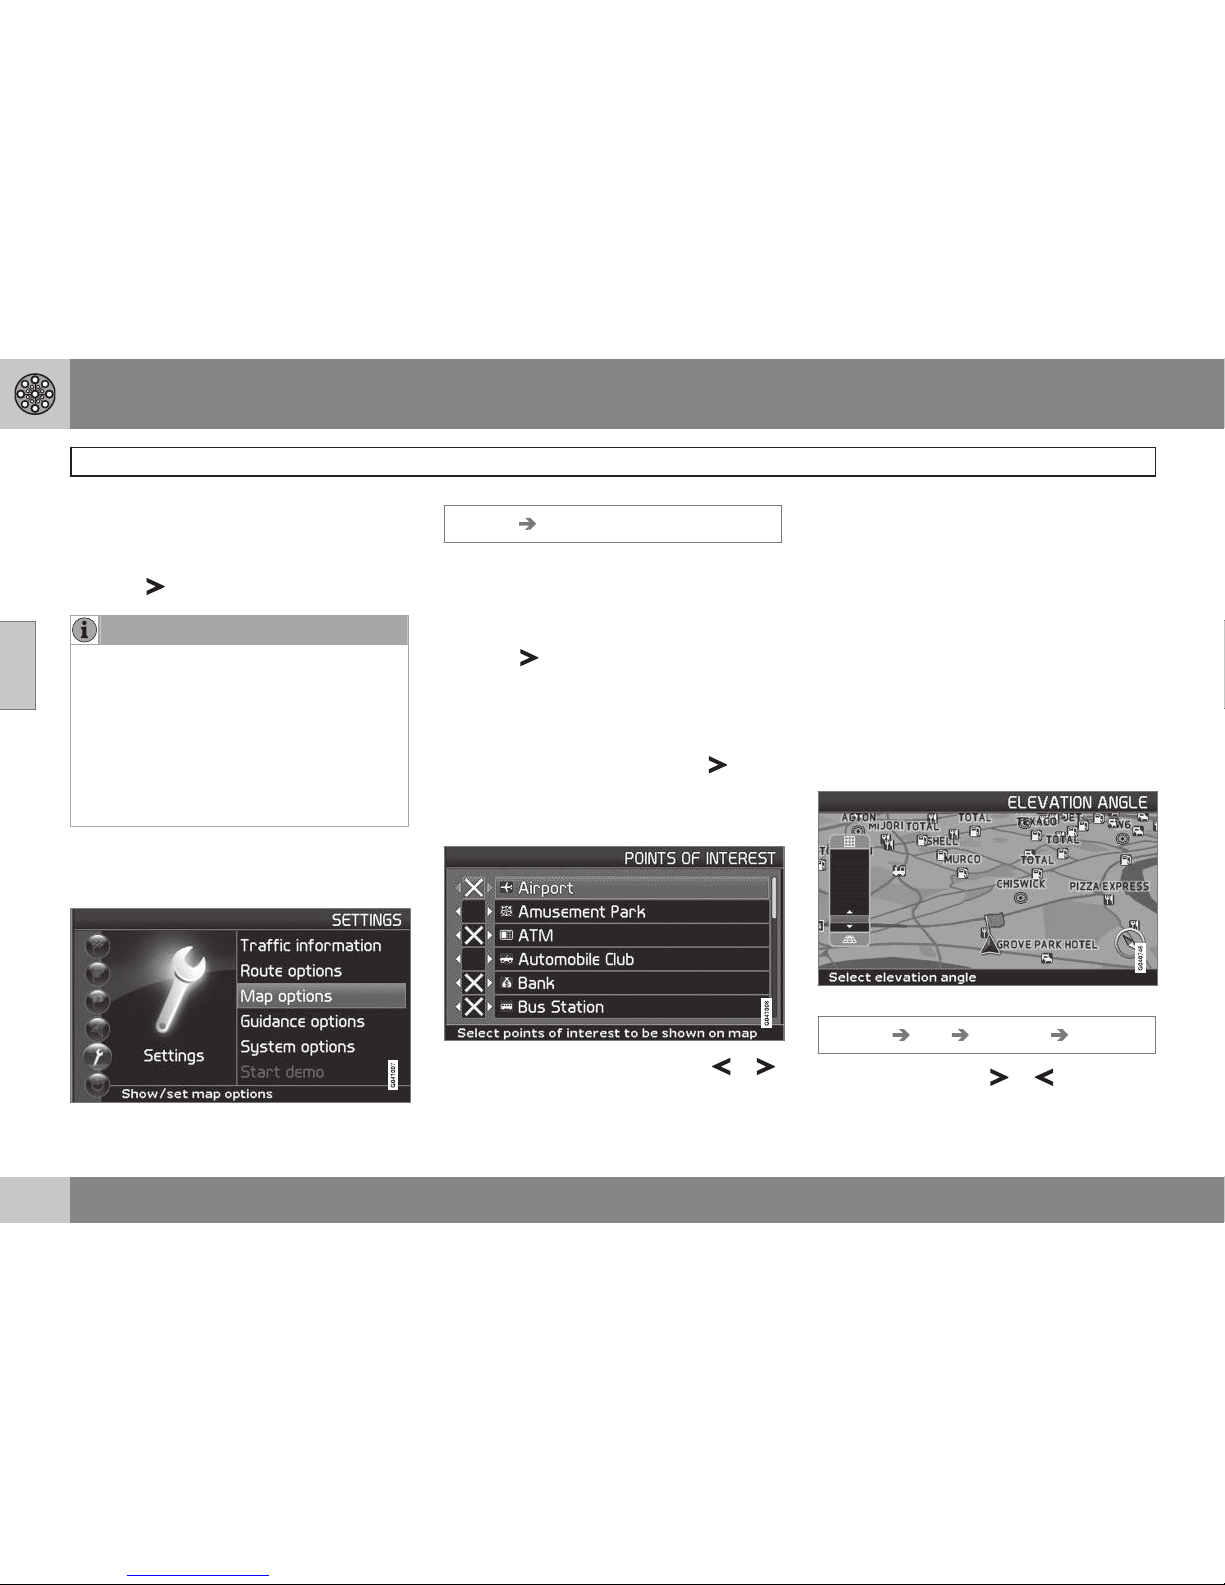
Map options
Select the way in which the map is displayed.
Settings Map options
•
Move among the functions with the
navigation control and press ENTER to
save.
POI selection
•
Press
to access a sub-menu.
– Select Show to display all POI symbols on
the map.
– Select Hide to show no POI symbols.
– Select Show selected and press to
select the symbols to be displayed on the
map. The symbols selected to be displayed
will be marked with an X.
•
Select or unselect symbols with
or
and press ENTER to save.
Map
Select Show or Hide. If the map is hidden,
the system will use an arrow for guidance.
Right map view
Choose to display the map in 2D (two dimensional - straight from above) or 3D (threedimensional - angled from above).
•
When
3D is selected, the vehicle's direc-
tion is always toward the top of the
screen.
•
When
2D is selected, choose whether 2D
Heading or 2D North is to be at the top
of the screen.
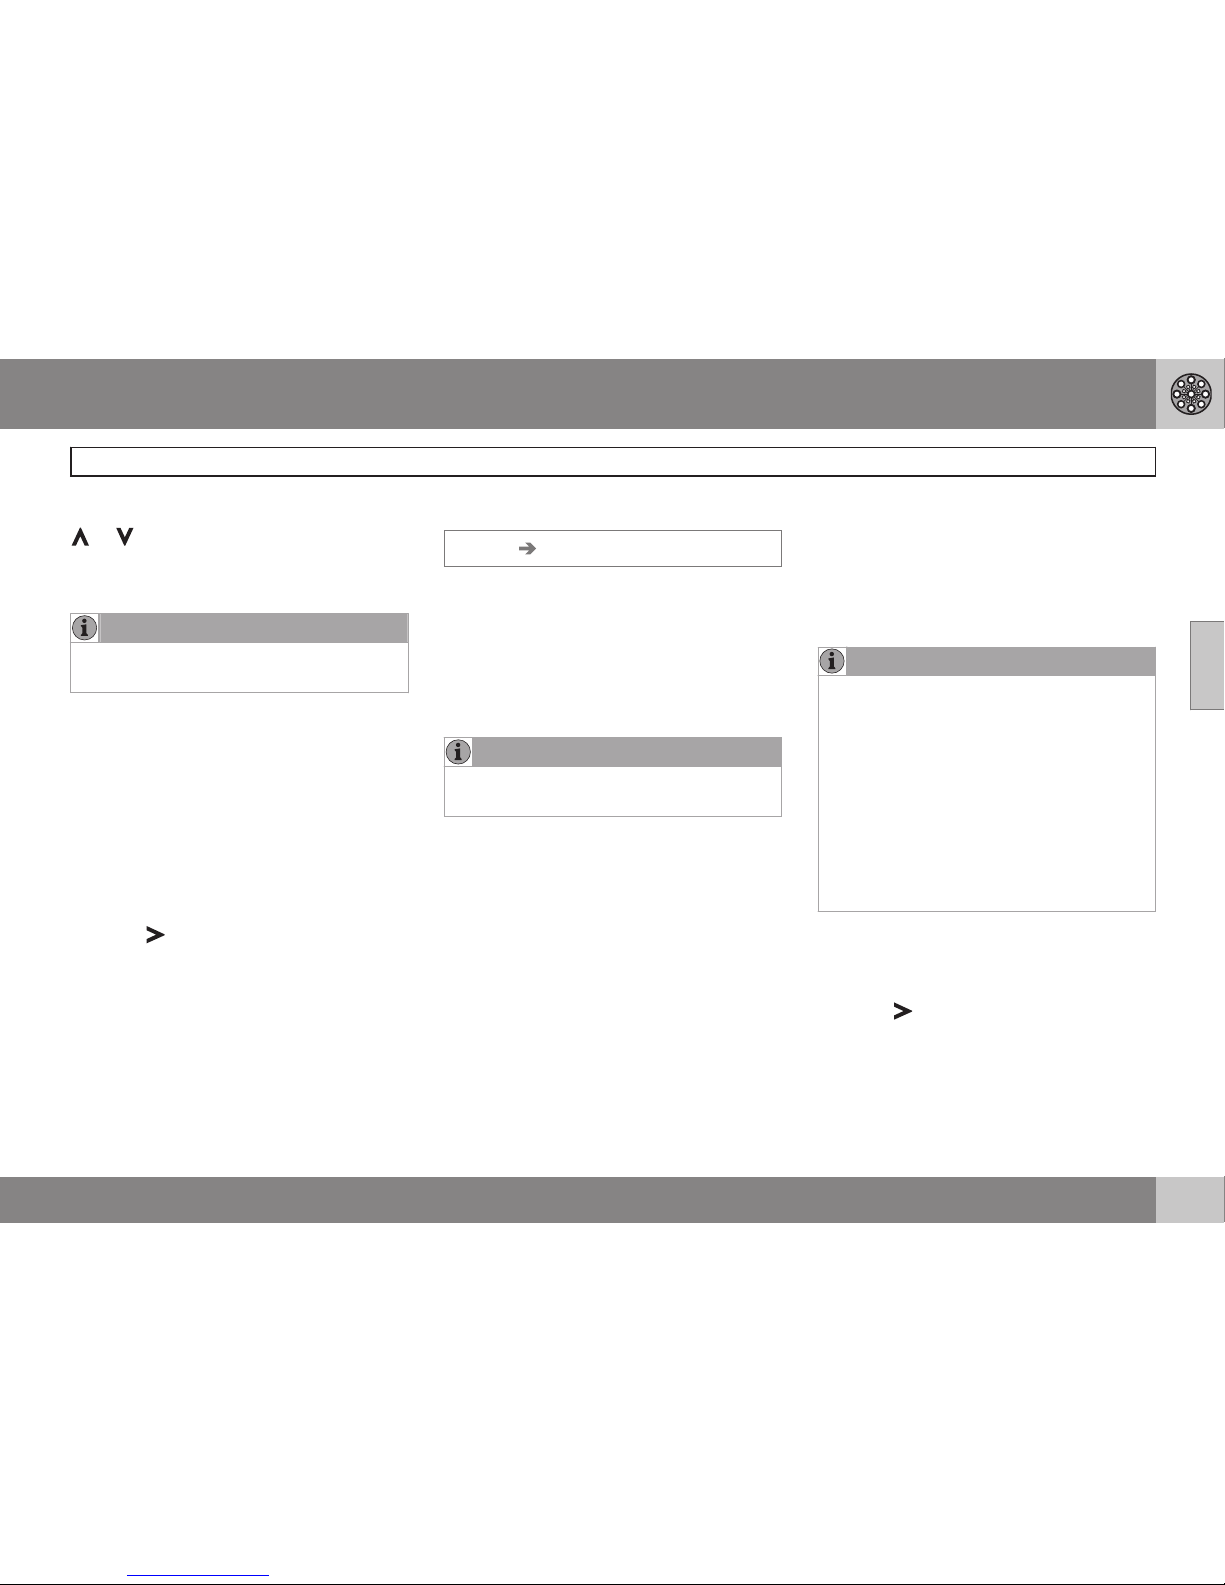
Selecting elevation angle.
Settings Map Map view 3D
After selecting 3D with or and ENTER,
the panel for selecting the elevation angle will
Page 55
03 Advanced user mode
Settings
03
53
be displayed. Select the desired angle with
or followed by ENTER and BACK.
Left map view
See the information in "Right map view."
NOTE
If 3D has been chosen for the right map,
the left map can only be viewed in 2D.
Compass
Select the way in which the compass is displayed on the screen:
Icon, Text or Hide.
Current location
Select whether or not the name of the street
on which you are currently driving will be displayed at the bottom of the screen.
Reset to default
Return to the factory setting for all map
options.
•
Press
, select OK and press ENTER.
Guiding options
Settings Guiding options
Time/dist. to go
Select RTA, ETA or Hide.
– RTA: (Remaining Time to Arrival) The time
remaining from the current location to the
destination.
– ETA: (Estimated Time of Arrival).
NOTE
The time set on the vehicle’s clock affects
the times calculated by the system.
Charge area warning
In addition to toll roads with gates or other
types of barriers, there are also other restricted roads/areas with no physical barriers for
which fees are charged.
Select
Yes/On for a warning when approach-
ing such areas or No/Off if no warning is
desired.
POI warning
The driver is alerted by an audible signal
when he/she is approaching a section of road
where accidents are common or a speed
camera.
•
Select
Yes to activate the audible signal
feature or No if no signal is desired.
Marking sections of road where accidents are
common and/or have speed cameras is
determined by state/provincial/local legislation.
NOTE
•
In certain areas, no speed limit is listed
on the map when a warning is provided for a camera.
•
Please keep in mind that the speed
limit in certain areas may have
changed and may not correspond to
the speed limit shown on the map
when a camera warning is provided.
•
The driver is always responsible for
adhering to current, applicable traffic
regulations.
Reset to default
Return to the factory setting for all guiding
options.
•
Press
, select OK and press ENTER.
Page 56
03 Advanced user mode
Settings
03
54
System options
Settings System options
•
Move among the functions with the
navigation control and press ENTER to
save settings.
•
Press BACK to undo a setting.
Guiding voice
Select a Male or Female voice.
Guiding volume
Set the volume level 1-5 for the guiding voice
or choose Off.
Language
Select the language to be used by the system.
Menu color
Select Black, Chrome or Blue.
Map color
Select Bright 1, Bright 2 or Dark .
Light colors are intended for daylight use and
dark colors are best suited for dark lighting
conditions.
Screen saver
If the screen saver is set to ON, the screen
will go blank after 30 seconds).
Help
Hide or Show context sensitive help texts at
the bottom of the screen.
Distance unit
Choose between miles or kilometers.
User mode
Toggle between Easy and Advanced modes.
Date & time info
Set date and time information.
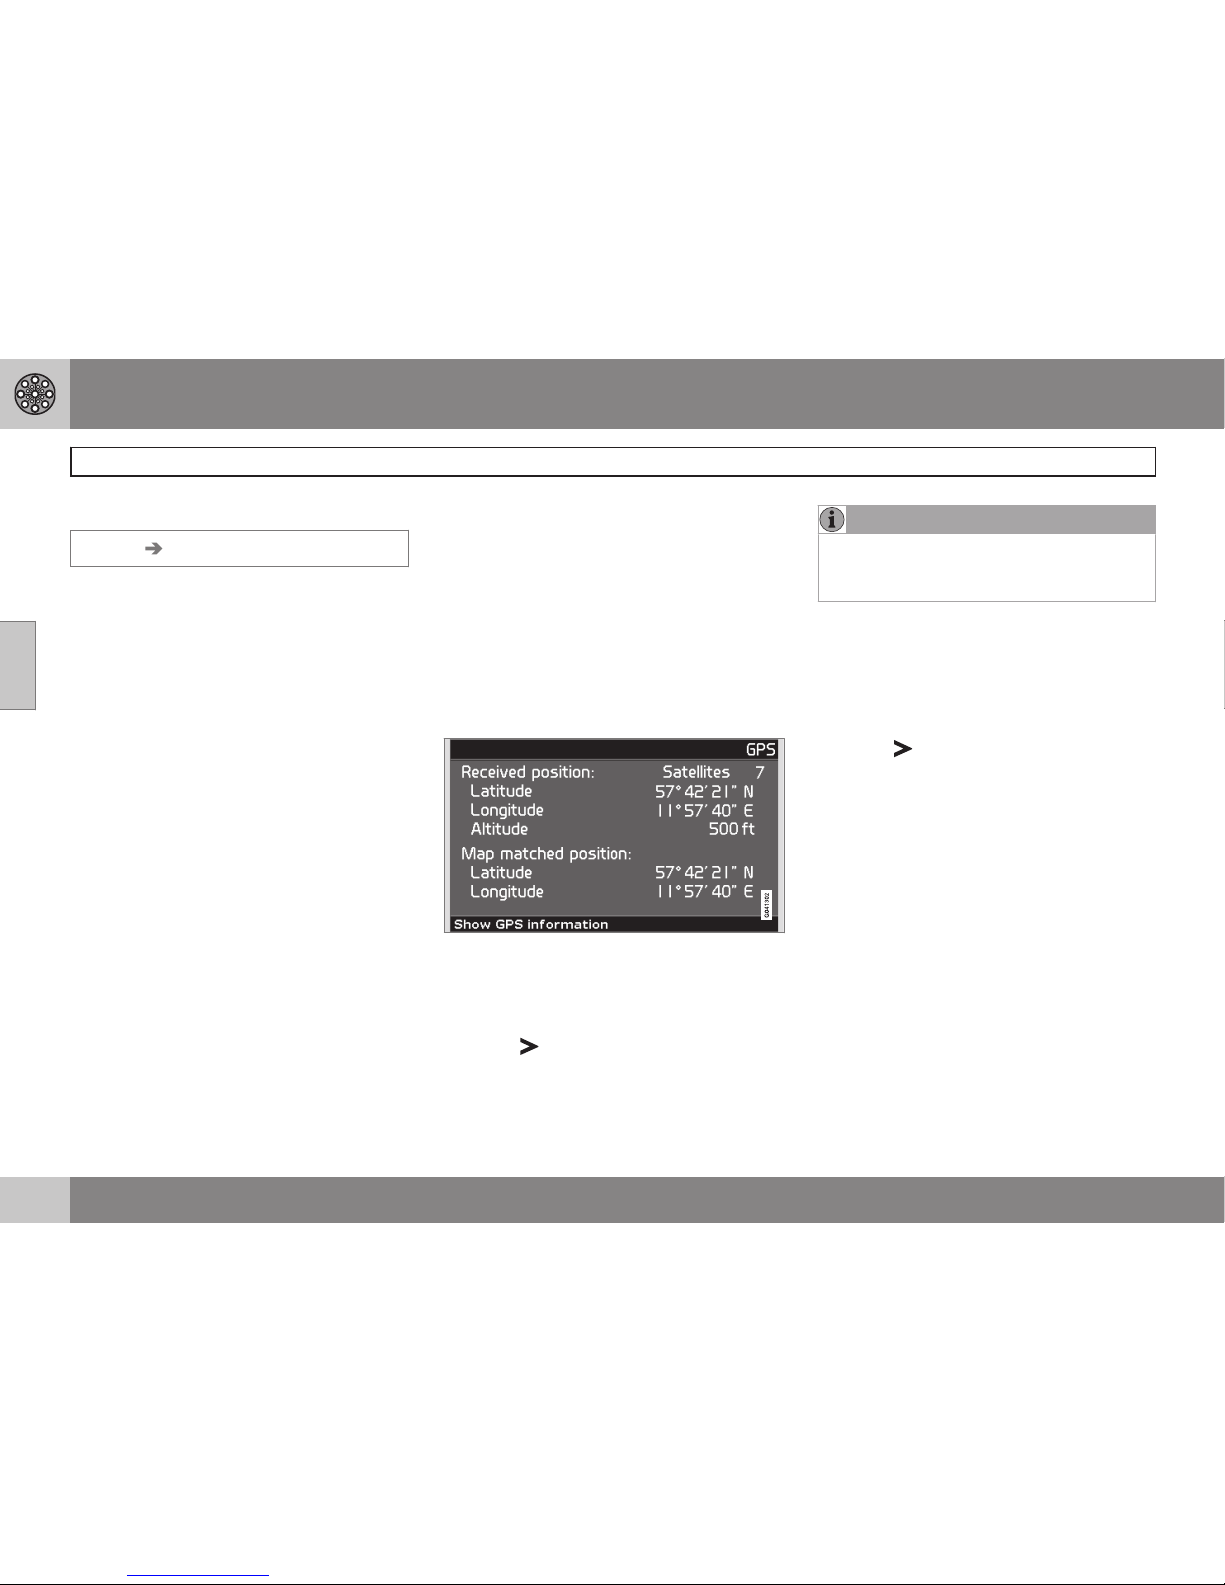
GPS Information
Shows coordinates and the altitude of the
vehicle’s current location, and displays the
number of satellites with which the system
has contact.
•
Press
NOTE
Information about altitude is shown in
steps of 30 ft. All altitudes below 150 ft are
shown as <150 ft.
About
Shows system and map information.
Reset to default
Return to the factory setting for all system
options.
•
Press
, select OK and press ENTER.
Page 57
03 Advanced user mode
System simulation
03
55
Start the demo (system simulation)
Settings Start demo
When the vehicle is at a standstill, this function offers simulated guidance to the currently
set destination. Settings can also be made
during the demonstration.
•
Use
Stop demo in Settings to stop the
simulation.
NOTE
The demonstration function can only be
used if a destination has been selected.
Page 58

G029197
56
Introduction............................................................................................. 58
Avoiding traffic problems ....................................................................... 59
Selecting information.............................................................................. 61
Reading information................................................................................ 62
Page 59

T R A F F I C I N F O R M A T I O N
Page 60
04 Traffic information
Introduction
04
58
Reception and display
Broadcast traffic information is always
received, regardless of whether the navigation system is in Easy or Advanced mode.
Settings for the way in which traffic information is presented can only be made in
Advanced mode, see page 34.
The way in which traffic information is presented is also affected by the way in which it
is broadcast.
NOTE
Traffic information is currently not available
in all areas.
The area covered by the system is being
steadily expanded.
Traffic symbols on the map
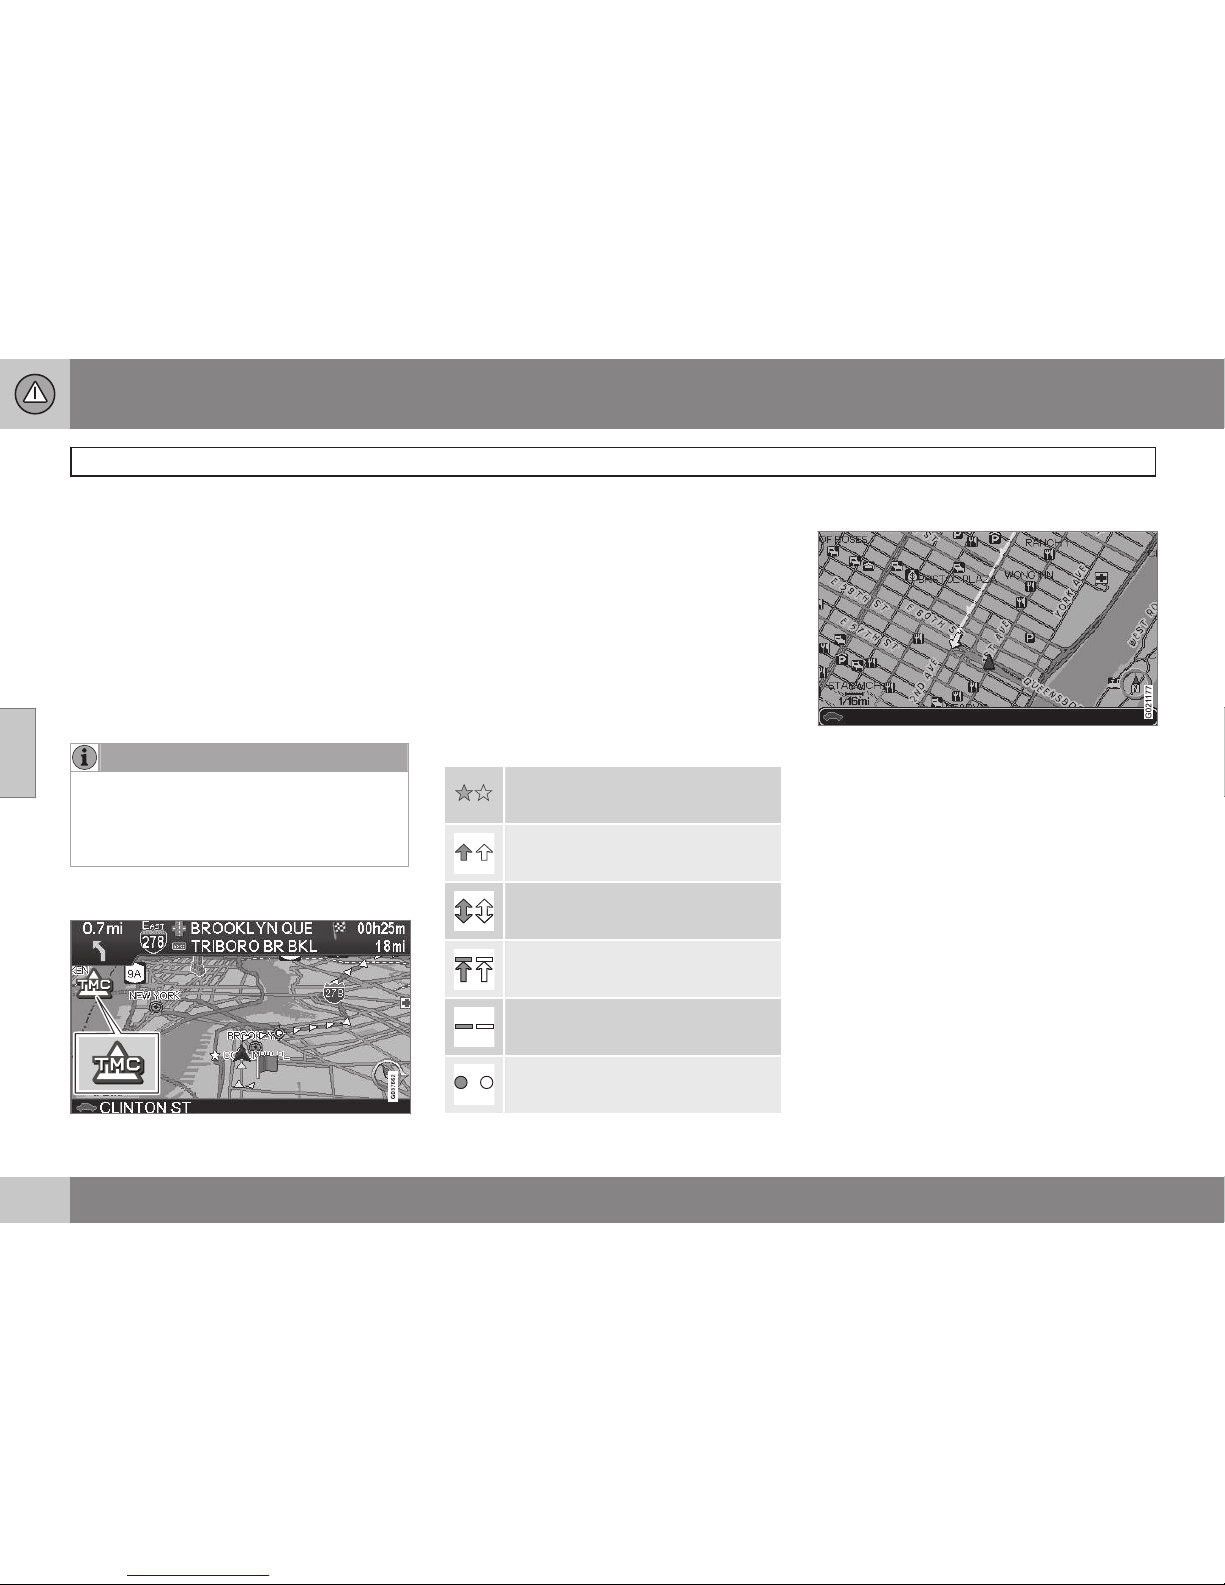
Symbol for traffic message.
When at least one traffic message has been
received for the programmed route, this will
be indicated by a symbol in the upper left
corner on the map. Use the navigation control
to scroll to the message in order to see the
location and type of problem indicated.
Disruptions in traffic are marked by symbols,
lines, and boxes. These symbols are displayed in red or yellow.
Red – important information.
Yellow – General information.
Accident
Slow-moving traffic
Slow-moving traffic in both directions
Traffic at a standstill
Local traffic message
Other information
Extent
Certain traffic messages also contain information about the extent of the traffic disruption.
For all map scales up to five miles (5 km) the
extent of the disruption is marked with a red
or yellow line along the affected road. The
length of the line indicates the extent (length)
of the disruption.
Page 61
04 Traffic information
Avoiding traffic problems
04
59
Before guidance begins
Settings Route options
When setting a new route, select whether or
not the system should take traffic problems
into account when the function Start
guidance is activated, see page 45.
1.
Select
Avoid traffic problems.
2.
Choose between
Yes and No.
Yes
The system will avoid roads where there are
traffic tie-ups to as great an extent as possible when a route is activated.
No
The system will not avoid roads where there
are traffic disruptions.
NOTE
When the system has been started, it can
take up to 15 minutes before all traffic
information for the area has been downloaded.
During your trip
Settings Traffic information
Dynamic route guidance
The system will suggest a different route if
there are better alternatives, for instance, if
traffic information indicates a tie-up along the
originally selected route.
Man/Sem-aut/Auto/Off
Select the way for the system to suggest an
alternative route.
•
Manual
An alternate route will be suggested, regardless of whether it is better or worse; select/
accept the suggested route and a new route
will be calculated.
•
Sem-auto
An alternative route will only be suggested if it
is better; select/accept the suggested route
and a new route will be calculated.
•
Auto
The system will calculate and use a new route
automatically on the condition that it is better.
•
Off
The system will not show or calculate an
alternative route.
Off
The system will not search for a better route
in the event of a traffic problem.
Messages along the route
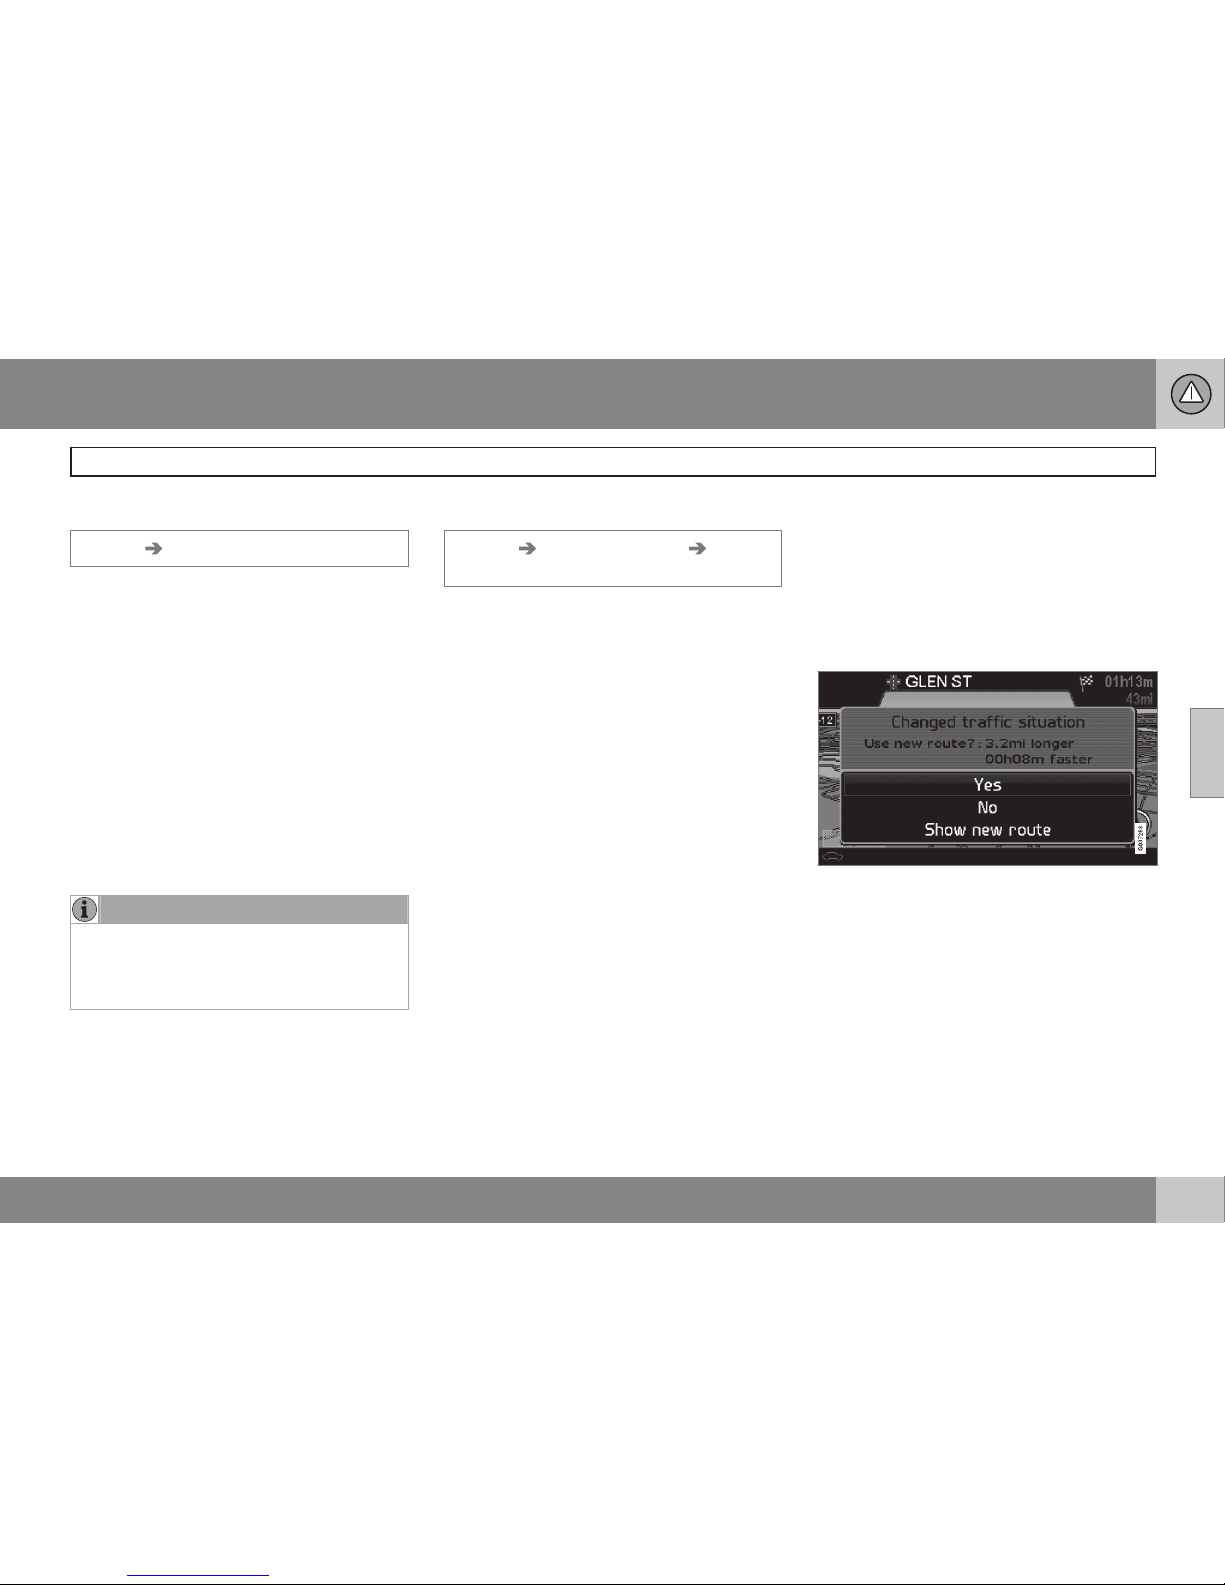
If Man/sem-aut/ has been selected and a
traffic disruption has occurred along the
route, the following will be displayed.
If there is another route that will enable you to
avoid the disruption, the difference in distance and driving time will be displayed on
the screen:
Changed traffic situation. Use new
route?: 200ft longer, 00h 09m faster.
•
Select
Yes or No.
Yes
A new route will be used around the affected
area.
Page 62
04 Traffic information
Avoiding traffic problems
04
60
No
The system will continue to guide you
through the area affected by the traffic disruption.
Show new route
This displays a map showing the new route.
Page 63
04 Traffic information
Selecting information
04
61
Traffic information selections
G021177
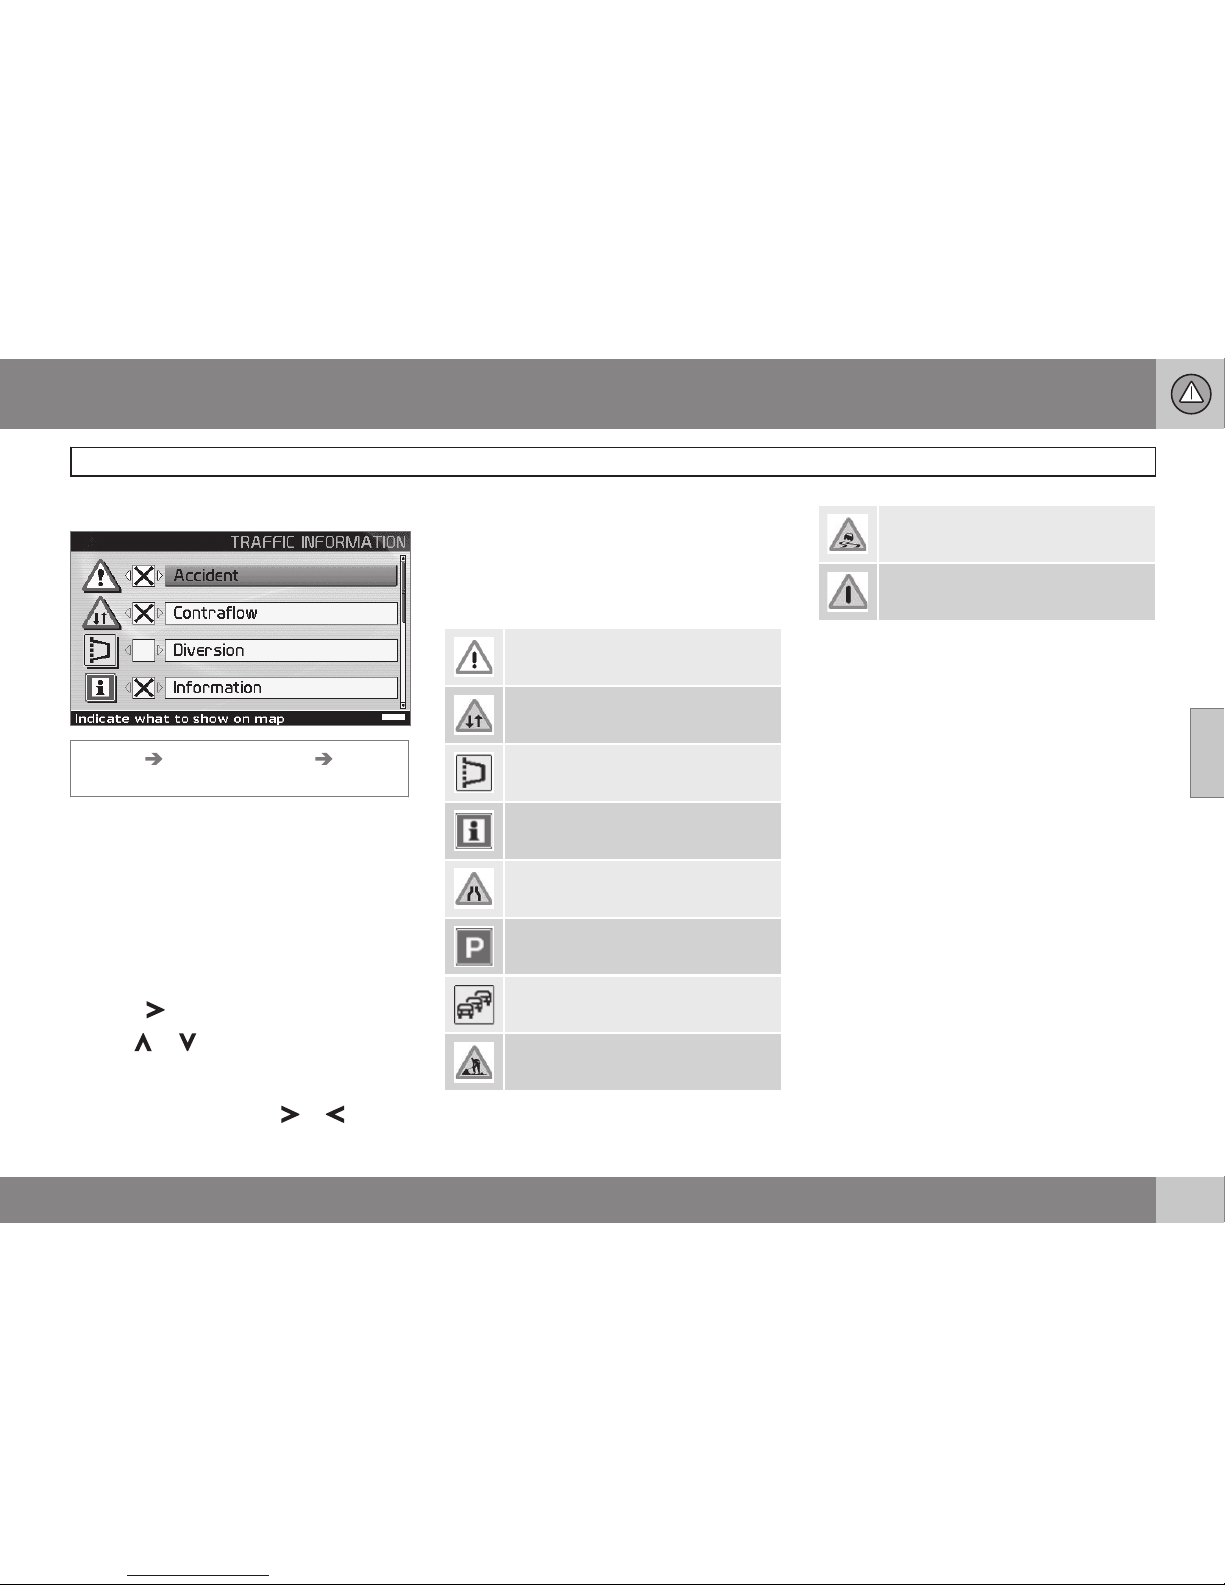
Settings Traffic information Trafficinfo. selection
Select the type of traffic information to be displayed and taken into consideration when the
system calculates a route.
Show all
All traffic information will be displayed.
Hide all
No traffic information will be displayed.
Show selected
1.
Press
to select among the symbols.
2.
Use
or to select which traffic information symbols (traffic messages) that
will be displayed on the map.
3.
Activate/deactivate with
or .
4. Confirm the settings with ENTER.
The scroll bar on the right side of the screen
indicates that there are more options in the
list than can be displayed at one time.
Traffic signs on the map
Accident
Contraflow (two-way traffic, single
lanes in each direction)
Diversion (Detour)
Information
Narrow road
Parking information
Congestion
Roadwork
Slippery road
Other hazard
Page 64
04 Traffic information
Reading information
04
62
Reading traffic messages
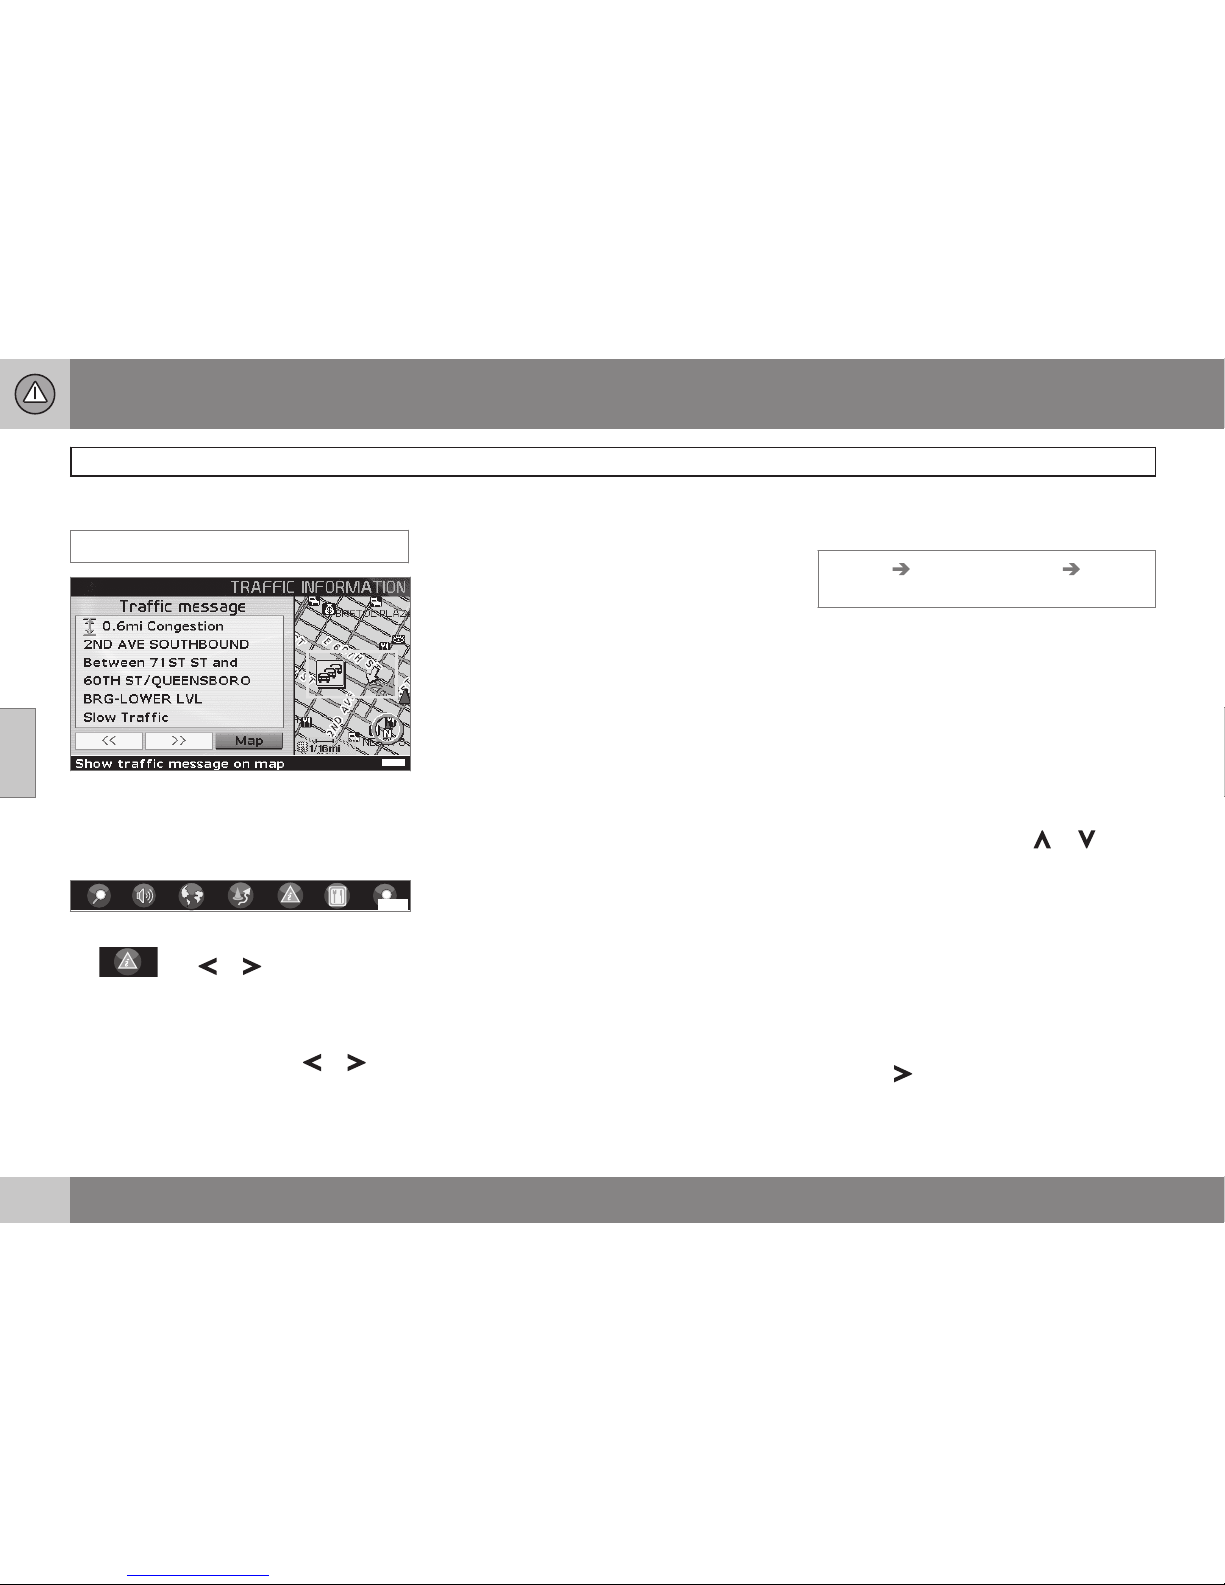
Read traffic msg.
G025966
Detailed traffic information
To read traffic messages on the screen:
1. Press ENTER in map mode for the Shortcut Menu:
G029190
2.
Select the sub-menu
Read traffic msg
G028755
G028755
with or and press ENTER,
see page 35.
> A red or yellow frame indicates the
current mesage.
3.
Scroll forward or back with
or and
press ENTER for detailed traffic information (see the example in the illustration).
4. Press BACK to return to the current messages again.
> The number of messages available for
the map area is displayed on the
screen.
Detailed information about the traffic disruption is also displayed. The extent of the disruption is shown at the top of the screen. If
the traffic disruption is on the currently
selected route, the distance to the disruption
will be displayed.
The information provided will vary, for example, duration, limitations in speed, vehicle
width and height, roads effected, etc.,
depending on the content of the message.
Scale
The current map scale determines the
amount of traffic information that can be displayed; the larger the area shown on the map,
the greater the amount of information that
can be displayed.
Station search/selecting a station for
traffic information
Settings Traffic information Search/
select station
The system searches automatically for traffic
information, but it is also possible to select a
specific station.
Search station
•
Press ENTER to search for existing stations.
Select station
1. Press ENTER to select among the existing stations.
2.
Select a station by using
or and
press ENTER.
3. Press BACK to return to the previous
screen.
Current station
Shows the station that is currently selected
for traffic information.
Reset to default
Return to the default factory settings for stations.
•
Press
, select OK and press ENTER.
Page 65
04 Traffic information
04
63
Page 66

G028760
64
Road numbers and Points of interest..................................................... 66
Page 67
S Y M B O L S O N T H E M A P
Page 68
05 Symbols on the map
Road numbers and Points of interest
05
66
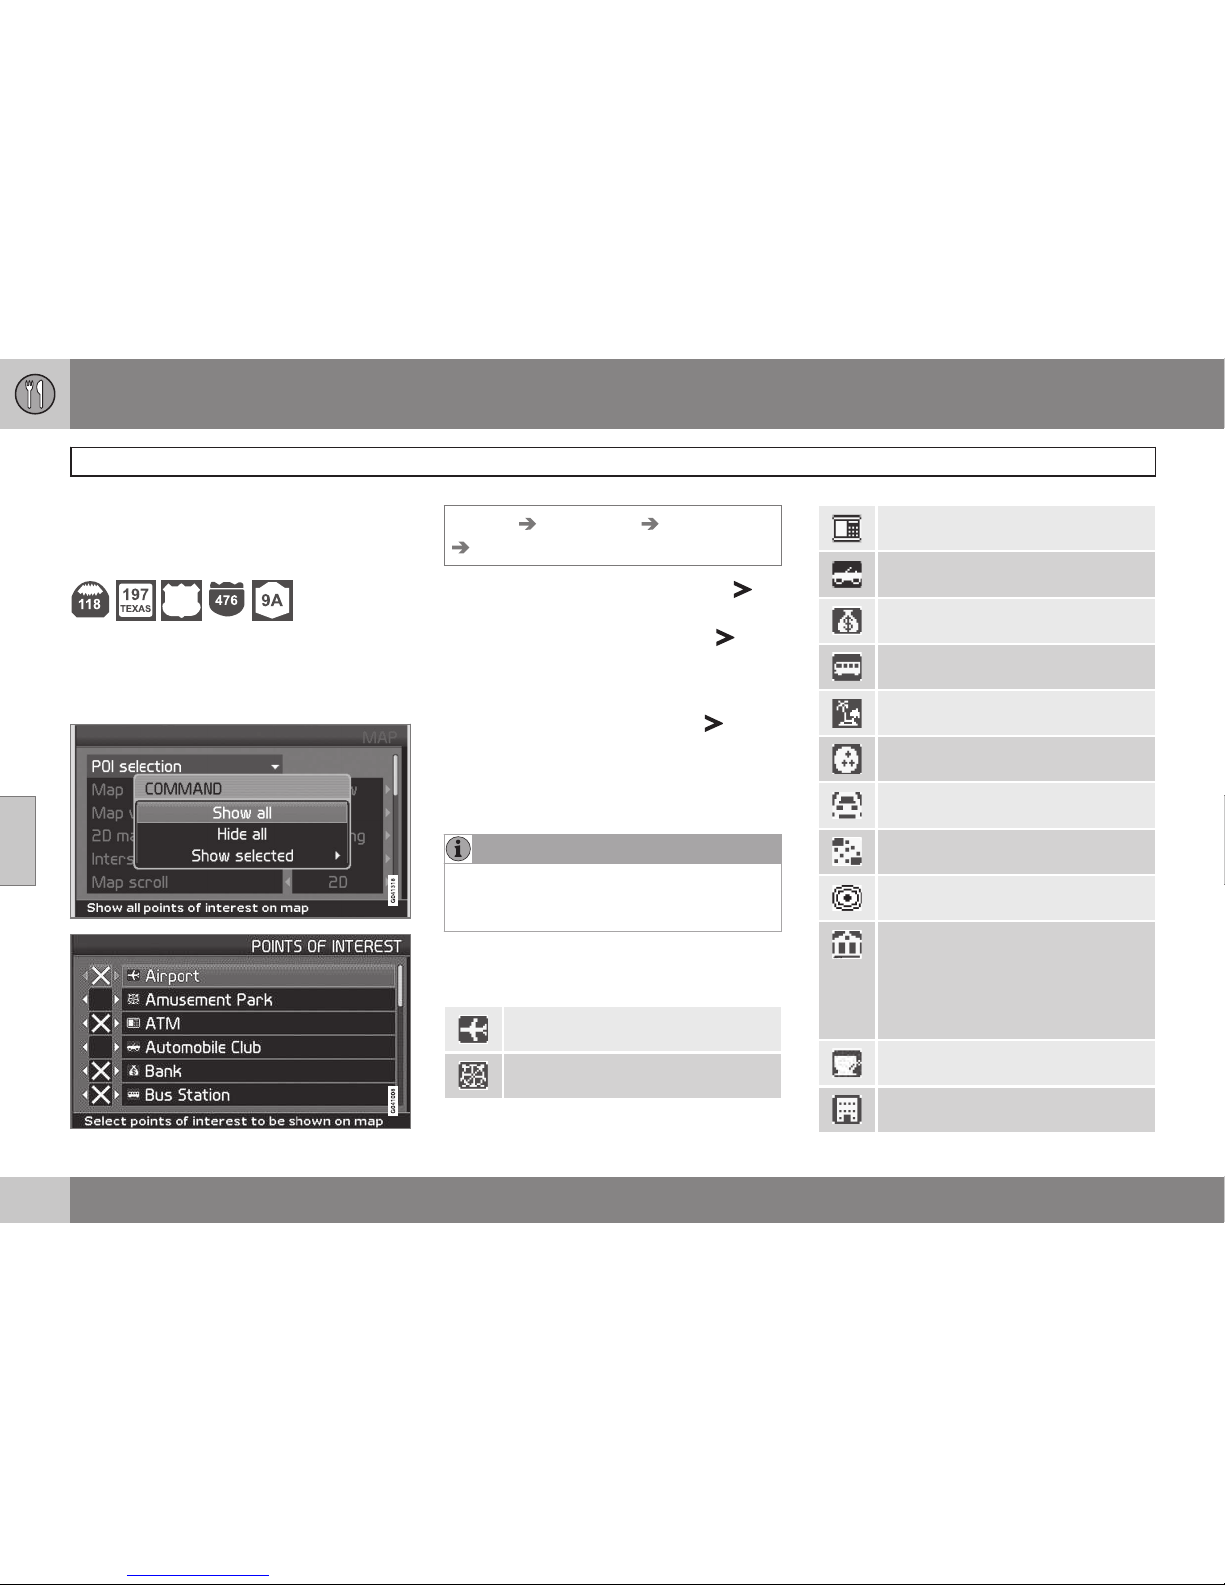
Road numbers
Local and interstate road numbers are shown
on the map.
1
Points Of Interest (POI)
Choose to show all or none of the points of
interest or select the ones to be displayed.
Settings Map options POI selection
Show selected
1.
With
POI selection marked, press – a
menu will open.
2.
Mark
Show selected and press – a
new menu will open.
3. Points of interest marked by an X will be
displayed on the map – move forward in
the list and remove the Xs with
for the
symbols that are not to be displayed.
4. Finish by pressing ENTER when all of the
choices have been made – and navigate
back out of the menu by pressing BACK.
NOTE
The symbol for a certain point of interest
may vary from one state or province to
another.
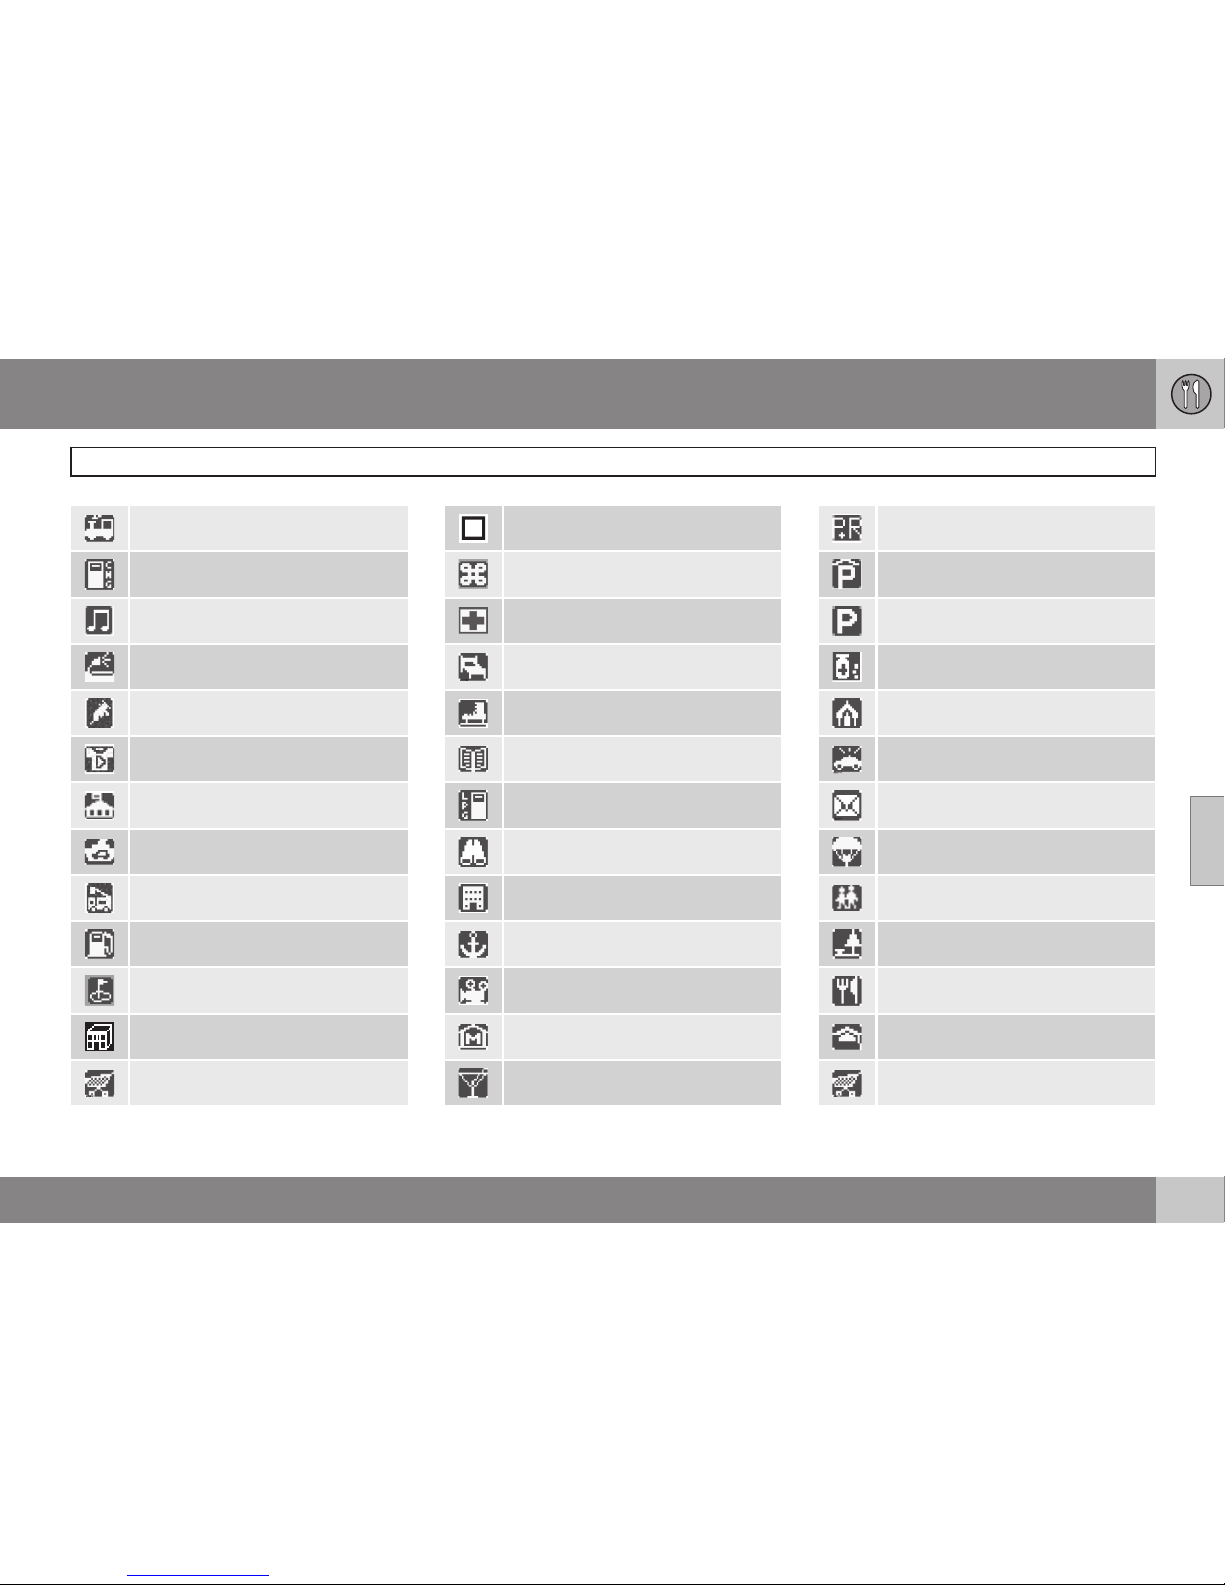
Select the points of interest to be shown on
the map.
Airport
Amusement park
ATM
Automobile club
Bank
Bus station
Beach
Bowling
Car rental
Casino
City center
City hall
Civic center
Community center
Court house
Coffe shop
Company
Page 69
05 Symbols on the map
Road numbers and Points of interest
05
}}
67
Commuter rail station
Compressed natural gas
Concert hall
Convention/exhibition center
Doctor
Dry cleaner
Embassy
Ferry terminal
Fire brigade
Gas station
Golf course
Government office
Grocery store
Hamlet
Historical monument
Hospital
Hotel
Ice skating
Library
Liquid petroleum gas
Lookout
Major companies
Marina
Movie theater
Museum
Night life/Music club
Park & ride
Parking garage
Parking
Pharmacy
Place of worship
Police station
Post office
Public sport airport
Recreation area/Park
Rest area
Restaurant
School
Shopping center
Page 70
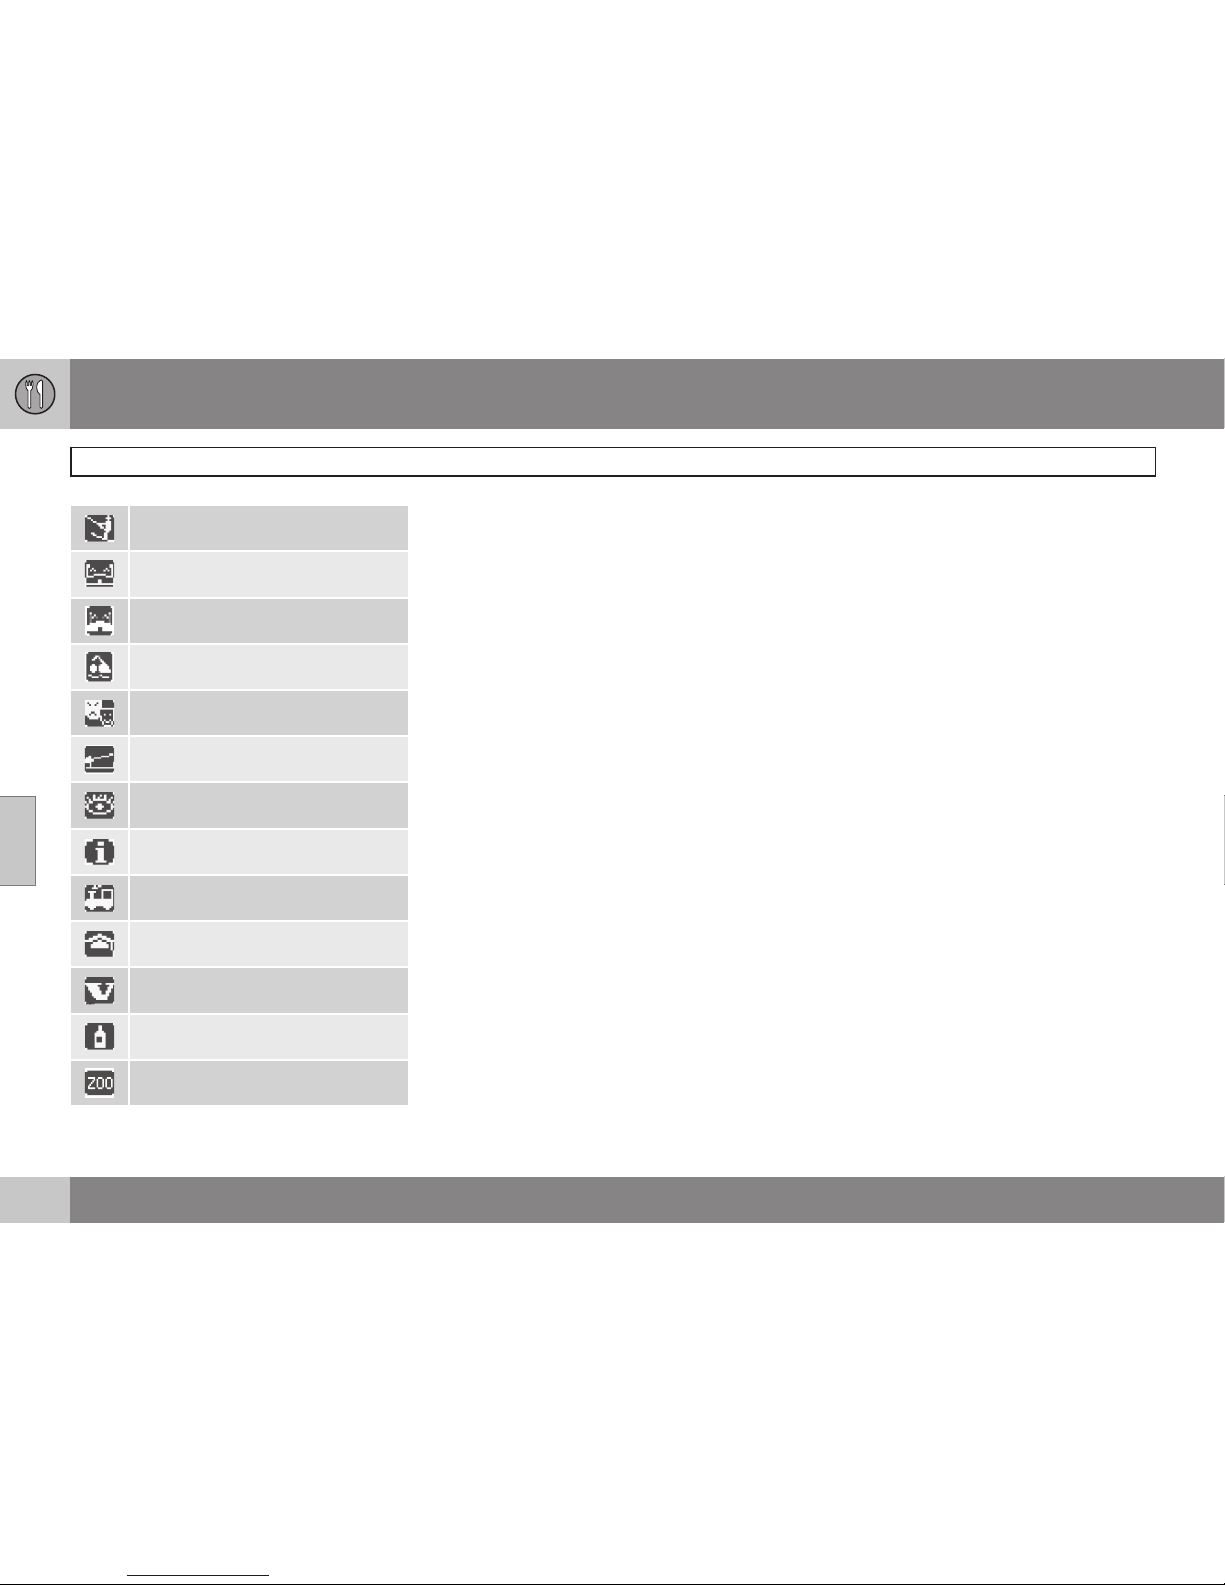
05 Symbols on the map
Road numbers and Points of interest
05
68
Ski resort
Sports complex
Stadium
Swimming pool
Theater/opera
Toll booth
A
Tourist attraction
Tourist information
Train station
University/college
Volvo retailer
Winery
Zoo
A
Cannot be selected as a destination
Page 71
05 Symbols on the map
05
69
Page 72

G028731
70
Frequently asked questions.................................................................... 72
EULA – End User License Agreement.................................................... 74
Page 73

Q U E S T I O N S & A N S W E R S
Page 74
06 Questions & answers
Frequently asked questions
06
72
The vehicle’s position on the map is
incorrect
The Global Positioning System (GPS) indicates the car’s position with an accuracy of
about 65 feet (20 meter). Accuracy may be
even less when driving on roads lying parallel
to another road, winding roads, roads on several levels and also after driving a long distance without making any distinct turns. Tall
buildings and mountains, tunnels, viaducts,
over/underpasses etc also have a negative
affect on the reception of GPS signals, which
means that the estimation of the car’s position may not be precise.
VNS does not always calculate the
fastest/shortest route.
When calculating a route, distance, width of
road, type of road, number of right or left
turns, traffic circles etc., are all taken into
account when calculating the best theoretical
route. Experience and local knowledge may,
however, lead to a better choice of route.
The VNS system chooses toll roads,
freeways, and ferries even though I
have opted to avoid them.
When calculating routes over longer distances, for technical reasons the system can
only use major roads. If you select NO for toll
roads, freeways, and ferries, they will be avoi-
ded as much as possible, but will be used if
no other reasonable alternative is available.
After being transported, the car’s
position on the map is incorrect.
If the car is transported, for example by ferry
or train, or in such a way as to impede the
reception of GPS signals, it can take up to
5 minutes to calculate the car’s new position
correctly.
The car’s position on the map is
incorrect after the car battery has been
disconnected.
If power has been cut from the GPS antenna,
it can take more than 5 minutes for the GPS
signals to be received correctly and the car’s
position to be calculated.
It may be necessary to drive ten to fifteen
miles, and make a number of turns before for
the system will function optimally.
The car symbol on the map moves
erratically after a tire change
In addition to the GPS receiver, the vehicle’s
speedometer and an onboard gyro are also
used to calculate the vehicle’s current location and direction of travel. If the spare tire is
put on the vehicle, or is a change is made
from summer to winter tires (or vice versa),
the navigation system must "learn" the new
dimensions of the tire(s). Therefore, it may be
necessary to drive for several miles, including
a number of turns, for the system to make
this adjustment.
The map image does not correspond
with actual conditions.
Factors such as the constant expansion and
rebuilding of the road network, new traffic
regulations constantly being introduced etc.,
mean that the digital map database is not
always complete. Maps information is periodically developed and updated. Additional
information is available from your Volvo
retailer.
The map scale sometimes changes
There is no detailed map information for certain areas. If this is the case, the system automatically changes the map scale.
Certain menu options are not available
Check the settings that you have made.
Select
Reset to default for the particular
option to return to the default settings.
The system indicates the route on
which I am already driving when I have
selected Start guidance or Detour
The system cannot find a better alternative to
the current route.
Page 75
06 Questions & answers
Frequently asked questions
06
73
The car symbol on screen jumps
forward or spins.
The system may need a few seconds to
sense the position and movement of the car
before you drive off. Switch off the VNS system and the ignition. Switch on the ignition
again and restart VNS, but remain at a standstill for a short time before driving off.
I am planning a long trip but do not
want to specify destinations in the cities
that I will be passing through. What is
the easiest way to set up an itinerary?
Select the final destination directly on the
map using the pointer. The system will automatically guide you to the final destination
even if you drive past intermediate destinations.
Why do I not receive all traffic
messages?
The function is not available, not fully developed, or is not available on all markets. Also,
check that the correct settings have been
made in
Route options.
The system’s map information is not
up-to-date
Contact your Volvo retailer for updated map
information.
WARNING
Navigating safely
Always use good judgment when following
navigation system guidance, and do not
follow guidance that seems contrary to
your own best judgment.
Page 76
06 Questions & answers
EULA – End User License Agreement
06
74
END-USER TERMS
The Map Data Disc ("Data") is provided for
your personal, internal use only and not for
resale. It is protected by copyright, and is
subject to the following terms and conditions
which are agreed to by you, on the one hand,
and NAVTEQ North America, LLC ("NT")
and its licensors (including their licensors and
suppliers) on the other hand.
© 2006-2014 NAVTEQ. All rights reserved.
The Data for areas of Canada includes information taken with permission from Canadian
authorities, including: © Her Majesty the
Queen in Right of Canada, © Queen’s Printer
for Ontario, © Canada Post Corporation,
GeoBase®.
NAVTEQ holds a non-exclusive license
from the United States Postal Service® to
publish and sell ZIP+4® information.
©United States Postal Service® 2005. Prices
are not established, controlled or approved
by the United States Postal Service®. The
following trademarks and registrations are
owned by the USPS: United States Postal
Service, USPS, and ZIP+4.
TERMS AND CONDITIONS
Personal Use Only
You agree to use this Data for the solely personal, non-commercial purposes for which
you were licensed, and not for service
bureau, time-sharing or other similar purposes. Accordingly, but subject to the restrictions set forth in the following paragraphs,
you may copy this Data only as necessary for
your personal use to (i) view it, and (ii) save it,
provided that you do not remove any copyright notices that appear and do not modify
the Data in any way.
You agree not to otherwise reproduce, copy,
modify, decompile, disassemble or reverse
engineer any portion of this Data, and may
not transfer or distribute it in any form, for any
purpose, except to the extent permitted by
mandatory laws.
You may transfer the Data and all accompanying materials on a permanent basis if you
retain no copies and the recipient agrees to
these End-User Terms. Data provided in
multi-disc sets may not be transferred or sold
on a divided or single disc basis.
Restrictions
Except where you have been specifically
licensed to do so by NT and without limiting
the preceding paragraph, you may not (a) use
this Data with any products, systems, or
applications installed or otherwise connected
to or in communication with vehicles, capable
of vehicle navigation, positioning, dispatch,
real time route guidance, fleet management
or similar applications; or (b) with or in communication with any positioning devices or
any mobile or wireless-connected electronic
or computer devices, including without limitation cellular phones, palmtop and handheld
computers, pagers, and personal digital
assistants or PDAs.
Warning
The Data may contain inaccurate or incomplete information due to the passage of time,
changing circumstances, sources used and
the nature of collecting comprehensive geographic data, any of which may lead to incorrect results.
No Warranty
This Data is provided to you "as is," and you
agree to use it at your own risk. NT and its
licensors (and their licensors and suppliers)
make no guarantees, representations or warranties of any kind, express or implied, arising
by law or otherwise, including but not limited
to, content, quality, accuracy, completeness,
effectiveness, reliability, fitness for a particular purpose, usefulness, use or results to be
obtained from this Data, or that the Data or
server will be uninterrupted or error-free.
Page 77
06 Questions & answers
EULA – End User License Agreement
06
}}
75
Disclaimer of Warranty
NT AND ITS LICENSORS (INCLUDING THEIR LICENSORS AND SUPPLIERS) DISCLAIM ANY WARRANTIES, EXPRESS OR IMPLIED, OF
QUALITY, PERFORMANCE, MERCHANTABILITY, FITNESS FOR A
PARTICULAR PURPOSE OR NONINFRINGEMENT.
Some States, Territories and Countries do not
allow certain warranty exclusions, so to that
extent the above exclusion may not apply to
you.
Disclaimer of Liability
NT AND ITS LICENSORS (INCLUDING THEIR LICENSORS AND SUPPLIERS) SHALL NOT BE LIABLE TO
YOU IN RESPECT OF ANY CLAIM,
DEMAND OR ACTION, IRRESPECTIVE OF THE NATURE OF THE
CAUSE OF THE CLAIM, DEMAND
OR ACTION ALLEGING ANY LOSS,
INJURY OR DAMAGES, DIRECT OR
INDIRECT, WHICH MAY RESULT
FROM THE USE OR POSSESSION
OF THE INFORMATION; OR FOR
ANY LOSS OF PROFIT, REVENUE,
CONTRACTS OR SAVINGS, OR
ANY OTHER DIRECT, INDIRECT,
INCIDENTAL, SPECIAL OR CONSEQUENTIAL DAMAGES ARISING
OUT OF YOUR USE OF OR INABILITY TO USE THIS INFORMATION,
ANY DEFECT IN THE INFORMATION, OR THE BREACH OF THESE
TERMS OR CONDITIONS,
WHETHER IN AN ACTION IN CONTRACT OR TORT OR BASED ON A
WARRANTY, EVEN IF NT OR ITS
LICENSORS HAVE BEEN ADVISED
OF THE POSSIBILITY OF SUCH
DAMAGES.
Some States, Territories and Countries do not
allow certain liability exclusions or damages
limitations, so to that extent the above may
not apply to you.
Export Control
You agree not to export from anywhere any
part of the Data provided to you or any direct
product thereof except in compliance with,
and with all licenses and approvals required
under, applicable export laws, rules and regulations.
Entire Agreement
These terms and conditions constitute the
entire agreement between NT (and its licensors, including their licensors and suppliers)
and you pertaining to the subject matter
hereof, and supersedes in their entirety any
and all written or oral agreements previously
existing between us with respect to such
subject matter.
Governing Law
The above terms and conditions shall be governed by the laws of the State of Illinois, without giving effect to (i) its conflict of laws provisions, or (ii) the United Nations Convention for
Contracts for the International Sale of Goods,
which is explicitly excluded.
You agree to submit to the jurisdiction of the
State of Illinois for any and all disputes,
claims and actions arising from or in connection with the Data provided to you hereunder.
Government End Users
If the Data is being acquired by or on behalf
of the United States government or any other
entity seeking or applying rights similar to
those customarily claimed by the United
States government, this Data is a "commercial item" as that term is defined at 48 C.F.R.
("FAR") 2.101, is licensed in accordance with
these End User Terms, and each copy of the
Page 78
06 Questions & answers
EULA – End User License Agreement
06
76
Data delivered or otherwise furnished shall be
marked and embedded as appropriate with
the following "Notice of Use," and shall be
treated in accordance with such Notice:
NOTICE OF USE
CONTRACTOR (MANUFACTURER/
SUPPLIER) NAME: NAVTEQ
CONTRACTOR (MANUFACTURER/
SUPPLIER) ADDRESS: 222 Merchan-
dise Mart Plaza, Suite 900, Chicago, Illinois
60654
This Data is a commercial item as defined in
FAR 2.101 and is subject to the End User
Terms under which this Data was provided.
© 2006-2014 NAVTEQ – All rights reserved.
If the Contracting Officer, federal government
agency, or any federal official refuses to use
the legend provided herein, the Contracting
Officer, federal government agency, or any
federal official must notify NAVTEQ prior to
seeking additional or alternative rights in the
Data.
Page 79
06 Questions & answers
06
77
Page 80

07 Index
07
78
1, 2, 3 ...
2D or 3D..................................................... 30
A
Advanced/Easy modes, switching
between..................................................... 18
Advanced mode
current position..................................... 49
guidance............................................... 34
guiding options..................................... 53
introduction........................................... 34
itinerary................................................. 45
last 20 (destinations)............................. 43
longitude/latitude.................................. 44
map/route............................................. 34
map options.......................................... 52
map scroll menu................................... 37
menu selections.............................. 19, 38
point on map........................................ 43
points of interest................................... 35
return trip.............................................. 43
route options........................................ 51
selecting an address............................. 40
shortcut menu....................................... 34
stored locations.................................... 42
system options..................................... 54
Audible signal
camera.................................................. 53
speed camera....................................... 53
Avoid
traffic disruptions.................................. 59
C
Camera
audible signal........................................ 53
Camera (Audible signal)............................. 53
Compass................................................... 18
D
Demo (system simulation)......................... 55
Destination
return trip.............................................. 46
Detours...................................................... 35
Display
appearance..................................... 16, 17
Distance unit.............................................. 30
DVD
care....................................................... 11
updating the system with..................... 11
E
Easy/Advanced modes, switching
between..................................................... 18
Easy mode
guidance............................................... 24
guiding voice........................................ 30
guiding volume..................................... 30
introduction........................................... 24
language............................................... 30
last 20 (destinations)............................. 27
map & menu colors............................... 30
map scale/current route....................... 24
menu selections.............................. 19, 25
point on map........................................ 28
remove destination............................... 29
selecting an address............................. 26
shortcut menu....................................... 24
show destination.................................. 29
End-User terms......................................... 74
Extent......................................................... 58
Page 81
07 Index
07
79
F
Frequently asked questions....................... 72
G
Guidance................................................... 24
voice..................................................... 17
Guiding options......................................... 53
I
Itinerary
next destination in................................ 48
removing destinations from.................. 46
setting/changing................................... 45
M
Main unit.................................................... 13
contents of............................................ 11
Map
options.................................................. 52
Map, symbols for points of interest........... 66
Map mode................................................... 9
Map scale.................................................. 24
Map scroll menu........................................ 37
Menu selections
in Advanced mode................................ 38
in Easy mode........................................ 25
overview................................................ 19
Modes
switching between................................ 18
N
Navigation system controls................. 13, 14
O
On/Off.......................................................... 9
P
Points of interest............................ 27, 35, 41
symbols on the map............................. 66
Q
Questions & Answers................................. 72
R
Remote key................................................ 14
Return trip, guidance................................. 43
Road numbers, symbols for...................... 66
Roads, unverified....................................... 18
Route options............................................ 51
S
Screen........................................................ 13
appearance..................................... 16, 17
care....................................................... 11
Scroll menu................................................ 24
Search/select stations for traffic informa-
tion............................................................. 62
Searching via a point on the map.............. 43
Selecting an address
in Advanced mode................................ 40
in Easy mode........................................ 26
Page 82

07 Index
07
80
Shortcut menu
in Advanced mode................................ 34
in Easy mode........................................ 24
Speakers.................................................... 13
Stations for traffic information
search/select........................................ 62
Stored locations
Advanced mode................................... 42
Surveillance......................................... 35, 37
Symbol - Do not disturb............................ 14
Symbols
traffic information............................ 58, 61
Symbols on the map.................................. 66
System options.......................................... 54
System simulation (demo)......................... 55
T
Traffic disruptions
avoid..................................................... 59
Traffic information................................ 24, 35
selections.............................................. 61
Traffic signs............................................... 61
Traffic symbols.......................................... 58
U
Unverified roads........................................ 18
Updating the system................................. 11
User modes, switching between............... 30
V
Voice
guidance............................................... 17
Volvo Navigation System
end-user terms..................................... 74
GPS receiver......................................... 13
infrared port.......................................... 13
main unit............................................... 13
Navigation control................................ 13
questions & answers............................ 72
route options........................................ 51
screen................................................... 13
turning on and off................................... 9
Z
Zip code
searching with, Advanced mode.......... 41
searching with, Easy mode................... 27
Page 83

Page 84

Volvo Car Corporation TP 16521 USA & Canada AT 1320, Printed in Sweden, Göteborg 2013, Copyright © 2000-2013 Volvo Car Corporation
 Loading...