

Page 1

QUICK GUIDE
Page 2
VÄLKOMMEN!
This Quick Guide describes a selection of the functions in your Volvo. More detailed owner's information is available in the car, in the app and
on the web.
THE CAR'S CENTRE DISPLAY
The owner's manual is available in the car's centre display, where it can be
accessed via the top view.
MOBILE APP
The owner's manual is available as an app (Volvo Manual) for smartphones and tablets. The app also contains video tutorials for selected
functions.
VOLVO'S SUPPORT SITE
The Volvo Cars support site (support.volvocars.com) contains manuals and
video tutorials, as well as additional information and assistance for your
Volvo and your car ownership.
PRINTED INFORMATION
There is a supplement to the owner's manual in the glovebox that contains information on fuses and specifications, as well as a summary of
important and practical information. A printed owner's manual and associated supplement can be ordered.
Page 3

CONTENTS
01. GET TO KNOW YOUR VOLVO
In this chapter you can find information about how to get started with your Volvo and you get an overview of the
inside and outside as well as the centre display.
02. CHARGING
This chapter describes the car's charging status, how you operate the charging unit, and the different symbols in the
driver display.
03. INTERIOR AND CONNECTIONS
Here you can read about seat settings, steering wheel buttons and levers, the car's passenger compartment climate
control, Internet connection, Bluetooth connections, etc.
04. THE CENTRE DISPLAY'S VIEWS
Here you can find information on the centre display's various main views. You can use them to control many of the
car's functions.
05. SMART DRIVING
This chapter describes the various functions that the car has to support your driving, as well as some tips for how
you can enjoy a purer driving experience.
06. VOICE RECOGNITION
Here you can find the various commands/phrases you can use with the car's voice recognition system.
07. SPECIAL TEXTS
Warning, important and note texts, which must be read.
Options in the Quick Guide are highlighted with an asterisk*.
Page 4
01
Page 5

GETTING STARTED
To get started with your Volvo in the best possible way there are several
functions, terms and tips that can be useful to know about.
Volvo ID
Volvo ID is a personal ID that gives access to several services online1.
Some examples are Volvo On Call*, map services, a personal login at
volvocars.com, and the option to book service and repair. You can create a Volvo ID via volvocars.com, the Volvo On Call app or directly in
your car.
Sensus
Sensus is the car's intelligent interface and covers all solutions in the
car associated with entertainment, Internet connection, navigation* and
information services. It is Sensus that makes possible the communication between you, the car and the outside world.
Volvo On Call*
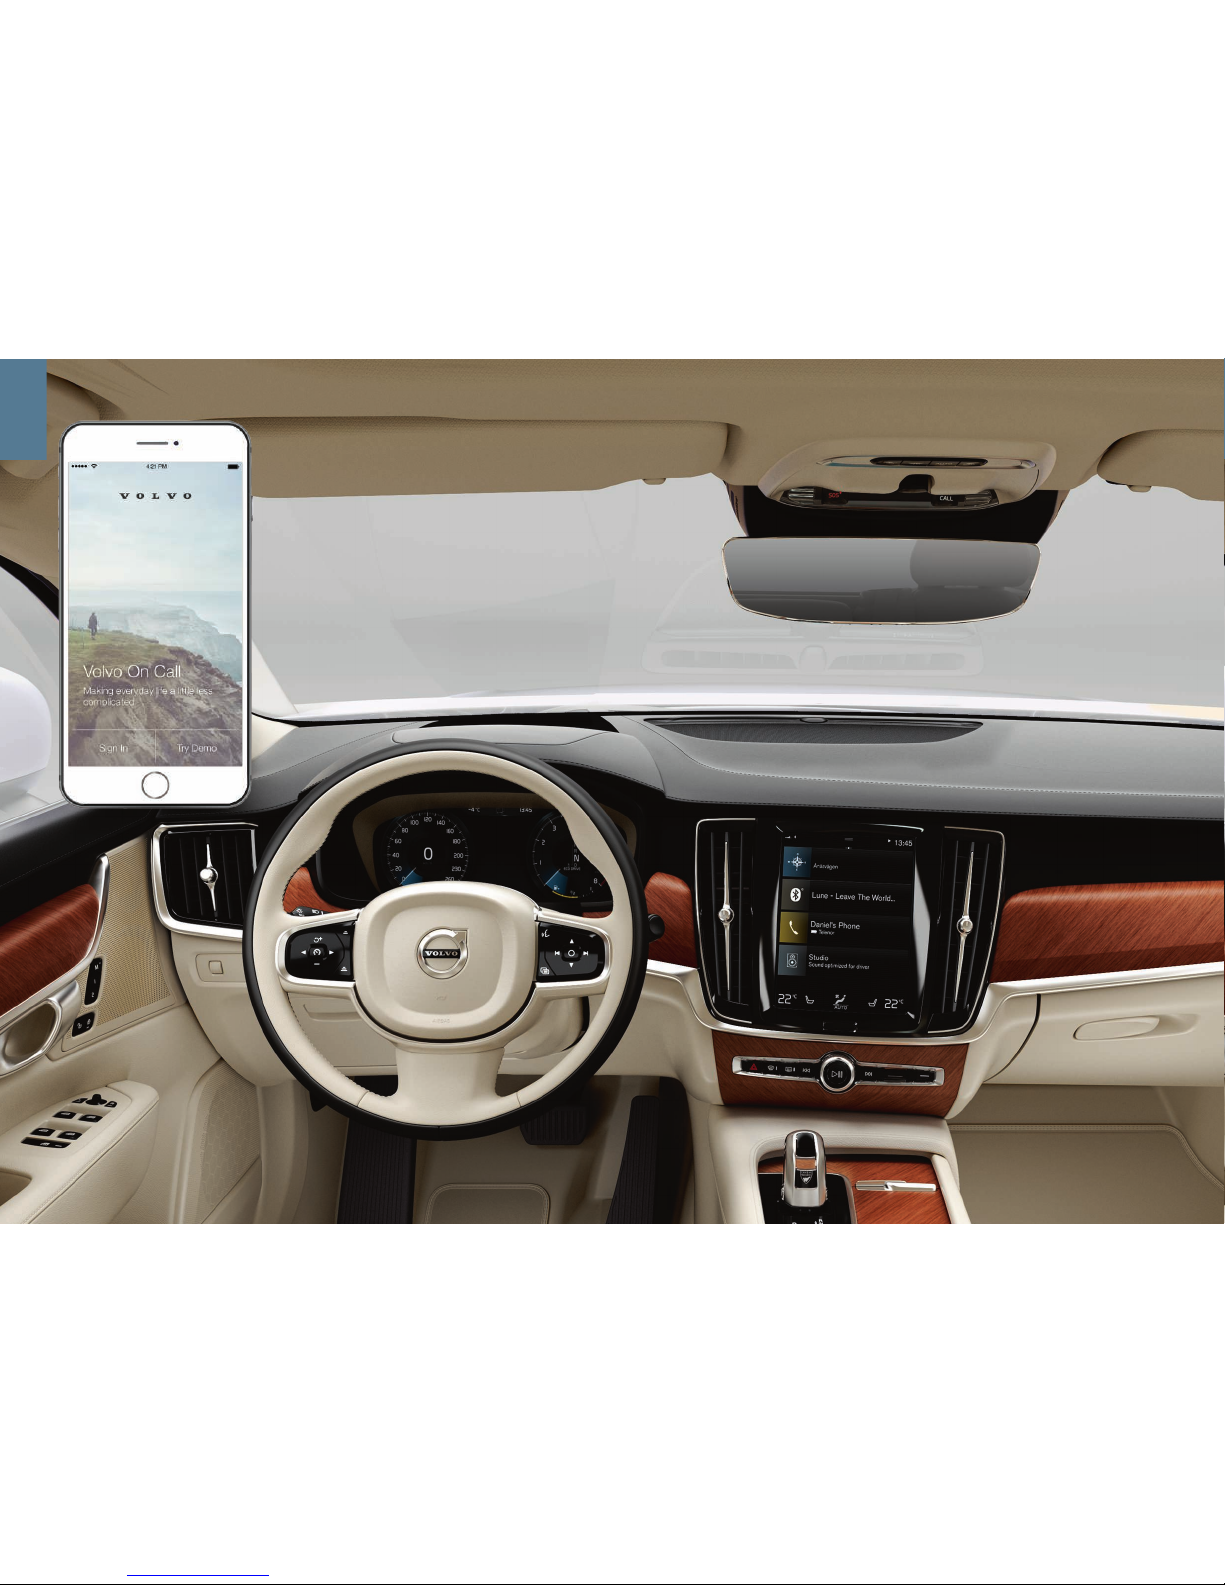
Volvo On Call is a built-in assistance system with an app that gives you
the facility to control your Volvo remotely. With the Volvo On Call app
you can, amongst other things, precondition the car before driving,
lock/unlock your car, see where it is parked, log journeys and receive
theft warnings. Download the Volvo On Call app to get started.
Volvo On Call also includes roadside assistance and emergency assistance using the ON CALL and SOS buttons in the car's roof console.
Driver profiles
Many of the settings made in the car can be adapted according to the
driver's personal preferences and can then be saved in one or more
driver profiles. Each key can be linked to a driver profile. See the section Top view in this Quick Guide for more information on driver profiles.
Preconditioning before you travel
Make it a habit to always precondition the car before departure. It
increases the range and reduces the wear on the car, while at the same
time you get a comfortable passenger compartment temperature. From
the centre display's climate view, select the
Parking climate tab or acti-
vate the function via the Volvo On Call app.
1
The services vary depending on the car's configuration and market.
01
Page 6
01
Page 7

OVERVIEW, EXTERIOR
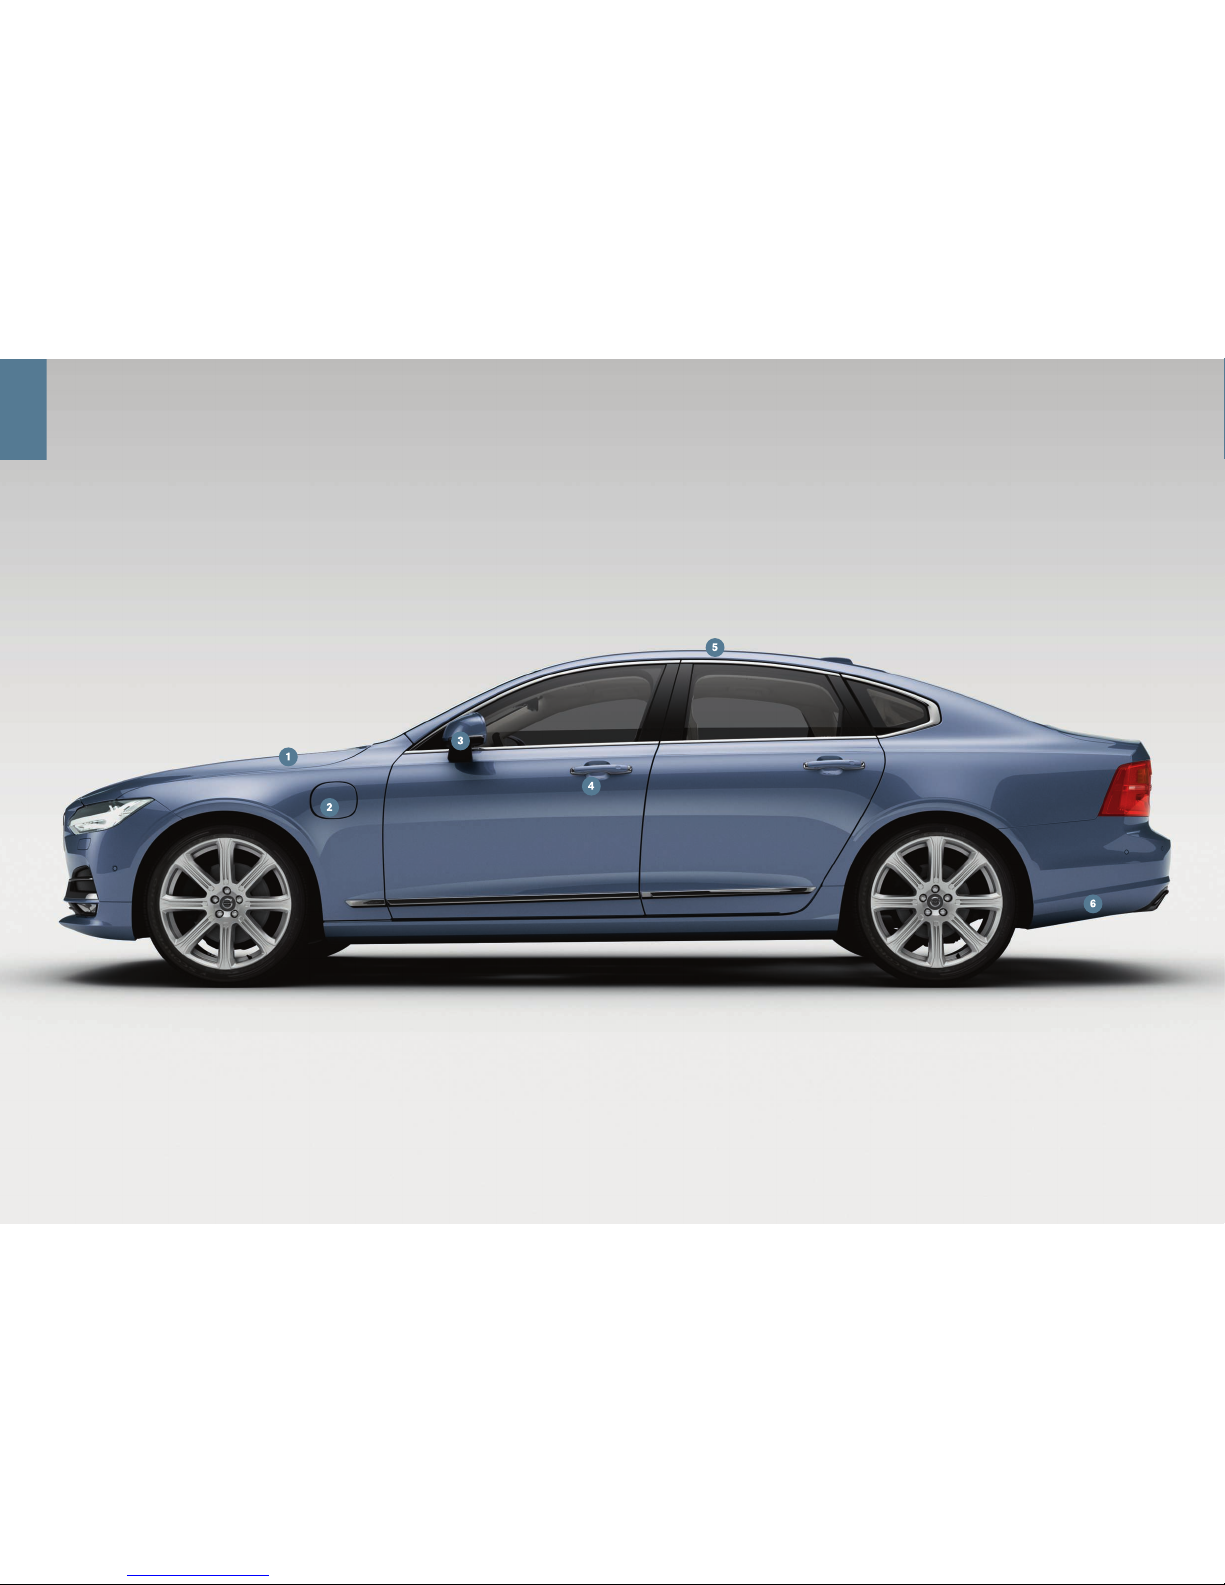
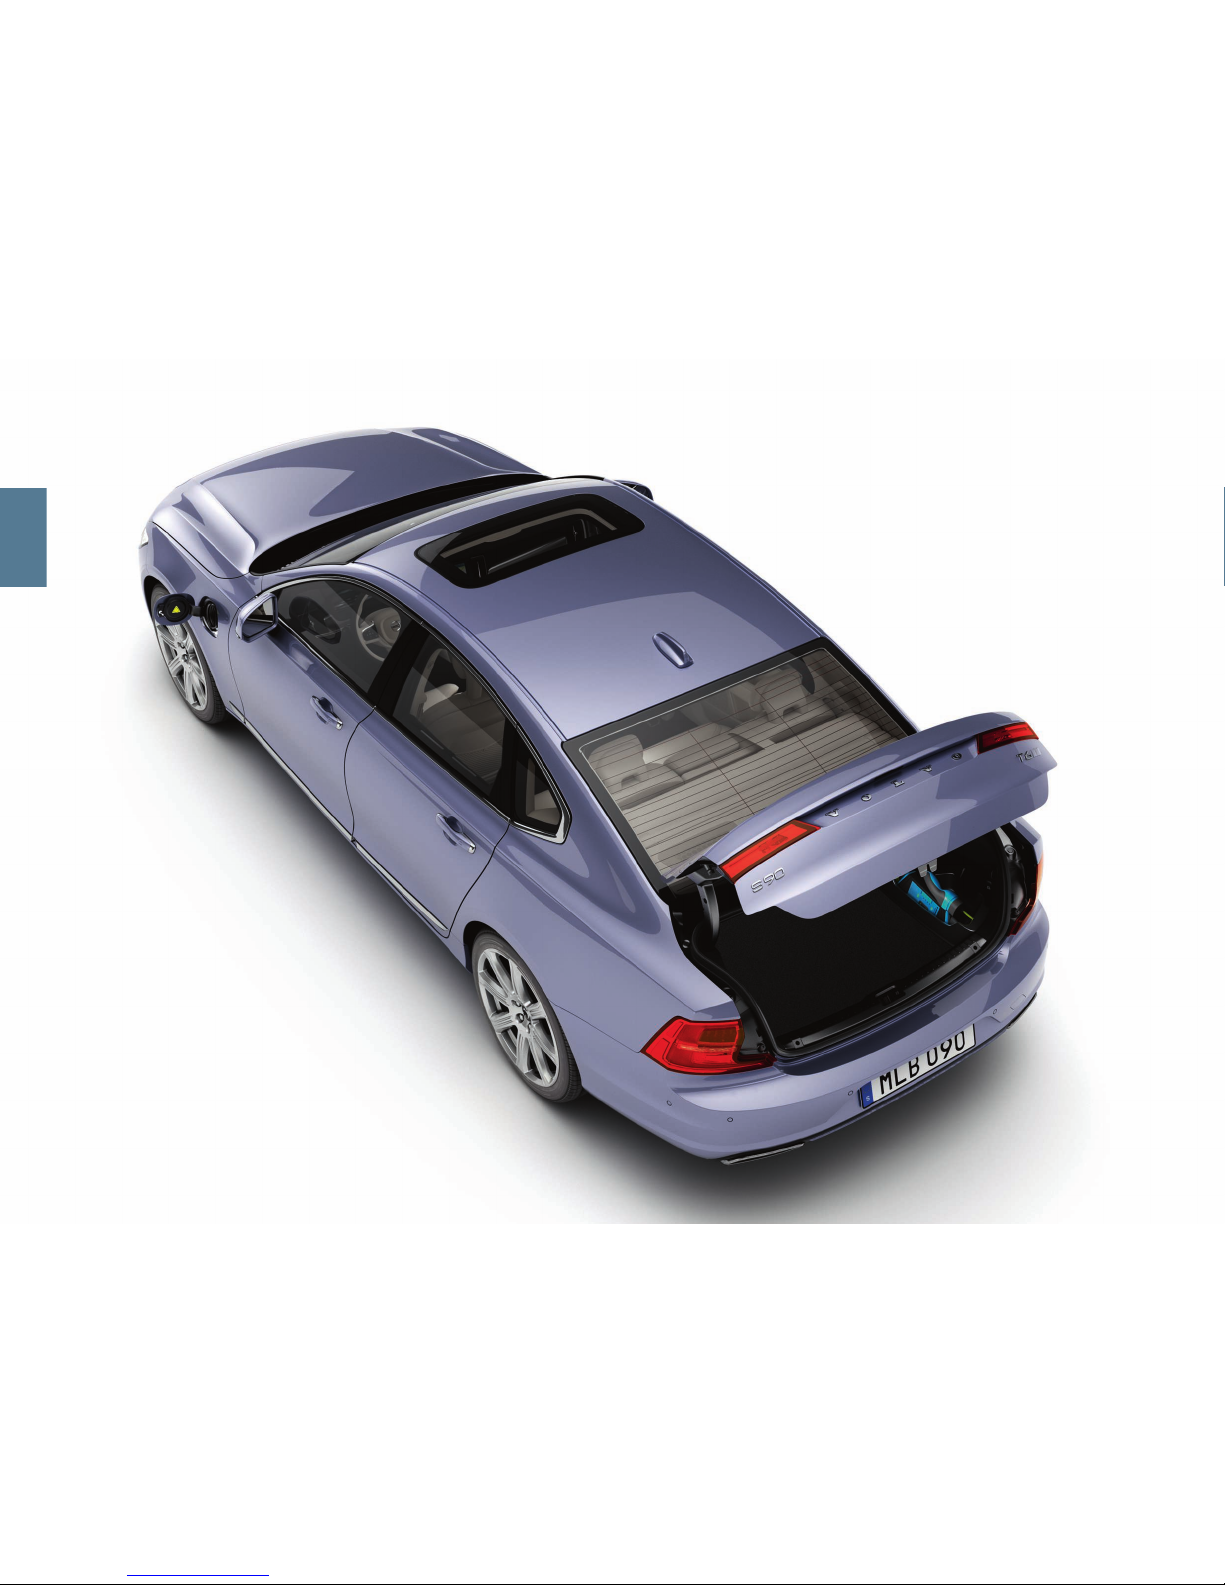
Checking the engine oil level and tyre pressures is performed
from the Car status app in the centre display's app view. In Car
status, you can also see status messages and book service and
repair*.
Charging the hybrid battery is performed via the charging input
socket in the front hatch. Open the hatch with a gentle push. For
optimum range, start the journey with a fully charged battery.
Rearview mirrors are angled down automatically* when reverse
gear is engaged, so that the driver can see the edge of the road
during parking, for example. The rearview mirrors are folded in/out
automatically when the car is locked/unlocked.
Keyless locking/unlocking* means that you simply need to have
the remote control key with you in a pocket, for example, in order to
lock or unlock the car. The remote control key must be within a
range of approx. 1 metre of the car.
Grip a door handle or press the boot lid's rubberised pressure plate
to unlock the car. To lock the car, press gently on one of the door
handle recesses. Avoid touching both pressure surfaces at the
same time.
Sunroof* is operated by a control above the rearview mirror when
the car is in at least ignition position I. Open to ventilation position
by pressing the control upward, and close by pulling the control
downward. To fully open the sunroof, press the control backward
and close by pulling the control downward. The sunscreen, which is
opened automatically when the sunroof is opened, is closed manually.
The power operated boot lid* can be opened either with the han-
dle on the boot lid or with a slow forward kicking motion* under the
left-hand section of the rear bumper. Close and lock the boot lid
using on its lower edge. Or close the tailgate with a kicking
motion.
01
Page 8
01
Page 9

LOCKING/UNLOCKING
Remote control key
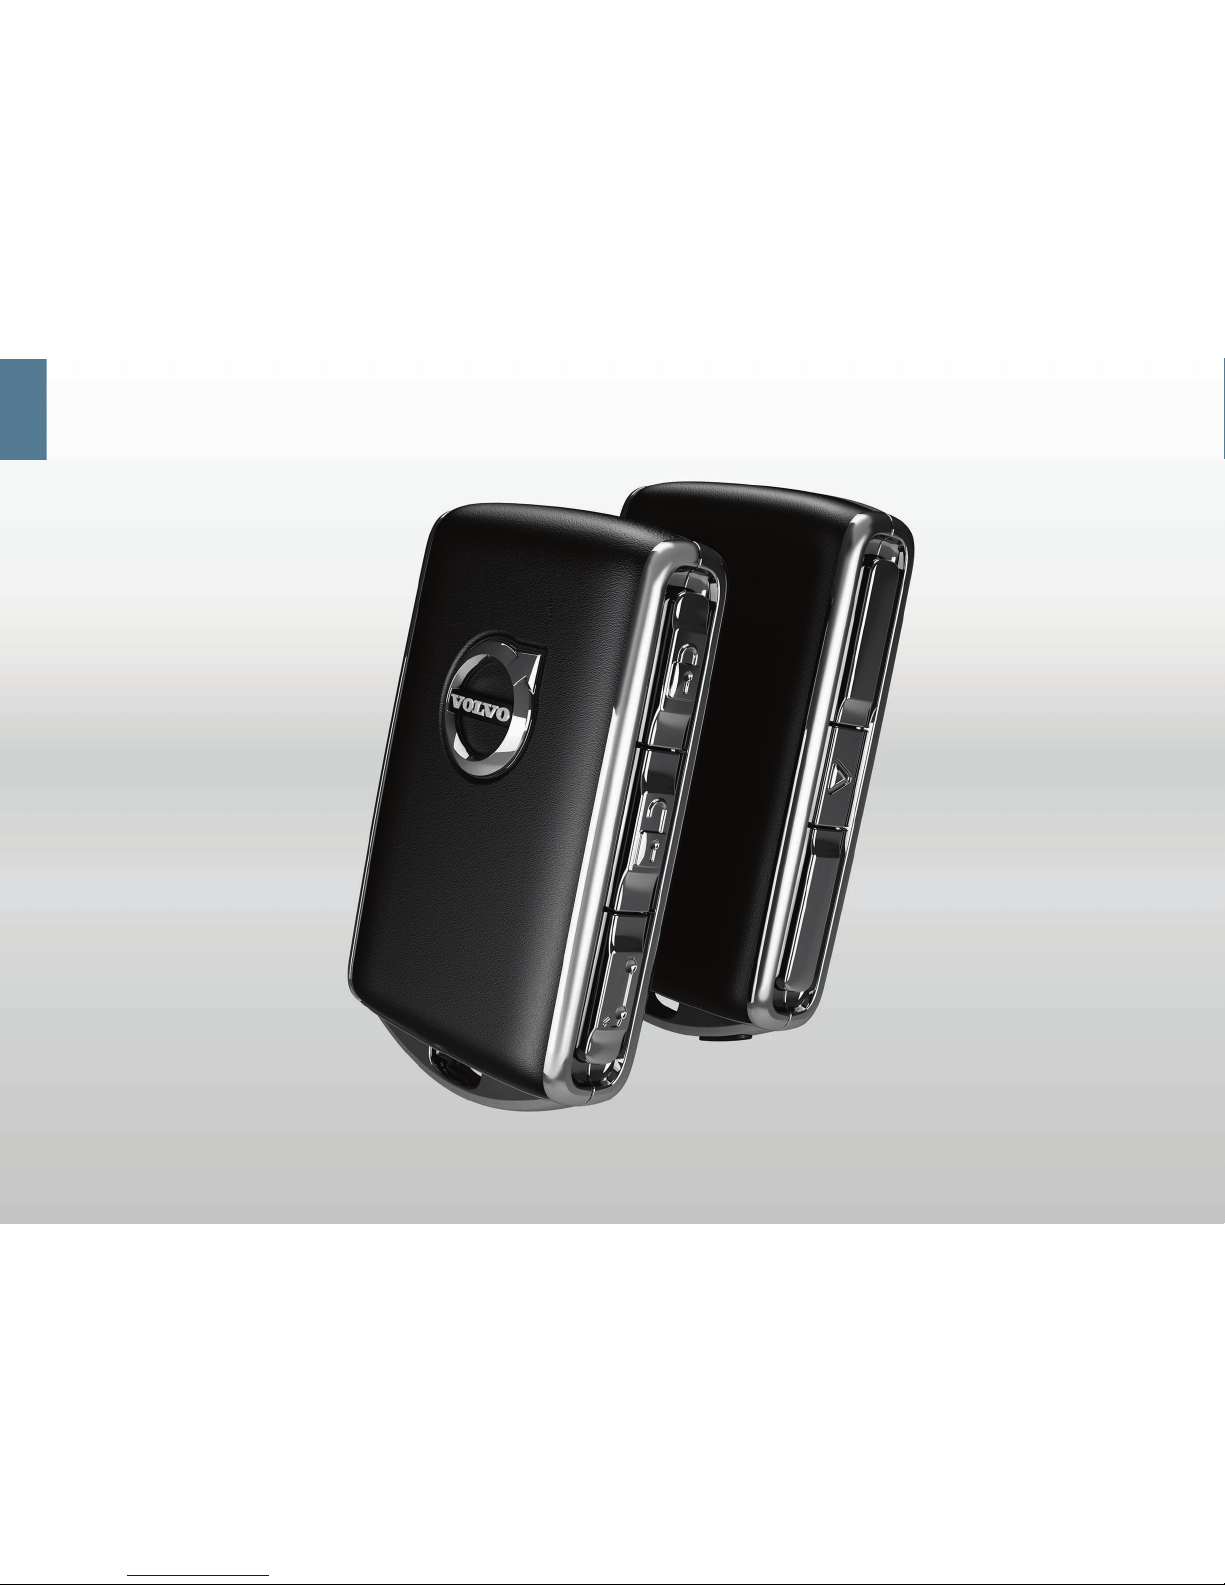
One short press locks doors, boot lid and fuel filler flap and arms
the alarm*. A long press closes the sunroof* and all side windows
simultaneously.
A short press unlocks doors and boot lid and disarms the alarm. A
long press opens all side windows simultaneously.
One short press unlocks and disarms the alarm for the boot lid only.
A long press opens or closes the power operated* boot lid.
The panic function activates the direction indicators and the horn to
attract attention when required. Press and hold the button for 3
seconds to activate.
Charging hatch
Make sure that the car is unlocked and switched off before you plug in
or unplug the charging cable.
1. Press in the rear section of the hatch and release.
2. Open the hatch.
The cable is locked into the socket after charging has started. Charging
is stopped if the car is unlocked, but resumes after a short while if the
cable is not unplugged.
Private locking
Private locking locks the boot lid, which can be practical when,
for example, the car is taken in for service. Locking the glovebox is done manually with the enclosed key.
- In the centre display's function view, tap on
Private Locking
to activate/deactivate the function.
A pop-up window is shown for activation/deactivation. A four-digit code
is selected each time locking is used. An extra security code must be
selected the first time the function is used.
01
Page 10
01
Page 11

OVERVIEW, INTERIOR
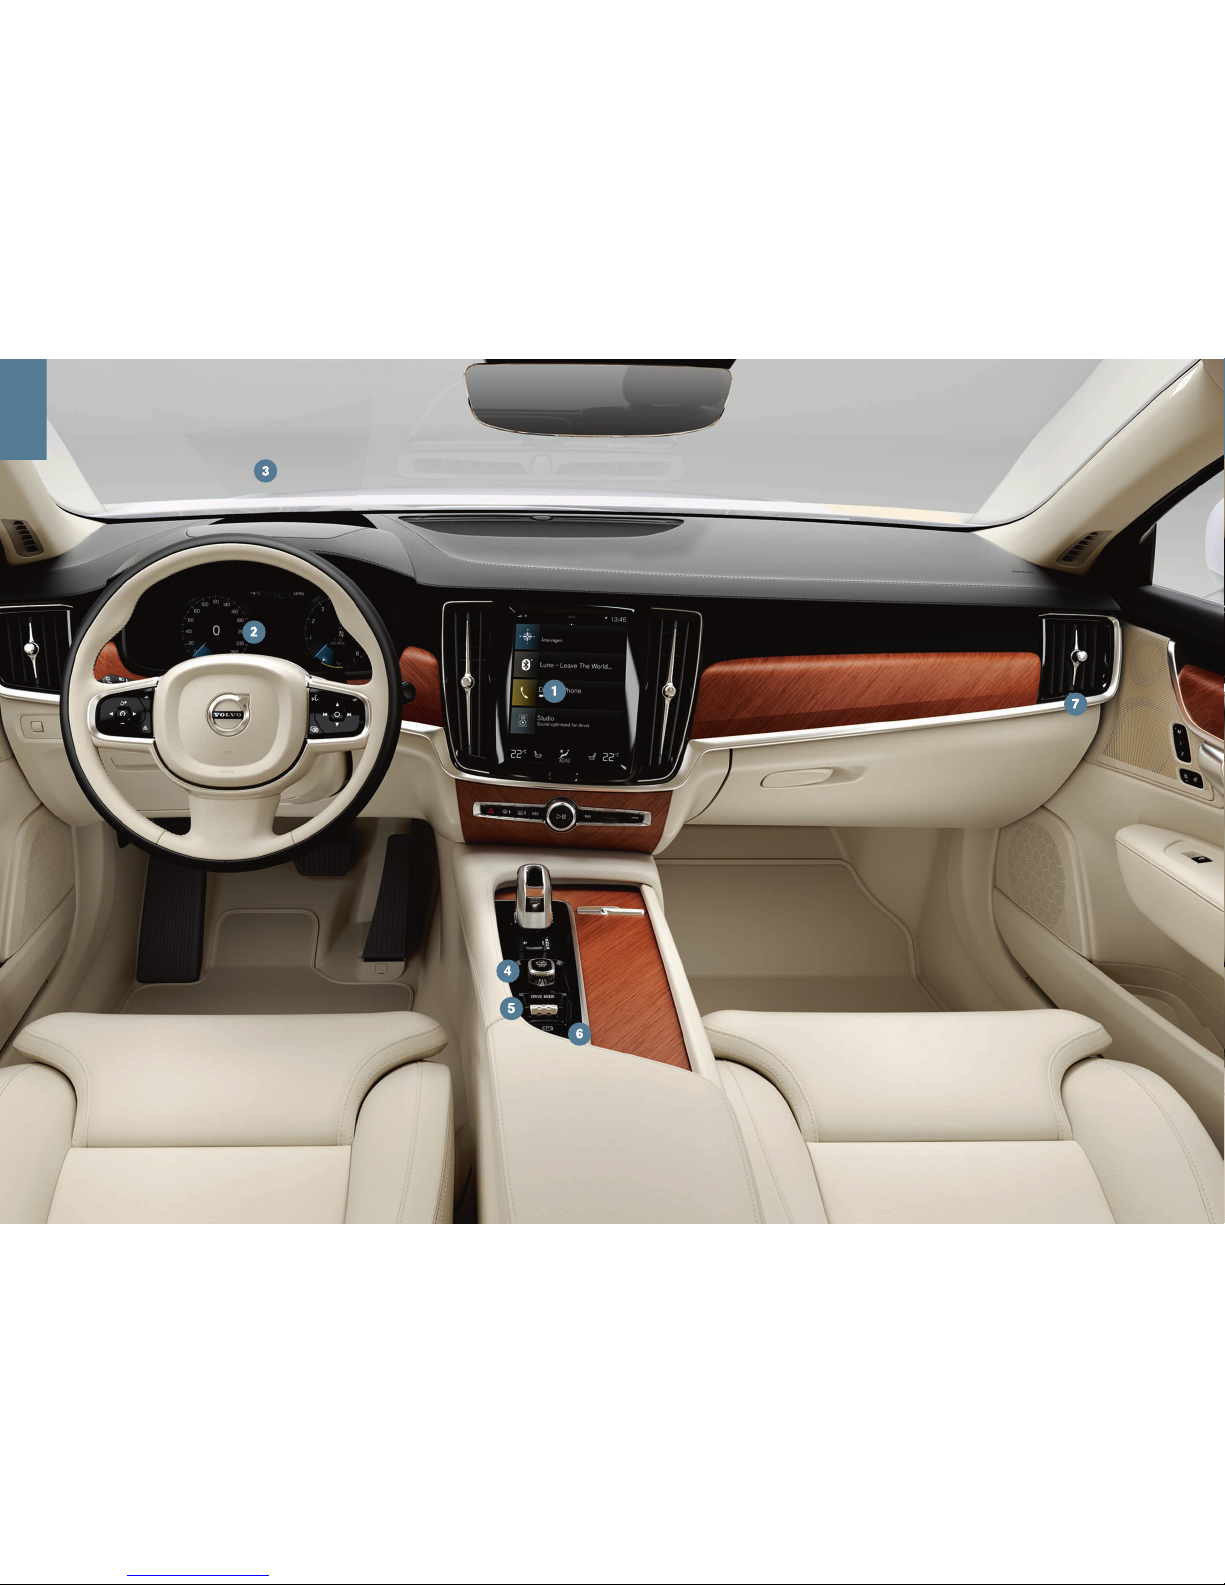
Centre display is used to control many of the car's main functions,
e.g. climate control, driver support systems and in-car apps.
Driver display shows most of what is related to driving such as
speed, engine speed, navigation* and active driver support. You can
yourself choose what should be shown in the driver display via
Settings My Car Displays in the centre display's top view.
Head-up display* is a complement to the car's driver display and
projects information on the windscreen. It is activated via the centre
display's function view.
Start/switch off the car with the start knob in the centre, between
the seats. Select gear position P or N. Turn clockwise and release
for ignition position I, depress and hold the brake pedal, then turn
the start knob and hold it depressed to start the car. Switch off by
turning the start knob clockwise.
Drive modes are set with the control in the centre, between the
seats. Press in the control and roll it to select between Pure, AWD,
Hybrid, Power and Individual in the centre display. Confirm by
pressing the wheel. With Individual you can adapt a drive mode
according to your own desired driving characteristics. It is activated
in
Settings My Car Individual Drive Mode in the centre dis-
play's top view.
Parking brake is activated when you pull the control upwards, a
symbol in the driver display illuminates. Release it manually by
pressing the control down at the same time as holding the brake
pedal depressed. Using Auto Hold (
) you can release the brake
pedal with maintained brake force when the car has stopped at e.g.
traffic lights.
Remember that both Auto hold and
Auto Activate Parking Brake
must be deactivated for an automatic car wash. The latter can be
performed in the centre display's top view under Settings My
Car
Parking Brake and Suspension. Then select gear position
N and turn the start knob clockwise for at least 4 seconds.
Switch for passenger airbag* is located on the end face of the
instrument panel on the passenger side and can be accessed when
the door is open. Pull the switch out and turn to ON/OFF in order
to activate/deactivate the airbag function.
01
Page 12
01
Page 13

CENTRE DISPLAY
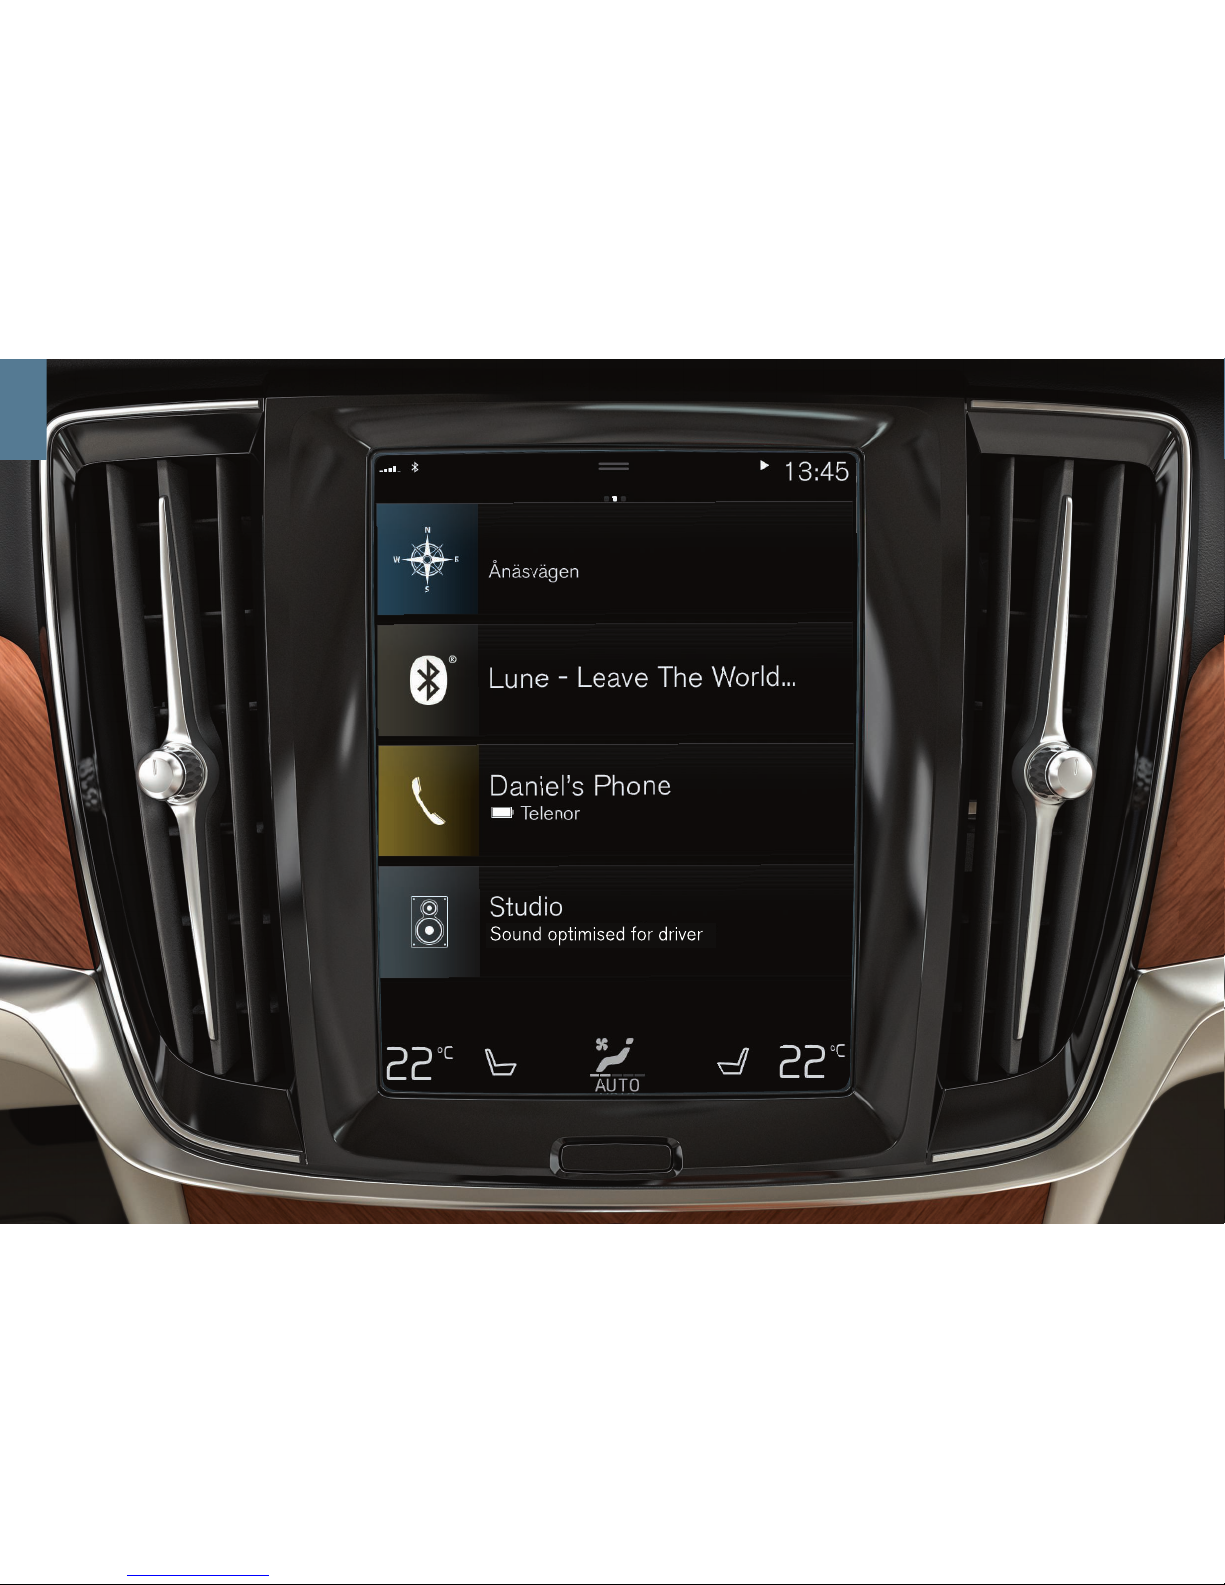
You can make settings and control most of the functions in the centre
display. Centre display has three main views, which you reach by swiping right/left: home view, function view and app view. There is also a top
view that you access by dragging down the top part of the display.
Change the appearance in the centre display and in the driver
display by selecting a theme in
Settings My Car Displays in the
top view. Here you can also select a dark or a light background for the
centre display.
Go back in the menu structure by means of a short press on the
physical home button under the display. A longer press takes you to the
home view.
For cleaning the centre display, lock the touch function with a long
press on the physical home button under the display. Reactivate the
display with a short press on the home button.
Status bar at the top of the display shows the activities in the car. Network information and connection information are shown on the left, and
media-related information and the clock are shown on the right.
In the climate row at the bottom you can set temperature, seat comfort and fan speed by tapping on the respective icon.
01
Page 14
02
Page 15

CHARGING
Your Volvo is equipped with an electric motor that mainly drives the car
at low speeds, as well as a petrol engine that drives the car at higher
speeds and for more active driving. The charging time of the hybrid battery depends on the charging current that the socket can supply. The
hybrid battery is also charged during smooth braking or engine braking,
e.g. on a downhill gradient. All types of charging are indicated in the
driver display.
Storing the charging cable
The charging cable is stored in the storage compartment on the righthand side of the cargo area.
Control unit on the charging cable
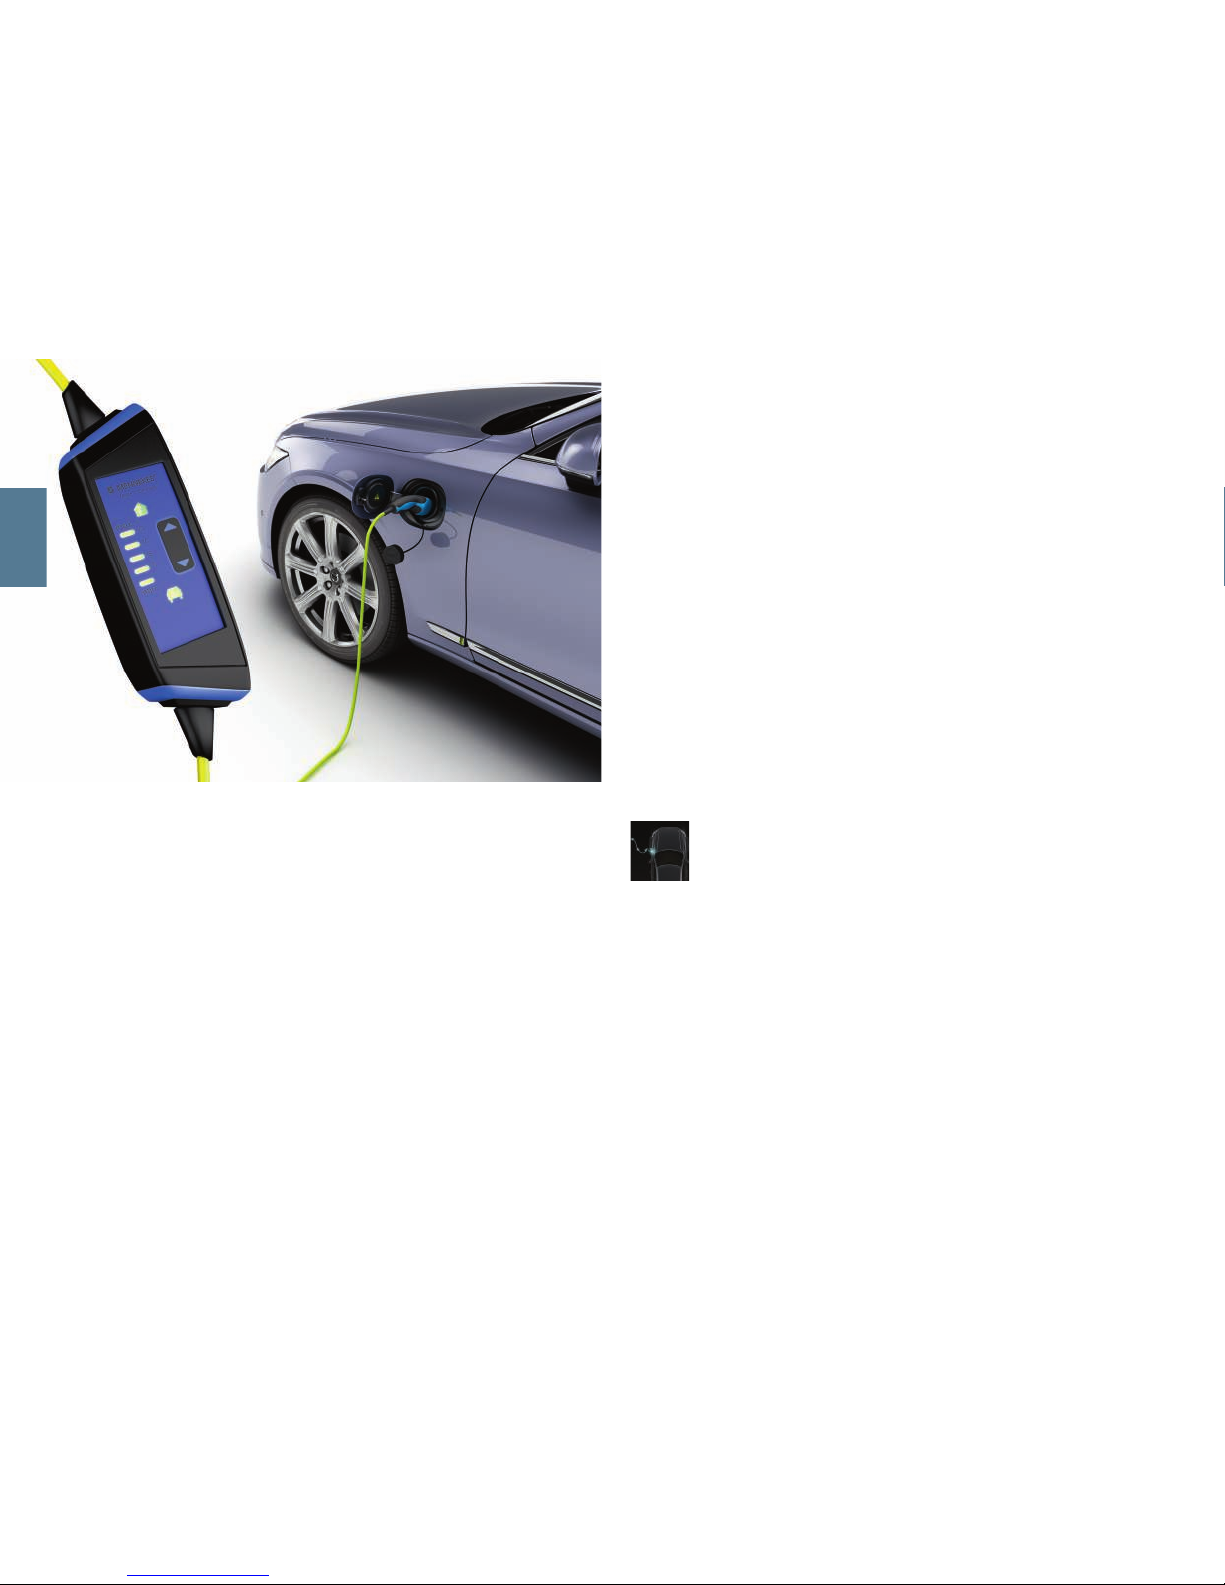
The enclosed charging cable is equipped with a control unit that shows
the charging status. It supports temperature monitoring and has a builtin ground fault breaker.
Starting charging
When the hybrid battery is charged, the car's starter battery is also
charged.
1. Connect the charging cable to a socket. Never use an extension
cable.
2. Set the correct charging current on the control unit with
and .
If you are uncertain about the socket's charging current rating, select
the lowest charging current on the control unit.
3. Open the charging hatch with a gentle push.
4. Remove the charging handle's protective cover and then press the
handle the whole way into the socket for the car. The charging cable
is locked automatically into the charging input socket and charging
starts within 5 seconds.
5. Position the charging handle's protective cover so that it does not
touch the car in order to avoid damage to the paintwork.
Finishing charging
1. Unlock the car with the remote control key's
button. Charging is
finished and the charging cable releases/is unlocked.
2. Unplug the charging cable from the car and close the hatch.
3. Detach the charging cable from the socket.
4. Return the charging cable to the storage compartment on the righthand side of the cargo area.
If the charging cable is not unplugged from the charging input socket, it
is locked automatically again a short time after unlocking to maximise
charging and range, as well as to allow preconditioning before departure. The charging cable can be unplugged again if the car is unlocked
with the remote control key. For cars with Passive Entry*, you can lock
and lock with the handle again.
02
Page 16
CHARGING STATUS
The car's charging status can be checked at the charging input socket,
on the control unit, in the driver display and in Volvo On Call* app.
Via the lamps for the charging input socket
•
White - LED light.
•
Yellow - Waiting mode, waiting for the charging to start.
•
Flashing green - Charging in progress.
•
Green constant glow - charging complete, extinguishes after a while.
•
Red constant glow - A fault has occurred.
Via the control unit
•
The car symbol illuminates with a green constant glow and the
charging indicator is extinguished: Standby.
•
The car symbol and the charging indicator illuminate with a green
constant glow: Charging in progress.
•
The car symbol flashes red and the charging indicator is extinguished: Charging is not possible. Check all connections, or use
another socket, then restart charging.
•
The car symbol illuminates with a red constant glow: Charging is not
possible. Unplug the charging cable from the socket and restart
charging.
•
The house symbol and the charging indicator flash red: Charging is
not possible. Restart charging. If the problem persists – contact a
qualified professional.
Via the driver display
The different colours of the symbol indicate charging status.
Blue light - charging in progress.
Green light - the battery is fully charged.
Red light - charging error, check the connection of the charg-
ing cable with the car and the 230 V socket.
02
Page 17
30
4.5
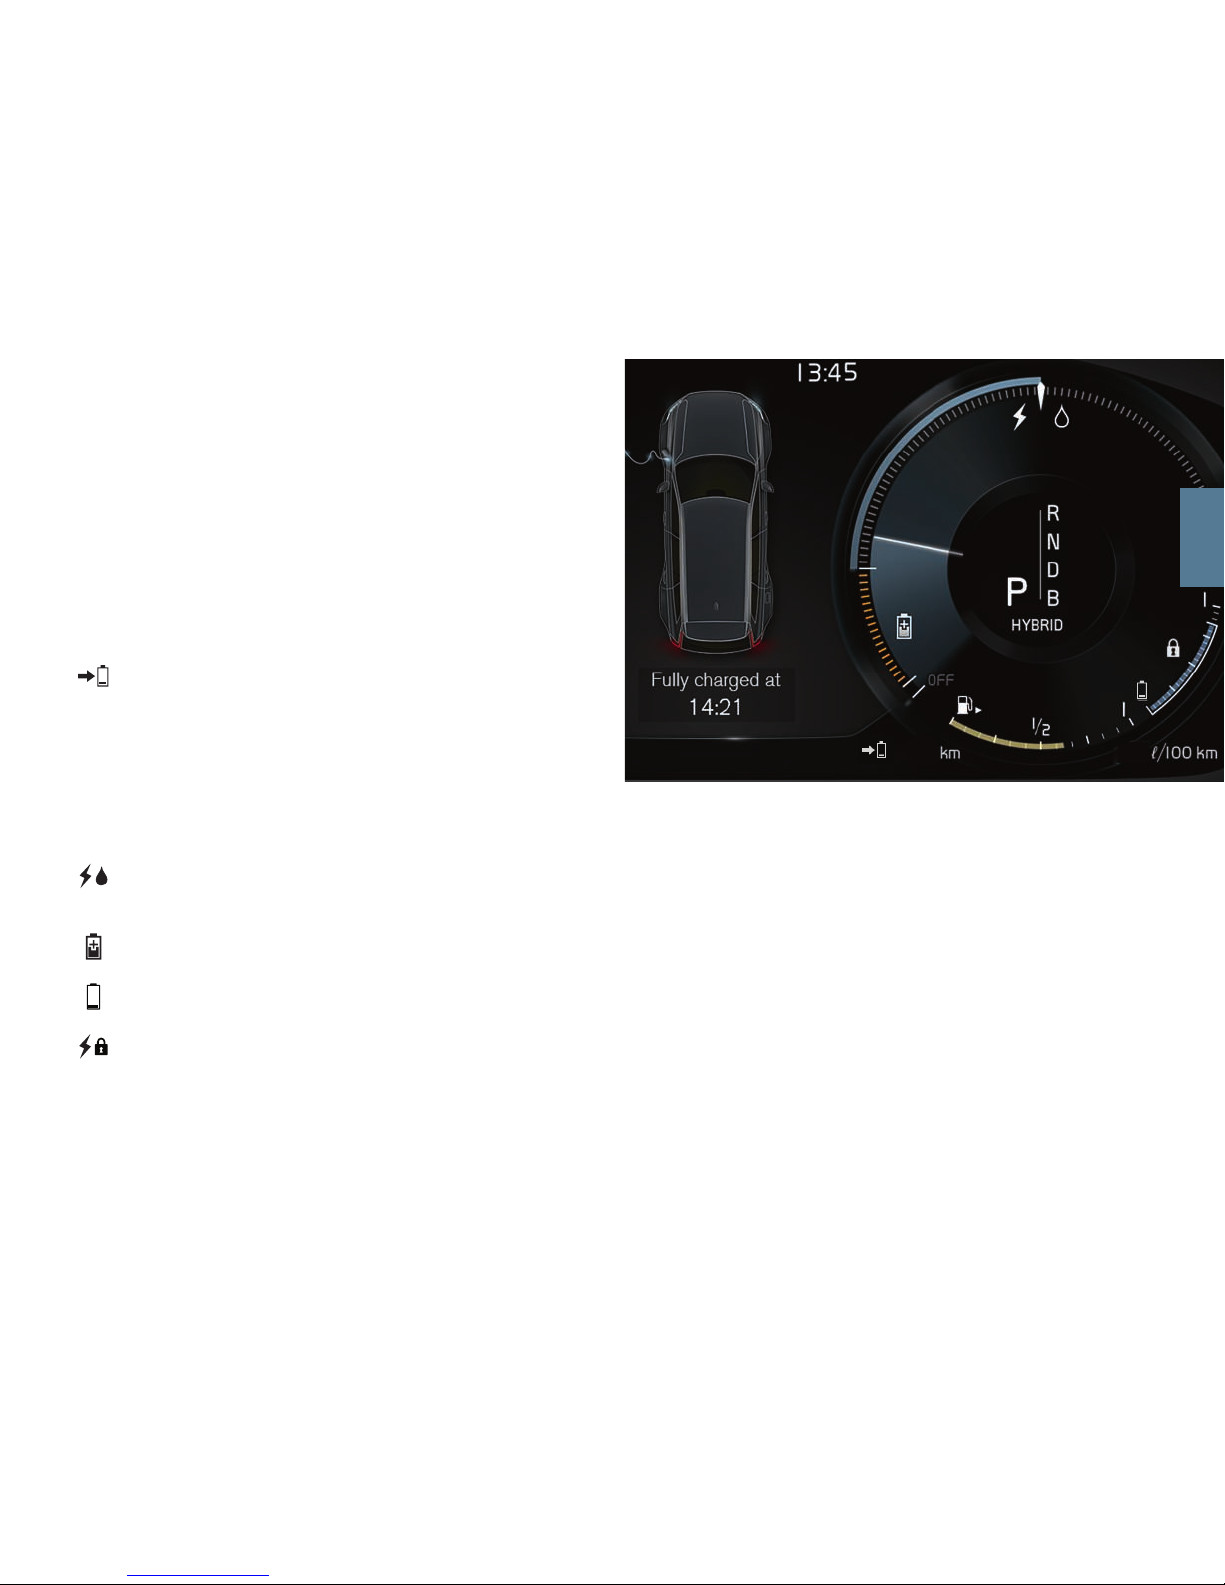
HYBRID INFORMATION IN THE DRIVER DISPLAY
A number of symbols and animations are shown in the driver display
depending on drive mode selected.
Electricity and petrol consumption are shown in the gauge on the right.
The consumption varies depending on driving style. When the thin
white pointer passes the white arrow at the top, the car is changed over
to the internal combustion engine. When the pointer is in the orangecoloured zone, the battery is being charged, e.g. during braking.
Distance to empty battery
The indicator shows the approximate distance to empty battery.
The distance is affected by several factors, e.g. driving style,
speed and outside temperature, and may vary during the journey.
Normally you can expect a range of 25-45 km. The start value
shown when the car is fully charged indicates an up-to figure
instead of a forecast for the range for electrical operation and is
adapted during the journey. No guaranteed range on electric
power remains when the driver display shows "---".
Symbols in the driver display
An all-white symbol indicates whether the electric motor or the
engine is being used. A lightning bolt indicates electric motor, a
drop indicates petrol engine.
Indicates that the battery is being charged, e.g. during engine
braking.
The gauge shows how much energy is available in the battery for
the electric motor. The energy is also used for the climate control.
Shows that the Charge or Hold functions are activated. They are
activated from the centre display's function view. Charge means
that the hybrid battery is charged when the state of charge is low.
Hold means that the battery level is maintained for later use.
Starting and stopping the internal combustion engine
The car calculates the extent of the need to use the internal combustion engine, electric motor or both simultaneously. During electrical
operation, the car may sometimes need to start the internal combustion
engine automatically due to external circumstances, e.g. in low outside
temperatures. The internal combustion engine always starts when the
hybrid battery reaches its lowest state of charge.
02
Page 18
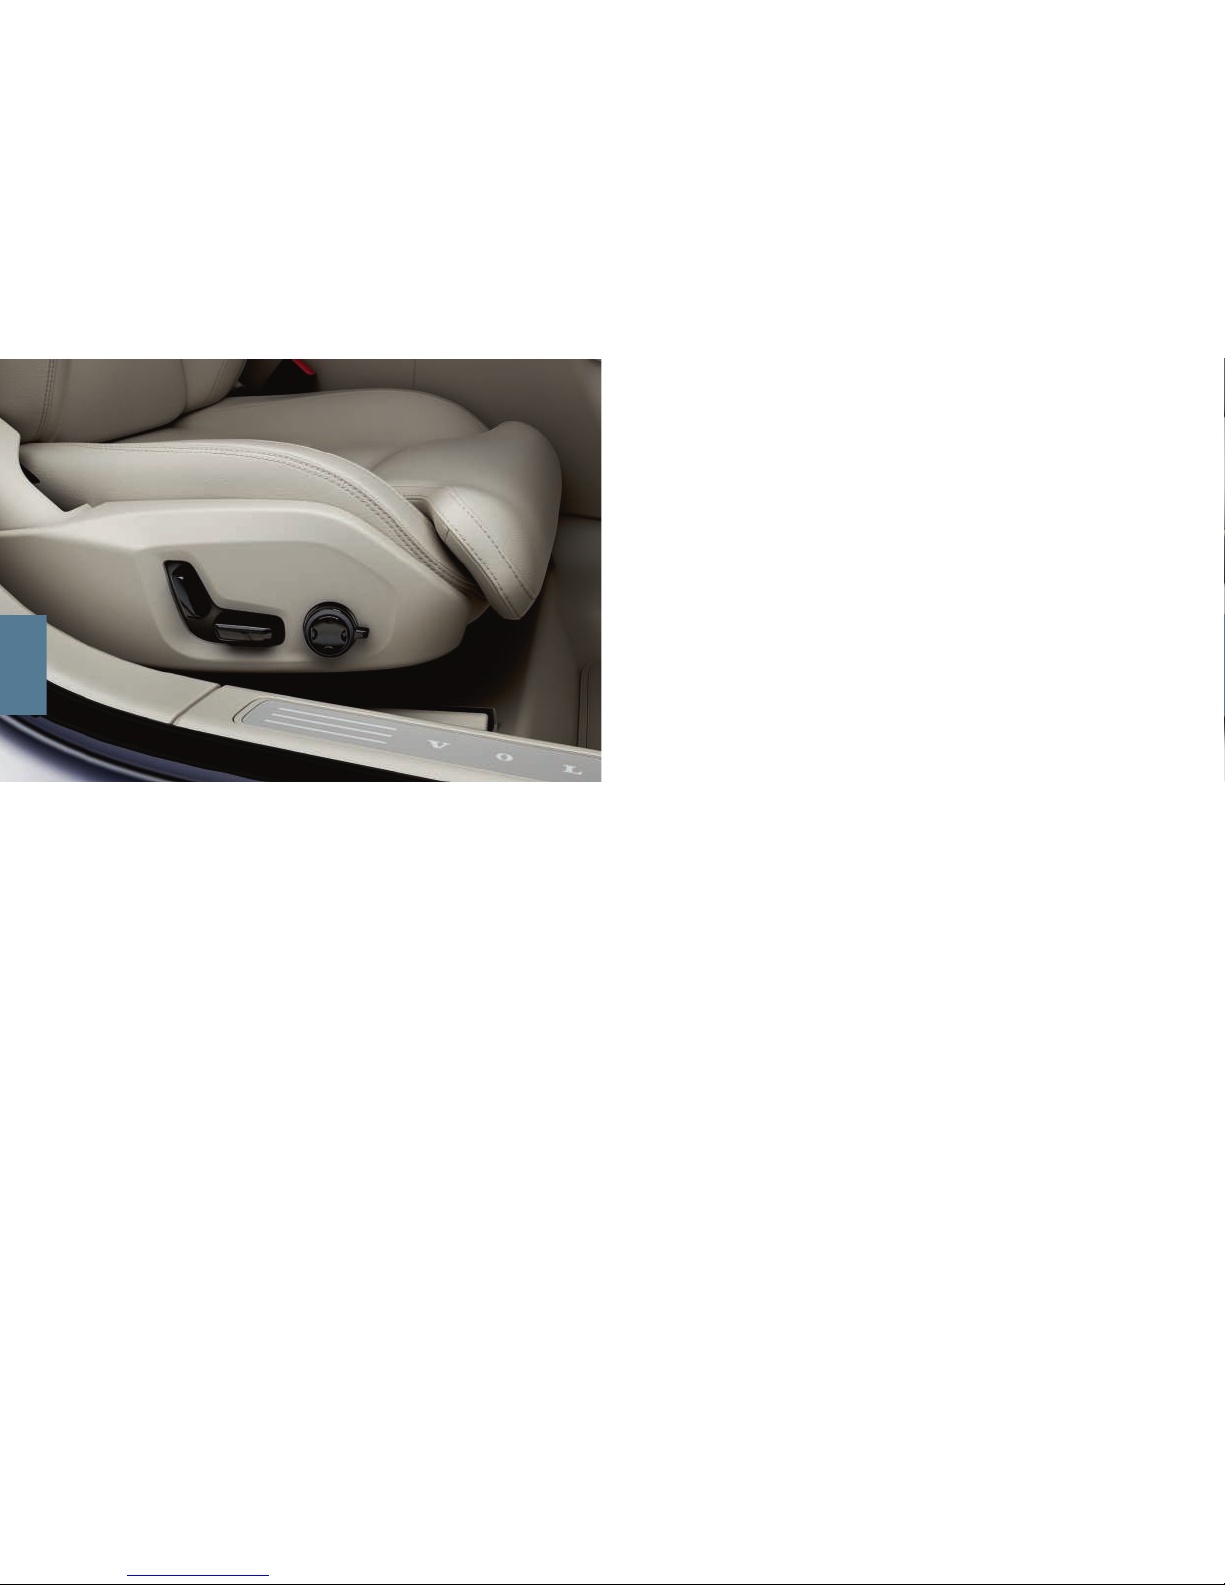
POWER* FRONT SEATS
Use the controls on the outside of the seats to adjust the seat position,
lumbar support*, etc. One control is shaped like a seat so you can more
easily understand how you change position, the other one, the multifunction control, is used for adjusting lumbar support, massage*, etc.
The seat-shaped control
Adjust the seat cushion or move the whole seat using the lower control.
Adjust the angle of the backrest using the rear control.
Multi-function control
Settings for massage*, side support*, lumbar support* and seat cushion
extension are linked to the multi-function control*.
1. Activate seat setting in the centre display by turning the control.
2. Select the desired function in the centre display by turning the control.
3. Change the setting by pressing in the upper/lower/front/rear part of
the control.
Saving settings
1.
Set the seat, door mirrors and head-up display* to the desired position and press the M button on the door panel. The light indicator in
the button illuminates.
2.
Within 3 seconds, press the memory button 1 or 2. An acoustic signal sounds and the light indicator in the M button extinguishes.
To use your saved seat settings:
With the door open - push and release one of the memory buttons.
With the door closed - hold one of the memory buttons pressed in until
the stored position is reached.
03
Page 19
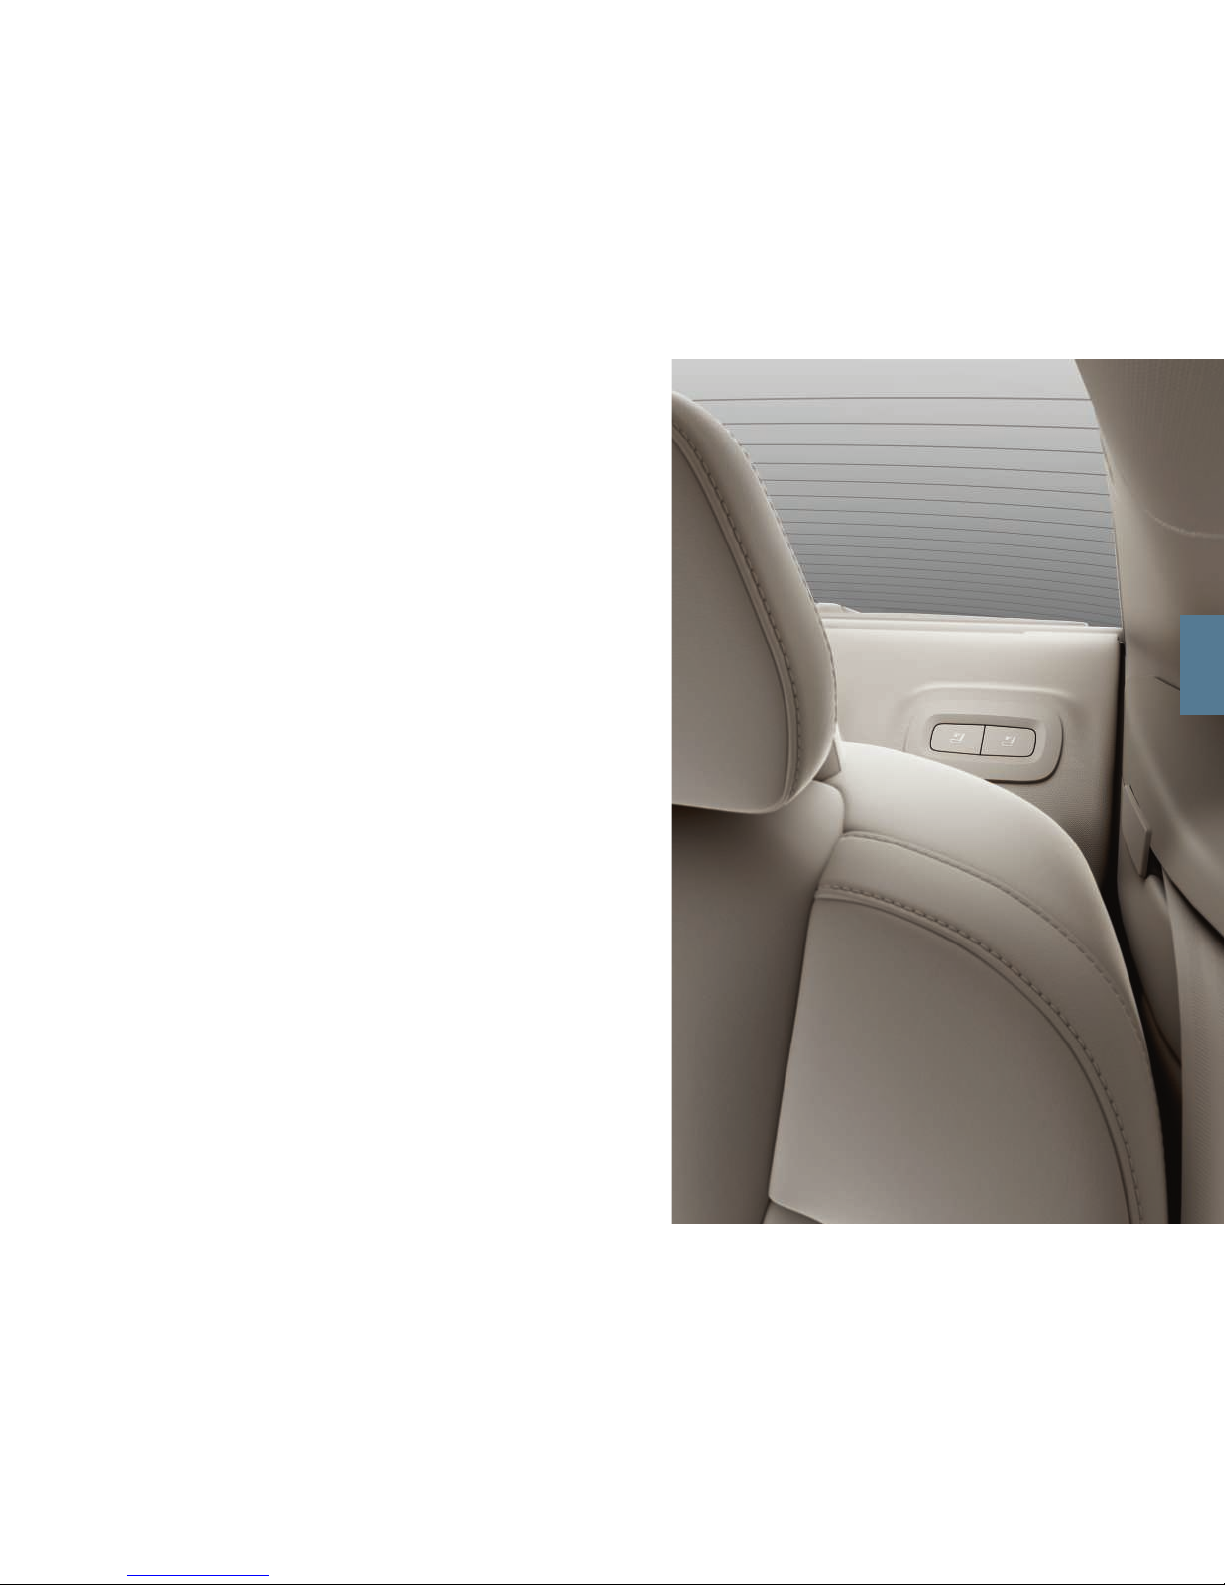
FOLDING THE BACKRESTS IN THE REAR SEAT
Ensure that a backrest with head restraint does not come into contact
with the backrest of the seat in front when lowering. The front seats
may need adjusting in order for the backrests to be lowered.
Folding the backrests
1. Lower the centre seat's head restraint manually.
2. Hold the button depressed. The buttons are located in the parcel
shelf on the left-hand side of the car.
3. The seat is released from the lock but remains in the same position.
The head restraints are lowered automatically*.
4. Lower the backrest manually to the horizontal position.
To allow the folding of the rear seat, the car must be stationary and at
least one rear door open.
Raising the backrests
1. Move the backrest upwards/backwards by hand until the lock
engages.
2. The head restraint is extended manually.
3. If necessary, raise the centre seat's head restraint.
03
Page 20
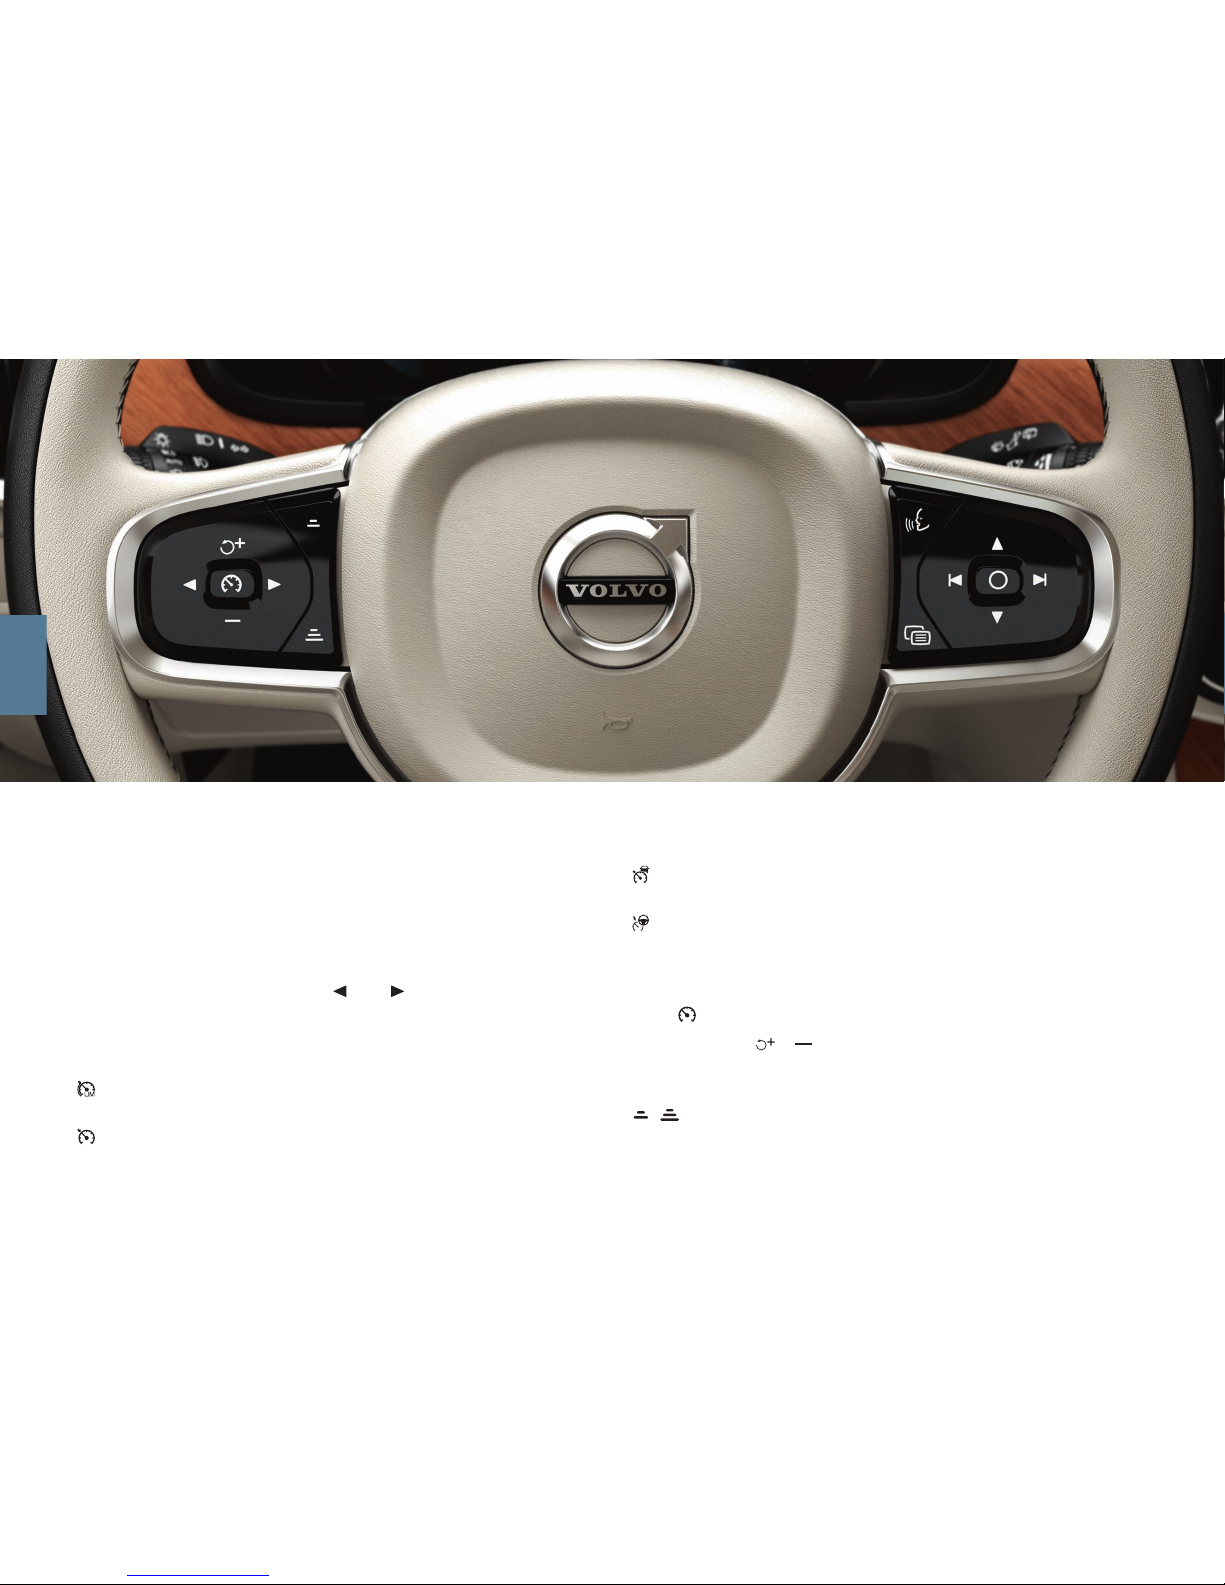
STEERING WHEEL
You can set the height and depth position of the steering wheel by
pulling the lever under the steering wheel towards/from2 you. Set the
desired position and move the lever back to locked position.
Left-hand keypad
Driver support is selected in the driver display using the arrows in the
steering wheel's left-hand keypad ( and ). When the driver support
symbol is WHITE the function is active. GREY means that the function
is stopped or in standby mode.
Display symbols in the driver display:
Speed limiter* helps to avoid exceeding a preselected/preset
maximum speed.
Cruise control helps to maintain a constant speed.
Adaptive cruise control* helps to maintain a constant speed,
combined with a preselected time interval to the vehicle ahead.
Pilot Assist* helps the driver to keep the car between the lane's
side markings using steering assistance as well as to maintain a
constant speed, combined with a preselected time interval to the
vehicle ahead.
Press
to start or stop the selected function.
A short press on / increases/decreases the stored speed by
5 km/h. Press and hold the button to change steplessly - release the
button for the required speed.
/ decreases/increases the distance to the vehicle ahead when
using Adaptive cruise control and Pilot Assist.
03
Page 21

One press on also resumes the stored speed for the selected function.
Right-hand keypad
Use the steering wheel's right-hand keypad to navigate in the diver display.
The driver display's app menu opens/closes. From here the trip
computer, media player, telephone and navigation can be con-
trolled.
Scroll between the different apps available by pressing the left or
right arrow.
Select, deselect or confirm an option, e.g. select the trip computer's menu or delete a message in the driver display.
Browse among the functions for the selected app by tapping up
or down.
Raise/lower the media volume by pressing and . If no other
function is active, these buttons act as volume control.
Voice control is activated using the button and allows you to con-
trol e.g. media, navigation and climate control using your voice. Say e.g.
"Play Avicii", "Raise temperature" or "Cancel".
See the chapter Voice control in this Quick Guide for more voice commands.
Trip computer
The trip computer shows e.g. mileage, fuel consumption and average
speed. It is possible to select which information from the trip computer
should be shown in the driver display. The trip computer calculates the
remaining distance to empty tank or empty hybrid battery. To show the
different options, use the steering wheel's right-hand keypad. No guaranteed range remains when the driver display shows "----".
2
Depending on market.
03
Page 22
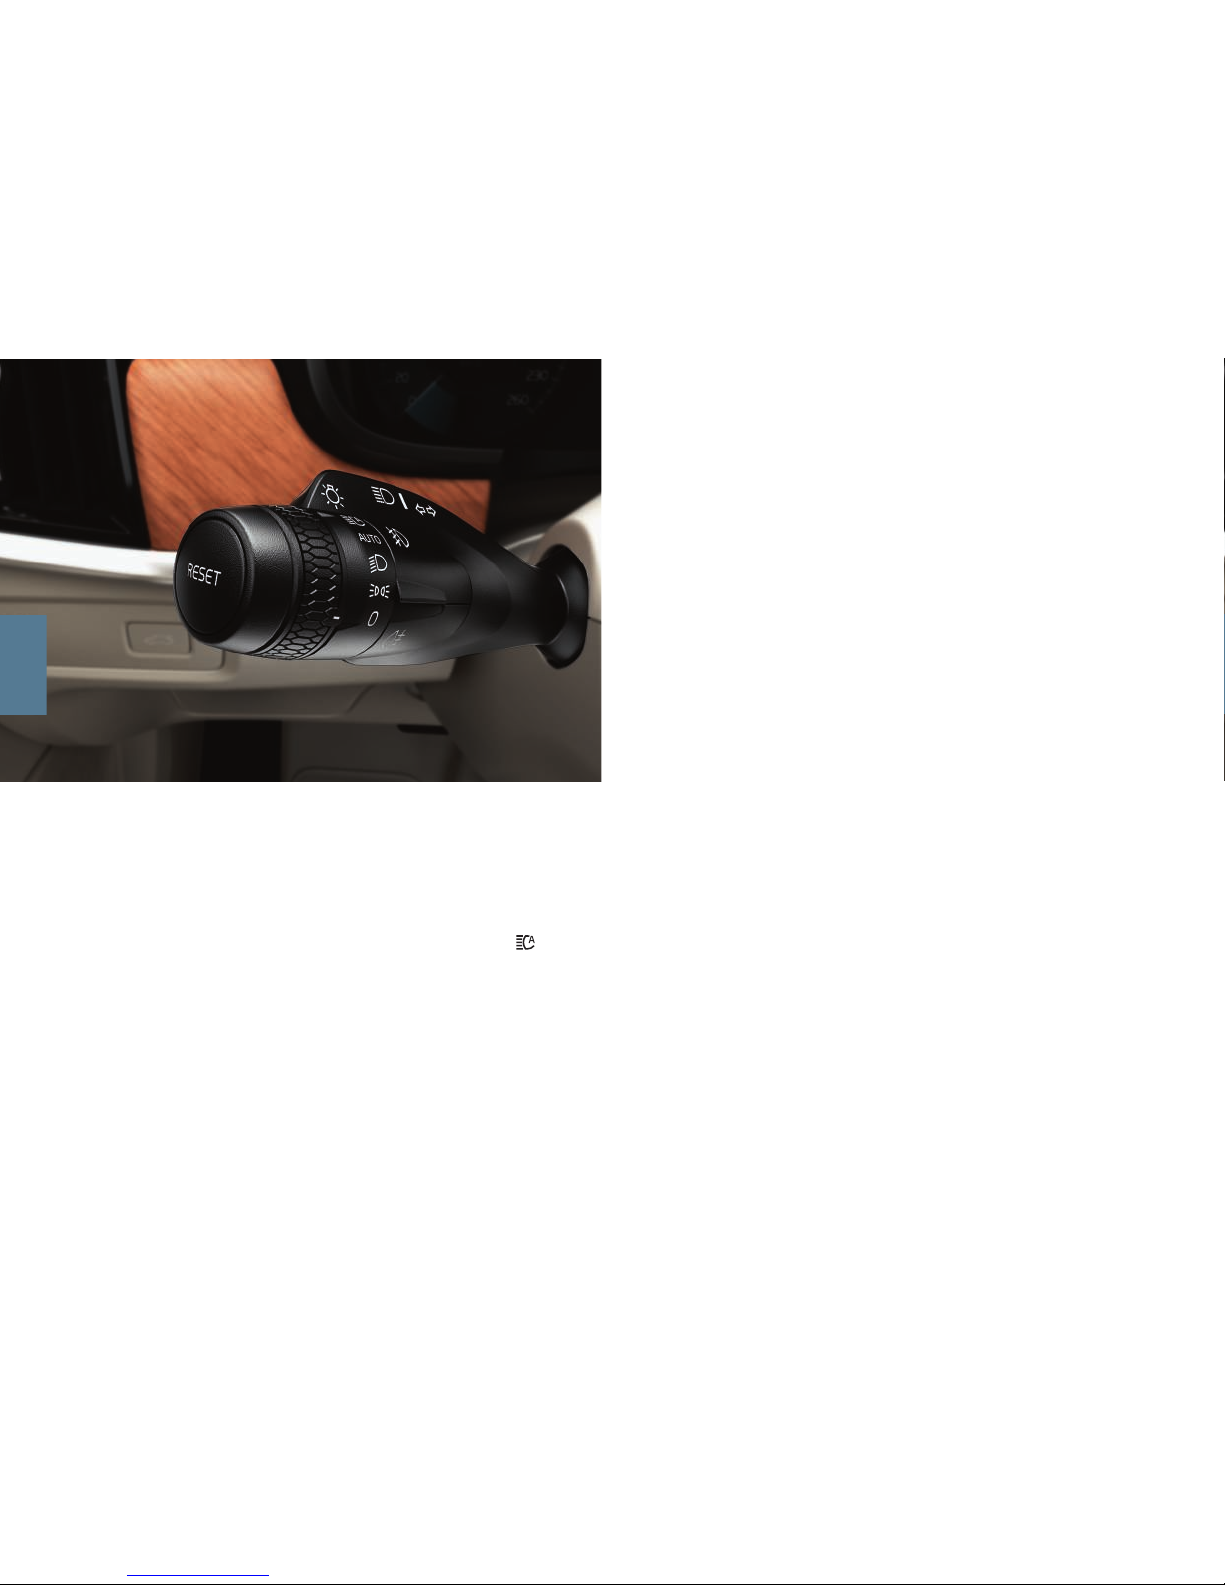
LEFT-HAND STALK SWITCH
Headlamp functions are controlled using the left-hand stalk switch.
If you select AUTO mode, the car detects when it is dark/light and the
lighting is set accordingly, e.g. when evening falls or when you drive into
a tunnel. You can also turn the stalk switch's thumbwheel to
for
main beam, which is dimmed automatically for oncoming traffic. Manual
main beam is activated by moving the stalk switch away from you.
Deactivate by moving the stalk switch towards you.
Active bending lights* are designed to provide maximum lighting in
bends and at junctions by means of the light following steering wheel
movements. The function is activated automatically when the car is
started and can be deactivated in the centre display's function view.
Approach lighting* switches on the outside lighting when you unlock
the car with the key, and helps you to reach the car safely in the dark.
Resetting the trip meter
Reset all information in the manual trip meter (TM) with a long press on
the RESET button. A short press only resets the mileage. Trip meter,
automatic (TA), is reset automatically when the car has not been used
for 4 hours.
03
Page 23
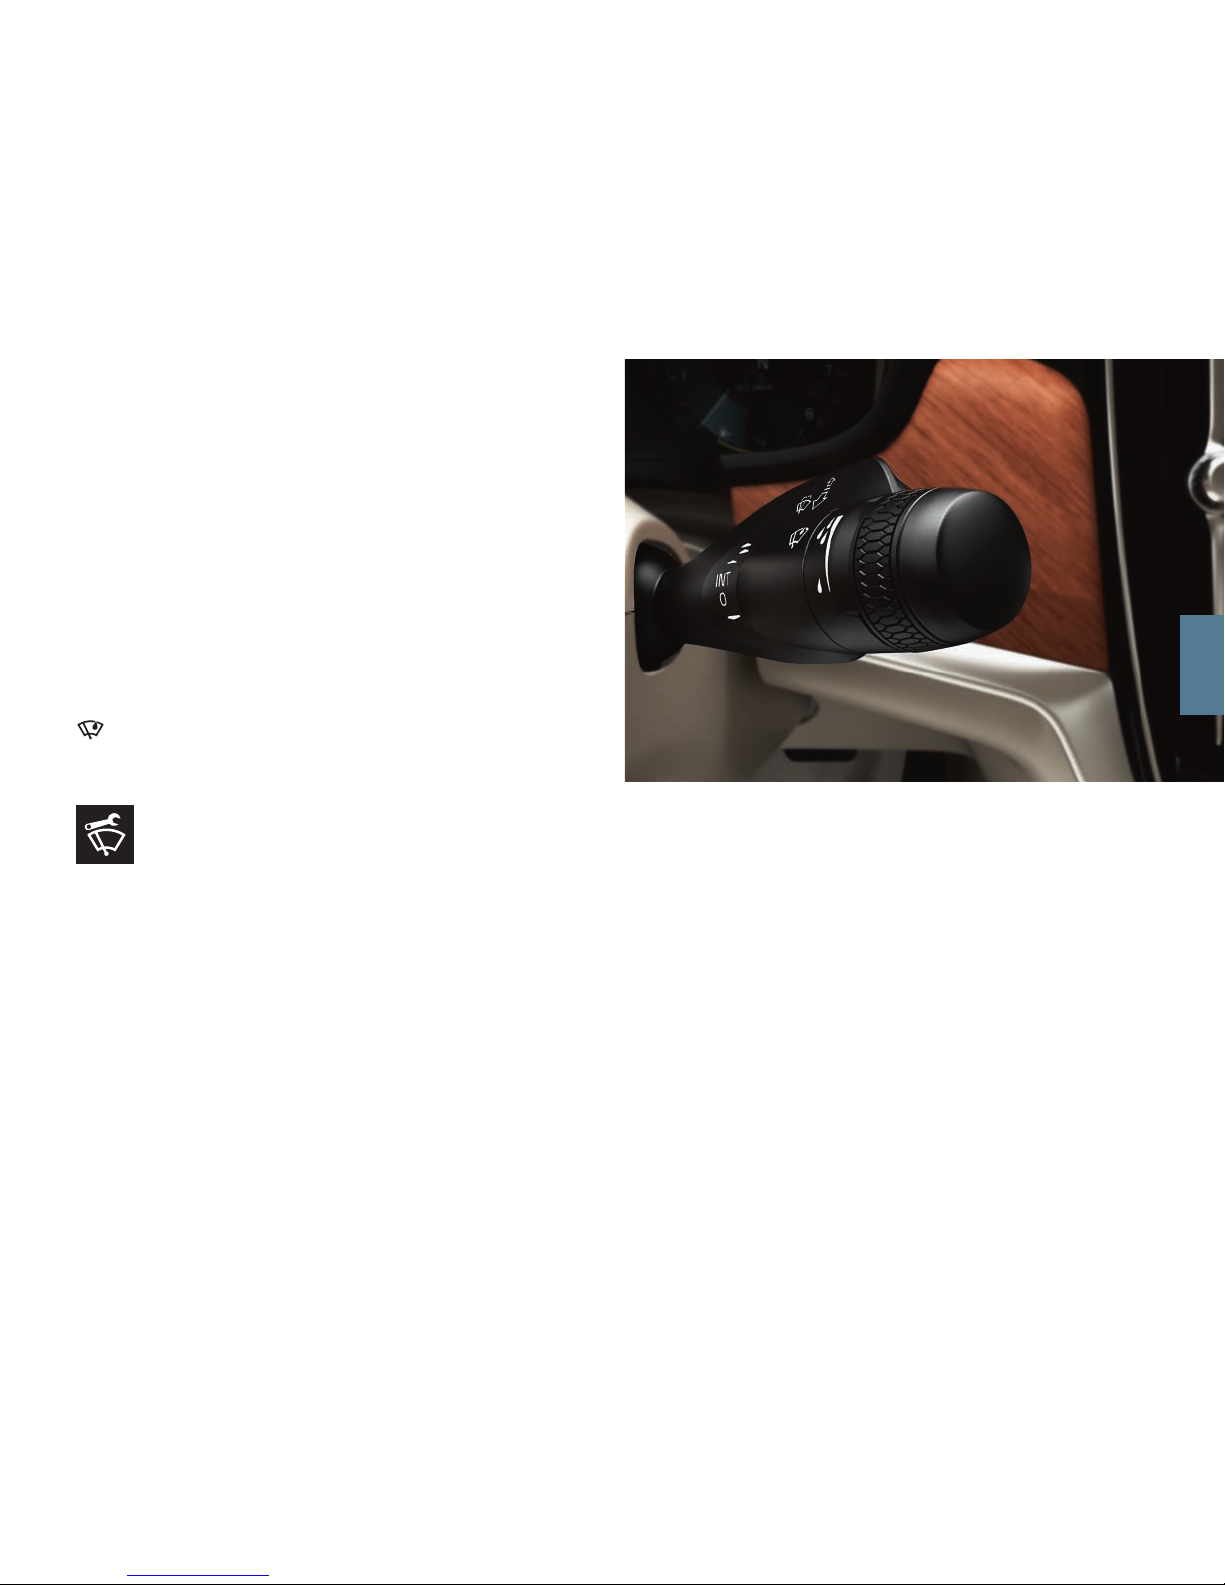
RIGHT-HAND STALK SWITCH
The right-hand stalk switch controls the wiper blades and the rain sensor.
–
Move the stalk switch downward to make one single sweep on the
windscreen.
–
Move the lever in steps upwards for intermittent, normal and fast
speeds.
–
Adjust the interval speed using the stalk switch's thumbwheel.
–
Move the stalk switch towards the steering wheel in order to start the
windscreen and headlamp washers, and towards the instrument
panel to start the rear window washers.
Press the rain sensor button to activate/deactivate the rain sensor.
The rain sensor automatically starts the windscreen wipers based
on how much water it detects on the windscreen. Turn the thumbwheel up/down for higher/lower sensitivity.
Use windscreen wiper service mode when, e.g. replacing,
cleaning or lifting wiper blades. It is activated in the centre
display's function view.
03
Page 24
03
Page 25

PASSENGER COMPARTMENT CLIMATE CONTROL
Preconditioning
Preconditioning can be set via the car's centre display and using the
Volvo On Call* app. Preconditioning cools or heats the passenger compartment to comfort temperature before driving, which can also reduce
wear and energy requirements while driving. It is possible to direct start
or set preconditioning via the timer.
Direct-starting preconditioning
1. Open the centre display's climate view by tapping at the bottom of
the display.
2. Select the
Parking climate tab, tick an appropriate option and then
tap on Preconditioning.
Setting the timer for preconditioning
–
Select Parking climate Add timer and set date/day as required.
In order that preconditioning should have full function, the car must be
connected to an electrical socket (applies to cars with electric heater).
Either a fuel-driven heater or electric heater3 is used depending on
market.
Climate settings
The climate control functions for the front and rear section of the passenger compartment are controlled via the centre display, and buttons
on the centre console and the rear of the tunnel console. Some climate
functions can also be controlled with voice control.
The icon used to access the climate view is located in the centre at the bottom of the centre display. When the text Clean
Zone is BLUE, this indicates that the conditions have been
met for good air quality in the passenger compartment.
–
Tap on AUTO for fully automatic passenger compartment climate
control according to desired temperature. Short press resets to previous settings for auto-regulated climate control. Long press changes
to default settings (22 °C and fan level 3 in the front seat, level 2 in
the rear seat). In AUTO mode the fan can also be set to five different
automatic fan speeds as well as Off and Max.
–
Tap on one of the icons in the climate row at the lower edge of the
centre display to adjust temperature, seat heating and fan speed.
To synchronise the temperature for all zones with the temperature on
the driver's side, tap on the temperature icon for the driver's side and
on
Synchronise temperature.
Air quality system IAQS*
IAQS is a part of the Clean Zone Interior Package* and is a fully-automatic system that cleans the air in the passenger compartment from
contaminants such as particles, hydrocarbons, nitrous oxides and
ground-level ozone. The function is activated in the centre display's top
view via
Settings Climate Air Quality Sensor.
3
An authorised Volvo dealer has information about which markets use which heater.
03
Page 26
CONNECTIONS
You can play back/control media, SMS and phone calls using voice
recognition, as well as connect the car to the Internet via different
external devices, e.g. smartphones. The car's electrical system must be
in at least ignition position I so that you can use the connected devices.
The car's modem
4
The simplest and most effective way to connect your car to the Internet
is via the car's own modem. It has the highest performance, is activated
automatically for each journey and does not require connection to a
smartphone.
1. Insert a personal SIM card into the holder under the floor in the
cargo area.
2. Press
Settings Communication Car Modem Internet in the
top view.
3. Activate by ticking the box for
Car modem Internet.
Tethering
When the car is connected to the Internet via the modem, you can
share the Internet connection (Wi-Fi hotspot) with other devices under
Settings in the top view. Press Communication Car Wi-Fi hotspot.
Bluetooth
Use Bluetooth primarily to manage phone calls, SMS and media from
your phone to the car's system. You can also connect the car to the
Internet via Bluetooth. It is possible to have two Bluetooth devices connected at once in which case one of them can only be streaming
media. The two most recently connected phones will be connected
automatically when the car is used again, if the phone's Bluetooth is
03
Page 27

active. Up to 20 devices are saved in a list to allow easier connection of
them at a later time.
1. Activate Bluetooth in your phone. To connect to the Internet, activate
tethering in the phone as well.
2. Open the
Phone subview in the centre display's home view.
3. Tap on
Add phone, or if a phone is already connected, tap on
Change and then Add phone.
4. Select the phone to be connected and follow the steps on the centre
display and the phone. Note that on certain phones the message
function must be activated.
Wi-Fi
By connecting the car to the Internet via Wi-Fi you can stream online
services at a higher speed than with Bluetooth, such as Internet radio
and music via in-car apps, download/update software, etc. A Wi-Fi connection from a smartphone operates as a hotspot for the car as well as
any other external devices in the car.
1. Activate tethering in your phone.
2. Tap on
Settings in the centre display's top view.
3. Tap on
Communication Wi-Fi and activate by ticking the box for
Wi-Fi connection.
Note that certain phones switch off tethering after the contact with the
car has been disconnected. The tethering in the phone therefore needs
to be reactivated the next time it is used.
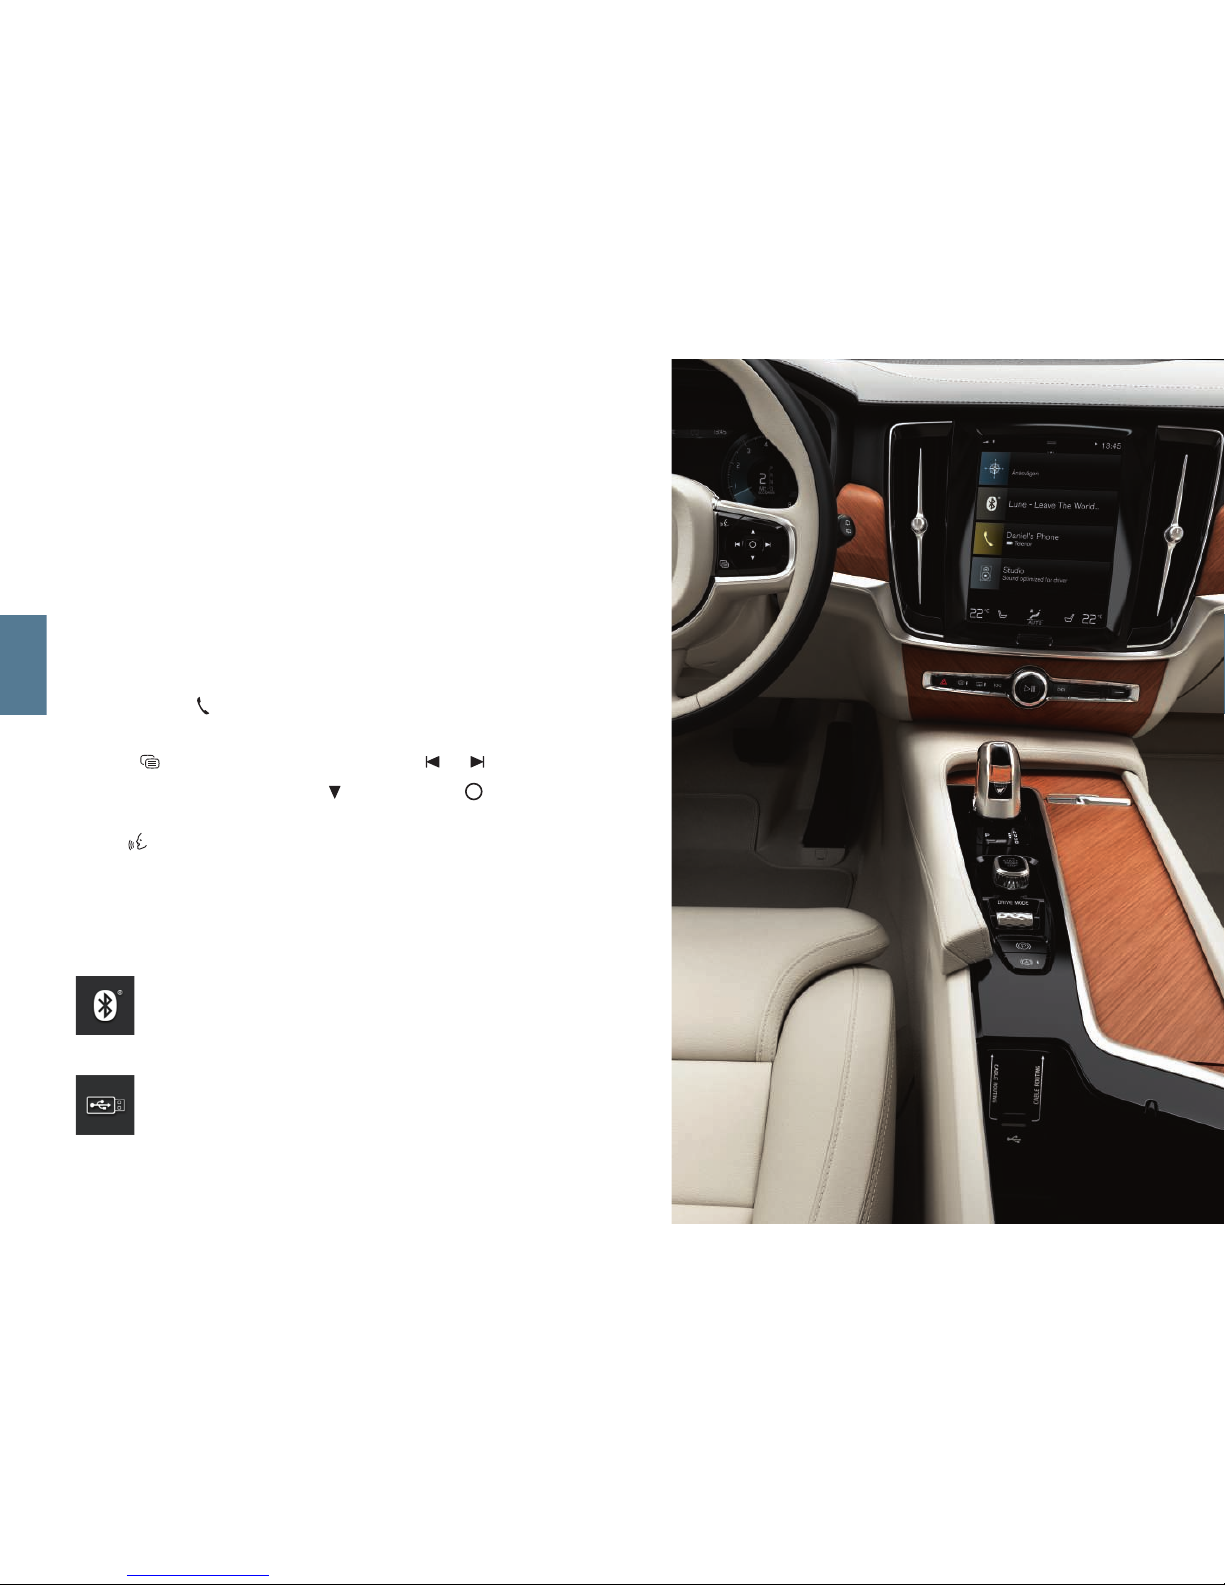
USB
Via USB you can connect an external device to play back media. You
can also use the USB port for Apple CarPlay and Android Auto. Your
external device is charged while it is connected to the car.
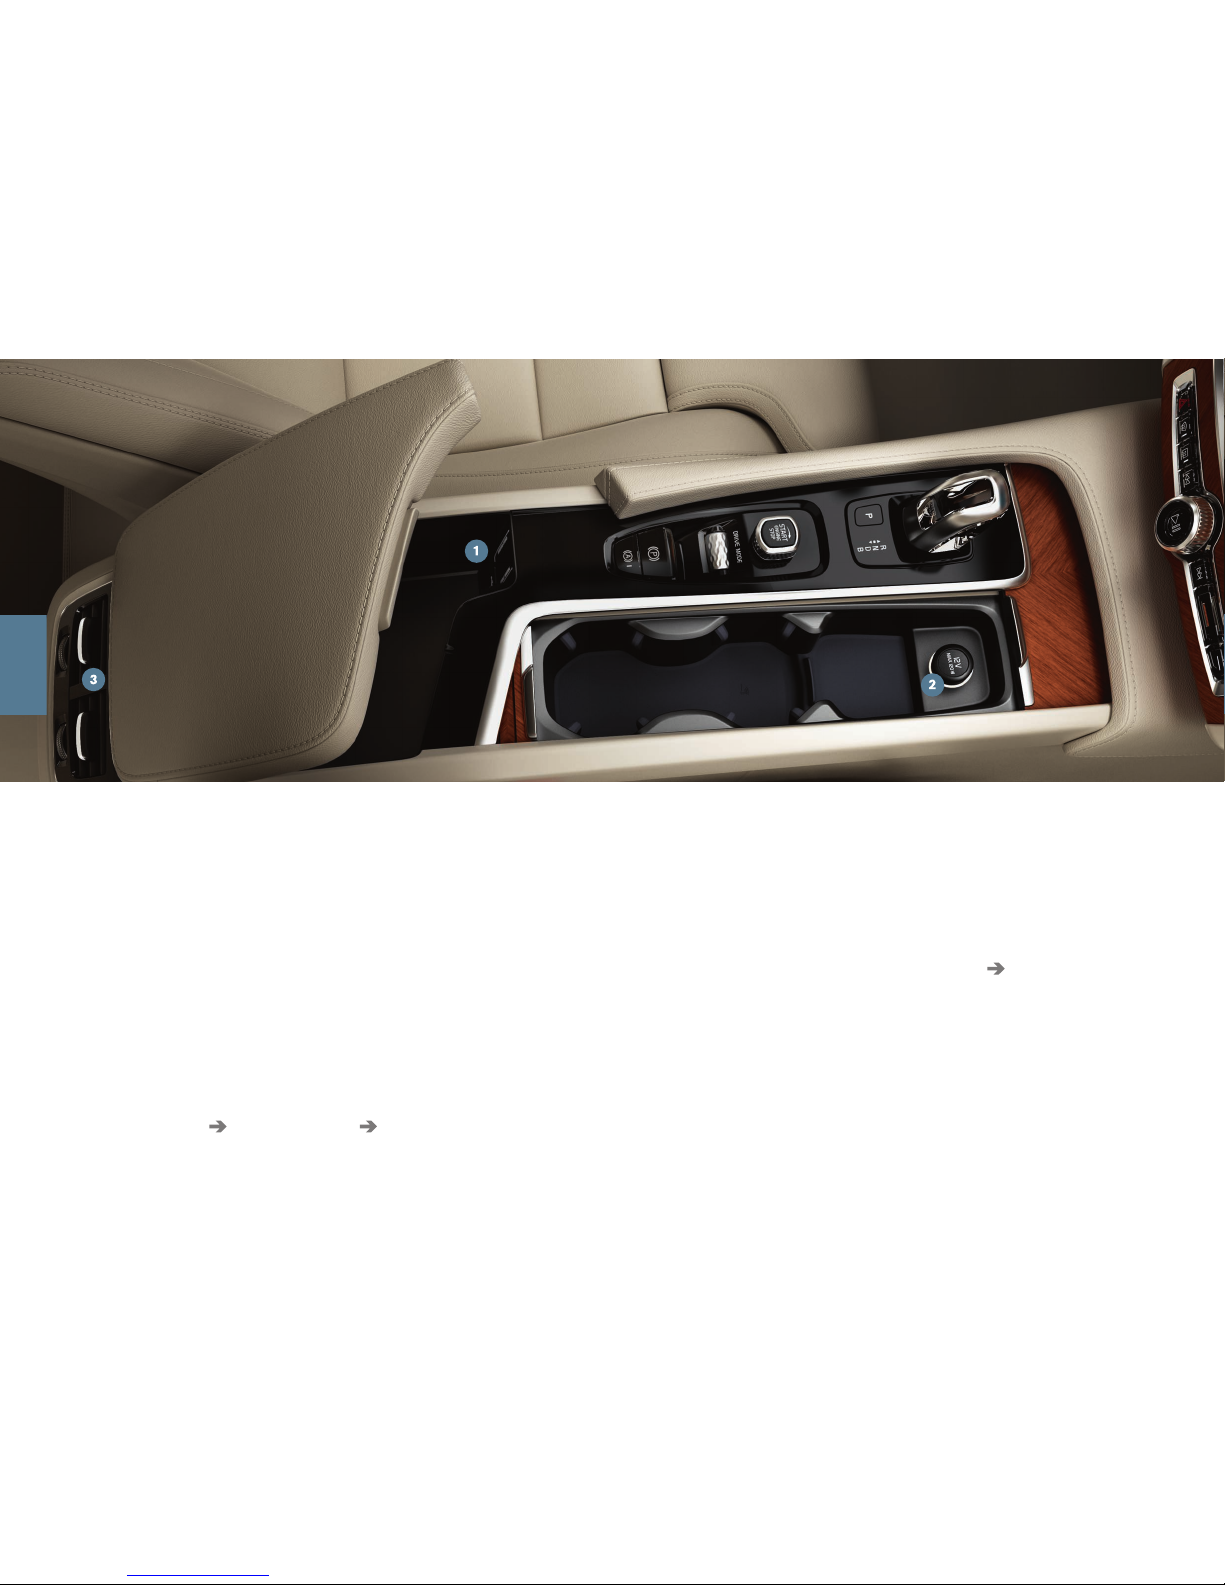
USB ports are located in the armrest's storage compartment
between the seats.
Electrical sockets
The following electrical sockets are available in your car:
12 V electrical socket.
12 V electrical socket and 230 V electrical socket*. There is also a
12 V electrical socket* in the cargo area.
4
Cars with Volvo On Call* only. When connecting using an in-car modem, the Volvo On Call services will use the connection.
03
Page 28
5
For information about which telephones are compatible with the car, see support.volvocars.com.
USING CONNECTED DEVICES
When the car is connected via an external device you can, for example,
manage phone calls and play back media via the car's audio and media
system.
Managing phone calls
5
It is possible to make and receive calls from a Bluetooth-connected
phone.
Calling via the centre display
1. Open the subview Phone in the home view. Select to call from the
call log, contact list or enter a number using the keypad.
2. Press
Call or .
Calling with the steering wheel's right-hand keypad
1. Press and navigate to Phone by pressing or .
2. Scroll through the calls list with and select with .
You can also manage calls using voice control. Press the voice control
button
in the steering wheel's right-hand keypad. See the chapter
Voice control in this Quick Guide for voice commands.
Playing back media
To play back audio from an external device, you need to connect it to
the car using your chosen method, see the previous page for different
connections.
Bluetooth-connected device
1. Start playback in the connected device.
2. Open the
Bluetooth app in the app view in the centre
display - playback starts.
USB-connected device
1. Start the USB app in the app view.
2. Select what to play - the playback starts.
03
Page 29
MP3 player or iPod connected device
1. Start playback in the device.
2. Open the
iPod or USB app depending on the connec-
tion method. To play back music from an iPod, select the
iPod app regardless of connection method - playback
starts.
Apple CarPlay and Android Auto
Apple CarPlay and Android Auto allow you to use certain apps in your
phone via the car to e.g. play back music or listen to podcasts. The
interaction takes place via the car's centre display or a phone.
If you have an iPhone, Siri voice control must be activated before using
Apple CarPlay.
1. Connect the phone to the USB port. If there is more than
one port then use the one with the white frame.
2. Tap on
Apple CarPlay or Android Auto in the app view
to activate.
Activate voice control with Apple CarPlay and Android Auto by means
of a long press on the
button in the steering wheel's right-hand key-
pad. A short press activates the car's own voice control system.
Bluetooth is switched off when Apple CarPlay is used. Use Wi-Fi or the
car's modem* to connect the car to the Internet as required.
03
Page 30
04
Page 31

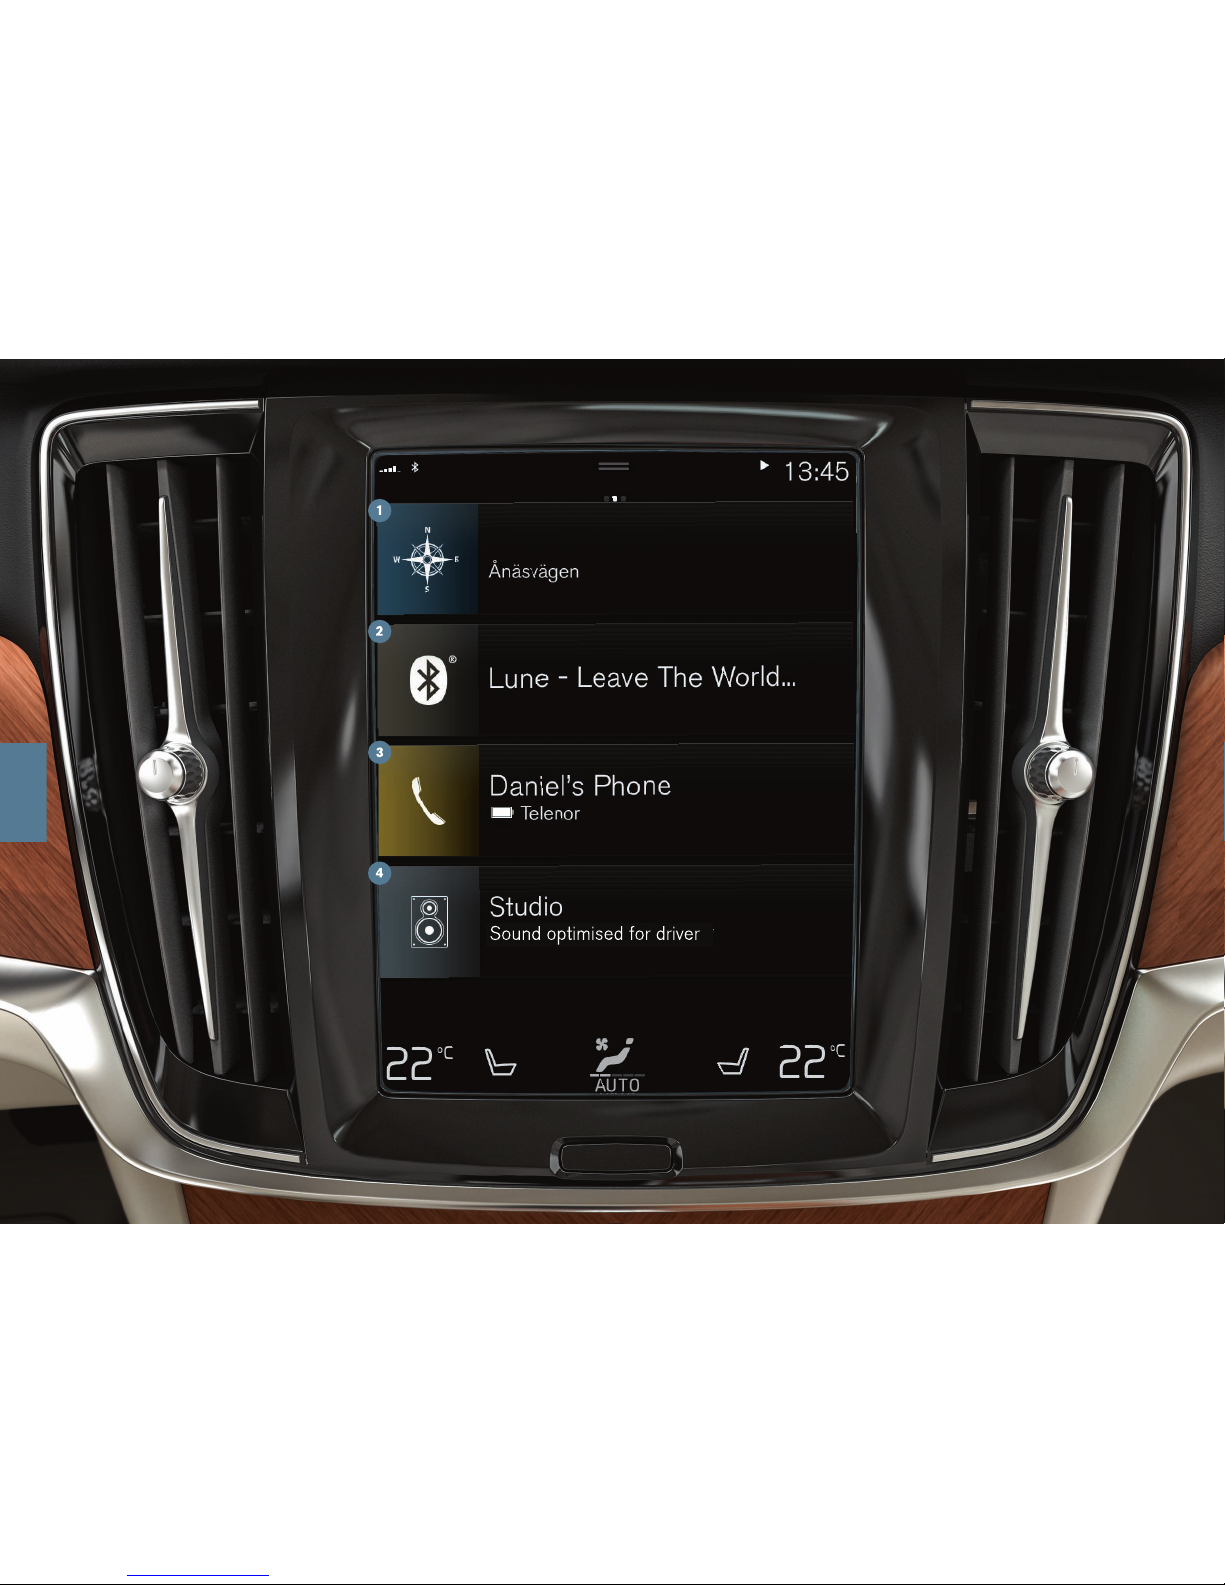
HOME VIEW
When the centre display starts it shows the home view, from where you
can access the subviews for Navigation, Media and Phone, as well as
the last used car function.
Navigation - tap here to access map navigation with Sensus
Navigation*.
Set destination with free text - Tap on . The map image
changes to free text search. Enter the search terms.
Set destination with map - Maximise the map with and tap
and hold at the destination you want to travel to.
Delete a destination - Tap on to open the itinerary. Tap on the
recycle bin to delete an intermediate destination in the itinerary, or
tap on Clear itinerary to delete the whole itinerary.
Map update6 - Tap on
Download Centre in the app view. The
number of available map updates is shown at
Maps. Tap on Maps
Install for map updating or installation of selected map. There is
also the option to download maps from support.volvocars.com to a
USB memory and then transfer them to the car.
Media - shown here is e.g. your music from an external device or if
you have selected FM radio in the app view. Tap on the subview to
access the settings. From here you can see your music library, radio
stations, etc.
Phone, the phone function is accessed from here. Tap on the subview to expand it. Here, for example, you can dial from the call history or the contact list, or enter a number manually using the key-
pad. Once you have selected a number, tap on
Call or .
Last used car function - here you can see the last used car func-
tion that is not shown in any of the other subviews, e.g. Car Status
or Driver performance. You can tap on the subview to access the
last used function.
6
Function availability may vary depending on market.
04
Page 32
04
Page 33
FUNCTION VIEW AND APP VIEW
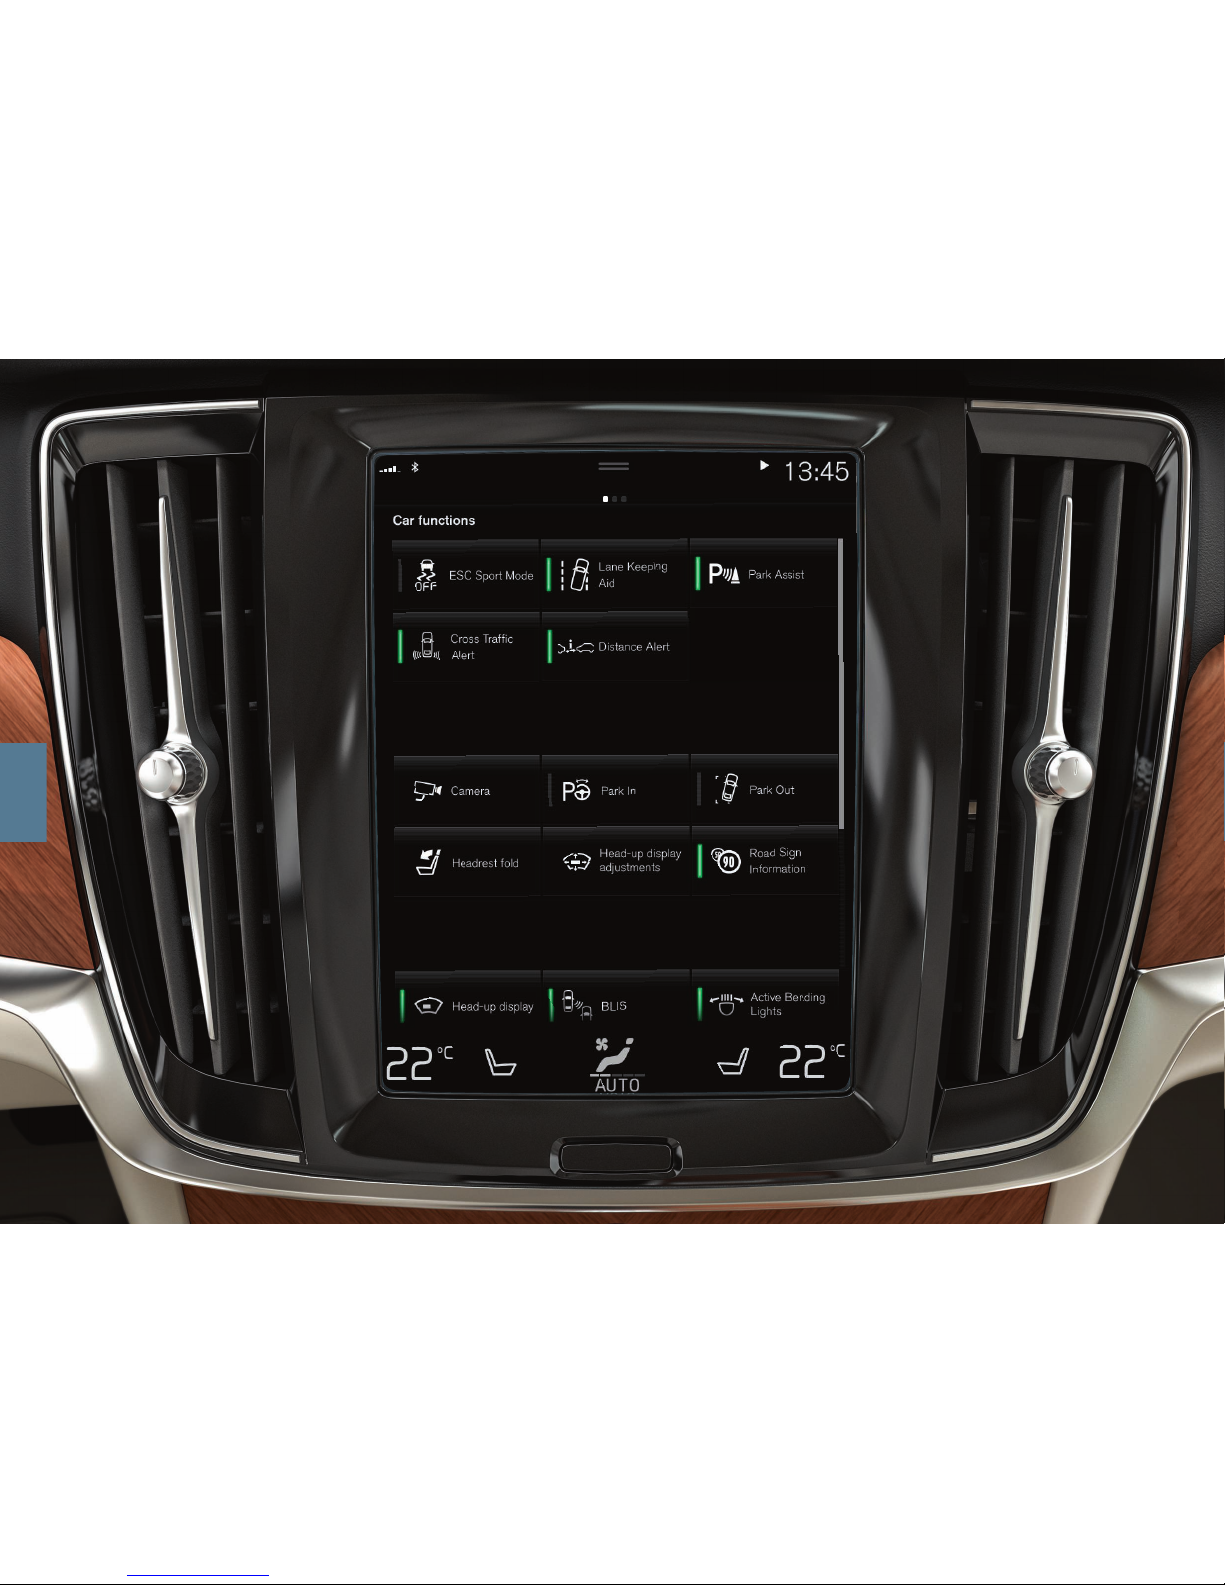
Function view
When you swipe from left to right7 in the home view you will reach the
function view. From here you can activate/deactivate different car functions, e.g.
Rear Sun Curtain *, Park Assist and Lane Keeping Aid. They
are activated/deactivated by tapping on the respective symbol. Some
functions open in a separate window.
Go back in the menu structure by pressing the physical home button
under the display.
App view
Swipe from right to left7 in the home view to access the app view. Here
you can see the apps supplied with the car, as well as the apps that you
can choose to download and install yourself.
Managing and updating apps and systems
In Download Centre, in the app view, you can update several
of the car's systems. For this to be possible the car must be
connected to the Internet. One tap on Download Centre
opens a download application. Here you can:
Download apps - Tap on New apps and select the app required.
Select Install to download the app.
Update apps - Tap on
Install all to update all apps. Select
Application updates to show a list of possible updates. Select the app
required and tap on Install.
Uninstall apps - Tap on
Application updates and select the app
required. Tap on
Uninstall to uninstall an app.
Update system software - Tap on System updates to show a list of
updates that can be installed in the car. - Tap on Install all at the bottom of the list to update all software or on Install for an individual software program. If no list is required, select Install all at the System
updates button.
Moving icons
The apps and buttons for car functions in the app view and function
view can be moved as required.
1. Press and hold an icon.
2. Drag the icon to an unoccupied space in the view and release.
7
Applies to left-hand drive cars. For right-hand drive cars - swipe in the opposite direction.
04
Page 34
04
Page 35

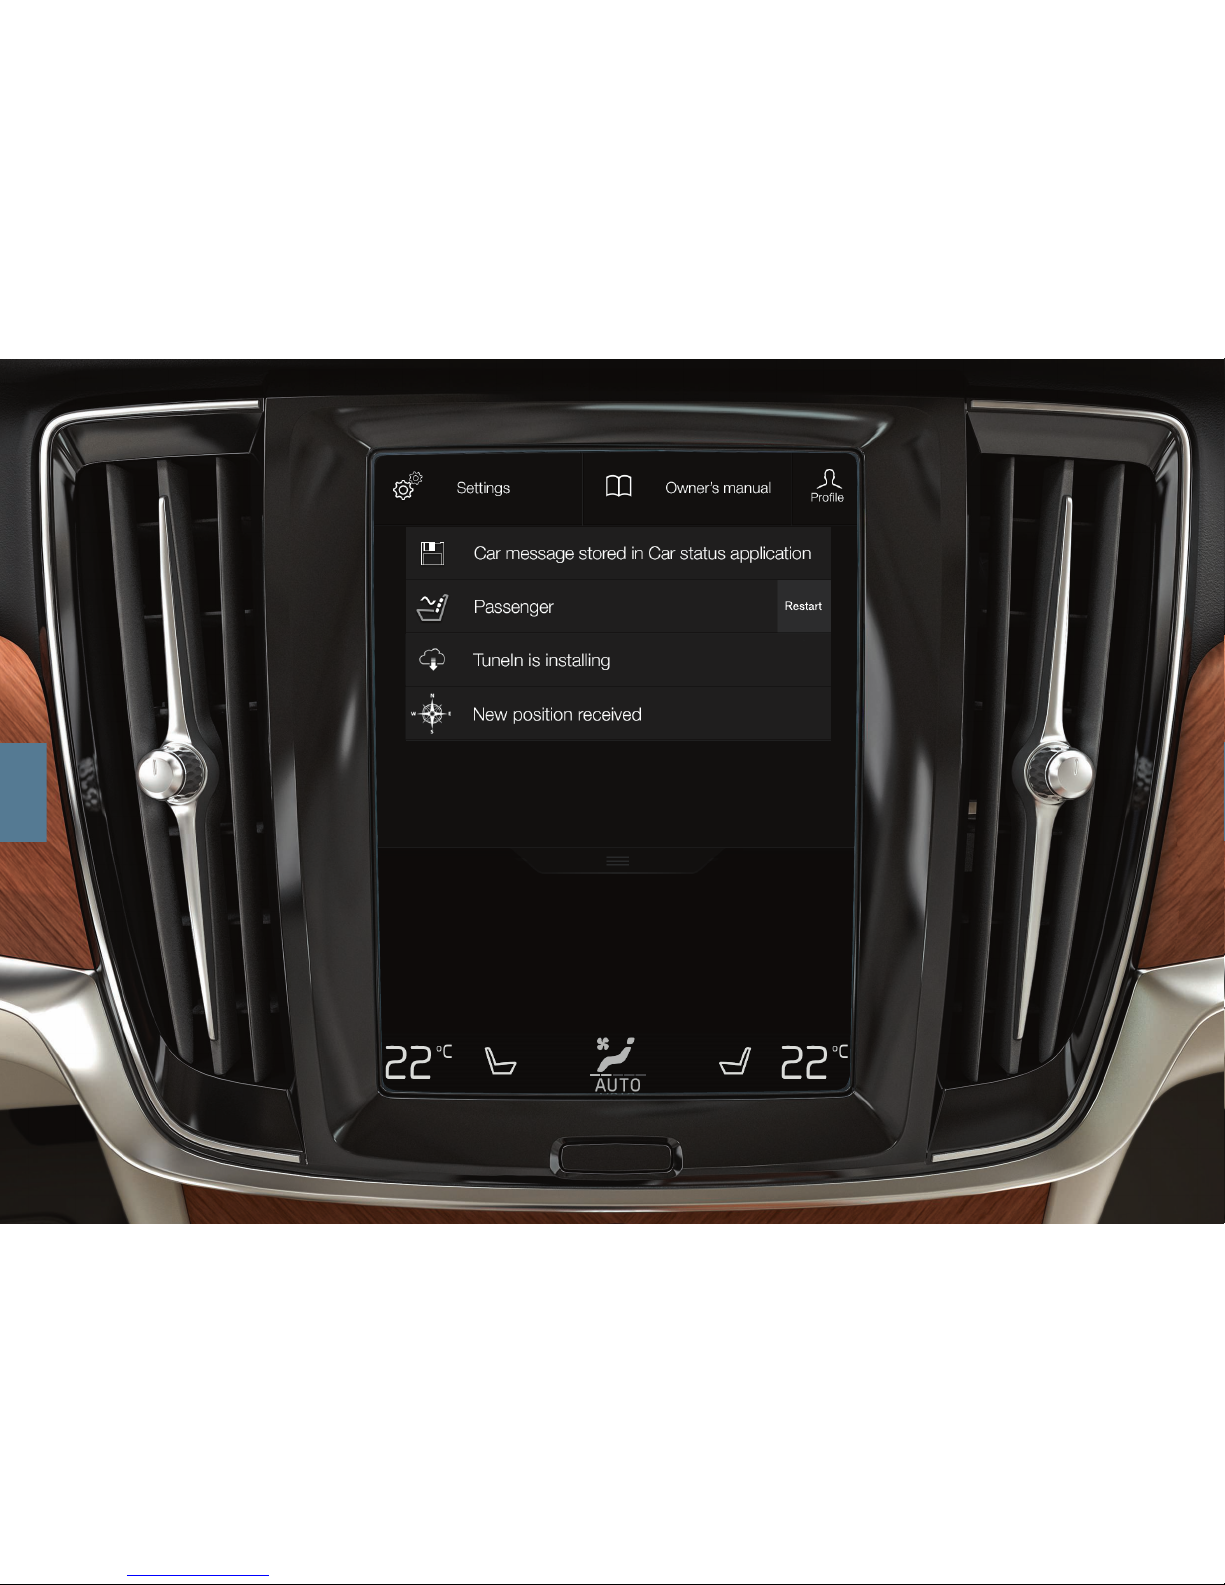
TOP VIEW
The upper part of the display contains a tab that you can drag down to
access the top view. From here you can access
Settings, Owner's
manual, Profile and the car's saved messages.
Personal preferences
Under
Settings you can set many personal preferences, e.g. for dis-
plays, mirrors, front seat, navigation*, audio and media system, language
and voice control.
Driver profiles
If the car is used by several drivers then each driver can have
a personal driver profile in the car. Every time you get into the
car you have the option to select your driver profile where
your personal preferences8 are saved. The number of profiles
depends on the number of keys available for the car. The
Guest profile
is not connected to any specific key.
The latest active driver profile is the one used for unlocking. Change
driver profile by selecting
Profile in the top view.
The driver profiles can be connected to the car's keys, and when it is
unlocked, the car is automatically adapted to your personal preferences.
Connect a key under
Settings System Driver Profiles. Select
one of the driver profiles (the Guest profile cannot be connected). The
home view is shown again. Drag down the top view again, repeat in
accordance with the above and select Edit on the chosen profile and
then Connect key.
Individual drive mode
If you want to adapt one of the
Hybrid, Pure or Power drive modes -
activate the drive mode under
Settings My Car Individual Drive
Mode
. Once you have made the settings, select
Individual
from the
drive modes on the tunnel console.
System volumes
If you want to adjust or switch off the volume of the system sounds, e.g.
the sound for tapping on the display, go to
Settings Sound
System Volumes.
8
For an overview of which settings are personal/global, see the owner's manual.
04
Page 36
05
Page 37
DRIVER SUPPORT
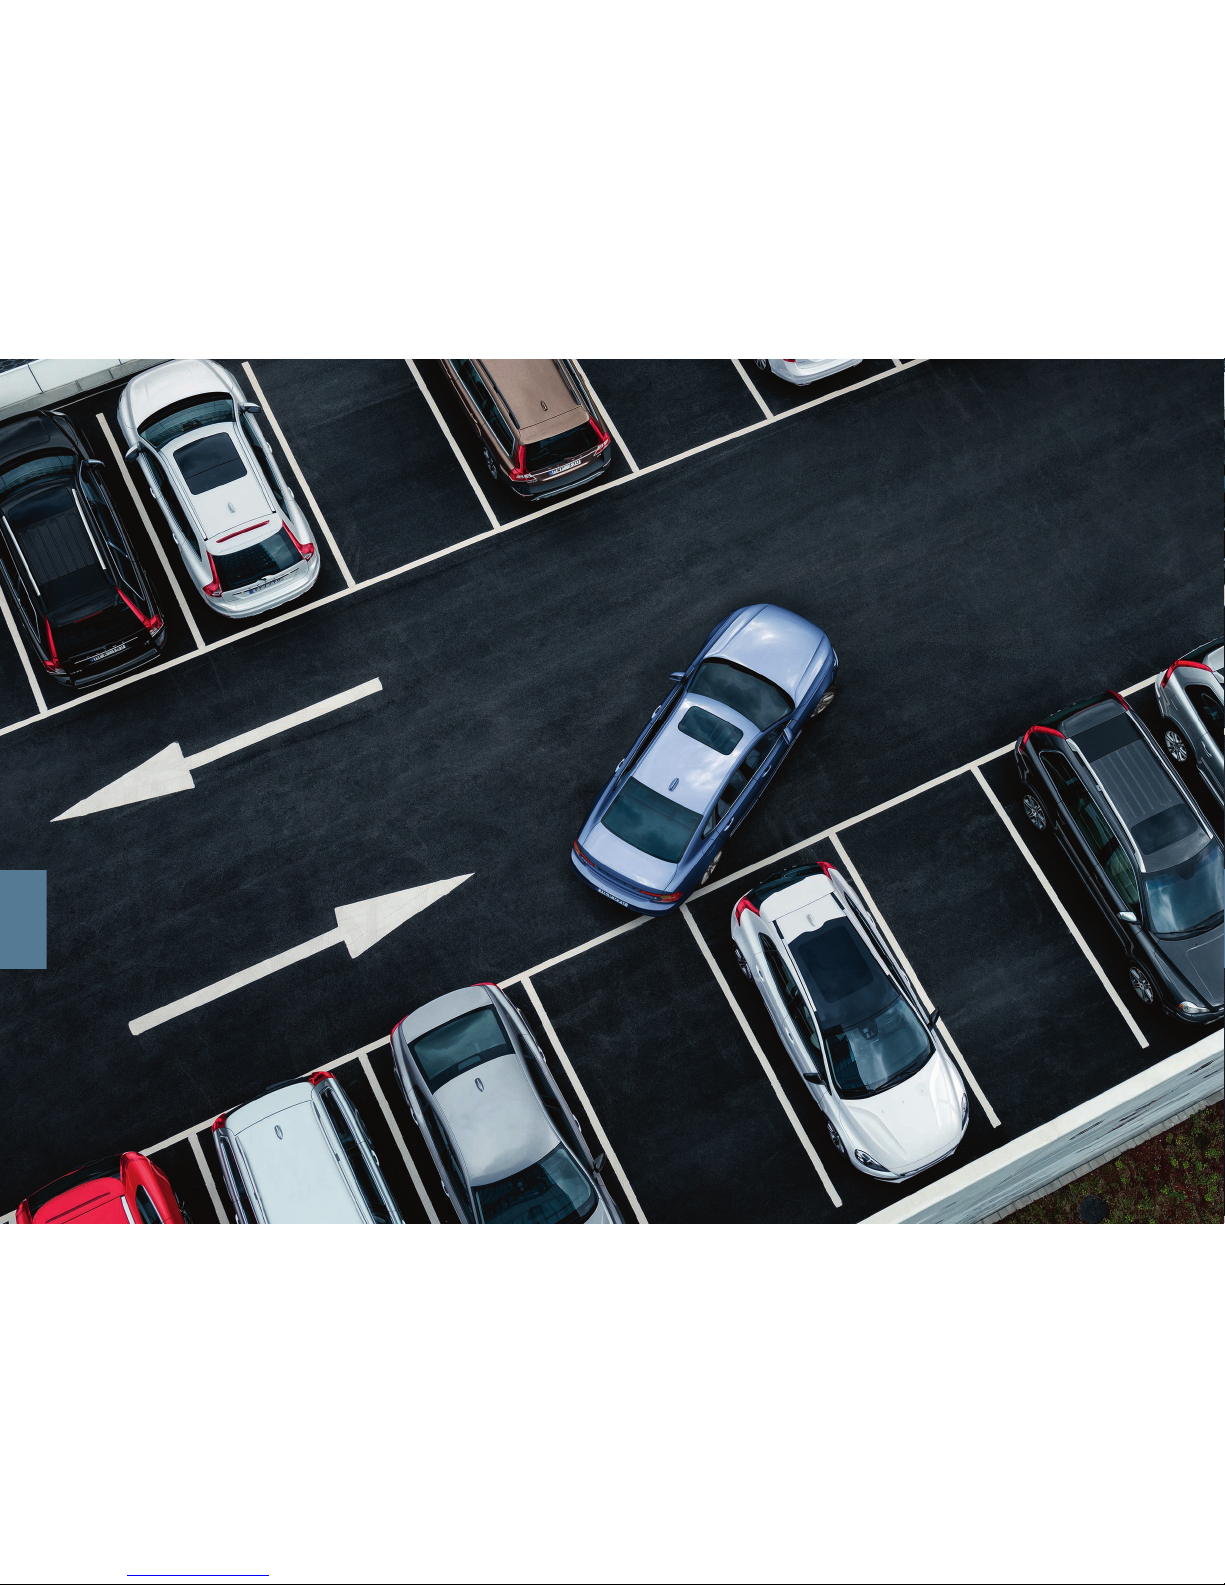
Your car is equipped with a number of functions that help you to drive
safely and which can prevent accidents. You can activate these functions in the centre display's function view. Remember that the driver
support functions are only aids and that as the driver you always have
full responsibility for driving the car in a safe manner.
City Safety
City Safety9 warns the driver of obstacles, by means of visual and
acoustic signals. The car is braked automatically if the driver does not
react in time in the event of a risk of collision. City Safety can,
amongst other things, prevent a collision and assist in the event of a
risk of colliding with e.g. vehicles, larger animals, pedestrians or cyclists.
City Safety is activated automatically when the engine is started.
Cross Traffic Alert (CTA)
*
CTA warns about crossing traffic behind the car and is activated if reverse gear is engaged or if the car is rolling backwards.
Blind Spot Information (BLIS)*
BLIS informs you about vehicles in the blind spot and quickly
approaching vehicles in an adjacent lane.
Lane Keeping Aid
Lane assistance (Lane Keeping Aid) can help you reduce the
risk of the car unintentionally leaving its own lane and/or colliding with another vehicle or obstacle by giving a warning,
steering the car back and/or evasive steering.
The settings for Lane assistance are made via
Settings My Car
IntelliSafe in the centre display's top view. Required type of assistance
can be selected in Lane Keeping Aid Mode. The subfunctions, Steering assistance at risk of run-off, Steering assistance at risk of collision
with oncoming traffic and Steering assistance at risk of rear-end colli-
sion* can be deactivated by deselecting
Collision Avoidance
Assistance.
Pilot Assist
Pilot Assist is a comfort function that can help to keep the car in its
lane and at a preset distance to the vehicle ahead.
Pilot Assist is selected and activated using the left-hand steering wheel
keypad. For steering assistance to work requires, amongst other things,
that the driver has his/her hands on the steering wheel and that the
lane markings are visible. When steering assistance is active, the driver
display shows a GREEN steering wheel symbol.
9
Not available for all markets.
05
Page 38
05
Page 39
PARK ASSIST
Park Assist Pilot*
Park Assist Pilot scans available parking space and then turns the
steering wheel to steer the car in. Your task is to pay attention around
the car, follow the centre display instructions, select gear, control the
speed and brake/stop.
Parking with Park Assist Pilot
1. Press the Driving in button in the function view. Drive in
at maximum 20 km/h. The distance between the car and
the parking spaces should be approximately 1 metre
when the function is searching for a parking space.
2. Stop the car when the graphic and text in the centre display advise that a suitable parking space has been found.
A pop-up window is shown.
3. Follow the instructions that appear in the centre display.
Be ready to stop the car when the information in the
centre display advises you to do so.
Leaving a parking space
The function can only be used for a parallel-parked car.
1. Press the Park out button in the function view.
2. Follow the instructions in the centre display.
Park assist camera*
The park assist camera helps the driver to observe any obstacles around the car using camera images and graphics in the
centre display. Selection of camera views and park assist lines
is made in the centre display. The camera starts automatically
when reverse gear is selected. The park assist camera can
also be started manually:
–
Press the Camera button in the function view to activate/deactivate
the function.
05
Page 40
05
Page 41

PURER DRIVING PLEASURE
By planning your driving and by driving economically, you can extend
the range for electric operation and reduce your impact on the environment at the same time. The conditions for achieving maximum range
vary according to the different circumstances and conditions the car is
driven in. You can influence some factors yourself, but not others. The
longest range is achieved under very favourable conditions when all
factors have a positive impact.
Plan your driving by always performing the following:
•
Charge the car before departure.
•
Precondition the car.
Drive economically by means of the following:
•
Activate drive mode Pure.
•
Lower the temperature in the passenger compartment and reduce
the fan strength.
•
Drive at a steady speed and keep a good distance to other vehicles
and objects to minimise braking.
•
Select Hold in the function view at higher speeds during journeys
that are longer than the range for electric operation.
•
Drive with the correct tyre pressure in the tyres and check them on a
regular basis. Select ECO tyre pressure for best results.
•
Avoid driving with the windows open.
Factors you cannot influence
•
Traffic situation.
•
Road conditions and topography.
•
Outside temperature and headwind.
See the owner's manual for more tips on range and fuel-efficient driving.
05
Page 42

VOICE COMMANDS
The voice control system gives you the option to use voice recognition10 to control certain functions of the media player, Bluetooth-connected phone, the climate system and Volvo's navigation system*. Voice
control is activated with a press on the voice control button in the steering wheel's right-hand keypad.
The following commands are always available for use:
•
Repeat
•
Cancel
•
Help
Voice commands for phone
•
Call [contact]
•
Call [telephone number]
•
Recent calls
•
Read message
•
Message to [contact]
Voice commands for radio and media
•
Media
•
Play [artist]
•
Play [song title]
•
Play [song title] from [album]
•
Play [TV channel name]
•
Play [radio station]
•
Tune to [frequency]
•
Tune to [frequency] [wavelength]
•
Radio
•
Radio FM
•
DAB
•
TV*
•
CD*
•
USB
•
iPod
•
Bluetooth
•
Similar music
Voice commands for climate control
•
Climate
•
Set temperature to X degrees
•
Raise temperature/Lower temperature
•
Sync temperature
•
Air on feet/Air on body
06
Page 43

•
Air on feet off/Air on body off
•
Set fan to max/Turn off fan
•
Raise fan speed/Lower fan speed
•
Turn on auto
•
Air condition on/Air condition off
•
Recirculation on/Recirculation off
•
Turn on defroster /Turn off defroster
•
Turn on max defroster/Turn max defroster off
•
Turn on electric defroster/Turn off electric defroster*
•
Turn on rear defroster/Turn off rear defroster
•
Turn steering wheel heat on/Turn steering wheel heat off*
•
Raise steering wheel heat/Lower steering wheel heat*
•
Turn on seat heat/Turn off seat heat*
•
Raise seat heat/Lower seat heat*
•
Turn on seat ventilation/Turn off seat ventilation*
•
Raise seat ventilation/Lower seat ventilation*
Voice commands for map navigation
•
Navigation
•
Take me home
•
Go to [city]
•
Go to [address]
•
Add intersection
•
Go to [postcode]
•
Go to [contact]
•
Search [POI category]
•
Search [POI category] [city]
•
Search [POI name]
•
Change country/Change state
11
,
12
•
Show favourites
•
Clear itinerary
•
Repeat voice guidance
•
Turn off voice guidance
•
Turn on voice guidance
10
Applies to certain markets.
11
In European countries, "Country" is used instead of "State".
12
For Brazil and India, the search area is changed via the centre display.
06
Page 44

SPECIAL TEXTS
The owner's manual and other manuals contain
safety instructions and all warning, important and
note texts, which must be read. Some functions
only apply to certain markets.
WARNING
GETTING STARTED
Volvo On Call – For cars with Volvo On Call, the
system only works in areas where Volvo On Call's
partners have mobile coverage and in the markets
where the service is available. Atmospheric disturbances or weak transmitter coverage can cause the
connection to fail, e.g. in sparsely populated areas.
For warning, important and note texts for Volvo On
Call services, see the contract applicable to the
Volvo On Call subscription as well as the Owner's
Manual.
Sensus Navigation* – direct all your attention to
the road and make sure that all your concentration
is on driving. Follow applicable traffic legislation and
drive with good judgment. Road and weather conditions may make certain recommendations less reliable.
OVERVIEW, EXTERIOR
Boot lid – bear in mind the risk of pinching when
opening/closing the boot lid. Check that no one is
near the boot lid as a pinching injury could have
serious consequences. Always operate the boot lid
with caution.
OVERVIEW, INTERIOR
If the car is not equipped with a switch for activating/deactivating the passenger airbag, then the
passenger airbag is always activated. Never use a
rear-facing child seat on the front passenger seat
when the airbag is activated. The passenger airbag
must always be activated when front-facing passengers (children and adults) are sitting in the front
passenger seat. Do not put objects in front of or
above the dashboard where the passenger airbag is
located.
Remote control key must always be taken out
from the car when you leave it, and make sure the
car's electrical system is in ignition position 0 especially if there are children in the car.
Parking brake should always be used when parking on a slope. Engaging a gear or the automatic
transmission's P position is not sufficient to hold
the car stationary in all situations.
CHARGING
•
The hybrid battery must only be charged at maximum permitted charging current or lower in
accordance with applicable local and national
recommendations for hybrid charging from 230 V
sockets/plugs.
•
The hybrid battery may only be charged using an
approved grounded 230 V socket (or equivalent
socket with a different voltage depending on the
market) or from a charging station with the loose
charging cable supplied by Volvo (Mode 3).
•
The control unit's ground fault breaker protects
the car, but there may still be a risk of overloading the 230 V mains power circuit.
•
The charging cable must not be used if any part
of it is damaged - there is then the risk of electric
shock and serious personal injury. A damaged or
inoperative charging cable must only be repaired
by a workshop - an authorised Volvo workshop is
recommended.
•
Avoid visible worn or damaged mains sockets
since they may lead to fire damage and/or personal injury if used.
•
Always position the charging cable where it cannot be run over, stepped on, tripped over, or otherwise cause damage or personal injury.
•
Never use an extension cable or adapter.
•
Unplug the charger from the wall socket before
cleaning.
•
Children should be supervised when in the vicinity of the charging cable when it is plugged in.
FOLDING THE BACKRESTS IN THE REAR SEAT
Make sure the backrests are properly locked after
they are lowered and raised. Make sure the head
restraints are properly locked after they are raised.
PASSENGER COMPARTMENT CLIMATE CONTROL
Heated seats* must not be used by people who
find it difficult to perceive an increase in temperature due to a lack of sensation or who otherwise
have problems operating the controls for the
heated seats. Otherwise they may suffer burn injuries.
Preconditioning can be started via a timer set far
in advance. Do not use preconditioning (applies to
fuel-driven heater):
•
In unventilated spaces indoors. Exhaust gases
are emitted if the heater starts.
•
In locations with combustible or flammable material nearby. Fuel, gas, long grass, sawdust, etc.
may ignite.
•
When there is a risk that the heater's exhaust
pipe may be blocked. The outlet is located in the
front right-hand wheel housing and, for example,
snow inside the front right-hand wheel housing
may obstruct the heater's ventilation.
DRIVER SUPPORT
BLIS and CTA are supplementary driver support,
but cannot handle all situations in all traffic, weather
and road conditions. The responsibility for changing
lanes safely and using good judgement always
rests with the driver. They are not a substitute for
the driver's attention and judgement. The driver is
always responsible for ensuring the car is driven in
a safe manner, at the appropriate speed, with an
appropriate distance to other vehicles, and in
accordance with current traffic rules and regulations. BLIS does not work in sharp curves or when
reversing.
Lane Keeping Aid and Steering assistance at
risk of lane departure are supplementary driver
support, but cannot handle all situations in all traffic,
weather and road conditions. The functions cannot
detect barriers, rails or similar obstacles at the side
of the road. Steering assistance is only activated if
there is a high risk of collision – you must therefore
never wait for the function to intervene. The functions are not a substitute for the driver's attention
and judgement. The driver is always responsible for
ensuring the car is driven in a safe manner, at the
appropriate speed, with an appropriate distance to
other vehicles, and in accordance with current traffic rules and regulations.
City Safety is supplementary driver support, but
cannot handle all situations in all traffic, weather
and road conditions. The City Safety auto-brake
function can prevent a collision or reduce collision
speed, but to ensure full brake performance the
driver should always depress the brake pedal –
even if the car auto-brakes. The warning and steering assistance are only activated if there is a high
risk of collision – you must therefore never wait for
a collision warning or for City Safety to intervene.
The warning and brake intervention for pedestrians
and cyclists are deactivated at vehicle speeds
exceeding 70 km/h (43 mph). City Safety does not
activate any auto-brake functions in the event of
heavy acceleration. City Safety is not a substitute
for the driver's attention and judgement. The driver
is always responsible for ensuring the car is driven
in a safe manner, at the appropriate speed, with an
appropriate distance to other vehicles, and in
accordance with current traffic rules and regulations.
Pilot Assist is supplementary driver support, but
cannot handle all situations in all traffic, weather
and road conditions. Pilot Assist must only be used
if there are clear lane lines painted on each side of
the lane. All other use involves increased risk of
contact with surrounding obstacles that cannot be
detected by the function. Pilot Assist is not a substitute for the driver's attention and judgement. The
driver is always responsible for ensuring the car is
driven in a safe manner, at the appropriate speed,
with an appropriate distance to other vehicles, and
in accordance with current traffic rules and regulations. Pilot Assist is not a collision avoidance system. The driver must intervene if the system does
not detect a vehicle in front. Pilot Assist does not
brake for people, animals, objects, small vehicles,
low trailers as well as oncoming, slow or stationary
vehicles. Do not use Pilot Assist in situations such
as in city traffic, at junctions, on slippery surfaces,
with a lot of water or slush on the road, in heavy
rain/snow, in poor visibility, on winding roads or on
slip roads. Pilot Assist only gives warning about
vehicles detected by its camera and radar unit.
07
Page 45

PARK ASSIST
Park Assist Pilot is supplementary driver support,
but cannot handle all situations in all traffic, weather
and road conditions. Pay particular attention if there
are people and animals near the car. Bear in mind
that the front of the car may swing out towards
oncoming traffic during the parking manoeuvre.
Objects situated higher than the sensor detection
area are not included when calculating the parking
manoeuvre, which could cause the function to
swing into the parking space too early – such parking spaces should be avoided for this reason. Park
Assist Pilot is not a substitute for the driver's attention and judgement. The driver is always responsible for ensuring the car is driven in a safe manner,
at the appropriate speed, with an appropriate distance to other vehicles, and in accordance with current traffic rules and regulations.
The parking camera is supplementary driver support, but cannot handle all situations in all traffic,
weather and road conditions. The cameras have
blind spots where obstacles cannot be detected.
Pay particular attention if there are people and animals near the car. Objects/obstacles may be closer
to the car than they appear to be on the screen.
The cameras are not a substitute for the driver's
attention and judgement. The driver is always
responsible for ensuring the car is driven in a safe
manner, at the appropriate speed, with an appropriate distance to other vehicles, and in accordance
with current traffic rules and regulations.
VOICE COMMANDS
The driver always holds overall responsibility for
driving the vehicle in a safe manner and complying
with all applicable rules of the road.
IMPORTANT
OVERVIEW, INTERIOR
The head-up display unit* from which the information is projected is located in the instrument
panel. To avoid damage to the display unit's cover
glass - do not store any objects on the cover glass
and make sure that no objects fall down onto it.
CENTRE DISPLAY
When cleaning the centre display, use a microfibre
cloth that is free from sand and the like. The screen
may otherwise be scratched. When cleaning the
centre display, only use gentle pressure on the display. Heavy pressure can damage the display.
Do not spray any liquid or caustic chemicals directly
on the centre display. Do not use window cleaning
agent, other cleaning agents, aerosol spray, solvents, alcohol, ammonia or cleaning agent containing abrasive. Never use abrasive cloths, paper towels or tissue paper, as these could scratch the display.
CHARGING
Charging cable – never connect the charging
cable when there is a risk of thunderstorm or lightning strike. Never unplug the charging cable from
the 230 V socket while charging is in progress there is then a risk of damaging the 230 V socket.
Always stop charging first and then disconnect the
charging cable - first of all from the car's charging
socket, and then from the 230 V socket. The aim of
this is to prevent damage to the system, as well as
to prevent charging being stopped accidentally. The
ground fault breaker does not protect the 230 V
socket/electrical installation.
Power strips, surge protection boxes or similar devices must not be used together with the charging
cable since this could involve a risk of fire, electric
shock, etc. Only use an adapter between the 230 V
socket and the charging cable if the adapter is
marked with approval in accordance with
IEC 61851 and IEC 62196.
The charging cable and its associated parts should
not be swamped or immersed in water.
Control unit – avoid exposing the control unit and
its plug to direct sunlight. In such cases, the overheating protection in the plug is at risk of reducing
or interrupting the charging of the hybrid battery.
Check that the 230 V socket has adequate power
supply for charging electric vehicles - in the event
of uncertainty, the socket must be checked by a
qualified professional. If the socket has unknown
current intensity – use the lowest level on the control unit
FOLDING THE BACKRESTS IN THE REAR SEAT
There must be no objects on the rear seat when
the backrest is to be folded down. Nor may the
seatbelts be connected.
The integrated child seat*/armrest* on the centre
seat must be in retracted position.
RIGHT-HAND STALK SWITCH
Before placing the wiper blades in the service position, make sure that they are not frozen down. If the
wiper arms in service position have been folded up
from the windscreen, they must be folded back
down onto the windscreen before the wipers are
activated. This is to avoid scraping the paint on the
bonnet.
CONNECTIONS
Electrical socket – the maximum power usage for
a 12 V electrical socket is 120 W (10 A) per
socket.
The maximum power usage for a 230 V electrical
socket is 150 W.
NOTE
OVERVIEW, EXTERIOR
Power operated boot lid – if the system has been
operating continuously for a long time, it is switched
off to avoid overload. It can be used again after
approx. 2 minutes. There is a risk of reduced function, or no function, if the rear bumper is loaded
with large amounts of ice, snow, dirt or similar. For
this reason, make sure you keep it clean.
The foot-operated boot lid function is available in
two versions:
•
Opening with foot movement.
•
Opening and closing with foot movement.
Note that the function for closing with foot movement requires additional options.
Electromagnetic fields and screening may interfere
with the functions of the remote control key.
Avoid storing the remote control key close to metal
objects or electronic apparatus, e.g. mobile phones,
tablets, laptops or chargers - preferably no closer
than 10-15 cm.
OVERVIEW, INTERIOR
Head-up display* – when City Safety* is activated,
the information in the head-up display is replaced
by a graphic for City Safety. This graphic is illuminated even if the head-up display is switched off.
The driver has less chance of seeing information in
the head-up display if polarising sunglasses are
worn, if the driver is not sitting centrally in the seat,
if there are any objects on the cover glass of the
display unit, or in unfavourable light conditions.
Certain visual defects may cause headaches and a
feeling of stress during the use of the head-up display.
CHARGING
The charging cable will remember the last setting
of the charging current. It is therefore important to
adjust the setting if another 230 V socket is used
at the next charging.
Volvo recommends a charging cable in accordance
with IEC 62196 and IEC 61851 which supports
temperature monitoring.
STEERING WHEEL
Trip computer – certain deviations may occur
when calculating the distance travelled if the driving
method is changed.
PASSENGER COMPARTMENT CLIMATE CONTROL
Heating or cooling cannot be hastened by selecting
a higher or lower temperature than the actual
desired temperature.
Preconditioning is available only when the car is
connected to an electrical socket (applies to electric heater). A charging station which is not always
active, e.g. due to a timer, may cause preconditioning to malfunction. If the car is not connected to an
electrical socket, it is still possible to cool the passenger compartment briefly in a warm climate by
starting preconditioning directly. The car's doors
and windows should be closed during the preconditioning of the passenger compartment.
CONNECTIONS
Internet – data is transferred (data traffic) when
using the Internet, and this may involve a cost. Activation of data roaming and Wi-Fi hotspots may
07
Page 46

involve further charges. Contact your network operator about data traffic costs. When downloading
with a mobile phone, note the data download costs.
Data downloading can affect other services that
transfer data, e.g. web radio. If the effect on other
services is experienced as problematic, the download can be interrupted. Alternatively, it may be
appropriate to switch off or cancel other services.
If the phone's operating system is being updated, it
is possible that the connection will be interrupted.
Delete the phone from the car and reconnect.
USING CONNECTED DEVICES
Apple CarPlay and Android Auto - Volvo is not
responsible for the content in the Apple CarPlay or
Android Auto app.
PARK ASSIST
Keep the camera lens clear of dirt, snow and ice to
ensure optimum function. This is particularly important in poor light.
07
Page 47
TP 24047 (English), AT 1717, MY18, Copyright © 2000-2017 Volvo Car Corporation
 Loading...