

Page 1
Instruction No Version Part. No.
31317574 1.1 30758207
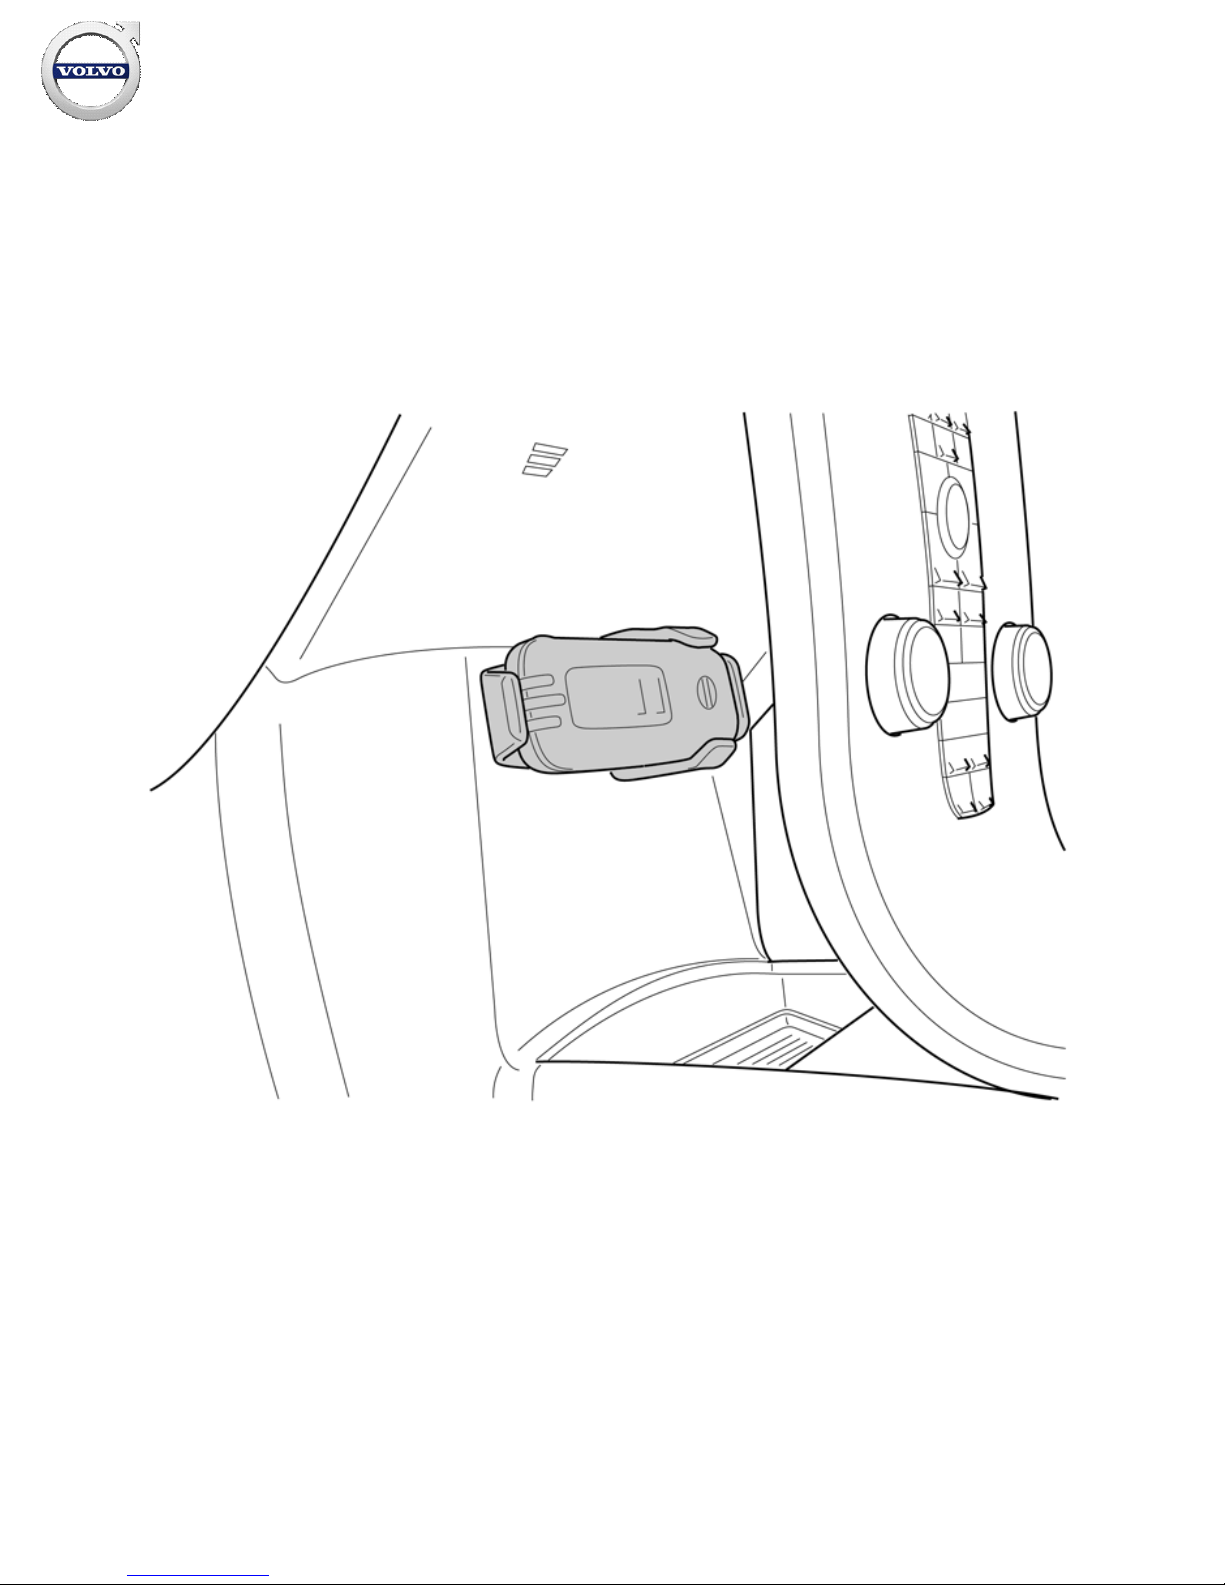
Alcoguard
IMG-
336184
Instruction No Version Part. No.
31317574 1.1 30758207
Alcoguard
IMG-
336184
Installation instructions, accessories
Volvo Car Corporation Gothenburg, Sweden
©
Volvo Car Corporation Alcoguard- 31317574 - V1.1
Page 1 / 15
Page 2
Equipment
A0000162
IMG-
242205
IMG-
239660
IMG-
239667
IMG-
239681
IMG-
239981
IMG-
240675
IMG-
336189
Installation instructions, accessories
Volvo Car Corporation Gothenburg, Sweden
©
Volvo Car Corporation Alcoguard- 31317574 - V1.1
Page 2 / 15
Page 3

INTRODUCTION
Read through all of the instructions before starting installation.
Notifications and warning texts are for your safety and to
minimise the risk of something breaking during installation.
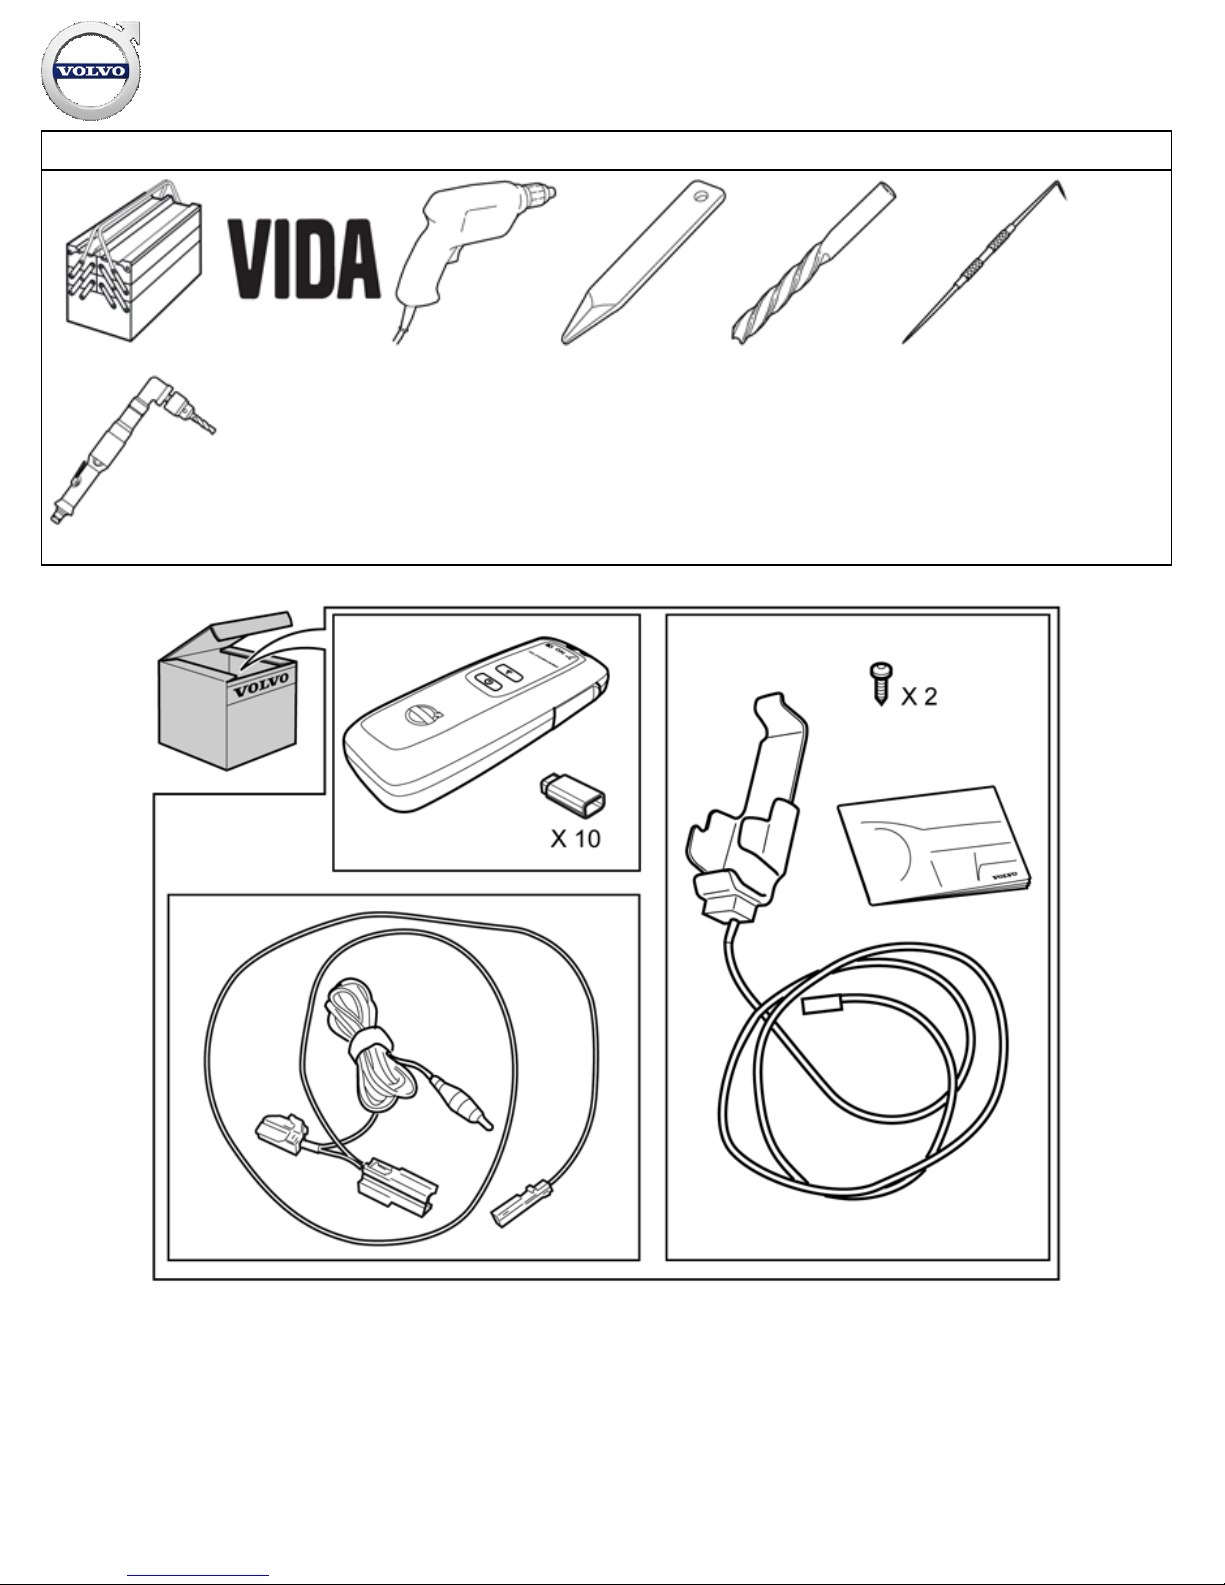
Ensure that all tools stated in the instructions are available
before starting installation.
Certain steps in the instructions are only presented in the form
of images. Explanatory text is also given for more complicated
steps.
In the event of any problems with the instructions or the
accessory, contact your local Volvo dealer.
Note!
The work is carried out the same way on left and right-hand
drive cars, but mirrored on right-hand drive cars. Left-hand
drive car shown.
1
IMG-
325286
Activate (and calibrate) the alcohol lock according to the
description in the Technical Journal in TIE. Relevant journal is TJ
19265 "Alcoguard, calibration and activation Software". It also
contains the necessary software.
After installing the software on the PC according to TJ, connect
the alcohol lock to the PC using the communication cable.
Installation instructions, accessories
Volvo Car Corporation Gothenburg, Sweden
©
Volvo Car Corporation Alcoguard- 31317574 - V1.1
Page 3 / 15
Page 4
2
IMG-
245980
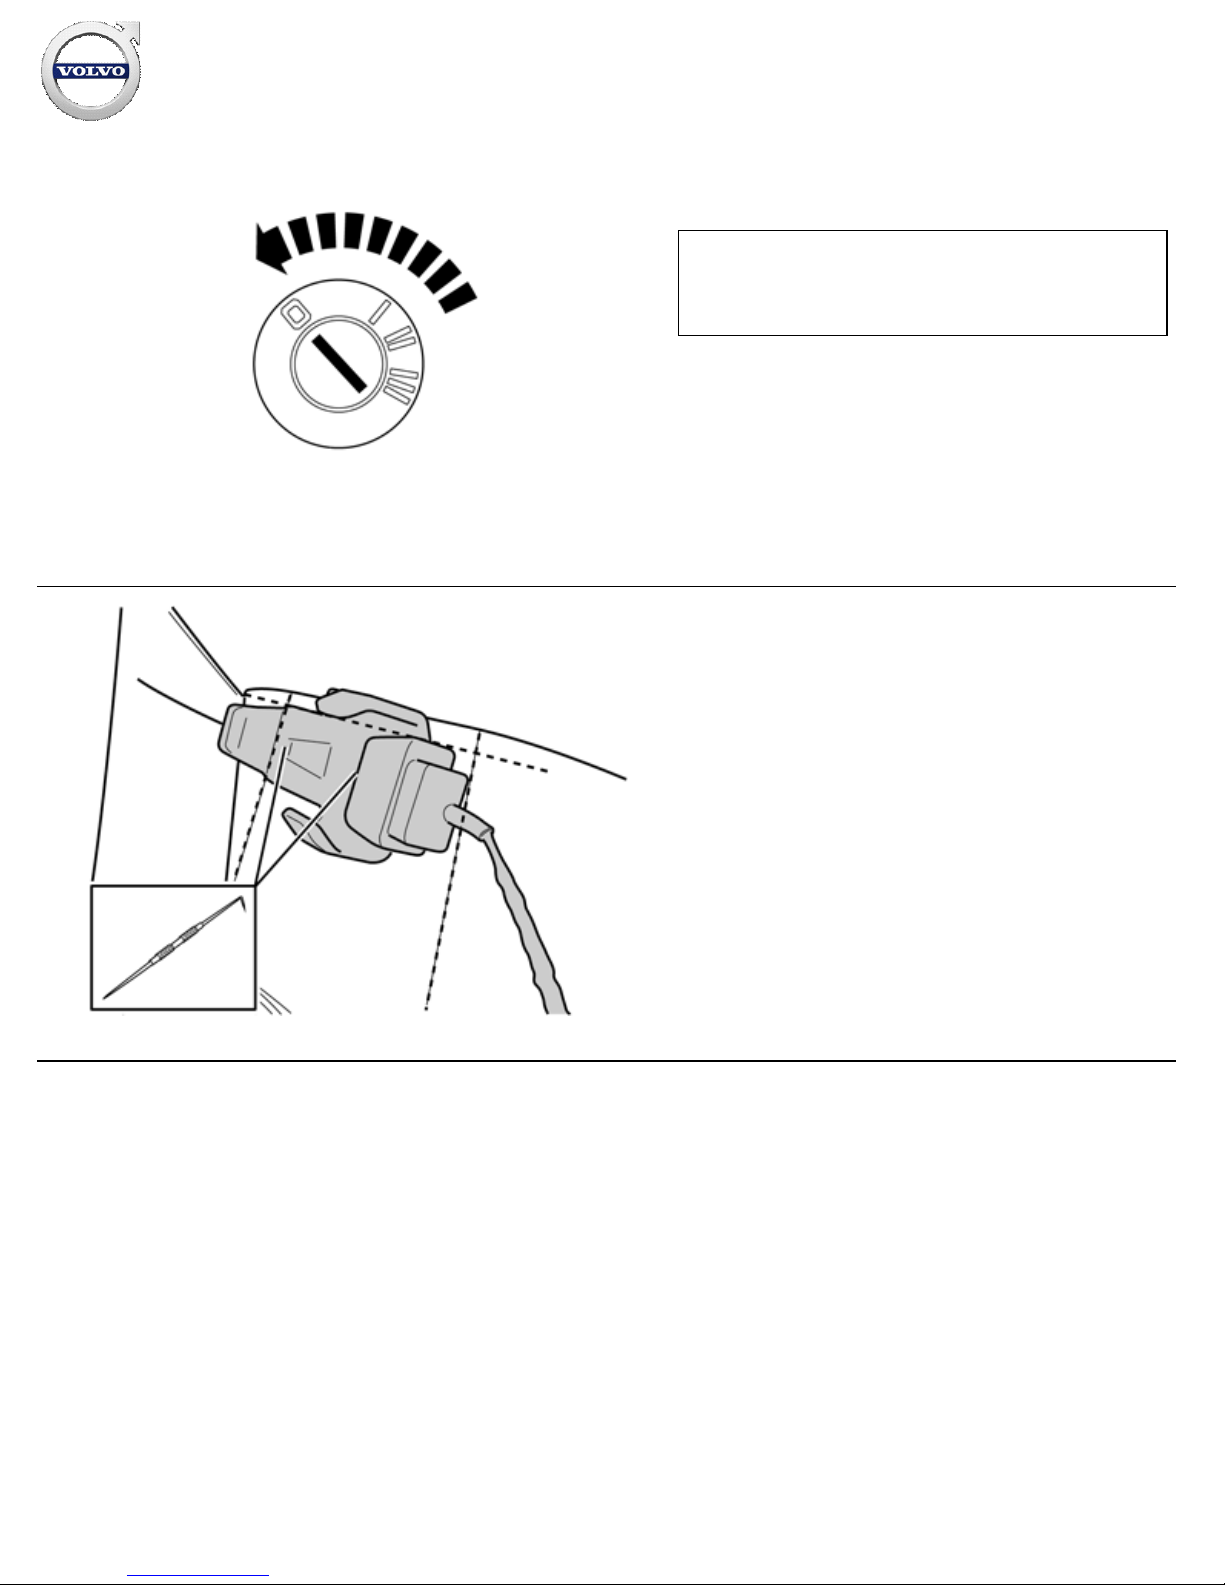
Turn the ignition switch to position 0.
Note!
Wait at least three minutes before unplugging the connectors or
removing other electrical equipment.
3
IMG-
336270
Place the cradle centrally between the two vertical lines at the
front edge of the tunnel console and parallel with the panel at the
upper edge.
Mark out for drilling holes.
Installation instructions, accessories
Volvo Car Corporation Gothenburg, Sweden
©
Volvo Car Corporation Alcoguard- 31317574 - V1.1
Page 4 / 15
Page 5
4
J8504532
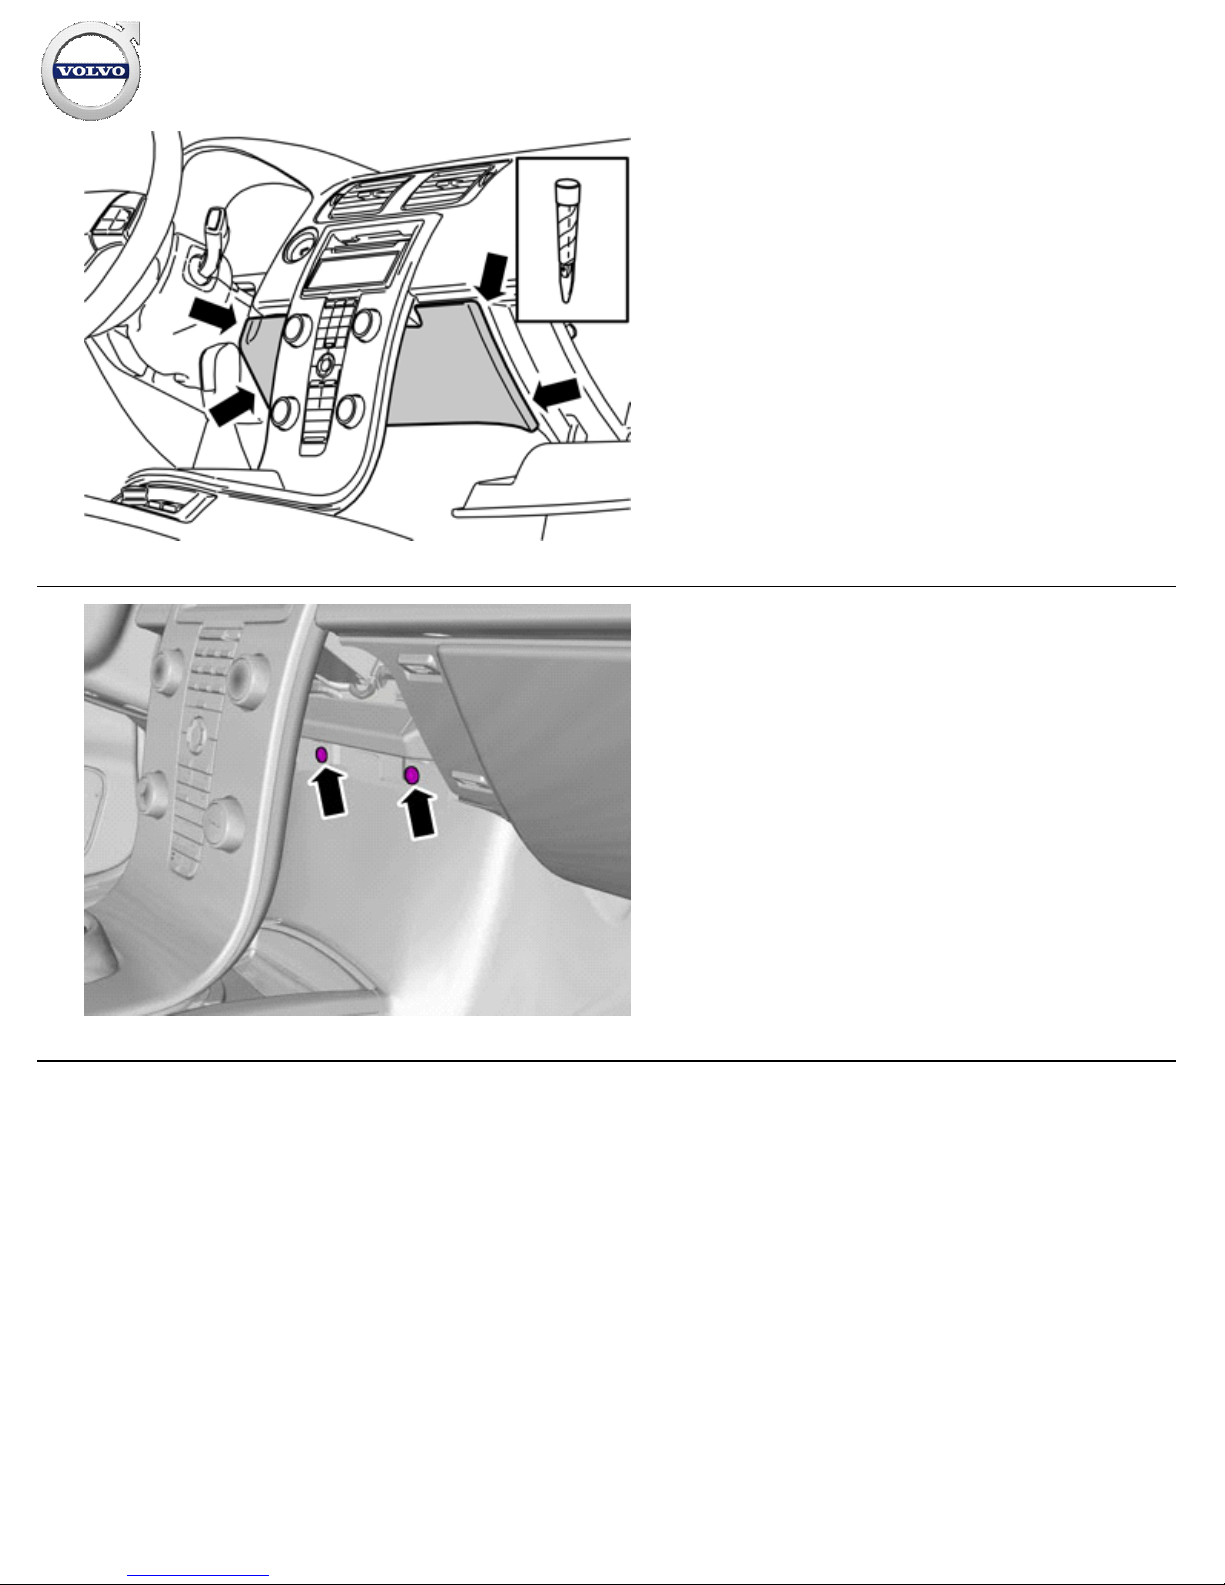
Open the glovebox.
Carefully pry off the panel inside the centre console. Use a
plastic weatherstrip tool. The panel is secured by two clips on
each of the short sides.
Pull the panel off downwards.
5
IMG-
336271
Remove the screws.
Installation instructions, accessories
Volvo Car Corporation Gothenburg, Sweden
©
Volvo Car Corporation Alcoguard- 31317574 - V1.1
Page 5 / 15
Page 6
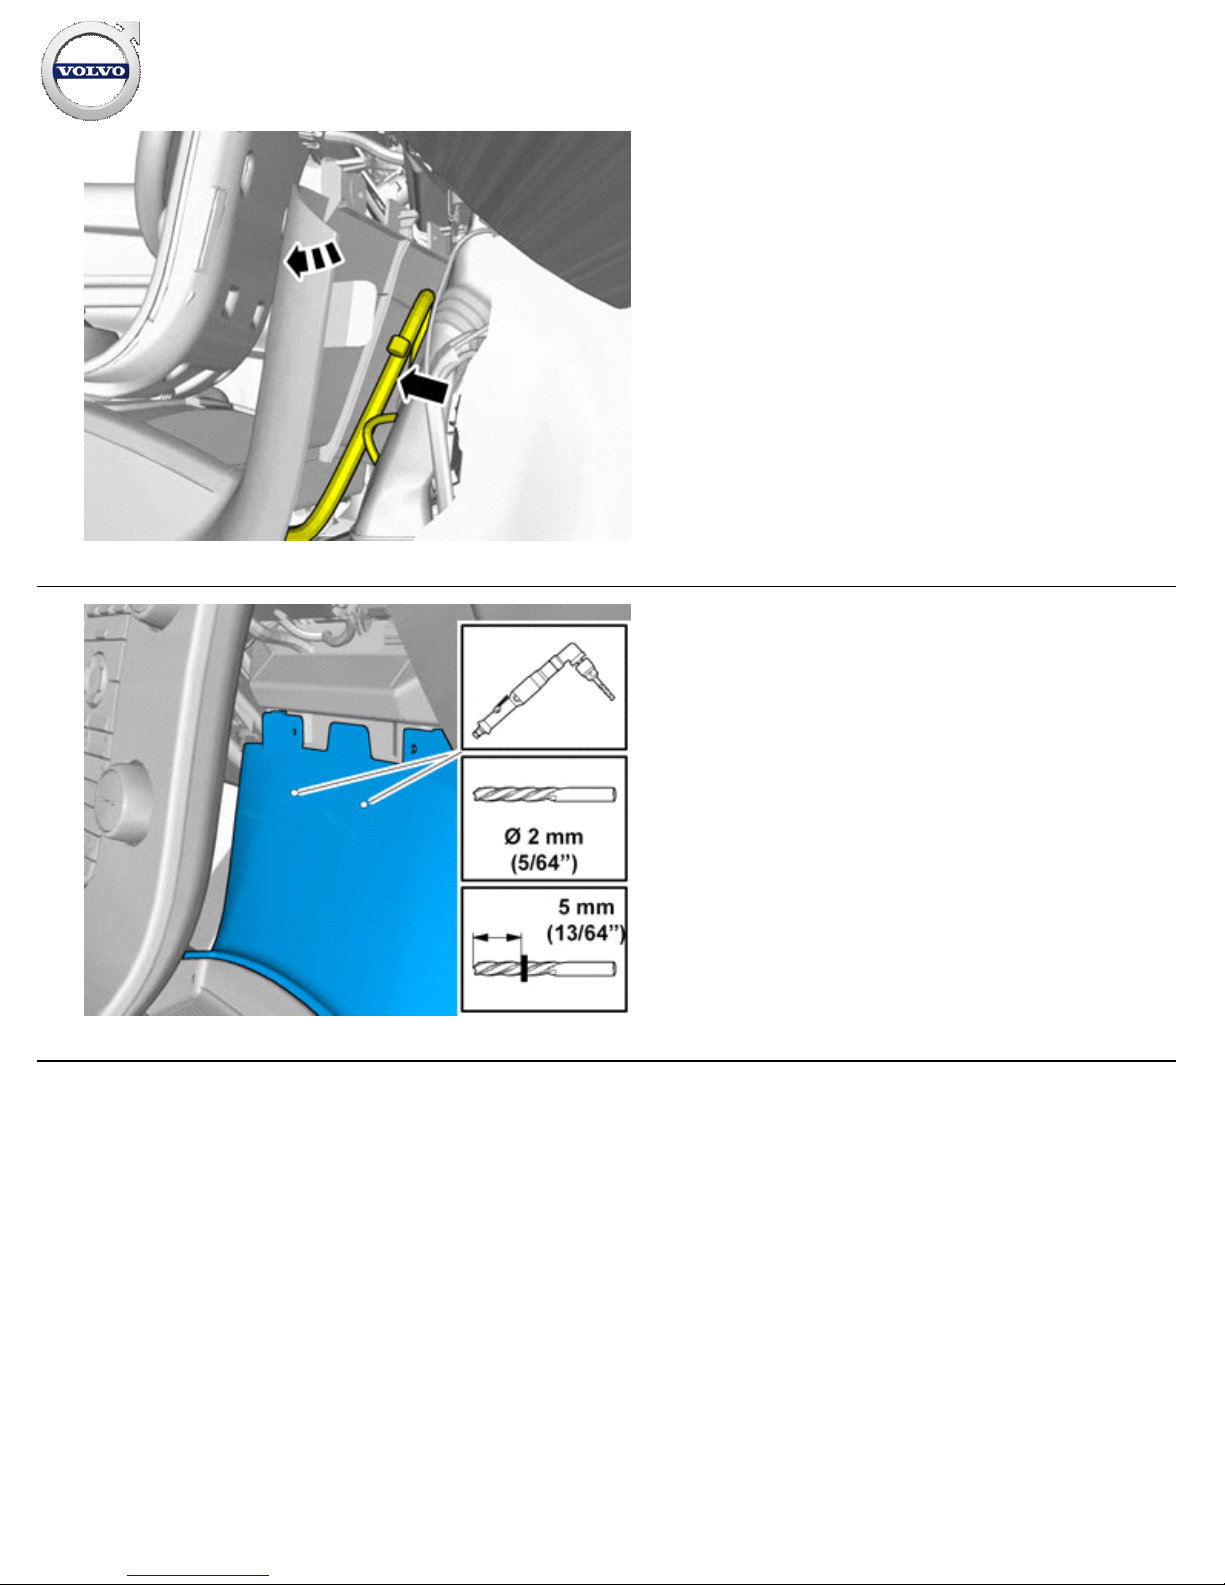
6
IMG-
336276
Carefully fold back the front edge on the tunnel console and
ensure that no cable harnesses or anything else is in the way
when drilling.
7
IMG-
336306
Drill out the holes.
Remove any swarf.
Installation instructions, accessories
Volvo Car Corporation Gothenburg, Sweden
©
Volvo Car Corporation Alcoguard- 31317574 - V1.1
Page 6 / 15
Page 7
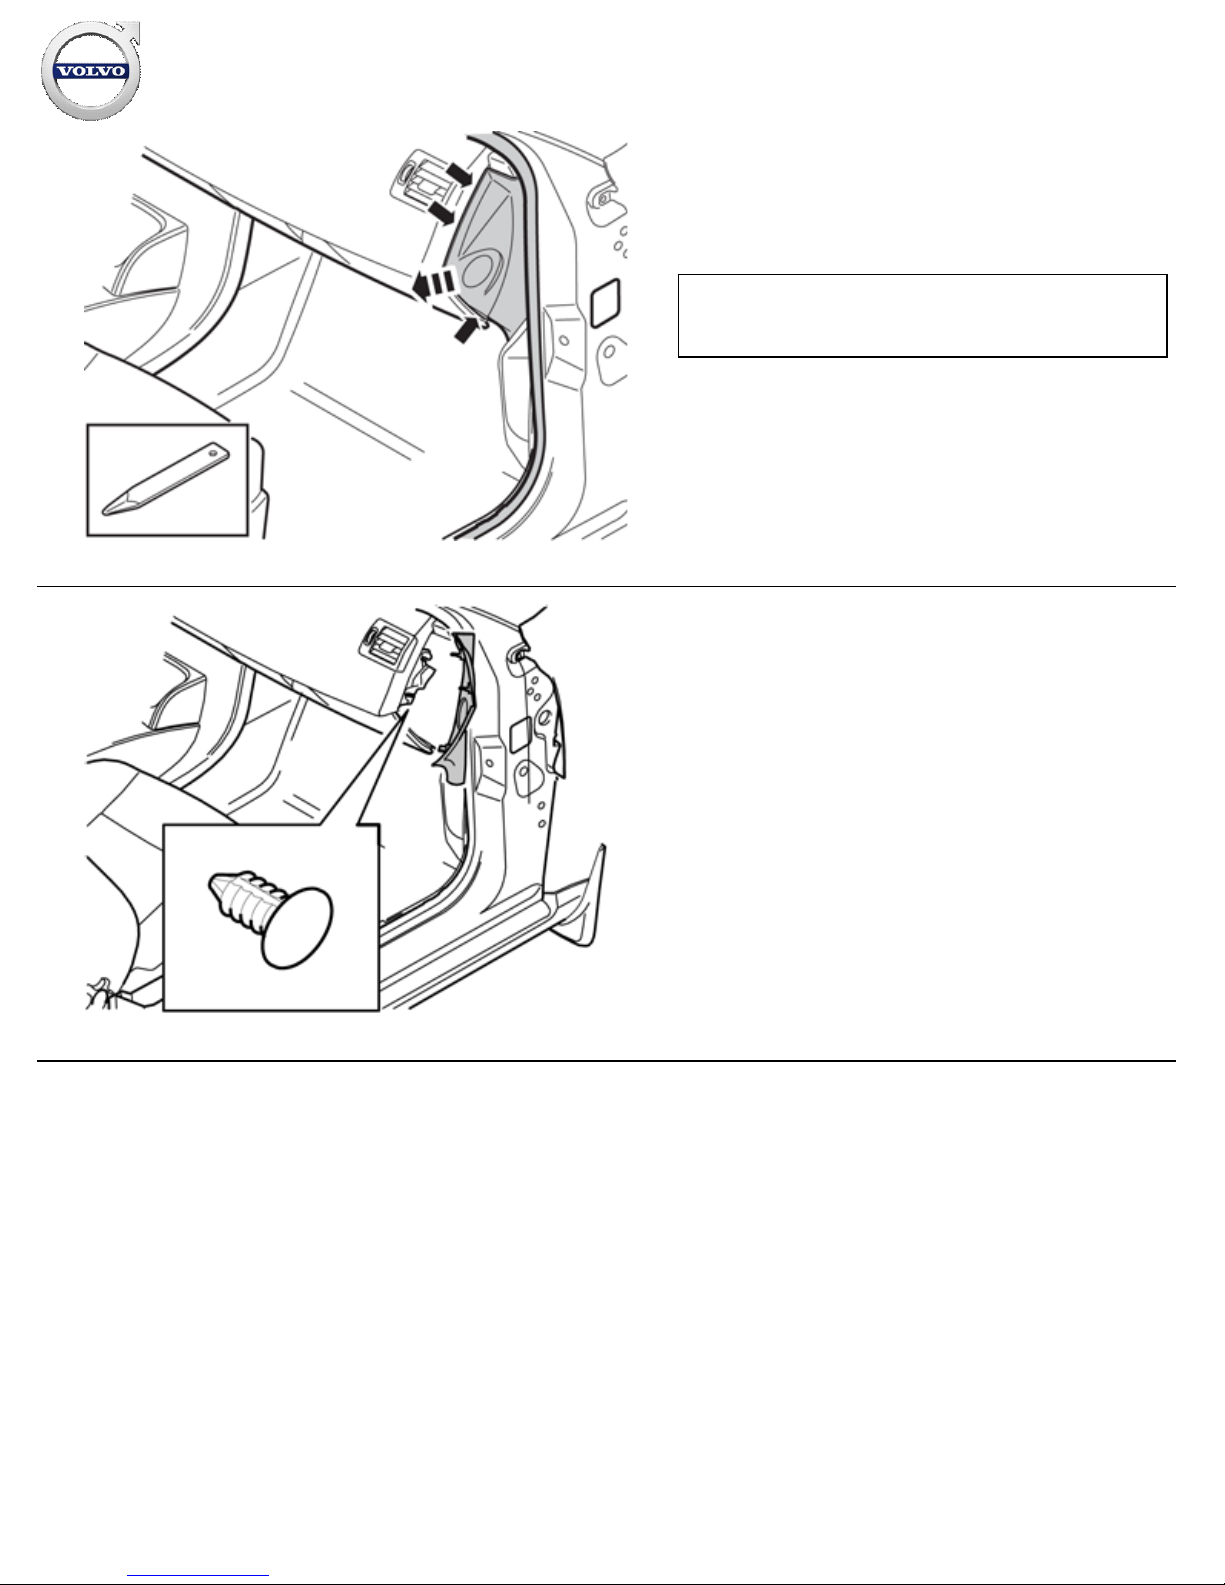
8
IMG-
240082
Remove the panel on the right end of the dashboard. Carefully
pry it loose all around with a weatherstrip tool, until the three
legs release.
Note!
Do not damage the dashboard.
9
IMG-
244221
Detach the clip holding the vent from the glove compartment.
Installation instructions, accessories
Volvo Car Corporation Gothenburg, Sweden
©
Volvo Car Corporation Alcoguard- 31317574 - V1.1
Page 7 / 15
Page 8
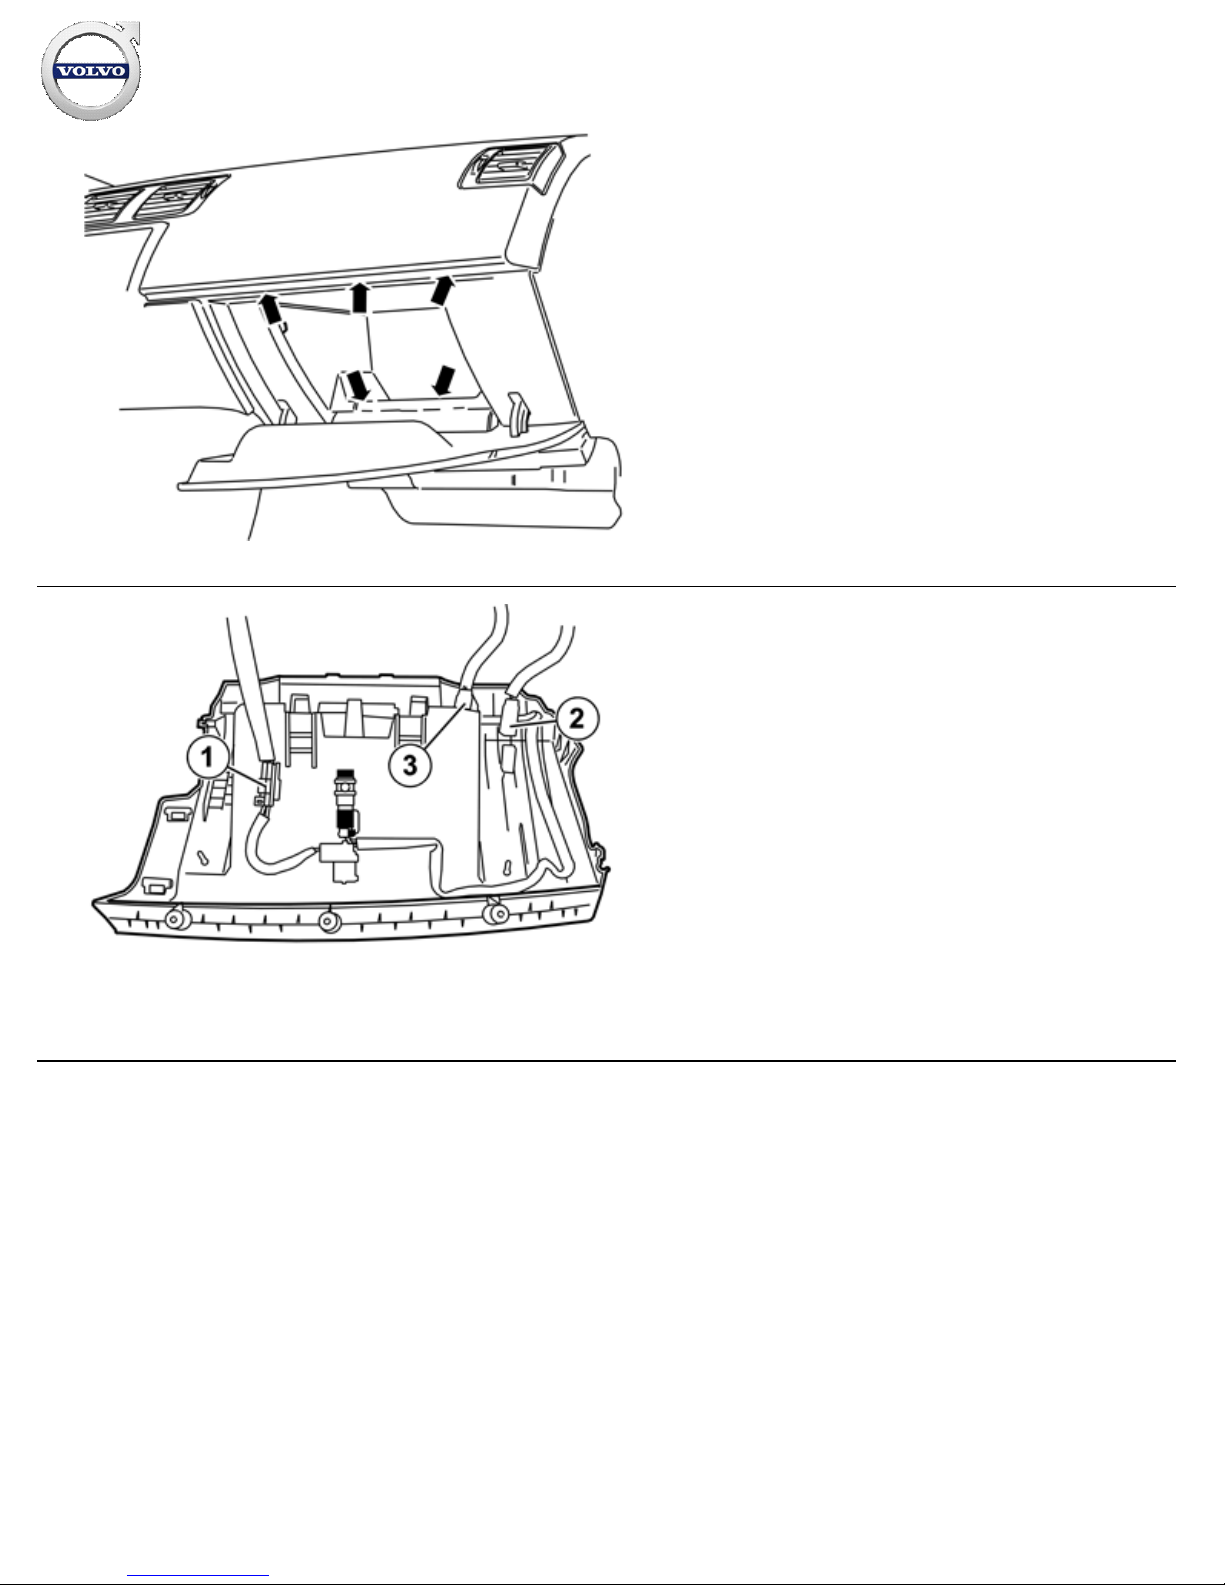
10
J8803318
Remove the glove compartment's rubber mat.
Remove the five screws in the opening to the glovebox.
Pull the glove compartment straight back to loosen the two
hidden clips in the upper edge.
Remove the outer section of the glovebox.
11
IMG-
222669
Unplug the connectors on the top.
Installation instructions, accessories
Volvo Car Corporation Gothenburg, Sweden
©
Volvo Car Corporation Alcoguard- 31317574 - V1.1
Page 8 / 15
Page 9
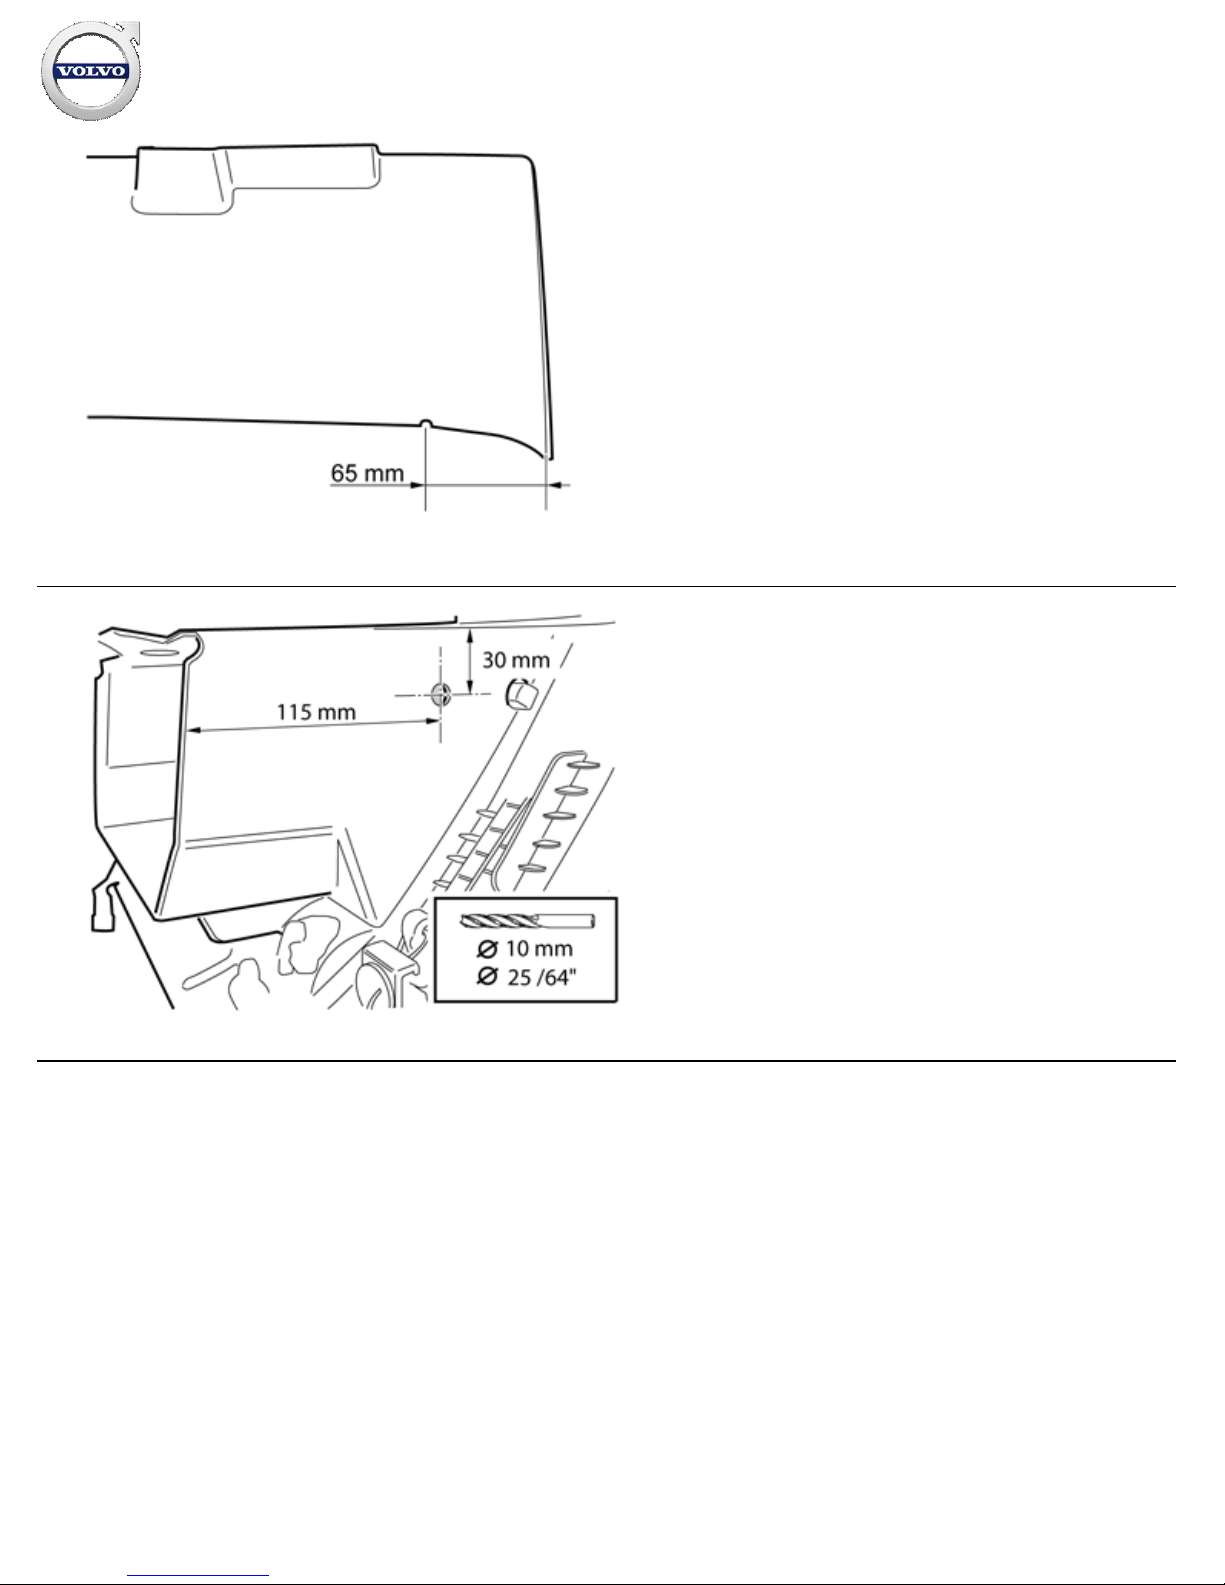
12
IMG-
336307
Make a cut out for the cable in the panel. Do not cut out more
than necessary so that the cable can be secured slightly.
13
IMG-
300892
Drill a Ø 10 mm (25/64") hole on the left side of the glove
compartment's outer part.
Remove any swarf.
Installation instructions, accessories
Volvo Car Corporation Gothenburg, Sweden
©
Volvo Car Corporation Alcoguard- 31317574 - V1.1
Page 9 / 15
Page 10
14
IMG-
300893
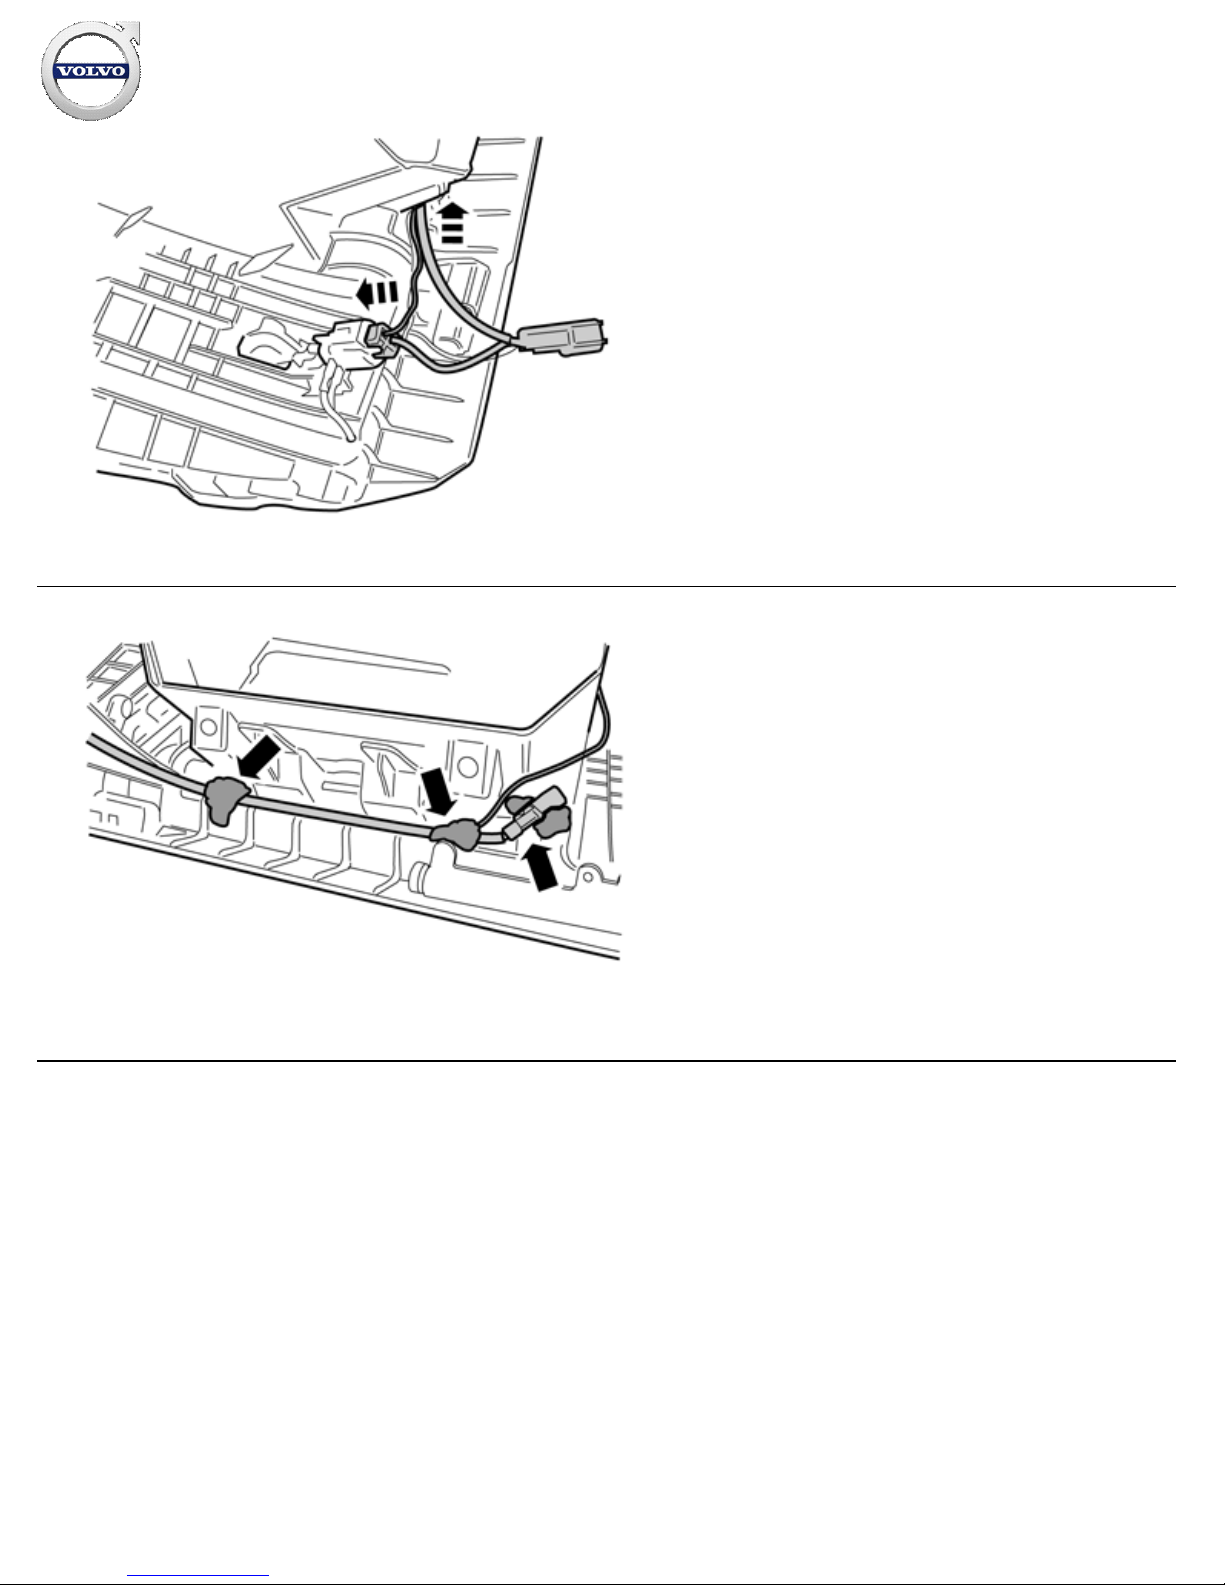
Get the adapter wire from the kit and plug in one connector to the
connection for the glove compartment lighting.
Route the wires at the lower edge to the other side.
15
IMG-
300896
Fasten the wires and the little green connector with pieces of
butyl tape.
Installation instructions, accessories
Volvo Car Corporation Gothenburg, Sweden
©
Volvo Car Corporation Alcoguard- 31317574 - V1.1
Page 10 / 15
Page 11
16
IMG-
300899
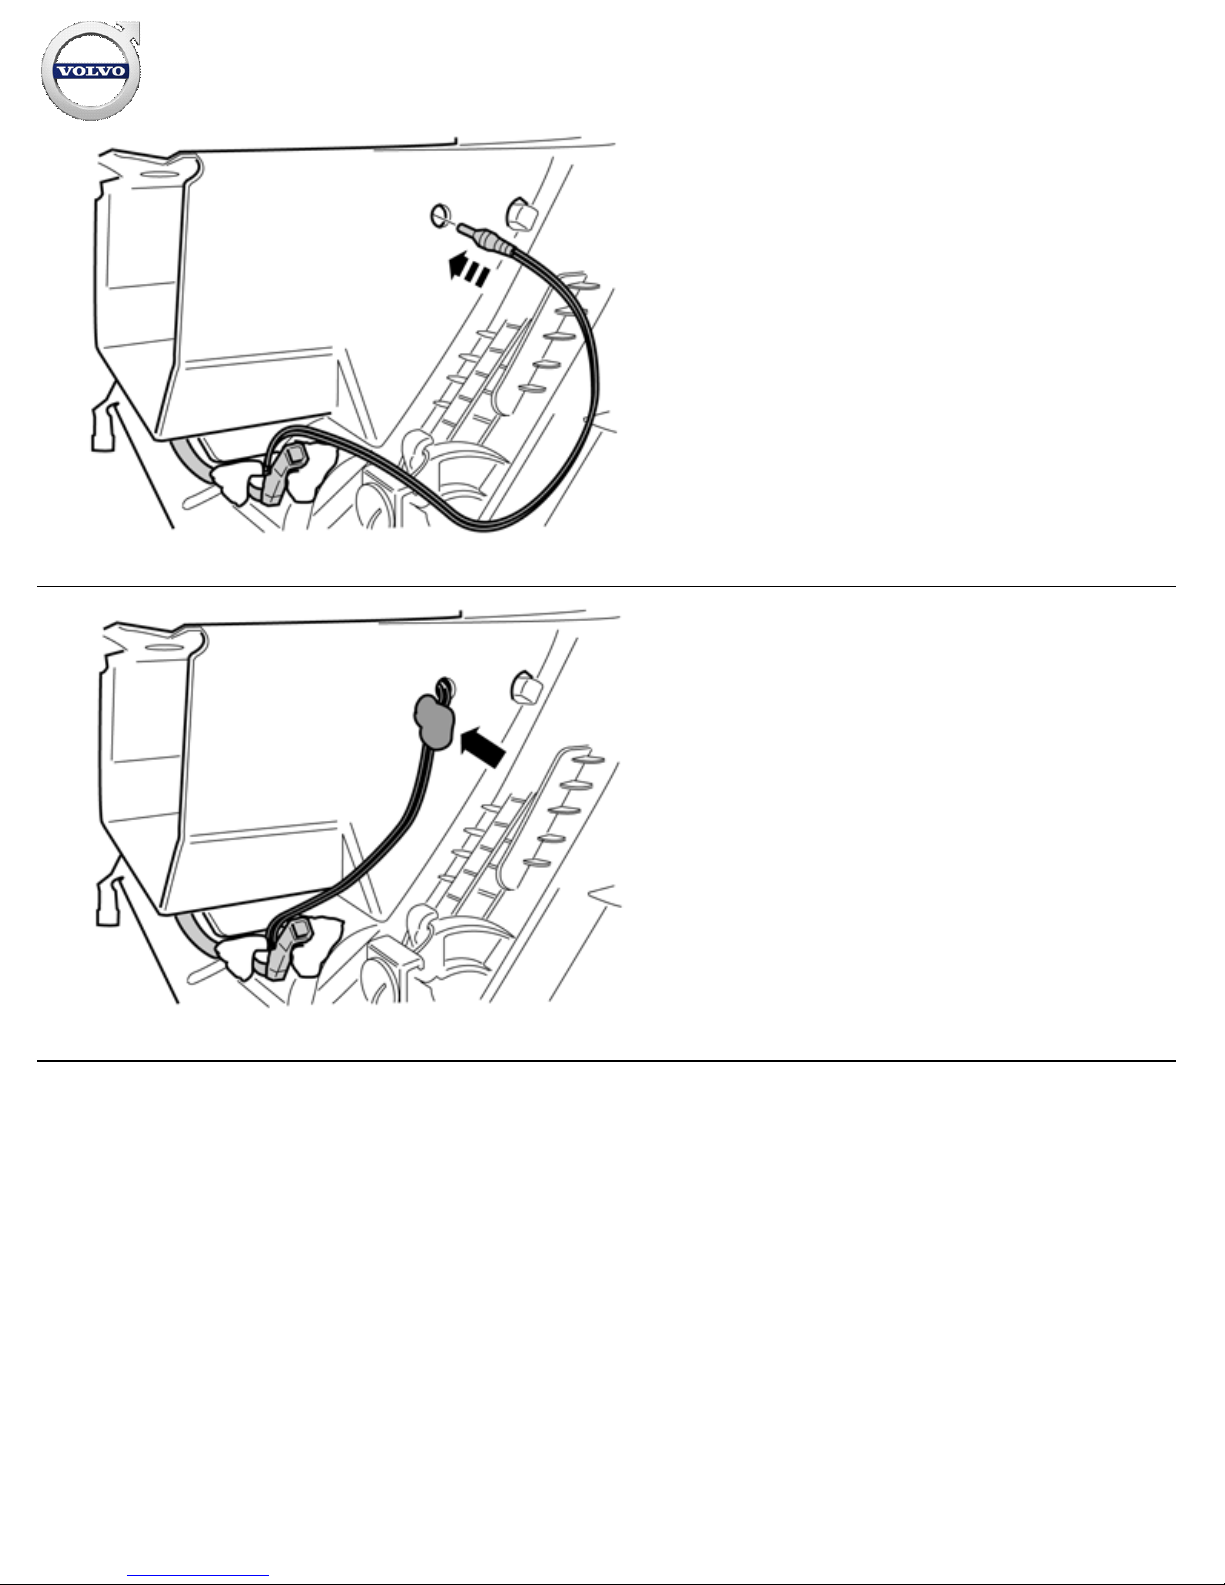
Insert the small connector and the whole cable in the glove
compartment's outer part.
17
IMG-
300904
Fasten the wire at the hole with a piece of butyl tape.
Installation instructions, accessories
Volvo Car Corporation Gothenburg, Sweden
©
Volvo Car Corporation Alcoguard- 31317574 - V1.1
Page 11 / 15
Page 12
18
IMG-
300923
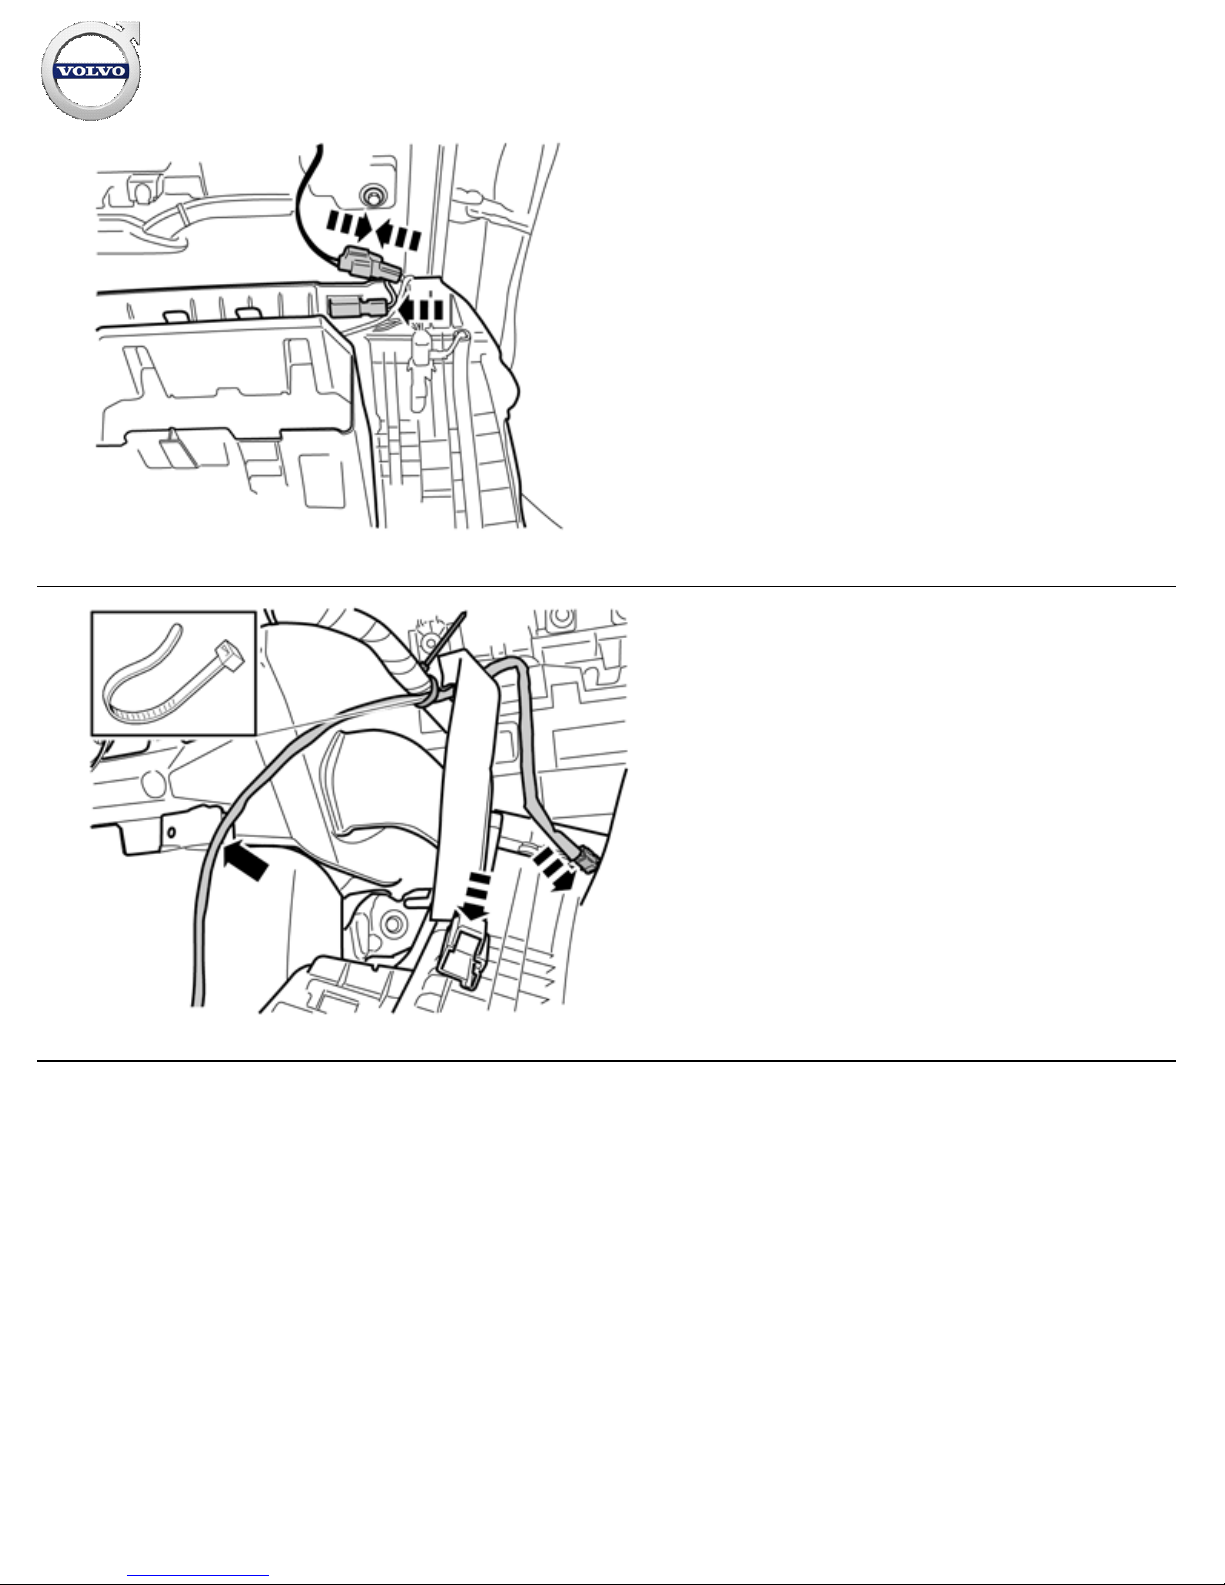
Get the outer glove compartment and plug in the connector from
the glove compartment lighting to the corresponding in the new
adapter wire.
Connect the remaining connector to the courtesy lighting.
19
IMG-
336308
Take the cradle with cable and connect the green connector to
the corresponding one that was secured in the glove
compartment.
Secure the cable at the existing cable harness using cable ties.
The cable must run along the right-hand mounting of the tunnel
console.
Secure the grey connector in the glove compartment.
Installation instructions, accessories
Volvo Car Corporation Gothenburg, Sweden
©
Volvo Car Corporation Alcoguard- 31317574 - V1.1
Page 12 / 15
Page 13
20
J8803318
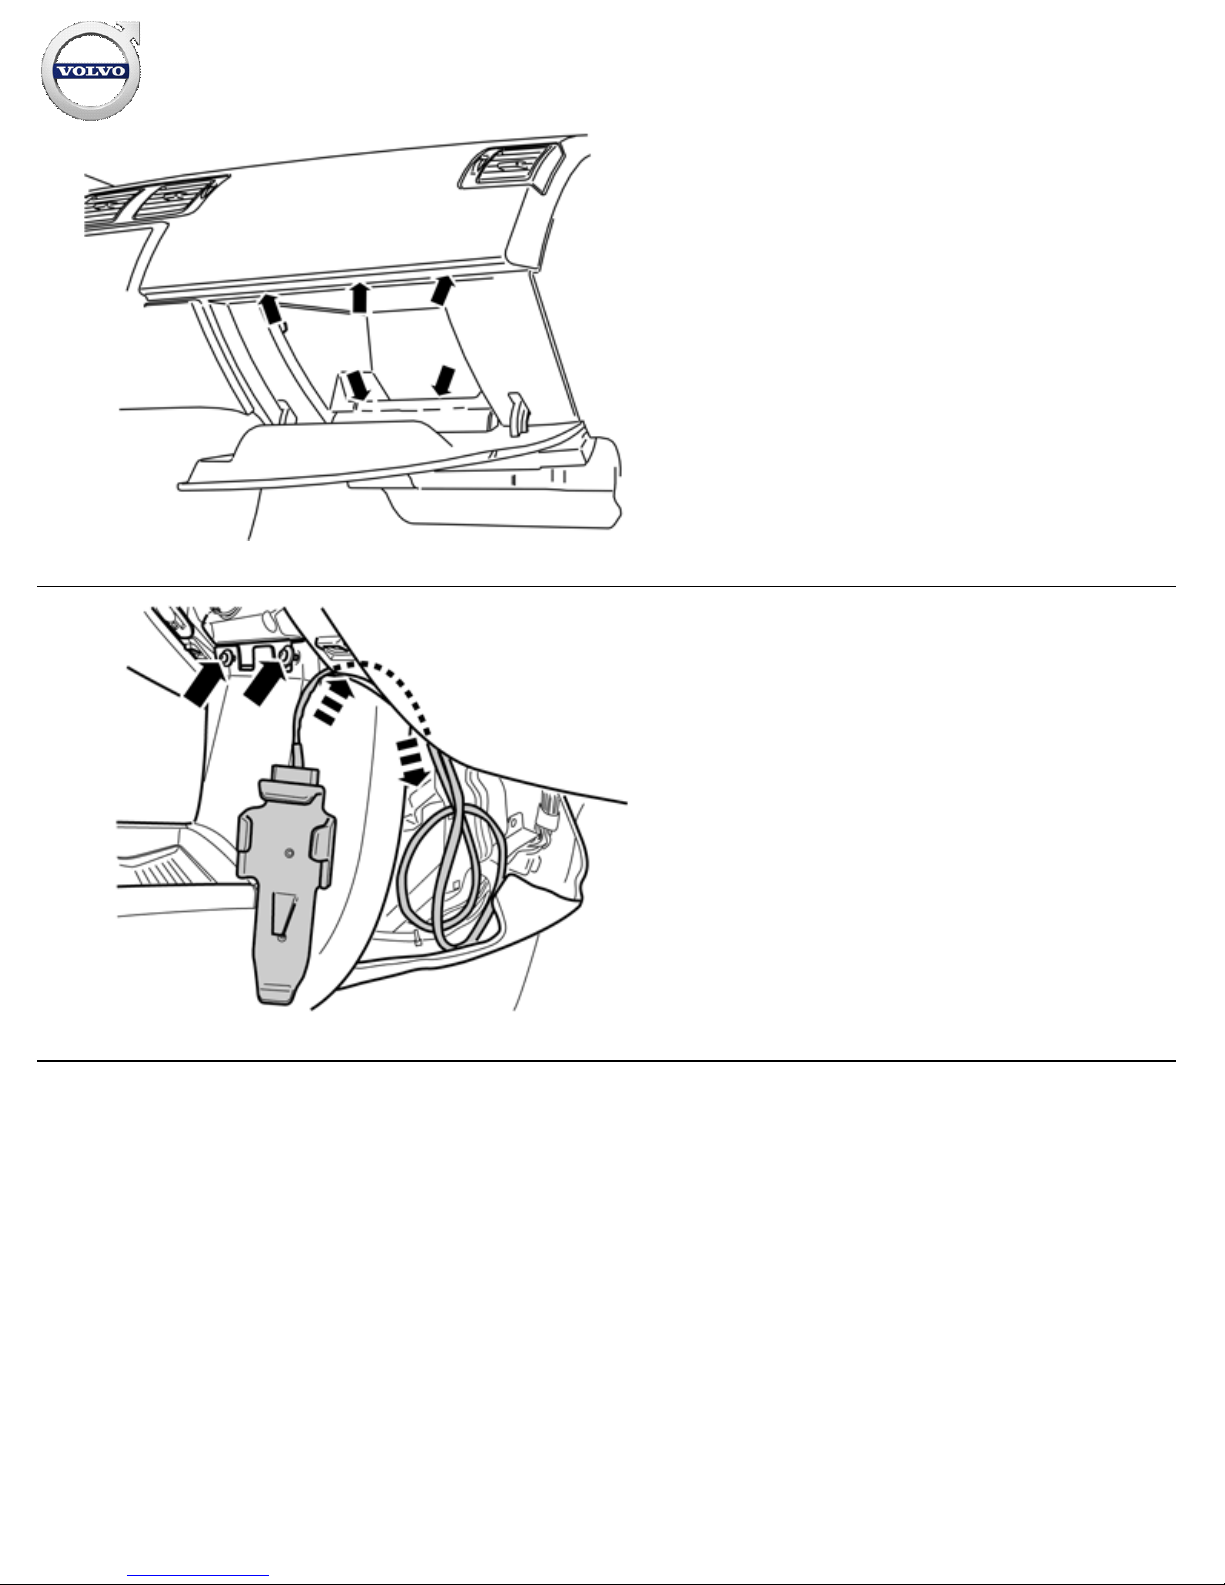
Reinstall and tighten down the glove compartment's outer part.
Roll up the wire in the glove compartment and fasten it with the
velcro strap.
21
IMG-
336309
Pull in the cable to the cradle and place it on the right
-hand side
of the tunnel console inside the carpet. If it is a tight fit, carefully
cut off a piece from the glove compartment's left-hand corner.
Tighten the tunnel console at the front edge.
Installation instructions, accessories
Volvo Car Corporation Gothenburg, Sweden
©
Volvo Car Corporation Alcoguard- 31317574 - V1.1
Page 13 / 15
Page 14
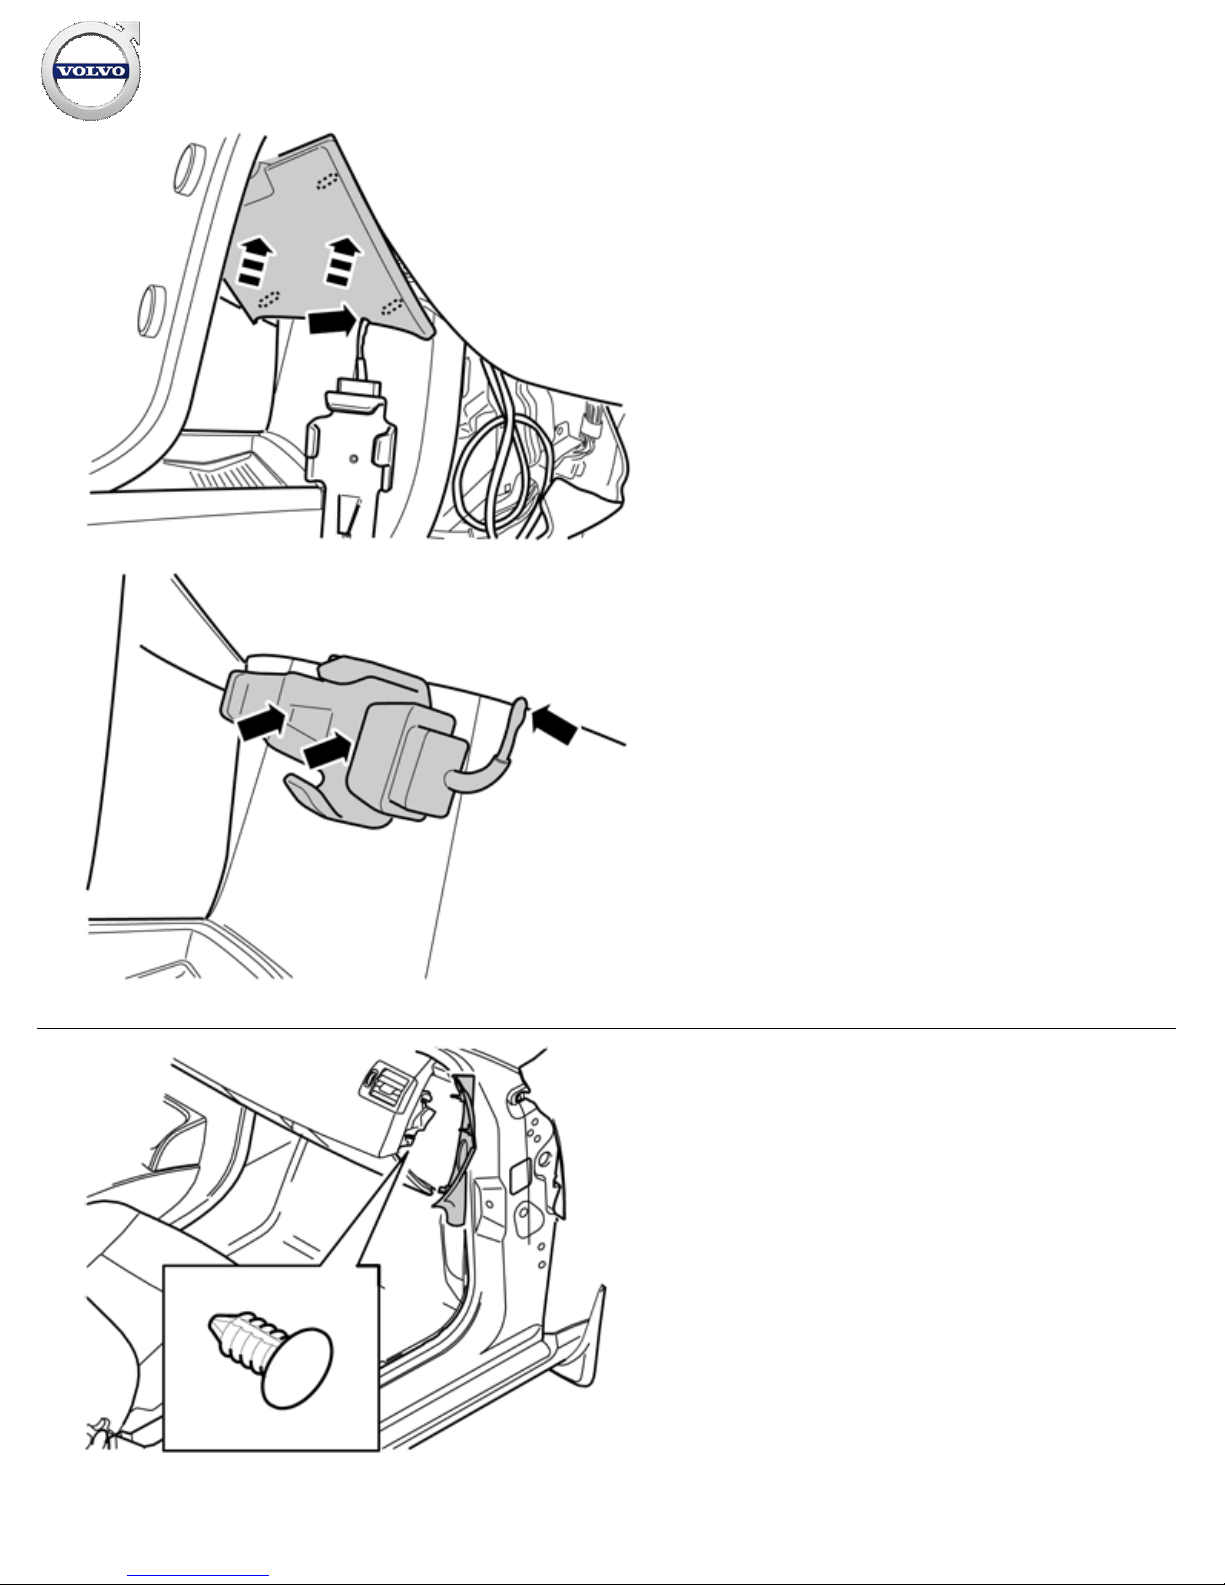
22A
IMG-
336310
22B
IMG-
336311
Illustrations A and B
Place the cable in the cut out in the panel and secure.
Fold back the carpet.
Tighten the cradle. Ensure that the cable is correctly routed in the
cut out.
23
IMG-
244221
Installation instructions, accessories
Volvo Car Corporation Gothenburg, Sweden
©
Volvo Car Corporation Alcoguard- 31317574 - V1.1
Page 14 / 15
Page 15
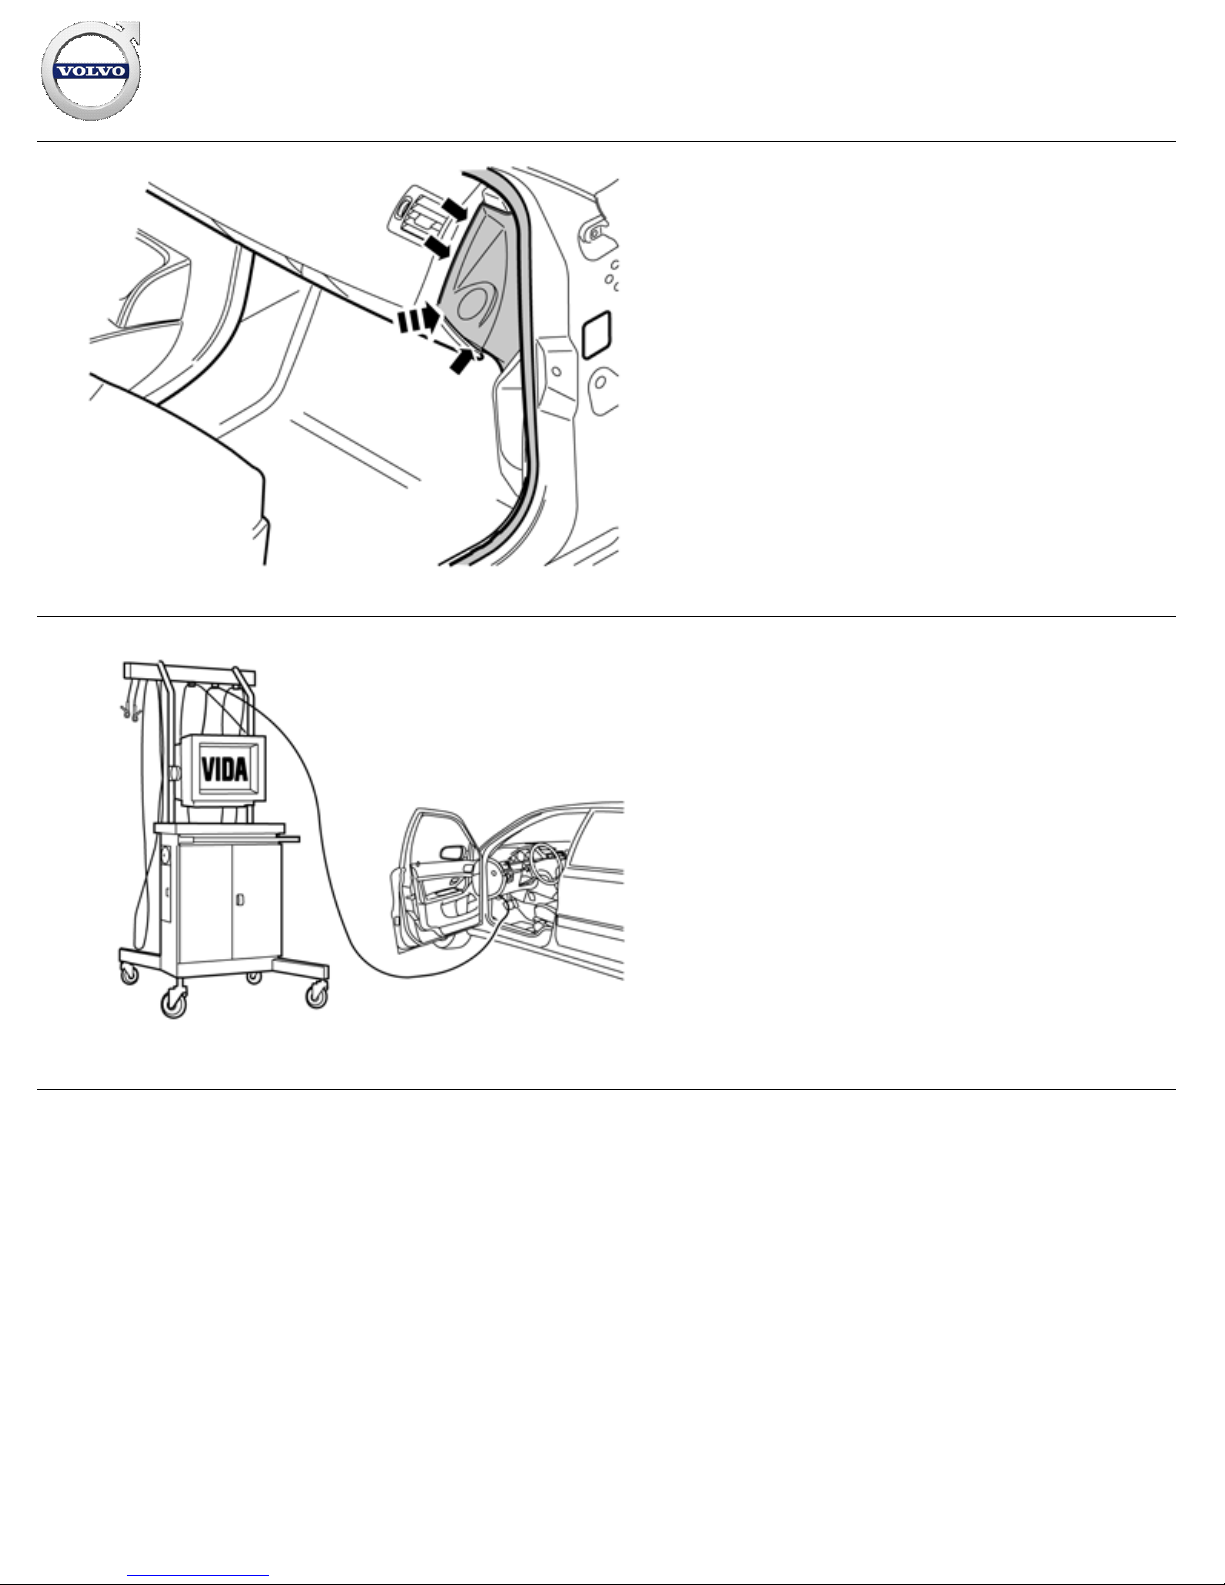
24
IMG-
300964
25
IMG-
242268
Download the software for the accessory's function following
the service information in VIDA.
Installation instructions, accessories
Volvo Car Corporation Gothenburg, Sweden
©
Volvo Car Corporation Alcoguard- 31317574 - V1.1
Page 15 / 15
 Loading...