

1997 Volvo 960
960 Model
VOLVO
960
1 9 9 7
This manual deals with the operation and care of your Volvo.
Welcome to the world-wide family of Volvo owners. We trust that you will enjoy many years of safe
driving in your Volvo, an automobile designed with your safety and comfort in mind. To help ensure
your satisfaction with this vehicle, we encourage you to familiarize yourself with the equipment
descriptions, operating instructions and maintenance requirements/recommendations in this manual. We
also urge you and your passengers to wear seat belts at all times in this (or any other) automobile. And,
of course, please do not operate a vehicle if you may be affected by alcohol, medication or any
impairment that could hinder your ability to drive.
Your Volvo is designed to meet all applicable safety and emission standards, as evidenced by the
certification labels attached to the driver's door opening and on the left wheel housing in the engine
compartment.
Volvo and the environment.
file:///K|/ownersdocs/1997/1997_960/97960_000.htm (1 of 3)12/30/2006 10:17:58 AM

1997 Volvo 960
Volvo is committed to the well being of our customers. As a natural part of this commitment, we care
about the environment in which we all live. Caring for the environment means an everyday involvement
in reducing our environmental impact.
Volvo's environmental activities are based on a holistic view, which means we consider the overall
environmental impact of a product throughout its complete life cycle. In this context, design, production,
product use, and recycling are all important considerations.
In production, Volvo has partly or completely phased out several chemicals including freons, lead
chromates, naphtanates, asbestos, mercury and cadmium; and reduced the amount of chemicals used in
our plants 50% since 1991.
In use, Volvo was the first in the world to introduce into production a three-way catalytic converter with
a Lambda sond, now called oxygen sensor, in 1976. The current version of this highly efficient system
reduces emissions of harmful substances (CO, HC, NOx) from the exhaust pipe by approximately 95%
and the search to eliminate the remaining emissions continues. Volvo is the only automobile
manufacturer to offer CFC-free retrofit kits for the air conditioning system for all models back to the M/
Y 1975 240. Advanced electronic engine controls, refined purification systems and cleaner fuels are
bringing us closer to our goal.
In addition to continuous environmental refinement of conventional gasoline-powered internal
combustion engines, Volvo is actively looking at advanced technology alternative-fuel vehicles and the
Dynaguide Information System (an advanced traffic information system).
When you drive a Volvo, you become our partner in the work to lessen the car's impact on the
environment.
To reduce your vehicle's environmental impact, you can:
● Maintain proper air pressure in your tires. Tests have shown decreased fuel economy with improperly
inflated tires
● Follow the recommended maintenance schedule
● Drive at a constant speed
● See an authorized Volvo retailer as soon as possible for inspection if the check engine (malfunction
indicator) lamp illuminates, or stays on after the vehicle has started
● Properly dispose of any vehicle related waste such as used motor oil, used batteries, brake pads, etc..
file:///K|/ownersdocs/1997/1997_960/97960_000.htm (2 of 3)12/30/2006 10:17:58 AM

1997 Volvo 960
Contents
1
Occupant safety, Reporting safety defects
2
Instruments and controls
3
Body and interior
4
Starting and driving
5
Wheels and tires
6
In case of emergency
7
Car care
8
Service and routine maintenance
9
Specifications
10
Audio systems
Important
Before you operate your car for the first time, please familiarize yourself with the BREAK-IN
information on page 4:2. You should also be familiar with the information in the first three chapters of
this book.
Information contained in the balance of the manual is extremely useful and should be studied after
operating the vehicle for the first time. This manual is structured so that it can be used for reference. It
should thus be kept in the car for ready access.
Do not export your Volvo to another country before investigating the country's applicable safety and
exhaust emission requirements. In some cases it may be difficult or impossible to comply with these
requirements. Modifications to the emission control system(s) may render your Volvo not certifiable for
legal operation in the U.S., Canada or other countries.
All information, illustrations and specifications contained in this manual are based on the latest product
information available at the time of publication. Volvo reserves the right to make model changes at any
time, or to change specifications or design, without notice and without incurring obligation.
1996 Volvo Cars of North America, Inc.
Contents | Top of Page
file:///K|/ownersdocs/1997/1997_960/97960_000.htm (3 of 3)12/30/2006 10:17:58 AM
1997 Volvo 960
Audio Systems
pg. 10:1 Audio systems
Audio systems
This chapter describes the audio system in your car.
10:2
SC-811
10:15
SC-815
10:31
General information
pg. 10:2 Premium Sound system SC-811 (certain models), general description
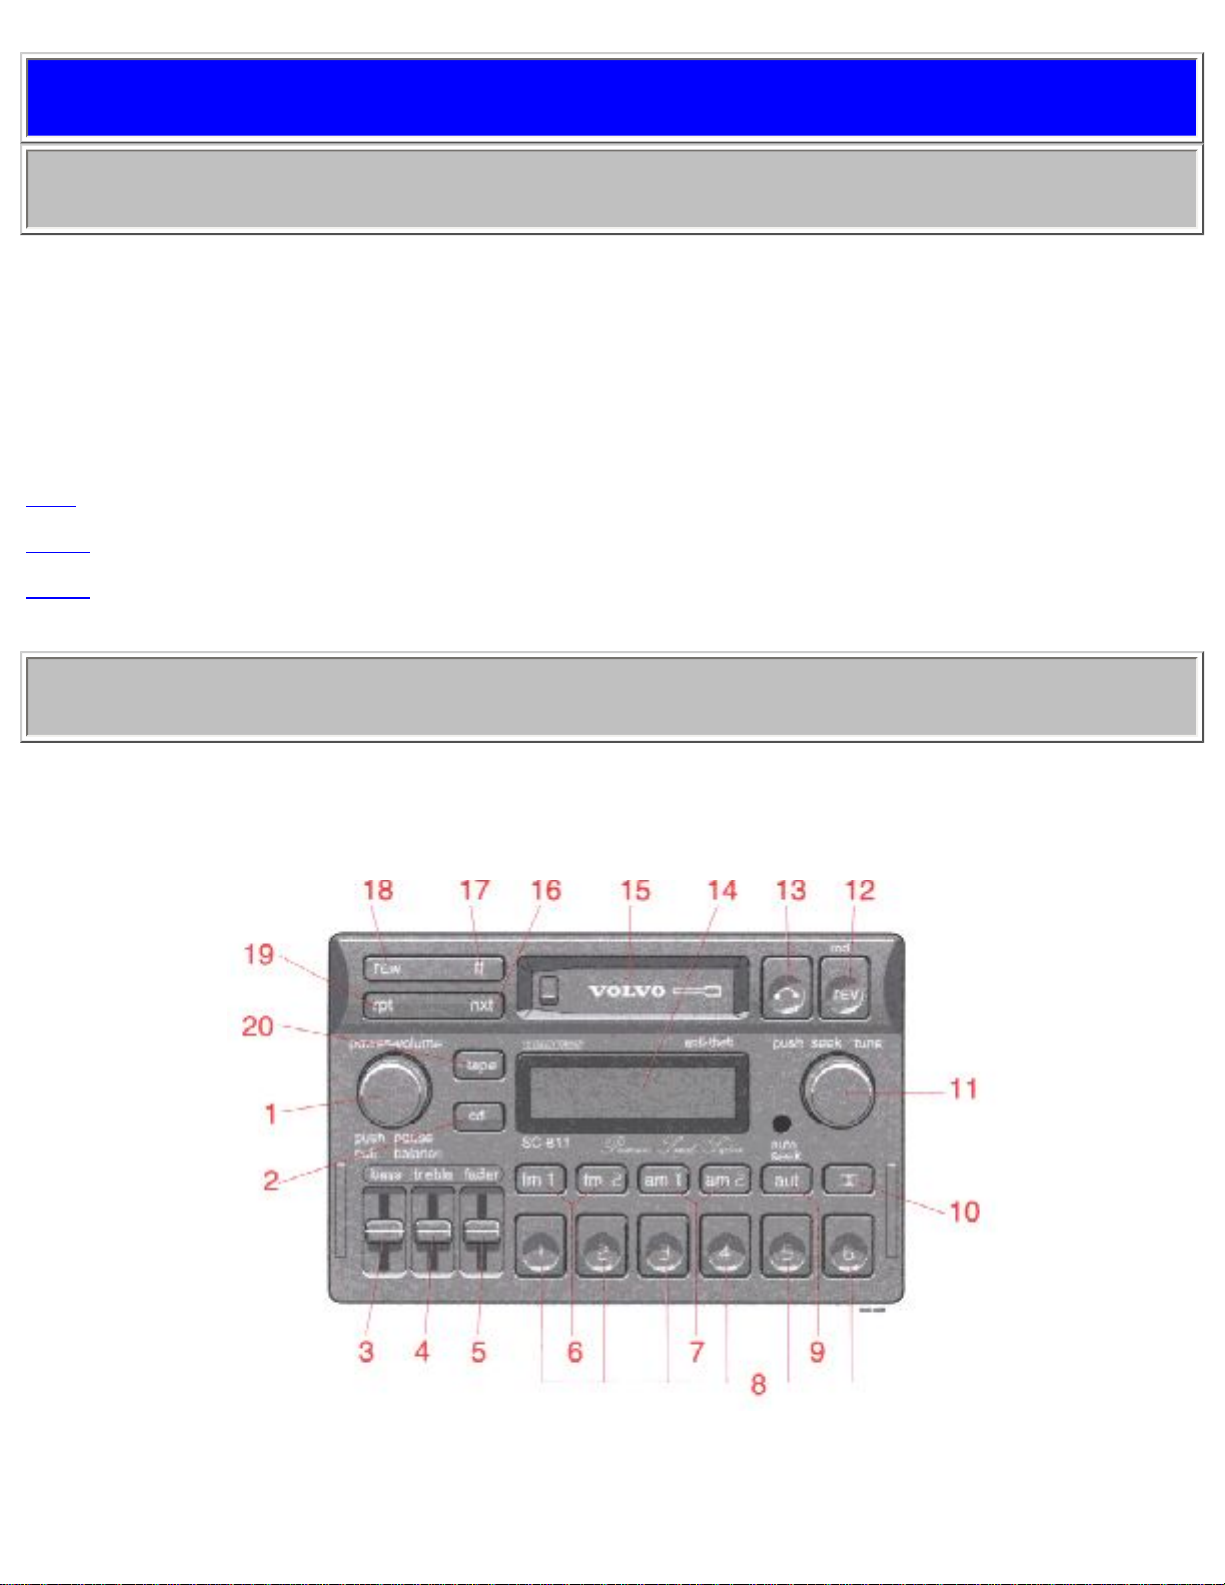
The following pages describe the use of your SC-811 Cassette Radio and CD remote control
1.
file:///K|/ownersdocs/1997/1997_960/97960_1001.htm (1 of 9)12/30/2006 10:17:59 AM

1997 Volvo 960
● On/off (turn)
● Volume (turn)
● Pause/Mute (push)
● Balance (pull)
2. CD mode selector
3. Bass control
4. Treble control
5. Fader control
6. Waveband selectors (FM)
7. Waveband selectors (AM)
8. Preset buttons, CD-Disc No. selector
9. Auto seek memory (FM)
10. Dolby B button
11.
● Manual tuning
● Seek tuning (push)
12. Tape direction selector REV, CD-Random play
13. Cassette eject
14. Display
15. Cassette slot
16. TP -Next song
CD -Next track UP
17. TP -Fast forward
CD -Music search UP
18. TP -Rewind
CD -Music search DOWN
19. TP -Previous song REPEAT
CD -Previous track DOWN
20. Tape mode selector
TP = Applicable only in tape mode
CD = Applicable only when in CD mode and connected to a CD changer
pg. 10:3 Anti-theft code
file:///K|/ownersdocs/1997/1997_960/97960_1001.htm (2 of 9)12/30/2006 10:17:59 AM
1997 Volvo 960
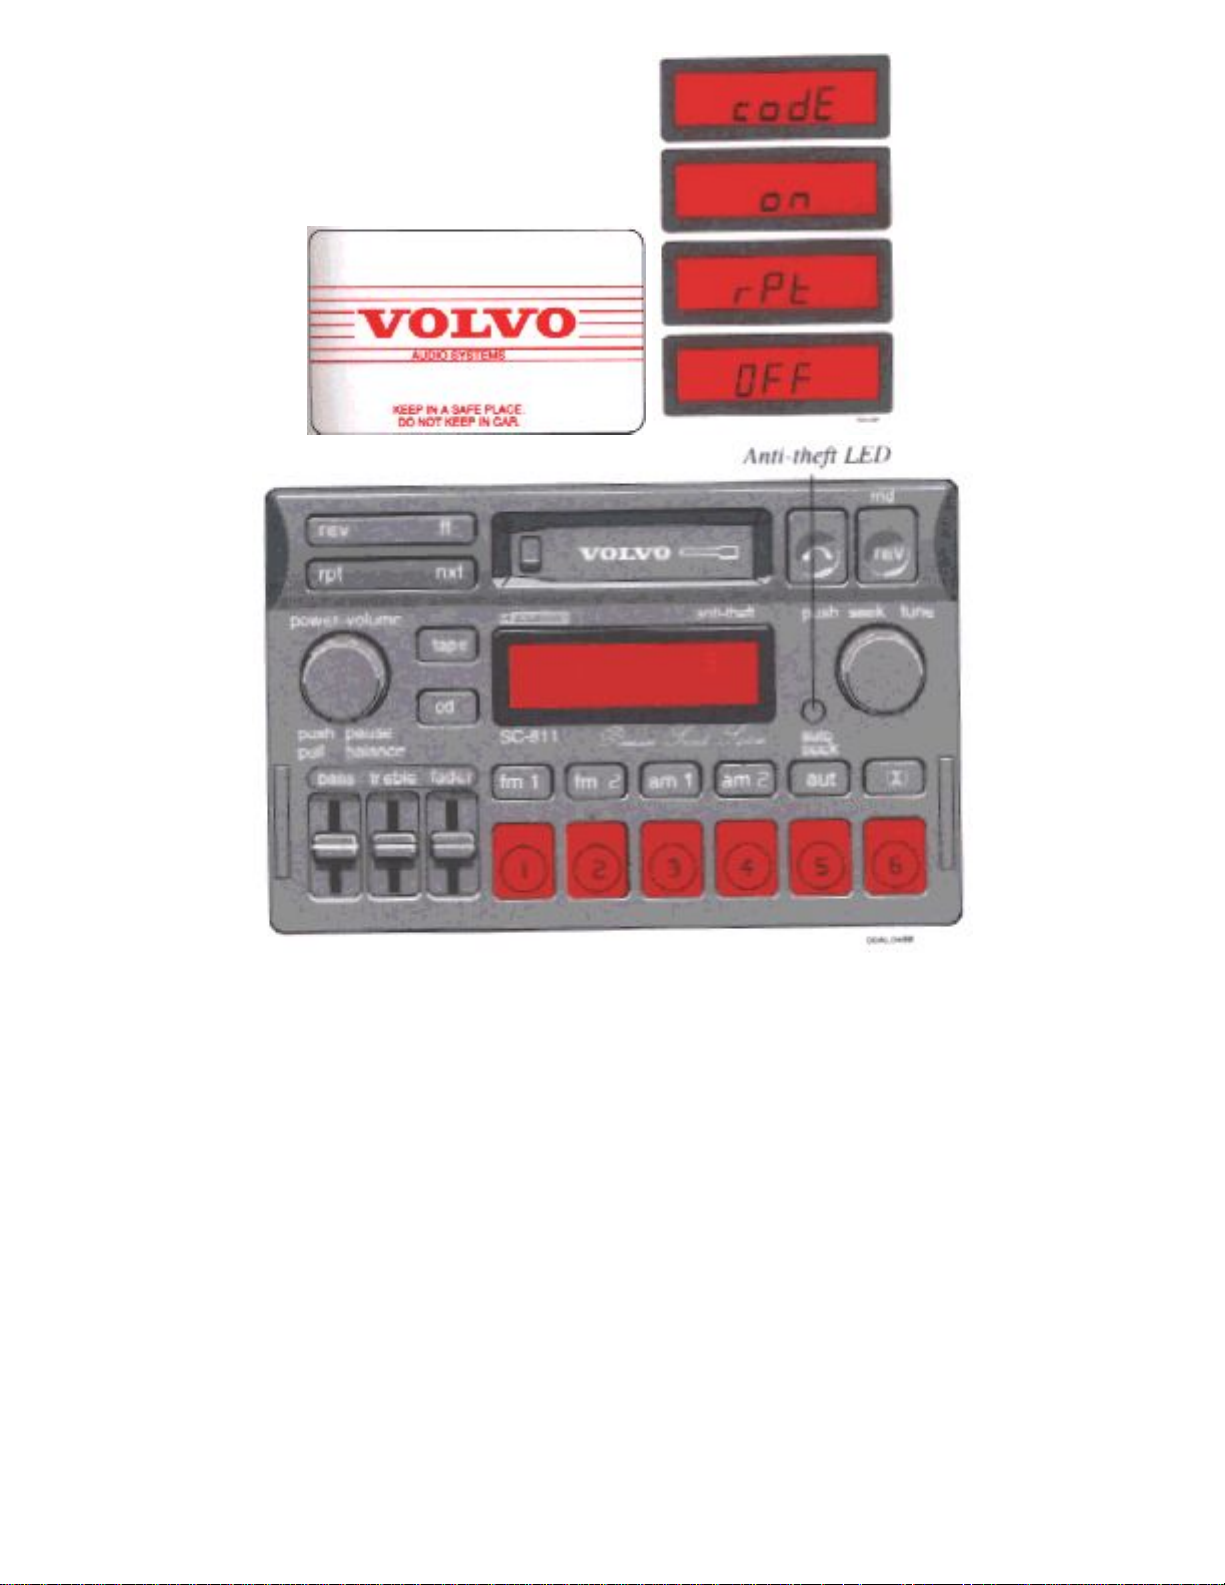
Anti-theft code
The radio features anti-theft circuitry. If the set is removed from the vehicle or if the battery power is
disconnected, a special code must be entered to enable operation of the set. Refer to the radio code card
supplied with your vehicle or ask your retailer for the correct code .
When the car is parked with the ignition key removed, the anti-theft LED will flash
To enter the code
After installation or when the set has been disconnected from power, the set displays "codE" when it is
switched on.
file:///K|/ownersdocs/1997/1997_960/97960_1001.htm (3 of 9)12/30/2006 10:17:59 AM
1997 Volvo 960
Enter the 4-digit code using the preset buttons. If the correct code is entered, "on" is displayed and the
set is ready to use.
If you enter an incorrect code you must enter the correct code again from the beginning.
Incorrect code
If an incorrect code has been entered "rPt" is displayed. Enter the correct code.
After three unsuccessful coding attempts the set will lock and remain locked for two hours.
"OFF" is displayed.
During this waiting period:
● the battery must be connected
● the ignition key must be turned to position I
● the unit must be turned on
Make sure the headlights are turned off to help prevent battery drain (please refer to page 2:6 for
information on turning the headlights off). Enter the code again once this time has elapsed.
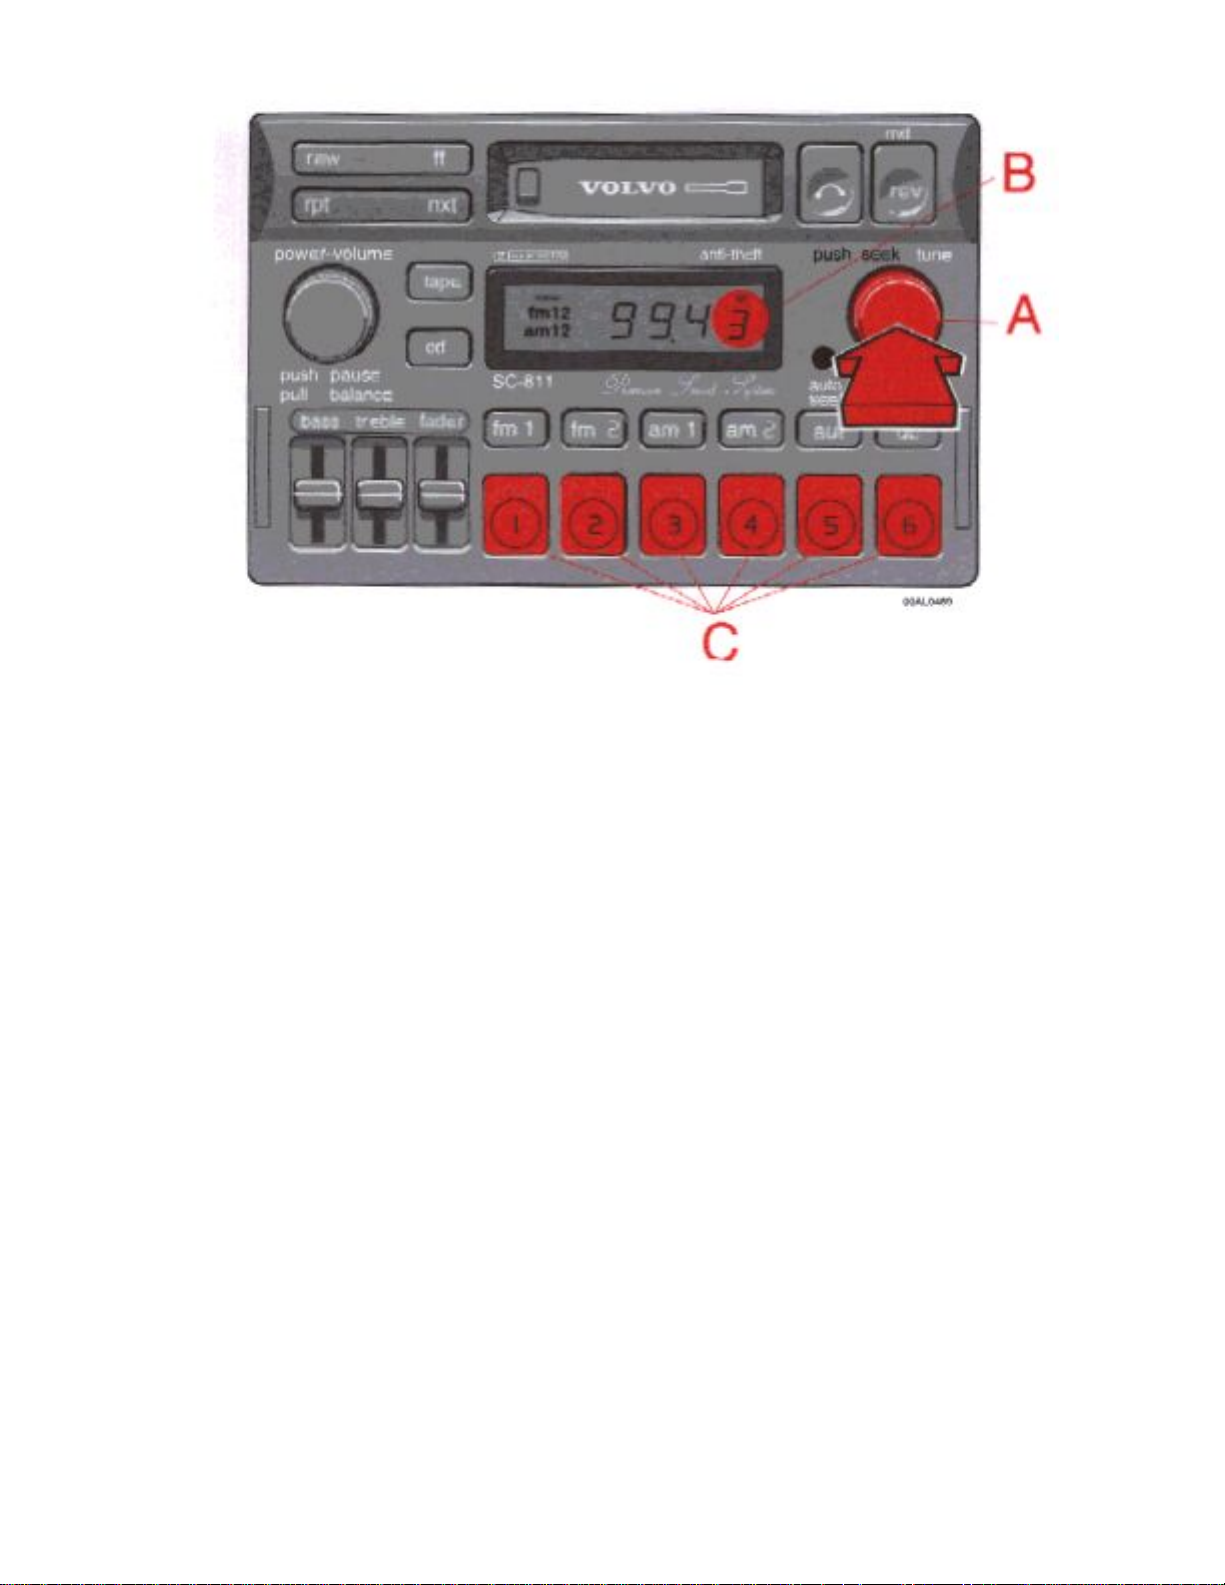
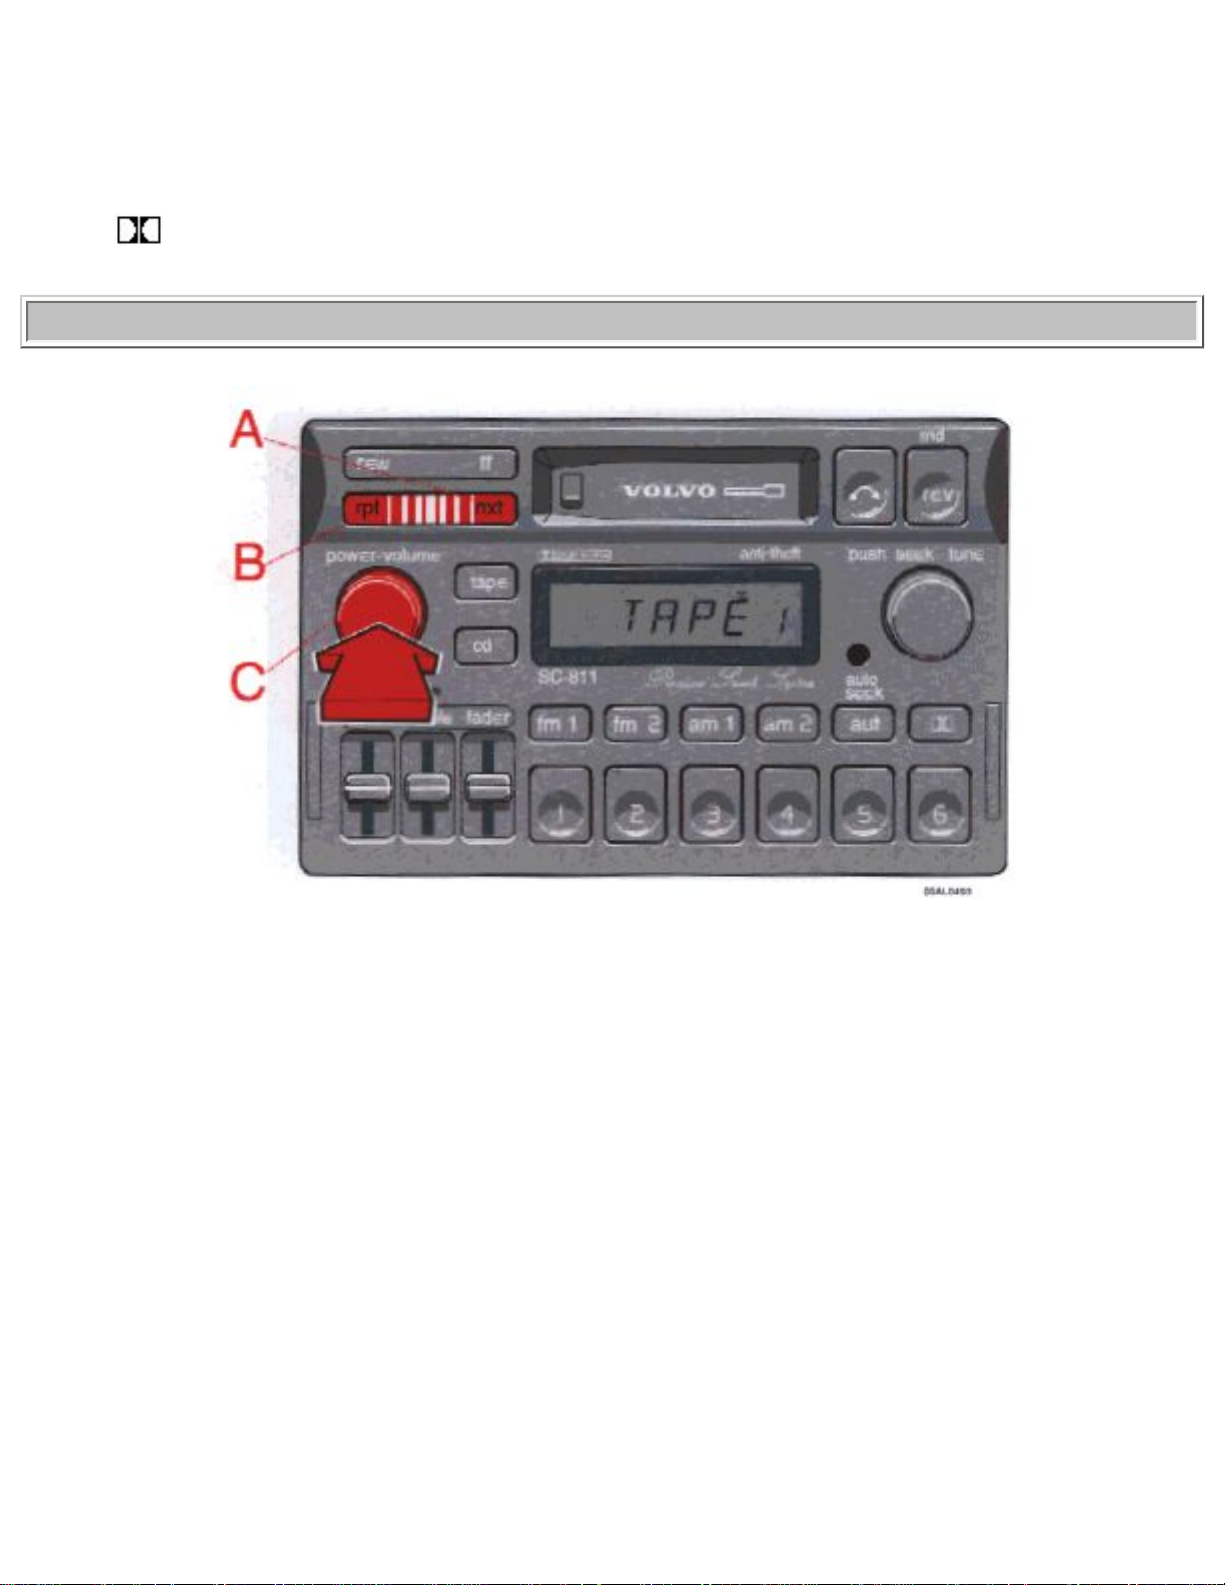
pg. 10:4 Radio SC-811
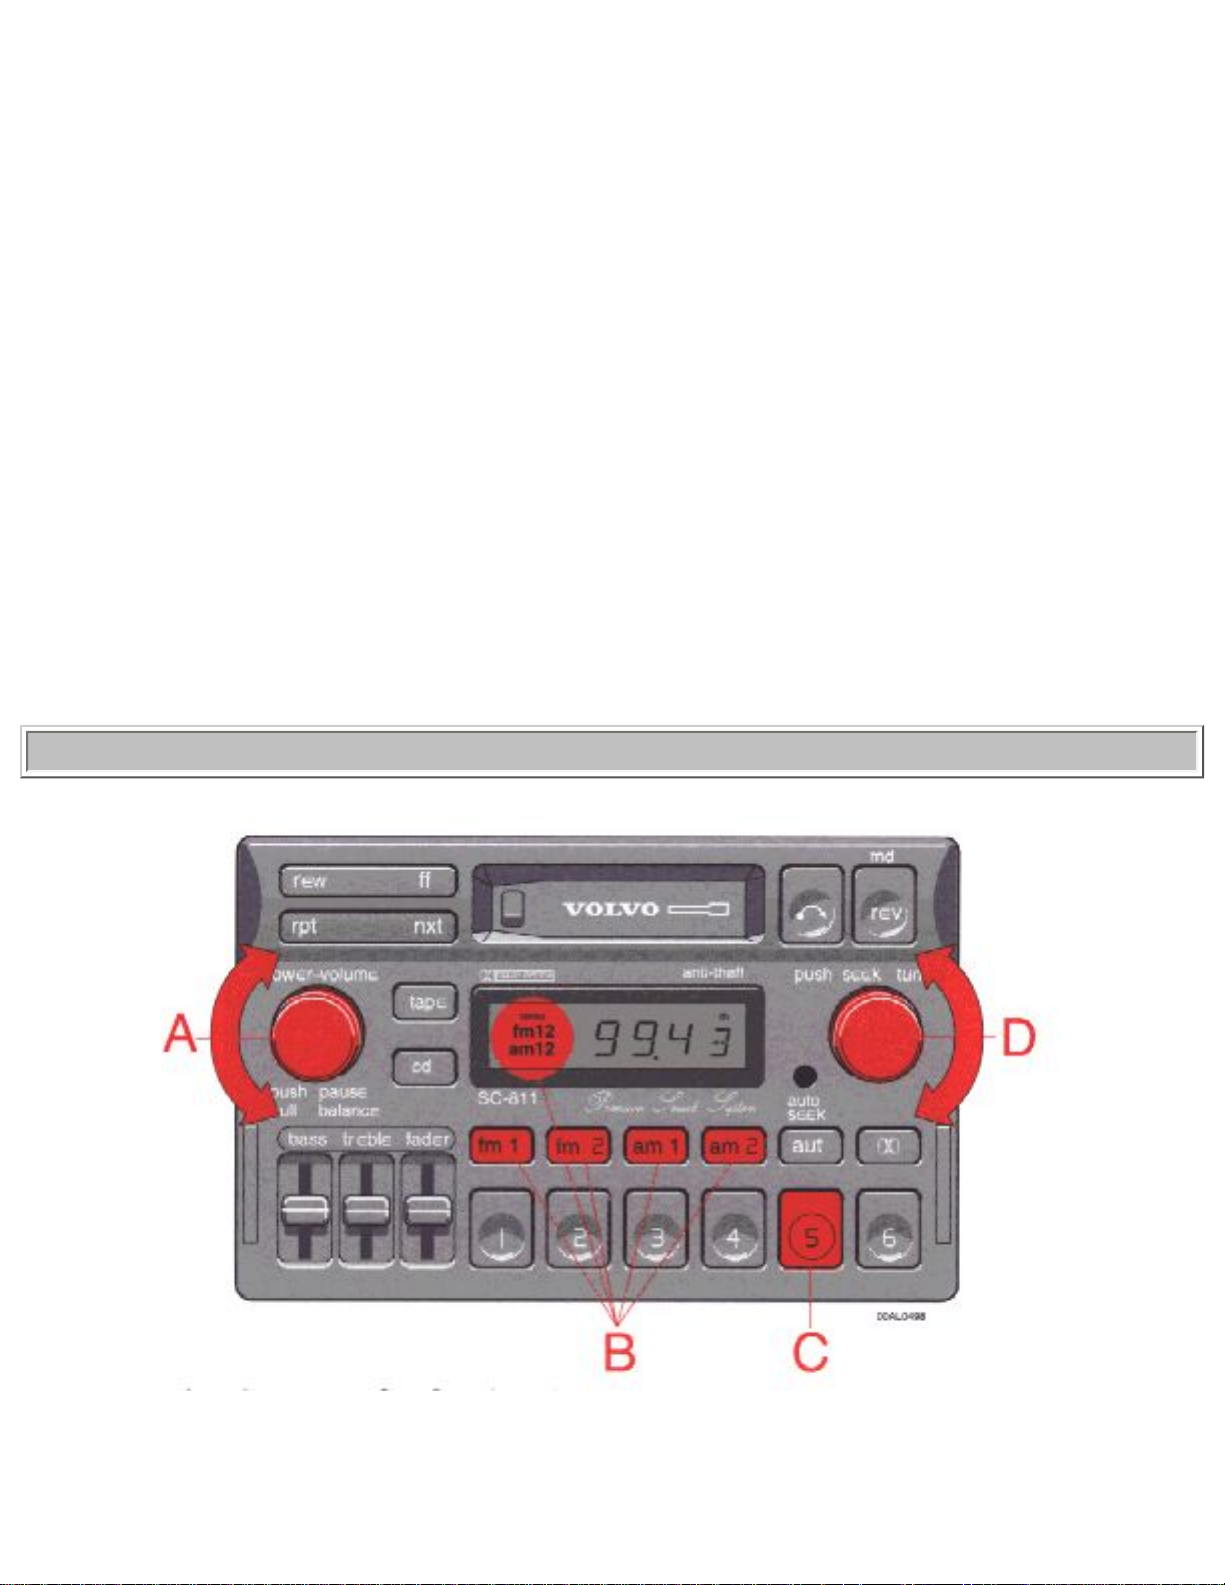
A - On/off switch and volume control
file:///K|/ownersdocs/1997/1997_960/97960_1001.htm (4 of 9)12/30/2006 10:17:59 AM

1997 Volvo 960
Turn the button clockwise to switch on and to increase the volume.
B - Waveband selector
The desired waveband is set by pressing one of the waveband selector buttons. The frequency and
waveband is shown on the display.
NOTE: There are two FM wavebands and two AM wavebands. This makes it possible to store 2 x 6 FM
stations and 2 x 6 AM stations in memory.
C - Setting frequency selection
The radio can be used in most parts of the world by changing the frequency selection intervals as
follows:
Depress and hold preset button 5 and turn the radio ON. "USA" will flash on the display. Each time
button 5 is pressed, the frequency selection will change from "USA" to "AUS", etc. When the correct
country name is displayed, wait 5 seconds and the radio will be ready for use.
D - Manual tuning
Turn the knob counter-clockwise to tune to lower frequencies and clockwise to tune to higher
frequencies. The tuned frequency is displayed.
pg. 10:5 Radio SC-811
file:///K|/ownersdocs/1997/1997_960/97960_1001.htm (5 of 9)12/30/2006 10:17:59 AM
1997 Volvo 960
A - Seek tuning
Push the tuning knob to seek for higher frequencies. The radio seeks the next audible station and stops
there. If you wish to continue the seek tuning, press the tuning knob again.
B - Preset programming
1. Tune to the desired frequency.
2. Depress and hold a preset button. The audio will cut out. Keep the button depressed until the audio
comes on again (approx. 2 seconds).
3. The frequency is now stored on this preset button.
C - Preset buttons
To select a pre-programmed radio frequency, depress the preset button. The set frequency will be
displayed.
file:///K|/ownersdocs/1997/1997_960/97960_1001.htm (6 of 9)12/30/2006 10:17:59 AM
1997 Volvo 960
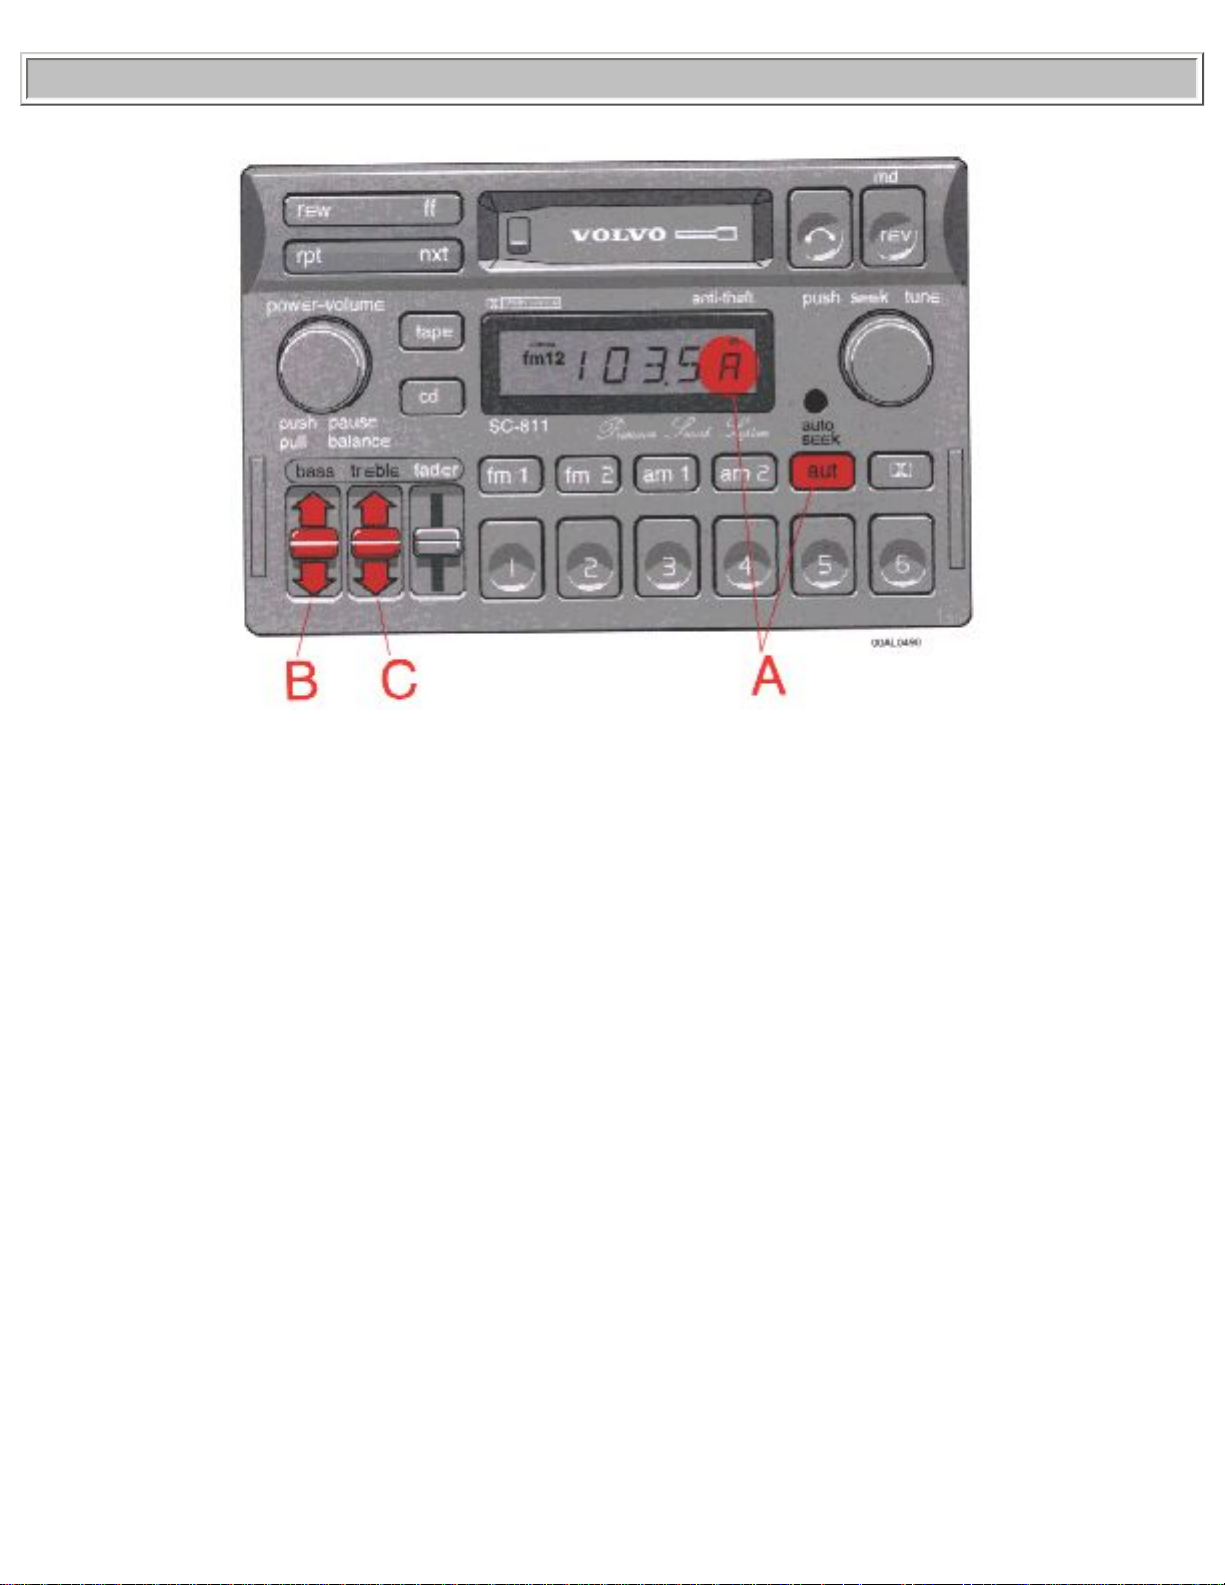
pg. 10:6 Radio SC-811
A - Automatic programming (Auto seek)
Please note that this function will not interfere with pre-stored stations on buttons 1-6.
This function automatically seeks and stores up to 8 strong AM or FM stations. This is especially useful
when travelling in areas where radio stations are unfamiliar.
1. Depress and hold the "auto-seek" button for at least 1 second. A number of strong stations (max. 8) on
the chosen waveband are now automatically stored in the auto seek memory. If there are no audible
stations, "no" is displayed.
2. Press the "auto seek" button (for less than 1 second) to obtain another autostored station. A new
station will be selected each time this button is pressed.
B - Bass control
Adjust the bass by sliding the control up or down (up to increase, down to decrease). A "detent"
indicates "equalized" bass.
C - Treble control
file:///K|/ownersdocs/1997/1997_960/97960_1001.htm (7 of 9)12/30/2006 10:17:59 AM
1997 Volvo 960
Adjust the treble by sliding the control up or down (up to increase, down to decrease). A "detent"
indicates "equalized" treble.
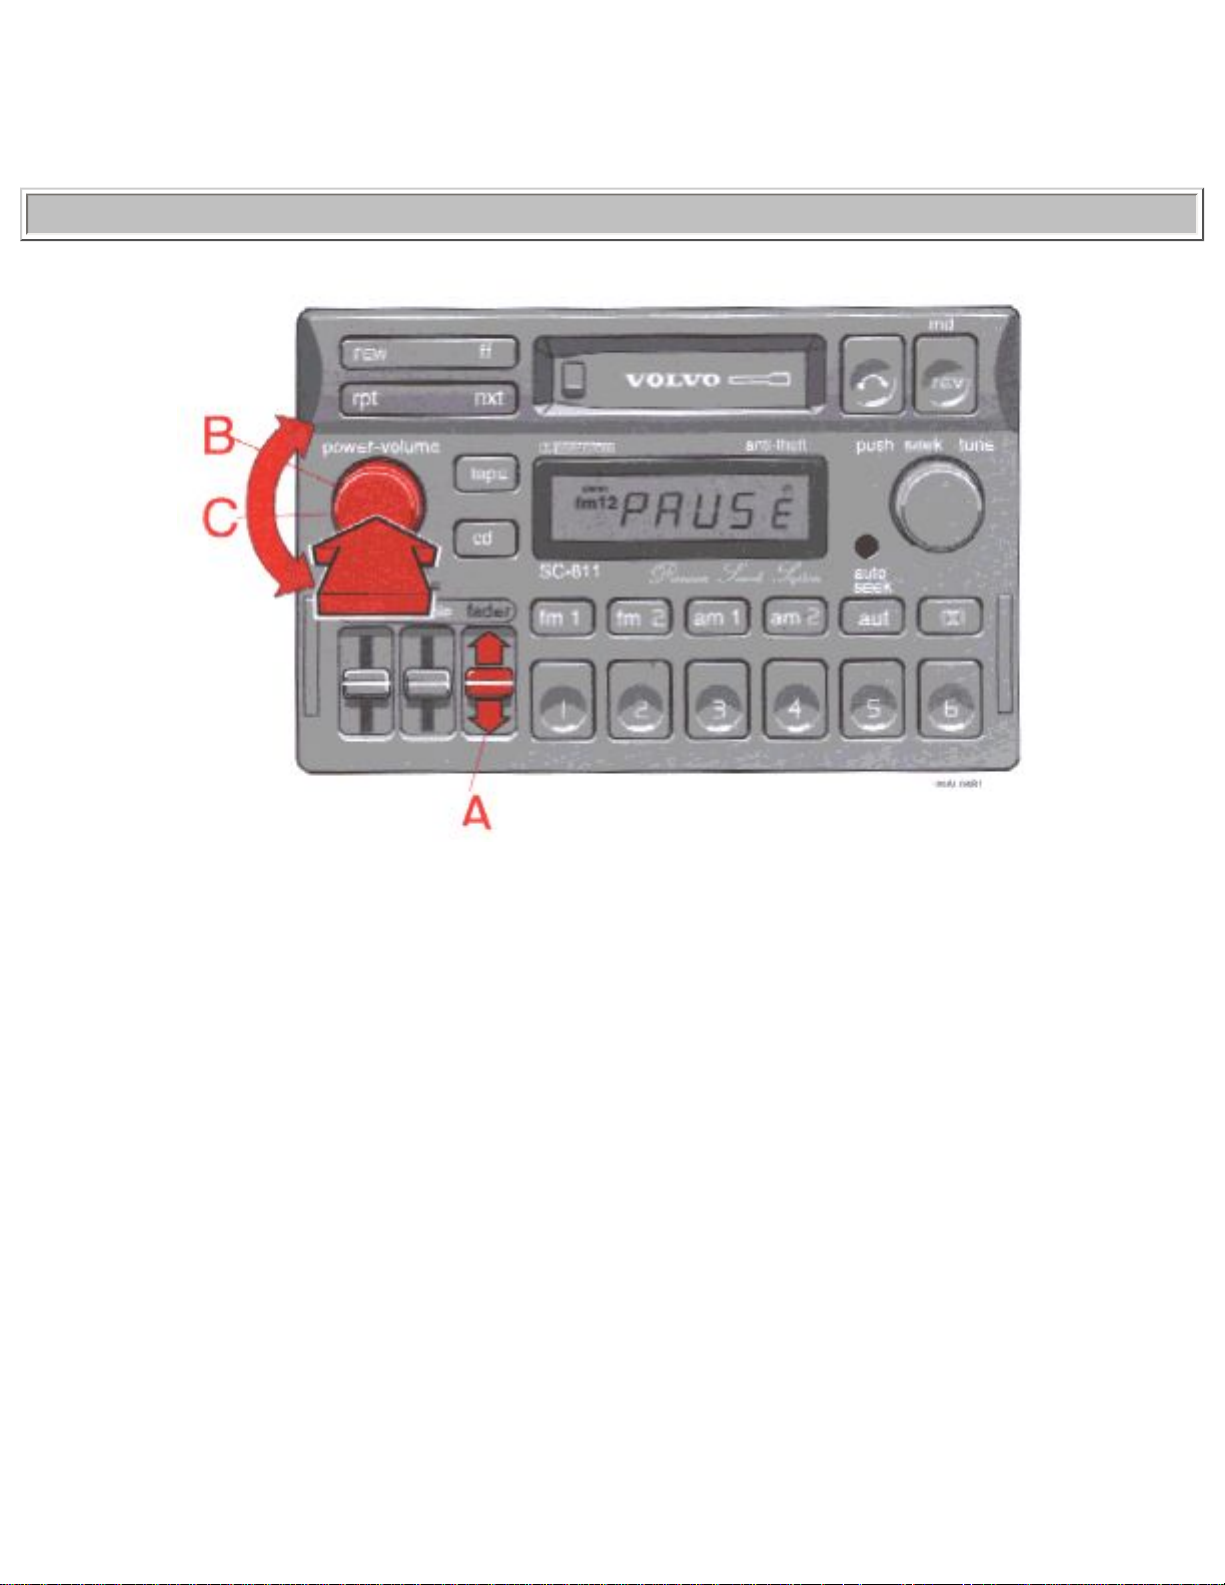
pg. 10:7 Radio SC-811
A - Fader control
Adjust front/rear speaker balance by sliding the control up or down.
(Up to direct more sound to the front speakers, down to direct more sound to the rear speakers).
The "detent" indicates "equalized" front/rear balance position.
B - Mute function
Press the "power-volume" knob to temporarily mute the sound. "PAUSE" is displayed.
C - Balance control
Pull out the "volume" knob and adjust the left/right balance by turning the knob counter-clockwise or
file:///K|/ownersdocs/1997/1997_960/97960_1001.htm (8 of 9)12/30/2006 10:17:59 AM

1997 Volvo 960
clockwise.
Contents | Top of Page
file:///K|/ownersdocs/1997/1997_960/97960_1001.htm (9 of 9)12/30/2006 10:17:59 AM
1997 Volvo 960
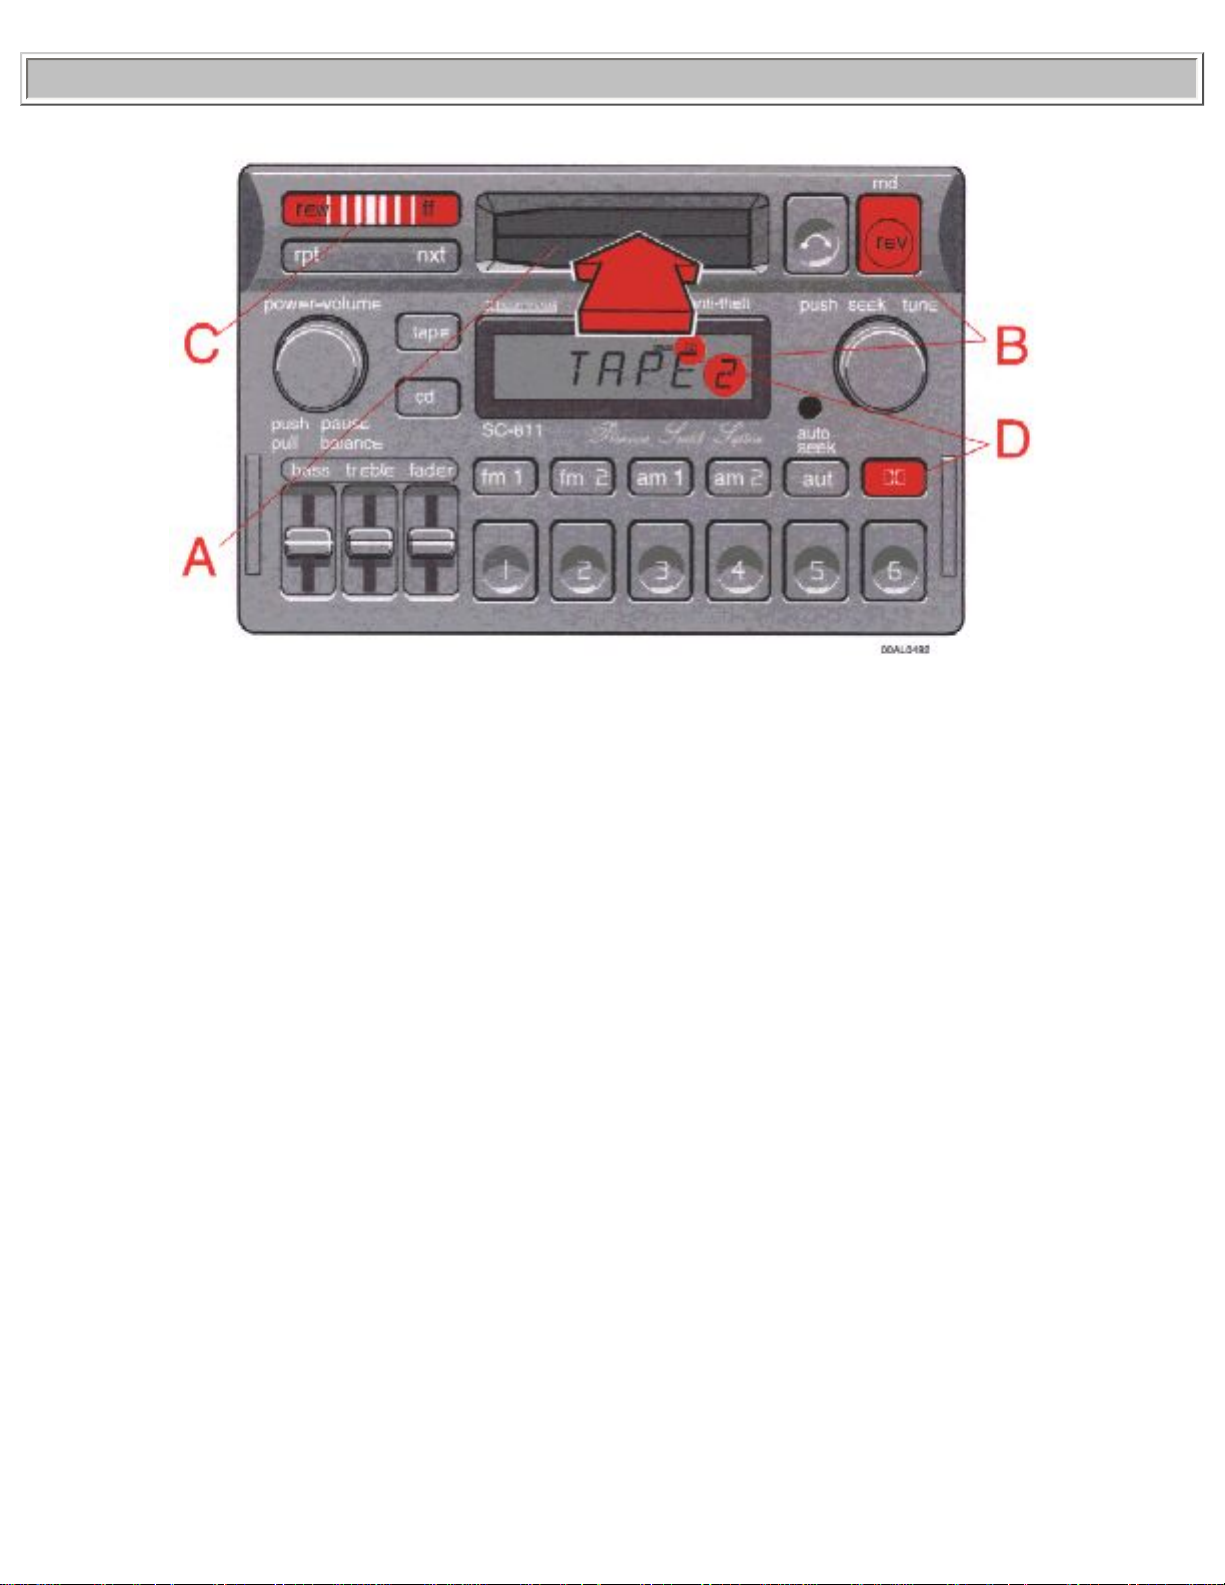
pg. 10:8 Cassette deck
A - Cassette slot
The cassette is inserted with the open side to the right (side 1 or A of the cassette upwards). When the
cassette is inserted, the radio is disengaged and the cassette will start to play automatically. "TAPE 1" or
"TAPE 2" is displayed to indicate which side of the tape is being played. When one side of the tape is
being played. When one side of the tape has been played the unit will automatically play the other side
(auto-reverse). The cassette can be inserted or ejected even when the unit is switched off.
B - Reversing the tape (rev)
Press the button to play the other side of the tape.
The side of the tape being played will be displayed.
C - Fast winding
The tape is advanced with "ff" and rewound with "rew". The tape side indicator in the display will flash
rapidly during fast winding. Fast winding can be stopped by pressing the button again.
file:///K|/ownersdocs/1997/1997_960/97960_1008.htm (1 of 3)12/30/2006 10:17:59 AM
1997 Volvo 960
D - Dolby B button
Press this button when you use tapes recorded with the Dolby B noise reduction system. The Dolby
Symbol
will be indicated in the display.
pg. 10:9 Cassette deck
A - "nxt" (next selector)
Press the "nxt" button and the tape will automatically advance to the next song. There must be a pause of
approx. 5 seconds between songs for this function to operate.
B - "rpt" (repeat) selector
Press the "rpt" button to rewind the tape to the beginning of the song. Press the button again to rewind to
the beginning of the previous song.
There must be a pause of approx. 5 seconds between the songs for this function to operate.
C - Pause
file:///K|/ownersdocs/1997/1997_960/97960_1008.htm (2 of 3)12/30/2006 10:17:59 AM

1997 Volvo 960
If you press the "power-volume" knob the tape is stopped, the unit is silent and "PAU
file:///K|/ownersdocs/1997/1997_960/97960_1008.htm (3 of 3)12/30/2006 10:17:59 AM

1997 Volvo 960
Occupant safety
pg. 1:1 Occupant safety
1:2
Seat belts
1:4
Volvo SRS
1:8
SIPS BAG
1:9
Child safety
1:13
Occupant safety
1:13
Reporting Safety Defects
Despite our strongest recommendations, and your best intentions, not wearing a seat belt is like
believing "It'll never happen to me!". Volvo urges you and all adult occupants of your car to wear seat
belts and ensure that children are properly restrained, using an infant, car or booster seat determined by
age, weight and height.
Fact: In every state and province, some type of child-restraint legislation has been passed. Additionally,
most states and provinces have already made it mandatory for occupants of a car to use seat belts.
So, urging you to "buckle up" is not just our recommendation - legislation in your state or province may
mandate seat belt usage. The few seconds it takes to buckle up may one day allow you to say, "It's a
good thing I was wearing my seat belt".
pg. 1:2 Seat belts
Seat belts
Always fasten the seat belts before you drive or ride.
Two lights above the rear view mirror will be illuminated for 4-8 seconds after the starting (ignition) key
is turned to the driving position. One light is located in the instrument panel and one in the console
between the front seats.
A chime will sound at the same time if the driver has not fastened his seat belt. The rear seats are
provided with self-retracting inertia reel belts. The front seats are provided with single roller belts with
tensioners.
To buckle:
Pull the belt out far enough to insert the latch plate into the receptacle (buckle for rear seats) until a
file:///K|/ownersdocs/1997/1997_960/97960_101.htm (1 of 4)12/30/2006 10:18:00 AM
1997 Volvo 960
distinct snapping sound is heard. The seat belt retractor is normally "unlocked" and you can move freely,
provided that the shoulder belt is not pulled out too far. The retractor will lock up as follows:
● if the belt is pulled out rapidly
● during braking and acceleration
● if the vehicle is leaning excessively
● when driving in turns
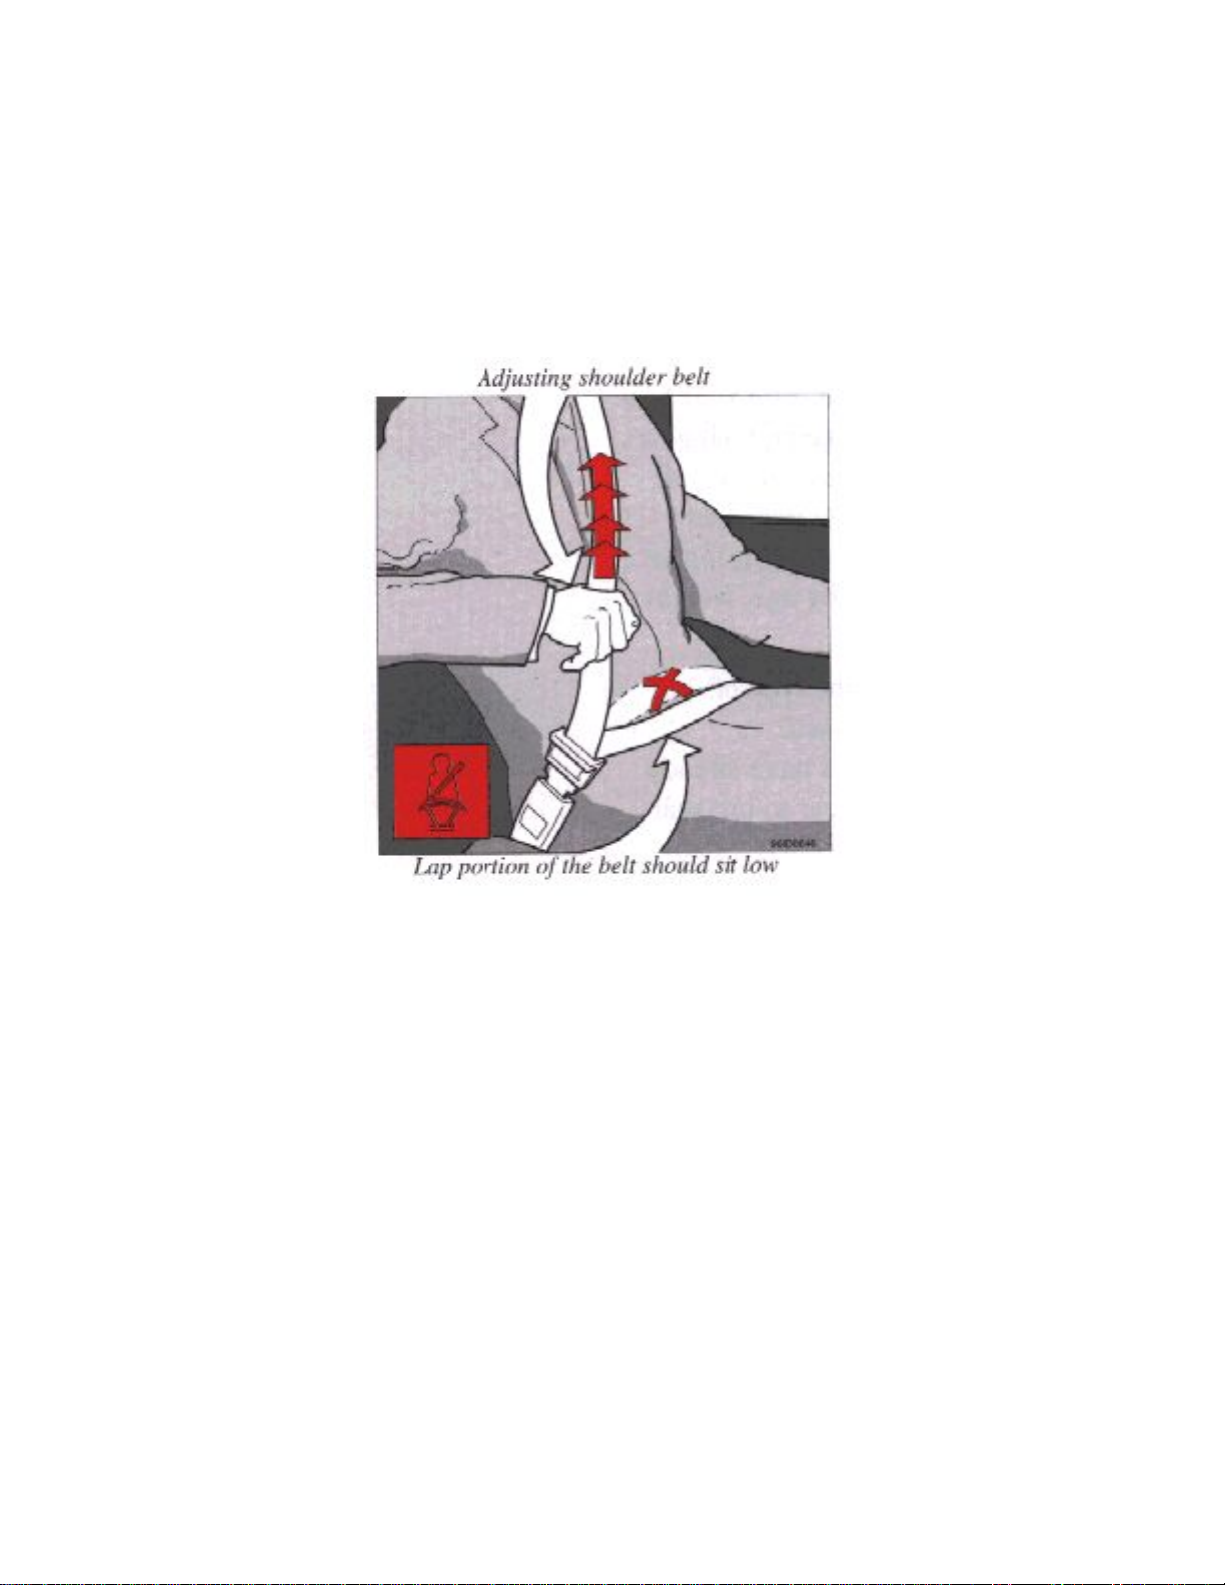
For the seat belt to provide maximum protection in the event of an accident, it must be worn correctly.
When wearing remember:
● The belt should not be twisted or turned.
● The lap belt must be positioned low on the hips (not pressing against the abdomen).
● The shoulder section of the front seat belts adjusts automatically to the driver's height.
Make sure that the shoulder belt is rolled up into its retractor and that the shoulder and lap belts are taut.
Before exiting the car, check that the seat belt retracts fully after being unbuckled. If necessary, guide
the belt back into the retractor slot.
NOTE : Legislation in your state or province may mandate seat belt usage.
file:///K|/ownersdocs/1997/1997_960/97960_101.htm (2 of 4)12/30/2006 10:18:00 AM
1997 Volvo 960
WARNING! Any device used to induce slack into the shoulder belt portion of the three-point belt
system will have a detrimental effect on the amount of protection available to you in the event of a
collision. The seat back should not be tilted too far back. The shoulder belt must be taut in order to
function properly.
Spool-out
To make child seat installation easier, each seat belt buckle (except for the driver's belt) is equipped with
a locking mechanism to help keep the lap section of the seat belt taut. Please refer to page 1:11 for more
information on this function.
pg. 1:3 Seat belts
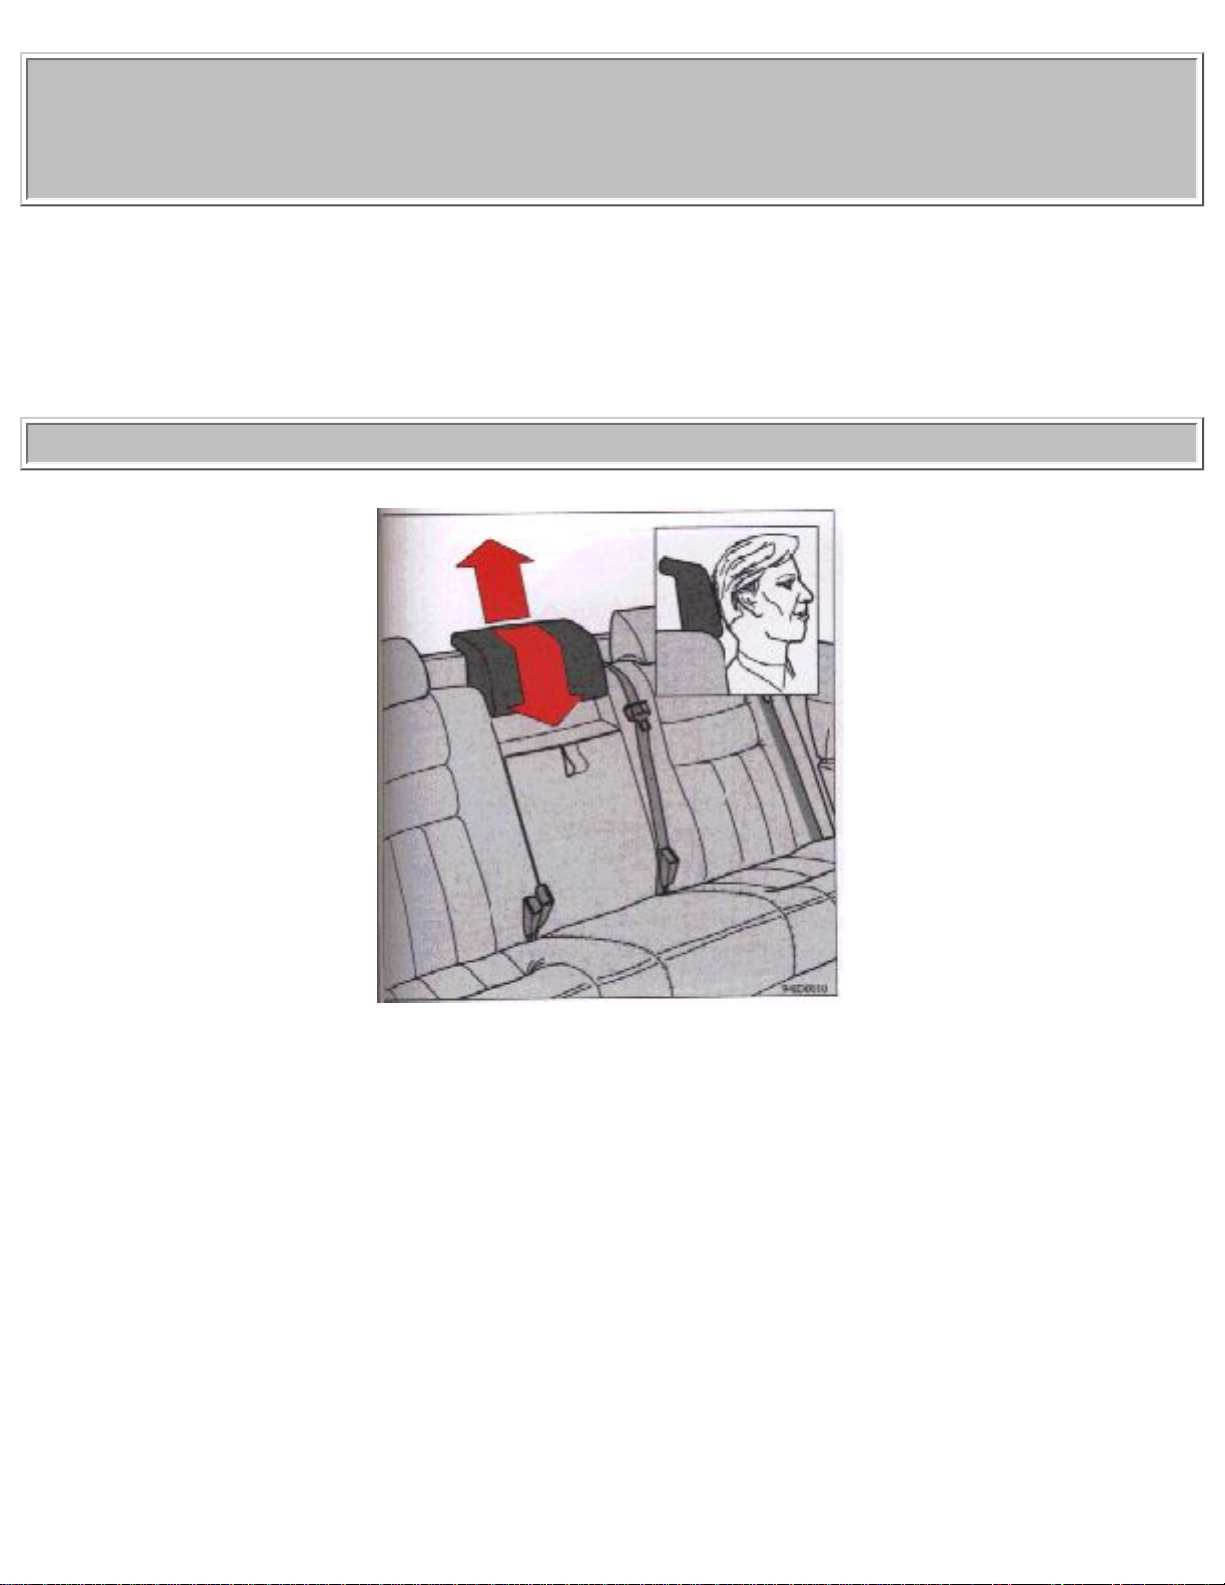
Center head restraint
The center head restraint can be adjusted according to the passenger's height. The restraint should be
carefully adjusted to support the occupant's head. The head restraint can be raised by pulling straight up
or lowered by grasping the restraint, pulling it slightly forward and pushing down.
file:///K|/ownersdocs/1997/1997_960/97960_101.htm (3 of 4)12/30/2006 10:18:00 AM
1997 Volvo 960
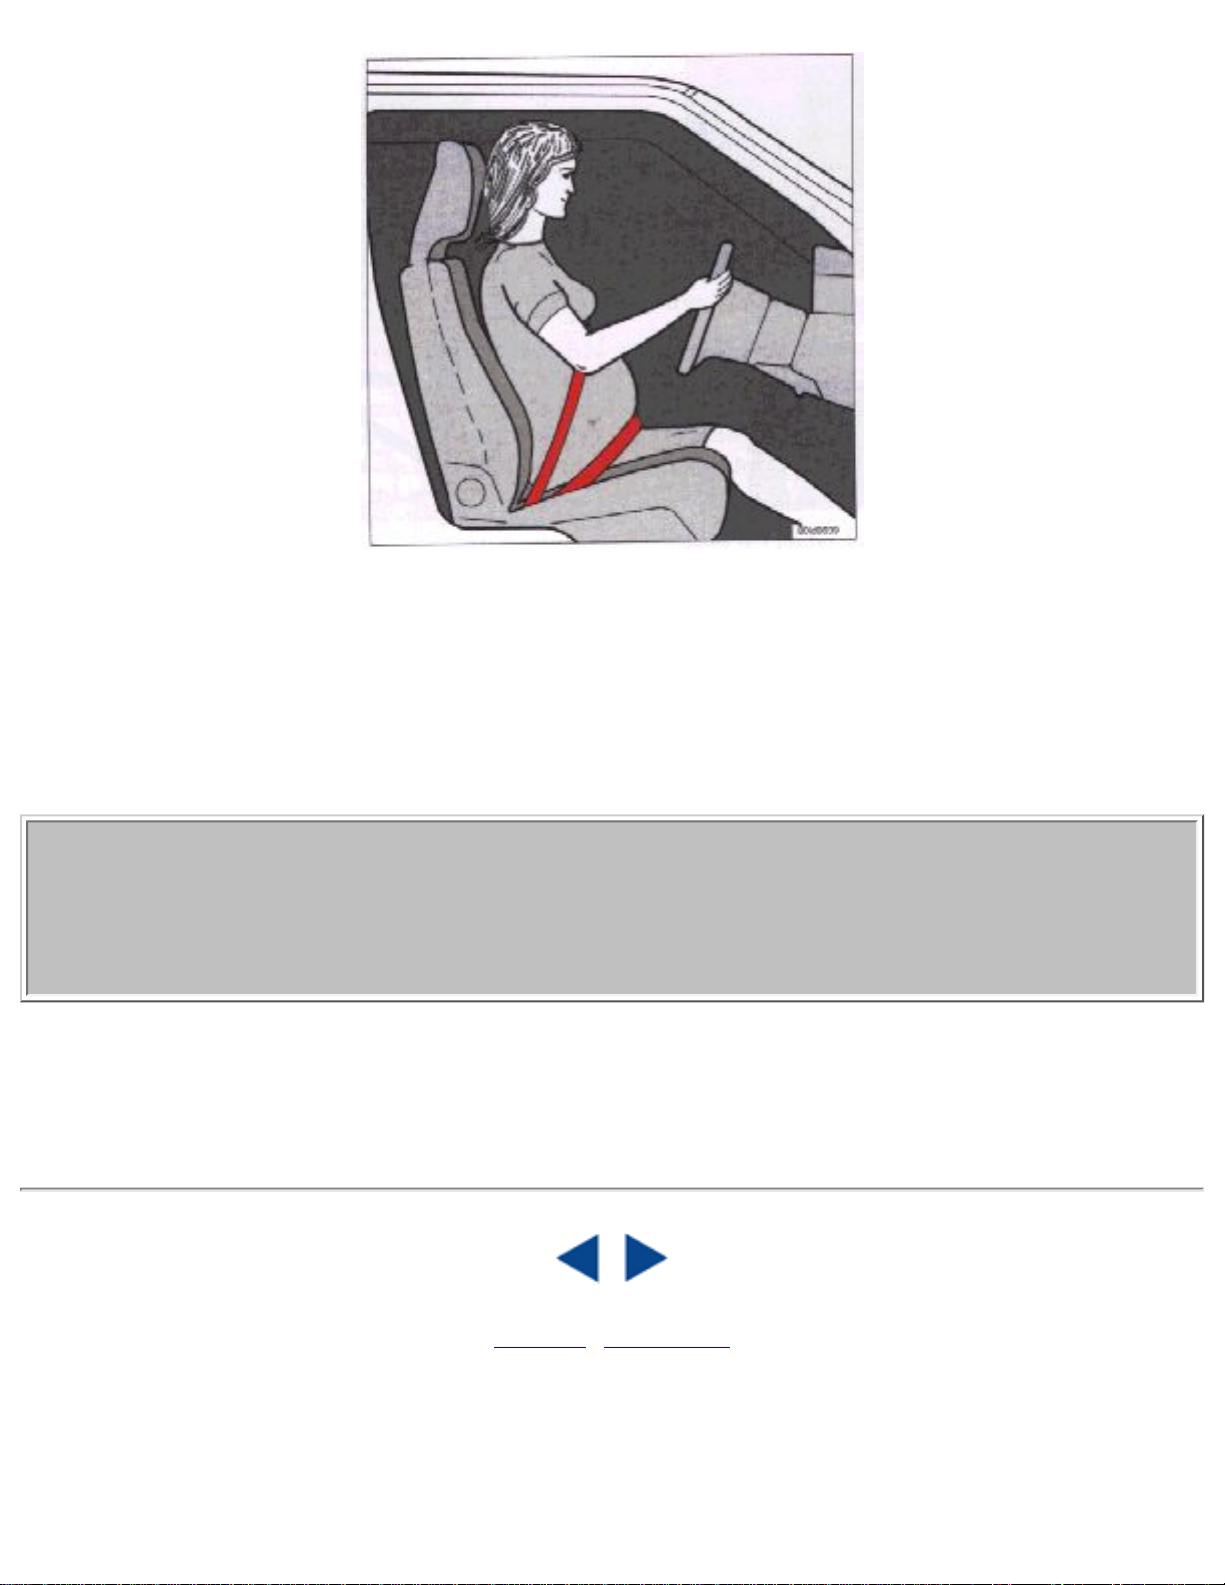
During pregnancy
Pregnant women should always wear seat belts. Remember that the belt should always be positioned in
such a way as to avoid any possible pressure on the abdomen. The lap portion of the belt should be
located low, as shown in the above illustration.
WARNING! Never use a seat belt for more than one occupant. Never wear the shoulder portion of the
belt under the arm, behind the back or otherwise out of position. Such use could cause injury in event
of accident. As the seat belts lose much of their strength when exposed to violent stretching, they
should be replaced after any collision, even though they may appear to be undamaged. Never repair
the belt on your own; have this done by an authorized Volvo retailer only.
NOTE:
Legislation in your state or province may mandate seat belt usage.
Contents | Top of Page
file:///K|/ownersdocs/1997/1997_960/97960_101.htm (4 of 4)12/30/2006 10:18:00 AM
1997 Volvo 960
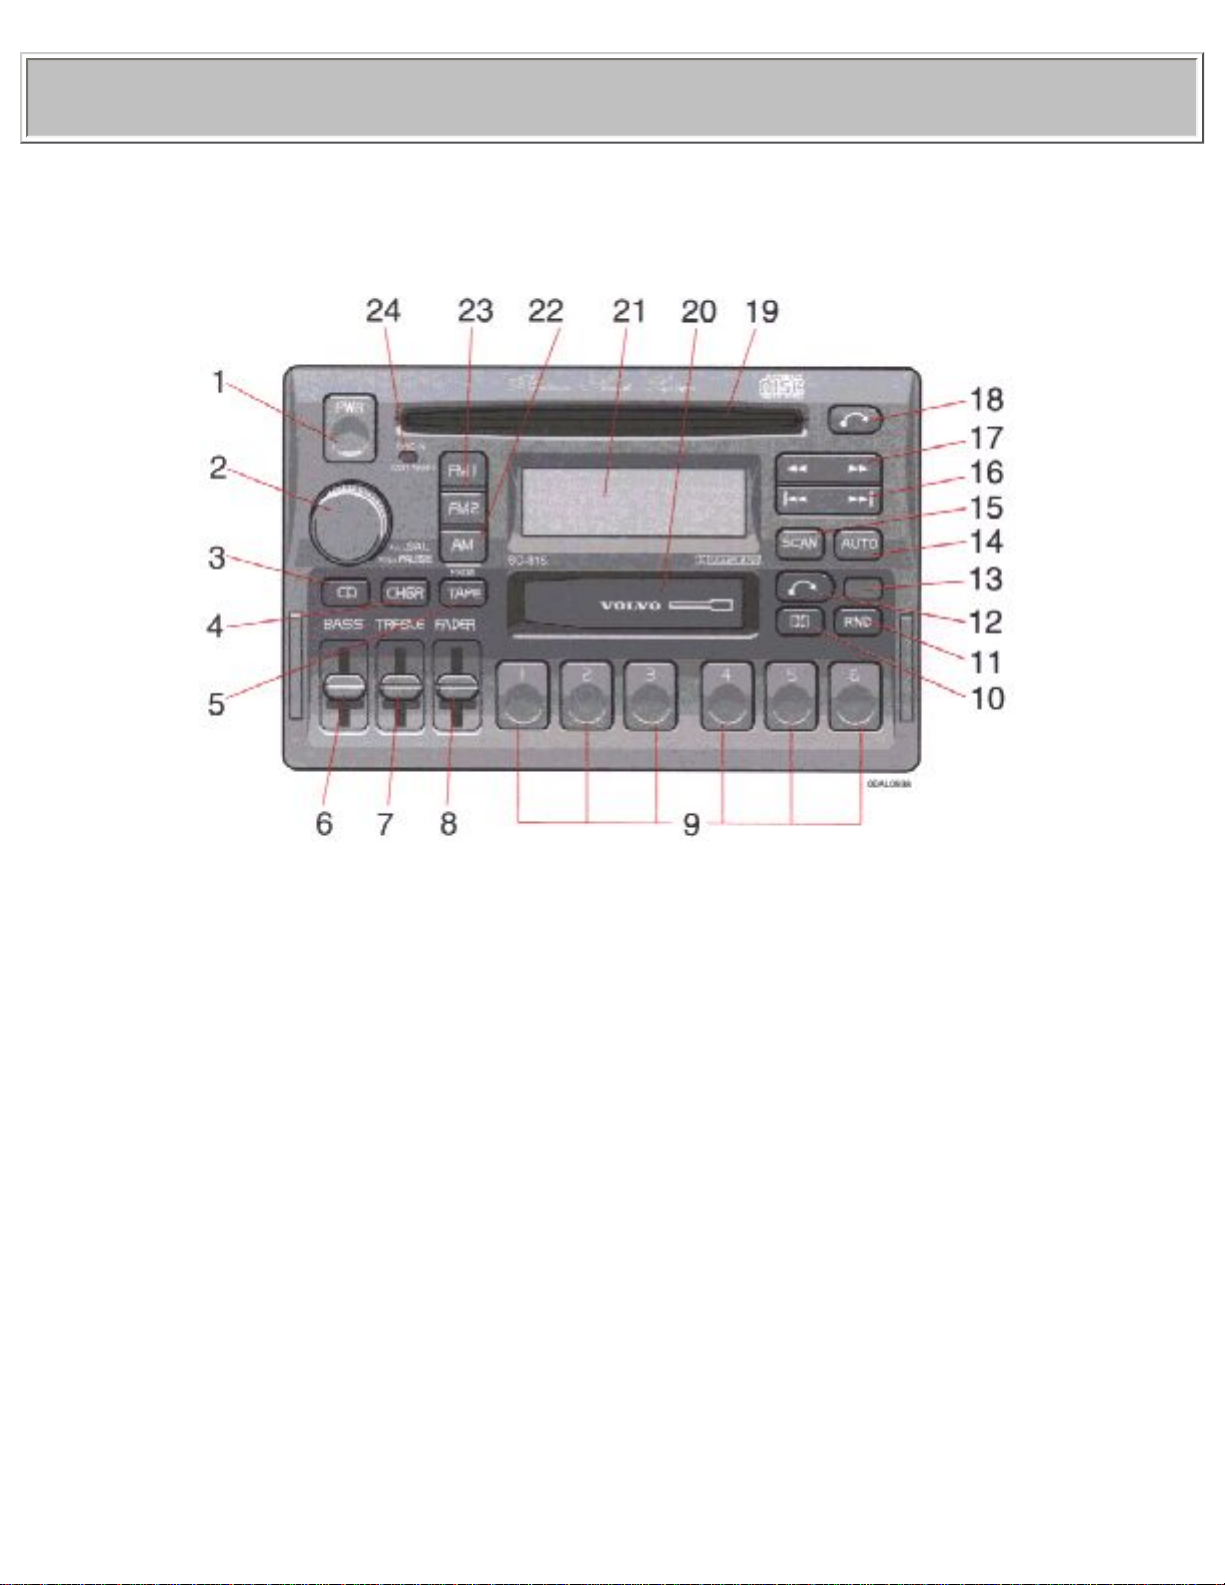
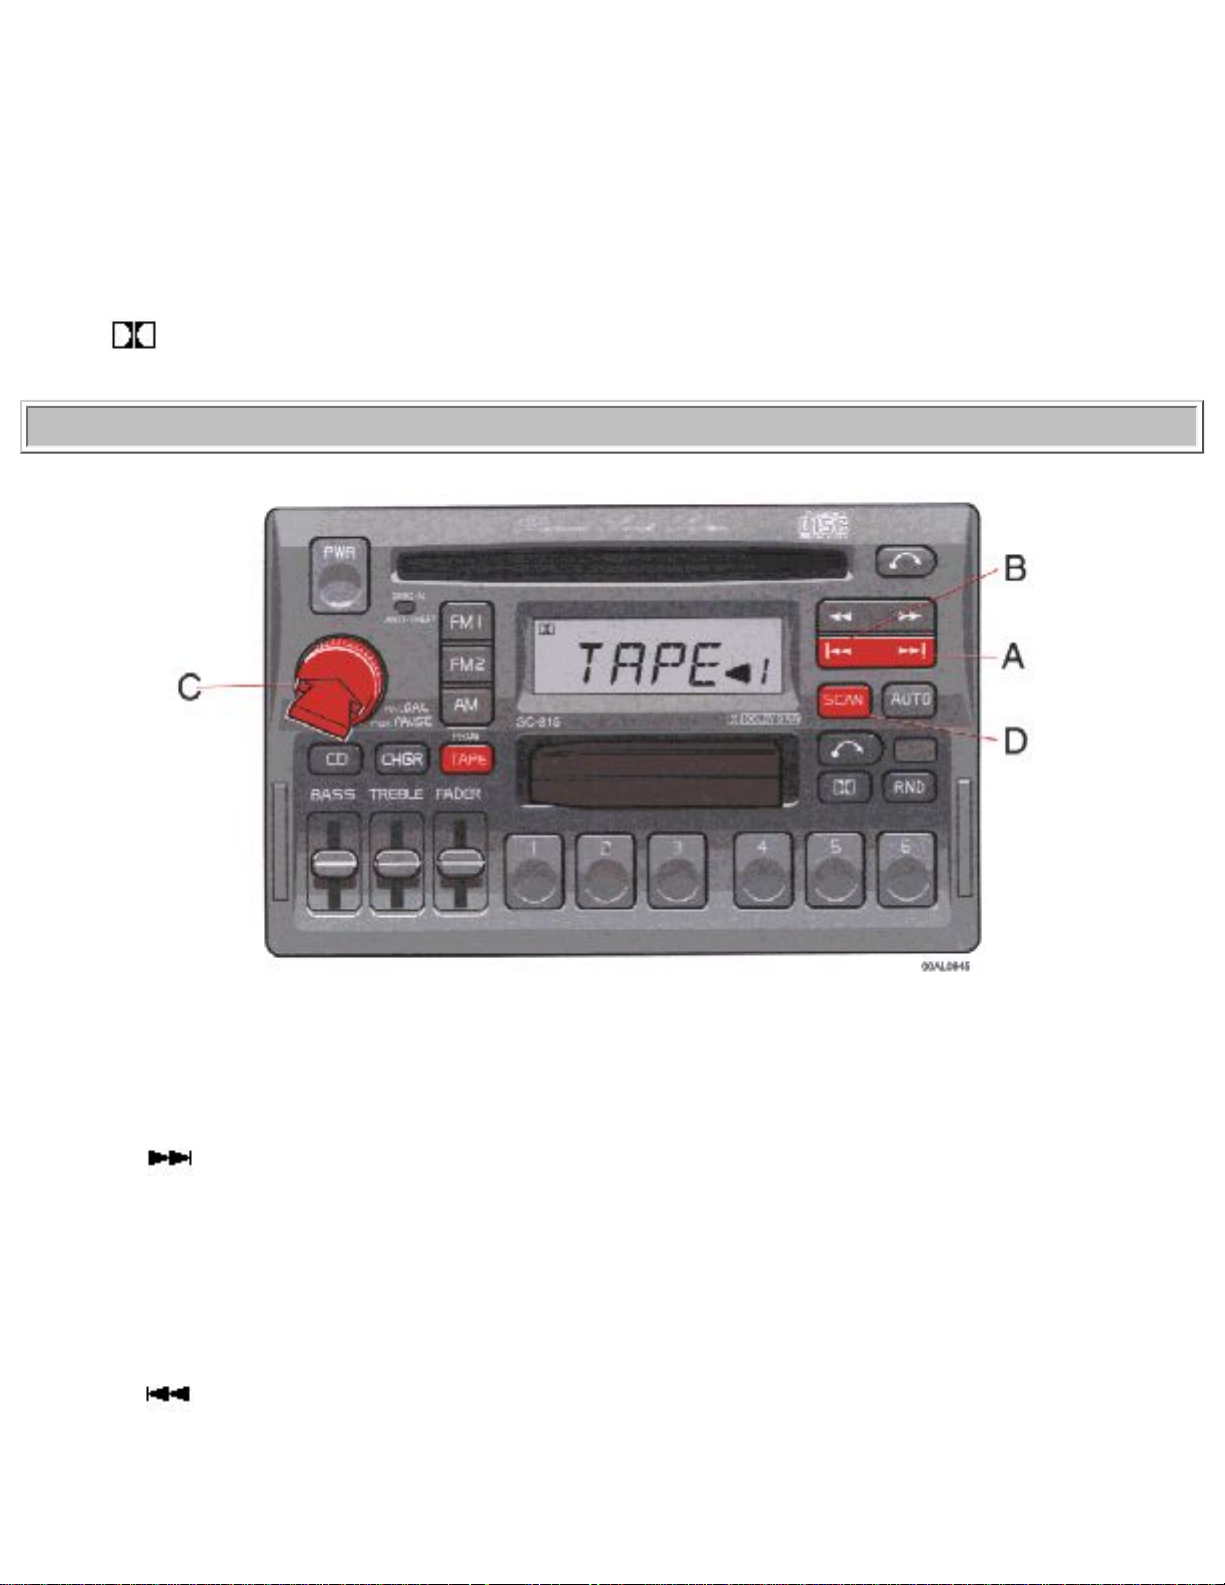
pg. 10:15 Premium Sound System SC-815 (certain models), general description
The following pages describe the use of your SC-815 Cassette radio and CD remote control
1. On/off (push)
2.
● Volume (turn)
● Pause/Mute (push)
● Balance (pull)
3. CD mode selector/Active sound control (single)
4. CD changer selector
5.
● Tape mode selector
● Tape direction selector PROG
6. Bass control
7. Treble control
8. Fader control
9.
● Preset buttons
● CD-Disc No. selector
file:///K|/ownersdocs/1997/1997_960/97960_1015.htm (1 of 9)12/30/2006 10:18:00 AM
1997 Volvo 960
10. Dolby B NR button
11. CD-random play
12. Cassette eject
13. Not in use
14. Scan
15. Auto seek memory
16.
● Seek tuning up/down
● TP -Next/Previous song
● CD -Next UP/Previous DOWN track
17.
● Manual tuning
● TP -fast forward/Rewind
● CD -Music search UP/DOWN
18. CD eject (single)
19. CD slot
20. Cassette slot
21. Display
22. Waveband selector (AM)
23. Waveband selectors (FM)
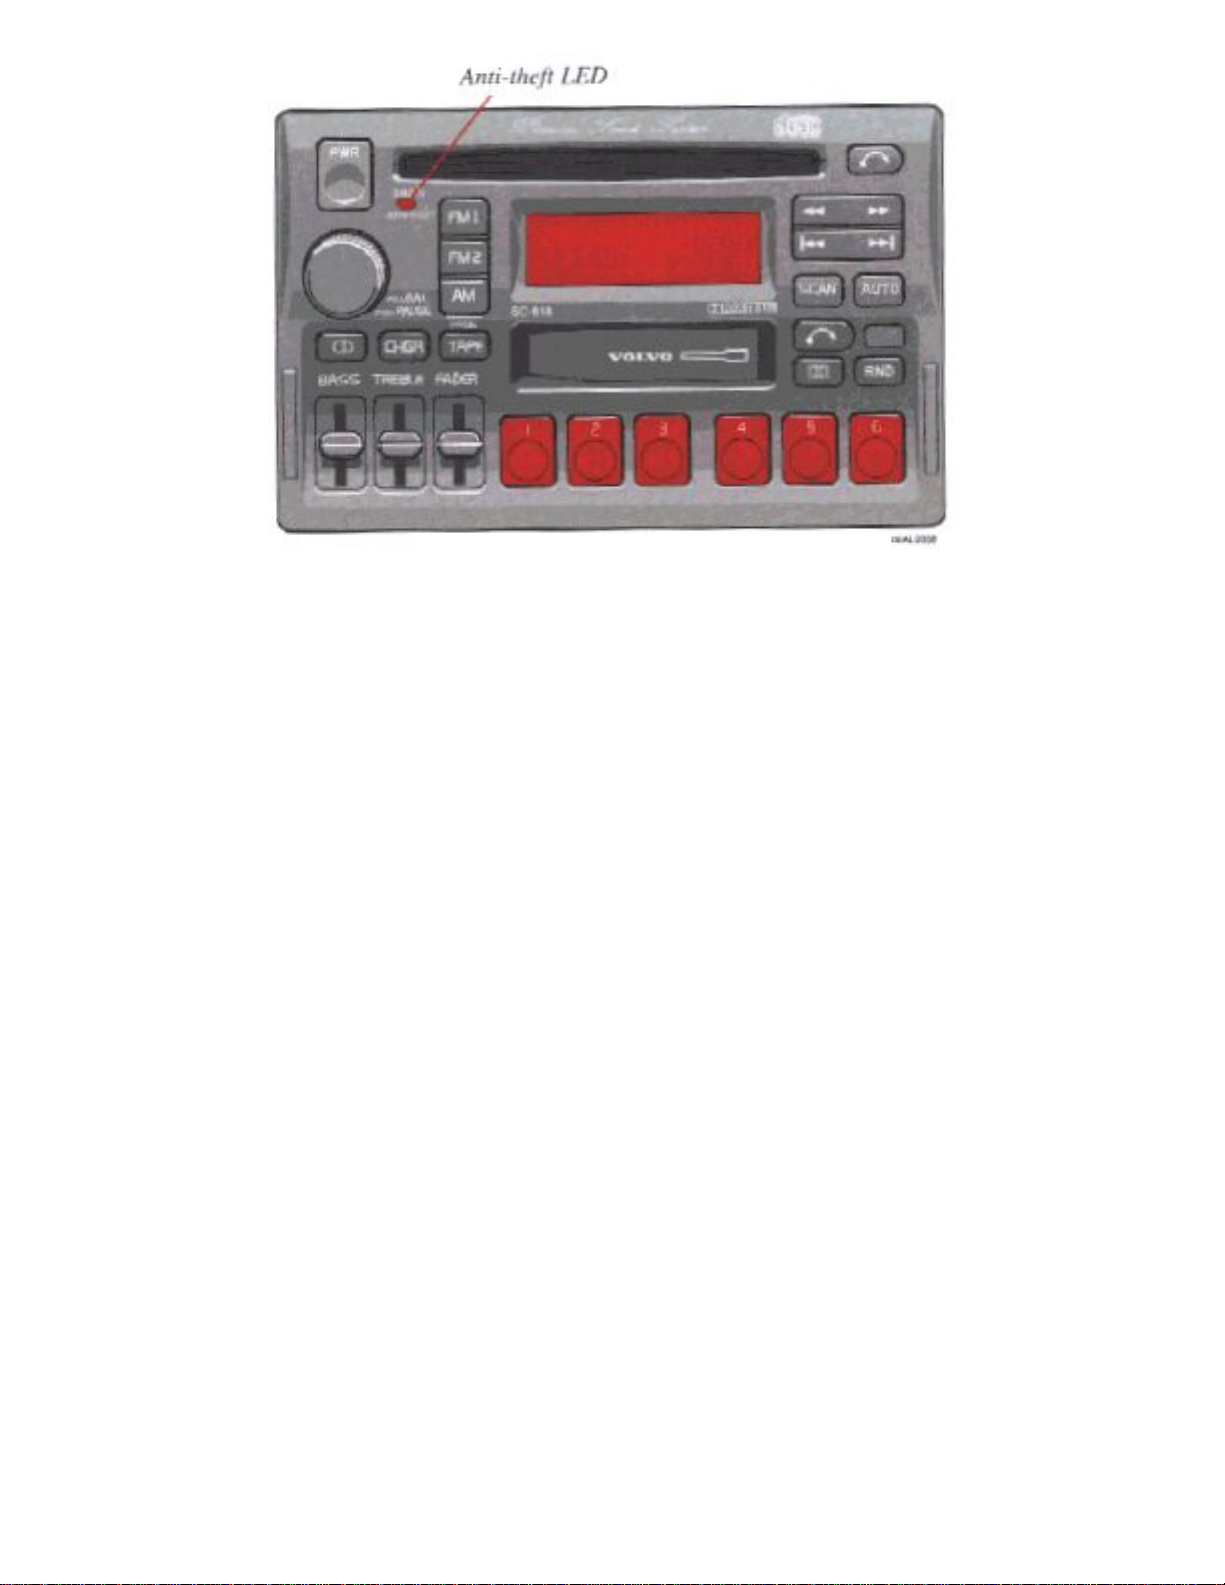
24.
● Anti-theft LED
● Disc in LED (single)
TP = Applicable only in Tape Mode
CD = Applicable only when in CD mode and connected to a CD changer.
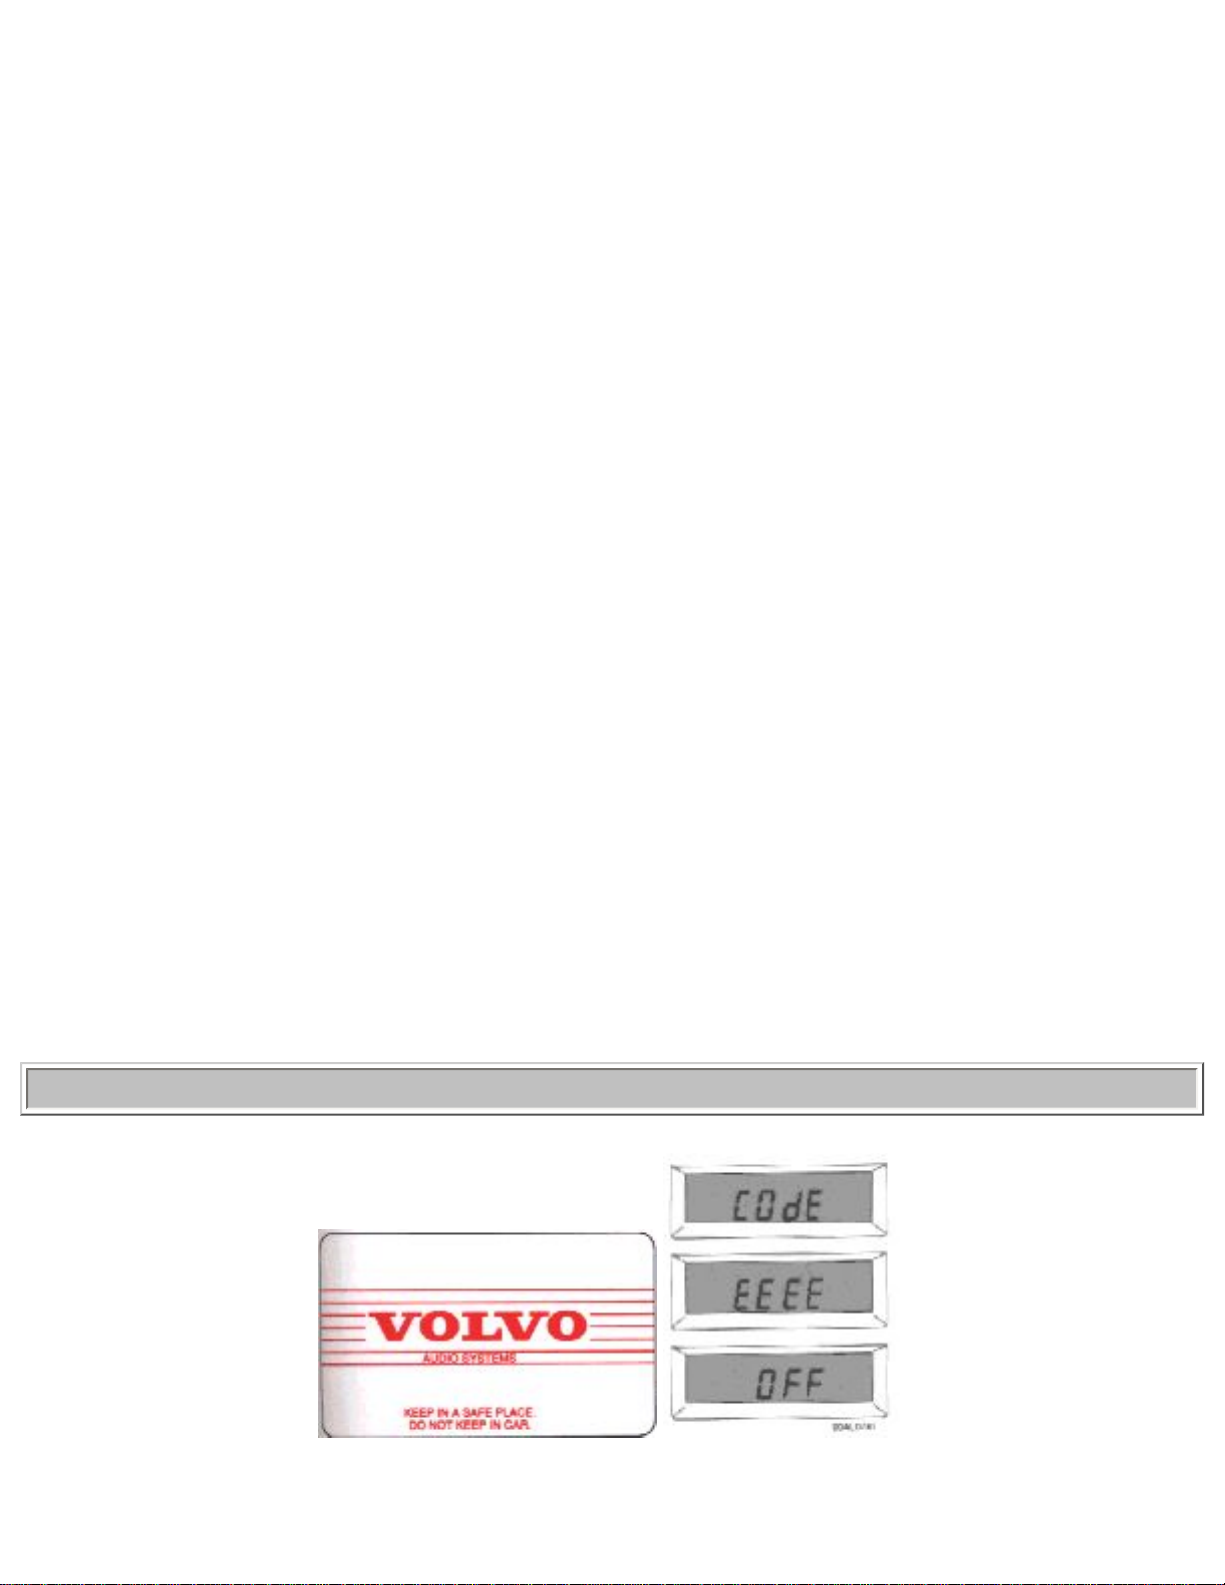
pg. 10:16 Anti-theft code
file:///K|/ownersdocs/1997/1997_960/97960_1015.htm (2 of 9)12/30/2006 10:18:00 AM
1997 Volvo 960
Anti-theft code
The radio features anti-theft circuitry. If the set is removed from the vehicle or if the battery power is
disconnected, a special code must be entered to enable operation of the set.
Refer to the radio code card supplied with your vehicle or ask your retailer for the correct code.
When the car is parked with ignition key removed the anti-theft LED will flash.
To enter the code
After installation or when the set has been disconnected from power, the set displays "CODE" when it is
switched on.
Enter the 4-digit code using the preset buttons.
If the correct code is entered the set is entered the set is ready to use.
If you enter an incorrect code you must enter the correct code again from the beginning.
Incorrect code
If an incorrect code has been entered "EEEE" is displayed. Enter the correct code. After three
unsuccessful coding attempts the set will lock and remain locked for two hours.
"OFF" is displayed.
During this waiting period:
● the battery must be connected
file:///K|/ownersdocs/1997/1997_960/97960_1015.htm (3 of 9)12/30/2006 10:18:00 AM
1997 Volvo 960
● the ignition key must be turned to position I
● the unit must be turned on
Make sure the headlights are turned off to help prevent battery drain. Enter the code again once this time
has elapsed.
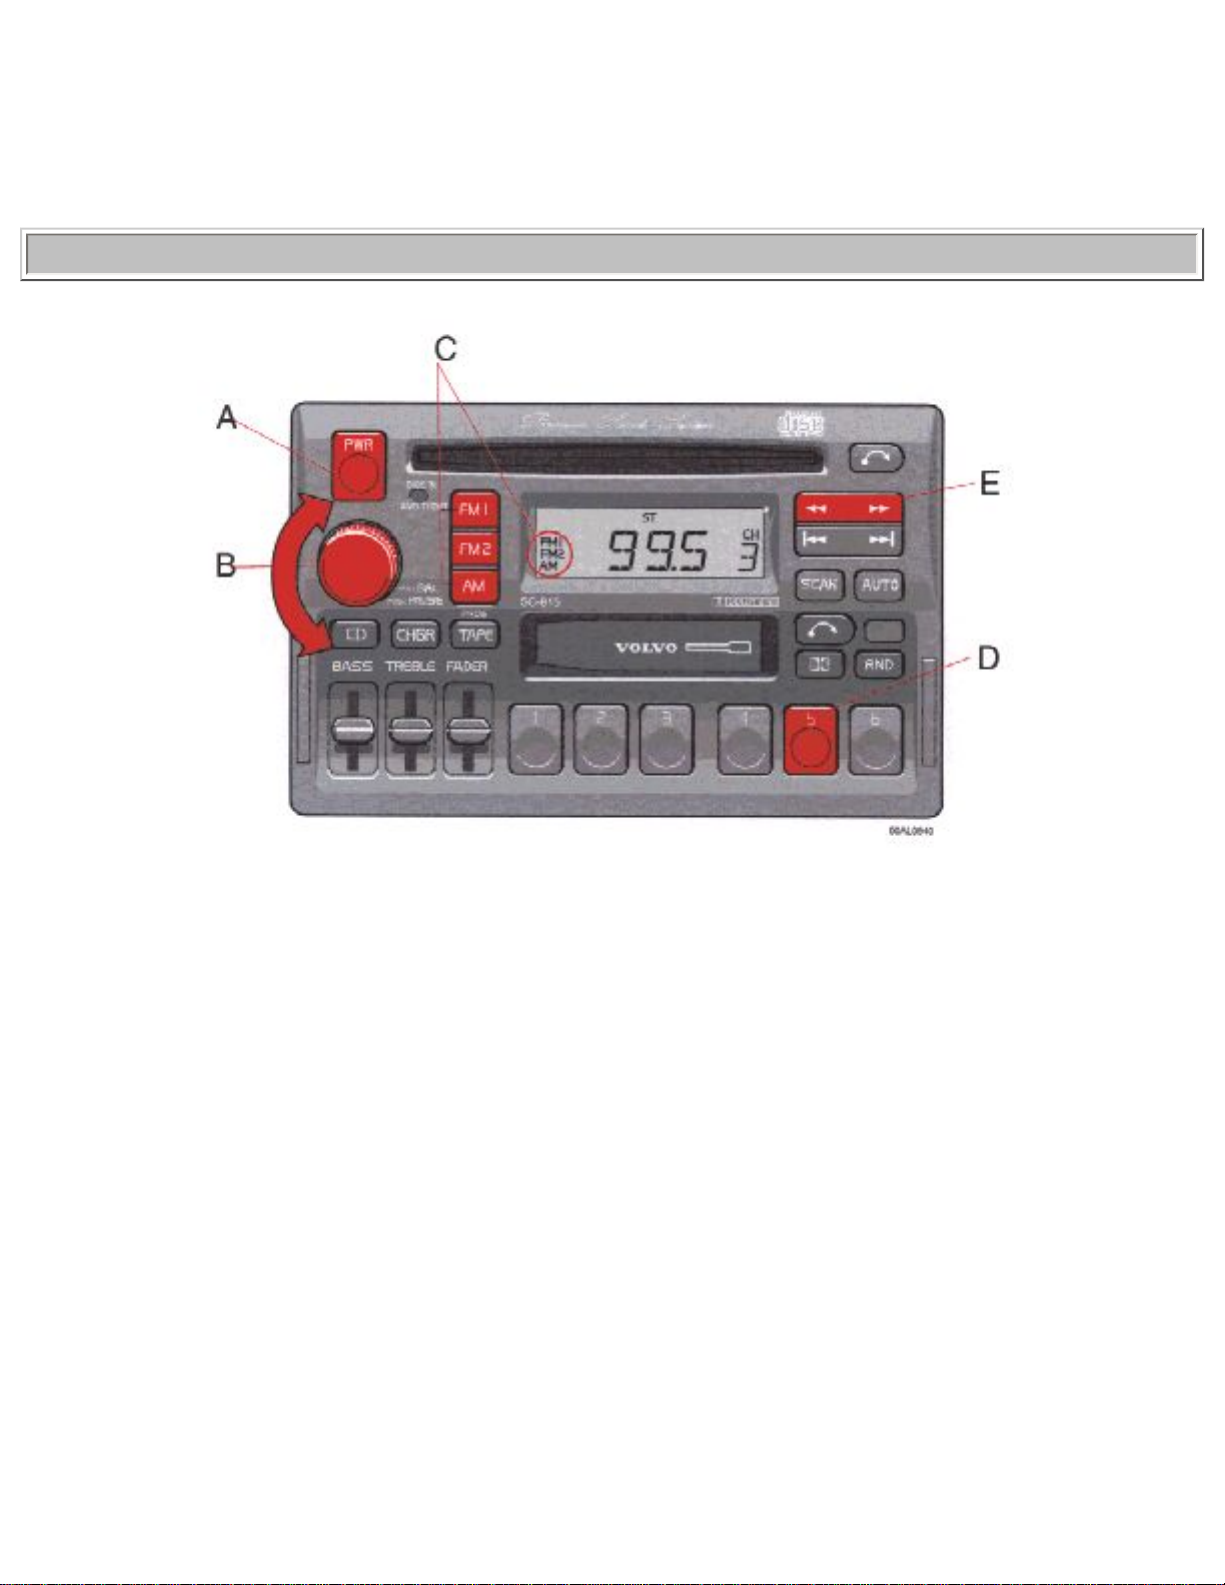
pg. 10:17 Radio SC-815
A - On/off switch
Push the button to switch on the radio. Press the button slightly longer to turn the radio off.
B - Volume control
Turn the button clockwise to increase the volume. The volume control is electronic and has no end stop.
C - Waveband selector
The desired waveband is set by pressing one of the waveband selector bands. The frequency and
waveband is shown on the display.
NOTE: There are two FM wavebands and one AM waveband. This makes it possible to store 2 x 6 FM
file:///K|/ownersdocs/1997/1997_960/97960_1015.htm (4 of 9)12/30/2006 10:18:00 AM
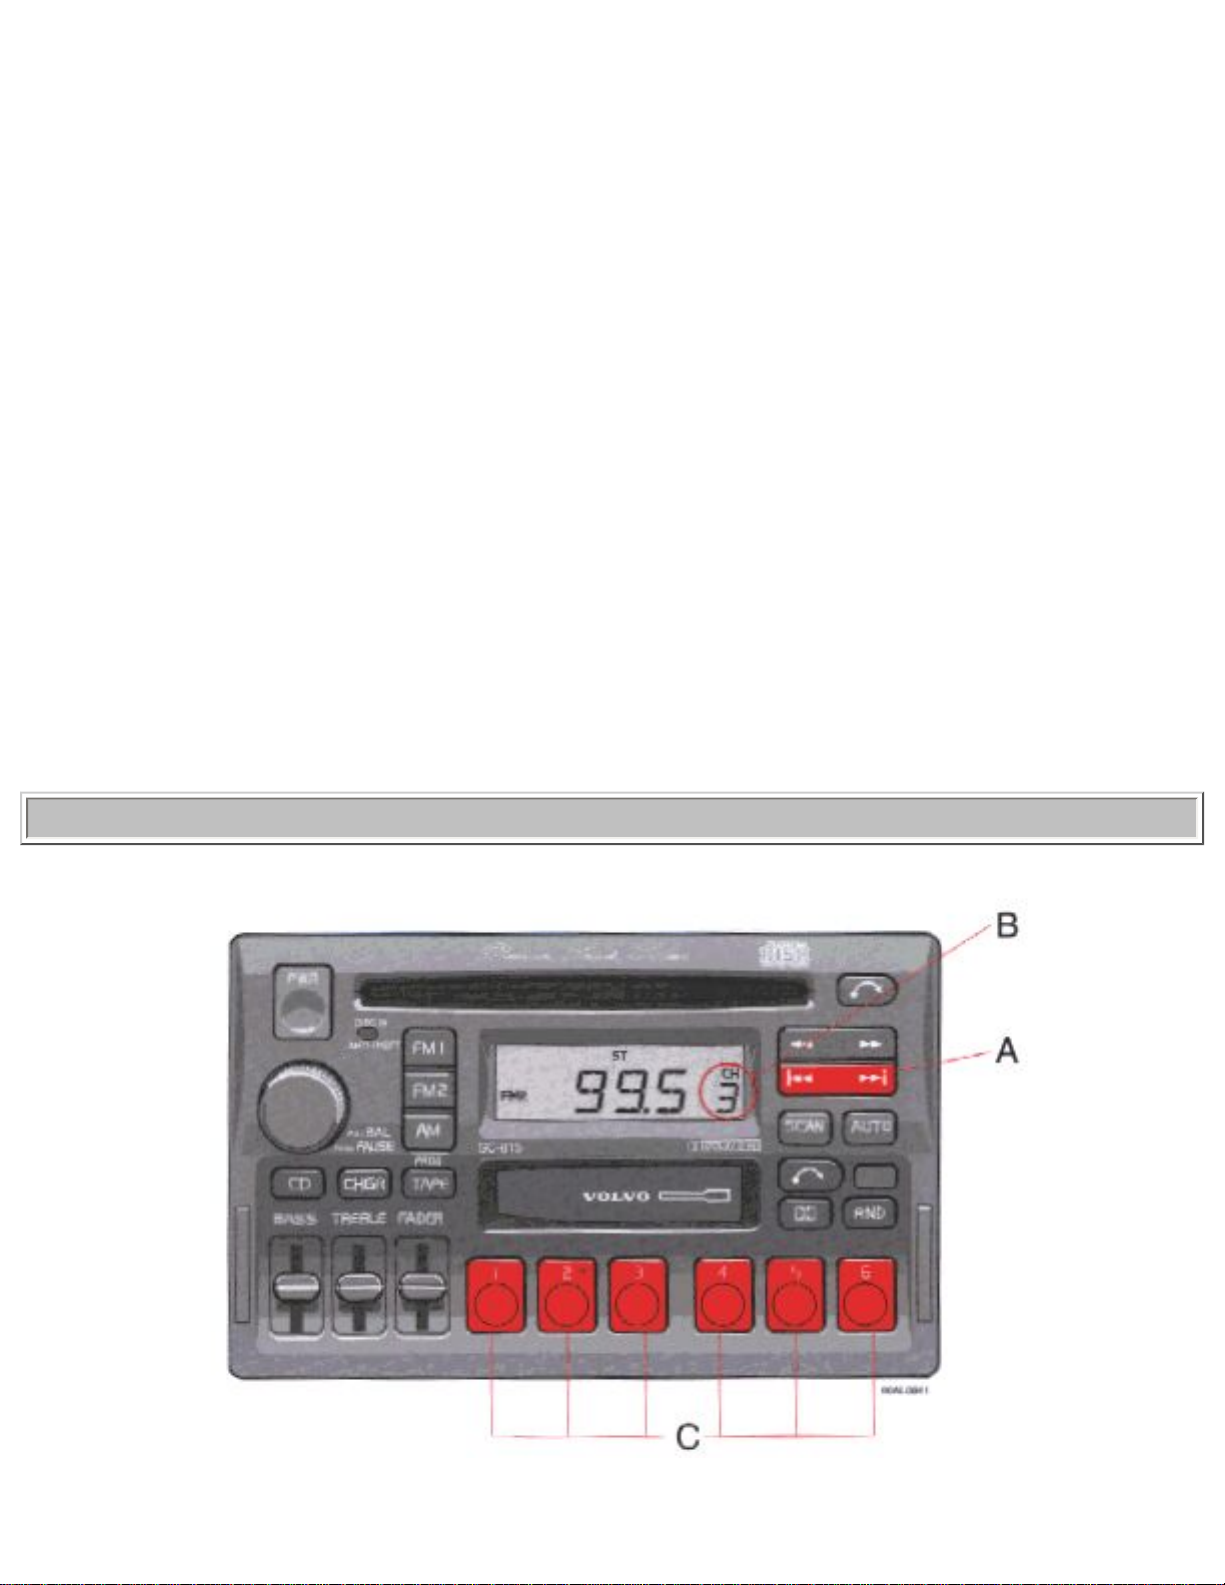
1997 Volvo 960
stations and 6 AM stations in memory.
D - Setting frequency selection
The radio can be used in most parts of the world by changing the frequency selection intervals as
follows:
Depress and hold preset button 5 and turn the radio ON. "USA" will flash on the display. Each time
button 5 is pressed, the frequency selection will change from "USA" to "AUS", etc. When the correct
country name is displayed, wait 5 seconds and the radio will be ready for use.
E - Manual tuning
Press the left side tune button to tune to lower frequencies and the right side to tune to higher
frequencies. The tuned frequency is displayed.
ST will be displayed to indicate stereo FM reception.
pg. 10:18 Radio SC-815
file:///K|/ownersdocs/1997/1997_960/97960_1015.htm (5 of 9)12/30/2006 10:18:00 AM
1997 Volvo 960
A - Seek tuning up/down
Press the left side tune button to tune to lower frequencies and the right side to tune to higher
frequencies. The radio seeks the next audible station and stops there. If you wish to continue the seek
tuning, press the tune button again.
B - Preset programming
1. Tune to the desired frequency.
2. Depress and hold a prest button. The audio will cut out. Keep the button depressed until the audio
comes on again (approx. 2 seconds).
3. The frequency is now stored on this present button.
C - Preset buttons
To select a pre-programmed radio frequency, depress the preset button. The set frequency will be
displayed.
pg. 10:19 Radio SC-815
file:///K|/ownersdocs/1997/1997_960/97960_1015.htm (6 of 9)12/30/2006 10:18:00 AM

1997 Volvo 960
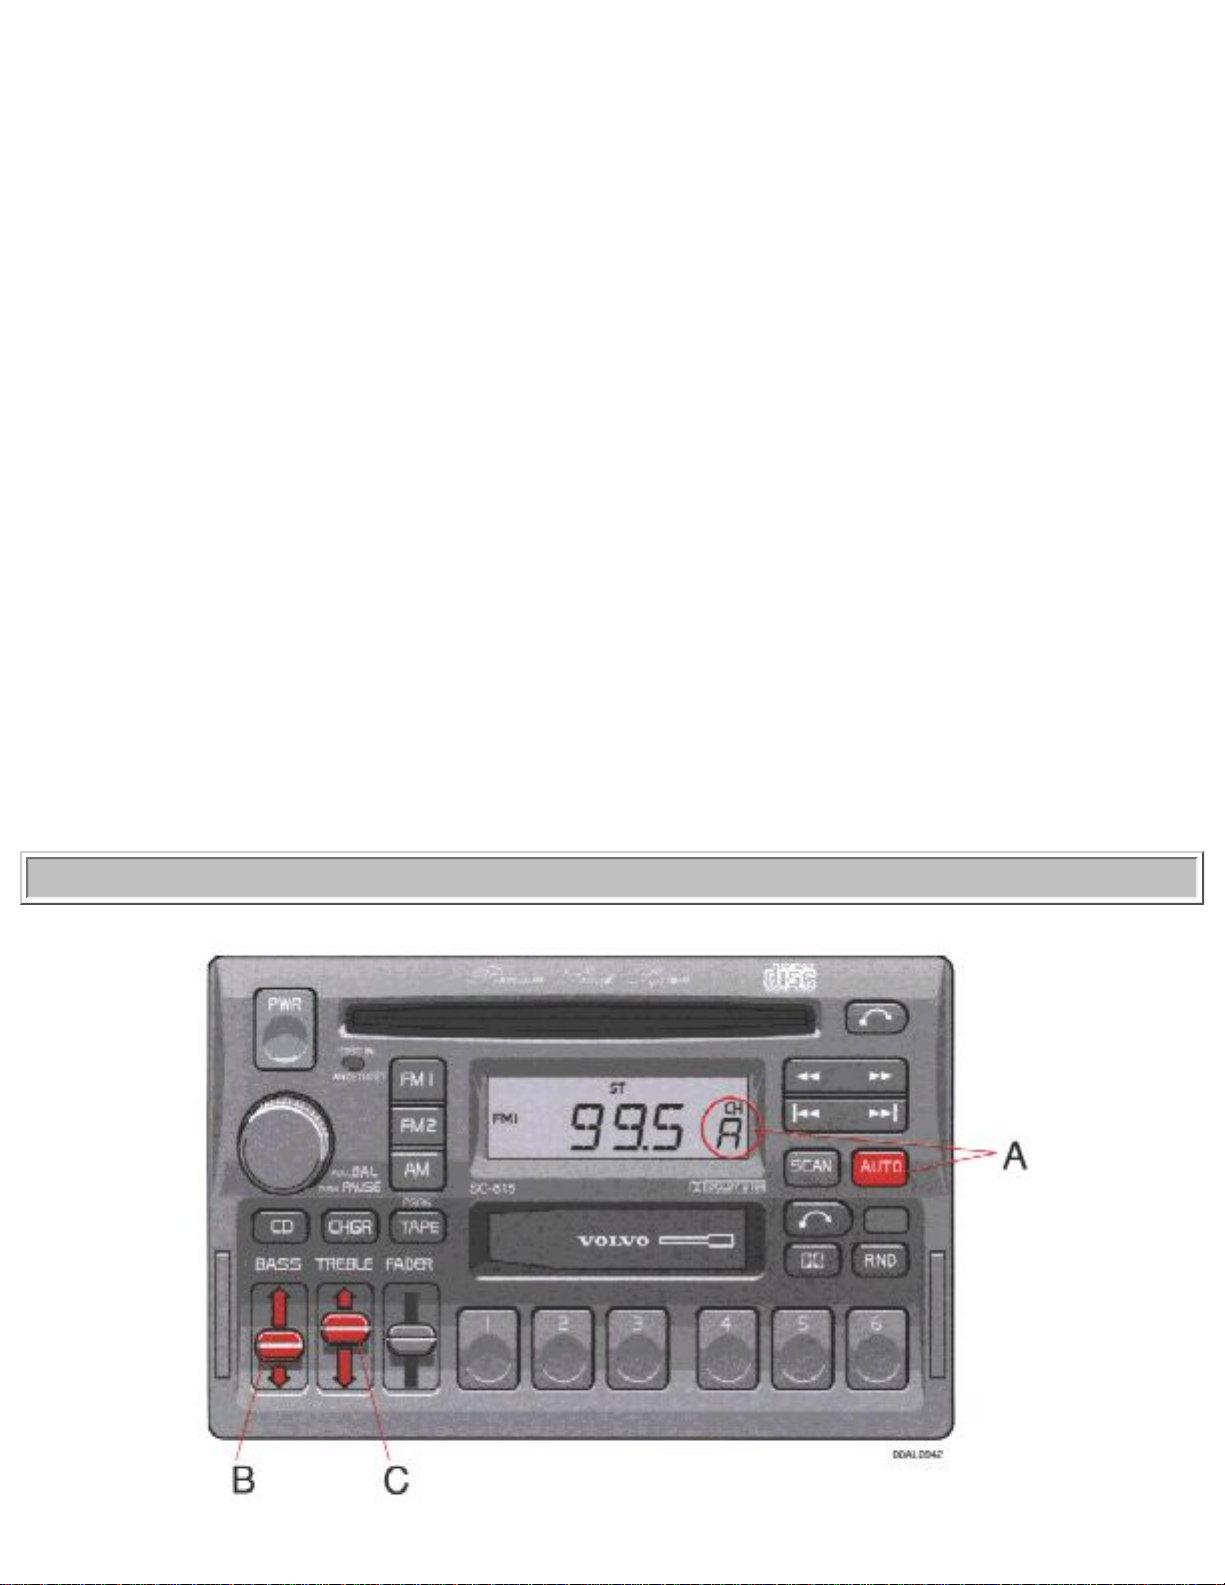
A - Automatic programming (AUTO)
This function automatically seeks and stores up to 8 strong AM or FM stations.
This is especially useful when travelling in areas where radio stations are unfamiliar.
1. Depress and hold the "AUTO" button for at least 1 second . A number of strong stations (max. 8) on
the chosen waveband are now automatically stored in the memory.
The lowest frequency station is heard. If there are no audible stations, "no" is displayed.
2. Press the "AUTO" button ( for less than 1 second ) to obtain another autostored station.
A new station will be selected each time the button is pressed momentarily.
B - Bass control
Adjust the bass by sliding the control up or down (up to increase, down to decrease). A "detent"
indicates "equalized" bass.
C - Treble control
Adjust the treble by sliding the control up or down (up to increase, down to decrease). A "detent"
indicates "equalized" treble.
pg. 10:20 Radio SC-815
file:///K|/ownersdocs/1997/1997_960/97960_1015.htm (7 of 9)12/30/2006 10:18:00 AM
1997 Volvo 960
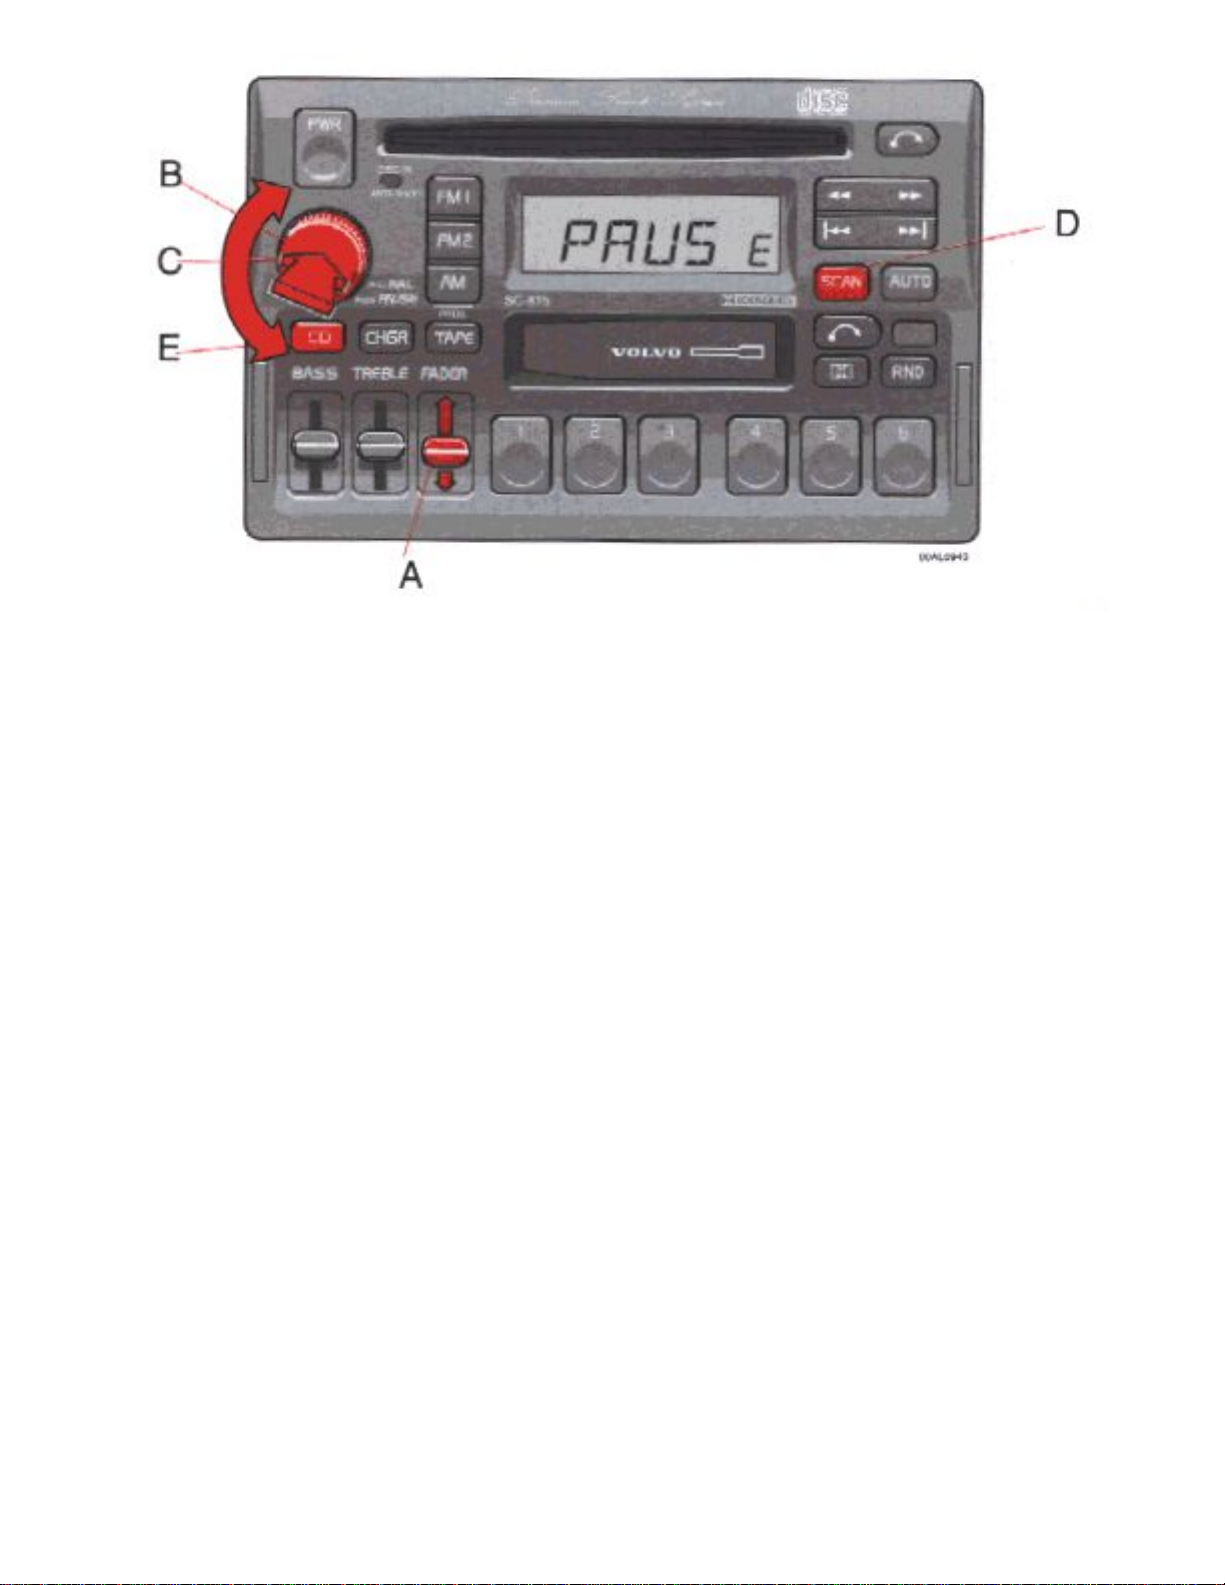
A - Fader control
Adjust front/rear speaker balance by sliding the control up or down.
(Up to direct more sound to the front speakers, down to direct more sound to the rear speakers.
The "detent" indicates "equalized" front/rear balance position.
B - Pause function
Press the "volume" knob to temporarily mute the sound. "PAUSE" is displayed.
C - Balance control
Pull out the "volume" knob and adjust the left/right balance by turning the knob counterclockwise or
clockwise.
D - Scan
Press this button to listen to each station for five seconds. Press it again to stop scanning.
file:///K|/ownersdocs/1997/1997_960/97960_1015.htm (8 of 9)12/30/2006 10:18:00 AM

1997 Volvo 960
E - Active Sound Control (ASC)
The ASC function automatically adjusts the volume level of the audio system according to driving
speed.
To deactivate ASC depress the "CD" button until "ASC" is no longer displayed.
To activate ASC, depress the "CD" button until "ASC" is displayed (approx. 2 seconds).
Contents | Top of Page
file:///K|/ownersdocs/1997/1997_960/97960_1015.htm (9 of 9)12/30/2006 10:18:00 AM
1997 Volvo 960
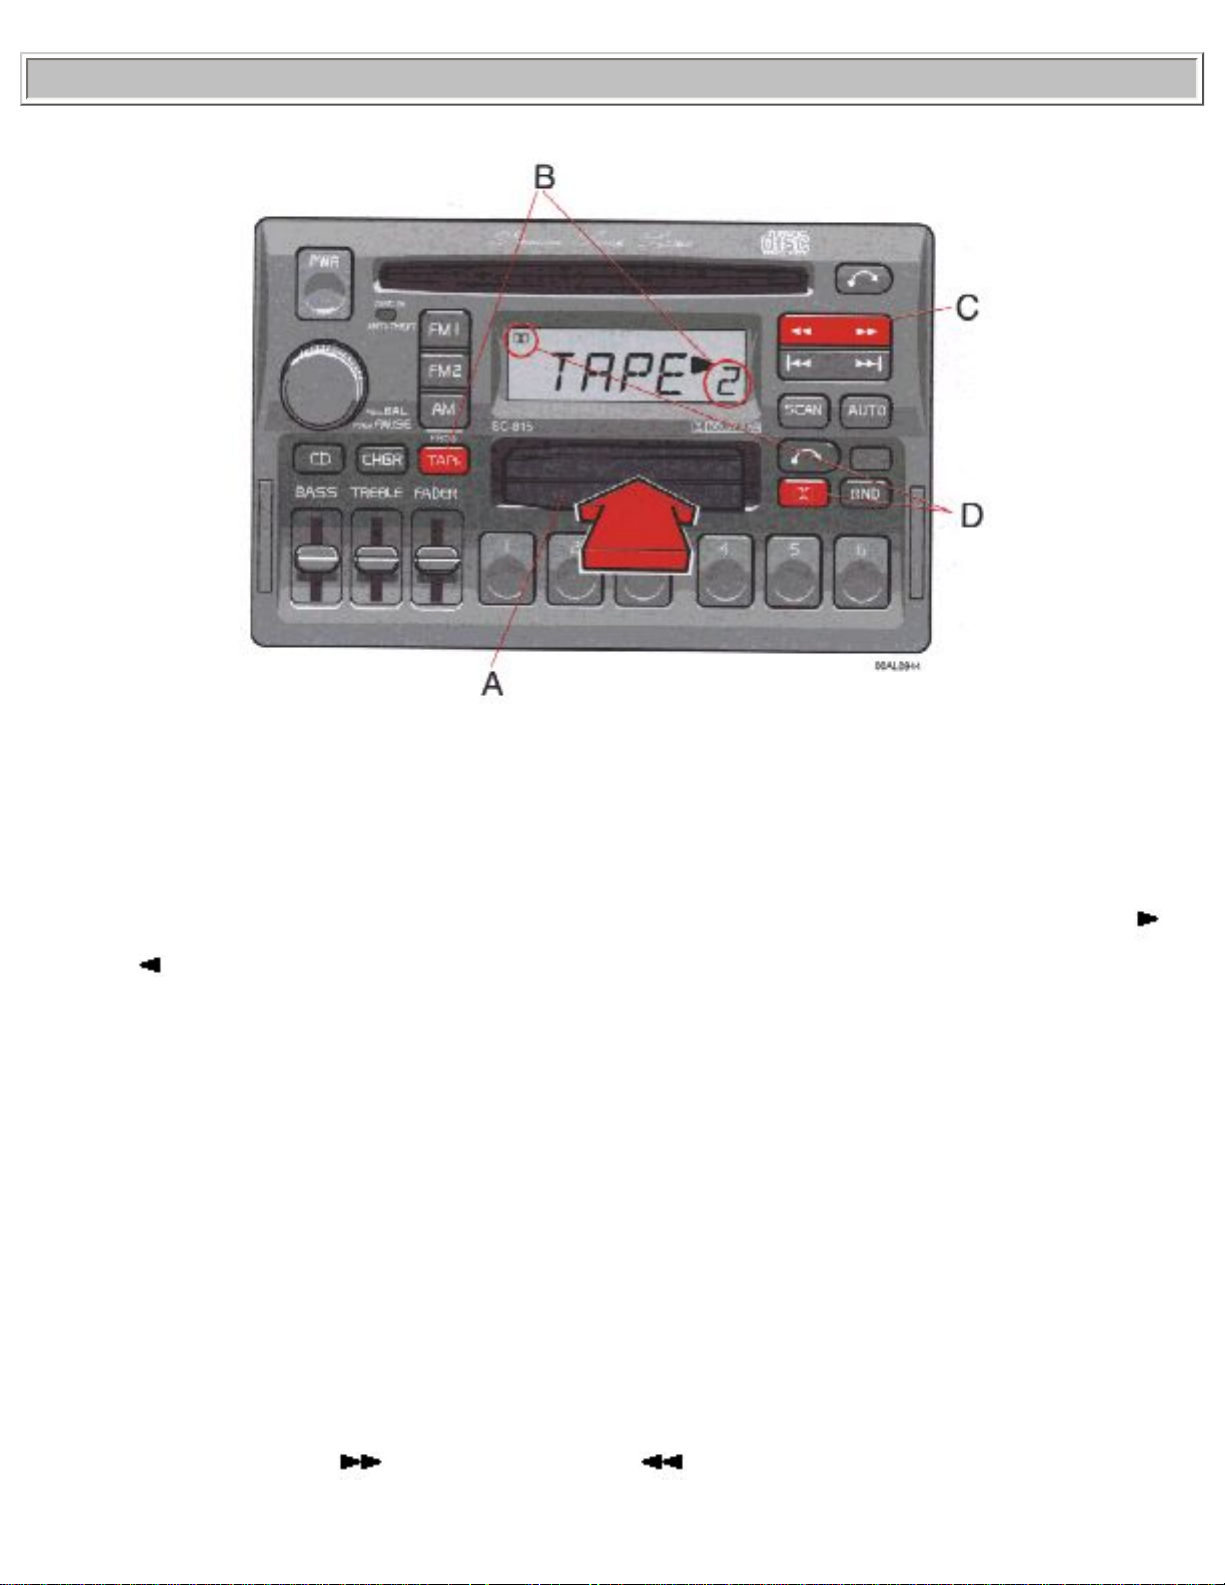
pg. 10:21 Cassette deck
A - Cassette slot
The cassette is inserted with the open side to the right (side 1 or A of the cassette upwards). When the
cassette is inserted, the radio is disengaged and the cassette will start to play automatically. "TAPE
"
or "TAPE " is displayed to indicate which side of the tape is being played. When one side of the tape
has been played the unit will automatically play the other side (auto-reverse). The cassette can be
inserted or ejected even when the unit switched off.
B - Reversing the tape (PROG)
Press the button to play the other side of the tape.
The side of the tape being played will be displayed.
C - Fast winding
The tape is advanced with "
" and rewound with " ". The tape side indicator in the display will
file:///K|/ownersdocs/1997/1997_960/97960_1021.htm (1 of 4)12/30/2006 10:18:01 AM
1997 Volvo 960
flash rapidly during the fast winding.
Fast winding can be stopped by pressing the button again.
D - Dolby B NR button
Press this button when you use tapes recorded with the Dolby B noise reduction system. The Dolby
symbol
will be indicated in the display.
pg. 10:22 Cassette deck
A - Next selector
Press the "
" button and the tape will automatically advance to next song. There must be a pause of
approx. 5 seconds between songs for this function to operate.
B - Previous selector
Press the "
" button and the tape will automatically rewind to the previous song. There must be a
pause of approx. 5 seconds between songs for this function to operate.
file:///K|/ownersdocs/1997/1997_960/97960_1021.htm (2 of 4)12/30/2006 10:18:01 AM

1997 Volvo 960
C - Pause
If you press the "volume" knob the tape is stopped, the unit is silent and "PAUSE" is displayed. To
restart the tape press the knob again.
D - Scan
Press this button to listen to the first five seconds of each song. Press it again to stop scanning.
pg. 10:23 Cassette deck
A - Cassette eject
If the button is pressed the tape will stop and the cassette will be ejected. The radio will be automatically
engaged. The radio, CD or CD changer will engage automatically (depending on which mode was
activated before the tape was played).
B - To re-enter Radio mode
file:///K|/ownersdocs/1997/1997_960/97960_1021.htm (3 of 4)12/30/2006 10:18:01 AM

1997 Volvo 960
There are three alternative ways to re-enter Radio mode:
● Push one of the waveband selector buttons
● Push the Auto seek button
● Push one of the preset buttons
When the unit re-enters Radio mode, the cassette will not be ejected.
C - To re-enter CD changer mode
If the CD changer function has been disconnected, the CD changer mode can be reentered by pressing
the "CHGR" button.
D - To re-enter CD mode
If the CD function has been disconnected and the CD has not been ejected, the CD mode can be reentered by pressing the "CD" button.
E - To re-enter Tape mode
If the Tape function has been disconnected and the cassette has not been ejected, the Tape mode can be
re-entered by pressing the "TAPE" button.
Contents | Top of Page
file:///K|/ownersdocs/1997/1997_960/97960_1021.htm (4 of 4)12/30/2006 10:18:01 AM

1997 Volvo 960
pg. 10:24 CD - Single
A - CD slot
With the audio system on, insert a disc into the slot with the label side up. When the CD is inserted, the
radio is disengaged and the CD will start to play automatically.
The CD can be inserted or ejected even when the unit is switched off.
When the CD has been inserted into the player, the "DISC IN" light will always be ON even if the radio,
tape deck or CD changer are in use.
B - CD mode selector
Press "CD" to actuate the CD mode. The track last listened to will continue to play. If the CD-player is
empty, "NO DISC" will be displayed.
C - CD eject
If the button is pressed the CD will stop and the disc will be ejected. The radio will be automatically
file:///K|/ownersdocs/1997/1997_960/97960_1024.htm (1 of 9)12/30/2006 10:18:01 AM

1997 Volvo 960
engaged. The radio, tape or CD changer will engage automatically (depending on which mode was
activated before the CD was played).
NOTE: If the CD eject button is pressed and the disc is not removed within 12 seconds, the disc will not
be drawn into the CD player again.
pg. 10:25 CD - Single
A - Music search
Press the "
" or " " button to search within a track. While the button is depressed the playing
time for this track will be displayed.
B - Changing the selected track number
Press "
" for forward selection or " " for backwards selection. The chosen track number will be
displayed.
C - Playing- time display
file:///K|/ownersdocs/1997/1997_960/97960_1024.htm (2 of 9)12/30/2006 10:18:01 AM

1997 Volvo 960
When the "CD" button is pressed the playing time for the current track is displayed for 5 seconds.
D - Scan
Press this button to listen to the first ten seconds of each track. Press it again to stop scanning.
pg. 10:26 CD - Single
A - Random choice
Press "RND" to actuate the random mode. From A disc, tracks will be played at random. "RND" will be
displayed when this function is engaged.
B - Pause
If you press the "volume" knob the disc is stopped, the unit is silent and "PAUSE" is displayed. To
restart the disc press the knob again.
C - To re-enter Radio mode
file:///K|/ownersdocs/1997/1997_960/97960_1024.htm (3 of 9)12/30/2006 10:18:01 AM

1997 Volvo 960
There are two ways to re-enter Radio mode:
● Push one of the waveband selector buttons
● Push the "AUTO" button"
D - To re-enter Tape mode
If a cassette is already inserted, the tape deck will re-engage if the "TAPE" button is pressed.
E - To re-enter CD mode
If the CD function has been disconnected and the CD has not been ejected, the CD mode can be reentered by pressing the "CD" button.
F - To re-enter CD changer mode
If the CD changer function has been disconnected, the CD changer mode can be re-entered by pressing
the "CHGR" button.
pg. 10:27 CD - Remote (certain models)
file:///K|/ownersdocs/1997/1997_960/97960_1024.htm (4 of 9)12/30/2006 10:18:01 AM

1997 Volvo 960
A - CD changer mode selector
Press "CHGR" to actuate the CD changer mode. The disc/track last listened to will continue to play. If
the CD-changer cartridge* is empty, "---" will be displayed. If a selected disc does not exist, the disc
number and "5--" will be displayed and the next disc will be automatically selected.
* The functions pertaining to the CD-changer are only applicable if the unit has been connected to the
Volvo CD-changer, which is sold separately as an accessory, or on certain models, standard on the car.
If no CD-changer is connected to the unit "EEEE" will be displayed if you happen to choose CHGR
mode.
B - Disc number selector
Depress one of the preset buttons (1-6) to select the disc number desired. THe selected disc number and
track number will be displayed.
C - Music search
file:///K|/ownersdocs/1997/1997_960/97960_1024.htm (5 of 9)12/30/2006 10:18:01 AM

1997 Volvo 960
Press the " " or " " button to search within a track. While the button is depressed the playing
time for this track will be displayed.
pg. 10:28 CD - Remote (certain models)
A - Changing the selected track number
Press "
" for forward selection or " " for backward selection. The chosen disc number and track
number will be displayed.
B - Playing-time display
When the "CHGR" button is pressed the playing time for current track is displayed for 5 seconds.
C - Scan
Press this button to listen to the first ten seconds of each track. Press it again to stop scanning.
pg. 10:29 CD - Remote (certain models)
file:///K|/ownersdocs/1997/1997_960/97960_1024.htm (6 of 9)12/30/2006 10:18:01 AM

1997 Volvo 960
A - Random choice
Press "RND" to actuate the random mode. From a disc chosen at random, 4 tracks will be played (also
chosen at random). A new disc will then be played in the same way. "RND" will be displayed when this
function is engaged.
B - Pause
If you press the "volume" knob the disc is stopped, the unit is silent and "PAUSE" is displayed. To
restart the disc press the knob again.
C - To re-enter Radio mode
There are two ways to re-enter Radio mode:
● Push one of the waveband selector buttons
● Push the "AUTO" button
D - To re-enter Tape mode
file:///K|/ownersdocs/1997/1997_960/97960_1024.htm (7 of 9)12/30/2006 10:18:01 AM

1997 Volvo 960
If a cassette is already inserted, the tape deck will re-engage if the "TAPE" button is pressed.
E - To re-enter CD mode
If the CD function has been disconnected and the CD has not been ejected, the CD mode can be reentered by pressing the "CD" button.
F - To re-enter CD changer mode
If the CD changer function has been disconnected, the CD changer mode can be reentered by pressing
the "CHGR" button.
pg. 10:30 Technical specifications
SC-815
Power output: 4 x 25 W (10% dist.)
Output impedance: 4Ohms
System voltage: 12 Volts, negative ground
Radio
System: PLL (Phase Lock LOOP) system with tuned RF (Radio Frequency) front and end automatic
wide band gain control. Electronic suppression circuitry (noise killer).
Frequency range: FM 87.9-107.9 MHz
AM 530-1710 kHz
Sensitivity: FM 1.1
● µV
AM 20
● µV
file:///K|/ownersdocs/1997/1997_960/97960_1024.htm (8 of 9)12/30/2006 10:18:01 AM

1997 Volvo 960
Stereo separation 35dB
Cassette deck 4-track, 2-channel stereo
Full logic electronic tape transport
Tape speed: 4.76 cm/sec.
Channel separation 53dB
Frequency range 30-15000 hz
S/N 56 dB without Dolby B NR
S/N 66dB with Dolby B NR
Wow and Flutter less than 0.06%
Pinch-off
"Dolby" and the double D symbol
are the trademarks of Dolby Laboratories Licensing Corporation.
Dolby noise reduction manufactured under license from Dolby Laboratories Licensing Corporation.
Contents | Top of Page
file:///K|/ownersdocs/1997/1997_960/97960_1024.htm (9 of 9)12/30/2006 10:18:01 AM

1997 Volvo 960
pg. 10:31 Audio systems, general information
CD remote changer
The CD changer, which is available separately, is loaded with a cartridge containing 6 discs. Extra
cartridges are available at your Volvo retailer.
Insert the discs into the cartridge, label (A) up.
Insert the cartridge and close the cover.
Eject the cartridge by pressing the eject button (B).
Remove the discs by depressing the lock tabs (C).
Operating tips :
● Before using a new disk for the first time, remove any burrs in the center/outer edge by running the
stem of a pen or similar object around the hole/edge of the disc.
● Use high quality discs only.
● Keep the discs clean. Wipe them with a soft, clean, lint-free cloth, working from the center outwards.
If necessary, dampen the cloth with a neutral soap solution. Dry thoroughly before using.
● Never use cleaning spray or anti-static liquid. Use only cleaners specifically made for CD's.
● Use discs of the correct size only (3.5" discs should never be used).
● Do not put tape or labels on the disc itself.
● Volvo does not recommend the use of plastic outer rings on the disc.
file:///K|/ownersdocs/1997/1997_960/97960_1031.htm (1 of 9)12/30/2006 10:18:03 AM

1997 Volvo 960
● Condensation may occur on discs/optical components of the changer in cold winter weather. The disc
can be dried with a clean, lint-free cloth. Optical components in the CD changer may, however, take up
to one hour to dry off.
● Never attempt to play a disc which is damaged in any way.
● When not in use, the discs should be stored in their covers. Avoid storing discs in excessive heat,
direct sunlight or dusty locations.
pg. 10:32 Audio systems, general information
Sending signals
The FM waves do not follow the earth's surface nor do they bounce off the atmosphere. For this reason
their range is limited. The AM waves follow the earth's surface and reflect against the atmosphere,
giving them a wide range.
file:///K|/ownersdocs/1997/1997_960/97960_1031.htm (2 of 9)12/30/2006 10:18:03 AM

1997 Volvo 960
Weak reception (fading)
Because of the limited range of the FM senders and the fact that these waves are very reflective, this
problem usually occurs with FM reception. If the sender is blocked by buildings or mountains, static can
result.
Static
The reason why FM but not AM is audible is covered parking areas, under bridges, etc., is that FM
file:///K|/ownersdocs/1997/1997_960/97960_1031.htm (3 of 9)12/30/2006 10:18:03 AM

1997 Volvo 960
signals reflect against solid objects such as buildings. Because these waves are very reflective, static can
result. This static is the result of the reflected signal and the direct signal reaching your antenna at
slightly different times causing a cancellation of all signals. This problem occurs largely in built-up
areas. To help minimize this situation, turn down the treble.
pg. 10:33 Audio systems, general information
Cross modulation
If you listen to a weak station in the vicinity of a stronger one, both stations may be received
simultaneously.
file:///K|/ownersdocs/1997/1997_960/97960_1031.htm (4 of 9)12/30/2006 10:18:03 AM

1997 Volvo 960
FM - reasons for distortion
FM is affected by the electrical systems of nearby vehicles, especially those without suppression. The
distortion increases if the station is weak or poorly set.
The FM reception is not as sensitive to electrical disturbances as AM.
AM - reasons for distortion
AM reception is sensitive to electrical disturbances such as power lines, lighting, etc.
file:///K|/ownersdocs/1997/1997_960/97960_1031.htm (5 of 9)12/30/2006 10:18:03 AM

1997 Volvo 960
pg. 10:34 Audio systems, general information
FM stereo reception
Stereo reception places very high demands on the signal quality which means the type of distortions
previously mentioned become even more obvious. The signal strength needs to be stronger for good
stereo reception and this limits the effective range of the slender.
We hope that this information proves to be useful and provides you with a better understanding of the
problems related to car radio reception.
Reception conditions are not always optimum and this is, of course, beyond our control. However, we
have endeavored to make the Volvo Audio System of a quality that will enable you to enjoy the best
possible reception no matter what the reception conditions may be.
Radio antenna (sedans)
NOTE: Always lower the antenna when using an automatic car wash or entering a garage.
The antenna should be cleaned at least every 10,000 miles (16,000 km) or more frequently if needed.
Use WD40 for cleaning.
Spray the antenna with WD40 and wipe it clean and dry with a rag. Spray it again. Lower and raise the
antenna. Wipe it clean and dry again. Lower and raise the antenna 4-6 times. Make sure it is dry and free
from dirt or lubricating oil.
Radio antenna (wagons)
The radio antenna is built into the driver side window of the cargo area. This antenna also has a factory
installed antenna booster.
NOTE: The antenna will not work without this booster.
Place objects in the cargo area so that the antenna wires on the inside of the window will not be
file:///K|/ownersdocs/1997/1997_960/97960_1031.htm (6 of 9)12/30/2006 10:18:03 AM

1997 Volvo 960
damaged. When cleaning the window be careful that the wires are not scratched by rings, etc. If they are
damaged, radio reception will be impaired.
Cassettes
● Store cassettes in their cases.
● Do not touch the tape surface with your fingers.
● Tapes should not be exposed to direct sunlight or extreme temperatures.
● Keep tapes away from oil, grease and other contaminants.
● For optimal tape deck performance Volvo does not recommend the use of C-120 tapes.
● Take up slack using a pen or a pencil before inserting a cassette in the cassette slot.
Cassette cleaning
We recommend the use of the Volvo Cleaning Cassette available as a genuine Volvo accessory. Regular
use improves sound quality, cleans vital parts and prevents tape tangle.
Inside back cover
WARNING!
Detergents and solvents
Do not use gasoline containing lead or benzene as a detergent or solvent. Both lead and benzene are
toxic and may be hazardous to your health.
Installation of optional equipment/use of mobile telephones
Incorrectly installed optional equipment, alarm systems or the use of mobile telephones which are not
connected to a suitable antenna can cause faults in the car's electronic control systems. Your car is
equipped with an accessory connector located under the dashboard on the driver's side. Please consult
your Volvo retailer if you have any questions before connecting accessory or optional equipment to the
vehicle's electrical systems.
Carbon monoxide
Carbon monoxide is a poisonous, colorless and odorless gas which is present in all exhaust gases. If
you ever smell exhaust fumes from inside the vehicle, make sure the passenger compartment is
ventilated and immediately return the vehicle to your retailer for correction.
Never sit in a parked or stopped car for any extended amount of time, nor have it unattended while the
engine is running.
Never operate the engine in confined, unventilated areas.
Back Cover
file:///K|/ownersdocs/1997/1997_960/97960_1031.htm (7 of 9)12/30/2006 10:18:03 AM

1997 Volvo 960
UNLEADED FUEL
ONLY
VOLVO
Octane rating, see p. 4:3.
Tire pressure, see label located on rear edge of right front door.
Bulbs Power Socket
US Bulb
No.
1 70 W HB3/9005
2 60 W HB4/90006
file:///K|/ownersdocs/1997/1997_960/97960_1031.htm (8 of 9)12/30/2006 10:18:03 AM

1997 Volvo 960
3 5 W BA 15s 67
4 21 W BA 15s 1156
5
21/5
W
BAY
15d
1157
6 21 W BAU 15s -
7
21/5
W
BAY
15d
1157NA
VOLVO
Volvo Car Corporation
Goteborg, Sweden
TP 3776/2 (Canada & U.S.A.) 25.000.11.95 Printed in Sweden, Graphic Systems AB, Goteborg 199
Contents | Top of Page
file:///K|/ownersdocs/1997/1997_960/97960_1031.htm (9 of 9)12/30/2006 10:18:03 AM

1997 Volvo 960
pg. 1:4 Volvo SRS
As an enhancement to the three-point seat belt system, your Volvo is equipped with a Supplemental
Restraint System (SRS). The Volvo SRS consists of airbags (2) and knee bolsters (5) on both the driver's
and passenger's sides and seat belt tensioners in both front door pillars (4). The system is designed to
supplement the protection provided by the three-point seat belt system.
The SRS system is indicated by the "SRS" embossed on the steering wheel pad and above the glove
compartment, the knee bolsters beneath the steering column and the glove compartment and decals on
both sun visors and on the far right side of the dash.
The airbags are folded and located in the center of the steering wheel and above the glove compartment.
They are designed to deploy during certain frontal-angular collisions, impacts, or decelerations,
depending on the crash severity, angle, speed and object impacted. Both air bags and seat belt tensioners
will deploy, even if the passenger seat is not occupied.
WARNING!
As its name implies, SRS is designed to be a SUPPLEMENT to - not a replacement for - the threepoint belt system. For maximum protection, wear seat belts at all times. Be aware that no system can
prevent all possible injuries that may occur in an accident.
file:///K|/ownersdocs/1997/1997_960/97960_104.htm (1 of 9)12/30/2006 10:18:04 AM

1997 Volvo 960
The airbag system includes gas generators (1) surrounded by the airbags (2) and front seat belt
tensioners for both of the front seats (4). To deploy the system, the sensor (3) activates the gas
generators causing the airbags to be inflated with nitrogen gas. As the movement of the seat's occupants
compresses the airbags, some of the gas is expelled at a controlled rate to provide better cushioning.
Both seat belt tensioners also deploy, minimizing any seat belt slack.
The entire process, including inflation and deflation of the airbags, takes approximately two-tenths of a
second.
WARNING!
When installing any optional equipment make sure that the SRS system is not damaged. Do not
attempt to service any component of the SRS yourself. Attempting to do so may result in serious
personal injury. If a problem arises, take your car to the nearest authorized Volvo Retailer for
inspection as soon as possible.
pg. 1:5 Volvo SRS
file:///K|/ownersdocs/1997/1997_960/97960_104.htm (2 of 9)12/30/2006 10:18:04 AM

1997 Volvo 960
A self-diagnostic system incorporated in the sensor monitors the SRS. This system does not, however,
monitor the SIPS airbags. If a fault is detected, the "SRS" warning light will illuminate. The light is
included in the warning/indicator light cluster in the instrument panel. Normally, the SRS warning lamp
should light up when the ignition is switched on and should go out after 10 seconds or when the engine
is started. Check that this light is functioning properly every time the car is started.
The following items are monitored by all the self-diagnostic system:
● Sensor unit
● Cable harness
● Gas generator ignitors
WARNING! Never drive an SRS equipped car with your hands on the steering wheel pad/airbag
housing. No objects, accessory equipment or stickers may be placed on, attached to or installed near
the SRS cover in the center of the steering wheel, the SRS cover above the glove compartment or the
area affected by the airbag deployment.
If the SRS warning light stays on after the engine has started or if it comes on while you are driving,
drive the car to the nearest authorized Volvo retailer for inspection as soon as possible.
There is no maintenance to perform on the SRS yourself. The only periodic maintenance recommended
on the SRS is that the air bag modules and front seat belts (including tensioners) should be replaced
approximately every ten years and that the other components in the system (wiring, connectors, etc.)
file:///K|/ownersdocs/1997/1997_960/97960_104.htm (3 of 9)12/30/2006 10:18:04 AM

1997 Volvo 960
should also be inspected at this time. The SRS decal on your car shows the month and year servicing is
due. This service must be performed by an authorized Volvo retailer. Should you have any questions
about the SRS system, please contact your authorized Volvo Retailer or Volvo Customer Support.
pg. 1:6 Volvo SRS
SRS texts at far right on instrument panel
CAUTION
TO AVOID SERIOUS INJURY:
FOR MAXIMUM SAFETY PROTECTION IN ALL TYPES OF CRASHES, YOU MUST ALWAYS
WEAR YOU SAFETY BELT.
DO NOT INSTALL REARWARD-FACING CHILD SEATS IN ANY FRONT PASSENGER SEAT
POSITION.
DO NOT SIT OR LEAN UNNECESSARILY CLOSE TO THE AIR BAG.
DO NOT PLACE ANY OBJECTS OVER THE AIR BAG OR BETWEEN THE AIR BAG AND
YOURSELF.
SEE THE OWNER'S MANUAL FOR FURTHER INFORMATION AND EXPLANATIONS.
VOLVO
SRS texts on inside of both sun visors
file:///K|/ownersdocs/1997/1997_960/97960_104.htm (4 of 9)12/30/2006 10:18:04 AM

1997 Volvo 960
SRS texts on outside of both sun visors
WARNING! Do not use child safety seats or child boosters cushions/backrests in the front passenger's
seat. We also recommend that children who have outgrown these devices sit in the rear seat with the
seat belt properly fastened.
NOTE: Deployment of SRS components occurs only one time during an accident. In a collision where
deployment occurs, the air bags and seat belt tensioners activate. Some noise occurs and a small amount
of powder is released. The release of the powder may appear as smoke-like matter. This is a normal
characteristic and does not indicate fire.
WARNING!
● Occupants in the front passenger's seat must never sit on the edge of the seat, sit leaning toward the
instrument panel or otherwise sit out of position. The occupant's back must be as upright as comfort
allows and be against the seat back with the seat properly fastened.
● Feet must be on the floor, e.g. not on the dash, seat or out of the window.
● Children must never be allowed to stand in front of the passenger seat.
● No objects or accessory equipment, e.g. dash covers, may be placed on, attached to or installed near
the SRS hatch (the area above the glove compartment) or the area affected by air bag deployment (see
illustration).
● There should be no loose articles, e.g. coffee cups, on the floor, seat or dash area.
● Never try to open the SRS cover on the steering wheel or the passenger side SRS hatch. This should
only be done by an authorized Volvo service technician.
● Failure to follow these instructions can result in injury to the vehicle occupants in an accident.
pg. 1:7 Volvo SRS
NOTE: The information on this page does not pertain to the Side Impact protection System airbags.
When are the airbags deployed?
file:///K|/ownersdocs/1997/1997_960/97960_104.htm (5 of 9)12/30/2006 10:18:04 AM

1997 Volvo 960
The SRS system is designed to deploy during certain frontal or front-angular collisions, impacts, or
decelerations, depending in the crash severity, angle, speed, and object impacted. The SRS sensor is
designed to react to both the impact of the collision and the inertial forces generated by it and to
determine if the intensity of the collision is sufficient for the airbags to be deployed.
WARNING! The SRS is designed to help prevent serious injury. Deployment occurs very quickly and
with considerable force. During normal deployment and depending on variables such as seating
position, one may experience abrasions, bruises, swellings, or other injuries as a result of airbag(s)
deployment.
If the airbags have been deployed, we recommend the following:
● Have the car towed to an authorized Volvo retailer. Even if it can be driven after an accident we do
not recommend driving the car with deployed airbags.
● Have an authorized Volvo retailer replace the SRS system components.
● Use only new, Genuine Volvo Parts when replacing SRS components (airbags, seat belts, tensioners,
etc.)
When are the airbags NOT deployed?
Not all frontal collisions activate the SRS system. If the collision involves a non-rigid object (e.g., a
snow drift or bush), or a rigid, fixed object at a low speed, the SRS system will not necessarily deploy.
Airbags do not normally deploy in a side impact collision, in a collision from the rear or in a rollover
situation. The amount of damage to the bodywork does not reliably indicate if the airbags should have
deployed or not.
Seat belts - the heart of the Volvo safety system
The heart of the Volvo safety system is the three-point seat belt! In order for the SRS system to provide
the protection intended, seat belts must be worn at all times by everyone in the car. The SRS system is a
supplement to the seat belts.
file:///K|/ownersdocs/1997/1997_960/97960_104.htm (6 of 9)12/30/2006 10:18:04 AM

1997 Volvo 960
WARNING! If your car has been subjected to flood conditions (e.g. soaked carpeting/standing water
on the floor of the vehicle) or if your car has become flood-damaged in any way, do not attempt to
start the vehicle or put the key in the ignition before disconnecting the battery (see below). This may
cause airbag deployment which could result in personal injury. Have the car towed to an authorized
Volvo retailer for repairs.
Automatic transmission only:
Before attempting to tow the car, use the following procedure to override the shiftlock system to move
the gear selector to the neutral position.
● Disconnect the battery
● Wait at least one minute
● Insert the key in the ignition and turn it to position 1
● Press firmly on the shiftlock override button (located near the base of the gear selector).
● While holding the override button down, move the gear selector from the park position.
WARNING! Never drive with the airbags deployed. The fact that they hang out can impair the
steering of your car. Other safety systems can also be damaged. The smoke and dust formed when the
airbags are deployed can cause skin and irritation in the event of prolonged exposure.
pg. 1:8 Volvo Side Impact Protection System (SIPS) airbag
SIPS airbag (front seats only)
file:///K|/ownersdocs/1997/1997_960/97960_104.htm (7 of 9)12/30/2006 10:18:04 AM

1997 Volvo 960
As an enhancement to the structural Side Impact Protection System built into your car, your car is also
equipped with Side Impact Protection System (SIPS) airbags. The SIPS airbag system consists of airbag
modules built into the sides of both front seat backrests (1), cables (2) from these modules to the
mechanical sensor units (3) and gas generators (4).
The SIPS airbag system is designed to help increase occupant protection in the event of certain side
impact collisions. The SIPS airbags are designed to deploy only during certain side-impact collisions,
depending on the severity, angle, speed, and point of impact. The airbags are not designed to deploy in
all side impact situations.
NOTE: SIPS airbag deployment (one airbag) occurs only on the side of the vehicle affected by the
impact.
WARNING!
● The SIPS airbag system is a supplement to the Side Impact Protection System and the three-point
seat belt system. It is not designed to deploy during collisions from the front or rear of the car or in
rollover situations.
● Only Volvo approved seat covers may be used. The use of non-approved aftermarket seat covers
may impede SIPS airbag deployment.
● No objects, accessory equipment or stickers may be placed on, attached to or installed near the SIPS
airbag system or in the area affected by SIPS airbag deployment (see illustration to the right above).
● Never try to open or repair any components of the SIPS airbag system. This should only be done by
an authorized Volvo service technician.
● For best protection from the SIPS airbag system, both front seat occupants should sit in an upright
position with the seat belt properly fastened.
file:///K|/ownersdocs/1997/1997_960/97960_104.htm (8 of 9)12/30/2006 10:18:04 AM

1997 Volvo 960
WARNING! Never drive with the airbags deployed. The fact that they hang out can impair the
steering of your car. Other safety systems can also be damaged. The smoke and dust formed when the
airbags are deployed can cause skin and irritation in the event of prolonged exposure.
* A SIPS airbag warning decal is located at the end of the instrument panel on the driver's side of the
car.
Contents | Top of Page
file:///K|/ownersdocs/1997/1997_960/97960_104.htm (9 of 9)12/30/2006 10:18:04 AM

1997 Volvo 960
pg. 1:9 Child safety
Child Restraint Anchorages
Volvo cars are fitted with Child Restraint Top Tether Anchorages in the rear seat. There are three
anchorages under the rear section of the car's rear window shelf on sedans and on the back rest on
wagons. The backrest on wagons must be folded down slightly to reach the anchorages. When the car is
delivered, the holes for these anchorages are covered by plastic covers. In cars designated for Canada,
one top tether anchorage set will be in the glove box.
The top tether anchorage set includes the top tether anchorage plate, an 5/16" UNC bolt and a plastic
trim cover. If another set is needed, consult your Volvo retailer.
Installing the top tether
Remove the plastic cover on the anchorage point you want to use. This can be done with a suitable coin.
The cover is removed counter-clockwise. Refer to the child seat manufacturer's instructions for securing
the seat. An additional bolt may be required for sedans. This may be obtained from your authorized
Volvo retailer.
file:///K|/ownersdocs/1997/1997_960/97960_109.htm (1 of 8)12/30/2006 10:18:05 AM

1997 Volvo 960
WARNING! Child Restraint Anchorages are designed to withstand only those loads imposed by
correctly fitted Child Restraints. Under no circumstances are they to be used for adult seat belts or
harnesses. The anchorages are not able to withstand excessive forces on them in the event of collision
if full harness seat belts or adult seat belts are installed to them. An adult who uses a belt anchored in a
Child Restraint Anchorage runs a great risk of suffering severe injuries should a collision occur. Do
not install rear speakers which would require the removal of the top tether anchors or interfere with the
proper use of the top tether strap.
pg. 1:10 Child safety
file:///K|/ownersdocs/1997/1997_960/97960_109.htm (2 of 8)12/30/2006 10:18:05 AM

1997 Volvo 960
Integrated booster cushion (certain models)
Volvo's own integrated booster cushion has been specially designed to help safeguard a child seated in
the center position of the rear seat. When using the integrated booster cushion, the child must be secured
with the vehicle's three-point seat belt. The booster cushion is approved for children weighing between
22.7 and 36 kg (50 and 80 lbs) and between 117 and 137 cm (46 and 54 in ) in height. It is not intended
for children under 3 years of age.
Sedans/Wagon
With the child properly seated on the booster cushion (see illustration), adjust the head restraint to
support the child's head (see page 1:3). The hip section of the three-point seat belt must fit snugly across
the child's hips, not across the stomach.
The shoulder section of the three-point seat belt should be positioned across the chest and shoulder (see
illustration). The shoulder belt must never be placed behind the child's back or under the arm.
To fold down the booster cushion:
● Pull the upper edge of the cushion down
● Fold up the backrest
To fold up the booster cushion:
● Fold down the booster cushion backrest
● Fold up the entire booster cushion unit
WARNING! Failure to follow the instructions on this page will increase the risk of your child being
injured during a sudden stop or collision.
In the event of a collision while the integrated booster cushion was occupied, the entire booster
cushion and center seat belt must be replaced. The booster cushion should also be replaced if it is
badly worn or damaged in any way. This work should be performed by an authorized Volvo retailer
only. The booster cushion should be cleaned while in place if the vehicle if possible. If not, please
consult your Volvo retailer.
pg. 1:11 Child safety
file:///K|/ownersdocs/1997/1997_960/97960_109.htm (3 of 8)12/30/2006 10:18:05 AM

1997 Volvo 960
Auxiliary seat (optional)
If all the seats are occupied, a rear-facing auxiliary seat in the cargo area of the wagon models can be
used. This seat is designed for two children, each weighing between 23 - 40 kg (50 - 88 lbs.) and up to
150 cm (59 inches) in height.
WARNING! Both rear seat backrests must be up when the auxiliary seat is being
used.
Do not use a booster cushion or child seat in conjunction with the auxiliary seat.
file:///K|/ownersdocs/1997/1997_960/97960_109.htm (4 of 8)12/30/2006 10:18:05 AM

1997 Volvo 960
Spool-out
To make child restraint installation easier, each seat buckle (except for the driver's belt) is equipped with
a locking mechanism to help keep the lap section of the seat belt taut.
When attaching the seat belt to a child restraint:
● Make sure the red lock button is moved to the right (see illustration A). A coin, etc. can be used to
move the button.
● Attach the seat belt to the child restraint according to the child restraint manufacturer's instructions.
● Pull the lap section of the seat belt taut.
The lap section of the seat belt cannot be loosened as long as the red lock button is in the right position.
The lap section of the seat belt can be adjusted when the lock button is in the left position (see
illustration B).
NOTE: Before exiting the car, check that the seat belt retracts fully after being unbuckled. If necessary,
guide the belt back into the retractor slot. When not in use, the child restraint should be secured with the
seat belt to help prevent movement during a sudden stop.
WARNING! Do not use child safety seats or child booster cushions/backrests in the front passenger's
seat. We also recommend that children who have outgrown these devices sit in the rear seat with the
seat belt properly fastened.
file:///K|/ownersdocs/1997/1997_960/97960_109.htm (5 of 8)12/30/2006 10:18:05 AM

1997 Volvo 960
pg. 1:12 Child safety
Child safety
Volvo recommends the proper use of restraint systems for all occupants including children. Remember
that, regardless of age and size, a child should always be properly restrained in a car.
Restraint systems for children are designed to be secured in the vehicle by lap belts or the lap portion of
a lap-shoulder belt. Such child restraint systems can help protect children in cars in the event of an
accident only if they are used properly. However, children could be endangered in a crash if the child
restraints are not properly secured in the vehicle. Failure to follow the installation instructions for your
child restraint can result in your child striking the vehicle's interior in a sudden stop.
Holding a child in your arms is NOT a suitable substitute for a child restraint system. In an accident, a
child held in a person's arms can be crushed between the vehicle's interior and an unrestrained person.
The child could also be injured by striking the interior, or by being ejected from the vehicle during a
sudden maneuver or impact. The same can also happen if the infant or child rides unrestrained on the
seat. Other occupants should also be properly restrained to help reduce the chance of injuries or
increasing the injury of a child. All states and provinces have legislation governing how and where
children should be carried in car. Find out the regulations existing in your state or province. Recent
accident statistics have shown that children are safer in rear seating positions than front seating positions
when properly restrained. A child restraint system can help protect a child in a vehicle. Here's what to
look for when selecting a child restraint system:
● It should have a label certifying that it meets applicable Federal Motor Vehicle Safety Standards
(FMVSS 213-80) - or in Canada, CMVSS 213.
● Make sure the child restraint system is approved for the child's height, weight and development - the
label required by the standard or regulation, or instructions for infant restraints, typically provide this
information.
● In using any child restraint system, we urge you to look carefully over the instructions that are
provided with the restraint. Be sure you understand them and can use the device properly and safely in
this vehicle. A misused child restraint system can result in increased injuries for both the infant or child
and other occupants in the vehicle.
● If your child restraint requires a top tether strap, consult your authorized Volvo retailer for top tether
anchorage and installation information.
When a child has outgrown the child safety seat, you should use the rear seat with the standard seat belt
fastened. The best way to help protect the child here is to place the child on a cushion (not available in
Canada) so that the seat belt is properly located on the hips (see page 1:10).
A specially designed and tested booster cushion for children between 22.7 - 36 kg (50 - 80 lbs) and 117 -
file:///K|/ownersdocs/1997/1997_960/97960_109.htm (6 of 8)12/30/2006 10:18:05 AM

1997 Volvo 960
137 cm (46 - 54") can be obtained from your Volvo retailer.
If necessary, an auxiliary seat for children is available for use in the luggage compartment of station
wagon models. This seat is designed for two children, each weighing between 23 - 40 kg (50 - 88 lbs.)
and up to 150 cm (59 inches) in height.
WARNING!
● When using the auxiliary seat for children, both sections of the rear seat backrest must be secured in
the upright position
● Do not use a booster cushion or child seat in conjunction with the auxiliary seat.
pg. 1:13 Occupant safety
Seat belt maintenance
Check periodically that the anchor bolts are secure and that the belts are in good condition. Use water
and a mild detergent for cleaning. Check seat belt mechanism function as follows:
Attach the seat belt and pull rapidly on the strap.
Volvo Concern for Safety
Safety is the cornerstone for Volvo. Our concern dates back to 1927 when the first Volvo rolled off the
production line. Three-point seat belts, safety cages, and energy-absorbing impact zones were designed
into Volvo cars long before it was fashionable or required by government regulation. We will not
compromise our commitment to safety. We continue to seek out new safety features and to refine those
already in our cars. You can help. We would appreciate hearing your suggestions about improving
automobile safety. We also want to know if you ever have a safety concern with your car. Call us in the
U.S. at:
800-458-1552 or in Canada at: 800-663-8255.
Occupant safety
How safely you drive doesn't depend on how old you are but rather on:
● how well you see
file:///K|/ownersdocs/1997/1997_960/97960_109.htm (7 of 8)12/30/2006 10:18:05 AM

1997 Volvo 960
● your ability to concentrate
● how quickly you make decisions under stress to avoid an accident.
The tips listed below are suggestions to help you cope with the ever changing traffic environment.
● Never drink and drive.
● If you are taking any medication, consult your physician about its potential effects on your driving
abilities.
● Take a driver-retraining course
● Have your eyes checked regularly
● Keep your windshield and headlamps clean.
● Replace wiper blades when they start to leave streaks.
● Take into account the traffic, road, and water conditions, particularly with regard to stopping distance.
Reporting Safety Defects in the U.S.
If you believe that your vehicle has a defect which could cause a crash or could cause injury or death,
you should immediately inform the National Highway Traffic Safety Administration (NHTSA) in
addition to notifying Volvo Cars of North America. If NHTSA receives similar complaints, it may open
an investigation, and if it finds that a safety defect exists in a group of vehicles, it may order a recall and
remedy campaign. However, NHTSA cannot become involved in individual problems between you,
your retailer, or Volvo Cars of North America. To contact NHTSA, you may either call the Auto Safety
Hotline toll-free at 1-800-424-9393 (or 366-0123 in Washington, D.C. area) or write to: NHSTA, U.S.
Department of Transportation, Washington D.C. 20590. You can also obtain other information about
motor vehicle safety from the Hotline.
Contents | Top of Page
file:///K|/ownersdocs/1997/1997_960/97960_109.htm (8 of 8)12/30/2006 10:18:05 AM

1997 Volvo 960
Instruments, switches and controls
Instruments, switches and controls
pg. 2:1 Instruments, switches and controls
IMPORTANT!
Your car is equipped with a Shiftlock-Keylock system.
SHIFTLOCK:
When your car is parked, the gear selector is locked in the (P)ark position. To release the selector from this position, turn the ignition
key to position II (or start the engine), depress the brake pedal, press the button on the front side of the gear selector and move the
selector from (P)ark.
If it is necessary to manually override the Shiftlock system, see page 4:9 for instructions.
KEYLOCK:
This means that when you switch off the ignition, the gear selector must be in the (P)ark position before the starting (ignition) key
can be removed from the ignition switch.
ANTI-LOCK BRAKE SYSTEM (ABS):
The ABS system in your car performs a self-diagnostic test when the vehicle is started and at 4 mph (6km/h). The driver may detect
one pulsation of the brake pedal and a sound will be audible from the ABS control module. This is normal.
file:///K|/ownersdocs/1997/1997_960/97960_201.htm (1 of 7)12/30/2006 10:18:06 AM

1997 Volvo 960
The pages in this section provide detailed descriptions of the vehicle's instruments and controls.
Note that vehicles may be equipped differently, depending on special legal requirements.
Some of the items below are available on certain models only.
2:11
1 Air vent
2:6
2 Headlights, parking lights
2:8
3 Rear fog light
2:8
4 Front fog lights
- 5 Space for additional equipment
2:8
6 Power antenna (sedans only)
2:2-2:5
7 Instruments
2:9, 3:19
8 Electrically operated sun roof
2:9
9 Heated rear window/side door mirrors
2:9
10 Hazard warning flasher
2:9
11 Central lock switch
2:11
12 Air vents
2:11-13
13 Heating and ventilation
1:6
14 Passenger's side SRS (air bag)
10:1
15 Audio system
2:15
16 Controls for electrically operated windows, and side-view mirrors
2:8
17 Instrument illumination
3:9
18 Hood-release handle
2:10
19 Turn signals, high/low beams, cruise control
2:8
20 Adjustable steering wheel
1:4
21 SRS (air bag)/Horn
2:7
22 Starting (ignition) switch/steering wheel lock
2:7
23 Windshield wiper/washer
2:16
24 Cigarette lighter
4:7
25 Transmission mode selector buttons
4:6
26 Gear selector
2:16
27 Ash tray
4:9
28 Shiftlock release (override) button
2:16
29 Parking brake
2:14
30 Electrically-heated front seats (certain models)
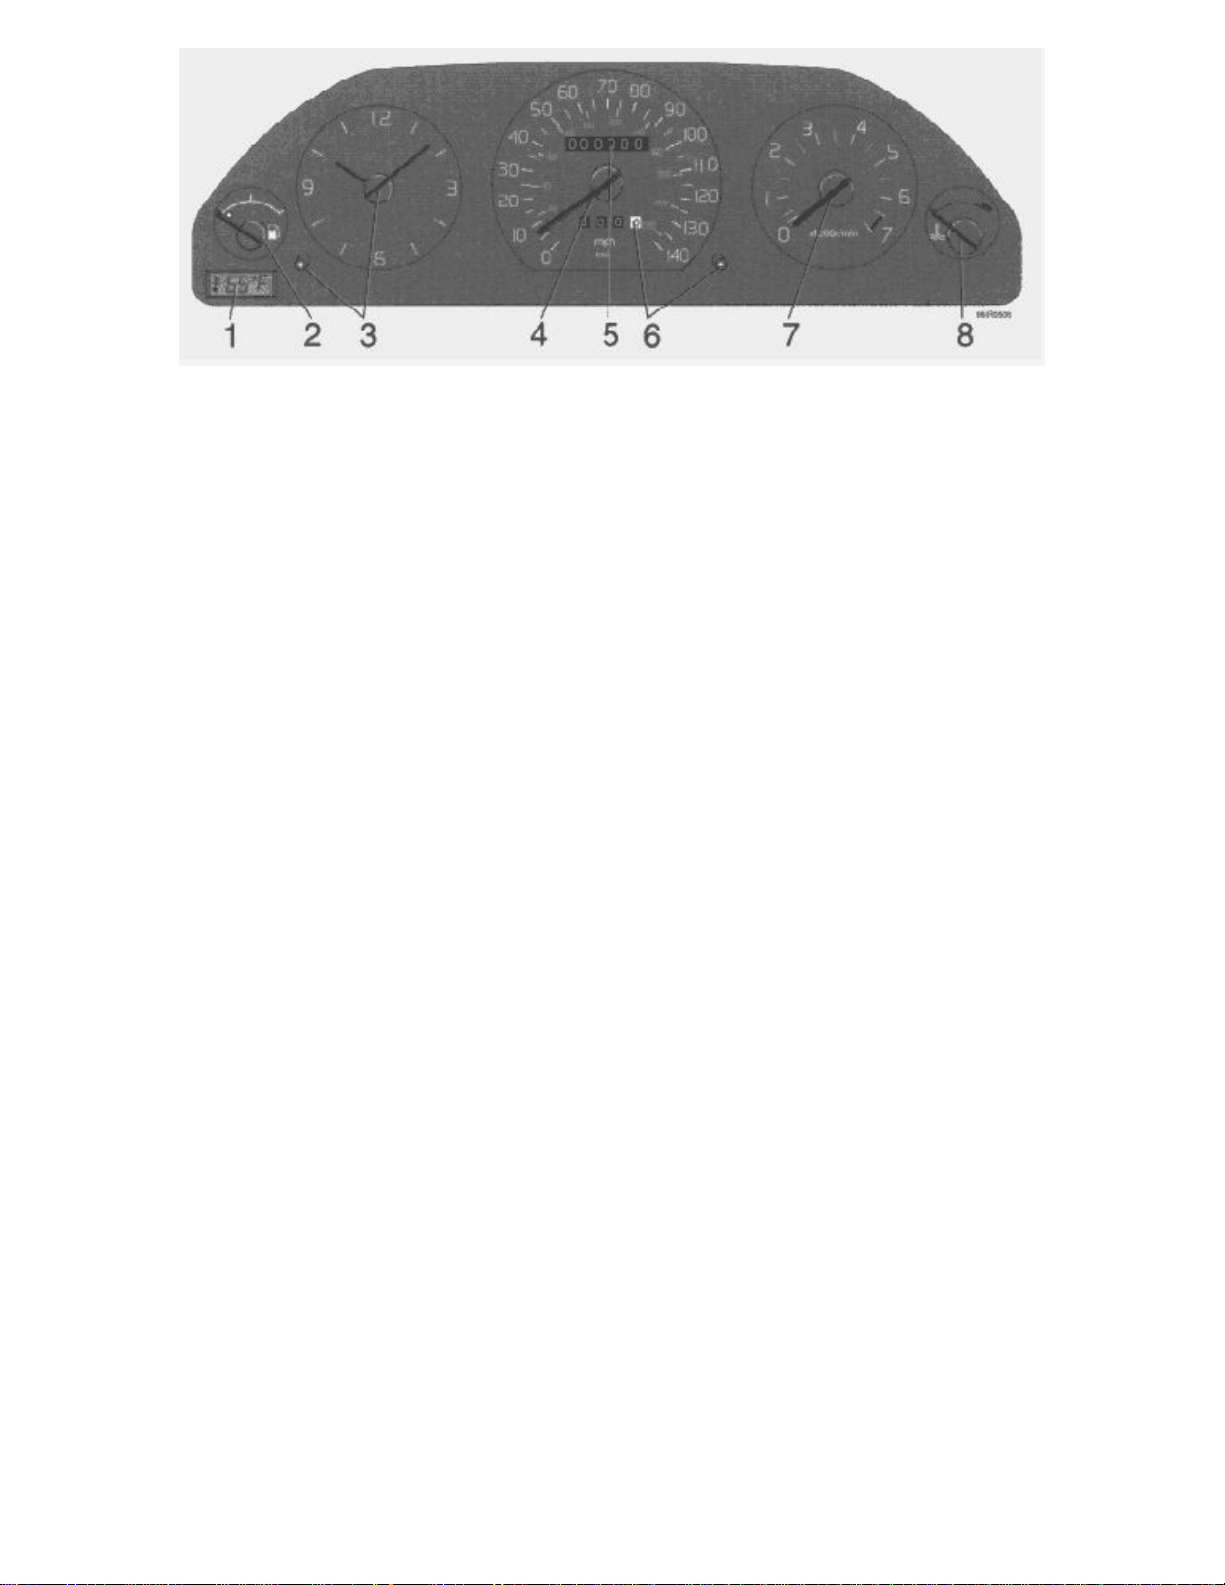
pg. 2:2 Instruments
file:///K|/ownersdocs/1997/1997_960/97960_201.htm (2 of 7)12/30/2006 10:18:06 AM
1997 Volvo 960
1 Ambient temperature indicator (certain models)
Indicates the temperature slightly above the surface of the road. An amber warning lamp lights up when the temperature is in the
range of 23-36° F (-5 - + 2° C). At low speeds or when the car is not moving, the temperature readings may be slightly higher than
the actual ambient temperature due to heat generated by the engine.
2 Fuel gauge
The total fuel tank capacity is approx. 21.1 US gals (80 liters). The "usable" capacity is 20.3 US gallons (77 liters). When the
warning light comes on, there are approximately 1.6 US gals. (6 liters) of fuel remaining in the tank. See "Refueling" for further
information.
3 Quartz crystal clock/clock set button
Press the button and turn to set the clock.
4 Speedometer
5 Odometer
6 Trip odometer/reset button
Used for measuring shorter distances. The last digit indicates 1/10 mile/kilometer. A black number on a white background = original
speedometer. A red number on a white background = replacement speedometer.
7 Tachometer
Reads thousands of engine rpm. Engine should not be operated in red range.
file:///K|/ownersdocs/1997/1997_960/97960_201.htm (3 of 7)12/30/2006 10:18:06 AM

1997 Volvo 960
8 Temperature gauge
The pointer should be approximately midway on the gauge face when driving. If the pointer approaches the red range repeatedly,
check coolant level. Do not drive the car with the pointer in the red range. See "Coolant" section.
Warning! Allow engine to cool before adding
coolant.
pg. 2:3 Indicator and warning lights
1 Turn signal, left
2 Turn signal , right
3 Malfunction indicator lamp
4 Direction indicator, trailer
5 Service reminder indicator
6 Low washer fluid level
If the lamp glows continuously when the engine is running, there is only about 1/2 -
1 US qts remaining in the washer fluid reservoir.
7 Rear fog lamp
8 Bulb failure
9 Generator not charging
10 Low engine oil pressure
11 High beams
12 Brake failure
13 Parking brake applied
14 ABS-system
15 Low coolant level
16 (Not in use)
17 "Winter" mode engaged/transmission fault
18 Fasten seat belts
19 SRS
20 (Not in use)
21 (Not in use)
pg. 2:4 Warning lights
file:///K|/ownersdocs/1997/1997_960/97960_201.htm (4 of 7)12/30/2006 10:18:06 AM

1997 Volvo 960
The warning lights described on pages 2:4 and 2:5 should never stay on when driving
When the ignition key is turned on, and before the engine starts, all of the warning lights should be on to test the function of the
bulbs. Should a light not go off after the engine has started, the system indicated should be inspected. However, the parking brake
reminder light will not go off until the parking brake is fully released.
Generator warning light
If the light comes on while the engine is running, check the tension of the generator drive belt as soon as possible.
Malfunction indicator lamp
If the lamp comes on (or stays on after the vehicle has started), the engine diagnostic system has detected a possible fault in the
emission control system. Although driveability may not be affected, see an authorized Volvo retailer as soon as possible for
inspection.
Oil pressure warning light
If the light comes on while driving, stop the car and then stop the engine immediately and check the engine oil level. See page 8:6. If
the light stays on after restart, have the car towed to the nearest authorized Volvo retailer. After hard driving, the light may come on
occasionally when the engine is idling. This is normal, provided it goes off when the engine speed is increased.
Parking brake reminder light
This light will be on when the parking brake (hand brake) is applied. The parking brake lever is situated between the front seats.
Canadian models are equipped with this warning light:
Brake fluid warning light
If the light comes on while driving or braking, stop immediately, open the hood and check the brake fluid level in the reservoir. See
page 8:13 for reservoir position.
Canadian models are equipped with this warning light:
WARNING!
If the level is below the MIN mark in either section of the reservoir: DO NOT DRIVE. Tow the car to a Volvo retailer and have the
brake system checked and any leakage repaired.
pg. 2:5 Warning lights
file:///K|/ownersdocs/1997/1997_960/97960_201.htm (5 of 7)12/30/2006 10:18:06 AM

1997 Volvo 960
Anti-lock Brake System (ABS)
If the warning lamp lights up there is a malfunction of the ABS system (the standard braking system will however function). The
vehicle should be driven to a Volvo retailer for inspection.
See page 4:15 for additional information.
Canadian models are equipped with this warning light:
Mode "W" engaged
The lamp will light up when the Winter/Wet mode is engaged.
If the warning lamp begins to flash , this means that there is a fault in the automatic gearbox.
Contact your Volvo retailer.
Supplemental Restraint System (SRS)
If the light comes on (or stays on after the vehicle has started), the SRS diagnostic system has detected a fault. Drive to an authorized
Volvo retailer for an inspection of the system. See the SRS section for more information.
Service reminder indicator
This light will come on at 10,000 mile (16,000 km) intervals. It is a reminder to the driver that the 10,000 mile (16,000 km) service
interval has been exceeded. The light will stay on 2 minutes after the start until reset by the servicing retailer.
Coolant level sensor
If the light comes on while driving, the coolant level is low. The coolant level in the expansion tank should be checked immediately
and topped off if necessary. The cooling system should be inspected by an authorized Volvo retailer.
Turn signal indicators-trailer (certain models)
When towing a trailer, this light will flash simultaneously with the turn signals on the trailer. If the light does not flash when
signaling, neither the trailer's turn signals nor the car's turn signals are functioning.
Bulb failure warning light
The light will come on if any of the following bulbs are defective:
one of the low beam headlights
one of the tail lights
one of the brake lights when the brake pedal is depressed.
Check the fuse and bulb.
See sections titled "Replacing bulbs" and "Fuses".
file:///K|/ownersdocs/1997/1997_960/97960_201.htm (6 of 7)12/30/2006 10:18:06 AM

1997 Volvo 960
Contents | Top of Page
file:///K|/ownersdocs/1997/1997_960/97960_201.htm (7 of 7)12/30/2006 10:18:06 AM
1997 Volvo 960
pg. 2:6 Lighting, Turn signals
Headlights and parking lights
All lights off *
Parking lights on **
Headlights and parking lights are on if starting (ignition) switch is in position I or II.
If the headlight switch is in position
all lights will go out when starting switch is switched off.
With the headlight switch in position
the parking lights will stay on (headlights off) with the daytime
running light switch (A) in position
.
The high beams can only be switched on if the headlight switch is in position
.
Switch from high to low beams, and vice versa, by moving the turn signal switch lever on the left side of
the steering column towards the steering wheel.
* Models equipped with daytime running lights: The low beams, tail lights, parking lights and license
plate lights will come on automatically when the ignition is switched on.
Automatic daytime running lights
NOTE: The daytime running light function may only be disabled (turned off) in the U.S. - Canadian law
mandates the use of daytime running lights.
Screw A in the illustration (available on U.S. models only) is used to control the automatic daytime
running lights when the headlight switch is in position 0. To adjust, press in the screw with a small
screwdriver and turn to one of the following positions:
Automatic daytime running lights
Automatic daytime running lights
** The daytime running lights will also function when the headlight switch is in position
and switch
A is in this position.
All lights off (daytime running light function disabled)
file:///K|/ownersdocs/1997/1997_960/97960_206.htm (1 of 10)12/30/2006 10:18:08 AM
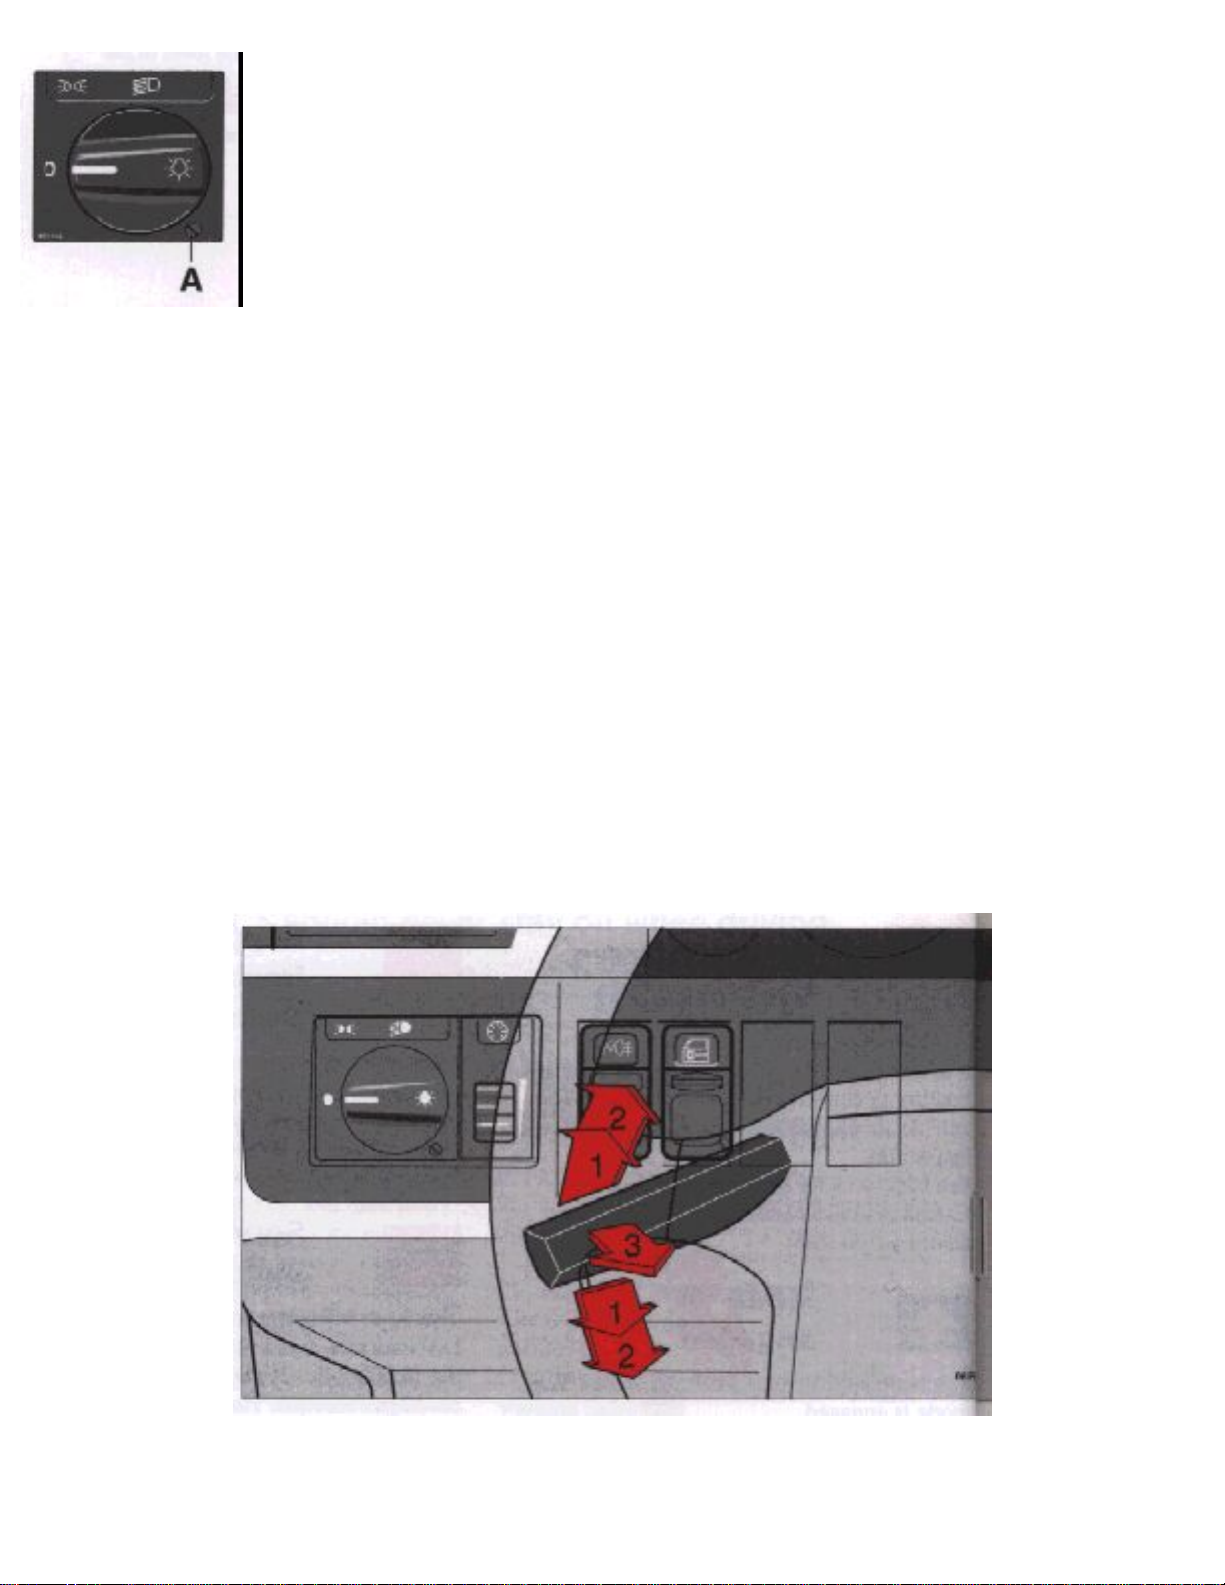
1997 Volvo 960
Turn signals
1 Lane change position : In maneuvers such as lane changing, the driver can flash the turn signals by
moving the turn signal lever to the first stop and holding it there. The lever will return to the neutral
position when released.
2 Signal lever engaged for normal turns
3 High beam/low beam switch (headlights on)
Move the lever towards the steering wheel and release it.
Headlight flasher (headlights off)
Move the lever towards the steering wheel.
The headlight high beam will be on until the lever is released.
NOTE: Defective turn signal bulbs will cause turn signal indicator and remaining signal lights to flash
more rapidly than normal.
file:///K|/ownersdocs/1997/1997_960/97960_206.htm (2 of 10)12/30/2006 10:18:08 AM

1997 Volvo 960
pg. 2:7 Windshield wipers/washers, Ignition switch
Wipers/washers
1 Intermittent wiper.
With switch in this position, the wipers will sweep approximately every seventh second.
2 "Single sweep" position.
Switch returns automatically when released
3 Wipers, low speed.
4 Wipers, high speed
5 Windshield wiper/washer, headlight wiper/washer (certain models)
The wiper will make 2-3 complete sweeps across the windshield and headlights after lever is released.
Starting (ignition) switch/steering wheel lock
The steering wheel lock might be under tension when the car is parked. Turn the steering wheel slightly
to free the ignition key. In order to reduce car theft, make sure the steering wheel lock is engaged before
leaving the car.
A chime will sound if the starting key is left in the ignition lock and the front door on the driver's side is
opened.
file:///K|/ownersdocs/1997/1997_960/97960_206.htm (3 of 10)12/30/2006 10:18:08 AM

1997 Volvo 960
0 Locked position:
remove the key to lock the steering wheel.
WARNING:
Never turn the key to position 0 while driving or when the car is being
towed.
I Intermediate position:
Certain accessories/radio, etc. on, daytime running lights off.
II Drive position:
key position when engine is running.
III Starting position:
release the key when the engine start. The key returns automatically to the Drive position.
* The gear selector must be in the (P)ark position before the key can be removed from the ignition
file:///K|/ownersdocs/1997/1997_960/97960_206.htm (4 of 10)12/30/2006 10:18:08 AM

1997 Volvo 960
switch.
pg. 2:8 Fog lights, Instrument illumination, Steering wheel adjustment, Power antenna
A - Rear foglight*
The indicator light in the instrument panel will light up when the rear foglight is on. This foglight is
considerably brighter than the normal tail light and should be used only when the atmospheric
conditions, such as fog, rain, snow, smoke or dust reduce the daytime or nighttime visibility of other
vehicles to less than 500 ft (150 meters).
* By design, there is one rear foglight only, located in the driver's side tail light cluster.
B - Instrument illumination
To increase the brightness, rotate the switch upward.
To decrease the brightness, rotate the switch downward.
C - Front foglights
The indicator light in the switch will light up when the front foglights are on. The front foglights will
only function when the low beam headlights are on.
NOTE: Local regulations governing the use of foglights may vary.
D - Power antenna (sedans only)
This button can be used lower the antenna when, for example, you are listening to a tape or CD, or when
you are driving into a low-roof garage or car wash.
CAUTION: The antenna must be lowered before washing the car in an automatic car wash.
E - Steering wheel adjustment
The steering wheel can be adjusted to 3 different positions.
file:///K|/ownersdocs/1997/1997_960/97960_206.htm (5 of 10)12/30/2006 10:18:08 AM

1997 Volvo 960
Move the control on the left side of the steering column downward and hold it in place. Adjust the
steering wheel to the position desired. Release the control and check that the steering wheel is locked in
position.
WARNING! Do not adjust the steering wheel while
driving.
pg. 2:9 Sun roof, Hazard warning flasher, Tailgate wiper/washer, heated rear window
file:///K|/ownersdocs/1997/1997_960/97960_206.htm (6 of 10)12/30/2006 10:18:08 AM

1997 Volvo 960
A - Tailgate window wiper/washer (wagon)
The tailgate window wiper/washer is operated by a switch at the end of the wiper level.
1. The wiper operates continuously.
2. Intermittent position: the wiper strokes approximately every 10 seconds.
3. Tailgate washer (note that the wiper also operates when this button is depressed): after the button is
released the wiper strokes 2-3 additional times before stopping.
file:///K|/ownersdocs/1997/1997_960/97960_206.htm (7 of 10)12/30/2006 10:18:08 AM

1997 Volvo 960
The electrical circuit is protected by fuse 19, located in the central electrical unit. See the section entitled
"Fuses".
B - Electrically operated sun roof (certain models)
The sun roof can be operated in two ways; as a conventional sliding roof; or the rear edge can be raised
to provide increased ventilation. On models equipped with the power glass sun roof, a manually
operated sun shade is also provided.
See page 2:19 for operating instructions.
NOTE: In case of sun roof malfunction, see page 2:19.
C - Heated rear window, heated side-door mirrors (certain models)
Depress the switch to start heating of rear window and side mirrors. Both orange control lights in the
switch will illuminate. A timer switches off the side mirror heating after approx. 6 minutes and the rear
window demister after 12 minutes. The control lights go out correspondingly.
D - Hazard warning flasher
The four-way flasher should be used to indicate that the vehicle has become a traffic hazard.
NOTE: Regulations regarding the use if the hazard warning flasher may vary from state to state.
E - Central lock switch
Press the switch to lock/unlock the doors and trunk/tailgate.
Lock: press the lower section of the switch
Unlock: press the upper section of the switch.
NOTE: The lock function only operates if the doors are closed.
pg. 2:10 Cruise control
file:///K|/ownersdocs/1997/1997_960/97960_206.htm (8 of 10)12/30/2006 10:18:08 AM

1997 Volvo 960
Cruise control
The cruise control switches are located on the turn signal switch lever.
To engage and set desired speed:
1. Set switch (B) to ON.
2. Accelerate to desired cruise speed.
NOTE: The cruise control cannot be engaged at speeds below 22 mph (35 km).
3. Press the + or - area of the SET button (A) to set the desired speed.
Braking
This will automatically disengage the cruise control. Previously selected cruise control speed is retained
in the memory and by momentarily setting the switch to RESUME position, that speed will be reengaged.
If the cruise control is already engaged, the cruising speed can be increased or decreased by depressing
the SET button (A) towards either + or -. One short press on the button corresponds to a speed change of
approx. 1 mph (1.6 km/h). When the button is released, the vehicle will maintain the current speed.
If actual speed falls below 70% of set speed or if the wheels spin or lock, the cruise control will
disengage automatically.
NOTE:
When driving in hilly terrain, the gearbox may tend to jump between different gears. This can be
avoided by selecting gear selector position 3 (intermediate position).
Normally, the (E)conomy mode should be used when the cruise control is engaged.
file:///K|/ownersdocs/1997/1997_960/97960_206.htm (9 of 10)12/30/2006 10:18:08 AM

1997 Volvo 960
Acceleration
Momentary acceleration, such as for passing, does not interrupt cruise control operation. The previously
selected speed will be maintained without having to set the switch to RESUME. To disengage the cruise
control system : set switch (B) to OFF, depress the brake pedal or move the gear selector to position N.
Switching off the starting (ignition) switch will automatically disengage the cruise control system.
WARNING! The cruise control should not be used in heavy traffic or when driving on wet or slippery
roads. Do not use or resume cruise control in reverse gear. When the ignition is switched off, any
information stored in the cruise control memory will be erased.
Contents | Top of Page
file:///K|/ownersdocs/1997/1997_960/97960_206.htm (10 of 10)12/30/2006 10:18:08 AM

1997 Volvo 960
pg. 2:11 Heating, ventilation and air conditioning
ECC - Electronic Climate Control
This is an automatic system that also permits manual operation. The in-car temperature is automatically
monitored by two sensors located in the passenger compartment.
One sensor is located on the top of the dashboard where it can sense sunlight. The second sensor is
located on the courtesy light where it can sense the temperature in the center of the car. The following
pages describe how ECC works and how it can be used most effectively.
Air vents (dash)
A Open
B Closed
file:///K|/ownersdocs/1997/1997_960/97960_211.htm (1 of 11)12/30/2006 10:18:10 AM

1997 Volvo 960
C Directing air flow horizontally
D Directing air flow vertically
pg. 2:12 Heating, ventilation and air conditioning
ECC - Electronic Climate Control panel
Blower
0 = off
5 = max speed
aut = blower speed
automatically regulated
Function selector
Set desired function
aut = normal setting
Temperature dial
Set desired temperature
Air in the passenger compartment recirculates with this button depressed. Will not function in
defrost setting. Light is on when recirculation is active*
file:///K|/ownersdocs/1997/1997_960/97960_211.htm (2 of 11)12/30/2006 10:18:10 AM
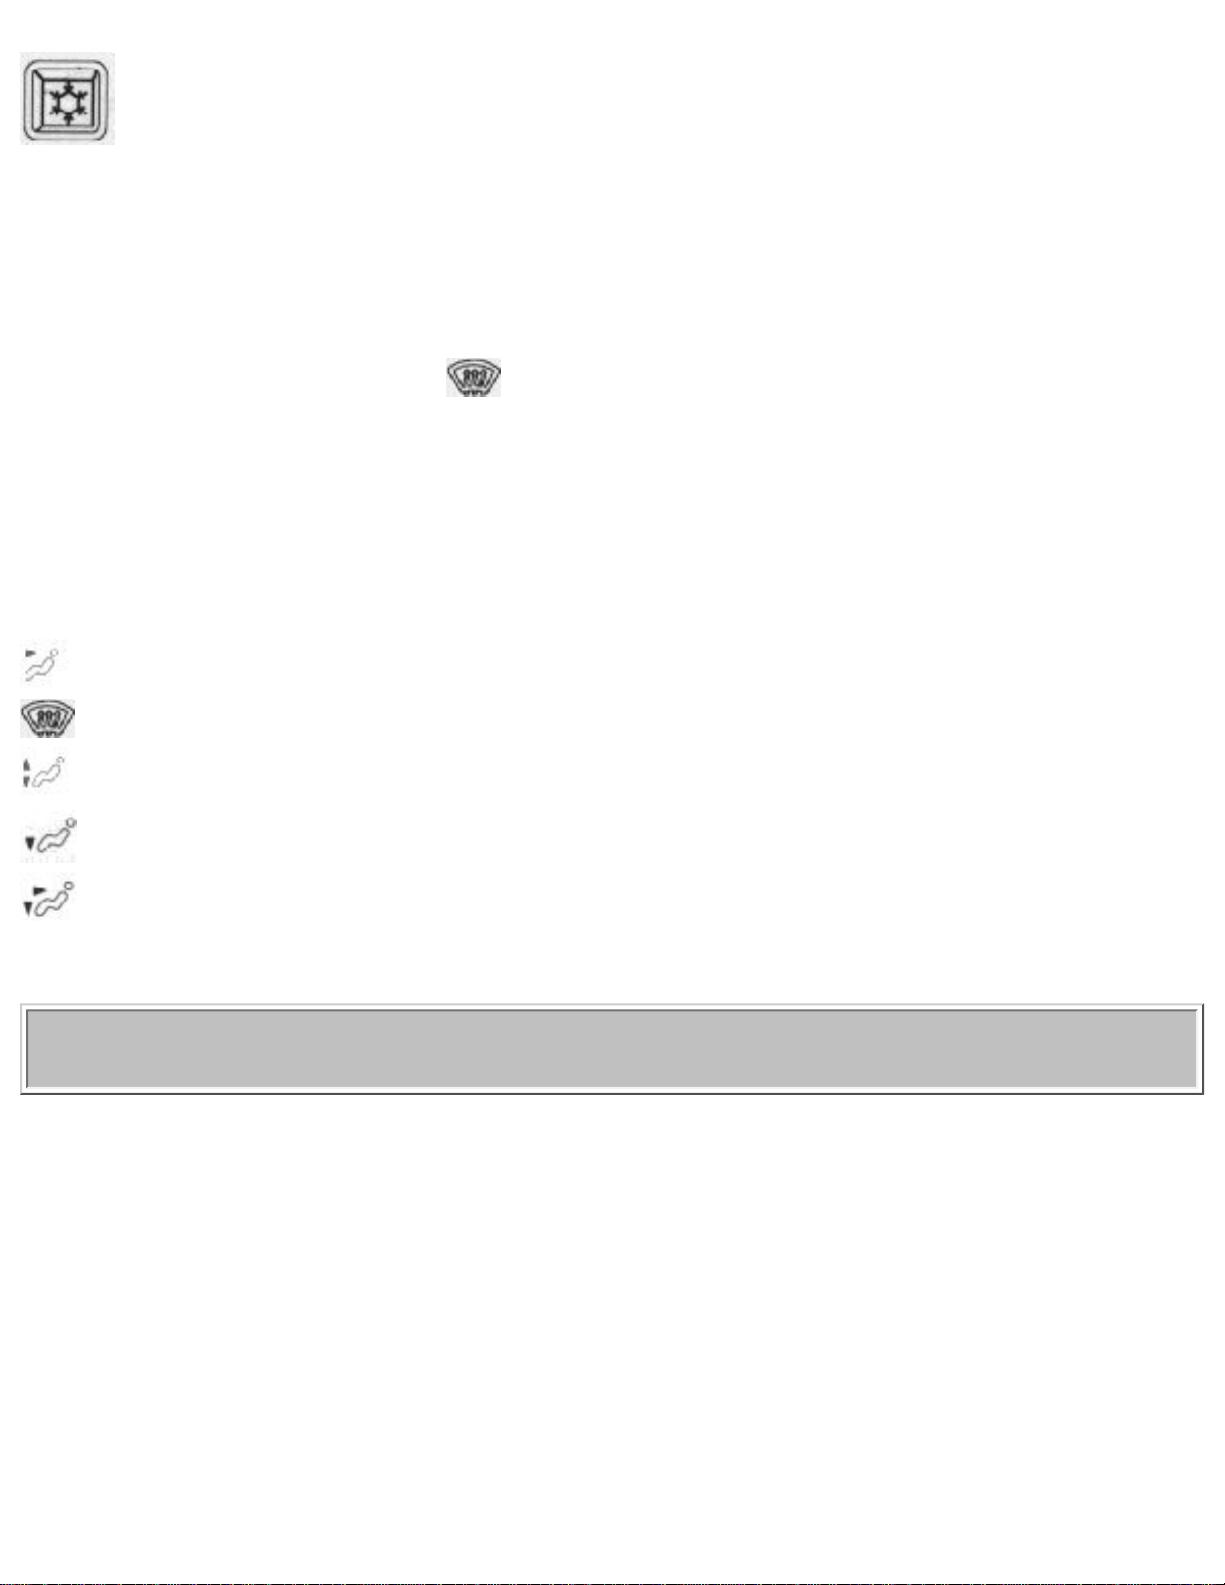
1997 Volvo 960
The air conditioning system is ON when this button is depressed (the light will be on). The
light has two functions:
● air conditioning OFF*
● fault in system (see next page)
* When the function selector is in the
mode, the air conditioning system is ON and recirculation is
OFF, regardless of button position. The light surrounding the "AC OFF" button will be OFF and the
light surrounding the recirculation button will be OFF.
NOTE: If your windows begin to fog or mist, check that the recirculation function is not engaged.
Function selector
aut aut=air distribution automatically regulated
Air through panel vents
Defrost. Air to windshield and side windows.
Air to floor, windshield and side windows.
Air through floor vents.
Bi-level. Air through floor and panel vents. Air supplied from panel vents is slightly colder than air
released at foot level.
pg. 2:13 Heating, ventilation and air conditioning
Automatic setting
The ECC system will automatically maintain a comfortable in-car temperature regardless of the outdoor
temperature.
file:///K|/ownersdocs/1997/1997_960/97960_211.htm (3 of 11)12/30/2006 10:18:10 AM
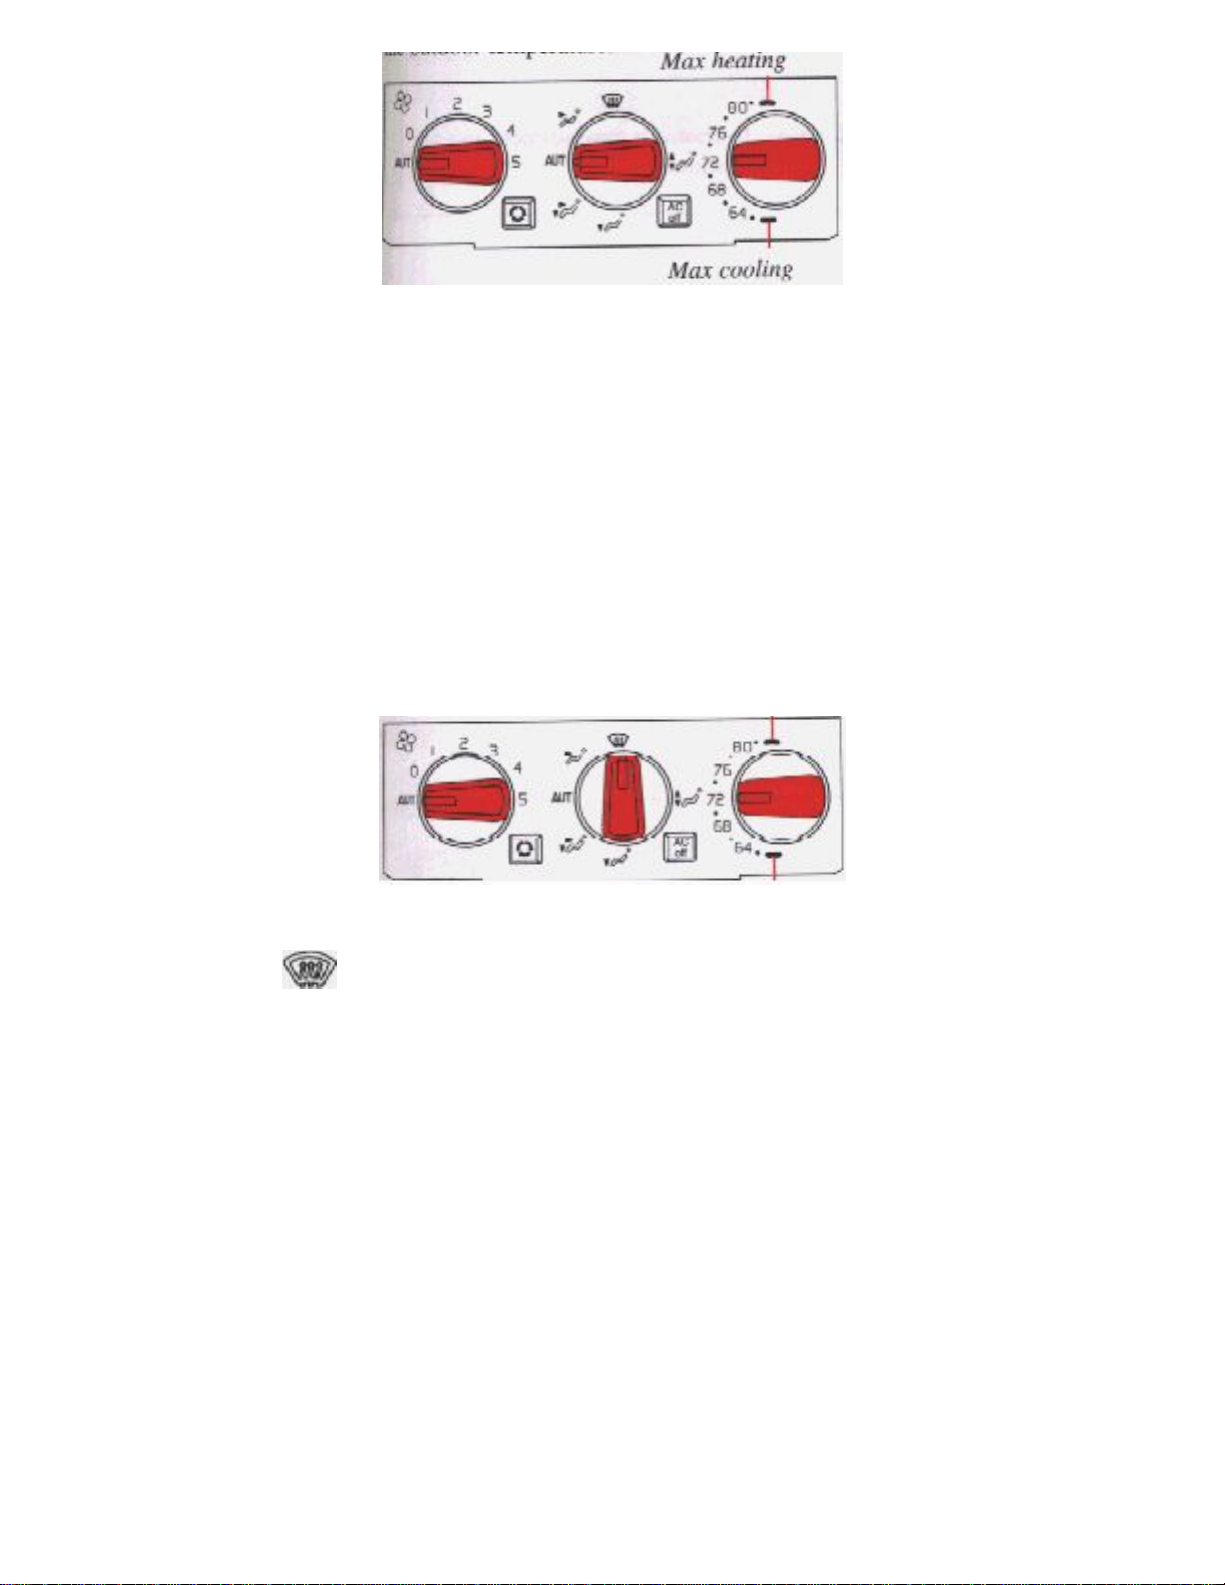
1997 Volvo 960
Select the desired temperature
The blower will run at its maximum speed in either the max cooling or max heating positions.
Water under the vehicle in hot weather can be the result of condensation from the air conditioning
system.
Optimum defrosting
Set the function dial to
.
The air conditioning light will NOT go on.
When the windows have cleared, set the blower control to position 2.
Operating Tips
When the outside air is contaminated with exhaust gases, smoke etc. (as when driving through a tunnel)
or to cool the car quickly, push the recirculation button. In this position, no air is drawn into the
passenger compartment from outside. However, do not leave the system in this mode for more than 1015 minutes, since the air inside the car will become stale and the windows may fog.
file:///K|/ownersdocs/1997/1997_960/97960_211.htm (4 of 11)12/30/2006 10:18:10 AM

1997 Volvo 960
NOTE:
● Do not place any objects over the sensor in the passenger side speaker grille as this will cause the
ECC system to respond incorrectly to ambient conditions.
● To help maintain stable passenger compartment temperature when driving with the sun roof or
windows open, place the blower control in position "0" and adjust the desired temperature manually.
● The air conditioning compressor only engages at temperatures above 41°F (5°C).
● Always keep the air intake grille at the base of the windshield free of snow.
Volvo cares about the environment. The air conditioning system in your car contains a CFC-free
refrigerant - R134a. This substance will not deplete the ozone layer. The system contains 2 lbs. (0.9 kg)
R134a and uses Sanden SP-20 (type PAG) oil.
ECC system fault indication
If the light in the air conditioning push button begins to flash when the ignition is switched on, a simple
fault is indicated. The system will compensate by substituting a standard value stored in the memory.
System performance loss will be slight.
If the light continues to flash more than 20 seconds, a more serious fault is indicated. While the system
will again attempt to substitute a standard value, some reduction in system performance will become
apparent. Contact your authorized Volvo retailer for service.
Difficult weather conditions
When driving in very humid conditions, heavy rain, sleet, etc., it may be better to use the manual rather
than the automatic setting to defrost the windows. Set the mode selector to "Defrost" or "Defrost/floor"
and the fan speed to 3 or higher. Also shut the middle air vents.
pg. 2:14 Heated front seats
file:///K|/ownersdocs/1997/1997_960/97960_211.htm (5 of 11)12/30/2006 10:18:10 AM

1997 Volvo 960
Heated front seats (certain models)
The heated front seats can be switched on and off as required. When switched on, the system senses the
ambient temperature and regulates the level of heat applied. When the optimum temperature is reached,
the heating is switched off automatically.
While driving, the passenger seat heating should be switched off when the seat is not occupied.
pg. 2:15 Electrically operated windows
file:///K|/ownersdocs/1997/1997_960/97960_211.htm (6 of 11)12/30/2006 10:18:10 AM

1997 Volvo 960
Electrically-operated windows
The electrically operated windows are controlled by switches from the driver's armrest as shown in the
above illustration.
The starting (ignition) switches must be ON (position II) for the electrically operated windows to
function. The window is lowered if the rear part of the switch is pressed and raised if the front part of the
switch is pressed.
NOTE: Driver's window only (AUTO): The window can be opened completely by pressing the rear part
of the switch lightly and releasing it immediately. The window can be stopped by pressing the button
again. If the button is held down, the window will be lowered until the button is released.
WARNING! Remove the starting (ignition) key when children are left unattended in the
vehicle.
Make sure that children's hands are clear before raising the windows.
file:///K|/ownersdocs/1997/1997_960/97960_211.htm (7 of 11)12/30/2006 10:18:10 AM

1997 Volvo 960
Cut-out switch for rear-door windows
If the car is equipped with rear door power windows, this function can be disabled by a switch located
on the driver's armrest. This switch is positioned 90° in relation to the other switches.
ON The rear door windows can be raised or lowered with the respective door switch as well as the
switch on the driver's door.
OFF The rear door windows cannot be raised or lowered with the respective door switch but instead
only with the corresponding switch on the driver's door.
NOTE: The power window motors have an overload protecting circuit breaker which is activated when
an object blocks a window. Should this occur, remove the object and wait 20 seconds for the circuit
breaker to reset. The power windows should then function.
pg. 2:16 Parking brake, Cigarette lighter, Ash trays
file:///K|/ownersdocs/1997/1997_960/97960_211.htm (8 of 11)12/30/2006 10:18:10 AM

1997 Volvo 960
Parking brake (hand brake)
The lever is situated between the front seats. The brake is applied to the rear wheels.
WARNING!
Always use the parking brake (hand brake) when parking. On hills, also turn the front wheels toward
the curb.
file:///K|/ownersdocs/1997/1997_960/97960_211.htm (9 of 11)12/30/2006 10:18:10 AM

1997 Volvo 960
Cigarette lighter/accessory outlet
To operate, depress the knob fully. When the knob automatically releases, the cigarette lighter is ready
for use.
The starting (ignition) switch must be switched on (to position I or II) for the cigarette lighter to
function.
Ash trays
To remove the ash trays depress the center spring and remove.
"OBD II"
A connector for on-board diagnostics ("OBD II") is located to the right of the parking brake. This
connector is intended for use by authorized service technicians only.
file:///K|/ownersdocs/1997/1997_960/97960_211.htm (10 of 11)12/30/2006 10:18:10 AM

1997 Volvo 960
Contents | Top of Page
file:///K|/ownersdocs/1997/1997_960/97960_211.htm (11 of 11)12/30/2006 10:18:10 AM

1997 Volvo 960
Body and interior
pg. 3:1 Body and interior
Body and interior
The seats, doors, sun roof, mirrors, etc. are described on the following pages.
3:2
Keys, Doors and Locks
3:3
Remote keyless entry system
3:4
Front seats
3:5
Rear/side view mirrors, Vanity mirror
3:6
Interior light, Rear reading lights
3:7
Child safety locks, Trunk lid
3:8
Passenger compartment storage spaces
3:9
Hood
3:10
Trunk light, spare tire, jack (sedan)
3:11
Wagon tailgate/child safety lock
3:12
Concealed storage bins, Folding rear seat (wagon)
3:14
Removing seat cushions, Securing cargo (wagon)
3:15
Cargo space lighting, spare tire, jack (wagon)
3:16
Cargo space - loading
3:17
Cargo net
3:18
Luggage cover
3:19
Sun roof
3:20
Emergency sun roof operation, Long load storage
3:21
Alarm
pg. 3:2 Keys, Doors and Locks
file:///K|/ownersdocs/1997/1997_960/97960_301.htm (1 of 9)12/30/2006 10:18:11 AM

1997 Volvo 960
Master key
This key operates all locks
Service key
Front doors, starting (ignition) switch/steering wheel lock
Number tag
The key number codes are stamped on a separate tag supplied with the keys. This tag should be
separated from the key ring and kept in a safe place. In the event the original keys are lost, duplicates
may be ordered from your Volvo retailer.
Doors and locks
Your car is equipped with a central locking system.
The key, used on the driver's door, will lock/unlock all doors and trunk/tailgate.
The key used on either of the front doors will lock all doors and trunk/tailgate.
file:///K|/ownersdocs/1997/1997_960/97960_301.htm (2 of 9)12/30/2006 10:18:11 AM

1997 Volvo 960
Turn the key once in the driver's door to unlock that door only.
Turn the key in the same direction again (within 10 seconds) to unlock all doors, trunk/tailgate.
One turn with the key towards locking in either of the front doors locks all doors, trunk/tailgate.
Use the switch on the instrument panel (with the doors closed) to lock/unlock the car from the inside.
Check the action of the buttons on the other doors to verify their correct function (lock/unlock). The
driver's door can be locked only by using the key when outside the vehicle. On vehicles equipped with
the optional remote control locking system, refer to the following page.
WARNING!
The doors should not be locked while driving. In case of an accident, this may hinder rapid access to
the occupants of the vehicle. (Also see information on "child safety locks".
pg. 3:3 Remote keyless entry system
Remote keyless entry system
As an option, your car can be equipped with a remote control transmitter. This transmitter uses a radio
frequency which will allow "keyless" entry into the passenger compartment or the trunk. You will be
supplied with two coded key ring transmitters, which will enable you to lock/unlock all doors and the
trunk/tailgate from a distance of 10-15 feet (3-5 meters).
To lock :
Press button 1 once to lock all doors and trunk/tailgate.
file:///K|/ownersdocs/1997/1997_960/97960_301.htm (3 of 9)12/30/2006 10:18:11 AM

1997 Volvo 960
To unlock :
Press button 2 once to unlock the driver's door only.
Press button 2 again (within 10 seconds) to unlock all doors and trunk/tailgate.
Aim the base of the remote control unit at the car to get the best range.
On vehicles equipped with an alarm, the alarm will also be activated/deactivated by this system.
As an extra security precaution in certain situations (valet parking, etc.), Volvo recommends that the
transmitter not be included when the keys are given to anyone. The service key can be used instead. If
one of the transmitters is misplaced, contact the nearest authorized Volvo retailer for assistance.
Batteries
The remote transmitter is powered by 2 three-volt batteries, type CR 1220. If three short signals are
audible from the transmitter each time you lock/unlock the car, this indicates that the batteries are weak.
Replacement: Remove the battery cover on the back of the transmitter with a coin. Replace the batteries.
Reinstall the cover, making sure it is secured tightly to help protect the transmitter.
New transmitters
If you purchase additional transmitters, they must be programmed to function with your remote keyless
entry system. Please refer to page 2:21 for instructions.
This device complies with the FCC rules Part 15. Operations is subject to the following two conditions:
(1) This device may not cause harmful interference and (2) this device must accept any interference that
may be received, including interference that may cause undesired operation.
file:///K|/ownersdocs/1997/1997_960/97960_301.htm (4 of 9)12/30/2006 10:18:11 AM

1997 Volvo 960
WARNING! Volvo does not recommend using the transmitter to lock the doors from inside the car.
On cars equipped with an alarm, the alarm would be activated and would sound when one of the doors
is opened. The doors must not be locked using the remote transmitter while the vehicle is occupied. In
case of an accident, this may hinder rapid access to the occupants of the vehicle. The alarm will also
sound on models equipped with this feature.
pg. 3:4 Front seats
Electrically operated front seats
The front seats are electrically operated. Using the switches on the sides of the seats you can adjust:
- the height of the seat (rear)
- the height of the seat (front)
- the forward-backward movement
- the backrest tilt
NOTE: The electrically operated front seats have an overload protector which engages if an object
blocks either of the seats. If this happens remove the object and wait 20 seconds. The overload protector
should then have cooled down and the power seats should function normally.
Passenger's seat (option)
file:///K|/ownersdocs/1997/1997_960/97960_301.htm (5 of 9)12/30/2006 10:18:11 AM
 Loading...