

Volvo 39825257, 39825262, 39825263, 39825254, 39825264 Installation Instructions, Accessories
...Page 1

Instruction No Version Part. No.
31414283 1.0 39825257, 39825262, 39825263, 39825264, 39825254, 39825255, 39825256, 39825253
Multimedia system, RSE, two screens, with two players
Instruction No Version Part. No.
31414283 1.0 39825257, 39825262, 39825263, 39825264, 39825254, 39825255, 39825256, 39825253
Multimedia system, RSE, two screens, with two players
Installation instructions, accessories
Volvo Car Corporation Gothenburg, Sweden
©
Volvo Car Corporation Multimedia system, RSE, two screens, with two players- 31414283 - V1.0
Strona 1 / 50
Page 2

Materials
Designation
Part number
Cable tie, 750 mm
988734
Electrical tape
Equipment
IMG-
345497
IMG-
239664
IMG-
382160
Installation instructions, accessories
Volvo Car Corporation Gothenburg, Sweden
©
Volvo Car Corporation Multimedia system, RSE, two screens, with two players- 31414283 - V1.0
Strona 2 / 50
Page 3

IMG-
382908
Installation instructions, accessories
Volvo Car Corporation Gothenburg, Sweden
©
Volvo Car Corporation Multimedia system, RSE, two screens, with two players- 31414283 - V1.0
Strona 3 / 50
Page 4
Information
1
Read through all of the instructions before starting installation.
Notifications and warning texts are for your safety and to
minimise the risk of something breaking during installation.
Ensure that all tools stated in the instructions are available before
starting installation.
Certain steps in the instructions are only presented in the form of
images. Explanatory text is also given for more complicated
steps.
In the event of any problems with the instructions or the
accessory, contact your local Volvo dealer.
Color symbols
2
IMG-
363036
Note!
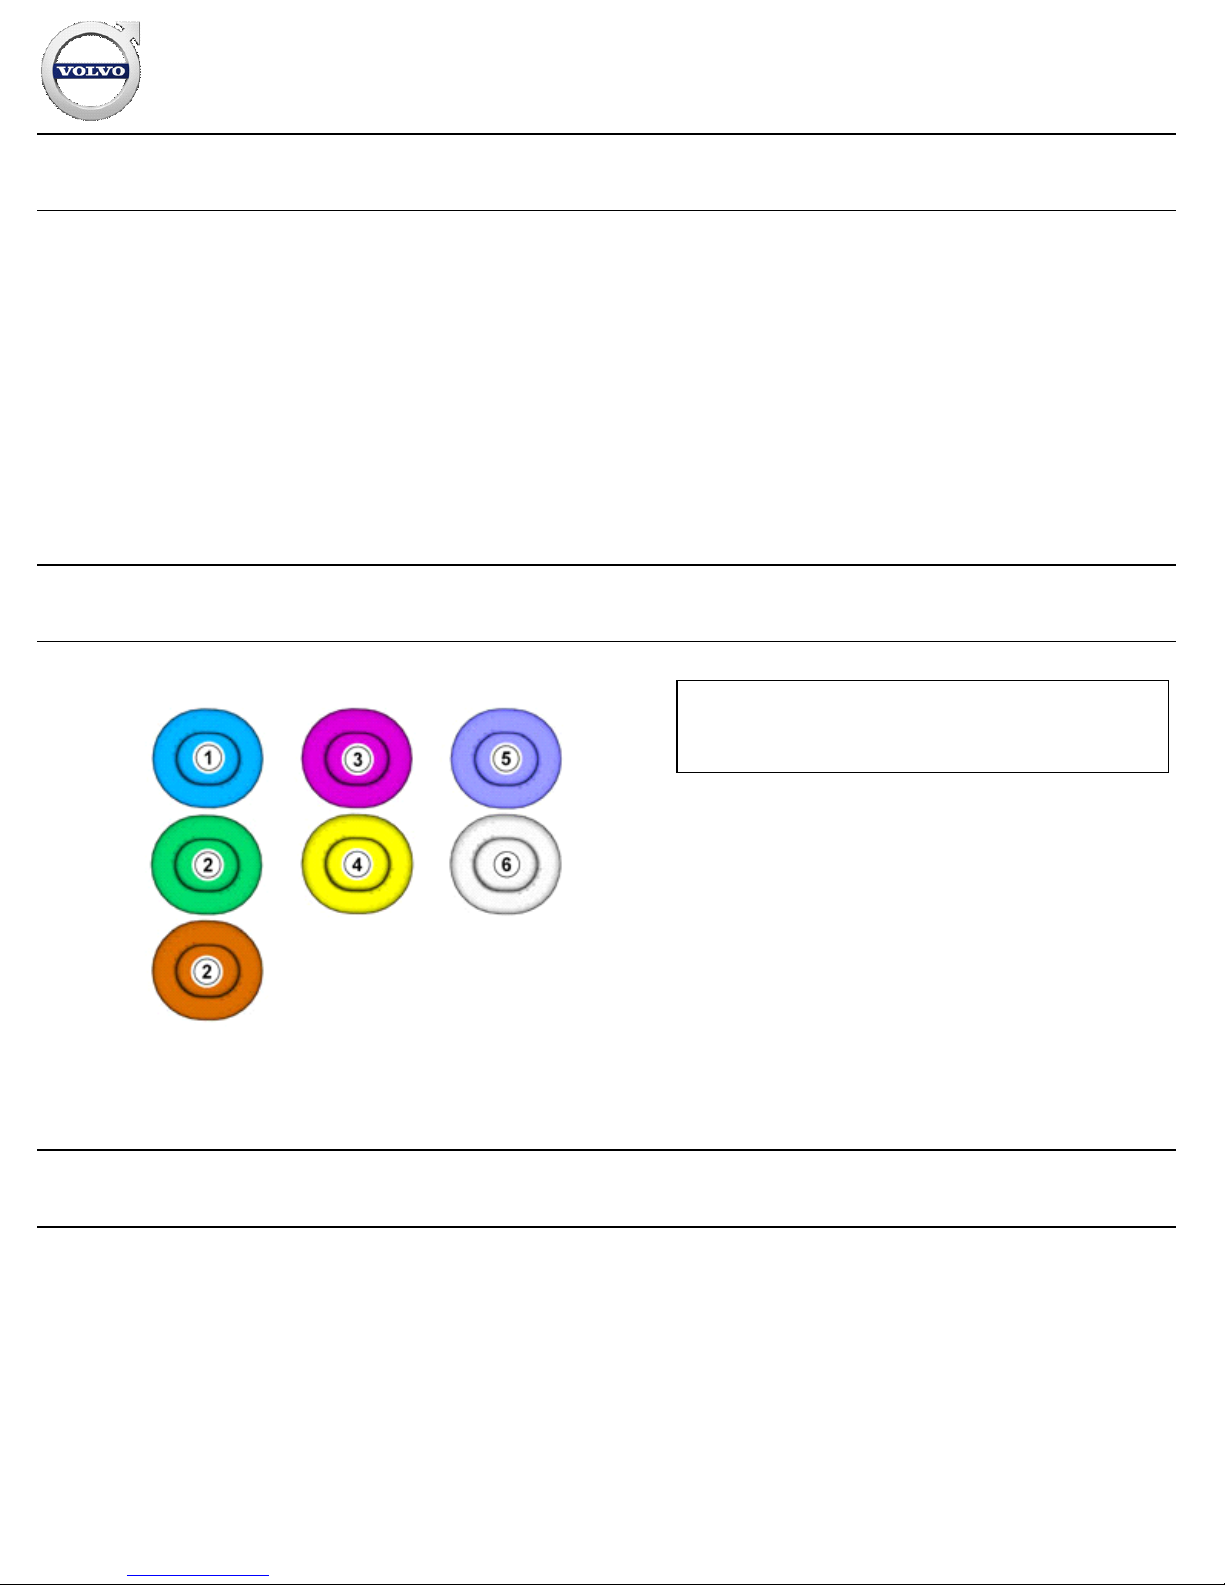
This colour chart displays (in colour print and electronic version)
the importance of the different colours used in the images of the
method steps.
Used for focused component, the component with
which you will do something.
1.
Used as extra colors when you need to show or
differentiate additional parts.
2.
Used for attachments that are to be removed/installed.
May be screws, clips, connectors, etc.
3.
Used when the component is not fully removed from
the vehicle but only hung to the side.
4.
Used for standard tools and special tools.5.
Used as background color for vehicle components.6.
Removal
Installation instructions, accessories
Volvo Car Corporation Gothenburg, Sweden
©
Volvo Car Corporation Multimedia system, RSE, two screens, with two players- 31414283 - V1.0
Strona 4 / 50
Page 5
3
IMG-
332194
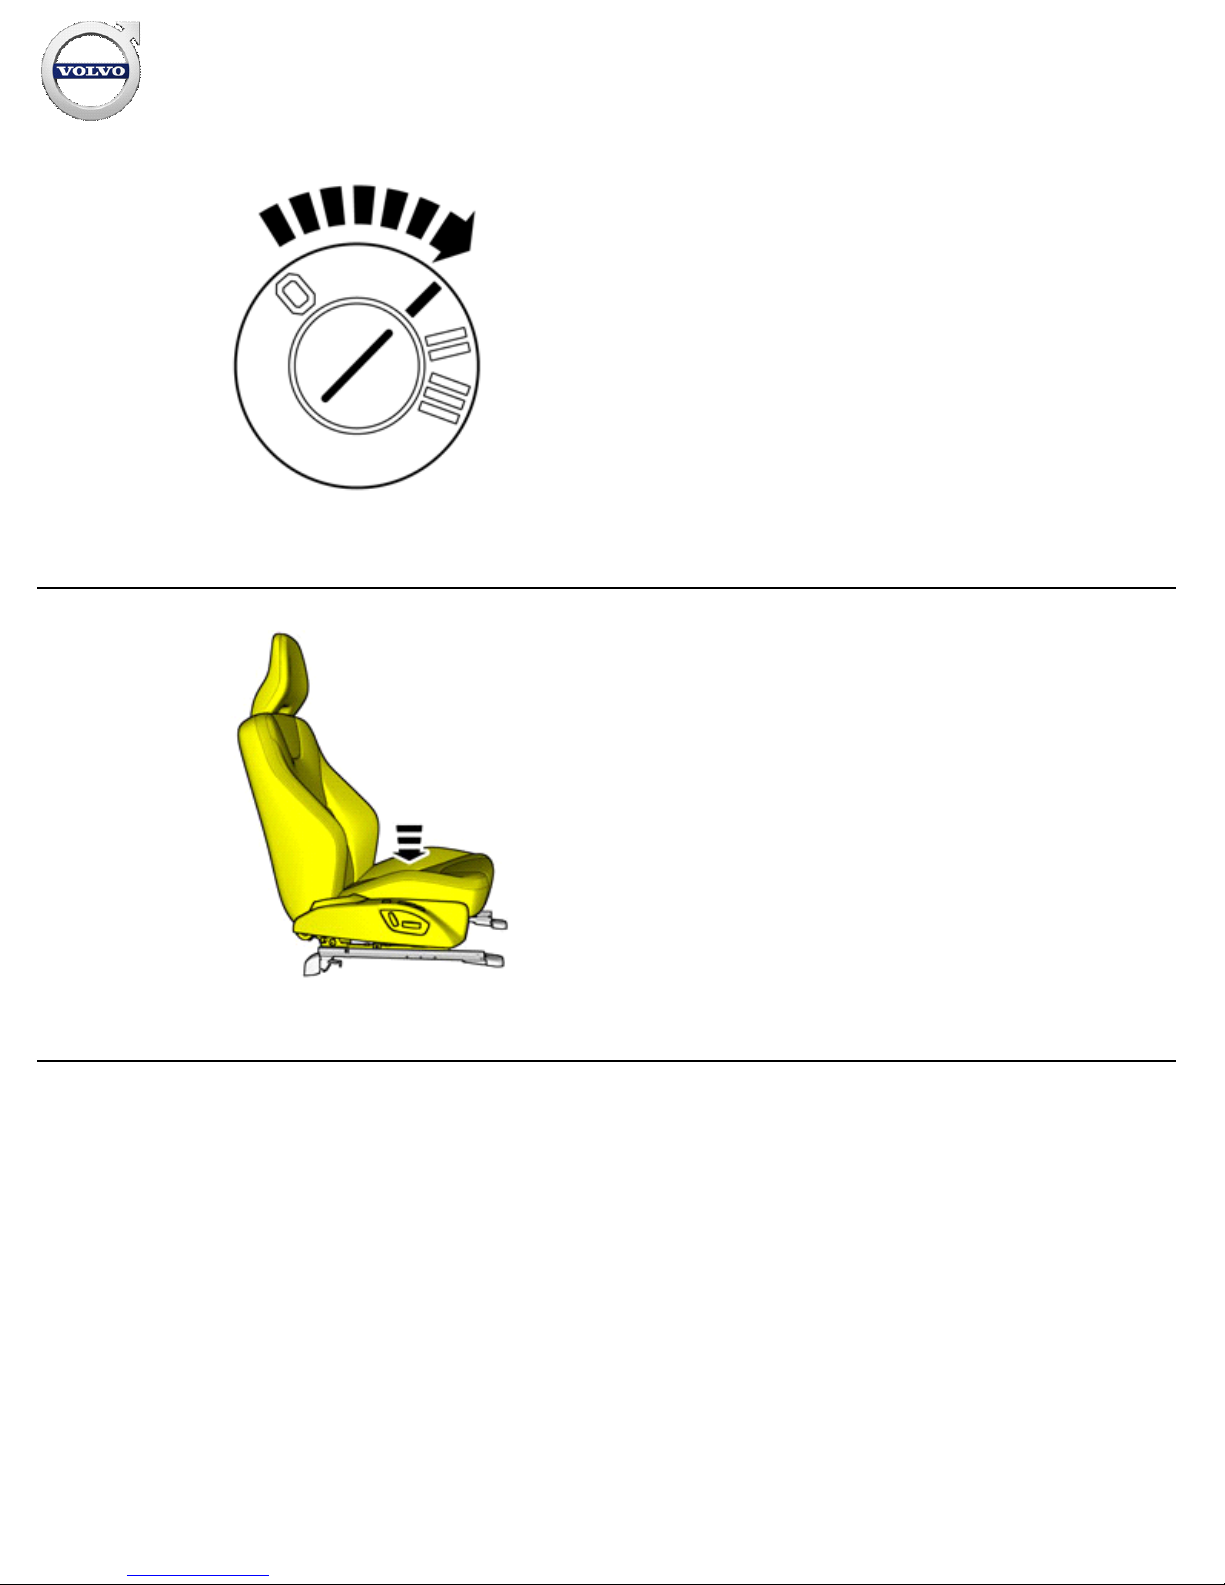
Set the ignition key to position I.
4
IMG-
372558
Adjust to the lowermost position.
Repeat on the other side.
Installation instructions, accessories
Volvo Car Corporation Gothenburg, Sweden
©
Volvo Car Corporation Multimedia system, RSE, two screens, with two players- 31414283 - V1.0
Strona 5 / 50
Page 6
5
IMG-
372559
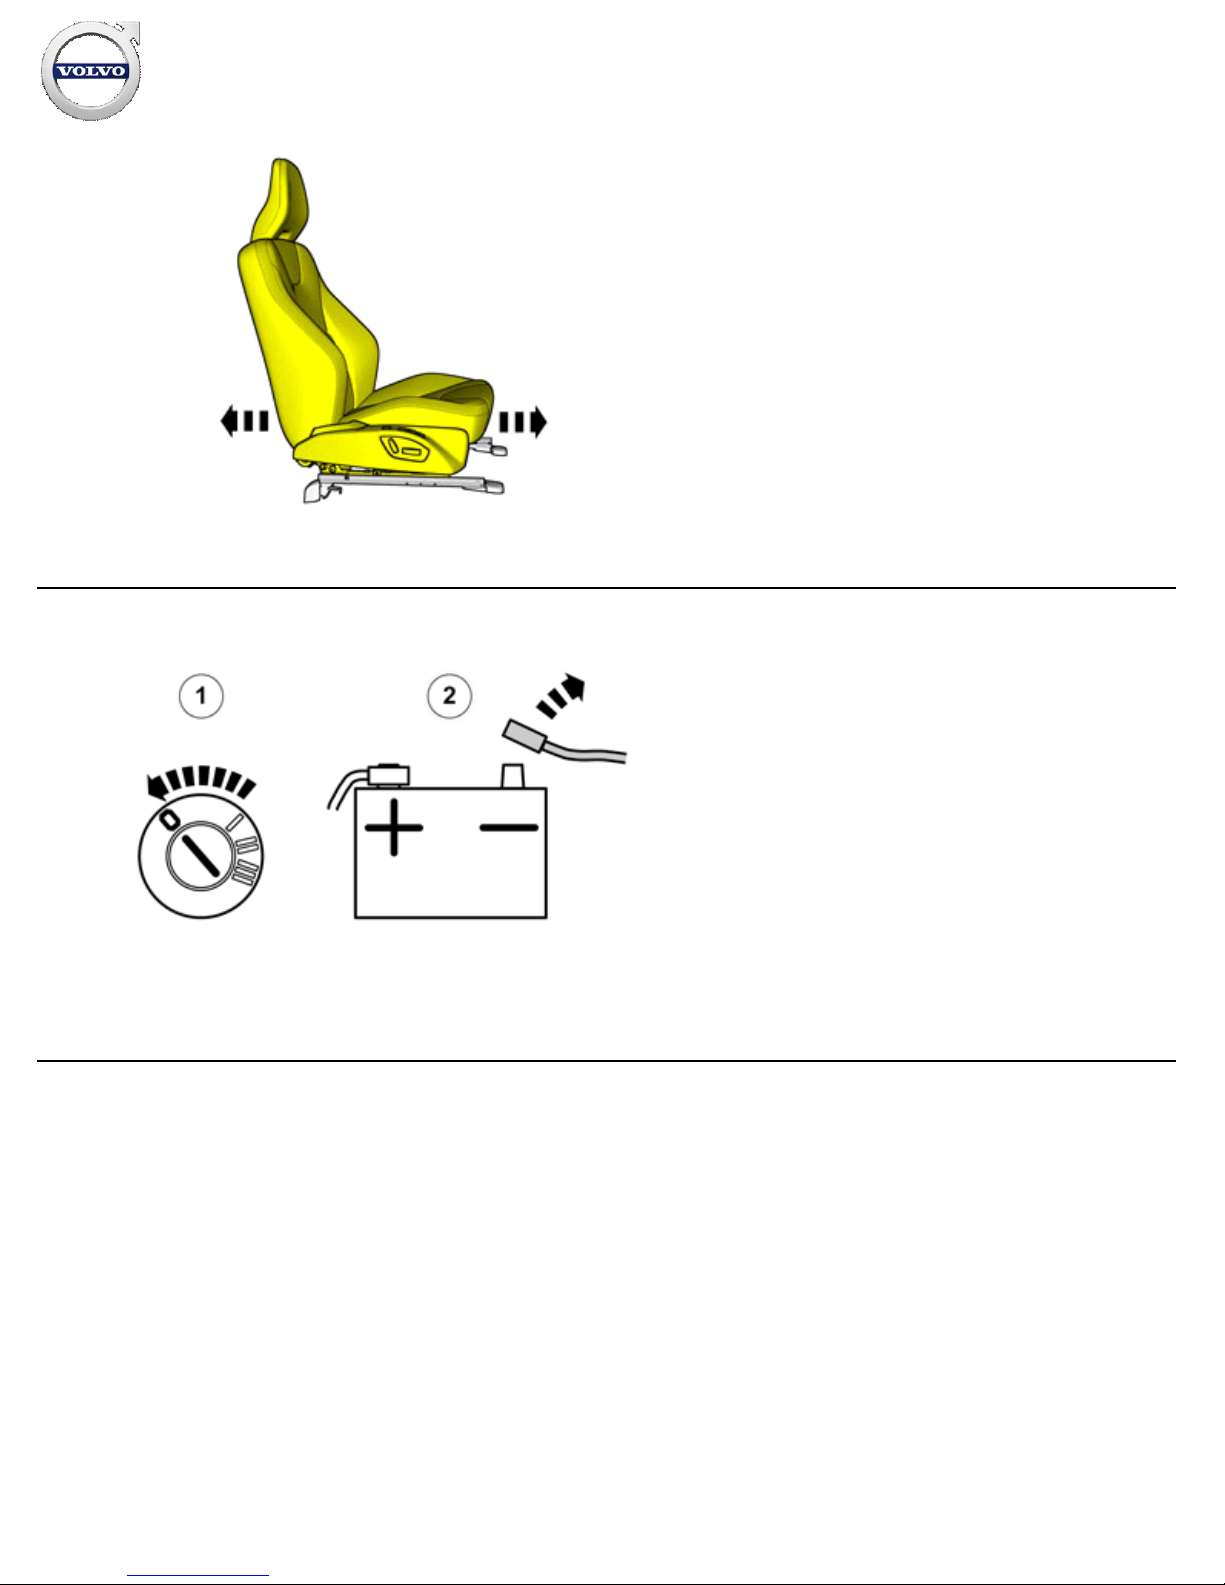
Adjust the seat to center position so that the seat fastening bolts
can be removed.
Repeat on the other side.
6
IMG-
332179
Set the ignition key to position 0.
1.
Remove the battery's negative cable.2.
Installation instructions, accessories
Volvo Car Corporation Gothenburg, Sweden
©
Volvo Car Corporation Multimedia system, RSE, two screens, with two players- 31414283 - V1.0
Strona 6 / 50
Page 7

7
IMG-
329148
8
IMG-
340979
Installation instructions, accessories
Volvo Car Corporation Gothenburg, Sweden
©
Volvo Car Corporation Multimedia system, RSE, two screens, with two players- 31414283 - V1.0
Strona 7 / 50
Page 8
9
IMG-
340980
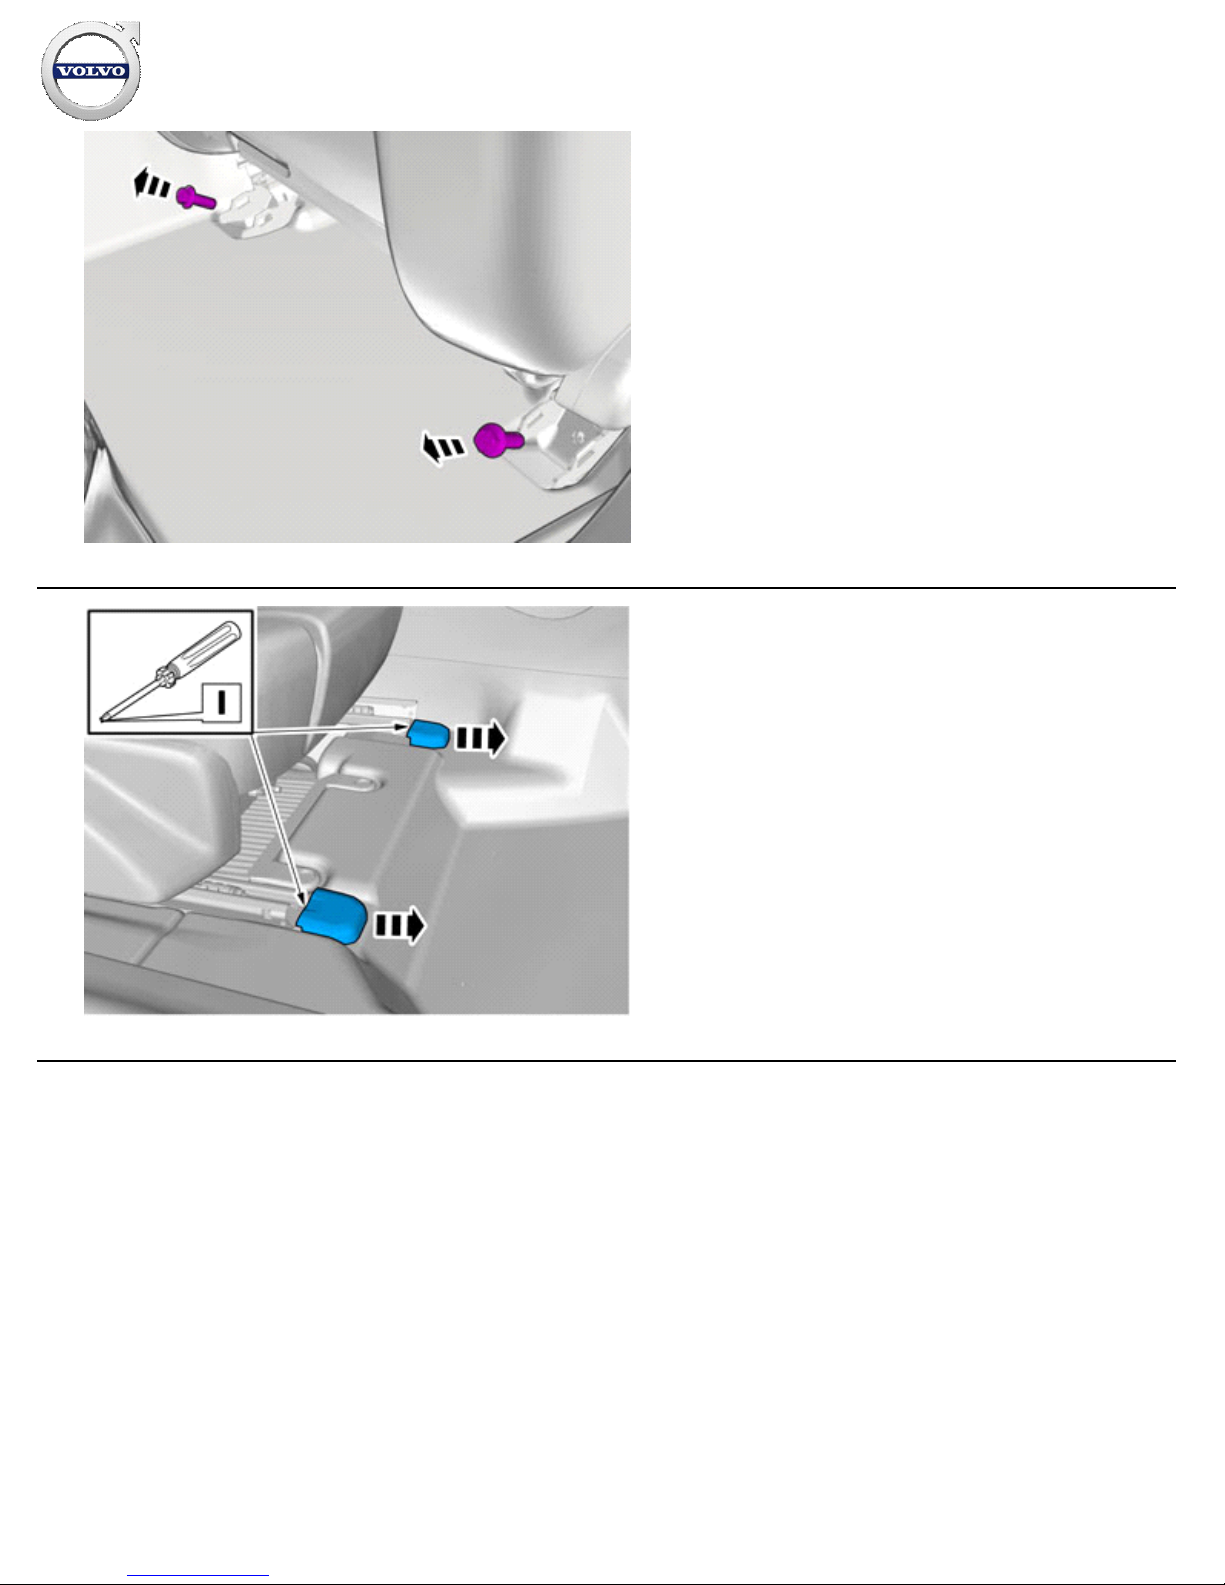
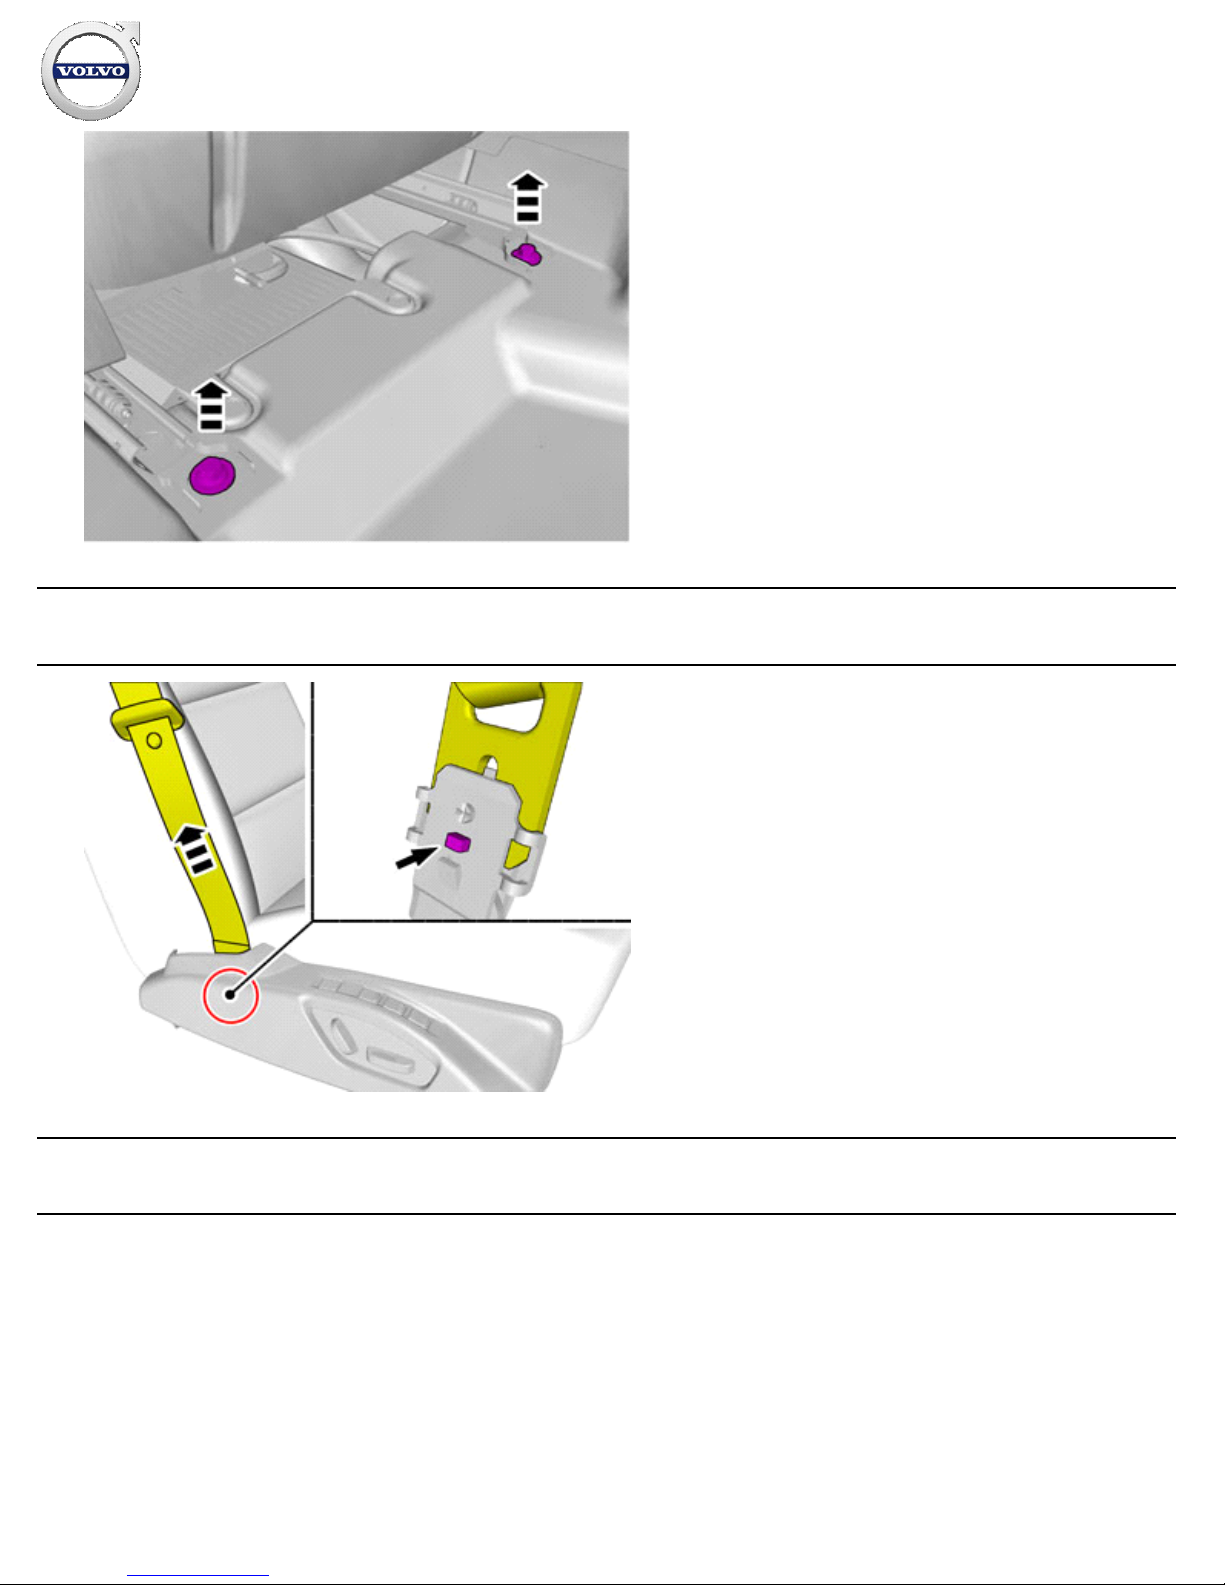
Remove the screws.
10
IMG-
303005
Installation instructions, accessories
Volvo Car Corporation Gothenburg, Sweden
©
Volvo Car Corporation Multimedia system, RSE, two screens, with two players- 31414283 - V1.0
Strona 8 / 50
Page 9
11
IMG-
303006
Remove the screws.
Alternative 1
12
IMG-
380657
Alternative 2
Installation instructions, accessories
Volvo Car Corporation Gothenburg, Sweden
©
Volvo Car Corporation Multimedia system, RSE, two screens, with two players- 31414283 - V1.0
Strona 9 / 50
Page 10

13
IMG-
380655
14
IMG-
380656
All vehicles
Installation instructions, accessories
Volvo Car Corporation Gothenburg, Sweden
©
Volvo Car Corporation Multimedia system, RSE, two screens, with two players- 31414283 - V1.0
Strona 10 / 50
Page 11

15
IMG-
329151
16
IMG-
373198
Note!
Orientation view
Installation instructions, accessories
Volvo Car Corporation Gothenburg, Sweden
©
Volvo Car Corporation Multimedia system, RSE, two screens, with two players- 31414283 - V1.0
Strona 11 / 50
Page 12

17
IMG-
329209
Remove the screws.
Disconnect the connector.
18
IMG-
329153
Caution!
Be extra careful when removing or installing this component.
Installation instructions, accessories
Volvo Car Corporation Gothenburg, Sweden
©
Volvo Car Corporation Multimedia system, RSE, two screens, with two players- 31414283 - V1.0
Strona 12 / 50
Page 13

19
IMG-
358761
Use: Electrician's screwdriver
20
IMG-
358762
Installation instructions, accessories
Volvo Car Corporation Gothenburg, Sweden
©
Volvo Car Corporation Multimedia system, RSE, two screens, with two players- 31414283 - V1.0
Strona 13 / 50
Page 14

21
IMG-
377070
Repeat the steps when removing on opposite side.
Accessory installation
22
IMG-
382958
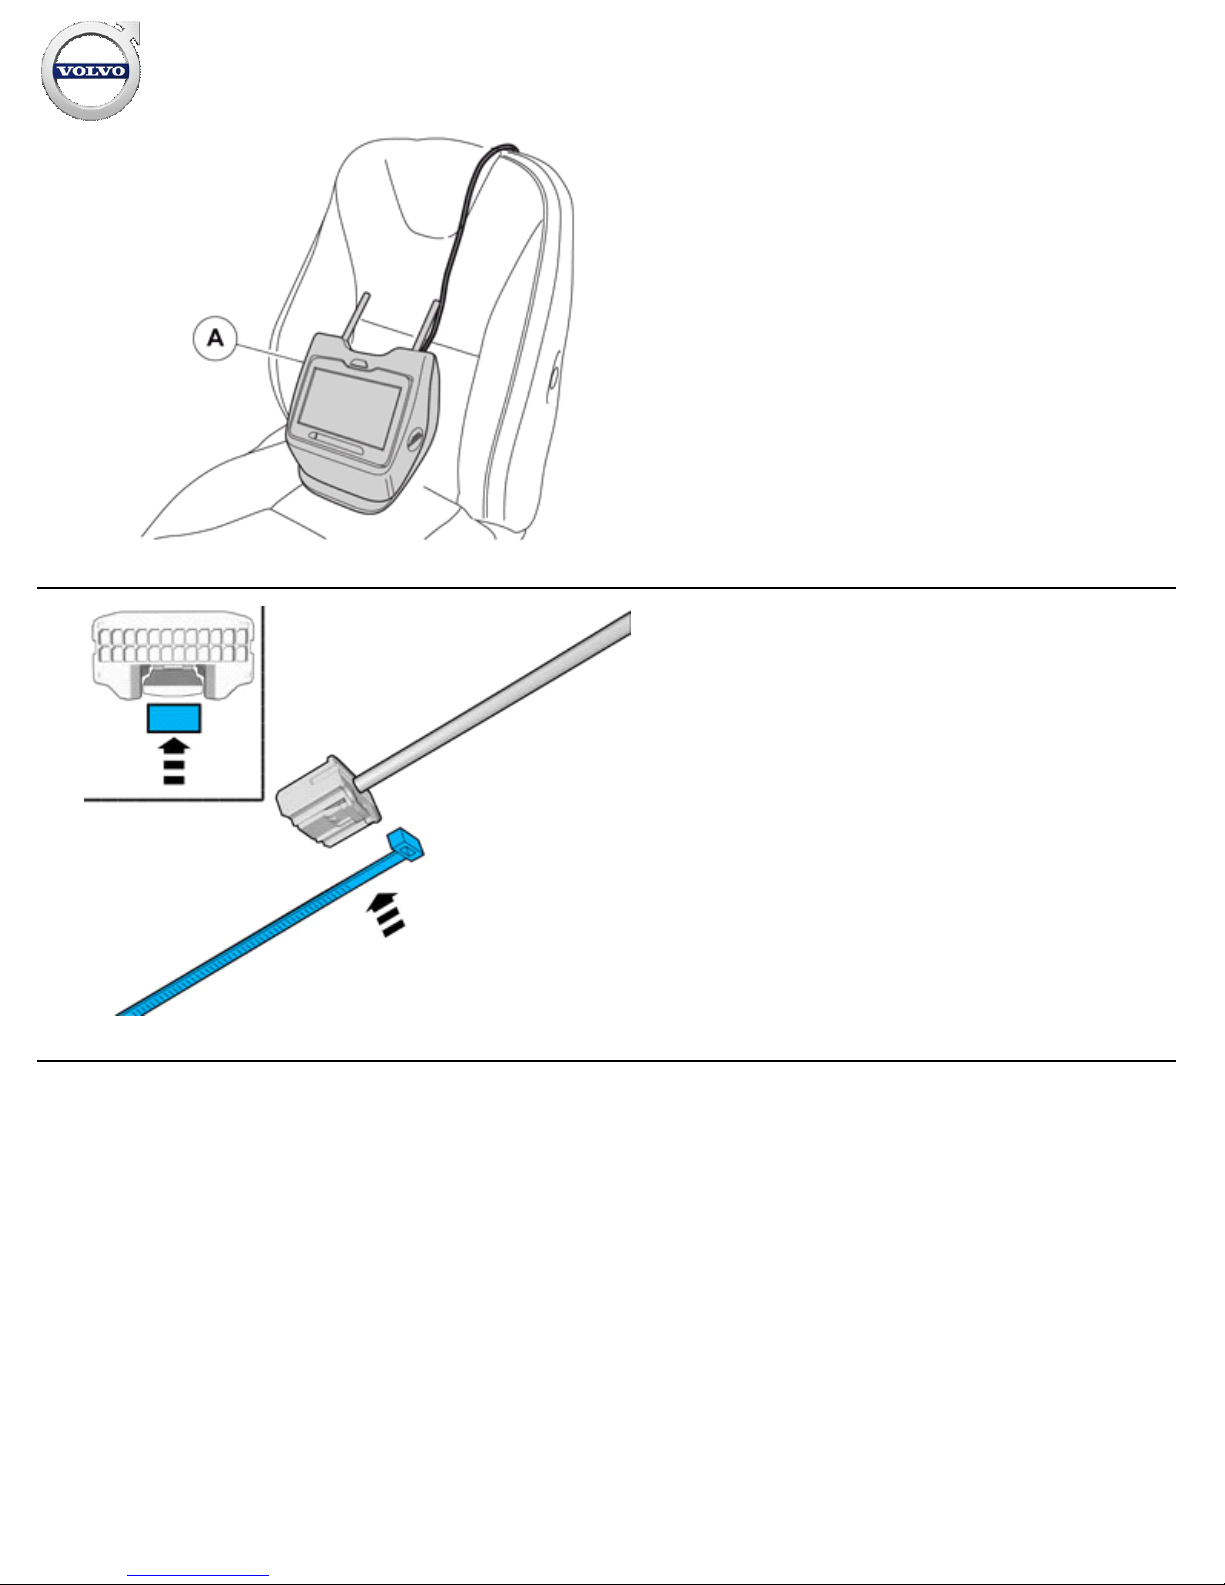
Thread the cable tie from the head restraint's inner mounting.
Route the cable tie inside the backrest between the upholstery's
thin foam and the impact protection.
Use:
988734, Cable tie, 750 mm
Installation instructions, accessories
Volvo Car Corporation Gothenburg, Sweden
©
Volvo Car Corporation Multimedia system, RSE, two screens, with two players- 31414283 - V1.0
Strona 14 / 50
Page 15
23
IMG-
380827
Place the component where indicated in the graphic.
24
IMG-
379510
Installation instructions, accessories
Volvo Car Corporation Gothenburg, Sweden
©
Volvo Car Corporation Multimedia system, RSE, two screens, with two players- 31414283 - V1.0
Strona 15 / 50
Page 16
25
IMG-
379514
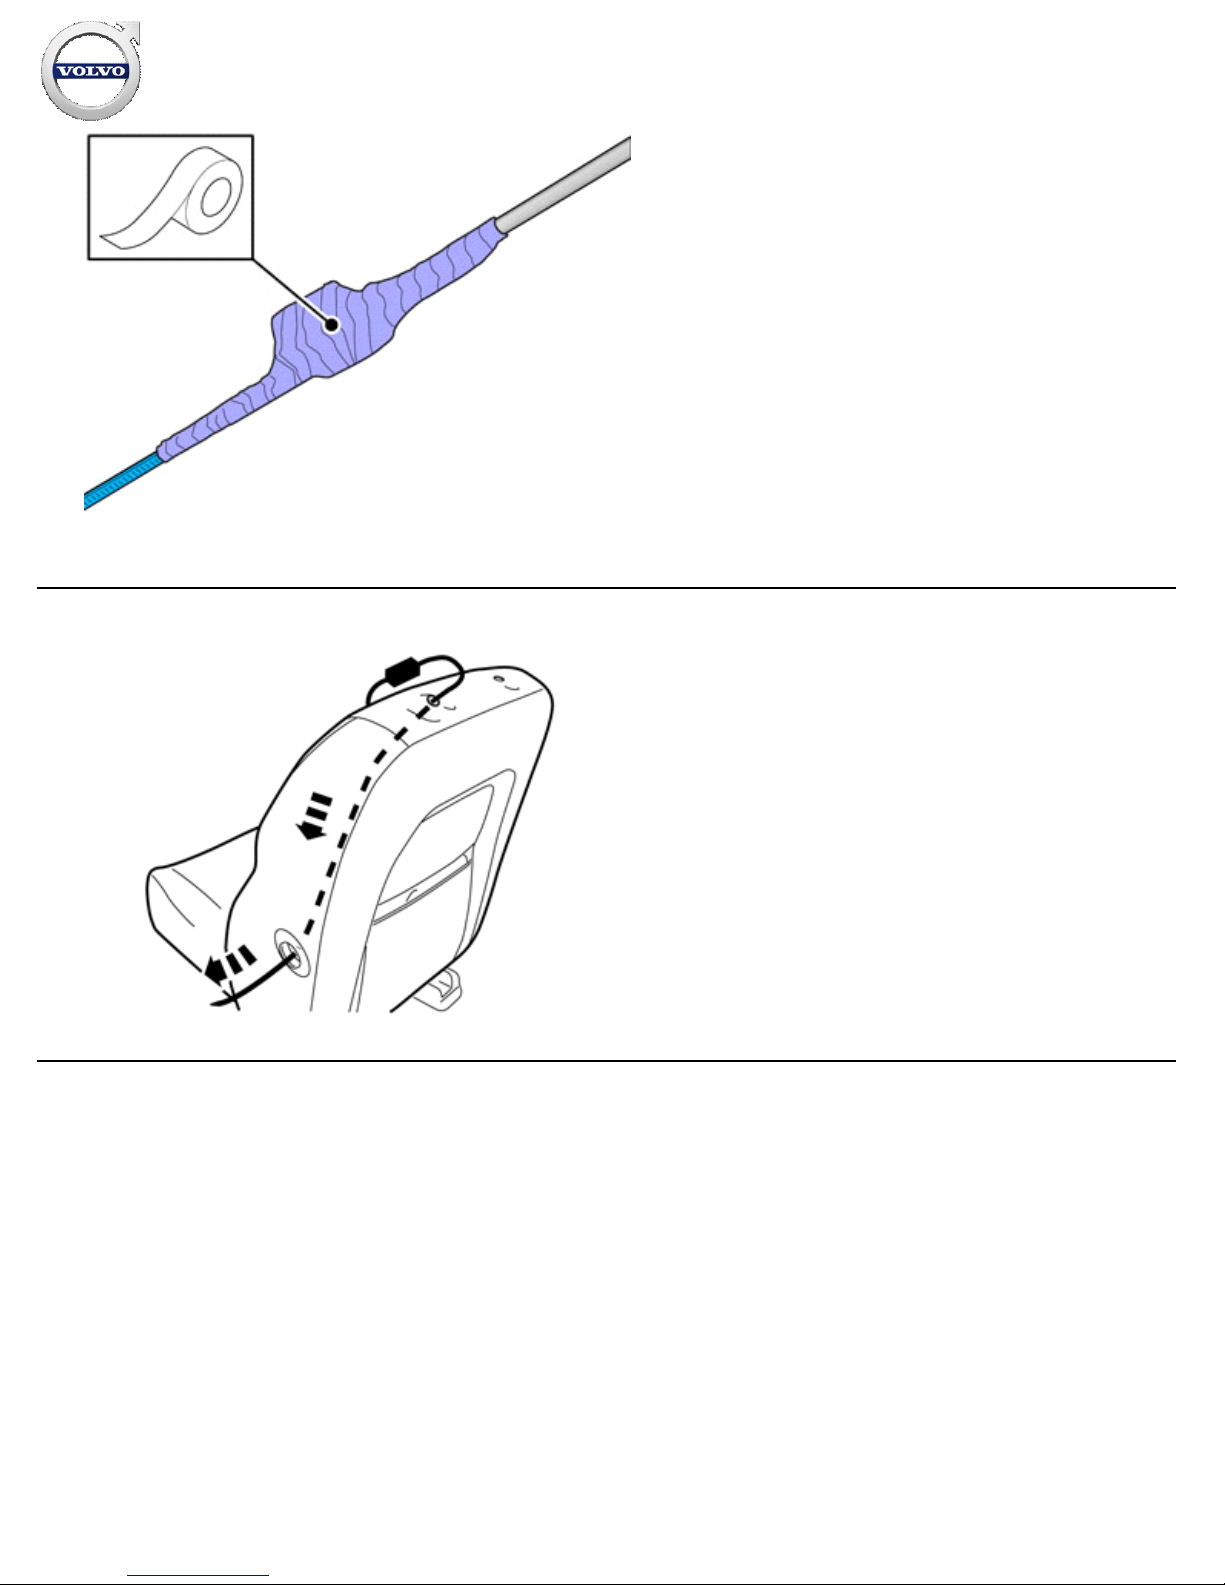
Use:
, Electrical tape
26
IMG-
382967
Pull the wiring through.
Installation instructions, accessories
Volvo Car Corporation Gothenburg, Sweden
©
Volvo Car Corporation Multimedia system, RSE, two screens, with two players- 31414283 - V1.0
Strona 16 / 50
Page 17
27
IMG-
382074
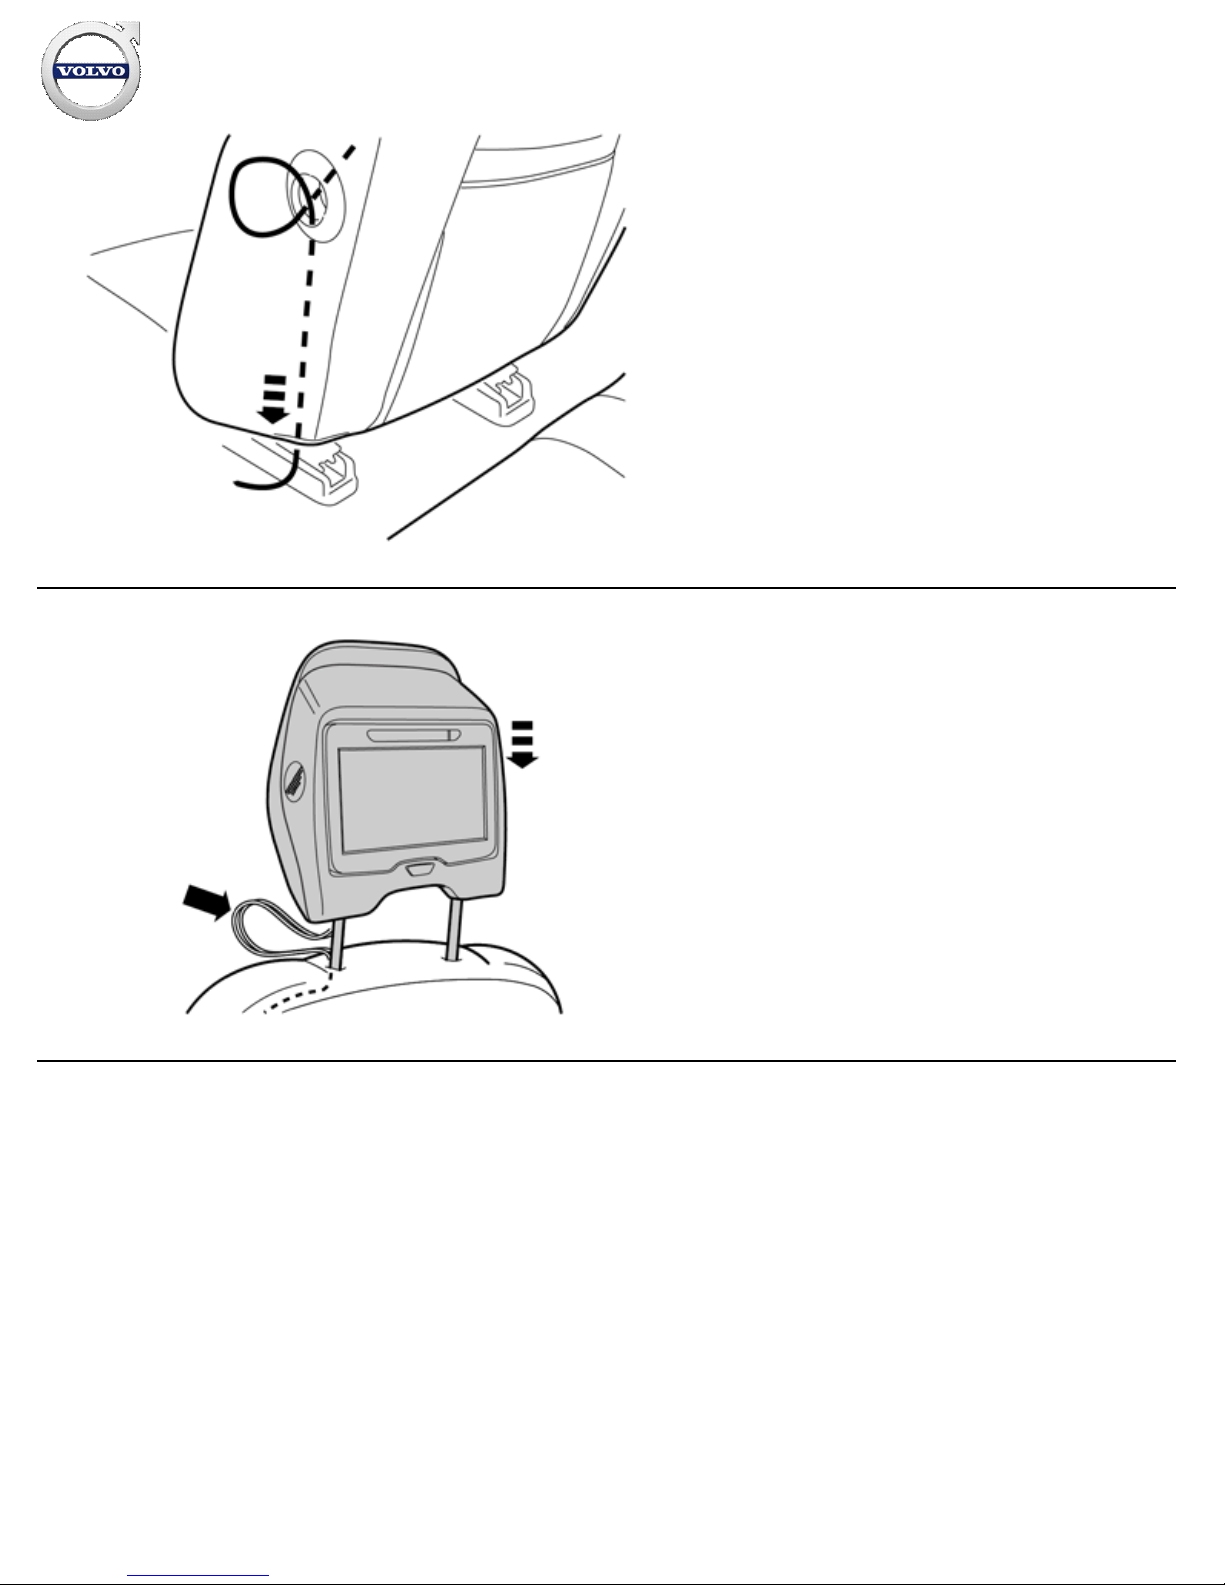
Pull the wiring through.
28
IMG-
380828
The cables must be positioned in front of the head restraint's
tube.
Installation instructions, accessories
Volvo Car Corporation Gothenburg, Sweden
©
Volvo Car Corporation Multimedia system, RSE, two screens, with two players- 31414283 - V1.0
Strona 17 / 50
Page 18
29
IMG-
380829
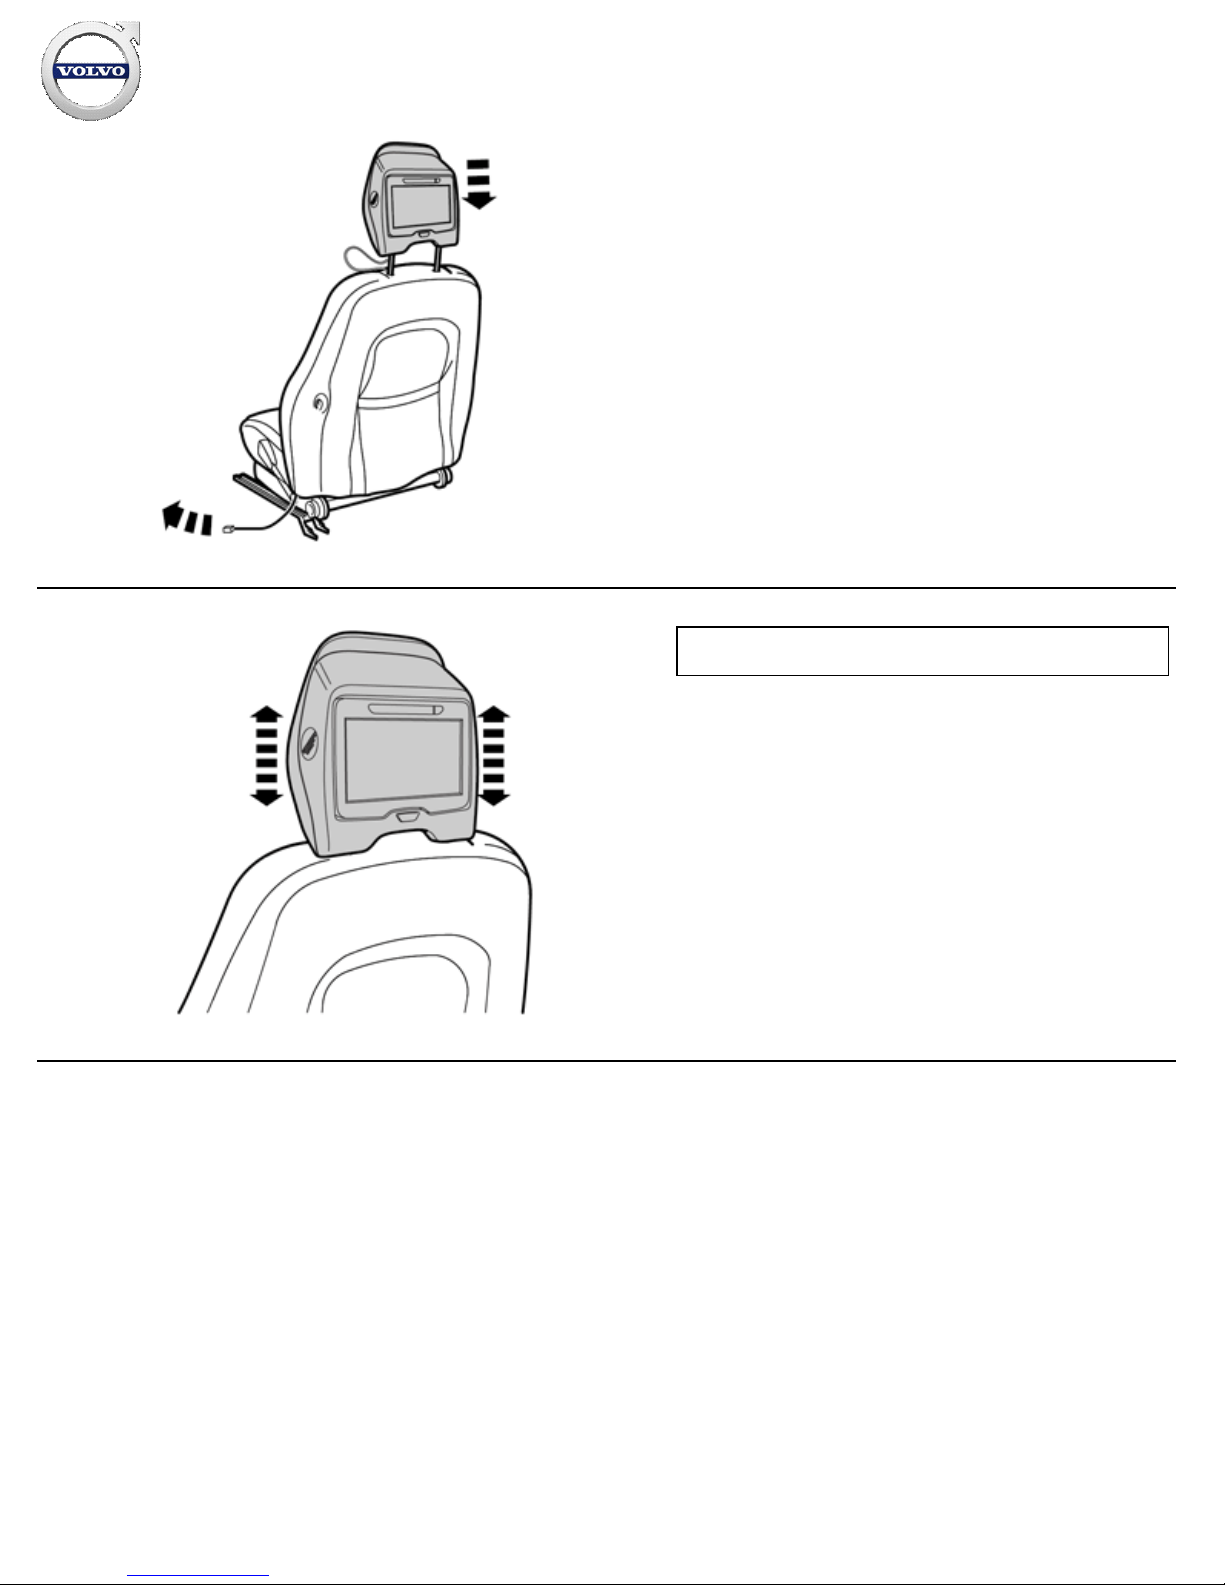
Pull the wiring through.
Remove the tape.
30
IMG-
380830
Caution!
Check that the component has locked in its bottom position.
Installation instructions, accessories
Volvo Car Corporation Gothenburg, Sweden
©
Volvo Car Corporation Multimedia system, RSE, two screens, with two players- 31414283 - V1.0
Strona 18 / 50
Page 19
31
IMG-
262956
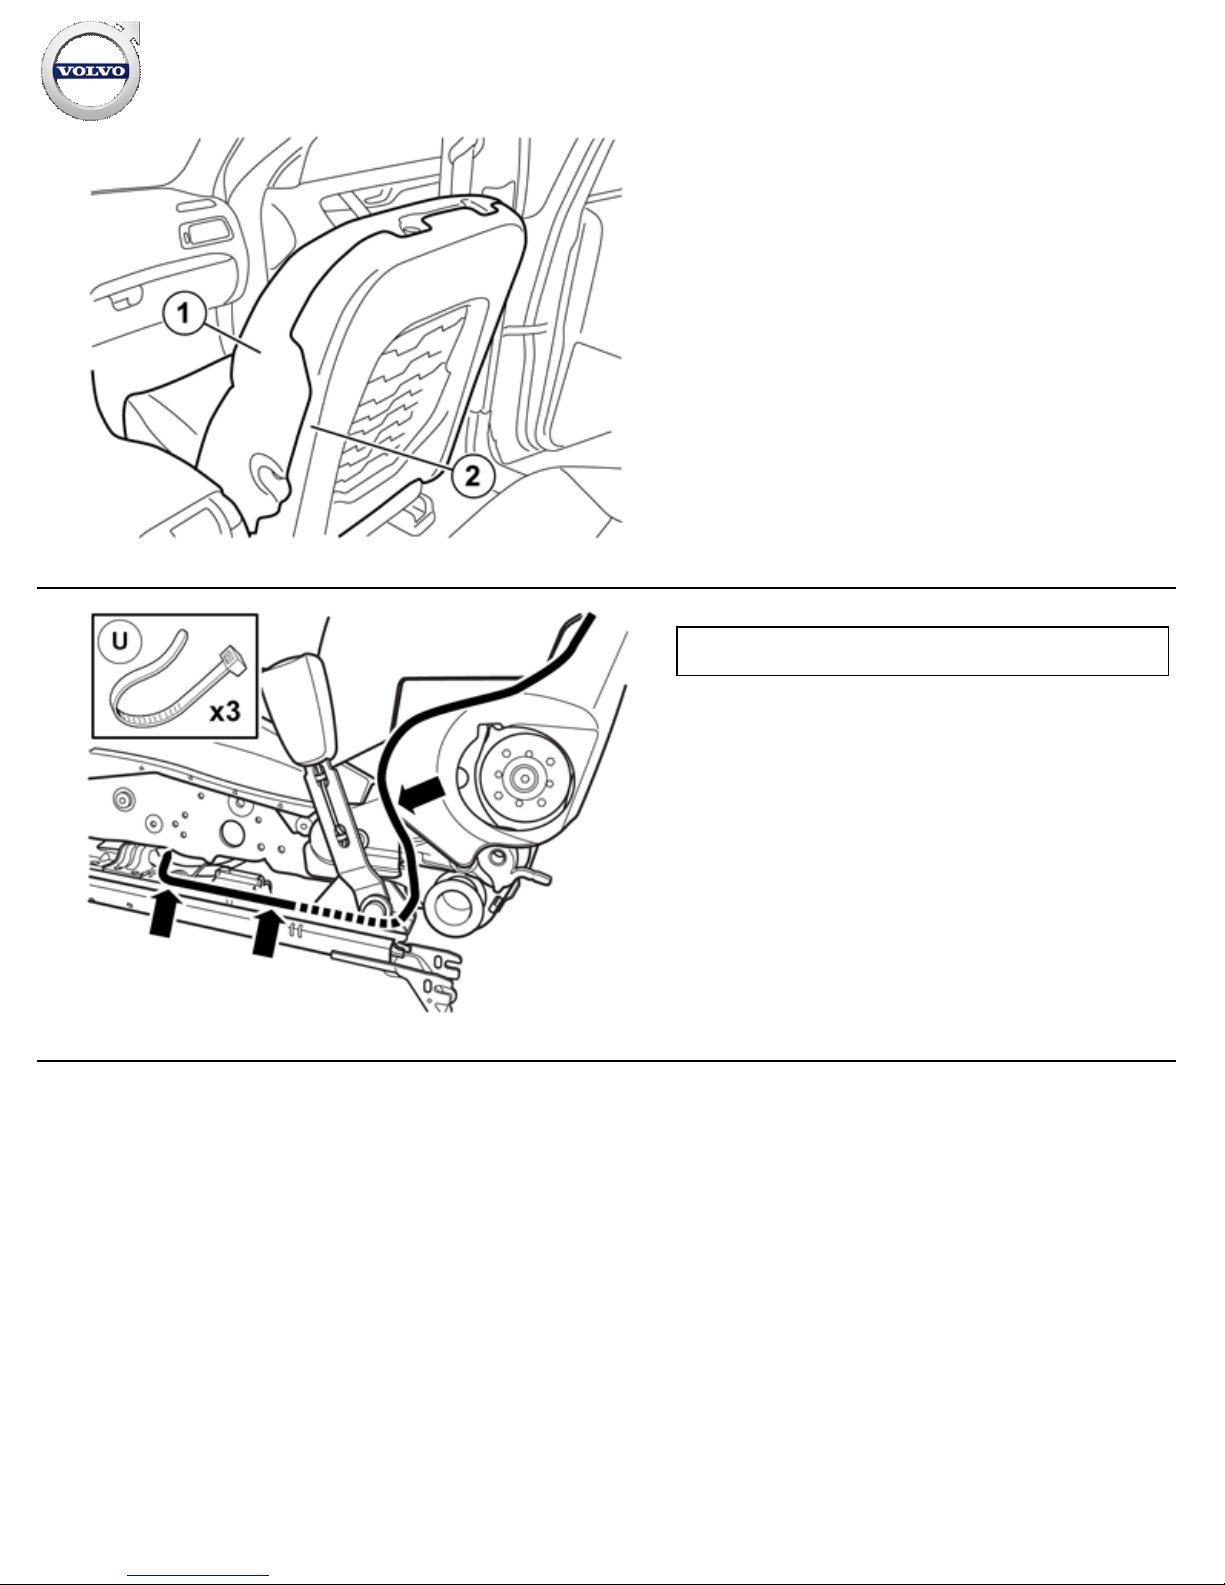
The image shows seat without upholstery.
Using your fingers, push the cable harness under the protective
pad. After installation, the cable harness must not appear under
the upholstery.
padding
1.
Protective pad2.
32
IMG-
373320
Caution!
Make sure that no part of the wiring harness is trapped.
Route the cable harness to the existing cable harness.
Install the cable.
Installation instructions, accessories
Volvo Car Corporation Gothenburg, Sweden
©
Volvo Car Corporation Multimedia system, RSE, two screens, with two players- 31414283 - V1.0
Strona 19 / 50
Page 20
33
IMG-
373201
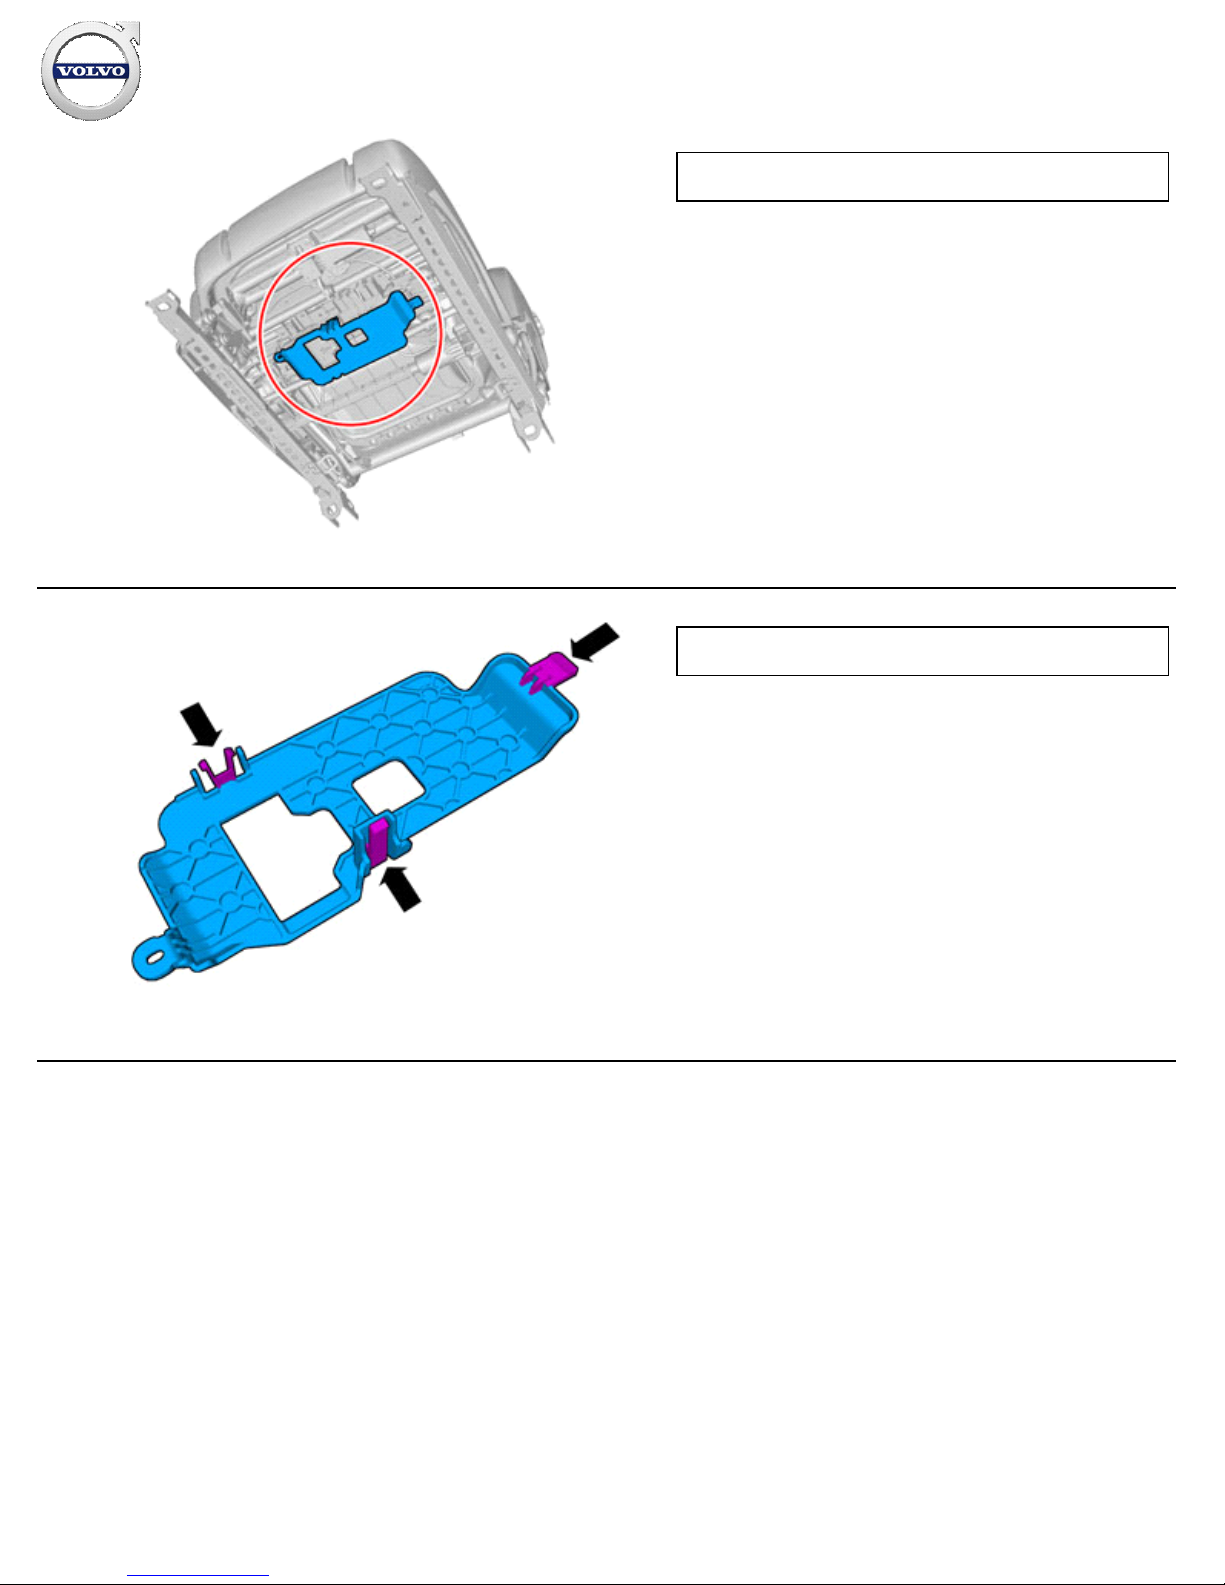
Note!
Orientation view
34
IMG-
373200
Note!
The graphic shows the back of the component before removal.
Installation instructions, accessories
Volvo Car Corporation Gothenburg, Sweden
©
Volvo Car Corporation Multimedia system, RSE, two screens, with two players- 31414283 - V1.0
Strona 20 / 50
Page 21
35
IMG-
373202
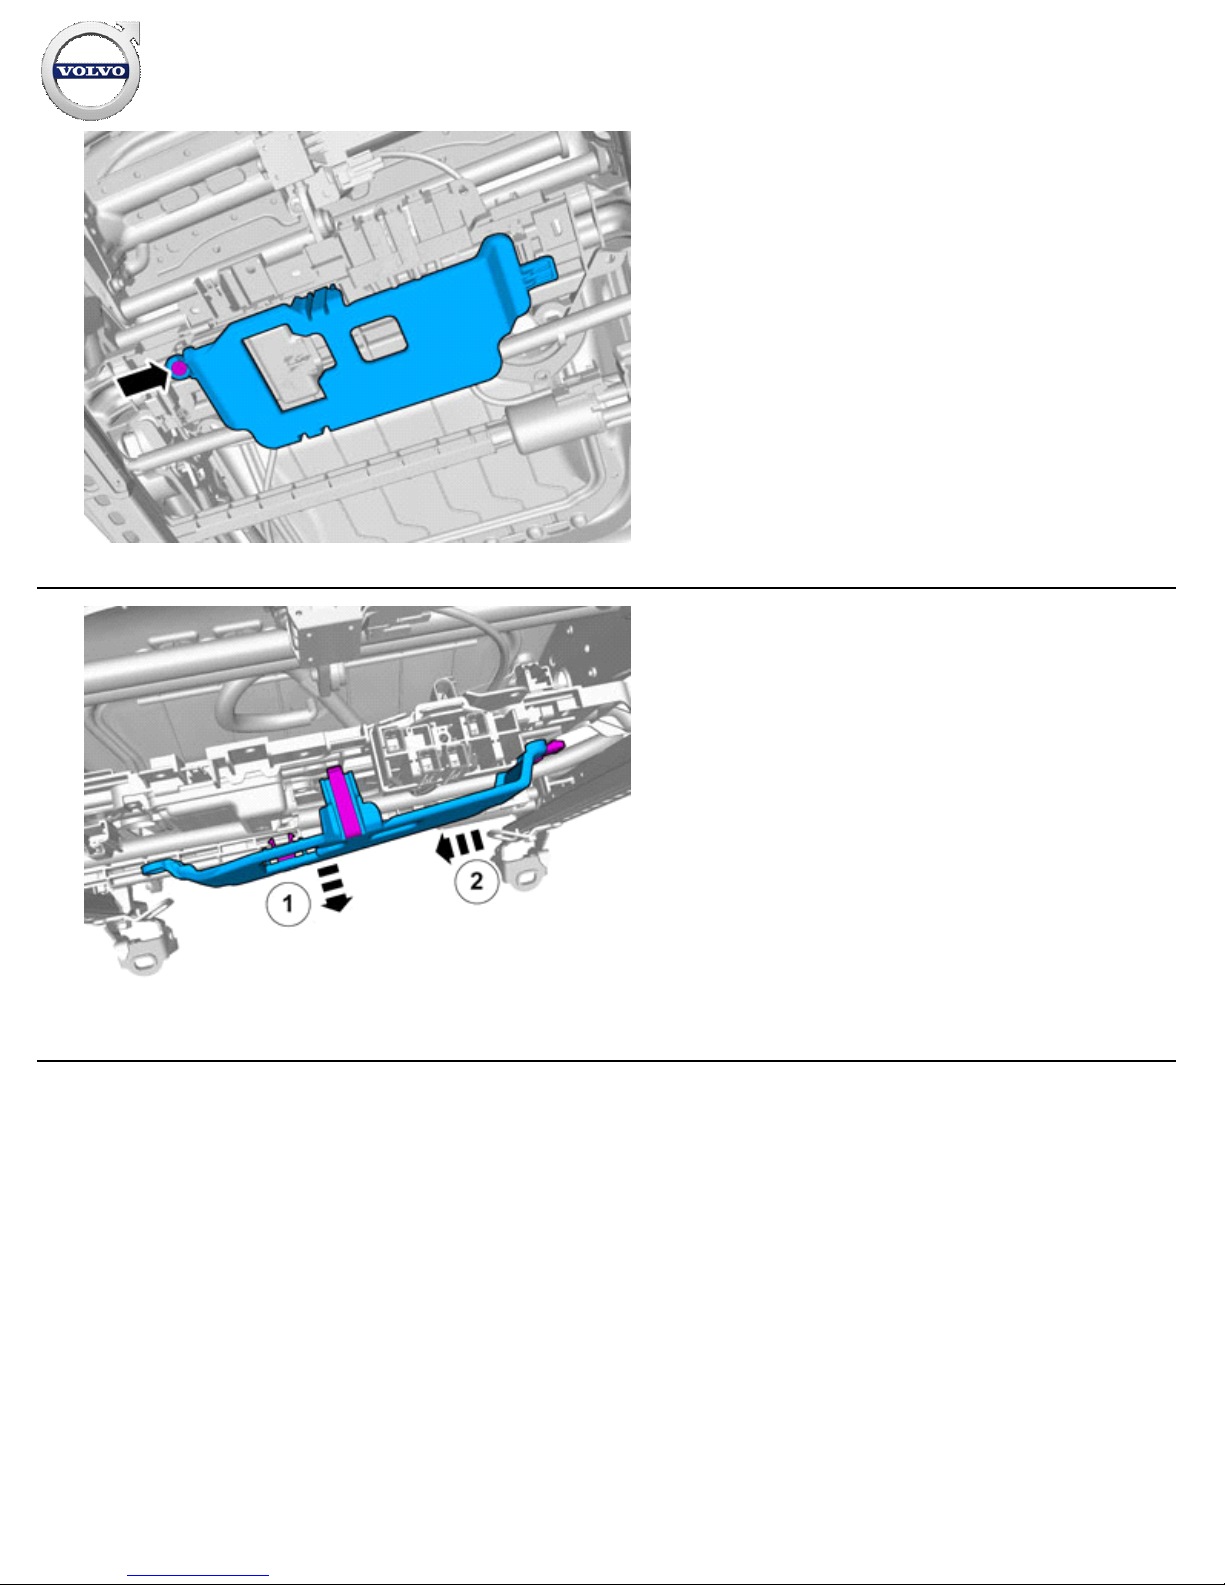
Remove the screw.
36
IMG-
373206
Installation instructions, accessories
Volvo Car Corporation Gothenburg, Sweden
©
Volvo Car Corporation Multimedia system, RSE, two screens, with two players- 31414283 - V1.0
Strona 21 / 50
Page 22
37
IMG-
380695
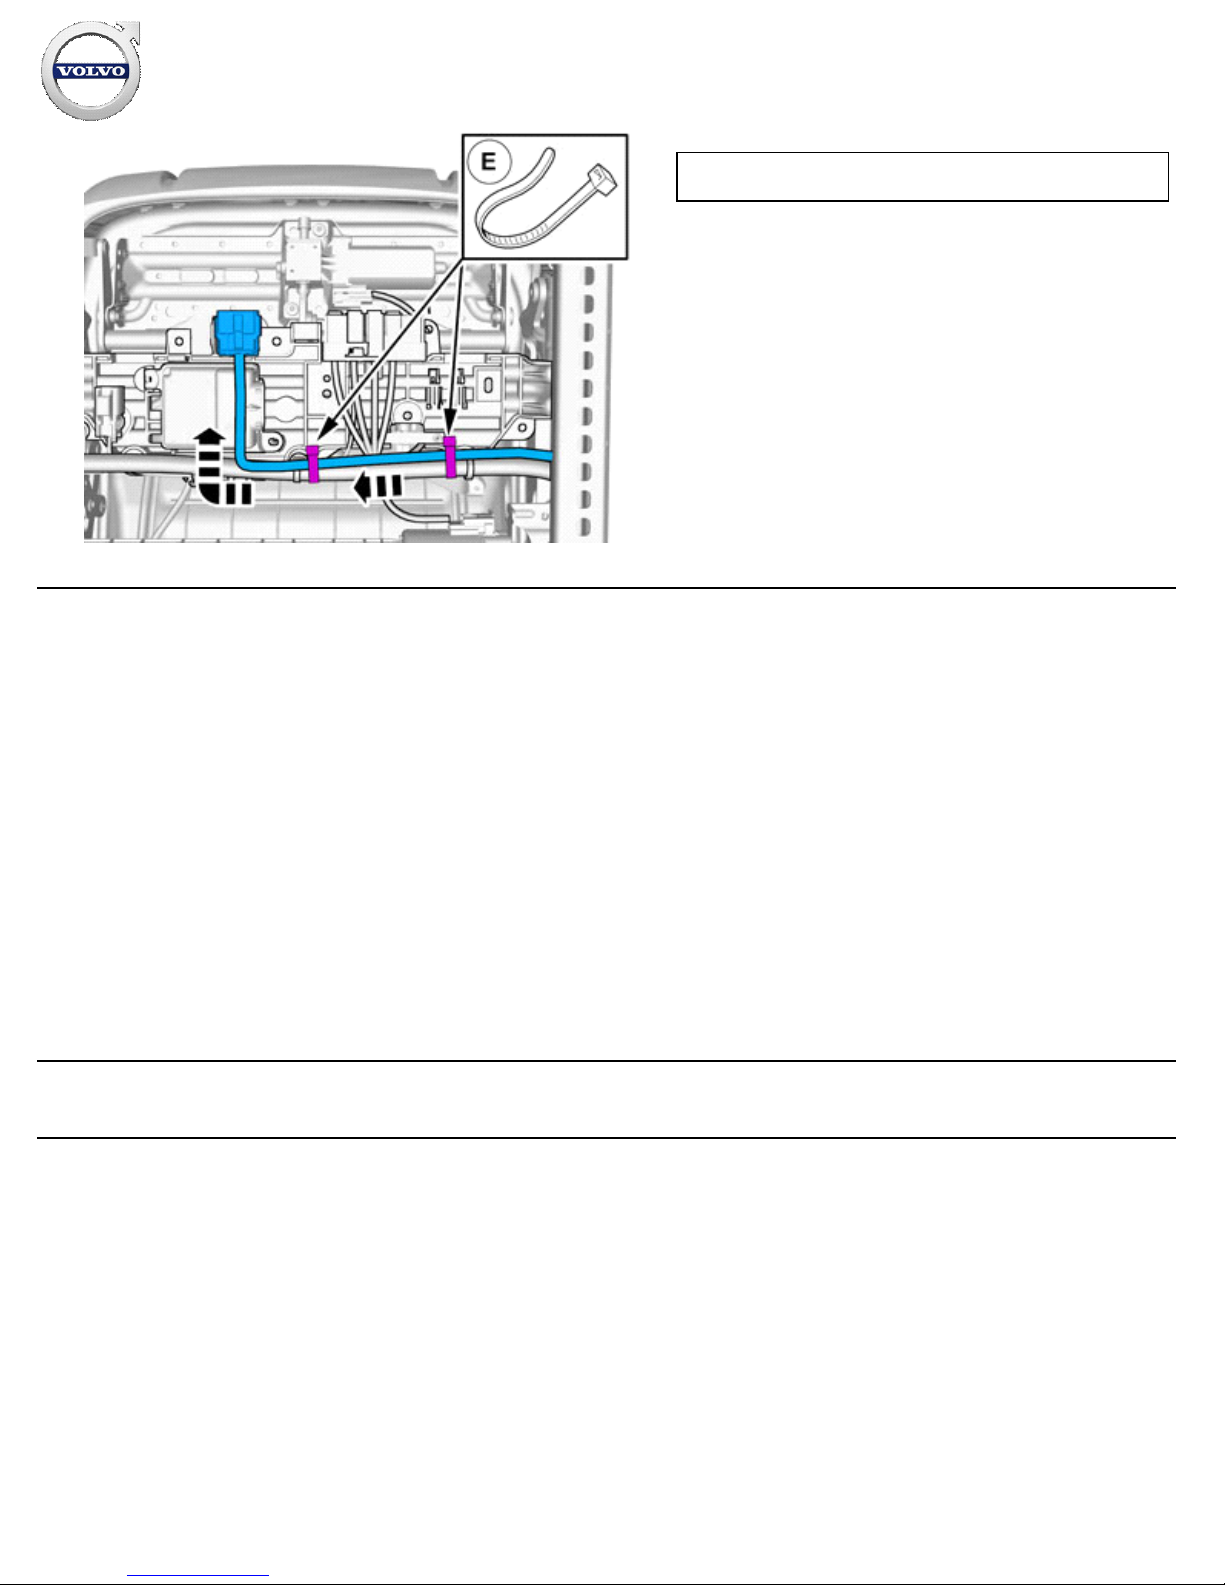
Note!
Extra cable length must be secured using cable ties.
Install the cable.
38
IMG-
377070
Repeat the steps when installing accessories on opposite side.
Removal
Installation instructions, accessories
Volvo Car Corporation Gothenburg, Sweden
©
Volvo Car Corporation Multimedia system, RSE, two screens, with two players- 31414283 - V1.0
Strona 22 / 50
Page 23
39
IMG-
341878
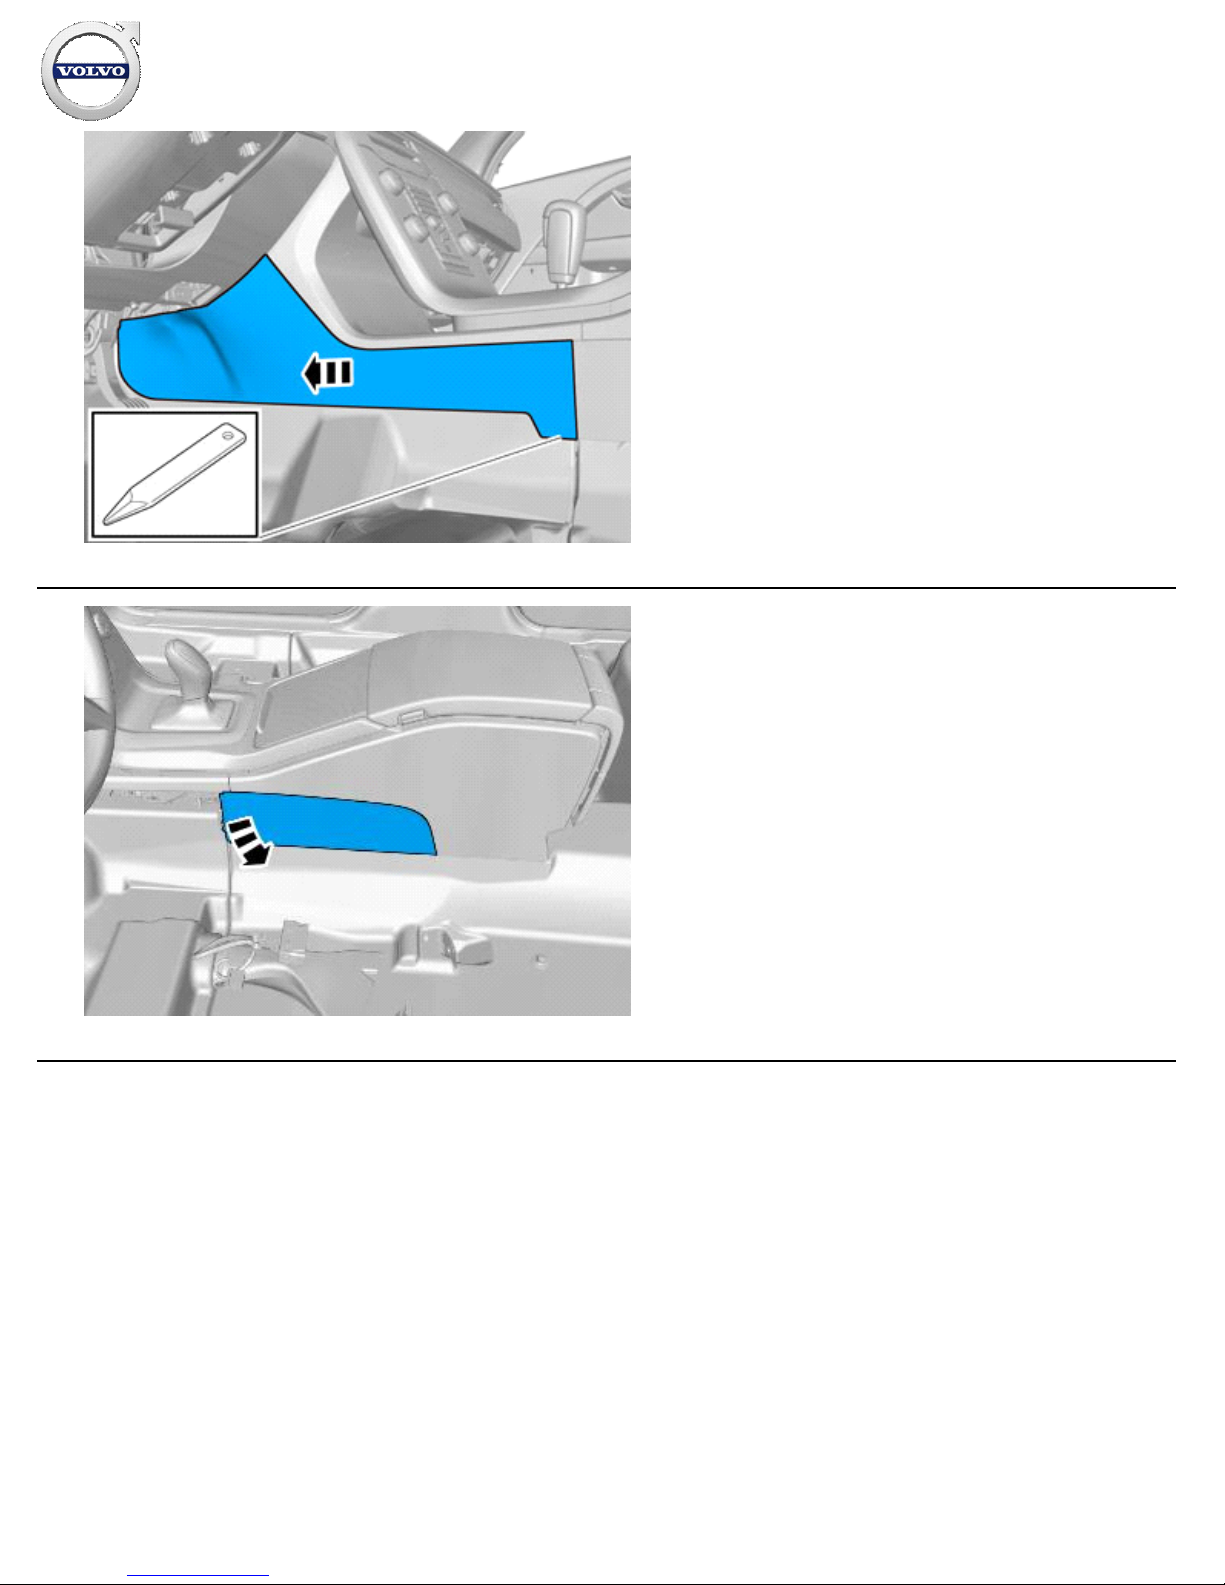
Remove the panel.
40
IMG-
384963
Remove the panel.
Installation instructions, accessories
Volvo Car Corporation Gothenburg, Sweden
©
Volvo Car Corporation Multimedia system, RSE, two screens, with two players- 31414283 - V1.0
Strona 23 / 50
Page 24
41
IMG-
347139
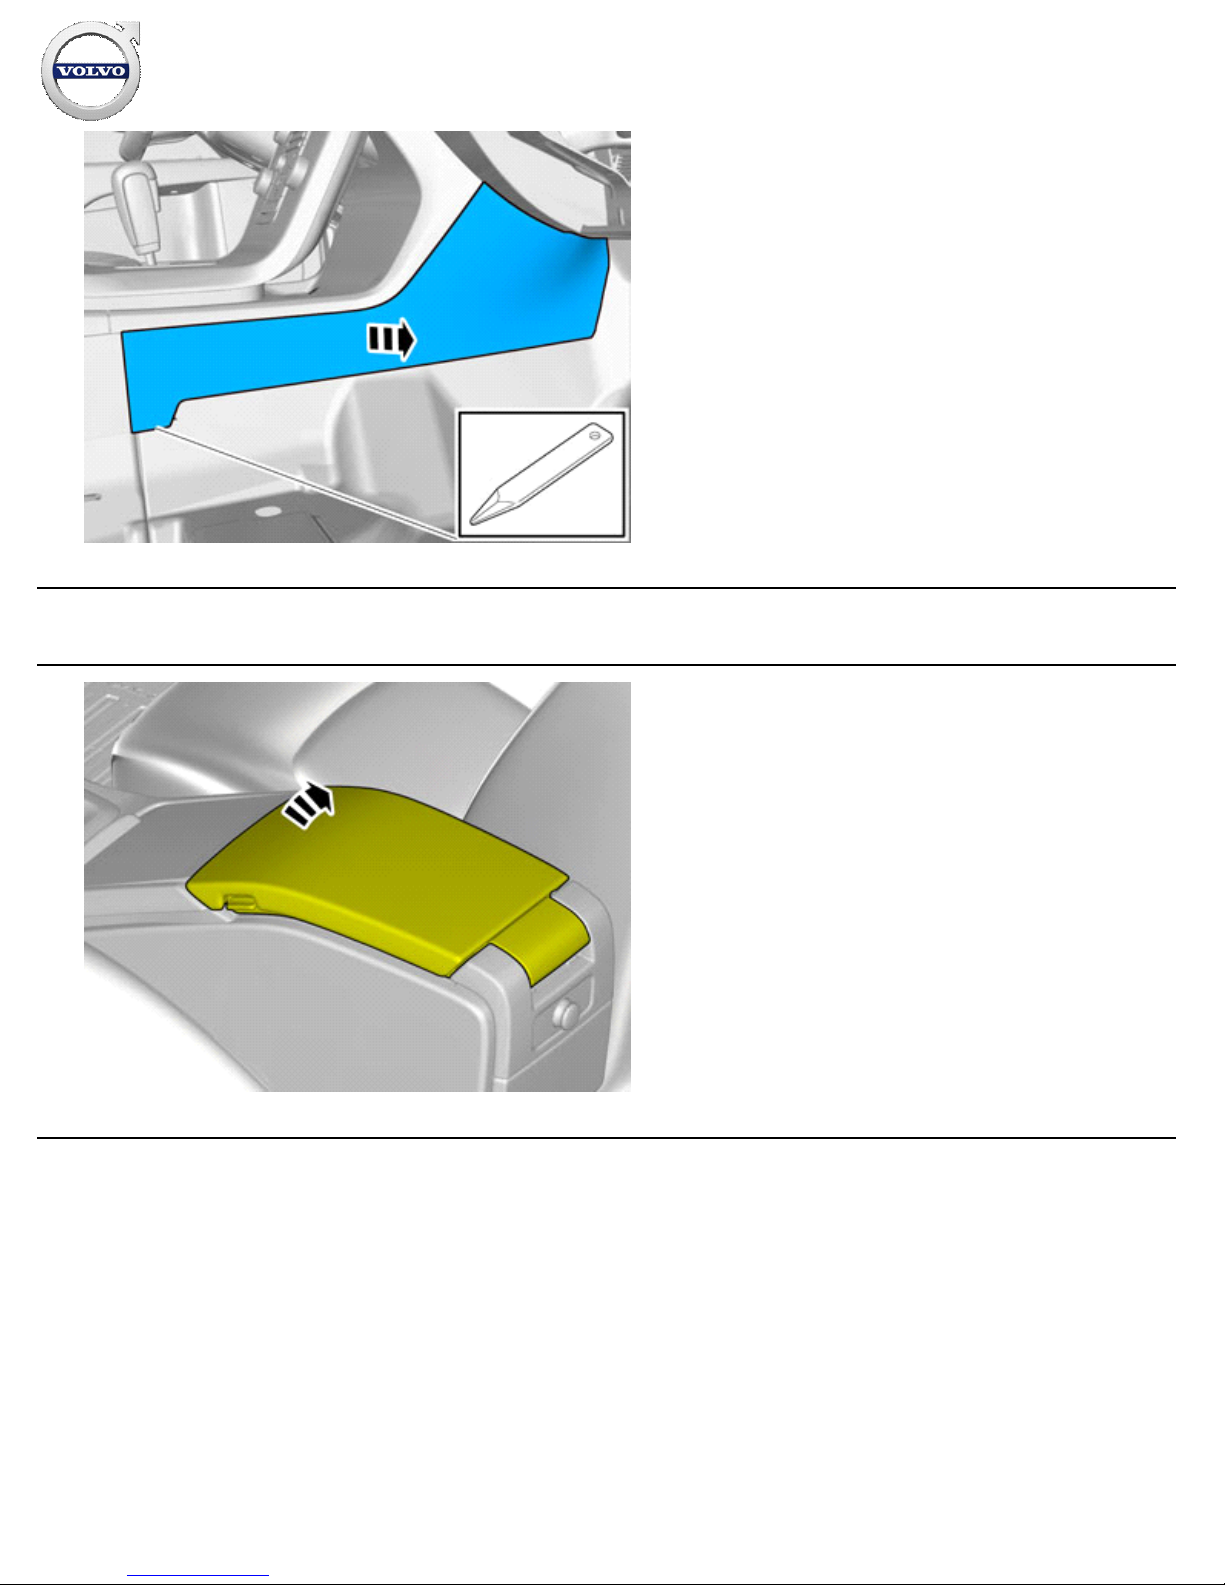
Remove the panel.
All vehicles
42
IMG-
353601
Installation instructions, accessories
Volvo Car Corporation Gothenburg, Sweden
©
Volvo Car Corporation Multimedia system, RSE, two screens, with two players- 31414283 - V1.0
Strona 24 / 50
Page 25
43
IMG-
353602
44
IMG-
355469
Installation instructions, accessories
Volvo Car Corporation Gothenburg, Sweden
©
Volvo Car Corporation Multimedia system, RSE, two screens, with two players- 31414283 - V1.0
Strona 25 / 50
Page 26
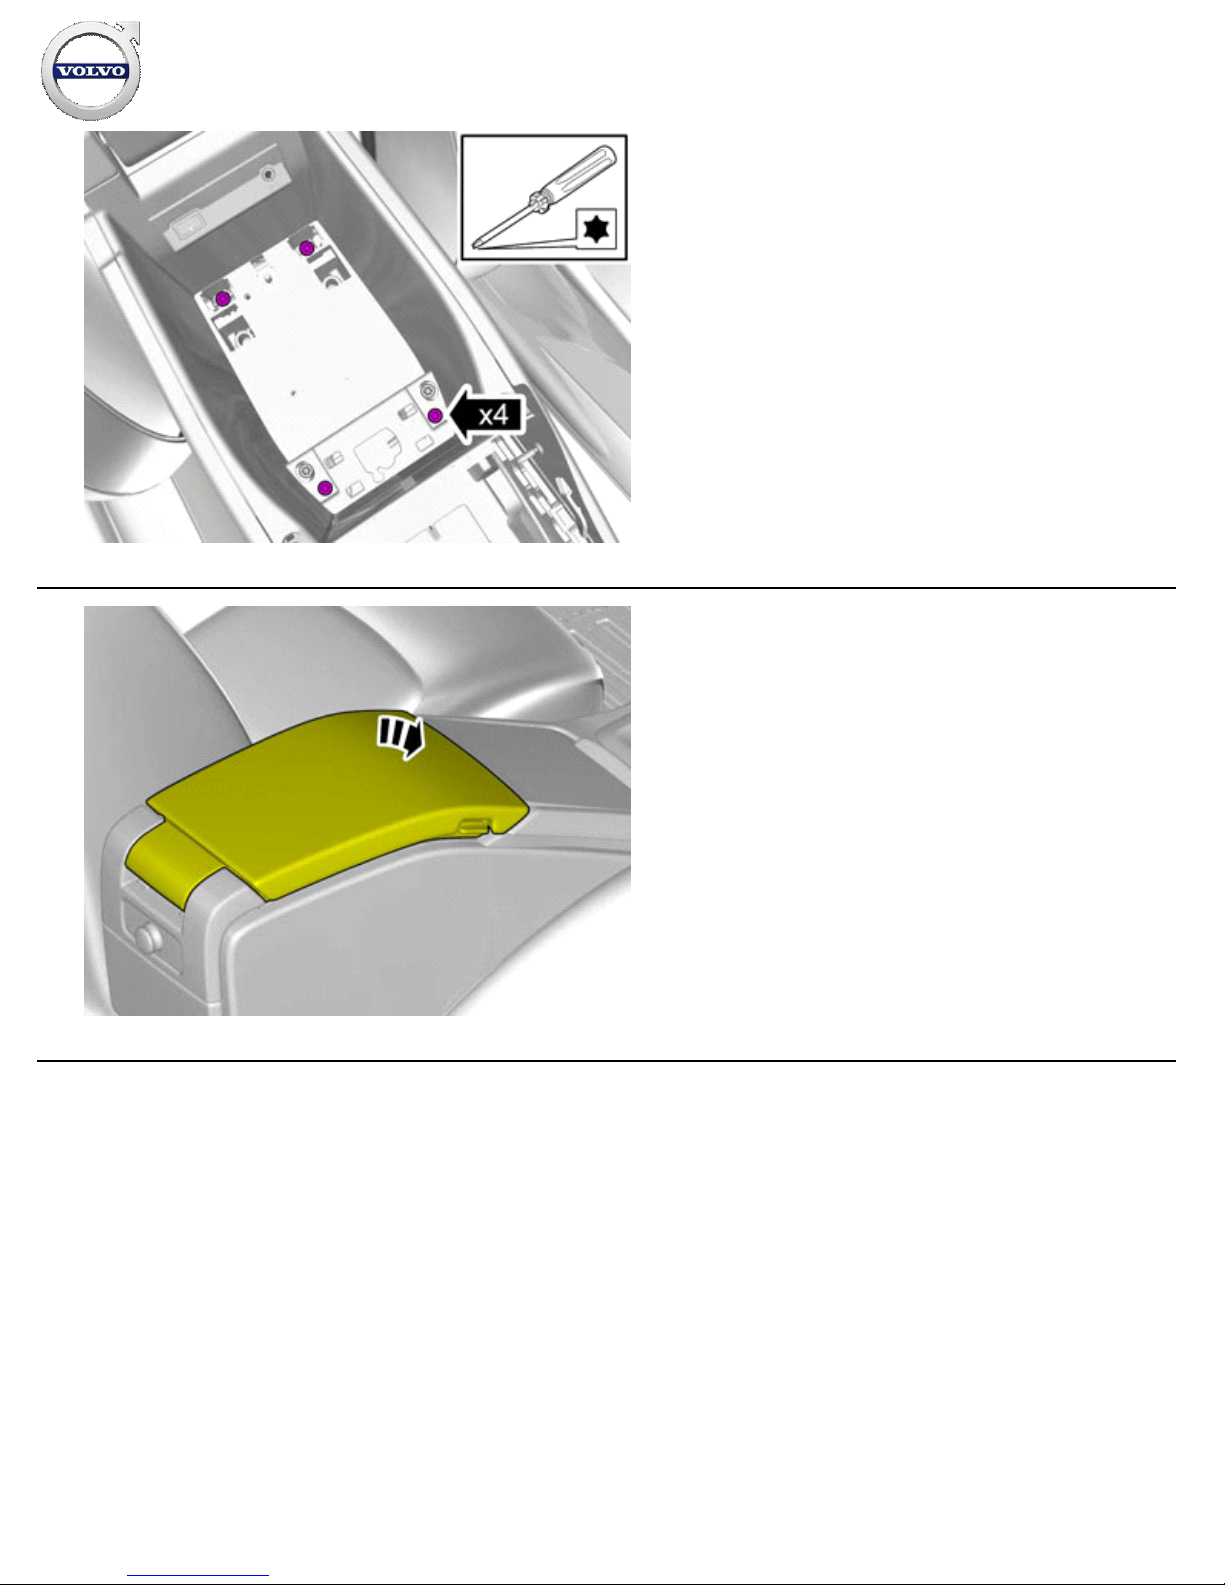
45
IMG-
355457
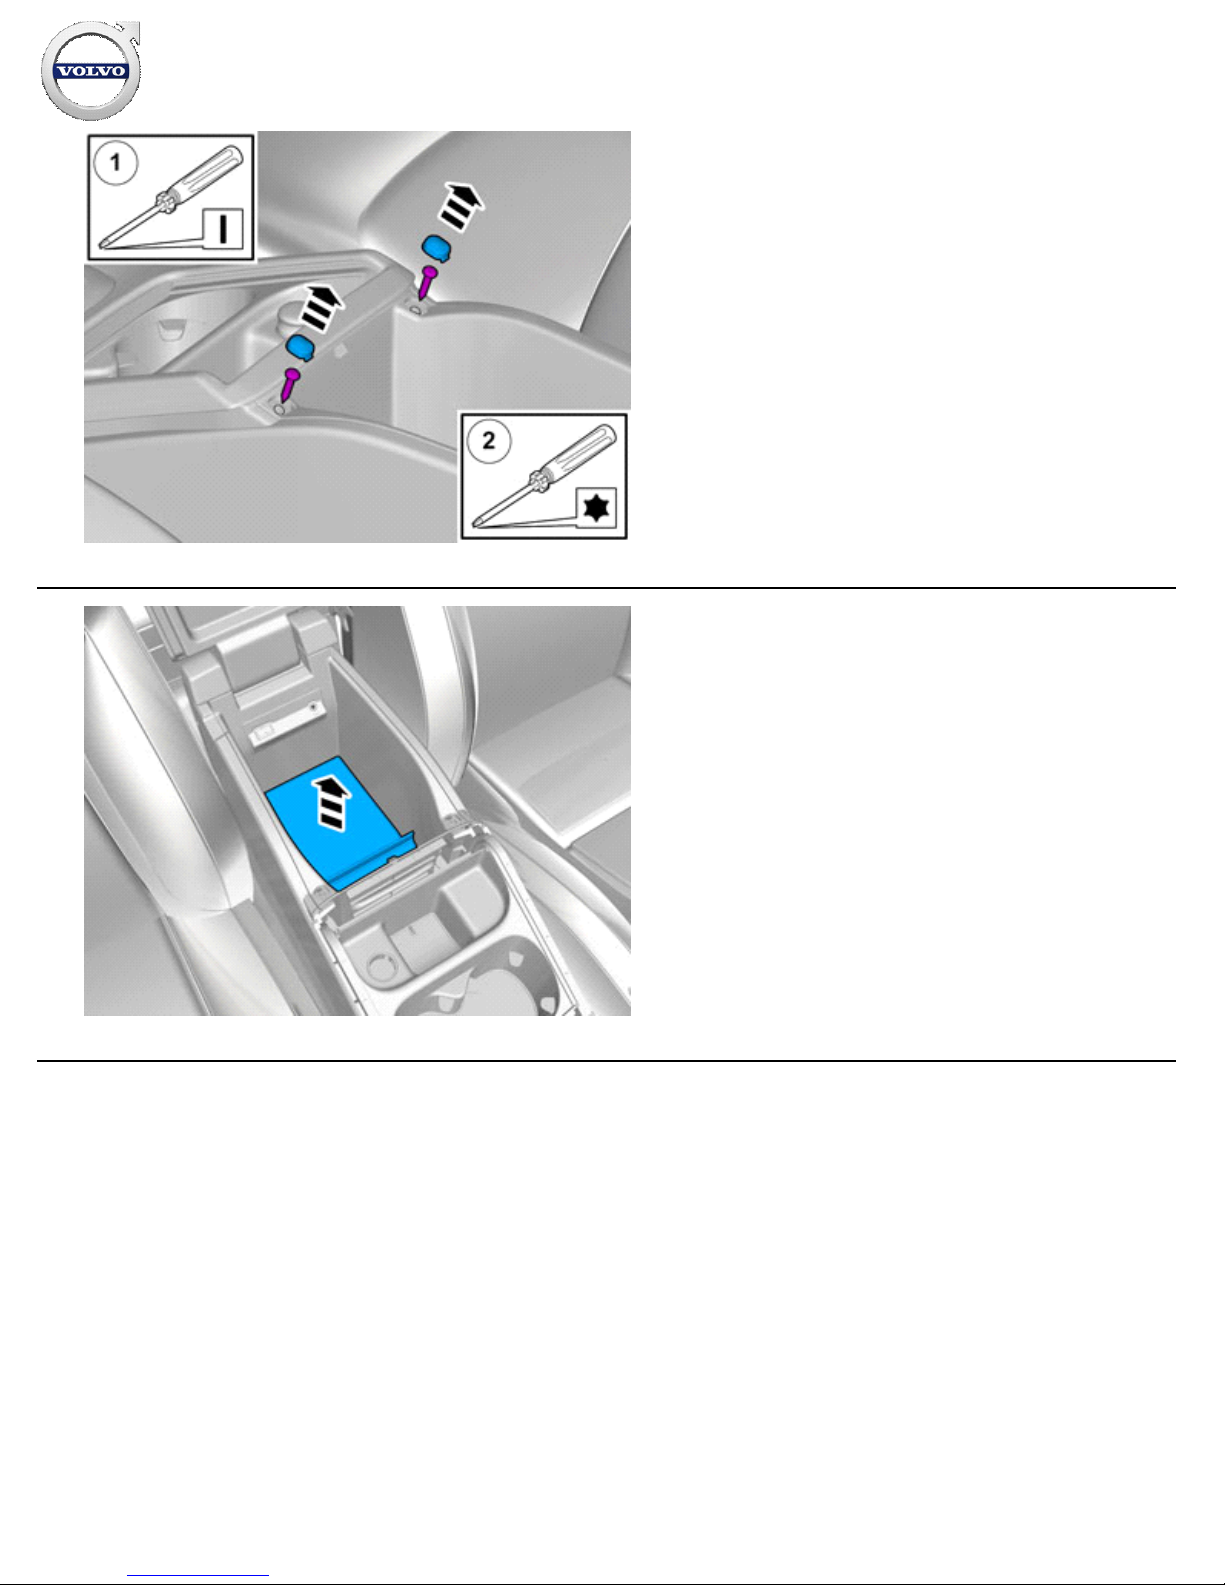
Remove the screws.
46
IMG-
382341
Installation instructions, accessories
Volvo Car Corporation Gothenburg, Sweden
©
Volvo Car Corporation Multimedia system, RSE, two screens, with two players- 31414283 - V1.0
Strona 26 / 50
Page 27
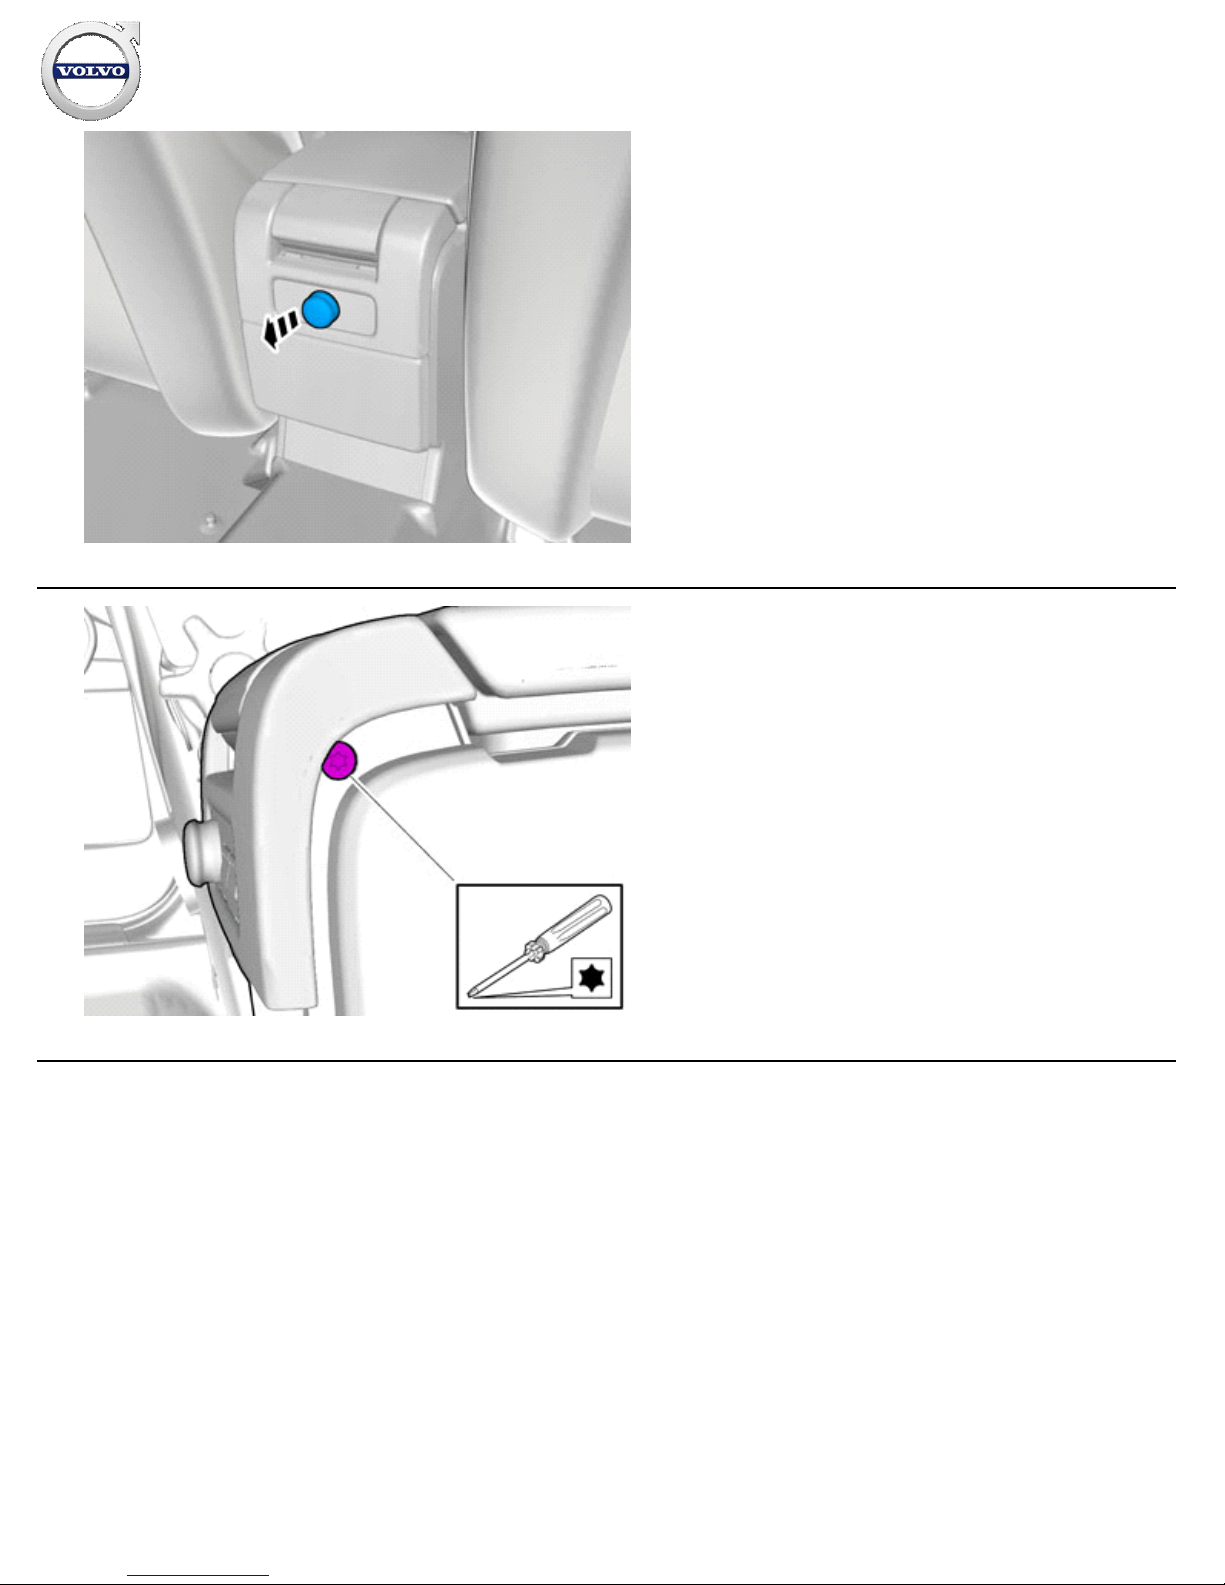
47
IMG-
382345
48
IMG-
352301
Remove the screw.
Repeat on the other side.
Installation instructions, accessories
Volvo Car Corporation Gothenburg, Sweden
©
Volvo Car Corporation Multimedia system, RSE, two screens, with two players- 31414283 - V1.0
Strona 27 / 50
Page 28
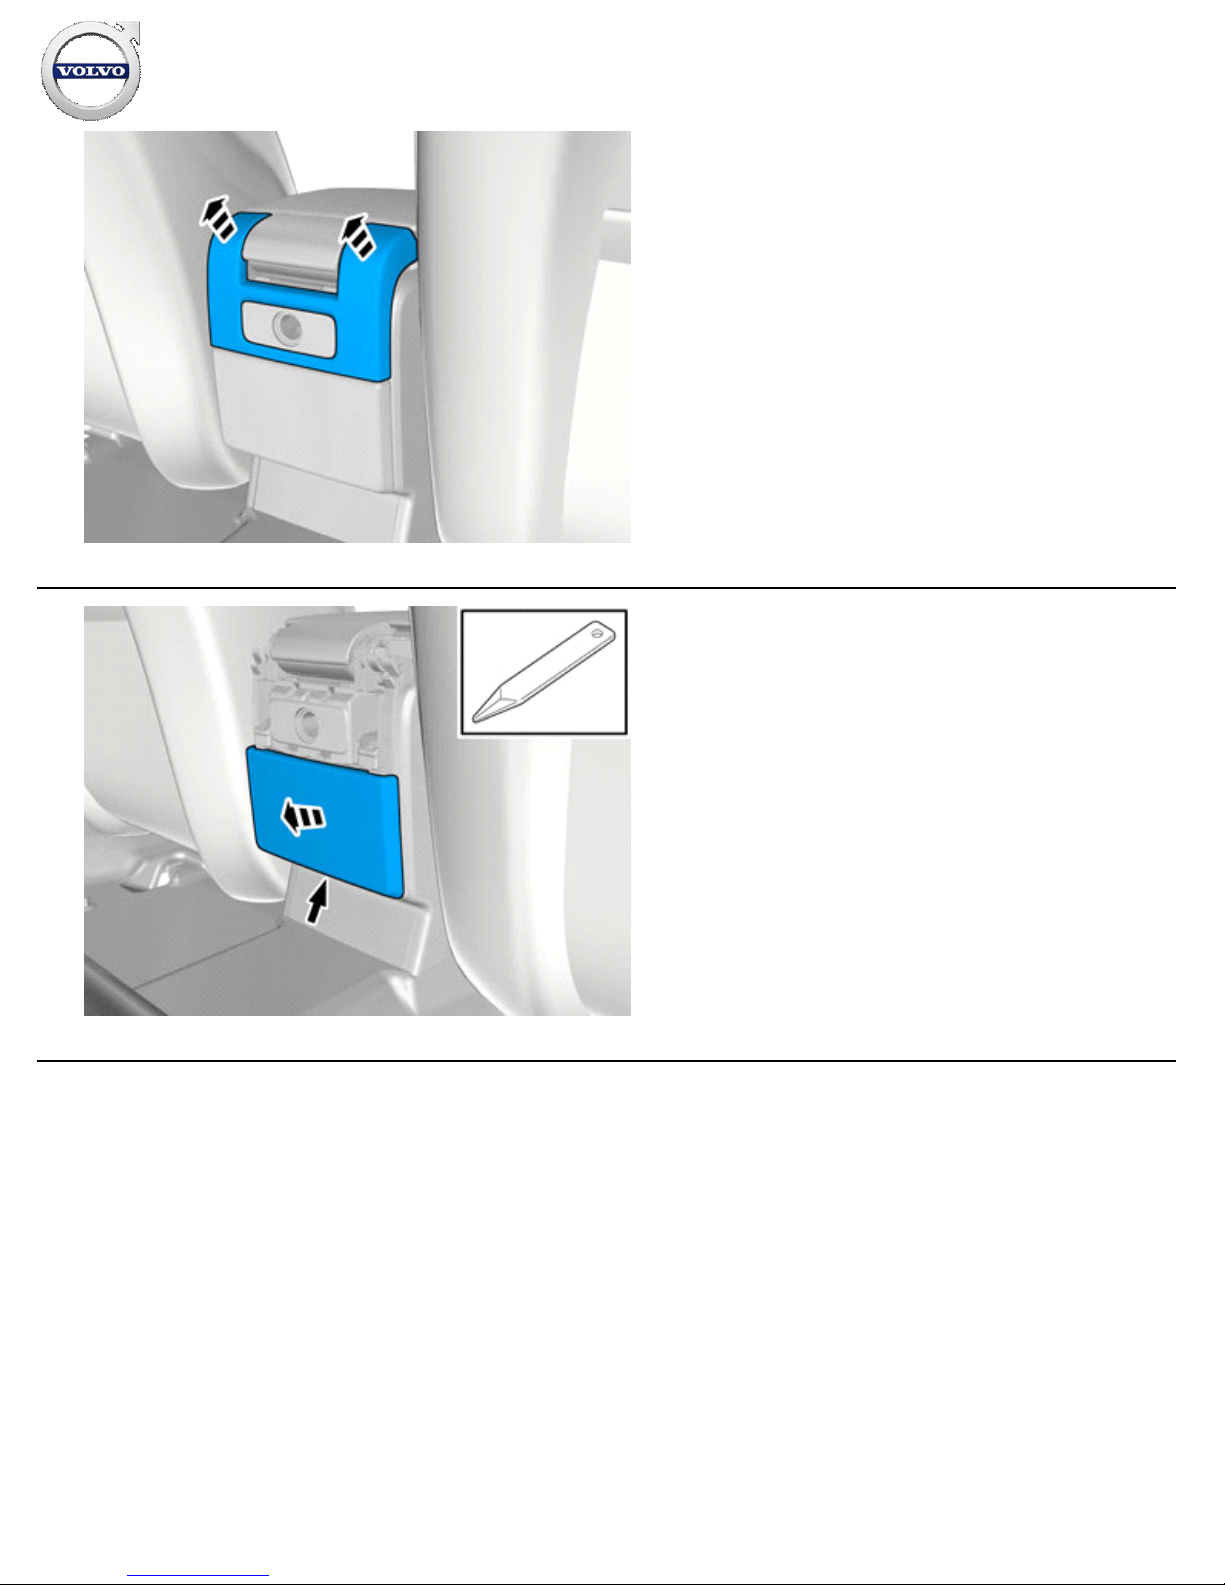
49
IMG-
382450
Remove the panel.
50
IMG-
382452
Installation instructions, accessories
Volvo Car Corporation Gothenburg, Sweden
©
Volvo Car Corporation Multimedia system, RSE, two screens, with two players- 31414283 - V1.0
Strona 28 / 50
Page 29
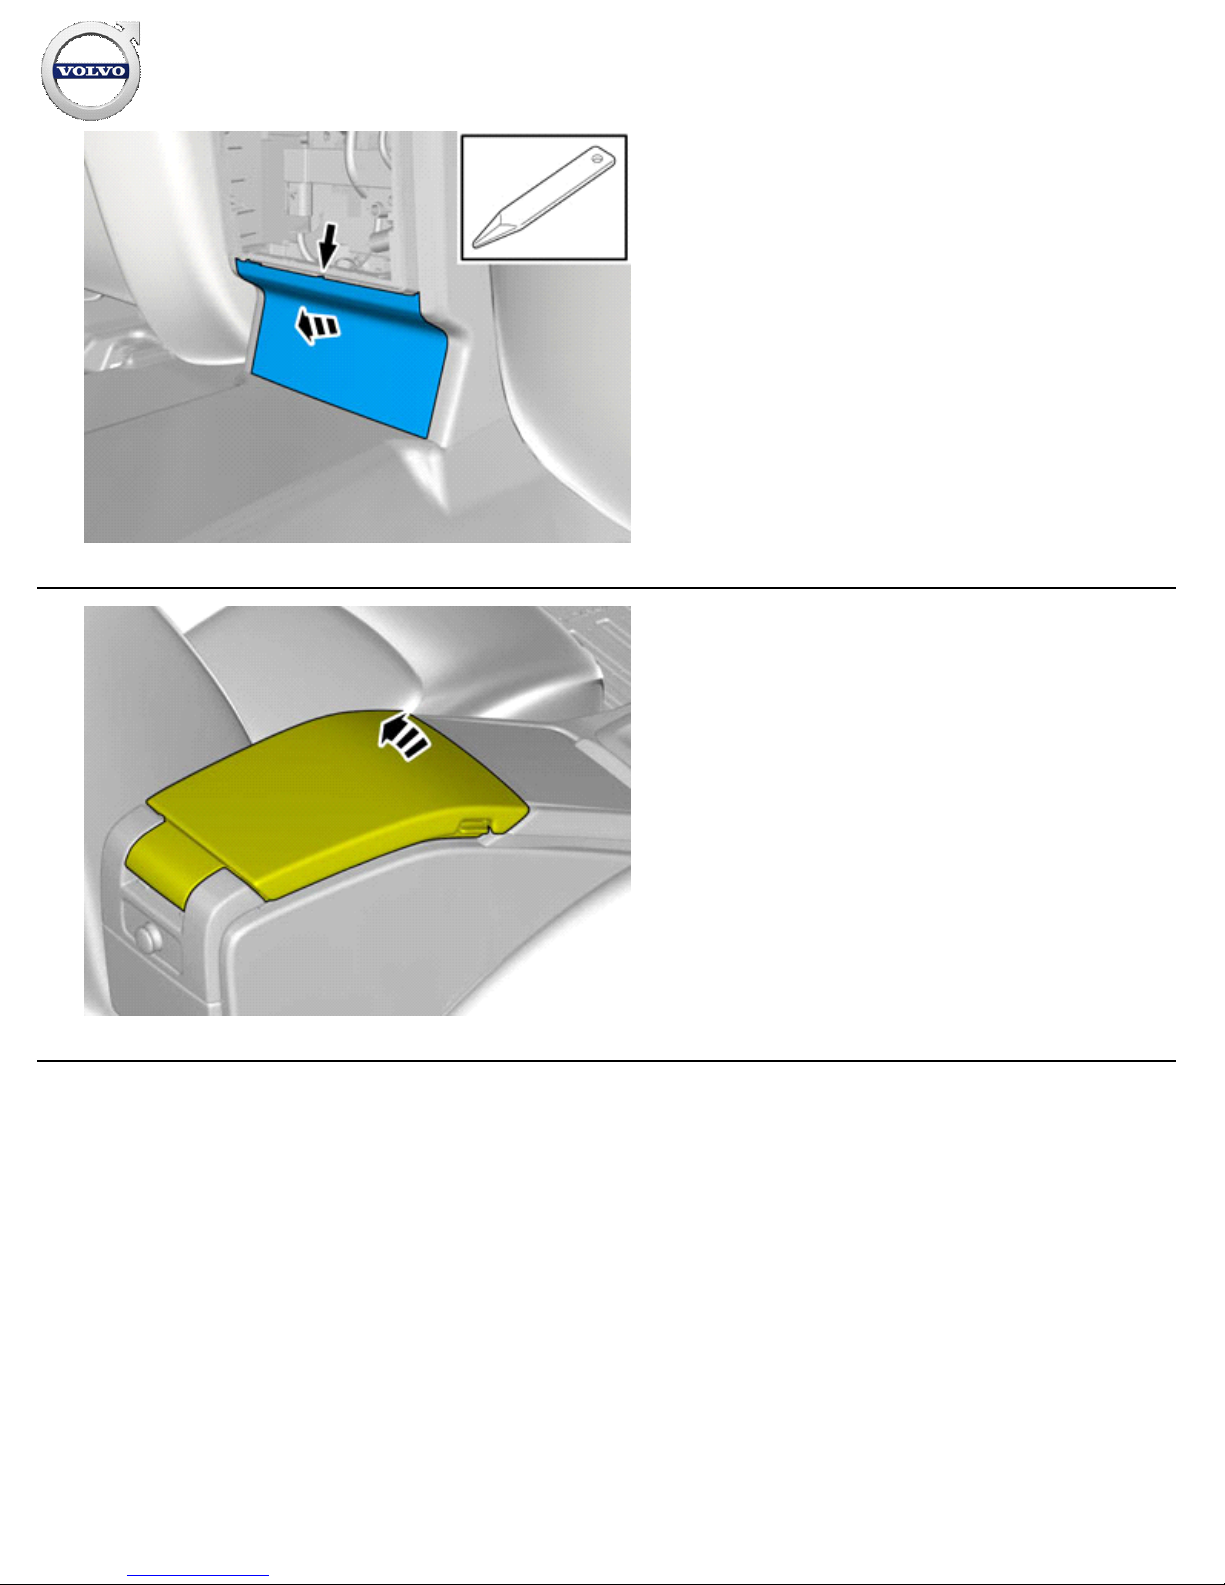
51
IMG-
382453
52
IMG-
382454
Installation instructions, accessories
Volvo Car Corporation Gothenburg, Sweden
©
Volvo Car Corporation Multimedia system, RSE, two screens, with two players- 31414283 - V1.0
Strona 29 / 50
Page 30
53
IMG-
382455
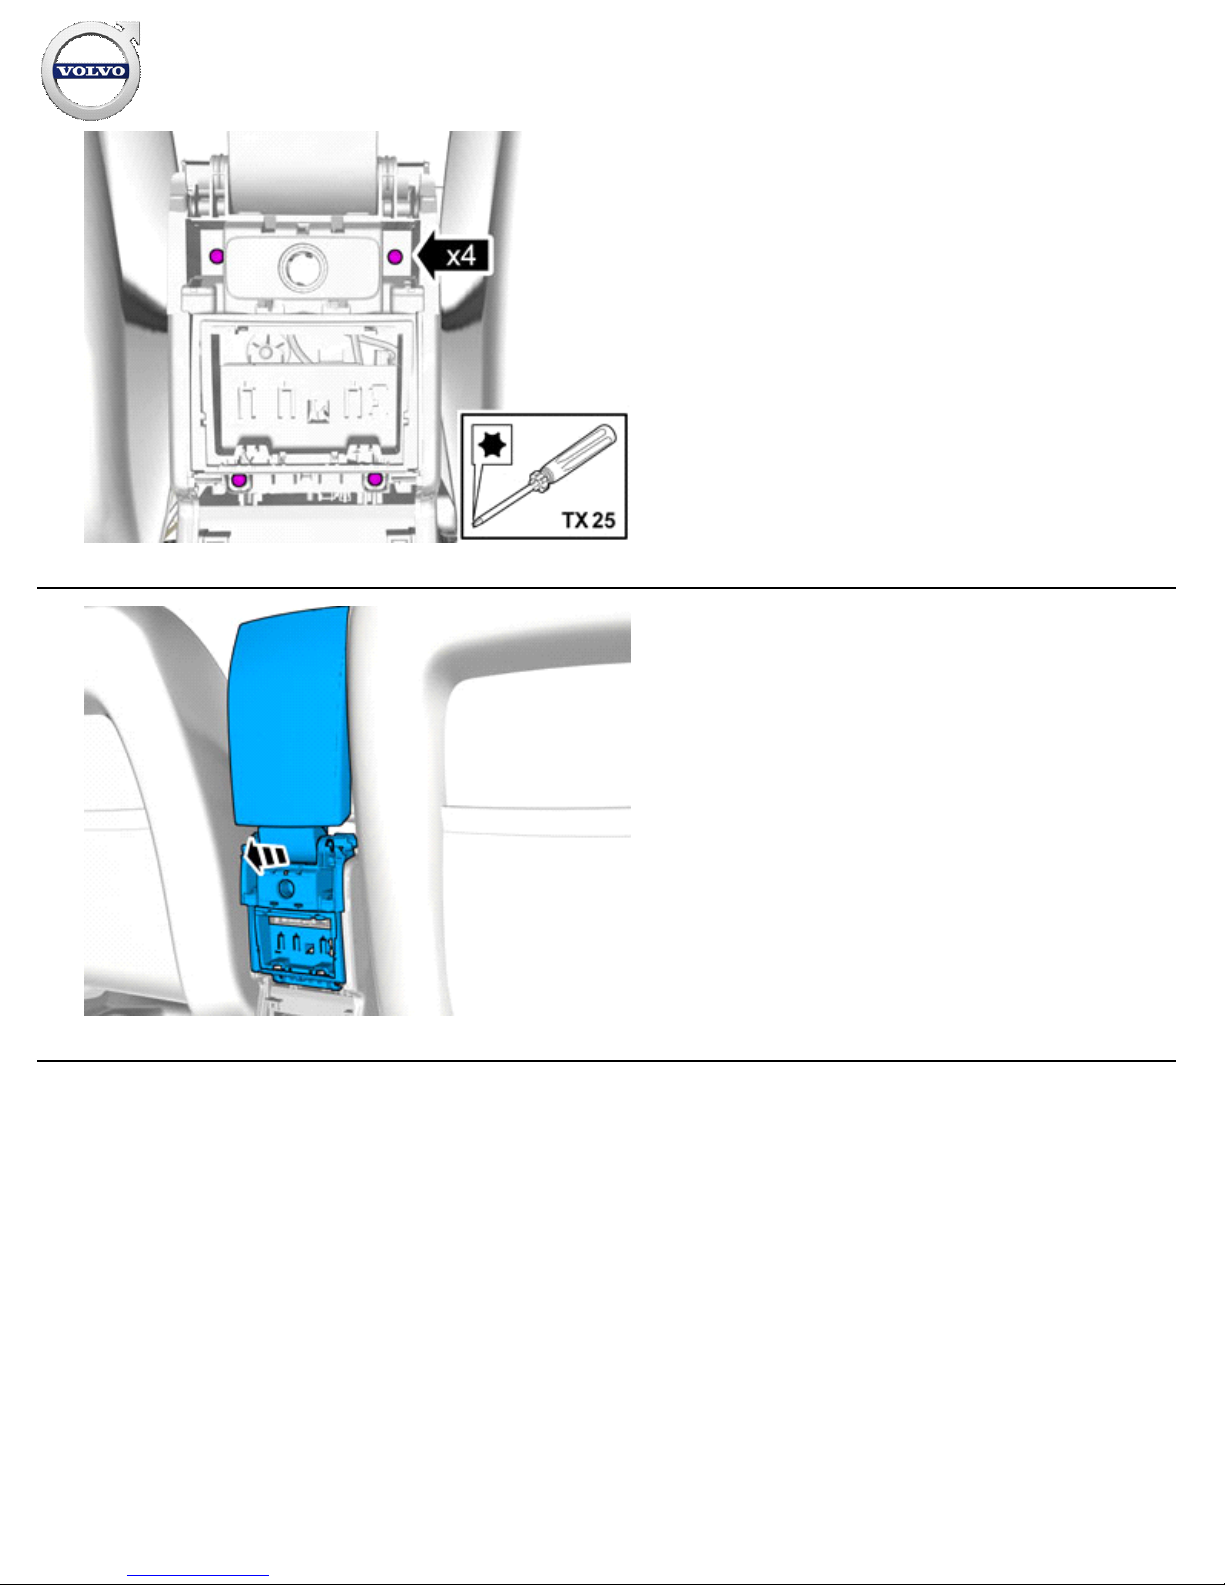
Remove the screws.
54
IMG-
382459
Installation instructions, accessories
Volvo Car Corporation Gothenburg, Sweden
©
Volvo Car Corporation Multimedia system, RSE, two screens, with two players- 31414283 - V1.0
Strona 30 / 50
Page 31
55
IMG-
382460
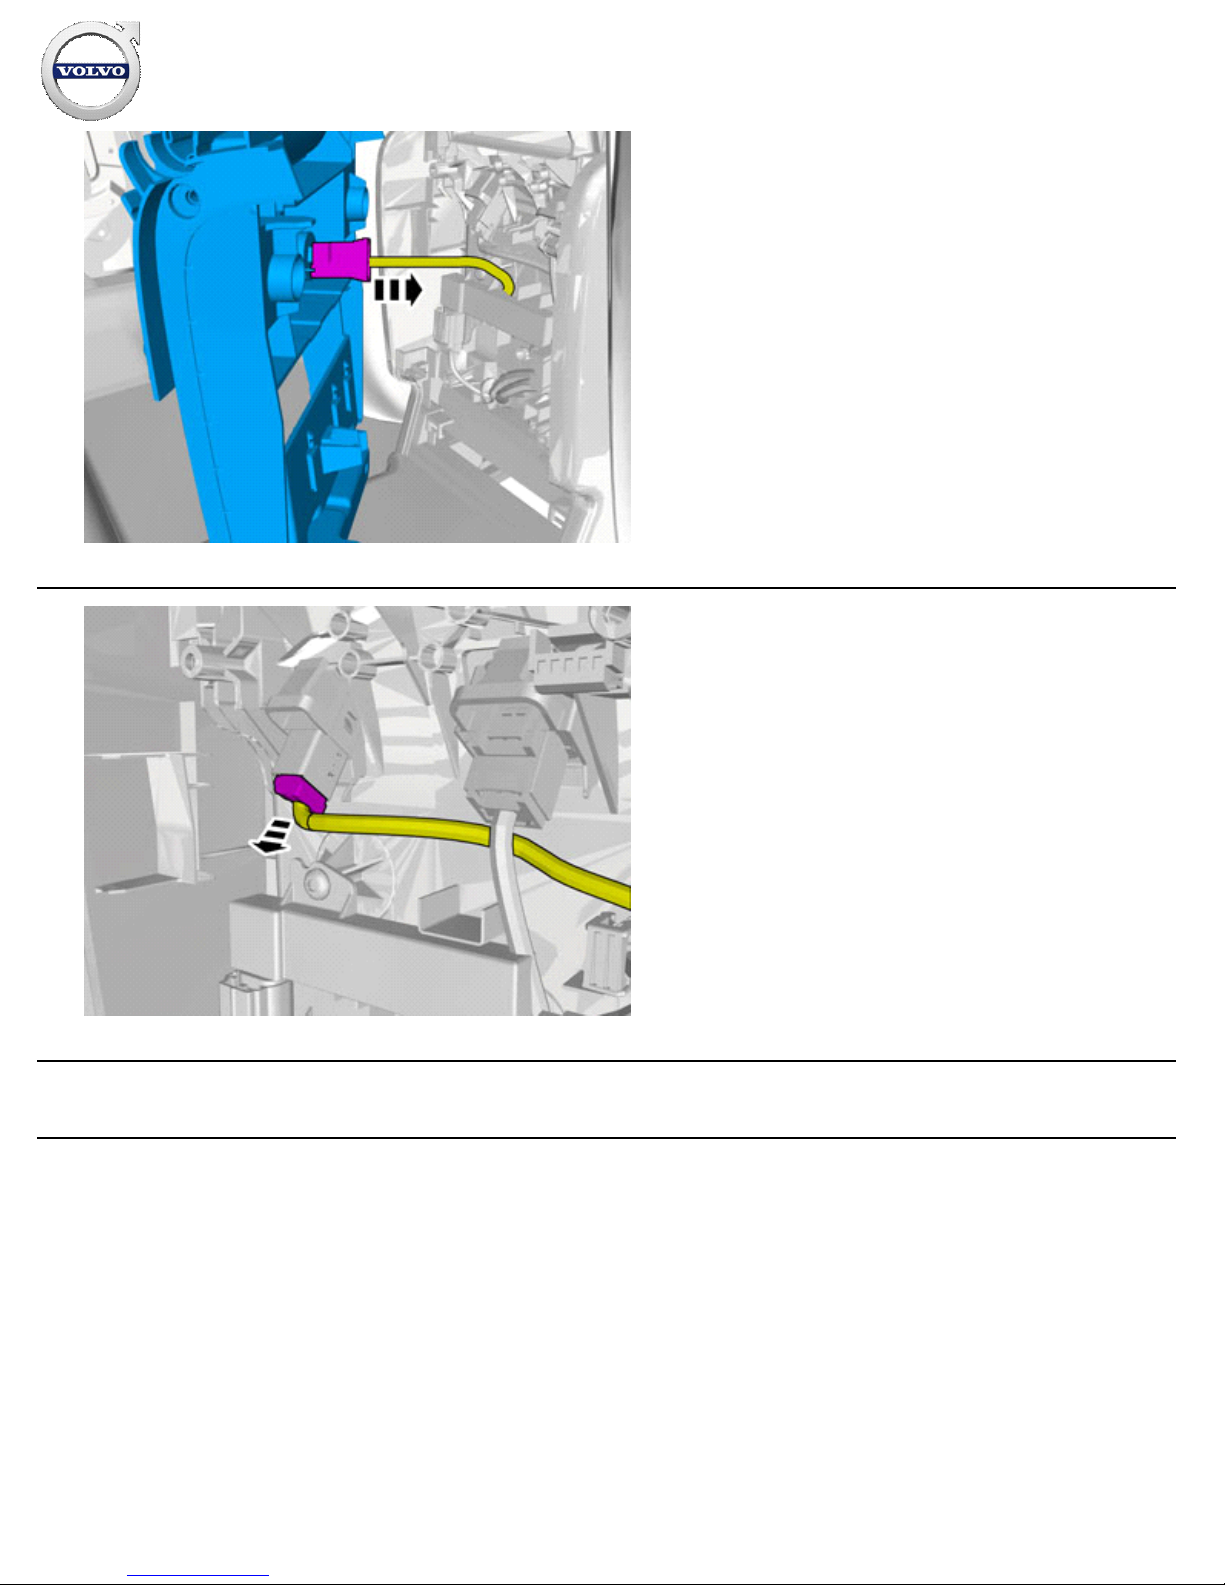
Disconnect the connector.
56
IMG-
382465
Disconnect the connector.
Accessory installation
Installation instructions, accessories
Volvo Car Corporation Gothenburg, Sweden
©
Volvo Car Corporation Multimedia system, RSE, two screens, with two players- 31414283 - V1.0
Strona 31 / 50
Page 32
57
IMG-
382494
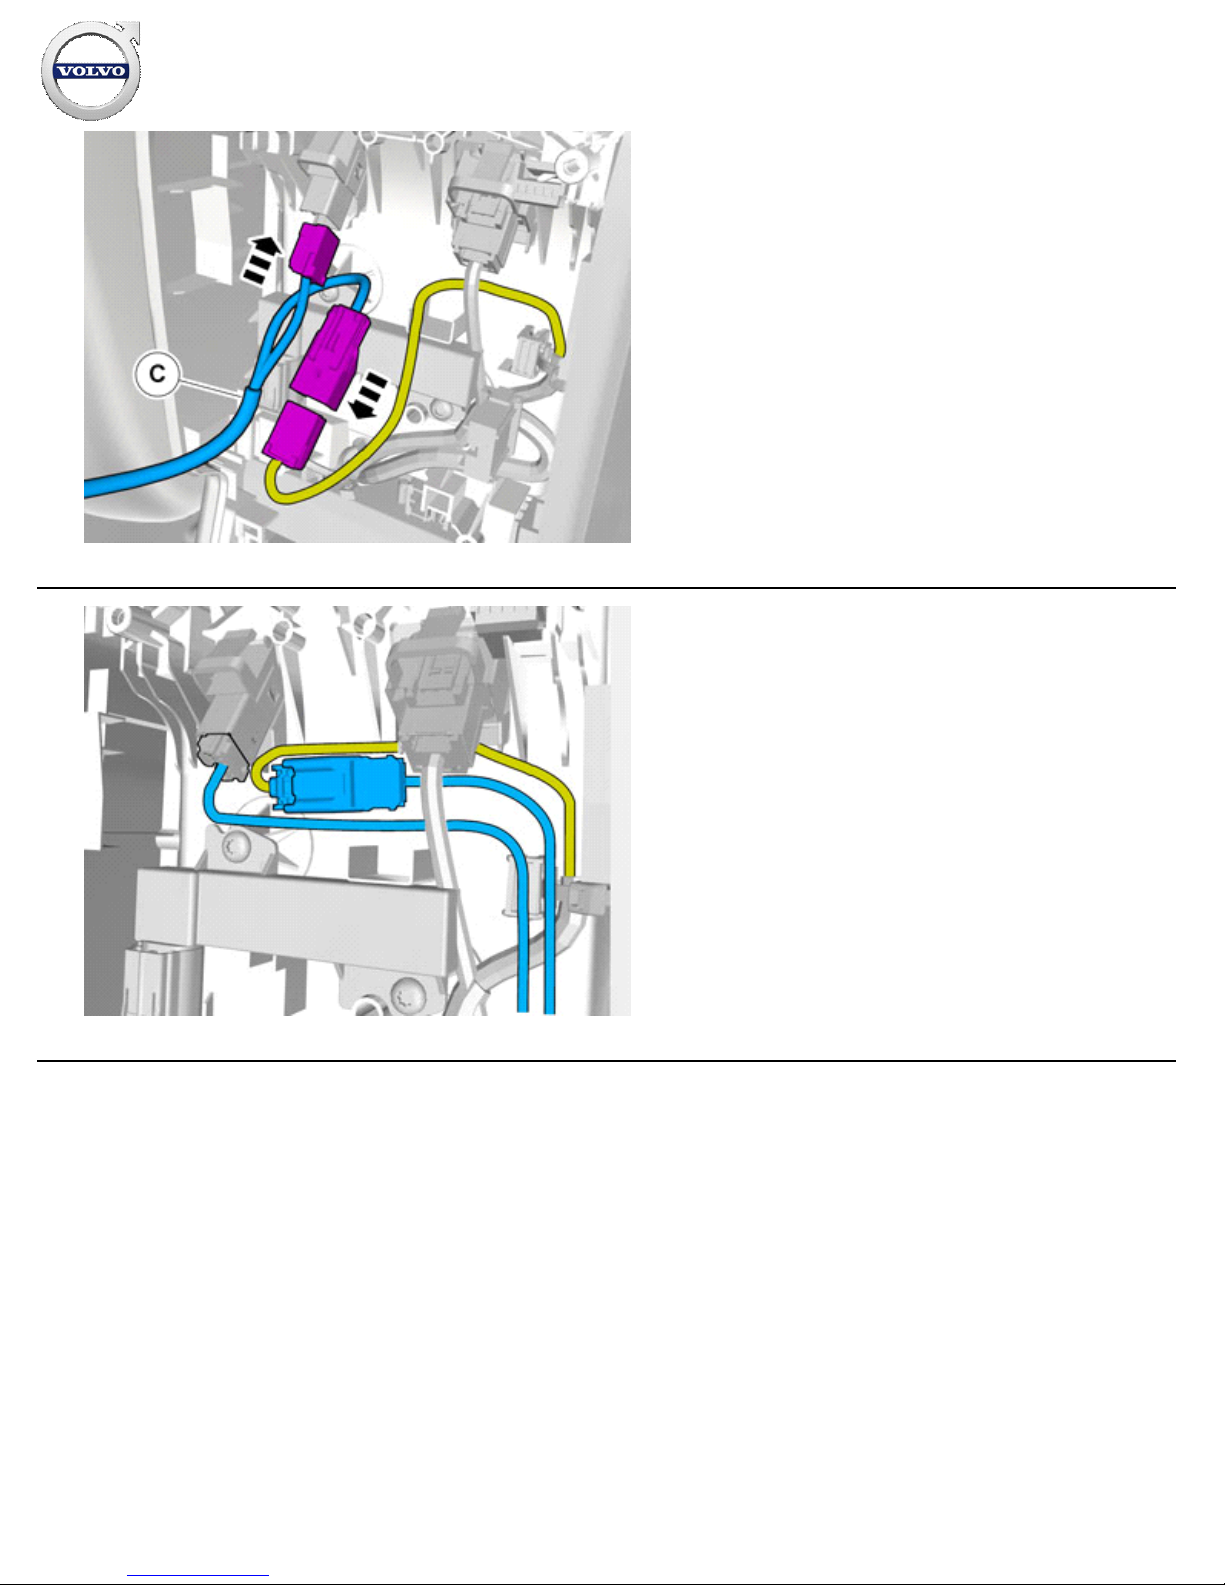
Install component that comes with the accessory kit.
58
IMG-
382510
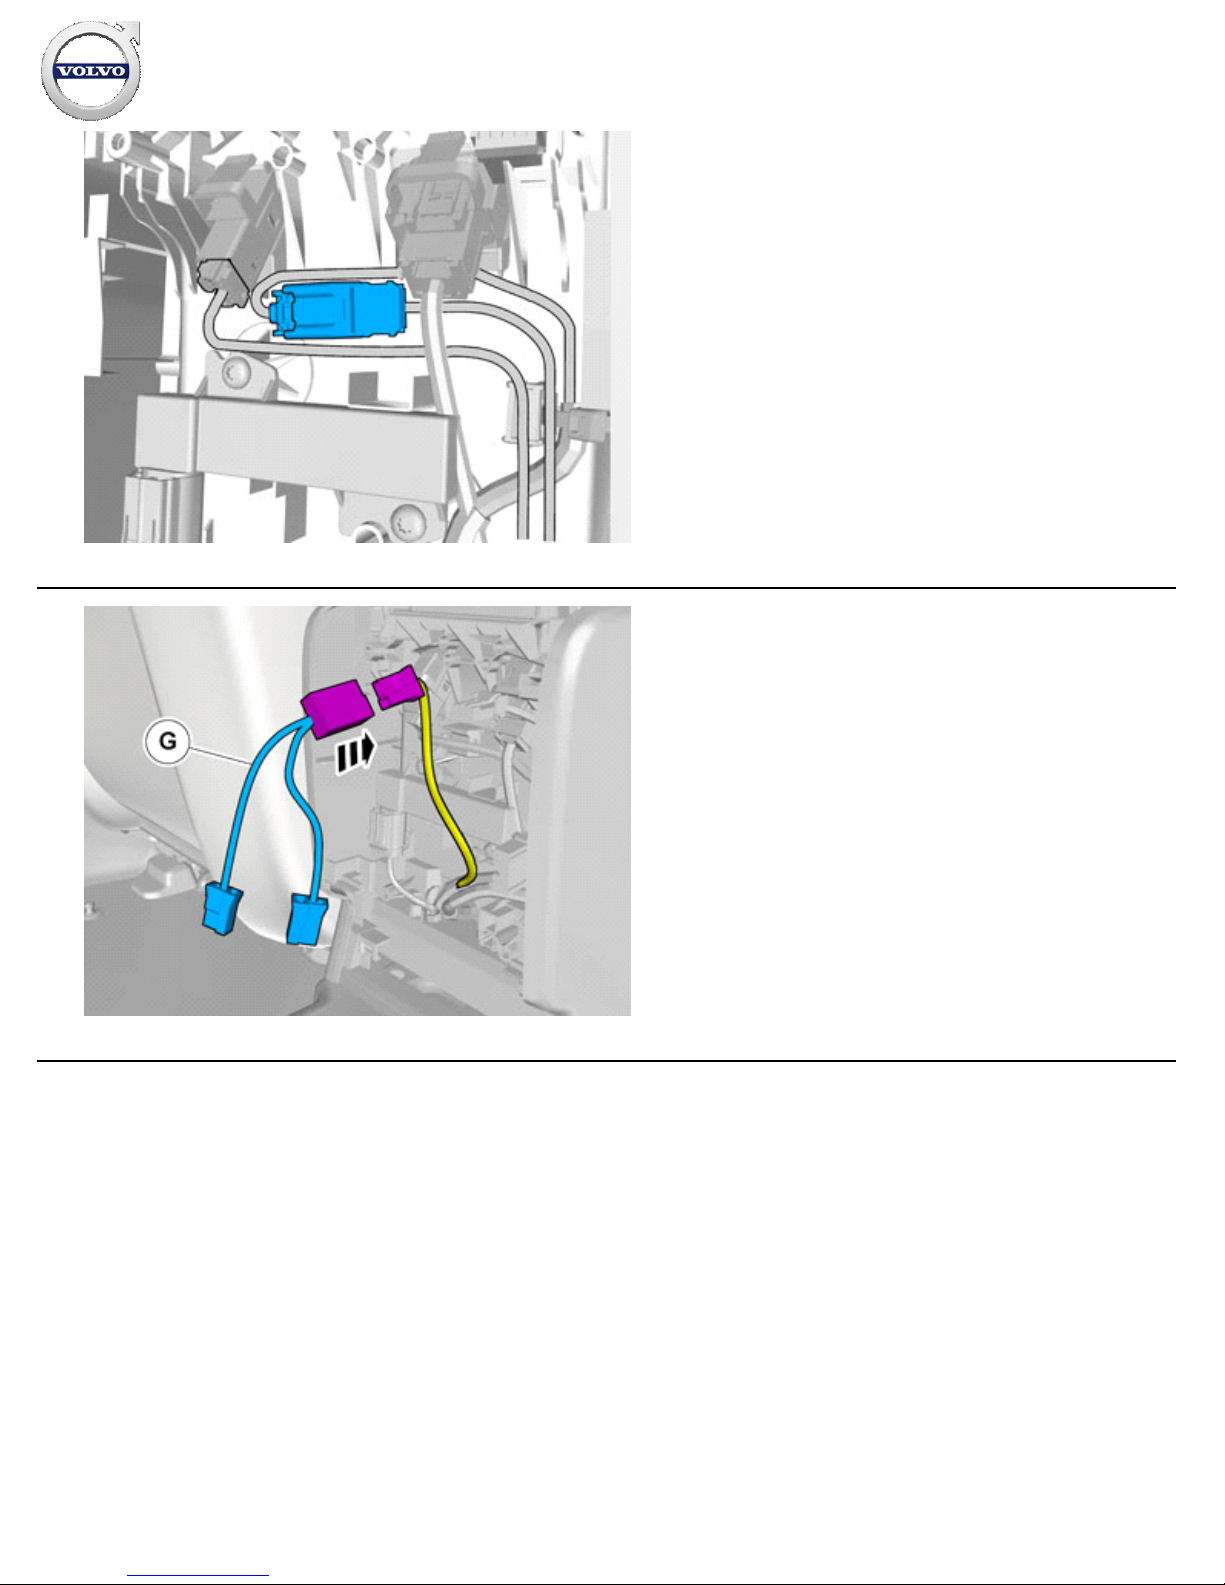
Position/route the cable harness as illustrated.
Installation instructions, accessories
Volvo Car Corporation Gothenburg, Sweden
©
Volvo Car Corporation Multimedia system, RSE, two screens, with two players- 31414283 - V1.0
Strona 32 / 50
Page 33
59
IMG-
382512
Install the part with butyl tape.
60
IMG-
382741
Install component that comes with the accessory kit.
Installation instructions, accessories
Volvo Car Corporation Gothenburg, Sweden
©
Volvo Car Corporation Multimedia system, RSE, two screens, with two players- 31414283 - V1.0
Strona 33 / 50
Page 34
61
IMG-
379247
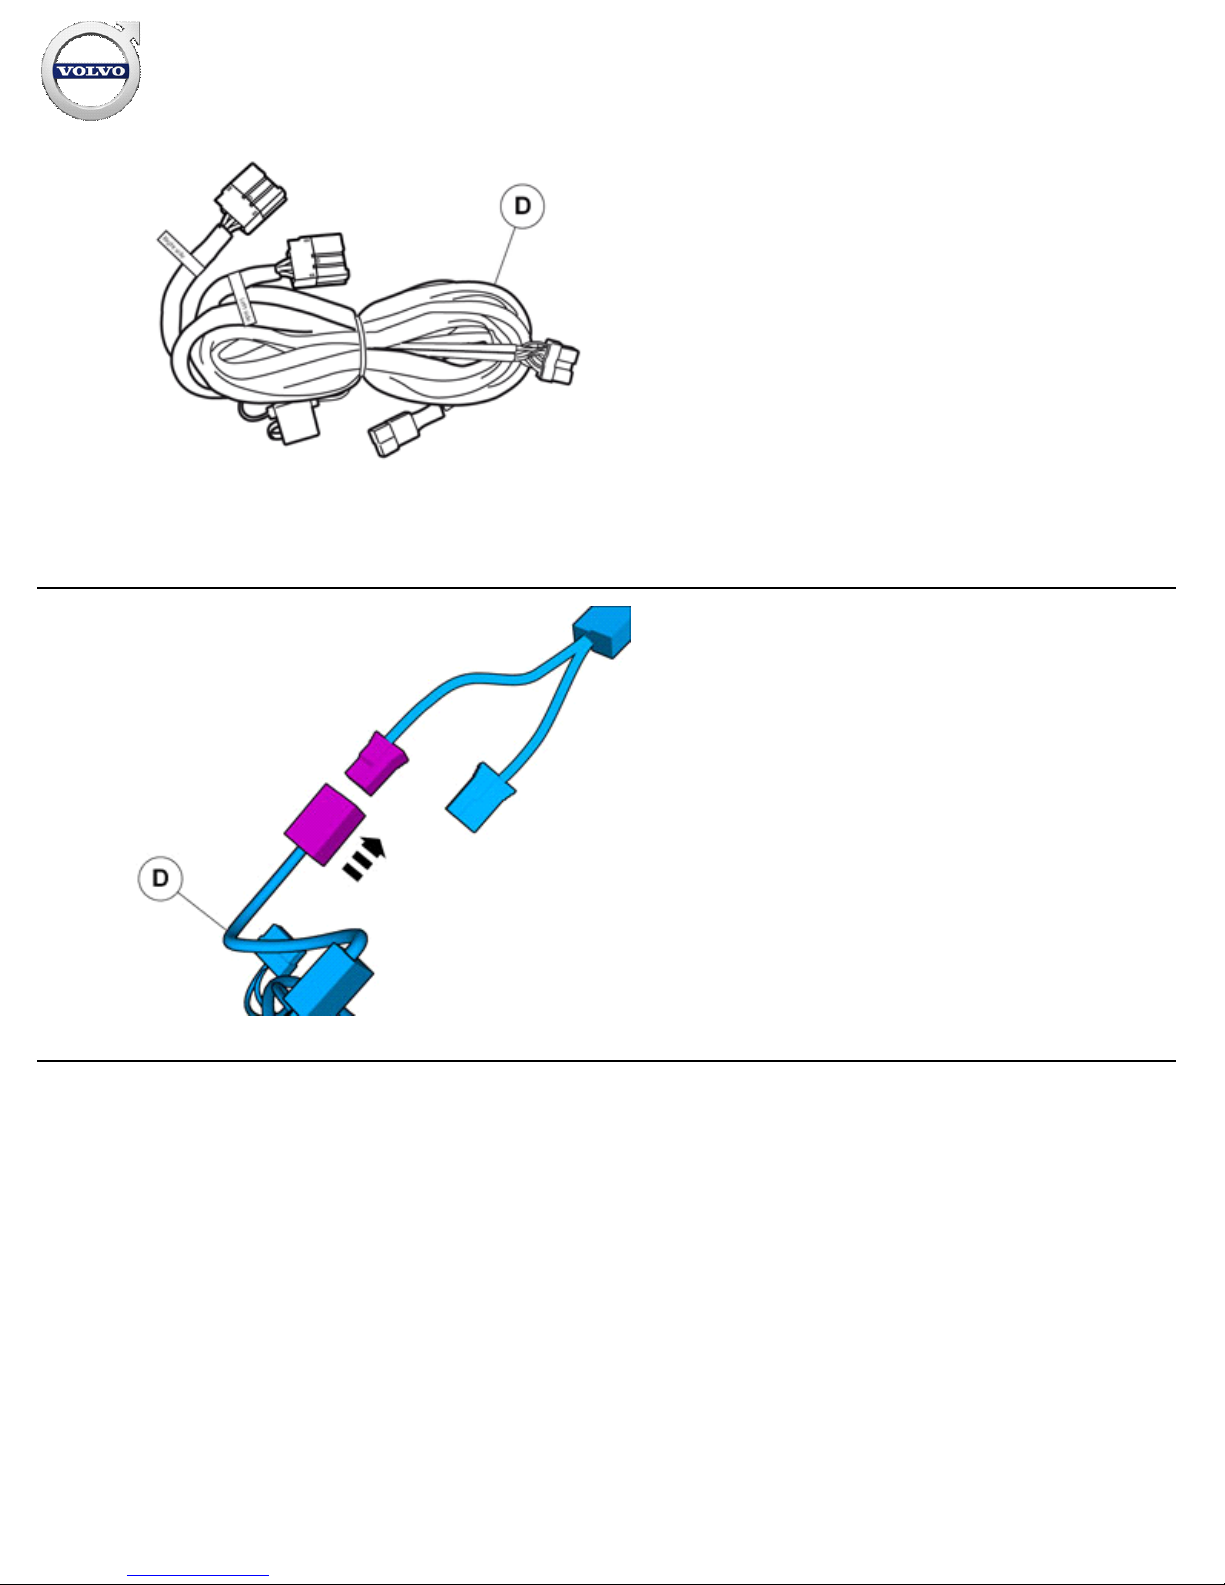
Install component that comes with the accessory kit.
62
IMG-
382746
Installation instructions, accessories
Volvo Car Corporation Gothenburg, Sweden
©
Volvo Car Corporation Multimedia system, RSE, two screens, with two players- 31414283 - V1.0
Strona 34 / 50
Page 35
63
IMG-
382757
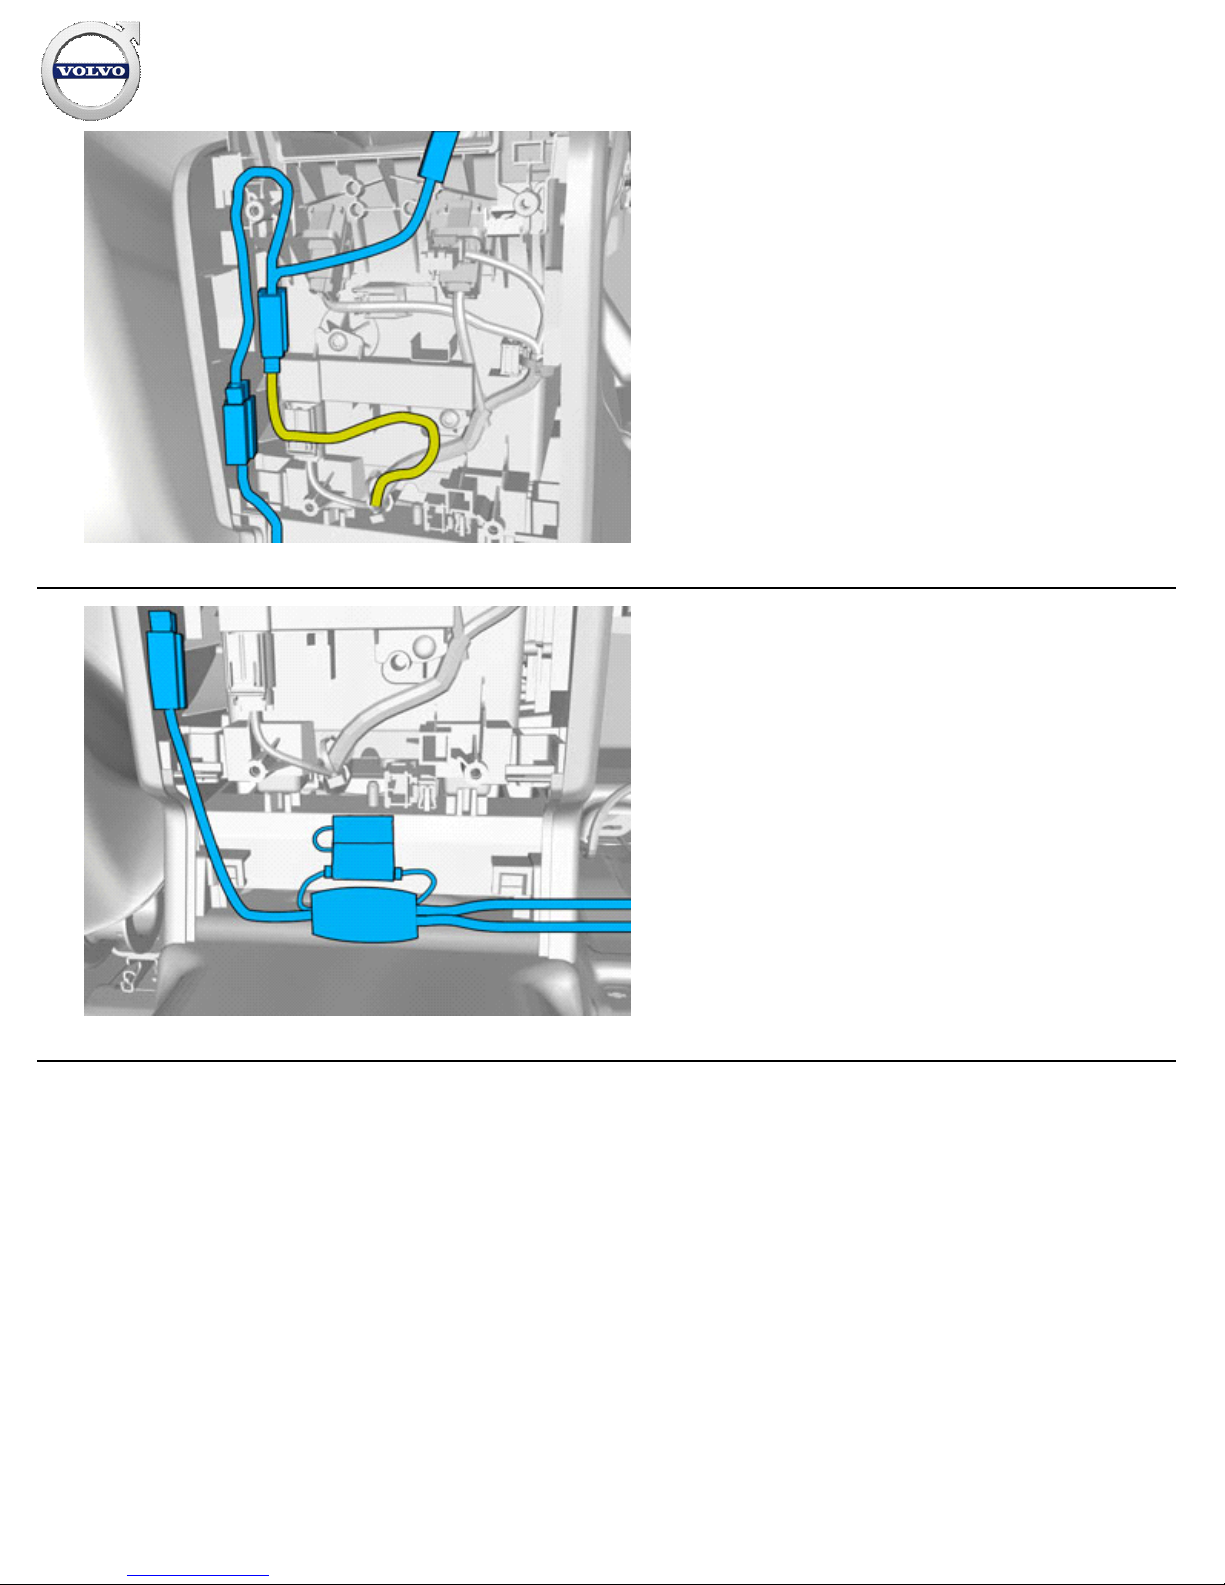
Position/route the cable harness as illustrated.
64
IMG-
382761
Position/route the cable harness as illustrated.
Installation instructions, accessories
Volvo Car Corporation Gothenburg, Sweden
©
Volvo Car Corporation Multimedia system, RSE, two screens, with two players- 31414283 - V1.0
Strona 35 / 50
Page 36
65
IMG-
382569
66
IMG-
382776
Installation instructions, accessories
Volvo Car Corporation Gothenburg, Sweden
©
Volvo Car Corporation Multimedia system, RSE, two screens, with two players- 31414283 - V1.0
Strona 36 / 50
Page 37
67
IMG-
382778
Caution!
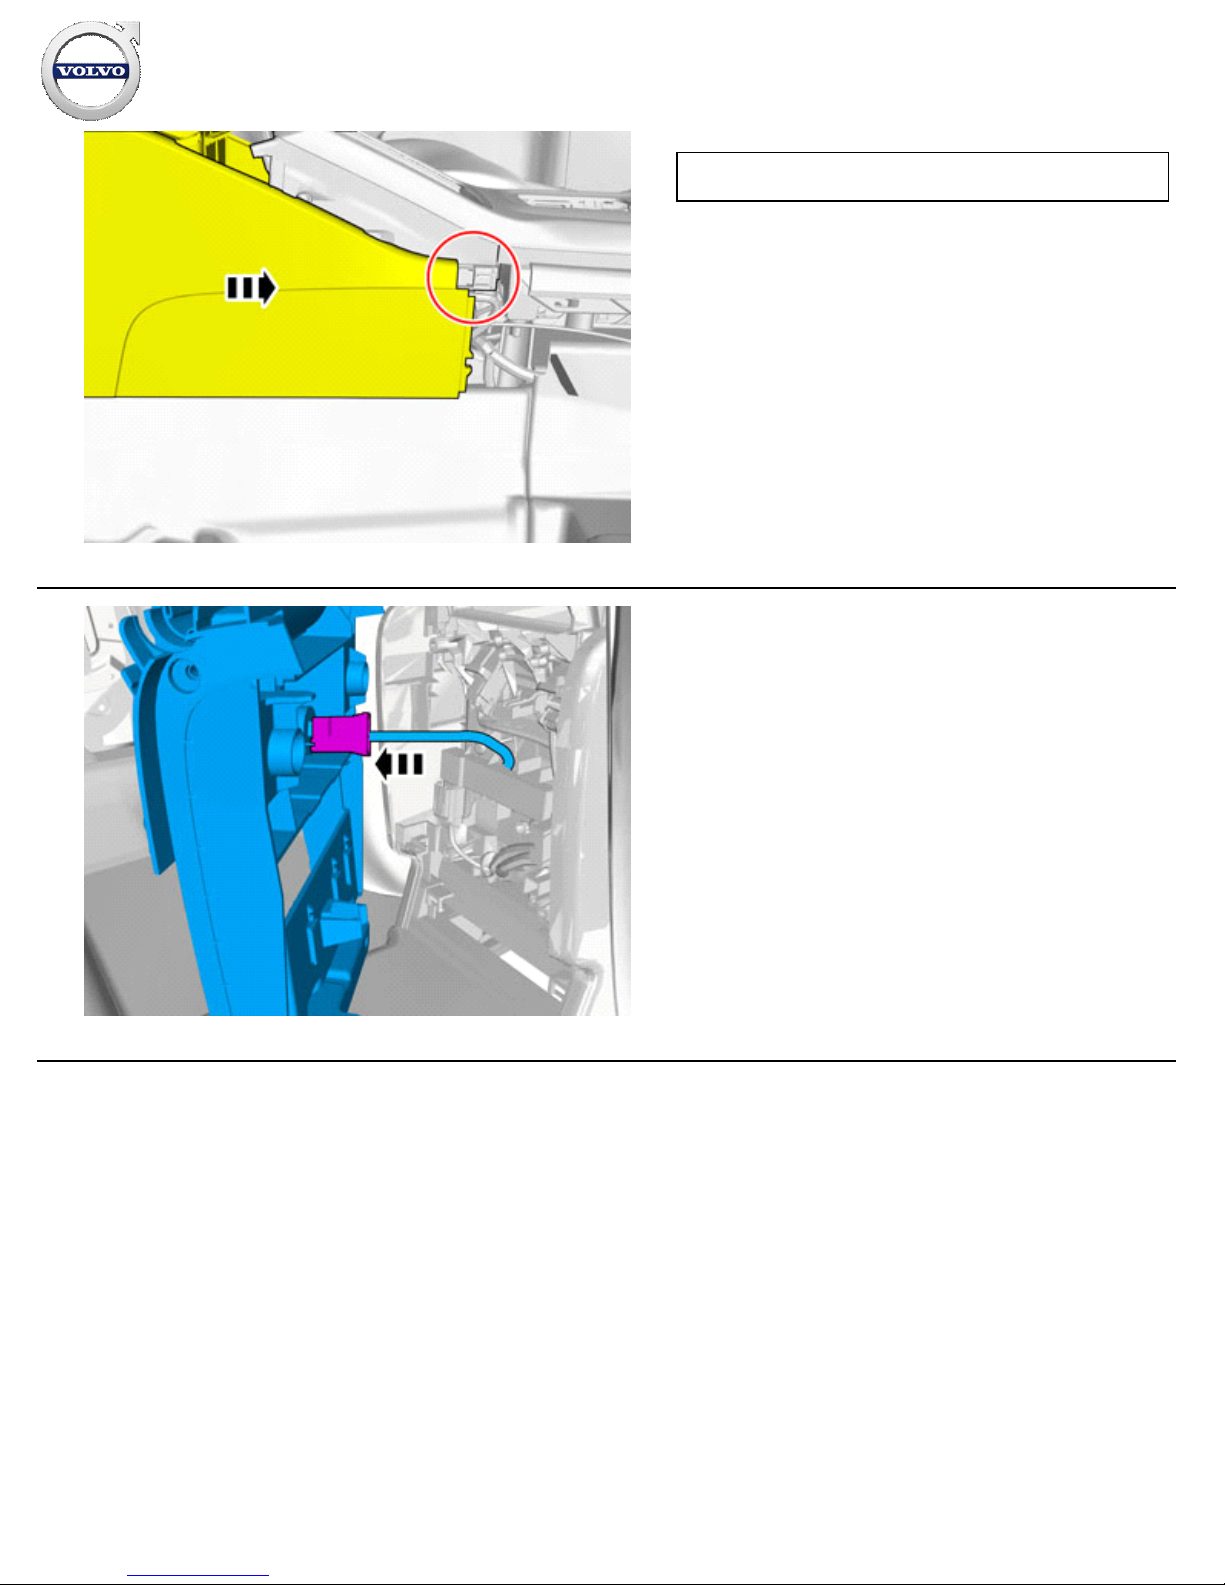
Make sure that no part of the wiring harness is trapped.
Reinstall the removed part.
68
IMG-
382779
Connect the connector.
Installation instructions, accessories
Volvo Car Corporation Gothenburg, Sweden
©
Volvo Car Corporation Multimedia system, RSE, two screens, with two players- 31414283 - V1.0
Strona 37 / 50
Page 38
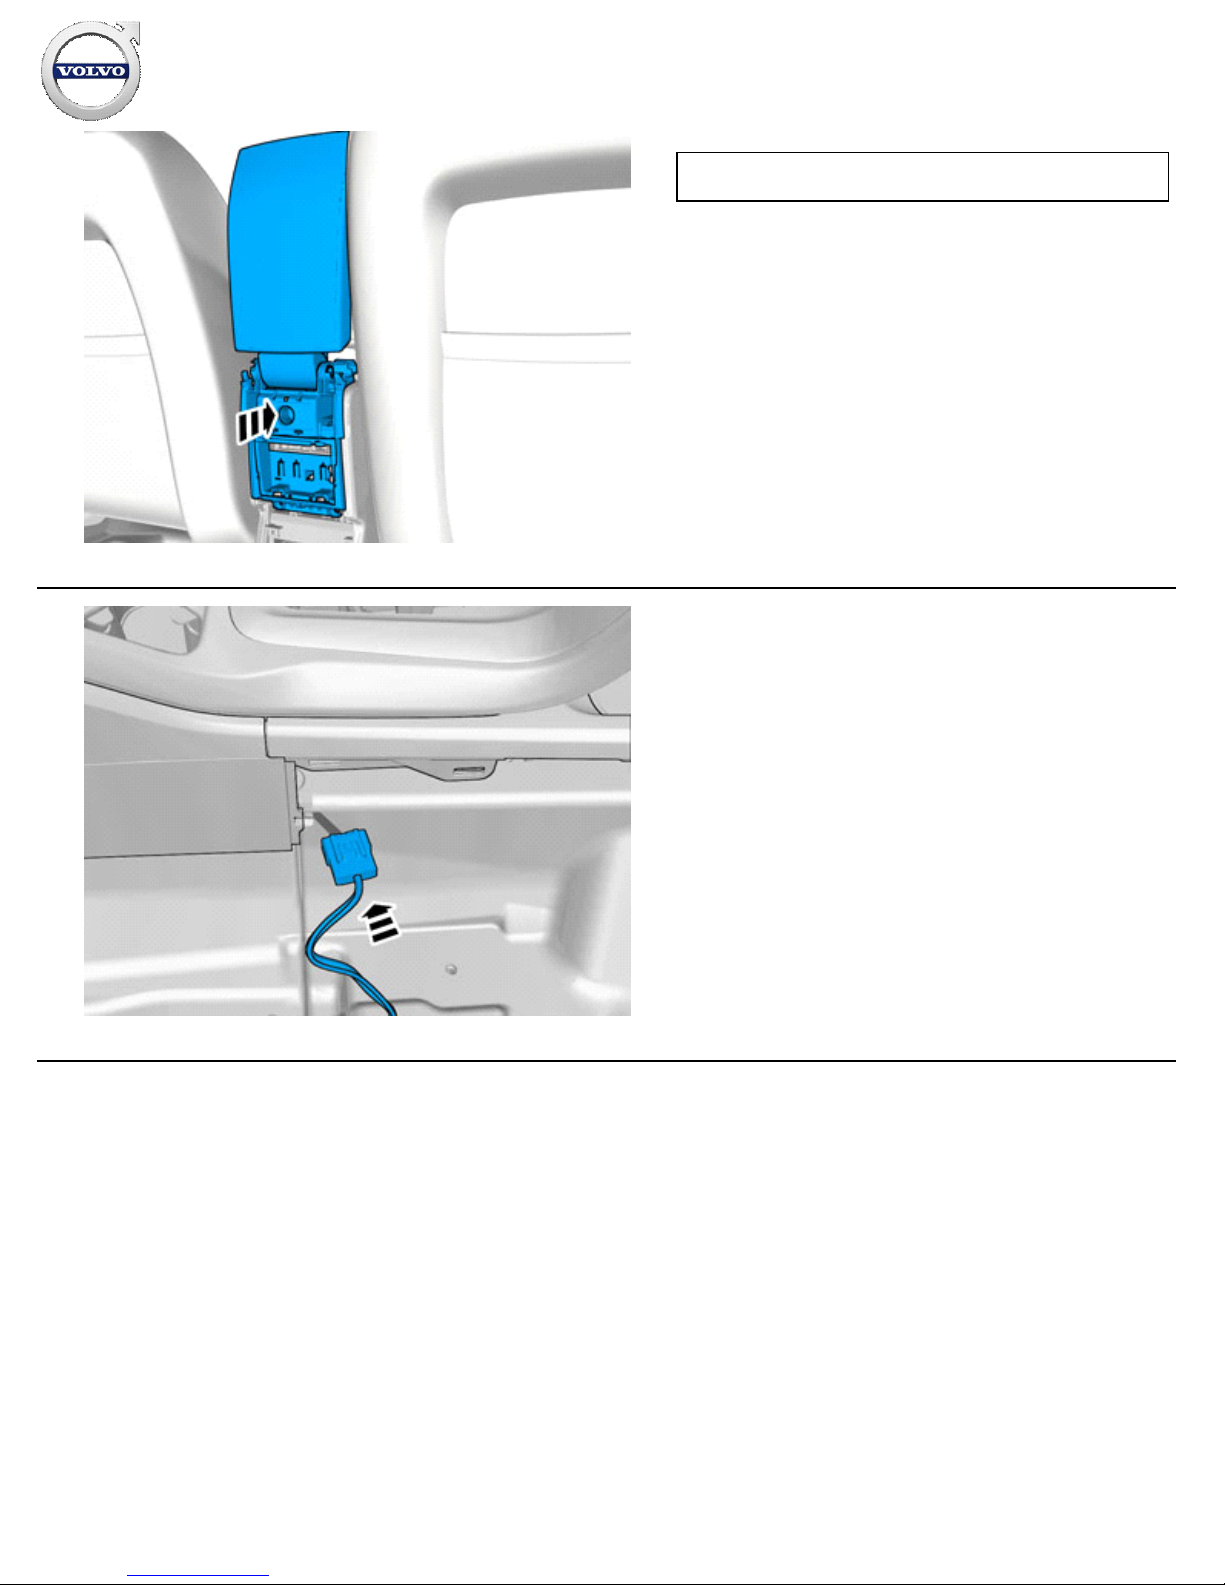
69
IMG-
382781
Caution!
Make sure that no part of the wiring harness is trapped.
Reinstall the removed part.
Reinstall the screws.
70
IMG-
382788
Route the cable marked "Left side" over to the left-hand side.
Installation instructions, accessories
Volvo Car Corporation Gothenburg, Sweden
©
Volvo Car Corporation Multimedia system, RSE, two screens, with two players- 31414283 - V1.0
Strona 38 / 50
Page 39
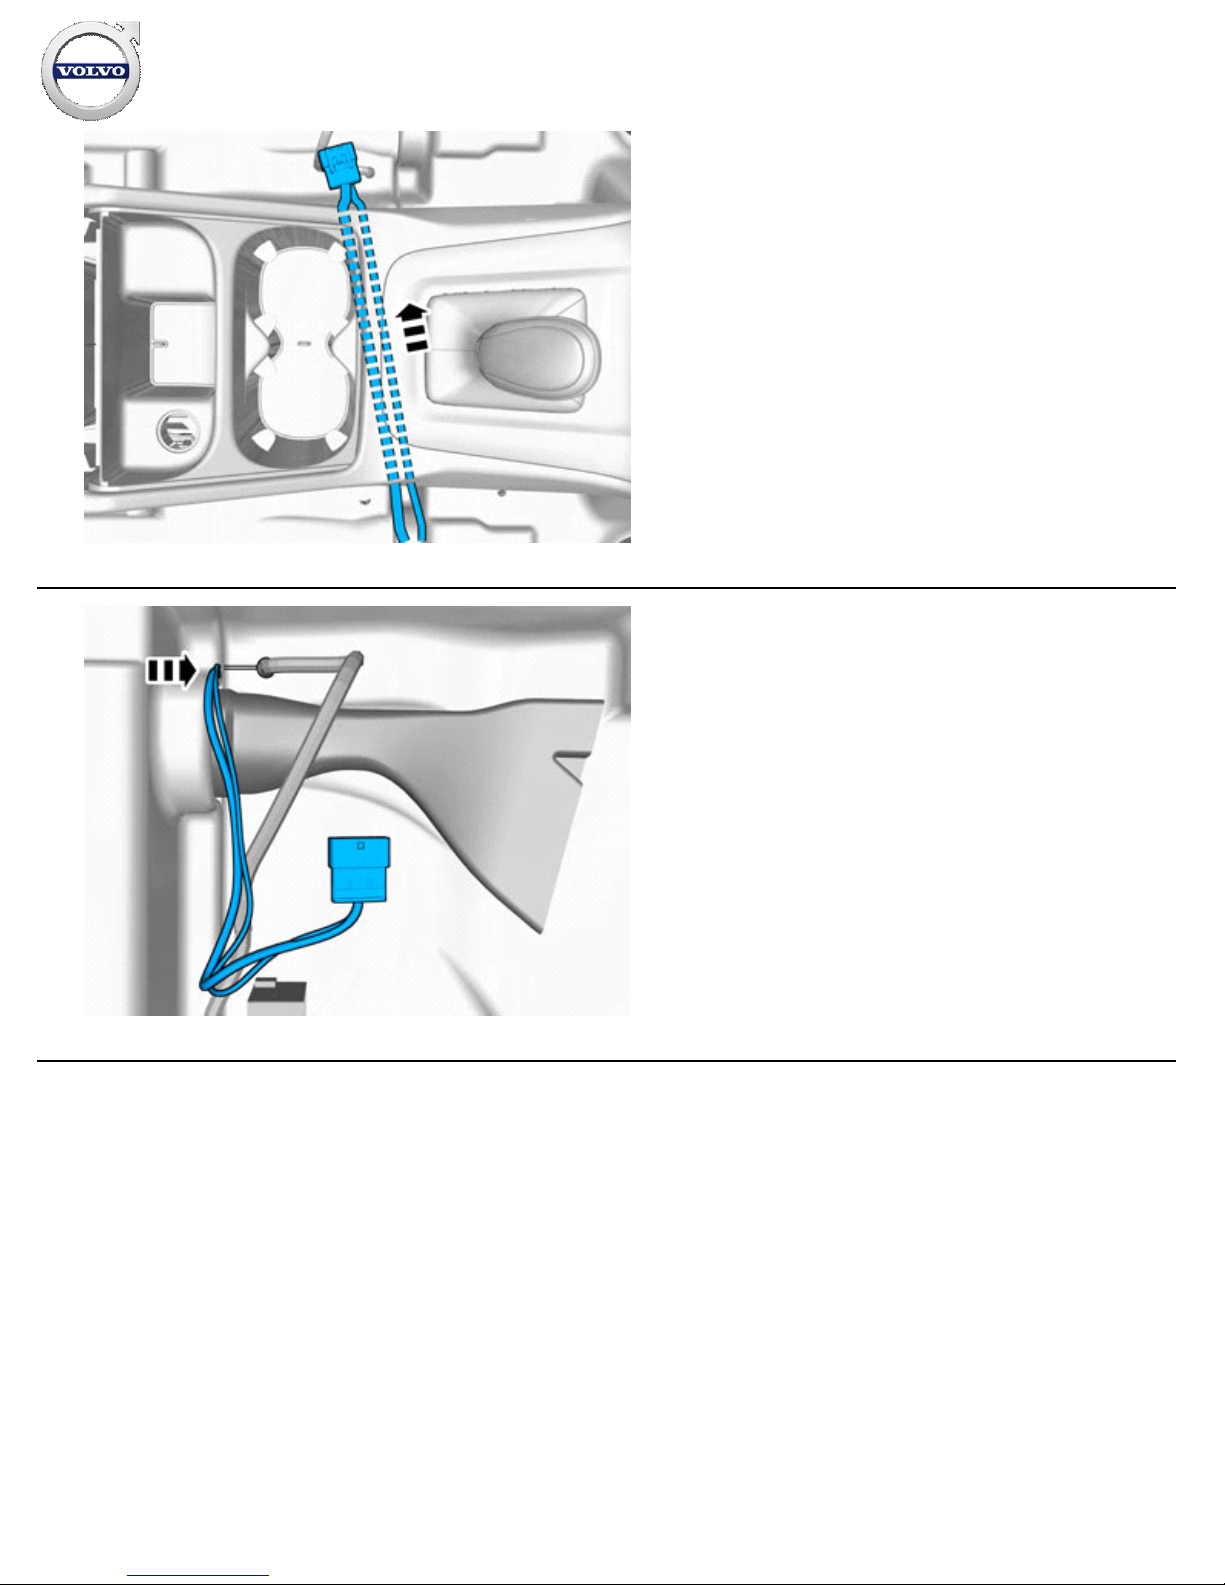
71
IMG-
382791
Pull the wiring through.
72
IMG-
382793
Route the cable harness to the existing cable harness.
Installation instructions, accessories
Volvo Car Corporation Gothenburg, Sweden
©
Volvo Car Corporation Multimedia system, RSE, two screens, with two players- 31414283 - V1.0
Strona 39 / 50
Page 40
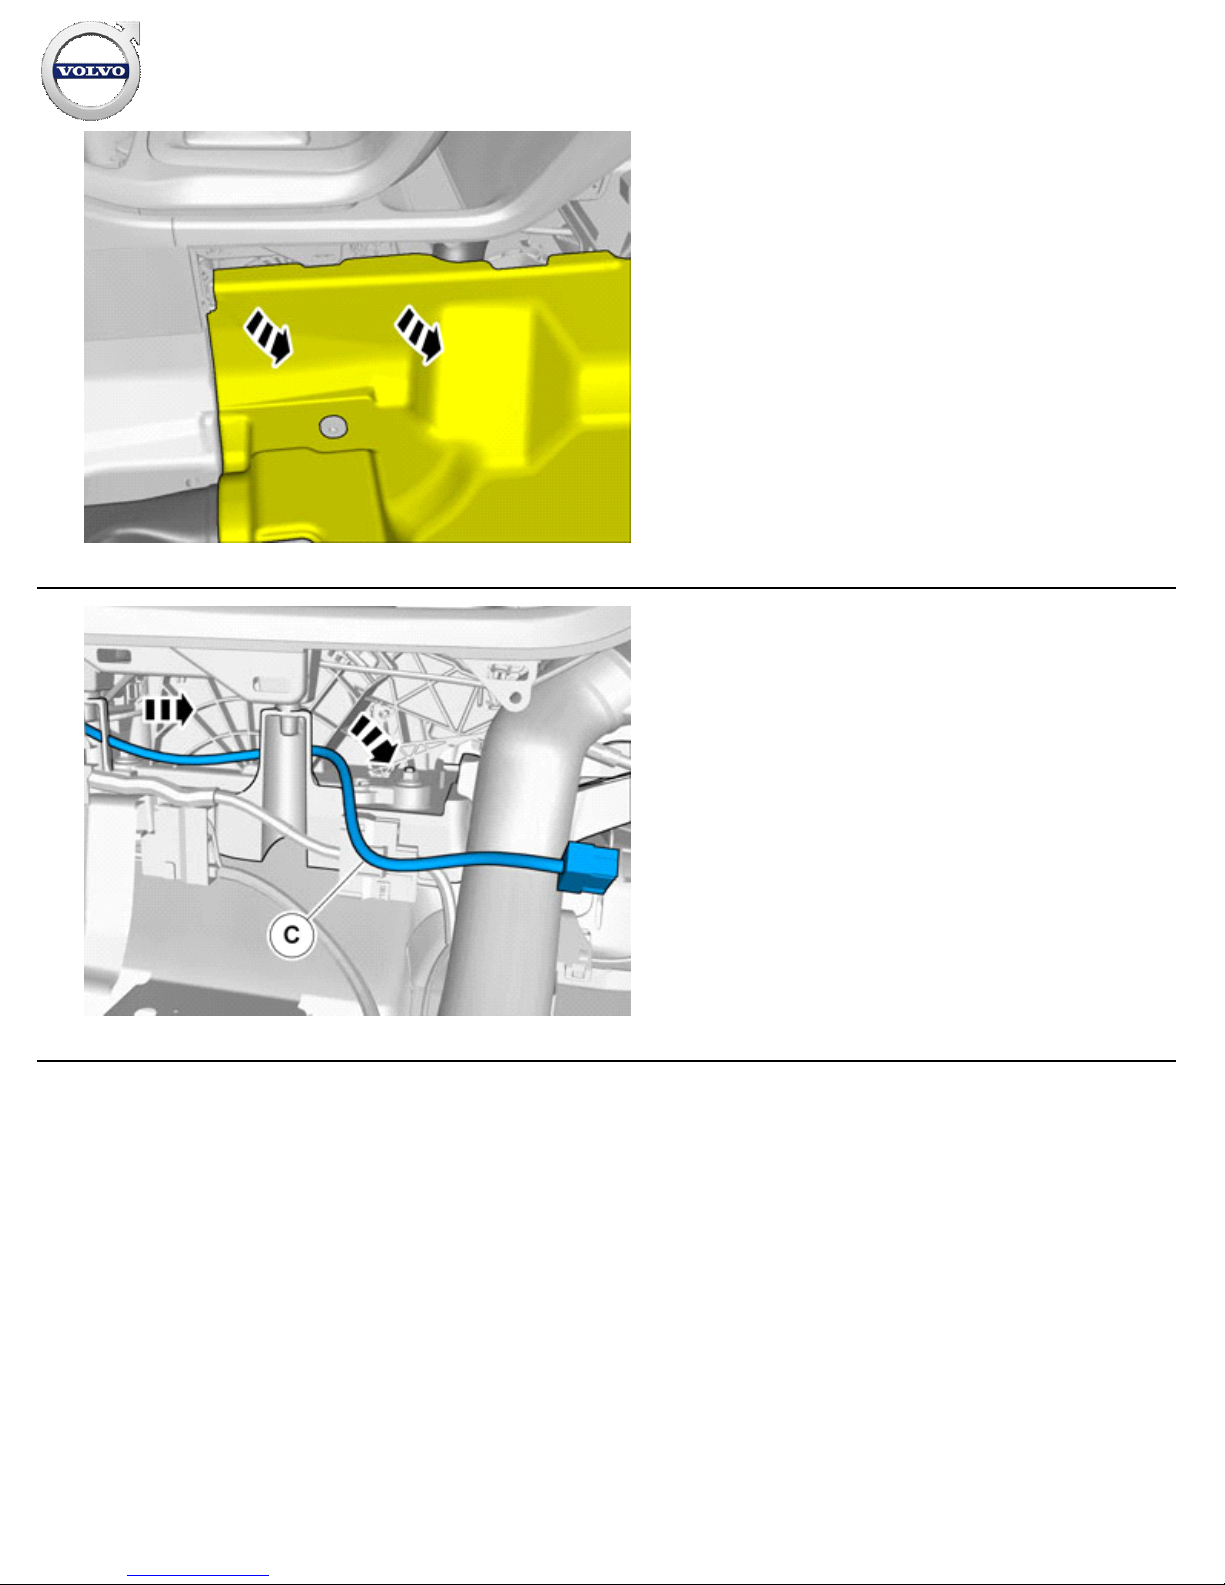
73
IMG-
382794
Fold the carpet to the side.
74
IMG-
382802
Installation instructions, accessories
Volvo Car Corporation Gothenburg, Sweden
©
Volvo Car Corporation Multimedia system, RSE, two screens, with two players- 31414283 - V1.0
Strona 40 / 50
Page 41
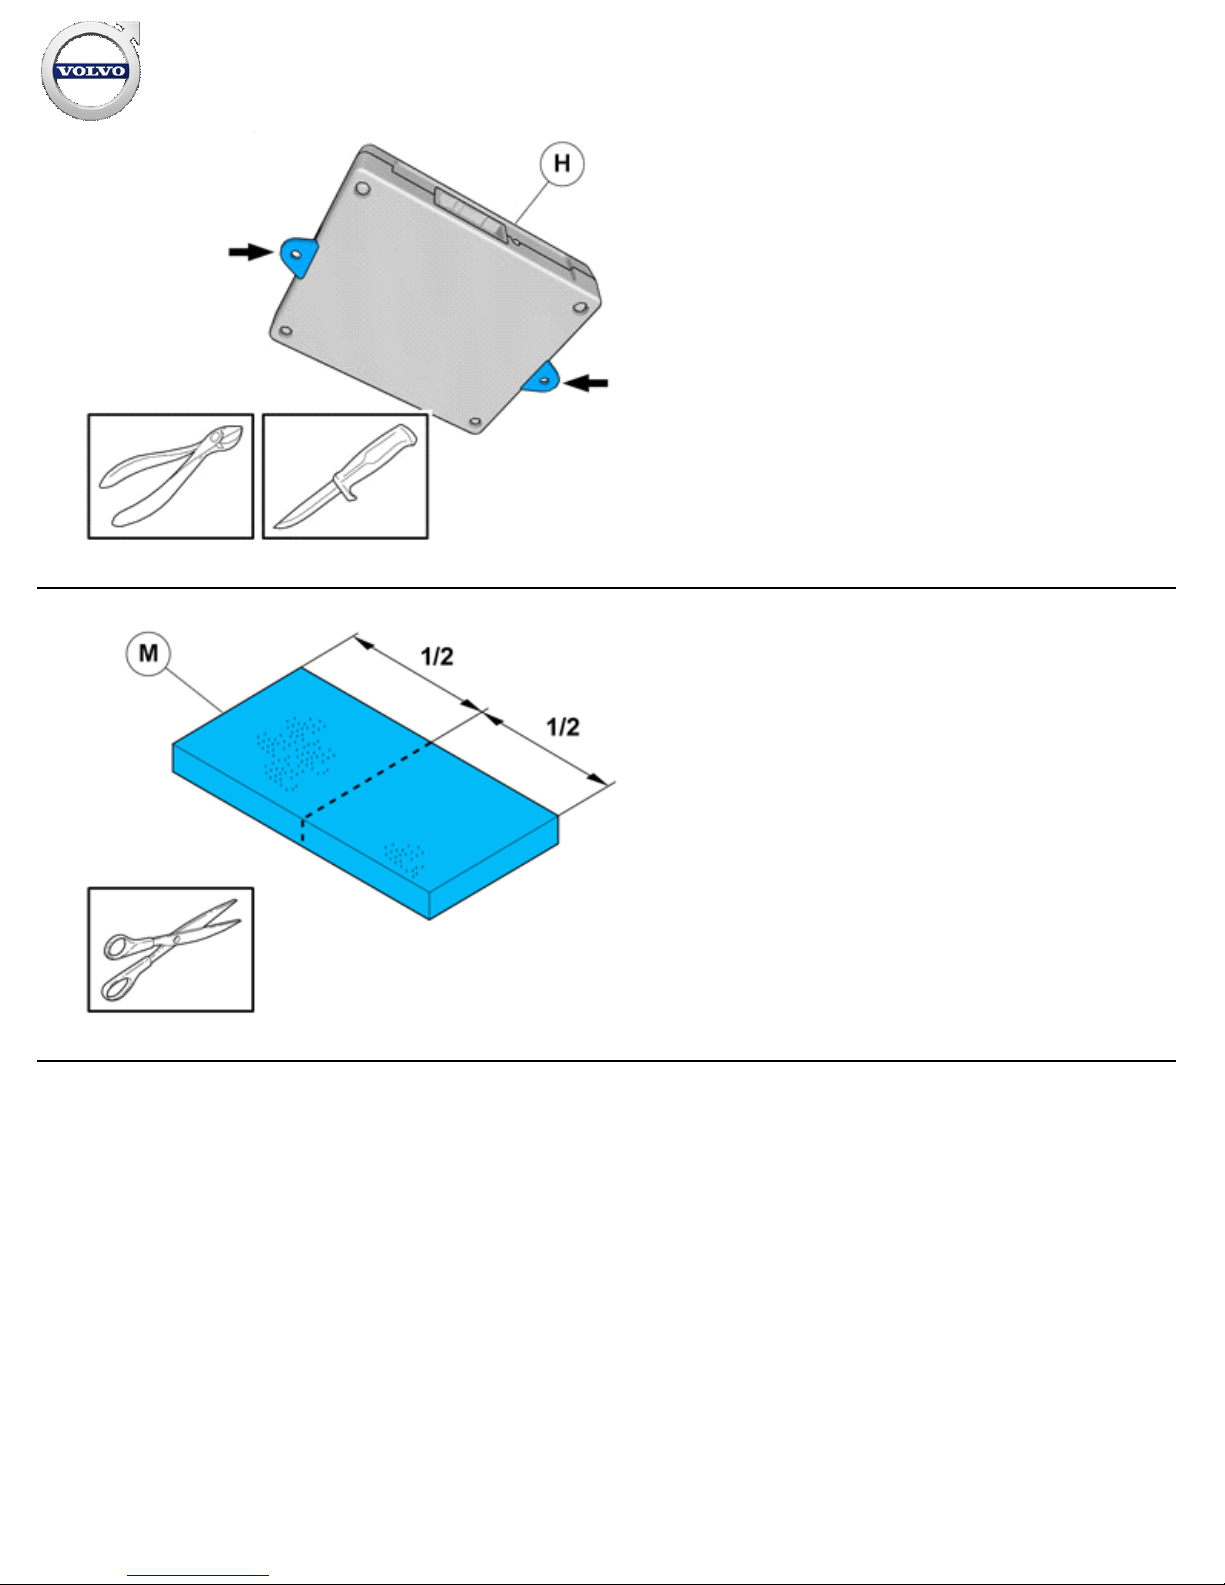
75
IMG-
382337
76
IMG-
382831
Installation instructions, accessories
Volvo Car Corporation Gothenburg, Sweden
©
Volvo Car Corporation Multimedia system, RSE, two screens, with two players- 31414283 - V1.0
Strona 41 / 50
Page 42
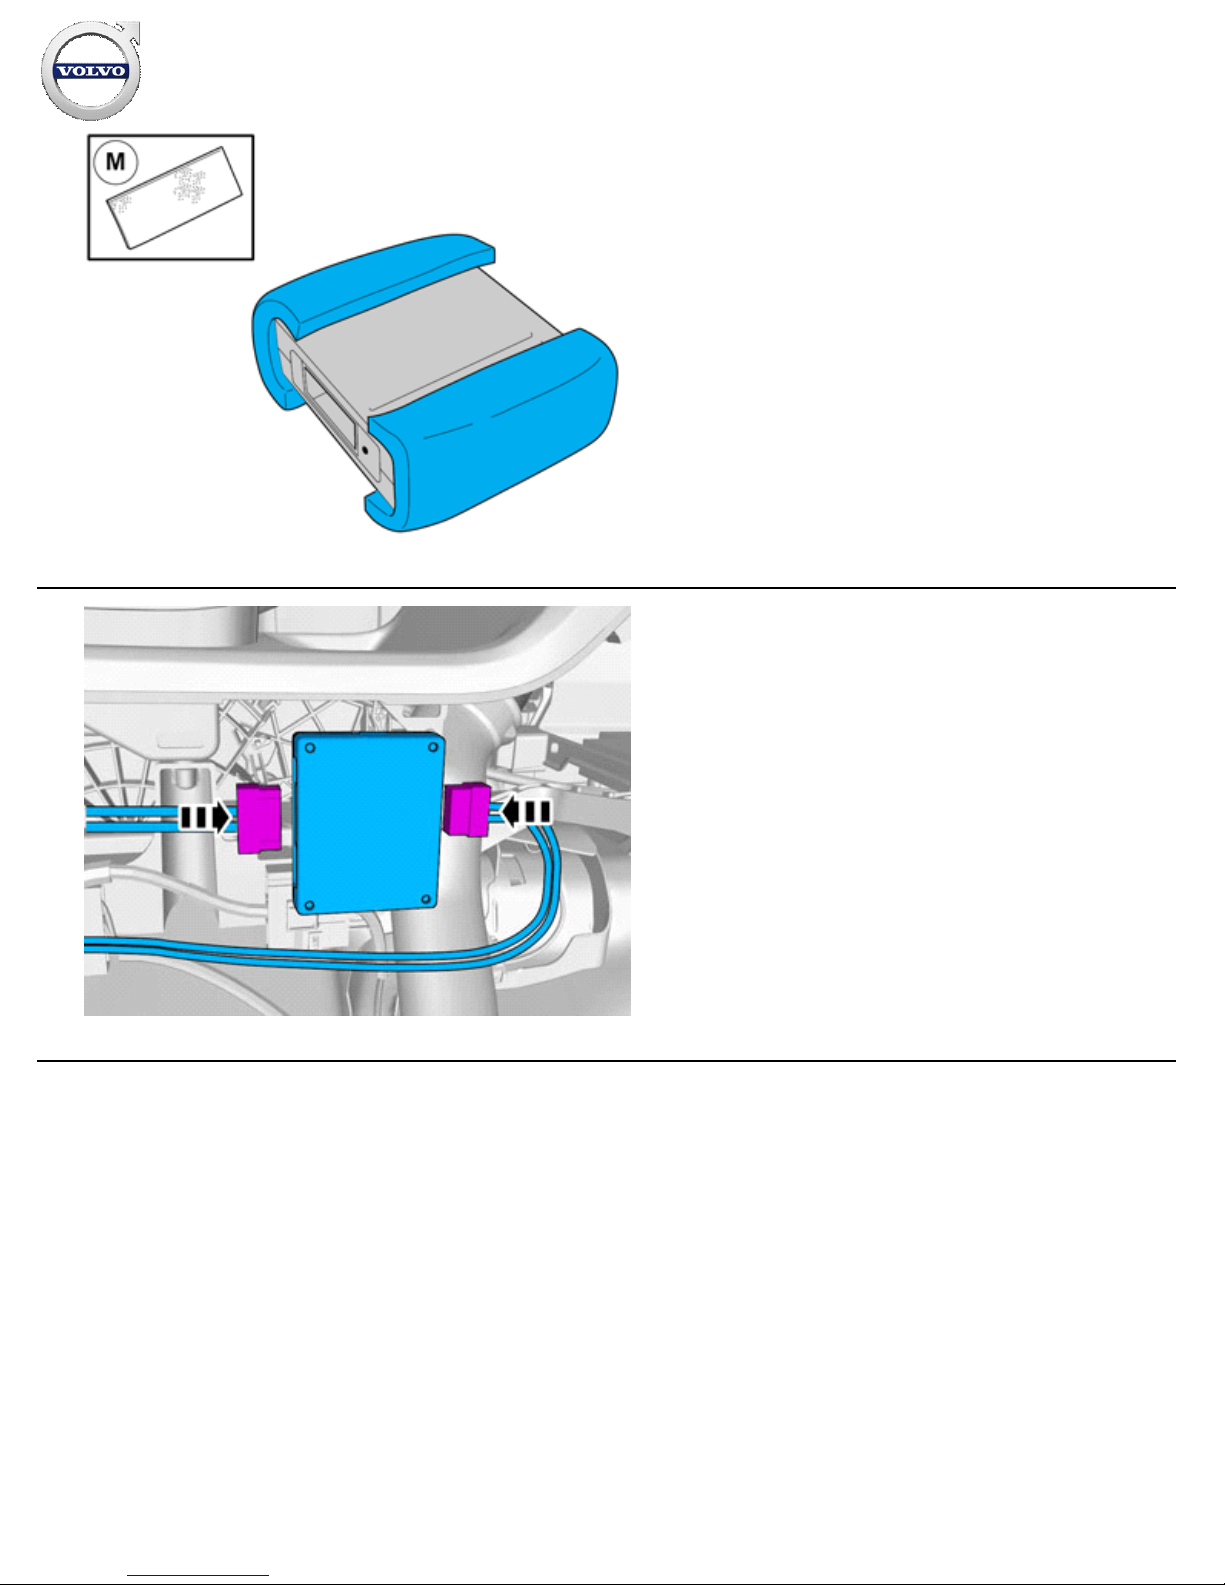
77
IMG-
382832
78
IMG-
382829
Connect the connectors.
Installation instructions, accessories
Volvo Car Corporation Gothenburg, Sweden
©
Volvo Car Corporation Multimedia system, RSE, two screens, with two players- 31414283 - V1.0
Strona 42 / 50
Page 43
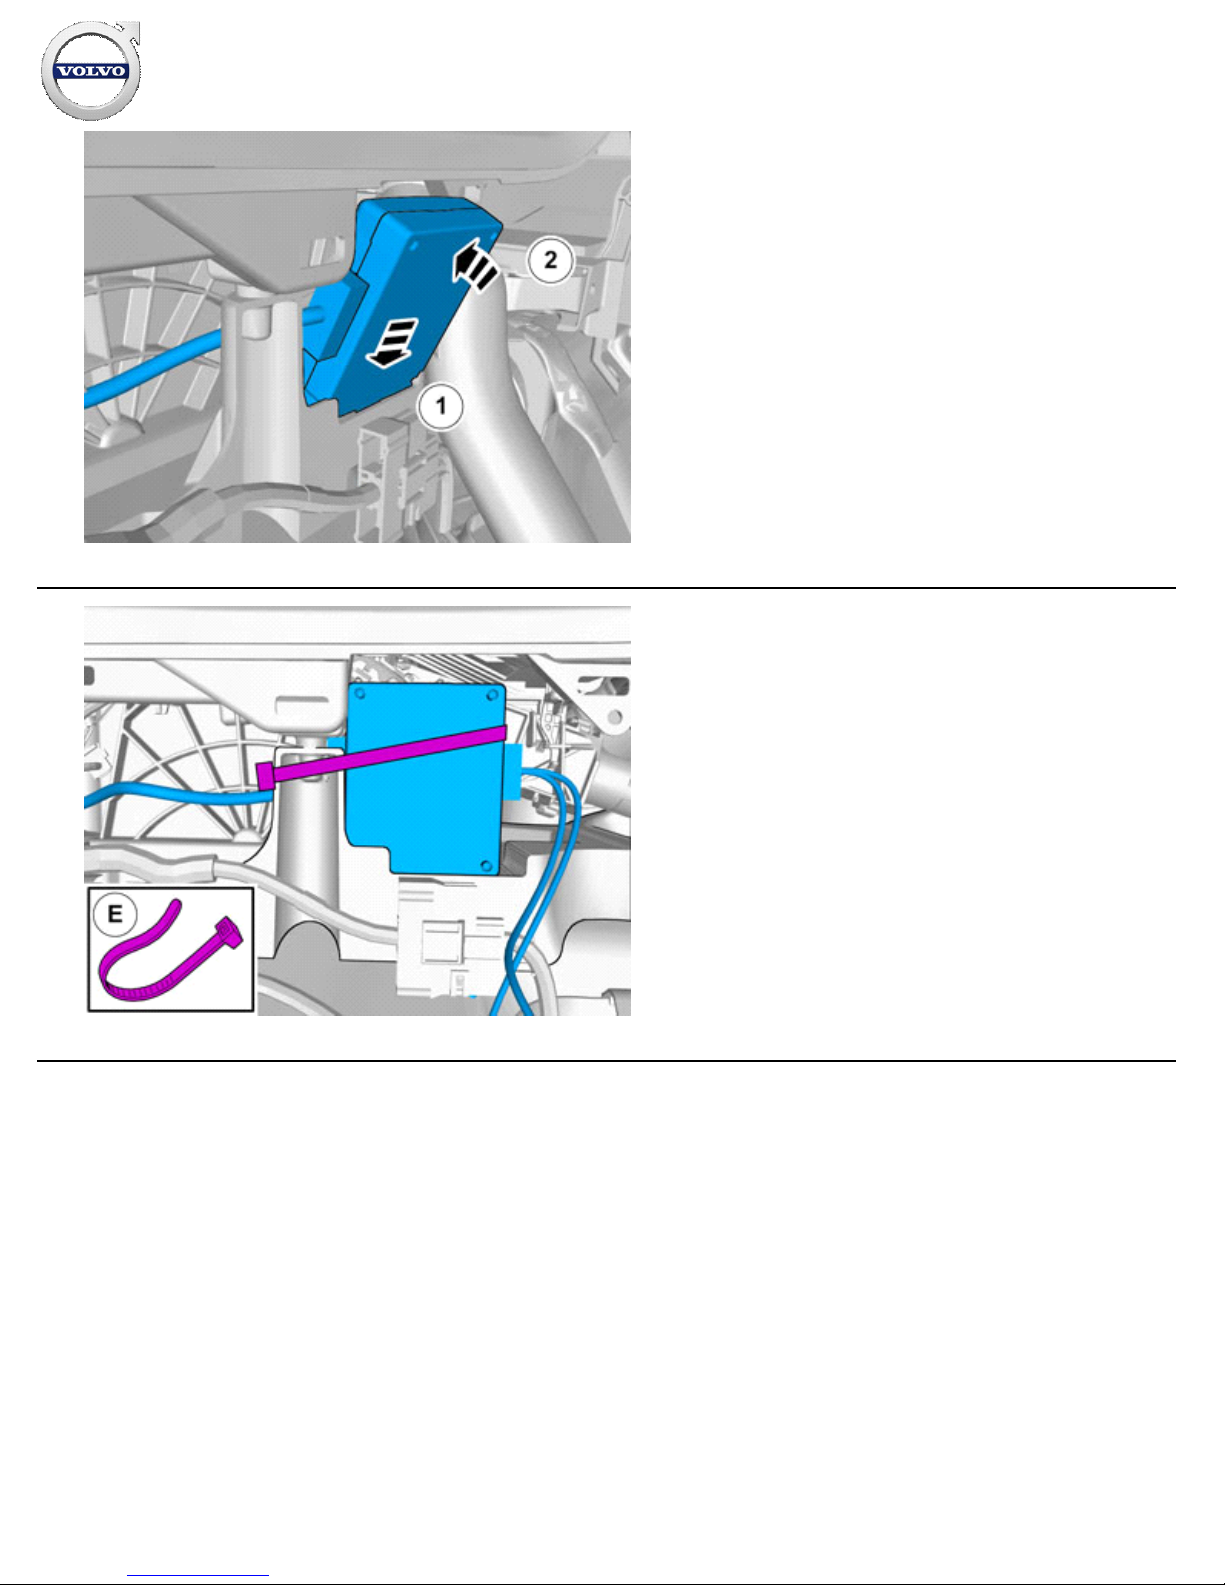
79
IMG-
382884
80
IMG-
382858
Installation instructions, accessories
Volvo Car Corporation Gothenburg, Sweden
©
Volvo Car Corporation Multimedia system, RSE, two screens, with two players- 31414283 - V1.0
Strona 43 / 50
Page 44
81
IMG-
382891
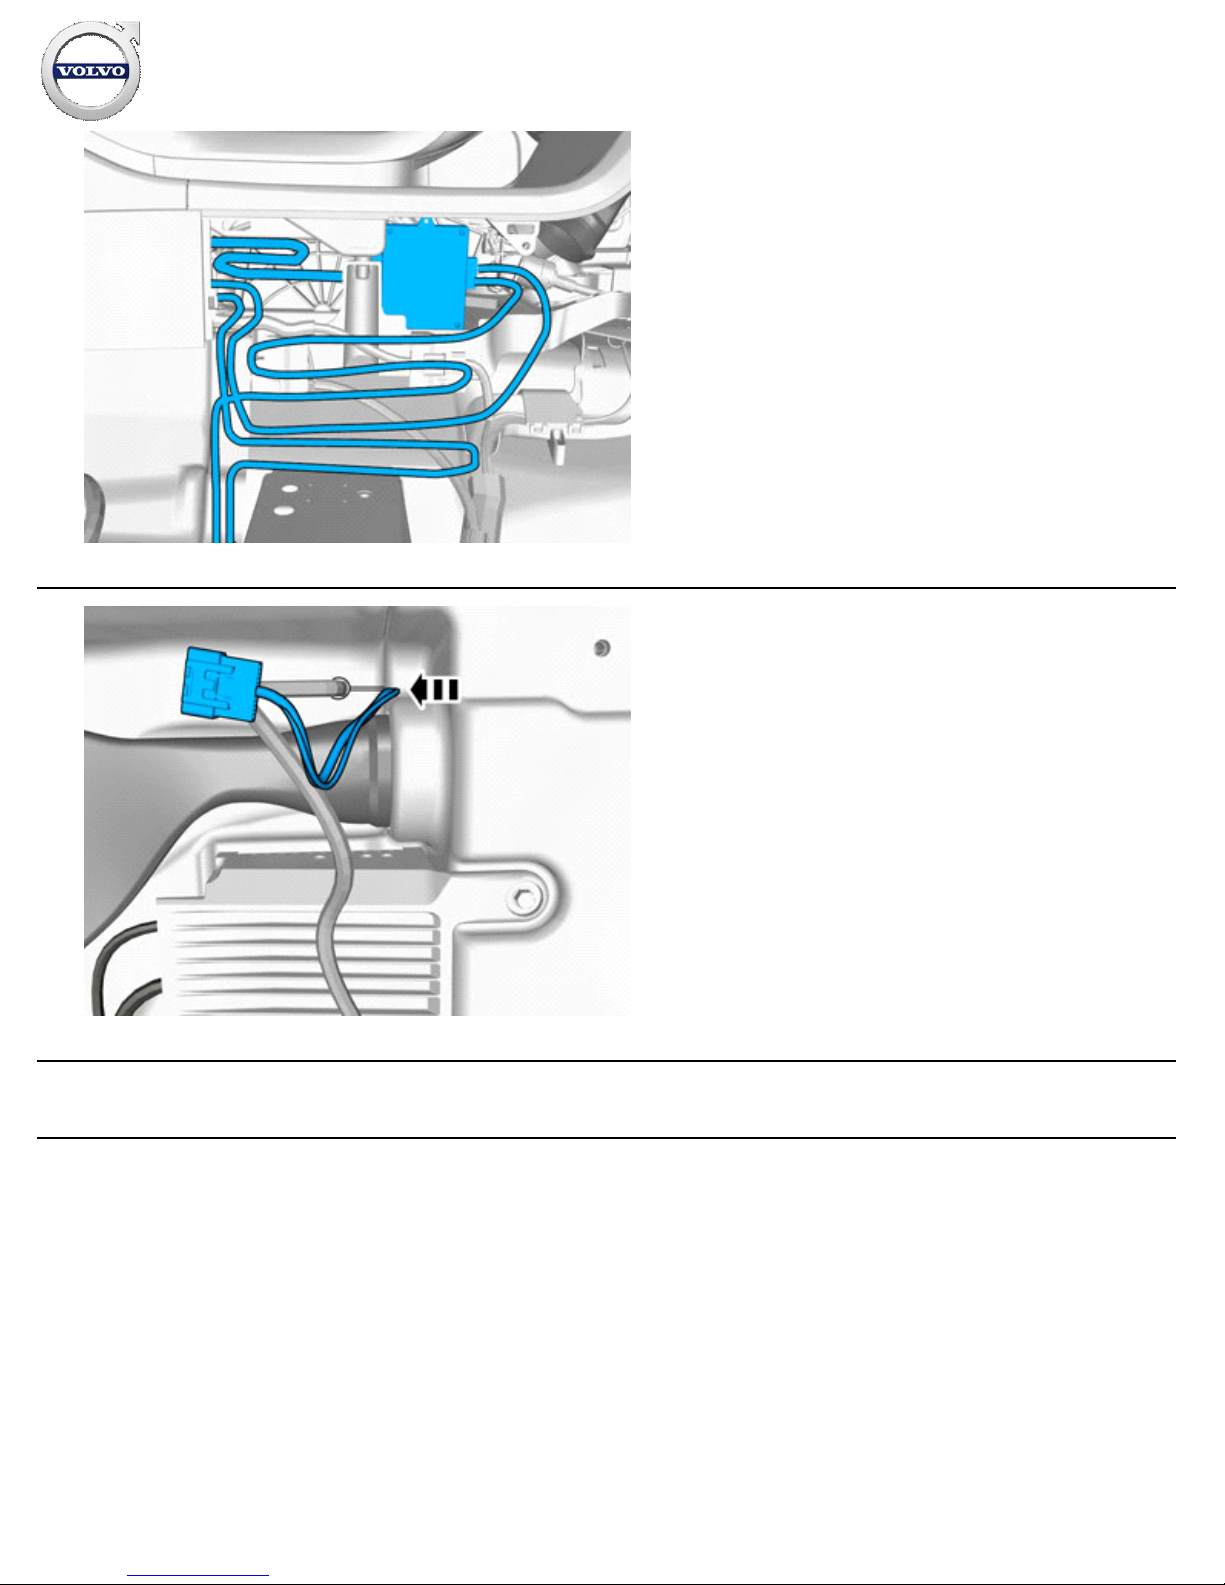
Position the cable harness excess as illustrated.
82
IMG-
382893
Route the cable harness to the existing cable harness.
Installation
Installation instructions, accessories
Volvo Car Corporation Gothenburg, Sweden
©
Volvo Car Corporation Multimedia system, RSE, two screens, with two players- 31414283 - V1.0
Strona 44 / 50
Page 45
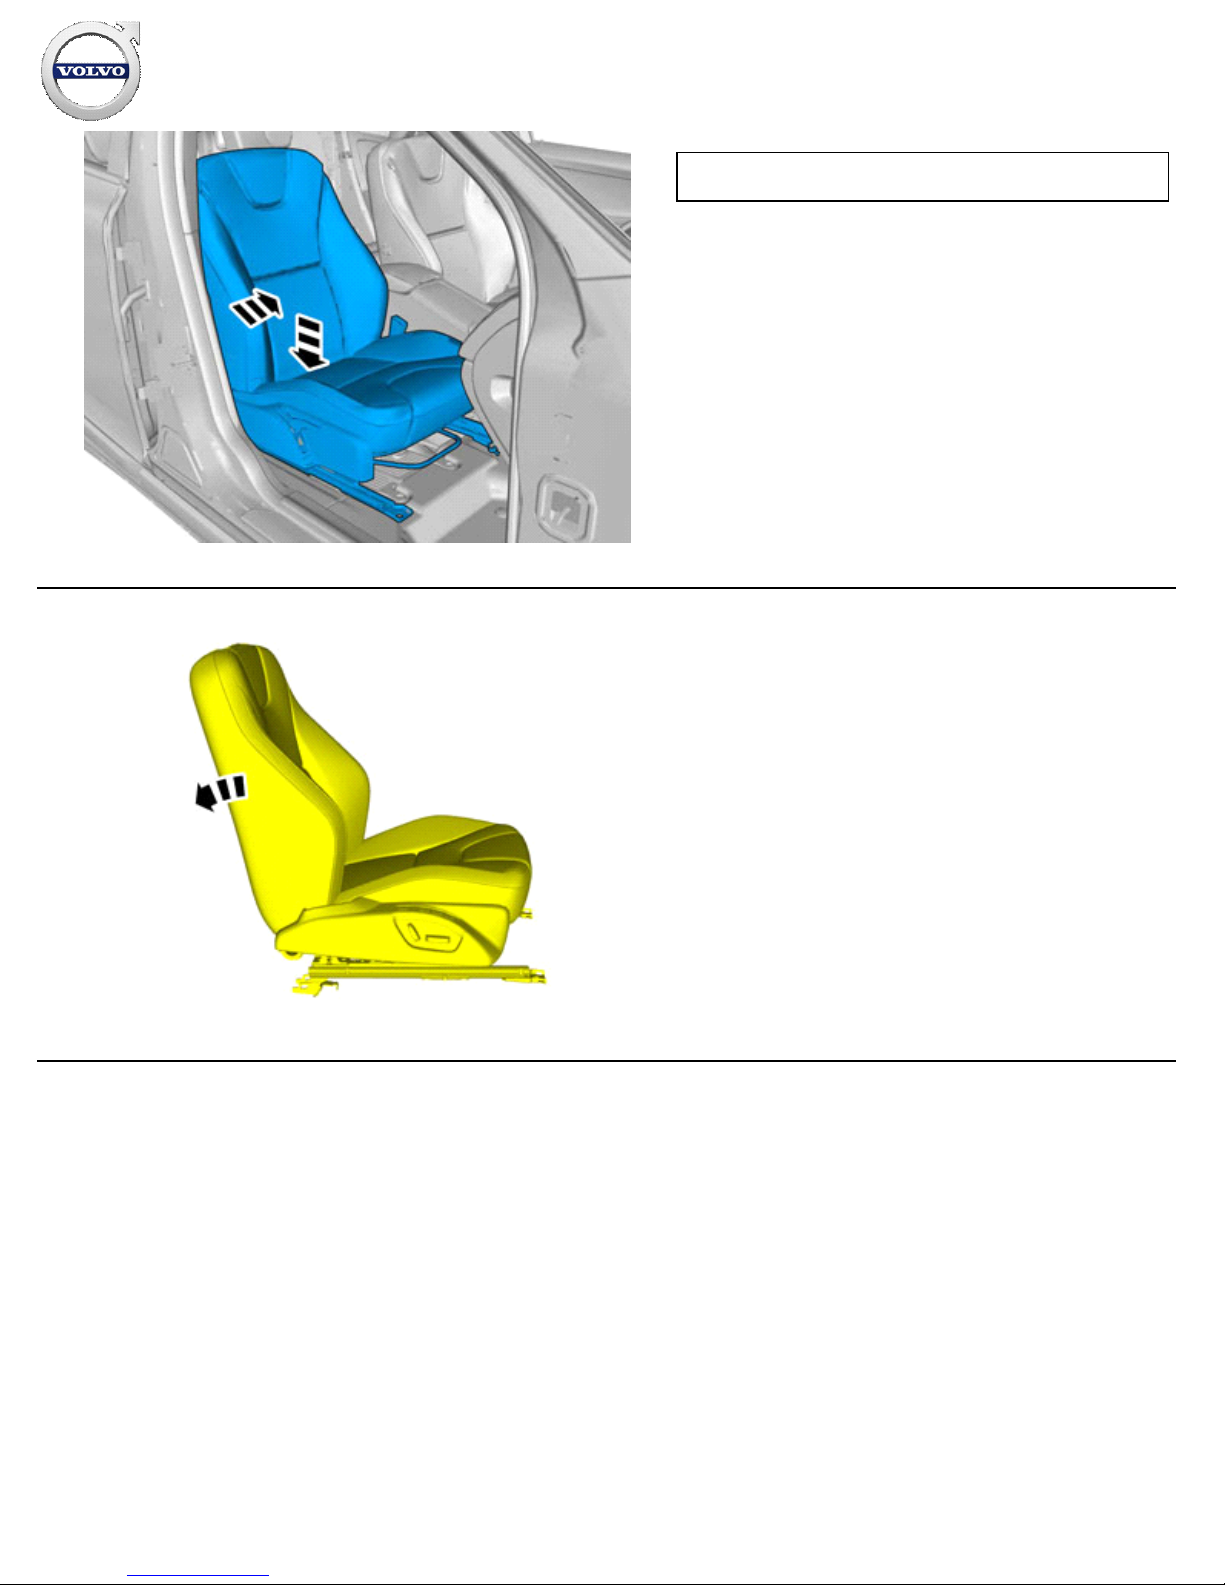
83
IMG-
329473
Caution!
Be extra careful when removing or installing this component.
84
IMG-
329151
Installation instructions, accessories
Volvo Car Corporation Gothenburg, Sweden
©
Volvo Car Corporation Multimedia system, RSE, two screens, with two players- 31414283 - V1.0
Strona 45 / 50
Page 46
85
IMG-
380703
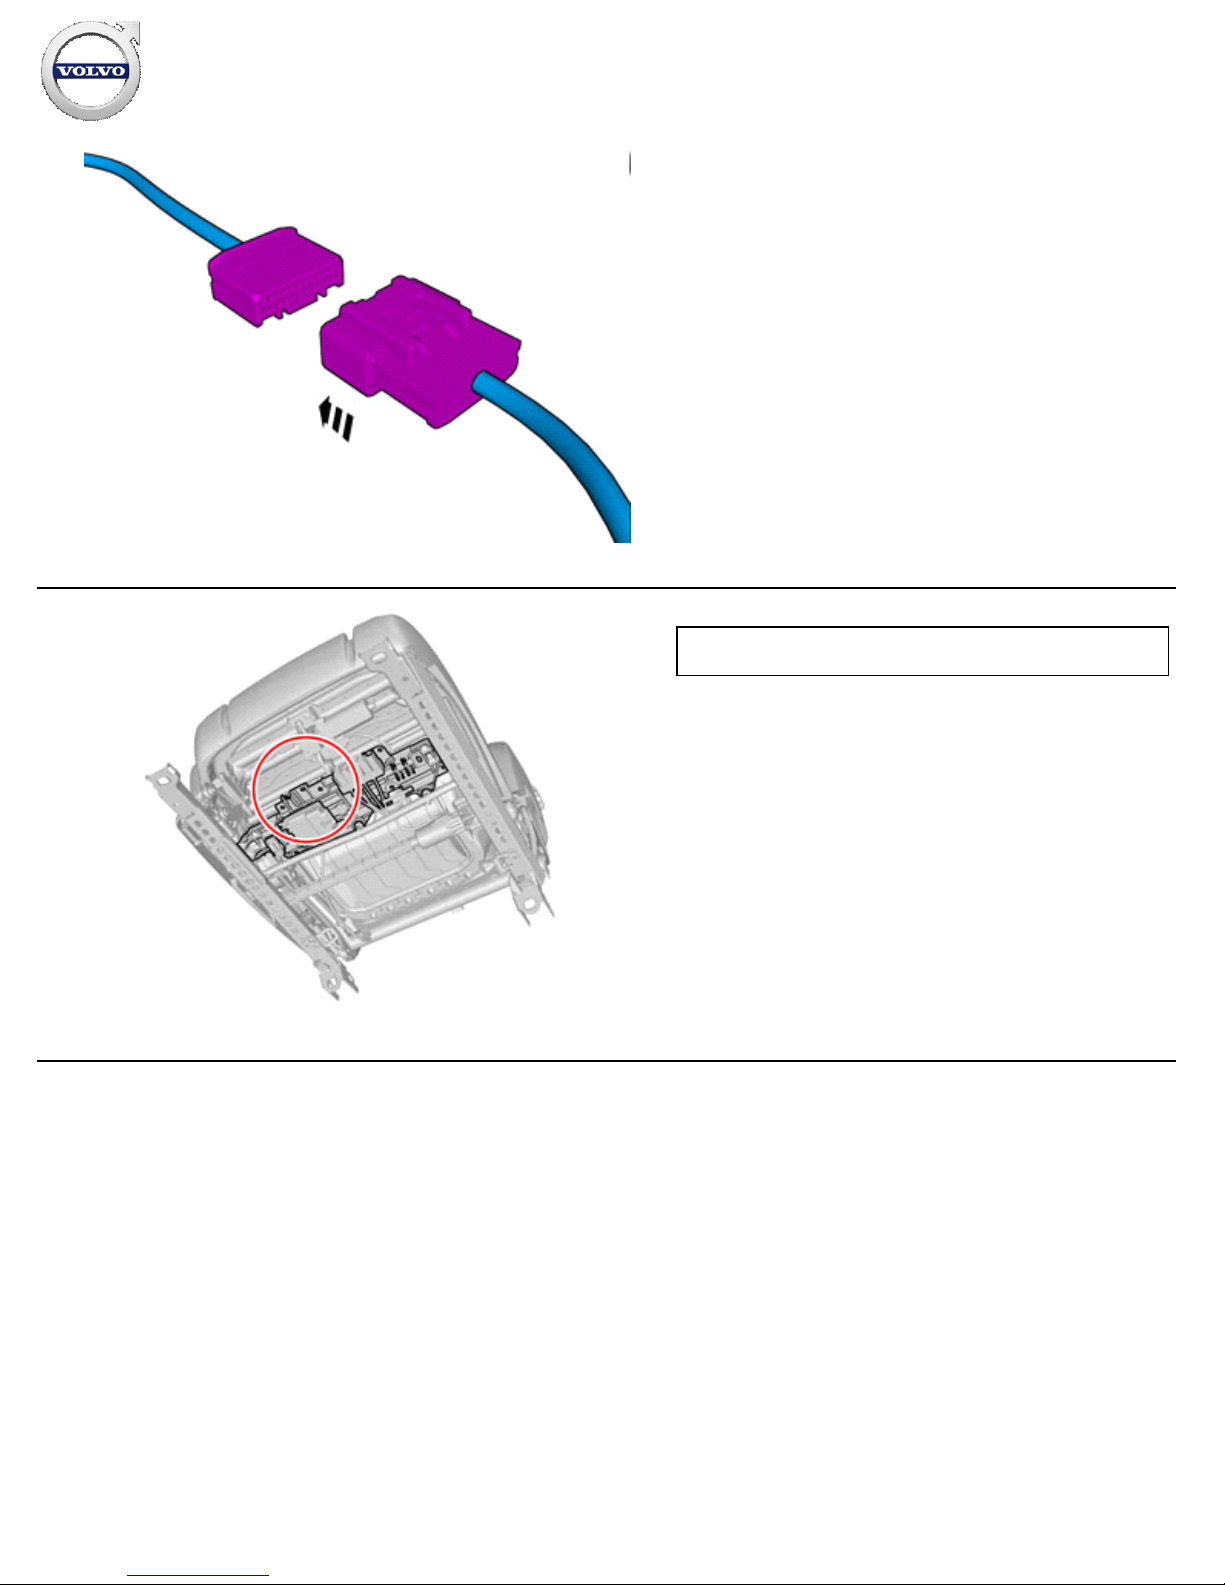
Connect the cable harness.
86
IMG-
372884
Note!
Orientation view
Installation instructions, accessories
Volvo Car Corporation Gothenburg, Sweden
©
Volvo Car Corporation Multimedia system, RSE, two screens, with two players- 31414283 - V1.0
Strona 46 / 50
Page 47
87
IMG-
380704
88
IMG-
329270
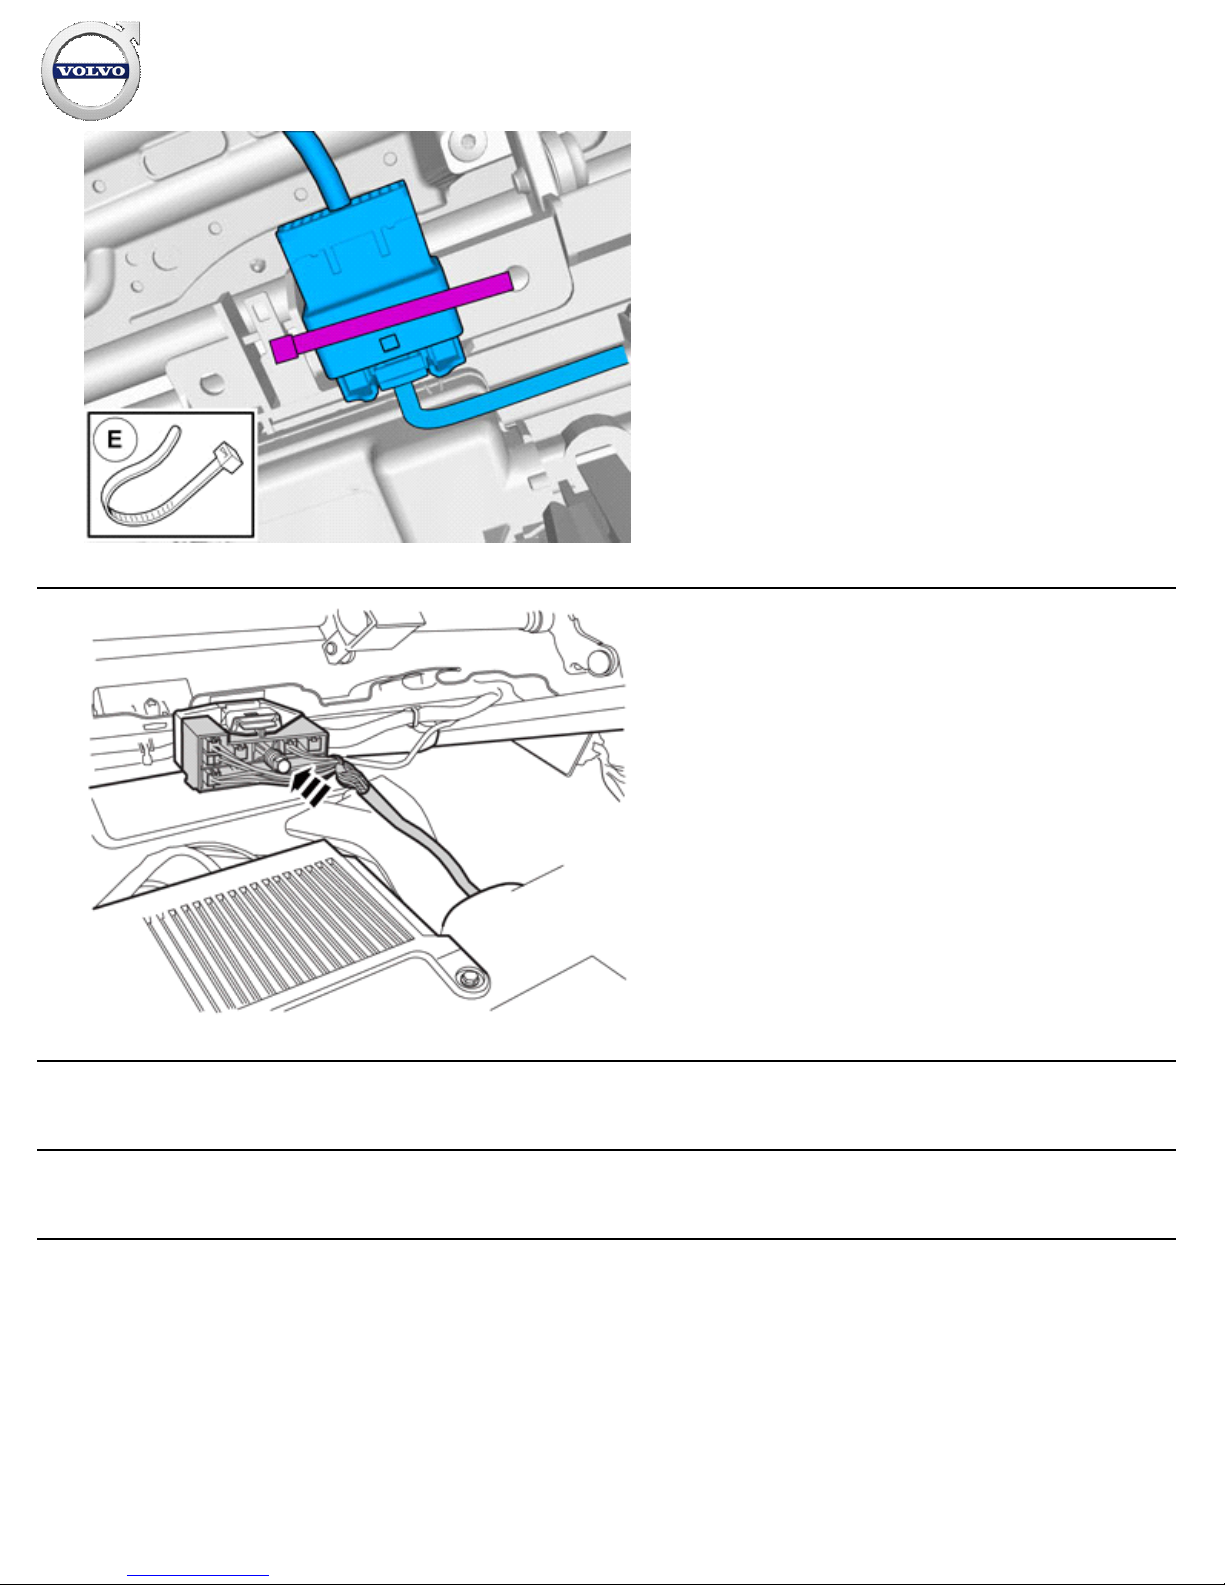
Connect the connector.
Tighten the screw.
89
Repeat the steps when installing on opposite side.
90
Reinstall the removed parts in reverse order.
Installation instructions, accessories
Volvo Car Corporation Gothenburg, Sweden
©
Volvo Car Corporation Multimedia system, RSE, two screens, with two players- 31414283 - V1.0
Strona 47 / 50
Page 48
91
IMG-
382312
92
IMG-
382311
93
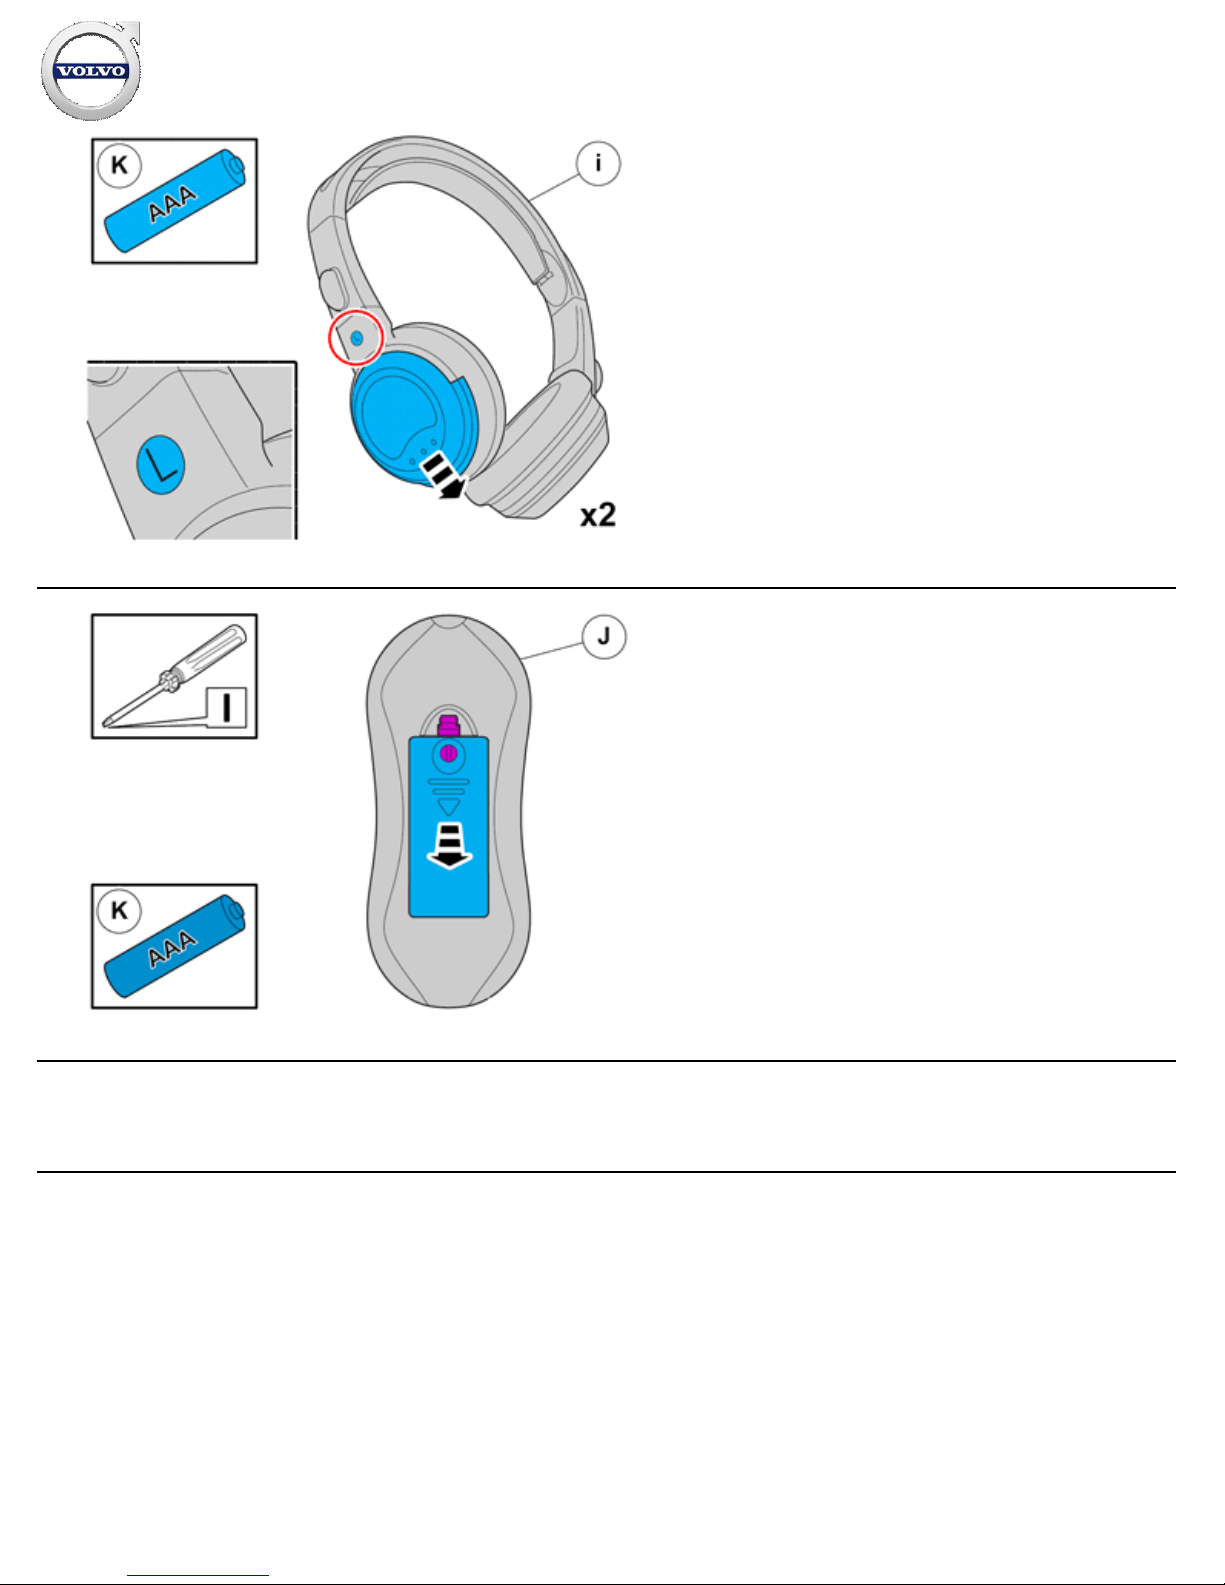
Place the manual for this accessory in a suitable location in the
car.
Installation instructions, accessories
Volvo Car Corporation Gothenburg, Sweden
©
Volvo Car Corporation Multimedia system, RSE, two screens, with two players- 31414283 - V1.0
Strona 48 / 50
Page 49
94
IMG-
336901
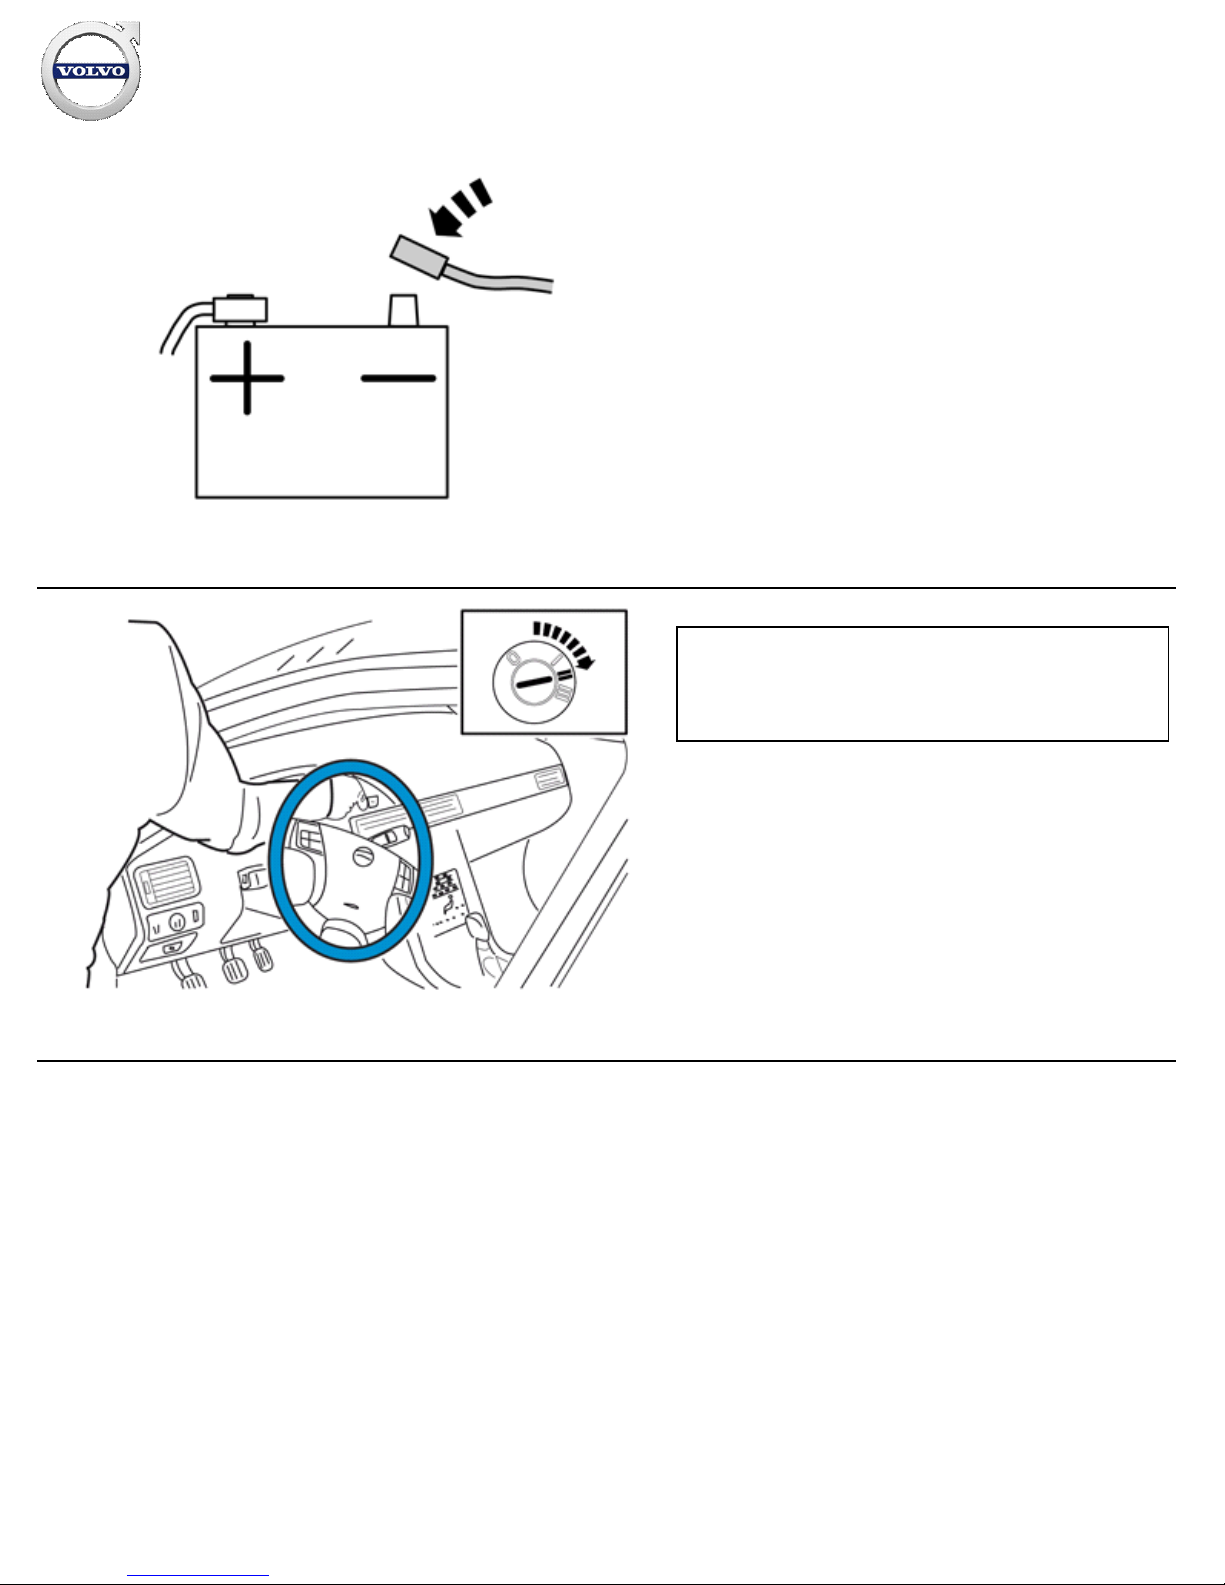
Reinstall the battery's negative cable.
95
IMG-
336904
Warning!
When switching the ignition on for the first time after a battery
disconnect and connect, make sure to stand outside the vehicle
and only reach into the vehicle keeping clear of the air bag
deployment areas.
Installation instructions, accessories
Volvo Car Corporation Gothenburg, Sweden
©
Volvo Car Corporation Multimedia system, RSE, two screens, with two players- 31414283 - V1.0
Strona 49 / 50
Page 50
96
IMG-
382943
Set the clock.
97
IMG-
275777
Adapt the DVD player to the vehicle according to: Product
specifications/Design and Function/3 Electrical system/39 Media communication and entertainment/393 Equipment for
entertainment/System for rear seat entertainment/Design
Installation instructions, accessories
Volvo Car Corporation Gothenburg, Sweden
©
Volvo Car Corporation Multimedia system, RSE, two screens, with two players- 31414283 - V1.0
Strona 50 / 50
 Loading...