

Volvo 31373230, 31399433, 31373229, 31399430, 31399429 Installation Instructions Manual
...Page 1

Instruction No
Version
Part. No.
31339825
1.2
31373230, 31373229, 31373227, 31373404, 31399433, 31399430, 31399429, 31399159, 31399158, 31399157,
31399156, 31401810, 31401811, 31401812
Navigation system, RTI
IMG-
367326
Instruction No
Version
Part. No.
31339825
1.2
31373230, 31373229, 31373227, 31373404, 31399433, 31399430, 31399429, 31399159, 31399158, 31399157,
31399156, 31401810, 31401811, 31401812
Navigation system, RTI
IMG-
367326
Installation instructions, accessories
Volvo Car Corporation Gothenburg, Sweden
©
Volvo Car Corporation
Navigation system, RTI- 31339825 - V1.2
Page 1 / 43
Page 2

Equipment
IMG-
242205
IMG-
345497
IMG-
371179
Installation instructions, accessories
Volvo Car Corporation Gothenburg, Sweden
©
Volvo Car Corporation
Navigation system, RTI- 31339825 - V1.2
Page 2 / 43
Page 3
Information
1
Read through all of the instructions before starting installation.
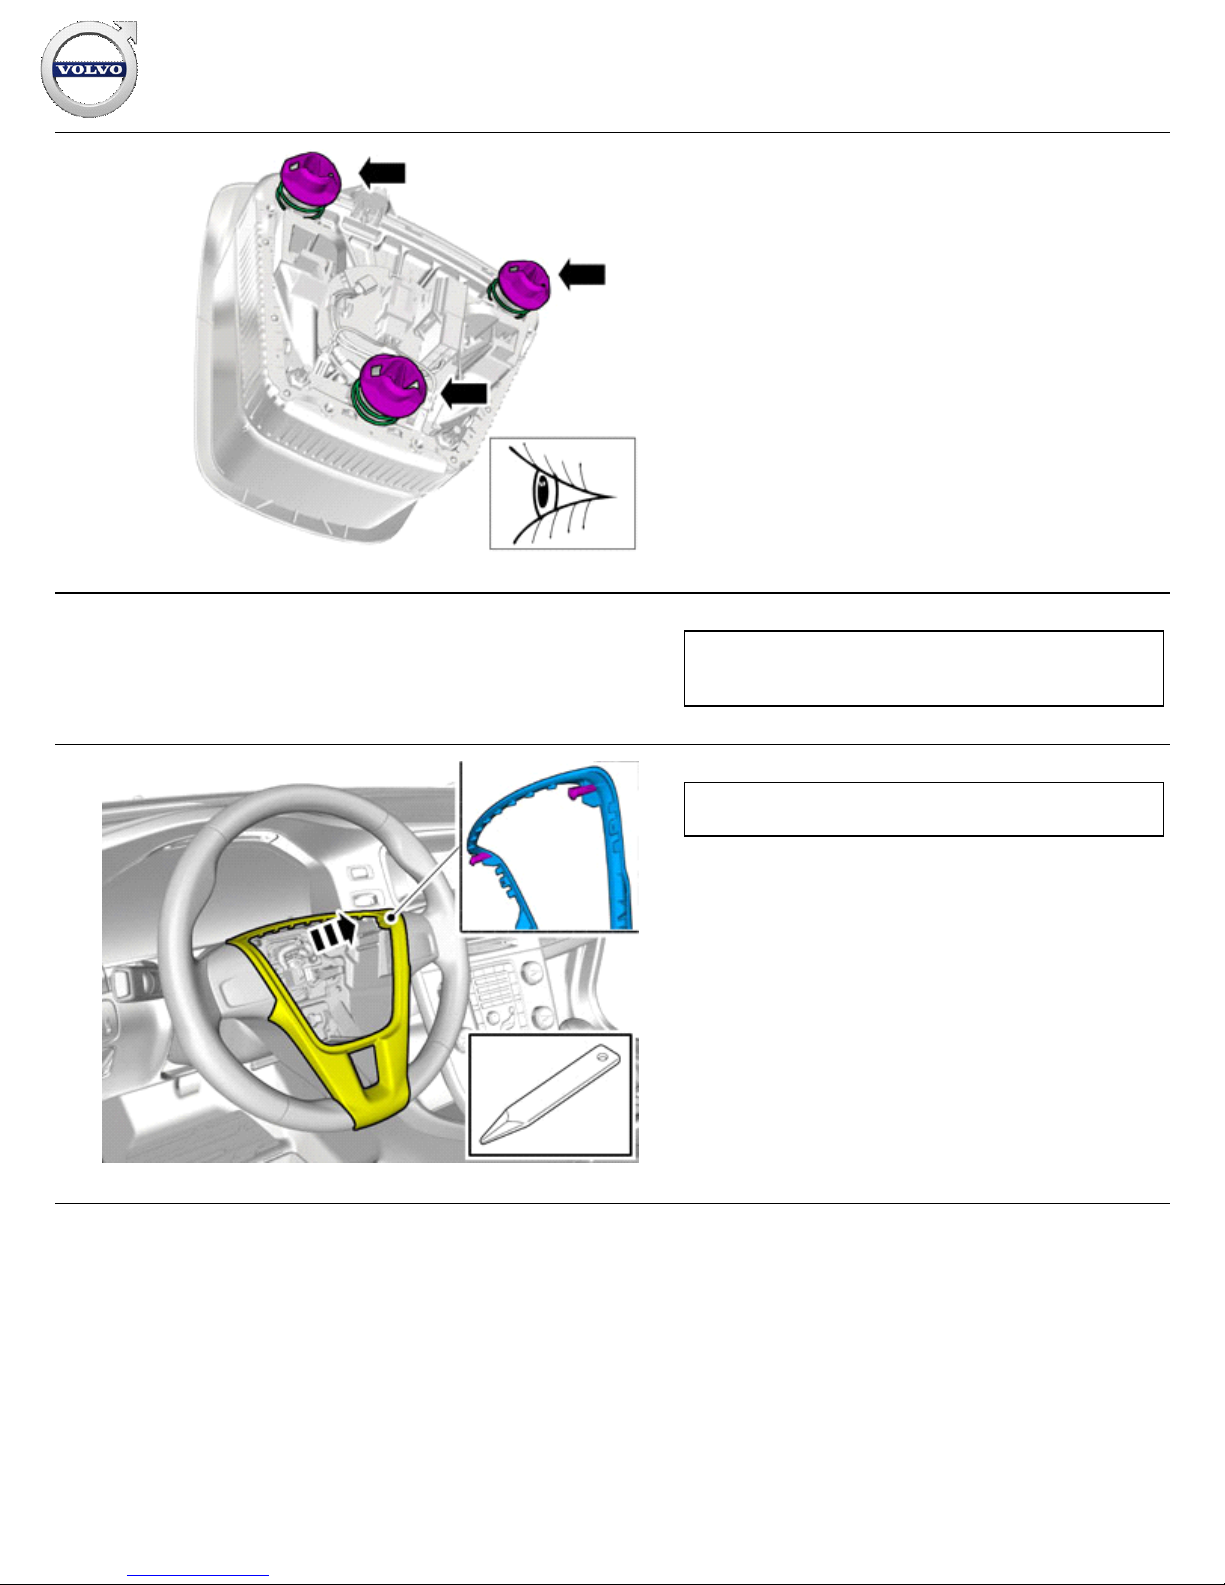
Notifications and warning texts are for your safety and to
minimise the risk of something breaking during installation.
Ensure that all tools stated in the instructions are available before
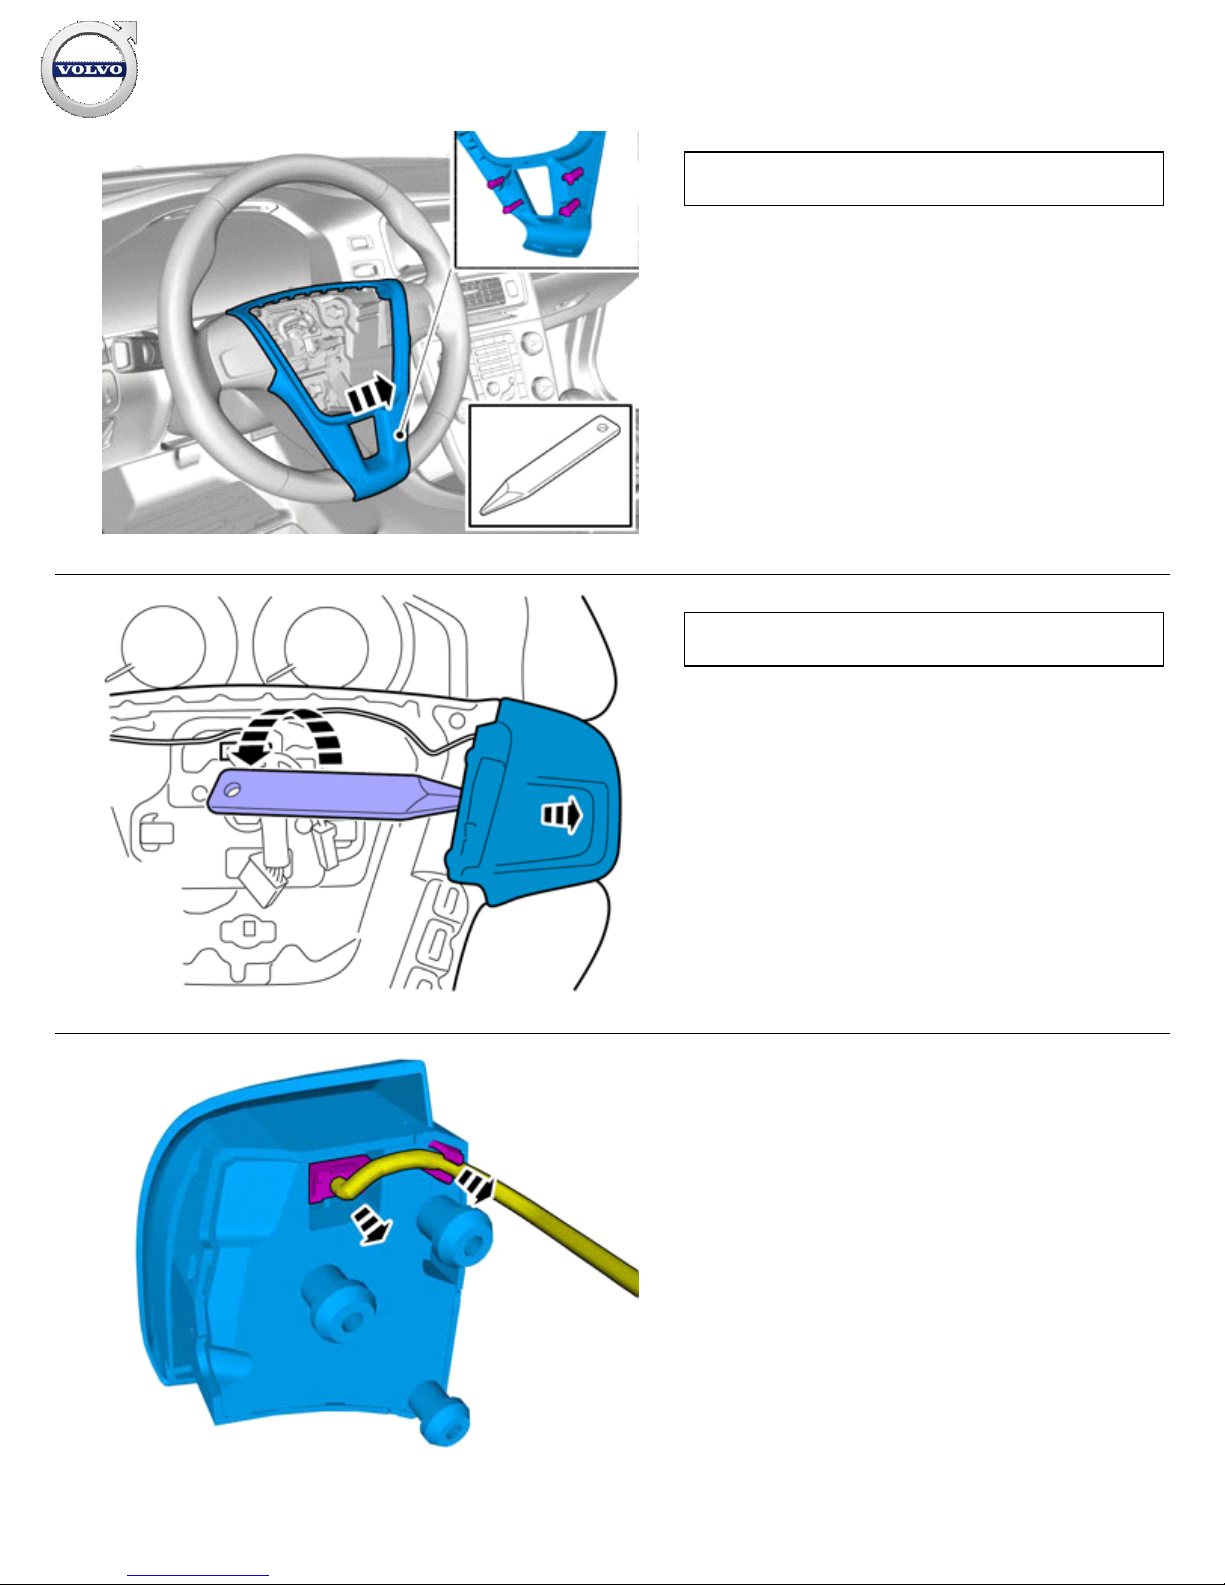
starting installation.
Certain steps in the instructions are only presented in the form of
images. Explanatory text is also given for more complicated
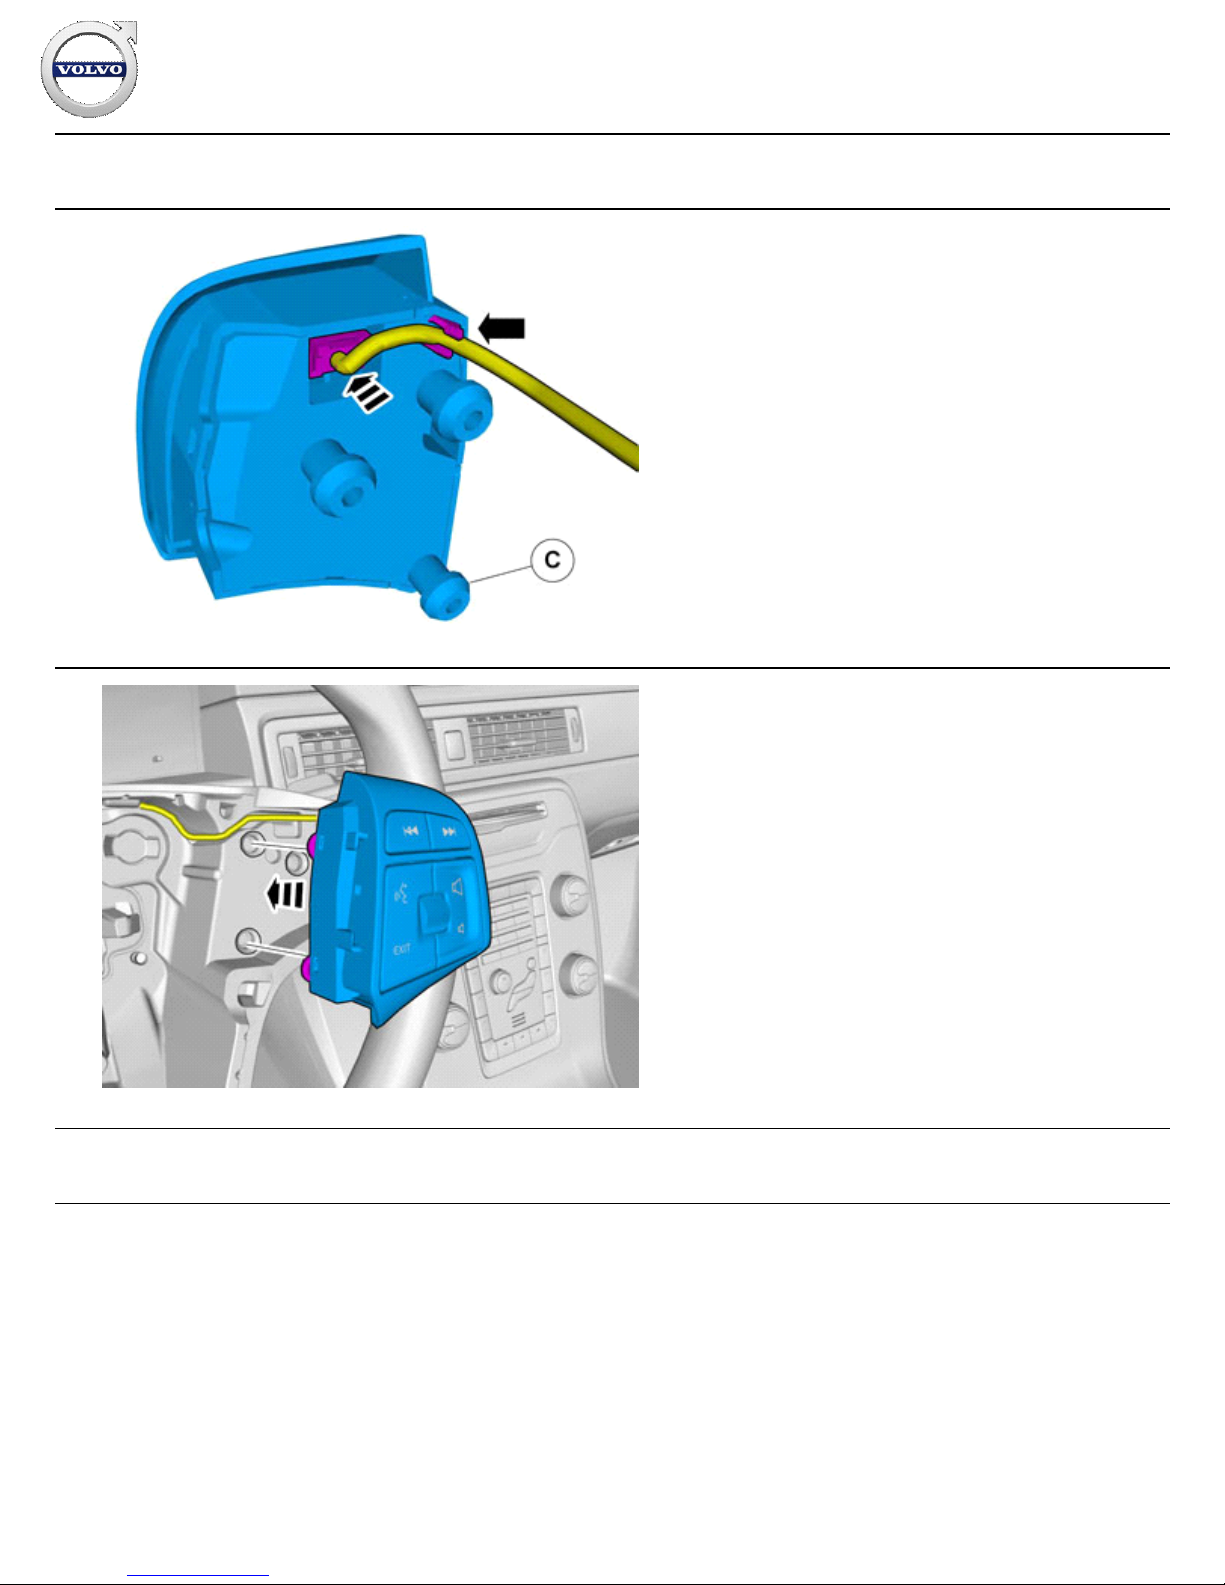
steps.
In the event of any problems with the instructions or the
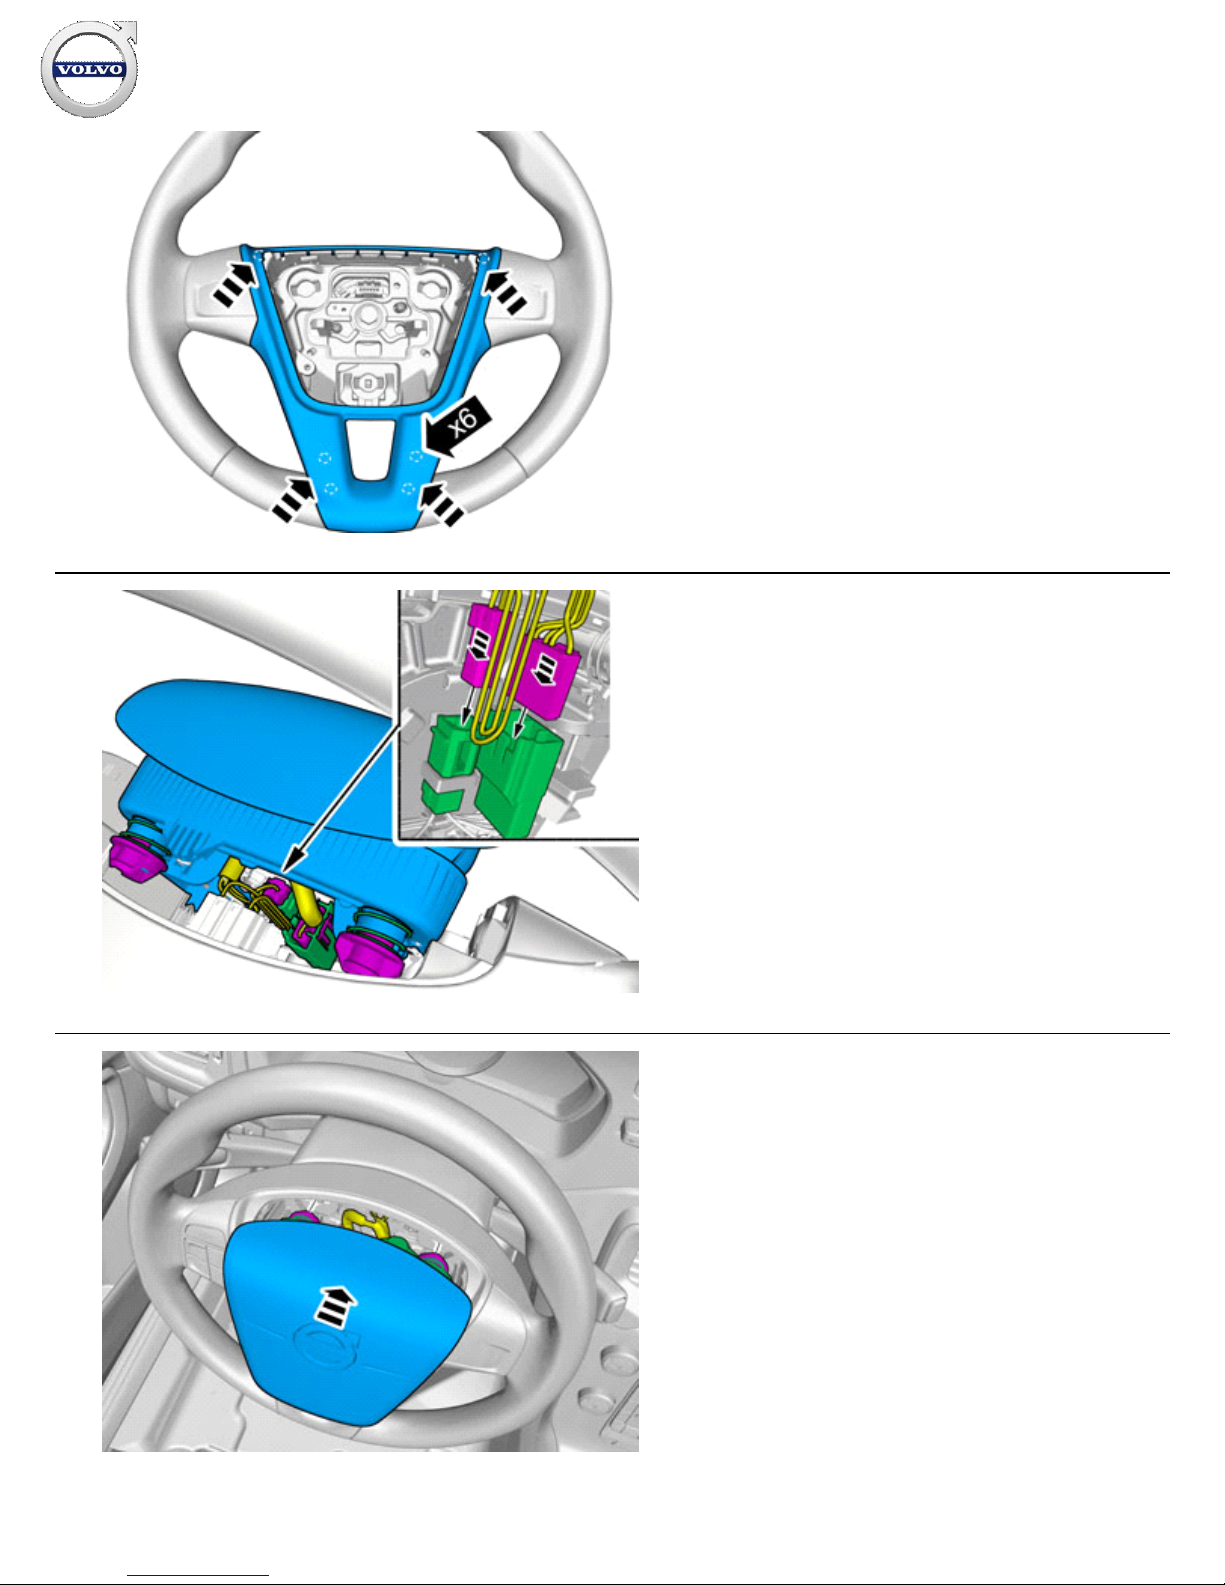
accessory, contact your local Volvo dealer.
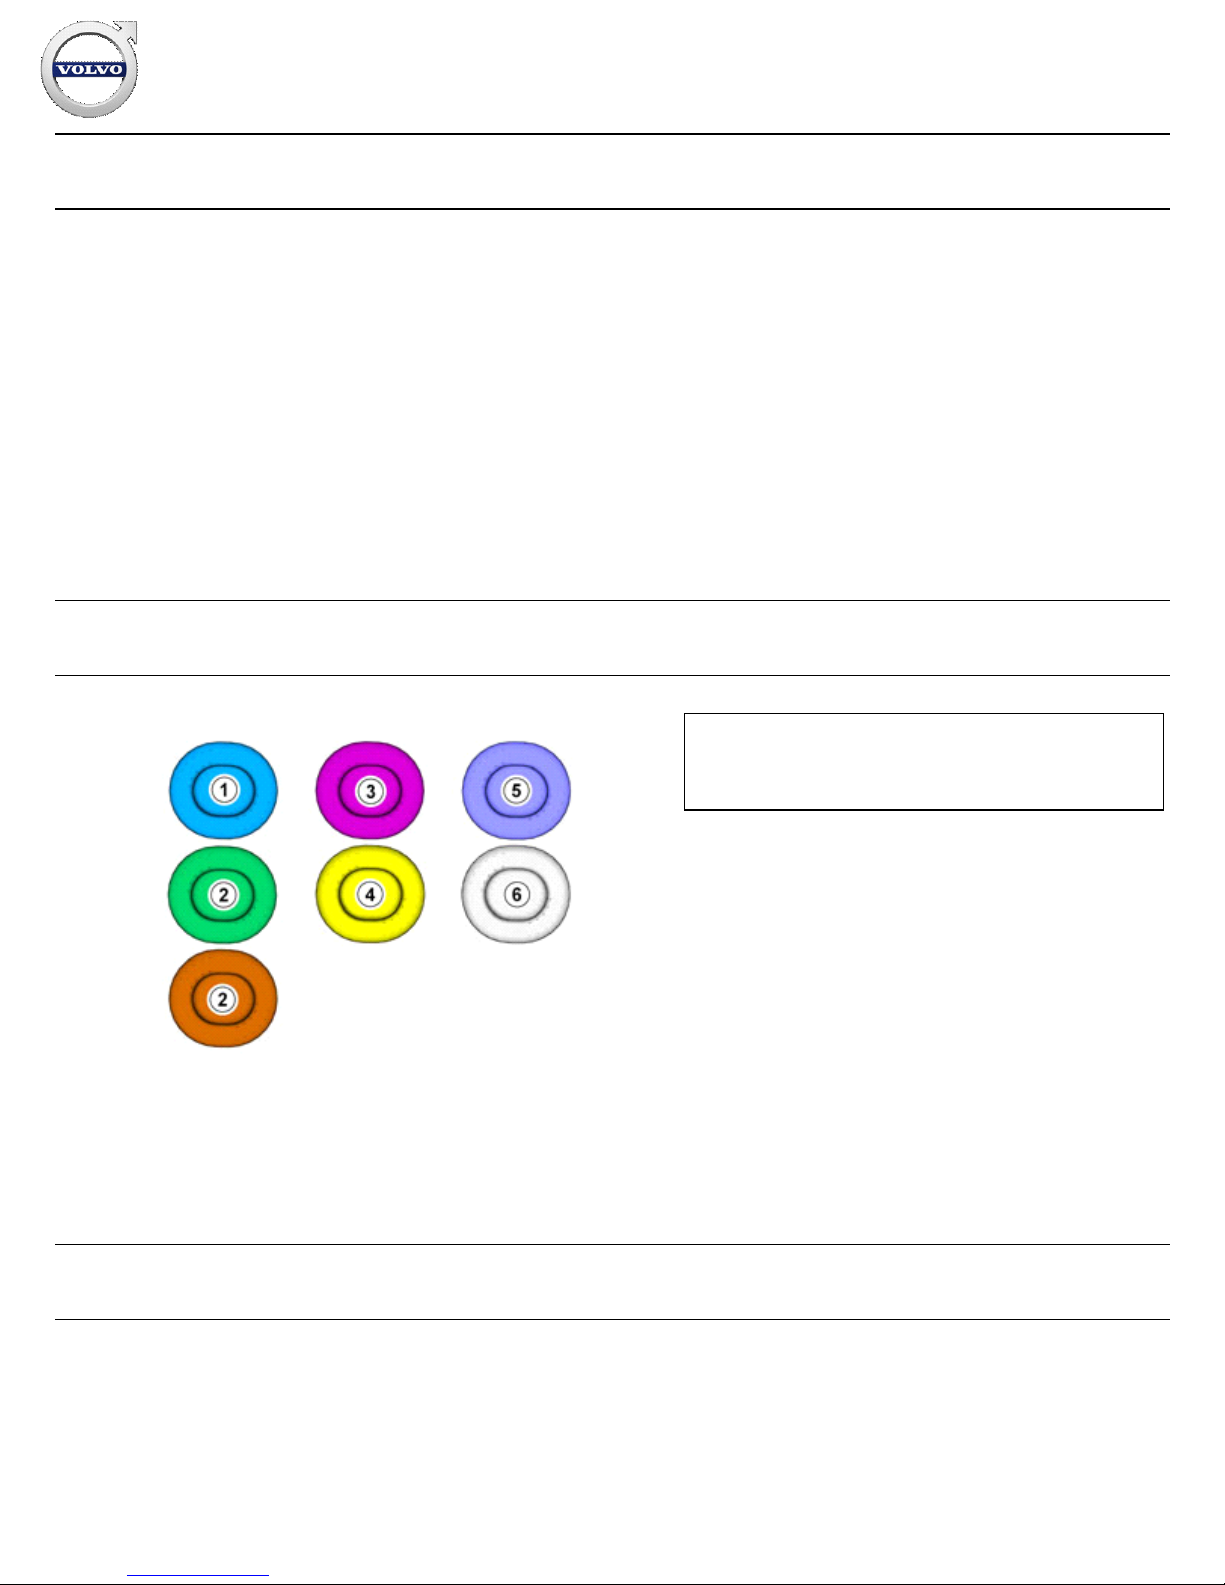
Color symbols
2
IMG-
363036
will do something.
additional parts.
screws, clips, connectors, etc.
vehicle but only hung to the side.
Note!
This colour chart displays (in colour print and electronic
version) the importance of the different colours used in the
images of the method steps.
Removal
Installation instructions, accessories
Volvo Car Corporation Gothenburg, Sweden
©
Volvo Car Corporation
Navigation system, RTI- 31339825 - V1.2
Page 3 / 43
Page 4

3
IMG-
361756
Release the lock.
4
IMG-
361757
5
IMG-
368346
Detach the panel.
Installation instructions, accessories
Volvo Car Corporation Gothenburg, Sweden
©
Volvo Car Corporation
Navigation system, RTI- 31339825 - V1.2
Page 4 / 43
Page 5

Vehicles with 5 inch ICM-display
6
IMG-
352828
Remove the screws.
7
IMG-
371226
Note!
Orientation view
Installation instructions, accessories
Volvo Car Corporation Gothenburg, Sweden
©
Volvo Car Corporation
Navigation system, RTI- 31339825 - V1.2
Page 5 / 43
Page 6
8
IMG-
371229
9
IMG-
371228
10
IMG-
367433
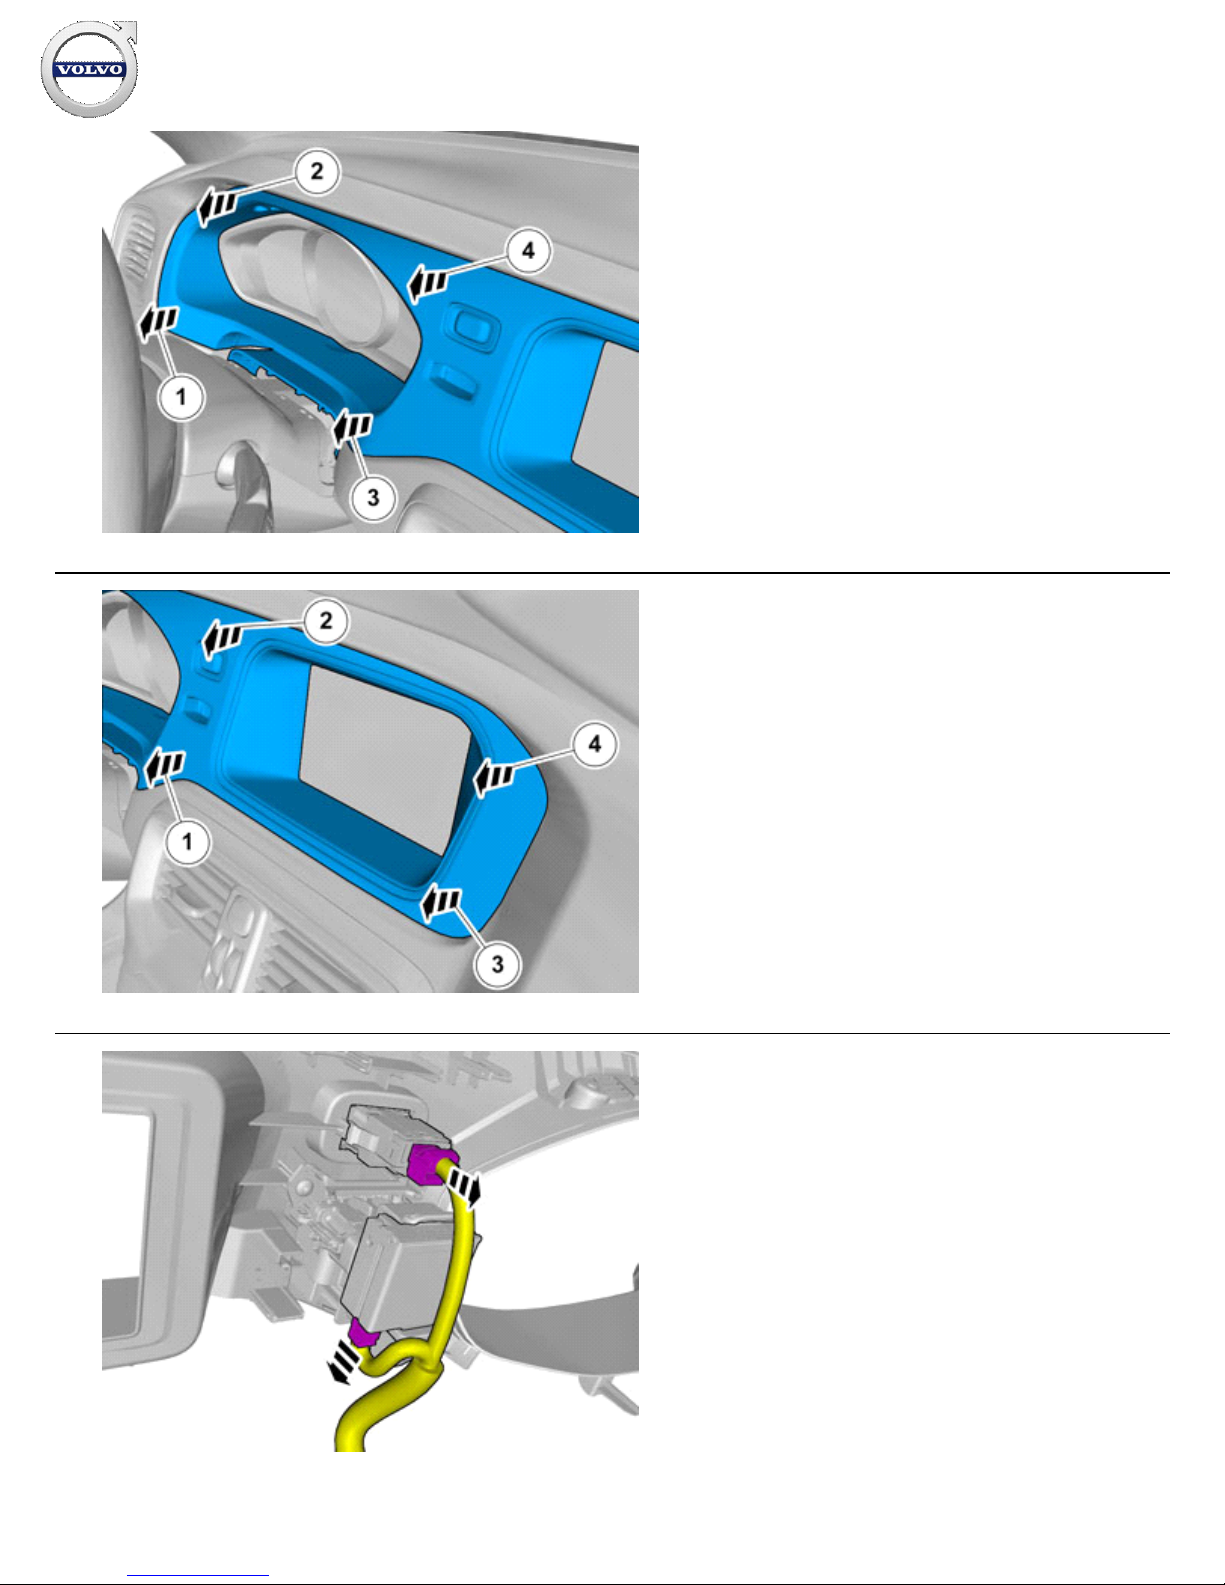
Disconnect the connectors.
Installation instructions, accessories
Volvo Car Corporation Gothenburg, Sweden
©
Volvo Car Corporation
Navigation system, RTI- 31339825 - V1.2
Page 6 / 43
Page 7
11
IMG-
352889
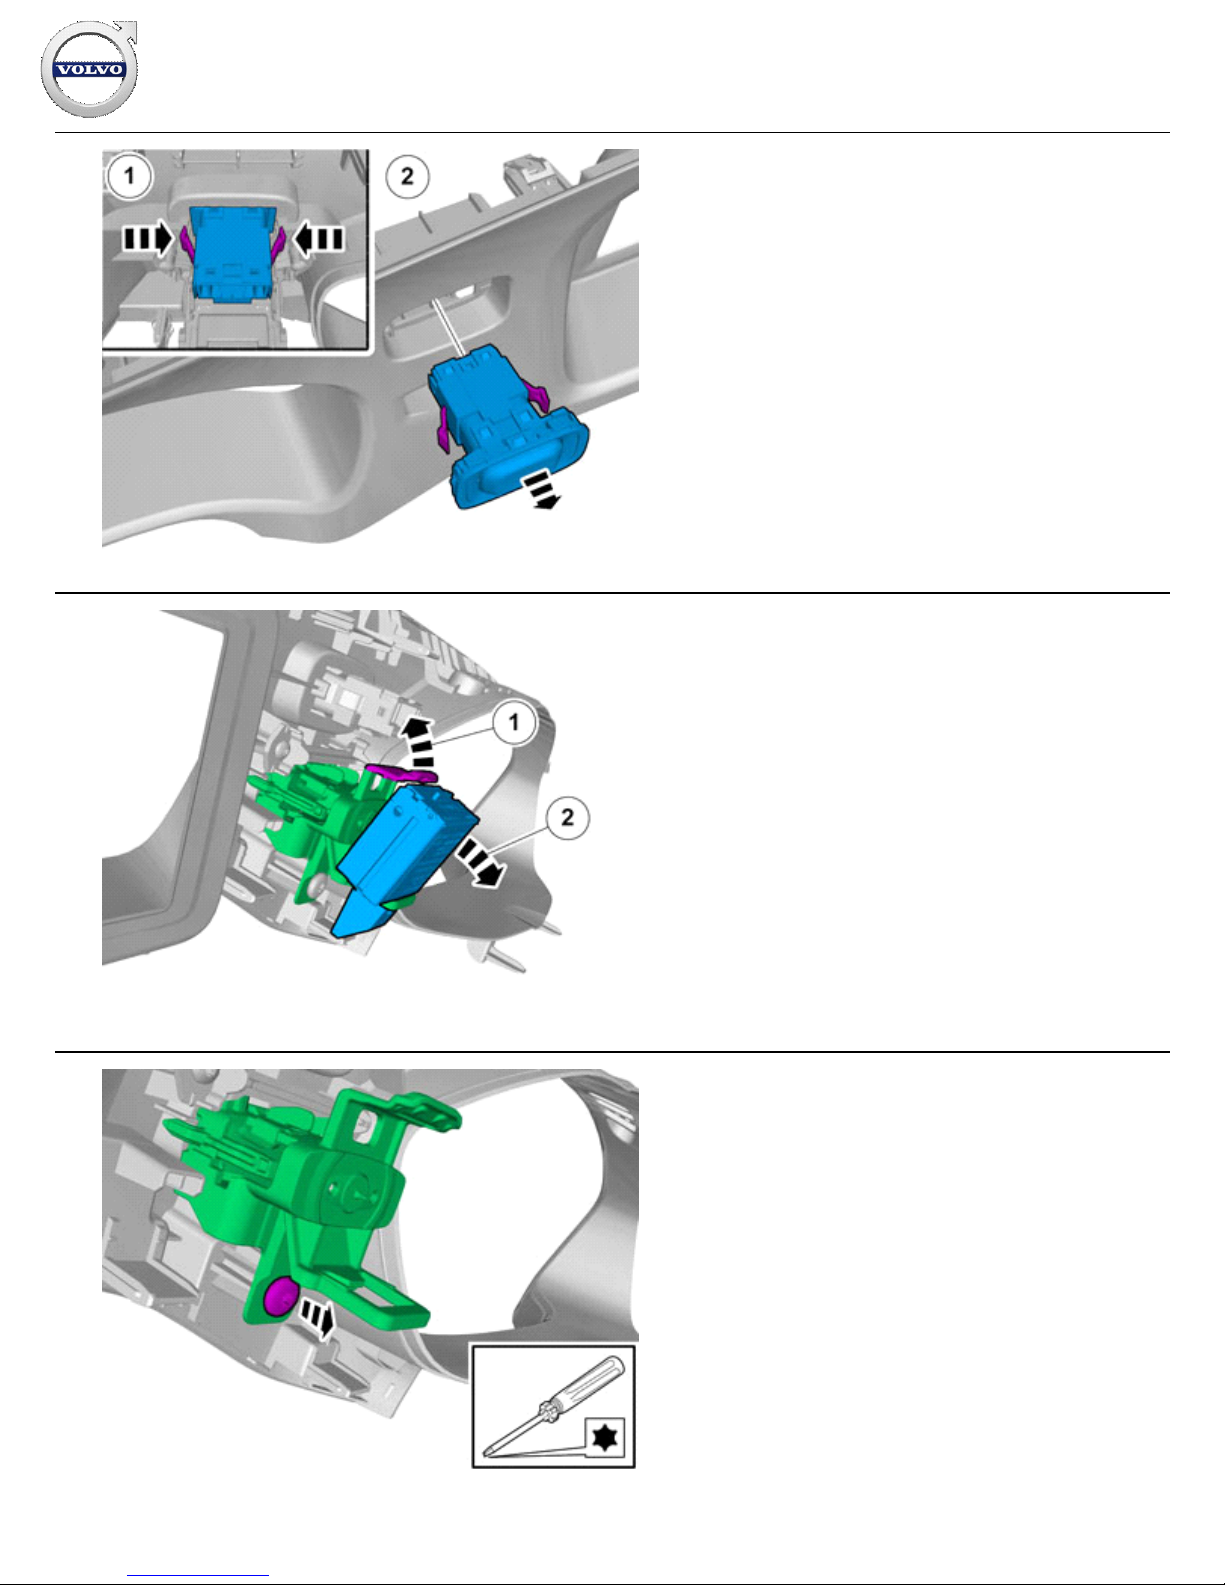
Depress the locking device.
12
IMG-
371215
13
IMG-
371217
Installation instructions, accessories
Volvo Car Corporation Gothenburg, Sweden
©
Volvo Car Corporation
Navigation system, RTI- 31339825 - V1.2
Page 7 / 43
Page 8
14
IMG-
371214
15
IMG-
371223
Installation
Installation instructions, accessories
Volvo Car Corporation Gothenburg, Sweden
©
Volvo Car Corporation
Navigation system, RTI- 31339825 - V1.2
Page 8 / 43
Page 9
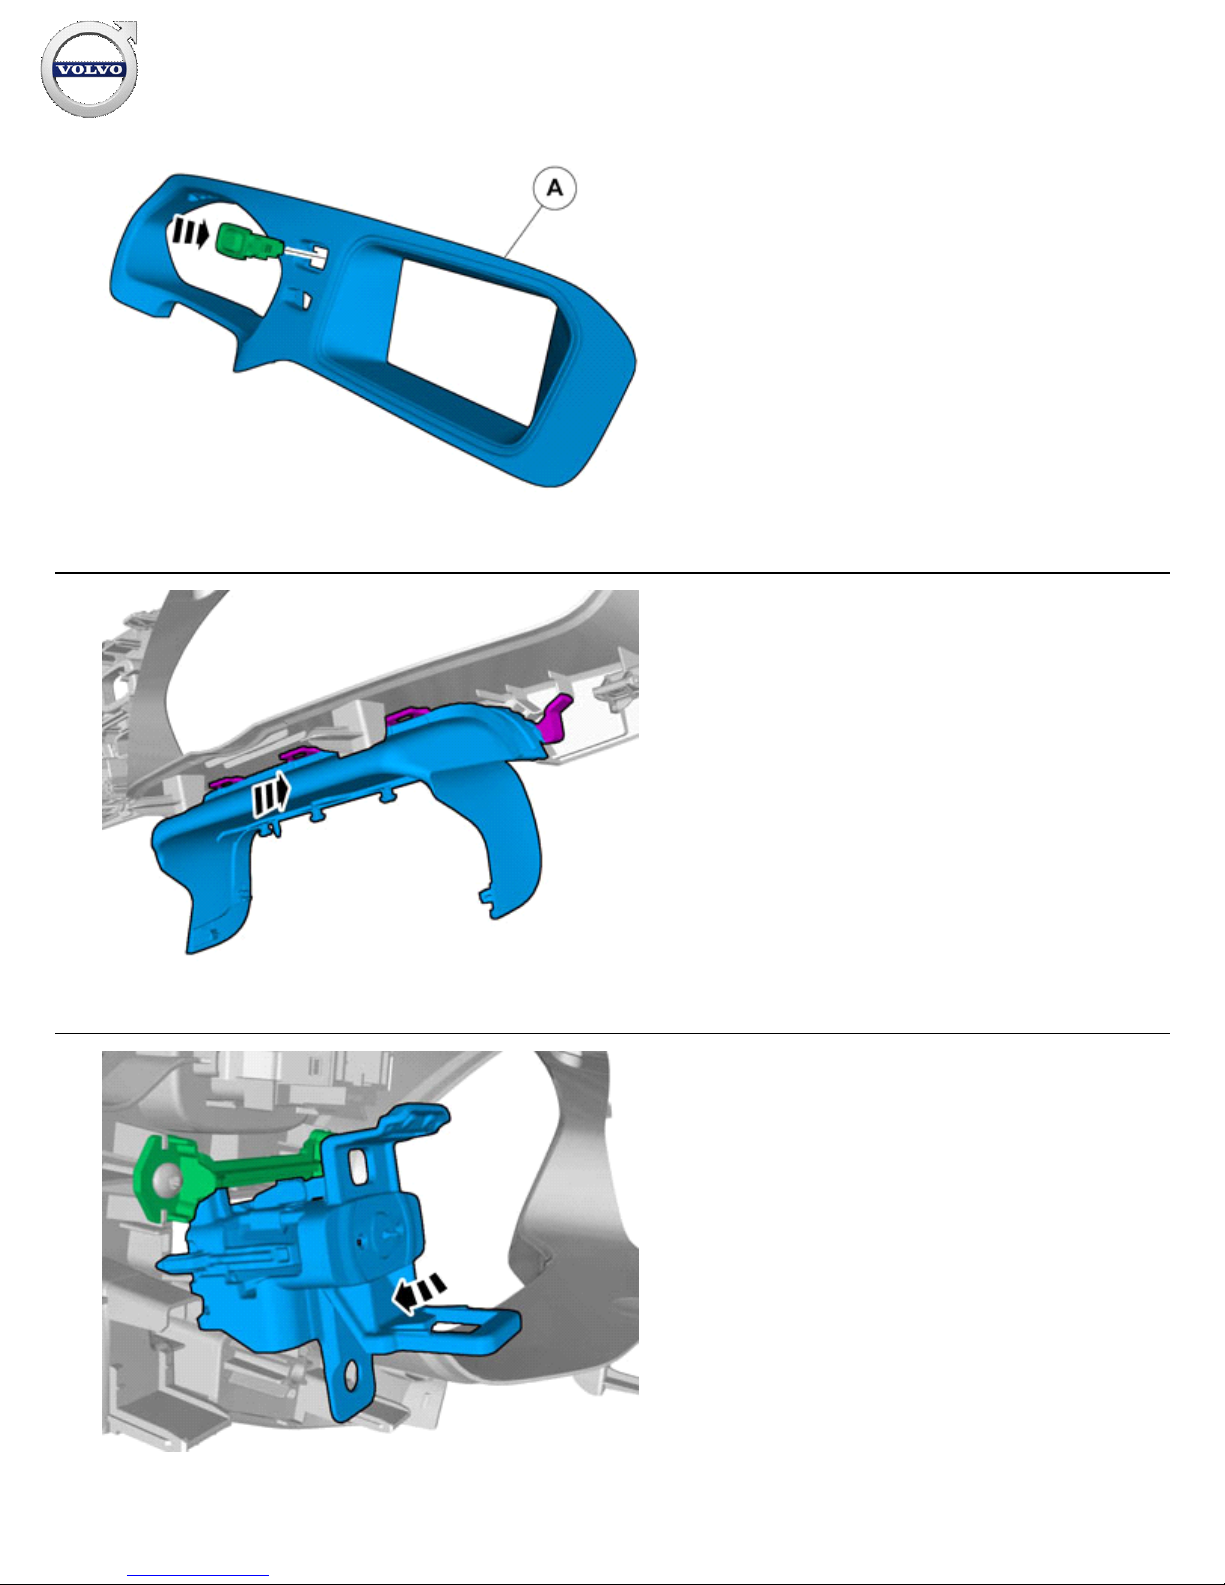
16
IMG-
353721
Install component that comes with the accessory kit.
17
IMG-
371222
18
IMG-
371219
Installation instructions, accessories
Volvo Car Corporation Gothenburg, Sweden
©
Volvo Car Corporation
Navigation system, RTI- 31339825 - V1.2
Page 9 / 43
Page 10

19
IMG-
371218
20
IMG-
371212
21
IMG-
368177
Installation instructions, accessories
Volvo Car Corporation Gothenburg, Sweden
©
Volvo Car Corporation
Navigation system, RTI- 31339825 - V1.2
Page 10 / 43
Page 11

22
IMG-
346175
Disconnect the connectors.
23
IMG-
356461
Installation instructions, accessories
Volvo Car Corporation Gothenburg, Sweden
©
Volvo Car Corporation
Navigation system, RTI- 31339825 - V1.2
Page 11 / 43
Page 12

24
IMG-
368485
Remove the foam bag.
Accessory installation
25
IMG-
370588
Installation instructions, accessories
Volvo Car Corporation Gothenburg, Sweden
©
Volvo Car Corporation
Navigation system, RTI- 31339825 - V1.2
Page 12 / 43
Page 13
26
IMG-
369406
27
IMG-
349902
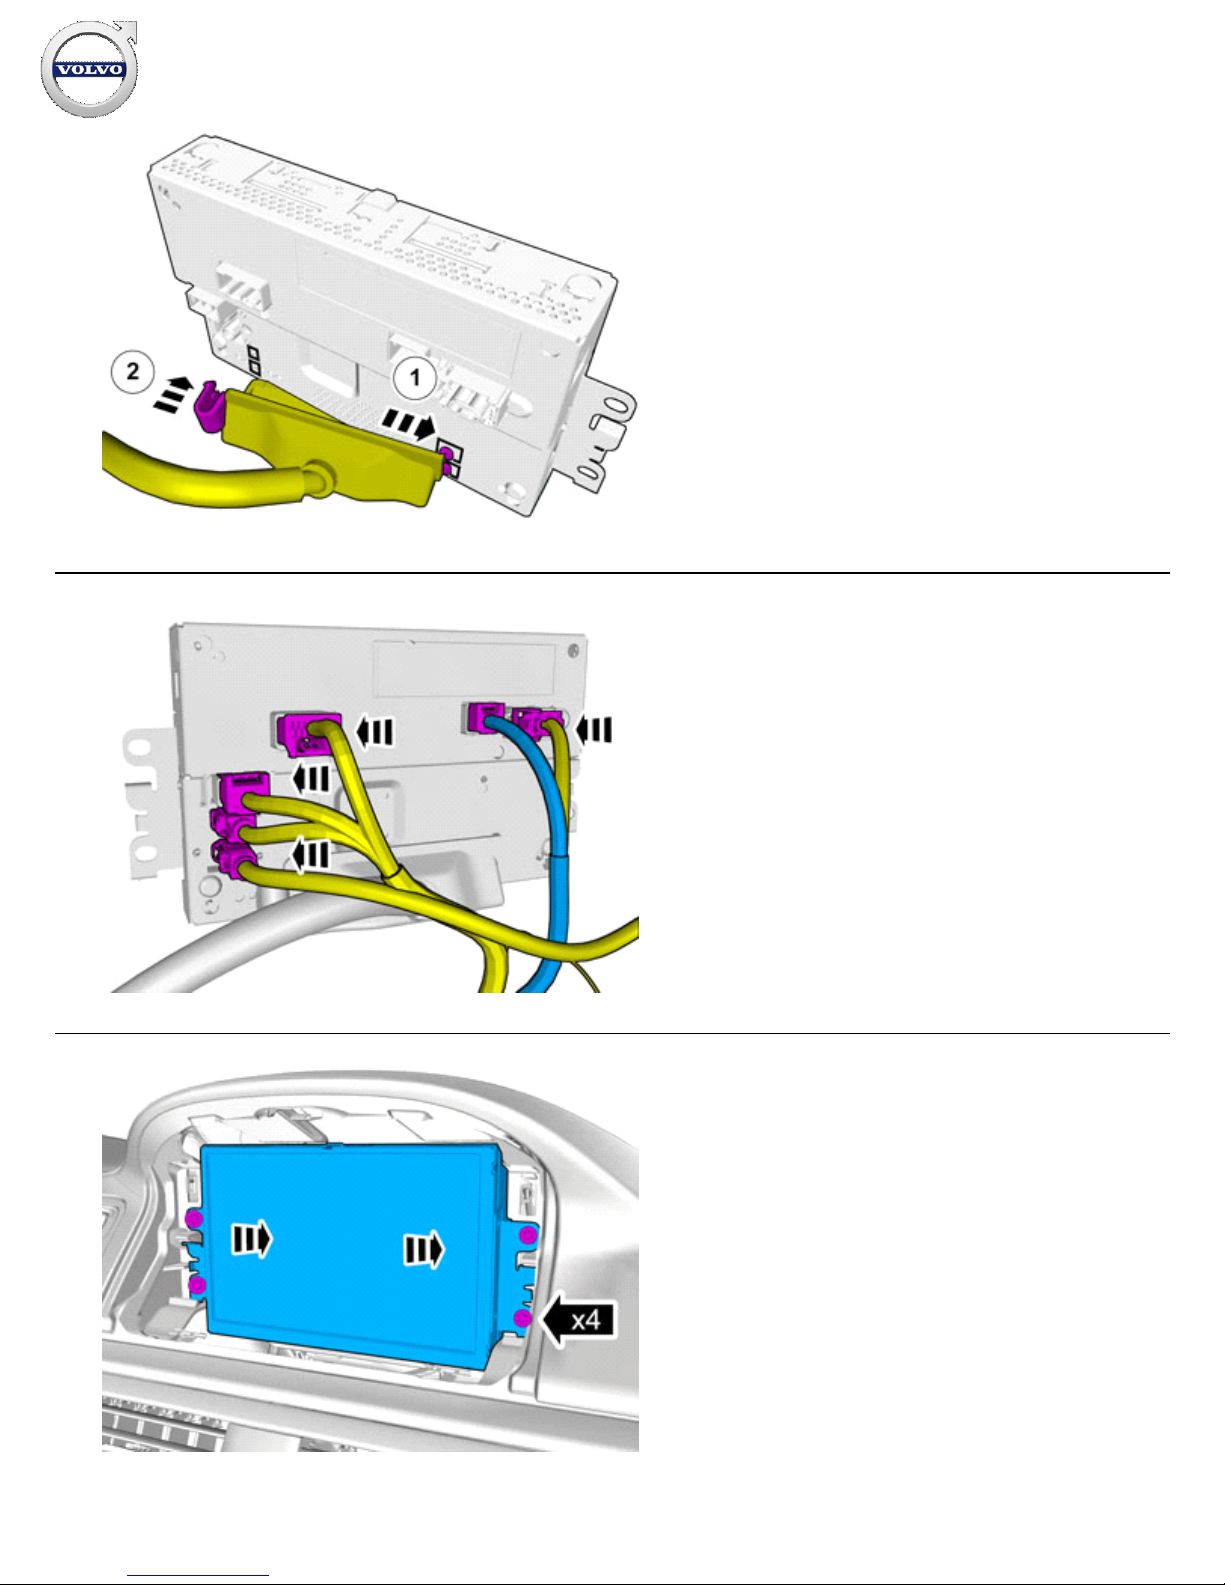
Connect the prerouted cable.
Connect the connectors.
28
IMG-
349904
Installation instructions, accessories
Volvo Car Corporation Gothenburg, Sweden
©
Volvo Car Corporation
Navigation system, RTI- 31339825 - V1.2
Page 13 / 43
Page 14
29
IMG-
371220
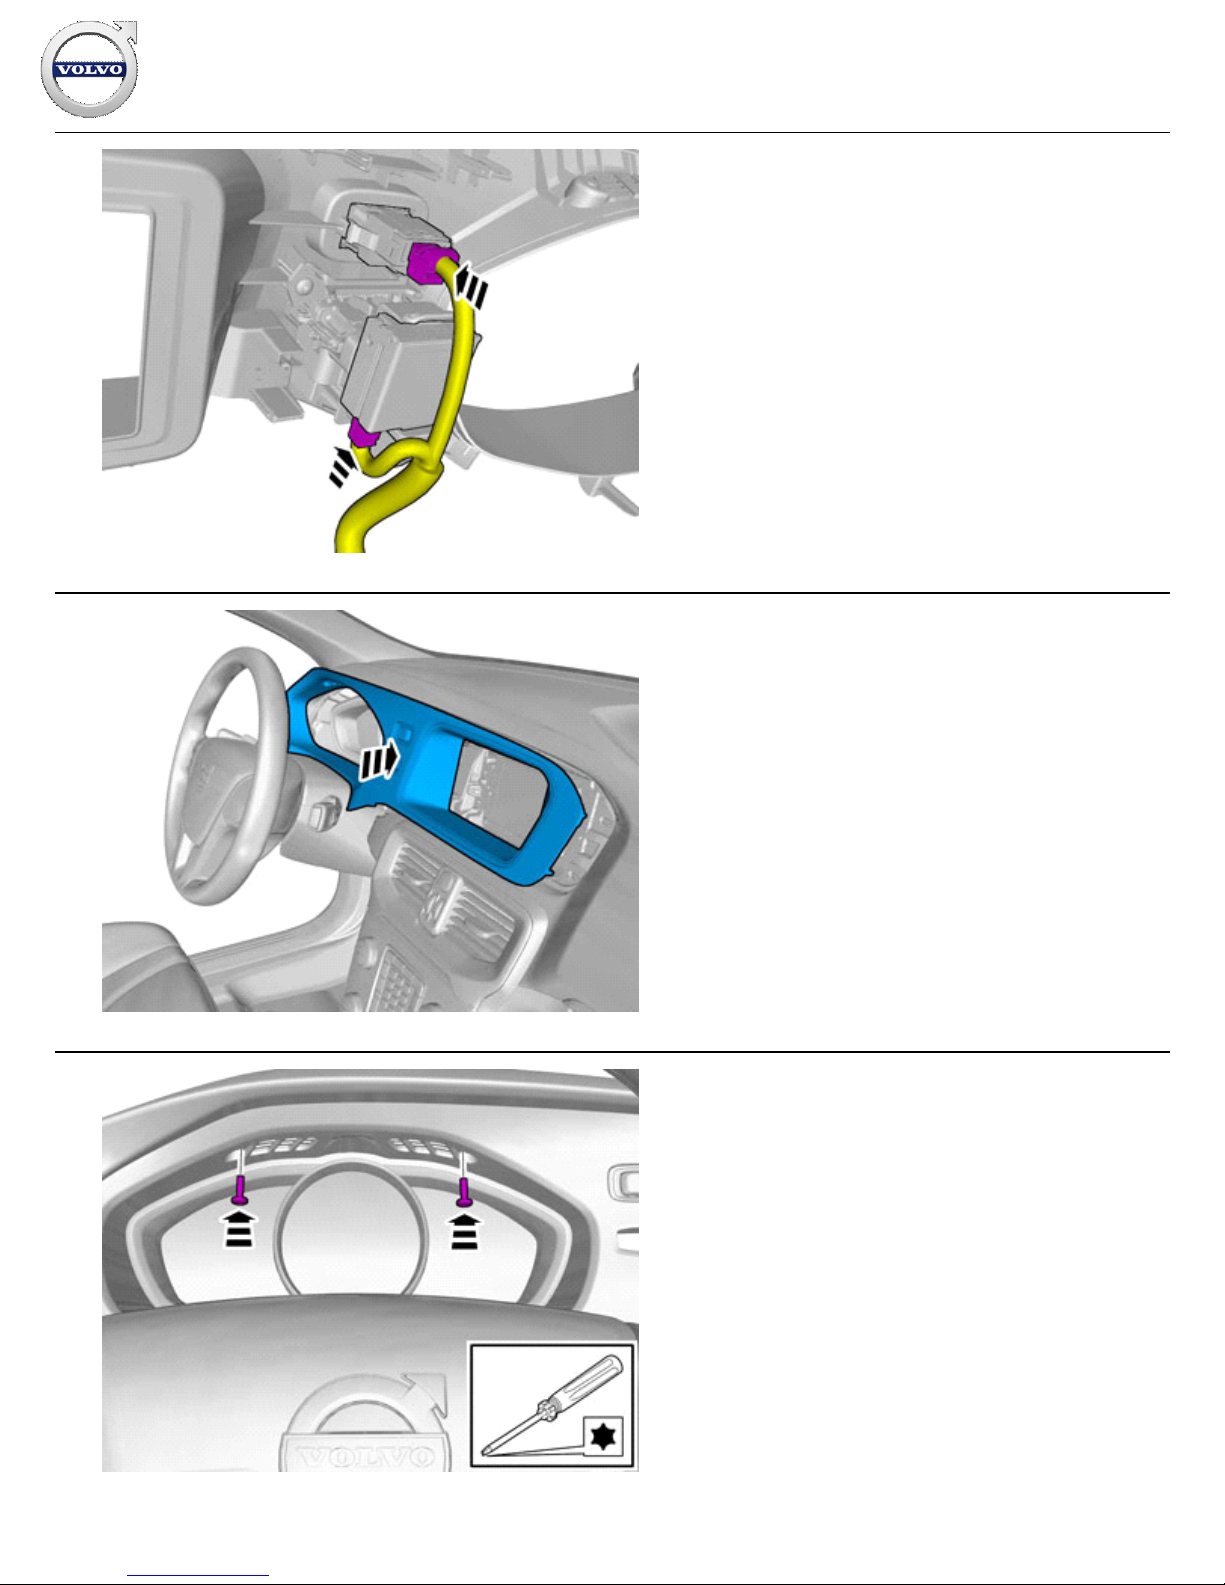
Connect the connectors.
30
IMG-
371224
31
IMG-
371225
Installation instructions, accessories
Volvo Car Corporation Gothenburg, Sweden
©
Volvo Car Corporation
Navigation system, RTI- 31339825 - V1.2
Page 14 / 43
Page 15
32
IMG-
242268
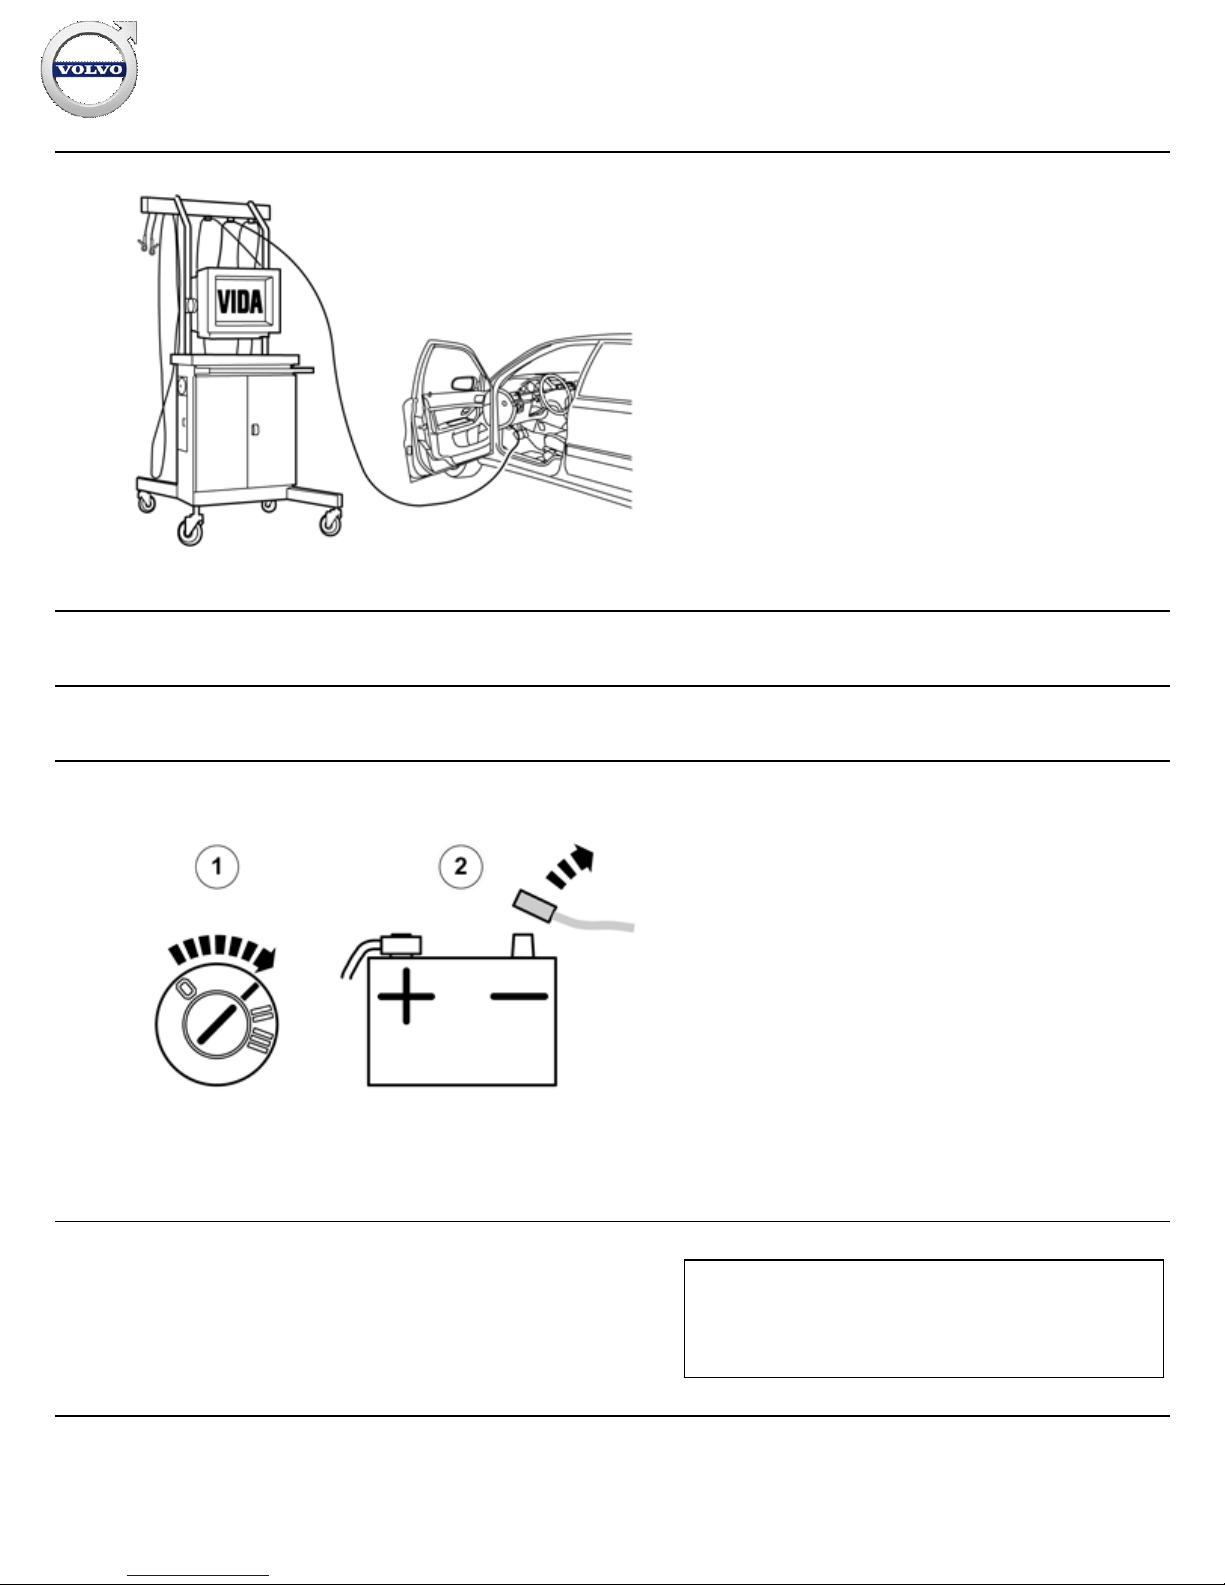
Download software (application) for the accessory's function
according to the service information in VIDA. See VIDA or the
accessories catalogue for software part number.
Order and download software according to: 31373032
Removal
All vehicles
33
IMG-
332180
Set the ignition key to position I.
Remove the battery's negative cable.
34
Warning!
The supplemental restraint system (SRS) is active for a certain
length of time after the power supply has been disconnected.
Wait for a minimum of 3 minutes before disconnecting or
removing any SRS components.
Installation instructions, accessories
Volvo Car Corporation Gothenburg, Sweden
©
Volvo Car Corporation
Navigation system, RTI- 31339825 - V1.2
Page 15 / 43
Page 16
35
IMG-
349355
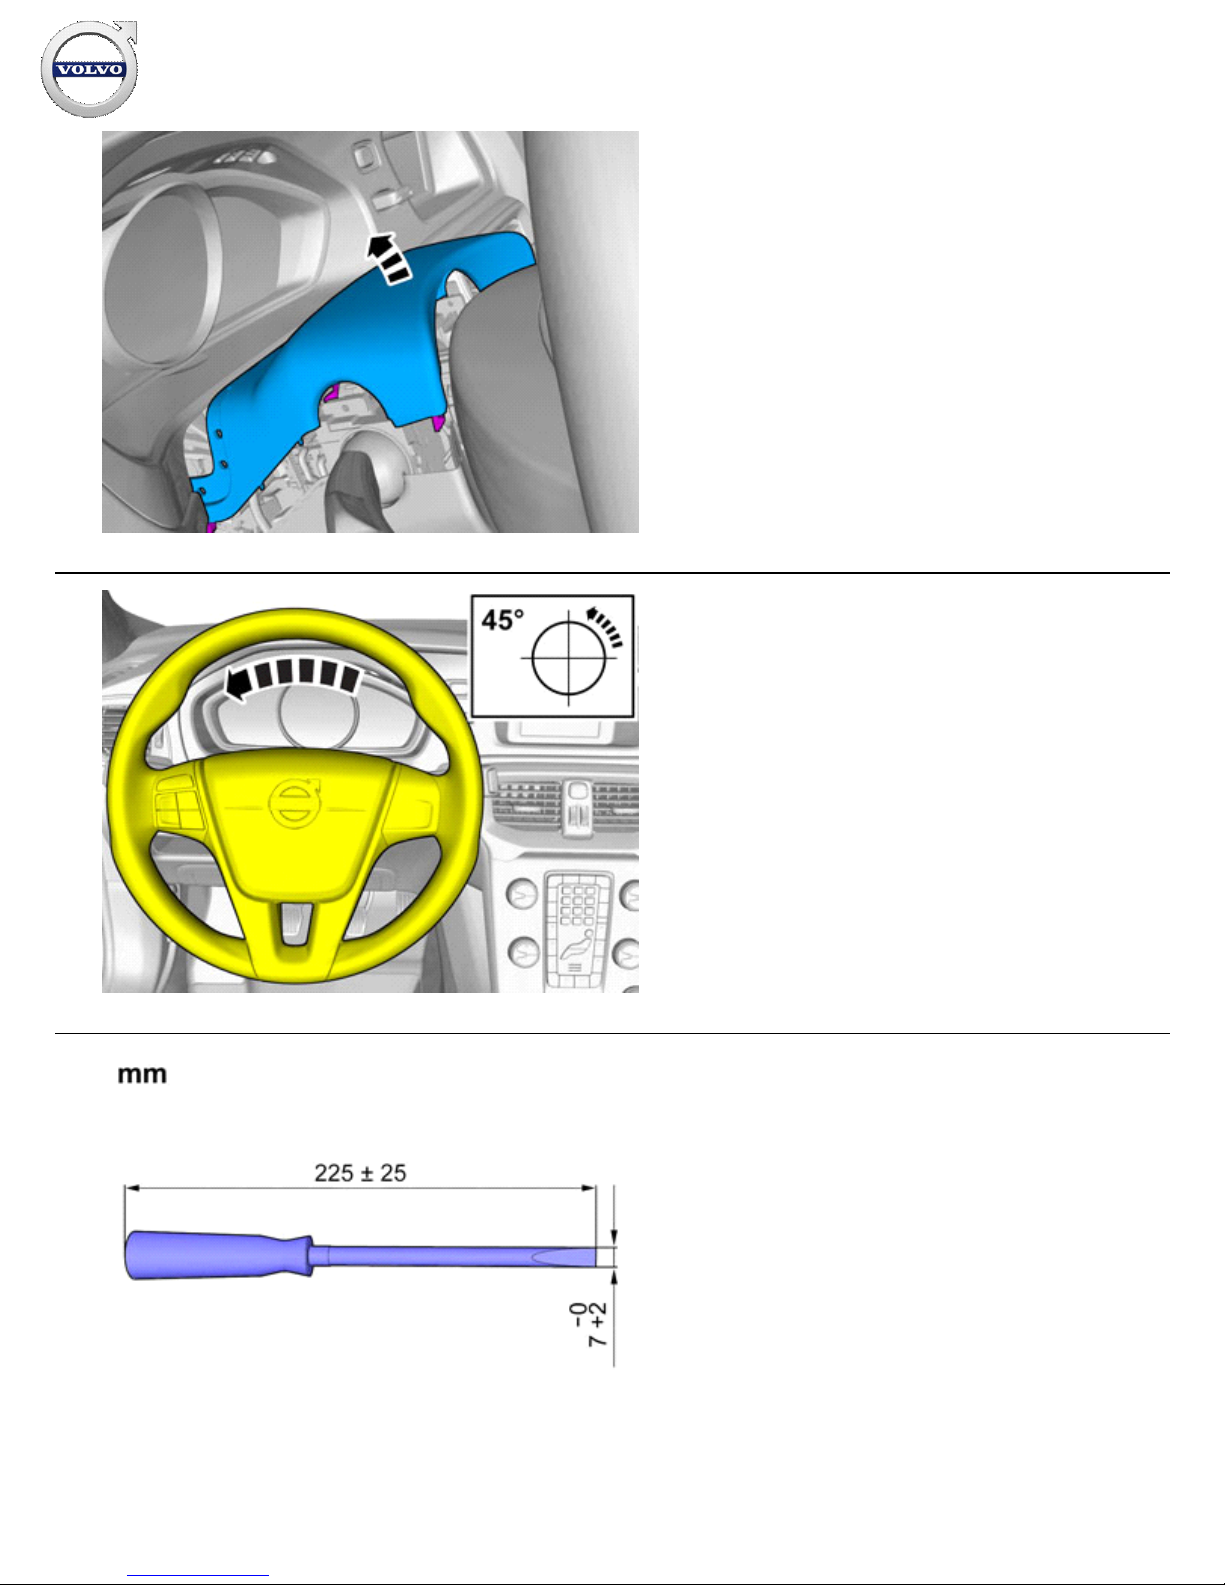
Remove the panel.
36
IMG-
349357
37
IMG-
337683
Installation instructions, accessories
Volvo Car Corporation Gothenburg, Sweden
©
Volvo Car Corporation
Navigation system, RTI- 31339825 - V1.2
Page 16 / 43
Page 17
38
IMG-
344725
39
IMG-
344726
40
IMG-
344727
Installation instructions, accessories
Volvo Car Corporation Gothenburg, Sweden
©
Volvo Car Corporation
Navigation system, RTI- 31339825 - V1.2
Page 17 / 43
Page 18
41
IMG-
349360
42
IMG-
349359
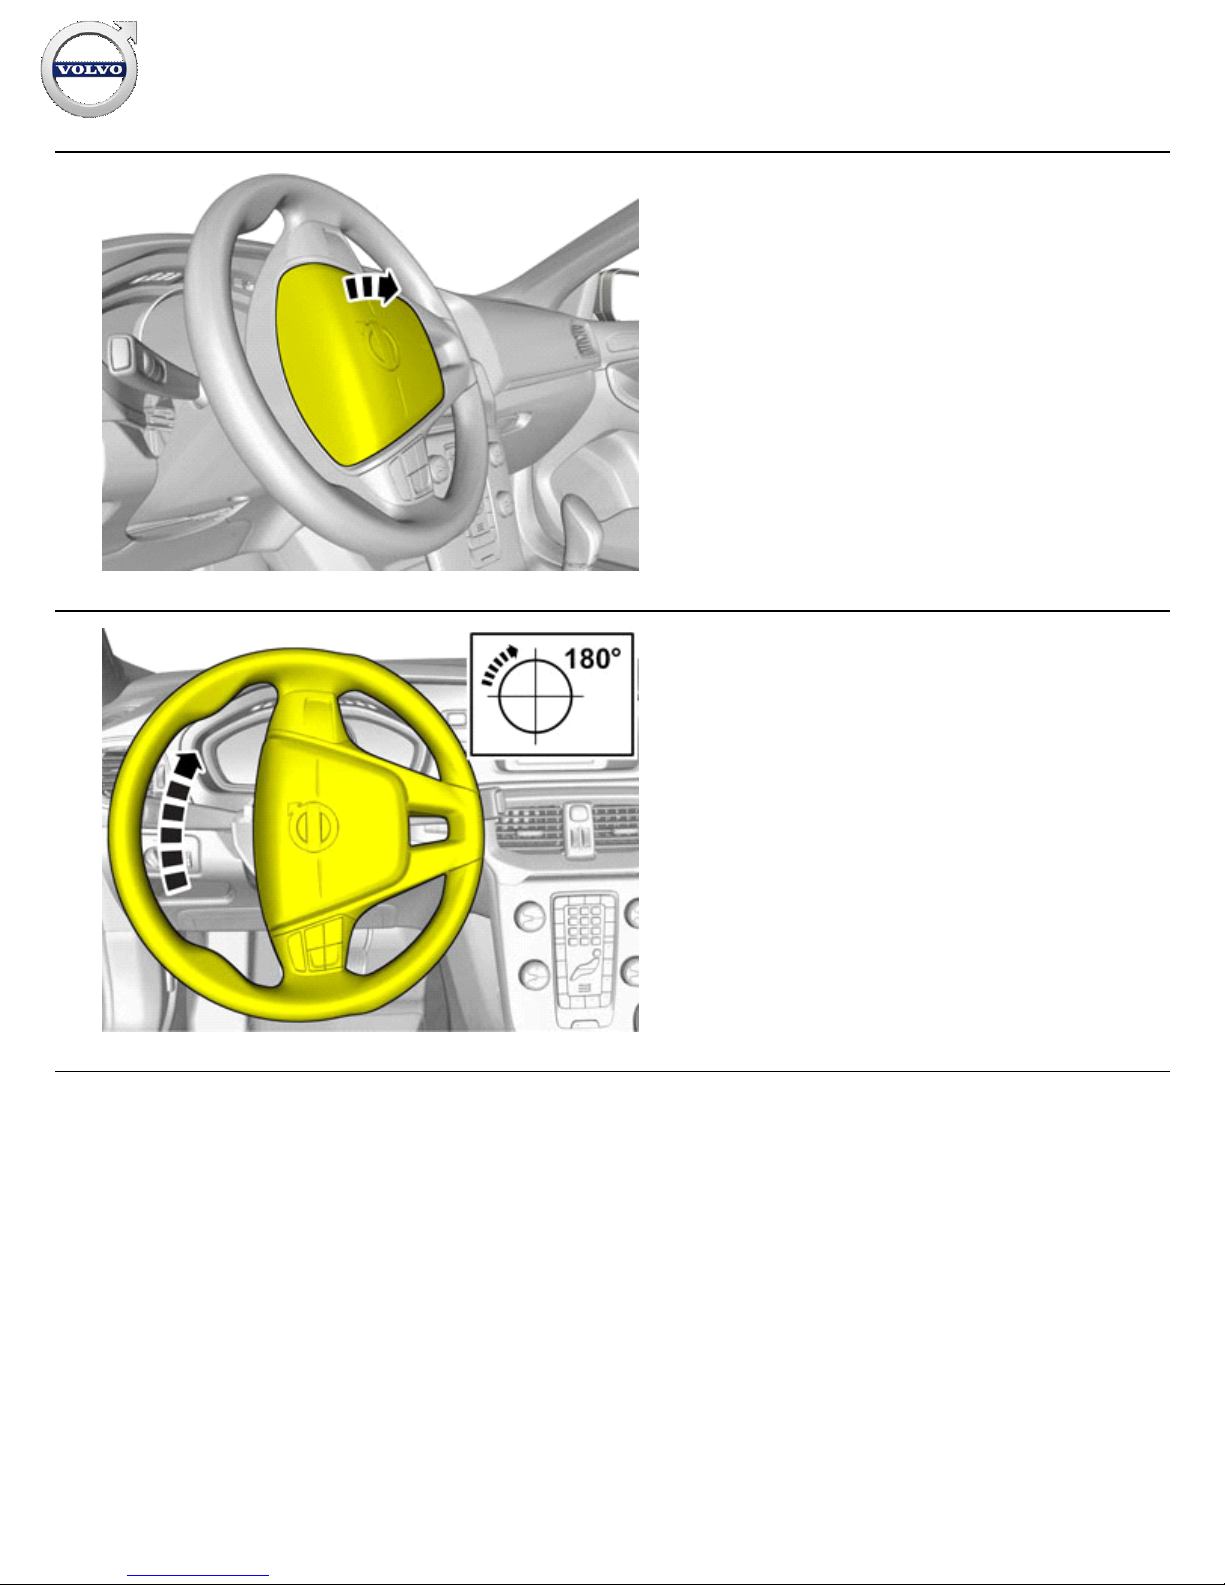
Repeat on the other side.
Installation instructions, accessories
Volvo Car Corporation Gothenburg, Sweden
©
Volvo Car Corporation
Navigation system, RTI- 31339825 - V1.2
Page 18 / 43
Page 19
43
IMG-
349364
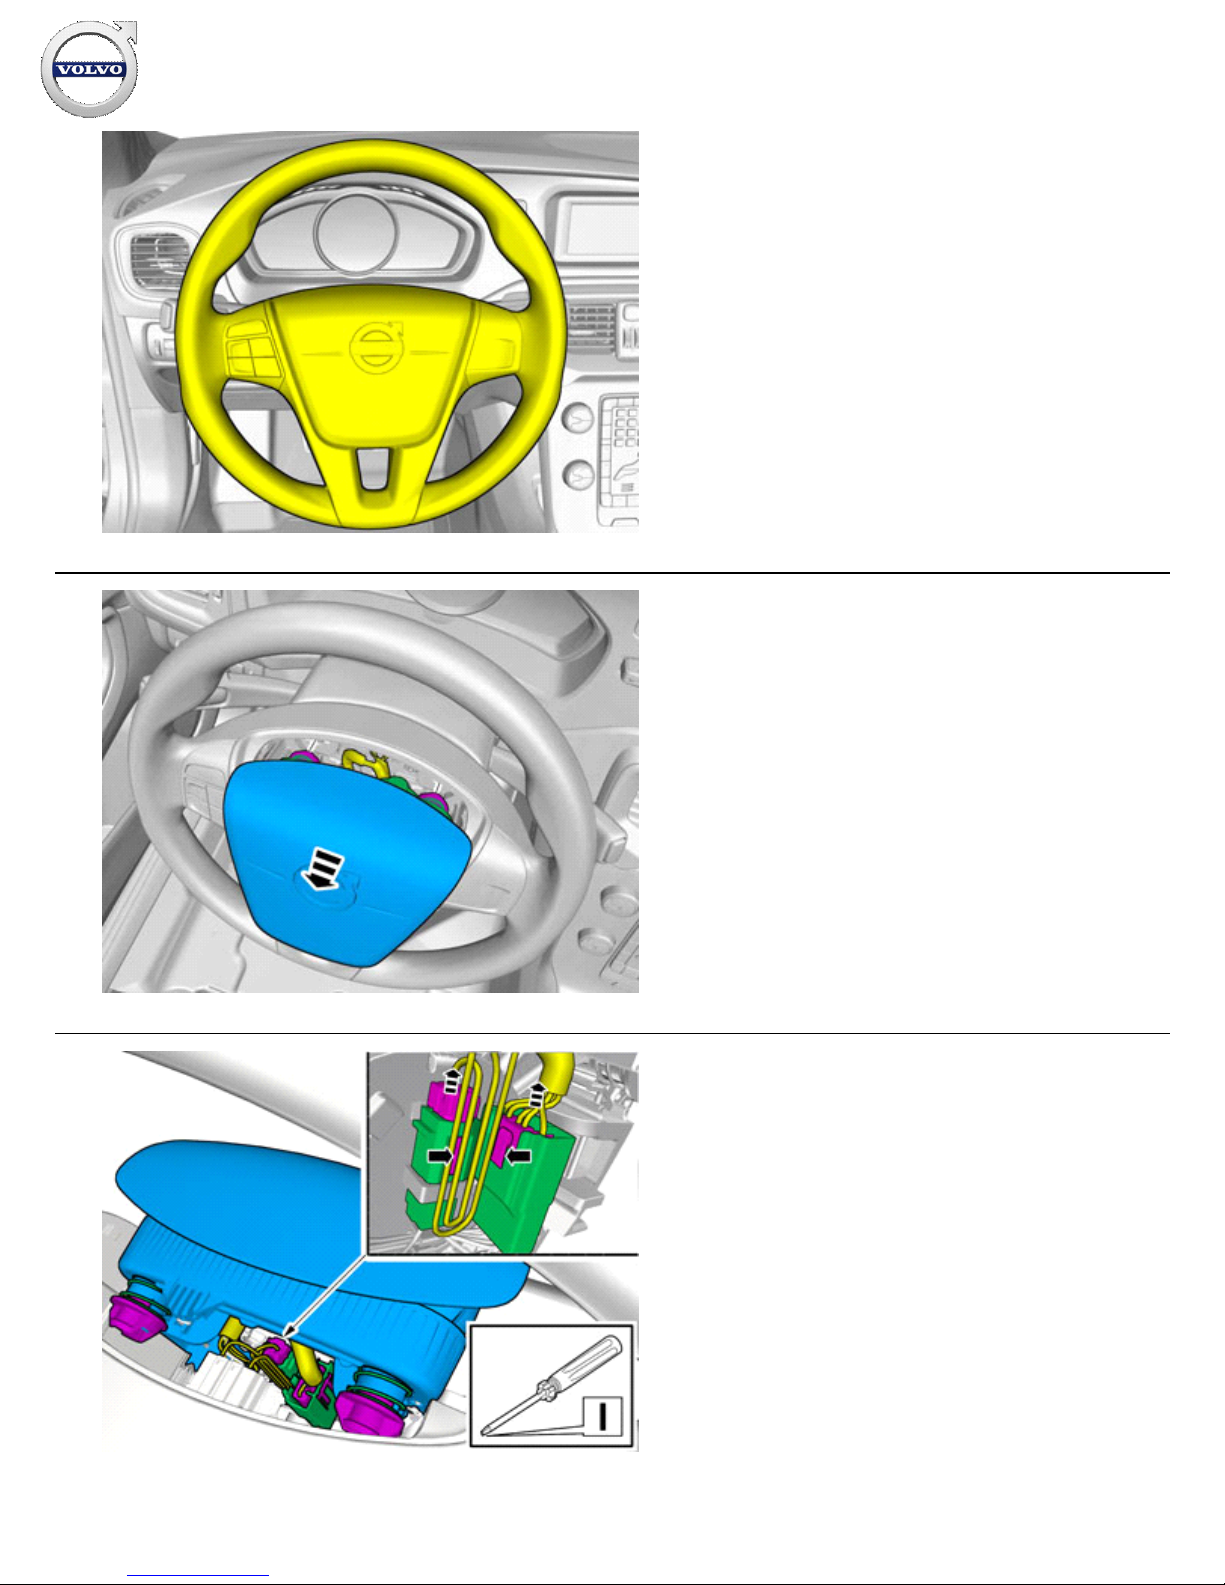
Turn the steering wheel into neutral position.
44
IMG-
367370
45
IMG-
344730
Release the connector catches.
Disconnect the connectors.
Installation instructions, accessories
Volvo Car Corporation Gothenburg, Sweden
©
Volvo Car Corporation
Navigation system, RTI- 31339825 - V1.2
Page 19 / 43
Page 20
46
IMG-
344731
47
Warning!
Place the airbag module with the front side facing up in a safe
storage area during work.
48
IMG-
345559
Detach the panel.
Note!
This step requires considerable force.
Installation instructions, accessories
Volvo Car Corporation Gothenburg, Sweden
©
Volvo Car Corporation
Navigation system, RTI- 31339825 - V1.2
Page 20 / 43
Page 21
49
IMG-
345560
Remove the panel.
Note!
This step requires considerable force.
50
IMG-
345561
Remove the panel.
Note!
This step requires considerable force.
51
IMG-
345562
Locate the pre-routed connector.
Loosen the wiring harness or move it to the side.
Disconnect the connector.
Installation instructions, accessories
Volvo Car Corporation Gothenburg, Sweden
©
Volvo Car Corporation
Navigation system, RTI- 31339825 - V1.2
Page 21 / 43
Page 22
Accessory installation
52
IMG-
370599
Install component that comes with the accessory kit.
Connect the connector.
Install the cable.
53
IMG-
349934
Install the panel.
Install the cable.
Installation
Installation instructions, accessories
Volvo Car Corporation Gothenburg, Sweden
©
Volvo Car Corporation
Navigation system, RTI- 31339825 - V1.2
Page 22 / 43
Page 23
54
IMG-
339675
Install the panel.
55
IMG-
344748
Connect the connectors.
56
IMG-
349387
Installation instructions, accessories
Volvo Car Corporation Gothenburg, Sweden
©
Volvo Car Corporation
Navigation system, RTI- 31339825 - V1.2
Page 23 / 43
Page 24
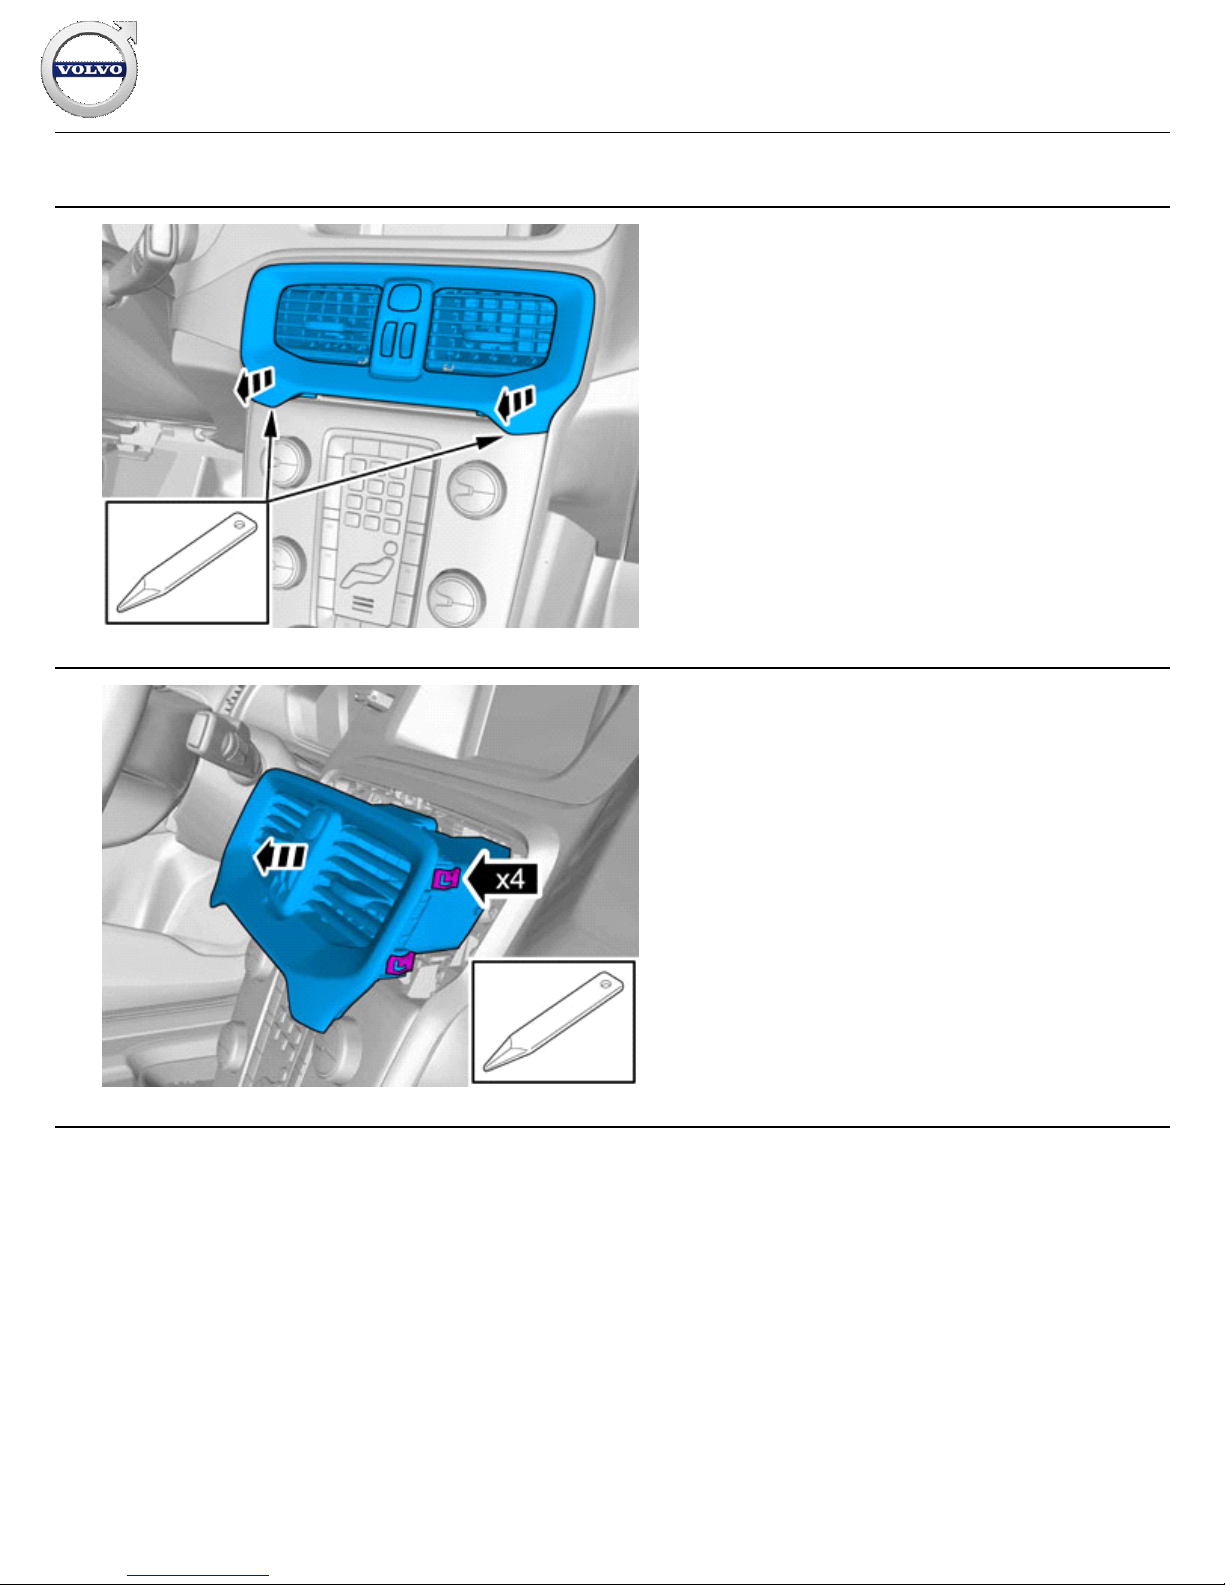
Removal
57
IMG-
368127
58
IMG-
352821
Remove the panel.
Installation instructions, accessories
Volvo Car Corporation Gothenburg, Sweden
©
Volvo Car Corporation
Navigation system, RTI- 31339825 - V1.2
Page 24 / 43
Page 25
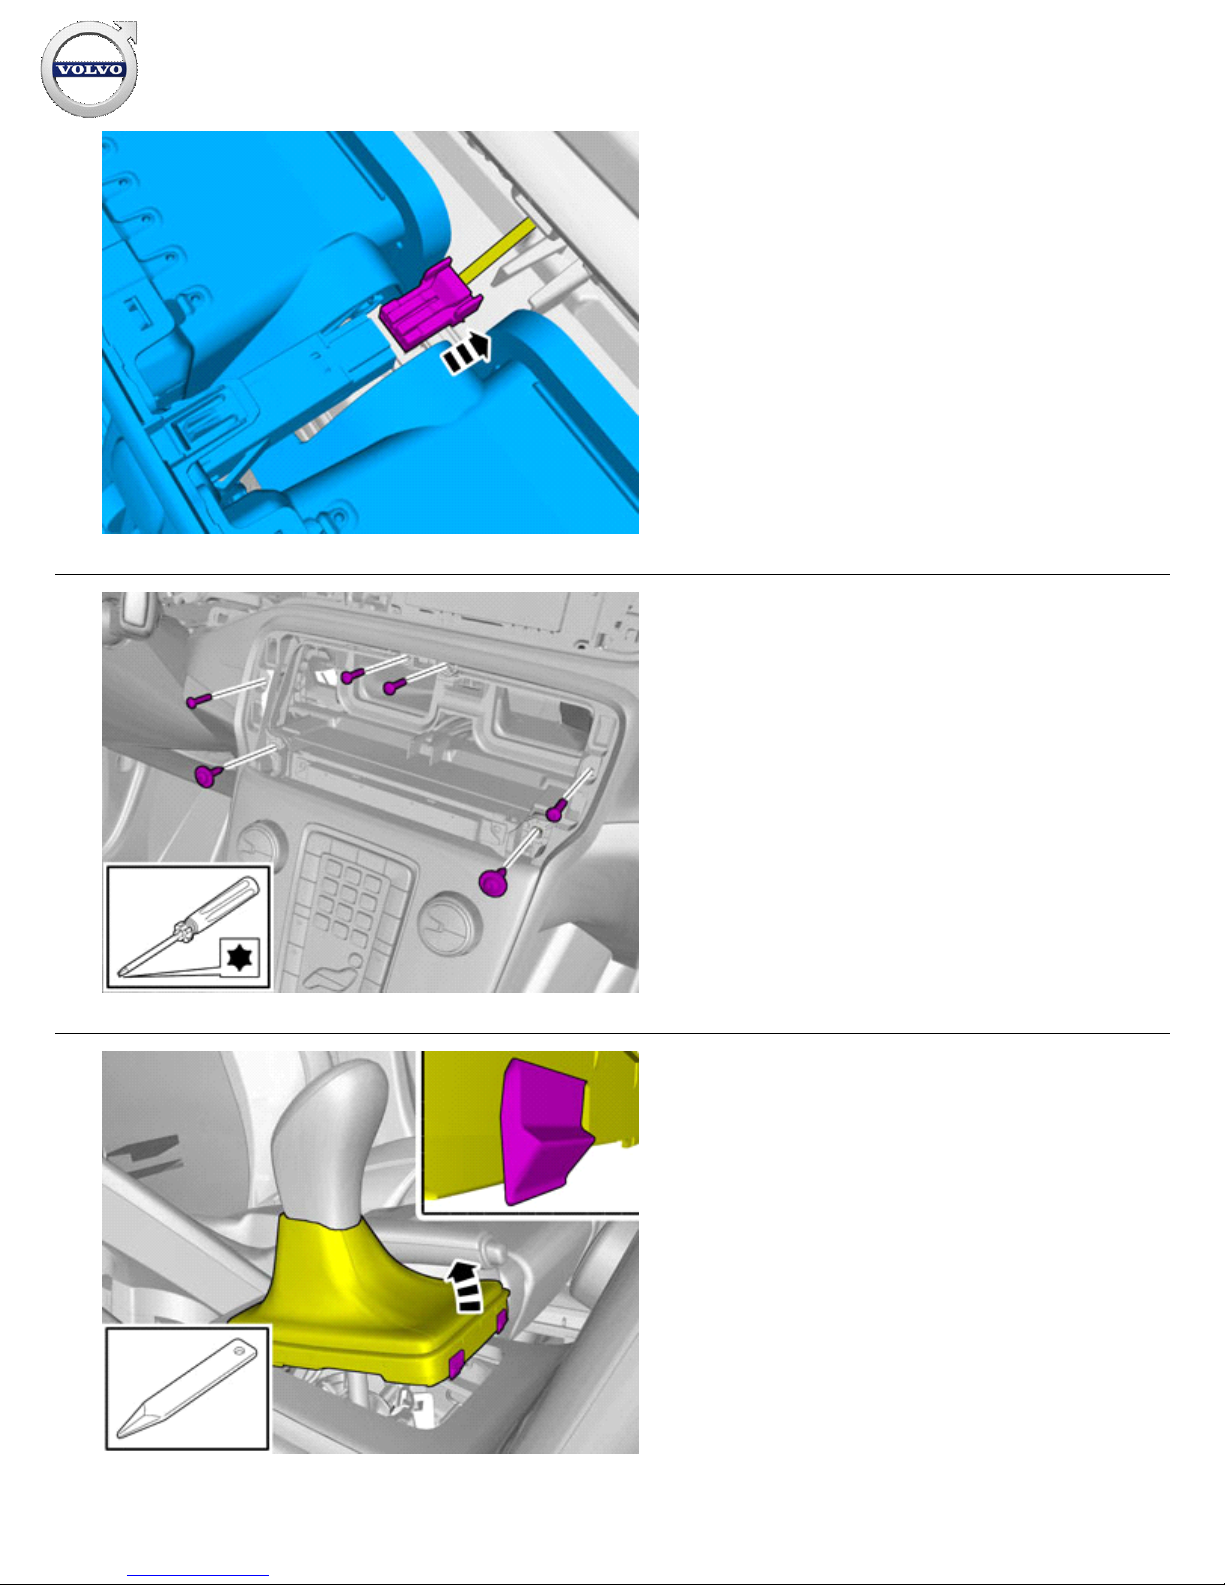
59
IMG-
352822
Disconnect the connector.
60
IMG-
352898
Remove the screws.
61
IMG-
352899
Remove the part carefully
Installation instructions, accessories
Volvo Car Corporation Gothenburg, Sweden
©
Volvo Car Corporation
Navigation system, RTI- 31339825 - V1.2
Page 25 / 43
Page 26
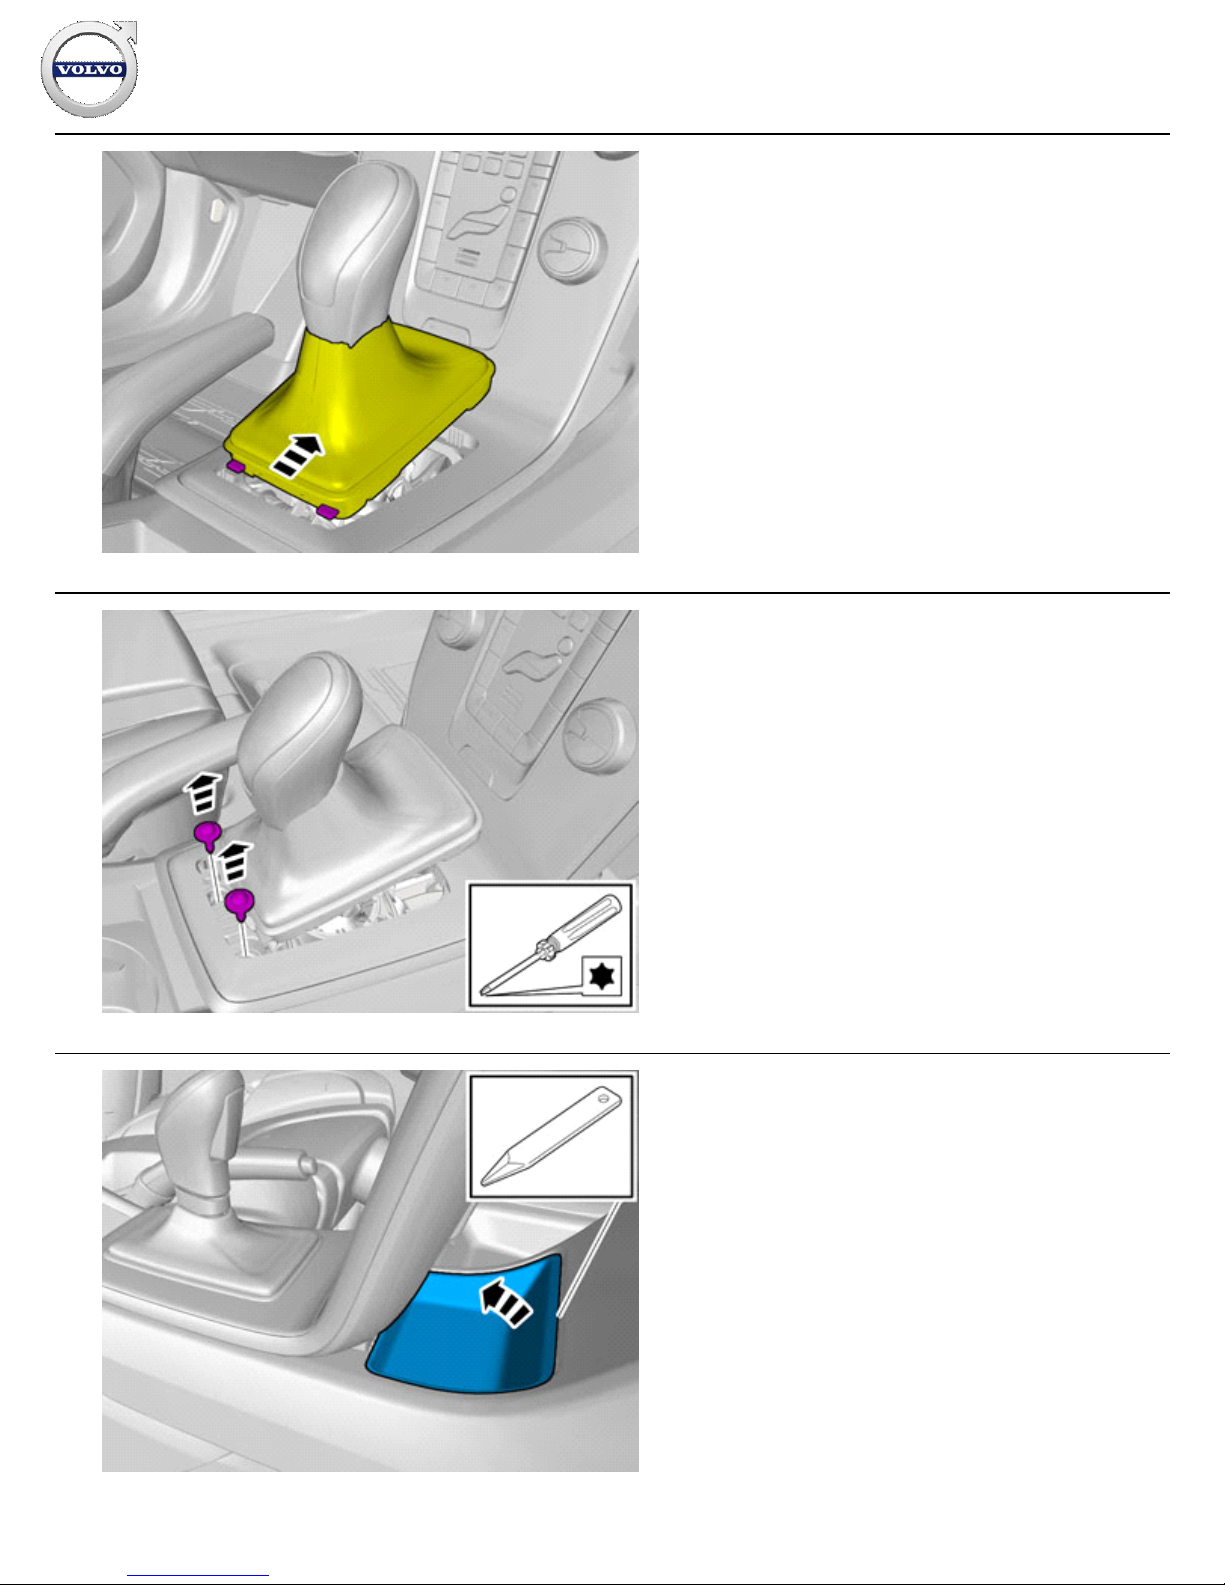
62
IMG-
352929
63
IMG-
352977
Remove the screws.
64
IMG-
356816
Installation instructions, accessories
Volvo Car Corporation Gothenburg, Sweden
©
Volvo Car Corporation
Navigation system, RTI- 31339825 - V1.2
Page 26 / 43
Page 27
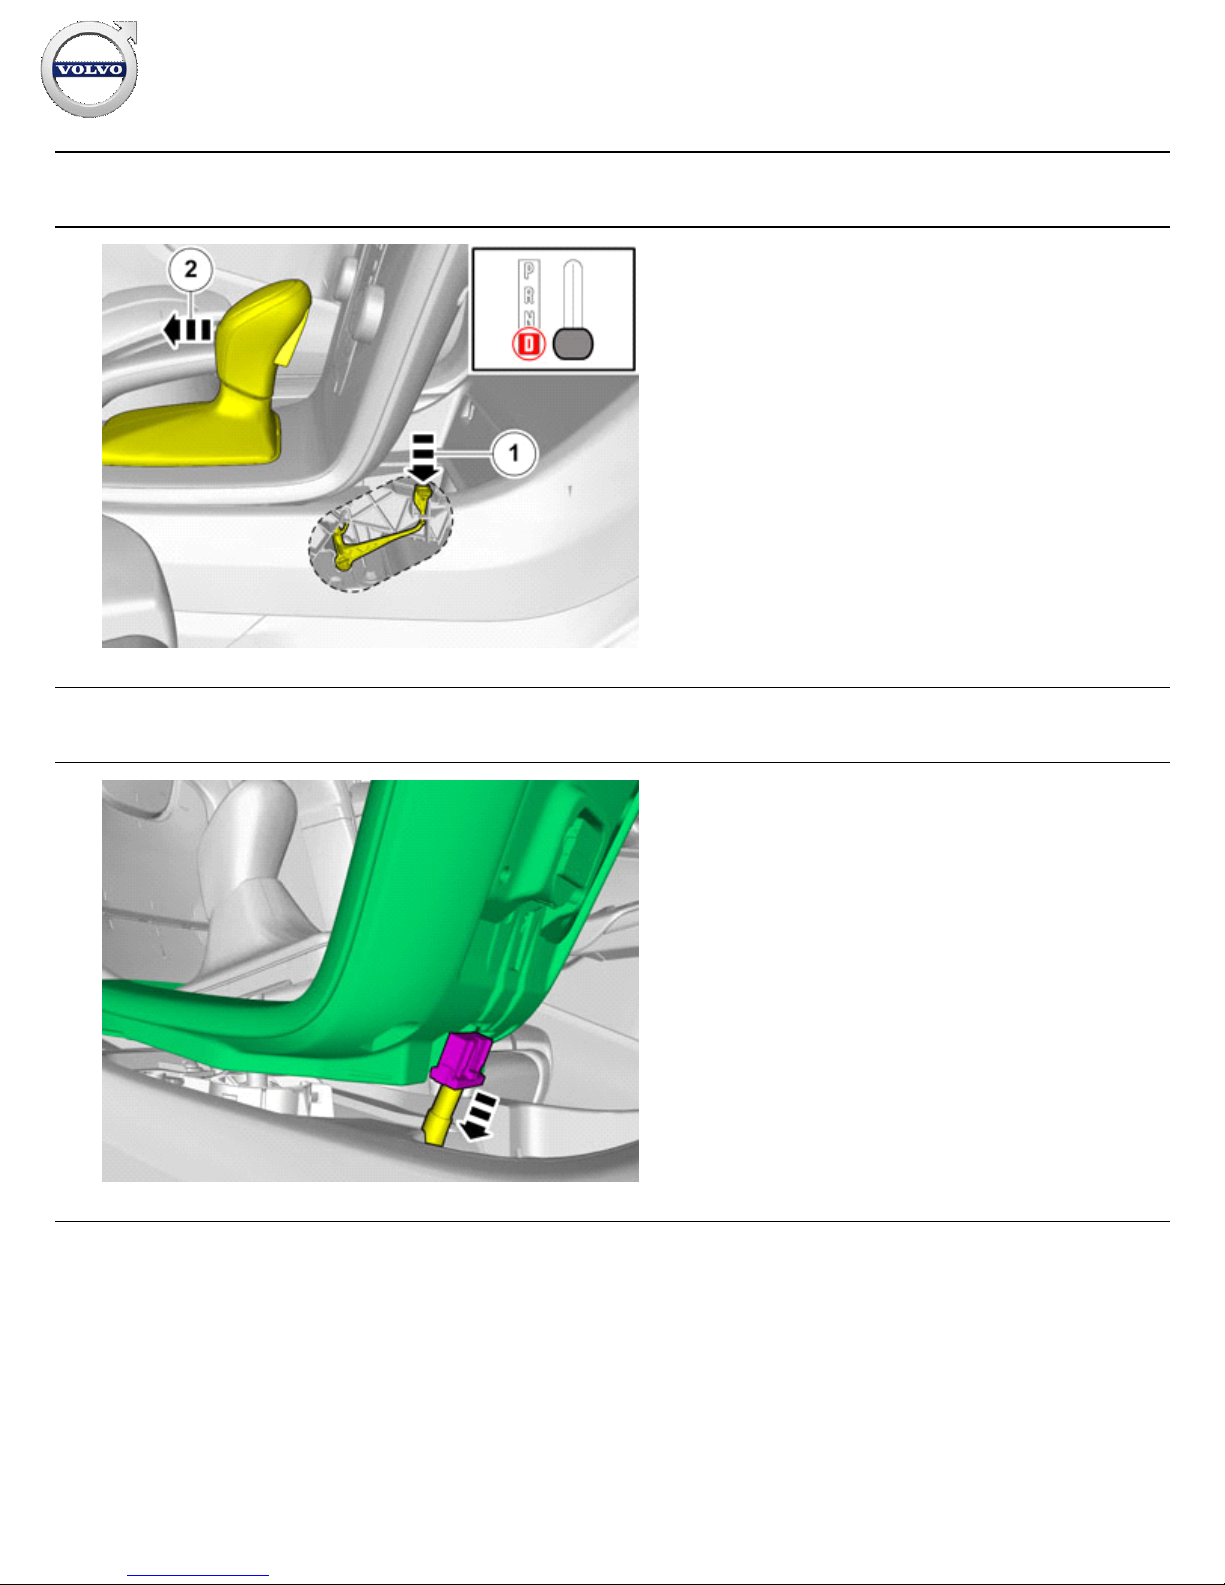
Cars with automatic transmissions
65
IMG-
369570
Release the shift-lock function.
All vehicles
66
IMG-
352951
Disconnect the connector.
Installation instructions, accessories
Volvo Car Corporation Gothenburg, Sweden
©
Volvo Car Corporation
Navigation system, RTI- 31339825 - V1.2
Page 27 / 43
Page 28
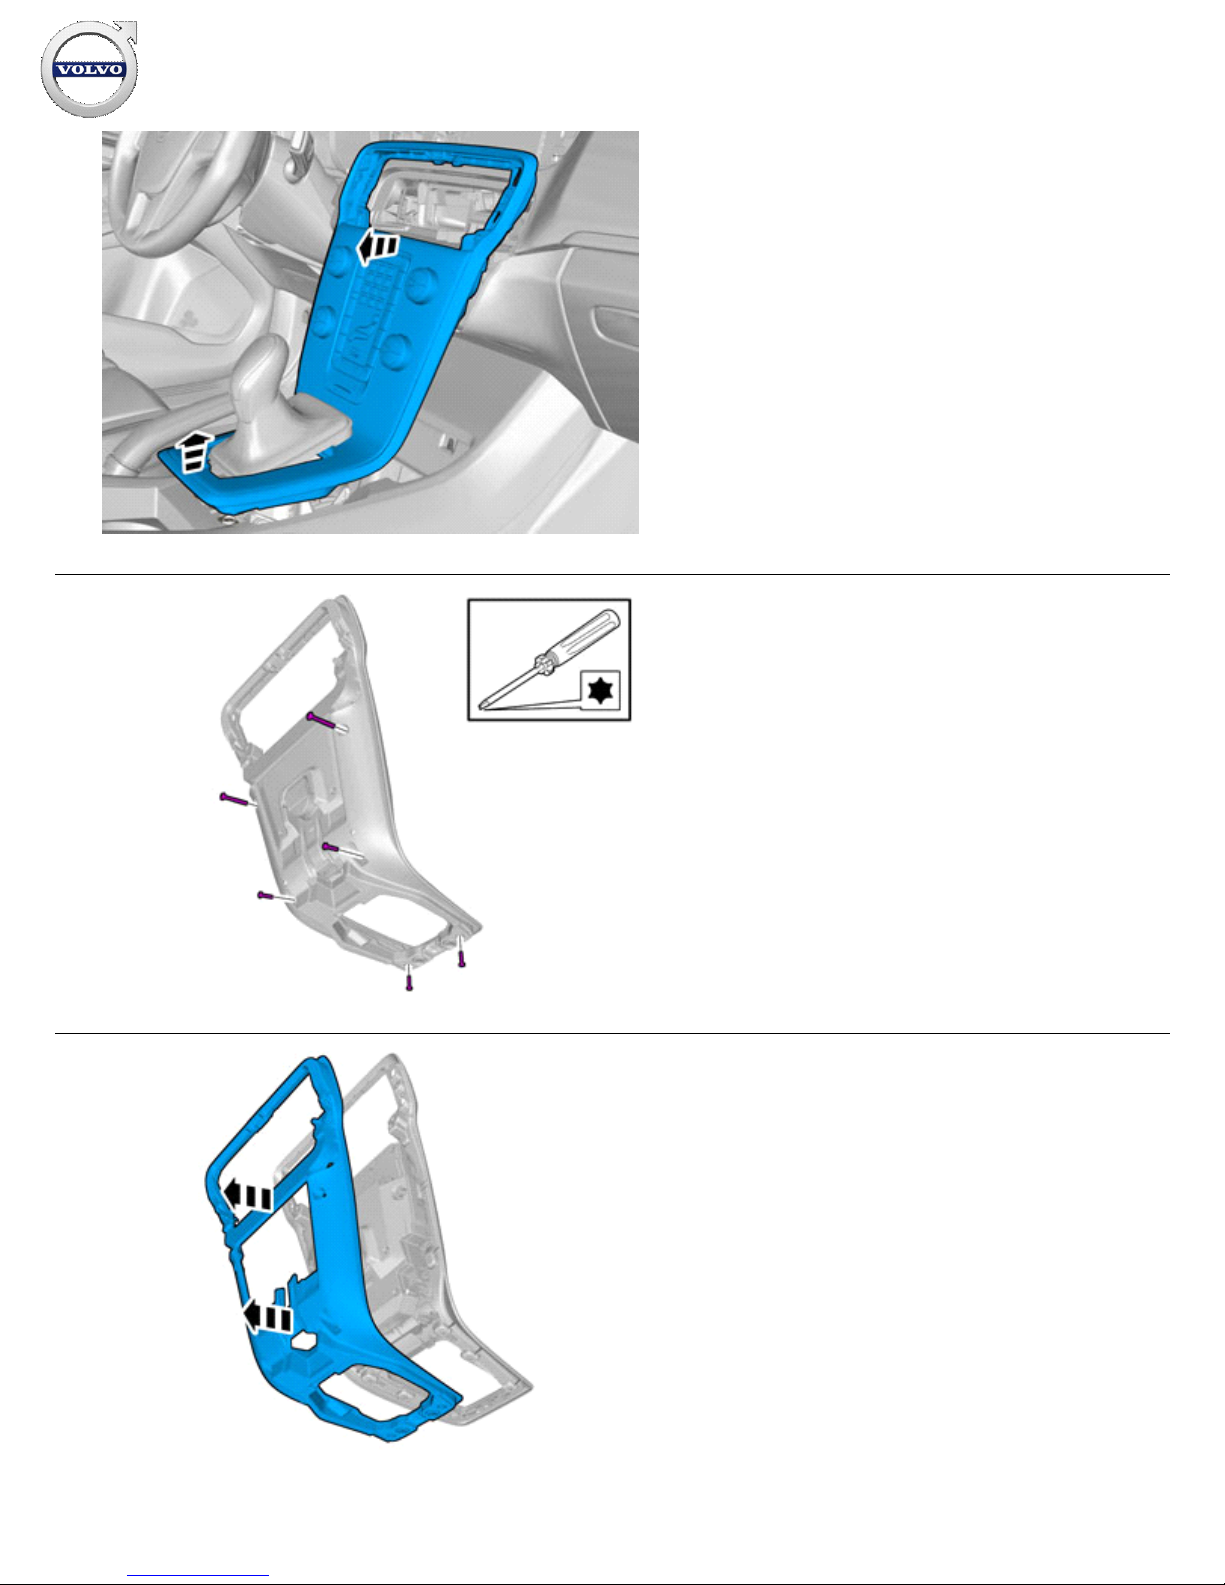
67
IMG-
352901
Remove the panel.
68
IMG-
360566
Remove the screws.
69
IMG-
360571
Remove the panel.
Installation instructions, accessories
Volvo Car Corporation Gothenburg, Sweden
©
Volvo Car Corporation
Navigation system, RTI- 31339825 - V1.2
Page 28 / 43
Page 29
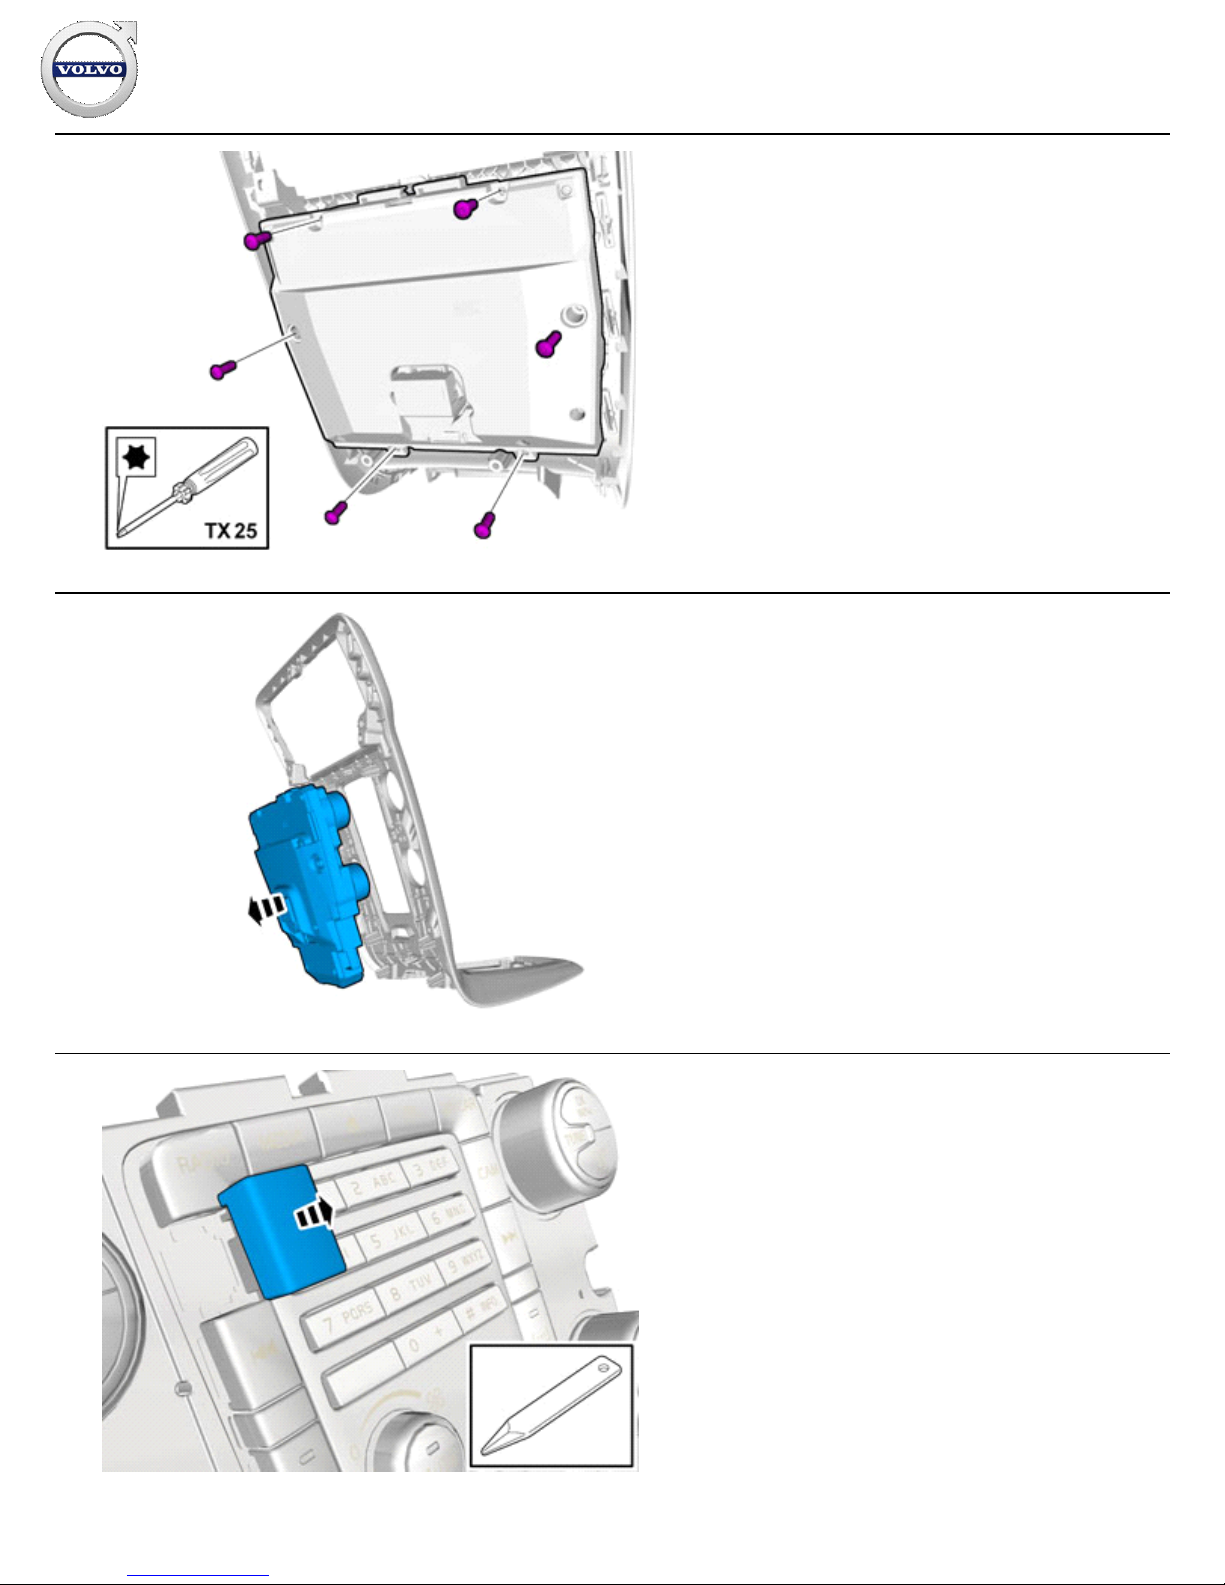
70
IMG-
340605
Remove the screws.
71
IMG-
360621
72
IMG-
350111
Installation instructions, accessories
Volvo Car Corporation Gothenburg, Sweden
©
Volvo Car Corporation
Navigation system, RTI- 31339825 - V1.2
Page 29 / 43
Page 30
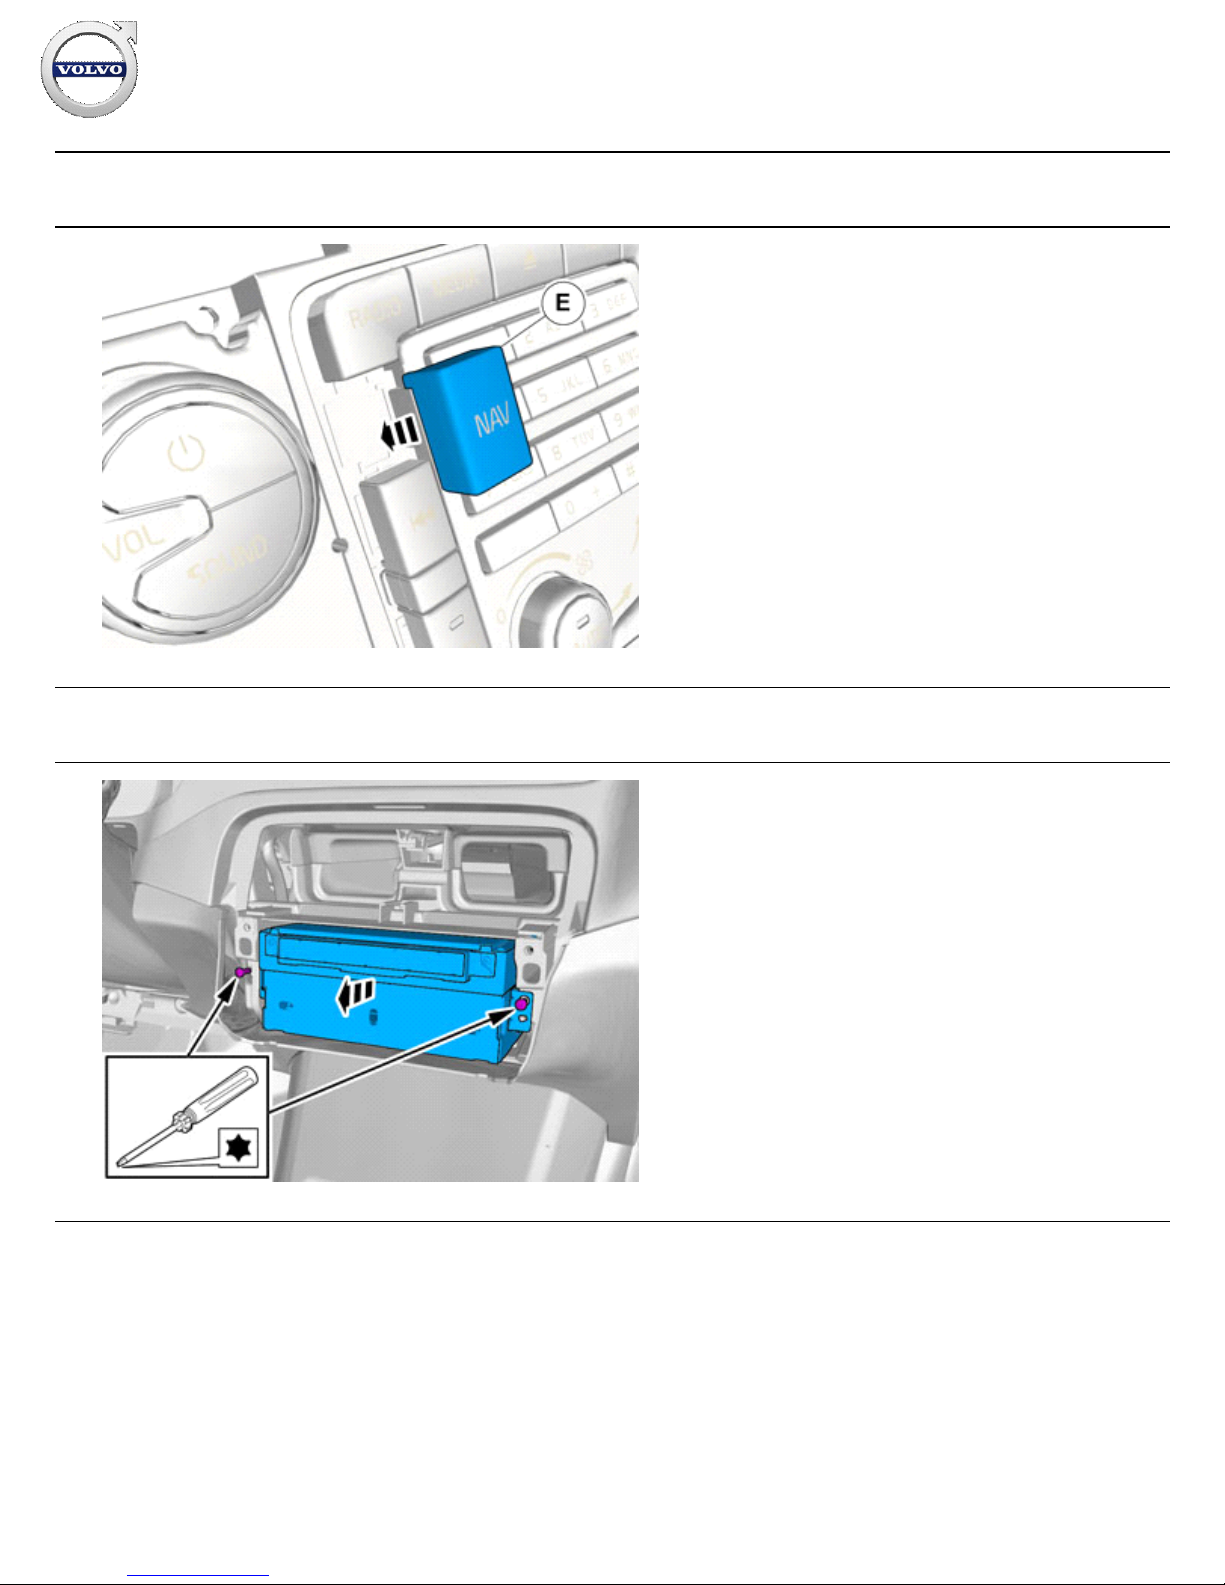
Accessory installation
73
IMG-
370600
Install component that comes with the accessory kit.
Removal
74
IMG-
368163
Installation instructions, accessories
Volvo Car Corporation Gothenburg, Sweden
©
Volvo Car Corporation
Navigation system, RTI- 31339825 - V1.2
Page 30 / 43
Page 31
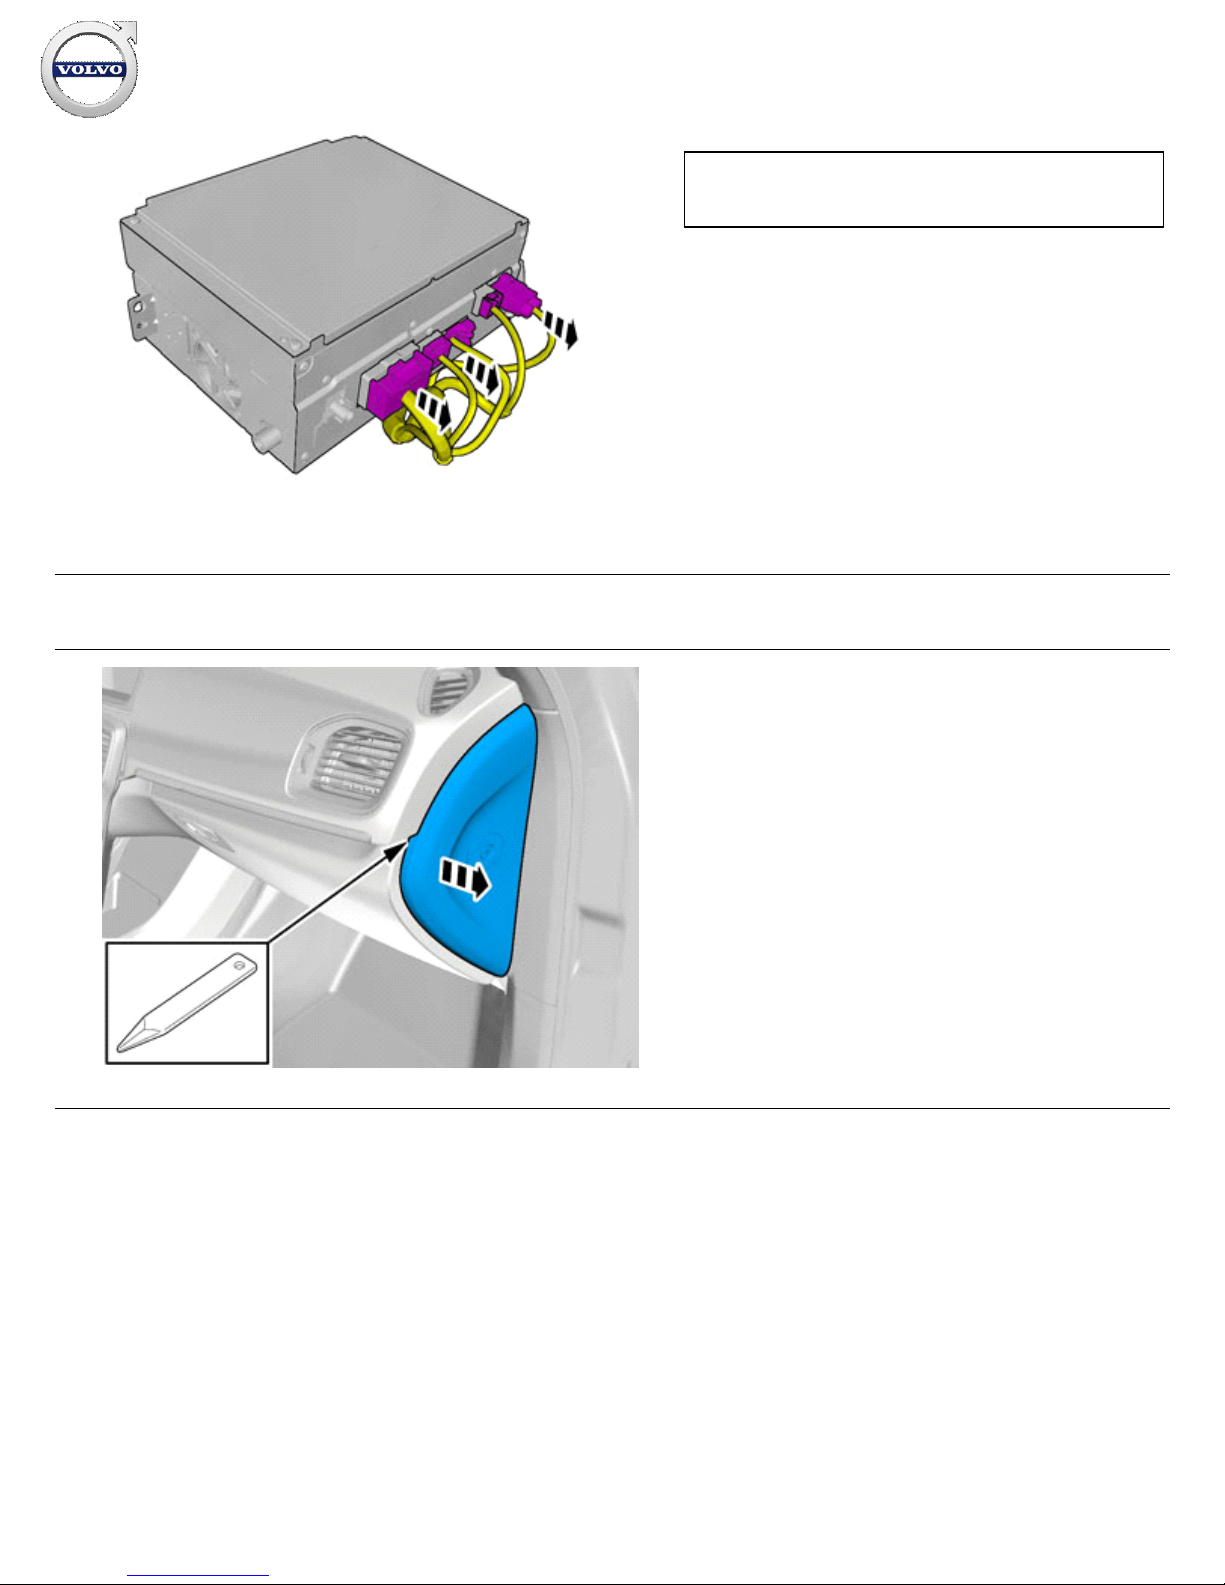
75
IMG-
370746
Disconnect the connectors.
Note!
The number of connectors may vary depending on the
vehicle's equipment level.
Vehicles with Volvo On Call
76
IMG-
356946
Remove the panel.
Installation instructions, accessories
Volvo Car Corporation Gothenburg, Sweden
©
Volvo Car Corporation
Navigation system, RTI- 31339825 - V1.2
Page 31 / 43
Page 32
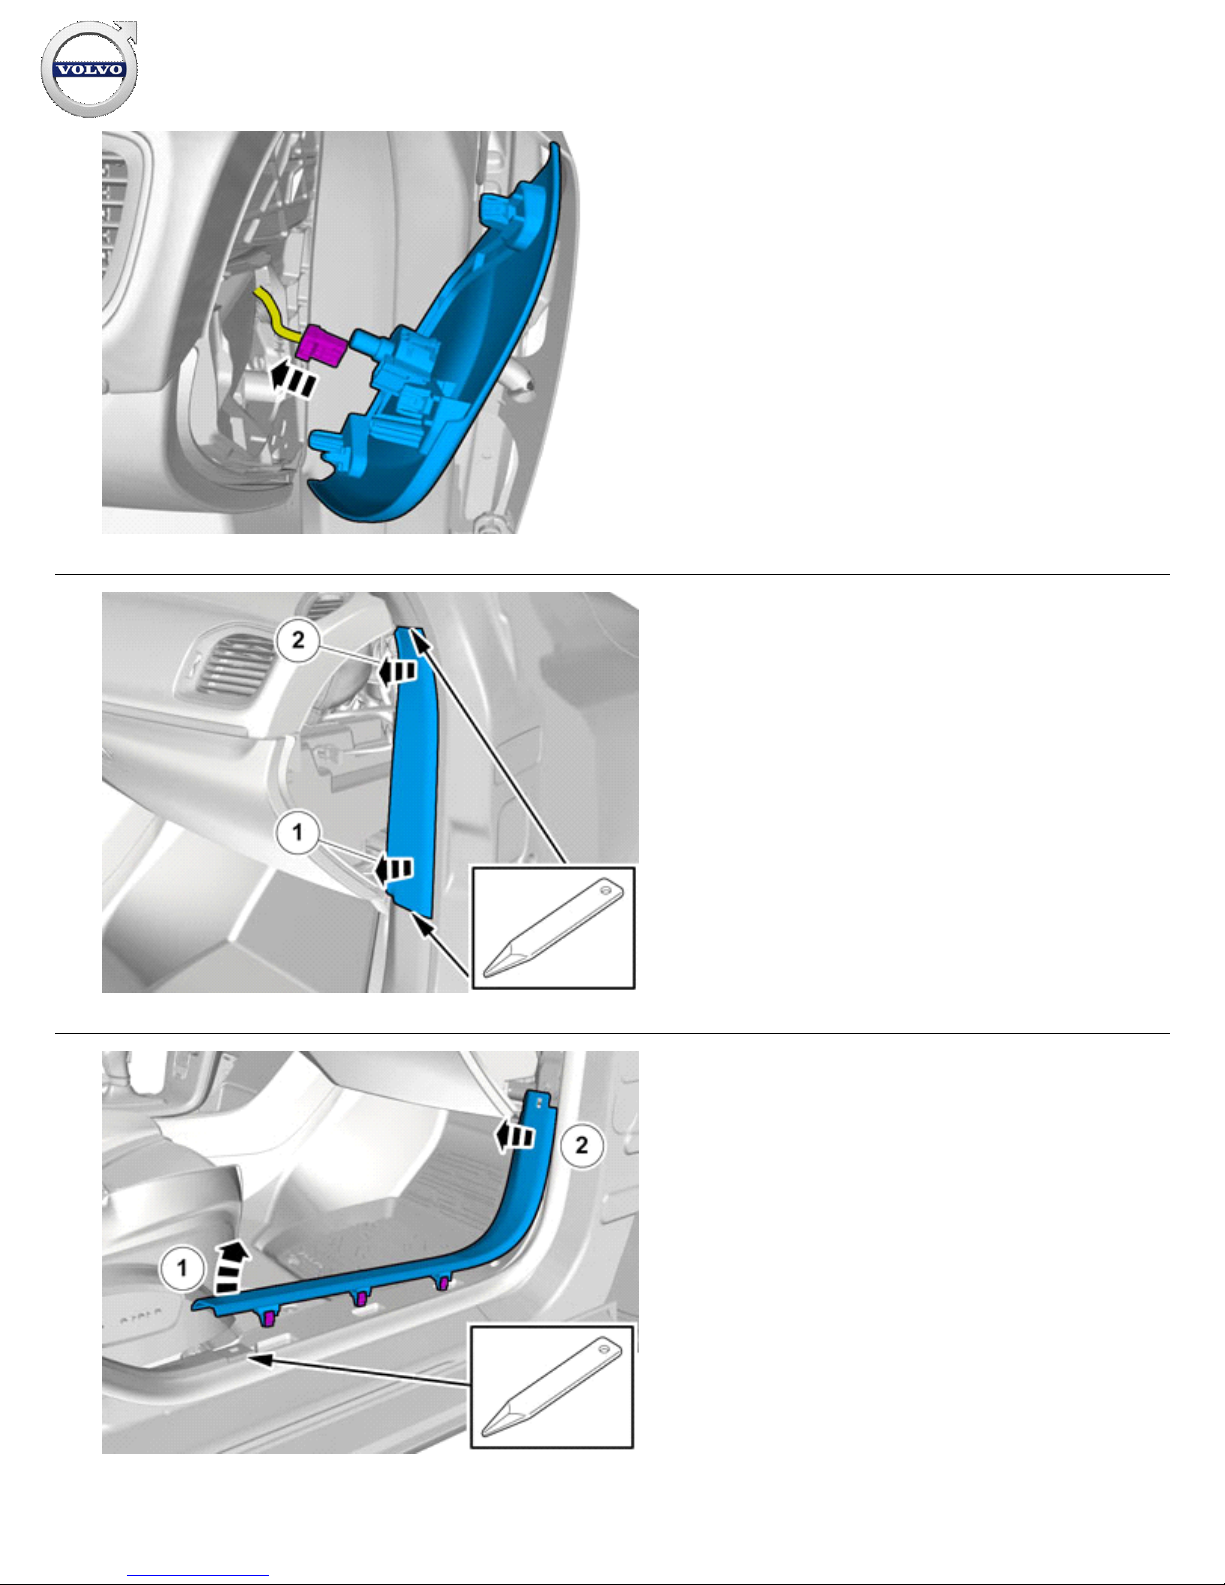
77
IMG-
356947
Disconnect any connector(s).
78
IMG-
358478
Remove the panel.
79
IMG-
358482
Remove the panel.
Installation instructions, accessories
Volvo Car Corporation Gothenburg, Sweden
©
Volvo Car Corporation
Navigation system, RTI- 31339825 - V1.2
Page 32 / 43
Page 33
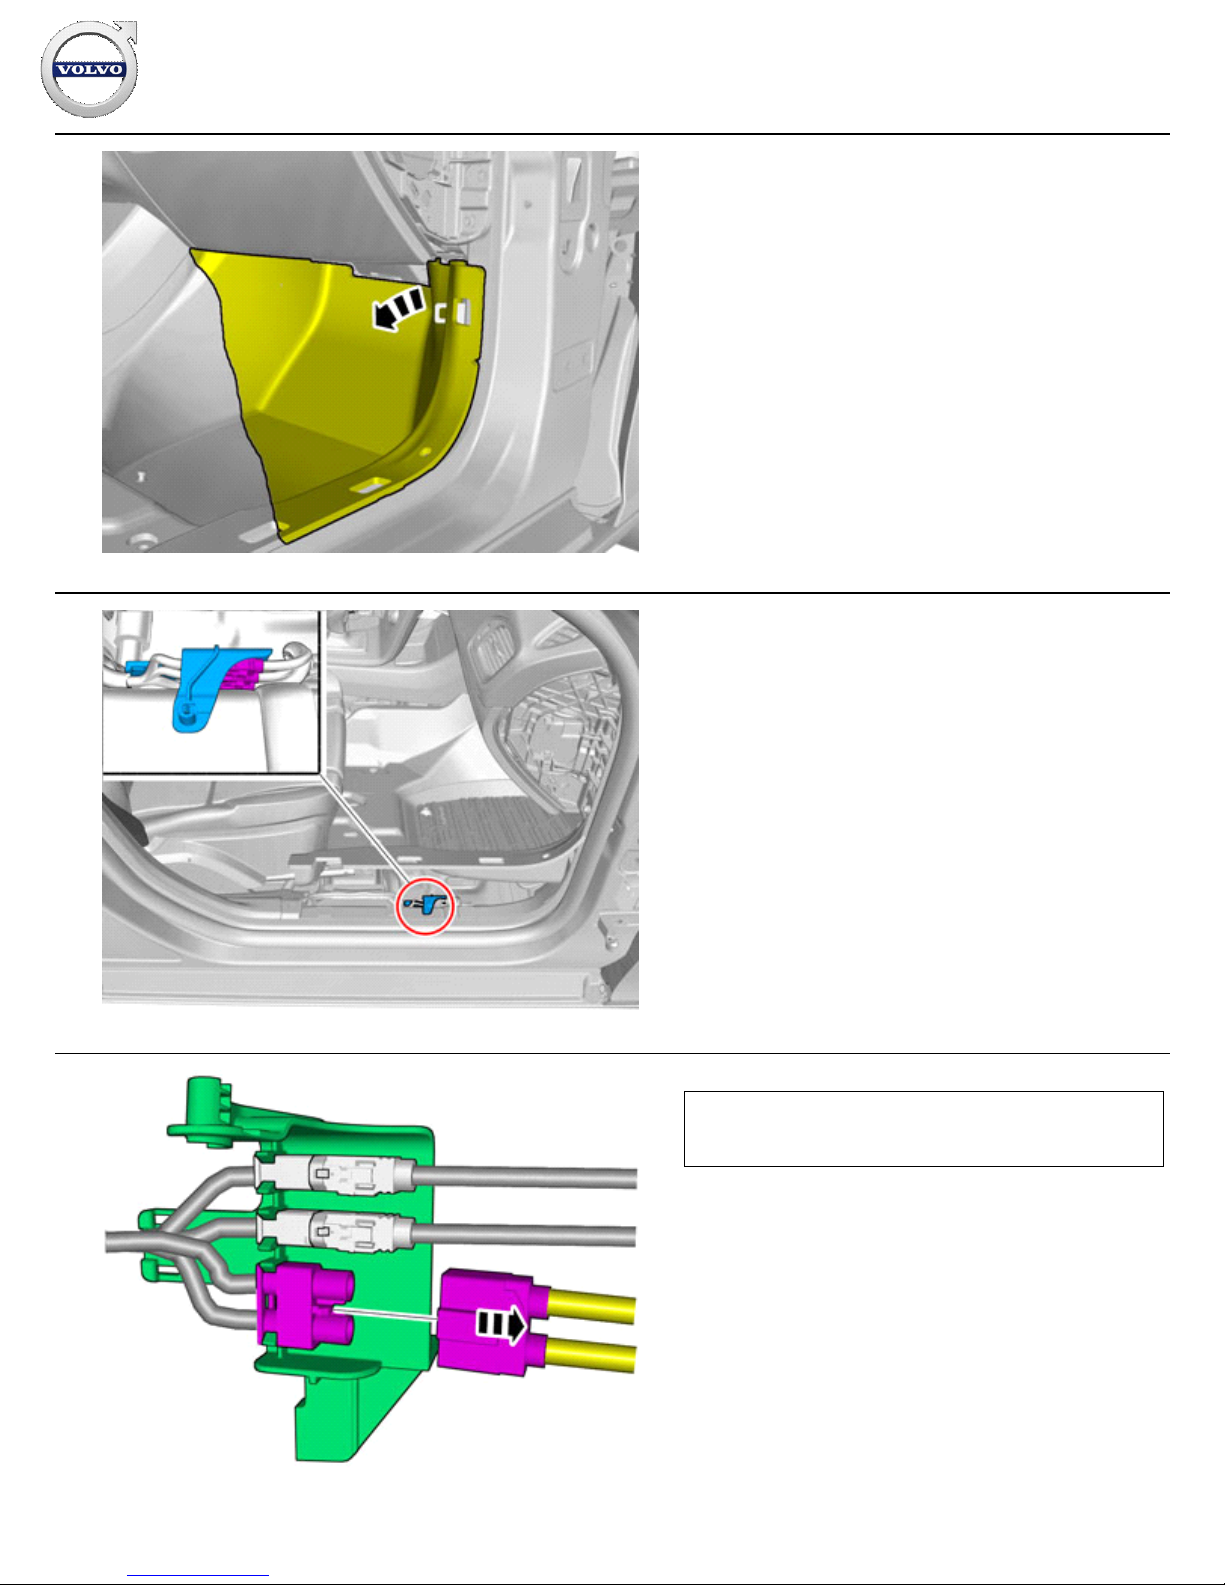
80
IMG-
358485
Fold the carpet to the side.
81
IMG-
368328
Locate the existing connectors in the vehicle's cable harness.
82
IMG-
368349
Disconnect the connector.
Caution!
The number of connectors, cables and cable ties may vary
depending on the vehicle specification.
Installation instructions, accessories
Volvo Car Corporation Gothenburg, Sweden
©
Volvo Car Corporation
Navigation system, RTI- 31339825 - V1.2
Page 33 / 43
Page 34
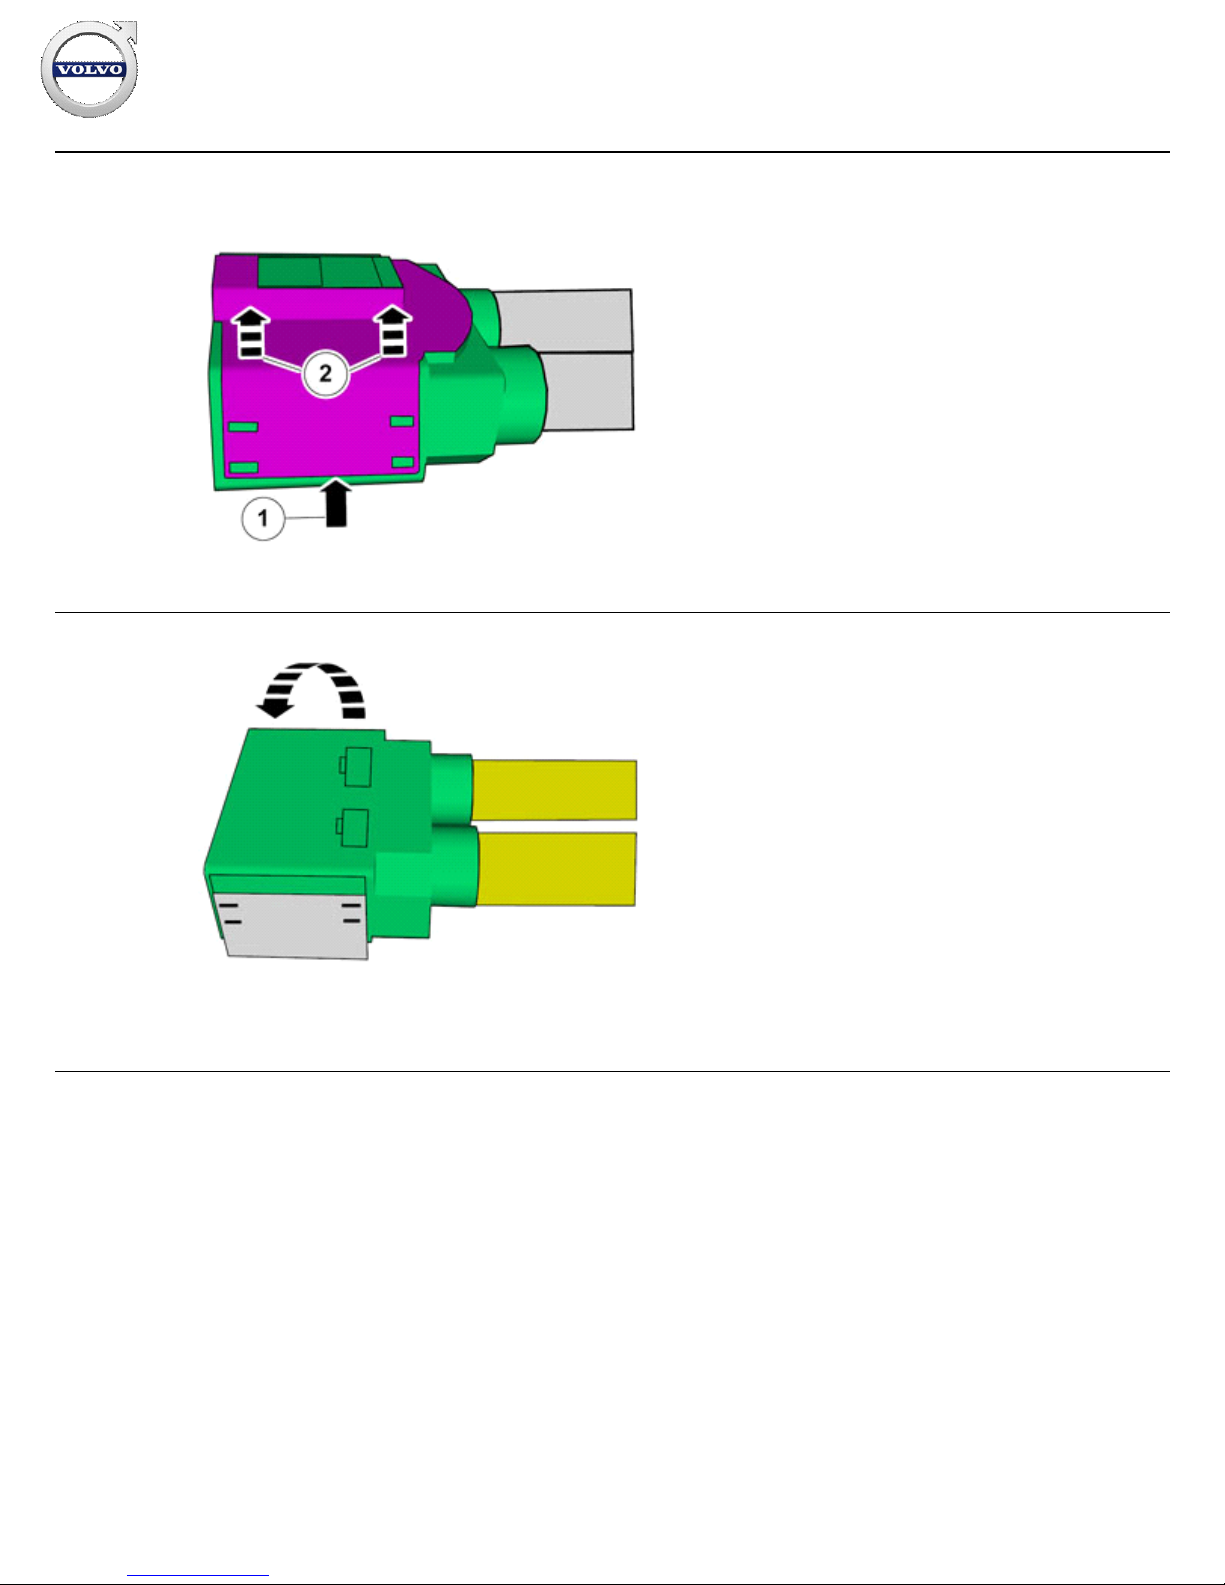
83
IMG-
368528
Release the connector's secondary lock.
Repeat on the other side.
Use: Electrician's screwdriver
84
IMG-
368577
Installation instructions, accessories
Volvo Car Corporation Gothenburg, Sweden
©
Volvo Car Corporation
Navigation system, RTI- 31339825 - V1.2
Page 34 / 43
Page 35
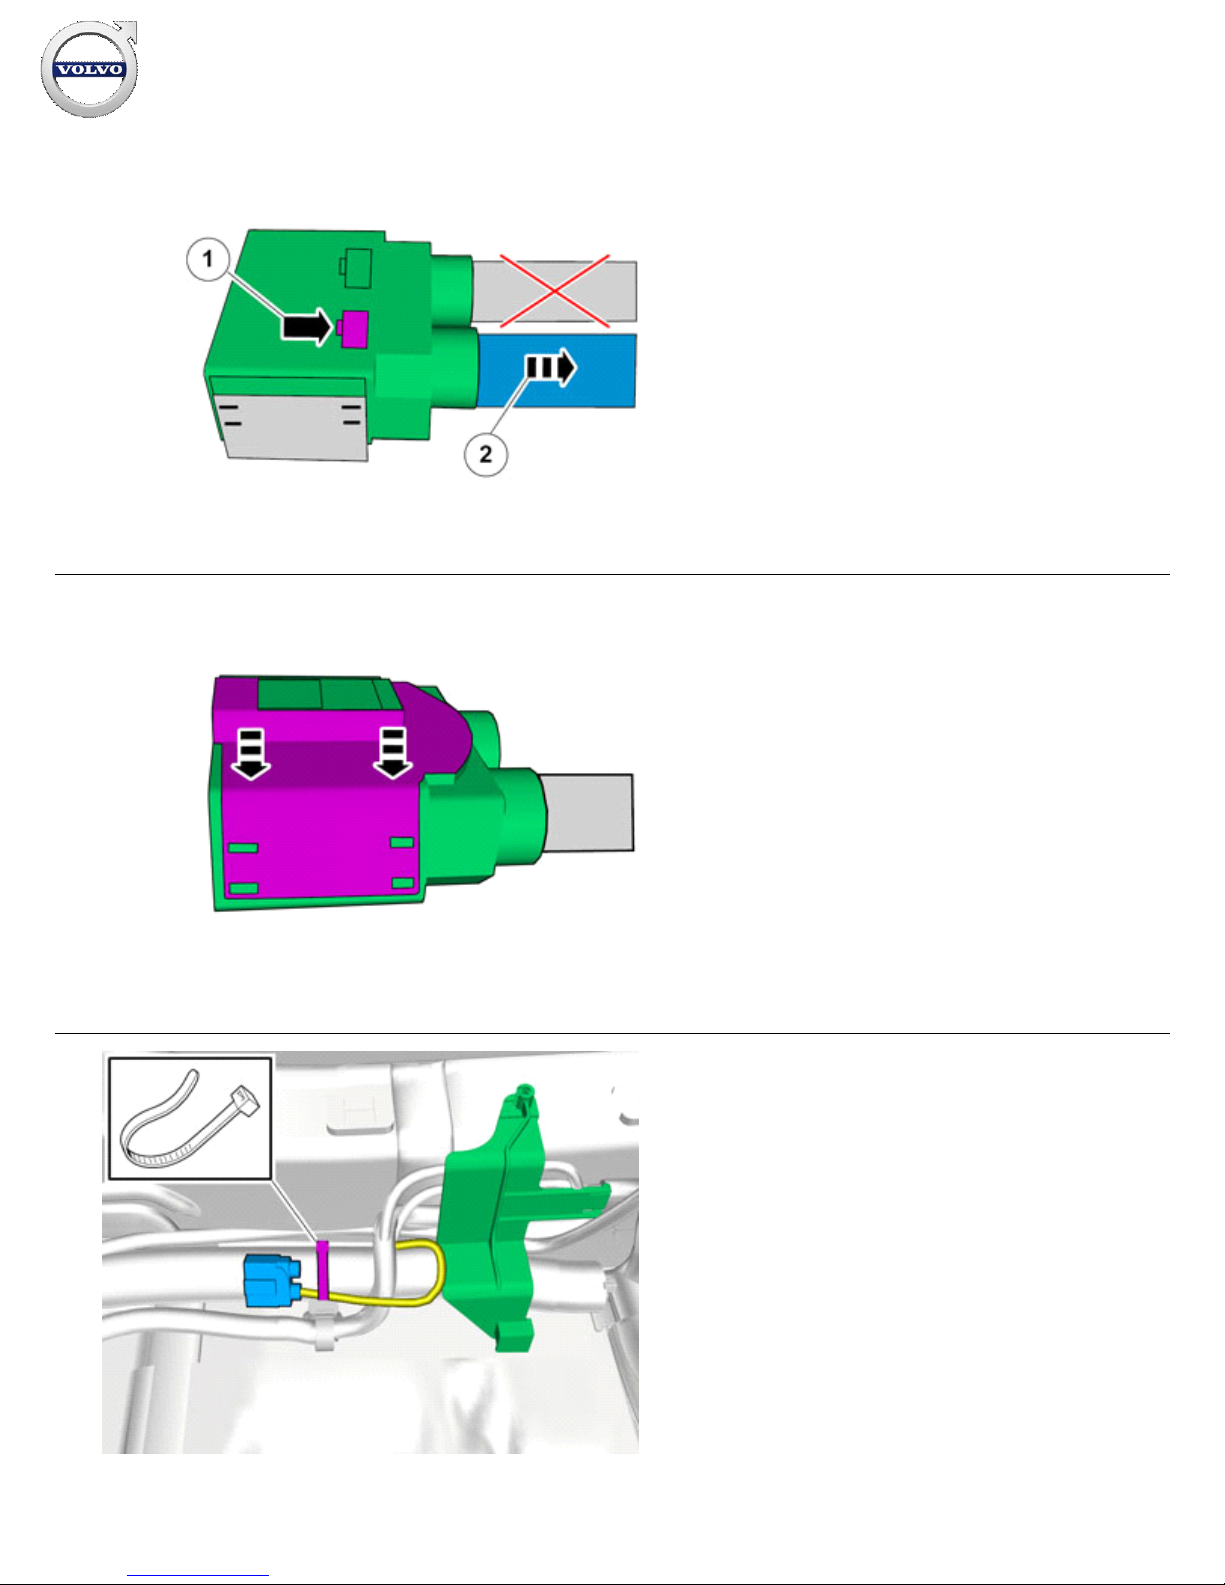
85
IMG-
368567
Release the connector's primary lock.
Use: Electrician's screwdriver
Loosen the wiring harness or move it to the side.
86
IMG-
368570
Depress the secondary lock.
87
IMG-
368575
Attach the connector to the wiring harness.
The cable harness must not be reused.
Installation instructions, accessories
Volvo Car Corporation Gothenburg, Sweden
©
Volvo Car Corporation
Navigation system, RTI- 31339825 - V1.2
Page 35 / 43
Page 36
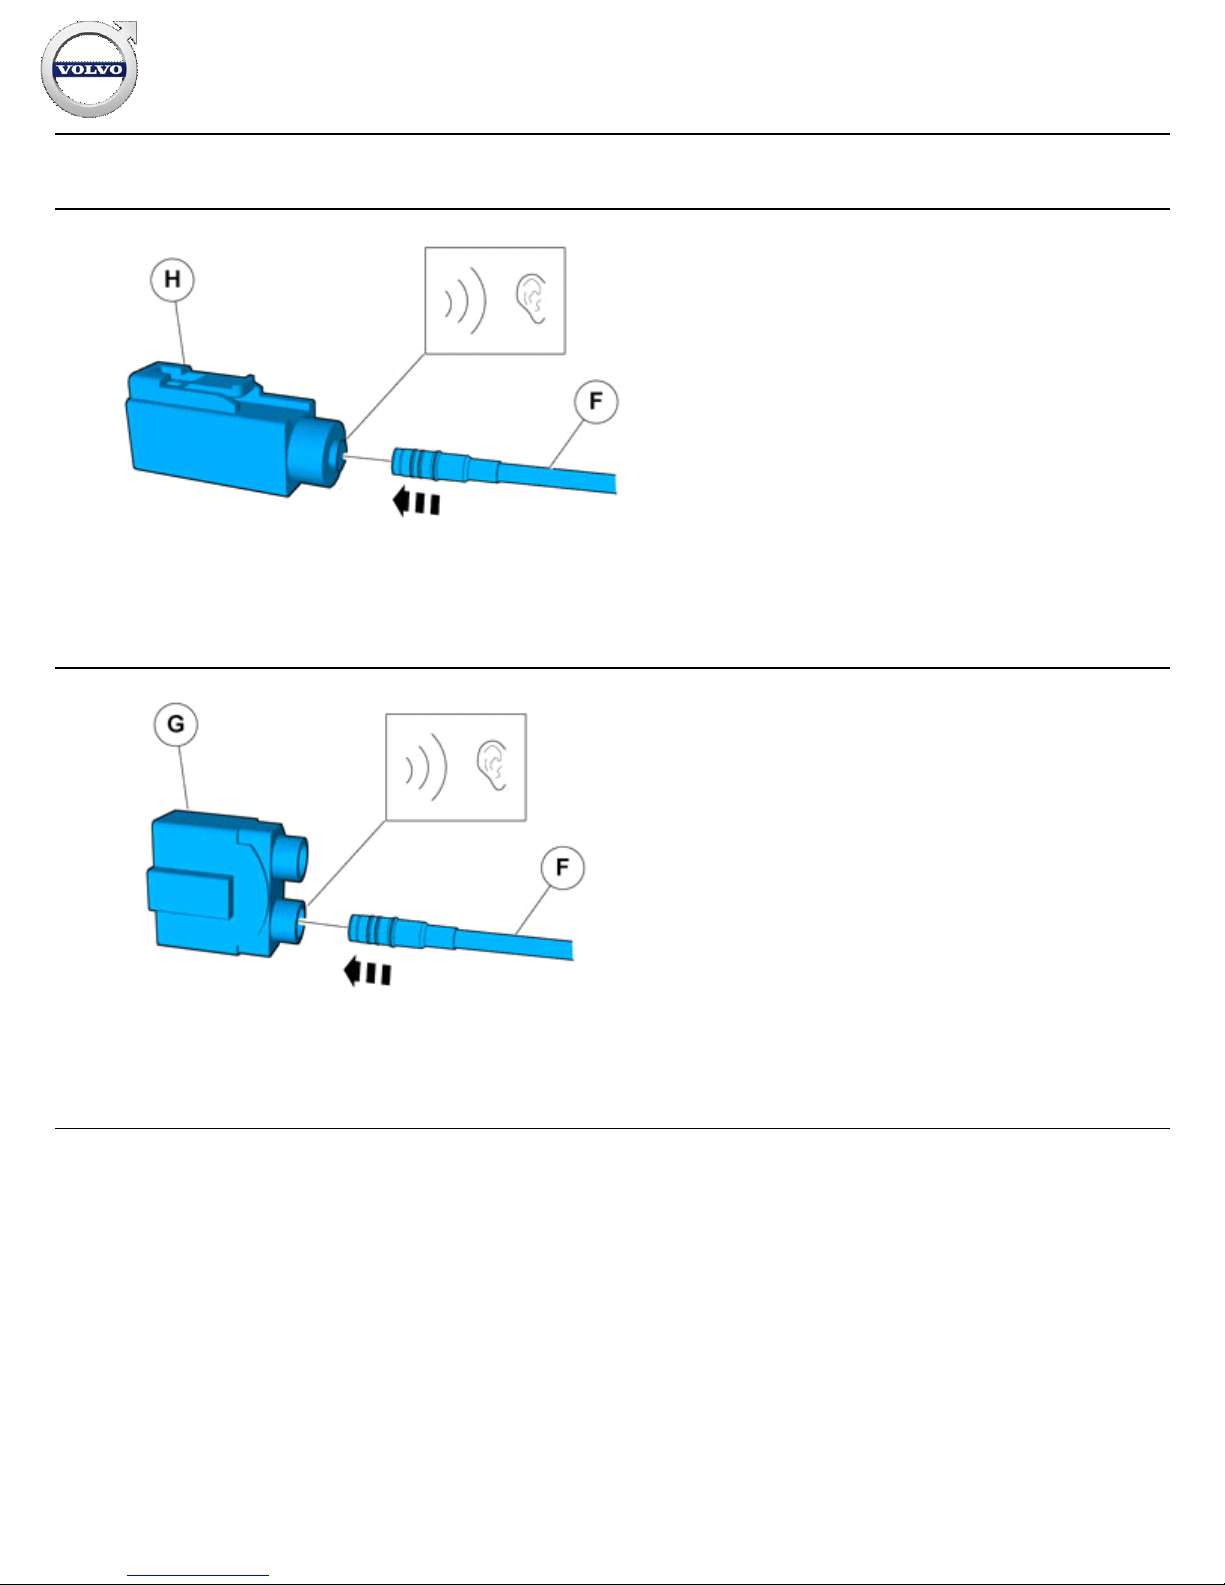
Accessory installation
88
IMG-
368475
Install component that comes with the accessory kit.
A click confirms that the component is in the correct position.
Depress the locking device.
89
IMG-
368416
Install component that comes with the accessory kit.
A click confirms that the component is in the correct position.
Installation instructions, accessories
Volvo Car Corporation Gothenburg, Sweden
©
Volvo Car Corporation
Navigation system, RTI- 31339825 - V1.2
Page 36 / 43
Page 37
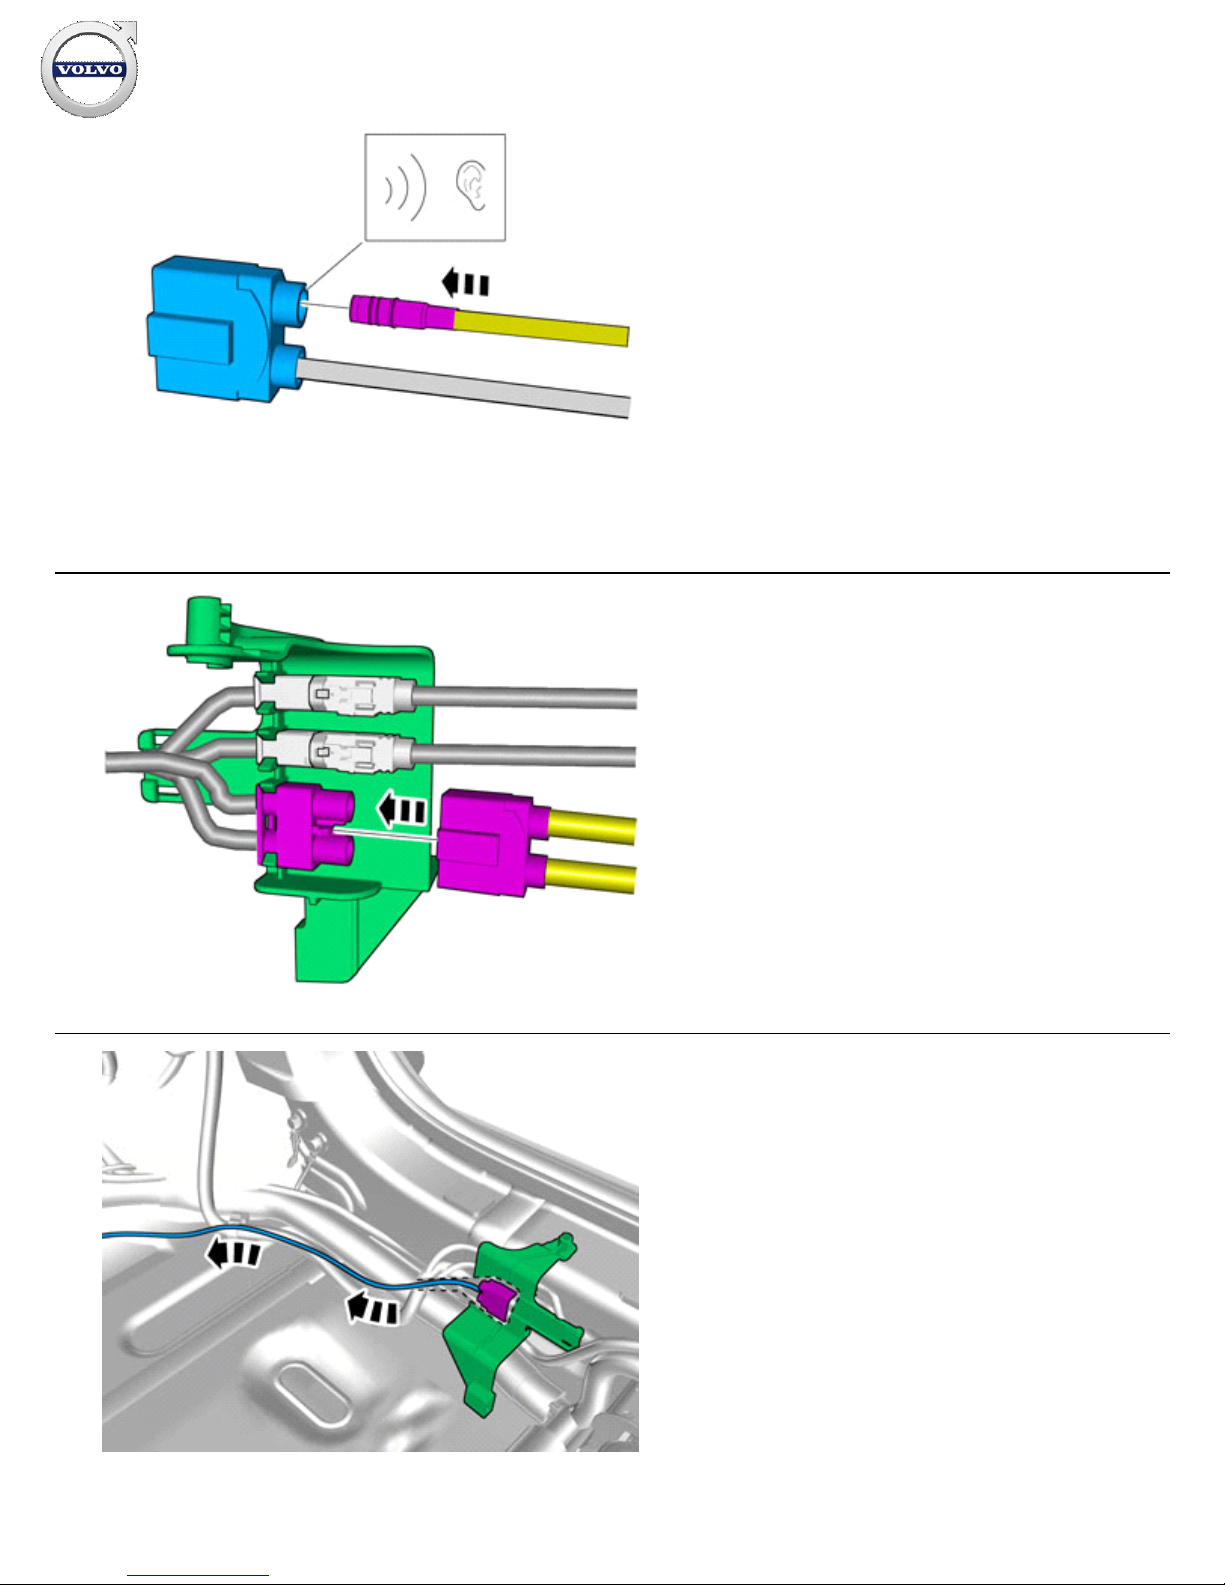
90
IMG-
368518
Connect the cable harness.
A click confirms that the component is in the correct position.
Depress the secondary lock.
91
IMG-
368370
Connect the connector.
A click confirms that the component is in the correct position.
92
IMG-
368371
Route the cable harness to the existing cable harness.
If necessary
Install the cable.
Installation instructions, accessories
Volvo Car Corporation Gothenburg, Sweden
©
Volvo Car Corporation
Navigation system, RTI- 31339825 - V1.2
Page 37 / 43
Page 38
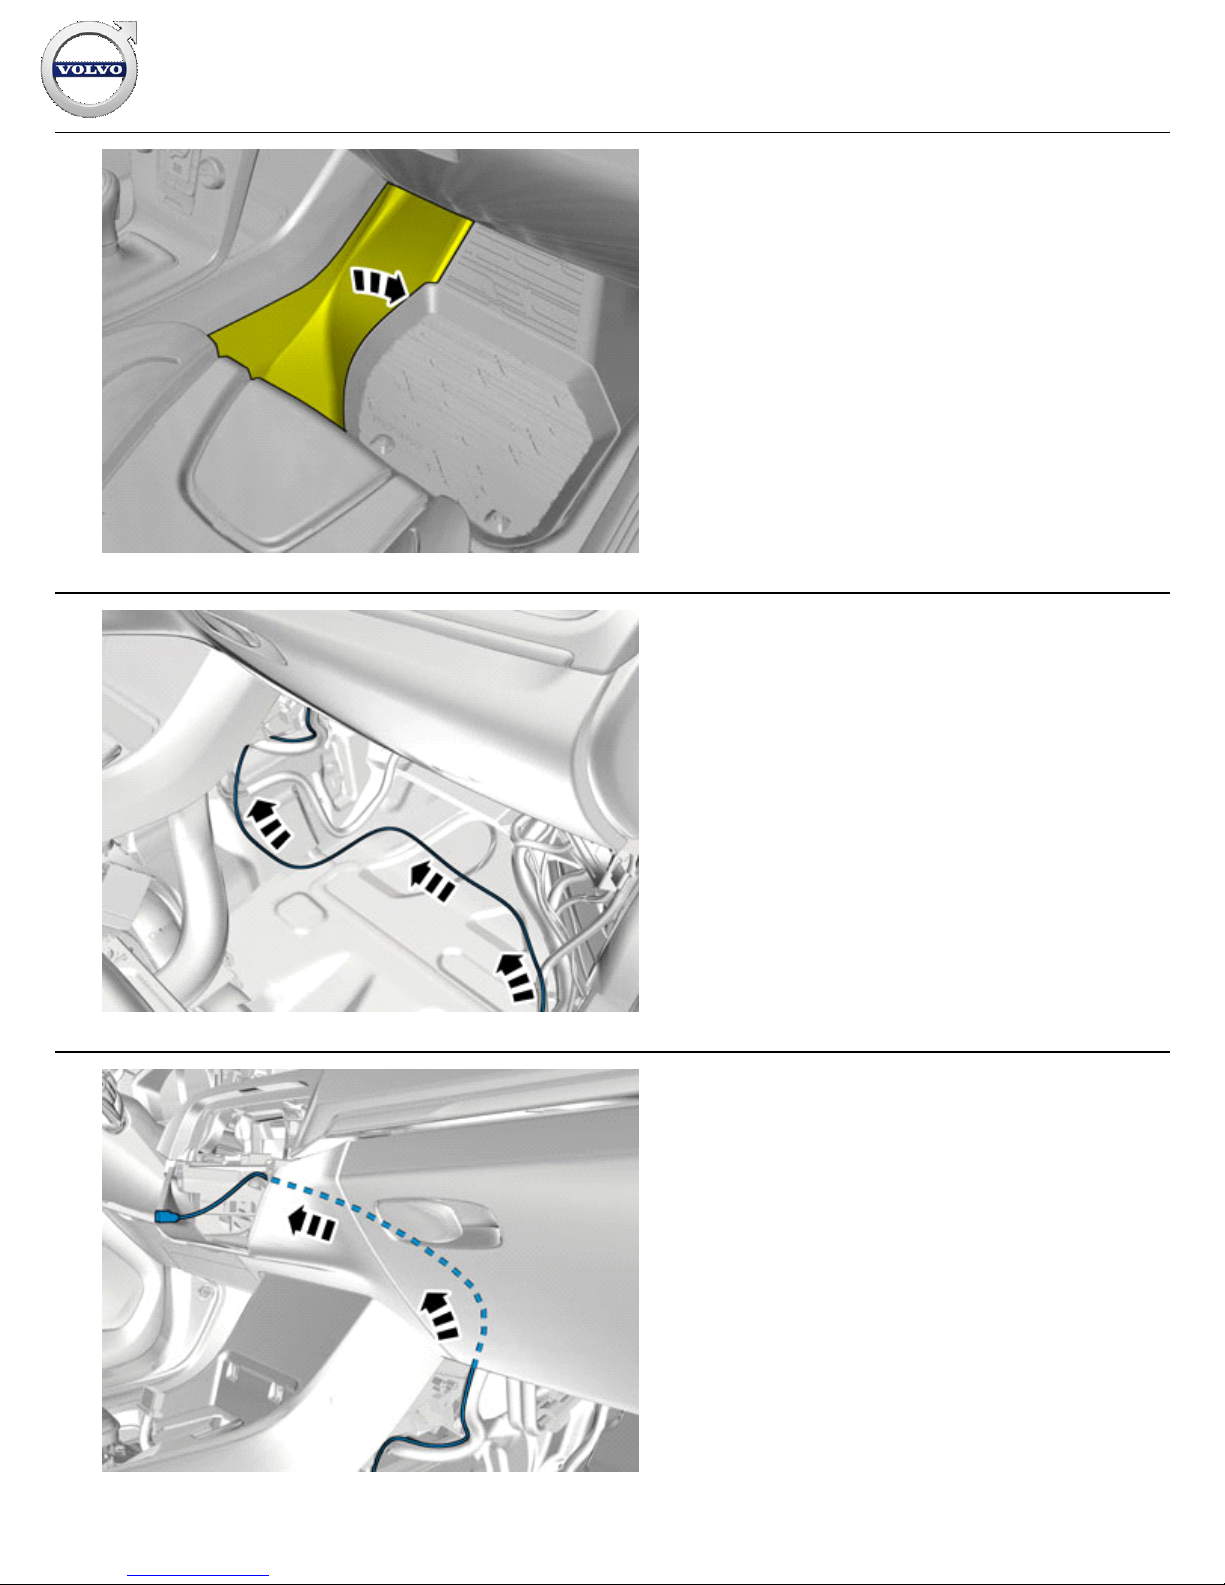
93
IMG-
365994
Fold the carpet to the side.
94
IMG-
368372
95
IMG-
368476
Pull the wiring through.
If necessary
Clamp the cables and connectors to the existing cables to
prevent noise.
Installation instructions, accessories
Volvo Car Corporation Gothenburg, Sweden
©
Volvo Car Corporation
Navigation system, RTI- 31339825 - V1.2
Page 38 / 43
Page 39
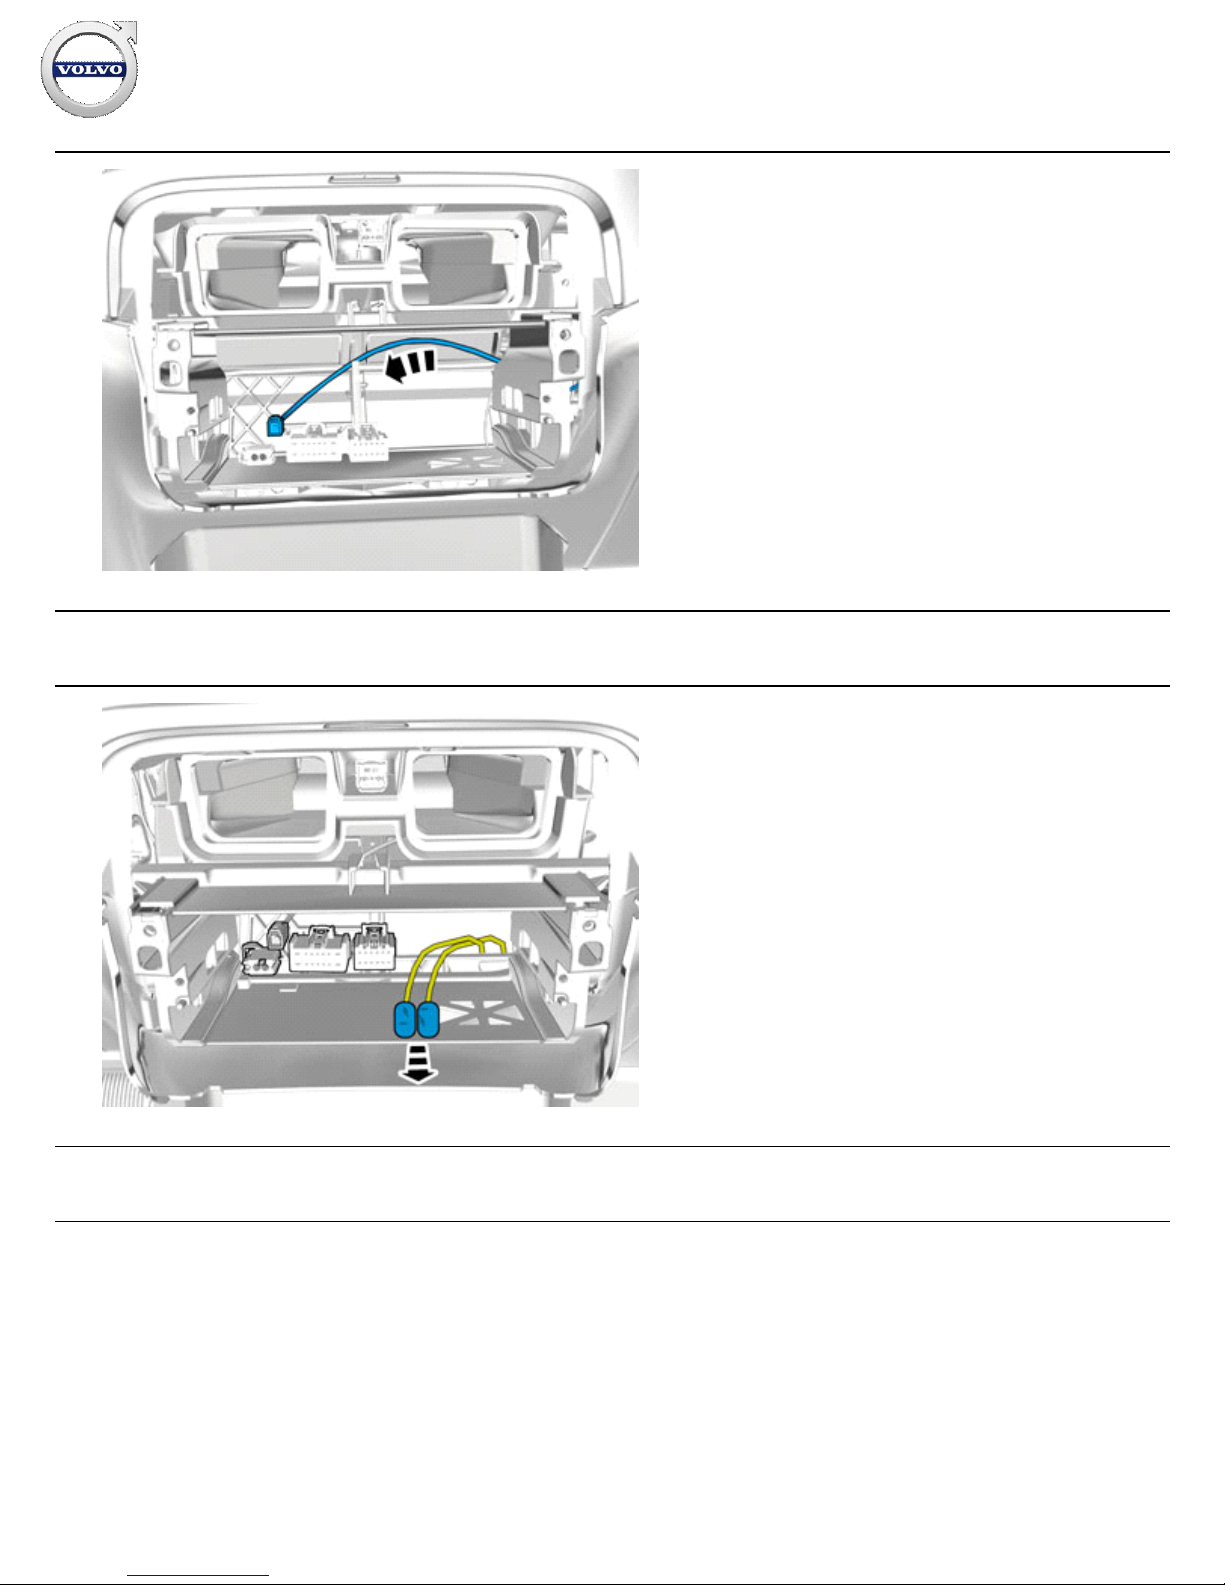
96
IMG-
368401
Vehicles with 5 inch ICM-display
97
IMG-
368492
Locate the existing connectors in the vehicle's cable harness.
Remove the foam bags.
Vehicles with 7 inch display
Installation instructions, accessories
Volvo Car Corporation Gothenburg, Sweden
©
Volvo Car Corporation
Navigation system, RTI- 31339825 - V1.2
Page 39 / 43
Page 40
98
IMG-
371176
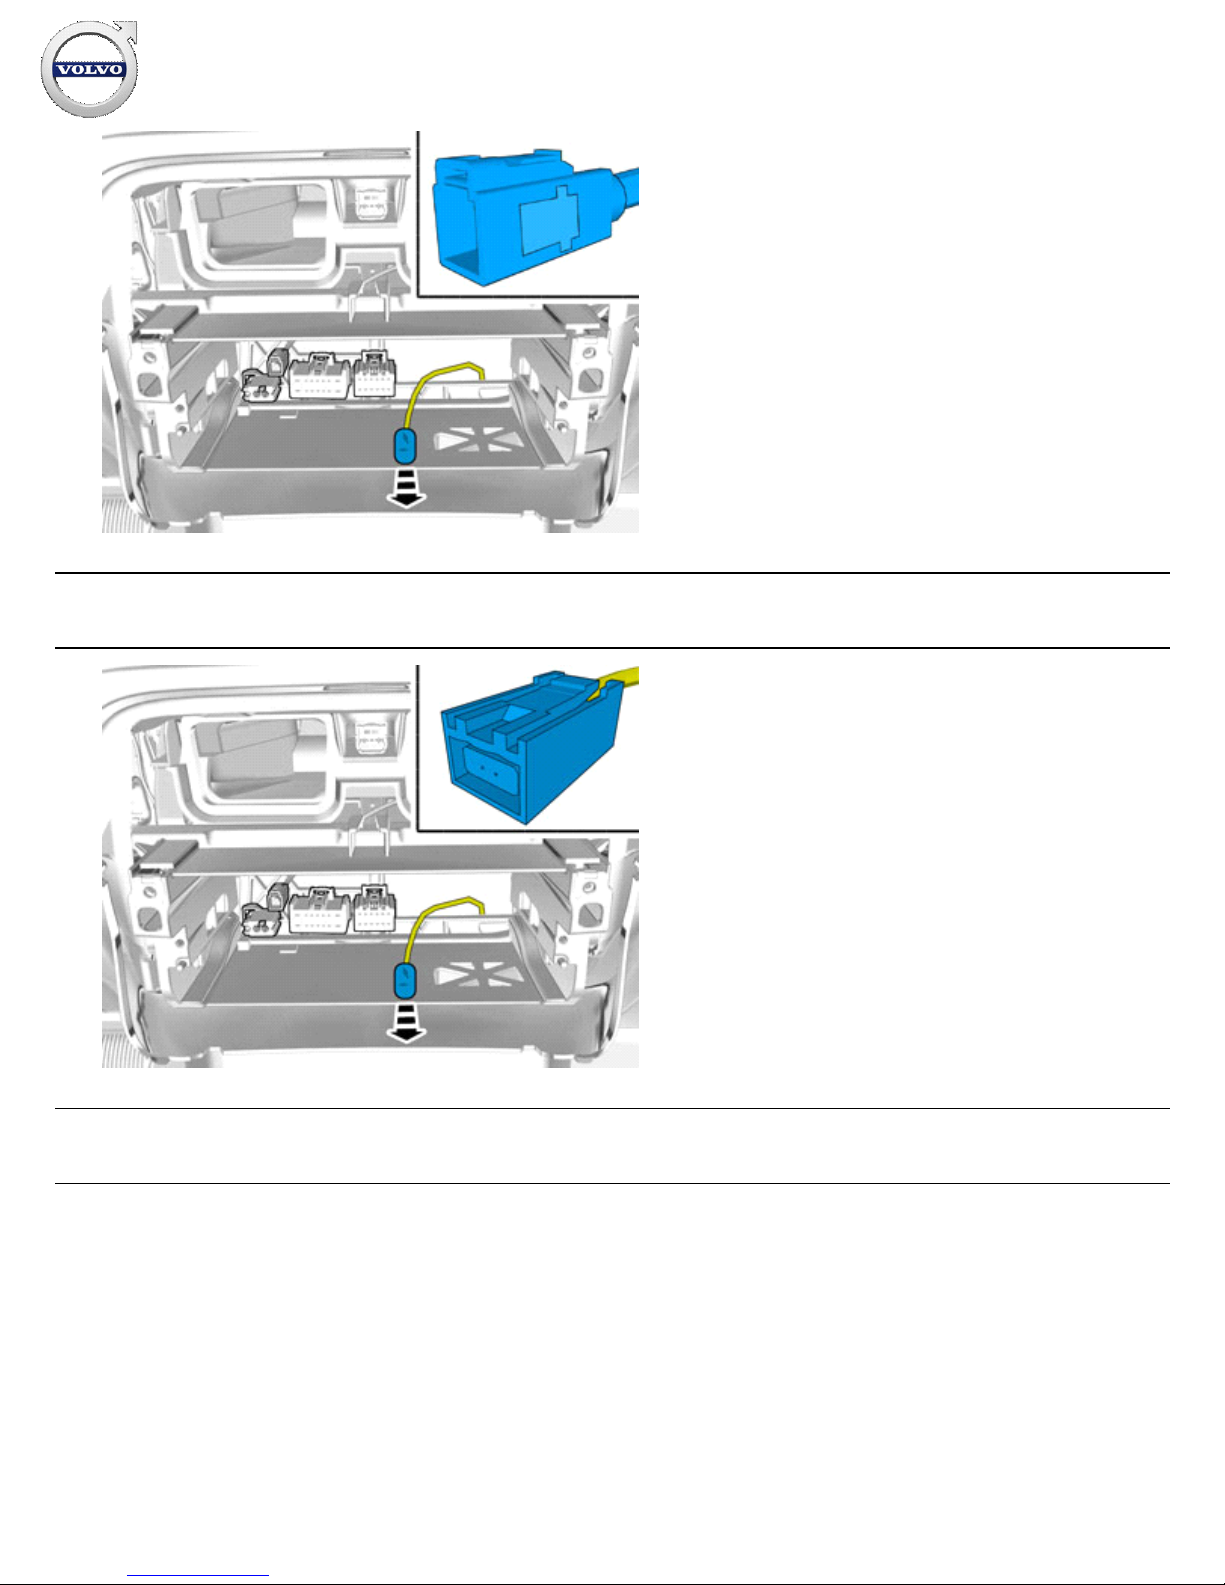
Locate the existing connector in the vehicle's cable harness.
Remove the foam bag.
Vehicles with Volvo On Call
99
IMG-
371175
Locate the existing connector in the vehicle's cable harness.
Remove the foam bag.
All vehicles
Installation instructions, accessories
Volvo Car Corporation Gothenburg, Sweden
©
Volvo Car Corporation
Navigation system, RTI- 31339825 - V1.2
Page 40 / 43
Page 41
100
IMG-
370446
101
IMG-
370753
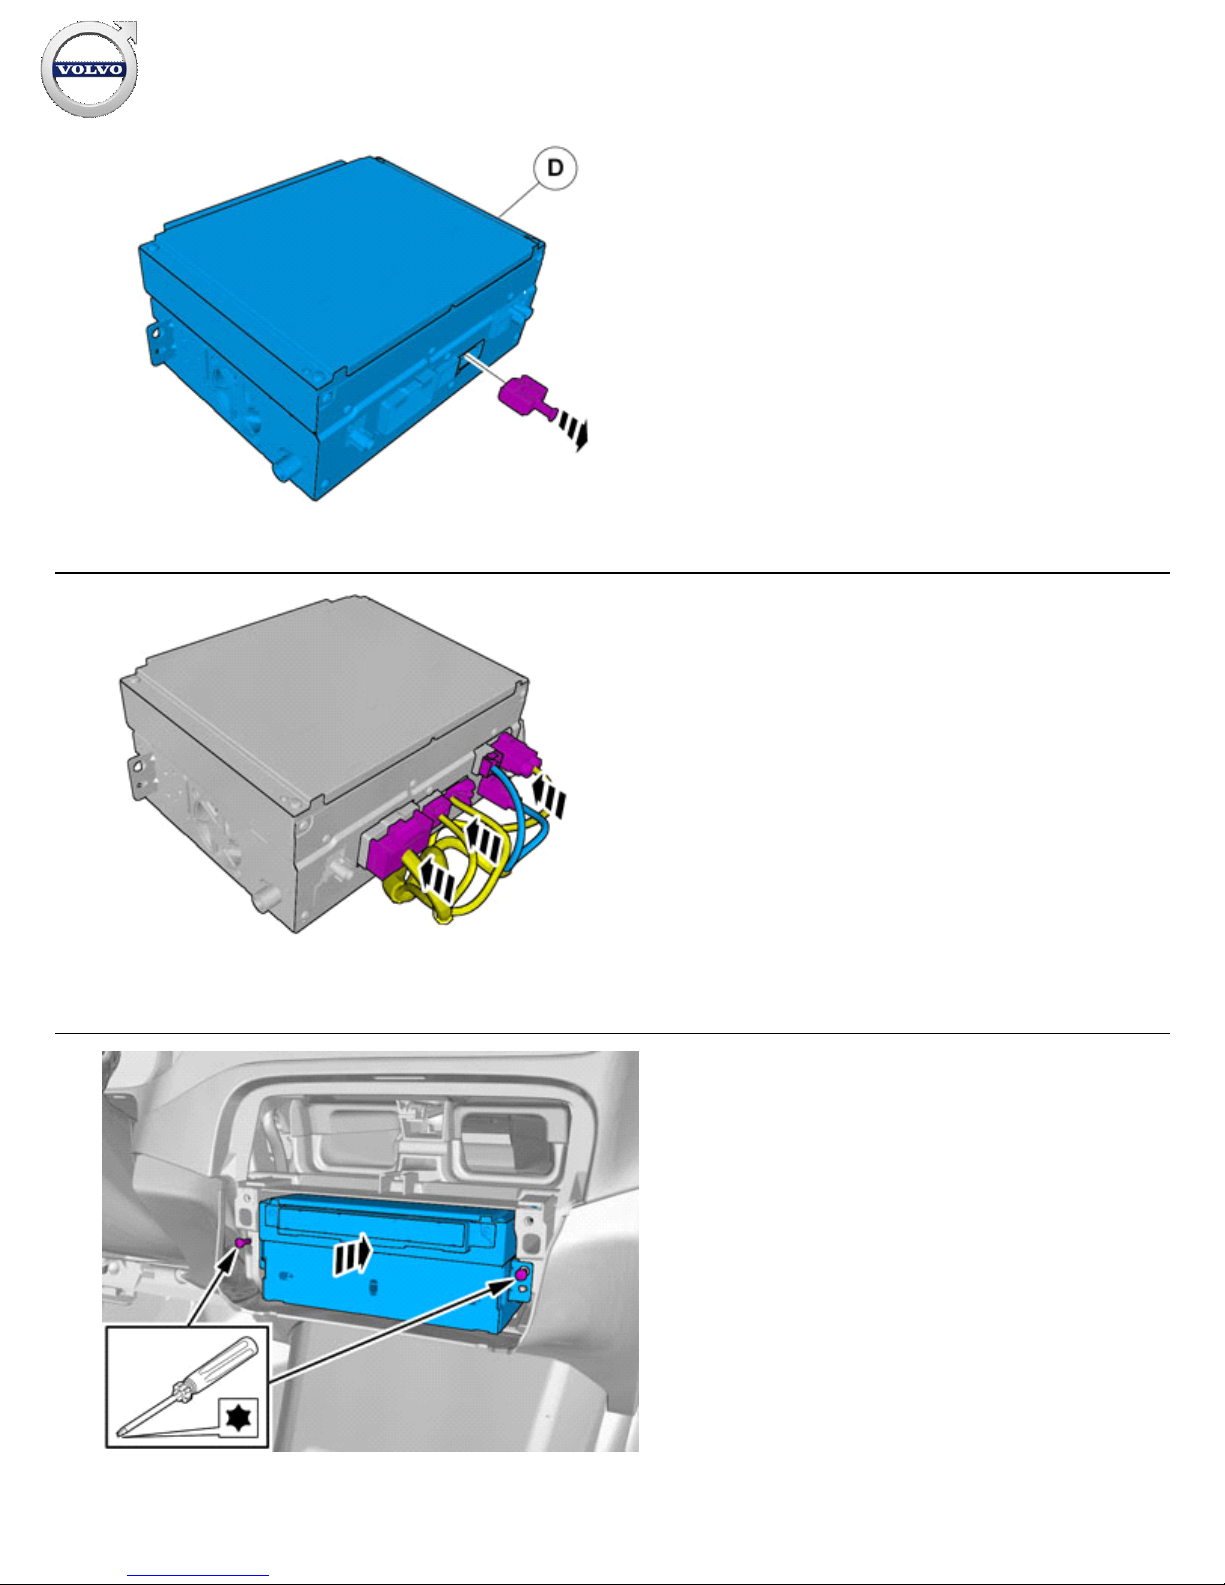
Connect the connectors.
Connect the prerouted cables.
102
IMG-
371174
Installation instructions, accessories
Volvo Car Corporation Gothenburg, Sweden
©
Volvo Car Corporation
Navigation system, RTI- 31339825 - V1.2
Page 41 / 43
Page 42
Installation
103
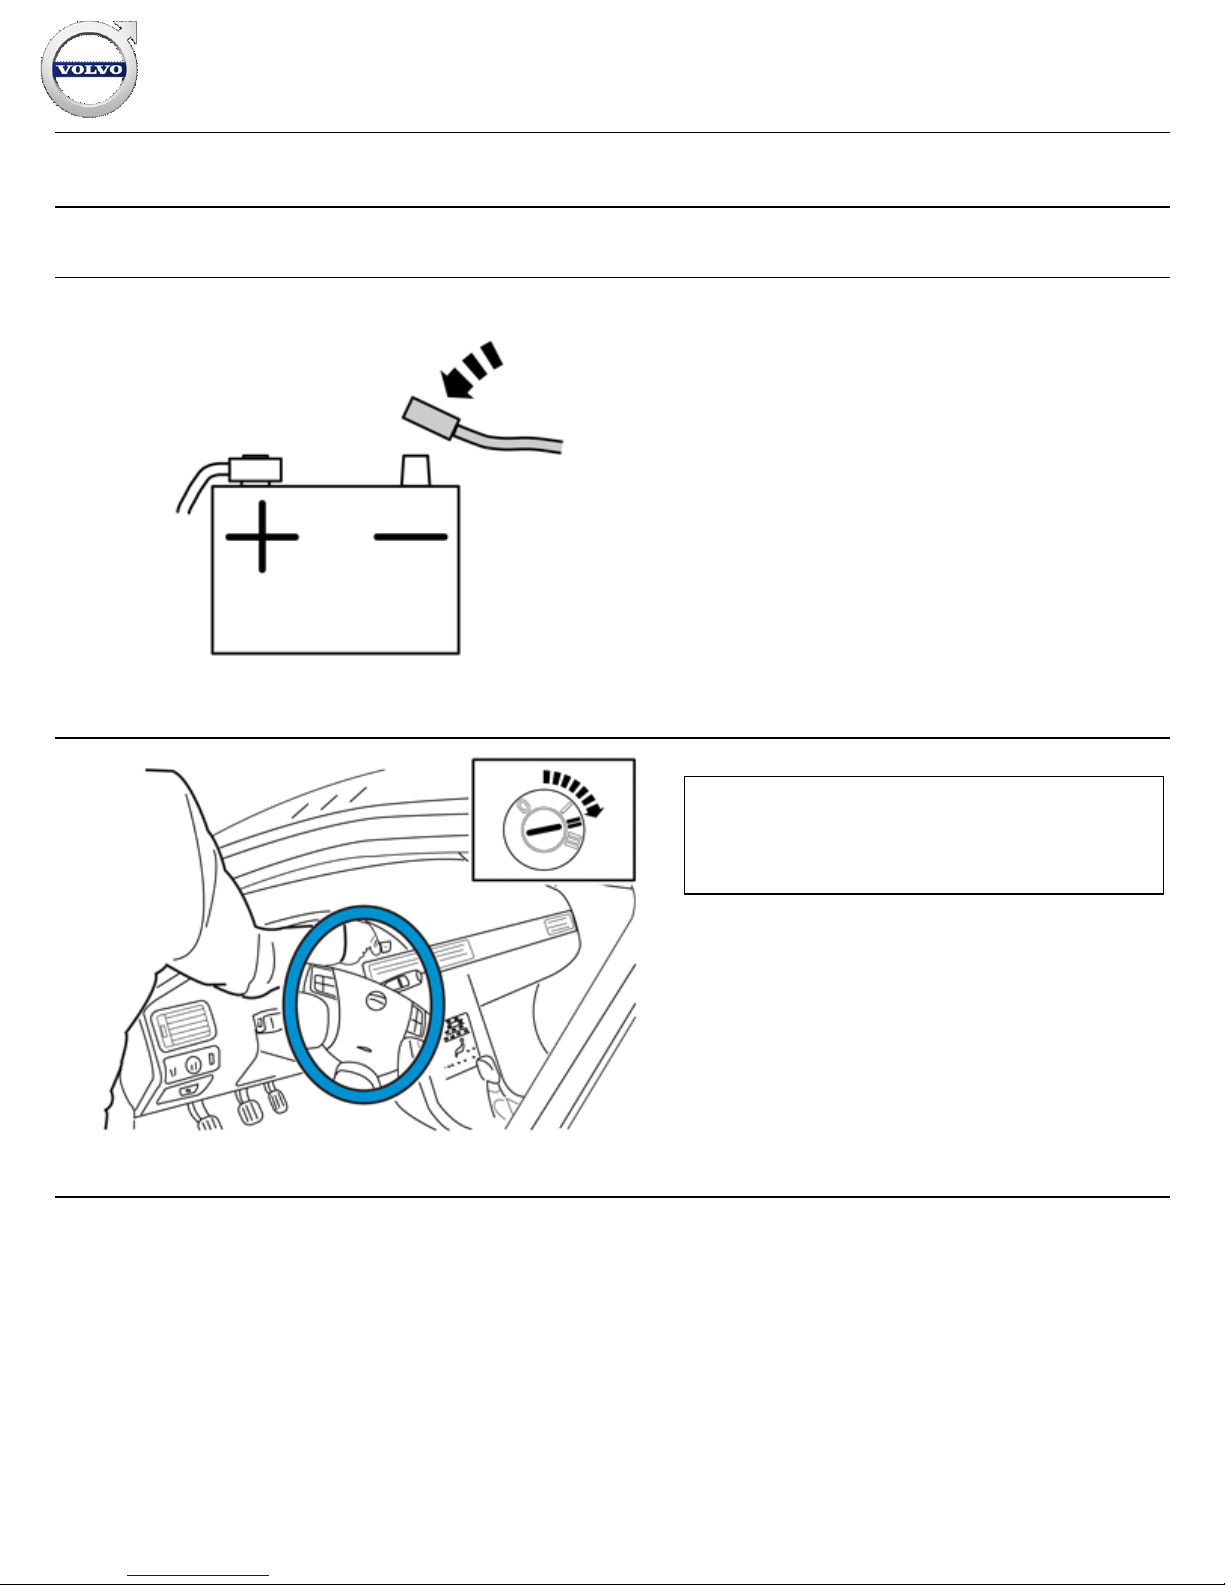
Reinstall the removed parts in reverse order.
104
IMG-
336901
Reinstall the battery's negative cable.
105
IMG-
336904
Warning!
When switching the ignition on for the first time after a battery
disconnect and connect, make sure to stand outside the
vehicle and only reach into the vehicle keeping clear of the air
bag deployment areas.
Installation instructions, accessories
Volvo Car Corporation Gothenburg, Sweden
©
Volvo Car Corporation
Navigation system, RTI- 31339825 - V1.2
Page 42 / 43
Page 43
106
IMG-
242268
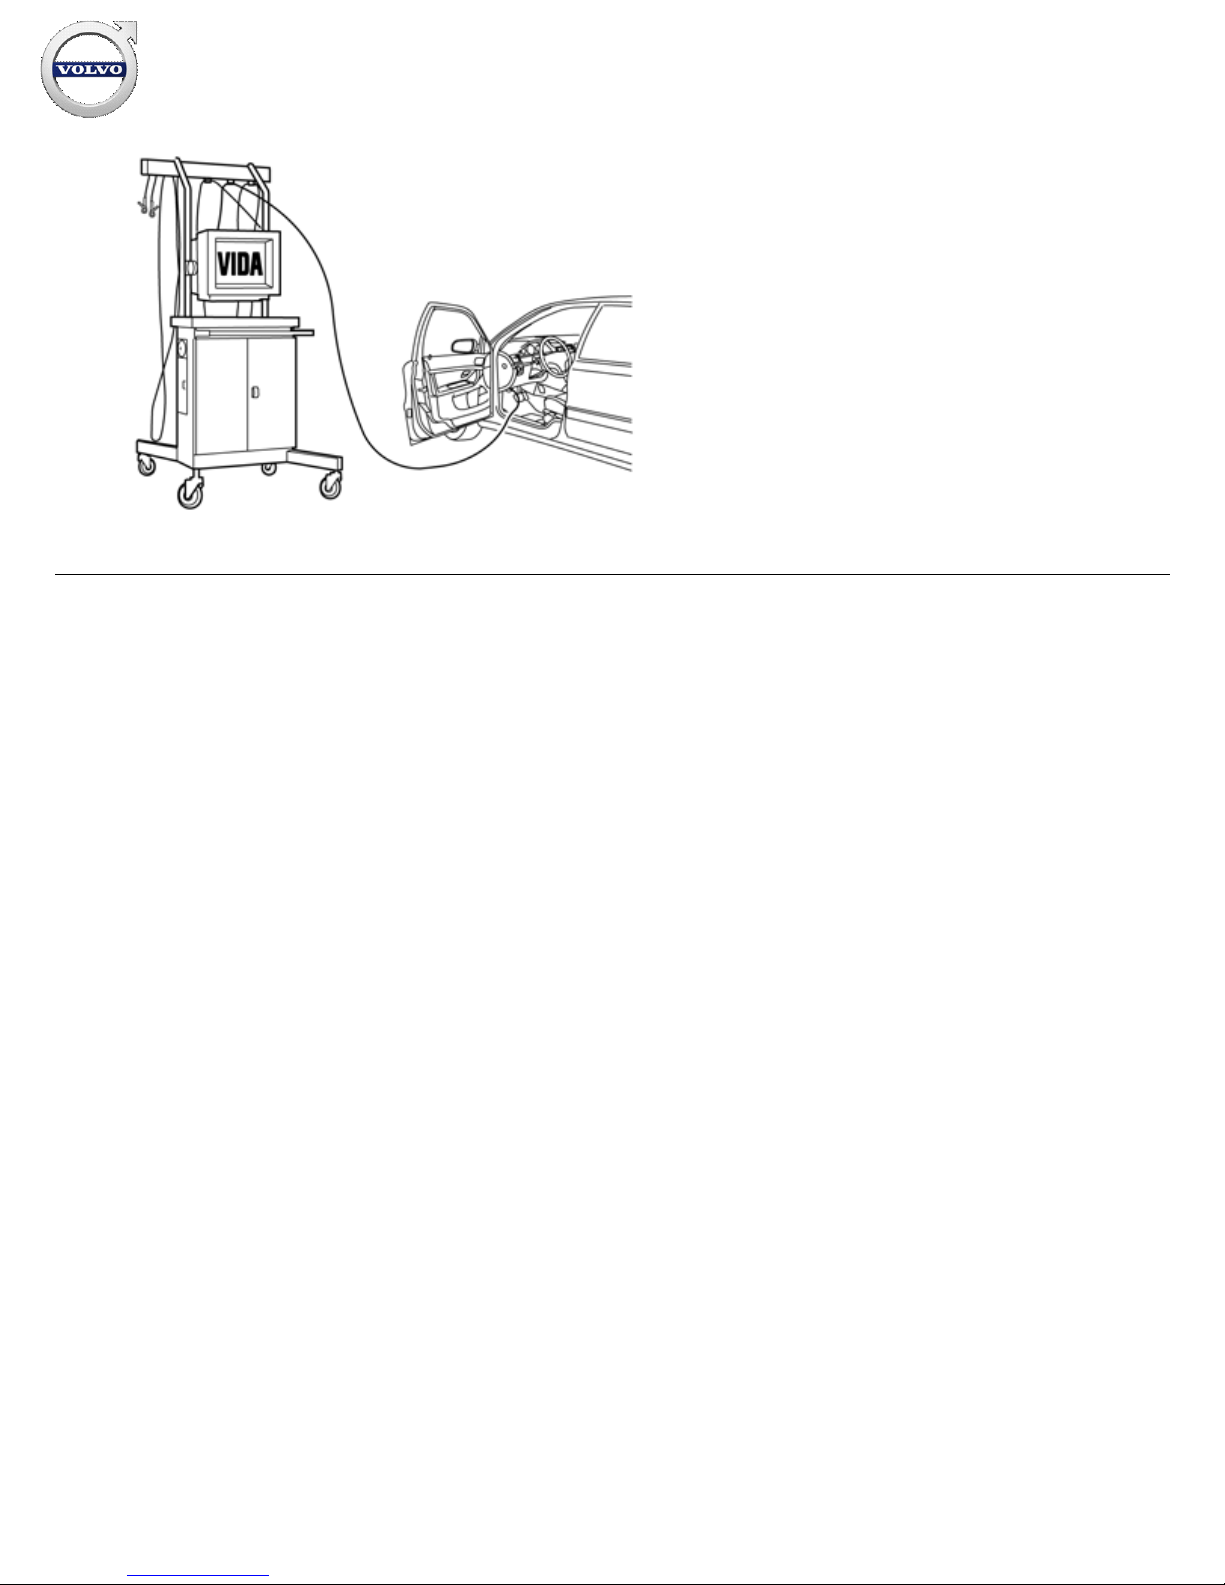
Download software (application) for the accessory's function
according to the service information in VIDA. See VIDA or the
accessories catalogue for software part number.
Order and download software according to: 31339278
Installation instructions, accessories
Volvo Car Corporation Gothenburg, Sweden
©
Volvo Car Corporation
Navigation system, RTI- 31339825 - V1.2
Page 43 / 43
 Loading...