

Volvo 31310746 Installation Instructions Manual

Instruction No
Version
Part. No.
31310747
1.4
31310746
Handsfree, Microphone, swan neck
Instruction No
Version
Part. No.
31310747
1.4
31310746
Handsfree, Microphone, swan neck
Installation instructions, accessories
Volvo Car Corporation Gothenburg, Sweden
©
Volvo Car Corporation
Handsfree, Microphone, swan neck- 31310747 - V1.4
Page 1 / 34
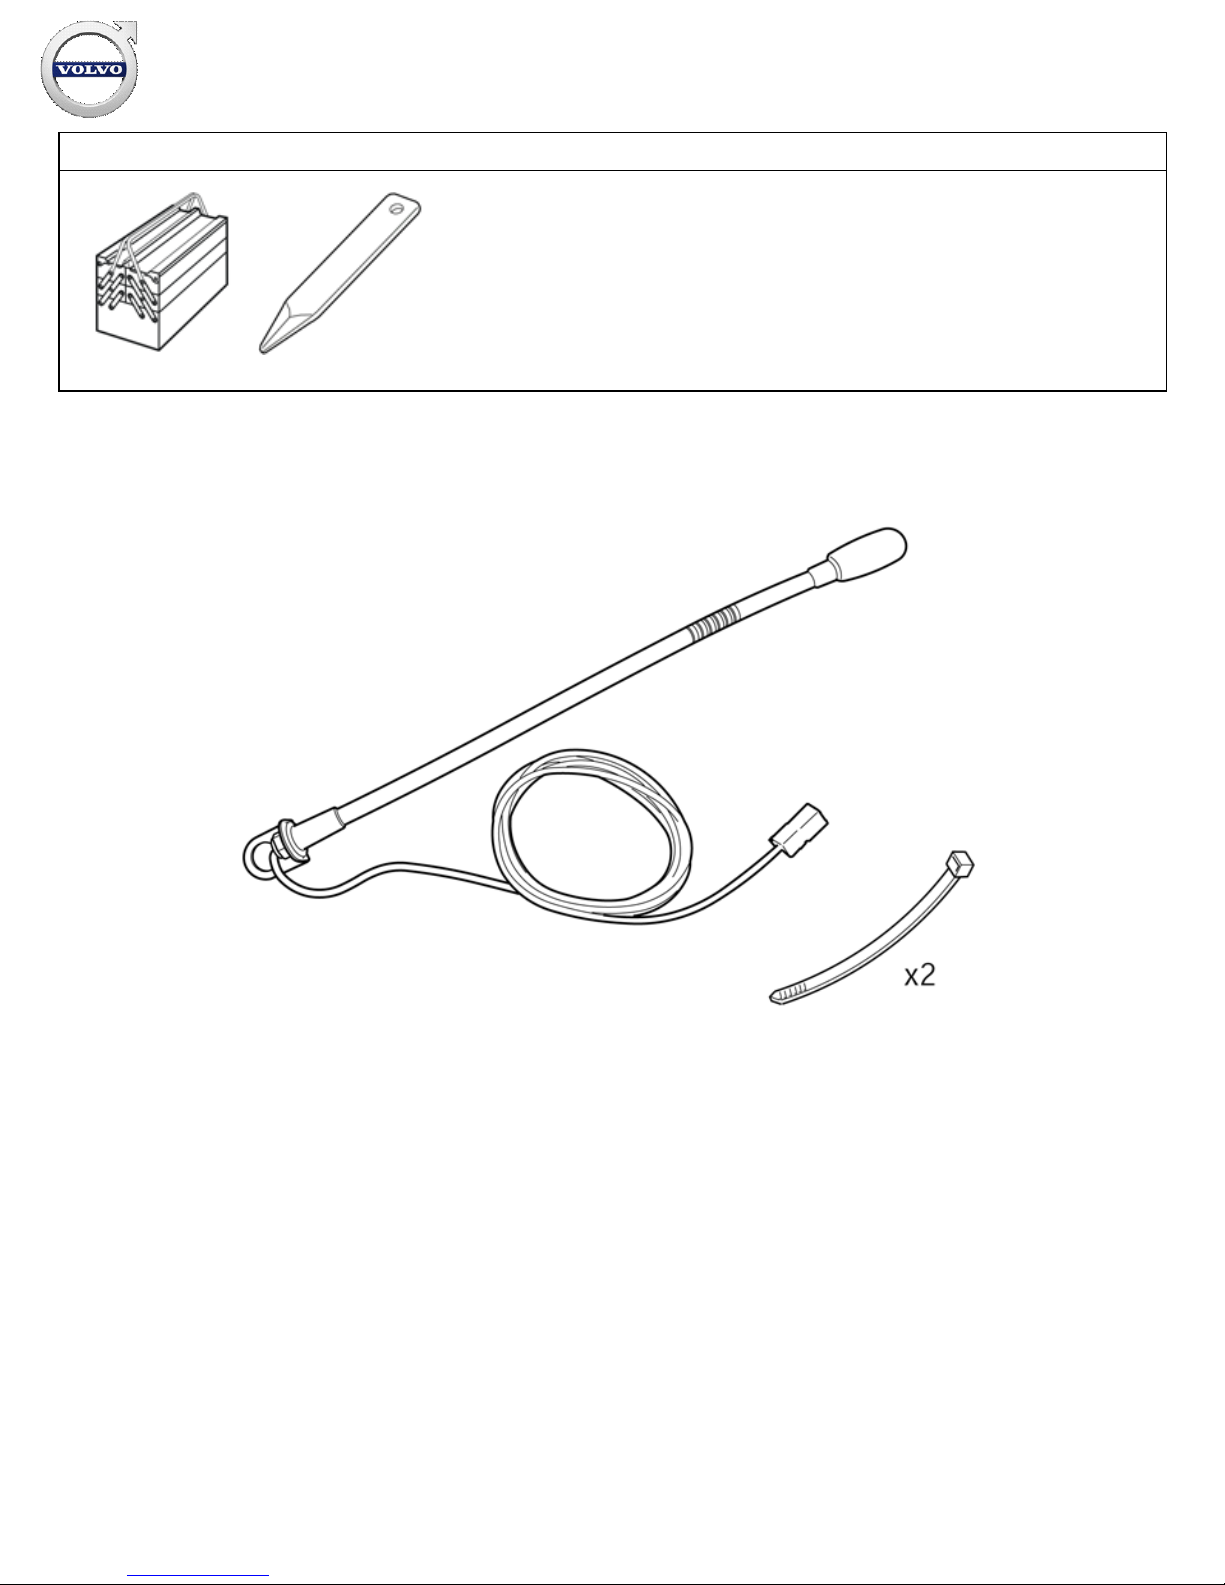
Equipment
A0000162
IMG-
239667
IMG-
256043
Installation instructions, accessories
Volvo Car Corporation Gothenburg, Sweden
©
Volvo Car Corporation
Handsfree, Microphone, swan neck- 31310747 - V1.4
Page 2 / 34

INTRODUCTION
Read through all of the instructions before starting installation.
Notifications and warning texts are for your safety and to
minimise the risk of something breaking during installation.
Ensure that all tools stated in the instructions are available
before starting installation.
Certain steps in the instructions are only presented in the form
of images. Explanatory text is also given for more complicated
steps.
In the event of any problems with the instructions or the
accessory, contact your local Volvo dealer.
Note!
These installation instructions show installation on a left-hand
drive vehicle. When installing a right-hand drive vehicle, the
procedures are reversed and/or carried out on the opposite
side. Where the operations differ, right-hand versions are
also shown.
Steps 1 -
16 apply to XC90
Steps 17-34 apply to S60, V70 and S80 (-06)
Steps 35-
46 apply to C30, S40, V50 and C70
Steps 47 – 60 apply to the S80 (07-)
Steps 61-80 apply to the S60 (11-)
and XC60
Applies to the XC90
Installation instructions, accessories
Volvo Car Corporation Gothenburg, Sweden
©
Volvo Car Corporation
Handsfree, Microphone, swan neck- 31310747 - V1.4
Page 3 / 34
1
R8504165
Applies to the XC90
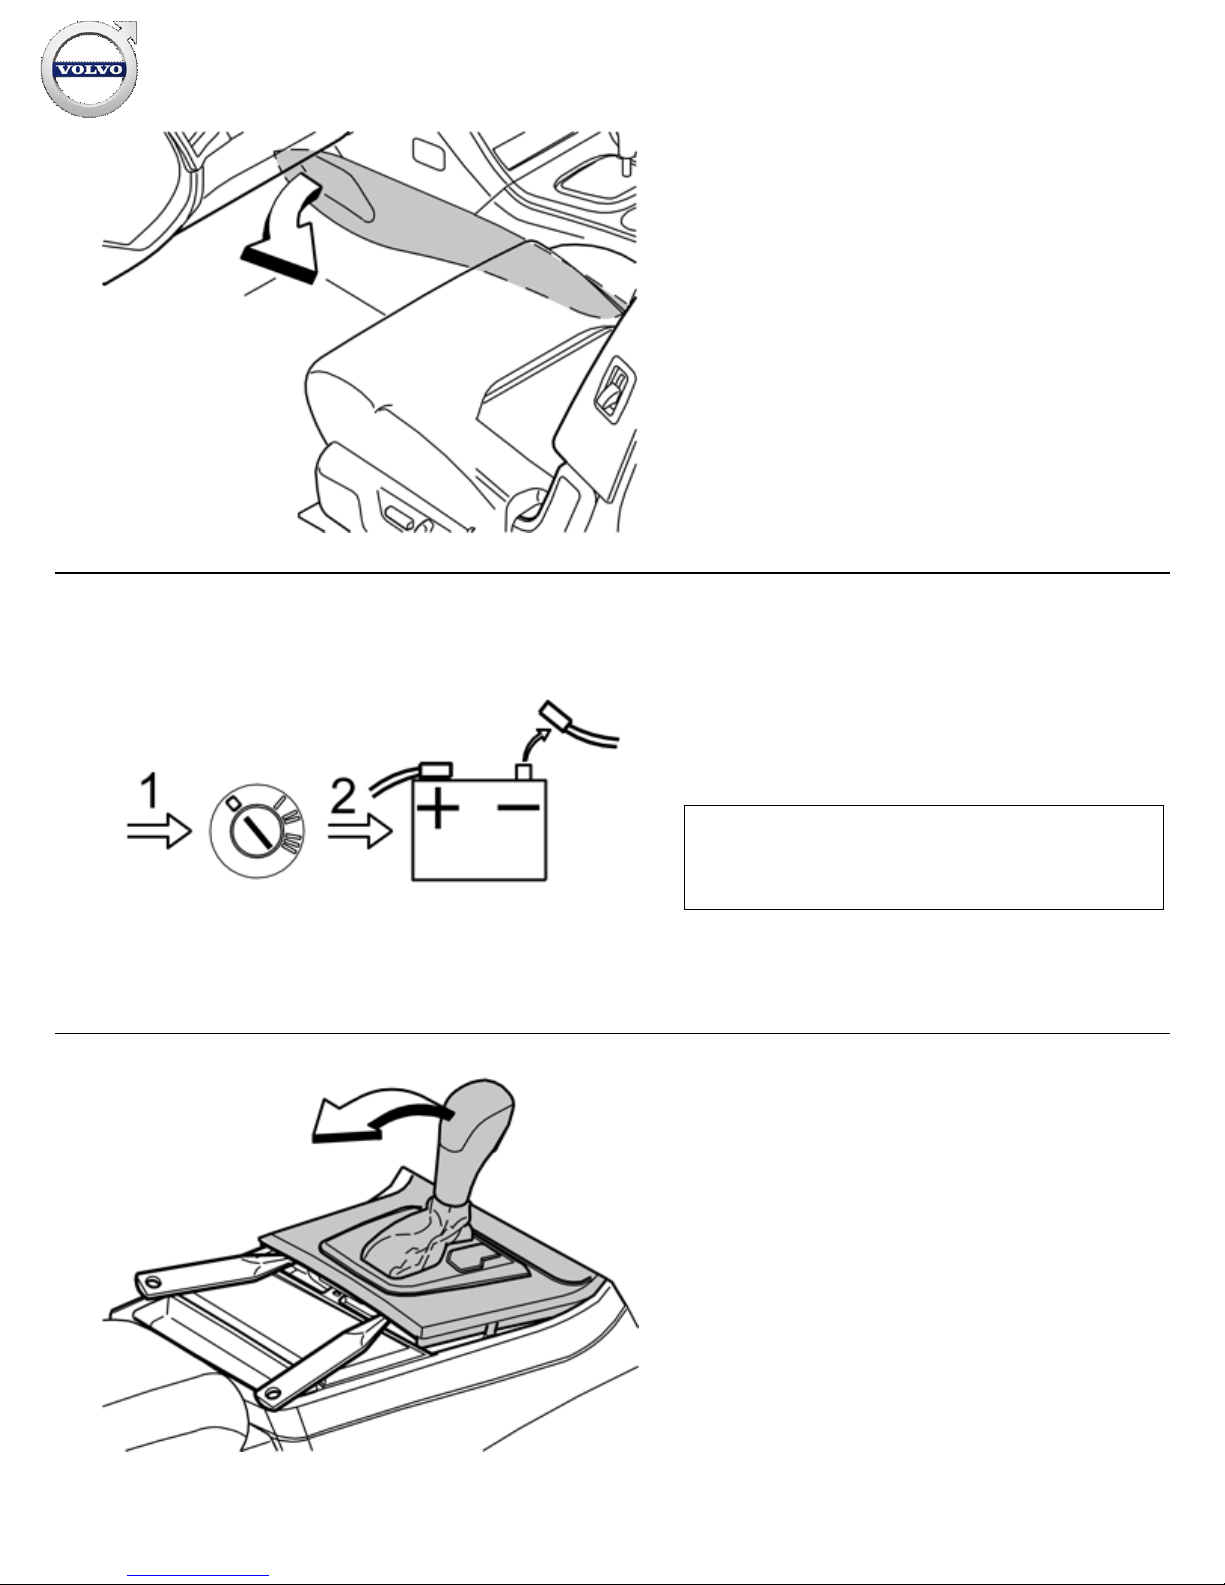
Remove the centre console's left side panel by first pulling it
away at the front edge and continuing backwards until all the
clips have released.
2
A8800136
Slide the driver's seat fully forwards and then fully upwards
from the rear edge.
Turn the ignition switch to position 0.
Disconnect the battery negative lead.
Note!
Wait at least three minutes before unplugging the connectors or
removing other electrical equipment.
3
R8504113
Turn the ignition key to position II.
Move the gear selector lever to its rearmost position.
Use a weatherstrip and pry off the gear selector panel at the
rear edge.
Installation instructions, accessories
Volvo Car Corporation Gothenburg, Sweden
©
Volvo Car Corporation
Handsfree, Microphone, swan neck- 31310747 - V1.4
Page 4 / 34
4
IMG-
239204
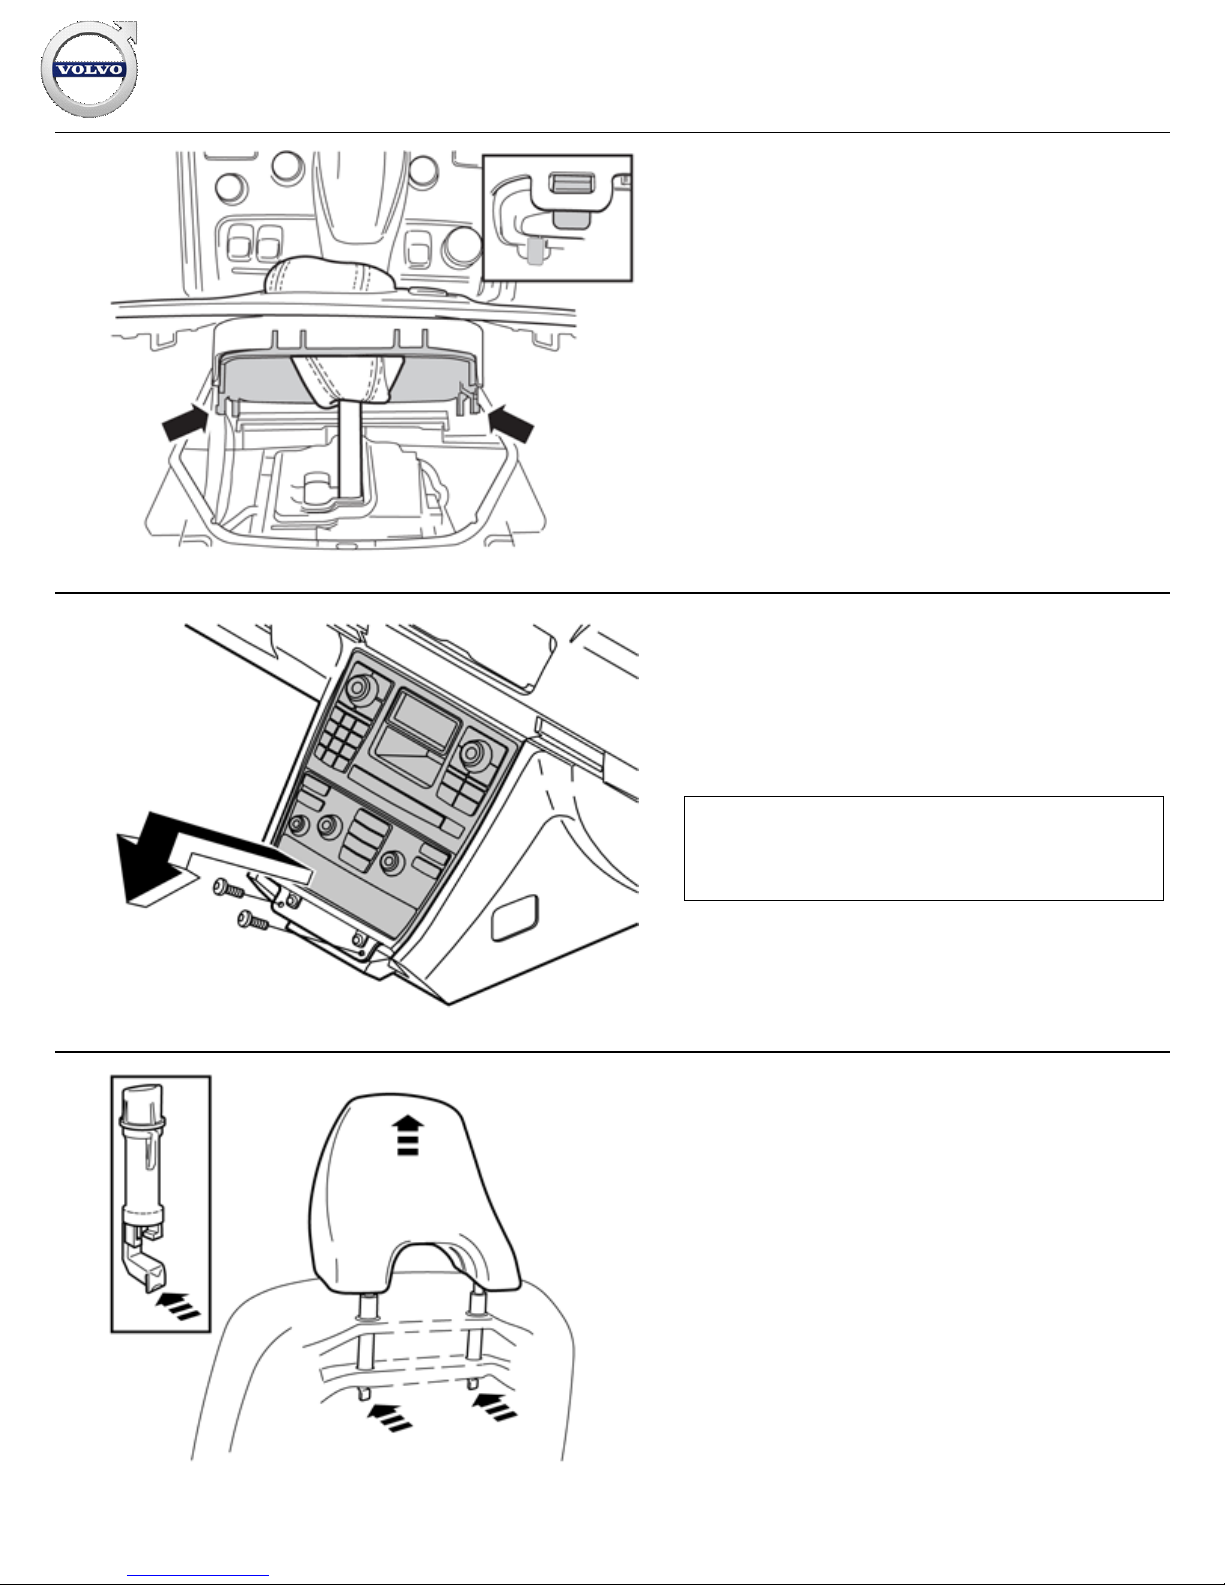
Press in the catches and remove the panel.
5
R8504051
Remove the two screws.
Remove the radio/AC unit from the center console. Pull from the
lower edge and then downwards until it releases from the
mounting at the upper edge.
Unplug the connectors.
Note!
Do not damage the removed components or the surrounding
panels.
6
IMG-
256044
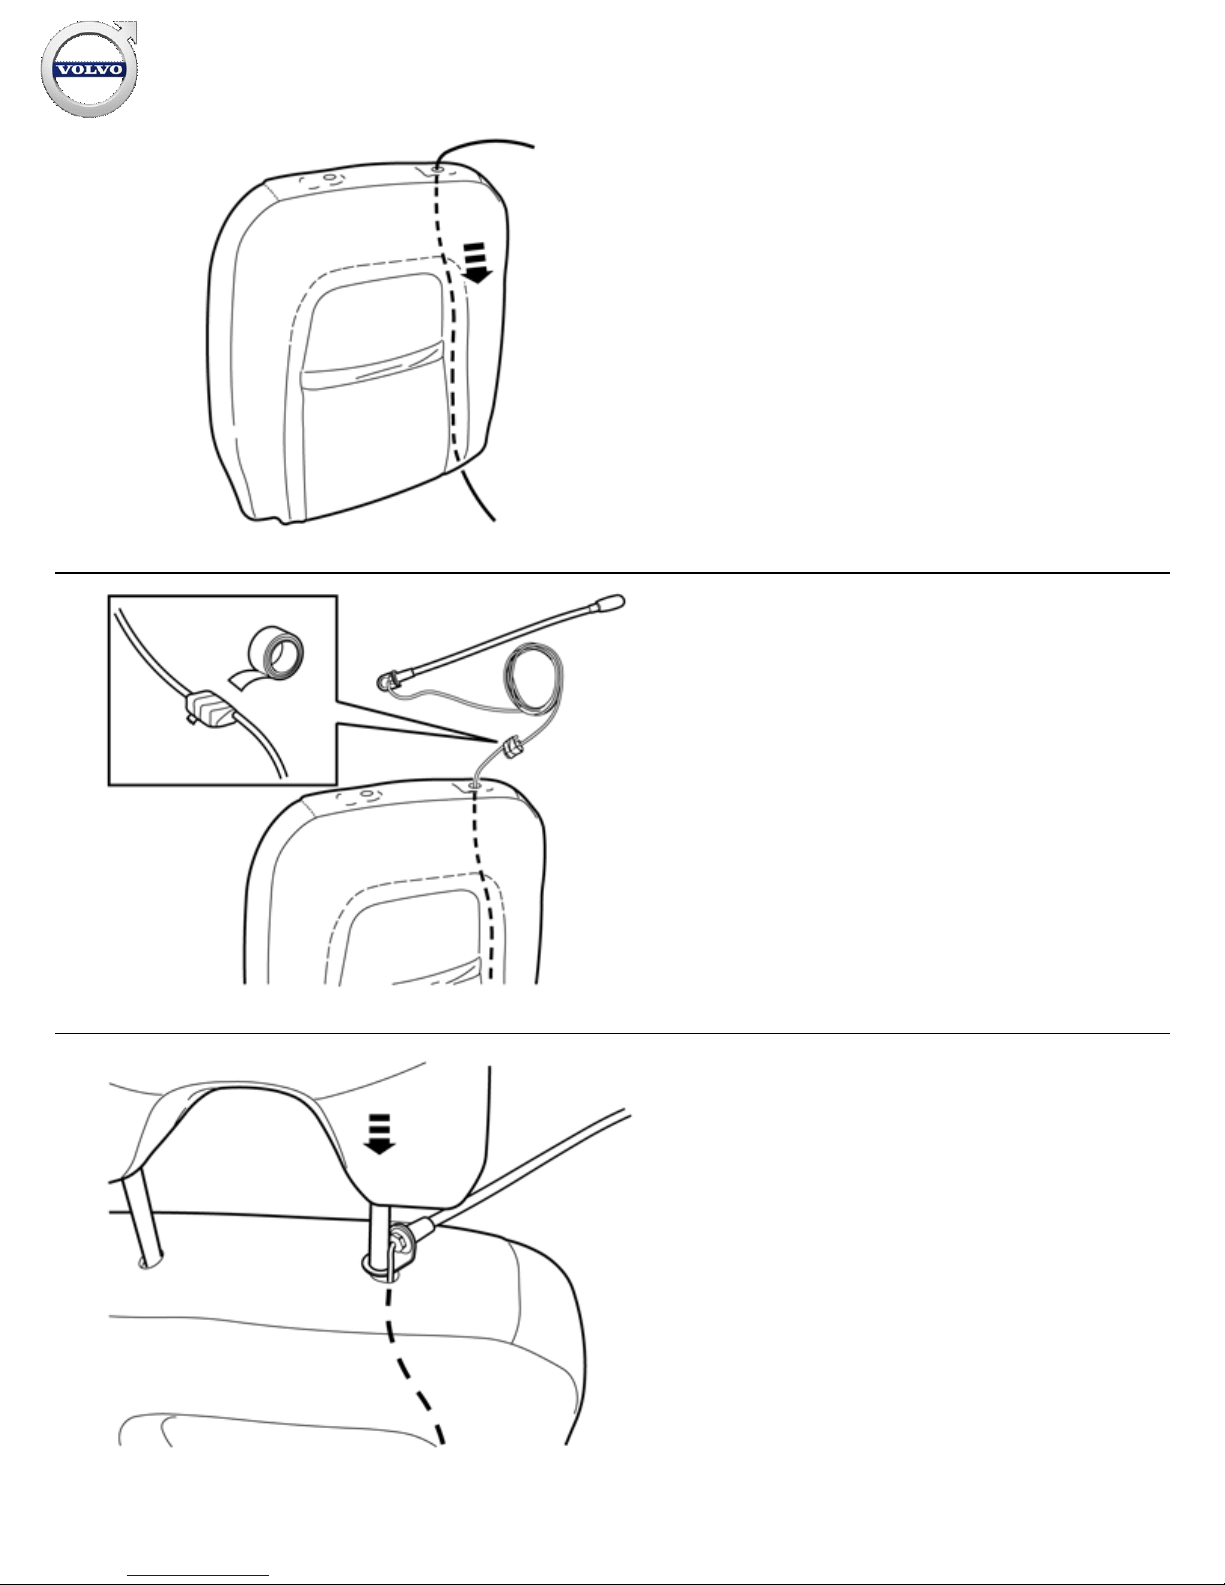
Find the headrest's two locks on the back of the driver's seat.
Press in the catches and pull the headrest upwards at the same
time.
Installation instructions, accessories
Volvo Car Corporation Gothenburg, Sweden
©
Volvo Car Corporation
Handsfree, Microphone, swan neck- 31310747 - V1.4
Page 5 / 34
7
IMG-
256045
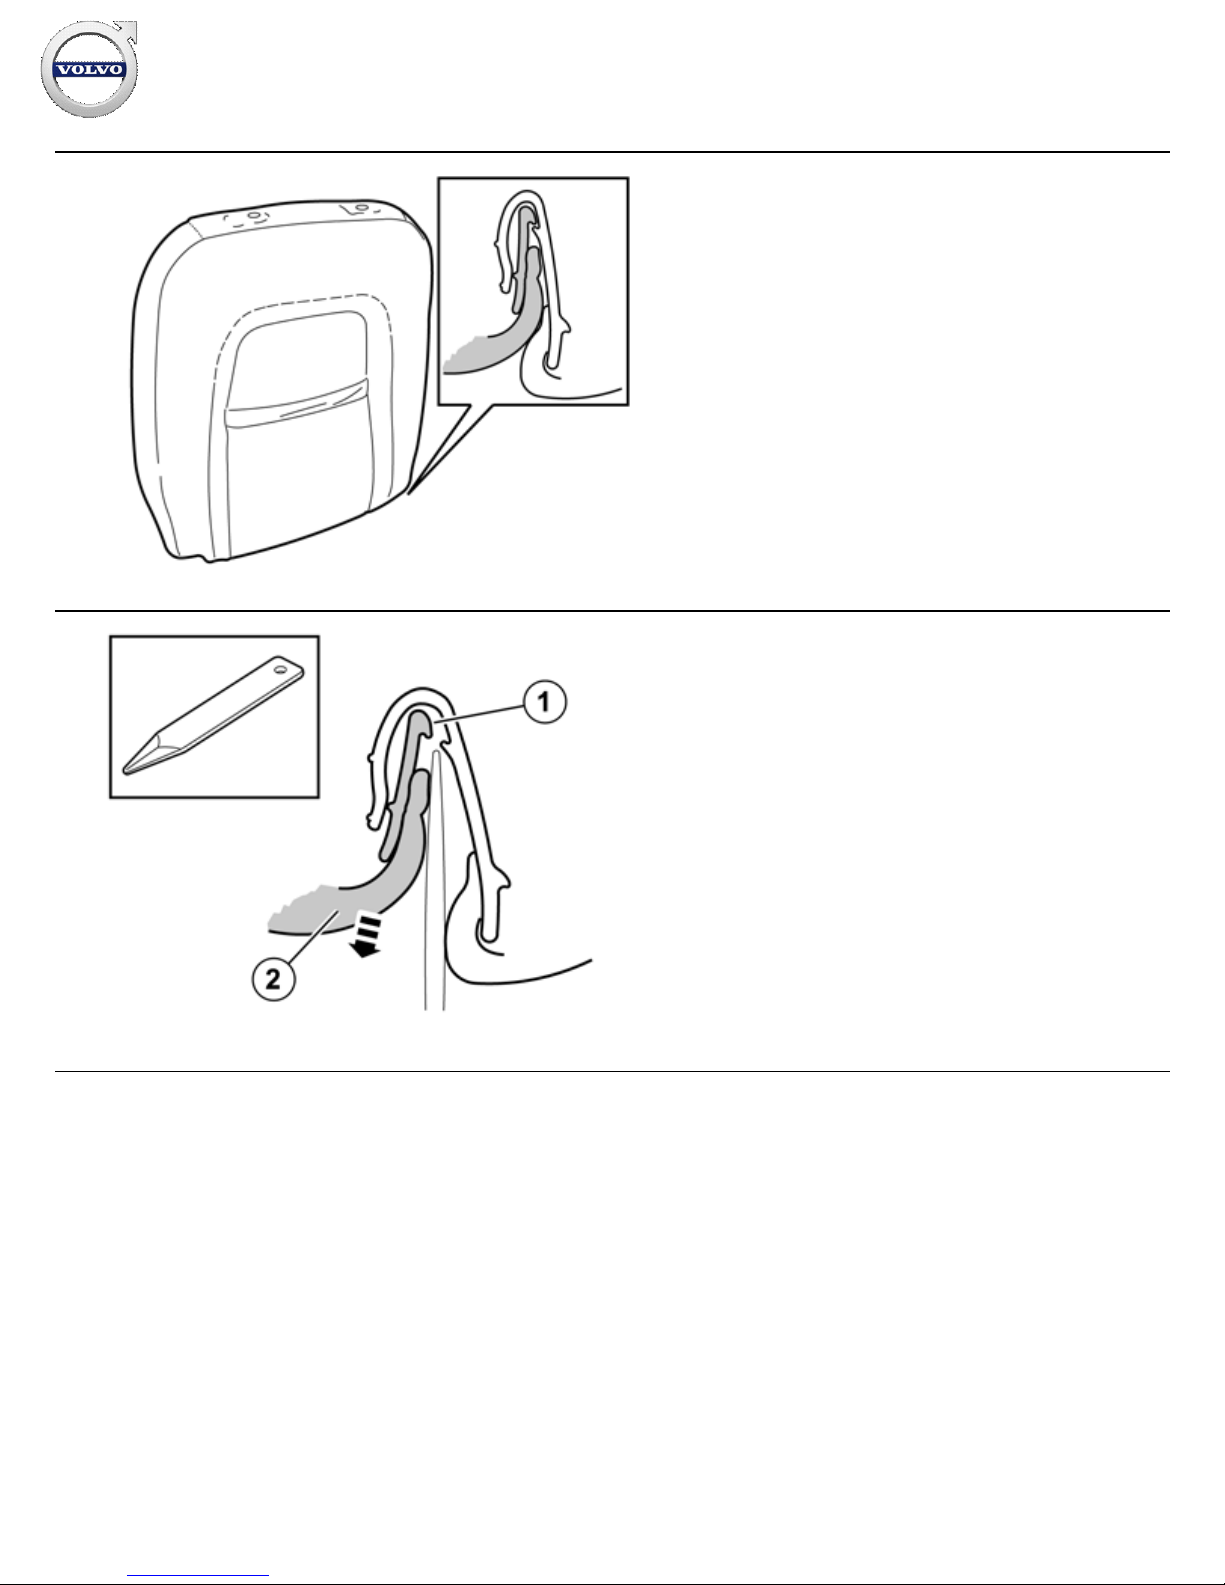
Find the grip strip (consists of two different strip profiles that are
hooked into each other) in the bottom edge on the upholstery.
8
IMG-
256046
Get a weatherstrip tool and pry apart the strips so that the catch
(1) releases.
Pull out the rear part of the upholstery with strip (2).
Installation instructions, accessories
Volvo Car Corporation Gothenburg, Sweden
©
Volvo Car Corporation
Handsfree, Microphone, swan neck- 31310747 - V1.4
Page 6 / 34
9
IMG-
256047
Insert a curtain wire or similar from above and down on the back
of the seat back, between the upholstery and padding.
10
IMG-
256048
Tape the connector from the microphone cable to the end of the
wire.
Pull through the cable.
Disconnect the cable from the wire.
11
IMG-
256049
Place the microphone's bracket over the hole on the backrest.
Point the microphone arm 45
º forward. Press down the headrest
so that it locks into place.
Check that the headrest has locked into place by pulling it
upwards.
Installation instructions, accessories
Volvo Car Corporation Gothenburg, Sweden
©
Volvo Car Corporation
Handsfree, Microphone, swan neck- 31310747 - V1.4
Page 7 / 34
12
IMG-
256050
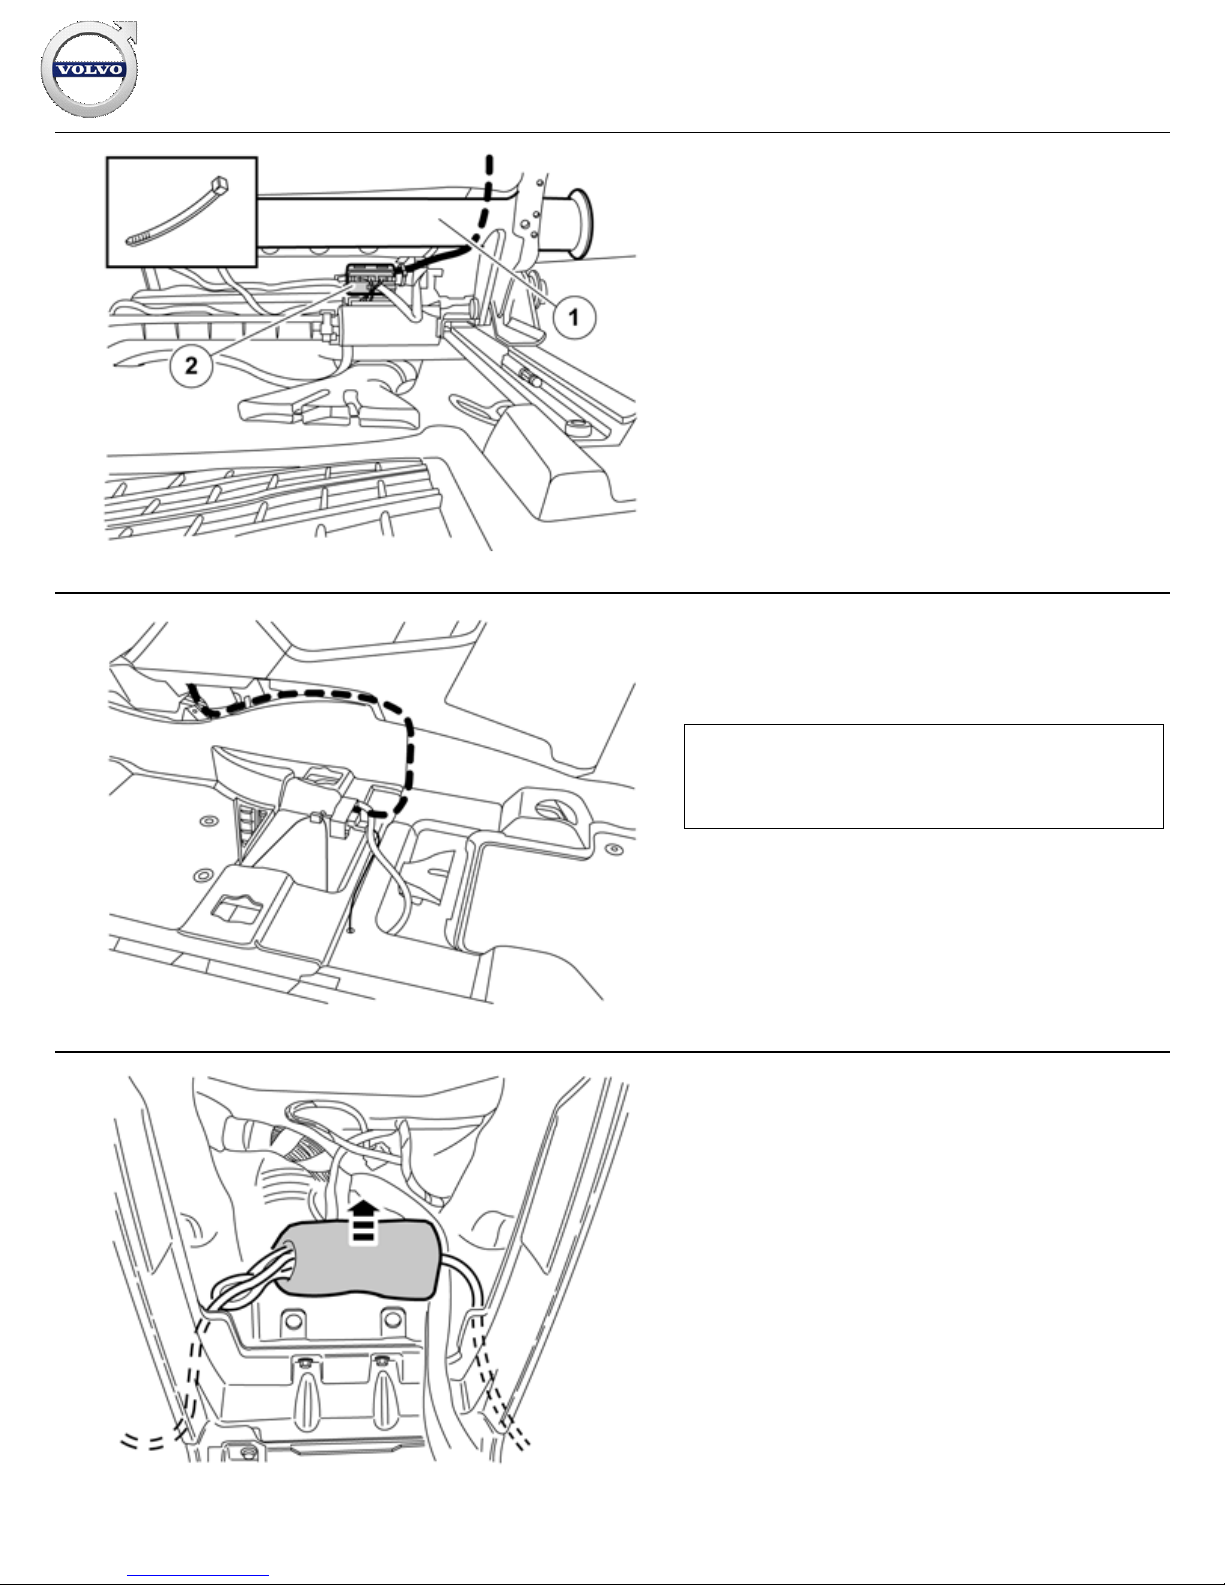
Route the cable in front of the tube (1).
Secure the cable with a cable tie to the large connector (2).
Reinstall the upholstery for the backrest.
13
IMG-
256051
Lay the cable in the carpet joint. Route the cable forward and up
in the centre console.
Note!
It is important that the cable has the right length so that the seat
can move back and forth freely.
14
IMG-
256052
Find the foam tape with connections for the Bluetooth system in
the bottom of the centre console's opening. Open the foam tape.
Installation instructions, accessories
Volvo Car Corporation Gothenburg, Sweden
©
Volvo Car Corporation
Handsfree, Microphone, swan neck- 31310747 - V1.4
Page 8 / 34

15
IMG-
256053
Loosen existing connection to the microphone.
Connect the new microphone cable and reinstall the foam tape.
Note!
Also secure the extra length of the microphone cable with the
foam tape.
16
IMG-
242267
Connect the connectors to the radio/AC unit.
Reinstall the radio/AC unit by first hooking it on at the upper edge.
Then press it upwards and angle in the lower part. At the same
time, check that the cable to the control panel for Bluetooth ends
up in the right position.
If the radio/A/C unit does not fit at the rear edge, check that no
cables have been trapped.
Reinstall the screws.
Reinstall the side panel.
Turn the ignition key to position II.
Reconnect the battery negative lead
Applies to S60, V70 and S80 (-06)
Installation instructions, accessories
Volvo Car Corporation Gothenburg, Sweden
©
Volvo Car Corporation
Handsfree, Microphone, swan neck- 31310747 - V1.4
Page 9 / 34

17
IMG-
245980
Applies to S60, V70 and S80 (-06)
Turn the ignition switch to position 0.
Note!
Wait at least three minutes before unplugging the connectors or
removing other electrical equipment.
18
IMG-
240984
Turn the clip (1) a quarter turn anti-clockwise.
Pull the panel out by the rear edge (2).
Then pull the panel backwards until the hooks release (3).
Remove the panel.
Repeat the operation on the other side.
19
IMG-
240985
Remove the screws and sound proofing bracket.
Installation instructions, accessories
Volvo Car Corporation Gothenburg, Sweden
©
Volvo Car Corporation
Handsfree, Microphone, swan neck- 31310747 - V1.4
Page 10 / 34
20
IMG-
242280
Applies to the S60 and V70
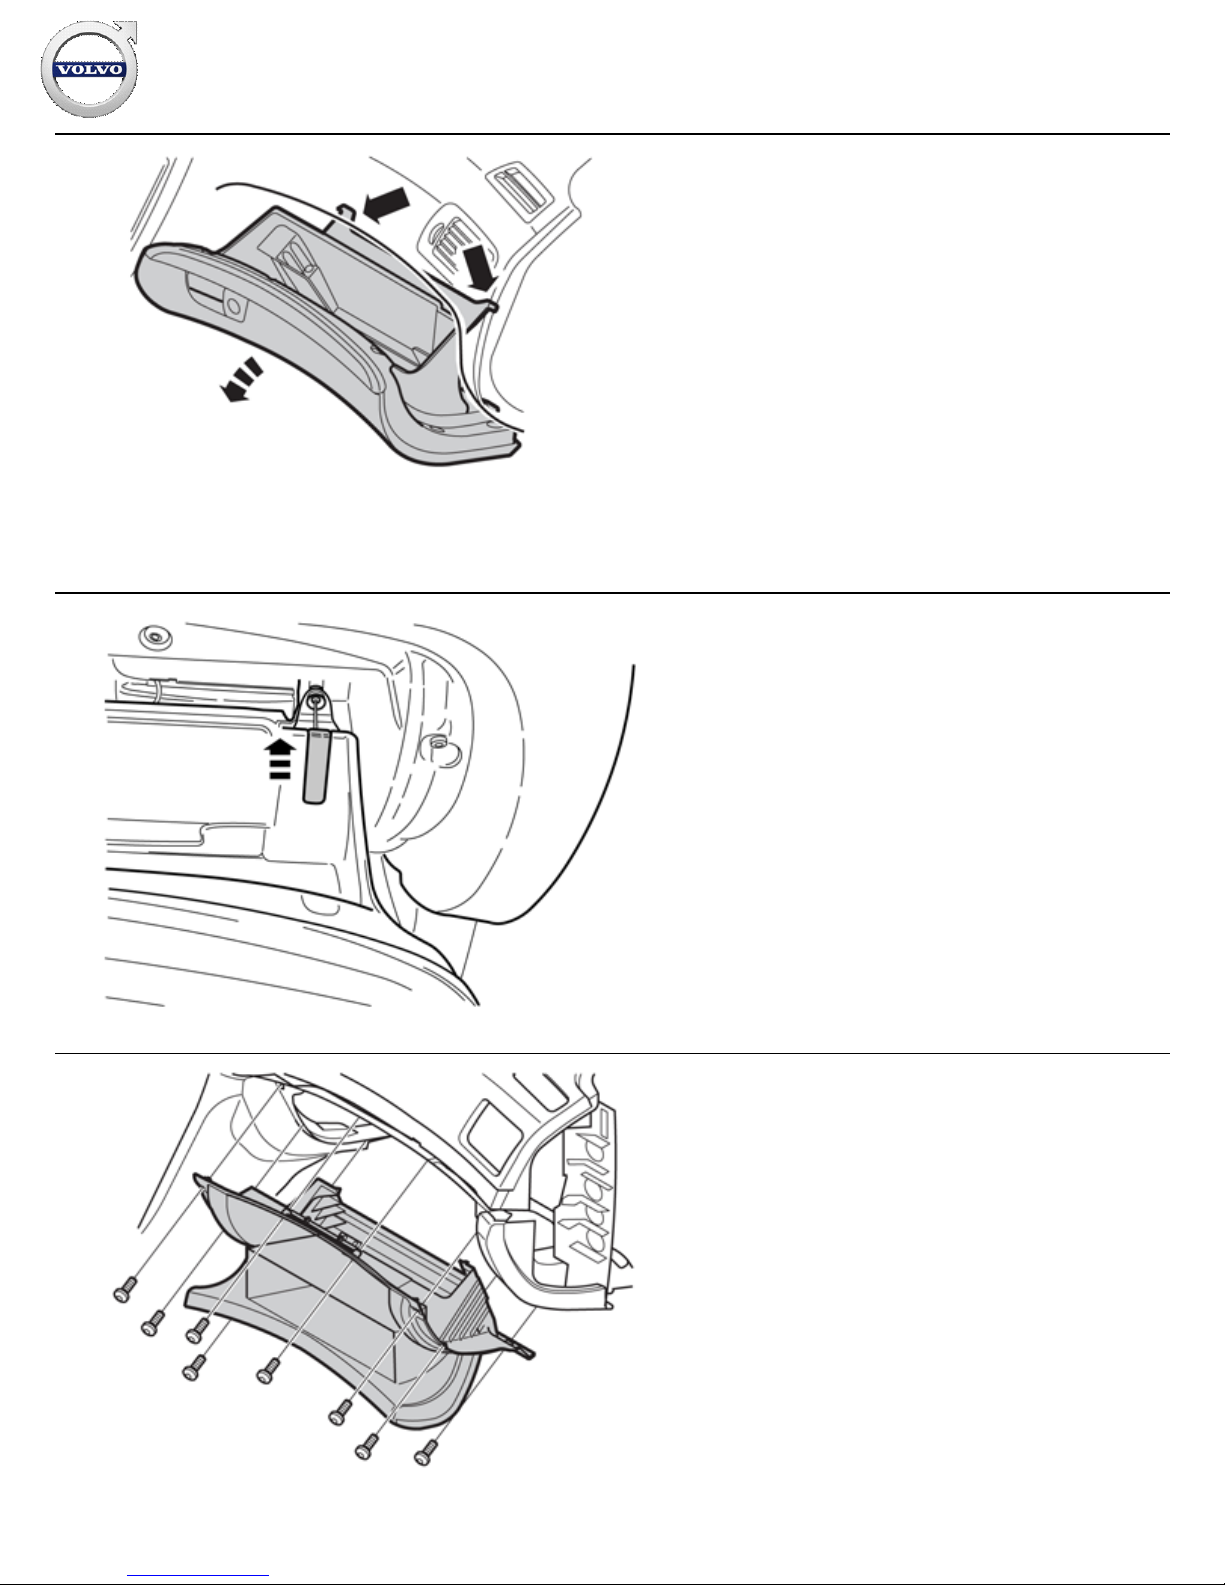
Open the glovebox.
Lift the two catches past the lugs.
21
IMG-
242281
Applies to the S60 and V70
Unhook the damping.
22
IMG-
242282
Applies to the S60 and V70
Remove:
the eight screws
the connector for the glove box lighting
the connector for the legroom lighting
the glove box.
Installation instructions, accessories
Volvo Car Corporation Gothenburg, Sweden
©
Volvo Car Corporation
Handsfree, Microphone, swan neck- 31310747 - V1.4
Page 11 / 34
 Loading...