

Volvo 30756181, 30756569 Installation Instructions Manual

Instruction No
Version
Part. No.
30756561
1.1
30756181, 30756569
TV receiver, digital
Instruction No
Version
Part. No.
30756561
1.1
30756181, 30756569
TV receiver, digital
Installation instructions, accessories
Volvo Car Corporation Gothenburg, Sweden
©
Volvo Car Corporation
TV receiver, digital- 30756561 - V1.1
Page 1 / 29
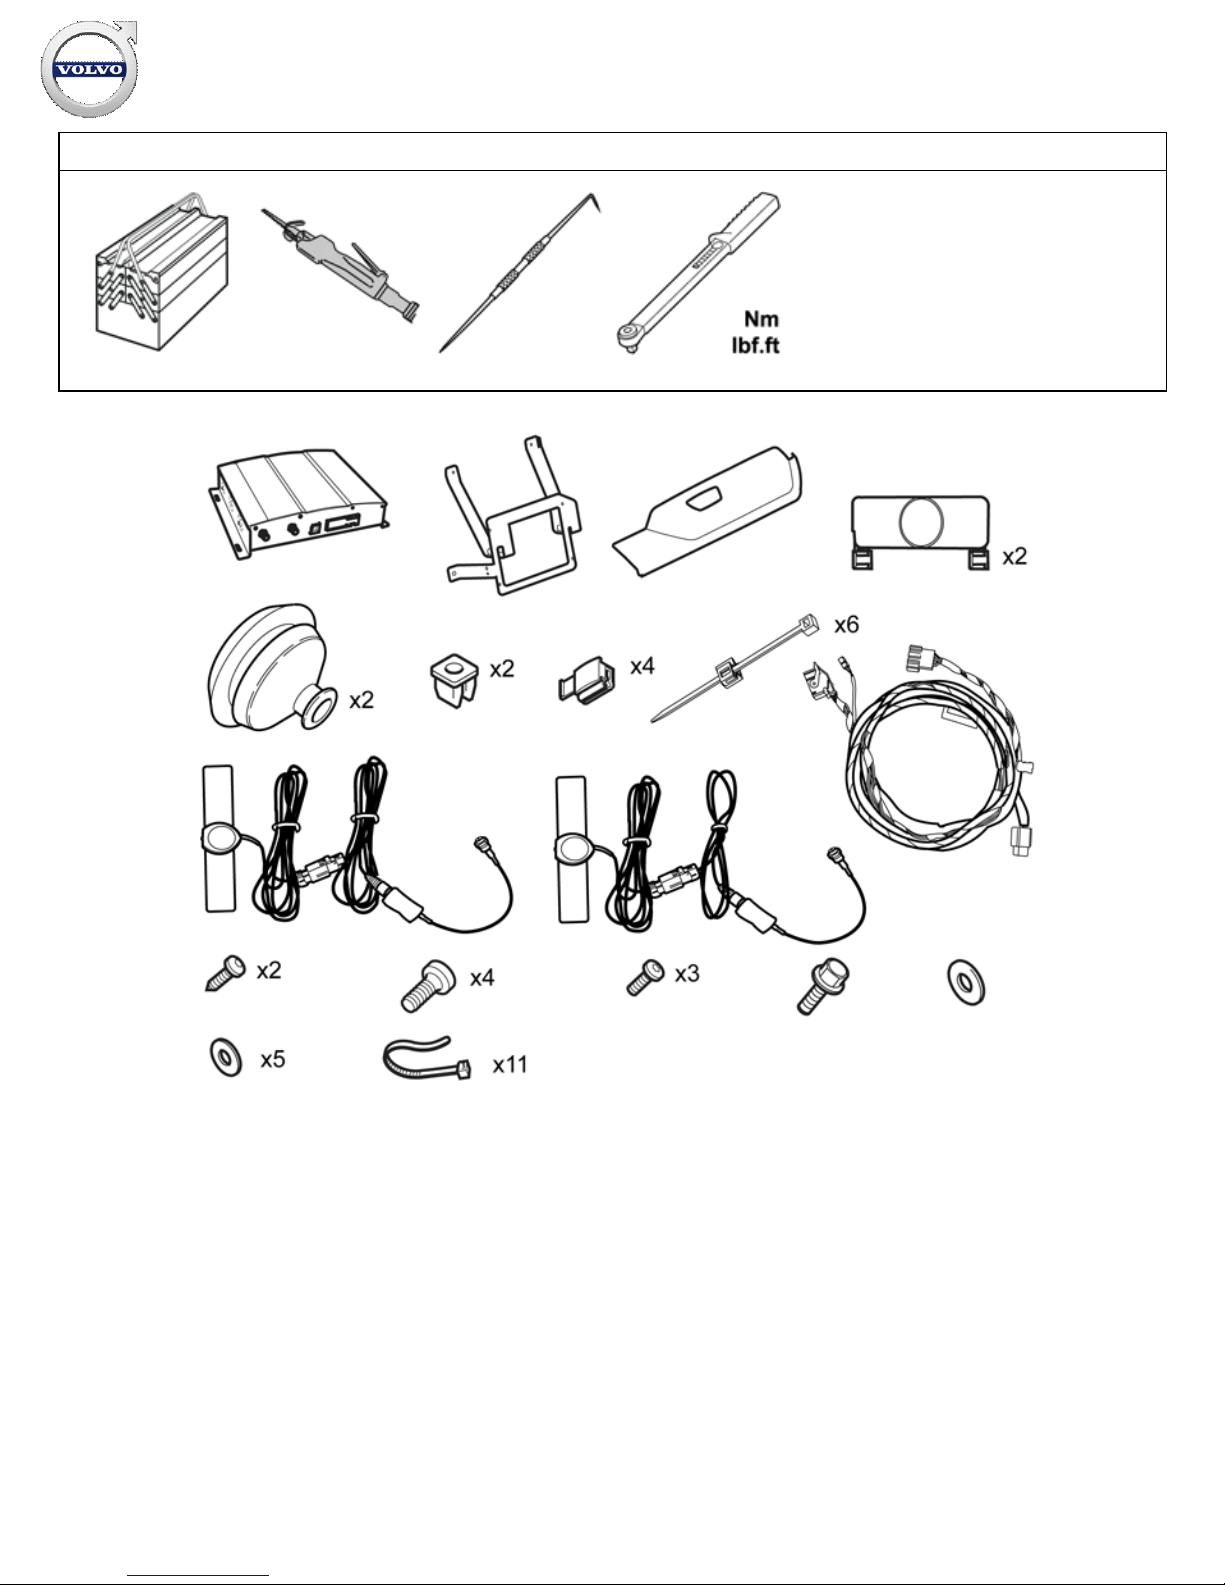
Equipment
A0000162
A0000165
IMG-
239981
IMG-
239664
IMG-
317204
Installation instructions, accessories
Volvo Car Corporation Gothenburg, Sweden
©
Volvo Car Corporation
TV receiver, digital- 30756561 - V1.1
Page 2 / 29
IMG-
213320
Installation instructions, accessories
Volvo Car Corporation Gothenburg, Sweden
©
Volvo Car Corporation
TV receiver, digital- 30756561 - V1.1
Page 3 / 29
INTRODUCTION
Read through all of the instructions before starting installation.
Notifications and warning texts are for your safety and to
minimise the risk of something breaking during installation.
Ensure that all tools stated in the instructions are available
before starting installation.
Certain steps in the instructions are only presented in the form
of images. Explanatory text is also given for more complicated
steps.
In the event of any problems with the instructions or the
accessory, contact your local Volvo dealer.
Note!
When installing Digital TV
-receiver on car with existing RSEsystem, start by changing the cable harness for the tunnel
console. See installation instructions Multimedia monitor with
DVD, Dual screen.
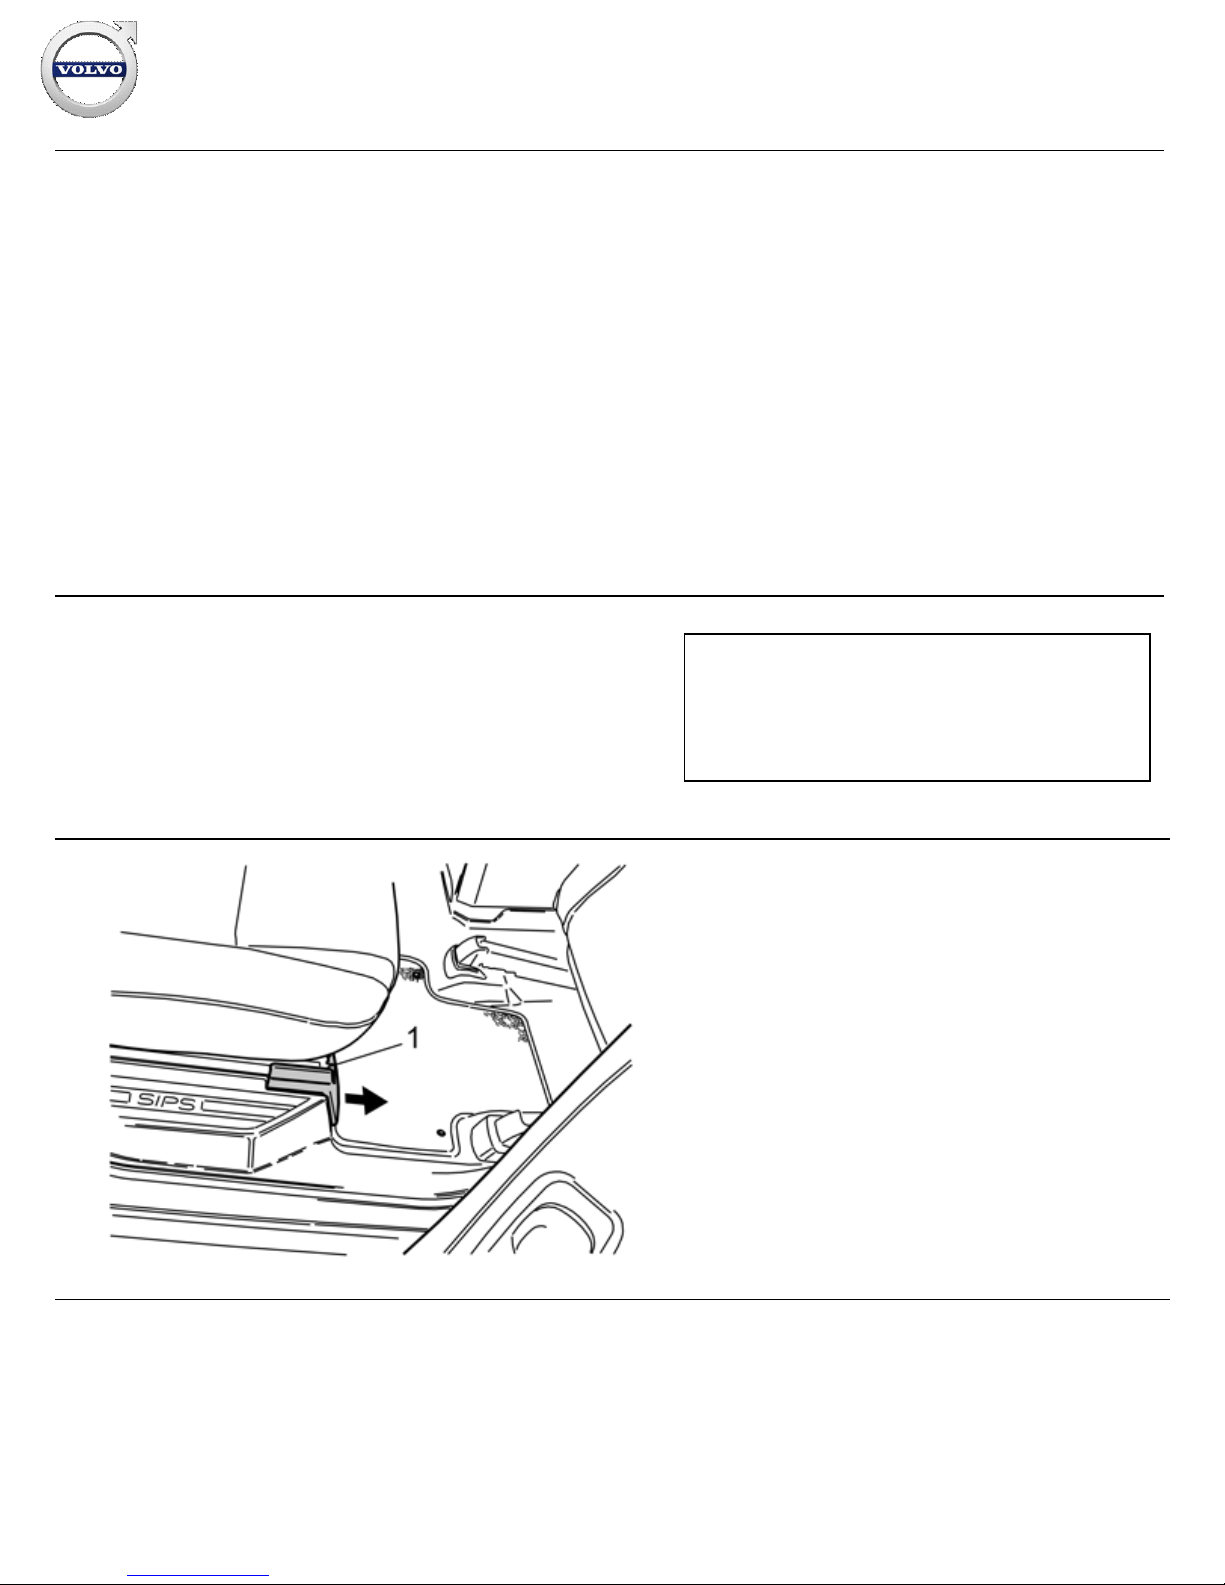
1
R8504171
Remove the right front seat mounting's panel of the second
row's right seat by pressing down the pawl (1) on top and
pulling it forward. Remove the screw underneath.
Installation instructions, accessories
Volvo Car Corporation Gothenburg, Sweden
©
Volvo Car Corporation
TV receiver, digital- 30756561 - V1.1
Page 4 / 29
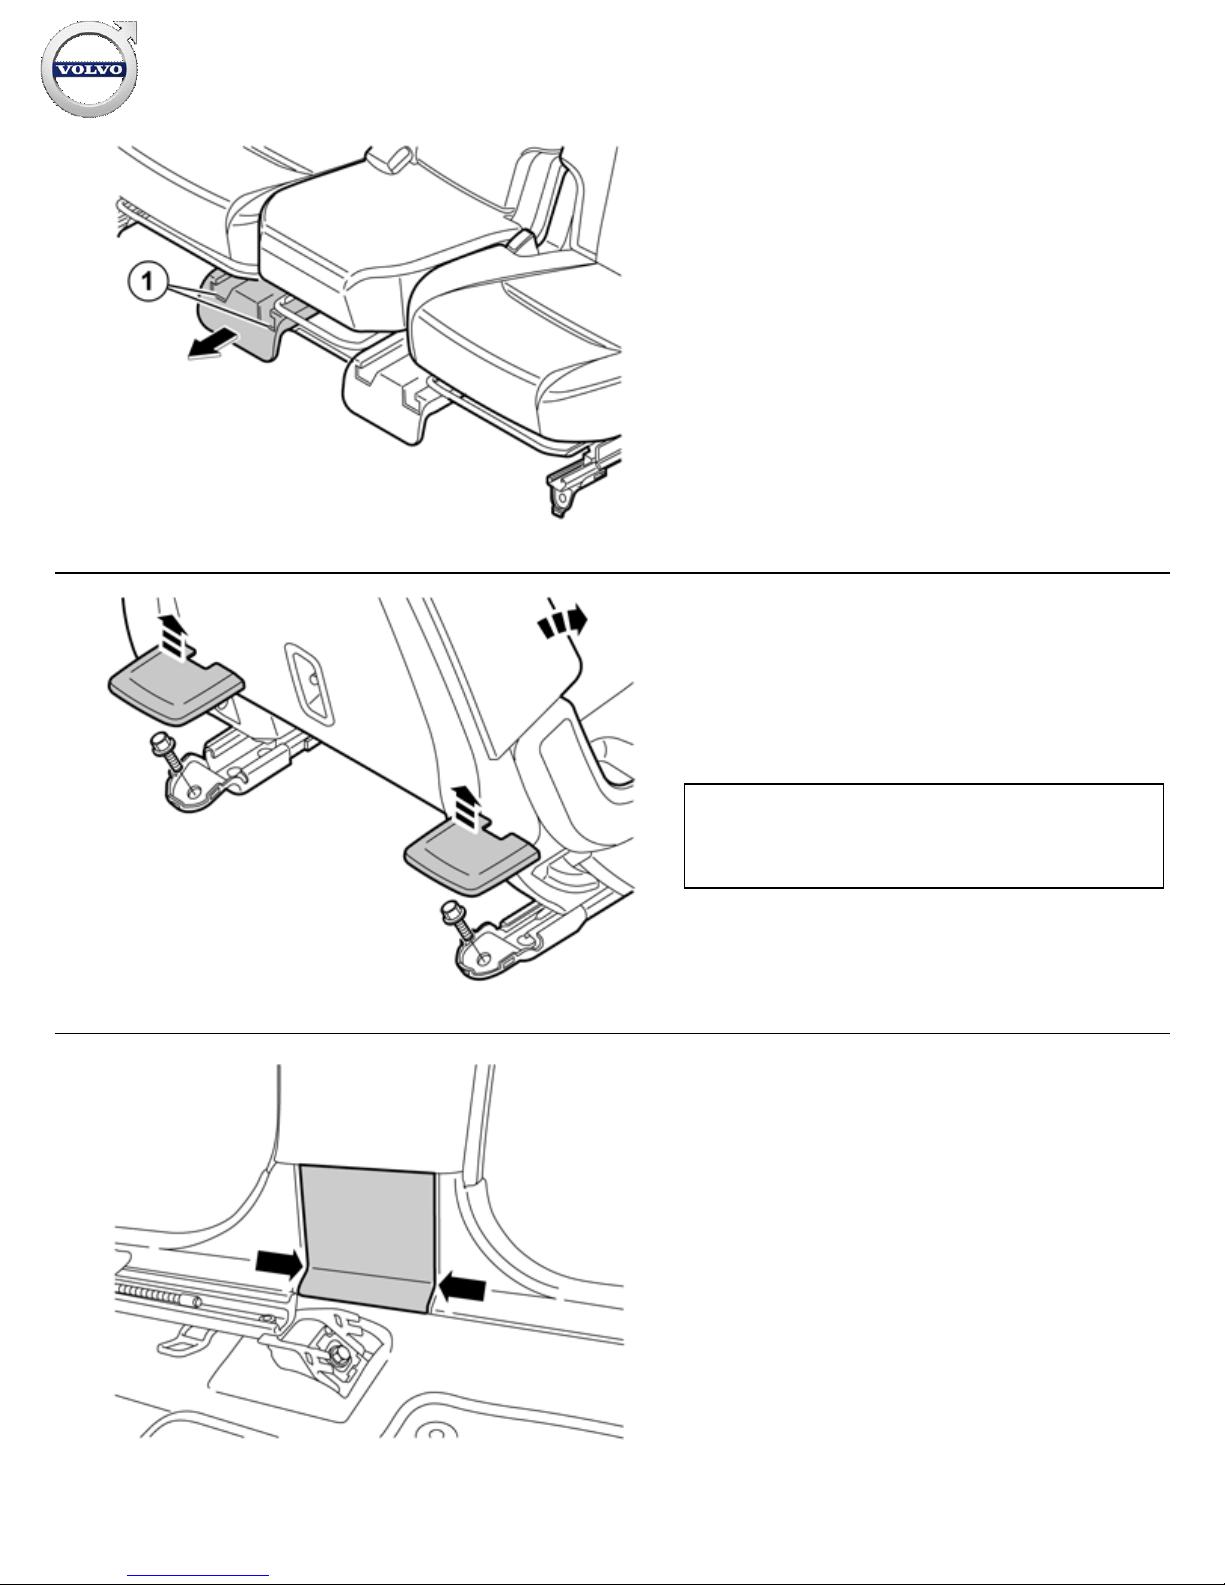
2
IMG-
318763
Remove the panel for the front seat mountings of the second
row's right seat/centre seat by pressing down the pawls (1) on
top and pulling the panel forward. Remove the screw for the
right seat.
3
IMG-
242247
Fold down the backrest.
Remove the seat links and bolts.
Lift out the seat.
Note!
This step should be performed carefully to avoid damaging
interior or door panel.
4
IMG-
317225
Carefully pry loose and remove the panel located over the joint
between the door sills on the right side.
Installation instructions, accessories
Volvo Car Corporation Gothenburg, Sweden
©
Volvo Car Corporation
TV receiver, digital- 30756561 - V1.1
Page 5 / 29

5
IMG-
317226
Loosen the upper part of the sill moulding at the rear edge and
loosen the seat belt from the end-fitting. The belt is loosened by
carefully pressing with a weatherstrip tool on the lock lug so that
it releases from the end-fitting.
6
IMG-
317227
Pull the sill protection upward until the three clips release. Angle
out the sill protection from the B-
pillar panel.
7
IMG-
242244
Insert a screwdriver through the hole (1) on the right seat's left
rear seat link and press in the pawl. Move the link backwards by
prying with a screwdriver between the seat rail and the link.
Installation instructions, accessories
Volvo Car Corporation Gothenburg, Sweden
©
Volvo Car Corporation
TV receiver, digital- 30756561 - V1.1
Page 6 / 29
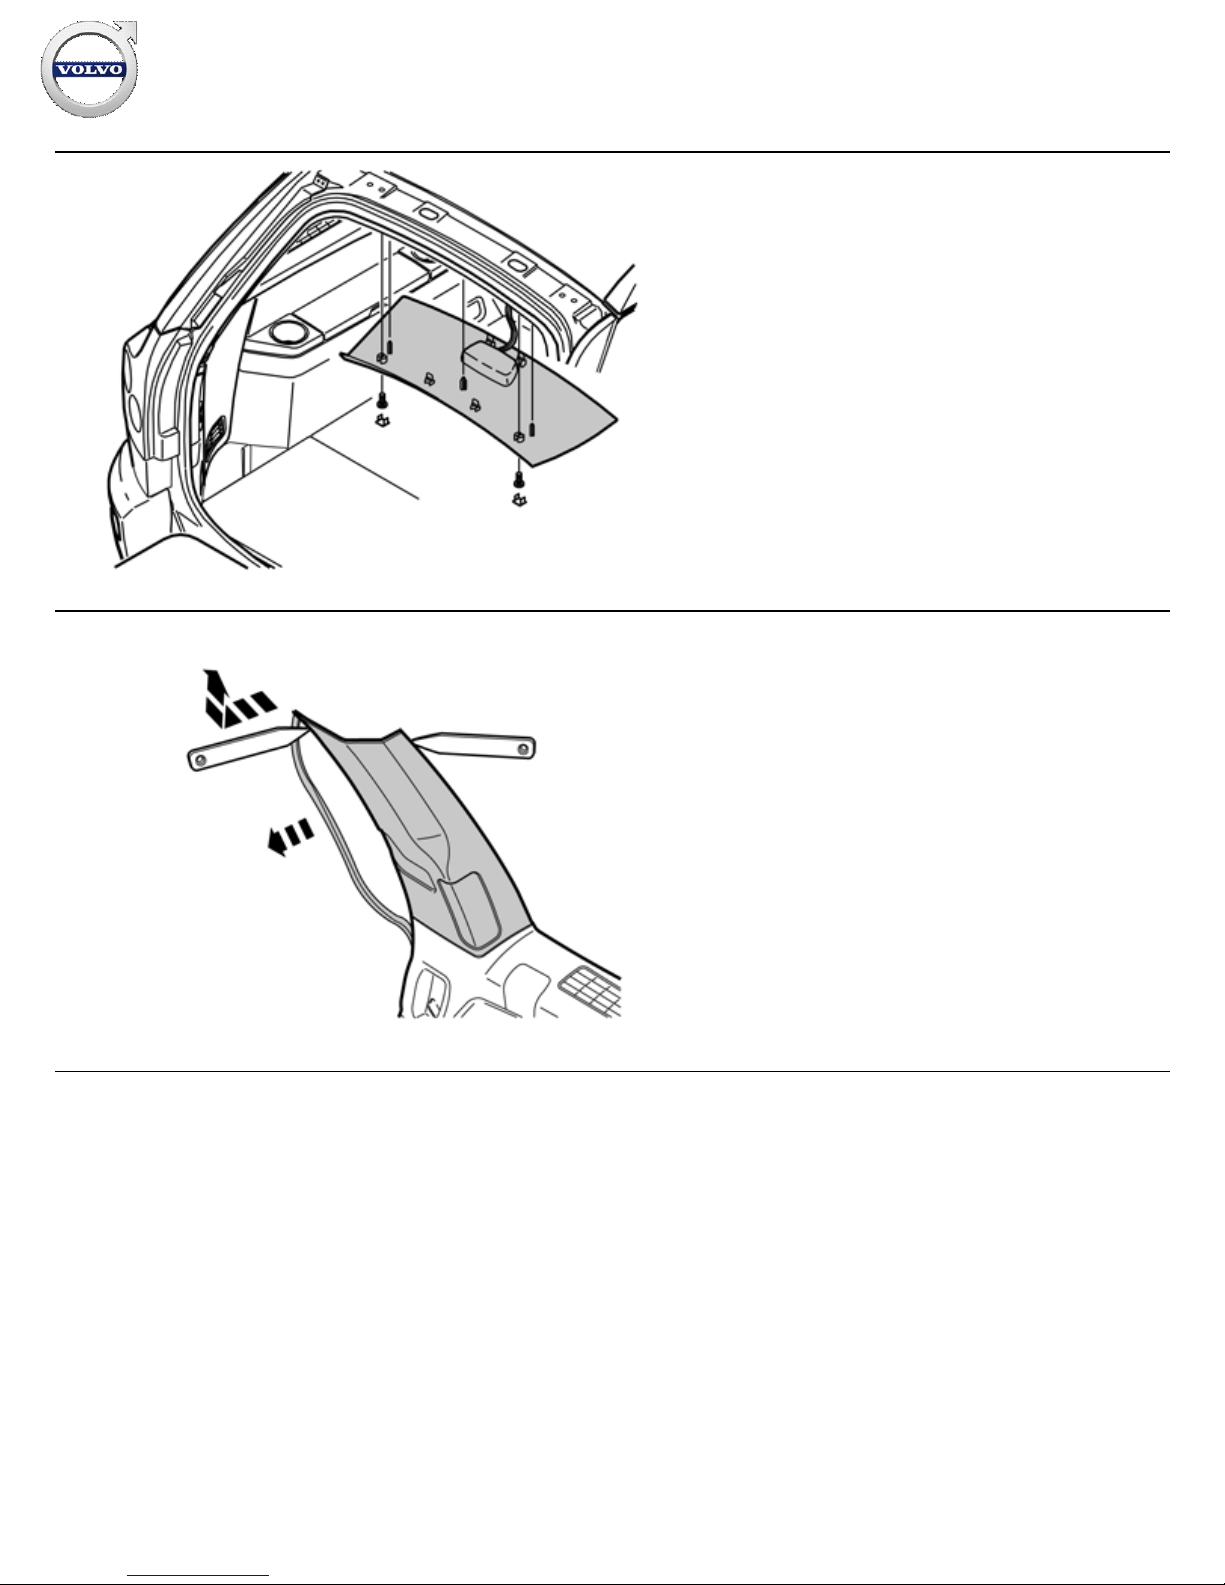
8
R8504201
Remove the rear roof panel covers and the screws beneath
them.
Carefully pry away the panel at the rear edge with a plastic
weatherstrip tool.
Pull the rear edge of the panel downwards until the four clips on
the top have released.
Unplug the connector for the lighting.
Pull the panel backwards to release it.
9
IMG-
317228
Pull loose the rubber strip at the trailing edge of the left door
opening, directly opposite the C-pillar panel.
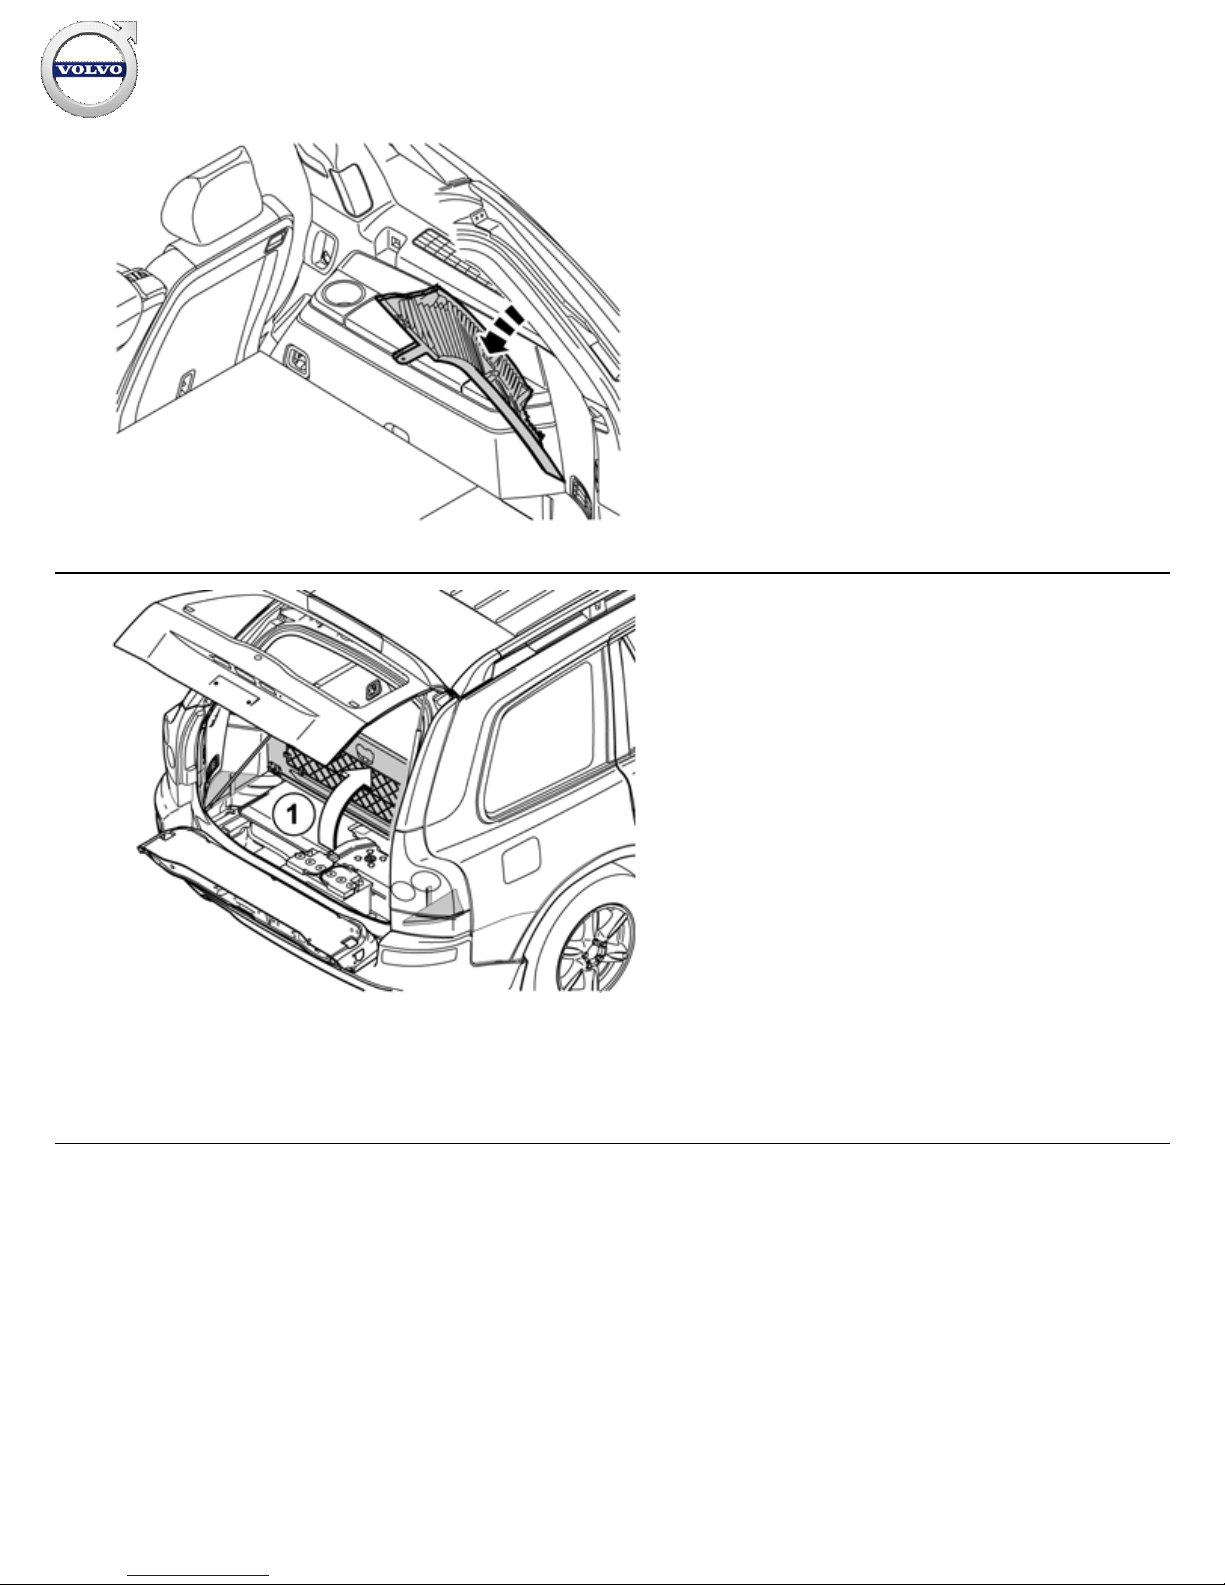
Carefully pry off the left C-post panel by the sides at the top with
a plastic weatherstrip tool. Then pull until the three clips on the
inside release. Do not damage the headlining or the panel.
If a headphone socket is mounted, disconnect the connector to
such.
Remove the panel by pulling upwards slightly and unhooking it
from the side panel.
Installation instructions, accessories
Volvo Car Corporation Gothenburg, Sweden
©
Volvo Car Corporation
TV receiver, digital- 30756561 - V1.1
Page 7 / 29
10
IMG-
317304
Carefully loosen the pillar panel. Start at the top and continue
downwards until the three clips on the inside have released.
Remove the connector on the D
-pillar panel. Cars with D-
pillar
speakers have the connector located on the speaker.
Remove the panel by pulling upwards slightly and unhooking it
from the side panel.
11
IMG-
242240
Applies to cars with two rows of seats
Open up the floor hatch (1). If the floor hatch is equipped with a
grocery bag holder on the underside, then it is fastened with a
strap on both sides of the storage box. Then these shall be
loosened by first removing the storage box under the floor hatch
and then removing the floor hatch by almost closing it and pulling
it backwards out of its attachments.
Applies to cars with three rows of seats and integrated carrier
bag holder on the underside of the floor hatch.
Fold up the floor hatch (1).
Loosen the two straps on the underlying panel. Lift up the trailing
edge of the panel, fold the floor hatch back towards the panel
and lift out the floor hatch and panel.
Applies to cars with three rows of seats without an integrated
carrier bag holder.
Open the floor hatch (1) at the trailing edge and lift it out.
Installation instructions, accessories
Volvo Car Corporation Gothenburg, Sweden
©
Volvo Car Corporation
TV receiver, digital- 30756561 - V1.1
Page 8 / 29
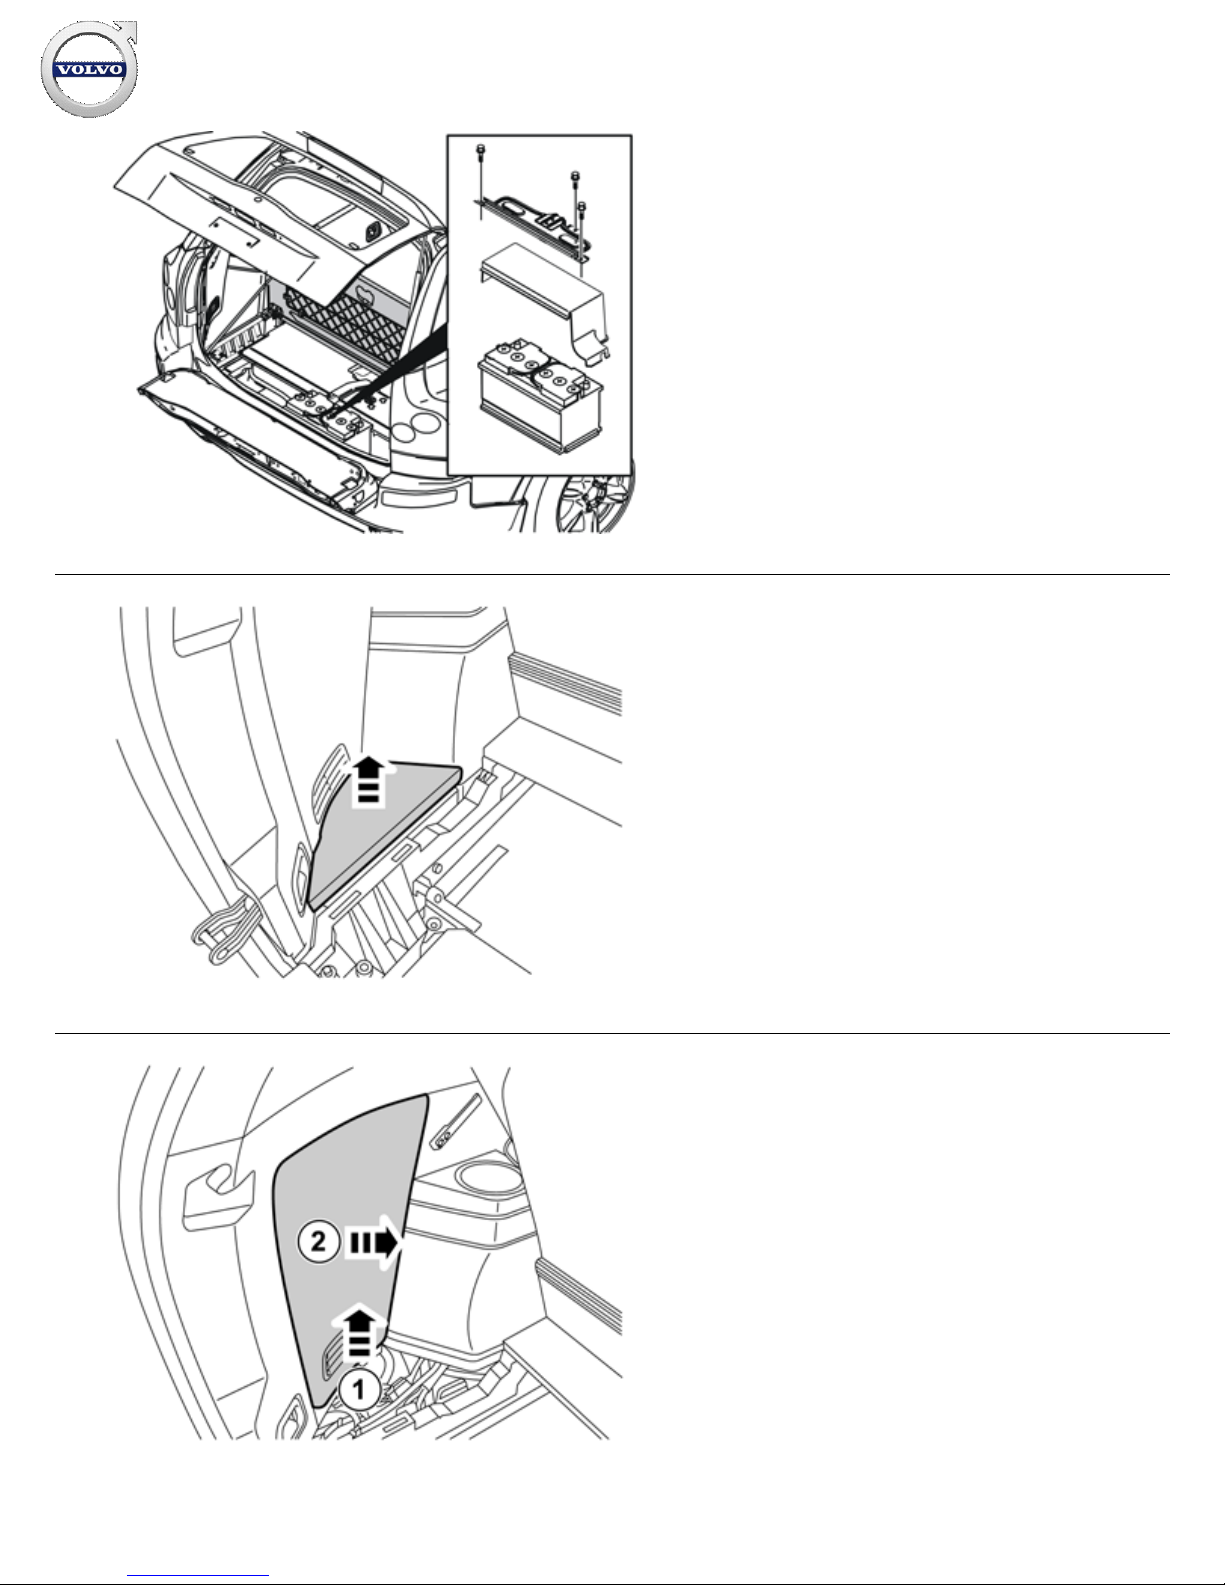
12
R3100130
Remove the three screws on the battery holder and lift it out.
Remove the battery cover.
13
IMG-
242241
Remove both covers on the floor.
14
IMG-
242242
Remove both panels.
Installation instructions, accessories
Volvo Car Corporation Gothenburg, Sweden
©
Volvo Car Corporation
TV receiver, digital- 30756561 - V1.1
Page 9 / 29
 Loading...