

Volvo 240 1989 Owner Manual

1989 Volvo 240
1 9 8 9
VOLVO
240
Important
You should be familiar with the information in the first two chapters before you operate the car.
Information contained in the balance of the manual is extremely useful and should be studied
shortly after operating the vehicle for the first time. The manual is structured so that it can be
used for reference. It should thus be kept in the car for ready access.
Contents
Introduction to the manual
Before you drive
This section provides a detailed description of the vehicle's instruments and controls.
Operating the car
This section contains items such as starting the engine, operating gear selector, towing trailers.
Service and maintenance
An investment which will pay dividends in the form of improved reliability, durability, and resale
value.
Specifications
All specifications are subject to change without notice. Consult your Volvo dealer for information.
Index
Should you require more detailed information please contact your Volvo dealer.
All information, illustrations and specifications contained in this manual are based on the latest product
information available at the time of publication. Volvo reserves the right to make model changes at any
time, or to change specifications or design, without notice and without incurring obligation.
pg. 2 This manual deals with the operation and care of your Volvo
file:///K|/ownersdocs/1989/1989_240/89240_00.htm (1 of 4)12/30/2006 8:22:07 AM
1989 Volvo 240
Welcome to the world-wide family of Volvo owners. We trust that you will enjoy many years of safe
driving in your Volvo, an automobile designed with your safety and comfort in mind. To ensure your
satisfaction with this vehicle, we encourage you to familiarize yourself with the equipment descriptions,
operating instructions, and maintenance requirements/recommendations in this manual. We also urge
you and your passengers to wear seat belts at all times in this (or any other) automobile. And, of course,
please do not operate a vehicle if you may be affected by alcohol, medication, or any impairment that
could hinder your ability to drive.
Your Volvo is designed to meet all applicable safety and emission standards, as evidenced by the
certification labels attached to the door opening sheet metal and on the left wheel housing in the engine
compartment. For further information regarding these regulations, please contact your dealer.
pg. 3 Seatbelts: "Something We Believe In"
Despite our strongest recommendation, and your best intentions, not wearing a seatbelt is like believing
"it'll never happen to me!", Volvo urges you and all adult occupants of your car to wear seatbelts and
ensure that children are properly restrained, using an infant, car or booster seat determined by age,
weight and height.
Fact: In every state, some type of child-restraint legislation has been passed. Additionally, some states
are seriously considering, or have already made it mandatory for occupants of a car to use seatbelts.
So, urging you to 'buckle up' is not just our recommendation - its becoming the law! The few seconds it
takes to buckle up may one day allow you to say, "Its a good thing I was wearing my seatbelt."
file:///K|/ownersdocs/1989/1989_240/89240_00.htm (2 of 4)12/30/2006 8:22:07 AM
1989 Volvo 240
pg. 4 General Information
Do not export your Volvo to another country before investigating that country's applicable safety and
exhaust emission requirements. In some cases it may be difficult or impossible to comply with these
requirements. Modifications to the emission control system(s) may render your Volvo non-certifiable for
legal operation in the U.S., Canada and other countries
pg. 5 Keys
file:///K|/ownersdocs/1989/1989_240/89240_00.htm (3 of 4)12/30/2006 8:22:07 AM

1989 Volvo 240
The key number codes are stamped on a separate tag supplied with the keys. This tag should be
separated from the key ring and kept in a safe place.
The double-sided tape on the back of the tag can be used to secure it safely.
In the event the original keys are lost, duplicates may be ordered from your Volvo dealer.
Top of Page
file:///K|/ownersdocs/1989/1989_240/89240_00.htm (4 of 4)12/30/2006 8:22:07 AM

1989 Volvo 240
1 9 8 9
VOLVO
240
Before you drive
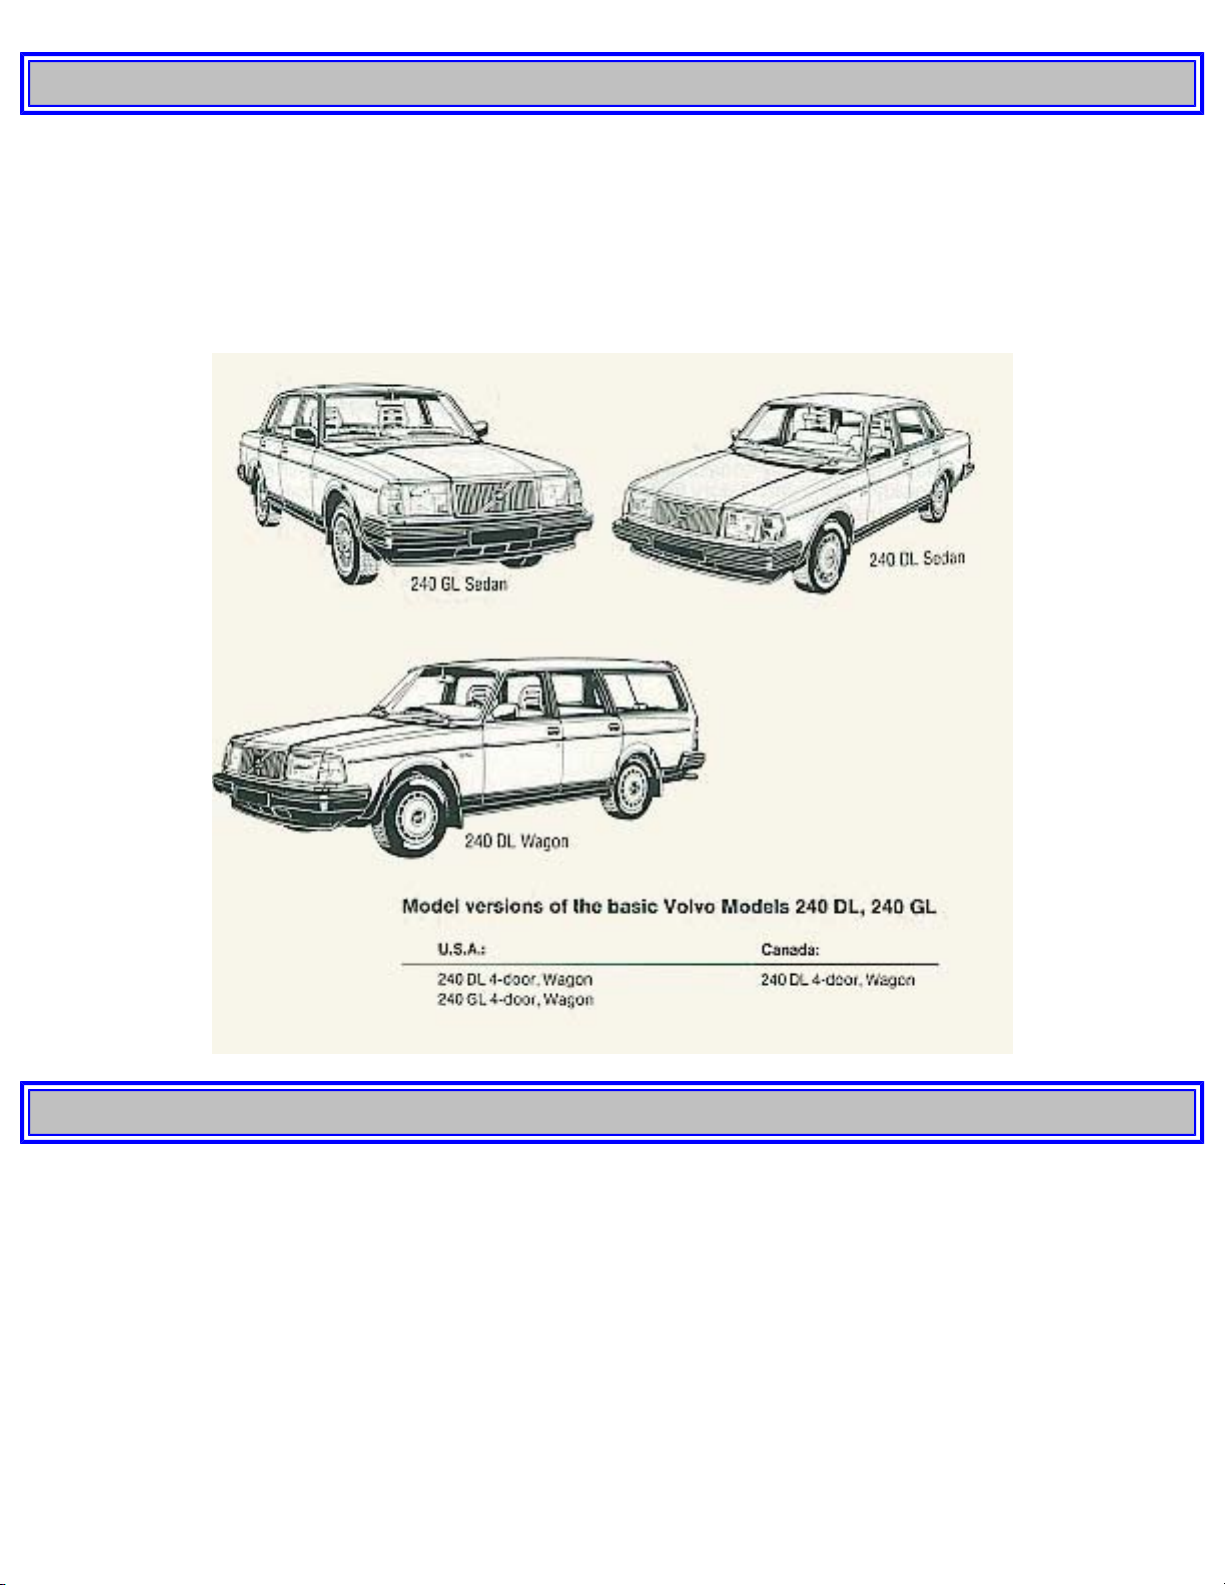
pg. 6 240 DL Sedan
pg. 7 Before you drive
Instruments and controls 8
Instruments 10
Warning lights 11
Clock, ambient temperature gauge 12
Oil pressure gauge, voltmeter 13
Ignition switch, turn signals 14
Lighting 15
Windshield wipers, washer nozzles 16
file:///K|/ownersdocs/1989/1989_240/89240_01a.htm (1 of 22)12/30/2006 8:22:09 AM

1989 Volvo 240
Washer fluid reservoir 17
Rear window demister, heated seat, hazard warning
flasher
18
Parking brake 19
Cigarette lighter, ash trays 20
Electrically operated windows 21
Heating and ventilation 22
Air conditioning 24
Radios, AM-FM-FM stereo/tape players 25
Front seats 26
Seat belts 28
Doors and locks 30
Trunk lid 31
Hood release, long load storage 32
Rear/side view mirrors 33
Interior light, sun roof, fuel tank cap 34
Rear seat (wagon) 35
Tailgate (wagon) 36
Cargo compartment (wagon) 37
pg. 8 Instruments and controls
file:///K|/ownersdocs/1989/1989_240/89240_01a.htm (2 of 22)12/30/2006 8:22:09 AM

1989 Volvo 240
pg. 9 Instruments and controls
See page
1 Air louver
23
2 Turn signals
14
3 Headlights, parking lights
15
4 Instruments, lights
15
5 Instruments
10
6 Wiper/washer, tailgate window wiper/washer (wagon)
16, 17
7 Starting (ignition) switch/steering wheel lock
14
8 Air louver
23
9 Storage compartment (extra instrument or radio location)
25
10 Air louver
23
11 Glove box -
12 Air louver
23
13 Fuse box
79
14 Hood release handle
32
15 Horn -
file:///K|/ownersdocs/1989/1989_240/89240_01a.htm (3 of 22)12/30/2006 8:22:09 AM

1989 Volvo 240
16 Cigarette lighter
20
17 Rear window demister
18
18 Hazard warning flashers
18
19 Air conditioning(some models)
24
20 Seat belt reminder light
28
21 Heating and ventilation
22
22 Gear lever or gear selector
43, 44
23 Ash tray
20
24 Fresh air louver(except models with air conditioning)
23
25 Storage compartment-
26 Fresh air louver
23
27 Electrically-operated windows (240 GL)
21
28 Control for electrically operated side mirrors (certain models only)-
29 Parking brake
19
30 Electrically-operated window, right front door (240 GL)
21
31 Seat belt release buttons
28
32 Seat heaters
19
33 Seat belt reminder light
24
34 Ash tray
20
The pages in this section provide a detailed description of the vehicle's instruments and controls.
Note that some vehicles may be equipped differently, depending on model, special legal requirements,
etc.
pg. 10 Instruments
A Clock or Tachometer (depending on model)
Tachometer reads thousands of engine rpm. Engine should not be operated in red range.
B Direction indicator (green)
C Speedometer
In kilometers and miles per hour (U.S. models) In kilometers per hour (Canadian models)
D Odometer
Total reading in miles (U.S. models) Total reading in kilometers (Canadian models)
file:///K|/ownersdocs/1989/1989_240/89240_01a.htm (4 of 22)12/30/2006 8:22:09 AM

1989 Volvo 240
E Temperature gauge
The gauge pointer should remain Inside the black range during normal operation.
If the pointer enters the red range repeatedly, check coolant level and fan belt tension (See sections titled
"Cooling system and coolant")
WARNING!
allow engine to cool before adding
fluid.
Do not continue to drive the car with the pointer in the red zone.
F Fuel gauge
The fuel tank capacity is approx. 60 liters 15.8 US gals. See "Fuel requirements".
G Clock reset knob (DL)
H Service reminder light
I Check engine (red)
J Alternator warning light (red)
K Oil pressure warning light (red)
Do not drive the car with this light on.
L Trip odometer reset knob
Push in to reset
file:///K|/ownersdocs/1989/1989_240/89240_01a.htm (5 of 22)12/30/2006 8:22:09 AM

1989 Volvo 240
M Trip odometer
N High beam indicator (blue)
O Parking brake reminder light (red)
P Brake failure warning light (red)
Q Bulb failure warning light (yellow)
R Overdrive OFF indicator light (yellow)
(automatic transmission models)
Shift indicator light (yellow)
(manual transmission models)
pg. 11 Warning lights
The warning lights described on this page should never be on
when driving
When the ignition is turned on, and before the engine starts, all of the warning lights should be on to test
the function of the bulbs. Should a light not go off after the engine has started, the system indicated
should be inspected. (However, the parking brake reminder light will not go off until the parking brake
is fully released.)
Alternator warning light (red)
If the light comes on while the engine is running, check the tension of the alternator drive belt as soon as
possible. (See section titled "Cooling system".)
NOTE: This warning light is illuminated if the alternator is not charging. However, alternator, parking
brake, brake failure, and bulb failure will be illuminated at the same time due to the design of the
system.
Oil pressure warning light (red)
file:///K|/ownersdocs/1989/1989_240/89240_01a.htm (6 of 22)12/30/2006 8:22:09 AM

1989 Volvo 240
If the light comes on during driving, the oil pressure is too low. Stop the engine immediately and check
the engine oil level. See section titled "Engine Oil". Do not continue to drive the car with this lighten.
After hard driving, the light will come on occasionally when the engine is idling. This is normal,
provided it goes off when the engine speed is increased.
Parking brake reminder light (red)
This light will be on when the parking brake (hand brake) is applied. The parking brake lever is situated
between the front seats.
Brake failure warning light (red)
If the light comes on while driving and the brake pedal can be depressed further than normal, it is an
indication that one of the brake circuits is not functioning. Stop immediately, open engine hood and
check brake fluid level (see section "Brake fluid, power steering").
Reservoir empty: do NOT drive. Tow car to shop for check/repair of brake system. Reservoir not
empty: proceed immediately and with caution to a Volvo dealer for an inspection of the brake system.
Bulb failure warning light (yellow)
The light will come on if any of the following bulbs are defective:
one of the lower beams
one of the tail lights
one of the brake lights (when the brake pedal is depressed).
See section on "Replacing Bulbs".
Check Engine warning light
If the light comes on (or stays on after the vehicle has started), the Engine Check diagnostic system has
detected a fault. Drive to an authorized Volvo dealer for inspection.
pg. 12 Service reminder light, Clock, ambient temperature gauge
Service reminder light
This light will come on at 5,000 mile (8,000 km) intervals. It is a reminder to the driver that the 5,000
file:///K|/ownersdocs/1989/1989_240/89240_01a.htm (7 of 22)12/30/2006 8:22:09 AM

1989 Volvo 240
mile (8,000 km) service interval has been exceeded. The light will stay on 2 minutes after start until
reset by the servicing dealer.
Quartz crystal clock
To reset the hands, push in the reset knob and turn.
Ambient temp. gauge (accessory)
An electronic thermometer that indicates ambient temperature just above the road surface. Warns you of
icy road conditions
pg. 13 Oil pressure gauge, Voltmeter
file:///K|/ownersdocs/1989/1989_240/89240_01a.htm (8 of 22)12/30/2006 8:22:09 AM

1989 Volvo 240
Oil pressure gauge (accessory)
The oil pressure gauge indicates the pressure of the oil in the lubricating system of the engine. The
pressure is dependent on the speed of the engine, the oil temperature and the viscosity of the oil.
The gauge pointer must not go down to the red field while driving.
Do not continue to drive the car with the pointer in the red zone.
Note: While idling with a hot engine the pointer may go into the red field. This is not a cause for
concern providing the pointer rises to the normal driving range again when you increase the engine
speed.
Voltmeter (accessory)
The voltmeter indicates the voltage in the electrical system and thereby also the state of the battery.
While the car is being driven the pointer should be within the black field.
Should the pointer point to the upper or lower red field when driving, this may indicate some fault in the
electrical system,
Note: While idling with a hot engine (especially with air conditioning ON), the pointer may indicate low
voltage. This is not a cause for concern provided that the indicated voltage increases when you increase
file:///K|/ownersdocs/1989/1989_240/89240_01a.htm (9 of 22)12/30/2006 8:22:09 AM

1989 Volvo 240
engine speed.
pg. 14 Starting (ignition) switch, Turn signals
Starting (ignition) switch/steering wheel lock
The steering wheel lock may be under tension when the car is parked. Turn the steering wheel slightly to
free the ignition key.
A chime will sound if the starting key is in the ignition lock and the front door on the driver's side is
open. The chime will also sound if the headlights or parking lights are on when the door is open.
The chime goes off when the front door is closed.
Turn signals
1 Signal lever engaged for normal turns.
file:///K|/ownersdocs/1989/1989_240/89240_01a.htm (10 of 22)12/30/2006 8:22:09 AM

1989 Volvo 240
Note: A defective turn signal bulb will cause turn signal indicator and remaining signal lights to flash
more rapidly than normal.
2 Lane change position. In maneuvers such as lane changing, the driver can flash the turn signals by
moving the turn signal lever to the first stop and holding it there. The lever will return to the neutral
position when released.
3 High and low beam switching (headlights on).
Move the lever towards the steering wheel and release it.
3 Headlight flasher (headlights off).
Move the lever towards the steering wheel. The headlight high beam will be on until the lever is
released.
pg. 15 Lighting
Headlights and position lights
All lights off
file:///K|/ownersdocs/1989/1989_240/89240_01a.htm (11 of 22)12/30/2006 8:22:09 AM

1989 Volvo 240
Parking lights on
Headlights and parking lights on
Switch from upper to lower beams, and vice versa, by moving the turn signal switch lever on the left
side of the steering column towards the steering wheel. The parking lights can be used without switching
on the starting (ignition) key.
A chime will sound if the starting (ignition) key is in the switch lock when the door is open. The chime
goes off when the driver's door is closed.
If the headlight is in position , all lights will go out when starting (ignition) switch is switched off.
Instrument panel lamps rheostat
Clockwise - brighter
Counterclockwise - dimmer.
file:///K|/ownersdocs/1989/1989_240/89240_01a.htm (12 of 22)12/30/2006 8:22:09 AM

1989 Volvo 240
pg. 16 Windshield wipers, Tailgate window wiper, Washer nozzles
Wiper/washer
1 Intermittent wiper.
With switch in this position, the wipers will make a stroke approx. every seventh second.
2 "Single stroke" position.
Switch returns automatically when released.
3 Wipers, low speed.
4 Wipers, high speed.
5 Windshield wiper/washer.
The wiper will make 2-3 complete stroking cycles after the lever is released.
file:///K|/ownersdocs/1989/1989_240/89240_01a.htm (13 of 22)12/30/2006 8:22:09 AM
1989 Volvo 240
Tailgate window wiper/washer, wagon
Operated by the switch at the end of the windshield wiper/washer operating lever.
1 Tailgate wiper
2 Interval position
With the switch in this position, there is one stroking cycle approx. every fifteen seconds.
3 Tailgate washer
Depress the button to start the-wiper/washer.
The wiper will complete 2-3 stroking cycles after the button is released.
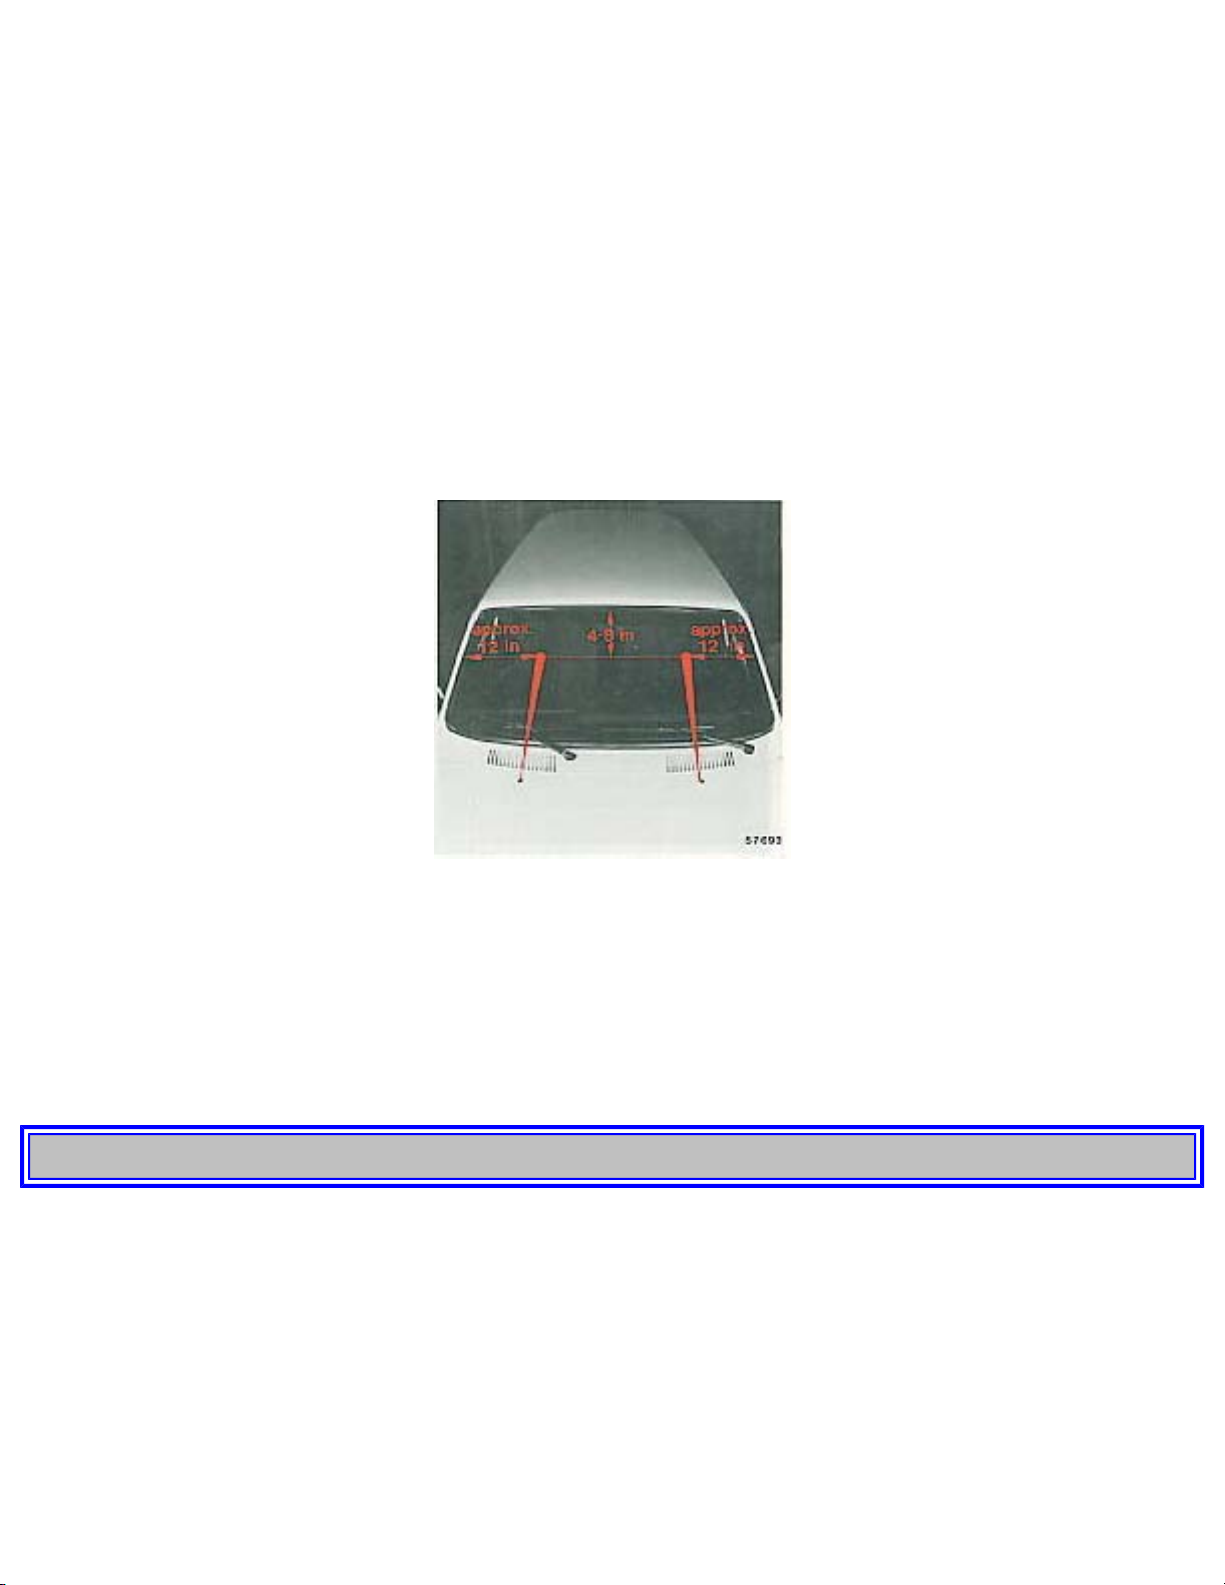
Adjusting washer nozzles
The fluid spray may be adjusted by carefully inserting a needle into the metal nozzle and rotating nozzle
to desired position.
4-8" = 10-20 cm. 12" = 30 cm.
pg. 17 Washer fluid reservoir, Rear fog lights
file:///K|/ownersdocs/1989/1989_240/89240_01a.htm (14 of 22)12/30/2006 8:22:09 AM

1989 Volvo 240
Washer fluid reservoir
The washer fluid reservoir for the windshield and tailgate washer (wagon) is located in the engine
compartment and holds approx. 0.8 US gals = 3.2 liters.
During wintertime, the reservoir should be filled with anti-freeze washer Fluid specified in section titled
"Cold weather".
Rear fog lights
The rear fog lights are considerably brighter than the normal tail lights and should be used only when
atmospheric conditions, such as fog, rain, snow, smoke or dust reduce the daytime or night time
visibility of other vehicles to less than 500 ft. (152 meters). (The headlights must be switched on.)
Note that local regulations governing the use of these lights may vary.
pg. 18 Rear window demister, Hazard warning flasher
file:///K|/ownersdocs/1989/1989_240/89240_01a.htm (15 of 22)12/30/2006 8:22:09 AM
1989 Volvo 240
Rear window demister
To operate depress the switch. The indicator lamp in the switch will come on. The system will be
switched off automatically after 10-15 minutes or when the starting (ignition) key is switched off. Do
not place items against the inner surface of the rear window that may damage the printed circuit. Do not
scrape the inner surface of the rear window glass with a hard object or use an abrasive window cleaner,
otherwise damage to the printed circuit will occur.
Hazard warning flasher
The four-way flasher should be used to indicate that the vehicle has become a traffic hazard.
Note: Regulations regarding the use of the hazard warning flasher may vary from state to state.
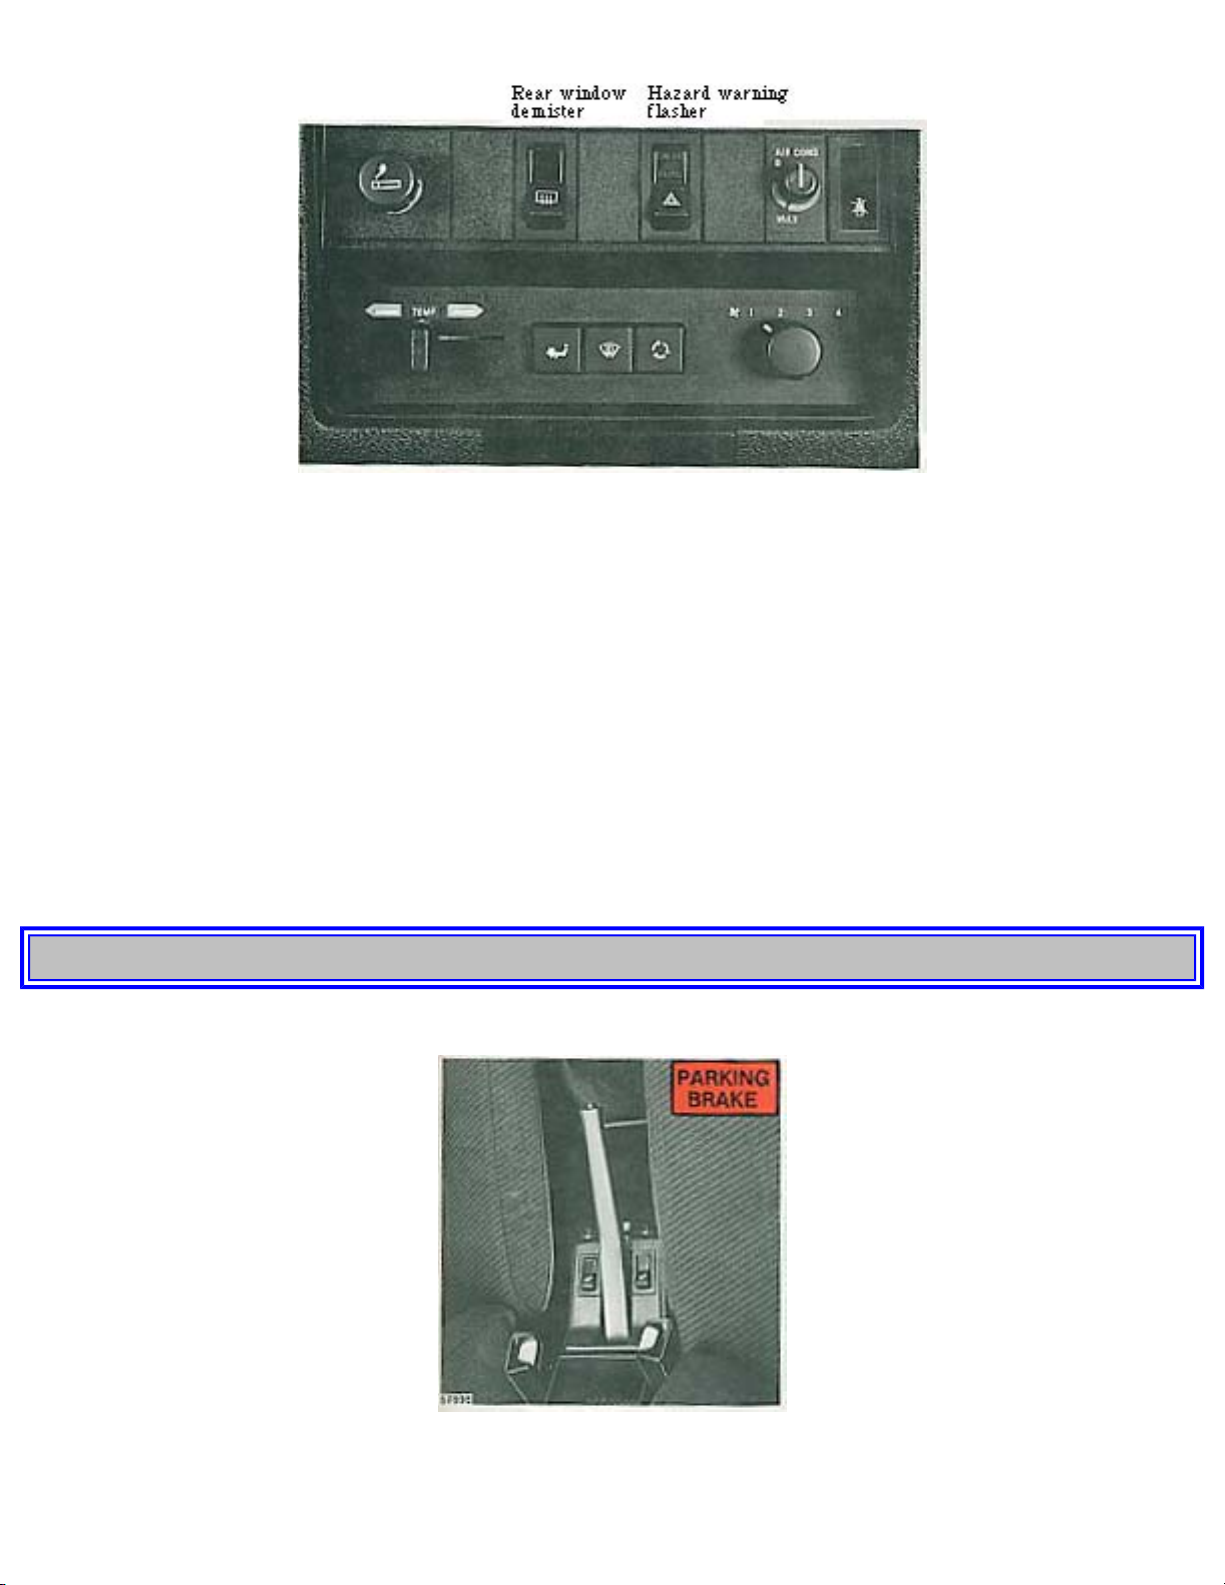
pg. 19 Parking brake
Parking brake (hand brake)
The lever is situated between the front seats. The brake is applied to the rear wheels. The PARKING
file:///K|/ownersdocs/1989/1989_240/89240_01a.htm (16 of 22)12/30/2006 8:22:09 AM

1989 Volvo 240
BRAKE reminder light on the instrument panel comes on whenever the parking brake lever is not fully
released and the ignition is on.
Always use the parking brake (hand brake) when parked.
In order to obtain the best possible performance of the parking brake, the brake linings should be broken
in. (See section titled "Break-in period".)
Seat heaters
The front seats are equipped with electrically- heated backrests and seat cushions. The switches engage
the heating which then is thermostatically controlled. It switches on automatically when the temperature
drops below 60°F (15°C) and switches off at approx. 95°F(35°C).
pg. 20 Cigarette lighter, Ash trays
Cigarette lighter
To operate, depress the knob fully. When the knob automatically releases, the cigarette lighter is ready
for use.
file:///K|/ownersdocs/1989/1989_240/89240_01a.htm (17 of 22)12/30/2006 8:22:09 AM

1989 Volvo 240
The starting (ignition) switch must be ON for the cigarette lighter to function.
Ash trays
To remove the ash trays depress the center spring and remove.
pg. 21 Electrically operated windows
Electrically operated windows (standard on certain models)
The electrically-operated windows are controlled by switches set in the door arm rests. All the windows
can be controlled from the driver's arm rest as shown in the above illustration.
The starting (ignition) switch must be ON for the electrically-operated windows to function. The
window is lowered if the rear part of the switch is pressed and raised if the front part of the switch is
pressed.
file:///K|/ownersdocs/1989/1989_240/89240_01a.htm (18 of 22)12/30/2006 8:22:09 AM

1989 Volvo 240
WARNING!
Remove the starting (ignition) key from the car when children are left alone in the
car.
Cut-out switch for rear-door electrically-operated windows
If the car is equipped with rear-door power windows, this function can be disabled by a switch located
on the driver's door armrest.
This switch is positioned 90° in relation to the other switches.
The rear door windows can be raised or lowered with the respective door switch on the driver's door.
The rear door windows cannot be raised or lowered with the respective door switch but instead only
with the corresponding switch on the driver's door.
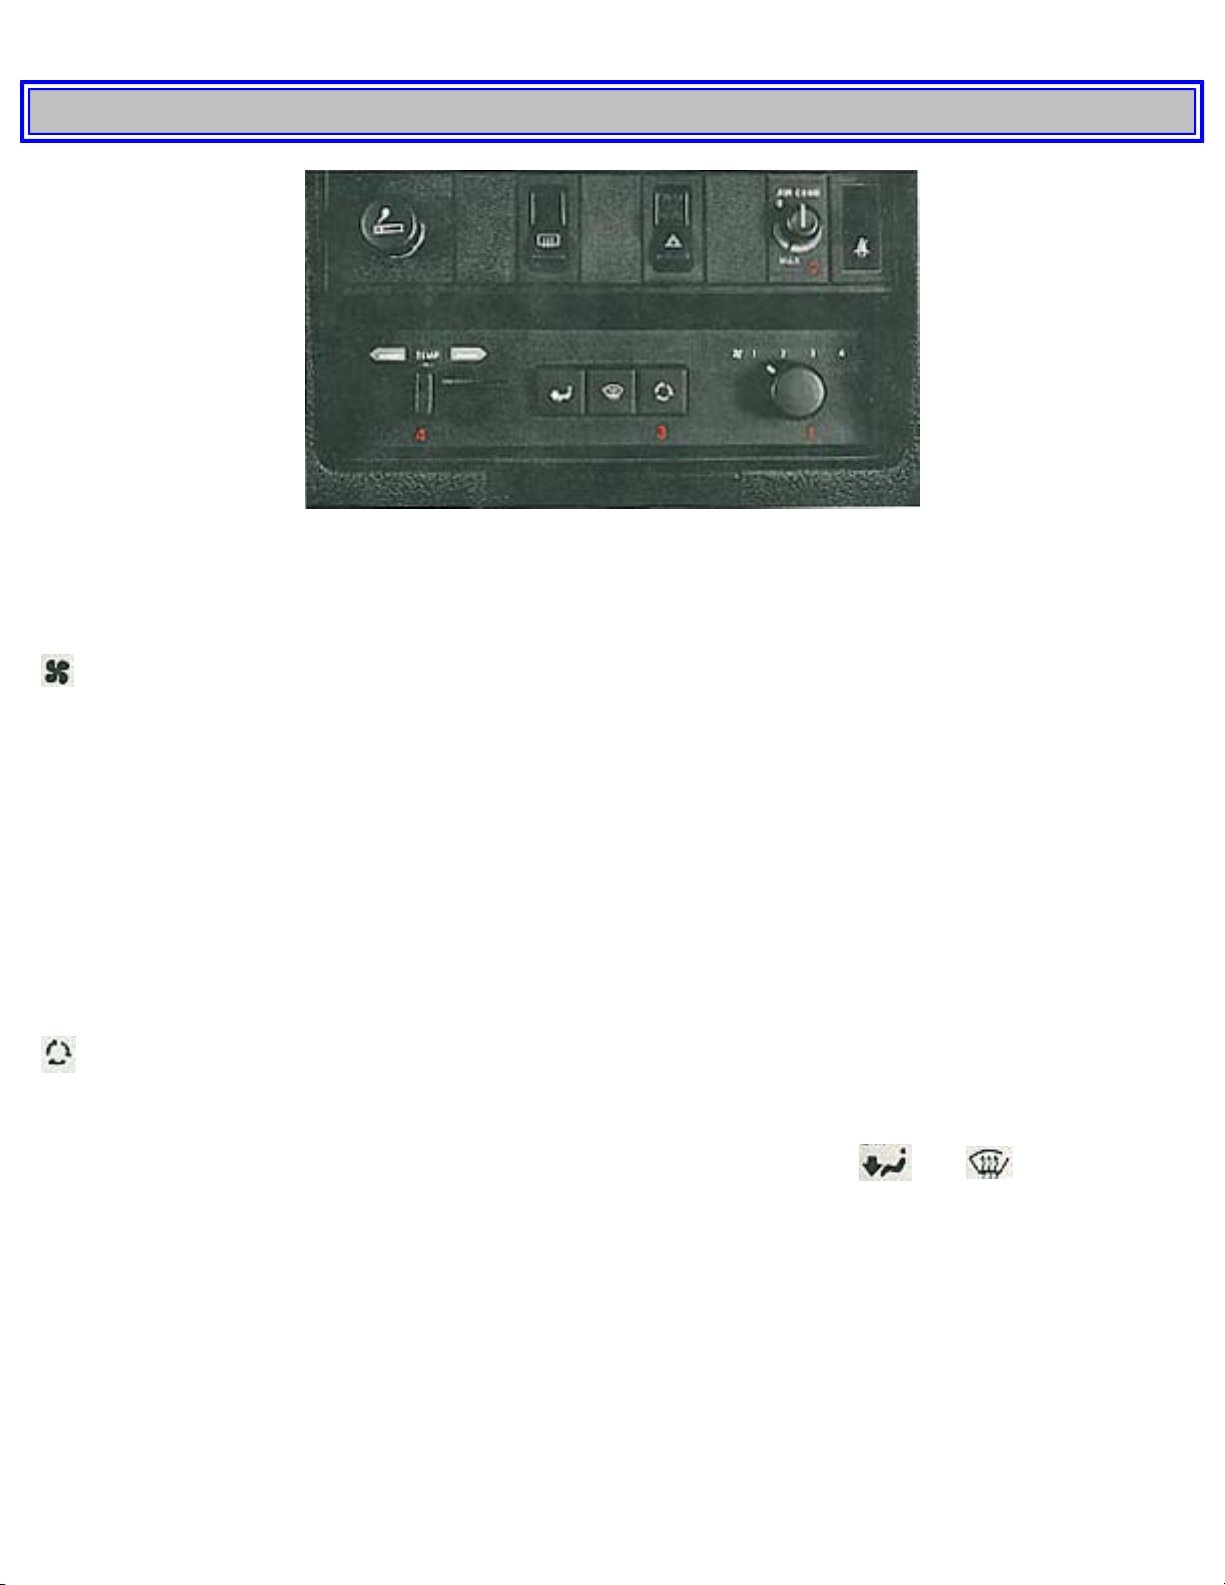
pg. 22 Heating and ventilation
Heating system
1 TEMP
Left = cool
Right = warm
2
FLOOR
Out = no air to floor
In = full flow of air to front and rear floor
file:///K|/ownersdocs/1989/1989_240/89240_01a.htm (19 of 22)12/30/2006 8:22:09 AM

1989 Volvo 240
3 Defrost
Out = low volume air flow to defroster
In = full flow
4
REC (recirculation)
To be used only on cars equipped with air conditioning.
Do not use for heating.
Out = full flow of outside air
In = air is recirculated for faster cooling
5
Blower motor
Has 4 speeds and is shut completely off when the knob is turned to the left.
6 Air louvers - dash
The air flow through the louvers is decreased when the
and/or controls are depressed.
7 Fresh air louvers - floor (except models with air conditioning)
Lever placed forward = louver opens
Lever placed rearward = louver closes
pg. 23 Heating and ventilation
file:///K|/ownersdocs/1989/1989_240/89240_01a.htm (20 of 22)12/30/2006 8:22:09 AM
1989 Volvo 240
How to . . .
. . . obtain max. heat
1 TEMP -> WARM
2
depressed
5 FAN
-> 3(or 4)
6 All dash louvers halfway open and floor air louver closed.
. . . remove condensation
1 TEMP ->WARM
3 DEF
depressed
5 FAN
-> 3 (or 4)
6 All louvers closed as well as the floor fresh air louver.
Always keep front external inlet grille (in front of the windshield) clear of obstructions (snow, ice, etc.).
Maximum defroster action
For maximum defroster capacity at very low ambient temperatures, use the recirculation control (button
depressed).
If not using air conditioning, the recirculation feature should not be used in humid climates and at
temperatures about +23°F (-5°C).
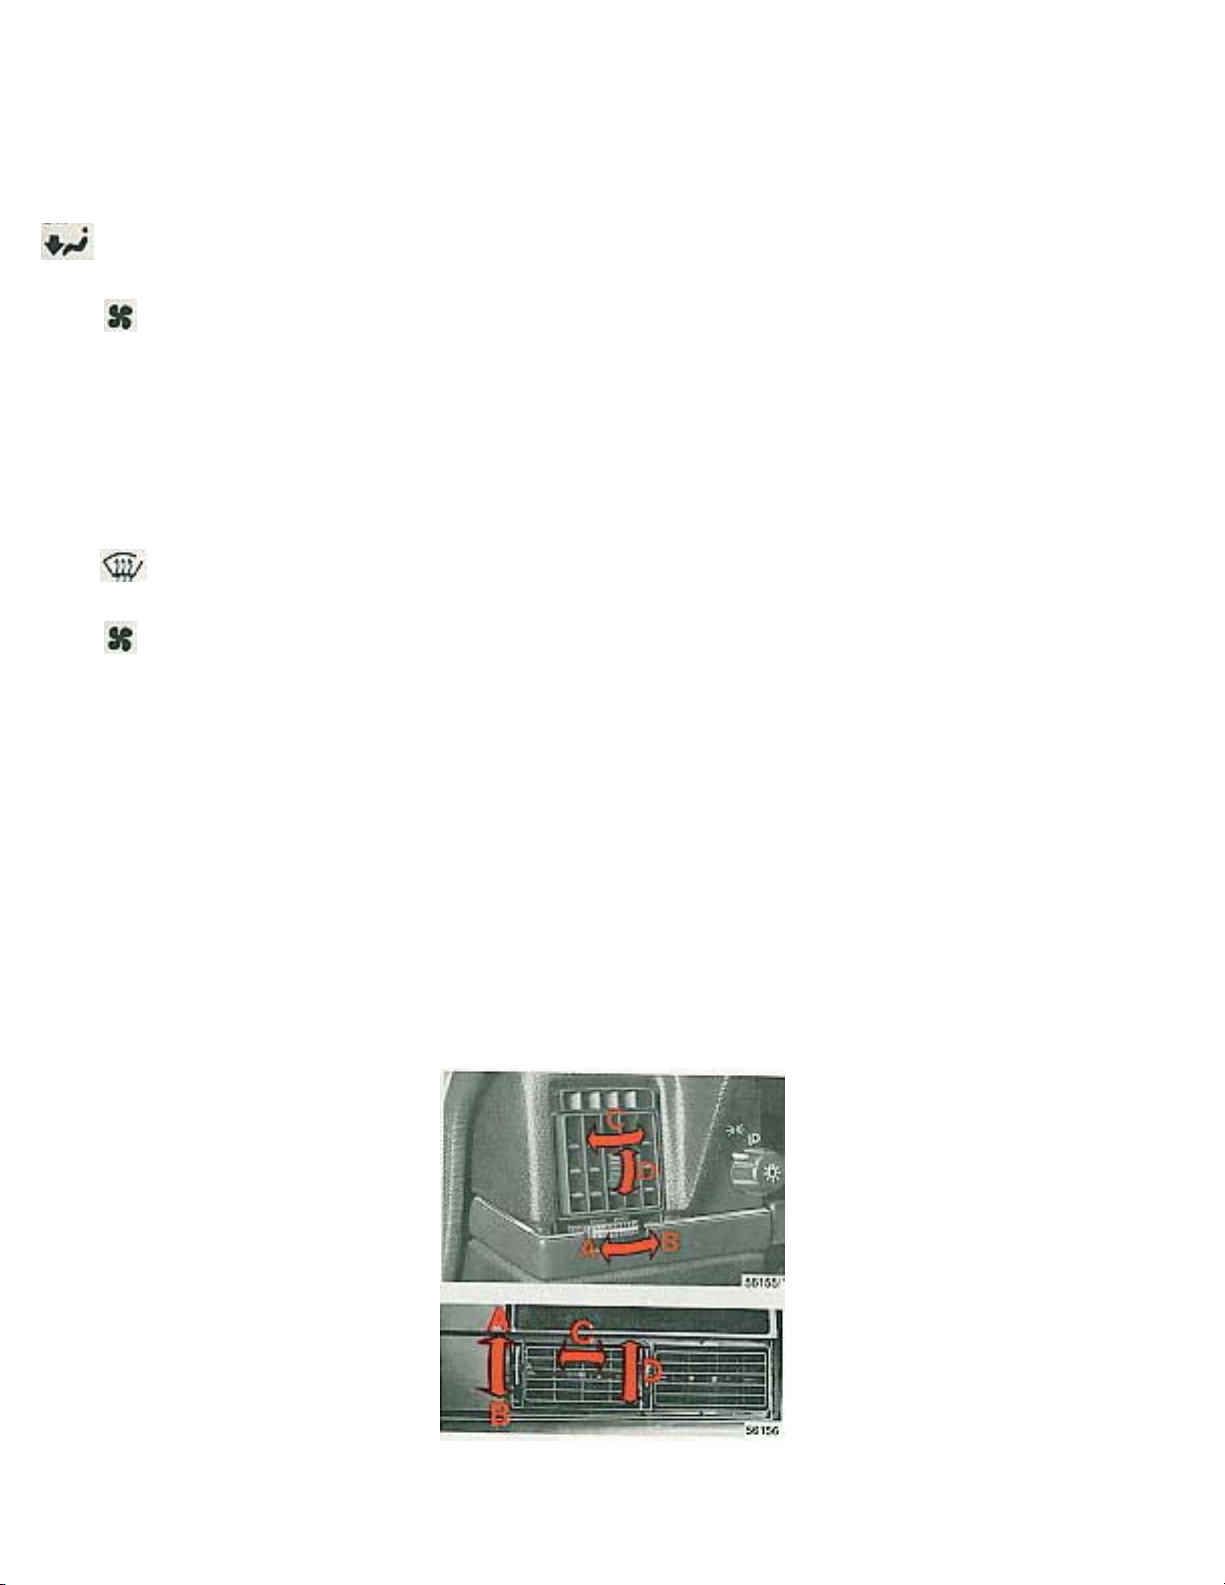
Air louvers - dash
file:///K|/ownersdocs/1989/1989_240/89240_01a.htm (21 of 22)12/30/2006 8:22:09 AM

1989 Volvo 240
A Closed
B Open
C Directing air flow horizontally
D Directing air flow vertically
Fresh air louver - floor (except models with air conditioning)
There is a floor-directed fresh air louver on the driver and passenger sides of the vehicle (driver's side
only on some models). Airflow is controlled by the lever at the center of the louver.
Lever placed forward = louver opens
Lever placed rearward = louver closes
Maximum airflow is obtained with louver fully open and the fan (blower motor) shut completely off.
(The fan forces the air through the dash louvers.)
Contents | Top of Page
file:///K|/ownersdocs/1989/1989_240/89240_01a.htm (22 of 22)12/30/2006 8:22:09 AM
1989 Volvo 240
pg. 24 Air conditioning
Air conditioning
Air conditioning (standard on certain models) How to use the air conditioner:
1
Fan
Position 4 for rapid cooling.
2 AIR COND
Start the air conditioning compressor by turning the control knob clockwise toward MAX.
For rapid cooling, position the knob into the orange range beyond MAX. After desired temperature is
reached re-position the control knob into the blue range.
At cruising speeds, the knob should be kept within the blue range. If it remains in the orange range,
icing may occur resulting in decreased cooling capacity.
3
Recirculation
Push in for rapid cooling and during high humidity conditions.
4 TEMP To obtain rapid cooling, all windows must be closed and buttons
and out. Close the
floor fresh air louvers.
Cool air will then be discharged through the four dash outlets which should be fully open.
Note: For rapid removal of condensation from inside glass surfaces, the air conditioner can be switched
on even when not required for interior cooling. The air conditioner will dehumidify the air inside the
vehicle.
Have your Volvo dealer check the system for correct operation yearly. The air conditioning system
should be operated periodically to ensure trouble-free performance year round.
file:///K|/ownersdocs/1989/1989_240/89240_01b.htm (1 of 20)12/30/2006 8:22:10 AM

1989 Volvo 240
pg. 25 Audio systems
Operating instructions
Operating instructions are contained in the manuals associated with each model.
These manuals are placed in the cars when the equipment is installed.
Your Volvo Dealer will be able to assist you with any questions regarding the operation of this
equipment.
Radio antenna mast
Note: Always lower the antenna mast when entering automatic car wash. The antenna should be cleaned
and lubricated every 5,000 miles (8,000 km).
The following information may help to explain differences between car radio reception and radio
reception in the home.
Signal sending
FM waves do not follow the earth's surface and do not bounce against the atmosphere as AM waves do.
Cross modulation
When receiving a weak signal in the vicinity of another, stronger signal, both stations may be received
simultaneously.
Weak reception (fading)
Because of the limited range of FM senders and the way FM waves spread, this problem usually occurs
with FM reception.
Mountains or similar obstacles can sometimes cause disturbances.
Multipath Distortion
FM Signals are typically "line-of-sight", and very reflective. Their reflectivity to objects such as
buildings, mountains, even other passing vehicles, causes the condition known as multipath distortion.
This distortion is the result of the reflected signal, and the direct signal reaching your antenna at slightly
different times causing a cancellation of all signals. This condition will sound like hissing, or static.
Very little can be done to eliminate this problem, however, lowering the treble on your radio could help
mask these disturbances thereby allowing you to achieve optimum pleasure from your audio system
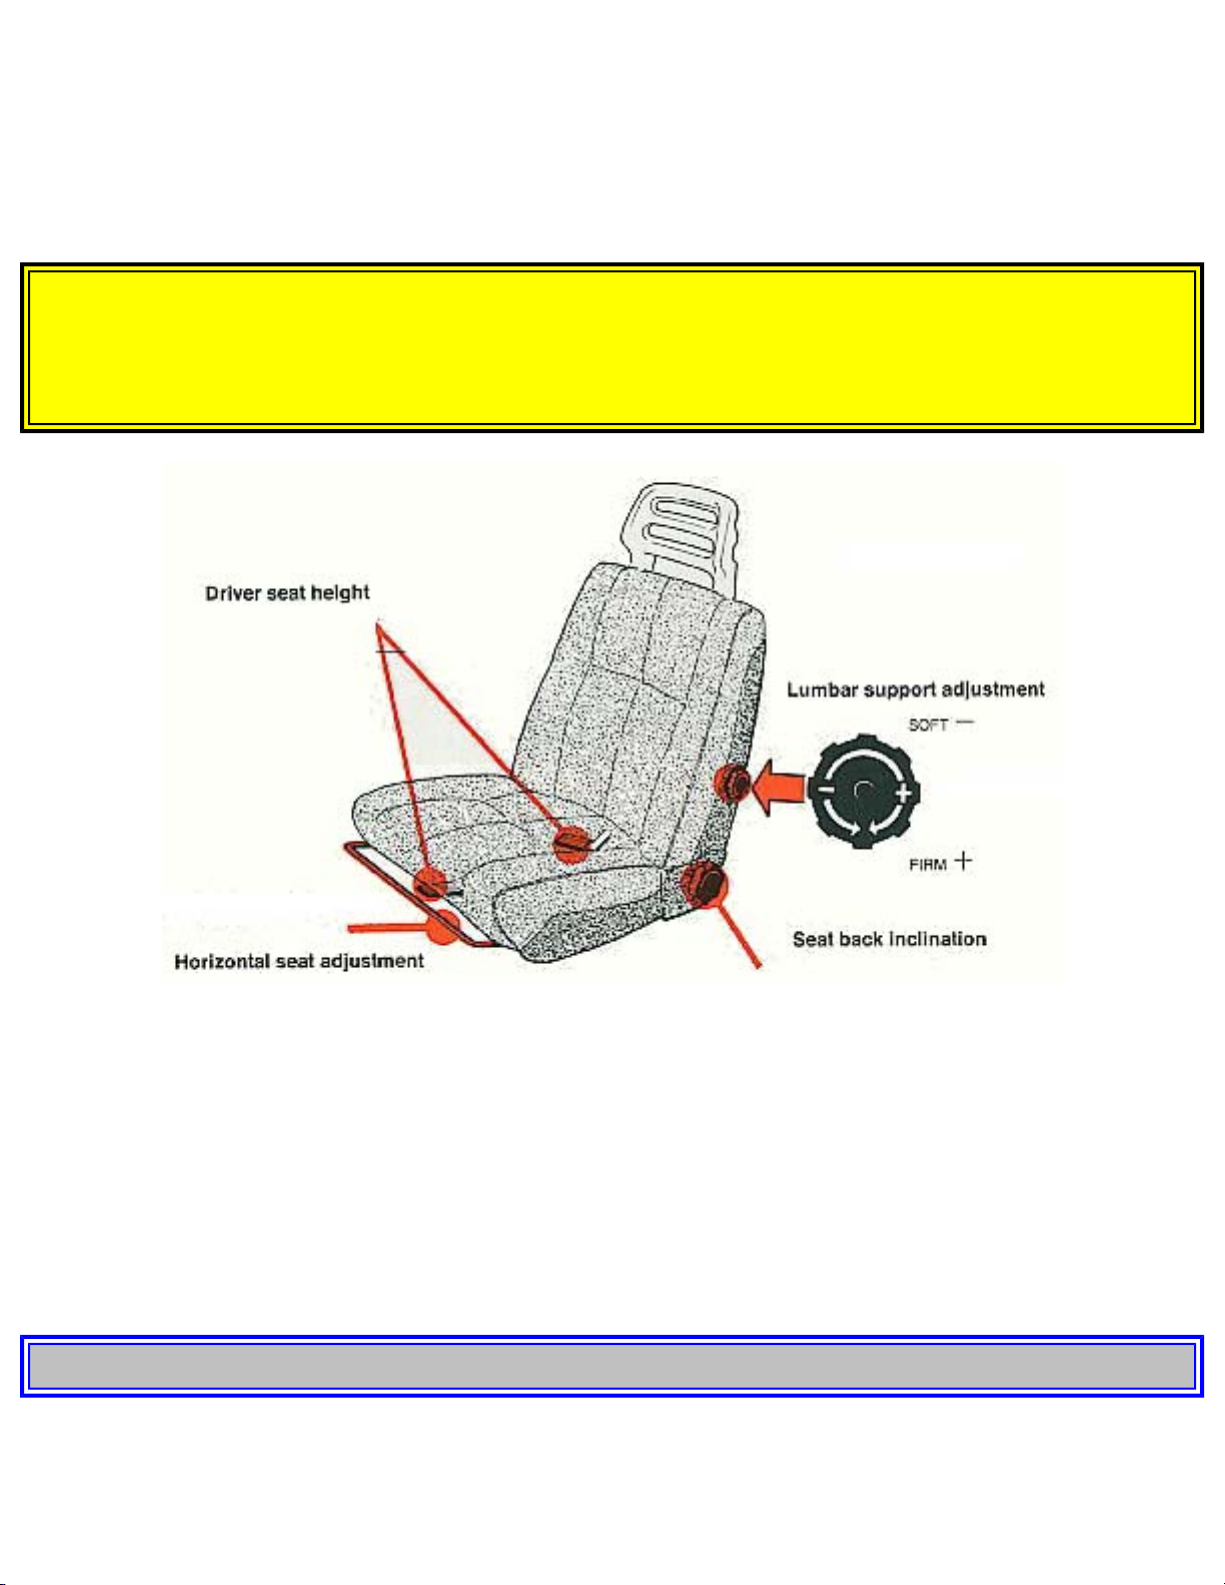
pg. 26 Front seats
Driver seat height
There are two levers, each with three positions, for adjusting the height of the seat (front and/or back of
cushion).
This allows adjustment of the seat cushion angle for added comfort.
After adjusting the seat check that it is securely latched.
file:///K|/ownersdocs/1989/1989_240/89240_01b.htm (2 of 20)12/30/2006 8:22:10 AM
1989 Volvo 240
Note: Do not attempt to raise seat height while seated.
Horizontal seat adjustment
Pull control upward, then slide seat forward or rearward to desired position.
Make sure that the seat is properly secured when you release the control.
WARNING!
For your safety, never adjust seat while driving. The seat should be adjusted so that the brake (and
clutch) pedal can be depressed fully.
Passenger seat height
The front passenger seat is retained by four brackets. There are two height positions at the front and
three at the rear. However this adjustment must be accomplished manually, using appropriate hand tools.
Seat back inclination
Rotate control clockwise to tilt seat back rearward. Rotate counterclockwise to tilt seat back forward.
Note: Body weight must be shifted to allow seat back to move forward or rearward.
pg. 27 Child safety
Child safety
Volvo recommends the proper use of restraint systems for all occupants, including children. Remember
file:///K|/ownersdocs/1989/1989_240/89240_01b.htm (3 of 20)12/30/2006 8:22:10 AM

1989 Volvo 240
that regardless of age and size, a child should always be properly restrained in a car. Restraint systems
for children are designed to be secured in the vehicle by lap belts or the lap portion of a lap-shoulder
belt. Such child restraint systems protect children in cars in the event of an accident only if they are used
properly. However, children could be endangered in a crash if the child restraints are not properly
secured in the vehicle. Failure to follow the installation instructions for your child restraint can result in
your child striking the vehicle's interior in a sudden stop.
Holding a child in your arms is NOT a suitable substitute for a child restraint system. In an accident, a
child held in a person's arms can be crushed between the vehicle's interior and an unrestrained person.
The child could also be injured by striking the interior, or by being ejected from the vehicle during a
sudden maneuver or impact. The same can also happen if the infant or child rides unrestrained on the
seat or in the cargo section of a station wagon. Other occupants should also be properly restrained to
help reduce the chance of injuring or increasing the injury of a child.
All states and provinces have legislation governing how and where children should be carried in a car.
Recent accident statistics have shown that children are safer in rear seating positions than front seating
positions when properly restrained.
A child restraint system can help protect a child in a vehicle. Here's what to look for when selecting a
child restraint system:
● It should have a label certifying that it meets applicable Federal Motor Vehicle Safety Standards
(FMVSS 213-80) - or in Canada, CMVSS 213.
● Make sure the child restraint system is appropriate for the child's height, weight and development -
the label required by the standard or regulation, or instructions for infant restraints, typically provide this
information.
● In using any child restraint system, we urge you to carefully look over the instructions that are
provided with the restraint. Be sure you understand them and can use the device properly and
safely in this vehicle.
● A misused child restraint can result in increased injuries for both the infant or child and other
occupants in the vehicle.
When a child has outgrown the child safety seat (approximately 4-5 years of age, depending on size) you
should use the rear seat with the standard seat belt fastened. The best way to protect the child here is to
place the child on a cushion so that the seat lap belt is as far down on the hips as possible. A specially
designed and tested safety cushion for this purpose can be obtained from your Volvo dealer.
If necessary, an extra seat is available for use in the luggage compartment of station wagon models. This
seat is designed for two children, each up to 80 lbs. in weight and up to 53 inches in height.
Additional child restraint Information regarding seat anchorage can be found on
page 104.
pg. 28 Seat belts
file:///K|/ownersdocs/1989/1989_240/89240_01b.htm (4 of 20)12/30/2006 8:22:10 AM
 Loading...