

Volvo 2010 c70 Quick Manual
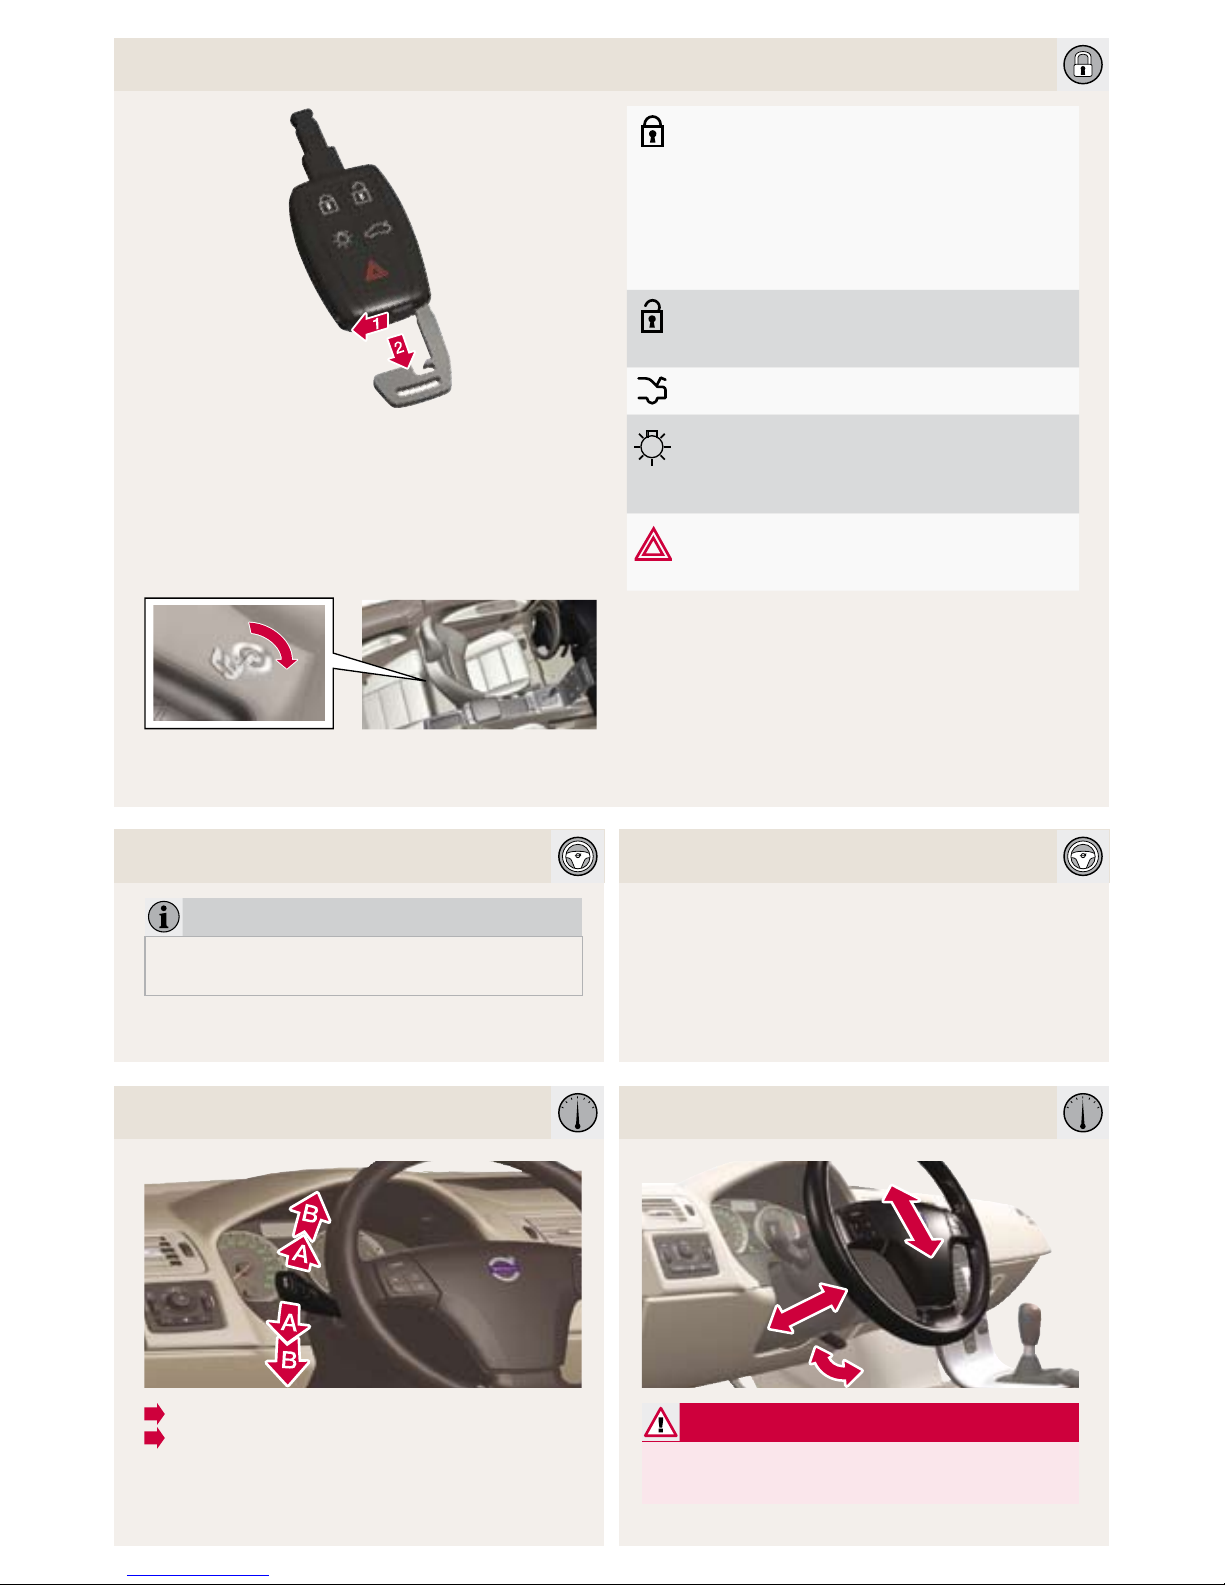
Insert the key blade to mechanically open the
trunk.
KEY BLADE
Used to lock/unlock the glove compartment or
the driver’s door if the vehicle has no electrical
current.
REMOTE KEY & KEY BLADE
Locks the doors, trunk, cabin storage
compartments, ski hatch, and arms
the alarm. If the car is locked with the
remote key while the power retractable
hard top is down, the double locking
feature activates after approximately
30 seconds. The doors can then not be
opened from inside the car.
Unlocks the doors, trunk, cabin storage
compartments, ski hatch, and disarms
the alarmA.
Unlocks (but does not open ) the trunk.
Approach lighting illuminates lights in
door mirrors, cabin, footwells, license
plates. Turn signals and parking lights
illuminate.
“Panic” alarm.
– Press and hold to sound the alarm.
Turn off alarm with unlock button.
A.
Automatic relock occurs if no door/trunk is opened within 2
minutes after unlock.
NOTE
After cold starts, your engine will idle at a
higher speed for a short time.
Depress the clutch and/or brake pedal. Turn
the key/keyless drive start control to position III and release it. The engine will start
automatically.
TURN SIGNALS STEERING WHEEL ADJUSTMENT
A
Lane-change sequence, three flashes.
B
Full turn sequence.
WARNING
Never adjust the steering wheel while
driving.
COLD START
AUTOSTART
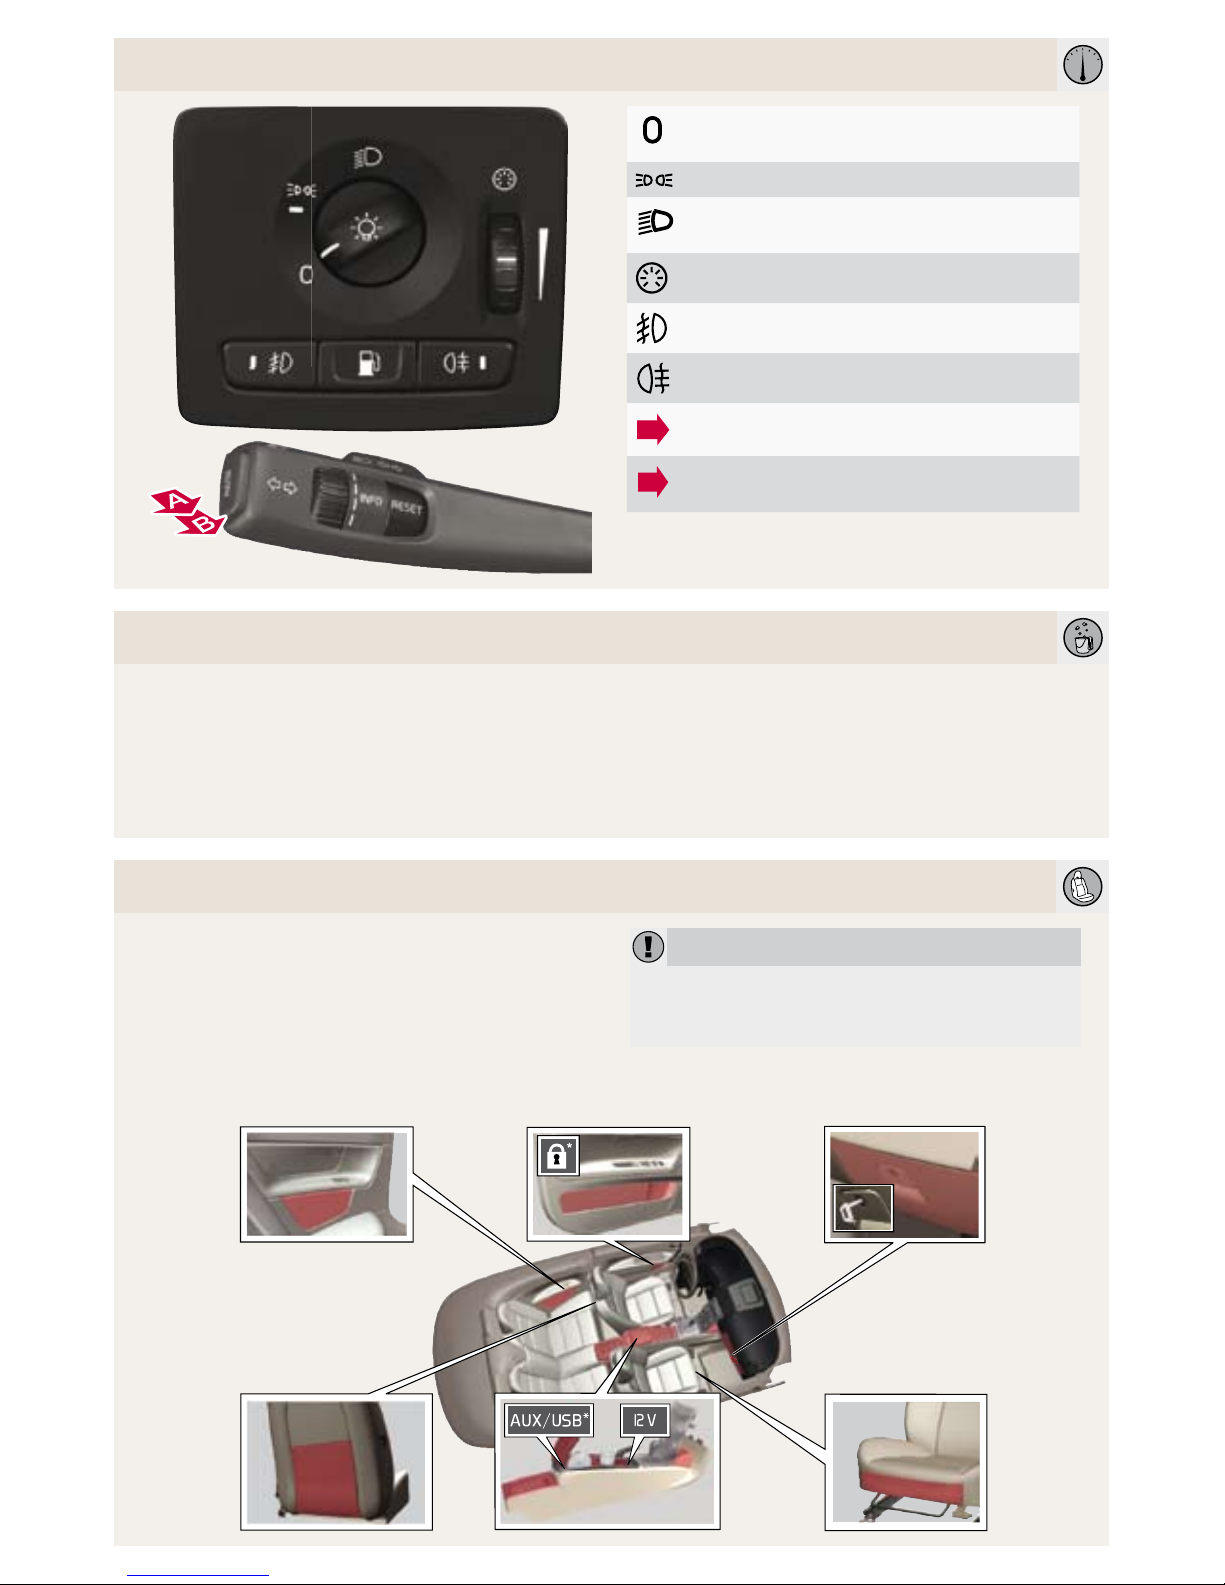
LIGHTING PANEL
Automatic headlights. High beam flash
only.
Parking lights.
Headlights: turn off when ignition is
switched off, high/low beams.
Display & instrument panel lighting.
Front fog lights.
Rear fog light (driver’s side only).
A
High beam flash.
B
Toggle between high/low beams, home
safe lighting.
STORAGE SPACES, 12-VOLT SOCKET & AUX/USB* CONNECTOR
The 12-volt sockets in the cabin function in
ignition positions I or II.
The 12-volt socket* in the trunk always functions.
AUX/USB*
can be used to connect e.g., an
mp3 player to the vehicle’s audio system.
CAUTION
Using the optional 12-volt socket in the trunk
with the engine switched off will drain the
battery.
CAR CARE
Hand washing is gentler on the paint than an
automatic car wash. Since the paint on a new
vehicle may take several months to harden
completely, we recommend washing the vehicle by hand during this period. Use clean water,
a suitable car washing detergent and a sponge.
Keep in mind that dirt or grit on the sponge can
scratch the paint.
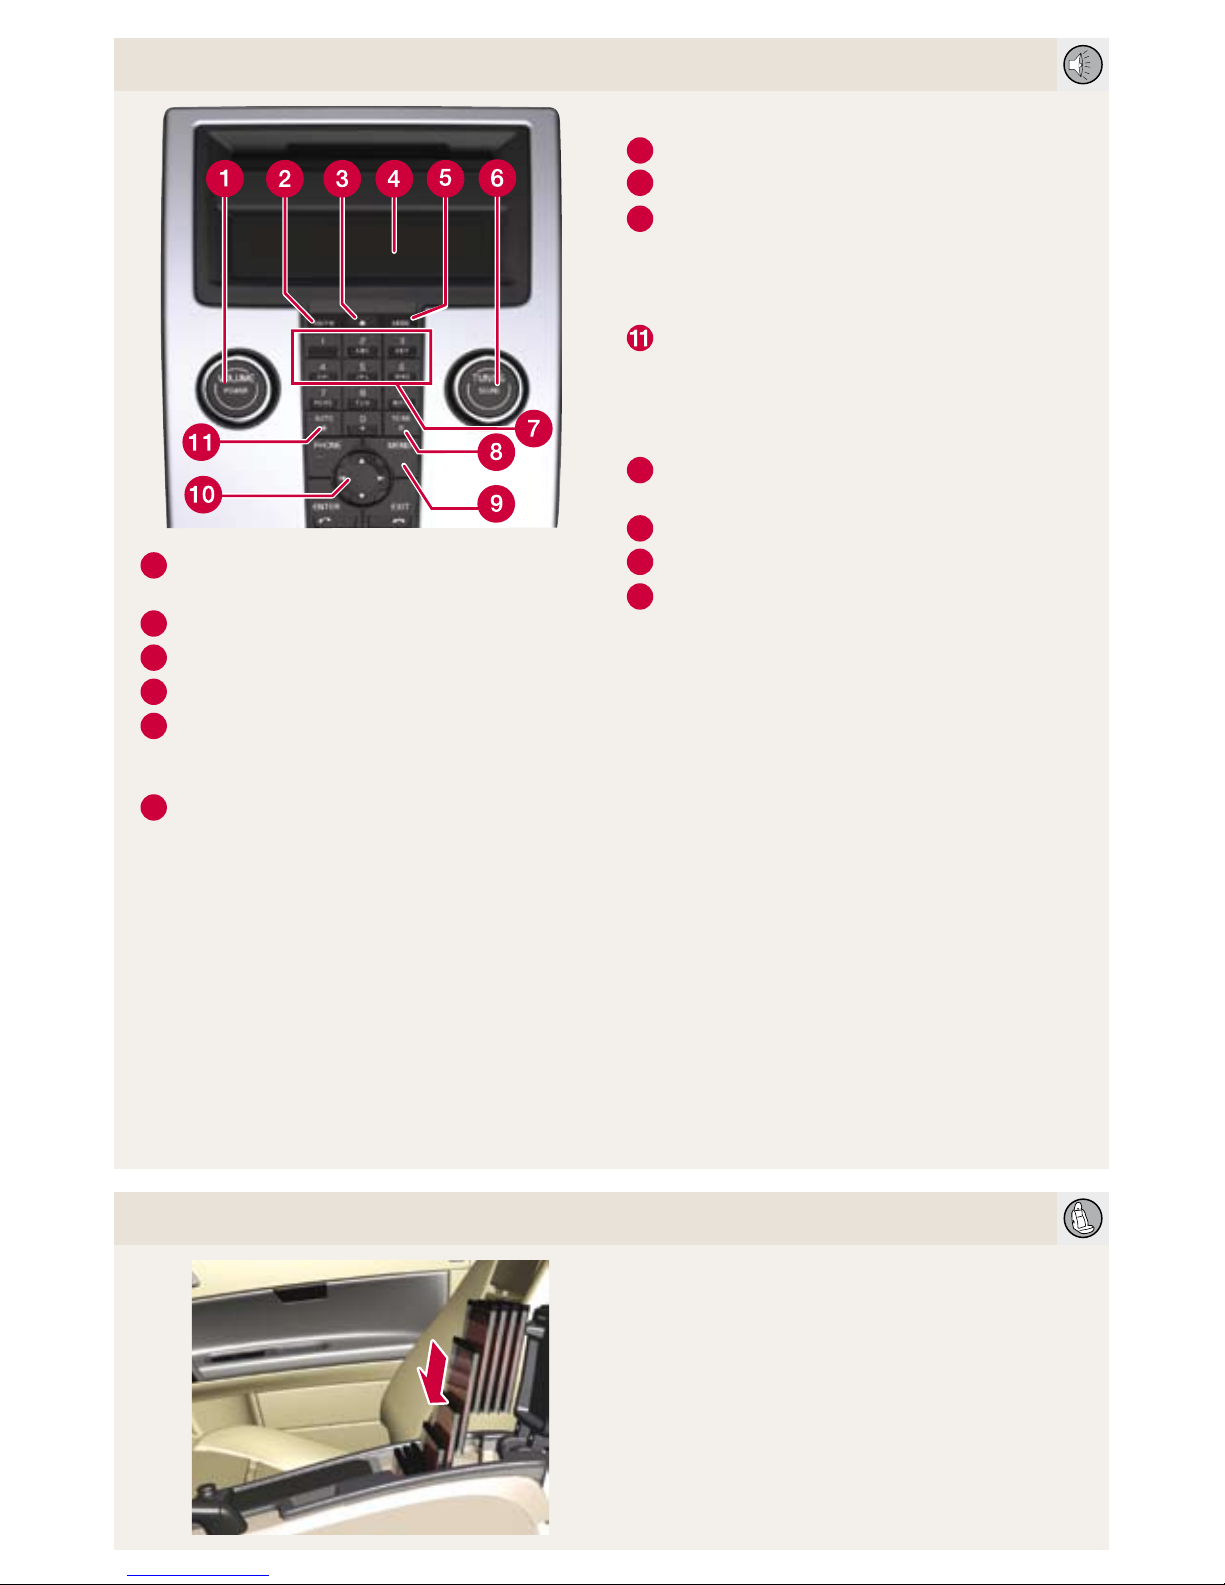
AUDIO SYSTEM
1
Press to turn on/off.
Turn to adjust volume.
2
FM1, FM2 or AM radio.
4
Display
5
MODE, CD, Sirius satellite radio*, AUX
A
6
Sound settings. Press to select e.g.,
BASS, TREBLE, etc.
Turn to adjust.
9
MENU. AUX, volume and advanced sound
settings.
HD RADIO
HD radio reception is subject to coverage limita
-
tions. See your Owner’s Manual for details.
A.
AUX connector for e.g., mp3 player. Set mp3 player’s volume
to medium for best sound quality.
RADIO
6
Turn to select a radio station.
8
Search for the next strong station.
10
Search for stations with left/right arrows.
Store up to 20 stations by pressing and
holding one of the preset buttons 0–9 in
FM1 and 0–9 in FM2, until the stored station is confirmed in the display.
Autostore stations by pressing for 2 sec-
onds. AUTOSTORE is displayed during
the search. The 10 strongest stations are
stored. Press 0–9 to select a station.
CD PLAYER
3
Press to eject current CD.
Press and hold to eject all CDs.
6
Turn to change tracks.
7
CD selectB. Press 1–6.
10
Change tracks with left/right arrows.
Select CDB with up/down arrows.
BLUETOOTH®
Make the cell phone searchable/visible.
Press the PHONE button on the audio sys-
tem control panel briefly.
Select ”Add phone” in the audio system
display.
Select the cell phone to be connected.
Enter the numbers shown in the audio sys
-
tem display using the cell phone’s keypad.
B
Optional CD changer only.
1.
2.
3.
4.
5.
The deep center storage compartment has
room for 10 CD jewel cases. These cases must
be inserted with their spines upward in order
to allow room for 10 CDs.
CD STORAGE
 Loading...