

Voltronic Power Taurus UPS-40, Taurus UPS-10, Taurus UPS-15, Taurus UPS-20, Taurus UPS-30 User Manual
...Page 1

7” Touch LCD Online UPS
208V 7.5K-60KVA
400V 10K-200KVA
Uninterruptible Power Supply System
User Manual
Page 2

GENERAL INDEX
1. INTRODUCTION.
1.1 ACKNOWLEDGEMENT LET TER.
2. INFORMATION FOR SAFETY.
2.1. USING THIS MANUAL.
2.1.1. Conventions and used symbols.
2.1.2. For more information and/or help.
2.2. SAFET Y INSTRUCTIONS.
2.2.1. To keep in mind.
2.2.2. General safety warnings.
2.2.3. Safety warnings regarding batteries.
3. STANDARD AND QUALITY GUARANTEE.
3.1. DECLARATION OF THE MANAGEMENT.
3.2. STANDARD.
3.3. ENVIRONMENT.
4. PRESENTATION.
4.1. VIEWS.
4.1.1. Views of the equipment.
4.1.2 Legend corresponding to the equipment views.
4.2. DEFINITION AND STRUCTURE.
4.2.1. Structural diagram.
4.3. UPS FUNCTION STAGES.
4.3.1. I/O EMI filters.
4.3.2. Rectifier-PFC stage (AC/DC).
4.3.3. Batteries.
4.3.4. Inverter stage (DC/AC).
4.3.5. Static bypass stage.
4.3.6. Maintenance or manual Bypass.
4.3.7. Terminals for EPO.
4.3.8. Control panel.
4.3.9. Control software and communications.
4.3.9.1. Control software at low level.
4.3.9.2. Managing software of the equipment.
4.3.9.3. Communications.
4.4. OPERATING PRINCIPLE OF AN EQUIPMENT.
4.4.1. Normal operating ().
4.4.2. Mains fault operating ().
4.4.3. Operating with non-active inverter ().
4.4.4. Manual bypass operating ().
4.4.5. Smart Eco-mode operating.
4.4.6. Frequency converter operating.
4.5. OPERATING STRUCTURE OF A PARALLEL SYSTEM.
5. INSTALLATION.
5.1. RECEPTION OF THE EQUIPMENT.
5.1.1. Reception, packaging and contents.
5.1.2. Storage.
5.1.3. Transport until its location.
5.1.4. Location, immobilized and considerations.
5.1.4.1. Location for single equipment.
5.1.4.2. Location for parallel systems.
5.1.4.3. Equipment immobilized and levelled.
5.1.4.4. Preliminary considerations before connecting.
5.1.4.5. Preliminary considerations before connecting, as regards to
batteries and protections.
5.1.4.6. Access to inside the cabinet for its connection.
5.2. CONNECTION.
5.2.1. Connection to mains, terminals (X1 to X4).
5.2.2. Connection of separate static bypass line, terminals (X14 a X17).
UPS B version only.
5.2.3. Connection to the output, terminals (X6 to X9).
5.2.4. Connection to the battery terminals of the equipment (X11, X12
and X23), with the battery modules (X47, X48 and X49).
5.2.5. Connection to the input main protecting earth terminal ( X5) and
the earth bonding terminal (X10) .
5.2.6. Relay COM port. Connector (X32).
5.2.7. RS-232 and RS-485 COM ports. Connector (X31).
5.2.8. EPO terminals (X50).
5.2.9. Auxiliary contact and battery temperature probe terminal strip.
5.2.9.1. Terminal strip, auxiliary contact of manual bypass switch (X51).
5.2.9.2.Terminal strip, auxiliary contact of output switch (X45).
5.2.9.3.Terminal strip, battery temperature probe (X34). For batteries in a
separate cabinet only.
5.2.10. Connection of parallel BUS (X36i) and (X36o).
5.2.10.1. Connection of the communication or BUS bundle (BC).
6. OPERATING.
6.1. PRELIMINARY CONSIDERATIONS.
6.2. START UP.
6.2.1. Control before start up.
6.2.2. Start up procedure.
6.2.2.1 Take into consideration about Master and Slave
6.3 SHUTDOWN OF ONE EQUIPMENT FROM THE PARALLEL SYSTEM
6.4 START UP THE PREVIOUS UPS AGAIN
6.5. COMPLETE SHUTDOWN OF UPS
6.6. EMERGENCY POWER OFF (EPO) OPERATION.
6.7. BYPASS MANUAL SWITCH (MAINTENANCE).
6.7.1. Principle of operation.
6.7.2. Transfer to maintenance bypass.
6.7.3. Transfer to normal operation.
7. DESCRIPTION OF THE CONTROL PANEL.
7.1. BASIC FUNCTIONS OF LCD TOUCH SCREEN.
7.2. SCREEN DESCRIPTION.
7.2.1 Main level (screen menu 0.0).
7.2.2 “Control” level (screen menu 1.0).
7.2.3. ‘‘Measure’’ level (screen menu 2.0).
7.2.4. ‘‘Setting” level (screen menu 3.0).
7.2.5. ‘‘Alarm’’ level (screen menu 4.0).
7.2.6. “Data Logger” level (screen menu 5.0).
8. MAINTENANCE, WARRANTY AND SERVICE.
8.1. BASIC MAINTENANCE GUIDE.
8.1.1. Battery fuses.
8.1.2. Batteries.
8.1.3. Fans.
8.1.4. Capacitors.
8.2. WARRANT Y CONDITIONS.
8.2.1. Warranty terms.
8.2.2. Out of the scope of supply.
9. ANNEXES.
9.1. PARTICULAR SPECIFICATIONS, EQUIPMENTS (LV).
9.2. TECHNICAL SPECIFICATIONS, EQUIPMENTS (HV).
9.2. GLOSSARY
Page 3
1
1. INTRODUCTION.
1.1 ACKNOWLEDGEMENT LETTER.
We would like to thank you in advance for the trust you have placed
in us by purchasing this product. Read this instruction manual carefully in order to be familiar with its contents, because as much you
understand and know the equipment, the higher will be the
satisfaction degree, safety level and functionality optimization.
We remain at you entire disposal for any further information or any
query you should wish to make.
Yours si
ncere
ly.
The equipment here described can cause important
physical damages due to wrong handling. This is why,
the installation, maintenance and/or fixing of the here
described equipment must be done by our staff or
specifically authorized personnel.
Although no effort has been spared to guarantee that the
information in this manual is complete and accurate, we are
not responsible for any errors or omissions that may exist.
The images included in this document are merely for
illustration
and may not accurate represent the parts of the
equipment showed. However, the dif ferences that may
arise will be smoothed or solved with the correct labelling on
the unit.
According to our policy of constant evolution, we reserve
the rights to modify the specifications, operating or
described actions in this document without prior
notification.
All reproduction, copy, third party concession,
modification
or partial or total translation of this
manual or document, in any form or medium, without the
previous written authorization from our firm is
prohibited, reserving of the complete and exclusive
property right over itself.
2. INFORMATION FOR SAFETY.
2.1. USING THIS MANUAL
The purpose of this manual or publication is to provide instructions
regarding the safety and to give explanations about the procedures for
delivery, installation and operating of the equipment.
Read this manual carefully before starting or making any action on the
equipment and especially in those instructions regarding safety.
Keep this document for future reference and keep it on hand during
the installation and commissioning procedures.
In the next pages, the «equipment» or «unit» and «(S.T.S.)» terms,
are referred to the Uninterruptible Power Supply (UPS) and Service
and Technical Support respectively.
2.1.1. Conventions and used symbols.
Some of the symbols can be used and shown in the equipment,
batteries and/or in the description of this document. It is advisable
to understand their meaning.
«Danger of electrical discharge» symbol. Pay special
attention to this symbol because it has features and basic
safety information for personnel. Not to respect these
indications can result in serious injuries or even death due
to electrical discharges.
«Warning» symbol. Carefully pay attention to this symbol
because it has features and basic safety information for
personnel and device. Not to respect these indications can
cause damages in the device during installation or loads.
«Warning» symbol. The electrolyte m ay corrode the
metals, and it is harmful to contact the electrolyte with
human skin directly. For the environment it is also a big
contaminant.
Never touch the spilled electrolyte of the deposited rests in the
batteries and its surrounding with bare hands. Under no
circumstances, it has not to be ingested or in contact with the
eyes.
In case of accidental spillage act accordingly while
collecting the electrolyte, in accordance with the protocol of
your company.
«Explosion» risk. Batteries emits explosive gases during its
charge, risk of explosion exists when it’s short-circuited or on
fire. Do not leave conductive parts over the battery terminals,
high risk of short-circuit and explosion might happen if there is
any accumulated gas inside the equipment or battery enclosure.
Attention! Danger of tipping might occur during transport
on inclined areas and when removing battery trays without
stabilizing the unit in advance. Do not pull out more than
one tray at the same time, or the possibility of falling down
the equipment and/or entrapment might cause high risk of
serious injury to the operator.
Precaution! Pay attention to fan blades in operation or fans
can start operating automatically suddenly.
Attention! Hot or very hot surface, elements or parts.
Possible burns happen due to the high temperature.
Page 4
2
Never touch or manipulate the components of the
electronic PCB with hands and without any protection
against electrostatic discharges (ESD). They are highly
destructive for most of the parts and they can cause
expensive breakdown.
«Main protective earthing terminal» symbol. Connect the
earth cables from the installation to this terminal.
«Earth bonding terminal» symbol. Connect the earth
cables from the load and the external battery cabinet to this
terminal.
«Notes of
information
» symbol. Additional topics that
complement the basic procedures. These instructions are
important for the equipment use and its optimum efficiency.
It is mandatory to use insulated gloves to prevent possible
electrical discharges when manipulating the connections related
to batteries.
It is mandatory to wear insulated shoes to prevent possible
electrical discharges when manipulating the connections which
are related to batteries.
It is mandatory to wear protective glasses, tight and
appropriate work clothes without hanging parts.
Obligation to turn off the power supply or loads
connected to the output.
Read carefully the instructions in the manual.
Smoking, fire or any actions that make sparks around the
batteries are prohibited.
To pull connecting cables is prohibited. Use the suitable
mediums
to unplug the
connections
from terminals.
To touch with bare hands is prohibited due to risk of electric
shock when contacting with low potential parts. To open,
manipulate the components inside the equipment and/or
terminals and battery connections are prohibited for nonauthorized and non-qualified personnel.
To randomly turn on the switches or protections is
prohibited. All maneuvers should be done according to the
instruction manual.
In case that the acid in the batteries contact with parts of the
body, wash the contacted areas with plenty of water and go to
the nearest medical service.
Preservation of the environment: The presence of this
symbol in the product or in their associated documentation
states that, when the life cycle of product expires, it cannot
be disposed together with the domestic residuals. In order to
avoid possible damages to the environment, separate this
product from other residuals and recycle it suitably. The users
can contact with their provider or with the pertinent local
authorities to get the information of how and where they can
recycle and/or dispose the product correctly.
Any packaging material must be recycled in accordance
with the legal norms applicable to each country where the
equipment is installed.
Alternating current a.c..
Direct current d.c..
2.1.2. For more information and/or help.
For more information and/or help of your specific unit, request it to
our Service and Technical Support (S.T.S.).
2.2. SAFET Y INSTRUCTIONS.
•
It is required to check the installation information
on
the nameplate.
• Please remember that the UPS is an electrical
energy generator, so the end-user must take all the
needed cautions against direct and indirect
contact.
Its power supply relies on the batteries, a n d AC mains,
which are included or excluded in the case or cabinet of the
electronic parts of the equipment depending on the model and/
or extended autonomies.
When the
equipment
is ON, and the
batteries
are
connected
to the
equipment and its protections, if any, are turned “On,” the fact
that the UPS is connected or not connected to mains is irrelevant,
and neither is the protections of mains. The outlets or output
terminals will supply voltage when there is energy in the battery set.
• Compliance as regards to “Safety instructions“ is
mandatory, being the user the legal responsible
regarding
to its
observance and application. Read
them
carefully and
follow the stated steps in the established order, keep them for
future consultations that may arise.
• If the instructions are not in total or partial understood
and in special those ones referred to safety, do not
carry
on with the installation or
commissioning
tasks,
because
there
could be a at a risk of your or other persons’ safety, being able
to make serious injuries even the death, also it can cause
damages to the equipment and/or loads and installation.
• The local electrical regulations and the dif ferent
restrictions of the client’s site can invalidate some
recommendations included in the manuals. When discrepancies
exist, the user has to comply with the local regulations.
• This equipment must be installed by qualified
personnel and for personnel with no specific
training, just act with the help of this manual.
A person is defined as qualified, if he has experience in
assembling, commissioning and perfect control operating of the
equipment, if (s)he has the requirements to do the job and if (s)he
has read and understand all the things described in this manual,
in particular the safety indications. Such preparation is
considered valid if it is certified by our (S.T.S.) only.
• Warning labels have to be placed in all primary switches, installed in
areas far away from the equipment, in order to warn the electrical
maintenance personnel of the presence of a UPS in the circuit.
The label shall contain the following text or an equivalent one:
Before operating in the circuit.
Isolate the Uninterruptible Power Supply (UPS).
Check the voltage of all terminals, including the
earth
main protective earth.
Risk of UPS backfeed voltage.
Page 5
3
• To manipulate the connected terminals of the
equipment, which has been already connected to mains,
wait for five minutes after its complete isolation, before taking
any action in it.
2.2.1. Points for Attention
• The UPS is supplied in complete package from factory in the
best way for its transport and shipment till you receive is. It is
recommended to remain it packaged until it arrives to its final
location.
• When serious damages are observed in the package, or its level
of damages can be sensed in the contents and/or the shock
indicator is in RED, handle the product according to the
instructions stated in the own label of transport control.
Keep the affected equipment isolated from other received
equipment, and wait the further inspection by qualified staff.
In case it has to be returned to the factory or your distributor
but the same package is in poor conditions, contact with the
appropriate person in order to agree the way and conditions for
its return.
• Respect the unpacking instructions, as well as the established
mode to remove the equipment from the pallet.
These operations require the manpower of at least two
persons.
• The equipment has to be always in vertical position.
When moving the equipment, consider the slope of the
ground or surface and the risk of tipping.
• Be careful not to lif t heavy loads without other people’s help.
Please refer to the following recommendations:
, < 18 kg.
, 18 - 32 kg.
, 32 - 55 kg.
, > 55 kg.
• To avoid accidentally dropping equipment or any
damaged enclosure, do not start it up under any concept. This
kind of fault can cause fire or electrical discharge. Contact
with our (S.T.S.).
• Some models include casters to move it till its location. They
are not designed for long distances or constant movements.
The equipment shall be guided by two persons as minimum,
which will be placed on either side and oriented to the walking
direction.
• UPSs are electronic equipment. Avoid jolting or bouncing like
those produced by moving the equipment over an uneven or
wavy surface.
• When moving an equipment from a cold to a warm environment
and vice versa, condensation (small water drops) might occur on
the external and internal surfaces. Before installing a moving
equipment from another place or even package, the
equipment should be placed in the new location for a minimum
of two hours before making any action, with the purpose of
adapting it to the new environmental conditions and avoid
possible condensations.
The UPS has to be completely dry before starting any
installation task.
• Do not store, install or expose the equipment in corrosive,
wets, warm, dusty environments or with conductive parts and
never outdoors.
The best location for installation should be cool, dry and far
from heat sources and easy to access. If possible, place it in
an environment with temperature control.
• Avoid locating, installing or storing the equipment in places
with direct sunlight or high temperatures. Batteries might
damage and/or shorten its lifetime.
In the exceptional and long exposure of intense heat, batteries
can cause filtrations, overheating or explosions, which can
cause fires, burn or other injuries. High temperatures can also
make deformation in the plastic enclosure.
• Do not obstruct the cooling grids by ins e r ting an y objects
through themselves or other orifices.
• Locate the equipment to the power supply outlet and supplied
loads as close as possible, leaving an easy access in case of
an urgent disconnection.
• All models with casters have four leveling feet at each corner of
the base, with the purpose of locking and level the unit.
Loosen them until they can be lifted from the ground.
With the help of a spanner, act on each one and loosen
them half round more against the ground.
For slightly uneven grounds, immobilize the equipment with
these leveling parts.
Check if the equipment is completely immobilized.
Fortuitously pulling out the connection cables from the
equipment will indirectly be avoided so unexpected
movements will not happen.
• Regarding any interventions inside the equipment, battery
cabinet and battery manipulation is a task reserved to
personnel with specific or qualified knowledge only and in
particular to (S.S.T.). It is mandatory to immobilize the
equipment with the leveling feet- stated in the previous point,
before doing any action.
Attention! Risk of tipping may happen when the
battery trays are moved without stabilizing the unit first.
Do not remove more than one tray at the same time. High risk
of injury may take place over the operators due to accident
shock of the possible equipment falling down and/or
entrapment.
• Leave a minimum of free space to cool the unit of:
25 cm at both sides.
50 cm at the rear side.
100 cm at the top side.
150 cm at the front side.
• It is recommended to leave an additional 75cm at both sides,
for possible interventions of the (S.T.S.) or the requisite
clearance of the connected cables to facilitate the movement
of the equipment.
• Do not cut, deteriorate or manipulate the electrical cables, or do
not put heavy objects on them. Any of these actions could
cause a short-circuit, fire or electrical discharge.
Check if the connected electrical cables, plugs and outlets are in
good conditions.
Page 6
4
• All electrical cables for power supply have to be fixed to the
equipment and loads, interfaces, etc..., or to immovable parts
for fear of being stepped on them or becoming a medium or
exposing to fortuitous pulls.
• Be careful not to wet the device because it is not waterproofed.
Do not allow any kind of liquids to leak to; if it happens, shut it
down immediately and contact with the (S.T.S.).
• If it accidentally contacts with liquids or high density of saline
air, dry it with a soft and absorbent cloth quickly.
Check if any liquid leak to the unit and act accordingly.
• To clean the equipment, wipe it with a slightly damp cloth and
then dry it. Avoid liquids sprinkling or spillage that could enter
through the slots or cooling grids, which may cause fire or
electric shock.
Do not clean the equipment with detergent products that
contain alcohol, benzene, solvent or other inflammable
substances, and needless to say they contain abrasive,
corrosive liquids.
• Never manipulate the equipment with wet hands.
• If it is observed that the UPS exhausts smoke or toxic gas, shut it
down immediately and disconnect it from power supply. This
incident may cause fire or electrical discharge. Contact with our
(S.T.S.).
• Do not put either materials or parts over the equipment that
might obstruct the synoptic visualization of the product.
• Before using the UPS for first time or after a long period
of time (6 months maximum), it has to be connected to
the power supply to charge the batteries for at least 12
hours.
Although the equipment can operate with batteries discharged,
you should keep in mind the possible risk of mains fault during
the first operating hours. Thus, the available back up time of
the UPS batteries should be lower than the expected.
2.2.2. General safety warnings.
• All electrical cables connections and disconnections of the
equipment, including the controlled ones, should be done
without power supply and with switches on «O» or «Off»
position.
• Pay special attention to the labelling of the equipment
that warns the «Electrical shock hazard». It indicate
there are dangerous voltages inside the equipment.
Do not open, dismantle or adjust the equipment when the
operating action is not stated in this document. To manipulate
equipment for repairing is restricted to qualified staff only. In
case of maintenance or fault, consult to the closest (S.T.S.).
A part from the implicit risk of electrical shock, any action
which is not stated in this document alters the internal or
external of the equipment or just only the simple intervention
inside can expire the warranty.
• Some action requires to open the front door or to remove the
protection cover from the terminals, i.e. erection or
commissioning operation.
Once the respective actions are completed, recover the
equipment to it was, with the protection cover put back and front
door closed.
• To shut down the equipment completely, follow the instructions
in the start-up and shutdown chapter.
Consult the documentation before doing any action.
A wrong manipulation over the switches can cause
important production losses and/or failures in the
equipment.
• Protection Earth cable of the UPS drives the leakage current
of the load devices. An isolated earth cable has to be
in
stalled as part
of the
circuit
that
supplies
the
equipment.
Cross
cable
section and its features will be the same as the
power supply
cables, but with green strip and with or
without yellow strip.
• The protection earth must be connected to the frame or
metallic chassis of any electrical equipment, by means
of the foreseen terminal (in our case to the UPS, battery
cabinet when it is available and loads), assuring that it is
done before turning on the input voltage.
It is essential that cables feeding the loads have their respective
protection earth cable.
When circuits branches, i.e. by means of terminal strips, it is
essential to have a protection earth terminal in each one of
them.
• Check the quality and availability of the earth to see if it’s between
the defined parameters defined by the local or national regulations.
• During the normal UPS operation, the input power supply
cable can’t be disconnected because the earth cable of
general protection in the UPS and all loads connecting at
the output will be disconnected, either.
Due to the same reason, the earth cable of general protection
in the building or switchgear panel that supplies the UPS will not
be disconnected.
•
Cross cable sections used to supply the equipment and loads to be
fed,
w
ill
be followed according
to the nominal current stated in the
nameplate l
abe
l of
the equipment, and respect the Low Voltage
Electrotechnical
Regu
lations
or
standards
of the country.
• UPS equipment can be manufactured in four different
configurations of Input-Output:
Three phase - Three phase.
Three phase - Single phase.
Single phase - Three phase.
Single phase - Single phase.
To correctly operate the UPS, it is necessary to use input
Neutral cable or an isolation transformer between the power supply
and the equipment.
• The UPS doesn’t modif y the input neutral regime at its output.
Do not earth the output neutral.
When, it is needed to modify the output neutral regime, an
isolation transformer has to be located between the loads and
the equipment.
• In those models with separate bypass line, an isolation
transformer has to be located in both input lines
(rectifier input or static bypass), in order to avoid the
direct connection of the neutral lines at both lines through
the internal wiring of the equipment.
This is only applicable when the two power supplies come from
different lines, i.e.::
Two different electrical companies.
Page 7
5
One electrical company and a generator, ...
• The installation will have input protections sized to the currents of
the equipment and stated in the nameplate label. (RCD devices
type B and circuit breakers with C characteristic or any other
equivalent one).
For equipment with three phase input, and connected to an IT
distribution system, the protection will be with four poles in order
to break the three phases and neutral in the same maneuvering.
Overload conditions are considered as a non-permanent and
exceptional operating mode, so these currents will not be kept in
mind when sizing the protections.
• Do not overload the UPS by connecting loads with inrush
consumptions at its output, i.e. laser printers.
• Installations with redundant equipment or separate bypass line,
there will be one and common RCD device only of 300 to
500mA for both lines at the beginning of the installation.
• It is recommended to distribute the output power into four lines at
minimum. Each one of them will have a protection circuit
breaker sized to the quarter of the nominal power. This kind of
outgoing distributions will allow any fault that makes a short
circuit in any device connected to the equipment to be affected to
the line with the failure only. Power supply will be guaranteed to
the rest of connected loads, because of the tripping of the
affected line by the short-circuit only.
• Under any concept the input power cables will be connected to
the output of the equipment, either directly or indirectly through
other outlets.
• When supplying input voltage to a UPS with static bypass
o
r separate bypass line, if the inverter is in «Off» (shutdown)
mode, it doesn’t mean no voltage at the output terminals.
To set no voltage, input and static bypass switches have to be turned
«Off».
Put warnings labels and/or emergency switches in the particular
installation if the safety norms require it.
• It is possible that the UPS supplies output voltage through the
manual bypass to those equipment through either standard or
optional mode under the consideration of safety.
If it is necessary to break the output supply of the equipment under
this situation, turn off the outgoing distribution protection or lack it, and
turn off the general protection of the distribution panel that feeds the
UPS.
• All the equipment have two auxiliary terminals to install an
external emergency power off button (EPO), which will belong to
the end-user.
EPO doesn’t affect the power supply of the equipment, but it only
breaks the power supply to the loads as a safety measure.
• RACK mounted equipment are destined to be installed in a predeter
mined
se
tting and to
be done b
y professionals.
Its installation has to be designed and executed by qualified
personnel, who will be responsible for applying the safety
and EMC regulations and standards controlling the
particular installations and the place where the product is
destined.
2.2.3. Safety warnings regarding batteries.
• The manipulation and connection of the batteries shall
be done and supervised by personnel with battery
knowledge only.
If Battery circuit is not isolated from input voltage, it is
dangerous to touch any part of the batteries. Dangerous
voltages can be found between the terminals of the battery set
and the earth. Check if there is any voltage at the input before
taking any action over them.
• Before doing any action inside the UPS, disconnect the batteries.
Check that no voltage is present and there is not potential danger in
the DC BUS
(capacitors) o
r in the en
dpo
int of the battery set terminals.
• In equipment with separate battery cabinet, check if they are
compatible before connecting them.
• When faulty batteries are found, the complete battery set has
to be replaced. But with few exceptional cases in new
equipment due to manufacturing faults, it will only be replaced
the defective ones.
The replacement should be conducted with another battery in
same type, voltage, capacity, quantity and the same brand.
Otherwise there is a risk of explosion.
• Do not reuse faulty batteries. There could be a ri s k o f
explosion or burst in any battery with the involved problems
and issues.
• Generally supplied batteries are installed in the same cabinet,
case or rack of the equipment. Depending on the power,
autonomy or both, they can be supplied separately from the
equipment in another cabinet, case or rack, with the interlink
cables among them. Do not modify its length.
• In those equipment without batteries, their acquisition, installation
and connection will be done by the end-user and it should be
under his/her responsibility. Information about the batteries
as regards to quantity, capacity and voltage, is stated in the
battery label stuck beside the nameplate of the equipment.
Respect these data, battery connection polarity and the
supplied circuit diagram strictly.
For an optimum and efficient operation, the battery set has to
be located as close to the equipment as possible.
• Battery voltage can involve the risk of electric shock and
can produce high short-circuited currents. Observe the
following preventive measures before manipulating any
terminal block identified in the labelling as «Batteries»:
Use the suitable IPE (Individual Protection Equipment):
gloves
and insulated shoes, protection glasses, suitable work clothes,
and etc.
Take off rings, bracelets or other metal hanging objects.
Use tools with insulated handles.
Disconnect the corresponding protection elements.
When connecting a battery cabinet to the UPS, respect the
polarity and color of the cables (red-positive; black-negative)
indicated in the manual and labelling.
Do not place metal tools or objects over the batteries.
Page 8

6
Risk of short-circuit and possible deflagration may
happen due to the accumulated hydrogen.
Metallic particles of different sizes should be avoided due
to the violent explosion of the short-circuit and/or the tool
itself or the metallic object. This might result in the incident,
and increase the risk of significant damage to nearby
people and other devices, instruments or machines.
Never manipulate them with your bare hands or through
con
ducting objects. Both the battery terminal block of the
equipment and the ones from the batteries are necessary.
In case the automatic software to shut down the devices
due to end of back up time is not set, it is recommended to
shut down the loads and the UPS before depleting the
autonomy of the batteries, as a preventive safety measure
for the own loads.
• If the equipment is not in operation during the nighttime,
weekends and holidays periods, it is recommended to shut
down the equipment completely. In particular due to this last
period and safety reasons, the energy generator should be
handled with care, especially to prevent batteries from
unnecessarily discharging during these periods of time.
•When the equipment and/or battery module is protected by fuse
which is needs to be replaced, substitute it for another one with
the same type, format and size.
•After prolonged time of disconnection, it is needed to recharge
the batteries for 12 hours at a minimum every 6 months, in order
to avoid the irreversible degradation of the batteries.
•The battery terminals are requisite in order to avoid the high risk
of detriment to the equipment and batteries.
• Avoid mechanical efforts and impacts.
• Do not open or mutilate the battery. Spilled electrolyte is harmful
and toxic for the skin and eyes.
• Do not dispose the batteries in a fire or expose it to high
temperatures. Batteries may explode.
•If acid contacts with parts of the body, wash it immediately with
plenty of water and urgently call the nearest medical service.
•Batteries involve a possible risk for health and environment so the
disposal should be done in accordance with the existing
regulations.
Page 9
7
3. STANDARD AND QUALITY GUARANTEE.
3.1. DECLARATION OF THE MANAGEMENT.
Our target is to fulfill the client’s satisfaction; therefore, this
Management has decided to establish a Quality and Environmental
policy, by means of installation a Quality and Environmental
Management System that enable us to comply with the
requirements demanded by the standard ISO 9001 and ISO
14001 and by our Clients and their concerns too.
Likewise, the enterprise Management is committed with the
development and improvement of the Quality and Environmental
Management System, through:
The communication with all of our c lient s to fulfill their
satisfaction and legal requirements and regulations.
The Quality and Environmental Policy diffusion and the fixation
of the Quality and Environment targets.
To carry out revisions by the Management.
To provide the necessary resources.
3.2. STANDARD.
This product is designed, manufactured and commercialized in
accordance with the standard EN ISO 9001 of Quality
Management Systems. The marking shows the conformity
to the EEC Directive by means of the application of the following
standards:
• 2006/95/EC of Low Voltage Safety.
• 2004/108/EC of Electromagnetic compatibility (EMC).
In accordance with the specifications of the harmonized standards.
Standards as reference:
• EN-IEC 62040-1. Uninterruptible power supply (UPS). Part 1-1:
General and safety requirements for UPS’s used in accessible
areas by end-users.
• EN-IEC 60950-1. IT equipment. Safety. Part 1: General
requirements.
• EN-IEC 62040-2. Uninterruptible power supply (UPS). Part 2:
EMC requirements.
The manufacturer’s responsibility excluded the event of any
modification or intervention in the product done by the enduser.
This is a product for its use in commercial and industrial
applications, so restrictions and additional measures is
required in the installation to prevent perturbations, in
accordance with the particular standards, laws or
regulations for its use in critical applications.
Pay attention to those systems used in vital signs
maintenance, medical applications, commercial
transportation, nuclear power stations, as well as other
applications or loads where a failure in the product can
cause serious personal injuries or material damages.
Declaration of conformity CE of the product is at the client
disposa
l under previous request to our headquarters
offices.
3.3. ENVIRONMENT.
This product has been designed to respect the environment and has
been manufactured in accordance with the standard ISO 14001.
Equipment recycling at the end of its lifetime:
Our company commits to use the services of authorized venders
and to follow the regulations, in order to properly treat the
recovered product at the end of its lifetime (contact your distributor).
Packaging:
To recycle the packaging, follow the legal regulations in force,
depending on the particular standard of the country where the
equipment is installed.
Batteries:
The batteries mean a serious danger for health and environment.
The disposal of them must be done in accordance with the
regulations in force.
Page 10

8
4. PRESENTATION.
4.1. VIEWS.
4.1.1. Views of the equipment.
Figures 1 to 20 show the illustrations of the equipment according to
different models, nominal operating voltages and input-output settings,
which are summarized in Chart 1.
Format of protections and size of the terminals shown in the figures
of this document always correspond to the highest power rate model
manufactured in that cabinet, at the same power supply voltage and
input-output setting.
Nevertheless by constant evolution of the products, some
discrepancies or small contradictions might arise. So, if any questions,
the labels on the equipment will prevail.
Each equipment model corresponds to one power rate,
voltage, frequency and input and output currents. All values
of these features can be checked in the nameplate, located
at the back of the front door (PF), and act in your installation
accordingly.
In the description of this manual, there are references to «LV» (Low
voltage) and «HV» (High voltage) abbreviations, described in the
nomenclature of the model with an «A » for «LV» and omitted «HV»,
grouping the following interval of voltages:
• LV.- 3x200 to 3x230 V (115 to 133 V in single phase).
• HV.- 3x380 to 3x415 V (220 to 240 V in single phase).
These abbreviations do not have any other purpose but matching
and/or helping to give a better comprehension of the detailed
information in this document and even they are not shown either in
the nomenclature, or in the reference of the nameplate model.
All models can operate as single units or connected in parallel with
other equipment of the same family because the necessary
electronic kit is included.
Connection in parallel can be done at any time when the upgrading
requirements are needed to increase the supplied power of the
equipment or in order to have redundant operating systems for
installations with higher safety.
Do not connect UPS equipment of different features versions,
settings, back up times or duplicated addresses (i.e.: two equipment,
although they are identical, coming from two parallel systems and
with the same address) in parallel.
In any parallel system only one and different address is assigned to
each equipment that makes the system.
Model.
Voltage (V)
Power (kVA / kW)
Fig. no. Front UPS cabinet
Fig. no. Front battery cabinet
Door closed
Door opened
Door closed
Door opened
UPS-7.5
«LV»
3x200.
3x230 V
(115. 133 V
in single
phase)
7.5 / 6.75
1
(*) 1 for (-B)
6
(*) 8 for (-B)
15
(Battery cabinet
for extended
back up time
models only)
16
(Battery cabinet
for extended
back up time
models only)
UPS-10
10 / 9
UPS-15
15 / 13,5
6
(*) 9 for (-B)
UPS-20
20 / 18
6
(*) 10for (-B)
UPS-30
30 / 27
7
15
16
UPS-40
40 / 36
2
11
17
18
UPS-50
50 / 45
12
UPS-60
60 / 54
UPS-80
80 / 72
3
13
19
20
UPS-100
100 / 90
UPS-10
«HV»
3x380.
3x415 V
(220. 240 V
in single
phase)
10 / 9
1
(*) 1 for (-B)
6
(*) 8 for (-B)
15
(Battery cabinet
for extended
back up time
models only)
16
(Battery cabinet
for extended
back up time
models only)
UPS-15
15 / 13.5
UPS-20
20 / 18
UPS-30
30 / 27
6
(*) 9 for (-B)
UPS-40
40 / 36
6
(*) 10for (-B)
UPS-60
60 / 54
1 7 15
16
UPS-80
80 / 72
2
11
17
18
UPS-100
100 / 90
2
12
UPS-120
120 / 108
UPS-160
160 / 144
4
13
19
20
UPS-200
200 / 180
(*) The equipment with separate static Bypass line (-B), are supplied in the same cabinet as basic models, less those ones stated in this
chart with other No of Fig..
Table 1. Reference relation among models and illustration.
Page 11
9
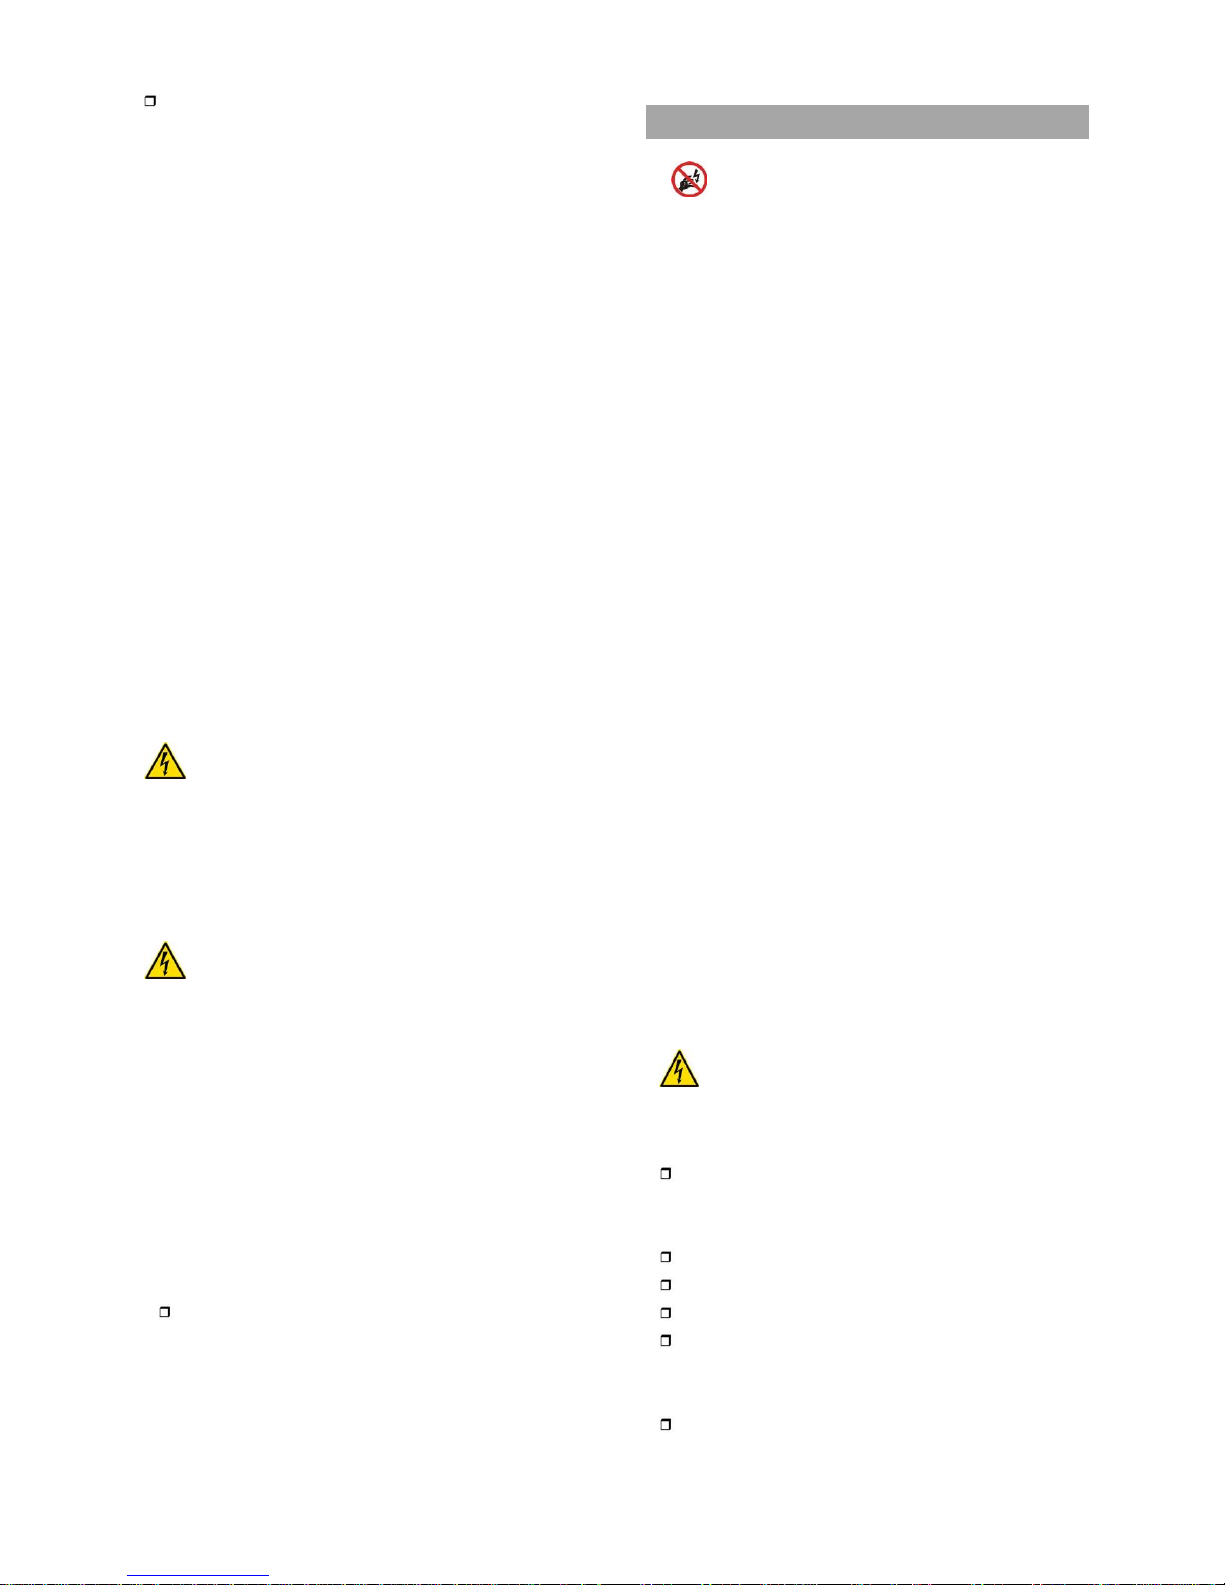
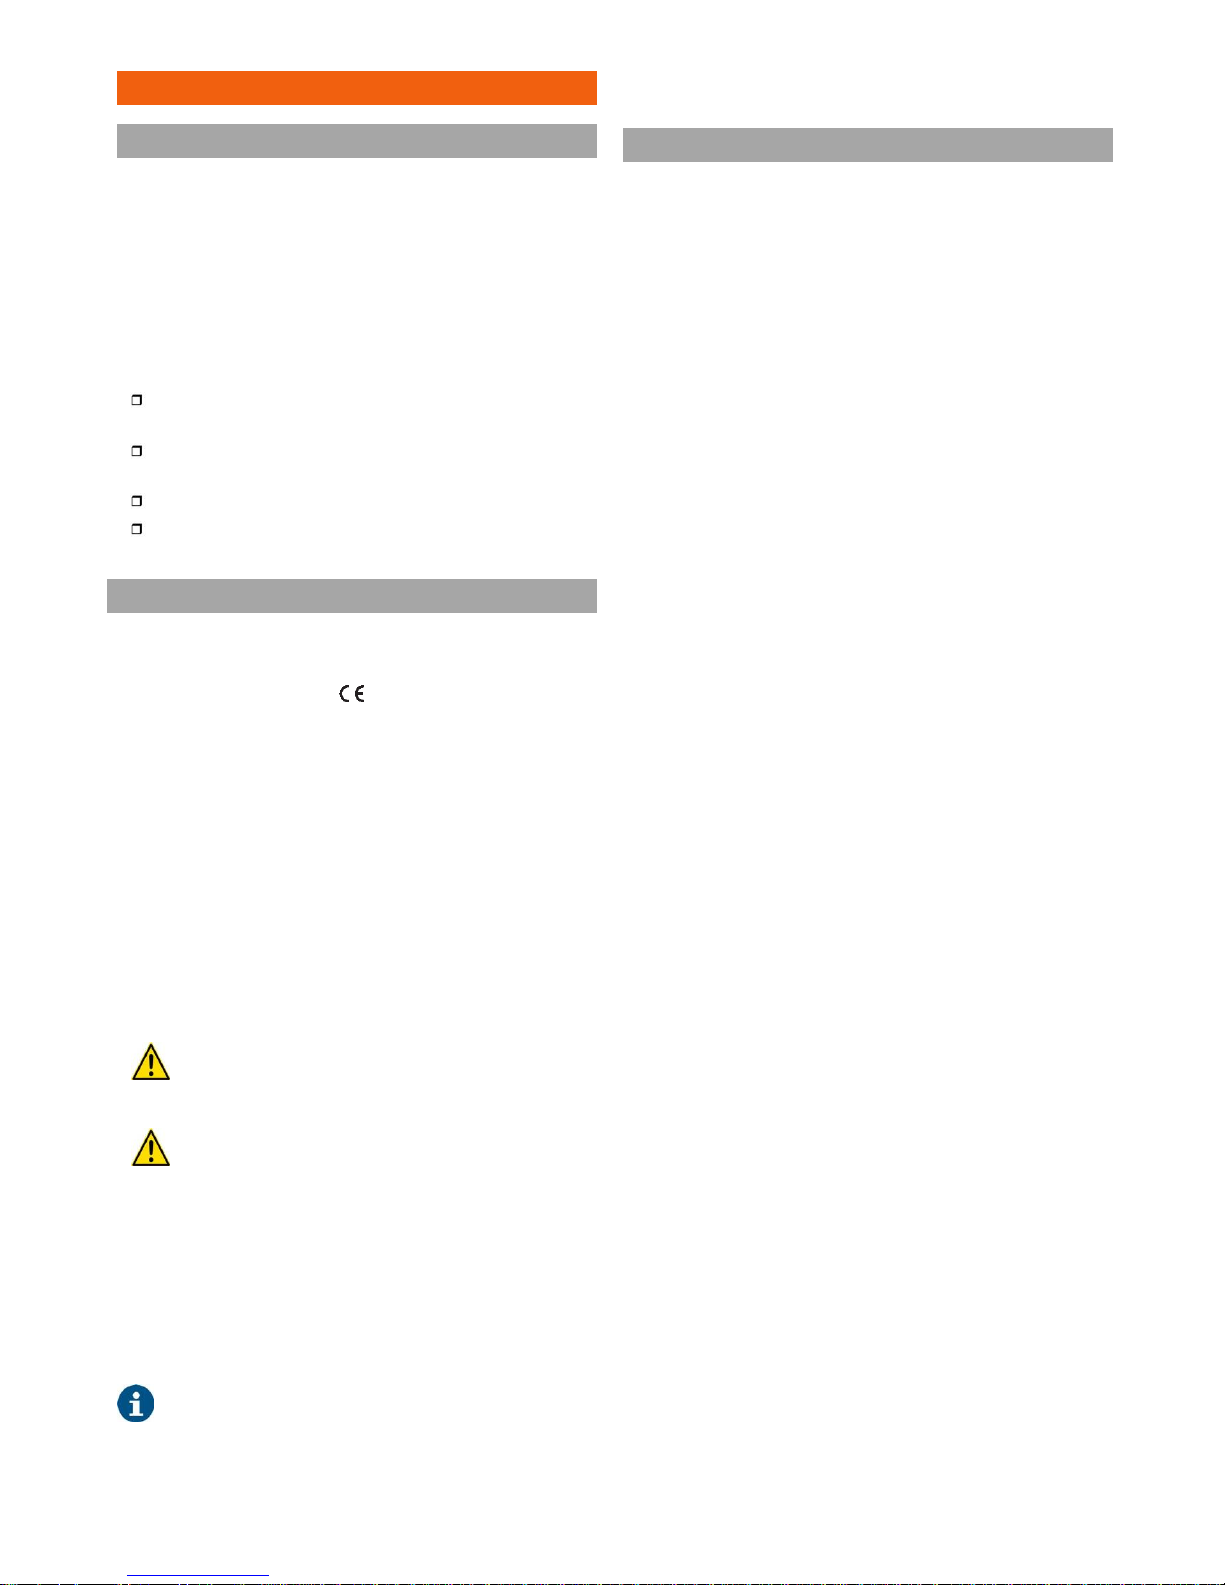
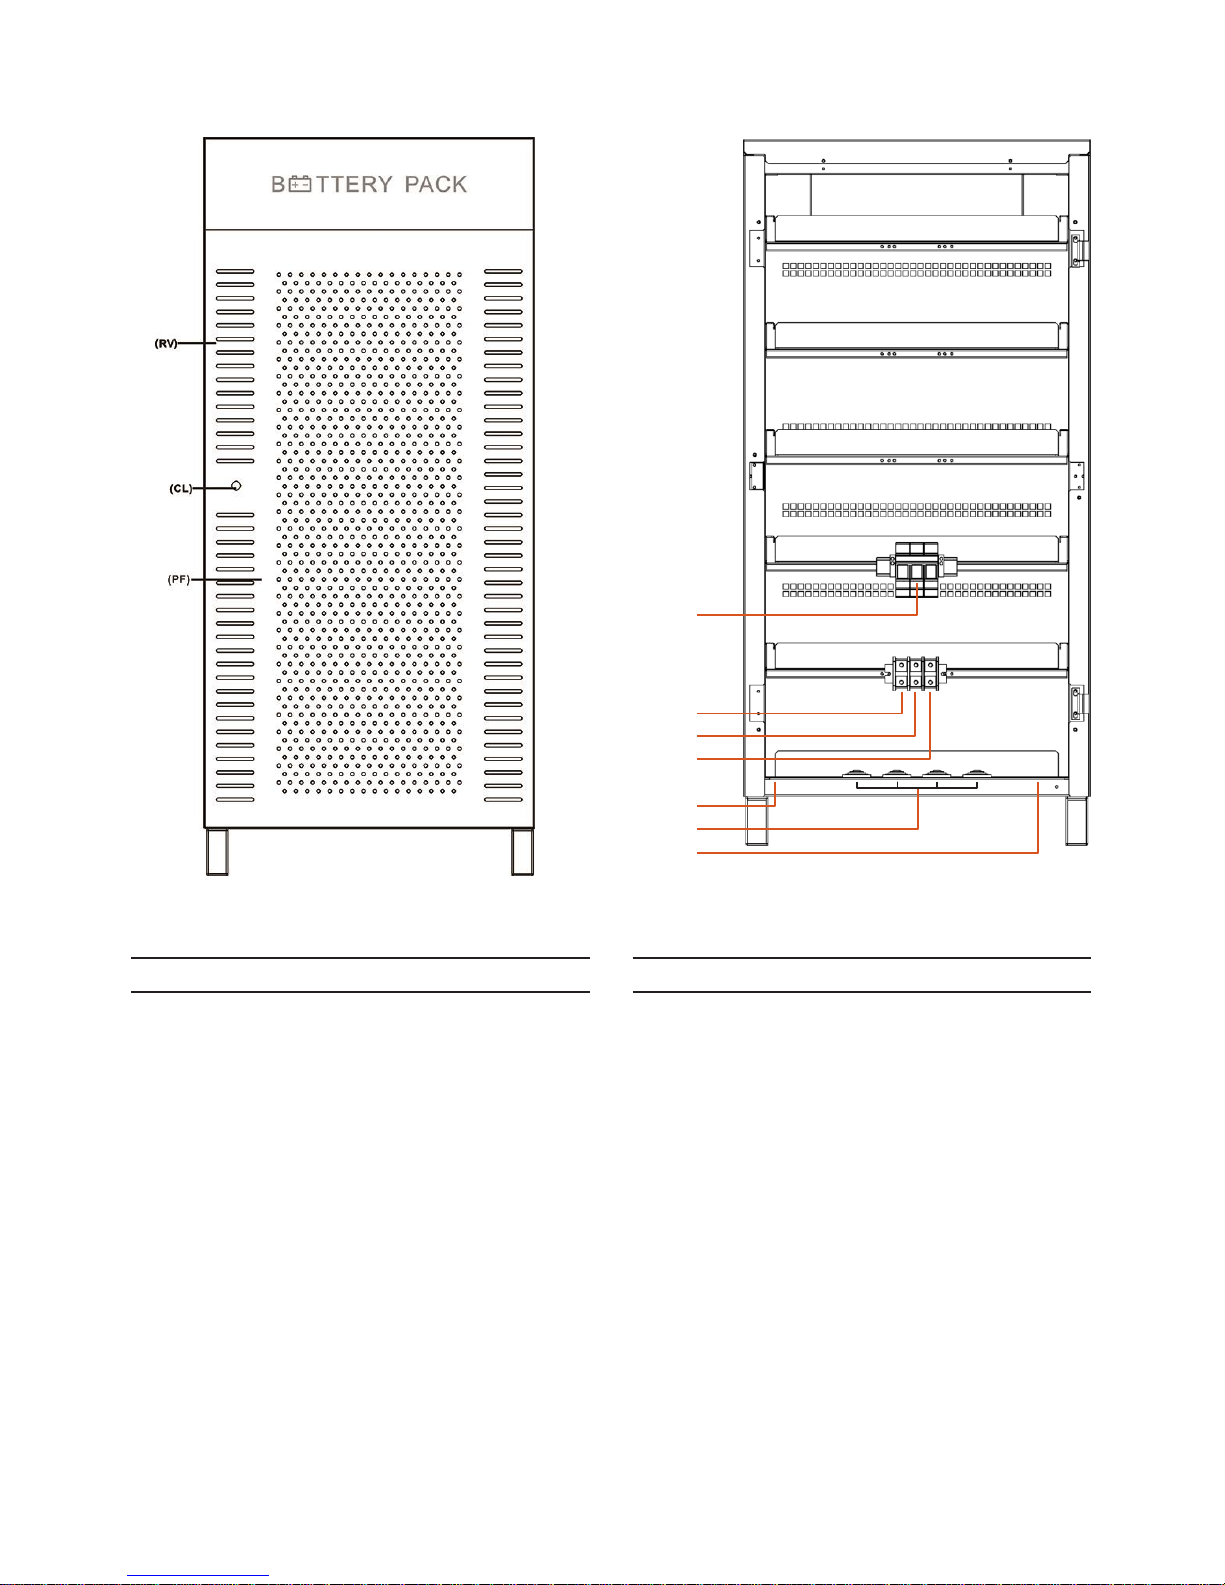
Fig. 1. UPS front view from 7.5 to 30 kVA (LV) / 10 to 60 kVA (HV),
with or without separate static bypass line (-B).
Fig. 2. UPS front view from 40 to 60 kVA (LV) / 80 to 120 kVA (HV),
without separate static bypass and 40 kVA (LV) / 80 kVA
(HV) with separate static bypass (-B).
Page 12
10
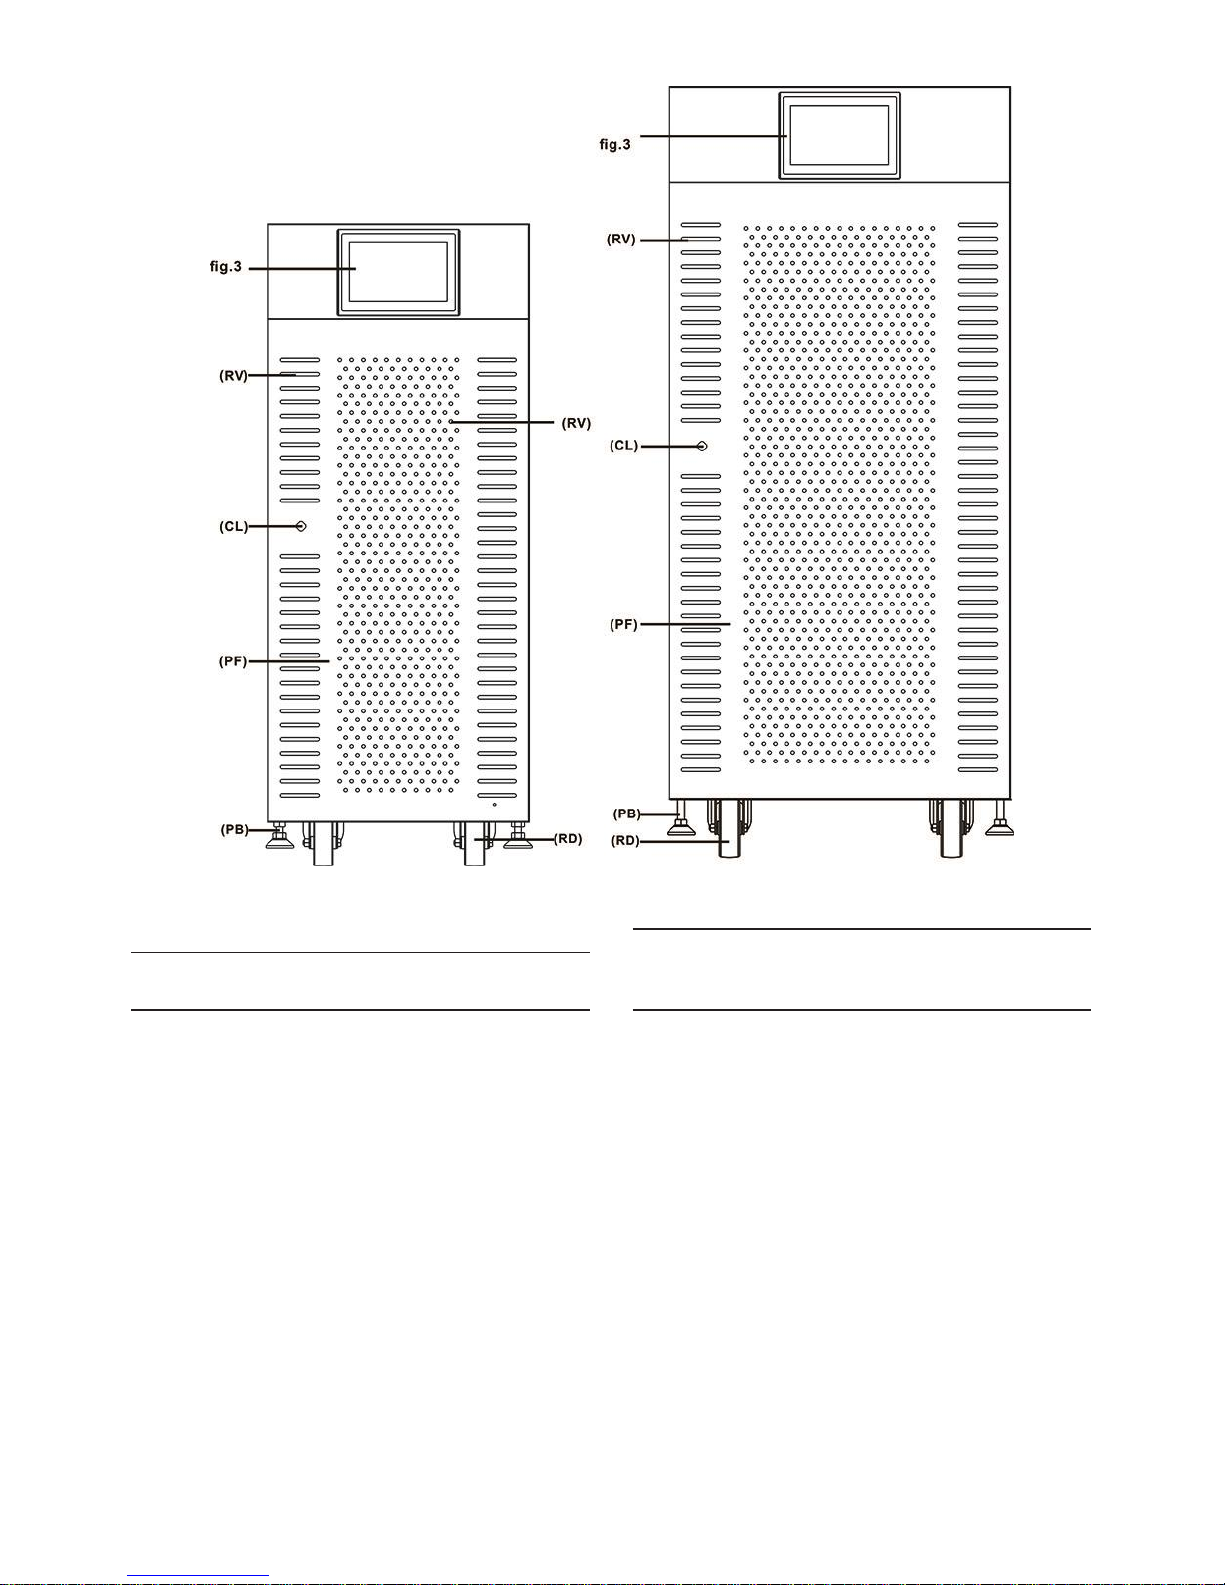
Fig.3. LCD Touch Screen View
(1)
Equipment with extended back up time only.
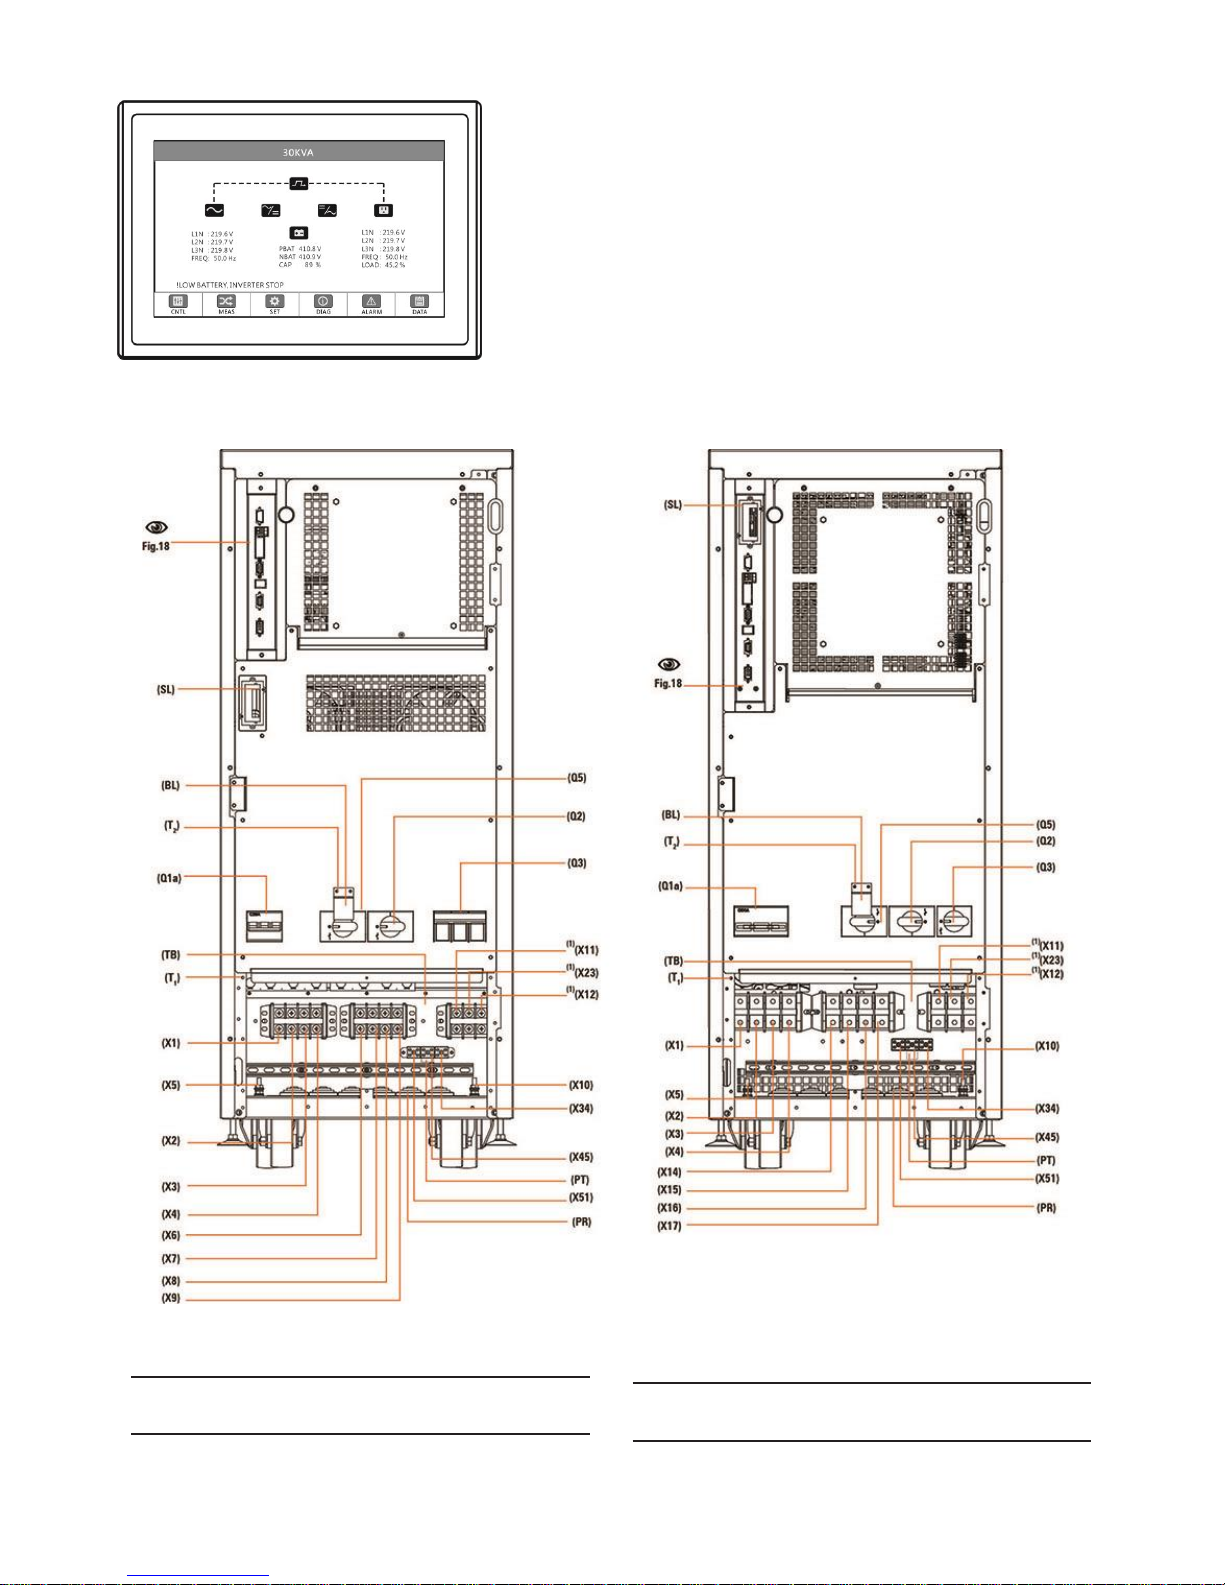
Fig. 4.
UPS Front view with door opened. 7.5KVA to 20KVA (LV)/
10KVA to 40KVA (HV) models.
Fig. 5.
UPS Front view with door opened. 30KVA (LV)/ 60KVA (HV)
models.
Page 13
11
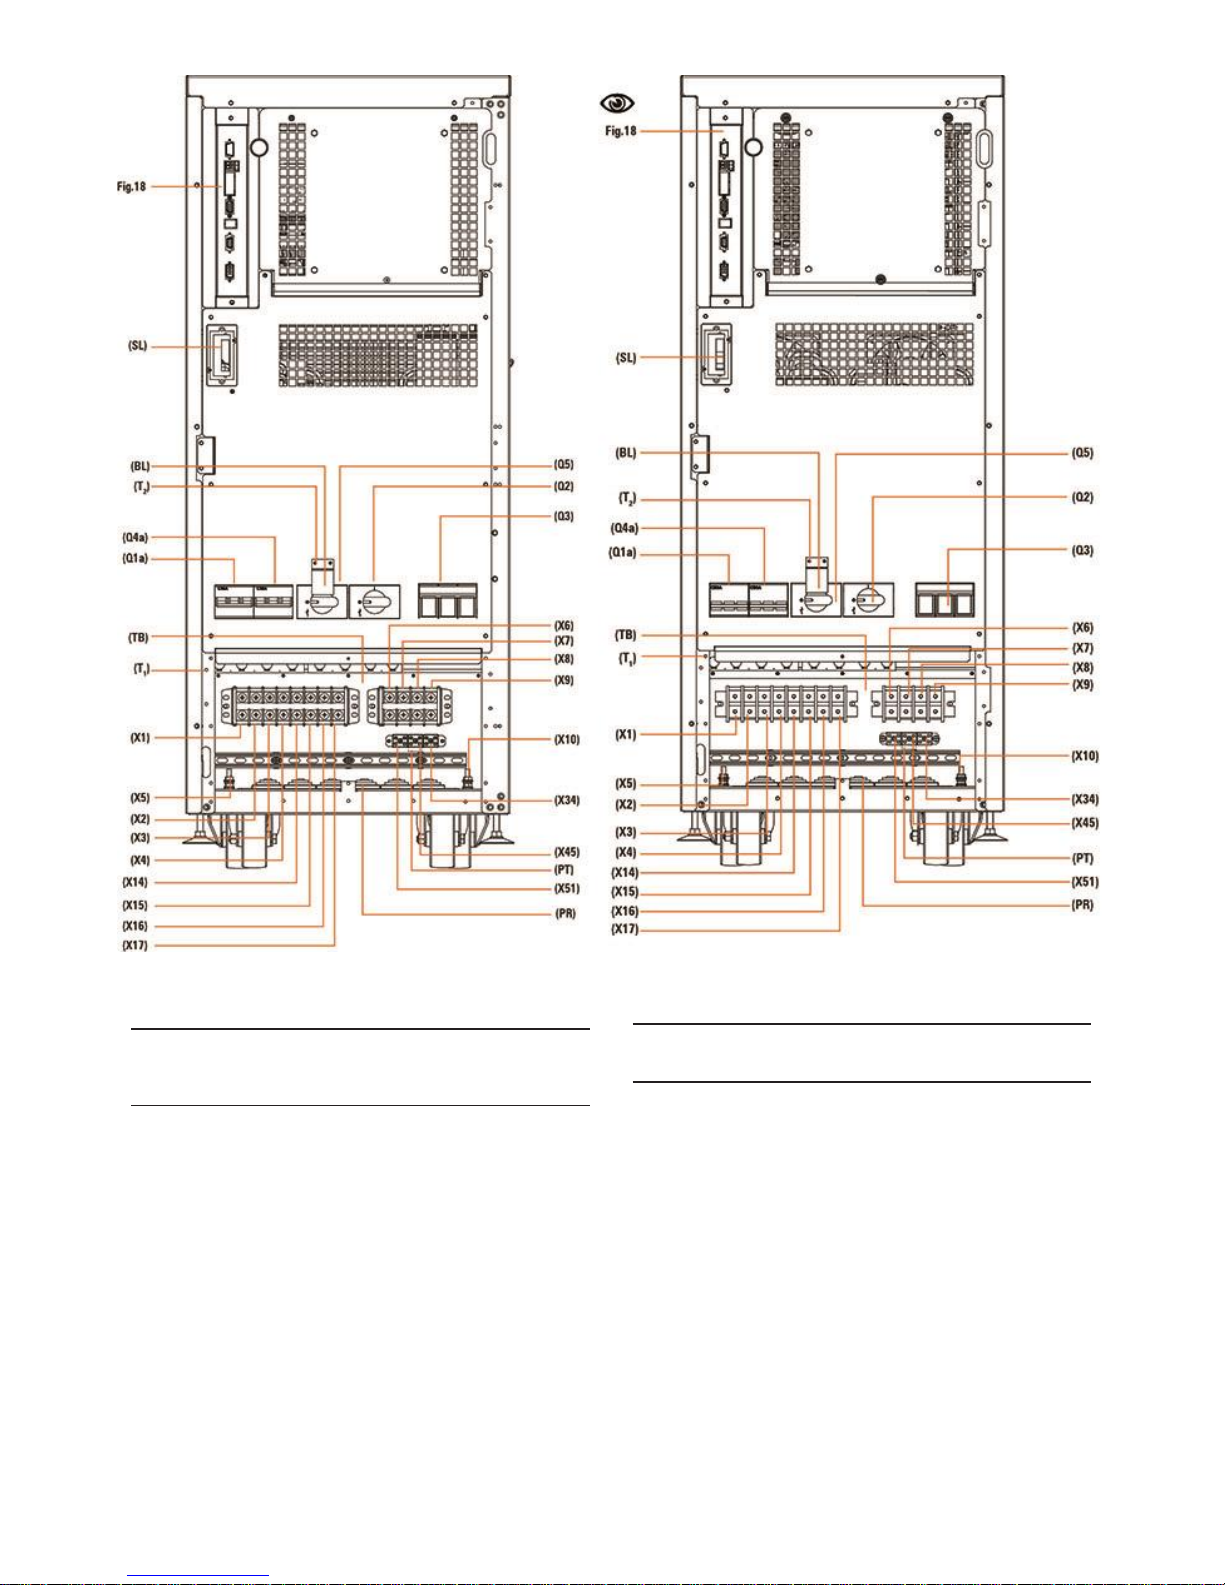
Fig. 6.
UPS Front view with door opened. 7.5KVA to 10KVA (LV) /
10KVA to 20KVA (HV) models with separate static bypass line.
(UPS-B models)
Fig. 7.
UPS Front view with door opened. 15KVA (LV) / 30KVA (HV)
models with separate static bypass line (UPS-B models)
Page 14
12
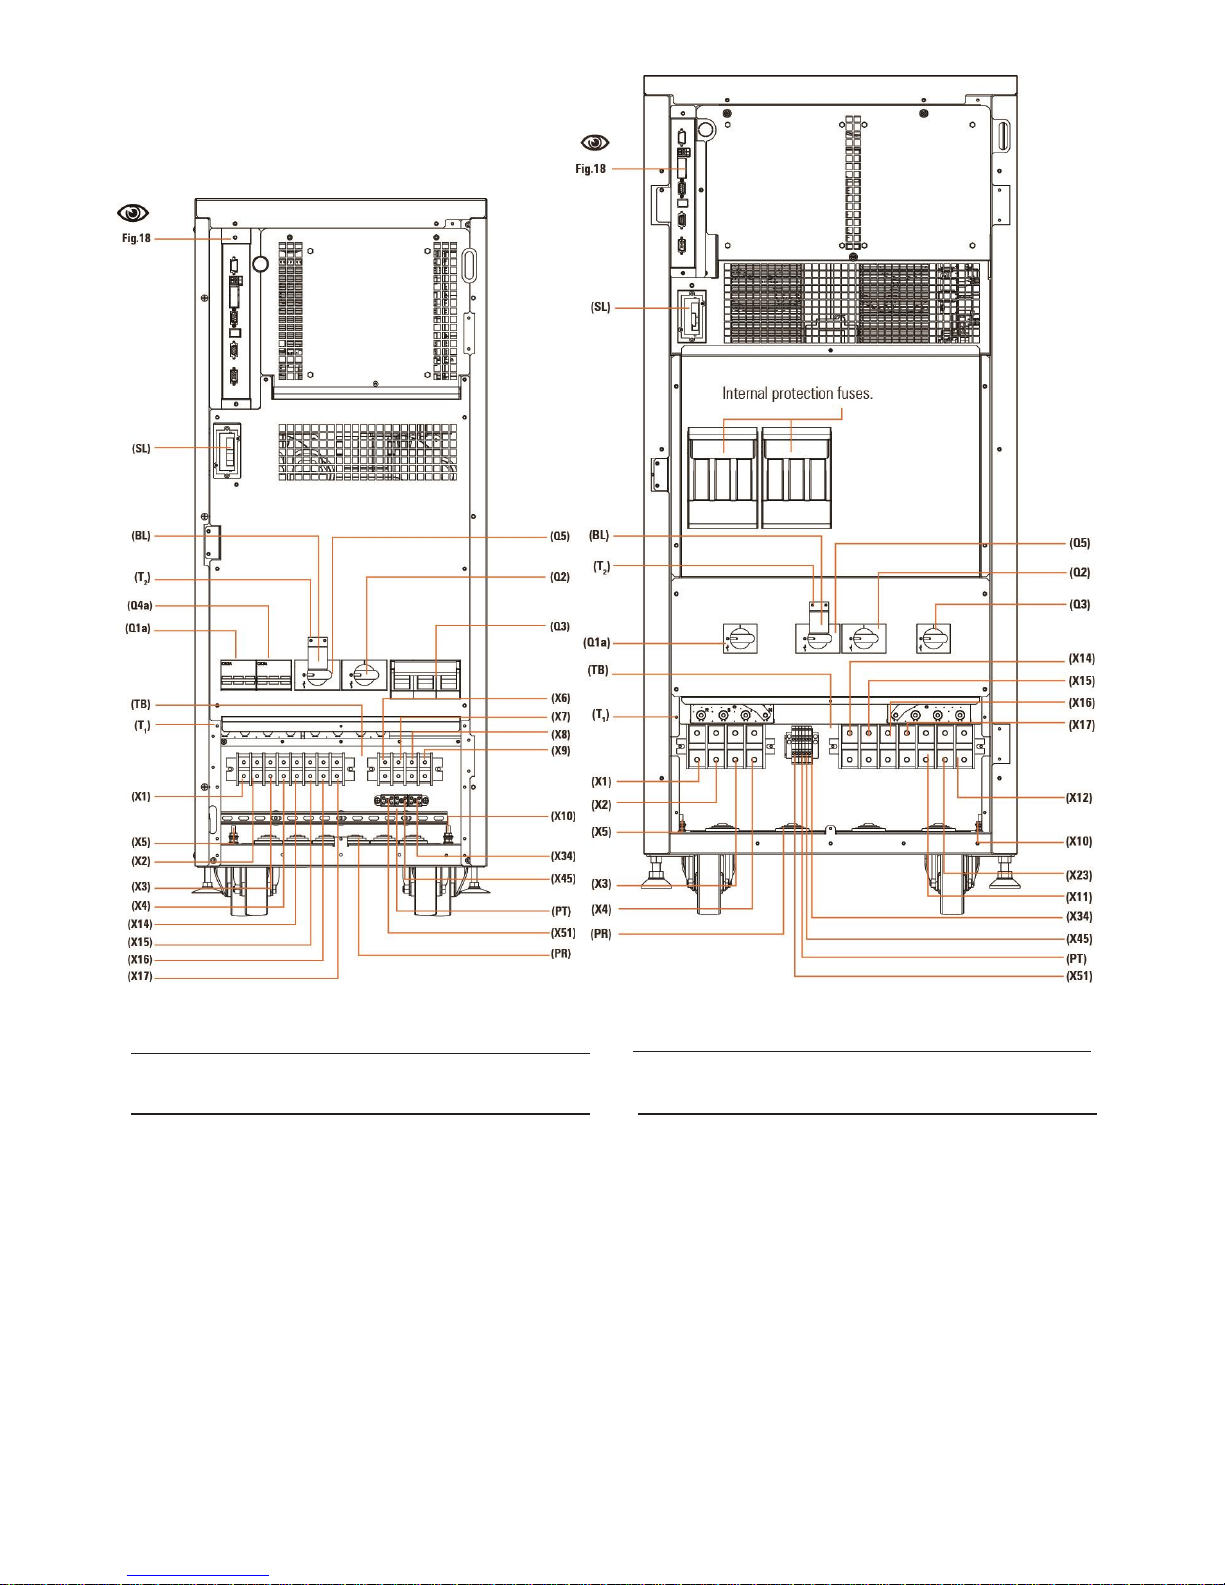
Fig. 8. UPS Front view with door opened, models 20KVA (LV) /
40KVA (HV) with separate static bypass line (UPS-B models)
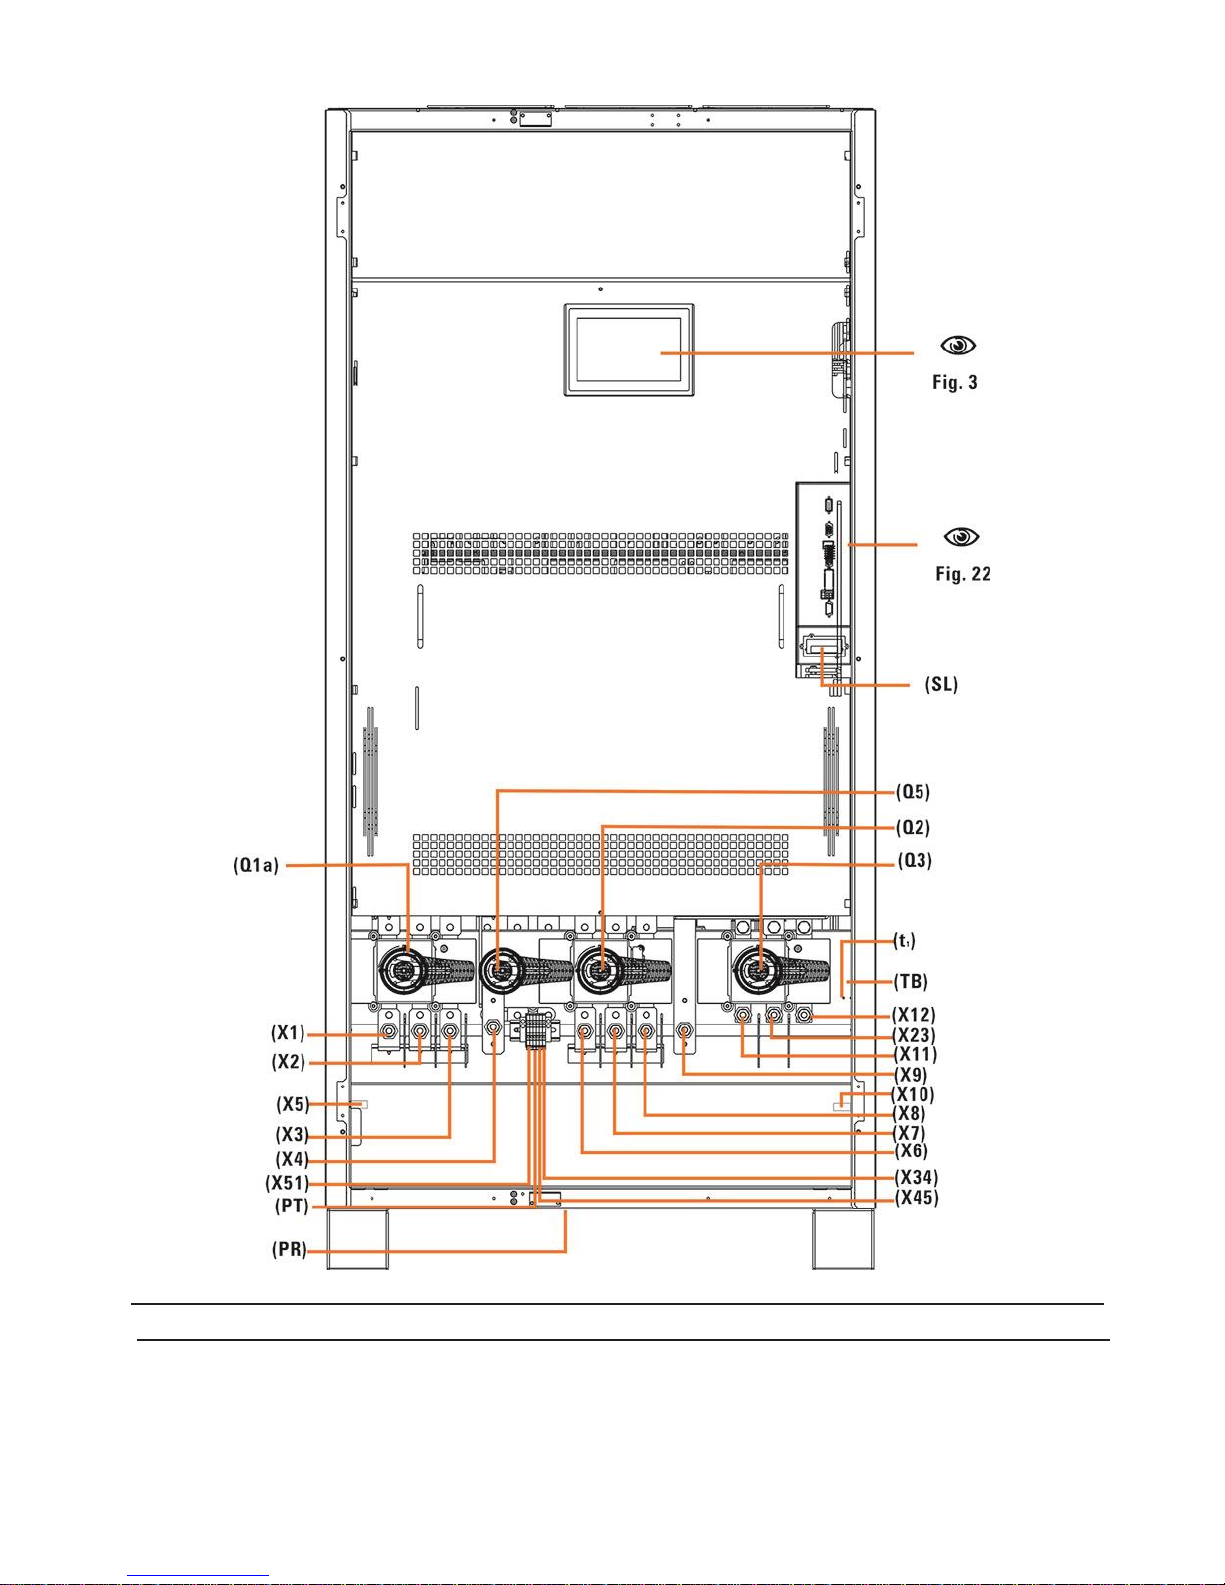
Fig. 9. UPS front view with door opened, models 40kVA (LV) /
80KVA (HV).
Page 15

13
Fig.
10. UPS front view with door opened, models 50 and 60 kVA (LV) / 100 and 120 kVA (HV), without separate
static bypass
line.
Page 16
14
Fig.
11. UPS front view with door opened, models 80 and 100 kVA (LV) / 160 and 200 kVA (HV), without separate
static bypass
line.
Page 17
15
(Q8)
(
X47
)
(X49)
(
X48
)
(BF)
(X5)
(PR)
(
X10)
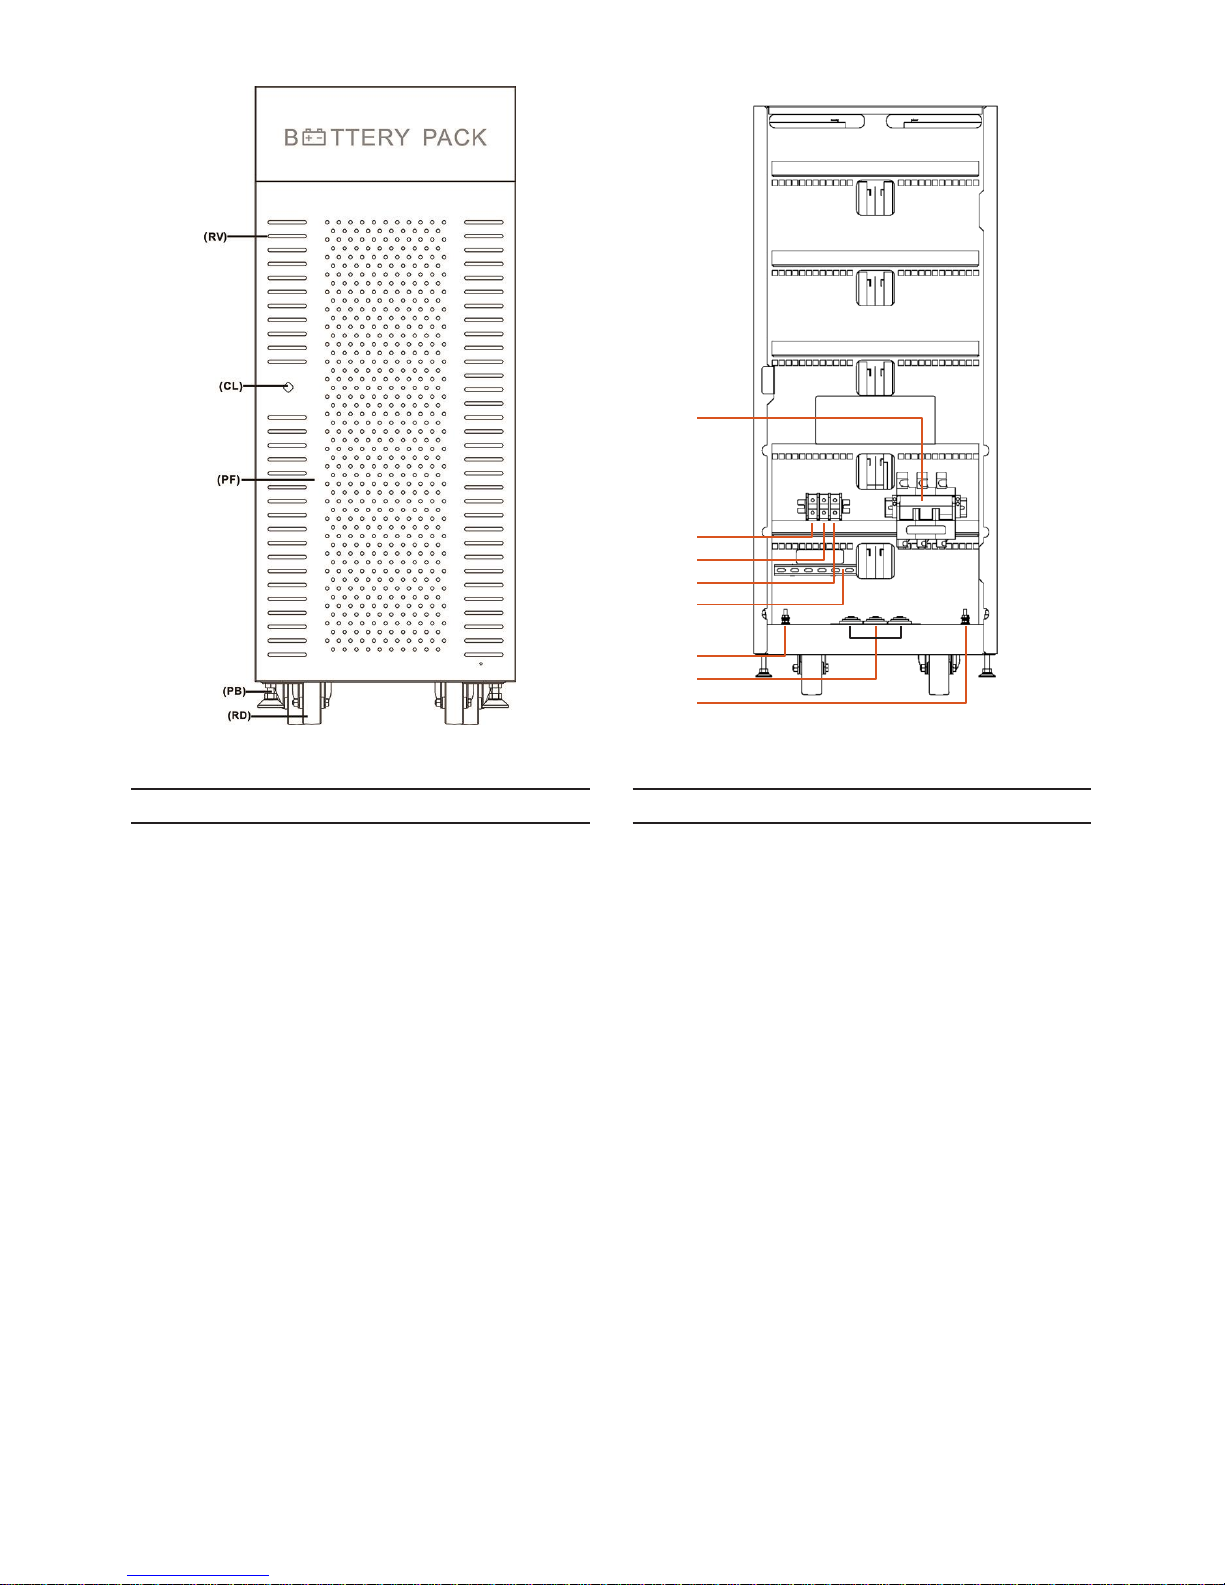
Fig. 12. Battery cabinet front view No 1, with door closed. Fig. 13. Battery cabinet front view No 1, with door opened.
Page 18
16
(Q8)
(X47)
(X49)
(X48)
(X5)
(PR)
(
X10)
Fig. 14. Battery cabinet front view No 2, with door closed. Fig. 15. Battery cabinet front view No 2, with door opened.
Page 19

17
Fig. 16. Battery cabinet front view No 3, with door closed. Fig. 17. Battery cabinet front view No 3, with door opened.
Page 20
18
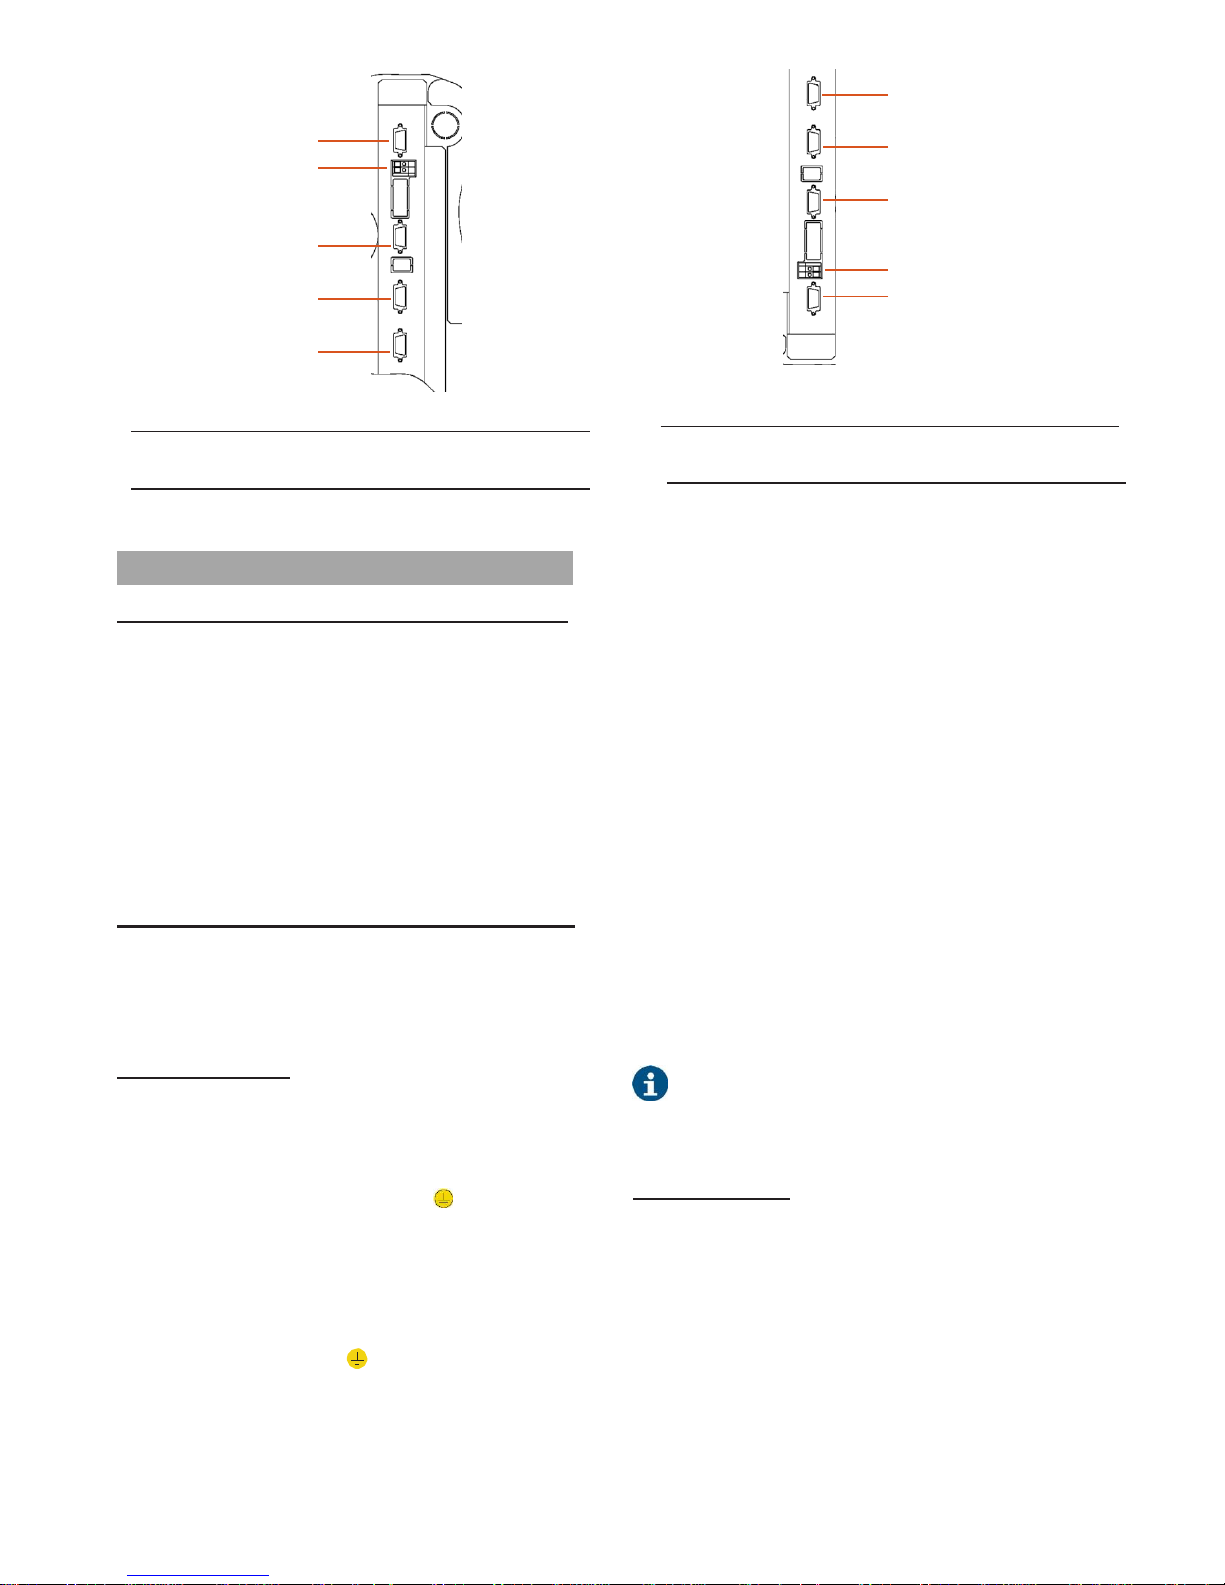
i
o
(X360 )
(X32) (X36i )
(X50)
(X31)
(X31)
(X36)
(X36)
Fig. 18. Connection of communications for models up to 60 kVA
(LV) / 120 kVA (HV).
Fig. 19. Connection of communications for models higher than
60 kVA (LV) / 120 kVA (HV).
4.1.2 Legend corresponding to the equipment views.
Protection and maneuvering parts (Q*) in the UPS cabinet:
(Q1a) Input circuit breaker or switch according to the equipment
power rate, two or three poles respectively depending on
the mains typology.
(Q2) Output switch.
(Q3) Battery fuse holder switch with 3 fuses in models up to 20
kVA (LV) / 40 kVA (HV) or switch for B1 versions and higher
power rates models.
(Q4a) Static bypass switch, two or three poles depending on
the mains typology (-B version only).
(Q5) Manual bypass switch.
Protection and manoeuvring parts(Q*) in the battery cabinet:
(Q8) Battery fuse holder switch of 3 fuses, for models up to 60
kVA (LV) / 120 kVA (HV).
Battery switch, in models higher than 60 kVA (LV) / 120 kVA
(HV).
Connection parts (X*):
(X1) Terminal of input phase R.
(X2) Terminal of input phase S.
(X3) Terminal of input phase T.
(X4) Terminal of input neutral N.
(X5) Terminal (copper bar) of main earth ( )
(X6) Terminal of output phase U.
(X7) Terminal of output phase V.
(X8) Terminal of output phase W.
(X9) Terminal of output neutral N.
(X10) Terminal (copper rod) of earth bonding for load or loads
and/or battery cabinet ( ).
(1)
(X11) Battery positive terminal (+).
(1)
(X12) Battery negative terminal (–).
(X14) Terminal of static bypass phase R (-B version only).
(X15) Terminal of static bypass phase S (-B version only).
(X16) Terminal of static bypass phase T (-B version only).
(X17) Terminal of static bypass neutral N (-B version only).
(1)
(X23) Battery neutral N terminal (central tap).
(X31) DB9 connector for COM RS-232 and RS-485 ports.
(X32) DB9 connector for relay interface.
(X34) Terminal strip of two terminals for temperature probe/floating
voltage. Equipment with separate battery cabinets
only.
(X36i ) HDB15 female connector, parallel bus input. Only useful in
parallel systems connection.
(X36o) HDB15 male connector, parallel bus output. Only useful in
parallel systems connection
(X45) Terminal strip of two terminals, auxiliary contact of output
switch. To be connected to its external homologous.
(X47) Battery positive terminal (+) of the battery cabinet.
(X48) Battery negative terminal (–) of the battery cabinet.
(X49) Battery neutral terminal N of the battery cabinet (central
tap).
(X50) External EPO terminals.
(X51) Terminal strip of two terminals, auxiliary contact of manual
bypass switch. To be connected to its external homologous.
(1)
: Battery terminals (X11), (X12) and (X23) available in
models > 20 kVA (LV) / > 40 kVA (HV) only, or in
equipment B1 type (extended back up time).
Other abbreviations:
(BC) Communication BUS bundle between equipment, of 5 m.
length with HDB15 connectors in both ends.
(BF) Rod to fix the connection wires of the equipment or battery
cabinet by means of wraps.
(BL) Mechanical lock for manual bypass switch (Q5).
(CL) Front door lock.
(LL) Key to lock and unlock (CL).
(PB) Levellers and fixing elements.
(PC) Control panel.
(PF) Front door.
(X50)
(
X32)
Page 21

19
1
2
(PR) Cable gland or bushing to enter the cables.
(PT) Cable in a bridge mode way to close the circuit between
both pins of (X45).
(R103) Two wires bundle with probe, to control the floating
voltage according to the temperature.
Equipment with separate battery cabinet only.
(RD) Casters.
(RV) Cooling grid.
(SL) Slot for SNMP card (option).
(TB) Terminal cover-connection elements.
(t ) Fixing screws for terminal cover (TB).
(t ) Fixing screws for mechanical locking (BL) of switch (Q5).
By means of the connectors (X36°) and (X36°) the
communication loop or ring is closed between two or
more equipment connected in parallel, by means of the bundle
(BC)
. These connectors are not useful when there is a single
eq
uipment only.
Together with each UPS, it is supplied only one bundle (BC) to
connect the communication BUS. Therefore in any parallel system
there will be the same quantity of communication bundles (BC) as
equipment there are, so it makes possible to close the
communication loop.
Each communication bundle (BC) has 5 meters length and it is
provided with HDB15 connectors at both ends, one male and
another female.
Page 22

20
4.2. DEFINITION AND STRUCTURE
4.2.1. Structural diagram.
To describe the operating principle, it is taken as a reference and
example the single line diagram of Fig. 25 and 26, corresponding to
UPS with three-phase input and output setting, one with basic
structure and the other one with separate bypass line.
All the equipment works and operates in the same way, although
they have common line or separate static bypass.
4.3. UPS FUNCTION STAGES.
This UPS series is structured in the following stages:
• I/O EMI filters.
• Rectifier-PFC (AC/DC).
• Batteries.
• Inverter (DC/AC).
• Static Bypass.
• Maintenance or manual Bypass.
• EPO emergency shutdown.
• Control panel.
• Control and communication Software.
4.3.1. I/O EMI filters.
EMI filter is a three phase low-band filter, whose function is to
attenuate and cancel all the radio frequency perturbations. The
filter performs in a bidirectional way:
• It cancels the perturbations that come from the line and
protect the UPS control circuits.
• It avoids the possible radio electrical perturbations that the
UPS generate through the line and affect other equipment
connected to it.
4.3.2. Rectifier-PFC stage (AC/DC).
Constructive parts:
• Input protection and switch: it is the particular protection of
the PFC rectifier.
• Current sensor: it uses alternating current transformers to
measure and control the input current, to get a THDi < 3% at
full load condition and even < 1% depending on the quality of
mains.
• “T” filter: it is used to attenuate the current ripple caused by
the PFC switching.
• IGBT's three phase bridge: it will be used to make the AC/
DC conversion with the lowest distortion and highest ef ficiency.
To do that, it is used the Trench-gate IGBT technology of 4th
generation.
• Input chokes: They are used by the PFC rectifier as energy
storage elements (in switching times), for the AC/DC
conversion.
• DC Bus: it is used to filter the DC needed for the correct
operation of PFC converter and inverter.
4.3.3. Batteries.
This UPS series has a battery set that stores energy during the
normal operating mode (present mains) and they are discharged
during the emergency operation (mains fault), keeping the critical
loads running during the required time.
Batteries are sized to supply full power to the assigned critical loads
during the back-up time for any load condition. Standard batteries
are sealed Lead Acid, maintenance free and VRLA technology.
Each cell or cell group (battery block) are duly marked in a
permanent way, with polarity indication, voltage and safety
warning required by the standard.
Cells are duly assembled and electrically connected. Battery set is
protected by means of a fuse holder with ultra fast fuses, ready for
the described conditions in section «4.3.2. Rectifier-PFC stage».
In normal operation (mains present and charged batteries), the
battery set is working on floating voltage.
As an option the battery set of Pb-Ca or Ni-Cd can be assembled
in a cabinet or rack separately from the equipment, shared for
systems made of two UPSs in parallel.
4.3.4. Inverter stage (DC/AC).
Constructive parts:
• DC Bus: it is used to filter the DC and it is in charge of
interconnecting the PFC and Inverter through the protection
fuses.
• IGBT three phase inverter bridge: it is equal to the PFC
stage but in counter way, it is in charge of making the DC/AC
conversion with the lowest distortion and highest ef ficiency. It
is also using the Trench-gate technology of 4th generation.
• Current sensor: as it has been described before, in this case
conventional AC currents sensors are also used (current
transformers) for measurement and control the output current of
the inverter to get a total harmonic distortion at the output
voltage lower than 1% in full load conditions.
• Output chokes: Use identical solution as the input. These
chokes are used by the inverter as energy storage elements (in
switching times), for DC/AC conversion.
Page 23

21
AC input
N R-S-T
AC bypass
AC input
N R-S-T
N
R-S-T
N U-V-W
AC salida
N U-V-W
AC output
(Q5)
Maintenance line (manual Bypass).
(Q1a)
Emergency line (static Bypass).
(Q2)
(Q3)
Normal operating.
Mains fault.
Operating
with inverter
non-active
(EPO
condition
to «Off»).
Operating over manual bypass.
Fig. 20. UPS single line diagram with operating flows.
(Q5)
(Q4a)
(Q1a)
Maintenance line (manual Bypass).
Emergency line (static Bypass).
(Q2)
(Q3)
Normal operating.
Mains fault.
Operating
with inverter
active
(EPO
condition
to «On»).
Operating over manual bypass.
Fig. 21. UPS-B single line diagram with operating flows.
4.3.5. Static bypass st
age
.
When the inverter can't keep the voltage to the critical loads due to
overloads, short-circuits, current limits or faults, the UPS has a
bypass circuit, which supplies isolation for the inverter and supplies
the critical loads directly from electrical mains.
The UPS controls the availability of inverter and bypass mode
permanently in order to make the shifting between them.
The bypass stage is based on six double thyristors in semipack
format, working as AC switches, three of them are for shifting the
input over the output and the other three are for shifting the inverter
over the output.
The managing system of the SCR switches is based on drivers
designed with a shifting system that responds to the following
requirements:
Full static shifting system.
Shifting with no high transient currents.
Shifting with no transfer time.
The control algorithm of the triggering signals of the thyristors
assures a nil transfer time, and avoids short-circuits between the
thyristors of bypass and inverter (shifting with zero cross current).
4.3.6. Maintenance or manual Bypass.
.
All UPSs from this series are foreseen with an auxiliary line
protected by a circuit breaker switch, which makes an electrical
bridge between the input and output terminals.
Managing this switch, properly together with the input and output,
allows isolating electrically all the UPS elements from the electrical
lines.
The type of maneuvering of the maintenance bypass is “make
before break”, with the purpose of keeping the critical loads fed,
even during the maintenance tasks.
Page 24

22
4.3.7. Terminals for EPO.
The UPS has two terminals to install an external button of
emergency output shutdown (EPO).
4.3.8. Control panel.
This UPS has a sophisticated control panel based on a DSP (Digital
Signal Processor) that performs as interface between the UPS and
end-user.
Each UPS is equipped with an alphanumerical LCD panel, which
automatically informs the end-user of the current status of the
equipment and electrical measurements. It is based on a tree
diagram, allowing an easy browsing through its screens.
4.3.9. Control software and communications.
AFC Control (Adaptive Feedforward Cancellation).
It consists in the use of digital resonators connected in parallel and
set to those frequencies where the consigns or perturbations to
refuse are expected.
This control technique allows doing the follow of the sinewave
signals of reference of the output voltage in the inverter and input
current of the active rectifier.
It is important to highlight that the different controls of the UPS
do not operate either independently or locally, but they interact
between them in such a way that it is an overall controller of
coupled type. It means operating advantages like to adapt the
rectifier to the load conditions immediately.
The digital control software works at two different levels:
4.3.9.1. Control software at low level.
• Input three-phase rectifier controller: PFC control and
battery charge loops. The structure adopted of independent
control per phase of cascade type allows managing both single
phase and three phase inputs.
The AFC control technique has also been applied, to assure a
sinewave mains currents, with a THDi < 2%, and in phase
shifting with the voltages, to balance the active power of all
the system, to accelerate its response and make it insensitive
to the load transients.
In normal conditions, the rectifier is running and charging the
batteries, controlling the charging current and floating voltage
at any moment according to the temperature of themselves.
The system is also in charge of minimizing the charging current
ripple that flows through them.
When the input voltage or frequency is out of the correct
operating range, it is shut down and batteries are responsible
for keeping the inverter in operation. Meanwhile, they supply
the loads connected at the output of the equipment till the
battery voltage decreases at the end of back-up time.
Another important feature of the rectifier is its bidirectional
capacity in operation. This allows consigning a battery
discharging current even with existing mains. This quality
performance will make it possible to do a battery test both in
full load and in no load conditions.
• Output three- phase rectifier controller: being independent
per phase, it is easily adapted to different settings, either single
phase or three phase.
It highlighted the use of the AFC control technique that allows
getting an output voltage with a THDv lower than 1,5% in nonlinear load at the output and good dynamic response against
unexpected step loads.
• Switching algorithm of the bypass thyristors.
• Parallel control: high speed communication and inverter
parallel connection.
4.3.9.2. Managing software of the equipment.
Managing and control of different parts.
Visualization software for user interface.
Software of communication and protocol implementation.
Managing software of parallel system.
4.3.9.3. Communications.
• COM port to relays: It supplies a digital signals in a dry
contact way, which makes the dialogue between the
equipment and other machines or devices possible.
By default the equipment is supplied with 4 signal relays with
a preset programming (see chart 2), which can be modified at
factory or by the S.T.S. upon request. Chart 6 shows all the
alarms that can be set to any relay. A fifth relay can be supplied
as an option and upon request, which can be defined in the
purchase order.
Also there is a “shutdown” input that allows shutdown the
inverter.
The most common use of this type of port is to supply the
necessary information to the closing file software.
• COM port RS-232 and RS-485: By means of the same DB9
connector supplies the RS-232 and RS-485 communication
ports. They are mutually exclusive between them and they are
used to connect the UPS with any machine or device that has
this standard bus.
The RS-232 port consists in the serial transmission of data, in
such a way that it can send a lot of information through a
communication cable of 3 wires.
The RS-485, unlike other serial communication channels, it
uses 2 wires only to dialogue among the systems connected to
this network. The communication is established by sending and
receiving signals in differential mode, so it gives the system
high immunity against the noise and long range (approx. 800m).
The used protocol is “MASTER/SLAVE” type. The computer or
IT system (“MASTER”) asks for a determined data, and the UPS
answers immediately (“SLAVE”).
4.4. OPERATING PRINCIPLE OF AN EQUIPMENT.
This UPS series is a double conversion system AC/DC, DC/AC with
sinewave output that supplies a safe protection in extreme
conditions of electrical power supply (fluctuations of voltage,
frequency, electrical noises, blackouts and mains faults,
Page 25

23
etc.). Whatever type of load to protect is, the equipment is ready to
assure the quality and uninterruptible electrical power supply.
The use of the transformerless technology allows a significant
reduction of weight and volume in the equipment, by improving
important co-efficiency a lot like the power/footprint ratio.
• Basically its operating is the following:
The rectifier, an IGBT three phase rectifier, conver ts the
AC voltage in DC by draining a sinewave current (THDi
<2%), charging the batteries with constant
current/voltage.
Batteries supply the energy required by the inverter in case
of mains fault.
The inverter is in charge of converting the DC bus
voltage
in to AC by providing an alternating sinewave output,
stabilizing voltage and frequency, ready to supply the loads
connected at the output.
The basic structure of double conversion is complemented
with two new functional stages, static bypass switch and
manual bypass switch.
The static bypass switch connects the output load with
bypass line directly in special conditions like overload or
over temperature and it is reconnected to inverter again,
once the normal conditions are restored.
UPS B version has two separate lines for the
rectifier
and bypass stages increasing in the safety of the
installation, because it allows the use of a second line
(generator set, other company, etc...).
The manual bypass switch isolates the UPS from mains and
loads connected at the output, so the maintenance tasks
can be done inside the UPS without interrupting the supply
to the loads.
4.4.1. Normal operating ().
With mains present, the rectifier converts the AC input voltage into
DC, by boosting the DC voltage to an optimal level to feed the
inverter and battery charger.
The inverter is in charge of converting the DC bus voltage into AC
by providing an alternating sinewave output, it stabilizes the
voltage and frequency, ready to supply the loads connected at the
output (Fig. 20 and 21).
4.4.2. Mains fault operating ().
In case of mains fault or blackout, the battery set supplies the
needed energy to feed the inverter.
The inverter still operates normally, without noticing the lack of
mains and the back-up time depends on the capacity of the battery
set only (Fig. 20 and 21).
When the battery voltage reaches the low voltage, the control
blocks the output in order to protect the batteries from being deep
discharge. When mains is restored and after the first analysis, the
UPS goes back to operate as it is described in the previous
section «4.4.1. Normal operating».
4.4.3. Operating with non-active inverter ().
The inverter is non-active due to alarm conditions like overloads,
over temperatures, etc... In this case the rectifier is still charging the
batteries in order to keep their optimal charge status.
The inverter is also non-active if the start-up has not been done
through the keypad of the control.
In both cases, the output voltage of the UPS comes from the
emergency bypass line through the static bypass switch (Fig. 20 and
21) in the condition that the EPO is inactive.
4.4.4. Manual bypass operating ().
When it is required to make any maintenance service to the
equipment, it can be disconnected from mains without breaking
the power supply of the system and affecting the critical load.
The UPS can only be intervened by technical or maintenance staff,
by means of the manual bypass switch (respect the corresponding
operative instructions stated later on).
4.4.5. Smart Eco-mode operating.
For those applications with lower requirements, the smart and
efficient function «Smart Eco-mode», meanwhile the power
supply is available, allow the equipment to feed the loads directly
from mains through the solid static bypass state («Off Line» mode).
In case of mains fault, the system will automatically shift to normal
operating mode («On Line») and will supply the loads through the
inverter with the energy of the batteries. The «Smart Eco-mode»
operating mode improve the ef ficiencies between 4 and 4.5 %
highest than «On Line» normal mode, so it is close to 100 %.
The «Smart Eco-mode» operation does not ensure a perfect
stabilization in frequency, voltage or sinewave shape (distortion)
as in «On Line» normal mode, because the figures of these
parameters depend on the static bypass line and preset activation
ranges completely.
The detection of these parameters can take up to 3 ms, so it is
recommended to assess the advisability of using this operating
mode, depending on the level of protection required by the loads.
This operating mode is disabled from factory and the end/user can
activate it if needed, according to section 7.2.2. and Fig. 35.
This operating mode is disabled from parameters and the end/user
can activate it if needed
4.4.6. Frequency converter operating.
.
This UPS can be set from factory as frequency converters, whether
they has batteries or not, being able to operate from 50 to 60 Hz or
vice versa.
The equipment is set as frequency converters, so the static bypass
and manual bypass are not available.
So, those functions, measurements, alarm messages, parameter
settings, as well as maneuvering of the related switches will not be
operative and they will not be taken into account.
Page 26

24
AC input
AC bypass
AC input
AC output
AC output
COM.
connectio ns
In
p.
Out.
R-S-T
N
COM.
connectio ns
U-V-W
N
In
p.
Out.
COM.
connectio ns
In
p.
Out.
Fig. 22. Single line diagram, connection of parallel system up to
4 units of UPS models.
COM.
connectio ns
In
p.
Out.
R-S-T
N
R-S-T
N
COM.
connectio ns
U-V-W
N
In
p.
Out.
COM.
connectio ns
In
p.
Out.
Fig. 23. Single line diagram, connection of parallel system up to 4 units of UPS-B models.
Page 27

25
4.5. OPERATING STRUCTURE OF A PARALLEL SYSTEM.
This Uninterruptible Power Supply Systems series is designed
and thought as «parallel» connection with a maximum of four units,
in the condition that they are the same model (setting, voltage,
power, frequency, back-up time, ...), all of them without adding
hardware. Fig. 22 and 23, as examples, show the circuit diagrams
of a three-phase input/three-phase output parallel system, with and
without separate static bypass line. Both circuit diagrams are only
showing the input-output power connections and the parallel
control BUS.
A part from the possible setting, conceptually, the parallel systems
are divided into two similar structures and at the same time very
different depending on the application.
Systems connected in parallel or active parallel, supply the loads
equally among them. Less when there is only one UPS, the system
will be able to be redundant or non-redundant depending on the
needs and requirements of the application.
• Simple parallel system (non-redundant): a non-redundant
parallel system, is that one where all UPSs supply the required
power by the loads. Total power of the system based on N
equipment of nominal power rate Pn, is N x Pn.
If the system is operating with a load close or equal to the
maximum and one of the faults, the load will be shifted to
bypass automatically with “ make before break technique”,
because it will not be able to support the consumption demand
due to the overload that it will be caused in the rest of UPSs.
• Redundant system: a redundant system is that one has one
or more UPSs than the minimum required by the total power of
the system (depending on the redundancy level), being the load
fair shared among them. So, the fault of any of them will cause
the damage that UPS will be out of the system and the rest
will continue supplying the load with all the guarantees. Once
the damaged UPS is fixed, it can be connected to the system in
order to recover the redundant condition.
A system with his configuration increases the reliability and
assures a quality of AC power supply for the most critical loads.
The quantity of redundant equipment to be connected has to
be studied according to the requirements of the application. No
matter Parallel connection is redundant or not, it adds several
advantages apart from the connection itself:
• Higher punctual power and back-up time: in a parallel
system of N+M equipment, it is considered the nominal
maximum load of N equipment and +M are the reserve ones,
so:
N, is the quantity of equipment in parallel,
corresponding
to
the minimum quantity required by the total needed power.
+M, is the additional quantity of equipment corresponding
to the residual safety power (redundant equipment).
Although, in practice it can drain the total power in which the
N+M
system can supply, the redundancy requirement or
conception
does not advice it and in compensation there is a
surplus of dynamic power against load demands. i.e., a
redundant parallel system with 3 UPS of 40 kVA and N+1
configuration, the nominal maximum load contemplates 80 kVA
(2x40 kVA), although the system can accept load demands up
to 120 kVA (3x40 kVA).
Therefore, the fact of having +M reserve equipment, increases
the back-up time of the set because the battery set is higher.
• Modularity: capacity can be added to a UPS parallel system
by adding equipment of the same feature, without needing to
replace the equipment already installed. i.e., if time later, an
installation with a parallel system of 2 UPSs is detected that the
capacity of this system is not enough, it can be opted for adding
a third equipment to the system, without replacing the 2
original equipment.
The UPS parallel system management of UPS series is done by a
MASTER-SLAVES protocol, where only one equipment (MASTER)
takes the control of the rest ones (SLAVES). So, the control of the
output voltage, bypass shifting, disconnections, mains
synchronization are managed by the MASTER equipment, and
transmitted to the SLAVES equipment through the management
bus of the parallel system.
This MASTER or SL AVE condition is dynamic as it is described later
and it will depend on several factors (initial status of the
equipment, chronological order of commissioning or shutdown of
the system through one equipment or other)
Page 28

26
5. INSTALLATION.
• Read and respect the Safety Information, described in
section 2 of this document to obviate some of the stated
indications which may cause a serious or very serious
injuries to persons in direct contact or in the vicinity as
well as break-downs in the equipment and/or loads
connected to itself.
• Unless the opposite is indicated, any action, indications,
premises, notes and others, are applicable to UPS equipment,
no matter it may belong to a parallel system or not.
5.1. RECEPTION OF THE EQUIPMENT.
• It is dangerous to handle the equipment over the pallet
without much prudence, because it could overturn and
cause serious or very serious injuries to the operators if
any fall and/or trapping occurs. Pay attention to section
«2.2.3.1. To keep in mind» as regards to handling,
moving and location of the unit.
• Use the most suitable medium to move the packaged UPS,
with a pallet truck or fork lifter.
• Pay attention to the weights of handling equipment according
to the model stated in the technical specifications in section «9.
Annexes».
5.1.1. Reception, packaging and contents.
• Reception. To check:
Data label stuck o n the package corresponds to
the ones
stated in the purchase order. Once the UPS is unpacked,
check the purchasing details with the one in the nameplate
of the equipment,
stuck
at the back of the front door (PF).
If any discrepancies exist, make the nonconformity as
soon as possible, by quoting the serial number of the
equipment and the references of the delivery note.
No incident has happened during the transport (packaging
and impact indicator are in perfect status). Otherwise,
follow the protocol stated in the label attached to the
impact indicator, located on the packaging.
• Unpacking.
Check
the content before deserting the packaging.
Unpack the package according to the «Un
packing»
procedure in the supplied document, including the manual
and/or attached CD.
• Contents.
Standard equipment up to 20 kVA (LV) / 40 kVA (HV):
CD,
manual and battery fuses.
Standard equipment > 20 kVA (LV) / 40 kVA (HV)
: CD
and manual.
Battery cabinet: Fuses and cable connection bundle of
3.5
m. length and suitable cross section.
If the UPS belongs to a parallel system: A
communication
cable bundle per equipment.
• Once the reception is finished, it is advisable to pack the UPS
again till its commissioning in order to protect it against
mechanical impacts, dust, dirt, etc.
• The packaging of the equipment has a cardboard pallet or
wooden type depending on the case, expanded polystyrene
corners, bag and polyethylene strip, all of them are recyclable
materials. When it is required to dispose them, do it in
accordance to the regulation in force.
It is advisable to keep the packaging for 1 year as minimum.
5.1.2. Storage.
• The storage of the equipment should be in a dry and cool place,
and protected from rain, dust, water jets or chemical agents. It
is advisable to keep each equipment and battery set inside
their original packaging because it is designed to assure the
best protection during transport ant storage.
• In general, less particular cases, the UPS has sealed lead
acid batteries and their storage must not exceed 6
months without recharging them (see last section of
charge, the label stuck in the packaging of the equipment
or battery set).
Lapsed this period of 6 months, connect the equipment to
mains together with the battery set if any, paying attention
to the safety instructions and connection.
Models with separate static bypass line is not necessary
to connect with this power terminal strip.
Page 29

27
Proceed to start it up as it is described in section 6, do not
turn «On» the output switch (Q2), and do not start up the
inverter through the control panel (PC).
Leave the equipment in this mode for 12 hours at minimum.
Once the battery recharging is finished, proceed to shut
down the equipment, disconnect the electricity and store
the UPS and batteries if any, inside their original packaging.
Regarding the battery recharge, units that belong to a
parallel system will be treated as single equipment, so it is
not
necessary to add any connection.
25 cm.
50cm
Do not store the equipment and/or battery modules, in places
where either temperatures exceed the stated ones in the technical
specifications in section «9. Annexes» or indications in section
«2.2.3.3. Safety warning regarding batteries».
UPS cabinet UPS battery
Cabinet
5.1.3. Transport until its destination
• UPSs up to 60 kVA (LV) / 120 kVA (HV) are equipped with
casters, two of which at front are swivel and at rear are fixed in
order to make it easier to transport to their destination.
Likewise, the battery cabinet is equipped with casters in the
same way, but in the smallest size of battery cabinet only.
For the rest of the models, it’s necessary to use a pallet jack or fork
lift.
UPS battery
cabinet no 1
50 cm.
UPS cabinet
UPS battery
cabinet no 2
In any case pay attention to the weights stated in section «9.
Annexes», and use the suitable mediums to transport the
equipment according to its load (pallet jack, fork lift, service lift or
freight lift, etc.) and environmental conditions (type of floor,
resistance of the floor kg/m2…)
25 cm.
25 cm. 150 cm.
25 cm.
25 cm
5.1.4. Location, immobilization and considerations.
5.1.4.1. Location for single equipment.
• As i.e. Fig. 24 it shows two typical cases depending on the m
ode
l.
For a single cabinet, UPS contains batteries inside, and the
other with batteries in another cabinet to extend its back-up
time.
For extending back-up times with more than one cabinet, it is
recommended to put one at each side of the equipment in case
of having more cabinets repeat the same sequence alternately.
As minimum, leave enough space for cooling the unit
with:
- 25 cm at both sides.
- 50 cm at the rear.
- 100 cm at the top.
- and 150 cm at the front.
It is recommended to leave an additional 75 cm free at both
sides, for the possible interventions of the (S.T.S.), or the
needed length of the connection wires to make it easier to
move forwards.
Fig. 24. Floor view with minimum distances for a UPS.
5.1.4.2. Location for parallel systems.
• As i.e. Fig. 25 it shows 4 UPSs in parallel with their respective
battery cabinets. For systems with less units act in each
case accordingly.
• It is advisable to put them in order by the number stated in the
door of each equipment. The number corresponding to the
assigned address preset from factory.
The arrangement is not random. It is ideal to have the battery
wires in length of 3.5 m and communication BUS in 5 m. For a
higher quantity of battery cabinets in systems with extended
back- up time, follow the same criteria to keep the symmetry.
• When the system is structured by models with batteries and
power electronics in the same cabinet, ignore the illustrations
of battery modules.
Always respect the distances stated in Fig. 25, and the
quantity of cabinets that sets the system.
150 cm
25cm
25 cm. 150 cm. 25 cm. 25 cm.
Page 30

28
50 cm.
UPS battery
cabinet no 1
UPS battery
cabinet no 2
UPS cabinet
no 1
UPS cabinet
no 2
UPS cabinet
no 3
UPS cabinet
no 4
UPS battery
cabinet no 3
UPS battery
cabinet no 4
25 cm. 150 cm. 10 cm.
25 cm.
50 cm.
50 cm.
50 cm. 25 cm. 10 cm. 25 cm.
Fig. 25. Floor view with minimum distances for a parallel system.
5.1.4.3. Equipment immobilized and levelled.
• All UPSs and battery modules with casters, have 4 stabilizer
elements (PB), arranged next to each caster.
• The purpose of the stabilizers elements (PB) is to lay,
immobilize and level the metallic cabinet once it is located, in
order to avoid possible overturns, in particular with those whose
battery shelves can be extracted.
Warning! Danger of turning over when extracting the
battery shelves without stabilizing the unit in advance. Do
not extract more than one shelf at the same time, or
high risk of serious injuries to the operators may cause
the possible impact of falling and/or trapping of the
equipment.
• Loosen the elements (PB) by turning them counterclockwise as
high as it is off the floor with the help of a spanner, and loosen
them more than half turn in order to immobilize the metallic
cabinet with a correct levelling.
Fig. 31 shows where the stabilizers elements (PB) have to
be finally fixed.
• To have access to the battery shelves, cabinet side covers have
to be removed and they have to be unblocked. Shelves can be
extracted through both sides and each one has a stopper.
5.1.4.4. Preliminary considerations before connecting.
• The description of this manual refers to the connection of terminals
and switching maneuvering that is only available in some versions
or equipment with extended back-up time. Ignore those
operations if the unit does not have them.
• Follow and respect the instructions described in this section
referred to the installation of a single equipment or parallel system.
• Switchgear or external manual bypass panel boards:
It is advisable to have an external manual bypass panel
board equipped with input, output, static bypass (UPS-B
version only) and manual bypass protections, in single
installations.
For parallel systems up to two units, it is very advisable
having a switchgear panel board and for systems with 3 or
4 equipment, it is essential. Switches of the panel board
have to allow isolating the UPS from the system against any
wrong operation and feed the loads with the rest ones,
either during the preventive maintenance period or the
reparation of itself.
• Upon request an external manual bypass panel board for a
single equipment or parallel system can be supplied.
Original position from factory
of the element (PB).
Element (PB) tighten
against the floor.
• If it requires more detailed information for particular
system configuration, ask for the relating information in
«Recommended installation». It shows the circuit diagram,
as well as the protection size and minimum cross section
of the wires that are connected to the equipment, taking
into account the nominal operating voltage. All figures are
calculated for a maximum total cable length of 30 m
between the distribution panel board, equipment and loads.
Fig. 26. Equipment / battery module stabilizers elements (PB).
• Equipment maintenance and battery handling is a reserved task
to the S.T.S. or authorized staff.
If for any reason, the battery sliding shelves are in use or any
intervention, it is essential to pay attention and respect the
indications of the label stuck in each shelf, before extracting
them (see Fig. 26).
For longer lengths correct the cross sections accordingly, in
order to avoid dropping voltages, by respecting the Regulations
or norms corresponding to the country.
For each setting in manual and the information is available
for
«N» units in parallel, as well as the features in «Backfeed
protection».
Page 31

29
• In parallel systems, the length and cross section of the
wires that goes from the panel board to the each UPS and
vice versa, will have the same for all of them, without any
exception.
• Always take into account the cross cable section, as regards to the
size of the terminals of the switches, in order to embrace all their
section properly for an optimal contact between both elements.
• In the nameplate of the equipment, nominal currents are only
printed as it states in the EN-IEC 62040-1 safety standard. The
input current calculation, has been taken into account the power
factor and the own efficiency of the equipment.
• If other peripheral elements are added to the UPS or parallel system
input, output or bypass like transformers or autotransformers, take
into account the currents stated in the own nameplates of those
elements in order to use the suitable cross sections, always
respect the Local and/or National Low Voltage Electrotechnical
Regulations.
• When a UPS or parallel system include a galvanic isolation
transformer, as standard, option or installed by yourself, either at
the input line, bypass line, output or in all of them, protections
against indirect contact (RCD) have to be fitted in at the output of
each transformer, because in case of electrical shock in the
secondary winding (output of the isolation transformer), its
isolating feature will block the tripping of the protections
located in the primary winding.
• As a reminder, all isolation transformer installed or supplied from
factory, has the output neutral connected to earth by means of a
bridge that connects the neutral and earth terminals. In case, an
isolated neutral is required to remove this bridge by following the
precautionary measures stated in the respective local and/or
national low voltage regulations.
• To reach the cables inside the cabinet, there are either cable glands
(PR) assembled in the metallic structure or an only one opening as
a register mode.
• Models with power rate higher than 40 kVA (LV) / 80 kVA (HV),
have a rod to fix the connection wires of the equipment to it, by
means of clamps (BF).
Once the cables are connected to their respective terminals,
proceed to fix them by means of clamps to the rod (BF).
5.1.4.5. Preliminary considerations before connecting, as
regards to batteries and protections.
• Battery protection has to be always done by fuses as minimum.
So, the physical layout of them is determined by the tangible
location of the batteries.
Standard equipment up to 20 kVA (LV) / 40 kVA (HV), batteries
are supplied already fitted in the same cabinet of the
equipment and B1 models and/or higher power rate are
supplied in a separate cabinet. Therefore, battery protection is
arranged as follows:
In the UPS (stated in this document as (Q3)):
Battery fuse holder switch with 3 fuses in models up to 20
kVA (LV) / 40 kVA (HV) or switch for B1 versions and higher
power rates.
In the battery cabinet and standard back up time:
Battery fuse holder switch with 3 fuses in models up to
60 kVA (LV) / 120 kVA (HV) stated in this user's manual
as (Q8).
Switch for battery string no 1 in models higher than 60 kVA
(LV) / 120 kVA (HV) stated in this user's manual as (Q8).
Inside there are 3 non-switchable fuses.
• In relation to fuses, they will be supplied inside a plastic bag with the
equipment documentation or inside the battery cabinet, less those
battery modules of models higher than 60 kVA (LV) / 120 kVA (HV),
which are mechanically fixed to the cabinet.
• The original type of the battery circuit is preset op e n from
factory..
– +
Put the fuses in the corresponding fuse holder switch and
turn it «On» when it is indicated only, never before. To
operate in other way, it can cause irreversible damages to
the equipment or serious and/or very serious injuries to
the fitter, as he has been exposed to a possible electrical
discharge during the connection of the UPS with the battery
set or battery cabinet.
• Do not maneuver the battery fuse holder and/or switch
when the equipment is turned on. This mechanisms
cannot be turned on/off with load.
• When power supply to the equipment or parallel system
is broken in a short intervention and it is planned to have
them out of service for long time, shut them down
completely and remove the 3 fuses from the fuse holder
switch or battery module for higher safety, and keep
them in a safe place. For models higher than 60 kVA (LV)
/ 120 kVA (HV), open the battery switch in both cabinets
(equipment and battery module).
5.1.4.6. Access to inside of the cabinet for connection.
• Any equipment and battery cabinet from this series has
terminals as connection for the power. Also UPSs have terminal
strips for the auxiliary connections and HDB9 / DB9
communication connectors.
To access to them, follow and repeat the same procedure in each
unit for parallel systems:
Unblock the lock/s (CL) with key (LL) supplied
in the equipment, turn it clockwise to 45º.
Open the front door (PF) completely. DB9 connectors of
communication ports and terminals for EPO remote button
are visible.
Remove the screws (t1) that fix the terminal cover (TB) to
the cabinet and connection terminals are visible.
When finishing the UPS connection, put the cover (TB)
back, fix it with the screws (t1), close the door (PF) with
the key (LL) and lock (CL).
Take into account the cross cable section, as regards to the
size of the own terminals of the switches, in order to execute
all their section properly for an optimal contact between both
elements.
Page 32

30
5.2. CONNECTION.
• This equipment is suitable to be installed in mains with
power distribution system of TT, TN-S, TN-C or IT. Take
into account the installation of the used system and the
national electrical regulation of the destination country.
5.2.1. Connection to mains, terminals (X1 to X4).
• As this is an equipment with class I protection against
electrical
shocks,
it is
essential
to install the
protection
earth
conductor (connect earth ( )). Connect this conductor to
terminal (X5), before supplying voltage to the input terminals.
• Equipment without static Bypass line, in accordance with the
safety standard EN-IEC 62040-1, installation has to be executed
with a «Backfeed protection» system, for example, a
contactor. That will prevent the appearance of dangerous
voltage or energy in the UPS input mains during a mains fault.
The standard is applicable both if power supply is in single phase
or in three-phase and for single units, and for each UPS of the
parallel system.
• If it requires more detailed information for particular
system configuration, ask for the relating information in
«Recommended installation». It will show the circuit
dia
gram, as we
ll as the
protection size and
minimum cr
oss
section o
f the wires that are connected to the equipment.
Take into account the nominal operating voltage. All figures
are calculated for a maximum total cable length of 30
m between the distribution panel board, equipment and
loads.
For longer lengths correct the cross sections accordingly,
in
order to avoid dropping voltages, by respecting the
Regulations or norms corresponding to the country.
In the own documentation and for each setting, it is available
the information for «N» units in parallel, as well as the features
of the own «Backfeed protection».
There can be no derivation in the line from th
e
«Back feed protection» to the UPS, as the safety standard
will
be infringed.
• Warning labels should be placed on all primary power switches
installed in locations away from the equipment to alert the
electrical maintenance staff of the presence of a UPS in the
circuit.
The label will bear the following or an equivalent text:
Before working on this
circ
uit.
Isolate the Uninterruptible Power System (UPS).
Check the voltage between all terminals, including the
protective earth.
Risk of UPS backfeed volt
age
.
• Connect the input cables to the respective terminals according
to the available equipment setting.
For parallel systems, it will be necessary to repeat the
connections that go from panel board to each equipment.
Connection to three phase mains:
Connect the power supply cables R-S-T-N to the input terminals
(X1), (X2), (X3) and (X4), respecting the phase rotation
and neutral indicated on the label of the equipment and in this
manual. If the phase rotation is not respected, the equipment
will not operate.
In case of discrepancies between the label and the instructions
of this manual, the label will always prevail.
Connection to single phase mains:
Connect the power supply cables R-N to the input terminals (X1)
and (X4), respecting the order of phase and neutral
indicated on the label of the equipment and in this manual. If the
order of the phase and neutral is not respected, the equipment
will be damaged seriously.
In case of discrepancies between the label and the instructions
of this manual, the label will always prevail.
5.2.2. Connection of separate static bypass line,
terminals (X14 a X17). UPS B version only.
• As this is an equipment with class I protection against electrical
shocks,
it is
essential
to install the
protection
earth conductor
(connect earth ( )). Connect this conductor to terminal
(X5), before supplying voltage to the input terminals.
• Equipment with static Bypass line, in accordance with the
safety standard EN-IEC 62040-1, installation has to be provided
with a «Backfeed protection» system, as for example a
contactor, which will prevent the appearance of dangerous
voltage or energy in the UPS input mains during a mains fault.
The standard is applicable if power supply both is single phase or
three phase and for single unit, and for each UPS of the parallel
system.
• If it’s required more detailed information for particular system
configuration, ask for the relating «R ecommended installation»
information. In that information is shown the circuit diagram, as
well as the protection size and minimum cross section of the
wires that are connected to the equipment, taking into account
the nominal operating voltage. All figures are calculated for a
maximum total cable length of 30 m between the distribution
panel board, equipment and loads.
For longer lengths correct the cross sections accordingly,
in
order to avoid dropping voltages, by respecting the
Regulations or norms corresponding to the country.
In the own documentation and for each setting, it is available
the information for «N» units in parallel, as well as the features
of the own «Backfeed protection».
• There can be no derivation in the line that goes from th
e
«Back feed protection» to the UPS, as the safety standard
would be infringed.
• Warning labels should be placed on all primary power switches
installed in places away from the equipment to alert the
electrical maintenance staff of the presence of a UPS in the
circuit.
Page 33

31
The label will bear the following or an equivalent text:
Before working on this
circ
uit.
Isolate the Uninterruptible Power System (UPS).
Check the voltage between all terminals, including the
protective earth.
Risk of UPS backfeed volt
age
.
• Connect the bypass input cables to the respective terminals
according to the available equipment setting.
For parallel systems, it will be needed to repeat the connections
that go from panel board to each equipment.
Connection to three phase bypass mains:
Connect the power supply cables R-S-T-N to the bypass
terminals (X14), (X15), (X16) and (X17), respecting the
phase rotation and neutral indicated on the label of the
equipment and in this manual. If the phase rotation is not
respected, the equipment will not operate.
In case of discrepancies between the labelling and the
instructions of this manual, the label will always prevail.
Connection to single phase bypass mains:
Connect the power supply cables R-N to the bypass terminals
(X14) and (X17), respecting the order of phase and neutral
indicated on the label of the equipment and in this manual. If the
order of the phase and neutral is not respected, the equipment
will be damaged seriously.
In case of discrepancies between the label and the instructions
of this manual, the label will always prevail.
5.2.3. Connection to the output, terminals (X6 to X9).
• As this is an equipment with class I protection against
electrical
shocks,
it is
essential
to install the
protection
earth
conductor (connect earth ( )). Connect this conductor
to terminal (X5), before supplying voltage to the input
terminals.
•
The «Recommended
installation» information
for each
input
and
output
setting is available with the
supplied
documentation, manual and/or CD. In that information is
shown the circuit dia
gram, as we
ll as the
protection size and
minimum cr
oss section o
f the wires that are connected to
the equipment, taking into account the nominal operating
voltage. All figures are calculated for a maximum total
cable length of 30 m between the distribution panel
board, equipment and loads.
For longer lengths correct the cross sections accordingly, in
order to avoid dropping voltages, by respecting the Regulations
or norms corresponding to the country.
In the own documentation and for each setting, it is available
the information for «N» units in parallel.
• Connect the output cables to the respective terminals
according to the available equipment setting.
For parallel systems, it will be needed to repeat the connections
that go from panel board to each equipment.
Connection to three phase output:
Connect the loads to U-V-W-N output terminals (X6), (X7),
(X8) and (X9), respecting the phase rotation and neutral
indicated on the label of the equipment and in this manual. If the
phase rotation is not respected, the equipment will not operate.
In case of discrepancies between the label and the instructions
of this manual, the label will always prevail.
Connection to single phase output:
Connect the loads to U-N output terminals (X6) and (X9),
respecting the order of phase and neutral indicated on
the label of the equipment and in this manual. If the order of the
phase and neutral is not respected, the equipment will be
damaged seriously.
In case of discrepancies between the label and the instructions
of this manual, the label will always prevail.
• With respect to the protection that must be placed on the
output of the switchgear or manual bypass panel board, we
recommend that the output power should be distributed in at
least four lines. Each one should have a circuit breaker
protection switch of the suitable value. This type of output
power distribution will allow, in the event of a breakdown in
any of the machines connected to the equipment that causes a
short circuit, will only affect to the line that is faulty. The rest of
the connected loads will have their continuity assured due to
the tripping of the protection of the line affected by the short
circuit only.
5.2.4. (X11, X12 and X23), with the battery modules (X47,
X48 and X49).
• As this is an equipment with class I protection against
electrical
shocks,
it is
essential
to install the
protection
earth
conductor (connect earth ( )). Connect this conductor
to terminal (X5), before supplying voltage to the input
terminals.
• The original type of the battery circuit, preset from factory is
opened.
– +
Put the fuses in the corresponding fuse holder switch and
turn it «On» when it is indicated only, never before. To
operate in other way, can cause irreversible damages to the
equipment or serious and/or very serious injuries to the
fitter, as he has been exposed to a possible electrical
discharge during the connection of the UPS with the battery
set or battery cabinet.
• Do maneuver the battery fuse holder switch
and/o
r
switc
h, when the equipment is turned on. This
mechanisms cannot be turned on/off with load.
• The connection of the battery cabinet with a UPS with power
rate higher than 20 kVA (LV) / 40 kVA (HV) or for B1 models, will
be done with the supplied cable bundle, by connecting one side
to terminals (X11), (X23) and (X12) of UPS and the other one
to terminals (X47), (X49) and (X48) of battery module, always
respecting the stated polarity on the labelling of each element
and this manual, as well as the color of the cables (red for
positive, black for negative, blue for middle tap (N) and greenyellow for earth bonding), see Fig. 28.
Page 34

32
UPS
Battery cabinet
UPS Battery cabinet 1 Battery cabinet «N»
+ N –
+ N – + N –
+ N –
+ N –
Fig. 27. Connection between UPS and battery cabinet.
Fig. 28. Example of connection between UPS and two battery
cabinets.
• For extended back up times with more than one battery module
or cabinet, the connection will always be done in parallel among
them and the equipment.
So, cable with black color, from the UPS negative to the negative
of the first battery cabinet and from this negative to the second
battery
cabinet
and so on. Proceed in the same way, for connecting
the positive red cable, the blue cable of the middle tap (N) and for
the green-yellow of the earth bonding.
As an example Fig. 28 shows the connection between one UPS
and two battery cabinets. Proceed in the same way when
connecting more modules.
• In case of belonging or being connected to parallel system, the
connection of the batteries with the UPS don not have any
difference as regards to a single equipment, because by default,
each battery set is connected directly with its UPS, regardless
of the quantity of battery cabinets.
UPS 1
+ N –
Battery
cabine
t
+ N –
UPS 2
+ N –
• Also, as an option, there is another structure, a common battery
set for parallel system of two equipment fitted in a cabinet or
rack.
The connection of each UPS with the battery cabinet will be
done with the supplied cable bundle, by connecting one side to
terminals (X11), (X23) and (X12) of UPS and the other one to
terminals (X47), (X49) and (X48) of battery module, always
respecting the stated polarity on the labelling of each element
and this manual, as well as the color of the cables (red for
positive, black for negative, blue for middle tap (N) and greenyellow for earth bonding), see Fig. 29.
Repeat the same procedure with the other UPS.
• This set can be extended in back up time and be based on
several units connected in parallel among them and the own
UPSs.
•
Electrical discharge danger. If after starting up
the UPS, it is required to disconnect the battery
cabinet, the
equipment has to be completely shutdown (see section
6.5). Turn off the battery fuse holder switch (Q8) located in the
battery cabinet and/or fuse holder switch or switch (Q3) located in
the UPS. Wait 5 min. at least till the filter capacitors have been
discharged.
Fig. 29. Example of connection of two UPSs in parallel and a
common battery set.
5.2.5. Connection to the input main protecting earth
terminal (X5) and the earth bonding terminal
(X10) .
.
• As this is an equipment with class I protection against
electrical
shocks,
it is
essential
to install the
protection earth
conductor (connect earth ( )). Connect this conductor
to terminal (X5), before supplying voltage to the input
terminals.
• Make sure that all the loads connected to the UPS are only
connected to the earth bonding terminal ( ). The fact of not
restricting the earthing of the load or loads and/or the batteries
cabinet or cabinets to this single point will create backfeed loops
Page 35

33
to earth that will affect to the quality of the power supplied.
• All the terminals identified as earth bonding ( ), are joined
together, to the main protective earthing terminal ( ) and to
the ground of the equipment.
5.2.6. Relay COM port. Connector (X32).
• The communications line (COM) is a very low voltage
circuit of safety. To preserve the quality, it must be
installed separate from other lines that have dangerous
voltages (power distribution line).
• The relay communication port provides digital signals in dry
contacts form with a maximum applicable voltage and current
of 6 A 30 V DC or 6 A 100 V AC. This channel makes possible the
dialogue between the UPS and any other machines or devices,
through the DB9 male connector (X32).
Pin nr Relay Type of signal
Contact by default
N.C.-N
.O.
1 Shutdown signal +
-
2 Shutdown signal –
-
3 RL5
Configurable ((OPTIONAL)
N.C. or N.O.
4 RL2
Discharge - Mains fault
N.C
.
5
RL1 to RL5 Common
-
6 RL1
Equipment on Bypass
N
.O.
7 RL3
Low battery
N
.O.
8 RL4
General alarm
N
.O.
9 RL2
Discharge - Mains fault
N
.O.
N.O. and N.C.: Normally opened and closed contact
respectively.
It changes its status, when the corresponding alarm is
triggered.
Table 2. Relay interface alarm pin-out, DB9 connector (X32).
• The base of front door (PF) has a slot to facilitate the entering and
way out of the communication cables inside the UPS. Watch to not
trap them between the door and cabinet when closing it.
5.2.7. RS-232 and RS -485 COM ports. Connector (X31).
• The communications line (COM) is a very low voltage
circuit of safety. To preserve the quality, it must be
installed separate from other lines that have dangerous
voltages (power distribution line).
• In the same DB9 connector there are supplied both communication
ports of the equipment, the RS-232 and RS-485. Both ports cannot
be used at the same time, because they are mutually exclusive.
• Both channels are used for connecting the UPS with any
machine or devices that has this standard bus.
The RS-232 consists of the transmission of serial data, so it is
possible to send a large amount of information through a
communication cable of just 3 wires.
• Physical structure of the RS-232.
Pin 2. RXD. Serial data reception.
Pin 3. TXD. Serial data transmission.
Pin 5. GND. Ground signal.
• Physical structure of the RS-485.
Unlike other serial communication links, this uses only 2 wires
(pins 4 and 9 of the female DB9 connector) to make the dialogue
among the systems connected to the network. The
communication will be established by sending and receiving
signals in differential mode, which gives the system great
immunity to noise and a long range (approx. 800 m).
Pin 4. Output signal A (+) of the RS-485.
Pin 9. Output signal B (–) of the RS-485.
• Communication protocol.
The communication protocol used is «MASTER/SLAVE» type.
The computer or computer system («MASTER») asks about a
certain data, and the UPS («SLAVE») answers immediately with
the required data.
If this communication way, is going to be used, ask for the
5 1
(X31)
9 6
1 5
(X32)
6 9
protocol IN467*00.
Firstly the communication channel of the computer will be
programmed with the same parameters as the communication
channel of the UPS.
Then we will be ready to start the communication and therefore
send to the UPS the first question.
Fig. 30. DB9 connector (X31) and (X32).
• By default the equipment is supplied with 4 signal relays with
a preset programming (see chart 2), which can be modified at
factory or by the S.T.S. under request. Chart 6 shows all the
alarms that can be set to any relay. A fifth relay can be supplied
as an option and under request, which can be defined in the
purchase order.
Also, there is a «Shutdown» input that allows turning of f the
inverter, when there is a voltage between (5÷ 12 V) at this input.
• The most common use of these kinds of ports is to supply the
necessary information to the file closing sof tware.
If there is any problem meanwhile communicating, it will be
advisable to repeat the initialization sequence of the channel.
• The
communication parameters o
f the RS-232 and RS-485 are:
Baud rate: 1200, 2400, 4800, 9600 or 19200 Bauds.
Nr of data bits: 8 Bits.
Nr of stop bits: 1 or 2 Bits.
Type of parity: Even, Odd or None.
• The base of front door (PF) has a slot to facilitate the entering and
way out of the communication cables inside the UPS. Watch to not
trap them between the door and cabinet when closing it.
Page 36

34
5.2.8. EPO terminals (X50).
• All UPSs have two terminals to install an external emergency
button to shutdown the output (EPO).
• In case it was required to install a switch or button (EPO) in a
single equipment, the cable bridge that closes the circuit has to
be removed from terminal strip (X50) first.
• For a parallel system, two different solutions can be applied,
which are the following:
Connect the button (EPO) in only one equipment of the
parallel system. Remove the cable bridge from terminals
(X50) in the equipment that it is only connected.
In case of fault and removing of the equipment that has
physically connected the button (EPO), there is the risk of
leaving the system without the emergency stopping, unless
it is reconnected to the other operative UPSs.
Connect a button (EPO) to each equipment of the parallel
system. To do that, remove all the cable bridges from
terminals (X50) in each equipment.
Therefore, the functionality of the (EPO) will be kept in each
one of them, regardless what occurs in the rest of
equipment of the parallel system.
By means of the own communication BUS among the
equipment that make the parallel system, any action over any
button will affect to the whole.
• In any case, the switch or button (EPO) has to be normally closed
(NC), so the emergency shutdown order will be triggered when
opening the circuit between these terminals (X50).
To restore the UPS to normal mode, invert the position of the
switch or button (EPO), -close the circuit between the terminals
(X50)-, unblock the button.
• To know the operating of (EPO), see section 6.6. of this manual.
• The base of front door (PF) has a slot to facilitate the entering and
way out of the communication cables inside the UPS. Watch to not
trap them between the door and cabinet when closing it.
(X50) EPO
(Output
Emergency
Shutdown)
Fig. 31. Connection terminals for emergency shutdown switch or
button (EPO), belonging to the end/user.
5.2.9. Auxiliary contact and battery temperature
probe terminal strip.
• All the equipment are provided with terminal strip that
corresponds to the auxiliary contacts of manual bypass (X51)
and output (X45) switches.
• Also in the equipment either with separate battery cabinet
(models >20 kVA (LV) / >40 kVA (HV)), the additional
terminal strip (X34) are supplied, to connect the battery
temperature probe that allows compensating the floating voltage
according to the ambient temperature.
• Any wire connected to the terminals (X34), (X45) and (X51), will
be entered into the equipment through the cable bushing (PR).
5.2.9.1. Terminal strip, auxiliary contact of manual
bypass switch (X51).
.
• Terminal strip (X51) of two pins of the UPS, is connected in
parallel with the normally opened auxiliary contact of the switch
or manual bypass switch of the equipment.
• Switchgear panel board with manual bypass manufactured by
us (option), there is a terminal strip of two terminals connected
in parallel with the normally opened auxiliary contact of the
switch or manual bypass switch of the own switchgear panel
board. Any auxiliary contact of the manual bypass are moved on
in advance when closing.
• In case of acquiring a switchgear panel board
with manual bypass in another way, check that it has
the stated auxiliary contact and connect it to the
terminal strip (X51) of each equipment. As a must, the
auxiliary contact has to be moved on in advance when
closing.
• It is ESSENTIAL as safety measure of the system,
loads included, to connect the terminal strips (X51) of
the UPSs with the terminal strip with the same functionality of
the switchgear panel board. This way, any wrong action
over any switch or manual bypass switch of the turned
on UPSs will avoid causing a total or partial fault of the
installation, loads included.
5.2.9.2. Terminal strip, auxiliary contact of output
switch (X45).
• This terminal strip of two pins is available in any equipment, but
it is useful in parallel systems only.
• Basically, the normally opened auxiliary contact of the output
switch, is extended till the terminal strip of two pins (X45).
Through the isolated cable as a bridge mode that is supplied
connected between both pins, the circuit is closed. Do not
remove in single equipment, because although the equipment
would be in operation, there would be an alarm of output switch
deactivated.
• In those installations with parallel systems, the cable as a bridge
mode connected between the two pins of the terminal strip
(X45) of each UPS has to be removed, and connected to the
terminals
corresponding
to the auxiliary contact of the output
switch of the switchgear panel board.
• In case of acquiring a switchgear panel board by
yourself, check if the output auxiliary contact is
available and connect it to the terminal strip (X45) of
each equipment. As a must, the auxiliary contact has to
be moved on in advance when opening.
Page 37

35
i
5.2.9.3. Terminal strip, battery temperature probe (X34).
For batteries in a separate cabinet only.
• As the battery manufacturer recommends a variable floating
voltage depending on the ambient temperature.
The control of this feature will be done through the
measurement of the temperature by means of a probe, located
inside the cabinet itself when batteries and equipment are
fitted in the same enclosure.
For those cases that batteries are supplied in a separate cabinet
out from the own UPS (models >20 kVA (LV) / >40 kVA (HV),
there will be a terminal strip of two pins (X34), that allows
bringing the probe located at the end of a two wires bundle with
4.5 m., till inside the battery cabinet.
The connection of the two wires from the cable bundle to the
terminal strip (X34) does not have polarity.
• Also via this probe the ambient temperature inside the battery
cabinet can be visualized in the control panel with LCD.
• The bundle with the probe will always be supplied already
connected to the terminal strip (X34), so it is only necessary to
cut the clamp that keep it rolled, to take it out from the UPS
cabinet and enter it into the battery cabinet, in both cases,
through the foreseen cable bushing (PR).
5.2.10. Connection of parallel BUS (X36i) and (X36o).
• This section is only useful for parallel systems.
• For the correct operation of the parallel functions and operating,
any unit connected in parallel are continuously communicated
among them. It is achieved by means of the called
communication line or BUS.
• Any operation of this section, regarding parallel systems, has to
be done by authorized staff of our firm.
• Once the power connections of the UPSs of the parallel systems
are done, it is needed to make the ones related to the control
or communication BUS. To do it, connect them in a sequential
way, two lines of the communication BUS between a unit and
its adjacent.
• Together with each UPS of a parallel system, it is supplied a 15
wires bundle with HDB15 connectors at both ends, one male
and the other one female, with a length of 5 m. Therefore, there
will be as many communication BUS bundles (BC), as quantity
of equipment to parallel have the system.
See Fig. 6 to 14 for COM
port physical layout.
Fig. 32. Connection of the communication BUS.
5.2.10.1. Connection of the
communication
or BUS bundle
(BC).
.
• Respect the sequence and connection order of the
communication BUS among correlative equipment.
Although the order of the connections of communication BUS
among equipment are made, is not important, on condition
that the communication loop is completed or closed properly, it
is advisable to carry out the connections with the immediately
next equipment in order simplify the connection.
• The connection limit of the installation, will be determined by
the quantity of available equipment to parallel and in any case
till a maximum of four units.
• Each equipment has two HDB15 connectors for the
communications among them, one male labelled as “Output”
(X36
i
) and another one female as “Input” (X36°).
• In the same way, all the bundles supplied with the equipment,
are equal in connections and length.
DO NOT MODIFY THE COMMUNICATION
BUS
BUNDLE, OR THE CONNECTORS UNDER ANY
CONCEPT.
• Take one of the bundles and insert the HDB15 female connector
located in one of its ends, into the male connector labelled as
“Output” (X36°
o
), in any of the equipment of the system and
insert the HDB15 male connector located in the opposite end of
the bundle into the female connector labelled as “Input” (X36 )
Of the adjoining equipment.
• Repeat the previous step with each equipment of the system,
till closing the communication BUS loop or ring.
• As an example, Fig. 32 shows, how the communication BUS
connections have to be done.
Page 38

36
Although this illustration is not representative for the complete
UPS series, as for the format of the cabinet, terminal layout or size
and/or switches, as well as the own communication ports, it
expects to be a guide to clarify the possible doubts on how the
communication loop has to be connected.
To see the physical layout of the COM connectors for each
power rate, refer to the illustrations of figures 6 to 14.
• The base of front door (PF) has a slot to facilitate the entering and
way out of the communication cables inside the UPS. Watch to not trap
them between the door and cabinet when closing it
Page 39

37
6. OPERATING.
• During the description of this section, it is detailed the procedure
to follow to get the different functionalities, considering a system
of «n» equipment connected in parallel.
If in your case, it is available only one UPS from UPS, series,
proceed in the same order, but simplifying the operating for a
single unit.
• As it has been stated before, it is advisable to have an
external manual bypass panel board equipped with
input, output, static bypass (UPS B version only) and
manual bypass protections, in single installations.
For parallel systems up to two units, it is very
advisable
having a switchgear panel board and for systems with 3 or 4
equipment, it is essential. Switches of the panel board
have to allow isolating a UPS from the system against any
wrong operation and feeding the loads with the rest ones,
either during the preventive maintenance period or the
self-reparation.
Therefore it has been considered appropriate and naturally,
to contemplate in the instructions of the equipment, the
operation of a system with «n» equipment connected in
parallel with their respective external manual bypass
panel board as it is shown in the «Recommended
installation» documentation included in the CD.
This panel board allows isolating each equipment individually in
case of fault and removing it without any difficulty for its
reparation or replacement. Also, the included manual bypass
switch makes it easier to do the preventive maintenance tasks
or intervention over the complete system, supplying the
voltage to the loads directly from mains, on the «bypass»
mode operation, mean- while the input voltage is available.
In those installations without the external manual bypass panel
board, omit the actions and steps that involve the maneuvering
of their switches.
Fig.33. Procedure start-up / shutdown.
6.1. PRELIMINARY CONSIDERATIONS.
• It is very important to always operate in the established order
in the described instructions in the next sections, by respecting
the sequence of the switches in relation to its function.
So, i.e. in parallel system based on four equipment, when it is
stated to turn on the «Input» mechanisms, the order of turning
on them will not matter, but any other switch with different
function as it could be «Output» switch will not be turned on,
till is stated.
• Unlike other UPS structures, where the «Master» and «Slave»
equipment are preset strictly from factory, conditioning the
order of start-up and shutdown, the new UPS series is
managed by a more flexible hierarchy according to the
operating mode that it is.
6.2. START UP
6.2.1. Control before start up
˙ Carefully make sure that all the connections have been made
correctly and are sufficiently tight, respecting the labelling of the
device and the instructions of chapter «4.- Installation and
wiring of the unit».
˙ Check that the UPS switches and the batteries cabinet or
cabinets are turned off (position «Off»).
˙ Be sure that all the loads are turned «Off».
6.2.2. Start up procedure
It is very important to operate in the established order, considering
the following instructions.
ECO
ON/OFF
BATTERY TEST
CNTL
(Control)
Main
FAST CHG
screen 1.5
screen 1.4
screen 1.1
screen 1.3
screen 1.0
screen 0.0
screen 1.2
Confirm YES to do
Battery Test
If UPS is OFF, confirm
YES to turn ON UPS
If UPS is ON, Confirm YES
to turn OFF UPS.
Confirm YES to activate
ECO mode
Confirm YES to activate
Fast Battery Charger
Page 40

38
˙If the UPS connects to external battery cabinet, set the fuse holder
switch of the battery cabinet (Q8) to «On».
˙If the power supply you use to supply the UPS has a general switch.
Set the general switch of the header board to «On».
˙Turn the input switch (Q1a) to «On» position. The Display of the
Control Panel (PC) will be turned on automatically.
˙ If the following alarm message appears on the Control Panel
Display,
.. and also an audible alarm comes on, the UPS cannot be started,
because of incorrect input phase sequence. Disconnect the input
switch (Q1a) and the general cut-off of the header board, swap the
phases of the input terminals of the UPS according to the labelling
and repeat the start-up process described up to now.
˙In units with separate Bypass (UPS-B), also turn the Bypass switch
(Q4) to «On» position.
˙If the following alarm message appears on the Control Panel
Display,
... and also an audible alarm comes on, the UPS cannot be started,
because of incorrect input phase sequence. Disconnect the Bypass
switch (Q4) and the general cut-off of the header board, swap the
phases of the input bypass terminals of the UPS according to the
labelling and repeat the start-up process described up to now.
Start up the inverter through the keypad of the control panel.
a. Select ”CNTL”
b. Select ”ON/OFF”
c. Start up unit information will appear. Select ”Yes”.
Then, the inverter and rectifier will start.
˙Once the rectifier is completely working, it starts a process of
equalization (DC bus voltage starts to equalize with battery
voltage). After a few seconds (depending on the battery level), an
alarm message appears like this.
…it displays that the equalising process has been finished, and
IN THIS MOMENT ONLY is when the battery fuse holder switch or
switch of UPS (Q3) can be turned on.
DO NOT TRY to close any battery fuse holder switch at any other
moment, because this operation could damage the equipment and/or
cause possible accidents. They can only be turned on by following the
quoted previous steps.
Turn on the output switch (Q2) to “On” position. The system will
supply voltage at the output terminal.
If you want to start up a parallel system, you should follow the steps
below.
Close the mains circuit breaker to provide power to the input of the
each UPS in the system.
Turn the input switch (Q1a) to “On” position for each UPS in the
system. Each display of the Control Panel will be turned on
automatically. Do not close any other switches at this time.
Repeat the start-up process on LCD Touch Screen as what mentioned
before.
• After 30 seconds, the inverters and rectifiers of each UPS will start
up, but they will not supply voltage at their output yet because the
output switches are not turned on yet.
The first UPS to start up the inverter will be set as «Paral. Mst. Byp»
initially, the one with the highest address as «Paral. Slv. By.Rsv» and
the rest, if there are any as «Paral. Slv. By». Obviously in those
systems with two equipment, the «Paral. Slv. By» will not exist.
The UPS hierarchy relating to the rest of equipment of the system is a
dynamic depending on the status of the rest of the equipment.
To check the hierarchy of the UPSs (parallel status), is needed to go
back to main screen in each equipment marked in the picture below
(Screen 00):
Where:
–– «Paral. Mst. Byp» Bypass master of the parallel system. By default,
it is the first UPS that starts up the inverter by the previous
established procedure.
–– «Paral. Slv. By.Rsv» Reserved bypass slave. Initially corresponds to
the equipment with the highest address less the one with «Bypass
Master». In case of fault in the Master, it will take its functions.
–– «Paral. Slv. Byp» Bypass slave of parallel system (for systems with
more than two equipment only). It will become as «Reserved bypass
Slave», when it works as «Bypass Master». In those systems with
more than three equipment in parallel, the hierarchy of «Reserved
bypass Slave» will be taken by the highest address among the
«Bypass Slave».
–– «Paral. Mst. Volt» Voltage Master of parallel system. By default, it
is the first UPS running on normal mode (inverter in operation) that
the output switch (Q2) is turned «On».
–– «Paral. Slv. Vt.Rsv» Reserved voltage slave of parallel system.
Equipment on normal mode (inverter in operation), that the output
switch (Q2) has been turned «On» in 2nd place or subsequently (after
«Paral. Mst. Volt» or «Paral. Mst. Vt.Rsv»). Initially, it corresponds to
the equipment with the highest address less that one with «Voltage
Master». In case of fault in the Master it will take its functions.
–– «Paral. Slv. Volt» Voltage Slave of parallel system (systems with
more than two equipment only). Equipment on normal mode (inverter
! MAINS PHASE ROT. UPS START INH.
! BYPASS PHASE ROT. UPS START INH.
!BATT. SWITCH OPEN SWITCH IT ON
Page 41

39
in operation), that the output switch (Q2) is turned «On» in 2nd place
or subsequently (after the «Paral. Mst. Volt» or «Paral. Mst. Vt.Rsv»).
It will become as «Reserved voltage slave», when it works as
«Voltage Master». In those systems with more than three equipment
in parallel, the hierarchy of «Reserved voltage slave» will be taken by
the highest address between the «Voltage slave».
• Make sure that the inverter voltage is same, e.g.: 230Vac
• Turn all output switches from panel «On».
• Turn the output switch (Q2) of each UPS «On».
The system will supply voltage at the output terminals of the
protection panel.
˙If the system has outgoing distribution protections, switch them
«On».
˙Start up the loads to be supplied in a progressive way. The
system is started up completely, and the loads are protected through
the UPS.
• With the system running (switches turned «On»), when
shutdown or start up the inverter through the keypad of any UPS that
belongs to it, all of them will be turned «Off» or «On». In both cases,
the UPSs still supply output voltage at «On» position through the
inverters and «Off» position through the static bypass.
6.2.2.1 Take into consideration about Master and Slave
• Bypass Master and Slave («Mst. Byp.», «Slv. Byp.», «Slv. By.Rsv»).
■ Master manages the status of its own static bypass switch
and the one of the Slave equipment.
■ Equipment that are not sharing the load by the inverters.
The cause can be any of the following:
– Output switch (Q2) turned «Off».
– Equipment output on bypass.
– Inverters are shutdown or in start up process.
• Voltage Master and Slave («Mst. Volt», «Slv. Volt», «Slv. Vt.Rsv»).
■ Master manages both the status of its own static bypass
switch and the inverter voltage, as well as the one of the
Slave equipment.
■ Equipment are sharing the load on inverter. Therefore:
– Output switches (Q2) are turned «On».
– Inverters are running and static switches are on inverter.
6.3 SHUTDOWN OF ONE EQUIPMENT FROM THE PARALLEL
SYSTEM
• Turn the output switch (Q2) of the UPS to shutdown «Off». In the
screen 0.0 from LCD panel will display:
6.4 START UP THE PREVIOUS UPS AGAIN
• Start up the inverter by means of the keypad from control panel.
• Turn the output switch (Q2) of the UPS «On».
6.5. COMPLETE SHUTDOWN OF THE UPS
˙Shutdown the loads.
˙If the system has outgoing distribution protections, switch them
«Off».
˙Shutdown the inverter. Please go to «CNTL» submenu (Screen 1.0),
and select «OFF». You will get Screen 1.2, asking you to shut down
the unit, by selecting (YES) to shut down the inverter.
˙Turn the output switch (Q2) to «Off» position.
˙In standard units, set the input switch (Q1a) to «Off» position. In B
units, set the input switch (Q1a) and static bypass switch (Q4) to
«Off» position.
˙Turn fuse holder switch from battery cabinet (Q8) and/or battery
fuse holder switch or switch from UPS (Q3), to «Off».
˙Cut the power supply of the UPS and the bypass with the cut-off or
general switch of the header board. The system will be completely
deactivated.
˙ Electrical discharge hazard. If after shutdown of the equipment,
it is required to disconnect the separate battery pack/s, wait
several minutes (5 min. approx..), till the electronic capacitors have
been discharged.
˙The equipment is completely shut down.
6.6. EMERGENCY POWER OFF (EPO) OPEARTION
Emergency Power Off (EPO) is equivalent to a complete unit system
halt:
˙All UPS converters are turned off (rectifier and inverter off).
˙No output voltage is supplied to the loads.
See table below for operation:
E.P.O. function
Activation
(perform System Halt)
Return to
normal-mode.
Terminals (X50).
Normally closed
circuit by means
of the provided
cable bridge (it
allows an external
switch (EPO)).
Remote button or switch
has to be opened
permanently in terminal
strip (X50).
The equipment has to
be shut down and deenergized completely
(turn off all switches),
wait till DC bus is
discharged (LCD has
to be turned off).
The equipment has to
be started up
according to section
“5.1.2. Start up
procedure”.
Table.4. Emergency Power Off (EPO) operation
Emergency shutdown function (EPO) can only be activated through
the terminal strip (X50). In a parallel system, it is not needed to make
additional connections than there is just only one equipment, because
through the communication BUS, any action over the button will
affect to the joint of the parallel system.
6.7. BYPASS MANUAL SWITCH (MAINTENANCE).
6.7.1. Principle of operation.
The integrated manual bypass of the UPS is a very useful element, but
Not connected
Screen 0.0
Page 42

40
undue use can have irreversible consequences both for the UPS and
for the loads connected to its output. It is therefore important to
handle it as described in the following paragraphs.
6.7.2. Transfer to maintenance bypass.
Procedure for passing from normal operation to maintenance bypass:
˙Shutdown the inverter. Through the LCD touch panel, go to «CNTL»
submenu (Screen 1.0), and select «OFF». You will get Screen 1.2,
asking you to shut down the unit, by selecting (YES) to shut down
the inverter.
˙Remove the screws to that fixes the mechanical block (BL).
˙Remove the mechanical block (BL) of the manual bypass switch
(Q5) and set it to «On» position.
˙Set the output switch (Q2) to «Off» position.
˙Set the Battery Fuse Holder or battery switch (Q3) to «Off».
Besides, in models with independent battery pack/s also turn
Battery Fuse Holder (Q8) of each pack to «Off».
˙In standard units, set the input switch (Q1a) to «Off» position.
In UPS-B units, set the input switch (Q1a) and static bypass switch
(Q4) to «Off» position.
The UPS is supplying output voltage directly from the mains through
the manual bypass in units or from the mains of the static line bypass
in the version UPS-B units, through the manual bypass. The UPS is
completely shut down and inactive.
6.7.3. Transfer to normal operation.
Procedure for switching from maintenance bypass to normal
operation:
˙In model with external battery cabinet, set fuse holder switch from
battery cabinet (Q8) to «On» position.
˙In standard units, set the input switch (Q1a) to «On» position.
In B units, set the input switch (Q1a) and static bypass switch (Q4)
to «On» position.
˙Set the output switch (Q2) to «On» position.
˙Set the manual bypass switch (Q5) to «Off» position and refit the
mechanical block (BL) and the screws (t2).
It is an essential requirement for safety to refit the mechanical
block (BL), as this avoids dangerous handling for the life of the UPS
and the loads connected to it.
˙Start up the inverter. The start-up operation will be done through
the LCD touch panel. Select «CNTL» to get into control submenu
(screen 1.0), and then select «ON/OFF». You will get to screen 1.1,
asking you to start the unit up yes or not. You can select Yes. See
screen diagram (Fig. 33).
The UPS supplies output voltage entirely protected against voltage
variations, electric noise, etc.
˙Wait for alarm message to appear as:
˙Battery fuse holder switch or switch from UPS (Q3) can only be
turned «On» when the previous alarm message has been cancelled.
DO NOT TRY to close any battery fuse holder switch at any other
moment, because this operation could damage the equipment
and/or cause possible accidents. They can only be turned on by
following the quoted previous steps.
˙The UPS supplies output voltage entirely protected against cuts,
micro cuts, voltage variations, electric noise, etc.
!BATT. SWITCH OPEN SWITCH IT ON
Page 43

41
7. DESCRIPTION OF THE LCD TOUCH SCREEN.
7.1. BASIC FUNCTIONS OF LCD TOUCH SCREEN.
In LCD main screen, there are six icons in the bottom.
• Notes related with the screen map (see Fig. 34):
Some screens have a certain number of «–» characters.
It means one character, so the maximum length of the field
will be determined by the quantity of them.
Each screen is labelled with a number located in its right
corner of bottom. It is only for reference in the description and
explanation.
Fig. 34. Display messages menus and classification in submenus
7.2. SCREEN DESCRIPTIN
7.2.1. Main level (screen menu 0.0).
˙Screen 0.0: Main presentation screen, with time and date
indication.
Initialization:After power on
Using the Icon home ( ) from any screen of any submenu, we can
go back to main screen (Screen 0.0),
Fig.35. Screen 0.0 Main Screen.
7.2.2. ‘‘CONTROL” Level (screen menu 1.0).
˙Screens 1.1 and Screen 1.2 : It’s to start and stop the unit through
the LCD panel.
For procedure to start and stop, see chapters 6.2 and 6.5.
Fig.36 Control Menu Level
screen 2.0
screen 3.0
screen 1.0
screen 4.0
screen 5.0
The input/output/battery
voltage and the power
flow.
DIAG (Diagnose)
ALARM (Alarm)
SET(Setting)
CNTL (Control)
screen 0.0
MEAS
(Measures)
MAIN
DATA (Data Logger)
screen 6.0
Control
Confirm YES to
do Battery Test
Confirm YES to
turn OFF UPS
Confirm YES to activate
ECO mode
Confirm NO to deactivate
ECO mode
Confirm YES to
turn ON UPS
Battery Test
ON
OFF
Main
ECO
FAST CHG
Confirm YES to activate
Fast-battery Charger
Confirm NO to deactivate
Fast-battery Charger
screen 1.3
screen 1.1
screen 1.2
screen 1.0
screen 0.0
screen 1.4
screen 1.5
Page 44

42
Screen 1.0 «Control» and its submenus
Screen 1.1 Turn on UPS
Screen 1.2 Turn off UPS
˙Screen 1.3: Start a battery test. On the main scree (Screen 0.0),
information about the battery test is given. Possible messages:
“EXECUTING“: The battery test is running.
“SUCCESSFUL“: The battery test has been successful.
“NOT SUCCESSFUL”: The battery test has not been successful.
Screen 1.3 Battery Test
Screen 1.4 ECO mode activate
Screen 1.5 ECO mode deactivate
Screen 1.6 Fast battery charge activate
Screen 1.7 Fast battery charge deactivate
Page 45

43
7.2.3. ‘‘Measure’’ level (screen menu 2.0).
˙Screen 2.1:
Input Voltages: Phase to phase and phase to neutral voltage for
three phase unit, phase to neutral voltage for single phase
(accuracy 0.1V).
Input Current: Each phase current for three phase equipment, per
phase for single phase equipment (accuracy 0.1A).
Output Voltages: Phase to phase and phase to neutral voltage for
three phase unit, phase to neutral voltage for single phase
(accuracy 0.1V).
Output Current: Each phase for three phase equipment, per phase
for single phase equipment (accuracy 0.1A).
DC Bus Voltages: Positive and negative (accuracy 0.1V).
Battery Voltages: Positive and negative (accuracy 0.1V).
˙Screen 2.2:
Bypass Voltage: Phase to phase and phase to neutral voltage for
three phase unit, phase to neutral voltage for single phase
(accuracy 0.1V).
Bypass Current: Each phase current for three phase unit, per
phase for single phase equipment (accuracy 0.1A).
Inverter voltage:Inverter phases to neutral voltage (accuracy
0.1V).
Inverter Output Current: Each phase current for three phase
equipment, per phase for single phase equipment (accuracy 0.1A).
Charging Current: Positive and negative (accuracy 0.1A).
Discharging Current: Positive and negative (accuracy 0.1A).
˙Screen 2.3:
Frequency: Input, bypass and output frequencies (accuracy 0.1Hz).
Temperature:Rectifier, inverter and battery temperatures
(accuracy 1ºC).
Input Apparent Power: Input apparent power of L1,L2,L3
(accuracy 0.1kVA).
Input Active Power: Input active power of L1, L2, L3
(accuracy 0.1kW).
IP Total Power: Total input apparent power and active power
(accuracy 0.1kVA & 0,1kW).
Input Power Factor: Each phase Input power factor for three
phase equipment or power factor for single phase equipment
(accuracy 0.01).
˙Screen 2.4:
OP Apparent Power: Output apparent power of L1, L2, L3
(accuracy 0.1kVA).
OP Active Power: Output active power of L1, L2, L3 (accuracy
0.1kW).
OP Total Power: Total output apparent and active powers
(accuracy 0.1kVA and 0,1kW).
Output PF: Each phase output power factor for three phase
equipment or output power factor for single phase equipment
(accuracy 0.01).
Output Load: Output load percent of each phases, (accuracy
0.1%).
Total Load: Total input load and output load percent (accuracy
0.1%).
Estimated backup time (units 1minute).
Page 46

44
7.2.4. ‘‘Setting’’ level (screen menu 3.0).
Fig.38. Screen 3.0 «Setting» and its submenus
˙Screen 3.1: Basic Setting
You can program the date “dd/mm/yy” (day/month/year) and the time
“hh:mm:ss” (hours/minutes/seconds).
The display language only supports English so far.
You can program the Modbus Address. The range of addresses goes
from 1 to 246.
You can program the Service Phone, Service contactor, Service mail
and Service Address
˙Screen 3.2: Ports setting
In this screen you can program the BAUD RATE of communication
port #0 and port#2. The options are the following:
‘’1200’’
‘’2400’’
‘’4800’’
‘’9600’’
‘’19200’’
You can program the PARITY type of communication port #0 and port
#2. The options are the following:
‘’NONE”
‘’ODD’’
‘’EVEN’’
You can program the number of STOP BITS of communication port #0
and port #2. The options are the following:
‘’1’’ ‘’2’’
You can program the protocol type of communication port #0 and
port #2. The options are the following:
‘’SEC’’
‘’MODBUS’’
˙Screen 3.3: Automatic battery test setting
The options for the Type to be programmed are the following:
‘’DISABLED’’: The automatic battery test is disabled.
‘’WEEKLY’’: The automatic battery test runs once per week.
‘’MONTHL’’: The automatic battery test runs once per month.
‘’YEARLY’’: The automatic battery test runs once per year.
The line Weekday only have sense to be programmed if the
automatic battery test runs once per week. The options to be
programmed are the following:
‘’MON”: the selected day to run weekly the battery test is
Monday.
‘’TUE”: the selected day to run weekly the battery test is
Tuesday.
‘’WED”: the selected day to run weekly the battery test is
Wednesday.
‘’THU”: the selected day to run weekly the battery test is
Thursday.
‘’FRI”: the selected day to run weekly the battery test is
Friday.
‘’SAT”: the selected day to run weekly the battery test is
Saturday.
‘’SUN”: the selected day to run weekly the battery test is
Sunday.
The line Hour:Minute only have sense to be programmed if the
automatic battery test is enabled. You can program the time “hh:mm”
Page 47

45
(hours/minutes) in 24h format.
The Line Month/Day only have sense to be programmed if the
automatic battery test runs monthly or yearly. You can program the
day from 1 to 31 and the month selecting one of the following options:
‘’JAN”: the selected month to run yearly the battery test is
January.
‘’FEB”: the selected month to run yearly the battery test is
February.
‘’MAR”: the selected month to run yearly the battery test is
March.
‘’APR”: the selected month to run yearly the battery test is
April.
‘’MAY”: the selected month to run yearly the battery test is
May.
‘’JUN”: the selected month to run yearly the battery test is
June.
‘’JUL”: the selected month to run yearly the battery test is
July.
‘’AUG”: the selected month to run yearly the battery test is
August.
‘’SEP”: the selected month to run yearly the battery test is
September.
‘’OCT”: the selected month to run yearly the battery test is
October.
“NOV”: the selected month to run yearly the battery test is
November.
‘’DEC”: the selected month to run yearly the battery test is
December.
˙Screen 3.4: Advanced Setting
At this level an authorized password will be required to modify some
advanced parameters. If you need to modify advanced setting, please
check with your dealer to get password.
˙Screen 3.5: Rated Value
To modify the rated values on the screens, it is necessary to introduce
the «Password» on the previous screen 3.4. Otherwise, they only will
be able to be visualized.
The IP.V and OP.V shows the Rated Input Rectifier Voltage and Rated
Output Voltage.
It also shows Upper Margin and Input Rectifier Voltage Lower Margin
of the Input Rectifier Voltage and Input bypass voltage, The Rated DC
Bus Voltage and the Rated Output Current. The Rated Battery
Charging Current. And the probe for the battery and AC input current.
For parameter, calibration and system initial submenus, please check
your local dealer for the detailed settings.
˙Screen 3.6: Unit and service Information
In this Information Screen, you can check the UPS configuration of the
unit
Internal firmware versions of both Digital Signal Processor (“DSP Ver:”)
and microcontroller (“uC Ver:”). In the sample screen, “Ver. 4.4 D”
and “Ver. 3.2 J” respectively.
UPS Serial Number: Possible characters ranges are “0”-“9”, “A”-“Z”
and also “ “ (blank space), “-“. See sample screen.
And the Service Information set in the basic menu.
Page 48

46
˙Screen 3.7 Rated Values Information
The information of Rated Values set in the Rated Value Menu and the
last column of ”UPS Configuration” set in the Parameter Menu.
UPS Configuration:
- Single-Single: Single-phase input and single-phase output.
- Single-Three: Single-phase input and three-phase output.
- Three-Single: Three-phase input and single-phase output.
- Three-Three: Three-phase input and three-phase output.
7.2.5. ‘‘Alarm’’ level (screen menu 4.0).
When Alarm appears, in the Main Menu, you can only see one alarm,
but you can enter the Alarm Menu to check what the alarms are for
the unit currently as following:
˙
Screen 4.0 «Alarm»
Screen 4.0 is showing just only some alarms as an example, but there
could be some of them, the active ones. In table 5, there are all the
possible alarms displayed in the display LCD.
˙Alarm 1: This alarm indicates that the rectifier is overloaded. The
rectifier overload appears when the input current of any phase is
greater than the following ratio:
Iin-ovl = 0,326 x Pout / Vout_p-n
Where:
- Iin-ovl is Overload Input Current (A)
- Pout is Rated Output Apparent Power (VA)
- Vout_p-n is Rated Output Voltage phase-to-neutral (V)
˙Alarm 2: This alarm indicates that the inverter is overloaded. The
inverter overload appears either when the output current of any
phase is greater than the rated output current
Iout-ovl = Pout / (Vout_p-n * 3)
Where:
- Iout is rated Output Current (A)
- Pout is Rated Output Apparent Power (VA)
- Vout_p-n is Rated Output Voltage phase-to-neutral (V)
or when the total output active power is greater than the
following formula:
Pact_out-ovl = Pout x 0,8
Where:
- Pact_out-ovl is the Overload Output Active Power (W)
- Pout is Rated Output Apparent Power (VA)
˙Alarm 3: This alarm appears when the input the unit is under main
failure condition and the level of battery is lower than 11,5V/bat.
˙Alarm 4: This alarm appears when the inverter output voltage
phase to neutral in any phase is out of margins over +/-6%.
˙Alarm 5: This alarm appears when there is an offset voltage higher
than 5V, in any phase of the inverter output voltage phase to
neutral.
˙Alarm 6: When the maintenance bypass switch is ON the UPS
inverter will not be available.
˙Alarm 7: The mains failure occurs when in any phase, the input
voltage phase to neutral is out of the set margins (+15%/–20% by
default) or the input frequency is out of the set margins (± 0,5Hz
by default).
˙Alarm 8: When the inverter or PFC temperature sensors measure
temperatures over the programmed values (70ºC by default).
˙Alarm 9: This message appears when the battery switch is OFF
and the DC bus is charged to the battery voltage level, to inform
the user to switch ON the battery switch.
˙Alarm 10: This Alarm indicates that the bypass input voltage or the
bypass input frequency are out of margins. These margins are
programmable but by default the bypass voltage range is +12%/–
17% and the bypass frequency range is ± 0.5Hz.
˙ Alarm 11: The UPS is on bypass for any reason. It must be
restarted by display keypad.
˙Alarm 12: This is an alarm for parallel systems. It appears when
some UPS of the parallel system block because the maintenance
bypass switch of any unit is switched ON.
˙Alarm 13: This alarm indicates that the CAN BUS #1 fails. This
communication channel is used for remote control.
˙Alarm 14: This alarm indicates that the CAN BUS #2 fails. This
channel is used for data communication between UPS, in a parallel
system.
˙Alarm 15: This alarm appears at the estimated end of live of the
battery bank. The revision and replacement of some batteries will
be necessary to be done by calling the S.T.S. (Service and
Technical Support) department.
Page 49

47
Representation in display LCD
Alarms
Alarm NO.
Rectifier Overload.
RECTIFIER
1
Inverter Overload.
INVERTER
2
Mains Failure. Battery Low Level.
3
Inverter Voltage Out of Margins.
4
DC Voltage Detected at the Output.
5
Maintenance Bypass. Inverter Not
Available.
6
Battery Discharging.
UPS
7
High Temperature. Reduce Output
Load.
8
Battery Switch Open. Switch it ON.
9
Bypass Failure. Not Synchronised
Inverter.
10
Unit on Bypass. Initialise UPS.
11
Some Unit(s) Blocked due to
Maintenance Bypass.
12
CAN BUS 1 Communication Failure.
13
CAN BUS 2 Communication Failure.
14
End of Battery Life.
15
Battery Temperature too High.
16
Battery Test Not Succeeded.
17
Battery Disconnection. Shutdown &
Restart.
18
Mains Phase Rotation. UPS Start
Disabled.
19
Bypass Phase Rotation. UPS Start
Disabled.
20
EEPROM Failure.
77
Input Voltage Wrong. Rectifier Stop.
RECTIFIER
STOPS
21
Rectifier Desaturation. Rectifier
Stop.
22
DSP Internal Error. Rectifier Stop.
23
Input Phase Rotation. Rectifier Stop.
24
DC BUS Voltage Wrong. Rectifier
Stop.
68
Parallel System Rectifier Stop.
69
Cont. Test Fail Rectifier Stop.
75
Inverter Desaturation. Inverter Stop.
INVERTER
STOPS
25
Inverter Overload. Inverter Stop.
26
Inverter Stopped due to Shutdown.
27
Maintenance Bypass. Inverter Stop.
28
Parallel System Disconnection.
Inverter Stop.
29
High Overload. Inverter Stop.
30
Over-temperature. Inverter Stop.
31
Rectifier Overload. Inverter Stop.
32
DSP Internal Error. Inverter Stop.
33
Output Short-circuit. Inverter Stop.
34
Bypass Phase Rotation. Inverter
Stop.
35
Inverter Failure/Overload. Inverter
Stop.
65
Voltage Ramp Error. Inverter Stop.
67
Parallel System Inverter Stop.
70
Low Battery. UPS Stop.
36
DSP Internal Error. UPS Stop.
UPS
STOPS
37
Pfc., Inv. Stop UPS Stop.
71
Parallel System UPS Stop.
72
Emergency Power Off. No Output
Voltage.
BYP
STOPS
38
Output Short-circuit. No Output
Voltage.
39
DSP Internal Error. UPS Block All.
40
DC BUS Voltage Wrong. Rectifier
Block.
RECTIFIER
BLOCKS
41
Rectifier Blocked. BLK. UPS -> BLK
Rectifier.
42
Rectifier Desaturations. Rectifier
Block.
43
Voltage Ramp Error. Rectifier Block.
44
DSP Execution Error. Rectifier Block.
45
DSP Internal Error. Rectifier Block.
46
Contactor Test Failure. Rectifier
Block.
47
Voltage Ramp Error. Inverter Block.
INVERTER
BLOCKS
48
Output DC Voltage. Inverter Block.
49
Inverter Blocked. BLK. UPS -> BLK
Inverter.
50
Inverter Desaturations. Inverter
Block.
51
DSP Execution Error. Inverter Block.
52
DSP Internal Error. Inverter Block.
53
Inverter Failure. Inverter Block.
66
UPS Blocked. BLK. Rectifier ->
BLK. UPS.
UPS
BLOCKS
54
Internal Initialisation Error. UPS
Block (DSP).
55
Internal Execution Error. UPS Block
(DSP).
56
UPS Blocked. BLK. Inverter -> BLK.
UPS.
57
Internal Communication. UPS Block
(DSP).
58
Parallel System Discharging. UPS
Block.
59
UPS Over-temperature. UPS Block.
60
Rectifier Overload. UPS Block.
61
Inverter Desaturations. UPS Block.
62
DSP Internal Error. UPS Block.
63
PFC & Inverter Blockage. UPS Block.
64
Parall0. Coms Error UPS Block.
76
Error Coms. Paral. Master Fixed.
PARALLEL
73
Alarm Paral. Sist. Redundancy Lost.
74
Table .5 Alarm list displayed in the LCD panel.
˙Alarm 16: The temperature of battery cabinet (in case of separate
battery cabinet) or battery place (in case of battery are located
inside the UPS) is higher than 40ºC.
˙Alarm 17: If battery test (automatic or manual) is finished
unsuccessfully, this alarm will appear.
˙Alarm 18: Two possible reasons:
During the unit start up, a message appears indicating
that the battery switch can be switched ON. After some
period of time without switching ON, this alarm appears.
When the unit is running under normal conditions, and
the battery switch is switched OFF.
Page 50

48
˙Alarm 19: When the mains is connected during the start-up, a
phase rotation error is detected and the start-up procedure is
inhibited.
˙Alarm 20: When the bypass is connected during the start-up, a
bypass phase rotation error is detected and the start-up procedure
is inhibited.
˙Alarm 21: This alarm appears when in any phase, the rectifier input
voltage phase to neutral is out of the set margins (+15%/–20% by
default) or the rectifier input frequency is out of the set margins (±
0,5Hz by default). Then the rectifier is shut down.
˙Alarm 22: This alarm appears when any IGBT in the rectifier side,
desaturates the number of times programmed by display (50 by
default).
˙Alarm 23: This alarm appears when there is a (*) DSP Internal Error
in the rectifier module, shutting down the rectifier immediately.
There will be 3 more retries before the rectifier blocking.
˙Alarm 24: When a mains phase rotation error is detected and
under these conditions the rectifier is tried to be turned ON, an
input phase rotation alarm appears shutting down the rectifier.
˙Alarm 25: This alarm appears when any IGBT in the inverter side,
desaturates the number of times programmed by display (200 by
default).
˙Alarm 26: When the inverter output is overloaded, depending on
the level of this overload, the inverter will be shut down after some
time according to the UPS overload curve and this alarm will
appear.
˙ Alarm 27: When an external shutdown signal is enabled, the
inverter will shut down appearing this message.
˙ Alarm 28: When the inverter is running and the maintenance
bypass switch is turned ON the inverter shuts down immediately.
˙Alarm 29: This alarm appears when, in a parallel system, one UPS
goes to battery mode. The inverter will shut down.
˙Alarm 30: This message indicates that one UPS is running over
160% of load in a parallel system.
˙Alarm 31: When an over-temperature is detected by the PFC or
inverter temperature sensors, after 1 minute time the inverter will
be turned off automatically. If over-temperature condition remains
after another 1 minute with the rectifier working, rectifier is also
blocked (alarm 60).
˙Alarm 32: When the rectifier is overloaded, depending on the level
of this overload, the inverter will be shut down after some time
according to the rectifier overload curve and this alarm will appear.
If this overload is still present with the inverter switched off, the
rectifier will be blocked after 30’’ and a blocking alarm 61 will
appear.
˙Alarm 33: This alarm appears when there is a (*) DSP Internal Error
in the inverter module, shutting down the inverter immediately.
There will be 4 more retries before the inverter blocking.
˙ Alarm 34: This alarm appears when an output short-circuit is
detected limiting the output RMS current up to the set value
(150% of nominal current by default). The short-circuit is detected
when the output voltage phase to neutral is lower than 8% of
nominal voltage. The system will retry twice to restart.
˙Alarm 35: With the inverter is running, if there’s a bypass phase
rotation error, the inverter will shut down.
˙Alarm 36: This alarm appears when there is a (*) DSP Internal Error
in the UPS module, shutting down the UPS immediately. There will
be 2 more retries before the UPS blocking.
˙Alarm 37: This alarm describes that on battery mode, the battery
bank reaches the 10.5V/bat. This is the end of backup time,
shutting down the UPS.
˙Alarm 38: The EPO (Emergency Power Off) switch is ON. The UPS
and the static bypass are switched off and no AC voltage present
at the output anymore.
˙Alarm 39: This alarm appears after 3 times detecting output short-
circuit. Then the UPS and the static bypass are switched off and no
AC voltage present at the output anymore.
˙Alarm 40: This alarm appears when there is a (*) DSP Internal Error
in the UPS module, for three times shutting down the UPS. The
UPS blocks including the bypass, so no AC voltage present at the
output anymore.
˙Alarm 41: This alarm appears when there is one of the following
conditions:
Positive DC bus voltage over 450V.
Positive DC bus voltage less than 325V.
Negative DC bus voltage over –450V (absolute value).
˙Alarm 42: This alarm appears when the UPS is blocked for any
reason. This condition blocks also the rectifier.
˙Alarm 43: After 3 times shutting down the rectifier for desaturation
and retry, this alarm will appear indicating rectifier blocked.
˙Alarm 44: If an error in the initial rectifier ramp is detected during
the PFC start up, this alarm will appear blocking also the rectifier.
˙Alarm 45: There is a command from the microprocessor to the DSP,
with no response from the rectifier module of the DSP. The rectifier
will block.
˙Alarm 46: After 4 times shutting down the rectifier because of (*)
DSP Internal Error in the rectifier module, this alarm will appear
indicating rectifier blocked.
˙Alarm 47: During the start-up there is an input contactor test. If
this test ends unsuccessfully the rectifier will be blocked.
˙Alarm 48: If the output voltage ramp doesn’t work properly during
Page 51

49
the inverter start up the inverter will be blocked (See Alarm 67).
˙Alarm 49: This alarm appears when there is an offset voltage
higher than 8V, in any phase of the inverter output voltage phase
to neutral. Then the inverter will be blocked.
˙Alarm 50: This alarm appears when the UPS is blocked for any
reason. This condition blocks also the inverter.
˙Alarm 51: After 3 times shutting down the inverter for desaturation
and retry, this alarm will appear indicating inverter blocked.
˙Alarm 52: There is a command from the microprocessor to the
DSP, with no response from the inverter module of the DSP. The
inverter will block.
˙Alarm 53: After 5 times shutting down the inverter because of (*)
DSP Internal Error in the inverter module, this alarm will appear
indicating inverter blocked.
˙Alarm 54: This alarm appears when the rectifier is blocked for
some reasons that can also blocks the UPS.
˙Alarm 55: The alarm appears when the DSP doesn’t response to
the microprocessor during the initial procedure before the start up.
˙Alarm 56: There is a command from the microprocessor to the
DSP, with no response from the UPS module of DSP. The UPS will
block.
˙Alarm 57: This alarm appears when the inverter is blocked for
some reasons that can also blocks the UPS.
˙Alarm 58: There is an internal error in the communication channel
between microprocessor and DSP. This condition blocks the UPS.
˙Alarm 59: This alarm appears when, in a parallel system, one UPS
goes to battery mode. After some period of time, the UPS will shut
down.
˙Alarm 60: When an over-temperature is detected by the PFC or
inverter temperature sensors, first the inverter will be turned off
automatically after 1 minute time (alarm 31). If one minute later
the over-temperature is still detected, the UPS will be completely
blocked (rectifier also shut-down) and the alarm appears.
˙Alarm 61: When the rectifier is overloaded, depending on the level
of this overload, the inverter will be shut down after some time
according to the rectifier overload curve (alarm 32). If this overload
is still present with the inverter switched off, the UPS will be
completely blocked (rectifier also shut-down) after 30’’, appearing
this alarm message.
˙Alarm 62: When any IGBT in the inverter side, desaturates the
number of times programmed by display (200 by default) the
inverter blocks. After two more retries this alarm appears
indicating UPS blocked.
˙Alarm 63: After 3 times shutting down the UPS because of (*) DSP
Internal Error in the UPS module, this alarm will appear indicating
UPS blocked.
˙Alarm 64: If there is a blocking condition for the inverter and also a
blocking condition for the PFC, this alarm appears blocking also the
UPS.
˙Alarm 65: This alarm can be activated due to a connection
of a load with high inrush current, or also, if it is detected a
wrong transient voltage in the inverter (i.e., if there is a fault in
an inverter transistor). In such case, the inverter will be shutdown
for while and load will be transferred to bypass immediately.
The equipment will retry to start up the inverter several
times (see description of the Alarm 66 too).
˙Alarm 66: After several attempts detecting “Inverter Fault/
Overload” (see Alarm 65), the inverter will be blocked permanently,
and output will be transferred to bypass.
˙Alarm 67: The way to start up the inverter is on voltage
ramp mode (rms value from sinewave voltage starts at 0Vrms
till reaching its pre-set nominal value, i.e., 230Vrms). If when
doing the voltage ramp is detected any fault, the inverter will be
shutdown for a while, and it will retry to start it up several times
(see description of the Alarm 48 too).
˙Alarm 68:. When a high or low DC bus voltage is detected,
rectifier is shut down for a while, in order to retry to start up
later on (see description of Alarm 41 too).
˙Alarm 69: In parallel system, rectifiers from the equipment of
the system connected in parallel can be shutdown, due to the
management of system as a whole, therefore this alarm is
activated.
˙Alarm 70: In a parallel system, the inverters of the equipment
of the system connected at the output can be shutdown, due to
the management of system as a whole, therefore this alarm is
activated.
˙Alarm 71: This alarm is displayed when a combined shutdown
of the PFC-rectifier and inverter has been done at the same time
(there are several reasons).
˙Alarm 72: In parallel system, the equipment of the system
connected at the output can be shut down (complete shutdown
of the rectifier and inverter), due to the management of system as
a whole, therefore this alarm is activated.
˙Alarm 73: In a system with parallel configuration, this alarm is
displayed in one of the equipment (or some) that detect(s)
communication errors, due to several reasons (parallel
communication cables are disconnected, or wrong connected, or in
bad status; wrong configuration of any of the equipment; etc.).
Therefore, one the equipment is set as a fix Master of the system,
and the rest of the equipment can only be slaves permanently (or
till the equipment are shutdown and they will be started up again
to test it).
˙Alarm 74: In a parallel system, with N+M configuration,
where:
N: nr equipment to size the system according to the maximum
permissible load.
M: nr redundant equipment in the system. It is equivalent to over
Page 52

50
sizing the equipment in the system, in order to continue supplying
the maximum permissible load without overloading it. Usually, this
value is fixed to “1”.
The alarm is displayed when the load exceeds the maximum
permissible load by N equipment. In this condition, the equipment
will not be overloaded individually, meanwhile the load doesn’t
exceed the maximum load of N+M equipment.
Example: Assuming that a parallel system of 2+1 equipment
of 20kVA (N=2, M=1).
If the load of the system is lower than 40kVA. Any overload
alarm is displayed (if it is not exceeded the individual overload
for phase for each equipment).
If the load of the system is higher than 40kVA. The alarm
74 of Lost of Redundancy is displayed.
If the load of the system is higher than 60kVA. Besides of
the alarm 74 Lost of Redundancy, there will also be, at
minimum, (among others), the alarm 2 of Inverter overload
in all the equipment of the system.
˙Alarm 75: This alarm can be displayed for two reasons:
Input contactor from the equipment faults (it doesn’t close properly).
It is shown when the DC bus voltage, it is not kept at certain level
when closing such input contactor. The system can retry the
contactor test several times (see description of the Alarm 47 too).
˙Alarm 76: After the first error in the parallel system communication,
when one of the equipment has already been chosen as a Fix
Master in the system, a second error or break in the
communications has been detected by the Slaves equipment,
which will be blocked permanently (Rectifier and Inverter are
shutdown, output voltage is not supplied to the output of the
system), by displaying this alarm.
˙Alarm 77: Error in configuration memory
(*) DSP Internal Error can happen for the following reasons:
Watch Dog failure.
Wrong ADC measured.
Communication errors between DSP and processor.
7.2.6. ‘‘Data Logger’’ level (screen menu 5.0).
˙Screen 5.0 «Data logger»
The first line indicates the inverter runtime from the first unit start-up.
This counter accumulates the total inverter running time from the
beginning and it’s not possible to reset it.
Pressing the and icons, you can move through the different
registers of this historic file. The data logging file can save up to 100
historic registers.
Alarm on and off time
In the first row there is information about time and date of alarm
activation:
hh: hour of alarm activation
mm: minutes of alarm activation
ss: seconds of alarm activation
dd: day of alarm activation
mm: month of alarm activation
yy: year of alarm activation
In the second row there is information about time and date of deleted
alarm.
hh: hour of deleted alarm
mm: minutes of deleted alarm
ss: seconds of deleted alarm
dd: day of deleted alarm
mm: month of deleted alarm
yy: year of deleted alarm
The State for technical service, to know the state of the different
parts of the UPS at the moment the registered alarm was
activated.
Page 53

51
8. MAINTENANCE, WARRANTY AND SERVICE.
8.1. BASIC MAINTENANCE GUIDE.
Batteries, fans and capacitors must be replaced at the end of their
useful lifetime.
Inside the UPS there are dangerous voltages and metalli
c
parts at very high temperatures, although the UPS is shutdown. The direct contact can cause electrocutions and burns. All
the operating, less the battery fuse replacing, must be done by
authorized technical staff.
Some internal parts of the UPS (terminals, EMC filters an
d
measurement circuits) are still under voltage during th
e
maintenance bypass operating. To cancel all the voltages, the
c
ircuit breakers of mains and bypass of the panel board that feeds
the UPS and the fuse holders of the battery rack have to be
turned «OFF» / «0».
8.1.1. Battery fuses.
Turning on the battery switch and/or fuse holder «ON» or «I»
position, and only after displaying the alarm message «B AT T.
SWITCH OPEN, SWITCH IT ON» in the LCD panel.
The battery fuses can only be replaced by ultrafast fu
se
models type aR 660V, of the same size and current used in
the equipment and/or battery module.
8.1.2. Batteries.
The useful lifetime of the batteries depends on the ambient
temperature and other factors like the quantity of charging and
discharging cycles and the deep discharges done.
The average lifetime is between 3 and 7 years if the ambient
temperature is between 10 and 20ºC. To have more information of
its status, activate the battery test.
Risk of fire and/or explosion exists if a wrong quantity or
type of batteries is used. Do not dispose the batteries to the
fire: they can explode. Do not open and mutilate the batteries: the
dumped electrolyte is dangerous for the skin and eyes. It can be
toxic.
8.1.3. Fans.
The useful lifetime of the used fans to cool the power circuits
depends on the use and environment conditions. It is
recommended their preventive replacement by authorized technical
staff.
8.1.4. Capacitors.
The useful lifetime of the DC bus capacitors and those ones used in
the input and output filtering depends on the use and the
environment conditions. It is recommended their preventive
replacement by authorized technical staff.
8.2. WARRANT Y CONDITIONS.
.
The limited warranty only applies to those products that you
acquire for commercial or industrial use in the normal development
of your business.
8.2.1. Covered Product.
Online UPS.
8.2.2. Out of the scope of supply.
Our company is not forced by the warranty if it appreciates that
the defect in the product doesn’t exist or it was caused by a wrong
use, negligence, installation and/or inadequate testing, tentative of
non-authorized repairing or modification, or any other cause beyond
the foreseen use, or by accident, fire, lightings or other dangers.
Neither it will cover, in any case, compensations for damages or
injuries.
Page 54
52
9. ANNEXES.
9.1. PARTICULAR SPECIFICATIONS, EQUIPMENTS (LV).
Nominal power (kVA)
7.5
10
15
20
30
40
50
60
80
100
Nominal power (kVA)
Depending on the input/output setting and power supply voltage (See chart 9)
Input
Nominal voltage
Single phase 115V, 120V, 127V or 133V
--
Three phase 3x200V, 3x208V, 3x220V or 3x230V (4 wires: 3 phases+ N)
Input voltage range
+ 15% / –20%.
Frequency
50 / 60 Hz ± 5 %.
Total input current distortion
(depending on the quality of input mains)
100 % load: THD-i < 1.5 % ; 50
% load: THD-i < 2.5 % ; 10 %
load: THD-i < 6.0 %
100 % load: THD-i < 1.0 % ; 50 % load:
THD-i < 2.0 % ; 10 % load: THD-i <
5.0 %.
100 % load: THD-i < 1.5 % ; 50 %
load: THD-i < 2.0 % ; 10 % load: THD-
i < 6.0 %
Current limit
High overload: PFC Limit (discharging batteries).
Power factor
0.99 from 10% l
oad
Inverter
Output nominal voltage
Single phase 115V, 120V, 127V or 133V
-
Three phase 3x200V, 3x208V, 3x220V or 3x230V (4 wires: 3 phases + N)
(*) Output power fac tor
0.9 for three phase/three phase setting. 0.8 for L, M and N settings
0.9
Accuracy
Static: ± 1 %. Dynamic: ± 2 % (step loads 100-0-100 %)
Output frequency
50 or 60 Hz synchronized ± 5 Hz. Free running± 0.05 %
Maximum slew rate
± 1 Hz/s
Output wave shape
Sinewave .
Total output voltage harmonic distortion
Linear load: THD-v < 0.5 %. Ref. non-linear load (EN-62040-3): THD-v < 1.5 %
Phase shifting
120 ± 1 % (balanced load). 120 ± 2 % (unbalanced load of 50 % )
Dynamic response time
10 ms. till 98 % of the static value
(**) Permissible overload
125 % for 10 min., >125.. 135 % for 5 min., >135.. 150 % for 1 min., > 150 % for 20 ms.
Permissible crest factor
3.4 to 1
3.2 to 1
2.8 to 1
3.2 to 1
3 to 1
Permissible power fac tor
0.7 leading to 0.7 lagging
Unbalanced output voltage (100 % unbalanced load)
< 1 %
Current limit
High overload, short-circuit: RMS voltage limit. High current crest factor: Peak voltage limit
E
fficiency on battery mode (100% linear load) (%)
94.6
94.8
95.3
95.6
95.9
96.4
96.1
95.9
96.4
STATIC BYPASS
Type
Solid state(SCR)
Bypass line
Common. Separate as an option (B)
Nominal voltage
Single phase 115V, 120V, 127V or 133V
-
Three phase 3x200V, 3x208V, 3x220V or 3x230V (4 wires: 3 phases + N)
Voltage range
Preset +12 % (adjustable between +20... +5%) / –15% (adjustable between –25... –5%
Voltage hysteresis
± 2 % as regards the bypass voltage range. In a standard equipment is +10 /–13%
Frequency
50 or 60 Hz
Frequency range
± 5 Hz (selectable between 0.5 - 1.0 - 2 and 5.0 Hz)
Frequency hysteresis
1 Hz as regards the frequency range (selectable among 0.2 - 0.5 - 1.0 and 2.0 Hz)
Activation criteria
Controlled by microprocessor
Transference time
Nil, less in Smart Eco-mode < 3ms
Permissible overload
400 % for 10 s
Transference to bypass
Immediately, for overloads over 150 %
Re-transference
Automatic after alarm cancelling
Efficiency on Smart Eco-mode
95.5
96.0
97.4
97.8
98.0
98.4
98.0
MANUAL BYPASS (maintenance)
Type
Make before break .
Nominal voltage
Single phase 115V, 120V, 127V or 133V
-
Three phase 3x200V, 3x208V, 3x220V or 3x230V (4 wires: 3 phases + N)
Frequency
50 / 60 Hz.
GENERAL
Total efficiency (100% linear load) (%)
89.5
90
91
91.5
92
93,0
92.5
92
93
BATTERIES
Quantity
38
36
40
36
(***) Type
Pb Ca
Floating voltage per battery
13.65 V at 20ºC
Compensation of the battery floating voltage
Adjustable (preset to –18 mV/ºC)
Page 55

53
Nominal power (kVA)
7.5
10
15
20
30
40
50
60
80
100
Nominal power (kVA)
Depending on the input/output setting and power supply voltage (See chart 9)
Capacity (Ah)
7
12
18
26
Standard charging current (Cx0,2) (A)
1.4
2.4
3.6
5.2
Battery terminal torque
According to battery manufacturer
Fitted in the same UPS cabinet
YES
NO
DIMENSIONS AND WEIGHTS FOR UPS CONFIGURATIONS WITH STANDARD BACK UP TIME
Quantity of cabinets
1 (UPS + batteries)
1 (UPS) / 1 (batteries)
Maximum
dimensions(mm)
(Depth x Width
x Height)
UPS+ / UPS+ B1
770x450x1100
875x590x1320
850x900x1900
UPS+ B / UPS+ B B1
875x590x1320
875x870x1320
850x1225x1900
Batteries
-
770x450x1100
1050x650x1320
850x1300x1900
Casters without brake. Equipment / batteries
YES / -
YES / YES
YES / NO
NO / NO
Cabinet weight
(kg)
UPS+ B1
102
105
150
175 - - - - - -
UPS+ B B1
104
107
153
178 - - - - - -
UPS+
212
215
310
400
185
265
290
290
540
550
UPS+ B
214
217
313
403
190
275
310
310
570
580
External batteries
- - - - 510
1020
1020
1020
1655
1690
Table 6. Technical
specifications
for equipment with (LV) voltages.
NOTE: When temperature is above 30°C, the output power will be derated. The output power is derated to 90% at 31°C -35°C
and 80% at 36°C -40°C.
9.2. TECHNICAL SPECIFICATIONS, EQUIPMENTS (HV).
Nominal power (kVA)
7.5
10
15
20
30
40
50
60
80
100
120
160
200
Nominal power (kVA)
Depending on the input/output setting and power supply voltage (See chart 9)
INPUT
Nominal voltage
Single phase 220V, 230V or 240V
-
Three phase 3x380V, 3x400V or 3x415V (4 wires: 3 phases + N)
Input voltage range
+ 15% / –20%
Frequency
50 or 60 Hz ± 5 %
Total input current distortion (depending on the
quality of input mains)
100 % load: THD-i < 1.5 %
50 % load: THD-i < 2.5 %
10 % load: THD-i < 6.0 %
100 % load: THD-i < 1.0 %
50 % load: THD-i < 2.0 %
10 % load: THD-i < 5.0 %
100 % load: THD-i < 1.5 %
50 % load: THD-i < 2.0 %
10 % load: THD-i < 6.0 %
Current limit
High overload: PFC limit (discharging batteries)
Power factor
0.99 from 10% load
INVERTER
Output nominal voltage
Single phase 220V, 230V or 240V
-
Three phase 3x380V, 3x400V or 3x415V (4 wires: 3 phases + N)
(*) Output power factor
0.9 for three phase/three phase setting. 0.8 for L, M and N settings
0.9
Accuracy
Static: ± 1 %. Dynamic: ± 2 % (step loads 100-0-100 %)
Output frequency
50 or 60 Hz synchronized ± 5 Hz. Free running ± 0.05 %
Maximum slew rate
± 1 Hz/s
Output wave shape
Sinewave
Total output voltage harmonic distortion
Linear load: THD-v < 0.5 %. Ref. non-linear load (EN-62040-3): THD-v < 1.5 %
Phase shifting
120 ± 1 % (balanced load). 120 ± 2 % (unbalanced load of 50 % )
Dynamic response time
10 ms. at 98 % of the static value
(**) Permissible overload
125 % for 10 min., >125.. 135 % for 5 min., >135.. 150 % for 1 min., > 150 % for 20 ms.
Permissible crest factor
3.4 to 1
3.2 to 1
2.8 to 1
3.2 to 1
3 to 1
Permissible power factor
0.7 leading to 0.7 lagging
U
nbalanced output voltage (100 % unbalanced load) < 1 %
Current limit
High overload, short-circuit: RMS voltage limit. High current crest factor: Peak voltage limit
Efficiency on battery mode (100% linear load) (%)
94.3
94.5
95.0
95.3
95.9
96.2
96.3
96.4
96.9
96.5
96.4
96.8
96.9
STATIC BYPASS
Type
Solid state
Bypass line
Common. Separate as an option (B)
Nominal voltage
Single phase 220V, 230V or 240V
-
Three phase 3x380V, 3x400V or 3x415V (4 wires: 3 phases + N)
Voltage range
Preset +12 % (adjustable between +20... +5%) / –15% (adjustable between –25... –5%
Voltage hysteresis
± 2 % as regards to bypass voltage range. In a standard equipment is of +10 /–13%
Frequency
50 or 60 Hz
Frequency range
± 5 Hz (selectable among 0.5 - 1.0 - 2 and 5.0 Hz)
Frequency hysteresis
1 Hz as regards the frequency range (selectable among 0.2 - 0.5 - 1.0 and 2.0 Hz)
Activation criteria
Controlled by microprocessor
Transference time
Nil, less in Smart Eco-mode < 3ms
Page 56

54
Model
Voltage (V)
Power (kVA / kW)
UPS-7.5
«LV»
3x200.3x230 V (115.
133 V in single phase)
7,5 / 6,75
UPS-10
10 / 9
UPS-15
15 / 13,5
UPS-20
20 / 18
UPS-30
30 / 27
UPS-40
40 / 36
UPS-50
50 / 45
UPS-60
60 / 54
UPS-80
80 / 72
UPS-100
100 / 90
UPS-10
«HV»
3x380. 3x415 V (220.
240 V in single phase)
10 / 9
UPS-15
15 / 13,5
UPS-20
20 / 18
UPS-30
30 / 27
UPS-40
40 / 36
UPS-60
60 / 54
UPS-80
80 / 72
UPS-100
100 / 90
UPS-120
120 / 108
UPS-160
160 / 144
UPS-200
200 / 180
Table
8.
Powers according to
mo
del, configura
tion
and opera
ting
voltage
Nominal power (kVA)
7.5
10
15
20
30
40
50
60
80
100
120
160
200
Nominal power (kVA)
Depending on the input/output setting and power supply voltage (See chart 9)
Permissible overload
400 % for 10 s -
Transference to bypass
Immediate, for overloads higher than 150 %
Re-transference
Automatic after alarm cancelling
Efficiency on Smart Eco-mode
95
95.5
96
97.4
97.8
98
98.4
98
MANUAL BYPASS (MAINTENANCE)
Type
Make before break
Nominal voltage
Single phase 220V, 230V or 240V
-
Three phase 3x380V, 3x400V or 3x415V (4 wires: 3 phases + N)
Frequency
50 or 60 Hz
GENERAL
Total efficiency (100% linear load) (%)
91.0
91.5
92.0
93.0
93.5
94
95
94.5
94.0
95.0
BATTERIES
Quantity
31 + 31
(***) Type
Pb Ca
Floating voltage per battery
13.65 V at 20ºC
Compensation of the battery floating voltage
Adjustable (Preset to –18 mV/ºC)
Capacity (Ah)
4.5
9
12
2x12= 24
40
65
80
Standard charging current (Cx0,2) (A)
0.9
1.8
2.4
4.8
8.0
13
16
Battery terminal torque
According to battery manufacturer
Fitted in the same UPS cabinet
YES
NO
DIMENSIONS AND WEIGHTS FOR UPS CONFIGURATIONS WITH STANDARD BACK UP TIME
Quantity of cabinets
1 (UPS + batteries)
1 (UPS) / 1 (batteries)
Maximum
dimensions(mm)
(Depth x Width x
Height)
UPS+ / UPS+ B1
770x450x110
875x590x1320
850x900x1900
UPS+ B / UPS+ B B1
875x590x1320
875x870x1320
850x1225x1900
Batteries
-
770x450x1100
1050x650x1320
850x1300x1900
Casters without brake. Equipment / batteries
YES / -
YES / YES
YES / NO
NO / NO
Cabinet weight (kg)
UPS+ B1
100
100
102
105
150
175 - - - - - -
-
UPS+ B B1
102
102
104
107
153
178 - - - - - -
-
UPS+
210
210
212
215
310
400
185
185
265
290
290
540
550
UPS+ B
212
212
214
217
313
403
190
190
275
310
310
570
580
External batteries
- - - - - - 510
510
1020
1020
1020
1655
1690
Table 7. Technical specifications of equipment with (HV) voltage.
NOTE: When temperature is above 30°C, the output power will be derated. The output power is derated to 90% at 31°C -35°C
and 80% at 36°C -40°C.
Additional informations referred to charts 7 and 8:
• UPSs up to 20 kVA (LV) / 40 kVA (HV) with standard
back up time are supplied in only one cabinet,
batteries included. For extended back up times
and/or higher power rates, the UPS and batteries are
sup- plied in separate cabinets.
(*) P.F. 0.9 is only available in III / III configurations up to
60 kVA (LV) / 120 kVA (HV). Rest of configurations (L,
M or N) and power range rate, P.F. 0.8.
(**) Permissible overload per phase or total overload at
P.F. 0.8.
(***) Batteries fitted in as standard are Pb-Ca type.
As an option Ni-Cd batteries can be supplied, fitted in
a separate cabinet or rack.
It is also possible to have a common battery set of
Pb-Ca or Ni-Cd type fitted in a cabinet or rack, for two
equipments in parallel.
UPS-B Equipment with separate bypass line.
UPS-B B1 Equipment with separate bypass line, neither
batteries nor accessories (bolts, cables,... ).
Page 57

55
9.2. GLOSSARY.
• AC.- It is nominated as alternating current to the electrical
current in which the magnitude and direction varies in a cyclic
way. The most common wave shape of the alternating current
is sinewave, because the energy transmission is better.
Neverthe- less, some applications could need other period
wave shapes, like triangular or square.
• Bypass.- Manual or automatic, it is the physical junction
between the input and the output electric device.
• DC.- The direct current is the continuous electron flow through a
cable between two points with different potential. Unlike the
alternating current, in direct current the electrical loads always
flow in the same direction from the highest potential point to the
lowest one. Although, usually the direct current is identified with
the con- stant current (for example the one supplied by the
battery), it is continuous any current that always maintain the
polarity.
• DSP.- It is the acronym of Digital Signal Processor.A DSP is a
system based on a processor or microprocessor that has
instructions in it, a hardware and an optimized software to
develop applications where numerical operations are needed
with very fast speed. Due to this, it is very useful to process
ana- logical signals in real time: in a system that runs in this way
(real time) samples are received, usually coming from an
analogical/ digital converter(ADC).
• Power factor.- It is defined as power factor, p.f., of an
alternating current circuit, as the ratio between the active
power, P, and the apparent power, S, or as the cosines of the
angle that make the current and voltage vectors, designating
as cos , being j the value of that angle.
• GND.- The term ground, as its name states, refers to the
potential of the earth surface.
• IGBT.- The Insulated Gate Bipolar Transistor is a semiconductor
device that is used as a controlled switch in power electronic
circuits. This device has the feature of the gate signal of the
effect field transistors with the capacity of high current and
low voltage saturation of the bipolar transistor, combining an
isolated FET gate for the input and a bipolar transistor as switch
in a single device. The triggering circuit of the IGBT is as the
MOSFET one, while the driving features are like the BJT.
• Interface.- In electronic, telecommunications and hardware,
an interface (electronic) is the port (physical circuit) through
which are sent or received signals from a system or subsystems
toward others.
•
kVA.-
The
voltampere
is the unit of the
apparent power
in electrical
current. In direct current is almost equal to the real power but in
alternating current can defer depending on the power factor.
• LCD.- LCD acronym of Liquid Crystal Display, device invented
by Jack Janning, who was employee of NCR. It is an electric
system of data presentation based on 2 transparent conductor
layers and in the middle a special crystal liquid that have the
capacity to orientate the light when trespassing.
• LED.- LED acronym of Light Emitting Diode, is a semiconductor
device (diode) that emits light almost monochrome with a very
narrow spectrum, it means, when it is direct polarized and it is
crossed by an electric current. The color, (wave longitude),
depends on the semiconductor material used in its
construction, being able to vary from the ultraviolet one, going
through the
visible spectrum light, to the infrared, receiving these last ones
the denomination of IRED (Infra Red Emitting Diode).
• Circuit breaker.- A circuit breaker or switch, is a device ready
to break the electrical current of a circuit when it overcomes the
maximum set values.
• On-Line mode.- Regarding to an equipment, it is on line when
it is connected to the system, and it is in operation, and usually
has its power supply turned on.
• Inverter.- An inverter, is a circuit used to convert direct current
into alternating current. The function of an inverter is to change
an input voltage of direct current into a symmetrical output
voltage of alternating current, with the required magnitude and
frequency by the user or the designer.
• Rectifier.- In electronic, a rectifier is the element or circuit that
allows to convert the alternating current into direct current. This
is done by rectifier diodes, which can be solid state
semiconductors, vacuum or gassy valves as the mercury vapour.
Depending on the features of the alternating current power
supply used, it is classified as single phase, when they are fed
by a single phase electrical mains, or three phase when they are
fed by the three phases. Depending on the rectification type,
they can be half wave, when only one of the current semicycles is used, or full wave, where both semi-cycles are used.
• Relay.- The relay(in French relais, relief) is an electromechanical
device that works as a switch controlled by an electric circuit
where, through an electromagnet, a set of contacts are moved and
it allows to open or to close other independent electric circuit.
 Loading...