

Voltex SAS115BW User Manual
Important Safety Information
This Voltex Smoke Alarm is designed for use in
¬
residential dwellings. It is intended to detect smoke
before it reaches the sleeping occupants of a
building. The ensuing alarm is designed to wake the
occupants and give them time to evacuate the building.
¬
This smoke alarm SHALL be installed in accordance
with national and local council building regulations
and the latest edition of the Australian and New
Zealand wiring Rules AS/NZS 3000. Building codes
and regulations may vary from each state jurisdiction.
¬
The smoke alarm incorporates a non-replaceable battery
which is manufactured to power the smoke alarm for at
least 10 years without being recharged subject to normal
use and regular maintenance from the date of manufacture.
¬
The recommended date for replacement shall be marked
at the time of installation on the rating label. If this date
is exceeded or a battery-low condition is indicated, the
smoke alarm shall be replaced.
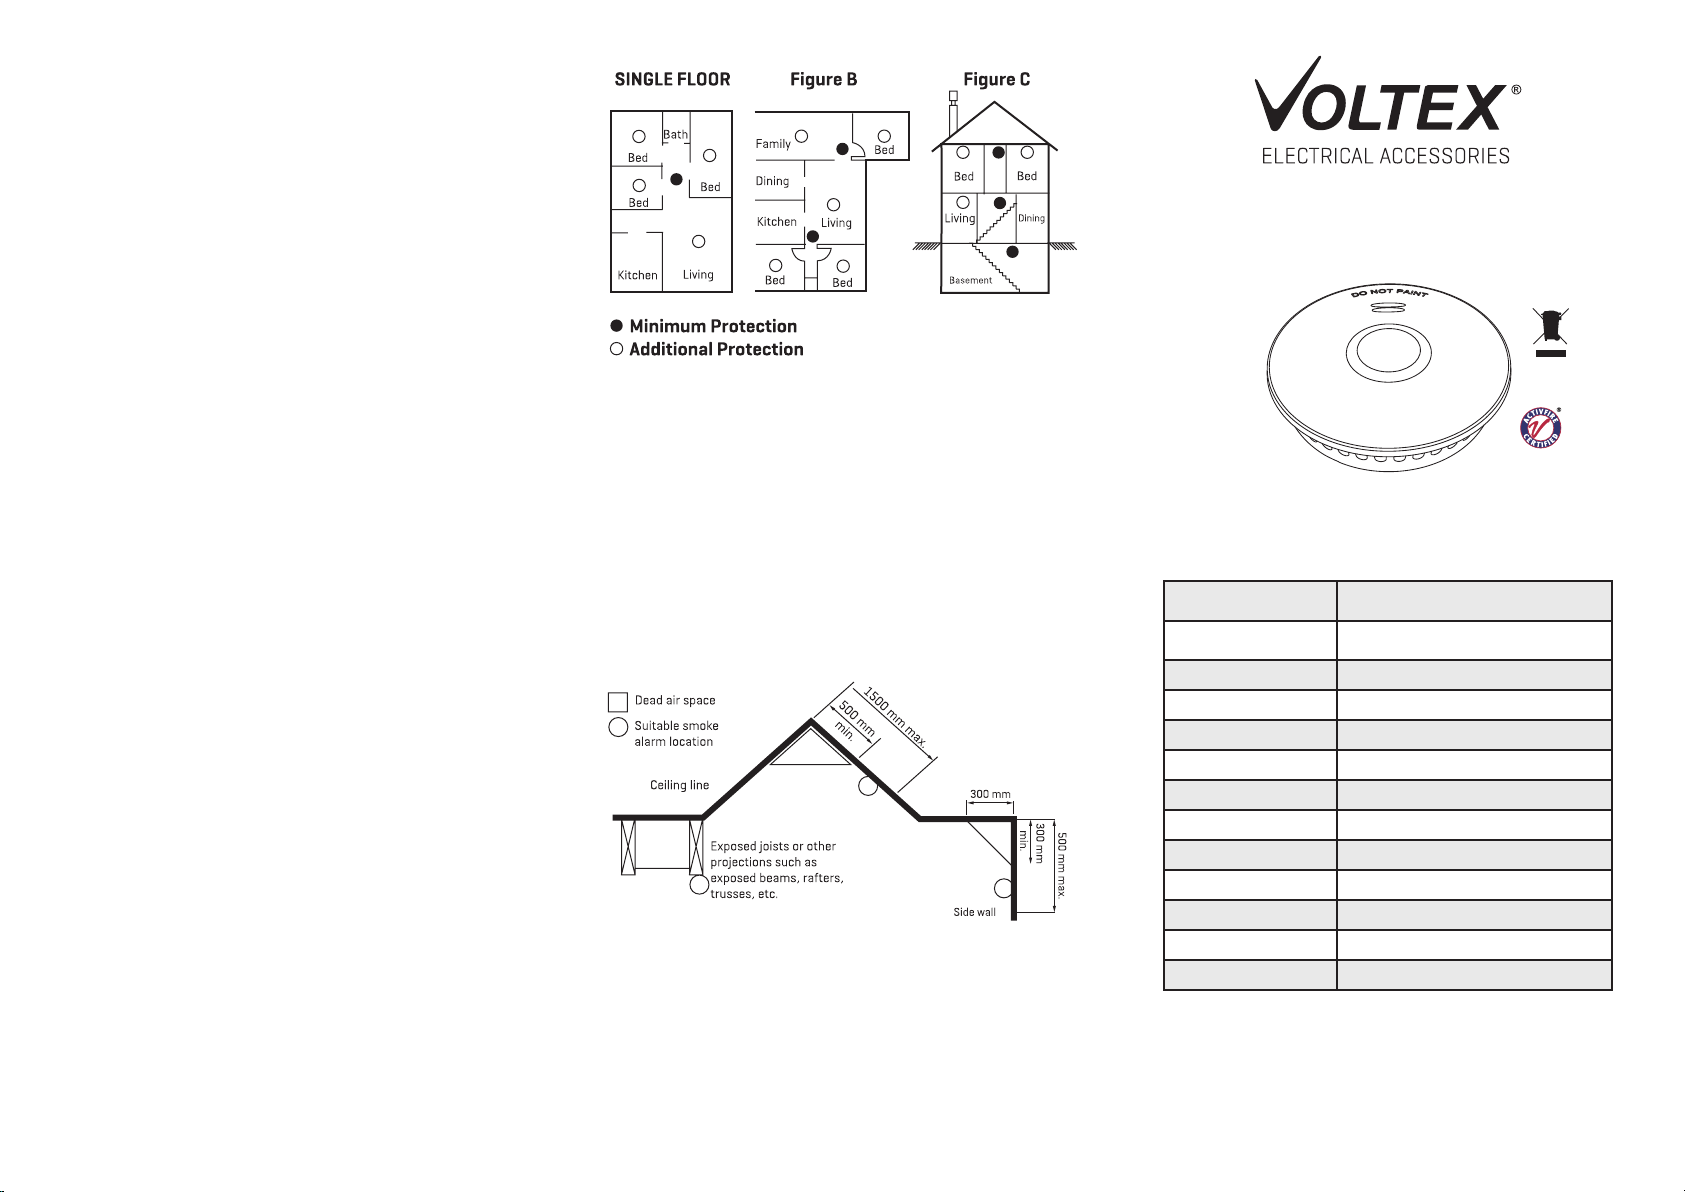
Recommended Installation Locations
¬
At least one smoke alarm shall be fitted on each storey
(including basements) - in each bedroom and in corridors
or hallways which connect bedrooms and the rest of
the dwelling or as required by relevant local legislation.
¬ Where practicable smoke alarms should be placed on the
ceiling.
¬
It is important to install the smoke alarm in the centre
of the room, avoiding dead air spaces (an area in which
trapped hot air will prevent smoke from reaching the
alarm). Smoke alarms must not be placed within:
• 300mm of a corner of a ceiling and a wall
• 300mm of a light fitting
• 400mm of an air-conditioning vent
• 400mm of the blades of a ceiling fan
¬
Smoke alarms must be paired (interconnected) with
every other smoke alarm so they all activate together
SAS115BW SMOKE ALARM
USER MANUAL
Recommended locations
Where it is not possible to place the alarm on the ceiling,
the smoke alarm may be installed on the wall at a minimum
of 300mm and a maximum of 500mm off the ceiling at the
junction of the wall.
There are special requirements for stairways, sloping ceilings
and ceilings with exposed beams. Specific requirements are
explained in the relevant Building Regulation.
Congratulations on purchasing a Voltex Smoke Alarm.
Please read these instructions carefully before Installation
and Operation.
Sensing Type
Power Supply
Interconnectivity Wireless (433.42MHz)
Wireless range Up to 100m
Interconnection Maximum 40 paired alarms
Size 114mm x 38mm
Temp range 0°C - 45°C
Max Humidity 93%RH
Alarm Signal Pattern ISO 8201
Alarm Volume 85dB at 3m
Hush Time 10 mins
Compliance AS 3786
Certification CSIRO Verification Service
Photoelectric (Type A - contains
no radioactive material)
Non-replaceable 10 Year Lithium
Battery
Nuisance Alarms
Warranty Information
To reduce the likelihood of nuisance alarms, it is preferable
that smoke alarms are not located near cooking appliances
and bathrooms.
Voltex warrants this accessory against defective workmanship
and faulty materials for seven (7) years from the original date
of purchase. Please retain proof of purchase.
AS 3786:2014
II190514-BO
Installation Procedure Audio-visual Indicators
g) When all SLAVE alarms have been paired
successfully, press the test button on the MASTER
1. Smoke alarms should be paired before mounting.
Pairing
NOTE: Smoke alarms can be paired and unpaired
indefinitely. The SAS115BW is only compatible with
Voltex wireless smoke alarm.
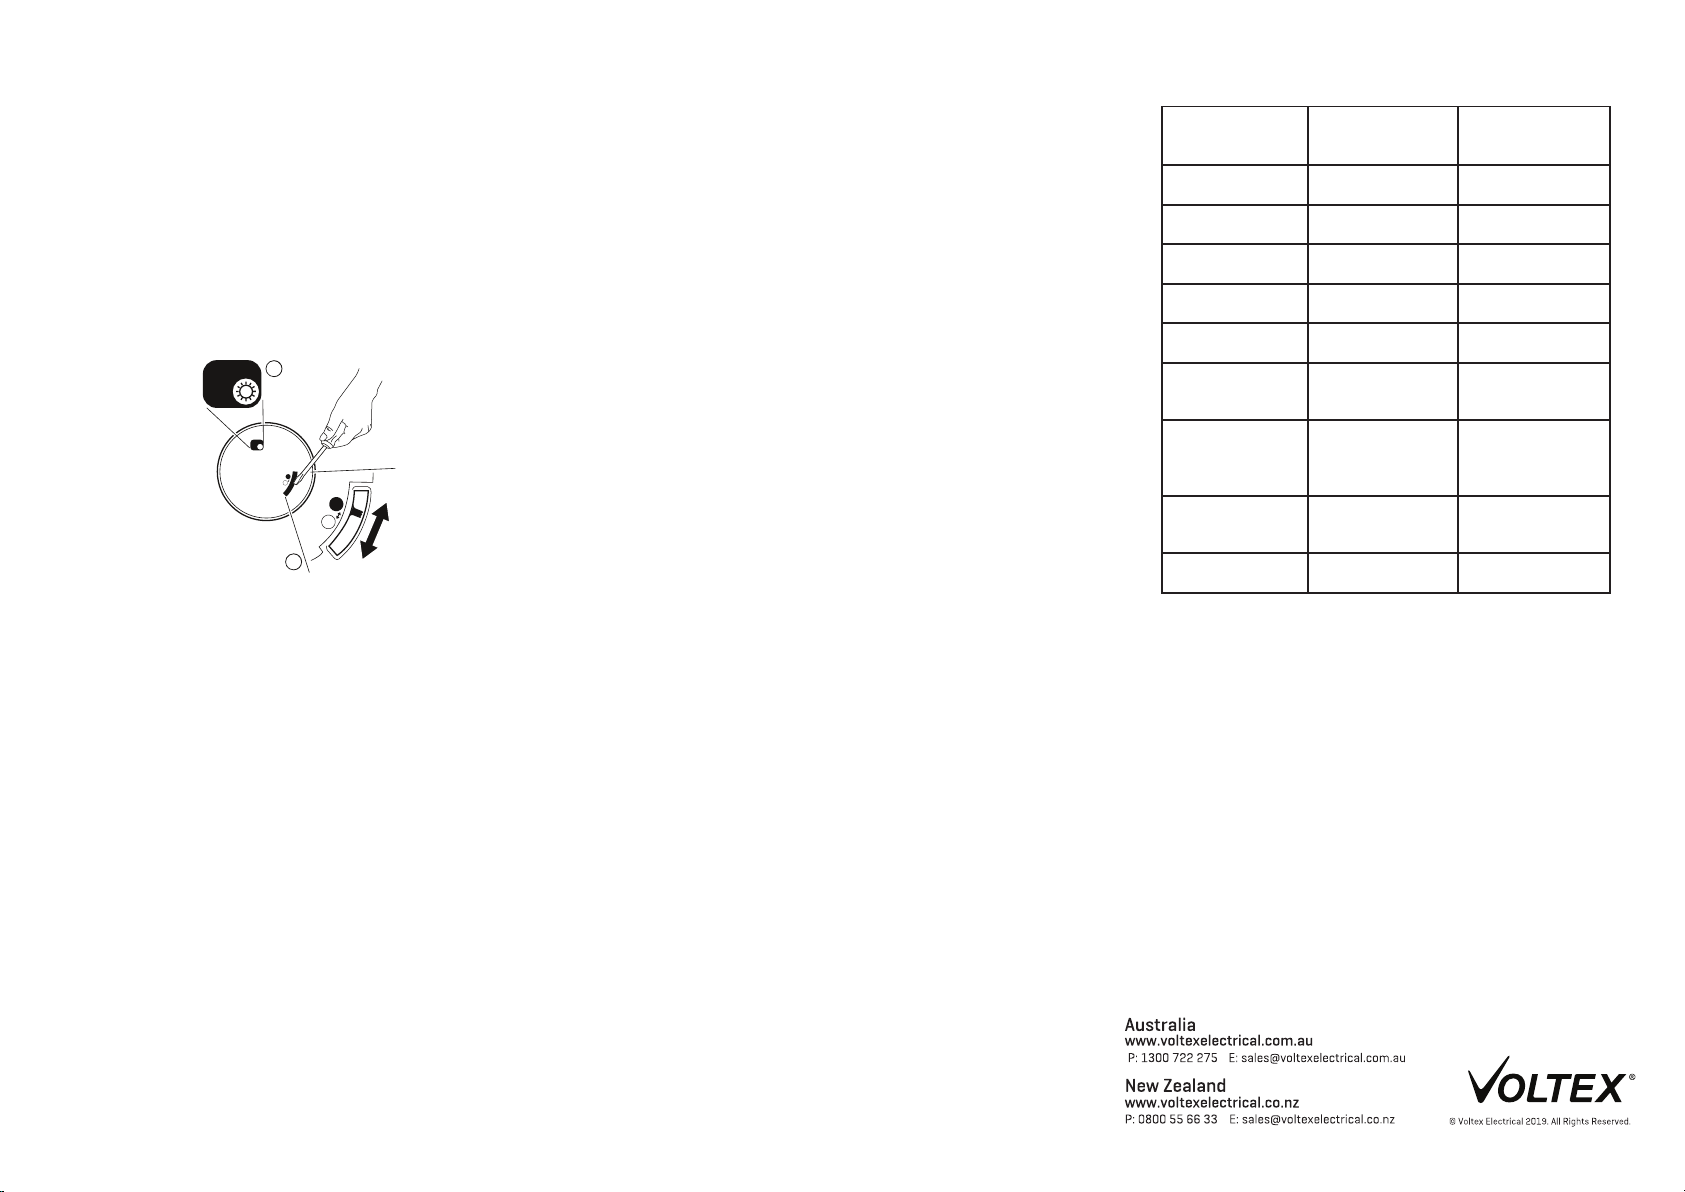
a) Remove the mounting plate from the back of the
smoke alarm.
b) Turn on each alarm by using a small screwdriver to
move the internal switch on the back of the smoke
alarm to the ON position.
A
Network
Network
O
F
F
ON
O
F
F
O
N
B
c) Test each smoke alarm individually by pressing
and holding the test button on the front centre of
the smoke alarm for 2 seconds. The smoke alarm
should sound after a short delay.
d) Press the test button on any smoke alarm 3 times
within 2 seconds to enter “Pairing Mode”. This unit
now becomes the MASTER smoke alarm.
e) The smoke alarm will check to see if any other smoke
alarms are sending a pairing request. The Network
status is indicated on the NET LED on the back of the
alarm.
• RED LED indicates there is no network available yet.
• BLUE LED indicates device is sending pairing request
• GREEN LED indicates the device is pairing
NOTE: If the smoke alarm fails to pair within 30 seconds or
the button is pressed again 3 times in 2 seconds the unit will
return to normal standby mode. To continue pairing, repeat
step d) and e).
f) On any other SLAVE smoke alarm, press the test
button 3 times within 2 seconds to enter pairing mode.
If the LED on both alarms is GREEN for 5 seconds they
have been successfully paired. Repeat pairing process
for any additional SLAVE smoke
smoke alarm to exit pairing mode, or wait 30
seconds. The BLUE LED will extinguish.
2. Take the smoke alarms into the rooms where they will be
installed and perform Wireless Test Procedure.
Wireless Test Procedure
a) Press and hold the test button on any alarm for at least
2 seconds to test all alarms. After a short delay,
all paired alarms should chirp and flash a RED LED
on the front face twice a second for 5 minutes or until
the button is pressed. Check all smoke alarms are
paired correctly.
b) Turn off each smoke alarm by moving the internal
switch back to the OFF position.
c) Place the bracket in the desired location and mark
the mounting holes. Mount the base plate using the
plugs and screws provided or an equivalent method.
3. Insert the smoke alarm into the mounting bracket and
rotate until it clicks positively into place. This will turn the
smoke alarm back on.
4. Test interconnection again using the Wireless Test
Procedure.
To reset to factory default setting
1. Remove the unit from the mounting bracket and ensure
the internal switch is in the OFF position.
2. Press and hold the test button while shifting the switch
to the ON position. A RED LED should be lit for 3 seconds.
3. When the RED LED distinguishes, release the test button.
The RED LED should light again for 3 seconds. During
these 3 seconds, press the test button momentarily to
unpair the smoke alarm. The RED LED should flash for a
few seconds.
4. When the RED LED stops flashing the product has been
returned to its factory state.
5. Turn the smoke alarm off by moving the internal switch
back to the OFF position.
Silent Mode
¬
While the unit is sounding an alarm, pushing the test
button will hush the alarm for approximately 10 minutes.
The red LED will flash once every 8 seconds to indicate the
smoke alarm is running in silent mode.
¬
If more than one alarm is paired, identify the alarm with
the red flashing LED, as this will be the only alarm that can
be hushed. All paired alarms will stop sounding thereafter.
OPERATION
MODE
RED LED STATUS SOUND
DEFINITION
Alarm functioning
correctly
Low Battery
Internal Fault -
Silent mode
Smoke detected
on local alarm*
Smoke detected
on paired unit*
Test on local
alarm
(while button
pressed)
Wireless test on
paired unit
Low Battery on
paired unit
*Smoke is detected, and the building must be vacated
immediately. Emergency services must be notified.
Low intensity flash
every 40 seconds
Flash every 40
seconds
Flash every 8
seconds
Flash every 1
second
Flash once Chirp once
Flash twice every
1 second for 5
minutes
Flash once every 3
Maintenance
Periodically apply the Wireless Test Procedure to test the
¬
alarm.
¬
Periodically clean the alarm by vacuuming the outside of
the smoke alarm to remove any dust build up.
¬ Do not spray any cleaning liquids directly onto the smoke
alarm.
¬
The battery is not replaceable: DO NOT ATTEMPT TO REPLACE
THE BATTERY. If the low battery alarm sounds, replace the
entire unit.
ALL ELECTRICAL WORK MUST BE CARRIED OUT BY A
LICENSED ELECTRICAL CONTRACTOR OR ELECTRICIAN.
Document Reference Number: II160519-AG/BO
-
hours
-
One chirp every
40 seconds
One chirp every
40 seconds
-
Continuous alarm
signal pattern
Continuous two
chirps every 2
seconds
Chirp twice every
1 second for 10
seconds
One chirp every 3
hours
 Loading...