


Vacuum Floor Cleaner Operating Instructions
Golvdammsugare Bruksanvisning
Støvsuger Brugsanvisning
Gulvstøvsuger Bruksanvisning
Lattiamallin pölynimuri Käyttöohje
2
3
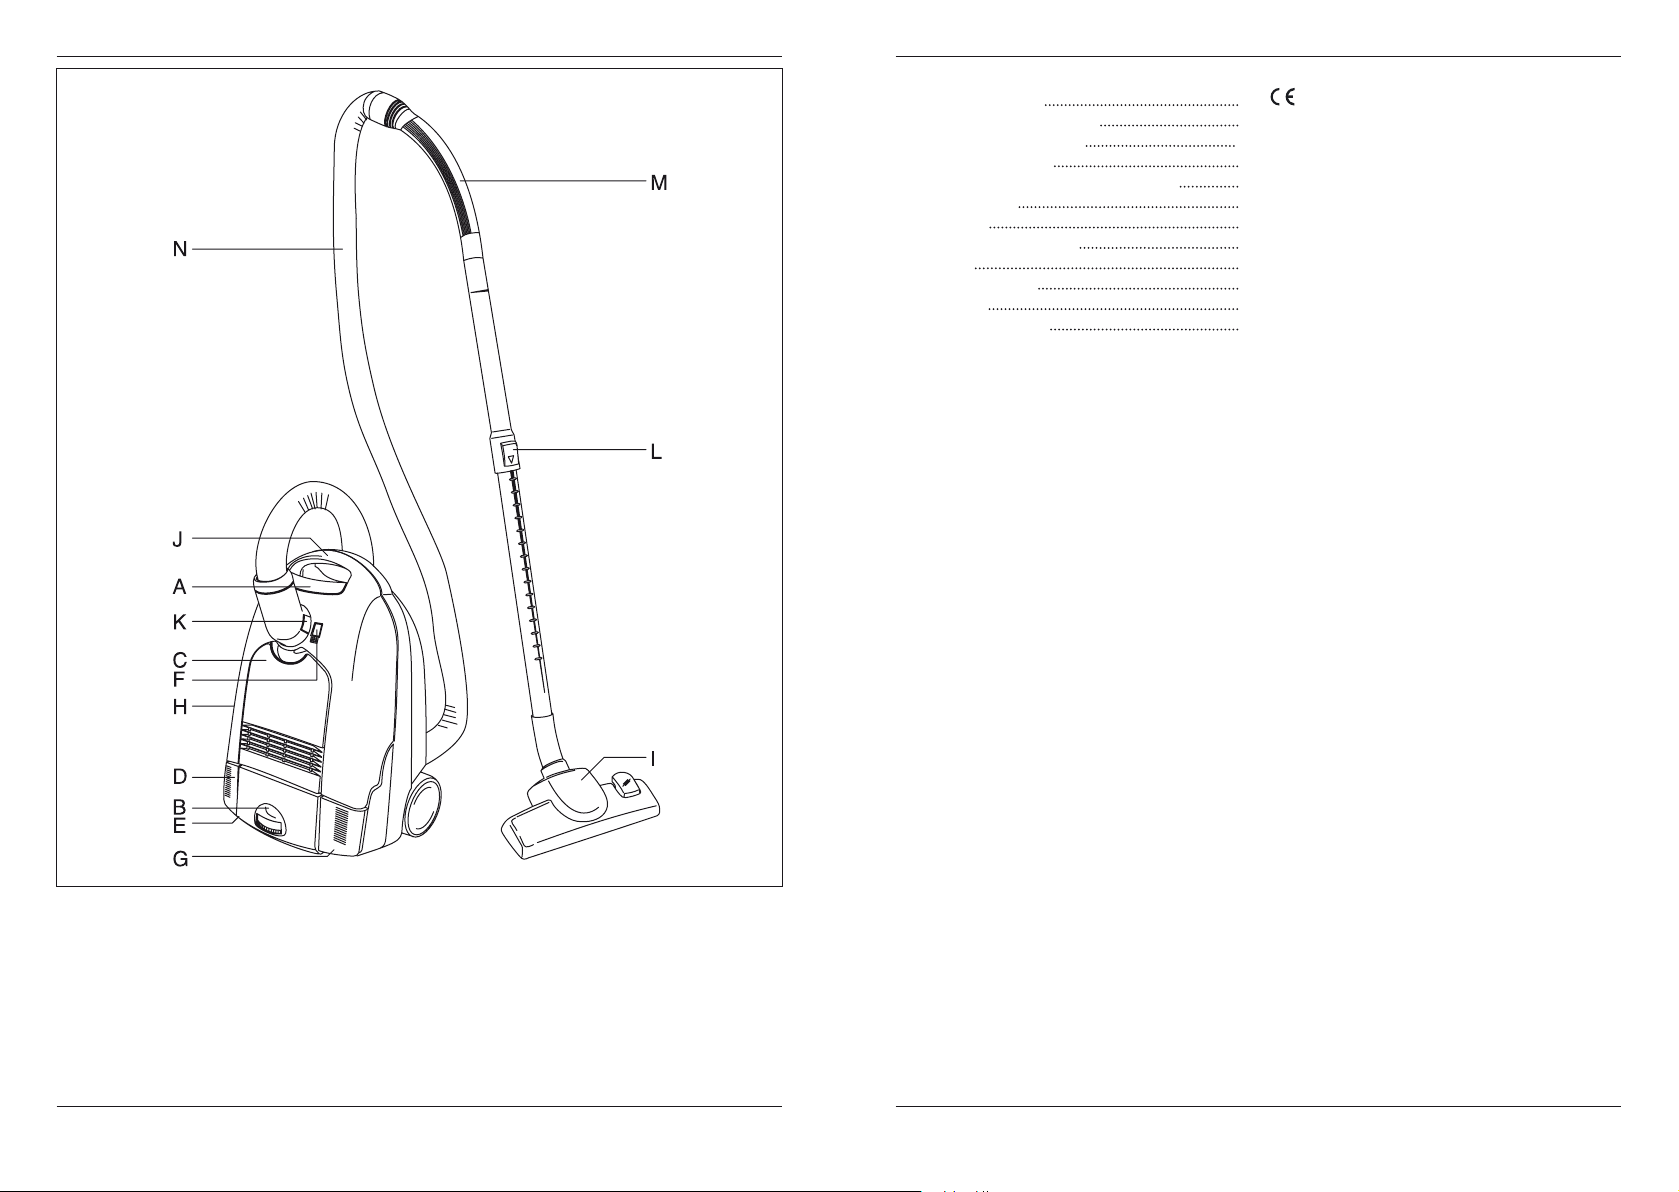
A = Button to Open the
Paper Filter Compartment
B = Power Regulation *
C = Accessories Compartment
D = On/Off Button
E = Parking Rail
F = Filter Replacement Indicator
G = Cable Rewind Button
H = Tool Rail
I = Nozzle
J = Carrying Handle
K = Hose Release Button
L = Suction Tube/Telescopic Tube*
M = Handle
N = Suction Hose
*depending on model
Contents
Appliance Description 2
Before Using for the First Time 3
Protecting the Environment 3
User Safety Instructions 3
Making the Vacuum Cleaner Ready for Use 4
Using the Nozzles 5
Switching On 6
Maintenance and Cleaning 6
Paper Filter 7
Carrying and Storage 8
What to do, if 8
Additional Accessories 9
Before Using for the First Time
Please read all the following information carefully. It
provides important instructions on appliance safety,
operation and maintenance. Keep these operating
instructions in a safe place and pass them on to any
subsequent owners.
Protecting the Environment
Do not simply throw away packaging material
and old appliances.
Equipment Packaging:
• The cardboard packaging can be deposited in the
waste paper collection.
• Deposit the recyclable polyethylene (PE) bag at a
PE collection point.
Recycling the Appliance at the End of its Life:
• The plastic components all carry a material identification marking so that, like the other materials,
they can be recycled at the end of the life of the
appliance.
Please inquire with your local authority about
your local recycling centre.
Safety Instructions
This device complies with the following EU
Directives: – 73/23/EWG dated 19 Feb. 1973 – Low
Voltage Directive – 89/336/EWG dated 3 May 1989
(including Directive Amendment 92/31/EWG) – EMC
Directive.
• Only connect the appliance to 220/230 V AC.
• The electric circuit for the socket used must have
at least a 10 A fuse.
• Never remove the mains plug from the socket by
pulling on the cable.
• Do not use the appliance if:
– the cable is damaged.
– the housing shows visible signs of damage.
• Avoid pulling the appliance or suction brush over
the mains lead. The insulation could be damaged.
• The cover cannot be closed if a paper filter is
not inserted. Please do not use force!
• Always ensure that a paper filter as well as a
MICROFILTER and a motor protection filter are
inserted.
• This vacuum cleaner may only be used for vacuuming dry materials in households. People and
animals must not be vacuumed with appliance.
Keep children away from electrical appliances.
The manufacturer shall not be liable for any
damage that may be caused by improper use or
operation.
• Leave wet shampooed carpets to completely dry.
Never vacuum liquids with the vacuum cleaner
– otherwise the vacuum cleaner will be damaged.
Furthermore, electric shock protection may be
impaired.
• Under no circumstances should the appliance be
used to vacuum matches, glowing ashes or cigarette ends. Avoid vacuuming hard, sharp objects
as they may damage the appliance or the paper
filter.
• Do not expose the appliance to weather, moisture or heat.
• In the event of a cable defect, the entire cable
roller should be replaced by customer service or
an authorised repair shop.
• Repairs to electrical appliances may only be performed by qualified service engineers. Improper
repairs may lead to serious hazards for the user.
• Therefore if your appliance needs repairing,
please contact your retailer or customer service.

4
5
Making the Vacuum Cleaner Ready for
Use
The accessories can be connected by pressing
together and turning, and separated by pulling and
turning:
Using the Nozzles
The nozzles are connected to the suction tube by
pressing and turning, and removed by pulling and
turning.
Connect Together the Suction Hose and
Suction Tube.
Firmly connect the suction tube handle to the suction tube.
Connect the Suction Tubes Together
(depending on model)
Connect the two tubes together.
Connect the Suction Hose
Plug the suction hose connector into the suction
inlet. The connector clips into place and is free to
rotate.
Press the release button and pull out the connector
in order to remove the suction hose.
Mains Connection/Cable Rewind
The mains cable is stored in the cable compartment
Pull out the cable and plug into a mains socket.
Unplug from the mains socket. Press the foot
button, the cable is automatically rewound after
vacuuming.
Crevice Nozzle
For vacuuming crevices, gaps and corners.
Using the VARIO 500 Floor Nozzle
For daily care of carpets and hard floors. The floor
nozzle is manually adjustable. Extended brushes for
smooth floors, retracted brushes for carpets.
See additional accessories for special floor nozzles.
Upholstery Nozzle
For vacuum cleaning all upholstered furniture, mattresses, etc.
The thread lifting strips on the nozzle even pick up
thread and lint.
Crevice and Upholstery Nozzle Stored in the
Appliance
To meet individual cleaning requirements two accessories are included with the appliance, these are
stored in an integrated accessories compartment.
Open the lid of the accessories compartment upwards at the recessed handle.
The nozzles can be fitted to both the suction
tube and the suction hose handle as required.
Adjust the Telescopic Tube
(depending on model)
Push down the button on the tube and adjust the
tube to the desired working position.
6
7
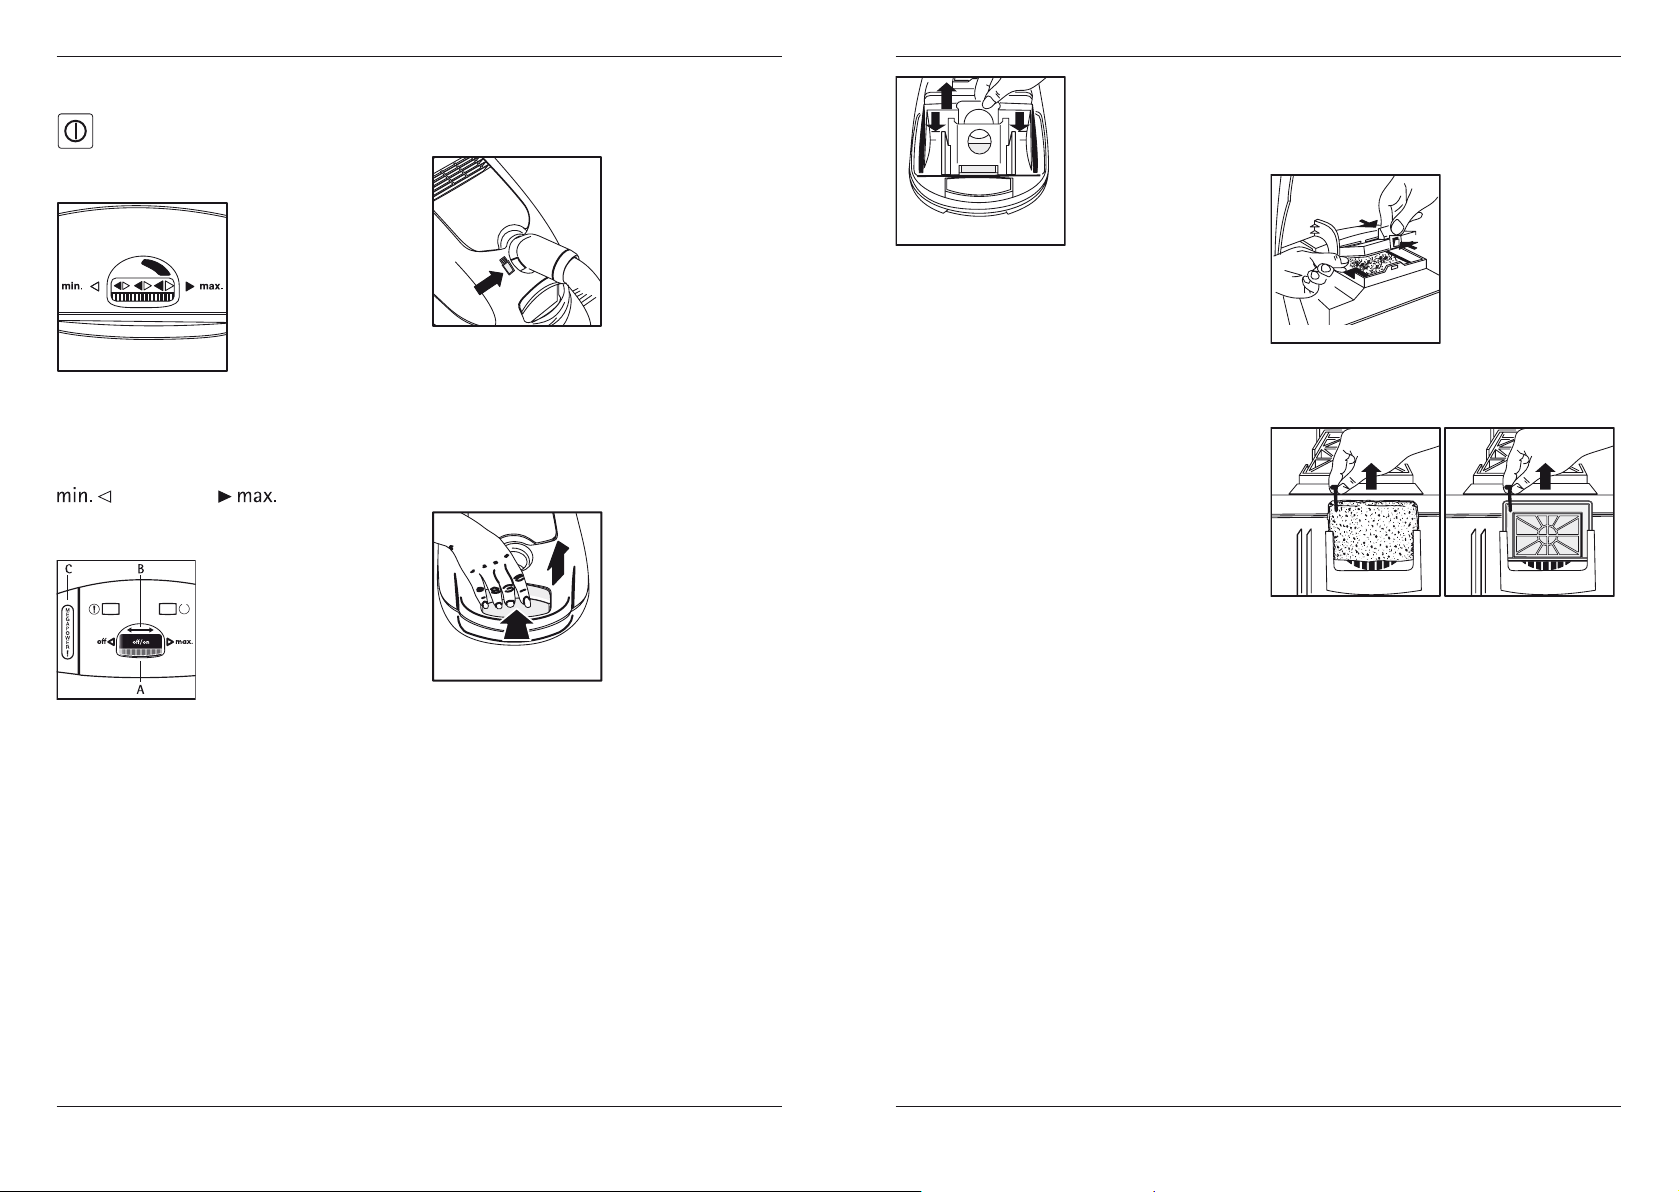
Switching On
Switch On and Off
The appliance is switched on and off by pressing the On/Off button.
Power Regulation*:
Power Regulation – Rotary Regulator
The suction power can be adjusted to suit the
specific situation using the electronic power
regulator.
Output control, Mega-Power
A Switching on and
off.
Switch on you vacuum
cleaner with the power
adjustment wheel by turning
the power adjustment wheel
in the direction of the arrow
➢ max. The operating lamp
indicates that the vacuum cleaner is connected to
the mains voltage and is ready for operation.
B Suction power adjustment.
With the power adjustment wheel you can set the
power of your vacuum cleaner to the optimum
value for the relevant cleaning work.
NOTE: If the power adjustment wheel is turned fully
to the right, this setting gives you a strong suction,
economical power setting for most cleaning work.
C Mega-Power button.
Press the Mega-Power button for cleaning work
which requires a particularly high suction power.
The vacuum cleaner then runs at maximum power.
The Mega-Power indicator lamp lights up for as long
as the Mega-Power stage is activated. In this power
stage, the adjustment wheel only has the function
of the on / off switch. Power adjustment is not possible in this stage.
Maintenance and Cleaning
Be sure that the appliance is turned off and that
the mains plug has been removed from the
socket before performing maintenance or cleaning.
Changing the Paper Filter
The paper filter must be replaced if the window on
the filter replacement indicator is completely red
when the appliance is operating at maximum power
and the nozzle is raised from the floor.
The paper filter should be replaced even if it does
not appear to be full because fine dust can block
the pores in the surface of the filter.
The cover can be opened by pressing the button
and folding back until it locks.
*depending on model
Hygiene filter replacement: When removing the full
filter bag, pull the closing tab to automatically close
the bag. During this process you must overcome
slight resistance when pulling the tab. Full dust bags
with normal household dust may be disposed of
with household rubbish.
Insert the new paper filter in the guide rails and
slide down to the lower stop (note marking), only
then can the lid be closed. If a paper filter is not
placed in the appliance, the lid cannot be closed.
Please do not use force!
Changing the Microfilter
We recommend replacing the microfilter on every
fifth paper filter replacement, at the latest when the
dust level indicator is completely red with a clean
dust bag and the nozzle raised.
Open the lid and fold back until it locks. Remove the
used microfilter (Figure) by the tab and dispose of
with household rubbish. Insert the new microfilter.
Motor Protection Filter
The motor protection filter is a permanent filter and
does not have to be regularly replaced. The only
exception is if the paper filter has been damaged
and the motor protection filter soiled: remove the
motor protection filter, clean (only tap out) and refit.
Insert new paper filter.
HEPA filter
A highly effective special filter belonging to Class
“S”. This filter offers relief and assistance to allergy
sufferers. The HEPA filter should be replaced after
one year.
Cleaning
Use a damp cloth to wipe off the housing and
paper filter compartment as required. Do not
use solvents or scourers. Clean the floor nozzle
and the brush holder periodically using the
crevice nozzle.
 Loading...