


Instruction Manual
U3510
1800W CYCLONIC BAGLESS
1800W CYCLONIC BAGLESS

1
IMPORTANT SAFETY INSTRUCTIONS
READ ALL INSTRUCTIONS BEFORE USING
(THIS APPLIANCE)
When using an electrical appliance basic precautions
should always be followed, including the following.
Before connecting the cleaner to an electrical supply
outlet, ensu re that the volta ge marked on t he rating
plate (on the underside of the cleaner) is correct for
your electrical supply. If it does not comply, do not
use the cleaner prior to contacting the manufacturer.
WARNING – To reduce the risk of fire, ele ctric
shock, or injury:
1. Do not leave vacu um clean er when plu gged in.
Unplug fro m outlet whe n not in use and b efore
servicing.
2. To reduce t he risk of ele ctric shoc k, do not use
outdoors or on wet surfaces.
3. This appliance is n ot intended fo r use by
persons (including children) with reduced
physical, sensory or mental capabilities, or lack
of experie nce and know ledge, unl ess they have
been given supervision or instruction concerning
use of the appliance by a person responsible for
their safet y. Children sho uld be supe rvised to
ensure that they do not play with the appliance.
4. Use only as descri bed in this ma nual. Use onl y
manufactures recommended attachments.
5. Do not use with damage d cord or plug. I f
vacuum cle aner is not wor king as it sh ould,
has been dropped, damaged, left outdoors,
or dropped i n water, take it to a servi ce centre
before using.
6. Do not pull or carr y on cord or use a s a handle.
Do not close do or on cord, or pu ll around
sharp edg es or corn ers. Do not run v acuum
cleaner ov er cord. Keep co rd away from heate d
surfaces.
7. Do n ot unplug by pul ling on the co rd. To unplug,
grasp the plug, not the cord.
8. Do not handle the plug or vacuum cleaner with
wet hands.
9. Keep hair, loose clothing, fingers and all parts
of body away from o penings a nd moving pa rts.
10. Turn all controls off before unplugging.
11. Do not use to pick up flammable or combustible
liquids, su ch as gasol ine, or use in are as where
they may be pres ent.
12. Do not pick up any thing that is burning
or smokin g, such as ciga rettes, match es,
or hot ashes.
13. Do not use withou t dust conta iner and /or filter
in place.
14. Do not use ex tension cor ds or outlets w ith
inadequate current carrying capacity.
15. We recommend you d o not use your vac uum on
carpet cl eaning foa ms, sharp or h eavy bui lding
materials or plaster dust. They could damage
or clog the fil ters and cau se failures to ot her key
parts in you r vacuum cle aner and re nder your
warrant y invalid.
16. Store your cleane r indoors i n a cool, dr y area.
17. Unplug electrical appliances before
vacuuming them.
18. Please remove the p lug from the so cket outlet
before cleaning or maintaining this appliance.
ELECTRICAL CABLE PRECAUTIONS
• If the supply c ord is damag ed, it must be re placed
by the manufacturer, its service agent or similarly
qualifie d person in o rder to avoid a ha zard.
Damage to the cl eaner ca ble will not b e covered by
th e wa rran ty.
• Never pull or l ift the vac uum clean er by the cabl e.
• Disconnect the plug from the wall socket before
cleaning or maintaining the vacuum cleaner.
• Regular ly check th at the cable is n ot damaged.
Never use the va cuum clea ner if the ca ble is
damaged. A ll serv ice and repa irs must be c arried
out by an autho rised Ele ctrolux se rvice ce ntre.
Always keep the vacuum cleaner in a dry place.
SERVICE & REPAIR
It is danger ous to alter the sp ecificati ons or modif y
the product i n any way. Under no circ umstance s
should you at tempt to repair t he cleane r yourself.
NEVER VACUUM
• In wet areas.
• Close to flammable gases, combustible
substances, etc.
• Without a ca rtridg e filter (this mayd amage the
cleaner ) and withou t the dust cont ainer. A safety
device is fit ted which p revents the cove r to close
without the fi lter. Do not attempt to forc e to
close the cover.
• Sharp objects.
• Fluids (this c an cause se rious da mage to the
machine).
• Hot or cold ci nders, lit c igarette bu tts, etc.
• Fine dust fr om plaster, concrete, o r ash, for
example. Th e above can cau se seriou s damage to
the motor – damag e which is not c overed by the
warranty. Products in aerosol may be flammable.
Do not spray these products on or near the
vacuum cleaner.
DOUBLE INSULATION
Your vacuum cleaner is double insulated. This means
that all exte rnal par ts are elect rically i nsulated fro m
the mains. This is done by placing insulation barriers
between the electrical and mechanical components,
making it unnecessary for the cleaner to be earthed.
WARNING: On collectio n of propriet ary car pet
conditioning powder, it is recommended that the
dust conta iner is empti ed and the ca rtridg e filter is
cleaned a fter each u se. Some of the pr eparation s
contain su bstances w hich if lef t in the vacuu m
cleaner for extended periods, could cause damage.
Many air fresheners, household deodorants,
sprays and polishes contain highly inflammable
gas propel lants, beca use of this it is p articu larly
important that these products are used strictly in
accordan ce with the rel evant
manufacturers instructions, it is essential that none
of the above products are sprayed directly into the
vacuum cle aner or any of th e filters, hose a ssembl y
or dust chamber.
2 3
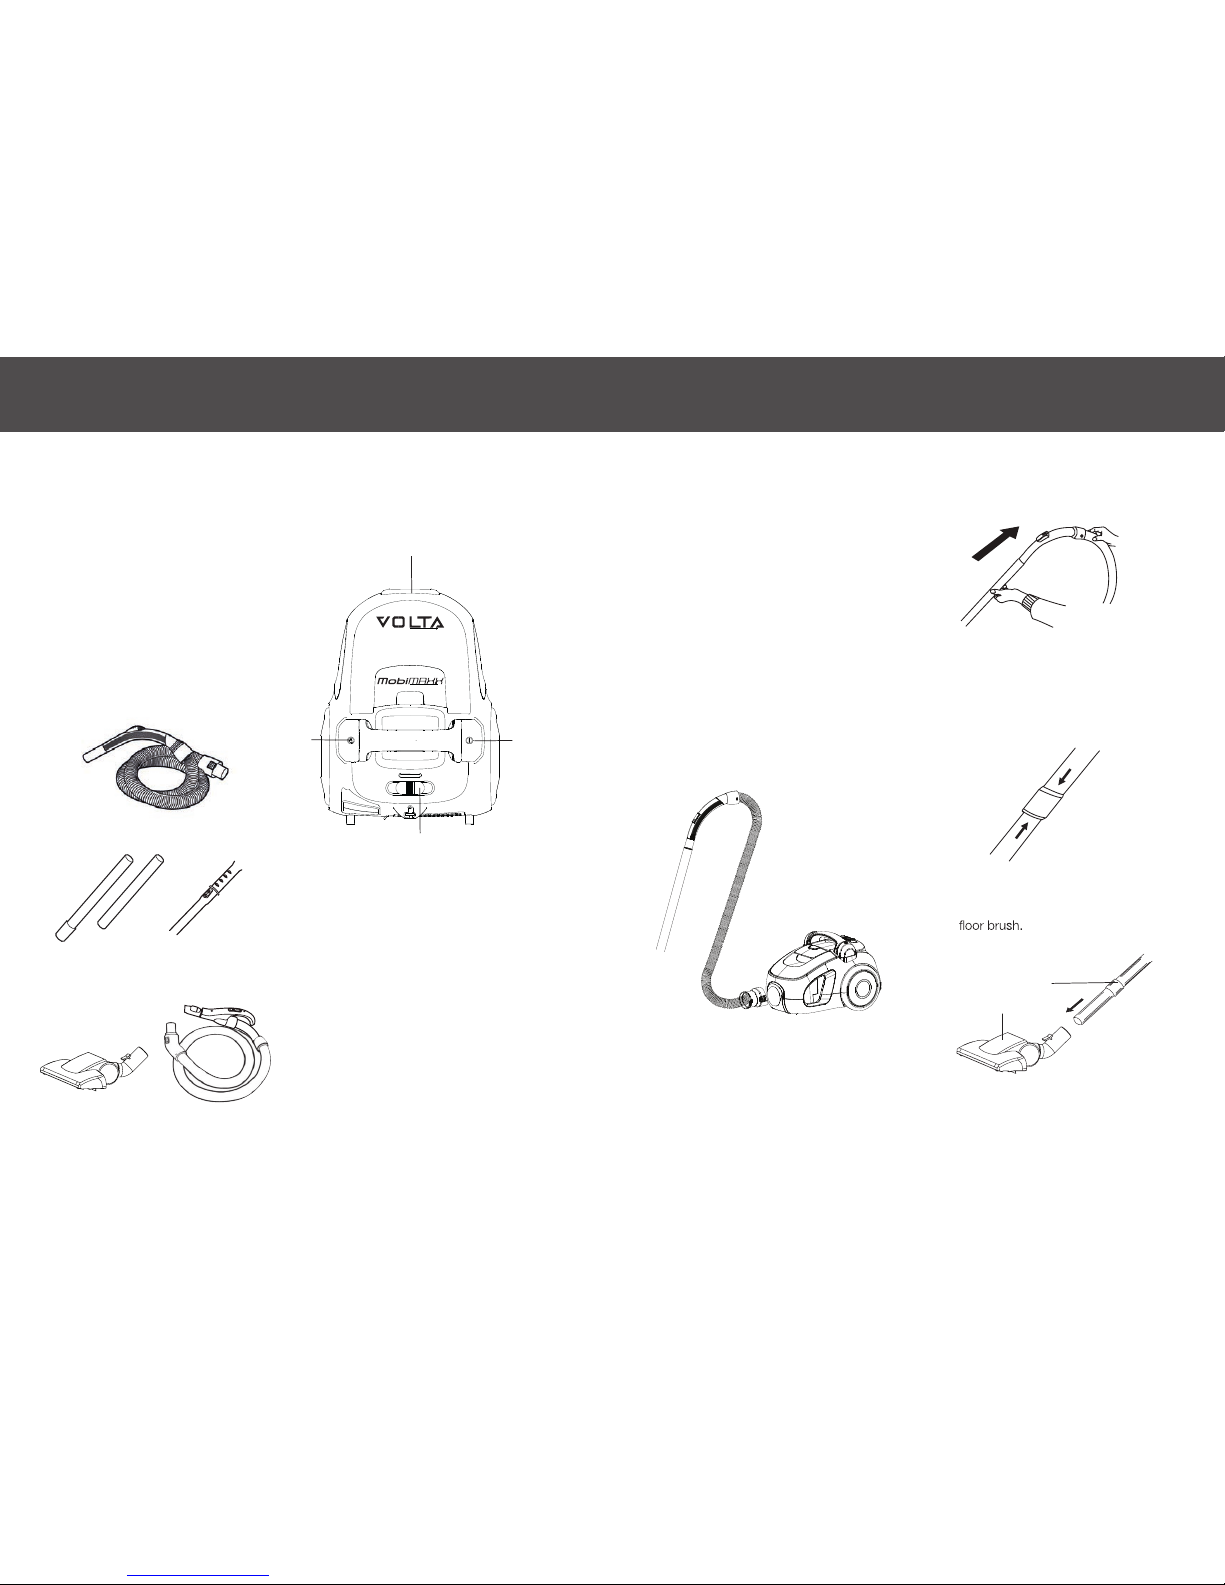
PARTS IDENTIFICATION
Line drawings are solely for illustration purposes and may vary from actual product.
Quick Guide
GNITRATS EROFEB
• On first removing the product from its
packaging, check for any damage.
• Check that the dust container and
the filters are in place. Never operate
the cleaner without the dust
container installed.
• Always remove the plug from the
power supply before fitting or
removing any accessories.
ASSEMBLING THE
VACUUM CLEANER
esoh elbixefl eht gnivomer ro gnittiF
• Insert the hose until the catch
clicks to engage (press the catch to
release the hose).
Fitting extension tubes and
accessories
• Attach the extension tubes or
telescopic tube (only on certain
models) to the hose handle.
• Fitting the extension tube to the
Extension Tube
Floor Brush
ASSEMBLING THE VACUUM CLEANER
Product and Accessories
1. Cord Rewinder Button
2. On/Off Button
3. Power Regulator***
4. Hose Connector
5. Hose
6. Long Extension Tubes**
7. Telescopic Tubes*
8. Adjustable Nozzle
9. Remote Control*
*Certain models only
**Not applic able for mod els with Telesco pic tubes
***Not appli cable for mo dels with Re mote Control
1 2
3
4
6
8
7
9
5
1800W
CYCLONIC B AGLES S
1800W
CYCLONIC B AGLES S

4 5
Instructions for Use
SWITCHING ON
Extend the cord and plug it into the
wall socket. A yellow mark on the
power cable shows the ideal cable
length. Don’t extend the cable beyond
the red mark.
• Press the On/Of f button to switch
the unit on. To stop, press the
button again.
Switch Button
Red Mark
Yel low
Mark
• To retract the cord, switch of f the
appliance and unplug it from the
wall socket. The vacuum cleaner
has an integrated cord winder.
To rewind the cable press the foot
pedal gently and guide the cord by
one hand, this will prevent it striking
you or damaging the cleaner.
Rewind
Red Mark
Yel low M ark
• Slide the electronic power switch
to control the suction of the cleaner.
Power Switch
ACCESSORIES
Use the appropriate accessory
according to the object(s) to be cleaned:
• Crevice nozzle
For corners, between cushions and
difficult-to-reach places.
• Upholstery nozzle
For upholstered furniture and curtains.
INSTRUCTIONS FOR USE
• Combination floor nozzle
Can be set for hard floors or carpets.
Carpet
Hard Floor
Maintenance
EMPTYING THE DUST CONTAINER
Note: Before removing the dust
container, switch off the appliance
and disconnec t the flexible hose .
• Remove the dust cup by pushing the
open buttons on the dust container
handle. Remove the content of the
dust cup by pushing the opening
button.The dust container is a
detachable unit. Hold the base of the
dust cup with one hand and open
the dust container by pushing the
opening button with the other hand.
• Empty the dust container.
INSTRUCTIONS FOR USE / MAINTENANCE

6 7
•
ensure they are completely dry before
reusing. Avoid direct sunlight or
extreme drying conditions. Do not
use a hair dryer to dry the filters.
•
aligning it with the dust container
and sitting it in place, then fit the
filter in the frame by aligning the frame
with the dust container and simply
sliding it into place.
•
will allow the dust container to fit
back into the dust container only if
the filter is properly installed. If the dust
container does not fit into the dust
compartment do not force it.
Check the filter is properly installed.
•
do not reuse them.
CHANGING THE EXHAUST FILTER
• Open the grill on the rear cover.
• Take the filter out and replace it with
a new one.
• Put the filter on the grill.
•
How To Store
Your Vacu u m
1. Choose a storage location that is
both safe and dry.
2. Depending on the space available,
you can choose to store it in an
upright or horizontal position using
the parking slot.
3. Be careful not to trap, twist or tie the
electrical cord. Wind it.
4. Keep the ex tension tubes, nozzles
and hose together to avoid
misplacing them.
Disposing Your
Vacuum
PACKAGING MATERIAL
The packaging materials are
environmentally-friendly and can be
recycled. The plastic components are
identified by markings, e.g. >PE<,
>PS<. Please dispose of the packaging
materials in the appropriate container at
a community waste disposal facility.
OLD APPLIANCE
The symbol
on the appliance or its
packaging indicates that this product
may not be treated as household waste.
Instead, it should be handed over to
the applicable collection point for the
recycling of electrical and electronic
equipment.
By ensuring that this product is disposed
of correctly, you can help prevent
potential negative consequences for
the environment and human health.
For more detailed information about
recycling, please contact your local
city council.
• To close the dust container, ensure
the hinge is securely fastened before
you lock the cover.
• Replace the dust container into
the cleaner.
• Always operate the appliance with the
dust container properly installed.
REPLACING AND CLEANING
THE HEPA FILTER
• Filter for air-inlet should be cleaned
at least twice a year or when it
becomes visiblly solid.
• Always operate the cleaner with
filters to avoid reduced suction
or a motor damage.
• Remove the dust container as
described in the previous section.
•
in this vacuum cleaner, a spongy
grey protection filter, and the
framed HEPA filter .
•
surface covered with a sheet
of paper. This will dislodge
excessive residue from the filter.
Dispose of the cover sheet with the
dust residue. Ge ntly beat the grey
protection filter in an open air space
to properly dislodge any dust.
•
grey protection filter can be washed
under a tap with cold water. Always
wash the filter from the underside, do
not scrub of use cleaning agents on
the filter. Do not use a washing
machine to wash the filter.
•
container by pulling on the release
tab on the top right side of the filter
frame. Remove the grey protection
filter by simply pulling it loose from
the container.
MAINTENANCE MAINTENANCE

8
TROUBLE SHOOTING
You can perform your own trouble shooting at hom e
based on the ch ecklist given in this section. However,
if the problem persists, please contact Electrolux on
1300 36 6 366 (AUS) or 0 508 73 0 730 (NZ)
PROBLEM POSSIBLE CAUSES CORRECTIONS
Vacuum cleaner
does not star t.
Plug is not prope rly conne cted to
the socket.
Check the plug connection or try another
socket.
Thermal protector activated due
to high temperature.
Press the On/Off button and wait 20-30
minutes for the m otor to cool down.
Filter indic ator light
stays on.
Dust contai ner is full. Empty the dust container.
Filters are cl ogged. Clean or replace filters.
Reduction of
suction capacity.
Suction hos e is blocked. Clean the hose.
Nozzle is blo cked. Clean the nozzle.
Dust contai ner is full. Empty the dust container.
Filters are cl ogged. Clean or replace filters.
Hose is damag ed or broken. Change the hose.
Over-heating. Dust contai ner is full. Empty the dust container.
Filters are cl ogged. Clean or replace filters.

From the Electrolux Group. The world's No. 1 choice.
From the Electrolux Group. The world's No. 1 choice.
KITCHEN, CLEANING AND SMALL APPLIANCES
From the Electrolux Group.
The world's No. 1 choice.
KEEP THIS FOR YOUR RECORDS
To be completed by the Purchaser
Model
Serial No
Date of Purchas
Retailers Name
Retailers Address
City State
Attach Your Purchase Receipt Here
Electrolux Home Products Pty Ltd
ABN 51 004 762 341
163 O’Riordan Street, Mascot, NSW 2020, Australia
Customer Service - Ph: 1300 366 366
www.electrolux.com
Electrolux Small Appliances
A division of Electrolux (NZ) Limited
3 - 5 Niall Burgess Road, Mt. Wellington, Auckland, New Zealand
Ph: (09) 9573 2220 Customer Service - Ph: 0508 730 730
www.electrolux.com
*Some models may be limited in availability or be available from certain stores only.
Not all models and specifications are available at time of printing and not all models
are available in Australia & New Zealand. See your local Electrolux retailer or call the
above phone numbers for further information if required.
*Due to the Electrolux policy of continual product development; specifications,
colours and details of our products and those mentioned in this manual are subject
to change without notice.
 Loading...