

Page 1
VOLT® Low Voltage Landscape Lighting
Coachman Path and Area light
VPL-1006
INSTALLATION INSTRUCTIONS
Specications and product details subject to change without notice.
© Copyright 2016, VOLT® Lighting, Lutz FL USA 33549 • All rights
reserved. [email protected] • 813.978.3700
- 1 -
Help Hotline:
1-813-978-3700 • Mon-Fri 8am-8pm • Sat-Sun 10am - 6pm (EST)
Page 2
VOLT® Coachman Path and Area light
VPL-1006
Important: Please Read Before Installation
Important Safety Instructions
INSTALLATION INSTRUCTIONS
LIGHTED LAMP IS HOT!
WARNING – TO REDUCE THE RISK OF FIRE OR INJURY TO PERSONS.
1. Turn o/unplug and allow to cool before reducing lamp.
2. Lamp gets HOT quickly!
3. Do not touch the hot lens, guard or cowl.
4. Keep lamp away from materials that may burn.
5. Do not touch lamp at any time.
6. Use a soft cloth.
7. Oil from skin may damage lamp.
8. Do not operate the xture with a damaged or missing lens or shield.
!
!
www.voltlighting.com
[email protected] • 813.978.3700
Package Contents
A. (1) Fixture
B. (1) Stem
Additional Parts Required (Sold Separately)
A. (1) LED SCB Lamp
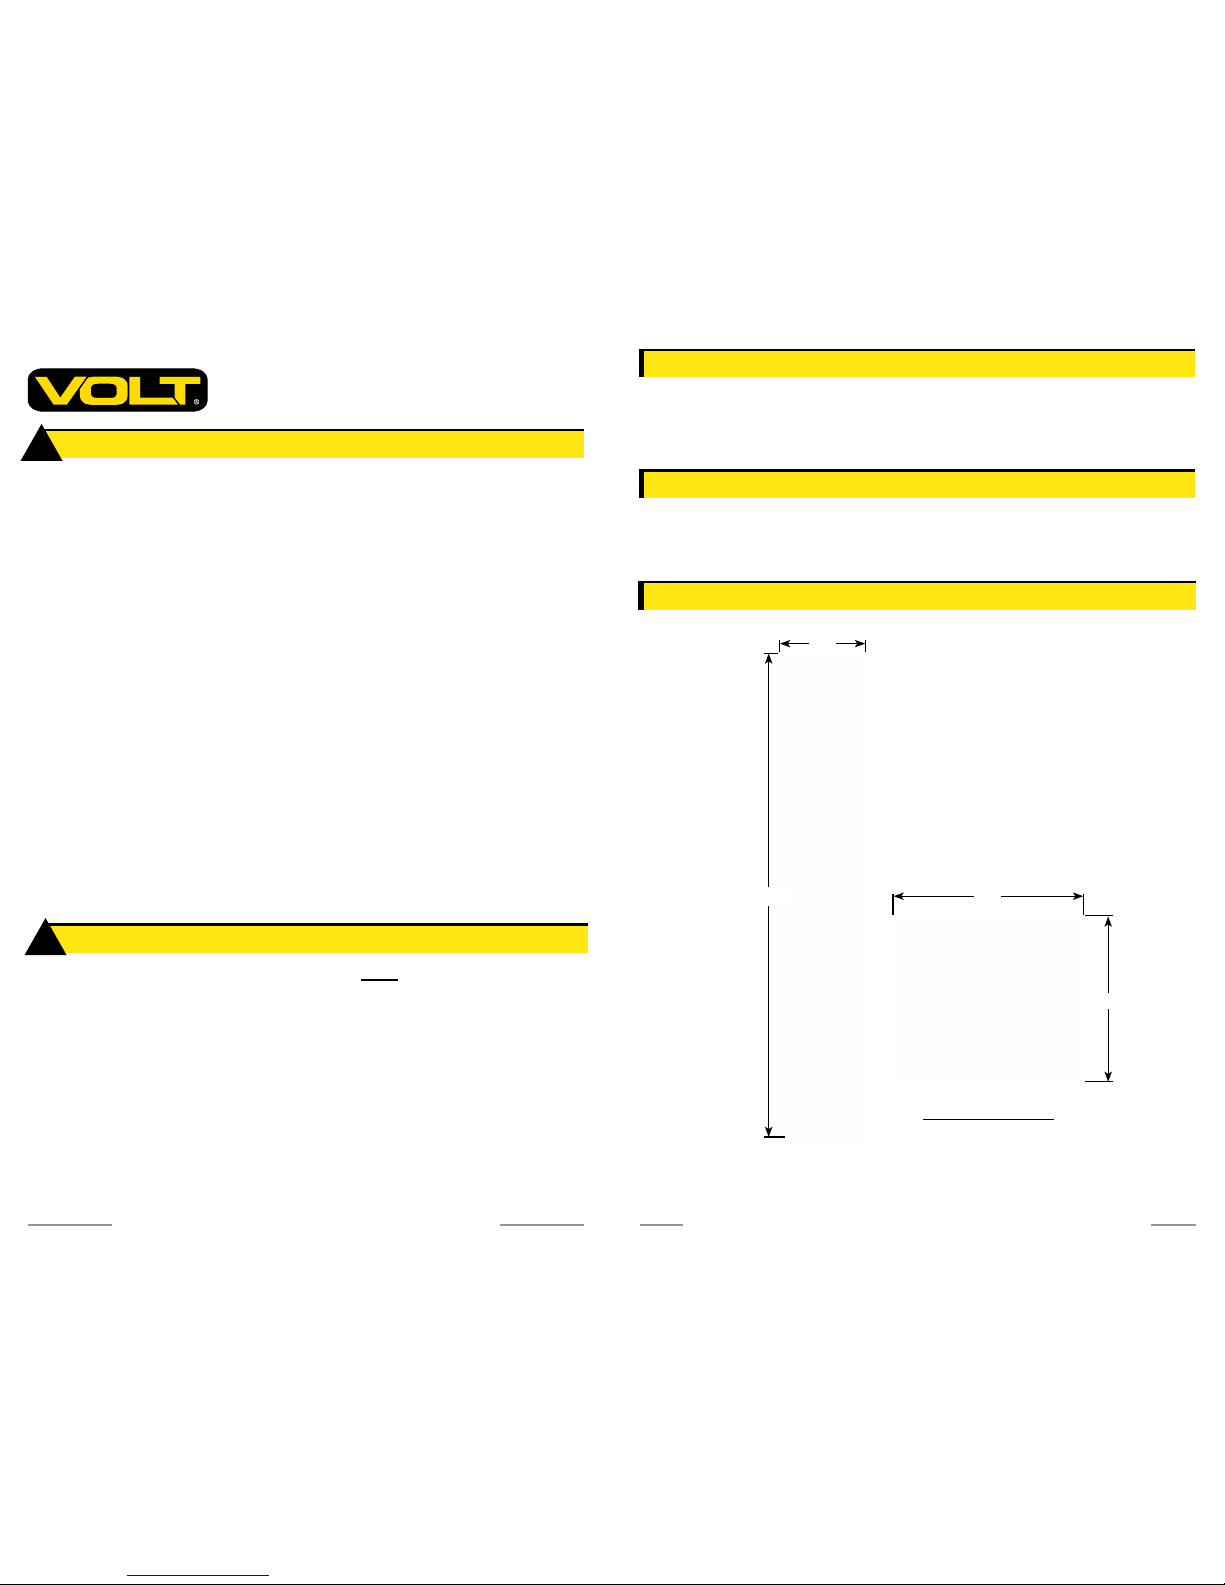
Product Dimensions
62.25”
OVERHEAD VIEW
11”
11”
9.5”
- 2 - - 3 -
C. (1) Ultra Realistic LED Moving
Flame Bi-Pin Candle
D. (1) VOLT XL Hammer Stake
This luminaire is intended for installation in accordance with local
codes and the National Electric Code (NEC). Failure to adhere to these
codes and instructions may result in serious injury, property damage
and void the warranty.
These instructions do not intend to cover all variations in installation,
operation maintenance or mounting situation.
1. Make sure that the power is turned OFF before installing or
servicing this luminaire.
2. Warning: risk of electrical shock. Install all luminaires 10 feet
(3.05M) or more from pool, spa or fountain.
3. This luminaire is intended to be used only with a power supply
(transformer) rated maximum of 300 watts (25 AMPS) at 15 volts.
4. Wiring connections must be made with wire connectors that is
suitable for outdoor use.
5. Position the low voltage wire and wire connector so that it is
located within 6 inches (15.2 cm) from a building structure, a
luminare, or tting.
6. The main low voltage cable is intended for shallow burial - less
than 6 inches (152 mm)
7. If additional lengths of low voltage cable is required, please
contact www.voltlighting.com or call 1-813-978-3700.
Page 3
INSTALLATION INSTRUCTIONS
[email protected] • 813.978.3700
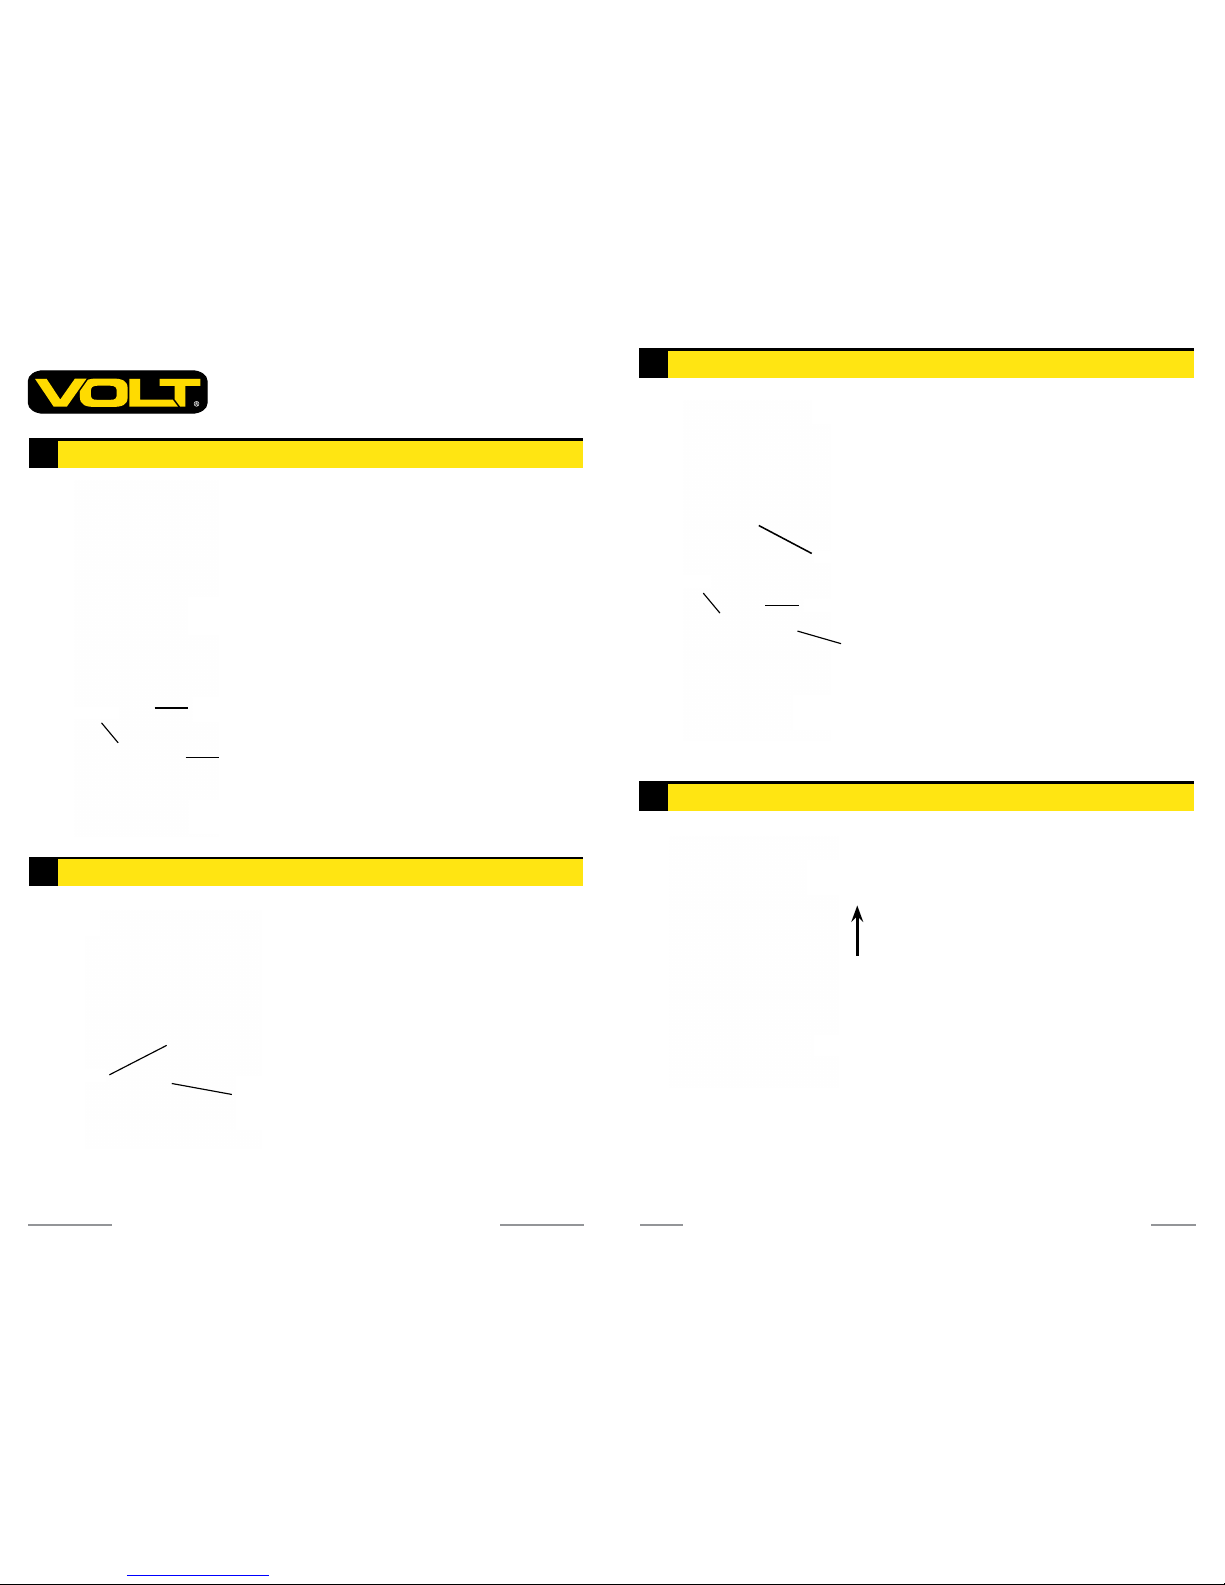
Insert lamp with correct wattage and
type marked on xture label. Align the
salient point on the LED bulb to the slot
of the socket inside of the bottom part
of the hat cage assembly. Push the LED
lamp into the slot of the socket and
twist the LED into the locking slot to
keep it from coming loose.
CAUTION: Do not exceed maximum
wattage marked on luminaire label.
NOTE: DO NOT touch bulb with bare
hands. Use soft cloth to handle bulb.
Install LED Lamp
2
Lower Socket
LED
SCB
LAMP
Remove the Hat Cage Assembly
1
Hat Cage
Assembly
Hat Cage
Assembly
Set Screw
Cage Mount
Support Stem
Assembly
Inner Lens
Remove the hat cage assembly from the
support stem assembly by removing the set
screws from the cage mount.
Remove Fixture Hat
4
Remove the hat from the rest of the
cage assembly by unlocking the set
screws on the upper edge of the cage.
After installing the LED lamp into
the socket, place the hat cage
assembly back onto the cage
mount at the top of the support
stem assembly.
Secure both pieces in place
with the set screws previously
removed. Hand tighten until snug.
Cage
Hat
Set Screw
www.voltlighting.com
- 4 - - 5 -
Reinstall Hat Cage Assembly
3
VOLT® Coachman Path and Area light
VPL-1006
Hat Cage
Assembly
Inner Lens
Set Screw
Support Stem
Assembly
Cage Mount
LED SCB LAMP
Page 4
INSTALLATION INSTRUCTIONS
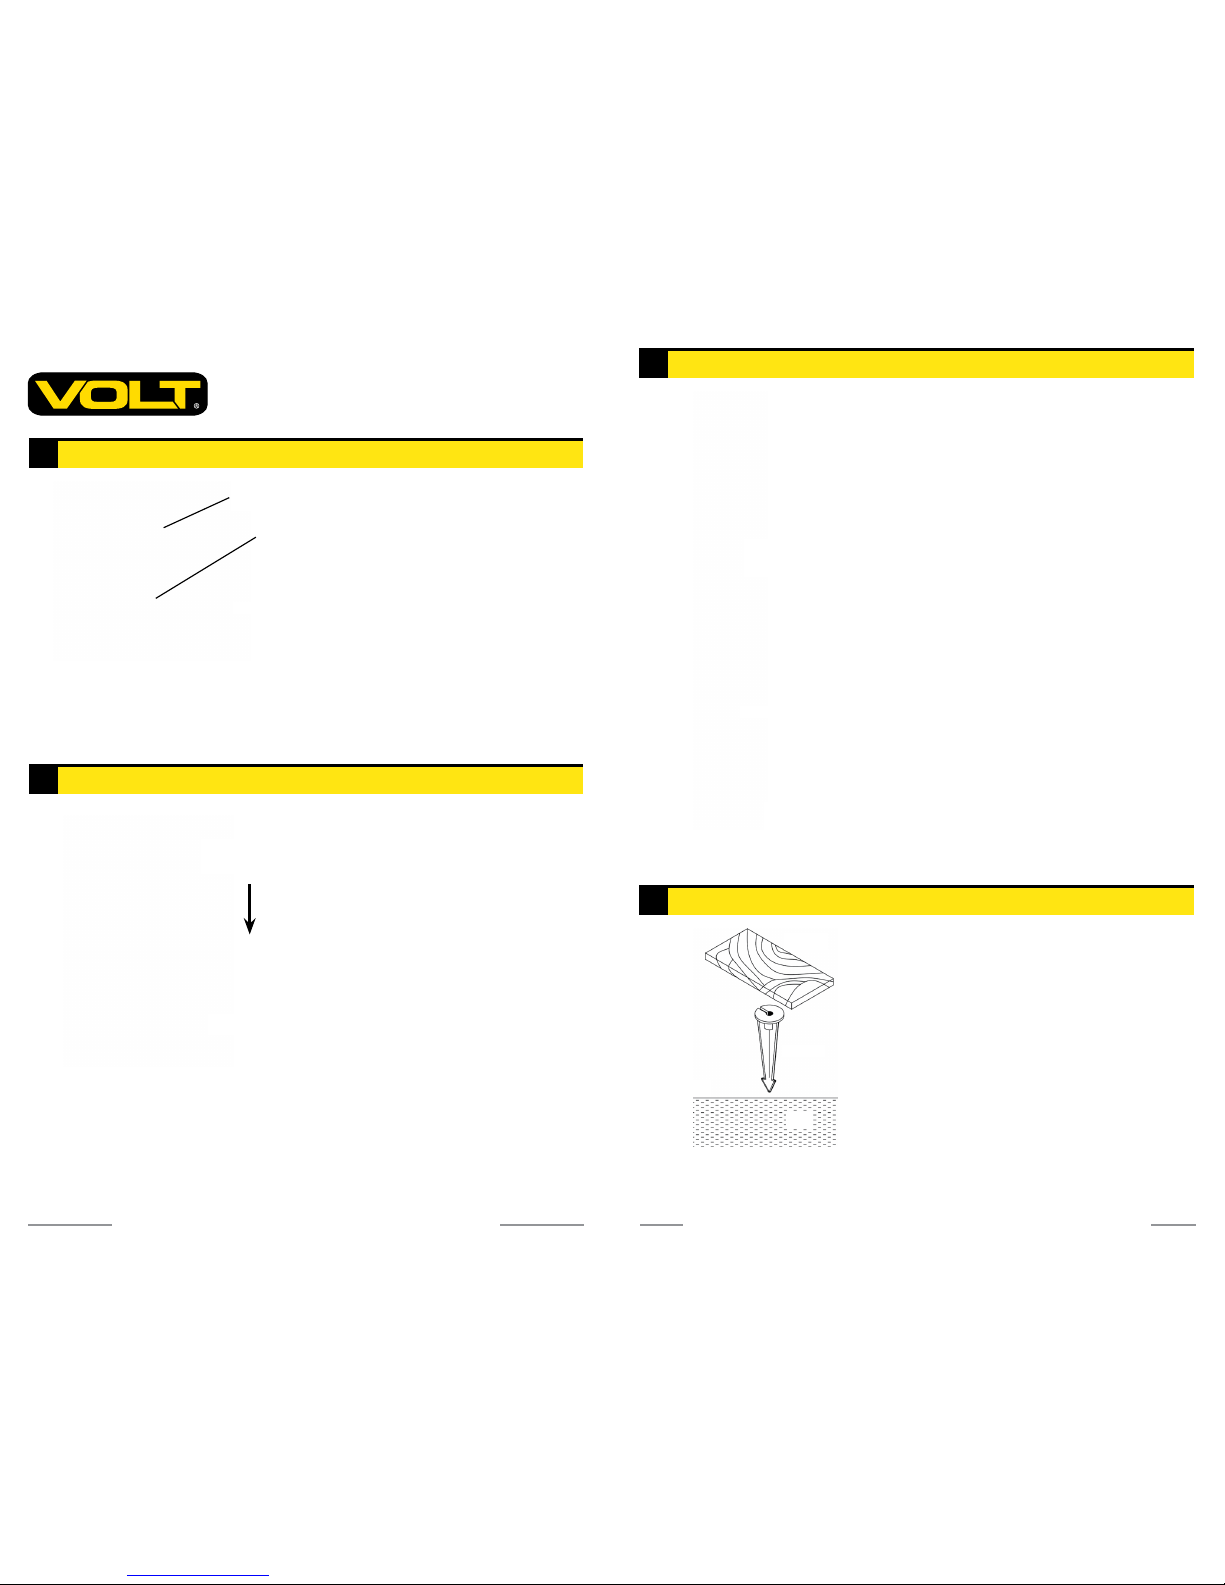
Place the xture hat back onto
the cage and secure with the set
screws previously removed. Hand
tighten until snug.
Reinstall Fixture Hood
6
Install LED Bi-Pin Candle
5
Led Bi-Pin
Candle
Upper
Socket
Hat Cage
Insert Ultra Realistic LED
Moving Flame Bi-Pin Candle
CAUTION: Do not exceed
maximum wattage marked
on luminaire label.
www.voltlighting.com
- 6 -
[email protected] • 813.978.3700
- 7 -
Cage
Fixture
Hat
Set Screws
Install Rod
7
Stem Extension
Support Stem
Assembly
Supply
Wires
Pass supply wires through the stem
extension and thread the stem
extension onto the support stem
assembly. Hand tighten until snug.
Install Stake
8
Board
Stake
Soil
Ground
VOLT® Coachman Path and Area light
VPL-1006
Determine your desired location
for mounting the xture. Hammer
stake into ground until the ange of
the stake is ush to grade. To avoid
damage to stake, place a board on top
of stake while hammering.
NOTE: If ground is hard and stake is
dicult to install, make a crosscut in
ground using a at shovel.
Page 5
INSTALLATION INSTRUCTIONS
www.voltlighting.com
- 8 -
[email protected] • 813.978.3700
- 9 -
Wire Connections
10
Pigtail
Main Supply Cable
Silicone Filled
Safety Connectors
Install Fixture to Stake
9
Pigtail
Wireway Slot
Stake
Lock Ring
Fixture
VOLT® Coachman Path and Area light
VPL-1006
Clear away area in ground at wireway
slot in top of stake. Lay luminaire
pigtail into wireway slot and screw
stem into stake until tight. Use the
lock nut to tighten adjustment to
t your needed alignement of the
xture’s orientation.
If assembly does not look straight,
adjust by pushing or pulling on
stake only. Use bubble level against
side of stem to make sure stem is
perpendicular to ground.
Strip both leads from the luminaire pigtail. Using two wire connectors
(sold separately), connect leads from luminaire to main low voltage
supply cable leads.
Page 6

- 10 - - 11 -
Page 7
VPL-1006-VER1.pdf
Specications and product details subject to change without notice.
© Copyright 2016, VOLT
®
Lighting, Lutz FL USA 33549 • All rights
reserved. [email protected] • 813.978.3700
www.voltlighting.com
- 12 -
Help Hotline:
1-813-978-3700 • Mon-Fri 8am-8pm • Sat-Sun 10am - 6pm (EST)
 Loading...